

Елена
в
Выбор товаров
3 года
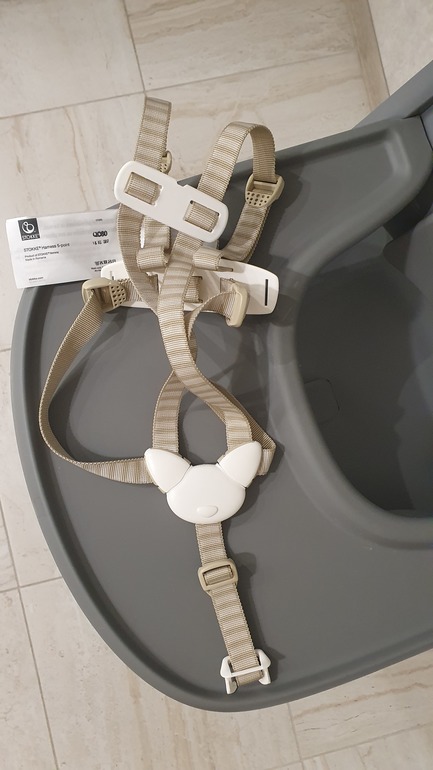
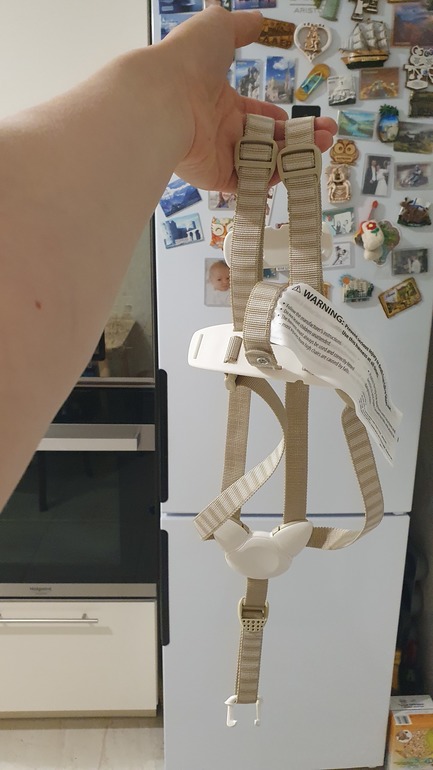
Как крепить ремни к стульчику Stokke Tripp Trapp?
Стульчики для кормления, шезлонги, качели
Вопрос в заголовке..Купила на авито ремни, продавец утверждает, что это старая модель и подойдут обязательно. Но как крепить она не знает, т.к. они ими не пользовались. В сети не могу найти ничего по ним((
| Language | Type | Pages | |
|---|---|---|---|
| All languages | User Manual | 24 | > Go to the manual |
626082
Report abuse
Libble takes abuse of its services very seriously. We’re committed to dealing with such abuse according to the laws in your country of residence. When you submit a report, we’ll investigate it and take the appropriate action. We’ll get back to you only if we require additional details or have more information to share.
Product: Stokke Tripp Trapp Harness
Forumrules
To achieve meaningful questions, we apply the following rules:
- First, read the manual;
- Check if your question has been asked previously;
- Try to ask your question as clearly as possible;
- Did you already try to solve the problem? Please mention this;
- Is your problem solved by a visitor then let him/her know in this forum;
- To give a response to a question or answer, do not use this form but click on the button ‘reply to this question’;
- Your question will be posted here and emailed to our subscribers. Therefore, avoid filling in personal details.
Your question has been posted on this page
Would you like to receive an email when new answers and questions are posted? Please enter your email address.
Table of Contents: Stokke TRIPP TRAPP Baby Accessories Owner’s Manual
-
Stokke TRIPP TRAPP 32 1 2 | TRIPP TRAPP ® STORAGE USER GUIDE UK/IE Allowed congurations: • This product ts any Tripp Trapp® chair produced after May 2003. • May be used with all other Tripp Trapp® accessories. • Attach Tripp Trapp® Storage to the Tripp Trapp® before attaching other accessories. • Max load: 1 kg / 2.2 lb Cleaning and maintenance: Dishwasher safe. Otherwise clean with damp cloth Correct assembly and disassembly: Please remove all accessories before attaching and detaching the Tripp Trapp® Storage on your chair. However, when using the Tripp Trapp® Storage with only the Tripp Trapp® classic cushion,
-
Stokke TRIPP TRAPP V2 – April 2019. 1041715 UG Tripp Trapp Storage STOKKE AS PO. Box 707, N-6001 Ålesund, Norway STOKKE LLC 5 High Ridge Park, Suite #105 CT 06905 Stamford, USA Call us: +1 877-978-6553 @stokkebaby stokke.com
-
Stokke TRIPP TRAPP USER GUIDE TRIPP TRAPP ® STORAGE | 3 正确的组装和拆卸方法: 在安装或拆卸椅上 Tripp Trapp ® 收纳盒 前,请先移除所有配件。 但是,当 Tripp Trapp ® 收纳盒仅与 Tripp Trapp ® 经典座 垫搭配使用时,请先安装座垫,然后将座垫 背面拉到一边,以确保 Trip p Trapp ® 收 纳盒可以直接稳固地安装到 Tripp Trapp ® 椅上。 1. 向上倾斜 Tripp Trapp ® 储物盒,然后 放入后面的层板之间 2. 向下按 3 . 安 装 好 了 警告: · 务必 时 时�
-
Stokke TRIPP TRAPP TRIPP TRAPP ® STORAGE USER GUIDE Designed to be closer ™ РЪКОВОДСТВО ЗА ПОТРЕБИТЕЛЯ 用户指南 用戶指南 NÁVOD K POUŽITÍ GEBRAUCHSANWEISUNG BRUGSANVISNING KASUTUSJUHEND INSTRUCCIONES DE USO KÄYTTÖOHJE NOTICE D’UTILISATION ΟΔΗΓΟΣ ΧΡΗΣΤΗ PRIRUČNIK ZA UPORABU KEZELÉSI ÚTMUTATÓ GUIDA UTENTI ユー ザ ーガ イド 사용설명서 VARTOTOJO INSTRUKCIJA LIETOTĀJA ROK ASGRĀMATA GEBRUIKSAANWIJZING BRUKSANVISNING INSTRUKCJA UŻYTKO
-
Stokke TRIPP TRAPP 8 | TRIPP TRAPP ® STORAGE USER GUIDE Correcte montage en demontage: Verwijder alle accessoires, voordat je de Tripp Trapp® Storage aan de stoel bevestigt of losmaakt. Als je de Tripp Trapp® Storage gebruikt met alleen de Tripp Trapp® Classic kussenset, dan bevestig je eerst de kussenset. Vervolgens schuif je de ach- terzijde van het kussen aan de rugleuning opzij. Bevestig nu de Tripp Trapp® Storage stevig op de Tripp Trapp® stoel. 1. Kantel de Tripp Trapp® Storage naar boven en plaats hem tussen de twee
-
Stokke TRIPP TRAPP USER GUIDE TRIPP TRAPP ® STORAGE | 9 dure no produto uma vez que pode fazer com que a cadeira tombe. • Nunca coloque quaisquer objetos aguçados ou perigosos no produto • Nunca coloque líquidos quentes no produto RO Congurații permise: • Acest produs este potrivit pentru orice scaun Tripp Trapp® fabricat după luna mai a anului 2003 • Poate folosit cu toate celelalte accesorii Tripp Trapp® • Atașați compartimentul de depozitare Tripp Trapp® la Tripp Trapp® înainte de a monta alte accesorii • Capacitatea max: 1 kg / 2.2 lb Curăţarea şi întreţinerea: Se poate spăla �
-
10 | TRIPP TRAPP ® STORAGE USER GUIDE Rengöring och underhåll: Tål maskindisk. Kan även rengöras med fuktad trasa. Korrekt montering och avmontering: Ta bort alla tillbehör innan Tripp Trapp®-förva — ringssfacket fästs eller tas bort från stolen. Vid användning av Tripp Trapp®-förvaringsfacket enbart i kombination med den klassiska Tripp Trapp®-dynan sätts dynan fast först. Skjut sedan den bakre delen av dynan åt sidan för att säkerställa att Tripp Trapp®-förvaringsfacket sitter fast säkert direkt på Tripp Trapp®-
-
Stokke TRIPP TRAPP 32 1 6 | TRIPP TRAPP ® STORAGE USER GUIDE • A többi kiegészítő rögzítése előtt a Tripp Trapp® tárolót erősítse a Tripp Trapp® székhez • Maximális terhelhetőség: 1 kg / 2,2 lb Tisztítás és karbantartás: Mosogatógépben tisztítható. Nedves törlőruhával is letörölhető. Helyes összeszerelés és szétszerelés: Kérjük, minden kiegészítőt távolítson el, mielőtt a Tripp Trapp® tárolót a székhez rögzíti, vagy onnan leveszi. Ugyanakkor, ha a Tripp Trapp® tárolót csak a Tripp Trapp® klasszikus párnával használja, előszö
-
USER GUIDE TRIPP TRAPP ® STORAGE | 11 UYARI! • Çocuğunuzu asla gözetimsiz bırakmayın. • Ürünün, bu talimatlara uygun olarak takıldığından emin olun. • Bir çocuğun ürünün üzerine tırmanmasına ya da ürüne asılmasına izin vermeyin. Bu tür hareketler sandalyenin devrilmesine neden olabilir. • Ürünün içine asla keskin ya da diğer türlerde tehlikeli maddeler yerleştirmeyin • Ürünün içine asla sıcak sıvı koymayın UA Допустим
-
4 | TRIPP TRAPP ® STORAGE USER GUIDE DK Tilladte kongurationer: • Dette produkt passer til alle Tripp Trapp® stole produceret efter maj 2003 • Kan bruges sammen med alt andet Tripp Trapp® tilbehør • Sæt Tripp Trapp® Storage på Tripp Trapp®, før andet tilbehør monteres • Maks. belastning: 1 kg Rengøring og vedligeholdelse: Tåler opvaskemaskine. Tørres af med en fugtig klud. Korrekt samling og demontering: Fjern alt tilbehør, før du monterer eller afmonterer Tripp Trap
-
32 1 USER GUIDE TRIPP TRAPP ® STORAGE | 7 KR 허용된 구성: • 이제품은2003년5월이후생산된모 든TrippTrapp ® 의자에적합합니다. •기타모든TrippTrapp ® 액세서리와함 께사용할수있습니다. •다른액세서리를설치하기전에Tripp Trapp ® 스토리지를TrippTrapp ® 에 설치하세요. •최대수납중량:1kg/2.2lb 세척 및 관리: 식기세척기�
Questions, Opinions and Exploitation Impressions:
You can ask a question, express your opinion or share our experience of Stokke TRIPP TRAPP device using right now.

Русский
- Bedienungsanleitung Stokke Tripp Trapp Harness
- Stokke Tripp Trapp Harness User Manual
- Manual Usuario Stokke Tripp Trapp Harness
- Mode d’emploi Stokke Tripp Trapp Harness
- Istruzioni Stokke Tripp Trapp Harness
- инструкция Stokke Tripp Trapp Harness
- Stokke Tripp Trapp Harnessの取扱説明書
- Handleiding Stokke Tripp Trapp Harness
- Manual de uso Stokke Tripp Trapp Harness
Вам нужна инструкция? Мы поможем Вам ее найти и сэкономить Ваше время.
- 24 stron
- 6.46 mb
Изделие Stokke Tripp Trapp Harness, а также другие, которыми Вы пользуетесь ежедневно, наверняка вы получили в комплекте с инструкцией обслуживания. Из опыта наших пользователей мы знаем, что большинство из Вас не уделили этому особого внимания. Большая часть инструкций, сразу же после покупки попадает в корзину для мусора вместе с коробкой — это ошибка. Ознакомьтесь с информацией, касающейся инструкции Stokke Tripp Trapp Harness, которая поможет Вам в будущем сэкономить нервы и избежать головной боли.
Важная подсказка — не забывайте хотя бы раз прочитать инструкцию Stokke Tripp Trapp Harness
Если вы не хотите каждый раз читать информационные брошюры, касающиеся, тех или Stokke Tripp Trapp Harness иных изделий, достаточно, прочитать их раз — сразу же после покупки устройства. Вы получите основное знания, касающиеся поддержания изделия Stokke Tripp Trapp Harness в хорошем эксплуатационном состоянии, так, чтобы без проблем достигнуть его планируемого цикла работы. Затем инструкцию можно отложить на полку и вернуться к ней только в случае, если вы не уверены, правильно ли проводится техобслуживание изделия. Правильный уход является необходимым элементом Вашего удовольствия Stokke Tripp Trapp Harness.
Раз в году пересмотрите шкафчик, в котором держите инструкции для всех устройств, — выбросите те, которыми вы уже не пользуетесься. Это поможет Вам сохранять порядок в своей домашней базе инструкций обслуживания.
Summary of Contents for Stokke Tripp Trapp Harness
Что находится в инструкции Stokke Tripp Trapp Harness? Почему стоит ее прочитать?
- Гарантия и подробности, касающиеся техобслуживания изделия
Хорошей идеей будет прикрепить чек к странице инструкции. Если что-то плохое случится во время использования Stokke Tripp Trapp Harness, у вас будет комплект документов, необходимый для гарантийного ремонта. В этой части инструкции вы найдете информацию об авторизованных сервисных центрахStokke Tripp Trapp Harness а также, как самостоятельно правильно ухаживать за оборудованием — так, чтобы не потерять гарантийных прав. - Указания по монтажу и Setup
Не терять нервов и времени на самостоятельную попытку установки и первого запуска изделия. Воспользуйтесь рекомендациями производителя Stokke Tripp Trapp Harness чтобы правильно запустить изделие, без лишнего риска повреждения оборудования. - Информация, касающаяся дополнительных запчастей (входящих в комплект а также являющихся опцией)
Пересматривая эту часть документа вы сможете проверить, доставлен ли ваш Stokke Tripp Trapp Harness с полним комплектом аксессуаров. Вы также сможете узнать, какие дополнительные запчасти или аксессуары для Stokke Tripp Trapp Harness Вы сможете найти и докупить к своему устройству. - Troubleshooting
Самые частые проблемы, касающиеся Stokke Tripp Trapp Harness и методы их решения. Это очень полезная часть руководства по обслуживанию — она позволит Вам сэкономить много времени на поиск решений. 90% проблем с Stokke Tripp Trapp Harness повторяется у многих пользователей. - Требования, касающиеся питания и энергетический класс
Информация, касающаяся количества потребляемой энергии, а также рекомендации, касающиеся установки и питания Stokke Tripp Trapp Harness. Прочитайте, чтобы оптимально пользоваться Stokke Tripp Trapp Harness и не использовать большего количества ресурсов, нежели это необходимо для правильной работы изделия. - Специальные функции Stokke Tripp Trapp Harness
Здесь вы можешь узнать, как персонализировать изделие Stokke Tripp Trapp Harness. Вы узнаете, какие дополнительные функции могут помочь Вам удобно использовать продукт Stokke Tripp Trapp Harness а также, какие функции Вашего устройства оптимальны для выполнения конкретной деятельности.
Как видите в инструкции вы найдете информацию, которая реально поможет Вам в использовании Вашего изделия. Стоит с ней ознакомиться, чтобы избежать разочарований, возникающих из более короткого, нежели предусматривалось, периода исправности изделия Stokke Tripp Trapp Harness. Если все же вы не хотите копить инструкции в своем доме, наш сайт поможет Вам в этом — вы должны найти у нас руководство по обслуживанию большинства из своих устройств, а также Stokke Tripp Trapp Harness.
Комментарии (0)

-
Безопасность в авто для детей старше 10 лет
Добрый день, Ребенку 11 лет, рост 150, ездит без бустера со штатным ремнем. При поездках на большие расстояний засыпает и заваливается на бок.…
-
Детский кокон-гамак
Хотим купить семилетке подвесной кокон-гамак. Знаю про Соволет, но за 15 тысяч — жаба душит. Да и крепить его в наших условиях сложно. Вот такой…
-
Автокресло группы 2-3 и сон
Намерил нам врач на плановом осмотре 106 см роста, срочно надо менять автокресло (joie i-spin 360). Я в печали. Сейчас дочь ездит спиной вперёд и…
STOKKE Tripp Trapp Stoel User Manual
IMPORTANT! KEEP FOR FUTURE REFERENCE
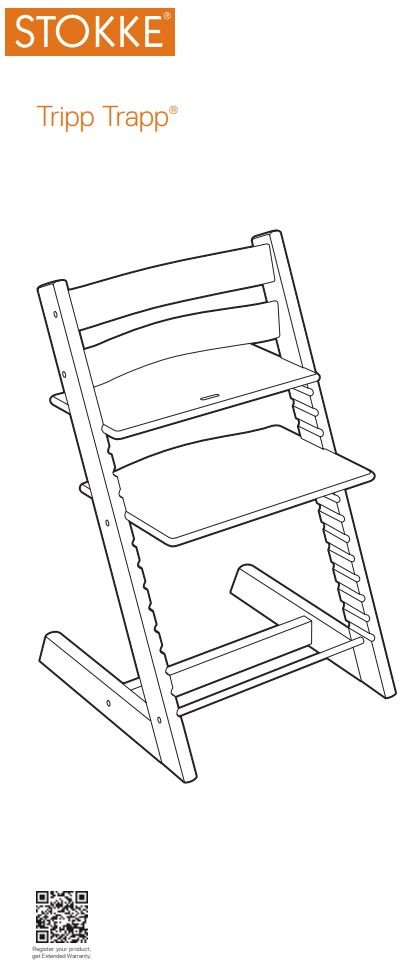
READ CAREFULLY BEFORE ASSEMBLING YOUR TRIPP TRAPP® HIGH CHAIR.
On the last pages of this user guide you will find pictures that describe the assembly of your Tripp Trapp® high chair and Tripp Trapp® Baby Set™. The Tripp Trapp® Baby Set™ should only be used with the seat plate in the first groove from the top of the chair. To further increase the backward stability of the Tripp Trapp® chair, a replaceable, extended rear glider (“Extended Glider” has been developed for the Tripp Trapp® chair. We recommend that you always use the Tripp Trapp® Extended Glider while the chair is being used with a harness or the Tripp Trapp® Baby Set™. The Extended glider is included in the Tripp Trapp® Baby Set™.
Seat and footrest placement
It is important to adjust the depth and height of the seat and footrest to fit the size of your child. See illustrations at page 62. The position of the seat and footrest should be checked as the child grows – at least once a year! The seat plate and the footrest must be supported by the full length of the grooves on the sides (not half way supported).
Seat placement Height – The seat is at the correct height when your child’s elbows are level with the table top. Depth – For correct depth of the seat, position the child’s back against the backrest with the seat supporting ¾ of the thighs. For the child’s best comfort it is important that the seat depth is not too deep. Leave comfortable space between the front edge of the seat and back of the child’s knee. It is surprising how small a seat a 6-8 month-old baby needs! The seat plate should not protrude more than 4-5 cm in front of the side legs.
Footrest placement
Height The footrest is at the correct height when the sole of the child’s foot can rest flat on the footrest, while the thighs are touching the seat. Depth Make sure the forward edge of the footrest NEVER protrudes beyond the front tip of the chair legs at floor level.
Cleaning and maintenance
Wipe with a clean damp cloth, wipe off excess of water with a dry cloth. Moisture will leave cracks in stain. We do not recommend the use of any detergent or micro fibre cloth. Colours may change if the high chair is exposed to sunlight.
Product information
The chair is made of cultivated beech. The varnish contains no harmful substances, and the liberation of formaldehyde from the varnish complies with E1 requirements.
Safety approval
Tripp Trapp® high chair assembled with Tripp Trapp® Baby Set™ complies with EN 14988:2012
WARNING!
▶ Do not leave the child unattended.
▶ Stay in reach of your child.
▶ If you use any harness with the high chair make sure it is correctly fitted.
▶ Do not use the high chair unless all components are correctly fitted and adjusted. Pay special attention to the seat and footplate – make sure these are properly fastened before you put your child into the high chair.
▶ Do not place the high chair near an open fire or other sources of strong heat, such as electric bar fires, gas fires etc due to the risk of fire.
▶ Do not use the high chair if any part is broken, torn or missing.
▶ Do not use the high chair before the child can sit up unassisted.
▶ Always place the high chair on a level stable surface and make sure that the high chair has space to slide backwards.
▶ Always use the crotch strap in combination with the rail and the high backrest.
▶ Be careful not to place small items, toxic substances, hot objects, electrical flexes etc near the high chair where your child can reach them, as they may cause choking, poisoning or other injuries.
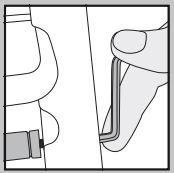
▶ Remember to retighten all screws 2-3 weeks after assembly of the high chair. After that you should check on and retighten the screws if necessary on a regular basis, e.g. every second month. Keep the Allen key for future use.
▶ Do not use any accessories or replacement parts not manufactured by STOKKE; this may affect your child’s safety.
▶ Do not use the high chair as a step stool.
▶ Loosen the screws before installing and removing the rail. This way you will not damage the lacquer and woodwork. If the Tripp Trapp® high chair is adjusted correctly, you can easily take your child in and out without removing the rail at all.
▶ When the footrest is positioned close to the metal rod, there will be a small gap between the inside of the chair legs and the metal rod. This is perfectly normal. Never try to use excessive force to make the metal rod touch the side legs of the chair as this can cause damage to the chair and/or make it unstable.
▶ NEVER use the Tripp Trapp® chair without a glider.
Table
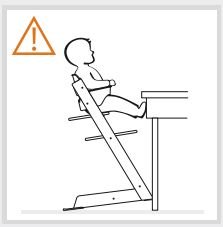 Be aware of the risk that a big frame under the table top makes it easier for children to push their legs against the table and tilt backwards. Also note that Tripp Trapp® is designed for dining tables 72-76 cm high.
Footrest
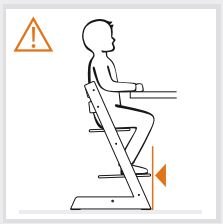 Make sure the forward edge of the footrest NEVER protrudes beyond the front tip of the chair legs at floor
level. This may cause the chair to be unstable when a child climbs in and out of the Tripp Trapp® high chair.
Rugs and tiles
 To prevent the Tripp Trapp® high chair from tilting backwards, it has plastic gliders underneath the legs. Their function is to make the high chair slide backwards and return to an upright position when lifted from the floor in front.
To make sure that the gliders function as intended, the high chair should be placed on a surface that doesn’t inhibit it from sliding backwards. That means that the surface should be level, stable and with a certain hardness.
Carpets and rugs that are soft or with long loose ends that the high chair could sink into, is an unsuitable surface for your Tripp Trapp® high chair. Uneven floors, like some tiled floors could be are also an unsuitable surface for your Tripp
Trapp® high chair.
The gliders as well as the floor must be kept clean.
RIGHT OF COMPLAINT AND EXTENDED WARRANTY
Applicable worldwide in respect of the chair TRIPP TRAPP®, hereinafter referred to as the product.
RIGHT OF COMPLAINT The customer has a right of complaint pursuant to the consumer protection legislation applicable at any given time, which legislation may vary from country to country.
Generally speaking, STOKKE AS does not grant any additional rights over and above those laid down by the legislation al to those under the “Extended Warranty”, and are not affected thereby.
STOKKE® “EXTENDED WARRANTY”
However, STOKKE AS, Parkgata 6, N-6003 Ålesund, Norway, grants an “Extended Warranty” to customers who register their product in our Warranty Database. This may be done via our webpage www.stokkewarranty.com. Upon registration, a warranty certificate will be issued and sent to the customer electronically (e-mail) or by ordinary mail.
Registration in the Warranty Database entitles the owner to an “Extended Warranty” as follows:
7-year warranty against any manufacturing defect in the product.
The “Extended Warranty” also applies if the product has been received as a gift or purchased secondhand. Consequently, the “Extended Warranty” may be invoked by whoever is the owner of the product any given time, within the warranty period, and subject to the warranty certificate being presented by the owner.
The STOKKE® “Extended Warranty” is conditional upon the following:
- Normal use.
- The product only having been used for the purpose for which the product is intended.
- The product having undergone ordinary maintenance, as described in the maintenance/instruction manual.
- Upon the “Extended Warranty” being invoked, the warranty certificate shall be presented, together with the original date-stamped purchase receipt. This also applies to any secondary or subsequent owner.
- The product appearing in its original state, hereunder that the only parts used have been supplied by STOKKE® and are intended for use on, or together with, the product. Any deviations therefrom require the prior written consent of STOKKE®.
- The serial number of the product not having been destroyed or removed.
The STOKKE® “Extended Warranty” does not cover:
- Damage caused by normal developments in the parts making up the product (e.g. colouration changes, as well as wear and tear).
- Damage caused by minor variations in materials (e.g. colour differences between parts).
- Damage caused by extreme influence from external factors like sun/light, temperature, humidity, environmental pollution, etc.
- Damage caused by accidents/mishaps for example any other objects having bumped into the product or any person having overturned the product by colliding with it. The same applies if the product has been overloaded, for example in terms of the weight placed on it.
- Damage inflicted on the product by external influence, for example when the product is being shipped as luggage.
- Consequential damage, for example damage inflicted on any persons and/or any other objects.
- If the product has been fitted with any accessories that have not been supplied by STOKKE®, the “Extended Warranty” shall lapse.
- The “Extended Warranty” shall not apply to any accessories that have been purchased or supplied together with the product, or at a subsequent date.
STOKKE® will under the “Extended Warranty”:
- Replace or if STOKKE® prefers repair the defective part or the product in its entirety (if necessary), provided that the product is delivered to a reseller.
- Cover normal transport costs for any replacement part/product from STOKKE® to the reseller from whom the product was purchased. No travel costs on the part of the purchaser are covered under the terms of the warranty.
- Reserve the right to replace, at the time of the warranty being invoked, defect parts by parts that are of approximately the same design.
- Reserve the right to supply a replacement product in cases where the relevant product is no longer being manufactured at the time of the warranty being invoked. Such product shall be of corresponding quality and value.
How to invoke the “Extended Warranty”:
Generally speaking, all requests relating to the “Extended Warranty” shall be made to the reseller from whom the product was purchased. Such request shall be made as soon as possible after any defect has been discovered, and shall be accompanied by the warranty certificate as well as the original purchase receipt.
Documentation/evidence confirming the manufacturing defect shall be presented, normally by way of the product being brought along to the reseller, or otherwise being presented to the reseller or a STOKKE® sales representative for inspection.
The defect will be remedied in accordance with the above provisions if the reseller or a STOKKE® sales representative determines that the damage is caused by a manufacturing defect.
Accessories
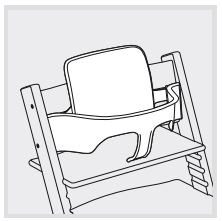 Tripp Trapp® Baby Set™
Baby set intended for children from 6 months and up to 3 years.
 Tripp Trapp® Cushion
Comes in several colours and designs. It fits your Tripp Trapp® high chair both with and without Tripp Trapp® Baby Set™.
 STOKKE® Harness
4 point harness with attachment brackets that fits your Tripp Trapp® high chair.
Tripp Trapp® Assembly Instructions

Tripp Trapp® Baby Set Assembly Instructions

Removal
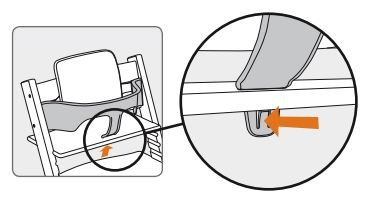
Tripp Trapp® seating adjustment

AUSTRALIA Exquira Pty Ltd. Tel. +61 (0)2 9417 3445, E-mail: [email protected]
AUSTRIA Stokke Customer Service Tel: +49 7031 611 58 0, Fax: +49 70 31 611 58 60, E-mail: [email protected]
BELGIUM Stokke Customer Service Tel: +49 7031 611 58 0, Fax: +49 7031 611 58 60, E-mail: [email protected]
BULGARIA, CROATIA , CYPRUS,
CZECH REPUBLIC, ESTONIA, GREECE,
HUNGARY, LITHUANIA, LATVIA,
POLAND, ROMANIA, SERBIA, SLOVAKIA
AND SLOVENIA:
Stokke Customer Service Tel: +49 7031 611 58 0, Fax: +49 7031 611 58 60, E-mail [email protected]
CHINA, SOUTH EAST ASIA
Stokke Hong Kong Ltd., 26th Floor, EIB Centre, No. 40 Bonhamstrand East, Sheung Wan, Hong Kong
Tel: (852) 2987 8178, Email Hong Kong: [email protected], Email China: [email protected]
DENMARK Stokke Customer Service Tel. +49 7031 611 58 0, Fax. +49 70731 611 58 60, E-mail: [email protected]
FINLAND Stokke Customer Service Tel: +49 7031 611 58 0, Fax: +49 70 31 611 58 60, E-mail: [email protected]
FRANCE Stokke Customer Service Tel: +49 7031 611 58 0, Fax +49 70 31 611 58 60, E-mail: [email protected]
GERMANY Stokke Customer Service Tel: +49 7031 611 58 0, Fax: +49 7031 611 58 60, E-mail: [email protected]
IRELAND Stokke Customer Service Tel: +49 7031 611 58 0, Fax +49 70 31 611 5860, E-mail: [email protected]
ISRAEL Shevtov G. Reiss Distributors. Tel: 972 9 8912314, E-mail: [email protected]
ITALY Stokke Customer Service , Tel: +49 7031 611 58 0, Fax: +49 7031 611 58 60, E-mail: [email protected]
JAPAN Stokke Ltd. Tel. +81 3 6892 3377, Fax. +81 3 6892 3386, E-mail: [email protected]
LUXEMBOURG Stokke Customer Service Tel: +49 7031 611 58 0, Fax: +49 7031 611 58 60, E-mail: [email protected]
MEXICO Stokke Customer Service Tel. +34 943 130 596, Fax. +34 943 133 201, E-mail: [email protected]
NETHERLANDS Stokke Customer Service Tel. +31 13-211 9002, Fax. +31 13-211 9003, E-mail: [email protected]
NEW ZEALAND Viking Imports Ltd. Tel: +64 9 4267822, Email: [email protected]
NORWAY Stokke Customer Service Tel. +47 70 24 49 70, Fax. +47 70 24 49 90, Email: [email protected]
PORTUGAL Stokke Atendimento ao Cliente Tel. +34 943 130 596, Fax. +34 943 133 201, E-mail: [email protected]
RUSSIA Da Baby. Tel: +7 (0) 495 688 7756, Email: [email protected]
SOUTH-AMERICA Stokke Customer Service Tel. +34 943 130 596, Fax. +34 943 133 201, E-mail: [email protected]
SOUTH-KOREA Stokke Korea Co., Ltd. Tel: 82-1544-8342 Fax:82-2-3453-6347 E-mail: [email protected]
SPAIN Stokke Atención al Cliente Tel. +34 943 130 596, Fax. +34 943 133 20, E-mail: [email protected]
SWEDEN Stokke Customer Service Tel. +49 7031 611 58 0, Fax. +49 70731 611 58 60, E-mail: [email protected]
SWITZERLAND Stokke Customer Service Tel: +49 7031 611 58 0, Fax: +49 70 31 611 58 60, E-mail: [email protected]
TURKEY Stokke Customer Service Tel: +49 7031 611 58 0, Fax: +49 7031 611 58 60, E-mail [email protected]
UKRAINE Millenium Ltd. Tel +38 044 492 00 22
UNITED ARAB
EMIRATES /MIDDLE EAST
DutchKid FZCO, Tel. +971 (0) 4 323 2500, E-mail: [email protected]
UNITED KINGDOM Stokke Customer Service Tel: +49 7031 611 58 0, Fax +49 70 31 611 58 60, E-mail: [email protected]
USA
Stokke Customer Contact: STOKKE LLC, 5 High Ridge Park, Suite 105, Stamford CT 06905
Tel: 877-978-6553. E-mail: [email protected]
OTHER MARKETS Locate your nearest retailer at www.stokke.com
ECOMMERCE For country specific phone numbers or to send an e-mail, visit www.stokke.com/ContactUs

66