
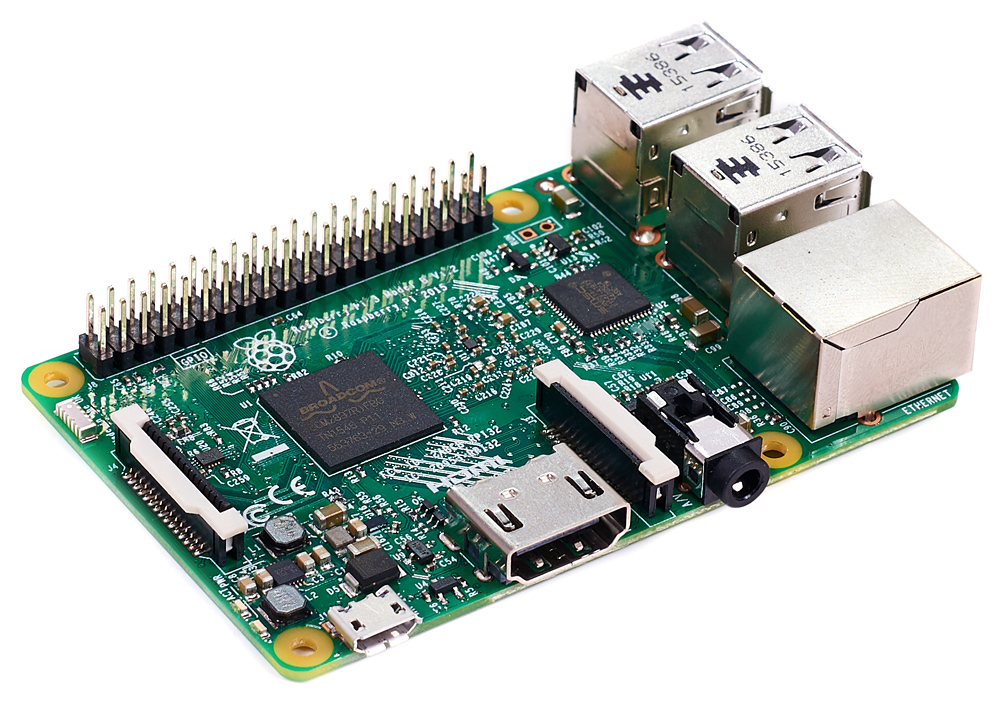
Raspberry Pi 3 Model B —полноценный бесшумный компьютер размером с банковскую карту, при этом с 64-х битным четырёхядерным процессором ARM Cortex-A53 на однокристальном чипе Broadcom BCM2837.
Видеообзор платформы
Установка и настройка
Для начало работы с одноплатником Raspberry Pi 3 прочитайте мануал «Заводим Raspberry Pi»
Элементы платы
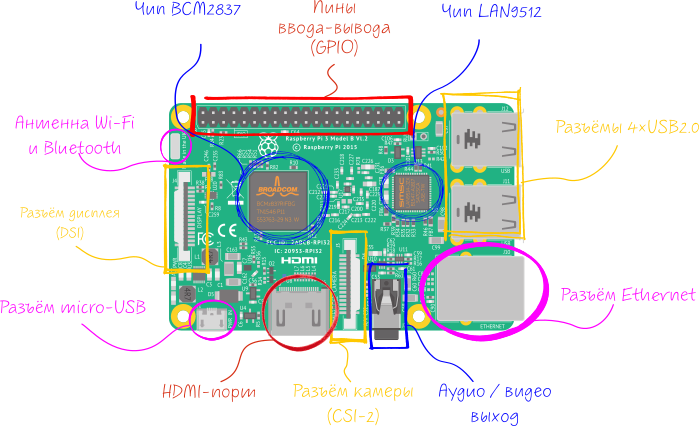
Чип BCM2837
На Raspberry Pi 3 установлен 64-х битный процессор Broadcom BCM2837 на архитектуре ARM Cortex-A53 с тактовой частотой 1,2 ГГц и модулем оперативной памяти на 1 ГБ. Процессор и память размещенны по технологии «package-on-package» непосредственно на процессоре. BCM2837 включает в себя также двухъядерный графический сопроцессор Video Core IV® Multimedia, который обеспечивает Open GL ES 2.0, аппаратное ускорение Open VG и 1080p30 H.264 декодирование.
USB-Ethernet преобразователь LAN9512
Чип LAN9512 — представляет из себя высокоскоростной USB2.0 Hub и Ethernet контроллер.
Пины ввода-вывода (GPIO)
Внимание! В отличие от плат Arduino, напряжение логических уровней Raspberry Pi является 3,3 В. Максимальное напряжение, которое могут выдержать вход/выходы составляет 3,3 В а не 5 В. Подав напряжение, например 5 В, можно вывести одноплатник из строя.
WiFi и Bluetooth
Интегрированный 802.11n Wi-Fi и Bluetooth 4.1.
HDMI-порт
Разъём предназначен для вывода цифрового видео и звука на мультимедийные устройства. Для коммуникации понадобиться HDMI-кабель
Аудио / Видео выход
3,5 мм разъём с дополнительным выводом на композитный видео-выход для подключения наушников или других устройств воспроизведения звука и телевизоров.
Разъём питания
Разъём micro-USB предназначен для питания Raspberry Pi.
Разъёмы 4×USB2.0
USB-хаб с четырьмя разъёмами для подключения клавиатуры, мыши, флешек и других USB-устройств.
Ethernet-разъём
10/100 Мбит Ethernet-разъем для подключения к сети через RJ45 патч-корд витой пары.
Разъём камеры (CSI-2)
15-контактный плоский гибкий разъем интерфейса MIPI CSI-2 для подключения камеры.
Разъём дисплея (DSI)
15-контактный плоский гибкий разъем, универсального высокоскоростного интерфейса для дисплеев.
Распиновка
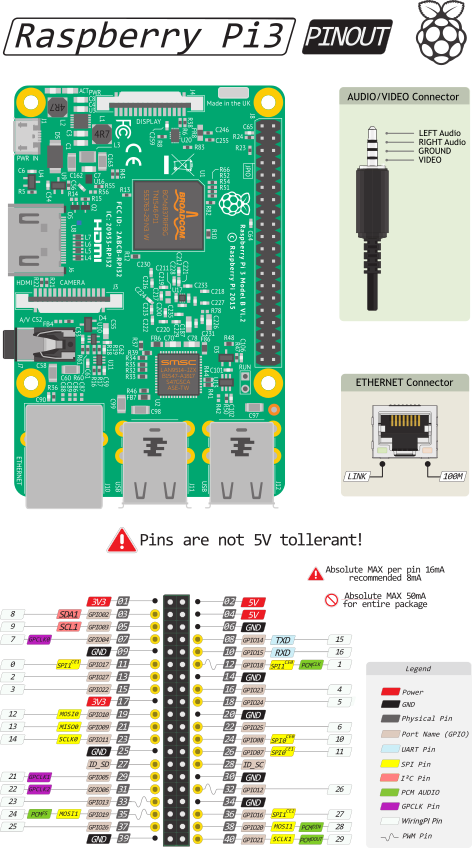
-
Physical Pin: нумерация, отвечающая за физическое расположение контакта на гребенке.
-
GPIO: нумерация контактов процессора Broadcom. Может пригодиться при работе с пакетом
Rpi.GPIO. -
WiringPi Pin: нумерация контактов для пакета Wiring Pi. Это Arduino-подобная библиотека для работы с GPIO-контактами.
-
ШИМ: плата имеет два канала ШИМ по два потока в каждом.
-
PWM0
12,18; -
PWM1
13,19.
-
-
I²C: SDA1
2, SCL13. Для общения с периферией по синхронному протоколу, через два провода. -
SPI: К
SPI0можно подключить два ведомых устройства, а кSPI1— три. Выбор осуществляется сигналом на пине CEx.-
SPI0:MOSI010, MISO09, SCLK011, CE08, CE17; -
SPI1:MOSI120, MISO119, SCLK121, CE018, CE117, CE216.
-
-
UART:
14,15. Асинхронный протокол последовательной передачи данных по двум проводамRXиTX, который позволяет обойтись без тактового сигнала.
Характеристики
-
Процессор: 64-битный 4-ядерный ARM Cortex-A53 на однокристальном чипе Broadcom BCM2837;
-
Тактовая частота: 1,2 ГГц
-
Оперативная память: 1ГБ LPDDR2 SDRAM;
-
Цифровой аудио/видео выход: HDMI;
-
Композитный аудио/видео выход: 3,5 мм (4 pin);
-
USB порты: USB 2.0×4;
-
Сеть:
-
WiFi: 802.11n;
-
Ethernet: 10/100 Мб RJ45;
-
-
Bluetooth: Bluetooth 4.1, Bluetooth Low Energy;
-
Разъем дисплея: Display Serial Interface (DSI);
-
Разъем видеокамеры: MIPI Camera Serial Interface (CSI-2);
-
Карта памяти: MicroSD;
-
Порты ввода-вывода: 40;
-
Габариты: 85×56×17 мм.
Ресурсы
Introduction: Raspberry Pi 3 Model B : a Beginners’ Guide
A newer version of Raspberry Pi, Raspberry Pi 3 Model B has been released recently. What makes it different from other previous models are :
- A faster 64 bit processor running at 1.2 GHz
- On-board Bluetooth Low Energy (BLE)
- Built in WiFi
You can see the complete description and specifications of this latest model at the following link.
https://www.sparkfun.com/products/13825
I had a very frustrating experience with my first Raspberry Pi Model B board and found it very difficult to boot. The LCD display I purchased did not work and the vendor from whom I purchased could not provide a solution other than pointing me out to some website for guidance. The HDMI cable I got did not display anything on a TV. Without the display, I could not do anything with older model and it is still lying unused.
When the Raspberry Pi 3 was out, I was very eager to get one. But to be on a safer side I made a detailed study and came up with the best combination of accessories which helped me to have a hassle free experience with the latest model.
The aim of this instructable is to provide a complete guide to beginners on selection of suitable accessories and the Operating systems compatible with Raspberry Pi 3.
Step 1: Raspberry Pi 3 : Out of the Box
The Raspberry Pi 3 is packed in a small white cardboard box as usual. What you get when you open up the box is just the credit card sized board with a Safety Guide and a Quick Start Guide printed in different languages. You can not do anything with the board unless you combine other accessories mentioned in the next step.
Step 2: Additional Accessories You May Require
- Suitable Power Adapter
- Micro SD Card with SD Adapter
- A Keyboard unit with a mouse or Track Pad
- A display unit compatible with the Pi 3.
We will discuss in detail about selection of each and every item mentioned above in subsequent steps.
Step 3: Selection of Power Adapter
First thing you need is a suitable power Adapter for the Pi 3. Many websites suggest a 5 V, 2 Amp Power Adapter, but practically that is not sufficient. Look at the first picture. There are three power adapters:
- The first one is a 5 V 2 Amp adapter marked as «Specially Designed for Raspberry Pi». But this works with older versions of Pi and not with Pi 3. When powered on, a series of rainbow square and blank white screen were displayed continuously as seen in the video here. If your power adapter does that then it is not suitable for the Pi 3.
- The second one is a travel adapter being used with a tablet. It is also 5 volts, 2 Amps capacity and works with the Pi 3. The problem is it does not support additional accessories connected through the USB ports.
- However, the third one is the recommended power adapter for Raspberry Pi 3 having 5.1 volts, 2.5 Amps output, the additional 0.1 volt is to compensate for for any loss. It comes with interchangeable heads (Please see Pic. 2) and can be used with voltages ranging from 100 to 240 as specified on the inside of the adapter (Please see picture 3). You can use this universal adapter anywhere irrespective of the supply voltage and different types of plug points used in different countries.
So, please go for this power adapter to take full advantage of the all four USB ports provided with the Pi 3.
Please refer the following link from where you can buy the official Raspberry Pi 3 Universal Power Supply.
https://thepihut.com/products/official-raspberry-p…
Step 4: Wireless Keyboard With Trackpad
Another important input device you need is a Keyboard. The Raspberry Pi 3 can accept a USB keyboard, but it will draw power from the Pi 3 leading to overheating.
Here I have selected a miniature wireless keyboard with a track-pad which will act as a mouse. This keyboard has its own power source and will not add additional load on the Pi 3.
If you open the backside of the keyboard, you will find the battery and an USB Dongle. Remove the USB Dongle and install it in any of the USB ports on the Pi 3. The wireless keyboard has an ON-OFF switch which is very handy to keep the keyboard off when not in use.
The keyboard uses a normal 3.7 volt Lithium Ion battery, which can be charged by connecting the keyboard with a micro USB cable to USB port of a computer / Laptop or can be charged using any normal charger of a mobile phone.
Step 5: 7″ Touch Screen Display for Raspberry Pi
While searching for a hassle free display, I stumbled upon this official 7″ Touch screen LCD suitable for the latest models of Raspberry Pi which is priced at $60 ($64.95 at Spark Fun Electronics). . This LCD comes with an adapter board, a DSI Ribbon Cable (Display Serial Interface), four stand-offs and screws which allows to connect the adapter board as well as the Raspberry Pi to the back of the display and four female-to-female jumper wires (you need only two of them) to power both the Pi and the LCD screen through the GPIO pins.
With this display you can create a standalone device which you can use as a custom tablet or as a mini Desk-top computer. This LCD screen works with the latest version of Raspbian OS, (which is Raspbian Jessie), also with Windows 10 IOT Core for the Pi 2 and Windows 10 IOT Core Insider Preview for Pi 3. The touch screen function works like a charm even during installing the Operating System. With proper touch screen drivers, you can also have an integrated 10 point touch screen and also an on-screen keyboard which allows you to use your Pi without an external keyboard.
My recommendation is go for it if you can afford it. It is well worth the investment.
Step 6: Assemble the 7″ Touch Screen
The 7″ Touch screen comes pre-assembled with the adapter board, mounted on the back of the display with four stand-offs and the required ribbon cables with the LCD. If you unscrew the four stand-offs,you can dismount the adapter board from the LCD. The DSI Ribbon Cable (Display Serial Interface) and two female-to-female jumper wires are the only things needed to be connected for the display to work with the Raspberry Pi.
To attach the DSI Ribbon cable,
- Lift the locking mechanism from the DSI interface on the adapter board with your finger nail.
- Insert the DSI Ribbon cable in the interface. Please see that the correct way to attach the DSI cable is the printed side down as shown in the picture
- Press down the locking mechanism
That’s all, you are done.
Step 7: Assemble the Pi Over the Touch Screen Display
The four holes used to attach the Display Adapter Board on the LCD Touch Screen are of the same alignment as the four holes on the Raspberry Pi 3.
- Align the Raspberry Pi 3 over the stand-offs above the Display Adapter.
- Attach the Pi 3 using four screws with the stand-offs
Step 8: Connect the DSI Ribbon Cable to the Pi
Now you need to attach the DSI (Display Serial Interface) Ribbon Cable from the Display Adapter to the Display Interface on the Raspberry Pi 3.
- Lift off the locking mechanism from the display interface on the Pi 3 with your finger nail
- Insert the DSI Ribbon cable from the Adapter board to the display interface on the Pi 3. The correct way is printed side on the Ribbon Cable facing the word «Display» on the Pi 3.
- Press down the locking mechanism and secure the DSI cable
You are done.
Step 9: Connect Power Pins With Jumper Wires
The Raspberry Pi 3 and the 7″ LCD Touch Screen can be powered by separate power adapters or can share the same power supply.
Here we are using a 5.1 Volt 2.5 Amp power adapter which can power both the units. Please follow the steps below to share the power supply:
Please look at the first picture which shows the layout of the Raspberry Pi 3 GPIO Pin Headers. The pins marked as 02 and 04 are for DC 5 volts and the Pin 06 is Ground. You can identify these pins by looking at the backside of the Pi 3 as shown in the second picture.
The inside pin on the top with a square solder is pin 01. The outer 2 pins on the top are DC 5 V and the third pin is Ground. Attaching the power to the wrong pins may damage your Pi 3, so please take care.
Now look at the third picture showing the power input (or output) pins on the display adapter. You can clearly see the end pins marked as 5 V and Ground.
Using female-to-female Jumper wire, connect the pin marked as 5 V on the display adapter to Pin 02 or 04 (both are 5 v DC) on the Raspberry Pi 3.
Using another female-to-female Jumper wire, connect the Pin marked as Ground on the display adapter to Pin 06 (Ground) on the Raspberry Pi 3.
Interconnecting and sharing the Power supply between Pi 3 and the Display Adapter is complete.
You can also view the pictorial demonstration of the above steps in the following link :
https://cdn.sparkfun.com/datasheets/Dev/RaspberryP…
Step 10: Connect Power Adapter and Ethernet Cable
There are two Micro USB power connectors available on the assembly, one on the Display Adapter and another on the Raspberry Pi 3. Both are adjacent to each other as you can see in the first picture. You can connect the power adapter to any one of them. Do not supply power to the assembly yet.
Installing the Operating System needs your Pi 3 to be connected to the Internet. Connect an Ethernet cable to the Ethernet Adapter on the Pi 3. Connect the other end of the Ethernet Cable to the LAN Port of your Modem.
Now the assembly of our Raspberry Pi 3 with the 7″ Touch screen display is completed in all respects.
Step 11: Selection of Micro SD Card With Adapter and Formating
None of the Raspberry Pi boards have their own storage device. You need a SD card to store the Operating System and the Pi will boot from it. Earlier versions of Pi have a SD card slot, whereas the latest models like the Pi 3 support Micro SD cards.
Capacity of Micro SD Card you need
Most of the sites recommend an 8 GB Micro SD card. Is it sufficient ? Look at the 3rd picture. I have loaded NOOBS (New Out Of Box Software : We will discuss about it latter) in an 8 GB Micro SD Card. When I tried to install Windows IOT Core Insider Preview, the system says that it needs 7765 MB of space whereas the space remaining in the Micro SD card is only 6428 MB. So, when you buy a Micro SD card go for a minimum of 16 GB. The cost difference between an 8 GB and 16 GB Micro SD cards is not much and you will not regret your decision.
What type of Micro SD Card to Buy ?
There are different types of Micro SD cards available in the market. You need a faster Micro SD card so that it won’t take lot of time to boot as well as easy to work with. Please see the second picture. The specifications on the Micro SD card cover says «Micro SDHC, UHS-1 card» and 16 GB capacity with 48 MB per second transfer speed / Class 10. The SDHC stands for «Secure Digital High Capacity» and the UHS stands for «Ultra High Speed». The SDHC cards have the capacity between 4GB to 32GB. Another type of MICRO SD card known as SDXC (Secure Digital eXtended Capacity) offers more than 32 GB storage capacity.
My suggestion is you can go for 16 GB capacity Micro SDHC, UHS-1 card which is sufficient for the Pi 3.
SD Adapter for the Micro SD Card
In the first picture I have shown a SD Adapter along with the 16 GB Micro SD Card. When Raspberry Pi 3 supports only Micro SD card, why do you need a SD Adapter ?
You need to load or flash the Operating System for the Pi 3 in the Micro SD Card using a Laptop or a Desktop Computer. The Card Reader slots provided in the Laptop / Desktop supports only SD type cards. Using the SD adapter it is possible to read or write to the Micro SD card in a Laptop / Desktop.
Formatting the Micro SD Card
The Micro SD Card needs to be formatted before being used. You can use a program known as «SD Formatter 4.0 for SD/SDHC/SDXC» which you can download and install on your computer based on the Operating System used from the following link :
https://www.sdcard.org/downloads/formatter_4/
Before progressing with formatting, insert the Micro SD Card with adapter in your system’s SD card reader slot and note down the correct drive letter from ‘My Computer’. Please refer the 4th picture here, which is Drive letter ‘F’ in my case. Selection of wrong drive letter may delete all data permanently from that drive, so proceed with caution.
Start the SD Formatter program and select the correct Drive letter to be formatted.In the Options Setting menu for Format Type, select ‘Full Erase’ and Format Size Adjustment ‘On’ Click ‘OK’ and then ‘Format’.
Now you have your SD Card formatted and ready
Step 12: Download, Extract and Copy NOOBS to the SD Card
NOOBS (New Out Of Box Software) is an operating system installer which contains Raspbian Operating System. It also provides a selection of alternative operating systems like Windows IOT Core which are then downloaded from the internet and installed. There are two versions of NOOBS, Offline and network install version and NOOBS LITE Network install only version. You can download the torrent or Zip file directly from the site. The latest version of NOOBS Offline and network install has been released on 10th May 2016 which contains the latest Raspbian Jessie operating system. You can download it from the following link :
https://www.raspberrypi.org/downloads/noobs/
The downloaded NOOBS is in WinRAR Zip Archive type. You need 7 Zip to extract the files from the archive.
Download 7 Zip from the following download page based on the OS installed on your computer (32 bit or 64 bit for Windows).
http://www.7-zip.org/download.html
Extract the WinRAR Zip file into a separate folder. Now copy all the extracted files to the Micro SD Card which has already been formatted and ready. Take care, you need to copy the extracted files only to the Micro SD card, not the folder in which the files have been extracted.
The extracted files contain many alternative operating systems. So I have copied them to 2 16 GB Micro SD Cards. One I will use to install Raspbian Jessie and the another one for Windows 10 IOT Core Insider Preview.
Guidelines on How to get and install NOOBS is available at the following page :
https://www.raspberrypi.org/help/noobs-setup/
Step 13: Insert Micro SD Card With NOOBS and Plug in Power Supply
The Micro SD card slot on the Raspberry Pi 3 is located just below the Display Serial Adapter on the other side. Insert the Micro SD card which was loaded with NOOBS in the slot and plug in power supply. The 7″ LCD Touch Screen displays the rainbow square for a few seconds and then boots into the NOOBS Start-up screen. Here you can select the Operating System of your choice and install to the Micro SD Card.
The Touch function of the LCD Display worked like a charm even before installing any OS. Watch the video here where I have used the touch function to select the OS to be installed.
Step 14: Install Windows 10 IOT Core Insider Preview
From NOOBS, I have selected the Windows 10 IOT Core for installation. This takes you to another screen where you have to sign to your Microsoft account. If you already have an account just enter the user name and password, otherwise create a new Microsoft account to proceed further.
Raspberry Pi 3 does not support Windows 10 IOT Core. I have tried it, it did not work. So when you sign in to your Microsoft account, it automatically takes you to a download link for Windows 10 IOT Core Insider Preview page from where you can down load and install the OS. This link is valid for 24 hours only, however you can request for a new download link without limitation.
There are two editions of the OS (Not much difference). The next screen asks you for the edition you want to down load and the device you want to install it to. Here select the edition you want to install and the device as Raspberry Pi. Then the download starts and installs Windows 10 IOT Core Insider Preview.
If you want to manually install Windows 10 IOT Core Insider Preview, please follow the steps provided on this page. Windows 10 IOT Core does not work with Raspberry Pi 3 only the Insider Preview works.
https://developer.microsoft.com/en-us/windows/iot/…
Step 15: Windows 10 IOT Core Insider Preview on Raspberry Pi 3
Windows 10 IOT Core Insider Preview takes about a minute to boot. Watch the video and see the boot sequence.
Once booted it takes you to the Device Info screen where the device name, Network Type, IP address and the OS version are listed.
The Device Settings tab lets you select the Language and view the Network & Wi-Fi and Blue Tooth devices. There is no support yet for Wi-Fi and Blue tooth devices.
There are some tutorials included which you can browse through but not much.
The Power Icon on the top left lets you Restart or Shut Down the system.
Windows 10 IOT Core Insider Preview is just a preview. You can not do anything else with this OS.
Step 16: How to Manually Install Raspbian Jessie
This step will show how you can download and manually install Raspbian Jessie on the Pi 3. You can download latest version of Raspbian Jessie from this page. There are two versions, full Desktop and a lite version. You can download the torrent or directly download the Zip file to your computer.
https://www.raspberrypi.org/downloads/raspbian/
Double click on the downloaded Zip file. This will extract the image file of the Operating System to the folder of your choice.
You can transfer this image file to your Micro SD Card using a Program Win32 Disk Imager, which can be downloaded from this link.
http://win32-disk-imager.en.uptodown.com/
Once the image file is transferred to the Micro SD Card, insert the same and power on the Raspberry Pi 3. Raspbian Jessie takes just 25 seconds to boot. Please watch the video to see the boot sequence of Raspbian Jessie.
There is no need to type a user name or pass word. The latest version of this OS directly takes you to the Desktop without any hassle and I liked it the most.
Step 17: External Storage Devices With Raspberry Pi 3
I have tested a couple of external storage devices with both Windows 10 IOT Core Insider Preview and Raspbian Jessie.
Both Windows 10 IOT Core Insider Preview and Raspbian Jessie detected the Cruzer Switch 16 GB Pen Drive.
The 1 TB capacity WD My Passport Ultra External Hard Drive was not detected by Windows 10 IOT Core Insider Preview. However, Raspbian Jessie detected it and I can browse and transfer files between the Micro SD Card and Hard Drive. So, storage and transfer of large files is not a problem.
Step 18: Bottom Line
I have explained almost everything involved in selection of accessories and installation of suitable Operating System for the Raspberry Pi 3. I hope this will be helpful for the beginners who are interested in the latest model of Raspberry Pi.
Suggestions and tips from experts for improvement are most welcome. Have Fun…
Наконец до меня добралась очередная посылка из интернет-магазина GearBest с одноплатным компьютером Raspberry Pi 3 Model B, базовыми аксессуарами для него и еще кое-какой мелочевкой.
О том, что такое Raspberry Pi и возможностях его применения можно прочитать подробнее в статье «Raspberry Pi и Arduino: в чем между ними разница и для чего они нужны».
А в этой статье будет описан процесс знакомства с микрокомпьютером — от распаковки до первого запуска операционной системы и выполнения первоначальных настроек.
Содержание
- 1 Что нам понадобится
- 2 Небольшой обзор Raspberry Pi 3 Model B
- 3 Блок питания для Raspberry Pi
- 4 Установка радиаторов на Raspberry Pi
- 5 Сборка корпуса для Raspberry Pi 3
- 6 Установка и настройка Raspbian
- 6.1 Установка Raspbian
- 6.1.1 Шаг 1. Форматирование microSD-карты
- 6.1.2 Шаг 2. Запись дистрибутива Raspbian
- 6.1.3 Шаг 3. Первый запуск Raspbian на Raspberry Pi
- 6.2 Ставим обновления
- 6.3 Убираем черные поля по краям экрана
- 6.4 Настройки локализации
- 6.5 Раскладка клавиатуры
- 6.1 Установка Raspbian
- 7 Впечатления от использования Raspberry Pi 3
- 8 Заключение
Что нам понадобится
Для начала работы понадобится обязательно:
- Raspberry Pi 3 Model B
- Набор медных радиаторов для Raspberry Pi
- Акриловый корпус для Raspberry Pi 3B / 2B
- Блок питания 5V 2.5A
- Карта памяти microSD объемом от 8Гб
Это то, из чего будет состоять микрокомпьютер в сборе.
Кроме того, нужно иметь следующую периферию:
- Монитор или телевизор с HDMI-входом
- Проводная клавиатура
- Проводная мышь
- Картридер для microSD-карт или устройство, способное выполнять его функцию
Экран для вывода информации, устройства ввода, картридер для записи образа операционной системы.
А для большего удобства не лишним будет иметь:
- Bluetooth-клавиатура
- Bluetooth-мышь
Управлять «малинкой» беспроводными мышью и клавиатурой удобнее, чем их проводными собратьями.
Небольшой обзор Raspberry Pi 3 Model B

Микрокомпьютер Raspberry Pi 3 Model B поставляется в картонной коробке красно-белой расцветки с фирменным логотипом в виде малины.
 Комплект поставки — сама плата Raspberry Pi 3 в антистатическом пакете и небольшая брошюра-памятка по технике безопасности (не накрывать «малинку» во включенном виде, не разгонять, избегать перегрева, не использовать в сырых и влажных местах, избегать механического повреждения печатной платы и т.д.).
Если Arduino может производить по open-source лицензии любой желающий, то с Raspberry Pi все проще: эти платы являются коммерческой разработкой, и выпускаются всего двумя компаниями: RS Components (в тандеме с Allied Electronics) в Англии и Element14 в Китае по лицензии Raspberry Pi Foundation.
Платы производства Element14 и RS Components/Allied Electronics являются 100% идентичными и единственное различие между ними заключается в дизайне упаковке — на ней будут логотипы либо того, либо другого производителя.

Я покупал Raspberry Pi 3 английского производства, о чем свидетельствует гордая надпись «made in UK» на печатной плате. На плате производства Element14 надпись выглядела бы как «made in PRC» (PRC — People’s Republic of China, Китайская Народная Республика).
Что представляет из себя Raspberry Pi 3 Model B в техническом плане?

- SoC: Broadcom BCM2837
- Процессор: ARM Cortex-A53 (4 ядра)
- Графический процессор: Broadcom VideoCore IV
- Оперативная память: 1Гб LDDR2
- Встроенные адаптеры: 10/100Мбит Ethernet, Bluetooth 4.1 LE, Wi-Fi 802.11n
- Порты: 4xUSB 2.0, HDMI, 3.5мм аудиовыход, 40-pin GPIO (как на Arduino), Camera Serial Interface (CSI), Display Serial Interface (DSI)
- Разъем под microSD-карту
 Главные отличия Raspberry Pi 3 от предыдущего поколения «малинки» — более мощный процессор и встроенные адаптеры Bluetooth и Wi-Fi.
Последнее — это действительно круто.
Раньше при использовании Raspberry Pi приходилось затыкать 2 USB-порта из имеющихся четырех адаптерами Bluetooth и Wi-Fi, а теперь они распаяны на печатной плате и оба беспроводных интерфейса работают «из коробки». Помимо того, что так «малина» выглядит эстетичнее, это еще и удешевляет конечную стоимость ее эксплуатации — ведь даже дешевые USB-адаптеры Bluetooth и Wi-Fi стоят не меньше 5 долларов каждый.
Питание на Raspberry Pi подается через стандартный microUSB-разъем, как и на большинство современных мобильных гаджетов.
Этот микрокомпьютер весьма требователен к электропитанию — для нормальной работы необходимо использовать источник питания, способный выдавать не менее 2А, а лучше 2,5А тока.
При недостатке питания Raspberry Pi скорее всего запустится, но будет очень сильно тормозить.
Вообще, Raspberry Pi может тормозить по 2 причинам: либо используется медленная microSD-карта (ниже 10 класса скорости), либо не хватает питания. Если не хватает питания, то на подключенном к микрокомпьютеру экране в правом верхнем углу будет отображаться желтый значок молнии.
Питания может не хватать по 2 причинам: слабый источник питания (например, большинство зарядных устройств для смартфоном выдают ток до 1А) или плохой USB-кабель.

Так что к выбору блока питания нужно подходить осознанно.
Я специально заказал БП на 2.5А для Raspberry Pi, несмотря на наличие в хозяйстве обычных зарядных устройств для смартфонов.
Установка радиаторов на Raspberry Pi

Первым делом при подготовке Raspberry Pi к запуску следует озаботиться его охлаждением.
Как-никак, а перед нами компьютер с процессором и другими чипами, которые имеют свойство нагреваться при работе.
Китайцы производят и продают наборы радиаторов для микрокомпьютеров. Радиаторы бывают алюминиевыми, медными и керамическими. Я выбрал набор из меди, потому что теплоемкость медных радиаторов больше алюминиевых, а керамика в качестве пассивного охлаждения — вещь для меня совершенно непонятная.

2 крупных радиатора крепятся на верхней части платы, а плоская пластина будет закреплена на чипе оперативной памяти с нижней стороны.
Крепятся радиаторы к чипам, судя по всему, обычным двусторонним скотчем. По крайней мере для 3M-ленты этот клейкий материал выглядит уж слишком тонким.

Чипы перед наклейкой радиаторов на всякий случай следует обезжирить спиртом. Крупный чип слева — сердце микрокомпьютера, однокристальная система Broadcom BCM2837 с интегрированным процессором и графическим адаптером. В синтетических тестах греется до 100°C, так что оставлять его без охлаждения никак нельзя.
Правее, возле USB-портов, находится контроллер USB. Он тоже греется, хотя и не так сильно, как SoC Broadcom BCM2837. Второй радиатор из набора будет закреплен на нем.

2 верхних радиатора надежно закреплены на своих местах.

Медная пластина закреплена на модуле 1Гб LDDR2 памяти с нижней стороны. Оперативная память сильно не греется, поэтому полноразмерный радиатор на ней не нужен. Но медная пластина все же пусть будет. На всякий случай. Как минимум, ее наличие способно защитить чип от случайных механических повреждений.
Забегая наперед: радиаторы оказались действительно полезной вещью, когда процессор «малины» находится под нагрузкой, то установленный на нем радиатор начинает обжигать палец. Так что пренебрегать их установкой, думая что «раз производитель не оснастил ими плату — значит и не нужно», не стоит.
Сборка корпуса для Raspberry Pi 3

После установки радиаторов остается только установить Raspberry Pi в корпус — и на этом приготовления к запуску можно считать законченными.
Корпус, как и радиаторы, продается отдельно. Конечно, можно обойтись и без него — но будет очень неприятно, если плата микрокомпьютера погибнет преждевременно от разряда статического электричества или будет случайно повреждена каким-то иным образом.
Кроме того, крепление в корпусе придает всей конструкции законченный и эстетичный вид.
Тот корпус, который я купил, сделан из прозрачного акрила (оргстекла) и поставляется в виде набора для самостоятельной сборки.
Состоит он из 6 акриловых пластин: 4 боковушки, днище и подъемная крышка.
Все элементы оклеены с обеих сторон защитной транспортировочной пленкой. Я сначала этого не понял: больно хорошо пленка прилегает к пластинам, нигде нет воздушных пузырей и надрывов. Так что про себя подумал плохо о китайцах, приславших мутный и исцарапанный корпус, и собрал его «как есть» :).

Потом сообразил что к чему, разобрал все обратно на составляющие и снял с них защитную пленку.

Затем снова собрал корпус. Вот такая получилась красота.
Единственный недостаток — такой корпус быстро собирает на себя жирные отпечатки пальцев, что портит вид. Поэтому периодически нужно протирать его салфеткой.
Установка и настройка Raspbian
С «железной» частью мы вроде разобрались.
Raspberry Pi установлен в корпус, на чипы наклеены радиаторы, найден подходящий источник питания.
Осталось установить на микрокомпьютер операционную систему, сделать базовые настройки — и можно пользоваться.
Установка Raspbian
На настоящий момент для Raspberry Pi существует 6 официальных операционных систем и около 30 неофициальных, включая в том числе и Android.
В большинстве руководств по Raspberry Pi рекомендуют использовать установщик NOOBS (New Out Of The Box Software). Это официальный установщик от разработчиков Raspberry Pi, содержащий в себе дистрибутив Raspbian и возможность загрузить из интернета 5 остальных официальных дистрибутивов и установить любой из них на Raspberry Pi.
Я попробовал — мне не понравилось.
NOOBS имеет смысл использовать для установки одновременно двух или более разных ОС на одну Raspberry Pi, с возможностью выбора между установленными ОС при включении.
Если мы планируем использовать на Raspberry Pi только одну ОС (в данном случае — Raspbian), то можно поступить сделать все гораздо проще и быстрее: сразу записать операционную систему на microSD-карту.
Для этого потребуется microSD-карта и картридер. Либо устройство, способное его заменить (mp3-плеер, смартфон, видеорегистратор, планшет — любое устройство, отображающее установленную в него карту памяти в качестве накопителя при подключении к компьютеру).
Крайне желательно использовать карту памяти не ниже 10 класса скорости, т.к. использование более медленных microSD-карт будет тормозить работу устройства.
А сам процесс установки Raspbian сводится к трем простым шагам.
Шаг 1. Форматирование microSD-карты
Имеющуюся microSD-карту необходимо отформатировать в формате FAT32.
Для этого нужно использовать бесплатную утилиту SD Card Formatter.
Стандартное средство для форматирования Windows почему-то не подходит: при попытке запуска Raspbian с отформатированной через него карты памяти будет выдаваться ошибка «error resizing existing FAT partition».
Шаг 2. Запись дистрибутива Raspbian
После подготовки microSD-карты необходимо скачать дистрибутив Raspbian с официального сайта.
Скачанный образ дистрибутива заархивирован, так что после скачивания архив нужно распаковать в любую папку.
Распакованный образ Raspbian нужно записать на подготовленную microSD-карту, для чего можно воспользоваться бесплатной утилитой Rufus.
Шаг 3. Первый запуск Raspbian на Raspberry Pi

На этом процедура установки завершена.
Карту памяти с записанным на нее Raspbian нужно установить в Raspberry Pi и подключить к микрокомпьютеру монитор и питание, после чего произойдет первый запуск операционной системы.
Теперь можно подключить Raspberry Pi к беспроводной Wi-Fi сети, а если есть Bluetooth мышь и клавиатура, то провести их сопряжение с микрокомпьютером для большего удобства использования.
Ставим обновления
После установки Raspbian и подключения к интернету посредством Ethernet или Wi-Fi соединения нужно на всякий случай обновить все пакеты до актуальной версии.
Делается это через терминал посредством ввода двух команд:
sudo apt-get update
sudo apt-get upgrade
Первая команда загружает сведения о доступных обновлениях пакетов, вторая загружает непосредственно сами обновления.
На всякий случай обновим еще прошивку Raspberry Pi:
sudo rpi-update
По завершению установки обновлений Rapsberry Pi нужно перезагрузить:
reboot
И если все сделано правильно, то после перезагрузки система уведомит нас о том, что она была обновлена до актуальной версии.
Многие команды в *nix-системах начинаются с sudo: это означает, что исполнение команды запускается с правами суперпользователя, что является аналогом «Запуска от имени администратора» в Windows.
Убираем черные поля по краям экрана
В некоторых случаях после загрузки Raspbian пользователь обнаруживает черные поля по краям экрана.
Это значит, что неверно выставлена развертка.
Исправляется буквально в два клика мышкой путем правки файла конфигурации через текстовый редактор:
sudo leafpad
Открываем файл /boot/config.txt и ищем в нем строку:
#disable_overscan=1
И убираем символ #, превращая ее из комментария в исполняемую команду:
disable_overscan=1
На этом все. После перезагрузки интерфейс Raspbian будет отображаться на полном экране без каких-либо черных полей.
Настройки локализации
По умолчанию Raspbian настроен под британского пользователя.
Изменить настройки локализации можно в настройках, как через графический интерфейс (Menu -> Parameters -> Raspberry Pi Configuration), так и через консоль:
sudo raspi-config
Мне показалось, что менять настройки через графический интерфейс удобнее, поэтому в этом тексте я буду рассматривать его.
Итак, запускаем «Raspberry Pi Configuration».
На вкладке System нажимаем «Change Password…» и задаем root-пароль. По умолчанию он отсутствует, что в дальнейшем может помешать выполнению некоторых команд.
Переключаемся на вкладку Localisation.
«Set Locale…» — выбираем Country: RU (Russia), Character Set: UTF-8. Язык системы (пункт Language) можно поменять на «ru (Russian)», а можно оставить как есть. Локализация Raspbian выполнена не на 100%, и при выборе русского языка придется довольствоваться мешаниной из русского и английского текстов в интерфейсе.
«Set Timezone…» — здесь нужно выбрать подходящий часовой пояс. Поскольку территория России захватывает и Европу и Азию, то в зависимости от географического положения в «Area» выбирается либо «Asia», либо «Europe», а в «Location» — один из городов, часовой пояс в котором соответствует часовому поясу вашей местности.
Например, на Урале часовой пояс UTC/GMT+5, что принято называть «Екатеринбургским часовым поясом». В графе «Location» в Raspbian нет населенного пункта Ekaterinburg (Yekaterinburg), но есть населенный пункт Ashkhabat, живущий по тому же часовому поясу. Поэтому я выставляю его, и на системных часах начинает отображаться мое местное время.
«Set Keyboard…» — не трогаем, о раскладках клавиатуры речь пойдет дальше.
«Set WiFi Country» — тут выставляем «RU Russia», хотя большой необходимости в этом нет, встроенный адаптер работает и на локальных настройках по умолчанию. Скорее всего, эта настройка важна для некоторых стран третьего мира, где стандарты Wi-Fi жестко ограничиваются в милитаристских целях.
Раскладка клавиатуры
Нужные раскладки клавиатуры и возможность переключения между ними добавляются вводом консольной команды:
setxkbmap us,ru -option grp:alt_shift_toggle
В данном случае добавляются русская и английская раскладка. Английская стоит как основная, а переключение между ними происходит по сочетанию клавиш Alt+Shift.
Можно изменить сочетание на Ctrl+Shift, если так привычнее, внеся соответствующую правку в эту команду.
Проблема в том, что Raspbian не запоминает эту команду, и после каждой перезагрузки Raspberry Pi ее придется вводить заново. А это неудобно.
Поэтому открываем текстовый редактор:
sudo leafpad
И правим через него системные настройки клавиатуры, хранящиеся в файле /etc/default/keyboard.
Нужно заменить строки:
XKBLAYOUT="gb"
XKBOPTIONS=""
На:
XKBLAYOUT="us,ru"
XKBOPTIONS="grp:alt_shift_toggle,grp_led:scroll"
Теперь добавим в систему графический индикатор раскладки клавиатуры:
sudo apt-get install gxkb
И поместим его в автозагрузку. Это тоже делается через редактирование текстовых файлов:
sudo leafpad
Открываем файл /home/pi/.config/lxsession/LXDE-pi/autostart и дописываем в его конец строку:
@gxkb
Теперь осталось только перезагрузить Raspberry Pi для применения изменений:
reboot
На этом базовую настройку можно считать завершенной.
Впечатления от использования Raspberry Pi 3

Первое, на что обращаешь внимание при использовании Raspberry Pi — полная бесшумность его работы.
Нет, понятно, что если используется полностью пассивное охлаждение и нет ни воздушных кулеров, ни даже обычного HDD на основе движущихся частей, то издавать шум просто нечему.
Но сам факт существования подобного компьютера — настоящего, полноценного компьютера, и при этом полностью бесшумного — поначалу потрясает воображение.
Теперь что касается производительности.

Мощности Raspberry Pi 3 Model B хватает на выполнение простых офисных и мультимедийных задач: комфортную работу в офисном пакете, просмотр видео и серфинг не очень тяжелых сайтов в интернете.
А вот просмотр онлайн-видео дается «малинке» уже тяжеловато, а при одновременном открытии 4-5 вкладок ютуба Raspbian начинает немного подвисать.
По слухам, с воспроизведением онлайн-видео все обстоит более чем хорошо в специально заточенных под мультимедийную составляющую операционных системах — например, OpenELEC. Тему использования Raspberry Pi в качестве домашнего медиацентра я планирую обязательно рассмотреть в будущем.
Ну а дистрибутив Raspbian предназначен для обучения программированию (недаром в нем «из коробки» уже предустановлены IDE для программирования на Java и Python, и такая забавная штука как Scratch — среда программирования, позволяющая составлять алгоритмы в визуально-графической форме) и для управления подключенной по GPIO периферией. Это тоже интересная тема, и к использованию GPIO-интерфейса Raspberry Pi я еще вернусь в будущем.
Заключение
Вот так прошло мое знакомство с микрокомпьютером Raspberry Pi 3.
В следующих статьях цикла будут рассмотрены такие темы как:
- подключение к Raspberry Pi сенсорного TFT-дисплея
- удаленное управление через SSH
- организация домашнего медиацентра
- совместное использование Raspberry Pi и Arduino
- сравнение Raspberry Pi с другими присутствующими на рынке одноплатными компьютерами
А для тех, кто заинтересовался перспективой покупки Raspberry Pi 3 хочу напомнить, что адекватная цена на этот микрокомпьютер колеблется в пределах $35-$40.
Именно по такой цене Raspberry Pi можно приобрести в Китае, в то время как у наших «серых» дилеров розничная стоимость этого микрокомпьютера начинается от 3000 рублей и может достигать 4500 рублей.
Не кормите кучу посредников — заказывайте Raspberry Pi по честной цене в Китае!
Raspberry Pi 3B (английская сборка)в интернет-магазине GearBest Raspberry Pi 3B (китайская сборка)в интернет-магазине GearBest

Raspberry Pi 3
Model B+
1
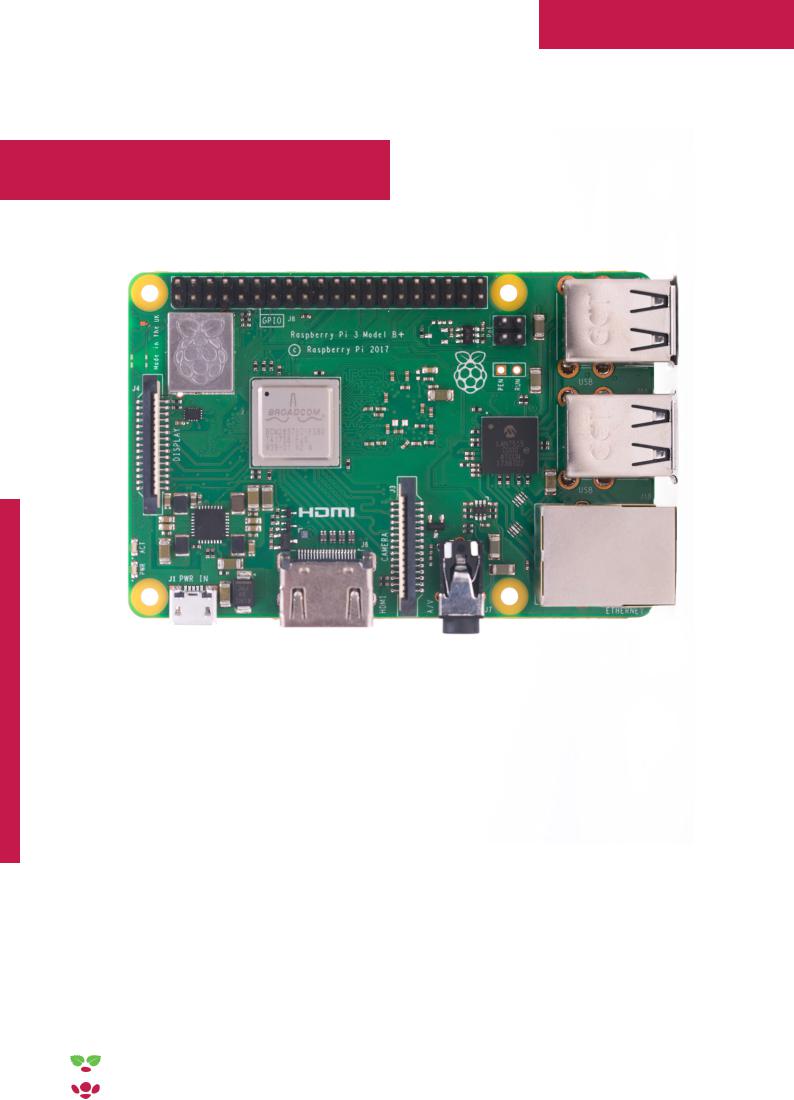
Raspberry Pi 3 Model B+
Overview
The Raspberry Pi 3 Model B+ is the latest product in the Raspberry Pi 3 range, boasting a 64-bit quad core processor running at 1.4GHz, dual-band 2.4GHz and 5GHz wireless LAN, Bluetooth 4.2/BLE, faster Ethernet, and PoE capability via a separate PoE HAT
The dual-band wireless LAN comes with modular compliance certification, allowing the board to be designed into end products with significantly reduced wireless LAN compliance testing, improving both cost and time to market.
The Raspberry Pi 3 Model B+ maintains the same mechanical footprint as both the Raspberry Pi 2 Model B and the Raspberry Pi 3 Model B.

 raspberrypi.org
 Loading…
You can only view or download manuals with
Sign Up and get 5 for free
Upload your files to the site. You get 1 for each file you add
Get 1 for every time someone downloads your manual
Buy as many as you need