

Приветствую Вас на блоге kuzov.info!
В этой статье рассмотрим что собой представляет защитное покрытие Raptor, его преимущества, подготовку к нанесению, процесс нанесения и сушки.
Raptor является торговой маркой компании U‑POL. Полное название этого продукта U‑POL’S RAPTOR Truck Bed Liner, что означает покрытие для задней платформы (грузового отсека) пикапов и грузовиков. Изначально это покрытие разрабатывалось именно для этих целей. В дальнейшем, краску Raptor стали применять повсеместно, для окрашивания как отдельных частей кузова, так и кузова целиком.
Содержание статьи:
- Что такое Raptor
- Преимущества покрытия Raptor
- Подготовка поверхности к нанесению покрытия Raptor
- Смешивание компонентов Raptor
- Покраска раптором своими руками
- Сушка покрытия Raptor

Покрытие Raptor является 2‑х компонентной краской, что означает, что она смешивается с отвердителем перед нанесением. Она имеет уретановую основу, которая и придаёт этой краске особую прочность, при этом она остаётся эластичной и не растрескивается при ударах.
Итак, перечислим основные преимущества покрытия Raptor:
- Raptor придаёт эстетичный внешний вид и может наноситься с разной текстурой.
- Raptor защищает от влаги, солей, коррозии.
- Противостоит воздействию топлива, масел.
- Обеспечивает защиту от ультрафиолетовых солнечных лучей и не выцветает со временем.
- Легко наносится, не требуется высокого профессионализма, не требуется покрасочная камера.
- Raptor хорошо противостоит появлению царапин (даже от веток), противостоит истиранию.
- Хорошо противостоит появлению сколов (при условии правильной подготовки поверхности перед нанесением).
- Raptor помогает поглощать шум и вибрации и может применяться как защита днища и арок.
- При применение в качестве покрытия задней платформы (грузового отсека) пикапов и грузовиков, может наноситься с текстурой (и добавкой), препятствующей скольжению.
- Raptor обеспечивает покрытие, которое способно выдержать жёсткие воздействия. Его можно наносить на места, наиболее подверженные износу.
Подготовка поверхности к нанесению покрытия Raptor
- Подготовка поверхности является очень важным этапом покраски Raptor’ом. Все свойства этого покрытия проявятся в полной мере только при тщательной подготовки.
- Сначала нужно очистить поверхность, удалить всё отслаивающееся покрытие и ржавчину при помощи специальных насадок на дрель или «болгарку».
- Raptor может напрямую наноситься на краску, подготовленную шлифованием.

- Отшлифуйте поверхность шлифовальной бумагой P120 — P220, в некоторых случаях P80. Это более крупный абразив, чем используется при подготовки автомобиля к покраске, но Raptor имеет более густую консистенцию, чем обычная краска и хорошо держится на поверхности, отшлифованной более крупной шлифовальной бумагой и хорошо заполняет царапины от неё. Используйте красный скотч-брайт для труднодоступных мест. Не должно оставаться областей с глянцем. Вся поверхность должна быть матовой.
- Для труднодоступных мест, где невозможно качественно отшлифовать поверхность, компания U‑Pol предлагает распылять усилитель адгезии GRIP#4 (UNIVERSAL ADHESION PROMOTER). Он также может применяться на «голом» пластике для улучшения адгезии (прилипания), алюминии, стеклопластике. Может распыляться прямо на глянцевое лакокрасочное покрытие, по которому потом можно красить без шлифования.
- Очистите поверхность от шлифовальных частиц и обезжирьте.
- Raptor нельзя наносить на «голый» металл. Места с «голым» металлом должны быть загрунтованы. Компания U‑Pol предлагает для этого использовать травящий грунт ACID#8 или эпоксидный грунт.
- При применении эпоксидного грунта нужно, чтобы он просох и был подготовлен шлифованием.
- Не рекомендуется использовать однокомпонентный акриловый грунт из баллончика.
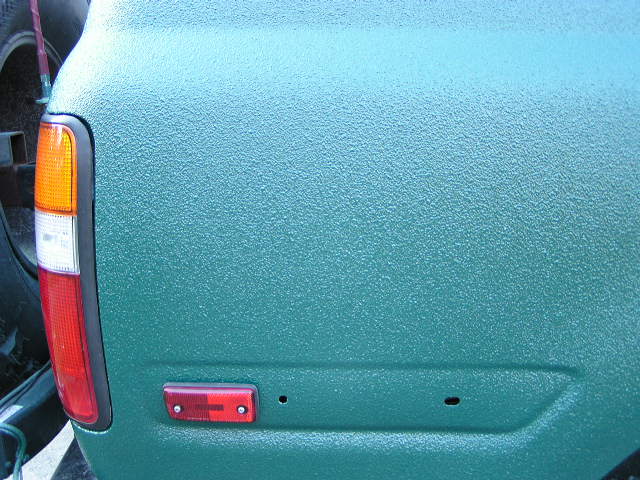
- Raptor может заполнить лишь мелкие несовершенства поверхности. Более серьёзные повреждения нужно сначала отремонтировать, зашпаклевать и загрунтовать.
- Нужно заклеить все места, не подлежащие окрашиванию малярной лентой и укрывным материалом. Подробнее о процессе маскировки автомобиля перед покраской можете прочитать в статье “Оклейка автомобиля перед покраской”. Маскировочную ленту лучше снимать после 15–20 минут после нанесения Raptor’а, чтобы граница получилась ровная.
Смешивание компонентов Raptor
- Raptor продаётся в двух вариантах – традиционный BLACK (чёрного цвета) и TINTABLE (колеруемый), к которому можно добавить автомобильную краску (или пигмент) нужного цвета. Раптор поставляется в наборах 1 литр, 2 литра и 4 литра для нанесения распылением, также есть набор для нанесения валиком (Roll-On RAPTOR).
- Смешайте раптор по инструкции. Бутылки раптор наполнены на 750 мл. Нужно добавить 250 мл отвердителя, либо смешать 3 части Raptor и одну часть отвердителя в отдельной таре. Далее нужно всё размешать в течение 2 минут. Если используется Raptor Tintable (колеруемый), то добавляется до 10% краски (или пигмента) от общего объёма.
Покраска раптором своими руками
- Raptor нельзя наносить при слишком высокой или слишком низкой температуре. Самая лучшая температура для распыления – 20 градусов по Цельсию с влажностью менее 60%.
- При нанесении Raptor’а, нужно использовать респиратор, а лучше работать на улице. Отвердитель раптора содержит изоцианаты, которые являются очень токсичными и вредными для здоровья.
- Raptor может наноситься специальным пистолетом (Schutz Gun), HVLP-краскопультом, валиком и кистью. В продаже также есть более дорогой пистолет с регулировкой сопла (RAPTOR PROFESSIONAL VARI-NOZZLE APPLICATION GUN), который позволяет легче манипулировать распылением, создавая разную текстуру.

- После размешивания бутылка прикручивается к пистолету, который, в свою очередь, должен быть соединён с компрессором. Нужно настроить давление на 2.5–5 атм, в зависимости от желаемой текстуры. Более низкое давление даст более крупную текстуру, а более высокое давление даст более мелкую текстуру.
- Дистанция и скорость движения пистолета также будет влиять на текстуру.
- Добавление разбавителя (до 10%) даст более гладкое покрытие. Для этого лучше использовать специальный разбавитель, но подойдёт и универсальный акриловый разбавитель. Не рекомендуется использовать растворители, так как они ослабят свойства покрытия.
- Поэкспериментируйте с настройками давления и сделайте пробное распыление на картонку, чтобы найти текстуру, которая вам понравится.
- Рекомендуемое расстояние 40–45 см (до 150 см). Более близкое расстояние даст более крупную текстуру.
- О том, как делать проходы пистолетом при распылении и об основных принципах покраски можете прочитать в статье “Технология покраски автомобиля”.
- Время, в течение которого нужно распылить разведённый Raptor составляет 60 минут.
- Если прошло более 5 часов после нанесения слоя, то перед нанесением последующего слоя нужно немного отшлифовать поверхность.
- U‑pol рекомендует наносить 2–3 слоя Raptor. Больше 3‑х слоёв не рекомендуется.
- Последующие слои можно наносить соблюдая 60 минутный период сушки между слоями.
- Между сменой бутылок пистолет нужно отмыть для беспроблемного распыления. Сразу после использования, пистолет также нужно промыть. Пистолет можно отмывать как растворителем, так и ацетоном.
Распыление краскопультом HVLP
- Нанесением Raptor’а краскопультом можно добиться наиболее гладкой поверхности.
- Разведите Raptor разбавителем на 10–20% от общего объёма.
- Наносите разведённый Raptor краскопультом с дюзой 1.6 – 2 мм.
- Пистолет должен распылять с давлением между 2–4 атм.
- Удерживайте пистолет на расстоянии 30–60 сантиметров от поверхности.
- Наносите раптор продолжительными движениями, чтобы достичь нужной текстуры.
- Каждый слой должен сохнуть 1 час до нанесения последующего слоя.
Раптор может окрашиваться большинством современных красок. Для этого нужно подождать 24 часа после его нанесения и обработать скотч-брайтом. Далее наносится краска или лак. Это не обязательный процесс, но возможный.
Сушка покрытия Raptor
Raptor высыхает на «отлип» за 1 час. Через 2–3 дня можно эксплуатировать с осторожностью. Через 7 дней поверхность, окрашенная Raptor’ом полностью готова к эксплуатации. Сушку можно ускорить повышением температуры (60 градусов), но полное затвердевание наступит также не ранее 7 дней.
Не рекомендуется сушить Raptor инфракрасной сушкой.
Печатать статью
new Date().getTime(),event:’gtm.js’});var f=d.getElementsByTagName(s)[0],
j=d.createElement(s),dl=l!=’dataLayer’?’&l=’+l:»;j.async=true;j.data-privacy-src=
‘https://www.googletagmanager.com/gtm.js?id=’+i+dl;f.parentNode.insertBefore(j,f);
})(window,document,’script’,’dataLayer’,’GTM-P57FPGC’);
Skip to content
![]()
RAPTOR Защитное покрытие повышенной прочности комплект из 4 бутылок
Комплект RAPTOR из 4 бутылок является промышленным стандартом среди покрытий специального назначения. Каждый комплект содержит четыре 0.71 л бутылки RAPTOR, 0.95 л банку отвердителя и мерный стакан.
- Стандартное покрытие составляет 4.2 м² на 1 л RAPTOR.
- Совместим со стандартным и профессиональным окрасочными пистолетами RAPTOR.
Похожие товары
Page load link
Go to Top

Description
Free Download Only
This is an information sheet that should help you understand the process of applying Raptor Liner
Click Here for larger view
You may also like
Recently viewed
Fast Delivery
Orders that are in stock will be sent within a day
Satisfied or refunded
If the product has been used correctly and your still unsatisfied we will refund you
Top-notch support
We strive to answer all questions about your project
Secure payments
Your safe here bro
Review thanks to shedheads.net
July 5th, 2017: We’ve received a few emails from readers who’ve sprayed their own truck bed. Based on their input, we’ve now updated this article. We now strongly recommend against doing a single coat, two coats gives a much better finish. We’ve also added some important safety notes about wearing a respirator. If you’ve sprayed your own truck bed, please drop us a line in the comments! We’d love to hear your experience.
Looking to get your truck ready for the next four wheeling season? Many consumers are turning to raptor liner to protect their truck beds. They’ve quickly become one of the bestselling spray of bed liner manufacturers on the market. But what exactly is it? And what kind of results should you expect? We’ll be taking an in-depth look at this popular product to find out if it’s something that you should trust your vehicle with, or if it’s just another over marketed add-on.
What is Raptor Liner Paint?
Raptor liner is an all-inclusive kit that contains almost all of the materials needed for vehicle enthusiasts to protect their investment. Once installed, it dries into an ultra-hard coating that can protect bare metal from chips, scratches, and the inevitable rust that comes along with it. What separates them from competing products is the look and feel. The first generation of bed liner was actually molded plastic that would sit inside your box. The disadvantage to this system was that bed liners had to be pre-manufactured for certain vehicles, and the cost of shipping made them prohibitively expensive for many consumers. But this product uses a spray-on formula that bonds directly to the contours of your vehicle. Because there is no air gap, less cargo space is lost. Because it comes in a spray, Raptor’s unique chemical formula allows them to bond the material with a number of dyes and pigments, so you can get a color that matches the paint of your vehicle.
How Should Spray on Bed Liner be Used?
Raptor bed liner started out as an easy way for truck owners to protect their cargo area, but it’s grown to be much more than that. Today, Raptor liner is in use in all kinds of industries from automotive restoration, off-roaders, marine, agricultural, and even with heavy equipment.
No matter how you intend to use this unique spray on bed liner, the process is pretty straightforward. First, you make a rough estimate of the area you need to cover. You then order the kit, and clean the surface. Then, just like a can of spray paint, you shake the can and apply. After a brief time to dry, your metal is protected.
How Raptor Liner Can Protect Your Vehicle
On a basic level, it serves to protect the metal of your vehicle. It’s reasonably thick, and even though it feels hard to the touch it has the ability to disperse pressure. Let’s say, for example, that you threw a generator into the back of your truck. If it was to bounce around, the force with which it impacts your truck bed could cause dents. This is because there is a lot of pressure applied to a very small area. But when the same force is applied to your newly applied protective coating, it flexes just enough to disperse the pressure so you don’t damage your vehicle. This elasticity is also what allows it to hold solid to your vehicle as well. Driving, even on rough roads, isn’t going to cause it to crack or chip like other coatings.
But there are a few other key reasons why people use spray on bed liner. It’s UV resistant, so it won’t fade or discolor like paint will. Heavy machinery and farm equipment is often given a coat as it doesn’t react with animal urine or engine lubricants.
Is It Worth It?
We have to admit, once we learned all of the above, we were intrigued. We decided to try Raptor Liner out for ourselves. After getting some firsthand experience, we learned a few things that you should be aware of before you consider this product yourself.
What You Need
The Raptor DIY Spray in Bed Liner comes in a kit that includes, for the most part, everything you need. Each kit contains four bottles, totalling about 3 liters of liner. You also get a gun to help you spray it on, and some sandpaper.
What they don’t tell you is that you’ll need a few tools. Most of you will have an orbital sander, but if you don’t, these are very easy to find. You’ll also need an air compressor. We recommend a minimum of 5 gallon capacity. It’s basic, but gets the job done. The reason you need 5 gallons or more is because specific air pressure is needed to get the desired finish. If you go for your typical low volume compressor, you’re going to spend a lot of time waiting for the compressor to build up pressure, and this can easily double the time it takes to apply. It goes on very quick, so it’s well worth the money to rent a larger compressor for a couple days while you complete the project, if you’re not interested in buying one.
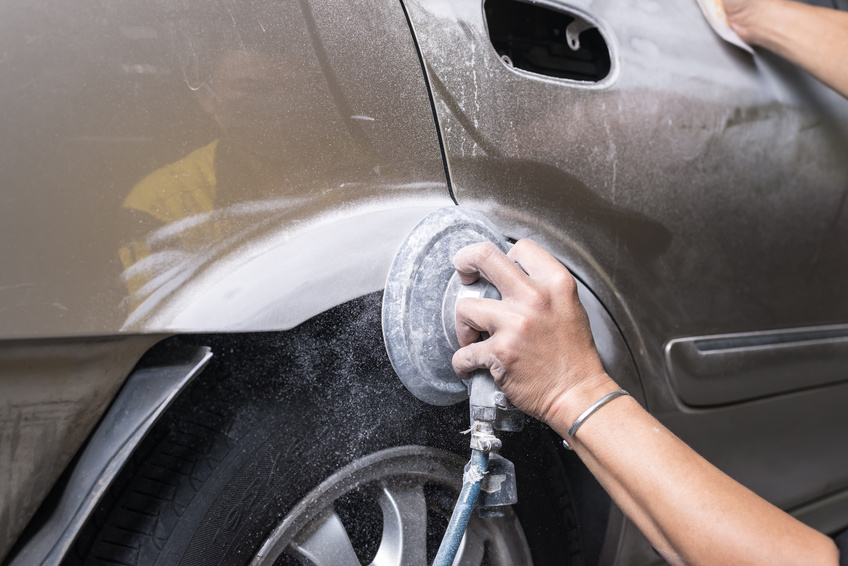
Step 1: Prepping the Surface
In order for the coating to stick, it needs a rough surface. You’ll have to use the included 3M pads to scuff up the box of the truck to make it rough. The entire process took us about two hours for a half ton truck. You might feel that you can do this much faster, but it’s important to take your time. By looking at the paint in the sunlight, you’ll see pretty clearly if you missed any areas. Doing it right the first time will be much quicker than rushing through the job and having to touch up all of the problem areas.
Just like when you paint a vehicle, many people recommend that you wipe your box down with a tack cloth . Although this isn’t required, this will help remove any dust from your box, and improve bonding. If you don’t own a tack cloth and you’re on a budget, one alternative is to hose your box down, dry it with a microfiber cloth or towel (make sure that it’s solid, and doesn’t leave any residue!)
Step 2: Tape
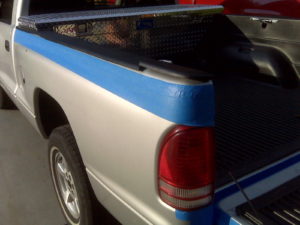
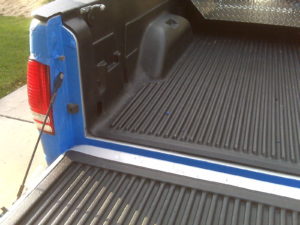
If you look at most truck bedliners, you’ll notice that it actually comes out of the box a little and covers the top. To get a nice clean line, you’ll want to run a strip of tape where you want the liner to stop. We’d recommend stretching the tape out about a foot past where you’re sticking it, then run your hand along the side of your truck in a smooth manner. This makes a nice clean line, giving you a very professional look.
Step 3: Spray
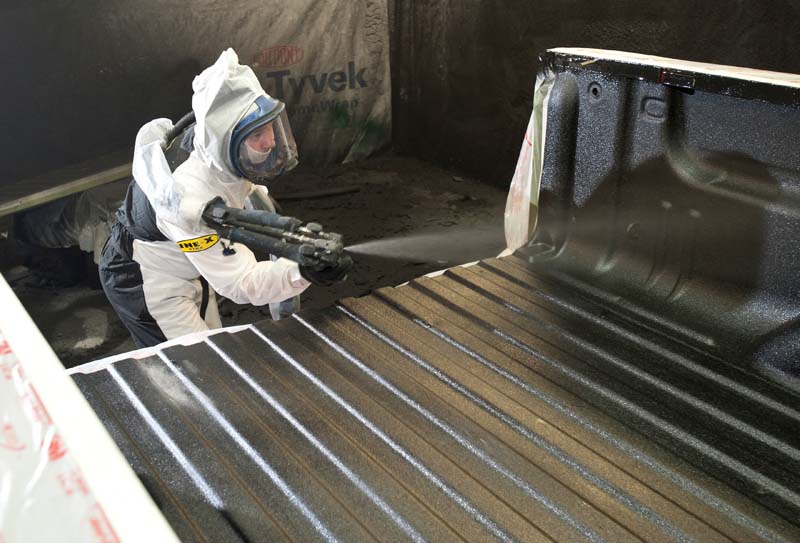
The included gun screws right into the top of your paint bottle, and your compressor attaches at the back. Reading the directions, we found that the amount of air pressure you use determines the finish. Typical finished jobs will have a rough, patchy feel to them. In our opinion, this is the way to go. It’s a slightly tougher finish, and helps keep things in place so they’re not sliding around in your box. But if you want a smoother finish, you can go as high as 100 PSI or as low as 30 PSI. 30 PSI is typically used for people who are using the bed liner as a finishing tool. If you’re doing your fender flares, or painting your rocker panels, set the pressure lower. If you’re using the product as intended (in your truck bed) we highly recommend that you use the manufacturers recommended pressure of 50 PSI.
As for the spraying itself, it’s very simple. As with anything, you want to start the spray pointed away from the vehicle, then slowly move your hand above the area to be painted in a smooth motion. If you’ve ever painted a car yourself, or seen videos where people are painting their own cars, this is much easier. This video gives a good example of proper spraying technique:
Raptor liner doesn’t bead or pool up like paint does, and it goes on thick. They recommend two coats. The trick with this is to make your first coat very light. It’s fine if it seems a little uneven, or splotchy. Just focus on making nice smooth, even passes. Move quickly, and don’t let it pool up. When you’re doing your second coat, you’ll be able to move slower and lay it down thicker. Because you’ll already have a layer, this second coat will be much more even. Many people have been able to do this in a single coat by using a higher air pressure, but we found that you get much more professional results with a single coat.
If you’ve done a good job, you should be pretty much finished at this point. But we’d really recommend a second set of eyes to check over your work. You might have small areas that you’ve missed, and it’s important to touch these up before it dries. If you’re spraying indoors, now is a great time to reverse out of your garage and set it in the sun. The bright light will make it easier to spot imperfections.
Safety Tip: Protect Your Lungs
The kit includes a basic paper respirator. The fumes from truck bed liner can be harmful. Although most people will spray indoors (to prevent leaves, pollen, and flying debris from mucking up your paint job) it’s a good idea to crack your garage window and turn on a fan.
Your respirator should have a tight seal. With the paper ones, we recommend being clean shaven. You can also tie a knot on the elastic band to make it fit tighter.
Paper respirators don’t work for everyone. Here is a simple test you can do to see if you have a good seal: with the mask on, take a deep breath through your nose and mouth. you will feel more resistance than normal if the mask is tight. Do you feel cool air rushing past the sides of the respirator? If so, you don’t have a good fit.
You’re already saving a ton of money by spraying your own truck, so don’t risk your health. Proper respirators are available at every hardware store, and should always be used when sanding, spraying, or grinding.
The Final Verdict

Would we use this product again? Absolutely! It’s extremely durable, easy to apply, and affordable. If you’re using it for its intended purpose, this is hands down one of the best bed liners on the market.
Would we use it to paint our entire vehicle? Maybe. It is commonly sold as a cheap alternative to a DIY paint job. In many ways this is true. You can paint right over the old paint, and don’t need to pay as much attention to small dings and dents. Applying raptor liner is much, much easier than automotive paint. Plus, it will hold up to much more abuse.
But you should consider the texture it is rough. It’s not anything like the smooth finish you’d get with typical paint. If you’re off-roading and getting rock chips is a very serious threat, then this coating is the way to go. The look comes off as very aggressive, and would suit a self-built 4×4 vehicle easily, plus it’s functional.
This isn’t the kind of finish you’d want to put on your moms civic. Raptor liner is built to be tough, and ideal for any vehicle where that’s a factor. If you’re really unsure, we’re recommend doing the rocker panels of your car and the fender flares. This can look good on any vehicle, and it’s a small enough area that you won’t be committed to the entire thing.