
Просмотр
Доступно к просмотру 9 страниц. Рекомендуем вам скачать файл инструкции, поскольку онлайн просмотр документа может сильно отличаться от оригинала.
-
H-1541
RADIO WITH ALARM                        РАДИОПРИЕМНИК
С БУДИЛЬНИКОМ
Instruction manual          Руководство по эксплуатации
-
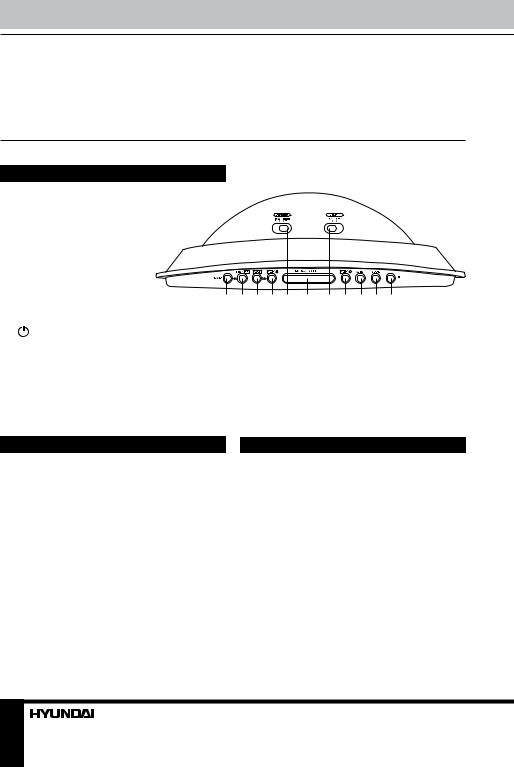
Instruction manual                                                                                                        Instruction manual
Dear customer!
Thank you for purchasing our product. For safety, it is strongly recommended to read
this manual carefully before connecting, operating and/or adjusting the product and keep
the manual for reference in future.
Description
1.  BAND button
2.  TEMP/   button
3.  Y-M-D/   button
4.  AL.1 button
5.  DIMMER switch
6.  SNOOZE/SLEEP button
7.  LIGHT switch
8.  AL.2 button                   1  2  3 4  5  6  7  8  9 10 11
9.  AL.SET button
10. MODE button
11.   button
Not indicated: power cord (back panel), FM antenna (back panel), temperature sensor (back
panel), line input (back panel), battery compartment (bottom), TUNER regulator (right panel),
VOLUME regulator (right panel), RESET button hole (left panel), display (front panel).
Important safeguards                Power supply
•  The instruction manual contains important   Battery operation
operating and maintenance instructions. For   •  Insert 1 x 3 V lithium battery CR2032 (not
your safety, it is necessary to refer the manual.   included) to the terminal inside the battery
Keep the manual for use in future.  compartment according to the polarity marks (+
•  Do not hit or drop the unit.   and -). Your set will not work normally from the
•  Do not expose the unit to vibration,   battery supply, but there is now the advantage
direct sunlight, too high or low temperature or   that, in case there is a mains current failure,
humidity.                           your clock will continue to work. The clock
•  If you are not going to use the unit within   display will not light up, the clock time and
a long period of time, remove the batteries to   alarm setting will be held in the clock memory
avoid their leakage.                by the battery back-up system.
•  Do not disassemble the unit yourselves.   This enables you to move the set from place to
Refer servicing to qualified service personnel.  place without re-setting the clock every time. The
battery back-up system is only meant to be used
from short temporary power failures. For longer
2                                                                                                                                                  3
-
Instruction manual                                Instruction manual
durations the battery may become exhausted or   Reset
there may be some deviation in accuracy.  To reset all settings of the unit to default
•  When the battery is exhausted, it should   settings, press the RESET hole with a pointed
be removed from the set to prevent leakage.   object (e.g., a ballpoint pen). This measure is
If you do not wish to take advantage of the   needed when you changed the batteries in the
battery back-up system, your set will work   unit or if the unit does not function correctly.
normally without a battery. However, if
disconnected from the mains, the clock figures   Daylight saving time
will flash when the mains are re-connected and   Press and hold Y-M-D/   button to
you must re-set the clock.          switch on or off the DST (Daylight Saving
Time) mode. This enables to observe 1-hour
AС operation                      difference between summer and winter time.
•  The appliance is for household use only.
•  Before the first connecting of the appliance   Thermometer
check that voltage indicated on the rating label   Press TEMP/   button to show the current
corresponds the mains voltage in your home.  temperature. The temerature indicatoin will
•  Insert the plug into the power supply.  be on for 5 seconds, the the display returns to
•  The set is now working as electronic clock.  initial mode. Press and hold TEMP/   button
to switch between Celsius and Fahrenheit
temperature modes.
General operations
Line input
Setting the clock and calendar      •  You can connect the audio output of an
•  Press and hold MODE button. Press it   external device to this unit, to listen to the
repeatedly to cycle through time and calendar   sound of that device through the amplifier of
settings in following order: Year => Month =>   this unit.
Day => 12/24H mode => Current hours =>   •  To connect an external audio device (eg.
Current minutes. The selected setting will blink.  MP3 player), please use a standard stereo
•  Press repeatedly TEMP/   button or   cable (not included) with 3.5 mm to 3.5 mm
press and hold it to decrease the setting; press   plugs to connect the headphone out or audio
repeatedly Y-M-D/   button or press and hold   line-out of the external device to the Line input
it to increase the setting.         socket of this unit.
•  In normal mode, press repeatedly Y-M-D/
button to switch the display between
current time, year and month and day. Each   Radio operation
indication will be on for 5 seconds, the the
display returns to initial mode.      Tuner operations
•  Press   button to turn the radio on or off.
Dimmer function                     •  Press BAND button to switch between AM
To adjust the brightness of the display, slide   and FM radio bands.
DIMMER switch to HIGH or LOW position.  •  Adjust the program by rotating TUNER
regulator.
Bottom backlight                    •  Use VOLUME regulator to adjust volume
To switch on/off backlight of the unit bottom,   level.
slide LIGHT switch to ON or OFF position.  •  To obtain better FM signal reception,
2                                                                          3
- 1
- 2
- 3
- 4
- 9
-
Инструкции по эксплуатации
1

HYUNDAI H-1541 инструкция по эксплуатации
(9 страниц)
- Языки:Русский
-
Тип:
PDF -
Размер:
126.1 KB -
Описание:
Часы с радиоприёмником
Просмотр
На NoDevice можно скачать инструкцию по эксплуатации для HYUNDAI H-1541. Руководство пользователя необходимо для ознакомления с правилами установки и эксплуатации HYUNDAI H-1541. Инструкции по использованию помогут правильно настроить HYUNDAI H-1541, исправить ошибки и выявить неполадки.
More products and manuals for Clock Hyundai
| Models | Document Type |
|---|---|
|
H-1518 |
User Manual
7 pages |
|
H-1515 Black |
User Manual
7 pages |
|
H-1507 |
User Manual
7 pages |
|
H-1509 |
User Manual
7 pages |
|
H-1535 |
User Manual
10 pages |
|
H-1513 |
User Manual
7 pages |
|
H-1525 |
User Manual
7 pages |
|
H-1548 |
User Manual
9 pages |
|
H-1546 |
User Manual
11 pages |
|
H-1545 |
User Manual
11 pages |
|
H-1540 |
User Manual
9 pages |
|
H-1521 |
User Manual
10 pages |
|
H-1547 |
User Manual
13 pages |
|
H-1511 |
User Manual
7 pages |
|
H-1544 |
User Manual
9 pages |
|
H-1514 |
User Manual
9 pages |
|
H-1517 |
User Manual
7 pages |
|
H-1527 |
User Manual
7 pages |
|
H-1508 |
User Manual
7 pages |
|
H-1528 |
User Manual
9 pages |


Новые ответы на вопросы
Такой инструкции не будет. Смотрите разбор стиральной машины, а подшипники меняются примерно одинаково на всех, ни чего сложного.
Ремонт машинки
10 месяцев 3 недели назад
Гость
Проблема со сливом или не видит тен
Посудомойка индезит dif16 перед сушкой загораются 4 индикатора первых из 6
1 год 5 месяцев назад
manualsman
Проверьте провод питания. Если провод исправен, но так и не включается — несите в сервис!
Што может быть не включаеца
1 год 6 месяцев назад
manualsbot
болты сзади выкрутить. См инструкцию, траница 12
Убрать подставку
1 год 6 месяцев назад
manualsbot

 H-1541
|
RADIO WITH ALARM |
РАДИОПРИЕМНИК |
|
С БУДИЛЬНИКОМ |
|
Instruction manual |
Руководство по эксплуатации |
Instruction manual
Dear customer!
Thank you for purchasing our product. For safety, it is strongly recommended to read this manual carefully before connecting, operating and/or adjusting the product and keep the manual for reference in future.
Description
1. BAND button
2. TEMP/ button
3.Y-M-D/ button
4.AL.1 button
5.DIMMER switch
|
6. |
SNOOZE/SLEEP button |
|||||||||||
|
7. |
LIGHT switch |
|||||||||||
|
8. |
AL.2 button |
1 |
2 |
3 |
4 |
5 |
6 |
7 |
8 |
9 |
10 11 |
|
|
9. |
AL.SET button |
|||||||||||
|
10. MODE button |
||||||||||||
|
11. |
button |
Not indicated: power cord (back panel), FM antenna (back panel), temperature sensor (back panel), line input (back panel), battery compartment (bottom), TUNER regulator (right panel), VOLUME regulator (right panel), RESET button hole (left panel), display (front panel).
Important safeguards
•The instruction manual contains important operating and maintenance instructions. For your safety, it is necessary to refer the manual. Keep the manual for use in future.
•Do not hit or drop the unit.
•Do not expose the unit to vibration,
direct sunlight, too high or low temperature or humidity.
•If you are not going to use the unit within a long period of time, remove the batteries to avoid their leakage.
•Do not disassemble the unit yourselves. Refer servicing to qualified service personnel.
Power supply
Battery operation
• Insert 1 x 3 V lithium battery CR2032 (not included) to the terminal inside the battery compartment according to the polarity marks (+ and -). Your set will not work normally from the battery supply, but there is now the advantage that, in case there is a mains current failure, your clock will continue to work. The clock display will not light up, the clock time and alarm setting will be held in the clock memory by the battery back-up system.
This enables you to move the set from place to place without re-setting the clock every time. The battery back-up system is only meant to be used from short temporary power failures. For longer
2

Instruction manual
durations the battery may become exhausted or there may be some deviation in accuracy.
• When the battery is exhausted, it should be removed from the set to prevent leakage. If you do not wish to take advantage of the battery back-up system, your set will work normally without a battery. However, if disconnected from the mains, the clock figures will flash when the mains are re-connected and you must re-set the clock.
AС operation
•The appliance is for household use only.
•Before the first connecting of the appliance check that voltage indicated on the rating label corresponds the mains voltage in your home.
•Insert the plug into the power supply.
•The set is now working as electronic clock.
General operations
Setting the clock and calendar
•Press and hold MODE button. Press it repeatedly to cycle through time and calendar settings in following order: Year => Month => Day => 12/24H mode => Current hours => Current minutes. The selected setting will blink.
•Press repeatedly TEMP/ button or press and hold it to decrease the setting; press repeatedly Y-M-D/
 button or press and hold it to increase the setting.
•In normal mode, press repeatedly Y-M-D/
 button to switch the display between current time, year and month and day. Each indication will be on for 5 seconds, the the display returns to initial mode.
Dimmer function
To adjust the brightness of the display, slide DIMMER switch to HIGH or LOW position.
Bottom backlight
To switch on/off backlight of the unit bottom, slide LIGHT switch to ON or OFF position.
Reset
To reset all settings of the unit to default settings, press the RESET hole with a pointed object (e.g., a ballpoint pen). This measure is needed when you changed the batteries in the unit or if the unit does not function correctly.
Daylight saving time
Press and hold Y-M-D/ button to switch on or off the DST (Daylight Saving Time) mode. This enables to observe 1-hour difference between summer and winter time.
Thermometer
Press TEMP/ button to show the current temperature. The temerature indicatoin will be on for 5 seconds, the the display returns to initial mode. Press and hold TEMP/
 button to switch between Celsius and Fahrenheit temperature modes.
Line input
•You can connect the audio output of an external device to this unit, to listen to the sound of that device through the amplifier of this unit.
•To connect an external audio device (eg. MP3 player), please use a standard stereo cable (not included) with 3.5 mm to 3.5 mm plugs to connect the headphone out or audio line-out of the external device to the Line input socket of this unit.
Radio operation
Tuner operations
•Press  button to turn the radio on or off.
•Press BAND button to switch between AM and FM radio bands.
•Adjust the program by rotating TUNER regulator.
•Use VOLUME regulator to adjust volume level.
•To obtain better FM signal reception,
3
 Loading…
8
Руководство по эксплуатации
Линейный вход
• Вы можете прослушивать внешнее
аудио устройство (напр., MP3-плеер),
подключив его к данному устройству при
помощи линейного разъема.
• Чтобы подключить внешнее устройство,
используйте стандартный кабель со штеке-
рами 3,5 мм (не входит в комплект) для под-
соединения разъема для наушников или ли-
нейного разъема внешнего аудио устройства
к линейному разъему данного устройства.
Операции с радио
Использование радиоприемника
• Нажмите кнопку , чтобы включить
или выключить радио.
• Нажимайте кнопку BAND для переклю-
чения между AM- и FM-диапазоном.
• Вращайте регулятор TUNER, чтобы на-
строиться на нужную радиоволну.
• При помощи регулятора VOLUME уста-
новите нужный уровень громкости.
• Для получения оптимального качества
приема FM-сигнала вытяните проводную
FM-антенну на всю длину.
• Для приема AМ сигнала устройство
оснащено втроенной антенной; для лучшего
приема вращайте устройство в различных
направлениях.
Автоматическое выключение
радио
• В режиме радио нажмите кнопку
SNOOZE/SLEEP для перехода к выбору
интервала автоотключения. По умолчанию
будет установлен период в 90 минут. На-
жимайте кнопку SNOOZE/SLEEP, чтобы
выбрать период в 60, 30 или 15 минут.
Цифры на дисплее будут мигать в течение
5 секунд. Также на дисплее отобразится
надпись “SLEEP”, означающая, что режим
автоотключения активен. По истечении
заданного периода времени радио автома-
тически выключится.
• Для отмены функции автоотключения
нажмите кнопку .
Операции с будильником
Установка будильника
• Нажмите и удерживайте кнопку AL.SET.
Нажимайте эту кнопку для поочередного вы-
бора параметра будильника для настройки в
следующем порядке: часы первого будиль-
ника => минуты первого будильника => дни
недели первого будильника (“1-5” означает,
что будильник будет срабатывать с поне-
дельника по пятницу включительно, “1-6“ — с
понедельника по субботу, “1-7“ — с поне-
дельника по воскресенье) => часы второго
будильника => минуты второго будильника
=> дни недели второго будильника. Выбран-
ный параметр будет мигать на дисплее.
• Нажимайте кнопку TEMP/
или на-
жмите и удерживайте ее для уменьшения
значения выбранного параметра; нажи-
майте кнопку Y-M-D/
или нажмите и
удерживайте ее для увеличения значения
выбранного параметра.
• В нормальном режиме работы часов или
радио нажимайте кнопку AL.SET для отобра-
жения на дисплее настроек будильника.
Выбор сигнала будильника
Нажимайте кнопку AL.1 (для первого
будильника) или кнопку AL.2 (для второго
будильника), чтобы выбрать звук сигнала
будильника. Нажмите один раз для выбора
встроенного звукового сигнала (на дисплее
отобразится индикатор ), нажмите два раза
для выбора радио (на дисплее отобразится
индикатор ), нажмите кнопку три раза для
отключения сигнала будильника (на дисплее
не будит отображаться никакой индикатор).
Повторный сигнал будильника
• После срабатыванию будильника
устройство будет подавать выбранный
звуковой сигнал в течение 30 минут (при от-