
PuTTY is a free (MIT-licensed) Windows Telnet and SSH client. This manual documents PuTTY, and its companion utilities PSCP, PSFTP, Plink, Pageant and PuTTYgen.
Note to Unix users: this manual currently primarily documents the Windows versions of the PuTTY utilities. Some options are therefore mentioned that are absent from the Unix version; the Unix version has features not described here; and the pterm and command-line puttygen and pageant utilities are not described at all. The only Unix-specific documentation that currently exists is the man pages.
This manual is copyright 1997-2023 Simon Tatham. All rights reserved. You may distribute this documentation under the MIT licence. See приложение D for the licence text in full.
- Глава 1: Introduction to PuTTY
- 1.1 What are SSH, Telnet, Rlogin, and SUPDUP?
- 1.2 How do SSH, Telnet, Rlogin, and SUPDUP differ?
- Глава 2: Getting started with PuTTY
- 2.1 Starting a session
- 2.2 Verifying the host key (SSH only)
- 2.3 Logging in
- 2.4 After logging in
- 2.5 Logging out
- Глава 3: Using PuTTY
- 3.1 During your session
- 3.2 Creating a log file of your session
- 3.3 Altering your character set configuration
- 3.4 Using X11 forwarding in SSH
- 3.5 Using port forwarding in SSH
- 3.6 Connecting to a local serial line
- 3.7 Making raw TCP connections
- 3.8 Connecting using the Telnet protocol
- 3.9 Connecting using the Rlogin protocol
- 3.10 Connecting using the SUPDUP protocol
- 3.11 The PuTTY command line
- Глава 4: Configuring PuTTY
- 4.1 The Session panel
- 4.2 The Logging panel
- 4.3 The Terminal panel
- 4.4 The Keyboard panel
- 4.5 The Bell panel
- 4.6 The Features panel
- 4.7 The Window panel
- 4.8 The Appearance panel
- 4.9 The Behaviour panel
- 4.10 The Translation panel
- 4.11 The Selection panel
- 4.12 The Copy panel
- 4.13 The Colours panel
- 4.14 The Connection panel
- 4.15 The Data panel
- 4.16 The Proxy panel
- 4.17 The SSH panel
- 4.18 The Kex panel
- 4.19 The Host Keys panel
- 4.20 The Cipher panel
- 4.21 The Auth panel
- 4.22 The Credentials panel
- 4.23 The GSSAPI panel
- 4.24 The TTY panel
- 4.25 The X11 panel
- 4.26 The Tunnels panel
- 4.27 The Bugs and More Bugs panels
- 4.28 The «Bare
ssh-connection» protocol - 4.29 The Serial panel
- 4.30 The Telnet panel
- 4.31 The Rlogin panel
- 4.32 The SUPDUP panel
- 4.33 Storing configuration in a file
- Глава 5: Using PSCP to transfer files securely
- 5.1 Starting PSCP
- 5.2 PSCP Usage
- Глава 6: Using PSFTP to transfer files securely
- 6.1 Starting PSFTP
- 6.2 Running PSFTP
- 6.3 Using public key authentication with PSFTP
- Глава 7: Using the command-line connection tool Plink
- 7.1 Starting Plink
- 7.2 Using Plink
- 7.3 Using Plink in batch files and scripts
- 7.4 Using Plink with CVS
- 7.5 Using Plink with WinCVS
- Глава 8: Using public keys for SSH authentication
- 8.1 Public key authentication — an introduction
- 8.2 Using PuTTYgen, the PuTTY key generator
- 8.3 Getting ready for public key authentication
- Глава 9: Using Pageant for authentication
- 9.1 Getting started with Pageant
- 9.2 The Pageant main window
- 9.3 The Pageant command line
- 9.4 Using agent forwarding
- 9.5 Loading keys without decrypting them
- 9.6 Security considerations
- Глава 10: Common error messages
- 10.1 «The host key is not cached for this server»
- 10.2 «WARNING — POTENTIAL SECURITY BREACH!»
- 10.3 «This server presented a certified host key which was signed by a different certification authority …»
- 10.4 «SSH protocol version 2 required by our configuration but remote only provides (old, insecure) SSH-1»
- 10.5 «The first cipher supported by the server is … below the configured warning threshold»
- 10.6 «Remote side sent disconnect message type 2 (protocol error): «Too many authentication failures for root»»
- 10.7 «Out of memory»
- 10.8 «Internal error», «Internal fault», «Assertion failed»
- 10.9 «Unable to use key file», «Couldn’t load private key», «Couldn’t load this key»
- 10.10 «Server refused our key», «Server refused our public key», «Key refused»
- 10.11 «Access denied», «Authentication refused»
- 10.12 «No supported authentication methods available»
- 10.13 «Incorrect MAC received on packet» or «Incorrect CRC received on packet»
- 10.14 «Incoming packet was garbled on decryption»
- 10.15 «PuTTY X11 proxy: various errors»
- 10.16 «Network error: Software caused connection abort»
- 10.17 «Network error: Connection reset by peer»
- 10.18 «Network error: Connection refused»
- 10.19 «Network error: Connection timed out»
- 10.20 «Network error: Cannot assign requested address»
- Приложение A: PuTTY FAQ
- A.1 Introduction
- A.2 Features supported in PuTTY
- A.3 Ports to other operating systems
- A.4 Embedding PuTTY in other programs
- A.5 Details of PuTTY’s operation
- A.6 HOWTO questions
- A.7 Troubleshooting
- A.8 Security questions
- A.9 Administrative questions
- A.10 Miscellaneous questions
- Приложение B: Feedback and bug reporting
- B.1 General guidelines
- B.2 Reporting bugs
- B.3 Reporting security vulnerabilities
- B.4 Requesting extra features
- B.5 Requesting features that have already been requested
- B.6 Workarounds for SSH server bugs
- B.7 Support requests
- B.8 Web server administration
- B.9 Asking permission for things
- B.10 Mirroring the PuTTY web site
- B.11 Praise and compliments
- B.12 E-mail address
- Приложение C: PPK file format
- C.1 Overview
- C.2 Outer layer
- C.3 Private key encodings
- C.4 Key derivation
- C.5 Older versions of the PPK format
- Приложение D: PuTTY Licence
- Приложение E: PuTTY hacking guide
- E.1 Cross-OS portability
- E.2 Multiple backends treated equally
- E.3 Multiple sessions per process on some platforms
- E.4 C, not C++
- E.5 Security-conscious coding
- E.6 Independence of specific compiler
- E.7 Small code size
- E.8 Single-threaded code
- E.9 Keystrokes sent to the server wherever possible
- E.10 640×480 friendliness in configuration panels
- E.11 Coroutines in protocol code
- E.12 Explicit vtable structures to implement traits
- E.13 Do as we say, not as we do
- Приложение F: PuTTY download keys and signatures
- F.1 Public keys
- F.2 Security details
- F.3 Key rollover
- Приложение G: SSH-2 names specified for PuTTY
- G.1 Connection protocol channel request names
- G.2 Key exchange method names
- G.3 Encryption algorithm names
- G.4 Agent extension request names
- Приложение H: PuTTY authentication plugin protocol
- H.1 Requirements
- H.2 Transport and configuration
- H.3 Data formats and marshalling
- H.4 Protocol versioning
- H.5 Overview and sequence of events
- H.6 Message formats
- H.7 References
Подключение между двумя компьютерами в среде Linux осуществляется через SSH. Это сетевой протокол прикладного уровня, производящий удаленное управление ОС и туннелирование TCP-соединений. Его использование обусловлено простотой и надежностью, что позволяет выполнять безопасное подключение к серверу.
Соединение по SSH дает возможность выполнять любые команды на удаленном компьютере так, будто мы находимся прямо перед ним. Такой процесс обычно осуществляется через специальные утилиты, особенно если нужно получить доступ к Linux через Windows. Одной из программ таких является PuTTY, о которой речь пойдет в сегодняшней статье. Как ее настроить и подключиться через нее к серверу – читайте далее.
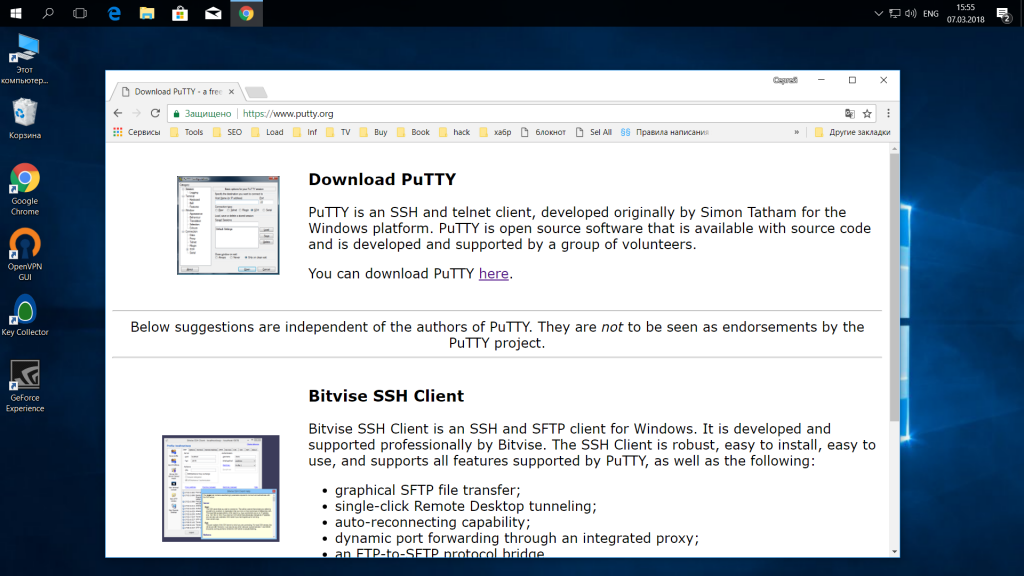
Где скачать PuTTY
PuTTY распространяется в бесплатном доступе на официальном сайте разработчика. Переходим по ссылке и загружаем подходящую версию приложения под разрядность операционной системы.

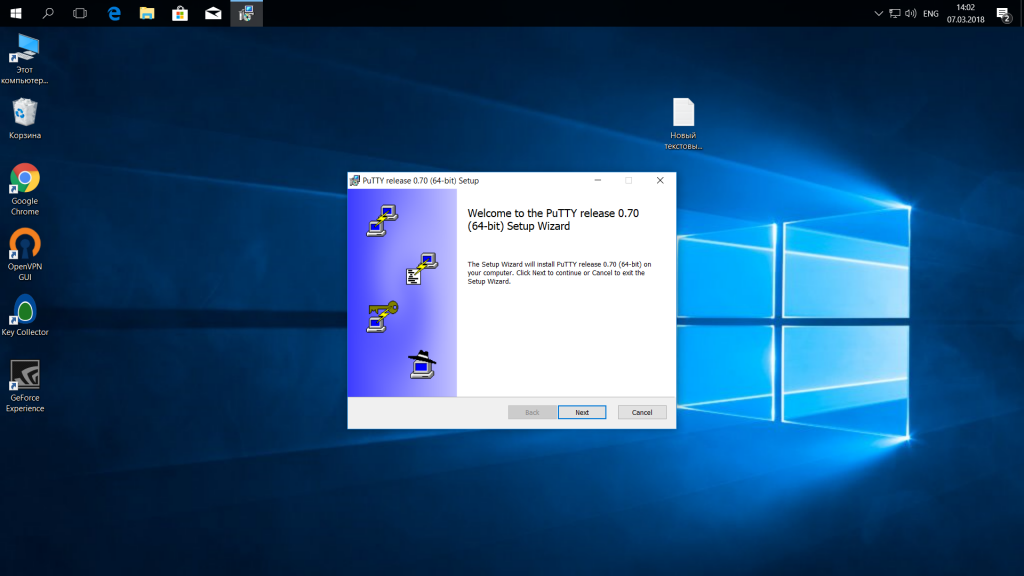
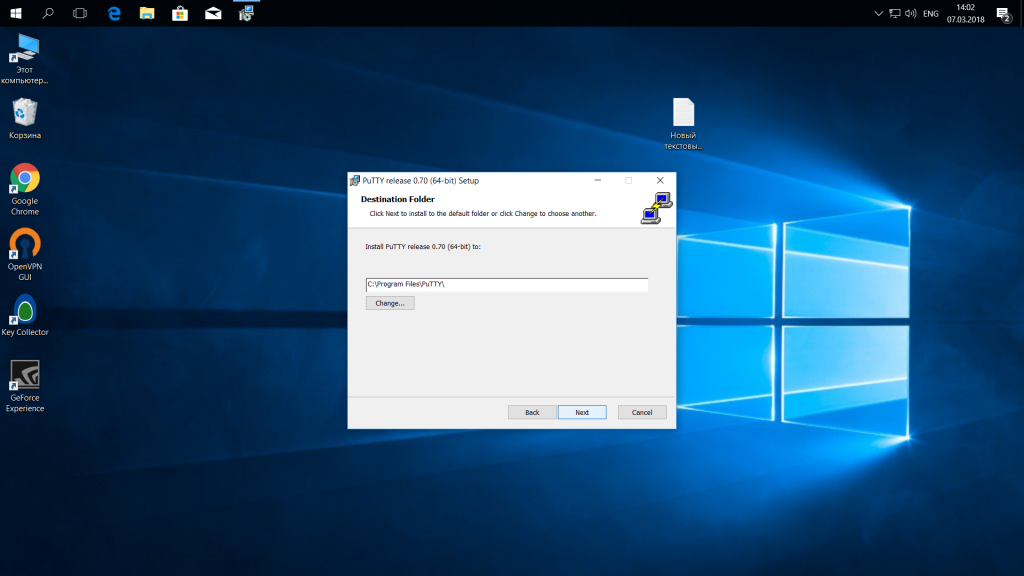
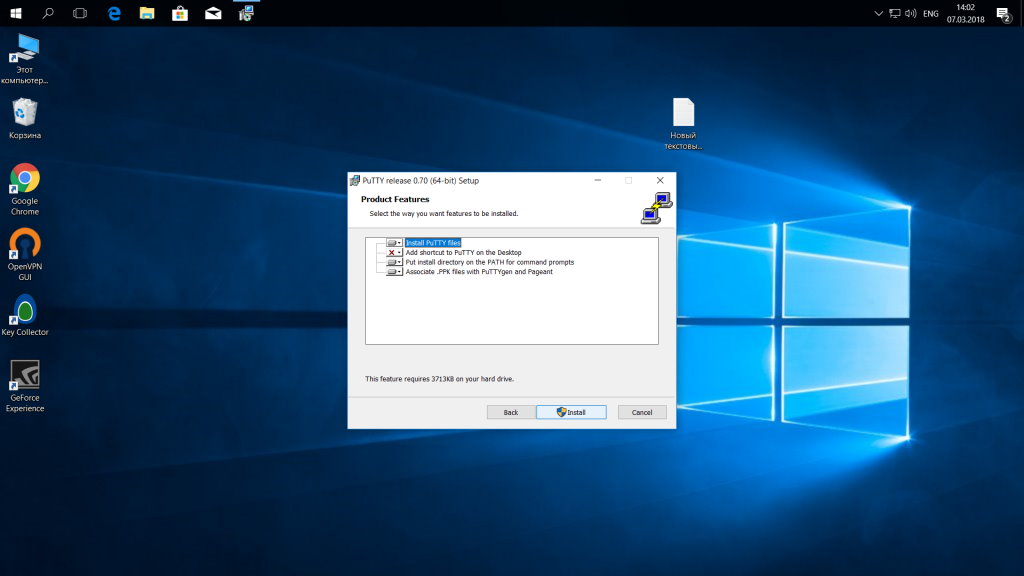
Скачиваем инсталлятор и запускаем его. Перед нами отобразится окно приветствия – кликаем по кнопке «Next» до конечного пункта. По пути мы также можем изменить местоположение программы, а также добавить или исключить некоторые функции PuTTY.

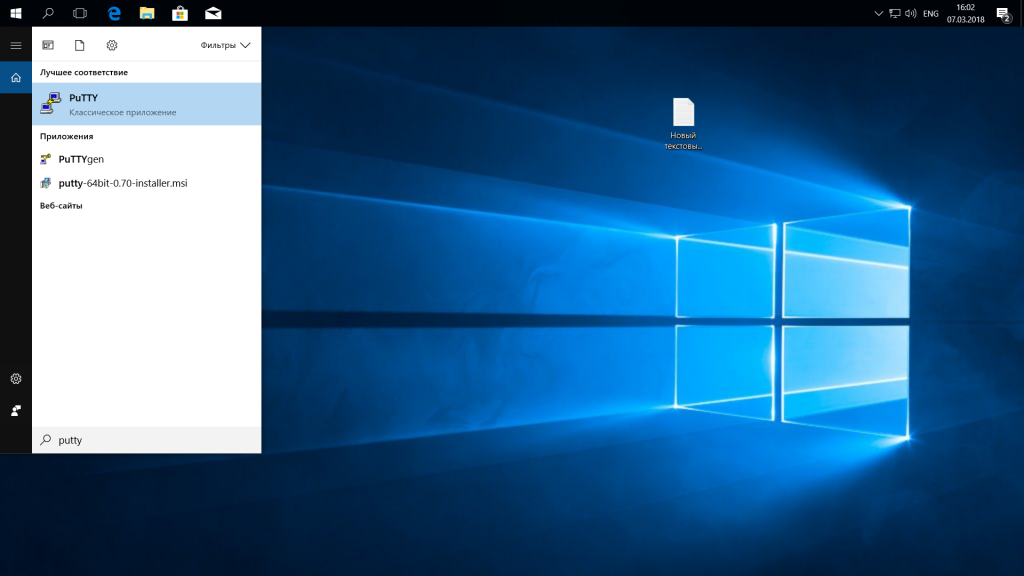
После успешной установки в меню «Пуск» появится новый ярлык под названием PuTTY – с ним мы и будем работать в последующих разделах.
Комьюнити теперь в Телеграм
Подпишитесь и будьте в курсе последних IT-новостей
Подписаться
Как настроить PuTTY
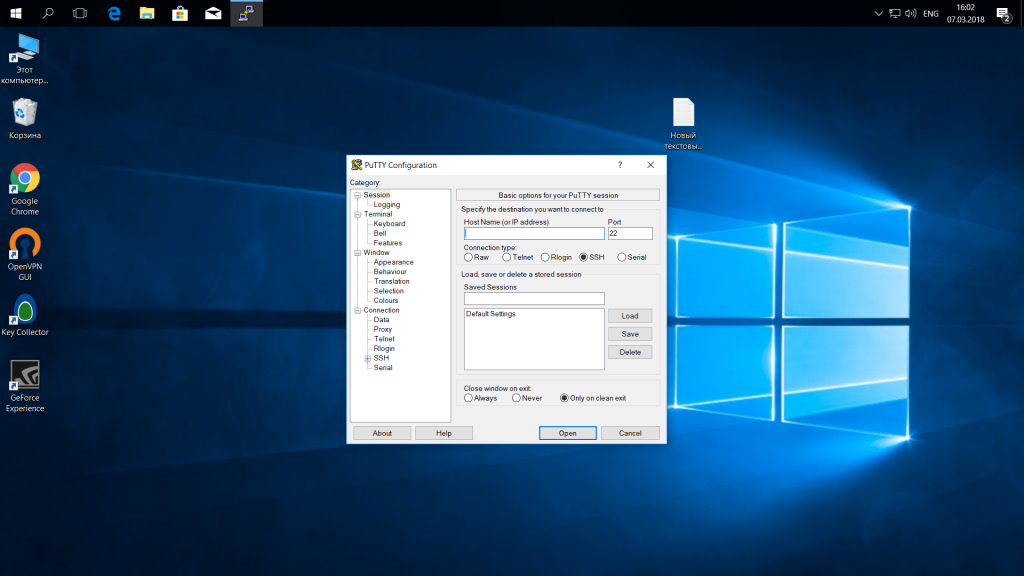
В настройках программы нет ничего сложного. Давайте откроем программу и посмотрим, что в ней есть. После запуска перед нами отобразится окно конфигурации приложения, где слева находятся различные категории, а справа – их настройки.

Программа включает в себя 4 основных раздела:
- Session — основная вкладка, предназначенная для подключения к удаленному компьютеру. Здесь вводятся параметры подключения, порт, адрес, а также вносятся так называемые пресеты, которыми можно воспользоваться, чтобы не вводить каждый раз данные для входа. Достаточно один раз прописать настройки сессии, сохранить ее и использовать при следующем запуске программы.
- Terminal — необходима для включения или отключения возможностей терминала.
- Window — здесь производятся все настройки интерфейса: внешний вид окна, цвет, шрифт и кодировка.
- Connection — настройка параметров подключения, алгоритма шифрования, сжатия, ключей аутентификации и других значений.
Нам потребуется всего две вкладки: Session и SSH. Первым делом перейдем ко второй и убедимся, что версия протокола стоит в значении «2». Как правило, сейчас используется понятие SSH-2, так как первая версия практически не применяется из-за существенных недостатков, например, ошибки в схеме обеспечения безопасности.

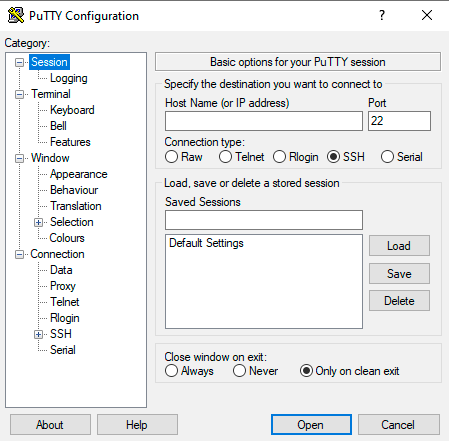
Вернемся к разделу Session, где находятся основные параметры, которые потребуются нам для подключения к серверу по SSH. Давайте немного остановимся и поговорим о них:
- Первый блок включает в себя основные параметры, необходимые для подключения: окно ввода IP-адреса и порта, строку с выбором типа подключения.

- Следующий блок предназначен для создания пресетов, которые можно использовать для быстрого подключения к удаленному компьютеру. В строку «Saved Sessions» вводится название сессии, оно сохраняется с помощью кнопки «Save». Чтобы воспользоваться сохраненным пресетом, достаточно его загрузить с помощью кнопки «Load».
- Последний блок – параметры закрытия окна при выходе. Доступные значения: always, never, only on clean exit.


Как видите, в настройках PuTTY нет ничего сложного. Теперь давайте перейдем к подключению по протоколу SSH.
Как подключиться по SSH
Нам понадобится IP-адрес удаленного компьютера или сервера, к которому мы хотим подключиться. Последующие действия мы будем рассматривать на примере VDS от Timeweb – все шаги аналогичны любому хостингу, поэтому у вас не должно возникнуть никаких вопросов. Если же подключаетесь не к серверу, а к компьютеру, то можете сразу переходить ко второму пункту.
Подключаемся по SSH:
- Первым делом узнаем, какой используется адрес у VDS – для этого переходим в личный кабинет хостинга и заходим в список подключенных серверов. На Timeweb адрес можно узнать в специально отведенном для этого столбце.
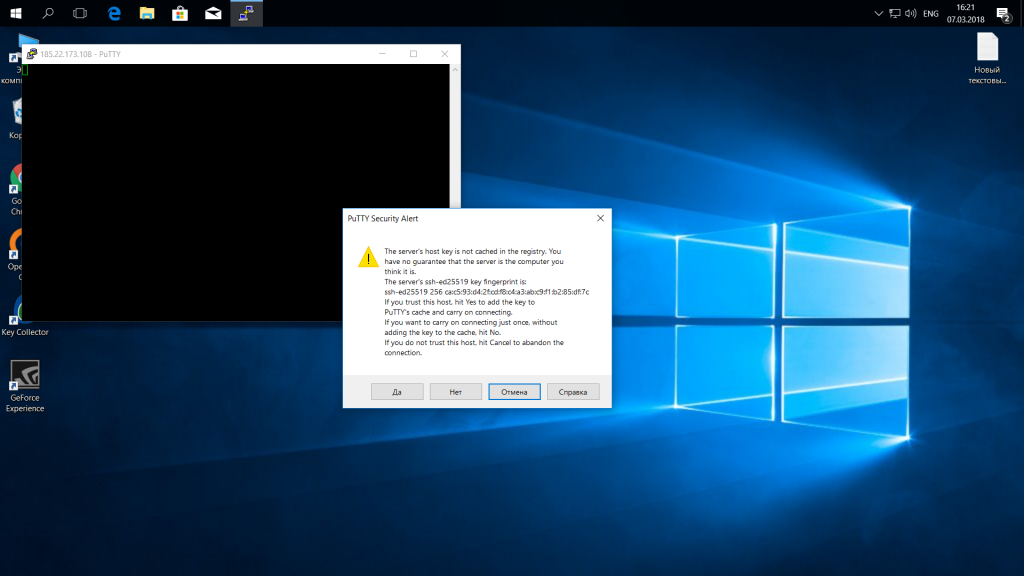
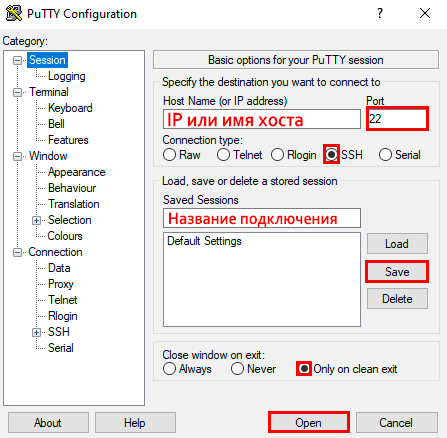
- Переходим к PuTTY – запускаем программу и открываем раздел «Session». Там вводим адрес удаленного компьютера, указываем порт 22 и в нижней части приложения кликаем по кнопке «Open».
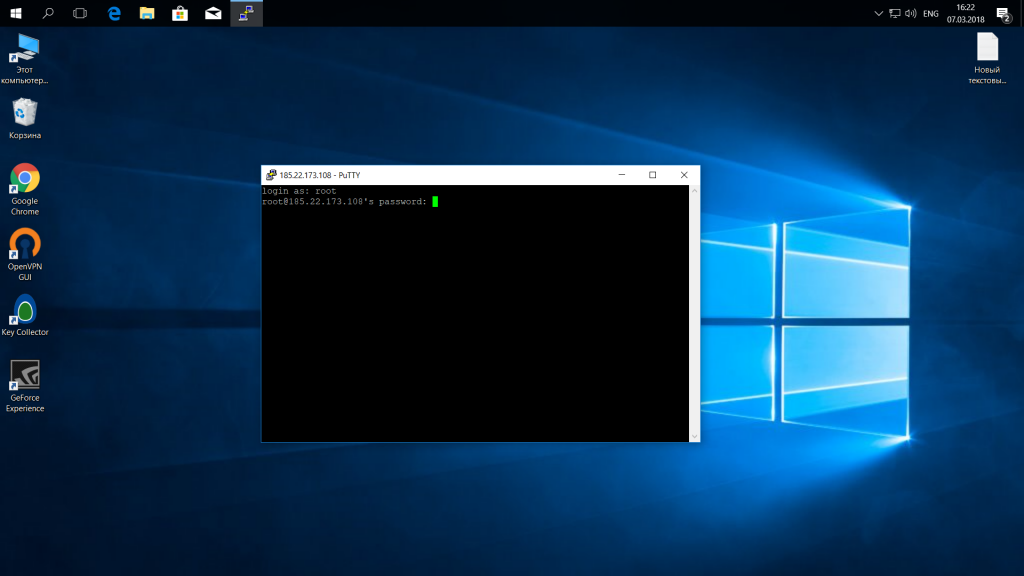
- При успешном вводе данных перед нами отобразится консольное окно, в котором нужно ввести логин и пароль для подключения к серверу. Как правило, логин – root, а пароль отправляется хостингом в почтовом письме после установки ОС.
- Если логин и пароль были введены корректно, то мы увидим окно приветствия.


Таким образом мы подключились к ПК на операционной системе Linux. Здесь мы можем вводить команды и удаленно взаимодействовать с компьютером.

Основные команды PuTTY
Как говорилось ранее, для использования удаленного компьютера нам необходимо вводить различный набор команд. Их огромное множество, но для первоначального изучения достаточно знать лишь их небольшую часть.
ls — предназначена для вывода файлов, содержит в себе набор команд:
- ls -la — выводит различные документы и показывает права доступа, включая имя создателя и владельца;
- ls -lha — также выводит файлы, но показывает размер файла в байтах;
- ls -lha | less — используется для постраничного просмотра документов.
cd — необходима для перемещения между директориями, например, cd [путь] перенаправляет пользователя в указанную папку, cd../ перемещает в верхний уровень, cd ~ открывает корневую папку.
echo — позволяет перемещать текст в файл. Например, если нам требуется создать новый текстовый документ или добавить текст в уже созданный файл, достаточно ввести «echo Привет, мир! >> new.txt».
sudo — наиболее используемая команда, означающая «SuperUser Do». Она позволяет выполнять любые команды от имени администратора.
df — дает возможность увидеть доступное дисковое пространство в каждом из разделов операционной системы. Синтаксис: df [опции устройство].
mv — используются для переименования файлов и перемещения их в другую директорию. Синтаксис: mv [опции исходные_файлы куда].
rm — если нужно удалить файлы или директорию целиком, то используйте эту команду. Синтаксис: rm [опции файл(ы)].
cp — для копирования файлов и целых директорий воспользуйтесь этой строчкой. Синтаксис: cp [опции файл-источник файл-приемник].
mc — предназначена для запуска файлового менеджера Midnight Commander, который позволяет работать с файлами по FTP внутри консольного окна.

cat — наиболее популярная команда в Linux, позволяющая считывать данные из файлов и выводить их содержимое. Наиболее простой способ отображения содержимого в командной строке. Синтаксис: cat [опции файл].
mkdir — позволяет создать одну или несколько директорий с указанным именем. Например, mkdir mdir1 mdir2 mdir3 добавит сразу 3 директории.
chmod — изменяет права доступа к файлам и каталогам. Синтаксис: chmod [ключи установка_прав имя_файла].
pwd — при первом запуске терминала мы оказываемся в домашнем каталоге пользователя. Если вдруг каталог был изменен, то проверить это можно с помощью данной команды.
touch — используется для создания любого типа файлов: от пустого txt до пустого zip. Синтаксис: touch [имя файла].
man и —help — нужны для того, чтобы узнать информацию о команде и о том, как ее можно использовать (man). Например, «man cat» покажет доступную информацию о команде cat. Ввод имени команды и аргумента помогает показать, каким образом можно использовать команду, например, cd –help.
locate — предназначена для поиска файла в системе Linux.
Это была лишь небольшая часть команд, которые можно использовать при подключении по SSH. Если вы только начинаете изучать основы администрирования серверов, то этого списка будет достаточно.
Как подключиться к серверу без пароля
Не всегда удобно каждый раз вводить пароль для входа на удаленное устройство. Комфортнее, когда вход выполняется автоматически и без лишних усилий. В PuTTY существует такой способ – использование авторизации по ключу SSH. Настроить его можно следующим образом:
- Для выполнения данной операции нам потребуется отдельная утилита под названием «PuTTYgen». Она автоматически устанавливается вместе с PuTTY, поэтому зайдем в меню «Пуск» и запустим ее оттуда.
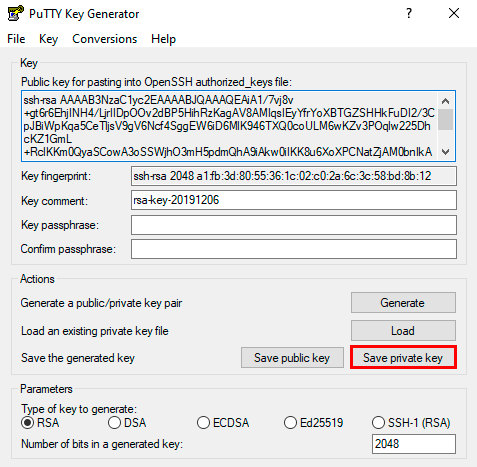
- Далее перемещаемся в меню «Key» и устанавливаем значение «SSH-2 RSA key». После этого кликаем по кнопке «Generate key pair».
- Как только ключ будет сгенерирован, сохраним его в публичном и приватном варианте.
- Теперь перемещаемся в PuTTY и открываем раздел «Auth» — в него добавляем приватный ключ.
- Открываем раздел «Session» и сохраняем в нем пресет для подключения, как мы делали ранее. Затем подключаемся к серверу по своему адресу.
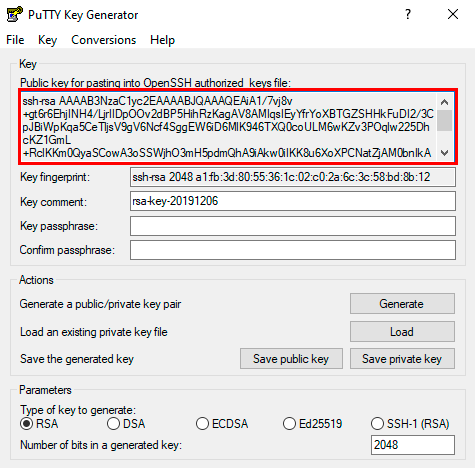
- Осталось подключиться к серверу и отправить на него открытый ключ. Для этого вставляем его в конец файла /root/.ssh/authorized_keys. Ключ мы можем скопировать напрямую из утилиты, в которой он был сгенерирован.


Готово! Теперь при повторном входе на сервер авторизация не потребуется. Главное – сохранить настройки сессии, чтобы не вводить ключ каждый раз.
Сегодня мы разобрали одну из важнейших тем, с которой сталкивается каждый, кто начинает изучать администрирование серверов. Использование PuTTY позволяет подключаться по протоколу SSH и удаленно работать с компьютером на операционной системе Linux. Такой способ позволяет легко администрировать устройство и всегда быть в курсе возникающих проблем. Надеемся, что наша статья была полезной, и у вас не осталось вопросов. Спасибо за внимание!
В операционных системах семейства Linux для удаленного доступа между машинами широко используется протокол SSH. Его популярность обусловлена простотой, надежностью и безопасностью соединения. Подключившись по SSH к удаленному компьютеру, вы получаете возможность выполнять на нем любые команды терминала, как будто вы работате на своем компьютере, работает даже автодополение и другие вспомогательные возможности.
Иногда возникает необходимость подключиться к удаленному компьютеру Linux из Windows, но по умолчанию, там нет утилиты предназначенной для этого. Есть сторонняя программа, она называется PuTTY и вы можете установить ее отдельно. В этой статье мы рассмотрим как пользоваться PuTTY для подключения к Linux системам, а также поговорим как выполняется настройка PuTTY для удобного использования.
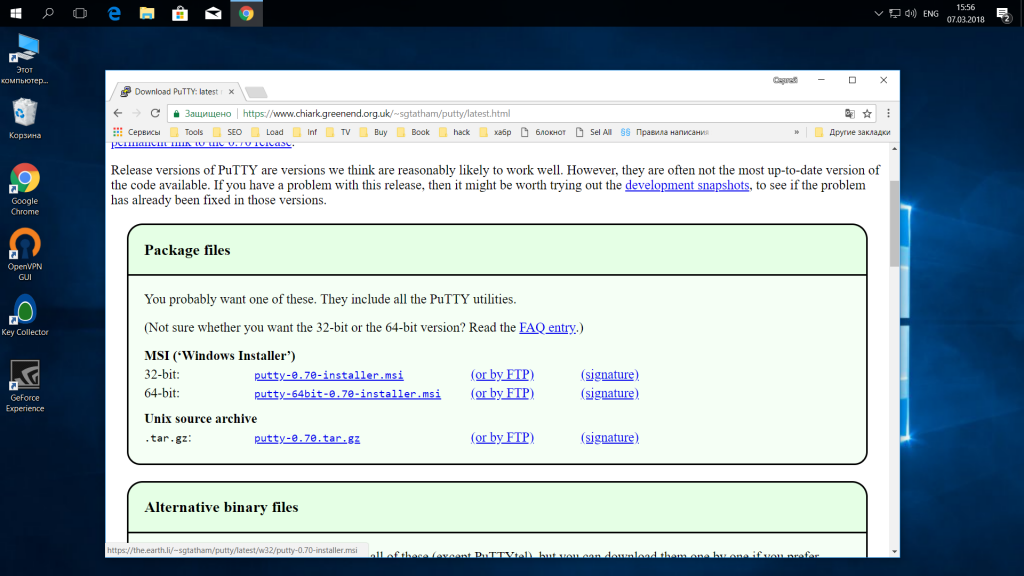
Сначала нужно скачать установщик программы. Для этого откройте официальный сайт и нажмите «You can download PuTTY here»:
Затем выберите установщик для вашей архитектуры, x86 или x64 и загрузите его.
На первом шаге нажмите «Next»:
Папку для установки можно оставить по умолчанию:
Компоненты тоже:
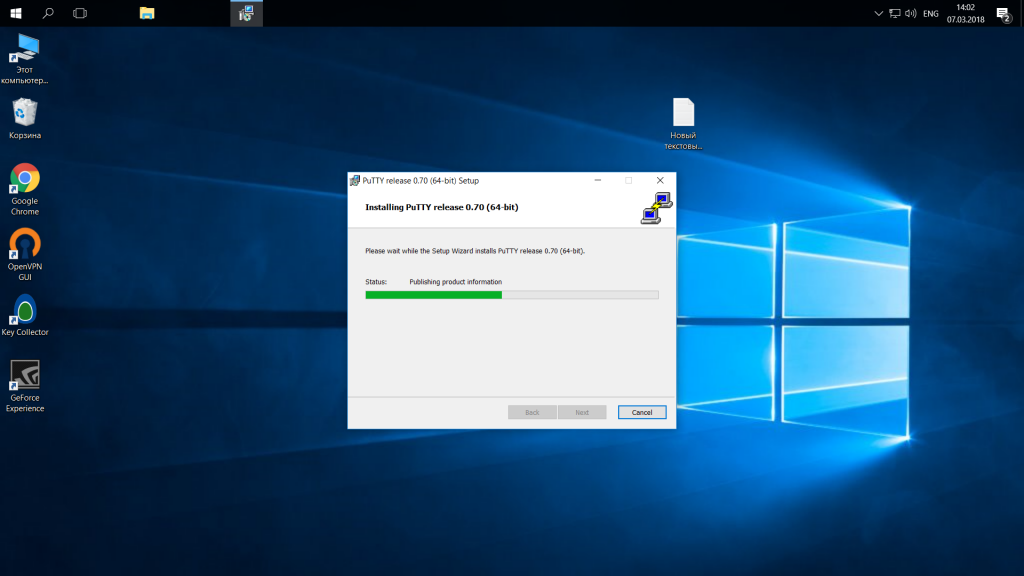
Дождитесь завершения установки:
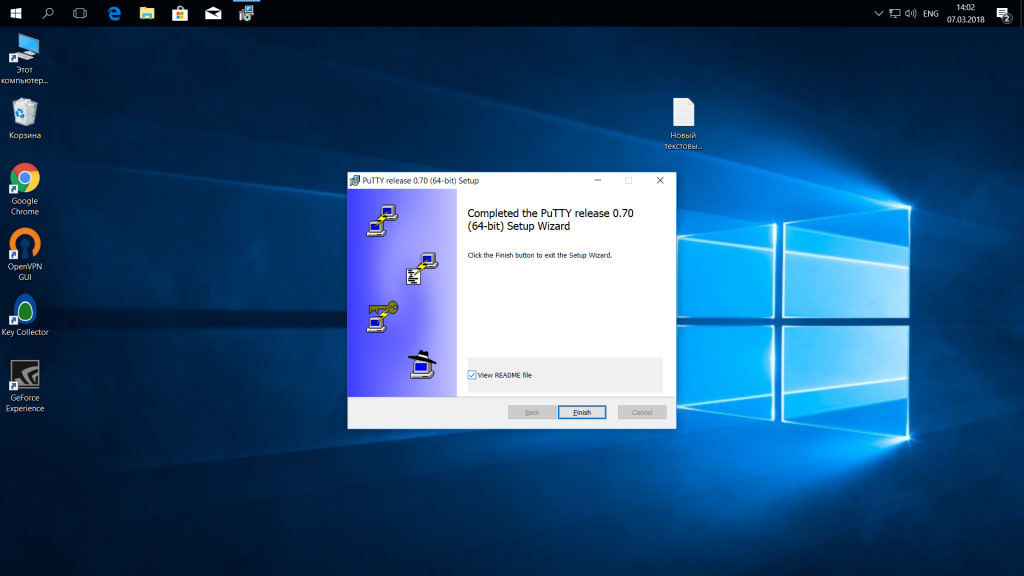
Снимите галочку с «View README» и нажмите «Finish»:
Теперь перейдем к тому как выполняется работа в PuTTY.
Как пользоваться PuTTY
1. Интерфейс программы
Сразу же после запуска программы из меню пуск вы увидите графический интерфейс ее настройки. После подключения вы будете видеть только терминал, но настроить программу можно через удобный интерфейс.
Рассмотрим за что отвечают те или иные вкладки программы, чтобы вы ориентировались что и где искать. У нас есть четыре вкладки:
- Session — отвечает за подключение удаленному серверу, тут мы вводим параметры подключения, порт, адрес, а также можем сохранить все настройки putty, чтобы не настраивать каждый раз заново.
- Terminal — позволяет включать или отключать возможности терминала;
- Window — настройка внешнего вида окна, цвет, шрифт, кодировка;
- Connection — настройка параметров подключения, алгоритма шифрования, сжатия, ключей аутентификации, X11 и других параметров.
Каждая вкладка имеет несколько подразделов, но мы не будем сейчас их трогать, а перейдем сразу к практике и посмотрим как подключиться putty к удаленному узлу.
2. Подключение к удаленному компьютеру PuTTY
Чтобы подключиться к удаленному компьютеру по SSH перейдите на вкладку «Session», здесь, в поле «Host Name» необходимо прописать ip адрес или имя хоста, компьютера, к которому вы хотите подключиться, в поле порт — нужно указать порт, на котором запущен SSH сервер, по умолчанию используется порт 22:
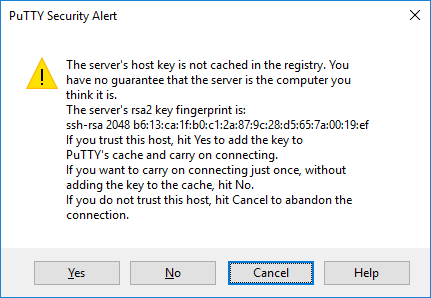
Далее, нажмите кнопку «Open». После этого появится запрос на добавление ключа сервера в список доверенных ключей, нажмите «Да»:
Затем вам будет нужно ввести логин пользователя и пароль. Важно заметить, что скопировать логин или пароль у вас не получится, необходимо только вводить вручную:

Теперь авторизация прошла успешно, и вы можете выполнять нужные действия на сервере:
3. Сохранение сессии PuTTY
Чтобы не вводить каждый раз ip и порт можно сохранить эти данные в виде сессии, для этого пропишите новое имя в поле «Saved Sessions», а затем нажмите кнопку «Save»:
Теперь вы сможете загрузить сохраненную сессию, нажав кнопку «Load».
После того как будет завершена настройка putty и все параметры будут выставлены правильно вы можете сохранить настройки и не вводить их несколько раз.
4. Имя пользователя по умолчанию
Вы можете не вводить имя пользователя каждый раз, для этого перейдите на влкадку «Connection», затем «Data» и в поле «Auto-login Username» пропишите имя пользователя, например, root:
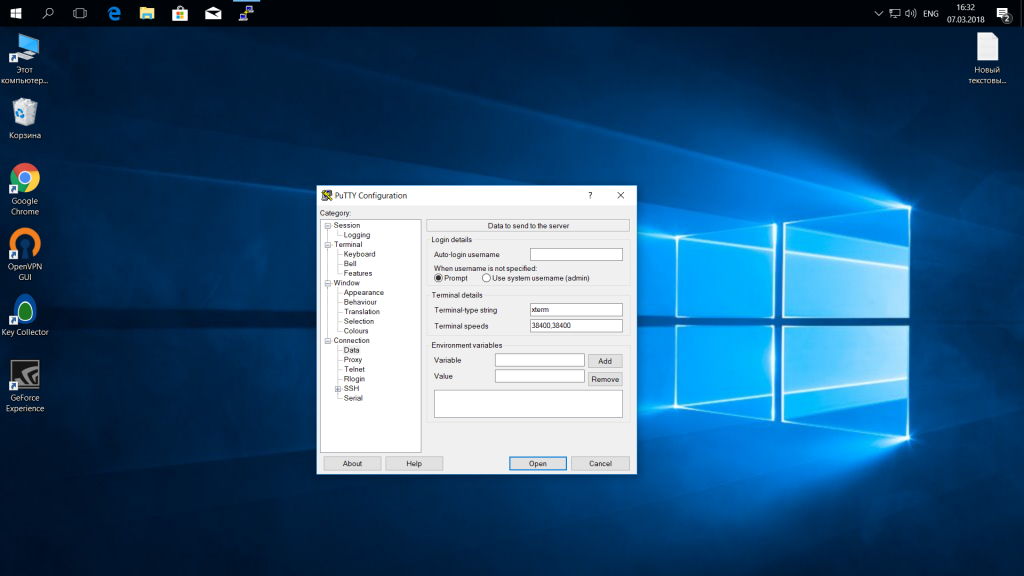
Теперь подключение putty будет выполняться от имени этого пользователя.
5. Авторизация по ключу ssh в PuTTY
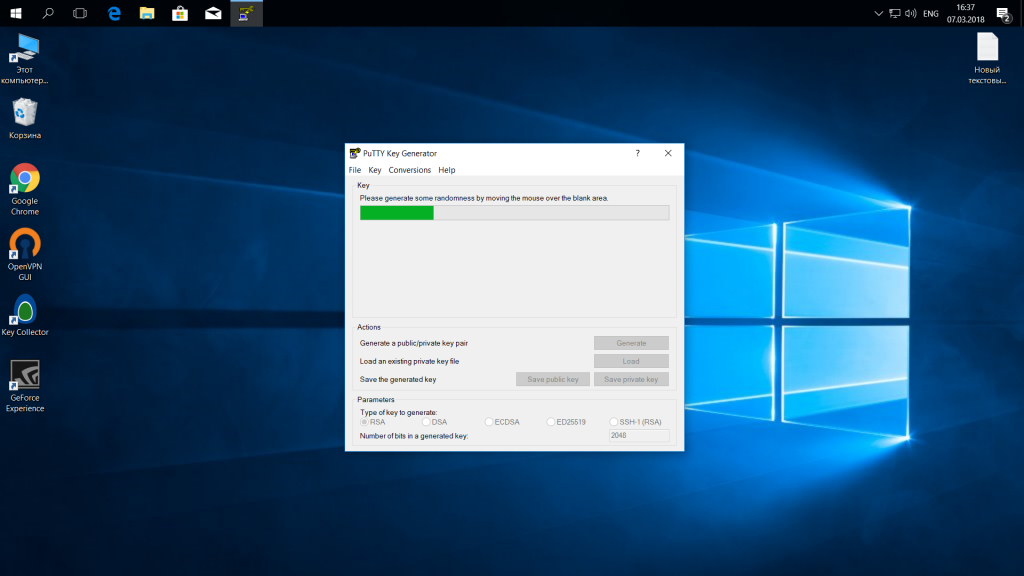
Чтобы не вводить каждый раз пароль можно настроить авторизацию по ключу. В Linux такая возможность используется очень широко потому что это удобно. Первым делом необходимо создать ключ. Для этого запустите утилиту PuTTYgen и установите переключатель в положение «SSH-2 RSA» нажмите «Generate»:
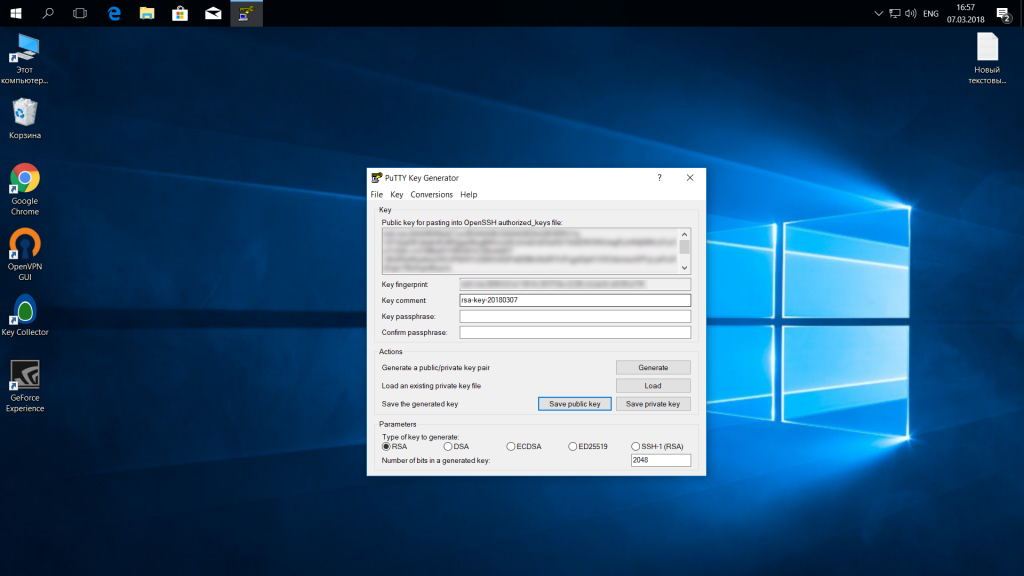
Обязательно ключ должен быть SSH-2 RSA, если в главном окне нет, выберите в меню «Key». Подвигайте мышкой, чтобы создать достаточное количество энтропии:
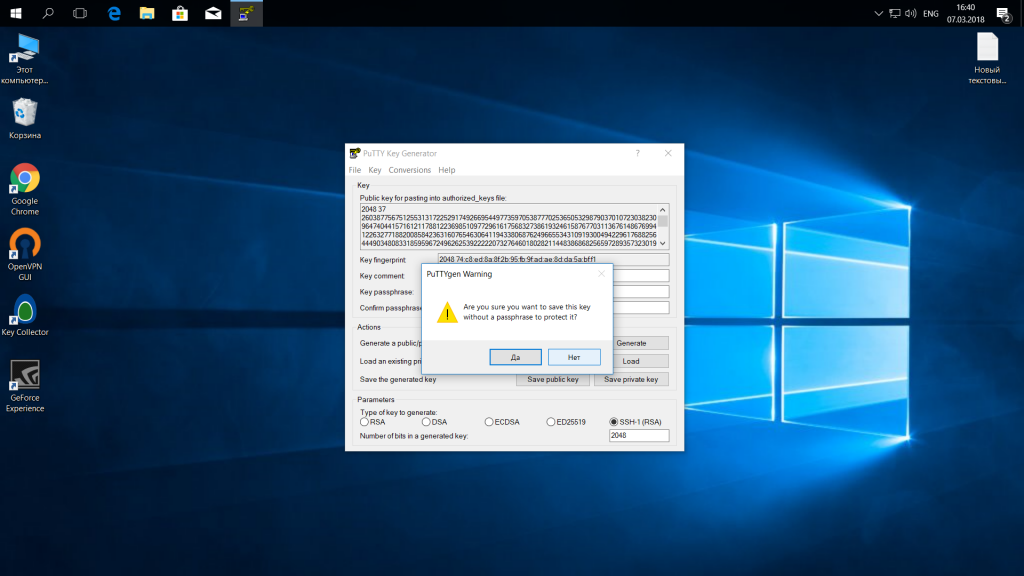
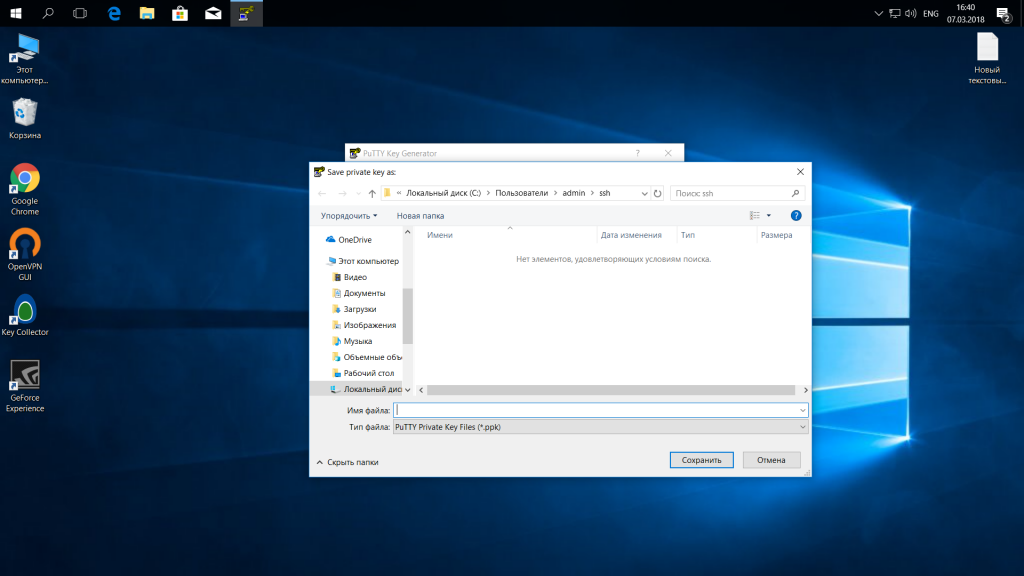
Ключ готов, затем, с помощью кнопок «Save Public Key» и «Save Private Key» сохраните оба ключа.
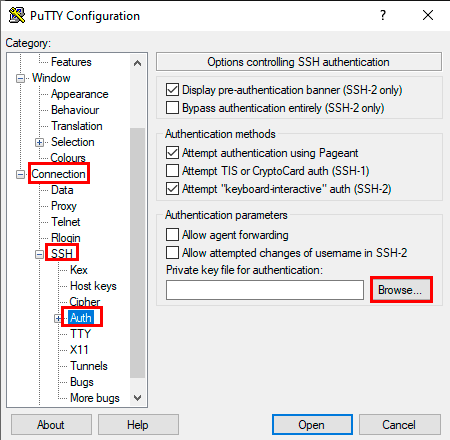
Далее, откройте PuTTY, перейдите на вкладку «Connection», затем «SSH», затем «Auth»:
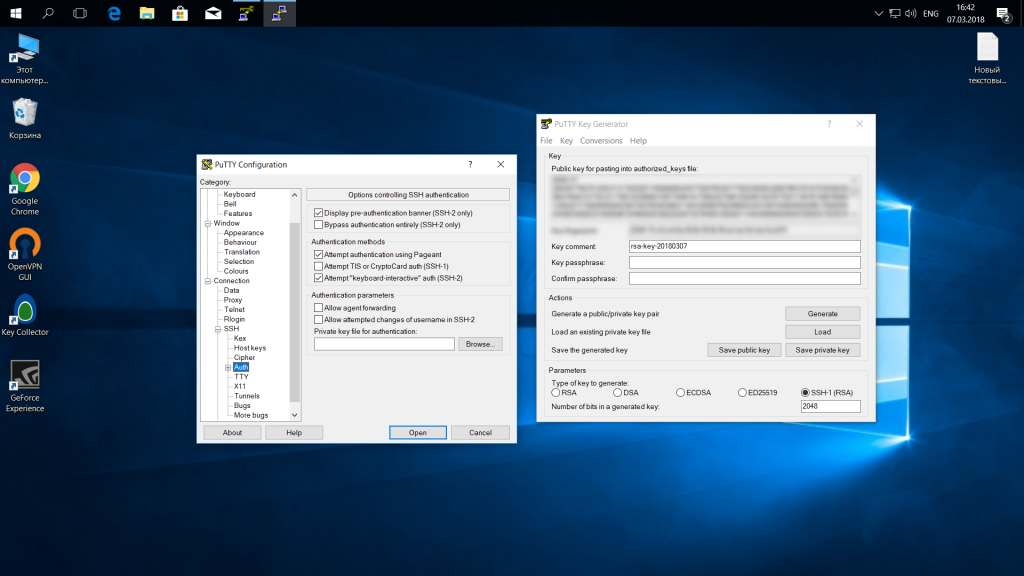
Здесь необходимо нажать кнопку «Browse» и добавить недавно сохраненный приватный ключ:
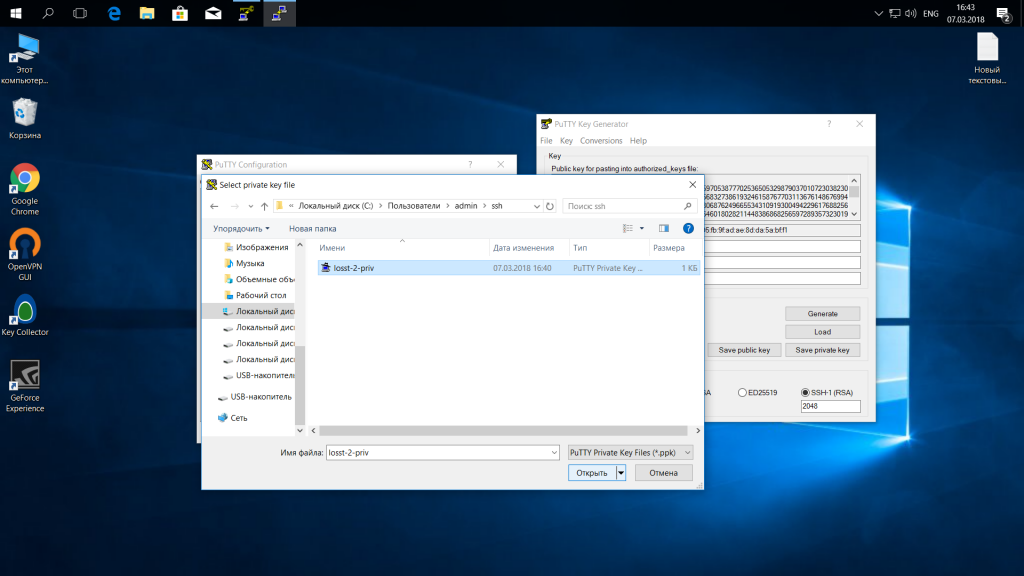
Далее, возвращаемся на вкладку «Session», выбираем наше сохранение и нажимаем «Save» чтобы сохранить настройки. Осталось только отправить наш открытый ключ на сервер. Для этого авторизуйтесь на нем с помощью пароля и открытый ключ вставьте ключ в конец файла /root/.ssh/authorized_keys.
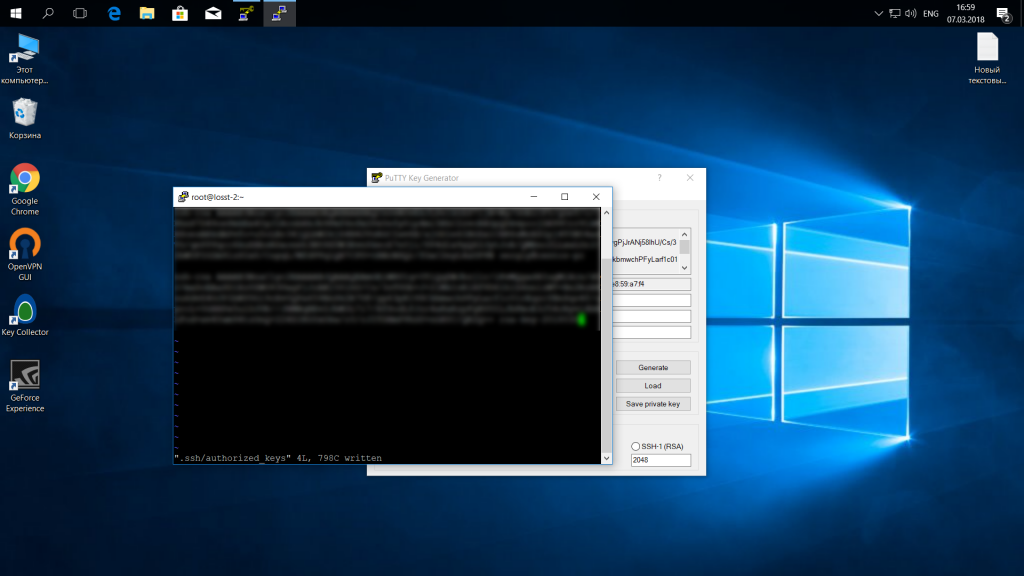
Ключ можно брать прямо из окна PuTTYgen «Public key for pasting» или из файла открытого ключа:
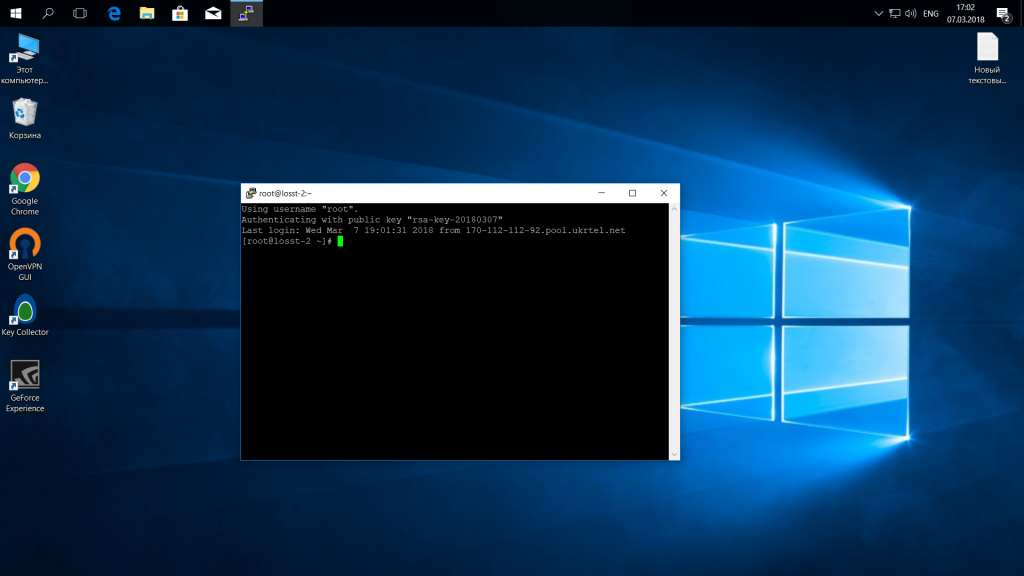
Все, теперь можно выходить и авторизоваться снова. На этот раз подключение по ssh putty будет выполняться с помощью нашего ключа. Не забывайте сохранять настройки сессии, чтобы не выбирать ключ каждый раз. Теперь вы знаете как пользоваться программой putty, рассмотрим еще передачу файлов.
5. Передача файлов через scp в PuTTY
Не все знают, но PuTTY позволяет передавать файлы через ssh также как это делает linux с помощью утилиты scp. Нажмите Win+R, затем пропишите cmd, чтобы запустить командную строку.
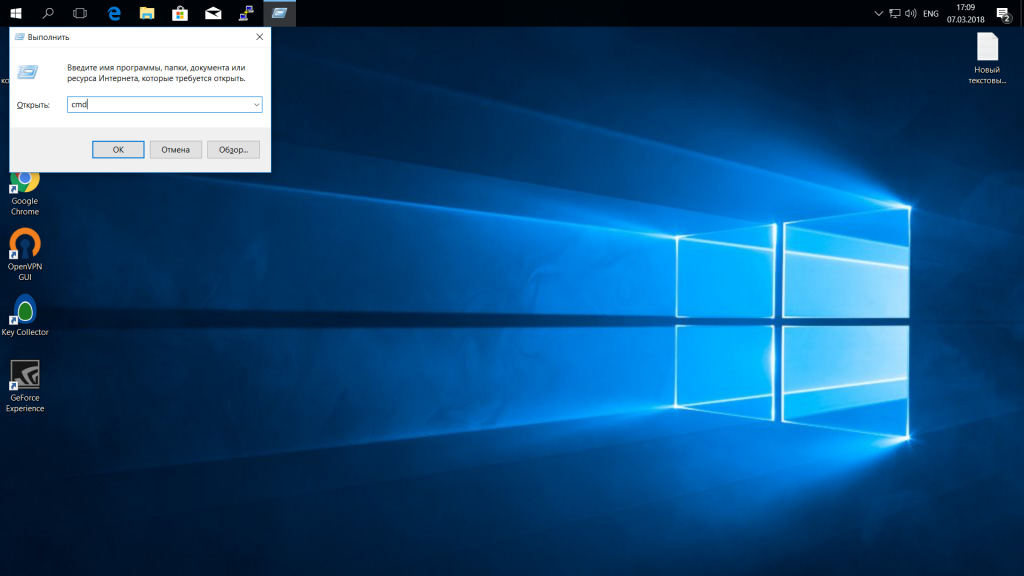
Синтаксис утилиты pcsp выглядит следующим образом:
pscp опции путь_файлу имя_пользователя@хост:/путь/к/файлу/на/удаленном/хосте
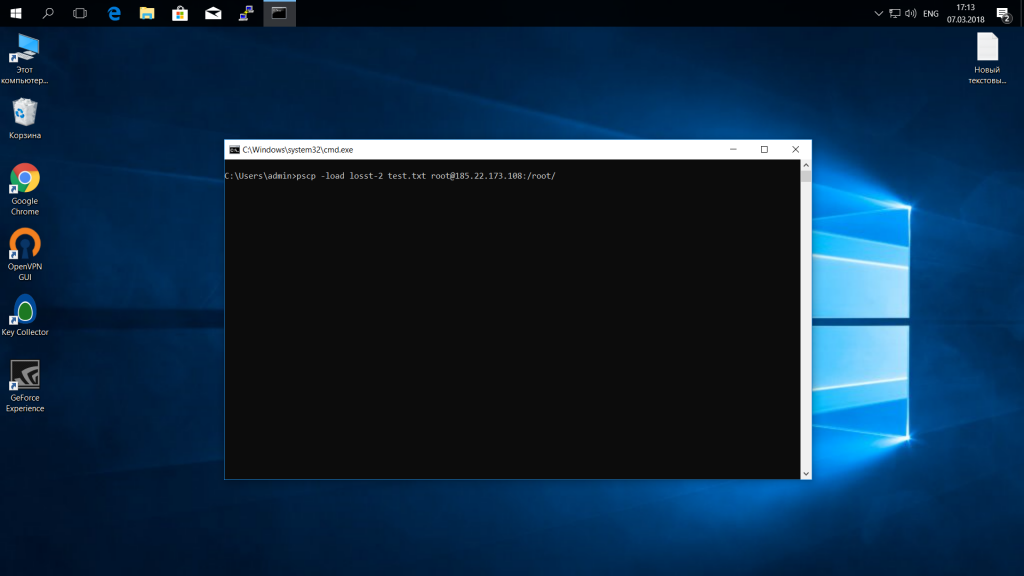
Например, мы можем отправить файл из текущей папки в папку пользователя /root/:
pscp test.txt root@185.22.173.108:/root/
С помощью опции -P можно задать удаленный порт:
pscp -P 2250 test.txt root@185.22.173.108:/root/
А опция load позволяет загрузить сохраенные настройки сессии PuTTY:
pscp -load losst-2 test.txt root@185.22.173.108:/root/

Теперь вы знаете как использовать putty для передачи файлов.
Выводы
В этой статье мы рассмотрели как пользоваться PuTTY для решения задач администрирования Linux в Windows. Иногда случаются ситуации, что без ssh в windows никуда, тогда эта утилита будет просто незаменимой.
Содержание
- Применение и возможности PuTTY
- Установка на Windows
- Работа с программой
- Распространенные ошибки
![]()
PuTTY — программа, которая позволяет установить соединение с удаленным сервером или компьютером. Программу можно также применять для реализации следующих целей:
- удаленного администрирования;
- взаимодействия с VPS-серверами.
- работы с Telnet-терминалами;
- настройки маршрутизаторов через RS-232;
Работать рекомендуется через SSH, поскольку он обеспечивает высокий уровень безопасности соединения с другим компьютером. PuTTY поддерживает Telnet, реализующий текстовый интерфейс в терминале (только для отображения текстовой информации в режиме консоли).
Возможности программы
- Сохранение информации и конфигурационных параметров для многократного применения.
- Работа с SSH-ключами.
- Поддержка разных версий SSH-протокола.
- Встроенные клиенты SCP и SFTP, используемые для различных операций с файлами. Возможности первого ограничиваются только функцией копирования.
- Перенаправление портов через протокол SSH.
- Поддержка xterm, ECMA-48 и VT-102.
- Возможность соединения по IPv6.
- Работа с алгоритмами шифрования.
- Аутентификация через ключ, который расположен на удаленной машине.
- Соединение через proxy.
- Использование порта RS-232.
Установка на Windows
- Программа PuTTY для Windows 10 скачивается с официального сайта.

- Далее нужно перейти по ссылке, скачать пакет для архитектуры x86 или x64, а затем запустить установку.

- После установки необходимо проверить программу на работоспособность, запустив исполняемый файл на Windows.

Работа с программой
Интерфейс
Пользоваться программой PuTTY удобно, т. к. она имеет понятный интерфейс. Чтобы ее настроить, нужно знать назначение основных ее вкладок.
- Session позволяет задать параметры соединения, чтобы подключиться к серверу (IP-адрес, протокол и порт), а также сохранить настройки для многократного использования.
- Terminal: режим активации или деактивации терминала.
- Window: установка кодировки и изменение интерфейса.
- Connection отвечает за выбор шифрования, аутентификацию без ввода пароля и т. д.
Соединение с удаленным сервером
Принцип подключения не зависит от операционной системы. Это могут быть разные версии Windows (7, 10) или популярные дистрибутивы на основе Linux — Ubuntu, CentOS, Debian.
Подключиться по SSH через PuTTY просто. Для этого нужно следовать приведенной ниже инструкции.
- Ввести IP-адрес или имя хоста, к которому необходимо подключиться.
- Указать порт (по умолчанию везде 22).
- Выбрать тип соединения SSH.
- Ввести название подключения и сохранить его, нажав кнопку «Save».
- Активировать соединение, нажав на «Open».

- Указать данные для авторизации (логин и пароль).
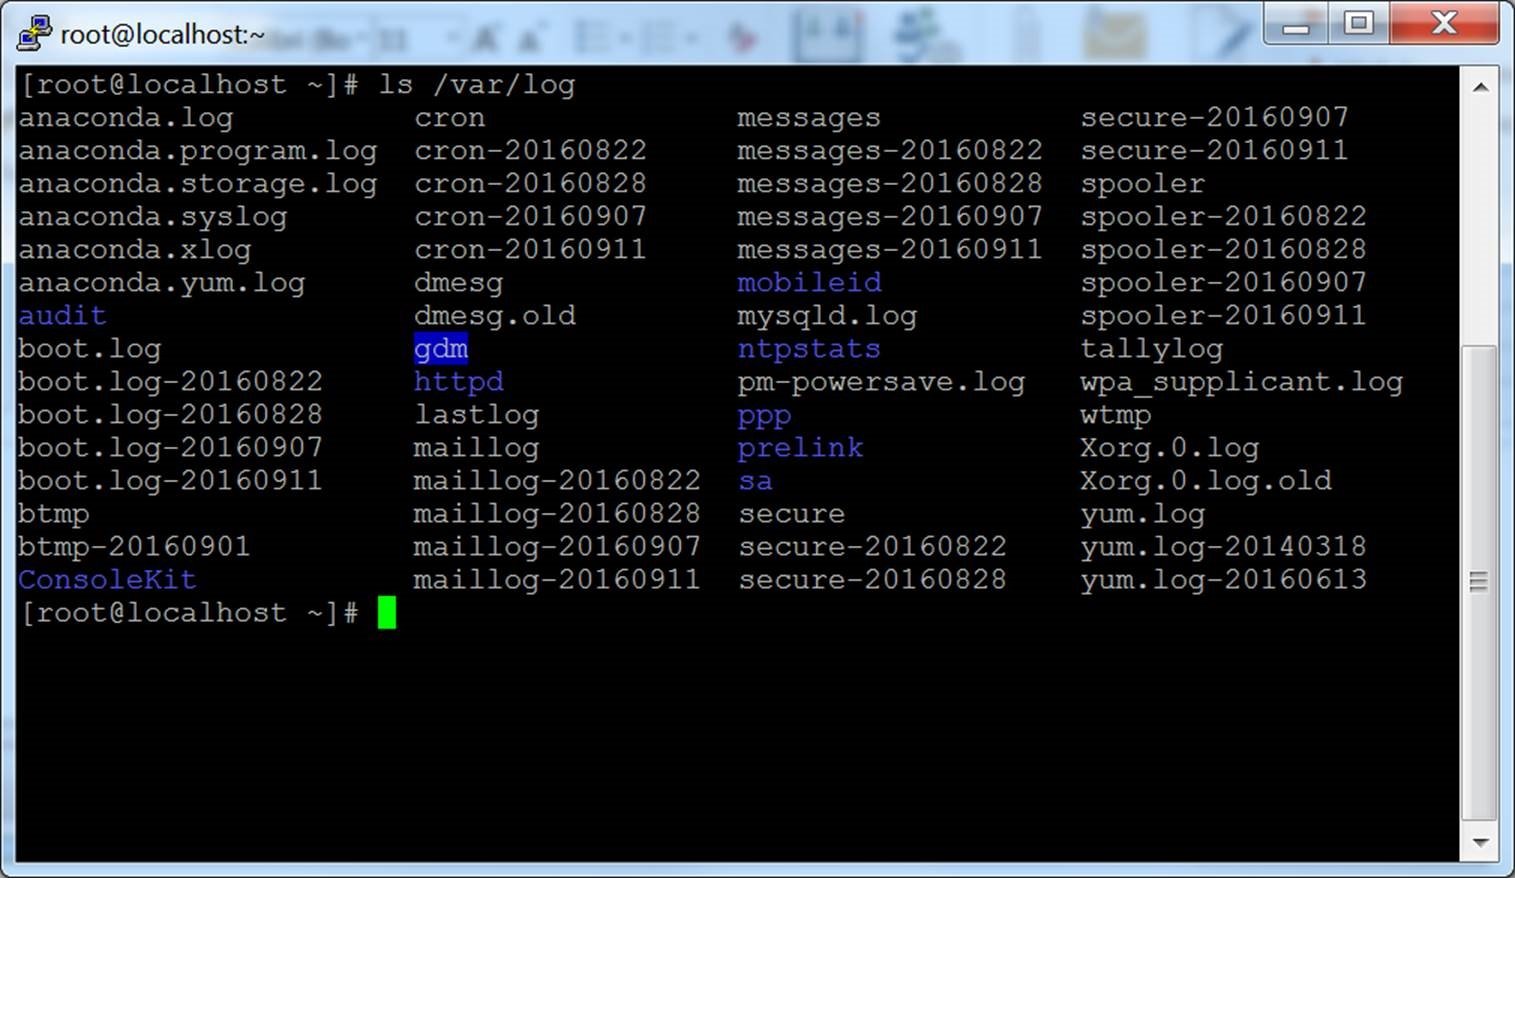
После этого работа с терминалом осуществляется, как на локальном компьютере. Чтобы узнать информацию о версии Ubuntu, нужно ввести команду:
sudo lsb_release -a.

Для удобства можно создать жесткую ссылку (ярлык) на программу для быстрого запуска.
Использование SSH-ключей
Чтобы постоянно не вводить данные авторизации для соединения с удаленным сервером, нужно установить ключ SSH-типа.
Для примера, продемонстрируем ниже, как подключиться через PuTTY, установленного в Windows 10, при помощи SSH-ключа к серверу на Ubuntu.
Шаг №1
Для начала, нужно выполнить ряд действий на компьютере с ОС Windows.
- Установить программу для генерации ключа «Putty Key Generator» и запустить ее.
- Задать параметр «RSA» и активировать процесс кнопкой «Generate». Нужно постоянно вводить указателем мыши в зоне окна выполнения операции для успешной генерации.

- Сохранить private key, для чего скопировать текст из консоли в документ. Предварительно нужно указать тип файла «.ppk».

- Затем сохраняем public key. Для этого необходимо скопировать и вставить текст из буфера обмена в любой пустой текстовый файл.

- Свернуть программу.

Шаг №2
Далее необходимо перенести SSH-ключ на сервер Ubuntu, выполнив перечисленные ниже действия.
- Запустить программу PuTTY.
- Подключиться к серверу, используя его параметры для доступа (хост, порт и SSH-протокол).
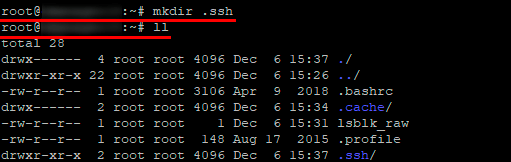
- Командой «mkdir .ssh» создаем папку «.ssh». Затем командой «ll» проверяем наличие папки.

- Прописываем права доступа для папки .ssh только для владельца, командой «сhmod 700 .ssh/».

- При помощи команды «cd .ssh» переходим в системную папку «./ssh».

- Создаем файл «authorized_keys», используя редактор nano, командой:
touch authorized_keys

- Прописываем права доступа для файла «authorized_keys», только для владельца, командой:
сhmod 600 authorized_keys

- Редактируем файл с помощью команды:
cat >> authorized_keys << EOF»
- Добавляем ваш public key и заканчиваем редактирование файла командой «EOF».


Шаг №3
Возвращаемся к программе PuTTY на Windows 10.
- Переходим в программу.
- Добавляем данные для подключения.
- Переходим во вкладку «Connection → SSH → Auth». Выбираем для аутентификации сохраненный файл «.ppk».

- Активируем соединение при помощи нажатия «Open».


Работа с файлами
Программа позволяет делать операции с файлами. Чтобы закачать файл на сервер, находящийся под управлением Linux Ubuntu (с компьютера на ОС Windows), нужно действовать по приведенной ниже инструкции.
- Сохранить тестовый файл «mydoc.txt» на диске C:\ вместе с исполняемым файлом для безопасного копирования — pscp.exe.
- Открыть командную строку Windows: «Win+R → cmd → Enter».
- Зайти в папку с программой pscp.exe, для чего ввести команду: «cd /d c:\Putty\pscp.exe»*, где «c:\Putty\» — путь к файлу pscp.exe.
* Путь к файлу «c:\Putty\pscp.exe» приведен в качестве примера.
- Далее можно приступать непосредственно к работе с файлом. Например, передать файл «mydoc.txt» на сервер «192.241.7.16»* со стандартным портом и пользователем Ubuntu74 в папку «root» можно командой:
* IP-адрес «192.241.7.16» приведен только в качестве примера.
pscp.exe mydoc.txt Ubuntu74@192.241.7.16:/root/
Если для соединения используется нестандартный порт (например, 25), то команда примет вид:
pscp.exe -P 25 mydoc.txt Ubuntu74@192.241.7.16:/root/
- Ввести пароль для Ubuntu74.
Скачать файл через PuTTY с сервера «192.241.7.16» в текущую папку можно с помощью команды:
pscp.exe Ubuntu@192.241.7.16:/root/mydoc.txt
Чтобы объединить файлы, нужно их загрузить на удаленную машину, а затем выполнить команду «sudo cat mydoc1.txt mydoc2.txt > mydoc.txt».
Распространенные ошибки
Проблемы с аутентификацией
PuTTY выдает при подключении сообщение: «Access denied». Это указывает на отказ в доступе, причиной которого являются ошибки при вводе логина или пароля.

Если соединение с удаленным сервером происходит при помощи SSH-ключа, то PuTTY выдаст в диалоговом окне такие строки:
Permission denied (publickey).
PuTTY Error output
Причины ошибки
Ошибка «Access denied» связана с некорректной аутентификацией на основе ключей. Вызвать ее может отсутствие соответствующих прав доступа к файлам или невозможность подтвердить права владельца.
Как решить
- Проверить параметры аутентификации (логин и пароль).
- Проверить наличие и правильность имени SSH-ключа в PuTTY.
- Выполнить проверку содержимого кода SSH-ключа в «authorized_keys».
Если ни один из вариантов не дал положительного результата, то нужно воспользоваться альтернативным графическим клиентом WinSCP. С его помощью нужно реализовать описанную ниже последовательность действий.
- Перейти в папку «/etc/ssh/», а затем открыть файл «sshd_config».
- Далее необходимо найти строки «PasswordAuthentication: YES» и «PermiRootLogin: NO». Значения переменных требуется поменять на противоположные значения, т. е. «PasswordAuthentication: NO» и «PermiRootLogin: YES».
- После сохранения изменений необходимо перезапустить PuTTY и соединиться с удаленным сервером.
Подробнее о том, как создать удаленное соединение для разных дистрибутивов Linux, можно узнать из отдельных руководств:
- Для Ubuntu;
- Для CentOS;
- Для Debian.
Ошибка подключения
Если программа PuTTY выдает ошибку «Unable to open connection to mysite.ru Host does not exist»*, то это свидетельствует о том, что ссылка на SSH-хост не соответствует сетевому адресу.
* Домен mysite.ru приведён для примера.
При истекшем времени подключения или отказе в соединении PuTTY выдаст сообщения «Network error: Connection timed out» и «Network error: Connection refused» соответственно.
Причины ошибки
- Отсутствие сетевого подключения.
- Неверно указан IP-адрес.
- Порт не поддерживается или его значение задано неверно.
- Блокировка исходящего подключения антивирусом или брандмауэром.
Как решить
Чтобы исправить ошибку, рекомендуется действовать по приведенной ниже инструкции.
- Проверить IP-адрес хоста.
- Убедиться, что порт не блокируется какой-либо программой. При необходимости внести его в список исключений.
- Проверить конфигурацию PuTTY во вкладках «Session» и «Connection».
- В список исключений антивируса или брандмауэра необходимо внести стандартный порт 22.
![]()
Download Article
The complete guide to installing PuTTY and making SSH connections
![]()
Download Article
- Installing PuTTY
- Connecting to a Server
- Generating Keys
- Transferring Files with PSFTP
- Tips
|
|
|
|
PuTTY is a free Windows app that lets you make a secure connection to a remote computer. One of the most common uses for PuTTY is to open a secure shell (SSH) connection to a remote Unix server, such as a Linux-based web server. PuTTY also comes with a secure FTP client (SFTP) called PSFTP, a secure file-transfer tool, and PuTTYgen, a tool you can use to generate public and private SSH keys. This wikiHow guide will teach you how to securely connect to another computer using PuTTY on Windows, and how to use other PuTTY tools to create keys and transfer files.
Things You Should Know
- You can use PuTTY to connect to school servers, work servers, and web servers securely via SSH.
- PuTTY is available for Windows from https://www.chiark.greenend.org.uk/~sgtatham/putty/latest.html.
- If the server you’re connecting to requires your public key, you can generate your public/private keypair in PuTTYgen.
-
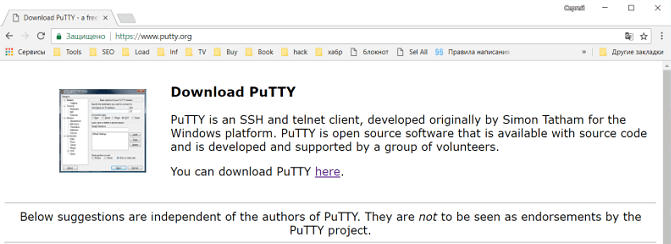
Go to https://www.chiark.greenend.org.uk/~sgtatham/putty/latest.html. PuTTY is a free tool for making secure shell (SSH) connections to a remote server. If you were asked to connect to a certain server via SSH (for your website, for work, school, or any other reason), PuTTY is the most straightforward way to connect on Windows.
-
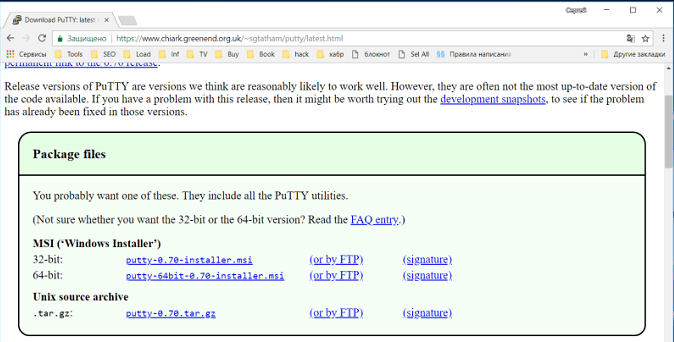
All the different files may seem confusing, but there’s no need to worry! In the «MSI (Windows Installer)» section, you’ll see three download links—64-bit x86, 64-bit Arm, and 32-bit x86.[1]
- First, you’ll need to figure out which file to download by finding your computer’s bit count. Open the Windows Search bar, type about, and then click About your PC. Look at the number next to «System type» in the right panel.
- If you see «64-bit operating system, x64-based processor,» you need the 64-bit x86 version. Download the file called putty-64bit-0.78-installer.msi.
- If you see «64-bit operating system, ARM-based processor,» you need the ARM version. Download putty-arm64-0.78-installer.msi.
- If you see 32-bit operating system, you need the 32-bit version. Download putty-0.78-installer.msi.
Advertisement
- First, you’ll need to figure out which file to download by finding your computer’s bit count. Open the Windows Search bar, type about, and then click About your PC. Look at the number next to «System type» in the right panel.
-
Double-click the installer you downloaded (it’ll be in your default Downloads folder), then follow the on-screen instructions to install PuTTY. Just choose the default settings and you’ll be okay. PuTTY, PSFTP, and PuTTYgen will be added to your Start menu once the installation is complete.


Advertisement
-
Most people won’t need much information to connect to a server with PuTTY. You’ll typically need:
- The hostname or IP address you want to connect to. A hostname looks like a string of words, like students.harvard.edu or mywebsite.com. An IP address is usually 4 numbers connected together, like 10.0.01.
- The port you’ll need to connect to. If your work, school, hosting provider, or other party hasn’t provided you with a port, don’t worry—this just means you’ll use the default SSH port of 22.
- Your username and password for the server.
- If you’re connecting to a server that has other requirements, such as using a certificate or private key to authenticate, you’ll need those files as well.
- Most people won’t need to do this, but if your host requires you to do so, you can use PuTTYgen to generate a key for your remote server.
-
It’ll be in the Start menu, but you can also type putty into the Windows Search bar to find it quickly. PuTTY will open to the «PuTTY Configuration» screen.
-
After you start up PuTTY, a dialogue box will pop up on your screen.
- Enter the hostname or IP address you want to connect to into the first field.
-
SSH is selected by default, which sets the «Port» field to 22. If you need to SSH to a different port, enter that port into the «Port» field.
- You can also use PuTTY to telnet into remote servers or check ports, but because telnet isn’t secure, it’s not used much anymore.
- Type a name for your profile under «Saved Sessions» and click Save. This makes it so you can quickly select this host in the future.
- If your host requires you to use a private key or certificate, expand the SSH menu, then expand the Auth menu, and select Credentials. Click the Browse… button next to the authentication type your server uses (Private key file and/or Certificate) and select the key or certificate file.
-
Once the connection is successful, you’ll be prompted to enter your username and password to log in. You can now run any Unix commands allowed by your system administrator.
- Some sysadmins tighten security by making you SSH into one server just to SSH into another. If you need to SSH into another server from the one you just logged into, use ssh -l username remotehostname.
- If you didn’t save a profile, you’ll be prompted to do so now. Click Yes or No when prompted.


Advertisement
-
If you were instructed to create an SSH key pair before connecting to the server via SSH, you can do so easily using PuTTYgen. Type puttygen into the Windows search bar, then click PuTTYgen to launch the tool.
- Use this method if your system administrator or host asked you to provide them with your public key. Once you create your public key and give it to your sysadmin, they’ll add it to a file that makes it possible for you to connect with PuTTY.
-
You can create RSA, DSA, ECDSA, EdDSA, or SSH-1(RSA) keys. RSA is selected by default, as it’s the most common type of key.
-
You’ll see this button next to «Generate a public/private key pair.»
-
Keep moving the cursor until the progress bar turns completely green. When the bar is filled, your public key will appear.
-
Don’t skip this step, as it’s important for security. Enter and confirm a new passphrase to use when connecting to the remote server with your key.[2]
-
- Click Save public key, choose a location you’ll remember, call the file something like publickey.pub, and click Save.
- Then, click Save private key, and save it to a location you’ll remember. This time, keep the default file extension of .ppk so you’ll remember that the file is your private key.
-
The process to add your public key to the SSH server will be different on each server, but you’ll usually have to upload it to a specific location using a web portal or FTP. You may need to copy it from the «Public key for pasting» field in PuTTYgen into an email so your sysadmin can add it. If you were instructed to add the key yourself, the default location for public keys is in your home directory at ~/.ssh/authorized_keys.
- If the file does not exist, you can create it in your home directory.
- If the file does exist and already contains a key, you can use a text editor like nano to paste your key on the line directly below the existing key.
-
Once your public key is in the right place, you’ll need to associate your private key with the connection to the server. If you’ve already saved your server information, select that server now. If not, enter the hostname and login information for your server, name the connection, and click Save to create one.
-
You can get here by expanding each of these menus in the «Category» section on the left side of PuTTY.
-
Choose the private key file you generated (the one that ends with .ppk).
-
As long as your keys match, you’ll be prompted to enter your passphrase and log in to the server via SSH.


Advertisement
-
PuTTY comes with a secure FTP app that lets you transfer files between your computer and a remote server. You’ll find PSFTP in the Start menu.
-
Replace hostname with the host name or IP that you need to connect to. A host name follows the format students.harvard.edu, while an IP address looks like this: 10.0.01.
-
This initializes the connection to the server.
- If you are prompted to store a key in your cache, type y.
-
Use the username and password you were assigned for this server. Once you’re logged in, you’ll see a prompt.
-
You’ll use the cd command, which means «change directory,» to do so. Type cd folderpath and press Enter. Replace folderpath with the path to the remote folder you need to access.
- For example, if you want to upload a new HTML file to a folder called www in your home directory, type cd www and press Enter.
- You can run the pwd command to view files in the remote folder. If the remote file is running a flavor of Unix, use ls to list the files in the folder.
-
This time, you’ll use the lcd command, which means «local change directory.» Type lcd folderpath, replacing folderpath with the full path of the folder.
- To see a list of files in the current folder, type !dir and press Enter.
-
The command is a little different depending on what you want to do. When the transfer is complete, you’ll return to the prompt.
- For example, if you want to upload a file that’s in your Documents folder, type cd Documents or C:\Users\yourname\Documents.
- To upload the file to the remote server, type put filename (replacing filename with the file’s real name) and press the Enter key.
- To download a file, type get filename (replace filename with the actual file name) and press Enter.


Advertisement
Ask a Question
200 characters left
Include your email address to get a message when this question is answered.
Submit
Advertisement
-
If you’re new to SFTP, you might want to try an app with a graphical user interface (GUI), as it’s a lot easier to use. Check out apps like Filezilla and CuteFTP.
-
Only download the PuTTY software from its official website. If you find PuTTY software anywhere else, download it at your own risk.
Thanks for submitting a tip for review!
Advertisement
References
About This Article
Article SummaryX
1. Download PuTTY from Putty.org.
2. Double-click the installer to run it.
3. Open PuTTY from the start menu.
4. Enter the information for the remote host.
5. Click Open.
6. Sign in with your account on the remote server.
Did this summary help you?
Thanks to all authors for creating a page that has been read 42,057 times.
Is this article up to date?
This page is about the PuTTY SSH client on Windows. For information about PuTTY on Mac, see the PuTTY Mac page. For PuTTY on Linux, see the PuTTY Linux page.
This page explains how to use the PuTTY terminal window on Windows. How to configure PuTTY, how to create and save profiles, and what configuration options to change. Advanced topics, such as configuring public key authentication, are also addressed.
Getting and installing
You can download a copy of the software for the Windows platform from the download page. Detailed installation instructions are provided on the installation instructions page.
Running PuTTY and connecting to a server
If you selected to create a desktop icon during installation, you can start the software simply by (double-)clicking on the icon. Otherwise, open the software from the Windows Start menu.
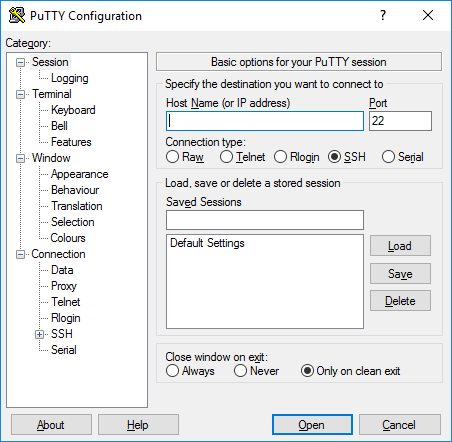
When the software starts, a window titled PuTTY Configuration should open. This window has a configuration pane on the left, a Host Name (or IP address) field and other options in the middle, and a pane for saving session profiles in the lower right area.
For simple use, all you need to do is to enter the domain name or IP address of the host you want to connect to in the Host Name field and click Open (or press Enter). A domain name looks like students.example.edu. An IP address looks something like 78.99.129.32.
What if you don’t have a server
If you don’t have a server to connect to, you can try Tectia SSH on Windows or OpenSSH on Linux.

Security alert dialog box
When you connect to a server for the first time, you are likely to see a PuTTY Security Alert dialog about the server’s host key not being cached in the registry. This is normal when you are connecting to a server for the first time. If you ever get this with a server, it could mean that someone is trying to attack your connection and steal your password using a man-in-the-middle attack.
But as said, the first time you connect, this is normal, and you should just click Yes. If you want to be fancy, you can check the displayed key fingerprint and make sure it is the same that is used by the server. In real life, almost nobody does that. It is more secure to use a proper SSH key management solution anyway.
Terminal window and login credentials
After the security alert, you should get a terminal window. By default, this is a black, very bland window. It should first ask for your user name and then password. After these, you should get a command line on the server.
You can then type into the terminal Window. You are now connected to the server, and anything you type in the Window is sent to the server. Server’s responses are displayed in the Window. You can run any text-based applications on the server using the window. The session terminates when you exit the command-line shell on the server (typically by typing exit) to the command line or pressing Control-D. Alternatively, you can forcibly terminate the session by closing the terminal window.
 Configuration options and saved profiles
The initial configuration window contains a lot of options. Most of them are not needed in normal use.
Port
The port field specifies the TCP/IP port to connect. For SSH, this is the port on which the SSH server runs. Normally it can be left to 22. If for some reason you need to connect to a different port number, just change the value. Usually only developers would change this to a different value, but some enterprises are known to run SSH servers in non-standard ports or to run multiple SSH servers on the same server at different ports.
Connection type
The Connection type selection almost never needs to be touched. Just leave it as SSH. SSH is a secure, encrypted communications protocol designed to ensure your password and data are maximally protected.
Raw connections might be used for developers to connect a TCP/IP socket for testing (e.g., when developing a network application that listens on a TCP/IP port).
Telnet is an old legacy protocol that is almost never used, unless you manage equipment that is more than 10 years old. Telnet is not secure. Passwords are sent in the clear on the network. Attackers can easily eavesdrop on plaintext communications and steal user names and passwords. Rlogin is another legacy protocol with similar woes.
Serial refers to a serial port, another legacy communications mechanism for connecting computers to peripheral devices. Most PCs these days no longer have serial ports, but they are still sometimes used for controlling physical equipment, instrumentation, machinery, or communications devices. Another use for serial ports is debugging operating systems or embedded software.
Load, save, or delete a stored session
This section allows you to save your settings as named profiles. Just write the name of your new profile in the Saved Sessions box and click Save to create a new profile. The host name and your other settings are saved in the profile.
Saved profiles appear in the larger box below it. Initially it will contain just Default Settings. Profiles you save will be included there. Select a profile and click Load to use a previously saved profile. Select a profile and click Delete to delete a profile that is no longer needed.
Close window on exit
Finally, the Close window on exit setting specifies whether the terminal window should be automatically closed when the connection is terminated. There is rarely any need to change it from the default value of Only on clean exit.
Left pane configuration options
More options can be found in the left pane titled Category. Select a category from the tree, and the right pane will change to show configuration options for that category. The initally shown options belong to the Session category.
Only the more relevant options are described here. There are lots of options, and most of them would never be used.
Terminal options
The options in this category influence terminal emulation and keyboard mappings. They are largely self-explanatory, and will not be covered here. Very few people need to touch these. Some people may change how the bell character is handled; people using exotic operating systems might change what is sent by the backspace or delete character.
Window options
The window options influence the appearance and behavior of the terminal window. It can also specify how characters are translated on output and to select fonts and colors for the window.
Connection options
Of the connection options, the Data options can be useful. The Auto-login user name specifies the user to log in as, so that the name will not have to be entered every time. The Proxy options are rarely useful for home users, but may be needed in enterprises that do not allow outgoing Internet connections without using a SOCKS proxy or other similar mechanisms. Don’t worry if you don’t know what a SOCKS proxy is; just stay out of that section.
The Telnet, Rlogin, and Serial categories only contain options for those protocols, and very few people would ever use them.
The SSH options, however, are important and useful for some people. The ordinary user or student need not worry about them. But if you want to use public key authentication, then they are needed. Note that you need to open the SSH options subtree by clicking on the small [+] symbol. Otherwise you won’t see all the options.
Key exchange, host keys, and cipher options
You almost never want to touch the Kex (key exchange), Host Keys, or Cipher options. They all have reasonable default values, and most people don’t know enough about cryptography to select any better values. Thus just skip these options, unless you know what you are doing.
Authentication options — public key authentication
The Auth subtree contains some options that may be useful. When Auth is clicked, it shows a pane titled Options controlling SSH authentication. To enable public key authentication, you just generate an SSH key and then click the Browse button in the Authentication parameters box in the middle right area of this configuration pane. For more information, see also configuring public key authentication for PuTTY. Advanced users may also want to check the Allow agent forwarding checkbox to use key-based single sign-on.
Most users have no need to generate SSH keys and need not know what public key authentication is. System administrators, however, should learn it and should also familiarize themselves with SSH key management and ensure their organization implements proper provisioning and termination processes and audits for SSH keys.
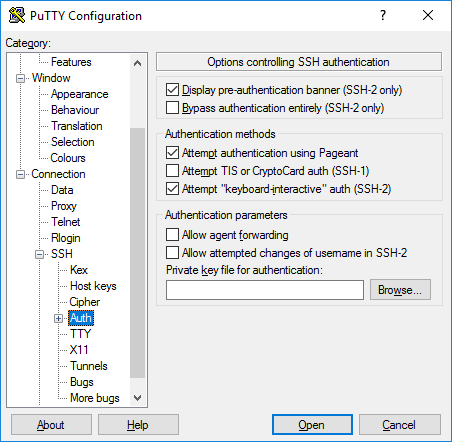
Active Directory authentication (GSSAPI / Kerberos)
One of the interesting features of PuTTY is support for Active Directory single sign-on. Technically it uses the Kerberos protocol via a programming interface called GSSAPI. In the SSH protocol, the mechanism is called GSSAPI authentication. Enterprise users using Kerberos authentication (e.g., via the Centrify or Quest Authentication Services aka Vintela) may want to take advantage of the single-sign-on capability. Other users don’t need to care. The settings for GSSAPI authentication can be found under the SSH / Auth section. Note that you must again expand the Auth section by clicking on the [+] symbol to see the GSSAPI options.
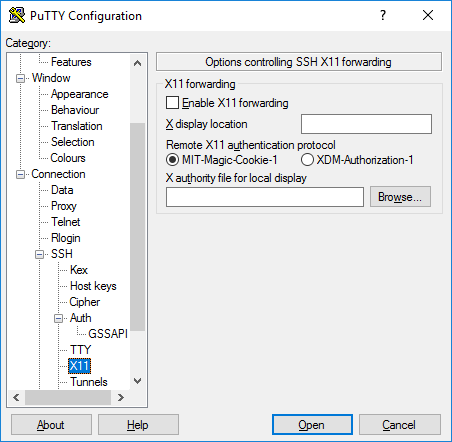
X11 forwarding options
X11 is a protocol and system for running graphical applications on Unix and Linux. It supports running graphical applications remotely over a network out-of-the-box.
PuTTY does not implement an X11 server (the display side), but it can work with some other product that implements X server functionality on Windows. A popular free alternative is XMing.
To use an X11 server, you need to check the Enable X11 forwarding box and enter localhost:0.0 in the X display location box. The other settings need not be touched. Detailed instructions can be found, e.g., here.
Tunneling options
The final category of configuration options we’ll discuss is Tunnels. They are used for configuring SSH tunneling, also called SSH port forwarding. This panel can be used for defining forwardings for the connection. Forwardings are saved in the profile.
To add a local forwarding (i.e., TCP/IP port on local machine forwarded to a port on the remote machine or to a machine reachable from the remote machine), write the source port in the Source port field, the destination host and port (e.g., www.dest.com:80) in the Destination field, and select Local. The click Add.
To add a remote forwarding (i.e., a TCP/IP port on the remote machine forwarded to a port on the local machine or to a machine reachable from the local machine), specify Source port on the destination machine and Destination that is reachable from the local machine (your desktop).
Normally you need not check Local ports accept connections from other hosts or the same for remote ports. However, if the connection to the forwarded port is from a over a network instead of from localhost, then you need to check these. There is a small security risk, but usually it is not a problem in the cases where SSH tunneling is used. However you should understand that anyone who can connect to the respective computer can then connect to the forwarded port. In some cases port forwarding can be used to traverse firewalls. We suggest you read our article on the risks of SSH port forwarding.