
INSTRUCTIONS FOR USE
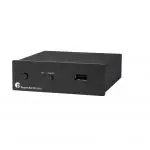
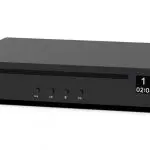
Stream Box S2 Ultra
Dear music lover,
thank you for purchasing a Pro-Ject Audio Systems streamer.
In order to achieve maximum performance and reliability you should study these instructions for use carefully.
 Warning of a hazard for the user, the unit or possible misuse
![]() Important notice
Important notice
Safety instructions
AC outlet voltages vary from country to country. Before connecting to the mains, make sure that the voltage in your area meets the voltage requirements printed on the power supply.
The power supply is used to disconnect the unit from the mains. Make sure that the power supply is easily accessible at all times. Never handle the device or the power supply while your hands are wet or damp.
Avoid letting liquids enter the device or the power supply. Never place any item containing liquid, such as a flower vase on or near the device. Never spill any liquid on the device or the power supply. Never place any naked flame sources, such as lighted candles on or near the device. The product shall not be used
in damp or wet locations, next to a bathtub, sink, swimming pool, or any other similar conditions. For optimum performance please place the unit on a well-vented spot.
Connectors

Make all connections whilst the unit is disconnected from the power supply
Mains power connection
Connect the low voltage plug from the power supply to the Power 18V DC socket before connecting the power supply to the mains.
HDMI output
this output allows to connect a TV or monitor. It can be used as an alternative to the small screen of a mobile device.
![]() In order to control the unit, the attached screen must be a touchscreen, unless a mouse and/or keyboard is connected.
In order to control the unit, the attached screen must be a touchscreen, unless a mouse and/or keyboard is connected.
Ethernet
Connect the unit with an Ethernet cable to your network to ensure a stable connection to your network music library and internet services. Ethernet connection is recommended for High-Resolution music playback.
USB inputs
The unit offers 2 USB inputs, one is located on the front panel and second on the rear panel marked as USB, these inputs allow to connect USB flash disks and drives. When a drive is connected, all the music stored on it will be automatically indexed and can be accessed from the Browse – Music Library section of the control screen.
DAC connection
The unit does not include a D/A converter. For connection to a USB DAC use the USB socket on the rear panel marked as DAC.
![]() Pro-Ject S2 USB DACs can be powered directly from the streamer. Connect USB B cable between Stream Box S2 Ultra and any of the S2 line USB DAC.
Pro-Ject S2 USB DACs can be powered directly from the streamer. Connect USB B cable between Stream Box S2 Ultra and any of the S2 line USB DAC.
Bypass
The micro USB connector marked Bypass on the back panel allows to connect the unit to a computer or laptop and to “detox” the USB output from the computer before it reaches D/A converter. This will clean up the signal coming from your PC or laptop, the unit must be connected to a DAC. The detox mode can be activated by pushing the USB/PC button on the front or by clicking on the corresponding icon in the control screen.
Boot
This function is intended only for experienced users who have knowledge about installing a system into Raspberry Pi computers. Manufacturer takes no responsibility for any damage or malfunction caused by any change or manipulation with software of the unit. Regular updates of the supplied software are managed in the Settings>System menu of the unit.
This button allows to boot into different Operating Systems that can be loaded into the internal memory of the Stream Box S2 Ultra.
The Boot button allows to place the device in bootloader mode, allowing to reflash its software.
– With the device on, press continuously the Boot button for at least 5 seconds
– The device will enter “bootloader mode” and the red Led will start blinking
– You can now access the device as a normal storage device
To exit from Bootloader mode press the USB/PC button once, the LED will become blue.
Front panel

To switch on from standby or to standby
The push-button on the left side of the front panel turns the Stream Box S2 Ultra on, or returns it to standby mode. The LED next to the button indicates standby with a stable red light, fully functional status is indicated by blue light. The unit has finished booting and is ready to use when the LED underneath Net is fully lid.
![]() Power on and return to standby mode takes some time. Longer time of switching off is to ensure all the open files and data are closed safely. During this period is the status LED is blinking red and blue.
Power on and return to standby mode takes some time. Longer time of switching off is to ensure all the open files and data are closed safely. During this period is the status LED is blinking red and blue.
Net
The LED underneath Net lights up blue when the connection to the network is established and the unit has completed the boot sequence. Only when the LED is stable blue the unit can be used.
USB/PC
The button USB/PC on the front panel activates the function for USB “detox”. The LED next to the button lights up when the function is active. The Bypass input on the rear panel cleans up the audio signal coming from a Laptop or Personal Computer.
It is possible to activate the function directly from the control screen by using icon USB/PC
![]() Once the function is active the unit does not work as a network player anymore. The control app will show “No Audio Output Available”. This mode can be de-activated by pushing the USB/PC button on front again or by clicking the corresponding icon in the control screen. Alternatively the unit changes back to network mode when a file from the Music Library is played or an Internet Radio station has been started.
Once the function is active the unit does not work as a network player anymore. The control app will show “No Audio Output Available”. This mode can be de-activated by pushing the USB/PC button on front again or by clicking the corresponding icon in the control screen. Alternatively the unit changes back to network mode when a file from the Music Library is played or an Internet Radio station has been started.
Installation and first use
The unit can be connected to the network/internet via wired or wireless connection.
1. Wired connection: Connect a LAN cable from your router to the socket Ethernet on the back panel.
2. Wireless connection:
![]() make sure that the supplied antenna is mounted to its connector on the back panel.
make sure that the supplied antenna is mounted to its connector on the back panel.
Open Settings in your mobile device > Wi-Fi > search for available networks > connect to Stream Box S2 Ultra network.
The welcome page will open automatically (open web browser if not). Go through the first config wizard:
1. Language – select your system language
2. Name – choose a unique name of the unit (here you can see the address where you will find the unit in your browser available only for iOS and MacOS)
3. Output – select a DAC with which you want to use with Stream Box S2 Ultra.
4. Network – here you can connect to a wireless network, a list of available Wi-Fi networks is shown. Select your desired Wi-Fi network, type in the password and tap on connect. The unit will reconnect to selected WiFi network at every reboot.
5. Music – managing all the network music location
![]() all the steps from the wizard can be changed later in Settings.
all the steps from the wizard can be changed later in Settings.
The control screen can be accessed by any web browser. A web browser is available on all platforms (Windows, MacOS, Android, iOS, and other operating systems). To access the control screen please enter the unit’s IP address in the address bar of your browser.
There are several different ways to open the unit´s control web page:
1. Open your internet browser and type in the IP address of the unit directly into the browser (e.g.: http://192.168.0.1)
The IP address can be found in the list of connected devices in the DHCP server list in your router administrations. Alternately programs such as Advanced IP Scanner, FING (Android) or Network Analyzer (iOS), can be used to find out the IP address of the streamer.
2. Use the address of the streamer which is shown in step 2 of the first config wizard (http://stream-box-s2ultra.local by default)
available only for iOS and MacOS
3. When using a Windows computer, the device can be found by the following path: File Explorer >Network > Media Devices. Here you can directly open the control page of the streamer by double-clicking on the streamer icon.
4. In the App Store or Google Play Store the application Pro-Ject Play can be downloaded free of charge, with this App you can connect to the Stream Box S2 Ultra.
BT connection
Pairing with Android devices
Open Settings and tap on BT. Turn on BT and tap on Scan. All found devices will show up now, tap on Stream Box S2 Ultra and confirm the connection.
BT pairing with Apple® devices
Open Settings and tap on BT, turn on BT if it is not activated yet. Your device will automatically start searching for available devices. Tap on Stream Box S2 Ultra and confirm “Pairing” on your Apple device.
Control the unit
The control screen is divided into three parts: Browse, Playback and Queue
Browse works as a home page. Here you can go to any of the following pages.

Music library – here you can find all the available Music in your network and connected directly to the streamer: USB or NAS. Your library will be created automatically and sorted using the available metadata. (Some of these options are shown only when available)

Web radio – here you have access to a list of available internet radio stations. You also have access to a list of selected internet radio stations under Pro-Ject Selection.

BT connection – enables the BT input. Play music from connected devices.
USB/PC – see chapter USB/PC

Shairport-Sync – This option lets you connect to Apple devices using the Airplay protocol
The following icons are shown after a successful login into the respective services under Settings > My Music
Tidal – gives you access to the Tidal streaming service
Spotify – gives you access to the Spotify streaming service
Playback: This page shows the currently playing music. You also see information about the Artist and the Album. Additionally, you will see the Album Cover, given it is available. Here you also have the option to add tracks to your Favourites or to a playlist. On the right side, you have volume control with which you can set the volume level of the unit. It is recommended to leave the volume at level 100 to ensure bit-perfect playback.
Queue: This page shows the list of tracks in the current queue. At the upper right corner, you also have the options for playback (shuffle, repeat), also you can save the current queue as a playlist.
Other useful Buttons
![]() Pro-Ject Logo – tap on this button to go back to the home page (Browse)
Pro-Ject Logo – tap on this button to go back to the home page (Browse)
![]() Settings – gives you access to all general settings. The following menus are accessible here:
Settings – gives you access to all general settings. The following menus are accessible here:
My Music: here you have access to all options for Network Drives and attached storages via USB. Also, you can enter your account information for TIDAL and Spotify. Additional settings can be found for Album Art and Music Library. Under Functionalities Control you have the ability to enable or disable certain services. This is especially useful to enhance the performance of the unit.
![]() Spotify and Tidal icons appear on the home page (Browse) only after the login information are successfully entered
Spotify and Tidal icons appear on the home page (Browse) only after the login information are successfully entered
Playback options: Here you have the option to choose your desired Output Device (USB DAC) and other settings for Playback, Volume, and Audio Resampling.
Appearance: Here you can change the language of the unit, switch between background images or set your own images as background.
Network: Here you can find all information about your network. You can assign your unit a static IP address, pick a wireless network and activate/deactivate the hotspot function of the unit. You can also make settings on your DNS Server.
System: General settings can be made here. You can also enable/disable the video output via the HDMI socket. Under System Updates you can search for new software for the unit and download it. You can also set the unit back to Factory Settings.
Alarm: Here you can set a time for an alarm clock. This function needs an already existing playlist.
Sleep: With the sleep timer you can set a time value after which the unit either turns off or stops the music.
Shutdown: Power off or reboot the unit.
Technical data
Internal Memory – 16 GB
Audio Formats – PCM 32bit/352.8kHz, DSD256
Internet Radio – Shoutcast
Streaming Services – TIDAL, Spotify
Supported data protocols – RAAT, Shairport, DLNA
Multi-room – Up to six devices
Inputs – 2 x USB A (maximum combined current draw 1A), Micro USB B (PCDetox), Network (Ethernet, WiFi), BT
Supported WiFi standards – 802.11 b/g/n/d/e/h/i
BT – BT Classic + EDR v2.1, v3.0, v4.0 and Low Energy
Outputs – Audio optimized USB A, HDMI (video)
Outboard Power supply – 18V/1A DC (included)
Accessories – Wi-Fi antenna
Dimensions W x H x D – 103 x 37 x 115 mm
Weight (without power supply): – 375 g
Service
Should you encounter a problem which you are not able to alleviate or identify, please contact your dealer for further advice. Only if the problem cannot be resolved there, the unit should be sent to the responsible distributor in your country.
Warranty
The manufacturer accepts no responsibility for damage caused by not adhering to these instructions for use. Modification or changes to any part of the product by unauthorized persons release the manufacturer from any liability over and above the lawful rights of the customer.
Copyright, trademarks
Pro-Ject Audio Systems is a registered Trademark of H. Lichtenegger.
This guide was produced by: Pro-Ject Audio Systems Copyright© 2018. All rights reserved.
The information was correct at the time of going to press. The manufacturer reserves the right to make changes to the technical specification without prior notice as deemed necessary to uphold the ongoing process of technical development.
Windows® is a registered trademark of the Microsoft group of companies. Mac® and Mac OS® are trademarks of Apple Inc., registered in the U.S. and other countries. DSD is a registered trademark of Sony Corporation. BT® is a trademark owned by the BT SIG, Inc., Apple is registered trademark of Apple Inc., Android™ is a trademark of Google Inc. Contains FCC ID: VVXLM811-0451
© Pro-Ject Audio Systems · Stream Box S2 Ultra · Revision 22.04.2021
More Manuals From Pro-Ject

ИНСТРУКЦИЯ ПО ПРИМЕНЕНИЮ
Stream Box S2 Ультра
Уважаемый меломан,
благодарим вас за покупку стримера Pro-Ject Audio Systems.
Для достижения максимальной производительности и надежности внимательно изучите данную инструкцию по эксплуатации.
![]() Предупреждение об опасности для пользователя, устройства или возможном неправильном использовании
Предупреждение об опасности для пользователя, устройства или возможном неправильном использовании
![]() Важное замечание
Важное замечание
Инструкции по технике безопасности
Напряжение розетки переменного токаtages варьируются от страны к стране. Перед подключением к сети убедитесь, что напряжениеtagе в вашем районе соответствует voltagТребования указаны на блоке питания.
Блок питания используется для отключения агрегата от сети. Убедитесь, что источник питания всегда легко доступен. Никогда не прикасайтесь к устройству или источнику питания, пока у вас мокрые руки илиamp.![]()
Избегайте попадания жидкостей в устройство или источник питания. Никогда не ставьте на устройство или рядом с ним какие-либо предметы, содержащие жидкость, например вазу для цветов. Никогда не проливайте жидкость на устройство или блок питания. Никогда не ставьте на устройство или рядом с ним какие-либо источники открытого огня, например зажженные свечи. Продукт нельзя использовать
в damp или в сырых местах, рядом с ванной, раковиной, бассейном или в любых других подобных условиях. Для оптимальной производительности поместите устройство в хорошо вентилируемое место.
Соединители

![]() Выполняйте все подключения, когда устройство отключено от источника питания.
Выполняйте все подключения, когда устройство отключено от источника питания.
Подключение к электросети
Подключите низкий уровень громкостиtagПодключите блок питания к розетке Power 18V DC перед подключением блока питания к сети.
выход HDMI
этот выход позволяет подключить телевизор или монитор. Его можно использовать как альтернативу маленькому экрану мобильного устройства.
![]() Для управления устройством подключенный экран должен быть сенсорным, если не подключены мышь и / или клавиатура.
Для управления устройством подключенный экран должен быть сенсорным, если не подключены мышь и / или клавиатура.
Ethernet
Подключите устройство с помощью кабеля Ethernet к вашей сети, чтобы обеспечить стабильное соединение с вашей сетевой музыкальной библиотекой и интернет-сервисами. Для воспроизведения музыки с высоким разрешением рекомендуется подключение к сети Ethernet.
USB-входы
Устройство имеет 2 входа USB, один расположен на передней панели, а второй — на задней панели, помечен как USB, эти входы позволяют подключать USB-накопители и флеш-накопители. Когда накопитель подключен, вся музыка, хранящаяся на нем, будет автоматически проиндексирована, и к ней можно будет получить доступ из раздела «Обзор — Музыкальная библиотека» на экране управления.
Подключение ЦАП
Устройство не включает цифро-аналоговый преобразователь. Для подключения к USB-ЦАП используйте USB-разъем на задней панели, помеченный как DAC.
![]() USB-ЦАПы Pro-Ject S2 могут получать питание непосредственно от стримера. Подключите кабель USB B к Stream Box S2 Ultra и любому ЦАП USB линии S2.
USB-ЦАПы Pro-Ject S2 могут получать питание непосредственно от стримера. Подключите кабель USB B к Stream Box S2 Ultra и любому ЦАП USB линии S2.
Обход
Разъем micro USB с маркировкой Bypass на задней панели позволяет подключать устройство к компьютеру или ноутбуку и «очищать» USB-выход компьютера до того, как он достигнет цифро-аналогового преобразователя. Это очистит сигнал, поступающий с вашего ПК или ноутбука, устройство должно быть подключено к ЦАП. Режим детоксикации можно активировать, нажав кнопку USB / ПК на передней панели или щелкнув соответствующий значок на экране управления.
Boot
![]() Эта функция предназначена только для опытных пользователей, которые знают об установке системы на компьютеры Raspberry Pi. Производитель не несет ответственности за любые повреждения или неисправности, вызванные любыми изменениями или манипуляциями с программным обеспечением устройства. Регулярные обновления прилагаемого программного обеспечения регулируются в меню «Настройки»> «Система» устройства.
Эта функция предназначена только для опытных пользователей, которые знают об установке системы на компьютеры Raspberry Pi. Производитель не несет ответственности за любые повреждения или неисправности, вызванные любыми изменениями или манипуляциями с программным обеспечением устройства. Регулярные обновления прилагаемого программного обеспечения регулируются в меню «Настройки»> «Система» устройства.
Эта кнопка позволяет загружать различные операционные системы, которые могут быть загружены во внутреннюю память Stream Box S2 Ultra.
Кнопка Boot позволяет перевести устройство в режим загрузчика, позволяя перепрограммировать его программное обеспечение.
— При включенном устройстве нажмите и удерживайте кнопку загрузки не менее 5 секунд.
— Устройство перейдет в режим загрузчика, и красный светодиод начнет мигать.
— Теперь вы можете получить доступ к устройству как к обычному запоминающему устройству.
Для выхода из режима загрузчика нажмите кнопку USB / ПК один раз, светодиод станет синим.
Передняя панель

Включение из режима ожидания или в режим ожидания
Кнопка на левой стороне передней панели включает Stream Box S2 Ultra или возвращает его в режим ожидания. Светодиод рядом с кнопкой показывает режим ожидания постоянным красным светом, полностью функциональное состояние отображается синим светом. Устройство завершило загрузку и готово к использованию, когда светодиод под сеткой полностью закрыт.
![]() Включение и возврат в режим ожидания занимает некоторое время. Более длительное время выключения — чтобы убедиться, что все открытые files и данные закрыты безопасно. В это время светодиодный индикатор состояния мигает красным и синим светом.
Включение и возврат в режим ожидания занимает некоторое время. Более длительное время выключения — чтобы убедиться, что все открытые files и данные закрыты безопасно. В это время светодиодный индикатор состояния мигает красным и синим светом.
Чистыми
Светодиод под Net загорается синим, когда соединение с сетью установлено и устройство завершило последовательность загрузки. Только когда светодиодный индикатор горит синим цветом, устройство можно использовать.
USB / PC
Кнопка USB / PC на передней панели активирует функцию USB «детокс». Светодиод рядом с кнопкой загорается, когда функция активна. Вход байпаса на задней панели очищает аудиосигнал от портативного или персонального компьютера.
Функцию можно активировать прямо с экрана управления с помощью значка USB / ПК.![]()
![]() Как только функция активна, устройство больше не работает как сетевой проигрыватель. Управляющее приложение покажет «Аудиовыход недоступен». Этот режим можно отключить, снова нажав кнопку USB / ПК на передней панели или щелкнув соответствующий значок на экране управления. В качестве альтернативы устройство возвращается в сетевой режим, когда file из музыкальной библиотеки или запущена интернет-радиостанция.
Как только функция активна, устройство больше не работает как сетевой проигрыватель. Управляющее приложение покажет «Аудиовыход недоступен». Этот режим можно отключить, снова нажав кнопку USB / ПК на передней панели или щелкнув соответствующий значок на экране управления. В качестве альтернативы устройство возвращается в сетевой режим, когда file из музыкальной библиотеки или запущена интернет-радиостанция.
Установка и первое использование
Устройство можно подключить к сети / Интернету через проводное или беспроводное соединение.
1. Проводное соединение: подключите кабель LAN от маршрутизатора к разъему Ethernet на задней панели.
2. Беспроводное соединение:
![]() убедитесь, что прилагаемая антенна вставлена в разъем на задней панели.
убедитесь, что прилагаемая антенна вставлена в разъем на задней панели.
Откройте «Настройки» на мобильном устройстве> Wi-Fi> поиск доступных сетей> подключитесь к сети Stream Box S2 Ultra.
Страница приветствия откроется автоматически (открыть web браузер, если нет). Пройдите через первый мастер настройки:
1. Язык — выберите язык вашей системы
2. Имя и фамилия — выберите уникальное имя устройства (здесь вы можете увидеть адрес, по которому вы найдете устройство в вашем браузере, доступном только для iOS и MacOS)
3. Результат — выберите ЦАП, с которым вы хотите использовать Stream Box S2 Ultra.
4. Cеть — здесь можно подключиться к беспроводной сети, отображается список доступных сетей Wi-Fi. Выберите желаемую сеть Wi-Fi, введите пароль и нажмите «Подключиться». Устройство будет повторно подключаться к выбранной сети Wi-Fi при каждой перезагрузке.
5. Музыка — управление всей сетевой музыкальной локацией
![]() все шаги мастера можно изменить позже в настройках.
все шаги мастера можно изменить позже в настройках.
К экрану управления может получить доступ любой web браузер. А web браузер доступен на всех платформах (Windows, MacOS, Android, iOS и другие операционные системы). Чтобы получить доступ к экрану управления, введите IP-адрес устройства в адресной строке браузера.
Есть несколько разных способов открыть панель управления агрегатом. web страницы:
1. Откройте свой интернет-браузер и введите IP-адрес устройства прямо в браузере (например: http://192.168.0.1)
IP-адрес можно найти в списке подключенных устройств в списке DHCP-серверов в администрации вашего маршрутизатора. В качестве альтернативы можно использовать такие программы, как Advanced IP Scanner, FING (Android) или Network Analyzer (iOS), чтобы узнать IP-адрес стримера.
2. Используйте адрес стримера, показанный на шаге 2 первого мастера настройки (http://stream-box-s2ultra.local по умолчанию)
доступно только для iOS и MacOS
3. При использовании компьютера с Windows устройство можно найти по следующему пути: File Проводник> Сеть> Медиа-устройства. Здесь вы можете напрямую открыть страницу управления стримером, дважды щелкнув значок стримера.
4. В App Store или Google Play Store приложение Pro-Ject Play можно загрузить бесплатно, с помощью этого приложения вы можете подключиться к Stream Box S2 Ultra.
BT соединение
Сопряжение с устройствами Android
Откройте «Настройки» и нажмите на BT. Включите BT и нажмите «Сканировать». Теперь появятся все найденные устройства, нажмите на Stream Box S2 Ultra и подтвердите подключение.
Сопряжение BT с устройствами Apple®
Откройте «Настройки» и нажмите на BT, включите BT, если он еще не активирован. Ваше устройство автоматически начнет поиск доступных устройств. Нажмите на Stream Box S2 Ultra и подтвердите «Сопряжение» на своем устройстве Apple.
Управляйте агрегатом
Экран управления разделен на три части: Обзор, Воспроизведение и Очередь.
Обзор работает как домашняя страница. Здесь вы можете перейти на любую из следующих страниц.

Музыкальная библиотека — здесь вы можете найти всю музыку, доступную в вашей сети и подключенную напрямую к стримеру: USB или NAS. Ваша библиотека будет создана автоматически и отсортирована с использованием доступных метаданных. (Некоторые из этих параметров отображаются только тогда, когда они доступны)

Web радио — здесь у вас есть доступ к списку доступных интернет-радиостанций. У вас также есть доступ к списку избранных интернет-радиостанций в Pro-Ject Selection.
Подключение BT — включает вход BT. Воспроизведение музыки с подключенных устройств.
USB / ПК — см. Главу USB / ПК
Shairport-Sync — этот параметр позволяет подключаться к устройствам Apple по протоколу Airplay.
Следующие значки отображаются после успешного входа в соответствующие службы в разделе «Настройки»> «Моя музыка».
Tidal — дает вам доступ к потоковому сервису Tidal.
Spotify — дает вам доступ к сервису потоковой передачи Spotify.
Воспроизведение: на этой странице отображается музыка, воспроизводимая в данный момент. Вы также видите информацию об исполнителе и альбоме. Кроме того, вы увидите обложку альбома, если она есть. Здесь у вас также есть возможность добавлять треки в избранное или в список воспроизведения. С правой стороны у вас есть регулятор громкости, с помощью которого вы можете установить уровень громкости устройства. Рекомендуется оставить громкость на уровне 100, чтобы обеспечить воспроизведение с идеальным битовым качеством.
Очередь: на этой странице отображается список треков в текущей очереди. В правом верхнем углу у вас также есть опции для воспроизведения (случайное воспроизведение, повтор), также вы можете сохранить текущую очередь как список воспроизведения.
Другие полезные кнопки
![]() Логотип Pro-Ject — нажмите эту кнопку, чтобы вернуться на главную страницу (Обзор)
Логотип Pro-Ject — нажмите эту кнопку, чтобы вернуться на главную страницу (Обзор)
![]() Настройки — дает вам доступ ко всем общим настройкам. Здесь доступны следующие меню:
Настройки — дает вам доступ ко всем общим настройкам. Здесь доступны следующие меню:
Моя музыка: здесь у вас есть доступ ко всем параметрам сетевых дисков и подключенных хранилищ через USB. Кроме того, вы можете ввести информацию о своей учетной записи для TIDAL и Spotify. Дополнительные настройки можно найти для обложек альбомов и музыкальной библиотеки. В разделе «Контроль функций» у вас есть возможность включать или отключать определенные службы. Это особенно полезно для повышения производительности устройства.
![]() Значки Spotify и Tidal появляются на главной странице (Обзор) только после успешного ввода информации для входа.
Значки Spotify и Tidal появляются на главной странице (Обзор) только после успешного ввода информации для входа.
Варианты воспроизведения: Здесь у вас есть возможность выбрать желаемое устройство вывода (USB DAC) и другие настройки для воспроизведения, громкости и звукового разрешения.ampлин.
Внешний вид: Здесь вы можете изменить язык устройства, переключаться между фоновыми изображениями или установить свои собственные изображения в качестве фона.
Cеть: Здесь вы можете найти всю информацию о вашей сети. Вы можете назначить своему устройству статический IP-адрес, выбрать беспроводную сеть и активировать / деактивировать функцию точки доступа устройства. Вы также можете выполнить настройки на своем DNS-сервере.
Система: Здесь можно сделать общие настройки. Вы также можете включить / отключить вывод видео через разъем HDMI. В разделе «Обновления системы» вы можете найти новое программное обеспечение для устройства и загрузить его. Вы также можете вернуть устройство к заводским настройкам.
Сигнализация: Здесь вы можете установить время для будильника. Для этой функции нужен уже существующий список воспроизведения.
Спящий режим: С помощью таймера сна вы можете установить значение времени, по истечении которого устройство либо выключится, либо остановит музыку.
выключение: Выключите или перезагрузите устройство.
Технические данные
Внутренняя память — 16 ГБ
Аудиоформаты — PCM 32 бит / 352.8 кГц, DSD256
Интернет-радио — Shoutcast
Стриминговые сервисы — TIDAL, Spotify
Поддерживаемые протоколы передачи данных — RAAT, Shairport, DLNA
Мультирум — до шести устройств
Входы — 2 x USB A (максимальный комбинированный ток потребления 1A), Micro USB B (PCDetox), Сеть (Ethernet, WiFi), BT
Поддерживаемые стандарты WiFi — 802.11 b / g / n / d / e / h / i
BT — BT Classic + EDR v2.1, v3.0, v4.0 и с низким энергопотреблением
Выходы — оптимизированный для звука USB A, HDMI (видео)
Внешний источник питания — 18 В / 1 А постоянного тока (в комплекте)
Аксессуары — антенна Wi-Fi
Размеры Ш x В x Г — 103 x 37 x 115 мм
Вес (без блока питания): — 375 г
Сервис
Если вы столкнетесь с проблемой, которую вы не можете устранить или определить, обратитесь к своему дилеру за дальнейшими советами. Только если проблема не может быть решена там, устройство следует отправить ответственному дистрибьютору в вашей стране.
Гарантия
Производитель не несет ответственности за ущерб, вызванный несоблюдением данных инструкций по эксплуатации. Модификация или изменение любой части продукта неуполномоченными лицами освобождает производителя от любой ответственности сверх законных прав покупателя.
Авторские права, товарные знаки
Pro-Ject Audio Systems является зарегистрированным товарным знаком H. Lichtenegger.
Это руководство подготовлено: Pro-Ject Audio Systems Авторские права © 2018. Все права защищены.
Информация была верной на момент публикации в печати. Производитель оставляет за собой право вносить изменения в технические характеристики без предварительного уведомления, если это будет сочтено необходимым для поддержания текущего процесса технического развития.
Windows® является зарегистрированным товарным знаком группы компаний Microsoft. Mac® и Mac OS® являются товарными знаками Apple Inc., зарегистрированными в США и других странах. DSD — зарегистрированная торговая марка Sony Corporation. BT® является товарным знаком, принадлежащим BT SIG, Inc., Apple является зарегистрированным товарным знаком Apple Inc., Android ™ является товарным знаком Google Inc. Содержит идентификатор FCC: VVXLM811-0451
© Pro-Ject Audio Systems · Stream Box S2 Ultra · Редакция от 22.04.2021
Документы / Ресурсы

INSTRUCTIONS FOR USE
Stream Box S2 Ultra
Dear music lover,
thank you for purchasing a Pro-Ject Audio Systems streamer.
In order to achieve maximum performance and reliability you should study these instructions for use carefully.
![]() Warning of a hazard for the user, the unit or possible misuse
Warning of a hazard for the user, the unit or possible misuse
![]() Important notice
Important notice
Safety instructions
AC outlet voltages vary from country to country. Before connecting to the mains, make sure that the voltage in your area meets the voltage requirements printed on the power supply.
The power supply is used to disconnect the unit from the mains. Make sure that the power supply is easily accessible at all times. Never handle the device or the power supply while your hands are wet or damp.![]()
Avoid letting liquids enter the device or the power supply. Never place any item containing liquid, such as a flower vase on or near the device. Never spill any liquid on the device or the power supply. Never place any naked flame sources, such as lighted candles on or near the device. The product shall not be used
in damp or wet locations, next to a bathtub, sink, swimming pool, or any other similar conditions. For optimum performance please place the unit on a well-vented spot.
Connectors

![]() Make all connections whilst the unit is disconnected from the power supply
Make all connections whilst the unit is disconnected from the power supply
Mains power connection
Connect the low voltage plug from the power supply to the Power 18V DC socket before connecting the power supply to the mains.
HDMI output
this output allows to connect a TV or monitor. It can be used as an alternative to the small screen of a mobile device.
![]() In order to control the unit, the attached screen must be a touchscreen, unless a mouse and/or keyboard is connected.
In order to control the unit, the attached screen must be a touchscreen, unless a mouse and/or keyboard is connected.
Ethernet
Connect the unit with an Ethernet cable to your network to ensure a stable connection to your network music library and internet services. Ethernet connection is recommended for High-Resolution music playback.
USB inputs
The unit offers 2 USB inputs, one is located on the front panel and second on the rear panel marked as USB, these inputs allow to connect USB flash disks and drives. When a drive is connected, all the music stored on it will be automatically indexed and can be accessed from the Browse – Music Library section of the control screen.
DAC connection
The unit does not include a D/A converter. For connection to a USB DAC use the USB socket on the rear panel marked as DAC.
![]() Pro-Ject S2 USB DACs can be powered directly from the streamer. Connect USB B cable between Stream Box S2 Ultra and any of the S2 line USB DAC.
Pro-Ject S2 USB DACs can be powered directly from the streamer. Connect USB B cable between Stream Box S2 Ultra and any of the S2 line USB DAC.
Bypass
The micro USB connector marked Bypass on the back panel allows to connect the unit to a computer or laptop and to “detox” the USB output from the computer before it reaches D/A converter. This will clean up the signal coming from your PC or laptop, the unit must be connected to a DAC. The detox mode can be activated by pushing the USB/PC button on the front or by clicking on the corresponding icon in the control screen.
Boot
![]() This function is intended only for experienced users who have knowledge about installing a system into Raspberry Pi computers. Manufacturer takes no responsibility for any damage or malfunction caused by any change or manipulation with software of the unit. Regular updates of the supplied software are managed in the Settings>System menu of the unit.
This function is intended only for experienced users who have knowledge about installing a system into Raspberry Pi computers. Manufacturer takes no responsibility for any damage or malfunction caused by any change or manipulation with software of the unit. Regular updates of the supplied software are managed in the Settings>System menu of the unit.
This button allows to boot into different Operating Systems that can be loaded into the internal memory of the Stream Box S2 Ultra.
The Boot button allows to place the device in bootloader mode, allowing to reflash its software.
– With the device on, press continuously the Boot button for at least 5 seconds
– The device will enter “bootloader mode” and the red Led will start blinking
– You can now access the device as a normal storage device
To exit from Bootloader mode press the USB/PC button once, the LED will become blue.
Front panel

To switch on from standby or to standby
The push-button on the left side of the front panel turns the Stream Box S2 Ultra on, or returns it to standby mode. The LED next to the button indicates standby with a stable red light, fully functional status is indicated by blue light. The unit has finished booting and is ready to use when the LED underneath Net is fully lid.
![]() Power on and return to standby mode takes some time. Longer time of switching off is to ensure all the open files and data are closed safely. During this period is the status LED is blinking red and blue.
Power on and return to standby mode takes some time. Longer time of switching off is to ensure all the open files and data are closed safely. During this period is the status LED is blinking red and blue.
Net
The LED underneath Net lights up blue when the connection to the network is established and the unit has completed the boot sequence. Only when the LED is stable blue the unit can be used.
USB/PC
The button USB/PC on the front panel activates the function for USB “detox”. The LED next to the button lights up when the function is active. The Bypass input on the rear panel cleans up the audio signal coming from a Laptop or Personal Computer.
It is possible to activate the function directly from the control screen by using icon USB/PC![]()
![]() Once the function is active the unit does not work as a network player anymore. The control app will show “No Audio Output Available”. This mode can be de-activated by pushing the USB/PC button on front again or by clicking the corresponding icon in the control screen. Alternatively the unit changes back to network mode when a file from the Music Library is played or an Internet Radio station has been started.
Once the function is active the unit does not work as a network player anymore. The control app will show “No Audio Output Available”. This mode can be de-activated by pushing the USB/PC button on front again or by clicking the corresponding icon in the control screen. Alternatively the unit changes back to network mode when a file from the Music Library is played or an Internet Radio station has been started.
Installation and first use
The unit can be connected to the network/internet via wired or wireless connection.
1. Wired connection: Connect a LAN cable from your router to the socket Ethernet on the back panel.
2. Wireless connection:
![]() make sure that the supplied antenna is mounted to its connector on the back panel.
make sure that the supplied antenna is mounted to its connector on the back panel.
Open Settings in your mobile device > Wi-Fi > search for available networks > connect to Stream Box S2 Ultra network.
The welcome page will open automatically (open web browser if not). Go through the first config wizard:
1. Language – select your system language
2. Name – choose a unique name of the unit (here you can see the address where you will find the unit in your browser available only for iOS and MacOS)
3. Output – select a DAC with which you want to use with Stream Box S2 Ultra.
4. Network – here you can connect to a wireless network, a list of available Wi-Fi networks is shown. Select your desired Wi-Fi network, type in the password and tap on connect. The unit will reconnect to selected WiFi network at every reboot.
5. Music – managing all the network music location
![]() all the steps from the wizard can be changed later in Settings.
all the steps from the wizard can be changed later in Settings.
The control screen can be accessed by any web browser. A web browser is available on all platforms (Windows, MacOS, Android, iOS, and other operating systems). To access the control screen please enter the unit’s IP address in the address bar of your browser.
There are several different ways to open the unit´s control web page:
1. Open your internet browser and type in the IP address of the unit directly into the browser (e.g.: http://192.168.0.1)
The IP address can be found in the list of connected devices in the DHCP server list in your router administrations. Alternately programs such as Advanced IP Scanner, FING (Android) or Network Analyzer (iOS), can be used to find out the IP address of the streamer.
2. Use the address of the streamer which is shown in step 2 of the first config wizard (http://stream-box-s2ultra.local by default)
available only for iOS and MacOS
3. When using a Windows computer, the device can be found by the following path: File Explorer >Network > Media Devices. Here you can directly open the control page of the streamer by double-clicking on the streamer icon.
4. In the App Store or Google Play Store the application Pro-Ject Play can be downloaded free of charge, with this App you can connect to the Stream Box S2 Ultra.
BT connection
Pairing with Android devices
Open Settings and tap on BT. Turn on BT and tap on Scan. All found devices will show up now, tap on Stream Box S2 Ultra and confirm the connection.
BT pairing with Apple® devices
Open Settings and tap on BT, turn on BT if it is not activated yet. Your device will automatically start searching for available devices. Tap on Stream Box S2 Ultra and confirm “Pairing” on your Apple device.
Control the unit
The control screen is divided into three parts: Browse, Playback and Queue
Browse works as a home page. Here you can go to any of the following pages.

Music library – here you can find all the available Music in your network and connected directly to the streamer: USB or NAS. Your library will be created automatically and sorted using the available metadata. (Some of these options are shown only when available)

Web radio – here you have access to a list of available internet radio stations. You also have access to a list of selected internet radio stations under Pro-Ject Selection.
BT connection – enables the BT input. Play music from connected devices.
USB/PC – see chapter USB/PC
Shairport-Sync – This option lets you connect to Apple devices using the Airplay protocol
The following icons are shown after a successful login into the respective services under Settings > My Music
Tidal – gives you access to the Tidal streaming service
Spotify – gives you access to the Spotify streaming service
Playback: This page shows the currently playing music. You also see information about the Artist and the Album. Additionally, you will see the Album Cover, given it is available. Here you also have the option to add tracks to your Favourites or to a playlist. On the right side, you have volume control with which you can set the volume level of the unit. It is recommended to leave the volume at level 100 to ensure bit-perfect playback.
Queue: This page shows the list of tracks in the current queue. At the upper right corner, you also have the options for playback (shuffle, repeat), also you can save the current queue as a playlist.
Other useful Buttons
![]() Pro-Ject Logo – tap on this button to go back to the home page (Browse)
Pro-Ject Logo – tap on this button to go back to the home page (Browse)
![]() Settings – gives you access to all general settings. The following menus are accessible here:
Settings – gives you access to all general settings. The following menus are accessible here:
My Music: here you have access to all options for Network Drives and attached storages via USB. Also, you can enter your account information for TIDAL and Spotify. Additional settings can be found for Album Art and Music Library. Under Functionalities Control you have the ability to enable or disable certain services. This is especially useful to enhance the performance of the unit.
![]() Spotify and Tidal icons appear on the home page (Browse) only after the login information are successfully entered
Spotify and Tidal icons appear on the home page (Browse) only after the login information are successfully entered
Playback options: Here you have the option to choose your desired Output Device (USB DAC) and other settings for Playback, Volume, and Audio Resampling.
Appearance: Here you can change the language of the unit, switch between background images or set your own images as background.
Network: Here you can find all information about your network. You can assign your unit a static IP address, pick a wireless network and activate/deactivate the hotspot function of the unit. You can also make settings on your DNS Server.
System: General settings can be made here. You can also enable/disable the video output via the HDMI socket. Under System Updates you can search for new software for the unit and download it. You can also set the unit back to Factory Settings.
Alarm: Here you can set a time for an alarm clock. This function needs an already existing playlist.
Sleep: With the sleep timer you can set a time value after which the unit either turns off or stops the music.
Shutdown: Power off or reboot the unit.
Technical data
Internal Memory – 16 GB
Audio Formats – PCM 32bit/352.8kHz, DSD256
Internet Radio – Shoutcast
Streaming Services – TIDAL, Spotify
Supported data protocols – RAAT, Shairport, DLNA
Multi-room – Up to six devices
Inputs – 2 x USB A (maximum combined current draw 1A), Micro USB B (PCDetox), Network (Ethernet, WiFi), BT
Supported WiFi standards – 802.11 b/g/n/d/e/h/i
BT – BT Classic + EDR v2.1, v3.0, v4.0 and Low Energy
Outputs – Audio optimized USB A, HDMI (video)
Outboard Power supply – 18V/1A DC (included)
Accessories – Wi-Fi antenna
Dimensions W x H x D – 103 x 37 x 115 mm
Weight (without power supply): – 375 g
Service
Should you encounter a problem which you are not able to alleviate or identify, please contact your dealer for further advice. Only if the problem cannot be resolved there, the unit should be sent to the responsible distributor in your country.
Warranty
The manufacturer accepts no responsibility for damage caused by not adhering to these instructions for use. Modification or changes to any part of the product by unauthorized persons release the manufacturer from any liability over and above the lawful rights of the customer.
Copyright, trademarks
Pro-Ject Audio Systems is a registered Trademark of H. Lichtenegger.
This guide was produced by: Pro-Ject Audio Systems Copyright© 2018. All rights reserved.
The information was correct at the time of going to press. The manufacturer reserves the right to make changes to the technical specification without prior notice as deemed necessary to uphold the ongoing process of technical development.
Windows® is a registered trademark of the Microsoft group of companies. Mac® and Mac OS® are trademarks of Apple Inc., registered in the U.S. and other countries. DSD is a registered trademark of Sony Corporation. BT® is a trademark owned by the BT SIG, Inc., Apple is registered trademark of Apple Inc., Android™ is a trademark of Google Inc. Contains FCC ID: VVXLM811-0451
© Pro-Ject Audio Systems · Stream Box S2 Ultra · Revision 22.04.2021
![]()
Documents / Resources
References
- User Manual
Pro-Ject Audio Systems Stream Box S2 Ultra User manual manual
- Pro-Ject Audio Systems
- TV Tuner
- User manual manual for Pro-Ject Audio Systems Stream Box S2 Ultra
- pro-ject-audio-systems-stream-box-s2-ultra-user-manual-manual-8_manual.pdf
- 8 |
Pages Preview:


Document Transcription:
See Details
Download