
![]()
User Guide
What You Can Do with This Machine
Getting Started
Copy
Fax
Scan
Web Image Monitor
Adding Paper and Toner
Troubleshooting
Appendix
For information not in this manual, refer to the HTML/PDF files on the supplied
CD-ROM.
For safe and correct use, be sure to read the Safety Information in «Read This First» before using the machine.

TABLE OF CONTENTS |
|
|
How to Read the Manuals………………………………………………………………………………………………………………… |
5 |
|
Symbols used in the manuals………………………………………………………………………………………………………… |
5 |
|
Model-Specific Information………………………………………………………………………………………………………………. |
6 |
|
Names of Major Features…………………………………………………………………………………………………………………. |
7 |
|
1. What You Can Do with This Machine |
|
|
I Want to Save Paper……………………………………………………………………………………………………………………….. |
9 |
|
I Want to Convert Documents to Electronic Formats Easily……………………………………………………………….. |
10 |
|
I Want to Register Destinations……………………………………………………………………………………………………….. |
11 |
|
I Want to Operate the Machine More Effectively…………………………………………………………………………….. |
12 |
|
You Can Make Copies Using Various Functions………………………………………………………………………………. |
13 |
|
You Can Print Data Using Various Functions……………………………………………………………………………………. |
14 |
|
You Can Use the Scanner in a Network Environment……………………………………………………………………….. |
15 |
|
You Can Prevent Information Leakage (Security Functions)………………………………………………………………. |
16 |
|
You Can Monitor and Set the Machine Using a Computer………………………………………………………………. |
17 |
|
2. Getting Started |
|
|
Guide to Names and Functions of Components……………………………………………………………………………….. |
19 |
|
Guide to Components………………………………………………………………………………………………………………… |
19 |
|
Guide to Functions of the Machine’s Options…………………………………………………………………………………… |
24 |
|
Guide to Functions of the Machine’s External Options …………………………………………………………………. |
24 |
|
Guide to the Names and Functions of the Machine’s Control Panel………………………………………………….. |
25 |
|
Changing the Display Language…………………………………………………………………………………………………….. |
28 |
|
Turning On/Off the Power……………………………………………………………………………………………………………… |
29 |
|
Turning On the Main Power………………………………………………………………………………………………………… |
29 |
|
Turning Off the Main Power………………………………………………………………………………………………………… |
29 |
|
Placing Originals……………………………………………………………………………………………………………………………. |
31 |
|
Placing Originals on the Exposure Glass……………………………………………………………………………………… |
31 |
|
Placing Originals in the Auto Document Feeder…………………………………………………………………………… |
31 |
|
3. Copy |
|
|
Basic Procedure……………………………………………………………………………………………………………………………… |
33 |
|
Reducing or Enlarging Originals……………………………………………………………………………………………………… |
35 |
|
Preset Reduce/Enlarge………………………………………………………………………………………………………………. |
35 |
|
Zoom…………………………………………………………………………………………………………………………………………. |
36 |
|
Auto Reduce/Enlarge………………………………………………………………………………………………………………… |
36 |
1

|
Duplex Copying…………………………………………………………………………………………………………………………….. |
38 |
|
Combined Copying……………………………………………………………………………………………………………………….. |
40 |
|
One-Sided Combine………………………………………………………………………………………………………………….. |
41 |
|
Two-Sided Combine…………………………………………………………………………………………………………………… |
43 |
|
Copying onto Custom Size Paper from the Bypass Tray…………………………………………………………………… |
45 |
|
Copying onto Envelopes………………………………………………………………………………………………………………… |
46 |
|
Sort……………………………………………………………………………………………………………………………………………….. |
47 |
|
4. Fax |
|
|
Basic Procedure for Transmissions (Memory Transmission)……………………………………………………………….. |
49 |
|
Sending Originals Using the ADF………………………………………………………………………………………………… |
50 |
|
Sending Originals Using the Exposure Glass……………………………………………………………………………….. |
51 |
|
Registering a Fax Destination………………………………………………………………………………………………………. |
52 |
|
Deleting a Fax Destination………………………………………………………………………………………………………….. |
53 |
|
Canceling a Transmission……………………………………………………………………………………………………………….. |
54 |
|
Canceling a Transmission Before the Original Is Scanned……………………………………………………………. |
54 |
|
Canceling a Transmission While the Original Is Being Scanned……………………………………………………. |
54 |
|
Canceling a Transmission After the Original Is Scanned (While a Transmission Is in Progress)……….. |
54 |
|
Canceling a Transmission After the Original Is Scanned (Before a Transmission Is Started)……………. |
55 |
|
Printing the Journal Manually………………………………………………………………………………………………………….. |
57 |
|
5. Print |
|
|
Quick Install for USB………………………………………………………………………………………………………………………. |
59 |
|
Quick Install for Network………………………………………………………………………………………………………………… |
60 |
|
Displaying the Printer Driver Properties……………………………………………………………………………………………. |
61 |
|
Standard Printing……………………………………………………………………………………………………………………………. |
62 |
|
When Using the PCL 6 Printer Driver……………………………………………………………………………………………. |
62 |
|
6. Scan |
|
|
Basic Procedure for Using Scan to Folder………………………………………………………………………………………… |
63 |
|
Using Scan to Folder in the Windows Environment………………………………………………………………………. |
64 |
|
Registering an SMB Folder…………………………………………………………………………………………………………. |
66 |
|
Deleting an SMB Registered Folder…………………………………………………………………………………………….. |
68 |
|
Specifying a Folder Path by Entering it Manually…………………………………………………………………………. |
68 |
|
Basic Procedure for Sending Scan Files by E-mail……………………………………………………………………………. |
70 |
|
Registering an E-mail Destination………………………………………………………………………………………………… |
71 |
2

|
Deleting an E-mail Destination…………………………………………………………………………………………………….. |
71 |
|
Specifying an E-mail Address by Entering It Manually…………………………………………………………………. |
72 |
|
Specifying Send Options………………………………………………………………………………………………………………… |
73 |
|
Resolution………………………………………………………………………………………………………………………………….. |
73 |
|
Original Orientation…………………………………………………………………………………………………………………… |
73 |
|
Original Setting………………………………………………………………………………………………………………………….. |
74 |
|
Scan Size…………………………………………………………………………………………………………………………………… |
74 |
|
File Type…………………………………………………………………………………………………………………………………….. |
74 |
|
7. Web Image Monitor |
|
|
Displaying the Top Page…………………………………………………………………………………………………………………. |
77 |
|
8. Adding Paper and Toner |
|
|
Loading Paper into Paper Trays………………………………………………………………………………………………………. |
79 |
|
Loading Paper into the Bypass Tray………………………………………………………………………………………………… |
83 |
|
Printing from the Bypass Tray Using the Printer Function……………………………………………………………….. |
85 |
|
Loading Orientation-fixed Paper or Two-sided Paper………………………………………………………………………. |
87 |
|
Recommended Paper Sizes and Types……………………………………………………………………………………………. |
88 |
|
Thick Paper………………………………………………………………………………………………………………………………… |
93 |
|
Envelopes………………………………………………………………………………………………………………………………….. |
93 |
|
Adding Toner…………………………………………………………………………………………………………………………………. |
96 |
|
Sending Faxes or Scanned Documents When Toner Has Run Out………………………………………………… |
97 |
|
Disposing of Used Toner…………………………………………………………………………………………………………….. |
98 |
|
9. Troubleshooting |
|
|
Indicators………………………………………………………………………………………………………………………………………. |
99 |
|
Panel Tone…………………………………………………………………………………………………………………………………… |
100 |
|
When You Have Problems Operating the Machine……………………………………………………………………….. |
101 |
|
When Messages Are Displayed on the Control Panel……………………………………………………………………. |
104 |
|
Messages Displayed When Using the Copy Function………………………………………………………………… |
104 |
|
Messages Displayed When Using the Facsimile Function…………………………………………………………… |
105 |
|
Messages Displayed When Using the Printer Function……………………………………………………………….. |
107 |
|
Messages Displayed When Using the Scanner Function……………………………………………………………. |
110 |
|
When Messages Are Displayed on Your Computer Screen…………………………………………………………… |
115 |
|
Messages Displayed When Using the Scanner Function……………………………………………………………. |
115 |
3

|
10. Appendix |
|
|
Trademarks………………………………………………………………………………………………………………………………….. |
121 |
|
INDEX……………………………………………………………………………………………………………………………………….. |
123 |
4
How to Read the Manuals
Symbols used in the manuals
This manual uses the following symbols:
Indicates points to pay attention to when using the machine, and explanations of likely causes of paper misfeeds, damage to originals, or loss of data. Be sure to read these explanations.
Indicates supplementary explanations of the machine’s functions, and instructions on resolving user errors.
This symbol is located at the end of sections. It indicates where you can find further relevant information.
[ ]
Indicates the names of keys on the machine’s display or control panels.
Indicates the key sequence order you should perform using the control panel. Example:
Select [System]  Press [OK]
(Select [System], and then press the [OK] key.) 


 (mainly Europe and Asia)


 (mainly North America)
Differences in the functions of Region A and Region B models are indicated by two symbols. Read the information indicated by the symbol that corresponds to the region of the model you are using. For details about which symbol corresponds to the model you are using, see page 6 «Model-Specific Information».
5
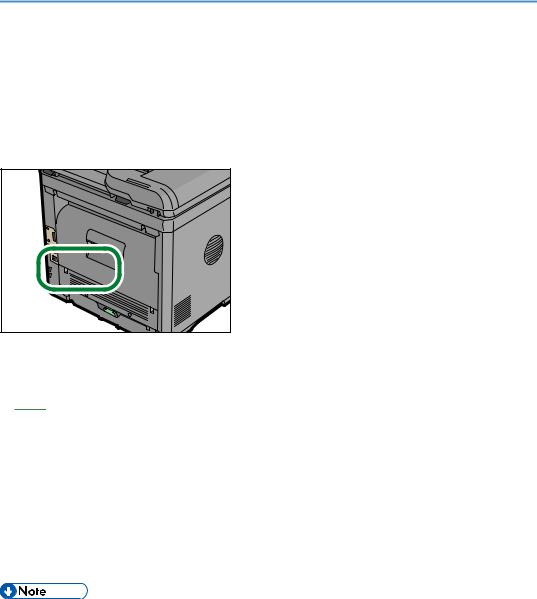
Model-Specific Information
This section explains how you can identify the region your machine belongs to.
There is a label on the rear of the machine, located in the position shown below. The label contains details that identify the region your machine belongs to. Read the label.
The following information is region-specific. Read the information under the symbol that corresponds to the region of your machine.


 (mainly Europe and Asia)
If the label contains the following, your machine is a region A model:
•CODE XXXX -27
•220–240 V


 (mainly North America)
If the label contains the following, your machine is a region B model:
•CODE XXXX -17
•120–127 V
•Dimensions in this manual are given in two units of measure: metric and inch. If your machine is a Region A model, refer to the metric units. If your machine is a Region B model, refer to the inch units.
6

Names of Major Features
In this manual, major features of the machine are referred to as follows:
• Auto Document Feeder  ADF
ADF
7

8
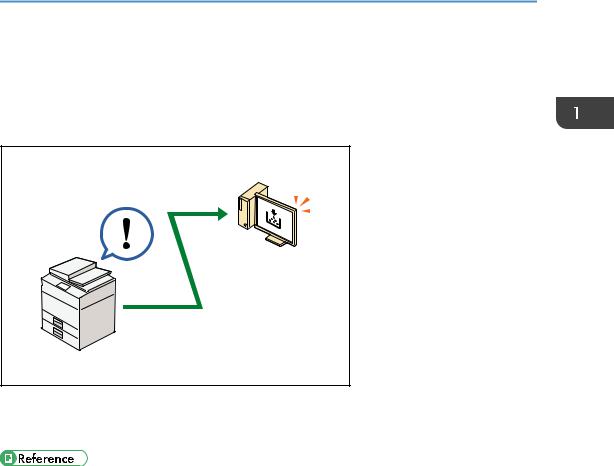
![]()
1. What You Can Do with This Machine
You can search for a description by what you want to do.
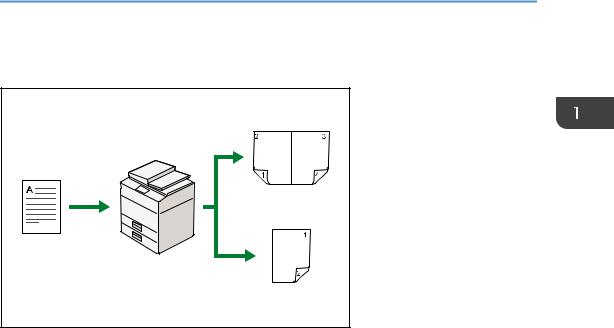
I Want to Save Paper
BRL059S
Printing multi-page documents on both sides of sheets (Duplex Copy)
 See «Duplex Copying», Copy
 .
.
Printing multi-page documents on a single sheet (Combine)
 See «Combined Copying», Copy
 .
.
Printing received faxes on both sides of sheets (2 Sided Print)
 See «Two-Sided Printing», Fax
 .
.
Sending files from the computer without printing them (LAN-Fax)
 See «Sending Fax Documents from Computers», Fax
 .
.
9

1. What You Can Do with This Machine
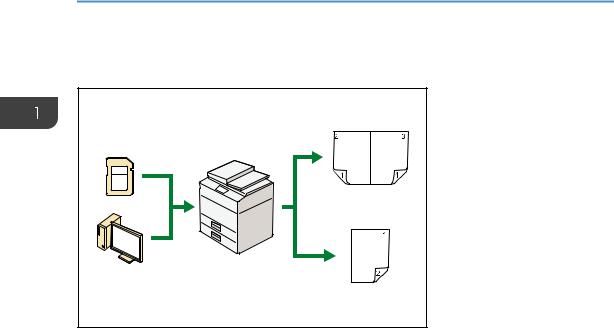
I Want to Convert Documents to Electronic Formats Easily
Sending scan files
 See «Basic Procedure for Sending Scan Files by E-mail», Scan
 .
.
Storing scan files in a shared folder
 See «Basic Procedure for Using Scan to Folder», Scan
 .
.
Storing scan files on media
 See «Storing the Scanned Documents on a USB Flash Memory Device», Scan
 .
.
10
I Want to Register Destinations
I Want to Register Destinations
BRL060S
Using the control panel to register destinations in the Address Book
 See «Registering Addresses and Users for Facsimile/Scanner Functions «, Connecting the Machine/ System settings
 .
.
Downloading destinations registered in the machine to the LAN-Fax driver destination list
 See «Using the machine’s Address Book as the LAN-Fax destination list», Fax
 .
.
11
1. What You Can Do with This Machine
I Want to Operate the Machine More Effectively
Registering frequently-used printing settings to the printer driver
 See «Using One Click Presets», Print
 .
.
Changing the initial settings of the printer driver to frequently-used printing settings
 See «Displaying the Printing Preferences Dialog Box», Print
 .
.
12
You Can Make Copies Using Various Functions
You Can Make Copies Using Various Functions
•You can reduce or enlarge the copy image. With the Auto Reduce/Enlarge function, the machine automatically calculates the reproduction ratio based on the sizes of the originals and the paper you have specified.
 See «Reducing or Enlarging Originals», Copy
 .
.
•Copier functions such as Duplex and Combine allow you to save on paper by copying multiple pages onto single sheets.
 For details about duplex copying, see «Duplex Copying», Copy
 .
.
 For details about combined copying, see «Combined Copying», Copy
 .
.
•You can copy onto various types of paper such as envelopes.
 See «Copying onto Various Types of Paper Using the Bypass Tray», Copy
 .
.
•You can sort copies.  See «Sort», Copy
 .
.
13
1. What You Can Do with This Machine
You Can Print Data Using Various Functions
•This machine supports network and local connections.
•You can collate printed paper.  See «Collate», Print
 .
.
14
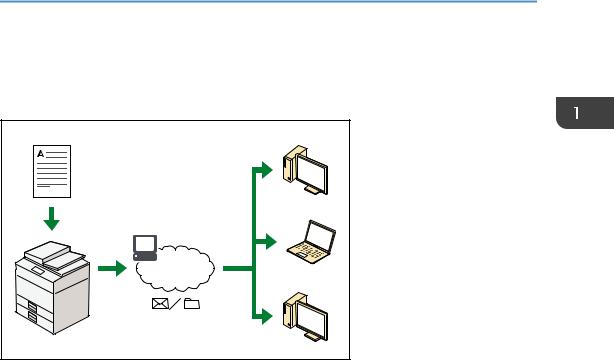
You Can Use the Scanner in a Network Environment
You Can Use the Scanner in a Network
Environment
•You can send scan files to a specified destination using e-mail (Sending scan files by e-mail).  See «Basic Procedure for Sending Scan Files by E-mail», Scan
 .
.
•You can send scan files directly to folders (Sending scan files by Scan to Folder).  See «Basic Procedure for Using Scan to Folder», Scan
 .
.
15
1. What You Can Do with This Machine
You Can Prevent Information Leakage
(Security Functions)
CJQ608
•By setting passwords, you can prevent unauthorized access via the network.
•See Security Guide .
.
16
You Can Monitor and Set the Machine Using a Computer
You Can Monitor and Set the Machine Using a
Computer
Using Web Image Monitor, you can check the machine’s status and change the settings.
CJQ609
You can check which tray is running out of paper, register information in the Address Book, specify the network settings, and configure the system settings.
•See «Using Web Image Monitor», Connecting the Machine/ System Settings .
.
•See Web Image Monitor Help.
17

1. What You Can Do with This Machine
18

2. Getting Started
This chapter describes how to start using this machine.
Guide to Names and Functions of Components
Guide to Components
•Do not obstruct the machine’s vents. Doing so risks fire caused by overheated internal components.
Exterior: Front view
5 6
1 2 3 4
7
8
9
10
11
12
13
DBH030
19

2.Getting Started
1.ADF
Lower the ADF over originals placed on the exposure glass.
If you load a stack of originals in the ADF, the ADF will automatically feed the originals one by one.
2.ADF cover
Open this cover to remove originals jammed in the ADF.
3.Input tray for the ADF
Place stacks of originals here.
4.Extender for the ADF tray
Extend this when placing paper longer than A4 in the input tray for ADF.
5.Exposure glass
Place originals face down here.
6.Cover for the exposure glass
Open this cover to place originals on the exposure glass.
7.Output tray for the ADF
Originals scanned with the ADF are output here.
8.Stop fence for the ADF
Pull out this fence to prevent originals from falling off.
9.Control panel
See page 25 «Guide to the Names and Functions of the Machine’s Control Panel».
10.Standard tray
Copied/printed paper and fax messages are delivered here.
11.Media slot
Insert a USB flash memory device.
12.Ventilation holes
Prevent overheating.
13.Front cover open button
Push this button to open the front cover.
14.Front cover
Open to access the inside of the machine and remove jammed paper. Open here to replace the toner cartridge and the drum unit.
15.Lower paper tray (option)
Load paper here.
16.Tray 1
Load paper here.
17.Main power switch
To operate the machine, the main power switch must be on. If it is off, turn the switch on.
20
Guide to Names and Functions of Components
18.Bypass tray open lever
Push this lever to open the bypass tray.
19.Tray Extension
Pull this fence to prevent paper from falling off.
20.Bypass tray
Use to copy or print on thick paper, OHP transparencies, envelopes, and label paper (adhesive labels).
21.Extender for the bypass tray
Pull this extender out when loading A4 , 81/2 × 11
 or larger size paper in the bypass tray.
22.Paper guides
When loading paper in the bypass tray, align the paper guides flush against the paper.
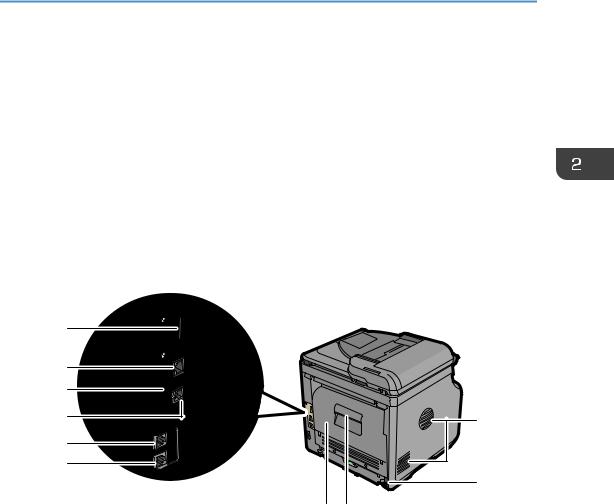
Exterior: Rear view
10
9
8
6 5
2
4 3
DBH031
1.Ventilation holes
Prevent overheating.
2.Power connector
Connect the power cord to the machine. Insert the other end into an electrical outlet.
3.Rear cover open lever
Pull this lever to open the rear cover.
4.Rear cover
Open to access the inside of the machine and remove jammed paper. Open here to replace the fusing unit.
5.External telephone connector
For connecting an external telephone.
6.Line interface connector
For connecting a telephone line.
21
2.Getting Started
7.USB 2.0 [Type B] port
Use a USB cable to connect the machine to a computer.
8.Security slot
Connect a security cable to prevent theft.
9.Ethernet port
Use a network interface cable to connect the machine to a network.
10.Slot
Optional wireless LAN interface unit can be inserted.
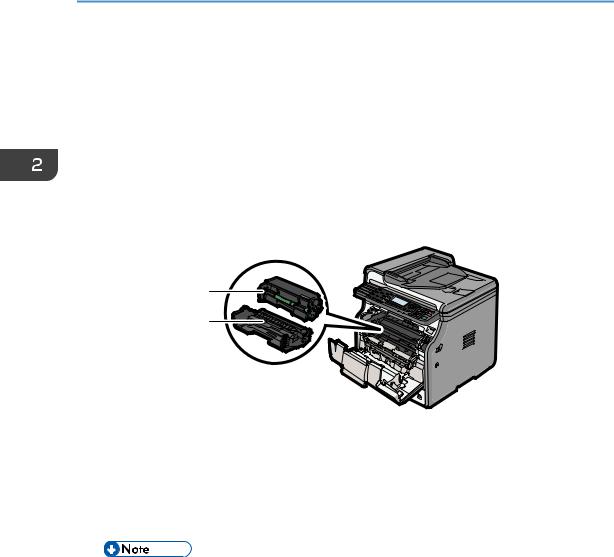
Interior: Front view
1
2
DBH032
1.Toner cartridge
Pull out the toner cartridge and remove jammed paper.
Messages appear on the screen when the toner cartridge needs to be replaced, or a new cartridge needs to be prepared.
For details about the messages that appear on the screen when consumables need to be replaced, see «Replenishing and Replacing Consumables», Maintenance and Specifications .
.
•When you remove jammed paper, pull out the toner cartridge with the drum unit. If you want to remove only the toner cartridge, pull down the lever on the right side of the toner cartridge, and then pull the toner cartridge out.
2.Drum unit
Messages appear on the screen when the drum unit needs to be replaced, or a new drum unit needs to be prepared.
For details about the messages that appear on the screen when consumables need to be replaced, see «Replenishing and Replacing Consumables», Maintenance and Specifications .
.
22

Guide to Names and Functions of Components
Interior: Rear view
1
DBH033
1.Fusing unit
Pull out the fusing unit and remove jammed paper.
Messages appear on the screen when the fusing unit needs to be replaced, or a new fusing unit needs to be prepared.
For details about the messages that appear on the screen when consumables need to be replaced, see «Replenishing and Replacing Consumables», Maintenance and Specifications .
.
The fusing unit is included in Maintenance Kit.
23
2. Getting Started
Guide to Functions of the Machine’s Options
Guide to Functions of the Machine’s External Options
1 


2
DBH086
1.Handset


 (mainly North America)
Used as a receiver.
Allows you to use the Manual Dial functions. It also allows you to use the machine as a telephone.
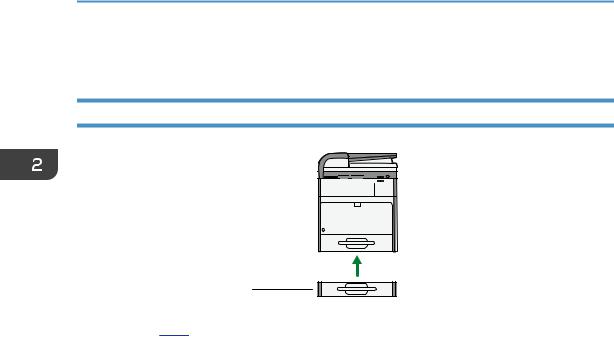
2.Lower paper tray
You can install a 250-sheet paper feed unit or a 500-sheet paper feed unit.
24
Guide to the Names and Functions of the Machine’s Control Panel
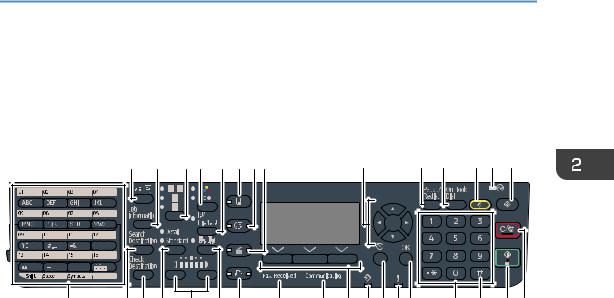
Guide to the Names and Functions of the Machine’s Control Panel
This illustration shows the control panel of the machine with options fully installed.
|
1 |
2 |
3 |
4 |
5 |
6 |
7 8 |
9 |
10 |
11 |
12 13 |
14 |
|
15 |
16 17 |
18 |
19 |
20 |
21 |
22 |
23 |
24 |
25 26 27 28 |
29 |
30 |
31 32 |
|
DBH001 |
1.[ID Card Copy] key
Press to jump to the ID card copy setting menu.
2.[Job Information] key (scanner and facsimile mode)
Press to obtain status information on transmitted data.
3.Original Selection key (copier, scanner and facsimile mode)
Press to select the most suitable scanning method for the original.
4.Color Selection key
Press to scan originals in full color.
5.[Duplex/Combine/Series] key (copier mode)
•Duplex
Perform duplex printing when copying a multiple-sheet original.
•Combine
Combines and prints the pages of a multiple-sheet original onto a single sheet.
•Series
Prints each page of a double-page spread as a single-page copy.
6.[Copy] key
Press to activate the copy function.
7.[Facsimile] key
Press to activate the facsimile function.
8.[Scanner] key
Press to activate the scanner function.
25

2.Getting Started
9.Scroll keys
Press these keys to move the cursor in each direction.
When the [ ] [
] [ ] [
] [ ] [
] [ ] keys appear in this manual, press the applicable key for the direction that you want to move the cursor.
10.[Pause/Redial] key (facsimile mode)
•Pause
Press to insert a pause in a fax dialing sequence. The pause is indicated by “-”.
•Redial
Press this to select a recently-dialed destination.
11.[On Hook Dial] key (facsimile mode)
Press to use the On Hook Dial function.
12.[Reset] key
Press to clear the current settings.
13.Main power indicator
The main power indicator goes on when you turn on the main power switch.
14.[User Tools] key
Press to change the default settings to meet your requirements.
15.Quick Dial keys
Press to enter letters and symbols.
Press to select the registered destination at a single touch.
16.[Search Destination] key (scanner and facsimile mode)
Press to search for a destination registered in the destination list.
17.[Check Destination] key (scanner and facsimile mode)
Press to check the specified destination.
18.Resolution Selection key (facsimile mode)
Press to specify the resolution of the fax.
19.Density Selection keys (copier, scanner, and facsimile mode)
Press to adjust the scanning density under the copier, scanner, and fax functions.
20.[Sort] key (copier mode)
Press to automatically sort printed copies.
21.[Printer] key
Press to activate the printer function.
22.Fax Received indicator (facsimile mode)
Lights continuously while data other than personal box or Memory Lock file is being received and stored in the fax memory.
23.Communicating indicator (facsimile mode)
Lights continuously during data transmission and reception.
26

Guide to the Names and Functions of the Machine’s Control Panel
24.Selection keys
Correspond to items on the display. Press to select the corresponding item.
25.Data In indicator
Flashes when the machine is receiving print jobs or LAN-Fax documents from a computer.
26.[Escape] key
Press to cancel an operation or return to the previous display.
27.Alert Indicators
Lights up when a machine error occurs.
Steady red: printing is not possible, or is possible but print quality cannot be ensured. Flashing yellow: the machine will soon require a replacement consumable.
28.[OK] key
Press to set a selected item or an entered numeric value.
29.Number keys
Use to enter the numbers for copies, fax numbers, and data for the selected function.
30.[ ] key (Enter key)
Press to confirm values entered or items specified.
31.[Start] key
Press to start copying, printing, scanning, or sending.
32.[Clear/Stop] key
•Clear
Clears an entered numeric value.
•Stop
Stops a job in progress, such as copying, scanning, faxing, or printing.
27

2. Getting Started
Changing the Display Language
You can change the language used on the display. English is set as default.
Press the [User Tools] key, and then select the setting items using the [ ] or [
 ] key.
1.Select [Language]  Press [OK]
2.Select the language you want to use  Press [OK]
28
![]()
Turning On/Off the Power
Turning On/Off the Power
The main power switch is on the front side of the machine. When this switch is turned on, the main power turns on and the main power indicator on the right side of the control panel lights up. When this switch is turned off, the main power turns off and the main power indicator on the right side of the control panel goes out. When this is done, machine power is off. Fax files in memory may be lost if you turn this switch off. Use this switch only when necessary.
Turning On the Main Power
•Do not turn off the main power switch immediately after turning it on. Doing so may result in damage to the memory, leading to malfunctions.
1.Make sure the power cord is firmly plugged into the wall outlet.
2.Push the main power switch.
The main power indicator goes on.
Turning Off the Main Power
•When disconnecting the power cord from the wall outlet, always pull the plug, not the cord. Pulling the cord can damage the power cord. Use of damaged power cords could result in fire or electric shock.
•After turning the machine’s power off, wait at least a few seconds before turning it back on.
29

2.Getting Started
•Before unplugging the power cord plug, turn off the main power switch and make sure the main power switch indicator turns off. Not doing so may result in damage to the memory, leading to malfunctions.
•Do not turn off the power while the machine is in operation. Doing so may result in damage to the memory, leading to malfunctions.
•Do not hold down the main power switch while turning off the main power. Doing so forcibly turns
off the machine’s power and may damage the memory and cause malfunctions.
1.Push the main power switch.
The main power indicator goes out.
30

Placing Originals
Placing Originals
Placing Originals on the Exposure Glass
•Keep your hands away from the hinges and exposure glass when lowering the ADF. Not doing so may result in an injury if your hands or fingers are pinched.
•Do not lift the ADF forcefully. Otherwise, the cover of the ADF might open or be damaged.
1.Lift the ADF.
2.Place the original face down on the exposure glass. The original should be aligned to the rear left corner.
Start with the first page to be scanned.
1.Positioning mark
3.Lower the ADF.
Placing Originals in the Auto Document Feeder
Be sure not to load the original untidily. Doing so may cause the machine to display a paper misfeed message. Also, be sure not to place originals or other objects on the top cover. Doing so may cause a malfunction.
1.Adjust the original guides to the original size.
2.Place the aligned originals squarely face up in the ADF.
Do not stack originals beyond the limit mark. The first page should be on the top.
31

2. Getting Started
When placing originals that are longer than A4 or 81/2 × 11
 , open the extenders.
1.Limit mark
2.Original guides
32

3. Copy
This chapter describes frequently used copier functions and operations. For the information not included in this chapter, see Copy on the supplied CD-ROM.
Basic Procedure
To make copies of originals, place them on the exposure glass or in the ADF.
When placing the original on the exposure glass, start with the first page to be copied. When placing the original in the ADF, place them so that the first page is on the top.
About placing the original on the exposure glass, see page 31 «Placing Originals on the Exposure Glass».
About placing the original in the ADF, see page 31 «Placing Originals in the Auto Document Feeder».
To copy onto paper other than plain paper, specify the paper type in User Tools according to the weight of the paper you are using. For details, see «System Settings», Connecting the Machine/ System Settings  .
.
The following procedure explains copying onto paper whose size and orientation matches that of the originals exactly.
2.Make sure no previous settings remain
When there are previous settings remaining, press the [Reset] key.
3.Place the originals
4.Make desired settings
33

3.Copy
5.Enter the number of copies with the number keys
6.Select the paper tray
7.Press [Start]
When placing the original on the exposure glass, press the [ ] key after all originals are scanned.
8.When the copy job is finished, press [Reset] to clear the settings
DBH019
34

Reducing or Enlarging Originals
Reducing or Enlarging Originals
This section describes methods of reducing or enlarging images by specifying a reproduction ratio, or a paper size.
Base Point
The base point of reduce/enlarge differs depending on how the original is scanned. When the original is placed on the exposure glass, the upper left corner will be the base point. When it is placed in the ADF, the bottom left corner will be the base point.
• Placing the original on the exposure glass
CKN005
• Placing the original in the ADF
CXC007
Preset Reduce/Enlarge
This function allows you to reduce or enlarge images by selecting a preset ratio.
CKN004
35

3. Copy
Press the [Copy] key, and then select the setting items using the [ ] or [
 ] key.
1.Press [R/E]
2.Press [Enlarge] or [Reduce]
3.Select a ratio  Press [OK]
4.Select the paper tray
5.Place the originals  Press [Start]
Zoom
You can specify the reproduction ratio in increments of 1%.
CKN007
Press the [Copy] key, and then select the setting items using the [ ] or [
 ] key.
1.Press [R/E].
2.Press [Zoom].
3.Enter the desired ratio with the number keys  Press [OK]
Pressing the [ ] or [
 ] key changes the ratio in increments of 1%. Pressing and holding down the [
 ] or [
 ] key changes it in increments of 10%.
4.Select the paper tray
5.Place the originals  Press [Start]
Auto Reduce/Enlarge
The machine automatically calculates the reproduction ratio based on the sizes of the originals and the paper you have specified. The machine will enlarge or reduce the image of the originals to fit them to the paper.
36

Reducing or Enlarging Originals
CKN008
•If you select a reproduction ratio after pressing [Auto R/E], the Auto Enlarge/Reduction function is canceled.
Press the [Copy] key, and then select the setting items using the [ ] or [
 ] key.
1.Specify the original size
For details, see «Specifying Original Sizes», Copy .
.
2.Press [Auto R/E]
3.Select the paper tray
4.Place the originals  Press [Start]
37

3. Copy
Duplex Copying
Copies two one-sided pages or one two-sided page onto a two-sided page.
•Copying one two-sided page on one two-sided page is available for SP 3610SF only.
•You cannot use the bypass tray with this function.
CKN009
For SP 3610SF, two types of Duplex are available.
1Sided Orig.->Duplex Copy
Copies two one-sided pages on one two-sided page.
2Sided Orig.->Duplex Copy
Copies one two-sided page on one two-sided page.
The resulting copy image will differ according to the orientation in which you place your originals ( or
or  ).
).
Original orientation and completed copies
To copy on both sides of the paper, select the original and copy orientation according to how you want the printout to appear.
|
Original |
Placing originals |
Orig. |
Dup. |
Output |
|
|
Orientation |
Orientation |
||||
|
Top to Top |
Top to Bottom
38
 Loading…
-
Страница 1
For safe and corr ect use, be sur e to read the Safety Information in «Read This First» before using the machine. For information not in this manual, refer to the HTML/PDF files on the supplied CD-ROM. Appendix T roubleshooting Adding Paper and T oner Web Image Monitor Scan Print Fax Copy Getting Started What Y ou Can Do with This Machin[…]
-
Страница 2
[…]
-
Страница 3
TABLE OF CONTENTS How to Read the Manuals …………………………………………………………………………………………………………………5 Symbols used in the manuals …………………………………………………………………………………………………………5 Model-Specific Information […]
-
Страница 4
Duplex Copying …………………………………………………………………………………………………………………………….. 38 Combined Copying ……………………………………………………………………………………………………………………….. 40 One-Sided Combine …………[…]
-
Страница 5
Deleting an E-mail Destination …………………………………………………………………………………………………….. 71 Specifying an E-mail Address by Entering It Manually …………………………………………………………………. 72 Specifying Send Options ……………………………………[…]
-
Страница 6
10. Appendix Trademarks ………………………………………………………………………………………………………………………………….. 121 INDEX ……………………………………………………………………………………………………………………………………….. 123 4[…]
-
Страница 7
How to Read the Manuals Symbols used in the manuals This manual uses the following symbols: Indicates points to pay attention to when using the machine, and explanations of likely causes of paper misfeeds, damage to originals, or loss of data. Be sure to read these explanations. Indicates supplementary explanations of the machine’s functions, […]
-
Страница 8
Model-Specific Information This section explains how you can identify the region your machine belongs to. There is a label on the rear of the machine, located in the position shown below. The label contains details that identify the region your machine belongs to. Read the label. DBH040 The following information is region-specific. Read the informa[…]
-
Страница 9
Names of Major Features In this manual, major features of the machine are referred to as follows: • Auto Document Feeder ADF 7[…]
-
Страница 10
8[…]
-
Страница 11
1. What You Can Do with This Machine You can search for a description by what you want to do. I Want to Save Paper BRL059S Printing multi-page documents on both sides of sheets (Duplex Copy) See «Duplex Copying», Copy . Printing multi-page documents on a single sheet (Combine) See «Combined Copying», Copy . Printing received fax[…]
-
Страница 12
I Want to Convert Documents to Electronic Formats Easily BQX138S Sending scan files See «Basic Procedure for Sending Scan Files by E-mail», Scan . Storing scan files in a shared folder See «Basic Procedure for Using Scan to Folder», Scan . Storing scan files on media See «Storing the Scanned Documents on a USB Flash Memory […]
-
Страница 13
I Want to Register Destinations BRL060S Using the control panel to register destinations in the Address Book See «Registering Addresses and Users for Facsimile/Scanner Functions «, Connecting the Machine/ System settings . Downloading destinations registered in the machine to the LAN-Fax driver destination list See «Using the machine[…]
-
Страница 14
I Want to Operate the Machine More Effectively BQX139S Registering frequently-used printing settings to the printer driver See «Using One Click Presets», Print . Changing the initial settings of the printer driver to frequently-used printing settings See «Displaying the Printing Preferences Dialog Box», Print . 1. What You Can D[…]
-
Страница 15
You Can Make Copies Using Various Functions CMQ002 • You can reduce or enlarge the copy image. With the Auto Reduce/Enlarge function, the machine automatically calculates the reproduction ratio based on the sizes of the originals and the paper you have specified. See «Reducing or Enlarging Originals», Copy . • Copier functions such as[…]
-
Страница 16
You Can Print Data Using Various Functions CMQ004 • This machine supports network and local connections. • You can collate printed paper. See «Collate», Print . 1. What You Can Do with This Machine 14[…]
-
Страница 17
You Can Use the Scanner in a Network Environment CJQ607 • You can send scan files to a specified destination using e-mail (Sending scan files by e-mail). See «Basic Procedure for Sending Scan Files by E-mail», Scan . • You can send scan files directly to folders (Sending scan files by Scan to Folder). See «Basic Procedure for Usi[…]
-
Страница 18
You Can Prevent Information Leakage (Security Functions) CJQ608 • By setting passwords, you can prevent unauthorized access via the network. • See Security Guide . 1. What You Can Do with This Machine 16[…]
-
Страница 19
You Can Monitor and Set the Machine Using a Computer Using Web Image Monitor, you can check the machine’s status and change the settings. CJQ609 You can check which tray is running out of paper, register information in the Address Book, specify the network settings, and configure the system settings. • See «Using Web Image Monitor»[…]
-
Страница 20
1. What You Can Do with This Machine 18[…]
-
Страница 21
2. Getting Started This chapter describes how to start using this machine. Guide to Names and Functions of Components Guide to Components • Do not obstruct the machine’s vents. Doing so risks fire caused by overheated internal components. Exterior: Front view 22 20 12 14 13 12 3 4 56 8 7 9 12 11 10 21 17 18 15 16 19 DBH030 19[…]
-
Страница 22
1. ADF Lower the ADF over originals placed on the exposure glass. If you load a stack of originals in the ADF, the ADF will automatically feed the originals one by one. 2. ADF cover Open this cover to remove originals jammed in the ADF. 3. Input tray for the ADF Place stacks of originals here. 4. Extender for the ADF tray Extend this when placing p[…]
-
Страница 23
18. Bypass tray open lever Push this lever to open the bypass tray. 19. Tray Extension Pull this fence to prevent paper from falling off. 20. Bypass tray Use to copy or print on thick paper, OHP transparencies, envelopes, and label paper (adhesive labels). 21. Extender for the bypass tray Pull this extender out when loading A4 , 8 1 / 2 × 11 or la[…]
-
Страница 24
7. USB 2.0 [Type B] port Use a USB cable to connect the machine to a computer. 8. Security slot Connect a security cable to prevent theft. 9. Ethernet port Use a network interface cable to connect the machine to a network. 10. Slot Optional wireless LAN interface unit can be inserted. Interior: Front view DBH032 1 2 1. Toner cartridge Pull out the […]
-
Страница 25
Interior: Rear view DBH033 1 1. Fusing unit Pull out the fusing unit and remove jammed paper. Messages appear on the screen when the fusing unit needs to be replaced, or a new fusing unit needs to be prepared. For details about the messages that appear on the screen when consumables need to be replaced, see «Replenishing and Replacing Consumab[…]
-
Страница 26
Guide to Functions of the Machine’s Options Guide to Functions of the Machine’s External Options 1 2 DBH086 1. Handset (mainly North America) Used as a receiver. Allows you to use the Manual Dial functions. It also allows you to use the machine as a telephone. 2. Lower paper tray You can install a 250-sheet paper feed unit or a 500-sheet […]
-
Страница 27
Guide to the Names and Functions of the Machine’s Control Panel This illustration shows the control panel of the machine with options fully installed. 12 3 4 5 6 7 8 9 1 0 1 11 2 1 3 1 4 15 16 17 18 19 20 21 22 23 24 25 26 28 29 31 30 32 27 DBH001 1. [ID Card Copy] key Press to jump to the ID card copy setting menu. 2. [Job Information] key (s[…]
-
Страница 28
9. Scroll keys Press these keys to move the cursor in each direction. When the [ ] [ ] [ ] [ ] keys appear in this manual, press the applicable key for the direction that you want to move the cursor. 10. [Pause/Redial] key (facsimile mode) • Pause Press to insert a pause in a fax dialing sequence. The pause is indicated by “-”. • Redial Pre[…]
-
Страница 29
24. Selection keys Correspond to items on the display. Press to select the corresponding item. 25. Data In indicator Flashes when the machine is receiving print jobs or LAN-Fax documents from a computer. 26. [Escape] key Press to cancel an operation or return to the previous display. 27. Alert Indicators Lights up when a machine error occurs. Stead[…]
-
Страница 30
Changing the Display Language You can change the language used on the display. English is set as default. Press the [User Tools] key, and then select the setting items using the [ ] or [ ] key. 1. Select [Language] Press [OK] 2. Select the language you want to use Press [OK] 2. Getting Started 28[…]
-
Страница 31
Turning On/Off the Power The main power switch is on the front side of the machine. When this switch is turned on, the main power turns on and the main power indicator on the right side of the control panel lights up. When this switch is turned off, the main power turns off and the main power indicator on the right side of the control panel goes ou[…]
-
Страница 32
• Before unplugging the power cord plug, turn off the main power switch and make sure the main power switch indicator turns off. Not doing so may result in damage to the memory, leading to malfunctions. • Do not turn off the power while the machine is in operation. Doing so may result in damage to the memory, leading to malfunctions. • Do not[…]
-
Страница 33
Placing Originals Placing Originals on the Exposure Glass • Keep your hands away from the hinges and exposure glass when lowering the ADF. Not doing so may result in an injury if your hands or fingers are pinched. • Do not lift the ADF forcefully. Otherwise, the cover of the ADF might open or be damaged. 1. Lift the ADF. 2. Place the original f[…]
-
Страница 34
When placing originals that are longer than A4 or 8 1 / 2 × 11 , open the extenders. 1 2 2 DBH075 1. Limit mark 2. Original guides 2. Getting Started 32[…]
-
Страница 35
3. Copy This chapter describes frequently used copier functions and operations. For the information not included in this chapter, see Copy on the supplied CD-ROM. Basic Procedure To make copies of originals, place them on the exposure glass or in the ADF. When placing the original on the exposure glass, start with the first page to be copied. When […]
-
Страница 36
5. Enter the number of copies with the number keys 6. Select the paper tray 7. Press [Start] When placing the original on the exposure glass, press the [ ] key after all originals are scanned. 8. When the copy job is finished, press [Reset] to clear the settings DBH019 3. Copy 34[…]
-
Страница 37
Reducing or Enlarging Originals This section describes methods of reducing or enlarging images by specifying a reproduction ratio, or a paper size. Base Point The base point of reduce/enlarge differs depending on how the original is scanned. When the original is placed on the exposure glass, the upper left corner will be the base point. When it is […]
-
Страница 38
Press the [Copy] key, and then select the setting items using the [ ] or [ ] key. 1. Press [R/E] 2. Press [Enlarge] or [Reduce] 3. Select a ratio Press [OK] 4. Select the paper tray 5. Place the originals Press [Start] Zoom You can specify the reproduction ratio in increments of 1%. CKN007 Press the [Copy] key, and then select the setting items usi[…]
-
Страница 39
CKN008 • If you select a reproduction ratio after pressing [Auto R/E], the Auto Enlarge/Reduction function is canceled. Press the [Copy] key, and then select the setting items using the [ ] or [ ] key. 1. Specify the original size For details, see «Specifying Original Sizes», Copy . 2. Press [Auto R/E] 3. Select the paper tray 4. Place […]
-
Страница 40
Duplex Copying Copies two one-sided pages or one two-sided page onto a two-sided page. • Copying one two-sided page on one two-sided page is available for SP 3610SF only. • You cannot use the bypass tray with this function. CKN009 For SP 3610SF, two types of Duplex are available. 1Sided Orig.->Duplex Copy Copies two one-sided pages on one tw[…]
-
Страница 41
Original Placing originals Orig. Orientation Dup. Orientation Output Top to Top Top to Bottom Press the [Copy] key, and then select the setting items using the [ ] or [ ] key. 1. Press [Duplex/Combine/Series]. DBH008 2. Select the duplex mode Press [OK] 3. Select the paper tray 4. Place the originals Press [Start] Duplex Copying 39[…]
-
Страница 42
Combined Copying This mode can be used to select a reproduction ratio automatically and copy the originals onto a single sheet of copy paper. The machine selects a reproduction ratio between 25 and 400%. Orientation of the original and image position of Combine The image position of Combine differs according to original orientation and the number o[…]
-
Страница 43
CKN010 • Originals read from right to left CKN017 One-Sided Combine Combine several pages onto one side of a sheet. • Combine Copies function from two-sided originals is available for SP 3610SF only. CKN014 There are following types of One-Sided Combine. For SP 3610SF Combine: 2 Orig. Copies two one-sided originals to one side of a sheet. Combi[…]
-
Страница 44
Combine 1 Orig. Copies one two-sided originals to one side of a sheet. Combine: 2 Orig. Copies two two-sided originals to one side of a sheet. For SP 3600SF Combine 1 Side (2 Orig.) Copies two one-sided originals to one side of a sheet. Combine 1 Side (4 Orig.) Copies four one-sided originals to one side of a sheet. Press the [Copy] key, and then s[…]
-
Страница 45
Two-Sided Combine Combines various pages of originals onto two sides of one sheet. • The Combine Copies function for two-sided originals is available for SP 3610SF only. • You cannot use the bypass tray with this function. CKN074 There are following types of Two-Sided Combine. For SP 3610SF Combine: 4 Orig. Copies four one-sided originals to on[…]
-
Страница 46
1. Press [Duplex/Combine/Series] DBH008 2. Select the combine mode Press [OK] 3. Select the paper tray 4. Place the originals Press [Start] • The default setting for the original orientation is unreadable direction ( ). When placing originals in unreadable direction, specify the original orientation. To specify the orientation, select [Always Spe[…]
-
Страница 47
Copying onto Custom Size Paper from the Bypass Tray Paper that has a horizontal length of 60.0–216.0 mm (2.37–8.50 inches) and a vertical length of 127.0–900.0 mm (5.00–35.43 inches) can be fed in from the bypass tray. Press the [Copy] key, and then select the setting items using the [ ] or [ ] key. 1. Load the paper face up in the bypass t[…]
-
Страница 48
Copying onto Envelopes This section describes how to copy onto regular size envelopes. Place the original on the exposure glass and place the envelope in the bypass tray. Specify the thickness of the paper according to the weight of the envelopes you are printing on. For details about the relationship between paper weight and paper thickness and th[…]
-
Страница 49
Sort The machine assembles copies as sets in sequential order. CKN018 Press the [Copy] key, and then select the setting items using the [ ] or [ ] key. 1. Press [Sort]. DBH009 2. Enter the number of copy sets using the number keys 3. Select the paper tray 4. Place the originals Press [Start] Sort 47[…]
-
Страница 50
3. Copy 48[…]
-
Страница 51
4. Fax This chapter describes frequently used facsimile functions and operations. For the information not included in this chapter, see Fax on the supplied CD-ROM. Basic Procedure for Transmissions (Memory Transmission) This section describes the basic procedure for transmitting documents using Memory Transmission. Transmission starts automatically[…]
-
Страница 52
Sending Originals Using the ADF 1. Press [Facsimile] DBH012 2. Make sure «Ready» appears on the screen 3. Place the originals into the ADF For details about how to place originals, see «Placing Originals in the Auto Document Feeder», Paper Specifications and Adding Paper . For details about how to place originals to send using t[…]
-
Страница 53
Sending Originals Using the Exposure Glass 1. Press [Facsimile] DBH012 2. Make sure «Ready» appears on the screen 3. Place the first page of the original face down on the exposure glass For details about the originals you can set, see «Placing Originals on the Exposure Glass», Paper Specifications and Adding Paper . For details […]
-
Страница 54
9. When all originals are scanned, press [ ] DBH089 The machine dials the destination and starts transmission. Registering a Fax Destination Press the [User Tools] key, and then select the setting items using the [ ] or [ ] key. DBH020 1. Select [Address Book Management] Press [OK] 2. Select [Program/Change] Press [OK] 3. Enter the registration num[…]
-
Страница 55
9. Press [OK] Deleting a Fax Destination This section describes how to delete a registered fax destination. • If you delete a destination that is a specified delivery destination, messages to its registered Personal Box, for example, cannot be delivered. Be sure to check the settings in the fax function before deleting any destinations. Press the[…]
-
Страница 56
Canceling a Transmission This section explains how to cancel a fax transmission. Canceling a Transmission Before the Original Is Scanned Use this procedure to cancel a transmission before pressing the [Start] key. 1. Press [Reset] DBH019 Canceling a Transmission While the Original Is Being Scanned Use this procedure to cancel scanning or transmitti[…]
-
Страница 57
Press the [Clear/Stop] key, and then select the setting items using the [ ] or [ ] key. DBH022 1. Select the file you want to cancel Press [Stop TX] 2. Press [Delete] 3. Press [Escape] DBH015 Canceling a Transmission After the Original Is Scanned (Before a Transmission Is Started) Use this procedure to delete a file stored in memory before its tran[…]
-
Страница 58
1. Select [Check/Stop TX File] Press [OK] 2. Select the file you want to cancel Press [Stop TX] 3. Press [Delete] 4. Press [Escape] twice DBH015 4. Fax 56[…]
-
Страница 59
Printing the Journal Manually You can print the Journal manually. Press the [Job Information] key, and then select the setting items using the [ ] or [ ] key. DBH003 1. Select [Print Journal] Press [OK] 2. Press [Start] To cancel printing after pressing the [Start] key, press the [Clear/Stop] key. 3. Press [Escape] DBH015 Printing the Journal Manua[…]
-
Страница 60
4. Fax 58[…]
-
Страница 61
5. Print This chapter describes frequently used printer functions and operations. For the information not included in this chapter, see Print on the supplied CD-ROM. Quick Install for USB You can install the printer drivers easily from the CD-ROM provided with this machine. Using USB Quick Install, the PCL 6 printer driver is installed for use with[…]
-
Страница 62
Quick Install for Network You can install the printer drivers easily from the CD-ROM provided with this machine. Using Network Quick Install, the PCL 6 printer driver is installed under network environment, and the Standard TCP/IP port will be set. • Manage Printers permission is required to install the drivers. Log on as an Administrators group […]
-
Страница 63
Displaying the Printer Driver Properties This section explains how to open the printer driver properties from [Devices and Printers]. • Manage Printers permission is required to change the printer settings. Log on as an Administrators group member. • You cannot change the machine default settings for individual users. Settings made in the print[…]
-
Страница 64
Standard Printing • The default setting is duplex printing. If you want to print on only one side, select [Off] for the duplex setting. • If you send a print job via USB 2.0 while the machine is in Sleep mode, an error message might appear when the print job is complete. In this case, check if the document was printed. When Using the PCL 6 Prin[…]
-
Страница 65
6. Scan This chapter describes frequently used scanner functions and operations. For the information not included in this chapter, see Scan on the supplied CD-ROM. Basic Procedure for Using Scan to Folder • Before performing this procedure, refer to «Preparing to Send by Scan to Folder», Scan and confirm the details of the destination c[…]
-
Страница 66
If you are scanning multiple originals, place them on the machine, and then press the [Start] key. Repeat this step until all originals are scanned, and then press the [ ] key. • When scanning from the ADF Transmission starts immediately after originals are scanned. Using Scan to Folder in the Windows Environment The following procedures explain […]
-
Страница 67
1. Create a folder, just as you would create a normal folder, in a location of your choice on the computer 2. Right-click the folder, and then click [Properties] 3. On the [Sharing] tab, select [Advanced Sharing…] When using Windows XP, on the [Sharing] tab, select [Share this folder]. Proceed to step 5. 4. Select the [Share this folder] check bo[…]
-
Страница 68
9. Press [OK] twice Registering an SMB Folder This section describes how to register an SMB folder. Press the [User Tools] key, and then select the setting items using the [ ] or [ ] key. DBH020 1. Select [Address Book Management] Press [OK] 2. Select [Program/Change] Press [OK] 3. Enter the registration number you want to register using the number[…]
-
Страница 69
14. Press [Escape] DBH015 15. Select [Folder Info] Press [OK] 16. Select [SMB] Press [OK] 17. Select [Manual Entry] or [Browse Network] Press [OK] To specify a folder, you can either enter the path manually or locate the folder by browsing the network. 18. Press [Com.Test] to check the path is set correctly. Locating the SMB folder manually This se[…]
-
Страница 70
5. Press [OK] Deleting an SMB Registered Folder This section describes how to delete the registered SMB folder. Press the [User Tools] key, and then select the setting items using the [ ] or [ ] key. 1. Select [Address Book Management] Press [OK] 2. Select [Program/Change] Press [OK] 3. Enter the registration number you want to delete using the num[…]
-
Страница 71
3. Enter the path for the folder Press [OK] In the following example path, the shared folder name is «user» and the computer name is «desk01»: desk01user 4. Depending on the destination setting, enter the user name for logging in to the computer Press [OK] 5. Depending on the destination setting, enter the password for loggin[…]
-
Страница 72
Basic Procedure for Sending Scan Files by E- mail 1. Press [Scanner] DBH013 2. Make sure that no previous settings remain If a previous setting remains, press the [Reset] key. 3. If the Scan to Folder screen is displayed, press [ ] to switch to the E-mail screen 4. Place originals 5. If necessary, specify scan settings according to the original you[…]
-
Страница 73
Registering an E-mail Destination This section describes how to register an e-mail destination. Press the [User Tools] key, and then select the setting items using the [ ] or [ ] key. DBH020 1. Select [Address Book Management] Press [OK] 2. Select [Program/Change] Press [OK] 3. Enter the registration number you want to register using the number key[…]
-
Страница 74
3. Enter the registration number you want to delete using the number keys or the Quick Dial keys Press [OK] You can automatically specify registration numbers 001 — 032 by pressing the Quick Dial key. Press [Search] to specify by name, destination list, registration number, fax number, e-mail address, or folder destination. 4. Press [OK] 5. Press [[…]
-
Страница 75
Specifying Send Options Resolution Select resolution for scanning originals. Select [100dpi], [200dpi], [300dpi], [400dpi], or [600dpi] as the scanning resolution. Press [Options] , and then select the setting items using the [ ] or [ ] key. 1. Select [Send Options] Press [OK] 2. Select [Resolution] Press [OK] 3. Select a resolution Press [OK] 4. P[…]
-
Страница 76
Original Setting This section explains how to specify the page opening orientation and whether both sides of the original are scanned. • This function is available for SP 3610SF only. Press [Options], and then select the setting items using [ ] or [ ] key. 1. Select [Send Options] Press [OK] 2. Select [Original Setting] Press [OK] 3. Select [1 Si[…]
-
Страница 77
• [Single Page:TIFF/JPEG], [Single Page:PDF] If you select a single-page file type when scanning multiple originals, one file is created for single page and the number of files sent is the same as the number of pages scanned. • [Multi-page:PDF] If you select a multi-page file type when scanning multiple originals, scanned pages are combined and[…]
-
Страница 78
6. Scan 76[…]
-
Страница 79
7. Web Image Monitor This chapter describes frequently used Web Image Monitor functions and operations. For the information not included in this chapter, see Connecting the Machine/ System Settings on the supplied CD-ROM or Web Image Monitor Help. Displaying the Top Page There are two modes available with Web Image Monitor: guest mode and administr[…]
-
Страница 80
DBH225 1 2 4 5 3 7 6 1. Menu area Displays the content of a selected menu item. 2. Header area Displays the dialog box for switching to the user mode and administrator mode and the menu for each mode. Also displays the link to Help. 3. Help Clicking the Help button ( ) in the header area displays the contents of Help. Clicking the Help button ( ) i[…]
-
Страница 81
8. Adding Paper and Toner This chapter describes how to load paper into the paper tray and recommended paper sizes and types. Loading Paper into Paper Trays Every paper tray is loaded in the same way. In the following example procedure, paper is loaded into Tray 1. • Be sure to select the correct paper size and feed direction using the paper size[…]
-
Страница 82
1. Check that paper in the paper tray is not being used, and then pull out the paper tray carefully. Adjust the paper size dial to match the size and feed direction of the paper in the paper tray. DBH053 2. Pull the tray carefully until it stops, lift the front side of the tray, and then pull it out of the machine. DBH054 Place the tray on a flat s[…]
-
Страница 83
4. Pinch the end guide and slide it inward to match the standard size. CXC614 5. Fan the paper before loading it in the tray. CBK254 6. Load the new paper stack print side down. Make sure paper is not stacked higher than the upper limit (upper line) marked inside the tray. CXC666 7. Adjust the paper guides to close any gaps. Do not move paper loade[…]
-
Страница 84
8. Lift the front side of the tray, and then slide it into the machine carefully until it stops. DBH055 To avoid paper jams, make sure the tray is securely inserted. • When loading paper larger than A4 or 8 1 / 2 × 11 into Tray 1, extend the tray. For details, see «Extending Tray 1», Paper Specifications and Adding Paper . • Letterhe[…]
-
Страница 85
Loading Paper into the Bypass Tray Use the bypass tray to use OHP transparencies and paper that cannot be loaded in the paper trays. • The maximum number of sheets you can load at the same time depends on paper type. Do not stack paper over the limit mark. For the maximum number of sheets you can load, see page 88 «Recommended Paper Sizes an[…]
-
Страница 86
2. Slide both sides of the paper guide outward, and then load paper print side up until it stops. 1 1 2 DBH078 3. Adjust both sides of the paper guide to match the paper width. DBH079 • When using the bypass tray, it is recommended that you set the paper direction to . • When loading thick paper or OHP transparencies, specify the paper size and[…]
-
Страница 87
Printing from the Bypass Tray Using the Printer Function • If you select [Machine Setting(s)] in [Bypass Tray] under [Tray Setting Priority] in [System] of the [Printer Features] menu, the settings made using the control panel have priority over the printer driver settings. For details, see «System», Print . • The default of [Bypass T[…]
-
Страница 88
Specifying thick paper or OHP transparencies for paper type using the control panel • Usually only one side of OHP transparencies can be used for printing. Be sure to load them with the print side up. • When printing onto OHP transparencies, remove printed sheets one by one. Press the [User Tools] key, and then select the setting items using th[…]
-
Страница 89
Loading Orientation-fixed Paper or Two-sided Paper Orientation-fixed (top to bottom) or two-sided paper (for example, letterhead paper, punched paper, or copied paper) might not be printed correctly, depending on how the originals and paper are placed. Settings for the User Tools Specify [Auto Detect] for [Letterhead Setting] in [System] under the […]
-
Страница 90
Recommended Paper Sizes and Types This section describes recommended paper sizes and types. • If you use paper that curls, either because it is too dry or too damp, a paper jam may occur. • Do not use paper designed for inkjet printers, as these may stick to the fusing unit and cause a misfeed. • When you load OHP transparencies, check the fr[…]
-
Страница 91
*1 When a print job is performed on A5 or 5 1 / 2 » X 8 1 / 2 » paper, it is recommended to set the paper horizontally. While a print job is performed on paper that is loaded vertically, smearing may occur near the edges of the printed paper. Also, use the bypass tray when printing on paper that is set horizontally. *2 Do not stack over t[…]
-
Страница 92
Paper type and weight Paper size Paper capacity 52–162 g/m 2 (14 lb. Bond– 90 lb. Index) Thin Paper–Thick Paper 2 Set the paper size dial on the tray to » «, and select the paper size with the control panel: A5 , B5 JIS , B6 JIS , 8 1 / 2 × 13 , 8 1 / 4 × 14 , 8 1 / 4 × 13 , 8 × 13 , 8 × 10 1 / 2 , 8 × 10 , 7 1 / 4 × 10 1 / 2[…]
-
Страница 93
Paper type and weight Paper size Paper capacity OHP transparencies Select the paper size *1*2 : A4 , A5 , A6 , B5 JIS , B6 JIS , 8 1 / 2 × 14 , 8 1 / 2 × 13 , 8 1 / 2 × 11 , 8 1 / 4 × 14 , 8 1 / 4 × 13 , 8 × 13 , 8 × 10 1 / 2 , 8 × 10 , 7 1 / 4 × 10 1 / 2 , 5 1 / 2 × 8 1 / 2 , 16K Custom size *4 : (mainly Europe and Asia) Vertical: 127.0?[…]
-
Страница 94
Paper Thickness *1 Paper weight Plain Paper 66–74 g/m 2 (18–20 lb. Bond) Plain Paper 2 75–90 g/m 2 (20–24 lb. Bond) Middle Thick 91–105 g/m 2 (24–28 lb. Bond) Thick Paper 1 106–130 g/m 2 (28–35 lb. Bond) Thick Paper 2 131–162 g/m 2 (35 lb. Bond–90 lb. Index) *1 Print quality will decrease if the paper you are using is close to t[…]
-
Страница 95
Thick Paper This section gives you various details about and recommendations concerning thick paper. When loading thick paper of 106–162 g/m 2 (28 lb. Bond–90 lb. Index) in the paper trays or bypass tray, follow the recommendations below to prevent misfeeds and loss of image quality. • Jams and misfeeds can occur when printing on thick smooth[…]
-
Страница 96
• Fan the envelopes before loading them to separate them and prevent the glue on them from causing them to stick together. • Some kinds of envelope might cause misfeeds, wrinkles or print poorly. • When loading envelopes in the orientation, load them with flaps closed. • Before loading envelopes, press down on them to remove any air from in[…]
-
Страница 97
How to load envelopes Types of envelopes Tray 1 Bypass tray Side-opening envelopes • Flaps: closed • Bottom side of envelopes: toward the right of the machine • Side to be printed: face down • Flaps: closed • Bottom side of envelopes: toward the right of the machine • Side to be printed: face up When loading envelopes, select «Enve[…]
-
Страница 98
Adding Toner Refer to the maintenance guide provided with the new items for the replacement. This section explains precautions when adding toner, how to send faxes or scanned documents when the toner has run out, and how to dispose of used toner. • Do not incinerate toner (new or used) or toner containers. Doing so risks burns. Toner will ignite […]
-
Страница 99
• When removing jammed paper or replacing toner, avoid getting toner (new or used) on your skin. If toner comes into contact with your skin, wash the affected area thoroughly with soap and water. • When replacing a toner or waste toner container or consumables with toner, make sure that the toner does not splatter. Put the waste consumables in […]
-
Страница 100
• Any reports are not printed. • If the fax or scanner screen does not appear in step 1, press the [Facsimile] key or the [Scanner] key. Disposing of Used Toner This section describes what to do with used toner. Toner cannot be re-used. Pack used toner containers in the container’s box or a bag to prevent the toner from leaking out of the […]
-
Страница 101
9. Troubleshooting This chapter describes basic troubleshooting procedures. Indicators This section describes the indicators displayed when the machine requires the user to remove misfed paper, to add paper, or to perform other procedures. Indicator Status : Paper Misfeed indicator Appears when a paper misfeed occurs. For details about removing jam[…]
-
Страница 102
Panel Tone The following table describes the meaning of the various beep patterns that the machine produces to alert users about left originals and other machine conditions. Beep pattern Meaning Causes Single short beep Panel/screen input accepted. A control panel or screen key was pressed. Short, then long beep Panel/screen input rejected. An inva[…]
-
Страница 103
When You Have Problems Operating the Machine This section describes common problems and messages. If other messages appear, follow the instructions displayed. Problem Causes Solutions The machine has just been turned on and the User Tools screen is displayed, but the User Tools menu has items missing. Functions other than the copier function are no[…]
-
Страница 104
Problem Causes Solutions An error message remains, even if misfed paper is removed. • When a misfeed message appears, it remains until you open and close the cover as required. • Paper is still jammed in the tray. After removing misfed paper, fully open the front cover, and then close it. For details about removing jammed paper, see «Remov[…]
-
Страница 105
Problem Causes Solutions Misfeeds occur frequently. The tray’s side or end fences may not be set properly. • Remove misfed paper. For details about removing jammed paper, see «Removing Jammed Paper», Troubleshooting . • Check that the side or end fences are set properly. Also, check that the side fences are locked. For details ab[…]
-
Страница 106
When Messages Are Displayed on the Control Panel Messages Displayed When Using the Copy Function This section describes the machine’s main messages. If other messages appear, follow their instructions. • If you cannot make copies as you want because of the paper type, paper size or paper capacity problems, use recommended paper. For details […]
-
Страница 107
Message Causes Solutions «Max. number of sets is nn.» (A figure is placed at nn.) The number of copies exceeds the maximum copy quantity. You can change the maximum copy quantity from [Max. Number of Sets] under [Copier Features]. For details about Max. Copy Quantity, see «Copier Features», Copy . «Original with this length[…]
-
Страница 108
Message Causes Solutions «Error occurred, and transmission was cancelled.» A problem occurred in the machine, or noise occurred on the telephone line. Press [Exit], and then send the documents again. » Func. Problems Data will be initialized.» There is a problem with the fax. Record the code number shown on the screen, and then […]
-
Страница 109
If you reconnect the machine to the network, be sure to set «Display» by configuring the appropriate User Parameter. Messages Displayed When Using the Printer Function This section describes the principal messages that appear on the display panel, error logs or reports. If other messages appear, follow their instructions. Status messages […]
-
Страница 110
Message Causes Solutions » (A1) Remove misfeed in Trays. Opn & cls Frt. Cov.» Open the front cover and remove the jammed paper from the paper feed path. For details, see «Removing Jammed Paper», Troubleshooting . » (A2) Open Front Cover and remove the paper.» Remove the jammed paper from the bypass tray. To reset t[…]
-
Страница 111
Message Causes Solutions «Cannot connect=>Comm.Serv. Check proxy user/ password.» The proxy user name or password is incorrect. Check the proxy server settings, and then change the user name and/or password if they are incorrect. «Change (Tray name) to the following settings:» The size of the paper in the tray does not match […]
-
Страница 112
Message Causes Solutions «Replcmnt Requrd Drum Unit» You need to replace the drum unit. For details, see «Replacing Drum Unit», Maintenance and Specifications . «Repl Requrd Soon Maint. Kit» You will need to replace the maintenance kit soon. Contact your sales or service representative to obtain a new unit. «Rplcm[…]
-
Страница 113
Message Causes Solutions «Authentication with the destination has failed. Check the settings.» The user name and password entered when sending to a folder were incorrect. Enter the correct user name and password, and try again. «Cannot write on memory device because remain. space is insufficient.» The memory device is insufficie[…]
-
Страница 114
Message Causes Solutions «Connection with the destination has failed. Check the status and connection.» The correct network settings are not made. • Check the network settings of the client computer. • Check that components such as the LAN cable are connected properly. • Check that the server settings are correct and the server is w[…]
-
Страница 115
Message Causes Solutions «Exceeded max. page capacity. Do you want to send the scanned data?» The number of scanned pages exceeded maximum page capacity. Select whether to send the data so far. «Exceeded max. pg. per file. Press [Write] to wrt. scanned data to mem. device. Or press [Cancel] to delete.» The scan could not be comp[…]
-
Страница 116
Message Causes Solutions «Transmission has failed. Insufficient memory in the destination hard disk.» There is not enough space on the receiver’s hard disk. Contact the receiver’s administrator. 9. Troubleshooting 114[…]
-
Страница 117
When Messages Are Displayed on Your Computer Screen Messages Displayed When Using the Scanner Function This section describes likely causes of and possible solutions for the main error messages displayed on the client computer when using the TWAIN driver. If a message not described here appears, act according to the message. Message Causes Solution[…]
-
Страница 118
Message Causes Solutions «Clear Misfeed(s) in ADF.» A paper misfeed has occurred inside the ADF. • Remove jammed originals, and then insert them again. For details about how to remove jammed paper, see «Removing Jammed Paper», Troubleshooting . • When a misfeed occurs, replace the jammed originals. • Check whether the orig[…]
-
Страница 119
Message Causes Solutions «Insufficient memory. Reduce the scanning area.» Scanner memory is insufficient. • Reset the scan size. • Lower the resolution. • Set with no compression. For details about the settings, see TWAIN driver Help. The problem may also be due to the following causes: • Scanning cannot be performed if large valu[…]
-
Страница 120
Message Causes Solutions «Scanner is in use for other function. Please wait.» A function of the machine other than the Scanner function is being used such as the Copier function. • Wait for a while, and then reconnect. • Cancel the job that is being processed. For example, press [Exit], and then press the [OK] key. Next, press the [Co[…]
-
Страница 121
Message Causes Solutions «Scanner is not ready. Check the scanner and the options.» The ADF cover is open. Check whether the ADF cover is closed. «The name is already in use. Check the registered names.» You tried to register a name that is already in use. Use another name. When Messages Are Displayed on Your Computer Screen 119[…]
-
Страница 122
9. Troubleshooting 120[…]
-
Страница 123
10. Appendix This chapter describes the trademarks. Trademarks PostScript and PostScript 3 are either registered trademarks or trademarks of Adobe Systems Incorporated in the United States and/or other countries. Microsoft and Windows are either registered trademarks or trademarks of Microsoft Corp. in the United States and/or other countries. The […]
-
Страница 124
10. Appendix 122[…]
-
Страница 125
INDEX 2 Sided Print ……………………………………………………. 9 A Address book ……………… 11, 52, 53, 66, 67, 68, 71 ADF …………………………………………………….. 7, 20, 31 ADF cover …………………………………………………….. 20 Alert Indicators………………………………[…]
-
Страница 126
M Main power indicator ……………………………………. 26 Main power switch ………………………………….. 20, 29 Media slot …………………………………………………….. 20 Memory ……………………………………………………… 105 Memory Transmission ………………………… 49, 50, 51[…]
-
Страница 127
Turning off the power …………………………………….. 29 Turning on the power …………………………………….. 29 Two-sided Combine ………………………………………. 43 Two-sided paper …………………………………………… 87 U USB 2.0 [Type B] port ……………………………………. 22 U[…]
-
Страница 128
MEMO 126[…]
-
Страница 129
MEMO 127[…]
-
Страница 130
MEMO 128 EN GB EN US M173-7600A[…]
-
Страница 131
© 2014[…]
-
Страница 132
M173-7600A US EN GB EN[…]
Код: 42438
Извините, товара сейчас нет в наличии
Бесплатная доставка
по Красноярску
Извините, товара сейчас нет в наличии
Новости интернет-магазина «Лаукар»:
Дополнительная информация в категории МФУ:
В интернет-магазине бытовой техники «Лаукар» Вы можете скачать инструкцию к товару МФУ Ricoh SP 3600SF совершенно бесплатно.
Все инструкции, представленные на сайте интернет-магазина бытовой техники «Лаукар», предоставляются производителем товара.
Перед началом использования товара рекомендуем Вам ознакомиться с инструкцией по применению.
Для того чтобы скачать инструкцию, Вам необходимо нажать на ссылку «скачать инструкцию», расположенную ниже, а в случае, если ссылки нет,
Вы можете попробовать обратиться к данной странице позднее,
возможно специалисты интернет-магазина бытовой техники «Лаукар» еще не успели загрузить для скачивания инструкцию к товару:
МФУ Ricoh SP 3600SF.

Фирма-производитель оставляет за собой право на внесение изменений в конструкцию, дизайн и комплектацию товара: МФУ Ricoh SP 3600SF. Пожалуйста, сверяйте информацию о товаре с информацией на
официальном сайте компании производителя.
Скачать
For safe and correct use, be sure to read the Safety Information in
«Read This First» before using the machine.
For information not in this manual, refer to
the HTML/PDF files on the supplied
CD-ROM.
Appendix
Troubleshooting
Adding Paper and Toner
Web Image Monitor
Scan
Fax
Copy
Getting Started
What You Can Do with This Machine
User Guide