
|
Код: 114461 Извините, товара сейчас нет в наличии
Бесплатная доставка
Извините, товара сейчас нет в наличии Сравнить Новости интернет-магазина «Лаукар»:28.03.2023 22.02.2023 13.02.2023 Дополнительная информация в категории МФУ:Принтеры и МФУ — особенности и термины Таблица Авторизованных сервисных центров по брендам. Описание Инструкция Отзывы (0) В интернет-магазине бытовой техники «Лаукар» Вы можете скачать инструкцию к товару МФУ Ricoh SP 330SN лазерный совершенно бесплатно. Все инструкции, представленные на сайте интернет-магазина бытовой техники «Лаукар», предоставляются производителем товара. Для того чтобы скачать инструкцию, Вам необходимо нажать на ссылку «скачать инструкцию», расположенную ниже, а в случае, если ссылки нет, Скачать инструкцию Смотреть инструкцию
Фирма-производитель оставляет за собой право на внесение изменений в конструкцию, дизайн и комплектацию товара: МФУ Ricoh SP 330SN лазерный. Пожалуйста, сверяйте информацию о товаре с информацией на |


![]()
Руководство по установке
|
2. Установка программного обеспечения |
2 |
3. Настройки факса (только для модели SP 330SFN/3710SF) 3
|
4. Установки сканирования |
4 |
Панель управления
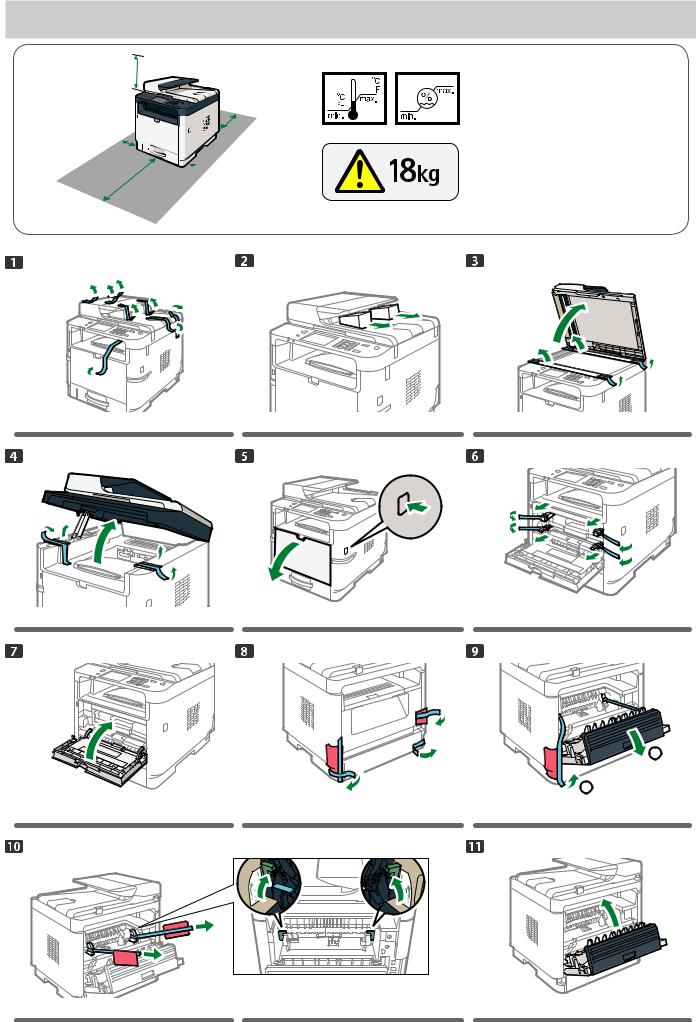
1. Настройка аппарата
32 см
(12,6 дюйма)
20 см
(7,9 дюйма)
10 см (4,0 дюйма)
 10 см (4,0 дюйма)
|
70 см |
|
|
(27,6 дюйма) |
DYG126 |
DYG127
DYG160
DYG132
|
32 |
80 |
|
|
10 |
89,6 |
|
|
50 |
15 |
Источник питания
120–127 В, 60 Гц, 7,7 А 220–240 В, 50/60 Гц, 4,3 А
DYG212
1
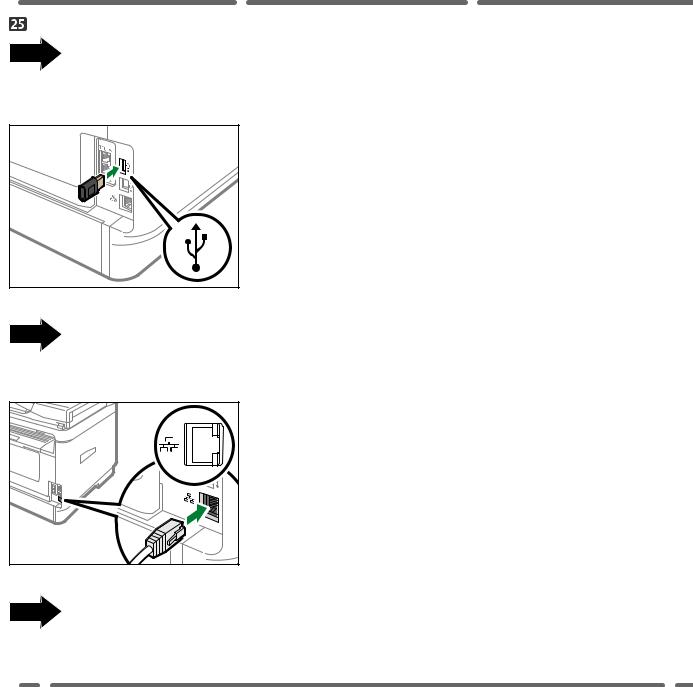
Если вы используете беспроводное соединение (Wi-Fi), подключите дополнительный модуль беспроводной локальной сети и переходите к шагу 26 (для SP 330SFN / 3710SF) или 55 (для SP 330SN).
DYG339
Если вы используете проводное соединение (Ethernet), подсоедините кабель Ethernet и переходите к шагу 67 (для SP 330SFN / 3710SF) или 91 (для SP 330SN).
Если вы используете USB-соединение, не подключайте кабель и переходите к шагу 67 (для SP 330SFN / 3710SF) или 91 (для SP 330SN).
3
SP 330 SFN / 3710SF (Wi-Fi)
DYG150
4
SSID :XXXXXXXXXXXXX
Encryption key :XXXXXXXXXXXXX
DYG085
SSID :XXXXXXXXXXXXX
Encryption key :XXXXXXXXXXXXX
DYG086
 Стр.9
Стр.9
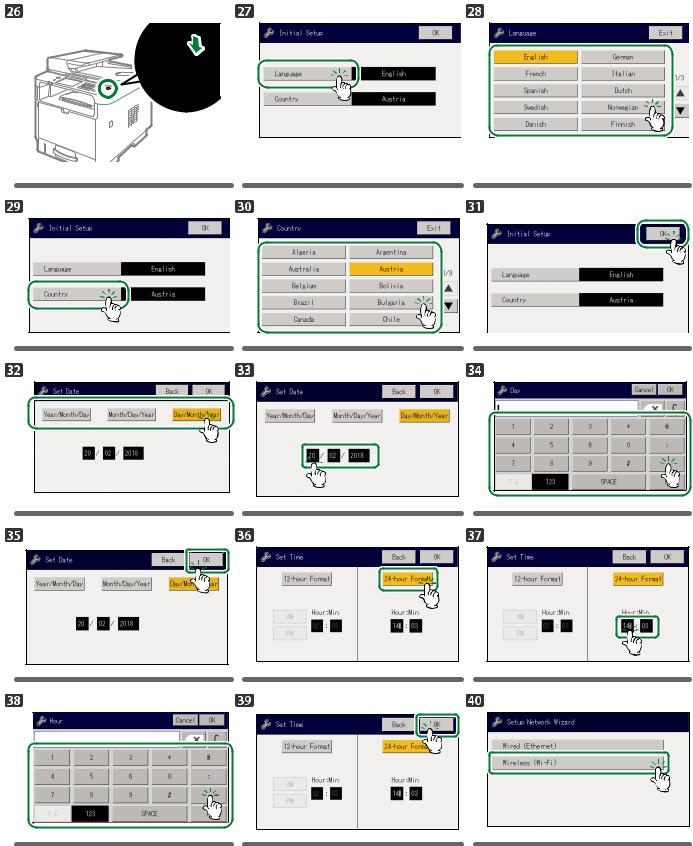
5
SP 330 SN (Wi-Fi)
English
German
French
DYG182
DYG150
|
Set Date |
2 3 |
Set Date |
||||||||||
|
Month/Day/Year |
Day/Month/Year |
|||||||||||
|
Day/Month/Year |
||||||||||||
|
12 |
/ |
12 |
/ |
2017 |
||||||||
|
Year/Month/Day |
||||||||||||
|
DSG330 |
DYG183 |
|
Set Time |
2 2 |
Set Time |
||||||||
|
12-hour Format |
Hour: Min |
|||||||||
|
24-hour Format |
: |
|||||||||
|
17 |
45 |
|||||||||
|
DSG332 |
DSG333 |
Wired (Ethernet)
Wireless (Wi-Fi)
DYG071
SSID :XXXXXXXXXXXXX Encryption key :XXXXXXXXXXXXX
DYG085
SSID :XXXXXXXXXXXXX Encryption key :XXXXXXXXXXXXX
DYG086
Wi-Fi Setup Wizard 1 13

Network 1
Network 2
Network 3
DYG072
Password
Key:
(8-63chars/64hex) WPA2-PSK
DYG073
Are you sure to connect?
|
(OK/Back) |
Connect succeed! |
DYG074 DYG075
6
 Loading…
Table of Contents: Ricoh SP 330SN All in One Printer Owner’s Manual
-
Ricoh SP 330SN 3 When using a wireless (Wi-Fi) connection, connect the wireless LAN option and proceed to Step 26 ( for SP 330SFN/3710SF) or Step 55 ( for SP 330SN). DYG339 When using a wired (Ethernet) connection, connect the Ethernet cable and proceed to Step 67 ( for SP 330SFN/3710SF) or Step 91 ( for SP 330SN). DYH608 When using a USB connection, do not connect the cable and proceed to Step 67 (for SP 330SFN/3710SF) or Step 91 (for SP 330SN).
-
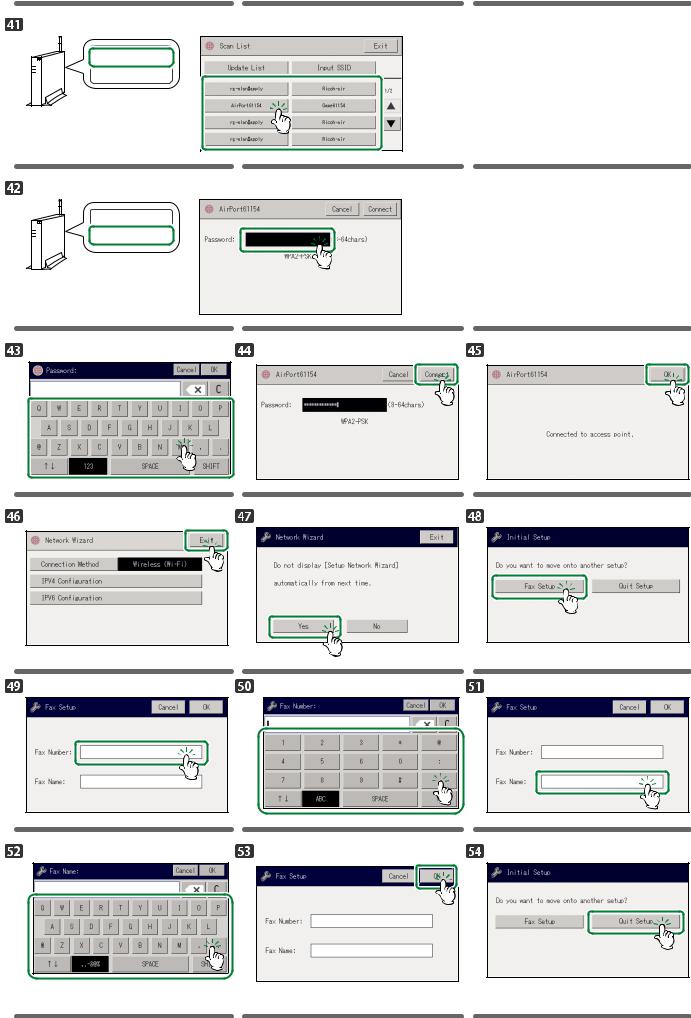
Ricoh SP 330SN 13 7. Enter the encryption key using the number keys, and then press the [OK] key. DSG353 Password Key : (8-63 chars/64 hex) WPA2-PSK • As the passphrase, you can enter either 8 to 63 ASCII characters (0x20-0x7e) or 64 hexadecimal digits (0-9, A-F, a-f). • For details about checking the encryption key, see “Checking the SSID and Encryption key”. 8. Press the [OK] key. DSG354 Are you sure to connect? (OK/Back) 9. Check the result. Connection has succeeded: DSG355 Connect succeed! Connection has failed: DSG356 Connect fai
-
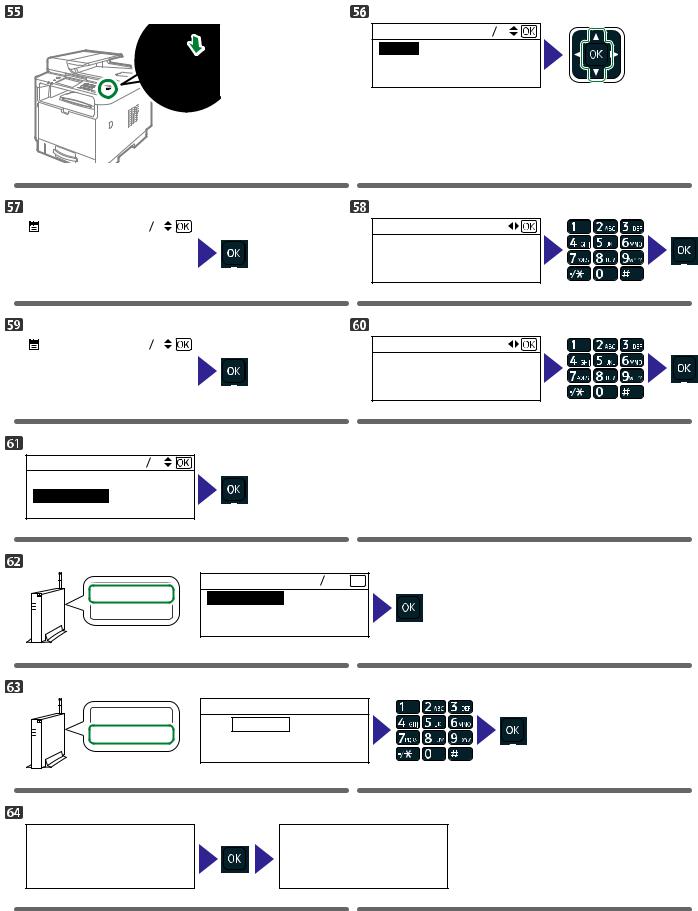
Ricoh SP 330SN 9 SP 330SN(Ethernet/USB) DYG150 Language 122 German English French DYG182 Set Date 23 Day/Month/Year Month/Day/Year Year/Month/Day DSG330 12 12 Set Date Day/Month/Year //2017 DYG183 Set Time 22 24-hour Format 12-hour Format DSG332 17 45 DSG333 Set Time Hour: Min : Network Wizard 12 Wired (Ethernet) DYG081 Wireless (Wi-Fi) Network Wizard 14 IPv4 Configuration IPv6 Configuration DYG076 Quit Setup Network Wizard Do not auto display Menu from the next time Yes No DYG077 P. 9 Install the software to use the machine.
-
Ricoh SP 330SN 1 1. Setting Up the Machine 120 — 127 V, 60 Hz, 7.7 A 220 — 240 V, 50/60 Hz, 4.3 A Power Source 10 50 15 80 32 89.6 DYG212 20 cm (7.9 inches) 70 cm (27.6 inches) 10 cm (4.0 inches) 10 cm (4.0 inches) 32 cm (12.6 inches) DYG126 DYG127 DYG128 DYG129 DYG160 DYG130 DYG131 DYG132 DYG133 1 2 DYG134 DYG135 DYG136
-
21 4. Scan settings For safe and correct use, be sure to read Safety Information before using the machine. Appendix Configuring Network Settings Using OS X Troubleshooting Maintaining the Machine Configuring the Machine Using Utilities Configuring the Machine Using the Control Panel Sending and Receiving a Fax Scanning Originals Copying Originals Printing Documents Paper Specifications and Adding Paper Guide to the Machine User’s Guide ■For those using the scanner features for the first time For information ab
-
Ricoh SP 330SN 6 SP 330 SN (Wi-Fi) DYG150 Language 122 German English French DYG182 Set Date 23 Day/Month/Year Month/Day/Year Year/Month/Day DSG330 12 12 Set Date Day/Month/Year //2017 DYG183 Set Time 22 24-hour Format 12-hour Format DSG332 17 45 DSG333 Set Time Hour: Min : Network Wizard 12 Wired (Ethernet) DYG071 Wireless (Wi-Fi) SSID Encryption key :XXXXXXXXXXXXX :XXXXXXXXXXXXX DYG085 Wi-Fi Setup Wizard 113 Network 2 Network 3 DYG072 Network 1 SSID Encryption key :XXXXXXXXXXXXX :XXXXXXXXXXXXX DYG086 Password (8-63chars/64hex) WPA2-PSK DYG073 Key: Are you sure to connect? DYG074 (OK/Back) DYG0
-
4 SP 330 SFN/3710SF (Wi-Fi) DYG150
-
10 2. Installing the Software Check how the computer is connected Specify how to connect to your computer according to the communication environment of your system. The wireless LAN (Wi-Fi) connection is available when you attach a wireless LAN option to the USB port on the back of the machine. If you have already set up a Wi-Fi connection during the initial setup of the machine and want to install the printer driver, see page 17 «Easy Setup Using the CD-ROM». Conne
-
16 2. Open the PIN code configuration window (web page) for the router (access point) on your computer. 3. Make sure the wireless LAN option is attached to the machine and the wireless (Wi-Fi) connection is enabled. For details, see page 10 «Attaching the wireless LAN option». 4. Press the [User Tools] key. DYG198 5. Press the [ ] or [ ] key to select [Network Settings], and then press the [OK] key. 6. If you are requested to enter a password, enter the password using the number keys, and then
-
Ricoh SP 330SN 17 Easy Setup Using the CD-ROM Using the CD-ROM supplied with this machine, you can install the driver from your computer and configure the Wireless (Wi-Fi) settings for this machine. If you intend to use this machine mainly from computers, we recommend using the CD-ROM to configure the settings. ● The following items are necessary to set up a Wireless (Wi-Fi) connection. ● USB interface cable Using the USB cable is needed to update the settings of this machine when it is installed or the Wireless (Wi-Fi) settings change in your environment. See Step 6 to connect your computer to this machine. ● Rout
-
Ricoh SP 330SN 19 3. FAX settings (SP 330SFN/3710SF only) Connection Connect a telephone line cord to LINE. If using an external telephone, connect the telephone to TEL. ● Connect the public switched telephone network (PSTN) to Line. Connecting lines other than PSTN to this machine may cause it to malfunction. DYG156 2 1 1. Port For External Telephone 2. Port For LINE If you connect a modular cable to the G3 (analog) line interface connector, make a loop 3 cm (1.2 inches) (1) from the end of the modular cable (connection side to the machine) and attach the included ferrite core to the loops as shown.
-
Ricoh SP 330SN 15 Easy Setup Using a PIN Code SP 330SFN/3710SF ● Make sure the Ethernet cable is not connected to the machine. ● In Steps 11 to 13, congure each setting within two minutes. ● To establish a connection using the PIN code, use a computer that is connected to the router (access point). ● The following item is necessary to set up a Wireless (Wi-Fi) connection. ● Router (access point) 1. Check that the router (access point) is working correctly. 2. Open the PIN code configuration window (web page) for the router (access point) on your computer. 3. Make sure the wireless LAN option is attached to the machin
-
18 Connecting the Machine (USB/Network) DYG153 DYG154 ● The following items are necessary to set up a wired connection. ● USB interface cable or Ethernet interface cable ● CD-ROM supplied with the machine ● To install the software for network connection, quick installation and manual installation can be used. Using the manual installation, you can specify data to be installed as you prefer. ● If you connect the computer by a USB cable, do not connect the cable until you are instructed to do so on
-
© 2018 Trademark Android is a trademark of Google Inc. IOS is a trademark or registered trademark of Cisco in the U.S. and other countries and is used under license. Wi-Fi, Wi-Fi Direct, Wi-Fi Protected Setup, WPA, Wi-Fi Protected Access, WPA2, and Wi-Fi Protected Access 2 are registered trademarks of Wi-Fi Alliance. Linux is a registered trademark of Linus Torvalds in the United States and other countries. Mac OS is a trademarks or registered trademarks of Apple Inc., in the United States and other countries. Microsoft ® , Windows ® , Windows Server ® and Windows Vista ® are e
-
5 SSID Encryption key :XXXXXXXXXXXXX :XXXXXXXXXXXXX DYG085 SSID Encryption key :XXXXXXXXXXXXX :XXXXXXXXXXXXX DYG086 P. 9
-
Ricoh SP 330SN Setup Guide 1 Setting Up the Machine 2 Installing the Software 3 FAX settings 4 Scan settings 1 2 Control Panel Sheet
-
Ricoh SP 330SN 14 «Failed to connect to access point.» is displayed. Press [OK] to return to the screen displayed in Step 7. Check the configuration for the router (access point), then try the connection again. 11. Configuring the Wireless (Wi-Fi) settings is complete. 12. To use the printer driver, install the printer driver according to the procedure on page 17 «Easy Setup Using the CD-ROM» and select «The machine’s IP address has been already configured.» on step 6. SP 330SN ● Make sure the Ethernet cable is not connected to the machine. ● In Steps 9 to 11, congure each setting within two
-
Ricoh SP 330SN 20 Selecting the Telephone Line Type and Telephone Network Connection Type 1. Press [Setting]. 2. Press [Administrator Tools]. 3. If you are requested to enter a password, enter the password using the number keys, and then press [OK]. A password for accessing the [Administrator Tools] menu can be specified in [Admin. Tools Lock] under [Administrator Tools] menu. 4. Press [Dial/Push Phone]. 5. Press the telephone line type appropriate for your telephone service. 6. Press [PSTN / PBX]. 7. Press [PSTN] or [PBX]. 8. Press the [Home] key to return the initial screen. Setting the Outside Line Access N
-
Ricoh SP 330SN 2 DYG137 DYG138 DYG139 DYG140 DYG141 DYG142 DYG143 DYG144 DYG145 DYG146 DYG147 DYG148 DYG149 1 2
-
7 Network Wizard 14 IPv4 Configuration IPv6 Configuration DYG076 Quit Setup Network Wizard Do not auto display Menu from the next time Yes No DYG077 P. 9 SP 330 SFN/3710SF (Ethernet/USB) DYG150
-
Ricoh SP 330SN M0C4-8503AU EN US EN GB EN
-
Ricoh SP 330SN 11 Use the machine from a smart device Android iOS ■How to use the machine from a smart device From smart device applications, you can use the following functions of the machine: •Sending scanned images or documents from the machine to the smart device •Printing photographs and documents stored on a smart device After scanning the following QR code with your smart device, search for the application corresponding to the machine and download it from the site that appears. DYG151 ■How to use the NF
-
8 P. 9
Questions, Opinions and Exploitation Impressions:
You can ask a question, express your opinion or share our experience of Ricoh SP 330SN device using right now.
- Каталог
- Офис и мебель
- Техника для печати
- Лазерные МФУ
- Ricoh
- МФУ Ricoh SP 330SN (Принтер/Сканер/Копир: A4 32ppm 256Mb LAN USB)
- Инструкции и файлы
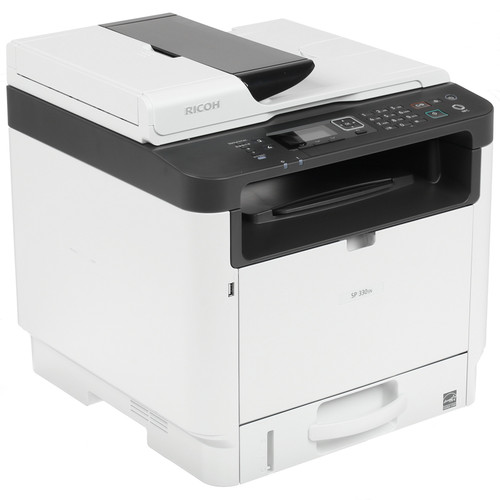
МФУ Ricoh SP 330SN (Принтер/Сканер/Копир: A4 32ppm 256Mb LAN USB)

13
Код товара: 1390933
МФУ Ricoh SP 330SN (Принтер/Сканер/Копир: A4 32ppm 256Mb LAN USB)

Характеристики
Отзывы13ОбзорыИнструкции и файлы1
Как выбрать?
Советуют эксперты DNS
Инструкции и файлы для МФУ Ricoh SP 330SN (Принтер/Сканер/Копир: A4 32ppm 256Mb LAN USB)
-
Инструкция: Ricoh SP 330SNРусский5.2 Мб
Нашли ошибку?
Выделите текст с ошибкой и нажмите Ctrl+Enter или
напишите нам
.
Указанное предложение действительно на 30.11.2023
3.0
Rated 3.0 out of 5
3.0 out of 5 stars (based on 1 review)
Your overall rating
RICOH SP 330SN (01) PDF MANUAL
Click here to download RICOH SP 330SN (01) PDF MANUAL
RICOH SP 330SN (01) PDF MANUAL
FREE ENGLISH PDF
OPERATING INSTRUCTIONS
USER GUIDE – USER MANUAL
OWNER GUIDE – OWNER MANUAL
REFERENCE GUIDE – REFERENCE MANUAL
INSTRUCTION GUIDE – INSTRUCTION MANUAL
Your overall rating
- YouTube
RICOH SP 330SN (01) PDF MANUAL
RICOH SP 330SN (01) PDF MANUAL