
Здравствуйте.
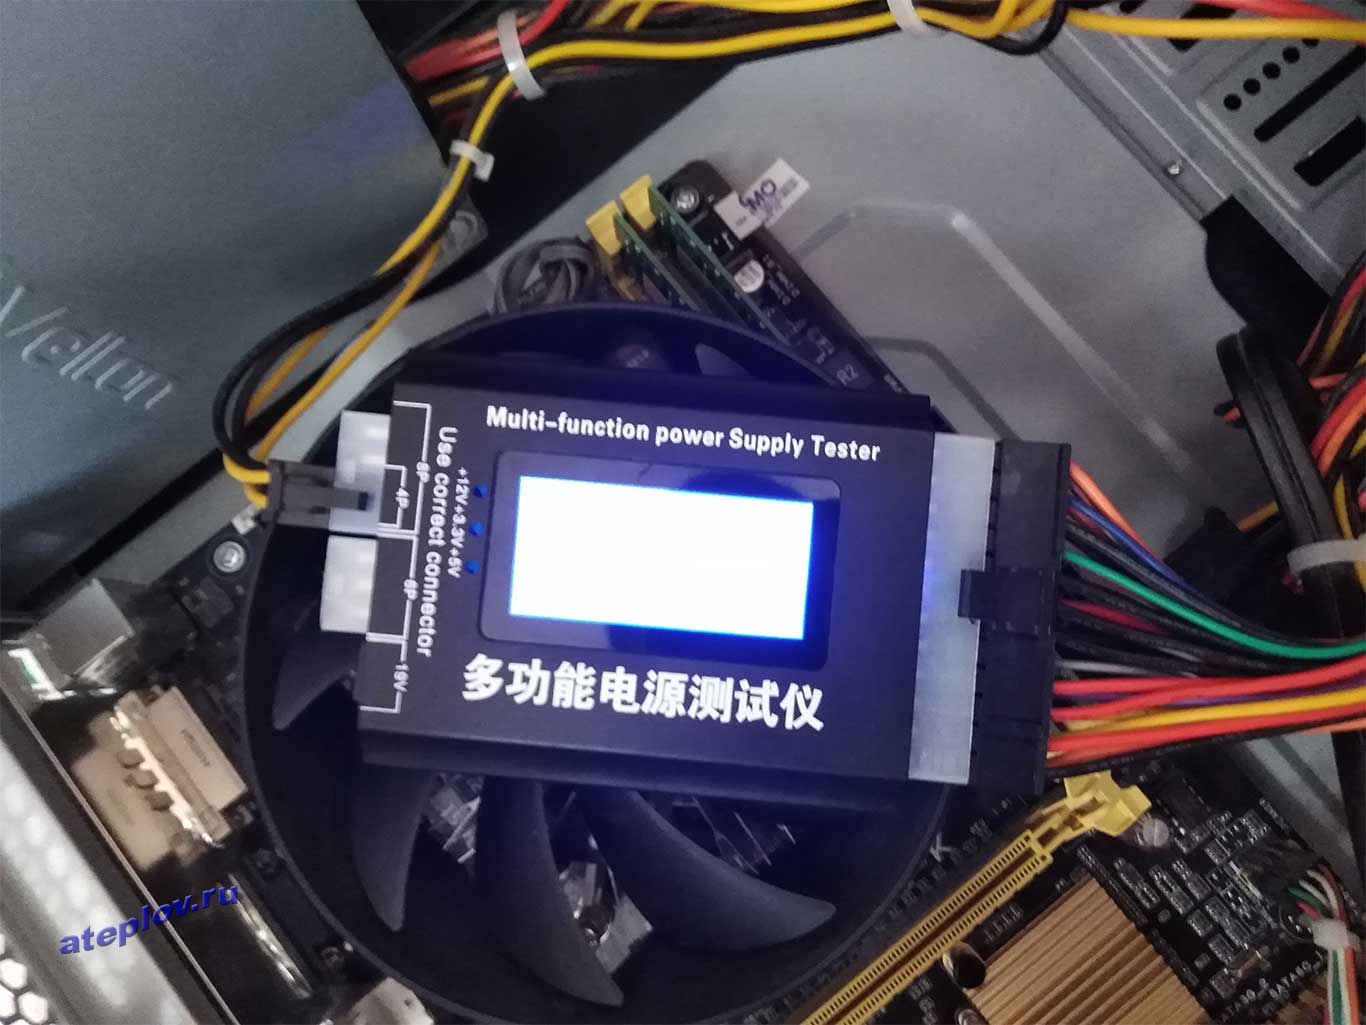
Мой первый небольшой обзор будет посвящен тестеру напряжения компьютерных блоков питания. Для кого-то эта штука окажется годной, так как позволяет протестировать приличное количество БП за короткое время, для кого-то это будет игрушкой, так как есть вольтметр, и всякие HWiNFO64, правды тут не найти. Я решил поиграться, и заказал себе его.
Начнем с упаковки. Пришел тестер завернутый в некий вспененный материал (забыл название), и на экране наклеена пленка, так что суровые будни Почты России врят ли что сделают с ним.
Сборку можно описать двумя словами — не развалится. Половинки корпуса приплавлены друг к другу (посему разборки не будет), есть коцки, и неровности. По разъемам можно придраться только к обоим Молексам, сидят они кривовато, но использованию это не мешает. В остальном все отлично, ножки не погнуты, качество нормальное.
Для общего развития — разъемы БП с вики:
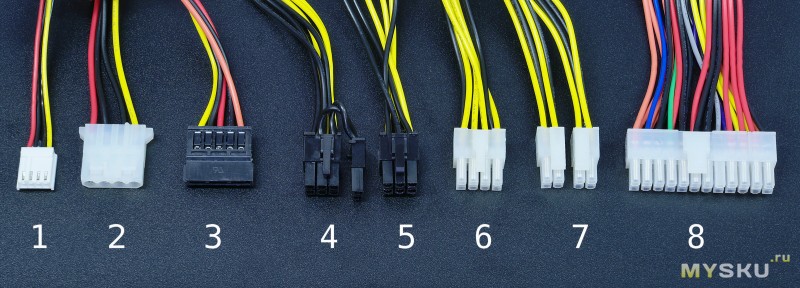
Вилки шлейфов питания (из блока питания), без переходников и адаптеров
1) AMP 171822-4 мини-размера для питания 5 и 12 вольтами периферийного устройства (обычно, дисковод)
2) Molex обычного размера (molex 8981)
3) 5-контактные разъёмы MOLEX 88751 для питания устройства с интерфейсом SATA: корпус MOLEX 675820000 или эквивалентный с контактами Molex 675810000 или эквивалентными[3]
4) «PCIe8connector» для питания видеокарты, расщепляемый на «PCIe6connector» (для питания видеокарты)
5) «PCIe6connector» для питания видеокарты
6) «EPS12V» (англ. Entry-Level Power Supply Specification для питания процессора
7) «ATX PS 12V» («P4 power connector») для питания процессора
«ATX12V» основного питания материнской платы: MOLEX 39-01-2040 или эквивалентная с контактами Molex 44476-1112 (HCS) или эквивалентными
 «ATX12V» основного питания материнской платы: MOLEX 39-01-2040 или эквивалентная с контактами Molex 44476-1112 (HCS) или эквивалентными
Тестирование исправного БП. Тут описывать особо нечего, сверка будет производится не вольтметром, а программным способом, с помощью HWiNFO64. Мамка исправная, и датчики не косячат. Хочу заметить, что при подключении БП к питанию вместе с тестером, на блок питания подается сигнал о включении, и он, собственно, включается. Так что замеры тестер производит при включенном БП.
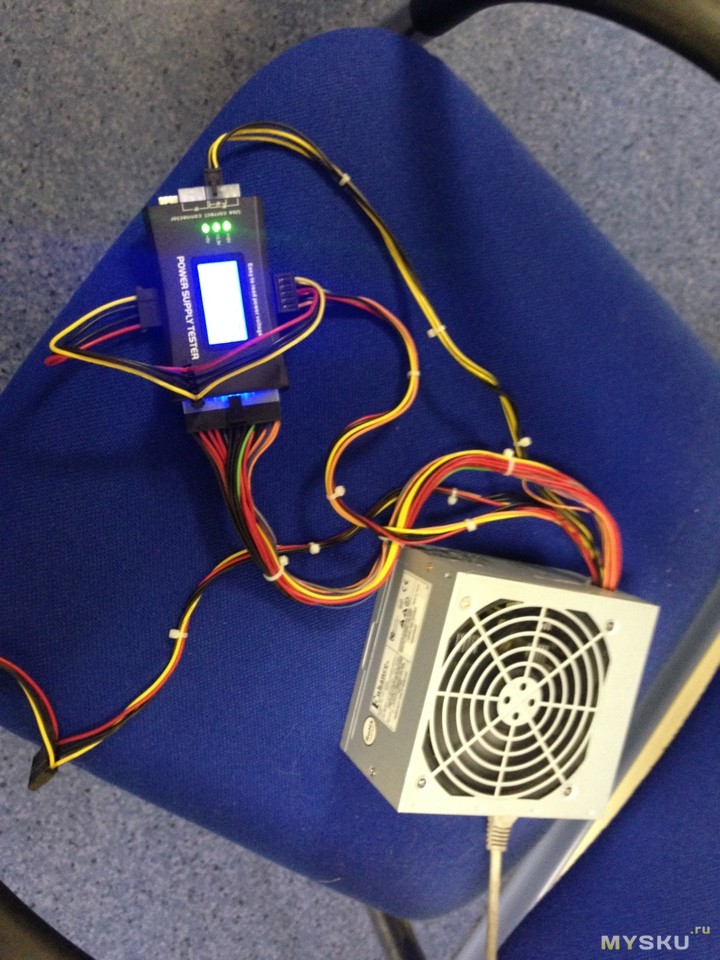
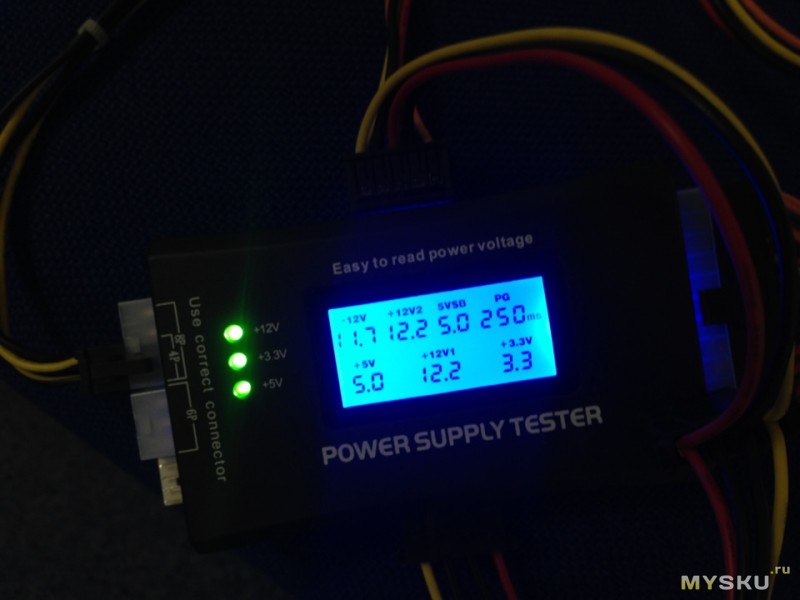
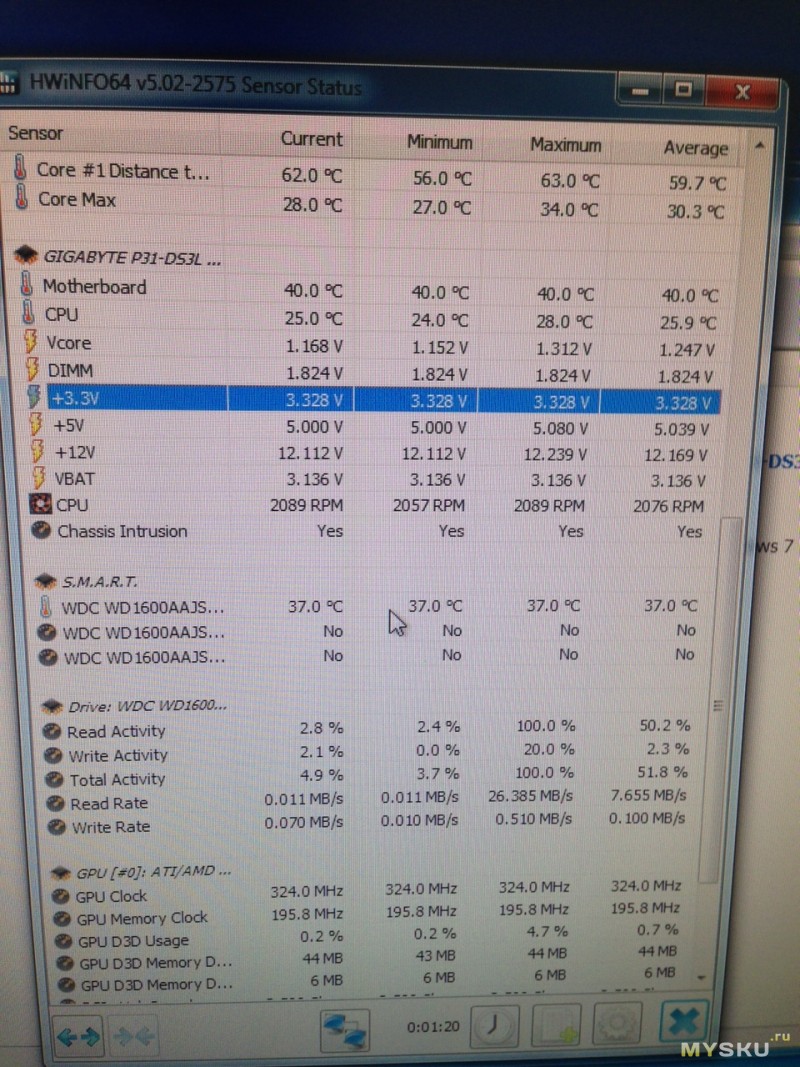
Допуски:
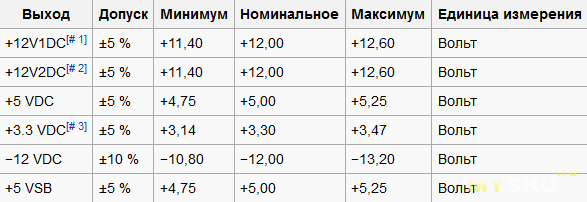
PG же это Power Good, задержка в миллисекундах — система защиты БП, которая дает возможность сформировать напряжение требуемого уровня. Должно быть в пределах 230-270.
К сожалению, в программе не отображаются половина линий, но думаю этого хватит.
Вполне себе интересная игрушка, которая может стать полезным инструментом. Я вот, наконец, разберу свои завалы из старых БП на работе.
upd
Пользователь stasv предоставил фотки внутренностей своего сгоревшего тестера, за что ему спасибо:
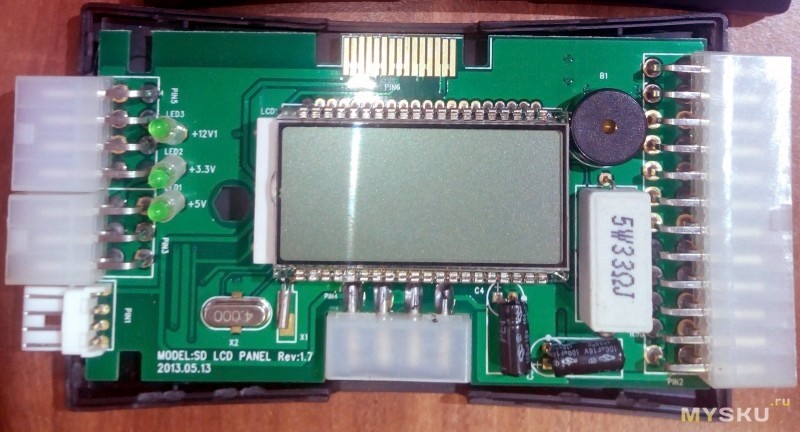
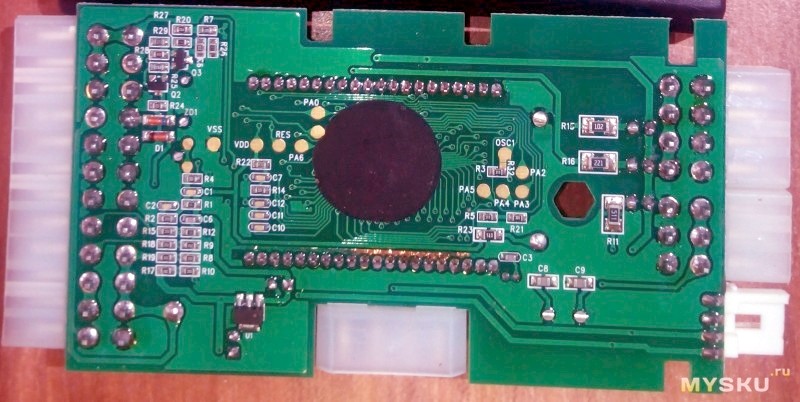
Как можно заметить, установлен простой резистор на 5W и 33 Ом. В принципе, этого и следовало ожидать. Серьезные замеры им не провести, само собой, но для отбраковывания очевидной некондиции за быстрое время более чем достаточно, как мне кажется.
43
43 people found this article helpful
If you are comfortable working on PCs, you can test the power supply yourself with a small device designed specifically for this task
Updated on December 23, 2022
What to Know
- Read PC Repair Safety Tips. Open case, unplug and organize power connectors. Check for proper voltage.
- Next, plug motherboard power connectors into power supply tester. Plug power supply into live outlet.
- Press and hold ON/OFF button on tester. Check power supply voltage tolerances and other criteria.
This article explains how to test the power supply unit (PSU) in your computer with a power supply tester. Instructions apply specifically to the Coolmax PS-228 ATX power supply tester, but they also suffice for most other PSU testers with an LCD.
Read Important Computer Repair Safety Tips before proceeding with testing a power supply unit. Working with high voltage electricity can be dangerous, and it’s crucial to prioritize safety when repairing a power supply. Do not neglect this step.
How to Test the Power Supply in a Computer
How to Test a Power Supply Using a Power Supply Tester
If you have some experience working on your computer and feel comfortable following instructions, this process should take about 30 minutes to complete. However, it may not be suitable for those who are new to computer maintenance. Before proceeding, be sure to read the safety tips. Once you have done so, you can begin the process.
-
Turn off the PC, remove the power cable, and unplug anything else connected to the outside of the computer. Then, open the case.
To make the power supply test easier, move the disconnected and open case somewhere you can easily work with it, such as to a table or other flat, non-static surface.
-
Unplug the power connectors from every internal device inside the computer. An easy way to make sure each power connector is unplugged is to work from the power cable bundle coming from the power supply. Each group of wires should terminate at one or more power connectors.
It’s not necessary to remove the actual power supply from the computer, nor should you need to disconnect any data cables or other cables not connected to the power supply.
-
Group all the power cables and connectors together for easy testing. As you organize the power cables, pull them away from the computer case as much as possible to make it easy to plug the power connectors into the power supply tester.
-
Check to make sure that the power supply voltage switch located on the power supply is properly set for your country. In the U.S., this switch should be set to 110V/115V.
-
Plug both the ATX 24-pin Motherboard Power Connector and ATX 4-pin Motherboard Power Connector into the power supply tester.
Depending on the PSU that you have, you might not have a 4-pin motherboard connector but instead a 6-pin or 8-pin variety. If you have more than one type, only plug in one at a time along with the 24-pin main power connector.
-
Plug the power supply into a live outlet and flip the switch on the back. Some power supplies don’t have a switch on the back. If the PSU you’re testing doesn’t, plugging in the device is sufficient to provide power.
-
Press and hold the ON/OFF button on the power supply tester. You should hear the fan inside the power supply begin to run. Some versions of the Coolmax PS-228 tester don’t require that you hold down the power button, but others do.
Just because the fan is running doesn’t mean your power supply is supplying power to your devices properly. Also, some power supply fans don’t run when being tested even though the PSU is fine. You need to continue testing to confirm anything.
-
Confirm the LCD on the power supply tester is lit, and you see numbers in all the fields. The motherboard power connectors plugged into the power supply tester support the entire range of voltages that your PSU can deliver, including +3.3 VDC, +5 VDC, +12 VDC, and -12 VDC. If any voltage reads «LL» or «HH» or if the LCD screen doesn’t light up at all, the power supply isn’t working properly; you need to replace it.
You’re just looking at the LCD screen at this point, so don’t worry about any other lights or voltage indicators not located on the actual LCD readout.
-
Check Power Supply Voltage Tolerances and confirm that the voltages reported by the power supply tester are within approved limits. If any voltage is outside of the range shown, or the PG Delay value isn’t 100–500 ms, replace the power supply. The tester is designed to give an error when a voltage is out of range, but you should check yourself to be safe.
If all the reported voltages fall within tolerance, you’ve confirmed that your power supply is working properly. If you’d like to test the individual peripheral power connectors, continue testing. If not, skip to Step 14.
-
Turn off the switch on the back of the power supply and unplug it from the wall.
-
Plug in one connector to the appropriate slot on the power supply tester: a 15-pin SATA Power Connector or a 4-pin Molex Power Connector. Don’t connect more than one of these peripheral power connectors at a time. You probably won’t damage the power supply tester doing so, but you won’t be accurately testing the power connectors either.
Both of the motherboard power connectors that you connected to the tester earlier should remain plugged in throughout these tests of the other power connectors.
-
Plug in the power supply and then flip on the switch on the back if you have one.
-
The lights labeled +12V, +3.3V, and +5V correspond to the voltages being delivered through the connected peripheral power connector and should light up appropriately. If not, replace the power supply.
Only the SATA power connector delivers +3.3 VDC. You can see the voltages delivered by the different power connectors by looking at the ATX Power Supply Pinout Tables.
Repeat this process, beginning with Step 11, testing the voltages for the other power connectors. Only test one at a time, not counting the motherboard power connectors that stay connected to the tester the entire time.
-
When the testing is complete, turn off and unplug the power supply, disconnect the power cables from the power supply tester, and then reconnect the internal devices to power.
Assuming your power supply didn’t test as bad, or you’ve replaced it with a new one, you can now turn your computer back on and/or continue troubleshooting the problem you are having.
A test using a power supply tester isn’t a true «load» test—a test of the power supply under more realistic usage conditions. A manual power supply test using a multimeter, while not a perfect load test, comes closer.
Your PSU Is Good, But Your PC Won’t Start
Testing a power supply on a desktop computer using a power supply tester device is one of two ways to test one in a computer. There should be little doubt about whether your PSU is working properly after testing it with a PSU tester.
However, there are several reasons a computer won’t start other than a malfunctioning power supply. See How to Fix a Computer That Won’t Turn On for a troubleshooting guide and more help with this problem.
Thanks for letting us know!
Get the Latest Tech News Delivered Every Day
Subscribe
- Информация о материале
-
-
Просмотров: 5367
Для проверки работоспособности блока питания компьютера можно использовать power supply tester китайских производителей. При подключении вы увидите значения напряжений, которые можете сравнить с диапазоном допустимых значений.
Подключается он обычно как показано ниже:
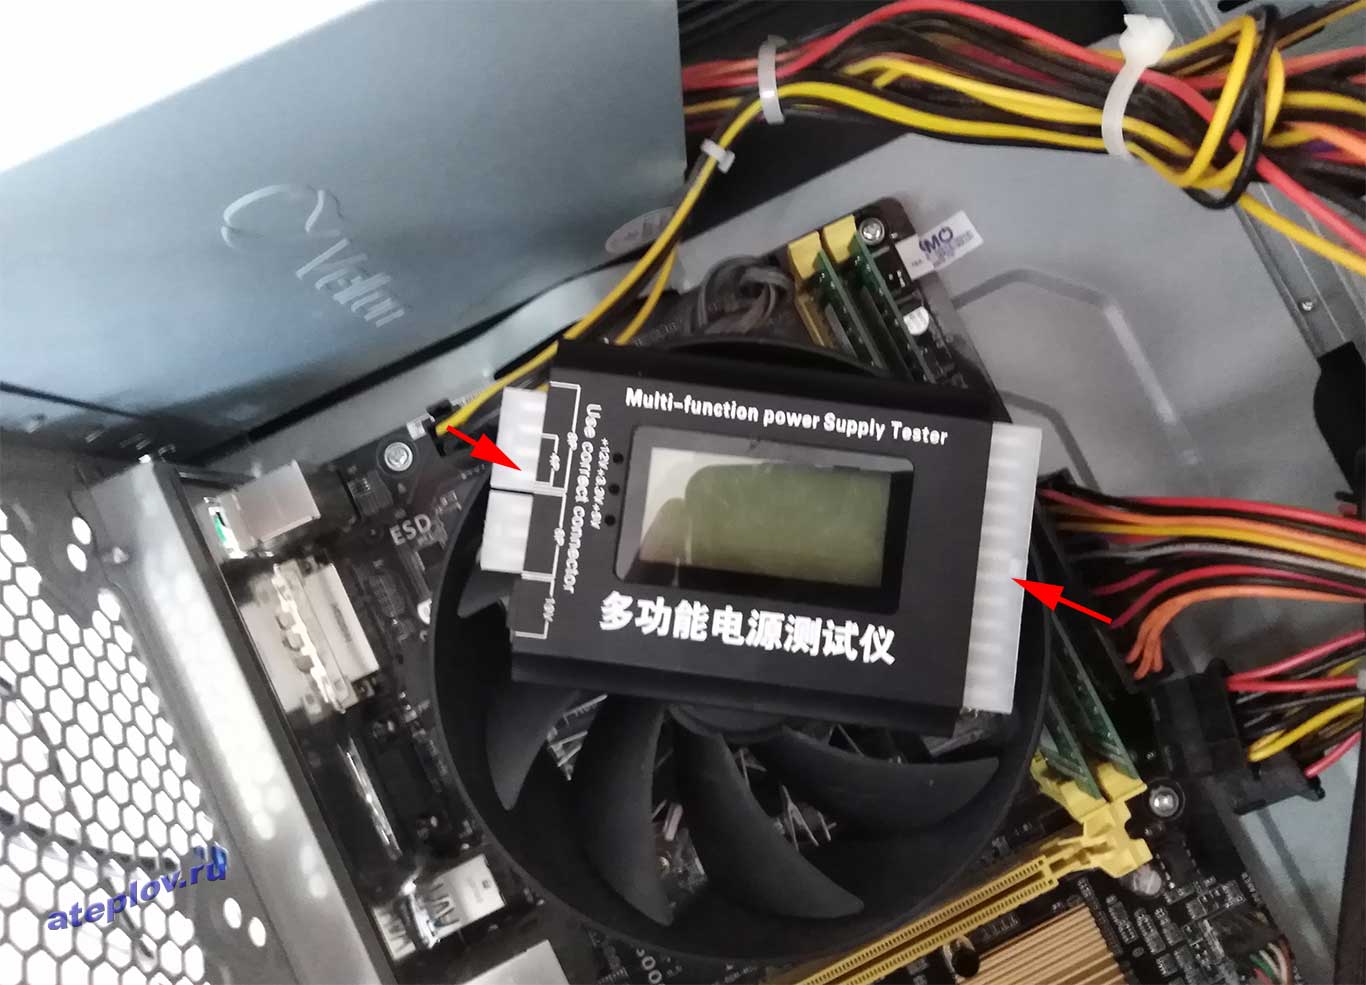
При необходимости слева подключается дополнительное питание видеокарты вместо питания для процессора.
Таблица допустимых значений для Power supply tester
| Параметр напряжения | Допустимое отклонение,+-% | Минимальное значение,В | Нормальное значение,В | Максимальное значение,В |
| +12VDC | 5 | 11.4 | +12.00 | +12.6 |
| +5VDC | 5 | 4.75 | +5.00 | +5.25 |
| +3.3VDC | 5 | 3.14 | +3.30 | +3.47 |
| -5VDC | 10 | -4.50 | -5.00 | -5.50 |
| -12VDC | 10 | -10.80 | -12.00 | -13.20 |
| +5VSB | 5 | +4.75 | +5.00 | +5.25 |
Уже не первый год пользуюсь дешевым китайским тестером для блоков питания Power Supply Tester. Модель неизвестна, кроме вышеназванного «имени» на корпусе есть только надпись «Easy to read power voltage«. Тестер предназначен для замеров напряжения на всех линиях БП и замера Power Good. Этот сигнал говорит о времени, необходимом блоку питания для нормализации напряжений на линиях БП при старте.

Разъёмы на тестере:
- 20/24pin
- 4+4pin CPU
- 6pin pci-ex (видеокарта)
- питание Sata
- молекс
- питание Floppy
Замеры производит с точностью лишь до десятых. В нагрузке замерять напряжения — невозможно, так как для включения устройства необходимо подключение 20 pin (или 24 pin) кабеля. В принципе — штука полезная, но не универсальная. Будет полезна при покупке б/у блока питания наложенным платежем, когда необходимо хотя бы узнать работает БП или не работает. Замкнуть черный и зеленый в таком случае — неинформативно. А с этим тестером уже больше информации: воткнул, посмотрел на сигнал и напряжения — купил/или не купил. Или если имеется множество блоков питания из которых необходимо в краткие сроки найти что-то работоспособное.
Измерения он производит очень и очень приблизительно. При одновременном подключении с мультиметром показания отличались на ~0.2 вольта (!). В то время как «тестер» из поднебесной показывал на линии 12В напряжение 11.9, подключенный на той же линии мультиметр (а точнее два мультиметра) показали результат 12.11В и 12.12В соответственно — что весьма немало и ставит под вопрос целесообразность использования его как измерительного прибора. Измерения проводились на БП Cooler Master Silent Pro Gold 1000W при нагрузке 600Вт на линию 12В.

тест китайца «power supply tester» с мультиметром. Китаец показывает 11.9В в отличии от 12.1В на мультиметре
В оправдание китайца была мысль, что просадка идет по его линии. Но мультиметрами как измерялось напряжение на нагруженых проводах, а тестер снимал 12В с ненагруженного кабеля питания PCI-EX и с 20pin для материнской платы и должен был наоборот, показать более высокое напряжение, если допускать наличие просадок.
Цена power supply tester
Точную цену уже не помню. Тестер был куплен несколько лет назад на ибее.

Порядок цен на сегодня: от $4,98+ доставка или же $6,5 с бесплатной доставкой.
 Отзыв на китайский power supply tester
 Отзыв на китайский power supply tester
Плюсы:
- можно быстро замерять напряжения и сигнал power good.
- компактный
- дешевый
- автоматически запускает БП при подключении.
Минусы:
- Замеры напряжений в нагрузке на ПК он не сделает, из-за невозможности одновременного подключения компьютера и тестера.
- Отсутствие кнопки перезапуска — когда БП уходит в защиту (например, при большой нагрузке по линии 12В) приходится отключать и заново подключать 20pin разъем.
- Точность — очень приблизительная.
- Никак не замеряет пульсации. Пункт применим конечно же и мультиметрам, но он здесь есть как раз для того, чтоб подчеркнуть, что этот девайс не может претендовать на роль узкоспециализированного «тестера» для блоков питания
В целом — девайсом доволен. Деньги потраченные на него — считаю уже отработал. Не раз выручал, когда нужно было проверить множество блоков питания. Для проверки в нагрузке — можно цеплять гирлянды из автомобильных лампочек на 12V линию… или шуруповёрт с молексом 🙂
Просмотров: 812
Rating: 4.0/5. From 1 vote.
Please wait…