
Throwing your own pottery at home, as a hobby or for a business, can be a thoroughly rewarding experience. From vases through to bowls, the finished articles that you can create are many and varied. The key skill to master when creating your pottery piece is the use of your pottery wheel. In this article, we look at how to use a pottery wheel for beginners, to create your perfect pottery piece.
How to use a pottery wheel: A step by step guide
One key element to successfully using your own pottery wheel is through thorough preparation. The first part of this preparation is to ensure that your ‘bat’ (the flat disk attached to the head of your pottery wheel) is cleaned by scraping off any excess clay using a wooden rib or metal scraper. You should avoid using too much water, as bats are liable to warp over time.
Step 1
Spin the wheel and slightly moisten the center of your bat with your sponge.
Step 2
Place your clay on to the center of the bat in a gumdrop shape. Flatten the edges of the clay with the palm of your hand, turning the wheel manually until all sides are flattened down. Following this, use your index finger to press the edges of the clay, sealing the edge of the clay to the bat.
Step 3
Once you are satisfied that the clay is firmly in place, increase the speed of the wheel and put some water on to your hands. Before starting to manipulate the clay, ensure that your elbows are locked to your legs.
Step 4
Use your left hand to push the clay up (this is called coning up) and use your right hand as support. Use the palms of your hands to squeeze the clay inwards, allowing the clay to pop up between your hands. As the manipulated clay gets taller, maintain an ‘A’ shape with your thumbs.
Step 5
Following the coning up of your clay, you also need to cone down in order to center the clay and ensure that you can push the clay to where you need it to go. At this point you should add more water if needed. Place the fat part of your left thumb (where it meets the palm of your hand) directly on top of the center of the clay and place pressure away from you (not down on to the clay). The fingers of your left hand should wrap gently around the front of the clay.
Step 6
Your right hand should also be placed at the top of your clay but on the side and gently pushing the clay to the center. The fingers of your right hand should also be gently wrapped around the clay.
Step 7
Both hands should be pushed in the directions described above and then slowly slide your hands down the clay in tandem. At this point you should have created a ‘cone up’ position for your clay. Keep repeating this method, with more water if necessary, until the clay is centered. The best method of establishing whether the clay is centered is by placing your hands gently around the clay and slowly spinning the wheel. If your hands stay in place then your clay is centered, but if they move and wobble then you will need to repeat more coning.
Step 8
At this point, you will start to form the size and shape of your pottery. Rest your hands on the sides of your clay, with the right thumb knuckle placed over the top of your left thumb knuckle, keeping your thumbs parallel to the floor. Press the top knuckle into the bottom in order to create a small divot in the top of the clay.

Step 9
To make the opening for your bowl, plate or vase, the next stage is called drilling. Place your left thumb in the previously created divot and turn the wheel, waiting until your thumb is centered and not moving about. Use your right hand fingers to guide your left hand thumb down towards the bat.
Step 10
Now is the time to form your pottery! Insert the middle finger of your left hand into the divot. Put your right hand over the top of your left hand and slowly pull the clay back towards you to create your desired shape.
Step 11
Once you are satisfied with your desired shape, you can also add different elements including a lip or handle, depending on what you are creating. You can also use a wooden rib to clean the inside and outside of the pot.
Step 12
To remove your pottery from the bat, place a taut wire on the far side of your piece and slowly slide the wire back towards you.
When learning how to use a pottery wheel, it’s all about practice. Your first effort may not be perfect, but the more time and patience you use, the more successful you will be. Following the above steps is a good start and having the right equipment in place ensures a consistent finished product.
How to use your own pottery wheel — we have the equipment you need

If you want to learn how to throw pottery, we advise that you invest in a high quality pottery wheel.
Whether you are looking to buy a pottery wheel for a hobby or to use for a business venture, there are a range of pottery wheels available, from simpler models through to more advanced.
If you want to learn more about what to consider when buying a pottery wheel, please follow the link or if you simply wish to know more about how to make pottery at home, this guide talks you through all the materials and equipment you will need.
If you are keen to learn how to use your own pottery wheel or even to invest in your own, feel free to contact us and we’ll be happy to help. In the meantime, you can view our range of pottery wheels here.
Additional resources on pottery
- How to make pottery at home
- How to fire pottery without a kiln
- How to prevent cracks in pottery
- Pottery wheel throwing tips & tricks
Introduction: Simple Electric Pottery Wheel
***WARNING *** Read all of this Instructable before starting work. Obviously if you are not completely confident with wiring mains powered appliances safely, do not use an AC/DC universal regulated switching DC power supply as your power option for this Pottery Wheel, and reduce the electrical risks by providing the 36V DC power supply needed by the ESC from a 36V ebike or hoverboard battery instead, or link three 12 V motorcycle or car batteries in series, but in all cases, make yourself aware of the potential hazards associated with AC and DC electricity.
If you are competent working with 240 V AC and 120 V AC and plan on using an AC/DC universal regulated switching DC power supply, always run it from an RCD-protected mains outlet. Whist the description below will work satisfactorily and safely when followed by a competent person, any work with mains power requires good knowledge and awareness of the electrical hazards likely to be encountered with AC and DC supplies. If you are in any doubt about these, always consult a qualified electrician before starting work on this project.
*** DISCLAIMER ***
The author cannot accept any liability for any harm, personal injury, damage to property, or loss experienced as a result of following this Instructable in an unsafe manner.
Background
The advantages of this Potters Wheel are: Simple and quick to build, cheap, wide and controllable speed range, plenty of power to centre 5 kg 10 lb of clay, parts readily available, not need special tooling, fairly lightweight and small size means it can be stored in a cupboard between use. Also, if any component fails you can replace it as you built it in the first place, unlike the very low budget commercial wheels that have poor availability of spares and are not designed for easy user maintenance.
This design was developed to be very easy to make and require only simple tools that a DIY enthusiast probably owns already, the most high tech tool being a jigsaw for cutting the circle of shower board / plywood for the wheelhead, and a soldering iron to extend the length of the motor wires and attach the multi-pin connectors.
As the main components are sourced from electric bikes and hoverboards, or are common electrical parts, they are not expensive and the total cost can be kept to around £60 $70, especially if you can obtain a faulty hoverboard (usually due to failed battery not the wheel motors) at low/zero cost from an online auction/marketplace.
The build process involves fixing the powerful brushless hoverboard motor (wheel) on a wooden base, adding an ebike electronic speed controller (ESC) incorporating a modified ebike twist grip throttle as foot pedal, and mounting the main wheel assembly firmly inside a plastic storage box which acts as a splashpan to catch the messy clay slip. For safety and ease of cleaning, the speed controller, power supply (or battery) and foot pedal are all located outside the splashpan plastic storage box. After use, the main wheel assembly can be lifted out of the splashpan for easy cleaning of the water clay slip left inside.
I’ve tried 4 different ebike Brushless electronic speed controllers (ESC) and 1 very cheap unhoused Brushless ESC and found the latter to be inferior as it had exposed circuit board and no heatsink. All the ebike brushless ESC were very similar quality and worked well. Try to buy one with a diagram identifying each connector as several of these connectors, like brakes, cruise control etc, are redundant for this project. We only need the 3 individual motor power wires each with a bullet connector, the Hall sensor connector (5 wires), main power input (3 wires, join the 2 reds so this becomes a 2 wire, red and black), and the throttle connector (3 wire) used for the foot pedal
Video of completed wheel and some tips on making at: https://youtu.be/kyMVY0iHxkA
Supplies
Electrics
Hoverboard (whole thing or just a replacement wheel) (24v, 36v better) — online auctions/marketplace £0 — 20
Ebike speed controller (36v 350W BRUSHLESS) — online auctions/marketplace £10
AC/DC universal regulated switching DC power supply (120/240v to 36v DC 10A (360W) — online auctions/marketplace £25 — 30
ebike/scooter twist grip throttle (£7)
2.8 mm multi-pin connectors Auto electrics shop or online auction
RCD safety plug (£7)
16 m of 1.5mm multistrand (flexible) electrical copper wire or similar
3mm heatshrink tubing or PVC insulation tape
Other
Splashpan e.g IKEA Vessla storage box or similar £10
Multipin connectors 2.8mm auto electrics type (6 pin , 3 pin and 2 pin)
Various pieces of MDF, plywood (waterproof showerboard best if available), CLS timber, screws etc (£5)
Biscuit tin or other splashproof container to house the external electrics.
Silicone Bathroom Sealant
Tools
Drill, jigsaw, soldering iron, adjustable spanner, screwdrivers, wood saw, combination square, Hex Allen keys
Step 1: Prepare Hoverboard Motor
Remove Hoverboard Motor Open the hoverboard casing by removing all screws including any hiding under labels. Disconnect all electrical connectors and cut cable ties etc in order to safely remove battery (for disposal). Then remove the 4 Allen head bolts that clamp the wheel motor shaft to the chassis and lift out wheel motor.
Extending the Motor Wires Make notes recording the position of the 5 wires of the Hall Sensor connector (the large multi-pin connector on the motor) as the wires need to be reinstated in the same positions in the connector block once the wires have been extended. Remove the wires from the connector by pushing a small screwdriver against the retaining tab on the pin and slide the pin out of the connector.
Extend the 5 Hall Connector wires by soldering a 2m length of 1.5mm wire to each, with heatshrink tube or PVC tape to insulate each soldered joint. Hint If you only have one or two colours of wire, then using a permanent marker pen, mark each wire with a bar code (e.g. black wire is 1 bar, red wire 2 bars, green 3 bars etc. Add bar codes to each end of the 5 wires. This will allow you to track each coloured wire later on when adding multi-pin connectors to them.
Now add bar codes to 3 more 1.5mm x 2m wires ( use 6 bars to 8 bars codes), which are then used to extend the 3 thick motor wires.
Rather than have 8 loose wires, braid the 8 wires together, splitting the braid into a 3-wire braid and a 5-wire braid for the last 20 cm or so. Find a tutorial on Youtube how to braid hair and rope, and repeat with these wires. Seems complex at first but its worth persevering. Bind the area where the soldered joints are located with plenty of PVC tape to make it waterproof. You can also smear Silicone Sealant over this area for added protection.
Terminate Wires with Multi-pin Connectors Now connect a 5-pin multi connector to the 5 Hall Sensor wires from the motor (referring to your notes and codes so that each wire ends up in the right position in the connector as noted earlier) and also connect a 3-pin multi connector to the 3 motor wires, the position of these in the connector is not critical but i suggest you order them yellow, green, blue in the plug and match the same order when you replace the 3 bullet connectors on the ESC with a single 3-pin multi connector. To save time later, select the male/ female plug for your motor’s Hall Sensor wires that fits correctly to the Hall Sensor plug already on the ESC (Photo H), and follow the same format for the 3 motor wires (Photo M).
Note: If you prefer you can reuse the individual bullet connectors on the motor and ESC, but I preferred a single 3-pin multiconnector here. If you do reuse bullet connectors, just ensure they connect yellow-yellow, green-green, and blue-blue for the respective ESC and motor wires each time you connect up, getting the wrong order does no harm anything but may cause the hall signal to be out of sync with the power signal to the motor (so motor turns noisily).
Step 2: Make Motor Mount and Wheelhead
Cut Square Base The motor mount consists of a 335mm square of 17mm chipboard (plywood better) with its corners removed to allow it to fit tightly into the plastic splashpan (IKEA Vessla storage box). If you use a different box measure internal width at a point 60mm above its base and cut the square 20mm wider in order for it to fit tightly as you don’t want any movement between the base and wall when you throw pots. The corners of the plywood/MDF base are cut back about 50mm 2inch as the corner will not flex at all, unlike the side walls.
Make Motor Mount Join together two 240mm lengths of 90mm x 38mm CLS timber with 60mm wood screws and cut a perpendicular groove centrally in the 76mm side (photo) using a hand saw. The groove is 10 — 12mm wide and about 3 — 5 mm deep, use the combination square to ensure it is perpendicular. Screw this motor mount to the base from the underside (4 60mm wood screws) so that the groove aligns with a 20 — 30mm hole cut in the centre of the square base. This centralises the wheel and helps drainage.
Add Feet Cut 4 short lengths of 38mm CLS timber and screw to the underside of the square base to act as feet, keeping the base above the pool of water and clay slip that accumulate when throwing.
Fix Motor to the Motor Mount Finally, using four 60mm coach bolts or large wood screws, attach the motor to the bracket using the square metal plate that originally held the motor onto the hoverboard chassis (if you buy a bare motor you will need to fabricate a metal plate) placing the curved face of the motor shaft against the wood and the flat face against the metal bracket (photo).
Prepare Wheelhead Cut out a 280mm diameter circle of 18mm exterior grade plywood (waterproof showerboard better) and mark a 145mm diameter circle centrally, and then drill 5 or 6 holes approx equally spaced along this circle. Later when you can run the wheel you can centralize this wheelhead on top of the motor and then fix it in place with temporarily with Silicone Sealant and then permanently with wood screws that locate into the rubber tyre. These dimensions work for a 6.5 inch hoverboard wheel.
Step 3: Making Foot Pedal or Hand Controller
Options to Control Wheel Speed There are three ways described here to control the speed of the wheel, either a bespoke footpedal covered in my next Instructable (best option), a hand controller with rotating knob (uses a potentiometer), or a foot pedal based on an ebike twist grip throttle. The bespoke footpedal described in the follow-up Instructable is very cheap, easy to fabricate, and will suit most potters as they will be familiar with this method from using commercial wheels. The the foot pedal from twist grip (photo) described below is more awkward to make as it requires adaptation of the donor parts and is less robust. The hand controller (photo) is very simple to make and is probably the best option to get the wheel working in a short time and without too much effort.
All these systems have three wires which connect to the throttle multi-pin connector on the ESC (photo FP). Some trial and error may be needed to establish the correct position that the 3 wires must be located in the connector, but since there are only 6 different ways to locate these 3 wires the answer is soon found. Most likely, the connector supplied with an ebike twist grip throttle should match the throttle connector on the ESC allowing you to test it but it will need modification described below (or at least have the spring removed so it can be rotated and held at any desired position).
1) Bespoke Low cost Footpedal
A simple, robust and fully-operational electronic footpedal can be made from a Hall sensor and two magnets with some scraps of MDF. See my instructable «Low Cost Footpedal for Electric Pottery Wheel» for full details.
2) Hand Controller with Rotating Knob Acquire a 100k potentiometer (photo) (10k may be better for some ESC) and fix it into a small box and add a rotating knob to make the hand controller. For ease of use with clayey hands, fixing a kebab skewer instead of a knob may be more practical. Now solder three 2m wires onto a multipin connector that will connect with the one on the ESC (named as «Throttle» by most ESC manufacturers). Take the wires going to the positive and negative (red and black) wires of the ESC throttle connector and solder them to the outer pins of the potentiometer (the way you connect Red and Black will determine whether speed increases with clockwise or anticlockwise turning), and solder the third wire which runs from the coloured wire of the ESC connector onto the middle (wiper) terminal of the potentiometer. Job done. Note: the potentiometer must be «zeroed» before the ESC will work, do this by turning fully clockwise or anticlockwise before turning on the power.
3) Foot Pedal from Ebike twist grip throttle Acquire an Ebike twist grip throttle (photo). Cut off rubber coating and carefully hack away the outer end of the plastic body and lever off the plastic side plate of the wired end (photo) so that the rotating sleeve part can be slid off the main body. Throw away the internal spring. Now you need to make some internal adjustments. First change the position of one magnet from position 1 to position 2 (photo), leave the other magnet at position 3. I used hot glue to fix it. Second, create a new end stop for the rotating sleeve by gluing in some segments of wood or plastic against the original end stop, so that when the rotating sleeve is placed back on the main body it rotates through only 30 degrees or so. Dont let the magnet act as an end stop as the hot glue isn’t strong enough for that. Be careful to keep the magnet the same way round as it was as the N S poles are critical, just move it forward a little bit. As these twist grip throttles use a Hall Sensor between the two magnets, shortening the distance between these magnets as described causes the 0 — 100% resistance output to occur more quickly (less degrees of rotation needed) and the 30 degrees value suits foot operation better than 60 degrees.
Now attach the reassembled twist grip throttle to a piece of plywood (glue and screw) and attach another piece of wood or plastic to the rotating sleeve using glue and cable tie. If possible support the free end of the man body by inserting a 22mm diameter piece of tube or wood so that when you operate it with your foot it can bear the weight. I suggest you look at the YouTube video to get a better idea. This foot pedal fabrication is the hardest part of the project. I have tried using a scooter throttle pedal which also uses hall sensor but still had to mess around with the magnets inside to get a useful electrical resistance output that matched the ESC. Some Guitar pedals and the HSL Junior VS pottery wheel pedal are foot pedals with mechanical levers that turn a potentiometer, but these cost more than the rest of this wheel put together so are not the solution here. The Hand Controller (option 2 above) may be the safest way to start off if you go for a build or simply use an ebike twist grip throttle as it is, or with its spring removed so it stays at any speed you set.
Step 4: Final Assembly
1) Electrics. So far i have given details of the connectors on the ESC for the Motor Power Wires, the Motor Hall Sensor, and the Foot Pedal or Hand Controller. So finally we need cover the power connector on the ESC which brings the 36V Power Supply to the Ebike Controller. As Ebikes and scooters use an on/off «ignition» key for anti-theft protection most ESC Controllers don’t just have a simple 2-wire (black and red) connector for power, but instead use a three wire connector with two positive terminals and one negative so that the key switch can link the two positives when operated. This adds unnecessary complication for the Potters Wheel and we don’t need an on/off key switch, so simply solder the two red wires together (the 2 positives may be red and orange) then create 2-wire multi-pin connector for the power wires with one pin negative (black) and the other positive (the joined reds) (Photo Power).
All that remains to be completed now is to take a 36V DC supply (positive and negative wires), either from a 36V battery or a 36V mains Power Supply as mentioned earlier, and add the appropriate 2-wire multipin connector to fit the one on the ESC. When you want to operate the wheel just connect these two multipin connectors, when you finish throwing just disconnect these connectors.
2) Cables. I’ve tried various arrangements to bring the braided motor power cable into the splashpan from the external ESC power controller box (holes through the splashpan sidewall or base etc) but the simplest way is just to trail the cable over the top edge of the splashpan in a corner on the opposite side to where you will sit. It may be helpful to add extra water protection to the braided cable near to the motor shaft by cutting the bottom off a plastic milk bottle and using it to cover the vertical loop of braided wire at the point where the soldered wire connections have been covered with PVC tape (photo shows cable at the point that a milk bottle cover can be added). Further protection could be achieved by covering this PVC taped area of cable with Silicone Sealant. In practice, as long as water/slip accumulation in the splashpan is kept to less than 25mm the motor and vulnerable part of the braided cable will be high and dry.
Most Ebike ESC have a few plugs we do not need e.g. for braking, cruise control, power regeneration, and «Tuning». The Tuning plug, if you have it, can be used on the very first power up to tune (synchronize) the Hall Sensor with motor field frequency if the motor does not run smoothly. If you don’t have this feature and the wheel turns noisily or just hums without turning, the Hall Sensor is out of sync with the motor electric field windings. Don’t panic, just do some switching of the yellow/green/blue pins in the Hall Sensor Connector (eg start by trying yellow to yellow, green to blue, and blue to green, and if that does not solve the problem then proceed through the other 5 alternative pairings, e.g. yellow to green, green to yellow and Blue to blue, etc etc., and if you still have no joy try it all again after you have swapped around two pairs of the motor pin connections in a similar way. In total there are 6 lots of 6 i.e. 36 different ways to connect the YGB wire pairs of the Hall Sensor AND the YGB wire pairs of the motor, but you will hit on a working combination after just a few trials as there is more than one working combination.
The final ESC connector which is possibly very helpful is the Reverse Gear. This is usually two single white wires ending in a small connector (photo). You can either use this as it is if you just want to set the rotation direction permanently as clockwise or anticlockwise, but if you want to change direction regularly then run these wires to a switch so its easier.
All the remaining redundant connectors i would leave as they are and bind up with PVC Tape to avoid shorting. If you cut off the connectors the exposed wires may short.
WARNING the description above states to use 3-pin multi-pin connectors for both the motor power and the foot pedal. To avoid plugging the wrong ones together accidentally, mark each pair of male and female connectors with an «M» or an «FP» and check these labels carefully every time so you make the right connections. A better solution would be to use a 4-pin multi-pin connector for the 3 motor wires and leave one of the pin positions empty so there is no way to misconnect. The other safe way is to use a male 3-pin connector on the ESC for the motor wires and female 3-pin connector on the ESC for the foot pedal wires.
3) Fixing the Wheelhead. Step 2 described how to prepare the 280mm wheelhead but only now that the motor can spin under power should you fix the wheelhead onto the motor. Using a few spots if Silicone Sealant on the top of the motor centralise the wheelhead by eye (like centring a pot for turning) also check any vertical misalignment and if there’s too much, pull off the wheelhead and add some small coin-size pieces of paper under the low point and try again. After a bit of trial and error you should get the wheelhead spinning true vertically and horizontally. Use very low rotation speeds for this centring. Wait 12 hours until the Silicone Sealant has set before screwing the wheelhead firmly onto the motor with the holes drilled in Step 2. Tighten the screws gradually in a sequence checking you don’t create vertical misalignment of the wheel head by applying too much pressure on one side.
4) Operating the Wheel. It was not mentioned in Section 2, but the top of the wheelhead must be about 20 mm below the top edge of the splashpan in order to stop slip spinning everywhere and creating a right ol mess! The timber dimensions stated earlier achieve the correct height with the Vessla Storage box, but you can adjust the height easily by changing the size of the 4 blocks of wood that act as feet.
One of the advantages of this wheel is the small size and light weight that allows discrete storage at home, but this has the disadvantage that the wheel is not a 50kg lump that you sit on comfortably. So operation in a seated position is best achieved by placing the wheel on the ground and using a very low stool to sit (squat) on. Alternatively you can rest the wheel on a solid object (wooden chest, concrete blocks, chair, etc) and use a taller stool. Either way you should be able to brace your forearms on the top edge of the splashpan to steady your hands for centering of clay and achieve accurate lifting and turning techniques. Higher seating heights will give a more natural foot position to operate a foot pedal, but if using the Hand Controller this is less important. An alternative operating position is to place the wheel on a low table and just stand in position. Experiment to see what’s best for you.
If you build a wheel please drop a comment here or on the Youtube video, and if you get stuck i will respond on these platforms.
Happy Potting.
Гончарный набор — это портативная гончарная мастерская. Набор содержит настоящую глину и компактный гончарный круг, который упросит ребенку процесс лепки. Занятия с Pottery Wheel дадут возможность ребенку ощутить себя настоящим гончаром, создавая посуду, вазочки, горшки для цветов и многое другое.
Работа на гончарном круге не только порадует ребенка старше 8 лет. Она окажет полезное воздействие на функционирование детских пальчиков, запястий. Набор дает широкое поле для фантазий и деятельного мышления. С его помощью ребенок сможет обучиться навыкам гончарного искусства. Занятия с гончарным кругом принесут удовольствие от самостоятельного создания различных полезных в быту изделий.
Характеристики:
Размер: 25х20х8 см.
Материал: ABS пластик.
Питание: от 2-х батареек типа D. крона!
Цвет: розовый, бирюзовый, фиолетовый.
Упаковка: коробка.
Вес в упаковке: 1400 гр.
Размер упаковки: 33х8х24 см.
Страна производитель: Китай.
Комплектация:
Гончарный круг: 1 шт.
Глина: 2 упк.
Стеки: 2 шт.
Держатель для стек: 1 шт.
Леска для снятия работы с круга: 1 шт.
Кисти: 2 шт.
Акриловые краски: 6 цветов.
Палитра.
Инструкция.
Батарейки в комплект не входят.
Примечание: Из-за различных дисплеев и освещения изображение может не отражать фактический цвет товара.
-
Log in
-
Join
Watch in our app
Open in app
Kick Wheels are one of the earliest ways to Throw Pottery on a Wheel. They are used for making functional and decorative pieces of pottery and have been around since 4000 BC in the Sumerian civilization. Modern technology has not led to the demise of The Kick Wheel. Many potters still enjoy using them as their Primary Pottery Wheel.
Operating a Kick Wheel can be confusing and a little intimidating, I know I was a little nervous the first time. Follow along as I help you take away some of the fear and confusion in my Ultimate Beginners Guide on How To Use a Pottery Kick Wheel
Affiliate Disclaimer: We are ambassadors or affiliates for many of the brands we reference on the website. As an Amazon Associate, I earn from qualifying purchases.
How to Use the Kick Wheel to Get Started
A Kick Wheel is a manual spinning wheel that potters use to make clay vessels. Having no motor makes it easier to maintain. Plus with no electricity needed, you can go green unless you want an optional motor.
Kick Wheels have a steel or a wooden frame, and a heavy concrete or steel flywheel. Usually a 14″ cast aluminum wheel head. An Adjustable seat and worktable in the front of the wheel head.
Using a kick wheel involves kicking the heavy flywheel in a counterclockwise or clockwise direction and controlling its speed by the potter’s foot and molding your clay with the momentum of the wheel.
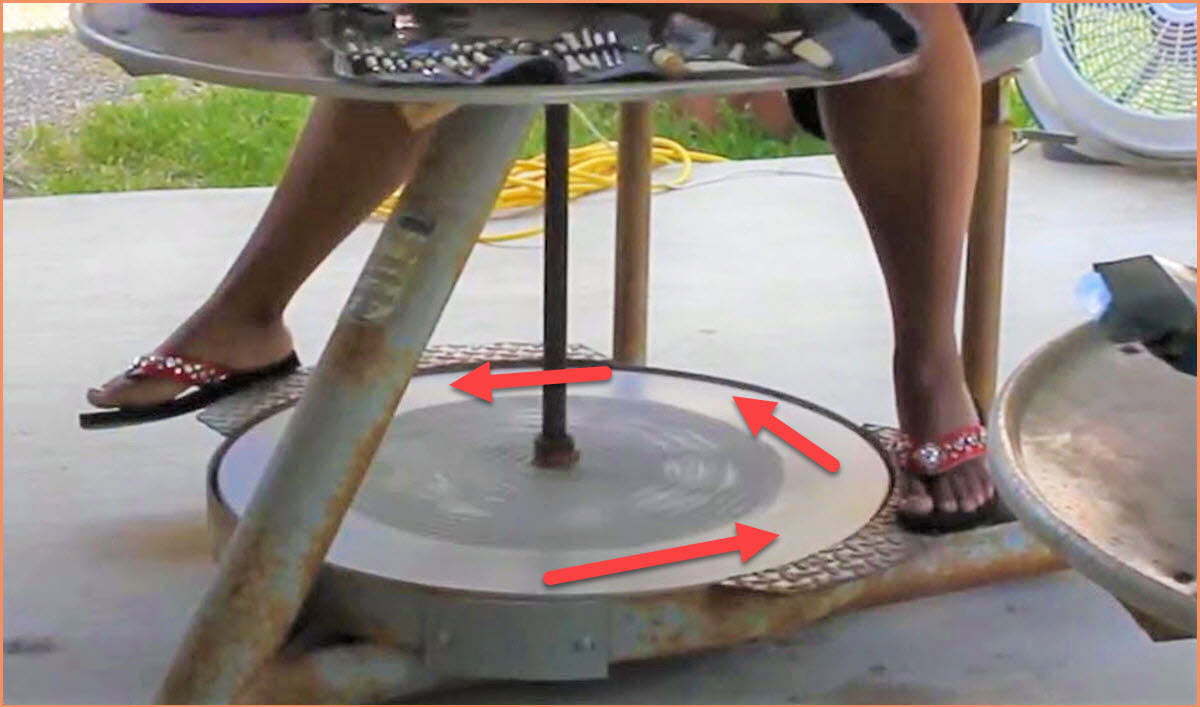
Although kicking sounds simple, it actually requires some skill, balance, and concentration to operate the wheel as you throw the pottery.
Because not all clays are alike make sure you have the right Clay for throwing on the Kickwheel.
How to Adjust the Kick Wheel Seat Before Sitting
Before you begin your pottery-making process using a kick wheel, you should adjust the seat. This will ensure that your body is well-positioned to kick the wheel and create your pottery.
To adjust your kick wheel’s seat, you can lift it out and turn it around to adjust the space between you and the throwing surface. You want to be seated close to the wheel head.
After that, lower or raise the seat’s height, depending on how high the wheel is. This is to ensure you sit comfortably and can reach the throwing surface and throw your clay effectively.
How to Maintain and increase the Kick Wheel Speed
After the flywheel has started moving, you can increase its speed to prepare for the throwing pot technique. To increase the kick wheel’s speed, kick the flywheel as you move your foot closer to the center (toward the axle).

Kicking closer to the center will not tire you as the wheel head will gain speed in a smooth rhythm, unlike trying to kick the flywheel harder around the edges, which will require more effort and time. The momentum of the wheel head will last for several minutes.
How to Center Your Clay on The Kick Wheel
This process involves slamming the clay on the wheel head to ensure that it sticks on the wheel surface. This must be done before you start spinning the wheel.
Wet the wheel head lightly with a damp sponge and slam the clay ball at the center of the wheel.
To make the wheel head start moving, kick the outside top edge of the flywheel using your foot in a counterclockwise (right-handed) or clockwise (left-handed) direction. The benefit of having a kick wheel is that you can easily go forward or reverse. For more information on the direction of your wheel check out Which Direction Should a Potters Wheel Turn.
You don’t want to move your knee up and down because this will cause your upper body to move more. You want to keep your knee as still as you can while kicking the wheel.
To center the clay properly, increase the wheel head speed by kicking the flywheel. Then, start centering your clay. Applying force to the clay will slow the kick wheel down. Kick the center of the flywheel to increase the speed of your wheel head.
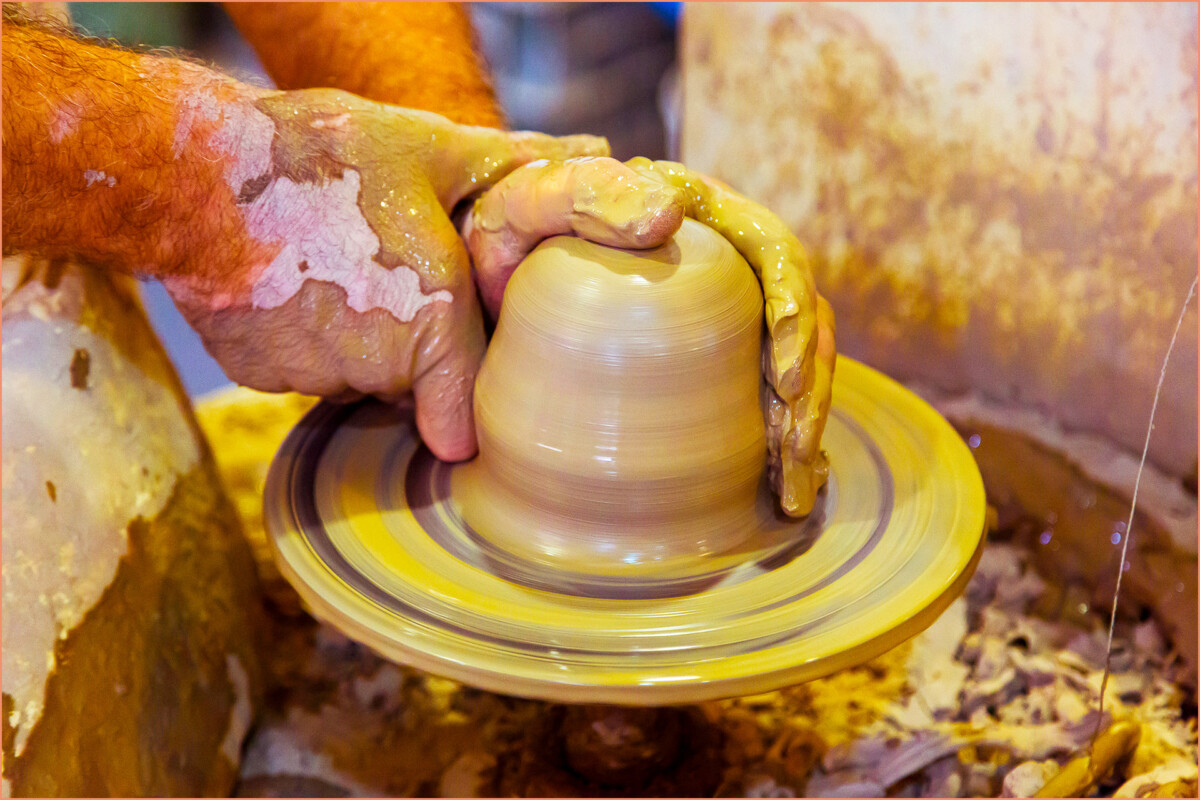
As you are opening your clay try not to kick the wheel when working with your clay. Slowly release your hands from the clay and continue to kick the inside of the flywheel.
For more detailed information on centering your clay check out this video. How to Center Clay on The Wheel Easy A 5 Step Beginners Guide
How to Open Your Clay in the Center
Once your clay is centered, the next step involves opening the clay. It’s a straightforward process that involves making a hole in the middle of the clay. However, you can use different methods to open the clay, depending on your skills or preferences.
The flywheel of the potter’s kick wheel can be quite heavy. As you kick the momentum of the wheel speeds up and you can start working on the Clay as the wheel head spins.
Push your forefinger (or thumb) in the middle of the clay. Or a half inch if you are planning on trimming the bottom. Use your other hand to hold the clay in position, making it stable.
When the momentum of the flywheel starts to slow down. Slowly release your hands from the wheel and continue kicking towards the center of the wheel.
Form the Base of the Clay and Compress the Bottom
This step enlarges the hole you created in the previous step to form the base before pulling up the walls of your pot.
During this process, you will have to release your hands from the clay more often and kick the flywheel to continue a higher speed on your wheel head.
Place your fingers inside the hole and push them slowly toward the edges. Use your other hand to support the wall that forms on the spinning clay. Continue pulling the clay until the opening enlarges to your desired width. Then compress the bottom.
Pull up the Walls
You can start slowing down the speed of your wheel head when pulling up the walls. Go with the momentum of the wheel as it starts to slow down. Then kick the flywheel to continue your desired speed. Because of the weight of the flywheel, you shouldn’t have to kick it as often.

If you are not familiar with throwing cylinder Here is a helpful video on throwing a mug
Continue controlling the wheel’s speed throughout this process by kicking the kick wheel in between throwing your pot. Allow the weight of the flywheel to spin on its own when throwing.
Shape and Finish Your Pottery
Your pot’s top may become uneven as you thin out the walls. So, shaping and finishing may involve several additional steps depending on what shape you want to create.
Now, the basic shaping step involves slowing the flywheel down as you are smoothing out the pot’s sides and evening its rim. To do this, cut off the undesired parts using a needle tool.
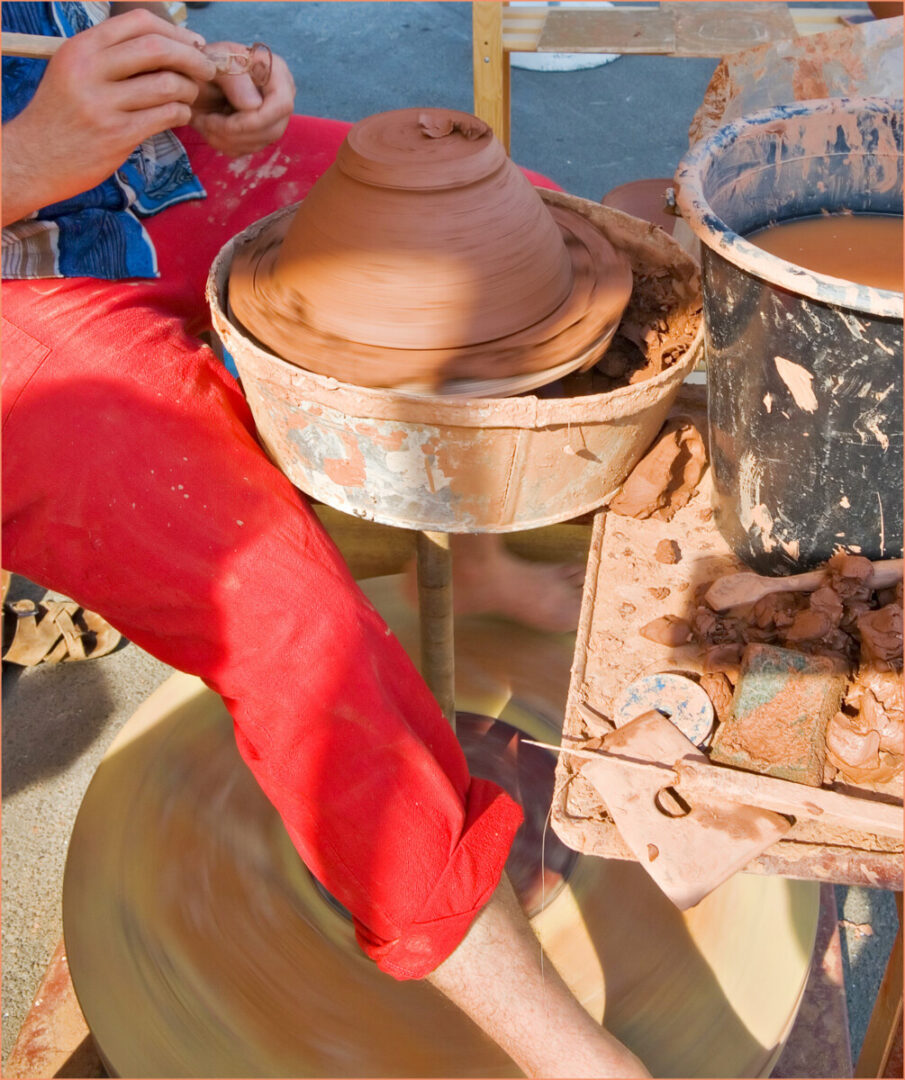
Press the pin on the spinning clay until you remove the clay. When doing this it’s important not to have your wheel routing too fast.
How to Slow Down and Stop the Kick Wheel
As you approach the end of the throwing process, allow the kick wheel’s speed to reduce gradually on its own. Don’t try to slow down the flywheel as you shape your pot in the last step.
As the wheel slows down automatically, it’ll eventually stop, or you can gradually press your foot on the flywheel to slow down and stop the wheel.
Then you can lift your pottery from the throwing surface using a wire cutter to remove the piece at the bottom and lift it from the wheel. Your pottery is now ready for other steps, including decorating and firing.
After the wheel has stopped, you can now clean it to prepare it for another throwing procedure. The cleaning process is easy, as you kick the flywheel a few times Scaping off the clay and press a damp sponge on the wheel, stop the wheel and throw another ball of clay on the wheel, and repeat.
How To Prepare Your Clay for Wheel Throwing
Clay is the major component of creating pottery, and you should prepare it before you begin the throwing process.
Here are The Three clay Bodies you can use during the wheel throwing technique on a kick wheel:
- Earthenware – is a grainier porous clay. Though it’s relatively easy to work on, earthenware is weaker than stoneware and requires glazing to hold liquids.
- Stoneware – is a more durable non-porous clay. It is easy to work with and more suitable for dinnerware.
- Porcelain – is less forgiving than other clays. It absorbs water rather quickly which can make big changes in its workability, so, it’s not the best clay for newbies.
For more detailed information check out different Clays to choose from.
Wedging Your Clay
After choosing your desired clay body, you have to prepare it well for wheel throwing. The process of wedging your clay properly will help align its particles evenly to create an even consistency and remove air bubbles from the Clay.

The wedging process involves different approaches.
- Ram’s Head wedging – involves pushing a chunk of clay forward toward the table while applying pressure to get rid of air bubbles.
- Spiral wedging – entails pressing a brick-shaped piece of clay away from you at an angle and rotating it to end up with spiral-shaped clay.
For all 5 ways to wedge, check out How To Wedge Clay – A Beginner’s Guide With A Step By Step Video.
Conclusion
So there you have it, everything you need to know in order to start using a pottery kick wheel. It’s not a super easy process, but with practice and patience, it will be able to create beautiful pieces of pottery that will last for generations.
I hope this guide was helpful and that you are now feeling more confident in your ability to use a Kick Wheel. Feel free to refer back here if you need help with any of the steps as you continue learning how to use a kick wheel.
Набор Pottery Wheel — это портативная гончарная мастерская. Набор содержит настоящую глину и компактный гончарный круг, который упросит ребенку процесс лепки. Занятия с Pottery Wheel дадут возможность ребенку ощутить себя настоящим гончаром, создавая посуду, вазочки, горшки для цветов и многое другое. Упругая глина и крутящийся гончарный круг дадут необходимую нагрузку для пальчиков, способствуя развитию мелкой моторики и пространственного мышления. В набор входят краски для декорирования изделий, что позволит ребенку научиться правильно сочетать цвета, развивая чувство цвета и эстетическое восприятие.
Состав набора:
Гончарный круг
Глина
Педаль ножного управления
Регулируемый рычаг
Палитра
Ножи и инструменты для моделирования
Краски — 6 цветов
Кисти для рисования
Инструкция
Рекомендуемый возраст: от 8 лет
Купить Гончарный набор Pottery Wheel