

DSR 15B3, DVSR 5
EN English
Operating instructions
DISHWASHER — Contents
Operating instructions,1
Precautions and advice, 2-3
Assistance, 6
Product Data, 6
Installation, 7-8
Description of the appliance, 9
Refined salt and rinse aid, 10
Loading the racks, 11-12
Detergent and dishwasher use, 13
Wash cycles, 14
Care and maintenance, 15
Troubleshooting, 16
RU Итальянский
Руководство по эксплуатации
ПОСУДОМОЕЧНАЯ МАШИНА — Оглавление
Руководство по эксплуатации, 1 Меры предосторожности и рекомендации, 3-4 Установка, 17-18
Техническая спецификация изделия, 19 Описание изделия, 20 Регенерирующая соль и Ополаскиватель, 21 Загрузка корзин, 22-23
Моющее средство и использование посудомоечной машины, 24 Программы, 25
Техническое обслуживание и уход, 26 Неисправности и методы их устранения, 27 Сервисное обслуживание, 28
KZ Қазақша
Пайдалану нұсқаулығы
ЫДЫС ЖУУ МАШИНАСЫ — Мазмұны
Пайдалану нұсқаулығы, 1 Сақтық шаралары мен кеңес, 4-5 Көмек, 6 Орнату, 29-30
Өнім парақшасы, 31 Құрылғы сипаттамасы, 32
Тазаланған тұз және шаюға көмекші зат, 33 Тартпаларға жүктеу, 34-35 Жуғыш зат пен ыдыс жуу машинасын қолдану, 36 Жуу циклдары, 37
Күтім және техникалық қызмет көрсету, 38 Ақаулықтарды жою, 39

EN Precautions and advice
 This appliance was designed and manufacturedincompliancewithinternational safety standards. The following information has been provided for safety reasons and should be read carefully.
Keep this instruction manual in a safe place for future reference. If the appliance is sold, given away or moved, make sure the manual is kept with the machine.
Read the instructions carefully, as they include important information on safe installation, use and maintenance.
This appliance was designed for domestic use or similar applications, for example:
— farmhouses;
— use by guests in hotels, motels and other residential settings;
— bed & breakfasts.
Remove the appliance from all packaging and make sure it was not damaged during transportation. If it was damaged, contact the retailer and do not proceed any further with the installation process.
General safety
• This appliance should not be operated by children younger than 8 years, people with reduced physical, sensory or mental capacities, or inexperienced people who are not familiar with the product, unless they are given close supervision or instructions on how to use it safely and are made aware by a responsible person of the dangers its use might entail.
• Children must not play with the appliance.
• It is the user’s responsibility to clean and maintain the appliance. Children should never clean or maintain it unless they are given supervision.
• The appliance was designed for domestic use inside the home and is not intended for commercial or industrial use.
• The appliance must be used to wash domestic crockery in accordance with the instructions in this manual.
• The appliance must not be installed outdoors, even in covered areas. It is extremely dangerous to leave the machine exposed to rain and storms.
• Do not touch the appliance when barefoot.
• When unplugging the appliance always pull the plug from the mains socket. Do
not pull on the cable.
• The water supply tap must be shut off and the plug should be removed from the electrical socket at the end of every cycle and before cleaning the appliance or carrying out any maintenance work.
• The maximum number of place settings is shown in the product sheet.
• Iftheappliancebreaksdown,donotunder any circumstances touch the internal parts in an attempt to perform the repair work yourself.
• Do not lean or sit on the open door: this may cause the appliance to overturn.
• The door should not be left open as it may create a dangerous obstacle.
• Keep detergent and rinse aid out of reach of children.
• The packaging material should not be used as a toy.
• Knives and other utensils with sharp edges must be placed either with the points/blades facing downwards in the cutlery basket or horizontally on the tip-up compartments or in the tray/third basket, if available.
• Connect the appliance to the water mains using the new supply hose provided with the appliance. Do not re-use the old hose.
• Install the back side of a free-standing dishwasher against a wall.
Disposal
• To dispose of any packaging materials, follow local legislation so that the packagings may be reused.
• The European Directive 2012/19/EU relating to Waste Electrical and Electronic Equipment (WEEE) states that household appliances should not be disposed of using the normal solid urban waste cycle.
Exhaustedappliancesshouldbecollected separately in order to optimise the cost of reusing and recycling the materials inside the machine, while preventing potential damage to the atmosphere and public health. The crossed-out dustbin symbol shown on all products reminds the owners of their obligations regarding separated waste collection.
For further information relating to the correct disposal of household appliances, owners may contact the relevant public authority or the local appliance dealer.
Saving energy and respecting the environment
2

Saving water and energy
• Only begin a wash cycle when the dishwasher is full. While waiting for the dishwasher to be filled, prevent unpleasant odours with the Soak cycle (if available, see
Wash Cycles).
• Select a wash cycle that is suited to the type of crockery and to the soil level using the Table of Wash Cycles:
— For dishes with a normal soil level, use the Eco wash cycle, which guarantees low energy and water consumption levels.
— If the load is smaller than usual activate
the Half Load option (see Special wash cycles
and options, if available).
• If your electricity supply contract gives details of electricity-saving time bands, run the wash cycles when electricity prices are lower. The Delayed Start option can help you organise the wash cycles accordingly
(see Special wash cycles and options, if available).
Меры предосторожности RU и рекомендации
 Изделие спроектировано и изготовлено в соответствии с международными нормативамипобезопасности.Настоящие инструкции составлены в целях вашей безопасностиидолжныбытьвнимательно прочитаны.
Важно сохранить данное руководство для его последующих консультации. В случае продажи, передачи или переезда проверьте, чтобы данное техническое руководство сопровождало изделие.
Необходимо внимательно прочитать настоящие инструкции: в них содержатся важные сведения об установке изделия, его эксплуатации и безопасности.
Данное изделие предназначено для бытового или другого аналогичного использования, например:
— в агротуристических усадьбах; — для использования проживающими в
гостинице, мотеле и в других временных местах проживания; — в гостиницах типа «номер с завтраком».
Снимите упаковку с изделия и проверьте, чтобы на нем не было повреждений, нанесенных при транспортировке. При обнаружении повреждений не подсоединяйте машину, а обратиться к продавцу.
Общие требования к безопасности
•Данный бытовой электроприбор может быть использован детьми не младше 8 лет и лицами с ограниченными физическими сенсорными или умственными способностями или не обладающимидостаточнымопытомили знанием о работе подобного прибора, под наблюдением или после обучения безопасному пользованию прибором и усвоения связанных с ним опасностей.
•Неразрешайтедетямигратьсприбором.
•Чистка и уход за прибором должны выполнятьсяпользователем.Непоручать чистку и уход детям без контроля.
•Данное изделие предназначается для непрофессионального использования в домашних условиях.
•Изделие предназначено для мытья посуды в домашних условиях, может бытьиспользованотольковсоответствии синструкциями,приведеннымивданном техническом руководстве.
•Запрещается устанавливать изделие на улице, даже под навесом, так как воздействие на него дождя и грозы является чрезвычайно опасным.
•Не прикасайтесь к посудомоечной машине с босыми ногами.
•Не тяните за сетевой кабель для отсоединения вилки изделия из сетевой розетки, возьмитесь за штепсельную вилку рукой.
•Необходимо перекрыть водопроводный кран и вынуть штепсельную вилку из сетевой розетки в конце каждого цикла и перед началом чистки и технического обслуживания.
•Максимальное количество столовых приборов указывается в технической спецификации изделия.
•В случае неисправности категорически запрещается открывать внутренние механизмы изделия с целью их самостоятельного ремонта.
•Не опирайтесь и не садитесь на открытуюдверцумашины:машинаможет опрокинуться.
•Не держите дверцу открытой, так как об нее можно случайно споткнуться.
•Храните моющие средства и ополаскиватель вдали от детей.
•Не разрешайте детям играть с упаковочными материалами.
•Ножи и кухонные принадлежность с заостренными краями необходимо укладыватьострымконцом/лезвиемвниз в корзине для столовых приборов или в горизонтальном положении на откидных
3

полках или в лоток/третью корзину в моделях, где предусмотрен.
• Прибор должен быть подсоединен к водопроводу посредством новой трубы подачи, не использовать старую трубу для подачи.
• Если посудомоечная машина не встраивается в мебельный элемент, ее задняя панель должна быть обращена к стене.
Утилизация
• Утилизация упаковочных материалов: соблюдайте местные нормативы по утилизации упаковочных материалов.
• СогласноЕвропейскойДирективе2012/19/ СЕкасательноутилизацииэлектронныхи электрическихэлектроприборов(RAEE), электроприборынемогутутилизироваться вместе с обычным городским мусором. Выведенные из строя приборы должны собиратьсяотдельнодляоптимизацииих утилизацииирекуперациисоставляющих ихматериалов,атакжедлябезопасности окружающейсредыиздоровьячеловека. Символзачеркнутаямусорнаякорзинка, имеющийся на всех приборах, служит напоминанием об их отдельной утилизации.
За более подробной информацией о правильной утилизации бытовых электроприборов пользователи могут обратиться в специальную государственную организацию или в магазин.
Энергосбережение и охрана окружающей среды
Экономия воды и электроэнергии
• Используйте посудомоечную машину только с полной загрузкой. В ожидании полного заполнения машины избежать образованиянеприятныхзапаховможно с помощью цикла Ополаскивание (где
доступен — см.Программы).
• Выбирайтепрограммумойки,подходящую для данного типа посуды и степени загрязнения в соответствии с Таблицей программ:
— для нормально грязной посуды используйте программу Есо, обеспечивающую низкий расход электроэнергии и воды.
— если машина загружена не полностью, включите дополнительную функцию Половина загрузки (где доступна, см.
Специальные программы и Дополнительные
функции).
• Если ваш контракт с поставщиком
электроэнергии предусматривает разные часовые тарифы для экономии электроэнергии, пользуйтесь машиной во время с льготным тарифом. Дополнительная функция Запуск с задержкой поможет оптимально организовать мойку (где доступна,
см.Специальные программы и Дополнительные функции).
KZ Сақтық шаралары мен кеңес
 Бұл құрылғы халықаралық қауіпсіздік стандарттарына сай өңделіп шығарылған. Төмендегі ақпарат қауіпсіздік мақсатында берілген, сондықтан оны мұқият оқып шығу қажет.
Бұл нұсқаулықты кейін қарау үшін жоғалып қалмайтындай бір жерге сақтап қойыңыз. Құрылғы сатылса, тегін берілсе немесе жылжытылса, нұсқаулық машинамен бірге болатынын қамтамасыз етіңіз.
Нұсқауларды мұқият оқып шығыңыз, себебі олардың ішінде қауіпсіз түрде орнату, қолдану және техникалық қызмет көрсету туралы маңызды ақпарат берілген.
Бұл құрылғы үйде немесе соған ұқсас жағдайда қолдануға арналған, мысалы:
— фермадағы үйлер; -қонақүйлеріндегі,мотельдердегіжәнебасқа
да қонақ күту орындарындағы қонақтардың пайдалануы үшін; — кіші қонақ үйлерінде.
Құрылғыны барлық орамасынан босатыңыз және ол тасымалдау кезінде зақымдалмағанын тексеріңіз. Ол зақымдалғанболса,сатушығахабарласыңыз және орнату үдерісін тоқтатыңыз.
Жалпы қауіпсіздік
• Құрылғыны қауіпсіз түрде қолдану бойыншажауаптыадамнұсқаубермеген нежақсылапбақыламағаняоғанқатысты қауіптертуралыхабарламағанжағдайда, 8 жасқа толмаған балалар, физикалық, сезімталдықжәнепсихикалыққабілеттері төмен адамдар немесе өнімнен хабары жоқ тәжірибесіз адамдар құрылғыны қолданбауы тиіс.
• Балаларға құрылғымен ойнауға болмайды.
4

•Құрылғынытазалаужәнеоғанкүтімкөрсету пайдаланушының жауапкершілігіне жатады.Балаларбақылаусызқұрылғыны тазаламауы не оған күтім көрсетпеуі керек.
•Құрылғы үйде қолдануға арналған, оны коммерциялықнемесеөндірістіктұрғыда қолдануға болмайды.
•Құрылғы үйдегі ыдыс-аяқты осы нұсқаулықтағы нұсқауларға сәйкес жуу үшін қолданылуға арналған.
•Жабық жер болса да, құрылғыны сыртта қолданбау қажет. Құрылғыны жауын мен найзағай астында қалдыру өте қауіпті
•Жалаң аяқ болған кезде құрылғыға тимеңіз.
•Құрылғыны токтан ажыратқан кезде, розеткадан әрдайым айырынан ұстап тартыңыз. Кабелінен ұстап тартпаңыз.
•Құрылғынытазаламаснемесекезкелген қызмет көрсету жұмысын орындамас бұрын және әр циклдан кейін су шүмегін жабу және айырды розеткадан ағыту керек.
•Орын параметрлерінің ең көп саны өнім парағында көрсетілген.
•Құрылғыбұзылыпқалса,ешбіржағдайда өз бетіңізбен жөндеу мақсатында ішкі бөліктерге тиюші болмаңыз.
•Ашық тұрған есікке сүйенбеңіз немесе оғанотырмаңыз:бұлқұрылғыныаударып түсуі мүмкін.
•Есікті ашық қалдырып кетуге болмайды, себебіолқауіптікедергіболыптабылады.
•Жуғыш зат пен шаюға көмекші затты балалардан аулақ ұстаңыз.
•Орама материалын ойыншық ретінде қолдануға болмайды.
•Өткір жиектері бар пышақтар мен басқа құралдардың ұштарын/жүздерін төмен қаратып ыдыс-аяқ себетіне салынуы керек немесе көлденеңінен қайырмалы бөліктерге, я болмаса тартпаға/үшінші себетке (бар болса) қою керек.
•Құрылғыны бірге берілген жаңа құбыршекпен су желісіне жалғаңыз. Ескі құбыршекті қолданбаңыз.
•Бекітілмеген ыдыс жуу машинасының артын қабырғаға орнатыңыз.
Қоқысқа тастау
• Қаптау материалдарын тастағанда
оларды қайта пайдалану мүмкін болуы үшін, жергілікті заңдарды сақтаңыз.
• Электр және электроникалық құралдардың қалдықтарына (WEEE) қатысты2012/19/EUЕуропазаңнамасына сәйкес үй құрылғылары қалыпты толық қалалық қалдық айналымын пайдаланып жойылмауы тиіс. Қоршаған орта мен халық денсаулығына тиетін зиянның алдын ала отырып, жарамсыз құрылғылар қайта пайдалану мен машина ішіндегі материалдарды өңдеу құнын оңтайландыру мақсатында бөлек жиналуы керек. Барлық өнімдердегі сызылған қоқыс жәшігінің таңбасы өнім иелерінің бөлектелген қоқыс жинауға қатысты міндетін еске салады.
Үй құрылғыларын тиісті түрде қоқысқа тастау туралы қосымша ақпарат алу үшін ие адамдар тиісті мекемеге немесе жергілікті құрылғы сатушысына хабарласуы мүмкін.
Қуатты үнемдеу және қоршаған ортаны құрметтеу
Су мен қуатты үнемдеу
• Ыдыс жуу машинасы толған кезде ғана жуу циклын бастаңыз. Ыдыс жуу машинасының толуын күтіп тұрғанда жағымсыз иістердің алдын алыңыз (бар
болса,«Жуу циклдары» бөлімін қараңыз).
• «Жуу циклдары» кестесін пайдалана отырып, ыдыс-аяқ түріне және ластану дәрежесіне қолайлы жуу циклын таңдаңыз:
— Орташа ластанған ыдыстар үшін Эко жуу циклын пайдаланыңыз, ол қуат пен судың төмен деңгейі қолданылатынын қамтамасыз етеді.
-Жүктемеәдеттегіденазболса,Жартылай
жүктеу опциясын («Арнайы жуу циклдары мен
опциялары» бөлімін қараңыз (бар болса)).
• Егер ток жеткізу келісім-шартында токты үнемдеуге арналған уақыт аралықтары болса, төмен баға қолданылатын кезде жуу циклдарын орындаңыз. КЕШІКТІРІП БАСТАУ опциясы жуу циклдарын тиісті түрде реттеуге көмектесе алады(«Арнайы
жуу циклдары мен опциялары» бөлімін қараңыз (бар болса)).
5
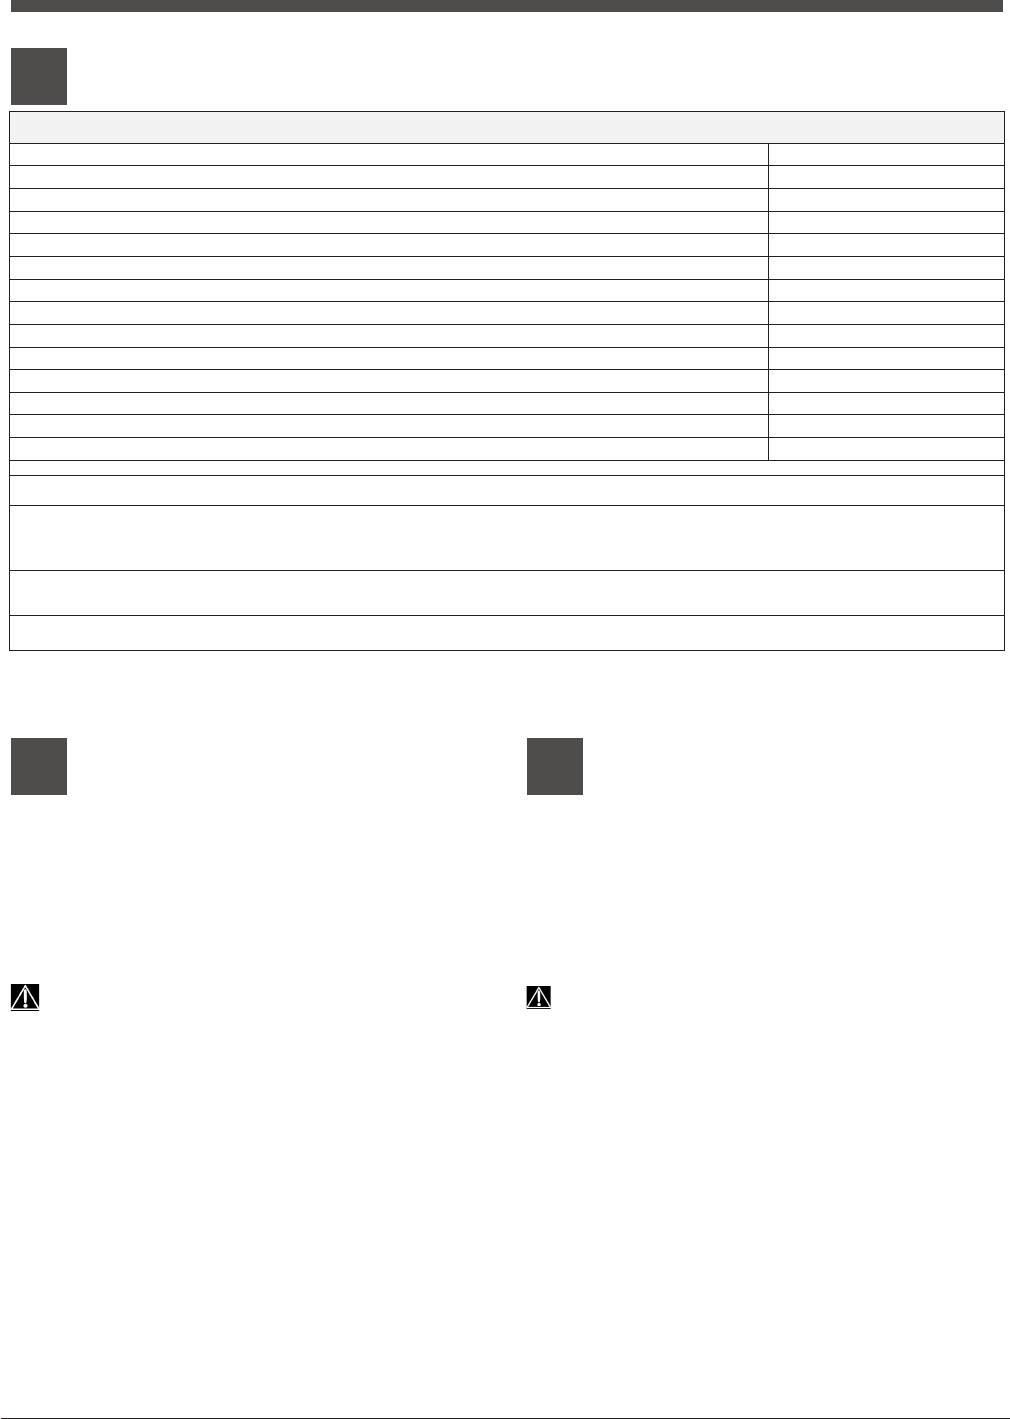
EN Product Data (product fiche)
|
Product Fiche |
|
|
Brand |
INDESIT |
|
Model |
DSR 15B3, DVSR 5 |
|
Rated capacity in standard place settings (1) |
10 |
|
Energy efficiency class on a scale from A+++ (low consumption) to D (high consumption) |
A |
|
Energy consumption per year in kWh (2) |
267 |
|
Energy consumption of the standard cleaning cycle in kWh |
0.94 |
|
Power consumption of the off-mode in W |
0.5 |
|
Power consumption of the left-on mode in W |
5.0 |
|
Water consumption per year in litres (3) |
2800 |
|
Drying efficacy class on a scale from G (low efficacy) to A (high efficacy) |
A |
|
Programme time for standard cleaning cycle in minutes |
180 |
|
The duration of the left-on mode in minutes |
12 |
|
Noise in dB(A) Re 1pW |
53 |
|
Built-in model |
No |
NOTES
1) The information on the label and fiche relates to the standard cleaning cycle, this programme is suitable to clean normally soiled tableware and it is the most efficient programme in terms of combined energy and water consumption. The standard cleaning cycle corresponds to the Eco cycle.
2) Based on 280 standard cleaning cycles using cold water fill and the consumption of the low power modes. Actual energy consumption depends on how the appliance is used.
3) Based on 280 standard cleaning cycles. Actual water consumption depends on how the appliance is used.
EN Assistance
Before contacting Assistance:
•Check whether the problem can be resolved using the
Troubleshooting guide (see Troubleshooting).
•Restart the programme to check whether the problem has ceased to exist.
•Ifthe problem persists, contact the Authorised Technical
Assistance Service.
 Never use the services of unauthorised technicians. Please have the following information to hand:
•The type of malfunction.
•The appliance model (Mod.).
•The serial number (S/N).
This information can be found on the appliance data plate
(see Description of the appliance).
KZ Көмек
Көмек қызметіне хабарласпас бұрын:
•Проблеманы Ақаулықтарды жою нұсқаулығын қолданаотырыпшешугеболатынын,неболмайтынын тексеріңіз («Ақаулықтарды жою» бөлімін қараңыз).
•Бағдарламаны қайта іске қосыңыз да, проблема кеткенін тексеріңіз.
•Проблемашешілмесе,Куәландырылғантехникалық көмек беру қызметіне хабарласыңыз.
 Куәландырылмаған мамандарға қызмет көрсеткізбеңіз.
Келесі мәліметтерді оңай жерде ұстаңыз:
•Проблеманың түрі
•Құрылғының моделі (Мод.).
•Сериялық нөмірі (С/н).
Бұл ақпаратты құрылғының деректер тілімшесінде табуғаболатын(«Құрылғыныңсипаттамасы»бөлімін қараңыз).
6
Installation
 If the appliance must be moved at any time, keep it in an upright position; if absolutely necessary, it may be tilted onto its back.
Connecting the water supply
 Adaptation of the water supply for installation should only be performed by a qualified technician.
The water inlet and outlet hoses may be positioned towards the right or the left in order to achieve the best possible installation.
Make sure the dishwasher does not bend or squash the hoses.
Connecting the water inlet hose
•To a 3/4” gas cold or hot water connection point (max. 60°C).
•Run the water until it is perfectly clear.
•Screw the inlet hose tightly into position and turn off the tap.
 If the inlet hose is not long enough, contact a specialist store or an authorised technician (see Assistance).
 The water pressure must be within the values indicated in the Technical Data table — otherwise the dishwasher may be function properly.
 Make sure the hose is not bent or compressed.
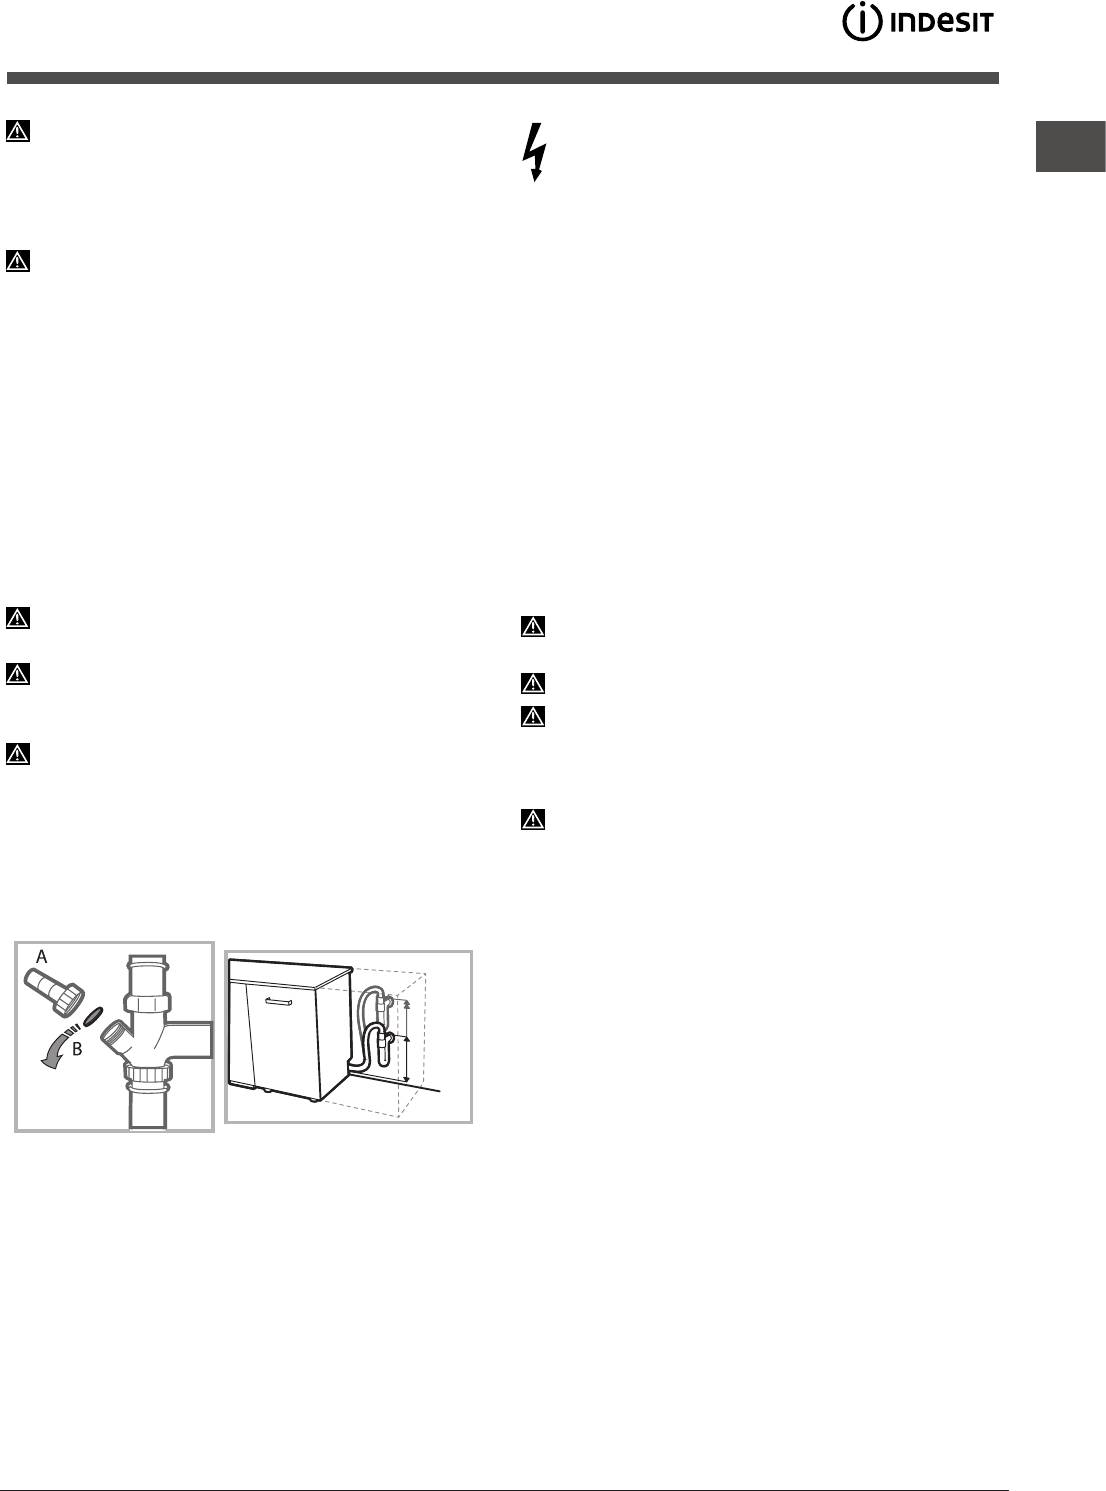
Connecting the water outlet hose
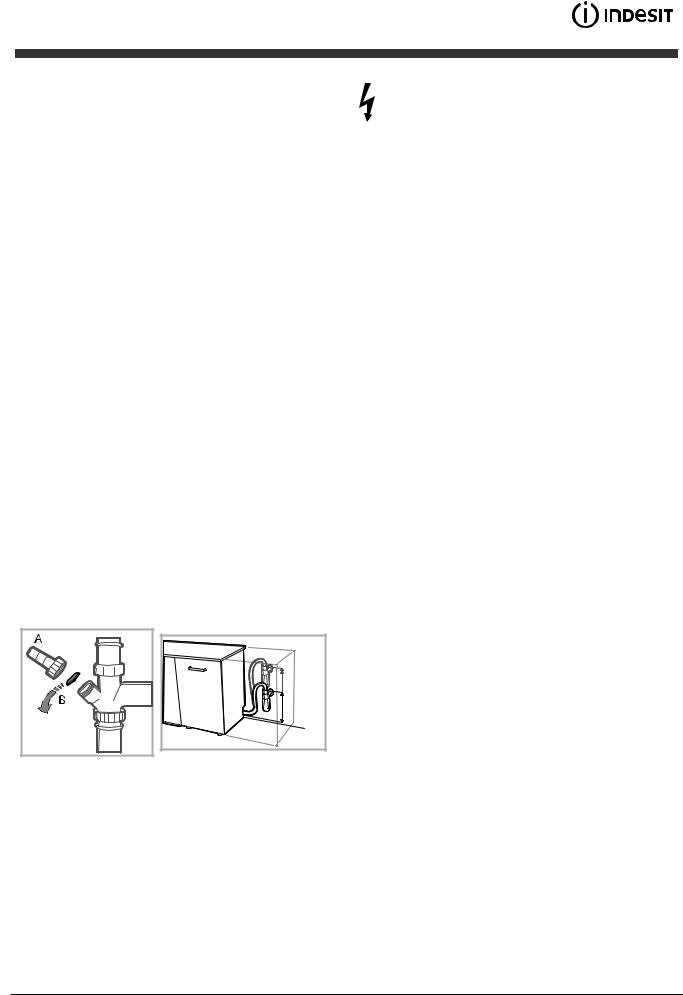
Connect the outlet hose to a drain duct with a minimum diameter of 2 cm. (A)
The outlet hose connection must be at a height ranging from 40 to 80 cm from the floor or surface where the dishwasher
Before connecting the water outlet hose to the sink drain, remove the plastic plug (B).
Anti-flooding protection
To ensure floods do not occur, the dishwasher:
— is provided with a special system which blocks the water supply in the event of anomalies or leaks from inside the appliance.
Some models are also equipped with the supplementary safety device New Acqua Stop*, which guarantees antiflooding protection even in the event of a supply hose rupture.
|
WARNING: HAZARDOUS VOLTAGE! |
EN |
Under no circumstances should the water inlet hose be cut as it contains live electrical parts.
Electrical connection
Before inserting the plug into the electrical socket, make sure that:
•The socket is earthed and complies with current regulations;
•the socket can withstand the maximum load of the appliance as shown on the data plate located on the inside of the door
(see chapter Description of the appliance);
•The power supply voltage falls within the values indicated on the data plate on the inside of the door.
•The socket is compatible with the plug of the appliance. If this is not the case, ask an authorised technician to replace the plug (see Assistance). Do not use extension cables or multiple sockets.
 Once the appliance has been installed, the power supply cable and the electrical socket should be easily accessible.
 The cable should not be bent or compressed.
 If the power supply cable is damaged, have it replaced by the manufacturer or its authorised Technical Assistance Service in order to prevent all potential hazards. (See Assistance)
 The Company shall not be held responsible for any incidents, if these regulations are not observed.
Positioning and levelling
1.Position the dishwasher on a level sturdy floor. If the floor is uneven, the front feet of the appliance may be adjusted until it reaches a horizontal position. If the appliance is levelled correctly, it will be more stable and much less likely to move or cause vibrations and noise while it is operating.
2.Before recessing the dishwasher, stick the adhesive transparent strip* under the wooden shelf in order to protect it from any condensation which may form.
3.Place the dishwasher so that its sides or back panel are in contact with the adjacent cabinets or the wall. This appliance
can also be recessed under a single worktop* (see the Assembly instruction sheet).
4*. To adjust the height of the rear foot, turn the red hexagonal bushing on the lower central part at the front of the dishwasher using a hexagonal spanner with an opening of 8 mm. Turn the spanner in a clockwise direction to increase the height and in an anticlockwise direction to decrease it. (see Building-in instruction sheet attached to the documentation)
* Only available in selected models.
7
Advice regarding the first wash cycle
EN After the installation, remove the stoppers from the racks and the retaining elastic elements from the upper rack (if any).
Water softener settings
Before starting the first wash cycle, set the hardness level of the water from the mains supply. (see chapter Rinse aid and refined salt).
First load the softener tank with water, then introduce about 1 kg of salt. It is perfectly normal for water to flow out.
As soon as this procedure is complete, run a wash cycle. Only use salt that has been specifically designed for dishwashers.
After the salt has been poured into the machine, the LOW SALT indicator light* switches off.
 If the salt container is not filled, the water softener and the heating element may be damaged as a result.
The machine has a buzzer/set of tones (depending on the dishwasher model) to inform the user that a command has been implemented: power on, cycle end etc.
The symbols/indicator lights/LEDs on the control panel/ display may vary in colour and may have a flashing or fixed light (depending on the dishwasher model).
The display* provides useful information concerning the type of wash cycle, drying/wash-cycle phase, remaining time, temperature etc.
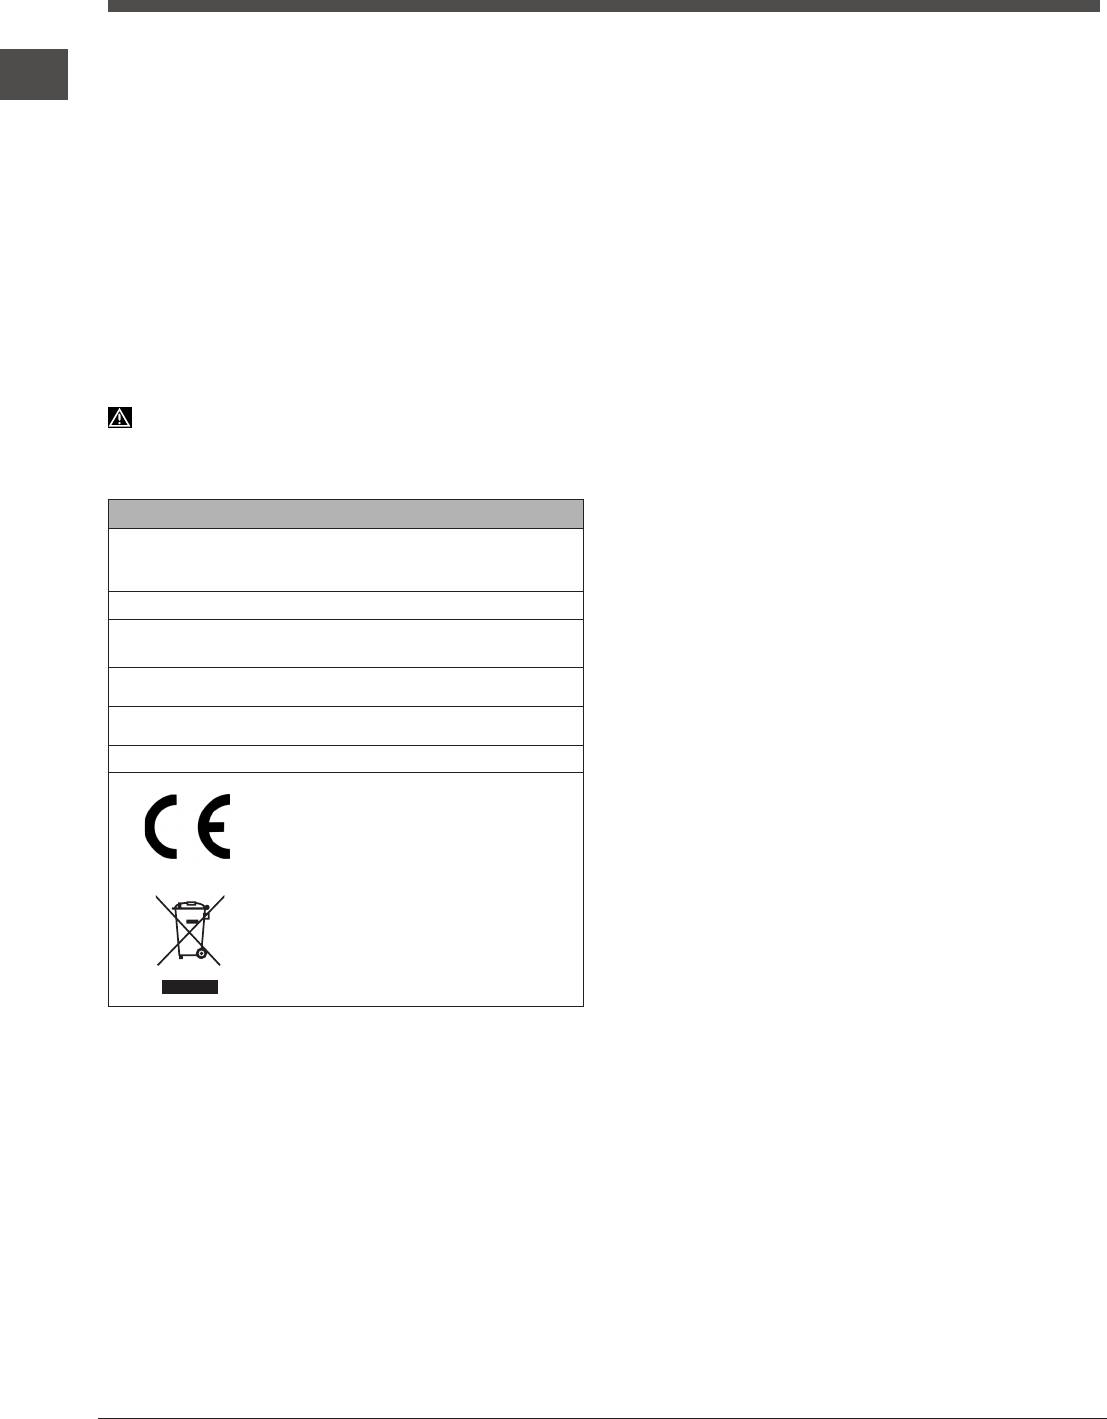
Technical data
|
Dimensions |
width 45cm |
||
|
height 85 cm |
|||
|
depth 60 cm |
|||
|
Capacity |
10 standard place-settings |
||
|
Water supply pressure |
0,05 ÷ 1MPa (0.5 ÷ 10 bar) |
||
|
7,25 psi – 145 psi |
|||
|
Power supply voltage |
See appliance data plate |
||
|
Total absorbed power |
See appliance data plate |
||
|
Fuse |
See appliance data plate |
||
|
This dishwasher conforms to the |
|||
|
following European Community |
|||
|
Directives: |
|||
|
-2006/95/EC (Low Voltage) |
|||
|
-2004/108/EC (Electromagnetic |
|||
|
Compatibility) |
|||
|
-2009/125/EC (Comm. Reg. |
|||
|
1016/2010) (Ecodesign) |
|||
|
-97/17/EC (Labelling) |
|||
|
-2012/19/CE Waste Electrical |
|||
|
and Electronic Equipment (WEEE) |
|||
* Only available in selected models.
8
Description of the appliance
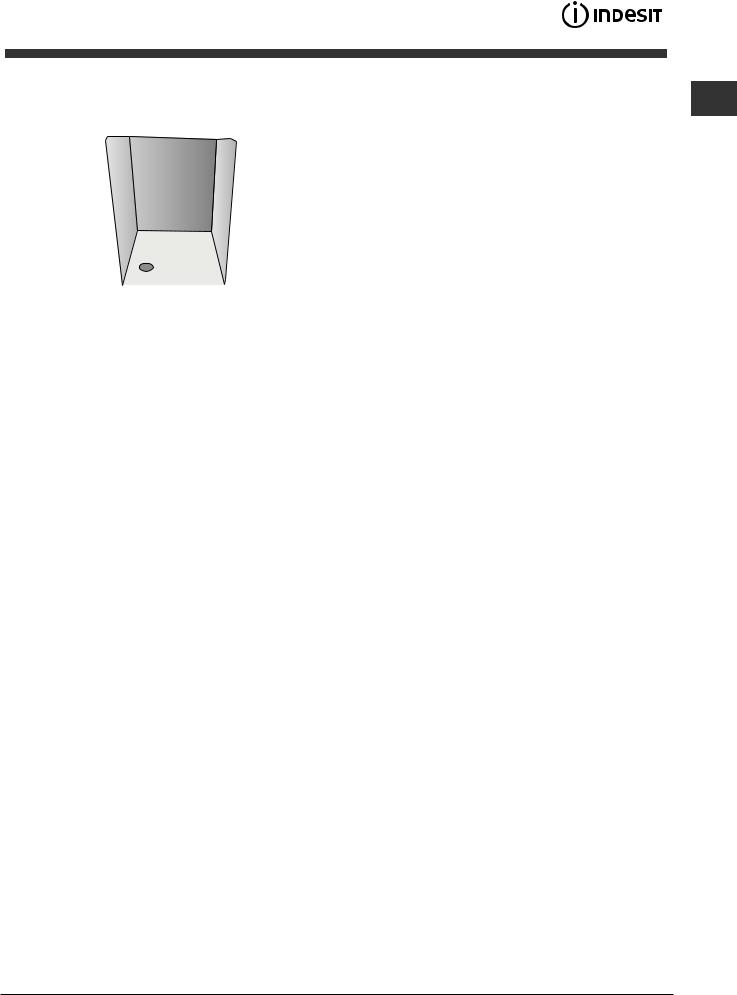
1.Upper rack
2. Upper spray arm
3. Tip-up compartments
4. Rack height adjuster
5. Lower rack
6.Lower spray arm
7. Cutlery basket
8. Washing filter
9. Salt dispenser
10. Detergent and rinse aid dispensers
11.Data plate
12. Control Panel***
Control panel
|
Cycle select knob |
Start/Pause button and |
||||
|
indicator light |
|||||
|
ON/OFF/RESET |
|||||
|
button |
|||||
|
Indicator light Washing |
Low Salt |
|||
|
Indicator light |
||||
|
Indicator light Drying |
||||
|
Indicator light Wash Cycle End |
***Only in completely built-in models. * Only available in selected models.
The number and type of wash cycles and options may vary depending on the dishwasher model.
9
Refined Salt and Rinse Aid
|
EN |
Only use products which have been specifically designed |
||
|
for dishwashers. Do not use table salt or industrial salt. |
|||
|
Follow the instructions given on the packaging. |
 If you are using a multi-function product, we recommend that you add salt in any case, especially if the water is hard or very hard. (Follow the instructions given on the packaging.)
 If you do not add salt or rinse aid, the LOW SALT* and LOW RINSE AID* indicator lights will remain lit.
Measuring out the refined salt
The use of salt prevents the formation of LIMESCALE on the dishes and on the machine’s functional components.
•It is important that the salt dispenser be never empty.
•It is important to set the water hardness.
The salt dispenser is located in the lower part of the dishwasher (see Description) and should be filled:
•When the LOW RINSE AID indicator light in the control panel is lit *;
•When the green float* on the cap of the salt dispenser is no longer visible.
•See autonomy in the water hardness table.
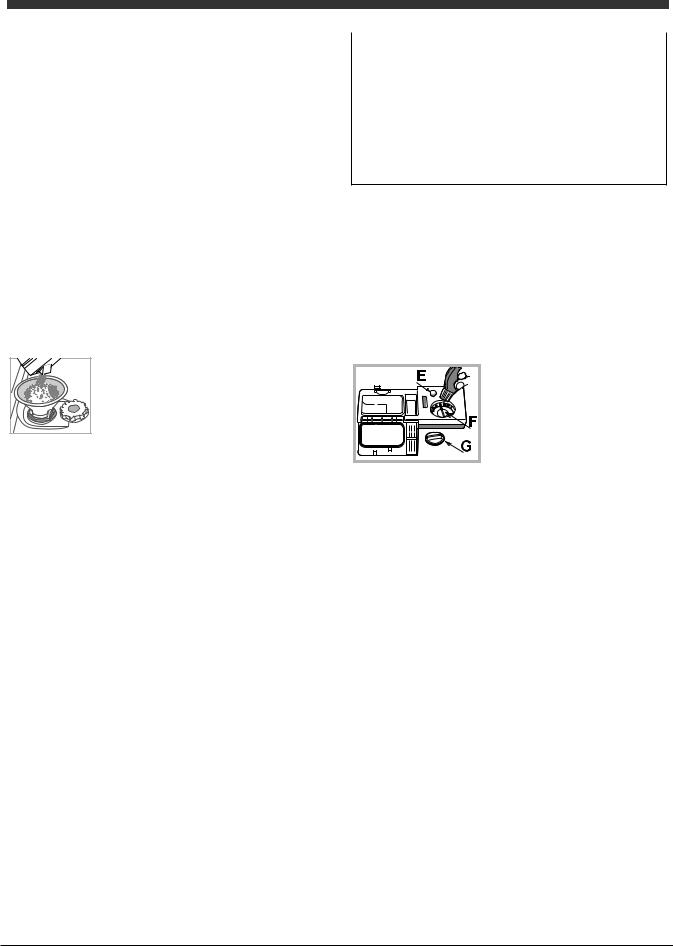
1. Remove the lower rack and unscrew the
container cap (anticlockwise).
2. Only the first time you do this: fill the water
dispenser up to the edge.
3. Position the funnel (see figure) and fill the salt container right up to its edge
(approximately 1 kg); it is not unusual for a little water to leak out.
4. Remove the funnel and wipe any salt residue away from the opening; rinse the cap under running water and then screw it on. It is advisable to perform this procedure every time you add salt to the container.
Make sure the cap is screwed on tightly, so that no detergent can get into the container during the wash cycle (this could damage the water softener beyond repair).
 Whenever you need to add salt, we recommend carrying out the procedure before the washing cycle is started.
Setting the water hardness
For perfect water softener operation, it is essential that the adjustment be based on the water hardness in your house. Ask your local water supplier for this information. The factory setting is for medium water hardness.
•Switch the dishwasher on using the On/Off button. 
•Switch it off using the On/Off button 
•Press and hold the START/PAUSE button 
 for 5 seconds.
•Switch it on using the On/Off button 
•The salt indicator light flashes (as many times as the current selection.)
•Set the knob to the desired hardness level number (see Table on water hardness.)
•Switch it off using the On/Off button 
•Setting is complete!
|
Water Hardness Table |
Average autonomy |
||||
|
salt dispenser with 1 |
|||||
|
wash cycle per day |
|||||
|
level |
°dH |
°fH |
mmol/l |
months |
|
|
1 |
0 |
— 6 |
0 — 10 |
0 — 1 |
7 months |
|
2 |
6 — 11 |
11 — 20 |
1.1 — 2 |
5 months |
|
|
3 |
12 |
— 17 |
21 — 30 |
2.1 — 3 |
3 months |
|
4 |
17 |
— 34 |
31 — 60 |
3.1 — 6 |
2 months |
|
5* |
34 |
— 50 |
61 — 90 |
6.1 — 9 |
2/3 weeks |
For values between 0°f and 10°f, we do not recommend the use of salt. A setting of 5 may increase cycle duration.
(°dH = hardness measured in German degrees — °f = hardness measured in French degrees – mmol/l = millimoles per litre)
Measuring out the rinse aid
Rinse aid makes dish DRYING easier. The rinse aid dispenser should be filled:
•When the LOW RINSE AID indicator light on the panel/display is lit *;
•When the dark optical indicator on the dispenser door “E” becomes transparent.
1.Open the dispenser by turning
the cap «G» in an anticlockwise
direction.
2. Pour in the rinse aid, making
sure it does not overflow from the
dispenser. If this happens, clean
the spill immediately with a dry cloth.
3. Screw the cap back on.
NEVER pour the rinse aid directly into the tub.
Adjusting the amount of rinse aid
If you are not completely satisfied with the drying results, you can adjust the quantity of rinse aid used. Turn the adjuster “F”. A maximum of 4 levels can be set according to the dishwasher model. The factory setting is for a medium level.
•If you see bluish streaks on the dishes, set a low number (1-2).
•If there are drops of water or limescale marks on the dishes, set a high number (3-4).
* Only available in selected models.
10
Loading the racks
Tips
Before loading the racks, remove all food residues from the crockery and empty liquids from glasses and containers. No preventive rinsing is needed under running water.
Arrange the crockery so that it is held in place firmly and does not tip over; and arrange the containers with the openings facing downwards and the concave/convex parts placed obliquely, thus allowing the water to reach every surface and flow freely.
Make sure that the lids, handles, trays and frying pans do not prevent the spray arms from rotating. Place any small items in the cutlery basket.
Since plastic dishes and non-stick frying pans usually retain more water drops, their drying will be not so good as that of ceramic or stainless-steel dishes.
Lightweight items such as plastic containers should be placed in the upper rack and arranged so that they cannot move. After loading the appliance, make sure that the spray arms can rotate freely.
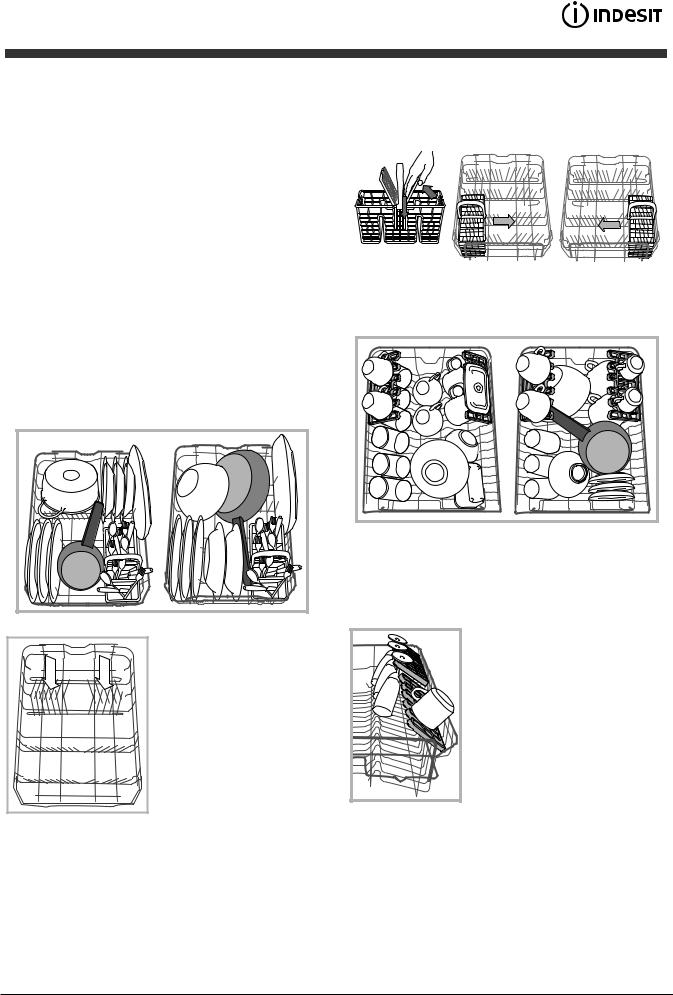
Lower rack
The lower rack can hold pans, lids, dishes, salad bowls, cutlery etc. Large plates and lids should ideally be placed at the sides.
Several dishwasher models are fitted with tip-up sectors*.
They can be used in a vertical position when arranging dishes or in a horizontal position (lower) to load pans and salad bowls easily.
Some models are equipped with
Vertical Zone, special pull-out supports*in the rear of the rack that can be used to support frying pans and baking pans in a more vertical position, thus taking up
less space.
In order to use it, just get hold of the coloured grip and pull it upwards while rotating it forward. The supports can slide right and left to fit the size of the crockery.
Very soiled dishes and pans should be placed in the lower rack because in this sector the water sprays are stronger and allow a higher washing performance.
|
Cutlery basket |
|||
|
EN |
|||
|
The basket is equipped with top grilles for improved cutlery |
|||
|
arrangement. The cutlery basket should be positioned only at |
|||
|
the front of the lower rack. |
|||
Upper rack
Load this rack with delicate and lightweight crockery such as glasses, cups, saucers and shallow salad bowls.
Adjustable position tip-up compartments*
The side tip-up compartments can be positioned at three different heights to optimize the arrangement of the crockery inside the rack.
Wine glasses can be placed safely in the tip-up compartments by inserting the stem of each glass into the corresponding slot.
For optimum drying results incline the tip-up compartments more. To change the inclination, pull up the tipup compartment, slide it slightly and position it as you wish.
*Only available in selected models with different numbers and positions.
11
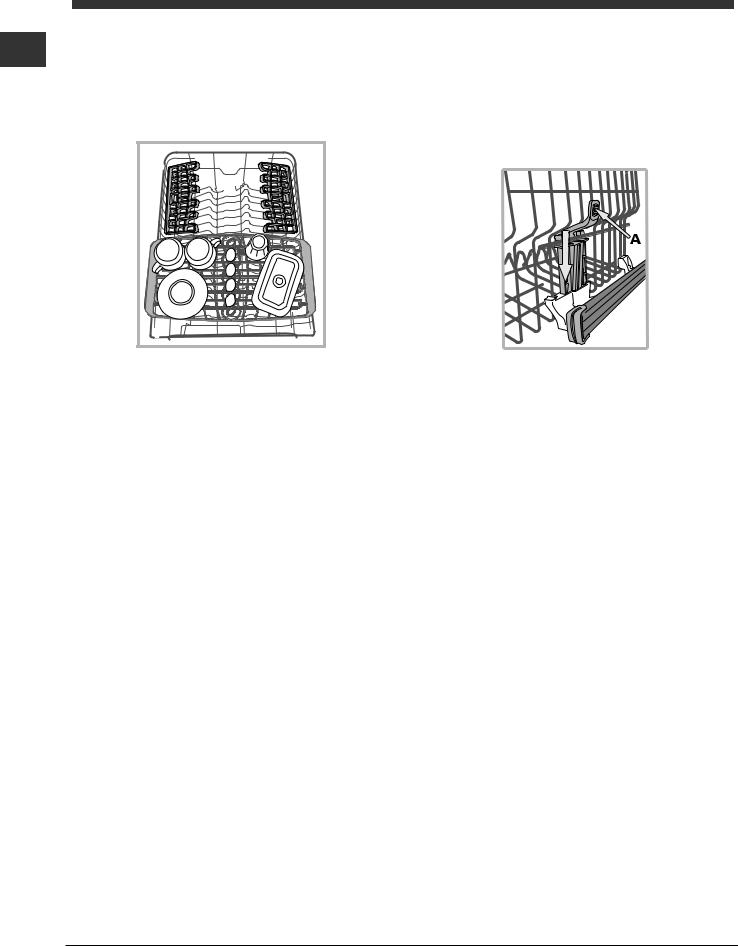
EN Tray*
Some dishwasher models are fitted with a sliding tray which can be used to hold small crockery and cutlery.
For optimum washing performance, avoid positioning bulky crockery directly below the tray. The cutlery tray can be removed. (see Figure.)
* Only available in selected models.
Adjusting the height of the upper rack
The height of the upper rack can be adjusted: high position to place bulky crockery in the lower rack and low position to make the most of the tip-up compartments by creating more space upwards.
The height of the upper rack should be adjusted WHEN THE RACK IS EMPTY.
NEVER raise or lower the rack on one side only.
If the rack is equipped with a Lift-Up device* (see figure), lift it up by holding its sides. To restore the lower position, press the levers (A) at the sides of the rack and follow the rack down.
Unsuitable crockery
•Wooden crockery and cutlery.
•Delicate decorated glasses, artistic handicraft and antique crockery. Their decorations are not resistant.
•Parts in synthetic material which do not withstand high temperatures.
•Copper and tin crockery.
•Crockery soiled with ash, wax, lubricating grease or ink.
The colours of glass decorations and aluminium/silver pieces can change and fade during the washing process. Some types of glass (e.g. crystal objects) can become opaque after a number
of wash cycles too.
Damage to glass and crockery
Caused by:
•Type of glass and glass production process.
•Chemical composition of detergent.
•Water temperature of rinse cycle.
Tips:
•Only use glasses and porcelain guaranteed by the manufacturer as dishwasher safe.
•Use a delicate detergent suitable for crockery.
•Collect glasses and cutlery from the dishwasher as soon as the wash cycle is over.
12
 Loading…
Страницы и текст этой инструкции
 Инструкция посудомоечной машины Indesit DSR 15B3
 Информация отображена на картинке
 Информация отображена на картинке
 Информация отображена на картинке
 Информация отображена на картинке
Как использовать наш сайт инструкций OnlineManuals.ru
Наша цель состоит в том, чтобы предоставить вам быстрый доступ к содержанию инструкции для посудомоечной машины Indesit DSR 15B3.
С помощью онлайн просмотра, Вы можете быстро просмотреть содержимое инструкции и найти решение проблемы с посудомоечной машины Indesit DSR 15B3.
Для Вашего удобства
Если листать руководство пользователя посудомоечной машины Indesit DSR 15B3 прямо на сайте, не очень удобно для Вас, есть два возможных решения:
• Просмотр в полноэкранном режиме — легко просмотреть руководство пользователя (без загрузки его на свой компьютер), Вы можете использовать режим полноэкранного просмотра.
Для просмотра инструкции пользователя посудомоечной машины Indesit DSR 15B3 на полном экране, используйте кнопку «Открыть в Pdf-viewer».
• Загрузка на компьютер — Вы можете также скачать Инструкция посудомоечной машины Indesit DSR 15B3 на свой компьютер и сохранить его в файлах.
Многие люди предпочитают читать документы не на экране, а в печатной версии.
Возможность печати руководства пользователя также была предусмотрена на нашем сайте,
и вы можете использовать ее, нажав на иконку «печать» в Pdf-viewer.
Нет необходимости печатать все руководство посудомоечной машины Indesit DSR 15B3, можно выбрать только нужные страницы инструкции.
Руководство пользователя INDESIT DSR 15B3 RU. Основные функции, характеристики и условия эксплуатации изложены на 40 страницах документа в pdf формате.
Просмотр
Доступно к просмотру 40 страниц. Рекомендуем вам скачать файл инструкции, поскольку онлайн просмотр документа может сильно отличаться от оригинала.
-
DSR 15B3, DVSR 5
EN   English                                        KZ   ?аза?ша
Operating instructions                              Пайдалану н?с?аулы?ы
DISHWASHER - Contents                               ЫДЫС ЖУУ МАШИНАСЫ - Мазм?ны
Operating instructions,1                            Пайдалану н?с?аулы?ы, 1
Precautions and advice, 2-3                         Са?ты? шаралары мен ке?ес, 4-5
Assistance, 6                                       К?мек, 6
Product Data, 6                                     Орнату, 29-30
Installation, 7-8                                   ?нім пара?шасы, 31
Description of the appliance, 9                     ??рыл?ы сипаттамасы, 32
Refined salt and rinse aid, 10                      Тазалан?ан т?з ж?не шаю?а к?мекші зат, 33
Loading the racks, 11-12                            Тартпалар?а ж?ктеу, 34-35
Detergent and dishwasher use, 13                    Жу?ыш зат пен ыдыс жуу машинасын ?олдану, 36
Wash cycles, 14                                     Жуу циклдары, 37
Care and maintenance, 15                            К?тім ж?не техникалы? ?ызмет к?рсету, 38
Troubleshooting, 16                                 А?аулы?тарды жою, 39
RU   Итальянский
Руководство по эксплуатации
ПОСУДОМОЕЧНАЯ МАШИНА - Оглавление
Руководство по эксплуатации, 1
Меры предосторожности и рекомендации, 3-4
Установка, 17-18
Техническая спецификация изделия, 19
Описание изделия, 20
Регенерирующая соль и Ополаскиватель, 21
Загрузка корзин, 22-23
Моющее средство и использование посудомоечной
машины, 24
Программы, 25
Техническое обслуживание и уход, 26
Неисправности и методы их устранения, 27
Сервисное обслуживание, 28
-
not pull on the cable.
EN   Precautions and advice                       • The water supply tap must be shut off
This appliance was designed and                    and the plug should be removed from
manufactured in compliance with international         the electrical socket at the end of every
cycle and before cleaning the appliance
safety standards. The following information           or carrying out any maintenance work.
has been provided for safety reasons and           • The maximum number of place settings is
should be read carefully.                             shown in the product sheet.
Keep this instruction manual in a safe place       • If the appliance breaks down, do not under
for future reference. If the appliance is sold,       any circumstances touch the internal parts
given away or moved, make sure the manual             in an attempt to perform the repair work
is kept with the machine.                             yourself.
Read the instructions carefully, as they           • Do not lean or sit on the open door: this
include important information on safe                 may cause the appliance to overturn.
installation, use and maintenance.                 • The door should not be left open as it may
create a dangerous obstacle.
This appliance was designed for domestic           • Keep detergent and rinse aid out of reach
use or similar applications, for example:             of children.
- farmhouses;                                      • The packaging material should not be
- use by guests in hotels, motels and other           used as a toy.
residential settings;                              •  Knives  and  other  utensils  with  sharp
- bed & breakfasts.                                   edges must be placed either with the
Remove the appliance from all packaging               points/blades facing downwards in the
and make sure it was not damaged during               cutlery basket or horizontally on the tip-up
transportation. If it was damaged, contact            compartments or in the tray/third basket,
the retailer and do not proceed any further           if available.
with the installation process.                     • Connect the appliance to the water mains
General safety                                        using the new supply hose provided with
the appliance. Do not re-use the old hose.
• This appliance should not be operated            • Install the back side of a free-standing
by children younger than 8 years, people            dishwasher against a wall.
with reduced physical, sensory or mental
capacities, or inexperienced people              Disposal
who are not familiar with the product,           • To dispose of any packaging materials,
unless they are given close supervision             follow local legislation so that the
or instructions on how to use it safely and         packagings may be reused.
are made aware by a responsible person           • The  European  Directive  2012/19/EU
of the dangers its use might entail.                relating to Waste Electrical and Electronic
• Children must not play with the appliance.          Equipment (WEEE) states that household
•  It is the user's responsibility to clean and       appliances should not be disposed of
maintain the appliance. Children should             using the normal solid urban waste cycle.
never clean or maintain it unless they are          Exhausted appliances should be collected
given supervision.                                  separately in order to optimise the cost of
• The appliance was designed for domestic             reusing and recycling the materials inside
use inside the home and is not intended             the machine, while preventing potential
for commercial or industrial use.                   damage to the atmosphere and public
• The appliance must be used to wash                  health. The crossed-out dustbin symbol
domestic crockery in accordance with the            shown on all products reminds the owners
instructions in this manual.                        of their obligations regarding separated
• The  appliance  must  not  be  installed            waste collection.
outdoors, even in covered areas. It is             For further information relating to the
extremely dangerous to leave the machine            correct disposal of household appliances,
exposed to rain and storms.                         owners may contact the relevant public
• Do not touch the appliance when barefoot.           authority or the local appliance dealer.
• When unplugging the appliance always              Saving energy and respecting the
pull the plug from the mains socket. Do          environment
2
-
Saving water and energy                             •  Данный бытовой электроприбор может
• Only  begin  a  wash  cycle  when  the              быть использован детьми не младше
dishwasher is full. While waiting for the           8  лет  и  лицами  с  ограниченными
dishwasher to be filled, prevent unpleasant         физическими  сенсорными  или
odours with the Soak cycle (if available, see       умственными способностями или не
Wash Cycles).                                       обладающими достаточным опытом или
• Select a wash cycle that is suited to the           знанием о работе подобного прибора,
type of crockery and to the soil level using        под наблюдением или после обучения
the Table of Wash Cycles:                           безопасному пользованию прибором и
усвоения связанных с ним опасностей.
- For dishes with a normal soil level, use        •  Не разрешайте детям играть с прибором.
the Eco wash cycle, which guarantees low          •  Чистка и уход за прибором должны
energy and water consumption levels.                выполняться пользователем. Не поручать
- If the load is smaller than usual activate        чистку и уход детям без контроля.
the Half Load option (see Special wash cycles     •  Данное изделие предназначается для
and options, if available).                         непрофессионального использования в
• If your electricity supply contract gives           домашних условиях.
details of electricity-saving time bands, run     •  Изделие  предназначено  для  мытья
the wash cycles when electricity prices are         посуды в домашних условиях, может
lower. The Delayed Start option can help            быть использовано только в соответствии
you organise the wash cycles accordingly            с инструкциями, приведенными в данном
(see Special wash cycles and options, if available).  техническом руководстве.
•  Запрещается устанавливать изделие
Меры предосторожности                        на улице, даже под навесом, так как
RU
и рекомендации                                воздействие на него дождя и грозы
является чрезвычайно опасным.
Изделие спроектировано и изготовлено             •  Не  прикасайтесь  к  посудомоечной
в  соответствии  с  международными                    машине с босыми ногами.
нормативами по безопасности. Настоящие              •  Не  тяните  за  сетевой  кабель  для
инструкции составлены в целях вашей                   отсоединения вилки изделия из сетевой
безопасности и должны быть внимательно                розетки, возьмитесь за штепсельную
вилку рукой.
прочитаны.                                          •  Необходимо перекрыть водопроводный
Важно сохранить данное руководство                    кран и вынуть штепсельную вилку из
для его последующих консультации. В                   сетевой розетки в конце каждого цикла
случае продажи, передачи или переезда                 и перед началом чистки и технического
проверьте, чтобы данное техническое                   обслуживания.
руководство сопровождало изделие.                   •  Максимальное количество столовых
Необходимо  внимательно  прочитать                    приборов указывается в технической
настоящие инструкции: в них содержатся                спецификации изделия.
важные сведения об установке изделия,               •  В случае неисправности категорически
его эксплуатации и безопасности.                      запрещается  открывать  внутренние
Данное  изделие  предназначено  для                   механизмы  изделия  с  целью  их
самостоятельного ремонта.
бытового  или  другого  аналогичного                •  Не  опирайтесь  и  не  садитесь  на
использования, например:                              открытую дверцу машины: машина может
- в агротуристических усадьбах;                       опрокинуться.
- для использования проживающими в                  •  Не держите дверцу открытой, так как об
гостинице, мотеле и в других временных                нее можно случайно споткнуться.
местах проживания;                                  •  Храните  моющие  средства  и
- в гостиницах типа «номер с завтраком».              ополаскиватель вдали от детей.
Снимите упаковку с изделия и проверьте,             •  Не  разрешайте  детям  играть  с
чтобы  на  нем  не  было  повреждений,                упаковочными материалами.
нанесенных  при  транспортировке.                   • Ножи и кухонные принадлежность с
При  обнаружении  повреждений  не                     заостренными  краями  необходимо
подсоединяйте машину, а обратиться к                  укладывать острым концом/лезвием вниз
продавцу.                                             в корзине для столовых приборов или в
Общие требования к безопасности                       горизонтальном положении на откидных
3

DSR 15B3, DVSR 5
EN
English
KZ
Operating instructions
DISHWASHER — Contents
Operating instructions,1
Precautions and advice, 2-3
Assistance, 6
Product Data, 6
Installation, 7-8
Description of the appliance, 9
Refined salt and rinse aid, 10
Loading the racks, 11-12
Detergent and dishwasher use, 13
Wash cycles, 14
Care and maintenance, 15
Troubleshooting, 16
RU

not pull on the cable.
EN
Precautions and advice
• The water supply tap must be shut off
and the plug should be removed from
This appliance was designed and
the electrical socket at the end of every
manufactured in compliance with international
cycle and before cleaning the appliance
safety standards. The following information
or carrying out any maintenance work.
has been provided for safety reasons and
• The maximum number of place settings is
should be read carefully.
shown in the product sheet.
Keep this instruction manual in a safe place
• If the appliance breaks down, do not under
for future reference. If the appliance is sold,
any circumstances touch the internal parts
given away or moved, make sure the manual
in an attempt to perform the repair work
is kept with the machine.
yourself.
• Do not lean or sit on the open door: this
Read the instructions carefully, as they
may cause the appliance to overturn.
include important information on safe
• The door should not be left open as it may
installation, use and maintenance.
create a dangerous obstacle.
This appliance was designed for domestic
• Keep detergent and rinse aid out of reach
use or similar applications, for example:
of children.
— farmhouses;
• The packaging material should not be
— use by guests in hotels, motels and other
used as a toy.
residential settings;
• Knives and other utensils with sharp
— bed & breakfasts.
edges must be placed either with the
Remove the appliance from all packaging
points/blades facing downwards in the
and make sure it was not damaged during
cutlery basket or horizontally on the tip-up
transportation. If it was damaged, contact
compartments or in the tray/third basket,
the retailer and do not proceed any further
if available.
with the installation process.
• Connect the appliance to the water mains
using the new supply hose provided with
General safety
the appliance. Do not re-use the old hose.
• This appliance should not be operated
• Install the back side of a free-standing
by children younger than 8 years, people
dishwasher against a wall.
with reduced physical, sensory or mental
capacities, or inexperienced people
Disposal
who are not familiar with the product,
• To dispose of any packaging materials,
unless they are given close supervision
follow local legislation so that the
or instructions on how to use it safely and
packagings may be reused.
are made aware by a responsible person
• The European Directive 2012/19/EU
of the dangers its use might entail.
relating to Waste Electrical and Electronic
• Children must not play with the appliance.
Equipment (WEEE) states that household
• It is the user’s responsibility to clean and
appliances should not be disposed of
maintain the appliance. Children should
using the normal solid urban waste cycle.
never clean or maintain it unless they are
Exhausted appliances should be collected
given supervision.
separately in order to optimise the cost of
• The appliance was designed for domestic
reusing and recycling the materials inside
use inside the home and is not intended
the machine, while preventing potential
for commercial or industrial use.
damage to the atmosphere and public
• The appliance must be used to wash
health. The crossed-out dustbin symbol
domestic crockery in accordance with the
shown on all products reminds the owners
instructions in this manual.
of their obligations regarding separated
• The appliance must not be installed
waste collection.
outdoors, even in covered areas. It is
For further information relating to the
extremely dangerous to leave the machine
correct disposal of household appliances,
exposed to rain and storms.
owners may contact the relevant public
• Do not touch the appliance when barefoot.
authority or the local appliance dealer.
• When unplugging the appliance always
Saving energy and respecting the
pull the plug from the mains socket. Do
environment
2
Saving water and energy
• Only begin a wash cycle when the
dishwasher is full. While waiting for the
dishwasher to be filled, prevent unpleasant
odours with the Soak cycle
(if available, see
Wash Cycles).
• Select a wash cycle that is suited to the
type of crockery and to the soil level using
the Table of Wash Cycles:
— For dishes with a normal soil level, use
the Eco wash cycle, which guarantees low
energy and water consumption levels.
— If the load is smaller than usual activate
the Half Load option
(see Special wash cycles
and options, if available).
• If your electricity supply contract gives
details of electricity-saving time bands, run
the wash cycles when electricity prices are
lower. The Delayed Start option can help
you organise the wash cycles accordingly
(see Special wash cycles and options, if available).
RU
3

KZ
4

5
EN
Product Data (product fiche)
Product Fiche
Brand
INDESIT
Model
DSR 15B3, DVSR 5
10
No
NOTES
EN
KZ
Assistance
Before contacting Assistance:
• Check whether the problem can be resolved using the
Troubleshooting guide
(see Troubleshooting).
«Ақаулықтарды жою» бөлімін қараңыз
• Restart the programme to check whether the problem
has ceased to exist.
• If the problem persists, contact the Authorised Technical
Assistance Service.
Never use the services of unauthorised technicians.
Please have the following information to hand:
• The type of malfunction.
• The appliance model (Mod.).
• The serial number (S/N).
This information can be found on the appliance data plate
(see Description of the appliance)
.
«Құрылғының сипаттамасы» бөлімін
қараңыз
6
Installation
If the appliance must be moved at any time, keep it in an
WARNING: HAZARDOUS VOLTAGE!
EN
upright position; if absolutely necessary, it may be tilted onto
its back.
Under no circumstances should the water inlet hose be cut
Connecting the water supply
as it contains live electrical parts.
Adaptation of the water supply for installation should only
Electrical connection
be performed by a qualified technician.
Before inserting the plug into the electrical socket, make
The water inlet and outlet hoses may be positioned towards
sure that:
the right or the left in order to achieve the best possible
• The socket is earthed
and complies with current
installation.
regulations;
Make sure the dishwasher does not bend or squash the
• the socket can withstand the maximum load of the
hoses.
appliance as shown on the data plate located on the inside
of the door
Connecting the water inlet hose
(see chapter Description of the appliance);
• To a 3/4” gas cold or hot water connection point (max.
• The power supply voltage falls within the values indicated
60°C).
on the data plate on the inside of the door.
• Run the water until it is perfectly clear.
• The socket is compatible with the plug of the appliance. If
• Screw the inlet hose tightly into position and turn off the
this is not the case, ask an authorised technician to replace
tap.
the plug (
see Assistance
). Do not use extension cables or
multiple sockets.
If the inlet hose is not long enough, contact a specialist
Once the appliance has been installed, the power supply
store or an authorised technician
(see Assistance)
.
cable and the electrical socket should be easily accessible.
The water pressure must be within the values indicated
The cable should not be bent or compressed.
in the Technical Data table — otherwise the dishwasher may
be function properly.
If the power supply cable is damaged, have it replaced
by the manufacturer or its authorised Technical Assistance
Make sure the hose is not bent or compressed.
Service in order to prevent all potential hazards.
(See
Assistance)
Connecting the water outlet hose
The Company shall not be held responsible for any
Connect the outlet hose to a drain duct with a minimum
incidents, if these regulations are not observed.
diameter of 2 cm. (A)
The outlet hose connection must be at a height ranging from
40 to 80 cm from the floor or surface where the dishwasher
Positioning and levelling
rests.
1. Position the dishwasher on a level sturdy floor. If the floor is
uneven, the front feet of the appliance may be adjusted until
it reaches a horizontal position. If the appliance is levelled
correctly, it will be more stable and much less likely to move
or cause vibrations and noise while it is operating.
MAX 80 cm
2. Before recessing the dishwasher, stick the adhesive
MIN 40 cm
transparent strip* under the wooden shelf in order to protect
it from any condensation which may form.
3. Place the dishwasher so that its sides or back panel are in
contact with the adjacent cabinets or the wall. This appliance
Before connecting the water outlet hose to the sink drain,
can also be recessed under a single worktop*
(see the
remove the plastic plug (B).
Assembly instruction sheet)
.
Anti-flooding protection
4*. To adjust the height of the rear foot, turn the red hexagonal
To ensure floods do not occur, the dishwasher:
bushing on the lower central part at the front of the dishwasher
— is provided with a special system which blocks the water
using a hexagonal spanner with an opening of 8 mm. Turn the
supply in the event of anomalies or leaks from inside the
spanner in a clockwise direction to increase the height and
appliance.
in an anticlockwise direction to decrease it.
(see Building-in
Some models are also equipped with the supplementary
instruction sheet attached to the documentation)
safety device New Acqua Stop*, which guarantees anti-
flooding protection even in the event of a supply hose rupture.
* Only available in selected models.
7
Advice regarding the first wash cycle
The machine has a buzzer/set of tones
(depending on the
EN
After the installation, remove the stoppers from the racks and
dishwasher model
) to inform the user that a command has
the retaining elastic elements from the upper rack
(if any).
been implemented: power on, cycle end etc.
The symbols/indicator lights/LEDs on the control panel/
Water softener settings
display may vary in colour and may have a flashing or fixed
Before starting the first wash cycle, set the hardness lev-
light
(depending on the dishwasher model)
.
el of the water from the mains supply.
(see chapter Rinse
aid and refined salt).
The display* provides useful information concerning the
First load the softener tank with water, then introduce about
type of wash cycle, drying/wash-cycle phase, remaining
1 kg of salt. It is perfectly normal for water to flow out.
time, temperature etc.
As soon as this procedure is complete, run a wash cycle.
Only use salt that has been specifically designed for dish-
washers.
After the salt has been poured into the machine, the LOW
SALT indicator light* switches off.
If the salt container is not filled, the water softener and
the heating element may be damaged as a result.
Technical data
Dimensions
Capacity 10
Water supply pressure
Power supply voltage
Total absorbed power
Fuse
* Only available in selected models.
8