

Моющий робот
Руководство пользователя
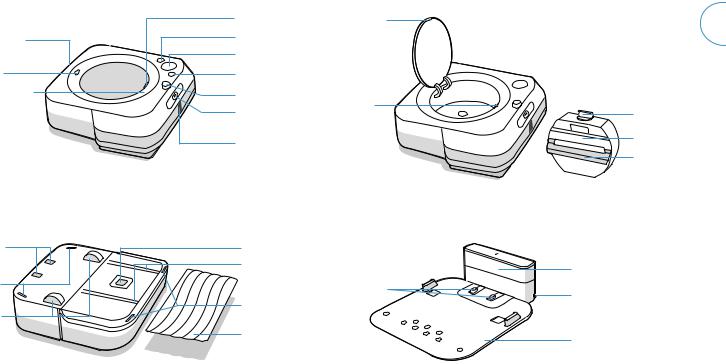
Сведения о моющем роботе Braava jet™ m6
|
Вид сверху |
Доступ в резервуар |
||
|
Защелка крышки |
Защелка |
RU |
|
|
Задний датчик |
Кнопка HOME |
крышки |
|
|
возвращения на |
|||
|
док-станцию |
Кнопка CLEAN |
||
|
Камера |
Кнопка SPOT Clean |
||
|
Удобная ручка для |
Датчик инфракрасного |
||
|
переноски |
излучения |
Открывание |
|
|
Форсунка |
|||
|
крышки |
Крышка |
||
|
распылителя |
резервуара |
||
|
Кнопка извлечения |
Резервуар |
||
|
салфетки |
Складная ручка |
||
|
резервуара |
Вид снизу
|
Зарядные |
|
контакты |
|
Датчики |
|
распознавания |
|
перепада высоты |
|
Колесики |
Док-станция Home Base для зарядки
|
Устройство распознавания |
||
|
салфеток |
||
|
Направляющие для |
Окно ИК-датчика |
|
|
салфетки |
||
|
Зарядные |
Место для хранения |
|
|
Датчики распознавания контакты |
||
|
перепада высоты |
шнура |
|
|
Салфетка |
Съемный |
|
|
влагосборник |
|
Для безопасной эксплуатации моющего робота Braava jet™ m6 изучите Руководство |
Руководство пользователя Braava jet™ m6 |
iii |
|
|
по безопасности |
|||

Начало работы
1 Подготовьтесь
|
RU |
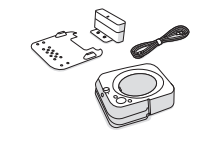
Чтобы начать, вам потребуется |
|
робот, док-станция зарядки, |
|
|
влагосборник и шнур питания. |
2 Установите док-станцию для зарядки и подключите ее к сети
|
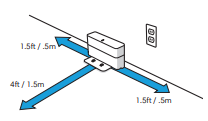
Выберите место недалеко от розетки в |
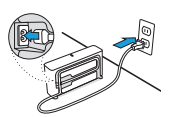
Подключите шнур питания к док-станции |
|
зоне хорошего покрытия Wi-Fi. |
для зарядки, а затем — к розетке. |
1.5 ft/00,5.5мm
4 ft/11,2.5мm
1.5 ft/00,5.5мm
ПРЕДУПРЕЖДЕНИЕ. Во избежание падения робота с лестницы размещайте докстанцию для зарядки на расстоянии не менее 1,2 м от лестницы.
|
3 Установите влагосборник |
4 Выведите робота из спящего режима |
|
|
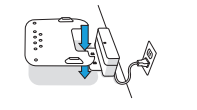
Поместите влагосборник на переднюю |
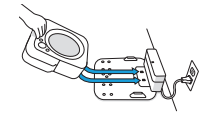
Задвиньте робот на контакты док-станции для |
|
|
часть док-станции для зарядки. |
зарядки, чтобы активировать аккумулятор. Через |
|
|
несколько минут загорится световое кольцо и |
||
|
раздастся звук, свидетельствующий о том, что |
||
|
устройство вышло из режима сна. |
||
|
5 |
Подключитесь к Интернету |
|
и выполните обновления |
|
Подключите робот к приложению iRobot |
RU |
|
HOME, чтобы обеспечить возможность |
|
|
удаленного управления, пользовательской |
|
|
настройки уборки и обновления |
|
|
программного обеспечения робота. |
iRobot HOME
|
4 Чтобы узнать больше, посетите веб-сайт global.irobot.com |
Руководство пользователя Braava jet™ m6 5 |
 Loading…
You can only view or download manuals with
Sign Up and get 5 for free
Upload your files to the site. You get 1 for each file you add
Get 1 for every time someone downloads your manual
Buy as many as you need
Перейти к контенту

Русские электронные инструкции по эксплуатации
Постоянно обновляемый большой каталог документации по эксплуатации и использованию современных устройств и оборудования на русском языке. Бесплатное скачивание файлов.
Поиск:
Главная
♥ В закладки
Просмотр инструкции в pdf


Инструкция по эксплуатации робота-пылесоса iRobot Braava Jet m6.
Скачать инструкцию к роботу-пылесосу iRobot Braava Jet m6 (678,82 КБ)

Инструкции по эксплуатации роботов-пылесосов iRobot
« Инструкция к роботу-пылесосу iBoto Aqua X220G
» Инструкция к роботу-пылесосу VITEK VT-1802
Вам также может быть интересно

Инструкция к роботу-пылесосу iRobot iRobot Roomba 606

Инструкция к роботу-пылесосу iRobot Braava 390T

Инструкция к роботу-пылесосу iRobot Roomba 616

Инструкция к роботу-пылесосу iRobot Roomba 631

Инструкция к роботу-пылесосу iRobot Roomba i3

Инструкция к роботу-пылесосу iRobot Roomba 896
.jpg)
Инструкция к роботу-пылесосу iRobot iRobot Roomba i3 (i315840)

Инструкция к роботу-пылесосу iRobot iRobot Roomba 694
Добавить комментарий
Имя *
Email *
Сайт
Комментарий


Сохранить моё имя, email и адрес сайта в этом браузере для последующих моих комментариев.
- Добавить инструкцию
- Заказать инструкцию
- Политика конфиденциальности
user manualiRobot Braava Jet m6

Braava jet
®
m6 Owner’s Guide 1
EN
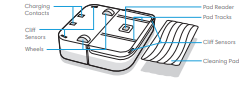
Bottom View
Top View
Precision Jet
Spray Nozzle
Easy-Carrying
Handle
SPOT Clean Button
RCON Sensor
Rear Docking
Sensor
HOME Button
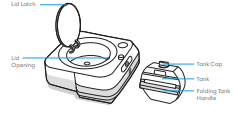
Lid Latch
Accessing the Tank
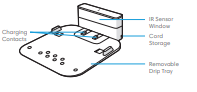
Home Base Charging Station
CLEAN Button
Pad Eject Button
Camera
Tank
Tank Cap
Lid
Opening
Lid Latch
Folding Tank
Handle
Cord
Storage
IR Sensor
Window
Charging
Contacts
Removable
Drip Tray
Cli Sensors
Pad Tracks
Pad Reader
Cleaning Pad
Wheels
Cli
Sensors
Charging
Contacts
About your Braava jet
®
m6 Robot Mop
See Safety Guide to ensure safe operation of your Braava jet
®
m6
View the manual for the iRobot Braava Jet m6 here, for free. This manual comes under the category vacuum cleaners and has been rated by 28 people with an average of a 8.8. This manual is available in the following languages: English. Do you have a question about the iRobot Braava Jet m6 or do you need help? Ask your question here
The iRobot Braava Jet m6 is a square-shaped vacuum cleaner that offers intelligent navigation for efficient cleaning. Its dust container is of the combi type, providing versatility for both dry and wet cleaning. A power cord is included for easy maneuverability and extended reach during cleaning sessions. With smartphone remote support, users can conveniently control and monitor the vacuum cleaner from their mobile devices.
Featuring automatic base station return, the iRobot Braava Jet m6 can autonomously dock and recharge after completing its cleaning tasks. This saves users time and effort in manually handling the device. Its intelligent navigation system enables the vacuum cleaner to map and navigate the cleaning area effectively, ensuring thorough coverage.
Equipped with a timer function, the iRobot Braava Jet m6 allows users to schedule cleaning sessions according to their preferences and needs. This adds convenience to the cleaning routine, as the vacuum cleaner can be set to automatically start and finish cleaning at specified times.
Constructed with high-quality materials, this vacuum cleaner prioritizes reliability and durability for long-lasting performance. Its comprehensive capabilities and efficient cleaning process make the iRobot Braava Jet m6 a suitable choice for maintaining cleanliness in various environments.
(Note: Please note that the information provided is based on the given specifications. No personal opinion or conclusion has been made about the product’s quality or performance.)

Design
| Dust container type | Combi |
| Product colour | White |
| Shape | Square |
| Smartphone remote support | Yes |
Packaging content
| Power cord included | Yes |
| Base station | Yes |
| Cleaning cloth | Yes |
Performance
| Wet mopping | Yes |
| Dust capacity (total) | — L |
| HEPA filtration system | — |
| Automatic base station return | Yes |
| Noise level | — dB |
| Navigation type | Intelligent |
| Timer | Yes |
| Base station functions | Charging |
| Floor surfaces supported | Hard floor, Linoleum, Parquet, Tiles |
| Mobile operating systems supported | Android, iOS |
| Works with the Google Assistant | Yes |
| Works with Amazon Alexa | Yes |
| SMART technology | Yes |
| Dust sensor | Yes |
Power
| Runtime | — min |
| Battery technology | Lithium-Ion (Li-Ion) |
| Battery capacity | — mAh |
| Charging time | 3 h |
| Rechargeable | Yes |
Weight & dimensions
| Height | 90 mm |
| Width | 270 mm |
| Depth | 252 mm |
| Weight | 2200 g |
Packaging data
| Package width | 495 mm |
| Package depth | 385 mm |
| Package height | 129 mm |
| Package weight | 5000 g |
| Package type | Box |
show more
Can’t find the answer to your question in the manual? You may find the answer to your question in the FAQs about the iRobot Braava Jet m6 below.
My iRobot vacuum is losing suction. Why is that?
Your iRobot vacuum cleaner losing suction power can be due to the following causes: — The suction power is not set to maximum — The dust container or dust bag is full — The hose, brush or tube is clogged
How often should I check the filter?
A clean filter is important to maintain the vacuum cleaner’s suction power. Therefore, check the filter regularly. When a filter is clogged, dust absorption decreases and energy consumption increases.
What do I do with a smelly vacuum cleaner?
A commonly used method is to put a little washing powder in the dust container or the dust bag.
How often should I vacuum my house?
For allergy sufferers, vacuuming the house at least twice a week is recommended.
What is the weight of the iRobot Braava Jet m6?
The iRobot Braava Jet m6 has a weight of 2200 g.
What is the height of the iRobot Braava Jet m6?
The iRobot Braava Jet m6 has a height of 90 mm.
What is the width of the iRobot Braava Jet m6?
The iRobot Braava Jet m6 has a width of 270 mm.
What is the depth of the iRobot Braava Jet m6?
The iRobot Braava Jet m6 has a depth of 252 mm.
Is the manual of the iRobot Braava Jet m6 available in English?
Yes, the manual of the iRobot Braava Jet m6 is available in English .
Is your question not listed? Ask your question here
user manualiRobot Braava Jet m6

Braava jet
®
m6 Owner’s Guide 1
EN
Bottom View
Top View
Precision Jet
Spray Nozzle
Easy-Carrying
Handle
SPOT Clean Button
RCON Sensor
Rear Docking
Sensor
HOME Button
Lid Latch
Accessing the Tank
Home Base Charging Station
CLEAN Button
Pad Eject Button
Camera
Tank
Tank Cap
Lid
Opening
Lid Latch
Folding Tank
Handle
Cord
Storage
IR Sensor
Window
Charging
Contacts
Removable
Drip Tray
Cli Sensors
Pad Tracks
Pad Reader
Cleaning Pad
Wheels
Cli
Sensors
Charging
Contacts
About your Braava jet
®
m6 Robot Mop
See Safety Guide to ensure safe operation of your Braava jet
®
m6
View the manual for the iRobot Braava Jet m6 here, for free. This manual comes under the category vacuum cleaners and has been rated by 28 people with an average of a 8.8. This manual is available in the following languages: English. Do you have a question about the iRobot Braava Jet m6 or do you need help? Ask your question here
The iRobot Braava Jet m6 is a square-shaped vacuum cleaner with intelligent navigation. It is designed for efficient wet mopping and is equipped with a combi dust container type.
With the inclusion of a power cord, the iRobot Braava Jet m6 ensures easy and convenient operation. Its compatibility with smartphone remote support allows users to control the device remotely, offering added convenience.
The vacuum cleaner is equipped with an automatic base station return feature, allowing it to return to its base station for charging when required. This ensures that the device is always ready for use.
Intelligent navigation enables the iRobot Braava Jet m6 to efficiently clean different areas of the house, adapting to its surroundings for a thorough clean. With the timer function, users can schedule the vacuum cleaner to operate at specific times, providing flexibility in cleaning routines.
The iRobot Braava Jet m6 is a reliable and durable vacuum cleaner, constructed with high-quality materials. Its square shape allows it to reach and clean corners effectively.
In summary, the iRobot Braava Jet m6 vacuum cleaner offers efficient wet mopping and intelligent navigation. Its smartphone remote support and automatic base station return feature provide convenience, while the timer function allows for scheduling cleaning routines. Constructed with durable materials, it ensures reliability over time.

Design
| Dust container type | Combi |
| Product colour | White |
| Shape | Square |
| Smartphone remote support | Yes |
Packaging content
| Power cord included | Yes |
| Base station | Yes |
| Cleaning cloth | Yes |
Performance
| Wet mopping | Yes |
| Dust capacity (total) | — L |
| HEPA filtration system | — |
| Automatic base station return | Yes |
| Noise level | — dB |
| Navigation type | Intelligent |
| Timer | Yes |
| Base station functions | Charging |
| Floor surfaces supported | Hard floor, Linoleum, Parquet, Tiles |
| Mobile operating systems supported | Android, iOS |
| Works with the Google Assistant | Yes |
| Works with Amazon Alexa | Yes |
| SMART technology | Yes |
| Dust sensor | Yes |
Power
| Runtime | — min |
| Battery technology | Lithium-Ion (Li-Ion) |
| Battery capacity | — mAh |
| Charging time | 3 h |
| Rechargeable | Yes |
Weight & dimensions
| Height | 90 mm |
| Width | 270 mm |
| Depth | 252 mm |
| Weight | 2200 g |
Packaging data
| Package width | 495 mm |
| Package depth | 385 mm |
| Package height | 129 mm |
| Package weight | 5000 g |
| Package type | Box |
show more
Can’t find the answer to your question in the manual? You may find the answer to your question in the FAQs about the iRobot Braava Jet m6 below.
My iRobot vacuum is losing suction. Why is that?
Your iRobot vacuum cleaner losing suction power can be due to the following causes: — The suction power is not set to maximum — The dust container or dust bag is full — The hose, brush or tube is clogged
How often should I check the filter?
A clean filter is important to maintain the vacuum cleaner’s suction power. Therefore, check the filter regularly. When a filter is clogged, dust absorption decreases and energy consumption increases.
What do I do with a smelly vacuum cleaner?
A commonly used method is to put a little washing powder in the dust container or the dust bag.
How often should I vacuum my house?
For allergy sufferers, vacuuming the house at least twice a week is recommended.
What is the weight of the iRobot Braava Jet m6?
The iRobot Braava Jet m6 has a weight of 2200 g.
What is the height of the iRobot Braava Jet m6?
The iRobot Braava Jet m6 has a height of 90 mm.
What is the width of the iRobot Braava Jet m6?
The iRobot Braava Jet m6 has a width of 270 mm.
What is the depth of the iRobot Braava Jet m6?
The iRobot Braava Jet m6 has a depth of 252 mm.
Is the manual of the iRobot Braava Jet m6 available in English?
Yes, the manual of the iRobot Braava Jet m6 is available in English .
Is your question not listed? Ask your question here
iRobot Braava Jet M6 (6110) Ultimate Robot Mop — Use Manual — Use Guide PDF.
Documents: Go to download!
User Manual
- User Manual — (English)
- User Manual Portugal — (Portuguese)
- User Manual France — (French)
- User Manual Deutsche — (German)
- User Manual Spain — (Spanish)
Other Documents
- Tank Guide — (English)
Specification
- Spec Sheet (web) — (English)
- About your Braava jet® m6 Robot Mop
- Getting started
- Using Your Braava jet® m6 Robot Mop
- Care and Maintenance
- iRobot Customer Care
- Regulatory Information
Table of contents
User manual Ultimate Robot Mop iRobot Jet M6
About your Braava jet® m6 Robot Mop
Top View

Bottom View
Accessing the Tank
Home Base Charging Station
Getting started
1. Get ready
To start, you’ll need your robot, charging station, drip tray, and power cord.
2. Position the charging station and plug in
Choose an area near an outlet with good Wi-Fi coverage.
Plug the power cord into the charging station, and then into the wall.
3. Attach the drip tray
Place the drip tray onto the front of the charging station.
4. Wake up your robot
Slide your robot onto the charging station contacts to activate the battery. The light ring will light up and after a few minutes, and a sound will let you know it’s awake.
5. Connect and update
Connect your robot to the iRobot HOME App to allow remote control, cleaning customization, and to keep robot software up to date.
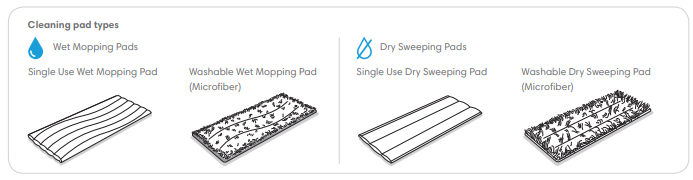
6. Attach a cleaning pad
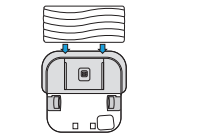
Slide a wet mopping or dry sweeping pad onto the underside of the robot.
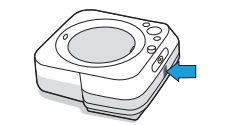
Detach an existing cleaning pad by pressing the button on the front of the robot.
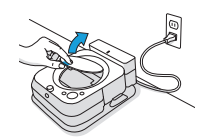
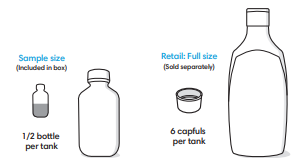
7. Fill the tank
Remove the tank from the robot.
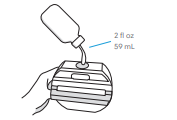
Add Braava jet® Hard Floor Cleaning Solution (if using).
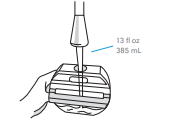
Then fill to top with water.
Cleaning Solution
- When wet mopping, you may add Braava jet® Hard Floor Cleaning Solution to the tank before adding water. This product is a concentrate that is suitable for all wellsealed hard floors.
Important: Braava jet® Hard Floor Cleaning Solution is the only solution that can be safely used in your robot mop. Please do not use other cleaning solutions.
Using Your Braava jet® m6 Robot Mop
Cleaning
Use your robot frequently to maintain well-conditioned floors.
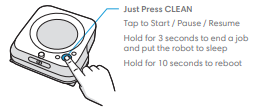
- Your robot will automatically explore and clean your home, moving in a methodical manner across the floor, with some overlap from one pass to the next to ensure that every spot on the floor is cleaned three times. If you are looking for a quicker clean or a deeper clean than this default setting, or if you want to adjust the amount of water sprayed, you can change your cleaning preferences from the iRobot HOME App.
- Your robot will return to the charging station at the end of a cleaning job, whenever it needs to recharge, or when the tank needs to be refilled.
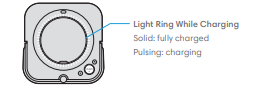
Note: Note: If the “CLEAN” text is pulsing while charging, your robot is in the middle of a cleaning job and will automatically resume where it left off once recharged.
- To send the robot back to its charging station, tap (home). A blue light ring pattern will indicate that the robot is seeking the charging station. This feature will only work if your robot started the job from the charging station.
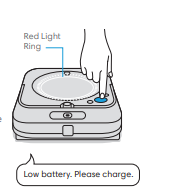
- When the robot senses its tank needs to be filled, the light ring indicator will illuminate in a red sweeping motion toward the lid latch.
- Clean smaller designated areas (3.3 ft2 /1 m2 ) by placing your robot at the bottom center of the space you’d like to focus on. Tap (spot clean) to start cleaning
Tips for Optimizing Performance
- Your robot works best when used with the iRobot HOME App.
- For optimal mopping performance, we recommend that you vacuum first to pick up large dirt and debris before running Braava jet® .
- Your robot will only run with Braava jet® m Series pads, which are made specifically for Braava jet® m Series robots.
- Use a new pad for each cleaning job, and do not pre-wet the pads prior to use.
- Keep your charging station plugged in and the area around it clear of clutter.
- You can use a Dual Mode Virtual Wall® Barrier to help keep your robot in places you want to be cleaned, and out of the ones you don’t. (Sold separately)
- Within the iRobot HOME App, you can adjust cleaning preferences to modify cleaning power, speed, and coverage.
Charging
- Slide your robot onto the charging station contacts to activate the battery.
Note: Your robot comes with a partial charge, but we recommend that you charge the robot for 3 hours prior to starting the first cleaning job.
- The light ring indicator will show the current charging status. This will turn off after 1 minute to save power, but can be shown again if you press CLEAN. This can also been seen in the iRobot HOME App
- Your robot uses a small amount of power whenever it is on the charging station. You can put the robot in a further-reduced power state when not in use. For instructions and more details on this Reduced Power Standby Mode, refer to the iRobot HOME App.
- For long-term storage, turn off your robot by removing it from the charging station and holding down (home) for 10 seconds. Store your robot in a cool, dry place.
Lithium Ion Battery
For best results, only use the iRobot Lithium Ion Battery that comes with your Braava jet® m6.
WARNING: Lithium ion batteries and products that contain lithium ion batteries are subject to stringent transportation regulations. If you need to ship this product (with the battery included) for service, travel or any other reason, you MUST follow these shipping instructions.
- Battery MUST be turned off before shipping.
- Turn off the battery by removing the robot from the charging station and holding down (home) for 10 seconds. All indicators will turn off.
- Package the product in its original packaging.
- Ship via ground transportation only (no air shipping).
- If you need further assistance, contact our Customer Care team.
Troubleshooting
- Your robot will tell you something is wrong by playing an audio alert and turning the light ring indicator red. Press CLEAN for details. Further support and instructional videos are available in the iRobot HOME App.
- After 90 minutes of inactivity off the charging station, your robot will automatically end its cleaning job.
Care and Maintenance
Cleaning the Sensors and Pad Reader
- Clean sensors on the bottom of your robot with a damp cloth.

Important: Do not spray cleaning solution or water onto the sensors or sensor openings.
Cleaning the Wheels
- Pull off any visible debris or hair that gathers around the wheels.
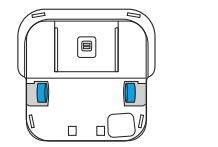
Cleaning the Body of the Robot
- Wipe clean with a damp cloth.
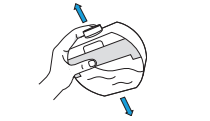
Cleaning the Tank
If you notice an odor from the tank
- Remove the tank from your robot mop.
- Fill the tank with warm water. Do not use boiling water.
- Close cap and lightly shake the tank.
- Rinse the tank and repeat as necessary.
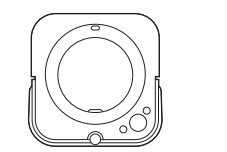
Cleaning the Drip Tray
- Remove the robot from the charging station.
- Separate the drip tray by lifting it up from charging station.
- Clean the drip tray with a damp cloth or with warm water in sink.
- Dry thoroughly before reattaching the drip tray to the charging station.
- Put your robot mop back onto the charging station.

Caring for Washable Cleaning Pads
Note: You can clean your washable pads two ways: either by hand washing, or in a washing machine.
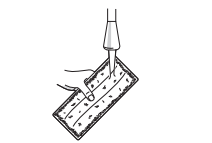
Hand Washing
- Thoroughly wash the pad with warm water.
Machine Washing
- Wash using the warm cycle, then air dry. Do not put in dryer. Do not wash with delicates.
iRobot Customer Care
USA & Canada
- If you have questions or comments about your Braava jet ® robot mop, please contact iRobot before contacting a retailer.
- You can start by visiting www.irobot.com for support tips, frequently asked questions and information about accessories. This information can also be found in the iRobot HOME App. If you need further assistance, call our Customer Care team at (877) 855-8593.
iRobot Customer Care Hours
- Monday to Friday, 9AM – 9PM Eastern Time
- Saturday and Sunday 9AM – 6PM Eastern Time
Outside USA & Canada
Visit www.global.irobot.com to:
- Learn more about iRobot in your country.
- Get hints and tips to improve your Braava jet ® robot mop’s performance.
- Get answers to questions.
- Contact your local support center.
Regulatory Information
This device complies with part 15 of the FCC Rules. Operation is subject to the following two conditions: (1) This device may not cause harmful interference, and (2) this device must accept any interference received, including interference that may cause undesired operation. This device complies with Industry Canada license-exempt RSS standard(s). Operation is subject to the following two conditions: 1) This device may not cause interference, and 2) this device must accept any interference, including interference that may cause undesired operation of the device.
- Changes or modifications not expressly approved by iRobot Corporation could void the user’s authority to operate the equipment.
- This equipment has been tested and found to comply with the limits for a Class B digital device, pursuant to part 15 of the FCC Rules as well as ICES-003 Rules. These limits are designed to provide reasonable protection against harmful interference in a residential installation. This equipment generates, uses and can radiate radio frequency energy and, if not installed and used in accordance with the instructions, may cause harmful interference to radio commu — nications. However, there is no guarantee that interference to radio communication will not occur in a particular installation. If this equipment does cause harmful interference to radio or television reception, which can be determined by turning the equipment off and on, the user is encouraged to try to correct the interference by one or more of the following measures: Reorient or relocate the receiving antenna. Increase the separation between the equipment and receiver. Connect the equipment into an outlet on a circuit different from that to which the receiver is connected. Consult the dealer or an experienced radio/TV technician for help.
- Under Industry Canada regulations, this radio transmitter may only operate using an antenna of a type and maximum (or lesser) gain approved for the transmitter by Industry Canada. To reduce potential radio interference to other users, the antenna type and its gain should be so chosen that the equivalent isotropically radiated power (e.i.r.p.) is not more than the necessary for successful communication.
- FCC Radiation Exposure Statement: This product complies with FCC §2.1093(b) for portable RF exposure limits, set forth for an uncontrolled environment and is safe for the intended operation as described in this manual.
- ISED Radiation Exposure Statement: This product complies with the Canadian Standard RSS-102 for portable RF exposure limits, set forth for an uncontrolled environment and is safe for the intended operation as described in this manual.
See other models: E5 (5150 Roomba 675 Roomba S9 (9150)