
Category
- Getting Started
- Cleaning & Maintenance
- Video
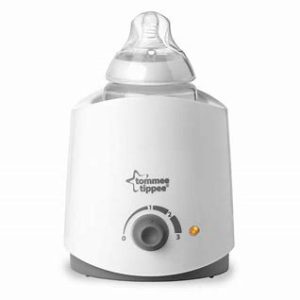
Great to see that you’ve purchased our electric food and bottle warmer. To help you get started and to keep your product working effectively, we’ve added all the guidance you should need within this area, as well as some handy hints and tips and troubleshooting advice.
You’ll be pleased to know that there’s nothing you need to do before using your bottle warmer for the first time!
How to use your Electric Food & Bottle Warmer
The speed at which the warmer heats the milk or food will depend on the size of the bottle or container and the starting temperature of the milk or food (e.g. room temperature 20˚C or from the refrigerator 5˚C).
We recommend that setting 3 is always used for heating up, and settings 2 and 1 are used for keeping warm only.
**Milk of food should not be heated for over 30-minutes**

How do I heat a bottle?
- Place filled bottle in warmer with the bottle hood on
- Fill the warmer with water to approximately 10mm below the rim of the warmer. Never let the water overflow or rise above the neck of the bottle. For larger bottles, fill to 12mm below the rim of the warmer.
- Before plugging in, make sure the bottle warmer is switched to the “MIN” setting.
- Plug in unit. The amber light will turn on to indicate the warmer is switched on and is heating up.
- Turn dial to setting 3
- Once the water is heated, the amber light will switch off to indicate that the thermostat will maintain the temperature of the water. It does not indicate that the milk is ready.
- Heat the milk to the desired temperature. Ensure that the heating guidelines are followed to ensure that the food is not heated for too long.
- Take care when removing the bottle, as it and the surrounding water will be hot.
- For your child’s safety – Always check food temperature before feeding by testing on a sensitive part of your skin.
- Take care not to overheat the milk
- In between can be placed back in the warmer to keep milk warm. The thermostat will maintain the temperature of the water. In doing this the indicator light will switch to amber to indicate the warmer is heating up.
- Turn back the dial to the lowest setting and unplug the unit after feeding.
How do I heat a baby jar?
- Remove the lid from the jar, placing the jar into the warmer
- Fill the warmer with water to approximately 10mm below the rim of the warmer.
- Before plugging in, make sure the bottle warmer is switched to the lowest setting.
- Plug in the unit. The amber light will turn on to indicate the warmer is switched on and is heating up.
- Turn dial to preferred setting
- Once the water is heated, the amber light will switch off to indicate that the thermostat will maintain the temperature of the water. It does not indicate that the food is ready. To ensure that the food stays at the temperature you have selected, the thermostat will maintain the temperature of the water. In doing this the indicator light may switch to amber whilst you are heating the food.
- Heat food to the desired temperature. Ensure that the heating guidelines are followed to ensure that the food is not heated for too long.
- Take care when removing the jar, as the surrounding water will be hot
- For your child’s safety – Always check food temperature before feeding by testing on a sensitive part of your skin. Take care not to overheat the food.
- In between feeding, the jar can be placed back in the warmer to keep milk warm. The thermostat will maintain the temperature of the water. In doing this the indicator light will switch to amber to indicate the warmer is heating up.
- Turn back dial to the lowest setting and unplug the unit after feeding.
Can I use the Express and Go™ Milk Pouches in the Tommee Tippee Electric Food & Bottle Warmer?
We wouldn’t really recommend this to be honest — but there is a specially designed Express and Go pouch and bottle warmer that will do the job far better!
Can I use the Ultra™ Bottle in the Tommee Tippee Electric Food and Bottle Warmer?
Yep! The Tommee Tippee Ultra™ bottle fits in the Tommee Tippee Electric Food and Bottle Warmer – it may take a little longer to heat though.
To keep your warmer nice and healthy, we advise to wipe it with a clean damp cloth after each use. It’s really important that the warmer is unplugged, allowing it to cool before doing this and please don’t clean it with abrasive cleaners or allow it to come into contact with solvents or harsh chemicals, as it doesn’t like that — damage could result!
As well as giving it a wipe over, descaling your warmer as regularly as is needed will keep the machine working as it should. We know it’s hard to find time with a newborn but we highly recommend that you descale your warmer approximately every 4 weeks. If you live in a hard water area or if you notice marks on the inside of the machine sooner, you may need to do it more often, just as you do with your kettle.
Not sure of your water quality — we’d suggest contacting your water supplier.
How do I descale my Electric Food & Bottle Warmer?
There are two simple options. You could use a descaling productwhich is suitable for an electric warmer or you could use cleaning or food grade white/clear vinegar (ideally not the stuff you use on your chips as it’s a bit smelly!). If you choose a specialist product, it should come with instructions; if you choose vinegar, here’s two ways that you can do it:
Option 1:
- Empty the warmer and wipe the inside with a clean sponge or damp cloth
- Pour in 250ml (1 cup) of white/clear vinegar and leave for between 30-mins and 24-hours, depending on the extent of limescale
- Pour any remaining liquid down the sink and rinse with clean water. Use a sponge or cloth to remove any loose bits of limescale that there might be
- Plug your warmer back in, adding the regular volume of water for a normal warming.
- to remove any additional build up. Upon completion, rinse warmer again and use as directed.
Option 2:
- Empty the warmer and wipe the inside with a clean sponge or damp cloth.
- Pour in 250ml (1 cup) of white/clear vinegar
- Turn on the warmer and run for a warming cycle, approximately 5-minutes.
- Unplug the unit and leave to cool, then pour any remaining liquid down the sink.
- Rinse the interior of the warmer well with cold water and use a clean or damp cloth to remove any build up that came loose as a result of the descaling process.
- Plug unit back in and add regular amount of water used for normal warming. Turn on and run for 5 minutes to remove any additional build up.
- Upon completion, rinse warmer again and use as normal
The water isn’t heating up?
The first thing to check is whether the amber light is illuminating after the warmer has been switched on for a few minutes. If it isn’t, there could be a little issue with the thermostat.
If your warmer is still valid under your retail warranty period and you still hold your receipt, we’d advise to return the machine to store for a replacement. If you’ve had it a little longer than this, come and chat to us in your preferred way – you can choose one of the 3 options in our contact area.
I’ve noticed bits floating in the water?
This is likely to be limescale that’s become loose within the warmer. Descaling is a quick and easy process, and here’s two ways to do it with white/ clear vinegar:
Option 1:
- Empty the warmer and wipe the inside with a clean sponge or damp cloth
- Pour in 250ml (1 cup) of white/clear vinegar and leave for between 30-mins and 24-hours, depending on the extent of limescale
- Pour any remaining liquid down the sink and rinse with clean water. Use a sponge or cloth to remove any loose bits of limescale that there might be
- Plug your warmer back in, adding the regular volume of water for a normal warming.
- to remove any additional build up. Upon completion, rinse warmer again and use as directed.
Option 2:
- Empty the warmer and wipe the inside with a clean sponge or damp cloth.
- Pour in 250ml (1 cup) of white/clear vinegar
- Turn on the warmer and run for a warming cycle, approximately 5-minutes.
- Unplug the unit and leave to cool, then pour any remaining liquid down the sink.
- Rinse the interior of the warmer well with cold water and use a clean or damp cloth to remove any build up that came loose as a result of the descaling process.
- Plug unit back in and add regular amount of water used for normal warming. Turn on and run for 5 minutes to remove any additional build up.
- Upon completion, rinse warmer again and use as normal
The milk isn’t warming up as quickly as it should?
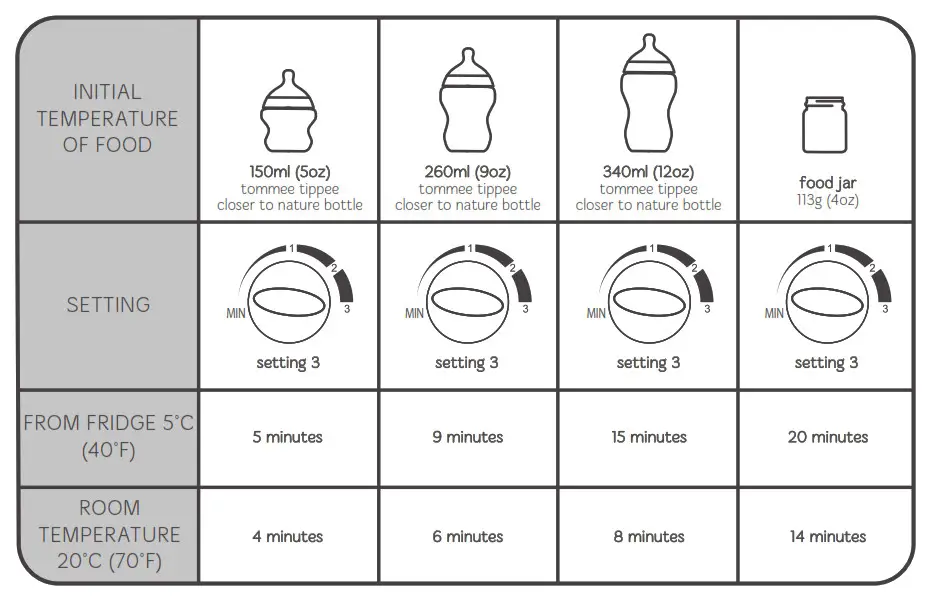
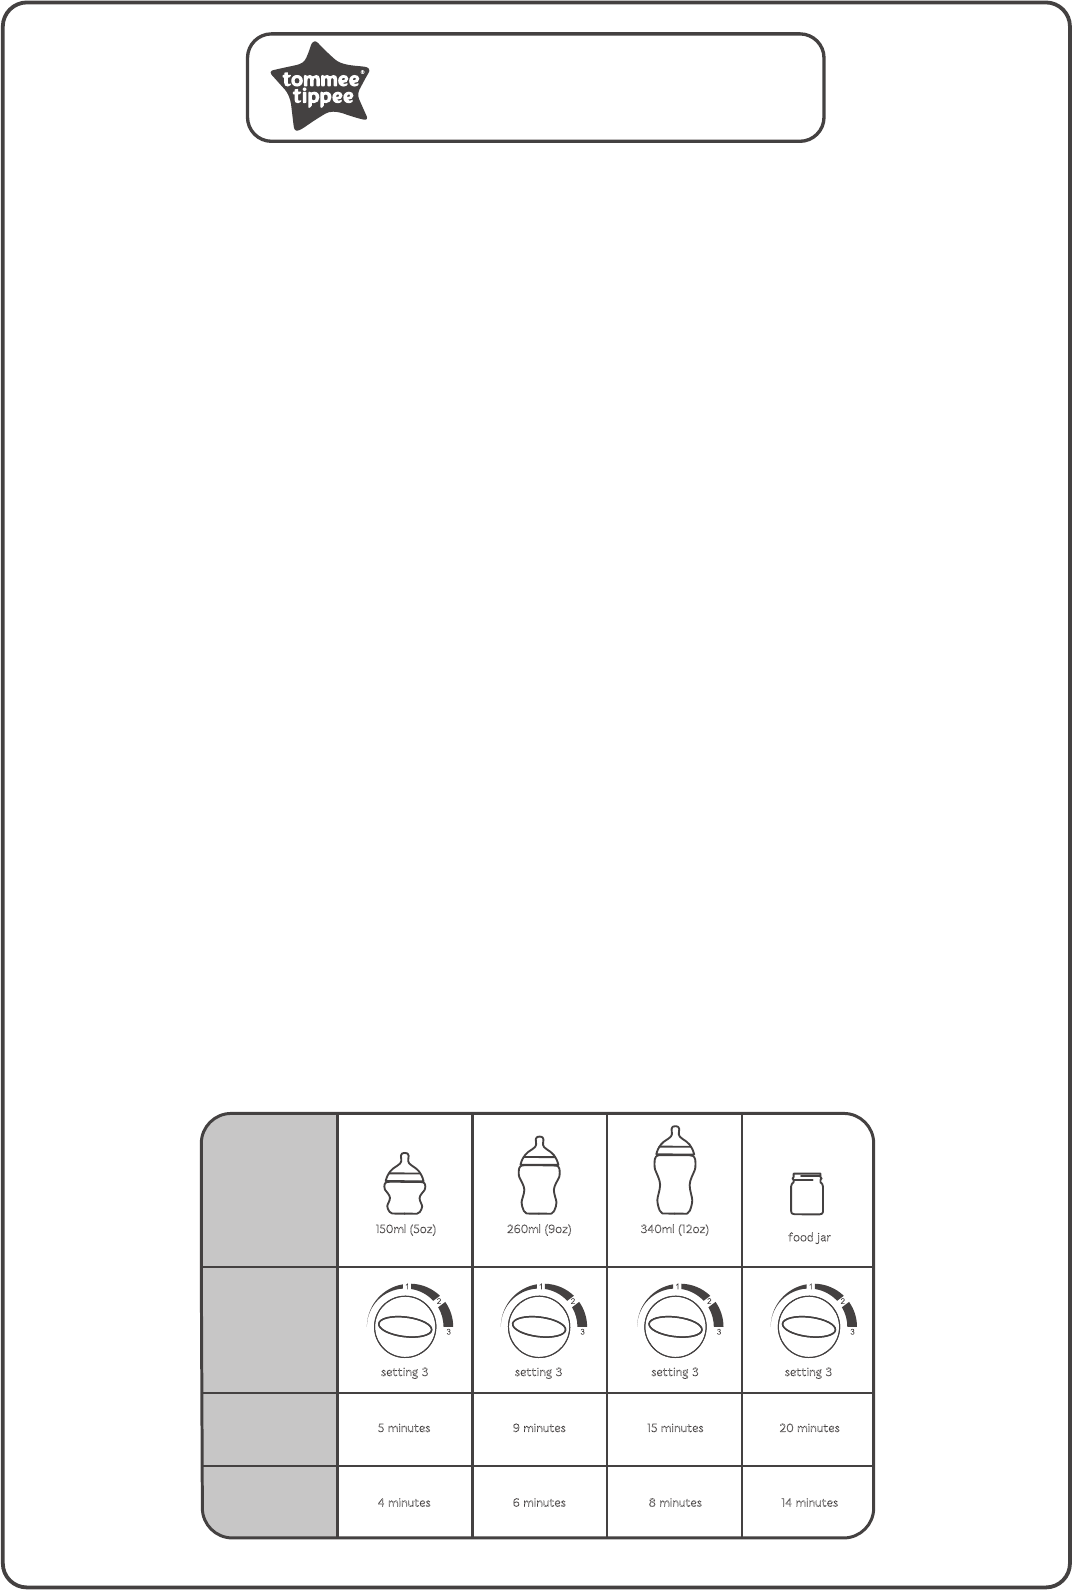
OK, let’s see what we can do…… Firstly, the temperature of the water you add to the warmer may affect this, we used cold water for our timings but of course across the year, tap water temp can change. The guidelines that we give (we’ve included them below for easy reference) are an indication of how long it will take for a bottle or jar to heat up, as there are factors that could impact the timings. An example of this is where we indicate that an 150ml bottle taken from the fridge can take around 5-minutes, although this is based on the fridge being at a temperature of 5 C (40 C). If your fridge is colder than this, it’s likely to take a little longer. Equally, we’re using a room temperature of 20 C (70 F) so if your room is colder or hotter, it may change the timings too.
How to use the electric bottle & food warmer

IMPORTANT WARNINGS!
Keep this instruction sheet for future reference as it includes important information.
• This appliance is intended for household use only. Do not use outdoors.
• Before plugging in the Bottle Warmer for the first time ensure that the voltage is compatible with
your electricity supply by checking the label on the base of the unit.
• Ensure water has been added to the unit before switching the unit on.
• Do not immerse in water, to protect against fire, electric shock and injury to persons. Do not immerse
cord, plugs or other parts of the unit in water or other liquid.
• Misuse of the product may result in the risk of fire, electric shock and/or personal injury.
• This appliance can be used by children aged from 14 years and above if they have been given
super vision or instruction concerning use of the appliance in a safe way and understand the hazards
involved.
• Cleaning and user maintenance shall not be made by children unless they are aged 14 years and
above and supervised.
• Keep the appliance and its cord out of reach of children aged less than 3 years.
• Appliances can be used by persons with reduced physical, sensory or mental capabilities or
lack of experience and knowledge if they have been given supervision or instruction
concerning use of the appliance in a safe way and understand the hazards involved.
• Children shall not play with this appliance.
• The heating element surface is subject to residual heat after use.
• Do not touch hot surfaces use handles and knobs.
• Ensure that the heating guidelines are followed to ensure that the food is not heated for
too long.
For your child’s safety – Always check food temperature before feeding by testing on a sensitive
part of your skin.
• Do not operate any appliance with a damaged cord or plug or after the appliance malfunctions or
has been damaged in any manner. If the supply cord is damaged it must be changed by a qualified
person in order to avoid a hazard.
If the damage is from new the unit must be returned to the manufacturer.
• If within a retail warranty period this product should be exchanged at place of purchase.
The manufacturer will then be made aware.
Any questions? Visit our website tommeetipee.com or call us FREE on 0500 97 98 99 (UK only).
• Always use on a flat heat resistant surface.
• Do not move appliance when in use.
• Do not let the cord hang over edge of kitchen work surface or touch hot surfaces. The product has
been fitted with a cord wind on the base of the unit to allow you to adjust the length of the cord safely.
It is recommended that the cord be kept as short as possible.
• Do not use any accessories other than those supplied with this appliance.
electric bottle warmer
INSTRUCTIONS FOR USE
150ml (5oz)
tommee tippee
closer to nature bottle
5 minutes 9 minutes 15 minutes 20 minutes
4 minutes 6 minutes 8 minutes 14 minutes
260ml (9oz)
tommee tippee
closer to nature bottle
340ml (12oz)
tommee tippee
closer to nature bottle
food jar
113g (4oz)
FROM FRIDGE
5˚C (40˚F)
ROOM
TEMPERATURE
20˚C (70˚F)
setting 3
MIN
setting 3
MIN
setting 3
MIN
setting 3
MIN
INITIAL
TEMPERATURE
OF FOOD
SETTING

electric bottle warmer
INSTRUCTIONS FOR USE
IMPORTANT WARNINGS!
Keep this instruction sheet for future reference as it includes important information.
- This appliance is intended for household use only. Do not use the outdoors.
- Before plugging in the Bottle Warmer for the first time ensure that the voltage is compatible with your electricity supply by checking the label on the base of the unit.
- Ensure water has been added to the unit before switching the unit on.
- Do not immerse in water, to protect against fire, electric shock, and injury to persons. Do not immerse cord, plugs or other parts of the unit in water or other liquid.
- Misuse of the product may result in the risk of fire, electric shock, and/or personal injury.
- This appliance can be used by children aged from 14 years and above if they have been given supervision or instruction concerning use of the appliance in a safe way and understand the hazards involved.
- Cleaning and user maintenance shall not be made by children unless they are aged 14 years and above and supervised.
- Keep the appliance and its cord out of reach of children aged less than 3 years.
- Appliances can be used by persons with reduced physical, sensory or mental capabilities or lack of experience and knowledge if they have been given supervision or instruction concerning use of the appliance in a safe way and understand the hazards involved.
- Children shall not play with this appliance.
- The heating element surface is subject to residual heat after use.
- Do not touch hot surfaces use handles and knobs.
- Ensure that the heating guidelines are followed to ensure that the food is not heated for too long.
For your child’s safety – Always check food temperature before feeding by testing on a sensitive part of your skin. - Do not operate any appliance with a damaged cord or plug or after the appliance malfunctions or has been damaged in any manner. If the supply cord is damaged it must be changed by a qualified person in order to avoid a hazard. If the damage is from new the unit must be returned to the manufacturer.
- If within a retail warranty period this product should be exchanged at place of purchase. The manufacturer will then be made aware. Any questions? Visit our website www.tommeetippee.com
- Always use on a flat heat resistant surface.
- Do not move appliance when in use.
- Do not let the cord hang over edge of kitchen work surface or touch hot surfaces. The product has been fitted with a cord wind on the base of the unit to allow you to adjust the length of the cord safely. It is recommended that the cord be kept as short as possible.
- Do not use any accessories other than those supplied with this appliance.
HOW TO USE
The speed at which the warmer heats the milk or food will depend on the size of the bottle or container and the starting temperature of the milk or food (e.g. room temperature 20˚C or from the refrigerator 5˚C).
We recommend that setting 3 is always used for heating up, and settings 2 and 1 are used for keeping warm only.
MILK OR FOOD SHOULD NOT BE HEATED FOR OVER 30 MINUTES.
The guide gives an indication of the time you can expect the warmer to take. Maximum average stabilised temperature is approximate 85˚C
FOR FEEDING BOTTLES
- Place filled bottle in warmer.
- Fill the warmer with water to approximately 10mm below the rim of the warmer. Never let the water overflow or rise
above the neck of the bottle. For larger bottles, fill to 12mm below the rim of the warmer. - Before plugging in, make sure the bottle warmer is switched to the “MIN” setting.
- Plug in unit. The amber light will turn on to indicate the warmer is switched on and is heating up.
- Turn dial to setting 3.
- Once the water is heated, the amber light will switch off to indicate that the thermostat will maintain the temperature
of the water. It does not indicate that the milk is ready. - Heat the milk to the desired temperature. Ensure that the heating guidelines are followed to ensure that the food is
not heated for too long. - Take care when removing the bottle, as it and the surrounding water will be hot.
- For your child’s safety – Always check food temperature before feeding by testing on a sensitive part of your skin.
Take care not to overheat the milk. - In betwee can be placed back in the warmer to keep milk warm. The thermostat will maintain the temperature of the
water. In doing this the indicator light will switch to amber to indicate the warmer is heating up. - Turn back the dial to the lowest setting and unplug the unit after feeding.
FOR BABY JARS
- Remove the lid and place jar in warmer.
- Fill the warmer with water to approximately 10mm below the rim of the warmer.
- Before plugging in, make sure the bottle warmer is switched to the lowest setting.
- Plug in the unit. The amber light will turn on to indicate the warmer is switched on and is heating up.
- Turn dial to preferred setting.
- Once the water is heated, the amber light will switch off to indicate that the thermostat will maintain the temperature of the water. It does not indicate that the food is ready. To ensure that the food stays at the temperature you have selected, the thermostat will maintain the temperature of the water. In doing this the indicator light may switch to amber whilst you are heating the food.
- Heat food to the desired temperature. Ensure that the heating guidelines are followed to ensure that the food is not heated for too long.
- Take care when removing the jar, as the surrounding water will be hot.
- For your child’s safety – Always check food temperature before feeding by testing on a sensitive part of your skin.
Take care not to overheat the food. - In between feeding, the jar can be placed back in the warmer to keep milk warm. The thermostat will maintain the temperature of the water. In doing this the indicator light will switch to amber to indicate the warmer is heating up.
- Turn back dial to the lowest setting and unplug the unit after feeding.
HOW TO CLEAN THE ELECTRIC BOTTLE WARMER
Unplug and allow to cool before cleaning. Wipe with a damp cloth only. Do not clean with abrasive cleaners or allow to come into contact with solvents or harsh chemicals, damage could result.
DE-SCALING
De-scale your bottle warmer every 4 weeks to ensure it continues to work efficiently. To de-scale, your bottle warmer, use de-scaling sachets, following the manufacturer’s instructions on the pack carefully.
INFORMATION ON THE DISPOSAL FOR WASTE ELECTRICAL & ELECTRONIC EQUIPMENT (WEEE)
This symbol on the products and accompanying documents means that used electrical and electronic products should not be mixed with general household waste. For proper disposal for treatment, recovery and recycling, please take these products to designated collection points where they will be accepted on a free of charge basis. In some countries you may be able to return your products to your local retailer upon the purchase of a new product.
Disposing of this product correctly will help you save valuable resources and prevent any possible effects on human health and the environment, which could otherwise arise from inappropriate waste handling. Please contact your local authority for further details of your nearest collection point for WEEE.
Penalties may be applicable for the incorrect disposal of this product in accordance with national legislation.
The product is fitted with a BS 1363 mains plug containing a fuse. If it ever becomes necessary to replace the fuse, only use fuses that are marked BS 1362, and rated at 13A. In the unlikely event that this plug is not suitable for the sockets in your home, it should be removed and a suitable plug fitted as follows:
The wires of the mains lead are coloured in accordance with the following code:
GREEN AND YELLOW – EARTH
BLUE – NEUTRAL
BROWN – LIVE
As these colours may not correspond with the coloured markings sometimes used to identify the terminals in the plug, connect as follows.
The wire coloured GREEN AND YELLOW must be connected to the terminal marked E or by the earth symbol or coloured GREEN or GREEN AND YELLOW. The wire coloured BLUE must be connected to the terminal marked N or coloured BLACK. The wire coloured BROWN must be connected to the terminal marked L or coloured RED.
If you are in any doubt about how to wire a plug or replace a fuse safely, consult a qualified electrician.
WARRANTY: This product has 12 months warranty period after the date of purchase.
If you have any questions please visit our website www.tommeetippee.com
Nothing in this warranty shall be construed as removing or limiting a consumers rights in law.
Jackel International Limited trading as Mayborn Group.
Northumberland Business Park West, Cramlington, Northumberland NE23 7RH, UK
Copyright © Jackel International Limited 2016.
TOMMEE TIPPEE is a registered trademark of Jackel International Limited.
 422144
More Manuals From Tommee Tippee
IMPORTANT WARNINGS!
Keep this instruction sheet for future reference as it includes important information.
• This appliance is intended for household use only. Do not use outdoors.
• Before plugging in the Bottle Warmer for the first time ensure that the voltage is compatible with
your electricity supply by checking the label on the base of the unit.
• Ensure water has been added to the unit before switching the unit on.
• Do not immerse in water, to protect against fire, electric shock and injury to persons. Do not immerse
cord, plugs or other parts of the unit in water or other liquid.
• Misuse of the product may result in the risk of fire, electric shock and/or personal injury.
• This appliance can be used by children aged from 14 years and above if they have been given
super vision or instruction concerning use of the appliance in a safe way and understand the hazards
involved.
• Cleaning and user maintenance shall not be made by children unless they are aged 14 years and
above and supervised.
• Keep the appliance and its cord out of reach of children aged less than 3 years.
• Appliances can be used by persons with reduced physical, sensory or mental capabilities or
lack of experience and knowledge if they have been given supervision or instruction
concerning use of the appliance in a safe way and understand the hazards involved.
• Children shall not play with this appliance.
• The heating element surface is subject to residual heat after use.
• Do not touch hot surfaces use handles and knobs.
• Ensure that the heating guidelines are followed to ensure that the food is not heated for
too long.
For your child’s safety – Always check food temperature before feeding by testing on a sensitive
part of your skin.
• Do not operate any appliance with a damaged cord or plug or after the appliance malfunctions or
has been damaged in any manner. If the supply cord is damaged it must be changed by a qualified
person in order to avoid a hazard.
If the damage is from new the unit must be returned to the manufacturer.
• If within a retail warranty period this product should be exchanged at place of purchase.
The manufacturer will then be made aware.
Any questions? Visit our website www.tommeetippee.com
• Always use on a flat heat resistant surface.
• Do not move appliance when in use.
• Do not let the cord hang over edge of kitchen work surface or touch hot surfaces. The product has
been fitted with a cord wind on the base of the unit to allow you to adjust the length of the cord safely.
It is recommended that the cord be kept as short as possible.
• Do not use any accessories other than those supplied with this appliance.
electric bottle warmer
INSTRUCTIONS FOR USE
150ml (5oz)
tommee tippee
closer to nature bottle
5 minutes 9 minutes 15 minutes 20 minutes
4 minutes 6 minutes 8 minutes 14 minutes
260ml (9oz)
tommee tippee
closer to nature bottle
340ml (12oz)
tommee tippee
closer to nature bottle
food jar
113g (4oz)
FROM FRIDGE 5˚C
(40˚F)
ROOM
TEMPERATURE
20˚C (70˚F)
setting 3
MIN
setting 3
MIN
setting 3
MIN
setting 3
MIN
INITIAL
TEMPERATURE
OF FOOD
SETTING