
D3-4-2-1-7a_A_Ru
BAЖHO
Символ молнии, заключенный в равносторонний треугольник, используется для предупреждения пользователя об «опасном напряжении» внутри корпуса изделия, которое может быть достаточно высоким и стать причиной поражения людей электрическим током.
CAUTION
RISK OF ELECTRIC SHOCK
DO NOT OPEN
ВНИМАНИЕ:
ВО ИЗБЕЖАНИЕ ПОРАЖЕНИЯ ЭЛЕКТРИЧЕСКИМ ТОКОМ НЕ СНИМАЙТЕ КРЫШКУ (ИЛИ ЗАДНЮЮ СТЕНКУ). ВНУТРИ НЕ СОДЕРЖАТСЯ ДЕАТЛИ, ПРЕДНАЗНАЧЕННЫЕ ДЛЯ РЕМОНТА ПОЛЬЗОВАТЕЛЕМ. ДЛЯ ОБСЛУЖИВАНИЯ ОБРАТИТЕСЬ К КВАЛИФИЦИРОВАННОМУ СОТРУДНИКУ СЕРВИСНОЙ СЛУЖБЫ.
Восклицательный знак, заключенный в равносторонний треугольник, используется для предупреждения пользователя о наличии в литературе, поставляемой в комплекте с изделием, важных указаний по работе с ним и обслуживанию.
D3-4-2-1-1_Ru-A
ПРЕДУПРЕЖДЕНИЕ
Данное оборудование не является водонепроницаемым. Во избежание пожара или поражения электрическим током не помещайте рядом с оборудованием емкости с жидкостями (например, вазы, цветочные горшки) и не допускайте попадания на него капель, брызг,
|
дождя или влаги. |
D3-4-2-1-3_A_Ru |
ПРЕДУПРЕЖДЕНИЕ
Перед первым включением оборудования внимательно прочтите следующий раздел.
Напряжение в электросети может быть разным в различных странах и регионах. Убедитесь, что сетевое напряжение в местности, где будет использоваться данное устройство, соответствует требуемому напряжению (например, 230 В или 120 В), указанному на
|
задней панели. |
D3-4-2-1-4_A_Ru |
|
|
CAUTION |
CLASS 3B VISIBLE AND INVISIBLE LASER RADIATION WHEN OPEN, AVOID EXPOSURE TO THE BEAM. |
VRW2262 — A |
||||||
|
ATTENTION |
RADIATIONS LASER VISIBLES ET INVISIBLES DE CLASSE 3B QUAND OUVERT. ÉVITEZ TOUT EXPOSITION AU FAISCEAU. |
|||||||
|
ADVARSEL |
KLASSE 3B SYNLIG OG USYNLIG LASERSTRÅLING VED ÅBNING. UNDGÅ UDSÆTTELSE FOR STRÅLING. |
|||||||
|
VARNING |
KLASS 3B SYNLIG OCH OSYNLIG LASERSTRÅLNING NÄR DENNA DEL ÄR ÖPPNAD. UNDVIK ATT UTSÄTTA DIG FÖR STRÅLEN. |
|||||||
|
VORSICHT |
BEI GEÖFFNETER ABDECKUNG IST SICHTBARE UND UNSICHTBARE LASERSTRAHLUNG DER KLASSE 3B IM GERÄTEINNEREN VORHANDEN. |
|||||||
|
NICHT DEM LASERSTRAHL AUSSETZEN! |
||||||||
|
PRECAUCIÓN CUANDO SE ABRE HAY RADIACIÓN LÁSER DE CLASE 3B VISIBLE E INVISIBLE. EVITE LA EXPOSICIÓN A LOS RAYOS LÁSER. |
||||||||
|
VARO! |
AVATTAESSA OLET ALTTIINA NÄKYVÄLLE JA NÄKYMÄTTÖMÄLLE LUOKAN 3B LASERSÄTEILYLLE. ÄLÄ KATSO SÄTEESEEN. |
|||||||
D3-4-2-1-8_B_Ru
D3-4-2-1-9a_Ru
ПРЕДУПРЕЖДЕНИЕ
Во избежание пожара не приближайте к оборудованию источники открытого огня (например, зажженные свечи).

Содержание
01 До начала эксплуатации
Содержимое упаковки . . . . . . . . . . . . . . . . . . . 6
Установка батареек в пульт ДУ . . . . . . . . . . . 6 Использование пульта ДУ. . . . . . . . . . . . . . . . 6 Совместимость форматов/содержимого дисков при воспроизведении . . . . . . . . . . . . . 7 О внутреннем жестком диске . . . . . . . . . . . . 12 Символы, используемые в данном руководстве. . . . . . . . . . . . . . . . . . . . . . . . . . . 13
02 Подключения
Соединения на задней панели. . . . . . . . . . . . 14 Подключения на передней панели. . . . . . . . 15
Простое подключение . . . . . . . . . . . . . . . . . . 16
Использование аудио-видео выходов другого типа . . . . . . . . . . . . . . . . . . . . . . . . . . 17
Подключение декодера, спутникового ресивера или цифрового наземного ресивера . . . . . . . . . . . . . . . . . . . . . . . . . . . . . . 18
Подключение внешнего декодера (1) . . . . . 19 Подключение внешнего декодера (2) . . . . . 20 Подключение к аудио-видео усилителю/ресиверу. . . . . . . . . . . . . . . . . . . . 20
Подключение через HDMI . . . . . . . . . . . . . . 21 Подключение других аудио-видео источников. . . . . . . . . . . . . . . . . . . . . . . . . . . . 22
Подключение USB устройства . . . . . . . . . . . 23 Подключение к розетке . . . . . . . . . . . . . . . . . 24
03 Органы управления и дисплеи
Передняя панель. . . . . . . . . . . . . . . . . . . . . . . 25 Дисплей . . . . . . . . . . . . . . . . . . . . . . . . . . . . . . 26 Пульт ДУ . . . . . . . . . . . . . . . . . . . . . . . . . . . . . 27
04 Подготовка к эксплуатации
Включение и настройка. . . . . . . . . . . . . . . . . 29 Настройка системы GUIDE Plus+™. . . . . . . 31
05 Использование электронной телепрограммы GUIDE Plus+™
Система GUIDE Plus+™ . . . . . . . . . . . . . . . . 35
Использование системы
GUIDE Plus+™ . . . . . . . . . . . . . . . . . . . . . . . . 35 Области . . . . . . . . . . . . . . . . . . . . . . . . . . . . . . 37
Часто задаваемые вопросы и устранение неполадок GUIDE Plus+™. . . . . . . . . . . . . . . 46
4
06 Запись
О записи на диски DVD . . . . . . . . . . . . . . . . .49
О записи на жесткий диск. . . . . . . . . . . . . . . .50
Записываемый звук . . . . . . . . . . . . . . . . . . . . .50
Ограничения видеозаписи. . . . . . . . . . . . . . . .51 Использование встроенного телевизионного тюнера. . . . . . . . . . . . . . . . . .51 Установка качества изображения/времени
записи. . . . . . . . . . . . . . . . . . . . . . . . . . . . . . . . .52
Основная настройка записи с телевизора. . . . . . . . . . . . . . . . . . . . . . . . . . . . .53
Функция Pause Live TV
(пауза трансляции ТВ в реальном времени или отложенный просмотр ТВ) . . . . . . . . . . .55 Установка записи по таймеру. . . . . . . . . . . . .57 Одновременная запись и воспроизведение (воспроизведение с задержкой) . . . . . . . . . . .60 Запись с внешнего компонента . . . . . . . . . . .60 Воспроизведение записей на проигрывателях DVD . . . . . . . . . . . . . . . . . . .61
Инициализация записываемых
DVD-дисков . . . . . . . . . . . . . . . . . . . . . . . . . . .62
Автоматическая инициализация
диска DVD-RW. . . . . . . . . . . . . . . . . . . . . . . . .63
07 Воспроизведение
Введение . . . . . . . . . . . . . . . . . . . . . . . . . . . . . .64
Прямое воспроизведение . . . . . . . . . . . . . . . .64 Просмотр содержания диска с помощью функции Disc Navigator . . . . . . . . . . . . . . . . . .68 Поиск на дисках . . . . . . . . . . . . . . . . . . . . . . . .69
Замедленное воспроизведение. . . . . . . . . . . .69
Кадр вперед/кадр назад. . . . . . . . . . . . . . . . . .70 Меню Play Mode. . . . . . . . . . . . . . . . . . . . . . . .70
Отображение и переключение субтитров. . . . . . . . . . . . . . . . . . . . . . . . . . . . . .72
Переключение звуковых дорожек
DVD и DivX . . . . . . . . . . . . . . . . . . . . . . . . . . .73
Переключение аудиоканалов . . . . . . . . . . . . .73 Переключение ракурсов камеры . . . . . . . . . .74 Отображение информации о дисках на экране. . . . . . . . . . . . . . . . . . . . . . . .74
Ru

08 Воспроизведение и запись c цифровой видеокамеры
Воспроизведение c цифровой
видеокамеры . . . . . . . . . . . . . . . . . . . . . . . . . . 76
Запись c цифровой видеокамеры . . . . . . . . . 76
О DV . . . . . . . . . . . . . . . . . . . . . . . . . . . . . . . . . 78
09 Редактирование
Параметры редактирования. . . . . . . . . . . . . . 79
Экран Disc Navigator . . . . . . . . . . . . . . . . . . . 80
10 Копирование и резервирование
Введение . . . . . . . . . . . . . . . . . . . . . . . . . . . . . 91 Функция One Touch Copy . . . . . . . . . . . . . . . 91
Использование списков копирования
(Copy Lists) . . . . . . . . . . . . . . . . . . . . . . . . . . . 93
Резервное копирование диска. . . . . . . . . . . . 97
11 Использование функции Jukebox
Копирование музыки на жесткий диск . . . . 99 Копирование файлов через USB. . . . . . . . . . 99 Воспроизведение музыки с помощью функции Jukebox. . . . . . . . . . . . . . . . . . . . . . 102
Редактирование альбомов с помощью функции Jukebox. . . . . . . . . . . . . . . . . . . . . . 103
12 Функция PhotoViewer
Расположение файлов изображений
JPEG . . . . . . . . . . . . . . . . . . . . . . . . . . . . . . . . 104
Переключение стиля отображения
PhotoViewer . . . . . . . . . . . . . . . . . . . . . . . . . . 105 Показ слайдов . . . . . . . . . . . . . . . . . . . . . . . . 105
Считывание файлов с диска или USB
устройства . . . . . . . . . . . . . . . . . . . . . . . . . . . 106
Импорт файлов на жесткий диск . . . . . . . . 106 Выбор нескольких файлов или папок . . . . 107 Копирование файлов на
диск DVD-R/-RW . . . . . . . . . . . . . . . . . . . . . 107
Копирование выбранных файлов на
диск DVD-R/-RW . . . . . . . . . . . . . . . . . . . . . 108
Редактирование файлов на жестком диске. . . . . . . . . . . . . . . . . . . . . . . . . . . . . . . . 109
Распечатка файлов . . . . . . . . . . . . . . . . . . . . 111
14 Меню Video Adjust
Настройка качества изображения для телевизора и внешних источников . . . . . . .115 Настройка качества изображения для воспроизведения дисков . . . . . . . . . . . . . . . .116
15 Меню Initial Setup
Использование меню Initial Setup . . . . . . . .118 Выбор других языков в параметрах языка . . . . . . . . . . . . . . . . . . . . . . . . . . . . . . . .130
16 Дополнительная информация
Минимальное время копирования. . . . . . . .131 Режимы записи вручную. . . . . . . . . . . . . . . .132 Устранение неисправностей. . . . . . . . . . . . .133 Если изображение зависло и перестали работать кнопки на передней панели и пульте ДУ . . . . . . . . . . . . . . . . . . . . . . . . . . . .137 Экранные меню . . . . . . . . . . . . . . . . . . . . . . .138
Дисплеи передней панели. . . . . . . . . . . . . . .140
Список кодов языков. . . . . . . . . . . . . . . . . . .141
Список кодов стран/регионов. . . . . . . . . . . .141 Размеры экранов и форматы дисков . . . . . .142
Обращение с дисками . . . . . . . . . . . . . . . . . .143
Чистка считывающей линзы. . . . . . . . . . . . .143
Конденсация влаги. . . . . . . . . . . . . . . . . . . . .143 Советы по установке . . . . . . . . . . . . . . . . . . .144
Перемещение рекордера . . . . . . . . . . . . . . . .144 Переустановка рекордера . . . . . . . . . . . . . . .144 Технические параметры . . . . . . . . . . . . . . . .145
13 Меню Disc Setup
Основные настройки . . . . . . . . . . . . . . . . . . 112
Настройки инициализации . . . . . . . . . . . . . 113 Настройки закрытия от записи . . . . . . . . . . 113 Оптимизация жесткого диска . . . . . . . . . . . 113 Инициализация жесткого диска . . . . . . . . . 114
5
Ru
Глава 1
До начала эксплуатации
Содержимое упаковки
При вскрытии упаковки убедитесь в наличии следующих аксессуаров:
•Пульт ДУ
•Сухие батарейки AA/R6P x 2
•Аудио-видео кабель (красный/белый/ желтый)
•Кабель G-LINK™
•Кабель высокочастотной антенны
•Сетевой шнур
•Данные Инструкции по эксплуатации
•Карточка гарантийного обслуживания
Установка батареек в пульт ДУ
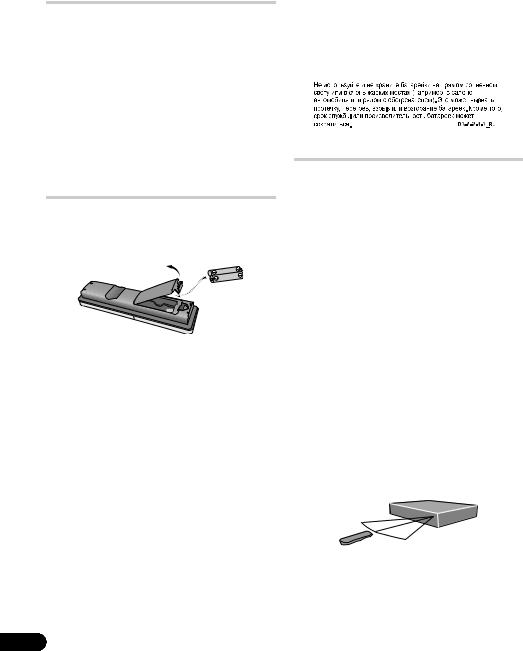
• Вставьте две батарейки AA/R6P в отсек для батареек в соответствии с маркировкой ( , ) внутри отсека для
батареек.
 Важно
Важно
Неправильное использование батареек может вызывать потенциально опасную ситуацию (например, они могут протечь или взорваться). Соблюдайте следующие рекомендации:
•Не используйте одновременно новые и старые батарейки.
•Неиспользуйтеодновременноразныетипы батареек — даже если батарейки выглядят одинаково, они могут иметь разное напряжение.
•Убедитесь, что положительные и отрицательные полюсы каждой батарейки соответствуют маркировке внутри отсека для батареек.
•Извлеките батарейки из оборудования, которое не предполагается использовать в течение месяца или более.
•При утилизации использованных батареек следуйтедействующимввашейстранеили врегионеправилампоохранеокружающей среды, изложенным в постановлениях правительства или в других официальных документах.
ПРЕДУПРЕЖДЕНИЕ
Использование пульта ДУ
При использовании пульта ДУ помните следующее:
•Убедитесь в отсутствии препятствий между пультом ДУ и сенсором ДУ на аппарате.
•Управление с помощью пульта ДУ может быть неустойчивым, если на сенсор ДУ на аппарате падает яркий солнечный или свет люминесцентной лампы.
•Пульты ДУ от различного оборудования могут мешать друг другу. Старайтесь не пользоваться пультами ДУ от другого оборудования, расположенного рядом с данным аппаратом.
•При сокращении дальности действия пульта ДУ замените батарейки.
•Если батарейки разряжены или были заменены, режим дистанционного управленияавтоматическисбрасываетсяна
Recorder 1. См. Remote Control Mode на стр. 127.
•Располагайте ДУ в пределах дальности действия, направляя на сенсор ДУ, расположенный на фронтальной панели, как показано ниже.
 7 м
7 м
•Данныйрекордерможетуправлятьсячерез сенсор ДУ другого компонента Pioneer через гнездо CONTROL IN на задней панели. Подробнееоб этом см. Соединения на задней панели на стр. 14.
6
Ru

Совместимость форматов/ содержимого дисков при воспроизведении
Поддерживаемые носители
•DVD-RW вер. 1.1 / 1x / 1x до 2x, вер. 1.2 / 2x до 4x / 2x до 6x
•DVD-R вер. 2.0 / 1x / 1x до 4x / 1x до 8x / 1x до 16x, вер. 2.1 / 1x до 8x / 1x до 16x
•DVD+RW 1x до 2.4x / 1x до 4x / 3.3x до 8x
•DVD+R 1x до 2.4x / 1x до 4x / 1x до 8x / 1x до 16x
•DVD-RAM вер. 2.0 / 2x, вер. 2.1 / 2x /
2x до 3x / 2x до 5x, вер. 2.2 / 2x / 2x до 3x / 2x до 5x
•DVD-R DL вер. 3.0 / 2x до 4x / 2x до 8x
•DVD+R DL 2.4x / 2.4x до 8x
Обратите внимание на то, что более старые модели DVD-рекордеров и дисководов DVD с возможностью записи могут не поддерживать диски DVD-RW вер. 1.2 и/или повреждать данные на таких дисках. Если диски DVD-RW предполагаетсяиспользоватьодновременнона этом рекордере и на более старой модели рекордера/дисководе DVD с возможностью записи, рекомендуется использовать диски вер. 1.1.
В следующей таблице демонстрируется ограничение совместимости более ранних
DVD-рекордеров‘Pioneer’ сдискамиDVD-RW вер. 1.2.
|
Модель |
Воспроизводимый |
Записываемый |
|
DVR-7000 |
Да*1,2,3 |
Нет |
|
DVR-3100/ |
Да*1 |
Нет |
|
DVR-5100H |
||
*1 Передвоспроизведениемдискидолжныбытьзакрыты для записи на данном рекордере. Диски, не закрытые для записи и записанные в режиме VR и в режиме Video, могут не воспроизводиться.
*2 При установке диска на дисплее отображается сообщение Cannot read the CPRM information.
Однако это не влияет на воспроизведение.
*3 На диске с возможностью однократного копирования не воспроизводятся главы.
Считываемая файловая система
Данный рекордер может воспроизводить DVD-диски, записанные по следующим файловым системам1: ISO 9660*, UDF 1.02, UDF 1.50, UDF 2.00, UDF 2.01.
* Поддерживает ISO 9660 уровень 1 или 2. Данный рекордер поддерживает файловые системы Romeo и Joliet.
 Примечание
1• В зависимости от использованной техники записи, могут неправильно считываться даже файлы, записанные с совместимыми файловыми системами.
• Файлы MP3/WMA могут воспроизводиться при записи на DVD-диск, на котором не содержится видеофайлов и который используетс файловые системы UDF 1.02, UDF 1.50, UDF 2.01 или ISO 9660.
7
Ru

Поддержка записи и воспроизведения HDD/DVD
Данный рекордер может воспроизводить и записывать все широко распространенные типы DVD дисков, и кроме того обладает функциями жесткого диска. В таблице ниже показаны некоторые различия в совместимости дисков разных типов.
|
HDD |
DVD-R |
DVD-RW |
DVD+R |
DVD |
DVD- |
|||||||
|
+RW |
RAM |
|||||||||||
|
Обозначения, |
HDD |
DVD (VR) |
DVD (Video) |
DVD (VR) |
DVD (Video) |
DVD+R |
DVD+RW |
DVD-RAM |
||||
|
используемые в данном |
||||||||||||
|
руководстве |
*1 |
*1 |
*2 |
*13, 16 |
||||||||
|
Логотипы |
||||||||||||
|
Перезаписываемый/ |
*3 |
*3 |
*3 |
*14 |
||||||||
|
стираемый |
||||||||||||
|
Редактирование |
*4 |
*4 |
*4 |
*4 |
||||||||
|
записанных программ |
||||||||||||
|
Запись материалов с |
*12 |
*12 |
*12 |
|||||||||
|
возможностью |
||||||||||||
|
однократного копирования |
||||||||||||
|
Воспроизведение на |
нет |
*5 |
*6 |
*7 |
*6 |
*8 |
*9 |
|||||
|
других проигрывателях/ |
*6, 15 |
|||||||||||
|
рекордерах |
||||||||||||
|
Воспроизведение с |
||||||||||||
|
задержкой |
||||||||||||
|
Запись программ 16:9 и |
||||||||||||
|
4:3 |
||||||||||||
|
Запись обоих звуковых |
*11 |
*11 |
*11 |
|||||||||
|
каналов двуязычной |
*10, 11 |
|||||||||||
|
трансляции |
||||||||||||
Примечания к таблице
*1 Для записи в режиме VR необходима инициализация
(стр. 113).
*2 ДлязаписиврежимеVideo необходимаинициализация
(стр. 113).
*3 При стиранииколичествосвободногоместанадиске не увеличивается.
*4 Нельзя стирать разделы, редактировать главы или пользоваться редактированием списка воспроизведения. *5 Необходимаподдержкавоспроизведения DVD-R (VR). *6 Закрытие для записи с помощью этого рекордера (можетневоспроизводитьсявнекоторыхустройствах) (стр. 61).
*7 Необходима поддержка воспроизведения DVD-RW (VR).
*8 Необходима поддержка воспроизведения DVD+RW.
*9 Необходима поддержка воспроизведения DVD-RAM.
*10 Только когда функция HDD Recording Format установлена на Video Mode Off (стр. 125).
*11 Только если режим записи установлен не на LPCM.
*12 Только для дисков, поддерживающих CPRM.
*13 Перед использованием извлеките диск из картриджа. На правильную работу с этим рекордером проверенытолькодискиPanasonic иMaxell. Дискидругих изготовителей могут оказаться непригодными для записи или редактирования.
*14 При удалении главы ни доступное время записи, ни число оставшихся для записи глав не увеличивается. *15 Необходима поддержка воспроизведения DVD+R. *16 В зависимости от типа диска до начала записи может быть необходима инициализация (стр. 113). Инициализация в этом случае занимает около одного часа.
 является товарным знаком DVD Format/ Logo Licensing Corporation.
8
Ru

Использование дисков DVD-R DL/ DVD+R DL
Диски DVD-R DL (Dual-Layer) и DVD+R DL (Double-Layer) содержат два записывающих слоясоднойстороны, чтопозволяетувеличить объем записи примерно в 1,8 раза по сравнению с обычными однослойными дисками. Данноеустройствоможетзаписывать как диски DVD-R DL, так и диски DVD+R DL.
•Если записанные на данном устройстве диски DVD-R DL (режим Video) или
DVD+R DL предполагается воспроизводить на других DVDрекордерах/проигрывателях, то диски необходимозакрытьдлязаписи. (Обратите внимание на то, что некоторые DVDрекордеры/проигрыватели могут не воспроизводить диски DL, даже если они закрыты для записи.)
•Этот логотип указывает, что данный диск является диском DVD-R DL или DVD+R DL:
Правильная работа была подтверждена для дисков DL:
•DVD-R DL вер. 3.0/2x до 4x Mitsubishi Kagaku Media (Verbatim)
•DVD-R DL вер. 3.0/2x до 8x Mitsubishi Kagaku Media (Verbatim) That’s
JVC
•DVD+R DL 2.4x
Mitsubishi Kagaku Media (Verbatim) RICOH
•DVD+R DL 2.4x до 8x
Mitsubishi Kagaku Media (Verbatim) RICOH
Овоспроизведении дисков
DualDisc
DualDisc – это новый двусторонний диск, на одной стороне которого содержатся данные в формате DVD (видео, аудио и др.), а на другой стороне содержатся данные не в формате DVD (цифровые аудиоданные).
Сторона не в формате DVD (звуковая) не поддерживает характеристику CD Audio и поэтому может не воспроизводиться.
Во время загрузки или извлечения DualDisc сторона, противоположная воспроизводимой, может быть поцарапана. Поцарапанные диски могут не воспроизводиться.
Вданном устройстве воспроизводится сторона DVD диска DualDisc. Содержимое в формате DVD-Audio не воспроизводится.
Подробнее о технических характеристиках диска DualDisc можно узнать у изготовителя диска или продавца.
Совместимость с другими дисками
Кроме DVD, данный рекордер поддерживает диски (носители информации) и форматы самых различных типов. На воспроизводимых дисках или на их упаковке обычно помещен один из логотипов, указанных ниже. Обратите внимание, что диски некоторых типов (например, записываемые диски CD и DVD) могут иметь формат, который не будет воспроизводиться на данном рекордере. Более подробно о совместимости см. ниже.
|
Audio CD |
CD-R |
CD-RW |
|
Video CD |
Super Video CD (Super VCD) |
Поддержка дисков СD-R/-RW
Данный рекордер не записывает диски CD-R
или CD-RW.
•Читаемые форматы: CD-Audio, Video CD/ Super VCD, ISO 9660 CD-ROM* с файлами MP3, WMA, JPEG или DivX
*Поддерживает ISO 9660 уровень 1 или 2. ФизическийформатCD: Mode1, Mode2 XA Form1. Данный рекордер поддерживает файловые системы Romeo и Joliet.
•Мультисессионное воспроизведение: Да (за исключением дисков CD-Audio и Video CD/Super VCD)
•Воспроизведение дисков, не закрытых для записи: Только диск CD-Audio
Поддержка сжатого аудиосигнала
•Поддерживаемые носители: DVD-ROM, DVD-R/-RW, DVD+R/+RW, DVD-RAM, CD-ROM, CD-R, CD-RW, USB
•Поддерживаемыеформаты: MPEG-1 Audio Layer 3 (MP3), Windows Media Audio (WMA)
9
Ru

•Частоты дискретизации: 32 кГц, 44,1 кГц или 48 кГц
•Скорости передачи данных: любая (рекомендуется 128 килобит в секунду и выше)
•Воспроизведение MP3 с переменной скоростью передачи данных (VBR): Да
•Воспроизведение WMA с переменной скоростью передачи данных: Нет
•Поддержка программ кодирования WMA: Windows Media Codec 8 (файлы,
закодированныесиспользованиемWindows Media Codec 9, могут воспроизводиться, но некоторые характеристики, в
частности Pro, Lossless, Voice и VBR, не поддерживаются)
•Воспроизведение файлов DRM (система защитыцифровыхправприкопировании)1: Нет
•Расширения файлов: .mp3, .wma (они должны использоваться в рекордере для распознавания файлов MP3 и WMA – не используйте их для файлов других типов)
•Файловая структура: До 99 папок/999 файлов (если пределы превышены, воспроизводятся только файлы и папки, находящиеся в этих пределах)
Поддержка WMA (Windows Media™ Audio)
Данный рекордер может воспроизводить формат Windows Media Audio.
WMA – это аббревиатура Windows Media Audio, применяемая для обозначения технологии сжатия аудиосигнала, разработанной компанией Microsoft Corporation. Данные в формате WMA могут быть закодированы с использованием программыWindows Media Player дляWindows XP серииWindows Media Player 9 илиWindows Media 10.
Windows Media является торговой маркой
Microsoft Corporation.
Данной изделие содержит технологию,
принадлежащую Microsoft Corporation, и не можетиспользоватьсяилираспространяться без лицензии от Microsoft Licensing, Inc.
Поддержка видео в формате DivX
DivX представляет собой формат сжатия видеосигнала, созданный с использованием видеокодека DivX® компании DivX, Inc. Данный рекордер может воспроизводить видеофайлы в формате DivX, записанные на дисках CD-R/-RW/-ROM. Используется та же терминология, что и для DVD-Video: отдельные видеофайлы DivX называются “главами”. Обратите внимание на то, что если файлам/главам присваиваются названия до записи на диск CD-R/-RW, то по умолчанию они будут воспроизводиться в алфавитном порядке.
•Логотип “DivX® Certified”.
•Воспроизводит видеофайлы в формате DivX® всех версий (включая DivX® 6) в ст
андартном режиме воспроизведения файлов формата DivX®.
•Расширения файлов: .avi и .divx (используются в рекордере для распознавания видеофайлов DivX).
Обратите внимание, что все файлы с расширением .avi распознаются как MPEG4, но они не обязательно являются файлами в формате DivX, и поэтому на этом рекордере могут воспроизводиться не все файлы данного формата.
•Файловая структура: До 99 папок или 999 файлов.
DivX, “DivX Certified” и соответствующие логотипы являются торговыми марками компании DivX, Inc. и используются в соответствии с лицензией.
 Примечание
1Система защиты от копирования DRM (система защиты цифровых прав при копировании) представляет собой технологию защиты от несанкционированного копирования путем ограничения воспроизведения и т.д. сжатых звуковых файлов на используемых для записи устройствах, кроме ПК (или другого записывающего оборудования). Подробнее см. руководства или справочные файлы, поставляемые с ПК и/или с программным обеспечением.
10
Ru

Данные DivX® VOD
DivX
Чтобы воспроизводить данные DivX VOD (видео по требованию) на этом рекордере, сначала необходимо зарегистрировать рекордерупровайдераданныхDivX VOD. Для этого необходимо создать регистрационный код DivX VOD и сообщить его провайдеру. Некоторые данные DivX VOD можно воспроизводить ограниченное число раз. При загрузке диска с данными DivX VOD такого типана экране отображается оставшееся число попыток воспроизведения, и можно выбрать воспроизведение (потратив при этом одну из оставшихся попыток) или же остановку. При загрузке диска с просроченными данными DivX VOD (например, не осталось ни одной попытки воспроизведения), отображается сообщение Rental Expired.
Если число попыток воспроизведения данных DivX VOD не ограничено, можно загружать диск в рекордер и воспроизводить данные нужное число раз. При этом никаких сообщений не отображается.
 Важно
Важно
•Данные DivX VOD защищены системой DRM. Эта система позволяет воспроизводить данные только на специальных, зарегистрированных устройствах.
•Если загружен диск с данными DivX VOD, не авторизированный для этого рекордера, то отображается сообщение Authorization Error, и данные не отображаются.
•Сброс настроек рекордера (см.
Переустановка рекордера на стр. 144) не приводит с потере вашего регистрационного кода.
Поддержка файла JPEG
•Поддерживаемые форматы: Графические файлы Baseline JPEG и EXIF 2.2* *Файловый формат, используемый цифровыми фотокамерами
•Соотношение дискретизации: 4:4:4, 4:2:2, 4:2:0
•Горизонтальное разрешение: 160 до 5120 пикселей
•Вертикальное разрешение: 120 до 3840 пикселей
•Поддержка Progressive JPEG: Нет
•Расширенияфайлов: .jpg, .jpeg, .jpe, .jif, .jfif (должны использоваться, чтобы рекордер мог распознать файлы JPEG – не используйте для файлов других типов)
•Файловая структура: Рекордер может загружать до 99 папок/999 файлов за один раз (если на диске содержится больше файлов/папок, может загружаться больше)
Поддержка дисков, созданных на ПК
Диски, записанные на персональном компьютере, могут не воспроизводиться на этом устройстве вследствие настроек программного обеспечения, использованного для создания дисков. В этих случаях обратитесь к разработчику программного обеспечения для получения более подробной информации.
Этот рекордер не поддерживает диски, записанныеврежимепакетнойзаписи(формат
UDF).
Подробнее о совместимости см. на упаковке дисков программного обеспечения DVD-R/ -RW или CD-R/-RW.
Dolby Digital
Изготовлено по лицензии компании Dolby Laboratories. “Долби” и знак в виде двойной буквы D являются товарными знаками компании Dolby Laboratories.
DTS
“DTS” и “DTS Digital Out” являются зарегистрированными торговыми марками компании DTS, Inc.
11
Ru

О внутреннем жестком диске
Внутренний жесткий диск (HDD) может быть легко поврежден. При использовании без надлежащего ухода или в несоответствующих условиях, имеется вероятность повреждения или полной потери содержания рекордера, а в некоторых случаях даже приводит к невозможностиобычноговоспроизведенияили записи. Помните, что в случае ремонта или замены жесткого диска или связанных с ним компонентов все записи на жестком диске будут потеряны.
Во избежание возможного повреждения жесткого диска следуйте приведенным ниже рекомендациям.
Жесткий диск не следует использовать для постоянного хранения записей. Для предотвращениянеожиданнойпотериданных рекомендуется создать резервную копию важных записей на диске DVD.
Компания Pioneer ни при каких обстоятельствах не несет ответственности за любой прямой или косвенный ущерб, возникший вследствие повреждения или потери записанных данных в результате повреждения жесткого диска.
•Не перемещайте рекордер во включенном состоянии(включаязагрузкуEPG, когдана дисплее отображается EPG).
•Рекордер следует устанавливать и эксплуатировать на устойчивой ровной поверхности.
•Не перекрывайте расположенное сзади вентиляционное отверстие/охлаждающий вентилятор.
•Не используйте рекордер в слишком жарких или влажных помещениях, а также впомещениях, вкоторыхвозможнырезкие перепады температуры. Резкие перепады температуры могут вызвать конденсацию внутри рекордера. Это может привести к повреждению жесткого диска.
•Неотсоединяйтесетевойкабельотстенной розетки и не отключайте электропитание выключателем, когда рекордер включен (включая загрузку EPG, когда на дисплее отображается EPG).
•Не перемещайте рекордер сразу после выключения. При необходимости передвинуть рекордер выполните следующие действия:
1 После отображения на дисплее передней панелисообщенияPOWER OFF, подождите минимум две минуты.
2 Отсоедините сетевой кабель от розетки.
3 Переместите рекордер.
•При сбое электропитания во время работы рекордера возможна потеря части данных на жестком диске.
•Жесткий диск очень чувствителен. При продолжительном использовании ненадлежащим образом или в несоответствующей среде, есть вероятность поломки жесткого диска. Признакаминеполадокявляютсявнезапная остановка изображения или заметные помехи (мозаика) в изображении. Однако иногда признаков повреждения жесткого диска может не быть. Если жесткий диск поврежден, то воспроизведение записанных данных будет невозможно. В этом случае может потребоваться замена жесткого диска.
Оптимизация работы жесткого диска
При записи или редактировании данные на жесткомдискефрагментируются. Современем это отражается на работе рекордера. До того как это произошло, рекордер напомнит о необходимости оптимизации жесткого диска (выполняется из меню Disc Setup; см.
Оптимизация жесткого диска на стр. 113).
12
Ru

Символы, используемые в данном руководстве
Следующие значки предназначены для быстрого указания инструкций, необходимых для конкретного типа диска.
|
HDD |
Жесткий диск |
|
DVD |
Диск DVD любого типа |
|
(записываемый или только |
|
|
воспроизводимый), |
|
|
закрыт для записи или нет. |
|
|
DVD-Video |
Имеющийся в продаже DVD, |
|
закрытыедлязаписиврежиме |
|
|
Video диски DVD-R/-RW. |
|
|
DVD (Video) |
Диски DVD-R/-RW в режиме |
|
Video (не закрытые для записи) |
|
|
DVD (VR) |
DVD-R/-RW диски в |
|
режиме VR |
|
|
DVD+R |
DVD+R |
|
DVD+RW |
DVD+RW |
|
DVD-RAM |
DVD-RAM |
|
CD |
Audio CD |
|
Video CD |
Video CD |
|
Super VCD |
Super VCD |
|
WMA/MP3 |
Файлы WMA или MP3 |
|
DivX |
Файлы DivX |
|
A L L |
Все вышеперечисленное |
13
Ru

Глава 2
Подключения
Соединения на задней панели
|
1 |
2 |
3 |
4 |
5 |
|||||
|
ANTENNA |
R |
AUDIO |
L |
VIDEO |
DIGITAL |
||||
|
IN |
INPUT 3 |
AUDIO OUT |
|||||||
|
S-VIDEO |
|||||||||
|
AV 2 (INPUT 1/DECODER) |
AC IN |
||||||||
|
HDMI OUT |
COAXIAL |
||||||||
|
G-LINK |
IN |
||||||||
|
OUT |
|||||||||
|
Y |
PB |
PR |
AV 1 (RGB) – TV |
CONTROL |
|||||
|
COMPONENT VIDEO OUT |
OUTPUT |
||||||||
|
6 |
7 |
8 |
9 |
10 |
11 |
1 ANTENNA IN (RF IN)/OUT
Подключитетелевизионнуюантеннукразъему
ANTENNA IN (RF IN). При подключении к телевизору сигнал передается на разъем
ANTENNA OUT.
2 INPUT 3
Входные разъемы стереофонического аналогового аудиосигнала, видеосигнала и сигнала S-video для подключения к видеомагнитофону или другому компонентуисточнику.
3 AV2 (INPUT 1/DECODER) Аудио-
видео терминал
Разъемаудио-видеовхода/выходаSCART-типа для подключения к видеомагнитофону или другому оборудованию, оборудованному разъемом SCART. Входной разъем принимает видеосигнал, сигнал S-video и сигнал RGB. О настройке см. AV2/L1 In на стр. 121.
4 HDMI OUT
Выход HDMI для высококачественных цифровых аудио и видеосигналов.
5 DIGITAL AUDIO OUT
Коаксиальный цифровой аудиоразъем для подключенияаудио-видеоусилителя/ресивера,
декодераDolby Digital/DTS/MPEG илидругого оборудования с цифровым входом.
6 COMPONENT VIDEO OUT (Выход компонентного видео)
Видеовыход высокого качества для подключения к телевизору или монитору с входом компонентного видео.
7 OUTPUT
Выходные разъемы стереофонического аналогового аудиосигнала, видеосигнала и сигнала S-video для подключения к телевизору или аудио-видео усилителю/ресиверу.
8 AV1 (RGB)-TV Аудио-видео терминал
Аудио-видео разъем SCART для подключения к телевизору или другому оборудованию с разъемом SCART. Выходной видеосигнал переключается между видеосигналом, сигналомS-video исигналомRGB. Онастройке см. AV1 Out на стр. 120.
9 G-LINK™
Используется для подключения поставляемого кабеля G-LINK™, чтобы включить GUIDE Plus+™ дляуправлениявнешнимспутниковым ресивером и т.д.
10 CONTROL IN
Используетсядляуправленияэтимрекордером от сенсора ДУ другого компонента Pioneer с терминалом CONTROL OUT и знаком Pioneer. Подключите терминал CONTROL OUT другого компонента к терминалу CONTROL IN этого рекордера через кабель mini-plug.
11 AC IN – Гнездо питания
14
Ru
Подключения на передней панели
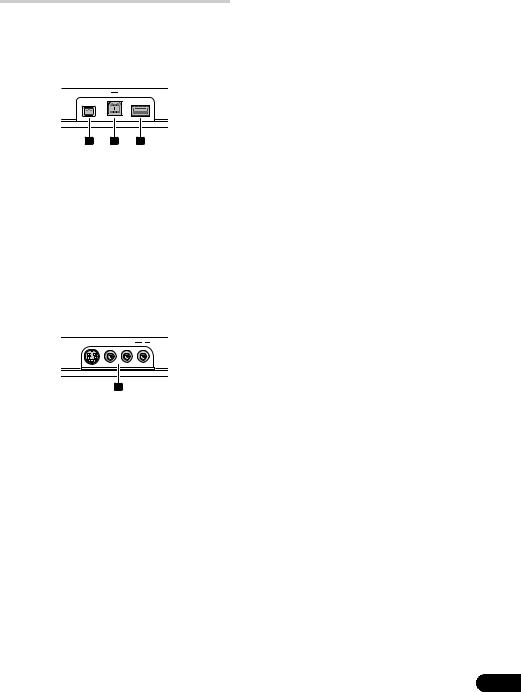
На передней панели имеется раскрывающаяся крышка, под которой находятся дополнительные подключения.
Левая сторона:
DV IN USB 

12 13 14
12 DV IN
Разъем i.LINK для приема цифрового видеосигнала, подходящий для подключения цифровой видеокамеры.
13 USB порт (Тип B)
USB порт для подключения принтера, поддерживающего PictBridge, или компьютера.
14 USB порт (Тип А)
USB порт для подключения цифровой фотокамеры, клавиатуры или другого USB устройства.
Правая сторона:
INPUT 2 S-VIDEO VIDEO L(MONO) R AUDIO
15
15 INPUT 2
Аудио-видео вход (стереофонический аналоговый аудиосигнал; композитный и S-video): особенно удобен для использования видеокамер, игровых приставок, портативных аудиоустройств и т.д.
15
Ru

Простое подключение
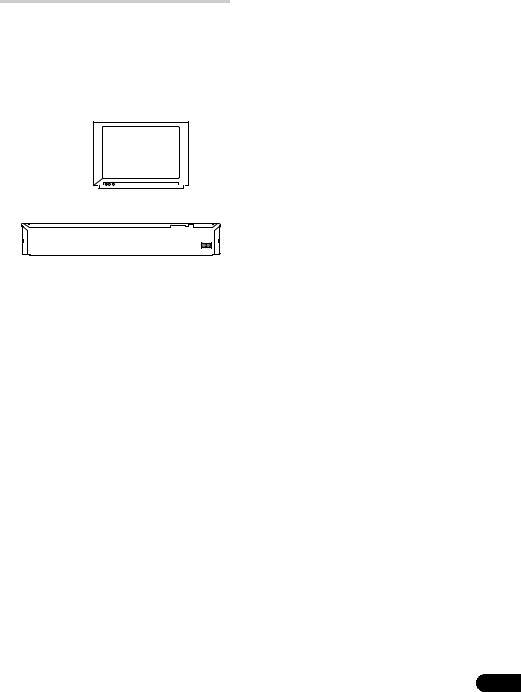
Описанная ниже настройка является основной и позволяет просматривать и записывать телепрограммы и воспроизводить диски. Другие типы подключений описаны, начиная со следующей страницы.
 Важно
Важно
• Для этих подключений требуется кабель SCART (не поставляется). Если телевизор (или видеомагнитофон) не снабжен соединением SCART, и если вы хотите использовать поставляемый аудио/ видеокабель, см. Использование поставляемого аудио-видео кабеля на стр. 17.
• Аудио-видео терминал AV1 (RGB)-TV может выводить обычные (композитные) сигналы, S-video сигналы или видеосигналы RGB, плюс аналоговые стереофонические аудиосигналы.
Терминал AV2 (INPUT 1/DECODER) может принимать обычные сигналы,
S-video сигналы или видеосигналы RGB, а также аналоговые стереофонические аудиосигналы. Для настройки данных опций, см. AV1 Out на стр. 120 и AV2/L1 In
на стр. 121.
• Перед выполнением или изменением любых подключений на задней панели убедитесь, чтовсекомпонентывыключены и отсоединены от розетки.
|
1 |
|||||
|
2 |
От разъема |
||||
|
SCART AV |
|||||
|
5 |
|||||
|
ANTENNA |
AV2 (INPUT 1/ |
||||
|
IN (RF IN) |
DECODER) |
||||
|
ANTENNA R |
AUDIO |
L |
VIDEO |
DIGITAL |
|
|
IN |
INPUT 3 |
AUDIO OUT |
|||
|
S-VIDEO |
|||||
|
AV 2 (INPUT 1/DECODER) |
AC IN |
||||
|
HDMI OUT COAXIAL |
|||||
|
G-LINK |
IN |
||||
|
OUT |
|||||
|
Y PB |
PR |
AV 1 (RGB) – TV |
CONTROL |
||
|
COMPONENT VIDEO OUT OUTPUT |
ANTENNA
AV1 (RGB)-TV
OUT
4
3
К разъему SCART AV
16
1Подключите кабель от антенны/ разъема кабельного ТВ к разъему антенны на видеомагнитофоне.
•Если видеомагнитофон подключается последовательно с другими устройствами, подключите антенный кабель к разъему ANTENNA IN (RF IN) на этом рекордере и пропустите следующий шаг.
2Для подключения выхода антенны видеомагнитофона к разъему ANTENNA IN (RF IN) этого рекордера используйте высокочастотный антенный кабель (поставляется).
3Используя другой антенный кабель, подключите разъем ANTENNA OUT этого рекордера к входу антенны на телевизоре.
4Используя кабель SCART (не поставляется), подключите аудиовидео разъем AV1 (RGB)-TV на этом рекордере к аудио-видео разъему SCART на телевизоре.
5Используя другой SCART-кабель, подключите аудио-видео разъем AV2
(INPUT 1/DECODER) к аудио-видео разъему SCART на видеомагнитофоне.
 Совет
Совет
•Этот рекордер оборудован функцией ‘прямо’ ( или “сквозной канал”), что позволяет записывать телепрограмму из встроенного телевизионного тюнера рекордера и одновременно просматривать видеозаписи на видеомагнитофоне (Для использования данной функции, когда рекордер находится в режиме ожидания, параметр Power Save должен быть установлен на Off — см. Power Save на стр. 118).
Ru
Использование аудиовидео выходов другого типа
Если невозможно использовать аудио-видео терминалSCART дляподключения телевизора кданномурекордеру, существуютстандартные аудио-видео выходы, а также выход S-video и компонентного видеосигнала.
Использование поставляемого аудио-видео кабеля
|
К аудиовходу |
|
К видеовходу |
|
Телевизор |
|
AUDIO |
VIDEO |
|||||
|
OUTPUT |
OUTPUT |
|||||
|
ANTENNA R |
AUDIO |
L |
VIDEO |
|||
|
2 IN |
INPUT 3 |
DIGITAL |
||||
|
1 |
AUDIO OUT |
|||||
|
S-VIDEO |
||||||
|
AV 2 (INPUT 1/DECODER) |
AC IN |
|||||
|
HDMI OUT COAXIAL |
||||||
|
G-LINK |
IN |
|||||
|
OUT |
||||||
|
Y PB |
PR |
AV 1 (RGB) – TV |
CONTROL |
|||
|
COMPONENT VIDEO OUT OUTPUT |
1 Подсоедините разъем VIDEO OUTPUT к видеовходу телевизора.
Для подключения видео используйте желтый разъем поставляемого аудио-видео кабеля.
2 Подсоедините разъемы AUDIO OUTPUT к соответствующим аудиовходам телевизора.
Для подключения аудио используйте красный и белый разъемы поставляемого аудио-видео кабеля. Для обеспечения правильного стереозвучания убедитесь, что левый и правый выходы подключены к соответствующим входным разъемам.
Использование функции выхода S-video или компонентного видео
|
К компонентному |
|
|
видеовходу |
|
|
К видеовходу |
|
|
К аудиовходу |
|
|
2 |
1 |
|
Телевизор |
|
AUDIO |
S-VIDEO |
||||
|
OUTPUT |
OUTPUT |
||||
|
ANTENNA R |
AUDIO |
L |
VIDEO |
DIGITAL |
|
|
IN |
INPUT 3 |
AUDIO OUT |
|||
|
S-VIDEO |
|||||
|
AV 2 (INPUT 1/DECODER) |
AC IN |
||||
|
HDMI OUT COAXIAL |
|||||
|
G-LINK |
IN |
||||
|
OUT |
|||||
|
Y PB |
PR |
AV 1 (RGB) – TV |
CONTROL |
||
|
COMPONENT VIDEO OUT OUTPUT |
COMPONENT
VIDEO OUT
1 Подсоедините выход S-video или выход компонентного видео к соответствующему разъему телевизора.
Для подключения S-video с помощью S-video кабеля (не поставляется) подключите разъем S-VIDEO OUTPUT к входу S-video телевизора. Для подключения компонентного видео воспользуйтесь кабелем компонентного видео (не поставляется), чтобы подключить разъем
COMPONENT VIDEO OUT к входу компонентного видео телевизора.
О настройке выхода компонентного видео для использования на телевизоре с поддержкой строчнойразверткисм. также Component Video Out на стр. 120.
2 Подсоедините разъемы AUDIO OUTPUT к соответствующим аудиовходам телевизора.
Можно использовать поставляемый аудиовидеокабель, неподключаяжелтыйштекердля видео. Для обеспечения правильного стереозвучания убедитесь, что левый и правый выходы подключены к соответствующим входным разъемам.
17
Ru

Подключение декодера, спутникового ресивера или цифрового наземного ресивера
При наличии кабеля, спутникового или цифрового наземного ресивера с встроенным декодером подключите его к данному рекордеру и телевизору, как показано на данной странице.1 При использовании отдельного декодера для кабельного/ спутникового телевидения подключите его в соответствии с инструкциями на следующей странице.
Данное подключение позволяет:
•Записывать любой канал, выбрав его на декодере, спутниковом ресивере или цифровом наземном ресивере.
•Изменять каналы и устанавливать таймер записи на внешнем ресивере, используя систему GUIDE Plus+™ (через кабель G-LINK™, после настройки).
 Важно
Важно
•Не подключайте этот рекордер к телевизору через видеомагнитофон, спутниковый ресивер или другой компонент, используя функцию ‘прямо’. Всегда подключайте каждый компонент непосредственно к телевизору или аудиовидео усилителю/ресиверу.
•Для установки таймера записи с использованием системы GUIDE Plus+ убедитесь, что внешний ресивер включен.
1
1
3
|
ANTENNA |
AV2 (INPUT 1/ |
|||||
|
IN (RF IN) |
DECODER) |
4 |
||||
|
ANTENNA R |
AUDIO |
L |
VIDEO |
DIGITAL |
||
|
IN |
INPUT 3 |
AUDIO OUT |
||||
|
S-VIDEO |
||||||
|
AV 2 (INPUT 1/DECODER) |
AC IN |
|||||
|
HDMI OUT |
COAXIAL |
|||||
|
G-LINK |
IN |
|||||
|
OUT |
||||||
|
Y PB |
PR |
AV 1 (RGB) – TV |
CONTROL |
|||
|
COMPONENT VIDEO OUT OUTPUT |
ANTENNA
AV1 (RGB)-TV
OUT
2
1
1 Подключите высокочастотные антенные кабели как показано на иллюстрации.
Это позволит просматривать и записывать телевизионные каналы.
2С помощью кабеля SCART (не поставляется) подключитеаудио-видео разъем AV1 (RGB)-TV к аудио-видео разъему SCART на телевизоре.
Это позволит просматривать диски.
3Используя другой SCART кабель, подключите аудио-видео терминал
AV2 (INPUT 1/DECODER) к аудио-видео терминалу SCART на кабельной коробке/ спутниковом/цифровом наземном ресивере.
Это позволит записывать закодированные
телевизионные каналы.
4 Подключите поставляемый кабель
G-LINK™ к разъему G-LINK™.
Это позволит управлять тюнером внешнего ресивера с помощью системы GUIDE Plus+™.
 Примечание
1 На схеме показаны видео соединения SCART, но также можно использовать любое другое аудио-видео подключение.
18
Ru
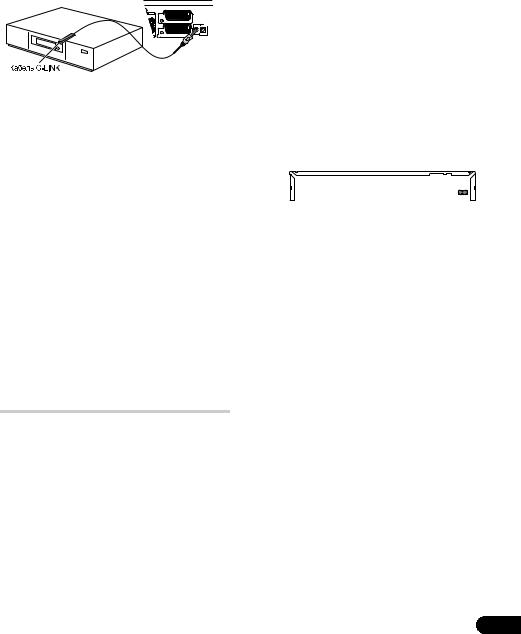
Установите конец с инфракрасным передатчиком кабеля G-LINK™ таким образом, чтобы инфракрасный передатчик на кабельном/спутниковом/цифровом наземном ресиверемогприниматьуправляющиесигналы (см. рисунок).
O
INPUT 3
S-VIDEO
AV 2 (INPUT 1/DECODER)
G-LINK IN
CONTROL
AV 1 (RGB) – TV
OUTPUT
Чтобы определить место расположения инфракрасного ресивера на передней панели, см. руководство, поставляемое с кабельным/ спутниковым/цифровым наземным ресивером. Такжеможнопоэкспериментироватьспультом ДУ, включая его на очень близком расстоянии, что позволит определить расположение ресивера.
 Совет
Совет
•Этот рекордер оборудован функцией ‘прямо’ ( или “сквозной канал”), что позволяет записывать телепрограмму из встроенного телевизионного тюнера рекордера и одновременно просматривать видеозаписи на видеомагнитофоне (Для использования данной функции, когда рекордер находится в режиме ожидания, параметр Power Save должен быть установлен на Off — см. Power Save на стр. 118).
Подключение внешнего декодера (1)
При наличии внешнего отдельного декодера, предназначенного для системы спутникового или кабельного телевидения, используйте настройки, описанные на этой странице. О подключении кабеля G-LINK™ см. выше.
 Важно
Важно
•Неподключайтедекодернапрямуюкэтому рекордеру.
•Информация от декодера (например, связанная с платными телевизионными услугами) может просматриваться, только когдаэтотрекордервыключен(находитсяв режиме ожидания).
•Чтобы функция записи по таймеру на этом рекордере работала правильно, видеомагнитофон/ресивер спутникового телевидения/блок приема кабельного телевидениядолжныбытьтакжевключены во время записи.
•При использовании этой настройки невозможно просматривать одну телепрограмму и одновременно записывать другую.
|
1 |
Соединение |
||||
|
SCART AV |
|||||
|
2 |
|||||
|
3 |
|||||
|
AV2 (INPUT 1/ |
|||||
|
DECODER) |
|||||
|
ANTENNA R |
AUDIO |
L |
VIDEO |
DIGITAL |
|
|
IN |
INPUT 3 |
AUDIO OUT |
|||
|
S-VIDEO |
|||||
|
AV 2 (INPUT 1/DECODER) |
AC IN |
||||
|
HDMI OUT COAXIAL |
|||||
|
G-LINK |
IN |
||||
|
OUT |
|||||
|
Y P |
P |
AV 1 (RGB) – TV |
CONTROL |
||
|
COMPONENT VIDEO OUT OUTPUT |
AV1 (RGB)-TV
1Подключитекабельантенны/розетку кабельного ТВ к входу антенны на видеомагнитофоне/спутниковом ресивере/блоку приема спутникового телевидения.
2Используйте кабель SCART (не поставляется) для подключения декодера к видеомагнитофону/ ресиверу спутникового телевидения/ блоку приема кабельного телевидения.
Более подробно см. в руководстве по декодеру.
3Используйте кабель SCART для подключения видеомагнитофона/ ресивера спутникового телевидения/ блокаприемакабельноготелевиденияк аудио-видео разъему AV2 (INPUT 1/ DECODER) на этом рекордере.
4Используйте SCART кабель для подключения аудио-видео терминала
AV1 (RGB)-TV к телевизору.
19
Ru
Подключение внешнего декодера (2)
При наличии только декодера подключите его к этому рекордеру и телевизору, как показано на этой странице.1 Данное подключение позволяет:
•Записывать закодированные каналы, принимаемые встроенным ТВ-тюнером рекордера.
2С помощью кабеля SCART (не поставляется) подключитеаудио-видео разъем AV1 (RGB)-TV к аудио-видео разъему SCART на телевизоре.
Это позволит просматривать диски.
3Используя другой кабель SCART, подключите аудио-видео разъем
AV2 (INPUT 1/DECODER) к аудио-видео разъему SCART на декодере.
Это позволит записывать закодированные
телевизионные каналы.
 Важно
Важно
•Не подключайте этот рекордер к видеомагнитофону, ресиверуспутникового телевидения или блоку приема кабельного телевидения, используя функцию ‘прямо’. Всегда подключайте каждый компонент непосредственно к телевизору или аудиовидео усилителю/ресиверу.
1
|
3 |
|||||
|
ANTENNA |
AV2 (INPUT 1/ |
||||
|
IN (RF IN) |
DECODER) |
||||
|
ANTENNA R |
AUDIO |
L |
VIDEO |
DIGITAL |
|
|
IN |
INPUT 3 |
AUDIO OUT |
|||
|
S-VIDEO |
|||||
|
AV 2 (INPUT 1/DECODER) |
AC IN |
||||
|
HDMI OUT COAXIAL |
|||||
|
G-LINK |
IN |
||||
|
OUT |
|||||
|
Y PB |
PR |
AV 1 (RGB) – TV |
CONTROL |
||
|
COMPONENT VIDEO OUT OUTPUT |
1 Подключите высокочастотные антенные кабели как показано на иллюстрации.
Это позволит просматривать и записывать телевизионные каналы.
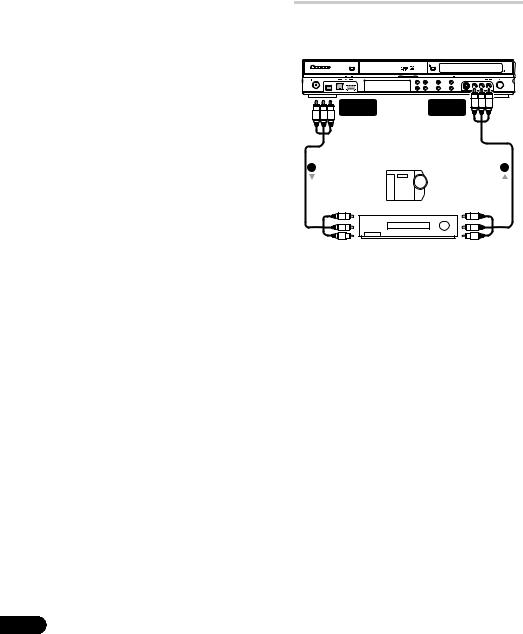
Подключениекаудио-видео усилителю/ресиверу
Для прослушивания многоканального объемного звучания требуется подключить этот рекордер к аудио-видео усилителю/ ресиверу через коаксиальный цифровой выход. Кроме цифрового подключения, рекомендуется также использовать аналоговое стереофоническое подключение для совместимости со всеми дисками и источниками.
Возможно, вы также захотите подключить видеовыход к аудио-видео усилителю/ ресиверу. Используйте обычный видеовыход (как показано здесь) или выход S-video.
 Важно
Важно
•Если рекордер не настроен соответствующим образом для работы с аудио-видео усилителем/ресивером, из акустических систем может быть слышен шум (см. Audio Out на стр. 122).
•Не подключайте этот рекордер к телевизору через видеомагнитофон, используя аудио-видео кабели, с помощью функции ‘прямо’. Всегда подключайте его к телевизору напрямую.
 Примечание
1Для использования этой настройки требуется выполнить следующие настройки в меню Initial Setup:
•Установите параметр AV2/L1 In на Decoder в меню Initial Setup (см. AV2/L1 In на стр. 121).
•Наэкране Manual CH Setting установитепараметрDecoder для смешанных каналовнаOn (см. Manual CH Setting
на стр. 119).
20
Ru

1
ANTENNA
IN (RF IN)
|
ANTENNA R |
AUDIO |
L |
VIDEO |
DIGITAL |
|
|
IN |
INPUT 3 |
AUDIO OUT |
|||
|
S-VIDEO |
|||||
|
AV 2 (INPUT 1/DECODER) |
AC IN |
||||
|
HDMI OUT COAXIAL |
|||||
|
G-LINK |
IN |
||||
|
OUT |
|||||
|
Y PB |
PR |
AV 1 (RGB) – TV |
CONTROL |
||
|
COMPONENT VIDEO OUT OUTPUT |
|||||
|
ANTENNA |
AUDIO/VIDEO |
DIGITAL |
|||
|
OUT |
OUTPUT |
AUDIO OUT |
|||
|
1 |
3 |
2 |
|||
4
Квходному гнездуантенны
1 Подключите высокочастотные антенные кабели как показано на иллюстрации.
Это позволит просматривать и записывать телевизионные каналы.
2 Подключите разъем DIGITAL OUT COAXIAL на данном рекордере к коаксиальному цифровому входу на аудиовизуальном усилителе/ресивере.
Это позволит прослушивать многоканальный стереозвук.
3Подключите аналоговые разъемы
AUDIO OUTPUT и VIDEO OUTPUT на этом рекордере к аналоговым входам аудио и видео на аудио-видео усилителе/ ресивере.
4Подключите видеовыход аудиовидео усилителя/ресивера к видеовходу телевизора.
Подключение через HDMI
При наличии оборудованного функциями HDMI или DVI 1 монитора или экрана2, с помощью HDMI кабеля (не поставляется), можно его подключить к данному рекордеру. Терминал HDMI выводит несжатые цифровые видеосигналы, а также почти любой вид цифровых аудиосигналов.
1 С помощью HDMI кабеля, соедините терминалHDMI OUT наданномрекордере с терминалом HDMI на мониторе, поддерживающем HDMI.
|
К HDMI входу |
|||||
|
HDMI-совместимыйдисплей |
|||||
|
HDMI |
|||||
|
OUT |
|||||
|
ANTENNA |
R |
AUDIO |
L VIDEO |
DIGITAL |
|
|
IN |
INPUT 3 |
AUDIO OUT |
|||
|
S-VIDEO |
|||||
|
AV 2 (INPUT 1/DECODER) |
AC IN |
||||
|
HDMI OUT COAXIAL |
|||||
|
G-LINK |
IN |
||||
|
OUT |
|||||
|
Y |
PB |
PR |
AV 1 (RGB) – TV |
CONTROL |
|
|
COMPONENT VIDEO OUT OUTPUT |
•Стрелканакорпусе разъемакабеля должна быть направлена вниз для правильной подгонки с разъемом на рекордере.
При подключении к компоненту HDMI или поддерживающему HDCP компоненту DVI, высвечивается индикатор HDMI.
Настройка HDMI обычно происходит автоматически. Однако, существуют параметры, которые при необходимости могут быть изменены. Подробнее об этом см. HDMI Output (доступен только при подключении устройства HDMI) на стр. 126. Помните, что параметры HDMI эффективны, пока они не изменены, или пока не подключен новый компонент HDMI.
 Примечание
1В зависимости от подключенного компонента, использование DVI подключения может привести к неустойчивым передачам сигнала.
2Разрешение в пикселях видеовыхода HDMI данного рекордера составляет (согласно телевизионному растру): NTSC (720 x 480i/p, 1280 x 720p, 1920 x 1080i/p) иPAL (720 x 576i/p, 1280 x 720p, 1920 x 1080i/p). Еслиэкраннеподдерживает данные разрешения, картинка может изображаться несоотвествующим образом.
21
Ru
 Важно
Важно
•Соединение HDMI может быть выполнено только с компонентами, оборудованными DVI, и поддерживающими одновременно технологии DVI и High-bandwidth Digital Content Protection (HDCP). Если вы выбрали подключение к терминалу DVI, требуется кабель-адаптер DVI — HDMI. Однако, при соединении DVI — HDCP, звук не передается. Для более подробной информации, обратитесь к местному аудиодилеру.
•Соединение HDMI поддерживает 2-канальныелинейныеимпульсно-кодовые сигналы с частотой 32 кГц, 44,1 кГц, 48 кГц, 96 кГц, 16 бит/20 бит/24 бит, а также звуковые битовые потоки Dolby Digital, DTS и MPEG.
•Если подключенный компонент поддерживает только сигналы Linear PCM, сигнал выводится в виде Linear PCM (звучание DTS не выводится).
•При подключении к плазменному экрану Pioneer, пожалуйста, выберите настройку HDMI на экране (подробнее об этом, см. поставляемую инструкцию).
Об HDMI
С помощью одного цифрового соединения, HDMI (High Definition Multimedia Interface)
поддерживает одновременно видео и аудио сигналы, используемые для DVDпроигрывателей, цифрового телевидения, декодеров, и других аудиовизуальных устройств. HDMI был разработан для предоставления технологий High Bandwidth Digital Content Protection (HDCP), а также Digital Visual Interface (DVI) в одном виде. HDCP используется для защиты цифровых материалов, передающихся и получаемых экранами, поддерживающими DVI.
HDMI может поддерживать стандартные, усовершенствованные, или высокоточные видеосигналы плюс аудиосигналы, начиная от стандартных и до многоканального окружающего звучания. Отличительной чертой HDMI являются несжатые цифровые видеосигналы, полоса пропускания до пяти гигабит в секунду (Dual Link), один терминал (вместо нескольких кабелей и терминалов), и связь между аудиовизуальным источником и аудиовизуальными устройствами как цифровые телевизоры.
22
HDMI, логотип HDMI и High-Definition Multimedia Interface являются торговыми марками или зарегистрированными торговыми марками HDMI licensing LLC.
Подключение других аудиовидео источников
Подключение видеомагнитофона или аналоговой видеокамеры
|
AUDIO/VIDEO |
AUDIO/VIDEO |
|||
|
OUTPUT |
INPUT |
|||
|
(Задняя панель) |
(Передняя панель) |
|||
|
1 |
2 |
|||
|
К аудио/ |
Аналоговая видеокамера |
От аудио/ |
||
|
видеовходу |
видеовыхода |
|||
Видеомагнитофон
1 Подключите аудио и видео входы видеомагнитофона или видеокамеры к выходам этого рекордера.
Это позволит выполнить запись с данного рекордера на видеомагнитофон или видеокамеру.
•Для подключения видео можно использовать стандартные видео кабели и кабели S-video.
•Также, используя один SCART кабель, можно использовать терминал AV2 (INPUT 1/DECODER) SCART для аудио-видео приема и выхода.
2 Подсоедините аудио и видео выходы видеомагнитофона или видеокамеры к входам этого рекордера.
Это позволит выполнить запись с кассет на видеомагнитофоне или видеокамере.
•Для подключения видео можно использовать стандартные видео кабели и кабели S-video.
•Подключения на передней панели удобны для подключения входа видеокамеры.
Ru
•При подключении внешнего аудиовизуального источника, поддерживающеготолькомонофоническое звучание, подключите только левый (белый) аудиоразъем к данному устройству. Это позволит записать одинаковую звуковую дорожку на оба канала. Нужно подключить к гнездуINPUT 2 на фронтальной панели.
Подключение цифровой видеокамеры
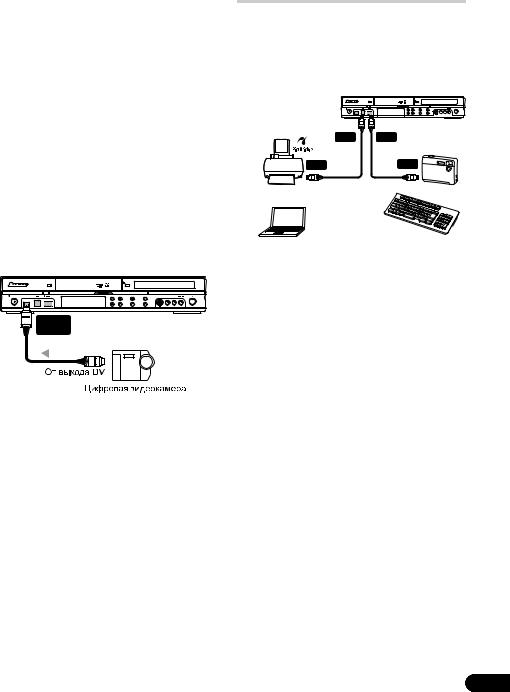
Цифровую видеокамеру или DVD-рекордер с выходом DV можно подключить к гнезду DV IN на передней панели.
 Важно
Важно
•Данное гнездо предназначено только для подключения цифрового видеооборудования. Оно не поддерживает цифровые спутниковые ресиверы или видеомагнитофоны D-VHS.
DV
IN
•С помощью цифрового видеокабеля (не поставляется), подключите гнездо DV цифровой видеокамеры к гнезду DV IN на передней панели данного рекордера.
Подключение USB устройства
С помощью USB портов на фронтальной части рекордера, можно подключить такие USB устройства, как цифровые фотокамеры, принтеры, клавиатуры и компьютеры. Пожалуйста, также предварительно изучите инструкции к подключаемому устройству.
|
USB |
USB |
||||||||
|
(Тип B) |
(Тип A) |
||||||||
|
USB |
USB |
||||||||
|
PictBridge-совместимый принтер |
Цифровая камера |
|
Компьютер |
Клавиатура |
 Важно
Важно
•Некоторые USB устройства могут не работать с данным рекордером.
•При подключении компьютера к данному аппарату через USB порт, убедитесь, что питание на компьютере и данном аппарате отключено.
•Рекомендуется подключать USB устройства, когда данный рекордер находится в выключенном состоянии (режиме ожидания).
Накопительные устройства файлов JPEG
•Цифровая фотокамера
•Считывающее устройство карт памяти (любой тип карты памяти)
•USB накопитель
Устройствоклассазапоминающегоустройства большого объема (Mass Storage Class — MSC)
должно быть совместимо с файловой системой FAT. Помните, что если устройство разбито на разделы, данныйрекордерможетнераспознать его.
Протокол передачи картинок (Picture Transfer Protocol — PTP) может использоваться для передачи до максимум 4000 файлов.
23
Ru

Запоминающие устройства WMA/ MP3 файлов
•Считывающее устройство карт памяти (любой тип карты памяти)
•USB накопитель
•Компьютер (Воспользуйтесь функцией
Connect PC)
Устройствоклассазапоминающего устройства большого объема (Mass Storage Class — MSC)
должно быть совместимо с файловой системой FAT. Помните, что если устройство разбито на разделы, данныйрекордерможетнераспознать его.
Помните, что даже если могут использоваться мультислотныесчитывающиеустройствакарт, рекордер будет распознавать только первую вставленную карту. Для считывания другой карты, извлеките все карты, и заново вставьте карту для считывания.
Использование USB концентратора
•Использование концентратора, совместимого с USB 1.1 и/или 2.0.
•Используйте концентратор с отдельным питанием (концентраторы с питанием от шины могут работать со сбоями).
•В случае сбоев в работе концентратора, рекомендуется подсоединить устройство напрямую к USB порту рекордера.
•Если к концентратору подключено слишком много устройств, он может работать со сбоями. В таком случае, попытайтесь отсоединить некоторые устройства.
•При недостатке питания, идущего на подключенные устройства через концентратор, связь может прерываться. В таком случае, отсоедините одно или больше устройств, затем перезапустите
USB. См. Restart USB Device на стр. 128.
Использование USB принтера
•Используйте принтер, совместимый с
PictBridge.
Использование USB клавиатуры
•Не используйте PS/2 клавиатуру, подключенную через адаптер PS/2-USB.
Использование компьютера
•Помните, чтокданномуустройствуможно подключить компьютер через USB для копирования WMA и MP3 файлов.
Подробнее, см. Connect PC (Копирование с
PC) настр. 100. ДляиспользованияConnect PC с данным устройством, компьютер должен работать по ОС Windows XP Home Edition (SP2) или Windows XP Professional (SP2) и должен быть способен запускать
Windows Media Player 10. Даже если компьютер может запустить Windows Media Player 10, нет гарантии, что он будет правильноработатьсданнымустройством. Подробнее, смотрите раздел ‘Help’ в Windows Media Player 10.
Подключение к розетке
После проверки всех соединений подключите рекордер к розетке.
• Для подключения данного рекордера к розетке используйте поставляемый кабель питания.
24
Ru
Глава 3
Органы управления и дисплеи
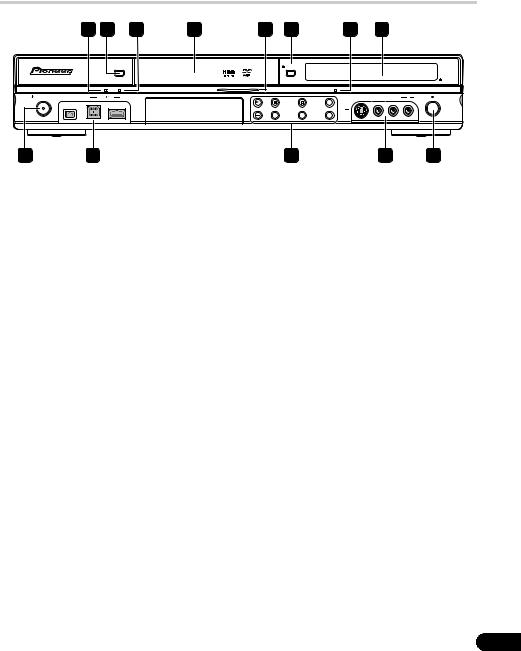
Передняя панель
|
1 |
2 |
3 |
4 |
5 |
6 |
7 |
8 |
||||
|
HDD/DVD |
OPEN/CLOSE |
||||||||||
|
DivX |
COPY |
HDMI |
|||||||||
|
STANDBY/ON |
DV IN |
USB |
INPUT 2 S-VIDEO |
VIDEO L(MONO) |
R |
AUDIO |
REC |
||||
|
STOP REC |
ONE TOUCH |
||||||||||
|
COPY |
|
9 |
10 |
11 |
10 |
12 |
1 Индикатор DivX
Высвечивается во время воспроизведения данным рекордером видеофайлов DivX.
2 HDD/DVD
Нажмите для выбора жесткого диска или DVD-диска для записи и воспроизведения.
3 Индикатор COPY
Высвечивается во время выполнения копирования.
4Лоток для дисков
5Индикатор HDD/DVD
Индикатор светится синим цветом, если выбран жесткий диск (HDD), и оранжевым цветом, если выбран DVD-диск.
6 OPEN/CLOSE
Нажмите, чтобы открыть/закрыть лоток для дисков.
7 Индикатор HDMI
Высвечивается при подключении данного рекордеракустройству, совместимомусHDMI (HDCP).
8Дисплей передней панели и инфракрасный сенсор ДУ
Подробнее см. Дисплей на стр. 26.
9STANDBY/ON
Нажмите, чтобы включитьрекордер/перевести его в режим ожидания.
10 Входы передней панели
Подробнее см. Подключения на передней панели на стр. 15.
Нажмите, чтобы начать или возобновить воспроизведение.
Нажмите, чтобы остановить воспроизведение.
STOP REC
Нажмите для остановки записи.
ONE TOUCH COPY
Нажмите для запуска копирования с помощью One Touch Copy
воспроизводимой главы на DVD-диск или жесткий диск.
CH +/–
Используйте для переключения телевизионных каналов, пропуска разделов/дорожек и т.д.
INPUT SELECT
Нажмите для переключения источника, используемого для записи.
REC MODE
Повторно нажимайте для переключения режимов записи (качество картинки).
12 REC
Нажмите, чтобы начать запись. Повторно нажимайте для установки времени записи в 30-минутных блоках.
25
Ru
|
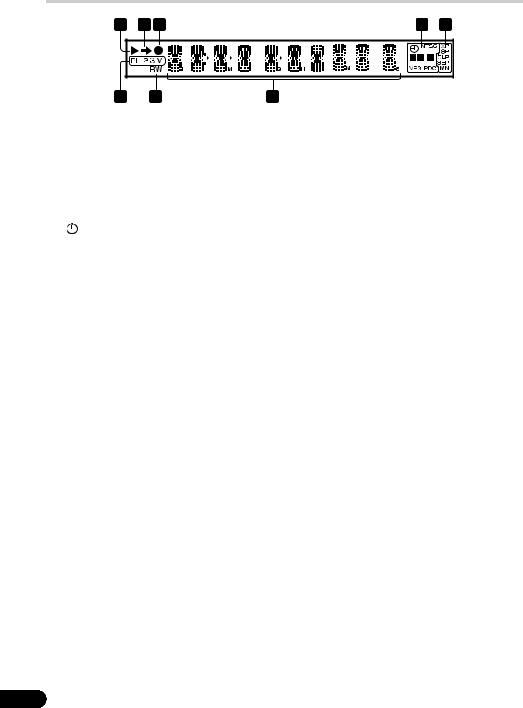
8 |
7 |
6 |
|
|
1 |
|||
|
Подсвечивается во время воспроизведения; |
|||
|
мигает во время паузы воспроизведения. |
|||
|
2 |
|||
|
Подсвечивается во время копирования. |
|||
|
3 |
|||
|
Подсвечивается во время записи, мигает во |
|||
|
время паузы записи. |
|||
|
4 |
(стр. 57) |
||
|
Подсвечивается при установке таймера |
|||
|
записи. (Индикатор мигает, если таймер |
установлен на DVD-диск, но записываемый диск не установлен, или если таймер установлен на жесткий диск, но жесткий диск не является записываемым.)
NTSC
Подсвечивается, если формат выходного видеосигнала – NTSC.

 (стр. 121)
Указывает, какие каналы записываются при двуязычной передаче.
 (стр. 120)
Подсвечивается, когда выход компонентного видео установлен на строчную развертку.
VPS/PDC (стр. 57)
Подсвечивается при приеме трансляции VPS/PDC при включенном таймере записи
VPS/PDC.
5Индикаторы качества записи (стр. 52)
XP
Подсвечивается, если режим записи установлен на ХР (высокое качество).
SP
Подсвечивается, если режим записи установлен на SP (стандартное воспроизведение).
LP/SLP
Подсвечивается, если режим записи установленнаLP (долгоевоспроизведение) или SLP (очень долгое воспроизведение).
EP/SEP
Подсвечивается, если режим записи установлен на EP (продленное воспроизведение) или SEP (крайне продленное воспроизведение).
MN
Подсвечивается, если режим записи установлен на режим MN (уровень записи вручную).
6Символьный дисплей
7R/RW
Подсвечивается, если загружен записываемый диск DVD-R или DVD-RW.
8PL (стр. 80)
Подсвечивается при установке диска в режиме VR, и если рекордер находится в режиме списка воспроизведения.
2 3 (стр. 127)
ОтображаетрежимпультаДУ(еслиничего не отображается, режим пульта ДУ установлен на 1).
V
Подсвечивается при установке незавершенного диска, записанного в видеорежиме.
26
Ru
Пульт ДУ
|
STANDBY/ON |
HDD/DVD |
||||
|
1 |
11 |
||||
|
PAUSE LIVE TV |
HOME MENU |
INFO |
12 |
||
|
2 |
|||||
|
13 |
|||||
|
TOP MENU |
|||||
|
3 |
DISC |
GUIDE |
14 |
||
|
NAVIGATOR |
CHANNEL |
||||
|
+ |
|||||
|
4 |
|||||
|
CM |
ENTER |
CM |
|||
|
BACK |
SKIP |
||||
|
PAUSE |
RETURN |
||||
|
5 |
CHANNEL |
15 |
|||
|
– |
|||||
|
REC |
PLAY |
STOP |
|||
|
6 |
16 |
||||
|
STOP REC |
PREV |
NEXT |
|||
|
17 |
|||||
|
7 |
TIMER REC |
||||
|
8 |
/ |
/ HELP |
TV/DVD |
18 |
|
|
REC MODE |
ONE TOUCH COPY |
||||
|
19 |
|||||
|
AUDIO SUBTITLE ANGLE |
INPUT SELECT |
||||
|
9 |
20 |
||||
|
PLAY MODE MENU |
|||||
|
21 |
|||||
|
SHIFT |
CLEAR |
DISPLAY |
|||
|
10 |
22 |
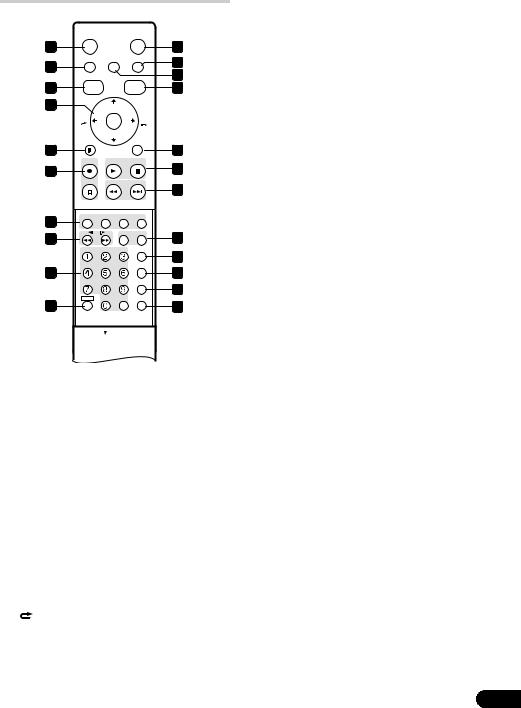
1 STANDBY/ON
Нажмите, чтобы включитьрекордер/перевести его в режим ожидания.
2 PAUSE LIVE TV (стр. 55)
Нажмите, чтобы начать запись текущего телевизионного канала. Если при этом включается пауза воспроизведения, то включается пауза трансляции.
3 DISC NAVIGATOR (стр. 68, 80)/ TOP MENU (стр. 65)
Нажмите для отображения экрана Disc Navigator, илиосновногоменюустановленного диска DVD-Video или завершенного диска
DVD-R/-RW (Video).
4 / / / и ENTER
Используется для навигации по всем экранным меню. Нажмите кнопку ENTER для выбора подсвеченного параметра.
CM BACK (реклама назад)
Повторно нажимайте для быстрого пропуска назад воспроизводимого видеоизображения.
 CM SKIP (пропуск рекламы)
Повторно нажимайте для быстрого пропуска вперед воспроизводимого видеоизображения.
CHANNEL +/– (стр. 51)
Нажмите для переключения канала встроенного ТВ-тюнера.
5 PAUSE
Нажмите, чтобы приостановить воспроизведение или запись.
6 Органы управления записью (стр. 53)
REC
Нажмите, чтобыначатьзапись. Нажимайте несколько раз, чтобы задать время записи блоками по 30 минут.
Когда эта красная командная кнопка видна на экране GUIDE Plus+™, используйте ее для функции One-Button-Record.
STOP REC
Нажмите для остановки записи.
7 Командные кнопки GUIDE Plus+™
(стр. 36)
В системе GUIDE Plus+™ эти кнопки действуют как Красная, Зеленая, Желтая и Синяя командные кнопки (функции этих кнопок изменяются в соответствии с областью GUIDE Plus+™).
TIMER REC (стр. 36)
Удерживайте нажатой кнопку SHIFT и нажмите, чтобы установить таймер записи с системы GUIDE Plus+™.
8(стр. 69)
Нажмите для прокрутки назад или вперед. Для изменения скорости нажмите еще раз.
/ / (стр. 69)
Во время паузы нажмите и удерживайте нажатой для начала замедленного воспроизведения. Нажимайте для изменения скорости воспроизведения.
В режиме паузы нажимайте для перехода к следующему или предыдущему кадру.
Если отображается GUIDE Plus+™, используйте для отображения предыдущего/следующего дня.
27
Ru

9Цифровые кнопки, CLEAR
Цифровые кнопки используются для выбора дорожки/раздела/главы, выбора канала и т.д. Те же самые кнопки могут использоваться для ввода глав, дисков и т.д.
Используйте CLEAR для сброса введенных данных и повторного ввода.
REC MODE (стр. 52)
Удерживайте SHIFT и нажимайте, чтобы изменить режим записи (качество изображения).
AUDIO (стр. 51, 73)
Удерживайте SHIFT и нажмите, чтобы изменить язык воспроизведения звука или канал. (Если устройство записи остановлено, нажмитедляизменениязвука тюнера.)
SUBTITLE (стр. 72)
Удерживайте SHIFT и нажмите для отображения/переключения субтитров на многоязычных дисках DVD-Video.
ANGLE (стр. 74)
Удерживайте SHIFT и нажмите для переключения ракурсов камеры на диске с много-ракурсными сценами.
PLAY MODE (стр. 70)
Удерживайте SHIFT и нажмите, чтобы изменить режим воспроизведения (поиск, повтор, воспроизведение программы и т.д.).
10SHIFT
Используйтедлядоступакфункциямнапульте ДУ, отмеченным зеленым цветом.
11 HDD/DVD (стр. 53)
Нажмите для выбора жесткого диска или DVD-диска для записи и воспроизведения.
12 INFO
Нажмите для просмотра дополнительной информации о подсвеченном пункте в GUIDE Plus+™.
13 HOME MENU
Нажмите для отображения Home Menu, из которого можно перейти к любым функциям рекордера.
14 GUIDE
Нажмите, чтобы отобразить экран GUIDE Plus+™. Для выхода нажмите еще раз.
15 RETURN
Нажмите для возврата на один уровень назад в экранном меню или дисплее.
16PLAY (стр. 64)
Нажмите, чтобы начать воспроизведение.
STOP (стр. 64)
Нажмите, чтобы остановить воспроизведение.
17 PREV NEXT
Нажмите для перехода на предыдущее или следующую главу/раздел/дорожку/папку; или для отображения предыдущей или следующей страницы меню.
Если отображается GUIDE Plus+™, используйте для отображения предыдущей/ следующей страницы.
18HELP
Нажмите для справки по использованию текущего экрана графического интерфейса пользователя.
TV/DVD
Нажмите, чтобы переключаться между режимом ‘TV mode’, в котором можно получить изображение и звук с телевизионного тюнера, и режимом ‘DVD mode’, в котором можно получить изображение и звук с тюнера рекордера (или с внешнего источника).
19ONE TOUCH COPY (стр. 91)
Нажмите для запуска копирования с помощью One Touch Copy воспроизводимой главы на DVD-диск или жесткий диск.
20 INPUT SELECT (стр. 60)
Нажмите для переключения функции приема для записи.
21 MENU (стр. 65)
Нажмите для отображения меню диска, если загружен диск DVD-Video, закрытый для записи диск DVD-R/-RW (режим Video) или закрытый для записи диск DVD+R/+RW. В системе GUIDE Plus+™ используйте для прямого перехода к строке меню.
22 DISPLAY (стр. 74)
Отображение/изменение информации на экране.
28
Ru
Глава 4
Подготовка к эксплуатации
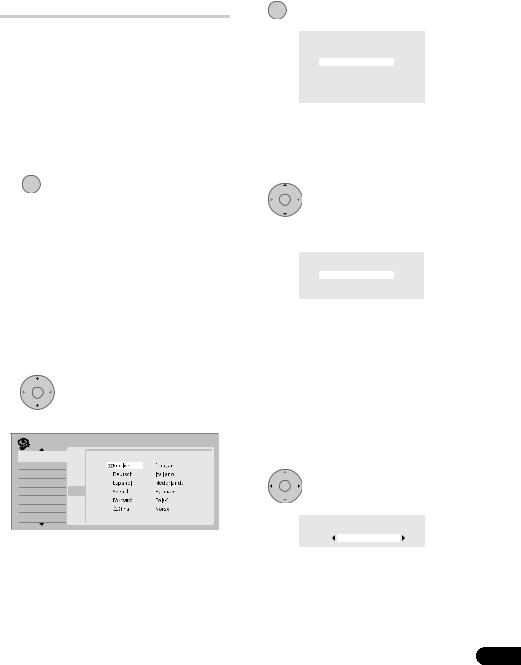
Включение и настройка
При включении рекордера в первый раз можно выполнить основные настройки с помощью функции Setup Navigator. К основным настройкам относится настройка часов, внутреннего ТВ-тюнера и видеовыхода. Если рекордер используется в первый раз, настоятельно рекомендуется использовать функцию Setup Navigator до начала эксплуатации рекордера.
1 Включите телевизор и настройте видеовход на этот рекордер.
STANDBY/ON
2 Включите рекордер.
При включении в первый раз на экране телевизора должен появиться экран Setup Navigator (Если экран Setup Navigator не появляется, его можно включить через меню
Initial Setup; см. стр. 118).
•Если рекордер подсоединен к совместимому телевизору с использованием 21-штырькового SCARTкабеля с полной распайкой, рекордеру потребуетсянесколькосекунддлязагрузки информации о стране, размере экрана телевизора и языке. (Подробнее о совместимости можно узнать из руководства к телевизору.)
|
ENTER |
Выберите язык (затем |
|
3 |
|
|
нажмите ENTER). |
|
|
Initial Setup |
|
|
Basic |
Clock SettingLanguage |
|
Tuner |
Input Line System |
|
Video In/ O ut |
Power Save |
|
Audio In |
HELPp |
|
Audio O ut |
Setup N avig ator |
|
Language |
|
|
Recording |
|
|
Playback |
4 ENTER Запустите Setup Navigator.
Complete this setup before you start using your recorder.
Start
p Navigator Cancel
Please use the Initial Setup if you want to make more detailed settings.
•Если использование функции Setup Navigator нетребуется, нажмитекнопку , выберите Cancel, затем нажмите кнопку ENTER, чтобы закрыть экран Setup Navigator.
|
5 |
ENTER |
|
Выберите параметр Auto |
Channel Setting (‘Auto Scan’, ‘Download from TV’) или ‘Do not set’.
Auto Channel Setting
AutoEnglishScan
Download from TV
p Navigator Do not Set
•Выберите Do not set, чтобы пропустить настройку каналов (например, если они уже настроены).
•Функция Download from TV может использоваться, только если данный рекордер подсоединен к телевизору с помощью21-штырьковогокабеляSCART с полной распайкой, подключенного к аудио-видео разъему AV1 (RGB)-TV, и если телевизор поддерживает эту функцию (более подробную информацию можно получить в руководстве по телевизору).
ENTER
•Выберите страну.
Country Selection
Ru

• Автоматическая настройка каналов
Функция Auto Scan автоматически ищет и настраивает предварительно установленные каналы.
Tuning
32/99
Cancel
• Загрузка каналов с телевизора
Используйте функцию Download from TV для загрузки всех каналов, настроенных на телевизоре.
|
Downloading |
Pr 5 |
|
|
32/99 |
||
|
Cancel |
||
|
6 |
ENTER |
|
|
Выберите ‘Auto’ для |
автоматической установкивремениили ‘Manual’ для ручной настройки.
Clock Setting

 Auto
Auto
Manual
•Автоматическая установка часов
Некоторые телевизионные каналы передают вместе с программой сигналы времени. Рекордер может использовать такие сигналы для автоматической установки часов.
Установите функцию ‘Clock Set CH’ на номер предварительного настроенного канала, передающего сигнал времени, затем переместите курсор вниз на ‘Start’ и нажмите кнопку ENTER.
|
Auto Clock Setting |
|||
|
Date |
–– |
/ |
–– / –––– |
|
Time |
–– |
: |
–– |
|
p Navigator |
Pr 1 |
||
|
Clock Set CH |
|||
|
Start |
Установка времени выполняется быстро. После установки времени выберите Next, чтобы продолжить.
|
Auto Clock Setting |
||||
|
Date |
MON |
01 |
/ |
01 / 2007 |
|
Time |
11 |
: |
20 |
|
|
p Navigator |
Pr 1 |
|||
|
Clock Set CH |
Start
Next
30
Еслинеудалосьавтоматически установить время, нажмите кнопку RETURN для перехода на предыдущую страницу и выберите Manual.
•Установка часов вручную
Если в вашем регионе нет каналов, передающих сигналы времени, то часы можно установить вручную.
Чтобы указать часовой пояс, используйте кнопки /.
Вы можете установить его, выбрав город или время относительно времени по Гринвичу.
|
Manual Clock Setting |
1/2 |
|
|
Time Zone |
Austria |
|
|
Vienna |
||
|
p NavigatorSummer Time |
Off |
Нажмите кнопку , затем кнопками / выберите ‘On’ или ‘Off’ для
летнего времени, а затем нажмите кнопку ENTER.
Если в настоящий момент используется летнее время, выберите On.
|
Manual Clock Setting |
1/2 |
|
|
Time Zone |
Austria |
|
|
Vienna |
||
|
p NavigatorSummer Time |
On |
Установите дату (день/месяц/год) и время, азатемнажмитеENTER, чтобы сохранить все эти настройки.
|
Manual Clock Setting |
2/2 |
|||
|
Date |
MON 01 |
/ |
01 |
/ 2007 |
|
Time |
00 |
: |
00 |
|
|
p Navigator |
Austria |
|||
|
Time Zone |
||||
|
Vienna |
||||
|
Summer Time |
On |
•Используйте кнопки / для изменения значения в выбранном поле.
•Используйте кнопки / для перехода от одного поля к другому.
•В любой момент можно перейти на предыдущийэкранвSetup Navigator, нажав кнопку RETURN.
Ru

телевизионногоэкрана, ‘Wide (16:9)’ или
‘Standard (4:3)’.
TV Screen Size

 Wide (16:9)
Standard (4:3)
|
8 |
ENTER |
|
Выберите в зависимости от |
того, поддерживает ли телевизор видеосигналы прогрессивной развертки.
Progressive
Compatible

 Not Compatible
p Navigator Don’t Know
•Помните, что видеосигнал прогрессивной развертки выводится с разъема AV1 (RGB)- TV и выходов компонентного видео.
9 ENTER Нажмите, чтобы продолжить
после предупреждения о состоянии жесткого диска.
In the event of HDD failure, recordings may be lost or normal playback/recording may not be possible.
As recordings might be lost in case of a HDD failure, we recommend to use the HDD only
as temporary storage media. p Navigator
Please copy recordings you want to keep to recordable DVD.
Press ENTER to continue.
|
10 |
ENTER |
|
Выберите ‘Finish Setup’, |
чтобы выйти из Setup Navigator, или ‘Go Back’, чтобы запустить еще раз.
Setup is complete!
|
Finish Setup |
|
|
p Navigator |
Go Back |
Этим завершается основная настройка с помощью функции Setup Navigator.
•При наличии пустых каналов (на которых отсутствуют станции) можно пропускать их при ручной настройке каналов. См.
Manual CH Setting на стр. 119.
Настройка системы GUIDE
Plus+™
Система GUIDE Plus+™ представляет собой бесплатное интерактивное экранное руководство по программированию телепрограмм. Эта функция позволяет принимать программы передач всех крупных каналов, обеспечивает функцию записи одним нажатием, поиск по жанру, а также предоставляет рекомендации в соответствии с заданным профилем и многое другое.
Для правильной работы системы GUIDE Plus+ важно правильно настроить язык и страну в функции Setup Navigator и выполнить поиск доступных каналов, используемых в дальнейшем системой GUIDE Plus+. Если эти установки еще не выполнены, то сначала запустите Setup Navigator (см. Включение и настройка на стр. 29).
Для получения сведений о программах телепередач используются ‘хост-каналы’. Для получения правильной информации о программах телепередач в стране или регионе, необходимо настроить систему GUIDE Plus+ и ‘загрузить’ программы телепередач. Первая загрузка может продолжаться до 24 часов. После того, как загрузка завершена, все последующие обновления выполняются автоматически.
1 GUIDE Отобразите меню настройки
GUIDE Plus+.
Настройкиязыка истраны ужеустановлены на значения, выбранные в Setup Navigator.
31
Ru

|
2 |
ENTER |
|
Выберите ‘Postal Code’. |
|
REC MODE |
|
|
AUDIO |
SUBTITLE ANGLE |
|
PLAY MODE |
|
|
3 |
ENTER |
|
Введите свой |
почтовый индекс.
Система использует почтовый индекс для проверки программ телепередач, поэтому важно правильно ввести индекс.
32
4 При использовании внешнего ресивера (например, спутниковый ресивер) с поставляемым кабелем G-LINK выполните этот шаг, в противном случае переходите к шагу 5.
•Подробнее об использовании поставляемого кабеля G-LINK см.
Подключение декодера, спутникового ресивера или цифрового наземного ресивера на стр. 18.
•Выберите External Receiver 1, 2 или 3, а
затем нажмите ENTER. (если используется толькоодинвнешнийресивер, используйте
External Receiver 1. Если необходимо, с
помощью 2 и 3 можно добавить дополнительные ресиверы.)
После нажатия ENTER:
•Выберите метод приема (Terrestrial, Cable
или Satellite).
•Выберите провайдера (если необходимо).
•Выберите марку внешнего ресивера.
•Укажите, к какому входу подключен внешний ресивер.
После выполнения этих шагов рекордер установит соединение с внешним ресивером и изменит канал через кабель G-LINK. Если канал успешно изменен, выберите Yes для подтверждения.
Если канал не был изменен, выберите No. Система GUIDE Plus+ попытается использовать другие коды, назначенные внешнему ресиверу. Если ни один из кодов не подходит для изменения канала, настройте внешний ресивер на хост-канал вашей страны (см. ниже в шаге 5), и оставьте его на ночь. Рекордерследуетоставитьврежимеожидания: он автоматически активизируется и загрузит новые коды с хост-канала. На следующий день повторите процесс настройки еще раз:
Ru

•Нажмите GUIDE, чтобы отобразить меню настроек GUIDE Plus+.
•Нажмите , чтобы вызвать строку меню, затемиспользуйте длядоступакобласти
Setup, и выберите Setup.
•Продолжите настройки, начиная с этого шага еще раз.
Если внешний ресивер по-прежнему не отвечает контроллеру G-LINK, обратитесь в службу поддержки и сообщите марку и модель внешнего ресивера.
См. также Часто задаваемые вопросы и устранение неполадок GUIDE Plus+ на стр. 46.
5 Укажите хост-канал страны.
Хост-каналами называются телевизионные станции, предоставляющие в Европе информацию о программах телепередач, доступную через систему GUIDE Plus+. Для получения списков (загрузка EPG) важно правильно указать хост-канал для вашей страны.
Взависимостиотнастроекследуйтевариантам А, Б или В, описанным ниже:
А Если внешний ресивер не используется, то рекордер выполняет поиск хост-канала автоматически:
•Оставьте рекордер в режиме ожидания на ночь (не оставляйте его включенным). Б Если внешний ресивер используется, то хост-канал следует указать, пользуясь приведенной таблицей:
|
Страна/ |
Хост- |
Комментарии |
|
|
регион |
каналы |
||
|
Австрия |
Eurosport |
||
|
Бельгия |
RTL-TVI |
||
|
Франция |
Canal+ |
Только аналоговый |
|
|
Германия |
Eurosport |
||
|
Италия |
MTV |
Только аналоговый |
|
|
Нидерланды |
Eurosport |
||
|
Испания |
Tele 5 |
Только аналоговый |
|
|
Швейцария |
Eurosport |
Великобритания ITV, Eurosport ITV только аналоговый. При наличии подписки на спутниковое телевидение SKY и отсутствии наземной антенны используйте канал Eurosport.
•Настройте внешний ресивер на соответствующий хост-канал и оставьте ресивер включенным на ночь, а рекордер
– в режиме ожидания.
В При использовании в качестве источников одновременно и внешнего ресивера, и данного рекордера следуйте описанным выше инструкциям по настройкебезвнешнегоресивера. Тольков том случае, если описанная настройка не удастся, используйте способ с внешним ресивером.
Озагрузке EPG
•Данные EPG могут быть получены, только если рекордер находится в режиме ожидания. (Еслирекордернеиспользуется, переключите его в режим ожидания.) Если используется внешний ресивер, оставьте его включенным во время загрузки данных
EPG.
•Если ни один из хост-каналов (см. таблицу выше) не принимается, то использование системы GUIDE Plus+ невозможно. В этом случае не вводите почтовый индекс на экране GUIDE Plus+ (или установите страну на Other). (Когда служба GUIDE Plus+ начнет работу в вашем регионе, введите почтовый индекс еще раз.)
33
Ru

•Если в месте вашего проживания невозможно использовать функции EPG, все еще можно установить запись по функции ShowView и запись вручную — см.Установка записи по таймеру на стр. 57.
•Во время приема данных на дисплее передней панели отображается EPG. Если вовремязагрузкиEPG включаетсяпитание рекордера, то загрузка прерывается.
•Данные EPG можно принимать несколько раз в день. Все обновления происходят автоматически.
•При загрузке данных EPG рекордер может подаватьзвуковыесигналы, какеслибы он был включен. Это нормальное явление.
На следующий день проверьте загруженные данные.
|
1 |
GUIDE Отобразите экран GUIDE Plus+. |
Должна отобразиться сетка с логотипами каналов и программами телепередач. Используйте кнопки / для просмотра списка. Если некоторые каналы исчезли, или появились каналы, которые не были настроены, перейдите к экрану Editor:
•Нажимайте вплоть до отображения строки меню.
•Нажимайте вплоть до отображения Editor. Теперь в главной области экрана отображается список каналов. В сетке отображаются каналы, установленные на ON. Каналы, установленные на OFF, не отображаются. Используйте кнопки / / /, чтобы перемещаться по списку и
устанавливать каналы на ON или OFF.
•Для каналов, установленных на ON, необходимы используемые системой GUIDE Plus+ данныеобисточникеканалаи номере программы. Источником может быть встроенный тюнер рекордера или внешний ресивер. Номер программы – это номер, по которому можно найти канал на устройстве приема/источнике. Для корректной записи канала значение на экране Editor должно совпадать с этим номером.
•Это особенно важно для ‘хост-каналов’. Обратите внимание на то, что хост-каналы
всегда должны быть установлены на ON.
|
REC MODE |
|
|
AUDIO |
SUBTITLE ANGLE |
|
PLAY MODE |
|
|
2 |
Измените номер программы |
по своему усмотрению.
Изменение номеров программ позволяет устанавливать их очередность при последовательном переключении. Это можно использовать для группировки определенных каналов.
3 По завершении нажмите СИНЮЮ командную кнопку (Home), чтобы вернуться на исходный экран GUIDE Plus+.
•Подробнее об использовании системы GUIDE Plus+ см. в следующей главе.
34
Ru

Глава 5
Использование электронной телепрограммы GUIDE Plus+™
Система GUIDE Plus+
Система GUIDE Plus+™* представляет собой бесплатное интерактивное экранное руководство по программированию телепрограмм.1 Эта система показывает программы телепередач по всем основным каналам и имеет функции записи одним нажатием, поиска по жанру, выдачи рекомендаций по профилю телезрителя и т.д. Система GUIDE Plus+ удобна для получения информации о том, что идет в данный момент или на следующей неделе на том или ином канале или в определенном жанре. Кроме того, система GUIDE Plus+ позволяет быстро и просто устанавливать предпочтения для просмотра и записи.
Для получения правильной информации о программах телепередач в стране или регионе, необходимо настроить систему GUIDE Plus+ и ‘загрузить’ программы телепередач. Если эта настройка еще не выполнена, то сначала просмотрите раздел Настройка системы
GUIDE Plus+™ на стр. 31.
* GUIDE Plus+, SHOWVIEW, VIDEO Plus+, G-LINK являются (1) зарегистрированными товарными знаками или товарными знаками,
(2) выпускаются по лицензии и (3) защищены различными международными патентами и заявками на патент, принадлежащими или лицензированными компанией Gemstar-TV Guide International, Inc. и/или ее дочерними компаниями.
Официальное уведомление
GEMSTAR-TV GUIDE INTERNATIONAL, INC. И/ИЛИ ЕЕ ДОЧЕРНИЕ КОМПАНИИ НЕ НЕСУТ НИКАКОЙ ОТВЕТСТВЕННОСТИ ЗА ТОЧНОСТЬ ИНФОРМАЦИИ В ПРОГРАММАХ ТЕЛЕПЕРЕДАЧ, ПРЕДОСТАВЛЯЕМЫХ СИСТЕМОЙ GUIDE PLUS+.
КОМПАНИЯ GEMSTAR-TV GUIDE INTERNATIONAL, INC. И/ИЛИ ЕЕ ДОЧЕРНИЕ КОМПАНИИ НИ ПРИ КАКИХ ОБСТОЯТЕЛЬСТВАХ НЕ НЕСУТ ОТВЕТСТВЕННОСТИ НИ В КАКОМ ОБЪЕМЕ ЗА ПОТЕРЮ ПРИБЫЛИ, ПЕРЕРЫВ В КОММЕРЧЕСКОЙ ДЕЯТЕЛЬНОСТИ, А ТАКЖЕ КОСВЕННЫЕ, ФАКТИЧЕСКИЕ ИЛИ ПОБОЧНЫЕ
УБЫТКИ, СВЯЗАННЫЕ С ПРЕДОСТАВЛЕНИЕМ ИЛИ ИСПОЛЬЗОВАНИЕМ ЛЮБОЙ ИНФОРМАЦИИ, ОБОРУДОВАНИЯ ИЛИ УСЛУГ, ОТНОСЯЩИХСЯ К СИСТЕМЕ GUIDE PLUS+.
Использование системы
GUIDE Plus+
Для удобства все функции и области имеют цветовую маркировку. На всех экранах (кроме некоторых экранов настройки) имеются следующие общие элементы:
|
3 |
|
|
1 |
4 |
|
5 |
|
|
2 |
6 |
1Окно видеоизображения – позволяет просматриватьтекущуюпередачувовремя использования системы GUIDE Plus+.
2Информационные панели – здесь отображаются рекламные материалы о передачах и указания по работе системы
GUIDE Plus+.
3Команднаястрока– цветныекомандные кнопки, функция которых зависит от текущей области.
4Окно информации – здесь отображаются краткие описания передач или пояснения к меню.
5Строка меню – обеспечивает доступ к различным областям системы GUIDE Plus+.
6Сетка – отображает программу телепередач на следующие семь дней с указанием канала и времени.
 Примечание
1Систему GUIDE Plus+ нельзя использовать, если параметр Input Line System установлен на 525 System (см. также
Input Line System на стр. 118).
35
Ru

Перемещение по GUIDE Plus+
В следующей таблице приведены кнопки пульта дистанционного управления, используемыедлянавигации всистемеGUIDE Plus+.
|
Кнопка |
Назначение |
|
REC |
Нажмите, чтобы установить |
|
или отменить функцию записи |
|
|
одной кнопкой. |
|
|
GUIDE |
Нажмите для доступа к экрану |
|
GUIDE Plus+ (а также для |
|
|
выхода из GUIDE Plus+). |
|
|
/ / / |
Нажимайте для перемещения |
|
по экранам (выделения |
|
|
пункта). |
|
|
КРАСНАЯ, |
Командные кнопки, функция |
|
ЗЕЛЕНАЯ, |
которых меняется в |
|
ЖЕЛТАЯ, |
зависимости от области. |
|
СИНЯЯ |
|
|
MENU |
Быстрый переход к строке |
|
меню. |
|
|
TIMER REC |
Нажмите для быстрого |
|
(SHIFT + |
перехода к области Schedule. |
|
КРАСНАЯ) |
|
|
INFO |
Нажмите для отображения |
|
дополнительной информации |
|
|
о текущей передаче. |
|
|
ENTER |
Нажмите для подтверждения |
|
выбора или выхода из экрана |
|
|
GUIDE Plus+. |
|
|
Цифровые |
Используются для ввода цифр. |
|
кнопки |
|
|
PREV/ |
Нажмите для выбора |
|
NEXT |
предыдущей/следующей |
|
страницы (например, в сетке). |
|
|
/ |
Нажмите для выбора |
|
предыдущего/следующего дня. |
|
One-Button-Record (Запись одной кнопкой)
КРАСНАЯ командная кнопка (Record) отображается в любой момент, когда можно выделить название программы (например, в области Grid, в результатах поиска или в рекомендациях из области My TV).
При планировании записи одной кнопкой по таймеру название передачи, дата, канал, время начала и окончания записи устанавливаются автоматически.
При необходимости эти настройки можно изменить в любое время до начала записи (см.
Редактирование запланированной записи на стр. 41).
передачи.
2 Нажмите КРАСНУЮ командную кнопку (Record).
Запись передачи запланирована. В момент начала этой передачи рекордер переключается на соответствующий канал и начинает запись1.
•Для настройки записи можно также использовать кнопку REC.
•Телепередачи, запланированные для записи, можно проверить в области
Schedule (см. также Область Schedule на стр. 40).
 Примечание
1Есливпрограммевещанияпроизошлиизменения, этиизменениянеотражаютсяавтоматическивнастройкахвремени записи в системе GUIDE Plus+.
36
Ru

Блокировкаиразблокировкаокна видео
После входа в систему GUIDE Plus+ просматриваемый канал продолжает отображаться в окне видео. Над окном отображаются название канала, дата и время. По умолчанию это окно ‘заблокировано’, что обозначается значком запертого висячего замка над окном видео. В заблокированном окне видео всегда отображается канал, который был выбран до входа в систему. Перемещение по сетке телепередач не влияет на него.
При желании окно видео можно разблокировать, чтобы при выборе в сетке передач различных каналов в нем отображалась передача, которая идет по этому каналу в данный момент.
Логотипы каналов отображаются слева от названий телепередач.
2 Нажмите КРАСНУЮ командную кнопку (Unlock).
Значок над окном видео принимает вид открытого замка. Окно остается разблокированным до окончания текущего сеанса просмотра телепередач.
Если требуется заблокировать окно видео, выполнитетужепроцедуруещераз. КРАСНАЯ командная кнопка теперь будет выполнять функцию Lock.
Экран каналов в виде мозаики
СпомощьюЖЕЛТОЙкоманднойкнопкиможно изменить режим отображения каналов в областяхGrid, Schedule илиMy TV соспискана отображение значков каналов в виде мозаики. Выберите нужный канал, используя кнопкиуказатели, а затем нажмите ENTER, чтобы вернуться к предыдущему экрану на этом канале.
Области
Система GUIDE Plus+™ состоит из семи областей. Все области доступны из строки меню.
•Grid – основная область системы GUIDE Plus+. В ней отображается программа телепередач на следующие семь дней с указанием канала и времени.
•Search – поиск телепередач по категории (например, Sport), подкатегории (например, Football) или по ключевому слову.
•My TV – настройка профиля и получение рекомендаций согласно вашим предпочтениям.
•Schedule – отображает все запланированные записи.
•Info – область для дополнительных сведений, например, опогоде(действуетне во всех регионах).
•Editor – изменение настроек канала.
•Setup – настройкасистемыGUIDE Plus+™.
Область Grid
Область Grid – это основной экран программ телепередач в системе GUIDE Plus+ и первый экран, отображаемый при нажатии GUIDE. На нем можно просматривать программы телепередач на следующие семь дней, начиная с сегодняшнего дня.
Если выделить передачу в области Grid, в окне информации отображаются сведения о ней: наименование, краткое описание, канал, источник, время начала и продолжительность. Символ i в окне информации означает, что имеется дополнительное описание. Чтобы просмотреть его, нажмите кнопку INFO.
В некоторых странах отображается также рейтинг передачи (в большинстве случаев для кинофильмов). Эти рейтинги предоставляются региональными партнерами (например, телевизионными журналами).
Область Grid позволяет:
•Просматриватьипрокручиватьпрограммы телепередач
•Читать описания передач
37
Ru

•Настраивать программу, которая отображается в настоящий момент1
•Планировать запись передачи
•Блокировать или разблокировать окно видео
•Получать доступ к информационным панелям
Просмотр области Grid
Для просмотра сетки служат следующие кнопки пульта ДУ:
/ / / (кнопки курсора) – навигация по области Grid
PREV/ NEXT – предыдущая/следующая страница / – предыдущий/следующий день
BLUE командная кнопка – возврат к текущим дате/времени в области Grid
ENTER – нажмите выбранный элемент, чтобы выйти из системы GUIDE Plus+ и начать просмотр телепрограмм
Область Search
Область Search позволяет:
•Выполнять поиск по категории
•Выполнять поиск по подкатегории
•Выполнять поиск по ключевому слову
•Читать описания передач
•Настраивать программу, которая отображается в настоящий момент
•Планировать запись передачи
•Получать доступ к информационным панелям
Поиск
Можно искать программы по категории, подкатегории или по ключевому слову (My Choice). К категориям для поиска относятся Movies (фиолетовая пометка), Sport (зеленая пометка), Children (синяя пометка) и Others (бирюзовая пометка). В некоторых странах доступна подкатегория (‘Tip of the Day’). В подкатегорию входят передачи, рекомендованные региональным партнером (например, телевизионным журналом).
1Выберите в строке меню
‘Search’.
2Выберите категорию и подкатегорию.
•Если в качестве подкатегории выбрано All, товрезультатахпоискабудутпоказанывсе программы выбранной категории.
3 ENTER Начните поиск.
Результаты поиска отображаются отсортированными по времени и дате.
•Если поиск не дает результатов, это означает, что ни одна программа в выбранный день не соответствует условиям поиска.
 Примечание
1Если используется внешний тюнер (например, спутниковый тюнер), то настройка на канал происходит с задержкой в несколько секунд. Это нормальное явление.
38
Ru

Использование для поиска ключевых слов (режим My Choice)
Кроме стандартных категорий, можно также задавать собственные ключевые слова.
|
1 |
Доступ к функции My Choice. |
2 Чтобы добавить ключевое слово, нажмите ЖЕЛТУЮ командную кнопку.
|
3 |
ENTER |
|
Введите ключевое слово, |
которое должно появиться в меню.
ПозавершениинажмитеЗЕЛЕНУЮкомандную кнопку, чтобы выйти и продолжить.
4 ENTER Начните поиск по ключевому слову.
•Ключевые слова можно удалять или редактировать с помощью КРАСНОЙ и ЗЕЛЕНОЙ командных кнопок.
•Если задано более двух ключевых слов, автоматически отображается подкатегория All, позволяющая выполнятьпоискпо всем ключевым словам.
Область My TV
Область My TV позволяет устанавливать собственный профиль. Профиль можно определить с помощью каналов, тем и/или ключевых слов. После задания персонального профиля система GUIDE Plus+ начинает поиск программ телепередач на семь следующих дней. При каждом доступе к области My TV отображается список передач, соответствующий профилю.
Область My TV позволяет:
•Устанавливать профиль с помощью каналов, тем или/или ключевых слов
•Редактировать и удалять профили
•Читать описания передач
•Настраивать программу, которая отображается в настоящий момент
•Планировать запись передачи
•Получать доступ к информационным панелям
Настройка профиля
Можно настроить профиль с любым сочетанием каналов (до 16), категорий (до четырех) и ключевых слов (до 16).
1Выберите в строке меню пункт ‘My TV’.
2Чтобы настроить профиль, нажмите ЖЕЛТУЮ командную кнопку.
Пункт Channels выделяется.
39
Ru

3 Чтобы добавить канал в профиль, нажмите ЖЕЛТУЮ командную кнопку.
Выберите канал из мозаичного отображения значков каналов и нажмите ENTER. Повторите для добавления других каналов (до 16).
4 Чтобы добавить категорию в профиль, выберите ‘Categories’ и нажмите ЖЕЛТУЮ командную кнопку.
Выберите категорию из категорий в области Search и нажмите ENTER. Повторите для добавления других категорий (до четырех).
5 Чтобы добавить ключевое слово в профиль, выберите ‘Keywords’ и нажмите ЖЕЛТУЮ командную кнопку.
Используйте кнопки / / /, а затем кнопку ENTER для выбора букв на экранной клавиатуре. По завершении нажмите ЗЕЛЕНУЮ командную кнопку, чтобы выйти и продолжить.
6 Нажмите ENTER, чтобы активизировать профиль.
•Повторяя шаг 5, можно добавить до 16 ключевых слов.
•Профильможноредактироватьилиудалять с помощью КРАСНОЙ и ЗЕЛЕНОЙ
командных кнопок.
Область Schedule
Область Schedule предназначена для установки, просмотра, изменения и удаления запланированных (по таймеру) записей. (Другие функции записи по таймеру см.
Установка записи по таймеру на стр. 57.)
Область Schedule позволяет:
•Редактировать или удалять записи одной кнопкой
•Устанавливать, редактировать или удалять записи ShowView
•Устанавливать, редактировать или удалять записи в ручном режиме
40
Ru

Редактирование запланированной записи
Любой из параметров запланированной записи можно изменить или полностью удалить параметр, если он больше не нужен.
1 Выделите левую часть запланированной записи.
•Если требуется изменить качество, периодичность записи, устройство для записи, временные или жанровые параметры, перейдите к шагу 5 ниже.
2Нажмите ЗЕЛЕНУЮ командную кнопку (Edit).
3Используя кнопки курсора и цифровые кнопки, отредактируйте дату записи, время начала, время окончания и канал.
Используйте для редактирования кнопки / или цифровые кнопки.
ДляперемещениявпереднажимайтеЗЕЛЕНУЮ командную кнопку, а для перемещения назад КРАСНУЮ командную кнопку.
4 Введите название запланированной записи.
Используйте кнопки / / /, а затем кнопку ENTER для выбора букв на экранной клавиатуре.
После того, как название введено, нажмите ЗЕЛЕНУЮ командную кнопку, чтобы продолжить.
5Выделите правую часть записи.
6Нажмите КРАСНУЮ командную кнопку (Quality), чтобы изменить качество записи.
Выберитеодинизследующихпунктов: AUTO1,
XP, SP, LP, EP, SLP, SEP или режим записи вручную (см. Manual Recording на стр. 124 и
Режимы записи вручную на стр. 132).
 Примечание
1В этом режиме используется наивысшее качество для записи на один DVD-диск. Этот режим можно использовать также для записи на жесткий диск.
41
Ru

7 Нажмите ЗЕЛЕНУЮ командную кнопку (Frequency), чтобы изменить частоту записи.
Выберите однократную, ежедневную или еженедельную запись.
8 Чтобы выбрать устройство, на которое производится запись, нажмите ЖЕЛТУЮ командную кнопку
(Destination).
Выберите DVD, HDD или HDDr (запись с автозаменой)1.
•Записьсавтоматическойзаменойдоступна только при регулярной ежедневной или еженедельной записи.
9 Для доступа к дополнительным параметрам записи нажмите .
•Если на жесткий диск необходимо выполнить запись по жанру, нажмите ЖЕЛТУЮ командную кнопку (Genre), чтобы выбрать жанр.
•С помощью ЗЕЛЕНУЮ командной кнопки (Timing) можно добавить к концу записи
дополнительное время (+0, +10, +20, +30
или VPS/PDC2 (V–P)).
•Нажмите , чтобы отобразить стандартные параметры записи еще раз.
 Примечание
1• При записи по таймеру на DVD-диск, если параметр Optimized Rec (см. Optimized Rec на стр. 124) установлен на On (при этом параметр VPS/PDC установлен на off), рекордер регулирует качество записи таким образом, чтобы запись поместилась на диск. Если запись не помещается на DVD-диск, даже если установлено качество записи MN1 (MN4 для диска DVD+R/+RW), то функция Recovery Recording автоматически выполняет запись на жесткий диск.
•Если свободного места на жестком диске недостаточно, запись с автозаменой может быть не завершена.
•Если жесткий диск используется для воспроизведения или высокоскоростного копирования в момент, когда должна начатьсязаписьсавтоматическойзаменой, новаязаписьпотаймерунезаменяетстарую. Однакооберанеезаписанные программы будут удалены при следующем запуске записи по таймеру.
2• Если установлена запись по таймеру с использованием системы VPS/PDC, то для обеспечения правильной работы системырекордер необходимопереключитьврежиможидания доначалазаписипотаймеру. Длязаписейпотаймеру, которые не используют систему VPS/PDC, переводить рекордер в режим ожидания не нужно.
•Когда система VPS/PDC включена, функция оптимизированной записи не работает.
•С помощью VPS/PDC можно установить до восьми записей с таймером.
•Систему VPS/PDC нельзя установить для записей, выполняемых с внешнего источника или в режиме записи AUTO.
42
Ru

Удаление запланированной записи
1 Выделите левую часть запланированной записи.
2 Нажмите КРАСНУЮ командную кнопку (Delete).
Запланированное событие удалено.
Настройка записи ShowView™
1 Выберите в строке меню ‘Schedule’.
2 Нажмите КРАСНУЮ командную кнопку (ShowView).
3 Используя цифровые кнопки, введите программный номер ShowView.
•Если в вашей области еще не поддерживается система GUIDE Plus+, то, возможно, потребуется ввести номер канала. Дляэтогоследуйтеинструкциямна экране.
4 Нажмите ENTER для подтверждения.
Настройка записи вручную
1 Выберите в строке меню ‘Schedule’.
2 Нажмите ЗЕЛЕНУЮ командную кнопку (Manual).
43
Ru

3 С помощью цифровых кнопок и кнопок / / / введите дату записи,
затем нажмите ЗЕЛЕНУЮ командную кнопку (Next).
4Таким же образом введите время начала записи, затем нажмите для подтверждения ЗЕЛЕНУЮ командную кнопку (Next).
5Таким же образом введите время окончания записи, затем нажмите для подтверждения ЗЕЛЕНУЮ командную кнопку (Next).
6С помощью цифровых кнопок введите номер канала, затем нажмите ЗЕЛЕНУЮ командную кнопку (Next).
Можно также использовать ЖЕЛТУЮ командную кнопку (Mosaic), кнопками / / /выбрать значок канала и нажать ENTER.
Область Info
Эта область зарезервирована для дополнительных сведений, таких как новости, сообщенияопогоде, биржевыесводкиит.д. Ее содержимое зависит от региона. (Следует помнить, чтоэтафункция доступнанедлявсех стран/регионов.)
Область Editor
Область Editor – основное место для управления каналами. Все изменения, сделанные в этой области, отображаются в областиGrid. ОбластьEditor преимущественно используется при настройке системы GUIDE Plus+ для необходимых изменений вручную. Область Editor может также понадобиться, есливвашемрегионепоявилисьновыеканалы, или если вы переходите от кабельного телевидения к спутниковому или переехали на другое место.
Область Editor позволяет:
•Отображать/скрывать каналы в сетке (включать/ выключать каналы)
•Выбирать источник канала (Tuner,
Ext. Rec. 1, Ext. Rec. 2, и т.д.)
•Вводить номер программы для канала
Включение/выключение канала
ВключивиливыключивканалвобластиEditor, можно выбрать, будет ли он отображаться в области Grid.
1 Выберите в строке меню ‘Editor’.
2Выделите левую часть строки канала, который требуется включить или выключить.
3Нажмите КРАСНУЮ командную кнопку, чтобывключитьиливыключить канал.
44
Ru

Изменение источника и номера программы
1 Выберите в строке меню ‘Editor’.
Область Setup
В области Setup систему GUIDE Plus+ можно настроить на определенный регион, условия приема телесигнала и т.д.
Внесениеизмененийвустановкисистемы
GUIDE Plus+
1 Выберите в строке меню ‘Setup’.
2Выделите правую часть строки канала, для которого требуется внести изменения.
3Нажмите КРАСНУЮ командную кнопку, чтобы изменить источник канала, или ЗЕЛЕНУЮ командную кнопку, чтобы ввести номер программы.
При каждом нажатии КРАСНОЙ командной
кнопки изменяется источник канала (Tuner, Ext. Rec. 1 и т.д.). Чтобы установить номер программы, введите его с помощью цифровых кнопок и нажмите ENTER (Если в качестве источника выбран Tuner, убедитесь, что номер программысоответствуетпредустановленному номеру рекордера).
Press ENTER to access the Basic Setup screen.
Basic Setup
Host Channel Setup
GUIDE Plus+ System Information
2 Выделите параметр, который требуется изменить.
МожноизменитьнастройкиLanguage, Country, Postal Code1 и External Receiver.
3 Нажмите ENTER для подтверждения.
 Примечание
1После изменения настроек Country или Postal Code может потребоваться новая загрузка программы телепередач. Это может занять до 24 часов.
45
Ru
 Loading…
-
Инструкции по эксплуатации
2
Языки:

Pioneer DVR-LX60 инструкция по эксплуатации
(147 страниц)
- Языки:Немецкий
-
Тип:
PDF -
Размер:
7.56 MB
Просмотр

Pioneer DVR-LX60 инструкция по эксплуатации
(147 страниц)
- Языки:Французский
-
Тип:
PDF -
Размер:
7.34 MB
Просмотр
На NoDevice можно скачать инструкцию по эксплуатации для Pioneer DVR-LX60. Руководство пользователя необходимо для ознакомления с правилами установки и эксплуатации Pioneer DVR-LX60. Инструкции по использованию помогут правильно настроить Pioneer DVR-LX60, исправить ошибки и выявить неполадки.
www.pioneer.eu
Home Entertainment Guide Autumn 2007
P
ri
n
te
d i
n B
e
lg
iu
m
. A
s a p
a
r
t o
f P
io
n
e
e
r’
s c
o
m
m
it
m
e
n
t t
o a c
le
a
n
e
r e
n
v
ir
o
n
m
e
n
t a
n
d t
h
e p
ro
te
c
ti
o
n o
f t
h
e e
a
r
th
, t
h
is c
a
ta
lo
g
u
e h
a
s b
e
e
n p
ri
n
te
d o
n c
h
lo
ri
n
e
-f
re
e p
a
p
e
r.
Computer Hardware
Blu-ray disc is a trademark. DLNA and DNL A CERTIFIED are trademarks and/or servicemarks of Digital Living Network
Alliance. DVB is a registered trademark of the DVB Project. HDMI, the HDMI logo and High-Defi nition Multimedia
Interface are trademarks or registered trademarks of HDMI Licensing LLC. „i.LINK“ and the „i.LINK“ logo are trademarks
of Sony Corp. iPod is a trademark of Apple Inc., registered in the U.S. and other countries. DivX, DivX Certifi ed, DivX
Ultra Certifi ed are associated logos are trademarks of DivX, Inc. and are used under license. Windows, Windows
Media are either registered trademarks or trademarks of Microsoft Corporation in the United States and/or other
countries and are used under license from Microsoft. Air Studios and the Air Studios logo are registered trademarks
of Air Studios, Inc. THX and Select 2 are trademarks of THX Ltd. THX may be registered in some jurisdictions. All
rights reserved. „DTS“ and „DTS-ESINeo:6“ are registered trademarks of DTS, Inc. „96/24“ is a trademark of DTS,
Inc. Dolby, Pro Logic, Surround EX and the double-D symbol are registered trademarks of Dolby Laboratories. Neural
Music Direct, created by Neural Audio Corporation, allows high defi nition surround music to be broadcast over the
Internet via home systems with Neural-THX Surround. When Neural-THX Surround mode is selected, music can be
played back in multi-channel surround sound. Copyright protected WMA fi les can be played back on a PC operating
system installed with either: Microsoft Windows XP Service Pack 2 with Windows Media Connect; or Microsoft Win-
dows Vista or Microsoft Windows XP Service Pack with Windows Media
®
Player 11. Music recognition technology and
related data are provided by Gracenote
®
. Gracenote
®
is a registered trademark of Gracenote, Inc.. The Gracenote logo
and logotype, and the „Powered by Gracenote“ logo are trademarks of Gracenote.
Features and specifi cations of the products described or illustrated in this catalogue are correct at the time of printing
but could change as production changes might occur. This catalogue may contain typo graphical errors and the colours
of the depicted products may deviate slightly from reality. Consult your Pioneer dealer to ensure that actual features
and specifi ca tions match your requirements. This catalogue may contain references to products that may or will not be
available in your country.
Your local Pioneer shop
DJ Products
In-Car AV/ Navigation
Blu-ray Disc Player
GREAT BRITAIN
PIONEER GB LIMITED
Pioneer House
Hollybush Hill
Stoke Poges
Slough
Buckinghamshire SL2 4QP
Tel.: +44 (0)1753 789 789
Customer services:
Tel.: +44 (0)870 600 1539
www.pioneer.co.uk
IRELAND
AUDIO VISION IMPORT LTD.
John F. Kennedy Drive, Naas
Road,
Dublin 12
Tel.: +353 1 240 5600
e-mail: info@avi.ie
published by: PIONEER EUROPE N.V.
Haven 1087, Keetberglaan 1,
B-9120 Melsele
Tel.: +32 (0)3 570 05 11
Copyright 2007 by Pioneer Europe N.V.
All rights reserved.
0
7
—
A
—
S
D
1
F
A
L
L
—
U
K
-
Страница 1
Operating Instructions Discover the benefits of registering your product online at http://www .pioneer .co.uk (or http://www .pioneer .eu ) DV R-LX60D HDD/DVD RECORDER HDD/D VD RECORDER Operating Instructions <VRB1459-A> P rinted in UK P ublished by Pioneer Corporation. Copyright © 2007 P ioneer Corporation. All rights reser ved. http://www.[…]
-
Страница 2
Thank you for buying this P ioneer product. Please read through these operating instructions so you will know how to operate your model properly . After you have finished reading the instructions, put them away in a safe place for future reference. The exclamation point within an equilateral triangle is intended to alert the user to the presence of[…]
-
Страница 3
CAUTION The ST ANDBY/ON switch on this unit will not completely shut off all power from the AC outlet. Since the power cord ser ves as the main disconnect device for the unit, you will need to unplug it from the AC outlet to shut down all power . Therefore, make sure the unit has been installed so that the power cord can be easily unplugged from th[…]
-
Страница 4
01 4 En Contents 01 Before you start What’s in the box . . . . . . . . . . . . . . . . . . . 6 Putting the batteries in the remote control . . . . . . . . . . . . . . . . . . . . . . . . . . . . 6 Using the remote control . . . . . . . . . . . . . . 6 Disc/content format playback compatibility . . . . . . . . . . . . . . . . . . . . . . . 7 About[…]
-
Страница 5
5 En Switching DVD and DivX soundtracks . . . . . . . . . . . . . . . . . . . . . . 82 Switching audio channels . . . . . . . . . . . . 83 Switching camera angles . . . . . . . . . . . . 83 Displaying disc information on-screen . . . . . . . . . . . . . . . . . . . . . . . . 84 09 Playing and recording from a DV camcorder Playing from a DV camcorde[…]
-
Страница 6
Before you start 01 6 En Chapter 1 Before you start What’s in the box Please confirm that the following accessories are in the box when you open it; • Remote control • AA/R6P dry cell batteries x 2 • Audio/video cable (red/white/yellow) • G-LINK™ cable • RF antenna cable x 2 • Power cable • These operating instructions • Warrant[…]
-
Страница 7
Before you start 7 En 01 • You can control this recorder using the remote sensor of another Pioneer component via the CONTROL IN jack on the rear panel. See Rear panel connections on page 14 for more information. Disc/content format playback compatibility Compatible media • DVD-RW ver. 1.1 / 1x / 1x to 2x, ver. 1.2 / 2x to 4x / 2x to 6x • DVD[…]
-
Страница 8
Before you start 01 8 En HDD/DVD Recording and playback compatibility This recorder can play and record all widely-used DVD disc types, and additionally provides HDD functionality. The table below shows some specific compatibility differences between the different disc types. Notes to table *1 Must be initialized for VR mode recording (page 122). *[…]
-
Страница 9
Before you start 9 En 01 Using DVD-R DL/DVD+R DL discs DVD-R DL (Dual-Layer) and DVD+R DL (Double-Layer) discs contain two recordable layers on a single side, giving about 1.8 times the recording capacity of a conventional single-layer disc. This unit can record to both DVD-R DL and DVD+R DL discs. • If you intend to play DVD-R DL (Video mode) or[…]
-
Страница 10
Before you start 01 10 En • Sampling rates: 32 kHz, 44.1 kHz or 48 kHz • Bit-rates: Any (128 kbps or higher recommended) • Variable bit-rate (VBR) MP3 playback: Yes • VBR WMA playback: No • WMA encoder compatibility: Windows Media Codec 8 (files encoded using Windows Media Codec 9 may be playable but some parts of the specification are no[…]
-
Страница 11
Before you start 11 En 01 DivX ® VOD content In order to play DivX VOD (video on demand) content on this recorder, you first need to register the recorder with your DivX VOD content provider. You do this by generating a DivX VOD registration code, which you submit to your provider. Some DivX VOD content may only be playable a fixed number of times[…]
-
Страница 12
Before you start 01 12 En DVB The Digital Video Broadcasting Project, or DVB for short, is a set of open standards for digital broadcasting, covering terrestrial, cable and satellite broadcasts. Based around the MPEG-2 coding system, these open standards ensure that compliant systems are able to work together, independent of manufacturer. DVB is ex[…]
-
Страница 13
Before you start 13 En 01 Optimizing HDD performance As you record and edit material on the HDD, the data on the disk becomes fragmented, eventually affecting the recorder’s performance. Before this happens, the recorder will warn you that it is time to optimize the HDD (which you can do from the Disc Setup menu; see Optimize HDD on page 122). Sy[…]
-
Страница 14
Connections 02 14 En Chapter 2 Connections Rear panel connections 1 ANTENNA IN (RF IN)/OUT Connect your TV antenna to the ANTENNA IN (RF IN) jack. The signal is passed through to the ANTENNA OUT jack for connection to your TV. 2 INPUT 3 Stereo analog audio, video and S-video inputs for connection to a VCR or other source component. 3 AV2 (INPUT 1/D[…]
-
Страница 15
Connections 15 En 02 Front panel connections On the front panel there is a flip-down cover that hides more connections. Left side: 13 DV IN A DV input i.LINK connector, suitable for connecting a DV camcorder. 14 USB port (Type B) USB port for connecting a PictBridge- compatible printer or PC. 15 USB port (Type A) USB port for connecting a digital c[…]
-
Страница 16
Connections 02 16 En Easy connections The setup described below is a basic setup that allows you to watch and record TV programmes, and play discs. Other types of connections are explained starting on the following page. Important • These connections use SCART cables (not supplied). If your TV (or VCR) does not have a SCART connection, and you wa[…]
-
Страница 17
Connections 17 En 02 1 Connect the VIDEO OUTPUT jack to a video input on your TV. Use the yellow jack of the supplied audio/ video cable for the video connection. 2 Connect the AUDIO OUTPUT jacks to the corresponding audio inputs on your TV. Use the red and white jacks of the supplied audio/video cable for the audio connection. Make sure you match […]
-
Страница 18
Connections 02 18 En 1 Connect RF antenna cables as shown. See Connecting a TV antenna on page 15 for more on RF antenna connections, including from this recorder to your TV. 2 Use a SCART cable (not supplied) to connect the AV1 (RGB)-TV AV connector to a SCART AV connector on your TV. This enables you to watch discs. 3 Use another SCART cable to c[…]
-
Страница 19
Connections 19 En 02 • It is not possible to watch one TV programme and record another using this setup. 1 Connect the cable from the antenna/ cable TV outlet to the antenna input on your VCR/satellite receiver/cable box. 2 Use a SCART cable (not supplied) to connect your decoder to your VCR/ satellite receiver/cable box. See the manual for your […]
-
Страница 20
Connections 02 20 En 2 Use a SCART cable (not supplied) to connect the AV1 (RGB)-TV AV connector to a SCART AV connector on your TV. This enables you to watch discs. 3 Use another SCART cable to connect the AV2 (INPUT 1/DECODER) AV connector to a SCART AV connector on your decoder box. This enables you to record scrambled TV channels. Connecting to[…]
-
Страница 21
Connections 21 En 02 The HDMI connector outputs uncompressed digital video, as well as almost every kind of digital audio. 1 Use an HDMI cable to connect the HDMI OUT connector on this recorder to an HDMI connector on an HDMI- compatible display. • The arrow on the cable connector body should be face down for correct alignment with the connector […]
-
Страница 22
Connections 02 22 En Connecting other AV sources Connecting a VCR or analog camcorder 1 Connect a set of audio and video inputs of your VCR or camcorder to a set of outputs on this recorder. This enables you to record from this recorder to your VCR or camcorder. • You can use standard video or S-video cables for the video connection. • Alternat[…]
-
Страница 23
Connections 23 En 02 Important • Some USB devices may not work with this recorder. • When connecting a PC to this unit, make sure the power is turned off on both the PC and this unit when you connect them via USB. • We recommend connecting USB devices when this recorder is switched off (in standby). JPEG file storage devices • Digital still[…]
-
Страница 24
Controls and displays 03 24 En Chapter 3 Controls and displays Front panel 1 A.TV indicator Lights when analog TV is selected. D.TV indicator Lights when digital TV is selected. PLTV indicator Lights during recording started using the Pause Live TV feature. DivX indicator Lights during DivX playback. COPY indicator Lights when copying is underway. […]
-
Страница 25
Controls and displays 25 En 03 11 Press to start or restart playback. Press to stop playback. STOP REC Press to stop recording. ONE TOUCH COPY Press to start One Touch Copy of the currently playing title to DVD or the HDD. CH +/– Use to change channels, skip chapters/ tracks, etc. INPUT SELECT Press to change the input used for record[…]
-
Страница 26
Controls and displays 03 26 En Display 1 Lights during playback; blinks when playback is paused. 2 Lights when copying. 3 Lights during recording; blinks when recording is paused. 4 (page 68) Lights when a timer recording has been set. (Indicator blinks if the timer has been set to DVD but there isn’t a recordable disc loaded, or the […]
-
Страница 27
Controls and displays 27 En 03 Remote control 1 STANDBY/ON Press to switch the recorder on/into standby. 2 PLAY (page 74) Press to start playback. PAUSE Press to pause playback or recording. STOP (page 74) Press to stop playback. PREV NEXT Press to skip to the previous or next title/ chapter/track/folder; or to display the p[…]
-
Страница 28
Controls and displays 03 28 En 6 A.TV/D.TV Press to switch between analog TV antenna input and digital TV antenna input. The A.TV and D.TV indicators on the front panel show which is selected. 7 Colour buttons (RED, GREEN, YELLOW, BLUE) Use when an EPG screen is displayed or when tuned to a data channel of a digital broadcast. The function of each […]
-
Страница 29
Controls and displays 29 En 03 22 DISPLAY (page 84) Displays/changes the on-screen information displays. 23 TEXT (page 62, 63) Press to display Teletext information (in European countries except the UK) or to start the MHEG application display (UK only) if available during digital broadcasts. 24 TV/DVD Press to switch between ‘TV mode’, in whic[…]
-
Страница 30
Getting started 04 30 En Chapter 4 Getting started Switching on and setting up When you switch the recorder on for the first time, you can make several basic settings using the Setup Navigator feature. This takes you through setting the clock, the internal TV tuner and the video output. If you’re using the recorder for the first time, we strongly[…]
-
Страница 31
Getting started 31 En 04 • The clock will also be set automatically here if D.TV channels are found. • If no new channels were found a message appears asking if you want to scan again. Check the aerial connection before selecting Yes . (If you select No, skip to step 8 below.) 8 Select the analog TV (A.TV) Auto Channel Setting (‘Auto Scan’ […]
-
Страница 32
Getting started 04 32 En • Manual clock setting If no stations in your area are broadcasting time signals, you can set the clock manually. Use the / buttons to set your time zone. You can set this by selecting a city or a time relative to GMT. Press then use the / buttons to select ‘On’ or ‘Off’ for summer time, then press[…]
-
Страница 33
Getting started 33 En 04 14 Select ‘Finish Setup’ to exit the Setup Navigator, or ‘Go Back’ if you want to start again. That completes basic setup using the Setup Navigator. • If there are blank channels with no station, you can set these to skip using the manual channel setting. See Manual CH Setting on page 130. For users receiving digi[…]
-
Страница 34
Getting started 04 34 En 2 Highlight ‘Postal Code’. 3 Enter your postal code. The system uses your postal code to identify which TV listings data is correct for the area in which you live, so it is important that you enter it correctly. 4 If you are using an external receiver (such as a satellite receiver) with the supplied G-LINK cable, comple[…]
-
Страница 35
Getting started 35 En 04 recorder needs to be in standby; it will wake up automatically and download new codes from the host channel. The next day, try this setup process again: • Press GUIDE to display the GUIDE Plus+ screen. • Press to highlight the Menu bar, then use to reach the Setup area and select Setup. • Continue setting up f[…]
-
Страница 36
Getting started 04 36 En • Even if you can’t use the EPG functions where you live, you can still set VIDEO Plus+ recordings and manual recordings — see Setting a manual recording on page 45. • The front panel display shows EPG when receiving data. If you power on the recorder during an EPG download, the download is cancelled. • EPG data m[…]
-
Страница 37
Using the GUIDE Plus+® electronic programme guide 37 En 05 Chapter 5 Using the GUIDE Plus+® electronic programme guide This chapter is only applicable if the EPG Type Select setting made in the Setup Navigator (or the Initial Setup menu) is set to GUIDE Plus+ . The GUIDE Plus+ system The GUIDE Plus+® system* is a free, interactive on-screen tele[…]
-
Страница 38
Using the GUIDE Plus+® electronic programme guide 05 38 En 5 Menu bar – Gives access to the various areas of the GUIDE Plus+ system. 6 Grid – Shows TV listings information for the next seven days by channel and time. GUIDE Plus+ navigation The table below shows a summary of the remote buttons you’ll use to navigate the GUIDE Plus+ system. On[…]
-
Страница 39
Using the GUIDE Plus+® electronic programme guide 39 En 05 Lock/Unlock video window When you enter the GUIDE Plus+ system, the channel you were watching remains visible in the video window. The date stamp above the window lets you know the channel, date and time. The default setting for this window is ‘locked’, as indicated by a closed padlock[…]
-
Страница 40
Using the GUIDE Plus+® electronic programme guide 05 40 En • Tune to a programme that’s currently showing 1 • Set a programme to record • Lock or unlock the video window • Access Information panels Browsing the Grid Use the following remote buttons to browse the grid: /// (cursor buttons) – Navigate the Grid PREV / N[…]
-
Страница 41
Using the GUIDE Plus+® electronic programme guide 41 En 05 Using My Choice keywords for a search In addition to the standard categories, you can also set your own keywords. 1 Access My Choice. 2 Press the YELLOW Action button to add a keyword. 3 Enter a keyword to appear in the menu. When you’re finished, press the GREEN Action button to exit an[…]
-
Страница 42
Using the GUIDE Plus+® electronic programme guide 05 42 En 3 To add a channel to your profile, press the YELLOW Action button. Select a channel from the mosaic of channel icons and press ENTER . Repeat this step to add up to 16 channels. 4 To add a category to your profile, highlight ‘Categories’ and press the YELLOW Action button. Select a ca[…]
-
Страница 43
Using the GUIDE Plus+® electronic programme guide 43 En 05 Editing a scheduled recording You can edit any parameter in a scheduled recording, or delete it if you no longer require it 1 . 1 Highlight the left tile of a scheduled recording. • If you only want to edit the recording quality, frequency, destination, timing or genre settings, skip to […]
-
Страница 44
Using the GUIDE Plus+® electronic programme guide 05 44 En 7 Press the GREEN Action button (Frequency) to change the recording frequency. Select from the various options for one-time, daily and weekly recordings. 8 Press YELLOW Action button (Destination) to select the recording destination. Select from DVD , HDD or HDDr (Auto Replace Recording) 1[…]
-
Страница 45
Using the GUIDE Plus+® electronic programme guide 45 En 05 Deleting a scheduled recording 1 Highlight the left tile of a scheduled recording. 2 Press the RED Action button (Delete). The scheduled event is deleted. Setting a VIDEO Plus+® recording 1 Select ‘Schedule’ from the Menu bar. 2 Press the RED Action button (VIDEO Plus+). 3 Use the num[…]
-
Страница 46
Using the GUIDE Plus+® electronic programme guide 05 46 En 3 Use the number and /// buttons to enter the recording date, then press the GREEN Action button (Next). 4 In the same way, enter the recording start time, followed by the GREEN Action button (Next) to confirm. 5 Enter the recording end time in the same way, followed by the GRE[…]
-
Страница 47
Using the GUIDE Plus+® electronic programme guide 47 En 05 Changing the source and programme number 1 Select ‘Editor’ from the Menu bar. 2 Highlight the right channel tile of the channel you want to make a change to. 3 Press the RED Action button to change the channel source, or the GREEN Action button to enter a programme number. Each press o[…]
-
Страница 48
Using the GUIDE Plus+® electronic programme guide 05 48 En Manual Host Channel setup The GUIDE Plus+ system will automatically identify your Host Channel as soon as the recorder is put into standby for the first time. See the table on page 35 for a list of all the European Host Channels. If you know your Host Channel details (source and programme […]
-
Страница 49
Using the GUIDE Plus+® electronic programme guide 49 En 05 Switch this recorder into standby. The next morning, please perform the GUIDE Plus+ setup again to see if your external receiver can now be controlled. – The external receiver that you use is currently not supported. If, after leaving your external receiver on overnight, and doing the Re[…]
-
Страница 50
Using the GUIDE Plus+® electronic programme guide 05 50 En •I used the One-Button-Record feature (red Action button) to set a recording, but I recorded the wrong channel. If the channel to be recorded is received via the external receiver first make sure that the external receiver was left switched on. Next, in the Editor Area, make sure that th[…]
-
Страница 51
Using the digital electronic programme guide 51 En 06 Chapter 6 Using the digital electronic programme guide This chapter is only applicable if the EPG Type Select setting made in the Setup Navigator (or the Initial Setup menu) is set to Digital EPG . The Digital EPG system The Digital EPG shows a table of scheduled digital TV programmes and detail[…]
-
Страница 52
Using the digital electronic programme guide 06 52 En Using the Digital EPG Using the Digital EPG you can check the schedule of digital TV programmes, view information about desired programmes, and/or select programmes. 1 Press to display the Digital EPG screen. The EPG screen updates automatically if the EPG data is acquired successfully. If not, […]
-
Страница 53
Using the digital electronic programme guide 53 En 06 3 Enter the timer recording settings. Use the / buttons to select a field; use the / buttons to change the value 1 . • CH – Choose a channel (Pr 1 to Pr 99 for analog channels and available digital channels (excluding skip channels)), or one of the external inputs from which to r[…]
-
Страница 54
Using the digital electronic programme guide 06 54 En EPG Link 1 (UK only) – Choose whether or not to have this device automatically record scheduled programmes from the Digital EPG even if the times in which they are broadcast change. Series Recording 2 (UK only) – Choose whether or not to record all programmes from a series when you make a re[…]
-
Страница 55
Using the digital electronic programme guide 55 En 06 2 Highlight the timer programme you want to change . . . . If you want to set a new timer programme, select ‘New Input’ and skip to step 4 . 3 Press then select ‘Modify’ from the command menu panel. Alternatively, press ENTER . The Timer Programme Set screen appears from which you ca[…]
-
Страница 56
Using the digital electronic programme guide 06 56 En • When you have EPG Link or Series Recording set to On , any changes in broadcast time or division of broadcasts are automatically accommodated for and your scheduled recordings are carried out without any additional settings. As a result, even when you have not scheduled programmes to record […]
-
Страница 57
Using the digital electronic programme guide 57 En 06 3 Press then select ‘Series Search’ from the command menu panel. • The search results are displayed. Choose the programme you would like to record and press either the RED button or ENTER to schedule a recording. Searching for recommendations (UK only) You can search for recommended pr[…]
-
Страница 58
Using the digital electronic programme guide 06 58 En 3 In the ‘Time’ field select the time of day (0:00 to 23:00) to search in. 4 In the ‘Genre’ field, select the genre to search for. You can search for multiple genres by pressing ENTER after each genre. 5 Select ‘OK’. 6 Select ‘Search’. The results of your search are displayed. EN[…]
-
Страница 59
Recording 59 En 07 Chapter 7 Recording About DVD recording This recorder can record to DVD-R, DVD- RW, DVD+R, DVD+RW, DVD-RAM, DVD-R DL and DVD+R DL media. DVD-R and DVD-RW discs can be initialized for Video mode or VR mode recording. Each has its advantages, and it depends on what you want to do with the recording which mode you choose. If you wan[…]
-
Страница 60
Recording 07 60 En • See also Disc/content format playback compatibility on page 7 for detailed disc compatibility information. Recording to DVD-R DL/DVD+R DL discs Recording to DVD-R DL/DVD+R DL discs is generally the same as recording to regular single-layer discs; however, please note the following points: • When the recorder switches from t[…]
-
Страница 61
Recording 61 En 07 Restrictions on video recording You cannot record copy-protected video using this recorder. Copy-protected video includes DVD-Video discs and some satellite broadcasts. If copy-protected material is encountered during a recording, recording will pause automatically and an error message will be displayed on-screen. Video that is ?[…]
-
Страница 62
Recording 07 62 En Tip • When changing terrestrial digital broadcast channels, channels with a low signal strength may result in a black screen being displayed. • For other channels, it may take a short while for the channel picture to appear, and/or for the channel number to appear. • In both of the above cases, some improvement may be possi[…]
-
Страница 63
Recording 63 En 07 The channel banner displays an icon ( ) to indicate that the MHEG application can be run. • Press to start the MHEG application. 1 • You can also use any of the colour buttons. • Press TEXT to quit the MHEG application. Viewing Teletext (European countries except the UK.) You can view the Teletext that comes simultaneously […]
-
Страница 64
Recording 07 64 En Setting the picture quality/ recording time Before starting a recording, you will usually want to set the picture quality/recording time. There are six standard settings available, which allow you to choose a balance between picture quality and recording time. When Manual Recording is set to On (see Manual Recording on page 135),[…]
-
Страница 65
Recording 65 En 07 3 Select a TV channel to record. The front panel display shows the channel number, or channel name if it’s available: • While the recorder is stopped, you can also use the number buttons on the remote to select the channel (For channel 24, press 2 , 4 then ENTER ). • If the recorder is stopped, you can also use the CH +/–[…]
-
Страница 66
Recording 07 66 En Pause Live TV The Pause Live TV feature lets you effectively pause a TV programme you’re watching. When you’re ready to resume watching, just press the PLAY button. Setting up for Pause Live TV You can use the Pause Live TV feature with an AV Link-compatible TV connected using a SCART cable (see TV tuner setup for Pause L[…]
-
Страница 67
Recording 67 En 07 Using Pause Live TV 1 Start recording the current TV channel. Recording continues with playback paused. • Note that it may take up to 10 seconds for recording to start. 2 Press to start playback. You can also use the scan buttons ( / ), pause ( PAUSE ) and stop ( STOP ) — all without affecting the recording. 3 […]
-
Страница 68
Recording 07 68 En About timer recordings Using the timer recording features you can program up to 32 timer recordings up to a month in advance. Timer recording programmes can be set to record just once, every day, or every week. You can set the recording quality for your timer recording in the same way as for a regular recording, but with the adde[…]
-
Страница 69
Recording 69 En 07 • If VPS/PDC is active for two timer programmes that are programmed to start at the same time, then the programme that actually starts first takes priority. Extending a timer recording in progress You can extend a timer recording beyond the programmed end time. This can be useful if a broadcast programme overruns, for example. […]
-
Страница 70
Recording 07 70 En Simultaneous recording and playback (Chase Play) Chase Play allows you to watch a recording that is still in progress from the start, without having to wait until the recording has finished (i.e., playback is ‘chasing’ the recording). In fact, you’re not just limited to watching the recording in progress. You can watch anyt[…]
-
Страница 71
Recording 71 En 07 4 Select the HDD or DVD for recording. 5 Press to start recording. • If your source is copy-protected using Copy Guard, you will not be able to record it. See Restrictions on video recording on page 61 for more details. Playing your recordings on other DVD players Most regular DVD players can play finalized discs recorded in DV[…]
-
Страница 72
Recording 07 72 En 1 Load the disc you want to finalize. Make sure that the recorder is stopped before proceeding. 2 Select ‘Disc Setup’ from the Home Menu. 3 Select ‘Finalize’ > ‘Finalize’ > ‘Next Screen’. 4 For DVD-R/-RW (Video mode) and DVD+R/+RW discs only, select a title menu style, then select ‘Yes’ to start finaliza[…]
-
Страница 73
Recording 73 En 07 Important • Initializing a DVD-RW, DVD+RW or DVD-RAM disc will erase everything recorded on it. Make sure there is nothing on the disc that you want to keep! • You may not be able to re-initialize a DVD-RW disc in a different format if it was originally initialized on an older DVD recorder. • Once initialized for VR mode re[…]
-
Страница 74
Playback 08 74 En Chapter 8 Playback Introduction Most of the features described in this chapter make use of on-screen displays. Navigate these using the cursor buttons and ENTER . To go back one level from any screen, use the RETURN/EXIT button. Remember also that the button guide at the bottom of every screen shows which buttons do what. Many of […]
-
Страница 75
Playback 75 En 08 Playing DVD discs The table below shows the basic playback controls for DVD-Video, and recordable DVD discs. Playing from the HDD The table below shows the basic playback controls when playing video recorded on the hard disk (HDD). P ress to start playback. If RESUME is displayed on- screen, playback starts from the place last sto[…]
-
Страница 76
Playback 08 76 En Playing CDs and WMA/MP3 discs The table below shows the basic playback controls for audio CDs 1 , and WMA/MP3 files. Playing Video CD/Super VCDs The table below shows the basic playback controls for Video CD/Super VCDs. Some discs feature Playback Control (PBC for short) menus. These discs show PBC in the display when you load the[…]
-
Страница 77
Playback 77 En 08 Playing DivX video files The table below shows the basic playback controls for DivX video files. P auses playback, or restarts playback when paused. P ress to start scanning. Press repeatedly to increase the scan- ning speed. P ress to skip to previous/next track. When a PBC menu is dis- played, press to display the pre- vious/nex[…]
-
Страница 78
Playback 08 78 En Using the Disc Navigator to browse the contents of a disc Use the Disc Navigator to browse the contents of a disc and start playback. Using the Disc Navigator with recordable discs and the HDD You can use the Disc Navigator to browse and edit video on recordable DVDs and the HDD, and to view information on titles. See also Editing[…]
-
Страница 79
Playback 79 En 08 Using the Disc Navigator with playback-only discs 1 Display the Home Menu. 2 Select ‘Disc Navigator’. Alternatively, for a CD, Video CD, Super VCD or WMA/MP3/DivX disc, you can press DISC NAVIGATOR , which takes you straight to the Disc Navigator screen. 3 Select what you want to play. Depending on the type of disc you have lo[…]
-
Страница 80
Playback 08 80 En Frame advance/frame reverse You can advance or back up video on a DVD disc 1 or the HDD frame-by-frame. With Video CDs/Super VCDs and DivX titles, you can only use frame advance. 1 Pause playback. 2 Back up or advance one frame with each press. • You can also do this by rotating the Smart Jog . 3 Resume normal playback. The Play[…]
-
Страница 81
Playback 81 En 08 2 With ‘A (Loop Start)’ highlighted, press at the point you want the loop to start. 3 With ‘B (Loop End)’ highlighted, press at the point you want the loop to end. Playback immediately jumps back to the start point and plays the loop round and round. • When playing a DVD-Video, DVD-R/-RW (Video mode), DVD+R/+RW, or from […]
-
Страница 82
Playback 08 82 En After pressing ENTER to add the title/ chapter/folder/track, the step number automatically moves down one. • To insert a step into the programme list, highlight the step number where you want to insert another step, then select a chapter/title/folder/track as usual. After pressing ENTER , all the subsequent steps move down one. […]
-
Страница 83
Playback 83 En 08 Check the disc packaging for details of the soundtrack options. • Change the audio soundtrack. The current audio language is shown on- screen and in the front panel display. • The sound may drop out for a few seconds when switching soundtracks. • Some discs feature both Dolby Digital and DTS soundtracks. There is no analog a[…]
-
Страница 84
Playback 08 84 En Displaying disc information on-screen You can display various on-screen information about the disc loaded or the HDD. • Display/change the on-screen information. • Press once to show the HDD and removable disc (DVD, etc.) activity together. Press again to show the status of just the currently selected playback/ recording devic[…]
-
Страница 85
Playing and recording from a DV camcorder 85 En 09 Chapter 9 Playing and recording from a DV camcorder You can play back and record video from a DV camcorder connected to the DV IN jack on the front panel of this recorder. Important • If you connect a second recorder using a DV cable, you cannot control the second unit from this one. • You can?[…]
-
Страница 86
Playing and recording from a DV camcorder 09 86 En 1 Make sure your DV camcorder is connected to the front panel DV IN jack. Also, set the camcorder to VTR mode. 2 Set the recording quality. • See Setting the picture quality/recording time on page 64 for detailed information. 3 From the Initial Setup menu, check that the DV audio input is setup a[…]
-
Страница 87
Playing and recording from a DV camcorder 87 En 09 5 Select ‘Record to Hard Disk Drive’ or ‘Record to DVD’. The DV tape is rewound to the beginning. Once it is rewound, the DV tape is played from the beginning and copied to either the HDD or a DVD. • If there is a gap of two minutes or more between recorded contents, the copying process i[…]
-
Страница 88
Editing 10 88 En Chapter 10 Editing Editing options The table below shows which commands you can use with the HDD and different disc types. *1 DVD-R/-RW only HDD DVD-R/-RW (Video mode), DVD+R/+RW DVD-R/-RW , DVD-RAM (VR mode) Original Play List Create (page 90) Play (page 90) Erase (page 90) Edit > Title Name (p[…]
-
Страница 89
Editing 89 En 10 The Disc Navigator screen The Disc Navigator screen is where you can edit video content on unfinalized Video mode and DVD-R/-RW (VR mode) discs, DVD+R/ +RW and DVD-RAM, as well as video content on the hard disk drive. Important • Titles that have been recorded with a Input Line System setting different to the current setting of t[…]
-
Страница 90
Editing 10 90 En HDD genres The large capacity of the HDD means that there may be many hours of video in the recorder. To help you organize your HDD video content you can assign different genres to titles. There are 20 genres in total, including five user-definable ones that you can name as you like. Create Play List only Use this function to creat[…]
-
Страница 91
Editing 91 En 10 1 Highlight the title you want to erase. • You can also use the Smart Jog to select titles. 2 Select ‘Erase’ from the command menu panel. 3 Select ‘Yes’ to confirm or ‘No’ to cancel. Tip • You can erase a title quickly by pressing CLEAR when the title is highlighted. Confirm the edit by pressing ENTER . Title Name Y[…]
-
Страница 92
Editing 10 92 En Using the remote key shortcuts to input a name The table below shows the remote control key shortcuts that you can use to input characters in the name input screen. Pressing a button repeatedly cycles through the characters shown. If you want to enter two characters in succession that are both on the same button (for example a P an[…]
-
Страница 93
Editing 93 En 10 Set Thumbnail You can change the thumbnail picture that appears in the Disc Navigator for a title to any frame that appears in that title. 1 Highlight the title you want to change the thumbnail picture for. • You can also use the Smart Jog to select titles. 2 Select ‘Edit’ > ‘Set Thumbnail’ from the command menu panel.[…]
-
Страница 94
Editing 10 94 En 5 Highlight ‘To’ then, in the same way, find the end of the section to erase, then press ENTER. After pressing ENTER , another marker indicates the end of the section, with the section itself marked in red. 6 Select ‘Yes’ to confirm, or ‘No’ to cancel. In the thumbnail viewer you can see a few seconds of video either si[…]
-
Страница 95
Editing 95 En 10 3 HDD only: Select the type of edit. • For more information about these options, see Editing accuracy on page 89. 4 Select the command you want: • Divide – Divide a chapter into two or more parts: Use the playback controls ( , , , , etc.) to find the point at which you want to divide the chapter, then press EN[…]
-
Страница 96
Editing 10 96 En 2 Select ‘Edit’ > ‘Set Genre’ from the command menu panel. 3 Select a genre for the title. Lock Original only You can lock a title so that it can’t be edited or erased accidently. If you do need to edit it, you can always unlock it later. Important • You can’t undo any edits made before changing the lock status. Yo[…]
-
Страница 97
Editing 97 En 10 3 Select a new position for the title. After pressing ENTER , the new, updated Play List is displayed. Combine Play List only Use this function to combine two Play List titles into one. 1 Highlight the title you want to combine. • You can also use the Smart Jog to select titles. This title will remain in the same place after comb[…]
-
Страница 98
Editing 10 98 En 2 Select one of the user- definable genre names. 3 Input a name for the genre. • The name can be up to 12 characters long. • For information on remote control key short cuts, see Using the remote key shortcuts to input a name on page 92. 4 Select ‘OK’ to enter the name and exit. Multi-Mode Multi-Mode allows you to select se[…]
-
Страница 99
Editing 99 En 10 Undo If you make a mistake while editing, you can generally undo it. There is one level of undo (in other words, you can only undo the last edit you made). • Select ‘Undo’ from the command menu panel. • You can’t undo anything after exiting the Disc Navigator screen. Frequently asked questions • Why doesn’t the availa[…]
-
Страница 100
Copying and backup 11 100 En Chapter 11 Copying and backup Introduction Use the copying features of this recorder to: • Back up important recordings stored on the HDD to a DVD. • Make a DVD copy of a recording on the HDD to play in another player. • Transfer video from a DVD to the HDD for editing. • Transfer edited video from the HDD to DV[…]
-
Страница 101
Copying and backup 101 En 11 HDD to DVD copies are made in the same recording mode. When copying DVD to HDD, the copy is made in whatever recording mode is currently set. Make sure that a recordable DVD disc is loaded when trying to copy from the HDD. 1 If you’re copying from DVD to the HDD, select a recording mode. Note that selecting a recordin[…]
-
Страница 102
Copying and backup 11 102 En • Thumbnail picture markers and chapter markers for the Disc Navigator are copied, but their position in the copy may be slightly changed from the original. • If some part of the title being copied is copy-protected, copying will start, but the copy-protected portions will not be copied. Using Copy Lists * See also […]
-
Страница 103
Copying and backup 103 En 11 • When adding titles that contain copy- once protected material, the copy-once parts will not be added. • When adding titles that contain material of more than one aspect ratio (screen size), each part with a different aspect ratio will be added as a separate title if high-speed copying is possible. Depending on the[…]
-
Страница 104
Copying and backup 11 104 En • Set Thumbnail – Set the thumbnail frame for a title (see Set Thumbnail on page 93). • Recording Mode – Set the picture quality of the copy (see Recording Mode on page 105). • Bilingual – Set how bilingual audio should be copied when copying from HDD to DVD-R/-RW (Video mode) and DVD+R/+RW (see Bilingual on[…]
-
Страница 105
Copying and backup 105 En 11 – the recorder is reset to its factory settings (see Resetting the recorder on page 157). • It may not be possible to copy from a DVD disc that was recorded on a different DVD recorder or a PC. 1 Select ‘Copy’ from the Home Menu. 2 Select ‘DVD/CD HDD’. 3 Select a Copy List type. • Selecting Create New […]
-
Страница 106
Copying and backup 11 106 En • Optimized 1,2 – The recording quality is automatically adjusted so that the Copy List fits on to the space available on the disc. Copying is carried out in real-time. When you change the recording mode setting, you can see how much disc space it will require. If this is more than is available, it shows up in red a[…]
-
Страница 107
Copying and backup 107 En 11 • You can cancel the backup process by pressing ONE TOUCH COPY for more than one second. 5 When the data has been copied, take out the disc and load a blank* recordable DVD. * If you’re using a DVD-RW or DVD+RW, the disc doesn’t have to be blank, although the previous contents of the disc will be erased in the bac[…]
-
Страница 108
Using the Jukebox 12 108 En Chapter 12 Using the Jukebox The Jukebox feature allows you to use the recorder’s HDD to store and playback music from up to 999 of your CDs. You can also transfer WMA/MP3 files stored on CD-R/ -RW/-ROM, DVD, USB device or PC. Once on the HDD, you can name albums and tracks, assign them a genre, and set tracks that you[…]
-
Страница 109
Using the Jukebox 109 En 12 • Up to 99 folders/999 files on the USB device can be copied/displayed. Connect PC Using a USB connection, you can copy WMA and MP3 files from a PC to the HDD of this device. Operations carried out on the PC require Windows Media Player 10. Important • If the PC you are using does not currently have Windows Media Pla[…]
-
Страница 110
Using the Jukebox 12 110 En From the PC, in Windows Media Player 10: 1. Click ‘Library’. 2. Choose the artist, album or song you would like to copy, and press the right mouse button. 3. Click ‘Add to Sync list’ (when choosing songs, click ‘Add to’ then ‘Sync list’). 4. Click ‘Start Sync’. This begins the synchronization process.[…]
-
Страница 111
Using the Jukebox 111 En 12 • File whose extensions are not supported by the Jukebox (i.e. files that are not .mp3 or .wma) cannot be transferred. • Files imported to this recorder via Connect PC cannot be exported from this recorder. • Note that no recording functions, including timer recordings, will be carried out when you are using the Co[…]
-
Страница 112
Using the Jukebox 12 112 En • Genre All Genres – All albums are displayed. Genre – Only albums in the selected genre are displayed. Editing Jukebox albums A number of commands are available for editing and changing the playback behavior of albums. 1 Select ‘Jukebox’ from the Home Menu. 2 Select ‘Listen to Music/Edit’. 3 Select what yo[…]
-
Страница 113
The PhotoViewer 113 En 13 Chapter 13 The PhotoViewer From the PhotoViewer you can view JPEG photos and picture files stored on the HDD, recordable DVD or CD-R/-RW/-ROM, or on a USB-equipped digital camera. 1 You can also import files and save them to the recorder’s HDD or a DVD-R/-RW disc. Locating JPEG picture files 1 Select ‘PhotoViewer’ fr[…]
-
Страница 114
The PhotoViewer 13 114 En • If you encounter a disc that will not play, check that the disc and file formats are compatible with this recorder (see JPEG file compatibility and PC-created disc compatibility on page 11). • The thumbnail of files that cannot be played is displayed as the logo. Changing the display style of the PhotoViewer You can […]
-
Страница 115
The PhotoViewer 115 En 13 Zooming an image During a slideshow you can zoom in to enlarge a portion of the picture by a factor of two or four. You can also move the area of the picture displayed. 1 Press during the slideshow to zoom the picture. Repeated presses cycle between zoom off, 2x zoom and 4x zoom. The zoom factor is displayed on-screen. 2 U[…]
-
Страница 116
The PhotoViewer 13 116 En • Importing to the HDD will not work if there is insufficient space on the HDD, or if there are already the maximum number of files and/or folders on the HDD (999 folders/999 files per folder). Selecting multiple files or folders The Multi-Mode allows you to select multiple folders/files at once for importing or editing.[…]
-
Страница 117
The PhotoViewer 117 En 13 Important • Use a blank DVD-R/-RW disc, or one that has already been initialized for Video mode recording but has nothing yet recorded on it. Discs that have already been recorded on (as well as CD-R/-RW discs) cannot be used. • After backing up the pictures in your digital camera to DVD, we recommend verifying that th[…]
-
Страница 118
The PhotoViewer 13 118 En Editing files on the HDD There are a number of commands you can use to edit and organize your pictures stored on the HDD. Creating a new folder 1 From the folder list, display the menu. 2 Select ‘New Folder’. The folder appears at the bottom of the folder list with the name F_ number . • There can be up to 999 folder[…]
-
Страница 119
The PhotoViewer 119 En 13 2 Display the command menu. 3 Select ‘File Options’ or ‘Folder Options’. 4 Select ‘Copy’ or ‘Copy Folder Contents’. 5 Select a folder to copy the folder(s)/file(s) to. 6 Select ‘Yes’ to confirm, or ‘No’ to cancel. • Copying to the HDD will not work if there is insufficient space on the HDD; if the[…]
-
Страница 120
The PhotoViewer 13 120 En 4 Select ‘Lock’ or ‘Lock Folder Contents’. Locked files are shown with a padlock icon next to them. To remove all locks within a given folder, choose ‘Folder Option’ > ‘Unlock Folder Contents’ . To view detailed information This feature allows you to check the settings of the camera from which you import[…]
-
Страница 121
The Disc Setup menu 121 En 14 Chapter 14 The Disc Setup menu From the Disc Setup menu you can name discs, lock the contents to prevent accidental recording and erasure, initialize and finalize discs. The Disc Setup menu is accessed from the Home menu. Basic settings Input Disc Name When you initialize a disc for recording, the recorder automaticall[…]
-
Страница 122
The Disc Setup menu 14 122 En Initialize settings You can initialize a recordable DVD-R/-RW disc for either VR mode or Video mode recording. The first time you load a new DVD-RW disc, it will be automatically initialized for recording according to the DVD-RW Auto Init. setting in the Disc Setup menu (see page 73). New DVD-R discs are ready for Vide[…]
-
Страница 123
The Disc Setup menu 123 En 14 1 Select ‘Disc Setup’ from the Home Menu. 2 Select ‘Optimize HDD’ then ‘Start’. A progress bar indicates how long there is left to go. If no actions are carried out for more than 20 minutes after the optimization process is completed, the unit turns itself off. Initialize HDD When your HDD/DVD recorder is w[…]
-
Страница 124
The Video Adjust menu 15 124 En Chapter 15 The Video Adjust menu Using the Video Adjust menu you can set up the picture quality for the built-in tuner and external inputs, for disc playback, and for recording. Setting the picture quality for TV and external inputs Picture Creation lets you choose a set of picture quality settings for the built-in T[…]
-
Страница 125
The Video Adjust menu 125 En 15 • PureCinema – This setting optimizes the picture for film material when the video output is set to progressive. Usually set to Auto ; but try switching to Off if the picture appears unnatural. • 3-D Y/C – Adjusts the brightness/colour separation. • YNR – Adjusts the amount of noise reduction (NR) applied[…]
-
Страница 126
The Video Adjust menu 15 126 En 2 Move the cursor down and select ‘Detailed Settings’. 3 Select the picture quality setting you want to adjust. You can adjust the following settings: • Prog. Motion – Adjusts the motion and still picture quality when video output is set to progressive. (Prog. Motion is ineffective when PureCinema is On.) •[…]
-
Страница 127
The Initial Setup menu 127 En 16 Chapter 16 The Initial Setup menu Using the Initial Setup menu The Initial Setup menu is where you can set various recorder options for sound, picture, language and so on. Some settings can only be changed when the recorder is stopped. During playback and recording these settings are grayed out in the Initial Setup […]
-
Страница 128
The Initial Setup menu 16 128 En EPG Type Select GUIDE Plus+ Use the Gemstar GUIDE Plus+ EPG. Digital EPG Use the EPG based on information provided by D.TV broadcasts. Setup Navigator Start Select to start the Setup Navigator . See also Switching on and setting up on page 30 . Digital T uner Replace Channels Next Screen Scans for digital channels a[…]
-
Страница 129
The Initial Setup menu 129 En 16 Channel Options Next Screen F rom this screen you can skip or lock channels. Locked channels will require the correct password to be entered before the channel can be watched. Use the /// buttons to highlight a preference box and press ENTER to toggle the preference. To enter this screen, input the paren[…]
-
Страница 130
The Initial Setup menu 16 130 En Analog T uner Auto Channel Setting Auto Scan Select your countr y and then wait for the recorder to auto tune into channels in your area. After auto scan has finished, the channel mapping screen appears showing which channels have been assigned to which programme numbers. Y ou can skip unwanted channels using the M[…]
-
Страница 131
The Initial Setup menu 131 En 16 Video In/Out Input Colour System Next Screen P roceed to the next screen to set the input colour system for the external input and the built-in TV tuner . Use the Smart Jog or INPUT SELECT buttons to change the preset or external input. On the default Auto setting the recorder can generally correctly detect whether […]
-
Страница 132
The Initial Setup menu 16 132 En A V2/L1 In Video • Sets the AV2 (INPUT 1/DECODER) SCART input to standard composite video. S-Video Sets the AV2 (INPUT 1/DECODER) SCART input to S-video. RGB Sets the AV2 (INPUT 1/DECODER) SCART input to RGB. Decoder Use this setting if you connected a decoder to the AV2 (INPUT 1/DECODER) SCART connector . For scr[…]
-
Страница 133
The Initial Setup menu 133 En 16 DV Input Stereo 1 • Select to use the ‘live’ audio track (recorded during the video shoot) from a camcorder that supports two stereo audio tracks. Stereo 2 Select to use the overdubbed audio track from a camcorder that supports two stereo audio tracks. Mix Select one of the three settings to use a mix of the t[…]
-
Страница 134
The Initial Setup menu 16 134 En Language OSD Language English • Sets the language of the on-screen displays to English. available languages Choose from the languages displayed for the on- screen displays. On Screen Display and D.TV Language will both reflect this setting. Audio Language English • Sets the default audio language for DVD-V ideo […]
-
Страница 135
The Initial Setup menu 135 En 16 DVD Menu Language w/Subtitle Language • Sets the language of DVD-V ideo menus to the same as that set for the subtitle language. English Sets the language of DVD-V ideo menus to English. available languages Choose from the displayed languages to set the default language for DVD-V ideo menus. Other Select to set th[…]
-
Страница 136
The Initial Setup menu 16 136 En Set Thumbnail 0 seconds • Sets the default thumbnail picture in the Disc Navigator to the first frame of the title. 30 seconds Sets the default thumbnail picture to 30 seconds into the title. 3 minutes Sets the default thumbnail picture to three minutes into the title. Auto Chapter (HDD/VR) On • When recording […]
-
Страница 137
The Initial Setup menu 137 En 16 Playback TV Screen Size 4:3 (Letter Box) Select if you have a standard 4:3 TV and prefer the letter box format presentation for widescreen material. 4:3 (Pan & Scan) Select if you have a standard 4:3 TV and prefer the pan and scan presentation for widescreen material. 16:9 • Select if you have a widescreen 16:[…]
-
Страница 138
The Initial Setup menu 16 138 En HDMI Output (only available when an HDMI device is connected) Screen Resolution 1920 x 1080p Constant 1920 x 1080p output. 1920 x 1080i Constant 1920 x 1080i output. 1280 x 720p Constant 1280 x 720p output. 720 x 576p (720 x 480p) Constant 720 x 576p output (when setting the Input Line System to 525 System , video i[…]
-
Страница 139
The Initial Setup menu 139 En 16 Options On Screen Display On • The recorder displays operation displays ( Stop , Play , etc.) on-screen. Off Switches off the on-screen operation displays. Front Panel Display On • The time is shown in the front panel display when the recorder is in standby . Off The front panel display is switched off in standb[…]
-
Страница 140
The Initial Setup menu 16 140 En Options 2 USB Restart USB Device If the connected USB device does not respond to the recorder , tr y using this option to restart it. If the device still does not work properly tr y switching it off then back on, and/or disconnecting then reconnecting the USB cable. Confirm Printer Use this option to confirm the m[…]
-
Страница 141
The Initial Setup menu 141 En 16 Additional information about the TV system settings About the input line system This recorder is compatible with PAL, SECAM, 3.58 NTSC and PAL-60 TV systems. The Input Line System and Input Colour System settings determine how the recorder treats incoming video signals from an external input. Please note the followi[…]
-
Страница 142
The Initial Setup menu 16 142 En Selecting other languages for language options 1 Select ‘Other’ from the language list. This option appears in the settings for DVD Menu Language, Audio Language, and Subtitle Language. 2 Select the language you want. • Select by language name: Use the / buttons to change the language. • Select by code[…]
-
Страница 143
Additional information 143 En 17 Chapter 17 Additional information Setting up the remote to control your TV You can use the supplied remote to control your TV. To be able to use this feature you first have to program the remote with a maker code from the table below. 1 Press and hold down the CLEAR button, then enter the maker code for your TV. See[…]
-
Страница 144
Additional information 17 144 En Minimum copying times The table below shows the minimum HDD to DVD copying time for one hour of video. Please note that not all discs are compatible with high-speed copying. 1 Check with the disc manufacturer for compatibility. Note that all times in the above table are approximate. Also that actual copy speed varie[…]
-
Страница 145
Additional information 145 En 17 Manual recording modes The table below shows the approximate recording times for different DVD types in each manual recording mode, as well as the standard recording mode equivalents. For recording time on the HDD, see Specifications on page 158. *1 Recording time may be slightly shorter for certain disc types or re[…]
-
Страница 146
Additional information 17 146 En • Levels separated by a bold line show where there is a noticeable change in picture quality. • Audio recording in all manual recording modes is in Dolby Digital 2 ch format, except for LPCM mode, which is in Linear PCM format. • See also Recording on page 59. Troubleshooting Incorrect operation is often mista[…]
-
Страница 147
Additional information 147 En 17 No picture • Check that ever ything is connected properly (page 14). • Check that the connected TV and/or the A V amp/receiver is set to the correct input. • The recorder may be set to progressive scan with an incompatible TV . Reset to interlace by pressing and holding the front panel (Stop) button then p[…]
-
Страница 148
Additional information 17 148 En Can’t play a disc recor ded using this recor der on another player • If the disc was recorded in DVD-R/-RW (Video mode) or DVD+R , make sure that it’s finalized (page 71). • Some players will not play recordable DVD discs, even when recorded in DVD-R/-RW (Video mode) or DVD+R and finalized. • If the disc[…]
-
Страница 149
Additional information 149 En 17 After briefly unplugging or after a power failure the fr ont panel display shows ‘—:—’ • A backup batter y inside the recorder keeps the clock and other settings from being reset when there is no power to the recorder . Af ter unplugging or a power failure, the batter y keeps all settings for a period of se[…]
-
Страница 150
Additional information 17 150 En HDMI If the unit does not operate normally due to external effects such as static electricity, disconnect the power plug from the outlet and insert again to return to normal operating conditions. If the picture freezes and the front panel and remote control buttons stop working • Press (Stop) then try restarti[…]
-
Страница 151
Additional information 151 En 17 On-screen displays The table below shows a list of error messages that you may encounter when using the recorder and an explanation of their meaning. Message Explanation/Action • Initializing disc. Please wait a moment. When you load a blank DVD-RW or DVD+RW disc, the recorder automatically initializes it. • Inc[…]
-
Страница 152
Additional information 17 152 En • Repairing disc. • Repairing the HDD. During recording, the power was cut. This display appears when the power is restored. • Could not repair the disc. The recorder was unable to repair the disc af ter a power cut. The contents of the recording will be lost. • Overheating has stopped operation. Press DISPL[…]
-
Страница 153
Additional information 153 En 17 • Y ou are not allowed to watch this Conditional Access Programme. A CA module or smart card (obtained from your ser vice provider) is required to watch the selected programme. Insert the supplied module or card into the Common Inter face card slot on the front panel of the recorder (page 25). • There is no DV i[…]
-
Страница 154
Additional information 17 154 En Front-panel displays The table below shows a list of error messages that you may encounter when using the recorder and an explanation of their meaning. Language code list Language (Language code letter), Language code Message Explanation/Action • E01 The HDD may be damaged or broken. Please ask your nearest P ione[…]
-
Страница 155
Additional information 155 En 17 Country/Area code list Country/Area, Country/Area code , Code letter Screen sizes and disc formats Argentina, 0118 , ar Australia, 0121 , au Austria, 0120 , at Belgium, 0205 , be Brazil, 0218 , br Canada, 0301 , ca Chile, 0312 , cl China, 0314 , cn Denmark, 0411 , dk Finland, 0609 , fi France, 0618 , fr Germany, 040[…]
-
Страница 156
Additional information 17 156 En Handling discs When holding discs of any type, take care not to leave fingerprints, dirt or scratches on the disc surface. Hold the disc by its edge or by the center hole and edge. Damaged or dirty discs can affect playback and recording performance. Take care also not to scratch the label side of the disc. Although[…]
-
Страница 157
Additional information 157 En 17 Hints on installation We want you to enjoy using this unit for years to come, so please bear in mind the following points when choosing a suitable location for it: Do… Use in a well-ventilated room. Place on a solid, flat, level surface, such as a table, shelf or stereo rack. Don’t… Use in a place […]
-
Страница 158
Additional information 17 158 En Specifications General Power requirements . . . . . 220 V to 240 V, 50 Hz/60 Hz Power consumption . . . . . . . . . . . . . . . . . . . . . . . . 58 W Power consumption in standby mode . . . . . . . 0.69 W (Front panel display: off) Weight . . . . . . . . . . . . . . . . . . . . . . . . . . . . . . . . . . 4.8 kg Di[…]
-
Страница 159
Additional information 159 En 17 Input/Output Antenna . . . . 75 Ω IEC 169-2 connector for VHF/UHF in/out (analog) . . . . 75 Ω IEC 169-2 connector for VHF/UHF in/out (digital) Video input . . . . . . . . . . . . AV2 (Input 1), Input 2 (front), Input 3 (rear) Input level . . . . . . . . . . . . . . . . . . . . . . . . 1 Vp-p (75 Ω ) Jacks . .[…]
-
Страница 160
Operating Instructions Discover the benefits of registering your product online at http://www .pioneer .co.uk (or http://www .pioneer .eu ) DV R-LX60D HDD/DVD RECORDER HDD/D VD RECORDER Operating Instructions <VRB1459-A> P rinted in UK P ublished by Pioneer Corporation. Copyright © 2007 P ioneer Corporation. All rights reser ved. http://www.[…]
-
Pioneer DVR-LX60D — page 1
Operating Instructions Discover the benefits of registering your product online at http://www .pioneer .co.uk (or http://www .pioneer .eu ) DV R-LX60D HDD/DVD RECORDER HDD/D VD RECORDER Operating Instructions <VRB1459-A> P rinted in UK P ublished by Pioneer Corporation. Copyright © 2007 P ioneer Corporation. All rights reser ved. http://www. …
-
Pioneer DVR-LX60D — page 2
Thank you for buying this P ioneer product. Please read through these operating instructions so you will know how to operate your model properly . After you have finished reading the instructions, put them away in a safe place for future reference. The exclamation point within an equilateral triangle is intended to alert the user to the presence of …
-
Pioneer DVR-LX60D — page 3
CAUTION The ST ANDBY/ON switch on this unit will not completely shut off all power from the AC outlet. Since the power cord ser ves as the main disconnect device for the unit, you will need to unplug it from the AC outlet to shut down all power . Therefore, make sure the unit has been installed so that the power cord can be easily unplugged from th …
-
Pioneer DVR-LX60D — page 4
01 4 En Contents 01 Before you start What’s in the box . . . . . . . . . . . . . . . . . . . 6 Putting the batteries in the remote control . . . . . . . . . . . . . . . . . . . . . . . . . . . . 6 Using the remote control . . . . . . . . . . . . . . 6 Disc/content format playback compatibility . . . . . . . . . . . . . . . . . . . . . . . 7 About …
-
Pioneer DVR-LX60D — page 5
5 En Switching DVD and DivX soundtracks . . . . . . . . . . . . . . . . . . . . . . 82 Switching audio channels . . . . . . . . . . . . 83 Switching camera angles . . . . . . . . . . . . 83 Displaying disc information on-screen . . . . . . . . . . . . . . . . . . . . . . . . 84 09 Playing and recording from a DV camcorder Playing from a DV camcorde …
-
Pioneer DVR-LX60D — page 6
Before you start 01 6 En Chapter 1 Before you start What’s in the box Please confirm that the following accessories are in the box when you open it; • Remote control • AA/R6P dry cell batteries x 2 • Audio/video cable (red/white/yellow) • G-LINK™ cable • RF antenna cable x 2 • Power cable • These operating instructions • Warrant …
-
Pioneer DVR-LX60D — page 7
Before you start 7 En 01 • You can control this recorder using the remote sensor of another Pioneer component via the CONTROL IN jack on the rear panel. See Rear panel connections on page 14 for more information. Disc/content format playback compatibility Compatible media • DVD-RW ver. 1.1 / 1x / 1x to 2x, ver. 1.2 / 2x to 4x / 2x to 6x • DVD …
-
Pioneer DVR-LX60D — page 8
Before you start 01 8 En HDD/DVD Recording and playback compatibility This recorder can play and record all widely-used DVD disc types, and additionally provides HDD functionality. The table below shows some specific compatibility differences between the different disc types. Notes to table *1 Must be initialized for VR mode recording (page 122). * …
-
Pioneer DVR-LX60D — page 9
Before you start 9 En 01 Using DVD-R DL/DVD+R DL discs DVD-R DL (Dual-Layer) and DVD+R DL (Double-Layer) discs contain two recordable layers on a single side, giving about 1.8 times the recording capacity of a conventional single-layer disc. This unit can record to both DVD-R DL and DVD+R DL discs. • If you intend to play DVD-R DL (Video mode) or …
-
Pioneer DVR-LX60D — page 10
Before you start 01 10 En • Sampling rates: 32 kHz, 44.1 kHz or 48 kHz • Bit-rates: Any (128 kbps or higher recommended) • Variable bit-rate (VBR) MP3 playback: Yes • VBR WMA playback: No • WMA encoder compatibility: Windows Media Codec 8 (files encoded using Windows Media Codec 9 may be playable but some parts of the specification are no …
-
Pioneer DVR-LX60D — page 11
Before you start 11 En 01 DivX ® VOD content In order to play DivX VOD (video on demand) content on this recorder, you first need to register the recorder with your DivX VOD content provider. You do this by generating a DivX VOD registration code, which you submit to your provider. Some DivX VOD content may only be playable a fixed number of times …
-
Pioneer DVR-LX60D — page 12
Before you start 01 12 En DVB The Digital Video Broadcasting Project, or DVB for short, is a set of open standards for digital broadcasting, covering terrestrial, cable and satellite broadcasts. Based around the MPEG-2 coding system, these open standards ensure that compliant systems are able to work together, independent of manufacturer. DVB is ex …
-
Pioneer DVR-LX60D — page 13
Before you start 13 En 01 Optimizing HDD performance As you record and edit material on the HDD, the data on the disk becomes fragmented, eventually affecting the recorder’s performance. Before this happens, the recorder will warn you that it is time to optimize the HDD (which you can do from the Disc Setup menu; see Optimize HDD on page 122). Sy …
-
Pioneer DVR-LX60D — page 14
Connections 02 14 En Chapter 2 Connections Rear panel connections 1 ANTENNA IN (RF IN)/OUT Connect your TV antenna to the ANTENNA IN (RF IN) jack. The signal is passed through to the ANTENNA OUT jack for connection to your TV. 2 INPUT 3 Stereo analog audio, video and S-video inputs for connection to a VCR or other source component. 3 AV2 (INPUT 1/D …
-
Pioneer DVR-LX60D — page 15
Connections 15 En 02 Front panel connections On the front panel there is a flip-down cover that hides more connections. Left side: 13 DV IN A DV input i.LINK connector, suitable for connecting a DV camcorder. 14 USB port (Type B) USB port for connecting a PictBridge- compatible printer or PC. 15 USB port (Type A) USB port for connecting a digital c …
-
Pioneer DVR-LX60D — page 16
Connections 02 16 En Easy connections The setup described below is a basic setup that allows you to watch and record TV programmes, and play discs. Other types of connections are explained starting on the following page. Important • These connections use SCART cables (not supplied). If your TV (or VCR) does not have a SCART connection, and you wa …
-
Pioneer DVR-LX60D — page 17
Connections 17 En 02 1 Connect the VIDEO OUTPUT jack to a video input on your TV. Use the yellow jack of the supplied audio/ video cable for the video connection. 2 Connect the AUDIO OUTPUT jacks to the corresponding audio inputs on your TV. Use the red and white jacks of the supplied audio/video cable for the audio connection. Make sure you match …
-
Pioneer DVR-LX60D — page 18
Connections 02 18 En 1 Connect RF antenna cables as shown. See Connecting a TV antenna on page 15 for more on RF antenna connections, including from this recorder to your TV. 2 Use a SCART cable (not supplied) to connect the AV1 (RGB)-TV AV connector to a SCART AV connector on your TV. This enables you to watch discs. 3 Use another SCART cable to c …
-
Pioneer DVR-LX60D — page 19
Connections 19 En 02 • It is not possible to watch one TV programme and record another using this setup. 1 Connect the cable from the antenna/ cable TV outlet to the antenna input on your VCR/satellite receiver/cable box. 2 Use a SCART cable (not supplied) to connect your decoder to your VCR/ satellite receiver/cable box. See the manual for your …
-
Pioneer DVR-LX60D — page 20
Connections 02 20 En 2 Use a SCART cable (not supplied) to connect the AV1 (RGB)-TV AV connector to a SCART AV connector on your TV. This enables you to watch discs. 3 Use another SCART cable to connect the AV2 (INPUT 1/DECODER) AV connector to a SCART AV connector on your decoder box. This enables you to record scrambled TV channels. Connecting to …
-
Pioneer DVR-LX60D — page 21
Connections 21 En 02 The HDMI connector outputs uncompressed digital video, as well as almost every kind of digital audio. 1 Use an HDMI cable to connect the HDMI OUT connector on this recorder to an HDMI connector on an HDMI- compatible display. • The arrow on the cable connector body should be face down for correct alignment with the connector …
-
Pioneer DVR-LX60D — page 22
Connections 02 22 En Connecting other AV sources Connecting a VCR or analog camcorder 1 Connect a set of audio and video inputs of your VCR or camcorder to a set of outputs on this recorder. This enables you to record from this recorder to your VCR or camcorder. • You can use standard video or S-video cables for the video connection. • Alternat …
-
Pioneer DVR-LX60D — page 23
Connections 23 En 02 Important • Some USB devices may not work with this recorder. • When connecting a PC to this unit, make sure the power is turned off on both the PC and this unit when you connect them via USB. • We recommend connecting USB devices when this recorder is switched off (in standby). JPEG file storage devices • Digital still …
-
Pioneer DVR-LX60D — page 24
Controls and displays 03 24 En Chapter 3 Controls and displays Front panel 1 A.TV indicator Lights when analog TV is selected. D.TV indicator Lights when digital TV is selected. PLTV indicator Lights during recording started using the Pause Live TV feature. DivX indicator Lights during DivX playback. COPY indicator Lights when copying is underway. …
-
Pioneer DVR-LX60D — page 25
Controls and displays 25 En 03 11 Press to start or restart playback. Press to stop playback. STOP REC Press to stop recording. ONE TOUCH COPY Press to start One Touch Copy of the currently playing title to DVD or the HDD. CH +/– Use to change channels, skip chapters/ tracks, etc. INPUT SELECT Press to change the input used for record …
-
Pioneer DVR-LX60D — page 26
Controls and displays 03 26 En Display 1 Lights during playback; blinks when playback is paused. 2 Lights when copying. 3 Lights during recording; blinks when recording is paused. 4 (page 68) Lights when a timer recording has been set. (Indicator blinks if the timer has been set to DVD but there isn’t a recordable disc loaded, or the …
-
Pioneer DVR-LX60D — page 27
Controls and displays 27 En 03 Remote control 1 STANDBY/ON Press to switch the recorder on/into standby. 2 PLAY (page 74) Press to start playback. PAUSE Press to pause playback or recording. STOP (page 74) Press to stop playback. PREV NEXT Press to skip to the previous or next title/ chapter/track/folder; or to display the p …
-
Pioneer DVR-LX60D — page 28
Controls and displays 03 28 En 6 A.TV/D.TV Press to switch between analog TV antenna input and digital TV antenna input. The A.TV and D.TV indicators on the front panel show which is selected. 7 Colour buttons (RED, GREEN, YELLOW, BLUE) Use when an EPG screen is displayed or when tuned to a data channel of a digital broadcast. The function of each …
-
Pioneer DVR-LX60D — page 29
Controls and displays 29 En 03 22 DISPLAY (page 84) Displays/changes the on-screen information displays. 23 TEXT (page 62, 63) Press to display Teletext information (in European countries except the UK) or to start the MHEG application display (UK only) if available during digital broadcasts. 24 TV/DVD Press to switch between ‘TV mode’, in whic …
-
Pioneer DVR-LX60D — page 30
Getting started 04 30 En Chapter 4 Getting started Switching on and setting up When you switch the recorder on for the first time, you can make several basic settings using the Setup Navigator feature. This takes you through setting the clock, the internal TV tuner and the video output. If you’re using the recorder for the first time, we strongly …
-
Pioneer DVR-LX60D — page 31
Getting started 31 En 04 • The clock will also be set automatically here if D.TV channels are found. • If no new channels were found a message appears asking if you want to scan again. Check the aerial connection before selecting Yes . (If you select No, skip to step 8 below.) 8 Select the analog TV (A.TV) Auto Channel Setting (‘Auto Scan’ …
-
Pioneer DVR-LX60D — page 32
Getting started 04 32 En • Manual clock setting If no stations in your area are broadcasting time signals, you can set the clock manually. Use the / buttons to set your time zone. You can set this by selecting a city or a time relative to GMT. Press then use the / buttons to select ‘On’ or ‘Off’ for summer time, then press …
-
Pioneer DVR-LX60D — page 33
Getting started 33 En 04 14 Select ‘Finish Setup’ to exit the Setup Navigator, or ‘Go Back’ if you want to start again. That completes basic setup using the Setup Navigator. • If there are blank channels with no station, you can set these to skip using the manual channel setting. See Manual CH Setting on page 130. For users receiving digi …
-
Pioneer DVR-LX60D — page 34
Getting started 04 34 En 2 Highlight ‘Postal Code’. 3 Enter your postal code. The system uses your postal code to identify which TV listings data is correct for the area in which you live, so it is important that you enter it correctly. 4 If you are using an external receiver (such as a satellite receiver) with the supplied G-LINK cable, comple …
-
Pioneer DVR-LX60D — page 35
Getting started 35 En 04 recorder needs to be in standby; it will wake up automatically and download new codes from the host channel. The next day, try this setup process again: • Press GUIDE to display the GUIDE Plus+ screen. • Press to highlight the Menu bar, then use to reach the Setup area and select Setup. • Continue setting up f …
-
Pioneer DVR-LX60D — page 36
Getting started 04 36 En • Even if you can’t use the EPG functions where you live, you can still set VIDEO Plus+ recordings and manual recordings — see Setting a manual recording on page 45. • The front panel display shows EPG when receiving data. If you power on the recorder during an EPG download, the download is cancelled. • EPG data m …
-
Pioneer DVR-LX60D — page 37
Using the GUIDE Plus+® electronic programme guide 37 En 05 Chapter 5 Using the GUIDE Plus+® electronic programme guide This chapter is only applicable if the EPG Type Select setting made in the Setup Navigator (or the Initial Setup menu) is set to GUIDE Plus+ . The GUIDE Plus+ system The GUIDE Plus+® system* is a free, interactive on-screen tele …
-
Pioneer DVR-LX60D — page 38
Using the GUIDE Plus+® electronic programme guide 05 38 En 5 Menu bar – Gives access to the various areas of the GUIDE Plus+ system. 6 Grid – Shows TV listings information for the next seven days by channel and time. GUIDE Plus+ navigation The table below shows a summary of the remote buttons you’ll use to navigate the GUIDE Plus+ system. On …
-
Pioneer DVR-LX60D — page 39
Using the GUIDE Plus+® electronic programme guide 39 En 05 Lock/Unlock video window When you enter the GUIDE Plus+ system, the channel you were watching remains visible in the video window. The date stamp above the window lets you know the channel, date and time. The default setting for this window is ‘locked’, as indicated by a closed padlock …
-
Pioneer DVR-LX60D — page 40
Using the GUIDE Plus+® electronic programme guide 05 40 En • Tune to a programme that’s currently showing 1 • Set a programme to record • Lock or unlock the video window • Access Information panels Browsing the Grid Use the following remote buttons to browse the grid: /// (cursor buttons) – Navigate the Grid PREV / N …
-
Pioneer DVR-LX60D — page 41
Using the GUIDE Plus+® electronic programme guide 41 En 05 Using My Choice keywords for a search In addition to the standard categories, you can also set your own keywords. 1 Access My Choice. 2 Press the YELLOW Action button to add a keyword. 3 Enter a keyword to appear in the menu. When you’re finished, press the GREEN Action button to exit an …
-
Pioneer DVR-LX60D — page 42
Using the GUIDE Plus+® electronic programme guide 05 42 En 3 To add a channel to your profile, press the YELLOW Action button. Select a channel from the mosaic of channel icons and press ENTER . Repeat this step to add up to 16 channels. 4 To add a category to your profile, highlight ‘Categories’ and press the YELLOW Action button. Select a ca …
-
Pioneer DVR-LX60D — page 43
Using the GUIDE Plus+® electronic programme guide 43 En 05 Editing a scheduled recording You can edit any parameter in a scheduled recording, or delete it if you no longer require it 1 . 1 Highlight the left tile of a scheduled recording. • If you only want to edit the recording quality, frequency, destination, timing or genre settings, skip to …
-
Pioneer DVR-LX60D — page 44
Using the GUIDE Plus+® electronic programme guide 05 44 En 7 Press the GREEN Action button (Frequency) to change the recording frequency. Select from the various options for one-time, daily and weekly recordings. 8 Press YELLOW Action button (Destination) to select the recording destination. Select from DVD , HDD or HDDr (Auto Replace Recording) 1 …
-
Pioneer DVR-LX60D — page 45
Using the GUIDE Plus+® electronic programme guide 45 En 05 Deleting a scheduled recording 1 Highlight the left tile of a scheduled recording. 2 Press the RED Action button (Delete). The scheduled event is deleted. Setting a VIDEO Plus+® recording 1 Select ‘Schedule’ from the Menu bar. 2 Press the RED Action button (VIDEO Plus+). 3 Use the num …
-
Pioneer DVR-LX60D — page 46
Using the GUIDE Plus+® electronic programme guide 05 46 En 3 Use the number and /// buttons to enter the recording date, then press the GREEN Action button (Next). 4 In the same way, enter the recording start time, followed by the GREEN Action button (Next) to confirm. 5 Enter the recording end time in the same way, followed by the GRE …
-
Pioneer DVR-LX60D — page 47
Using the GUIDE Plus+® electronic programme guide 47 En 05 Changing the source and programme number 1 Select ‘Editor’ from the Menu bar. 2 Highlight the right channel tile of the channel you want to make a change to. 3 Press the RED Action button to change the channel source, or the GREEN Action button to enter a programme number. Each press o …
-
Pioneer DVR-LX60D — page 48
Using the GUIDE Plus+® electronic programme guide 05 48 En Manual Host Channel setup The GUIDE Plus+ system will automatically identify your Host Channel as soon as the recorder is put into standby for the first time. See the table on page 35 for a list of all the European Host Channels. If you know your Host Channel details (source and programme …
-
Pioneer DVR-LX60D — page 49
Using the GUIDE Plus+® electronic programme guide 49 En 05 Switch this recorder into standby. The next morning, please perform the GUIDE Plus+ setup again to see if your external receiver can now be controlled. – The external receiver that you use is currently not supported. If, after leaving your external receiver on overnight, and doing the Re …
-
Pioneer DVR-LX60D — page 50
Using the GUIDE Plus+® electronic programme guide 05 50 En •I used the One-Button-Record feature (red Action button) to set a recording, but I recorded the wrong channel. If the channel to be recorded is received via the external receiver first make sure that the external receiver was left switched on. Next, in the Editor Area, make sure that th …
-
Pioneer DVR-LX60D — page 51
Using the digital electronic programme guide 51 En 06 Chapter 6 Using the digital electronic programme guide This chapter is only applicable if the EPG Type Select setting made in the Setup Navigator (or the Initial Setup menu) is set to Digital EPG . The Digital EPG system The Digital EPG shows a table of scheduled digital TV programmes and detail …
-
Pioneer DVR-LX60D — page 52
Using the digital electronic programme guide 06 52 En Using the Digital EPG Using the Digital EPG you can check the schedule of digital TV programmes, view information about desired programmes, and/or select programmes. 1 Press to display the Digital EPG screen. The EPG screen updates automatically if the EPG data is acquired successfully. If not, …
-
Pioneer DVR-LX60D — page 53
Using the digital electronic programme guide 53 En 06 3 Enter the timer recording settings. Use the / buttons to select a field; use the / buttons to change the value 1 . • CH – Choose a channel (Pr 1 to Pr 99 for analog channels and available digital channels (excluding skip channels)), or one of the external inputs from which to r …
-
Pioneer DVR-LX60D — page 54
Using the digital electronic programme guide 06 54 En EPG Link 1 (UK only) – Choose whether or not to have this device automatically record scheduled programmes from the Digital EPG even if the times in which they are broadcast change. Series Recording 2 (UK only) – Choose whether or not to record all programmes from a series when you make a re …
-
Pioneer DVR-LX60D — page 55
Using the digital electronic programme guide 55 En 06 2 Highlight the timer programme you want to change . . . . If you want to set a new timer programme, select ‘New Input’ and skip to step 4 . 3 Press then select ‘Modify’ from the command menu panel. Alternatively, press ENTER . The Timer Programme Set screen appears from which you ca …
-
Pioneer DVR-LX60D — page 56
Using the digital electronic programme guide 06 56 En • When you have EPG Link or Series Recording set to On , any changes in broadcast time or division of broadcasts are automatically accommodated for and your scheduled recordings are carried out without any additional settings. As a result, even when you have not scheduled programmes to record …
-
Pioneer DVR-LX60D — page 57
Using the digital electronic programme guide 57 En 06 3 Press then select ‘Series Search’ from the command menu panel. • The search results are displayed. Choose the programme you would like to record and press either the RED button or ENTER to schedule a recording. Searching for recommendations (UK only) You can search for recommended pr …
-
Pioneer DVR-LX60D — page 58
Using the digital electronic programme guide 06 58 En 3 In the ‘Time’ field select the time of day (0:00 to 23:00) to search in. 4 In the ‘Genre’ field, select the genre to search for. You can search for multiple genres by pressing ENTER after each genre. 5 Select ‘OK’. 6 Select ‘Search’. The results of your search are displayed. EN …
-
Pioneer DVR-LX60D — page 59
Recording 59 En 07 Chapter 7 Recording About DVD recording This recorder can record to DVD-R, DVD- RW, DVD+R, DVD+RW, DVD-RAM, DVD-R DL and DVD+R DL media. DVD-R and DVD-RW discs can be initialized for Video mode or VR mode recording. Each has its advantages, and it depends on what you want to do with the recording which mode you choose. If you wan …
-
Pioneer DVR-LX60D — page 60
Recording 07 60 En • See also Disc/content format playback compatibility on page 7 for detailed disc compatibility information. Recording to DVD-R DL/DVD+R DL discs Recording to DVD-R DL/DVD+R DL discs is generally the same as recording to regular single-layer discs; however, please note the following points: • When the recorder switches from t …
-
Pioneer DVR-LX60D — page 61
Recording 61 En 07 Restrictions on video recording You cannot record copy-protected video using this recorder. Copy-protected video includes DVD-Video discs and some satellite broadcasts. If copy-protected material is encountered during a recording, recording will pause automatically and an error message will be displayed on-screen. Video that is ? …
-
Pioneer DVR-LX60D — page 62
Recording 07 62 En Tip • When changing terrestrial digital broadcast channels, channels with a low signal strength may result in a black screen being displayed. • For other channels, it may take a short while for the channel picture to appear, and/or for the channel number to appear. • In both of the above cases, some improvement may be possi …
-
Pioneer DVR-LX60D — page 63
Recording 63 En 07 The channel banner displays an icon ( ) to indicate that the MHEG application can be run. • Press to start the MHEG application. 1 • You can also use any of the colour buttons. • Press TEXT to quit the MHEG application. Viewing Teletext (European countries except the UK.) You can view the Teletext that comes simultaneously …
-
Pioneer DVR-LX60D — page 64
Recording 07 64 En Setting the picture quality/ recording time Before starting a recording, you will usually want to set the picture quality/recording time. There are six standard settings available, which allow you to choose a balance between picture quality and recording time. When Manual Recording is set to On (see Manual Recording on page 135), …
-
Pioneer DVR-LX60D — page 65
Recording 65 En 07 3 Select a TV channel to record. The front panel display shows the channel number, or channel name if it’s available: • While the recorder is stopped, you can also use the number buttons on the remote to select the channel (For channel 24, press 2 , 4 then ENTER ). • If the recorder is stopped, you can also use the CH +/– …
-
Pioneer DVR-LX60D — page 66
Recording 07 66 En Pause Live TV The Pause Live TV feature lets you effectively pause a TV programme you’re watching. When you’re ready to resume watching, just press the PLAY button. Setting up for Pause Live TV You can use the Pause Live TV feature with an AV Link-compatible TV connected using a SCART cable (see TV tuner setup for Pause L …
-
Pioneer DVR-LX60D — page 67
Recording 67 En 07 Using Pause Live TV 1 Start recording the current TV channel. Recording continues with playback paused. • Note that it may take up to 10 seconds for recording to start. 2 Press to start playback. You can also use the scan buttons ( / ), pause ( PAUSE ) and stop ( STOP ) — all without affecting the recording. 3 …
-
Pioneer DVR-LX60D — page 68
Recording 07 68 En About timer recordings Using the timer recording features you can program up to 32 timer recordings up to a month in advance. Timer recording programmes can be set to record just once, every day, or every week. You can set the recording quality for your timer recording in the same way as for a regular recording, but with the adde …
-
Pioneer DVR-LX60D — page 69
Recording 69 En 07 • If VPS/PDC is active for two timer programmes that are programmed to start at the same time, then the programme that actually starts first takes priority. Extending a timer recording in progress You can extend a timer recording beyond the programmed end time. This can be useful if a broadcast programme overruns, for example. …
-
Pioneer DVR-LX60D — page 70
Recording 07 70 En Simultaneous recording and playback (Chase Play) Chase Play allows you to watch a recording that is still in progress from the start, without having to wait until the recording has finished (i.e., playback is ‘chasing’ the recording). In fact, you’re not just limited to watching the recording in progress. You can watch anyt …
-
Pioneer DVR-LX60D — page 71
Recording 71 En 07 4 Select the HDD or DVD for recording. 5 Press to start recording. • If your source is copy-protected using Copy Guard, you will not be able to record it. See Restrictions on video recording on page 61 for more details. Playing your recordings on other DVD players Most regular DVD players can play finalized discs recorded in DV …
-
Pioneer DVR-LX60D — page 72
Recording 07 72 En 1 Load the disc you want to finalize. Make sure that the recorder is stopped before proceeding. 2 Select ‘Disc Setup’ from the Home Menu. 3 Select ‘Finalize’ > ‘Finalize’ > ‘Next Screen’. 4 For DVD-R/-RW (Video mode) and DVD+R/+RW discs only, select a title menu style, then select ‘Yes’ to start finaliza …
-
Pioneer DVR-LX60D — page 73
Recording 73 En 07 Important • Initializing a DVD-RW, DVD+RW or DVD-RAM disc will erase everything recorded on it. Make sure there is nothing on the disc that you want to keep! • You may not be able to re-initialize a DVD-RW disc in a different format if it was originally initialized on an older DVD recorder. • Once initialized for VR mode re …
-
Pioneer DVR-LX60D — page 74
Playback 08 74 En Chapter 8 Playback Introduction Most of the features described in this chapter make use of on-screen displays. Navigate these using the cursor buttons and ENTER . To go back one level from any screen, use the RETURN/EXIT button. Remember also that the button guide at the bottom of every screen shows which buttons do what. Many of …
-
Pioneer DVR-LX60D — page 75
Playback 75 En 08 Playing DVD discs The table below shows the basic playback controls for DVD-Video, and recordable DVD discs. Playing from the HDD The table below shows the basic playback controls when playing video recorded on the hard disk (HDD). P ress to start playback. If RESUME is displayed on- screen, playback starts from the place last sto …
-
Pioneer DVR-LX60D — page 76
Playback 08 76 En Playing CDs and WMA/MP3 discs The table below shows the basic playback controls for audio CDs 1 , and WMA/MP3 files. Playing Video CD/Super VCDs The table below shows the basic playback controls for Video CD/Super VCDs. Some discs feature Playback Control (PBC for short) menus. These discs show PBC in the display when you load the …
-
Pioneer DVR-LX60D — page 77
Playback 77 En 08 Playing DivX video files The table below shows the basic playback controls for DivX video files. P auses playback, or restarts playback when paused. P ress to start scanning. Press repeatedly to increase the scan- ning speed. P ress to skip to previous/next track. When a PBC menu is dis- played, press to display the pre- vious/nex …
-
Pioneer DVR-LX60D — page 78
Playback 08 78 En Using the Disc Navigator to browse the contents of a disc Use the Disc Navigator to browse the contents of a disc and start playback. Using the Disc Navigator with recordable discs and the HDD You can use the Disc Navigator to browse and edit video on recordable DVDs and the HDD, and to view information on titles. See also Editing …
-
Pioneer DVR-LX60D — page 79
Playback 79 En 08 Using the Disc Navigator with playback-only discs 1 Display the Home Menu. 2 Select ‘Disc Navigator’. Alternatively, for a CD, Video CD, Super VCD or WMA/MP3/DivX disc, you can press DISC NAVIGATOR , which takes you straight to the Disc Navigator screen. 3 Select what you want to play. Depending on the type of disc you have lo …
-
Pioneer DVR-LX60D — page 80
Playback 08 80 En Frame advance/frame reverse You can advance or back up video on a DVD disc 1 or the HDD frame-by-frame. With Video CDs/Super VCDs and DivX titles, you can only use frame advance. 1 Pause playback. 2 Back up or advance one frame with each press. • You can also do this by rotating the Smart Jog . 3 Resume normal playback. The Play …
-
Pioneer DVR-LX60D — page 81
Playback 81 En 08 2 With ‘A (Loop Start)’ highlighted, press at the point you want the loop to start. 3 With ‘B (Loop End)’ highlighted, press at the point you want the loop to end. Playback immediately jumps back to the start point and plays the loop round and round. • When playing a DVD-Video, DVD-R/-RW (Video mode), DVD+R/+RW, or from …
-
Pioneer DVR-LX60D — page 82
Playback 08 82 En After pressing ENTER to add the title/ chapter/folder/track, the step number automatically moves down one. • To insert a step into the programme list, highlight the step number where you want to insert another step, then select a chapter/title/folder/track as usual. After pressing ENTER , all the subsequent steps move down one. …
-
Pioneer DVR-LX60D — page 83
Playback 83 En 08 Check the disc packaging for details of the soundtrack options. • Change the audio soundtrack. The current audio language is shown on- screen and in the front panel display. • The sound may drop out for a few seconds when switching soundtracks. • Some discs feature both Dolby Digital and DTS soundtracks. There is no analog a …
-
Pioneer DVR-LX60D — page 84
Playback 08 84 En Displaying disc information on-screen You can display various on-screen information about the disc loaded or the HDD. • Display/change the on-screen information. • Press once to show the HDD and removable disc (DVD, etc.) activity together. Press again to show the status of just the currently selected playback/ recording devic …
-
Pioneer DVR-LX60D — page 85
Playing and recording from a DV camcorder 85 En 09 Chapter 9 Playing and recording from a DV camcorder You can play back and record video from a DV camcorder connected to the DV IN jack on the front panel of this recorder. Important • If you connect a second recorder using a DV cable, you cannot control the second unit from this one. • You can? …
-
Pioneer DVR-LX60D — page 86
Playing and recording from a DV camcorder 09 86 En 1 Make sure your DV camcorder is connected to the front panel DV IN jack. Also, set the camcorder to VTR mode. 2 Set the recording quality. • See Setting the picture quality/recording time on page 64 for detailed information. 3 From the Initial Setup menu, check that the DV audio input is setup a …
-
Pioneer DVR-LX60D — page 87
Playing and recording from a DV camcorder 87 En 09 5 Select ‘Record to Hard Disk Drive’ or ‘Record to DVD’. The DV tape is rewound to the beginning. Once it is rewound, the DV tape is played from the beginning and copied to either the HDD or a DVD. • If there is a gap of two minutes or more between recorded contents, the copying process i …
-
Pioneer DVR-LX60D — page 88
Editing 10 88 En Chapter 10 Editing Editing options The table below shows which commands you can use with the HDD and different disc types. *1 DVD-R/-RW only HDD DVD-R/-RW (Video mode), DVD+R/+RW DVD-R/-RW , DVD-RAM (VR mode) Original Play List Create (page 90) Play (page 90) Erase (page 90) Edit > Title Name (p …
-
Pioneer DVR-LX60D — page 89
Editing 89 En 10 The Disc Navigator screen The Disc Navigator screen is where you can edit video content on unfinalized Video mode and DVD-R/-RW (VR mode) discs, DVD+R/ +RW and DVD-RAM, as well as video content on the hard disk drive. Important • Titles that have been recorded with a Input Line System setting different to the current setting of t …
-
Pioneer DVR-LX60D — page 90
Editing 10 90 En HDD genres The large capacity of the HDD means that there may be many hours of video in the recorder. To help you organize your HDD video content you can assign different genres to titles. There are 20 genres in total, including five user-definable ones that you can name as you like. Create Play List only Use this function to creat …
-
Pioneer DVR-LX60D — page 91
Editing 91 En 10 1 Highlight the title you want to erase. • You can also use the Smart Jog to select titles. 2 Select ‘Erase’ from the command menu panel. 3 Select ‘Yes’ to confirm or ‘No’ to cancel. Tip • You can erase a title quickly by pressing CLEAR when the title is highlighted. Confirm the edit by pressing ENTER . Title Name Y …
-
Pioneer DVR-LX60D — page 92
Editing 10 92 En Using the remote key shortcuts to input a name The table below shows the remote control key shortcuts that you can use to input characters in the name input screen. Pressing a button repeatedly cycles through the characters shown. If you want to enter two characters in succession that are both on the same button (for example a P an …
-
Pioneer DVR-LX60D — page 93
Editing 93 En 10 Set Thumbnail You can change the thumbnail picture that appears in the Disc Navigator for a title to any frame that appears in that title. 1 Highlight the title you want to change the thumbnail picture for. • You can also use the Smart Jog to select titles. 2 Select ‘Edit’ > ‘Set Thumbnail’ from the command menu panel. …
-
Pioneer DVR-LX60D — page 94
Editing 10 94 En 5 Highlight ‘To’ then, in the same way, find the end of the section to erase, then press ENTER. After pressing ENTER , another marker indicates the end of the section, with the section itself marked in red. 6 Select ‘Yes’ to confirm, or ‘No’ to cancel. In the thumbnail viewer you can see a few seconds of video either si …
-
Pioneer DVR-LX60D — page 95
Editing 95 En 10 3 HDD only: Select the type of edit. • For more information about these options, see Editing accuracy on page 89. 4 Select the command you want: • Divide – Divide a chapter into two or more parts: Use the playback controls ( , , , , etc.) to find the point at which you want to divide the chapter, then press EN …
-
Pioneer DVR-LX60D — page 96
Editing 10 96 En 2 Select ‘Edit’ > ‘Set Genre’ from the command menu panel. 3 Select a genre for the title. Lock Original only You can lock a title so that it can’t be edited or erased accidently. If you do need to edit it, you can always unlock it later. Important • You can’t undo any edits made before changing the lock status. Yo …
-
Pioneer DVR-LX60D — page 97
Editing 97 En 10 3 Select a new position for the title. After pressing ENTER , the new, updated Play List is displayed. Combine Play List only Use this function to combine two Play List titles into one. 1 Highlight the title you want to combine. • You can also use the Smart Jog to select titles. This title will remain in the same place after comb …
-
Pioneer DVR-LX60D — page 98
Editing 10 98 En 2 Select one of the user- definable genre names. 3 Input a name for the genre. • The name can be up to 12 characters long. • For information on remote control key short cuts, see Using the remote key shortcuts to input a name on page 92. 4 Select ‘OK’ to enter the name and exit. Multi-Mode Multi-Mode allows you to select se …
-
Pioneer DVR-LX60D — page 99
Editing 99 En 10 Undo If you make a mistake while editing, you can generally undo it. There is one level of undo (in other words, you can only undo the last edit you made). • Select ‘Undo’ from the command menu panel. • You can’t undo anything after exiting the Disc Navigator screen. Frequently asked questions • Why doesn’t the availa …
-
Pioneer DVR-LX60D — page 100
Copying and backup 11 100 En Chapter 11 Copying and backup Introduction Use the copying features of this recorder to: • Back up important recordings stored on the HDD to a DVD. • Make a DVD copy of a recording on the HDD to play in another player. • Transfer video from a DVD to the HDD for editing. • Transfer edited video from the HDD to DV …
-
Pioneer DVR-LX60D — page 101
Copying and backup 101 En 11 HDD to DVD copies are made in the same recording mode. When copying DVD to HDD, the copy is made in whatever recording mode is currently set. Make sure that a recordable DVD disc is loaded when trying to copy from the HDD. 1 If you’re copying from DVD to the HDD, select a recording mode. Note that selecting a recordin …
-
Pioneer DVR-LX60D — page 102
Copying and backup 11 102 En • Thumbnail picture markers and chapter markers for the Disc Navigator are copied, but their position in the copy may be slightly changed from the original. • If some part of the title being copied is copy-protected, copying will start, but the copy-protected portions will not be copied. Using Copy Lists * See also …
-
Pioneer DVR-LX60D — page 103
Copying and backup 103 En 11 • When adding titles that contain copy- once protected material, the copy-once parts will not be added. • When adding titles that contain material of more than one aspect ratio (screen size), each part with a different aspect ratio will be added as a separate title if high-speed copying is possible. Depending on the …
-
Pioneer DVR-LX60D — page 104
Copying and backup 11 104 En • Set Thumbnail – Set the thumbnail frame for a title (see Set Thumbnail on page 93). • Recording Mode – Set the picture quality of the copy (see Recording Mode on page 105). • Bilingual – Set how bilingual audio should be copied when copying from HDD to DVD-R/-RW (Video mode) and DVD+R/+RW (see Bilingual on …
-
Pioneer DVR-LX60D — page 105
Copying and backup 105 En 11 – the recorder is reset to its factory settings (see Resetting the recorder on page 157). • It may not be possible to copy from a DVD disc that was recorded on a different DVD recorder or a PC. 1 Select ‘Copy’ from the Home Menu. 2 Select ‘DVD/CD HDD’. 3 Select a Copy List type. • Selecting Create New …
-
Pioneer DVR-LX60D — page 106
Copying and backup 11 106 En • Optimized 1,2 – The recording quality is automatically adjusted so that the Copy List fits on to the space available on the disc. Copying is carried out in real-time. When you change the recording mode setting, you can see how much disc space it will require. If this is more than is available, it shows up in red a …
-
Pioneer DVR-LX60D — page 107
Copying and backup 107 En 11 • You can cancel the backup process by pressing ONE TOUCH COPY for more than one second. 5 When the data has been copied, take out the disc and load a blank* recordable DVD. * If you’re using a DVD-RW or DVD+RW, the disc doesn’t have to be blank, although the previous contents of the disc will be erased in the bac …
-
Pioneer DVR-LX60D — page 108
Using the Jukebox 12 108 En Chapter 12 Using the Jukebox The Jukebox feature allows you to use the recorder’s HDD to store and playback music from up to 999 of your CDs. You can also transfer WMA/MP3 files stored on CD-R/ -RW/-ROM, DVD, USB device or PC. Once on the HDD, you can name albums and tracks, assign them a genre, and set tracks that you …
-
Pioneer DVR-LX60D — page 109
Using the Jukebox 109 En 12 • Up to 99 folders/999 files on the USB device can be copied/displayed. Connect PC Using a USB connection, you can copy WMA and MP3 files from a PC to the HDD of this device. Operations carried out on the PC require Windows Media Player 10. Important • If the PC you are using does not currently have Windows Media Pla …
-
Pioneer DVR-LX60D — page 110
Using the Jukebox 12 110 En From the PC, in Windows Media Player 10: 1. Click ‘Library’. 2. Choose the artist, album or song you would like to copy, and press the right mouse button. 3. Click ‘Add to Sync list’ (when choosing songs, click ‘Add to’ then ‘Sync list’). 4. Click ‘Start Sync’. This begins the synchronization process. …
-
Pioneer DVR-LX60D — page 111
Using the Jukebox 111 En 12 • File whose extensions are not supported by the Jukebox (i.e. files that are not .mp3 or .wma) cannot be transferred. • Files imported to this recorder via Connect PC cannot be exported from this recorder. • Note that no recording functions, including timer recordings, will be carried out when you are using the Co …
-
Pioneer DVR-LX60D — page 112
Using the Jukebox 12 112 En • Genre All Genres – All albums are displayed. Genre – Only albums in the selected genre are displayed. Editing Jukebox albums A number of commands are available for editing and changing the playback behavior of albums. 1 Select ‘Jukebox’ from the Home Menu. 2 Select ‘Listen to Music/Edit’. 3 Select what yo …
-
Pioneer DVR-LX60D — page 113
The PhotoViewer 113 En 13 Chapter 13 The PhotoViewer From the PhotoViewer you can view JPEG photos and picture files stored on the HDD, recordable DVD or CD-R/-RW/-ROM, or on a USB-equipped digital camera. 1 You can also import files and save them to the recorder’s HDD or a DVD-R/-RW disc. Locating JPEG picture files 1 Select ‘PhotoViewer’ fr …
-
Pioneer DVR-LX60D — page 114
The PhotoViewer 13 114 En • If you encounter a disc that will not play, check that the disc and file formats are compatible with this recorder (see JPEG file compatibility and PC-created disc compatibility on page 11). • The thumbnail of files that cannot be played is displayed as the logo. Changing the display style of the PhotoViewer You can …
-
Pioneer DVR-LX60D — page 115
The PhotoViewer 115 En 13 Zooming an image During a slideshow you can zoom in to enlarge a portion of the picture by a factor of two or four. You can also move the area of the picture displayed. 1 Press during the slideshow to zoom the picture. Repeated presses cycle between zoom off, 2x zoom and 4x zoom. The zoom factor is displayed on-screen. 2 U …
-
Pioneer DVR-LX60D — page 116
The PhotoViewer 13 116 En • Importing to the HDD will not work if there is insufficient space on the HDD, or if there are already the maximum number of files and/or folders on the HDD (999 folders/999 files per folder). Selecting multiple files or folders The Multi-Mode allows you to select multiple folders/files at once for importing or editing. …
-
Pioneer DVR-LX60D — page 117
The PhotoViewer 117 En 13 Important • Use a blank DVD-R/-RW disc, or one that has already been initialized for Video mode recording but has nothing yet recorded on it. Discs that have already been recorded on (as well as CD-R/-RW discs) cannot be used. • After backing up the pictures in your digital camera to DVD, we recommend verifying that th …
-
Pioneer DVR-LX60D — page 118
The PhotoViewer 13 118 En Editing files on the HDD There are a number of commands you can use to edit and organize your pictures stored on the HDD. Creating a new folder 1 From the folder list, display the menu. 2 Select ‘New Folder’. The folder appears at the bottom of the folder list with the name F_ number . • There can be up to 999 folder …
-
Pioneer DVR-LX60D — page 119
The PhotoViewer 119 En 13 2 Display the command menu. 3 Select ‘File Options’ or ‘Folder Options’. 4 Select ‘Copy’ or ‘Copy Folder Contents’. 5 Select a folder to copy the folder(s)/file(s) to. 6 Select ‘Yes’ to confirm, or ‘No’ to cancel. • Copying to the HDD will not work if there is insufficient space on the HDD; if the …
-
Pioneer DVR-LX60D — page 120
The PhotoViewer 13 120 En 4 Select ‘Lock’ or ‘Lock Folder Contents’. Locked files are shown with a padlock icon next to them. To remove all locks within a given folder, choose ‘Folder Option’ > ‘Unlock Folder Contents’ . To view detailed information This feature allows you to check the settings of the camera from which you import …
-
Pioneer DVR-LX60D — page 121
The Disc Setup menu 121 En 14 Chapter 14 The Disc Setup menu From the Disc Setup menu you can name discs, lock the contents to prevent accidental recording and erasure, initialize and finalize discs. The Disc Setup menu is accessed from the Home menu. Basic settings Input Disc Name When you initialize a disc for recording, the recorder automaticall …
-
Pioneer DVR-LX60D — page 122
The Disc Setup menu 14 122 En Initialize settings You can initialize a recordable DVD-R/-RW disc for either VR mode or Video mode recording. The first time you load a new DVD-RW disc, it will be automatically initialized for recording according to the DVD-RW Auto Init. setting in the Disc Setup menu (see page 73). New DVD-R discs are ready for Vide …
-
Pioneer DVR-LX60D — page 123
The Disc Setup menu 123 En 14 1 Select ‘Disc Setup’ from the Home Menu. 2 Select ‘Optimize HDD’ then ‘Start’. A progress bar indicates how long there is left to go. If no actions are carried out for more than 20 minutes after the optimization process is completed, the unit turns itself off. Initialize HDD When your HDD/DVD recorder is w …
-
Pioneer DVR-LX60D — page 124
The Video Adjust menu 15 124 En Chapter 15 The Video Adjust menu Using the Video Adjust menu you can set up the picture quality for the built-in tuner and external inputs, for disc playback, and for recording. Setting the picture quality for TV and external inputs Picture Creation lets you choose a set of picture quality settings for the built-in T …
-
Pioneer DVR-LX60D — page 125
The Video Adjust menu 125 En 15 • PureCinema – This setting optimizes the picture for film material when the video output is set to progressive. Usually set to Auto ; but try switching to Off if the picture appears unnatural. • 3-D Y/C – Adjusts the brightness/colour separation. • YNR – Adjusts the amount of noise reduction (NR) applied …
-
Pioneer DVR-LX60D — page 126
The Video Adjust menu 15 126 En 2 Move the cursor down and select ‘Detailed Settings’. 3 Select the picture quality setting you want to adjust. You can adjust the following settings: • Prog. Motion – Adjusts the motion and still picture quality when video output is set to progressive. (Prog. Motion is ineffective when PureCinema is On.) • …
-
Pioneer DVR-LX60D — page 127
The Initial Setup menu 127 En 16 Chapter 16 The Initial Setup menu Using the Initial Setup menu The Initial Setup menu is where you can set various recorder options for sound, picture, language and so on. Some settings can only be changed when the recorder is stopped. During playback and recording these settings are grayed out in the Initial Setup …
-
Pioneer DVR-LX60D — page 128
The Initial Setup menu 16 128 En EPG Type Select GUIDE Plus+ Use the Gemstar GUIDE Plus+ EPG. Digital EPG Use the EPG based on information provided by D.TV broadcasts. Setup Navigator Start Select to start the Setup Navigator . See also Switching on and setting up on page 30 . Digital T uner Replace Channels Next Screen Scans for digital channels a …
-
Pioneer DVR-LX60D — page 129
The Initial Setup menu 129 En 16 Channel Options Next Screen F rom this screen you can skip or lock channels. Locked channels will require the correct password to be entered before the channel can be watched. Use the /// buttons to highlight a preference box and press ENTER to toggle the preference. To enter this screen, input the paren …
-
Pioneer DVR-LX60D — page 130
The Initial Setup menu 16 130 En Analog T uner Auto Channel Setting Auto Scan Select your countr y and then wait for the recorder to auto tune into channels in your area. After auto scan has finished, the channel mapping screen appears showing which channels have been assigned to which programme numbers. Y ou can skip unwanted channels using the M …
-
Pioneer DVR-LX60D — page 131
The Initial Setup menu 131 En 16 Video In/Out Input Colour System Next Screen P roceed to the next screen to set the input colour system for the external input and the built-in TV tuner . Use the Smart Jog or INPUT SELECT buttons to change the preset or external input. On the default Auto setting the recorder can generally correctly detect whether …
-
Pioneer DVR-LX60D — page 132
The Initial Setup menu 16 132 En A V2/L1 In Video • Sets the AV2 (INPUT 1/DECODER) SCART input to standard composite video. S-Video Sets the AV2 (INPUT 1/DECODER) SCART input to S-video. RGB Sets the AV2 (INPUT 1/DECODER) SCART input to RGB. Decoder Use this setting if you connected a decoder to the AV2 (INPUT 1/DECODER) SCART connector . For scr …
-
Pioneer DVR-LX60D — page 133
The Initial Setup menu 133 En 16 DV Input Stereo 1 • Select to use the ‘live’ audio track (recorded during the video shoot) from a camcorder that supports two stereo audio tracks. Stereo 2 Select to use the overdubbed audio track from a camcorder that supports two stereo audio tracks. Mix Select one of the three settings to use a mix of the t …
-
Pioneer DVR-LX60D — page 134
The Initial Setup menu 16 134 En Language OSD Language English • Sets the language of the on-screen displays to English. available languages Choose from the languages displayed for the on- screen displays. On Screen Display and D.TV Language will both reflect this setting. Audio Language English • Sets the default audio language for DVD-V ideo …
-
Pioneer DVR-LX60D — page 135
The Initial Setup menu 135 En 16 DVD Menu Language w/Subtitle Language • Sets the language of DVD-V ideo menus to the same as that set for the subtitle language. English Sets the language of DVD-V ideo menus to English. available languages Choose from the displayed languages to set the default language for DVD-V ideo menus. Other Select to set th …
-
Pioneer DVR-LX60D — page 136
The Initial Setup menu 16 136 En Set Thumbnail 0 seconds • Sets the default thumbnail picture in the Disc Navigator to the first frame of the title. 30 seconds Sets the default thumbnail picture to 30 seconds into the title. 3 minutes Sets the default thumbnail picture to three minutes into the title. Auto Chapter (HDD/VR) On • When recording …
-
Pioneer DVR-LX60D — page 137
The Initial Setup menu 137 En 16 Playback TV Screen Size 4:3 (Letter Box) Select if you have a standard 4:3 TV and prefer the letter box format presentation for widescreen material. 4:3 (Pan & Scan) Select if you have a standard 4:3 TV and prefer the pan and scan presentation for widescreen material. 16:9 • Select if you have a widescreen 16: …
-
Pioneer DVR-LX60D — page 138
The Initial Setup menu 16 138 En HDMI Output (only available when an HDMI device is connected) Screen Resolution 1920 x 1080p Constant 1920 x 1080p output. 1920 x 1080i Constant 1920 x 1080i output. 1280 x 720p Constant 1280 x 720p output. 720 x 576p (720 x 480p) Constant 720 x 576p output (when setting the Input Line System to 525 System , video i …
-
Pioneer DVR-LX60D — page 139
The Initial Setup menu 139 En 16 Options On Screen Display On • The recorder displays operation displays ( Stop , Play , etc.) on-screen. Off Switches off the on-screen operation displays. Front Panel Display On • The time is shown in the front panel display when the recorder is in standby . Off The front panel display is switched off in standb …
-
Pioneer DVR-LX60D — page 140
The Initial Setup menu 16 140 En Options 2 USB Restart USB Device If the connected USB device does not respond to the recorder , tr y using this option to restart it. If the device still does not work properly tr y switching it off then back on, and/or disconnecting then reconnecting the USB cable. Confirm Printer Use this option to confirm the m …
-
Pioneer DVR-LX60D — page 141
The Initial Setup menu 141 En 16 Additional information about the TV system settings About the input line system This recorder is compatible with PAL, SECAM, 3.58 NTSC and PAL-60 TV systems. The Input Line System and Input Colour System settings determine how the recorder treats incoming video signals from an external input. Please note the followi …
-
Pioneer DVR-LX60D — page 142
The Initial Setup menu 16 142 En Selecting other languages for language options 1 Select ‘Other’ from the language list. This option appears in the settings for DVD Menu Language, Audio Language, and Subtitle Language. 2 Select the language you want. • Select by language name: Use the / buttons to change the language. • Select by code …
-
Pioneer DVR-LX60D — page 143
Additional information 143 En 17 Chapter 17 Additional information Setting up the remote to control your TV You can use the supplied remote to control your TV. To be able to use this feature you first have to program the remote with a maker code from the table below. 1 Press and hold down the CLEAR button, then enter the maker code for your TV. See …
-
Pioneer DVR-LX60D — page 144
Additional information 17 144 En Minimum copying times The table below shows the minimum HDD to DVD copying time for one hour of video. Please note that not all discs are compatible with high-speed copying. 1 Check with the disc manufacturer for compatibility. Note that all times in the above table are approximate. Also that actual copy speed varie …
-
Pioneer DVR-LX60D — page 145
Additional information 145 En 17 Manual recording modes The table below shows the approximate recording times for different DVD types in each manual recording mode, as well as the standard recording mode equivalents. For recording time on the HDD, see Specifications on page 158. *1 Recording time may be slightly shorter for certain disc types or re …
-
Pioneer DVR-LX60D — page 146
Additional information 17 146 En • Levels separated by a bold line show where there is a noticeable change in picture quality. • Audio recording in all manual recording modes is in Dolby Digital 2 ch format, except for LPCM mode, which is in Linear PCM format. • See also Recording on page 59. Troubleshooting Incorrect operation is often mista …
-
Pioneer DVR-LX60D — page 147
Additional information 147 En 17 No picture • Check that ever ything is connected properly (page 14). • Check that the connected TV and/or the A V amp/receiver is set to the correct input. • The recorder may be set to progressive scan with an incompatible TV . Reset to interlace by pressing and holding the front panel (Stop) button then p …
-
Pioneer DVR-LX60D — page 148
Additional information 17 148 En Can’t play a disc recor ded using this recor der on another player • If the disc was recorded in DVD-R/-RW (Video mode) or DVD+R , make sure that it’s finalized (page 71). • Some players will not play recordable DVD discs, even when recorded in DVD-R/-RW (Video mode) or DVD+R and finalized. • If the disc …
-
Pioneer DVR-LX60D — page 149
Additional information 149 En 17 After briefly unplugging or after a power failure the fr ont panel display shows ‘—:—’ • A backup batter y inside the recorder keeps the clock and other settings from being reset when there is no power to the recorder . Af ter unplugging or a power failure, the batter y keeps all settings for a period of se …
-
Pioneer DVR-LX60D — page 150
Additional information 17 150 En HDMI If the unit does not operate normally due to external effects such as static electricity, disconnect the power plug from the outlet and insert again to return to normal operating conditions. If the picture freezes and the front panel and remote control buttons stop working • Press (Stop) then try restarti …
-
Pioneer DVR-LX60D — page 151
Additional information 151 En 17 On-screen displays The table below shows a list of error messages that you may encounter when using the recorder and an explanation of their meaning. Message Explanation/Action • Initializing disc. Please wait a moment. When you load a blank DVD-RW or DVD+RW disc, the recorder automatically initializes it. • Inc …
-
Pioneer DVR-LX60D — page 152
Additional information 17 152 En • Repairing disc. • Repairing the HDD. During recording, the power was cut. This display appears when the power is restored. • Could not repair the disc. The recorder was unable to repair the disc af ter a power cut. The contents of the recording will be lost. • Overheating has stopped operation. Press DISPL …
-
Pioneer DVR-LX60D — page 153
Additional information 153 En 17 • Y ou are not allowed to watch this Conditional Access Programme. A CA module or smart card (obtained from your ser vice provider) is required to watch the selected programme. Insert the supplied module or card into the Common Inter face card slot on the front panel of the recorder (page 25). • There is no DV i …
-
Pioneer DVR-LX60D — page 154
Additional information 17 154 En Front-panel displays The table below shows a list of error messages that you may encounter when using the recorder and an explanation of their meaning. Language code list Language (Language code letter), Language code Message Explanation/Action • E01 The HDD may be damaged or broken. Please ask your nearest P ione …
-
Pioneer DVR-LX60D — page 155
Additional information 155 En 17 Country/Area code list Country/Area, Country/Area code , Code letter Screen sizes and disc formats Argentina, 0118 , ar Australia, 0121 , au Austria, 0120 , at Belgium, 0205 , be Brazil, 0218 , br Canada, 0301 , ca Chile, 0312 , cl China, 0314 , cn Denmark, 0411 , dk Finland, 0609 , fi France, 0618 , fr Germany, 040 …
-
Pioneer DVR-LX60D — page 156
Additional information 17 156 En Handling discs When holding discs of any type, take care not to leave fingerprints, dirt or scratches on the disc surface. Hold the disc by its edge or by the center hole and edge. Damaged or dirty discs can affect playback and recording performance. Take care also not to scratch the label side of the disc. Although …
-
Pioneer DVR-LX60D — page 157
Additional information 157 En 17 Hints on installation We want you to enjoy using this unit for years to come, so please bear in mind the following points when choosing a suitable location for it: Do… Use in a well-ventilated room. Place on a solid, flat, level surface, such as a table, shelf or stereo rack. Don’t… Use in a place …
-
Pioneer DVR-LX60D — page 158
Additional information 17 158 En Specifications General Power requirements . . . . . 220 V to 240 V, 50 Hz/60 Hz Power consumption . . . . . . . . . . . . . . . . . . . . . . . . 58 W Power consumption in standby mode . . . . . . . 0.69 W (Front panel display: off) Weight . . . . . . . . . . . . . . . . . . . . . . . . . . . . . . . . . . 4.8 kg Di …
-
Pioneer DVR-LX60D — page 159
Additional information 159 En 17 Input/Output Antenna . . . . 75 Ω IEC 169-2 connector for VHF/UHF in/out (analog) . . . . 75 Ω IEC 169-2 connector for VHF/UHF in/out (digital) Video input . . . . . . . . . . . . AV2 (Input 1), Input 2 (front), Input 3 (rear) Input level . . . . . . . . . . . . . . . . . . . . . . . . 1 Vp-p (75 Ω ) Jacks . . …
-
Pioneer DVR-LX60D — page 160
Operating Instructions Discover the benefits of registering your product online at http://www .pioneer .co.uk (or http://www .pioneer .eu ) DV R-LX60D HDD/DVD RECORDER HDD/D VD RECORDER Operating Instructions <VRB1459-A> P rinted in UK P ublished by Pioneer Corporation. Copyright © 2007 P ioneer Corporation. All rights reser ved. http://www. …
-
Page 1: Pioneer DVR-LX60D
Operating Instructions Discover the benefits of registering your product online at http://www .pioneer .co.uk (or http://www .pioneer .eu ) DV R-LX60D HDD/DVD RECORDER HDD/D VD RECORDER Operating Instructions <VRB1459-A> P rinted in UK P ublished by Pioneer Corporation. Copyright © 2007 P ioneer Corporation. All rights reser ved. http://www.[…]
-
Page 2: Pioneer DVR-LX60D
Thank you for buying this P ioneer product. Please read through these operating instructions so you will know how to operate your model properly . After you have finished reading the instructions, put them away in a safe place for future reference. The exclamation point within an equilateral triangle is intended to alert the user to the presence of[…]
-
Page 3: Pioneer DVR-LX60D
CAUTION The ST ANDBY/ON switch on this unit will not completely shut off all power from the AC outlet. Since the power cord ser ves as the main disconnect device for the unit, you will need to unplug it from the AC outlet to shut down all power . Therefore, make sure the unit has been installed so that the power cord can be easily unplugged from th[…]
-
Page 4: Pioneer DVR-LX60D
01 4 En Contents 01 Before you start What’s in the box . . . . . . . . . . . . . . . . . . . 6 Putting the batteries in the remote control . . . . . . . . . . . . . . . . . . . . . . . . . . . . 6 Using the remote control . . . . . . . . . . . . . . 6 Disc/content format playback compatibility . . . . . . . . . . . . . . . . . . . . . . . 7 About[…]
-
Page 5: Pioneer DVR-LX60D
5 En Switching DVD and DivX soundtracks . . . . . . . . . . . . . . . . . . . . . . 82 Switching audio channels . . . . . . . . . . . . 83 Switching camera angles . . . . . . . . . . . . 83 Displaying disc information on-screen . . . . . . . . . . . . . . . . . . . . . . . . 84 09 Playing and recording from a DV camcorder Playing from a DV camcorde[…]
-
Page 6: Pioneer DVR-LX60D
Before you start 01 6 En Chapter 1 Before you start What’s in the box Please confirm that the following accessories are in the box when you open it; • Remote control • AA/R6P dry cell batteries x 2 • Audio/video cable (red/white/yellow) • G-LINK™ cable • RF antenna cable x 2 • Power cable • These operating instructions • Warrant[…]
-
Page 7: Pioneer DVR-LX60D
Before you start 7 En 01 • You can control this recorder using the remote sensor of another Pioneer component via the CONTROL IN jack on the rear panel. See Rear panel connections on page 14 for more information. Disc/content format playback compatibility Compatible media • DVD-RW ver. 1.1 / 1x / 1x to 2x, ver. 1.2 / 2x to 4x / 2x to 6x • DVD[…]
-
Page 8: Pioneer DVR-LX60D
Before you start 01 8 En HDD/DVD Recording and playback compatibility This recorder can play and record all widely-used DVD disc types, and additionally provides HDD functionality. The table below shows some specific compatibility differences between the different disc types. Notes to table *1 Must be initialized for VR mode recording (page 122). *[…]
-
Page 9: Pioneer DVR-LX60D
Before you start 9 En 01 Using DVD-R DL/DVD+R DL discs DVD-R DL (Dual-Layer) and DVD+R DL (Double-Layer) discs contain two recordable layers on a single side, giving about 1.8 times the recording capacity of a conventional single-layer disc. This unit can record to both DVD-R DL and DVD+R DL discs. • If you intend to play DVD-R DL (Video mode) or[…]
-
Page 10: Pioneer DVR-LX60D
Before you start 01 10 En • Sampling rates: 32 kHz, 44.1 kHz or 48 kHz • Bit-rates: Any (128 kbps or higher recommended) • Variable bit-rate (VBR) MP3 playback: Yes • VBR WMA playback: No • WMA encoder compatibility: Windows Media Codec 8 (files encoded using Windows Media Codec 9 may be playable but some parts of the specification are no[…]
-
Page 11: Pioneer DVR-LX60D
Before you start 11 En 01 DivX ® VOD content In order to play DivX VOD (video on demand) content on this recorder, you first need to register the recorder with your DivX VOD content provider. You do this by generating a DivX VOD registration code, which you submit to your provider. Some DivX VOD content may only be playable a fixed number of times[…]
-
Page 12: Pioneer DVR-LX60D
Before you start 01 12 En DVB The Digital Video Broadcasting Project, or DVB for short, is a set of open standards for digital broadcasting, covering terrestrial, cable and satellite broadcasts. Based around the MPEG-2 coding system, these open standards ensure that compliant systems are able to work together, independent of manufacturer. DVB is ex[…]
-
Page 13: Pioneer DVR-LX60D
Before you start 13 En 01 Optimizing HDD performance As you record and edit material on the HDD, the data on the disk becomes fragmented, eventually affecting the recorder’s performance. Before this happens, the recorder will warn you that it is time to optimize the HDD (which you can do from the Disc Setup menu; see Optimize HDD on page 122). Sy[…]
-
Page 14: Pioneer DVR-LX60D
Connections 02 14 En Chapter 2 Connections Rear panel connections 1 ANTENNA IN (RF IN)/OUT Connect your TV antenna to the ANTENNA IN (RF IN) jack. The signal is passed through to the ANTENNA OUT jack for connection to your TV. 2 INPUT 3 Stereo analog audio, video and S-video inputs for connection to a VCR or other source component. 3 AV2 (INPUT 1/D[…]
-
Page 15: Pioneer DVR-LX60D
Connections 15 En 02 Front panel connections On the front panel there is a flip-down cover that hides more connections. Left side: 13 DV IN A DV input i.LINK connector, suitable for connecting a DV camcorder. 14 USB port (Type B) USB port for connecting a PictBridge- compatible printer or PC. 15 USB port (Type A) USB port for connecting a digital c[…]
-
Page 16: Pioneer DVR-LX60D
Connections 02 16 En Easy connections The setup described below is a basic setup that allows you to watch and record TV programmes, and play discs. Other types of connections are explained starting on the following page. Important • These connections use SCART cables (not supplied). If your TV (or VCR) does not have a SCART connection, and you wa[…]
-
Page 17: Pioneer DVR-LX60D
Connections 17 En 02 1 Connect the VIDEO OUTPUT jack to a video input on your TV. Use the yellow jack of the supplied audio/ video cable for the video connection. 2 Connect the AUDIO OUTPUT jacks to the corresponding audio inputs on your TV. Use the red and white jacks of the supplied audio/video cable for the audio connection. Make sure you match […]
-
Page 18: Pioneer DVR-LX60D
Connections 02 18 En 1 Connect RF antenna cables as shown. See Connecting a TV antenna on page 15 for more on RF antenna connections, including from this recorder to your TV. 2 Use a SCART cable (not supplied) to connect the AV1 (RGB)-TV AV connector to a SCART AV connector on your TV. This enables you to watch discs. 3 Use another SCART cable to c[…]
-
Page 19: Pioneer DVR-LX60D
Connections 19 En 02 • It is not possible to watch one TV programme and record another using this setup. 1 Connect the cable from the antenna/ cable TV outlet to the antenna input on your VCR/satellite receiver/cable box. 2 Use a SCART cable (not supplied) to connect your decoder to your VCR/ satellite receiver/cable box. See the manual for your […]
-
Page 20: Pioneer DVR-LX60D
Connections 02 20 En 2 Use a SCART cable (not supplied) to connect the AV1 (RGB)-TV AV connector to a SCART AV connector on your TV. This enables you to watch discs. 3 Use another SCART cable to connect the AV2 (INPUT 1/DECODER) AV connector to a SCART AV connector on your decoder box. This enables you to record scrambled TV channels. Connecting to[…]
-
Page 21: Pioneer DVR-LX60D
Connections 21 En 02 The HDMI connector outputs uncompressed digital video, as well as almost every kind of digital audio. 1 Use an HDMI cable to connect the HDMI OUT connector on this recorder to an HDMI connector on an HDMI- compatible display. • The arrow on the cable connector body should be face down for correct alignment with the connector […]
-
Page 22: Pioneer DVR-LX60D
Connections 02 22 En Connecting other AV sources Connecting a VCR or analog camcorder 1 Connect a set of audio and video inputs of your VCR or camcorder to a set of outputs on this recorder. This enables you to record from this recorder to your VCR or camcorder. • You can use standard video or S-video cables for the video connection. • Alternat[…]
-
Page 23: Pioneer DVR-LX60D
Connections 23 En 02 Important • Some USB devices may not work with this recorder. • When connecting a PC to this unit, make sure the power is turned off on both the PC and this unit when you connect them via USB. • We recommend connecting USB devices when this recorder is switched off (in standby). JPEG file storage devices • Digital still[…]
-
Page 24: Pioneer DVR-LX60D
Controls and displays 03 24 En Chapter 3 Controls and displays Front panel 1 A.TV indicator Lights when analog TV is selected. D.TV indicator Lights when digital TV is selected. PLTV indicator Lights during recording started using the Pause Live TV feature. DivX indicator Lights during DivX playback. COPY indicator Lights when copying is underway. […]
-
Page 25: Pioneer DVR-LX60D
Controls and displays 25 En 03 11 Press to start or restart playback. Press to stop playback. STOP REC Press to stop recording. ONE TOUCH COPY Press to start One Touch Copy of the currently playing title to DVD or the HDD. CH +/– Use to change channels, skip chapters/ tracks, etc. INPUT SELECT Press to change the input used for record[…]
-
Page 26: Pioneer DVR-LX60D
Controls and displays 03 26 En Display 1 Lights during playback; blinks when playback is paused. 2 Lights when copying. 3 Lights during recording; blinks when recording is paused. 4 (page 68) Lights when a timer recording has been set. (Indicator blinks if the timer has been set to DVD but there isn’t a recordable disc loaded, or the […]
-
Page 27: Pioneer DVR-LX60D
Controls and displays 27 En 03 Remote control 1 STANDBY/ON Press to switch the recorder on/into standby. 2 PLAY (page 74) Press to start playback. PAUSE Press to pause playback or recording. STOP (page 74) Press to stop playback. PREV NEXT Press to skip to the previous or next title/ chapter/track/folder; or to display the p[…]
-
Page 28: Pioneer DVR-LX60D
Controls and displays 03 28 En 6 A.TV/D.TV Press to switch between analog TV antenna input and digital TV antenna input. The A.TV and D.TV indicators on the front panel show which is selected. 7 Colour buttons (RED, GREEN, YELLOW, BLUE) Use when an EPG screen is displayed or when tuned to a data channel of a digital broadcast. The function of each […]
-
Page 29: Pioneer DVR-LX60D
Controls and displays 29 En 03 22 DISPLAY (page 84) Displays/changes the on-screen information displays. 23 TEXT (page 62, 63) Press to display Teletext information (in European countries except the UK) or to start the MHEG application display (UK only) if available during digital broadcasts. 24 TV/DVD Press to switch between ‘TV mode’, in whic[…]
-
Page 30: Pioneer DVR-LX60D
Getting started 04 30 En Chapter 4 Getting started Switching on and setting up When you switch the recorder on for the first time, you can make several basic settings using the Setup Navigator feature. This takes you through setting the clock, the internal TV tuner and the video output. If you’re using the recorder for the first time, we strongly[…]
-
Page 31: Pioneer DVR-LX60D
Getting started 31 En 04 • The clock will also be set automatically here if D.TV channels are found. • If no new channels were found a message appears asking if you want to scan again. Check the aerial connection before selecting Yes . (If you select No, skip to step 8 below.) 8 Select the analog TV (A.TV) Auto Channel Setting (‘Auto Scan’ […]
-
Page 32: Pioneer DVR-LX60D
Getting started 04 32 En • Manual clock setting If no stations in your area are broadcasting time signals, you can set the clock manually. Use the / buttons to set your time zone. You can set this by selecting a city or a time relative to GMT. Press then use the / buttons to select ‘On’ or ‘Off’ for summer time, then press[…]
-
Page 33: Pioneer DVR-LX60D
Getting started 33 En 04 14 Select ‘Finish Setup’ to exit the Setup Navigator, or ‘Go Back’ if you want to start again. That completes basic setup using the Setup Navigator. • If there are blank channels with no station, you can set these to skip using the manual channel setting. See Manual CH Setting on page 130. For users receiving digi[…]
-
Page 34: Pioneer DVR-LX60D
Getting started 04 34 En 2 Highlight ‘Postal Code’. 3 Enter your postal code. The system uses your postal code to identify which TV listings data is correct for the area in which you live, so it is important that you enter it correctly. 4 If you are using an external receiver (such as a satellite receiver) with the supplied G-LINK cable, comple[…]
-
Page 35: Pioneer DVR-LX60D
Getting started 35 En 04 recorder needs to be in standby; it will wake up automatically and download new codes from the host channel. The next day, try this setup process again: • Press GUIDE to display the GUIDE Plus+ screen. • Press to highlight the Menu bar, then use to reach the Setup area and select Setup. • Continue setting up f[…]
-
Page 36: Pioneer DVR-LX60D
Getting started 04 36 En • Even if you can’t use the EPG functions where you live, you can still set VIDEO Plus+ recordings and manual recordings — see Setting a manual recording on page 45. • The front panel display shows EPG when receiving data. If you power on the recorder during an EPG download, the download is cancelled. • EPG data m[…]
-
Page 37: Pioneer DVR-LX60D
Using the GUIDE Plus+® electronic programme guide 37 En 05 Chapter 5 Using the GUIDE Plus+® electronic programme guide This chapter is only applicable if the EPG Type Select setting made in the Setup Navigator (or the Initial Setup menu) is set to GUIDE Plus+ . The GUIDE Plus+ system The GUIDE Plus+® system* is a free, interactive on-screen tele[…]
-
Page 38: Pioneer DVR-LX60D
Using the GUIDE Plus+® electronic programme guide 05 38 En 5 Menu bar – Gives access to the various areas of the GUIDE Plus+ system. 6 Grid – Shows TV listings information for the next seven days by channel and time. GUIDE Plus+ navigation The table below shows a summary of the remote buttons you’ll use to navigate the GUIDE Plus+ system. On[…]
-
Page 39: Pioneer DVR-LX60D
Using the GUIDE Plus+® electronic programme guide 39 En 05 Lock/Unlock video window When you enter the GUIDE Plus+ system, the channel you were watching remains visible in the video window. The date stamp above the window lets you know the channel, date and time. The default setting for this window is ‘locked’, as indicated by a closed padlock[…]
-
Page 40: Pioneer DVR-LX60D
Using the GUIDE Plus+® electronic programme guide 05 40 En • Tune to a programme that’s currently showing 1 • Set a programme to record • Lock or unlock the video window • Access Information panels Browsing the Grid Use the following remote buttons to browse the grid: /// (cursor buttons) – Navigate the Grid PREV / N[…]
-
Page 41: Pioneer DVR-LX60D
Using the GUIDE Plus+® electronic programme guide 41 En 05 Using My Choice keywords for a search In addition to the standard categories, you can also set your own keywords. 1 Access My Choice. 2 Press the YELLOW Action button to add a keyword. 3 Enter a keyword to appear in the menu. When you’re finished, press the GREEN Action button to exit an[…]
-
Page 42: Pioneer DVR-LX60D
Using the GUIDE Plus+® electronic programme guide 05 42 En 3 To add a channel to your profile, press the YELLOW Action button. Select a channel from the mosaic of channel icons and press ENTER . Repeat this step to add up to 16 channels. 4 To add a category to your profile, highlight ‘Categories’ and press the YELLOW Action button. Select a ca[…]
-
Page 43: Pioneer DVR-LX60D
Using the GUIDE Plus+® electronic programme guide 43 En 05 Editing a scheduled recording You can edit any parameter in a scheduled recording, or delete it if you no longer require it 1 . 1 Highlight the left tile of a scheduled recording. • If you only want to edit the recording quality, frequency, destination, timing or genre settings, skip to […]
-
Page 44: Pioneer DVR-LX60D
Using the GUIDE Plus+® electronic programme guide 05 44 En 7 Press the GREEN Action button (Frequency) to change the recording frequency. Select from the various options for one-time, daily and weekly recordings. 8 Press YELLOW Action button (Destination) to select the recording destination. Select from DVD , HDD or HDDr (Auto Replace Recording) 1[…]
-
Page 45: Pioneer DVR-LX60D
Using the GUIDE Plus+® electronic programme guide 45 En 05 Deleting a scheduled recording 1 Highlight the left tile of a scheduled recording. 2 Press the RED Action button (Delete). The scheduled event is deleted. Setting a VIDEO Plus+® recording 1 Select ‘Schedule’ from the Menu bar. 2 Press the RED Action button (VIDEO Plus+). 3 Use the num[…]
-
Page 46: Pioneer DVR-LX60D
Using the GUIDE Plus+® electronic programme guide 05 46 En 3 Use the number and /// buttons to enter the recording date, then press the GREEN Action button (Next). 4 In the same way, enter the recording start time, followed by the GREEN Action button (Next) to confirm. 5 Enter the recording end time in the same way, followed by the GRE[…]
-
Page 47: Pioneer DVR-LX60D
Using the GUIDE Plus+® electronic programme guide 47 En 05 Changing the source and programme number 1 Select ‘Editor’ from the Menu bar. 2 Highlight the right channel tile of the channel you want to make a change to. 3 Press the RED Action button to change the channel source, or the GREEN Action button to enter a programme number. Each press o[…]
-
Page 48: Pioneer DVR-LX60D
Using the GUIDE Plus+® electronic programme guide 05 48 En Manual Host Channel setup The GUIDE Plus+ system will automatically identify your Host Channel as soon as the recorder is put into standby for the first time. See the table on page 35 for a list of all the European Host Channels. If you know your Host Channel details (source and programme […]
-
Page 49: Pioneer DVR-LX60D
Using the GUIDE Plus+® electronic programme guide 49 En 05 Switch this recorder into standby. The next morning, please perform the GUIDE Plus+ setup again to see if your external receiver can now be controlled. – The external receiver that you use is currently not supported. If, after leaving your external receiver on overnight, and doing the Re[…]
-
Page 50: Pioneer DVR-LX60D
Using the GUIDE Plus+® electronic programme guide 05 50 En •I used the One-Button-Record feature (red Action button) to set a recording, but I recorded the wrong channel. If the channel to be recorded is received via the external receiver first make sure that the external receiver was left switched on. Next, in the Editor Area, make sure that th[…]
-
Page 51: Pioneer DVR-LX60D
Using the digital electronic programme guide 51 En 06 Chapter 6 Using the digital electronic programme guide This chapter is only applicable if the EPG Type Select setting made in the Setup Navigator (or the Initial Setup menu) is set to Digital EPG . The Digital EPG system The Digital EPG shows a table of scheduled digital TV programmes and detail[…]
-
Page 52: Pioneer DVR-LX60D
Using the digital electronic programme guide 06 52 En Using the Digital EPG Using the Digital EPG you can check the schedule of digital TV programmes, view information about desired programmes, and/or select programmes. 1 Press to display the Digital EPG screen. The EPG screen updates automatically if the EPG data is acquired successfully. If not, […]
-
Page 53: Pioneer DVR-LX60D
Using the digital electronic programme guide 53 En 06 3 Enter the timer recording settings. Use the / buttons to select a field; use the / buttons to change the value 1 . • CH – Choose a channel (Pr 1 to Pr 99 for analog channels and available digital channels (excluding skip channels)), or one of the external inputs from which to r[…]
-
Page 54: Pioneer DVR-LX60D
Using the digital electronic programme guide 06 54 En EPG Link 1 (UK only) – Choose whether or not to have this device automatically record scheduled programmes from the Digital EPG even if the times in which they are broadcast change. Series Recording 2 (UK only) – Choose whether or not to record all programmes from a series when you make a re[…]
-
Page 55: Pioneer DVR-LX60D
Using the digital electronic programme guide 55 En 06 2 Highlight the timer programme you want to change . . . . If you want to set a new timer programme, select ‘New Input’ and skip to step 4 . 3 Press then select ‘Modify’ from the command menu panel. Alternatively, press ENTER . The Timer Programme Set screen appears from which you ca[…]
-
Page 56: Pioneer DVR-LX60D
Using the digital electronic programme guide 06 56 En • When you have EPG Link or Series Recording set to On , any changes in broadcast time or division of broadcasts are automatically accommodated for and your scheduled recordings are carried out without any additional settings. As a result, even when you have not scheduled programmes to record […]
-
Page 57: Pioneer DVR-LX60D
Using the digital electronic programme guide 57 En 06 3 Press then select ‘Series Search’ from the command menu panel. • The search results are displayed. Choose the programme you would like to record and press either the RED button or ENTER to schedule a recording. Searching for recommendations (UK only) You can search for recommended pr[…]
-
Page 58: Pioneer DVR-LX60D
Using the digital electronic programme guide 06 58 En 3 In the ‘Time’ field select the time of day (0:00 to 23:00) to search in. 4 In the ‘Genre’ field, select the genre to search for. You can search for multiple genres by pressing ENTER after each genre. 5 Select ‘OK’. 6 Select ‘Search’. The results of your search are displayed. EN[…]
-
Page 59: Pioneer DVR-LX60D
Recording 59 En 07 Chapter 7 Recording About DVD recording This recorder can record to DVD-R, DVD- RW, DVD+R, DVD+RW, DVD-RAM, DVD-R DL and DVD+R DL media. DVD-R and DVD-RW discs can be initialized for Video mode or VR mode recording. Each has its advantages, and it depends on what you want to do with the recording which mode you choose. If you wan[…]
-
Page 60: Pioneer DVR-LX60D
Recording 07 60 En • See also Disc/content format playback compatibility on page 7 for detailed disc compatibility information. Recording to DVD-R DL/DVD+R DL discs Recording to DVD-R DL/DVD+R DL discs is generally the same as recording to regular single-layer discs; however, please note the following points: • When the recorder switches from t[…]
-
Page 61: Pioneer DVR-LX60D
Recording 61 En 07 Restrictions on video recording You cannot record copy-protected video using this recorder. Copy-protected video includes DVD-Video discs and some satellite broadcasts. If copy-protected material is encountered during a recording, recording will pause automatically and an error message will be displayed on-screen. Video that is ?[…]
-
Page 62: Pioneer DVR-LX60D
Recording 07 62 En Tip • When changing terrestrial digital broadcast channels, channels with a low signal strength may result in a black screen being displayed. • For other channels, it may take a short while for the channel picture to appear, and/or for the channel number to appear. • In both of the above cases, some improvement may be possi[…]
-
Page 63: Pioneer DVR-LX60D
Recording 63 En 07 The channel banner displays an icon ( ) to indicate that the MHEG application can be run. • Press to start the MHEG application. 1 • You can also use any of the colour buttons. • Press TEXT to quit the MHEG application. Viewing Teletext (European countries except the UK.) You can view the Teletext that comes simultaneously […]
-
Page 64: Pioneer DVR-LX60D
Recording 07 64 En Setting the picture quality/ recording time Before starting a recording, you will usually want to set the picture quality/recording time. There are six standard settings available, which allow you to choose a balance between picture quality and recording time. When Manual Recording is set to On (see Manual Recording on page 135),[…]
-
Page 65: Pioneer DVR-LX60D
Recording 65 En 07 3 Select a TV channel to record. The front panel display shows the channel number, or channel name if it’s available: • While the recorder is stopped, you can also use the number buttons on the remote to select the channel (For channel 24, press 2 , 4 then ENTER ). • If the recorder is stopped, you can also use the CH +/–[…]
-
Page 66: Pioneer DVR-LX60D
Recording 07 66 En Pause Live TV The Pause Live TV feature lets you effectively pause a TV programme you’re watching. When you’re ready to resume watching, just press the PLAY button. Setting up for Pause Live TV You can use the Pause Live TV feature with an AV Link-compatible TV connected using a SCART cable (see TV tuner setup for Pause L[…]
-
Page 67: Pioneer DVR-LX60D
Recording 67 En 07 Using Pause Live TV 1 Start recording the current TV channel. Recording continues with playback paused. • Note that it may take up to 10 seconds for recording to start. 2 Press to start playback. You can also use the scan buttons ( / ), pause ( PAUSE ) and stop ( STOP ) — all without affecting the recording. 3 […]
-
Page 68: Pioneer DVR-LX60D
Recording 07 68 En About timer recordings Using the timer recording features you can program up to 32 timer recordings up to a month in advance. Timer recording programmes can be set to record just once, every day, or every week. You can set the recording quality for your timer recording in the same way as for a regular recording, but with the adde[…]
-
Page 69: Pioneer DVR-LX60D
Recording 69 En 07 • If VPS/PDC is active for two timer programmes that are programmed to start at the same time, then the programme that actually starts first takes priority. Extending a timer recording in progress You can extend a timer recording beyond the programmed end time. This can be useful if a broadcast programme overruns, for example. […]
-
Page 70: Pioneer DVR-LX60D
Recording 07 70 En Simultaneous recording and playback (Chase Play) Chase Play allows you to watch a recording that is still in progress from the start, without having to wait until the recording has finished (i.e., playback is ‘chasing’ the recording). In fact, you’re not just limited to watching the recording in progress. You can watch anyt[…]
-
Page 71: Pioneer DVR-LX60D
Recording 71 En 07 4 Select the HDD or DVD for recording. 5 Press to start recording. • If your source is copy-protected using Copy Guard, you will not be able to record it. See Restrictions on video recording on page 61 for more details. Playing your recordings on other DVD players Most regular DVD players can play finalized discs recorded in DV[…]
-
Page 72: Pioneer DVR-LX60D
Recording 07 72 En 1 Load the disc you want to finalize. Make sure that the recorder is stopped before proceeding. 2 Select ‘Disc Setup’ from the Home Menu. 3 Select ‘Finalize’ > ‘Finalize’ > ‘Next Screen’. 4 For DVD-R/-RW (Video mode) and DVD+R/+RW discs only, select a title menu style, then select ‘Yes’ to start finaliza[…]
-
Page 73: Pioneer DVR-LX60D
Recording 73 En 07 Important • Initializing a DVD-RW, DVD+RW or DVD-RAM disc will erase everything recorded on it. Make sure there is nothing on the disc that you want to keep! • You may not be able to re-initialize a DVD-RW disc in a different format if it was originally initialized on an older DVD recorder. • Once initialized for VR mode re[…]
-
Page 74: Pioneer DVR-LX60D
Playback 08 74 En Chapter 8 Playback Introduction Most of the features described in this chapter make use of on-screen displays. Navigate these using the cursor buttons and ENTER . To go back one level from any screen, use the RETURN/EXIT button. Remember also that the button guide at the bottom of every screen shows which buttons do what. Many of […]
-
Page 75: Pioneer DVR-LX60D
Playback 75 En 08 Playing DVD discs The table below shows the basic playback controls for DVD-Video, and recordable DVD discs. Playing from the HDD The table below shows the basic playback controls when playing video recorded on the hard disk (HDD). P ress to start playback. If RESUME is displayed on- screen, playback starts from the place last sto[…]
-
Page 76: Pioneer DVR-LX60D
Playback 08 76 En Playing CDs and WMA/MP3 discs The table below shows the basic playback controls for audio CDs 1 , and WMA/MP3 files. Playing Video CD/Super VCDs The table below shows the basic playback controls for Video CD/Super VCDs. Some discs feature Playback Control (PBC for short) menus. These discs show PBC in the display when you load the[…]
-
Page 77: Pioneer DVR-LX60D
Playback 77 En 08 Playing DivX video files The table below shows the basic playback controls for DivX video files. P auses playback, or restarts playback when paused. P ress to start scanning. Press repeatedly to increase the scan- ning speed. P ress to skip to previous/next track. When a PBC menu is dis- played, press to display the pre- vious/nex[…]
-
Page 78: Pioneer DVR-LX60D
Playback 08 78 En Using the Disc Navigator to browse the contents of a disc Use the Disc Navigator to browse the contents of a disc and start playback. Using the Disc Navigator with recordable discs and the HDD You can use the Disc Navigator to browse and edit video on recordable DVDs and the HDD, and to view information on titles. See also Editing[…]
-
Page 79: Pioneer DVR-LX60D
Playback 79 En 08 Using the Disc Navigator with playback-only discs 1 Display the Home Menu. 2 Select ‘Disc Navigator’. Alternatively, for a CD, Video CD, Super VCD or WMA/MP3/DivX disc, you can press DISC NAVIGATOR , which takes you straight to the Disc Navigator screen. 3 Select what you want to play. Depending on the type of disc you have lo[…]
-
Page 80: Pioneer DVR-LX60D
Playback 08 80 En Frame advance/frame reverse You can advance or back up video on a DVD disc 1 or the HDD frame-by-frame. With Video CDs/Super VCDs and DivX titles, you can only use frame advance. 1 Pause playback. 2 Back up or advance one frame with each press. • You can also do this by rotating the Smart Jog . 3 Resume normal playback. The Play[…]
-
Page 81: Pioneer DVR-LX60D
Playback 81 En 08 2 With ‘A (Loop Start)’ highlighted, press at the point you want the loop to start. 3 With ‘B (Loop End)’ highlighted, press at the point you want the loop to end. Playback immediately jumps back to the start point and plays the loop round and round. • When playing a DVD-Video, DVD-R/-RW (Video mode), DVD+R/+RW, or from […]
-
Page 82: Pioneer DVR-LX60D
Playback 08 82 En After pressing ENTER to add the title/ chapter/folder/track, the step number automatically moves down one. • To insert a step into the programme list, highlight the step number where you want to insert another step, then select a chapter/title/folder/track as usual. After pressing ENTER , all the subsequent steps move down one. […]
-
Page 83: Pioneer DVR-LX60D
Playback 83 En 08 Check the disc packaging for details of the soundtrack options. • Change the audio soundtrack. The current audio language is shown on- screen and in the front panel display. • The sound may drop out for a few seconds when switching soundtracks. • Some discs feature both Dolby Digital and DTS soundtracks. There is no analog a[…]
-
Page 84: Pioneer DVR-LX60D
Playback 08 84 En Displaying disc information on-screen You can display various on-screen information about the disc loaded or the HDD. • Display/change the on-screen information. • Press once to show the HDD and removable disc (DVD, etc.) activity together. Press again to show the status of just the currently selected playback/ recording devic[…]
-
Page 85: Pioneer DVR-LX60D
Playing and recording from a DV camcorder 85 En 09 Chapter 9 Playing and recording from a DV camcorder You can play back and record video from a DV camcorder connected to the DV IN jack on the front panel of this recorder. Important • If you connect a second recorder using a DV cable, you cannot control the second unit from this one. • You can?[…]
-
Page 86: Pioneer DVR-LX60D
Playing and recording from a DV camcorder 09 86 En 1 Make sure your DV camcorder is connected to the front panel DV IN jack. Also, set the camcorder to VTR mode. 2 Set the recording quality. • See Setting the picture quality/recording time on page 64 for detailed information. 3 From the Initial Setup menu, check that the DV audio input is setup a[…]
-
Page 87: Pioneer DVR-LX60D
Playing and recording from a DV camcorder 87 En 09 5 Select ‘Record to Hard Disk Drive’ or ‘Record to DVD’. The DV tape is rewound to the beginning. Once it is rewound, the DV tape is played from the beginning and copied to either the HDD or a DVD. • If there is a gap of two minutes or more between recorded contents, the copying process i[…]
-
Page 88: Pioneer DVR-LX60D
Editing 10 88 En Chapter 10 Editing Editing options The table below shows which commands you can use with the HDD and different disc types. *1 DVD-R/-RW only HDD DVD-R/-RW (Video mode), DVD+R/+RW DVD-R/-RW , DVD-RAM (VR mode) Original Play List Create (page 90) Play (page 90) Erase (page 90) Edit > Title Name (p[…]
-
Page 89: Pioneer DVR-LX60D
Editing 89 En 10 The Disc Navigator screen The Disc Navigator screen is where you can edit video content on unfinalized Video mode and DVD-R/-RW (VR mode) discs, DVD+R/ +RW and DVD-RAM, as well as video content on the hard disk drive. Important • Titles that have been recorded with a Input Line System setting different to the current setting of t[…]
-
Page 90: Pioneer DVR-LX60D
Editing 10 90 En HDD genres The large capacity of the HDD means that there may be many hours of video in the recorder. To help you organize your HDD video content you can assign different genres to titles. There are 20 genres in total, including five user-definable ones that you can name as you like. Create Play List only Use this function to creat[…]
-
Page 91: Pioneer DVR-LX60D
Editing 91 En 10 1 Highlight the title you want to erase. • You can also use the Smart Jog to select titles. 2 Select ‘Erase’ from the command menu panel. 3 Select ‘Yes’ to confirm or ‘No’ to cancel. Tip • You can erase a title quickly by pressing CLEAR when the title is highlighted. Confirm the edit by pressing ENTER . Title Name Y[…]
-
Page 92: Pioneer DVR-LX60D
Editing 10 92 En Using the remote key shortcuts to input a name The table below shows the remote control key shortcuts that you can use to input characters in the name input screen. Pressing a button repeatedly cycles through the characters shown. If you want to enter two characters in succession that are both on the same button (for example a P an[…]
-
Page 93: Pioneer DVR-LX60D
Editing 93 En 10 Set Thumbnail You can change the thumbnail picture that appears in the Disc Navigator for a title to any frame that appears in that title. 1 Highlight the title you want to change the thumbnail picture for. • You can also use the Smart Jog to select titles. 2 Select ‘Edit’ > ‘Set Thumbnail’ from the command menu panel.[…]
-
Page 94: Pioneer DVR-LX60D
Editing 10 94 En 5 Highlight ‘To’ then, in the same way, find the end of the section to erase, then press ENTER. After pressing ENTER , another marker indicates the end of the section, with the section itself marked in red. 6 Select ‘Yes’ to confirm, or ‘No’ to cancel. In the thumbnail viewer you can see a few seconds of video either si[…]
-
Page 95: Pioneer DVR-LX60D
Editing 95 En 10 3 HDD only: Select the type of edit. • For more information about these options, see Editing accuracy on page 89. 4 Select the command you want: • Divide – Divide a chapter into two or more parts: Use the playback controls ( , , , , etc.) to find the point at which you want to divide the chapter, then press EN[…]
-
Page 96: Pioneer DVR-LX60D
Editing 10 96 En 2 Select ‘Edit’ > ‘Set Genre’ from the command menu panel. 3 Select a genre for the title. Lock Original only You can lock a title so that it can’t be edited or erased accidently. If you do need to edit it, you can always unlock it later. Important • You can’t undo any edits made before changing the lock status. Yo[…]
-
Page 97: Pioneer DVR-LX60D
Editing 97 En 10 3 Select a new position for the title. After pressing ENTER , the new, updated Play List is displayed. Combine Play List only Use this function to combine two Play List titles into one. 1 Highlight the title you want to combine. • You can also use the Smart Jog to select titles. This title will remain in the same place after comb[…]
-
Page 98: Pioneer DVR-LX60D
Editing 10 98 En 2 Select one of the user- definable genre names. 3 Input a name for the genre. • The name can be up to 12 characters long. • For information on remote control key short cuts, see Using the remote key shortcuts to input a name on page 92. 4 Select ‘OK’ to enter the name and exit. Multi-Mode Multi-Mode allows you to select se[…]
-
Page 99: Pioneer DVR-LX60D
Editing 99 En 10 Undo If you make a mistake while editing, you can generally undo it. There is one level of undo (in other words, you can only undo the last edit you made). • Select ‘Undo’ from the command menu panel. • You can’t undo anything after exiting the Disc Navigator screen. Frequently asked questions • Why doesn’t the availa[…]
-
Page 100: Pioneer DVR-LX60D
Copying and backup 11 100 En Chapter 11 Copying and backup Introduction Use the copying features of this recorder to: • Back up important recordings stored on the HDD to a DVD. • Make a DVD copy of a recording on the HDD to play in another player. • Transfer video from a DVD to the HDD for editing. • Transfer edited video from the HDD to DV[…]
-
Page 101: Pioneer DVR-LX60D
Copying and backup 101 En 11 HDD to DVD copies are made in the same recording mode. When copying DVD to HDD, the copy is made in whatever recording mode is currently set. Make sure that a recordable DVD disc is loaded when trying to copy from the HDD. 1 If you’re copying from DVD to the HDD, select a recording mode. Note that selecting a recordin[…]
-
Page 102: Pioneer DVR-LX60D
Copying and backup 11 102 En • Thumbnail picture markers and chapter markers for the Disc Navigator are copied, but their position in the copy may be slightly changed from the original. • If some part of the title being copied is copy-protected, copying will start, but the copy-protected portions will not be copied. Using Copy Lists * See also […]
-
Page 103: Pioneer DVR-LX60D
Copying and backup 103 En 11 • When adding titles that contain copy- once protected material, the copy-once parts will not be added. • When adding titles that contain material of more than one aspect ratio (screen size), each part with a different aspect ratio will be added as a separate title if high-speed copying is possible. Depending on the[…]
-
Page 104: Pioneer DVR-LX60D
Copying and backup 11 104 En • Set Thumbnail – Set the thumbnail frame for a title (see Set Thumbnail on page 93). • Recording Mode – Set the picture quality of the copy (see Recording Mode on page 105). • Bilingual – Set how bilingual audio should be copied when copying from HDD to DVD-R/-RW (Video mode) and DVD+R/+RW (see Bilingual on[…]
-
Page 105: Pioneer DVR-LX60D
Copying and backup 105 En 11 – the recorder is reset to its factory settings (see Resetting the recorder on page 157). • It may not be possible to copy from a DVD disc that was recorded on a different DVD recorder or a PC. 1 Select ‘Copy’ from the Home Menu. 2 Select ‘DVD/CD HDD’. 3 Select a Copy List type. • Selecting Create New […]
-
Page 106: Pioneer DVR-LX60D
Copying and backup 11 106 En • Optimized 1,2 – The recording quality is automatically adjusted so that the Copy List fits on to the space available on the disc. Copying is carried out in real-time. When you change the recording mode setting, you can see how much disc space it will require. If this is more than is available, it shows up in red a[…]
-
Page 107: Pioneer DVR-LX60D
Copying and backup 107 En 11 • You can cancel the backup process by pressing ONE TOUCH COPY for more than one second. 5 When the data has been copied, take out the disc and load a blank* recordable DVD. * If you’re using a DVD-RW or DVD+RW, the disc doesn’t have to be blank, although the previous contents of the disc will be erased in the bac[…]
-
Page 108: Pioneer DVR-LX60D
Using the Jukebox 12 108 En Chapter 12 Using the Jukebox The Jukebox feature allows you to use the recorder’s HDD to store and playback music from up to 999 of your CDs. You can also transfer WMA/MP3 files stored on CD-R/ -RW/-ROM, DVD, USB device or PC. Once on the HDD, you can name albums and tracks, assign them a genre, and set tracks that you[…]
-
Page 109: Pioneer DVR-LX60D
Using the Jukebox 109 En 12 • Up to 99 folders/999 files on the USB device can be copied/displayed. Connect PC Using a USB connection, you can copy WMA and MP3 files from a PC to the HDD of this device. Operations carried out on the PC require Windows Media Player 10. Important • If the PC you are using does not currently have Windows Media Pla[…]
-
Page 110: Pioneer DVR-LX60D
Using the Jukebox 12 110 En From the PC, in Windows Media Player 10: 1. Click ‘Library’. 2. Choose the artist, album or song you would like to copy, and press the right mouse button. 3. Click ‘Add to Sync list’ (when choosing songs, click ‘Add to’ then ‘Sync list’). 4. Click ‘Start Sync’. This begins the synchronization process.[…]
-
Page 111: Pioneer DVR-LX60D
Using the Jukebox 111 En 12 • File whose extensions are not supported by the Jukebox (i.e. files that are not .mp3 or .wma) cannot be transferred. • Files imported to this recorder via Connect PC cannot be exported from this recorder. • Note that no recording functions, including timer recordings, will be carried out when you are using the Co[…]
-
Page 112: Pioneer DVR-LX60D
Using the Jukebox 12 112 En • Genre All Genres – All albums are displayed. Genre – Only albums in the selected genre are displayed. Editing Jukebox albums A number of commands are available for editing and changing the playback behavior of albums. 1 Select ‘Jukebox’ from the Home Menu. 2 Select ‘Listen to Music/Edit’. 3 Select what yo[…]
-
Page 113: Pioneer DVR-LX60D
The PhotoViewer 113 En 13 Chapter 13 The PhotoViewer From the PhotoViewer you can view JPEG photos and picture files stored on the HDD, recordable DVD or CD-R/-RW/-ROM, or on a USB-equipped digital camera. 1 You can also import files and save them to the recorder’s HDD or a DVD-R/-RW disc. Locating JPEG picture files 1 Select ‘PhotoViewer’ fr[…]
-
Page 114: Pioneer DVR-LX60D
The PhotoViewer 13 114 En • If you encounter a disc that will not play, check that the disc and file formats are compatible with this recorder (see JPEG file compatibility and PC-created disc compatibility on page 11). • The thumbnail of files that cannot be played is displayed as the logo. Changing the display style of the PhotoViewer You can […]
-
Page 115: Pioneer DVR-LX60D
The PhotoViewer 115 En 13 Zooming an image During a slideshow you can zoom in to enlarge a portion of the picture by a factor of two or four. You can also move the area of the picture displayed. 1 Press during the slideshow to zoom the picture. Repeated presses cycle between zoom off, 2x zoom and 4x zoom. The zoom factor is displayed on-screen. 2 U[…]
-
Page 116: Pioneer DVR-LX60D
The PhotoViewer 13 116 En • Importing to the HDD will not work if there is insufficient space on the HDD, or if there are already the maximum number of files and/or folders on the HDD (999 folders/999 files per folder). Selecting multiple files or folders The Multi-Mode allows you to select multiple folders/files at once for importing or editing.[…]
-
Page 117: Pioneer DVR-LX60D
The PhotoViewer 117 En 13 Important • Use a blank DVD-R/-RW disc, or one that has already been initialized for Video mode recording but has nothing yet recorded on it. Discs that have already been recorded on (as well as CD-R/-RW discs) cannot be used. • After backing up the pictures in your digital camera to DVD, we recommend verifying that th[…]
-
Page 118: Pioneer DVR-LX60D
The PhotoViewer 13 118 En Editing files on the HDD There are a number of commands you can use to edit and organize your pictures stored on the HDD. Creating a new folder 1 From the folder list, display the menu. 2 Select ‘New Folder’. The folder appears at the bottom of the folder list with the name F_ number . • There can be up to 999 folder[…]
-
Page 119: Pioneer DVR-LX60D
The PhotoViewer 119 En 13 2 Display the command menu. 3 Select ‘File Options’ or ‘Folder Options’. 4 Select ‘Copy’ or ‘Copy Folder Contents’. 5 Select a folder to copy the folder(s)/file(s) to. 6 Select ‘Yes’ to confirm, or ‘No’ to cancel. • Copying to the HDD will not work if there is insufficient space on the HDD; if the[…]
-
Page 120: Pioneer DVR-LX60D
The PhotoViewer 13 120 En 4 Select ‘Lock’ or ‘Lock Folder Contents’. Locked files are shown with a padlock icon next to them. To remove all locks within a given folder, choose ‘Folder Option’ > ‘Unlock Folder Contents’ . To view detailed information This feature allows you to check the settings of the camera from which you import[…]
-
Page 121: Pioneer DVR-LX60D
The Disc Setup menu 121 En 14 Chapter 14 The Disc Setup menu From the Disc Setup menu you can name discs, lock the contents to prevent accidental recording and erasure, initialize and finalize discs. The Disc Setup menu is accessed from the Home menu. Basic settings Input Disc Name When you initialize a disc for recording, the recorder automaticall[…]
-
Page 122: Pioneer DVR-LX60D
The Disc Setup menu 14 122 En Initialize settings You can initialize a recordable DVD-R/-RW disc for either VR mode or Video mode recording. The first time you load a new DVD-RW disc, it will be automatically initialized for recording according to the DVD-RW Auto Init. setting in the Disc Setup menu (see page 73). New DVD-R discs are ready for Vide[…]
-
Page 123: Pioneer DVR-LX60D
The Disc Setup menu 123 En 14 1 Select ‘Disc Setup’ from the Home Menu. 2 Select ‘Optimize HDD’ then ‘Start’. A progress bar indicates how long there is left to go. If no actions are carried out for more than 20 minutes after the optimization process is completed, the unit turns itself off. Initialize HDD When your HDD/DVD recorder is w[…]
-
Page 124: Pioneer DVR-LX60D
The Video Adjust menu 15 124 En Chapter 15 The Video Adjust menu Using the Video Adjust menu you can set up the picture quality for the built-in tuner and external inputs, for disc playback, and for recording. Setting the picture quality for TV and external inputs Picture Creation lets you choose a set of picture quality settings for the built-in T[…]
-
Page 125: Pioneer DVR-LX60D
The Video Adjust menu 125 En 15 • PureCinema – This setting optimizes the picture for film material when the video output is set to progressive. Usually set to Auto ; but try switching to Off if the picture appears unnatural. • 3-D Y/C – Adjusts the brightness/colour separation. • YNR – Adjusts the amount of noise reduction (NR) applied[…]
-
Page 126: Pioneer DVR-LX60D
The Video Adjust menu 15 126 En 2 Move the cursor down and select ‘Detailed Settings’. 3 Select the picture quality setting you want to adjust. You can adjust the following settings: • Prog. Motion – Adjusts the motion and still picture quality when video output is set to progressive. (Prog. Motion is ineffective when PureCinema is On.) •[…]
-
Page 127: Pioneer DVR-LX60D
The Initial Setup menu 127 En 16 Chapter 16 The Initial Setup menu Using the Initial Setup menu The Initial Setup menu is where you can set various recorder options for sound, picture, language and so on. Some settings can only be changed when the recorder is stopped. During playback and recording these settings are grayed out in the Initial Setup […]
-
Page 128: Pioneer DVR-LX60D
The Initial Setup menu 16 128 En EPG Type Select GUIDE Plus+ Use the Gemstar GUIDE Plus+ EPG. Digital EPG Use the EPG based on information provided by D.TV broadcasts. Setup Navigator Start Select to start the Setup Navigator . See also Switching on and setting up on page 30 . Digital T uner Replace Channels Next Screen Scans for digital channels a[…]
-
Page 129: Pioneer DVR-LX60D
The Initial Setup menu 129 En 16 Channel Options Next Screen F rom this screen you can skip or lock channels. Locked channels will require the correct password to be entered before the channel can be watched. Use the /// buttons to highlight a preference box and press ENTER to toggle the preference. To enter this screen, input the paren[…]
-
Page 130: Pioneer DVR-LX60D
The Initial Setup menu 16 130 En Analog T uner Auto Channel Setting Auto Scan Select your countr y and then wait for the recorder to auto tune into channels in your area. After auto scan has finished, the channel mapping screen appears showing which channels have been assigned to which programme numbers. Y ou can skip unwanted channels using the M[…]
-
Page 131: Pioneer DVR-LX60D
The Initial Setup menu 131 En 16 Video In/Out Input Colour System Next Screen P roceed to the next screen to set the input colour system for the external input and the built-in TV tuner . Use the Smart Jog or INPUT SELECT buttons to change the preset or external input. On the default Auto setting the recorder can generally correctly detect whether […]
-
Page 132: Pioneer DVR-LX60D
The Initial Setup menu 16 132 En A V2/L1 In Video • Sets the AV2 (INPUT 1/DECODER) SCART input to standard composite video. S-Video Sets the AV2 (INPUT 1/DECODER) SCART input to S-video. RGB Sets the AV2 (INPUT 1/DECODER) SCART input to RGB. Decoder Use this setting if you connected a decoder to the AV2 (INPUT 1/DECODER) SCART connector . For scr[…]
-
Page 133: Pioneer DVR-LX60D
The Initial Setup menu 133 En 16 DV Input Stereo 1 • Select to use the ‘live’ audio track (recorded during the video shoot) from a camcorder that supports two stereo audio tracks. Stereo 2 Select to use the overdubbed audio track from a camcorder that supports two stereo audio tracks. Mix Select one of the three settings to use a mix of the t[…]
-
Page 134: Pioneer DVR-LX60D
The Initial Setup menu 16 134 En Language OSD Language English • Sets the language of the on-screen displays to English. available languages Choose from the languages displayed for the on- screen displays. On Screen Display and D.TV Language will both reflect this setting. Audio Language English • Sets the default audio language for DVD-V ideo […]
-
Page 135: Pioneer DVR-LX60D
The Initial Setup menu 135 En 16 DVD Menu Language w/Subtitle Language • Sets the language of DVD-V ideo menus to the same as that set for the subtitle language. English Sets the language of DVD-V ideo menus to English. available languages Choose from the displayed languages to set the default language for DVD-V ideo menus. Other Select to set th[…]
-
Page 136: Pioneer DVR-LX60D
The Initial Setup menu 16 136 En Set Thumbnail 0 seconds • Sets the default thumbnail picture in the Disc Navigator to the first frame of the title. 30 seconds Sets the default thumbnail picture to 30 seconds into the title. 3 minutes Sets the default thumbnail picture to three minutes into the title. Auto Chapter (HDD/VR) On • When recording […]
-
Page 137: Pioneer DVR-LX60D
The Initial Setup menu 137 En 16 Playback TV Screen Size 4:3 (Letter Box) Select if you have a standard 4:3 TV and prefer the letter box format presentation for widescreen material. 4:3 (Pan & Scan) Select if you have a standard 4:3 TV and prefer the pan and scan presentation for widescreen material. 16:9 • Select if you have a widescreen 16:[…]
-
Page 138: Pioneer DVR-LX60D
The Initial Setup menu 16 138 En HDMI Output (only available when an HDMI device is connected) Screen Resolution 1920 x 1080p Constant 1920 x 1080p output. 1920 x 1080i Constant 1920 x 1080i output. 1280 x 720p Constant 1280 x 720p output. 720 x 576p (720 x 480p) Constant 720 x 576p output (when setting the Input Line System to 525 System , video i[…]
-
Page 139: Pioneer DVR-LX60D
The Initial Setup menu 139 En 16 Options On Screen Display On • The recorder displays operation displays ( Stop , Play , etc.) on-screen. Off Switches off the on-screen operation displays. Front Panel Display On • The time is shown in the front panel display when the recorder is in standby . Off The front panel display is switched off in standb[…]
-
Page 140: Pioneer DVR-LX60D
The Initial Setup menu 16 140 En Options 2 USB Restart USB Device If the connected USB device does not respond to the recorder , tr y using this option to restart it. If the device still does not work properly tr y switching it off then back on, and/or disconnecting then reconnecting the USB cable. Confirm Printer Use this option to confirm the m[…]
-
Page 141: Pioneer DVR-LX60D
The Initial Setup menu 141 En 16 Additional information about the TV system settings About the input line system This recorder is compatible with PAL, SECAM, 3.58 NTSC and PAL-60 TV systems. The Input Line System and Input Colour System settings determine how the recorder treats incoming video signals from an external input. Please note the followi[…]
-
Page 142: Pioneer DVR-LX60D
The Initial Setup menu 16 142 En Selecting other languages for language options 1 Select ‘Other’ from the language list. This option appears in the settings for DVD Menu Language, Audio Language, and Subtitle Language. 2 Select the language you want. • Select by language name: Use the / buttons to change the language. • Select by code[…]
-
Page 143: Pioneer DVR-LX60D
Additional information 143 En 17 Chapter 17 Additional information Setting up the remote to control your TV You can use the supplied remote to control your TV. To be able to use this feature you first have to program the remote with a maker code from the table below. 1 Press and hold down the CLEAR button, then enter the maker code for your TV. See[…]
-
Page 144: Pioneer DVR-LX60D
Additional information 17 144 En Minimum copying times The table below shows the minimum HDD to DVD copying time for one hour of video. Please note that not all discs are compatible with high-speed copying. 1 Check with the disc manufacturer for compatibility. Note that all times in the above table are approximate. Also that actual copy speed varie[…]
-
Page 145: Pioneer DVR-LX60D
Additional information 145 En 17 Manual recording modes The table below shows the approximate recording times for different DVD types in each manual recording mode, as well as the standard recording mode equivalents. For recording time on the HDD, see Specifications on page 158. *1 Recording time may be slightly shorter for certain disc types or re[…]
-
Page 146: Pioneer DVR-LX60D
Additional information 17 146 En • Levels separated by a bold line show where there is a noticeable change in picture quality. • Audio recording in all manual recording modes is in Dolby Digital 2 ch format, except for LPCM mode, which is in Linear PCM format. • See also Recording on page 59. Troubleshooting Incorrect operation is often mista[…]
-
Page 147: Pioneer DVR-LX60D
Additional information 147 En 17 No picture • Check that ever ything is connected properly (page 14). • Check that the connected TV and/or the A V amp/receiver is set to the correct input. • The recorder may be set to progressive scan with an incompatible TV . Reset to interlace by pressing and holding the front panel (Stop) button then p[…]
-
Page 148: Pioneer DVR-LX60D
Additional information 17 148 En Can’t play a disc recor ded using this recor der on another player • If the disc was recorded in DVD-R/-RW (Video mode) or DVD+R , make sure that it’s finalized (page 71). • Some players will not play recordable DVD discs, even when recorded in DVD-R/-RW (Video mode) or DVD+R and finalized. • If the disc[…]
-
Page 149: Pioneer DVR-LX60D
Additional information 149 En 17 After briefly unplugging or after a power failure the fr ont panel display shows ‘—:—’ • A backup batter y inside the recorder keeps the clock and other settings from being reset when there is no power to the recorder . Af ter unplugging or a power failure, the batter y keeps all settings for a period of se[…]
-
Page 150: Pioneer DVR-LX60D
Additional information 17 150 En HDMI If the unit does not operate normally due to external effects such as static electricity, disconnect the power plug from the outlet and insert again to return to normal operating conditions. If the picture freezes and the front panel and remote control buttons stop working • Press (Stop) then try restarti[…]
-
Page 151: Pioneer DVR-LX60D
Additional information 151 En 17 On-screen displays The table below shows a list of error messages that you may encounter when using the recorder and an explanation of their meaning. Message Explanation/Action • Initializing disc. Please wait a moment. When you load a blank DVD-RW or DVD+RW disc, the recorder automatically initializes it. • Inc[…]
-
Page 152: Pioneer DVR-LX60D
Additional information 17 152 En • Repairing disc. • Repairing the HDD. During recording, the power was cut. This display appears when the power is restored. • Could not repair the disc. The recorder was unable to repair the disc af ter a power cut. The contents of the recording will be lost. • Overheating has stopped operation. Press DISPL[…]
-
Page 153: Pioneer DVR-LX60D
Additional information 153 En 17 • Y ou are not allowed to watch this Conditional Access Programme. A CA module or smart card (obtained from your ser vice provider) is required to watch the selected programme. Insert the supplied module or card into the Common Inter face card slot on the front panel of the recorder (page 25). • There is no DV i[…]
-
Page 154: Pioneer DVR-LX60D
Additional information 17 154 En Front-panel displays The table below shows a list of error messages that you may encounter when using the recorder and an explanation of their meaning. Language code list Language (Language code letter), Language code Message Explanation/Action • E01 The HDD may be damaged or broken. Please ask your nearest P ione[…]
-
Page 155: Pioneer DVR-LX60D
Additional information 155 En 17 Country/Area code list Country/Area, Country/Area code , Code letter Screen sizes and disc formats Argentina, 0118 , ar Australia, 0121 , au Austria, 0120 , at Belgium, 0205 , be Brazil, 0218 , br Canada, 0301 , ca Chile, 0312 , cl China, 0314 , cn Denmark, 0411 , dk Finland, 0609 , fi France, 0618 , fr Germany, 040[…]
-
Page 156: Pioneer DVR-LX60D
Additional information 17 156 En Handling discs When holding discs of any type, take care not to leave fingerprints, dirt or scratches on the disc surface. Hold the disc by its edge or by the center hole and edge. Damaged or dirty discs can affect playback and recording performance. Take care also not to scratch the label side of the disc. Although[…]
-
Page 157: Pioneer DVR-LX60D
Additional information 157 En 17 Hints on installation We want you to enjoy using this unit for years to come, so please bear in mind the following points when choosing a suitable location for it: Do… Use in a well-ventilated room. Place on a solid, flat, level surface, such as a table, shelf or stereo rack. Don’t… Use in a place […]
-
Page 158: Pioneer DVR-LX60D
Additional information 17 158 En Specifications General Power requirements . . . . . 220 V to 240 V, 50 Hz/60 Hz Power consumption . . . . . . . . . . . . . . . . . . . . . . . . 58 W Power consumption in standby mode . . . . . . . 0.69 W (Front panel display: off) Weight . . . . . . . . . . . . . . . . . . . . . . . . . . . . . . . . . . 4.8 kg Di[…]
-
Page 159: Pioneer DVR-LX60D
Additional information 159 En 17 Input/Output Antenna . . . . 75 Ω IEC 169-2 connector for VHF/UHF in/out (analog) . . . . 75 Ω IEC 169-2 connector for VHF/UHF in/out (digital) Video input . . . . . . . . . . . . AV2 (Input 1), Input 2 (front), Input 3 (rear) Input level . . . . . . . . . . . . . . . . . . . . . . . . 1 Vp-p (75 Ω ) Jacks . .[…]
-
Page 160: Pioneer DVR-LX60D
Operating Instructions Discover the benefits of registering your product online at http://www .pioneer .co.uk (or http://www .pioneer .eu ) DV R-LX60D HDD/DVD RECORDER HDD/D VD RECORDER Operating Instructions <VRB1459-A> P rinted in UK P ublished by Pioneer Corporation. Copyright © 2007 P ioneer Corporation. All rights reser ved. http://www.[…]