
Страницы и текст этой инструкции
 Инструкция пылесоса Philips HR6835_04_05_HR6836_03 Triathlon
 Информация отображена на картинке
 Информация отображена на картинке
 Информация отображена на картинке
 Информация отображена на картинке
Как использовать наш сайт инструкций OnlineManuals.ru
Наша цель состоит в том, чтобы предоставить вам быстрый доступ к содержанию инструкции для пылесоса Philips HR6835_04_05_HR6836_03 Triathlon.
С помощью онлайн просмотра, Вы можете быстро просмотреть содержимое инструкции и найти решение проблемы с пылесоса Philips HR6835_04_05_HR6836_03 Triathlon.
Для Вашего удобства
Если листать руководство пользователя пылесоса Philips HR6835_04_05_HR6836_03 Triathlon прямо на сайте, не очень удобно для Вас, есть два возможных решения:
• Просмотр в полноэкранном режиме — легко просмотреть руководство пользователя (без загрузки его на свой компьютер), Вы можете использовать режим полноэкранного просмотра.
Для просмотра инструкции пользователя пылесоса Philips HR6835_04_05_HR6836_03 Triathlon на полном экране, используйте кнопку «Открыть в Pdf-viewer».
• Загрузка на компьютер — Вы можете также скачать Инструкция пылесоса Philips HR6835_04_05_HR6836_03 Triathlon на свой компьютер и сохранить его в файлах.
Многие люди предпочитают читать документы не на экране, а в печатной версии.
Возможность печати руководства пользователя также была предусмотрена на нашем сайте,
и вы можете использовать ее, нажав на иконку «печать» в Pdf-viewer.
Нет необходимости печатать все руководство пылесоса Philips HR6835_04_05_HR6836_03 Triathlon, можно выбрать только нужные страницы инструкции.

111
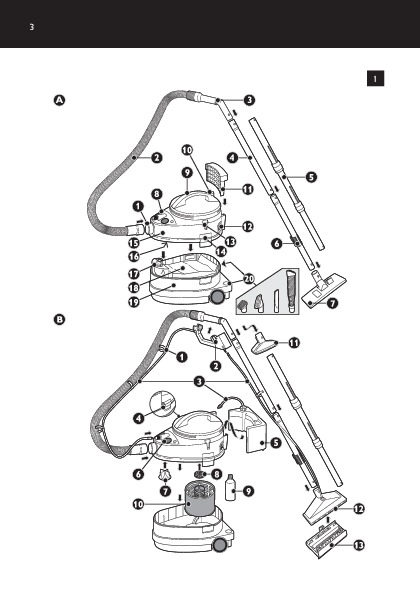
Общее описание (рис. 1)
A
Сухая уборка
1 Разъем шланга
2 Всасывающий шланг
3 Механический регулятор мощности всасывания
4 Всасывающая трубка
5 Телескопическая трубка Tri-scopic (только у некоторых моделей)
6 Приспособление для закрепления трубки (только у некоторых моделей)
7 Насадка
8 Кнопка включения/выключения электродвигателя
9 Ручка
10 Кнопка для сматывания шнура
11 Микрофильтр (только у некоторых моделей)
12 Сетевой шнур
13 Ячейка для закрепления трубки
14 Фиксаторы
15 Блок электродвигателя
16 Заводская бирка
17 Держатель мешка для мусора
18 Мешок для мусора
19 Контейнер
20 Приспособление для хранения 2 небольших насадок (маленькой щётки, маленькой
насадки, щелевой насадки или гибкой щелевой насадки)
B
Влажная уборка
1 Зажимы шланга для шампуня
2 Устройство подачи шампуня
3 Шланги для шампуня
4 Разъемы шлангов для шампуня
5 Ёмкость для шампуня
6 Кнопка включения/выключения насоса для шампуня с индикатором
7 Диффузор
8 Фильтр защиты электродвигателя
9 Чистящая жидкость Philips HR6965
10 Поплавок с фильтром для пены
11 Насадка для обивки
12 Насадка двойной инжекции для чистки шампунем
13 Адаптер для твердых полов
Внимание
До начала эксплуатации прибора внимательно ознакомьтесь с настоящим руководством и
сохраните его для дальнейшего использования в качестве справочного материала.
Перед подключением прибора убедитесь, что номинальное напряжение, указанное на
заводской бирке, соответствует напряжению местной электросети. Заводская бирка
находится на нижней стороне блока электродвигателя.
Запрещено пользоваться электроприбором, если сетевая вилка, сетевой шнур или сам
прибор повреждены.
В случае повреждения сетевого шнура, его необходимо заменить. Чтобы обеспечить
безопасную эксплуатацию прибора, заменяйте шнур только в торговой организации
Philips, в авторизованном сервисном центре Philips или в сервисном центре с персоналом
аналогичной квалификации.
Перед влажной уборкой обязательно извлекайте микрофильтр и мешок для мусора
(бумажный или многократного использования).
,
,
,
,
русский
Перейти к контенту
Пылесосы Philips

- Размер инструкции: 8.22 Мб
- Формат файла: pdf
Если вы потеряли инструкцию от пылесоса Philips HR6835, можете скачать файл для просмотра на компьютере или печати.
Инструкция для пылесоса Philips HR6835 на русском языке. В руководстве описаны возможности и полезные функции, а также правила эксплуатации. Перед использованием внимательно ознакомьтесь с инструкцией.
Чтобы не читать всю инструкцию вы можете выполнить поиск по содержимому внутри инструкции и быстро найти необходимую информацию. Рекомендации по использованию помогут увеличить срок службы пылесоса Philips HR6835. Если у вас появилась проблема, то найдите раздел с описанием неисправностей и способами их решения. В нем указаны типичные поломки и способы их решения.
-
Инструкции по эксплуатации
3
Языки:

Philips HR6835/03 инструкция по эксплуатации
(178 страниц)
- Языки:Английский, Арабский, Болгарский, Венгерский, Казахский, Латышский, Литовский, Персидский, Польский, Румынский, Русский, Сербский, Словацкий, Словенский, Хорватский, Чешский, Эстонский
-
Тип:
PDF -
Размер:
8.51 MB -
Описание:
Пылесос


На NoDevice можно скачать инструкцию по эксплуатации для Philips HR6835/03. Руководство пользователя необходимо для ознакомления с правилами установки и эксплуатации Philips HR6835/03. Инструкции по использованию помогут правильно настроить Philips HR6835/03, исправить ошибки и выявить неполадки.
Download or browse on-line these Operation & User’s Manual for Philips HR6835 Vacuum Cleaner.
Summary of Contents:
 |
[Page 1] Philips HR6835 … |
 |
[Page 2] Philips HR6835 2 English page 3 Français Page 16 Deutsch Seite 29 Nederlands Pagina 42 Italiano Pagina 55 Español Página 68 Português Página 81 Dansk Side 94 Norsk Side 107 Svenska Sid 120 Suomi Sivu 133 |
 |
[Page 3] Philips HR6835 3 English Important • Read these instructions in conjunction with the illustrations before using the appliance. • Before wet use (i.e. vacuuming liquid and shampooing), never forget to — remove the Micro-filter and the paper dustbag; — place red… |
 |
[Page 4] Philips HR6835 4 1 2 43 Small nozzle with two (red) fluff collectors (fig. 3). Especially suitable for furniture, curtains, tapestry. For dry use only Crevice nozzle (fig. 4) for narrow spaces. For dry as well as wet use. Convertible carpet & hard floors n… |
 |
[Page 5] Philips HR6835 5 5 Double Injection shampoo nozzle with click-on «3-Actions» hard floors adaptor (brush, sponge and squeegee) (fig. 6). Suitable for wet use: vacuuming liquid as well as shampooing. Clips to fix the shampoo tube to the hose and tubes Ph… |
 |
[Page 6] Philips HR6835 Dry vacuuming cleaning 6 How to make your Triathlon ready for use General • Connecting the hose: Slightly turning, insert the end of the hose into the hose connector (fig. 7). To disconnect: Slightly turning, pull the end of the hose out of the con… |
 |
[Page 7] Philips HR6835 To place a (new) dustbag: — Press and hold the red lever when placing the cardboard front plate into the holder (fig. 15). — First position the bottom ridge (1). Then press the top ridge into position (2) (fig. 16). Ensure that the two notches on th… |
 |
[Page 8] Philips HR6835 Vacuuming liquid (water) 8 — Using the handle lift the motor unit from the container (fig. 26). — Remove the paper dustbag (fig. 27). — Using the handle place the float unit (fig. 28). Note correct placement: due to its form the float unit will fit i… |
 |
[Page 9] Philips HR6835 9 — Switch on (fig. 34). • To prevent overfilling and to protect the motor, the round- shaped float shuts off the air/water stream if the container is full (fig. 35). — If this happens, empty the container (fig. 36). Then you can continue. • C… |
 |
[Page 10] Philips HR6835 — Add one measuring cap of the cleaning liquid to the full reservoir (3 litre) (fig. 39). — Place the shampoo reservoir (fig. 40). — Attach the short shampoo tube to the connector on the vacuum cleaner. Insert (1) and rotate anti-clockwise (2) (fig…. |
 |
[Page 11] Philips HR6835 If there are still traces of liquid on the cleaned strip, these areas can be vacuumed over again, but make sure that the trigger control is released! — After shampooing, release the trigger and switch off the pump (fig. 54). Let the motor run on. Ho… |
 |
[Page 12] Philips HR6835 your Double Injection nozzle employs three familiair cleaning tools: ➀ a brush (to release sticking dirt from the floor); ➁ a sponge (to spread out and rub in the shampoo); ➂ a squeegee (to collect the used shampoo from the floor so that it can… |
 |
[Page 13] Philips HR6835 separately (fig. 65). Please note: you can squeeze the foam filter, but do not wring! — The motor protection filter can also be removed (fig. 66) and rinsed (fig. 67) for cleaning. Do not forget to replace the motor protection filter! — Rinse the Dou… |
 |
[Page 14] Philips HR6835 under service nr. 4822 480 40242. Replacing the mains cord If the mains cord of this appliance is damaged, it must only be replaced by Philips or their service representative, as special tools and/or parts are required. Storage — Switch off. — Remove… |
 |
[Page 15] Philips HR6835 15 Accessory «Hobby» suction set Dust bags type «Athena» Fabric filter Micro filter Shampoo «Turbo» nozzle Parquet brush nozzle Foam filter «3-Actions» hard floors adaptor Upholstery nozzle Diffusor Applicatio… |
 |
[Page 16] Philips HR6835 16 Français Important • Lisez le mode d’emploi avant la mise en service de l’appareil. • Avant l’usage humide (aspiration de liquides et shampooinage) assurez-vous de toujours: — retirer le Micro-filtre et le sac poussières en papier; … |
 |
[Page 17] Philips HR6835 17 1 2 43 Petit suceur avec deux collecteurs (rouges) de peluches (fig. 3). Surtout pour l’aspiration de meubles, rideaux, tapisserie. Uniquement pour l’aspiration à sec. Bec long (fig. 4) pour les ouvertures étroites. Pour l’aspiration … |
 |
[Page 18] Philips HR6835 18 5 Suceur shampooing double injection avec accessoire «3-Actions» supplémentaire (clic) pour surfaces dures (brosse, éponge, essuie- glace) (fig. 6). Pour l’aspiration de liquides aussi bien que le shampooinage. Clips pour fixer l… |
 |
[Page 19] Philips HR6835 Aspiration à sec 19 Préparation du Triathlon • Généralités — Fixation du tuyau: Introduire l’embout du tuyau dans le point de fixation, le mettre en place en le tournant (fig. 7). Démontage du tuyau: retirer l’embout du point de fixation … |
 |
[Page 20] Philips HR6835 Placer/remplacer le sac poussières: — Appuyer sur la languette rouge en plaçant la plaque de carton dans son support (fig. 15). — Pour la mise en place du carton: placer d’abord le bord inférieur (1) et ensuite le bord supérieur (2) (fig. 16)…. |
 |
[Page 21] Philips HR6835 Aspiration de liquides (eau) 21 — Placer le diffuseur (fig. 29, 30). (Notez s.v.p.: n’oubliez pas de retirer le diffuseur avant l’usage sec.) — Replacer le bloc moteur et refermer les attaches (“clic”) (fig. 31). — Retirer le Micro-filtre (f… |
 |
[Page 22] Philips HR6835 22 • Attention: Si vous aspirez de l’eau dans un récipient situé plus haut que l’appareil (une gouttière, un réservoir de chasse), le système fonction- nera inévitablement comme un siphon. De ce fait, la cuve peut devenir trop pleine (fig… |
 |
[Page 23] Philips HR6835 — Fixer le régleur de débit du shampooing à la poignée du tuyau (fig. 42, 43). — Introduire l’embout du long tuyau de shampooing dans le point de fixation de l’appareil (clic) (fig. 44). Détacher: pousser l’anneau dans la direction de l’… |
 |
[Page 24] Philips HR6835 Soulever et retourner le suceur pour aspirer les dernières gouttes d’eau afin d’éviter qu’elles ne tombent sur votre sol (fig. 55). — Arrêter le moteur. Shampooinage de tapis: Trois techniques Selon le degré de salissure du tapis, vous pou… |
 |
[Page 25] Philips HR6835 • Maintenez le suceur bien à plat sur le sol à traiter. • Effectuez des mouvements de va et vient assez courts (fig. 58) comme avec n’importe quel aspirateur. N’injectez le shampooing que lorsque le suceur va en avant (cela est suffis… |
 |
[Page 26] Philips HR6835 — Le suceur double injection peut être rincé sous le robinet (fig. 68). A cet effet, vous pouvez détacher l’accessoire supplémentaire pour sols durs (fig. 69) et le nettoyer séparément. — Remplissez le réservoir d’eau avec de l’eau propr… |
 |
[Page 27] Philips HR6835 Rangement — Arrêter l’appareil. — Débrancher; le cordon d’alimentation est automatiquement enroulé (fig. 74). — Ranger les petits suceurs comme il est indiqué à la fig. 75. — Vous pouvez ranger le tube dans le clip (fig. 76). Attention: Pour… |
 |
[Page 28] Philips HR6835 28 Accessoire Jeu d’accessoires “Hobby” Sacs poussières «Athena» Filtre permanent Micro-filtre Liquide de nettoyage Suceur “Turbo” Suceur brosse à parquet Filtre mousse Accessoire «3-Actions» Petit suceur Diffuseur … |
 |
[Page 29] Philips HR6835 29 Deutsch WICHTIG • Lesen Sie diese Gebrauchsanweisung sorgfältig durch, und sehen Sie sich dabei die Abbildungen an, bevor Sie das Gerät zum ersten Mal benutzen. • Vergessen Sie niemals, vor der Naßanwendung, wenn Sie also Flüssigkeit aufsa… |
 |
[Page 30] Philips HR6835 30 1 2 43 Kleine Düse mit zwei roten Flusenfängern (Abb. 3), besonders geeignet für Möbel, Gardinen, Wandbespannung. Nur zur Trockenanwendung. Fugendüse (Abb. 4) für schmale Fugen. Für Trocken- und Naßanwendung. Umschaltbare Düse für Tex… |
 |
[Page 31] Philips HR6835 31 5 Shampoo-Düse mit doppelter Einspritzung, Aufklemmechanismus und “3-Actions” Hartboden- Adapter (Bürste, Schwamm und Gummi- schrubber) für Naß- anwendung zum Naß- saugen und Shampo- nieren (Abb. 6). Klemmen zur Befestigung des Shampoo… |
 |
[Page 32] Philips HR6835 Trockenanwendung 32 Vorbereitung zum Gebrauch des Triathlon Allgemeines • Schlauch anschließen: Stecken Sie das Ende des Saugschlauchs unter leichtem Drehen fest in den Stutzen (Abb. 7). Schlauch lösen: Ziehen Sie das Ende des Saugschlauchs unter… |
 |
[Page 33] Philips HR6835 Einsetzen des Papier- Staubbeutels — Halten Sie den roten Hebel eingedrückt, und setzen Sie die Frontplatte aus Karton in den Halter (Abb. 15). — Setzen Sie den unteren Rand auf die Leiste (1) und drücken Sie dann den oberen Rand an (2) (Abb. 16). … |
 |
[Page 34] Philips HR6835 Naßanwendung (Wasser aufsaugen) 34 (Abb. 26). — Nehmen Sie den Papier-Staubbeutel heraus (Abb. 27). — Fassen Sie die Schwimmer-Einheit am Griff, und setzen Sie sie in die Auffangkammer ein (Abb. 28). Achten Sie auf den richtigen Sitz: Durch die in… |
 |
[Page 35] Philips HR6835 35 (“Klick”) (Abb. 31). — Nehmen Sie den Microfilter heraus (Abb. 32). Wichtig: Der Microfilter verliert seine elektrostatische Wirkung, wenn er sehr hoher Luftfeuchtigkeit ausgesetzt wird. — Ziehen Sie das Kabel aus dem Gerät und stecken Sie de… |
 |
[Page 36] Philips HR6835 3 Liter (Abb. 39). — Bringen Sie den Shampoo-Behälter am Motorgehäuse an (Abb. 40). — Befestigen Sie den kurzen Shampoo-Schlauch am Motorgehäuse. Einstecken (1) und entgegen dem Uhrzeigersinn (2) drehen (Abb. 41). — Schieben Sie den Shampoo-Regler… |
 |
[Page 37] Philips HR6835 Reinigen Sie einen Streifen neben dem anderen, mit einer kleinen Überlappung. Bleibt irgendwo Flüssigkeit zurück, kann sie abgesaugt werden, solange Sie den Shampoo-Regler loslassen. — Lassen Sie nach Beendigung den Shampoo- Regler los und schalt… |
 |
[Page 38] Philips HR6835 ➀ eine Bürste zum Lockern von festsitzendem Schmutz, ➁ einen Schwamm zum Auftragen und Einreiben von Shampoo, ➂ einen Gummischrubber zum Aufwischen des verbrauchten Shampoos, bevor es aufgesaugt wird. • Bearbeiten Sie keine zu langen Bahn… |
 |
[Page 39] Philips HR6835 Reinigung ausgespült werden (Abb. 67). Vergessen Sie nicht, den Motorschutzfilter wieder einzusetzen! — Spülen Sie die Shampoo-Düse unter fließendem Wasser (Abb. 68). — Den “3-Actions”-Shamponier-Adapter können Sie abnehmen und getrennt säu… |
 |
[Page 40] Philips HR6835 benötigt werden. Aufbewahrung des Geräts — Schalten Sie das Gerät aus. — Ziehen Sie den Stecker aus der Steckdose. — Drücken Sie den Kabelaufwickler. Das Netzkabel wird automatisch im Gerät aufgewickelt (Abb. 74). — Die kleinen Düsen können au… |
 |
[Page 41] Philips HR6835 41 Gegenstand ”Hobby” Saugzubehör Staubbeutel “Athena” Textilfilter Micro filter Shampoo «Turbo»-Düse Parkettdüse Schaumstoffilter «3-Actions” Hartboden- Adapter Polsterdüse Diffusor Anwendung Außer Haus, Werkstatt Pa… |
 |
[Page 42] Philips HR6835 42 Nederlands Belangrijk • Lees de gebruiksaanwijzing en bekijk de illustraties voordat u het apparaat in gebruik neemt. • Vóór nat gebruik (d.w.z. vloeistof opzuigen of shamponeren) altijd: — het Micro Filter en de papieren stofzak verwijderen… |
 |
[Page 43] Philips HR6835 43 1 2 43 Klein mondstuk met twee (rode) pluisopnemers (fig. 3). Vooral geschikt voor meubels, gordijnen, wandbekleding. Alleen voor droog gebruik. Spleetzuiger (fig. 4) voor nauwe openingen. Geschikt voor droog en nat gebruik. Omschakelbaar monds… |
 |
[Page 44] Philips HR6835 44 5 Klemmetjes om shampoo-slang vast te maken aan slang en buizen. Philips reinigingsvloeistof HR 6965 Motor- beschermingsfilter Vlotterkooi met schuimstoffilter (Dient te worden geplaatst voor nat gebruik: beschermt de motor tegen water.) Shampo… |
 |
[Page 45] Philips HR6835 Droog stofzuigen 45 • Algemeen — Slang aansluiten: Steek het uiteinde van de slang met een draaiende beweging stevig in het aansluitpunt (fig. 7). Losmaken: Trek het uiteinde van de slang met een draaiende beweging uit het aansluitpunt (fig. 8). — … |
 |
[Page 46] Philips HR6835 (Nieuwe) stofzak plaatsen: — Houd het rode lipje ingedrukt terwijl u de kartonnen frontplaat in de houder zet (fig. 15). — Zet eerst de onderste rand op zijn plaats (1). Druk daarna de bovenste rand aan (2) (fig. 16). Let erop dat de twee uitstekende… |
 |
[Page 47] Philips HR6835 Vloeistof (water) opzuigen 47 — Zet de diffusor op zijn plaats (fig. 29, 30). (N.B. Vergeet niet de diffusor te verwijderen voordat u droog gaat stofzuigen.) — Zet het motorgedeelte weer op zijn plaats en druk de klemmen aan («Klik!») (fig…. |
 |
[Page 48] Philips HR6835 Verwijderen: papieren stofzak en Micro Filter. Plaatsen: vlotterkooi, diffusor, gevulde shampoo-reservoir, Double Injection mondstuk en de trekker voor shampoo- regeling. — Maak de stofzuiger gereed voor gebruik zoals beschreven in het hieraan voor… |
 |
[Page 49] Philips HR6835 — Zet de shampoo-regelaar vast aan de handgreep van de slang (fig. 42, 43). — Steek het uiteinde van de lange shampoo-slang stevig in het aansluitpunt op het apparaat («Klik!») (fig. 44). Losmaken: duw de ring in de richting van het apparaa… |
 |
[Page 50] Philips HR6835 Draai het mondstuk met de opening omhoog, zodat het laatste water uit het mondstuk wordt gezogen. Zo voorkomt u dat dit op de vloer druppelt (fig. 55). — Schakel de motor uit. Tapijt shamponeren: Drie Technieken Afhankelijk van de mate waarin het tap… |
 |
[Page 51] Philips HR6835 • Maak niet te lange bewegingen. • Voor het beste resultaat bij schrobben: beweeg het mondstuk naar voren en naar achteren (fig. 58), zoals u met een gewone stofzuiger zou doen. Het is meestal voldoende als u alleen shampoo aanbrengt terwijl u h… |
 |
[Page 52] Philips HR6835 — Het Double Injection mondstuk kunt u schoonspoelen onder de kraan (fig. 68). U kunt daarbij het opzetstuk voor harde vloeren losmaken (fig. 69) en apart schoonmaken. — Vul het waterreservoir met lauwwarm schoon water. Spuit dit water via de beide … |
 |
[Page 53] Philips HR6835 Opbergen — Schakel het apparaat uit. — Haal de stekker uit het stopcontact. — Druk op de knop van de snoeropwinder. Het snoer wordt automatisch in het apparaat opgewikkeld (fig. 74). — U kunt de kleine mondstukken opber-gen zoals in fig. 75 wordt aa… |
 |
[Page 54] Philips HR6835 54 Typenummers en Servicenummers (voor nabestellen en/of bijbestellen van accessoires) Accessoire «Hobby» zuigset Stofzakken type «Athena» Textielfilter Micro filter Shampoo «Turbo»- borstelmondstuk Parketborstel- mondst… |
 |
[Page 55] Philips HR6835 55 Italiano Importante • Prima di usare l’apparecchio, leggete attentamente le istruzioni per l’uso e osservate le figure. • Prima di usare l’apparecchio ad acqua (ad esempio, quando pulite con del liquido e con il detergente) non … |
 |
[Page 56] Philips HR6835 56 1 2 43 Piccola bocchetta con due spazzole raccoglilanugine (rosse) (fig. 3) Particolarmente adatta per mobili, tende, tappezzerie. Esclusivamente per uso a secco. Bocchetta a lancia (fig. 4) per angoli difficili. Per uso a secco e ad acqua. Boc… |
 |
[Page 57] Philips HR6835 57 5 Bocchetta detergente a doppia iniezione con dispositivo a scatto per inserimento adattatore a «tripla azione» per pavimenti duri (spazzola, spugna e spazzolone) Adatto ad uso ad acqua: per l’aspirazione di liquidi e per il lava… |
 |
[Page 58] Philips HR6835 Pulitura a secco 58 Messa a punto dell’aspirapolvere prima dell’uso Istruzioni generali • Per collegare il tubo flessibile: ruotatelo leggermente e inserite la parte finale del tubo flessibile nel connettore (fig. 7) Per disinserirlo: ruo… |
 |
[Page 59] Philips HR6835 Inserimento di un (nuovo) sacchetto raccoglipolvere: — Tenete premuta la levetta rossa mentre inserite il cartoncino del sacchetto raccoglipolvere nell’apposito supporto (fig. 15). — Per prima cosa, posizionate il bordo inferiore (1). Poi, preme… |
 |
[Page 60] Philips HR6835 Pulitura ad acqua 60 maniglia (fig. 26). — Togliete il sacchetto raccoglipolvere (fig. 27). — Inserite il cestello prendendolo per la maniglia (fig. 28). Nota per il corretto inserimento: a causa della sua forma particolare, il cestello può essere i… |
 |
[Page 61] Philips HR6835 61 dall’aspirapolvere e inseritela nella presa di alimentazione (fig. 33). — Accendete l’apparecchio (fig. 34). • Per evitare un riempimento eccessivo e per proteggere il motore, il cestello rotondo blocca il flusso di aria/acqua quando i… |
 |
[Page 62] Philips HR6835 fredda (fig. 38). — Aggiungete un misurino di liquido detergente nel serbatoio pieno (3 litri) (fig. 39). — Inserite il serbatoio del detergente (fig. 40). — Collegate il tubo del detergente, quello corto, al connettore sull’aspirapolvere. Inser… |
 |
[Page 63] Philips HR6835 Nel caso in cui rimangano tracce di liquido sulla striscia appena pulita, potete ripassarla ancora una volta ma assicuratevi che il comando della levetta sia stato rilasciato. — Dopo aver pulito con il detergente, rilasciate la levetta e spegnete la … |
 |
[Page 64] Philips HR6835 iniezione e quella per la tappezzeria, vi consentono di valutare se il tappeto o il pavimento duro è pulito in base al colore del detergente già usato. • Dopo aver vuotato e pulito l’apparecchio, potete asciugare il tubo flessibile e gli al… |
 |
[Page 65] Philips HR6835 dell’apparecchio, incluso il contenitore, devono essere pulite con un panno bagnato e, se necessario, con un po’ di detergente. Assicuratevi, però, che non ci siano infiltrazioni di acqua nelle parti del motore. — Potete risciacquare il ce… |
 |
[Page 66] Philips HR6835 Normalmente, è sufficiente sostituire il micro filtro (figg. 71, 72) ogni volta che inserite il primo sacchetto raccoglipolvere di una nuova confezione. L’indicatore sul supporto del micro filtro resta bianco. Se il filtro diventa visibilmente … |
 |
[Page 67] Philips HR6835 67 Accessori Set di aspirazione «Hobby» Sacchetti raccoglipolvere modello Athena Filtro di carta Micro filtro Liquido detergente Bocchetta «turbo» Bocchetta con spazzola per parquet Filtro schiuma Adattatore per pavimenti duri &qu… |
 |
[Page 68] Philips HR6835 68 Español Importante • Antes de usar el aparato lean estas instrucciones conjuntamente con las ilustraciones. • Antes de usar el aparato en mojado (por ejemplo, en la aspiración de líquidos y en la limpieza con champú), no se olviden de: -… |
 |
[Page 69] Philips HR6835 69 1 2 43 Boquilla pequeña con dos recogedores (rojos) para pelusas (fig. 3). Especialmente adecuada para muebles, cortinas, tapices. Solo para uso en seco. Boquilla estrecha (fig. 4) para espacios estrechos. Para uso tanto en seco como en mojado… |
 |
[Page 70] Philips HR6835 70 5 Bridas para sujetar el tubo del champú a la manguera y a los tubos. Liquido limpiador Philips HR 6965 Filtro protector del motor Unidad flotante con filtro de espuma (debe colocarse para el uso en mojado. Protege el motor contra el agua). Lan… |
 |
[Page 71] Philips HR6835 Limpieza aspirando en seco 71 Generalidades • Conexión de la manguera: Girando suavemente, inserten la punta de la manguera en su conector (fig. 7). Desconexión de la manguera: Girando suavemente, saquen la punta de la manguera de su conector (fi… |
 |
[Page 72] Philips HR6835 Para colocar una (nueva) bolsa para el polvo — Presionen y sostengan la manecilla roja cuando coloquen el frontal de cartón dentro del soporte (fig. 15). — Primero posicionen el reborde inferior (1). Presionen entonces el reborde superior en su luga… |
 |
[Page 73] Philips HR6835 Quiten: La bolsa de papel para el polvo y el microfiltro. Coloquen: La unidad flotante y el difusor. — Quiten la clavija para la red de la toma de corriente. — Desarmen las bridas (fig. 25). — Usando el asa, saquen la unidad motora del depósito (f… |
 |
[Page 74] Philips HR6835 Quiten: La bolsa de papel para el polvo y el microfiltro Coloquen: La unidad flotante, el difusor, el deposito del champú (lleno), la boquilla de inyección doble y el lanzador de champú. — Preparen el aspirador tal como se indica para aspirar líq… |
 |
[Page 75] Philips HR6835 — Fijen el lanzador de champú a la empuñadura de la manguera (figs. 42, 43). — Inserten firmemente el extremo del tubo largo del champú en el conector del aspirador (Click) (fig. 44). Para liberarlo, empujen la arandela hacia el aparato (fig. 45)…. |
 |
[Page 76] Philips HR6835 Mantengan la boquilla levantada y dejen que el aparato funcione solo con aire durante un cierto tiempo para secar el interior de la manguera de succión y los tubos (fig. 55). — Paren el motor. Limpieza de alfombras con champú: Tres técnicas Según… |
 |
[Page 77] Philips HR6835 Técnica para la limpieza de suelos duros con champú El adaptador de 3 acciones para suelos duros (que pueden colocar en su boquilla de doble inyección), emplea tres conocidas herramientas de limpieza: ➀ Un cepillo (para quitar la suciedad pegad… |
 |
[Page 78] Philips HR6835 Para garantizar un tiempo de vida óptimo de su filtro de espuma, es aconsejable sacarlo cuidadosamente de la unidad flotante (fig. 64) y lavarlo mano separadamente (fig. 65). Nota: ¡ Pueden exprimir el filtro de espuma pero no retorcerlo ! — El fi… |
 |
[Page 79] Philips HR6835 Nota: Para evitar daños accidentales al aparato, el tubo puede soltarse del soporte, o el soporte del aparato, cuando estiren o golpeen fuertemente. Pueden, simplemente, colocar de nuevo el tubo o el soporte. Extras opcionales Conjunto de succión … |
 |
[Page 80] Philips HR6835 80 Números de tipo y de Servicio ( para pedir accesorios nuevos y / o extra ) Accesorio Conjunto de succión “Hobby” Bolsas para polvo tipo “Athena”. Filtro de tela Microfiltro Champú Boquilla “Turbo” Boquilla cepillo para parquet Filtr… |
 |
[Page 81] Philips HR6835 81 Português Importante • Leia cuidadosamente estas instruções em conjunto com as ilustrações antes de utilizar o aparelho. • Antes da utilização com líquido (isto é, aspirar líquido e aplicar champô), nunca se esqueça de: — retirar o… |
 |
[Page 82] Philips HR6835 82 1 2 43 Bocal pequeno com dois colectores (vermelhos) para o cotão (fig. 3). Especialmente apropriado para móveis, cortinados, tapeçarias. Unicamente para uso a seco Bico (fig. 4) para espaços estreitos. Para utilização em seco ou com l�… |
 |
[Page 83] Philips HR6835 83 5 Bocal de injeção dupla de champô com prisão e adaptador de «3 Acções» para soalhos duros (escova, esponja e rodo) (fig. 6). Apropriado para utilização com líquido: aspirar líquidos ou aplicar champô. Grampos para fixar o … |
 |
[Page 84] Philips HR6835 Aspirar a seco 84 Preparação do seu Triathlon para utilização: Geral • Colocação da mangueira: rodando ligeiramente, introduza a extremidade da mangueira na abertura (fig. 7). Para desligar: rodando ligeiramente, puxe a extremidade da manguei… |
 |
[Page 85] Philips HR6835 Para colocar um (novo) saco para o pó: — Carregue e mantenha premido o botão vermelho quando colocar a parte da frente de cartão no suporte (fig. 15) — Posicione em primeiro lugar a aresta do fundo (1). Carregue em seguida na aresta superior para … |
 |
[Page 86] Philips HR6835 Aspirar líquido (água) 86 — Coloque o difusor (fig. 29, 30). (Tome atenção: não se esqueça de retirar o difusor antes da utilização a seco.) — Volte a colocar o motor e prenda-o com os grampos («Clique!») (Fig. 31). — Retire o Micro… |
 |
[Page 87] Philips HR6835 87 — Se isso acontecer, esvazie o contentor (fig. 36). Em seguida, poderá prosseguir. • Cuidado: Quando aspirar água a partir de um recipiente que esteja mais elevado do que o aspirador (por exemplo, um algeroz, uma cisterna), o sistema funciona… |
 |
[Page 88] Philips HR6835 — Fixe o disparador do champô na pega da mangueira (fig. 42, 43). — Introduza com firmeza a ponta do tubo comprido do champô na ligação do aspirador («Clique!») (fig. 44). Para soltar: carregue no anel em direcção ao aspirador (fig. 4… |
 |
[Page 89] Philips HR6835 — Suspenda o bocal ao alto e deixe o aspirador funcionar só com ar durante algum tempo, a fim de secar o interior da mangueira de sucção e dos tubos (fig. 55). — Desligue o motor. Aplicação de champô em carpetes: Três Técnicas Dependendo do g… |
 |
[Page 90] Philips HR6835 • Não faça passagens muito compridas. • Para uma limpeza eficiente, movimente o bocal para a frente e para trás (fig. 58), como faz normalmente com qualquer aspirador. Regra geral, é suficiente a aplicação do champô apenas quando desloca o… |
 |
[Page 91] Philips HR6835 — Enxague o bocal de Dupla Injecção do champô (fig. 68). Pode retirar o acessório para superfícies rijas (fig. 69) e limpá-lo em separado. — Encha o depósito com água limpa e morna, bombeie a água pelos dois tubos do champô para uma tina ou… |
 |
[Page 92] Philips HR6835 Extras opcionais: Conjunto de sucção “Hobby” (tipo nº HR 6955) Para aplicações mais exigentes (exteriores, alpendres, áreas de lazer, oficinas), existe um conjunto de sucção de 54 mm de diâmetro (mangueira, tubos, bocais) como acessóri… |
 |
[Page 93] Philips HR6835 93 Acessório Conjunto de sucção «Hobby» Sacos para pó tipo «Athena» Filtro de pano Micro Filtro Champô Bocal «Turbo» Bocal de escova para soalhos Filtro de espuma Adaptador de 3 Acções para superfícies rijas Boc… |
 |
[Page 94] Philips HR6835 94 Dansk Vigtigt. • Læs denne brugsanvisning grundigt igennem og kig på illustrationerne, før De tager støvsugeren i brug. • Før vådstøvsugning (d.v.s. opsugning af væsker og rensning med shampoo) skal De huske at: — fjerne mikrofilteret… |
 |
[Page 95] Philips HR6835 95 1 2 43 Lille mundstykke med to (røde) fnugsamlere (fig. 3). Specielt velegnet til møbler, gardiner, tapeter etc. Kun til tørstøvsugning. Møbel/radiatormundstykke (fig. 4) Til støvsugning vanskeligt tilgængelige steder. Anvendes både t… |
 |
[Page 96] Philips HR6835 96 5 Vådmundstykke og til- hørende “Hard Floor Adapter” (børste, svamp og svaber) som “klikkes” på (fig. 6). Anvendes til vådstøv- sugning. Opsuger både væske og shampoo. Klemmer til montering af de tynde shampooslanger til støvs… |
 |
[Page 97] Philips HR6835 Tørstøvsugning 97 Sådan gøres Deres “Triathlon”- støvsuger klar til brug. Generelt. • Sådan tilsluttes støvsugerslangen: — Drej lidt på slangen samtidig med at den sættes ind i tilslutningen på støvsugeren (fig. 7). • Sådan aftage… |
 |
[Page 98] Philips HR6835 Sådan isættes en (ny) støvpose: — Tryk den røde knap ind når støvposens pappla- de anbringes i holderen (fig. 15). Sæt først den nederste kant af pappladen på plads (1) og tryk derefter det øverste stykke på plads (2) og slip den røde kn… |
 |
[Page 99] Philips HR6835 Vådstøvsugning, væske (vand) 99 sidde på een måde. 33 34 35 36 C L I C K 31 32 Udtag: Papirstøvpose og mikrofilter. Isæt : Flydeenhed og skumdæmper. — Træk stikket ud af stikkontakten. — Luk låsebøjlerne op (fig. 25). — Hold i håndtag… |
 |
[Page 100] Philips HR6835 100 — Anbring skumdæmperen (fig. 29, 30) (Venligst bemærk: Husk altid at fjerne skumdæmperen igen før tørstøvsugning) — Sæt motorenheden på plads igen og luk låsebøjlerne (“klik!) (fig. 31). — Fjern mikrofilteret (fig. 32). Bemærk: Mik… |