
Pfaff
1527 Инструкция по эксплуатации
Популярность:
1655 просмотры
Подсчет страниц:
1 страницы
Тип файла:
Размер файла:
219 Kb
-
Страница 1
ClassicStyle Quilt 1527 Owner´s manual[…]
-
Страница 2
19 22 21 23 24 27 20 25 26 1 2 4 3 5 7 8 9 10 11 12 13 14 15 16 17 18 6 Machine Overview 1 Connection socket “foot control with main cord” 2 Main switch 3 Handwheel release disk 4 Handwheel 5 Bobbin winder 6 Lid with stitches 7 Extra spool holder 8 Spool holder with spool cap 9 Take-up lever 10 Needle thread tension dial 11 Threading path 12 Th[…]
-
Страница 3
3 1 04 5 12 3 56 4 78 Stitches and presser feet Stitch descriptions are found in the introduction section. Presser feet (normal accessories) For more information about accessories, please contact your PFAFF dealer. 0 Standard Presser F oot with ID T Part No. 820250-096 (pictured) (select 1546 and 1536) Part No. 820258-096 (select 1526) 1 Clearview […]
-
Страница 4
! ClassicStyle Quilt 1527 Some fabrics have a lot of excess dye which can cause discoloration on other fabric but also on your sewing machine. This discoloring may be very dif À cult or impossible to remove. Fleece and denim fabric in especially red and blue often contain a lot of excess dye. If you suspect that your fabric/ready-to-wear garment c[…]
-
Страница 5
This household sewing machine is designed to comply with IEC/EN 60335-2-28 and UL1594. IMPORT ANT SAFETY INS TRUCTIONS When using an electrical appliance, basic safety precautions should always be followed, including the following: Read all instructions before using this household sewing machine. D ANGER — T o reduce the risk of electric shock: •[…]
-
Страница 6
[…]
-
Страница 7
III III Introduction Contents Introduction Stitch table V 1. Operate your Pf aff select Electrical connection 1:2 Removable accessory tray 1:3 Bobbins 1:4 Bobbin case 1:8 Threading the needle 1:10 Needle threader 1:11 Bringing up the bobbin thread 1:12 Presser foot lifter 1:13 Thread cutter 1:12 Changing the presser foot 1:13 IDT System/Integrated […]
-
Страница 8
IV IV Introduction Stitch table (non-elastic stitches) select 1546 select 1536 & select 1526 Stitch Description Application 1546 1536/1526 A/B/C A/B/C Buttonhole Standard buttonhole for blouses or bed linens DH Blind stitch with zigzag (elastic) For invisible hemming with simultaneous seam/ overcasting. Especially for stretch material E– Gree[…]
-
Страница 9
V V Introduction select 1546 select 1536 & select 1526 Stitch table (stretch stitches) Stitch Description Application 1546 1536/1526 DH Peacock’s eye stitch Elastic closing and serging seam. The material must be turned by 180 degrees E– Cover stitch For top-stitching and overstitching stretch materials, e.g. cuffs, hems and panels F– Herr[…]
-
Страница 10
VI VI Introduction select 1546 Stitch table (stretch stitches) Stitch Description Application 1546 LC Dutch stitch, narrow A decorative stitch, e.g. for household textiles LD Dutch stitch A decorative stitch, e.g. for household textiles LG Border stitch A decorative stitch, e.g. for traditional embroidery LI Weaving stitch An ornamental stitch, e.g[…]
-
Страница 11
1. Oper ate your Pfaff select[…]
-
Страница 12
1:2 1:2 Operate your Pf aff select Carrying-case Place the cords, foot control and instruction book in the front pocket of the carrying case. Lid Open the folding lid (6) upwards. The stitches of the sewing machine are illustrated on the inside of the lid. Connecting the foot control Connect the plug of the foot control to the connecting socket (1)[…]
-
Страница 13
1:3 1:3 Operate your Pf aff select Accessory tray Your Pfaff select sewing machine has a removable accessory tray (15) which is also used as an extended work support. Model 1546, has a special removable accessory organizer. The enclosed accessories are numbered. Sort the enclosed accessories into the corresponding sections of the accessory organize[…]
-
Страница 14
1:4 1:4 Operate your Pf aff select Preparing the machine for bobbin winding Hold the handwheel (4) À rmly and turn the handwheel release disc (3) until it stops in the direction of the arrow. This stops the needle from moving while the machine is winding the bobbin. Placing the bobbin Switch off the main switch (2) Place the empty bobbin so that t[…]
-
Страница 15
1:5 1:5 A B C Operate your Pf aff select Winding the bobbin from the spool holder Place the sewing thread on the spool holder (8). To guarantee free movement of the thread and to give additional hold to the thread spool, À t a spool cap corresponding to the size of the thread spool. Threading Place the thread into guide A and pull it through openi[…]
-
Страница 16
1:6 1:6 B A C Operate your Pf aff select Winding from the second spool holder Push the second spool holder (7) into its hole and place a spool of thread with the corresponding spool cap on it. Threading Place the thread into guide A and pull it through opening B to the right under hook C. Wind the thread clockwise a few times around the bobbin. Swi[…]
-
Страница 17
1:7 1:7 C Operate your Pf aff select Winding through the needle Even if the machine has been completely threaded, you can still wind the bobbin. Raise presser foot lifter (19). Pass the needle thread through the presser foot and downwards; then through the right threading slot (11) and upwards. Now, pull the thread into the take-up lever from left […]
-
Страница 18
1:8 1:8 Operate your Pf aff select Bobbin Case/Hook Cover Switch off the main switch. Hold the side of the bobbin case/hook cover and open it towards you. Removing the bobbin case Raise the bobbin case lever and pull out the bobbin case. Release the lever and remove the empty bobbin.[…]
-
Страница 19
1:9 1:9 C A B D E Operate your Pf aff select Inserting the bobbin Insert the full bobbin (with the Pfaff logo facing towards the bobbin case) into the bobbin case. In doing so, pull the thread sideways through slot A, then under the tension plate B until it rests in the opening (see arrow). Check: When you look at the bobbin and pull the thread, th[…]
-
Страница 20
1:10 1:10 B A D C E G F F H Operate your Pf aff select Threading the needle thread Switch off the main switch Raise the presser foot lifter (19) and turn the handwheel until the take-up lever (9) has moved to the top. Place the thread on the spool holder (8) and À t the corresponding spool cap. Now, using both hands, pull the thread into guide A a[…]
-
Страница 21
1:11 1:11 C A B Operate your Pf aff select Needle threader (Model 1546) To make threading the needle easier and quicker, use the PFAFF needle threader (13). Lower the presser foot. Turn the handwheel until the needle is at its highest position. Place the needle thread under hook A and hold it taut. Move the needle threader fully downwards and turn […]
-
Страница 22
1:12 1:12 Operate your Pf aff select Bringing up the bobbin thread Switch off the main switch. Raise the presser foot. Hold the needle thread and turn the handwheel towards you until the needle is in the highest position and the bobbin thread has formed a loop. Pull the needle thread to bring up the bobbin thread. Bobbin thread Close the bobbin cas[…]
-
Страница 23
1:13 1:13 Operate your Pf aff select Presser foot lifter The presser foot is raised or lowered with the presser foot lifter (19). Removing the presser foot Switch off the main switch. Position the needle at its highest point. Press the presser foot upwards at the front and down at the back at the same time so that it disengages from the presser foo[…]
-
Страница 24
1:14 1:14 Operate your Pf aff select The Integrated dual feed/ID T System (Models 1536 and 1546) PFAFF offers the ideal solution for sewing dif À cult materials: the IDT. This system feeds the material from the top and bottom simultaneously as is done in industrial sewing machines. The fabric is fed precisely. When sewing light or dif À cult mate[…]
-
Страница 25
1:15 1:15 C B A Operate your Pf aff select Changing the needle Switch off the main switch. To remove: Lower the presser foot and move the needle to its highest point. Now loosen the needle screw (18) and pull the needle down. To insert: The Á at side A of the needle must face to the rear. Lower the presser foot and insert the needle, pushing it up[…]
-
Страница 26
1:16 1:16 27 26 Operate your Pf aff select Stitch width dial The stitch width can be adjusted with this dial (26). When selecting the width, the needle must not be in the material. Basic setting: Turn the stitch width knob (26) to the symbol (maximum stitch width). Exception: Straight stitch is sewn with stitch width 0. In chapter “2. Utility sti[…]
-
Страница 27
1:17 1:17 20 21 A 21 Operate your Pf aff select Reverse sewing The machine sews in reverse only as long as the reverse sewing button (20) is pressed. Stitch length adjustment dial With the stitch length adjustment dial (21) you can adjust the stitch length between 0 and 6 mm by turning the point marking on the button to the required length. Between[…]
-
Страница 28
1:18 1:18 B B B Operate your Pf aff select Utility stitches Each stitch has been given a letter that you can À nd on the push button controls. By pressing the correct button, the stitch is selected and the machine is ready to sew. Button B releases the buttons that have been activated. Under the lid (6) you will À nd the stitch table with all the[…]
-
Страница 29
1:19 1:19 24 A 21 Operate your Pf aff select Stitch selection, stitch dial – select 1536, 1526 Utility stitches Each stitch is identi À ed by a letter. The stitches and their corresponding letters are shown on the inside of the lid, a chart is also found in the Introduction chapter. Turn the dial (24) until the corresponding letter is positioned[…]
-
Страница 30
1:20 1:20 Operate your Pf aff select[…]
-
Страница 31
2. Utility stitches and pr actical sewing[…]
-
Страница 32
2:2 Utility stitches and practical sewing Explanation of the sewing chart The following charts show the recommended settings for each stitch or technique. These charts also provide you with instructions that are necessary when sewing the selected stitches. The choice of the sewing foot, the setting of the needle thread tension and whether to use ID[…]
-
Страница 33
2:3 B A Utility stitches and practical sewing Needle thread tension To get perfect sewing results, the needle and bobbin thread tensions must be perfectly tuned to each other. The normal setting for utility stitches is in the range of 4-5. Check the tension with a wide zigzag stitch. The threads must be interlaced between the two fabric pieces. If […]
-
Страница 34
2:4 A C B Utility stitches and practical sewing Straight stitch Stitch G is the basic straight stitch. The stitch length can be increased up to 6 mm. It is easier to do some sewing jobs by changing the needle position, e.g. top- stitching a collar or sewing in a zipper. You can select up to 15 different needle positions (see page 1:16). Please ensu[…]
-
Страница 35
2:5 B A Utility stitches and practical sewing Remember! If the stitches are visible on the right side, adjust edge guide B by turning adjusting screw A. Tip: If you chose to sew Blindhem stitch H or Blidhem stitch D with stitch width less than 5, use foot nr.0. Stitch H Stitch D Blindhem stitch Blindhem stitch H is best suited for invisible hems; s[…]
-
Страница 36
2:6 Utility stitches and practical sewing Elastic stitch Because of its high elasticity, this stitch can be used for sewing elastic on swimwear, skirts or lingerie. • Mark elastic and fabric in quarters. • Pin elastic to fabric at quarter markings. • Place fabric and elastic under sewing foot. • Stretch elastic to À t the fabric. Begin sew[…]
-
Страница 37
2:7 Utility stitches and practical sewing What is an overlock stitch? For stretch fabrics, the select models offer overlock stitches which sew two fabric layers together and overcast simultaneously. They are more elastic than normal seams, very durable and quickly sewn. Tip: We recommend using blindhem stitch foot No. 3 when sewing overlock seams. […]
-
Страница 38
2:8 Utility stitches and practical sewing Shell-edging Shell-edging is attractive on thin, soft fabrics such as silk and Bastiste. It is often used as a decorative edging on lingerie. The higher the needle thread tension, the deeper the shell edge scallop. • Serge the fabric edge and iron the seam allowance to the left. • Take care that the fab[…]
-
Страница 39
2:9 Utility stitches and practical sewing Buttonholes Sewing buttonholes is very easy with all the models with push button controls since the fabric does not have to be turned. Buttonholes are generally sewn onto a piece of doubled fabric. However, for some fabrics, e.g. silk, organza and viscose, it is necessary to use stabilizer to prevent the fa[…]
-
Страница 40
2:10 B A h 3-5 3-5 3-5 Utility stitches and practical sewing Standard buttonhole with gimp thread To sew especially durable buttonholes, on heavy fabrics, knits or sportswear, we recommend using a gimp thread. On knits the gimp thread is particularly important to prevent the buttonhole from stretching. • Lay the gimp thread over the rear protrusi[…]
-
Страница 41
2:11 Utility stitches and practical sewing Sewing on buttons With zigzag stitch G (stitch width 4 mm) you can sew on two and four hole buttons. • Remove the sewing foot and lower the feed dog. • Turn the handwheel towards you and move the button so that the needle enters the left hole in the button. • Now lower the presser foot lifter; this h[…]
-
Страница 42
2:12 D C G F E A B Utility stitches and practical sewing Free Motion Sewing Insert the darning foot: Loosen screw D. Set the needle at its highest point and push the pin of the darning foot fully into the hole C of the sewing foot holder. When doing this, the guide fork G should position itself around the presser bar. The lever E must be behind the[…]
-
Страница 43
2:13 Utility stitches and practical sewing Sewing on zippers There are various methods of sewing on zippers. For skirts, we recommend the fully concealed zipper, for men’s and ladies’ trousers the semi concealed zipper. Various zippers are available. We recommend using a metal zipper for strong fabrics such as denim. For all other fabrics we re[…]
-
Страница 44
2:14 Utility stitches and practical sewing F ully concealed, sew-in zipper • Insert the zipper foot on the right side. • Baste in the zipper and lay it underneath the presser foot so that the teeth of the zipper run alongside the foot. • Stitch in half of the zipper, leave the needle in the fabric, raise the presser foot and close the zipper.[…]
-
Страница 45
2:15 Utility stitches and practical sewing Stabilizing edges With the rolled hem foot you can hem blouses, silk scarves and valances with ease, without having to pre-iron the fabric edges. The hemming prevents the edges from fraying and a clean, durable edge is the result. • Fold the beginning of the fabric edge over twice (approx. 2 mm) • Lay […]
-
Страница 46
[…]
-
Страница 47
3. Maintenance and trouble-shooting[…]
-
Страница 48
3:2 Maintenance and trouble-shooting Changing the needle plate Switch off the main switch. It is very important to clean your sewing machine, because it will reward you with a longer service life. The more often you use the machine, the more care it needs. Removal: • Raise the sewing foot and remove the removable accessory tray. • Push the poin[…]
-
Страница 49
3:3 Maintenance and trouble-shooting Changing the sewing bulb Switch off the main switch. • Disconnect the main plug and the foot control plug from the machine. • Take off the removable accessory tray (15). The sewing bulb is located inside the left side of the sewing machine. Removal: • Hold the sewing machine tightly. • Push the bulb into[…]
-
Страница 50
3:4 Maintenance and trouble-shooting The machine skips stitches The needle is not properly inserted. Push needle fully upwards, Á at side facing the back. The wrong needle is inserted. Use a needle system 130/705 H. Needle is bent or blunt. Insert a new needle. Machine is not properly threaded. Check how machine is threaded. Needle is too small fo[…]
-
Страница 51
3:5 Maintenance and trouble-shooting Machine does not feed or feeds irregularly Sewing lint has collected between the feed dog teeth rows. Remove needle plate, remove lint with brush. Feed dog is lowered, slide A (see page 1:15) at right. Push slide B (see page 1:15) to left. Machine is running with dif À culty There are thread remnants in the hoo[…]
-
Страница 52
[…]
-
Страница 53
[…]
-
Страница 54
[…]
-
Страница 55
We reserve the right to change the machine equipment and the ass ort ment of accessories without prior notice, or make modi À cations to the performance or design. Such modi À cations, however, will always be to the bene À t of the user and the product. Please note that on disposal, this product must be safely recycled in accordance with relevan[…]
-
Страница 56
VSM Group AB • SE-561 84 Huskv arna • SWEDEN www .pfaff.com 412 93 31 — 26B • English • Inhouse • © 2004-2006 VSM Group AB • All rights reserved • Printed in Sweden on environmentally-friendly paper[…]
-
Pfaff ClassicStyle Quilt 1527 — page 1
ClassicStyle Quilt 1527 Owner´s manual …
-
Pfaff ClassicStyle Quilt 1527 — page 2
19 22 21 23 24 27 20 25 26 1 2 4 3 5 7 8 9 10 11 12 13 14 15 16 17 18 6 Machine Overview 1 Connection socket “foot control with main cord” 2 Main switch 3 Handwheel release disk 4 Handwheel 5 Bobbin winder 6 Lid with stitches 7 Extra spool holder 8 Spool holder with spool cap 9 Take-up lever 10 Needle thread tension dial 11 Threading path 12 Th …
-
Pfaff ClassicStyle Quilt 1527 — page 3
3 1 04 5 12 3 56 4 78 Stitches and presser feet Stitch descriptions are found in the introduction section. Presser feet (normal accessories) For more information about accessories, please contact your PFAFF dealer. 0 Standard Presser F oot with ID T Part No. 820250-096 (pictured) (select 1546 and 1536) Part No. 820258-096 (select 1526) 1 Clearview …
-
Pfaff ClassicStyle Quilt 1527 — page 4
! ClassicStyle Quilt 1527 Some fabrics have a lot of excess dye which can cause discoloration on other fabric but also on your sewing machine. This discoloring may be very dif À cult or impossible to remove. Fleece and denim fabric in especially red and blue often contain a lot of excess dye. If you suspect that your fabric/ready-to-wear garment c …
-
Pfaff ClassicStyle Quilt 1527 — page 5
This household sewing machine is designed to comply with IEC/EN 60335-2-28 and UL1594. IMPORT ANT SAFETY INS TRUCTIONS When using an electrical appliance, basic safety precautions should always be followed, including the following: Read all instructions before using this household sewing machine. D ANGER — T o reduce the risk of electric shock: • …
-
Pfaff ClassicStyle Quilt 1527 — page 6
…
-
Pfaff ClassicStyle Quilt 1527 — page 7
III III Introduction Contents Introduction Stitch table V 1. Operate your Pf aff select Electrical connection 1:2 Removable accessory tray 1:3 Bobbins 1:4 Bobbin case 1:8 Threading the needle 1:10 Needle threader 1:11 Bringing up the bobbin thread 1:12 Presser foot lifter 1:13 Thread cutter 1:12 Changing the presser foot 1:13 IDT System/Integrated …
-
Pfaff ClassicStyle Quilt 1527 — page 8
IV IV Introduction Stitch table (non-elastic stitches) select 1546 select 1536 & select 1526 Stitch Description Application 1546 1536/1526 A/B/C A/B/C Buttonhole Standard buttonhole for blouses or bed linens DH Blind stitch with zigzag (elastic) For invisible hemming with simultaneous seam/ overcasting. Especially for stretch material E– Gree …
-
Pfaff ClassicStyle Quilt 1527 — page 9
V V Introduction select 1546 select 1536 & select 1526 Stitch table (stretch stitches) Stitch Description Application 1546 1536/1526 DH Peacock’s eye stitch Elastic closing and serging seam. The material must be turned by 180 degrees E– Cover stitch For top-stitching and overstitching stretch materials, e.g. cuffs, hems and panels F– Herr …
-
Pfaff ClassicStyle Quilt 1527 — page 10
VI VI Introduction select 1546 Stitch table (stretch stitches) Stitch Description Application 1546 LC Dutch stitch, narrow A decorative stitch, e.g. for household textiles LD Dutch stitch A decorative stitch, e.g. for household textiles LG Border stitch A decorative stitch, e.g. for traditional embroidery LI Weaving stitch An ornamental stitch, e.g …
-
Pfaff ClassicStyle Quilt 1527 — page 11
1. Oper ate your Pfaff select …
-
Pfaff ClassicStyle Quilt 1527 — page 12
1:2 1:2 Operate your Pf aff select Carrying-case Place the cords, foot control and instruction book in the front pocket of the carrying case. Lid Open the folding lid (6) upwards. The stitches of the sewing machine are illustrated on the inside of the lid. Connecting the foot control Connect the plug of the foot control to the connecting socket (1) …
-
Pfaff ClassicStyle Quilt 1527 — page 13
1:3 1:3 Operate your Pf aff select Accessory tray Your Pfaff select sewing machine has a removable accessory tray (15) which is also used as an extended work support. Model 1546, has a special removable accessory organizer. The enclosed accessories are numbered. Sort the enclosed accessories into the corresponding sections of the accessory organize …
-
Pfaff ClassicStyle Quilt 1527 — page 14
1:4 1:4 Operate your Pf aff select Preparing the machine for bobbin winding Hold the handwheel (4) À rmly and turn the handwheel release disc (3) until it stops in the direction of the arrow. This stops the needle from moving while the machine is winding the bobbin. Placing the bobbin Switch off the main switch (2) Place the empty bobbin so that t …
-
Pfaff ClassicStyle Quilt 1527 — page 15
1:5 1:5 A B C Operate your Pf aff select Winding the bobbin from the spool holder Place the sewing thread on the spool holder (8). To guarantee free movement of the thread and to give additional hold to the thread spool, À t a spool cap corresponding to the size of the thread spool. Threading Place the thread into guide A and pull it through openi …
-
Pfaff ClassicStyle Quilt 1527 — page 16
1:6 1:6 B A C Operate your Pf aff select Winding from the second spool holder Push the second spool holder (7) into its hole and place a spool of thread with the corresponding spool cap on it. Threading Place the thread into guide A and pull it through opening B to the right under hook C. Wind the thread clockwise a few times around the bobbin. Swi …
-
Pfaff ClassicStyle Quilt 1527 — page 17
1:7 1:7 C Operate your Pf aff select Winding through the needle Even if the machine has been completely threaded, you can still wind the bobbin. Raise presser foot lifter (19). Pass the needle thread through the presser foot and downwards; then through the right threading slot (11) and upwards. Now, pull the thread into the take-up lever from left …
-
Pfaff ClassicStyle Quilt 1527 — page 18
1:8 1:8 Operate your Pf aff select Bobbin Case/Hook Cover Switch off the main switch. Hold the side of the bobbin case/hook cover and open it towards you. Removing the bobbin case Raise the bobbin case lever and pull out the bobbin case. Release the lever and remove the empty bobbin. …
-
Pfaff ClassicStyle Quilt 1527 — page 19
1:9 1:9 C A B D E Operate your Pf aff select Inserting the bobbin Insert the full bobbin (with the Pfaff logo facing towards the bobbin case) into the bobbin case. In doing so, pull the thread sideways through slot A, then under the tension plate B until it rests in the opening (see arrow). Check: When you look at the bobbin and pull the thread, th …
-
Pfaff ClassicStyle Quilt 1527 — page 20
1:10 1:10 B A D C E G F F H Operate your Pf aff select Threading the needle thread Switch off the main switch Raise the presser foot lifter (19) and turn the handwheel until the take-up lever (9) has moved to the top. Place the thread on the spool holder (8) and À t the corresponding spool cap. Now, using both hands, pull the thread into guide A a …
-
Pfaff ClassicStyle Quilt 1527 — page 21
1:11 1:11 C A B Operate your Pf aff select Needle threader (Model 1546) To make threading the needle easier and quicker, use the PFAFF needle threader (13). Lower the presser foot. Turn the handwheel until the needle is at its highest position. Place the needle thread under hook A and hold it taut. Move the needle threader fully downwards and turn …
-
Pfaff ClassicStyle Quilt 1527 — page 22
1:12 1:12 Operate your Pf aff select Bringing up the bobbin thread Switch off the main switch. Raise the presser foot. Hold the needle thread and turn the handwheel towards you until the needle is in the highest position and the bobbin thread has formed a loop. Pull the needle thread to bring up the bobbin thread. Bobbin thread Close the bobbin cas …
-
Pfaff ClassicStyle Quilt 1527 — page 23
1:13 1:13 Operate your Pf aff select Presser foot lifter The presser foot is raised or lowered with the presser foot lifter (19). Removing the presser foot Switch off the main switch. Position the needle at its highest point. Press the presser foot upwards at the front and down at the back at the same time so that it disengages from the presser foo …
-
Pfaff ClassicStyle Quilt 1527 — page 24
1:14 1:14 Operate your Pf aff select The Integrated dual feed/ID T System (Models 1536 and 1546) PFAFF offers the ideal solution for sewing dif À cult materials: the IDT. This system feeds the material from the top and bottom simultaneously as is done in industrial sewing machines. The fabric is fed precisely. When sewing light or dif À cult mate …
-
Pfaff ClassicStyle Quilt 1527 — page 25
1:15 1:15 C B A Operate your Pf aff select Changing the needle Switch off the main switch. To remove: Lower the presser foot and move the needle to its highest point. Now loosen the needle screw (18) and pull the needle down. To insert: The Á at side A of the needle must face to the rear. Lower the presser foot and insert the needle, pushing it up …
-
Pfaff ClassicStyle Quilt 1527 — page 26
1:16 1:16 27 26 Operate your Pf aff select Stitch width dial The stitch width can be adjusted with this dial (26). When selecting the width, the needle must not be in the material. Basic setting: Turn the stitch width knob (26) to the symbol (maximum stitch width). Exception: Straight stitch is sewn with stitch width 0. In chapter “2. Utility sti …
-
Pfaff ClassicStyle Quilt 1527 — page 27
1:17 1:17 20 21 A 21 Operate your Pf aff select Reverse sewing The machine sews in reverse only as long as the reverse sewing button (20) is pressed. Stitch length adjustment dial With the stitch length adjustment dial (21) you can adjust the stitch length between 0 and 6 mm by turning the point marking on the button to the required length. Between …
-
Pfaff ClassicStyle Quilt 1527 — page 28
1:18 1:18 B B B Operate your Pf aff select Utility stitches Each stitch has been given a letter that you can À nd on the push button controls. By pressing the correct button, the stitch is selected and the machine is ready to sew. Button B releases the buttons that have been activated. Under the lid (6) you will À nd the stitch table with all the …
-
Pfaff ClassicStyle Quilt 1527 — page 29
1:19 1:19 24 A 21 Operate your Pf aff select Stitch selection, stitch dial – select 1536, 1526 Utility stitches Each stitch is identi À ed by a letter. The stitches and their corresponding letters are shown on the inside of the lid, a chart is also found in the Introduction chapter. Turn the dial (24) until the corresponding letter is positioned …
-
Pfaff ClassicStyle Quilt 1527 — page 30
1:20 1:20 Operate your Pf aff select …
-
Pfaff ClassicStyle Quilt 1527 — page 31
2. Utility stitches and pr actical sewing …
-
Pfaff ClassicStyle Quilt 1527 — page 32
2:2 Utility stitches and practical sewing Explanation of the sewing chart The following charts show the recommended settings for each stitch or technique. These charts also provide you with instructions that are necessary when sewing the selected stitches. The choice of the sewing foot, the setting of the needle thread tension and whether to use ID …
-
Pfaff ClassicStyle Quilt 1527 — page 33
2:3 B A Utility stitches and practical sewing Needle thread tension To get perfect sewing results, the needle and bobbin thread tensions must be perfectly tuned to each other. The normal setting for utility stitches is in the range of 4-5. Check the tension with a wide zigzag stitch. The threads must be interlaced between the two fabric pieces. If …
-
Pfaff ClassicStyle Quilt 1527 — page 34
2:4 A C B Utility stitches and practical sewing Straight stitch Stitch G is the basic straight stitch. The stitch length can be increased up to 6 mm. It is easier to do some sewing jobs by changing the needle position, e.g. top- stitching a collar or sewing in a zipper. You can select up to 15 different needle positions (see page 1:16). Please ensu …
-
Pfaff ClassicStyle Quilt 1527 — page 35
2:5 B A Utility stitches and practical sewing Remember! If the stitches are visible on the right side, adjust edge guide B by turning adjusting screw A. Tip: If you chose to sew Blindhem stitch H or Blidhem stitch D with stitch width less than 5, use foot nr.0. Stitch H Stitch D Blindhem stitch Blindhem stitch H is best suited for invisible hems; s …
-
Pfaff ClassicStyle Quilt 1527 — page 36
2:6 Utility stitches and practical sewing Elastic stitch Because of its high elasticity, this stitch can be used for sewing elastic on swimwear, skirts or lingerie. • Mark elastic and fabric in quarters. • Pin elastic to fabric at quarter markings. • Place fabric and elastic under sewing foot. • Stretch elastic to À t the fabric. Begin sew …
-
Pfaff ClassicStyle Quilt 1527 — page 37
2:7 Utility stitches and practical sewing What is an overlock stitch? For stretch fabrics, the select models offer overlock stitches which sew two fabric layers together and overcast simultaneously. They are more elastic than normal seams, very durable and quickly sewn. Tip: We recommend using blindhem stitch foot No. 3 when sewing overlock seams. …
-
Pfaff ClassicStyle Quilt 1527 — page 38
2:8 Utility stitches and practical sewing Shell-edging Shell-edging is attractive on thin, soft fabrics such as silk and Bastiste. It is often used as a decorative edging on lingerie. The higher the needle thread tension, the deeper the shell edge scallop. • Serge the fabric edge and iron the seam allowance to the left. • Take care that the fab …
-
Pfaff ClassicStyle Quilt 1527 — page 39
2:9 Utility stitches and practical sewing Buttonholes Sewing buttonholes is very easy with all the models with push button controls since the fabric does not have to be turned. Buttonholes are generally sewn onto a piece of doubled fabric. However, for some fabrics, e.g. silk, organza and viscose, it is necessary to use stabilizer to prevent the fa …
-
Pfaff ClassicStyle Quilt 1527 — page 40
2:10 B A h 3-5 3-5 3-5 Utility stitches and practical sewing Standard buttonhole with gimp thread To sew especially durable buttonholes, on heavy fabrics, knits or sportswear, we recommend using a gimp thread. On knits the gimp thread is particularly important to prevent the buttonhole from stretching. • Lay the gimp thread over the rear protrusi …
-
Pfaff ClassicStyle Quilt 1527 — page 41
2:11 Utility stitches and practical sewing Sewing on buttons With zigzag stitch G (stitch width 4 mm) you can sew on two and four hole buttons. • Remove the sewing foot and lower the feed dog. • Turn the handwheel towards you and move the button so that the needle enters the left hole in the button. • Now lower the presser foot lifter; this h …
-
Pfaff ClassicStyle Quilt 1527 — page 42
2:12 D C G F E A B Utility stitches and practical sewing Free Motion Sewing Insert the darning foot: Loosen screw D. Set the needle at its highest point and push the pin of the darning foot fully into the hole C of the sewing foot holder. When doing this, the guide fork G should position itself around the presser bar. The lever E must be behind the …
-
Pfaff ClassicStyle Quilt 1527 — page 43
2:13 Utility stitches and practical sewing Sewing on zippers There are various methods of sewing on zippers. For skirts, we recommend the fully concealed zipper, for men’s and ladies’ trousers the semi concealed zipper. Various zippers are available. We recommend using a metal zipper for strong fabrics such as denim. For all other fabrics we re …
-
Pfaff ClassicStyle Quilt 1527 — page 44
2:14 Utility stitches and practical sewing F ully concealed, sew-in zipper • Insert the zipper foot on the right side. • Baste in the zipper and lay it underneath the presser foot so that the teeth of the zipper run alongside the foot. • Stitch in half of the zipper, leave the needle in the fabric, raise the presser foot and close the zipper. …
-
Pfaff ClassicStyle Quilt 1527 — page 45
2:15 Utility stitches and practical sewing Stabilizing edges With the rolled hem foot you can hem blouses, silk scarves and valances with ease, without having to pre-iron the fabric edges. The hemming prevents the edges from fraying and a clean, durable edge is the result. • Fold the beginning of the fabric edge over twice (approx. 2 mm) • Lay …
-
Pfaff ClassicStyle Quilt 1527 — page 46
…
-
Pfaff ClassicStyle Quilt 1527 — page 47
3. Maintenance and trouble-shooting …
-
Pfaff ClassicStyle Quilt 1527 — page 48
3:2 Maintenance and trouble-shooting Changing the needle plate Switch off the main switch. It is very important to clean your sewing machine, because it will reward you with a longer service life. The more often you use the machine, the more care it needs. Removal: • Raise the sewing foot and remove the removable accessory tray. • Push the poin …
-
Pfaff ClassicStyle Quilt 1527 — page 49
3:3 Maintenance and trouble-shooting Changing the sewing bulb Switch off the main switch. • Disconnect the main plug and the foot control plug from the machine. • Take off the removable accessory tray (15). The sewing bulb is located inside the left side of the sewing machine. Removal: • Hold the sewing machine tightly. • Push the bulb into …
-
Pfaff ClassicStyle Quilt 1527 — page 50
3:4 Maintenance and trouble-shooting The machine skips stitches The needle is not properly inserted. Push needle fully upwards, Á at side facing the back. The wrong needle is inserted. Use a needle system 130/705 H. Needle is bent or blunt. Insert a new needle. Machine is not properly threaded. Check how machine is threaded. Needle is too small fo …
-
Pfaff ClassicStyle Quilt 1527 — page 51
3:5 Maintenance and trouble-shooting Machine does not feed or feeds irregularly Sewing lint has collected between the feed dog teeth rows. Remove needle plate, remove lint with brush. Feed dog is lowered, slide A (see page 1:15) at right. Push slide B (see page 1:15) to left. Machine is running with dif À culty There are thread remnants in the hoo …
-
Pfaff ClassicStyle Quilt 1527 — page 52
…
-
Pfaff ClassicStyle Quilt 1527 — page 53
…
-
Pfaff ClassicStyle Quilt 1527 — page 54
…
-
Pfaff ClassicStyle Quilt 1527 — page 55
We reserve the right to change the machine equipment and the ass ort ment of accessories without prior notice, or make modi À cations to the performance or design. Such modi À cations, however, will always be to the bene À t of the user and the product. Please note that on disposal, this product must be safely recycled in accordance with relevan …
-
Pfaff ClassicStyle Quilt 1527 — page 56
VSM Group AB • SE-561 84 Huskv arna • SWEDEN www .pfaff.com 412 93 31 — 26B • English • Inhouse • © 2004-2006 VSM Group AB • All rights reserved • Printed in Sweden on environmentally-friendly paper …
- Главная
-
Pfaff
-
Швейные машинки
-
1527
На этой странице вы найдёте полный список документов на Швейные машинки Pfaff 1527.
Выберите необходимый PDF файл.
-

Швейные машинки
Pfaff 1527 Инструкция по эксплуатацииТип файла
PDFРазмер
219 KbКол-во страниц
1Просмотров
1655Download / Read online

- 1
Другие Pfaff Швейные машинки
-
Pfaff 360 Инструкция по эксплуатации
PDF файлов
1Просмотров
32895 -
Pfaff 1183 Инструкция по эксплуатации
PDF файлов
1Просмотров
27066 -
Pfaff 1245 Руководство пользователя
PDF файлов
2Просмотров
18742 -
Pfaff 591 Инструкция по эксплуатации
PDF файлов
1Просмотров
14052 -
Pfaff 463 AND 463 H Инструкция по эксплуатации
PDF файлов
1Просмотров
12567 -
Pfaff 141 Инструкция по эксплуатации
PDF файлов
1Просмотров
11720
Другие устройства Pfaff
-
Стереосистемы
Pfaff 2170 Руководство пользователяPDF файлов
2Просмотров
9002 -
Водонагреватели
Pfaff 581 583 Инструкция по эксплуатацииPDF файлов
1Просмотров
4536
Вопросы
-
слабая батарея
Ноутбуки
Acer
1310
Alex 12.02.2016 17:26
Ранее вы смотрели
Производители
Carl Zeiss
Cloud B
Deutsche Telekom
Ecom Instruments
Evolve Communications
FLAVIA Beverage Systems
Genie
Hobie
JUDY CRAFT
Типы устройств
Гидромассажные ванны
Ресиверы
Карточные игры
Детские шезлонги
Высоторезы
Звуковое спа
Кардиотренажеры
Машинки для жарки чеснока
Судовая электроника
Антирадары
Устройства
Anton/Bauer HyTRON 140
Avaya ipView SoftBoard BCM Rls 6.0
Canon imageCLASS Laser Multifunction Printer 5252B001
Delta Electronics SMT Power Inductor SIWC1360
One For ALL URC-7721
Peterbilt Medium Duty Models
Philips SCF138/05
Samsung SyncMaster 305T
TERK Technologies Terk Advantage Non Powered AM Radio Antenna Advantage
Texas Instruments Calculator TI-73
freeuserguide.ru
About Us
Contacts
Disclamers
Privacy Policy
Эта страница полезна для вас? Поделитесь ссылкой:
-
Page 1: Pfaff ClassicStyle Quilt 1527
ClassicStyle Quilt 1527 Owner´s manual[…]
-
Page 2: Pfaff ClassicStyle Quilt 1527
19 22 21 23 24 27 20 25 26 1 2 4 3 5 7 8 9 10 11 12 13 14 15 16 17 18 6 Machine Overview 1 Connection socket “foot control with main cord” 2 Main switch 3 Handwheel release disk 4 Handwheel 5 Bobbin winder 6 Lid with stitches 7 Extra spool holder 8 Spool holder with spool cap 9 Take-up lever 10 Needle thread tension dial 11 Threading path 12 Th[…]
-
Page 3: Pfaff ClassicStyle Quilt 1527
3 1 04 5 12 3 56 4 78 Stitches and presser feet Stitch descriptions are found in the introduction section. Presser feet (normal accessories) For more information about accessories, please contact your PFAFF dealer. 0 Standard Presser F oot with ID T Part No. 820250-096 (pictured) (select 1546 and 1536) Part No. 820258-096 (select 1526) 1 Clearview […]
-
Page 4: Pfaff ClassicStyle Quilt 1527
! ClassicStyle Quilt 1527 Some fabrics have a lot of excess dye which can cause discoloration on other fabric but also on your sewing machine. This discoloring may be very dif À cult or impossible to remove. Fleece and denim fabric in especially red and blue often contain a lot of excess dye. If you suspect that your fabric/ready-to-wear garment c[…]
-
Page 5: Pfaff ClassicStyle Quilt 1527
This household sewing machine is designed to comply with IEC/EN 60335-2-28 and UL1594. IMPORT ANT SAFETY INS TRUCTIONS When using an electrical appliance, basic safety precautions should always be followed, including the following: Read all instructions before using this household sewing machine. D ANGER — T o reduce the risk of electric shock: •[…]
-
Page 6: Pfaff ClassicStyle Quilt 1527
[…]
-
Page 7: Pfaff ClassicStyle Quilt 1527
III III Introduction Contents Introduction Stitch table V 1. Operate your Pf aff select Electrical connection 1:2 Removable accessory tray 1:3 Bobbins 1:4 Bobbin case 1:8 Threading the needle 1:10 Needle threader 1:11 Bringing up the bobbin thread 1:12 Presser foot lifter 1:13 Thread cutter 1:12 Changing the presser foot 1:13 IDT System/Integrated […]
-
Page 8: Pfaff ClassicStyle Quilt 1527
IV IV Introduction Stitch table (non-elastic stitches) select 1546 select 1536 & select 1526 Stitch Description Application 1546 1536/1526 A/B/C A/B/C Buttonhole Standard buttonhole for blouses or bed linens DH Blind stitch with zigzag (elastic) For invisible hemming with simultaneous seam/ overcasting. Especially for stretch material E– Gree[…]
-
Page 9: Pfaff ClassicStyle Quilt 1527
V V Introduction select 1546 select 1536 & select 1526 Stitch table (stretch stitches) Stitch Description Application 1546 1536/1526 DH Peacock’s eye stitch Elastic closing and serging seam. The material must be turned by 180 degrees E– Cover stitch For top-stitching and overstitching stretch materials, e.g. cuffs, hems and panels F– Herr[…]
-
Page 10: Pfaff ClassicStyle Quilt 1527
VI VI Introduction select 1546 Stitch table (stretch stitches) Stitch Description Application 1546 LC Dutch stitch, narrow A decorative stitch, e.g. for household textiles LD Dutch stitch A decorative stitch, e.g. for household textiles LG Border stitch A decorative stitch, e.g. for traditional embroidery LI Weaving stitch An ornamental stitch, e.g[…]
-
Page 11: Pfaff ClassicStyle Quilt 1527
1. Oper ate your Pfaff select[…]
-
Page 12: Pfaff ClassicStyle Quilt 1527
1:2 1:2 Operate your Pf aff select Carrying-case Place the cords, foot control and instruction book in the front pocket of the carrying case. Lid Open the folding lid (6) upwards. The stitches of the sewing machine are illustrated on the inside of the lid. Connecting the foot control Connect the plug of the foot control to the connecting socket (1)[…]
-
Page 13: Pfaff ClassicStyle Quilt 1527
1:3 1:3 Operate your Pf aff select Accessory tray Your Pfaff select sewing machine has a removable accessory tray (15) which is also used as an extended work support. Model 1546, has a special removable accessory organizer. The enclosed accessories are numbered. Sort the enclosed accessories into the corresponding sections of the accessory organize[…]
-
Page 14: Pfaff ClassicStyle Quilt 1527
1:4 1:4 Operate your Pf aff select Preparing the machine for bobbin winding Hold the handwheel (4) À rmly and turn the handwheel release disc (3) until it stops in the direction of the arrow. This stops the needle from moving while the machine is winding the bobbin. Placing the bobbin Switch off the main switch (2) Place the empty bobbin so that t[…]
-
Page 15: Pfaff ClassicStyle Quilt 1527
1:5 1:5 A B C Operate your Pf aff select Winding the bobbin from the spool holder Place the sewing thread on the spool holder (8). To guarantee free movement of the thread and to give additional hold to the thread spool, À t a spool cap corresponding to the size of the thread spool. Threading Place the thread into guide A and pull it through openi[…]
-
Page 16: Pfaff ClassicStyle Quilt 1527
1:6 1:6 B A C Operate your Pf aff select Winding from the second spool holder Push the second spool holder (7) into its hole and place a spool of thread with the corresponding spool cap on it. Threading Place the thread into guide A and pull it through opening B to the right under hook C. Wind the thread clockwise a few times around the bobbin. Swi[…]
-
Page 17: Pfaff ClassicStyle Quilt 1527
1:7 1:7 C Operate your Pf aff select Winding through the needle Even if the machine has been completely threaded, you can still wind the bobbin. Raise presser foot lifter (19). Pass the needle thread through the presser foot and downwards; then through the right threading slot (11) and upwards. Now, pull the thread into the take-up lever from left […]
-
Page 18: Pfaff ClassicStyle Quilt 1527
1:8 1:8 Operate your Pf aff select Bobbin Case/Hook Cover Switch off the main switch. Hold the side of the bobbin case/hook cover and open it towards you. Removing the bobbin case Raise the bobbin case lever and pull out the bobbin case. Release the lever and remove the empty bobbin.[…]
-
Page 19: Pfaff ClassicStyle Quilt 1527
1:9 1:9 C A B D E Operate your Pf aff select Inserting the bobbin Insert the full bobbin (with the Pfaff logo facing towards the bobbin case) into the bobbin case. In doing so, pull the thread sideways through slot A, then under the tension plate B until it rests in the opening (see arrow). Check: When you look at the bobbin and pull the thread, th[…]
-
Page 20: Pfaff ClassicStyle Quilt 1527
1:10 1:10 B A D C E G F F H Operate your Pf aff select Threading the needle thread Switch off the main switch Raise the presser foot lifter (19) and turn the handwheel until the take-up lever (9) has moved to the top. Place the thread on the spool holder (8) and À t the corresponding spool cap. Now, using both hands, pull the thread into guide A a[…]
-
Page 21: Pfaff ClassicStyle Quilt 1527
1:11 1:11 C A B Operate your Pf aff select Needle threader (Model 1546) To make threading the needle easier and quicker, use the PFAFF needle threader (13). Lower the presser foot. Turn the handwheel until the needle is at its highest position. Place the needle thread under hook A and hold it taut. Move the needle threader fully downwards and turn […]
-
Page 22: Pfaff ClassicStyle Quilt 1527
1:12 1:12 Operate your Pf aff select Bringing up the bobbin thread Switch off the main switch. Raise the presser foot. Hold the needle thread and turn the handwheel towards you until the needle is in the highest position and the bobbin thread has formed a loop. Pull the needle thread to bring up the bobbin thread. Bobbin thread Close the bobbin cas[…]
-
Page 23: Pfaff ClassicStyle Quilt 1527
1:13 1:13 Operate your Pf aff select Presser foot lifter The presser foot is raised or lowered with the presser foot lifter (19). Removing the presser foot Switch off the main switch. Position the needle at its highest point. Press the presser foot upwards at the front and down at the back at the same time so that it disengages from the presser foo[…]
-
Page 24: Pfaff ClassicStyle Quilt 1527
1:14 1:14 Operate your Pf aff select The Integrated dual feed/ID T System (Models 1536 and 1546) PFAFF offers the ideal solution for sewing dif À cult materials: the IDT. This system feeds the material from the top and bottom simultaneously as is done in industrial sewing machines. The fabric is fed precisely. When sewing light or dif À cult mate[…]
-
Page 25: Pfaff ClassicStyle Quilt 1527
1:15 1:15 C B A Operate your Pf aff select Changing the needle Switch off the main switch. To remove: Lower the presser foot and move the needle to its highest point. Now loosen the needle screw (18) and pull the needle down. To insert: The Á at side A of the needle must face to the rear. Lower the presser foot and insert the needle, pushing it up[…]
-
Page 26: Pfaff ClassicStyle Quilt 1527
1:16 1:16 27 26 Operate your Pf aff select Stitch width dial The stitch width can be adjusted with this dial (26). When selecting the width, the needle must not be in the material. Basic setting: Turn the stitch width knob (26) to the symbol (maximum stitch width). Exception: Straight stitch is sewn with stitch width 0. In chapter “2. Utility sti[…]
-
Page 27: Pfaff ClassicStyle Quilt 1527
1:17 1:17 20 21 A 21 Operate your Pf aff select Reverse sewing The machine sews in reverse only as long as the reverse sewing button (20) is pressed. Stitch length adjustment dial With the stitch length adjustment dial (21) you can adjust the stitch length between 0 and 6 mm by turning the point marking on the button to the required length. Between[…]
-
Page 28: Pfaff ClassicStyle Quilt 1527
1:18 1:18 B B B Operate your Pf aff select Utility stitches Each stitch has been given a letter that you can À nd on the push button controls. By pressing the correct button, the stitch is selected and the machine is ready to sew. Button B releases the buttons that have been activated. Under the lid (6) you will À nd the stitch table with all the[…]
-
Page 29: Pfaff ClassicStyle Quilt 1527
1:19 1:19 24 A 21 Operate your Pf aff select Stitch selection, stitch dial – select 1536, 1526 Utility stitches Each stitch is identi À ed by a letter. The stitches and their corresponding letters are shown on the inside of the lid, a chart is also found in the Introduction chapter. Turn the dial (24) until the corresponding letter is positioned[…]
-
Page 30: Pfaff ClassicStyle Quilt 1527
1:20 1:20 Operate your Pf aff select[…]
-
Page 31: Pfaff ClassicStyle Quilt 1527
2. Utility stitches and pr actical sewing[…]
-
Page 32: Pfaff ClassicStyle Quilt 1527
2:2 Utility stitches and practical sewing Explanation of the sewing chart The following charts show the recommended settings for each stitch or technique. These charts also provide you with instructions that are necessary when sewing the selected stitches. The choice of the sewing foot, the setting of the needle thread tension and whether to use ID[…]
-
Page 33: Pfaff ClassicStyle Quilt 1527
2:3 B A Utility stitches and practical sewing Needle thread tension To get perfect sewing results, the needle and bobbin thread tensions must be perfectly tuned to each other. The normal setting for utility stitches is in the range of 4-5. Check the tension with a wide zigzag stitch. The threads must be interlaced between the two fabric pieces. If […]
-
Page 34: Pfaff ClassicStyle Quilt 1527
2:4 A C B Utility stitches and practical sewing Straight stitch Stitch G is the basic straight stitch. The stitch length can be increased up to 6 mm. It is easier to do some sewing jobs by changing the needle position, e.g. top- stitching a collar or sewing in a zipper. You can select up to 15 different needle positions (see page 1:16). Please ensu[…]
-
Page 35: Pfaff ClassicStyle Quilt 1527
2:5 B A Utility stitches and practical sewing Remember! If the stitches are visible on the right side, adjust edge guide B by turning adjusting screw A. Tip: If you chose to sew Blindhem stitch H or Blidhem stitch D with stitch width less than 5, use foot nr.0. Stitch H Stitch D Blindhem stitch Blindhem stitch H is best suited for invisible hems; s[…]
-
Page 36: Pfaff ClassicStyle Quilt 1527
2:6 Utility stitches and practical sewing Elastic stitch Because of its high elasticity, this stitch can be used for sewing elastic on swimwear, skirts or lingerie. • Mark elastic and fabric in quarters. • Pin elastic to fabric at quarter markings. • Place fabric and elastic under sewing foot. • Stretch elastic to À t the fabric. Begin sew[…]
-
Page 37: Pfaff ClassicStyle Quilt 1527
2:7 Utility stitches and practical sewing What is an overlock stitch? For stretch fabrics, the select models offer overlock stitches which sew two fabric layers together and overcast simultaneously. They are more elastic than normal seams, very durable and quickly sewn. Tip: We recommend using blindhem stitch foot No. 3 when sewing overlock seams. […]
-
Page 38: Pfaff ClassicStyle Quilt 1527
2:8 Utility stitches and practical sewing Shell-edging Shell-edging is attractive on thin, soft fabrics such as silk and Bastiste. It is often used as a decorative edging on lingerie. The higher the needle thread tension, the deeper the shell edge scallop. • Serge the fabric edge and iron the seam allowance to the left. • Take care that the fab[…]
-
Page 39: Pfaff ClassicStyle Quilt 1527
2:9 Utility stitches and practical sewing Buttonholes Sewing buttonholes is very easy with all the models with push button controls since the fabric does not have to be turned. Buttonholes are generally sewn onto a piece of doubled fabric. However, for some fabrics, e.g. silk, organza and viscose, it is necessary to use stabilizer to prevent the fa[…]
-
Page 40: Pfaff ClassicStyle Quilt 1527
2:10 B A h 3-5 3-5 3-5 Utility stitches and practical sewing Standard buttonhole with gimp thread To sew especially durable buttonholes, on heavy fabrics, knits or sportswear, we recommend using a gimp thread. On knits the gimp thread is particularly important to prevent the buttonhole from stretching. • Lay the gimp thread over the rear protrusi[…]
-
Page 41: Pfaff ClassicStyle Quilt 1527
2:11 Utility stitches and practical sewing Sewing on buttons With zigzag stitch G (stitch width 4 mm) you can sew on two and four hole buttons. • Remove the sewing foot and lower the feed dog. • Turn the handwheel towards you and move the button so that the needle enters the left hole in the button. • Now lower the presser foot lifter; this h[…]
-
Page 42: Pfaff ClassicStyle Quilt 1527
2:12 D C G F E A B Utility stitches and practical sewing Free Motion Sewing Insert the darning foot: Loosen screw D. Set the needle at its highest point and push the pin of the darning foot fully into the hole C of the sewing foot holder. When doing this, the guide fork G should position itself around the presser bar. The lever E must be behind the[…]
-
Page 43: Pfaff ClassicStyle Quilt 1527
2:13 Utility stitches and practical sewing Sewing on zippers There are various methods of sewing on zippers. For skirts, we recommend the fully concealed zipper, for men’s and ladies’ trousers the semi concealed zipper. Various zippers are available. We recommend using a metal zipper for strong fabrics such as denim. For all other fabrics we re[…]
-
Page 44: Pfaff ClassicStyle Quilt 1527
2:14 Utility stitches and practical sewing F ully concealed, sew-in zipper • Insert the zipper foot on the right side. • Baste in the zipper and lay it underneath the presser foot so that the teeth of the zipper run alongside the foot. • Stitch in half of the zipper, leave the needle in the fabric, raise the presser foot and close the zipper.[…]
-
Page 45: Pfaff ClassicStyle Quilt 1527
2:15 Utility stitches and practical sewing Stabilizing edges With the rolled hem foot you can hem blouses, silk scarves and valances with ease, without having to pre-iron the fabric edges. The hemming prevents the edges from fraying and a clean, durable edge is the result. • Fold the beginning of the fabric edge over twice (approx. 2 mm) • Lay […]
-
Page 46: Pfaff ClassicStyle Quilt 1527
[…]
-
Page 47: Pfaff ClassicStyle Quilt 1527
3. Maintenance and trouble-shooting[…]
-
Page 48: Pfaff ClassicStyle Quilt 1527
3:2 Maintenance and trouble-shooting Changing the needle plate Switch off the main switch. It is very important to clean your sewing machine, because it will reward you with a longer service life. The more often you use the machine, the more care it needs. Removal: • Raise the sewing foot and remove the removable accessory tray. • Push the poin[…]
-
Page 49: Pfaff ClassicStyle Quilt 1527
3:3 Maintenance and trouble-shooting Changing the sewing bulb Switch off the main switch. • Disconnect the main plug and the foot control plug from the machine. • Take off the removable accessory tray (15). The sewing bulb is located inside the left side of the sewing machine. Removal: • Hold the sewing machine tightly. • Push the bulb into[…]
-
Page 50: Pfaff ClassicStyle Quilt 1527
3:4 Maintenance and trouble-shooting The machine skips stitches The needle is not properly inserted. Push needle fully upwards, Á at side facing the back. The wrong needle is inserted. Use a needle system 130/705 H. Needle is bent or blunt. Insert a new needle. Machine is not properly threaded. Check how machine is threaded. Needle is too small fo[…]
-
Page 51: Pfaff ClassicStyle Quilt 1527
3:5 Maintenance and trouble-shooting Machine does not feed or feeds irregularly Sewing lint has collected between the feed dog teeth rows. Remove needle plate, remove lint with brush. Feed dog is lowered, slide A (see page 1:15) at right. Push slide B (see page 1:15) to left. Machine is running with dif À culty There are thread remnants in the hoo[…]
-
Page 52: Pfaff ClassicStyle Quilt 1527
[…]
-
Page 53: Pfaff ClassicStyle Quilt 1527
[…]
-
Page 54: Pfaff ClassicStyle Quilt 1527
[…]
-
Page 55: Pfaff ClassicStyle Quilt 1527
We reserve the right to change the machine equipment and the ass ort ment of accessories without prior notice, or make modi À cations to the performance or design. Such modi À cations, however, will always be to the bene À t of the user and the product. Please note that on disposal, this product must be safely recycled in accordance with relevan[…]
-
Page 56: Pfaff ClassicStyle Quilt 1527
VSM Group AB • SE-561 84 Huskv arna • SWEDEN www .pfaff.com 412 93 31 — 26B • English • Inhouse • © 2004-2006 VSM Group AB • All rights reserved • Printed in Sweden on environmentally-friendly paper[…]

Производитель: Pfaff
Электромеханическая швейная машина Пфафф Классик Стайл Квилт 1527

Модель Pfaff Classic Style Quilt 1527 сменила на конвейере одну из самых популярных машин — Pfaff Classic Style 1525 и отличается от нее наличием в комплекте поставки набора лапок для квилтинга и пэчворка.
Благодаря особой конструкции челнока, наличию верхнего транспортера ткани и высокой мощности двигателя, эта машина позволяет получить качественную строчку практически на любых материалах — от шифона до кожи.
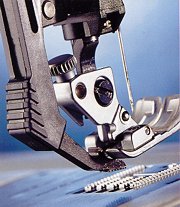 Встроенный верхний транспортер ткани (Integrated Dual Transporter — IDT) швейной машины Pfaff 1527 обеспечивает одновременное продвижение материала снизу и сверху, что позволяет избежать нежелательного сдвига слоев ткани друг относительно друга. Эта функция очень удобна для квилтинга, и самое главное, верхний транспортер обеспечивает равномерную подачу даже самых тонких и сложных тканей.
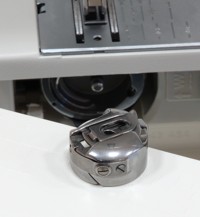 В швейной машине Pfaff Classic Style 1527 применен вертикальный челнок двойного обегания, прекрасно зарекомендовавший себя в промышленных швейных машинах. Этот тип челнока позволяет шить на большой скорости, с низким уровнем шума и вибрации. Наименее капризен и наиболее надёжен из всех, обеспечивает лучшее качество строчки на любых материалах. Важно, что натяжение нижней нити может быть легко отрегулировано для получения отличного результата практически на любой ткани.
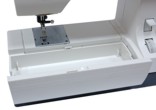 Под откидной крышкой удобно хранятся лапки, шпульки и другие аксессуары.
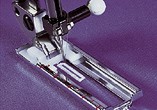 Швейная машина Pfaff Classic Style 1527 выполняет бельевую петлю за 4 приема без поворота ткани.
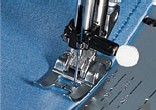 Функция точного позиционирования иглы очень удобна при отстрочке по краю, пришивании молнии и других подобных операциях.
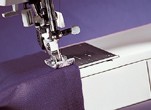 Функция «Свободный рукав». Вы можете снять часть столика для обработки манжет, штанин, рукавов и т.п.
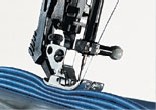 Большая высота подъема лапки для шитья толстых материалов или нескольких слоев ткани. Высота зазора под лапкой до 11 мм. Усилие прокола не зависит от скорости шитья и регулируется электронным блоком.
 Видеоролик «Встроенный верхний транспортер ткани» (WMV, 1,18MB, eng)
Видеоролик «Pfaff шьет консервные банки» (WMV, 1,08MB)
 Описание Pfaff Classic Style Quilt 1527 на сайте производителя (eng)
Характеристики Pfaff Classic Style Quilt 1527:
- Тип челнока
- вертикальный вращающийся челнок двойного обегания
- Максимальная ширина строчки
- 5,5 мм
- Максимальная длина стежка
- 6 мм
- Количество строчек
- 13
- Режим вымётывания петли
- Полуавтоматическое выметывание бельевой петли за 4 переключения без поворота ткани
- Верхний транспортёр
- Встроенный (Integrated Dual Transporter — IDT)
- Длина платформы
- 17 см
- Размеры рукавной платформы (длина/обхват)
- 12/26 см
- Ширина гребёнки транспортера
- 14 мм
- Высота подъема лапки (нормальная/максимальная)
- 8/11
- Электронный стабилизатор усилия прокола
- есть
- Регулятор (ограничитель) максимальной скорости
- На педали
- Программируемая остановка иглы в верхнем/нижнем положении
- нет
- Нитевдеватель
- нет
- Горизонтальное расположение катушки
- есть
- Регулятор давления лапки
- нет
- Потребляемая мощность
- 90 Вт
- Тип освещения
- Лампа накаливания 220v 15w
- Автостоп при намотке нитки на шпульку
- есть
- Линейка на корпусе
- есть
- Чехол
- Жесткий
- Стандарт игл
- 130/705H
- Страна производства
- Чехия
- Гарантия
- 2 года

Строчки Pfaff Classic Style Quilt 1527:
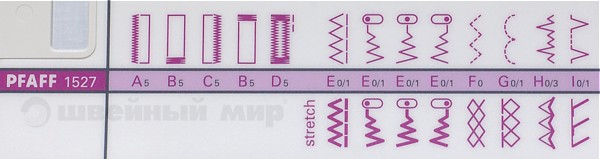
- Прямая бельевая петля
- Прямая строчка
- Зигзаг
- Трехступенчатый зигзаг. Может использоваться, например, для пришивания резинки
- Декоративная строчка
- Потайная строчка для эластичных тканей. Используется для подшивания кромки изделия, например брюк, если строчка не должна быть видна.
- Краеобметочный шов. Используется для декоративной обработки кромки ткани
- Усиленная прямая строчка. Рекомендуется для шитья эластичных тканей или толстого трикотажа. Также этот стежок применяется там, где нужна крепость и надежность шва. Используйте его для усиления таких деталей как крючки и проймы, для пошива рюкзаков и т.п. Строчка шьется двумя стежками вперед и одним стежком назад, образуя шов, который нелегко порвать
- Усиленный зигзаг. Может использоваться для сшивания тяжелых эластичных тканей и всех типов работ, для которых используется зигзаг. Его можно также использовать как декоративную строчку
- Сотовый стежок. Может использоваться как декоративный шов или для пришивания шнура, декоративных нитей или резинки
- Декоративная строчка.
- Пуловерный стежок с усиленным краем. Эластичные и отделочные и краеобметочные швы на вязанных деталях, сшивание деталей
- Оверлочная строчка. Используется для одновременного сшивания и обметки края не очень склонных к осыпанию материалов
Комплектация
- Стандартная лапка
- Прозрачная лапка
- Лапка для потайных и оверлочных швов
- Лапка для застежек «молний»
- Лапка для петель
- Линейка направитель
- Фетровая прокладка и пластинки для катушки
- Второй стержень для катушки
- Распарыватель
- Кисточка
- Шпульки
- Набор игл
- Набор лапок для квилтинга и пэчворка
Обратите внимание!
«Швейный Мир» является официальным дистрибьютором швейных машин фирмы Pfaff. Покупая Pfaff в наших магазинах, Вы получите качественную машину обеспеченную гарантийным и сервисным обслуживанием.
Опубликуйте ваш отзыв
Отзывы о товаре могут оставлять только зарегистрированные покупатели.