
Раздел: Бытовая, кухонная техника, электроника и оборудование
Тип: Мясорубка
Характеристики, спецификации
Номинальная мощность:
2000 Вт
Производительность:
2.9 кг/мин
Насадки-решетки:
Есть, 2 штуки (4.7 мм, 7.5 мм)
Насадки для шинковки:
Есть, 4 штуки
Прочие насадки:
для приготовления кеббе, для приготовления колбас
Отделение для хранения насадок:
есть
Лоток для подачи продуктов:
есть, металл
Материал изготовления корпуса:
пластик
Отделение для хранения кабеля:
есть
Инструкция к Мясорубке Moulinex HV8 ME645
I
J
C
I1I2
J1J2
B
K
K2 K1
GE
F
D
A4cA4b A4d
H
A5 A3
A4a
A2 A1
A
L2
L
L3a L3b L3c
L1
L3d L3e
EN
p 1 – p 7
RU
p 8 – p 14
p 15 – p 21
p 22 – p 28
p 29 – p 35
p 36 – p 42
p 43 – p 49
p 50 – p 56
p 57 – p 63
p 64 – p 70
p 71 – p 77
p 78 – p 84
p 85 – p 91
p 92 – p 98
p 99 – p 105
EN
RU
UK
CS
SK
HU
PL
LV
LT
ET
BG
SR
HR
SL
RO
BS
www.moulinex.com
UK
CS
SK
HU
PL
LV
LT
ET
BG
SR
HR
SL
RO
BS
p 106 – p 112
Réf. 2643164
Notice_2643164_EE_Mise en page 1 07/04/11 15:59 Pagea1
!!
!!
Notice_2643164_EE_Mise en page 1 07/04/11 15:59 Pagea4
Notice_2643164_EE_Mise en page 1 07/04/11 15:59 Pagea7

EN
Thank you for choosing an appliance from the Moulinex range.
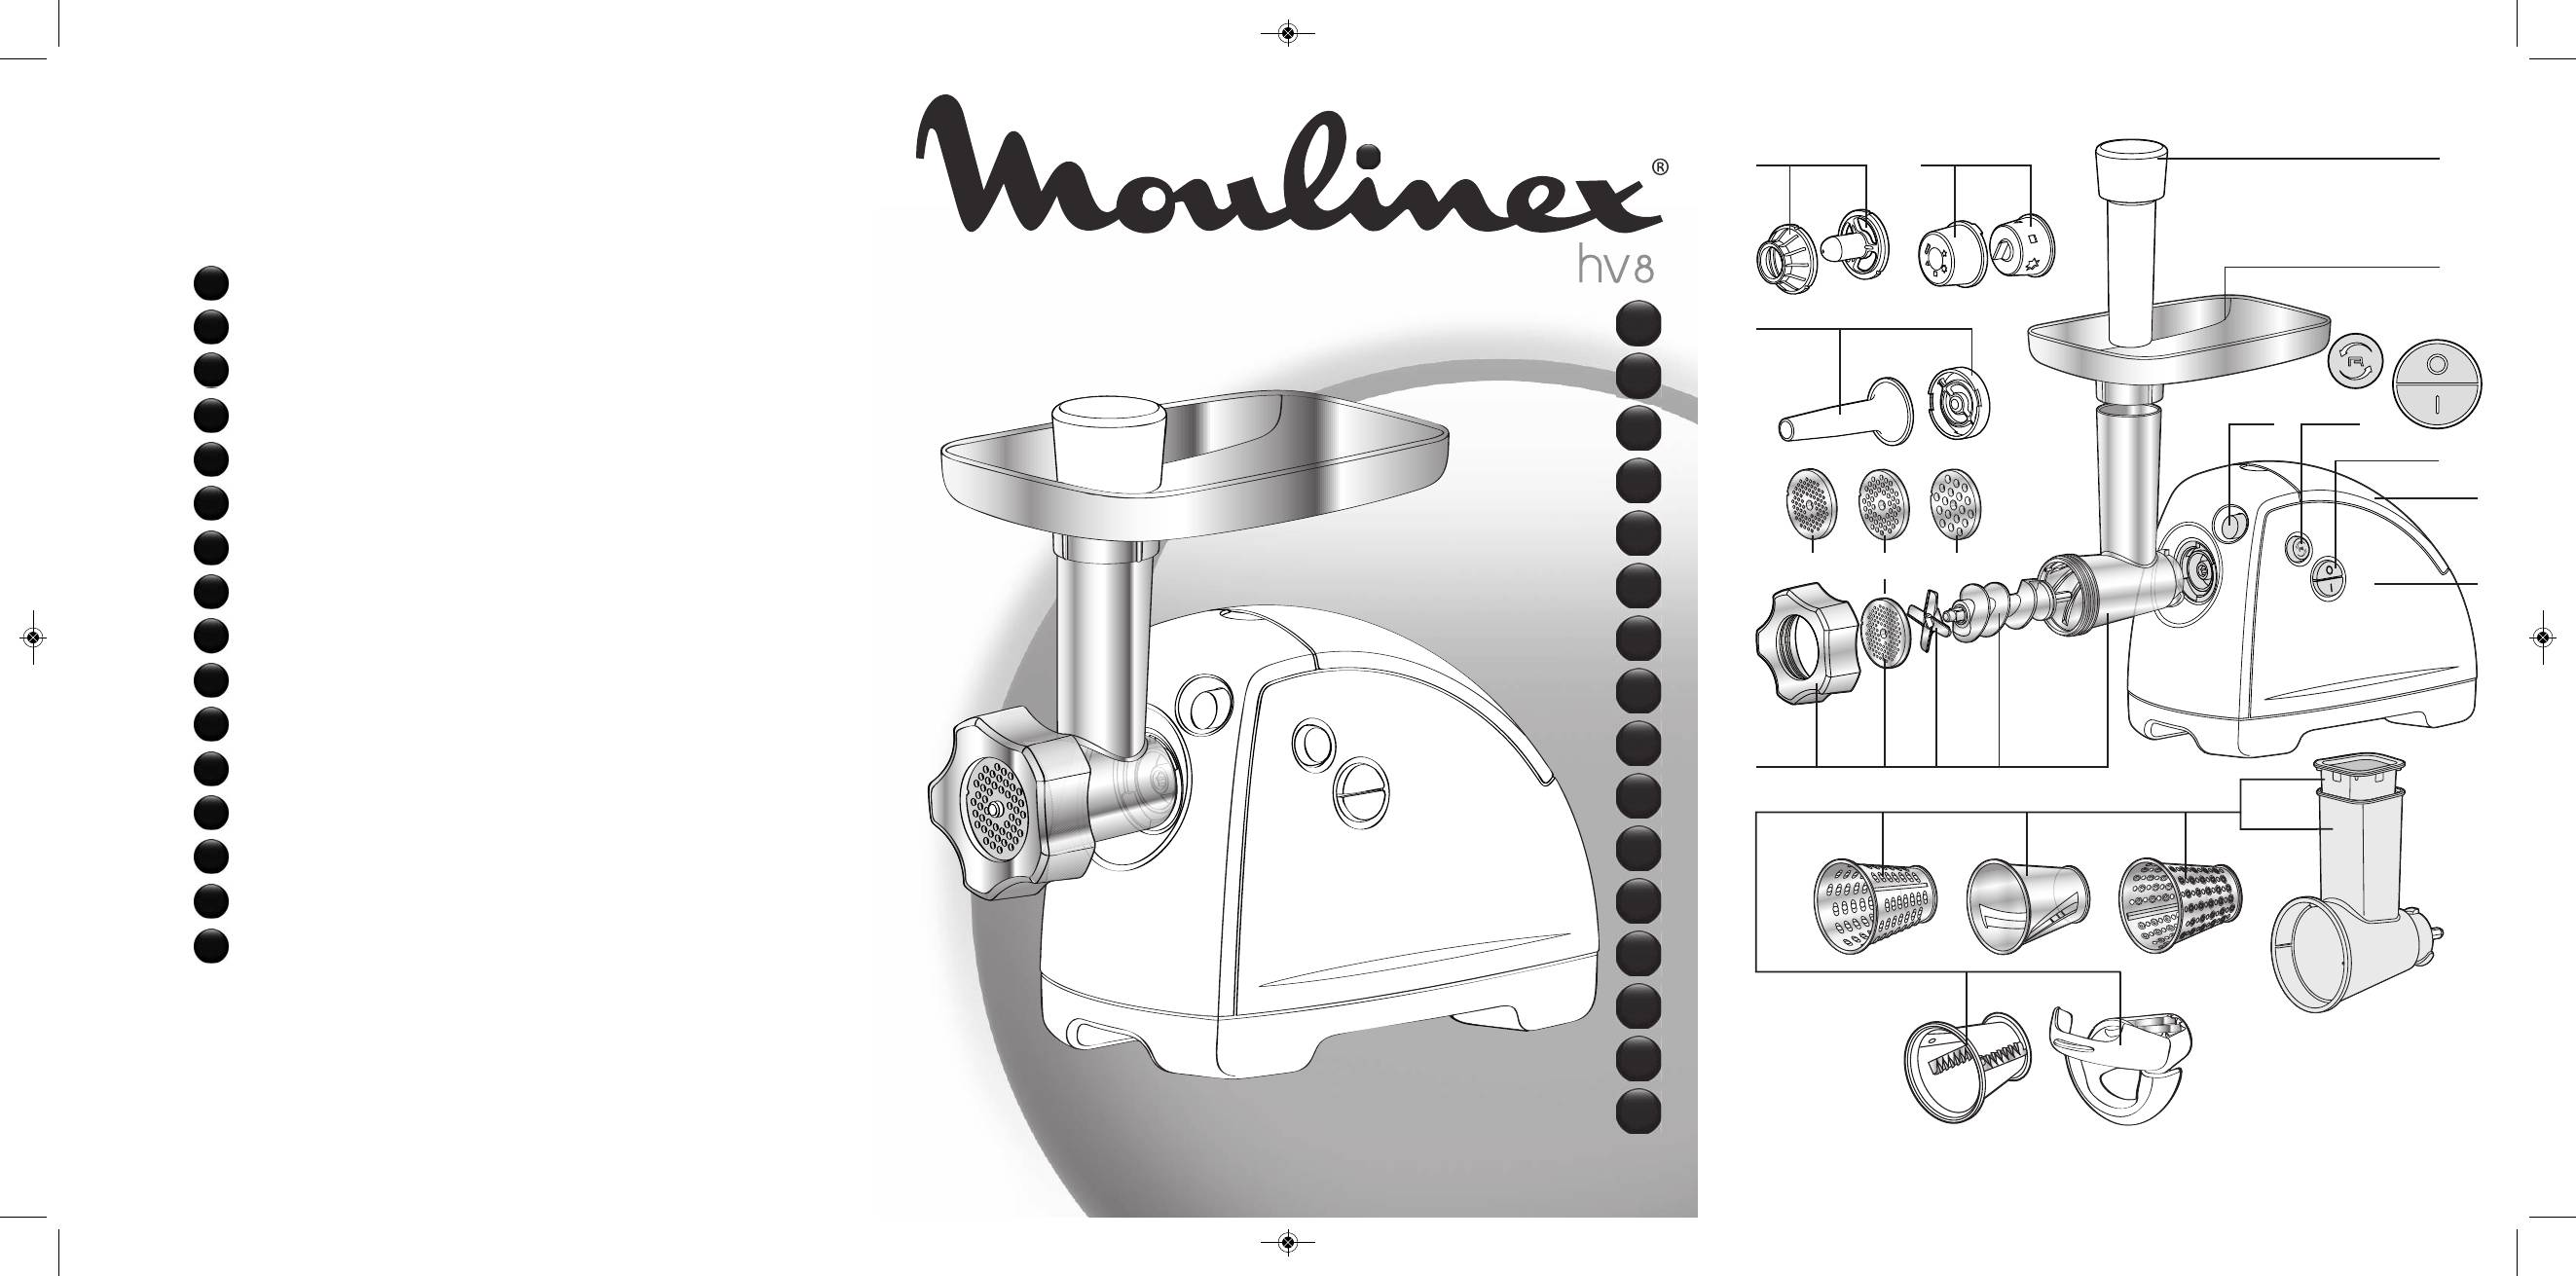
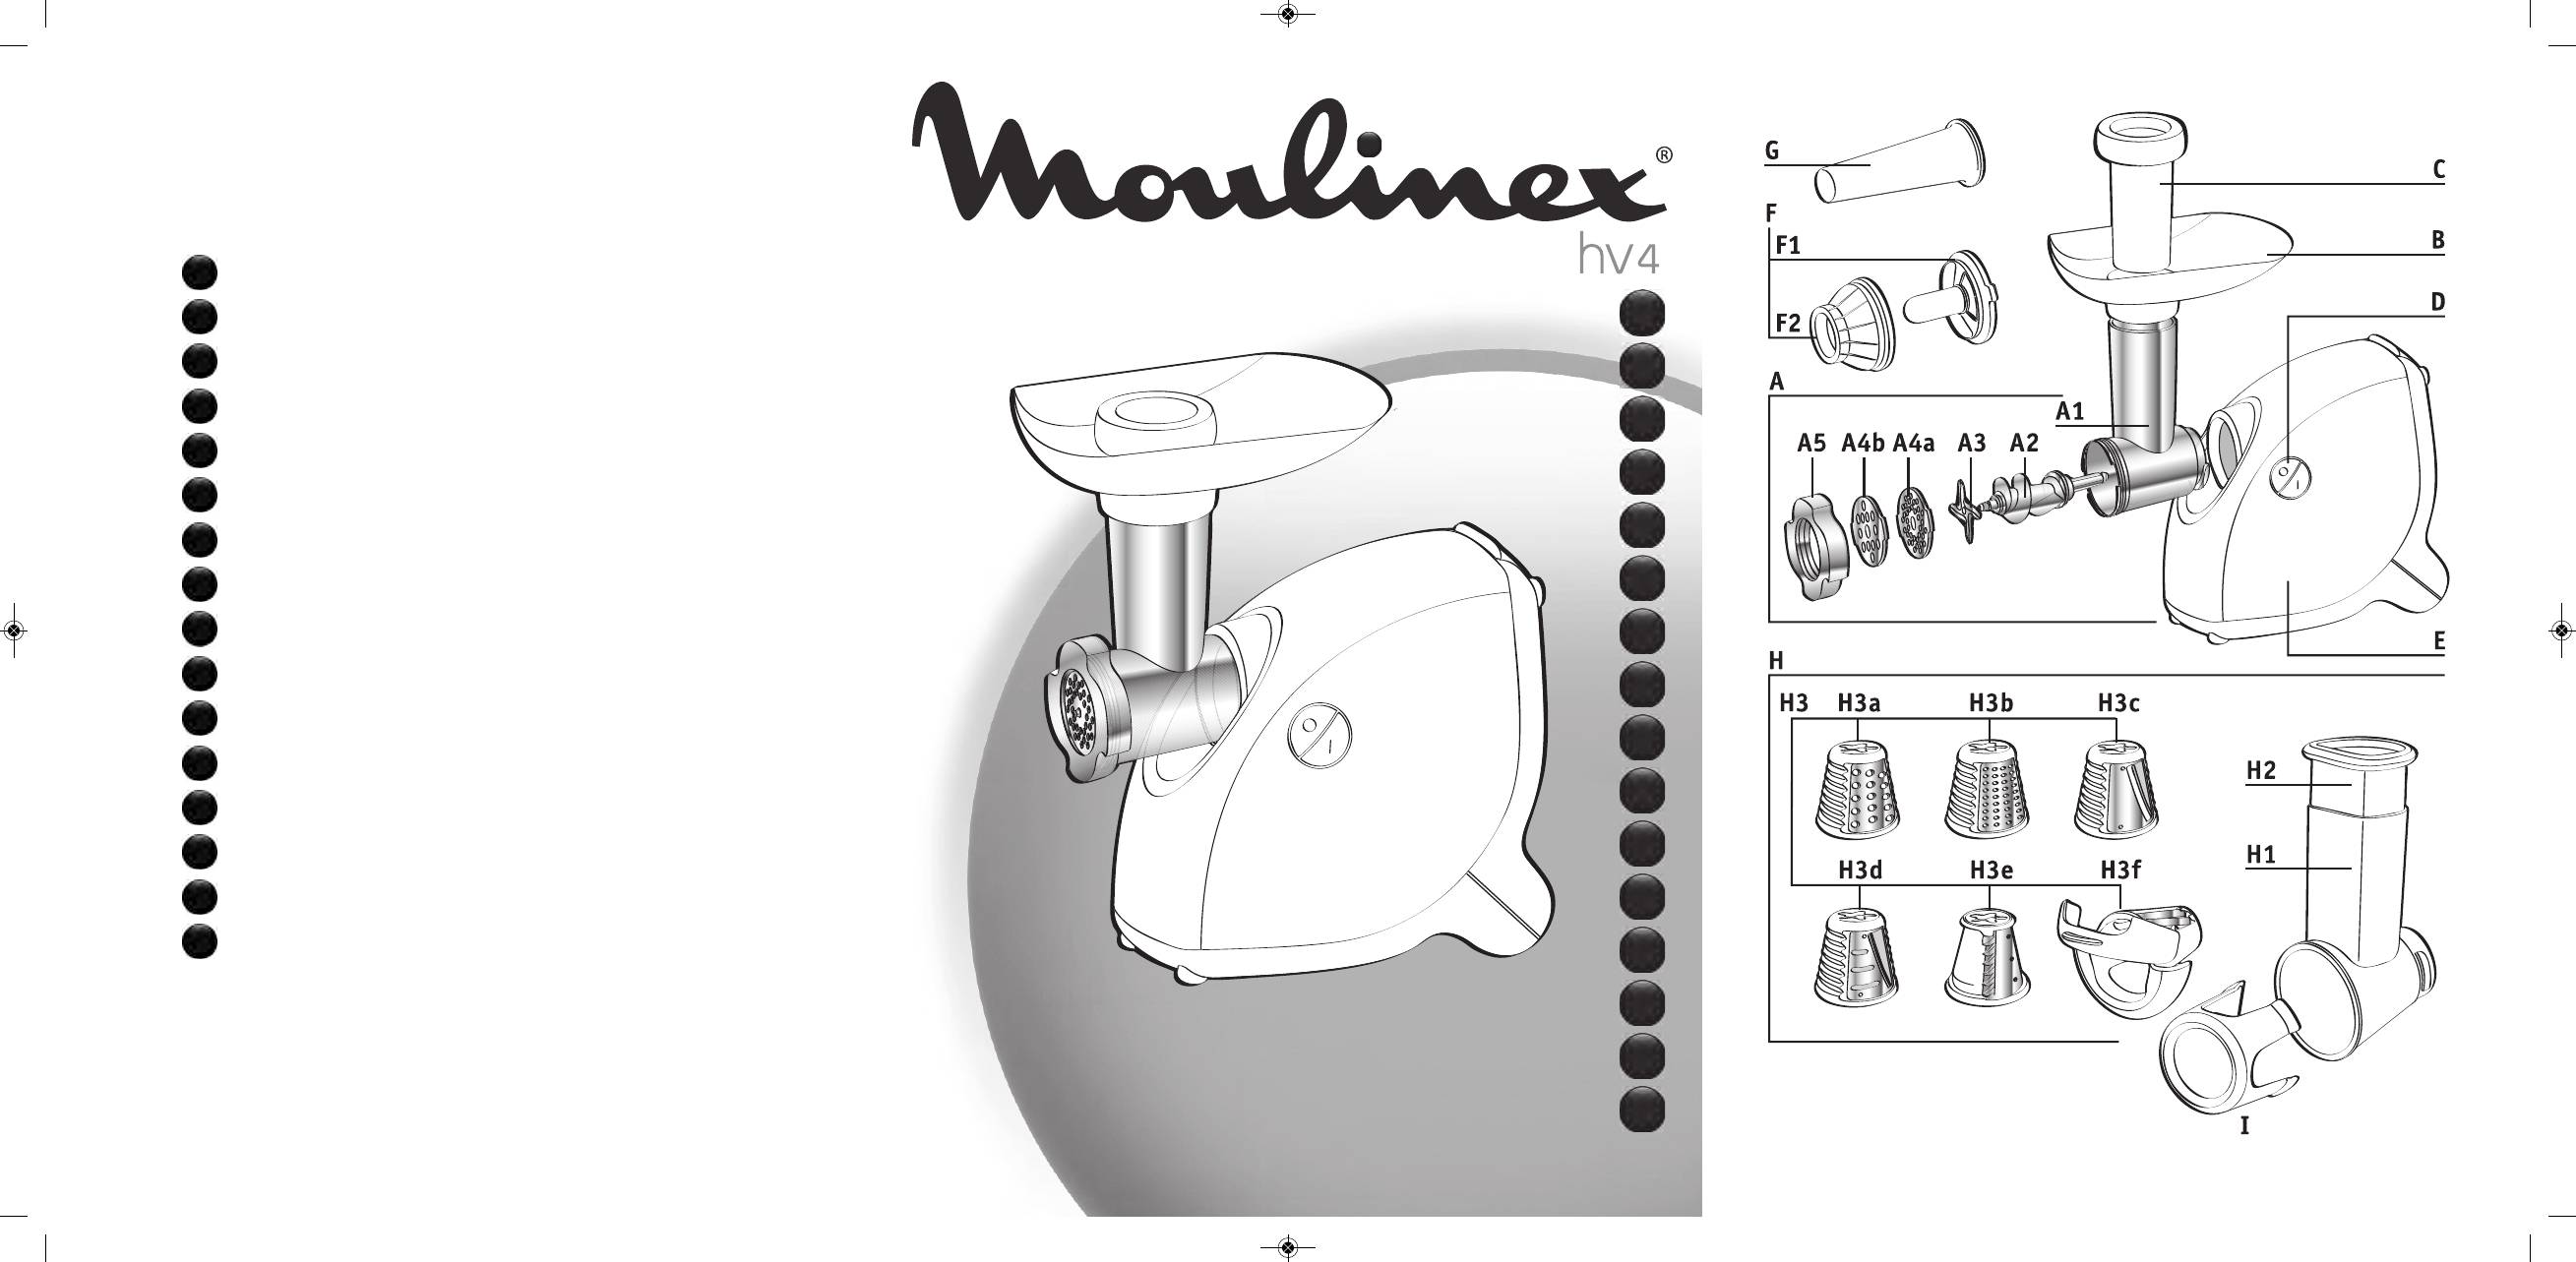
DESCRIPTION:
A Removable mincer head
A1 Aluminium casing
A2 Screw feeder
A3 Self-sharpening stainless steel blades
A4 Screens
A4a Fine hole screen (2.4 mm)
(availability depends on model) very fine mincing
A4b Fine hole screen (3 mm) (availability depends on model) very fine mincing
A4c Medium hole screen (4.7 mm) fine mincing
A4d Large hole screen (8 mm)coarse mincing
A5 Aluminium locking nut
B Removable aluminium tray
C Meat pusher
D Accessory storage compartment
E Mincer head release button
F On/off switch
G Reverse button (momentary reverse action)
H Motor unit
I KEBBE accessory
I1 Ring fitting
I2 Ring
J Biscuit nozzle
(availability depends on model)
J1 Support
J2 Nozzle
K Sausage unit
K1 Centring ring
K2 Nozzle
L Vegetable cutter
L1 Drum holder / hopper
L2 Pusher
L3 Drums
L3a Shredder
L3b Slicer
L3c Grater
L3d Dicer
SAFETY RECOMMENDATIONS:
— Always read the instructions carefully before using your appliance for the first time: Moulinex will not accept
responsibility for any use which does not comply with the instructions for use.
— This appliance is not intended to be used by persons (including children) with reduced physical, sensory or
mental capacities or lack of experience and knowledge, unless they are supervised or have been given
instructions beforehand concerning use of the appliance by a person responsible for their safety.
— Children should be supervised to ensure they do not play with the appliance.
— Check that the voltage of your appliance corresponds to your domestic power supply.
— Any incorrect connection to the power supply will invalidate the guarantee.
— This product has been designed for domestic use only. Any commercial use, inappropriate use or failure to comply
with the instructions, the manufacturer accepts no responsibility and the guarantee will not apply
— Do not leave the appliance unattended when switched on and in use.
1
Notice_2643164_EE_Mise en page 1 07/04/11 15:59 Page1

— Use the appliance on a flat, clean and dry surface.
— Never allow long hair, scarves or ties to hang down over the appliance when it is in use.
— Unplug the appliance after use and when you clean it or fit or remove accessories.
— Do not use the appliance if it is not working correctly or if it has been damaged. In this case contact an approved
Moulinex service centre (see list in service booklet).
— Any servicing other than cleaning and normal upkeep by the customer must be carried out by an approved service
centre.
— Do not use the appliance if the power lead is damaged. To avoid all possible danger, have it replaced at an approved
service centre (see list in the service booklet).
— Never place the appliance, the power cord or the plug in water or any other liquid.
— Keep the power lead out of the reach of children.
— The power lead should never touch hot surfaces, or be placed near heat sources or sharp edges.
— For your own safety, only use Moulinex accessories and spare parts which are suitable for your appliance.
— Do not use the appliance for longer than 14 minutes.
— For your safety, this appliance complies with all applicable standards and regulations:
• Low voltage directive
• Electro-magnetic compatibility
• Environmental regulations
• Regulations regarding materials in contact with foodstuffs.
BEFORE USING THE APPLIANCE FOR THE FIRST TIME:
Wash all accessories inwarm water and washing up liquid. Rinse and dry carefully.
The screen and blades must be kept lubricated. Apply a little culinary oil to them.
Do not run the appliance empty if the screen has not been oiled.
WARNING! Handle the drums carefully as the blades are extremely sharp.
USING THE APPLIANCE:
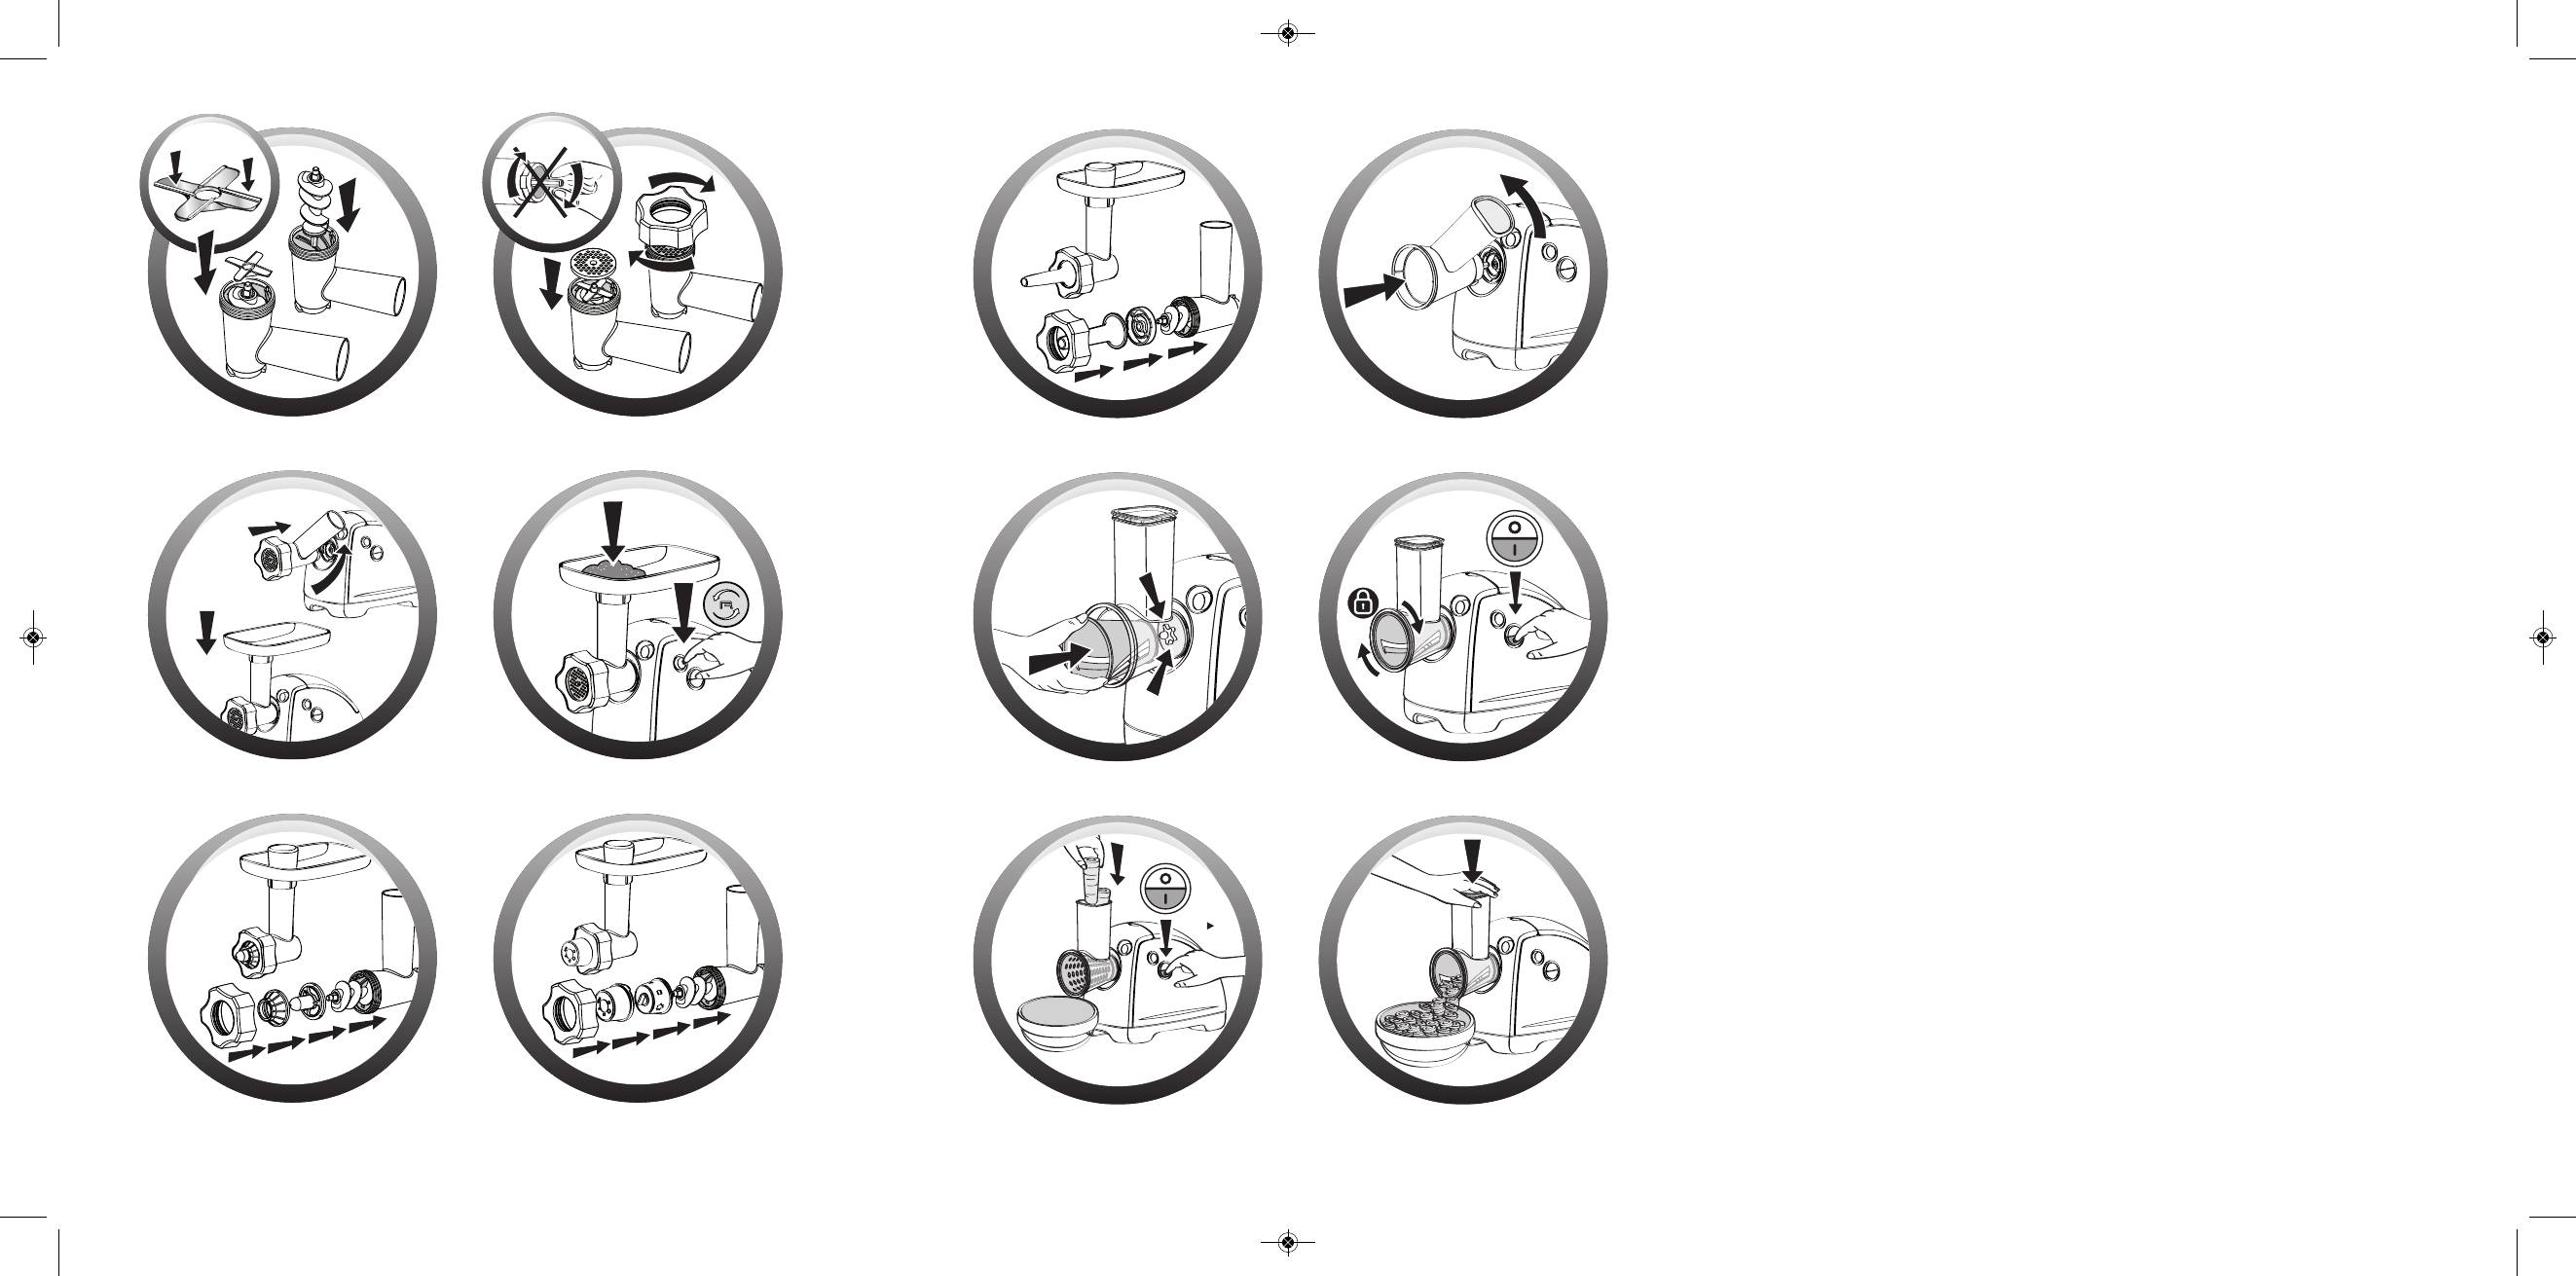
MINCER HEAD ASSEMBLY (A) :
Assembling the mincer head (figures 1.1 and 1.2)
Hold section A1 by the hopper with the wider opening at the top. Insert the screw feeder (A2) (long shaft first) in the
head assembly A1.
Fit the stainless steel blades (A3) on the short shaft of the screw feeder (A2), so that the cutting edges face outward.
Fit the screen of your choice over the blades (A3) ensuring that the pin fits into the notch on the assembly (A1).
Tighten the locking nut A5 (do not apply excessive pressure).
Fitting the mincer head to the appliance (diagram 2):
• The motor unit (H) must be unplugged. Position the mincer head in front of the unit with the hopper tilted to the
right. Fit the two pins on the mincer head into the two notches on the motor unit.
Push the mincer head firmly into the motor unit (H) and then turn the hopper to the left until it locks into position
(the hopper should be vertical).
• Fit the removable tray (B) onto the pins of the hopper.
Plug the appliance in. It is now ready for use.
Use:
Prepare all the food you wish to mince, removing any bones, cartilage or nerves. Thaw frozen food completely before mincing
Cut the meat into pieces (approximately 2 cm x 2 cm).
Place a container under the mincer head.
Press the On / Off switch (F) to start the appliance.
Place the pieces of meat on the tray (B) and use the pusher (C) to push them into the hopper one by one.
Never use your fingers or any other object to push the meat into the hopper.
To make extra fine Kebbe or Kefta mince, pass the meat through the mincer 2 or 3 times until it has the right consistency.
Tip:
When you have finished mincing put a few pieces of bread through the mincer to push out all the meat.
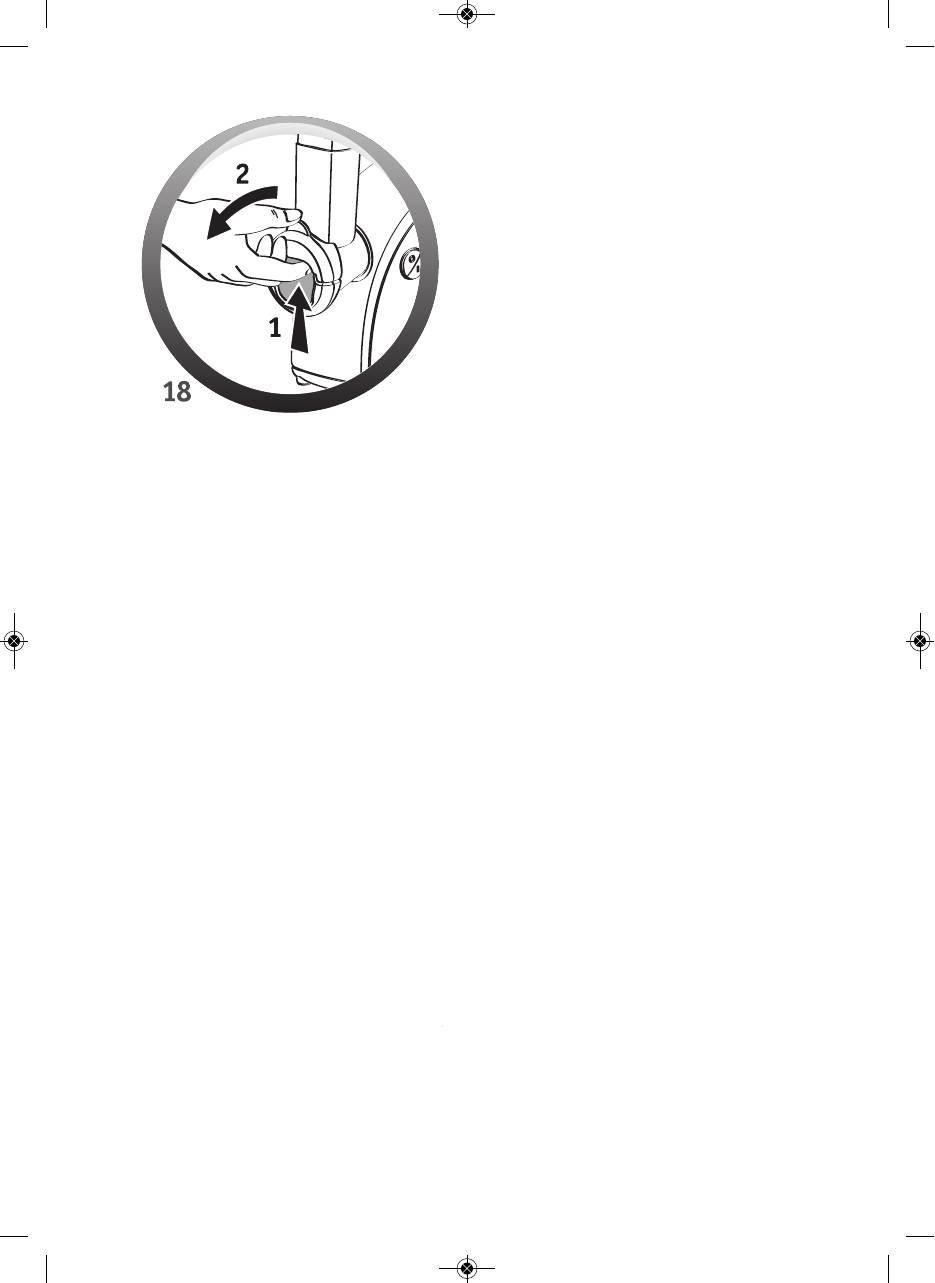
What to do if the mincer is blocked (diagram 3)
Turn off the mincer by pressing the On / Off switch (F).
2
Notice_2643164_EE_Mise en page 1 07/04/11 15:59 Page2

Press the Reverse button (G) for a few seconds to clear the blockage.
Press the On / Off switch (F) to continue mincing.
Important : wait until the appliance stops completely before you use the On (F) or Reverse (G) buttons.
KEBBE ACCESSORY (I)
Kebbe are fried Lebanese meat balls. A bulgar wheat mixture, or minced meat and bulgar wheat mixture, is squeezed
out into a hollow tube by the kebbe accessory. The inside is often filled with vegetables or minced meat.
Assembly (diagram 4):
Fit the screw feeder (A2) into the mincer head assembly (A1). Insert the ring fitting (I1) in the head assembly (A1),
so that the pin fits into the notch.
Place the ring (I2) over the ring fitting and then secure them by tightening the locking nut (A5).
When assembled, fit the mincer head to the motor unit (H).
Note: this accessory is used without a screen or blades.
BISCUIT MAKER (J) (availability depends on model)
Assembly (diagram 5):
Fit the screw feeder (A2) into the mincer head assembly (A1). Fit the nozzle (J2) onto the ring (J1) aligning the pin
with the notch on the head assembly (A1).
Secure it by tightening the locking nut (A5) on the head assembly (do not apply excessive pressure).
Fit the head assembly to the motor unit (H).
NB : this accessory is used without a screen or blades.
Use:
Prepare the dough. Results will be better if the dough is not too stiff.
Choose the design by pointing the arrow to the shape you want.
Keep adding dough until you have made the desired number of biscuits.
SAUSAGE NOZZLE (K)
This accessory can be fitted to the mincer head so that you can make all kinds of sausages, flavouring them to your
own taste.
Assembly (diagram 6) :
Fit the screw feeder (A2) into the mincer head assembly (A1). Fit the screw feeder centring plate (K1), aligning the
pin with the notch on the head assembly (A1). Fit the nozzle (K2) and secure it by tightening the locking nut (A5).
When assembled, fit the mincer head to the motor unit (H).
NB : this accessory is used without a screen or blades. The centring plate keeps the screw feeder in position while
the appliance is being used.
Use:
Important: this accessory should only be used after you have minced the meat, added seasoning and mixed the
preparation thoroughly.
Soak the sausage casing in warm water to soften it and slide all of it onto nozzle (K2) leaving about 5 cm of casing
over hanging at the end.
Fill the hopper (A1) on the head assembly (A) with mince, turn the appliance on and push down with the pusher (C)
until the mince reaches the end of the nozzle.
Turn off the appliance.
Tie a knot in the 5 cm length of free casing. Slide the knot up to the end of the nozzle so that air is not trapped in
the casing.
Turn the appliance on again and continue to add mince. Ease the casing along as it fills. Do not overfill the sausages
as this will stretch the casing.
NB : this operation is easier if two people do it together, one feeding the mince into the mincer and the other
holding the casing in position as it fills.
Make sausages of the desired length by pinching the casing and twisting it where appropriate.
For the best results take care to prevent air becoming trapped in the casing during filling and make sausages 10 cm to
15 cm in length (separate the sausages by tying a knot round the casing).
Sausage casings (for UK only)
If your local butcher is unable to sell you some sausage skins suitable for thick sausages, we suggest contacting some
of the following companies (information correct at March 2011):
3
Notice_2643164_EE_Mise en page 1 07/04/11 15:59 Page3

Ascott Smallholding Supplies Ltd
W Weschenfelder and Sons Ltd,
Units 21/22
2–4 North Road
Whitewalls — Easton Grey — Malmesbury
Middlesborough
Wiltshire SN16 0RD
TS2 1DD
United Kingdom
United Kingdom
Tel: 0845 130 6285 — Fax: 01666 826931
Tel: 01642 247524
e-mail:sales@ascott.biz
e-mail: via contact us section on website
www.ascott.biz
www.weschenfelder.co.uk
Scobie & Junor (Estd. 1919) Ltd,
Designa Sausage
1 Singer Road,
15 Buxton Road
East Kilbride,
Disley
Glasgow G75 0XS
Stockport
Scotland
Cheshire SK12 2DZ
Tel: 0800 783 7331 (free phone)
United Kingdom
Tel: 01355 237041 — Fax: 01355 576343
Tel: 01663 733499
e-mail: info@scobiesdirect.com
e-mail: via contact us section on website
www.scobiesdirect.com
www.designasausage.com
VEGETABLE CUTTER (L)
Assembly (diagram 7):
The motor unit must be unplugged. Position the vegetable cutting unit (L1) in front of the motor unit tilted to the
right so that the lugs are aligned with the notches in the motor unit (H). Insert the shaft of the unit in the centre hole
of of the motor unit (H). Turn the hopper to the left until the unit (L1) clicks home with the hopper in the upright
position.
Use:
• Select the drum you wish to use.
• Fit the drum into the opening at the front of the vegetable cutter (L1), ensuring that it is pushed firmly home
(Fig.  .
.
• Plug in the appliance.
• Press the On / Off button (F) once or twice to lock the drum into position (Fig. 9).
• Start the appliance and feed the vegetables into the hopper (L1) (Fig. 10), pushing them down with the pusher (L2)
(Fig. 11).
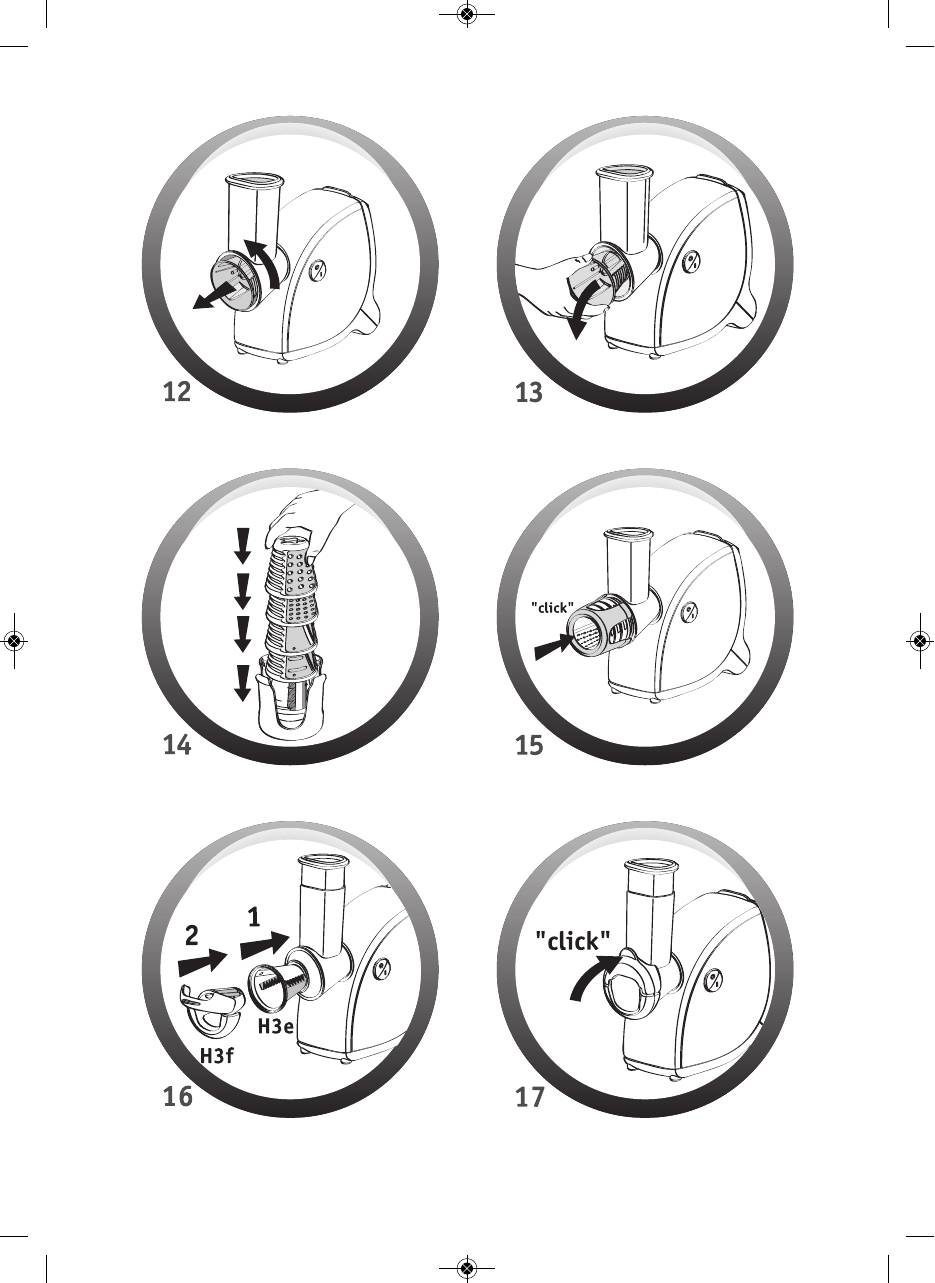
• To change the drum, wait for the appliance to stop completely and then press the Reverse button (G) for 1 second.
The drum will be released automatically (Fig. 12).
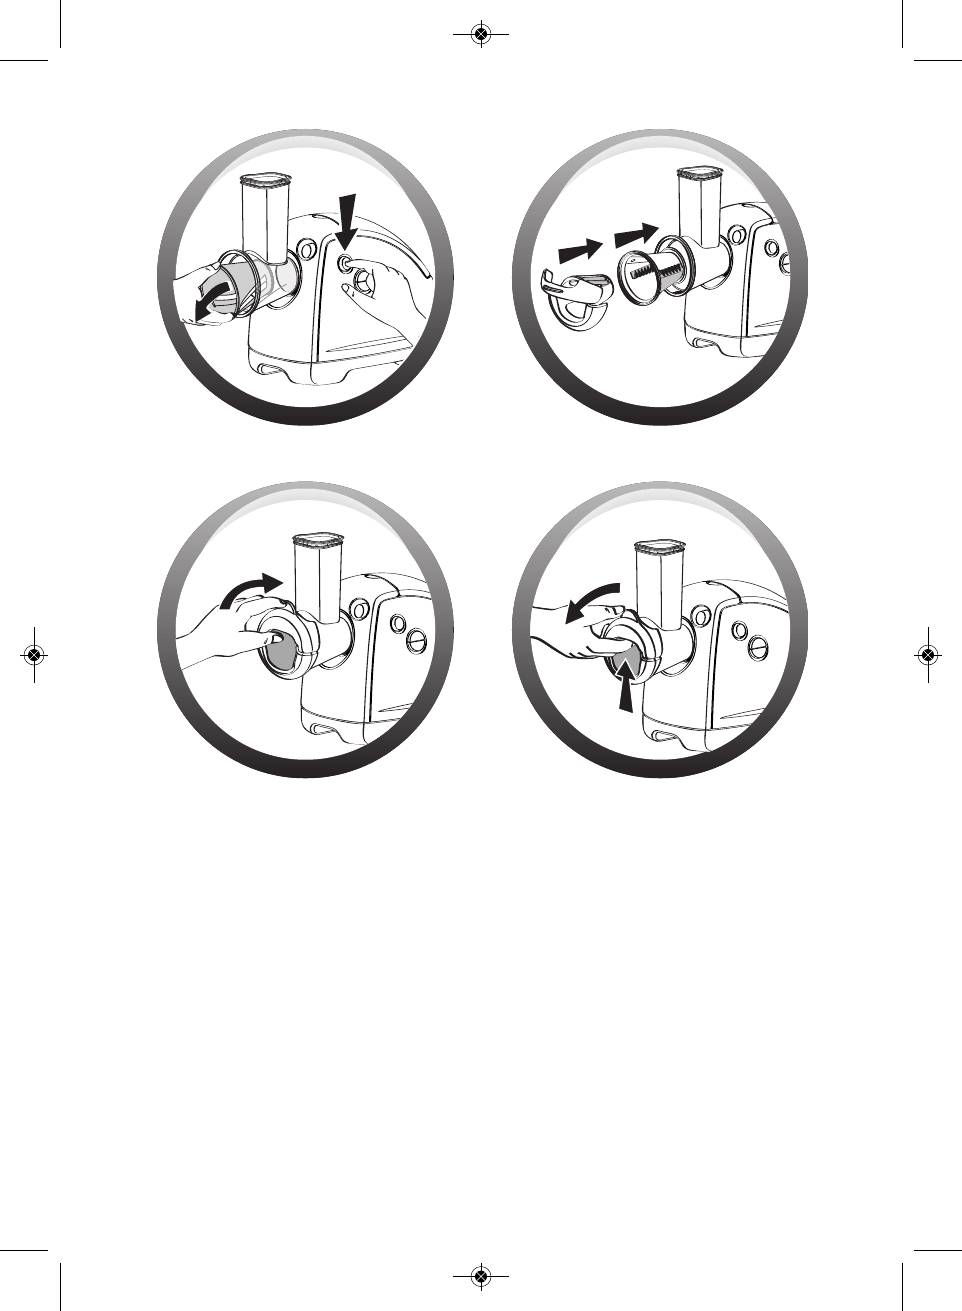
Dicer assembly:
● Fit the dicer drum into the opening at the front of the vegetable chopper (L1), ensuring that it is pushed firmly
home (Fig. 13).
● Position the dicer attachment with the safety catch open aligning the catch with the hopper (Fig. 13).
● Check that the ring of the dicer accessory is clipped firmly to the lower part of the opening (Fig.14).
● Close the safety catch over the opening in the chopper.
● Dice food by feeding it into the hopper.
● To remove the dicer attachment pull the lug at the top of the safety catch.
Tip: to release the safety catch (L3e) more easily push it upward with your finger as you pull the lug towards
you (Fig 15).
4
Notice_2643164_EE_Mise en page 1 07/04/11 15:59 Page4

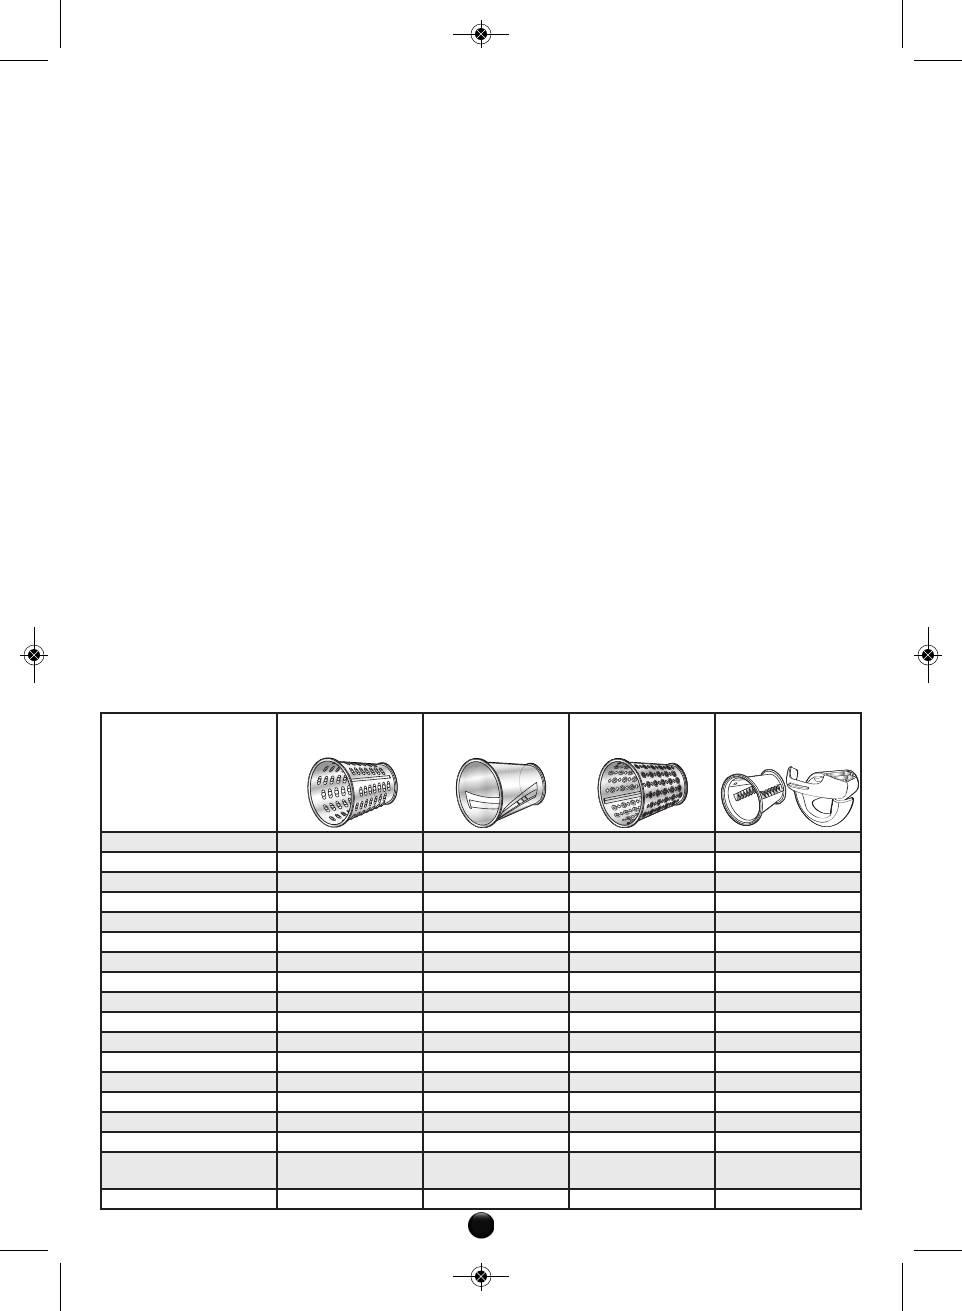
Use the right drum for each type of food:
L3a Shredder L3b Slicer L3c Grater L3d / L3e Dicing
drum and
attachment
Carrots
X X X
Courgettes
X X X
Potatoes
X X X (raw only)
Cucumber
X X X
Pepper
X X
Onions
X X
Beetroot
X X
Cabbage (white/red)
X
Apples
X X
Black radish Mooli
X X X
Celeriac
X X
Banana
X X
Parmesan
X
Gruyère
X X X
Chocolate
X X
Dry bread/biscuits
X
Hazelnuts/walnuts/almonds
X
Coconut
X
Recommendations for the best results:
For best results the ingredients you use should be firm. Do not allow food remains to build up inside the unit. Do not
use the appliance to grate or mince substances which are too hard, such as sugar or large pieces of meat. Cut food into
small pieces so that it can be fed easily into the hopper.
CLEANING:
• Always unplug the appliance before cleaning the motor unit (H).
• Do not put the motor unit in water or hold it under a running tap. Clean the motor unit with a damp cloth and dry
it carefully.
1) Mincer accessories:
— Release the head or accessory by pressing button E.
— Turn the mincer head unit (A) to the right and pull it towards you to remove it from the motor unit (H).
— To remove the head unit (A), lift off the pusher (C) and the tray (B), unscrew the locking nut (A5), remove the screen
(A4), the blades (A3) and the screw feeder (A2).
— Take special care when handling sharp components.
— Wash all pieces in warm water and washing up liquid, rinse and dry carefully.
Do not put any parts of the head unit (A) in the dishwasher (main body (A1), screw feeder (A2), blades (A3),
screens (A4), locking nut (A5)).
2) Vegetable cutter and other accessories:
— The drum holder (L1), the pusher (L2), the drums (L3a, L3b, L3c, L3d) and the dicer attachment (L3e) can be wa-
shed in the dishwasher in the top tray only using the ECONOMY or QUICK WASH settings.
— Handle the drums carefully as the blades are extremely sharp.
— If the plastic parts become stained by foods such as carrots, rub the discoloured areas with a cloth soaked in vege-
table oil and then clean as normal.
All other accessories can be washed in the dishwasher.
STORAGE:
The screens, the blades, the screw feeder centring plate, the Kebbe and sausage accessories (I1, I2, J1, J2, K1 and
K2) can be stored in the compartment (D) at the back of the appliance.
5
Notice_2643164_EE_Mise en page 1 07/04/11 16:00 Page5

WHAT DO I DO IF THE APPLIANCE DOESN’T WORK?
Check that it is correctly connected to the power supply.
If the problem persists, contact an approved Moulinex service centre (see list in service booklet).
DISPOSAL OF ELECTRICAL OR ELECTRONIC PRODUCTS
Let’s work together to protect the environment!
Your appliance contains valuable materials which can be recovered or recycled.
Leave it at a local civic waste collection point or an approved service centre so that it can be
disposed of correctly
RECIPES
N.B. When preparing recipes that require extensive use of the mincer take care not to operate it continuously
for more than 20 seconds.
Sample recipe, using 4.7 mm medium screen (A4b):
LEBANESE KEBBE
(meat balls with yoghurt)
(Serves 6) – Preparation time: 1 hr
Leave to chill for 1 hr in fridge
Ingredients for kebbe paste:
600 g of meat – 300 g of cracked bulgur wheat — Salt
Ingredients for sauce:
1 kg yoghurt – 1 bunch coriander – 4 cloves garlic – 3 tablespoons cornflour – Salt, pepper
1. Cut the meat into 4 pieces. Fit the 4.7 mm screen on your mincer. Mince the meat, adding the bulgur wheat as you
do so. Add salt and allow to chill for 1 hour in a cool place.
2. To make the kebbe balls: fit the kebbe accessory on to the mincer. Roll the mixture into a ball, sealing the ends with
a little water.
3. To prepare the sauce: wash the coriander, dry it with kitchen paper and remove the leaves. Peel and crush the garlic.
Cook the coriander and garlic gently in a pan for 1 – 2 minutes. Set aside.
4. Beat the yoghurt and cornflour together. Add salt and pepper. Put the mixture into a saucepan after passing it
through a fine sieve. Heat until the mixture boils and then turn down the heat. Stir the mixture continuously while
it is cooking to ensure that the yoghurt does not curdle.
5. Add the garlic and coriander. Warm the kebbe balls in the mixture for 10 minutes.
Variation on the recipe: You can also stuff the balls with a mixture of onion and minced meat (previously lightly
browned in a little oil with a few pine nuts).
BRIOUATS
(Serves 4) – Preparation time: 40 min. Cooking time: 35 min.
Ingredients:
250 g puff pastry – 350 g beef steak – 1 onion – 2 eggs – Paprika – Ground cinnamon and ginger – Parsley – Coriander
– Chervil – Sugar – 60 g melted butter – Olive oil
1. Fit the 4.7 mm screen on your mincer. Cut the onion into 8 pieces and put it through the mincer. Warm 4 tables-
poons of olive oil in a pan and add the onion. Sweat it on a low heat without allowing it to brown. Set aside.
2. Mince the beef. Brown it on a low heat with the onion for 10 minutes. Set aside.
3. Mince the herbs. Add them to the pan with salt and pepper, half a teaspoon of paprika, a pinch of ginger and a small
teaspoonful of cinnamon.
4. Add the beaten eggs, stir into the mixture and then remove from the heat.
5. Roll out the puff pastry. It should be quite thin. Cut it into squares 10 cm x 10 cm. Brush the edges with butter.
6. Put a small spoonful of filling on each square. Roll the squares up and seal the ends.
7. Fry the briouats in very hot oil. When fried, place on kitchen paper for a few seconds. Sprinkle with sugar and
cinnamon. Serve very hot.
Variation on the recipe:
Fit the 4.7 mm screen on your mincer. Cut the onion in 8 pieces. Mince a little meat and then the onion.
Then mince a little more meat, then the herbs and then the rest of the meat. Beat the eggs and add them to the stuffing with
salt and pepper, half a teaspoon of paprika, a pinch of ginger and a small teaspoonful of cinnamon. Mix all the ingredients
together. Proceed as in steps 5 to 7 above.
6
Notice_2643164_EE_Mise en page 1 07/04/11 16:00 Page6

PIROZHKI
(small fish pasties)
(Serves 4) – Preparation time: 25 min. Cooking time: 10 — 15 min.
Ingredients:
250 g puff pastry – 300 g cooked fish or smoked salmon – 2 hard boiled eggs – 1 bunch dill – 2 onions – 100 g salted
butter, diced small — Oil
1. Fit the 4.7 mm screen on your mincer. Cut the onions into 8 and put them through the mincer. Brown them in a pan
with a little oil over a low heat. Set aside.
2. Mince a little fish, then put the cooked onion, butter and dill through the mincer and finally the rest of the fish.
3. Roll out the puff pastry so that it is quite thin and then cut circles out using a glass or a fairly large bowl.
4. Pre-heat the oven to 210oC
5. Place a little filling on each circle, fold the edges over and seal them together.
6. Brown in the oven for 10 – 15 minutes.
BEEF BALLS
(Serves 4) – Preparation time: 20 min. Cooking time: 10 — 15 min.
Ingredients:
1 kg beef steak – 1 onion – 1 clove garlic – 2 slices rye or pumpernickel bread soaked in milk – 2 eggs – 1 potato pee-
led – Flour – Salt, pepper
1. For this recipe choose lean pieces of beef. Mince the beef with the slices of bread.
2. Slice the onion using the slicing drum (L3b) and grate the garlic and the potato using the shredder drum (K3a).
3. Mix the minced meat and bread with the sliced onion, garlic and potato.
4. Add the eggs, ground black pepper and salt, and shape the mixture into balls.
5. Roll the balls in flour and fry in the oil.
OVEN BAKED POTATO PIE
(Serves 4) – Preparation time: 30 min. Cooking time: 45 min.
Ingredients:
400 g minced meat – 1 kg potatoes- 2 eggs – 2 glasses milk – 1 clove garlic – 1½ tablespoonful butter – 2 tablespoon-
ful oil – Salt, pepper
1. Clean wash and dry the potatoes. Slice them using the L3b drum.
2. Mince the beef and fry it in a pan with oil for 5 minutes.
3. Rub the inside of an ovenproof dish with garlic and then grease it with some of the butter.
4. Put a first layer in the dish using Ê of the potato. Then add a layer of meat, add salt and pepper and then a final
layer with the rest of the potato.
5. Beat the eggs with hot milk and pour this mixture over the potato. Add the rest of the butter. Cook in a medium
oven for about 45 minutes.
APPLE GRATIN WITH ALMONDS
(Serves 4) – Preparation time: 40 min. Cooking time: 30 min.
Ingredients:
6 apples – 60 g soft brown sugar – 50 g butter – 50 g whole almonds – 200 ml double cream – 1 teaspoon ground cin-
namon
Peel the apples, remove the pips and cut into quarters. Slice finely using the L3b slicer attachment and brown with
30 g of butter. Lightly grease an ovenproof dish with butter and spread the caramelised apple over the bottom. Grind
the almonds using the L3c grater drum. Mix the ground almond, the cream and the cinnamon in a bowl. Pour the mix-
ture over the apples and sprinkle with soft brown sugar. Cook the dish in the oven at 160°C for about 30 minutes.
RUSSIAN VINAIGRETTE SALAD
(Serves 4) – Preparation time: 40 min. Cooking time: 30 min.
Ingredients:
400g beetroot – 300g carrots – 400g potatoes – 200g pickled cabbage – 200g cucumber (pickled or marinated) – 150g
onion – 100g tinned green peas — salt – 2 teaspoons oil
Dice the potatoes, beetroot, carrots, onion and cucumber using dicer drum and dicer attachment (L3d and L3e).
Steam the diced potato, beetroot and carrot.
Mix and then add the cabbage, peas, onion and cucumber. Add salt and vegetable oil.
Allow the salad to stand in the refrigerator for 1 hour.
7
Notice_2643164_EE_Mise en page 1 07/04/11 16:00 Page7

ˆ¯¤§²¨¤´¬°«¤³²®·³®·³´¬¥²´¤µ©´¬¬Moulinex.
RU
ОПИСАНИЕ
A
—¾©°±¤Ã§²¯²¦®¤°Ãµ²´·¥®¬
A1
‡¯Â°¬±¬©¦¿-®²´³·µ
A2
‰¬±¶
A3
—¤°²«¤¶¤»¬¦¤Â½¬-µÃ±²ª¬«±©´ª¤¦©Â½©-µ¶¤¯¬
A4
–©¼©¶®¤
A4a
’©¯®¤Ã´©¼©¶®¤°°(в зависимости от модели
‹¯Ã²»©±À°©¯®²-´·¥®¬
A4b
’©¯®¤Ã´©¼©¶®¤°°(в зависимости от модели
‹¯Ã²»©±À°©¯®²-´·¥®¬
A4c
—´©¨±Ãô©¼©¶®¤°°
‹¯Ã°©¯®²-´·¥®¬
A4d
ž¬´²®¤Ã´©¼©¶®¤°°
‹¯Ã®´·³±²-´·¥®¬
A5
‡¯Â°¬±¬©¦¤Ã§¤-®¤
B
—¾©°±¿-¤¯Â°¬±¬©¦¿-³²¨¨²±
C
˜²¯®¤¶©¯À°Ãµ¤
D
•©¹²¯¨¯Ã¤®µ©µµ·¤´²¦
E
•±²³®¤¨¯Ãµ±Ã¶¬Ã§²¯²¦®¬°Ãµ²´·¥®¬
F
•±²³®¤«¤³·µ®¤²µ¶¤±²¦®¬
G
•±²³®¤T–©¦©´µU¨¦¬ª©±¬©¶²¶»¤µ°©±Ã©¶µÃ±¤³´²¶¬¦²³²¯²ª±²©
H
ˆ¯²®°²¶²´¤
I
‡®µ©µµ·¤´•ŒˆˆŒ
I1
š¬¯À©´±¤Ã±¤µ¤¨®¤
I2
•²¯Àº©¦²©·³¯²¶±©±¬©
J
š¬¯À©´±¤Ã±¤µ¤¨®¤¨¯Ã¥¬µ®¦¬¶²¦(в зависимости от модели)
J1
•²¨µ¶¤¦®¤
J2
š²´°¤
K
“¤µ¤¨®¤¨¯Ã®²¯¥¤µ²®¦«¤¦¬µ¬°²µ¶¬²¶°²¨©¯¬
K1
™µ¶´²-µ¶¦²¨¯Ãº©±¶´¬´²¦¤±¬Ã¦¬±¶¤
K2
‰²´²±®¤
L
”¦²½©´©«®¤(в зависимости от модели)
L1
•²±·µ±¿-®²´³·µµ«¤§´·«²»±²-§²´¯²¦¬±²-
L2
˜²¯®¤¶©¯À
L3
•²±·µ¿
L3a
•²±·µ¶©´®¤
L3b
•²±·µ¨¯Ã´©«®¬¶²±®¬°¬¯²°¶¬®¤°¬
L3c
•²±·µ¨¯Ãµ®²¥¯©±¬Ã
L3d
•²±·µ¨¯Ã´©«®¬®·¥¬®¤°¬
L3e
“¤µ¤¨®¤¨¯Ã´©«®¬®·¥¬®¤°¬
МЕРЫ ПРЕДОСТОРОЖНОСТИ :
— Внимательно прочитайте инструкцию перед началом работы: использование прибора, не
соответствующее инструкции, освобождает Moulinex от ответстенности.
— Данный прибор не предназначен для использования лицами (включая детей), чьи физические,
сенсорные или умственные способности ограничены, или лицами, не имеющими опыта или
необходимых знаний, за исключением случаев, когда за ними присматривало или помогало третье лицо
ответственное за их безопасность.
8
Notice_2643164_EE_Mise en page 1 07/04/11 16:00 Page8

— Необходимо ограничить доступ детей к прибору, который не является игрушкой.
“¤³´Ãª©±¬©³¬¶¤±¬Ã¦¤¼©§²³´¬¥²´¤¨²¯ª±²µ²²¶¦©¶µ¶¦²¦¤¶À±¤³´Ãª©±¬Â¦¤¼©§²Á¯©®¶´¬»©µ®²§²³¬¶¤±¬Ã
— Любое неправильное подключение аннулирует гарантию.
•´¬¥²´³´©¨±¤«±¤»©±¶²¯À®²¨¯Ã¨²°¤¼±©§²¬µ³²¯À«²¦¤±¬Ã¬³´¬§²¶²¦¯©±¬Ã¥¯Â¨¬³²¨³´¬µ°²¶´²°
•µ³²¯À«·-¶©³´¬¥²´¶²¯À®²±¤´²¦±²-³²¦©´¹±²µ¶¬»¬µ¶²-¬µ·¹²-
“©²µ¶¤¦¯Ã-¶©±©·¥´¤±±¿°¬¨¯¬±±¿©¦²¯²µ¿¼¤´¸¬¯¬§¤¯µ¶·®±¤¨¤®µ©µµ·¤´¤°¬³´¬¦©¨©±±¿°¬¦¨©-µ¶¦¬©
—¯©¨·©¶²¶®¯Â»¬¶À³´¬¥²´²¶³¬¶¤±¬Ã®¤®¶²¯À®²¦¿³´©®´¤¶¬¯¬´¤¥²¶·²¶®¯Â»©±¬©¶´©¥·©¶µÃ¶¤®ª©®²§¨¤
¦¿©§²°²©¶©µ¶¤¦¬¶©±¤°©µ¶²¬¯¬·¥¬´¤©¶©¤®µ©µµ·¤´¿
“©¬µ³²¯À«·-¶©³´¬¥²´©µ¯¬²±´¤¥²¶¤©¶±©³´¤¦¬¯À±²¬¯¬³²¦´©ª¨©±‰Á¶²°µ¯·»¤©µ¯©¨·©¶²¥´¤¶¬¶ÀµÃ¦
µ©´¦¬µ±¿-º©±¶´Moulinex (µ°µ³¬µ²®¦¥´²¼Â´©³²²¥µ¯·ª¬¦¤±¬Â).
— ‘Â¥²©¦°©¼¤¶©¯Àµ¶¦²²¶¯¬»±²©²¶»¬µ¶®¬¬©ª©¨±©¦±²§²·¹²¨¤®¯¬©±¶²°¨²¯ª±²²µ·½©µ¶¦¯Ã¶ÀµÃ¦µ©´¦¬µ±²°
º©±¶´©Moulinex.
— Œµ¯¬ ³²¦´©ª¨©± ³´²¦²¨ ±© ¬µ³²¯À«·-¶© ³´¬¥²´ ‹¯Ã ·µ¶´¤±©±¬Ã ²³¤µ±²µ¶¬ ²¥´¤¶¬¶©µÀ ¨¯Ã «¤°©±¿ ¦
µ©´¦¬µ±¿-º©±¶´Moulinex (µ°µ³¬µ²®¦¥´²¼Â´©³²²¥µ¯·ª¬¦¤±¬Â).
— “©®¯¤¨¬¶©³´¬¥²´®¤¥©¯À³¬¶¤±¬Ã¬¯¬¼¶©³µ©¯À¦¦²¨·¬¯¬¨´·§·Âª¬¨®²µ¶À
™¥¬´¤-¶©®¤¥©¯À³¬¶¤±¬Ã²¶¨©¶©-
•¤¥©¯À³¬¶¤±¬Ã±©¨²¯ª©±±¤¹²¨¬¶ÀµÃ¦¥¯¬«¬¬¯¬¦®²±¶¤®¶©µ±¤§´©¦¤Â½¬°¬µÃÁ¯©°©±¶¤°¬¬µ¶²»±¬®²°
¶©³¯¤¬¯¬²µ¶´¿°·§¯²°
‹¯Ã¦¤¼©-¥©«²³¤µ±²µ¶¬µ¯©¨·©¶¬µ³²¯À«²¦¤¶À¶²¯À®²¤®µ©µµ·¤´¿¬«¤³¤µ±¿©»¤µ¶¬Moulinex ²¶¦©»¤Â½¬©
¶´©¥²¦¤±¬Ã°¦¤¼©§²³´¬¥²´¤
“©³²¯À«·-¶©µÀ³´¬¥²´²°µ¦¿¼©°¬±
‹¯Ã¦¤¼©-¥©«²³¤µ±²µ¶¬¨¤±±¿-³´¬¥²´²¶¦©»¤©¶¨©-µ¶¦·Â½¬°±²´°¤°¬³´¤¦¬¯¤°
S‹¬´©®¶¬¦¤±¬«®²§²±¤³´Ãª©±¬Ã
S¢¯©®¶´²°¤§±¬¶±¤Ãµ²¦°©µ¶¬°²µ¶À
S”®´·ª¤Â½¤Ãµ´©¨¤
S’¤¶©´¬¤¯¿®²±¶¤®¶¬´·Â½¬©µ³´²¨·®¶¤°¬³¬¶¤±¬Ã
ПЕРЕД НАЧАЛОМ ИСПОЛЬЗОВАНИЯ:
‰¿°²-¶©¦µ©¤®µ©µµ·¤´¿¦²¨²-µ°¿¯²°—³²¯²µ±¬¶©¬¶½¤¶©¯À±²¦¿¶´¬¶©
Решетка и нож должны оставаться жирными. Необходимо смазать их маслом.
Не включайте прибор в холостую, не смазав предварительно решетку.
ВНИМАНИЕ: Лезвия конусов очень острые, обращайтесь с ними осторожно.
ЗАПУСК:
ГОЛОВКА МЯСОРУБКИ (A) :
Сборка головки мясорубки (схемы 1.1 и 1.2)
“©²¥¹²¨¬°²¦«Ã¶À®²´³·µA1 «¤«¤§´·«²»±·Â§²´¯²¦¬±·±¤³´¤¦¬¦µ¤°²©¼¬´²®²©²¶¦©´µ¶¬©®¦©´¹·Ž¤¶©°
¦µ¶¤¦À¶©¦¬±¶A2 (¨¯¬±±·Â²µÀµ±¤»¤¯¤) ¦®²´³·µA1.
‰µ¶¤¦À¶©±²ª¬«±©´ª¤¦©Â½©-µ¶¤¯¬A3 ±¤®²´²¶®·Â²µÀ®²¶²´¤Ã¦¿¹²¨¬¶«¤¦¬±¶A2, ´©ª·½¬°¬§´¤±Ã°¬®
µ©¥©‘Â¥·Â´©¼©¶®·³²¦¤¼©°·¦¿¥²´·±¤¨©±À¶©±¤±²ªA3, ¦¿µ¶·³¨²¯ª©±³²³¤µ¶À¦³¤«®²´³·µ¤A1.
Ž¤®´·¶¬¶©±©¥¯²®¬´·-¶©§¤-®·A5
Установка головки мясорубки (схема 2) :
S•©´©¨ ²¶®¯Â»©±±¿° ²¶ ³¬¶¤±¬Ã ¥¯²®²° °²¶²´¤ H ¨©´ª¬¶© §²¯²¦®· °Ãµ²´·¥®¬ «¤§´·«²»±¤Ã §²´¯²¦¬±¤
±¤³´¤¦¯©±¤¦³´¤¦²—²µ¶¿®·-¶©¥¤-²±©¶±¿¹µ²©¨¬±©±¬Ã§²¯²¦®¬°Ãµ²´·¥®¬¬³¤«¤¥¯²®¤°²¶²´¤
Š²¯²¦· °Ãµ²´·¥®¬ ¦µ¶¤¦À¶© ¦ ¥¯²® °²¶²´¤ H , «¤§´·«²»±·Â §²´¯²¦¬±· ³²¦©´±¬¶© «¤¶©° ¦¯©¦² ¨² °©¶®¬
«¤§´·«²»±¤Ã§²´¯²¦¬±¤¨²¯ª±¤«¤±Ã¶À¦©´¶¬®¤¯À±²©³²¯²ª©±¬©
S™µ¶¤±²¦¬¶©µ¾©°±¿-³²¨¨²±B ±¤¦¿µ¶·³¿«¤§´·«²»±²-§²´¯²¦¬±¿°Ãµ²´·¥®¬
‰®¯Â»¬¶©³´¬¥²´¦µ©¶À²±§²¶²¦®Á®µ³¯·¤¶¤º¬¬
Использование:
•´¬§²¶²¦À¶©±©²¥¹²¨¬°²©¨¯Ã´·¥®¬®²¯¬»©µ¶¦²³´²¨·®¶²¦·¨¤¯¬¶©®²µ¶¬¹´Ã½¬¬µ·¹²ª¬¯¬Ã
“¤´©ªÀ¶©°Ãµ²®·µ®¤°¬³´¬¥¯¬«¬¶©¯À±²µ°X 2 µ°
•²¨§²¯²¦®·°Ãµ²´·¥®¬³²µ¶¤¦À¶©©°®²µ¶À
“¤ª°¬¶©±¤³²¯²ª©±¬©TIU®±²³®¬«¤³·µ®¤²µ¶¤±²¦®¬F , »¶²¥¿¦®¯Â»¬¶À³´¬¥²´
•²¯²ª¬¶©®·µ®¬°Ãµ¤±¤³²¨¨²±B ¬³²²¨±²°·²³·µ®¤-¶©¦²¶¦©´µ¶¬©µ³²°²½À¶²¯®¤¶©¯ÃC.
Ни в коем случае не пытайтесь проталкивать пальцами или другим инструментом.
•¶²¥¿³²¯·»¬¶À°Ã§®²©¶©µ¶²•¬¥¥©¬¯¬•©¸¶¤³´²³·µ¶¬¶©°Ãµ²´¤«¤»©´©«°Ãµ²´·¥®·¨²³²¯·»©±¬Ã°¤µµ¿
ª©¯¤©°²-®²±µ¬µ¶©±º¬¬
9
Notice_2643164_EE_Mise en page 1 07/04/11 16:00 Page9

Полезный совет:
‰®²±º©´¤¥²¶¿¦¿°²ª©¶©³´²³·µ¶¬¶À±©µ®²¯À®²®·µ®²¦¹¯©¥¤»¶²¥¿¦¿¼¯¬²µ¶¤¶®¬´·¥¯©±²§²°Ãµ¤
Что делать в случае застревания? (схема 3)
‰¿®¯Â»¬¶©°Ãµ²´·¥®·±¤ª¤¦±¤³²¯²ª©±¬©TU®±²³®¬«¤³·µ®¤²µ¶¤±²¦®¬F.
Ž¤¶©°±©µ®²¯À®²µ©®·±¨¨©´ª¬¶©±¤ª¤¶²-®±²³®·T–©¦©´µUG , »¶²¥¿²µ¦²¥²¨¬¶À«¤µ¶´Ã¦¼¬©³´²¨·®¶¿
“¤ª°¬¶©±¤³²¯²ª©±¬©TIU®±²³®¬«¤³·µ®¤²µ¶¤±²¦®¬F , »¶²¥¿³´²¨²¯ª¬¶À´¤¥²¶·
Важно: ¨²ª¨¬¶©µÀ ²®²±»¤¶©¯À±²-²µ¶¤±²¦®¬³´¬¥²´¤ ³©´©¨ ¶©° ®¤® ¤®¶¬¦¬´²¦¤¶À ®²°¤±¨·T•·µ®U ¬¯¬
®²°¤±¨·T–©¦©´µUG.
АКСЕССУАР КЕББЕ (I)
Сборка (схема 4) :
‰µ¶¤¦À¶©¦¬±¶A2 ¦®²´³·µA1 §²¯²¦®¬°Ãµ²´·¥®¬™µ¶¤±²¦¬¶©¸¬¯À©´±·Â±¤µ¤¨®·I1 ¶¤®»¶²¥¿
¦¿µ¶·³³²³¤¯¦³¤«®²´³·µ¤A1. “¤¨©±À¶©®²¯Àº©¦²©·³¯²¶±©±¬©I2 ±¤¸¬¯À©´±·Â±¤µ¤¨®·¬«¤®´·¶¬¶©§¤-®·A5
¨²®²±º¤
—²¥´¤±±·Â¶¤®¬°²¥´¤«²°§²¯²¦®··µ¶¤±²¦¬¶©±¤¥¯²®°²¶²´¤“
Примечание: ¨¤±±¿-¤®µ©µµ·¤´¬µ³²¯À«·©¶µÃ¥©«´©¼©¶®¬¬¥©«±²ª¤
НАСАДКА ДЛЯ БИСКВИТОВ (J) (в зависимости от модели)
Сборка (схема 5):
‰µ¶¤¦À¶©¦¬±¶A2 ¦®²´³·µA1. ™µ¶¤±²¦¬¶©«¤¶©°¸²´°·J2 ±¤³²¨µ¶¤¦®·J1 ¶¤®»¶²¥¿¦¿µ¶·³³²³¤¯¦³¤«®²´³·µ¤
A1. Ž¤®´·¶¬¶©¨²®²±º¤±©¥¯²®¬´·Ã§¤-®·A5 ®²´³·µ¤A1. ™µ¶¤±²¦¬¶©§²¯²¦®·°Ãµ²´·¥®¬µ²¥´¤±±·Â¶¤®¬°²¥
´¤«²°±¤¥¯²®°²¶²´¤“
Примечание: данный аксессуар используется без решетки и без ножа.
Использование:
•´¬§²¶²¦À¶©¶©µ¶²‘·»¼¬-´©«·¯À¶¤¶³²¯·»¬¶µÃµ¶©µ¶²°µ¯©§®¤°Ã§®¬°‰¿¥©´¬¶©»©´¶©ªµ¶´©¯®¤¨²¯ª±¤
µ²²¶¦©¶µ¶¦²¦¤¶À¦¿¥´¤±±²-¸²´°©•´²³·µ®¤-¶©¶©µ¶²³²®¤±©³²¯·»¬¶©ª©¯¤©°²©®²¯¬»©µ¶¦²¥¬µ®¦¬¶²¦
ВОРОНКА ДЛЯ КОЛБАСОК (J) (в зависимости от модели)
‹¤±±¿- ¤®µ©µµ·¤´ ³´¬®´©³¯Ã©°¿- ® §²¯²¦®© °Ãµ²´·¥®¬ ³²«¦²¯¬¶ ¨©¯¤¶À ¯Â¥¿© ®²¯¥¤µ®¬ ®²¶²´¿© ¦¤°
²µ¶¤±©¶µÃ¶²¯À®²³´¬³´¤¦¬¶À³²µ¦²©°·¦®·µ·
Сборка (схема 6)
‰µ¶¤¦À¶©¦¬±¶A2 ¦®²´³·µA1 §²¯²¦®¬°Ãµ²´·¥®¬™µ¶¤±²¦¬¶©«¤¶©°·µ¶´²-µ¶¦²¨¯Ãº©±¶´¬´²¦¤±¬Ã¦¬±¶¤K1
¶¤®»¶²¥¿¦¿µ¶·³³²³¤¯¦³¤«®²´³·µ¤‡™µ¶¤±²¦¬¶©¦²´²±®·K2, «¤®´·¶¬¶©§¤-®·A5 ¨²®²±º¤™µ¶¤±²¦¬¶©§²
¯²¦®·°Ãµ²´·¥®¬µ²¥´¤±±·Â¶¤®¬°²¥´¤«²°±¤¥¯²®°²¶²´¤H.
Использование:
Важно: ¨¤±±¿-¤®µ©µµ·¤´µ¯©¨·©¶¬µ³²¯À«²¦¤¶À¶²¯À®²³²µ¯©¶²§²®¤®°Ãµ²¥¿¯²³²´·¥¯©±²µ³©º¬¬¨²¥¤¦¯©±¿
¬°¤µµ¤¹²´²¼²³©´©°©¼¤±¤
••´©¨¦¤´¬¶©¯À±²¦¿°²»©±±·Â¦¶©³¯²-¦²¨©®²¯¥¤µ±·Â²¥²¯²»®·µ¶¤¦¼·Âµ±²¦¤Á¯¤µ¶¬»±²-±¤¨©±À¶©±¤¦²
´²±®·K2 , ²µ¶¤¦¬¦³´¬¥¯¬«¬¶©¯À±²µ°
–·¥¯©±²©°Ãµ²³²°©µ¶¬¶©¦«¤§´·«²»±·Â§²´¯²¦¬±·®²´³·µ¤A1 §²¯²¦®¬°Ãµ²´·¥®¬A, ¦®¯Â»¬¶©¬¶²¯®¤-¶©¶²¯
®¤¶©¯©°C ¶¤®»¶²¥¿´·¥¯©±²©°Ãµ²¦¿¼¯²±¤®´¤-¦²´²±®¬
‰¿®¯Â»¬¶©³´¬¥²´
—¨©¯¤-¶©·«©¯µ²µ¶¤¦¯©±±¿¹µ°®²¯¥¤µ±²-²¥²¯²»®¬•©´©¨¦¬±À¶©·«©¯®®´¤Â¦²´²±®¬»¶²¥¿±©¥¯²®¬´²
¦¤¶À¦²«¨·¹¦®²¯¥¤µ±²-²¥²¯²»®©
‰®¯Â»¬¶©³´¬¥²´¬³´²¨²¯ª¤-¶©±¤®¯¤¨¿¦¤¶À´·¥¯©±²©°Ãµ²—¯©¨¬¶©«¤®²¯¥¤µ±²-²¥²¯²»®²-³²®¤²±¤±©±¤
³²¯±¬¶µÃ•¶²¥¿µ¬¯À±²±©´¤µ¶Ã§¬¦¤¶À²¥²¯²»®·±©¨©¯¤-¶©µ¯¬¼®²°¶²¯µ¶¿¹®²¯¥¤µ²®
Примечание: работу лучше выполнять вдвоем, один накладывает рубленое мясо, а второй держит
оболочку, пока она наполняется.
•²¯¥¤µ®¬°²ª±²¨©¯¤¶À¯Â¥²-ª©¯¤©°²-¨¯¬±¿µª¬°¤Ã¬³²¦²´¤»¬¦¤Ã²¥²¯²»®·
•¶²¥¿³²¯·»¬¶À®¤»©µ¶¦©±±¿©®²¯¥¤µ®¬±©²¥¹²¨¬°²µ¯©¨¬¶À«¤¶©°»¶²¥¿³´¬±¤³²¯±©±¬¬¦²«¨·¹±©µ²¥¬´¤¯µÃ
¦±·¶´¬´©®²°©±¨·©°¨©¯¤¶À®²¯¥¤µ®¬¨¯¬±²-µ°²¶¨©¯Ã-¶©®²¯¥¤µ®¬²µ¶¤¦¯Ãî·µ²®²¥²¯²»®¬¨¯Ã¸²´
°¬´²¦¤±¬Ã·«¯¤
10
Notice_2643164_EE_Mise en page 1 07/04/11 16:00 Page10
ОВОЩЕРЕЗКА (L) (в зависимости от модели)
Сборка (схема 7):
“¤³´²¶¬¦²¶®¯Â»©±±²§²²¶³¬¶¤±¬Ã¥¯²®¤°²¶²´¤·µ¶¤±²¦¬¶©®²´³·µL1 , ±¤®¯²±©±±¿-¦³´¤¦²·¼®¬®²´³·µ¤
¨²¯ª±¿¦²-¶¬¦²¶¦©´µ¶¬Ã¥¯²®¤°²¶²´¤H. ™µ¶¤±²¦¬¶©µ¶©´ª©±À¦¿¹²¨Ã½¬-¬«®²´³·µ¤L1 ,¦²µÀ¥¯²®¤°²¶²´¤
H. Ž¤§´·«²»±·Â§²´¯²¦¬±·®²´³·µ¤L1 ³²¦©´±¬¶©¦¯©¦²¨²°©¶®¬
Использование:
ɉ¿¥©´¬¶©®²±·µµ²²¶¦©¶µ¶¦·Â½¬-ª©¯¤©°²°·¬µ³²¯À«²¦¤±¬Â
ɉµ¶¤¦À¶©¦¿¥´¤±±¿-®²±·µ¦²¶¦©´µ¶¬©±¤¹²¨Ã½©©µÃ¦³©´©¨±©-»¤µ¶¬®²´³·µ¤L1, ®²±·µ¨²¯ª©±«¤±¬°¤¶À
³´¤¦¬¯À±²©³²¯²ª©±¬©¦±·¶´¬±©µ·½©§²Á¯©°©±¶¤´¬µ
É•²¨®¯Â»¬¶©³´¬¥²´®³¬¶¤±¬Â
É“¤ª°¬¶©²¨¬±¬¯¬¨¦¤´¤«¤±¤®±²³®·«¤³·µ®¤²µ¶¤±²¦®¬F , »¶²¥¿¥¯²®¬´²¦¤¶À®²±·µ´¬µ
ɉ®¯Â»¬¶©³´¬¥²´«¤¶©°»©´©««¤§´·«²»±·Â§²´¯²¦¬±·®²´³·µ¤±¤®¯¤¨¿¦¤-¶©³´²¨·®¶¿L1 (´¬µ) ¬³´²
¶¤¯®¬¦¤-¶©¬¹µ³²°²½À¶²¯®¤¶©¯ÃL2 (´¬µ).
● •¶²¥¿«¤°©±¬¶À®²±·µ±©²¥¹²¨¬°²¨²ª¨¤¶ÀµÃ³²¯±²-²µ¶¤±²¦®¬®²±·µ¤™¨©´ª¬¦¤-¶©±¤ª¤¶²-¦¶©»©±¬©µ©
®·±¨¿®±²³®·G –©¦©´µ®²±·µ¦¿-¨©¶¤¦¶²°¤¶¬»©µ®¬´¬µ
Сборка насадок для резки кубиками:
ɉµ¶¤¦À¶©®²±·µ¨¯Ã´©«®¬®·¥¬®¤°¬¦²¶¦©´µ¶¬©±¤¹²¨Ã½©©µÃ¦³©´©¨±©-»¤µ¶¬®²´³·µ¤L1, ®²±·µ¨²¯ª©±«¤
±¬°¤¶À³´¤¦¬¯À±²©³²¯²ª©±¬©¦±·¶´¬±©µ·½©§²Á¯©°©±¶¤´¬µ
É™µ¶¤±²¦¬¶©«¤¶©°±¤µ¤¨®·¨¯Ã´©«®¬®·¥¬®¤°¬µ²¶®´¿¶¿°«¤°®²°¥©«²³¤µ±²µ¶¬´¤µ³²¯¤§¤Ã«¤°²®¥©«²³¤µ
±²µ¶¬¦º©±¶´©«¤§´·«²»±²-§²´¯²¦¬±¿®²±·µ±²§²®²´³·µ¤´¬µ
É•´²¦©´À¶©»¶²¥¿®²¯Àº²¨¯Ã´©«®¬®·¥¬®¤°¬¥¿¯²¹²´²¼²«¤ª¤¶²·²µ±²¦¤±¬Ã®²±·µ±²§²®²´³·µ¤´¬µ
ÉŽ¤®´²-¶©«¤°²®¥©«²³¤µ±²µ¶¬±¤®²±·µ±²°®²´³·µ©
É“¤»¬±¤-¶©´©«®·®·¥¬®¤°¬²³·µ®¤Ã³´²¨·®¶¿¦«¤§´·«²»±·Â§²´¯²¦¬±·®²±·µ±²§²®²´³·µ¤
É•¶²¥¿¦¿±·¶À±¤µ¤¨®·¨¯Ã´©«®¬®·¥¬®¤°¬¨²µ¶¤¶²»±²³²¶Ã±·¶À«¤Ã«¿»²®±¤¹²¨Ã½¬-µÃµ¦©´¹·«¤°®¤¥©«
²³¤µ±²µ¶¬
Полезный совет: Чтобы легко разблокировать замок безопасности L3e, следует одновременно
сделать движен
ие пальцем вверх и потянуть язычок вперед (рис. 15).
Используйте рекомендуемый конус для каждого типа продукта:
•²±·µ¶©´®¤L3a
•²±·µ ¨¯Ã ´©«®¬
•²±·µ¨¯Ã
•²±·µ¬±¤µ¤¨®¤
¶²±®¬°¬¯²°¶¬®¤°¬ L3b
µ®²¥¯©±¬ÃL3c
¨¯Ã´©«®¬®·¥¬®¤°¬
L3d ¬L3e
’²´®²¦À
X X X
•¤¥¤»®¬
X X X
•¤´¶²¸©¯À
X X X (¶²¯À®²µ¿´¿©)
”§·´©º
X X X
•©´©º
X X
‘·®
X X
—¦©®¯¤
X X
•¤³·µ¶¤¥©¯¤Ã®´¤µ±¤Ã
X
£¥¯²®¬
X X
–©¨À®¤»©´±¤Ã
X X X
•²´±©¦²-µ©¯À¨©´©-
X X
ˆ¤±¤±¿
X X
•¤´°©«¤±
X
Š´Â-©´
X X X
ž²®²¯¤¨
X X
—·¹²-¹¯©¥µ·¹¤´¬
X
‘©µ±²-²´©¹§´©º®¬-
²´©¹°¬±¨¤¯À
X
•²®²µ²¦¿-²´©¹
X
11
Notice_2643164_EE_Mise en page 1 07/04/11 16:00 Page11
Советы для получения хорошего результата:
•¶²¥¿³²¯·»¬¶À·¨²¦¯©¶¦²´¬¶©¯À±¿-´©«·¯À¶¤¶¬³´©¨²¶¦´¤¶¬¶À«¤µ¶´©¦¤±¬©³´²¨·®¶²¦¦®²´³·µ©¬µ³²¯À«·©
°¿©¬±§´©¨¬©±¶¿¨²¯ª±¿¥¿¶À®´©³®¬°¬“©¬µ³²¯À«·-¶©³´¬¥²´»¶²¥¿¶©´©¶À¬¯¬´©«¤¶À¯²°¶¬®¤°¬³´²
¨·®¶¿ µ¯¬¼®²° ª©µ¶®¬© ¶¤®¬© ®¤® µ¤¹¤´ ¬¯¬ ®·µ®¬ °Ãµ¤ –¤«´©«¤-¶© ³´²¨·®¶¿ »¶²¥¿ ¬¹ ¥¿¯² ³´²½©
³´²¶¤¯®¬¦¤¶À¦§²´¯²¦¬±·®²´³·µ¤
ЧИСТКА:
•
Перед чисткой блока мотора Н всегда отключайте прибор от питания.
É“©³²§´·ª¤-¶©¥¯²®°²¶²´¤¦¦²¨·±©³²¨µ¶¤¦¯Ã-¶©©§²³²¨¦²¨·•¬µ¶¬¶©¥¯²®°²¶²´¤¦¯¤ª±²-¶´Ã³®²-
•²µ¯©»¬µ¶®¬µ¯©¨·©¶³²¯±²µ¶À¦¿µ·¼¬¶À
1) Аксессуары мясорубки :
—±¬°¬¶©¥¯²®¬´²¦®·§²¯²¦®¬¬¯¬¤®µ©µµ·¤´¤²¦²½©´©«®¬±¤ª¤¦±¤®±²³®·E.
— •²¦©´±¬¶©§²¯²¦®·°Ãµ²´·¥®¬A ¦³´¤¦²¬³²¶Ã±¬¶©±¤µ©¥Ã»¶²¥¿´¤«¾©¨¬±¬¶À¥¯²®°²¶²´¤H.
— •¶²¥¿µ±Ã¶À§²¯²¦®·²¦²½©´©«®¬A, ¦¿±À¶©¶²¯®¤¶©¯ÀC ¬µ±¬°¬¶©³²¨¨²±B, ²¶¦¬±¶¬¶©§¤-®·A5, µ±¬°¬¶©
´©¼©¶®·A4, ±²ªA3 ¬¦¬±¶A2.
— Осторожно обращайтесь с острыми запчастями.
‰¿°²-¶©¦µ©«¤³»¤µ¶¬³²¨§²´Ã»©-¦²¨²-µ°¿¯²°µ³²¯²µ±¬¶©¬¶½¤¶©¯À±²¦¿¶´¬¶©
“©°²-¶©§²¯²¦®·°Ãµ²´·¥®¬A ¦³²µ·¨²°²©»±²-°¤¼¬±©¶²©µ¶À®²´³·µA1, ¦¬±¶A2, §¤-®·A5, ±²ªA3 ¬
´©¼©¶®¬A4
2) Аксессуары овощерезки и прочие:
É•²´³·µL1¶²¯®¤¶©¯ÀL2®²±·µ¿L3a, L3b, L3c, L3d¬¤®µ©µµ·¤´¨¯Ã´©«®¬®·¥¬®¤°¬L3©°²ª±²°¿¶À¦
³²µ·¨²°²©»±²-°¤¼¬±©¦®²´«¬±©¬µ³²¯À«·Ã³´²§´¤°°·T¢•”U¬¯¬T“Œ—•‘¡“”Š–£Ž“”ŒU
É—¯©¨·©¶²µ¶²´²ª±²²¥´¤½¤¶ÀµÃµ®²±·µ¤°¬¶¤®®¤®¯©«¦¬Ã®²±·µ²¦²»©±À²µ¶´¿©
ÉŒµ¯¬³¯¤µ¶°¤µµ²¦¿©»¤µ¶¬³²®´¤µ¬¯¬µÀ²¶³´²¨·®¶²¦¶¤®¬¹®¤®±¤³´¬°©´°²´®²¦À³´²¶´¬¶©¬¹¶´Ã³®²-
µ°²»©±±²-¦³¬½©¦²°°¤µ¯©«¤¶©°¦¿°²-¶©²¥¿»±¿°µ³²µ²¥²°
‰µ© ¨´·§¬© ¤®µ©µµ·¤´¿ °²ª±² °¿¶À ¦ ³²µ·¨²°²©»±²- °¤¼¬±©.
ХРАНЕНИЕ:
–©¼©¶®¬±²ª·µ¶´²-µ¶¦²¨¯Ãº©±¶´¬´²¦¤±¬Ã¦¬±¶¤¤®µ©µµ·¤´¿•©¥¥©¨¯Ã¥¬µ®¦¬¶²¦¬®²¯¥¤µ²®I1, I2, J1, J2,
K1 ¬K2°²ª±²¹´¤±¬¶À±¤«¤¨±©-µ¶©±®©³´¬¥²´¤¦µ³©º¬¤¯À±²°²¶¨©¯©±¬¬D
ЕСЛИ ПРИБОР НЕ РАБОТАЕТ, ЧТО ДЕЛАТЬ?
•´²¦©´À¶©³¬¶¤±¬©
Œµ¯¬³´¬¥²´¶¤®¬±©«¤´¤¥²¶¤¯²¥´¤¶¬¶©µÀ¦µ©´¦¬µ±¿-º©±¶´»;@85:1B
µ°µ³¬µ²®¦¥´²¼Â´©³²²¥µ¯·ª¬¦¤±¬Â
СРОК ЭКСПЛУАТАЦИИ ЭЛЕКТРОННЫХ ИЛИ ЭЛЕКТРИЧЕСКИХ
ПРИБОРОВ ЗАКАНЧИВАЕТСЯ
Поучаствуем в защите окружающей среды!
‰¤¼³´¬¥²´µ²¨©´ª¬¶°±²§²°¤¶©´¬¤¯¤³´¬§²¨±²§²®³©´©´¤¥²¶®©
—¨¤-¶©©§²¦³·±®¶µ¥²´¤¬¯¬¦µ©´¦¬µ±¿-º©±¶´¨¯Ã³©´©´¤¥²¶®¬
12
Notice_2643164_EE_Mise en page 1 07/04/11 16:00 Page12

РЕЦЕПТЫ
Обратить внимание: Для рецептов, для которых требуется более высокая мощность, время использования прибора не
должно превышать 20 сек.
Пример рецепта (со средней решеткой – отверстия 4,7мм A4b) :
KIBBE BI LABAN
(котлеты киббе с йогуртом) – 6 порций
Приготовление: 1 ч. Поставить на 1 ч в холодильник
Ингредиенты для пасты киббе : §°Ãµ¤W§¥·¯À§·´¤¨´²¥¯©±²©«©´±²Wµ²¯À
•±§´©¨¬©±¶¿¨¯Ãµ²·µ¤®§-²§·´¶¤W³·»²®®²´¬¤±¨´¤W«·¥»¬®¤»©µ±²®¤Wµ¶²¯²¦¿©¯²ª®¬®·®·´·«±²-
°·®¬Wµ²¯À³©´©º
–¤«´©ªÀ¶©°Ãµ²±¤®·µ®¤™µ¶¤±²¦¬¶©´©¼©¶®·°°¦°Ãµ²´·¥®·•´²³·µ¶¬¶©°Ãµ²¨²¥¤¦À¶©¥·¯À§·´
•²µ²¯¬¶©³²µ¶¤¦À¶©³²¯·»©±±·Â°¤µµ·¦¹²¯²¨±²©°©µ¶²±¤»¤µ
•¶²¥¿µ¸²´°¬´²¦¤¶À®²¶¯©¶¿®¬¥¥©·µ¶¤±²¦¬¶©±¤°Ãµ²´·¥®·¤®µ©µµ·¤´®©¥¥©•´²³·µ¶¬¶©°¤µµ·®´¤Ã
®²¶¯©¶¿µ®¯©-¶©±©¥²¯À¼¬°®²¯¬»©µ¶¦²°¦²¨¿
‹¯Ã³´¬§²¶²¦¯©±¬Ãµ²·µ¤³´²°²-¶©³·»²®®²´¬¤±¨´¤³´²°²®±¬¶©¥·°¤§²-¬²¶²´¦¬¶©¯¬µ¶ÀÕ²»¬µ¶¬¶©
»©µ±²®¬´¤«¨¤¦¬¶©©§²•©µ±²®¬®²´¬¤±¨´³²¨©´ª¬¶©°¬±·¶¿±¤µ®²¦²´²¨®©±¤µ¯¤¥²°²§±©”µ¶¤¦À¶©
¦µ¶²´²±·
‰«¥©-¶©-²§·´¶¬®·®·´·«±·Â°·®·³²µ²¯¬¶©³²³©´»¬¶©‰¿¯©-¶©¦µ©¦®¤µ¶´Â¯Â»©´©«°©¯®²©µ¬¶©»®²
‹²¦©¨¬¶©µ°©µÀ¨²®¬³©±¬Ã«¤¶©°·°©±À¼¬¶©²§²±À•´¬µ°¤¶´¬¦¤-¶©«¤³´¬§²¶²¦¯©±¬©°³²µ¶²Ã±±²
³²°©¼¬¦¤Ã»¶²¥¿-²§·´¶±©³´¬µ¶¤¦¤¯
‹²¥¤¦À¶©»©µ±²®¬®²´¬¤±¨´•²¨©´ª¬¶©®²¶¯©¶¿®¬¥¥©¦§²´Ã»©-µ°©µ¬°¬±·¶
Вариант: ‰¿¶¤®ª©°²ª©¶©±¤»¬±¬¶À®²¶¯©¶¿µ°©µÀ¯·®¤¬´·¥¯©±²§²°Ãµ¤³´©¨¦¤´¬¶©¯À±²³´²ª¤´©±±²§²¦
±©¥²¯À¼²°®²¯¬»©µ¶¦©°¤µ¯¤µ³´Ã±²µ¶Ã°¬
САМСА
порции – Приготовление: 40 мин. Время запекания: 35 мин.
™¥œ¨ž• ž¥ª« §µ¯²Ä±²§²¶©µ¶¤W§§²¦Ã¨¬±¿W¯·®²¦¬º¤WÃ-º¤W³¤³´¬®¤W°²¯²¶¤Ã®²´¬º¤¬
¬°¥¬´ÀW³©¶´·¼®¤W®²´¬¤±¨´W®©´¦©¯ÀWµ¤¹¤´W§°¤µ¯¤W²¯¬¦®²¦²©°¤µ¯²
™µ¶¤±²¦¬¶©´©¼©¶®·µ²¶¦©´µ¶¬©°°°¦°Ãµ²´·¥®·–¤«´©ªÀ¶©¯·®±¤»¤µ¶©-¬³´²³·µ¶¬¶©»©´©«
°Ãµ²´·¥®·•²¨²§´©-¶©µ¶²¯²¦¿©¯²ª®¬²¯¬¦®²¦²§²°¤µ¯¤¦µ²¶©-±¬®©«¤¶©°¨²¥¤¦À¶©¯·®•²¶²°¬¶©±¤
µ¯¤¥²°²§±©¨²³²¯·»©±¬Ã«²¯²¶¬µ¶²§²º¦©¶¤”¶µ¶¤¦À¶©¦µ¶²´²±·
•«°©¯À»¬¶©§²¦Ã¨¬±·•²¨´·°Ã±À¶©±¤µ¯¤¥²°²§±©¦°©µ¶©µ¯·®²°¦¶©»©±¬©°¬±·¶”¶µ¶¤¦À¶©¦µ¶²´²±·
•´¬³´¤¦¿³´²³·µ¶¬¶©»©´©«°Ãµ²´·¥®·‰¿µ¿³À¶©¬¹¦µ²¶©-±¬®¦°©µ¶©µµ²¯À¬³©´º©°¨²¥¤¦À¶©
³²¯»¤-±²-¯²ª®¬³¤³´¬®¬½©³²¶®·¬°¥¬´Ã¬±©°±²§²®²´¬º¿
Ž¤¶©°¦¦©¨¬¶©¦«¥¬¶¿©Ã-º¤³²°©¼¤-¶©¬¦¿®¯Â»¬¶©²§²±À
–¤µ®¤¶¤-¶©¨²¦²¯À±²¶²±®²µ¯²Ä±²©¶©µ¶²–¤«´©ªÀ¶©±¤®¦¤¨´¤¶¿³²µ°—°¤ªÀ¶©°¤µ¯²°¬µ³²¯À«·©°·Â
³²¦©´¹±²µ¶À
“¤®¤ª¨¿-®¦¤¨´¤¶³²¯²ª¬¶©±©°±²§²¸¤´¼¤Ž¤¦©´±¬¶©µ®¯©¬¦«¤¶©°®´¤Ã
•¤´À¶©µ¤°µ¤†¦®¬³Ã½©°°¤µ¯©•²µ¯©ª¤´®¬¦¿¯²ª¬¶©±¤±©µ®²¯À®²°¬±·¶±¤¦³¬¶¿¦¤Â½·Â¥·°¤§·
•²µ¿³À¶©µ¤¹¤´²°¬®²´¬º©-•²¨¤¦¤-¶©§²´Ã»¬°
Вариант:
™µ¶¤±²¦¬¶©´©¼©¶®·µ²¶¦©´µ¶¬Ã°¬°°¦°Ãµ²´·¥®·–¤«´©ªÀ¶©¯·®±¤»¤µ¶©-“¤´·¥¬¶©±©°±²§²°Ãµ¤
¯·®³´²³·µ¶¬¶©»©´©«°Ãµ²´·¥®·
•´²³·µ¶¬¶©©½©±©°±²§²°Ãµ¤«¤¶©°³´¬³´¤¦¿¬±¤®²±©º²µ¶¤¶²®°Ãµ¤‰«¥©-¶©Ã-º¤¬¦¦©¨¬¶©¬¹¦¸¤´¼
¦°©µ¶©µµ²¯À¬³©´º©°³²¯»¤-±²-¯²ª®²-³¤³´¬®¬½©³²¶®²-¬°¥¬´Ã¬±©¥²¯À¼¬°®²¯¬»©µ¶¦²°®²´¬º¿
‰µ©³©´©°©¼¤-¶©•²¦¶²´¬¶©³·±®¶¿
ПИРОЖКИ С РЫБОЙ
¤š£ž¥¬¢ ž§ ¨¦Ÿ¢ ©¨«›¦¡
порции – Приготовление: 25 мин. Время запекания: 10 — 15 мин.
™¥œ¨ž• ž¥ª«§µ¯²Ä±²§²¶©µ¶¤W§¦¤´©±²-´¿¥¿¬¯¬®²³»©±²§²¯²µ²µÃWÃ-º¤µ¦¤´©±±¿¹¦®´·¶·Â
W³·»²®¨·¼¬µ¶²§²·®´²³¤W¯·®²¦¬º¿W§µ²¯Ä±²§²µ¯¬¦²»±²§²°¤µ¯¤°¤¯©±À®¬°¬®·µ²»®¤°¬W´¤µ¶¬
¶©¯À±²©°¤µ¯²
™µ¶¤±²¦¬¶´©¼©¶®·µ²¶¦©´µ¶¬Ã°¬°°¦°Ãµ²´·¥®·–¤«´©ªÀ¶©¯·®±¤»¤µ¶©-¬³´²³·µ¶¬¶©»©´©«
°Ãµ²´·¥®·•´¬³·µ¶¬¶©±¤µ¯¤¥²°²§±©¦µ²¶©-±¬®©¦±©¥²¯À¼²°®²¯¬»©µ¶¦©´¤µ¶¬¶©¯À±²§²°¤µ¯¤”µ¶¤¦À¶©
¦µ¶²´²±·
13
Notice_2643164_EE_Mise en page 1 07/04/11 16:00 Page13

“¤´©ªÀ¶©±©°±²§²´¿¥¿¨²¥¤¦À¶©«¤¶©°³´¬§²¶²¦¯©±±¿-¯·®µ¯¬¦²»±²©°¤µ¯²¨·¼¬µ¶¿-·®´²³¬
²µ¶¤¦¼·ÂµÃ´¿¥·
–¤µ®¤¶¤-¶©¶²±®¬°µ¯²©°µ¯²Ä±²©¶©µ¶²¦¿´©ªÀ¶©®´·§¬µ¶¤®¤±²°¬¯¬¥²®¤¯²°¥²¯©©¬¯¬°©±©©¥²¯À¼¬°
•´©¨¦¤´¬¶©¯À±²´¤«²§´©-¶©¨·¹²¦®·¨²RC (³).
5. “¤®¤ª¨¿-®´·ª²®³²¯²ª¬¶©±©°±²§²¸¤´¼¤µ¯²ª¬¶©¶©µ¶²¬«¤®¯©-¶©®´¤Ã
Š²¶²¦À¶©¦¨·¹²¦®©°¬±·¶
Котлеты из говядины
4 порции – Приготовление: 20 мин. Время запекания: 10 — 15 мин.
™¥œ¨ž• ž¥ª«®§§²¦Ã¨¬±¿W¯·®²¦¬º¤W«·¥»¬®»©µ±²®¤W®·µ²»®¤»©´±²§²¹¯©¥¤«¤°²»©±±²§²¦
°²¯²®©WÃ-º¤W®¤´¶²¼¬±¤W°·®¤Wµ²¯À³©´©º
‹¯Ã³´¬§²¶²¦¯©±¬ÃÁ¶²§²´©º©³¶¤¦¿¥©´¬¶©±©ª¬´±¿©®·µ®¬§²¦Ã¨¬±¿•´²³·µ¶¬¶©°Ãµ²»©´©«°Ãµ²´·¥®·µ
®·µ²»®¤°¬¹¯©¥¤
“¤´©ªÀ¶©¯·®¶²±®¬°¬¯²°¶¬®¤°¬®²±·µ²°K3b¬±¤¶´¬¶©»©µ±²®¬®¤´¶²¸©¯À®²±·µ²°¶©´®²-K3a
—°©¼¤-¶©´·¥¯©±²©°Ãµ²µ¹¯©¥²°±¤´©«¤±±¿°¯·®²°»©µ±²®²°¬®¤´¶²¸©¯©°
‹²¥¤¦À¶©¦µ°©µÀÃ-º¤°²¯²¶¿-»©´±¿-³©´©ºµ²¯À¬µ¸²´°¬´·-¶©®²¶¯©¶¿
”¥¦¤¯Ã-¶©®²¯©¶¿¦°·®©¬ª¤´À¶©¦´¤µ¶¬¶©¯À±²°°¤µ¯©
Картофельный пудинг, приготовленный в духовке
4 порции – Приготовление: 30 мин. Время запекания: 45 мин.
™¥œ¨ž• ž¥ª««·¥»¬®»©µ±²®¤Wµ¶²¯²¦²-¯²ª®¬µ¯¬¦²»±²§²°¤µ¯¤Wµ¶²¯²¦¿©¯²ª®¬´¤µ¶¬¶©¯À±²§²
°¤µ¯¤Wµ²¯À³©´©º
•²»¬µ¶¬¶©¦¿°²-¶©¬¦¿µ·¼¬¶©®¤´¶²¸©¯À“¤´©ªÀ¶©©§²¶²±®¬°¬¯²°¶¬®¤°¬®²±·µ²°K3b
Š²¦Ã¨¬±·³´²³·µ¶¬¶©»©´©«°Ãµ²´·¥®·¬³´²ª¤´À¶©´·¥¯©±²©°Ãµ²¦¨·¹²¦®©¦°¤µ¯©¦¶©»©±¬©°¬±·¶
“¤¶´¬¶©¦±·¶´©±±Â³²¦©´¹±²µ¶À¥¯Â¨¤»©µ±²®²°«¤¶©°µ°¤ªÀ¶©²¨±²-»¤µ¶Àµ¯¬¦²»±²§²°¤µ¯¤
—¯²Ã°¬¦¿¯²ª¬¶©®¤´¶²¸©¯Ã¬´·¥¯©±²§²°Ãµ¤³²µ²¯¬¶©³²³©´»¬¶©«¤¶©°¦¿¯²ª¬¶©²µ¶¤¦¼¬-µÃ
®¤´¶²¸©¯À
‰«¥©-¶©Ã-º¤µ¶©³¯¿°°²¯²®²°¬¦¿¯©-¶©µ°©µÀ±¤®¤´¶²¸©¯À‹²¥¤¦À¶©²µ¶¤¦¼©©µÃµ¯¬¦²»±²©°¤µ¯²
Š²¶²¦À¶©¦¨·¹²¦®©³´¬µ´©¨±©-¶©°³©´¤¶·´©°¬±·¶
Печеные яблоки с миндалем
4 порции – Приготовление: 40 мин. Время запекания: 30 мин.
™¥œ¨ž• ž¥ª«Ã¥¯²®W§µ¤¹¤´¤µ¿´º¤W§µ¯¬¦²»±²§²°¤µ¯¤W§º©¯À±²§²°¬±¨¤¯ÃW°¯µ¯¬¦²®W
»¤-±¤Ã¯²ª®¤®²´¬º¿
•²»¬µ¶¬¶©Ã¥¯²®¬·¨¤¯¬¶©µ©´¨º©¦¬±·¬´¤«´©ªÀ¶©±¤»©¶¦©´¶¬“¤´©ªÀ¶©Ã¥¯²®¬¶²±®¬°¬¯²°¶¬®¤°¬
®²±·µ²°K3b¬³´²ª¤´À¶©¦§µ¯¬¦²»±²§²°¤µ¯¤—°¤ªÀ¶©µ¯©§®¤°¤µ¯²°¥¯Â¨²¬¦¿¯²ª¬¶©«¤µ¤¹¤´©±±¿©
Ã¥¯²®¬±¤¨±²•«°©¯À»¬¶©°¬±¨¤¯À¦³²´²¼²®®²±·µ²°K3c‰µ¤¯¤¶±¬º©³©´©°©¼¤-¶©°²¯²¶¿-°¬±¨¤¯À
µ¯¬¦®¬¬®²´¬º·‰¿¯²ª¬¶©µ°©µÀ±¤Ã¥¯²®¬¬³²µ¿³À¶©µ¤¹¤´²°µ¿´º²°ˆ¯Â¨²³²µ¶¤¦À¶©¦¨·¹²¦®·
§²¶²¦À¶©³´¬RC.
Русский винегрет
4 порции – Приготовление 40 мин. Время запекания: 30 мин.
™¥œ¨ž• ž¥ª«§µ¦©®¯¿W§°²´®²¦¬W§®¤´¶²¸©¯ÃW§®¤³·µ¶¿W§²§·´º²¦°¤´¬±²¦¤±±¿¹
¬¯¬µ²¯©±¿¹W§¯·®¤W§§²´²¼®¤®²±µ©´¦¬´²¦¤±±²§²Wµ²¯ÀWµ¶¯²ª®¬´¤µ¶¬¶©¯À±²§²°¤µ¯¤
•²´©ªÀ¶©®·¥¬®¤°¬®¤´¶²¸©¯Àµ¦©®¯·°²´®²¦À¯·®¬²§·´º¿¬µ³²¯À«·Ã®²±·µ¬±¤µ¤¨®·¨¯Ã´©«®¬®·¥¬®¤°¬
L3d ¬L3e
“¤³¤´·³´¬§²¶²¦À¶©®·¥¬®¬®¤´¶²¸©¯Ãµ¦©®¯¿¬°²´®²¦¬
—°©¼¤-¶©¦µ©¬¨²¥¤¦À¶©®¤³·µ¶·§²´²¼©®¯·®¬²§·´º¿•²µ²¯¬¶©³²¯©-¶©³²¨µ²¯±©»±¿°°¤µ¯²°‰¬±©§´©¶
³²µ¶¤¦À¶©¦¹²¯²¨¬¯À±¬®±¤»¤µ
14
Notice_2643164_EE_Mise en page 1 07/04/11 16:00 Page14

‹Ã®·Å°²«¤³²®·³®·³´¬¯¤¨·µ©´ÆÇMoulinex.
UK
ОПИС:
A
Ž±Æ°±¤§²¯Æ¦®¤°Ãµ²´·¥®¬
A1
‡¯Â°Æ±ÆŦ¬-®²´³·µ
A2
ž±©®
A3
—¤°²«¤§²µ¶´Â¦¤¯À±¬-±Æª¦¬§²¶²¦¯©±¬-«±©´ª¤¦Æ»²Çµ¶¤¯Æ
A4
–©¼Æ¶®¬
A4a
‹´Æ¥±¤´©¼Æ¶®¤°°(залежно від моделі)
‹¯Ã¨·ª©¨´Æ¥±²Ç´·¥®¬
A4a
‹´Æ¥±¤´©¼Æ¶®¤°°(залежно від моделі)
‹¯Ã¨·ª©¨´Æ¥±²Ç´·¥®¬
A4b
—©´©¨±Ã´©¼Æ¶®¤°°
‹¯Ã¨´Æ¥±²Ç´·¥®¬
A4c
ž¬´²®¤´©¼Æ¶®¤°°
‹¯Ã§´·¥²Ç´·¥®¬
A5
‡¯Â°Æ±ÆŦ¤§¤-®¤
B
Ž±Æ°±¬-¤¯Â°Æ±ÆŦ¬-¯²¶²®
C
ž¶²¦¹¤»°Ãµ¤
D
•²¹²¯¨¯Ã¤®µ©µ·¤´Æ¦
E
•±²³®¤´²«¥¯²®·¦¤±±Ã§²¯Æ¦®¬
F
•±²³®¤«¤³·µ®·«·³¬±®¬
G
•±²³®¤T–©¦©´µU´·¹¦Æ¨´¤«·ª«°Æ±ÂŶÀµÃ±¤«¦²´²¶±Æ-
H
ˆ¯²®°²¶²´¤
I
‡®µ©µ·¤´•ŒˆŒ
I1
šÆ¯ÀÅ´±¤±¤µ¤¨®¤
I2
•Æ¯Àº©¦©·½Æ¯À±©±±Ã
J
“¤µ¤¨®¤¨¯Ã³©»¬¦¤(залежно від моделі)
J1
˜´¬°¤»
J2
š²´°¤
K
‡®µ©µ·¤´¨¯Ã®²¦¥¤µ²®
K1
•´¬µ¶´Æ-¨¯Ãº©±¶´·¦¤±±Ã
K2
‰²´²±®¤
L
”¦²»©´Æ«®¤
L1
•²±·µ±¬-¥·±®©´§²´¯²¦¬±¤
L2
˜²¦®¤»
L3
•²±·µ¬
L3a
•²±·µ¶©´¶®¤
L3b
•²±·µ¨¯Ã±¤´Æ«®¬¶²±®¬°¬µ®¬¥²»®¤°¬
L3c
•²±·µ¨¯Ãµ®²¥¯Æ±±Ã
L3d
•²±·µ¨¯Ã±¤´Æ«®¬®·¥¬®¤°¬
L3e
‡®µ©µ·¤´¨¯Ã±¤´Æ«®¬®·¥¬®¤°¬
ЗАХОДИ БЕЗПЕКИ:
— Перед початком роботи уважно прочитайте інструкцію: неналежне використання приладу звільняє
компанію «Moulinex» від відповідальності.
— Цей пристрій не призначений для використання особами (включаючи дітей) з обмеженими фізичними,
сенсорними або розумовими здібностями, або особами, що не мають досвіду або необхідних знань, за
винятком випадків, коли за ними наглядає або допомагає третя особа, відповідальна за їхню безпеку.
15
Notice_2643164_EE_Mise en page 1 07/04/11 16:00 Page15

— Необхідно обмежити доступ дітей до приладу, який не є іграшкою.
“¤³´·§¤ª¬¦¯©±±Ã¦¤¼²§²³´¬¯¤¨·³²¦¬±±¤¦Æ¨³²¦Æ¨¤¶¬±¤³´·«Æ©¯©®¶´²°©´©ªÆ·¦¤¼²°·¨²°Æ
ˆ·¨À©³´¤¦¬¯À±©³Æ¨®¯Â»©±±Ã¤±·¯Âŧ¤´¤±¶ÆÂ
•´¬¯¤¨³´¬«±¤»©±¬-¶Æ¯À®¬¨¯Ã¨²°¤¼±À²§²¦¬®²´¬µ¶¤±±ÃƳ´¬§²¶·¦¤±±Ãµ¶´¤¦¶¤³Æ¨±¤§¯Ã¨²°
‰¬®²´¬µ¶²¦·-¶©³´¬¯¤¨¶Æ¯À®¬±¤´Æ¦±Æ-»¬µ¶Æ-¶¤µ·¹Æ-³²¦©´¹±Æ
“©¨²³·µ®¤-¶©«¦¬µ¤±±Ã¨²¦§²§²¦²¯²µµÃ¼¤´¸¤»¬®´¤¦¤¶®¬±¤¨³´¬¦©¨©±¬°¬¦¨Æ¤®µ©µ·¤´¤°¬
•Æµ¯Ã³´¬³¬±©±±Ã´²¥²¶¬µ¯Æ¨«´¤«·ª¦Æ¨®¯Â»¬¶¬³´¬¯¤¨¦Æ¨©¯©®¶´²°©´©ªÆ¦Æ¨®¯Â»©±±Ã³²¶´Æ¥±©¶¤®²ª
®²¯¬¦¬-²§²°¬Å¶©µ¶¤¦¬¶©±¤°Æµº©¤¥²«±Æ°¤Å¶©¤®µ©µ·¤´¬
“©¦¬®²´¬µ¶²¦·-¶©³´¬¯¤¨Ã®½²¦Æ±³´¤ºÂű©³´¤¦¬¯À±²¤¥²³²¼®²¨ª©±¬-™ºÀ²°·¦¬³¤¨®·µ¯Æ¨«¦©´±·¶¬µÃ
¨²µ©´¦Æµ±²§²º©±¶´·®²°³¤±ÆÇTMoulinexU¨¬¦µ³¬µ²®¦¥´²¼·´Æ«²¥µ¯·§²¦·¦¤±±Ã
ˆ·¨À¶´·»¤±±Ã²®´Æ°»¬½©±±Ãƽ²¨©±±²§²¨²§¯Ã¨·®¯Æű¶²°³²¦¬±±²«¨Æ-µ±Â¦¤¶¬µÃ¦µ©´¦Æµ±²°·º©±¶´Æ
TMoulinexU
“©¦¬®²´¬µ¶²¦·-¶©³´¬¯¤¨Ã®½²¼±·´ª¬¦¯©±±Ã³²¼®²¨ª©±¬-‹¯Ã·µ·±©±±Ã±©¥©«³©®¬«¦©´±Æ¶ÀµÃ¦µ©´¦Æµ±¬-
º©±¶´TMoulinexU¨¯Ã«¤°Æ±¬¨¬¦µ³¬µ²®·¥´²¼·´Æ«²¥µ¯·§²¦·¦¤±±Ã
“©®¯¤¨Æ¶À³´¬¯¤¨¼±·´ª¬¦¯©±±Ã¤¥²¼¶©³µ©¯À±·¦¬¯®··¦²¨·¤¥²Æ±¼·´Æ¨¬±·
ˆ©´©ªÆ¶À¼±·´ª¬¦¯©±±Ã¦Æ¨¨Æ¶©-
ž±·´ª¬¦¯©±±Ã±©³²¦¬±©±«±¤¹²¨¬¶¬µÃ³²¥¯¬«·¤¥²®²±¶¤®¶·¦¤¶¬«±¤§´Æ¦¤Â»¬°¬©¯©°©±¶¤°¬¨ª©´©¯²°
¶©³¯¤¤¥²§²µ¶´¬°¬®·¶¤°¬
‹¯Ã ¦¤¼²Ç ¥©«³©®¬ µ¯Æ¨ ¦¬®²´¬µ¶²¦·¦¤¶¬ ¶Æ¯À®¬ ¤®µ©µ·¤´¬ Æ «¤³¤µ±Æ »¤µ¶¬±¬ ®²°³¤±ÆÇ TMoulinexU îÆ
¦Æ¨³²¦Æ¨¤Â¶À¦¬°²§¤°¦¤¼²§²³´¬¯¤¨·
“©®²´¬µ¶·-¶©µÃ³´¬¯¤¨²°¨²¦¼©±Æª¹¦
‹¯Ã¦¤¼²Ç¥©«³©®¬¨¤±¬-³´¬¯¤¨¦Æ¨³²¦Æ¨¤Å»¬±±¬°±²´°¤°Æ³´¤¦¬¯¤°
S‹¬´©®¶¬¦¤±¬«À®²Ç±¤³´·§¬
SŒ¯©®¶´²°¤§±Æ¶±¤µ·°Æµ±Æµ¶À
S“¤¦®²¯¬¼±Åµ©´©¨²¦¬½©
S’¤¶©´Æ¤¯¬½²®²±¶¤®¶·Â¶À«³´²¨·®¶¤°¬¹¤´»·¦¤±±Ã
ПЕРЕД ПОЧАТКОМ ВИКОРИСТАННЯ:
‰¬°¬-¶©¦µÆ¤®µ©µ·¤´¬¦²¨²Â«°¬¯²°—³²¯²µ±Æ¶ÀÆ´©¶©¯À±²¦¬¶´Æ¶À
Решітка і ніж повинні залишатися жирними. Необхідно змастити їх олією.
Не вмикайте прилад в холосту, не змастивши попередньо решітку.
УВАГА: Оскільки леза конусів дуже гострі, з ними слід поводитися обережно.
ЗАПУСК:
ГОЛІВКА М’ЯСОРУБКИ (A) :
Складання голівки м’ясорубки (схеми 1.1 і 1.2)
“©²¥¹Æ¨±²¦«Ã¶¬®²´³·µA1 «¤§²´¯²¦¬±·±¤³´¤¦¬¦¼¬±¤-¼¬´¼¬-²¶¦Æ´¦§²´·•²¶Æ°¦µ¶¤¦¶©¼±©®A2 (µ³²»¤¶®·
¨²¦§·¦ÆµÀ) ¦®²´³·µA1.
“¤¨Æ±À¶©±Æª «±©´ª¤¦Æ»²Ç µ¶¤¯Æ A3 ±¤ ®²´²¶®·¦ÆµÀ¬µ¶·³¤Å«¤¼±©® A2, ´Æª·»¬°¬¯©«¤°¬¨²µ©¥©
ˆ·¨Àî·´©¼Æ¶®·«¤¦¤¼¬°¦¬¥²´²°±¤¨Æ±À¶©±¤±ÆªA3, ¦¬µ¶·³³²¦¬±©±³²¶´¤³¬¶¬¦³¤«®²´³·µ·A1.
Ž¤®´·¶Æ¶À±©¥¯²®·-¶©§¤-®·A5.
Установка голівки м’ясорубки (схема 2) :
S•©´©¨¦Æ¨®¯Â»©±¬°¦Æ¨©¯©®¶´²°©´©ªÆ¥¯²®·°²¶²´¤H ¶´¬°¤-¶©§²¯Æ¦®·°Ãµ²´·¥®¬§²´¯²¦¬±¤µ³´Ã°²¦¤±¤
¦³´¤¦²ŽÆµ¶¬®·-¶©¥¤-²±©¶±Æ«Å¨±¤±±Ã§²¯Æ¦®¬°Ãµ²´·¥®¬Æ³¤«¬¥¯²®¤°²¶²´¤Š²¯Æ¦®·°Ãµ²´·¥®¬¦µ¶¤¦¶©
¦ ¥¯²® °²¶²´¤ H, ³Æµ¯Ã »²§² ³²¦©´±Æ¶À §²´¯²¦¬±· ¨² °Æ¶®¬ §²´¯²¦¬±¤ ³²¦¬±±¤ «¤-±Ã¶¬ ¦©´¶¬®¤¯À±©
³²¯²ª©±±Ã
S‰µ¶¤±²¦Æ¶À«±Æ°±¬-¯²¶²®B ±¤¦¬µ¶·³¬§²´¯²¦¬±¬§²¯Æ¦®¬°Ãµ²´·¥®¬
™¦Æ°®±Æ¶À³´¬¯¤¨¦Æ±§²¶²¦¬-¨²©®µ³¯·¤¶¤ºÆÇ
Використання:
•´¬§²¶·-¶©±©²¥¹Æ¨±·¨¯Ã´·¥®¬®Æ¯À®Æµ¶À³´²¨·®¶Æ¦¦¬¨¤¯Æ¶À®Æµ¶®¬¹´Ã½ÆƵ·¹²ª¬¯¯Ã
“¤´Æª¶©°Ãµ²¼°¤¶®¤°¬³´¬¥¯¬«±²µ°X 2 µ°
•Æ¨§²¯Æ¦®·°Ãµ²´·¥®¬³²µ¶¤¦¶©Å°±Æµ¶À
“¤¶¬µ±Æ¶À±¤³²¯²ª©±±ÃTIU®±²³®¬«¤³·µ®·«·³¬±®¬F, ½²¥¦®¯Â»¬¶¬³´¬¯¤¨
•²®¯¤¨Æ¶À¼°¤¶®¬°Ãµ¤±¤³Æ¨¨²±B Ƴ²²¨±²°·²³·µ®¤-¶©¦²¶¦Æ´«¤¨²³²°²§²Â¼¶²¦¹¤»¤C.
16
Notice_2643164_EE_Mise en page 1 07/04/11 16:00 Page16

Ні в якому разі не намагайтеся проштовхувати пальцями або іншим інструментом.
Ÿ²¥²¶´¬°¤¶¬°Ã®©¶Æµ¶²•©¥©¤¥²•©¸¶¤³´²³·µ¶Æ¶À°Ãµ²´¤«¬»©´©«°Ãµ²´·¥®·¨²²¶´¬°¤±±Ã°¤µ¬
¥¤ª¤±²Ç®²±µ¬µ¶©±ºÆÇ
Корисна порада:
‰®Æ±ºÆ´²¥²¶¬¦¬°²ª©¶©³´²³·µ¶¬¶¬®Æ¯À®¤¼°¤¶®Æ¦¹¯Æ¥¤½²¥¦¬-¼¯¬«¤¯¬¼®¬°©¯©±²§²°Ãµ¤
Що робити у випадку застрягання? (Схема 3)
‰¬°®±Æ¶À°Ãµ²´·¥®·±¤¶¬µ±·¦¼¬±¤³²¯²ª©±±ÃTU®±²³®¬«¤³·µ®·«·³¬±®¬F.
•²¶Æ°®Æ¯À®¤µ©®·±¨¶´¬°¤-¶©±¤ª¤¶²Â®±²³®·T–©¦©´µUŽ¦²´²¶±¬-¹Æ¨G, ½²¥«¦Æ¯À±¬¶¬«¤µ¶´Ã§¯Æ³´²¨·®¶¬
“¤¶¬µ±Æ¶À±¤³²¯²ª©±±ÃTIU®±²³®¬«¤³·µ®·«·³¬±®¬F, ½²¥³´²¨²¦ª¬¶¬´²¥²¶·
Важливо: дочекайтеся остаточної зупинки приладу перед тим, як активувати команду «Пуск» F або
команду «Зворотний хід» G
АКСЕСУАР КЕБЕ (I)
Складання (схема 4) :
‰µ¶¤¦¶©¼±©®A2 ¦®²´³·µA1 §²¯Æ¦®¬°Ãµ²´·¥®¬‰µ¶¤±²¦Æ¶À¸Æ¯ÀÅ´±·±¤µ¤¨®·I1 ¶¤®½²¥¦¬µ¶·³³²¶´¤³¬¦·³¤«
®²´³·µ·A1. “¤¨Æ±À¶©®Æ¯Àº©¦©·½Æ¯À±©±±ÃI2 ±¤¸Æ¯ÀÅ´±·±¤µ¤¨®·Æ«¤®´·¶Æ¶À§¤-®·A5 ¨²®Æ±ºÃ
ŽÆ¥´¤±·¶¤®¬°»¬±²°§²¯Æ¦®·¦µ¶¤±²¦Æ¶À±¤¥¯²®°²¶²´¤Ã®«¤«±¤»©±²¦µ¹©°Æ
Примітка: даний аксесуар використовується без решітки та без ножа.
АКСЕСУАР ДЛЯ ПЕЧИВА (J) (залежно від моделі)
Складання (схема 5) :
‰µ¶¤¦¶©¼±©®A2 ¦®²´³·µA1 §²¯Æ¦®¬°Ãµ²´·¥®¬•²¶Æ°¦µ¶¤±²¦Æ¶À¸²´°·J2 ·¶´¬°¤»J1 ¶¤®½²¥¦¬µ¶·³
³²¶´¤³¬¦·³¤«®²´³·µ·A1.
Ž¤®´·¶Æ¶À§¤-®·A5 ±¤®²´³·µA1 ¨²®Æ±ºÃ±©¥¯²®·Â»¬‰µ¶¤±²¦Æ¶À§²¯Æ¦®·°Ãµ²´·¥®¬«Æ¥´¤±·¶¤®¬°»¬±²°±¤
¥¯²®°²¶²´¤H.
Примітка: даний аксесуар використовується без решітки та без ножа.
Використання
•Æ¨§²¶·-¶©¶Æµ¶²‰¬²¶´¬°¤Å¶©®´¤½Æ´©«·¯À¶¤¶¬Ã®½²¶Æµ¶²¥·¨©¶´²¹¬°Z
Ÿ²¥¦¬¥´¤¶¬¸²´°·³©»¬¦¤¦¬µ¶¤¦¶©µ¶´Æ¯®·±¤¦³´²¶¬³²¶´Æ¥±²Ç¸²´°¬
•²¨¤¦¤-¶©¶Æµ¶²³²®¬±©²¶´¬°¤Å¶©¥¤ª¤±·®Æ¯À®Æµ¶À³©»¬¦¤
ВОРОНКА ДЛЯ КОВБАСОК (K)
‹¤±¬- ¤®µ©µ·¤´ ½² ³´¬®´Æ³¯ÂŶÀµÃ ¨² §²¯Æ¦®¬ °Ãµ²´·¥®¬ ¨²«¦²¯¬¶À ´²¥¬¶¬ ¥·¨ÀÃ®Æ ®²¦¥¤µ®¬ Ã®Æ ¦¤°
«¤¯¬¼¬¶ÀµÃ¶Æ¯À®¬³´¬³´¤¦¬¶¬«¤µ¦²Ç°µ°¤®²°
Складання (схема 6)
‰µ¶¤¦¶©¼±©®A2 ¦®²´³·µA1 §²¯Æ¦®¬°Ãµ²´·¥®¬‰µ¶¤±²¦Æ¶À³´¬µ¶´Æ-¨¯Ãº©±¶´·¦¤±±Ã•¶¤®½²¥¦¬µ¶·³³²
¶´¤³¬¦·³¤«®²´³·µ·A1. •²¶Æ°¦µ¶¤±²¦Æ¶À¦²´²±®·•§¤-®·A5 ¶¤«¤®´·¶Æ¶ÀÇǨ²®Æ±ºÃ‰µ¶¤±²¦Æ¶À§²¯Æ¦®·°Ãµ²
´·¥®¬«Æ¥´¤±·¶¤®¬°»¬±²°±¤¥¯²®°²¶²´¤H.
Примітка: даний аксесуар використовується без решітки та без ножа. Пристрій для центрування шнека
дозволяє утримати шнек у потрібному положенні при приготуванні рецепта.
Використання:
Важливо: ¨¤±¬-¤®µ©µ·¤´µ¯Æ¨¦¬®²´¬µ¶²¦·¦¤¶¬¶Æ¯À®¬³Æµ¯Ã¶²§²Ã®°Ãµ²¥·¯²³²°©¯©±©µ³©ºÆǨ²¨¤±ÆÆ°¤µ¤
¨²¥´©³©´©°Æ¼¤±¤
•²³©´©¨±À²¦¬°²»©±·¦¶©³¯Æ-¦²¨Æ®²¦¥¤µ±·²¥²¯²±®·Ã®¤µ¶¤¯¤«±²¦·©¯¤µ¶¬»±²Â±¤¨Ã§±Æ¶À±¤¦²´²±®·K2,
«¤¯¬¼¬¦¼¬³´¬¥¯¬«±²µ°
’©¯©±©°Ãµ²³²°Æµ¶Æ¶À¦§²´¯²¦¬±·®²´³·µ·A1 §²¯Æ¦®¬°Ãµ²´·¥®¬A, ¦®¯Â»Æ¶ÀƳ´²¼¶²¦¹·-¶©«¤¨²³²°²§²Â
¼¶²¦¹¤»¤C ¶¤®½²¥°©¯©±©°Ãµ²¦¬-¼¯²±¤®´¤-¦²´²±®¬
‰¬°®±Æ¶À³´¬¯¤¨
Ž´²¥Æ¶À¦·«²¯««¤¯¬¼©±¬¹µ°®²¦¥¤µ±²Ç²¥²¯²±®¬•©´©µ·±À¶©¦·«²¯¨²®´¤Â¦²´²±®¬½²¥±©¥¯²®·¦¤¶¬
³²¦Æ¶´Ã¦®²¦¥¤µ±²Ç²¥²¯²±ºÆ
™¦Æ°®±Æ¶À ³´¬¯¤¨ Æ ³´²¨²¦ª·-¶© ±¤®¯¤¨¤¶¬ °©¯©±© °Ãµ² —¶©ª¶© «¤ ®²¦¥¤µ±²Â ²¥²¯²±®²Â ³²®¬ ¦²±¤ ±©
±¤³²¦±¬¶ÀµÃŸ²¥µ¬¯À±²±©´²«¶Ã§·¦¤¶¬²¥²¯²±®·±©´²¥Æ¶À±¤¨¶²¶²¦µ¶¬¹®²¦¥¤µ²®
17
Notice_2643164_EE_Mise en page 1 07/04/11 16:00 Page17
Аннотация для Мясорубки Moulinex HV8 ME645 в формате PDF
Топ 10 инструкций
Другие инструкции

366.22 kB

2.84 Мб

3.65 Мб

963.30 kB

2.39 Мб

575.15 kB
Новые ответы на вопросы
Такой инструкции не будет. Смотрите разбор стиральной машины, а подшипники меняются примерно одинаково на всех, ни чего сложного.
Ремонт машинки
11 месяцев 3 дня назад
Гость
Проблема со сливом или не видит тен
Посудомойка индезит dif16 перед сушкой загораются 4 индикатора первых из 6
1 год 6 месяцев назад
manualsman
Проверьте провод питания. Если провод исправен, но так и не включается — несите в сервис!
Што может быть не включаеца
1 год 6 месяцев назад
manualsbot
болты сзади выкрутить. См инструкцию, траница 12
Убрать подставку
1 год 6 месяцев назад
manualsbot
EN
p 1 – p 8
LT
p 9 – p 16
LV
p 17 – p 24
ET
p 25 – p 32
PL
p 33 – p 40
RU
p 41 – p 49
UK
p 50 – p 58
HU
p 59 – p 66
CS
p 67 – p 74
SK
p 75 – p 82
BS
p 83 – p 90
BG
p 91 – p 99
HR
p 100 – p 107
RO
p 108 – p 115
SR
p 116 – p 123
SL
p 124 – p 131
EN
LT
LV
ET
PL
RU
UK
HU
CS
SK
BS
BG
HR
RO
SR
SL
www.moulinex.com
Réf. 2643049A
Notice_2643049A:Mise en page 1 29/10/10 16:23 Pagea1
!#
8><496026F7<4A>@<B286//L
<?2/j.?=>6=>.B25
%<j6@285B59.169;68A
Sestavine za testo za kibbé:
280=,U6:D,<0.2-?<2?7,D/<:-75090;`094.0U%:7
Sestavine za omako:
625:2?<>,U`:;066:<4,9/<,U=><:64i0=9,U5?`90b74.06:<?D0U%:7;:;0<
0=:<,D<0b4>09,6:=0!,@,`=0675,79469,80=>4>0889,=>,@06+80754>080=:49-?<2?7%:74>049;?=>4>0
>0=>:=>,>49,37,/908?<:
»-746:@,9506<:274.64—J9,=0675,79469,80=>4>0/:/,>0664—J&0=>:/,5>0@=0675,7946492,:-746?5>0@6<:27:>,6:
/,9,<:-:@09,90=0>08,7:@:/0
#<4;<,@,:8,60?845>0`:;066:<4,9/<,:=?`4>02,D@;:5948;,;4<50849:/><2,5>074=>0h0=09:7?;4>049=><4>0
h0=09496:<4,9/0<6?3,5>0/:849?>49,8,53908:295?@;:9@4D@4`548<:-:8»/=>,@4>0
:2?<>496:<?D:D80`,5>0=6?;,59,>:;:=:74>049;:;:;<,5>0(=0D745>0@09:;:=:/:=6:D4.0/47:D8,5394847?
695,84#:i,6,5>0/,80`,94.,D,@<09,>:D8,95`,5>08:i:295, 0/6?3,9508;,D4>0/,=05:2?<>90D,=?`49,
;:90@
:/,5>0i0=09496:<4,9/0<<:274.064—J/:/,5>0i0D849?>
Različica
<:274.07,36:>?/49,/0@,>0DD80=5:i0-?7049870>02,80=,64=>05:;<0/>08;:;<,b474@:75?D906,5D<94;49450
%&$
:.75;<>6/72=206B<
<?2/2j.?=>6=>.B2:6;
i.?8A5.;7.:6;
Sestavine:
274=>9,>02,>0=>, U26?3,90<4-0,74/48750902,7:=:=, U></:6?3,945,5.4 U`:;066:;<, Ui0-?74 U2
=:750902,8,=7,@8,539436:.6,3 U»750
!,80=>4>0889,=>,@069,=0675,7946$,D<0b4>0i0-?7:9,6:=:@495:=><0=4>0@=0675,7946#<,b4>09,8,53908
:295?@;:9@4D8,7::75,%3<,94>0
+80754>08,7:<4-09,>:54/:/,5>0;<,b09:i0-?7:8,=7:6:;0<49`0;<0:=>,7:<4-:
4=>9,>:>0=>:<,D@,75,5>0/,-:/:6,5>,96:<,D<0b4>02,9,6<:20=6:D,<.08,74D/:6,5@0746:;:=:/:
#0i4.:;<0/3:/9::2<05>09,R=>
!,@=,66<:29,7:b4>08,7:9,/0@,492,D,;:294>0>,6:/,D@450>0<:-:@0
#?=>4>0@;0i4.4/:849?>>,6:/,;:<5,@45:
Recepti:
Pomnite: Pri receptih, kjer morate sekljati z zvišano močjo (približno 500 W), naprave ne uporabljajte več kot 20
sekund.
Primer recepta (z nastavkom s srednje velikimi luknjami 4,7 mm A4a):
Ovčetina z grahom
2:@i0>490U2D/<:-750902,2<,3,U28:60U.7@:/0U=<0/950@0746,i0-?7,U=><:6,i0=9,U%:7
;:;0<
(;:=:/4D80`,5>0=0=0675,9:8,=:498:6:9,>:;,/:/,5,5>0@:/:>,6:/,/:-4>03:8:209:80`,94.:#<4b24>0
9,;<,@:4909,6:80<9:/:/,5,5>0D80=9,;7:`i:>0<;:i,=4;:>4=6,5>080`,94.:=6:D4@<,>=;:>4=946:8C
$,D<0b4>0i0-?7:i0=094980=:9,8,53906:=09,>:;,543/:/,5>0=0=0675,908?80=?
(;:=:/:D745>074><,@:/0/:/,5>054=:7;:;0<499,>:`080`,94.:
?3,5>0?<:;<48,95`08:295?;:6<45>06:=0D,i906,/4>4
131
Notice_2643049A:Mise en page 1 29/10/10 16:23 Pagea4
Notice_2643049A:Mise en page 1 29/10/10 16:23 Pagea7
Notice_2643049A:Mise en page 1 29/10/10 16:23 Pagea8

Thank you for choosing an appliance from the Moulinex range.
EN
DESCRIPTION:
A Removable mincer head
A1 Aluminium body
A2 Feed screw
A3 Self-sharpening stainless steel cutter
A4 Screens
A4a Medium hole screen
(4.7 mm) fine mincing
A4b Large hole screen
(7.5 mm) coarse mincing
A5 Aluminium nut
B Removable tray
C Meat pusher
D Start/stop button
E Motor unit
F KEBBE attachment
F1 KEBBE making end
F2 Ring
G Sausage filler tube
H Vegetable cutter
H1 Cone storage unit/feed tube
H2 Pusher
H3 Cones
H3a Coarse grater cone (red)
H3b Fine grater cone (orange)
H3c Coarse slicer cone (dark green)
H3d Fine slicer cone (light green)
H3e Chip slicer cone
H3f Dicer attachment
I Storage attachment
SAFETY INSTRUCTIONS:
— Read the instructions carefully.
— Before first using your appliance, note that any use that does not conform to the instructions for use absolves
Moulinex from any liability.
— This appliance is not intended for use by persons (including children) with reduced physical, sensory or mental
capabilities, or lack of experience and knowledge, unless they have been given supervision or instruction
concerning use of the appliance by a person responsible for their safety
— Children must be supervised to ensure that they do not play with the appliance.
— Check that the power rating of your appliance corresponds to your electrical supply.
— Any connection fault invalidates the guarantee.
— This product has been designed for domestic use only. Any commercial use, inappropriate use or failure to comply
with the instructions, the manufacturer accepts no responsibility and the guarantee will not apply.
— Use your appliance on a flat, stable, heat resistant, clean and dry surface.
— Never let long hair, scarves or ties dangle over attachments during operation.
— Unplug your appliance as soon as you have finished using it, when you clean it and when you fit or remove
attachments.
— Do not use your appliance if it does not work correctly or if it has been damaged. In such cases, contact a Moulinex
approved service centre (see the list in the service booklet).
1
Notice_2643049A:Mise en page 1 29/10/10 16:23 Page1

— Any intervention other than normal cleaning and maintenance by the customer must be carried out by a Moulinex
approved service centre.
— If the cord is damaged, do not use the appliance. In order to avoid any risk, have the cord replaced by an approved
Moulinex service centre (see the list in the service booklet).
— Do not place the appliance, the supply cord or the plug in water or any other liquid.
— Do not leave the supply cord within reach of children.
— The supply cord should never be near to or in contact with hot surfaces, near to a heat source or sharp edges.
— Do not leave the appliance unattended whilst in operation.
— For your own safety, only use the Moulinex accessories and spare parts suitable for your appliance.
— For your safety, this appliance complies with applicable standards and laws:
Low Voltage Directive
Electromagnetic Compatibility
Environment
Materials in contact with foodstuffs.
— Do not use your appliance for more than 14 minutes.
BEFORE FIRST USE
Wash all accessories in soapy water. Rinse, and carefully dry them straight away.
The screen and the cutter must remain greased. Coat them with oil.
Do not use your product when empty if the screens are not greased.
ATTENTION: The blades of the cones are extremely sharp; handle the cones with precaution, always holding them
by the plastic parts.
USING YOUR APPLIANCE FOR THE FIRST TIME:
MINCER HEAD (A):
Assembling the mincer head (diagrams 1.1 and 1.2)
Hold the body A1 by the feed tube, with the wider opening uppermost. Insert the feed screw A2 (long shaft first) into
the body A1.
Fit the stainless steel cutter A3 on the short shaft that protrudes from the feed screw A2 with the cutting edges facing
outwards. Fit the screen of your choice on the cutter A3, locating the two lugs in the corresponding two notches in
the body A1.
Screw tight (without locking) the nut A5.
Fitting the mincer head to the appliance (diagram 2):
Facing the unplugged motor unit E, insert the mincer head with the feed tube inclined to the right.
Line up the two pins of the mincer head with the two notches of the motor unit.
Push the mincer head home into the motor unit E and then turn the feed tube to the left until it comes to a stop (the
feed tube should now be vertical).
Engage the removable tray B with the lugs on the mincer head feed tube.
Plug the appliance in; it is ready to use.
Use:
Prepare the entire quantity of foodstuffs to be minced, removing bones and gristle. Cut the meat into pieces (approxi-
mately 2 cm x 2 cm).
Place a bowl beneath the mincer head.
Press position “1” of button D to start the appliance, place the pieces of meat on the tray and slide them one by one
into the feed tube with the help of the pusher C.
Never push in the feed tube with the fingers or any other implement.
Tip:
At the end of the operation, you can feed a few pieces of bread into the feed tube to clear any meat remaining in the
machine.
KEBBE ATTACHMENT
Fitting (diagram 3):
Insert the feed screw A2 into the body A1 of the mincer head. Fit the kebbe making head F1, locating the lugs in the
2
Notice_2643049A:Mise en page 1 29/10/10 16:23 Page2

corresponding notches in the body A1.
Position the ring F2 on the kebbe making head, then screw the nut A5 tight.
Place the head thus assembled on the motor unit as indicated in diagram 2.
Note: this attachment is used without screen or cutter.
SAUSAGE FILLER TUBE (G)
This attachment, which fits to the mincer head, enables you to produce all sorts of sausages that you can season to
your own taste.
Fitting (diagram 4)
Insert the feed screw A2 into the body A1 of the mincer head A. Position the filler tube G, then the nut A5, and
tighten firmly. Place the head thus assembled on the motor unit E as indicated in diagram 2.
Note: this attachment is used without screen or cutter.
Use:
Important: this attachment should only be used after you have minced the meat, added the seasoning and thoroughly
mixed the filling.
After having soaked the sausage skin in lukewarm water to make it supple, thread it onto the filler tube G, leaving 5 cm
at the end (which you close by making a knot with a tie). Start the appliance, feed the mincer with mince and guide
the sausage skin as it fills up.
Note: this job is easier with two people, one to feed the appliance with mince, and the other to control the filling
of the sausage skin.
Make the sausages the required length by pinching and turning the sausage skin.
To make a good quality sausage, take care to avoid trapping air when filling and make the sausages 10 to 15 cm long
(separate the sausages by using a tie to make a knot).
VEGETABLE CUTTER (H)
Fitting (diagram 5 and 6):
Facing the motor unit, which should be unplugged, insert the storage unit H1 inclined to the right, aligning the ears
on the storage unit with the openings on the motor unit E. Insert the stem protruding from the storage unit H1 into
the shaft of the motor unit E. Turn the feed tube of the storage unit H1 to the left until it reaches the stop.
Use:
• Select the cone corresponding to the required use.
• Place the selected cone in the opening at the front of the storage unit H1. The cone must be inserted fully into the
guide (fig.7).
• Connect the appliance.
• Press once or twice on the start/stop button (D) to lock the cone (fig. .
• Insert the foodstuffs into the feed tube of the storage unit H1 (fig.9) and push the foodstuff with the help of the
pusher H2 (fig.10).
• To change cone, turn the storage unit H1 by a quarter turn to the right, then turn it back to the vertical position
(fig. 11 and 12). Then remove the cone (fig. 13).
Fitting the dicer attachment:
• Place the chip slicer cone in the opening at the front of the storage unit H1. The cone must be inserted fully into the
guide (fig.16).
• Next fit the dicer attachment with the safety hinge open, centring the safety hinge in relation to the storage unit
feed tube (fig.16).
• Check that the dicer attachment ring is correctly clipped to the base of the storage unit (fig.17).
• Close the safety hinge onto the storage unit (fig.17).
• Use the dicer function by inserting ingredients via the feed tube of the storage unit.
• Remove the dicer attachment by pulling the tab on the top of the safety hinge.
Tip: to make it easier to unlock the safety hinge H3f, simultaneously lift upwards and pull the tab to the front
with one finger (fig.18).
ATTENTION: Before using the appliance, ensure that the cone is correctly positioned on the guide.
3
Notice_2643049A:Mise en page 1 29/10/10 16:23 Page3
Use the cone recommended for each food type:
Coarse grater cone
Fine grater cone H3b
Coarse slicer cone H3c
Fine slicer cone H3d
* Dicer cone H3e/H3f
H3a (red)
(orange)
(dark green)
(dark green)
(yellow)
Carrots x x x x x (raw only)
Courgettes x x x x x (raw only)
Potatoes x x x x (raw only)
Cucumber x x x (raw only)
Pepper x x x
Onions x x x (raw only)
Beetroot x x x (raw only)
Cabbage (white/red) x x
Apples x x x (raw only)
Chinese radish x (raw only)
Celeriac x (raw only)
Banana x
Gruyère x x x x x
Chocolate x x
Coconut x
To achieve good results:
The ingredients that you use must be firm in order obtain satisfactory results and to avoid any build up of foodstuff in
the storage unit. Do not use the appliance to grate or slice foodstuffs that are too hard, such as sugar or pieces of meat.
Cut the foodstuffs into pieces to insert them more easily into the feed tube of the storage unit.
RECIPES
CONES
PREPARATION INGREDIENTS ADVICE
Dark green cone
Gratin dauphinois
800 g potatoes – 250 ml milk – 200 ml li-
Slice the potatoes with the coarse slicer
(for 4 people)
quid cream – 1 clove of garlic – 2 egg
cone (H3c). Arrange the slices in a
yolks – 100 g gruyère – salt and pepper
greased oven-proof dish that has been
rubbed with the clove of garlic. In a large
bowl, mix the egg yolks, milk and liquid
cream. Pour this mixture over the
potatoes. Season and sprinkle with
COARSE SLICER
gruyère grated with the coarse grater
cone (H3a). Cook in the oven at 200 °C.
(H3c)
Light green cone
Greek salad
1 cucumber – 2 large tomatoes – 1 red
Slice the cucumber in fine slices with the
(for 4 people)
pepper – 1 green pepper – 1 medium
fine slicer cone (H3d). Cut the peppers in
onion – 200 g feta cheese – 50 g black
half and remove the seeds. Thinly slice
olives (optional) –
the peppers and the onion. Cut the
FINE SLICER
4 tablespoons oil – 1 lemon – 30 g fresh
tomatoes and feta into small dice. In a
herbs (choice of: basil, parsley, mint,
salad bowl, mix all these ingredients and
coriander)
add the olives. Prepare the dressing by
(H3d)
mixing the oil with the juice of the lemon.
Combine carefully and sprinkle the salad
with the chopped fresh herbs.
Red cone
Gratin du soleil
6 small courgettes –
Grate the courgettes and potatoes with
(for 6 people)
2 potatoes – 1 onion – 1 cup cooked rice –
the coarse grater cone (H3a). Thinly slice
COARSE GRATER
1 egg – 1 glass of milk – 150 g gruyère —
the onion with the coarse slicer cone
(H3a)
butter
(H3c). Brown all the vegetables in butter.
In an oven-proof dish, alternate a layer of
vegetables, a layer of cooked rice and
another of vegetables. Add the milk
beaten with
the egg; season. Sprinkle with grated
gruyère and knobs of butter. Cook in the
oven at 180 °C.
4
Notice_2643049A:Mise en page 1 29/10/10 16:23 Page4
Orange cone
Coleslaw
¼ white cabbage – 2 carrots – 3 tables-
Thinly slice the white cabbage with the
(for 4 people)
poons mayonnaise – 3 tablespoons liquid
coarse slicer cone (H3c) and grate the
cream – 2 tablespoons vinegar –
carrots with the fine grater cone (H3b).
2 tablespoons sugar
Mix them in a salad bowl. Prepare the
dressing by mixing the mayonnaise,
liquid cream, oil, vinegar and sugar.
Dress the grated vegetables with the
sauce, then combine and leave to stand
FINE GRATER
in the refrigerator for one hour.
(H3b)
Yellow cone
Russian Vinaigrette 400 g beetroot – 300 g carrots – 400 g
Cut the potatoes, beetroot, carrots,
potatoes –
onions and cucumbers into dice with the
200 g cabbage –
dicer cone (H3e/H3f).
Dicer cone
200 g cucumber (marinated or salted) –
Steam the potatoes, beetroot and carrots.
150 g onions – 100 g tinned peas – salt –
Mix the cooked vegetables and add the
2 tablespoons oil
cabbage, peas, onion and cucumber. Add
(H3e / H3f)
salt and oil.
Leave the vinaigrette to stand in the
refrigerator for an hour.
CLEANING:
• Always disconnect the appliance before cleaning the motor unit E.
• Do not submerge the motor unit, nor put it under running water. Clean the motor unit with a damp cloth. Dry it
carefully.
1) Meat mincer attachments:
— Turn the mincer head A to the right and pull it towards you to remove it from the motor unit E.
— To dismantle the mincer head A, remove the pusher C and the tray B, unscrew the nut A5, remove the screen A4,
the cutter A3 and the screw A2.
— Handle cutting parts with care.
– Wash all parts with hot soapy water, rinse and wipe carefully.
— Do not put the mincer head A in the dish washer (this applies to the body A1, screw A2, nut A5, cutter A3, and
screens A4).
2) Vegetable cutter attachments:
• The storage unit (H1), the pusher (H2), the cones (H3a, H3b, H3c, H3d, H3e, H3f) and the storage attachment
(I) may be put in the top basket of the dish washer, using the «ECO» or «LIGHTLY SOILED» programme.
• Handle the cones with care, as the blades of the cones are extremely sharp.
• In the case of colouration of the plastic parts by foodstuffs such as carrots, rub with a cloth soaked in cooking oil,
then proceed with normal cleaning.
STORAGE:
All of the cones (H3a, H3b, H3c, H3d, H3e) can be stored on the appliance.
Stack the 5 cones (fig.14) and slide them into the opening at the front of the storage unit H1. The storage
attachment I clips to the opening at the front of the storage unit H1 (fig.15).
WHAT TO DO IF YOUR APPLIANCE DOES NOT WORK
Check the electrical connection.
If your appliance still does not work, contact a Moulinex approved service centre(see the list in the service booklet).
END-OF-LIFE ELECTRICAL OR ELECTRONIC PRODUCTS
Think of the environment!
Your appliance contains valuable materials which can be recovered or recycled
Leave it at a local civic waste collection point or to an approved service centre.
5
Notice_2643049A:Mise en page 1 29/10/10 16:23 Page5

RECIPES
Meat balls
4 people – Preparation 20 min.
Cooking time: 10 — 15 min.
Ingredients:
1 kg beef – 1 onion – 1 clove of garlic – 2 slices of black bread soaked in milk – 2 eggs – 1 potato – Flour –
Salt, pepper
1. For this recipe, select a cut of beef with a low fat content. Feed the meat into the mincer with the slices of bread.
2. Slice the onion with the fine slicer cone (H3d) and grate the garlic and potato with the fine grater cone (H3b).
3. Mix the minced meat with the bread, sliced onion, garlic and potato.
4. Add the eggs, the freshly ground black pepper and the salt, and form into balls.
5. Roll the meatballs in the flour and fry them in oil.
Chicken and mushroom meatballs
4 people – Preparation 50 min.
Cooking time: 10 — 15 min.
Ingredients:
200 g chicken breast – Salt, pepper – 1 egg – 10 g dried mushrooms – 1 onion – 30 g oil – 1 egg – Breadcrumbs –
Salt, pepper
1. Mince the chicken breast in the meat mincer. Season the mince and mix it well with the egg.
2. Add the milk and mix carefully until the mixture becomes crumbly. Divide it into portions.
3. Soak the mushrooms for a while then cook them in boiling water. Once cooked, cut them into little pieces. Slice
the onion with the fine slicer cone (H3d), then fry it. Mix the chopped mushrooms with the onion.
4. Spread out each portion of the mince mixture to make a thin paste and put a little of the mushroom mixture in
the middle. Fold the edges of the paste together to form a meatball.
5. Soak the meatballs in beaten egg and roll them in breadcrumbs, then fry them in oil.
Mini-meatballs with mustard sauce
4 people – Preparation 1 hour
Cooking time: 16 min.
Standing time: 30 minutes in refrigerator
Ingredients:
800 g beef – 1 large onion – 2 cloves of garlic – 1 bunch of parsley – 1 egg – 2 tablespoons of oil – 3 tablespoons of
mustard – 300 ml 22% fat cream – Salt, pepper
1. Peel the onion and slice it with the fine slicer cone (H3d), and grate the garlic with the coarse grater cone
(H3a).
2. Wash, dry and chop the parsley.
3. Mince the beef in the mincer, then mix the mince with the onion, garlic, parsley and egg in a large bowl. Season.
Leave the mince to stand in the refrigerator for 30 minutes.
4. Form round meatballs with the mince and fry them in oil for 6 minutes, turning them from time to time. Beat the
cream with the mustard and pour the mixture into the pan containing the meatballs. Reduce the heat, cover and
cook for 10 minutes.
Potato soup with meatballs
4 people – Preparation 30 min.
Cooking time: 20 — 25 min.
Ingredients:
500 g minced beef – 700 g potatoes – 250 g carrots – 250 g onions – 3 tablespoons of breadcrumbs – 2 — 3 bay leaves
– Salt – Freshly ground black pepper – Peppercorns
1. The quantities indicated above correspond to a 4 litre saucepan. Peel and cut the potatoes and onions into dice
with the dicer cone (H3e / H3f). Grate the carrots with the coarse grater cone (H3a).
2. Mince the beef with the mincer head, then mix the mince with the breadcrumbs in a large bowl. Season. Stir
again.
3. Form meatballs with the minced meat.
4. Put the potatoes, onions and carrots into boiling water. Season and bring to the boil. Add the meatballs and cook
for 15 to 20 minutes.
Add the bay leaves 5 minutes before the end of cooking.
6
Notice_2643049A:Mise en page 1 29/10/10 16:23 Page6

Oven baked potato pudding
4 people – Preparation 30 min.
Cooking time: 45 min.
Ingredients:
400 g minced beef – 1 kg potatoes – 2 eggs – 2 glasses of milk – 1 clove of garlic –1.5 tablespoons of butter –
2 tablespoons of oil – Salt, pepper
1. Clean, wash and dry the potatoes. Cut them with the fine grater cone (H3d).
2. Mince the beef with the mincer head and fry it in oil in a frying pan for 5 minutes.
3. Rub the inside of an oven-proof dish with garlic, then grease it with a little of the butter.
4. Arrange two-thirds of the potatoes and the minced meat in alternating layers. Season, then add the remaining
potatoes.
5. Beat the eggs with the warm milk and pour the resulting mixture over the potatoes. Add the rest of the butter.
Cook in the oven for 45 minutes at medium temperature.
SAMOSAS
4 people – Preparation: 40 min.
Cooking time: 35 min.
Ingredients:
250 g puff pastry – 350 g beef – 1 onion – 2 eggs – Paprika – Powdered cinnamon and ginger – Parsley – Coriander –
Chervil – Sugar – 60 g butter – Olive oil
1. Fit the 4.7 mm screen to the mincer. Cut the onion in 8, then mince it with the mincer head. Heat 4 tablespoons of
olive oil in a frying pan, then add the onion. Allow it to sweat on a low heat without browning. Put to one side.
2. Mince the beef. Brown it on a low heat with the onion for 10 minutes. Put to one side.
3. Chop the herbs with the mincing head. Then add them to the frying pan with salt and pepper, half a teaspoon of
paprika, a pinch of ginger and a small teaspoon of cinnamon.
4. Next incorporate the beaten eggs, stir and remove from the heat.
5. Roll out the puff pastry quite thinly. Cut into 10 cm squares. Butter the edge of each square.
6. Put a little spoonful of stuffing on each square. Roll them up, pinching the ends.
7. Fry the samosas in boiling water. Once fried, leave them to stand for a little while on kitchen paper. Sprinkle them
with sugar and cinnamon. Serve very hot.
Variant:
Fit the 4.7 mm screen to the mincer. Mince a little meat. Cut the onion in 8, then mince it with the mincer head.
Add a little more meat, then the herbs, then the rest of the meat. Beat the eggs, and incorporate them into the
stuffing with salt and pepper, half a teaspoon of paprika, a pinch of ginger and a small teaspoon of cinnamon. Mix
well. Repeat steps 5 to 7.
LAHMA BI AJEEN
(stuffed focaccia)
4 people – Preparation: 20 min.
Cooking time: 45 min. – 1 h
Ingredients:
300 g pizza dough – 300 g beef or lamb – 4 ripe tomatoes –1 onion – 1 dried red pepper – Fresh tarragon, mint and
thyme – 1 lemon – Sugar – Milk – Olive oil
1. Mix the dough with a spoonful of oil and half a glass of milk, and form into a ball. Cover and leave to rise for
1 hour.
2. Fit the 4.7 mm screen to the mincer. Mince a little meat. Cut the onion in 8, then mince it with the mincer head.
Mince a little more meat, then the herbs, then the rest of the meat.
3. Heat 3 tablespoons of olive oil in a frying pan, then add the mixture. Incorporate the finely chopped tomatoes,
salt and pepper, and a teaspoon of sugar. Leave to cook for 10 minutes.
4. While stirring, add a small glass of water mixed with lemon juice.
5. Add the pepper. Cover and cook on a low heat for 20 minutes. Remove the lid and reduce for a little while.
Remove from the heat and leave to cool.
6. Preheat the oven to 220 °C (mark 6/7).
7. Cut four discs from the dough. Top with stuffing and fold.
8. Cook for 10 minutes in the oven. Serve immediately.
Variant:
Use tomato purée instead of fresh tomatoes.
7
Notice_2643049A:Mise en page 1 29/10/10 16:23 Page7

KIBBE BI LABAN
(kibbe meatballs with yoghurt)
6 people – Preparation: 1 h
Standing time: 1 hour in refrigerator
Ingredients for the kibbe:
400 g beef – 1 glass (180 g) of bulghur (cracked wheat) – Salt
Ingredients for the sauce: – 1 kg yoghurt – 1 bunch of coriander – 4 cloves of garlic –3 tablespoons of cornflour – Salt,
pepper
1. Cut the meat in 4 pieces. Fit the 4.7 mm screen to the mincer. Mince the meat, at the same time adding the bulghur.
Add salt, then leave the mixture to stand in the refrigerator for 1 hour.
2. To form the kibbe meatballs: fit the kibbe attachment to the meat mincer. Feed the mixture through the mincer,
closing the meatball by sealing the ends with a little water.
3. To prepare the sauce: wash the bunch of coriander, sponge it dry with kitchen paper and remove the leaves. Peel and
crush the garlic. Brown the garlic and coriander leaves in a frying pan for 1 to 2 minutes on low heat. Put to one
side.
4. Beat the yoghurt and cornflour together, then season. Pour the yoghurt and cornflour mix into a saucepan through
a fine sieve. Bring the mixture to the boil, then reduce the heat. Cook carefully, stirring so that the yoghurt does
not stick.
5. Add the garlic and coriander. Poach the kibbe meatballs for 10 minutes.
Variant:
You can also stuff the meatballs (with a mixture of onion and minced meat, browned in a little oil with a few pine nuts.)
PIROJKI
small fish pasties)
4 people – Preparation: 25 min.
Cooking time: 10 — 15 min.
Ingredients:
250 g puff pastry – 300 g cooked fish or smoked salmon – 2 hard boiled eggs – 1 bunch of dill – 2 onions –
100 g salted butter, in small cubes – Oil
1. Fit the 4.7 mm screen to the mincer. Cut the onions into 8 and mince them with the mincer head. Brown them on a
low heat in a frying pan with a little oil. Put to one side.
2. Mince a little fish, then the cooked onion, butter and dill, and finally the rest of the fish.
3. Roll out the puff pastry quite thinly, and cut out discs with a glass or small bowl of the desired size.
4. Preheat the oven to 210 °C (mark 6).
5. Place a little stuffing on each pastry disc and fold the pastry over, sealing the edges.
6. Cook for 10 to 15 minutes in the oven until golden brown.
Recipe:
N. B.: For the recipes requiring high power (approximately 500 W), the use time of the appliance must not
exceed 20 seconds.
Example recipe (with medium hole screen 4.7 mm A4a):
Lamb with split peas:
150 g lamb – 45 g split peas – 30 g flour –150 ml water –1 medium onion – 2 cloves of garlic – Salt, pepper
In a container mix the split peas and flour, then add the water gradually to obtain a smooth mixture. Start the
appliance and gradually pour the mixture onto the tray, while gently pushing the preparation into the feed tube with
the pusher C.
Cut the onion, garlic and meat into small pieces and add them to the mince.
Pour 800 ml water into a saucepan, season and add the preparation.
Simmer over a low heat for 1 hour, skim and cover.
8
Notice_2643049A:Mise en page 1 29/10/10 16:23 Page8
Сомнительное обаяние европейского производства
Оглавление
- Характеристики
- Комплектация
- Внешний осмотр
- Инструкция
- Управление
- Эксплуатация
- Тестирование
- Выводы
Перед нами мясорубка из среднего ценового сегмента. Большое количество подобных приборов известных брендов продаются на российском рынке за примерно эти же деньги. Однако наша подопытная была выбрана для лабораторного тестирования iXBT.com неспроста: модель совмещает в себе две функции.
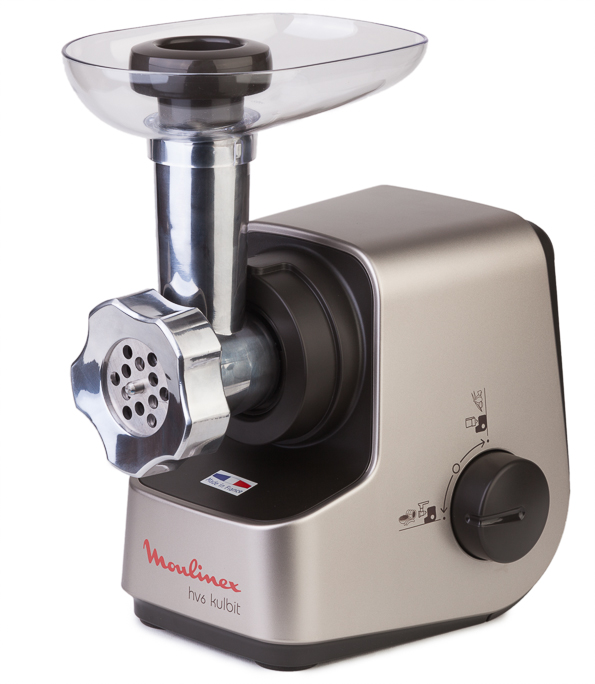
Название «Кульбит» выбрано производителем не ради красного словца (хотя получилось и вправду хорошо), это метафорическое описание принципа устройства мясорубки. Вот перед нами стандартный прибор для приготовления фарша: коробка основного блока и алюминиевый корпус со всеми прилагающимися деталями.
И тут — хоп! — основной блок переворачивается на свою заднюю панель, вместо алюминиевого блока устанавливается чаша измельчителя, и перед нами появляется маленький блендер на большом рабочем блоке. Такой кульбит.
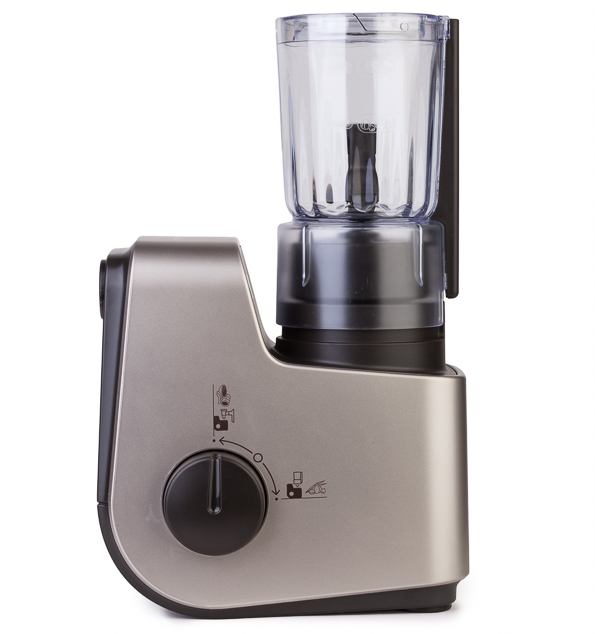
По заявлению производителя, прибор изготавливают и собирают во Франции. Устройство выполнено в металлическом корпусе, что нынче для условно недорогих моделей скорее редкость. Основной блок цвета «металлик» имеет классический для современных мясорубок вид: усеченная трапеция без верхнего левого угла, грани и углы коробки скруглены. Прибор весьма компактен, занимает немного места в собранном виде и удобно хранится в разобранном состоянии. Основной блок оснащен отделением для насадок и решеток.
Управляется прибор в обеих своих ипостасях с помощью одной поворотной ручки. У изделия довольно короткий шнур питания, поэтому следует продумать удобное место рядом с розеткой для установки мясорубки.
Характеристики
| Производитель | Moulinex |
| Наименование модели | HV6 Kulbit |
| Тип | гибрид мясорубки и стационарного блендера |
| Потребляемая мощность | 500 Вт / 1500 Вт при блокировке вала |
| Материал корпуса основного блока | алюминий |
| Материал насадки | силумин |
| Материал толкателя и чаши | пластик |
| Цвет корпуса | металлик |
| Управление | поворотная ручка |
| Формовочные диски | 2 шт: 4,5 и 7,5 мм |
| Отсек для хранения дисков | есть |
| Отсек для хранения шнура | есть |
| Высота горловины насадки | 10 см |
| Максимальная высота емкости для фарша | 11 см |
| Высота блока / в сборе | 23 / 32 см |
| Дополнительные аксессуары в комплекте | насадка для кеббе, насадка для приготовления колбас, насадка-блендер |
| Защита от перегрузок | есть |
| Реверс | нет |
| Производительность согласно инструкции | до 1,7 кг/мин. |
| Производительность по результатам теста | 0,7 кг/мин. |
| Размер упаковки | 30×25×15 см |
| Вес без упаковки | 3,85 кг |
| Гарантия производителя | 2 года |
| Средняя цена | T-10608312 |
| Розничные предложения | L-10608312-10 |
Комплектация
Прибор продается в коробке традиционного для французской компании «веселенького», позитивного дизайна, как бы настраивающего нас на то, что теперь-то уж точно все будет легко. Также нам не забыли напомнить про «Сделано во Франции».
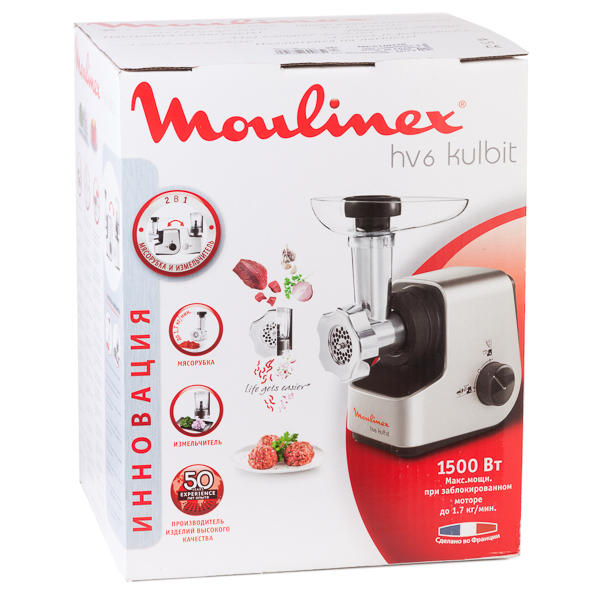
Забегая вперед, отметим, что надпись на самом приборе еще раз напоминает о «благородном европейском происхождении».

Вскрыв коробку, внутри мы обнаружим:
- блок двигателя;
- насадку-мясорубку;
- винт;
- самозатачивающийся нож из нержавеющей стали;
- решетки;
- алюминиевую гайку;
- съемный поддон;
- толкатель для мяса;
- воронку для колбасок;
- насадку кеббе;
- фильерную насадку;
- насадку-измельчитель.

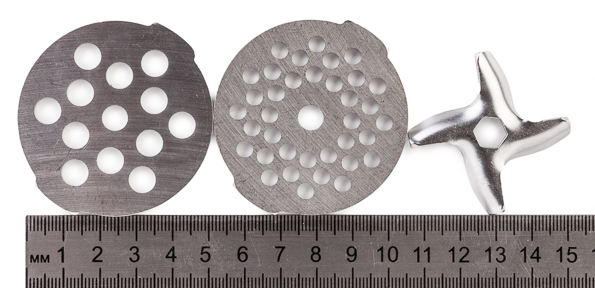
Внешний осмотр
При сборке модели в качестве мясорубки вместилищем для дополнительных насадок и шнура является задняя панель прибора. Поворотная ручка оказывается на левой панели. Дно блока двигателя оснащено прорезиненными ножками для устойчивости и защиты от вибрации.

Если мы используем прибор как блендер, задняя панель с отсеком для шнура и аксессуаров превращается в нижнюю часть блока (дно). Прорезиненные ножки существуют и на этой стороне блока. Поворотная ручка при таком способе сборки оказывается справа.

Инструкция
Руководство к прибору издано в виде малоформатной книжки на скрепке и содержит текст на 16 языках. В инструкцию вложена брошюра международной гарантии на нескольких языках и листок с адресом производителя и импортера и списком документов соответствия стандартам.
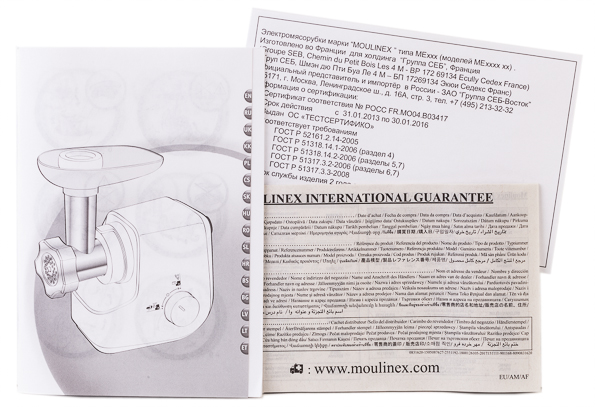
Первый раскладной листок содержит схему частей прибора и вспомогательные рисунки для сборки. Расшифровка схемы приводится на каждом языке отдельно. Буквальной инструкции по сборке в письменном виде нет, но рисунки довольно подробные и понятные.
Руководство на русском языке содержит схему прибора, сведения об использовании дополнительных насадок и мини-измельчителя (блендера), а также несколько практических советов, оформленных в серые плашки. Информация об уходе за прибором изложена излишне кратко.
Управление
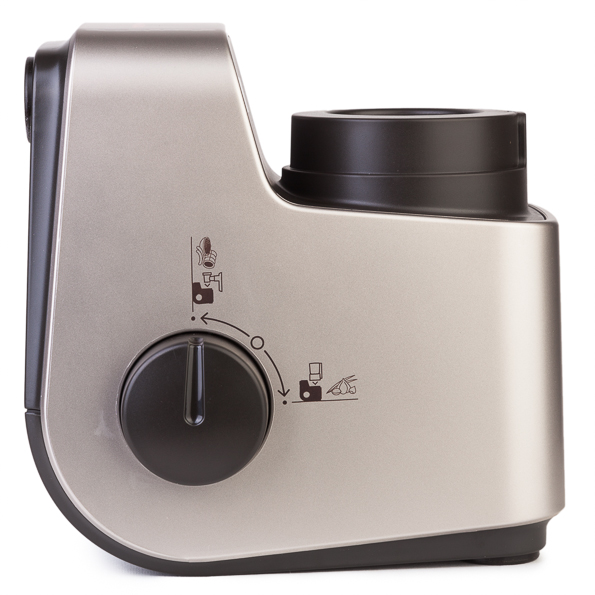
Не справиться с управлением этим устройством очень сложно. Единственная ручка имеет три положения: среднее (выключено) и два крайних — для включения, соответственно, мясорубки и блендера. При этом вследствие конструкции прибора (и, видимо, для большей интуитивности) включение текущей активной насадки всегда вызывается поворотом ручки вниз. Очень трудно запутаться.
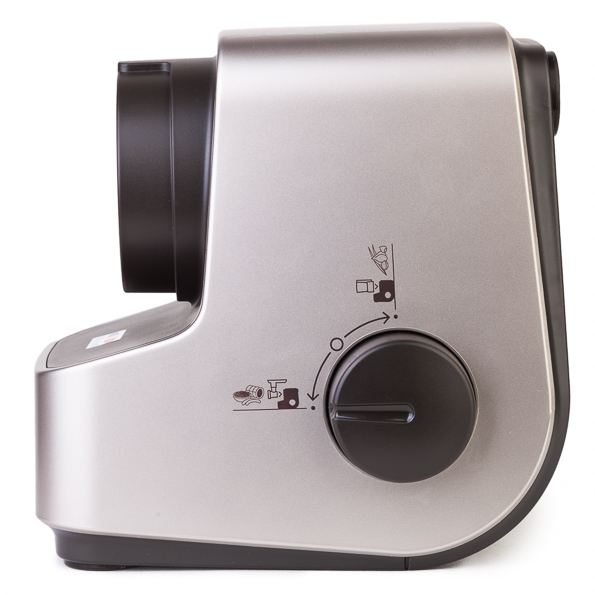
Эксплуатация
Подготовка
Прибор нужно установить на ровной поверхности вблизи от источника электропитания. Руководство советует перед использованием ополоснуть все насадки в теплой мыльной воде и сразу тщательно вытереть. Затем, согласно инструкции, нужно смазать все ножи и решетки растительным маслом. После этого прибор готов к сборке и работе.
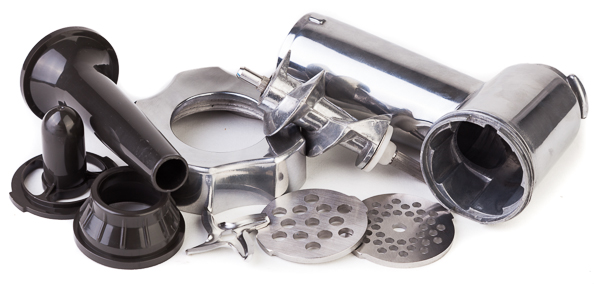
Сборка мясорубки производится легко, все подобные модели устроены в этом смысле одинаково. Инструкция содержит понятные картинки, к которым можно обращаться в случае затруднений.
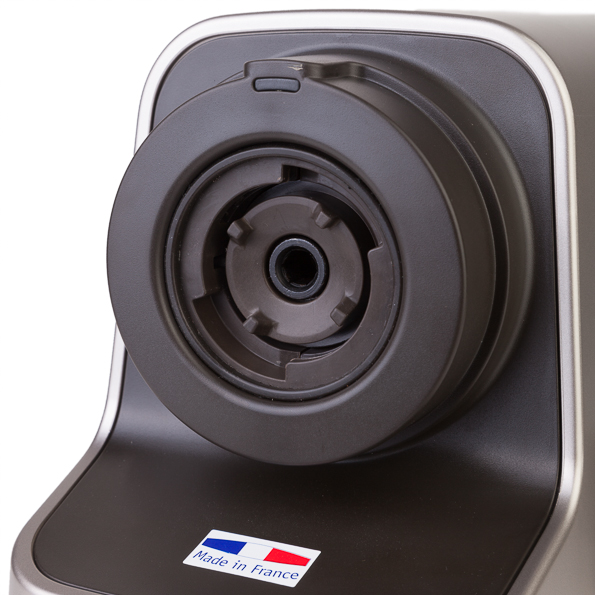
Сборка мини-измельчителя — процесс еще более легкий, благодаря меньшему количеству деталей. Здесь, опять же, можно обратиться к вспомогательным картинкам.
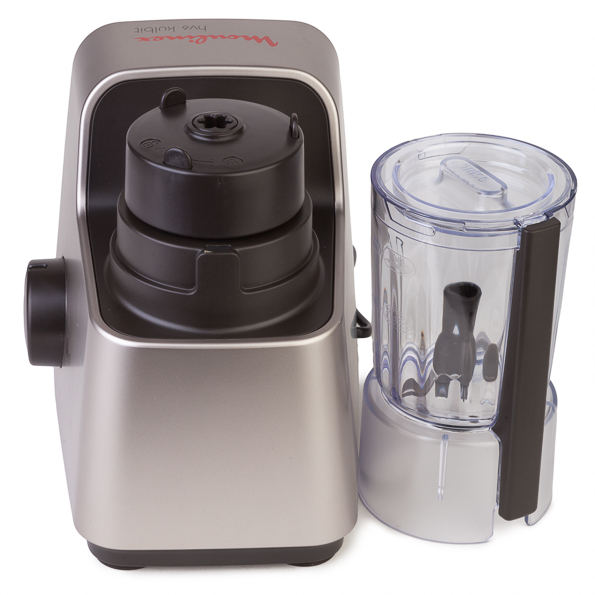
Уход
Мы уже описали указанные в инструкции действия для подготовки деталей мясорубки к первому использованию. Для чаши измельчителя такой информации мы в руководстве не нашли, поэтому просто помыли эту деталь мягкой мыльной губкой и ополоснули теплой проточной водой.
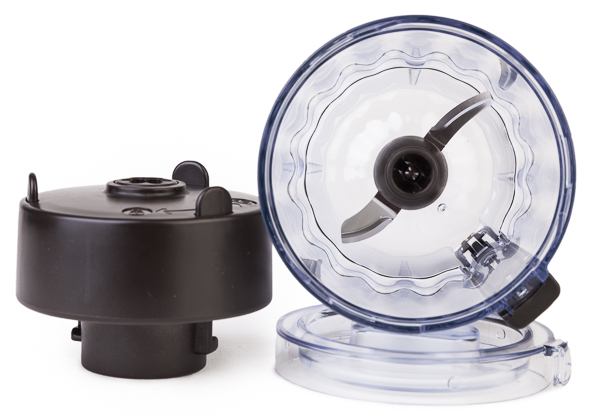
Процесс очистки прибора после работы изложен в картинках, главное не полениться и долистать их до конца. Из рисунков можно узнать, что металлические детали мясорубки можно мыть только вручную, пластмассовые съемные детали, включая измельчитель и нож измельчителя, можно ставить в посудомоечную машину, а акселератор измельчителя (привод для ножа; деталь, соединяющая моторный блок с чашей) можно только протирать влажной тканью или салфетками. Инструкция напоминает нам также о том, что при хранении прибора все ножи и решетки должны быть смазаны растительным маслом.
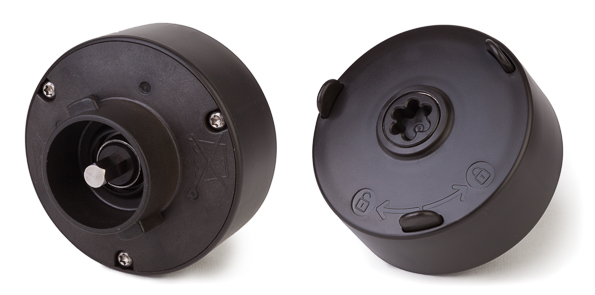
В целом уход за этой моделью ничем не отличается от очистки частей любой другой электромясорубки. Сложность процесса зависит от вида перерабатываемого продукта и периода времени, прошедшего от конца работы прибора до начала уходовых действий.
Тестирование
Мясорубка
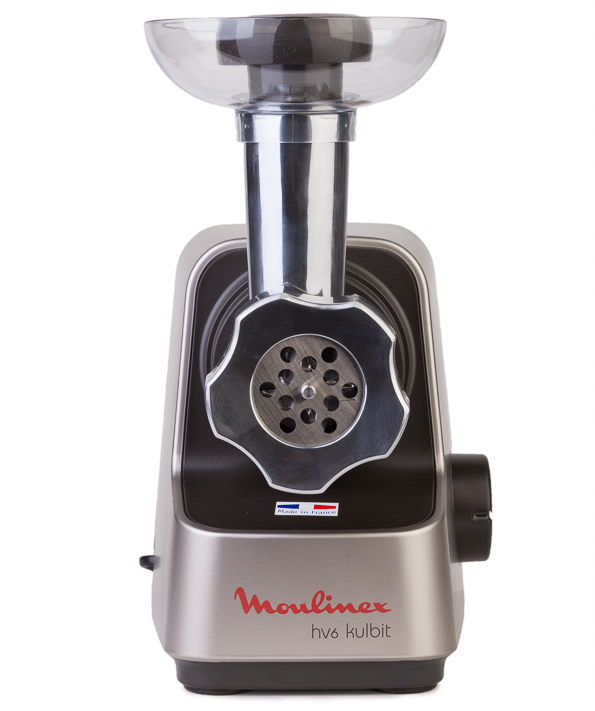
Свинина бескостная, 1 кг
Для первого теста мы взяли бескостную свинину и нарезали мясо на куски 2×2 см, как предписывает инструкция. Жир и жилы удалять не стали. При замерах времени наша тестовая группа обратила внимание на то, что фарш не рубится ножом, а давится, как чеснок в чеснокодавилке. Килограмм свинины прибор прокрутил за 1 минуту и 16 секунд. При этом немалая часть мяса и жил осталась на шнеке.
Говядина, 3-й сорт, 1 кг
Мы очистили части мясорубки от остатков свинины и начали следующий опыт. Для тестирования был заготовлен кусок третьесортной говядины весом 1 килограмм. В этот раз, порезав мясо на куски, мы все же убрали самые большие жилы и пленки. Наблюдая за процессом переработки продукта, мы снова обратили внимание на то, что мясо, выходя из отверстий решетки, выглядит давленым, а не измельченным. Один килограмм говядины модель прокрутила за 2 минуты ровно. Внутри раструба, на шнеке и ноже при разборке снова обнаружилось непрокрученное мясо с жилами.
Тестовая группа произвела осмотр деталей прибора и обратила внимание, что нож очевидно тупой, да и решетка выглядит, мягко говоря, не лучшим образом с точки зрения качества исполнения. Говоря начистоту, возникло впечатление, что ни ножа, ни решетки фреза не касалась: они были просто отштампованы — и всё.
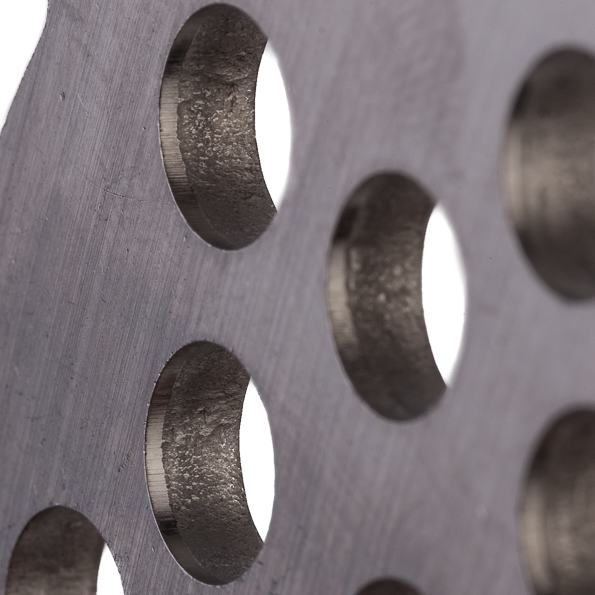
Усомнившись в качестве произведенного эксперимента, мы заказали новый нож для этой модели (новую решетку найти не удалось). Новый нож на вид и на ощупь был заметно острее первого. Установив его, мы повторили эксперимент с теми же видами мяса.
Свиной бескостный окорок, 1 кг
Мы взяли свиной окорок без кости весом один килограмм и нарезали мясо целиком, включая жир и жилы. В этот раз процесс измельчения продукта занял 1 минуту и 46 секунд — на 30 секунд больше, чем в первом опыте. Мясо, выходящее из отверстий решетки, на этот раз выглядело обычным образом. Разобрав прибор после тестирования, мы обнаружили мизерное количество недопровернутой свинины, а намотанных на шнек жил и пленок не было вовсе.
Говяжья голяшка, 1 кг
Мы снова нарезали мясо на калиброванные кусочки, не отделяя жилы и пленки. Этот продукт мясорубка перерабатывала с явным усилием, весь процесс занял 2 минуты и 18 секунд. За это время прибор перемолол все мясо целиком, включая жилы и пленки, в однородный фарш.
Грейпфруты, 1 кг
Для этого теста мы взяли 1 кг грейпфрутов, нарезали их на дольки и перемололи вместе с кожурой. Эта задача оказалась трудной даже для нового ножа. Кожура застревала на шнеке и решетках, иногда стопорился вал. Сок грейпфрута заполнял верхнюю трубу алюминиевого корпуса, брызгал фонтаном из отверстий решетки и лился из места сочленения алюминиевого корпуса с моторным блоком. В какой-то момент мы прервали эксперимент, чтобы проверить, правильно ли мы собрали и закрепили детали прибора. Все было в порядке, но для надежности мы еще раз перебрали части мясорубки и закрепили их должным образом, потом возобновили опыт.
Фарш из килограмма грейпфрутов модель провернула за 3 минуты 15 секунд. При этом все описанные проблемы не исчезли, вал стопорился, сок грейпфрута лился из щели между трубкой и моторным блоком.
Коэффициент производительности iXBT для Moulinex HV6 равен 0,7 кг/мин.
Мини-измельчитель
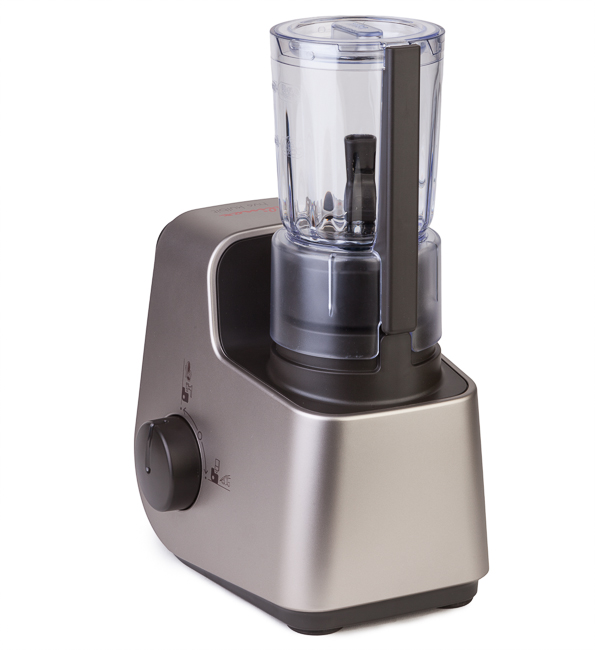
Перед нами не классический блендер, а мини-измельчитель, предназначенный для вспомогательных целей при работе с мясорубкой. По этой причине мы не стали тестировать устройство по классической схеме, а просто проверили, как оно выполняет свои основные задачи. В инструкции есть информация о том, что запускать измельчитель лучше импульсно.
Лук для фарша
Самая частая задача при пользовании мясорубкой — это измельчение лука для фарша. Мы взяли 1 крупную луковицу весом 200 г, порезали ее на небольшие куски и положили в измельчитель. Запуская блендер импульсно, на несколько секунд, мы потратили около 2,5 минут на обработку лука. При этом некоторое количество продукта забилось под нож и осталось неперемолотым.
Чеснок для фарша
Одну головку чеснока мы почистили, разделили на дольки и положили в чашу. С этой задачей измельчитель справился за 1,5 минуты, часть продукта налипла на нож и стенки чаши. Блендер перемалывает чеснок в почти гомогенную кашеобразную субстанцию, при этом не отделяя сок, как делает давилка.
Томатный соус
В этот раз мы положили в измельчитель 5 помидоров сорта «слива», нарезанных с кожурой, и измельчили до жидкого состояния, затем добавили отделенную от стеблей зелень, аджику, специи и вустерский соус и смешали все ингредиенты вместе. Процесс пригототовления заправки в блендере занял целиком около 6 минут.
Грецкие орехи
Мы взяли 150 г очищенных нами от скорлупы и пленок грецких орехов и поместили их в чашу измельчителя. Молоть орехи устройству было довольно непросто: жирный продукт налипал на нож, забивался под него и разлетался по стенкам чаши. В результате процесс приготовления порции дробленых орехов занял около 7 минут, бо́льшую часть которых мы снимали куски орехов с частей прибора. Полученная субстанция не была полностью гомогенной, в ней все же попадались большие куски. По нашему опыту, для задачи измельчения небольшого количества любых орехов лучше подходит большая ступка. Хотя, конечно, если вам нужно получить несколько килограммов дробленых орехов в домашних условиях, блендер пригодится.
Выводы
Мясорубка Moulinex HV6 Kulbit радует не особо высокой ценой и идеей совмещения двух взаимодополняющих кухонных приборов в одном корпусе. В случае этой модели дизайн гибрида получился довольно продуманным, фишка «два в одном» не усложнила работу с устройством, как это часто бывает, а скорее упростила жизнь некоторым пользователям.
Moulinex HV6 Kulbit могла бы похвастаться французской сборкой — но хвастаться по итогу тестирования получается нечем. Наша подопытная продемонстировала заметные проблемы: алюминиевый корпус ходит при работе, сок из грейпфрута сочится через щель сочленения моторного блока и трубы с ножом и шнеком.
Не может модель претендовать и на высокую производительность — по нашим замерам, реальные показатели приготовления единицы продукта за единицу времени в 2,5 раза ниже номинальных.
Нас удивила и история с ножом: вряд ли многие пользователи желают, приобретя мясорубку, тут же начать покупать к ней сменные детали. Вероятно, это единичный случай, но такое предположение мы никак не можем ни доказать, ни опровергнуть. Тем не менее, Moulinex HV6 ME 510 Kulbit справляется с основной своей работой — делает из мяса фарш, а также реализует дополнительные функции, измельчая небольшое количество продукта с помощью блендера. Резюмируя все вышесказанное — модель рабочая, использовать можно, но без всякого восторга.
Плюсы
- Невысокая цена
- Компактность и легкий вес
- Совмещение основного прибора с измельчителем
Минусы
- Плохое качество сборки
- Производительность в 2,5 раза ниже заявленной
- В тестируемой модели обнаружился тупой нож

— В случае нарушения нормальной работы или повреждения
прибора, его эксплуатация не допускается. В этом случае
вам следует обратиться в авторизованный сервисный
центр компании Moulinex (см. перечень в сервисной
брошюре).
— За исключением чистки и обычного обслуживания прибора
согласно инструкции по эксплуатации этого прибора,
все остальные операции должен осуществлять
авторизованный сервисный центр компании Moulinex.
— Не используйте прибор с поврежденным шнуром питания.
В целях безопасности следует обратиться в авторизован-
ный сервисный центр компании Moulinex для замены
шнура (см. перечень в сервисной брошюре).
— Не помещайте прибор, шнур питания и штепсельную вилку
в воду или в какие-либо другие жидкости.
— Размещайте шнур питания в недоступном для детей месте.
— Шнур питания не должен контактировать с горячими
поверхностями, располагаться около источников тепла и
острых предметов.
— В целях безопасности используйте только насадки и
запасные части Moulinex, предназначенные для данного
прибора.
— В целях Вашей безопасности данный прибор соответствует
действующим нормам и стандартам:
директива о низковольтном оборудовании;
директива об электромагнитной совместимости;
нормативные документы по защите окружающей
среды;
нормативные документы по материалам, контакти-
рующим с пищей.
— Не включайте прибор дольше, чем на 14 минут.
10
Инструкция и руководство для
Moulinex ME656B3E  на русском

9 страниц подробных инструкций и пользовательских руководств по эксплуатации
 28:46
28:46
Ремонт мясорубки Moulinex своими руками
 30:46
30:46
Мясорубка MOULINEX HV8 ME626132.
 13:59
13:59
Обзор мясорубки Moulinex. Нарезка овощей . Такого обзора вы еще не видели
 04:35
04:35
Домашние колбаски с помощью мясорубки Moulinex ME740
 08:45
08:45
мясорубка Мулинекс ME 688832 обзор насадок
 04:35
04:35
Домашние колбаски с помощью мясорубки Moulinex ME 740 H 30
 02:36
02:36
Видеообзор мясорубки Moulinex ME659
 05:11
05:11
Мясорубка Moulinex hv8. Тест в тяжелых условиях. Помол ячменя
A1
A5
A4
A3
A2
1
A
I
J
K
L
B
C
D
G
A
E
F
H
A4a
A4b
L2
L3a
L3b
L3c
L3
L3d
L3e
L3f
L1
I2
I1
J1
J2

A
A
A
1
3
7
4
6
2
A
B
a
b
c
e
d
b
B
a
A
B
A
A
a
b
c
5

Фир ма «Му ли некс» бла го да рит вас за
то, что вы пред по чли ее из де лие.
A
Съемная
Г
оловка мясорубки
A1
Кор пус
A2
Шнек
A3
Самозатачивающийся нож
из нержавеющей стали
A4
Ре шет ка
A4a Решетка с маленькими
отверстиями: тонкий помол
A4b Решетка с большими
отверстиями: крупный помол
A5
Гай ка
B
Съемный поддон
C
Толкатель для мяса
D
От де ле ние для хранения насадок
E
Кнопка разблокировки „оловки
мясорубки
F
Кнопка Вкл./Выкл. (0 — I)
G
Кнопка «Reverse» (обратный ход)
H
Блок дви
Г
ателя
I
Насадка для кебаба
(в за ви си мости от мо де ли)
I1
Наконечник насадки для кебаба
I2
Кольцо
J
Насадка для печенья
(в за ви си мости от мо де ли)
J1
Опора
J2
Фор ма
K
Насадка для набивания колбас
(в за ви си мости от мо де ли)
L
Овощерезка
(в за ви си мости от мо де ли)
L1
Кон тей нер
L2
Толкатель
L3
Ба ра ба ны (в за ви си мости от мо де ли)
L3a Ба ра бан для нарезания
L3b Ба ра бан для фигурного
нарезания
L3c Ба ра бан-крупная терка
L3d Ба ра бан-мелкая терка
L3e Ба ра бан для твердого сыра
L3f
Ба ра бан для льда
— Пе ред первым использованием
при бо ра вни ма тель но про чти те ин —
ст рук цию: фир ма «Му ли некс» не
не сет ни ка кой от вет ст вен но с ти за
не пра виль ное ис поль зо ва ние при —
бо ра.
— Устройство не предназначено для
использования
людьми
с
ограниченными физическими и
умственными
способностями
(включая детей), а также людьми,
не имеющими соответствующего
опыта или необходимых знаний.
Указанные лица могут использовать
данное устройство только под
наблюдением или после получения
инструкций по его эксплуатации от
лиц, отвечающих за их безопасность.
Следите за тем, чтобы дети не играли
с устройством.
— Убе ди тесь, что ра бо чее на пря же ние
при бо ра со от вет ст ву ет на пря же нию
ва шей бы то вой эле к т ро се ти.
Лю бая ошиб ка при под клю че нии при —
бо ра ан ну ли ру ет дей ст вие
Г
а ран тии.
— Дан ный при бор пред наз на чен ис клю чи —
тель но для бы то во го при го тов ле ния
пи щи в по ме ще нии и под при смо т ром
поль зо ва те ля.
— Ус та но ви те при бор на устойчивую,
чи с тую и су хую по верх ность.
— Сле ди те,
что бы
длин ные
волосы,
шар фы или гал сту ки не на хо ди лись над
ра бо та ю щим при бо ром.
— По сле ис поль зо ва ния, пе ред чи ст кой, а
так же пе ред сборкой или разборкой на —
са док обя за тель но от клю чай те при бор.
— За пре ща ет ся поль зо ваться не ис прав —
ным или по вреж ден ным при бором. В
этом слу чае сле ду ет об ра тить ся в тех —
ни че с кий центр фир мы «Му ли некс» (см.
пе ре чень, при ве ден ный в ин ст рук ции).
— Лю бая
тех ни че с кая
опе ра ция
с
при бо ром, за ис клю че ни ем чи ст ки или
те ку ще го об слу жи ва ния, вы пол ня ет ся
в тех ни че с ком цен т ре фир мы «Му ли —
некс».
— Ес ли шнур пи та ния или штеп сель
по вреж де ны, не вклю чай те при бор. По
со об ра же ни ям
бе зо пас но с ти
их
за ме на вы пол ня ет ся толь ко в в тех ни —
че с ком цен т ре фир мы «Му ли некс» (см.
пе ре чень, при ве ден ный в ин ст рук ции).
— За пре ща ет ся
по гру жать
при бор,
шнур пи та ния и штеп сель в во ду или
дру гую жид кость.
— Сле ди те, что бы де ти не мог ли до тя нуть ся
до ви ся ще го шну ра пи та ния при бо ра.
— Сле ди те, что бы шнур пи та ния не
на хо дил ся вбли зи или в кон так те с
46
Опи са ние
Меры безорасности

на гре ва ю щи ми ся по верх но с тя ми ра бо —
та ю ще го
при бо ра,
по бли зо с ти
от
ис точ ни ков теп ла или ос т рых уг лов.
— В це лях ва шей соб ст вен ной бе зо пас но с ти
ис поль зуй те толь ко при над леж но с ти и за —
пас ные ча с ти мар ки «Му ли некс», пред наз —
на чен ные для дан но го при бо ра.
Вы мой те все на сад ки и при над леж но с ти
к при бо ру и тща тель но вы су ши те их.
Решетка и нож должны оставаться
смазанными.
Обрабатывайте
их
растительным
маслом.
Не давайте прибору работать без
продуктов, если решетка и нож не
смазаны.
Г
ОЛОВКА МЯСОРУБКИ
. Монтаж
Г
оловки мясорубки
— Возь ми те кор пус (A1) за гор ло ви ну
рас тру бом вверх. Вставь те шнек (A2)
(длинн ой осью впе ред) в кор пус (A1).
— На день те нож (A3) на ко рот кую ось
ре жу щи ми кром ка ми на ру жу .
— Установите нужную решетку (A4a или
A4b) после ножа (A3) так, что бы 2 вы —
сту па во шли в 2 па за на кор пу се (A1).
— Завинтите до упора гайку (A5) на кор пу —
се (A1).
— Про верь те пра виль ность сбор ки. Ось не
долж на ша тать ся или по во ра чи вать ся са —
ма по се бе. В про тив ном слу чае по вто ри —
те пе ре чис лен ные вы ше опе ра ции.
. Установка мясорубки на прибор
— Вы клю чи те при бор и на кло ни те гор ло —
ви ну впра во. Под толк ни те го ло вку
мя со руб ки так, что бы за кре пить ее на
бло ке дви га те ля.
— Пе ре ве ди те гор ло ви ну мя со руб ки в
вер ти каль ное по ло же ние, что бы за бло —
ки ро вать на сад ку.
— Ус та но ви те съем ный под дон (B) на вы сту —
пы гор ло ви ны.
Вклю чи те прибор: он готов к работе.
. Порядок работы
— Пол но стью под го товь те про дук ты к по мо —
лу. Уда ли те ко с ти, хря щи и су хо жи лия.
— На режь те мя со на ку соч ки (при бли зи —
тель но 2 x 2 см) и по ло жи те его на
под дон (B).
— По ставь те ка кую-ни будь по су ду под мя —
со руб ку.
— Нажмите на сторону «I» («вкл.») клавиши
(F).
— По сте пен но по да вай те мя со в мя со руб —
ку с по мо щью тол ка те ля (C).
— Ни ко
Г
да
не
под тал ки вай те
мя со
паль ца ми или ку хон ны ми при над леж но —
с тя ми.
— Прибор не должен непрерывно молоть
мясо дольше, чем в течение 14 ми ну т.
Прак ти че с кий со вет. По окон ча нии
по мо ла
мож но
про пу с тить
че рез
мя со руб ку не сколь ко ку соч ков хле ба,
что бы весь фарш вы шел на ру жу.
Что делать, если мясорубку заело?
— Выключите прибор, нажав на сторону
«0» («выкл.») кнопки (F).
— На жми те и не сколь ко се кунд по дер жи те
кноп ку «Reverse» («Об рат ный ход») (G),
что бы ос во бо дить про дук ты.
— Вновь нажмите на сторону «I» кнопки
(F), чтобы продолжить помол.
Вни ма ние! Пе ред тем, как ис поль зо вать
ко ман ду вклю че ния (F) или об рат но го
хо да (G), дож ди тесь пол ной ос та нов ки
при бо ра.
Ре цеп ты
При ме ча ние. Для ре цеп тов, тре бу ю щих
большой мощ но с ти, вре мя не пре рыв ной
ра бо ты при бо ра не долж но пре вы шать
20 се кунд.
При мер ре цеп та. Ба ра ни на с го ро хом.
150 г ба ра ни ны без ко с тей, 90 г дроб ле но —
го го ро ха, 60 г му ки, 30 г во ды, 1 го ло вка
лу ка сред не го раз ме ра, 2 доль ки чес но ка,
соль, пе рец.
В от дель ной по су де сме шай те дроб ле ный
го рох и му ку. Про дол жая ме шать, по сте —
пен но до бав ляй те во ду, что бы по лу чить
од но род ную смесь.
Вставь те тол ка тель в гор ло ви ну и по ло жи —
те смесь в под дон.
Вклю чи те при бор и ос то рож но под а вай те
смесь в гор ло ви ну с по мо щью тол ка те ля.
На ре жь те лу к, чеснок и мя со на мелкие
кусочки.
Добавьте их в фарш и поместите фарш в
кастрюлю, налив в нее 0,8 л во ды с солью
и перцем. Варите на медленном огне в
течение часа.
После закипания закройте крышкой.
47
1c
1d
1e
2a
2b
3
1b
2
Порядок работы
1a
1
Перед первым
использованием

П
РИСТАВКА ДЛЯ КЕБАБА (В ЗАВИСИМОСТИ ОТ
МОДЕЛИ)
. Монтаж
— Вставь те шнек (A2) в кор пус (A1) мя со —
руб ки (A).
— Установите наконечник (I1) на головку
мясорубки (A) так, что бы два вы сту па
во шли в два па за на головке.
— На день те коль цо (I2) на на ко неч ник (I1),
а за тем ус та но ви те и за вин ти те до упо ра
гай ку (A5).
— Установите собранную головку на блок
двигателя, как указано на рисунке 2A.
При ме ча ние. Эта на сад ка ис поль зу ет ся
без ре шет ки и но жа.
Н
АСАДКА ДЛЯ ПЕЧЕНЬЯ (В ЗА ВИ СИ МОСТИ ОТ
МО ДЕ ЛИ)
. Монтаж
— Вставь те шнек (A2) в кор пус (A1) мя со —
руб ки (A).
— Установите фор му (J2) на опору (J1).
— Сле ди те, что бы два вы сту па опо ры (J1)
во шли в два па за на кор пу се мя со руб ки
(A).
— Сильно за винтите гайку (A5) на корпусе
(A1), но не блокируйте ее.
— Установите собранную головку на блок
двигателя, как указано на рисунке 2A.
При ме ча ние
Эта на сад ка ис поль зу ет ся без ре шет ки и
но жа.
. Порядок работы
— При гот овьте тесто.
Что бы по лу чить хо ро ший ре зуль тат,
те с то долж но быть не слишком плотным.
— Чтобы выбрать рисунок, совместите .
— По да вай те те с то, по ка не сде ла е те
нуж ное ко ли че ст во пе че нья.
Н
АСАДКА ДЛЯ НАБИВКИ КОЛБАС (В ЗА ВИ СИ —
МОСТИ ОТ МО ДЕ ЛИ)
Эта
при став ка
ус та нав ли ва ет ся
на
го ло вку мя соруб ки (A) и слу жит для
при го тов ле ния различных кол бас по
ва ше му вку су.
. Монтаж
— Вставь те шнек (A2) в кор пус (A1) мя со —
руб ки (A).
— Ус та но ви те на сад ку для кол бас (K), а
за тем силь но за вин ти те гай ку (A5).
— Установите собранную головку на блок
двигателя, как указано на рисунке 2A.
При ме ча ние. Эта на сад ка ис поль зу ет ся
без ре шет ки и но жа.
. Порядок работы
— Эта на сад ка ус та нав ли ва ет ся по сле то —
го, как вы смо ло ли мя со и при го то ви ли
фарш по сво е му вку су.
— За мо чи те киш ки в теп лой во де, что бы
они ста ли эла с тич ны ми. На день те их на
на сад ку (K) так, что бы кон чик вы сту пал
при бли зи тель но на 5 см.
— На пол ни те фар шем гор ло ви ну кор пу са
(A1) мя со руб ки (A), вклю чи те при бор и
нажмите на тол ка тель так, что бы фарш
по до шел к краю на сад ки.
— Выключите прибор.
— Ос тав ший ся кон чик киш ки дли ной 5 см
за вя жи те уз лом. На день те этот узел на
край на сад ки, что бы в киш ку не по пал
воз дух.
— Вновь вклю чи те при бор и про дол жай те
по да вать
фарш.
Кош ка
долж на
за пол нить ся. Что бы киш ка не слиш ком
рас тя ги ва лась, сле ди те, что бы кол ба сы
не бы ли слиш ком тол сты ми.
— Эту ра бо ту про ще вы пол нять вдво ем:
один по да ет фарш, а дру гой под дер жи —
ва ет заполняющуюся киш ку.
— Ког да весь фарш бу дет по дан, вы клю чи —
те при бор, сни ми те киш ку и за вя жи те
уз лом дру гой ко нец.
— Что бы сде лать кол ба су же ла е мой дли ны,
за щи пы вай те и по во ра чи вай те киш ку в
нуж ном ме с те.
О
ВОЩЕРЕЗКА (В ЗА ВИ СИ МОСТИ ОТ МО ДЕ ЛИ)
. Монтаж
— От клю чи те дви га тель (H) и под ве ди те к
не му кон тей нер (L1), на кло нив его
впра во.
— Вве ди те вы сту па ю щий из кон тей не ра
(L1) шпин дель в ось бло ка дви га те ля.
— По вер ни те гор ло ви ну впра во, что бы она
вста ла в вер ти каль ное по ло же ние.
— Установите
в
кон тей нер
нуж ный
ба ра бан (L3), слег ка по вер нув его,
что бы он пра виль но встал на ме с то.
— Проверьте правильность сборки.
— При ра бо те ово ще рез ки не ль зя
поль зо вать ся кноп кой «Reverse»
(«Об рат ный ход») (G).
. Порядок работы
— Полностью подготовьте продукты.
— По ставь те ка кую-ни будь по су ду под
кон тей нер (L1).
48
7
7a
7b
7c
4
4a
4b
4c
5
6

— Вклю чи те прибор, нажав на сторону «І»
кнопки (F).
— По ме с ти те продукты в гор ло ви ну ово ще —
рез ки (L1) и на жми те на тол ка тель (L2).
По да вай те рав но мер но.
— Ни ко
Г
да не под тал ки вай те про дук ты
паль ца ми или ку хон ны ми при над —
леж но с тя ми.
— Сле ди те, что бы паль цы не по па ли в
ра бо та ю щий ба ра бан.
— Пе ред вы пол не ни ем чи ст ки обя за тель —
но от клю чи те при бор от се ти.
— На жми те на кноп ку раз бло ки ров ки (E),
по сле
че го
на кло ни те
весь
узел
(мя со руб ка (A)
+ под дон (B)
или
ово ще рез ка (L)) вправо и сни ми те его с
бло ка дви га те ля (H).
— Что бы ра зо брать мя со руб ку, сни ми те
под дон (B) с гор ло ви ны, от вин ти те
гай ку (A5), а за тем сни ми те ре шет ку
(A4), нож (A3) и шнек (A2).
— Об ра щай тесь с ре жу щи ми ча с ты ми с
ос то рож но с тью.
— Про мой те
все
де та ли
го ря чей
мыль ной во дой, спо лос ни те и тща —
тель но вы су ши те их.
— Ре шет ка (A4) и нож (A3) дол жны
быть по кры ты смаз кой. Смажь те их
рас ти тель ным мас лом.
— Сле ди те, что бы во да не по па ла в блок
дви га те ля (H). Его до ста точ но об те реть
влаж ной тряп кой.
— Не по ме щай те мя со руб ку (A) (т.е. кор —
пус (A1), шнек (A2), нож (A3),
ре шет ку (A4) и гай ку (A5)) в по су до мо —
еч ную ма ши ну.
— Проверьте правильность подключения к
сети.
Ваш прибор по-прежнему не работает?
Обратитесь в технический центр фирмы
«Мулинекс» (см. перечень, при ве ден ный в
ин ст рук ции).
49
Что делать, если прибор
не работает?
Чистка

Комментарии
Код: 41441
Извините, товара сейчас нет в наличии
Бесплатная доставка
по Красноярску
Извините, товара сейчас нет в наличии
Новости интернет-магазина «Лаукар»:
Дополнительная информация в категории Мясорубка:
В интернет-магазине бытовой техники «Лаукар» Вы можете скачать инструкцию к товару Мясорубка Moulinex HV6 ME 510 Kulbit совершенно бесплатно.
Все инструкции, представленные на сайте интернет-магазина бытовой техники «Лаукар», предоставляются производителем товара.
Перед началом использования товара рекомендуем Вам ознакомиться с инструкцией по применению.
Для того чтобы скачать инструкцию, Вам необходимо нажать на ссылку «скачать инструкцию», расположенную ниже, а в случае, если ссылки нет,
Вы можете попробовать обратиться к данной странице позднее,
возможно специалисты интернет-магазина бытовой техники «Лаукар» еще не успели загрузить для скачивания инструкцию к товару:
Мясорубка Moulinex HV6 ME 510 Kulbit.

Фирма-производитель оставляет за собой право на внесение изменений в конструкцию, дизайн и комплектацию товара: Мясорубка Moulinex HV6 ME 510 Kulbit. Пожалуйста, сверяйте информацию о товаре с информацией на
официальном сайте компании производителя.
инструкцияMoulinex ME686832

RU
KK
FA
FR
PT
EL
UK
AR
EN
ES
IT
1520004863
RU p. 6 – 8
UK p. 9 – 11
KK p. 12 – 14
AR p. 17 – 15
FA p. 20 – 18
EN p. 21 – 23
FR p. 24 – 26
ES p. 27 – 29
PT p. 30 – 32
IT p. 33 – 35
EL p. 36 – 38
E
H
B*
A4c*
D1 D2
A5 A4*
D*
C1 C2
IJ* FG
B1/C3*
C*
A
A3 A2
A1
A8A7*A6*
A4b*
A4a*
RU
KK
FA
FR
PT
EL
UK
AR
EN
ES
IT
* в зависимости от модели — залежно від моделі — үлгісіне байланысты — —
— depending on model — selon modèle — según modelo — de acordo com o modelo — a
seconda del modello — ανάλογα με το μοντέλο
Для ознакомления с инструкцией необходимо нажать на ссылку «ЗАГРУЗИТЬ», чтобы скачать pdf файл. Если есть кнопка «ПРОСМОТР», то можно просто посмотреть документ онлайн.
Для удобства, Вы можете сохранить данную страницу с файлом руководства по эксплуатации в свой список «избранное» прямо на сайте (доступно для зарегистрированных пользователей).
Смотрите инструкцию для похожих моделей:

Вы можете задать вопрос посетителям сайта по модели MOULINEX HV6 ME 510 Kulbit. Если Вы являетесь её пользователем, то пожалуйста оставьте, по возможности развёрнутый отзыв: