
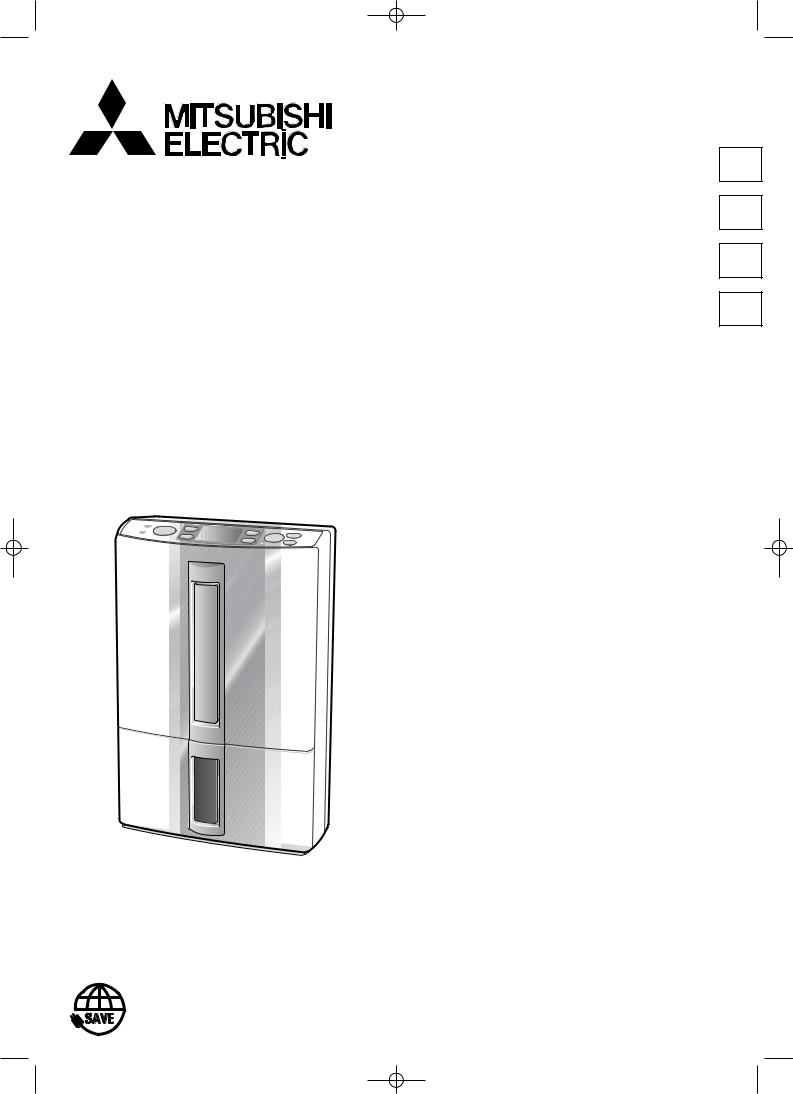
DEHUMIDIFIER
MODEL
MJ-E16VX-S1
INSTRUCTION MANUAL
Features
●Drying inside
●Air Filter and Washable Photocatalytic Filter
●Easy Dehumidifying/Laundry
|
English |
E |
|
Italiano |
I |
|
Svenska |
SV |
|
Deutsch |
DE |
|
Table of Contents |
page |
|||
|
¡Recommended ways of using the unit |
||||
|
depending on purpose ……………………. |
2 |
unit |
||
|
¡Frequently Asked Questions …………… |
3 |
|||
|
¡Precautions |
4 |
the |
||
|
¡Warnings ………………………………………… |
6 |
using |
||
|
¡Tips on dehumidifying |
6 |
|||
|
¡Names and Functions of Parts ………… |
7 |
Before |
||
|
Unit-Control Panel-LCD Panel |
||||
|
(Low Temperature/Defrost/High humidity) |
||||
|
¡Things to be aware of……………………. |
10 |
|||
|
¡Before using your dehumidifier……… |
10 |
|||
|
¡Turning the Unit ON and OFF |
12 |
|||
|
To turn ON/To turn OFF |
||||
|
Reading the humidity display/Tank full lamp |
||||
|
¡Easy Operation……………………………… |
13 |
|||
|
EASY DEHUMIDIFYING/LAUNDRY |
||||
|
¡Setting modes ………………………………. |
14 |
Operating |
||
|
LOW, MILDEW GUARD and LOW TEMP/ |
||||
|
AUTO/AIR PURIFIER |
||||
|
¡Swing louvre function …………………… |
16 |
|||
|
¡Drying inside ………………………………… |
17 |
|||
|
¡Using the Timer …………………………….. |
18 |
|||
|
OFF timer operation/ON timer operation |
||||
|
¡Using the Child Lock …………………….. |
20 |
|||
|
¡Carrying the Unit…………………………… |
20 |
|||
|
¡Removing Water from the Tank………. |
21 |
|||
|
¡Continuous Drainage…………………….. |
22 |
|||
|
¡Maintenance |
23 |
|||
|
Troubleshooting |
||||
|
¡Specifications……………………………….. |
28 |
|||
|
¡Replacing the Filter and Cartridge ……. |
25 |
|||
|
¡Storage and Disposal ……………………. |
25 |
|||
|
¡Troubleshooting ……………………………. |
26 |
|||
¡In order to ensure correct usage, please read this instruction manual carefully and retain it for future reference.
¡Before accepting the Warranty at the time of purchase, please make sure that the date of purchase, place of purchase and other items are correctly filled in the form.
Protect our environment and enrich our lives by saving energy
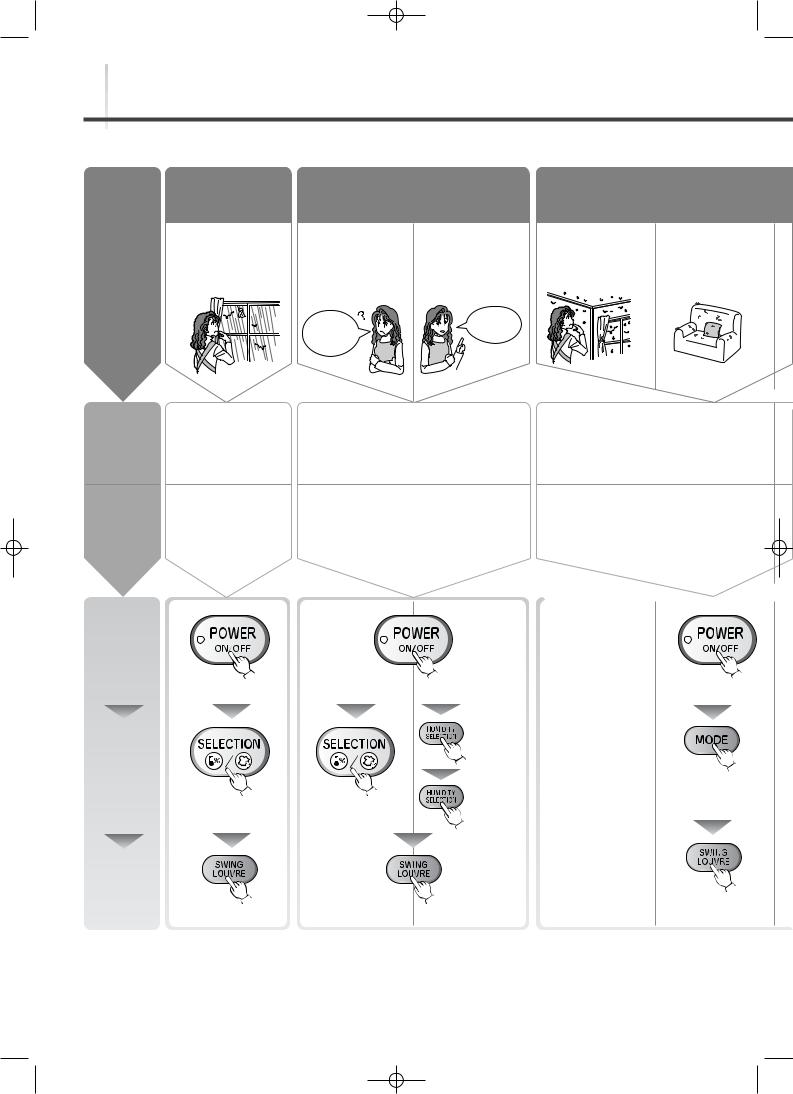
Recommended ways of using the unit depending
Combine operating mode and swing louvre function to get optimum results.
Drying laundry
When you don’t want to hang the
Objective clothes outside or it is raining…
|
Lowering room humidity |
Preventing mold/ |
When you don’t know what humidity level to set the unit to…
What should I set it to?
|
When you want to |
When |
To prevent |
|
set the humidity |
condensation |
mildew… |
|
level… |
occurs indoors… |
I want to set it to 60%
Recommended operating mode
Recommended swing setting
Procedure
Press the power button (the unit turns on)
Page 12
Select the
mode
Page 13-15
Select the louvre swing range
Page 16
|
LAUNDRY |
EASY |
AUTO |
LOW TEMP |
MILDEW |
|
DEHUMIDIFYING |
GUARD |
|||
|
The unit operates for 12 |
The unit operates |
The unit maintains |
The unit changes the |
The unit operates |
|
hours and automatically |
until the air is |
the set humidity. |
airflow according to |
in mildew sup- |
|
switches off. |
comfortable. |
room temperature. |
pression mode. |
|
|
UPWARD |
||||
|
Aim toward clothes. |
Any swing setting |
Any swing setting |
|
Turn the power on |
Turn the power on |
Turn the |
|||
|
power on |
|||||
|
Switch to |
|||||
|
HUMIDITY |
|||||
|
SELECTION |
|||||
|
Set the |
Select |
Select |
|||
|
Select |
Select EASY |
MILDEW |
|||
|
humidity |
LOW TEMP |
||||
|
GUARD |
|||||
|
LAUNDRY |
DEHUMIDIFYING |
|
Select UPWARD |
Select any swing setting |
Select any swing setting |
2
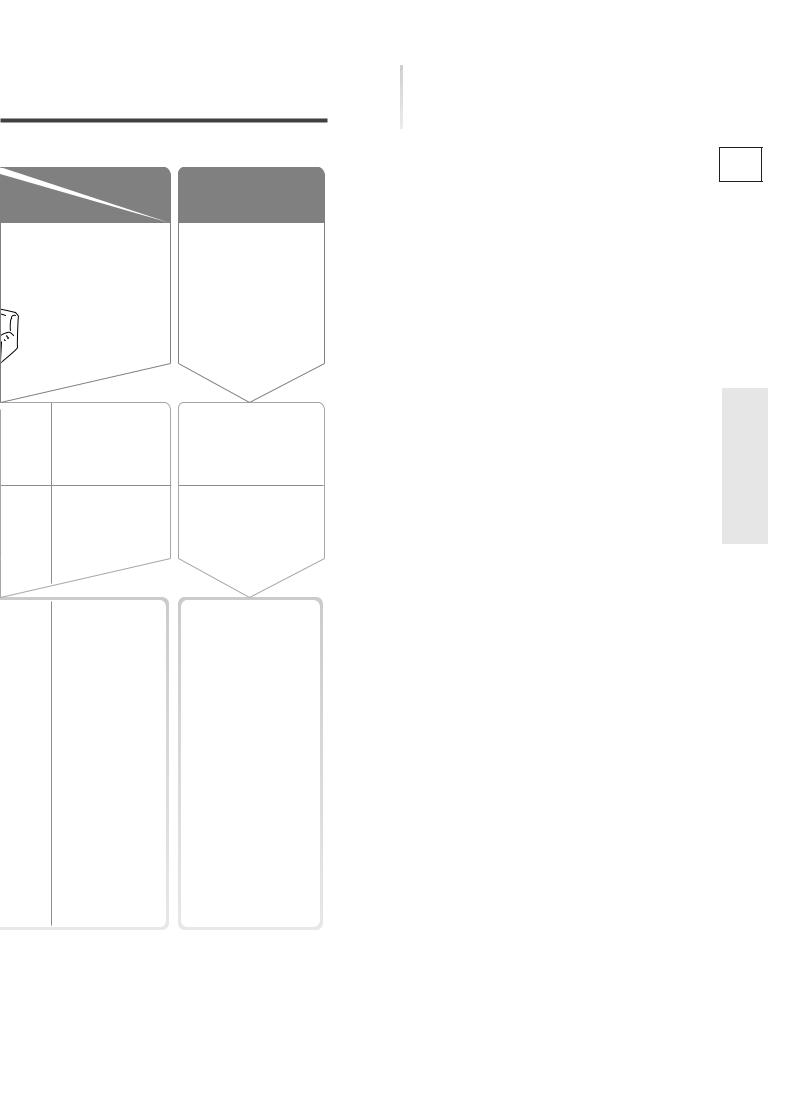
on purpose
|
condensation |
To clean |
||
|
the air |
|||
|
To keep the inside |
There is no need for |
||
|
of closets and |
dehumidification, but you |
||
|
shoeboxes dry… |
wish to remove pollen and |
||
|
dust from the air. |
|||
|
LOW |
AIR PURIFIER |
|
The dehumidifier |
The unit operates the air |
|
operates regardless |
purifier only. |
|
of the humidity level. |
|
|
REAR |
|
|
Direct the |
Any swing setting |
|
air flow |
|
the |
Turn the power on |
|
r on |
|
ct |
Switch to AIR PURIFIER |
|
EW |
|
|
RD |
Select LOW |
|
Select any |
|
|
Select REAR |
swing setting |
Frequently Asked Questions
|
Why does the dehumidifier seem |
E |
|
to collect less water in winter? |
A.When the temperature and humidity are low, the amount of water collected is
decreased.
In winter, because the temperature is lower than in summer, the effects of the dehumidifier decrease dramatically as shown in the graph below. Although less water collects in the tank, this is not a malfunction.
|
Summer (humidity) |
Winter (dampness) |
unit |
|||||||
|
the |
|||||||||
|
* If the temperature is low, but the humidity is high |
using |
||||||||
|
due to snow or rain, operating the unit in LOW |
Before |
||||||||
|
TEMP mode will yield better results than in LOW |
|||||||||
|
mode. |
14 |
||||||||
|
Values for LOW dehumidifying |
|||||||||
|
(L/day) |
14 |
operation. |
|||||||
|
capacity |
16 |
||||||||
|
12 |
|||||||||
|
10 |
|||||||||
|
Dehumidification |
8 |
||||||||
|
6 |
|||||||||
|
4 |
|||||||||
|
2 |
|||||||||
|
0 |
5 |
10 |
15 |
20 |
25 |
30 |
|||
Room temperature (°C)
¡ The values shown on the graph were measured at constant temperature and humidity and do not reflect values obtained in actual usage conditions.
• Why doesn’t the dehumidifier operate?
• Why does the unit stop operating suddenly?
A.The unit might be in LAUNDRY mode.
The unit operates for 12 hours and automatically
switches off.
13
A.The unit might be in EASY DEHUMIDIFYING, MILDEW GUARD, or AUTO mode.
|
The unit automatically switches between |
13~15 |
|
dehumidifying, airflow only, and non-operation. |
3
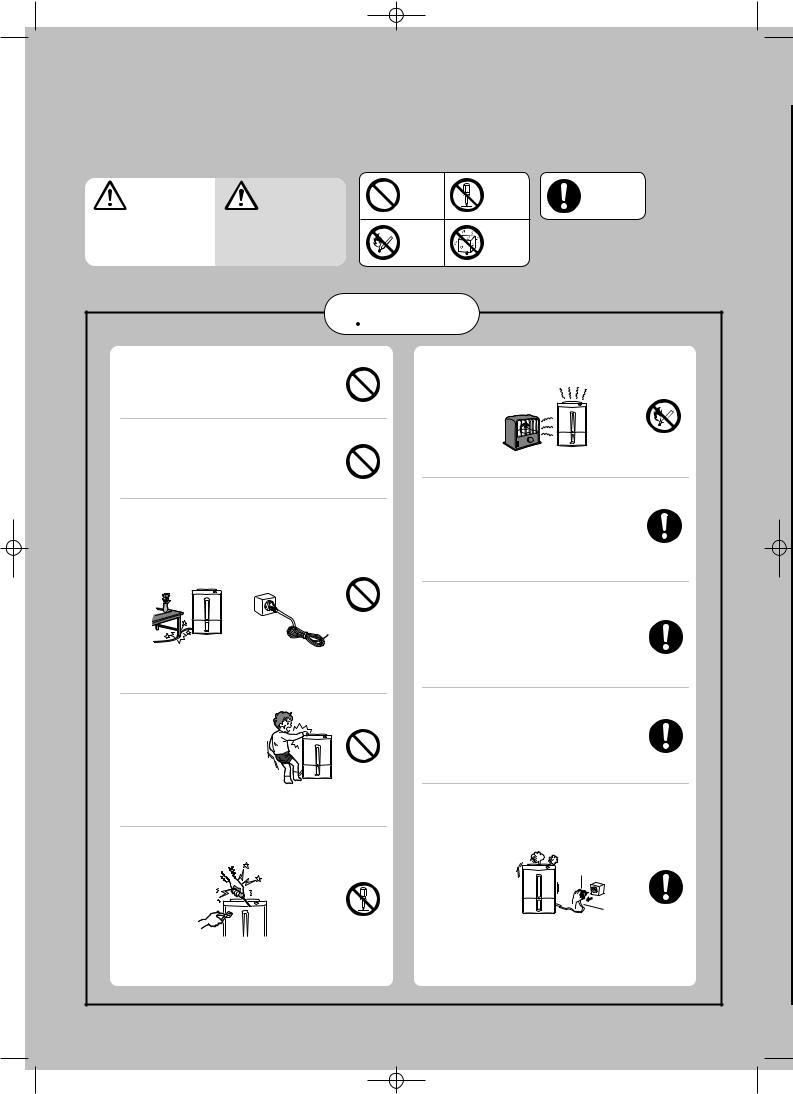
Precautions
The following diagrams indicate circumstances where danger can result from mishandling the unit.
|
WARNING |
CAUTION |
|
Mishandling may |
Mishandling may result in |
|
result in fatal or |
injuries or damage to your |
|
serious injuries. |
home or property, etc. |
Meanings of the graphic symbols used in this manual and on the unit are explained below.
|
Do not |
Always |
||
|
Forbidden |
follow the |
||
|
disassemble |
|||
|
instructions |
|||
|
Keep |
Do not |
||
|
away |
subject to |
||
|
from fire |
water |
 WARNING
Do not start/stop the unit by plugging/unplugging the power cord.
This may result in fire and/or electric shock.
Do not use extension cords or multiple head adapters.
This may result in fire, electric shock or malfunctions.
Do not damage or modify the power cord or plug.
Do not modify, bundle, twist, bend or heat the power cord. Do not place under objects or use with the end close to the plug bent.
The cord may be damaged resulting in fire or electric shock. (Keep pets from biting the cord.)
Do not put your fingers or any long object, into the air intake/outlet. Do not touch the swing louvre.
The internal fan rotates at high speeds, and such actions may result in injury or malfunctions.
Do not attempt to repair, disassemble, or modify the unit.
Do not put the unit near heatgenerating devices (such as stoves, fan heaters, etc.).
The plastic parts may melt causing fire.
Wipe dust off the power plug and insert the plug firmly.
If the plug is not fully inserted into the socket, dust may gather on the connectors which may cause fire and/or electric shock.
Use 220-240V AC power sockets.
Connecting to power sockets other than 220240V AC may result in fire and/or electric shock.
Remove water that has collected in the tank.
Accidentally drinking the water or using it for other purposes may cause illness and/or unforeseen accidents.
Should abnormal symptoms occur (a burning smell, etc.), switch off the unit and unplug it from the socket.
This may result in fire and/or electric shock. See the last page for service contact details.
Continuing to operate the unit may result in fire, electric shock, or malfunctions.
See the last page for service contact details.
4
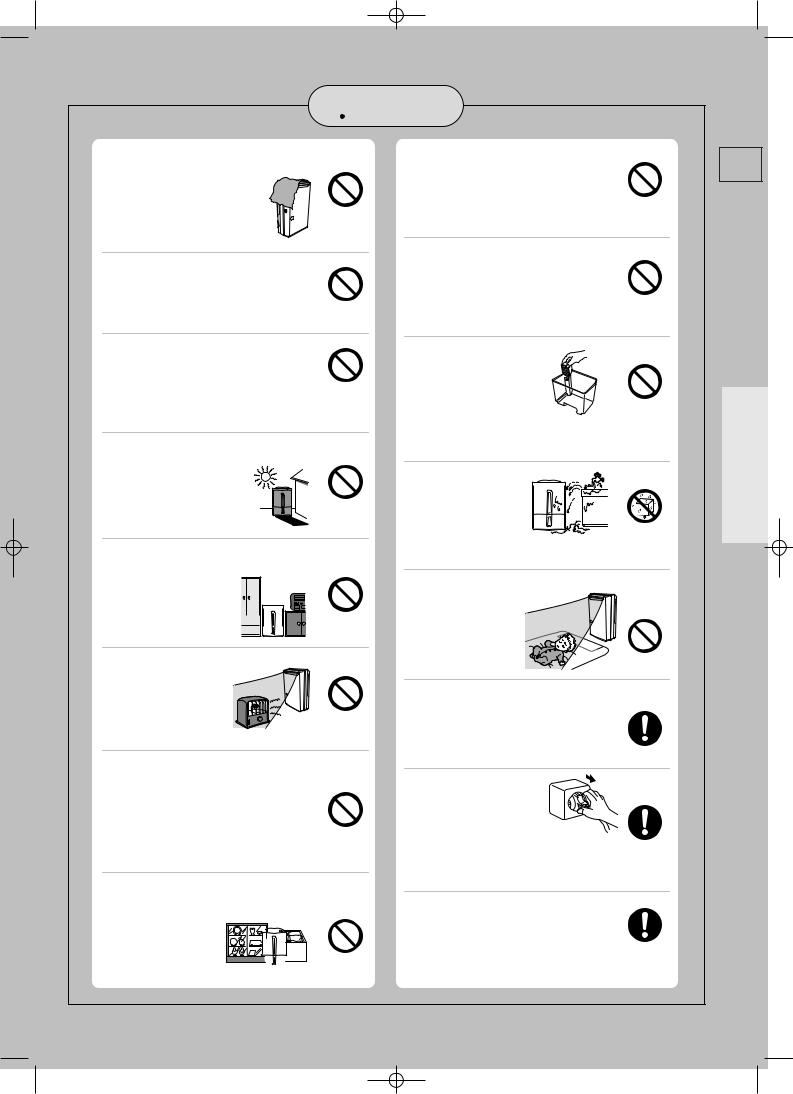
 CAUTION
Do not cover the front or side air intakes or the air outlet with cloth, curtain, etc. 

This results in poor ventilation and may cause heat generation/fire.
Do not stand on, sit on or lean against the unit.
The unit may tip over causing injury.
Do not put vases or any other objects filled with water on the unit.
Water may leak into the unit adversely affecting electric insulation and cause electric shock and/or fire by short-circuiting.
Do not use the unit where it may be exposed to direct sunlight or other weather conditions. (This unit is for
indoor use only.)
This may cause overheating, electric shock and/or fire caused by an electric leak.
Do not use the unit in narrow, enclosed places such as inside closets, between
pieces of furniture, etc.
This results in poor  ventilation and may cause
  heat generation and/or fire.

Do not use combustion appliances in the path of the
air outlet.
This may cause incomplete combustion in the appliance.
Do not use the unit in places where chemicals are used (such as hospitals, factories, laboratories or beauty salons).
Chemicals and solvents evaporated in the air may harm the unit and cause water in the tank to leak, resulting in damage to property.
Do not use the unit for special purposes, such as preservation of food, art or scientific works.
This may negatively affect  the quality of the items stored.
Do not drain water continuously if there is a possibility that temperature around
the hose could drop to freezing point.
Water inside the hose may freeze and prevent the water in the tank from flowing out.
The water may leak from the unit and damage surrounding objects.
Do not use the unit in places that may be subject to oil or flammable gas leakage.
Such a leak around the unit may cause combustion and fire.
Do not remove the Styrofoam from the floating element.
The floating element will not be able to detect a full tank
resulting in water leakage, which may damage surrounding objects or cause electric shock and/or an electric leak.
Do not wash the unit with water. Do not 
use the unit where it is likely to come in contact with water.
Exposure to water may result in fire or electric shock caused by an electric leak .
Do not point air-flow from the unit directly at the body.
If air-flow is directed at the body for long periods, it may harm one’s physical condition and lead to dehydration.
Install the unit in a location where the floor is flat and stable.
If the unit falls over, the water collected in the water tank may leak damaging surrounding objects and in turn result in fire or electric shock caused by an electrical leak.
Grasp the plug and remove from the power socket.
When removing the plug from
the power socket, do not pull on it diagonally or by the cord as this may cause the projections/wiring to be damaged resulting in a short circuit, electric shock or fire.
Before moving the unit always switch it off, unplug it and remove water from the water tank.
Moving the unit with water in its tank may cause the water to leak and damage the surrounding objects and in turn result in electric shock and/or an electric leak.
5
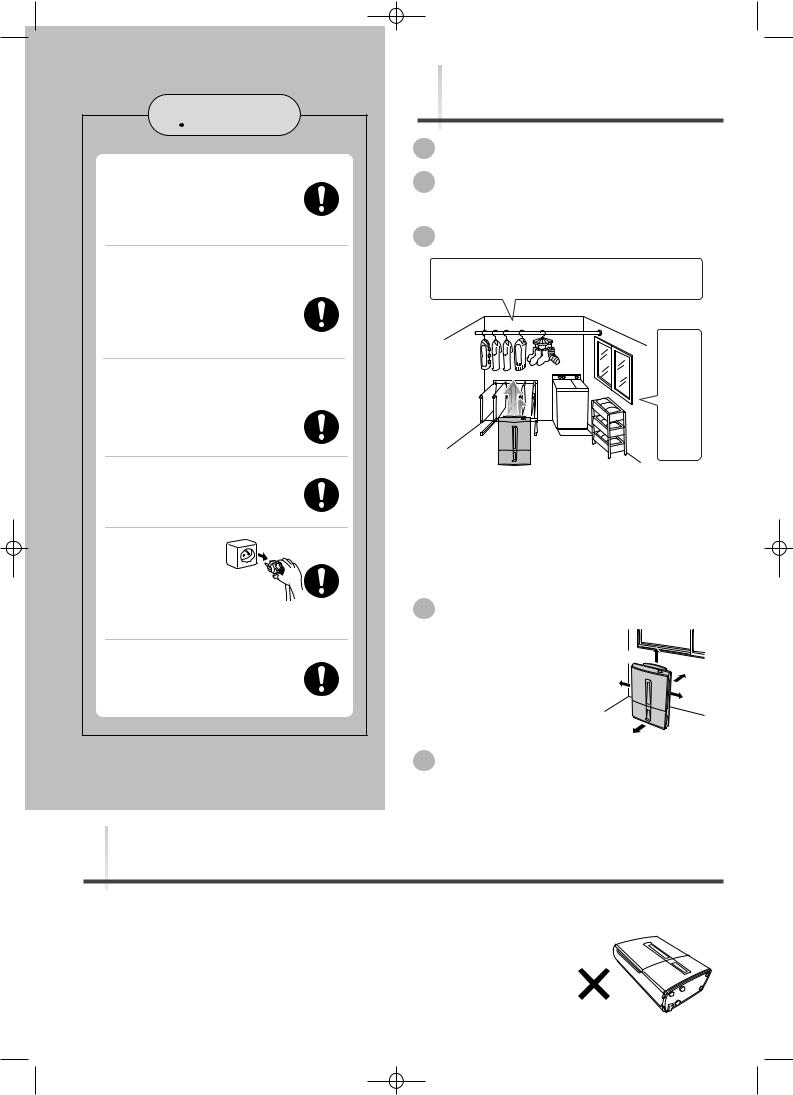
Precautions (cont.)
 CAUTION
After emptying the tank, transport the unit by grasping the handle firmly.
Losing your footing while carrying the unit may cause personal injury or damage to the floor.
When using the continuous drainage outlet, make sure to position the hose so that the water drains without obstruction.
The water in the tank may leak and damage surrounding objects.
When draining water continuously or left unattended for long periods, inspect the unit every two weeks.
Do not allow debris to clog the filter/hose as this may cause overheating/leakage.
Use the unit with caution in rooms where the walls, furniture and art work are vulnerable to dry air, as it may cause cracks and warping.
Switch the unit off
and unplug from the power source when cleaning it.
When the unit is on, the internal fan rotates at high speeds and may cause injury.
Unplug the unit from the power source when not using the unit for an extended period of time.
Otherwise it may cause fire and/or electric shock caused by an electric leak.
Tips on dehumidifying
Drain the water tank before use
Refrain from opening doors/windows during operation
Drying laundry indoors
¡Direct the louvres at the laundry. ¡Space laundry to improve airflow.
|
dehumidifier in |
enclosed room. |
|
Use the |
a small, |
Maintain room temperature above 16°C with a heater.
¡Drying times will vary depending on the nature of the laundry and the room temperature. In low temperatures, drying takes about twice as long as normal. In low temperatures (10°C), drying takes about twice as long as when normal (20°C+).
¡The airflow is strongest to the top right of the unit.
Installing your dehumidifier
Make sure to leave some space around the unit.
<For use in close proximity to
awall>
Stop the louvre in the vertical position. Blowing air at the wall may cause staining.
At least 50 cm
|
At least |
|
|
At least |
2 cm |
|
20 cm |
At least |
|
20 cm |
|
|
At least 20 cm |
Operating noise
Place the unit on top of a mat. This reduces vibration and noise. It also prevents leaving depressions on carpets.
Warnings
●Keep the unit always in an upright position.
Inclining the unit may cause water in the tank to leak into the unit, resulting in malfunction. Should this happen contact service number on the last page for advice.
●Damage to the dehumidifier caused by atmospheric conditions (ie. Salt or Sulphur) will not be covered under warranty.
●Do not carry the unit horizontally. This may result in malfunctions. Such malfunctions
are NOT covered under warranty.
6

Names and Functions of Parts
Washable photocatalytic filter 24~25
(hereafter: photocatalytic filter) (see box below for discussion)
Supplied with unit.
Pre-filter 23
Air filter performance testing facility
Japan Spinners Inspecting Foundation (tested under JIS L 1902 standards)
 Front panel 10
 Front Air Intake
Do not block.
|
What is a washable photocatalytic filter? |
|||
|
The washable photocatalytic filter is made from |
|||
|
two layers: a white particle filter and a blue air- |
|||
|
freshener filter. |
|||
|
Water tank 11•21 |
<Particle filter> |
||
|
The particle filter removes pollen* and dust |
|||
|
Tank lid 11•21 |
particles. |
||
|
<Air-freshener Filter> |
|||
|
Floating element |
21 |
The special air-freshening agent contained in |
|
|
the fibres absorbs odorants such as ammonia. |
|||
|
Front door |
The odorants are broken down by |
||
|
photocatalysis constantly renewing the air- |
freshening properties.
As the filter’s particle and air-freshening properties are renewed by simply soaking and leaving it to dry in the sun, the filter can be used continuously over a long time.
Cigarette smoke and toxins found in smoke, such as carbon monoxide, cannot be removed with this filter.
* Diameter of pollen: approx. 10–100 m
Back
Handle 20
Raise handle to transport.
 Louvre 16
 Side air intakes (left/right)
Do not block.
Sensor
Do not cover.
|
Continuous drainage |
|
|
outlet |
22 |
Power plug
NOTE
It is impossible to remove the back panel because the two spots shown are fastened with two special screws.
If the unit malfunctions, contact your Mitsubishi dealer:
The water tank may contain water residue at time of purchase. This is from final product testing at the factory and is not due to a defect.
7
Names and Functions of Parts (cont.)
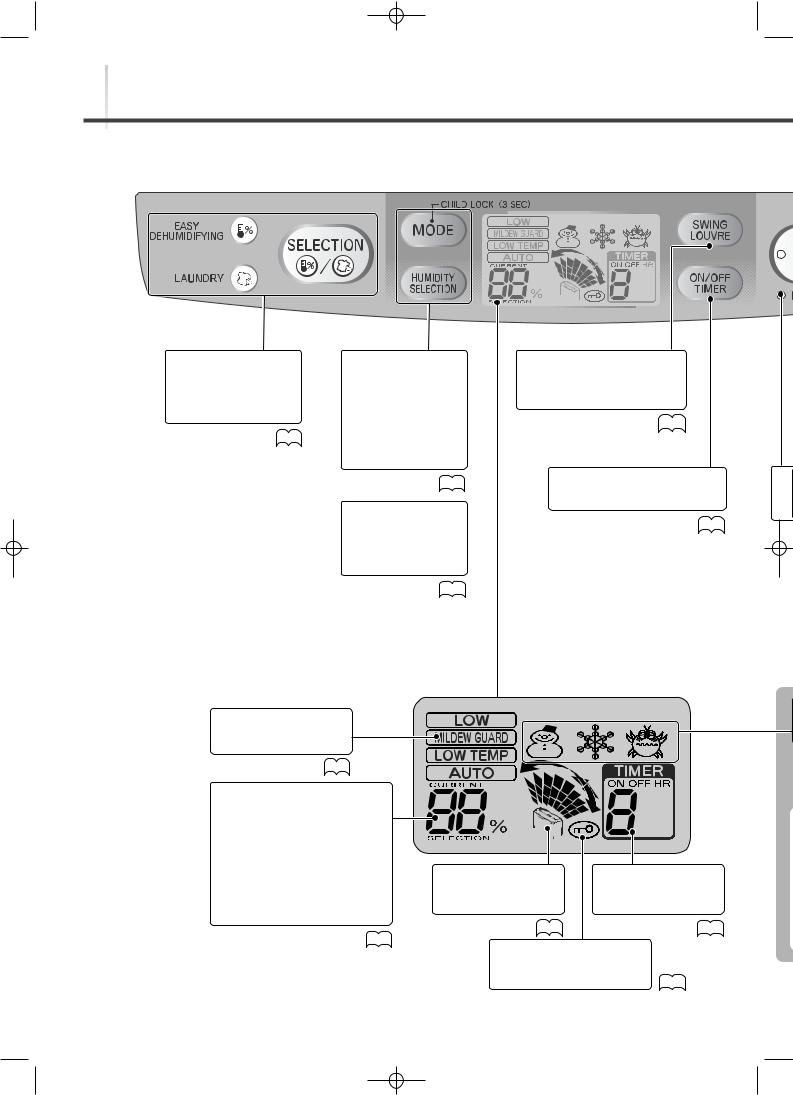
Control Panel
¡Lamp
Current mode lights.
¡Selection button
Switches modes.
13
¡Mode button
For switching from one operating mode to another.
¡Humidity
Selection
This is used to set the target humidity.
14~15
¡Child lock
To set child lock, press the mode button for three seconds.
20
LCD Panel
All indicators on the LCD panel shown below.
¡Mode Indicator
Indicates the current operating mode.
14~15
¡Swing louvre button
Sets swing louvre direction or locks it into position.
16
¡Timer ON/OFF
Sets timer.
18~19
¡Humidity Indicator
This indicates the approximate humidity.
indicates the  current humidity
indicates the


 humidity setting in AUTO mode
The current humidity is displayed in a range from 30 to 80%.
12
|
¡Swing monitor |
¡Timer display |
|
Indicates the direction |
Displays the time set |
|
of the swing louvre. |
for the ON/OFF timer. |
|
16 |
18~19 |
¡Child lock indicator
Displayed while child lock
8
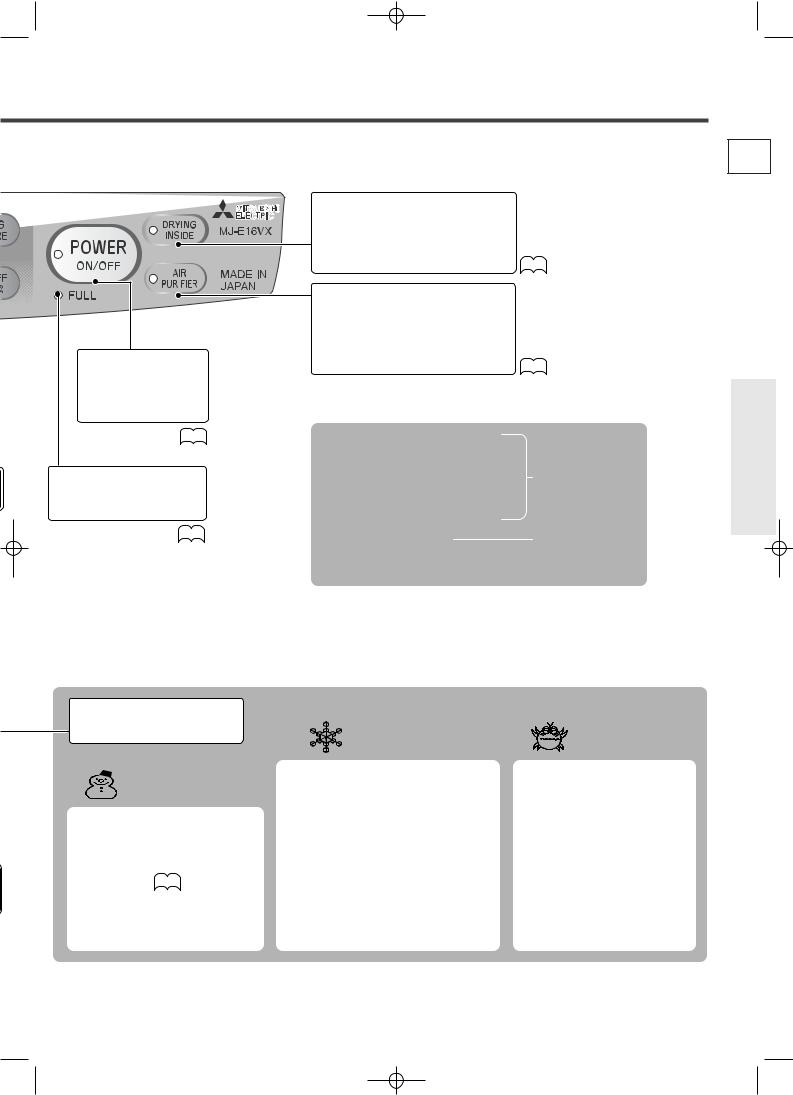
¡Power lamp
Lights when unit is ON.
¡Power button
Use this to switch the unit ON and OFF.
12
¡Tank full light
This lights up to warn that the water tank is full.
12
¡Information display
Indicates room and unit condition.
Low Temperature
Indicator
The  indicator comes on if the room temperature drops below 15°C. Activating Low Temp mode is recommended. 14
¡Drying inside lamp
Flashes when drying inside in
progress.
¡Drying inside button
Activates/deactivates drying inside. 17
¡Air purifier lamp
Lights during air purifier-only operation.
¡Air purifier button
|
Switches to air purifier-only |
|
|
operation. |
15 |
You can select from 7 operating modes.
¡EASY DEHUMIDIFYING ¡LAUNDRY
¡LOW
¡MILDEW GUARD ¡LOW TEMP
¡AUTO
¡AIR PURIFIER
DEFROST Indicator
Airflow (dehumidifying) will stop and the frost that has accumulated inside will be melted and dropped into the tank when the  indicator is on.
Please wait a moment as operation will resume in around 5 minutes.
While in DEFROST mode, airflow (dehumidifying) and the louvre will stop. The sounds coming from the unit will also change.
DEFROST will start automatically when room temperature drops below 15°C (This may be as often as once every 40 minutes).
All modes include dehumidifier and air purifier functions.
Air purifier only operation. The dehumidifier function is disabled.
High humidity warning
The  indicator flashes when the unit is OFF and the humidity in the room exceeds 75%. Activating the dehumidifier is recommended when the
  indicator is flashing.
If the High humidity warning is not used, remove the power plug from the power socket.
9
 Loading…
You can only view or download manuals with
Sign Up and get 5 for free
Upload your files to the site. You get 1 for each file you add
Get 1 for every time someone downloads your manual
Buy as many as you need
-
Инструкции по эксплуатации
1

Mitsubishi MJ-E16VX-S1 инструкция по эксплуатации
(23 страницы)
- Языки:Русский
-
Тип:
PDF -
Размер:
755.59 KB
Просмотр
На NoDevice можно скачать инструкцию по эксплуатации для Mitsubishi MJ-E16VX-S1. Руководство пользователя необходимо для ознакомления с правилами установки и эксплуатации Mitsubishi MJ-E16VX-S1. Инструкции по использованию помогут правильно настроить Mitsubishi MJ-E16VX-S1, исправить ошибки и выявить неполадки.
More products and manuals for Dehumidifiers Mitsubishi Electric
| Models | Document Type |
|---|---|
|
MJ-E15BX-A1 |
Instruction Manual
28 pages |
|
MJ-E26VX-A1 |
Instruction Manual
28 pages |
|
MJ-E22VX-A1 |
Service Manual
39 pages |
|
MJ-E16SX-A1 |
Service Manual
48 pages |
|
MJ-E26VX-A1 |
Instruction Manual
24 pages |
|
MJ-E16SX-A1 |
Instruction Manual
28 pages |
|
MJ-E22VX-A1 |
Instruction Manual
28 pages |
|
MJ-E20TX-H |
Instruction Manual
26 pages |
|
MJ-E15BX-A1 |
Service Manual
49 pages |
|
MJ-E16SX-A1 |
Service Manual
47 pages |
|
MJ-E16SX-A1 |
Instruction Manual
24 pages |
|
MJ-E16VX-S1 |
User Manual
28 pages |
|
MJ-E16SX-A1 |
Service Manual
52 pages |


 |
[Page 1] Mitsubishi MJ-E16VX-S1 CONTENTS 1. PRODUCT SPECIFICATIONS……………………………………………………………………………. 2 2. OUTER DIMENSIONS ………………………………………………………………………………………. 3 3…. |
 |
[Page 2] Mitsubishi MJ-E16VX-S1 2 1. Product specifications Easy Dehumidifying * The brackets [ ] enclose values measured at a room temperature of about 15°C or lower. 16.0 41 37 Single phase, 220-240V, 50Hz 275 1.3 5.5 Blue (A) 570 × 384 × 187 11.7 120 Slit fin Slit fin Th… |
 |
[Page 3] Mitsubishi MJ-E16VX-S1 3 2. Outer Dimensions 3. External View, Parts and Display Section Drain the water tank before use Refrain from opening doors/windows during operation Drying laundry indoors Use the dehumidifier in a small, enclosed room. Maintain room temperature abo… |
 |
[Page 4] Mitsubishi MJ-E16VX-S1 Continuous drainage outlet 4 Front Back What is a washable photocatalytic filter? The water tank may contain water residue at time of purchase. This is from final product testing at the factory and is not due to a defect. The washable photocatalytic … |
 |
[Page 5] Mitsubishi MJ-E16VX-S1 5 Control Panel LCD Panel All indicators on the LCD panel shown below. ¡Lamps Current mode lights ¡Selection button Switches modes ¡Mode button For switching from one operating mode to another ¡ Humidity Selection This is used to set the target h… |
 |
[Page 6] Mitsubishi MJ-E16VX-S1 6 ¡ LOW TEMP The unit operates continuously and automatically by controlling airflow according to room temperature. The air flow is strongest below 15°C. The use of LOW TEMP mode is recommended when the Low temperature indicator is lit. When the te… |
 |
[Page 7] Mitsubishi MJ-E16VX-S1 7 ¡ AUTO The unit maintains the humidity level by automatically controlling airflow and operating intermittently as necessary. All you have to do is set the humidity level. ¡ The unit turns off when current humidity decreases past the set humidity … |
 |
[Page 8] Mitsubishi MJ-E16VX-S1 ¡ Drying inside The inside of the unit can be dried to suppress mildew growth on the cooler. On days the dehumidifier is used, drying inside is recommended. 8 <Drying inside operation> This operation takes approximately one hour. However, when… |
 |
[Page 9] Mitsubishi MJ-E16VX-S1 9 The unit automatically shuts down and indicates with the light and sound that the water tank is full. Empty the water tank. ¡ Tank full light lights (The unit beeps continuously.) ¡ Air flows stops (louvre stops) ¡ Swing monitor turns off ¡ Com… |
 |
[Page 10] Mitsubishi MJ-E16VX-S1 To cancel the OFF timer <When you want to turn the unit off> Press the POWER button. (Power off) ¡ The OFF Timer is cancelled. <When you want to disable the Timer OFF mode, and continue operation> Keep pressed until the remaining time di… |
 |
[Page 11] Mitsubishi MJ-E16VX-S1 11 5. Technical points 5.1 The technical points of the new products 1) Drying inside During dehumidification, moisture accumulates on the heat exchanger. If left, this can lead to mildew growth, which is circulated around the room with the air discha… |
 |
[Page 12] Mitsubishi MJ-E16VX-S1 12 The dehumidifier does not have a cooler function. Due to heat produced during operation, the room temperature may rise 2-4°C As a result, the unit may blow warm air, but this is not due to a malfunction. During winter, the air may not feel warm a… |
 |
[Page 13] Mitsubishi MJ-E16VX-S1 13 5.3 Coolant Circuit Dehumidifying Defrosting Coolant flow Blow Fan Heat exchanger (heat radiation) φ 5 φ 6.35 φ 5 φ6.35 Compressor Heat exchanger (cooling) Intake φ 6.35 Tube temperature sensing thermistor φ 6.35 Capillary tube Capillary… |
 |
[Page 14] Mitsubishi MJ-E16VX-S1 14 6. Maintenance Dry well in the sun (The performance of the filter renews with soaking, and the photocatalytic effect of the sunlight removes remaining odorants) Hose with lukewarm water when excessively soiled. Dry well. Remove grit with … |
 |
[Page 15] Mitsubishi MJ-E16VX-S1 15 Pour the water out as shown. Removing Water from the Tank The unit automatically shuts down and lights the Tank full lamp when the tank (approximately 4L) is full. Empty the tank. 1 Remove the water tank. 2 Remove the tank lid, and empty. Floating… |
 |
[Page 16] Mitsubishi MJ-E16VX-S1 16 After switching the unit off, leave for one day until any water inside has had time to run off, then carry out the following steps. 1 Perform drying inside Performing drying inside to prevent mildew growth is recommended. 2 Bundle power cord. 3 Re… |
 |
[Page 17] Mitsubishi MJ-E16VX-S1 17 7. Wiring Diagram and Block Diagram 7.1 Wiring Diagram (1) Current fuse ………………..Overcurrent flow caused by deterioration in electrical parts or other problems turns the power source to OFF. <Current setting: 2A> (2) Motor protect… |
 |
[Page 18] Mitsubishi MJ-E16VX-S1 18 7.2 Function List Compressor Blower Solenoid valve Swing louvre Power Selection Air Purifier Tank full Drying inside Humidity (set/current) Operation mode Swing area Swing monitor On/off timer Mildew guard Defrost Low temp Child lock Operation Au… |
 |
[Page 19] Mitsubishi MJ-E16VX-S1 19 <Operation Control> 1 Specifications shared at all operation modes The compressor and blower fan will operate for about 6 minutes after turning on the operation switch or activating the compressor, regardless of humidity or temperature level… |
 |
[Page 20] Mitsubishi MJ-E16VX-S1 20 5 Easy Dehumidifier 1. Controls (a) Adjusts humidity according to room temperature for increased comfort. (b) CIRCULATION mode is activated when the temperature is high and the humidity is low. This mode keeps the compressor off. (c) Switches temp… |
 |
[Page 21] Mitsubishi MJ-E16VX-S1 21 6 Drying inside 1. Controls (a) Prevents the growth of mildew by drying the moisture accumulated on the heat exchanger when the dehumidifier is OFF. (b) Drying inside operation does not depend on having a full water level. (c) The following operat… |
 |
[Page 22] Mitsubishi MJ-E16VX-S1 22 7.3. Timing Charts Power button Mode indicator Compressor Fan Solenoid valve Float switch Tank full indicator Humidity Tube temperature High humidity warning Low temp indicator Louvre Swing OFF Swing ON Louvre indicator (For swing ON only) Bu… |
 |
[Page 23] Mitsubishi MJ-E16VX-S1 23 Power button Mode indicator Compressor Fan Solenoid valve Float switch Tank full indicator Humidity Tube temperature High humidity warning Low temp indicator Louvre Swing OFF Swing ON Louvre indicator Buzzer Drying inside ON OFF ON OFF ON OFF O… |
 |
[Page 24] Mitsubishi MJ-E16VX-S1 24 Power button Mode indicator Compressor Fan Solenoid valve Float switch Tank full indicator Humidity Tube temperature High humidity warning Low temp indicator Louvre Swing OFF Swing ON Louvre indicator Buzzer Drying inside ON OFF ON OFF ON OFF O… |
 |
[Page 25] Mitsubishi MJ-E16VX-S1 25 Power button Mode indicator Compressor Fan Solenoid valve Float switch Tank full indicator Humidity Tube temperature High humidity warning Low temp indicator Louvre Swing OFF Swing ON Louvre indicator Buzzer Drying inside ON OFF ON OFF ON OFF O… |
 |
[Page 26] Mitsubishi MJ-E16VX-S1 26 7.4 General Block Diagram |
 |
[Page 27] Mitsubishi MJ-E16VX-S1 27 |
 |
[Page 28] Mitsubishi MJ-E16VX-S1 28 Restore AC power supply Replace fuse Mechanical check • Correct defects. • Replace the switch if defective. Replace control board Normal Abnormal ON OFF Not blown Blown Uncorrected The unit does not operate Start Check AC power supply Has the… |
 |
[Page 29] Mitsubishi MJ-E16VX-S1 29 Step 3 NO YES NO Does the compressor operate? (NO if stalled) *The compressor does not operate for 3 minutes after turning the power ON or OFF. (See page 12) Is there an overcurrent? (Surface is hot) Replace compressor Is the compressor relay … |
 |
[Page 30] Mitsubishi MJ-E16VX-S1 30 8.2 Key Component Check Procedures Component name Testing procedure Tub temperature sensing thermistor Room temperature and humidity sensor board Compressor Fan motor Solenoid valve coil Detach the connector and measure the resistance using … |
 |
[Page 31] Mitsubishi MJ-E16VX-S1 31 Error (failure) P10 connector out of position Room temperature thermistor blowout Check the P10 connection. Check the room temperature and humidity sensor board. Corrective action Room temperature thermistor short Room temperature and humidity … |
 |
[Page 32] Mitsubishi MJ-E16VX-S1 32 LCD and LED all lit Current humidity Room temperature indicator Tube temperature indicator Current fan rank Determined frequency For current humidity (all displays in decimal) Mode displayed Examples (2) LED, LCD and fan tests ●Start:… |
 |
[Page 33] Mitsubishi MJ-E16VX-S1 33 Even if the metal fins on the inside of the unit become bent, this does not affect performance. 2. Removing the front panel, and air filter assembly 1. Remove the water tank (Pic. 1) Step 1) Push the front panel downward, and pull toward y… |
 |
[Page 34] Mitsubishi MJ-E16VX-S1 34 [To remove the control board] Step 1) Pull the front casing/switch operation part toward the outside, release the catch (protrusion) on the switch button on the main board cover side, and remove the main board cover assembly. (Pic. 6) Step … |
 |
[Page 35] Mitsubishi MJ-E16VX-S1 35 5. To remove the fan assembly [To remove the fan motor] Step 1) Remove the fan locknut and fan. (Pic. 15) Step 2) Remove the tape securing the fan motor lead wire, and separate the lead wire from the fan guide casing. (Pic. 16) Step 3) Remove t… |
 |
[Page 36] Mitsubishi MJ-E16VX-S1 36 6. To remove the drain pan assembly Repairable parts Compressor Step 1) Remove the water tank, front panel, front casing assembly, rear panel, and fan assembly following the steps for sections 1 to 5 above. Step 2) Detach the catches interloc… |
 |
[Page 37] Mitsubishi MJ-E16VX-S1 37 10. Continuous Water Drainage If a drain is available, the unit can continuously drain excess water by attaching a commercially available hose (internal diameter 15mm). The unit can be operated for extensive periods without the need to empty the w… |
 |
[Page 38] Mitsubishi MJ-E16VX-S1 38 Model MJ-E16VX-S1 Exploded View <Casing and Structure> 5 1 A C B 154 13 16 17 18 14 2 3 6 10 11 12 9 8 7 20 19 21 magnifing picture 22 Parts Catalog |
 |
[Page 39] Mitsubishi MJ-E16VX-S1 39 * 1. If the part is out of production, you may be required to use a common part. * 2. Parts found installed in products may have a different part number from service parts. However, there should be no difference inperformance and can be installe… |
 |
[Page 40] Mitsubishi MJ-E16VX-S1 40 Model MJ-E16VX-S1 Exploded View <Casing and Structure> 34 25 29 38 26 28 30 31 33 32 27 D 353637 Parts Catalog |
 |
[Page 41] Mitsubishi MJ-E16VX-S1 41 * 1. If the part is out of production, you may be required to use a common part. * 2. Parts found installed in products may have a different part number from service parts. However, there should be no difference inperformance and can be installe… |
 |
[Page 42] Mitsubishi MJ-E16VX-S1 42 Model MJ-E16VX-S1 Exploded View <Electrical Parts> 3 B C 5 4 2 1 6 D 9 8 7 A E Parts Catalog |
 |
[Page 43] Mitsubishi MJ-E16VX-S1 43 M22 C38 440 M22 B31 311 M22 B25 500 M22 C44 260 M22 C44 300 — M22 C44 502 M22 B13 511 M22 C29 395 M22 B30 792 — — — — 1 1 1 1 1 1 1 3 1 1 3 3 3 1 PCA * MJ-E23/16VX * P SENSOR * HUM-100W… |
 |
[Page 44] Mitsubishi MJ-E16VX-S1 44 Model MJ-E16VX-S1 Exploded View <Compressor Parts> 10 7 2220 8 9 6 5 4 12 18 19 1 2 3 A 11 13 14 15 17 16 21 back Parts Catalog |
 |
[Page 45] Mitsubishi MJ-E16VX-S1 45 * 1. If the part is out of production, you may be required to use a common part. * 2. Parts found installed in products may have a different part number from service parts. However, there should be no difference inperformance and can be installe… |
 |
[Page 46] Mitsubishi MJ-E16VX-S1 46 11. Troubleshooting Symptom Cause/Remedy The unit blows warm air Water does not collect in the water tank (minimal dehumidifying results) The unit does not operate (no air comes out) The unit stops The humidity level does not reach the level set T… |
 |
[Page 47] Mitsubishi MJ-E16VX-S1 47 Symptom Cause/Remedy ¡ Check to see if the unit is on a slope or uneven surface. ➝ Move to a sturdy even surface. ¡ Check to see if the pre-filter is clogged. → Clean according to the maintenance procedures ¡ Operating the unit in small roo… |
 |
[Page 48] Mitsubishi MJ-E16VX-S1 48 Precautions Do not start/stop the unit by plugging/unplugging the power cord. This may result in fire and/or electric shock. Do not use extension cords or multiple head adapters. This may result in fire, electric shock or malfunctions. Do not dama… |
 |
[Page 49] Mitsubishi MJ-E16VX-S1 49 CAUTION Do not cover the front or side air intakes or the air outlet with cloth, curtain, etc. This results in poor ventilation and may cause heat generation/fire. Do not stand on, sit on or lean against the unit. The unit may tip over causing in… |
 |
[Page 50] Mitsubishi MJ-E16VX-S1 50 CAUTION After emptying the tank, transport the unit by grasping the handle firmly. Losing your footing while carrying the unit may cause personal injury or damage to the floor. When using the continuous drainage outlet, make sure to position the h… |
 |
[Page 51] Mitsubishi MJ-E16VX-S1 51 Packaging diagram |
 |
[Page 52] Mitsubishi MJ-E16VX-S1 Issued in 2005.07 Printed in Japan |