
Страницы 1 2 3 … 6 Далее
Чтобы отправить ответ, вы должны войти или зарегистрироваться
RSS
Сообщений с 1 по 25 из 136
1 2014-04-21 18:41:13

- admin
- Administrator
- Неактивен

- Откуда: СПб
- Зарегистрирован: 2013-04-12
- Сообщений: 120
- Спасибо: 39
Тема: Документация — руководства, мануалы, инструкции и т.д. — скачать
В этой теме будем собирать различную техническую документацию по электромобилю Nissan Leaf — инструкции, руководства по эксплуатации, мануалы, брошюры и прочие файлы.
-
Руководство по эксплуатации Nissan Leaf 2011 года (на англ. языке). Скачать (3.8 Mb)
-
Руководство по эксплуатации Nissan Leaf 2012 года (на англ. языке). Скачать (4.2 Mb)
-
Руководство по эксплуатации Nissan Leaf 2013 года (на англ. языке). Скачать (5.1 Mb)
-
Инструкция по демонтажу Nissan Leaf 2013 года (на англ. языке). Скачать (1.6 Mb)
-
Инструкция по технической помощи на дороге Nissan Leaf 2013 года (на англ. языке). Скачать (1.3 Mb)
-
Руководство по навигации в Nissan Leaf 2013 года (на англ. языке). Скачать (6.8 Mb)
-
Руководство по сервисному обслуживанию Nissan Leaf 2013 года (на англ. языке). Скачать (408 Kb)
-
Гарантийный буклет Nissan Leaf 2013 года (на англ. языке). Скачать (375 Kb)
-
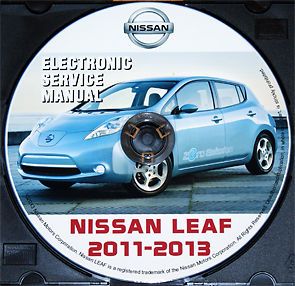
Ремонт и эксплуатация Nissan Leaf 2011-2013. Полное руководство (на англ. языке). Скачать (98 Mb)
-
Ремонт и эксплуатация Nissan Leaf 2014 – PDF Owner’s Manuals (по страницам, на англ. языке). Ссылка.
-
Электрическая схема Nissan Leaf для второго (AZE0) поколения и свежее. Ссылка
P.S. Если у вас есть какие-либо еще инструкции, руководства и прочие полезные файлы, выложите их, пожалуйста, на http://disk.yandex.ru и скиньте сюда ссылку. Мы соберем все в одной теме.
В Подпись ставим марку, год и комплектацию вашего автомобиля
В Профиль — Персональное — Местонахождение указываем город
Спасибо сказали: all-ex, sswagin, dac, ty-154m, vita7272more, AlexeyMorozov, Кос007, LKA, Radiy85, auto-ritet, flash0ff, aswedr12
3 Ответ от HOUSTON68 2014-04-22 15:22:22

- HOUSTON68
- Участник
- Неактивен
- Откуда: Забайкальский край г. Чита
- Зарегистрирован: 2013-11-15
- Сообщений: 791
- Спасибо: 118
Re: Документация — руководства, мануалы, инструкции и т.д. — скачать
admin пишет:
В этой теме будем собирать различную техническую документацию по электромобилю Nissan Leaf — инструкции, руководства по эксплуатации, мануалы, брошюры и прочие файлы.
Руководство по эксплуатации Nissan Leaf 2011 года (на англ. языке). Скачать (3.8 Mb)
P.S. Если у вас есть какие-либо еще инструкции, руководства и прочие полезные файлы, выложите их, пожалуйста, на http://disk.yandex.ru и скиньте сюда ссылку. Мы соберем все в одной теме.
Чем богаты:
http://yadi.sk/d/4eM9Q6ycMyHdg
http://yadi.sk/d/e9yFp6taMyHdC
http://yadi.sk/d/kfQwpAWXMyHe5
http://yadi.sk/d/BCY24_EtMyHeF
http://yadi.sk/d/-dMeD_OOMyHed
http://yadi.sk/d/zbC-B_FgMyHew
http://yadi.sk/d/mZKR1H7sMyHfE
http://yadi.sk/d/SKwJAvZRMyHfY
Если есть повторы, удалю.
LEAF ZEO G зимняя, (подогрева батареи в японских лифах нет) 2011г. Япония.
Есть только два способа прожить жизнь. Первый — будто чудес не существует. Второй — будто кругом одни чудеса.
А. Эйнштейн
4 Ответ от admin 2014-04-23 14:10:51
- admin
- Administrator
- Неактивен
- Откуда: СПб
- Зарегистрирован: 2013-04-12
- Сообщений: 120
- Спасибо: 39
Re: Документация — руководства, мануалы, инструкции и т.д. — скачать
HOUSTON68 пишет:
Чем богаты:
Спасибо за ссылки. Вынес в заглавный пост.
В Подпись ставим марку, год и комплектацию вашего автомобиля
В Профиль — Персональное — Местонахождение указываем город
5 Ответ от HOUSTON68 2014-04-25 12:58:20
- HOUSTON68
- Участник
- Неактивен
- Откуда: Забайкальский край г. Чита
- Зарегистрирован: 2013-11-15
- Сообщений: 791
- Спасибо: 118
Re: Документация — руководства, мануалы, инструкции и т.д. — скачать
Всегда пожалуйста.
Лишь бы форум процветал. Ну и конечно росло количество электро-водов. 
LEAF ZEO G зимняя, (подогрева батареи в японских лифах нет) 2011г. Япония.
Есть только два способа прожить жизнь. Первый — будто чудес не существует. Второй — будто кругом одни чудеса.
А. Эйнштейн
6 Ответ от HOUSTON68 2014-04-25 13:51:59
- HOUSTON68
- Участник
- Неактивен
- Откуда: Забайкальский край г. Чита
- Зарегистрирован: 2013-11-15
- Сообщений: 791
- Спасибо: 118
Re: Документация — руководства, мануалы, инструкции и т.д. — скачать
Вот еще кое что нашел, из документации:
http://www.mynissanleaf.com/viewtopic.p … &t=255
LEAF ZEO G зимняя, (подогрева батареи в японских лифах нет) 2011г. Япония.
Есть только два способа прожить жизнь. Первый — будто чудес не существует. Второй — будто кругом одни чудеса.
А. Эйнштейн
7 Ответ от mostenec 2014-05-12 00:08:20

- mostenec
- Участник
- Неактивен
- Откуда: Москва
- Зарегистрирован: 2014-03-16
- Сообщений: 38
- Спасибо: 11
Re: Документация — руководства, мануалы, инструкции и т.д. — скачать
Вот что я искал, и наконец то нашел. Ремонт и эксплуатация Nissan Leaf 2011-2012-2013 а также электрические схемы, ТО, самая полная информация.
Закинул на файлообменник- скачивайте на здороье! 
http://files.mail.ru/8FCCD753EA734DFF8BAB6383FC9B080D
8 Ответ от HOUSTON68 2014-05-25 12:01:47
- HOUSTON68
- Участник
- Неактивен
- Откуда: Забайкальский край г. Чита
- Зарегистрирован: 2013-11-15
- Сообщений: 791
- Спасибо: 118
Re: Документация — руководства, мануалы, инструкции и т.д. — скачать
Вот это я понимаю, Информация!
Теперь это все на русский язык перелопатить, цены не будет.
Но в общем, многое и так понятно, из таблиц и рисунков.
LEAF ZEO G зимняя, (подогрева батареи в японских лифах нет) 2011г. Япония.
Есть только два способа прожить жизнь. Первый — будто чудес не существует. Второй — будто кругом одни чудеса.
А. Эйнштейн
9 Ответ от admin 2014-05-27 08:44:41
- admin
- Administrator
- Неактивен
- Откуда: СПб
- Зарегистрирован: 2013-04-12
- Сообщений: 120
- Спасибо: 39
Re: Документация — руководства, мануалы, инструкции и т.д. — скачать
Спасибо! Закачивайте, пожалуйста, файлы на сервис http://disk.yandex.ru — он доступен для скачивания без регистрации и гораздо быстрей
На mail.ru надо ставить загрузчик, либо ждать ооочень долго…
В Подпись ставим марку, год и комплектацию вашего автомобиля
В Профиль — Персональное — Местонахождение указываем город
10 Ответ от admin 2014-05-27 09:48:32
- admin
- Administrator
- Неактивен
- Откуда: СПб
- Зарегистрирован: 2013-04-12
- Сообщений: 120
- Спасибо: 39
Re: Документация — руководства, мануалы, инструкции и т.д. — скачать
Закачала на форум. Ссылка вверху.
В Подпись ставим марку, год и комплектацию вашего автомобиля
В Профиль — Персональное — Местонахождение указываем город
11 Ответ от admin 2015-01-05 18:11:11
- admin
- Administrator
- Неактивен
- Откуда: СПб
- Зарегистрирован: 2013-04-12
- Сообщений: 120
- Спасибо: 39
Re: Документация — руководства, мануалы, инструкции и т.д. — скачать
В этой теме только выкладываем и обсуждаем документацию! Все остальные разговоры раскидал по новым темам и разделам.
Не устраивайте бардак на форуме!
В Подпись ставим марку, год и комплектацию вашего автомобиля
В Профиль — Персональное — Местонахождение указываем город
12 Ответ от boinc 2015-07-19 12:47:27
- boinc
- Новый участник
- Неактивен
- Зарегистрирован: 2015-07-18
- Сообщений: 6
- Спасибо: 0
Re: Документация — руководства, мануалы, инструкции и т.д. — скачать
Страничка закачки недоступна(
13 Ответ от banny75 2015-08-04 12:11:03

- banny75
- Новый участник
- Неактивен

- Откуда: UA
- Зарегистрирован: 2015-08-04
- Сообщений: 5
- Спасибо: 0
Re: Документация — руководства, мануалы, инструкции и т.д. — скачать
Подтверждаю — перезалейте!
14 Ответ от imagic 2015-08-05 00:55:05
- imagic
- Участник
- Неактивен
- Откуда: Владивосток
- Зарегистрирован: 2014-05-14
- Сообщений: 85
- Спасибо: 16
Re: Документация — руководства, мануалы, инструкции и т.д. — скачать
Первый пост, «Ремонт и эксплуатация Nissan Leaf 2011-2013. Полное руководство (на англ. языке).». Качайте на здоровье.
15 Ответ от dima.reksha 2016-01-06 08:39:07 (2016-01-06 08:44:08 отредактировано dima.reksha)

- dima.reksha
- Участник
- Неактивен

- Откуда: Одесса
- Зарегистрирован: 2015-01-03
- Сообщений: 151
- Спасибо: 32
Re: Документация — руководства, мануалы, инструкции и т.д. — скачать
LEAF SPY PRO ssilka rabo4aj, sam ska4al i ystanovil.
https://drive.google.com/file/d/0B924Xl … E1REk/view
16 Ответ от Kiwi 2016-01-15 11:29:56
- Kiwi
- Участник
- Неактивен
- Зарегистрирован: 2016-01-15
- Сообщений: 31
- Спасибо: 6
Re: Документация — руководства, мануалы, инструкции и т.д. — скачать
17 Ответ от Evgen 2016-01-15 15:58:47 (2016-01-15 16:00:02 отредактировано Evgen)

- Evgen
- Участник
- Неактивен

- Откуда: Чита
- Зарегистрирован: 2015-10-19
- Сообщений: 62
- Спасибо: 7
Re: Документация — руководства, мануалы, инструкции и т.д. — скачать
Ай-я-яй, выложил с просьбой проверить работу после отвязки от лицухи, скачало много, но отзывов нет) Скажите хоть, как пашет на разных устройствах.
18 Ответ от georgich602 2016-02-04 18:49:43 (2016-02-05 07:15:39 отредактировано georgich602)
- georgich602
- Участник
- Неактивен
- Откуда: Хабаровск
- Зарегистрирован: 2014-03-04
- Сообщений: 18
- Спасибо: 3
Re: Документация — руководства, мануалы, инструкции и т.д. — скачать
Благодарю за программу. Работает.
Ссылка на мануал одной из версий программы (англ.): http://www.electricvehiclewiki.com/Leaf_Spy_Pro
Извиняюсь, если мануал выкладывали ранее, но тем кто берёт прогу здесь надеюсь будет полезен.
AZEO-2016 (30)
ZEO-2010 продан
TIIDA-2011
19 Ответ от dima.reksha 2016-06-01 20:55:56
- dima.reksha
- Участник
- Неактивен
- Откуда: Одесса
- Зарегистрирован: 2015-01-03
- Сообщений: 151
- Спасибо: 32
Re: Документация — руководства, мануалы, инструкции и т.д. — скачать
20 Ответ от Ladium 2016-06-21 13:31:41
- Ladium
- Участник
- Неактивен
- Откуда: Kiev
- Зарегистрирован: 2016-04-04
- Сообщений: 10
- Спасибо: 5
Re: Документация — руководства, мануалы, инструкции и т.д. — скачать
Я сервисные руководства для Leaf брал здесь: http://www.nicoclub.com/FSM/Leaf/
21 Ответ от Evgeniy58 2016-07-12 22:34:20
- Evgeniy58
- Участник
- Неактивен
- Откуда: Киев
- Зарегистрирован: 2016-07-09
- Сообщений: 167
- Спасибо: 15
Re: Документация — руководства, мануалы, инструкции и т.д. — скачать
Скачать то скачалось на планшет, только не работает)))
И еще, смотрю скриншоты, непонятно ничего, мож кто напишет что там что обозначает))
Leaf S Aмерикос
22 Ответ от Evgeniy58 2016-07-16 18:50:19
- Evgeniy58
- Участник
- Неактивен
- Откуда: Киев
- Зарегистрирован: 2016-07-09
- Сообщений: 167
- Спасибо: 15
Re: Документация — руководства, мануалы, инструкции и т.д. — скачать
Evgeniy58 пишет:
Скачать то скачалось на планшет, только не работает)))
И еще, смотрю скриншоты, непонятно ничего, мож кто напишет что там что обозначает))
Все понятно стало!!!
Leaf S Aмерикос
23 Ответ от 7439655a 2016-07-17 07:36:06
- 7439655a
- Новый участник
- Неактивен
- Зарегистрирован: 2016-07-16
- Сообщений: 6
- Спасибо: 0
Re: Документация — руководства, мануалы, инструкции и т.д. — скачать
добрый день. подскажите лиф 2015 года S отсутствует в настройках уровень заряда 80% и 100%. как зарядить на 80%? или производители от этого уже отказались? и еще не можем включить круиз контроль. при нажатии на кнопку круиз загорается на щитке индикатор круиза и не чего не происходит.
24 Ответ от terminal 2016-07-17 07:56:48
- terminal
- Участник
- Неактивен
- Откуда: Владивосток
- Зарегистрирован: 2016-05-12
- Сообщений: 2,073
- Спасибо: 562
Re: Документация — руководства, мануалы, инструкции и т.д. — скачать
7439655a пишет:
добрый день. подскажите лиф 2015 года S отсутствует в настройках уровень заряда 80% и 100%. как зарядить на 80%? или производители от этого уже отказались? и еще не можем включить круиз контроль. при нажатии на кнопку круиз загорается на щитке индикатор круиза и не чего не происходит.
Нет больше выбора 80% Только 100% по умолчанию
БЫЛ : Leaf ZEO Х, 2011 Япония. Батарея 2015 год.
Все подогревы, антибуксы и ABSы
25 Ответ от Ai! 2016-07-17 07:57:30

- Ai!
- Участник
- Неактивен
- Откуда: Нижний Новгород
- Зарегистрирован: 2016-04-25
- Сообщений: 1,882
- Спасибо: 589
Re: Документация — руководства, мануалы, инструкции и т.д. — скачать
Приветствую! Вы правильно подметили, производитель наклал на уровень заряда 80%, т.к. якобы по статистике это нужно очень не многим и лишил возможности иметь такую опцию в машине.
После включения круиза нужно задать скоростной лимит, это делается переключателем который чуть выше кнопки круиза, его нужно опустить вниз (или нажать вниз), чтобы задать нужную скорость которую будет поддерживать авто, т.е. скорость при которой вы нажмете кнопку и будет потолком для круиза. Далее увеличить этот потолок можно этим же рычажком вверх, уменьшить — вниз.
+795341509семдесяd
Страницы 1 2 3 … 6 Далее
Чтобы отправить ответ, вы должны войти или зарегистрироваться
- 4500
Руководство по эксплуатации на Ниссан Лиф 2 поколение в кузове ZE1 с 2017 года
Характеристики Nissan Leaf 2
Тип привода Передний
Тип кузова Хэтчбек
Тип трансмиссии Редуктор
Клиренс (высота дорожного просвета), мм 150
Страна сборки Япония
Число дверей 5
Габариты кузова (Д x Ш x В), мм 4480 x 1790 x 1560
Число мест 5
Количество рядов сидений 2
Габариты салона (Д x Ш x В), мм 2030 x 1455 x 1185
Колесная база, мм 2700
Минимальный радиус разворота, м 5.4
Ширина передней колеи, мм 1530
Ширина задней колеи, мм 1545
Масса, кг 1520
Общий вес автомобиля, кг 1795
Объем багажника, л 435
Коэффициент аэродинамического сопротивления, cW 0.28
Марка двигателя EM57
Используемое топливо Электричество
Тип двигателя электродвигатель
Запас хода на электротяге в км 322
Электродвигатель: мощность, кВт 110
Электродвигатель: крутящий момент, Нм 320
Ёмкость батареи, кВт*ч 40
Передняя подвеска Независимая, амортизационная стойка типа МакФерсон
Задняя подвеска Полузависимая, торсионная балка
Передние тормоза Дисковые вентилируемые
Задние тормоза Дисковые вентилируемые
Система рекуперативного торможения
Стояночный тормоз Электронный
Руководство Nissan Leaf
Добавлять комментарии могут только зарегистрированные пользователи.
[
Регистрация
|
Вход
]
2. Органы управления, приборная панель, оборудование салона
Приборная панель и органы управления
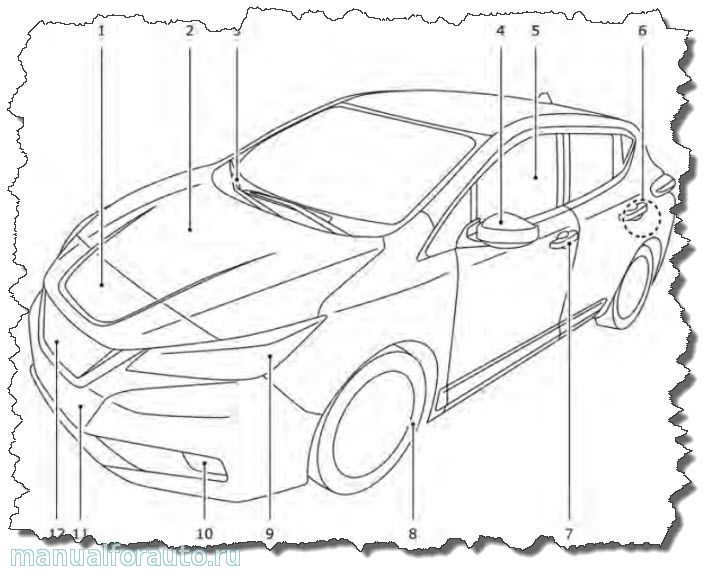
1. Переключатель одометра/счетчиков пробега. 2. Переключатель бортового компьютера. 3. Переключатель регулировки яркости подсветки приборной панели. 4. Переключатель головного и противотуманного освещения и указателей поворотов. 5. Левые переключатели дистанционного управления на рулевом колесе. 6. Рулевое колесо. 7. Переключатель стеклоочистителей и омывателей. 8. Правые переключатели дистанционного управления на рулевом колесе. 9. Крышка блока предохранителей салона. 10. Переключатель выключения системы VDC (динамического контроля автомобиля). 11. Регулятор уровня света фар. 12. Переключатель выключения системы VSP (звукового предупреждения о приближении пешеходов). 13. Переключатель непосредственной подзарядки. 14. Рычаг регулировки наклона рулевой колонки. 15. Рычаг селектора. 16. Электрический стояночный тормоз.
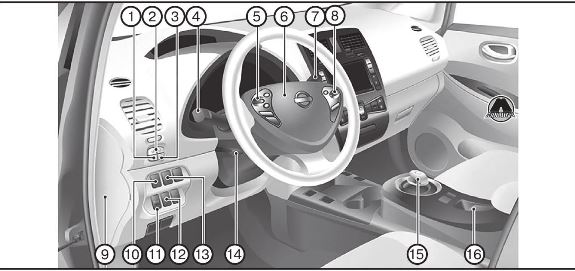
1. Левый боковой вентиляционный дефлектор. 2. Комбинация приборов. 3. Центральный многофункциональный дисплей. 4. Выключатель световой аварийной сигнализации. 5. Центральные вентиляционные дефлекторы. 6. Фронтальная подушка безопасности переднего пассажира. 7. Рычаг открытия лючка зарядных портов. 8. Рычаг отпирания капота. 9. Кнопка питания. 10. Разъем iPod/USB. 11. Выключатель подогрева заднего стекла. 12. Розетка электропитания. 13. Гнездо для подключения дополнительного оборудования AUX. 14. Индикатор подушки безопасности переднего пассажира. 15. Панель управления отопителем и кондиционером. 16. Перчаточный ящик.
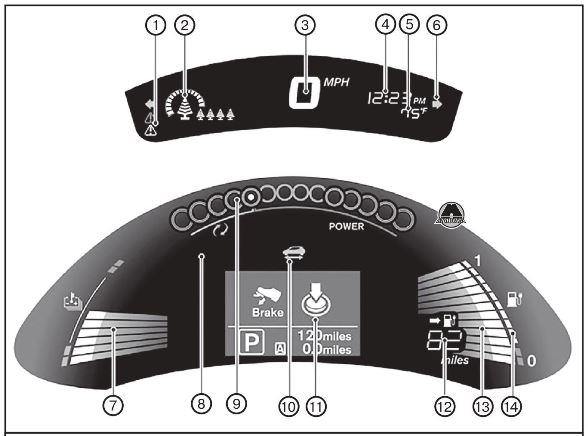
Верхний и нижний дисплеи комбинации приборов
1. Общий сигнализатор неисправности. 2. Индикатор «ЕСО». 3. Спидометр. 4. Часы. 5. Температура воздуха снаружи автомобиля. 6. Индикатор указателей поворота/аварийной сигнализации. 7. Указатель температуры литий-ионных аккумуляторных батарей. 8. Индикаторы и сигнализаторы. 9. Указатель энергопотребления. 10. Индикатор готовности к движению («READY»). 11. Матричный жидкокристаллический дисплей. 12. Указатель остаточного пробега. 13. Указатель текущего заряда литий-ионных аккумуляторных батарей. 14. Указатель емкости литий-ионных аккумуляторных батарей.
Спидометр
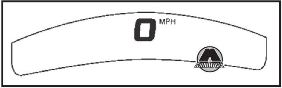
Спидометр отображает скорость движения автомобиля в километрах в час (km/h) или в милях в час (МРН).
Одометр/счетчик пробега
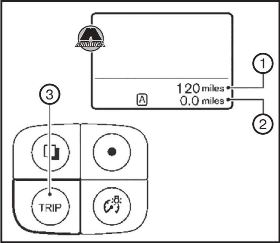
Одометр (1) и счетчик пробега (2) отображаются на матричном жидкокристаллическом дисплее при включенном питании или состоянии готовности автомобиля к движению («READY»).
Одометр записывает общий пробег, пройденный автомобилем за весь период эксплуатации.
Счетчик пробега записывает расстояние, пройденное за отдельную поездку.
Изменение отображения
При нажатии на кнопку «TRIP» (3), расположенную в левой части панели комбинации приборов, отображение изменяется следующим образом:
ПРОБЕГ А → ПРОБЕГ В → ПРОБЕГ А
Сброс данных счетчика пробега
Нажатие на кнопку «TRIP» (3) примерно на одну секунду сбрасывает счетчик пробега в нуль.
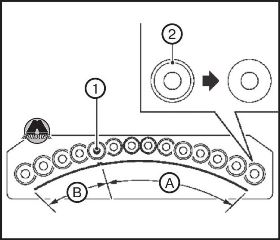
Указатель температуры литий-ионной аккумуляторной батареи
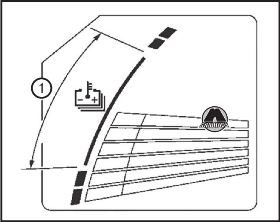
Данный указатель отображает температуру литий-ионных аккумуляторных батарей.
Температура литий-ионных аккумуляторных батарей находится в нормальном диапазоне, когда индикаторы дисплея соответствуют диапазону (1), указанному на рисунке.
Температура литий-ионных аккумуляторных батарей может изменяться в зависимости от температуры наружного воздуха и условий вождения.
Примечание
Если отображаемая на дисплее температура литий-ионных аккумуляторных батарей ниже красной зоны нормального диапазона, необходимо снизить скорость движения автомобиля, чтобы уменьшить температуру. Если отображается значение температуры выше нормального диапазона, питание, подаваемое на тяговый электромотор, понижается. При этом включается индикатор ограничения подачи питания, поэтому скорость движения автомобиля не повышается даже при нажатии водителем педали акселератора.
Если температура наружного воздуха чрезвычайно низкая, указатель температуры литий-ионных аккумуляторных батарей может не отображать значение температуры. При этом электромобиль не может перейти в режим готовности к движению («READY»). Нужно связаться с сертифицированным дилером Nissan.
Указатель энергопотребления
Данный указатель отображает текущее потребление тягового электромотора (А), а также регенеративную энергию торможения, подаваемую на литий-ионные аккумуляторные батареи (В).
Белая точка (1) на дисплее перемещается вправо или влево в зависимости от текущего состояния.
Белая точка перемещается вправо, когда питание потребляется тяговым электромотором (литий-ионные аккумуляторные батареи разряжаются).
Белая точка перемещается влево, когда питание генерируется и подается на литий-ионную аккумуляторную батарею от регенеративной тормозной системы (литий-ионные аккумуляторные батареи заряжаются).
Указатель энергопотребления также отображает ограничение подачи питания на электромотор или регенеративного торможения. Если ограничено регенеративное торможение, кружок на дисплее изменяется с двойного на одинарный (2).
Регенеративное торможение автоматически уменьшается, если литий-ионные аккумуляторные батареи полностью заряжены, для предотвращения перезарядки аккумуляторов. Кроме того, регенеративное торможение также автоматически уменьшается при слишком высокой или слишком низкой температуре литий-ионных аккумуляторных батарей (отображается красной/синей зонами указателя температуры литий-ионных аккумуляторных батарей) для предотвращения повреждений литий-ионных аккумуляторных батарей.
Чем больше снижается регенеративное торможение, тем больше двойных кружков изменяются на одинарные.
Если заряд литий-ионных аккумуляторных батарей низок, ограничивается питание, подаваемое на тяговый электромотор. Питание электромотора также ограничивается при слишком высокой или слишком низкой температуре литий-ионных аккумуляторных батарей (отображается красной/синей зонами указателя температуры литий-ионных аккумуляторных батарей) для предотвращения повреждений литий-ионных аккумуляторных батарей.
Чем больше ограничивается питание, подаваемое на тяговый электромотор, тем больше двойных кружков изменяется на одинарные.
Указатель остаточного пробега
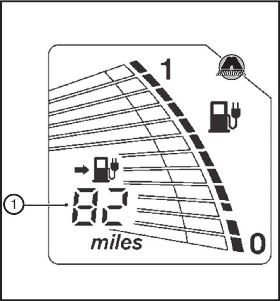
Указатель остаточного пробега (1) (в милях или в километрах) показывает прогнозируемое расстояние, которое сможет пройти электромобиль без подзарядки. Значение указателя остаточного пробега постоянно пересчитывается, основываясь на имеющейся величине заряда литий-ионных аккумуляторных батарей и текущем значении энергопотребления.
Примечание
Указатель остаточного пробега начинает мигать, если загорается предупредительный индикатор низкого заряда батарей. Кроме того, если при этом продолжается движение автомобиля в таком режиме, а литий-ионные батареи близки к полной разрядке, отображается «—». Необходимо зарядить литий-ионные аккумуляторные батареи как можно скорее. После того как аккумуляторы будут заряжены, восстанавливается исходное отображение.
После зарядки электромобиля отображаемое значение указателя остаточного пробега вычисляется, основываясь на действительных значениях энергопотребления с предыдущей поездки. Поэтому значение указателя остаточного пробега при полном заряде батарей может быть различным после каждой новой зарядки.
Значение указателя остаточного пробега увеличивается или уменьшается при включении или выключении кондиционера, а также переключении электромобиля из режима «О» (вождение) в режим «ЕСО» (или наоборот), при включении или выключении различных электропотребителей или в зависимости от условий вождения.
Указатель текущего заряда литий-ионных аккумуляторных батарей
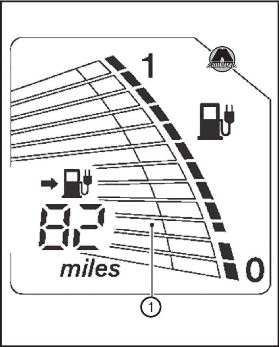
Указатель (1) отображает приблизительное значение текущего уровня заряда литий-ионных аккумуляторных батарей.
Необходимо заряжать литий-ионные аккумуляторные батареи до того, как указатель снизится до нижней линии.
Индикатор низкого заряда батарей загорается, когда уровень заряда литий-ионных аккумуляторных батарей становится слишком низким. Нужно подзарядить батареи при первом удобном случае, желательно, до снижения до нижней линии. Нижняя линия указателя соответствует чрезвычайно низкому остатку заряда литий-ионных аккумуляторных батарей.
Примечание
Количество сегментов указателя текущего заряда литий-ионных аккумуляторных батарей определяется по имеющемуся уровню заряда и емкости батарей при текущей температуре.
Температура влияет на емкость литий-ионных аккумуляторных батарей. Емкость понижается, если литий-ионные аккумуляторные батареи холодные, и, соответственно, повышается, если батареи теплые. Количество сегментов указателя текущего заряда литий-ионных аккумуляторных батарей может изменяться в зависимости от емкости литий-ионных аккумуляторных батарей. Например, при охлаждении литий-ионных аккумуляторных батарей количество горящих сегментов указателя увеличивается, поскольку в процентном соотношении имеющийся заряд к емкости становится больше. По этой же причине при нагреве литий-ионных аккумуляторных батарей количество горящих сегментов указателя уменьшается.
Указатель емкости литий-ионных аккумуляторных батарей
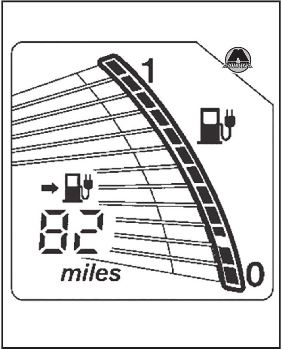
Данный указатель отображает емкость литий-ионных аккумуляторных батарей, то есть их способность к сохранению заряда.
Емкость литий-ионных батарей со временем уменьшается, при этом уменьшается и уровень указателя.
Температура воздуха снаружи автомобиля
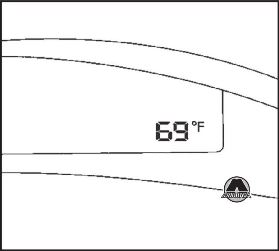
Наружная температура воздуха может отображаться в градусах Фаренгейта (°F) или Цельсия (°С).
Отображаемое значение может отличаться от реальной температуры воздуха снаружи автомобиля по различным причинам.

Индикатор «ЕСО» показывает, насколько экономичен стиль вождения водителя.
На работу данного индикатора влияют следующие условия:
— работа педали акселератора;
— работа педали тормоза;
— условия вождения;
— дорожная обстановка;
— использование отопителя и кондиционера;
— время простоя автомобиля в режиме готовности к движению («READY») с включенным дополнительным оборудованием.
Мгновенный уровень ЕСО-вождения
Мгновенный уровень ЕСО-вождения отображается полосой (1), которая увеличивается (более экономичное вождение) или уменьшается (менее экономичное вождение) в зависимости от работы электромобиля.
Долгосрочный уровень ЕСО-вождения
Долгосрочный уровень ЕСОвождения отображается большим значком деревца (2). Чем дольше электромобиль работает экономично, тем большее количество сегментов большого значка деревца отображаются. После того, как загорятся все сегменты большого значка деревца, загорается маленький значок деревца (3), а большой значок сбрасывается. Чем дольше электромобиль работает в экономичном режиме, тем больше маленьких деревьев отображается на дисплее. Большое и маленькие деревья, «выращенные» за время движения, гаснут после выключения питания электромобиля. Однако количество отображаемых деревьев сохраняется в памяти навигационной системы для показа долгосрочного эффективного вождения электромобиля.
Для повышения уровня ЕСО-вождения необходимо учитывать следующее:
— В режиме «ЕСО» электромобиля применяется большее регенеративное торможение при отпущенной педали акселератора, чем в режиме «D» (вождение). Как следствие, большее количество электроэнергии подается на литий-ионные аккумуляторные батареи.
— Режим «ЕСО» помогает снизить потребление электроэнергии за счет снижения ускорения по сравнению с аналогичным положением педали акселератора в режиме «Р» (вождение).
— Режим «ЕСО» уменьшает подачу питания на систему отопителя и кондиционера.
— Нужно стараться поддерживать постоянную скорость движения. Для этого можно удерживать педаль акселератора в одном положении или пользоваться круиз-контролем.
— Ускоряться нужно медленно и плавно. Нажатия и отпускания педали акселератора для ускорения и замедления должны быть мягкими.
— На шоссе скорость движения должна быть умеренной.
— Нужно избегать частых остановок и торможений, соблюдая безопасную дистанцию до впередиидущего автомобиля.
— Нужно выключать кондиционер/ отопитель, если в них нет необходимости.
— Выбор умеренных температурных настроек отопления или охлаждения салона поможет уменьшить энергопотребление.
— Рекомендуется использовать кондиционер/отопитель и закрыть все окна для уменьшения сопротивления воздуха при движении с крейсерской скоростью по шоссе,
— Для замедления автомобиля рекомендуется отпускать педаль акселератора и не применять тормоза, когда это позволяют дорожные условия. Данный автомобиль оборудован регенеративной тормозной системой. Первичной задачей регенеративной тормозной системы является использование энергии торможения для подзарядки литий-ионных аккумуляторных батарей и, таким образом, увеличение пробега на одной зарядке. Вторичная задача заключается в реализации «торможения двигателем», основанной на состоянии литий-ионных аккумуляторных батарей.
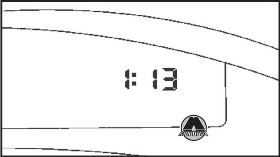
Настройка часов на матричном жидкокристаллическом дисплее осуществляется через бортовой компьютер (см. ниже в данной главе).
Если подача питания (12-вольтная аккумуляторная батарея) прерывается, часы сбиваются. Необходимо перенастроить их заново.
Примечание
Данные часы не синхронизированы с часами, отображаемыми на экране навигационной системы. Таймер зарядки запускает и останавливает зарядку, основываясь на времени, отображаемом на экране навигационной системы.
Сигнализаторы и индикаторы
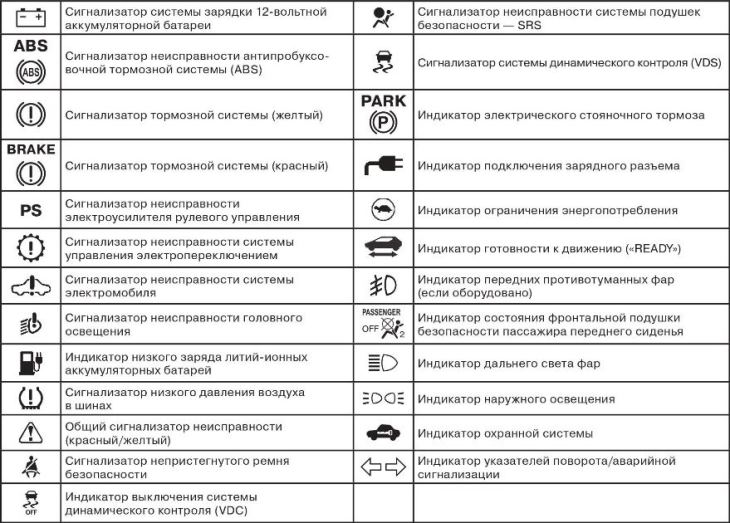
Проверка исправности ламп сигнализаторов и индикаторов
Когда все двери автомобиля закрыты, активировать и нажать кнопку включения питания электромобиля. Должны загореться следующие сигнализаторы и индикаторы (если они установлены):
Следующие сигнализаторы и индикаторы загорятся кратковременно, а затем гаснут:
Если какой-либо сигнализатор при проверке не включился, это может означать перегорание лампы или разрыв электрической цепи соответствующего сигнализатора. Нужно обратиться на сервисную станцию официального дилера NISSAN для проверки и ремонта системы.
Некоторые индикаторы и сигнализаторы также отображаются на матричном жидкокристаллическом дисплее в нижней части комбинации приборов.
Сигнализатор системы зарядки 12-вольтной аккумуляторной батареи
Преобразователь DC/DC преобразует напряжение 400 В литий-ионных аккумуляторных батарей для зарядки 12-вольтной аккумуляторной батареи.
Данный сигнализатор горит постоянно после включения питания электромобиля, и гаснет при включении индикатора готовности к движению («READY»).
Если данный сигнализатор загорается в процессе эксплуатации автомобиля, раздается звуковой сигнал и дополнительно отображаются следующие сигнализаторы:
— общий сигнализатор неисправности (красный);
— сигнализатор неисправности системы электромобиля.
На матричном жидкокристаллическом дисплее также появляются и исчезают следующие предупредительные текстовые сообщения. Если автомобиль движется: «Stop the vehicle» («Остановите автомобиль»), а если автомобиль остановлен: «When parked apply parking brake» («Если остановлен, затяните стояночный тормоз»). При появлении этих сообщений нужно незамедлительно остановить автомобиль в безопасном месте, затянуть стояночный тормоз и нажать кнопку «Р» на рычаге селектора, чтобы перевести автомобиль в режим парковки. При этом должен загореться индикатор стояночного тормоза и прозвучать соответствующий звуковой сигнал. Необходимо связаться с сертифицированным дилером Nissan.
ВНИМАНИЕ
Если сигнализатор системы зарядки 12-вольтной аккумуляторной батареи продолжает гореть после включения индикатора готовности к движению («READY»), нужно незамедлительно остановить автомобиль в безопасном месте и связаться с сертифицированным дилером Nissan.
Если индикатор системы зарядки 12-вольтной аккумуляторной батареи продолжает гореть после включения индикатора готовности к движению («READY»), не производить подзарядку 12-вольтной аккумуляторной батареи. Это может привести к неисправности преобразователя DC/DC. Необходимо связаться с сертифицированным дилером Nissan.
Примечание
Если автомобиль не переходит в режим готовности к движению («READY») при включенном питании и нажатой педали тормоза, нужно выполнить процедуру запуска от внешнего источника питания (см. главу 1 «Действия в чрезвычайных ситуациях»).
Сигнализатор неисправности антиблокировочной тормозной системы (ABS)
После включения питания или в режиме готовности к движению («READY») световой сигнализатор антиблокировочной тормозной системы загорается и через некоторое время гаснет. Это означает, что антиблокировочная тормозная система исправна.
Если сигнализатор антиблокировочной тормозной системы не гаснет при работающем электромоторе или загорается во время движения, это может указывать на неисправность антиблокировочной системы и необходимость ее проверки. Нужно обратиться на сервисную станцию официального дилера Nissan для проверки и ремонта антиблокировочной тормозной системы.
При возникновении неисправности ABS ее антиблокировочная функция отключается. Тормозная система при этом полностью сохраняет свою работоспособность. Однако система не будет способна предотвратить блокировку колес при торможении.
Сигнализатор неисправности тормозной системы (желтый)
Данный сигнализатор работает для совместных регенеративных тормозов и электронно-управляемой интеллектуальной тормозной системы. После включения питания или в режиме готовности к движению («READY») сигнализатор продолжает гореть еще около двух или трех секунд. Если сигнализатор загорается в любое другое время, это может указывать на неполадки в работе совместных регенеративных тормозов и/или электронно-управляемой интеллектуальной тормозной системы. Нужно обратиться в дилерский центр Nissan для проверки системы. Если также загорается красный сигнализатор неисправности тормозной системы, необходимо немедленно остановить автомобиль и связаться с сертифицированным дилерским центром Nissan.
ВНИМАНИЕ
Нажатие на педаль тормоза при выключенном питании электромобиля и/или низком уровне тормозной жидкости может привести к увеличению тормозного пути автомобиля и потребовать большего усилия и большего хода на педали тормоза.
Если уровень тормозной жидкости в бачке ниже минимальной отметки, не следует совершать поездок на автомобиле до полной проверки герметичности тормозной системы.
Система совместных регенеративных тормозов может не работать должным образом, если сигнализатор неисправности тормозной системы продолжает гореть в режиме готовности к движению («READY»). Даже если существует уверенность, что продолжать движение безопасно, автомобиль следует отбуксировать к месту ремонта, поскольку управление им при таком техническом состоянии может представлять опасность.
Сигнализатор неисправности тормозной системы (красный)
После включения питания электромобиля и перехода в режим готовности к движению («READY») данный сигнализатор продолжает гореть в течение нескольких секунд.
Если сигнализатор загорается в любое другое время, это может указывать на неполадки в гидравлической системе тормозов. При включении данного сигнализатора необходимо незамедлительно остановить автомобиль и связаться с сертифицированным дилером Nissan.
Сигнализатор низкого уровня тормозной жидкости
Если включено питание электромобиля, включение сигнализатора предупреждает о низком уровне тормозной жидкости. Если включен этот сигнализатор, то также включаются сигнализатор неисправности системы динамического управления (VDC) и сигнализатор неисправности тормозной системы (желтый). Если данный сигнализатор загорается в режиме готовности к движению («READY») при выключенном стояночном тормозе, нужно остановить автомобиль и выполнить следующее:
1. Проверить уровень тормозной жидкости. Если уровень тормозной жидкости низкий, долить тормозную жидкость и обратиться на сервисную станцию официального дилера Nissan для проверки системы.
2. Если уровень тормозной жидкости соответствует норме, следует немедленно обратиться на сервисную станцию официального дилера Nissan.
ВНИМАНИЕ
Тормозная система может работать неправильно, если включен сигнализатор низкого уровня тормозной жидкости. Продолжать движение опасно.
Даже если существует уверенность, что продолжать движение безопасно, автомобиль следует отбуксировать к месту ремонта, поскольку управление им при таком техническом состоянии может представлять опасность.
При выключенном питании электромобиля и/или при недостаточном уровне тормозной жидкости усилие на педали тормоза и ее ход увеличатся; соответственно увеличится тормозной путь автомобиля.
Если уровень тормозной жидкости в бачке ниже минимальной отметки, нельзя продолжать движение до проверки тормозной системы.
Сигнализатор неисправности электроусилителя рулевого управления
После включения питания электромобиля сигнализатор неисправности электроусилителя рулевого управления загорается и гаснет при переходе в режим готовности к движению («READY»). Это означает, что система электроусилителя рулевого управления исправна.
Если сигнализатор электроусилителя рулевого управления продолжает гореть после включения индикатора готовности к движению («READY»), это может указывать на неисправность системы электроусилителя рулевого управления и на необходимость ее обслуживания. Следует проверить состояние электроусилителя рулевого управления.
Если сигнализатор электроусилителя рулевого управления продолжает гореть после включения индикатора готовности к движению («READY»), усилитель рулевого управления прекращает свою работу, но водитель по-прежнему может управлять автомобилем. При этом необходимо прилагать большие усилия на рулевом колесе, особенно, в крутых поворотах и на низких скоростях движения.
Сигнализатор неисправности системы управления электропереключением
Данный сигнализатор предупреждает о неисправностях в системе управления электропереключением. Одновременно с этим сигнализатором загорается общий сигнализатор неисправности, звучит звуковой сигнал и выдается сообщение «When parked apply parking brake» на матричном жидкокристаллическом дисплее.
После выключения питания звуковой сигнал будет продолжаться. Нужно активировать стояночный тормоз. После того как стояночный тормоз будет активирован, общий сигнализатор неисправности и сообщение на матричном жидкокристаллическом дисплее погаснут, а звуковой сигнал прекратится. Необходимо проверить систему электропереключения.
Сигнализатор неисправности системы электромобиля
Данный сигнализатор загорается при обнаружении неисправностей в следующих системах:
— система тягового электромотора и инвертора;
— зарядный порт или бортовое зарядное устройство;
— система литий-ионных аккумуляторных батарей;
— система охлаждения;
— система управления переключениями;
— активация системы экстренного выключения (см. главу 1 «Действия в чрезвычайных ситуациях»).
Рекомендуется связаться с дилерским центром Nissan.
Сигнализатор неисправности головного освещения
Данный сигнализатор загорается в случае неисправности фар головного освещения. Необходимо проверить систему головного освещения.
Сигнализатор низкого давления воздуха в шинах
Автомобиль оборудован системой контроля давления воздуха в шинах (TPMS), которая следит за давлением воздуха в каждой шине.
Сигнализатор низкого давления воздуха в шинах предупреждает о низком давлении воздуха в шинах или о неисправности системы TPMS.
После включения питания электромобиля данный сигнализатор загорается приблизительно на секунду, а потом гаснет.
Предупреждение о низком давлении воздуха в шинах
Если при движении автомобиля давление воздуха в какой-либо шине упадет, этот сигнализатор загорится. Также на информационном дисплее появляется предупреждение о низком давлении воздуха в шинах (например, «Check tyre pressure» — «Проверьте давление в шинах»).
Если загорелся сигнализатор низкого давления воздуха в шинах, нужно остановить автомобиль, проверить давление воздуха во всех шинах и при необходимости довести его до величины, указанной на табличке с информацией о шинах в графе «COLD» (холодные шины), расположенной в проеме двери водителя. Сигнализатор низкого давления воздуха в шинах не выключается автоматически после корректировки давления воздуха в шине. После того как давление воздуха в шине будет доведено до рекомендованной величины, необходимо проехать на автомобиле со скоростью не менее 25 км/ч, чтобы система TPMS активировалась, а сигнализатор низкого давления воздуха в шинах погас. Для проверки давления воздуха в шинах использовать манометр.
Предупреждение о низком давлении воздуха в шинах (например, «Check tyre pressure» — «Проверьте давление в шинах») будет появляться каждый раз при включении питания электромобиля до тех пор, пока будет гореть сигнализатор низкого давления воздуха в шинах.
После замены колеса или перестановки колес также требуется сброс данных системы TPMS.
В зависимости от колебаний температуры наружного воздуха сигнализатор низкого давления воздуха в шинах может загореться даже при правильном давлении воздуха в шинах. Когда шины остынут, нужно скорректировать давление воздуха в них в соответствии с рекомендованной величиной давления воздуха в холодной шине и выполнить сброс данных системы TPMS.
Если после сброса данных системы TPMS сигнализатор низкого давления воздуха в шинах не погаснет, это может указывать на неисправность системы. Рекомендуется обратиться на сервисную станцию официального дилера Nissan для проверки и ремонта системы.
Неисправность системы контроля давления воздуха в шинах (TPMS) Если в системе TPMS обнаружена неисправность, сигнализатор низкого давления воздуха в шинах будет мигать в течение примерно минуты после перевода выключателя зажигания в положение «ON». По истечении минуты сигнализатор останется гореть постоянно. Рекомендуется обратиться на сервисную станцию официального дилера Nissan для проверки и ремонта системы. Предупреждение о низком давлении воздуха в шинах не появляется, если сигнализатор низкого давления воздуха в шинах включается при неисправности системы TPMS.
ВНИМАНИЕ
Радиоволны могут вызывать нарушения в работе медицинских приборов. Лица, пользующиеся кардиостимуляторами, должны проконсультироваться с производителем медицинского электрооборудования, прежде чем пользоваться системой.
Если сигнализатор не загорается при включении питания электромобиля, нужно как можно скорее обратиться на сервисную станцию официального дилера Nissan для проверки системы.
Если сигнализатор низкого давления воздуха в шинах загорается во время движения, нужно как можно скорее снизить скорость и остановить автомобиль на обочине, избегая при этом резких маневров и интенсивного торможения. Продолжение движения при низком давлении воздуха в шинах может привести к повреждению шин. Возможно дорожно-транспортное происшествие, сопряженное с тяжелыми травмами и повреждением автомобиля. Следует проверить давление воздуха во всех четырех шинах, довести давление воздуха в шинах до величины, рекомендованной для холодных шин («COLD») и указанной в табличке с информацией о шинах, расположенной в проеме двери водителя, чтобы сигнализатор низкого давления воздуха в шинах погас. Если сигнализатор продолжает гореть после корректировки давления воздуха в шинах, возможно, шина повреждена. Если шина повреждена, необходимо как можно скорее отремонтировать ее с помощью комплекта для временного ремонта поврежденной шины (см. главу «Действия в чрезвычайных ситуациях»).
После корректировки давления воздуха в шинах необходимо обязательно выполнить сброс данных системы TPMS. До того, как будет произведен сброс данных системы TPMS, она не сможет функционировать надлежащим образом.
При замене колеса система TPMS не будет функционировать, а сигнализатор низкого давления воздуха в шинах будет мигать примерно минуту. По истечении минуты сигнализатор останется гореть постоянно. Для замены колеса и/или возврата данных системы в исходное состояние рекомендуется обратиться на сервисную станцию официального дилера Nissan.
Замена оригинальных шин на шины, не рекомендованные компанией Nissan, может повлиять на правильность функционирования системы TPMS.
Наличие системы TPMS не отменяет необходимость регулярно проверять давление воздуха в шинах. Нужно обязательно регулярно проверять давление воздуха в шинах.
Если автомобиль движется со скоростью менее 25 км/ч, система TPMS может функционировать неправильно.
Необходимо обязательно устанавливать шины рекомендованного размера на все четыре колеса автомобиля.
Общий сигнализатор неисправности (красный/желтый)
Имеется два типа общего сигнализатора неисправности: желтый и красный. Эти сигнализаторы включаются вместе с другими сигнализаторами или индикаторами, а также при возникновении информационных сообщений на жидкокристаллическом дисплее.
Желтый общий сигнализатор неисправности
Желтый общий сигнализатор неисправности расположен в верхней части панели приборов.
Данный сигнализатор загорается при включении желтых сигнализаторов в нижней части комбинации приборов, а также при появлении сообщений на матричном жидкокристаллическом дисплее.
Красный общий сигнализатор неисправности
Красный общий сигнализатор неисправности расположен в верхней части панели приборов.
Данный сигнализатор загорается при включении красных сигнализаторов в нижней части комбинации приборов или при появлении сообщений на матричном жидкокристаллическом дисплее.
Сигнализатор непристегнутого ремня безопасности
Сигнализатор непристегнутого ремня безопасности и соответствующий звуковой сигнал напоминают водителю о необходимости пристегнуть ремень безопасности. Сигнализатор загорается каждый раз при включении питания электромобиля и продолжает гореть до тех пор, пока ремень безопасности водителя остается непристегнутым. Одновременно в течение примерно шести секунд будет звучать предупреждающий звуковой сигнал, если ремень безопасности водителя не был пристегнут. Сигнализатор непристегнутого ремня безопасности может загореться также в случае, если переднее пассажирское сиденье занято, а ремень безопасности пассажира не был пристегнут. Однако в течение пяти секунд после включения питания электромобиля система не включает сигнализатор непристегнутого ремня безопасности переднего пассажира.
Сигнализатор неисправности системы подушек безопасности (SRS)
ВНИМАНИЕ
Если горит сигнализатор неисправности системы подушек безопасности, то существует вероятность, что фронтальные, боковые подушки и надувные шторки безопасности, а также преднатяжители ремней безопасности могут не сработать при столкновении. Для того чтобы защитить себя и пассажиров от тяжелых последствий при столкновении, нужно как можно быстрее доставить автомобиль на сервисную станцию официального дилера Nissan для проверки и ремонта.
При нажатии кнопки включения питания электромобиля световой сигнализатор неисправности системы подушек безопасности должен загореться примерно на семь секунд и затем погаснуть, что указывает на исправность системы.
Если возникает одно из перечисленных ниже условий, то система подушек безопасности и пиротехнические преднатяжители ремней безопасности нуждаются в ремонте:
— сигнализатор неисправности системы подушек безопасности остается включенным по истечении примерно семи секунд;
— сигнализатор неисправности системы подушек безопасности мигает;
— сигнализатор неисправности системы подушек безопасности не включается.
До проверки и устранения неисправности система подушек безопасности и/или преднатяжители ремней безопасности могут не функционировать должным образом.
Сигнализатор системы динамического контроля (VDS)
Данный индикатор мигает при срабатывании системы динамического управления автомобилем (VDC), чтобы предупредить водителя о движении по скользкой дороге, когда тягово-сцепные возможности автомобиля ограничены.
Если сигнализатор системы VDC горит постоянно, это говорит о том, что система переведена в безопасный режим работы, например, из-за неправильного функционирования. Рекомендуется проверить систему в дилерском центре Nissan. В случае обнаружения неисправности в системе VDC данная система прекращает функционировать, но автомобиль по-прежнему сохраняет управляемость.
Индикатор низкого заряда литий-ионных аккумуляторных батарей
Данный индикатор загорается, когда доступный заряд литий-ионных аккумуляторных батарей слишком низок. В таком случае необходимо как можно скорее зарядить батареи. Желательно это сделать, пока указатель текущего заряда литий-ионных аккумуляторных батарей не достигнет нижней линии.
Примечание
Индикатор низкого заряда литий-ионных аккумуляторных батарей выключается непосредственно перед полной разрядкой литий-ионных аккумуляторных батарей и остановкой автомобиля. Для продолжения движения необходимо снова зарядить батареи.
Индикатор электрического стояночного тормоза
После включения питания электромобиля данный индикатор загорается, если стояночный тормоз активирован, и гаснет, если стояночный тормоз отпущен. Одновременно с данным индикатором включается общий сигнализатор неисправности (красный). Если стояночный тормоз отпущен, оба индикатора гаснут.
Если индикатор электрического стояночного тормоза мигает после включения питания электромобиля или готовности к движению («READY») и продолжает мигать после активации и отпускания стояночного тормоза, это указывает на неисправность электрического стояночного тормоза.
Индикатор подключения зарядного разъема
Данный индикатор загорается при подключении зарядного разъема к электромобилю и мигает в процессе зарядки.
Примечание
Если зарядный разъем подключен к электромобилю, переключатель питания не может быть переведен в режим готовности к движению («READY»).
Индикатор ограничения энергопотребления
Когда загорается индикатор ограничения энергопотребления, подача питания на тяговый электромотор уменьшается. Поэтому скорость движения электромобиля не будет увеличиваться даже при нажатии на педаль акселератора.
Если загорается данный индикатор, на дисплее навигационной системы и матричном жидкокристаллическом дисплее выводятся предупреждающие текстовые сообщения. Необходимо следовать инструкциям, приведенным на дисплеях.
Данный индикатор загорается в следующих случаях:
— доступный заряд литий-ионных аккумуляторных батарей слишком низкий;
— температура литий-ионных аккумуляторных батарей слишком низкая (примерно -20 °С);
— температура компонентов электромобиля (электромотор, инвертор, система охлаждения, литий-ионные аккумуляторные батареи и т. п.) слишком высокая;
— в системе электромобиля обнаружена неисправность.
Если загорается индикатор низкого заряда литий-ионных аккумуляторных батарей, необходимо зарядить батареи как можно скорее.
Если данный индикатор загорается из-за того, что литий-ионные аккумуляторные батареи слишком холодные вследствие низкой температуры окружающей среды, нужно переместить электромобиль в более теплое место. Кроме того, температуру литий-ионных аккумуляторных батарей можно повысить за счет зарядки.
Если индикатор загорается вследствие перегрева системы электромобиля из-за продолжительного движения на подъем, то нужно либо продолжить движение на низкой скорости в безопасном режиме, либо полностью остановить автомобиль в безопасном месте. Если данный индикатор не гаснет, нужно связаться с официальным дилером Nissan для получения помощи.
Если данный индикатор загорается не по описанным выше причинам или не гаснет, наиболее вероятной причиной является неисправность какого-либо компонента системы электромобиля. Нужно связаться с официальным дилером Nissan для получения помощи.
ВНИМАНИЕ
Режим ограничения энергопотребления может привести к падению мощности и снижению скорости движения автомобиля. Если пониженная скорость движения ниже скорости движения дорожного потока вокруг автомобиля, увеличивается риск столкновений. Необходимо быть особенно осторожным при вождении в подобной ситуации. Если автомобиль не способен поддерживать скорость безопасного движения, нужно увести его с дороги в безопасное место, после чего подзарядить литий-ионные аккумуляторные батареи, если причина заключается в низком заряде, или дать батареям остыть.
-
Страница 1
F o r y o u r s a f e t y , r e a d c a r e f u l l y a n d k e e p i n t h i s v e h i c l e . O W N E R ‘ S M A N U A L 2 0 1 5 L E A F 2 0 1 5 N I S SA N L EA F ZE 0- D ZE0-D P ri n t i ng : J u ly 2 0 14 ( 1 2 ) P ub l i c at i o n No . : OM 1 5 E A 0 Z E 0 U1 P ri n t e d i n U SA I n f o r m a t i o n P r o v i d e d b y :[…]
-
Страница 2
W elcome to the growing family of new NISSAN owners. This vehicle is delivered to you with confidence. It was produced using the latest techniques and strict quality control. This manual was prepared to help you under- stand the operation and maintenance of your vehicle so that you may enjoy many miles of driving pleasure. Please read through this […]
-
Страница 3
All information, specifications and illustrations in this manual are those in effect at the time of printing. NISSAN reserves the right to change specifications, performance, design or compo- nent suppliers without notice and without obliga- tion. From time to time, NISSAN may update or revise this manual to provide Owners with the most accurate in[…]
-
Страница 4
Arrows in an illustration that are similar to those above call attention to an item in the illustration. [] : Indicates a key/item displayed on the screen. CALIFORNIA PROPOSITION 65 W ARNING WARNING Certain vehicle components contain or emit chemicals known to the State of California to cause cancer and birth de- fects or other reproductive harm. I[…]
-
Страница 5
NISSAN CUST OMER CARE PROGRAM NISSAN CARES … Both NISSAN and your NISSAN certified LEAF dealer are dedicated to serving all your automotive needs. Y our satisfaction with your vehicle and your NISSAN certified LEAF dealer are our primary concerns. Y our NISSAN certified LEAF dealer is always available to assist you with all your automobile sales […]
-
Страница 6
T able of contents Illustrated table of contents EV Overview Charging Safety–Seats, seat belts and supplemental restraint system Instruments and controls Pre-driving checks and adjustments Display screen, heater, air conditioner, audio and phone systems Starting and driving In case of emergency Appearance and care Maintenance and do-it yourself T[…]
-
Страница 7
I n f o r m a t i o n P r o v i d e d b y :[…]
-
Страница 8
0 Illustrated table of contents Seats, seat belts and Supplemental Restraint System (SRS) ……………………….. .0-2 Exterior front ……………………. .0-3 Exterior rear ……………………. .0-4 Passenger compartment ……………… .0-5 Cockpit ………………………. .0-6 Instrument panel ………………….. .0-8 […]
-
Страница 9
1. Rear head restraints/headrests (P 1-5) 2. Child restraint anchor points (for top tether strap child restraint) (P 1-32) 3. Roof-mounted curtain side-impact supple- mental air bags (P 1-36) 4. Seat belts (P 1-8) 5. Front head restraints/headrests (P 1-5) 6. Seat belt pretensioners (P 1-49) 7. Front seats (P 1-3) 8. Supplemental front-impact air b[…]
-
Страница 10
1. Charge port lid (P 3-19) 2. Hood (P 3-17) 3. Headlight and turn signal lights — Switch operation (P 2-42) — Bulb replacement (P 8-22) 4. Windshield wiper and washer — Switch operation (P 2-38) — Blade replacement (P 8-13) — Window washer fluid (P 8-10) 5. Side camera (if so equipped) (See LEAF Navigation System Owner’s Manual.) 6. Ou[…]
-
Страница 11
1. Rear view camera* (See LEAF Navigation System Owner’s Manual.) 2. Rear window wiper and washer — Switch operation (P 2-40) — Window washer fluid (P 8-10) 3. High-mounted stop light — Bulb replacement (P 8-23) 4. Rear window defroster (P 2-41) 5. Solar cell module (if so equipped)* (P EV-30) 6. Antenna . 4-46 (See LEAF Information Sys- te[…]
-
Страница 12
1. Ceiling light (P 2-58) 2. Sun visors (P 3-21) 3. Map lights (P 2-57) — Bluetooth® Hands-Free Phone System microphone (See LEAF Navigation System Owner’s Manual.) 4. Sunglasses holder (P 2-51) 5. Inside rearview mirror (P 3-23) — HomeLink®* (if so equipped) (P 2-59) 6. Cargo area — T onneau cover* (if so equipped) (P 2-53) — EVSE (Ele[…]
-
Страница 13
1. TRIP switch for twin trip odometer (P 2-6) 2. T rip computer switch (P 2-27) 3. Instrument brightness control switch (P 2-41) 4. Headlight, fog light and turn signal switch — Headlight (P 2-42) — T urn signal light (P 2-44) — Fog light (if so equipped) (P 2-44) 5. Steering-wheel-mounted controls (left side) (See LEAF Navigation System Owne[…]
-
Страница 14
11. V ehicle Dynamic Control (VDC) OFF switch (P 2-48) 12. Charge timer OFF switch (P 2-49) 13. Charge connector lock switch (P 2-49) 14. Charge port lid opener switch (P 2-48) 15. Tilting steering wheel lever (P 3-21) 16. Heated seat switch (P 2-46) 17. Shift lever (P 5-12) 18. Storage tray (P 2-50) Illustrated table of contents 0-7 I n f o r m a […]
-
Страница 15
1. Side vents (P 4-8) 2. Meters and gauges (P 2-5) 3. Center multi-function control panel (See LEAF Navigation System Owner’s Manual.) — Navigation system — V ehicle information and setting buttons — Bluetooth® Hands-Free Phone System — Audio system 4. Hazard warning flasher switch (P 6-2) 5. Center vents (P 4-8) 6. Rear window defroster[…]
-
Страница 16
This vehicle is equipped with an upper display and a lower display . 1. Master warning light (P 2-18) 2. ECO indicator (P 2-10) 3. Speedometer (P 2-6) 4. Clock (P 2-11) 5. Outside air temperature (P 2-10) 6. T urn signal/Hazard indicator light (P 2-21) 7. Li-ion battery temperature gauge (P 2-7) 8. Warning/indicator lights (P 2-12) 9. Power meter ([…]
-
Страница 17
1. Brake fluid reservoir (P 8-10) 2. 12-volt battery (P 8-11) 3. Fuse/fusible link holder (P 8-16) 4. Fuse/fusible link holder (P 8-16) 5. Coolant tank cap (P 8-7) 6. Window washer fluid reservoir (P 8-10) 7. Fuse/fusible link holder (P 8-16) MO T OR COMP ARTMENT 0-10 Illustrated table of contents I n f o r m a t i o n P r o v i d e d b y :[…]
-
Страница 18
Warn- ing light Name Page 12-volt battery charge warning light 2-13 Anti-lock Braking Sys- tem (ABS) warning light 2-14 Approaching V ehicle Sound for Pedestrians (VSP) system warning light 2-14 BRAKE system warning light (yellow) 2-14 BRAKE warning light (red) 2-15 Warn- ing light Name Page Electric shift control sys- tem warning light 2-16 EV sys[…]
-
Страница 19
Indica- tor light Name Page High beam indicator light (blue) 2-19 Plug in indicator light 2-20 P ower limitation indica- tor light 2-20 READ Y to drive indica- tor light 2-20 Security indicator light 2-21 T urn signal/hazard indi- cator lights 2-21 V ehicle Dynamic Control (VDC) off indicator light 2-21 0-12 Illustrated table of contents I n f o r […]
-
Страница 20
EV Overview The EV (Electric V ehicle) system ………… .EV-2 Li-ion battery …………………… .EV-2 Driving with a discharged Li-ion battery …… .EV-3 Charging the 12-volt battery …………. .EV-5 Li-ion battery warmer …………….. .EV-5 High voltage precautions …………….. .EV-7 High-voltage components ………….. .E[…]
-
Страница 21
The LEAF is an electric vehicle. Some of the vehicle’s systems operate differently and have different operating characteristics than vehicles equipped with an internal combustion engine. It is important to carefully review the entire Owner’s Manual for this reason. The main difference is the LEAF is powered by electricity. The LEAF does not req[…]
-
Страница 22
NO TE: • If the outside temperature is −13°F (−25°C) or less, the Li-ion battery may freeze and it cannot be charged or provide power to run the vehicle. Move the vehicle to a warm location. • The capacity of the Li-ion battery in your vehicle to hold a charge will, like all such batteries, decrease with time and usage. As the battery age[…]
-
Страница 23
There are three levels of information that will be displayed as the Li-ion battery becomes dis- charged: 1. The following warning lights illuminate on the instrument panel and messages are displayed on the vehicle information display at the same time to indicate low Li-ion battery charge: • The low battery charge warning light • The master warn[…]
-
Страница 24
there is no power available to drive the ve- hicle. Contact Roadside assistance service shown in your NISSAN Warranty Information Booklet. See “If the Li-ion battery becomes completely discharged” in the “In case of emergency” section. CHARGING THE 12-VOL T BA TTERY The 12-volt battery is charged automatically us- ing electricity stored in […]
-
Страница 25
• The Li-ion battery warmer uses Li-ion bat- tery power to operate, even if the vehicle is connected to a charger when: – the vehicle’s power switch is in the ON position. – there is no electrical power being sup- plied to the charging equipment. • When the Li-ion battery warmer is already in operation using an external power source, it w[…]
-
Страница 26
HIGH-VOL T AGE COMPONENTS WARNING • The EV (Electric Vehicle) system uses high voltage up to approximately DC 400 volt. The system can be hot during and after starting and when the vehicle is shut off. Be careful of both the high voltage and the high temperature. Fol- low the warning labels that are at- tached to the vehicle. • Never disassembl[…]
-
Страница 27
WARNING In case of a collision: • If your vehicle is drivable, pull your vehicle off the road, push the P (Park) position switch on the shift lever, apply the parking brake and turn the EV (Electric Vehicle) system off. • Check your vehicle to see if there are exposed high-voltage parts or cables. For their locations, see “High voltage compon[…]
-
Страница 28
EMERGENC Y SHUT -OFF S Y STEM The emergency shut-off system is activated and the high-voltage system automatically turns off in the following conditions: — Front and side collisions in which the air bags are deployed. — Certain rear collisions. — Certain EV (Electric Vehicle) system malfunc- tions For the above collisions and certain other EV (Elec[…]
-
Страница 29
• Less deceleration is provided by the re- generative brake system when the Li-ion battery is fully charged. Regenerative brake is automatically reduced when the Li-ion battery is fully charged to prevent the Li-ion battery from becoming over- charged. Regenerating brake is also auto- matically reduced when the battery tem- perature is high/low ([…]
-
Страница 30
EV Overview EV-11 I n f o r m a t i o n P r o v i d e d b y :[…]
-
Страница 31
EV-12 EV Overview I n f o r m a t i o n P r o v i d e d b y :[…]
-
Страница 32
BEFORE DRIVING Y OUR VEHICLE (MODELS WITH NA VIGA TION S Y STEM) The Li-ion battery charging status and the Li-ion battery warmer operation can be checked using an internet enabled smart phone or personal computer at home. Y ou may also choose to have SMS messages (text messages) sent to a cellular phone. Additionally, the heater and air condi- tio[…]
-
Страница 33
Checking Li-ion battery charging status The Li-ion battery charge status can be checked on the NISSAN CARWINGS Data Center web- site via an internet enabled smart phone or per- sonal computer. If the Li-ion battery is not sufficiently charged, you can start charging the Li-ion battery via the re- mote charge function. See “Charging related re- mo[…]
-
Страница 34
Operating the climate control system before driving The vehicle heating and air conditioning system can be turned on via remote control with an internet enabled smart phone or personal com- puter. This allows the interior of the vehicle to be heated or cooled while the vehicle is charging. This re- duces the load on the Li-ion battery while the veh[…]
-
Страница 35
Notification of the Li-ion battery warmer operation Y ou can be notified the Li-ion battery warmer operation on the NISSAN CARWINGS Data Center website via an internet enabled smart phone or personal computer. When the power switch is in the OFF position and charge connector is not connected, if the Li-ion battery warmer starts or stops, it notifie[…]
-
Страница 36
ST ARTING Y OUR VEHICLE 1. Depress the brake pedal. 2. Press the power switch. 3. Check that the READ Y to drive indicator light illuminates and the start up sound is audible. See “Ready to drive indicator light” in the “Instruments and controls” section. 4. For models with navigation system: If route guidance is necessary , enter the desti[…]
-
Страница 37
DRIVING THE VEHICLE 1. Depress the brake pedal. 2. Release the parking brake. 3. Move the shift lever into the D (Drive) position. When released, the shift lever returns to its original center position. 4. Confirm that the vehicle is in the D (Drive) position. The indicator next to the “D” by the shift lever illuminates and “D” is displayed[…]
-
Страница 38
Use the ECO position for maximum vehicle range and for city driving. The ECO position helps re- duce power consumption by reducing accelera- tion when compared to the same accelerator pedal position in the D (Drive) position. Without navigation system model: When the ECO position is used, more regenerative brake is applied when the accelerator peda[…]
-
Страница 39
If the low battery charge warning light illuminates, the Li-ion battery charge is too low for travel. See ⬙ Low battery charge warning light” in the “Instruments and controls” section. Charge the Li-ion battery as soon as possible. EV-20 EV Overview I n f o r m a t i o n P r o v i d e d b y :[…]
-
Страница 40
Parking the vehicle 1. When stopping the vehicle, push the P (Park) position switch on the shift lever while de- pressing the brake pedal. Confirm that the vehicle is in the P (Park) position by checking the shift indicator located near the shift lever or on the vehicle information display . 2. Apply the parking brake. 3. Push the power switch to t[…]
-
Страница 41
A T HOME AFTER DRIVING Charging the Li-ion battery When you return home, connect the vehicle to the charging station installed at your home using the normal charge connector. Charge the vehicle or set the charging timer function to have the vehicle charge at a specific time. See “Charging timer” in the “Charge” sec- tion. 1. When the power […]
-
Страница 42
RANGE The distance you can drive the vehicle (range) varies considerably depending upon available charge, weather, temperature, usage, battery age, topography , and driving style. V ehicle range depends on a number of factors. When the Li-ion battery is new , the estimated ve- hicle range with a fully charged Li-ion battery is estimated to be 84 mi[…]
-
Страница 43
• Release the accelerator pedal to slow down and do not apply the brakes when traffic and road conditions allow . – This vehicle is equipped with a regenerative brake system. The primary purpose of re- generative brake system is to provide some power to recharge the Li-ion battery and extend driving range. A secondary benefit is “engine braki[…]
-
Страница 44
LI-ION BA TTER Y MAINTENANCE In addition to the regular maintenance recom- mended by NISSAN, the LEAF requires some special Li-ion battery inspections. • See the NISSAN Warranty Information Booklet for significant limitations, exclusions and pos- sible voiding of your warranty resulting from failure to have these necessary inspections, re- pairs […]
-
Страница 45
ECO indicator: This indicator provides instant information about how efficiently the vehicle is being operated. Y ou can see how changing your driving style or op- eration of vehicle accessories affects power con- sumption. For additional information, see “ECO indicator” in the “Instruments and controls” section. Lower display Li-ion batter[…]
-
Страница 46
Driving range: This indicator displays the estimated driving range (calculated based on a program that ac- counts for current driving style and operational conditions) that can be driven before recharging is necessary . For additional information, see “Driving range” in the “Instruments and controls” section. Li-ion battery available charge[…]
-
Страница 47
W arning and indicator lights The EV (Electric Vehicle) system uses the follow- ing EV (Electric V ehicle) specific warning and indicator lights. 1. Master warning light (red) 2. Master warning light (yellow) 3. 12-volt battery charge warning light 4. Plug in indicator light 5. READ Y to drive indicator light 6. Power limitation indicator light 7. […]
-
Страница 48
The sound starts when the vehicle speed is less than 16 MPH (25 km/h) while decelerating. The sound stops when the vehicle stops. The sound does not stop with the vehicle in the R (Reverse) position even if the vehicle stops. WARNING • If the sound cannot be heard, pedestri- ans may not notice the oncoming ve- hicle, which may cause an accident r[…]
-
Страница 49
SOLAR CELL MODULE (IF SO EQUIPPED) This vehicle uses a solar cell module to provide power to the 12-volt battery . The solar cell mod- ule only provides power to help maintain the charge of the 12-volt battery; it will not recharge a discharged 12-volt battery . The solar cell module does not provide power to the Li-ion battery . For maintenance, s[…]
-
Страница 50
Charging Precautions on charging …………….. .CH-2 T ypes of charge and how to charge the Li-ion battery ……………………… .CH-5 How to normal charge ……………. .CH-9 How to trickle charge ……………. .CH-11 How to quick charge (if so equipped) …… .CH-15 Charge connector lock switch ………. .CH-18 Charging methods […]
-
Страница 51
WARNING • If you use any medical electric devices, such as an implantable cardiac pace- maker or an implantable cardiovascu- lar defibrillator, check with the electric medical device manufacturer concern- ing the effects that charging may have on implanted devices before starting the charge operation. Charging may affect the operation. • If you[…]
-
Страница 52
• Pass the lower side belt of the EVSE (Electric V ehicle Supply Equipment) case securely through the fastener on the bottom of the luggage board. If the case suddenly becomes loose, it may cause serious injury or death. CAUTION • T o prevent damage to the charging equipment : – Do not close the charge port lid without closing the cap. – Do[…]
-
Страница 53
NO TE: • When charging the Li-ion battery, place the power switch in the OFF position. When the power switch is in the ON posi- tion, the Li-ion battery will not start charg- ing. • If the charger is connected to the vehicle when it is in the READY to drive position, the power switch automatically changes to the ON position. Place the power swi[…]
-
Страница 54
TYPES OF CHARGE AND HOW T O CHARGE THE LI-ION BA TTER Y Charging CH-5 I n f o r m a t i o n P r o v i d e d b y :[…]
-
Страница 55
CH-6 Charging I n f o r m a t i o n P r o v i d e d b y :[…]
-
Страница 56
This vehicle is an electric vehicle and it requires electricity to operate. The Li-ion battery is the only source of power to operate the vehicle. It is important to conserve power and plan your charging needs when you drive to avoid com- pletely discharging the Li-ion battery and being unable to drive. There are three methods available to charge t[…]
-
Страница 57
hardware and software differences. NISSAN is working with state, municipalities utility compa- nies and others to assist in the preparation of markets and infrastructure, but makes no repre- sentations that public charging stations will be available in locations where you wish to operate the vehicle, nor can NISSAN predict the period of time it may[…]
-
Страница 58
• Check by using the Li-ion battery available charge gauge on the meter when the power switch is placed in the ON position. See “Li-ion battery available charge gauge” in the “Instru- ments and controls” section and “Li-ion battery low charge warning” in the “Instruments and controls” section. • Check by using the charging statu[…]
-
Страница 59
• NISSAN recommends that you connect the normal charge cable when getting out of the vehicle, even if it is not going to be used. By doing this, you can get the most out of the remote climate control (models with navigation system) and Climate Ctrl. Timer functions the next time you use the vehicle. T o start normal charge: 1. Push the P (Park) p[…]
-
Страница 60
NO TE: • T o stop charging mid-charge, remove the charge connector. Charging automatically stops. HOW T O TRICKLE CHARGE WARNING • If you use any medical electric devices, such as an implantable cardiac pace- maker or an implantable cardiovascu- lar defibrillator, check with the electric medical device manufacturer concern- ing the effects that[…]
-
Страница 61
• Pass the lower side belt of the EVSE (Electric V ehicle Supply Equipment) case securely through the fastener on the bottom of the luggage board. If the case suddenly becomes loose, it may cause serious injury or death. CAUTION • Only charge using a standard 110 — 120 volt, 15A dedicated electrical outlet (For example do not use an electric ge[…]
-
Страница 62
T o start trickle charging: *:Y ou can pass a rope through the hole 䊊 A on the control box in order to hang it up while the Li-ion battery is charging. 1. Push the P (Park) position switch to place the vehicle in the P (Park) position and apply the parking brake. 2. When charging the Li-ion battery, place the power switch in the OFF position. Whe[…]
-
Страница 63
8. Connect the charge connector to the charge port. If it is connected normally , a beep will sound once. 9. If charging has started, or if the Li-ion battery is waiting for charging timer, a beep will sound twice and the charging status indicator light display will change. See “Charging status in- dicator lights” in this section. 10. When rech[…]
-
Страница 64
5. Store in its case. NO TE: Perform the following procedure to store the EVSE (Electric Vehicle Supply Equipment) in the case. a. Wind the charge cable into a size that will allow it to be stored in the case (approximately 9.8 in (250 mm) in diameter) . b. Place the EVSE (Electric Vehicle Sup- ply Equipment) control box into the back of the case. […]
-
Страница 65
NO TE: Quick charging is possible (even several times a day) if the battery temperature is not near the red zone. If the battery tem- perature reaches the red zone, in order to protect the battery, quick charging is not allowed and the power limitation mode will be triggered. T o start charging: 1. Push the P (Park) position switch to place the veh[…]
-
Страница 66
CAUTION • Be sure to insert the charge connector straight into the quick charge port right up to the base. Failure to do so may result in the Li-ion battery not charging or could cause damage to the charging equipment. 5. Grasp the lock lever and lock the charge connector. 6. Follow the instructions on the quick charge equipment to start charging[…]
-
Страница 67
T o finish charging: 1. Confirm charging is stopped by looking at the indicators on the dash. The charge connector can be disconnected from the vehicle when charging is stopped. 2. Unlock the charge connector and remove from the vehicle and properly store it. 3. Close the quick charge port cap. 4. Shut the charge port lid. CAUTION • As the quick […]
-
Страница 68
AUT O mode T o select AUT O mode, push the AUT O side 䊊 1 of the charge connector lock switch. The indicator light on the switch 䊊 3 will illuminate. When AUT O mode is selected, the charge con- nector is locked while charging is in process. The charge connector will be unlocked automatically when charging is completed. L OCK mode T o select th[…]
-
Страница 69
Unlock operation using charge port lid opener switch: 1. Push the charge port lid opener switch. 2. The charging status indicator light flashes 3 times and a beep sounds 3 times. The charge connector lock is unlocked for 30 seconds. 3. After 30 seconds, the charge connector lock is locked. NO TE: • Depending on the charging station, the lock mech[…]
-
Страница 70
CHARGING TIMER Use charging timer to schedule when the Li-ion battery charges. The vehicle automatically begins charging at the scheduled times when the charge connector is connected to the vehicle. The timers do not need to be reset each time the Li-ion battery needs charging. With navigation system The charging timer can save two timer settings t[…]
-
Страница 71
3. Enter the Li-ion battery charge start time. T ouch [END Time] to change the time to stop charging. NO TE: Charging timer is performed according to the current time setting on the bottom right of the display. When setting the charging timer function, be sure to check that the current time displayed is correct. 4. T ouch [Assign Days] to set the c[…]
-
Страница 72
7. The [Timer 1] indicator illuminates after the charging timer is set. Use the same procedure to set the Timer 2 setting. 8. Place the power switch in the OFF position, and then connect the charge connector to the vehicle. NO TE: • Always place the power switch in the OFF position after setting the charging timers. When the power switch is in th[…]
-
Страница 73
two timers are not set to operate at the same time, it is possible that the charger will not start or the battery will not be charged to the level expected. • If the Li-ion battery warmer is operating while the Climate Ctrl. Timer or Remote Climate Control is being used, perfor- mance of the Climate Control will be reduced. • The Li-ion battery[…]
-
Страница 74
2. Push the switch 䊊 B to highlight “Charg- ing Timer” on the vehicle information display and then push the switch. 3. The “Charging Timer” screen is displayed. T o change the time or turn the timer on or off, push the switch. T o turn the timer on or off, use the switch to highlight “On” or “Off” and then push the switch. If “O[…]
-
Страница 75
4. The hour portion of the time is highlighted on the screen. Push the switch to change the hour field in increments of one hour. Push the switch to move to the minutes field. 5. Push the switch to change the minute field in increments of ten minutes. Push the switch to finish setting the charging timer. IMMEDIA TE CHARGE When a charging timer is n[…]
-
Страница 76
NO TE: • Y ou have 15 minutes to connect a normal or trickle charge connector to the vehicle after the immediate charge switch is pressed. If a charge connector is not con- nected to the vehicle within 15 minutes, the vehicle automatically returns to the previous setting. • Immediate charge will be available for 15 minutes before returning auto[…]
-
Страница 77
CHARGING ST A TUS INDICA T OR LIGHTS The charging status indicator lights 䊊 1 to 䊊 3 display the charging status, and are visible from both inside and outside the vehicle. When the normal charge connector lock is unlocked All of the indicator lights, 䊊 1 to 䊊 3 , will flash and beep will sound three times when the normal charge connector lo[…]
-
Страница 78
Ready for immediate charge When the power switch is off and if the immedi- ate charge switch is pressed while the charge cable is not connected, the indicator light 䊊 2 illuminates. This indicator light 䊊 2 illuminates when the ve- hicle is ready for immediate charge. Y ou have 15 minutes to connect the charge connector to the vehicle. If the c[…]
-
Страница 79
When the indicator light 䊊 3 flashes The indicator light 䊊 3 flashes when the 12-volt battery is being charged. See “Charging the 12- volt battery” in the “EV overview” section. The indicator will also flash for up to 5 minutes if the electrical power to the EVSE is interrupted during charging. Charging will restart automati- cally when[…]
-
Страница 80
EVSE (ELECTRIC VEHICLE SUPPL Y EQUIPMENT) CONTROL BOX INDICA T OR LIGHT When a trickle charge is being performed, the charging status is shown by the indicator light that is on the EVSE (Electric V ehicle Supply Equipment) control box. An indicator light also indicates if there is a EVSE (Electric Vehicle Supply Equipment) malfunction. Charging CH-[…]
-
Страница 81
READ Y CHARGE F AUL T Status and action to be taken 䡩䡩 䡩 Every time the EVSE (Electric V ehicle Supply Equipment) plug is connected to an outlet, all indicator lights illuminate for 0.5 seconds. 䡩 쏹쏹 After initial processing is completed, when the EVSE (Electric Vehicle Supply Equipment) is not connected to the vehicle, or the EVSE (Ele[…]
-
Страница 82
Symptom Possible cause Possible solution Charging cannot be per- formed. The vehicle power switch is in the ON position. Before charging, place the vehicle power switch in the OFF position. Both the normal charge connector and the quick charge connector are connected at the same time. The normal charge connector and the quick charge connector canno[…]
-
Страница 83
Symptom Possible cause Possible solution Charging timer cannot be performed. The charge cable is not connected. Connect the charge cable. The time on the clock is wrong. The charging timer function does not start charging based on the clock located on the upper dis- play. Confirm that the date and time shown on the charging timer screen are the sam[…]
-
Страница 84
Symptom Possible cause Possible solution Normal charge stops in the middle of charging. There is no power coming from the outlet. There may have been a electrical power failure, or the breaker may have failed. Charging will resume when the power source is reset. The charge cable has been disconnected. Check that the charge cable has not been discon[…]
-
Страница 85
NO TES CH-36 Charging I n f o r m a t i o n P r o v i d e d b y :[…]
-
Страница 86
1 Safety–Seats, seat belts and supplemental restraint system Seats ……………………….. .1-2 Front seats …………………… .1-3 Rear seats …………………… .1-4 Head restraints/headrests …………… .1-5 Seat belts …………………….. .1-8 Precautions on seat belt usage ………… .1-8 Pregnant women ………[…]
-
Страница 87
WARNING • Do not ride in a moving vehicle when the seatback is reclined. This can be dangerous. The shoulder belt will not be against your body. In an accident, you could be thrown into it and receive neck or other serious injuries. Y ou could also slide under the lap belt and receive serious internal injuries. • For the most effective protecti[…]
-
Страница 88
FRONT SEA TS Front manual seat adjustment Forward and backward: Pull the bar up and hold it while sliding the seat forward or backward to the preferred position. Release the bar to lock the seat in position. Reclining: T o recline the seatback, pull the lever up and lean back. T o bring the seatback forward, pull the lever up and lean your body for[…]
-
Страница 89
REAR SEA TS Folding Before folding the rear seats: • Secure the seat belts on the seat belt hooks located on the side wall. See “Seat belt hooks” in this section. T o fold down the seatback, pull the release knob. T o return the seatback to the seating position, lift up each seatback and push it to the upright position until it is latched. WA[…]
-
Страница 90
HEAD RESTRAINTS/HEADRESTS WARNING Head restraint/headrest supplement the other vehicle safety systems. They may provide additional protection against in- jury in certain rear end collisions. Adjust- able head restraints/headrests must be adjusted properly, as specified in this section. Check the adjustment after someone else uses the seat. Do not a[…]
-
Страница 91
Adjustable head restraint/headrest components 1. Removable head restraint/headrest 2. Multiple notches 3. Lock knob 4. Stalks Non-adjustable head restraint/ headrest components 1. Removable head restraint/headrest 2. Single notch 3. Lock knob 4. Stalks Adjust For adjustable head restraint/headrest Adjust the head restraint/headrest so the center is[…]
-
Страница 92
Make sure the head restraint/headrest is posi- tioned so the lock knob is engaged in the notch before riding in that designated seating position. Remove Use the following procedure to remove the head restraint/headrest. 1. Pull the head restraint/headrest up to the highest position. 2. Push and hold the lock knob. 3. Remove the head restraint/headr[…]
-
Страница 93
Raise T o raise the head restraint/headrest, pull it up. Make sure the head restraint/headrest is posi- tioned so the lock knob is engaged in the notch before riding in that designated seating position. Lower T o lower, push and hold the lock knob and push the head restraint/headrest down Make sure the head restraint/headrest is posi- tioned so the[…]
-
Страница 94
Safety–Seats, seat belts and supplemental restraint system 1-9 I n f o r m a t i o n P r o v i d e d b y :[…]
-
Страница 95
WARNING • Every person who drives or rides in this vehicle should use a seat belt at all times. Children should be properly re- strained in the rear seat and, if appro- priate, in a child restraint. • The seat belt should be properly ad- justed to a snug fit. Failure to do so may reduce the effectiveness of the entire restraint system and incre[…]
-
Страница 96
PREGNANT WOMEN NISSAN recommends that pregnant women use seat belts. The seat belt should be worn snug, and always position the lap belt as low as pos- sible around the hips, not the waist. Place the shoulder belt over your shoulder and across your chest. Never put the lap/shoulder belt over your abdominal area. Contact your doctor for specific rec[…]
-
Страница 97
• If the seat belt cannot be pulled from its fully retracted position, firmly pull the belt and release it. Then smoothly pull the belt out of the retractor. 3. Position the lap belt portion low and snug on the hips as shown. 4. Pull the shoulder belt portion toward the re- tractor to take up extra slack. Be sure the shoulder belt is routed over […]
-
Страница 98
Unfastening the seat belts T o unfasten the seat belt, push the button on the buckle. The seat belt automatically retracts. Checking seat belt operation Seat belt retractors are designed to lock seat belt movement by two separate methods: • When the belt is pulled quickly from the retrac- tor. • When the vehicle slows down rapidly. T o increase[…]
-
Страница 99
WARNING • After adjustment, release the adjust- ment button and then try to move the shoulder belt anchor up and down to make sure that it is securely fixed in position. • The shoulder belt anchor height should be adjusted to the position that is best for you. Failure to do so may reduce the effectiveness of the entire restraint system and incr[…]
-
Страница 100
SEA T BEL T EXTENDERS If, because of body size or driving position, it is not possible to properly fit the lap-shoulder belt and fasten it, an extender that is compatible with the installed seat belts is available that can be purchased. The extender adds approximately 8 in (200 mm) of length and may be used for either the driver or front passenger […]
-
Страница 101
There are three basic types of child restraint systems: • Rear-facing child restraint • Forward-facing child restraint • Booster seat The proper restraint depends on the child’s size. Generally , infants up to about 1 year and less than 20 lb (9 kg) should be placed in rear-facing child restraints. Forward-facing child restraints are availa[…]
-
Страница 102
placed in a commercially available booster seat to obtain proper seat belt fit. For a seat belt to fit properly , the booster seat should raise the child so that the shoulder belt is properly positioned across the chest and the top, middle portion of the shoulder. The shoulder belt should not cross the neck or face and should not fall off the shoul[…]
-
Страница 103
PRECAUTIONS ON CHILD RESTRAINTS WARNING • Failure to follow the warnings and in- structions for proper use and installa- tion of child restraints could result in serious injury or death of a child or other passengers in a sudden stop or collision: – The child restraint must be used and installed properly. Always follow all of the child restrain[…]
-
Страница 104
For details, see “Lower Anchors and T ethers for CHildren System (LA T CH)” in this section. If you do not have a LA T CH compatible child restraint, the vehicle seat belts can be used. Several manufacturers offer child restraints for infants and small children of various sizes. When selecting any child restraint, keep the following points in m[…]
-
Страница 105
seat belt (not the lower anchors) to install the child restraint. Be sure to follow the child restraint manufacturer’s instructions for installation. LA T CH lower anchor WARNING Failure to follow the warnings and in- structions for proper use and installation of child restraints could result in serious injury or death of a child or other passen-[…]
-
Страница 106
Installing child restraint LA T CH lower anchor attachments LA T CH compatible child restraints include two rigid or webbing-mounted attachments that can be connected to two anchors located at certain seating positions in your vehicle. With this sys- tem, you do not have to use a vehicle seat belt to secure the child restraint. Check your child re-[…]
-
Страница 107
• Child restraint anchorages are de- signed to withstand only those loads imposed by correctly fitted child re- straints. Under no circumstances are they to be used to attach adult seat belts, or other items or equipment to the vehicle. Doing so could damage the child restraint anchorages. The child restraint will not be properly in- stalled usin[…]
-
Страница 108
2. Secure the child restraint anchor attachments to the LA T CH lower anchors. Check to make sure that the LA T CH attachment is properly attached to the lower anchors. 3. For child restraints that are equipped with webbing-mounted attachments, remove any additional slack from the anchor attachments. Press downward and rearward firmly in the center[…]
-
Страница 109
5. Check to make sure that the child restraint is properly secured prior to each use. If the child restraint is loose, repeat steps 2 through 4. REAR-F ACING CHILD RESTRAINT INST ALLA TION USING THE SEA T BEL TS WARNING The three-point seat belt with Automatic Locking Retractor (ALR) must be used when installing a child restraint. Failure to use th[…]
-
Страница 110
Follow these steps to install a rear-facing child restraint using the vehicle seat belt in the rear seat: 1. Child restraints for infants must be used in the rear-facing direction and there- fore must not be used in the front seat. P osition the child restraint on the seat. Always follow the restraint manufacturer’s instructions. 2. Route the sea[…]
-
Страница 111
4. Allow the seat belt to retract. Pull up on the shoulder belt to remove any slack in the belt. 5. Remove any additional slack from the child restraint. Press downward and rearward firmly in the center of the child restraint with your hand to compress the vehicle seat cushion and seatback while pulling up on the seat belt. 6. After attaching the c[…]
-
Страница 112
FORW ARD-FACING CHILD RESTRAINT INST ALLA TION USING LA T CH Refer to all Warnings and Cautions in “Child safety” and “Child restraints” in this section be- fore installing a child restraint. NISSAN does not recommend the use of the lower anchors if the combined weight of the child and the child restraint exceeds 65 lbs (29.5 kg) . If the c[…]
-
Страница 113
3. The back of the child restraint should be se- cured against the seatback. If necessary, remove the head restraint/headrest to obtain the correct child restraint fit. If the head restraint/headrest is removed, store it in a secure place. Be sure to reinstall the head restraint/headrest when the child re- straint is removed . See “ Adjust” in […]
-
Страница 114
7. Check to make sure the child restraint is prop- erly secured prior to each use. If the child restraint is loose, repeat steps 1 through 6. FORW ARD-FACING CHILD RESTRAINT INST ALLA TION USING THE SEA T BEL TS WARNING The three-point seat belt with Automatic Locking Retractor (ALR) must be used when installing a child restraint. Failure to use th[…]
-
Страница 115
If the seating position does not have a remov- able head restraint/headrest and it is interfer- ing with the proper child restraint fit, try an- other seating position or a different child restraint. 3. Route the seat belt tongue through the child restraint and insert it into the buckle until you hear and feel the latch engage. Be sure to follow th[…]
-
Страница 116
5. Allow the seat belt to retract. Pull up on the shoulder belt to remove any slack in the belt. 6. Remove any additional slack from the seat belt. Press downward and rearward firmly in the center of the child restraint with your knee to compress the vehicle seat cushion and seatback while pulling up on the seat belt. 7. Tighten the tether strap ac[…]
-
Страница 117
After the child restraint is removed and the seat belt is fully retracted, the ALR mode (child re- straint mode) is canceled. INST ALLING T OP TETHER STRAP WARNING • Child restraint anchorages are de- signed to withstand only those loads imposed by correctly fitted child re- straints. Under no circumstances are they to be used to attach adult sea[…]
-
Страница 118
WARNING Do not pass the tether strap through strap will be not be properly routed. Y our child could be seriously injured or killed in a collision if the child restraint top tether strap is not properly routed (mod- els without rear seat) . 3. Secure the tether strap to the tether anchor point on the seatback. 4. Refer to the appropriate child rest[…]
-
Страница 119
Booster seats of various sizes are offered by several manufacturers. When selecting any booster seat, keep the following points in mind: • Choose only a booster seat with a label certify- ing that it complies with Federal Motor Vehicle Safety Standard 213 or Canadian Motor V e- hicle Safety Standard 213. • Check the booster seat in your vehicle[…]
-
Страница 120
BOOSTER SEA T INST ALLA TION CAUTION Do not use the lap/shoulder belt Auto- matic Locking Retractor (ALR) mode when using a booster seat with the seat belts. Refer to all Warnings and Cautions in “Child safety” , “Child restraints” and “Booster seats” in this section before installing a child restraint. Follow these steps to install a b[…]
-
Страница 121
If the seating position does not have an adjust- able head restraint/headrest and it is interfer- ing with the proper booster seat fit, try another seating position or a different booster seat. 4. Position the lap portion of the seat belt low and snug on the child’s hips. Be sure to follow the booster seat manufacturer’s instructions for adjust[…]
-
Страница 122
Roof-mounted curtain side-impact supple- mental air bag system: This system can help cushion the impact force to the head of occu- pants in front and rear outboard seating positions in certain side impact collisions. In a side impact, the curtain air bags are designed to inflate on the side where the vehicle is impacted. These supplemental restrain[…]
-
Страница 123
WARNING • The front air bags ordinarily will not inflate in the event of a side impact, rear impact, rollover or lower severity frontal collision. Always wear your seat belts to help reduce the risk or severity of injury in various kinds of accidents. • The front passenger air bag will not inflate if the passenger air bag status light is lit or[…]
-
Страница 124
WARNING • Never let children ride unrestrained or extend their hands or face out of the window. Do not attempt to hold them in your lap or arms. Some examples of dangerous riding positions are shown in the illustrations. • Children may be severely injured or killed when the front air bags, side air bags or curtain air bags inflate if they are n[…]
-
Страница 125
WARNING Front seat-mounted side-impact supple- mental air bags and roof-mounted cur- tain side-impact supplemental air bags: • The side air bags and curtain air bags ordinarily will not inflate in the event of a frontal impact, rear impact, rollover or lower severity side collision. Always wear your seat belts to help reduce the risk or severity […]
-
Страница 126
• The seat belts, the side air bags and curtain air bags are most effective when you are sitting well back and upright in the seat. The side air bag and curtain air bag inflate with great force. Do not allow anyone to place their hand, leg or face near the side air bag on the side of the seatback of the front seat or near the side roof rails. Do […]
-
Страница 127
1. Crash zone sensor 2. Supplemental front-impact air bag modules 3. Front seat-mounted side-impact supplemen- tal air bag modules 4. Occupant classification sensors (weight sensors) 5. Occupant classification system control unit 6. Roof-mounted curtain side-impact supple- mental air bag inflators 7. Roof-mounted curtain side-impact supple- mental […]
-
Страница 128
• If you notice that the front passenger air bag status light is not operating as described in this section, please take your vehicle to your NISSAN certified LEAF dealer to check the occupant classification system. • Until you have confirmed with your dealer that your passenger seat occu- pant classification system is working properly, positio[…]
-
Страница 129
The front air bags deflate quickly after a collision. The front air bags operate only when the power switch is in the ON position. After the power switch is placed in the ON position, the supplemental air bag warning light illuminates. The supplemental air bag warning light will turn off after about 7 seconds if the system is operational. Front pas[…]
-
Страница 130
seat, the Advanced Air Bag System is designed to turn the passenger air bag OFF in accordance with the regulations. Also, if a child restraint of the type specified in the regulations is on the seat, its weight and the child’s weight can be detected and cause the air bag to turn OFF . Front passenger seat adult occupants who are properly seated a[…]
-
Страница 131
becomes unoccupied, the air bag status light will remain off. If a malfunction occurs in the front passenger air bag system, the supplemental air bag warning light , located in the meter and gauges area, will blink. Have the system checked by a NISSAN certified LEAF dealer. Other supplemental front-impact air bag precautions WARNING • Do not plac[…]
-
Страница 132
• No unauthorized changes should be made to any components or wiring of the seat belt system. This may affect the front air bag system. T ampering with the seat belt system may result in serious personal injury. • Work on and around the front air bag system should be done by a NISSAN certified LEAF dealer. Installation of electrical equipment s[…]
-
Страница 133
practical away from the side air bags. Rear seat passengers should be seated as far away as practical from the door finishers and side roof rails. The side air bags and curtain air bags inflate quickly in order to help protect the occupants in the outboard seating positions. Because of this, the force of the side air bags and curtain air bags infla[…]
-
Страница 134
SEA T BEL TS WITH PRETENSIONERS (FRONT SEA TS) WARNING • The pretensioners cannot be reused after activation. They must be replaced together with the retractor and buckle as a unit. • If the vehicle becomes involved in a collision but a pretensioner is not acti- vated, be sure to have the pretensioner system checked and, if necessary, re- place[…]
-
Страница 135
SUPPLEMENT AL AIR BAG W ARNING LABELS W arning labels about the supplemental front- impact air bag system are placed in the vehicle as shown in the illustration. 䊊 1 SRS air bag The warning labels are located on the surface of the sun visors. SUPPLEMENT AL AIR BAG W ARNING LIGHT The supplemental air bag warning light, display- ing in the instrume[…]
-
Страница 136
WARNING If the supplemental air bag warning light is on, it could mean that the front air bag, side air bag, curtain air bag and/or pre- tensioner systems will not operate in an accident. T o help avoid injury to yourself or others, have your vehicle checked by a NISSAN certified LEAF dealer as soon as possible. REP AIR AND REPLACEMENT PROCEDURE Th[…]
-
Страница 137
NO TES 1-52 Safety–Seats, seat belts and supplemental restraint system I n f o r m a t i o n P r o v i d e d b y :[…]
-
Страница 138
2 Instruments and controls Cockpit ………………………. .2-3 Instrument panel ………………….. .2-4 Meters and gauges ………………… .2-5 Speedometer and odometer ………….. .2-6 Li-ion battery temperature gauge ……….. .2-7 P ower meter ………………….. .2-7 Driving range ………………….. .2-8 Li-ion bat[…]
-
Страница 139
Console box …………………. .2-52 T onneau cover (if so equipped) ……….. .2-53 Stowing golf bags ………………. .2-54 Luggage side hook ……………… .2-54 Windows …………………….. .2-55 P ower windows ……………….. .2-55 Interior lights …………………… .2-57 Map lights ………………….. .2-57 C[…]
-
Страница 140
1. TRIP switch for twin trip odometer 2. T rip computer switch 3. Instrument brightness control switch 4. Headlight, fog light (if so equipped) and turn signal switch — Headlight — T urn signal light — Fog light (if so equipped) 5. Steering-wheel-mounted controls (left side) (See LEAF Navigation System Owner’s Manual.) — Driving range but[…]
-
Страница 141
1. Side ventilator 2. Meters and gauges 3. Center multi-function control panel (See LEAF Navigation System Owner’s Manual.) — Navigation system — V ehicle information and setting buttons — Bluetooth® Hands-Free Phone System — Audio system 4. Hazard warning flasher switch 5. Center ventilator 6. Rear window defroster switch 7. Front passe[…]
-
Страница 142
1. Master warning lights 2. ECO indicator 3. Speedometer 4. Clock 5. Outside air temperature 6. T urn signal/Hazard indicator light 7. Li-ion battery temperature gauge 8. W arning/Indicator lights 9. P ower meter 10. ECO indicator 11. READ Y to drive indicator light 12. V ehicle information display — Odometer/twin trip odometer — T rip computer[…]
-
Страница 143
SPEEDOMETER AND ODOMETER Speedometer The speedometer indicates the vehicle speed in miles per hour (MPH) or kilometers per hour (km/h) . Odometer/twin trip odometer The odometer 䊊 1 and twin trip odometer 䊊 2 are displayed on the vehicle information display when the power switch is in the ON or READ Y to drive position. The odometer records the[…]
-
Страница 144
LI-ION BA TTER Y TEMPERA TURE GAUGE The gauge indicates the temperature of the Li-ion battery . The temperature of the Li-ion battery is within the normal range when the display is within the zone 䊊 1 shown in the illustration. The temperature of the Li-ion battery varies ac- cording to the outside air temperature and driving conditions. NO TE: ?[…]
-
Страница 145
the regenerative brake system (Li-ion battery charging) . The power meter also indicates if the power provided to the motor is limited or if regenerative braking is limited. When power or regenerative braking is limited, the circles on the display change from a double circle to a single circle 䊊 2 . Regenerative braking is automatically reduced w[…]
-
Страница 146
LI-ION BA TTER Y A V AILABLE CHARGE GAUGE The gauge 䊊 1 indicates the approximate avail- able Li-ion battery charge to run the vehicle. Charge the Li-ion battery before the display reaches the bottom line. The low battery charge warning light illu- minates when the Li-ion battery available charge gauge is getting low . Charge as soon as it is con[…]
-
Страница 147
LI-ION BA TTER Y CAP ACITY LEVEL GAUGE This gauge indicates the amount of charge the Li-ion battery is capable of storing. When the capacity of the Li-ion battery de- creases with age and usage, the level of the gauge will also decrease. OUTSIDE AIR TEMPERA TURE The outside air temperature is displayed in °F or °C. The display may differ from the[…]
-
Страница 148
• Time the vehicle is not moving while the vehicle is in the READ Y to drive mode and accessories are on. Instant ECO driving level The instant ECO driving level 䊊 1 is displayed by the number of bars that increase (more economi- cal driving) or decrease (less economical driving) depending on vehicle operation. Long term ECO driving level Long […]
-
Страница 149
12-volt battery charge warning light Low tire pressure warning light High beam indicator light Anti-lock Braking System (ABS) warning light Master warning light (red/yellow) Plug in indicator light Approaching Vehicle Sound for Pedestrians (VSP) system warning light Power steering warning light Power limitation indicator light BRAKE system warning […]
-
Страница 150
Headlight warning light Front fog light indicator light (if so equipped) Low battery charge warning light Front passenger air bag status light CHECKING BULBS With all doors closed, apply the parking brake, and push the power switch in the ON position. The following lights will illuminate (if so equipped): , , The following lights illuminate briefly[…]
-
Страница 151
• If the 12-volt warning light illuminates continuously when the power switch is in the READ Y to drive position. Do not charge the 12-volt battery while this warning light is illuminated. It may lead to a malfunction of the DC/DC converter system. Contact a NISSAN certified LEAF dealer. NO TE: • If the vehicle does not go into the READ Y to dr[…]
-
Страница 152
switch is placed in the ON position or in the READ Y to drive position, the light remains illumi- nated for about 2 or 3 seconds. If the light illumi- nates at any other time, it may indicate that the cooperative regenerative brake and/or the elec- tronically driven intelligent brake systems are not functioning properly . Have the system checked by[…]
-
Страница 153
• Pressing the brake pedal when the power switch position is not in the ON or READY to drive position and/or low brake fluid level may increase the stopping distance and braking will re- quire greater pedal effort as well as pedal travel. • If the brake fluid level is below the minimum or MIN mark on the brake fluid reservoir, do not drive unti[…]
-
Страница 154
When the low tire pressure warning light illumi- nates, you should stop and adjust the tire pres- sure to the recommended COLD tire pressure shown on the Tire and Loading Information label. The low tire pressure warning light does not automatically turn off when the tire pressure is adjusted. After the tire is inflated to the recom- mended pressure[…]
-
Страница 155
• If the vehicle is being driven at speeds of less than 16 MPH (25 km/h) , the TPMS may not operate correctly. • Be sure to install the specified size of tires to the four wheels correctly. Master warning light (red/yellow) There are two types of master warning lights: yellow and red. These lights illuminate if any warning lights or indicator l[…]
-
Страница 156
must be taken to your nearest NISSAN certified LEAF dealer. • The supplemental air bag warning light remains on after approximately 7 seconds. • The supplemental air bag warning light flashes intermittently . • The supplemental air bag warning light does not illuminate at all. Unless checked and repaired, the Supplemental Restraint Systems an[…]
-
Страница 157
Plug in indicator light This light illuminates while charge connector is connected to the vehicle and blinks during charg- ing. NO TE: If the charge connector is connected to the vehicle, the power switch can not be placed in the READ Y to drive position. P ower limitation indicator light When the power limitation indicator light is illu- minated, […]
-
Страница 158
Security indicator light This light blinks when the power switch is in the ACC, OFF or L OCK position. This function indi- cates the security system equipped on the ve- hicle is operational. If the security system is malfunctioning, this light will remain on while the power switch is in the ON position. For additional information, see “Security s[…]
-
Страница 159
Seat belt warning chime The seat belt warning chime will sound for about 6 seconds unless the driver’s seat belt is securely fastened. 12-volt battery charge warning chime If the 12-volt battery charge warning light illumi- nates, the chime will sound when a warning mes- sage is displayed on the vehicle information dis- play on the lower display […]
-
Страница 160
INDICA T ORS FOR OPERA TION 1. READ Y to drive position operation indicator This indicator appears while the vehicle is in the P (Park) position. This indicator means that the EV (Electric Vehicle) system will start when the power switch is pressed with the brake pedal depressed. 2. K ey is not detected warning This warning appears in either of the[…]
-
Страница 161
Unregistered Intelligent Key: This warning appears when the power switch is placed in the ON, ACC or READ Y to drive posi- tion and the Intelligent Key cannot be recognized by the system. Y ou cannot place the power switch in the READ Y to drive position with an unregistered key. Use an Intelligent Key that has been registered. See “NISSAN Intell[…]
-
Страница 162
(See “Window washer fluid” in the “Maintenance and do-it-yourself” section.) 10. Light reminder warning This warning appears when the power switch is turned to the OFF position but the headlight switch is still ON. T urn off the headlight switch. 11. Plug in indicator This indicator appears when the charge connec- tor is connected. If the c[…]
-
Страница 163
in a safe location and contact a NISSAN certified LEAF dealer. 19. Apply parking brake warning This warning appears if the DC/DC converter system is not functioning properly after the “Stop the vehicle” message above. If this warning ap- pears on the display, stop the vehicle in a safe location and push the P (Park) position switch on the shift[…]
-
Страница 164
25. Parking brake release warning This warning appears when the vehicle speed is above 4 MPH (7km/h) and the parking brake is applied. TRIP COMPUTER Switches for the trip computer are located on the left side of the combination meter panel. T o op- erate the trip computer, push the following switches: 䊊 A switch 䊊 B switch When the power switch[…]
-
Страница 165
Charging time Displays the estimated time to a full Li-ion charge based on the Charging Mode selected. The time needed to charge the Li-ion battery charges based on: • Outside temperature • Li-ion battery temperature • Available electrical power supplied to the charger NO TE: • Immediately after charging has finished, the charge time will b[…]
-
Страница 166
Instant energy economy: The instant energy economy mode shows the instant energy economy via a moving bar graph. When regenerated energy is being stored in the Li-ion battery while driving, the instant energy economy display will show the maximum value. State of charge (%) Displays the vehicles current state of charge. Average speed The average spe[…]
-
Страница 167
Driving distance and elapsed time Driving distance: The driving distance mode shows the total distance (miles or km) the vehicle has been driven since the last reset. The distance can be reset by pushing the switch 䊊 B for longer than 1 second. (The elapsed time is also reset at the same time.) Elapsed time: The elapsed time mode shows the time s[…]
-
Страница 168
Maintenance: There are 5 submenus under the maintenance menu. • Back Select this submenu to return to the top page of the settings mode. • Tire Select this submenu to set or reset the dis- tance for replacement of the tires. • Other -1, -2 and -3 Select this submenu to set or reset the dis- tance for replaceable/maintenance items. Up to three[…]
-
Страница 169
W arning check Skip: Push the switch 䊊 A to move to the Esti- mated charge time display . Push the switch 䊊 B to select another menu. Detail: This item is available only when a warning is displayed. Select this menu to see details of warnings. W ARNING INFORMA TION DISPLA Y S Low battery warning When the low battery charge warning light and the[…]
-
Страница 170
2. The system displays a message screen and announces the contents of the message to warn that the Li-ion battery power level is low. Check the message displayed on the screen. T ouch [Nearby Charging Station] to search all charging stations that are located around the current vehicle position. 3. T ouch [BACK] or push the MAP button to return to t[…]
-
Страница 171
2. The system displays a message screen and announces the contents of the message to warn that power output is restricted and in- form the driver of the reason for this occur- rence and what action is to be taken. INDICA T ORS FOR MAINTENANCE 1. Tire replacement indicator This indicator appears when the customer set distance comes for replacing tir[…]
-
Страница 172
INDICA T OR FOR TIMER When the power switch is turned off, this display appears for 10 seconds. If the switch 䊊 A is pushed within 10 seconds, the display can be selected and each setting information display can be confirmed. 1. Timer setting status (charging and Climate Ctrl.) The timer setting status (ON or OFF) of the charge and the climate co[…]
-
Страница 173
activates when a vehicle is moved or when a vibration occurs. The system helps deter vehicle theft but cannot prevent it, nor can it prevent the theft of interior or exterior vehicle components in all situations. Al- ways secure your vehicle even if parking for a brief period. Never leave your keys in the vehicle, and always lock it when it is left[…]
-
Страница 174
• The alarm automatically turns off after approxi- mately 50 seconds. However, the alarm reacti- vates if the vehicle is tampered with again. The alarm is activated by: • Unlocking the door without using the Intelligent K ey, the request switch or the key. (Even if the door is opened by releasing the door inside lock knob, the alarm will activa[…]
-
Страница 175
[…]
-
Страница 176
If the windshield wiper operation is inter- rupted by snow or ice, the wiper may stop moving to protect its motor. If this occurs, turn the wiper switch to the OFF position and remove the snow or ice that is on and around the wiper arms. In approximately 1 minute, turn the switch on again to operate the wiper. The windshield wiper and washer operat[…]
-
Страница 177
WARNING In freezing temperatures the washer so- lution may freeze on the rear window glass and obscure your vision. Warm the rear window with the defroster before you wash the rear window. CAUTION • Do not operate the washer continu- ously for more than 30 seconds. • Do not operate the washer if the reser- voir tank is empty. • Do not fill th[…]
-
Страница 178
T o defog/defrost the rear window glass and out- side mirrors, place the power switch in the ON position and push the switch 䊊 1 on. The indicator light will illuminate. Push the switch again to turn the defroster off. It will automatically turn off in approximately 15 minutes. CAUTION When cleaning the inner side of the rear window, be careful n[…]
-
Страница 179
HEADLIGHT SWIT CH Lighting 䊊 1 T urn the switch to the position: The front park, side marker, tail, license plate and the instrument light will come on. 䊊 2 T urn the switch to the position: The headlights will come on and all the other lights will remain on. Autolight system (if so equipped) The autolight system allows the headlights to be set[…]
-
Страница 180
Be sure not to put anything on top of the photo sensor 䊊 1 located on the top of the instrument panel. The photo sensor con- trols the autolight ; if it is covered, the photo sensor reacts as if it is dark and the head- lights will illuminate. Headlight beam select 䊊 1 T o select the low beam, put the lever in the neutral position as shown. 䊊[…]
-
Страница 181
Daytime running light system (for Canada) The daytime running lights automatically illumi- nate when the power switch is in the READ Y to drive position with the parking brake released. The daytime running lights operate with the head- light switch in the OFF position. T urn headlight switch to the position for full illumination when driving at nig[…]
-
Страница 182
The heated steering wheel system is designed to operate only when the surface temperature of the steering wheel is below approximately 68°F (20°C) . Push the heated steering wheel switch to warm the steering wheel when the power switch is in the ON position. The indicator light 䊊 1 on the switch will illuminate. If the surface temperature of th[…]
-
Страница 183
T o sound the horn, push the center pad area of the steering wheel. WARNING Do not disassemble the horn. Doing so could affect proper operation of the supplemental front air bag system. T am- pering with the supplemental front air bag system may result in serious per- sonal injury. T o activate the ECO mode, press the ECO switch 䊊 1 on the right […]
-
Страница 184
The front seats and the rear outboard seats can be warmed by built-in heaters. The switches lo- cated on the center console and at the side of the front passenger seatback can be operated inde- pendently of each other. 1. Place the power switch in the ON position. 2. Push the L O or HI position of the switch, as desired, depending on the temperatur[…]
-
Страница 185
The vehicle should be driven with the V ehicle Dynamic Control (VDC) system on for most driv- ing conditions. If the vehicle is stuck in mud or snow, the VDC system reduces the traction motor output to re- duce wheel spin. The traction motor speed will be reduced even if the accelerator is depressed to the floor. If maximum traction motor power is […]
-
Страница 186
T o lock or unlock the charge connector, push the charge connector lock switch. See “Charge Connector Lock Switch” in the “Charging” sec- tion. T o turn off the charge timer, push the charge timer OFF switch. See “Charging Timer” in the “Charging” section. The power outlet is located in the instrument panel. CAUTION • The outlet a[…]
-
Страница 187
• Use the power outlet with the power switch is in the ON or READY to drive position to avoid discharging the 12- volt battery. • Avoid using the power outlet when the air conditioner, headlights or rear win- dow defroster are on. • This power outlet is not designed for use with a cigarette lighter unit. • Push the plug in as far as it will[…]
-
Страница 188
Soft bottle holders CAUTION • Do not use the bottle holder for any other objects that could be thrown about in the vehicle and possibly injure people during sudden braking or an accident. • Do not use the bottle holder for open liquid containers. SEA TBACK POCKET The seatback pocket is located on the back of the passenger’s seat. The pocket c[…]
-
Страница 189
CAUTION • Do not use for anything other than sunglasses. • Do not leave sunglasses in the sun- glasses holder while parking in direct sunlight. The heat may damage the sunglasses. GL OVE BO X T o open the glove box, pull the handle. T o close, push the lid in until the lock latches. WARNING Keep the glove box lid closed while driv- ing to preve[…]
-
Страница 190
T ONNEAU COVER (IF SO EQUIPPED) WARNING • Never put anything on the tonneau cover, no matter how small. Any object on it could cause an injury in an acci- dent or sudden stop. • Do not leave the tonneau cover in the vehicle with it disengaged from the holder. • Properly secure all cargo with ropes or straps to help prevent it from sliding or […]
-
Страница 191
4. Slide down the tonneau cover along the rear seat back. 5. Remove the tonneau cover by pulling either the left or right side backward away from the pillar. ST OWING GOLF BAGS Normally , two standard golf bags can be stowed in the cargo area. Insert the top of the golf bag into right side of the cargo area 䊊 1 then rotate the bag backward 䊊 2 […]
-
Страница 192
POWER WINDOWS WARNING • Make sure that all passengers have their hands, etc . inside the vehicle while it is in motion and before closing the windows. Use the window lock switch to prevent unexpected use of the power windows. • Do not leave children unattended in- side the vehicle. They could unknow- ingly activate switches or controls and beco[…]
-
Страница 193
Passenger side power window switch The passenger’s side power window switch will open or close only the corresponding window. T o open or close the window, push down or pull up the switch and hold it. Automatic operation The automatic operation is available for the switch that has an mark on its surface. T o fully open or close the window, comple[…]
-
Страница 194
If the windows do not close automatically If the power window automatic function (closing only) does not operate properly, perform the fol- lowing procedure to initialize the power window system. 1. Place the power switch in the ON position. 2. Close the door. 3. Open the window completely by operating the power window switch. 4. Pull the power win[…]
-
Страница 195
CEILING LIGHT The ceiling light switch has three positions: ON , DOOR and OFF . ON position When the switch is in the ON position 䊊 1 , the ceiling light will illuminate. DOOR position When the switch is in the DOOR position 䊊 2 , the ceiling light will illuminate under the following conditions: • the power switch is placed in the L OCK posit[…]
-
Страница 196
The HomeLink® Universal T ransceiver provides a convenient way to consolidate the functions of up to three individual hand-held transmitters into one built-in device. HomeLink® Universal T ransceiver: • Will operate most Radio Frequency (RF) de- vices such as garage doors, gates, home and office lighting, entry door locks and security systems. […]
-
Страница 197
2. Using both hands, simultaneously press and hold the desired HomeLink® button and handheld transmitter button. DO NO T release until the HomeLink® indicator light 䊊 1 flashes slowly and then rapidly. When the indicator light flashes rapidly, both buttons may be re- leased. (The rapid flashing indicates success- ful programming.) NO TE: Some d[…]
-
Страница 198
PROGRAMMING HOMELINK® FOR CANADIAN CUST OMERS AND GA TE OPENERS Canadian radio-frequency laws require transmit- ter signals to “time-out” (or quit) after several seconds of transmission – which may not be long enough for HomeLink® to pick up the signal during training. Similar to this Canadian law, some U.S. gate operators are designed to ?[…]
-
Страница 199
CLEARING THE PROGRAMMED INFORMA TION The following procedure clears the programmed information from both buttons. Individual buttons cannot be cleared. However, individual buttons can be reprogrammed, see “Reprogramming a single HomeLink® button” in this section. T o clear all programming: 1. Press and hold the two outer HomeLink® buttons unt[…]
-
Страница 200
3 Pre-driving checks and adjustments K e y s ………………………… .3-2 NISSAN Intelligent K ey® …………… .3-2 Doors ……………………….. .3-3 Locking with Mechanical key …………. .3-4 Locking with inside lock knob …………. .3-4 Locking with power door lock switch ……… .3-5 Automatic door locks ………….[…]
-
Страница 201
A key number plate is supplied with your keys. Record the key number and keep it in a safe place (such as your wallet) , not in the vehicle. If you lose your keys, see a NISSAN certified LEAF dealer for duplicates by using the key number. NISSAN does not record any key numbers so it is very important to keep track of your key number plate. A key nu[…]
-
Страница 202
• Do not place the Intelligent Key near an electric appliance such as a televi- sion set, personal computer or cellular phone. • Do not allow the Intelligent Key to come into contact with water or salt water, and do not wash it in a washing machine. This could affect the system function. If an Intelligent Key is lost or stolen, NISSAN recommend[…]
-
Страница 203
L OCKING WITH MECHANICAL KEY The power door lock system allows you to lock or unlock all doors simultaneously using the me- chanical key . • T urning the driver’s door key cylinder towards the front of the vehicle 䊊 1 will lock all doors and the rear hatch. • T urning the driver’s door key cylinder once to- wards the rear of the vehicle ?[…]
-
Страница 204
L OCKING WITH POWER DOOR L OCK SWIT CH Operating the power door lock switch will lock or unlock all the doors. The switches are located on the driver’s and front passenger’s door armrests. T o lock the doors, push the power door lock switch to the lock position 䊊 1 with the driver’s or front passenger’s door open, then close the door. Whe[…]
-
Страница 205
CHILD SAFETY REAR DOOR L OCK Child safety rear door locks help prevent the rear doors from being opened accidentally, especially when small children are in the vehicle. When the levers are in the lock position 䊊 1 , the rear doors can be opened only from the outside. T o disengage, move the levers to the unlock position 䊊 2 . WARNING • Radio […]
-
Страница 206
In such cases, correct the operating conditions before using the Intelligent Key function or use the mechanical key . Although the life of the battery varies depending on the operating conditions, the battery’s life is approximately 2 years. If the battery is dis- charged, replace it with a new one. When the Intelligent K ey battery is almost dis[…]
-
Страница 207
NISSAN INTELLIGENT KEY® OPERA TING RANGE OF THE DOOR L OCK/UNL OCK FUNCTION The Intelligent K ey functions can only be used when the Intelligent Key is within the specified operating range from the request switch 䊊 1 . When the Intelligent Key battery is discharged or strong radio waves are present near the operat- ing location, the Intelligent […]
-
Страница 208
• T o prevent the Intelligent Key from being left inside the vehicle, make sure you carry the key with you and then lock the doors. • Do not pull the door handle before pushing the door handle request switch. The door will be unlocked but will not open. Release the door handle once and pull it again to open the door. NISSAN INTELLIGENT KEY® OP[…]
-
Страница 209
Locking doors 1. Push the power switch into the OFF position and make sure you carry the Intelligent Key with you.*1 2. Close all the doors and the rear hatch. 3. Push the door handle request switch (driver’s or front passenger’s) 䊊 A or the rear hatch request switch 䊊 B while carrying the Intelli- gent K ey with you.*2 4. All the doors and[…]
-
Страница 210
warning displays in the vehicle information dis- play . When a chime or beep sounds or the warning displays, be sure to check the vehicle and Intelli- gent K ey. See “V ehicle information display” in the “Instru- ments and controls” section. Pre-driving checks and adjustments 3-11 I n f o r m a t i o n P r o v i d e d b y :[…]
-
Страница 211
TROUBLESHOO TING GUIDE Symptom Possible cause Action to take When opening the driver’s door to get out of the vehicle The inside warning chime sounds continuously. The power switch is pushed to the OFF po- sition while the driver’s door is open. Close the driver’s door. The power switch is in the ACC position. Push the power switch to the OFF[…]
-
Страница 212
HOW T O USE REMO TE KEYLESS ENTR Y FUNCTION WARNING • Radio waves could adversely affect electric medical equipment. Those who use a pacemaker should contact the electric medical equipment manu- facturer for the possible influences be- fore use. • The Intelligent Key transmits radio waves when the buttons are pushed. The FA A advises that the r[…]
-
Страница 213
Locking doors 䊊 1 L OCK button 䊊 2 UNL OCK button 䊊 3 CHARGE PORT UNL OCK 䊊 4 P ANIC button When you lock or unlock the doors, the hazard indicator will flash and the horn will sound as a confirmation. See “Hazard warning indicator light” and “Horn” in the “Instruments and con- trols” section. 1. Push the power switch to the OFF[…]
-
Страница 214
3. The panic alarm stops when: • It has run for a period of time, or • Any of the buttons on the Intelligent Key is pushed. (Note: The PANIC button must be pushed for more than 1 second.) Setting hazard indicator and horn mode This vehicle is set in hazard indicator and horn mode when you first receive the vehicle. In hazard indicator and horn […]
-
Страница 215
Hazard indicator and horn mode: Operation DOOR LOCK DOOR UNLOCK Pushing door handle request switch or rear hatch request switch HAZARD — twice OUTSIDE CHIME — twice HAZARD — once OUTSIDE CHIME — once Pushing or button HAZARD — twice HORN — once HAZARD — once HORN — none Hazard indicator mode: Operation DOOR LOCK DOOR UNLOCK Pushing door handle requ[…]
-
Страница 216
WARNING • Make sure that the hood is completely closed and latched before driving. Fail- ure to do so could cause the hood to open during driving and result in an accident. • If steam or smoke is emitting from the motor compartment, do not open the hood. Doing so could cause an injury. When opening the hood: 1. Securely close the charge port do[…]
-
Страница 217
WARNING • Always make sure that the rear hatch has been closed securely to prevent it from opening while driving. • Do not drive with the rear hatch open. • Make sure that all passengers have their hands, etc . inside the vehicle be- fore closing the rear hatch. T o open the rear hatch, unlock it and push the rear hatch opener switch 䊊 A . […]
-
Страница 218
SECONDAR Y REAR HA T CH RELEASE The secondary rear hatch release mechanism allows the rear hatch to be opened in the event of a discharged battery , etc. Push the lever up to open the rear hatch with a suitable tool. If you had to open the rear hatch using this lever, have the vehicle checked by a NISSAN certified LEAF dealer as soon as possible. O[…]
-
Страница 219
When opening the charge port lid: 1. The charge port lid will then spring up slightly . 2. Put your hand into the under side of the lid and open until it is in the fully open position. When closing the charge port lid: 1. Slowly move the lid down. 2. Lock it securely into place. CHARGE PORT CAP When opening the charge port cap, press the tab and op[…]
-
Страница 220
WARNING Do not adjust the steering wheel while driving. Y ou could lose control of your vehicle and cause an accident. TIL T OPERA TION Push the lock lever down 䊊 1 and adjust the steering wheel up or down 䊊 2 to the desired position. Pull the lock lever up 䊊 3 to lock the steering wheel in place. 䊊 1 T o block out glare from the front, swi[…]
-
Страница 221
䊊 3 Slide the extension sun visor in or out as needed. CAUTION • Do not store the sun visor before re- turning the extension to its original position. • Do not pull the extension sun visor forcedly downward. V ANITY MIRROR T o use the front vanity mirror, pull down the sun visor and pull up the cover. T o access the card holder, pull the sun […]
-
Страница 222
INSIDE REARVIEW MIRROR Adjust the angle of the inside rearview mirror to the preferred position. AUT OMA TIC ANTI-GLARE TYPE (IF SO EQUIPPED) The inside mirror is designed so that it automati- cally changes reflection based on the intensity of the headlights of the vehicle behind. The anti-glare system automatically turns on when the power switch i[…]
-
Страница 223
light will turn off. Push the “I” switch 䊊 D to turn the system on. Do not allow any object to cover the sen- sors 䊊 E or apply glass cleaner on them. Doing so will reduce the sensitivity of the sensor, resulting in improper operation. WARNING Use the night position only when neces- sary, because it reduces rear view clarity. OUTSIDE MIRROR[…]
-
Страница 224
Folding outside mirrors Fold the outside mirror by pushing it toward the rear of the vehicle. Pre-driving checks and adjustments 3-25 I n f o r m a t i o n P r o v i d e d b y :[…]
-
Страница 225
NO TES 3-26 Pre-driving checks and adjustments I n f o r m a t i o n P r o v i d e d b y :[…]
-
Страница 226
4 Display screen, heater, air conditioner, audio and phone systems Rearview monitor …………………. .4-2 How to read the displayed lines ………… .4-3 Difference between predicted and actual distances ……………………. .4-3 Adjusting the screen ……………… .4-5 Adjusting the brightness setting ……….. .4-6 RearView mon[…]
-
Страница 227
[…]
-
Страница 228
HOW T O READ THE DISPLA YED LINES Guiding lines which indicate the vehicle width and distances to objects with reference to the vehicle body line 䊊 A are displayed on the monitor. Distance guide lines: Indicate distances from the vehicle body . • Red line 䊊 1 : approx. 1.5 ft (0.5 m) • Y ellow line 䊊 2 : approx. 3 ft (1 m) • Green line […]
-
Страница 229
the hill is the place 䊊 B . Note that any object on the hill is further than it appears on the monitor. Backing up on a steep downhill When backing up the vehicle down a hill, the distance guide lines and the vehicle width guide lines are shown farther than the actual distance. For example, the display shows 3 ft (1.0 m) to the place 䊊 A , but […]
-
Страница 230
Backing up behind a projecting object The position 䊊 C is shown farther than the position 䊊 B in the display . However, the position 䊊 C is actually at the same distance as the position 䊊 A . The vehicle may hit the object when backing up to the position 䊊 A if the object projects over the actual backing up course. ADJUSTING THE SCREEN Th[…]
-
Страница 231
ADJUSTING THE BRIGHTNESS SETTING For vehicles with Navigation System: 1. T ouch [SETTINGS] on the display screen. 2. T ouch [DISPLA Y]. 3. Select [BRIGHTNESS] or [CONTRAST] to adjust the brightness setting. 4. T ouch the “+” or “-” icons to adjust the Bright- ness or Contrast of the display screen. Note When the headlights are in the ON po-[…]
-
Страница 232
REARVIEW MONIT OR BRIGHTNESS CONTROL 1. T o adjust the brightness of the RearView monitor, fully depress the foot brake pedal and move the shift lever to the R (Reverse) posi- tion. See “Shifting” in the “Starting and driving” section for more information. 2. Once the vehicle is in the R (Reverse) posi- tion, with the foot brake pedal fully[…]
-
Страница 233
• If dirt, rain or snow attaches to the camera, the RearView Monitor may not display objects. Clean the camera. • Do not use body wax on the camera window. If body wax does get on the camera window, wipe off the wax with a clean cloth dampened with mild detergent diluted with water. CENTER VENTS Open/close the vents by moving the control to eit[…]
-
Страница 234
WARNING • The air conditioning cooling function operates only when the power switch is in the ON position or when the READ Y to drive indicator light is ON . • Do not leave children or adults who would normally require the support of others alone in your vehicle. Pets should not be left alone either. On hot, sunny days, temperatures in a closed[…]
-
Страница 235
These functions operate in the following condi- tions. Power switch position L OCK/OFF ACC ON READY to drive Fan — — Available Available Heater and air conditioner — — Available*2 Available Timer (Climate Ctrl. Timer) Available*1 Available*1 — — Remote control*3 Available Available — — *1: The EVSE (Electric V ehicle Supply Equip- ment) must be con[…]
-
Страница 236
DISPLA YING CLIMA TE CONTROL S Y STEM ST ATUS SCREEN (MODELS WITH NAVIGA- TION SY STEM) Push the ST A TUS button to display the climate control system status on the navigation system screen. (See the LEAF Navigation System Own- er’s Manual.) NO TE: • If the READ Y to drive indicator light is illuminated and the EVSE (Electric Vehicle Supply Equ[…]
-
Страница 237
AUT OMA TIC CLIMA TE CONTROL (MODELS WITHOUT NA VIGA TION S Y STEM) 1. (fan speed control) dial 2. (intake air control) button 3. (front defroster) button 4. Climate Ctrl. display 5. (rear window defroster) button (See “Rear window and outside mirror defroster switch” in the “Instruments and controls” section.) 6. T emperature control dial […]
-
Страница 238
1. Press the AUT O button. The AUT O indicator will illuminate. 2. If the A/C indicator light does not illuminate, press the A/C button. The A/C indicator light will illuminate. 3. If the HEA T indicator light does not illuminate, press the HEA T button. The HEA T indicator light will illuminate. 4. T urn the temperature control dial to set the des[…]
-
Страница 239
Air flow control: Press the MODE button to change the air flow mode. — Air flows from the center and side ventilators. — Air flows from the center and side ventilators and foot outlets. — Air flows mainly from the foot outlets. — Air flows from the defroster outlets and foot outlets. T emperature control: T urn the temperature control dial […]
-
Страница 240
therefore not necessary to set the Climate Ctrl. Timer everyday . WARNING Even if the Climate Ctrl. Timer is set, the temperature in the passenger compart- ment may become high or low if the sys- tem automatically stops. Do not leave children or adults who would normally require the support of others alone in your vehicle. Pets should not be left a[…]
-
Страница 241
3. The “Climate Ctrl. Timer” screen is displayed. T o change the time of day and the day of the week that the climate control timer turns on or off, or to turn the climate control timer on or off, push the switch. 4. T o turn the timer on or off, use the switch to highlight “On” or “Off” and then push the switch. If “On” is selected[…]
-
Страница 242
6. Push the switch to change the minute field in increments of ten minutes. Push and hold the switch to fast forward the minutes. Push the switch to move to the day of the week setting. 7. Push the switch to set the day to on or off. Push the switch and then set the next day with the same procedure. When all days of the week have been set, push the[…]
-
Страница 243
8. The settings confirmation screen will be dis- played. T o confirm and finish setting the cli- mate control timer, push the switch. Operating tips: • The automatic climate control is equipped with sensors as illustrated. The sensors 䊊 A and 䊊 B help maintain a constant temperature. Do not put anything on or around these sensors. • Push th[…]
-
Страница 244
automatically changes to the ON position. The climate control system automatically turns off the heater or air conditioner and switches to the air recirculation mode. Place the power switch in the off position to begin charging. T urn on the desired climate control function. • The remote climate control or climate control timer may fog up windows[…]
-
Страница 245
AUT OMA TIC CLIMA TE CONTROL (MODELS WITH NA VIGA TION S Y STEM) 1. T emperature control button 2. HEA T button 3. Climate Ctrl. Timer indicator 4. (front defroster) button 5. (fan speed control) button 6. (rear window defroster) button (See “Rear window and outside mirror defroster switch” in the “Instruments and controls” section.) 7. (in[…]
-
Страница 246
1. Press the AUT O button. The AUT O indicator will illuminate. 2. If the A/C indicator light does not illuminate, press the A/C button. The A/C indicator light will illuminate. 3. If the HEA T indicator light does not illuminate, press the HEA T button. The HEA T indicator light will illuminate. 4. T urn the temperature control dial to set the des[…]
-
Страница 247
Air flow control: Press the MODE button to change the air flow mode. — Air flows from the center and side ventilators. — Air flows from the center and side ventilators and foot outlets. — Air flows mainly from the foot outlets. — Air flows from the defroster outlets and foot outlets. T emperature control: Press the temperature control , but[…]
-
Страница 248
Once the Climate Ctrl. Timer is set, it will com- plete air conditioning by the time that is set. It is not necessary to set the Climate Ctrl. Timer ev- eryday . WARNING Even if the Climate Ctrl. Timer is set, the temperature in the passenger compart- ment may become high or low if the sys- tem automatically stops. Do not leave children or adults w[…]
-
Страница 249
2. T ouch “Climate Ctrl. Timer”. 3. T ouch “Set Timer 1” or “Set Timer 2” . The following procedure explains the Timer 1 setting. 4. Enter the departure time. 5. T o set the Climate Ctrl. Timer for different days of the week, touch “ Assign Days”. Select the preferred timer setting for each day of the week. After setting, touch “O[…]
-
Страница 250
8. The indicator of “Timer 1” illuminates after the Climate Ctrl. Timer is set. Use the same pro- cedure to set the Timer 2 setting. 9. Place the power switch to the OFF position, and then connect the charge connector to the vehicle. Operation tips: • The Climate Ctrl. Timer will only start when the power switch is in the “OFF” position. […]
-
Страница 251
• When charging is set as the first priority, the Climate Ctrl. Timer does not start until 10 seg- ments of the Li-ion battery available charge gauge are illuminated. • When the climate control is set as the first priority , the climate control system will be turned on as scheduled by the Climate Ctrl. Timer regardless of the remaining battery […]
-
Страница 252
Operating tips: • When the charge connector is connected, the climate control operates using electric power. When the charge connector is disconnected from the vehicle, the climate control operates using vehicle battery electric power. • The climate control can be operated for a maxi- mum of 2 hours when the charge connector is connected to the[…]
-
Страница 253
Note • The temperature in the passenger com- partment may not be comfortable if enter- ing the vehicle too soon before or too long after the scheduled time of departure. • Air conditioning is limited to the capacity of the electric power when the charge connector is connected. Therefore, the temperature may not reach the set tem- perature due t[…]
-
Страница 254
FM RADIO RECEPTION Range: FM range is normally limited to 25 – 30 mi (40 – 48 km) , with monaural (single channel) FM having slightly more range than stereo FM. External influences may sometimes interfere with FM station reception even if the FM station is within 25 mi (40 km) . The strength of the FM signal is directly related to the distance […]
-
Страница 255
AUDIO OPERA TION PRECAUTIONS Compact disc (CD) player CAUTION • Do not force a compact disc into the CD insert slot. This could damage the CD and/or CD player. • T rying to load a CD with the CD door closed could damage the CD and/or CD player. • Only one CD can be loaded into the CD player at a time. • Only use high quality 4.7 in (12 cm) […]
-
Страница 256
PRESS EJECT: This is an error due to excessive tempera- ture inside the player. Remove the CD by pressing the EJECT button. After a short time, reinsert the CD. The CD can be played when the temperature of the player returns to normal. UNPLA Y ABLE: The file is unplayable in this audio system (only MP3 orWMA(if so equipped) CD) . Compressed audio f[…]
-
Страница 257
• If there is a file in the top level of the disc, “Root Folder” is displayed. • The playback order is the order in which the files were written by the writing software. Therefore, the files might not play in the desired order. 4-32 Display screen, heater, air conditioner, audio and phone systems I n f o r m a t i o n P r o v i d e d b y :[…]
-
Страница 258
Specification chart : Supported media CD, CD-R, CD-RW, USB 2.0 Supported file systems ISO9660 LEVEL1, ISO9660 LEVEL2, Apple ISO, Romeo, Joliet * ISO9660 Level 3 (packet writing) is not supported. USB memory: FA T16, FA T32 Supported media CD, CD-R, CD-RW Supported versions*1 MP3 V ersion MPEG1, Audio Layer 3 Sampling frequency 8 kHz — 48 kHz Bit ra[…]
-
Страница 259
T roubleshooting guide: Symptom Cause and Countermeasure Cannot play Check if the disc or USB device was inserted correctly. Check if the disc is scratched or dirty. Check if there is condensation inside the player. If there is, wait until the condensation is gone (about 1 hour) before using the player. If there is a temperature increase error, the[…]
-
Страница 260
USB (Universal Serial Bus) connection port WARNING Do not connect, disconnect or operate the USB device while driving. Doing so can be a distraction. If distracted you could lose control of your vehicle and cause an accident or serious injury. CAUTION • Do not force the USB device into the USB port. Inserting the USB device tilted or up-side-down[…]
-
Страница 261
• Operating procedure of the Bluetooth® audio will vary depending on the devices. Make sure how to operate your audio device before using it with this system. • The Bluetooth® audio may be stopped under the following conditions: – Receiving a call on the Hands-Free Phone System. – Checking the connection to the hands-free phone. • Do no[…]
-
Страница 262
9. Radio CA T (category)/FF (fast forward) but- ton for SEEK/CA T 10. BACK button 11. CD·AUX button 12. PWR (power) button/VOL (volume) control knob 13. RPT (repeat) play button 14. RDM (random) play button 15. Radio station preset select buttons 16. AUX IN jack 17. TUNE·SCROLL control knob 18. ENTER/SETTING button For all operation precautions, […]
-
Страница 263
• Clock Adjust Adjust the clock according to the following procedure: 1) Press the ENTER/SETTING button 䊊 1 and turn the TURN/SCROLL knob 䊊 2 un- til “Setting Clock” and “Clock Adjust” ap- pear on the display . 2) Press the ENTER/SETTING button 䊊 1 to select “Clock Adjust.” 3) T urn the TUNE·SCROLL control knob 䊊 2 to adjust […]
-
Страница 264
When the XM band select button is pressed while the power switch is in the ACC or ON position, the radio will come on at the channel last played. The last channel played will also come on when the PWR button is pressed to ON. The satellite radio is not available in Alaska, Ha- waii and Guam. If another audio source is playing when the radio select […]
-
Страница 265
If the radio is already operating, it will automati- cally turn off and the CD will play . If the system has been turned off while the CD was playing, pressing the PWR button will start the CD. Do not use 3.1 in (8 cm) discs. CD·AUX button: When the CD·AUX button is pressed with the system off and the CD loaded, the system will turn on and the CD[…]
-
Страница 266
USB CONNECTION PORT OPERA TION Audio main operation: The USB outlet connector is located in the center console. Open the lid and connect a USB memory as illustrated. Then, switch to the USB memory mode automatically . If the system has been turned off while the USB memory was playing, pressing the PWR button will start the USB memory . WARNING Do n[…]
-
Страница 267
Normal → 1 Folder Repeat → 1 T rack Repeat- → Normal RANDOM (RDM) : When the RDM button is pressed while a USB memory device is being playing, the play pattern can be changed as follows: T o change the play mode, press the RDM button repeatedly and the mode will change as follows: Normal → All Random → 1 Folder Random → Nor- mal BACK bu[…]
-
Страница 268
Compatibility The following models are available: • Third generation iPhone® (Firmware version IOS4/4.0) • Fourth generation iPhone® (Firmware version IOS4/4.0) • Fifth generation iPod® (Firmware version 1.3) • First generation iP od Classic® (Firmware ver- sion 1.1.1 or 1.1.2PC) • Second generation iP od Classic® (Firmware version 2[…]
-
Страница 269
the next track or the beginning of the current track on the iP od® will be played. REPEA T (RPT) : When the RPT play button is pressed while a track is being played, the play pattern can be changed as follows: Repeat Off → 1 T rack Repeat → All Repeat → Re- peat Off RANDOM (RDM) : When the RDM play button is pressed while a track is being pl[…]
-
Страница 270
SOURCE select switch Push the source select switch to change the mode in the following sequence: AM → FM1 → FM2 → XM1 → XM2 → XM3 → CD* → USB/iP od®* → AUX* → AM. * These modes are only available when compat- ible media storage is inserted into the device or connected to the system. V olume control switch Push the volume control […]
-
Страница 271
ANTENNA Removing antenna The antenna cannot be shortened, but can be removed. When you need to remove the antenna, turn the antenna rod counterclockwise 䊊 B . T o install the antenna rod, turn the antenna rod clockwise 䊊 A and hand tighten. CAUTION • T o avoid damaging or deforming the antenna, be sure to remove the an- tenna under the follow[…]
-
Страница 272
WARNING • Use a phone after stopping your ve- hicle in a safe location. If you have to use a phone while driving, exercise ex- treme caution at all times so full atten- tion may be given to vehicle operation. • If you are unable to devote full atten- tion to vehicle operation while talking on the phone, pull off the road to a safe location and […]
-
Страница 273
Y ou can connect up to 5 different Bluetooth® cellular phones to the in-vehicle phone module. However, you can talk on only one cellular phone at a time. Before using the Bluetooth® Hands-Free Phone System, refer to the following notes. • Set up the wireless connection between a com- patible cellular phone and the in-vehicle phone module before[…]
-
Страница 274
USING THE S Y STEM The NISSAN V oice Recognition system allows hands-free operation of the Bluetooth® Phone System. If the vehicle is in motion, some commands may not be available so full attention may be given to vehicle operation. Initialization When the power switch is placed in the ON position, NISSAN V oice Recognition is initialized, which t[…]
-
Страница 275
How to say numbers NISSAN V oice Recognition requires a certain way to speak numbers in voice commands. Refer to the following rules and examples. • Either “zero” or “oh” can be used for “0” . Example: 1-800-662-6200 – “One eight oh oh six six two six two oh oh”, or – “One eight zero zero six six two six two oh oh” • W o[…]
-
Страница 276
CONTROL BUTT ONS The control buttons for the Bluetooth® Hands- Free Phone System are located on the steering wheel. 1. Phone/send button 2. Phone/end button 3. T uning switch Phone/send Press the button to initiate a VR session or answer an incoming call. Y ou can also use the button to interrupt the system feedback and give a command at once. See[…]
-
Страница 277
Connecting procedure NO TE: The connecting procedure must be per- formed when the vehicle is stationary. If the vehicle starts moving during the procedure, the procedure will be cancelled. Main Menu “ Add phone” 䊊 A Initiate from handset 䊊 B Name phone 䊊 C 1. Press the button on the steering wheel. The system announces the available comma[…]
-
Страница 278
Once the call has ended, press the button on the steering wheel. NO TE: If you do not wish to take the call when you hear the ring tone, press the button on the steering wheel. For additional command options, see “List of voice commands” in this section. LIST OF VOICE COMMANDS Main Menu “Call” “Phonebook” “Recent calls” “Connect p[…]
-
Страница 279
“Special Number” 䊊 C For dialing up to 24 digits or any special charac- ters, say “Special Number” . When the system acknowledges the command, the system will prompt you to speak the number. “Redial” 䊊 D Use the Redial command to call the last number that was dialed. The system acknowledges the command, re- peats the number and begi[…]
-
Страница 280
For phones that do not support automatic down- load of the phonebook (PBAP Bluetooth® pro- file) , the “Phonebook”command is used to manu- ally add entries to the vehicle phonebook. The phonebook stores up to 40 names for each phone connected to the system. NO TE: Each phone has its own separate phone- book. Y ou cannot access Phone A ’s pho[…]
-
Страница 281
“Phonebook” (phones with automatic phonebook download function) NO TE: The “T ransfer Entry” command is not avail- able when the vehicle is moving. Main Menu “Phonebook” Main Menu Speak a Name “List Names” 䊊 A “Record Name” 䊊 B For phones that support automatic download of the phonebook (PBAP Bluetooth® profile) , the “Ph[…]
-
Страница 282
“Outgoing” 䊊 C Use the Outgoing command to list the outgoing calls made from the vehicle. “Redial” 䊊 D Use the Redial command to dial the number of the last outgoing call from the vehicle. “Call Back” 䊊 E Use the Call Back command to dial the number of the last incoming call to the vehicle. “Connect phone” NO TE: The Add Phone[…]
-
Страница 283
6. V oice memory A or memory B is selected automatically . If both memory locations are already in use, the system will prompt you to overwrite one. Follow the instructions pro- vided by the system. 7. When preparation is complete and you are ready to begin, press the button. 8. The V A mode will be explained. Follow the instructions provided by th[…]
-
Страница 284
select an entry from the Phonebook or Recent Calls lists. T o re-activate V oice Recognition, exit the manual control mode by pressing and holding the PHONE/END ( ) button. At that time, pressing the PHONE/SEND ( ) button will start the Hands Free Phone System. Operating tips • T o enter manual control mode, start the Voice Recognition system and[…]
-
Страница 285
NO TES 4-60 Display screen, heater, air conditioner, audio and phone systems I n f o r m a t i o n P r o v i d e d b y :[…]
-
Страница 286
5 Starting and driving Precautions when starting and driving ………. .5-2 Tire Pressure Monitoring System (TPMS) …… .5-2 Avoiding collision and rollover …………. .5-5 Off-road recovery ……………….. .5-5 Rapid air pressure loss …………….. .5-5 Drinking alcohol/drugs and driving ………. .5-6 Push-button power switch ….[…]
-
Страница 287
WARNING • Do not leave children or adults who would normally require the support of others alone in your vehicle. Pets should not be left alone either. They could accidentally injure themselves or others through inadvertent operation of the vehicle. Also, on hot, sunny days, temperatures in a closed vehicle could quickly become high enough to cau[…]
-
Страница 288
light. Use a tire pressure gauge to check the tire pressure. • The CHECK TIRE PRESSURE warning ap- pears on the vehicle information display when the low tire pressure warning light is illuminated and low tire pressure is detected. The CHECK TIRE PRESSURE warning turns off when the low tire pressure warning light turns off. The CHECK TIRE PRESSURE[…]
-
Страница 289
Some devices and transmitters may temporarily interfere with the operation of the TPMS and cause the low tire pressure warning light to illu- minate. Some examples are: • Facilities or electric devices using similar radio frequencies that are near the vehicle. • If a transmitter set to similar frequencies is being used in or near the vehicle. ?[…]
-
Страница 290
– There is a malfunction in the horn or hazard indicators. – If the Easy Fill Tire Alert does not operate due to TPMS interference, move the vehicle about 3 ft (1 m) backward or forward and try again. If the Easy Fill Tire Alert is not working, use a tire pressure gauge. A VOIDING COLLISION AND ROLL OVER WARNING Failure to operate this vehicle […]
-
Страница 291
Help prevent rapid air pressure loss by maintain- ing the correct air pressure and visually inspect the tires for wear and damage. See “Wheels and tires” in the “Maintenance and do-it-yourself” section of this manual. If a tire rapidly loses air pressure or “blows-out” while driving maintain control of the vehicle by following the proce[…]
-
Страница 292
WARNING Do not operate the power switch while driving the vehicle except in an emer- gency. (The EV system shuts down when the power switch is pushed 3 consecutive times or the power switch is pushed and held for more than 2 seconds.) If the EV system stops while the vehicle is being driven, this could lead to a crash and serious injury. Before ope[…]
-
Страница 293
If the Intelligent Key is within the operating range, it is possible for anyone, even someone who does not carry the Intelligent Key , to push the power switch to start the EV (Electric V ehicle) system. • The cargo area is not included in the operating range but the Intelligent K ey may function. • If the Intelligent Key is placed on the instr[…]
-
Страница 294
ACC (Accessories) This position activates electrical accessories, such as the radio, when EV system is OFF . ON This position turns on the EV (Electric Vehicle) system and electrical accessories. READ Y (Normal operating position) This position turns on the EV (Electric Vehicle) system, electrical accessories and the vehicle can be driven. OFF The […]
-
Страница 295
4. Push the power switch while depressing the brake pedal within 10 seconds after the chime sounds. The power switch position changes to READ Y to drive mode. After step 3 is performed, if the power switch is pushed without depressing the brake pedal, the power switch position will change to ACC. NO TE: • When the power switch is pushed to the AC[…]
-
Страница 296
ELECTRIC SHIFT CONTROL S Y STEM This vehicle is electronically controlled to pro- duce maximum available power and smooth op- eration. The recommended operating procedures for this vehicle are shown on the following pages. Starting vehicle 1. After placing the vehicle in the READ Y to drive position, fully depress the foot brake pedal before moving[…]
-
Страница 297
Shifting T o move the shift lever, : Slide along the gate while the brake pedal is depressed. : After sliding, maintain it in the same position until the vehicle placed to N (Neutral) position. : When in the D (Drive) position, slide along the gate. NO TE: • Confirm that the vehicle is in the desired shift position by checking the shift indica- t[…]
-
Страница 298
CAUTION • Do not slide the shift lever while push- ing the P position switch. This may also damage the electric motor. • When switching to the preferred posi- tion by operating the shift lever, check that the shift lever returns to the cen- tral position by releasing your hand from the lever. Holding the shift lever in a mid-way position may al[…]
-
Страница 299
N (Neutral): Neither forward nor reverse gear is engaged. The vehicle can be placed in READ Y to drive position in this position. Do not shift to the N (Neutral) position while driving. The regenerative brake system does not operate in the N (Neutral) position. However, the vehicle brakes will still stop the car. D (Drive): Use this position for al[…]
-
Страница 300
WARNING • Be sure the parking brake is released before driving. Failure to do so could cause brake failure and lead to an ac- cident. • Do not release the parking brake from outside the vehicle. • Do not leave children unattended in a vehicle. They could release the parking brake and cause an accident. • When leaving the vehicle, apply the […]
-
Страница 301
WARNING Do not use the cruise control when driv- ing under the following conditions: • when it is not possible to keep the vehicle at a set speed • in heavy traffic or in traffic that varies in speed • on winding or hilly roads • on slippery roads (rain, snow, ice, etc .) • in very windy areas Doing so could cause a loss of vehicle contro[…]
-
Страница 302
• If you move the shift lever to the N (Neutral) position, the cruise control will be canceled. T o reset at a faster cruising speed, use one of the following methods. • Depress the accelerator pedal. When the ve- hicle attains the preferred speed, push and re- lease the COAST/SET switch. • Push and hold the ACCEL/RES switch. When the vehicle[…]
-
Страница 303
– The ECO position helps reduce power con- sumption by reducing acceleration when compared to the same accelerator pedal position in the D (Drive ) position. • Drive at a constant speed. Maintain cruising speeds with a constant accelerator positions or by using cruise control when appropriate. • Accelerate slowly and smoothly. Gently press an[…]
-
Страница 304
1. Firmly apply the parking brake. 2. Push the P position switch on the shift lever. 3. T o help prevent the vehicle from rolling into the street when parked on a slope, it is a good practice to turn the wheels as illustrated. • HEADED DOWNHILL WITH CURB: 䊊 1 • T urn the wheels into the curb and move the vehicle forward until the curb side wh[…]
-
Страница 305
Y ou may hear a noise when the steering wheel is operated quickly. However, this is not a malfunc- tion. If the power steering warning light illumi- nates while the READ Y to drive indicator light is ON, it may indicate the power steering system is not functioning properly and may need servicing. Have the power steering system checked by a NISSAN c[…]
-
Страница 306
• If the power switch position is in a posi- tion other than ON or READ Y to drive, you can stop the vehicle by depressing the brake pedal. However, greater foot pres- sure on the brake pedal will be required to stop the vehicle, and the stopping dis- tance will be longer. • When depressing the brake pedal, the braking pedal feel will not be sm[…]
-
Страница 307
ANTI-L OCK BRAKING S Y STEM (ABS) WARNING • The Anti-lock Braking System (ABS) is a sophisticated device, but it cannot prevent accidents resulting from care- less or dangerous driving techniques. It can help maintain vehicle control during braking on slippery surfaces. Remember that stopping distances on slippery surfaces will be longer than on […]
-
Страница 308
The V ehicle Dynamic Control (VDC) system uses various sensors to monitor driver inputs and ve- hicle motion. Under certain driving conditions, the VDC system helps to perform the following functions. • Controls brake pressure to reduce wheel slip on one slipping drive wheel so power is transferred to a drive wheel on the same axle that is not sl[…]
-
Страница 309
handling performance, and the warning may flash or may il- luminate. • If brake related parts such as brake pads, rotors and calipers are not NISSAN recommended or are ex — tremely deteriorated, the VDC system may not operate properly and may illuminate. • If traction motor control related parts are not NISSAN recommended or are extremely deter[…]
-
Страница 310
The hill start assist system automatically keeps the brakes applied to help prevent the vehicle from rolling backwards in the time it takes the driver to release the brake pedal and apply the accelerator when the vehicle is stopped on a hill. Hill start assist will operate automatically under the following conditions: • The shift lever is shifted[…]
-
Страница 311
FREEING A FROZEN DOOR L OCK T o prevent a door lock from freezing, apply deicer through the key hole. If the lock becomes frozen, heat the key before inserting it into the key hole or use the remote keyless entry keyfob. ANTI-FREEZE In the winter when it is possible that the outside temperature will drop below 32°F (0°C) , check the antifreeze to[…]
-
Страница 312
• Allow greater following distances on slippery roads. • Watch for slippery spots (glare ice) . These may appear on an otherwise clear road in shaded areas. If a patch of ice is seen ahead, brake before reach- ing it. T ry not to brake while on the ice, and avoid any sudden steering maneu- vers. • Do not use cruise control on slippery roads. […]
-
Страница 313
NO TES 5-28 Starting and driving I n f o r m a t i o n P r o v i d e d b y :[…]
-
Страница 314
6 In case of emergency Roadside assistance program …………… .6-2 Emergency EV (Electric V ehicle) shut off …….. .6-2 Hazard warning flasher switch ………….. .6-2 Flat tire ………………………. .6-3 Tire Pressure Monitoring System (TPMS) …… .6-3 Repairing flat tire ……………….. .6-4 Jump starting ……………..[…]
-
Страница 315
In the event of a roadside emergency, Roadside Assistance Service is available to you. Please refer to your Warranty Information Booklet (U.S.) or W arranty & Roadside Assistance Information Booklet (Canada) for details. T o shut off the EV (Electric V ehicle) system in an emergency situation while driving, perform the following procedure. • […]
-
Страница 316
The flasher can be actuated with the power switch in any position. Some state laws may prohibit the use of the hazard warning flasher switch while driving. TIRE PRESSURE MONIT ORING S Y STEM (TPMS) This vehicle is equipped with the Tire Pressure Monitoring System (TPMS) . It monitors tire pres- sure of all tires. When the low tire pressure warn- in[…]
-
Страница 317
• Replacing tires with those not origi- nally specified by NISSAN could affect the proper operation of the TPMS. • The Genuine NISSAN Emergency Tire Repair Sealant or equivalent can be used for temporarily repairing a tire. Do not inject any other tire liquid or aerosol tire sealant into the tires, as this may cause a malfunction of tire pressu[…]
-
Страница 318
• Do not use the emergency tire punc- ture repair kit under the following con- ditions. Contact a NISSAN certified LEAF dealer or professional road assistance. – when the sealant has passed its ex- piration date (shown on the label attached to the bottle) – when the cut or the puncture is ap- proximately 0.25 in (6 mm) or longer – when the […]
-
Страница 319
Before using emergency tire puncture repair kit • If any foreign object (for example, a screw or nail) is embedded in the tire, do not remove it. • Check the expiration date of the sealant (shown on the label attached to the bottle) . Never use a sealant whose expiration date has passed. Repairing tire: WARNING Observe the following precautions[…]
-
Страница 320
2. T ake the hose 䊊 1 and the power plug 䊊 2 out of the air compressor. Remove the cap of the bottle holder from the air compressor. 3. Remove the cap from the tire sealant bottle, and screw the bottle clockwise onto the bottle holder. (Leave the bottle seal intact. Screwing the bottle onto the bottle holder will pierce the seal of the bottle.)[…]
-
Страница 321
6. Push the power switch to the “ ACC” position. Then turn the compressor switch to the ON (−) position and inflate the tire up to the pressure that is specified on the Tire and Loading Information label affixed to the driv- er’s side center pillar if possible, or to the minimum of 26 psi (180 kPa) . T urn the air compressor off briefly in […]
-
Страница 322
the tire pressure with the pressure gauge. T emporary repair is completed if the tire pres- sure does not drop. Make sure the pressure is adjusted to the pressure that is specified on the Tire and Loading Information label before driving. 10. If the tire pressure drops, repeat the steps from 5 to 9. If the pressure drops again or under 19 psi (130 […]
-
Страница 323
• Keep the 12-volt battery out of the reach of children. • The booster battery must be rated at 12 volt. Use of an improperly rated battery can damage your vehicle. • Whenever working on or near a 12-volt battery, always wear suitable eye pro- tectors (for example, goggles or indus- trial safety spectacles) and remove rings, metal bands, or a[…]
-
Страница 324
If the 12-volt battery is discharged, the power switch cannot be moved from the OFF position. Connect the jumper cables to the booster vehicle 䊊 B before pushing the power switch. 3. Push the P (Park)position switch to place the vehicle in the P (Park) position. 4. Switch off all unnecessary electrical systems (headlights, heater, air conditioner[…]
-
Страница 325
(Park) position. If this occurs, place suit- able blocks at both the front and back of a wheel to prevent the vehicle from mov- ing. Failure to block a wheel may allow the vehicle to move unexpectedly which may result in serious personal injury or death. T o place the vehicle in the READ Y position so the vehicle can be driven, charge the Li-ion ba[…]
-
Страница 326
For information about towing your vehicle behind a recreational vehicle (RV) , see “Flat towing” in the “T echnical and consumer information” section. T OWING RECOMMENDED BY NISSAN NISSAN recommends that your vehicle be towed with the driving (front) wheels off the ground or that the vehicle be placed on a flatbed truck as illustrated. CAUT[…]
-
Страница 327
VEHICLE RECOVER Y (FREEING STUCK VEHICLE) WARNING • Stand clear of a stuck vehicle. • Do not spin your tires at high speed. This could cause them to explode, which could result in serious injury. Parts of the vehicle could also over- heat and be damaged. Pulling a stuck vehicle Do not use the tie down hook for towing or vehicle recovery . Rear:[…]
-
Страница 328
• Always pull the cable straight out from the front of the vehicle. Never pull on the vehicle at an angle. • Pulling devices should be routed so they do not touch any part of the sus- pension, steering, brake or cooling systems. • Pulling devices such as ropes or can- vas straps are not recommended for use in vehicle towing or recovery. Rocki[…]
-
Страница 329
NO TES 6-16 In case of emergency I n f o r m a t i o n P r o v i d e d b y :[…]
-
Страница 330
7 Appearance and care Cleaning exterior …………………. .7-2 W ashing ……………………. .7-2 W axing …………………….. .7-2 Removing spots ………………… .7-3 Underbody …………………… .7-3 Glass ……………………… .7-3 Solar cell module (if so equipped) ………. .7-3 Wheels …………………..[…]
-
Страница 331
In order to maintain the appearance of your ve- hicle, it is important to take proper care of it. T o protect the paint surfaces, wash your vehicle as soon as you can: • after a rainfall to prevent possible damage from acid rain • after driving on coastal roads • when contaminants such as soot, bird drop- pings, tree sap, metal particles or b[…]
-
Страница 332
REMOVING SPO TS Remove tar and oil spots, industrial dust, insects, and tree sap as quickly as possible from the paint surface to avoid lasting damage or staining. Spe- cial cleaning products are available at a NISSAN certified LEAF dealer or any automotive acces- sory stores. UNDERBOD Y In areas where road salt is used in winter, the underbody mus[…]
-
Страница 333
CHROME P ARTS Clean chrome parts regularly with a non- abrasive chrome polish to maintain the finish. TIRE DRESSING NISSAN does not recommend the use of tire dressings. Tire manufacturers apply a coating to the tires to help reduce discoloration of the rub- ber. If a tire dressing is applied to the tires, it may react with the coating and form a co[…]
-
Страница 334
Carefully read and follow the manufacturer’s in- structions before using air fresheners. FL OOR MA TS WARNING T o avoid potential pedal interference that may result in a collision or injury: • NEVER place a floor mat on top of another floor mat in the driver front position. • Use only genuine NISSAN floor mats specifically designed for use in[…]
-
Страница 335
WARNING Do not allow wet seat belts to roll up in the retractor. NEVER use bleach, dye, or chemical solvents to clean the seat belts, since these materials may severely weaken the seat belt webbing. ELECTRIC VEHICLE SUPPL Y EQUIPMENT (EVSE) The Electric Vehicle Supply Equipment (EVSE) can be cleaned by wiping gently with a soft cloth dampened in a […]
-
Страница 336
CAUTION • NEVER remove dirt, sand or other de- bris from the passenger compartment by washing it out with a hose. Remove dirt with a vacuum cleaner. • Never allow water or other liquids to come in contact with electronic com- ponents inside the vehicle as this may damage them. Chemicals used for road surface deicing are extremely corrosive. The[…]
-
Страница 337
NO TES 7-8 Appearance and care I n f o r m a t i o n P r o v i d e d b y :[…]
-
Страница 338
8 Maintenance and do-it yourself Maintenance requirement …………….. .8-2 Scheduled maintenance ……………. .8-2 General maintenance ……………… .8-2 Where to go for service ……………. .8-2 General maintenance ……………….. .8-2 Explanation of maintenance items ………. .8-2 Maintenance precautions ……………..[…]
-
Страница 339
Y our new NISSAN has been designed to have minimum maintenance requirements with long service intervals to save you both time and money . However, some day-to-day and regular maintenance is essential to maintain your NIS- SAN’s fine mechanical condition, as well as its EV (Electric V ehicle) system performance. It is the owner’s responsibility […]
-
Страница 340
keeps the motor hood from opening when the primary latch is released. When driving in areas using road salt or other corrosive materials, check lubrication frequently . Lights*: Clean the headlights on a regular basis. Make sure that the headlights, stop lights, tail lights, turn signal lights and other lights are all operating properly and install[…]
-
Страница 341
head restraints/headrests move up and down smoothly and that the locks (if so equipped) hold securely in all latched positions. Seat belts: Check that all parts of the seat belt system (for example, buckles, anchors, adjusters and retractors) operate properly and smoothly, and are installed securely. Check the belt web- bing for cuts, fraying, wear[…]
-
Страница 342
When performing any inspection or maintenance work on your vehicle, always take care to prevent serious accidental injury to yourself or damage to the vehicle. The following are general precau- tions that should be closely observed. WARNING • The EV (Electric Vehicle) system uses high voltage up to approximately DC 400 volt. The system can be hot[…]
-
Страница 343
– The Climate Ctrl. Timer and remote climate control are not active or op- erating. See “Climate Ctrl. Timer” and “Remote climate control” in the “V entilators and climate control sys- tems” section. – The 12-volt battery is not being charged by the Li-ion battery and that all charging status indicator lights are off, see “Chargin[…]
-
Страница 344
1. Brake fluid reservoir 2. 12-volt battery 3. Fuse/fusible link holder 4. Fuse/fusible link holder 5. Coolant tank cap 6. Window washer fluid reservoir 7. Fuse/fusible link holder The cooling system is filled at the factory with a pre-diluted mixture of 50% genuine NISSAN Long Life Antifreeze/Coolant (blue) and 50% wa- ter to provide year-round an[…]
-
Страница 345
• When adding or replacing coolant, be sure to use only a Genuine NISSAN Long Life Antifreeze/Coolant (blue) or equivalent. Genuine NISSAN Long Life Antifreeze/Coolant (blue) is pre- diluted to provide antifreeze protec- tion to −34°F (−37°C) . If additional freeze protection is needed due to the weather conditions where you operate your ve[…]
-
Страница 346
For additional information on the location of the engine coolant reservoir, refer to “Motor com- partment check locations” in this section. If the cooling system frequently requires coolant, have it checked by a NISSAN cer- tified LEAF dealer. CHANGING COOLANT Major cooling system repairs should be per- formed by a NISSAN certified LEAF dealer.[…]
-
Страница 347
For additional brake fluid information, see “Rec- ommended fluids/lubricants and capacities” in the “T echnical and consumer information” sec- tion of this manual. WARNING • Use only new fluid from a sealed con- tainer. Old, inferior or contaminated fluid may damage the brake system. The use of improper fluids can damage the brake system,[…]
-
Страница 348
T o fill the window washer fluid reservoir, lift the cap and pour the window washer fluid into the reservoir opening. Add a washer solvent to the washer for better cleaning. In the winter season, add a windshield washer antifreeze. Follow the manufacturer’s in- structions for the mixture ratio. Fill the window washer fluid reservoir periodically.[…]
-
Страница 349
do not touch or rub your eyes. Thor- oughly wash your hands. If the acid contacts your eyes, skin or clothing, immediately flush with water for at least 15 minutes and seek medical at- tention. • Do not operate the vehicle if the fluid in the 12-volt battery is low. Low 12- volt battery fluid can cause a higher load on the 12-volt battery which c[…]
-
Страница 350
JUMP ST ARTING Jump starting provides power to the 12 volt sys- tem to allow the electrical systems to operate. The electrical systems must be operating to allow the Li-ion battery to be charged. Jump starting does not charge the Li-ion battery . The Li-ion battery must be charged before the vehicle can be driven. If jump starting is necessary, see[…]
-
Страница 351
Wiper rise-up function: T o pull up the wiper arm, pull the lever 䊊 1 within 1 minute after the power switch is turned off. The wiper operation stops in mid-operation and wiper arm can be pulled up. T o lower the wiper arm, place the wiper arm in the down position and then push the lever 䊊 2 up once after the power switch is turned on. CAUTION […]
-
Страница 352
Be careful not to clog the washer nozzle 䊊 A . This may cause improper windshield washer opera- tion. If the nozzle is clogged, remove any objects with a needle or small pin 䊊 B . Be careful not to damage the nozzle. Contact a NISSAN certified LEAF dealer if checking or replacement is required. If the brakes do not operate properly, have the br[…]
-
Страница 353
Proper brake inspection intervals should be followed. For additional information, see the maintenance log section of your NISSAN Service and Maintenance Guide. MO T OR COMP ARTMENT WARNING • Never touch, disassemble, remove or replace the high-voltage parts and cables, as well as their connectors. High-voltage cables are colored or- ange. T ouchi[…]
-
Страница 354
4. Locate the fuse that needs to be replaced. 5. Remove the fuse using the fuse puller located in the passenger compartment fuse box. 6. If the fuse is open 䊊 A , replace it with a new fuse 䊊 B . 7. If a new fuse also opens, have the electrical system checked, and if necessary , repaired by a NISSAN certified LEAF dealer. Fusible links If any e[…]
-
Страница 355
P ASSENGER COMP ARTMENT CAUTION Never use a fuse of a higher or lower amperage rating than that specified on the fuse box cover. This could damage the electrical system or cause a fire. If any electrical equipment does not operate, check for an open fuse. 1. Make sure that the power switch and the headlight switch are turned off. 2. Insert a screwd[…]
-
Страница 356
CAUTION • Be careful not to allow children to swallow the battery and removed parts. • An improperly disposed battery can harm the environment. Always confirm local regulations for battery disposal. • When changing batteries, do not let dust or oil get on the components. • There is danger of explosion if the lithium battery is incorrectly r[…]
-
Страница 357
4. Align the tips of the upper and lower parts 䊊 1 , and then push them together 䊊 2 until it is securely closed. 5. Operate the buttons to check that it is func- tioning properly . See a NISSAN certified LEAF dealer if you need any assistance for replacement. FCC Notice: For USA: This device complies with Part 15 of the FCC Rules. Operation is[…]
-
Страница 358
1. Front parking light 2. Headlight (low-beam) 3. Front turn signal light 4. Map light 5. Ceiling light 6. Front fog light (if so equipped) 7. Headlight (high-beam) 8. High-mounted stop light 9. Rear combination light (stop/tail/turn signal/ back -up light/rear side marker) 10. License plate light 11. Cargo light Fog may temporarily form inside the[…]
-
Страница 359
HEADLIGHTS Replacing Halogen headlight (high-beam): The headlight high-beam is a semi-sealed beam type that uses a replaceable headlight (halogen) bulb. CAUTION • Do not leave the bulb out of the head- light reflector for a long period of time. Dust, moisture, smoke, etc . entering the headlight body may affect bulb performance. • High-pressure[…]
-
Страница 360
EXTERIOR AND INTERIOR LIGHTS Item W attage (W) Bulb No. Headlight low beams (T ype A)* LED — Headlight high beams (Halogen) (T ype A) 65 H9 Headlight (T ype B) 60/55 H13 T urn/Park light 27/7 3457NAK Front fog light (if so equipped)* 55 H11 Rear combination light T urn signal 21 WY21W Stop/tail* LED — Back -up 16 W16W Front sidemarker 5 W5W Lic[…]
-
Страница 361
Front turn signal light Parking light License plate light 8-24 Maintenance and do-it yourself I n f o r m a t i o n P r o v i d e d b y :[…]
-
Страница 362
1. Remove the rear combination attachment bolt 䊊 1 . 2. Pull the rear combination assembly evenly toward rear of the vehicle 䊊 2 . 3. T urn the bulb socket and then remove the bulb 䊊 3 . Rear combination light Cargo light Ceiling light Maintenance and do-it yourself 8-25 I n f o r m a t i o n P r o v i d e d b y :[…]
-
Страница 363
If you have a flat tire, see “Flat tire” in the “In case of emergency” section. TIRE PRESSURE Tire Pressure Monitoring System (TPMS) This vehicle is equipped with the Tire Pressure Monitoring System (TPMS) . It monitors tire pres- sure of all tires. When the low tire pressure warn- ing light is lit, and the CHECK TIRE PRESSURE warning appea[…]
-
Страница 364
• Before taking a long trip, or whenever you heavily load your vehicle, use a tire pressure gauge to ensure that the tire pressures are at the specified level. • For additional information re- garding tires, refer to “Important Tire Safety Information” (US) or “Tire Safety Information” (Canada) in the Warranty Infor- mation Booklet. Tir[…]
-
Страница 365
䊊 3 Original size: The size of the tires originally installed on the vehicle at the factory. 䊊 4 Cold tire pressure: Inflate the tires to this pressure when the tires are cold. Tires are considered COLD after the vehicle has been parked for 3 or more hours, or driven less than 1 mile (1.6 km) at moderate speeds. The recommended cold tire inflat[…]
-
Страница 366
SIZE COLD TIRE INFLA TION PRESSURE FRONT ORIGI- NAL TIRE P205/55R16 89H 250 kPa, 36 PSI REAR ORIGI- NAL TIRE P205/55R16 89H 250 kPa, 36 PSI REAR ORIGI- NAL TIRE P215/50R17 90V 250 kPa, 36 PSI TIRE LABELING Federal law requires tire manufacturers to place standardized information on the sidewall of all tires. This information iden- tifies and descri[…]
-
Страница 367
3. T wo-digit number (60): This number, known as the aspect ratio, gives the tire’s ratio of height to width. 4. R: The “R” stands for radial. 5. T wo-digit number (16): This number is the wheel or rim diameter in inches. 6. T wo- or three-digit number (94): This number is the tire’s load index. It is a measurement of how much weight each t[…]
-
Страница 368
be carried by the tire. When replacing the tires on the vehicle, always use a tire that has the same load rating as the factory installed tire. 䊊 6 T erm of “tubeless” or “tube type” Indicates whether the tire requires an inner tube (“tube type”) or not (“tube- less”) . 䊊 7 The word “radial” The word “radial” is shown, i[…]
-
Страница 369
Generally , snow tires will have lower speed rat- ings than factory equipped tires and may not match the potential maximum vehicle speed. Never exceed the maximum speed rating of the tire. If you install snow tires, they must be the same size, brand, construction and tread pattern on all four wheels. For additional traction on icy roads, studded ti[…]
-
Страница 370
The wheel nuts must be kept tight- ened to the specification at all times. It is recommended that wheel nuts be tightened to the specification at each tire rotation interval. WARNING • After rotating the tires, check and adjust the tire pressure. • Retighten the wheel nuts when the vehicle has been driven for 600 miles (1,000 km) (also in cases[…]
-
Страница 371
Replacing wheels and tires When replacing a tire, use the same size, tread design, speed rating and load carrying capacity as originally equipped. See “Specifications” in the “T echnical and consumer information” sec- tion for recommended types and sizes of tires and wheels. WARNING • The use of tires other than those rec- ommended or the[…]
-
Страница 372
EMERGENC Y TIRE PUNCTURE REP AIR KIT The emergency tire puncture repair kit (Emer- gency Tire Sealant) is supplied with the vehicle instead of a spare tire. It can be used to tempo- rarily repair minor tire punctures. If possible, have the vehicle towed to a facility that can repair or replace the flat tire. Using the emer- gency tire puncture repa[…]
-
Страница 373
NO TES 8-36 Maintenance and do-it yourself I n f o r m a t i o n P r o v i d e d b y :[…]
-
Страница 374
9 T echnical and consumer information Recommended fluids/lubricants and capacities …. .9-2 Air conditioning system refrigerant and lubricant recommendations ……………….. .9-3 Specifications …………………… .9-4 Charging system ……………….. .9-4 Motor ……………………… .9-5 Wheels and tires ……………….. .[…]
-
Страница 375
The following are approximate capacities. The actual refill capacities may be slightly different. When refilling, follow the procedure that is described in the “Maintenance and do-it-yourself” section to determine the proper refill capacity. Capacity (approximate) Recommended specifications US measure Imp measure Liter Cooling system With reser[…]
-
Страница 376
AIR CONDITIONING S Y STEM REFRIGERANT AND LUBRICANT RECOMMENDA TIONS The air conditioning system in your NISSAN vehicle must be charged with the refriger- ant, HFC-134a (R-134a) and the oil, com- pressor oil ND-OIL11 or the equivalents. CAUTION The use of any other refrigerant or oil will cause severe damage to the air condi- tioning system and wil[…]
-
Страница 377
CHARGING S Y STEM Rated input voltage AC120V (single phase) , AC240V (single phase) Rated input frequency 60Hz Maximum rated current 12A (AC120V) , 18A (AC240V) , 32A (AC240V; if so equipped) Maximum power consumption 1.4 kV A (AC120V) , 4.8 kVA (AC240V) , 7.7kVA (AC240V; if so equipped) Supply system TN-S system Sensitive current of GFI (Ground Fa[…]
-
Страница 378
Rated input voltage AC120V (single phase) , AC240V (single phase) Rated input frequency 60Hz Applicable standards SAE J1772: 2010 EN61851-1: 2010 EN61851-21: 2002 IEC61851-1: 2010 IEC61851-21: 2001 EN61000-6-1: 2007 EN61000-6-3: 2007 Adapters Adaptors shall not be used to connect a vehicle connector to a vehicle inlet. MO T OR Model EM61 WHEELS AND[…]
-
Страница 379
DIMENSIONS AND WEIGHTS Overall length in (mm) 175.0 (4,445)*1 174.8 (4,440)*2 Overall width in (mm) 69.7 (1,770) Overall height in (mm) 61.0 (1,550) Front tread in (mm) 60.6 (1,540) Rear tread in (mm) 60.4 (1,535) Wheelbase in (mm) 106.3 (2,700) Gross V ehicle Weight Rating (GVWR) lb (kg) See the F .M.V .S.S. or C.M.V .S.S. certifica- tion label on[…]
-
Страница 380
VEHICLE IDENTIFICA TION NUMBER (VIN) PLA TE The vehicle identification number plate is at- tached as shown. This number is the identifica- tion for your vehicle and is used in the vehicle registration. VEHICLE IDENTIFICA TION NUMBER (CHASSIS NUMBER) The vehicle identification number is located as shown. Remove the cover to access the number. TRACTI[…]
-
Страница 381
F .M.V .S.S./C.M.V .S.S CERTIFICA TION LABEL The Federal/Canadian Motor V ehicle Safety Standards (F .M.V.S.S./C.M.V .S.S.) certification label is affixed as shown. This label contains valuable vehicle information, such as: Gross Ve- hicle W eight Ratings (GVWR) , Gross Axle W eight Rating (GAWR) , month and year of manufacture, V ehicle Identifica[…]
-
Страница 382
AIR CONDITIONER SPECIFICA TION LABEL The air conditioner specification label is attached to the underside of the hood as shown in the illustration. Perform the following procedure to mount the license plate. Before mounting the license plate, confirm that the following parts are enclosed in the plastic bag. • License plate bracket • Screw ×2 1[…]
-
Страница 383
WARNING • It is extremely dangerous to ride in the cargo area inside the ve- hicle. In a collision, people riding in these areas are more likely to be seriously injured or killed. • Do not allow people to ride in any area of your vehicle that is not equipped with seats and seat belts. • Be sure everyone in your vehicle is in a seat and using […]
-
Страница 384
VEHICLE L OAD CAP ACITY Do not exceed the load limit of your ve- hicle shown as “The combined weight of occupants and cargo” on the Tire and Loading Information label. Do not exceed the number of occupants shown as “Seating Capacity” on the Tire and Load- ing Information label. T o get “the combined weight of occu- pants and cargo”, add[…]
-
Страница 385
(1400 − 750 (5 x 150) = 650 lbs) or (640 − 340 (5 x 70) = 300 kg.) 5. Determine the combined weight of luggage and cargo being loaded on the vehicle. That weight may not safely exceed the available cargo and lug- gage load capacity calculated in Step 4. Before driving a loaded vehicle, confirm that you do not exceed the Gross V ehicle W eight R[…]
-
Страница 386
• Do not load the front and rear axle to the GA WR. Doing so will exceed the GVWR. WARNING • Properly secure all cargo with ropes or straps to help prevent it from sliding or shifting. Do not place cargo higher than the seat- backs. In a sudden stop or colli- sion, unsecured cargo could cause personal injury. • Do not load your vehicle any he[…]
-
Страница 387
Do not tow a trailer with your vehicle. T owing your vehicle with all four wheels on the ground is sometimes called flat towing. This method is typically used when towing a vehicle behind a recreational vehicle, such as a motor home. CAUTION • Failure to follow these guidelines can result in severe reduction gear dam- age. • DO NOT tow this veh[…]
-
Страница 388
under controlled conditions on specified govern- ment test surfaces of asphalt and concrete. A tire marked C may have poor traction performance. WARNING The traction grade assigned to this tire is based on straight-ahead braking traction tests, and does not include acceleration, cornering, hydroplaning, or peak traction characteristic s. TEMPERA TU[…]
-
Страница 389
Y ou may notify NISSAN by contacting our Consumer Affairs Department, toll-free, at 1-877-NOGASEV (1-877-664-2738) . For Canada If you believe that your vehicle has a de- fect which could cause a crash or could cause injury or death, you should immedi- ately inform T ransport Canada in addition to notifying NISSAN. If T ransport Canada receives com[…]
-
Страница 390
offer you new or additional products or services; and as otherwise may be required by law. Such data may be shared with NISSAN’s parents, sub- sidiaries, affiliates, successors or assignees; au- thorized NISSAN certified LEAF dealers; NIS- SAN’s marketing partners; your fleet company, if your vehicle is a fleet vehicle; your rental com- pany , […]
-
Страница 391
interruption of data transmission and, as a result, certain features may be temporarily unavailable. Even if areas with good signal reception, cellular connectivity can be adversely affected by things such as tall buildings, apartments, tunnels, un- derground parking, mountainous areas, etc. Even if the signal strength bar of the in-vehicle data co[…]
-
Страница 392
NO TE: EDR data are recorded by your vehicle only if a nontrivial crash situation occurs; no data are recorded by the EDR under normal driving conditions and no personal data (for example, name, gender, age and crash location) are recorded. However, other par- ties, such as law enforcement, could com- bine the EDR data with the type of person- ally[…]
-
Страница 393
CHARGING INFORMA TION 9-20 T echnical and consumer information I n f o r m a t i o n P r o v i d e d b y :[…]
-
Страница 394
T echnical and consumer information 9-21 I n f o r m a t i o n P r o v i d e d b y :[…]
-
Страница 395
The label is typically located on the driver side center pillar or on the driver’s door. For additional information, see “Wheels and tires” in the “Main- tenance and do-it-yourself” section. COLD TIRE PRESSURES 9-22 T echnical and consumer information I n f o r m a t i o n P r o v i d e d b y :[…]
-
Страница 396
10 Index A ABS (Anti-lock Braking System) …….. 5 — 2 2 Advanced air bag system ……….. 1 — 4 2 Air bag system …………….. 1 — 4 2 Advanced air bag system ………. 1 — 4 2 Front passenger air bag and status light . .1-44 Front-seat mounted side-impact supplemental air bag system …….. 1 — 4 7 Roof-mounted curtain side-impact suppl[…]
-
Страница 397
B o o s t e r s e a t s …………….. 1 — 3 3 Precautions on child restraints ……. 1 — 1 8 T op tether strap ……………. 1 — 2 1 C h i l d s a f e t y ……………….. 1 — 1 5 Child safety rear door lock ………… 3 — 6 Circuit breaker, Fusible link ……….. 8 — 1 7 Cleaning exterior and interior …….. 7 — 2 , 7 — 4 C l i m[…]
-
Страница 398
Li-ion battery temperature gauge ……. 2 — 7 Odometer ……………….. 2 — 6 P ower meter ……………… 2 — 7 Speedometer ……………… 2 — 6 G e n e r a l m a i n t e n a n c e …………… 8 — 2 G l o v e b o x ………………… 2 — 5 2 H Hazard warning flasher switch ………. 6 — 2 Headlights ……………….. 8 — 2 2[…]
-
Страница 399
Lock …………………… 3 — 5 Automatic door locks …………. 3 — 5 Door locks ………………. 3 — 3 P ower door lock ……………. 3 — 3 R e a r h a t c h l o c k ……………. 3 — 1 8 Low tire pressure warning light ……… 2 — 1 6 Low tire pressure warning system (See tire pressure monitoring system (TPMS)) …… 5 — 2 Lugg[…]
-
Страница 400
Q Q u i c k c h a r g e …………….. C H — 1 5 R R a p i d a i r p r e s s u r e l o s s ………….. 5 — 5 R e a r c e n t e r s e a t b e l t ………….. 1 — 1 4 Rear door lock, Child safety rear door lock . . .3-6 Rear hatch ……………….. 3 — 1 8 R e a r s e a t s ………………… 1 — 4 Rearview monitor …………….. 4 […]
-
Страница 401
Supplemental restraint system ……… 1 — 3 6 Precautions on supplemental restraint s y s t e m ………………… 1 — 3 6 Switch …………………. 2 — 4 2 A u t o l i g h t s w i t c h ……………. 2 — 4 2 C h a r g e t i m e r O F F s w i t c h ………. 2 — 4 9 E C O s w i t c h ……………… 2 — 4 6 F o g l i g h t s w i t c[…]
-
Страница 402
W W a r n i n g…………………. 6 — 2 Hazard warning flasher switch …….. 6 — 2 Indicators for operation ……….. 2 — 2 3 Tire pressure monitoring system (TPMS) ……………… 5 — 2 , 6 — 3 W arning/indicator lights and audible reminders ………………. 2 — 1 2 W arning information displays …….. 2 — 3 2 W a r n i n g l i g h[…]
-
Страница 403
NO TES I n f o r m a t i o n P r o v i d e d b y :[…]
-
Страница 404
NO TES I n f o r m a t i o n P r o v i d e d b y :[…]
-
Страница 405
NO TES I n f o r m a t i o n P r o v i d e d b y :[…]
-
Страница 406
NO TES I n f o r m a t i o n P r o v i d e d b y :[…]
-
Страница 407
NO TES I n f o r m a t i o n P r o v i d e d b y :[…]
-
Страница 408
NO TES I n f o r m a t i o n P r o v i d e d b y :[…]
Ниссан Лиф (ZE0/AZE0, Mark I, платформа EV, Venucia e30) с электрическим двигателем EM61 мощностью: 109 л.с./80 кВт; Руководство по ремонту и эксплуатации. Расходные материалы для проведения ТО, регулярные и периодические проверки, помощь в дороге и гараже, уникальная система определения неисправностей, подробные электросхемы, контрольные размеры кузова, технические характеристики. Производственно-практическое издание легковой автомобиль компактного «Ц»-класса Nissan Leaf с цельнометаллическими несущими кузовами пятидверный хэтчбек переднеприводные модели первого поколения выпуска (включая рестайлинг 2012) с 2010 по 2017 год
ЕСЛИ ВЫ ВИДИТЕ ОШИБКУ 406 Not Acceptable и не видите документ, то скорей всего у Вас IP РФ и его надо сменить, на любой другой страны, с помощью VPN ( Scribd и SlideShare блокируют посетителей с Российским IP).
Видео Ниссан Лиф замена передних стоек амортизаторов и втулок стабилизатора (Nissan Leaf 10-17)
Ниссан Лиф mk1 общая информация (Nissan Leaf 2010-2017)
Стойка амортизатора передней подвески
Снятие
1. Снять соответствующее колесо с автомобиля.
2. Удалить стопорную пластину тормозного шланга со стойки передней подвески.
3. Снять колесный датчик.
4. Отсоединить стойку стабилизатора поперечной устойчивости от стойки передней подвески.
5. С помощью инструмента с силовым приводом отвернуть болты и гайки крепления поворотного кулака к стойке передней подвески.
6. Снять верхнюю панель капота.
7. Отвернуть болты крепления монтажного изолятора, после чего снять стойку передней подвески с автомобиля.
Установка
Установка производится в порядке, обратном снятию, с учетом следующего:
• Установить стойку передней подвески так, чтобы установочная метка (А) монтажного изолятора находилась с передней стороны автомобиля, а стрелка (В) была направлена наружу.
Примечание
Установочная метка «О» соответствует правому монтажному изолятору, а «1» — левому.
• Не использовать гайки крепления стойки передней подвески повторно.
• Окончательную затяжку крепежных элементов нужно производить в установочном положении автомобиля (резиновых втулок), на незагруженном автомобиле, стоящем на ровной поверхности.
• Выполнить проверку после установки.
• В случае замены стойки передней подвески новой, необходимо выполнить процедуру утилизации амортизаторной стойки.
Разборка
ВНИМАНИЕ
Соблюдать осторожность, чтобы не повредить шток поршня стойки передней подвески при снятии компонентов.
1. Снять колпачок.
2. Установить приспособление (ST35652000) на стойку передней подвески и зафиксировать всю сборку в тисках.
ВНИМАНИЕ
При установке стойки передней подвески в тиски нужно обмотать её ветошью для защиты от повреждений.
3. С помощью специального приспособления для сжатия пружин подвески сжать винтовую пружину между верхним и нижним седлами стойки подвески, чтобы полностью разгрузить седла.
ВНИМАНИЕ
Убедиться в том, что приспособление для сжатия надежно установлено на винтовую пружину.
4. Убедиться в том, что винтовая пружина не упирается в верхнее и нижнее седла стойки подвески. После этого отвернуть контргайку штока поршня,
удерживая конец штока от проворачивания.
5. Снять монтажный изолятор, монтажный подшипник и отбойный демпфер со стойки подвески.
6. После снятия винтовой пружины с приспособлением для сжатия постепенно освободить сжатую пружину.
ВНИМАНИЕ
При ослаблении пружины убедиться в том, что установочное положение приспособления для сжатия на пружине не меняется.
7. Снять нижнее резиновое седло.
8. Выполнить проверку после разборки.
Сборка
ВНИМАНИЕ
Соблюдать осторожность, чтобы не повредить шток поршня стойки передней подвески при установке компонентов.
1. Установить приспособление (ST35652000) на стойку передней подвески и зафиксировать всю сборку в тисках.
ВНИМАНИЕ
При установке стойки передней подвески в тиски нужно обмотать её ветошью для защиты от повреждений.
2. Установить нижнее резиновое седло.
3. Сжать винтовую пружину с помощью специального приспособления, после чего установить на стойку передней подвески.
ВНИМАНИЕ
Перед сжатием убедиться в том, что приспособление для сжатия надежно установлено на винтовой пружине. Соблюдать направление установки винтовой пружины подвески. Стрелка направлена в верхнюю сторону пружины Совместить нижний край винтовой пружины с выемкой нижнего резинового седла.
4. Нанести мыльный раствор на отбойный демпфер.
ВНИМАНИЕ
Не использовать машинное масло.
5. Установить отбойный демпфер на монтажный изолятор.
6. Установить монтажный подшипник.
ВНИМАНИЕ
Не наносить масло в качестве смазки при установке монтажного подшипника.
7. Убедиться в расположении установочной метки монтажного изолятора, после чего установить его на стойку подвески стрелкой наружу автомобиля.
Примечание
Установочная метка «О» соответствует правому монтажному изолятору, а «1» — левому.
8. Зафиксировать конец штока поршня от проворачивания, после чего затянуть контргайку моментом 68 Нм.
ВНИМАНИЕ
Не использовать контргайку штока поршня повторно.
9. Постепенно освободить приспособление для сжатия пружины и снять его с пружины.
ВНИМАНИЕ
При ослаблении приспособления убедиться в том, что установочное положение пружины не нарушается.
10. Снять приспособление со стойки передней подвески.
11. Установить колпачок.
Проверка после разборки
Проверить следующие параметры.
При обнаружении дефектов заменить детали новыми.
Стойка подвески:
• Проверить стойку подвески на наличие деформации, трещин или повреждений.
• Проверить шток поршня на наличие повреждений, неравномерного износа или искажений.
• Проверить наличие масляных течей.
Монтажный изолятор и отбойный демпфер стойки подвески:
• Проверить монтажный изолятор и отбойный демпфер на наличие трещин, износа или повреждений.
Винтовая пружина:
• Проверить винтовую пружину на наличие трещин, износа или повреждений. Проверка после установки
1. Проверить надежность подсоединения разъема колесного датчика.
2. Проверить углы установки колес.
3. Отрегулировать нейтральное положение датчика угла поворота рулевого колеса.
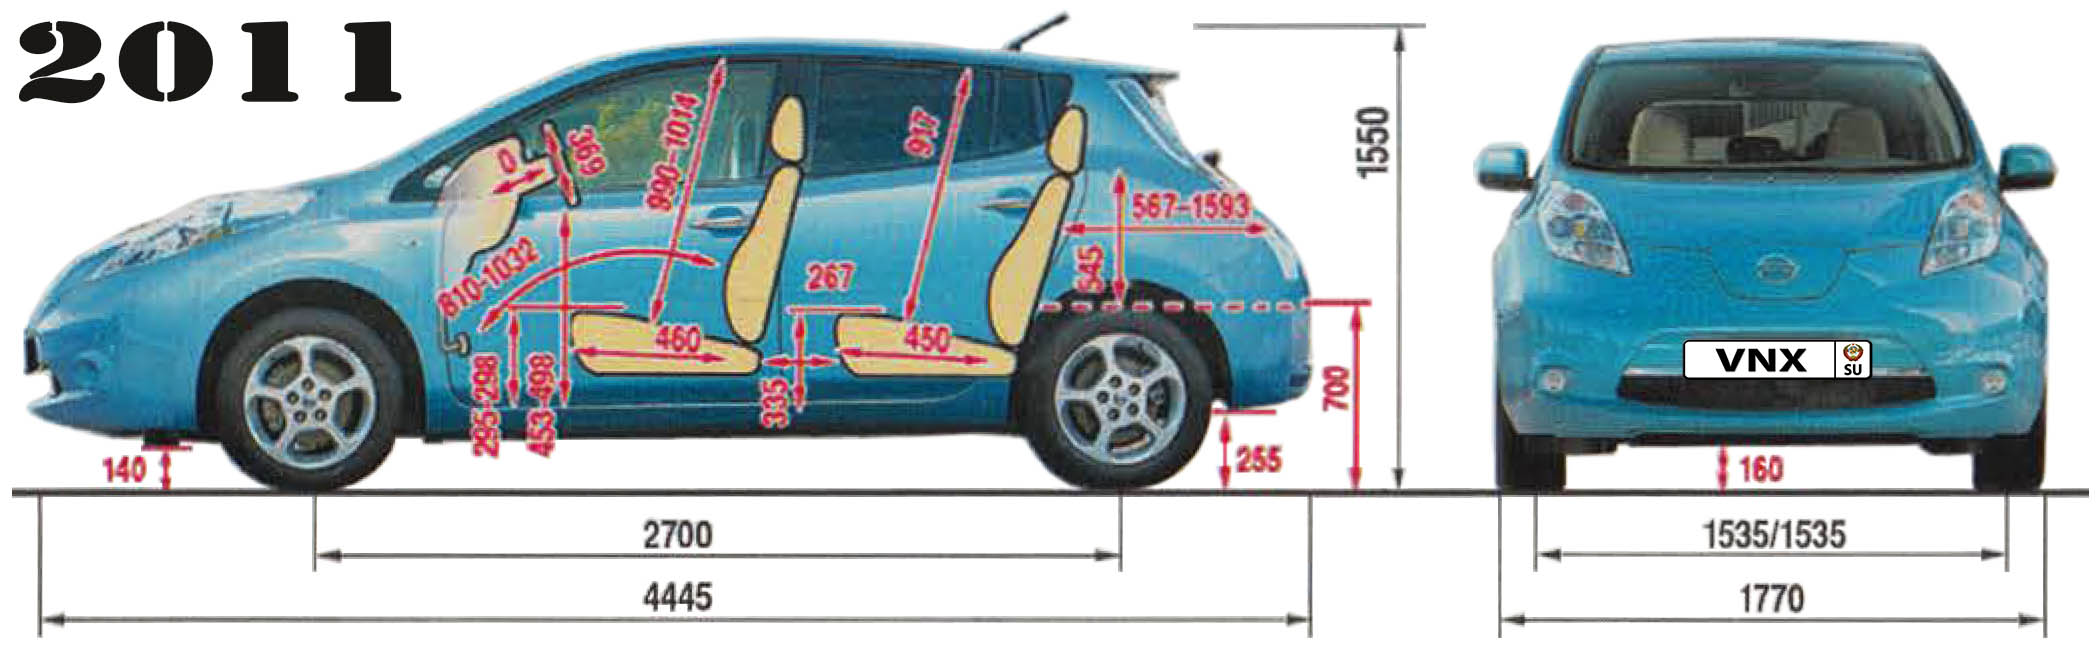
| № | Спецификация / Specs | Данные |
| Габариты (мм/mm) и масса (кг/kg) / Dimensions and Weight | ||
| 1 | Длина / Length | 4446.8 |
| 2 | Ширина (без/с зеркалами) / Width | 1771.4 |
| 3 | Высота (загружен/пустой) / Height | 1549.5 |
| 4 | Колёсная база / Wheelbase | 2700 |
| 5 | Дорожный просвет (клиренс) / Ground clearance | 160⇒140 |
| 6 | Снаряжённая масса / Total (curb) weight | 1525 |
| Полная масса / Gross (max.) weight | 1965 | |
|
Двигатель / Engine |
||
| 7 | Тип / Engine Type, Code | Электрический, EM61 |
| 8 | Количество цилиндров / Cylinder arrangement: Total number of cylinders, of valves | Синхронный, переменного тока |
| 9 | Диаметр цилиндра / Bore | — |
| 10 | Ход поршня / Stroke | — |
| 11 | Объём / Engine displacement | Ёмкости батареи 24 кВт·ч |
| 12 | Система питания / Fuel supply, Aspiration | Литий-ионная 192 ячеек |
| Аккумуляторные батареи | ||
| 13 | Степень сжатия / Compression ratio | — |
| 14 | Максимальная мощность / Max. output power kW (HP) at rpm | 80 кВт (109 л.с.) при 2730-9800 об/мин |
| 15 | Максимальный крутящий момент / Max. torque N·m at rpm | 280 Нм при 0-2730 об/мин |
|
Трансмиссия / Transmission |
||
| 16 | Сцепление / Clutch type | Прямая передача |
| 17 | КПП / Transmission type | RE1F61A Автоматическая, одноступенчатая с передаточным числом 7.937:1 |
О Книге
- Название: Nissan Leaf Руководство по ремонту и эксплуатации
- Электрические двигатели: EM61 109 л.с./80 кВт
- Выпуск с 2010 года
- Серия: «Золотая»
- Год издания: 2016
- Автор: Коллектив авторов
- Издательство: «Ассоциация независимых издателей»
- Формат: PDF
- Страниц в книге: 523
- Размер: 256.64 МБ (4 книги — две по ремонту, эксплуатация и брошюра)
- Язык: Русский
- Количество электросхем: 32
-
Nissan Leaf (2011) — page 1
F or your saf ety , read carefully and k eep in this vehicle. OWNER’S MANUAL REVISED 2011 LEAF 2011 NISSAN LEAF ZE0-D ZE0-D Printing: January 2012 (04A) (SC) Publication No.: OM1E-0ZE0U2 Printed in U.S.A. K100 PANTONE 297C PANTONE 299C PANTONE 300C PANTONE 289C PANTONE 102C …
-
Nissan Leaf (2011) — page 2
…
-
Nissan Leaf (2011) — page 3
…
-
Nissan Leaf (2011) — page 4
…
-
Nissan Leaf (2011) — page 5
…
-
Nissan Leaf (2011) — page 6
…
-
Nissan Leaf (2011) — page 7
Welcome to the growing family of new NISSAN owners. This vehicle is delivered to you with confidence. It was produced using the latest techniques and strict quality control. This manual was prepared to help you under- stand the operation and maintenance of your vehicle so that you may enjoy many miles of driving pleasure. Please read through this m …
-
Nissan Leaf (2011) — page 8
All information, specifications and illustrations in this manual are those in effect at the time of printing. NISSAN reserves the right to change specifications or design at any time without notice. IMPORT ANT INFORMA TION ABOUT THIS MANUAL Y ou will see various symbols in this manual. They are used in the following ways: WARNING This is used to in …
-
Nissan Leaf (2011) — page 9
CALIFORNIA PERCHLORATE ADVI- SORY Some vehicle parts, such as lithium bat- teries, may contain perchlorate material. The following advisory is provided: “Per- chlorate Material — special handling may apply, see www.dtsc.ca.gov/ hazardouswaste/perchlorate.” Bluetooth ® is a trademark owned by Bluetooth SIG, Inc. * C 2011 NISSAN MO T OR CO., L T …
-
Nissan Leaf (2011) — page 10
NISSAN CUSTOMER CARE PROGRAM NISSAN CARES … Both NISSAN and your NISSAN certified LEAF dealer are dedicated to serving all your automotive needs. Y our satisfaction with your vehicle and your NISSAN certified LEAF dealer are our primary concerns. Y our NISSAN certified LEAF dealer is always available to assist you with all your automobile sales a …
-
Nissan Leaf (2011) — page 11
…
-
Nissan Leaf (2011) — page 12
Illustrated table of contents 0 EV Overview EV Charging Safety—Seats, seat belts and supplemental restraint system Instruments and controls Pre-driving checks and adjustments V entilators and climate control systems Starting and driving In case of emergency Appearance and care Maintenance and do-it-yourself CH 1 2 3 4 5 6 7 8 T able of Contents T …
-
Nissan Leaf (2011) — page 13
…
-
Nissan Leaf (2011) — page 14
0 Illustrated table of contents Seats, seat belts and Supplemental Restraint System (SRS) ………………………………………………………………… 0-2 Exterior front …………………………………………………………………… 0-3 Exterior rear ………………………………………………………….. …
-
Nissan Leaf (2011) — page 15
0-2 Illustrated table of contents 1. Rear headrests (Page.1-4) 2. Child restraint anchor points (for top tether strap child restraint) (P .1-32) 3. Roof-mounted curtain side-impact supplemental air bags (P .1-36) 4. Seat belts (P .1-10) 5. Front head restraints (P .1-4) 6. Seat belt pretensioners (P .1-49) 7. Front seats (P .1-3) 8. Supplemental fr …
-
Nissan Leaf (2011) — page 16
1. Charge port lid (P .3-17) 2. Hood (P .3-16) 3. Headlight and turn signal lights — Switch operation (P .2-41) — Bulb replacement (P .8-21) 4. Windshield wiper and washer — Switch operation (P .2-38) — Blade replacement (P .8-12) — Window washer fluid (P .8-10) 5. Outside mirrors (P .3-21) 6. P ower windows (P .2-54) 7. License plate ins …
-
Nissan Leaf (2011) — page 17
0-4 Illustrated table of contents 1. Rear view camera* (See LEAF Navigation System Owner’s Manual.) 2. Rear window wiper and washer — Switch operation (P .2-39) — Window washer fluid (P .8-10) 3. High-mounted stop light — Bulb replacement (P .8-22) 4. Rear window defroster (P .2-40) 5. Solar cell module* (P .EV-30) 6. Antenna — Satellite …
-
Nissan Leaf (2011) — page 18
1. Ceiling light (P .2-57) 2. Sun visors (P .3-20) 3. Map lights (P .2-56) — Bluetooth ® Hands-Free Phone System micro- phone (See LEAF Navigation System Owner’s Manual.) 4. Sunglasses holder (P .2-50) 5. Inside rearview mirror (P .3-20) — HomeLink ® * (P .2-58) 6. Cargo area — Cargo cover* (P .2-51) — Parking brake mechanical release ( …
-
Nissan Leaf (2011) — page 19
0-6 Illustrated table of contents 1. TRIP switch for twin trip odometer (P .2-6) 2. T rip computer switch (P .2-27) 3. Instrument brightness control switch (P .2-41) 4. Headlight, fog light* and turn signal switch — Headlight (P .2-41) — T urn signal light (P .2-44) — Fog light* (P .2-44) 5. Steering-wheel-mounted controls (left side) (See LE …
-
Nissan Leaf (2011) — page 20
1. Side ventilator (P .4-2) 2. Meters and gauges (P .2-5) 3. Center multi-function control panel (See LEAF Navigation System Owner’s Manual.) — Navigation system — V ehicle information and setting buttons — Bluetooth ® Hands-Free Phone System — Audio system 4. Hazard warning flasher switch (P .2-45) 5. Center ventilator (P .4-2) 6. Front …
-
Nissan Leaf (2011) — page 21
0-8 Illustrated table of contents Upper display and lower display This vehicle is equipped with an upper display and a lower display . 1. Master warning light (P .2-17) 2. ECO indicator (P .2-10) 3. Speedometer (P .2-6) 4. Clock (P .2-11) 5. Outside air temperature (P .2-10) 6. T urn signal/Hazard indicator light (P .2-20) 7. Li-ion battery tempera …
-
Nissan Leaf (2011) — page 22
1. Coolant tank cap (P .8-7) 2. Window washer fluid reservoir (P .8-10) 3. Brake fluid reservoir (P .8-9) 4. T raction motor inverter (P .EV-7) 5. T raction motor and reduction gear (P .8-9) 6. Charge port lid (P .3-17) 7. Coolant reservoir (P .8-7) 8. 12-volt battery (P .8-11) — Jump starting (P .6-9) 9. Fuse/fusible link holder (P .8-16) Illust …
-
Nissan Leaf (2011) — page 23
0-10 Illustrated table of contents Warning light Name Page 12-volt battery charge warning light 2-13 Anti-lock Braking System (ABS) warning light 2-14 BRAKE system warning light (yellow) 2-14 BRAKE warning light (red) 2-14 Electric power steering warning light 2-15 Electric shift control sys- tem warning light 2-15 EV system warning light 2-16 Head …
-
Nissan Leaf (2011) — page 24
EV Overview The EV (Electric V ehicle) system ……………………………….. EV-2 Li-ion battery ……………………………………………………………….. EV-2 Driving with a discharged Li-ion battery ………………. EV-3 Charging the 12-volt battery …………………………………. EV-5 Li-ion battery heater (i …
-
Nissan Leaf (2011) — page 25
EV-2 EV Overview The LEAF is an electric vehicle. Some of the vehicle’s systems operate differently and have different operating characteristics than vehicles equipped with an internal combustion engine. It is important to carefully review the entire Own- er’s Manual for this reason. The main difference is the LEAF is powered by electricity . T …
-
Nissan Leaf (2011) — page 26
NOTE: . If the outside temperature is − 13 8 F ( − 25 8 C) or less, the Li-ion battery may freeze and it cannot be charged or provide power to run the vehicle. Move the vehicle to a warm location. . The capacity of the Li-ion battery in your vehicle to hold a charge will, like all such batteries, decrease with time and usage. As the battery age …
-
Nissan Leaf (2011) — page 27
EV-4 EV Overview indicate low Li-ion battery charge: . The low battery charge warning light . The master warning light . “Li-ion battery level is Low” warning message is displayed on the dot matrix liquid crystal display See “16. Li-ion battery low charge warning ” in the “2. Instruments and controls” section. . Messages are displayed o …
-
Nissan Leaf (2011) — page 28
CHARGING THE 12-VOL T BA TTERY While vehicle is driven The Li-ion battery charges the 12-volt battery as necessary when the power switch is in the READ Y to drive position. While the vehicle is not in use When the EV (Electric V ehicle) system is off, the 12-volt battery charges automatically for 5 minutes every 5 days. The charge timing resets to …
-
Nissan Leaf (2011) — page 29
EV-6 EV Overview — the vehicle’s power switch is in the ON position. — there is no electrical power being supplied to the charging equipment. . When the Li-ion battery heater is already in operation using an external power source, it will continue to use the external power even if the power switch is placed in the ON position. . Vehicle drivi …
-
Nissan Leaf (2011) — page 30
HIGH-VOL T AGE COMPONENTS WARNING . The EV (Electric Vehicle) system uses high voltage up to approxi- mately DC 400 volt. The system can be hot during and after starting and when the vehicle is shut off. Be careful of both the high voltage and the high temperature. Follow the warning labels that are attached to the vehicle. . Never disassemble, rem …
-
Nissan Leaf (2011) — page 31
EV-8 EV Overview WARNING In case of a collision: . If your vehicle is drivable, pull your vehicle off the road, push the P (Park) position switch on the selec- tor lever, apply the parking brake and turn the EV (Electric V ehicle) system off. . Check your vehicle to see if there are exposed high-voltage parts or cables. For their locations, see “ …
-
Nissan Leaf (2011) — page 32
EMERGENCY SHUT -OFF SY STEM The emergency shut-off system is activated and the high-voltage system automatically turns off in the following conditions: — Front and side collisions in which the air bags are deployed. — Certain rear collisions. — Certain EV (Electric Vehicle) system malfunc- tions For the above collisions and certain other EV (Electr …
-
Nissan Leaf (2011) — page 33
EV-10 EV Overview ion battery is fully charged. Regenera- tive brake is automatically reduced when the Li-ion battery is fully charged to prevent the Li-ion battery from becoming overcharged. Regenerating brake is also automatically reduced when the battery temperature is high/ low (indicated by the red/blue zones on the Li-ion battery temperature …
-
Nissan Leaf (2011) — page 34
EV Overview EV-11 …
-
Nissan Leaf (2011) — page 35
EV-12 EV Overview …
-
Nissan Leaf (2011) — page 36
BEFORE DRIVING Y OUR VEHICLE The Li-ion battery charging status can be checked using an internet enabled smart phone or personal computer at home. Y ou may also choose to have SMS messages (text messages) sent to a cellular phone. Additionally, the heater and air conditioner of the vehicle can be set to operate using the A/C-Heater Timer (Climate C …
-
Nissan Leaf (2011) — page 37
EV-14 EV Overview Checking Li-ion battery charging status The Li-ion battery charge status can be checked on the NISSAN CARWINGS Data Center website via an internet enabled smart phone or personal computer. If the Li-ion battery is not sufficiently charged, you can start charging the Li-ion battery via the remote charge function. See “Charging re …
-
Nissan Leaf (2011) — page 38
Operating the climate control sys- tem before driving The vehicle heating and air conditioning system can be turned on via remote control with an internet enabled smart phone or personal computer. This allows the interior of the vehicle to be heated or cooled while the vehicle is charging. This reduces the load on the Li-ion battery while the vehic …
-
Nissan Leaf (2011) — page 39
EV-16 EV Overview ST ARTING Y OUR VEHICLE 1. Depress the brake pedal. 2. Press the power switch. 3. Check that the READ Y to drive indicator light illuminates and the start up sound is audible. See “READY to drive indicator light” in the “2. Instruments and controls” section. 4. If route guidance is necessary, enter the destination in the n …
-
Nissan Leaf (2011) — page 40
DRIVING THE VEHICLE 1. Depress the brake pedal. 2. Release the electric parking brake. 3. Move the selector lever into the D (Drive) position. When released, the selector lever returns to its original center position. 4. Confirm that the vehicle is in the D (Drive) position. The indicator next to the “D” by the selector lever illuminates and ? …
-
Nissan Leaf (2011) — page 41
EV-18 EV Overview The ECO position helps extend vehicle range by providing more regenerative brake than the D (Drive) position. The ECO position also helps reduce power consumption by reducing accel- eration when compared to the same accelerator pedal position in the D (Drive) position and reduces the power provided to the heating and air condition …
-
Nissan Leaf (2011) — page 42
If the low battery charge warning light illuminates, the Li-ion battery charge is too low for travel. See “Low battery charge warning light” in the “2. Instruments and controls” section. Charge the Li-ion battery as soon as possible. EV Overview EV-19 …
-
Nissan Leaf (2011) — page 43
EV-20 EV Overview Parking the vehicle 1. When stopping the vehicle, push the P position switch on the selector lever while depressing the brake pedal. Confirm that the vehicle is in the P (Park) position by checking the shift indicator located near the selector lever or on the dot matrix liquid crystal display . 2. Apply the electric parking brake …
-
Nissan Leaf (2011) — page 44
A T HOME AFTER DRIVING Charging the Li-ion battery When you return home, connect the vehicle to the charging station installed at your home using the normal charge connector. Charge the vehicle or set the charging timer function in the navigation system to have the vehicle charge at a specific time. See “Charging timer” in the “CH. Charging? …
-
Nissan Leaf (2011) — page 45
EV-22 EV Overview RANGE The distance you can drive the vehicle (range) varies considerably depending upon available charge, weather, temperature, usage, battery age, topography , and driving style. V ehicle range depends on a number of factors. When the Li-ion battery is new, the estimated vehicle range with a fully charged Li-ion battery is approx …
-
Nissan Leaf (2011) — page 46
. Release the accelerator pedal to slow down and do not apply the brakes when traffic and road conditions allow . — This vehicle is equipped with a regen- erative brake system. The primary pur- pose of regenerative brake system is to provide some power to recharge the Li- ion battery and extend driving range. A secondary benefit is “engine brak …
-
Nissan Leaf (2011) — page 47
EV-24 EV Overview resulting from failure to have these neces- sary inspections, repairs and/or adjustments performed. . See the NISSAN Service and Maintenance Guide for a detailed explanation of the Li-ion battery inspection and intervals. METERS AND INDICA TORS The vehicle has two displays to provide informa- tion regarding vehicle operation: . Up …
-
Nissan Leaf (2011) — page 48
ECO indicator: This indicator provides instant information about how efficiently the vehicle is being operated. Y ou can see how changing your driving style or operation of vehicle accessories affects power consumption. For additional information, see “ECO indicator” in the “2. Instruments and controls” section. Lower display Li-ion battery …
-
Nissan Leaf (2011) — page 49
EV-26 EV Overview Driving range: This indicator displays the estimated driving range (calculated based on a program that accounts for current driving style and opera- tional conditions) that can be driven before recharging is necessary . For additional information, see “Driving range” in the “2. Instruments and controls” section. Li-ion bat …
-
Nissan Leaf (2011) — page 50
Warning and indicator lights The EV (Electric Vehicle) system uses the following EV (Electric V ehicle) specific warning and indicator lights. 1. Master warning light (red) 2. Master warning light (yellow) 3. 12-volt battery charge warning light 4. Plug in indicator light 5. READY to drive indicator light 6. Power limitation indicator light 7. EV s …
-
Nissan Leaf (2011) — page 51
EV-28 EV Overview The sound stops when the vehicle stops. The sound does not stop with the vehicle in the R (Reverse) position even if the vehicle stops. 1. The VSP system is automatically turned on when the vehicle is in the READY to drive mode. (The indicator light * 1 on the VSP OFF switch is off.) 2. Push the VSP OFF switch to turn OFF the VSP …
-
Nissan Leaf (2011) — page 52
ELECTRIC SHIFT CONTROL SY S- TEM This vehicle is equipped with an electric shift control system. This control system has three features. . Smooth and easy shift selector operation. . T o place the vehicle in the P (Park) position, push the P (Park) position switch on the selector lever. . The vehicle automatically applies the P (Park) position when …
-
Nissan Leaf (2011) — page 53
EV-30 EV Overview Solar cell module on the rear spoiler SOLAR CELL MODULE (if so equipped) This vehicle uses a solar cell module to provide power to the 12-volt battery. The solar cell module only provides power to help maintain the charge of the 12-volt battery; it will not recharge a discharged 12-volt battery . The solar cell module does not pro …
-
Nissan Leaf (2011) — page 54
Charging Precautions on charging ……………………………………………. CH-2 T ypes of charge and how to charge the Li-ion battery ………………………………………………………………. CH-5 How to normal charge ………………………………………….. CH-9 How to trickle charge ……………………… …
-
Nissan Leaf (2011) — page 55
CH-2 Charging WARNING . If you use any medical electric devices, such as an implantable cardiac pacemaker or an implanta- ble cardiovascular defibrillator, check with the electric medical de- vice manufacturer concerning the effects that charging may have on implanted devices before starting the charge operation. Charging may affect the operation. …
-
Nissan Leaf (2011) — page 56
. Pass the lower side belt of the EVSE (Electric Vehicle Supply Equipment) case securely through the fastener on the bottom of the luggage board. If the case suddenly becomes loose, it may cause serious injury or death. CAUTION . T o prevent damage to the charging equipment: — Do not close the charge port lid without closing the cap. — Do not s …
-
Nissan Leaf (2011) — page 57
CH-4 Charging NOTE: . When charging the Li-ion battery, place the power switch in the OFF position. When the power switch is in the ON position, the Li-ion battery will not start charging. . If the charger is connected to the vehicle when it is in the READ Y to drive position, the power switch automati- cally changes to the ON position. Place the p …
-
Nissan Leaf (2011) — page 58
Charging CH-5 TYPES OF CHARGE AND HOW TO CHARGE THE LI-ION BA TTERY …
-
Nissan Leaf (2011) — page 59
CH-6 Charging …
-
Nissan Leaf (2011) — page 60
This vehicle is an electric vehicle and it requires electricity to operate. The Li-ion battery is the only source of power to operate the vehicle. It is important to conserve power and plan your charging needs when you drive to avoid completely discharging the Li-ion battery and being unable to drive. There are three methods available to charge the …
-
Nissan Leaf (2011) — page 61
CH-8 Charging charging infrastructure to be developed in your area. Depending on where you live or drive, there may not be sufficient public charging stations available to meet your particular needs for driving range and charging away from your home. T rip planning is therefore important, and you should plan trips with these facts in mind. Quick ch …
-
Nissan Leaf (2011) — page 62
. Check by using a cellular phone, smart phone or personal computer. See LEAF Navigation System Owner’s Manual. . Check by using the charging status indicator light. See “Charging status indicator lights” later in this section. NOTE: . During the charge operation, charge continues when the power switch is placed in the ON position. . The Li-i …
-
Nissan Leaf (2011) — page 63
CH-10 Charging . The Genuine NISSAN charging equipment communicates with the vehicle before Li-ion battery charging starts. If this communica- tion does not occur because other equip- ment is used, the Li-ion battery will not charge. . NISSAN recommends that you connect the normal charge cable when getting out of the vehicle, even if it is not goin …
-
Nissan Leaf (2011) — page 64
HOW TO TRICKLE CHARGE WARNING . If you use any medical electric devices, such as an implantable cardiac pacemaker or an implanta- ble cardiovascular defibrillator, check with the electric medical de- vice manufacturer concerning the effects that charging may have on implanted devices before starting the charge operation. Charging may affect the ope …
-
Nissan Leaf (2011) — page 65
CH-12 Charging — Do not use if a malfunction occurs or if charger has been damaged in any manner. Return to a NISSAN certified LEAF deal- er for replacement. — The charger contains no user serviceable parts. Do not at- tempt to repair the charger, doing so will void your warranty. . Pass the lower side belt of the EVSE (Electric Vehicle Supply …
-
Nissan Leaf (2011) — page 66
T o start trickle charging: *:Y ou can pass a rope through the hole * A on the control box in order to hang it up while the Li-ion battery is charging. 1. Push the P position switch to place the vehicle in the P (Park) position and apply the electric parking brake. 2. When charging the Li-ion battery , place the power switch in the OFF position. Wh …
-
Nissan Leaf (2011) — page 67
CH-14 Charging 8. Connect the charge connector to the charge port. If it is connected normally, a beep will sound once. 9. If charging has started, or if the Li-ion battery is waiting for charging timer, a beep will sound twice and the charging status in- dicator light display will change. See “Char- ging status indicator lights” later in this …
-
Nissan Leaf (2011) — page 68
4. Store in its case. NOTE: Perform the following procedure to store the EVSE (Electric V ehicle Supply Equipment) in the case. a. Wind the charge cable into a size that will allow it to be stored in the case (approximately 9.8 in (250 mm) in diameter) . b. Place the EVSE (Electric Vehicle Supply Equipment) control box into the back of the case. c. …
-
Nissan Leaf (2011) — page 69
CH-16 Charging T o start charging: 1. Push the P position switch to place the vehicle in the P (Park) position and apply the electric parking brake. 2. When charging the Li-ion battery , place the power switch in the OFF position. When the power switch is in the ON position, the Li- ion battery will not start charging. 3. Open the charge port lid a …
-
Nissan Leaf (2011) — page 70
5. Grasp the lock lever and lock the charge connector. 6. Follow the instructions on the quick charge equipment to start charging. When the equipment is properly installed and ready to charge a beep sounds twice and the charging status indicator light will change. See “Charging status indicator lights” in the “3. Pre-driving checks and adjust …
-
Nissan Leaf (2011) — page 71
CH-18 Charging CAUTION . As the quick charge connector is heavier in comparison to the other charge connectors, allowing it to drop could cause damage to the vehicle or charge connector or per- sonal injury. When removing the connector, be sure to pull it out straight and as carefully as possible. CHARGING TIMER Use charging timer to schedule when …
-
Nissan Leaf (2011) — page 72
2. T ouch [Set Timer 1] or [Set Timer 2]. The following procedure explains Timer 1 setting. 3. Enter the Li-ion battery charge start time. T ouch [% Charge] to change the amount of charging. T ouch [END Time] to change the time to stop charging. NOTE: . Charging timer is performed accord- ing to the current time setting on the bottom right of the d …
-
Nissan Leaf (2011) — page 73
CH-20 Charging 6. T ouch [Y es] if the settings shown on the screen are correct. 7. The [Timer 1] indicator illuminates after the charging timer is set. Use the same proce- dure to set the Timer 2 setting. 8. Place the power switch in the OFF position, and then connect the charge connector to the vehicle. NOTE: . Always place the power switch in th …
-
Nissan Leaf (2011) — page 74
. If charging timer and the A/C-Heater Timer (Climate Ctrl. Timer) are operat- ing at the same time due to an overlap of the timer settings, you can prioritize which function receives electrical power first. See LEAF Navigation Sys- tem Owner’s Manual. . When charging is set as the first priority, the A/C-Heater Timer (Climate Ctrl. Timer) does n …
-
Nissan Leaf (2011) — page 75
CH-22 Charging 1. Push the (Zero Emission menu) button . 2. T ouch [Charging Timer]. 3. T ouch [Set Timer 1] or [Set Timer 2]. …
-
Nissan Leaf (2011) — page 76
4. T ouch [% Charge]. 5. T ouch [80% Charging (Improves Battery Longevity)]. The indicator light illuminates when the long life mode is set to on. 6. T ouch [BACK] to return to the previous screen. 7. T ouch [Save Timer] when the settings are complete and a settings confirmation screen is displayed. 8. T ouch [Y es] if the settings shown on the scr …
-
Nissan Leaf (2011) — page 77
CH-24 Charging 9. The [Timer 1] or [Timer 2] indicator illumi- nates after the charging timer is set. Immediate charge When a charging timer is not turned on, charging automatically starts when a normal or trickle charge connector is connected to the vehicle. Use the immediate charge mode anytime you want to start charging when a charging timer is …
-
Nissan Leaf (2011) — page 78
or internet enabled smart phone even if you are not in the vehicle. . Remote charge: The function of starting Li-ion battery charge or starting the heater and air conditioner is available using your personal computer or internet enabled smart phone. . Unplugged status: A notification e-mail will be sent to your personal computer or internet enabled …
-
Nissan Leaf (2011) — page 79
CH-26 Charging CHARGING STA TUS INDICA TOR LIGHTS The charging status indicator lights * 1 to * 3 display the charging status, and are visible from both inside and outside the vehicle. Ready for charging timer If charging timer is set, the indicator lights illuminate, in order from * 1 to * 3 . The indicator lights turn off after approximately 15 m …
-
Nissan Leaf (2011) — page 80
When charging When the Li-ion battery is being charged, the charging status indicator lights will change depending on the amount the Li-ion battery is charged. When fully charged All of the indicator lights * 1 to * 3 illuminate when: . The Li-ion battery is fully charged . 80% of a charging timer is completed . When 90% of a quick charge is comple …
-
Nissan Leaf (2011) — page 81
CH-28 Charging When not charging None of the lights are illuminated when the Li- ion battery and 12-volt battery are not charging. EVSE (Electric V ehicle Supply Equipment) CONTROL BOX INDI- CA T OR LIGHT When a trickle charge is being performed, the charging status is shown by the indicator light that is on the EVSE (Electric Vehicle Supply Equipm …
-
Nissan Leaf (2011) — page 82
READ Y CHARGE F AUL T Status and action to be taken *** Every time the EVSE (Electric V ehicle Supply Equipment) plug is connected to an outlet, all indicator lights illuminate for 0.5 seconds. * ** After initial processing is completed, when the EVSE (Electric V ehicle Supply Equipment) is not connected to the vehicle, or the EVSE (Electric V ehic …
-
Nissan Leaf (2011) — page 83
CH-30 Charging Symptom Possible cause Possible solution Charging cannot be per- formed. The vehicle power switch is in the ON position. Before charging, place the vehicle power switch in the OFF position. Both the normal charge connector and the quick charge connector are connected at the same time. The normal charge connector and the quick charge …
-
Nissan Leaf (2011) — page 84
Symptom Possible cause Possible solution Charging timer cannot be performed. The charge cable is not connected. Connect the charge cable. The time on the clock is wrong. The charging timer function does not start charging based on the clock located on the upper display. Confirm that the date and time shown on the charging timer screen are the same …
-
Nissan Leaf (2011) — page 85
CH-32 Charging Symptom Possible cause Possible solution Normal charge stops in the middle of charging. There is no power coming from the outlet. There may have been a electrical power failure, or the breaker may have failed. Charging will resume when the power source is reset. The charge cable has been disconnected. Check that the charge cable has …
-
Nissan Leaf (2011) — page 86
1 Safety—Seats, seat belts and supple- mental restraint system Seats ………………………………………………………………………………. 1-2 Front seats ………………………………………………………………… 1-3 Rear seats ………………………………………………………………… 1-4 …
-
Nissan Leaf (2011) — page 87
1-2 Safety—Seats, seat belts and supplemental restraint system WARNING . Do not ride in a moving vehicle when the seatback is reclined. This can be dangerous. The shoulder belt will not be against your body. In an accident, you could be thrown into it and receive neck or other serious injuries. Y ou could also slide under the lap belt and receive …
-
Nissan Leaf (2011) — page 88
FRONT SEA TS Front manual seat adjustment Forward and backward: Pull the lever * 1 up and hold it while sliding the seat forward or backward to the preferred position. Release the lever to lock the seat in position. Reclining: T o recline the seatback, pull the lever * 2 up and lean back. T o bring the seatback forward, pull the lever up and lean y …
-
Nissan Leaf (2011) — page 89
1-4 Safety—Seats, seat belts and supplemental restraint system REAR SEA TS Folding Before folding the rear seats: . Secure the seat belts on the seat belt hooks located on the side wall. See “Seat belt hooks ” later in this section. T o fold down the seatback, pull the release knob. T o return the seatback to the seating position, lift up eac …
-
Nissan Leaf (2011) — page 90
has been removed. If the head restraint was removed, reinstall and properly adjust the head restraint before an occupant uses the seating position. Failure to follow these instructions can reduce the effectiveness of the head restraints. This may increase the risk of serious injury or death in a collision. The illustration shows the seating positio …
-
Nissan Leaf (2011) — page 91
1-6 Safety—Seats, seat belts and supplemental restraint system Adjustment Adjust the head restraint so the center is level with the center of your ears. T o raise the head restraint, pull it up. T o lower, push and hold the lock knob and push the head restraint down. …
-
Nissan Leaf (2011) — page 92
Removal Use the following procedure to remove the adjustable head restraints. 1. Pull the head restraint up to the highest position. 2. Push and hold the lock knob. 3. Remove the head restraint from the seat. 4. Store the head restraint properly in a secure place so it is not loose in the vehicle. 5. Reinstall and properly adjust the head restraint …
-
Nissan Leaf (2011) — page 93
1-8 Safety—Seats, seat belts and supplemental restraint system The illustration shows the seating positions equipped with adjustable headrests. & Indicates the seating position is equipped with an adjustable headrest. Components 1. Adjustable headrest 2. Adjustment notch 3. Lock knob 4. Stalks Adjustment T o raise the headrest, pull it up. …
-
Nissan Leaf (2011) — page 94
T o lower, push and hold the lock knob and push the headrest down. Removal Use the following procedure to remove the adjustable headrests. 1. Pull the headrest up to the highest position. 2. Push and hold the lock knob. 3. Remove the headrest from the seat. 4. Store the headrest properly in a secure place so it is not loose in the vehicle. 5. Reins …
-
Nissan Leaf (2011) — page 95
1-10 Safety—Seats, seat belts and supplemental restraint system PRECAUTIONS ON SEA T BEL T USAGE If you are wearing your seat belt properly adjusted, and you are sitting upright and well back in your seat with both feet on the floor, your chances of being injured or killed in an accident and/or the severity of injury may be greatly reduced. NISSA …
-
Nissan Leaf (2011) — page 96
WARNING . Every person who drives or rides in this vehicle should use a seat belt at all times. Children should be prop- erly restrained in the rear seat and, if appropriate, in a child restraint. . The seat belt should be properly adjusted to a snug fit. Failure to do so may reduce the effectiveness of the entire restraint system and in- crease th …
-
Nissan Leaf (2011) — page 97
1-12 Safety—Seats, seat belts and supplemental restraint system . Once a seat belt pretensioner has activated, it cannot be reused and must be replaced together with the retractor. See a NISSAN certified LEAF dealer. . Removal and installation of the pretensioner system components should be done by a NISSAN certi- fied LEAF dealer. . All seat bel …
-
Nissan Leaf (2011) — page 98
by cutting the seat belt with a suitable tool (such as a knife or scissors) to release the seat belt. Fastening the seat belts 1. Adjust the seat. See “Seats” earlier in this section. 2. Slowly pull the seat belt out of the retractor and insert the tongue into the buckle until you hear and feel the latch engage. . The retractor is designed to l …
-
Nissan Leaf (2011) — page 99
1-14 Safety—Seats, seat belts and supplemental restraint system of movement in the seat. The ELR locks the seat belt when the vehicle slows down rapidly or during certain impacts. The Automatic Locking Retractor (ALR) mode (child restraint mode) locks the seat belt for child restraint installation. When ALR mode is activated the seat belt cannot …
-
Nissan Leaf (2011) — page 100
Shoulder belt height adjustment (for front seats) The shoulder belt anchor height should be adjusted to the position that is best for you. See “Precautions on seat belt usage” earlier in this section. T o adjust, pull the adjustment button * 1 , and then move the shoulder belt anchor to the preferred position * 2 so that the belt passes over th …
-
Nissan Leaf (2011) — page 101
1-16 Safety—Seats, seat belts and supplemental restraint system Center of rear seat Selecting correct set of seat belts: The center seat belt buckle is identified by the CENTER mark * A . The center seat belt tongue can be fastened only into the center seat belt buckle. SEA T BEL T EXTENDERS If, because of body size or driving position, it is not …
-
Nissan Leaf (2011) — page 102
WARNING Do not allow children to play with the seat belts. Most seating positions are equipped with Automatic Locking Re- tractor (ALR) mode seat belts. If the seat belt becomes wrapped around a child’s neck with the ALR mode acti- vated, the child can be seriously injured or killed if the seat belt retracts and becomes tight. This can occur even …
-
Nissan Leaf (2011) — page 103
1-18 Safety—Seats, seat belts and supplemental restraint system use. SMALL CHILDREN Children that are over 1 year old and weigh at least 20 lbs (9 kg) should remain in a rear-facing child restraint as long as possible up to the height or weight limit of the child restraint. Forward-facing child restraints are available for children who outgrow re …
-
Nissan Leaf (2011) — page 104
PRECAUTIONS ON CHILD RE- STRAINTS WARNING . Failure to follow the warnings and instructions for proper use and in- stallation of child restraints could result in serious injury or death of a child or other passengers in a sudden stop or collision: — The child restraint must be used and installed properly. Always follow all of the child restraint …
-
Nissan Leaf (2011) — page 105
1-20 Safety—Seats, seat belts and supplemental restraint system For details, see “Lower Anchors and T ethers for CHildren System (LA T CH) ” later in this section. If you do not have a LA TCH compatible child restraint, the vehicle seat belts can be used. Several manufacturers offer child restraints for infants and small children of various s …
-
Nissan Leaf (2011) — page 106
LA T CH lower anchor WARNING Failure to follow the warnings and instructions for proper use and installa- tion of child restraints could result in serious injury or death of a child or other passengers in a sudden stop or collision: . Attach LA TCH system compatible child restraints only at the locations shown in the illustration. . Do not secure a …
-
Nissan Leaf (2011) — page 107
1-22 Safety—Seats, seat belts and supplemental restraint system LA TCH rigid-mounted attachment When installing a child restraint, carefully read and follow the instructions in this manual and those supplied with the child restraint. T op tether anchor WARNING . If the cargo cover contacts the top tether strap when it is attached to the top tethe …
-
Nissan Leaf (2011) — page 108
REAR-FACING CHILD RESTRAINT INST ALLA TION USING LA TCH Refer to all Warnings and Cautions in “Child safety” and “Child restraints” earlier in this section before installing a child restraint. Follow these steps to install a rear-facing child restraint using the LA T CH system 1. Position the child restraint on the seat. Always follow the c …
-
Nissan Leaf (2011) — page 109
1-24 Safety—Seats, seat belts and supplemental restraint system Rear-facing — step 3 3. For child restraints that are equipped with webbing-mounted attachments, remove any additional slack from the anchor attach- ments. Press downward and rearward firmly in the center of the child restraint with your hand to compress the vehicle seat cushion an …
-
Nissan Leaf (2011) — page 110
REAR-FACING CHILD RESTRAINT INST ALLA TION USING THE SEA T BEL TS WARNING The three-point seat belt with Auto- matic Locking Retractor (ALR) must be used when installing a child restraint. Failure to use the ALR mode will result in the child restraint not being properly secured. The restraint could tip over or be loose and cause injury to a child i …
-
Nissan Leaf (2011) — page 111
1-26 Safety—Seats, seat belts and supplemental restraint system Rear-facing — step 2 2. Route the seat belt tongue through the child restraint and insert it into the buckle until you hear and feel the latch engage. Be sure to follow the child restraint manufacturer’s instructions for belt routing. Rear-facing — step 3 3. Pull the shoulder b …
-
Nissan Leaf (2011) — page 112
Rear-facing — step 5 5. Remove any additional slack from the child restraint. Press downward and rearward firmly in the center of the child restraint with your hand to compress the vehicle seat cushion and seatback while pulling up on the seat belt. Rear-facing — step 6 6. After attaching the child restraint, test it before you place the child …
-
Nissan Leaf (2011) — page 113
1-28 Safety—Seats, seat belts and supplemental restraint system Front-facing (webbing-mounted) — step 2 2. Secure the child restraint anchor attach- ments to the LA T CH lower anchors. Check to make sure that the LA TCH attachment is properly attached to the lower anchors. If the child restraint is equipped with a top tether strap, route the to …
-
Nissan Leaf (2011) — page 114
Front-facing — step 6 6. After attaching the child restraint, test it before you place the child in it. Push it from side to side while holding the child restraint near the LA T CH attachment path. The child restraint should not move more than 1 inch (25 mm) , from side to side. T ry to tug it forward and check to see if the LA T CH attachment ho …
-
Nissan Leaf (2011) — page 115
1-30 Safety—Seats, seat belts and supplemental restraint system 2. Position the child restraint on the seat. Always follow the child restraint manufac- turer’s instructions. The back of the child restraint should be secured against the seatback. If necessary, adjust the head restraint (front passenger seat only) or remove the head restraint/hea …
-
Nissan Leaf (2011) — page 116
Front-facing — step 5 5. Allow the seat belt to retract. Pull up on the shoulder belt to remove any slack in the belt. Front-facing — step 6 6. Remove any additional slack from the seat belt. Press downward and rearward firmly in the center of the child restraint with your knee to compress the vehicle seat cushion and seatback while pulling up …
-
Nissan Leaf (2011) — page 117
1-32 Safety—Seats, seat belts and supplemental restraint system 9. Check to make sure the child restraint is properly secured prior to each use. If the seat belt is not locked, repeat steps 2 through 8. 10. If the child restraint is installed on the front passenger seat, push the power switch to the ON position. The front passenger air bag status …
-
Nissan Leaf (2011) — page 118
See “Adjustable headrests” earlier in this section for headrest adjustment, removal and installation information. Position the top tether strap over the top of the seatback. 3. Secure the tether strap to the tether anchor point on the seatback. 4. Refer to the appropriate child restraint installation procedure steps in this section before tight …
-
Nissan Leaf (2011) — page 119
1-34 Safety—Seats, seat belts and supplemental restraint system . Make sure the child’s head will be properly supported by the booster seat or vehicle seat. The seatback must be at or above the center of the child’s ears. For example, if a low back booster seat * 1 is chosen, the vehicle seatback must be at or above the center of the child’ …
-
Nissan Leaf (2011) — page 120
Front passenger seat 1. If you must install a booster seat in the front seat, move the seat to the rear- most position. 2. Position the booster seat on the seat. Only place it in the forward-facing direction. Always follow the booster seat manufac- turer’s instructions. 3. The booster seat should be positioned on the vehicle seat so that it is st …
-
Nissan Leaf (2011) — page 121
1-36 Safety—Seats, seat belts and supplemental restraint system 7. If the booster seat is installed in the front passenger seat, push the power switch to the ON position. The front passenger air bag status light may or may not illuminate depending on the size of the child and the type of booster seat used. See “Front passenger air bag and statu …
-
Nissan Leaf (2011) — page 122
WARNING . The front air bags ordinarily will not inflate in the event of a side impact, rear impact, rollover or lower sever- ity frontal collision. Always wear your seat belts to help reduce the risk or severity of injury in various kinds of accidents. . The front passenger air bag will not inflate if the passenger air bag status light is lit or i …
-
Nissan Leaf (2011) — page 123
1-38 Safety—Seats, seat belts and supplemental restraint system against it when it inflates. Always sit back against the seatback and as far away as practical from the steer- ing wheel or instrument panel. Al- ways use the seat belts. . The driver and front passenger seat belt buckles are equipped with sensors that detect if the seat belts are fa …
-
Nissan Leaf (2011) — page 124
WARNING . Never let children ride unrestrained or extend their hands or face out of the window. Do not attempt to hold them in your lap or arms. Some examples of dangerous riding posi- tions are shown in the illustrations. . Children may be severely injured or killed when the front air bags, side air bags or curtain air bags inflate if they are not …
-
Nissan Leaf (2011) — page 125
1-40 Safety—Seats, seat belts and supplemental restraint system Do not lean against doors or windows. WARNING Front seat-mounted side-impact sup- plemental air bags and roof-mounted curtain side-impact supplemental air bags: . The side air bags and curtain air bags ordinarily will not inflate in the event of a frontal impact, rear im- pact, rollo …
-
Nissan Leaf (2011) — page 126
. The seat belts, the side air bags and curtain air bags are most effective when you are sitting well back and upright in the seat. The side air bag and curtain air bag inflate with great force. Do not allow anyone to place their hand, leg or face near the side air bag on the side of the seatback of the front seat or near the side roof rails. Do no …
-
Nissan Leaf (2011) — page 127
1-42 Safety—Seats, seat belts and supplemental restraint system 1. Crash zone sensor 2. Supplemental front-impact air bag modules 3. Front seat-mounted side-impact supplemental air bag modules 4. Occupant classification sensors (weight sensors) 5. Occupant classification system control unit 6. Roof-mounted curtain side-impact supplemental air bag …
-
Nissan Leaf (2011) — page 128
your NISSAN certified LEAF dealer to check the occupant classification system. . Until you have confirmed with your dealer that your passenger seat occupant classification system is working properly, position the occu- pants in the rear seating positions. This vehicle is equipped with the NISSAN Advanced Air Bag System for the driver and front pass …
-
Nissan Leaf (2011) — page 129
1-44 Safety—Seats, seat belts and supplemental restraint system The front air bags operate only when the power switch is in the ON position. After the power switch is placed in the ON position, the supplemental air bag warning light illuminates. The supplemental air bag warning light will turn off after about 7 seconds if the system is operationa …
-
Nissan Leaf (2011) — page 130
Front passenger air bag: The front passenger air bag is designed to automatically turn OFF when the vehicle is operated under some conditions as described below as permitted by U.S. regulations. If the front passenger air bag is OFF , it will not inflate in a crash. The driver air bag and other air bags in your vehicle are not part of this system. …
-
Nissan Leaf (2011) — page 131
1-46 Safety—Seats, seat belts and supplemental restraint system If the passenger air bag status light will not illuminate even though you believe that the child restraint, the seat belts and the occupant are properly positioned, the system may be sensing an unoccupied seat (in which case the air bag is OFF) . Y our NISSAN certified LEAF dealer ca …
-
Nissan Leaf (2011) — page 132
. Removing or modifying the front passenger seat may affect the func- tion of the air bag system and result in serious personal injury. . Modifying or tampering with the front passenger seat may result in serious personal injury. For exam- ple, do not change the front seats by placing material on the seat cushion or by installing additional trim ma …
-
Nissan Leaf (2011) — page 133
1-48 Safety—Seats, seat belts and supplemental restraint system designed to inflate in higher severity side collisions, although they may inflate if the forces in another type of collision are similar to those of a higher severity side impact. They are designed to inflate on the side where the vehicle is impacted. They may not inflate in certain …
-
Nissan Leaf (2011) — page 134
such as seat covers, around the side air bag. . Work around and on the side air bag and curtain air bag systems should be done by a NISSAN certified LEAF dealer. Installation of electrical equipment should also be done by a NISSAN certified LEAF dealer. The Supplemental Restraint System (SRS) wiring harnesses* should not be modified or disconnected …
-
Nissan Leaf (2011) — page 135
1-50 Safety—Seats, seat belts and supplemental restraint system may cause irritation and choking. Those with a history of a breathing condition should get fresh air promptly. After pretensioner activation, load limiters allow the seat belt to release webbing (if necessary) to reduce forces against the chest. The supplemental air bag warning light …
-
Nissan Leaf (2011) — page 136
When the power switch is in the ON position, the supplemental air bag warning light illumi- nates for about 7 seconds and then turns off. This means the system is operational. If any of the following conditions occur, the front air bag, side air bag, curtain air bag and pretensioner systems need servicing: . The supplemental air bag warning light r …
-
Nissan Leaf (2011) — page 137
1-52 Safety—Seats, seat belts and supplemental restraint system MEMO …
-
Nissan Leaf (2011) — page 138
2 Instruments and controls Cockpit …………………………………………………………………………… 2-3 Instrument panel …………………………………………………………….. 2-4 Meters and gauges ………………………………………………………… 2-5 Speedometer and odometer ……………. …
-
Nissan Leaf (2011) — page 139
Cargo cover (if so equipped) ……………………………….. 2-51 Stowing golf bags ………………………………………………….. 2-53 Luggage side hook ………………………………………………… 2-53 Windows ……………………………………………………………………… 2-54 Power windows …. …
-
Nissan Leaf (2011) — page 140
1. TRIP switch for twin trip odometer 2. T rip computer switch 3. Instrument brightness control switch 4. Headlight, fog light* and turn signal switch — Headlight — Turn signal light — Fog light* 5. Steering-wheel-mounted controls (left side) (See LEAF Navigation System Owner’s Manual.) — Driving range button — Audio control — Bluetoo …
-
Nissan Leaf (2011) — page 141
2-4 Instruments and controls 1. Side ventilator 2. Meters and gauges 3. Center multi-function control panel (See LEAF Navigation System Owner’s Manual.) — Navigation system — Vehicle information and setting buttons — Bluetooth ® Hands-Free Phone System — Audio system 4. Hazard warning flasher switch 5. Center ventilator 6. Front passenge …
-
Nissan Leaf (2011) — page 142
Upper display and lower display 1. Master warning lights 2. ECO indicator 3. Speedometer 4. Clock 5. Outside air temperature 6. T urn signal/Hazard indicator light 7. Li-ion battery temperature gauge 8. Warning/Indicator lights 9. Power meter 10. READY to drive indicator light 11. Dot matrix liquid crystal display — Odometer/twin trip odometer ? …
-
Nissan Leaf (2011) — page 143
2-6 Instruments and controls SPEEDOMETER AND ODOMETER Speedometer The speedometer indicates the vehicle speed in miles per hour (MPH) or kilometers per hour (km/h) . Odometer/twin trip odometer The odometer * 1 and twin trip odometer * 2 are displayed on the dot matrix liquid crystal display when the power switch is in the ON or READY to drive posi …
-
Nissan Leaf (2011) — page 144
LI-ION BA TTERY TEMPERA TURE GAUGE The gauge indicates the temperature of the Li- ion battery . The temperature of the Li-ion battery is within the normal range when the display is within the zone * 1 shown in the illustration. The temperature of the Li-ion battery varies according to the outside air temperature and driving conditions. NOTE: . If t …
-
Nissan Leaf (2011) — page 145
2-8 Instruments and controls The power meter also indicates if the power provided to the motor is limited or if regenerative braking is limited. When power or regenerative braking is limited, the circles on the display change from a double circle to a single circle * 2 . Regenerative braking is automatically reduced when the Li-ion battery is fully …
-
Nissan Leaf (2011) — page 146
LI-ION BA TTERY A V AILABLE CHARGE GAUGE The gauge * 1 indicates the approximate available Li-ion battery charge to run the vehicle. Charge the Li-ion battery before the dis- play reaches the bottom line. The low battery charge warning light illumi- nates when the Li-ion battery available charge gauge is getting low. Charge as soon as it is conveni …
-
Nissan Leaf (2011) — page 147
2-10 Instruments and controls LI-ION BA TTERY CAP ACITY LEVEL GAUGE This gauge indicates the amount of charge the Li-ion battery is capable of storing. When the capacity of the Li-ion battery decreases with age and usage, the level of the gauge will also decrease. OUTSIDE AIR TEMPERA TURE The outside air temperature is displayed in 8 Fo r 8 C. The …
-
Nissan Leaf (2011) — page 148
accessories are on. Instant ECO driving level The instant ECO driving level * 1 is displayed by the number of bars that increase (more eco- nomical driving) or decrease (less economical driving) depending on vehicle operation. Long term ECO driving level Long term ECO driving is indicated by ECO TREE symbols. The longer the vehicle is operated econ …
-
Nissan Leaf (2011) — page 149
2-12 Instruments and controls 12-volt battery charge warning light Low tire pressure warning light High beam indicator light Anti-lock Braking System (ABS) warning light Master warning light (red/yellow) Plug in indicator light BRAKE system warning light (yellow) Seat belt warning light Power limitation indicator light BRAKE warning light (red) Sup …
-
Nissan Leaf (2011) — page 150
CHECKING BULBS With all doors closed, apply the parking brake, and push the power switch in the ON position. The following lights will illuminate (if so equipped): , or , , The following lights illuminate briefly and then turn off: (yellow) , , or (red) , or , , , , , , , If any light does not illuminate, it may indicate a burned-out bulb or an ope …
-
Nissan Leaf (2011) — page 151
2-14 Instruments and controls battery may be discharged or there may be a malfunction in the 12-volt battery related system. — If the 12-volt charge warning light continues to illuminate when the vehicle is in the READ Y to drive mode, there may be a malfunction in the DC/DC converter. Contact a NISSAN certified LEAF dealer for inspection. or Ant …
-
Nissan Leaf (2011) — page 152
Low brake fluid warning light: When the power switch is in the ON position, the light warns of a low brake fluid level. If this warning light illuminates, the Vehicle Dynamic Control (VDC) warning light and the brake system warning light (yellow) also illuminate. If the light illuminates while the power switch is in the READ Y to drive position wit …
-
Nissan Leaf (2011) — page 153
2-16 Instruments and controls EV system warning light This light illuminates if there is a malfunction in the following systems. Contact a NISSAN certified LEAF dealer. . T raction motor and inverter system . Charge port or on board charger . Li-ion battery system . Cooling system . Shift control system . Emergency shut off system is activated. See …
-
Nissan Leaf (2011) — page 154
Starting and driving” section. WARNING . If the light does not illuminate when the power switch is placed in the ON position, have the vehicle checked by a NISSAN certified LEAF dealer as soon as possible. . If the light illuminates while driving, avoid sudden steering maneuvers or abrupt braking, reduce vehicle speed, pull off the road to a safe …
-
Nissan Leaf (2011) — page 155
2-18 Instruments and controls Seat belt warning light The light and chime remind you to fasten seat belts. The light illuminates whenever the power switch is placed in the ON position, and will remain illuminated until the driver’s seat belt is fastened. At the same time, the chime will sound for approximately 6 seconds unless the driver’s seat …
-
Nissan Leaf (2011) — page 156
brake is applied and turns off if the electric parking brake is released. At the same time the master warning light (red) turns on. If the parking brake is released, the indicator and the master warning light turn off. If the indicator light blinks after the power switch in the ON or READY to drive position and it continues after the parking brake …
-
Nissan Leaf (2011) — page 157
…
-
Nissan Leaf (2011) — page 158
T urn the light switch off when you leave the vehicle. Brake pad wear warning The disc brake pads have audible wear warn- ings. When a brake pad requires replacement, it will make a high pitched scraping sound when the vehicle is in motion. This scraping sound will first occur only when the brake pedal is depressed. After more wear of the brake pad …
-
Nissan Leaf (2011) — page 159
2-22 Instruments and controls The dot matrix liquid crystal display * 1 is located in the lower display, and it displays charging related information, Average electricity con- sumption/Instant electricity consumption, Aver- age vehicle speed, Driving distance/Driving time (Elapsed time) , shift position indicator, the cruise control, the Intelligen …
-
Nissan Leaf (2011) — page 160
INDICA TORS FOR OPERA TION Instruments and controls 2-23 …
-
Nissan Leaf (2011) — page 161
2-24 Instruments and controls 1. READY to drive position opera- tion indicator This indicator appears while the vehicle is in the P (Park) position. This indicator means that the EV (Electric V ehicle) system will start when the power switch is pressed with the brake pedal depressed. 2. Key is not detected warning This warning appears in either of …
-
Nissan Leaf (2011) — page 162
temperature warning feature. If the outside air temperature is below 37 8 F( 3 8 C) , the warning is displayed on the screen. The outside temperature sensor is located in front side of the vehicle. The sensor may be affected by road, wind directions and other driving conditions. The display may differ from the actual outside temperature or the temp …
-
Nissan Leaf (2011) — page 163
2-26 Instruments and controls 17. Power limitation warning This display appears when the Li-ion battery capacity is getting too low to move the vehicle or if there is any reason to limit traction power (Li- ion battery low or high temperature etc.) . The power limitation indicator light and the master warning light (yellow) also illuminate. The [i] …
-
Nissan Leaf (2011) — page 164
25. Cruise control indicator Cruise main switch indicator: This indicator is displayed when the cruise control main switch is pushed. When the main switch is pushed again, the indicator disap- pears. When the cruise control main switch indicator is displayed, the cruise control system is operational. Cruise set switch indicator: This indicator is d …
-
Nissan Leaf (2011) — page 165
2-28 Instruments and controls Setting ? W arning check 1. Charging time Displays the estimated time to a full Li-ion charge (80% or 100%) . The time needed to charge the Li-ion battery charges based on: . Outside temperature . Li-ion battery temperature . Available electrical power supplied to the charger NOTE: . Immediately after charging has fin- …
-
Nissan Leaf (2011) — page 166
Instant energy economy: The instant energy economy mode shows the instant energy economy via a moving bar graph. When regenerated energy is being stored in the Li-ion battery while driving, the instant energy economy display will show the maximum value. The maximum value will then continue to be displayed until the regenerated power is con- sumed. …
-
Nissan Leaf (2011) — page 167
2-30 Instruments and controls used in the settings mode. Push the switch * B to scroll through the menus. Push the switch * A to select a menu. Skip: Push the switch * A to move to the warning check mode. Push the switch * B to select other menus. Clock: The clock can be adjusted in this menu. . Back Select this submenu to return to the top page of …
-
Nissan Leaf (2011) — page 168
Factory settings: Select this menu to reset all values to the factory default settings except for the odometer set- tings. NOTE: When resetting to the factory settings, all previous settings made are restored to the default settings. T o return to the top page of the settings mode, select “BACK” . 6. Warning check Skip: Push the switch * A to m …
-
Nissan Leaf (2011) — page 169
2-32 Instruments and controls 1. The notification is displayed on the upper left side of the screen. T ouch [Show] to display the screen showing detailed information. 2. The system displays a message screen and announces the contents of the message to warn that the Li-ion battery power level is low . Check the message displayed on the screen. T ouc …
-
Nissan Leaf (2011) — page 170
1. The notification is displayed on the upper left side of the screen. T ouch [Show] to display the screen showing detailed information. 2. The system displays a message screen and announces the contents of the message to warn that power output is restricted and inform the driver of the reason for this occurrence and what action is to be taken. IND …
-
Nissan Leaf (2011) — page 171
2-34 Instruments and controls WARNING The tire replacement indicator is not a substitute for regular tire checks, in- cluding tire pressure checks. See “Changing wheels and tires” in the “8. Maintenance and do-it-yourself” sec- tion. Many factors including tire infla- tion, alignment, driving habits and road conditions affect tire wear and …
-
Nissan Leaf (2011) — page 172
1. Timer setting status (charging and A/C-Heater/Climate control) The timer setting status (ON or OFF) of the charge and the air conditioning/heater (climate control) can be checked. 2. Charging timer setting confirma- tion The charging timer starting hours, minutes and days for the next charge time that has been set can be checked. 3. Charging tim …
-
Nissan Leaf (2011) — page 173
2-36 Instruments and controls How to arm the vehicle security system 1. Close all windows. The system can be armed even if the windows are open. 2. Place the power switch in the L OCK or OFF position and remove the Intelligent Key from the vehicle. 3. Close all doors. Lock all doors. The doors can be locked with: . the LOCK button on the Intelligen …
-
Nissan Leaf (2011) — page 174
another registered key, an automated toll road device or automated payment device on the key ring. Restart the EV system using the following procedure: 1. Leave the power switch in the ON position for approximately 5 seconds. 2. Place the power switch in the OFF position and wait approximately 10 seconds. 3. Repeat step 1 and 2 again. 4. Place the …
-
Nissan Leaf (2011) — page 175
2-38 Instruments and controls certified LEAF dealer for a NISSAN Vehicle Immobilizer System service as soon as possible. Please bring all registered keys that you have when visiting a NISSAN certified LEAF dealer for service. WARNING In freezing temperatures the washer solution may freeze on the windshield and obscure your vision which may lead to …
-
Nissan Leaf (2011) — page 176
The windshield wiper and washer operates when the power switch is in the ON position. Push the lever down to operate the wiper at the following speed: * 1 Intermittent — intermittent operation can be adjusted by turning the knob toward * A (Slower) or * B (Faster) . * 2 Low — continuous low speed operation * 3 High — continuous high speed ope …
-
Nissan Leaf (2011) — page 177
2-40 Instruments and controls window washer reservoir tank to mix the washer fluid concentrate and water. If the rear window wiper operation is interrupted by snow etc., the wiper may stop moving to protect its motor. If this occurs, turn the wiper switch to the OFF position and remove the snow etc. on and around the wiper arms. After about 1 minut …
-
Nissan Leaf (2011) — page 178
The instrument brightness control switch can be operated when the power switch is in the ON position. When the switch is operated, the dot matrix liquid crystal display switches to the brightness adjustment mode. Push the switch * 1 to display the setting menu of the brightness control on the dot matrix liquid crystal display . Push the * 1 button …
-
Nissan Leaf (2011) — page 179
2-42 Instruments and controls Autolight system (if so equipped) The autolight system allows the headlights to be set so they turn on and off automatically . T o set the autolight system: 1. Make sure the headlight switch is in the AUT O position * 1 . 2. Place the power switch in the ON position. 3. The autolight system automatically turns the head …
-
Nissan Leaf (2011) — page 180
Headlight beam select * 1 T o select the low beam, put the lever in the neutral position as shown. * 2 T o select the high beam, push the lever forward while the switch is in the position. Pull it back to select the low beam. * 3 Pulling the lever toward you will flash the headlight high beam even when the headlight switch is in the OFF position. B …
-
Nissan Leaf (2011) — page 181
2-44 Instruments and controls Headlight Aiming Control Manual type: Depending on the number of occupants in the vehicle and the load it is carrying, the headlight axis may be higher than desired. If the vehicle is traveling on a hilly road, the headlights may directly hit the rearview mirror of the vehicle ahead or the windshield of the oncoming ve …
-
Nissan Leaf (2011) — page 182
Push the switch on to warn other drivers when you must stop or park under emergency condi- tions. All turn signal lights will flash. WARNING . If stopping for an emergency, be sure to move the vehicle well off the road. . Do not use the hazard warning flashers while moving on the high- way unless unusual circumstances force you to drive so slowly t …
-
Nissan Leaf (2011) — page 183
2-46 Instruments and controls Push the switch again to turn the heated steering wheel system off manually. The indica- tor light turn off. NOTE: . If the surface temperature of the steer- ing wheel is above 68 8 F (20 8 C) when the switch is turned on, the system will not heat the steering wheel. This is not a malfunction. . If the outside temperat …
-
Nissan Leaf (2011) — page 184
WARNING Do not use or allow occupants to use the seat heater if you or the occupants cannot monitor elevated seat tempera- tures or have an inability to feel pain in those body parts in contact with the seat. Use of the seat heater by such people could result in serious injury. CAUTION . Do not use the seat heater for extended periods or when no on …
-
Nissan Leaf (2011) — page 185
2-48 Instruments and controls The front seats and the rear outboard seats can be warmed by built-in heaters. The switches located on the center console and at the side of the front passenger seatback can be operated independently of each other. 1. Place the power switch in the ON position. 2. Push the LO or HI position of the switch, as desired, de …
-
Nissan Leaf (2011) — page 186
The power outlet is located in the instrument panel. CAUTION . The outlet and plug may be hot during or immediately after use. . Do not use with accessories that exceed a 12-volt, 120W (10A) power draw. Do not use double adapters or more than one electrical accessory. . Use the power outlet with the power switch is in the ON or READ Y to drive posi …
-
Nissan Leaf (2011) — page 187
2-50 Instruments and controls Front Soft bottle holders CAUTION . Do not use the bottle holder for any other objects that could be thrown about in the vehicle and possibly injure people during sudden braking or an accident. . Do not use the bottle holder for open liquid containers. SUNGLASSES HOLDER WARNING Keep the sunglasses holder closed while d …
-
Nissan Leaf (2011) — page 188
CAUTION . Do not use for anything other than glasses. . Do not leave glasses in the sun- glasses holder while parking in direct sunlight. The heat may da- mage the glasses. GLOVE BOX WARNING Keep the glove box lid closed while driving to prevent injury in case of an accident or a sudden stop. T o open the glove box, pull the handle. T o close, push …
-
Nissan Leaf (2011) — page 189
2-52 Instruments and controls . Do not leave the cargo cover in the vehicle with it disengaged from the holder. . Properly secure all cargo with ropes or straps to help prevent it from sliding or shifting. Do not place cargo higher than the seatbacks. In a sudden stop or collision, unse- cured cargo could cause personal injury. . Y our child could …
-
Nissan Leaf (2011) — page 190
…
-
Nissan Leaf (2011) — page 191
2-54 Instruments and controls POWER WINDOWS WARNING . Make sure that all passengers have their hands, etc . inside the vehicle while it is in motion and before closing the windows. Use the win- dow lock switch to prevent unex — pected use of the power windows. . Do not leave children unattended inside the vehicle. They could un- knowingly activate …
-
Nissan Leaf (2011) — page 192
Passenger side power window switch The passenger’s side power window switch will open or close only the corresponding window. T o open or close the window, push down or pull up the switch and hold it. Automatic operation The automatic operation is available for the switch that has an mark on its surface. T o fully open or close the window, comple …
-
Nissan Leaf (2011) — page 193
2-56 Instruments and controls If the windows do not close auto- matically If the power window automatic function (closing only) does not operate properly, perform the following procedure to initialize the power window system. 1. Place the power switch in the ON position. 2. Close the door. 3. Open the window completely by operating the power window …
-
Nissan Leaf (2011) — page 194
The map light control switch has three positions: ON * 1 , DOOR * 2 and OFF * 3 . The light * 4 (if so equipped) will illuminate when the headlight switch is turned to the or position. ON position When the switch is in the ON position * 1 , the map lights will illuminate. Door position When the switch is in the DOOR position * 2 , the map lights wi …
-
Nissan Leaf (2011) — page 195
2-58 Instruments and controls — remains on for about 15 seconds. . doors are unlocked by pushing the UN- L OCK button or the request switch, with the power switch in the L OCK position — remains on for about 15 seconds. . any door is opened and then closed with the power switch in the L OCK position — remains on for about 15 seconds. . any do …
-
Nissan Leaf (2011) — page 196
PROGRAMMING HomeLink ® T o program your HomeLink ® T ransceiver to operate a garage door, gate, or entry door opener, home or office lighting, you need to be at the same location as the device. Note: Garage door openers (manufactured after 1996) have “rolling code protection” . T o pro- gram a garage door opener equipped with “rolling code …
-
Nissan Leaf (2011) — page 197
2-60 Instruments and controls perform step 7. For convenience, use the help of a second person for assis- tance when performing this step. 7. Quickly (within 30 seconds of pushing and releasing the garage door opener training button) and firmly push and release the HomeLink ® button that you have just pro- grammed. Push and release the HomeLink ® …
-
Nissan Leaf (2011) — page 198
CLEARING PROGRAMME D INFOR- MA TION Individual buttons cannot be cleared, however to clear all programming, push and hold the two outside buttons and release them when the indicator light begins to flash (in approximately 20 seconds) . REPROGRAMMING A SINGLE HomeLink ® BUTTON T o reprogram a HomeLink ® Universal T ranscei- ver button, perform the …
-
Nissan Leaf (2011) — page 199
2-62 Instruments and controls The Approaching V ehicle Sound for Pedestrians (VSP) system is a function that uses sound to help alert pedestrians of the presence of the vehicle when it is being driven at a low speed. When the vehicle starts to move, it produces a sound. The sound stops when the vehicle speed is more than approximately 19 MPH (30 km …
-
Nissan Leaf (2011) — page 200
3 Pre-driving checks and adjustments Keys ………………………………………………………………………………… 3-2 Intelligent Keys ………………………………………………………… 3-2 Doors ………………………………………………………………………………. 3-4 Locking with Mechani …
-
Nissan Leaf (2011) — page 201
3-2 Pre-driving checks and adjustments A key number plate is supplied with your keys. Record the key number and keep it in a safe place (such as your wallet) , not in the vehicle. If you lose your keys, see a NISSAN certified LEAF dealer for duplicates by using the key number. NISSAN does not record any key numbers so it is very important to keep t …
-
Nissan Leaf (2011) — page 202
ceed 140 8 F (60 8 C) . — Do not change or modify the Intelligent Key. — Do not use a magnet key holder. — Do not place the Intelligent Key near an electric appliance such as a television set, personal computer or cellular phone. — Do not allow the Intelligent Key to come into contact with water or salt water, and do not wash it in a washin …
-
Nissan Leaf (2011) — page 203
3-4 Pre-driving checks and adjustments WARNING . Always have the doors locked while driving. Along with the use of seat belts, this provides greater safety in the event of an accident by helping to prevent persons from being thrown from the vehicle. This also helps keep children and others from unintentionally opening the doors, and will help keep …
-
Nissan Leaf (2011) — page 204
LOCKING WITH INSIDE LOCK KNOB T o lock the door without the key , move the inside lock knob to the lock position * 1 then close the door. T o unlock, move the inside lock knob to the unlock position * 2 . When the front door is locked, pulling the front door handle will unlock the front door. When locking the door without a key, be sure not to leav …
-
Nissan Leaf (2011) — page 205
3-6 Pre-driving checks and adjustments 4. When activated, the hazard warning lights will flash twice. When deactivated, the hazard warning lights will flash once. 5. The power switch must be placed in the OFF and ON position again between each setting change. When the automatic door unlock system is deactivated, the doors do not unlock when the pow …
-
Nissan Leaf (2011) — page 206
CAUTION . Be sure to carry the Intelligent Key with you when operating the vehi- cle. . Never leave the Intelligent Key in the vehicle when you leave the vehicle. The Intelligent K ey is always communicating with the vehicle because it receives radio waves. The Intelligent Key system transmits weak radio waves. Environmental conditions may interfer …
-
Nissan Leaf (2011) — page 207
3-8 Pre-driving checks and adjustments . Do not place the Intelligent Key for an extended period in an area where temperatures exceed 140 8 F (60 8 C) . . Do not attach the Intelligent Key to a key holder that contains a magnet. . Do not place the Intelligent Key near equipment that produces a mag- netic field, such as a TV, audio equipment, person …
-
Nissan Leaf (2011) — page 208
DOOR LOCKS/UNLOCKS PRECAU- TION . Do not push the door handle request switch with the Intelligent Key held in your hand as illustrated. The close distance to the door handle will cause the Intelligent Key system to have difficulty recognizing that the In- telligent Key is outside the vehicle. . After locking with the door handle request switch, ver …
-
Nissan Leaf (2011) — page 209
3-10 Pre-driving checks and adjustments INTELLIGENT KEY OPERATION Y ou can lock or unlock the doors without taking the key out from your pocket or bag. When you carry the Intelligent Key with you, you can lock or unlock all doors by pushing the door handle request switch (driver’s or front passen- ger’s) * A or rear hatch request switch * B wit …
-
Nissan Leaf (2011) — page 210
. Opening any door. . Pushing the power switch. During this 1-minute time period, if the UNLOCK button on the Intelligent Key is pushed, all doors will be locked automatically after another 1 minute. Opening rear hatch 1. Carry the Intelligent Key . 2. Push the rear hatch opener switch * C . 3. The rear hatch will unlock and open. 12-VOL T BA TTERY …
-
Nissan Leaf (2011) — page 211
3-12 Pre-driving checks and adjustments TROUBLESHOOTING GUIDE Symptom Possible cause Action to take When opening the driver’s door to get out of the vehicle The inside warning chime sounds continu- ously. The power switch is pushed to the OFF position while the driver’s door is open. Close the driver’s door. The power switch is in the ACC pos …
-
Nissan Leaf (2011) — page 212
HOW TO USE REMOTE KEYLESS ENTR Y FUNCTION WARNING . Radio waves could adversely affect electric medical equipment. Those who use a pacemaker should con- tact the electric medical equipment manufacturer for the possible influ- ences before use. . The Intelligent Key transmits radio waves when the buttons are pushed. The FA A advises that the radio w …
-
Nissan Leaf (2011) — page 213
3-14 Pre-driving checks and adjustments * 1 L OCK button * 2 UNL OCK button * 3 P ANIC button Locking doors When you lock or unlock the doors, the hazard indicator will flash and the horn will sound as a confirmation. For details, see “Setting hazard indicator and horn mode” later in this section. 1. Push the power switch to the OFF position an …
-
Nissan Leaf (2011) — page 214
When the UNLOCK button * 2 is pushed, the hazard indicator flashes once. If horns are not necessary, the system can be switched to the hazard indicator mode. In hazard indicator mode, when the LOCK button is pushed, the hazard indicator flashes twice. When the UNLOCK button is pushed, neither the hazard indicator nor the horn operates. Hazard indic …
-
Nissan Leaf (2011) — page 215
3-16 Pre-driving checks and adjustments WARNING . Make sure that the hood is comple- tely closed and latched before driv- ing. Failure to do so could cause the hood to open during driving and result in an accident. . If steam or smoke is emitting from the motor compartment, do not open the hood. Doing so could cause an injury. When opening the hood …
-
Nissan Leaf (2011) — page 216
WARNING . Always make sure that the rear hatch has been closed securely to prevent it from opening while driv- ing. . Do not drive with the rear hatch open. . Make sure that all passengers have their hands, etc . inside the vehicle before closing the rear hatch. T o open the rear hatch, unlock it and push the rear hatch opener switch * A . Pull up …
-
Nissan Leaf (2011) — page 217
3-18 Pre-driving checks and adjustments When opening the charge port lid: 1. Pull the charge port lid opener handle located below the instrument panel. The charge port lid will then spring up slightly . 2. Put your hand into the under side of the lid and open until it is in the fully open position. When closing the charge port lid: 1. Slowly move t …
-
Nissan Leaf (2011) — page 218
. Pay particular attention when using the normal charge port as the charge port lid can be closed even when the normal charge port cap is open. . Close the quick charge port cap before closing the charging lid. The quick charge port cap can be da- maged if it is open when closing the charge port lid. WARNING Do not adjust the steering wheel while d …
-
Nissan Leaf (2011) — page 219
3-20 Pre-driving checks and adjustments 1. T o block out glare from the front, swing down the sun visor * 1 . 2. T o block glare from the side, remove the sun visor from the center mount and swing it to the side * 2 . INSIDE REARVIEW MIRROR Adjust the angle of the inside rearview mirror to the preferred position. T ype A T ype B SUN VISORS MIRRORS …
-
Nissan Leaf (2011) — page 220
Automatic anti-glar e type The inside mirror is designed so that it automatically changes reflection based on the intensity of the headlights of the vehicle behind. The anti-glare system automatically turns on when the power switch is moved to the ON position. When the system is turned on, the indicator light * A will illuminate and excessive glare …
-
Nissan Leaf (2011) — page 221
3-22 Pre-driving checks and adjustments The outside mirror control switch is located on the armrest. The outside mirror will operate only when the power switch is in the ACC or ON position. T urn the switch right or left to select the right or left side mirror * 1 , then adjust the mirror using the control switch * 2 . Defrosting outside mirrors (i …
-
Nissan Leaf (2011) — page 222
4 V entilators and climate control systems V entilators ……………………………………………………………………….. 4-2 Center ventilators ……………………………………………………… 4-2 Side ventilators …………………………………………………………. 4-2 Climate control system ……. …
-
Nissan Leaf (2011) — page 223
4-2 Ventilator s and climate control systems CENTER VENTILAT ORS Open/close the ventilators by moving the control to either direction. : This symbol indicates that the vents are closed. Moving the side control to this direction will close the ventilators. : This symbol indicates that the vents are open. Moving the side control to this direction wil …
-
Nissan Leaf (2011) — page 224
WARNING . The air conditioning cooling func- tion operates only when the power switch is in the ON position or when the READY to drive indicator light is ON. . Do not leave children or adults who would normally require the support of others alone in your vehicle. Pets should not be left alone either. On hot, sunny days, temperatures in a closed veh …
-
Nissan Leaf (2011) — page 225
4-4 Ventilator s and climate control systems Power switch position L OCK/OFF ACC ON READY to drive Fan — — Available Available Heater and air conditioner — — Available*1 Available A/C-Heater Timer (Climate Ctrl. Timer) Available*2 — — — Remote control Available — — — *1: Can only be used during charging. *2: The charger must be connected. Push the …
-
Nissan Leaf (2011) — page 226
1. T emperature control button 2. (front defroster) button 3. MODE (manual air flow control) button 4. AUT O climate control ON button 5. A/C-Heater Timer (Climate Ctrl. Timer) indicator 6. A/C (air conditioner) ON·OFF button 7. (fresh air intake) button 8. (fan speed control) button 9. (rear window defroster) button (See “Rear window and outsid …
-
Nissan Leaf (2011) — page 227
4-6 Ventilator s and climate control systems . When the outside air circulation mode is on, push and hold the outside air circulation button for more than 1.5 seconds. . When the air recirculation mode is on, push and hold the air recirculation button for more than 1.5 seconds. When setting the automatic control mode, both indicator lights will bli …
-
Nissan Leaf (2011) — page 228
T emperature control: Push the temperature control , button to set the desired temperature. The temperature range is between 64 8 F (18 8 C) and 90 8 F (32 8 C) . Air recirculation: Push the air recirculation button to change the air circulation mode. When the indicator light illuminates, the flowing air is recirculated inside the vehicle. Outside …
-
Nissan Leaf (2011) — page 229
4-8 Ventilator s and climate control systems How to set A/C-Heater Timer (Cli- mate Ctrl. Timer) 1. Push the (Zero Emission menu) button. 2. T ouch [A/C-Heater Timer] ([Climate Ctrl. Timer]) . 3. T ouch [Set Timer 1] or [Set Timer 2]. The following procedure explains the Timer 1 setting. …
-
Nissan Leaf (2011) — page 230
4. Enter the departure time. 5. T o set the A/C-Heater Timer (Climate Ctrl. Timer) for different days of the week, touch [Assign Days]. Select the preferred timer setting for each day of the week. After setting, touch [OK]. The previous screen is displayed. 6. When the settings are completed, touch [Save Timer]. The settings confirmation screen wil …
-
Nissan Leaf (2011) — page 231
4-10 V entilators and climat e control systems 8. The indicator of [Timer 1] illuminates after the A/C-Heater Timer (Climate Ctrl. Timer) is set. Use the same procedure to set the Timer 2 setting. 9. Place the power switch to the OFF position, and then connect the charge connector to the vehicle. Operation tips: . The A/C-Heater Timer (Climate Ctrl …
-
Nissan Leaf (2011) — page 232
. The A/C-Heater Timer (Climate Ctrl. Timer) settings cannot be modified while it is operating. If timer settings are modified while the A/C-Heater Timer (Climate Ctrl. Timer) is operating, these changes will be reflected the next time the A/C-Heater Timer (Climate Ctrl. Timer) operates. . When charging is set as the first priority, the A/C-Heater …
-
Nissan Leaf (2011) — page 233
4-12 V entilators and climat e control systems — The vehicle must be located in a cellular phone coverage area. — The cellular phone must be located in an area with cellular phone cover- age. — The computer must be connected to the internet. . Some cellular phones are not compa- tible with this system and cannot be used to check the Li-ion ba …
-
Nissan Leaf (2011) — page 234
OPERA TING TIPS . The automatic climate control is equipped with sensors as illustrated. The sensors * A and * B help maintain a constant tempera- ture. Do not put anything on or around these sensors. . T o push the AUT O switch will make the climate system reduce the power consump- tion. . When the AUT O switch is pushed, both the AUT O and A/C in …
-
Nissan Leaf (2011) — page 235
4-14 V entilators and climat e control systems control system. SERVICING CLIMA TE CONTROL The climate control system in your NISSAN is charged with a refrigerant designed with the environment in mind. This refrigerant will not harm the earth’s ozone layer. Special char- ging equipment and lubricant are required when servicing your NISSAN climate …
-
Nissan Leaf (2011) — page 236
5 Starting and driving Precautions when starting and driving …………………………. 5-2 Tire Pressure Monitoring System (TPMS) ………………. 5-2 Avoiding collision and rollover …………………………………. 5-5 Off-road recovery ……………………………………………………… 5-5 Rapid air pressure loss … …
-
Nissan Leaf (2011) — page 237
5-2 Starting and driving WARNING . Do not leave children or adults who would normally require the support of others alone in your vehicle. Pets should not be left alone either. They could accidentally injure themselves or others through inadvertent op- eration of the vehicle. Also, on hot, sunny days, temperatures in a closed vehicle could quickly …
-
Nissan Leaf (2011) — page 238
pressure warning light. Use a tire pressure gauge to check the tire pressure. . The Check tire Pressure warning appears on the dot matrix liquid crystal display when the low tire pressure warning light is illuminated and low tire pressure is detected. The Check tire Pressure warning turns off when the low tire pressure warning light turns off. The …
-
Nissan Leaf (2011) — page 239
5-4 Starting and driving . Do not place metalized film or any metal parts (antenna, etc .) on the windows. This may cause poor re- ception of the signals from the tire pressure sensors, and the TPMS will not function properly. Some devices and transmitters may temporarily interfere with the operation of the TPMS and cause the low tire pressure warn …
-
Nissan Leaf (2011) — page 240
— If an electrical equipment is being used in or near the vehicle. — There is a malfunction in the TPMS system. — There is a malfunction in the horn or hazard indicators. — If the Easy Fill Tire Alert does not operate due to TPMS interference, move the vehicle about 3 ft (1 m) backward or forward and try again. If the Easy Fill Tire Alert i …
-
Nissan Leaf (2011) — page 241
5-6 Starting and driving Rapid air pressure loss can affect the handling and stability of the vehicle, especially at highway speeds. Help prevent rapid air pressure loss by main- taining the correct air pressure and visually inspect the tires for wear and damage. See “Wheels and tires” in the “8. Maintenance and do-it-yourself” section of t …
-
Nissan Leaf (2011) — page 242
drugs, or some other physical condition. WARNING Do not operate the power switch while driving the vehicle except in an emer- gency. (The EV system shuts down when the power switch is pushed 3 consecutive times or the power switch is pushed and held for more than 2 seconds.) If the EV system stops while the vehicle is being driven, this could lead …
-
Nissan Leaf (2011) — page 243
5-8 Starting and driving OPERA TING RANGE FOR EV (Elec- tric Vehicle) ST ART FUNCTION The Intelligent Key function can only be used for starting the EV (Electric Vehicle) system when the Intelligent Key is within the specified operating range * 1 . When the Intelligent Key battery is almost discharged or strong radio waves are present near the oper …
-
Nissan Leaf (2011) — page 244
or ON position. The power lock is designed so that the power switch position cannot be switched to L OCK until the vehicle is into the P (Park) position. When the power switch cannot be switched to the L OCK position, proceed as follows. 1. Push the P position switch on the selector lever to place the vehicle in the P (Park) position. 2. Push the p …
-
Nissan Leaf (2011) — page 245
5-10 Starting and driving INTELLIGENT KEY BA TTERY DIS- CHARGE If the Intelligent Key battery is discharged, or environmental conditions interfere with the Intelligent Key operation, start the EV (Electric V ehicle) system in the READY to drive mode according to the following procedure: 1. Push the P (Park) position switch on the selector lever. 2. …
-
Nissan Leaf (2011) — page 246
1. Confirm the parking brake is applied. 2. Confirm that the vehicle is in the P (Park) position. The EV (Electric Vehicle) is designed not to operate unless the selector position is in the P (Park) or N (Neutral) positions. The Intelligent Key must be carried with you when operating the power switch. 3. Depress the brake pedal and push the power s …
-
Nissan Leaf (2011) — page 247
5-12 Starting and driving . Do not hang items on the selector lever. This may cause an accident due to a sudden start. . Do not shift to the ECO position abruptly on slippery roads. This may cause a loss of control. NOTE: If the accelerator pedal is depressed when the vehicle is in the D (Drive) or ECO position and the driver’s seat belt is secur …
-
Nissan Leaf (2011) — page 248
NOTE: The vehicle automatically applies the P (Park) position when the power switch is in the OFF position. WARNING . The selector lever is always in the center position when released. When the power switch is placed in the READY to drive position, the driver needs to confirm that the vehicle is in the P (Park) position. The indicator next to the ? …
-
Nissan Leaf (2011) — page 249
5-14 Starting and driving P (Park) : Use this shift position when the vehicle is parked or when placing the vehicle in the READ Y to drive position. Make sure that the vehicle is completely stopped. In order to switch to the P (Park) position, press the P position switch as shown in the illustration above once the vehicle has come to a complete sto …
-
Nissan Leaf (2011) — page 250
The electric parking brake can be applied or released by operating the electric parking brake switch. WARNING . Be sure the electric parking brake is released before driving. Failure to do so could cause brake failure and lead to an accident. . Do not release the electric parking brake from outside the vehicle. . Do not leave children unattended in …
-
Nissan Leaf (2011) — page 251
5-16 Starting and driving NOTE: . While the electric parking brake is applied or released, an operating sound is heard from the lower side of the rear seat. However, this is not a malfunction. . When the electric parking brake is frequently applied and released in a short period of time, the electric park- ing brake may not operate in order to prev …
-
Nissan Leaf (2011) — page 252
PRECAUTIONS ON CRUISE CON- TROL . If the cruise control system malfunctions, it will cancel automatically. The SET indicator on the dot matrix crystal display will then blink to warn the driver. . If the SET indicator on the dot matrix crystal display blinks, turn the cruise control MAIN switch off and have the system checked by a NISSAN certified …
-
Nissan Leaf (2011) — page 253
5-18 Starting and driving COAST switch and release it. T ake your foot off the accelerator pedal. The vehicle will maintain the set speed. . T o pass another vehicle, depress the accelerator pedal. When you release the pedal, the vehicle will return to the previously set speed. . The vehicle may not maintain the set speed on winding or hilly roads. …
-
Nissan Leaf (2011) — page 254
V ehicle range depends on a number of factors. Actual vehicle range will vary depending upon: . speed, . vehicle load, . electrical load from vehicle accessories, . traffic and road conditions, NISSAN recommends the following driving habits to help maximize vehicle range: Before driving: . Follow recommended periodic maintenance. . Keep tires infla …
-
Nissan Leaf (2011) — page 255
5-20 Starting and driving WARNING . Do not stop or park the vehicle over flammable materials such as dry grass, waste paper or rags. They may ignite and cause a fire. . Never leave the vehicle in the READ Y to drive mode while the vehicle is unattended. . Do not leave children unattended inside the vehicle. They could un- knowingly activate switche …
-
Nissan Leaf (2011) — page 256
WARNING . If the READY to drive indicator light is OFF while driving, the power assist for the steering will not work. Steering will be harder to operate. . When the electric power steering warning light illuminates while the READ Y to drive indicator light ON , the power assist for the steering will cease operation. Y ou will still have control of …
-
Nissan Leaf (2011) — page 257
5-22 Starting and driving speed driving you may feel that regenerative brake provides less deceleration than the engine braking in an ordinary vehicle. This is normal. Less deceleration is provided by the regenera- tive brake system when the Li-ion battery is fully charged. Regenerative brake is automatically reduced when the Li-ion battery is full …
-
Nissan Leaf (2011) — page 258
ELECTRIC PARKING BRAKE BREAK-IN Break in the parking brake shoes whenever the holding effect of the parking brake is weakened or whenever the parking brake shoes and/or drums are replaced, in order to maintain optimum braking performance. This procedure is described in the vehicle Service Manual, and it can be performed by a NISSAN certified LEAF d …
-
Nissan Leaf (2011) — page 259
5-24 Starting and driving If the ABS warning light illuminates during the self-test or while driving, have the vehicle checked by a NISSAN certified LEAF dealer. Normal operation The ABS operates at speeds above 3 to 6 MPH (5 to 10 km/h) . The speed varies according to road conditions. When the ABS senses that one or more wheels are close to lockin …
-
Nissan Leaf (2011) — page 260
the power switch is placed in the OFF position then back to the ON position. The computer has a built-in diagnostic feature that tests the system each time you start the EV (Electric Vehicle) and move the vehicle forward or in reverse at a slow speed. When the self-test occurs, you may hear a “clunk” noise and/or feel a pulsation in the brake p …
-
Nissan Leaf (2011) — page 261
5-26 Starting and driving CAUTION T o prevent damage to the Li-ion battery: Do not store a vehicle in temperatures below -13 8 F (-25 8 C) for over seven days. If the outside temperature is -13 8 F (-25 8 C) or less, the Li-ion battery may freeze and it cannot be charged or provide power to run the vehicle. Move the vehicle to a warm location. NOTE …
-
Nissan Leaf (2011) — page 262
yourself” section. TIRE EQUIPMENT SUMMER tires have a tread designed to provide superior performance on dry pavement. How- ever, the performance of these tires will be substantially reduced in snowy and icy condi- tions. If you operate your vehicle on snowy or icy roads, NISSAN recommends the use of MUD & SNOW or ALL SEASON tires on all four …
-
Nissan Leaf (2011) — page 263
5-28 Starting and driving MEMO …
-
Nissan Leaf (2011) — page 264
6 In case of emergency Roadside assistance program ………………………………………. 6-2 Emergency EV (Electric V ehicle) shut off …………………….. 6-2 Flat tire ……………………………………………………………………………. 6-2 Tire Pressure Monitoring System (TPMS) ………………. 6-2 Repairing …
-
Nissan Leaf (2011) — page 265
6-2 In case of emergency In the event of a roadside emergency , Roadside Assistance Service is available to you. Please refer to your Warranty Information Booklet (U.S.) or Warranty & Roadside Assistance Information Booklet (Canada) for details. T o shut off the EV (Electric Vehicle) system in an emergency situation while driving, perform the f …
-
Nissan Leaf (2011) — page 266
and increase the likelihood of tire failure. Serious vehicle damage could occur and may lead to an accident and could result in serious personal injury. Check the tire pres- sure for all four tires. Adjust the tire pressure to the recommended COLD tire pressure shown on the Tire and Loading Information label to turn the low tire pressure warning li …
-
Nissan Leaf (2011) — page 267
6-4 In case of emergency If you have a flat tire, follow the instructions below. CAUTION . T o avoid the emergency tire punc- ture kit being damaged during sto- rage or use: — Only use the emergency tire puncture repair kit on your ve- hicle. Do not use it on other vehicles. — Only use the kit to inflate the tires of your vehicle and to check t …
-
Nissan Leaf (2011) — page 268
Getting emergency tire puncture repair kit T ake out the emergency tire puncture repair kit located under the cargo area. The repair kit consists of the following items: * 1 Tire sealant bottle * 2 Air compressor * 3 Speed restriction sticker Before using emergency tire punc- ture repair kit . If any foreign object (for example, a screw or nail) is …
-
Nissan Leaf (2011) — page 269
6-6 In case of emergency 2. T ake the hose * 1 and the power plug * 2 out of the air compressor. Remove the cap of the bottle holder from the air compressor. 3. Remove the cap from the tire sealant bottle, and screw the bottle clockwise onto the bottle holder. (Leave the bottle seal intact. Screwing the bottle onto the bottle holder will pierce the …
-
Nissan Leaf (2011) — page 270
5. Remove the protective cap * A of the hose and screw the hose securely onto the tire valve. Make sure that the pressure release valve * B is securely tightened. Make sure that the air compressor switch is in the OFF (O) position, and then insert the power plug into the power outlet in the vehicle. 6. Push the power switch to the “ ACC” positi …
-
Nissan Leaf (2011) — page 271
6-8 In case of emergency If the tire pressure does not increase to 26 psi (180 kPa) within 10 minutes , the tire may be seriously damaged and the tire cannot be repaired with this tire repair kit. Contact a NISSAN certified LEAF dealer. 7. When the tire pressure is at the specified amount, turn the air compressor off. If the tire cannot be inflated …
-
Nissan Leaf (2011) — page 272
. NISSAN recommends using only NISSAN Genuine Emergency Tire Sealant provided with your vehicle. Other tire sealants may damage the valve stem seal which can cause the tire to lose air pressure. T o start your EV system with a booster battery , the instructions and precautions below must be followed. Jump starting provides power to the 12-volt syst …
-
Nissan Leaf (2011) — page 273
6-10 In case of emergency WARNING . Always follow the instructions be- low. Failure to do so could result in damage to the DC/DC converter and cause personal injury. CAUTION . Do not attempt to perform a jump start on the 12-volt battery at the same time that the Li-ion battery is being charged. Doing so may da- mage the vehicle or charging equip- …
-
Nissan Leaf (2011) — page 274
compartment and that the cable clamps do not contact any other metal. 8. Start the engine of the booster vehicle * B . 9. While the booster vehicle * B engine is running, place the EV system in the READY to drive position. CAUTION If the system does not start right away, push the power switch to the OFF position and wait 10 seconds before trying ag …
-
Nissan Leaf (2011) — page 275
6-12 In case of emergency in the P (Park) position, and the electric parking brake cannot be applied. If this occurs, place suitable blocks at both the front and back of a wheel to prevent the vehicle from moving. Failure to block a wheel may allow the vehicle to move unexpectedly which may result in serious personal injury or death. T o place the …
-
Nissan Leaf (2011) — page 276
When towing your vehicle, all State (Provincial in Canada) and local regulations for towing must be followed. Incorrect towing equipment could damage your vehicle. T owing instructions are available from a NISSAN certified LEAF dealer. Local service operators are familiar with the applicable laws and procedures for towing. To assure proper towing a …
-
Nissan Leaf (2011) — page 277
6-14 In case of emergency T OWING RECOMMENDED BY NISSAN NISSAN recommends that your vehicle be towed with the driving (front) wheels off the ground or that the vehicle be placed on a flatbed truck as illustrated. CAUTION . Never tow with the front wheels on the ground or four wheels on the ground (forward or backward) , as this may cause serious an …
-
Nissan Leaf (2011) — page 278
Front VEHICLE RECOVERY (freeing stuck vehicle) WARNING . Stand clear of a stuck vehicle. . Do not spin your tires at high speed. This could cause them to explode, which could result in serious injury. Parts of the vehicle could also over- heat and be damaged. Pulling a stuck vehicle Do not use the tie down hook for towing or vehicle recovery . Fron …
-
Nissan Leaf (2011) — page 279
6-16 In case of emergency . Never tow a vehicle using the vehi- cle tie down hook or recovery hook. . Always pull the cable straight out from the front of the vehicle. Never pull on the vehicle at an angle. . Pulling devices should be routed so they do not touch any part of the suspension, steering, brake or cool- ing systems. . Pulling devices suc …
-
Nissan Leaf (2011) — page 280
If the electric parking brake cannot be released by operating the electric parking brake switch, the parking brake can be mechanically released. Note that the following procedure must be performed only when the parking brake needs to be released in an emergency . NOTE: . Depending on the type of parking brake system malfunction, the parking brake s …
-
Nissan Leaf (2011) — page 281
6-18 In case of emergency . If the vehicle is driven with the electric parking brake applied, the electric brake components may overheat causing a deterioration in electric parking brake effectiveness and premature electric parking brake wear. . The electric parking brake mechan- ical release tool should be used only to release the electric parking …
-
Nissan Leaf (2011) — page 282
7 Appearance and care Cleaning exterior ……………………………………………………………. 7-2 Washing …………………………………………………………………….. 7-2 Waxing ………………………………………………………………………. 7-2 Removing spots …………………………… …
-
Nissan Leaf (2011) — page 283
7-2 Appearance and care In order to maintain the appearance of your vehicle, it is important to take proper care of it. T o protect the paint surfaces, wash your vehicle as soon as you can: . after a rainfall to prevent possible damage from acid rain . after driving on coastal roads . when contaminants such as soot, bird droppings, tree sap, metal …
-
Nissan Leaf (2011) — page 284
Machine compound or aggressive polishing on a base coat/clear coat paint finish may dull the finish or leave swirl marks. REMOVING SPOTS Remove tar and oil spots, industrial dust, insects, and tree sap as quickly as possible from the paint surface to avoid lasting damage or staining. Special cleaning products are available at a NISSAN certified LEA …
-
Nissan Leaf (2011) — page 285
7-4 Appearance and care wheel temperature should be the same as ambient temperature. . Rinse the wheel to completely re- move the cleaner within 15 minutes after the cleaner is applied. CHROME PARTS Clean chrome parts regularly with a non- abrasive chrome polish to maintain the finish. TIRE DRESSING NISSAN does not recommend the use of tire dressin …
-
Nissan Leaf (2011) — page 286
CAUTION . Never use benzine, thinner, or any similar material. . Small dirt particles can be abrasive and damaging to the leather sur- faces and should be removed promptly. Do not use saddle soap, car waxes, polishes, oils, cleaning fluids, solvents, detergents or am- monia-based cleaners as they may damage the leather’s natural finish. . Never u …
-
Nissan Leaf (2011) — page 287
7-6 Appearance and care Floor mat positionin g aid (driver’s side only) This vehicle includes front floor mat brackets to act as floor mat positioning aid. NISSAN floor mats have been specially designed for your vehicle model. The driver’s side floor mat has grommet holes incorporated in it. P osition the mat by placing the floor mat bracket ho …
-
Nissan Leaf (2011) — page 288
MOST COMMON FACTORS CON- TRIBUTING TO VEHICLE CORRO- SION . The accumulation of moisture-retaining dirt and debris in body panel sections, cavities, and other areas. . Damage to paint and other protective coat- ings caused by gravel and stone chips or minor traffic accidents. ENVIRONMENT AL FACTORS IN- FLUENCE THE RA TE OF CORRO- SION Moisture Accu …
-
Nissan Leaf (2011) — page 289
7-8 Appearance and care MEMO …
-
Nissan Leaf (2011) — page 290
8 Maintenance and do-it-yourself Maintenance requirement ………………………………………………. 8-2 Scheduled maintenance …………………………………………… 8-2 General maintenance ……………………………………………….. 8-2 Where to go for service ………………………………………….. …
-
Nissan Leaf (2011) — page 291
8-2 Maintenance and do-it-yourself Y our new NISSAN has been designed to have minimum maintenance requirements with long service intervals to save you both time and money . However, some day-to-day and regular maintenance is essential to maintain your NISSAN’s fine mechanical condition, as well as its EV (Electric V ehicle) system performance. It …
-
Nissan Leaf (2011) — page 292
When driving in areas using road salt or other corrosive materials, check lubrication frequently. Lights*: Clean the headlights on a regular basis. Make sure that the headlights, stop lights, tail lights, turn signal lights and other lights are all operating properly and installed securely. Also check the aim of the headlights. Road wheel nuts (lug …
-
Nissan Leaf (2011) — page 293
8-4 Maintenance and do-it-yourself webbing for cuts, fraying, wear or damage. Steering wheel: Check for changes in the steering conditions, such as excessive free play, hard steering or strange noises. Warning lights and chimes: Make sure that all warning lights and chimes are operating properly. Windshield defroster: Check that the air emits from …
-
Nissan Leaf (2011) — page 294
maintenance. . Park the vehicle on a level surface, apply the parking brake securely and chock the wheels to prevent the vehicle from moving. Push the P position switch on the selector lever or place the vehicle into the N (Neutral) position. . If you must work with the EV (Electric vehicle) system is turned on, keep hands, clothing, hair and tools …
-
Nissan Leaf (2011) — page 295
8-6 Maintenance and do-it-yourself the ON position and then in the OFF position to prevent the 12-volt bat- tery automatically being charged by the Li-ion battery. See “Charging the 12-volt battery” in the “EV. Overview” section. This “8. Maintenance and do-it-yourself” section gives instructions regarding only those items that are rela …
-
Nissan Leaf (2011) — page 296
The cooling system is filled at the factory with a pre-diluted mixture of 50% genuine NISSAN Long Life Antifreeze/Coolant (blue) and 50% water to provide year-round anti-freeze and coolant protection. The antifreeze solution con- tains rust and corrosion inhibitors. Additional cooling system additives are not necessary . WARNING . Never remove the …
-
Nissan Leaf (2011) — page 297
8-8 Maintenance and do-it-yourself CHECKING COOLANT LEVEL Check the coolant level in the reservoir when the high voltage parts are cold. If the coolant level is below the MIN level * 2 , open the reservoir cap and add coolant up to the MAX level * 1 . If the reservoir is empty, check the coolant level in the coolant tank when the high voltage parts …
-
Nissan Leaf (2011) — page 298
When checking or replacement is required, we recommend a NISSAN certified LEAF dealer for servicing. CAUTION . Use only Genuine NISSAN Matic Fluid S. Do not mix with other fluids. . Using reduction gear fluid other than Genuine NISSAN Matic Fluid S will damage the reduction gear, which is not covered by the NISSAN new vehicle limited warranty. For …
-
Nissan Leaf (2011) — page 299
8-10 Maintenance and do-it-yourself Except for Canada T o check the fluid level, use your finger to plug the center hole * 1 of the cap/tube assembly, then remove it from the reservoir. If there is no fluid in the tube, add fluid. For Canada Fill the window washer fluid reservoir periodi- cally . Add window washer fluid when the low washer fluid wa …
-
Nissan Leaf (2011) — page 300
. Keep the 12-volt battery surface clean and dry . Clean the 12-volt battery with a solution of baking soda and water. . Make certain the terminal connections are clean and securely tightened. WARNING . Do not expose the 12-volt battery to flames or electrical sparks. Hydro- gen gas generated by the 12-volt battery is explosive. Do not allow 12-vol …
-
Nissan Leaf (2011) — page 301
8-12 Maintenance and do-it-yourself 1. Remove the cell plugs * A . 2. Add distilled water up to the UPPER LEVEL * 1 line. If the side of the 12-volt battery is not clear, check the distilled water level by looking directly above the cell; the condition * 1 indicates OK and the condition * 2 needs more to be added. 3. Tighten cell plugs * A . V ehic …
-
Nissan Leaf (2011) — page 302
Pulling up the wiper arm The wiper arm should be in the up position when replacing the wiper. Pull up the wiper arm manually or using the wiper rise-up function. Wiper rise-up function: T o pull up the wiper arm, pull the lever * 1 within one minute after the power switch is turned off. The wiper operation stops in mid-operation and wiper arm can b …
-
Nissan Leaf (2011) — page 303
8-14 Maintenance and do-it-yourself Replacing 1. Push the release tab * A , and move the wiper blade down the wiper arm * 1 while pushing the release tab to remove. 2. Insert the new wiper blade onto the wiper arm until a click sounds. 3. Rotate the wiper blade so that the dimple is in the groove. CAUTION . After wiper blade replacement, re- turn t …
-
Nissan Leaf (2011) — page 304
Contact a NISSAN certified LEAF dealer if checking or replacement is required. If the brakes do not operate properly, have the brakes checked by a NISSAN certified LEAF dealer. WARNING Do not adjust the height of the brake pedal. Doing so could alter the effec- tiveness of the brakes, which could result in a serious accident and perso- nal injury. …
-
Nissan Leaf (2011) — page 305
8-16 Maintenance and do-it-yourself MO TOR COMPARTMENT WARNING . Never touch, disassemble, remove or replace the high-voltage parts and cables, as well as their connec- tors. High-voltage cables are co- lored orange. T ouching, disassembling, removing or repla- cing those parts and cables can cause severe burns or electric shock that may result in …
-
Nissan Leaf (2011) — page 306
Fusible links If any electrical equipment does not operate and the fuses are in good condition, check the fusible links in the holders * 1 , * 2 and * 3 . If any of these fusible links are melted, replace only with genuine NISSAN parts. For checking and replacing the fusible links in the holders * 1 , * 2 and * 3 , contact a NISSAN certified LEAF d …
-
Nissan Leaf (2011) — page 307
8-18 Maintenance and do-it-yourself 5. If the fuse is open * A , replace it with a new fuse * B . 6. If a new fuse also opens, have the electrical system checked, and if necessary repaired, by a NISSAN certified LEAF dealer. CAUTION . Be careful not to allow children to swallow the battery and removed parts. . An improperly disposed battery can har …
-
Nissan Leaf (2011) — page 308
the casing. 3. Replace the battery with a new one. Recommended battery: CR2025 or equivalent . Do not touch the internal circuit and electric terminals as doing so could cause a malfunction. . Hold the battery by the edges. Holding the battery across the contact points will seriously deplete the storage capacity . . Make sure that the + side faces …
-
Nissan Leaf (2011) — page 309
8-20 Maintenance and do-it-yourself 1. Front parking light 2. Headlight (low-beam) 3. Front turn signal light 4. Front side marker light 5. Map light 6. Ceiling light 7. Front fog light (if so equipped) 8. Headlight (high-beam) 9. Side turn signal light 10. High-mounted stop light 11. Rear combination light (stop/tail/turn signal/back- up light/rea …
-
Nissan Leaf (2011) — page 310
HEADLIGHTS Replacing Halogen headlight (high-beam) : The headlight high-beam is a semi-sealed beam type that uses a replaceable headlight (halogen) bulb. CAUTION . Do not leave the bulb out of the headlight reflector for a long period of time. Dust, moisture, smoke, etc . entering the headlight body may affect bulb performance. . High-pressure halo …
-
Nissan Leaf (2011) — page 311
8-22 Maintenance and do-it-yourself EXTERIOR AND INTERIOR LIGHTS Item Wattage (W) Bulb No. Headlight low beams* LED — Headlight high beams (Halogen) 65 H9 Front turn signal light 27 3457NAK Front fog light (if so equipped)* 55 H11 Front side marker light 5 W5W Front park light 5 W5W Side turn signal light 5 WY5W Rear combination light T urn signa …
-
Nissan Leaf (2011) — page 312
Front side marker light Front turn signal light Parking light Side turn signal light License plate light Maintenance and do-it-yourself 8-23 …
-
Nissan Leaf (2011) — page 313
8-24 Maintenance and do-it-yourself Rear combination light 1. Remove the rear combination attachment bolt * 1 . 2. Pull the rear combination assembly evenly toward rear of the vehicle * 2 . 3. T urn the bulb socket and then remove the bulb * 3 . Map light Cargo light …
-
Nissan Leaf (2011) — page 314
Ceiling light If you have a flat tire, see “Flat tire” in the “6. In case of emergency” section. TIRE PRESSURE Tire Pressure Monitoring System (TPMS) This vehicle is equipped with the Tire Pressure Monitoring System (TPMS) . It monitors tire pressure of all tires. When the low tire pressure warning light is lit and the Check tire Pressure w …
-
Nissan Leaf (2011) — page 315
8-26 Maintenance and do-it-yourself Incorrect tire pressure, including un- der inflation, may adversely affect tire life and vehicle handling. WARNING . Improperly inflated tires can fail suddenly and cause an accident. . The Gross V ehicle Weight rating (GVWR) is located on the F.M.V. S.S. certification label. The ve- hicle weight capacity is indi …
-
Nissan Leaf (2011) — page 316
Tire and Loading Information label * 1 Seating capacity: The maximum number of occupants that can be seated in the vehicle. * 2 V ehicle load limit: See “V ehicle loading information” in the “9. T echnical and consumer information” section. * 3 Original size: The size of the tires originally installed on the vehicle at the factory . * 4 Col …
-
Nissan Leaf (2011) — page 317
8-28 Maintenance and do-it-yourself Checking tire pressure 1. Remove the valve stem cap from the tire. 2. Press the pressure gauge securely onto the valve stem. Do not press too hard or force the valve stem sideways, other- wise air will escape. If the hissing sound of air escaping from the tire is heard while checking the pressure, reposition the …
-
Nissan Leaf (2011) — page 318
Example * 1 Tire size (example: P215/60R16 94H) 1. P: The “P” indicates the tire is designed for passenger vehicles. (Not all tires have this information.) 2. Three-digit number (215): This number gives the width in millimeters of the tire from sidewall edge to sidewall edge. 3. T wo-digit number (60): This number, known as the aspect ratio, gi …
-
Nissan Leaf (2011) — page 319
8-30 Maintenance and do-it-yourself 5. Three-digit code: Date of Manufacture 6. Four numbers represent the week and year the tire was built. For example, the numbers 3103 means the 31st week of 2003. If these numbers are missing, then look on the other sidewall of the tire. * 3 Tire ply composition and material The number of layers or plies of rubb …
-
Nissan Leaf (2011) — page 320
All season tires NISSAN specifies all season tires on some models to provide good performance all year, including snowy and icy road conditions. All Season tires are identified by ALL SEASON and/or M&S (Mud and Snow) on the tire sidewall. Snow tires have better snow traction than All Season tires and may be more appro- priate in some areas. Sum …
-
Nissan Leaf (2011) — page 321
8-32 Maintenance and do-it-yourself CHANGING WHEELS AND TIRES Tire rotation NISSAN recommends rotating the tires every 7,500 miles (12,000 km) . As soon as possible, tighten the wheel nuts to the specified torque using a torque wrench. Wheel nut tightening torque: 80 ft-lb (108 N·m) The wheel nuts must be kept tigh- tened to the specification at a …
-
Nissan Leaf (2011) — page 322
. The original tires have built-in tread wear indicators. When wear indicators are visible, the tire(s) should be replaced. . Tires degrade with age and use. Have tires, over 6 years old checked by a qualified techni- cian, because some tire damage may not be obvious. Replace the tires as necessary to prevent tire failure and possible personal inju …
-
Nissan Leaf (2011) — page 323
8-34 Maintenance and do-it-yourself Wheel balance Unbalanced wheels may affect vehicle handling and tire life. Even with regular use, wheels can get out of balance. Therefore, they should be balanced as required. Wheel balance service should be per- formed with the wheels off the vehicle. Spin balancing the wheels on the vehicle could lead to mecha …
-
Nissan Leaf (2011) — page 324
9 T echnical and consumer information Capacities and recommended lubricants …………………….. 9-2 Air conditioning system refrigerant and lubricant recommendations ………………………………………. 9-3 Specifications …………………………………………………………………. 9-4 Charging system ………….. …
-
Nissan Leaf (2011) — page 325
9-2 T echnical and consumer informat ion The following are approximate capacities. The actual refill capacities may be slightly different. When refilling, follow the procedure that is described in the “8. Maintenance and do-it-yourself” section to determine the proper refill capacity. Capacity (approximate) Recommended specifications US measure …
-
Nissan Leaf (2011) — page 326
AIR CONDITIONING SY STEM RE- FRIGERANT AND LUBRICANT RE- COMMENDA TIONS The air conditioning system in your NISSAN vehicle must be charged with the refrigerant, HFC-134a (R-134a) and the oil, compressor oil ND-OIL11 or the equiva- lents. CAUTION The use of any other refrigerant or oil will cause severe damage to the air conditioning system and will …
-
Nissan Leaf (2011) — page 327
9-4 T echnical and consumer informat ion CHARGING SY STEM Rated input voltage AC120V (single phase) , AC240V (single phase) Rated input frequency 60Hz Maximum rated current 12A (AC120V) , 18A (AC240V) Maximum power consumption 1.4 kVA (AC120V) , 4.8 kV A (AC240V) Supply system TN-S system Sensitive current of GFI (Ground Fault Interrupter) circuit …
-
Nissan Leaf (2011) — page 328
MO TOR Model EM61 WHEELS AND TIRES Road wheel T ype Size Offset in (mm) Aluminum 16 6 6 1/2J 1.57 (40) Tire T ype Size Pressure PSI (kPa) [Cold] Conventional P205/55R16 89H 36 (250) DIMENSIONS AND WEIGHTS Overall length in (mm) 175.0 (4,445)*1 174.8 (4,440)*2 Overall width in (mm) 69.7 (1,770) Overall height in (mm) 61.0 (1,550) Front tread in (mm) …
-
Nissan Leaf (2011) — page 329
9-6 T echnical and consumer informat ion When planning to travel in another coun- try, you should first find out if the charging equipment is compatible with that country’s electrical system. When transferring the registration of your vehicle to another country, state, province or district, it may be necessary to modify the vehicle to meet local …
-
Nissan Leaf (2011) — page 330
TRACTION MOT OR SERIAL NUM- BER The serial number of the traction motor is stamped on the traction motor as shown. F .M .V.S.S./C.M .V.S.S CERTIFICA- TION LABEL The Federal/Canadian Motor Vehicle Safety Standards (F .M.V.S.S./C.M.V .S.S.) certification label is affixed as shown. This label contains valuable vehicle information, such as: Gross V ehi …
-
Nissan Leaf (2011) — page 331
9-8 T echnical and consumer informat ion TIRE AND LOADING INFORMATION LABEL The cold tire pressure is shown on the Tire and Loading Information label affixed to the driver’s side center pillar as shown. AIR CONDITIONER SPECIFICA TION LABEL The air conditioner specification label is at- tached to the underside of the hood as shown in the illustrat …
-
Nissan Leaf (2011) — page 332
Perform the following procedure to mount the license plate. Before mounting the license plate, confirm that the following parts are enclosed in the plastic bag. . License plate bracket . J-nut 6 2 . Screw 6 2 . Screw grommet 6 2 1. Align the height of the license plate bracket with the position of * A . 2. Align the position * B of the license plat …
-
Nissan Leaf (2011) — page 333
9-10 T echnical and consumer information the fascia.) 5. Insert grommets into the mounting holes on the fascia. 6. Insert a flat-blade screwdriver into the grommet hole and turn the part * C 90 8 . 7. Insert a J-nut into the license plate bracket before placing the license plate bracket on the fascia. 8. Install the license plate bracket with screw …
-
Nissan Leaf (2011) — page 334
used to tow a trailer, the trailer tongue weight must be included as part of the cargo load. This information is located on the Tire and Loading Information label. . Cargo capacity — permissible weight of cargo, the subtracted weight of occu- pants from the load limit. VEHICLE LOAD CAPACITY Do not exceed the load limit of your vehicle shown as “T …
-
Nissan Leaf (2011) — page 335
9-12 T echnical and consumer information 4. The resulting figure equals the available amount of cargo and luggage load capacity . For example, if the XXX amount equals 1400 lbs. and there will be five 150 lb. passengers in your vehicle, the amount of available cargo and luggage load capacity is 650 lbs. (1400 − 750 (5 x 150) = 650 lbs) or (640 ? …
-
Nissan Leaf (2011) — page 336
LOADING TIPS . The GVW must not exceed the GVWR or GAWR as specified on the F .M.V.S. S./C.M.V .S.S. certification label. . Do not load the front and rear axle to the GAWR. Doing so will exceed the GVWR. WARNING . Properly secure all cargo with ropes or straps to help prevent it from sliding or shifting. Do not place cargo higher than the seatbacks …
-
Nissan Leaf (2011) — page 337
9-14 T echnical and consumer information T owing your vehicle with all four wheels on the ground is sometimes called flat towing. This method is typically used when towing a vehicle behind a recreational vehicle, such as a motor home. CAUTION . Failure to follow these guidelines can result in severe reduction gear damage. . DO NOT tow this vehicle …
-
Nissan Leaf (2011) — page 338
WARNING The temperature grade for this tire is established for a tire that is properly inflated and not overloaded. Excessive speed, under-inflation, or excessive loading, either separately or in combi- nation, can cause heat build-up and possible tire failure. For USA If you believe that your vehicle has a defect which could cause a crash or could …
-
Nissan Leaf (2011) — page 339
9-16 T echnical and consumer information ers) or www.tc.gc.ca/securiteroutiere (French speakers) . T o notify NISSAN of any safety concerns please contact our Consumer Information Centre toll free at 1-800-387-0122. In addition to Event Data Recorders (EDRs) discussed elsewhere in this Owner’s Manual, this vehicle is equipped with electronic modu …
-
Nissan Leaf (2011) — page 340
future may also not function without telematics data transmission. CARWINGS TM telematics services are provided by NISSAN pursuant to a subscription services agreement covering your vehicle. This agree- ment is necessary for all owners. This agree- ment, and an explanation of its terms and conditions, can be found at the NISSAN Own- er’s P ortal …
-
Nissan Leaf (2011) — page 341
9-18 T echnical and consumer information initial free term if you do not wish to renew your subscription agreement at the prices then in effect. This vehicle is equipped with an Event Data Recorder (EDR) . The main purpose of an EDR is to record, in certain crash or near crash-like situations, such as an air bag deployment or hitting a road obstacl …
-
Nissan Leaf (2011) — page 342
Genuine NISSAN Service Manuals for this model year and prior can be purchased. A genuine NISSAN Service Manual is the best source of service and repair information for your vehicle. This manual is the same one used by the factory trained technicians working at a NISSAN certified LEAF dealer. Genuine NISSAN Own- er’s Manuals can also be purchased. …
-
Nissan Leaf (2011) — page 343
9-20 T echnical and consumer information MEMO …
-
Nissan Leaf (2011) — page 344
10 Index A A/C-Heater Timer (Climate Ctrl. Timer) ……………… 4-7 ABS (Anti-lock Braking System) ………………………. 5-23 Advanced air bag system ………………………………….. 1-42 Air bag system Advanced air bag system ……………………………. 1-42 Front passenger air bag and status light……. 1-44 Front-sea …
-
Nissan Leaf (2011) — page 345
10-2 Index Checking coolant level …………………………………… 8-8 Cooling system …………………………………………………….. 8-7 Corrosion protection …………………………………….. …….. 7-7 Cruise control ……………………………………………………… 5-17 Cup holders…………. …
-
Nissan Leaf (2011) — page 346
Interior light replacement ……………………………………. 8-22 Interior lights……………………………………………………….. 2-56 ISOFIX child restraint …………………………………………. 1-20 J Jump starting ……………………………………………… ………… 6-9 K Keyless entry With I …
-
Nissan Leaf (2011) — page 347
10-4 Index Parking brake mechanically release ………………….. 6-16 Power Electric power steering system …………………… 5-21 Power door lock ……………………………………………… 3-4 Power windows …………………………………………. … 2-54 Power economy……………………………………….. …
-
Nissan Leaf (2011) — page 348
Precautions on supplemental restraint system …………………………………………….. 1-36 Switch Approaching Vehicle Sound for Pedestrians (VSP) OFF switch ………………………………………… 2-62 Autolight switch ……………………………………………. 2-42 Fog light switch…………………………….. …
-
Nissan Leaf (2011) — page 349
10-6 Index Washer switch Rear window wiper and washer switch ……… 2-39 Windshield wiper and washer switch…………. 2-38 Washing ………………………………………………………………… 7-2 Waxing………………………………………………………………….. 7-2 Weights (See dimensions and weights)……… …
-
Nissan Leaf (2011) — page 350
CHARGING INFORMATION …
-
Nissan Leaf (2011) — page 351
…
-
Nissan Leaf (2011) — page 352
The label is typically located on the driver side center pillar or on the driver’s door. For additional information, see “Wheels and tires” in the “8. Maintenance and do-it-yourself” section. COLD TIRE PRESSURES …