
7
11. •
EQ (
EQUALIZER Effect)
You can choose 7 fixed sound impressions and
adjust the BASS, MIDDLE and TREBLE.
-You can select a desired sound mode by using EQ
button on the front panel or the remote control.
When you want to change a sound mode press the
EQ button repeatedly within 3 seconds.
Each time you press the button the setting changes
in the display window as shown below.
NORMAL → USER EQ → POP → CLASSIC
→ ROCK → DRAMA → JAZZ → NORMAL…
You can set the BASS, MIDDLE and TREBLE on
the USER EQ mode.
1.Select the USER EQ mode by using EQ
button.“USER EQ” will be displayed in the display
window.
2.Press the SET/CD
[[
button on the front panel
when “USER EQ” is displayed in the display win-
dow.
“BASS 0” will be displayed in the display window
3.Select the BASS, MIDDLE or TREBLE you want
by pressing the PRESET (-/+) buttons on the front
panel.
4.Press the TUNING (-/+) buttons on the front panel
to set the sound level you want. (MIN, -4 ~ +4,
MAX steps)
5.Repeat the 3-4 steps as above.
6.When the sound level is completed, press the the
SET/CD
[[
button on the front panel.
•
XTS Pro
This unique sound quality developed by our
technology creates the optimum sound for you to
play the perfect playback of the original sound and
to feel the living sound source.
Each time you press XTS Pro the setting changes
in the following order.
XTS — P ON ↔ NORMAL
Note
Note : The XTS Pro function will not be operated
when a headphone has been connected
•
SOUND
You can enjoy surround sound simply by select-
ing one of the pre-programmed sound fields
according to the program you want to listen to (2
ch. sound only).Press SOUND button repeatedly.
BYPASS → ON STAGE → STUDIO →
CLUB → HALL → THEATER 1 → CHURCH
→ BYPASS…
Note
Note :Initial sound mode is BYPASS.
•
FEMALE( ),
AUDIO/ MALE( )
If you want to sing a song of MAN’s or WOMEN’s
key, press MALE( )/ FEMALE
()
button repeat-
edly to change MAN’s or WOMEN’s key in a
karaoke.
• AUDIO
AUDIO language: During playback, press AUDIO
repeatedly to hear a different audio language or
audio track.
(AUDIO channel): Press AUDIO repeatedly during
playback to hear a different audio channel
(Stereo., Left or Right).
• SUBTITLE (S-TITLE)
SUBTITLE
During playback, press
S-TITLE repeatedly to
select a desired subtitle language.
• SHADOW
It will be highlighted by background shadow
image.
• CLEAR
Removes a track number on the program menu or
a mark on the MARKER SEARCH menu.
12. ECHO VOL. ( / )
You can give an echo effect to the sound from the
microphones. Press ECHO VOL. ( / ) on the
remote control to increase the echo volume or
decrease it. (MIN,1 — 14, MAX steps)
13. MIC VOL. ( / )- OPTIONAL
Adjust the microphone volume by turning MIC vol-
ume knob. (MIN,1 — 14, MAX steps)
Note
Note
• When not using the microphone, set the MIC volume
knob to minimum or turn off the MICs and remove the
microphone from the MIC Jacks.
• If the microphone is set too near the speaker, a howl-
ing sound may be produced. In this case, move the
microphone away from the speaker or decrease the
sound level by using the MIC volume control.
• If sound through the microphone is extremely loud, it
may be distorted. In this case, turn the MIC volume
control toward minimum.
14. RDS,PTY — OPTIONAL
Views the various displays of the RDS options.
15. •
XDSS plus (Extreme Dynamic Sound
System)
XDSS (Extreme Dynamic Sound System)
Press XDSS plus to reinforce treble, bass and the
surround effect. The “XDSS ON” or “NORMAL”
indicator lights.
: XDSS ON ↔ NORMAL
: XDSS ON → MP3 — OPT ON
→ NORMAL → XDSS ON .
MP3 Optimizer
This function optimizes for compressed MP3 files. It
improves the bass sound to make sweet sound. Each
time you press “ MP3 OPT ”.
The setting changes in the following order.
XDSS ON → MP3 — OPT ON → NORMAL
MP3/WMA
DVD/DivX/ACD
DivX
DVD
DivX
DVD
ENGLISH
MDD112/72_X5U_ENG_UA_MFL37200121
MDD-K112Q
(MDD-K112Q, MDS-K112V)
MDD-K72Q
(MDD-K72Q, MDS-K72V)
English KARAOKE Mini Home Theater
Read the manual carefully before using the unit
Internet address ; http://ua.lge.com
Customer Information Center LG ; (380-44) 490-7777, 8-800-303-0000.
RUSSIAN СУП‡¯МЛИ ПЛМЛ-НЛМУЪВ‡Ъ Т ЩЫМНˆЛВИ Н‡ ‡УНВ
Lees deze handleiding aandacht door voordat u dit toestel gebruikt.
àÌÚ ÌÂÚ ‡‰ ÂÒ; http://ua.lge.com àÌÙÓ Ï‡ˆËÓÌ̇fl ÒÎÛÊ·‡ LG; (380-44) 490-7777, 8-800-303-0000
UKRAINE СйеДтзЯв еЯзЯ-дЯзйнЦДнк б дДкДйдЦ
è ¯ Ì¥Ê ÓÁÔÓ˜‡ÚË ‚ËÍÓ ËÒÚ‡ÌÌfl Ô ËÒÚ Ó˛, ·Û‰¸-·Ò͇, Û‚‡ÊÌÓ Ô Ó˜ËÚ‡ÈÚ ˆ˛ ¥ÌÒÚ Û͈¥˛.
ЯМЪВ МВЪ ‡‰ ВТ‡: http://ua.lge.com ЯМЩУ П‡ˆ¥ИМ‡ ТОЫК·‡ LG: (380-44) 490-7777 ЕВБНУ¯ЪУ‚М‡ ¥МЩУ П‡ˆ¥ИМ‡ О¥М¥fl: 8-800-303-0000
P/NO: MFL37200121
CAUTION
RISK OF ELECTRIC SHOCK
DO NOT OPEN
WARNING: TO REDUCE THE RISK
OF ELECTRIC SHOCK
DO NOT REMOVE COVER (OR BACK)
NO USER-SERVICEABLE PARTS INSIDE
REFER SERVICING TO QUALIFIED SERVICE
PERSONNEL.
This lightning flash with arrowhead symbol within an equilateral triangle is intended to alert the user to the presence of uninsulated dangerous voltage within the product’s enclosure that may be of sufficient magnitude to constitute a risk of electric shock to persons.
The exclamation point within an equilateral triangle is intended to alert the user to the presence of important operating and maintenance (servicing) instructions in the literature accompanying the appliance.
WARNING: TO REDUCE THE RISK OF FIRE OR ELECTRIC SHOCK, DO NOT EXPOSE THIS PRODUCT TO RAIN OR MOISTURE.
CAUTION: Do not block any ventilation openings. Install in accordance with the manufacturer’s instructions.
Slots and openings in the cabinet are provided for ventilation and to ensure reliable operation of the product and to protect it from over heating.
The openings should be never be blocked by placing the product on a bed, sofa, rug or other similar surface. This product should not be placed in a built-in installation such as a bookcase or rack unless proper ventilation is provided or the manufacturer’s instruction have been adhered to.
CAUTION:
This Product employs a Laser System.
To ensure proper use of this product, please read this owner’s manual carefully and retain for future reference, should the unit require maintenance, contact an authorized service locationsee service procedure.
Use of controls, adjustments or the performance of procedures other than those specified herein may result in hazardous radiation exposure.
To prevent direct exposure to laser beam, do not try to open the enclosure. Visible laser radiation when open. DO NOT STARE INTO BEAM.
CAUTION: The apparatus shall not be exposed to water, dripping or splashing and that no objects filled with liquids, such as vases, shall be placed on the apparatus.
CAUTION concerning the Power Cord
Most appliances recommend they be placed upon a dedicated circuit;
That is, a single outlet circuit which powers only that appliance and has no additional outlets or branch circuits. Check the specification page of this owner’s manual to be certain.
Do not overload wall outlets. Overloaded wall outlets, loose or damaged wall outlets, extension cords, frayed power cords, or damaged or cracked wire insulation are dangerous. Any of these conditions could result in electric shock or fire. Periodically examine the cord of your appliance, and if its appearance indicates damage or deterioration, unplug it, discontinue use of the appliance, and have the cord replaced with an exact replacement part by an authorized servicer.
Protect the power cord from physical or mechanical abuse, such as being twisted, kinked, pinched, closed in a door, or walked upon. Pay particular attention to plugs, wall outlets, and the point where the cord exits the appliance.
To disconnect power from the mains, pull out the mains cord plug. When installing the product, ensure that the plug is easily accessible.
Disposal of your old appliance
1.When this crossed-out wheeled bin symbol is attached to a product it means the product is covered by the European Directive 2002/96/EC.
2.All electrical and electronic products should be disposed of separately from the municipal waste stream via designated collection facilities appointed by the government or the local authorities.
3.The correct disposal of your old appliance will help prevent potential negative consequences for the environment and human health.
4.For more detailed information about disposal of your old appliance, please contact your city office, waste disposal service or the shop where you purchased the product.
POWER SAVE MODE
You can set up the unit into an economic power save mode.
In power-on status, press and hold 1/[(POWER) button for about 3 seconds.
—Nothing is displayed in the display window when the unit goes into the power save mode.
To cancel power save mode, press 1/[ (POWER).
2

DVD
the disc symbols for instructions
of which title has one of the following symbols only to the disc represented by the symbol.
DVD Audio CDs MP3 file WMA file JPEG file
Reference
Language Codes . . . . . . . . . . . . . . . . . . . . . . . . . . . 21 Area Codes . . . . . . . . . . . . . . . . . . . . . . . . . . . . . . . 21 Troubleshooting. . . . . . . . . . . . . . . . . . . . . . . . . . . . 22 Specifications
Before use
About the symbol display
“ ” may appear on the TV screen during operation. This icon means the function explained in this owner’s
is not available on that specific DVD video disc.
Operation with KARAOKE
Operation with TAPE
Presetting the radio stations . . . . . . . . . . . . . . . . . . 14 Listening to the radio . . . . . . . . . . . . . . . . . . . . . . . 14
RDS Operation — OPTIONAL . . . . . . . . . . . . 15
Timer function . . . . . . . . . . . . . . . . . . . . . . . . . 16 Setting the Clock . . . . . . . . . . . . . . . . . . . . . . . . . . 16 Timer Function . . . . . . . . . . . . . . . . . . . . . . . . . . . . 16
. . . . . . . . . . . . . . . . . . 17
. . . . . . . . . . . . . 17
Introduction
Installation
TV Connection . . . . . . . . . . . . . . . . . . . . . . . . . . . . . 4 Antenna Connection . . . . . . . . . . . . . . . . . . . . . . . . . 4 Speaker system connectionl . . . . . . . . . . . . . . . . . . . 5 Optional Equipment Connection . . . . . . . . . . . . . . . . 5
Operation
Operate using the front Pane. . . . . . . . . . . . . . . . . . . 5 Operate using the Remote Control . . . . . . . . . . . . . . 6 Additional features. . . . . . . . . . . . . . . . . . . . . . . . . . . 9
Setup
Initial Settings . . . . . . . . . . . . . . . . . . . . . . . . . . . . . 10 Playing an Audio CD or MP3/WMA file . . . . . . . . . . . 12 Programmed Playback . . . . . . . . . . . . . . . . . . . . . . 12 Viewing a JPEG file . . . . . . . . . . . . . . . . . . . . . . . . . 12 Playing a DivX Movie file . . . . . . . . . . . . . . . . . . . . 13
Presetting the Radio Stations / Listening
About the symbols for instructions
Caution Indicates hazards likely to cause harm to the unit itself or other material damage.
Note Indicates special operating features of this unit.
Tip Indicates tips and hints to make the task easier.
Playable Discs
ENGLISH
DVD
(8 cm / 12 cm disc)
Audio CD
(8 cm / 12 cm disc)
In addition, this unit can play a DVD±R, DVD±RW and CD-R or CD-RW that contains audio titles, MP3, WMA, JPEG or DivX files.
Note
•Depending on the conditions of the recording equipment or the CD-R/RW (or DVD±R/RW) disc itself, some CD-R/RW (or DVD±R/RW) discs cannot be played on the unit.
•Do not attach any seal or label to either side (the labeled side or the recorded side) of a disc.
•Do not use irregularly shaped CDs (e.g., heart-shaped or octagonal). It may result in malfunctions.
Regional Code
This unit has a regional code printed on the rear of the unit. This unit can play only DVD discs labelled as the same as the rear of the unit or “ALL”.
Notes on Regional Codes
•Most DVD discs have a globe with one or more numbers in it clearly visible on the cover. This number must match your unit’s regional code or the disc cannot play.
•If you try to play a DVD with a different regional code from your player, the message “Check Regional Code” appears on the TV screen.
3
Installation
FOR AM(MW) reception,connect the loop antenna (aerial) to the terminal marked AM
Rear of TV
|
VIDEO |
COMPONENT VIDEO / |
|
IN |
PROGRESSIVE SCAN INPUT |
|
Y |
|
|
V |
C |
|
FM wire |
|
|
antenna |
|
|
(supplied) |
|
|
To AUDIO IN |
|
VCR (or Auxliary |
IN OUT |
|
Device.etc) |
VIDEO |
|
AUDIO (L) |
|
|
AUDIO (R) |
To AUDIO OUT
TV Connection
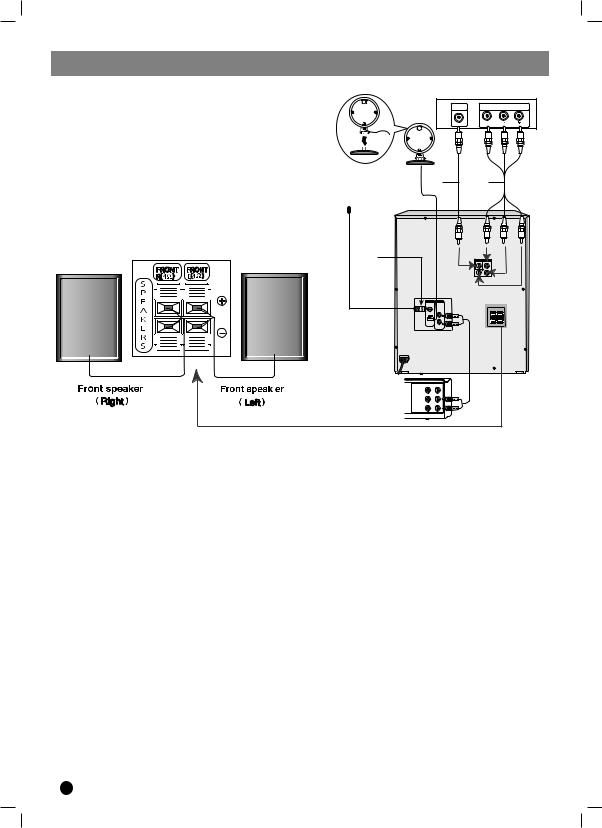
Make one of the following connections, depending on the capabilities of your existing equipment.
Tip
•Depending on your TV and other equipment you wish to connect, there are various ways you could connect the unit. Use one of the connections described below.
•Please refer to the manuals of your TV, VCR, Stereo System or other devices as necessary to make the best connections.
Progressive Scan connection
•If your television is a high-definition or “digital ready” television, you may take advantage of this unit’s progressive scan output for higher video resolution.
•If your TV does not accept the Progressive Scan format, the picture will appear scrambled if you try Progressive Scan on the unit.
Connect the COMPONENT VIDEO OUT (PROGRESSIVE SCAN) (Y PB PR) jacks from the unit to the corresponding jacks on the TV using an optional Y PB PR cable (C).
Caution
•Make sure the unit is connected directly to the TV. Select the correct AV input on your TV.
•Do not connect your unit to TV via your VCR. The DVD image could be distorted by the copy protection system.
Video connection
Connect the VIDEO OUT jack from the unit to the VIDEO IN jack on the TV using the video cable supplied
(V).
Component Video connection
Connect the COMPONENT VIDEO OUT (PROGRESSIVE SCAN) (Y PB PR) jacks from the unit to the corresponding jacks on the TV using a Y PB PR cable (C).
Antenna (Aerial) Connection
Connect the supplied FM/AM antennas to listen to the radio.
•Connect the AM loop antenna to the AM antenna connector.
•Connect the FM wire antenna to the FM antenna connector.
Note
•To prevent noise pickup, keep the AM loop antenna away from the unit and other component.
•Be sure to fully extend the FM wire antenna.
•After connecting the FM wire antenna, keep it as horizontal as possible.
4

Speaker System Connection
Connect the speaker wires the speaker terminals.
Note
•Be sure to match the speaker wires to the appropriate terminal on the components, + to + and – to –. If the cables are reversed, the sound will be distorted and will lack bass.
•If you use front speakers with low maximum input rating, adjust the volume carefully to avoid excessive output on the speakers.
Optional Equipment Connection
You can use VCR or other unit connected to the AUX connector.
Operation
Operation using the front Panel
1. NUMERIC buttons (0-9)
Select the melody number you want by pressing NUMERIC buttons in a KARAOKE function
2.DISPLAY WINDOW
3.( /[)POWER button
4.• CD SYNCHRO RECORDING (CD SYNC.)/ DUBBING (DUBB.)/ (ST./MONO) button
•EQ button
•REC/[] button
•USB / DEMO button
DEMO : Press DEMO in power off state to demonstrate the function in the display window.
To cancel it, press (  /[)POWER or DEMO again. During demonstration in power-on status, you can cancel it by using the CLOCK, TIMER buttons.
5.• XDSS/MP3 OPT.button
•XTS-PRO button
•FUNCTION SELECT buttons (TUNER, TAPE, AUX, CD/DVD)
•CD SKIP/SEARCH (. bb/BB >), CD SCAN (. bb/BB >) REWIND/ FAST FORWARD — TAPE (. bb/BB >),TUNING (-/+),
(b- KEY CON -#) KEY CONTROL buttons
•PRESET (-) button
•PRESET (+)/ FORWARD PLAY (B) button
•Volume control knob
6.HEADPHONE Jack (PHONES):  3.5 mm
7. USB 
 port
port
Connect the USB port of a USB Memory
(or MP3 player ,etc.) to the USB port on the front of the .
Removing the USB device from the unit
1.Choose a other functions except USB function order to remove the USB.
2.Remove the USB device from the unit
Note
Besides Basic Playback, if you want to operate other functions, see the CD Playback section.
Don’t extract the USB device while operating.
Music files (MP3/WMA), image files (JPEG) Video files can be played.
This unit cannot use a USB HUB.
Recommended Memory Cards.
Compact Flash Card (CFC), Micro Drive (MD), Smart Media Card (SMC), Memory Stick (MS), Secure Digital Card (SD), Multimedia Card (MMC), Memory Stick Pro (MS-Pro)
—Compatible with: FAT16, FAT32
—Only use the memory cards recommended.
Devices which require additional program installa tion when you have connected the unit to a puter are not supported.
In case of a USB HDD, make sure to connect auxiliary power cord to the USB HDD for proper operation. Up to four primary partitions of a drive are supported. If there is an extension partition, will not be supported.
If the drive of USB device is two or more, a folder is displayed on the screen. If you want move to the initial menu after you select a folder, press RETURN.
Digital cameras and mobile phones are not sup ported.
8 Z PUSH EJECT position (TAPE 1)
9.Z PUSH EJECT position (TAPE 2)
10.• MIC VOLUME(MIC VOL.) knob : OPTIONAL
•MIC Jacks (MIC1/ MIC2):  3.5 mm : OPTIONAL
11.• OPEN/CLOSE.( Z OP./CL.) button
•DISC SKIP (D.SKIP) button
•SET/CD[]/RDS-OPTIONAL
•STOP (x) button
|
12 |
• TIMER button |
|
|
• CLOCK button |
||
|
13. |
DISC DOOR |
5 |
ENGLISH
Operate using the Remote Control
|
POWER |
D.SKIP |
||
|
1 |
22 |
||
|
TUNER/BAND |
DVD/ |
||
|
2 |
KARAOKE AUX |
USB |
|
|
3 |
SLEEP |
||
|
21 |
|||
|
DIMMER |
|||
|
20 |
|||
|
4 |
1 — TAPE — 2 |
||
|
SETUP |
PRESET + |
DISPLAY |
|
|
5 |
19 |
||
|
TUN. — |
TUN. + |
||
|
6 |
SELECT |
||
|
/ENTER |
|||
|
7 |
MENU |
TITLE |
|
|
18 |
|||
|
8 |
PRESET — STOP PAUSE/STEP PLAY
9
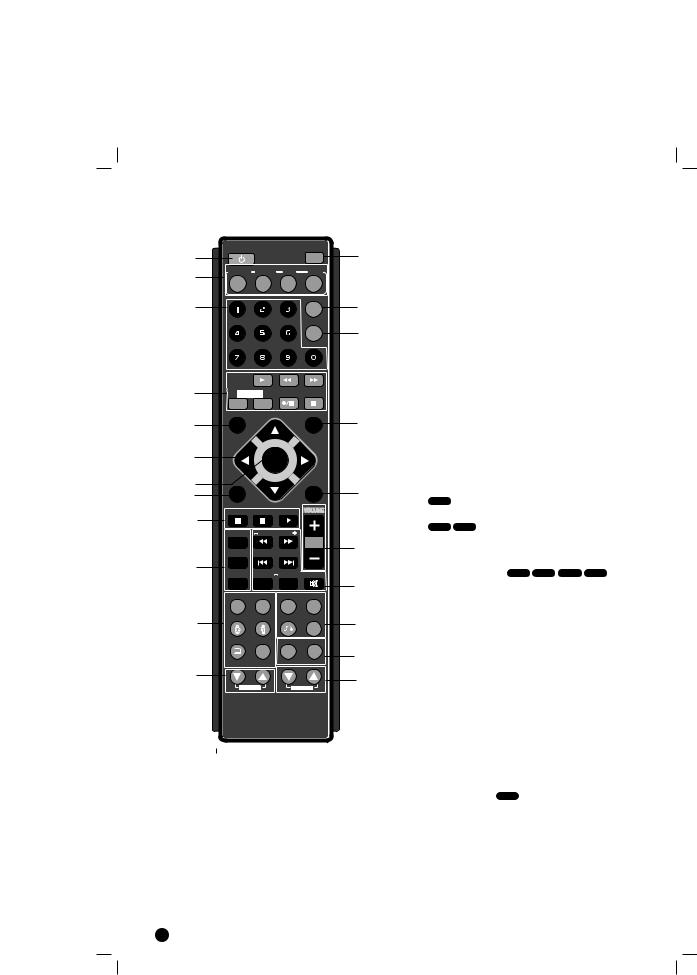
5.SETUP
6.• Arrow buttons b/B/v/V (left/right/up/down)
(Selects an option in the menu)
•PRESET -/+ (v/V)
Press PRESET +/- repeatedly to select the preset station you want.
Each time you press the button, the unit tunes in one preset station at a time.
Preset radio stations in the unit’s memory first (see “Presetting radio stations”)
•TUN.(-/+) (b/B)
For manual tuning, press TUN (-/+) repeatedly For automatic tuning, press and hold TUN. (-/+) for about two seconds on the front panel.
7.SELECT/ENTER
Acknowledges the menu selection.
8.MENU
Accesses the menu on a DVD disc.
9.• STOP (x)
•PAUSE(X)/ STEP
During playback, press X to pause playback.
ALL
X repeatedly to play Frame-by-Frame.
|
PROG./MEMO. |
TEMPO |
||
|
REPEAT |
b — KEY CON — # |
||
|
REPEAT A-B |
MARKER |
SEARCH |
MUTE |
|
EQ |
XTS Pro |
XDSS plus |
VSM |
|
SOUND |
AUDIO |
RETURN |
ZOOM |
|
S-TITLE |
CLEAR |
RDS |
PTY |
|
SHADOW |
|||
|
ECHO VOL. |
MIC VOL. |
|
17 |
• PLAY |
||
|
— To Play |
and file. |
||
|
16 |
1.5 speed |
DVD |
|
|
You can quickly enjoy a movie and music |
|||
|
The 1.5 speed allows you to watch the |
and lis- |
||
|
15 |
ten to the sound quicker than playing at a |
||
|
speed on the disc. |
|||
|
1. Press the PLAY button during the |
playback. |
||
|
14 |
The screen will appear at 1.5 speed |
sound . |
|
|
13 |
2. To return to normal PLAY, press PLAY |
||
|
10.• PROG./MEMO. |
|||
|
Accesses or removes Program menu |
|||
|
Enter a radio station’s frequency into |
tuner. |
1.POWER( )
)
2.FUNCTION SELECT
(TUNER/BAND,DVD, AUX, USB)
•REPEAT
During playback, press REPEAT repeatedly to select a desired repeat mode.
DVD Video discs: Chapter/Title/Off
Audio CD, DivX/MP3/WMA discs: Track/All/Off
3.NUMERIC buttons (0-9)
Selects a service, program number directly or selects numbered options in a menu.
4.TAPE FUNCTION
•PLAY (B)
•REWIND/ FAST FORWARD PLAY ( m / M)
•TAPE 1-2 SELECT buttons (1-TAPE-2)
•RECORD/ RECORD PAUSE (z/[])
•TAPE STOP (x)
|
DVD |
|
|
During |
REPEAT A-B to select a |
|
point A and a |
and repeats a sequence |
|
from point A |
point) to point B (End |
|
point). Press REPEAT A-B to exit. |
|
|
Note |
|
|
The A-B repeat |
available only in the current |
|
title. |
6

11. • EQ (EQUALIZER Effect)
You can choose 7 fixed sound impressions and
|
adjust the BASS, |
and TREBLE. |
|
-You can select a |
sound mode by using EQ |
|
button on the front |
or the remote control. |
When you want to change a sound mode press the
|
EQ button repeatedly |
3 seconds. |
|
Each time you press |
button the setting changes |
|
in the display window |
shown below. |
|
NORMAL → USER |
→ POP → CLASSIC |
|
→ ROCK → DRAMA |
JAZZ → NORMAL… |
|
You can set the |
and TREBLE on |
|
the USER EQ mode |
|
|
1.Select the USER |
by using EQ |
|
button.“USER EQ” |
displayed in the display |
|
window. |
|
|
2.Press the SET/CD |
on the front panel |
|
when “USER EQ” |
in the display win- |
|
dow. |
|
|
“BASS 0” will be displayed in the display windo |
|
|
3.Select the BASS, |
or TREBLE you want |
by pressing the PRESET (-/+) buttons on the front panel.
|
4.Press the TUNING |
buttons on the front panel |
|
to set the sound |
want. (MIN, -4 ~ +4, |
|
MAX steps) |
|
|
5.Repeat the 3-4 |
above. |
|
6.When the sound |
completed, press the the |
|
SET/CD[[ button |
front panel. |
• XTS Pro
|
This unique sound |
developed by our |
|
technology creates |
optimum sound for you to |
play the perfect playback of the original sound and
|
to feel the living |
. |
|
Each time you |
Pro the setting changes |
|
in the following |
|
|
XTS — P ON ↔ |
|
|
Note : The XTS |
will not be operated |
when a headphone has been connected
• SOUND
You can enjoy surround sound simply by select-
|
ing one of the pre |
sound fields |
|
according to the program you want to listen to (2 |
|
|
ch. sound only). |
button repeatedly. |
|
BYPASS → ON |
→ STUDIO → |
||||||
|
CLUB → HALL |
1 → CHURCH |
||||||
|
→ BYPASS… |
|||||||
|
Note :Initial sound |
is BYPASS. |
||||||
|
• FEMALE( |
), AUDIO/ MALE( |
) |
|||||
|
If you want to sing |
of MAN’s or WOMEN’s |
||||||
|
key, press MALE( |
( |
) button repeat- |
|||||
|
edly to change |
WOMEN’s key in a |
||||||
|
karaoke. |
|||||||
|
• AUDIO |
|||||||
|
AUDIO language: |
playback, press AUDIO |
||||||
|
repeatedly to hear |
audio language or |
||||||
|
audio track. DVD |
(AUDIO channel): Press AUDIO repeatedly during playback to hear a different audio channel (Stereo., Left or Right).
• SUBTITLE (S-TITLE)
SUBTITLE DVD
During playback, press S-TITLE repeatedly to select a desired subtitle language.
• SHADOW
It will be highlighted by background shadow image.
• CLEAR
|
Removes a track number on the program menu or |
ENGLISH |
|
a mark on the MARKER SEARCH menu. |
12. ECHO VOL. ( /
/ )- OPTIONAL
You can give an echo effect to the sound from the microphones. Press ECHO VOL. (  /
/ ) on the remote control to increase the echo volume or decrease it. (MIN,1 — 14, MAX steps)
13.MIC VOL. ( /
/ )- OPTIONAL
Adjust the microphone volume by turning MIC volume knob. (MIN,1 — 14, MAX steps)
Note
•When not using the microphone, set the MIC volume knob to minimum or turn off the MICs and remove the microphone from the MIC Jacks.
•If the microphone is set too near the speaker, a howling sound may be produced. In this case, move the microphone away from the speaker or decrease the sound level by using the MIC volume control.
•If sound through the microphone is extremely loud, it may be distorted. In this case, turn the MIC volume control toward minimum.
14.RDS,PTY — OPTIONAL
Views the various displays of the RDS options.
15.• XDSS plus (Extreme Dynamic Sound
System)
XDSS (Extreme Dynamic Sound System)
Press XDSS plus to reinforce treble, bass and the surround effect. The “XDSS ON” or “NORMAL” indicator lights.
DVD/DivX/ACD : XDSS ON ↔ NORMAL
→ NORMAL → XDSS ON .
optimizes for compressed MP3 files. It bass sound to make sweet sound. Each
“ MP3 OPT ”.
changes in the following order.
→ MP3 — OPT ON → NORMAL
7

• VSM (Virtual Sound Matrix)
Press VSM to set the VIRTUAL sound.
|
Source |
Display |
Effect |
|
|
2.1 ch. |
VIRTUAL |
3D STEREO |
|
|
5.1 ch |
VIRTUAL |
Virtual surround |
|
3D STEREO
Realtime 3D positioned sound rendering technology with stereo sources, optimized for stereo speakers. Listeners may experience amazing virtual surround effects with their own multimedia players.
Virtual surround
A patent pending downmix technology converts 5.1 channel to 2 channel sound having directional information of audio.
•ZOOM
During playback or in the pause mode, press ZOOM to enlarge the video image (3 steps).
You can move through the zoomed picture using b B v V buttons.
Note : Zoom may not work on some DVDs.
•RETURN (
 )
)
Removes the setup menu.
16.• MARKER — SEARCH
To enter a Marker
You can start playback from up to nine memorized points. To enter a marker, press MARKER at the desired point on the disc. The Marker icon appears on the TV screen briefly. Repeat to enter up to nine markers.
To Recall or Clear a Marked Scene
1.During disc playback, press SEARCH. The marker search menu appears on the screen.
2.Within 10 seconds, press b / B to select a marker number that you want to recall or clear.
3.Press SELECT/ENTER and playback starts from the marked scene. Or press CLEAR and the marker number is erased from the list.
4.You can play any marker by inputting its number on the marker search menu.
•MUTE( )
)
Press MUTE to temporarily stop the sound the
( ) indicator flashes on display window. To cancel it ,press volume (-/+) or MUTE again.
•KEY CON. (b/#)
You can change the key to suit your vocal range. You can adjust the key to the 13 steps in a karaoke function.
(6 steps higher, 6 steps lower and the original key).
— The setting appears on the screen.
Press b- KEY CON.- # repeatedly on the remote control to find the key that suits your vocal range.
•To flatten the key one by one, press the
b — KEY CON. repeatedly during playback.
•To sharp the key one by one, press the KEY CON. — # repeatedly during playback.
•To return to the original key, press the b — KEY CON. — # repeatedly to appear the original key.
•SKIP (. / >)
During playback, press SKIP (. or >) to go to the next chapter/track or to return to the beginning of the current chapter/track.
Press SKIP . twice briefly to step back to the previous chapter/track.
•SCAN (m / M)
During playback, press SCAN (m or M) repeatedly to select the required scan speed. DVD : 5 steps (BB, BBB, BBBB, BBBBB,
BBBBBB),
(bb, bbb, bbbb, bbbbb, bbbbbb) DivX disc :4 steps (BB, BBB, BBBB, BBBBB) (bb, bbb, bbbb, bbbbb)
WMA/MP3, Audio CD m (X2, X4, X8) or BB (X2, X4, X8)
•SLOW
In the pause mode, press m or M to select required speed.
DVD : t (1/2, 1/4, 1/8, 1/16) or T (1/2, 1/4, 1/8, 1/16)
•TEMPO (-/+)
You can use this function when you want to play fast or slow in a karaoke function.
•Press TEMPO + repeatedly during singing to play faster.
•Press TEMPO — repeatedly during singing slower.
17.VOLUME (-/+)
Adjusts speaker volume.
18.TITLE
(Use the TITLE button to display the title screen included on DVD video discs.)
19.DISPLAY
1.Press DISPLAY to show various information about the disc loaded on-screen.
The displayed items differ depending on the disc type or playing status.
2.You can select an item by pressing v / V and change or select the setting by pressing b / B.
Title (Track) –Current title (or track) number/total number of titles (or tracks).
Chapter – Current chapter number/ total number of chapters.
Time – Elapsed playing time.
Audio – Selected audio language or channel.
Subtitle – Selected subtitle.
Angle – Selected angle/ total number of angles.
Sound – Selected sound mode.
Note : If a button is not pressed for a few seconds, the on-screen display disappears.
8
 Loading…
Summary of Contents:
 |
[Page 1] LG MDD-K112Q MDD112/72_X5U_ENG_UA_MFL37200121 P/NO: MFL37200121 MDD-K112Q (MDD-K112Q, MDS-K112V) MDD-K72Q (MDD-K72Q, MDS-K72V) KARAOKE Mini Home Theater Read the manual carefully before using the unit Internet address ; http://ua.lge.com Customer Information Cent… |
 |
[Page 2] LG MDD-K112Q 2 This lightning flash with arrowhead symbol within an equilateral triangle is intended to alert the user to the presence of uninsulated dangerous voltage within the product’s enclosure that may be of sufficient magnitude to constitute a risk of e… |
 |
[Page 3] LG MDD-K112Q Introduction 3 ENGLISH Installation TV Connection . . . . . . . . . . . . . . . . . . . . . . . . . . . . . 4 Antenna Connection . . . . . . . . . . . . . . . . . . . . . . . . . 4 Speaker system connectionl . . . . . . . . . . . . . . . . . . . 5 Op… |
 |
[Page 4] LG MDD-K112Q Installation 4 Y COMPONENT VIDEO / PROGRESSIVE SCAN INPUT VIDEO IN Rear of TV V C VIDEO OUTIN AUDIO (L) AUDIO (R) TV Connection Make one of the following connections, depending on the capabilities of your existing equipment. T T ip ip • Depend… |
 |
[Page 5] LG MDD-K112Q Speaker System Connection Connect the speaker wires the speaker terminals. Note Note • Be sure to match the speaker wires to the appropriate terminal on the components, + to + and – to –. If the cables are reversed, the sound will be distorted … |
 |
[Page 6] LG MDD-K112Q 6 1. POWER( ) 2. FUNCTION SELECT (TUNER/BAND,DVD, AUX, USB) 3. NUMERIC buttons (0-9) Selects a service, program number directly or selects numbered options in a menu. 4. TAPE FUNCTION • PLAY ( BB ) • REWIND/ FAST FORWARD PLAY ( m / M) • TAPE … |
 |
[Page 7] LG MDD-K112Q 7 11. • EQ ( EQUALIZER Effect) You can choose 7 fixed sound impressions and adjust the BASS, MIDDLE and TREBLE. -You can select a desired sound mode by using EQ button on the front panel or the remote control. When you want to change a sound mode… |
 |
[Page 8] LG MDD-K112Q 8 • VSM (Virtual Sound Matrix) Press VSM to set the VIRTUAL sound. 3D STEREO Realtime 3D positioned sound rendering technology with stereo sources, optimized for stereo speakers. Listeners may experience amazing virtual surround effects wit… |
 |
[Page 9] LG MDD-K112Q 9 20. DIMMER This function dims the LED (Light-emitting diode) of front panel by half in power-on status. Press DIMMER once. The LED (Light-emitting diode) of front panel is turned off and the display window will be darken by half.To cancel it, pres… |
 |
[Page 10] LG MDD-K112Q 10 Initial Settings By using the Setup menu, you can make various adjust- ments to items such as picture and sound. You can also set a language for the subtitles and the Setup menu, among other things. For details on each Setup menu item, read the pa… |
 |
[Page 11] LG MDD-K112Q 11 ENGLISH Vocal Set Vocal to On only when a multi-channel karaoke DVD is playing. The karaoke channels on the disc will mix into normal stereo sound. LOCK (Parental Control) Rating Blocks playback of rated DVDs based on their contents. Not all discs… |
 |
[Page 12] LG MDD-K112Q 12 Playing an Audio CD or MP3/WMA file This unit can play Audio CDs or MP3/WMA files. MP3/ WMA/ Audio CD Once you insert a cd with MP3/WMA files or Audio, a menu appears on the TV screen. Press v / V to select a track/file and then press PLAY or SELE… |
 |
[Page 13] LG MDD-K112Q 13 Playing a DivX Movie file Using this unit you can play DivX disc. 1. Insert a disc and close the tray. The MOVIE menu appears on the TV screen. 2. Press v / V to select a folder and then press SELECT/ENTER. A list of files in the folder appears…. |
 |
[Page 14] LG MDD-K112Q 14 Presetting the Radio Stations / Listening Presetting the radio stations You can preset 50 stations for FM and AM. Before tuning, make sure that you have turned the vol- ume down to the minimum level. 1 Press TUNER/BAND on the remote control to s… |
 |
[Page 15] LG MDD-K112Q 15 RDS Operation OPTIONAL This unit is equipped with RDS (Radio Data System), which brings a wide range of information to FM radio. RDS, now being used in many countries, is a system for transmitting station call signs or network information, a descr… |
 |
[Page 16] LG MDD-K112Q 16 Setting the Clock 1 Press CLOCK. (If the clock requires setting, press and hold CLOCK for more than 2 seconds.) — The hours display begins to blink. 2 Select a 24 hour cycle or 12 hour cycle by pressing .. bbbb / BBBB >> on the front … |
 |
[Page 17] LG MDD-K112Q 17 Operation with TAPE Basic Playback 1 Press TAPE1-2 (or TAPE) to select tape function. (“NO TAPE ” appears in the display window.) 2 Open cassette TAPE1-2 by pushing to the Z PUSH EJECT position. 3 Insert one or two cassettes with the tape sid… |
 |
[Page 18] LG MDD-K112Q 18 Karaoke MENU Playback Preparation Press MENU on the karaoke mode. The main menu appears on the screen. SETUP 1 Select “1.SETUP” by pressing v/V on the main menu. 2 Use b / B to select the desired option, and press SELECT/ENTER. SCORE ON/O… |
 |
[Page 19] LG MDD-K112Q 19 ENGLISH SINGER LIST ( ) 1 Select and select the initial of the singer you want by pressing the v/V in the SONG LIST and SINGER LIST menu, and press SELECT/ ENTER . 2 Select the singer you want by pressing the v/V , and press SELECT/ ENTER . 3 … |
 |
[Page 20] LG MDD-K112Q 20 2 Select the composer you want by pressing the v/V , and press SELECT/ ENTER . 3 Select the song title you want by pressing the v/V , and press SELECT/ ENTER . Note Note • To move the previous mode, select the by press- ing the v/V , the… |
 |
[Page 21] LG MDD-K112Q 21 ENGLISH Language Code Abkhazian 6566 Afar 6565 Afrikaans 6570 Albanian 8381 Ameharic 6577 Arabic 6582 Armenian 7289 Assamese 6583 Aymara 6588 Azerbaijani 6590 Bashkir 6665 Basque 6985 Bengali; Bangla 6678 Bhutani 6890 Bihari 6672 Breton 6682 Bulga… |
 |
[Page 22] LG MDD-K112Q 22 Troubleshooting Check the following guide for the possible cause of a problem before contacting service. Symptom/ Cause/ Correction No power. The power cord is disconnected. Plug the power cord securely into the wall outlet. The power is on, but t… |
 |
[Page 23] LG MDD-K112Q 23 ENGLISH Designs and specifications are subject to change without notice for improvement. Specifications General Power supply Refer to the main label. Power consumption Refer to the main label. Net Weight 5.5 kg External dimensions (W x H x D) 2… |
 |
[Page 24] LG MDD-K112Q … |

LG MDD-D112X MDD-K112Q MDS112V AFN35036933

Type:  (PDF)
(PDF)
Size
37.2 MB
Page
69
Category
AUDIO
SERVICE MANUAL
If you get stuck in repairing a defective appliance
download
this repair information for help. See below.
Good luck to the repair!
Please do not offer the downloaded file for sell only
use it for personal usage!
Looking for similar lg manual?
Document preview [1st page]
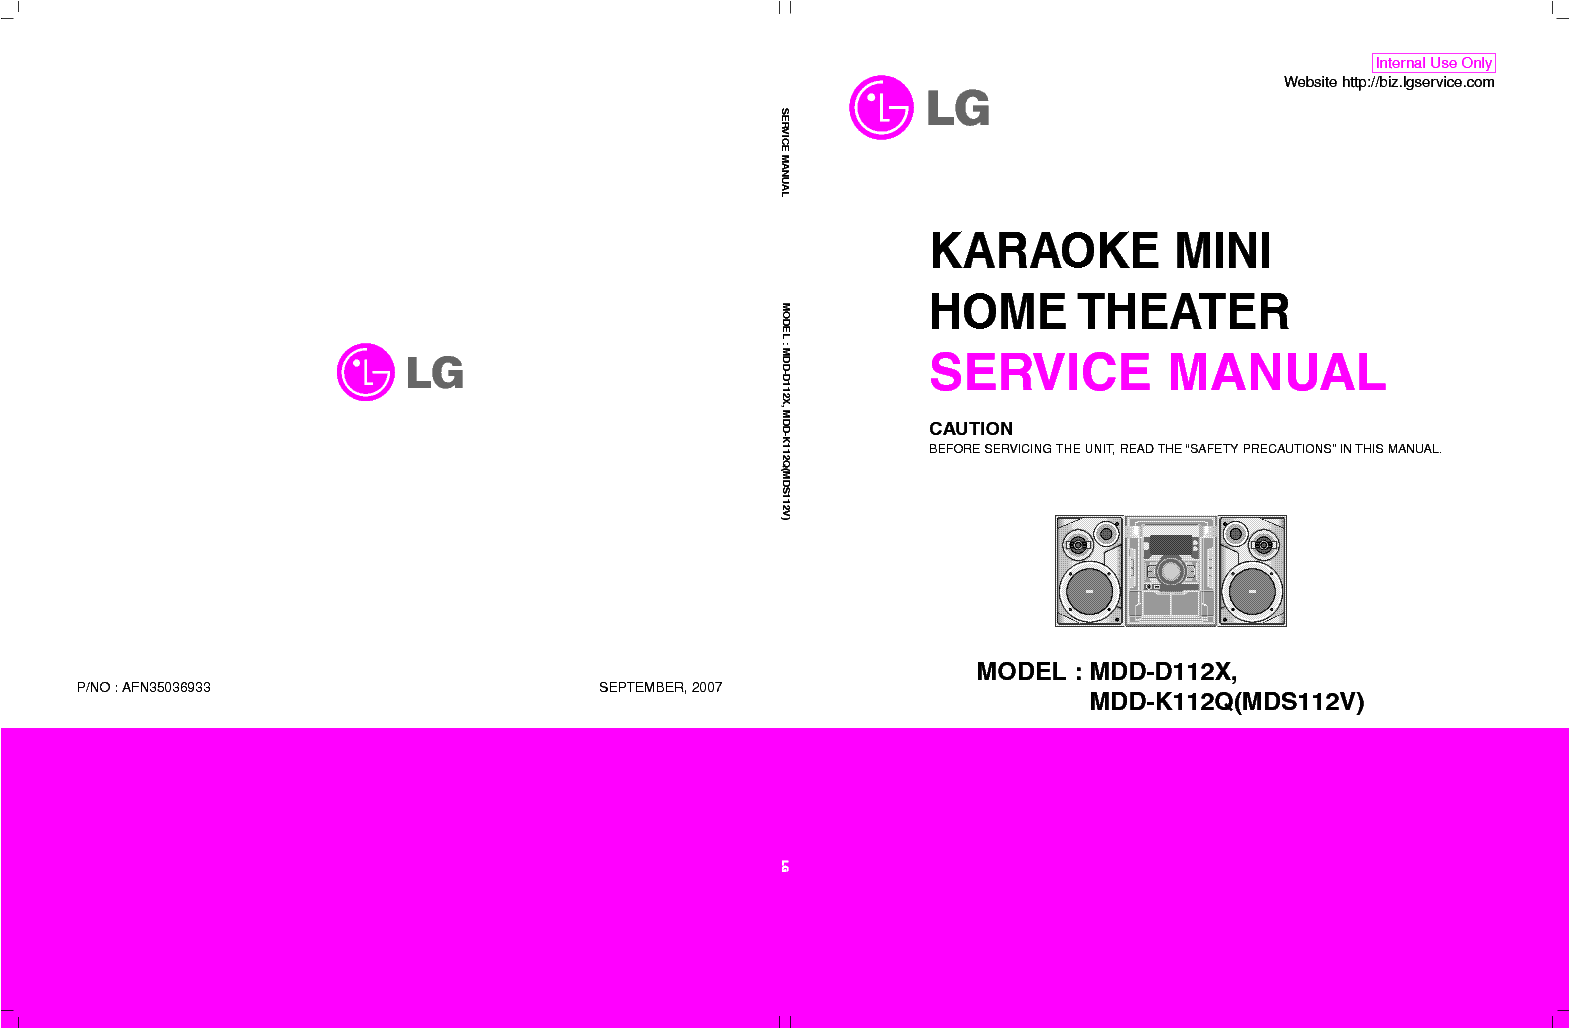
Click on the link for free download!
Document preview [2nd page]

Click on the link for free download!
Please tick the box below to get download link:
- Also known:
LG MDDD-112X MDDK-112Q MDS-112V MDDD112X MDDK112Q MDS112V MDDD 112 MDDK MDS AFN 35036933 MDD D112X K112Q MDD-D112X MDD-K112Q
- If you have any question about repairing write your question to the Message board. For this no need registration.
- If the site has helped you and you also want to help others, please Upload a manual, circuit diagram or eeprom that is not yet available on the site.
Have a nice Day! - See related repair forum topics below. May be help you to repair.
Warning!
If you are not familiar with electronics, do not attempt to repair!
You could suffer a fatal electrical shock! Instead, contact your nearest service center!
Note! To open downloaded files you need acrobat reader or similar pdf reader program. In addition,
some files are archived,
so you need WinZip or WinRar to open that files. Also some files are djvu so you need djvu viewer to open them.
These free programs can be found on this page: needed progs
If you use opera you have to disable opera turbo function to download file!
If you cannot download this file, try it with CHROME or FIREFOX browser.
Relevant AUDIO forum topics:
Sziasztok , egy ilyen bömbölőt hoztak :
https://www.lg.com/hu/audio/lg-OK55
semmi élet jel benne , a táp panelon két különálló kapcsolóüzemű táp , a kisebb (trafó) lenne a készenléti és 12V működik , és a második jel , meg erősítő panelón is mérek 12V, 5V , 3,3V , de semi életjel nincs benne , és nem lehet bekapcsolni . A másik tápot egy optón keresztül a main kapcsolná és azt még nem teszteltem , de feltételezem , hogy az jó . Main hiba (EBR85801115) a megérzésem , de sok mindent nem tudok vele kezdeni .
Kérdésem ki forgalmaz az országba alkatrészt (LG) , mert az ASWO (sini ) meglévő raktár készleten felül már csak rendelésre szállít rendelésre 1-2 hónapra .
Sziasztok.
A alábbi hibajelenséget produkálja a készülék.
Bekapcsolás után gyorsan beolvassa a lemezt, elkezdi játszani, de néhány perc után (olyan mintha «bemelegedne»..)elkezd úgy sercegni mintha régi bakelit lemez lenne, ez egyre erösebbé válik, végül el is hallgat.
A lemezt még egy darabig pörgeti, próbálkozik, de nem lesz jó, és kidobja.
Pár perc pihentetés után jó, de aztán kezdődik elölről.
Ezt a folyamatot -nekem legalábbis úgy tűnik- fel tudom gyorsítani, ha a lemez végéről próbálok lejátszani számot, akkor mintha hamarabb kezdené a sercegést. :szetver:
2 db kondit kicseréltem,
a nyákot meleglevegős pákával átmelegítettem,
fejet megtisztitottam,
lemezforgató motort cseréltem… 
A rádió része tökéletesen müködik.
Van valakinek valami ötlete???
Köszi.
Mellékletben a mecha képe…
Üdv. mindenkinek . Egy kis segítség kellene egy 3 cd.s mechanika be pozicionálásában (LG FFH-313A ) .
Sziasztok!
Adott a fent nevezett készülék, ami nem adja ki a cd lemezt. Az open gomb megnyomása után a «lock on» feliratot adja. A cd-t beolvassa, játsza hiba nélkül. A tulaj megnyomott valamit ami lezárta a cd kiadást. Sajnos a kezelési utasításban nem találtam semmi információt erre a problémára. Ha valaki esetleg tudna segíteni azt megköszönném. Távirányító nincs hozzá, tehát valamit az előlapi gombokkal csinált.
Köszönettel:
vertom
Similar manuals:
If you want to join us and get
repairing help
please sign in or sign up by completing a simple electrical test
or write your question to the Message board without registration.
You can write in English language into the forum (not only in Hungarian)!
E-Waste Reduce
Фотография музыкального центра LG MDD-K112Q

Основные характеристики LG MDD-K112Q
- Тип
- минисистема
- Основной блок
- одноблочная система
- Оптический привод
- DVD
- Цвет акустических систем
- серебристый/хром/титан
- Цвет основного блока
- серебристый/хром/титан
Аудио LG MDD-K112Q
- Комплект акустических систем
- 2.0
- Полная выходная мощность (RMS)
- 100 Вт
- Декодеры
- Dolby Digital
Акустика LG MDD-K112Q
- Мощность фронтальных колонок
- 2×50 Вт
Кассетная дека LG MDD-K112Q
- Тип
- двухкассетная с сенсорным управлением
- Функции
- синхростарт с компакт-диском, счетчик ленты
Оптический привод LG MDD-K112Q
- Cпособ загрузки/механика
- карусель на 3 диска
- Прогрессивная развертка
- есть
- Поддерживаемые носители
- CD, CD-R, CD-RW, DVD, DVD R
Радио LG MDD-K112Q
- Радио
- AM, FM, УКВ
- Количество радиостанций в памяти
- 50
Интерфейсы LG MDD-K112Q
- Входы
- аудио стерео
- Выходы
- наушники
- Интерфейсы
- USB Type A
Дополнительно LG MDD-K112Q
- Поддерживаемые форматы
- DivX, VCD, DVD-Audio, MP3
- Часы
- есть
- Таймер
- есть
Отзыв о музыкальном центре LG MDD-K112Q
Комментарий о музыкальном центре: LG MDD-K112Q.
Все отзывы о музыкальном центре LG MDD-K112Q . Только правда о музыкальном центре LG MDD-K112Q. С самого начала только положительные или отрицательные отзывы о музыкальном центре LG MDD-K112Q вы найдёте здесь! На нашем сайте!
Инструкция к музыкальному центру LG MDD-K112Q
Инструкцию к музыкальному центру LG MDD-K112Q скачать бесплатно. Читать инструкцию к музыкальному центру LG MDD-K112Q Изучать инструкцию к музыкальному центру LG MDD-K112Q
Цена музыкального центра LG MDD-K112Q
Цена по рынку , на момент создания страницы
нет в продаже.
Отзыв взят с сайта market.yandex.ru
Друзья!!! Мы работаем для Вас, чтобы у Вас была информация!
Мы будем Вам очень благодарны, если вы оцените наш труд, и поделитесь ссылкой в соцсетях!
Это самое малое, что Вы можете сделать для нас!
Заранее спасибо!
Оставить комментарий:
Не нажали на рекламное объявление!?
Ничего страшного!
Вы ещё можете помочь проекту!
Да не оскудеет рука дающего!