
More products and manuals for Unknown LG
| Models | Document Type |
|---|---|
|
MB-482UWV-G |
User Manual
2 pages |
|
VR5942L |
User Manual
35 pages |
|
23LC1RB |
User Manual
32 pages |
|
CM5760 |
User Manual
4 pages |
|
LHD645B |
User Manual
4 pages |
|
MH6548PR |
User Manual
33 pages |
|
GR-L227SVK |
User Manual
30 pages |
|
32LF520D |
User Manual
6 pages |
|
GC-181SA |
User Manual
17 pages |
|
DV692H |
User Manual
22 pages |
|
GR-B404ESNN |
User Manual
20 pages |
|
75XE3C-B |
User Manual
8 pages |
|
OLED65E6T |
User Manual
50 pages |
|
86TR3E-B |
User Manual
46 pages |
|
M4715CCBA |
User Manual
78 pages |
|
AN-WL100W |
User Manual
25 pages |
|
CJ88 |
User Manual
4 pages |
|
WD-14331AD |
User Manual
32 pages |
|
CT-20D15 |
User Manual
40 pages |
|
ARUN053GF2.AWGBLUS |
User Manual
26 pages |


MINI HI-FI AUDIO SYSTEM
OWNER’S MANUAL
MODELS : FFH-515A/L/S/AX/AD
FE-515E FFH-717A/L/S/AX/AD FE-717E FFH-818A/L/S/AX/AD FE-818E
Please read this manual carefully before operating your set. Retain it for future reference.
Designs and specifications are subject to change without notice for improvement.
COMPACT
DIGITAL AUDIO (for CE region)
N0M 
 N0M
N0M 

061 NYCE 260 NYCE
P/N:3828SXD018T
|
CAUTION |
|
RISK OF ELECTRIC SHOCK |
|
DO NOT OPEN |
|
CAUTION: TO REDUCE THE RISK OF |
|
ELECTRIC SHOCK |
|
DO NOT REMOVE COVER(OR BACK). |
|
NO USER SERVICEABLE PARTS INSIDE. |
|
REFER SERVICING TO QUALIFIED |
|
SERVICE PERSONNEL. |
Explanation Graphical Symbols:
The lightning flash with arrowhead symbol, within an equilateral triangle is intended to alert the user to the presence of uninsulated dangerous voltage within the product’s enclosure that may be of sufficient magnitude to constitute a risk of electric shock to persons.
The exclamation point within an equilateral triangle is intended to alert the user to the presence of important operating and maintenance (servicing) instructions in the literature accompanying the appliance.
WARNING:
TO REDUCE THE RISK OF FIRE OF ELECTRIC SHOCK, DO NOT EXPOSE THIS APPLIANCE TO RAIN OR MOISTURE.
To avoid electrical shock, do not open the cabinet. Refer servicing to qualified personnel only.
CAUTION
Use of controls or adjustments or performance of procedures other than those specified herein may result in hazardous radiation exposure.
(FOR THE CUSTOMERS IN EUROPE)
If this product is marked with the CE-symbol, it means which is conformed to EMC regulation 89/336/EEC.
Laser component in this product is capable of emitting radiation exceeding the limit for Class 1.
CAUTION: INVISIBLE LASER RADIATION WHEN OPEN AND INTERLOCKS DEFEATED. AVOID EXPOSURE TO BEAM.
WARNING: OSYNLIG LASERSTRÅLNING NÄR DENNA DEL ÄR ÖPPNAD STRÅLEN ÄR FARLIG.
ATTENTION: Quand I’appareil est ouvert, ne pas s’exposer aux radiations invisibles du faisceau laser.
This label is located on the interior.
|
CLASS 1 |
LASER PRODUCT |
This Compact Disc player |
||
|
is classified as a CLASS 1 |
||||
|
KLASSE 1 |
LASER PRODUKT |
LASER product. |
||
|
LUOKAN 1 |
LASER LAITE |
The CLASS 1 LASER |
||
|
KLASS 1 |
LASER APPARAT |
PRODUCT label is located |
||
|
CLASSE 1 |
PRODUIT LASER |
on the exterior. |
||
(FOR CUSTOMERS IN CANADA)
CAUTION: TO PREVENT ELECTRIC SHOCK, DO NOT USE THIS (POLARIZED) PLUG WITH AN EXTENSION CORD, RECEPTACLE, OR OTHER OUTLET UNLESS THE BLADES CAN BE FULLY INSERTED TO PREVENT BLADE EXPOSURE.
This class B digital apparatus meets all requirements of the Canadian Interference-Causing Equipment Regulations.
WARNING:
SHOCK HAZARD — DO NOT OPEN
MISE EN GARDE:
Pour éviter les chocs électriques, n’utilisez pas cette fiche (polarisée) avec une rallonge, un réceptacle ou une autre prise si vous ne pouvez pas y insérer les broches à fond.
2
MISE EN GARDE
Cet appareil numérique de la classe B respecte toutes les exigences de Règlement sur le matériel brouilleur de Canada.
AVERTISSEMENT
RISQUE DE CHOC ELECTRIQUENE-PAS OUVRIR
(FOR CUSTOMERS IN THE UNITED STATES OF AMERICA)
Note to CATV system Installer:
This reminder is provided to call the CATV system installer’s attention to Article 820-40 of the NEC that provides guidelines for proper grounding and, in particular, specifies that the cable ground shall be connected to the grounding system of the building, as close to the point of cable entry as practical.
NOTE:
The interference potential to the device.
This equipment generates and uses radio frequency energy and if not installed and used properly, that is in strict accordance with the manufacturer’s instructions, may cause interference to radio and television reception. It has been type tested and found to comply with the limits for a Class B computing device in accordance with the specifications in subparts J of Part 15 of FCC Rules, which are designed to provide reasonable protection against such interference in a residential installation. However, there is no guarantee that interference will not occur in a particular installation. If this equipment does cause interference to radio or television reception, which can be determined by turning the equipment off and on, the user in encouraged to try to correct the interference by one of more of the following measures:
—Reorients or relocate the receiving antenna.
—Increase the separation between the equipment and receiver.
—Connect the equipment into an outlet on a circuit different from that to which the receiver is connected.
—Consult the dealer or an experienced radio/TV technician for help.
(FOR CUSTOMERS IN THE UNITED KINGDOM) WIRING INSTRUCTIONS
This appliance is supplied with a BS1363 approved 3 amp fused mains plug. When replacing the fuse always use a 3 amp BS1362 approved type. Never use this plug with the fuse cover omitted. To obtain a replacement fuse cover contact your supplying dealer or “LG ELECTRONICS U.K.LTD”.
If the mains sockets in your home differ, or are not suitable for the type of plug supplied, then the plug should be removed and a suitable type fitted. Please refer to the wiring instructions below:
Warning :
The mains plug severed from the mains lead of this appliance must be destroyed. A mains plug with bared wires is hazardous if engaged in a mains output line socket.
IMPORTANT
The wires in this mains lead are coloured in accordance with the
|
following codes: |
||
|
Blue |
: |
Neutral |
|
Brown |
: |
Live |
As the colour of the wires in the mains lead of this appliance may not correspond with the coloured markings identifying the terminals in your plug, proceed as follows:
The wire which is coloured blue must be connected to the terminal which is marked with the letter N or coloured black.
The wire which is coloured brown must be connected to the terminal which is marked with the letter L or coloured red.
If a 13 amp BS1363 plug or any other type of plug is used, 3 amp BS1362 approved fuse must be fitted either in the plug or at the distribution board.
Warning :
Do not connect either wire to the earth pin, marked with the letter E or with the earth symbol  or coloured green or green and yellow.


 IMPORTANT SAFETY INSTRUCTIONS

FOR CUSTOMERS IN THE UNITED STATES
CAUTION:
•Read all of these instructions.
•Save these instructions for later use.
•Follow all warnings and instructions maked on the audio equipment.
•Read instructions — All the safety and operating instructions should be read before the product is operated.
•Retain instructions — The safety and operating instructions should be retained for future reference.
•Heed Warnings — All warnings on the product and in the operatiog instructions should be followed.
•Follow instructions — All operating and use instructions should be followed.
•Cleaning — Unplug this product from the wall outlet before cleaning. Do not use liquid cleaners or aerosol cleaners. Use a damp cloth for cleaning.
•Attachments — Do not use attachments not recommended by the product manufacturer as they may cause hazards.
•Water and Moisture — Do not use this product near water-for example, near a bath tub, wash bowl, kitchen sink, or laundry tub; in a wet basement; or near a swimming pool; and the like.
•Accessories — Do not place this product on an unstable cart, stand, tripod, bracket, or table. The product may fall, causing serious injury to a child or adult, and serious damage to the product. Use only with a stand, tripod, bracket, or table recommended by the manufactur or sold with the product. Any mounting of the product should follow the manufacturer’s instructions and should use a mounting accessory recommended by the manufacturer.
•A product and cart combination should be moved with care. Quick stops, excessive force, and uneven surfaces may cause the product and cart combination to overturn.
•Ventilation — Slots and openings in the cabinet are provided for ventilation and to ensure reliable operation of the product and to protect it from overheating, and these openings must not be blocked or covered. The openings should never be blocked by placing the product on a bed, sofa, rug, or other similar surface.
This product should not be placed in a built-in installation such as a bookcase or rack unless proper ventilation is provided or the manufacturer’s instructions have been followed.
•Power Sources — This product should be operated only from the type of power source indicated on the marking label. If you are not sure of the type of power supply to your home, consult your product dealer or local power company. For products intended to operate from battery power, or other sources, refer to the operating instructions.
•Power-Cord Protection — Power supply cords should be routed so that they are not likely to be walked on or pinched by items placed upon or against them, paying particular attention to cords at plugs, convenience receptacles, and the point where they exit from the product.
•Protective Attachment Plug — The product is equipped with an attachment plug having overload protection. This is a safety feature. See Instruction Manual for replacement or restting or protective device. If replacement of the plug is required, be sure the service technician has used a replacement play specified by the manufacturer that has the same overload protection as the original plug.
•Lightning — For added protection for this product during a lightning storm, or when it is left unattended and unused for long periods of time, unplug it from the wall outlet and disconnect the antenna or cable system. This will prevent damage to the product due to lightning and powerline surges.
3
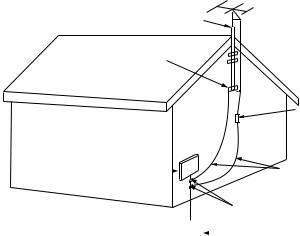
Antenna
Lead-in Wire
Ground Clamp
|
Antenna Discharge |
|||||||||||||||
|
Electric |
Unit (NEC Section 810-20) |
||||||||||||||
|
Grounding Conductors |
|||||||||||||||
|
Service |
(NEC Section 810-21) |
||||||||||||||
|
Equipment |
|||||||||||||||
|
Ground Clamps |
|||||||||||||||
|
Power Service Grounding |
|||||||||||||||
|
Electrode System |
|||||||||||||||
|
(NEC Art 250, Part H) |
•Outdoor Antenna Grounding — If an outside antenna or cable system is connected to the product, be sure the antenna or cable system is grounded so as to provide some protection against voltage surges and built-up static charges.
•Article 810 of the National Electrical Code, ANSI/NFPA 70 proviedes information with regard to proper grounding of the mast and supporting structure, grounding of the lead-in wire to an antenna discharge unit, size of grounding conductors, location of antenna discharge unit, connection to grounding electrodes, and requirements for the grounding electrode.
•Power Lines — An outside antenna system should not be located in the vicinity of overhead power lines or other electric light or power circuits, or where it can fall into such power lines or circuits. When installing an outside antenna system, extreme care should be taken to keep from touching such power lines or circuits as contact with them might be fatal.
•Overloading — Do not overload wall outlets, extension cords, or integral convenience receptacles, as this can result in a risk of fire or electric shock.
•Object and Liquid Entry — Never push objects of any kind into this poroduct through openings as they may touch dangerous voltage points or short-out parts that could result in a fire or electric shock. Never spill liquid of any kind on the product.
•Servicing — Do not attempt to service this product yourself as opening or removing covers may expose you to dangerous voltage or other hazards. Refer all servicing to qualified service personnel.
•Damage Requiring Service — Unplug this product from the wall outlet and refer servicing to qualified service personnel under the following conditions:
a)When the power-supply cord or plug is damaged.
b)If liquid has been spilled, or objects have fallen into the product.
c)If the product has been exposed to rain or water.
d)If the product does not operate normally by following the operating instructions. Adjust only those controls that are covered by the operating instructions as an improper adjustment of other controls may result in damage and will often require extensive work by a qualified technician to restore the product to its normal operation.
e)If the product has been dropped or damaged in any way.
f)When the product exhibits a distinct change in performance, this indicates a need for service.
•Replacement Parts — When replacement parts are required, be sure the service technician has used replacement parts specified by the manufacturer or have the same characteristics as the original parts. Unauthorized substitutions may result in fire, electric shock, or other hazards.
•Safety Check — Upon completion of any service or repairs to this product, ask the service technician to perform safety checks to determine that the product is in proper operating condition.
•Wall or Ceiling Mounting — The product should be mounted to a wall or ceiling only as recommended by the manufacturer.
•Heat — The product should be situated away from heat sources such as radiators, heat registers, stoves, or other products (including amplifiers) that produce heat.
4


 OPERATING ELEMENTS
|
1 |
|||
|
OPTION |
|||
|
29 |
|||
|
2 |
|||
|
3 |
28 |
||
|
4 |
27 |
||
|
5 |
26 |
30 |
|
|
6 |
|||
|
7 |
25 |
||
|
8 |
|||
|
24 |
31 |
||
|
9 |
|||
|
23 |
|||
|
10 |
|||
|
11 |
22 |
||
|
12 |
21 |
||
|
13 |
|||
|
14 |
20 |
||
|
15 |
19 |
32 |
16 17 18
FRONT VIEW
1.TUNING DOWN/UP(TUNER), TAPE REWIND /
FAST FORWARD(TAPE), TRACK SKIP / SEARCH(CD) ( 


 ) buttons
2.RECORD / RECORD PAUSE buttons
3.MEMORY / PROGRAM button
4.MODE / RIF button
5.REMOTE SENSOR
6.MDSS indicator
7.MDSS button
8.POWER button
9.DEMOSTRATION button (DEMO) PLAY MODE button (OPTIONAL)
10.UBB (Ultra Bass Booster) / Hi-TONE button
11.NORMAL DUBBING / CD SYNCHRO RECORDING button
12.HEADPHONE socket (PHONES)
13.HI-SPEED DUBBING button
14.TAPE DECK 1 EJECT position (  EJECT)
15.FUNCTION SELECT buttons (TUNER BAND, CD, TAPE 1/2, AUX)
16.PRESET DOWN / BACKWARD PLAY (OPTIONAL) button (PRESET DOWN /  )
)
17.TAPE STOP / CD STOP / CLEAR button ( 
 / CLEAR)
18.PRESET UP / FORWARD PLAY button (PRESET UP /  )
)
3433
19.JOG DIAL
•PRESET DOWN/UP (TUNER)
•ADJUST DOWN/UP (CLOCK/TIMER)
•SKIP DOWN/UP (CD TRACK)
20.TAPE DECK 2 EJECT POSITION (  EJECT)
21.CD PAUSE / SET(CLOCK / TIMER) / COUNTER RESET (TAPE) button (CD II / SET / COUNTER RESET) / RDS (TUNER) : OPTIONAL
22.DISC DIRECT PLAY buttons (DISC1, DISC2, DISC3)
23.DISC SKIP button
24.CD OPEN/CLOSE button
25.CD PAUSE / SET indicator
26.VOLUME knob
27.TIMER button
28.CLOCK button
29.CD DOOR
BACK VIEW
30.ANTENNA (AERIAL) terminal
31.AUXILIARY / PHONO (OPTIONAL) INPUT SOCKET
32.SPEAKER terminal
33.VOLTAGE SELECTOR (OPTIONAL)
34.POWER CORD
5
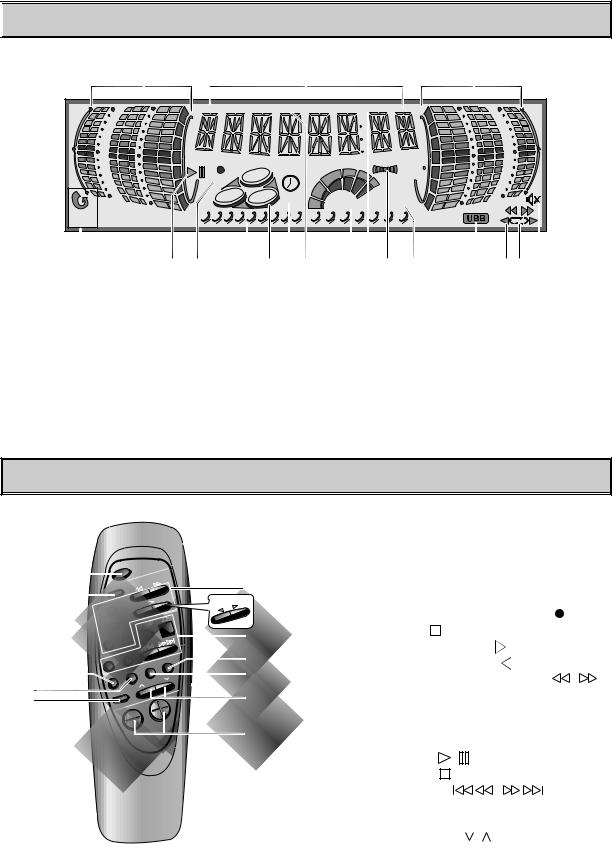

 FUNCTION DISPLAY
|
1 |
2 |
1 |
||||||||||||||||
|
RDS |
MONO |
|||||||||||||||||
|
kHz |
||||||||||||||||||
|
REC |
MHz |
|||||||||||||||||
|
1 |
VOLUME |
OVER |
||||||||||||||||
|
ALL |
3 |
4 |
5 |
6 |
7 |
8 |
10 |
11 |
12 |
13 |
14 |
15 |
16 |
|||||
|
DISC |
||||||||||||||||||
|
17 |
16 |
15 |
14 |
13 |
12 11 |
10 9 |
8 |
7 |
6 |
5 |
4 |
3 |
|
1. |
LEVEL indicator |
8. |
FM STEREO indicator |
|
2. |
FUNCTION, VOLUME LEVEL, CLOCK, |
9. |
FM MONO indicator |
|
FREQUENCY, TAPE COUNTER, CD PLAYING |
10. |
VOLUME indicator |
|
|
TIME display |
11. |
RDS function indicator (OPTIONAL) |
|
|
3. |
MUTE indicator |
12. |
TIMER indicator |
|
4. |
PLAY MODE indicator |
13. |
DISC NO. indicator |
|
(Use only auto reverse deck) |
14. |
CD MUSIC CALENDAR |
|
|
5. |
TAPE DIRECTION indicator |
15. |
RECORD indicator |
|
6. |
UBB indicator |
16. |
PLAY / PAUSE indicator |
|
7. |
CD MUSIC CALENDAR OVER indicator |
17. |
CD REPEAT indicator |
|
REMOTE CONTROL |
|||||||||||
|
1. |
POWER button |
||||||||||
|
2. |
SLEEP button |
||||||||||
|
3. |
DISPLAY MODE button |
||||||||||
|
1 |
POWER |
4. |
EQ PATTERN button |
||||||||
|
5. |
MUTE button |
||||||||||
|
2 |
6 |
||||||||||
|
6. |
TAPE FUNCTIONS |
||||||||||
|
REC II |
OPTIONAL |
||||||||||
|
• RECORD / RECORD PAUSE button( |
/REC II) |
||||||||||
|
TAPE |
1 |
TAPE |
7 |
• STOP button( |
) |
||||||
|
2 |
|||||||||||
|
D.SKIP |
8 |
• FORWARD PLAY button ( |
) |
||||||||
|
• BACKWARD PLAY button ( |
) : OPTIONAL |
||||||||||
|
REPEAT |
AUX TUNER/BAND |
||||||||||
|
3 |
.PATT |
9 |
|||||||||
|
MODE |
|||||||||||
|
EQ |
• REWIND / FAST FORWARD button ( |
/ |
) |
||||||||
|
4 |
PRESET |
10 |
|||||||||
|
MUTE |
• TAPE 1 / TAPE 2 button |
||||||||||
|
5 |
7. |
CD FUNCTIONS |
|||||||||
|
11 |
• DISK SKIP (D.SKIP) button |
||||||||||
|
• REPEAT button |
|||||||||||
|
• PLAY/PAUSE ( |
/ |
) button |
|||||||||
|
• STOP/CLEAR ( |
) button |
||||||||||
|
• SKIP / SEARCH ( |
/ |
)button |
|||||||||
|
8. |
TUNER / BAND button |
||||||||||
|
9. |
AUX button |
||||||||||
|
10. |
PRESET DOWN/UP ( |
/ |
) button |
||||||||
|
11. |
VOLUME CONTROL (+/-) buttons |
6
 Loading…
You can only view or download manuals with
Sign Up and get 5 for free
Upload your files to the site. You get 1 for each file you add
Get 1 for every time someone downloads your manual
Buy as many as you need
Руководства LG FFH515 Размер файлов: 5216 KB, Язык: English, Формат: pdf, Платформа: Windows/Linux, Дата: 2017-02-16
На данной странице вы можете скачать руководства LG FFH515. Мы предлагаем вам ознакомиться с руководством пользователя, инструкцией по сервисному обслуживанию и ремонту.
Также здесь вы найдете список заказных номеров на комплектующие LG FFH515.
Все файлы предоставляются исключительно в ознакомительных целях. И не являютя руководством по ремонту, а направлены лишь на то чтобы помочь вам более детально ознакомиться с принципом построения устройства.
Содержимое представленных здесь руководств требуют от вас знания технического английского языка.
Если вы собираетесь скачать руководство по сервисному обслуживанию LG FFH515, иными словами сервис мануал, вы дожны обладать хотя бы минимальными познаниями в области электроники и пониманием базовых принципов работы электромеханических устройств.
Для просмотра руководств вам понадобится Adobe Acrobat Reader версии 9 и выше либо другая программа для просмотра pdf файлов.
В связи с популярностью информации представленной на сайте и ее бесплатного предоставления конечному пользователю, убедительная просьба использовать специальные программные продукты для многопотокового скачивания файлов.
Руководства для LG FFH515
- Руководство пользователя (User manual)
- Руководство по сервисному обслуживанию (Service manual)
- Руководство по ремонту (Repair manual)
- Перечень комплектующих (PartList)
- Home
- Support
- Product Support
-
-
Troubleshooting
Screen color is red
- Screen color is red
-
-
-
Troubleshooting
I cannot make a Bluetooth connection to the sound bar
- Causes and Symptoms——————- * I cannot make a Bluetooth connection to the sound bar..Try this———This is how to set up a Bluetooth connection using the sound bar and mobilephone setting methods when you can’t normally make a …
-
-
-
Troubleshooting
The volume goes down while playing the sound bar
- Causes and Symptoms——————- * While playing the sound from the sound bar, the sound volume gets smaller than before even if I did not change it. * While playing the sound from the sound bar, the sound volume gets smaller than bef…
-
-
-
Troubleshooting
Troubleshooting for Sound Problems on your LG Home Theater
-
-
-
Troubleshooting
[LG TONE Free & TONE Plus Free] I want to reset my TONE Free.
- Try this———You can factory reset your TONE Free when it’s disconnected from your mobilephone.NoteApplicable models: PFL7/PFL7PPress and hold the pairing button for about 10 to 15 seconds until the indicatorlight blinks purple or pink.I…
-
-
-
Troubleshooting
Bad connection to bluetooth device
- SymptomTo connect a bluetooth device How to fix 1. Set the INPUT as BLUETOOTH. Turn on the bluetooth device andsearch. 2. Select LG Audio.3. Enter the PIN CODE. *Initial PIN CODE is 0000. For some devices,PIN CODE isnot required. 4. If they…
-
See More

- Some ads
- Спецификация
- Описание
- Скачать
| Название модели: | FFH-515AX |
| Производитель: | LG |
| Тип устройства: | Stereo |
| Добавлено: | Dec 3rd, 2007 |
| Размер: | 0.39 mb |
| язык: | RU |
| Просмотры/Скачивания: | 2547/133 |
| MD5: |
Теперь Вы можете скачать инструкцию пользователя для LG FFH-515AX.
Обратите внимание на информацию о файле, который Вы собираетесь скачать (Размер, Тип, Дата добавления и др.). Возможно, она
будет Вам полезна. Введите проверочный код, который Вы можете увидеть ниже, и кликните кнопку «Скачать», чтобы загрузить руководство
пользователя или инструкцию по эксплуатацию для LG FFH-515AX).
Если при загрузке файла Вы столкнулись с какими-либо трудностями или ошибками, свяжитесь с нами через нашу контактную форму, и мы постараемся Вам помочь.
Пожалуйста, введите код с изображения:

Больше Инструкций
-
LG FFH-2850AX
Инструкция LG FFH-2850AX -
LG FFH-286AX
Инструкция LG FFH-286AX -
LG FFH-363AX
Инструкция LG FFH-363AX
-
LG FFH-3785AX
Инструкция LG FFH-3785AX -
LG FFH-5500AX
Инструкция LG FFH-5500AX -
LG FFH-5600 AХ
Инструкция LG FFH-5600 AХ
-
LG FFH-576AX
Инструкция LG FFH-576AX -
LG FFH-717AX
Инструкция LG FFH-717AX -
LG FFH-868AX
Инструкция LG FFH-868AX