
-
Mini Countryman (2011) — page 1
OWNER’S MANUAL MINI COUNTRYMAN Contents A — Z Online Edition for Part no. 01 40 2 607 530 — © 03/11 BMW AG …
-
Mini Countryman (2011) — page 2
Online Edition for Part no. 01 40 2 607 530 — © 03/11 BMW AG …
-
Mini Countryman (2011) — page 3
Cooper Cooper S Cooper S ALL4 Congratulations on your new MINI This Owner’s Manual should be consid ered a perman ent part of this vehicle. It should stay with the vehicle when sold to provide the next owne r with important operating, safe ty and mainte- nance information. We wish you an en joyable driving experie nce. Online Edition for Part …
-
Mini Countryman (2011) — page 4
© 2011 Bayerische Motoren Werke Aktiengesellscha ft Munich, Germany Reprinting, including excerpts, only wi th the written consent of BMW AG, Munich. US English II/11 Printed on en vironmentally friendly pap er, bleached withou t chlorine , suitable for recycling. Online Edition for Part no. 01 40 2 607 530 — © 03/11 BMW AG Online Edition for Par …
-
Mini Countryman (2011) — page 5
CONTENTS The fastest w ay to find information on a particu- lar topic or item is by using the index, refer to page 180 . Notes 4 General inform ation 6 Reporting safety defects AT A GLANCE 10 Cockpit 16 Radio MINI Boost CD Controls 20 Opening an d closing 32 Adjustments 38 Transporting children sa fely 41 Drivin g 51 Control s overview 59 Technolog …
-
Mini Countryman (2011) — page 6
Notes General information 4 General information Using this Owner’s Manual We have tried to make a ll the information in this Owner’s Manual easy to find. The fastest way to find specific topics is to refer to the detailed index at the back of the manual. If you wish to gain an initial overview of your ve hicle, you w ill find this in the …
-
Mini Countryman (2011) — page 7
General information No tes 5 For your safety Maintenance and repair Advanced technology, e.g. the use of modern materials an d powerful electron- ics, requires specially adapted maintenance and repair methods. Th erefore, have the ne cessary work on your MINI only carried out by a MINI dealer or a workshop that has specially trained personnel worki …
-
Mini Countryman (2011) — page 8
Notes General information 6 Service and warranty We recommend that you read this publication thoroughly. Your MINI is covered by the following warran- ties: > New Vehicle Limited W arranty > Rust Perforation Limited Warranty > Federal Emissions Syst em Defect Warranty > Federal Emissions Performance Warranty > California Emission Con …
-
Mini Countryman (2011) — page 9
General information No tes 7 Online Edition for Part no. 01 40 2 607 530 — © 03/11 BMW AG Online Edition for Part no. 01 40 2 607 530 — © 03/11 BMW AG …
-
Mini Countryman (2011) — page 10
Watch Me. Online Edition for Part no. 01 40 2 607 530 — © 03/11 BMW AG …
-
Mini Countryman (2011) — page 11
Controls Driving tips Entertainment Communications Mobility Reference AT A GLANCE Online Edition for Part no. 01 40 2 607 530 — © 03/11 BMW AG …
-
Mini Countryman (2011) — page 12
AT A GLANCE Cockpit 10 Cockpit Around the steering wheel : Controls and displays 1 Adjusting the exterior mirrors, folding them in and out * 36 2 Parking lamps 71 Low beams 71 Automatic headlamp control * 71 Adaptive Light Control * 73 Turn signals 46 High beams 74 Headlamp f lasher 46 Roadsi de parki ng lamp s * 74 Computer * 52 Online Edition for …
-
Mini Countryman (2011) — page 13
Cockpit AT A GLANCE 11 6 Ignition lock 41 7 Buttons * on steering wheel 8 Horn: the entire surface 9 Adjusting the steering wheel 37 10 Releasing the hood 138 3 Tachometer 12 Instrument lighting 74 Resetting the trip odo meter 51 4 Wiper system 47 5 Switching the ignition on/off and starting /stopping the engi ne 41 Continuing cruise control * 49 R …
-
Mini Countryman (2011) — page 14
AT A GLANCE Cockpit 12 Displays 1 Tachometer 51 With indicator and warnin g lamps 13 2 Display for > Current vehicle speed 51 > Indicator and warning lamps 13 3 Resetting the trip odometer 51 4 Display for > Position of automatic trans mission * 43 > Computer * 52 > Date of next scheduled service, and remaining distance to be driven …
-
Mini Countryman (2011) — page 15
Cockpit AT A GLANCE 13 Indicator and warning lamps The concept Indicator and warning lamps can light up in var — ious combinations and co lors in indicato r area 1 or 2 . Some lamps are checked for proper functioning and thus come on briefly when th e engine is started or the ignition is switched on. What to do in case of a malfun ction A list of a …
-
Mini Countryman (2011) — page 16
AT A GLANCE Cockpit 14 Around the center console Online Edition for Part no. 01 40 2 607 530 — © 03/11 BMW AG Online Edition for Part no. 01 40 2 607 530 — © 03/11 BMW AG …
-
Mini Countryman (2011) — page 17
Cockpit AT A GLANCE 15 1 Microphone for voice activation system * and for telephone in hands-free mode * 2 Indicator/warning lamp * for front passen- ger airbags 69 4 Hazard warning flashers 5 Speedometer 12 6 Radio/CD 7 Air conditioner or automatic climate control * 76 8 Switches in the center console 9 Buttons in the ce nter console 10 AUX-IN con …
-
Mini Countryman (2011) — page 18
AT A GLANCE Radio MINI Boost CD 16 Radio MINI Boost CD 1 Selecting au dio sources 2 On/off * , loudspeaker controls 3 Accessing settings > Speed-dependent volume > Tone settings 4 Function buttons for co nfirming the menu items displayed above them 5 Changing stations, tracks > Changing stations > Changing track s on the CD player 6 Dis …
-
Mini Countryman (2011) — page 19
Radio MINI Boost CD AT A GLANCE 17 Menu navigation Radio and telephone functions * can be called up by us ing the b uttons on the ra dio an d menus. Calling up the settings menu Press the MENU button > Settings > MINI phone numbers > Telephone * Calling up the audio menu Press the MODE button > Radio > HD Radio * > Satellite radio …
-
Mini Countryman (2011) — page 20
Handle Me. Online Edition for Part no. 01 40 2 607 530 — © 03/11 BMW AG …
-
Mini Countryman (2011) — page 21
AT A GLANCE Driving tips Entertainment Communications Mobility Reference Controls Online Edition for Part no. 01 40 2 607 530 — © 03/11 BMW AG …
-
Mini Countryman (2011) — page 22
Controls Opening and closing 20 Opening and closing Keys/remote controls Buttons for the remote control 1 Opening the liftgate 2 Unlocking 3 Locking General information Each remote control co ntains a rechargeable battery that is recharged when it is in the igni- tion lock while the car is being driven. You should ther efore use each re mote contro …
-
Mini Countryman (2011) — page 23
Opening and closing Controls 21 > Settings for t he displays in the speedom eter and tachometer: > 12 h/24 h mode of the clock, refer to For- mats and units of measure 54 > Date format, refer to Formats and units of measure 54 > Units of measure for f uel consump tion, distance covered/re maining distances and temperature, refer to Form …
-
Mini Countryman (2011) — page 24
Controls Opening and closing 22 3. Press and hold the button until the display changes. 4. Press the button as often as necessary until the symbol and «SET» are displayed. 5. Press and hold the button until the display changes. 6. Briefly press the button re peatedly until the display shows the illu strated symbol, arrow. 7. Press and hol …
-
Mini Countryman (2011) — page 25
Opening and closing Controls 23 5. Press and hold the butt on until th e display changes. 6. Press the button to select, arrow: > Confirmation signal during unlo cking > Confirmation signal during locking 7. Press and hold the butt on until th e display changes. 8. Press the button to select: > The hazard warning flashers light up dur- ing …
-
Mini Countryman (2011) — page 26
Controls Opening and closing 24 Using the door lo ck You can set which parts of the car are un locked, page 21 . Do not lock the vehicle from the outside if there is any person inside, because the vehicle cannot be unlocked fr om inside without special knowledge. < When there is no alarm system * or Com- fort Access * , only the driv er’s d …
-
Mini Countryman (2011) — page 27
Opening and closing Controls 25 Persons or animals in a parked vehicle could lock the doors from the inside. Take the key with you when you leav e the vehicl e so that the vehicle can be opened from the out — side. < Automatic lo cking* You can also set the situ ations in which the car locks. The setting is st ored for the remote co n- trol in u …
-
Mini Countryman (2011) — page 28
Controls Opening and closing 26 wise, the tail lamps will be obscured and driving safety will be compromised. < Press the top side of th e MINI emblem, arrow, or Press the button on the remote control for approx. 1 second and then release it. The lift- gate is unlock ed. Closing Make sure that the closing path of th e lift- gate is clear; othe r …
-
Mini Countryman (2011) — page 29
Opening and closing Controls 27 Display on the revolut ion counter When the sy stem is arme d, all LEDs pulse. After approx. 16 minutes one LED flashes. > LEDs pulse or LED flashes: system is armed. > One LED flashes at short intervals: A door, the hoo d or the liftgate is not prop- erly closed. Even if these are not closed fully, the remaini …
-
Mini Countryman (2011) — page 30
Controls Opening and closing 28 Comfort Access support s the following func- tions: > Unlocking/locking the vehicle > Convenient closing > Unlocking the liftgate separately > Starting the engine Comparison to standard remote controls Essentially, it makes no difference wh ether you control th e above-m entioned f unctions using Comfort …
-
Mini Countryman (2011) — page 31
Opening and closing Controls 29 Switching off the engine in cars with automatic transmiss ion The engine can on ly be switched of f when the selector lever is in position P, page 43 . To switch the engine o ff when the selector lever is in position N, the re mote control must be i n the ignition lock. Before driving a vehicle with automatic transmi …
-
Mini Countryman (2011) — page 32
Controls Opening and closing 30 > With the i gnition switch ed on, press th e switch backward beyo nd the resistance point. Both closed roofs are t ilted fully. Pressing again st ops the movement. Opening, closing With the ignition switch ed on and the glass sun- roof tilted, press the swit ch backward and hold it there. The front glass roof ope …
-
Mini Countryman (2011) — page 33
Opening and closing Controls 31 The window can b e closed in the same way by pressing the switch up. After switching off the ignition When the ignition is sw itched off, the windows can still be op erated for approx. 1 minut e as long as no door is opened. Take the key with you when you leave the car; otherwise, children could operate the electric …
-
Mini Countryman (2011) — page 34
Controls Adjustments 32 Adjustments Sitting safely The ideal sitting position can make a vital contri- bution to rel axed, fatigu e- free dri ving. In con- junction wi th the safe ty belts, the head rest raints and the airbags, the seated position has a major influence on your safety in the even t of an acci- de nt . T o e ns ur e t h at th e safet …
-
Mini Countryman (2011) — page 35
Adjustments Controls 33 Seats Note before adjusting Never attempt to adjust your seat while the vehicle is moving. The seat could respond with unexpected movem ent, and the ensuing loss of vehicle control could lead to an accident. On the front passenger seat as well, do not incline the backrest too far to the rear while the vehicle is being driv e …
-
Mini Countryman (2011) — page 36
Controls Adjustments 34 Turn the wheel to increase or decrease the cur- vature. Seat adjustment, rear Do not adju st rear seats whil e the vehicl e is moving; otherwise, passengers cou ld be injured. Make sure that the locking devices of the rear seats engage properly. Otherwise the restrain- ing effect o f the safet y belts du ring an acciden t co …
-
Mini Countryman (2011) — page 37
Adjustments Controls 35 Front 1. Pull up as far as it will go. 2. Fold the backrest back slightly. 3. Press button 1 and pull the head restraint out as far as it will go. 4. Also press button 2 with a suit able tool and completely remove the head restraint. 5. Fold back the backrest. Rear 1. Pull up as far as it will go. 2. Fold the backrest forwar …
-
Mini Countryman (2011) — page 38
Controls Adjustments 36 Safety belt reminder Front seats The indicator lamps come on and an acoustic signal sounds.Check whether the safety belt has b een fastened cor- rectly. The ‘Fa sten safety bel ts’ reminder is issued when the driver’s safety belt has not been fastened. Th e ‘Fasten safety belts’ reminder is also acti …
-
Mini Countryman (2011) — page 39
Adjustments Controls 37 Interior and exterior mirrors, automatic dimming feature* It is controlled by two photosensors: > Inside the interior rearview mirror, arrow. > On the back of the mirror. For proper function: > Keep the photo sensors clean. > Do not cover the area between the interior rearview mirror and the windshield. > Do n …
-
Mini Countryman (2011) — page 40
Controls Transporting children safely 38 Transporting children safely The right place for children Do not leave childre n unattended in the vehicle; otherwise, they could endanger themselves and/or other person s by opening the doors, for example. < Children should always sit in the rear Accident research has sh own that the safest place for chi …
-
Mini Countryman (2011) — page 41
Transporting children safely Controls 39 To lock the safety belt 1. Secure the child restraint system with the belt. 2. Pull the belt strap all the way out. 3. Allow the belt strap to retract and pull it taut against the child res traint system. The safety belt is locked. To unlock the safety belt 1. Open the belt buckl e 2. Remove the child restra …
-
Mini Countryman (2011) — page 42
Controls Transporting children safely 40 Attaching upper retaining strap to the attachment point 1. Slide the head restraint upward. 2. Guide the tether strap be tween the head restraint holders. 3. Attach the tether strap to the anchor using the hook. 4. Push the head restraint into its low ermost position. 5. Pull the retaining strap tight. Secur …
-
Mini Countryman (2011) — page 43
Driving Controls 41 Driving Ignition lock Inserting the key into the ignition lock Insert the key al l the way into th e ignition lock. Radio readiness Individual electrical consumers can operate. Removing the key fro m the ignition l ock Press in the key briefly. It is ejected sli ghtly. At the same time: > The ignition is s witched off if it w …
-
Mini Countryman (2011) — page 44
Controls Driving 42 Radio readiness and ignition off All indicator and warning lamps in the displays go out. The ignition switches off automatically if the driver’s door is open ed. Pressing the Start /Stop button again switches the ignition back on. The ignition is not switched off in situations such as the following: > The clutch or brake …
-
Mini Countryman (2011) — page 45
Driving Controls 43 Automatic tran smission* 1. With the car at a st op, move the sele ctor lever to position P. 2. Press the Start/Stop button. 3. Forcefully apply the parking brake. Before driving into a car wash By following these steps, the vehicle is able to roll: 1. Place the remote control, even wit h Comfort Access, in the ig ni tion lock. …
-
Mini Countryman (2011) — page 46
Controls Driving 44 Selector lever positions P R N D M/S + – Displays in the tachometer P R N D DS M1 t o M6 The selector lever position is displayed, or the current gear in the manual mode. Changing selector lever positions > The selector lever can only be moved out of position P when the ig nition is switched on or the engine is running. > …
-
Mini Countryman (2011) — page 47
Driving Controls 45 Sports programming and manual mode M/S Move the select or lever fr om position D to the left into th e M/S shifting slot: The Sport program is activated and DS is dis- played. This position is recommended for a pe r- formance-oriented driving style. To deactivate the Sport program or manual mode M/S, move th e selector lever to …
-
Mini Countryman (2011) — page 48
Controls Driving 46 4. Pull the loop up. 5. Move the selector lever into the desired position by pressing the button o n the front of the selector lever. Before manually unlo cking the selector lever lock, firmly set the parking brake to prevent the vehicl e from rolling aw ay. < Turn signals/ headlamp flasher 1 Turn si gnal 2 Headlamp flasher U …
-
Mini Countryman (2011) — page 49
Driving Controls 47 8. Press the button to select: > Brief in dication of a turn. > Triple turn signal. 9. Press and hold the butt on until th e display changes. The setting is stored. Wiper system 1 Switching on wipers 2 Switching off wipers or brief wipe 3 Activating/deactivating intermittent wipe or rain sensor * 4 Cleaning windshield and …
-
Mini Countryman (2011) — page 50
Controls Driving 48 4. Press the button as often as necessary until the symbol and «SET» are displayed. 5. Press and hold the button until the display changes. 6. Press the button to se lect the desired sensi- tivity. 7. Wait, or press and h old the button u ntil the display changes. The settings are stored. Deactivating intermi ttent wip …
-
Mini Countryman (2011) — page 51
Driving Controls 49 Do not use th e washers when the washer fluid reservoir is empt y; otherwise, you will damage the w asher pump. < Washer fluid Washer fluid is flammable. Keep it away from ignition sources, only stor e it in the closed, original container, and k eep out of reach of children; otherw ise, there is a danger of injury. Comply wit …
-
Mini Countryman (2011) — page 52
Controls Driving 50 pedal is released, the stored speed is ach ieved again and maintained. The stored speed is cleared when th e ignition is switched off. Maintaining current speed Press button 3 . The system maintains and stores the current vehicle speed. If, on a do wnhill g rade, the engine br aking eff ect is not sufficient, the controlled spee …
-
Mini Countryman (2011) — page 53
Controls overview Controls 51 Controls overview Tachometer Never opera te the engin e with th e needle in the red overspeed zone of the gau ge. In this range, the fuel supply is interrupted to prote ct the engine. Displays in tachometer 1 Current v ehicle speed 2 Odometer, trip odom eter, and external tem- perature display 3 Resetting the trip odom …
-
Mini Countryman (2011) — page 54
Controls Controls overview 52 Computer* Displays in the tachometer Press the button in the tu rn signal lever repeat- edly to call up various items of information. The following items of information are displayed in the order listed: > Cruising range > Average fu el consumptio n > Current fuel consu mption > Average speed > Outside t …
-
Mini Countryman (2011) — page 55
Controls overview Controls 53 1 Button for: > Selecting display > Setting values > Confirming selected display or set values > Calling up computer information 52 Symbol Function Adjustin g rain sensor * 47 Calling up Check Control 57 Displaying vehicle check 58 Initializing th e Flat Tire Monitor 63 Resetting the Tire Pres- sure Monitor …
-
Mini Countryman (2011) — page 56
Controls Controls overview 54 Exiting displays 1. Briefly press the button in the turn si gnal lever repeatedly until «HOME» is displayed. 2. Press the button fo r a longer period. Displays are also exited if no entries are made for approx. 8 seconds. Next setting or item of information 1. While in a setting or information item, briefly p …
-
Mini Countryman (2011) — page 57
Controls overview Controls 55 > Fuel consumption: l/100 km , mpg, km/l * > Distance covered: miles, km > Tempe rature: 7 , 6 7. Press and hold the butt on until th e display changes. 8. Press the button briefl y to change th e for- mat or unit of measure. 9. Press and hold the butt on until th e display changes. The settings are stored. Re …
-
Mini Countryman (2011) — page 58
Controls Controls overview 56 The extent of service w ork required can be read out from the remote control by your MINI dealer. < Displaying vehicle check For certain maintenance operatio ns, you can view the respective dist ance remaining or due date individually in the tachometer. 1. Switch on the ignition, refer to page 41 . 2. Press the butt …
-
Mini Countryman (2011) — page 59
Controls overview Controls 57 More information on th e MINI Maintenance Sys- tem can be found on page 142 . Clock Setting the time Radio MINI Boost CD: 1. Press the MENU butto n. 2. Press the button. 3. Press the button. 4. Select the desired menu item «FORMAT», «STD» or «MIN» and press the respective but- ton. 5. Turn …
-
Mini Countryman (2011) — page 60
Controls Controls overview 58 What to do in case of a malfunction The meanin g of each lamp in th e event of a mal- function and tips on how to respond are listed starting on page 162 . Hiding Check Control messa ges Press the button in th e turn si gnal lever. > Some Check Cont rol me ssages are displayed until the malfunctions h ave been recti …
-
Mini Countryman (2011) — page 61
Technology for driving comfort and safety Controls 59 Technology for driving comfort and safety Park Distance Control PDC* The concept PDC assists you with parking in reverse. Acoustic signals warn you of the presence of an object behind the vehicle. The measureme nt is carried out by four ultrasonic sensors in the rear bumper. An acoustic warning …
-
Mini Countryman (2011) — page 62
Controls Technology for driving comfort and safety 60 The laws of physics cannot be repealed, even with driving stabilit y control system s. An appropriate driving style always remains the responsibility of the driver. Therefore do not reduce the additional safe t y m a r g i n b y e n g a g i n g in hazardous dr iving thereby runn ing the risk of …
-
Mini Countryman (2011) — page 63
Technology for driving comfort and safety Controls 61 Dynamic Traction Control DTC* The concept D T C is a t yp e o f D SC t h a t is pr op ul si on op ti m i z e d for special road conditio ns such as uncleared snowy roads. The syst em ensures maximum propulsion though with restricted driving stabil- ity. You therefo re need to drive w ith suitabl …
-
Mini Countryman (2011) — page 64
Controls Technology for driving comfort and safety 62 Activating DSC Press the button again: the indicat or lamps go out. Hill Assist Hill Assist aids you in co mfortably driving off on inclines. It is not nece ssary to use the p arking brake for this. 1. Hold the MINI with t he brake. 2. Release the brake and imm ediately drive off. Hill Assist ho …
-
Mini Countryman (2011) — page 65
Technology for driving comfort and safety Controls 63 System limitations Sudden serious tire damage caused by external influences ca nno t be in dicate d in advance. < A natural, even pressure loss in all four tires can- not be detected. Therefore, check the tire infla- tion pressure regularly. In the following situatio ns, the system could be d …
-
Mini Countryman (2011) — page 66
Controls Technology for driving comfort and safety 64 Actions in the event of a flat tire Normal tires* 1. Identify the damaged tire. To do so, ch eck the infl ation pre ssure in all four tires. The inflation pre ssure display of the Mobility System, page 152 , can be used for this pur- pose. If the inflatio n pressure in all fo ur tires is cor- re …
-
Mini Countryman (2011) — page 67
Technology for driving comfort and safety Controls 65 Reset the system again after each correction of the tire inflation pressure and after every tire or wheel change. System limitations Sudden, serious tire dam age caused by external influences ca nno t be in dicate d in advance. < The system does not op erate correctly if it has not been reset …
-
Mini Countryman (2011) — page 68
Controls Technology for driving comfort and safety 66 1. Reduce speed and stop the vehicle with cau- tion. Avoid sudden braking and steering maneuvers. 2. Check whether the vehicle is equipped with normal tires or with run-flat tires. Run-flat tires, refer to page 136 , are identi- fied by a circular symbol containing the let- ters RSC on the tire …
-
Mini Countryman (2011) — page 69
Technology for driving comfort and safety Controls 67 Malfunction The small warning lamp flashes in yel- low and then lights up continuously ; the larger warning lamp lights up in yellow. No flat tire can be detecte d. Display in the following situations: > Wheel without TPM electronics is mounted: If need be, have it checked by your MINI dealer …
-
Mini Countryman (2011) — page 70
Controls Technology for driving comfort and safety 68 Airbags The following airbags ar e located under the marked covers: 1 Front airbags 2 Knee airbag 3 Side airbags in backrests 4 Head airbags at the front and rear Protective a ction Observe the instructions on page 32 to ensure the best possible personal protec- tion. < The front airbags help …
-
Mini Countryman (2011) — page 71
Technology for driving comfort and safety Controls 69 activates or deactivates the front, sid e, and knee airbags for the front passenger. Make sure that th e front passenger’s f eet remain in the f ootwell; otherwis e, it is not possible to guarante e the function of th e front passenger airbags. < The indicator lamp above the interior rea …
-
Mini Countryman (2011) — page 72
Controls Technology for driving comfort and safety 70 Operational readiness of airbag system As of radio readiness, page 41 , the warning lamp lights up briefly t o indicate that the e ntire airbag system and the be lt tensioners are oper- ational. Airbag system malfunction > The warning lamp does not come on wh en radio readiness is switched on …
-
Mini Countryman (2011) — page 73
Lamps Controls 71 Lamps Parking lamps/low beams 0 Lamps off and daytime runnin g lights 1 Parking lamps and daytime running lig hts 2 Low-beam headlamps and welcome lamps 3 Automatic headlamp control * , daytime run- ning lights, welcome lamps, and Adaptive Light Control * When you open the driver’s door with the igni- tion switched off, the e …
-
Mini Countryman (2011) — page 74
Controls Lamps 72 The setting is stored for the remote contro l in use, refer to Pers onal Profile, page 20 . Setting the dura tion or deacti vating the function 1. Switch on the ignition, refer to page 41 . 2. Press the button on the turn signal ind icator as often as necessary until «SET/INFO» is dis- played. 3. Press and hold the butto …
-
Mini Countryman (2011) — page 75
Lamps Controls 73 1. Switch on the ignition, refer to page 41 . 2. Press the button on the turn signal in dicator as often as nece ssary until «SET/I NFO» is dis- played. 3. Press and hold the butt on until th e display changes. 4. Press the button as of ten as necessary unt il the symbol and «SET» are disp layed. 5. Press and h …
-
Mini Countryman (2011) — page 76
Controls Lamps 74 High beams/ roadside parking lamps 1 Turn signals/roadside parking lamps * 2 Switching on high beam s 3 Switching off high beams/headlamp flasher Roadside parking lamps, left or right* The vehicle can be illuminated on one side for parking. Comply with local regulations when doing so. Switching on After parking the vehicle, press …
-
Mini Countryman (2011) — page 77
Lamps Controls 75 Reducing brightness Press the button briefly. The brightness decreases every time the button is pressed. Interior lamps The interior lamps, the footwell lamps * , t he entry lamps * , and the cargo area lamp are con- trolled automatically. To reduce the drain on the battery, a short while after the ignition is switched off, refer …
-
Mini Countryman (2011) — page 78
Controls Climate 76 Climate Equipment versions Depending on your vehicle’ s equipment, your MINI contains an air conditioner or an automatic climate control * . 1 Air conditioner 77 2 Automatic climate control * 78 Air vents 3 Airflow directed toward the windshield and side windows 4 Air to the upper body area, draft-free venti- lation 5 Air t …
-
Mini Countryman (2011) — page 79
Climate Controls 77 Air conditioner 1 Air flow rate 2 Cooling function 3 Recirculated-air mode 4 Temperature 5 Rear window defroster 6 Air distribution 7 Windshield heating * Air flo w rate Adjust the air flow r ate. The higher t he rate, the more effective the heating or cooling will be. The air flow rate is lo wered or switched off entirely to re …
-
Mini Countryman (2011) — page 80
Controls Climate 78 Air distribution Direct the flow of air to the windows , to the upper body area or to the footwell . Intermediate settings are possible. Windshield heating* The windshi eld heating is s witched off automatically after a short time. The front window heating is low- ered or switch ed off entire ly to reduce the drain on the bat te …
-
Mini Countryman (2011) — page 81
Climate Controls 79 Air flow rate, ma nual Press the – button to reduce air flow. Press the + button to increase it. You can reactivate the autom atic mode for the air flow rat e with the AUTO butt on. The air flow rate is lowered or switched off entirely to reduce t he drain on the bat tery. The display remains the same. Switching the system on/ …
-
Mini Countryman (2011) — page 82
Controls Climate 80 Defrosting windows and removin g condensation Quickly removes ice and condensa- tion from the w indshield and front side windows. For this purpose, also switch on the cooling function. The windshield heating * is switched on auto- matically. Windshield heating* The windshi eld heating is s witched off automatically after a certa …
-
Mini Countryman (2011) — page 83
Practical interior accessories Controls 81 Practical interior accessories Integrated universal remote control* The concept The integrated un iversal remote control can replace as many as thr ee hand-held transmitters for various remote-contro lled devices, such as garage and gate openers and lighting systems. The integrated universal remote control …
-
Mini Countryman (2011) — page 84
Controls Practical interior accessories 82 60 seconds, alter the distance and repeat this step. Canada: if the LED is not flashing rapidly after 60 seconds, chan ge the distance and repeat the step or, if the programming was interrupted by the hand-held transmitter, press and hold the memory button and press the button on the hand-hel d transmit- t …
-
Mini Countryman (2011) — page 85
Practical interior accessories Controls 83 original hand-held tr ansmit ter and release both buttons as soon as the LED 2 flashes rapidly. If the LED 2 does not flash rapidly after approx. 60 seconds, alter the distance and repeat this step. Canada: if the LED is not flashing rapidly after 60 seconds, change the distance and repeat the step or, if …
-
Mini Countryman (2011) — page 86
Controls Practical interior accessories 84 Opening Press the button, arrow, and lift the cover. Storage compartments In the vehicle interior Depending on your vehicle’ s equipment, you will find storage compartme nts in the front and rear doors and in the center console * . Pockets * are provid ed on the backrest rear pan- els of the front sea …
-
Mini Countryman (2011) — page 87
Practical interior accessories Controls 85 3. First insert the cupholde r into the front mounts 4 and then snap it into the rear mounts 5 . Make sure that the lever 6 is situated opposite the mount 4 . < Clothes hooks There are clothes hooks on the grab handles in the rear passenger compartment . Items of clothing hung from the hoo ks must not o …
-
Mini Countryman (2011) — page 88
Controls Practical interior accessories 86 Connecting electrical appliances In your MINI, wh en the engine is ru nning or the ignition is switched on, yo u can use electrical devices such as flashlights, car vacuum cleaners, e t c. , u p t o a p p r o x . 1 4 0 w a t t s a t 1 2 v o l t s , a s l o n g as one of the following sockets is available. …
-
Mini Countryman (2011) — page 89
Practical interior accessories Controls 87 Online Edition for Part no. 01 40 2 607 530 — © 03/11 BMW AG Online Edition for Part no. 01 40 2 607 530 — © 03/11 BMW AG …
-
Mini Countryman (2011) — page 90
Drive Me. Online Edition for Part no. 01 40 2 607 530 — © 03/11 BMW AG …
-
Mini Countryman (2011) — page 91
AT A GLANCE Controls Entertainment Communications Mobility Reference Driving tips Online Edition for Part no. 01 40 2 607 530 — © 03/11 BMW AG …
-
Mini Countryman (2011) — page 92
Driving tips Things to remember when driving 90 Things to remember when driving Break-in period Moving parts need breaking-in t ime to adjust to each other. Please follow the instructions below in order to achieve the optimal service life and economy of operatio n for your vehicle. Engine and differential Always obey all official speed l imits. Up …
-
Mini Countryman (2011) — page 93
Things to remember when driving Driving tip s 91 Hydroplaning When driving on wet or slushy roads, reduce road speed. If you do not, a wedge of water can form betw een tires and road sur- face. This situation, known as h ydroplani ng, can cause partial or complete loss of tire contact with the road surface , so that the car cann ot be steered or br …
-
Mini Countryman (2011) — page 94
Driving tips Things to remember when driving 92 increased tendency for corrosion to form on rotors, while contaminan ts accumulate on th e brake pads. This occurs because the minimum pressure which must be exerted by the pad s during brake applications to clean the rotors is not reached. Should corrosion form on the brak e rotors, the brakes will t …
-
Mini Countryman (2011) — page 95
Things to remember when driving Driving tip s 93 1. Hold on to the backrest near the top, f or example on the headre st, and pull on the loop, arrow. 2. Lock backrest in the de sired position or fold down. Folding the backrests back into position When folding th e backrest, ensure that the lock properly en gages. Otherwise , for example during brak …
-
Mini Countryman (2011) — page 96
Driving tips Things to remember when driving 94 3. Remove it from the guide s on the cargo area floor, arrows, and remove the privacy screen. Flat load floor* Do not exceed the maximum load of 150 kg for the load floor; otherwise, dam- age may result. < Access to the storage space Under the load floor, t here is storage space, e.g., for the carg …
-
Mini Countryman (2011) — page 97
Things to remember when driving Driving tip s 95 Removing When removing and stowing the cargo net, pro- ceed in the reverse sequen ce. To fold closed, press the release butto n, arrow. Bag holders* Holders on the left and right sid e of the support for the cargo area cover, arrow, e.g. for hanging shopping bags or storage bags. Only hang light shop …
-
Mini Countryman (2011) — page 98
Driving tips Things to remember when driving 96 Load The permissible load is the sum of the occu- pants’ weights and the we ight of the cargo. The greater the weight of th e occupants, the less cargo/luggage can be transported. Stowing cargo > Position heavy objects as low and as far for- ward as possible, ideally directly behind the rear s …
-
Mini Countryman (2011) — page 99
Things to remember when driving Driving tip s 97 Roof-mounted luggage rack* A special rack system is av ailable as an option for your MINI. Your MINI dealer will be glad to advise you. Comply with the in stallation instruc- tions supplied with the rack system. Loading roof-mounted lu ggage rack Because roof racks raise the vehicle’s center of …
-
Mini Countryman (2011) — page 100
Driving tips Things to remember when driving 98 Low inflation pressure increases rolling resis- tance and thus leads to greater fuel consump- tion and tire wear. Drive off immediately D o n o t wa i t f or t he e n g in e t o w a r m u p wh i l e th e vehicle remains stationary. Start driving right away, but at moderate engi ne spe eds. This is the …
-
Mini Countryman (2011) — page 101
Things to remember when driving Driving tip s 99 > After driving thro ugh water at low spee d, lightly press the brake pedal several times to dry the brakes and to prevent the braking effect from being reduced by wetness. > Depending o n the condit ion of the surf ace, it may be practi cal to briefly a ctivate DT C, refer to DTC Dynamic Tra c …
-
Mini Countryman (2011) — page 102
Rock Me. Online Edition for Part no. 01 40 2 607 530 — © 03/11 BMW AG …
-
Mini Countryman (2011) — page 103
AT A GLANCE Controls Driving tips Communications Mobility Reference Entertainment Online Edition for Part no. 01 40 2 607 530 — © 03/11 BMW AG …
-
Mini Countryman (2011) — page 104
Entertainment Radio MINI Boost CD 102 Radio MINI Boost CD switching Radio on/off Press the knob on the left. The radio selects the last set audio source: > Radio > HD Radio * > Satellite radio * > CD > External audio device > USB audio interface*. Listening to the radi o when the ignition is switched off After turning off the radi …
-
Mini Countryman (2011) — page 105
Radio MINI Boost CD Entertainment 103 4. Select the desired volume and press the but- ton on the right. Setting tone controls You can select be tween the foll owing settings: > Bass: bass setting. > Treble: tr eble setti ng. > Balance: volume distribution right/left. > Fader: volume distri bution front/back. The tone sett ings are set f …
-
Mini Countryman (2011) — page 106
Entertainment Radio MINI Boost CD 104 If you do not wish to use the Autostore feature, you can sto re six stations of yo ur choice in the FMA or AMA memory levels. < Playing and selecting stations, sca n You can play all the statio ns that can be received for approx. 10 seconds. Press the button. Interrupting the scan an d selecting a s tation: …
-
Mini Countryman (2011) — page 107
Radio MINI Boost CD Entertainment 105 HD Radio™ reception* Many radio stations transmit analog and digital signals. If a digital r adio network is availabl e, these stations can be received digitally and thus with improved sound quality. License conditions HD Radio™ techno logy is manufactured under U.S. and Foreign Patents licensed from iBiqui …
-
Mini Countryman (2011) — page 108
Entertainment Radio MINI Boost CD 106 2. Press the button. 3. Press the button. 4. Select the desi red category. The channels are displayed. This symbol indicates the current channel. Activating 1. Turn the knob on the ri ght to select a chan- nel that is not yet activated. 2. Press the knob on t he right to con firm a channel. A phone number and t …
-
Mini Countryman (2011) — page 109
Radio MINI Boost CD Entertainment 107 Additional information The name of the channel and additional infor- mation about the curren t track is displayed, e.g., the name of the artist. 1. Selecting a desired channel. 2. Press the button. Changing channels using buttons Press the … button for the co rresponding direction. The next activated ch annel …
-
Mini Countryman (2011) — page 110
Entertainment Radio MINI Boost CD 108 Selecting MP3 music tracks The CD player can also play CDs with com- pressed audio data, such as MP3 and WMA. Selecting a track 1. Press the button. 2. Select the desired folder and press the but- ton on the right. > : press the butto n on the right to open a folder > : press the button on the right to cl …
-
Mini Countryman (2011) — page 111
Radio MINI Boost CD Entertainment 109 Damaged CDs Avoid finger prints as well as dust, scratches and moisture . Store CDs in sleeves. Do not expose CDs to a temperat ure greater than 122 7 /50 6 , elevated humidity or direct sunlight. CDs with copy protection CDs are often provided with copy protection from the manu facturer. This can resul t in CD …
-
Mini Countryman (2011) — page 112
Entertainment Radio MINI Boost CD 110 USB device To play audio tracks over the car’s speaker sys- tem, connect the USB device to port 2 . After first connecting, the track informat ion is transferred to the vehicle. The time required is dependent on th e USB device and on the num — ber of tracks. Information from up to four USB devices or appr …
-
Mini Countryman (2011) — page 113
Radio MINI Boost CD Entertainment 111 Notes > The USB audio interface supplies the con- nected audio devices with power, provided that this is supported by the audio device. For this reason, audio devices are not to be connected to a receptac le in the vehicle dur- ing operat ion. > Do not expose aud io devices to extreme ambient conditions, …
-
Mini Countryman (2011) — page 114
Connect Me. Online Edition for Part no. 01 40 2 607 530 — © 03/11 BMW AG …
-
Mini Countryman (2011) — page 115
AT A GLANCE Controls Driving tips Entertainment Mobility Reference Communications Online Edition for Part no. 01 40 2 607 530 — © 03/11 BMW AG …
-
Mini Countryman (2011) — page 116
Communic ations Telephone 114 Telephone Overview The concept Mobile phones or other external device s, e.g. audio players, can be connect ed to the vehicle via Bluetooth. Bluetooth® i s a register ed tradem ark of Blue- tooth® SIG, Inc. Your MINI is equipp ed with a comp lete mobile phone preparation. Afte r a suitable mobile phone is pai red wit …
-
Mini Countryman (2011) — page 117
Telephone Communications 115 Operating the mobile phone via the radio To open the men u show above, refer to page 120 . 1 Making and receiving phone calls 119 > «#»: dial phone number > «A-Z»: phone book > «TOP8»: most frequently dialed phone numbers > «LAST8″: last phone numbers dialed > » …
-
Mini Countryman (2011) — page 118
Communic ations Telephone 116 10 Switching displays 120 > «PHONE»: telephone > «COMP» : computer > «CONFIG»: adj usting 11 Radio on/off, volume > Press: to switch radio on/off > Turn: adjustin g volume 119 12 Ejecting CD This symbol appears on the radio display when a phone call is bein g made with the h …
-
Mini Countryman (2011) — page 119
Telephone Communications 117 4. Press the button. 5. Press the button. 6. Press the button. Turn the right rota ry knob to display the Blue- tooth name of your vehicle on t he display. Preparation with mobil e phone 7. Other operations must be performed on the mobile phone and differ de pending on the type of mobile phone, refer to Owner’s Man …
-
Mini Countryman (2011) — page 120
Communic ations Telephone 118 To display the Hot line phone numbe r: Press the button. Turn the right rotary knob to display the Hotline phone number and to d isplay required pairing information on the display. Following the initial pairing > The mobile phone is detected/connect ed in the vehicle within a short period of time when the engine is …
-
Mini Countryman (2011) — page 121
Telephone Communications 119 > Is the mobile phone in power economy m o d e o r d o e s i t o n l y h a v e a s m a l l a m o u n t o f battery charge remaining? Charge the mobile phone in the snap-in adapter * or via a charging cable. > Depending o n the mobile phon e, it may only be possible to connect one device to the vehicle. Unpair the …
-
Mini Countryman (2011) — page 122
Communic ations Telephone 120 Accepting a call Press the butto n on the radio or on the st eer- ing wheel. Alternative: Press the button. Callrejectin g Press the button. Ending a call Press the butto n on the radio or on the st eer- ing wheel. Alternative: Press the button. Entering phone numbers Dialing a number 1. Press the MENU button. 2. Press …
-
Mini Countryman (2011) — page 123
Telephone Communications 121 name and phone number, are sorted alpha- betically. > «TOP8» The Top 8 list autom atically stores the eigh t phone numbers of the pho ne book that are dialed the most f requently. > «LAST8» The last eight phone numbers you have dialed are stor ed automati cally. The ph one number dialed last ap …
-
Mini Countryman (2011) — page 124
Communic ations Telephone 122 3. Press and hold the button to dial th e phone number. Dialing a phone nu mber stored in a list To select an entry and establish a connection: 1. Press the MENU button. 2. Press the button. 3. Press the desired button to select one of the four lists. 4. Turn the righ t rotary knob to select an entry and press the righ …
-
Mini Countryman (2011) — page 125
Telephone Communications 123 Finishing voice input Press the button on the steerin g wheel briefly or Possible commands Having possible commands read aloud Press the button on the steerin g wheel. Possible commands are read aloud. Each digit can be spoken individually or com- bined into a sequence t o accelerate the entry process. Using alternative …
-
Mini Countryman (2011) — page 126
Communic ations Telephone 124 Deleting all entries To listen to and select the entries: Selecting an entry Adjusting volume Turn knob during announcement. > The volume rema ins the same, ev en if the volume of other audi o sources is changed. > The volume is store d for the remote control currently in use. Notes Do not use the voice activat i …
-
Mini Countryman (2011) — page 127
Telephone Communications 125 2. Insert the snap-in adapte r at the front, arrow 1 , and press downward, arrow 2 , until it clicks into place. Inserting mobile phone 1. Depending on the mobile phone, it may be necessary to rem ove the protective cap of the antenna conn ector and from the U SB connection of the mobile phone. 2. Push the mobile phone …
-
Mini Countryman (2011) — page 128
Move Me. Online Edition for Part no. 01 40 2 607 530 — © 03/11 BMW AG …
-
Mini Countryman (2011) — page 129
AT A GLANCE Controls Driving tips Entertainment Communications Reference Mobility Online Edition for Part no. 01 40 2 607 530 — © 03/11 BMW AG …
-
Mini Countryman (2011) — page 130
Mobility Refueling 128 Refueling Switch off the en gine before refueling; otherwise, fuel cannot b e added to the tank and a message will be displayed. < Take all precautionary measures and observe all ap plicable regulations when handling fuel. Do not carry any sp are fuel con- tainers in your vehicle. They can develop a leak and cause an explo …
-
Mini Countryman (2011) — page 131
Refueling Mobility 129 Fuel specifications Fuels that are labeled at the pump as containing metal may not be used. Do not fill the tank with leaded gasoline o r gasoline that contains metal additives, such as manganese or iron; oth erwise, long term damage to the catalytic converter or other com- ponents may result. Do not fill the t ank with E85, …
-
Mini Countryman (2011) — page 132
Mobility Wheels and tires 130 Wheels and tires Tire inflation pressures Information for your safety It is not merely the tire s’ service life, but also driving comfort and, to a great extent, driving safety that depend on the conditio n of the tires and the maintenance of the specified tire pres- sure. Checking pressure Check the tire inflatio …
-
Mini Countryman (2011) — page 133
Wheels and tires Mobility 131 Observe all national and local maximum speed limits; otherwise, violations of the law could occur. Online Edition for Part no. 01 40 2 607 530 — © 03/11 BMW AG Online Edition for Part no. 01 40 2 607 530 — © 03/11 BMW AG …
-
Mini Countryman (2011) — page 134
Mobility Wheels and tires 132 Tire inflation pressures MINI Cooper Countryman Tire size Pressure specifications in psi/kPa Speeds up to a max. of 100 mph / 160 km/h Speeds including thos e exceeding 100 mph / 160 km/h All pressu re specif ications in the table are indicated in psi/kilopas- cal with cold tires. Cold = ambient temperature 195/60 R 16 …
-
Mini Countryman (2011) — page 135
Wheels and tires Mobility 133 Tire inflation pressures MINI Cooper S Cou ntryman / Cooper S ALL4 Country man Tire size Pressure specifications in psi/kPa Speeds up to a max. of 100 mph / 160 km/h Speeds including those exceeding 100 mph / 160 km/h All pressure specifications in the table are indicated in psi/kilopas- cal with cold tires. Co ld = am …
-
Mini Countryman (2011) — page 136
Mobility Wheels and tires 134 Tire identification marks Knowledge of the labeling on the side of the t ire makes it easier to identi fy and choose the right tires. Tire size Speed letter Q = up to 100 mph or 160 km/h T = up to 118 mph or 190 km/h H = up to 131 m ph or 210 km/h V = up to 150 mph or 240 km/h W = up to 167 mp h or 270 km/h Y = up to 1 …
-
Mini Countryman (2011) — page 137
Wheels and tires Mobility 135 failure. Th e grade C correspon ds to a level of performance which all passenger car tires must meet under the Federal Motor Vehicle Safe ty Standard No. 1 09. Grades B and A represen t lev- els of perfo rmance on the labora tory test w heel that exceed the m inimum required by law. The temperature grade for this tire …
-
Mini Countryman (2011) — page 138
Mobility Wheels and tires 136 Tire age The manufacturing date of tires is contained in the tire coding: DOT … 0211 means that t he tire was manufac- tured in week 2 of 2011. For various reasons, such as the development of brittleness, the manuf acturer of your MINI rec- ommends tire replacemen t after no more than 6 years, regardless of the actua …
-
Mini Countryman (2011) — page 139
Wheels and tires Mobility 137 Recommended tire brands For each tire size, the manufacturer of your MINI recommends certain tire brands. They are marked with a clearly visible MINI designation on the sidewall of the tire. When properly us ed, these tires meet the high- est standards in terms of safety and handling characteristics. Run-flat tires* Wh …
-
Mini Countryman (2011) — page 140
Mobility Under th e hood 138 Under the hood Never attempt to perform any service or repair operations on yo ur vehicle without the required professional technical traini ng. If you are not f amiliar with the regulations to be observed, have the necessary work on your vehicle carried out only by a MINI dealer or a workshop that has specially trained …
-
Mini Countryman (2011) — page 141
Under the hood Mobility 139 Important parts of the eng ine compartment 1 Vehicle identification number * 2 Battery, under the cover 159 3 Engine oil dipstick 139 4 Engine oil filler neck 140 5 Coolant e xpansion tank 140 6 Engine compartment fu se box 156 7 Reservoir for washer fl uid for the headlamp and window washer system 49 Engine oil The engi …
-
Mini Countryman (2011) — page 142
Mobility Under th e hood 140 Do not fill beyo nd the upper mark on the dipstick. Excess oil will damage th e engine. < Adding engine oil Do not add th e maximum qu antity of 1 US quart/1 liter of engine oil until the oil level has dropped to just above the lower mark on the dipstick, page 139 . Add oil within the next 30 miles/50 km; otherwise, …
-
Mini Countryman (2011) — page 143
Under the hood Mobility 141 Coolant temperature If the coolant, and therefore t he engine, should overheat, then a warning li ght wi ll go on, refer to page 165 . Checking coolant level Do not add coolant t o the cooling syst em when the eng ine is hot. Escaping cool ant can cause burns. < Do not open the hood until the engine has cooled down. T …
-
Mini Countryman (2011) — page 144
Mobility Maintenance 142 Maintenance MINI Maintenance System The MINI Maintenance System supports the preservation of the traffic and operating safety of your MINI. The objectiv e is to optimize efforts with respect to min imal vehicle maintenance costs. If and when you come to sell your MINI, a com- prehensive record of serv icing will prove a sig …
-
Mini Countryman (2011) — page 145
Maintenance Mobility 143 Socket for On-Board Diagnosis OBD The primary components that m ake up the emissions can be checked by a device via the OBD socket. Emissions The warning lamps co me on. The vehi cle is producing higher emissions. You can continue your journey, but moderate your speed and exercise due caution. Have the car checked as soon a …
-
Mini Countryman (2011) — page 146
Mobility Care 144 Care Car-care products Regular cleaning and care helps to maintain the value of your MIN I. The manufacturer of your MINI reco mmends using manufacturer-approved products to clean and care for your vehicle. Your MINI dealer would be ple ased to advise you on cleaning and care pro ducts and services for your MINI. The ingredients o …
-
Mini Countryman (2011) — page 147
Care Mobility 145 5. Insert the remote control in the ignition lock so that the vehicle can roll. Steam jets/high-pressure washers When using steam jets or high-pressure washers, make sure th at you maintain suf- ficient distance from the vehicle and do not exceed a maximum temperature of 140 7/60 6. If the distance is too close, the pressure too h …
-
Mini Countryman (2011) — page 148
Mobility Care 146 Chrome parts* Carefully clean vehicle part s such as the radiator grill and door handles with copious quantities of water and, if necessary, a shampoo additive, especially when contamin ated with road salt. For addition al treatmen t, use chrome polish. Light alloy wheels* The system produces brake dust that collects on the light …
-
Mini Countryman (2011) — page 149
Care Mobility 147 Decorative strips* Only clean decorative st rips with moi st cloths. Wipe dry with a soft cloth. Safety belts Dirty belt straps impede the reeling action and thus have a negat ive impact on safety. Do not clean che mically, as this m ay destroy the webbing. < Displays To clean displays such as radios or dis play ele- ments, use …
-
Mini Countryman (2011) — page 150
Mobility Replacing components 148 Replacing components Wiper blades Changing the front wiper blades 1. Fold out the wiper arm and hold it. 2. Press together the l o cking spring, arrows 1 , and fold out the wiper blade, arrow 2 . 3. Pull the wiper blade forward and out of the catch mechanism. 4. Press the new wiper blade into the fixture until it e …
-
Mini Countryman (2011) — page 151
Replacing components Mobility 149 tional laser di odes, and legislation de fines them as Class 1 light-em itting diodes. Do not remove the covers or expo se the eyes direct ly to the unfi ltered li ght source for several hours; otherw ise, this could cause irritation of the retina. < Headlamp glass lens In cool or humid weather, condensat ion ma …
-
Mini Countryman (2011) — page 152
Mobility Replacing components 150 2. Push on the catch, arrow 1 , and disconnect the connector, arrow 2 . 3. To insert the new bulb and replace the cover, proceed in reverse order. Turn signals, parking lamps, roadside parking lamps, and fog lamps Accessing the lamps via the wheel well 1 Turn si gnal 2 Parking/roadside parking/fog lamps Replacing a …
-
Mini Countryman (2011) — page 153
Replacing components Mobility 151 Replacing a fog lamp bulb H8 bulb, 35 watts 1. Turn in the wheel. 2. Remove cover 2 . To do so, turn the cover counterclockwise. 3. Pull the cable connector. 4. Unscrew the lower bulb counterclo ckwise. 5. To insert the new bul b and replace the cover, proceed in reverse order. Side turn signals 5w a t t b u l b , …
-
Mini Countryman (2011) — page 154
Mobility Replacing components 152 3. Disengage the bulb holder by pressing d own on the clamping clip, arrow. 4. Remove bulb holder. 5. Apply gentle pressure to th e bulb while turn- ing it to the left for removal and replace- ment. 6. Re-engage the bulb holder so that it audibly clicks into place. 7. Replace the cover pane l. License plate lamps 5 …
-
Mini Countryman (2011) — page 155
Replacing components Mobility 153 Sealant and compressor 1 Sealant bottle and adhesi ve label with speed limit 2 Filling hose Note the use- by date on the sealant bot- tle. < 3 Holder for the sealant bottle 4 Compressor 5 Plug and cable for th e socket in the ve hicle interior, pa ge 86 6 Connection h ose to connect the compresso r and sealant b …
-
Mini Countryman (2011) — page 156
Mobility Replacing components 154 approx. 73 psi/500 kPa. Do n ot switch off the compressor during this phase. < Do not run the comp ressor for longer than 10 minutes; otherwise, the device will overheat and possibly be dam- aged. < 8. Switch off the compressor. If an air pressure of 26 psi/180 kPa is not reached: 1. Unscrew the filling hose …
-
Mini Countryman (2011) — page 157
Replacing components Mobility 155 Changing wheels The pouch with the wheel changing kit * is stored under th e flat load floor * . It includes: > Vehicle jack > Reversible ratchet > Wheel stud wrench > Extractor hook fo r wheel center cover > Chock Preparing for a wheel change Observe the safety precautions regarding flat tires on pa …
-
Mini Countryman (2011) — page 158
Mobility Replacing components 156 7. Lower the veh icle. 8. Remove the jack. Tightening the lug bo lts Tighten the lu g bolts in a diagonal pattern. Immediately have the wheels checked with a calibrated torque wr ench to ensure that the lug bolts are firmly seated. Otherwise, incorrectly tightened lu g bolts can pres ent a safety hazard. < Tight …
-
Mini Countryman (2011) — page 159
Replacing components Mobility 157 In the engine compartment Opening the cover Press the latch. In the vehicle interior On the right side of the footwell. Opening the cover Press out at the recess. Online Edition for Part no. 01 40 2 607 530 — © 03/11 BMW AG Online Edition for Part no. 01 40 2 607 530 — © 03/11 BMW AG …
-
Mini Countryman (2011) — page 160
Mobility Giving and receiving assistance 158 Giving and receiving assistance Roadside Assistance Roadside Assistance is available by phone 24 hours a day in many countries. You can obtain assistance the re in the event of a vehicle breakdown. First aid pouch* Some of the articles co ntained in the first ai d pouch have a limited service life. There …
-
Mini Countryman (2011) — page 161
Giving and receiving assistance Mobility 159 Connecting jumper cables Connect the jumper cables in the correct o r d e r , s o t h a t n o s p arks which could cause injury occur. < 1. Open the battery cover in the engine com- partment to access the positive terminal of your MINI. 2. Release the tabs on the left and right side s of the positive …
-
Mini Countryman (2011) — page 162
Mobility Giving and receiving assistance 160 Using a tow fitting The screw-in to w fitting must alw ays be carried in the car. It can be screwe d in at the front or at the right rear. The tow fitting can be found under the right front seat or in the pocket of t he tire changing set * in the cargo area. Use only the to w fitting provided with the ve …
-
Mini Countryman (2011) — page 163
Giving and receiving assistance Mobility 161 With tow rope When starting off in the towing vehicle , make sure that the tow rope is taut. To avoid jerking and the associ ated stresses on vehicle com ponents when towing, always use nylon ropes or nylon strap s. Attach the tow rope to the tow fittings only, as attaching it to other parts of the vehic …
-
Mini Countryman (2011) — page 164
Mobility Indicator and warning lamps 162 Indicator and warning lamps Indicator and warning lamps can light up in var- ious combinations and colors in indic ator area 1 or 2 . Refer to th e table fo r information on causes and how to react. Note whether a lamp lights up alone or in combinatio n with another. Some lamps can light up in different colo …
-
Mini Countryman (2011) — page 165
Indicator and warning lamps Mobility 163 Lights up briefly: Approx. 2.1 US gal/8 liters of fuel are still in the tank Remains on: The remaining rang e is at most 30 miles/50 km, p age 51 Engine refuses to start Depress th e brake or clutch in order to start the engine, p age 41 . Ignition switched on and driver’s door open Switch o ff the igni …
-
Mini Countryman (2011) — page 166
Mobility Indicator and warning lamps 164 Lights up in red: Service due Arrange a servic e appointment . Check service requirements, page 142 . Lights up in yellow: The engine will start the next time the Start/Stop button is b riefly pressed, possibly with out the brake or clutch being depressed Remote control m alfunctioning or, in cars with Comfo …
-
Mini Countryman (2011) — page 167
Indicator and warning lamps Mobility 165 Indicator lamp 1 flashes: Engine malfunction under hig h load. High engine load will result in dam- age to the catalytic converter You can contin ue your journey, but moderate your speed and exercise due caution. Have t he vehicle checked wit hout delay. Indicator lamp 1 comes on: Engine malfunction with adv …
-
Mini Countryman (2011) — page 168
Mobility Indicator and warning lamps 166 Indication in Canadian models Parking brake applied Indication in US models Lights up in red: Brake fluid level too low Braking action is re duced, stop with care. Conta ct the neare st MINI de aler. Lights up in yellow: Hill Assist failed. The car will not be held in place after the brake is released Have t …
-
Mini Countryman (2011) — page 169
Indicator and warning lamps Mobility 167 Indication in US models Vehicle ele ctronics fai led You cannot co ntinue your jo urney. Contact your MIN I dealer. Indication * in Canadian models Vehicle ele ctronics fai led You cannot co ntinue your jo urney. Contact your MIN I dealer. Lights up in red: Have the system in question checked without delay. …
-
Mini Countryman (2011) — page 170
Mobility Indicator and warning lamps 168 Dynamic Traction Control DTC is acti- vated, refer also to page 61 The Dynamic Stability Control DSC and Dynamic Traction Control DTC are deactivated, refer also to page 59 Driving stability limited during accel- eration and cornering. Driving style must be adjusted. The Dynamic Stability Control DSC and Dyn …
-
Mini Countryman (2011) — page 171
Indicator and warning lamps Mobility 169 Indication * in Canadian models The driving stabili ty control systems, including ABS, ALL4 all-wheel drive, and the Flat Tire Monitor or the Tire Pressure Monitor * , have failed, refer also to page 59 Drive cautiously and think well ahead. Avoid braking with full force, driving on rough tracks, and depress …
-
Mini Countryman (2011) — page 172
Mobility Indicator and warning lamps 170 Vehicles with Tire Pressure Monitor * Light up in yel low and red: There is a flat tire or significant tire pressure loss, e.g. in the front rig ht tire Carefully bring the car to a stop. Observe the informatio n starting on page 64 . Vehicles with Tire Pressure Monitor * Light up in yel low: Tire Pressure M …
-
Mini Countryman (2011) — page 173
Indicator and warning lamps Mobility 171 Lights up in re d: > Transmission limp-home pro- gram active with restricted range of gears, possibly with reduced acceleration You can contin ue your journey, but moderate your speed and exercise due caution. Have t he system checked wit hout delay. > Gears can be engaged without depressing the brake …
-
Mini Countryman (2011) — page 174
Mobility Indicator and warning lamps 172 Selector lever position P not engaged. Ignition cannot be switched off Engage selector le ver position P when you wish to switch o ff the ignition, page 41 . Cruise control system fail ed Have the sy stem check ed. Park Distance Control fail ed Have the system checked. Bulb of exterior lightin g system faile …
-
Mini Countryman (2011) — page 175
Indicator and warning lamps Mobility 173 No service due Set speed limit exceeded Time and date no longer correct Set the time and date, page 57 . 1 2 Cause What to do Online Edition for Part no. 01 40 2 607 530 — © 03/11 BMW AG Online Edition for Part no. 01 40 2 607 530 — © 03/11 BMW AG …
-
Mini Countryman (2011) — page 176
Find Me. Online Edition for Part no. 01 40 2 607 530 — © 03/11 BMW AG …
-
Mini Countryman (2011) — page 177
AT A GLANCE Controls Driving tips Entertainment Communications Mobility Reference Online Edition for Part no. 01 40 2 607 530 — © 03/11 BMW AG …
-
Mini Countryman (2011) — page 178
Reference Technical data 176 Technical data Engine data Cooper Cooper S Displacement cu in/cm μ 97.5/1,598 97.5/1,598 Number of cylinders 4 4 Maximum power out- put hp 121 181 At engine speed rpm 6,000 5,500 Maximum torque with overboost lb ft/Nm 114/155 – 177/240 192/260 At engine speed with overboost rpm 4,250 – 1,600-5,000 1,700-4,500 Overb …
-
Mini Countryman (2011) — page 179
Technical data Reference 177 Dimensions All dimensions in inches/mm. Minimum turning radius dia.: 38.1 ft/11.6 m. Information after th e semicolon: differe nt values for MIN I Cooper S. Online Edition for Part no. 01 40 2 607 530 — © 03/11 BMW AG Online Edition for Part no. 01 40 2 607 530 — © 03/11 BMW AG …
-
Mini Countryman (2011) — page 180
Reference Technical data 178 Weights Never exceed either th e approved axle loads or the gross vehicle weight. Cooper Cooper S Cooper S A LL4 Curb weight, ready for travel , with all optional extras > Manu al transmission lbs./kg 2,9 54/1,340 3,053/1,385 3,208/1,455 > Automatic transmis- sion lbs./kg 3,020/1,370 3,097/1,405 3,252/1,475 Approv …
-
Mini Countryman (2011) — page 181
Technical data Reference 179 Capacities US gal/US quarts Liters Notes Fuel tank 12.4/– approx. 47 Fuel grade: page 129 Including reserve of 2.1/– approx. 8 Window washer system incl. headlamp washer system –/4.2 approx. 4 For more details: page 49 Online Edition for Part no. 01 40 2 607 530 — © 03/11 BMW AG Online Edition for Part no. 01 40 …
-
Mini Countryman (2011) — page 182
180 Reference Everything from A to Z Everything from A to Z Index A ABS Antilock Brake System 60 Accessories, refer to Your individual vehicle 4 Acknowledgment signals for locking/unlocking vehicle 22 Activated-charcoa l filter for automatic climate control 80 Adaptive Light Control 73 Additives – coolant 140 – engine oil 140 Adjusting temperat …
-
Mini Countryman (2011) — page 183
Everything from A to Z Reference 181 Battery 156 – charging 156 – disposal 29 , 156 – jump-starting 15 8 – temporary power failure 156 Battery renewal – remote control 29 Being towed 160 Bell – volume 102 Belt tensioner, refer to Safety belts 35 Belts, refer to Safe ty belts 35 Beverag e holders, re fer to Cupholders 85 Black ice, refer …
-
Mini Countryman (2011) — page 184
Reference Everything from A to Z 182 Center Rail, refer to Storage compartments 84 Central locking system 21 – Comfort Access 27 – from inside 24 – from outside 21 – setting unlocki ng behavior 21 Changing bulbs 148 Changing w heels 155 Chassis number, refer to Engine compartment 139 Check Control 57 Child restraint fixing system LATCH 39 C …
-
Mini Countryman (2011) — page 185
Everything from A to Z Reference 183 Door key, refer to Integr ated key/remote control 20 Door lock 24 Door lo ck, confi rmation signals 22 Doors, manu al operation 24 DOT Qual ity Grade s 134 Drinks holders, refer to Cupholders 85 Drive-off assistan t, refer to Hill Assist 62 Drivin g dynamics co ntrol, ref er to Sport button 62 Driving lamps, ref …
-
Mini Countryman (2011) — page 186
Reference Everything from A to Z 184 Flat Tire Monitor FTM 62 – indicating a flat tire 63 – initializing the system 63 – snow chains 63 – system limits 63 Flat tire s, refer to Tire condit ion 135 Floor mats, care 146 Floor plate, refer to Flat load floor 94 Fog lamps – replacing bulb 150 Folding rear seat backrest 92 Footbrake, refer to …
-
Mini Countryman (2011) — page 187
Everything from A to Z Reference 185 Ignition key position 1, ref er to Radio readiness 41 Ignition key position 2, ref er to Ignition on 41 Ignition key, refer to Integrated ke y/remote control 20 Ignition lock 41 Imprint 2 Incoming call 119 Indicator and warning lamps 13 , 162 – Tire Pressure Monitor TPM 65 Indicator lighting, refer to Instrume …
-
Mini Countryman (2011) — page 188
Reference Everything from A to Z 186 Luggage rack, refer to Roof-mounte d luggage rack 97 Lumbar support 33 M M+S tires, refer to Winter tires 137 Maintenance, refer to Service and Warranty Information Booklet for US models and Service Guide Boo klet for Canadian models Maintena nce system 142 Malfunction warn ings, refer to Check Control 57 Manual …
-
Mini Countryman (2011) — page 189
Everything from A to Z Reference 187 P Paintwork, care 145 Park Distance Control PDC 59 Parking – vehicle 42 Parking aid, refer to Park Distance Control PDC 59 Parking brake 43 Parking lamps, replacing bulb 150 Parking lamps/low beams 71 Parts and accessories, refer to Your individual vehicle 4 Pathway lighting 71 PDC – volume 102 Personal Prof …
-
Mini Countryman (2011) — page 190
Reference Everything from A to Z 188 Roadside Assistance 158 Roadside parking lamps 74 – replacing bulb 150 Roadworthiness test, refer to Service requirements 55 Roof load capacity 178 Roof-mounted lug gage rack 97 Rope, refer to Tow-starting, towing away 161 RSC Run-flat System Component, refer to Run-flat tires 136 Rubber parts, care 145 Run-fl …
-
Mini Countryman (2011) — page 191
Everything from A to Z Reference 189 Speedo, refer to Speedometer 12 Speedometer 12 Split rear seat backrest, refer to Expanding the cargo area 92 Sport button 62 Stability control, refer to Driving s tability contr ol systems 59 Start/Stop button 41 – starting the engine 42 – switchin g off the engine 42 Starting assistance, refer to Jump-star …
-
Mini Countryman (2011) — page 192
Reference Everything from A to Z 190 Torque 176 – lug bolts 156 Tow bar 160 Tow fitting 160 – screw thread 160 Tow fittings for tow-starting and towing away 160 Tow rope 161 Towing 159 – car with automati c transmission 160 – methods 160 Tow-starting 159 TPM, refer to Tire Pressure Monitor 64 Track width, refer to Dimension 177 Traction con …
-
Mini Countryman (2011) — page 193
Everything from A to Z Reference 191 Windows 30 – closing 30 – convenient operation 22 – opening 30 – pinch protection system 31 – safety switch 31 Windshield – cleaning 48 – defrosting and removing condensation 78 , 80 Windshield wiper blades, changing 148 Windshield wipers, refer to Wiper system 47 Winter tires 137 – storage 137 W …
-
Mini Countryman (2011) — page 194
Online Edition for Part no. 01 40 2 607 530 — © 03/11 BMW AG Online Edition for Part no. 01 40 2 607 530 — © 03/11 BMW AG …
-
Mini Countryman (2011) — page 195
Online Edition for Part no. 01 40 2 607 530 — © 03/11 BMW AG Online Edition for Part no. 01 40 2 607 530 — © 03/11 BMW AG …
-
Mini Countryman (2011) — page 196
01 40 2 607 530 ue *BL260753000J* DRIVE ME. Online Edition for Part no. 01 40 2 607 530 — © 03/11 BMW AG …
![]()
Contents
A — Z
OWNER’S MANUAL
MINI COUNTRYMAN
Online Edition for Part no. 01 40 2 606 301 — © 10/10 BMW AG
Online Edition for Part no. 01 40 2 606 301 — © 10/10 BMW AG

Cooper
Cooper S
Cooper S ALL4
Congratulations on your new MINI
This Owner’s Manual should be considered a permanent part of this vehicle. It should stay with the vehicle when sold to provide the next owner with important operating, safety and maintenance information.
We wish you an enjoyable driving experience.
Online Edition for Part no. 01 40 2 606 301 — © 10/10 BMW AG
© 2010 Bayerische Motoren Werke Aktiengesellschaft
Munich, Germany
Reprinting, including excerpts, only with the written consent of BMW AG, Munich.
US English X/10
Printed on environmentally friendly paper, bleached without chlorine, suitable for recycling.
Online Edition for Part no. 01 40 2 606 301 — © 10/10 BMW AG
CONTENTS
The fastest way to find information on a particular topic or item is by using the index, refer to page 162.
Using this Owner’s Manual
4 Notes
6 Reporting safety defects
AT A GLANCE
10 Cockpit
Controls
18 Opening and closing
30 Adjustments
36 Transporting children safely
39 Driving
48 Controls overview
56 Technology for driving comfort and safety
67 Lamps
72 Climate
77 Practical interior accessories
Driving tips
86 Things to remember when driving
Communications
98 Telephone
Mobility
|
112 |
Refueling |
|
114 |
Wheels and tires |
|
121 |
Under the hood |
|
125 |
Maintenance |
|
127 |
Care |
|
131 |
Replacing components |
|
140 |
Giving and receiving assistance |
|
144 |
Indicator and warning lamps |
Reference
158 Technical data
162 Everything from A to Z
3
Online Edition for Part no. 01 40 2 606 301 — © 10/10 BMW AG
AT A GLANCE
Controls
Communications Driving tips
Mobility
Reference

Notes
Notes
Using this Owner’s
Manual
We have tried to make all the information in this Owner’s Manual easy to find. The fastest way to find specific topics is to refer to the detailed index at the back of the manual. If you wish to gain an initial overview of your vehicle, you will find this in the first chapter.
Should you wish to sell your MINI at some time in the future, remember to hand over this Owner’s Manual to the new owner; it is an important part of the vehicle.
Additional sources of information
Should you have any other questions, your MINI dealer will be glad to advise you at any time.
You can find more information about the MINI, for example on its technology, on the Internet at www.MINI.com.
Symbols used
Indicates precautions that must be followed precisely in order to avoid the pos-
sibility of personal injury and serious damage to the vehicle.<
Indicates information that will assist you in gaining the optimum benefit from your
vehicle and enable you to care more effectively for your vehicle.<
Refers to measures that can be taken to help protect the environment.<
< Marks the end of a specific item of information.
* Indicates special equipment, country-specific equipment and optional accessories, as well as equipment and functions not yet available at the time of printing.
Symbols on vehicle components
Indicates that you should consult the relevant section of this Owner’s Manual for
information on a particular part or assembly.
The individual vehicle
The manufacturer of your MINI is the Bayerische Motoren Werke Aktiengesellschaft, BMW AG.
When you ordered your MINI, you chose various items of equipment. This Owner’s Manual describes the entire array of options and equipment that the manufacturer of your MINI makes available with a specific model range.
Bear in mind that the manual may contain information on accessories and equipment that you have not specified for your own vehicle. Sections describing options and special equipment are marked by asterisks * to assist you in identifying possible differences between the descriptions in this manual and your own vehicle’s equipment.
If your MINI features equipment not described in this Owner’s Manual, observe the enclosed Supplementary Owner’s Manuals.
Editorial notice
The manufacturer pursues a policy of continuous, ongoing development that is conceived to ensure that MINI vehicles continue to embody the highest quality and safety standards combined with advanced, state-of-the-art technology. For this reason, it is possible in exceptional cases that features described in this Owner’s Manual could differ from those on your vehicle.
4
Online Edition for Part no. 01 40 2 606 301 — © 10/10 BMW AG

For your safety
Maintenance and repair
Advanced technology, e.g. the use of modern materials and high-performance
electronics, requires specially adapted maintenance and repair methods. Therefore, have the necessary work on your MINI only carried out by a MINI dealer or a workshop that has specially trained personnel working in accordance with the specifications of the MINI manufacturer. If this work is not carried out properly, there is a danger of subsequent damage and related safety hazards.<
nents, brake dust shields, telephones, including operation of any mobile phone from within the vehicle without using an externally mounted antenna, or transceiver equipment, for instance, CBs, walkie-talkies, ham radios or similar accessories, may cause extensive damage to the vehicle, compromise its safety, interfere with the vehicle’s electrical system or affect the validity of the MINI Limited Warranty. See your MINI dealer for additional information.<
Maintenance, replacement, or repair of the emission control devices and systems
may be performed by any automotive repair establishment or individual using any certified automotive part.<
Parts and accessories
For your own safety, use genuine parts and accessories approved by the manu-
facturer of the MINI.
When you purchase accessories tested
and approved by the manufacturer of the MINI and Original MINI Parts, you simultaneously acquire the assurance that they have been thoroughly tested by the manufacturer of the MINI to ensure optimum performance when installed on your vehicle.
The manufacturer of the MINI warrants these parts to be free from defects in material and workmanship.
The manufacturer of the MINI will not accept any liability for damage resulting from installation of parts and accessories not approved by the manufacturer of the MINI.
The manufacturer of the MINI cannot test every product made by other manufacturers to verify if it can be used on a MINI safely and without risk to either the vehicle, its operation, or its occupants.
Original MINI Parts, MINI Accessories and other products approved by the manufacturer of the MINI, together with professional advice on using these items, are available from all MINI dealers.
Installation and operation of accessories that have not been approved by the manufacturer of your MINI, such as alarms, radios, amplifiers, radar detectors, wheels, suspension compo-
California Proposition 65 warning
California law requires us to issue the following warning:
Engine exhaust and a wide variety of automobile components and parts,
including components found in the interior furnishings in a vehicle, contain or emit chemicals known to the State of California to cause cancer and birth defects and reproductive harm. In addition, certain fluids contained in vehicles and certain products of component wear contain or emit chemicals known to the State of California to cause cancer and birth defects or other reproductive harm.
Battery posts, terminals and related accessories contain lead and lead compounds. Wash your hands after handling.
Used engine oil contains chemicals that have caused cancer in laboratory animals. Always protect your skin by washing thoroughly with soap and water.<
Service and warranty
We recommend that you read this publication thoroughly.
Your MINI is covered by the following warranties:
>New Vehicle Limited Warranty
>Rust Perforation Limited Warranty
5
Online Edition for Part no. 01 40 2 606 301 — © 10/10 BMW AG
AT A GLANCE
Controls
Communications Driving tips
Mobility
Reference
Notes
>Federal Emissions System Defect Warranty
>Federal Emissions Performance Warranty
>California Emission Control System Limited Warranty
Detailed information about these warranties is listed in the Service and Warranty Information Booklet for US models or in the Warranty and Service Guide Booklet for Canadian models.
Your vehicle has been specifically adapted and designed to meet the particular operating conditions and homologation requirements in your country and continental region in order to deliver the full driving pleasure while the vehicle is operated under those conditions. If you wish to operate your vehicle in another country or region, you may be required to adapt your vehicle to meet different prevailing operating conditions and registration requirements. You should also be aware of any applicable warranty limitations or exclusions for such country or region. In such a case, please contact Customer Relations for further information.
Reporting safety defects
For US customers
The following applies only to vehicles owned and operated in the US.
If you believe that your vehicle has a defect that could cause a crash or could cause injury or death, you should immediately inform the National Highway Traffic Safety Administration, NHTSA, in addition to notifying MINI of North America, LLC, P.O. Box 1227, Westwood, New Jersey 07675-1227, Telephone 1-800-831- 1117.
If NHTSA receives similar complaints, it may open an investigation, and if it finds that a safety defect exists in a group of vehicles, it may order a recall and remedy campaign. However, NHTSA cannot become involved in individual problems between you, your dealer, or MINI of North America, LLC.
To contact NHTSA, you may call the Vehicle Safety Hotline toll-free at 1-888-327-4236 (TTY: 1-800-424-9153); go to http://www.safercar.gov; or write to: Administrator, NHTSA, 400 Seventh Street, SW., Washington, DC 20590. You can also obtain other information about motor vehicle safety from http://www.safercar.gov
For Canadian customers
Canadian customers who wish to report a safety-related defect to Transport Canada, Defect Investigations and Recalls, may telephone the toll-free hotline1-800-333-0510. You can also obtain other information about motor vehicle safety from http://www.tc.gc.ca/ roadsafety.
6
Online Edition for Part no. 01 40 2 606 301 — © 10/10 BMW AG
AT A GLANCE
Controls
Communications Driving tips
Mobility
Reference
7
Online Edition for Part no. 01 40 2 606 301 — © 10/10 BMW AG

Online Edition for Part no. 01 40 2 606 301 — © 10/10 BMW AG
![]()
AT A GLANCE
AT A GLANCE
Controls
Driving tips
Communications
Mobility
Reference
Online Edition for Part no. 01 40 2 606 301 — © 10/10 BMW AG
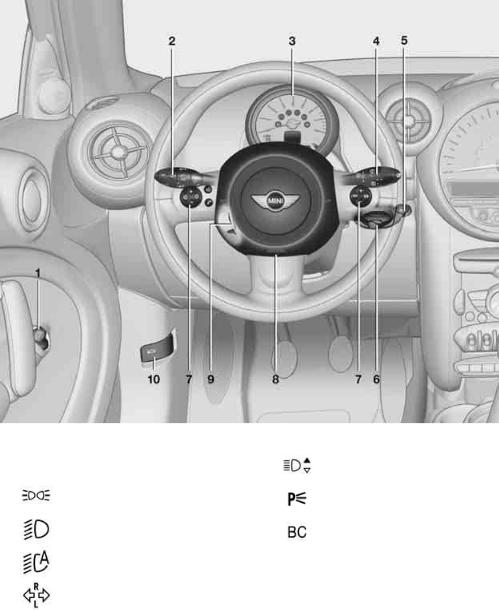
Cockpit
Cockpit
Around the steering wheel: Controls and displays
1Adjusting the exterior mirrors, folding them in and out* 34
2Parking lamps 67
Low beams 67
Automatic headlamp control* 67 Adaptive Light Control* 69
Turn signals 43
High beams 69
Headlamp flasher 43
Roadside parking lamps* 69
Computer* 49
10
Online Edition for Part no. 01 40 2 606 301 — © 10/10 BMW AG
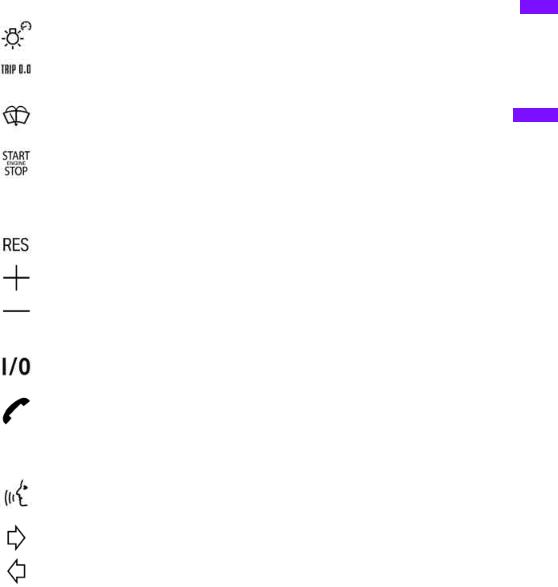
3 Tachometer 12
Instrument lighting 70
Resetting the trip odometer 48
5Switching the ignition on/off and starting/stopping the engine 39
6Ignition lock 39
7Buttons* on steering wheel
Continuing cruise control* 46
Right:
Storing speed and accelerating or decelerating
Left:
Increase or reduce volume
Activating/deactivating cruise control* 47
Telephone*:
Accepting and ending a call, starting dialing* of selected phone number and redialing if no phone number is selected Activating/deactivating voice activation system*
Changing the radio station
Selecting a music track
Scrolling through the redial list
8Horn: the entire surface
9Adjusting the steering wheel 35
10Releasing the hood 121
 Controls AT A GLANCE
Communications Driving tips
Mobility
Reference
11
Online Edition for Part no. 01 40 2 606 301 — © 10/10 BMW AG

|
1 |
Tachometer 48 |
5 |
Instrument lighting 70 |
|
|
with indicator and warning lamps |
13 |
6 |
Speedometer |
|
|
2 |
Display for |
with indicator and warning lamps 13 |
||
|
> Current vehicle speed 48 |
7 |
Fuel gauge 48 |
||
|
> Indicator and warning lamps |
13 |
8 |
Radio display, refer to separate Owner’s |
|
|
3 |
Resetting the trip odometer 48 |
Manual |
||
|
4 |
Display for |
9 |
Radio, refer to separate Owner’s Manual |
|
>Outside temperature 48
>Position of automatic transmission* 41
>Computer* 49
>Date of next scheduled service, and remaining distance to be driven 52
>Odometer and trip odometer 48
>Initializing the Flat Tire Monitor* 59
>Resetting the Tire Pressure Monitor* 61
>Settings and information 50
>Personal Profile settings 18
12
Online Edition for Part no. 01 40 2 606 301 — © 10/10 BMW AG
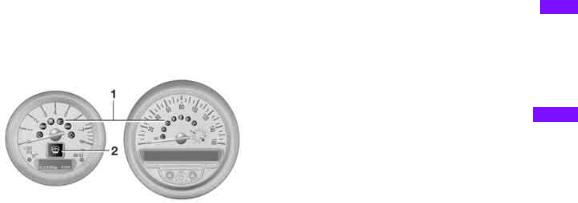
Indicator and warning lamps
The concept
Indicator and warning lamps can light up in various combinations and colors in indicator area 1 or 2.
Some lamps are checked for proper functioning and thus come on briefly when the engine is started or the ignition is switched on.
What to do in case of a malfunction
A list of all indicator and warning lamps, as well as notes on possible causes of malfunctions and on how to respond, can be found starting on page 144.
 Controls AT A GLANCE
Communications Driving tips
Mobility
Reference
13
Online Edition for Part no. 01 40 2 606 301 — © 10/10 BMW AG

Cockpit
Around the center console
14
Online Edition for Part no. 01 40 2 606 301 — © 10/10 BMW AG
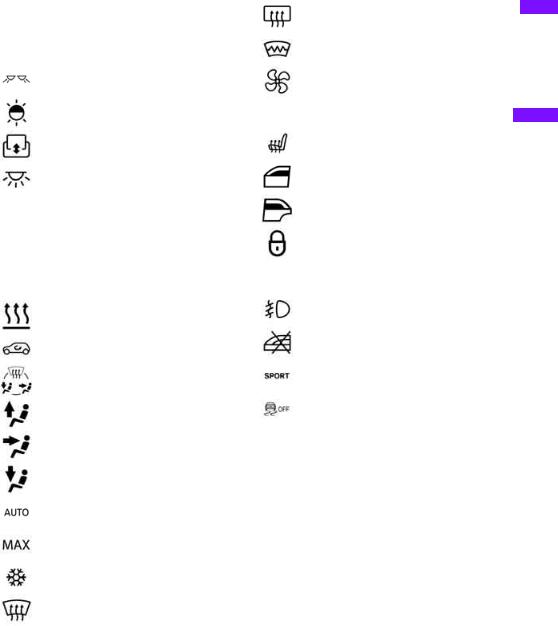
1Microphone for voice activation system* and for telephone in hands-free mode*
2Indicator/warning lamp* for front passenger airbags 65
3Reading lamps* 71 Ambient lighting* 71 Glass sunroof, electric* 27 Interior lamps 70
4Hazard warning flashers
5Speedometer 12
6Radio/CD, refer to separate Owner’s Manual
7Air conditioner or automatic climate control* 72
Temperature
Recirculated-air mode
Air distribution for air conditioner
Air distribution to the windshield*
Air distribution to the upper body area*
Air distribution to the footwell*
Automatic air distribution and flow rate*
Maximum cooling*
Cooling function
Defrosting windows*
Rear window defroster
Windshield heating*
Air flow rate
8 Switches in the center console
Seat heating* 33
Power windows, front 28
Power windows, rear 28
Central locking system, inside 22
9 Buttons in the center console
Fog lamps* 70
Safety switch for power windows in rear passenger compartment 29
Sport button* 59
Driving stability control systems
Dynamic Stability Control DSC 57
Dynamic Traction Control
DTC* 57
10AUX-IN connection/USB audio interface* 79
 Controls AT A GLANCE
Communications Driving tips
Mobility
Reference
15
Online Edition for Part no. 01 40 2 606 301 — © 10/10 BMW AG
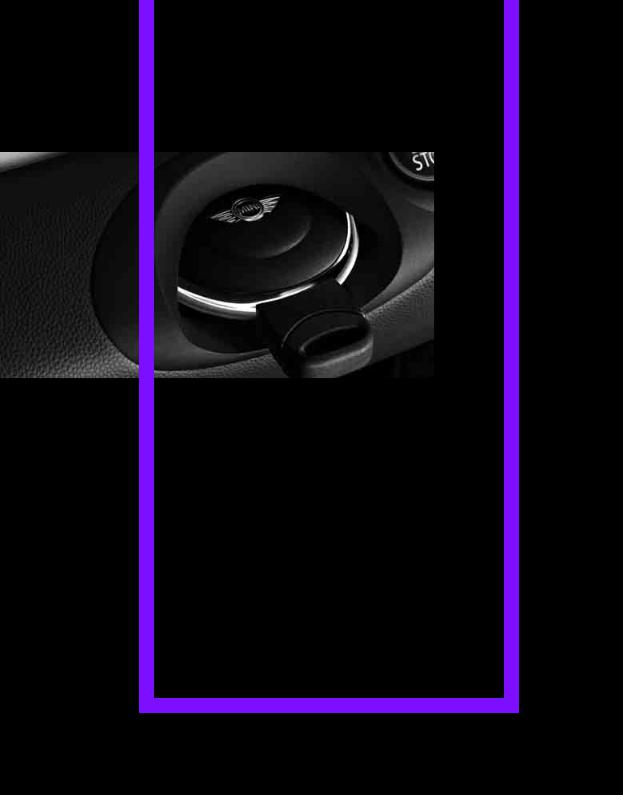
Online Edition for Part no. 01 40 2 606 301 — © 10/10 BMW AG

AT A GLANCE
Controls
Controls
Driving tips
Communications
Mobility
Reference
Online Edition for Part no. 01 40 2 606 301 — © 10/10 BMW AG
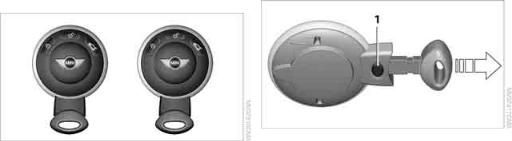
Opening and closing
Opening and closing
Keys/remote controls |
Integrated key |
Remote control
Each remote control contains a rechargeable battery that is recharged when it is in the ignition lock while the car is being driven. You should therefore use each remote control at least twice a year to maintain the charge status. In vehicles equipped with Comfort Access*, the remote control contains a replaceable battery, page 27.
If more than one remote control unit is used, the settings called up and implemented depend on which remote control is recognized when the car is unlocked, refer to Personal Profile,
page 18.
In addition, information about service requirements is stored in the remote control, refer to Service data in the remote control, page 125.
New remote controls
Your MINI dealer can supply new remote controls as additional units or as replacements in the event of loss.
Press button 1 to release the key.
The integrated key fits the following locks: > Driver’s door, page 21.
Personal Profile
The concept
The functions of your MINI can be set individually. By means of Personal Profiles, most of these settings are stored for the remote control currently in use. When you unlock the car, the remote control is recognized and the settings stored for it are called up and implemented.
This means that your settings will be activated for you, even if in the meantime your car was used by someone else with another remote control and the corresponding settings.
At most three remote controls can be set for three different people. A prerequisite is that each person uses a separate remote control.
Personal Profile settings
For more information on specific settings, refer to the specified pages.
>Response of the central locking system when the car is being unlocked 19
>Automatic locking of the vehicle 22
>Triple turn signal activation 43
18
Online Edition for Part no. 01 40 2 606 301 — © 10/10 BMW AG
![]()
>Settings for the displays in the speedometer and tachometer:
>12h/24h mode of the clock, refer to Formats and units of measure 51
>Date format, refer to Formats and units of measure 51
>Units of measure for fuel consumption, distance covered/remaining distances and temperature, refer to Formats and units of measure 51
>Light settings:
>Pathway lighting 67
>Daytime running lights 68
>Automatic climate control*: activating/ deactivating the AUTO program, setting the temperature, air volume and air distribution 74
>Entertainment:
>Adjusting volume levels, refer to separate Owner’s Manual
>Adjusting tone, refer to separate Owner’s Manual
The alarm system* is also activated or deactivated, page 24.
Operating from inside
Button for central locking system, page 22.
In the event of a sufficiently severe accident, the central locking system unlocks automatically. In addition, the hazard warning flashers and interior lamps come on.
Opening and closing: from outside
Persons or animals in a parked vehicle could lock the doors from the inside. Take
the key with you when you leave the vehicle so that the vehicle can be opened from the outside.<
Using the remote control
Unlocking
Press the  button.
The welcome lamps and interior lamps come on.
Central locking system
The concept
The central locking system is ready for operation whenever the driver’s door is closed.
The system simultaneously engages and releases the locks on the following:
>Doors
>Liftgate
>Fuel filler flap
Operating from outside
>Via the remote control
>Via the door lock*
>In cars with Comfort Access*, via the door handles on the driver’s and passenger’s sides
The remote control can also be used to switch on/off the welcome lamps and interior lamps.
Unlocking mode
You can also set which parts of the car are unlocked. The setting is stored for the remote control in use.
1.Switch on the ignition, refer to page 39.
2.Briefly press the button in the turn signal lever repeatedly until «SET/INFO» is displayed.
3.Press and hold the button until the display changes.
19
Online Edition for Part no. 01 40 2 606 301 — © 10/10 BMW AG
 Communications Driving tips Controls AT A GLANCE
Mobility
Reference
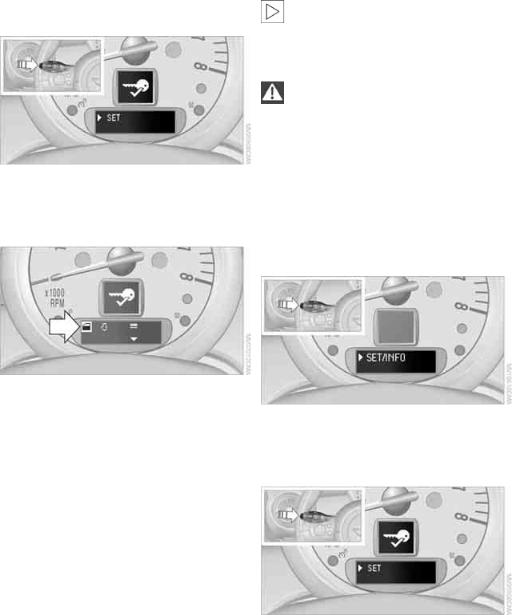
Opening and closing
|
4. Briefly press the button repeatedly until the |
Convenient closing is not possible by |
|
symbol and «SET» are displayed. |
means of the remote control.< |
|
Locking |
5.Press and hold the button until the display changes.
6.Briefly press the button repeatedly until the display shows the illustrated symbol, arrow.
7.Press and hold the button until the display changes.
8.Briefly press the button to select:
>
Press the  button once to unlock only the driver’s door and the fuel filler flap*.
Press the button twice to unlock the entire vehicle.
>
Press the  button once to unlock the entire vehicle.
9.Press and hold the button until the display changes. The setting is stored for the remote control currently in use.
Convenient opening
Hold the  button down.
The power windows are opened and the glass sunroof* is tilted.
Press the  button.
Do not lock the vehicle from the outside if there is any person inside, because the
vehicle cannot be unlocked from inside without special knowledge.<
Setting confirmation signals
To have the vehicle confirm when it has been locked or unlocked.
1.Switch on the ignition, refer to page 39.
2.Briefly press the button in the turn signal lever repeatedly until «SET/INFO» is displayed.
3.Press and hold the button until the display changes.
4.Briefly press the button repeatedly until the symbol and «SET» are displayed.
5.Press and hold the button until the display changes.
6.Briefly press the button to select, arrow:
> Confirmation signal during unlocking
> Confirmation signal during locking
20
Online Edition for Part no. 01 40 2 606 301 — © 10/10 BMW AG
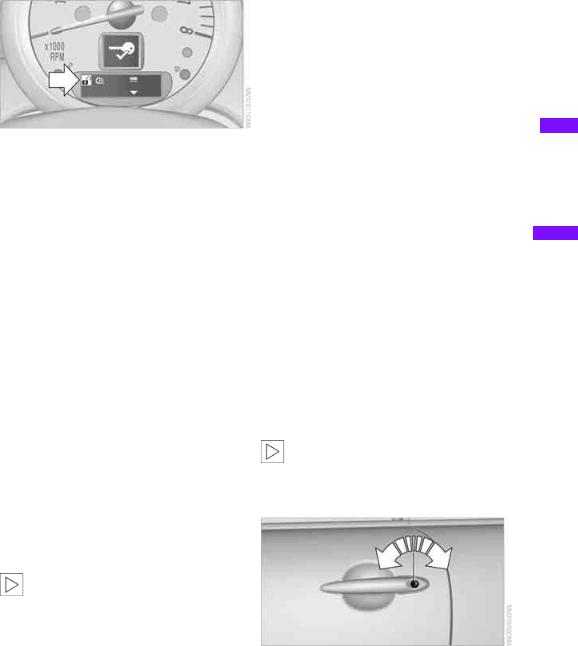
Malfunctions
7.Press and hold the button until the display changes.
8.Briefly press the button to select:
>
The hazard warning flashers light up during unlocking/locking.
>
An acoustic signal sounds during unlocking/locking.
>
The hazard warning flashers light up and an acoustic signal* sounds during unlocking/locking.
>
The function is deactivated.
9.Press and hold the button until the display changes. The setting is stored.
Switching on interior lamps
While the car is locked: Press the  button.
You can also use this function to locate your vehicle in parking garages, etc.
Unlocking liftgate
Press the  button for approx. 1 second and then release it.
When it is opened, the liftgate swings out and up toward the rear. Make sure that
adequate clearance is available before opening. To prevent accidentally locking yourself out, do not place the key down in the cargo area. If the liftgate was locked before opening, it will be locked again after it is closed.
Before and after each trip, check that the liftgate has not been inadvertently unlocked.<
The remote control may malfunction due to local radio waves. If this occurs, unlock and lock the car at the door lock with the integrated key.
If the car can no longer be locked with a remote control, the battery in the remote control is discharged. Use this remote control during an extended drive; this will recharge the battery, page 18.
For US owners only
The transmitter and receiver units comply with part 15 of the FCC/Federal Communications Commission regulations. Operation is governed by the following:
FCC ID:
LX8766S
LX8766E
LX8CAS
Compliance statement:
This device complies with part 15 of the FCC Rules. Operation is subject to the following two conditions:
>This device must not cause harmful interference, and
>this device must accept any interference received, including interference that may cause undesired operation.
Any unauthorized modifications or changes to these devices could void the
user’s authority to operate this equipment.<
Using the door lock
You can set which parts of the car are unlocked, page 19.
21
Online Edition for Part no. 01 40 2 606 301 — © 10/10 BMW AG
 Communications Driving tips Controls AT A GLANCE
Mobility
Reference
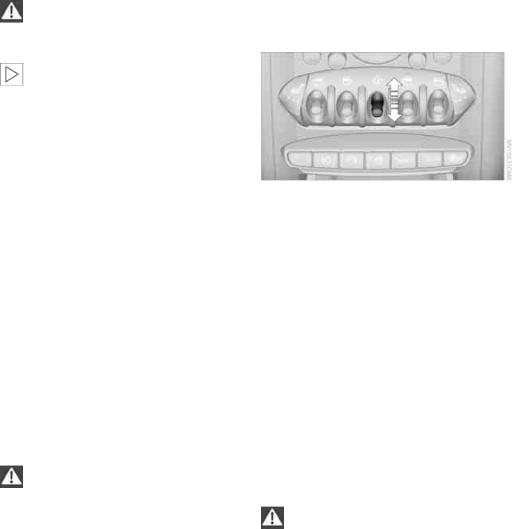
Opening and closing
Do not lock the vehicle from the outside if there is any person inside, because the
vehicle cannot be unlocked from inside without special knowledge.<
When there is no alarm system* or Comfort Access*, only the driver’s door is
locked with the door lock.<
To lock all doors, the fuel filler flap, and the liftgate together:
>With the doors closed, press the interior central locking button, page 22 to lock the vehicle.
>Unlocking and opening the driver or passenger door, page 22.
Locking the vehicle.
>Lock the driver’s door with the integrated key via the door lock, or
>press the safety lock button on the passenger’s door and close the door from the outside.
Convenient operation
With an alarm system* or Comfort Access*, the windows and glass sunroof* can be operated via the door lock.
Opening/closing
Hold the key in the position for unlocking or locking.
Watch during the closing process to be sure that no one is injured. Releasing the
key stops the operation.<
Manual operation
In the event of an electrical malfunction, the driver’s door can be unlocked or locked by turning the integrated key in the door lock to the end positions.
Opening and closing: from inside
The switch locks or unlocks the doors and liftgate when the doors are closed, but the antitheft system is not activated. The fuel filler flap remains unlocked*.
Unlocking and opening
>Either unlock the doors together using the switch for the central locking system and then pull the door handle above the armrest or
>pull on the door handle of either door twice: the first time unlocks the door, the second time opens it.
Locking
>Press the switch or
>press down the safety lock button of a door. To prevent you from being locked out, the open driver’s door cannot be locked using the lock button.
Persons or animals in a parked vehicle could lock the doors from the inside. Take
the key with you when you leave the vehicle so that the vehicle can be opened from the outside.<
Automatic locking*
You can also set the situations in which the car locks. The setting is stored for the remote control in use.
22
Online Edition for Part no. 01 40 2 606 301 — © 10/10 BMW AG
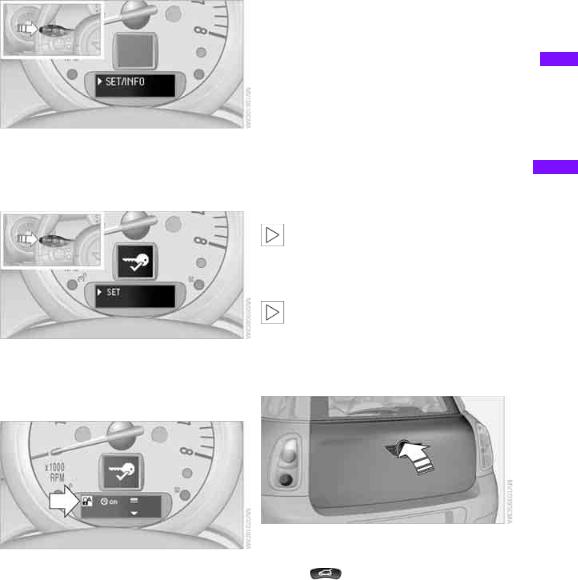
1.Switch on the ignition, refer to page 39.
2.Briefly press the button in the turn signal lever repeatedly until «SET/INFO» is displayed.
3.Press and hold the button until the display changes.
4.Briefly press the button repeatedly until the symbol and «SET» are displayed.
locks the vehicle after some time if no door has been opened.
>
The central locking system automatically locks the vehicle as soon as you drive off.
>
The central locking system automatically locks the vehicle after some time if no door has been opened, or as soon as you drive off.
>
The central locking system remains unlocked.
9.Press and hold the button until the display changes. The setting is stored.
Liftgate
To avoid damage, make sure there is sufficient clearance before opening the lift-
gate.<
Opening
|
In some market-specific versions, the lift- |
||
|
gate cannot be unlocked using the remote |
||
|
control unless the vehicle is unlocked first. |
||
|
5. Press and hold the button until the display |
Only drive with the liftgate fully closed; other- |
|
|
wise, the tail lamps will be obscured and driving |
||
|
changes. |
||
|
safety will be compromised.< |
||
6.Briefly press the button repeatedly until the display shows the illustrated symbol, arrow.
|
Press the top side of the MINI emblem, arrow, |
|||
|
7. Press and hold the button until the display |
or |
||
|
press the |
button for approx. 1 second |
||
|
changes. |
|||
|
and then release it. The liftgate is unlocked. |
|||
8.Briefly press the button to select:
>
The central locking system automatically
23
Online Edition for Part no. 01 40 2 606 301 — © 10/10 BMW AG
 Communications Driving tips Controls AT A GLANCE
Mobility
Reference
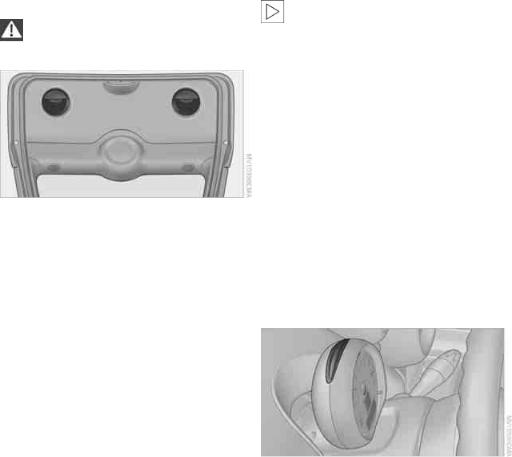
Opening and closing
Closing
Make sure that the closing path of the liftgate is clear; otherwise, injuries may
occur.<
The handle recesses on the interior trim panel of the liftgate make it easier to pull it down.
In certain market-specific versions, unlocking via the door lock triggers the
alarm.<
Panic mode*
You can activate the alarm system if you find yourself in a dangerous situation.
Press the  button for at least two seconds.
Switching off the alarm: Press any button.
Switching off an alarm
>Unlock the car with the remote control.
>Insert the key fully into the ignition lock.
>In cars with Comfort Access*, press the button on the door lock.
Alarm system*
The concept
The alarm system, when activated, reacts if:
>A door, the engine compartment lid or the liftgate is opened
>There is movement inside the car
>The car’s inclination changes, for instance if an attempt is made to jack it up and steal the wheels or to raise it prior to towing it away
>There is an interruption in the power supply from the battery
The alarm system briefly indicates unauthorized entry or tampering by means of:
>An acoustic alarm
>Switching on the hazard warning flashers
Arming and disarming
Whenever the car is locked or unlocked, the alarm system is armed or disarmed.
Even when the alarm system is armed, you can open the liftgate by means of the  button on the remote control.
When you subsequently close the liftgate it is again locked and monitored.
Display on the revolution counter
When the system is armed, all LEDs pulse. After approx. 16 minutes one LED flashes.
>LEDs pulse or LED flashes: system is armed.
>One LED flashes at short intervals:
A door, the hood or the liftgate is not properly closed. Even if these are not closed fully, the remaining items are deadlocked and the LEDs pulse after approx. 10 seconds for approx. 16 minutes. Afterwards, one LED flashes.
The interior movement detector is not activated.
>LEDs go out after the vehicle is unlocked: No attempt was made to tamper with the car.
>LEDs flash after unlocking until the key is inserted in the ignition, but for no longer
24
Online Edition for Part no. 01 40 2 606 301 — © 10/10 BMW AG

than approx. 5 minutes: an attempt was made to tamper with the car.
Tilt alarm sensor
The vehicle’s inclination is monitored. The alarm is triggered, for instance, if an attempt is made to steal the car’s wheels or tow it away.
Interior movement detector
Before the interior movement detector can operate correctly, the windows and glass roof must be closed.
Avoiding false alarms
The tilt alarm sensor and the interior movement detector can be switched off together.
This prevents false alarms, e.g. in the following situations:
>In duplex garages
>When being transported on car-carrying trains, ferries or trailers
>If pets are to remain inside the car
Switching off the tilt alarm sensor and interior movement detector
>Press the  button on the remote control twice in succession.
>Lock the vehicle twice with the integrated key.
LEDs flash in short succession for approx. 2 seconds.
The tilt alarm sensor and the interior movement detector are switched off until the car is next unlocked and locked.
Comfort Access*
Comfort Access enables you to enter your vehicle without having to hold the remote control in your hand. All you need to do is wear the remote control close to your body, e.g. in your jacket pocket. The vehicle automatically detects the remote control within the immediate vicinity or in the passenger compartment.
Functional requirements
>The vehicle or the liftgate can only be locked when the vehicle detects that the remote control currently in use is outside of the vehicle.
>The vehicle cannot be locked or unlocked again until after approx. 2 seconds.
>The engine can only be started when the vehicle detects that the remote control is inside the vehicle.
>The doors and liftgate must be closed to be
able to operate the windows and glass sunroof*.
Comfort Access supports the following functions:
>Unlocking/locking the vehicle
>Convenient closing
>Unlocking the liftgate by itself
>Starting the engine
Comparison to standard remote controls
Essentially, it makes no difference whether you control the above-mentioned functions using Comfort Access or by pressing the buttons on the remote control for Comfort Access.
Instructions on opening and closing are found starting on page 18.
Special features regarding the use of Comfort Access are described below.
If you notice a brief delay while opening or closing the windows or glass sunroof, the system is checking whether a remote control is inside the vehicle. Repeat the opening or closing
procedure, if necessary.<
 Communications Driving tips Controls AT A GLANCE
Mobility
Reference
25
Online Edition for Part no. 01 40 2 606 301 — © 10/10 BMW AG
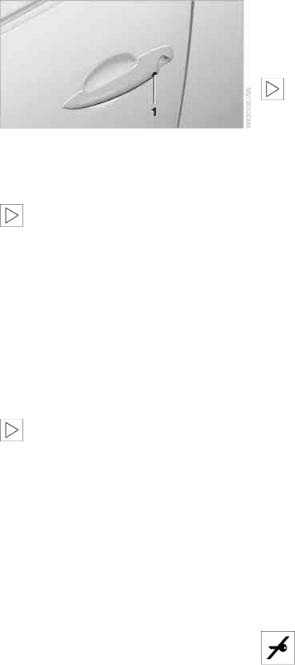
Opening and closing
Unlocking
Press button 1.
Depending on the setting, refer to Unlocking mode on page 19, only the driver’s door or the entire vehicle is unlocked.
Press the button again to lock the vehicle again.<
Convenient opening with the remote control, refer to page 20.
Locking
Press button 1.
For convenient closing, press and hold button 1.
In addition, the windows and the glass sunroof* are closed.
Unlocking the liftgate separately
Press the top side of the MINI emblem.
If the vehicle detects that a remote control has been accidentally left inside the
locked vehicle’s cargo area after the liftgate is closed, the liftgate will reopen slightly. The hazard warning flashers flash and an acoustic signal* sounds.<
Windows and glass sunroof, electric*
If the engine is switched off, you can still operate the windows and glass sunroof so long as a door or the liftgate has not been opened.
If the doors and liftgate are closed again and the remote control is located inside the vehicle, the windows and the glass sunroof can be operated again.
Insert the remote control into the ignition lock to be able to operate the windows or glass sunroof
when the engine is switched off and the doors are open.
Switching on radio readiness
Switch on radio readiness by briefly pressing the Start/Stop button, page 39.
Do not depress the brake or the clutch; otherwise, the engine will start.<
Starting the engine
The engine can be started or the ignition can be switched on when a remote control is inside the vehicle. It is not necessary to insert a remote control into the ignition lock, page 39.
Switching off the engine in cars with automatic transmission
The engine can only be switched off when the selector lever is in position P, page 40.
To switch the engine off when the selector lever is in position N, the remote control must be in the ignition lock.
Before driving a vehicle with automatic transmission into a car wash
1.Insert remote control into ignition lock.
2.Depress the brake.
3.Move the selector lever to position N.
4.Switch off the engine.
The vehicle can roll.
Malfunction
Comfort Access may malfunction due to local radio waves.
If this happens, open or close the vehicle via the buttons on the remote control or using the integrated key.
Insert the remote control into the ignition lock and start the engine.
Warning lamps
The warning lamp lights up when an attempt is made to start the engine: the engine cannot be started. The remote
control is not inside the vehicle or is malfunc-
26
Online Edition for Part no. 01 40 2 606 301 — © 10/10 BMW AG
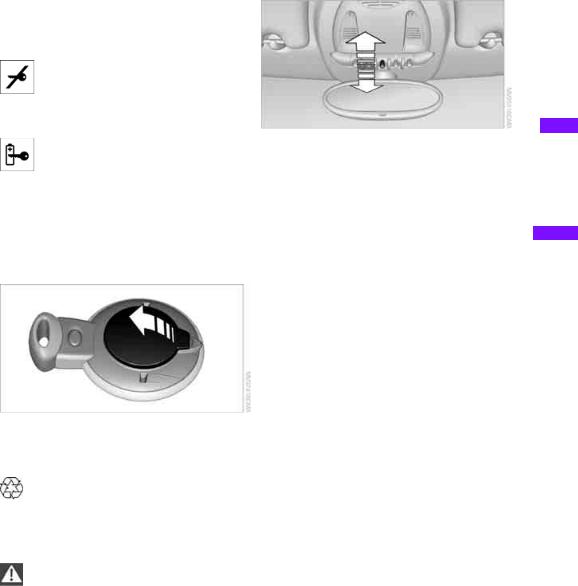
tioning. Take the remote control with you inside the vehicle or have it checked. If necessary, insert another remote control into the ignition lock.
The warning lamp lights up when the engine is running: the remote control is no longer inside the vehicle. After the
engine is switched off, the engine can only be restarted within approx. 10 seconds.
The indicator lamp lights up: replace the battery in the remote control.
Replacing the battery
The remote control for Comfort Access contains a battery that will need to be replaced from time to time.
1. Remove the cover.
2.Insert the new battery with the plus side facing up.
3.Press the cover on to close.
Take the old battery to a recycling center or to your MINI dealer.<
Glass sunroof, electric*
To prevent injuries, exercise care when closing the glass sunroof and keep it in
your field of vision until it is shut.
Take the key with you when you leave the car; otherwise, children could operate the sunroof and possibly injure themselves.<
Tilting
>Press the switch backward to the resistance point and hold it there.
Both glass sunroofs are tilted.
Releasing the switch stops the movement.
>With the ignition switched on, press the switch backward beyond the resistance point.
Both closed sunroofs are tilted fully. Pressing again stops the movement.
Opening, closing
With the ignition switched on and the glass sunroof tilted, press the switch backward and hold it there.
The front glass sunroof opens. The rear glass sunroof is closed.
Releasing the switch stops the movement.
The glass sunroof can be closed in the same way by pressing the switch forward.
The front glass sunroof remains in a tilted position. The rear glass sunroof is tilted. Pressing on the switch again closes both sunroofs completely.
Convenient operation via door lock or Comfort Access, refer to page 20, 22, 26.
Roller sun blind
The roller sun blind can be opened and closed independently of the glass sunroof.
Following interruptions in electrical power supply
After a power failure, there is a possibility that the glass sunroof can only be tilted. In this case, have the system initialized. The manufacturer of
27
Online Edition for Part no. 01 40 2 606 301 — © 10/10 BMW AG
 Communications Driving tips Controls AT A GLANCE
Mobility
Reference
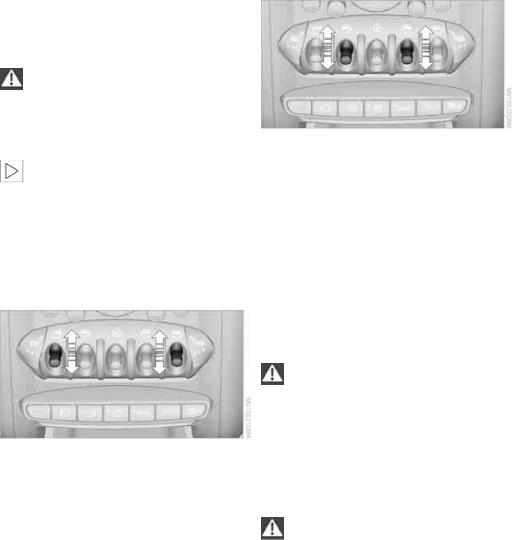
Opening and closing
your MINI recommends that you have this work done by your MINI dealer.
Windows
To prevent injuries, exercise care when closing the windows.
Take the remote control with you when you leave the car; otherwise, children could operate the electric windows and possibly injure themselves.<
If, after a window is opened and closed several times in close succession, the win-
dow can only be closed and not opened, the system is overheated. Let the system cool for several minutes with the ignition switched on or the engine running.<
Opening, closing
Front window
>Press the switch downward.
The window opens until you release the switch.
>Tap the switch downward.
As of radio readiness, the windows will open automatically. Tap the switch again to stop the opening movement.
The window can be closed in the same way by pressing the switch up.
Rear window
>Press the switch downward.
The window opens until you release the switch.
>Tap the switch downward.
As of radio readiness, the windows will open automatically. Tap the switch again to stop the opening movement.
The window can be closed in the same way by pressing the switch up.
After switching off the ignition
When the ignition is switched off, the windows can still be operated for approx. 1 minute as long as no door is opened.
Take the key with you when you leave the car; otherwise, children could operate the
electric windows and possibly injure themselves.<
Pinch protection system
If the closing force rises beyond a predefined threshold during closing, the system will stop moving the window prior to lowering it again slightly.
Even though there is the pinch protection system, always ensure that the window’s travel path is clear; otherwise, the safety system might fail to detect certain kinds of obstructions, such as thin objects, and the window would con-
tinue closing.
Do not install any accessories that might interfere with window movement. Otherwise, the pinch protection system could be impaired.<
28
Online Edition for Part no. 01 40 2 606 301 — © 10/10 BMW AG
![]()
Closing without pinch protection
If there is an external danger, or if ice on the windows, etc., prevents you from closing the windows normally, the window can be closed manually.
1.Press the switch upward and hold it there. Pinch protection is limited and the window reopens slightly if the closing force exceeds a certain value.
2.Press the switch upward again within approx. 4 seconds and hold it there. The window closes without pinch protection.
Safety switch
With the safety switch, you can prevent the rear windows from being opened or closed via the switches in the rear passenger area, by children, for example.
Press the button, arrow.
The LED lights up when this safety feature is activated.
Always press the safety switch when children ride in the rear, otherwise uncon-
trolled closing of the windows could lead to injuries.<
 Communications Driving tips Controls AT A GLANCE
Mobility
Reference
29
Online Edition for Part no. 01 40 2 606 301 — © 10/10 BMW AG

Adjustments
Adjustments
Sitting safely
The ideal sitting position can make a vital contribution to relaxed, fatigue-free driving. In conjunction with the safety belts, the head restraints and the airbags, the seated position has a major influence on your safety in the event of an accident. To ensure that the safety systems operate with optimal efficiency, we strongly urge you to observe the instructions contained in the following section.
For additional information on transporting children safely, refer to page 36.
Airbags
Always maintain an adequate distance between yourself and the airbags. Always
grip the steering wheel on the rim, with your hands in the 3 o’clock and 9 o’clock positions, to minimize the risk of injury to the hands or arms in the event of the airbag being triggered off. No one and nothing should come between the airbags and the seat occupant.
Do not use the cover of the front airbag on the front passenger side as a storage area. Ensure that the front passenger is correctly seated, e.g. that no feet or legs are propped against the dashboard. Otherwise, leg injury could result if the front airbag suddenly deployed.
Make sure that passengers keep their heads away from the side airbag and do not lean against the cover of the head airbag, otherwise injuries can occur when the airbags are triggered.<
Even if you follow all the instructions, injuries resulting from contact with airbags cannot be fully excluded, depending on the circumstances. The ignition and inflation noise may provoke a mild hearing loss in extremely sensitive individuals. This effect is usually only temporary.
For airbag locations and additional information on airbags, refer to page 64.
Head restraint
A correctly adjusted head restraint reduces the risk of neck injury in the event of an accident.
Adjust the head restraint in such a way that its center is at approx. ear level. Oth-
erwise, there is an increased risk of injury in the event of an accident.<
Head restraints, refer to page 32.
Safety belt
Before every drive, make sure that all occupants wear their safety belts. Airbags complement the safety belt as an additional safety device, but they do not represent a substitute.
Number of safety belts
Never allow more than one person to wear a single safety belt. Never allow
infants or small children to ride in a passenger’s lap.
Make sure that the belt in the lap area sits low across the hips and does not press against the abdomen. The safety belt must not rest against the throat, run across sharp edges, pass over hard or fragile objects or be pinched. Fasten the safety belt so that it is pulled taut across the lap and shoulder, fitting the body snugly without any twists. Otherwise, the belt could slide over the hips in the event of a frontal collision and injure the abdomen. Avoid wearing bulky clothing and regularly pull the belt in the upper-body area taut; otherwise, its restraining effect could be impaired.<
Safety belts, refer to page 33.
Seats
Note before adjusting
Never attempt to adjust your seat while the vehicle is moving. The seat could
respond with unexpected movement, and the ensuing loss of vehicle control could lead to an
30
Online Edition for Part no. 01 40 2 606 301 — © 10/10 BMW AG

accident.
On the front passenger seat as well, do not incline the backrest too far to the rear while the vehicle is being driven; otherwise, there is a danger in the event of an accident of sliding under the safety belt, eliminating the protection normally provided by the belt.<
Comply with the instructions on head restraint height on page 32 and on damaged safety belts on page 33.
Seat adjustment, front
Observe the instructions on page 30 to ensure the best possible personal protec-
tion.<
Backrest
Pull lever, arrow 1, and apply weight to or remove weight from the backrest as needed.
Lumbar support*
You can also adjust the contour of the backrest to obtain additional support in the lumbar region.
The upper hips and spinal column receive supplementary support to help you maintain a relaxed, upright sitting position.
Longitudinal direction
Pull the lever, arrow 1, and slide the seat into the desired position, arrows 2.
After releasing the lever, move the seat slightly forward or back so that it engages properly.
Height
Pull up or push down the lever repeatedly, arrows 1, until the desired height is reached.
Turn the wheel to increase or decrease the curvature.
Seat adjustment, rear
Do not adjust rear seats while the vehicle is moving; otherwise, passengers could be
injured.
Make sure that the locking devices of the rear seats engage properly. Otherwise the restraining effect of the safety belts during an accident could be reduced.<
 Communications Driving tips Controls AT A GLANCE
Mobility
Reference
31
Online Edition for Part no. 01 40 2 606 301 — © 10/10 BMW AG

Adjustments
|
Longitudinal adjustment |
Removing |
1.Pull the lever and slide the seat into the desired position.
2.Release the lever and move the seat slightly forward or back so that it engages properly.
Backrest
Adjusting backrest angle, refer to page 88.
Head restraints
Correctly adjusted head restraint
A correctly adjusted head restraint reduces the risk of neck injury in the event of an accident.
Correctly adjust the head restraints of all occupied seats; otherwise, there is an
increased risk of injury in an accident.<
Height
Adjust the head restraint so that its center is approximately at ear level.
Height adjustment
To raise: pull up.
To lower: press the button, arrow 1, and slide the head restraint down.
Only remove a head restraint if no one will be sitting on the seat in question.
Reinstall the head restraint before transporting passengers, as otherwise the head
restraint cannot provide its protective function.<
Front
1.Pull up as far as it will go.
2.Fold the backrest back slightly.
3.Press button 1 and pull the head restraint out as far as it will go.
4.Also press button 2 with a suitable tool and pull the head restraint all the way out.
5.Fold back the backrest.
Rear
1.Pull up as far as it will go.
2.Fold the backrest forward slightly.
3.Press button 1 and pull the head restraint out completely.
4.Also press button 2 with a suitable tool and completely remove the head restraint.
5.Fold rear seat backrest back into position.
32
Online Edition for Part no. 01 40 2 606 301 — © 10/10 BMW AG

Seat heating*
Switching on
Press once for each temperature level. Three LEDs indicate the highest temperature.
If you continue driving within the next 15 minutes, the seat heating is automatically activated at the previously set temperature.
The temperature is lowered or the heating is switched off entirely to reduce the drain on the battery.
The LEDs stay lit.
Switching off
Press button longer.
Safety belts
Observe the instructions on page 30 to ensure the best possible personal protec-
tion.<
Before every drive, make sure that all occupants wear their safety belts. Airbags complement the safety belt as an additional safety device, but they do not represent a substitute.
Front and rear seats
Closing
Make sure you hear the lock engage in the belt buckle.
The upper belt anchor is suitable for adults of any stature as long as the seat is adjusted properly, page 30.
Opening
1.Grasp the belt firmly.
2.Press the red button in the buckle.
3.Guide the belt into its reel.
Height adjustment for rear seat belt tongues
When the outer rear seats are unoccupied, the seat belt tongues can be slid back to the cargo area trim panel with a clasp to prevent noise.
Safety belt reminder
Front seats
The indicator lamps come on and an acoustic signal sounds.Check whether the safety belt has been fastened correctly. The ‘Fasten safety belts’
reminder is issued when the driver’s safety belt has not been fastened. The ‘Fasten safety belts’ reminder is also activated at road speeds above approx. 5 mph or 8 km/h if the front passenger’s safety belt has not been fastened, if objects are placed on the front passenger seat, or if driver or front passenger unfasten their safety belts.
Damage to safety belts
If the safety belts are damaged or stressed in an accident: have the safety belt system
and its seat-belt tensioners replaced and the belt anchors checked. Have this work carried out only by a MINI dealer or by a workshop that has specially trained personnel working in accordance with the specifications of the MINI manufacturer; otherwise, correct operation of these safety systems is not ensured.<
 Communications Driving tips Controls AT A GLANCE
Mobility
Reference
33
Online Edition for Part no. 01 40 2 606 301 — © 10/10 BMW AG

Adjustments
Mirrors
Exterior mirrors
The mirror on the passenger’s side is more curved than the driver’s mirror. The
objects seen in the mirror are closer than they appear. Do not gauge your distance from traffic behind you on the basis of what you see in the mirror; otherwise, there is an increased risk of an accident.<
1Adjusting the left or right exterior mirror
2Folding mirrors in and out*
Manual adjustment
The mirrors can also be adjusted manually: press the edge of the glass.
Folding mirrors in and out*
Turn the knob beyond the pressure point in direction 2. The mirrors can be folded in at road speeds up to approx. 20 mph/30 km/h.
This can be beneficial in narrow streets, for example, or for moving mirrors that were folded in by hand back out into their correct positions.
Automatic heating*
At outside temperatures below a certain limit, both exterior mirrors are automatically heated while the engine is running or the ignition switched on.
Interior rearview mirror
To reduce glare from vehicles behind you when you are driving at night:
Turn the knob.
Interior and exterior mirrors, automatic dimming feature*
It is controlled by two photosensors:
>inside the interior rearview mirror, arrow.
>on the back of the mirror.
For proper function:
>Keep the photosensors clean.
>Do not cover the area between the interior rearview mirror and the windshield.
>Do not place stickers or decals on the windshield in front of the mirror.
34
Online Edition for Part no. 01 40 2 606 301 — © 10/10 BMW AG

Steering wheel
Adjustments
Do not adjust the steering wheel position while the car is in motion; otherwise, there is a risk of accident due to an unexpected move-
ment.<
1.Fold the lever down.
2.Move the steering wheel to the preferred distance and angle to suit your seated position.
3.Swing the lever back up.
Do not use force to swing the lever back up; otherwise, the mechanism
will be damaged.<
 Communications Driving tips Controls AT A GLANCE
Mobility
Reference
35
Online Edition for Part no. 01 40 2 606 301 — © 10/10 BMW AG

Transporting children safely
Transporting children safely
The right place for children
Do not leave children unattended in the vehicle; otherwise, they could endanger
themselves and/or other persons by opening the doors, for example.<
Children should always sit in the rear
Accident research has shown that the safest place for children is on the rear seat.
Only transport children under the age of 13 or smaller than 5 ft/150 cm in the rear in a child restraint system suitable for their age,
weight and size. Otherwise, there is an increased risk of injury in the event of an accident.<
Children 13 years of age or older must be buckled in with a safety belt as soon as there no longer is any child restraint system that is appropriate for their age, size and weight.
Child restraint systems, installation
Before installing a child restraint system on the rear seats, move the seat as far back as possible.
After the child restraint system has been installed on the respective rear seat, move the backrest forward so that the it rests lightly against the child restraint system, refer to Rear seat backrests on page 88.
Observe the child restraint system manufacturer’s instructions when selecting,
installing and using child restraint systems. Otherwise, the protective effect may be diminished.<
On the front passenger seat
After installing a child restraint system on the front passenger seat, make sure that
the front, side, and knee airbags for the front passenger are deactivated; otherwise, there is an increased risk of injury if the airbags deploy.<
Exception for front passenger seat
Front passenger airbags
Should it be necessary to use a child restraint system on the front passenger
seat, the front and side airbags must be deactivated. Otherwise, there is an increased risk of injury to the child if the airbags deploy, even if the child is seated in a child restraint system.<
For more information on automatic deactivation of the front passenger airbags, refer to page 65.
Seat position
Before installing a child restraint system, move the front passenger seat as far back and up* as possible to obtain the best possible position for the belt. Do not change the seat position after this.
Child seat security
All rear safety belts and the safety belt for the front passenger can be prevented from being
36
Online Edition for Part no. 01 40 2 606 301 — © 10/10 BMW AG

|
pulled out in order to secure child restraint sys- |
backrest; otherwise, the protective function of |
|
tems. |
the seat may be compromised.< |
To lock the safety belt
1.Secure the child restraint system with the belt.
2.Pull the belt strap all the way out.
3.Allow the belt strap to retract and pull it taut against the child restraint system.
The safety belt is locked.
To unlock the safety belt
1.Open the belt buckle.
2.Remove the child restraint system.
3.Allow the safety belt strap to retract all the way.
Child restraint system with tether strap
Use the tether strap anchors to secure child restraint systems only; otherwise, the
anchors could be damaged.<
There are two additional anchors for child restraint systems with tether straps, arrows.
LATCH child restraint fixing system
LATCH: Lower Anchors and Tethers for CHildren.
To install and use the LATCH child restraint system, follow the operating and safety
instructions provided by the manufacturer of the system; otherwise, the protective function of the seat may be compromised.<
Placement of the tether strap
Make sure the upper retaining strap does not run over sharp edges and is not
twisted as it passes to the top anchor. Otherwise, the strap will not properly secure the child restraint system in the event of an accident.<
Anchor points for LATCH anchors
Before installing the child seat, pull the belt out of the area for the child restraint fixing system.
|
1 |
Direction of travel |
||
|
2 |
Head restraint |
||
|
3 |
Rear cargo well |
||
|
4 |
Tether strap hook |
||
|
5 |
Anchor |
||
|
The mounts for the lower LATCH anchors are |
6 |
Seat backrest |
|
|
7 |
Tether strap of the child restraint system |
||
|
located at the points indicated by the arrows. |
|||
Make sure that both lower LATCH anchors are properly engaged and that the child
restraint system rests firmly against the seat
37
Online Edition for Part no. 01 40 2 606 301 — © 10/10 BMW AG
 Communications Driving tips Controls AT A GLANCE
Mobility
Reference

Transporting children safely
Attaching upper retaining strap to the attachment point
1.Slide the head restraint upward.
2.Guide the tether strap between the head restraint holders.
3.Attach the tether strap to the anchor using the hook.
4.Push the head restraint into its lowermost position.
5.Pull the retaining strap tight.
Securing doors and windows
Rear doors
Slide down the safety lever on the rear doors.
The door can now be opened from the outside only.
Safety switch for power windows
The rear power windows are blocked and cannot be operated from the rear. Press the safety switch, refer to page 29.
38
Online Edition for Part no. 01 40 2 606 301 — © 10/10 BMW AG
![]()
Driving
Ignition lock
Inserting the key into the ignition lock
Insert the key all the way into the ignition lock.
Radio readiness
Individual electrical consumers can operate.
Removing the key from the ignition lock
Press in the key briefly. It is ejected slightly. At the same time:
>The ignition is switched off if it was on beforehand.
Automatic transmission
The key can only be removed if the selector lever is in position P: interlock.
Start/Stop button
If the Start/Stop button is pressed while the clutch is depressed in the manual
transmission or the brake pedal is depressed in the automatic transmission, the engine starts.<
Radio readiness
Individual electrical consumers can operate. The time and outside temperature are displayed in the tachometer.
Radio readiness is switched off automatically:
>When the key is removed from the ignition lock
>When using Comfort Access* by pushing the button on the door handle or the
 button on the remote control, refer to Locking on page 26
>After a certain has elapsed
Ignition on
Most indicator and warning lamps in indicator area 1, page 13, light up for varying lengths of time.
When the engine is off, switch off the ignition and any unnecessary electrical con-
sumers in order to preserve the battery.<
Radio readiness and ignition off
All indicator and warning lamps in the displays go out.
The ignition switches off automatically if the driver’s door is opened. Pressing the Start/Stop button again switches the ignition back on.
The ignition is not switched off in situations such as the following:
>The clutch or brake is depressed
>The low beams are switched on
Press the Start/Stop button to switch radio readiness or the ignition on and off. Do not depress the brake or clutch while doing so.
39
Online Edition for Part no. 01 40 2 606 301 — © 10/10 BMW AG
 Communications Driving tips Controls AT A GLANCE
Mobility
Reference

Driving
Starting the engine
Do not allow the engine to run in enclosed areas; otherwise, inhalation of the noxious exhaust gases can lead to loss of consciousness and death. Exhaust gases contain carbon monoxide, an odorless and colorless, but highly toxic gas. Never leave an unattended vehicle with the engine running; otherwise, such a vehicle repre-
sents a potential safety hazard.
Before leaving the car while the engine is running, place the transmission in neutral or move the selector lever to position P and forcefully apply the parking brake to prevent the car from moving.<
Avoid frequent starting in quick succession or repeated start attempts in which
the engine does not start. Otherwise, the fuel is not burned or inadequately burned and there is a danger of overheating and damaging the catalytic converter.<
Do not let the engine warm up with the vehicle at a standstill. Move off immediately at a moderate engine speed.
When starting the engine, do not depress the accelerator pedal.
Manual transmission
Key in ignition lock or inside vehicle with Comfort Access, refer to page 25.
1.Depress the brake.
2.Depress the clutch.
3.Press the Start/Stop button.
Automatic transmission*
Key in ignition lock or inside vehicle with Comfort Access, refer to page 25.
1.Depress the brake.
2.Shift the selector lever into position P or N.
3.Press the Start/Stop button.
The starter operates automatically for a certain time, and stops automatically as soon as the engine has started.
Switching off the engine
Always take the key with you when you leave the vehicle.
When parking, apply the parking brake forcefully; otherwise, the vehicle could begin to roll.<
Manual transmission
1.With the car at a standstill, press the Start/ Stop button.
2.Shift into first gear or reverse.
3.Forcefully apply the parking brake.
Automatic transmission*
1.With the car at a stop, move the selector lever to position P.
2.Press the Start/Stop button.
3.Forcefully apply the parking brake.
Before driving into a car wash
By following these steps, the vehicle is able to roll:
1.Place the remote control, even with Comfort Access, in the ignition lock.
2.Depress the brake.
3.Move the selector lever to position N.
4.Switch off the engine.
Parking brake
The parking brake is primarily intended to prevent the vehicle from rolling while parked; it brakes the rear wheels.
Applying
The lever locks in position automatically.
40
Online Edition for Part no. 01 40 2 606 301 — © 10/10 BMW AG

Releasing
Pull upward slightly, press the button, arrow, and guide the lever down.
In exceptional cases, if the parking brake has to be used to slow or stop the car, do not pull the lever up too hard. In doing so, con-
tinuously press the button of the parking brake lever.
Otherwise, excessive force could lead to overbraking and loss of traction, i.e. fishtailing, at the rear axle.<
Manual transmission
When shifting into 5th or 6th gear, press the gearshift lever to the right. Otherwise,
the engine could be damaged if you inadvertently shift into 3rd or 4th gear.<
Reverse gear
Select this only when the vehicle is stationary. When the gearshift lever is pressed to the left, a slight resistance has to be overcome.
Automatic transmission* with Steptronic
In addition to the fully automatic mode, you can shift gears manually using Steptronic, page 42.
Parking the vehicle
To prevent the vehicle from rolling, always select position P and apply the parking
brake before leaving the vehicle with the engine running.<
Removing the key
To remove the key from the ignition lock, first move the selector lever into position P and then switch off the engine: interlock. Remove the key from the ignition lock, refer to page 39.
Selector lever positions
P R N D M/S + –
Displays in the tachometer
P R N D DS M1 to M6
The selector lever position is displayed, or the current gear in the manual mode.
Changing selector lever positions
>The selector lever can only be moved out of position P when the ignition is switched on or the engine is running.
>Before moving the lever away from P or N with the vehicle stationary, first depress the brake; otherwise, the selector lever will refuse to move: shiftlock.
 Communications Driving tips Controls AT A GLANCE
Mobility
Reference
41
Online Edition for Part no. 01 40 2 606 301 — © 10/10 BMW AG

Driving
To prevent the vehicle from creeping after you select a driving position,
depress the brake until you are ready to start.<
A lock prevents accidental shifting into selector lever positions R and P.
Overriding the selector lever lock
Press the button on the front of the selector lever, arrow.
P Park
Select this only when the vehicle is stationary. The transmission locks to prevent the drive wheels from turning.
R Reverse
Select this only when the vehicle is stationary.
N Neutral
Select this when you are in a car wash, for example. The vehicle can roll.
D Drive, automatic position
Position for normal vehicle operation. All forward gears are selected automatically.
Under normal operating conditions, the fuel consumption is lowest when driving in position D.
Sport program and manual mode M/S
Move the selector lever from position D to the left into the M/S shifting slot:
The Sport program is activated and DS is displayed. This position is recommended for a per- formance-oriented driving style.
To deactivate the Sport program or manual mode M/S, move the selector lever to the right into position D.
Shifting with the selector lever
Push the selector lever forward or pull it back to activate manual operation. Steptronic shifts the gear.
>Pull the selector lever in the + direction. Transmission shifts up.
>Push the selector lever in the – direction. Transmission shifts down.
The selected gear is displayed in the tachometer, e.g. M1.
To use the automatic mode again, move the selector lever to the right into position D.
Upshifts and downshifts are executed only when they will result in a plausible combination of engine and vehicle speed; thus, for example, a downshift that would cause the engine to overrev will not be executed by the system. The selected gear is displayed briefly, followed by the current gear.
Kickdown
Kickdown enables you to achieve maximum performance.
Depress the accelerator pedal beyond the fullthrottle resistance point.
Shifting on the steering wheel*
With the selector lever in position D, automatic drive, you can shift gears using the shift paddles on the steering wheel. The transmission automatically switches to manual mode.
42
Online Edition for Part no. 01 40 2 606 301 — © 10/10 BMW AG

If you do not shift gears with the shift paddles or accelerate for a certain amount of time, the transmission automatically returns to D, automatic drive.
5.Move the selector lever into the desired position by pressing the button on the front of the selector lever.
Before manually unlocking the selector lever lock, firmly set the parking brake to
prevent the vehicle from rolling away.<
Turn signals/ headlamp flasher
>Pull one of the shift paddles. Transmission shifts up.
>Push one of the shift paddles. Transmission shifts down.
M1 through M6 are displayed in the tachometer.
Manually releasing the selector lever lock
Should the selector lever refuse to move out of position P even though the ignition is switched on, the brake is depressed and the button on the selector lever is pressed, the selector lever lock can be overridden:
1.Unclip the sleeve of the selector lever.
2.Pull the sleeve up over the selector lever until the sleeve is inside out. Disconnect the cable connector if necessary.
1Turn signal
2Headlamp flasher
Using turn signals
Press the lever beyond the resistance point.
To turn off manually, press the lever to the resistance point.
Unusually rapid flashing of the indicator lamp indicates that an indicator bulb has
failed.<
Indicating a turn briefly
Press the lever as far as the resistance point for as long as you wish to indicate a turn.
Triple turn signal activation
Press the lever as far as the resistance point.
You can set whether the turn signal flashes once or three times.
3.Insert extractor hook 1 into the loop on the passenger’s side.
4.Pull the loop up.
 Communications Driving tips Controls AT A GLANCE
Mobility
Reference
43
Online Edition for Part no. 01 40 2 606 301 — © 10/10 BMW AG

Driving
1.Switch on the ignition, refer to page 39.
2.Briefly press the button in the turn signal lever repeatedly until «SET/INFO» is displayed.
3.Press and hold the button until the display changes.
4.Briefly press the button repeatedly until the symbol and «SET» are displayed.
5.Press and hold the button until the display changes.
6.Briefly press the button repeatedly until the display shows the illustrated symbol, arrow.
8.Briefly press the button to select:
>
Brief indication of a turn.
>
Triple turn signal.
9.Press and hold the button until the display changes. The setting is stored.
Wiper system
1Switching on wipers
2Switching off wipers or brief wipe
3Activating/deactivating intermittent wipe or rain sensor*
4Cleaning windshield and headlamps*
Switching on wipers
Press the lever upward, arrow 1.
The lever automatically returns to its initial position when released.
7.Press and hold the button until the display changes.
Normal wiper speed
Press once.
The system switches to intermittent operation when the vehicle is stationary.
Fast wiper speed
Press twice or press beyond the resistance point. The system switches to normal speed when the vehicle is stationary.
Intermittent wipe or rain sensor*
If the car is not equipped with a rain sensor, the intermittent-wipe time is preset.
44
Online Edition for Part no. 01 40 2 606 301 — © 10/10 BMW AG

If the car is equipped with a rain sensor, the time between wipes is controlled automatically and depends on the intensity of the rainfall. The rain sensor is mounted on the windshield, directly in front of the interior rearview mirror.
Activating intermittent wipe or rain sensor
Press button, arrow 3.
This symbol is displayed in the tachometer.
Deactivate the rain sensor before entering an automatic car wash. Failure to do so
could result in damage caused by undesired wiper activation.<
5.Press and hold the button until the display changes.
6.Press the button to select the desired sensitivity.
7.Wait, or press and hold the button until the display changes.
The settings are stored.
Adjusting the sensitivity of the rain sensor
1.Switch on the ignition, refer to page 39.
2.Briefly press the button in the turn signal lever repeatedly until «SET/INFO» is displayed.
3.Press and hold the button until the display changes.
4.Briefly press the button repeatedly until the symbol and «SET» are displayed.
Deactivating intermittent wipe or rain sensor
Press the button again, arrow 3.
Brief wipe
Press the lever downward once, arrow 2.
Cleaning windshield and headlamps*
Pull the lever, arrow 4.
Washer fluid is sprayed onto the windshield and the wipers are operated briefly.
When the vehicle lighting system is switched on, the headlamps are cleaned at regular and appropriate intervals.
In cars equipped with an alarm system, the headlamps cannot be cleaned when the hood is open.
Do not use the washers when the washer fluid reservoir is empty; otherwise, you will
damage the washer pump.
Only use the washers if the hood has been completely closed; otherwise, the headlamp washer system* may be damaged. Do not use the washers if there is any danger that the fluid will freeze on the windshield. If you do, your vision could be obscured. For this reason, use antifreeze.<
 Communications Driving tips Controls AT A GLANCE
Mobility
Reference
45
Online Edition for Part no. 01 40 2 606 301 — © 10/10 BMW AG

Driving
Window washer nozzles
The window washer nozzles are heated automatically* while the engine is running or the ignition is switched on.
Rear window wiper
0Rear wipers parked
1To switch on intermittent wipe  : Turn the cap to level 1.
Operation is continuous in reverse gear.
The rear wiper does not move if the cap is in interval stage 1 before the ignition is switched on.
Cleaning the rear window
2To clean the rear window during intermit-
tent wipe  :
:
Turn the cap further to level 2 and hold it there.
3To clean the rear window when wipers are
parked  :
:
Turn the cap to level 3 and hold it there.
Do not use the washers when the washer fluid reservoir is empty; otherwise, you will
damage the washer pump.<
Washer fluid
Washer fluid is flammable. Keep it away from ignition sources, only store it in the closed, original container, and keep out of reach
of children; otherwise, there is a danger of injury. Comply with the instructions on the container.<
Washer fluid reservoir
Only refill washer fluid that contains antifreeze when the engine is cool, to avoid
contact with hot engine parts. Otherwise, fluid spills constitute a fire hazard and a risk to personal safety.<
Fill with water and, if required, with a washer antifreeze, according to manufacturer’s recommendations.
Mix the water and antifreeze before filling the washer fluid reservoir to make sure
the correct concentration is maintained.<
Capacity
Approx. 4.2 US quarts/4 liters.
Cruise control*
The concept
Cruise control is available at vehicle speeds of at least approx. 20 mph or 30 km/h. The car then stores and maintains the speed that you specify using the button on the steering wheel.
Do not use cruise control when driving at constant speed is prevented by adverse
conditions, e.g. winding roads, dense traffic or poor road conditions due to, e.g., snow, rain, ice or loose surfaces. Otherwise, you could lose control of the vehicle and cause an accident as a result.<
46
Online Edition for Part no. 01 40 2 606 301 — © 10/10 BMW AG

Activating
1Resuming cruise control
2Activating/deactivating cruise control
3Maintaining, storing and increasing speed
4Maintaining, storing and decreasing speed
Indicator lamp in the speedometer lights up. The cruise control system is ready and can be activated.
Increasing speed
Press button 3 repeatedly until the desired speed is reached. Every time you press the button, the speed increases by approx. 1 mph or 2 km/h.
Accelerating using the button
Press and hold button 3.
The vehicle accelerates without pressure on the accelerator pedal. After the button is released, the driving speed is maintained and stored.
Decreasing speed
Press button 4 repeatedly until the desired speed is reached.
The functions here are the same as for increasing the speed or accelerating, except that the speed will be decreased.
Activating/deactivating cruise control
Press button 2.
In addition, the system is automatically deactivated:
>When the brakes are applied
>When the clutch is depressed
>When the automatic transmission is in selection lever position N
>When the driving stability control system is active
Cruise control is not deactivated by depressing the accelerator pedal. Once the accelerator pedal is released, the stored speed is achieved again and maintained.
The stored speed is cleared when the ignition is switched off.
Maintaining current speed
Press button 3.
The system maintains and stores the current vehicle speed.
If, on a downhill grade, the engine braking effect is not sufficient, the controlled speed may be exceeded. On uphill grades vehicle speed may drop if the engine output is insufficient.
Resuming a speed stored beforehand
Press button 1.
The last speed stored is achieved again and maintained.
The stored speed is cleared when the ignition is switched off.
Display in tachometer*
Selected speed is displayed briefly.
If — mph or — km/h is displayed briefly in the tachometer, the conditions necessary
for operation may not be fulfilled.<
Malfunction
The warning lamp in the tachometer lights up if the system fails.
47
Online Edition for Part no. 01 40 2 606 301 — © 10/10 BMW AG
 Communications Driving tips Controls AT A GLANCE
Mobility
Reference

Controls overview
Controls overview
Tachometer
Never operate the engine with the needle in the red overspeed zone of the gauge. In this range, the fuel supply is interrupted to protect the engine.
Displays in tachometer
Odometer and trip odometer
Resetting the trip odometer
With the ignition switched on, press knob 3 in the tachometer.
Units of measure
Select the respective units of measure, miles or km for the odometer as well as 7 or 6 for the outside temperature, page 51.
Coolant temperature
A warning lamp will come on if the coolant, and therefore the engine, becomes too hot.
Check coolant level, refer to page 123.
Fuel gauge
1Current vehicle speed
2Odometer, trip odometer, and outside temperature display
3Resetting the trip odometer
Outside temperature warning
When the displayed temperature sinks to approx. +377/+36, a signal sounds and a warning lamp lights up. There is an increased risk of black ice.
Even at temperatures above +377/+36 ice can form. Therefore, drive carefully,
e.g. on bridges and sections of road in the shade; otherwise, there is an increased accident risk.<
Fuel tank capacity
Approx. 12.4 US gallons/47 liters.
You will find information on refueling on page 112.
If the tilt of the vehicle varies for a longer period, when you are driving in mountainous areas, for example, the indicator may fluctuate slightly.
The arrow next to the gas pump symbol of the fuel gauge points toward the side of the vehicle with the fuel filler flap.
48
Online Edition for Part no. 01 40 2 606 301 — © 10/10 BMW AG
 Loading…
-
Страница 1
OWNER’S MANUAL MINI COUNTRYMAN Contents A — Z Online Edition for Part no. 01 40 2 607 530 — © 03/11 BMW AG[…]
-
Страница 2
Online Edition for Part no. 01 40 2 607 530 — © 03/11 BMW AG[…]
-
Страница 3
Cooper Cooper S Cooper S ALL4 Congratulations on your new MINI This Owner’s Manual should be consid ered a perman ent part of this vehicle. It should stay with the vehicle when sold to provide the next owne r with important operating, safe ty and mainte- nance information. We wish you an en joyable driving experie nce. Online Edition for Part […]
-
Страница 4
© 2011 Bayerische Motoren Werke Aktiengesellscha ft Munich, Germany Reprinting, including excerpts, only wi th the written consent of BMW AG, Munich. US English II/11 Printed on en vironmentally friendly pap er, bleached withou t chlorine , suitable for recycling. Online Edition for Part no. 01 40 2 607 530 — © 03/11 BMW AG Online Edition for Par[…]
-
Страница 5
CONTENTS The fastest w ay to find information on a particu- lar topic or item is by using the index, refer to page 180 . Notes 4 General inform ation 6 Reporting safety defects AT A GLANCE 10 Cockpit 16 Radio MINI Boost CD Controls 20 Opening an d closing 32 Adjustments 38 Transporting children sa fely 41 Drivin g 51 Control s overview 59 Technolog[…]
-
Страница 6
Notes General information 4 General information Using this Owner’s Manual We have tried to make a ll the information in this Owner’s Manual easy to find. The fastest way to find specific topics is to refer to the detailed index at the back of the manual. If you wish to gain an initial overview of your ve hicle, you w ill find this in the […]
-
Страница 7
General information No tes 5 For your safety Maintenance and repair Advanced technology, e.g. the use of modern materials an d powerful electron- ics, requires specially adapted maintenance and repair methods. Th erefore, have the ne cessary work on your MINI only carried out by a MINI dealer or a workshop that has specially trained personnel worki[…]
-
Страница 8
Notes General information 6 Service and warranty We recommend that you read this publication thoroughly. Your MINI is covered by the following warran- ties: > New Vehicle Limited W arranty > Rust Perforation Limited Warranty > Federal Emissions Syst em Defect Warranty > Federal Emissions Performance Warranty > California Emission Con[…]
-
Страница 9
General information No tes 7 Online Edition for Part no. 01 40 2 607 530 — © 03/11 BMW AG Online Edition for Part no. 01 40 2 607 530 — © 03/11 BMW AG[…]
-
Страница 10
Watch Me. Online Edition for Part no. 01 40 2 607 530 — © 03/11 BMW AG[…]
-
Страница 11
Controls Driving tips Entertainment Communications Mobility Reference AT A GLANCE Online Edition for Part no. 01 40 2 607 530 — © 03/11 BMW AG[…]
-
Страница 12
AT A GLANCE Cockpit 10 Cockpit Around the steering wheel : Controls and displays 1 Adjusting the exterior mirrors, folding them in and out * 36 2 Parking lamps 71 Low beams 71 Automatic headlamp control * 71 Adaptive Light Control * 73 Turn signals 46 High beams 74 Headlamp f lasher 46 Roadsi de parki ng lamp s * 74 Computer * 52 Online Edition for[…]
-
Страница 13
Cockpit AT A GLANCE 11 6 Ignition lock 41 7 Buttons * on steering wheel 8 Horn: the entire surface 9 Adjusting the steering wheel 37 10 Releasing the hood 138 3 Tachometer 12 Instrument lighting 74 Resetting the trip odo meter 51 4 Wiper system 47 5 Switching the ignition on/off and starting /stopping the engi ne 41 Continuing cruise control * 49 R[…]
-
Страница 14
AT A GLANCE Cockpit 12 Displays 1 Tachometer 51 With indicator and warnin g lamps 13 2 Display for > Current vehicle speed 51 > Indicator and warning lamps 13 3 Resetting the trip odometer 51 4 Display for > Position of automatic trans mission * 43 > Computer * 52 > Date of next scheduled service, and remaining distance to be driven […]
-
Страница 15
Cockpit AT A GLANCE 13 Indicator and warning lamps The concept Indicator and warning lamps can light up in var — ious combinations and co lors in indicato r area 1 or 2 . Some lamps are checked for proper functioning and thus come on briefly when th e engine is started or the ignition is switched on. What to do in case of a malfun ction A list of a[…]
-
Страница 16
AT A GLANCE Cockpit 14 Around the center console Online Edition for Part no. 01 40 2 607 530 — © 03/11 BMW AG Online Edition for Part no. 01 40 2 607 530 — © 03/11 BMW AG[…]
-
Страница 17
Cockpit AT A GLANCE 15 1 Microphone for voice activation system * and for telephone in hands-free mode * 2 Indicator/warning lamp * for front passen- ger airbags 69 4 Hazard warning flashers 5 Speedometer 12 6 Radio/CD 7 Air conditioner or automatic climate control * 76 8 Switches in the center console 9 Buttons in the ce nter console 10 AUX-IN con[…]
-
Страница 18
AT A GLANCE Radio MINI Boost CD 16 Radio MINI Boost CD 1 Selecting au dio sources 2 On/off * , loudspeaker controls 3 Accessing settings > Speed-dependent volume > Tone settings 4 Function buttons for co nfirming the menu items displayed above them 5 Changing stations, tracks > Changing stations > Changing track s on the CD player 6 Dis[…]
-
Страница 19
Radio MINI Boost CD AT A GLANCE 17 Menu navigation Radio and telephone functions * can be called up by us ing the b uttons on the ra dio an d menus. Calling up the settings menu Press the MENU button > Settings > MINI phone numbers > Telephone * Calling up the audio menu Press the MODE button > Radio > HD Radio * > Satellite radio[…]
-
Страница 20
Handle Me. Online Edition for Part no. 01 40 2 607 530 — © 03/11 BMW AG[…]
-
Страница 21
AT A GLANCE Driving tips Entertainment Communications Mobility Reference Controls Online Edition for Part no. 01 40 2 607 530 — © 03/11 BMW AG[…]
-
Страница 22
Controls Opening and closing 20 Opening and closing Keys/remote controls Buttons for the remote control 1 Opening the liftgate 2 Unlocking 3 Locking General information Each remote control co ntains a rechargeable battery that is recharged when it is in the igni- tion lock while the car is being driven. You should ther efore use each re mote contro[…]
-
Страница 23
Opening and closing Controls 21 > Settings for t he displays in the speedom eter and tachometer: > 12 h/24 h mode of the clock, refer to For- mats and units of measure 54 > Date format, refer to Formats and units of measure 54 > Units of measure for f uel consump tion, distance covered/re maining distances and temperature, refer to Form[…]
-
Страница 24
Controls Opening and closing 22 3. Press and hold the button until the display changes. 4. Press the button as often as necessary until the symbol and «SET» are displayed. 5. Press and hold the button until the display changes. 6. Briefly press the button re peatedly until the display shows the illu strated symbol, arrow. 7. Press and hol[…]
-
Страница 25
Opening and closing Controls 23 5. Press and hold the butt on until th e display changes. 6. Press the button to select, arrow: > Confirmation signal during unlo cking > Confirmation signal during locking 7. Press and hold the butt on until th e display changes. 8. Press the button to select: > The hazard warning flashers light up dur- ing[…]
-
Страница 26
Controls Opening and closing 24 Using the door lo ck You can set which parts of the car are un locked, page 21 . Do not lock the vehicle from the outside if there is any person inside, because the vehicle cannot be unlocked fr om inside without special knowledge. < When there is no alarm system * or Com- fort Access * , only the driv er’s d[…]
-
Страница 27
Opening and closing Controls 25 Persons or animals in a parked vehicle could lock the doors from the inside. Take the key with you when you leav e the vehicl e so that the vehicle can be opened from the out — side. < Automatic lo cking* You can also set the situ ations in which the car locks. The setting is st ored for the remote co n- trol in u[…]
-
Страница 28
Controls Opening and closing 26 wise, the tail lamps will be obscured and driving safety will be compromised. < Press the top side of th e MINI emblem, arrow, or Press the button on the remote control for approx. 1 second and then release it. The lift- gate is unlock ed. Closing Make sure that the closing path of th e lift- gate is clear; othe r[…]
-
Страница 29
Opening and closing Controls 27 Display on the revolut ion counter When the sy stem is arme d, all LEDs pulse. After approx. 16 minutes one LED flashes. > LEDs pulse or LED flashes: system is armed. > One LED flashes at short intervals: A door, the hoo d or the liftgate is not prop- erly closed. Even if these are not closed fully, the remaini[…]
-
Страница 30
Controls Opening and closing 28 Comfort Access support s the following func- tions: > Unlocking/locking the vehicle > Convenient closing > Unlocking the liftgate separately > Starting the engine Comparison to standard remote controls Essentially, it makes no difference wh ether you control th e above-m entioned f unctions using Comfort […]
-
Страница 31
Opening and closing Controls 29 Switching off the engine in cars with automatic transmiss ion The engine can on ly be switched of f when the selector lever is in position P, page 43 . To switch the engine o ff when the selector lever is in position N, the re mote control must be i n the ignition lock. Before driving a vehicle with automatic transmi[…]
-
Страница 32
Controls Opening and closing 30 > With the i gnition switch ed on, press th e switch backward beyo nd the resistance point. Both closed roofs are t ilted fully. Pressing again st ops the movement. Opening, closing With the ignition switch ed on and the glass sun- roof tilted, press the swit ch backward and hold it there. The front glass roof ope[…]
-
Страница 33
Opening and closing Controls 31 The window can b e closed in the same way by pressing the switch up. After switching off the ignition When the ignition is sw itched off, the windows can still be op erated for approx. 1 minut e as long as no door is opened. Take the key with you when you leave the car; otherwise, children could operate the electric […]
-
Страница 34
Controls Adjustments 32 Adjustments Sitting safely The ideal sitting position can make a vital contri- bution to rel axed, fatigu e- free dri ving. In con- junction wi th the safe ty belts, the head rest raints and the airbags, the seated position has a major influence on your safety in the even t of an acci- de nt . T o e ns ur e t h at th e safet[…]
-
Страница 35
Adjustments Controls 33 Seats Note before adjusting Never attempt to adjust your seat while the vehicle is moving. The seat could respond with unexpected movem ent, and the ensuing loss of vehicle control could lead to an accident. On the front passenger seat as well, do not incline the backrest too far to the rear while the vehicle is being driv e[…]
-
Страница 36
Controls Adjustments 34 Turn the wheel to increase or decrease the cur- vature. Seat adjustment, rear Do not adju st rear seats whil e the vehicl e is moving; otherwise, passengers cou ld be injured. Make sure that the locking devices of the rear seats engage properly. Otherwise the restrain- ing effect o f the safet y belts du ring an acciden t co[…]
-
Страница 37
Adjustments Controls 35 Front 1. Pull up as far as it will go. 2. Fold the backrest back slightly. 3. Press button 1 and pull the head restraint out as far as it will go. 4. Also press button 2 with a suit able tool and completely remove the head restraint. 5. Fold back the backrest. Rear 1. Pull up as far as it will go. 2. Fold the backrest forwar[…]
-
Страница 38
Controls Adjustments 36 Safety belt reminder Front seats The indicator lamps come on and an acoustic signal sounds.Check whether the safety belt has b een fastened cor- rectly. The ‘Fa sten safety bel ts’ reminder is issued when the driver’s safety belt has not been fastened. Th e ‘Fasten safety belts’ reminder is also acti[…]
-
Страница 39
Adjustments Controls 37 Interior and exterior mirrors, automatic dimming feature* It is controlled by two photosensors: > Inside the interior rearview mirror, arrow. > On the back of the mirror. For proper function: > Keep the photo sensors clean. > Do not cover the area between the interior rearview mirror and the windshield. > Do n[…]
-
Страница 40
Controls Transporting children safely 38 Transporting children safely The right place for children Do not leave childre n unattended in the vehicle; otherwise, they could endanger themselves and/or other person s by opening the doors, for example. < Children should always sit in the rear Accident research has sh own that the safest place for chi[…]
-
Страница 41
Transporting children safely Controls 39 To lock the safety belt 1. Secure the child restraint system with the belt. 2. Pull the belt strap all the way out. 3. Allow the belt strap to retract and pull it taut against the child res traint system. The safety belt is locked. To unlock the safety belt 1. Open the belt buckl e 2. Remove the child restra[…]
-
Страница 42
Controls Transporting children safely 40 Attaching upper retaining strap to the attachment point 1. Slide the head restraint upward. 2. Guide the tether strap be tween the head restraint holders. 3. Attach the tether strap to the anchor using the hook. 4. Push the head restraint into its low ermost position. 5. Pull the retaining strap tight. Secur[…]
-
Страница 43
Driving Controls 41 Driving Ignition lock Inserting the key into the ignition lock Insert the key al l the way into th e ignition lock. Radio readiness Individual electrical consumers can operate. Removing the key fro m the ignition l ock Press in the key briefly. It is ejected sli ghtly. At the same time: > The ignition is s witched off if it w[…]
-
Страница 44
Controls Driving 42 Radio readiness and ignition off All indicator and warning lamps in the displays go out. The ignition switches off automatically if the driver’s door is open ed. Pressing the Start /Stop button again switches the ignition back on. The ignition is not switched off in situations such as the following: > The clutch or brake[…]
-
Страница 45
Driving Controls 43 Automatic tran smission* 1. With the car at a st op, move the sele ctor lever to position P. 2. Press the Start/Stop button. 3. Forcefully apply the parking brake. Before driving into a car wash By following these steps, the vehicle is able to roll: 1. Place the remote control, even wit h Comfort Access, in the ig ni tion lock. […]
-
Страница 46
Controls Driving 44 Selector lever positions P R N D M/S + – Displays in the tachometer P R N D DS M1 t o M6 The selector lever position is displayed, or the current gear in the manual mode. Changing selector lever positions > The selector lever can only be moved out of position P when the ig nition is switched on or the engine is running. >[…]
-
Страница 47
Driving Controls 45 Sports programming and manual mode M/S Move the select or lever fr om position D to the left into th e M/S shifting slot: The Sport program is activated and DS is dis- played. This position is recommended for a pe r- formance-oriented driving style. To deactivate the Sport program or manual mode M/S, move th e selector lever to […]
-
Страница 48
Controls Driving 46 4. Pull the loop up. 5. Move the selector lever into the desired position by pressing the button o n the front of the selector lever. Before manually unlo cking the selector lever lock, firmly set the parking brake to prevent the vehicl e from rolling aw ay. < Turn signals/ headlamp flasher 1 Turn si gnal 2 Headlamp flasher U[…]
-
Страница 49
Driving Controls 47 8. Press the button to select: > Brief in dication of a turn. > Triple turn signal. 9. Press and hold the butt on until th e display changes. The setting is stored. Wiper system 1 Switching on wipers 2 Switching off wipers or brief wipe 3 Activating/deactivating intermittent wipe or rain sensor * 4 Cleaning windshield and […]
-
Страница 50
Controls Driving 48 4. Press the button as often as necessary until the symbol and «SET» are displayed. 5. Press and hold the button until the display changes. 6. Press the button to se lect the desired sensi- tivity. 7. Wait, or press and h old the button u ntil the display changes. The settings are stored. Deactivating intermi ttent wip[…]
-
Страница 51
Driving Controls 49 Do not use th e washers when the washer fluid reservoir is empt y; otherwise, you will damage the w asher pump. < Washer fluid Washer fluid is flammable. Keep it away from ignition sources, only stor e it in the closed, original container, and k eep out of reach of children; otherw ise, there is a danger of injury. Comply wit[…]
-
Страница 52
Controls Driving 50 pedal is released, the stored speed is ach ieved again and maintained. The stored speed is cleared when th e ignition is switched off. Maintaining current speed Press button 3 . The system maintains and stores the current vehicle speed. If, on a do wnhill g rade, the engine br aking eff ect is not sufficient, the controlled spee[…]
-
Страница 53
Controls overview Controls 51 Controls overview Tachometer Never opera te the engin e with th e needle in the red overspeed zone of the gau ge. In this range, the fuel supply is interrupted to prote ct the engine. Displays in tachometer 1 Current v ehicle speed 2 Odometer, trip odom eter, and external tem- perature display 3 Resetting the trip odom[…]
-
Страница 54
Controls Controls overview 52 Computer* Displays in the tachometer Press the button in the tu rn signal lever repeat- edly to call up various items of information. The following items of information are displayed in the order listed: > Cruising range > Average fu el consumptio n > Current fuel consu mption > Average speed > Outside t[…]
-
Страница 55
Controls overview Controls 53 1 Button for: > Selecting display > Setting values > Confirming selected display or set values > Calling up computer information 52 Symbol Function Adjustin g rain sensor * 47 Calling up Check Control 57 Displaying vehicle check 58 Initializing th e Flat Tire Monitor 63 Resetting the Tire Pres- sure Monitor[…]
-
Страница 56
Controls Controls overview 54 Exiting displays 1. Briefly press the button in the turn si gnal lever repeatedly until «HOME» is displayed. 2. Press the button fo r a longer period. Displays are also exited if no entries are made for approx. 8 seconds. Next setting or item of information 1. While in a setting or information item, briefly p[…]
-
Страница 57
Controls overview Controls 55 > Fuel consumption: l/100 km , mpg, km/l * > Distance covered: miles, km > Tempe rature: 7 , 6 7. Press and hold the butt on until th e display changes. 8. Press the button briefl y to change th e for- mat or unit of measure. 9. Press and hold the butt on until th e display changes. The settings are stored. Re[…]
-
Страница 58
Controls Controls overview 56 The extent of service w ork required can be read out from the remote control by your MINI dealer. < Displaying vehicle check For certain maintenance operatio ns, you can view the respective dist ance remaining or due date individually in the tachometer. 1. Switch on the ignition, refer to page 41 . 2. Press the butt[…]
-
Страница 59
Controls overview Controls 57 More information on th e MINI Maintenance Sys- tem can be found on page 142 . Clock Setting the time Radio MINI Boost CD: 1. Press the MENU butto n. 2. Press the button. 3. Press the button. 4. Select the desired menu item «FORMAT», «STD» or «MIN» and press the respective but- ton. 5. Turn[…]
-
Страница 60
Controls Controls overview 58 What to do in case of a malfunction The meanin g of each lamp in th e event of a mal- function and tips on how to respond are listed starting on page 162 . Hiding Check Control messa ges Press the button in th e turn si gnal lever. > Some Check Cont rol me ssages are displayed until the malfunctions h ave been recti[…]
-
Страница 61
Technology for driving comfort and safety Controls 59 Technology for driving comfort and safety Park Distance Control PDC* The concept PDC assists you with parking in reverse. Acoustic signals warn you of the presence of an object behind the vehicle. The measureme nt is carried out by four ultrasonic sensors in the rear bumper. An acoustic warning […]
-
Страница 62
Controls Technology for driving comfort and safety 60 The laws of physics cannot be repealed, even with driving stabilit y control system s. An appropriate driving style always remains the responsibility of the driver. Therefore do not reduce the additional safe t y m a r g i n b y e n g a g i n g in hazardous dr iving thereby runn ing the risk of […]
-
Страница 63
Technology for driving comfort and safety Controls 61 Dynamic Traction Control DTC* The concept D T C is a t yp e o f D SC t h a t is pr op ul si on op ti m i z e d for special road conditio ns such as uncleared snowy roads. The syst em ensures maximum propulsion though with restricted driving stabil- ity. You therefo re need to drive w ith suitabl[…]
-
Страница 64
Controls Technology for driving comfort and safety 62 Activating DSC Press the button again: the indicat or lamps go out. Hill Assist Hill Assist aids you in co mfortably driving off on inclines. It is not nece ssary to use the p arking brake for this. 1. Hold the MINI with t he brake. 2. Release the brake and imm ediately drive off. Hill Assist ho[…]
-
Страница 65
Technology for driving comfort and safety Controls 63 System limitations Sudden serious tire damage caused by external influences ca nno t be in dicate d in advance. < A natural, even pressure loss in all four tires can- not be detected. Therefore, check the tire infla- tion pressure regularly. In the following situatio ns, the system could be d[…]
-
Страница 66
Controls Technology for driving comfort and safety 64 Actions in the event of a flat tire Normal tires* 1. Identify the damaged tire. To do so, ch eck the infl ation pre ssure in all four tires. The inflation pre ssure display of the Mobility System, page 152 , can be used for this pur- pose. If the inflatio n pressure in all fo ur tires is cor- re[…]
-
Страница 67
Technology for driving comfort and safety Controls 65 Reset the system again after each correction of the tire inflation pressure and after every tire or wheel change. System limitations Sudden, serious tire dam age caused by external influences ca nno t be in dicate d in advance. < The system does not op erate correctly if it has not been reset[…]
-
Страница 68
Controls Technology for driving comfort and safety 66 1. Reduce speed and stop the vehicle with cau- tion. Avoid sudden braking and steering maneuvers. 2. Check whether the vehicle is equipped with normal tires or with run-flat tires. Run-flat tires, refer to page 136 , are identi- fied by a circular symbol containing the let- ters RSC on the tire […]
-
Страница 69
Technology for driving comfort and safety Controls 67 Malfunction The small warning lamp flashes in yel- low and then lights up continuously ; the larger warning lamp lights up in yellow. No flat tire can be detecte d. Display in the following situations: > Wheel without TPM electronics is mounted: If need be, have it checked by your MINI dealer[…]
-
Страница 70
Controls Technology for driving comfort and safety 68 Airbags The following airbags ar e located under the marked covers: 1 Front airbags 2 Knee airbag 3 Side airbags in backrests 4 Head airbags at the front and rear Protective a ction Observe the instructions on page 32 to ensure the best possible personal protec- tion. < The front airbags help[…]
-
Страница 71
Technology for driving comfort and safety Controls 69 activates or deactivates the front, sid e, and knee airbags for the front passenger. Make sure that th e front passenger’s f eet remain in the f ootwell; otherwis e, it is not possible to guarante e the function of th e front passenger airbags. < The indicator lamp above the interior rea[…]
-
Страница 72
Controls Technology for driving comfort and safety 70 Operational readiness of airbag system As of radio readiness, page 41 , the warning lamp lights up briefly t o indicate that the e ntire airbag system and the be lt tensioners are oper- ational. Airbag system malfunction > The warning lamp does not come on wh en radio readiness is switched on[…]
-
Страница 73
Lamps Controls 71 Lamps Parking lamps/low beams 0 Lamps off and daytime runnin g lights 1 Parking lamps and daytime running lig hts 2 Low-beam headlamps and welcome lamps 3 Automatic headlamp control * , daytime run- ning lights, welcome lamps, and Adaptive Light Control * When you open the driver’s door with the igni- tion switched off, the e[…]
-
Страница 74
Controls Lamps 72 The setting is stored for the remote contro l in use, refer to Pers onal Profile, page 20 . Setting the dura tion or deacti vating the function 1. Switch on the ignition, refer to page 41 . 2. Press the button on the turn signal ind icator as often as necessary until «SET/INFO» is dis- played. 3. Press and hold the butto[…]
-
Страница 75
Lamps Controls 73 1. Switch on the ignition, refer to page 41 . 2. Press the button on the turn signal in dicator as often as nece ssary until «SET/I NFO» is dis- played. 3. Press and hold the butt on until th e display changes. 4. Press the button as of ten as necessary unt il the symbol and «SET» are disp layed. 5. Press and h[…]
-
Страница 76
Controls Lamps 74 High beams/ roadside parking lamps 1 Turn signals/roadside parking lamps * 2 Switching on high beam s 3 Switching off high beams/headlamp flasher Roadside parking lamps, left or right* The vehicle can be illuminated on one side for parking. Comply with local regulations when doing so. Switching on After parking the vehicle, press […]
-
Страница 77
Lamps Controls 75 Reducing brightness Press the button briefly. The brightness decreases every time the button is pressed. Interior lamps The interior lamps, the footwell lamps * , t he entry lamps * , and the cargo area lamp are con- trolled automatically. To reduce the drain on the battery, a short while after the ignition is switched off, refer […]
-
Страница 78
Controls Climate 76 Climate Equipment versions Depending on your vehicle’ s equipment, your MINI contains an air conditioner or an automatic climate control * . 1 Air conditioner 77 2 Automatic climate control * 78 Air vents 3 Airflow directed toward the windshield and side windows 4 Air to the upper body area, draft-free venti- lation 5 Air t[…]
-
Страница 79
Climate Controls 77 Air conditioner 1 Air flow rate 2 Cooling function 3 Recirculated-air mode 4 Temperature 5 Rear window defroster 6 Air distribution 7 Windshield heating * Air flo w rate Adjust the air flow r ate. The higher t he rate, the more effective the heating or cooling will be. The air flow rate is lo wered or switched off entirely to re[…]
-
Страница 80
Controls Climate 78 Air distribution Direct the flow of air to the windows , to the upper body area or to the footwell . Intermediate settings are possible. Windshield heating* The windshi eld heating is s witched off automatically after a short time. The front window heating is low- ered or switch ed off entire ly to reduce the drain on the bat te[…]
-
Страница 81
Climate Controls 79 Air flow rate, ma nual Press the – button to reduce air flow. Press the + button to increase it. You can reactivate the autom atic mode for the air flow rat e with the AUTO butt on. The air flow rate is lowered or switched off entirely to reduce t he drain on the bat tery. The display remains the same. Switching the system on/[…]
-
Страница 82
Controls Climate 80 Defrosting windows and removin g condensation Quickly removes ice and condensa- tion from the w indshield and front side windows. For this purpose, also switch on the cooling function. The windshield heating * is switched on auto- matically. Windshield heating* The windshi eld heating is s witched off automatically after a certa[…]
-
Страница 83
Practical interior accessories Controls 81 Practical interior accessories Integrated universal remote control* The concept The integrated un iversal remote control can replace as many as thr ee hand-held transmitters for various remote-contro lled devices, such as garage and gate openers and lighting systems. The integrated universal remote control[…]
-
Страница 84
Controls Practical interior accessories 82 60 seconds, alter the distance and repeat this step. Canada: if the LED is not flashing rapidly after 60 seconds, chan ge the distance and repeat the step or, if the programming was interrupted by the hand-held transmitter, press and hold the memory button and press the button on the hand-hel d transmit- t[…]
-
Страница 85
Practical interior accessories Controls 83 original hand-held tr ansmit ter and release both buttons as soon as the LED 2 flashes rapidly. If the LED 2 does not flash rapidly after approx. 60 seconds, alter the distance and repeat this step. Canada: if the LED is not flashing rapidly after 60 seconds, change the distance and repeat the step or, if […]
-
Страница 86
Controls Practical interior accessories 84 Opening Press the button, arrow, and lift the cover. Storage compartments In the vehicle interior Depending on your vehicle’ s equipment, you will find storage compartme nts in the front and rear doors and in the center console * . Pockets * are provid ed on the backrest rear pan- els of the front sea[…]
-
Страница 87
Practical interior accessories Controls 85 3. First insert the cupholde r into the front mounts 4 and then snap it into the rear mounts 5 . Make sure that the lever 6 is situated opposite the mount 4 . < Clothes hooks There are clothes hooks on the grab handles in the rear passenger compartment . Items of clothing hung from the hoo ks must not o[…]
-
Страница 88
Controls Practical interior accessories 86 Connecting electrical appliances In your MINI, wh en the engine is ru nning or the ignition is switched on, yo u can use electrical devices such as flashlights, car vacuum cleaners, e t c. , u p t o a p p r o x . 1 4 0 w a t t s a t 1 2 v o l t s , a s l o n g as one of the following sockets is available. […]
-
Страница 89
Practical interior accessories Controls 87 Online Edition for Part no. 01 40 2 607 530 — © 03/11 BMW AG Online Edition for Part no. 01 40 2 607 530 — © 03/11 BMW AG[…]
-
Страница 90
Drive Me. Online Edition for Part no. 01 40 2 607 530 — © 03/11 BMW AG[…]
-
Страница 91
AT A GLANCE Controls Entertainment Communications Mobility Reference Driving tips Online Edition for Part no. 01 40 2 607 530 — © 03/11 BMW AG[…]
-
Страница 92
Driving tips Things to remember when driving 90 Things to remember when driving Break-in period Moving parts need breaking-in t ime to adjust to each other. Please follow the instructions below in order to achieve the optimal service life and economy of operatio n for your vehicle. Engine and differential Always obey all official speed l imits. Up […]
-
Страница 93
Things to remember when driving Driving tip s 91 Hydroplaning When driving on wet or slushy roads, reduce road speed. If you do not, a wedge of water can form betw een tires and road sur- face. This situation, known as h ydroplani ng, can cause partial or complete loss of tire contact with the road surface , so that the car cann ot be steered or br[…]
-
Страница 94
Driving tips Things to remember when driving 92 increased tendency for corrosion to form on rotors, while contaminan ts accumulate on th e brake pads. This occurs because the minimum pressure which must be exerted by the pad s during brake applications to clean the rotors is not reached. Should corrosion form on the brak e rotors, the brakes will t[…]
-
Страница 95
Things to remember when driving Driving tip s 93 1. Hold on to the backrest near the top, f or example on the headre st, and pull on the loop, arrow. 2. Lock backrest in the de sired position or fold down. Folding the backrests back into position When folding th e backrest, ensure that the lock properly en gages. Otherwise , for example during brak[…]
-
Страница 96
Driving tips Things to remember when driving 94 3. Remove it from the guide s on the cargo area floor, arrows, and remove the privacy screen. Flat load floor* Do not exceed the maximum load of 150 kg for the load floor; otherwise, dam- age may result. < Access to the storage space Under the load floor, t here is storage space, e.g., for the carg[…]
-
Страница 97
Things to remember when driving Driving tip s 95 Removing When removing and stowing the cargo net, pro- ceed in the reverse sequen ce. To fold closed, press the release butto n, arrow. Bag holders* Holders on the left and right sid e of the support for the cargo area cover, arrow, e.g. for hanging shopping bags or storage bags. Only hang light shop[…]
-
Страница 98
Driving tips Things to remember when driving 96 Load The permissible load is the sum of the occu- pants’ weights and the we ight of the cargo. The greater the weight of th e occupants, the less cargo/luggage can be transported. Stowing cargo > Position heavy objects as low and as far for- ward as possible, ideally directly behind the rear s[…]
-
Страница 99
Things to remember when driving Driving tip s 97 Roof-mounted luggage rack* A special rack system is av ailable as an option for your MINI. Your MINI dealer will be glad to advise you. Comply with the in stallation instruc- tions supplied with the rack system. Loading roof-mounted lu ggage rack Because roof racks raise the vehicle’s center of […]
-
Страница 100
Driving tips Things to remember when driving 98 Low inflation pressure increases rolling resis- tance and thus leads to greater fuel consump- tion and tire wear. Drive off immediately D o n o t wa i t f or t he e n g in e t o w a r m u p wh i l e th e vehicle remains stationary. Start driving right away, but at moderate engi ne spe eds. This is the[…]
-
Страница 101
Things to remember when driving Driving tip s 99 > After driving thro ugh water at low spee d, lightly press the brake pedal several times to dry the brakes and to prevent the braking effect from being reduced by wetness. > Depending o n the condit ion of the surf ace, it may be practi cal to briefly a ctivate DT C, refer to DTC Dynamic Tra c[…]
-
Страница 102
Rock Me. Online Edition for Part no. 01 40 2 607 530 — © 03/11 BMW AG[…]
-
Страница 103
AT A GLANCE Controls Driving tips Communications Mobility Reference Entertainment Online Edition for Part no. 01 40 2 607 530 — © 03/11 BMW AG[…]
-
Страница 104
Entertainment Radio MINI Boost CD 102 Radio MINI Boost CD switching Radio on/off Press the knob on the left. The radio selects the last set audio source: > Radio > HD Radio * > Satellite radio * > CD > External audio device > USB audio interface*. Listening to the radi o when the ignition is switched off After turning off the radi[…]
-
Страница 105
Radio MINI Boost CD Entertainment 103 4. Select the desired volume and press the but- ton on the right. Setting tone controls You can select be tween the foll owing settings: > Bass: bass setting. > Treble: tr eble setti ng. > Balance: volume distribution right/left. > Fader: volume distri bution front/back. The tone sett ings are set f[…]
-
Страница 106
Entertainment Radio MINI Boost CD 104 If you do not wish to use the Autostore feature, you can sto re six stations of yo ur choice in the FMA or AMA memory levels. < Playing and selecting stations, sca n You can play all the statio ns that can be received for approx. 10 seconds. Press the button. Interrupting the scan an d selecting a s tation: […]
-
Страница 107
Radio MINI Boost CD Entertainment 105 HD Radio™ reception* Many radio stations transmit analog and digital signals. If a digital r adio network is availabl e, these stations can be received digitally and thus with improved sound quality. License conditions HD Radio™ techno logy is manufactured under U.S. and Foreign Patents licensed from iBiqui[…]
-
Страница 108
Entertainment Radio MINI Boost CD 106 2. Press the button. 3. Press the button. 4. Select the desi red category. The channels are displayed. This symbol indicates the current channel. Activating 1. Turn the knob on the ri ght to select a chan- nel that is not yet activated. 2. Press the knob on t he right to con firm a channel. A phone number and t[…]
-
Страница 109
Radio MINI Boost CD Entertainment 107 Additional information The name of the channel and additional infor- mation about the curren t track is displayed, e.g., the name of the artist. 1. Selecting a desired channel. 2. Press the button. Changing channels using buttons Press the … button for the co rresponding direction. The next activated ch annel[…]
-
Страница 110
Entertainment Radio MINI Boost CD 108 Selecting MP3 music tracks The CD player can also play CDs with com- pressed audio data, such as MP3 and WMA. Selecting a track 1. Press the button. 2. Select the desired folder and press the but- ton on the right. > : press the butto n on the right to open a folder > : press the button on the right to cl[…]
-
Страница 111
Radio MINI Boost CD Entertainment 109 Damaged CDs Avoid finger prints as well as dust, scratches and moisture . Store CDs in sleeves. Do not expose CDs to a temperat ure greater than 122 7 /50 6 , elevated humidity or direct sunlight. CDs with copy protection CDs are often provided with copy protection from the manu facturer. This can resul t in CD[…]
-
Страница 112
Entertainment Radio MINI Boost CD 110 USB device To play audio tracks over the car’s speaker sys- tem, connect the USB device to port 2 . After first connecting, the track informat ion is transferred to the vehicle. The time required is dependent on th e USB device and on the num — ber of tracks. Information from up to four USB devices or appr[…]
-
Страница 113
Radio MINI Boost CD Entertainment 111 Notes > The USB audio interface supplies the con- nected audio devices with power, provided that this is supported by the audio device. For this reason, audio devices are not to be connected to a receptac le in the vehicle dur- ing operat ion. > Do not expose aud io devices to extreme ambient conditions, […]
-
Страница 114
Connect Me. Online Edition for Part no. 01 40 2 607 530 — © 03/11 BMW AG[…]
-
Страница 115
AT A GLANCE Controls Driving tips Entertainment Mobility Reference Communications Online Edition for Part no. 01 40 2 607 530 — © 03/11 BMW AG[…]
-
Страница 116
Communic ations Telephone 114 Telephone Overview The concept Mobile phones or other external device s, e.g. audio players, can be connect ed to the vehicle via Bluetooth. Bluetooth® i s a register ed tradem ark of Blue- tooth® SIG, Inc. Your MINI is equipp ed with a comp lete mobile phone preparation. Afte r a suitable mobile phone is pai red wit[…]
-
Страница 117
Telephone Communications 115 Operating the mobile phone via the radio To open the men u show above, refer to page 120 . 1 Making and receiving phone calls 119 > «#»: dial phone number > «A-Z»: phone book > «TOP8»: most frequently dialed phone numbers > «LAST8»: last phone numbers dialed > «[…]
-
Страница 118
Communic ations Telephone 116 10 Switching displays 120 > «PHONE»: telephone > «COMP» : computer > «CONFIG»: adj usting 11 Radio on/off, volume > Press: to switch radio on/off > Turn: adjustin g volume 119 12 Ejecting CD This symbol appears on the radio display when a phone call is bein g made with the h[…]
-
Страница 119
Telephone Communications 117 4. Press the button. 5. Press the button. 6. Press the button. Turn the right rota ry knob to display the Blue- tooth name of your vehicle on t he display. Preparation with mobil e phone 7. Other operations must be performed on the mobile phone and differ de pending on the type of mobile phone, refer to Owner’s Man[…]
-
Страница 120
Communic ations Telephone 118 To display the Hot line phone numbe r: Press the button. Turn the right rotary knob to display the Hotline phone number and to d isplay required pairing information on the display. Following the initial pairing > The mobile phone is detected/connect ed in the vehicle within a short period of time when the engine is […]
-
Страница 121
Telephone Communications 119 > Is the mobile phone in power economy m o d e o r d o e s i t o n l y h a v e a s m a l l a m o u n t o f battery charge remaining? Charge the mobile phone in the snap-in adapter * or via a charging cable. > Depending o n the mobile phon e, it may only be possible to connect one device to the vehicle. Unpair the […]
-
Страница 122
Communic ations Telephone 120 Accepting a call Press the butto n on the radio or on the st eer- ing wheel. Alternative: Press the button. Callrejectin g Press the button. Ending a call Press the butto n on the radio or on the st eer- ing wheel. Alternative: Press the button. Entering phone numbers Dialing a number 1. Press the MENU button. 2. Press[…]
-
Страница 123
Telephone Communications 121 name and phone number, are sorted alpha- betically. > «TOP8» The Top 8 list autom atically stores the eigh t phone numbers of the pho ne book that are dialed the most f requently. > «LAST8» The last eight phone numbers you have dialed are stor ed automati cally. The ph one number dialed last ap[…]
-
Страница 124
Communic ations Telephone 122 3. Press and hold the button to dial th e phone number. Dialing a phone nu mber stored in a list To select an entry and establish a connection: 1. Press the MENU button. 2. Press the button. 3. Press the desired button to select one of the four lists. 4. Turn the righ t rotary knob to select an entry and press the righ[…]
-
Страница 125
Telephone Communications 123 Finishing voice input Press the button on the steerin g wheel briefly or Possible commands Having possible commands read aloud Press the button on the steerin g wheel. Possible commands are read aloud. Each digit can be spoken individually or com- bined into a sequence t o accelerate the entry process. Using alternative[…]
-
Страница 126
Communic ations Telephone 124 Deleting all entries To listen to and select the entries: Selecting an entry Adjusting volume Turn knob during announcement. > The volume rema ins the same, ev en if the volume of other audi o sources is changed. > The volume is store d for the remote control currently in use. Notes Do not use the voice activat i[…]
-
Страница 127
Telephone Communications 125 2. Insert the snap-in adapte r at the front, arrow 1 , and press downward, arrow 2 , until it clicks into place. Inserting mobile phone 1. Depending on the mobile phone, it may be necessary to rem ove the protective cap of the antenna conn ector and from the U SB connection of the mobile phone. 2. Push the mobile phone […]
-
Страница 128
Move Me. Online Edition for Part no. 01 40 2 607 530 — © 03/11 BMW AG[…]
-
Страница 129
AT A GLANCE Controls Driving tips Entertainment Communications Reference Mobility Online Edition for Part no. 01 40 2 607 530 — © 03/11 BMW AG[…]
-
Страница 130
Mobility Refueling 128 Refueling Switch off the en gine before refueling; otherwise, fuel cannot b e added to the tank and a message will be displayed. < Take all precautionary measures and observe all ap plicable regulations when handling fuel. Do not carry any sp are fuel con- tainers in your vehicle. They can develop a leak and cause an explo[…]
-
Страница 131
Refueling Mobility 129 Fuel specifications Fuels that are labeled at the pump as containing metal may not be used. Do not fill the tank with leaded gasoline o r gasoline that contains metal additives, such as manganese or iron; oth erwise, long term damage to the catalytic converter or other com- ponents may result. Do not fill the t ank with E85, […]
-
Страница 132
Mobility Wheels and tires 130 Wheels and tires Tire inflation pressures Information for your safety It is not merely the tire s’ service life, but also driving comfort and, to a great extent, driving safety that depend on the conditio n of the tires and the maintenance of the specified tire pres- sure. Checking pressure Check the tire inflatio[…]
-
Страница 133
Wheels and tires Mobility 131 Observe all national and local maximum speed limits; otherwise, violations of the law could occur. Online Edition for Part no. 01 40 2 607 530 — © 03/11 BMW AG Online Edition for Part no. 01 40 2 607 530 — © 03/11 BMW AG[…]
-
Страница 134
Mobility Wheels and tires 132 Tire inflation pressures MINI Cooper Countryman Tire size Pressure specifications in psi/kPa Speeds up to a max. of 100 mph / 160 km/h Speeds including thos e exceeding 100 mph / 160 km/h All pressu re specif ications in the table are indicated in psi/kilopas- cal with cold tires. Cold = ambient temperature 195/60 R 16[…]
-
Страница 135
Wheels and tires Mobility 133 Tire inflation pressures MINI Cooper S Cou ntryman / Cooper S ALL4 Country man Tire size Pressure specifications in psi/kPa Speeds up to a max. of 100 mph / 160 km/h Speeds including those exceeding 100 mph / 160 km/h All pressure specifications in the table are indicated in psi/kilopas- cal with cold tires. Co ld = am[…]
-
Страница 136
Mobility Wheels and tires 134 Tire identification marks Knowledge of the labeling on the side of the t ire makes it easier to identi fy and choose the right tires. Tire size Speed letter Q = up to 100 mph or 160 km/h T = up to 118 mph or 190 km/h H = up to 131 m ph or 210 km/h V = up to 150 mph or 240 km/h W = up to 167 mp h or 270 km/h Y = up to 1[…]
-
Страница 137
Wheels and tires Mobility 135 failure. Th e grade C correspon ds to a level of performance which all passenger car tires must meet under the Federal Motor Vehicle Safe ty Standard No. 1 09. Grades B and A represen t lev- els of perfo rmance on the labora tory test w heel that exceed the m inimum required by law. The temperature grade for this tire […]
-
Страница 138
Mobility Wheels and tires 136 Tire age The manufacturing date of tires is contained in the tire coding: DOT … 0211 means that t he tire was manufac- tured in week 2 of 2011. For various reasons, such as the development of brittleness, the manuf acturer of your MINI rec- ommends tire replacemen t after no more than 6 years, regardless of the actua[…]
-
Страница 139
Wheels and tires Mobility 137 Recommended tire brands For each tire size, the manufacturer of your MINI recommends certain tire brands. They are marked with a clearly visible MINI designation on the sidewall of the tire. When properly us ed, these tires meet the high- est standards in terms of safety and handling characteristics. Run-flat tires* Wh[…]
-
Страница 140
Mobility Under th e hood 138 Under the hood Never attempt to perform any service or repair operations on yo ur vehicle without the required professional technical traini ng. If you are not f amiliar with the regulations to be observed, have the necessary work on your vehicle carried out only by a MINI dealer or a workshop that has specially trained[…]
-
Страница 141
Under the hood Mobility 139 Important parts of the eng ine compartment 1 Vehicle identification number * 2 Battery, under the cover 159 3 Engine oil dipstick 139 4 Engine oil filler neck 140 5 Coolant e xpansion tank 140 6 Engine compartment fu se box 156 7 Reservoir for washer fl uid for the headlamp and window washer system 49 Engine oil The engi[…]
-
Страница 142
Mobility Under th e hood 140 Do not fill beyo nd the upper mark on the dipstick. Excess oil will damage th e engine. < Adding engine oil Do not add th e maximum qu antity of 1 US quart/1 liter of engine oil until the oil level has dropped to just above the lower mark on the dipstick, page 139 . Add oil within the next 30 miles/50 km; otherwise, […]
-
Страница 143
Under the hood Mobility 141 Coolant temperature If the coolant, and therefore t he engine, should overheat, then a warning li ght wi ll go on, refer to page 165 . Checking coolant level Do not add coolant t o the cooling syst em when the eng ine is hot. Escaping cool ant can cause burns. < Do not open the hood until the engine has cooled down. T[…]
-
Страница 144
Mobility Maintenance 142 Maintenance MINI Maintenance System The MINI Maintenance System supports the preservation of the traffic and operating safety of your MINI. The objectiv e is to optimize efforts with respect to min imal vehicle maintenance costs. If and when you come to sell your MINI, a com- prehensive record of serv icing will prove a sig[…]
-
Страница 145
Maintenance Mobility 143 Socket for On-Board Diagnosis OBD The primary components that m ake up the emissions can be checked by a device via the OBD socket. Emissions The warning lamps co me on. The vehi cle is producing higher emissions. You can continue your journey, but moderate your speed and exercise due caution. Have the car checked as soon a[…]
-
Страница 146
Mobility Care 144 Care Car-care products Regular cleaning and care helps to maintain the value of your MIN I. The manufacturer of your MINI reco mmends using manufacturer-approved products to clean and care for your vehicle. Your MINI dealer would be ple ased to advise you on cleaning and care pro ducts and services for your MINI. The ingredients o[…]
-
Страница 147
Care Mobility 145 5. Insert the remote control in the ignition lock so that the vehicle can roll. Steam jets/high-pressure washers When using steam jets or high-pressure washers, make sure th at you maintain suf- ficient distance from the vehicle and do not exceed a maximum temperature of 140 7/60 6. If the distance is too close, the pressure too h[…]
-
Страница 148
Mobility Care 146 Chrome parts* Carefully clean vehicle part s such as the radiator grill and door handles with copious quantities of water and, if necessary, a shampoo additive, especially when contamin ated with road salt. For addition al treatmen t, use chrome polish. Light alloy wheels* The system produces brake dust that collects on the light […]
-
Страница 149
Care Mobility 147 Decorative strips* Only clean decorative st rips with moi st cloths. Wipe dry with a soft cloth. Safety belts Dirty belt straps impede the reeling action and thus have a negat ive impact on safety. Do not clean che mically, as this m ay destroy the webbing. < Displays To clean displays such as radios or dis play ele- ments, use[…]
-
Страница 150
Mobility Replacing components 148 Replacing components Wiper blades Changing the front wiper blades 1. Fold out the wiper arm and hold it. 2. Press together the l o cking spring, arrows 1 , and fold out the wiper blade, arrow 2 . 3. Pull the wiper blade forward and out of the catch mechanism. 4. Press the new wiper blade into the fixture until it e[…]
-
Страница 151
Replacing components Mobility 149 tional laser di odes, and legislation de fines them as Class 1 light-em itting diodes. Do not remove the covers or expo se the eyes direct ly to the unfi ltered li ght source for several hours; otherw ise, this could cause irritation of the retina. < Headlamp glass lens In cool or humid weather, condensat ion ma[…]
-
Страница 152
Mobility Replacing components 150 2. Push on the catch, arrow 1 , and disconnect the connector, arrow 2 . 3. To insert the new bulb and replace the cover, proceed in reverse order. Turn signals, parking lamps, roadside parking lamps, and fog lamps Accessing the lamps via the wheel well 1 Turn si gnal 2 Parking/roadside parking/fog lamps Replacing a[…]
-
Страница 153
Replacing components Mobility 151 Replacing a fog lamp bulb H8 bulb, 35 watts 1. Turn in the wheel. 2. Remove cover 2 . To do so, turn the cover counterclockwise. 3. Pull the cable connector. 4. Unscrew the lower bulb counterclo ckwise. 5. To insert the new bul b and replace the cover, proceed in reverse order. Side turn signals 5w a t t b u l b , […]
-
Страница 154
Mobility Replacing components 152 3. Disengage the bulb holder by pressing d own on the clamping clip, arrow. 4. Remove bulb holder. 5. Apply gentle pressure to th e bulb while turn- ing it to the left for removal and replace- ment. 6. Re-engage the bulb holder so that it audibly clicks into place. 7. Replace the cover pane l. License plate lamps 5[…]
-
Страница 155
Replacing components Mobility 153 Sealant and compressor 1 Sealant bottle and adhesi ve label with speed limit 2 Filling hose Note the use- by date on the sealant bot- tle. < 3 Holder for the sealant bottle 4 Compressor 5 Plug and cable for th e socket in the ve hicle interior, pa ge 86 6 Connection h ose to connect the compresso r and sealant b[…]
-
Страница 156
Mobility Replacing components 154 approx. 73 psi/500 kPa. Do n ot switch off the compressor during this phase. < Do not run the comp ressor for longer than 10 minutes; otherwise, the device will overheat and possibly be dam- aged. < 8. Switch off the compressor. If an air pressure of 26 psi/180 kPa is not reached: 1. Unscrew the filling hose […]
-
Страница 157
Replacing components Mobility 155 Changing wheels The pouch with the wheel changing kit * is stored under th e flat load floor * . It includes: > Vehicle jack > Reversible ratchet > Wheel stud wrench > Extractor hook fo r wheel center cover > Chock Preparing for a wheel change Observe the safety precautions regarding flat tires on pa[…]
-
Страница 158
Mobility Replacing components 156 7. Lower the veh icle. 8. Remove the jack. Tightening the lug bo lts Tighten the lu g bolts in a diagonal pattern. Immediately have the wheels checked with a calibrated torque wr ench to ensure that the lug bolts are firmly seated. Otherwise, incorrectly tightened lu g bolts can pres ent a safety hazard. < Tight[…]
-
Страница 159
Replacing components Mobility 157 In the engine compartment Opening the cover Press the latch. In the vehicle interior On the right side of the footwell. Opening the cover Press out at the recess. Online Edition for Part no. 01 40 2 607 530 — © 03/11 BMW AG Online Edition for Part no. 01 40 2 607 530 — © 03/11 BMW AG[…]
-
Страница 160
Mobility Giving and receiving assistance 158 Giving and receiving assistance Roadside Assistance Roadside Assistance is available by phone 24 hours a day in many countries. You can obtain assistance the re in the event of a vehicle breakdown. First aid pouch* Some of the articles co ntained in the first ai d pouch have a limited service life. There[…]
-
Страница 161
Giving and receiving assistance Mobility 159 Connecting jumper cables Connect the jumper cables in the correct o r d e r , s o t h a t n o s p arks which could cause injury occur. < 1. Open the battery cover in the engine com- partment to access the positive terminal of your MINI. 2. Release the tabs on the left and right side s of the positive […]
-
Страница 162
Mobility Giving and receiving assistance 160 Using a tow fitting The screw-in to w fitting must alw ays be carried in the car. It can be screwe d in at the front or at the right rear. The tow fitting can be found under the right front seat or in the pocket of t he tire changing set * in the cargo area. Use only the to w fitting provided with the ve[…]
-
Страница 163
Giving and receiving assistance Mobility 161 With tow rope When starting off in the towing vehicle , make sure that the tow rope is taut. To avoid jerking and the associ ated stresses on vehicle com ponents when towing, always use nylon ropes or nylon strap s. Attach the tow rope to the tow fittings only, as attaching it to other parts of the vehic[…]
-
Страница 164
Mobility Indicator and warning lamps 162 Indicator and warning lamps Indicator and warning lamps can light up in var- ious combinations and colors in indic ator area 1 or 2 . Refer to th e table fo r information on causes and how to react. Note whether a lamp lights up alone or in combinatio n with another. Some lamps can light up in different colo[…]
-
Страница 165
Indicator and warning lamps Mobility 163 Lights up briefly: Approx. 2.1 US gal/8 liters of fuel are still in the tank Remains on: The remaining rang e is at most 30 miles/50 km, p age 51 Engine refuses to start Depress th e brake or clutch in order to start the engine, p age 41 . Ignition switched on and driver’s door open Switch o ff the igni[…]
-
Страница 166
Mobility Indicator and warning lamps 164 Lights up in red: Service due Arrange a servic e appointment . Check service requirements, page 142 . Lights up in yellow: The engine will start the next time the Start/Stop button is b riefly pressed, possibly with out the brake or clutch being depressed Remote control m alfunctioning or, in cars with Comfo[…]
-
Страница 167
Indicator and warning lamps Mobility 165 Indicator lamp 1 flashes: Engine malfunction under hig h load. High engine load will result in dam- age to the catalytic converter You can contin ue your journey, but moderate your speed and exercise due caution. Have t he vehicle checked wit hout delay. Indicator lamp 1 comes on: Engine malfunction with adv[…]
-
Страница 168
Mobility Indicator and warning lamps 166 Indication in Canadian models Parking brake applied Indication in US models Lights up in red: Brake fluid level too low Braking action is re duced, stop with care. Conta ct the neare st MINI de aler. Lights up in yellow: Hill Assist failed. The car will not be held in place after the brake is released Have t[…]
-
Страница 169
Indicator and warning lamps Mobility 167 Indication in US models Vehicle ele ctronics fai led You cannot co ntinue your jo urney. Contact your MIN I dealer. Indication * in Canadian models Vehicle ele ctronics fai led You cannot co ntinue your jo urney. Contact your MIN I dealer. Lights up in red: Have the system in question checked without delay. […]
-
Страница 170
Mobility Indicator and warning lamps 168 Dynamic Traction Control DTC is acti- vated, refer also to page 61 The Dynamic Stability Control DSC and Dynamic Traction Control DTC are deactivated, refer also to page 59 Driving stability limited during accel- eration and cornering. Driving style must be adjusted. The Dynamic Stability Control DSC and Dyn[…]
-
Страница 171
Indicator and warning lamps Mobility 169 Indication * in Canadian models The driving stabili ty control systems, including ABS, ALL4 all-wheel drive, and the Flat Tire Monitor or the Tire Pressure Monitor * , have failed, refer also to page 59 Drive cautiously and think well ahead. Avoid braking with full force, driving on rough tracks, and depress[…]
-
Страница 172
Mobility Indicator and warning lamps 170 Vehicles with Tire Pressure Monitor * Light up in yel low and red: There is a flat tire or significant tire pressure loss, e.g. in the front rig ht tire Carefully bring the car to a stop. Observe the informatio n starting on page 64 . Vehicles with Tire Pressure Monitor * Light up in yel low: Tire Pressure M[…]
-
Страница 173
Indicator and warning lamps Mobility 171 Lights up in re d: > Transmission limp-home pro- gram active with restricted range of gears, possibly with reduced acceleration You can contin ue your journey, but moderate your speed and exercise due caution. Have t he system checked wit hout delay. > Gears can be engaged without depressing the brake […]
-
Страница 174
Mobility Indicator and warning lamps 172 Selector lever position P not engaged. Ignition cannot be switched off Engage selector le ver position P when you wish to switch o ff the ignition, page 41 . Cruise control system fail ed Have the sy stem check ed. Park Distance Control fail ed Have the system checked. Bulb of exterior lightin g system faile[…]
-
Страница 175
Indicator and warning lamps Mobility 173 No service due Set speed limit exceeded Time and date no longer correct Set the time and date, page 57 . 1 2 Cause What to do Online Edition for Part no. 01 40 2 607 530 — © 03/11 BMW AG Online Edition for Part no. 01 40 2 607 530 — © 03/11 BMW AG[…]
-
Страница 176
Find Me. Online Edition for Part no. 01 40 2 607 530 — © 03/11 BMW AG[…]
-
Страница 177
AT A GLANCE Controls Driving tips Entertainment Communications Mobility Reference Online Edition for Part no. 01 40 2 607 530 — © 03/11 BMW AG[…]
-
Страница 178
Reference Technical data 176 Technical data Engine data Cooper Cooper S Displacement cu in/cm μ 97.5/1,598 97.5/1,598 Number of cylinders 4 4 Maximum power out- put hp 121 181 At engine speed rpm 6,000 5,500 Maximum torque with overboost lb ft/Nm 114/155 – 177/240 192/260 At engine speed with overboost rpm 4,250 – 1,600-5,000 1,700-4,500 Overb[…]
-
Страница 179
Technical data Reference 177 Dimensions All dimensions in inches/mm. Minimum turning radius dia.: 38.1 ft/11.6 m. Information after th e semicolon: differe nt values for MIN I Cooper S. Online Edition for Part no. 01 40 2 607 530 — © 03/11 BMW AG Online Edition for Part no. 01 40 2 607 530 — © 03/11 BMW AG[…]
-
Страница 180
Reference Technical data 178 Weights Never exceed either th e approved axle loads or the gross vehicle weight. Cooper Cooper S Cooper S A LL4 Curb weight, ready for travel , with all optional extras > Manu al transmission lbs./kg 2,9 54/1,340 3,053/1,385 3,208/1,455 > Automatic transmis- sion lbs./kg 3,020/1,370 3,097/1,405 3,252/1,475 Approv[…]
-
Страница 181
Technical data Reference 179 Capacities US gal/US quarts Liters Notes Fuel tank 12.4/– approx. 47 Fuel grade: page 129 Including reserve of 2.1/– approx. 8 Window washer system incl. headlamp washer system –/4.2 approx. 4 For more details: page 49 Online Edition for Part no. 01 40 2 607 530 — © 03/11 BMW AG Online Edition for Part no. 01 40 […]
-
Страница 182
180 Reference Everything from A to Z Everything from A to Z Index A ABS Antilock Brake System 60 Accessories, refer to Your individual vehicle 4 Acknowledgment signals for locking/unlocking vehicle 22 Activated-charcoa l filter for automatic climate control 80 Adaptive Light Control 73 Additives – coolant 140 – engine oil 140 Adjusting temperat[…]
-
Страница 183
Everything from A to Z Reference 181 Battery 156 – charging 156 – disposal 29 , 156 – jump-starting 15 8 – temporary power failure 156 Battery renewal – remote control 29 Being towed 160 Bell – volume 102 Belt tensioner, refer to Safety belts 35 Belts, refer to Safe ty belts 35 Beverag e holders, re fer to Cupholders 85 Black ice, refer[…]
-
Страница 184
Reference Everything from A to Z 182 Center Rail, refer to Storage compartments 84 Central locking system 21 – Comfort Access 27 – from inside 24 – from outside 21 – setting unlocki ng behavior 21 Changing bulbs 148 Changing w heels 155 Chassis number, refer to Engine compartment 139 Check Control 57 Child restraint fixing system LATCH 39 C[…]
-
Страница 185
Everything from A to Z Reference 183 Door key, refer to Integr ated key/remote control 20 Door lock 24 Door lo ck, confi rmation signals 22 Doors, manu al operation 24 DOT Qual ity Grade s 134 Drinks holders, refer to Cupholders 85 Drive-off assistan t, refer to Hill Assist 62 Drivin g dynamics co ntrol, ref er to Sport button 62 Driving lamps, ref[…]
-
Страница 186
Reference Everything from A to Z 184 Flat Tire Monitor FTM 62 – indicating a flat tire 63 – initializing the system 63 – snow chains 63 – system limits 63 Flat tire s, refer to Tire condit ion 135 Floor mats, care 146 Floor plate, refer to Flat load floor 94 Fog lamps – replacing bulb 150 Folding rear seat backrest 92 Footbrake, refer to […]
-
Страница 187
Everything from A to Z Reference 185 Ignition key position 1, ref er to Radio readiness 41 Ignition key position 2, ref er to Ignition on 41 Ignition key, refer to Integrated ke y/remote control 20 Ignition lock 41 Imprint 2 Incoming call 119 Indicator and warning lamps 13 , 162 – Tire Pressure Monitor TPM 65 Indicator lighting, refer to Instrume[…]
-
Страница 188
Reference Everything from A to Z 186 Luggage rack, refer to Roof-mounte d luggage rack 97 Lumbar support 33 M M+S tires, refer to Winter tires 137 Maintenance, refer to Service and Warranty Information Booklet for US models and Service Guide Boo klet for Canadian models Maintena nce system 142 Malfunction warn ings, refer to Check Control 57 Manual[…]
-
Страница 189
Everything from A to Z Reference 187 P Paintwork, care 145 Park Distance Control PDC 59 Parking – vehicle 42 Parking aid, refer to Park Distance Control PDC 59 Parking brake 43 Parking lamps, replacing bulb 150 Parking lamps/low beams 71 Parts and accessories, refer to Your individual vehicle 4 Pathway lighting 71 PDC – volume 102 Personal Prof[…]
-
Страница 190
Reference Everything from A to Z 188 Roadside Assistance 158 Roadside parking lamps 74 – replacing bulb 150 Roadworthiness test, refer to Service requirements 55 Roof load capacity 178 Roof-mounted lug gage rack 97 Rope, refer to Tow-starting, towing away 161 RSC Run-flat System Component, refer to Run-flat tires 136 Rubber parts, care 145 Run-fl[…]
-
Страница 191
Everything from A to Z Reference 189 Speedo, refer to Speedometer 12 Speedometer 12 Split rear seat backrest, refer to Expanding the cargo area 92 Sport button 62 Stability control, refer to Driving s tability contr ol systems 59 Start/Stop button 41 – starting the engine 42 – switchin g off the engine 42 Starting assistance, refer to Jump-star[…]
-
Страница 192
Reference Everything from A to Z 190 Torque 176 – lug bolts 156 Tow bar 160 Tow fitting 160 – screw thread 160 Tow fittings for tow-starting and towing away 160 Tow rope 161 Towing 159 – car with automati c transmission 160 – methods 160 Tow-starting 159 TPM, refer to Tire Pressure Monitor 64 Track width, refer to Dimension 177 Traction con[…]
-
Страница 193
Everything from A to Z Reference 191 Windows 30 – closing 30 – convenient operation 22 – opening 30 – pinch protection system 31 – safety switch 31 Windshield – cleaning 48 – defrosting and removing condensation 78 , 80 Windshield wiper blades, changing 148 Windshield wipers, refer to Wiper system 47 Winter tires 137 – storage 137 W[…]
-
Страница 194
Online Edition for Part no. 01 40 2 607 530 — © 03/11 BMW AG Online Edition for Part no. 01 40 2 607 530 — © 03/11 BMW AG[…]
-
Страница 195
Online Edition for Part no. 01 40 2 607 530 — © 03/11 BMW AG Online Edition for Part no. 01 40 2 607 530 — © 03/11 BMW AG[…]
-
Страница 196
01 40 2 607 530 ue *BL260753000J* DRIVE ME. Online Edition for Part no. 01 40 2 607 530 — © 03/11 BMW AG[…]

OWNER’S MANUAL
MINI COUNTRYMAN
Contents
A — Z
Online Edition for Part no. 01 40 2 606 301 — © 10/10 BMW AG
-
Page 1: Mini Countryman (2011)
OWNER’S MANUAL MINI COUNTRYMAN Contents A — Z Online Edition for Part no. 01 40 2 607 530 — © 03/11 BMW AG[…]
-
Page 2: Mini Countryman (2011)
Online Edition for Part no. 01 40 2 607 530 — © 03/11 BMW AG[…]
-
Page 3: Mini Countryman (2011)
Cooper Cooper S Cooper S ALL4 Congratulations on your new MINI This Owner’s Manual should be consid ered a perman ent part of this vehicle. It should stay with the vehicle when sold to provide the next owne r with important operating, safe ty and mainte- nance information. We wish you an en joyable driving experie nce. Online Edition for Part […]
-
Page 4: Mini Countryman (2011)
© 2011 Bayerische Motoren Werke Aktiengesellscha ft Munich, Germany Reprinting, including excerpts, only wi th the written consent of BMW AG, Munich. US English II/11 Printed on en vironmentally friendly pap er, bleached withou t chlorine , suitable for recycling. Online Edition for Part no. 01 40 2 607 530 — © 03/11 BMW AG Online Edition for Par[…]
-
Page 5: Mini Countryman (2011)
CONTENTS The fastest w ay to find information on a particu- lar topic or item is by using the index, refer to page 180 . Notes 4 General inform ation 6 Reporting safety defects AT A GLANCE 10 Cockpit 16 Radio MINI Boost CD Controls 20 Opening an d closing 32 Adjustments 38 Transporting children sa fely 41 Drivin g 51 Control s overview 59 Technolog[…]
-
Page 6: Mini Countryman (2011)
Notes General information 4 General information Using this Owner’s Manual We have tried to make a ll the information in this Owner’s Manual easy to find. The fastest way to find specific topics is to refer to the detailed index at the back of the manual. If you wish to gain an initial overview of your ve hicle, you w ill find this in the […]
-
Page 7: Mini Countryman (2011)
General information No tes 5 For your safety Maintenance and repair Advanced technology, e.g. the use of modern materials an d powerful electron- ics, requires specially adapted maintenance and repair methods. Th erefore, have the ne cessary work on your MINI only carried out by a MINI dealer or a workshop that has specially trained personnel worki[…]
-
Page 8: Mini Countryman (2011)
Notes General information 6 Service and warranty We recommend that you read this publication thoroughly. Your MINI is covered by the following warran- ties: > New Vehicle Limited W arranty > Rust Perforation Limited Warranty > Federal Emissions Syst em Defect Warranty > Federal Emissions Performance Warranty > California Emission Con[…]
-
Page 9: Mini Countryman (2011)
General information No tes 7 Online Edition for Part no. 01 40 2 607 530 — © 03/11 BMW AG Online Edition for Part no. 01 40 2 607 530 — © 03/11 BMW AG[…]
-
Page 10: Mini Countryman (2011)
Watch Me. Online Edition for Part no. 01 40 2 607 530 — © 03/11 BMW AG[…]
-
Page 11: Mini Countryman (2011)
Controls Driving tips Entertainment Communications Mobility Reference AT A GLANCE Online Edition for Part no. 01 40 2 607 530 — © 03/11 BMW AG[…]
-
Page 12: Mini Countryman (2011)
AT A GLANCE Cockpit 10 Cockpit Around the steering wheel : Controls and displays 1 Adjusting the exterior mirrors, folding them in and out * 36 2 Parking lamps 71 Low beams 71 Automatic headlamp control * 71 Adaptive Light Control * 73 Turn signals 46 High beams 74 Headlamp f lasher 46 Roadsi de parki ng lamp s * 74 Computer * 52 Online Edition for[…]
-
Page 13: Mini Countryman (2011)
Cockpit AT A GLANCE 11 6 Ignition lock 41 7 Buttons * on steering wheel 8 Horn: the entire surface 9 Adjusting the steering wheel 37 10 Releasing the hood 138 3 Tachometer 12 Instrument lighting 74 Resetting the trip odo meter 51 4 Wiper system 47 5 Switching the ignition on/off and starting /stopping the engi ne 41 Continuing cruise control * 49 R[…]
-
Page 14: Mini Countryman (2011)
AT A GLANCE Cockpit 12 Displays 1 Tachometer 51 With indicator and warnin g lamps 13 2 Display for > Current vehicle speed 51 > Indicator and warning lamps 13 3 Resetting the trip odometer 51 4 Display for > Position of automatic trans mission * 43 > Computer * 52 > Date of next scheduled service, and remaining distance to be driven […]
-
Page 15: Mini Countryman (2011)
Cockpit AT A GLANCE 13 Indicator and warning lamps The concept Indicator and warning lamps can light up in var — ious combinations and co lors in indicato r area 1 or 2 . Some lamps are checked for proper functioning and thus come on briefly when th e engine is started or the ignition is switched on. What to do in case of a malfun ction A list of a[…]
-
Page 16: Mini Countryman (2011)
AT A GLANCE Cockpit 14 Around the center console Online Edition for Part no. 01 40 2 607 530 — © 03/11 BMW AG Online Edition for Part no. 01 40 2 607 530 — © 03/11 BMW AG[…]
-
Page 17: Mini Countryman (2011)
Cockpit AT A GLANCE 15 1 Microphone for voice activation system * and for telephone in hands-free mode * 2 Indicator/warning lamp * for front passen- ger airbags 69 4 Hazard warning flashers 5 Speedometer 12 6 Radio/CD 7 Air conditioner or automatic climate control * 76 8 Switches in the center console 9 Buttons in the ce nter console 10 AUX-IN con[…]
-
Page 18: Mini Countryman (2011)
AT A GLANCE Radio MINI Boost CD 16 Radio MINI Boost CD 1 Selecting au dio sources 2 On/off * , loudspeaker controls 3 Accessing settings > Speed-dependent volume > Tone settings 4 Function buttons for co nfirming the menu items displayed above them 5 Changing stations, tracks > Changing stations > Changing track s on the CD player 6 Dis[…]
-
Page 19: Mini Countryman (2011)
Radio MINI Boost CD AT A GLANCE 17 Menu navigation Radio and telephone functions * can be called up by us ing the b uttons on the ra dio an d menus. Calling up the settings menu Press the MENU button > Settings > MINI phone numbers > Telephone * Calling up the audio menu Press the MODE button > Radio > HD Radio * > Satellite radio[…]
-
Page 20: Mini Countryman (2011)
Handle Me. Online Edition for Part no. 01 40 2 607 530 — © 03/11 BMW AG[…]
-
Page 21: Mini Countryman (2011)
AT A GLANCE Driving tips Entertainment Communications Mobility Reference Controls Online Edition for Part no. 01 40 2 607 530 — © 03/11 BMW AG[…]
-
Page 22: Mini Countryman (2011)
Controls Opening and closing 20 Opening and closing Keys/remote controls Buttons for the remote control 1 Opening the liftgate 2 Unlocking 3 Locking General information Each remote control co ntains a rechargeable battery that is recharged when it is in the igni- tion lock while the car is being driven. You should ther efore use each re mote contro[…]
-
Page 23: Mini Countryman (2011)
Opening and closing Controls 21 > Settings for t he displays in the speedom eter and tachometer: > 12 h/24 h mode of the clock, refer to For- mats and units of measure 54 > Date format, refer to Formats and units of measure 54 > Units of measure for f uel consump tion, distance covered/re maining distances and temperature, refer to Form[…]
-
Page 24: Mini Countryman (2011)
Controls Opening and closing 22 3. Press and hold the button until the display changes. 4. Press the button as often as necessary until the symbol and «SET» are displayed. 5. Press and hold the button until the display changes. 6. Briefly press the button re peatedly until the display shows the illu strated symbol, arrow. 7. Press and hol[…]
-
Page 25: Mini Countryman (2011)
Opening and closing Controls 23 5. Press and hold the butt on until th e display changes. 6. Press the button to select, arrow: > Confirmation signal during unlo cking > Confirmation signal during locking 7. Press and hold the butt on until th e display changes. 8. Press the button to select: > The hazard warning flashers light up dur- ing[…]
-
Page 26: Mini Countryman (2011)
Controls Opening and closing 24 Using the door lo ck You can set which parts of the car are un locked, page 21 . Do not lock the vehicle from the outside if there is any person inside, because the vehicle cannot be unlocked fr om inside without special knowledge. < When there is no alarm system * or Com- fort Access * , only the driv er’s d[…]
-
Page 27: Mini Countryman (2011)
Opening and closing Controls 25 Persons or animals in a parked vehicle could lock the doors from the inside. Take the key with you when you leav e the vehicl e so that the vehicle can be opened from the out — side. < Automatic lo cking* You can also set the situ ations in which the car locks. The setting is st ored for the remote co n- trol in u[…]
-
Page 28: Mini Countryman (2011)
Controls Opening and closing 26 wise, the tail lamps will be obscured and driving safety will be compromised. < Press the top side of th e MINI emblem, arrow, or Press the button on the remote control for approx. 1 second and then release it. The lift- gate is unlock ed. Closing Make sure that the closing path of th e lift- gate is clear; othe r[…]
-
Page 29: Mini Countryman (2011)
Opening and closing Controls 27 Display on the revolut ion counter When the sy stem is arme d, all LEDs pulse. After approx. 16 minutes one LED flashes. > LEDs pulse or LED flashes: system is armed. > One LED flashes at short intervals: A door, the hoo d or the liftgate is not prop- erly closed. Even if these are not closed fully, the remaini[…]
-
Page 30: Mini Countryman (2011)
Controls Opening and closing 28 Comfort Access support s the following func- tions: > Unlocking/locking the vehicle > Convenient closing > Unlocking the liftgate separately > Starting the engine Comparison to standard remote controls Essentially, it makes no difference wh ether you control th e above-m entioned f unctions using Comfort […]
-
Page 31: Mini Countryman (2011)
Opening and closing Controls 29 Switching off the engine in cars with automatic transmiss ion The engine can on ly be switched of f when the selector lever is in position P, page 43 . To switch the engine o ff when the selector lever is in position N, the re mote control must be i n the ignition lock. Before driving a vehicle with automatic transmi[…]
-
Page 32: Mini Countryman (2011)
Controls Opening and closing 30 > With the i gnition switch ed on, press th e switch backward beyo nd the resistance point. Both closed roofs are t ilted fully. Pressing again st ops the movement. Opening, closing With the ignition switch ed on and the glass sun- roof tilted, press the swit ch backward and hold it there. The front glass roof ope[…]
-
Page 33: Mini Countryman (2011)
Opening and closing Controls 31 The window can b e closed in the same way by pressing the switch up. After switching off the ignition When the ignition is sw itched off, the windows can still be op erated for approx. 1 minut e as long as no door is opened. Take the key with you when you leave the car; otherwise, children could operate the electric […]
-
Page 34: Mini Countryman (2011)
Controls Adjustments 32 Adjustments Sitting safely The ideal sitting position can make a vital contri- bution to rel axed, fatigu e- free dri ving. In con- junction wi th the safe ty belts, the head rest raints and the airbags, the seated position has a major influence on your safety in the even t of an acci- de nt . T o e ns ur e t h at th e safet[…]
-
Page 35: Mini Countryman (2011)
Adjustments Controls 33 Seats Note before adjusting Never attempt to adjust your seat while the vehicle is moving. The seat could respond with unexpected movem ent, and the ensuing loss of vehicle control could lead to an accident. On the front passenger seat as well, do not incline the backrest too far to the rear while the vehicle is being driv e[…]
-
Page 36: Mini Countryman (2011)
Controls Adjustments 34 Turn the wheel to increase or decrease the cur- vature. Seat adjustment, rear Do not adju st rear seats whil e the vehicl e is moving; otherwise, passengers cou ld be injured. Make sure that the locking devices of the rear seats engage properly. Otherwise the restrain- ing effect o f the safet y belts du ring an acciden t co[…]
-
Page 37: Mini Countryman (2011)
Adjustments Controls 35 Front 1. Pull up as far as it will go. 2. Fold the backrest back slightly. 3. Press button 1 and pull the head restraint out as far as it will go. 4. Also press button 2 with a suit able tool and completely remove the head restraint. 5. Fold back the backrest. Rear 1. Pull up as far as it will go. 2. Fold the backrest forwar[…]
-
Page 38: Mini Countryman (2011)
Controls Adjustments 36 Safety belt reminder Front seats The indicator lamps come on and an acoustic signal sounds.Check whether the safety belt has b een fastened cor- rectly. The ‘Fa sten safety bel ts’ reminder is issued when the driver’s safety belt has not been fastened. Th e ‘Fasten safety belts’ reminder is also acti[…]
-
Page 39: Mini Countryman (2011)
Adjustments Controls 37 Interior and exterior mirrors, automatic dimming feature* It is controlled by two photosensors: > Inside the interior rearview mirror, arrow. > On the back of the mirror. For proper function: > Keep the photo sensors clean. > Do not cover the area between the interior rearview mirror and the windshield. > Do n[…]
-
Page 40: Mini Countryman (2011)
Controls Transporting children safely 38 Transporting children safely The right place for children Do not leave childre n unattended in the vehicle; otherwise, they could endanger themselves and/or other person s by opening the doors, for example. < Children should always sit in the rear Accident research has sh own that the safest place for chi[…]
-
Page 41: Mini Countryman (2011)
Transporting children safely Controls 39 To lock the safety belt 1. Secure the child restraint system with the belt. 2. Pull the belt strap all the way out. 3. Allow the belt strap to retract and pull it taut against the child res traint system. The safety belt is locked. To unlock the safety belt 1. Open the belt buckl e 2. Remove the child restra[…]
-
Page 42: Mini Countryman (2011)
Controls Transporting children safely 40 Attaching upper retaining strap to the attachment point 1. Slide the head restraint upward. 2. Guide the tether strap be tween the head restraint holders. 3. Attach the tether strap to the anchor using the hook. 4. Push the head restraint into its low ermost position. 5. Pull the retaining strap tight. Secur[…]
-
Page 43: Mini Countryman (2011)
Driving Controls 41 Driving Ignition lock Inserting the key into the ignition lock Insert the key al l the way into th e ignition lock. Radio readiness Individual electrical consumers can operate. Removing the key fro m the ignition l ock Press in the key briefly. It is ejected sli ghtly. At the same time: > The ignition is s witched off if it w[…]
-
Page 44: Mini Countryman (2011)
Controls Driving 42 Radio readiness and ignition off All indicator and warning lamps in the displays go out. The ignition switches off automatically if the driver’s door is open ed. Pressing the Start /Stop button again switches the ignition back on. The ignition is not switched off in situations such as the following: > The clutch or brake[…]
-
Page 45: Mini Countryman (2011)
Driving Controls 43 Automatic tran smission* 1. With the car at a st op, move the sele ctor lever to position P. 2. Press the Start/Stop button. 3. Forcefully apply the parking brake. Before driving into a car wash By following these steps, the vehicle is able to roll: 1. Place the remote control, even wit h Comfort Access, in the ig ni tion lock. […]
-
Page 46: Mini Countryman (2011)
Controls Driving 44 Selector lever positions P R N D M/S + – Displays in the tachometer P R N D DS M1 t o M6 The selector lever position is displayed, or the current gear in the manual mode. Changing selector lever positions > The selector lever can only be moved out of position P when the ig nition is switched on or the engine is running. >[…]
-
Page 47: Mini Countryman (2011)
Driving Controls 45 Sports programming and manual mode M/S Move the select or lever fr om position D to the left into th e M/S shifting slot: The Sport program is activated and DS is dis- played. This position is recommended for a pe r- formance-oriented driving style. To deactivate the Sport program or manual mode M/S, move th e selector lever to […]
-
Page 48: Mini Countryman (2011)
Controls Driving 46 4. Pull the loop up. 5. Move the selector lever into the desired position by pressing the button o n the front of the selector lever. Before manually unlo cking the selector lever lock, firmly set the parking brake to prevent the vehicl e from rolling aw ay. < Turn signals/ headlamp flasher 1 Turn si gnal 2 Headlamp flasher U[…]
-
Page 49: Mini Countryman (2011)
Driving Controls 47 8. Press the button to select: > Brief in dication of a turn. > Triple turn signal. 9. Press and hold the butt on until th e display changes. The setting is stored. Wiper system 1 Switching on wipers 2 Switching off wipers or brief wipe 3 Activating/deactivating intermittent wipe or rain sensor * 4 Cleaning windshield and […]
-
Page 50: Mini Countryman (2011)
Controls Driving 48 4. Press the button as often as necessary until the symbol and «SET» are displayed. 5. Press and hold the button until the display changes. 6. Press the button to se lect the desired sensi- tivity. 7. Wait, or press and h old the button u ntil the display changes. The settings are stored. Deactivating intermi ttent wip[…]
-
Page 51: Mini Countryman (2011)
Driving Controls 49 Do not use th e washers when the washer fluid reservoir is empt y; otherwise, you will damage the w asher pump. < Washer fluid Washer fluid is flammable. Keep it away from ignition sources, only stor e it in the closed, original container, and k eep out of reach of children; otherw ise, there is a danger of injury. Comply wit[…]
-
Page 52: Mini Countryman (2011)
Controls Driving 50 pedal is released, the stored speed is ach ieved again and maintained. The stored speed is cleared when th e ignition is switched off. Maintaining current speed Press button 3 . The system maintains and stores the current vehicle speed. If, on a do wnhill g rade, the engine br aking eff ect is not sufficient, the controlled spee[…]
-
Page 53: Mini Countryman (2011)
Controls overview Controls 51 Controls overview Tachometer Never opera te the engin e with th e needle in the red overspeed zone of the gau ge. In this range, the fuel supply is interrupted to prote ct the engine. Displays in tachometer 1 Current v ehicle speed 2 Odometer, trip odom eter, and external tem- perature display 3 Resetting the trip odom[…]
-
Page 54: Mini Countryman (2011)
Controls Controls overview 52 Computer* Displays in the tachometer Press the button in the tu rn signal lever repeat- edly to call up various items of information. The following items of information are displayed in the order listed: > Cruising range > Average fu el consumptio n > Current fuel consu mption > Average speed > Outside t[…]
-
Page 55: Mini Countryman (2011)
Controls overview Controls 53 1 Button for: > Selecting display > Setting values > Confirming selected display or set values > Calling up computer information 52 Symbol Function Adjustin g rain sensor * 47 Calling up Check Control 57 Displaying vehicle check 58 Initializing th e Flat Tire Monitor 63 Resetting the Tire Pres- sure Monitor[…]
-
Page 56: Mini Countryman (2011)
Controls Controls overview 54 Exiting displays 1. Briefly press the button in the turn si gnal lever repeatedly until «HOME» is displayed. 2. Press the button fo r a longer period. Displays are also exited if no entries are made for approx. 8 seconds. Next setting or item of information 1. While in a setting or information item, briefly p[…]
-
Page 57: Mini Countryman (2011)
Controls overview Controls 55 > Fuel consumption: l/100 km , mpg, km/l * > Distance covered: miles, km > Tempe rature: 7 , 6 7. Press and hold the butt on until th e display changes. 8. Press the button briefl y to change th e for- mat or unit of measure. 9. Press and hold the butt on until th e display changes. The settings are stored. Re[…]
-
Page 58: Mini Countryman (2011)
Controls Controls overview 56 The extent of service w ork required can be read out from the remote control by your MINI dealer. < Displaying vehicle check For certain maintenance operatio ns, you can view the respective dist ance remaining or due date individually in the tachometer. 1. Switch on the ignition, refer to page 41 . 2. Press the butt[…]
-
Page 59: Mini Countryman (2011)
Controls overview Controls 57 More information on th e MINI Maintenance Sys- tem can be found on page 142 . Clock Setting the time Radio MINI Boost CD: 1. Press the MENU butto n. 2. Press the button. 3. Press the button. 4. Select the desired menu item «FORMAT», «STD» or «MIN» and press the respective but- ton. 5. Turn[…]
-
Page 60: Mini Countryman (2011)
Controls Controls overview 58 What to do in case of a malfunction The meanin g of each lamp in th e event of a mal- function and tips on how to respond are listed starting on page 162 . Hiding Check Control messa ges Press the button in th e turn si gnal lever. > Some Check Cont rol me ssages are displayed until the malfunctions h ave been recti[…]
-
Page 61: Mini Countryman (2011)
Technology for driving comfort and safety Controls 59 Technology for driving comfort and safety Park Distance Control PDC* The concept PDC assists you with parking in reverse. Acoustic signals warn you of the presence of an object behind the vehicle. The measureme nt is carried out by four ultrasonic sensors in the rear bumper. An acoustic warning […]
-
Page 62: Mini Countryman (2011)
Controls Technology for driving comfort and safety 60 The laws of physics cannot be repealed, even with driving stabilit y control system s. An appropriate driving style always remains the responsibility of the driver. Therefore do not reduce the additional safe t y m a r g i n b y e n g a g i n g in hazardous dr iving thereby runn ing the risk of […]
-
Page 63: Mini Countryman (2011)
Technology for driving comfort and safety Controls 61 Dynamic Traction Control DTC* The concept D T C is a t yp e o f D SC t h a t is pr op ul si on op ti m i z e d for special road conditio ns such as uncleared snowy roads. The syst em ensures maximum propulsion though with restricted driving stabil- ity. You therefo re need to drive w ith suitabl[…]
-
Page 64: Mini Countryman (2011)
Controls Technology for driving comfort and safety 62 Activating DSC Press the button again: the indicat or lamps go out. Hill Assist Hill Assist aids you in co mfortably driving off on inclines. It is not nece ssary to use the p arking brake for this. 1. Hold the MINI with t he brake. 2. Release the brake and imm ediately drive off. Hill Assist ho[…]
-
Page 65: Mini Countryman (2011)
Technology for driving comfort and safety Controls 63 System limitations Sudden serious tire damage caused by external influences ca nno t be in dicate d in advance. < A natural, even pressure loss in all four tires can- not be detected. Therefore, check the tire infla- tion pressure regularly. In the following situatio ns, the system could be d[…]
-
Page 66: Mini Countryman (2011)
Controls Technology for driving comfort and safety 64 Actions in the event of a flat tire Normal tires* 1. Identify the damaged tire. To do so, ch eck the infl ation pre ssure in all four tires. The inflation pre ssure display of the Mobility System, page 152 , can be used for this pur- pose. If the inflatio n pressure in all fo ur tires is cor- re[…]
-
Page 67: Mini Countryman (2011)
Technology for driving comfort and safety Controls 65 Reset the system again after each correction of the tire inflation pressure and after every tire or wheel change. System limitations Sudden, serious tire dam age caused by external influences ca nno t be in dicate d in advance. < The system does not op erate correctly if it has not been reset[…]
-
Page 68: Mini Countryman (2011)
Controls Technology for driving comfort and safety 66 1. Reduce speed and stop the vehicle with cau- tion. Avoid sudden braking and steering maneuvers. 2. Check whether the vehicle is equipped with normal tires or with run-flat tires. Run-flat tires, refer to page 136 , are identi- fied by a circular symbol containing the let- ters RSC on the tire […]
-
Page 69: Mini Countryman (2011)
Technology for driving comfort and safety Controls 67 Malfunction The small warning lamp flashes in yel- low and then lights up continuously ; the larger warning lamp lights up in yellow. No flat tire can be detecte d. Display in the following situations: > Wheel without TPM electronics is mounted: If need be, have it checked by your MINI dealer[…]
-
Page 70: Mini Countryman (2011)
Controls Technology for driving comfort and safety 68 Airbags The following airbags ar e located under the marked covers: 1 Front airbags 2 Knee airbag 3 Side airbags in backrests 4 Head airbags at the front and rear Protective a ction Observe the instructions on page 32 to ensure the best possible personal protec- tion. < The front airbags help[…]
-
Page 71: Mini Countryman (2011)
Technology for driving comfort and safety Controls 69 activates or deactivates the front, sid e, and knee airbags for the front passenger. Make sure that th e front passenger’s f eet remain in the f ootwell; otherwis e, it is not possible to guarante e the function of th e front passenger airbags. < The indicator lamp above the interior rea[…]
-
Page 72: Mini Countryman (2011)
Controls Technology for driving comfort and safety 70 Operational readiness of airbag system As of radio readiness, page 41 , the warning lamp lights up briefly t o indicate that the e ntire airbag system and the be lt tensioners are oper- ational. Airbag system malfunction > The warning lamp does not come on wh en radio readiness is switched on[…]
-
Page 73: Mini Countryman (2011)
Lamps Controls 71 Lamps Parking lamps/low beams 0 Lamps off and daytime runnin g lights 1 Parking lamps and daytime running lig hts 2 Low-beam headlamps and welcome lamps 3 Automatic headlamp control * , daytime run- ning lights, welcome lamps, and Adaptive Light Control * When you open the driver’s door with the igni- tion switched off, the e[…]
-
Page 74: Mini Countryman (2011)
Controls Lamps 72 The setting is stored for the remote contro l in use, refer to Pers onal Profile, page 20 . Setting the dura tion or deacti vating the function 1. Switch on the ignition, refer to page 41 . 2. Press the button on the turn signal ind icator as often as necessary until «SET/INFO» is dis- played. 3. Press and hold the butto[…]
-
Page 75: Mini Countryman (2011)
Lamps Controls 73 1. Switch on the ignition, refer to page 41 . 2. Press the button on the turn signal in dicator as often as nece ssary until «SET/I NFO» is dis- played. 3. Press and hold the butt on until th e display changes. 4. Press the button as of ten as necessary unt il the symbol and «SET» are disp layed. 5. Press and h[…]
-
Page 76: Mini Countryman (2011)
Controls Lamps 74 High beams/ roadside parking lamps 1 Turn signals/roadside parking lamps * 2 Switching on high beam s 3 Switching off high beams/headlamp flasher Roadside parking lamps, left or right* The vehicle can be illuminated on one side for parking. Comply with local regulations when doing so. Switching on After parking the vehicle, press […]
-
Page 77: Mini Countryman (2011)
Lamps Controls 75 Reducing brightness Press the button briefly. The brightness decreases every time the button is pressed. Interior lamps The interior lamps, the footwell lamps * , t he entry lamps * , and the cargo area lamp are con- trolled automatically. To reduce the drain on the battery, a short while after the ignition is switched off, refer […]
-
Page 78: Mini Countryman (2011)
Controls Climate 76 Climate Equipment versions Depending on your vehicle’ s equipment, your MINI contains an air conditioner or an automatic climate control * . 1 Air conditioner 77 2 Automatic climate control * 78 Air vents 3 Airflow directed toward the windshield and side windows 4 Air to the upper body area, draft-free venti- lation 5 Air t[…]
-
Page 79: Mini Countryman (2011)
Climate Controls 77 Air conditioner 1 Air flow rate 2 Cooling function 3 Recirculated-air mode 4 Temperature 5 Rear window defroster 6 Air distribution 7 Windshield heating * Air flo w rate Adjust the air flow r ate. The higher t he rate, the more effective the heating or cooling will be. The air flow rate is lo wered or switched off entirely to re[…]
-
Page 80: Mini Countryman (2011)
Controls Climate 78 Air distribution Direct the flow of air to the windows , to the upper body area or to the footwell . Intermediate settings are possible. Windshield heating* The windshi eld heating is s witched off automatically after a short time. The front window heating is low- ered or switch ed off entire ly to reduce the drain on the bat te[…]
-
Page 81: Mini Countryman (2011)
Climate Controls 79 Air flow rate, ma nual Press the – button to reduce air flow. Press the + button to increase it. You can reactivate the autom atic mode for the air flow rat e with the AUTO butt on. The air flow rate is lowered or switched off entirely to reduce t he drain on the bat tery. The display remains the same. Switching the system on/[…]
-
Page 82: Mini Countryman (2011)
Controls Climate 80 Defrosting windows and removin g condensation Quickly removes ice and condensa- tion from the w indshield and front side windows. For this purpose, also switch on the cooling function. The windshield heating * is switched on auto- matically. Windshield heating* The windshi eld heating is s witched off automatically after a certa[…]
-
Page 83: Mini Countryman (2011)
Practical interior accessories Controls 81 Practical interior accessories Integrated universal remote control* The concept The integrated un iversal remote control can replace as many as thr ee hand-held transmitters for various remote-contro lled devices, such as garage and gate openers and lighting systems. The integrated universal remote control[…]
-
Page 84: Mini Countryman (2011)
Controls Practical interior accessories 82 60 seconds, alter the distance and repeat this step. Canada: if the LED is not flashing rapidly after 60 seconds, chan ge the distance and repeat the step or, if the programming was interrupted by the hand-held transmitter, press and hold the memory button and press the button on the hand-hel d transmit- t[…]
-
Page 85: Mini Countryman (2011)
Practical interior accessories Controls 83 original hand-held tr ansmit ter and release both buttons as soon as the LED 2 flashes rapidly. If the LED 2 does not flash rapidly after approx. 60 seconds, alter the distance and repeat this step. Canada: if the LED is not flashing rapidly after 60 seconds, change the distance and repeat the step or, if […]
-
Page 86: Mini Countryman (2011)
Controls Practical interior accessories 84 Opening Press the button, arrow, and lift the cover. Storage compartments In the vehicle interior Depending on your vehicle’ s equipment, you will find storage compartme nts in the front and rear doors and in the center console * . Pockets * are provid ed on the backrest rear pan- els of the front sea[…]
-
Page 87: Mini Countryman (2011)
Practical interior accessories Controls 85 3. First insert the cupholde r into the front mounts 4 and then snap it into the rear mounts 5 . Make sure that the lever 6 is situated opposite the mount 4 . < Clothes hooks There are clothes hooks on the grab handles in the rear passenger compartment . Items of clothing hung from the hoo ks must not o[…]
-
Page 88: Mini Countryman (2011)
Controls Practical interior accessories 86 Connecting electrical appliances In your MINI, wh en the engine is ru nning or the ignition is switched on, yo u can use electrical devices such as flashlights, car vacuum cleaners, e t c. , u p t o a p p r o x . 1 4 0 w a t t s a t 1 2 v o l t s , a s l o n g as one of the following sockets is available. […]
-
Page 89: Mini Countryman (2011)
Practical interior accessories Controls 87 Online Edition for Part no. 01 40 2 607 530 — © 03/11 BMW AG Online Edition for Part no. 01 40 2 607 530 — © 03/11 BMW AG[…]
-
Page 90: Mini Countryman (2011)
Drive Me. Online Edition for Part no. 01 40 2 607 530 — © 03/11 BMW AG[…]
-
Page 91: Mini Countryman (2011)
AT A GLANCE Controls Entertainment Communications Mobility Reference Driving tips Online Edition for Part no. 01 40 2 607 530 — © 03/11 BMW AG[…]
-
Page 92: Mini Countryman (2011)
Driving tips Things to remember when driving 90 Things to remember when driving Break-in period Moving parts need breaking-in t ime to adjust to each other. Please follow the instructions below in order to achieve the optimal service life and economy of operatio n for your vehicle. Engine and differential Always obey all official speed l imits. Up […]
-
Page 93: Mini Countryman (2011)
Things to remember when driving Driving tip s 91 Hydroplaning When driving on wet or slushy roads, reduce road speed. If you do not, a wedge of water can form betw een tires and road sur- face. This situation, known as h ydroplani ng, can cause partial or complete loss of tire contact with the road surface , so that the car cann ot be steered or br[…]
-
Page 94: Mini Countryman (2011)
Driving tips Things to remember when driving 92 increased tendency for corrosion to form on rotors, while contaminan ts accumulate on th e brake pads. This occurs because the minimum pressure which must be exerted by the pad s during brake applications to clean the rotors is not reached. Should corrosion form on the brak e rotors, the brakes will t[…]
-
Page 95: Mini Countryman (2011)
Things to remember when driving Driving tip s 93 1. Hold on to the backrest near the top, f or example on the headre st, and pull on the loop, arrow. 2. Lock backrest in the de sired position or fold down. Folding the backrests back into position When folding th e backrest, ensure that the lock properly en gages. Otherwise , for example during brak[…]
-
Page 96: Mini Countryman (2011)
Driving tips Things to remember when driving 94 3. Remove it from the guide s on the cargo area floor, arrows, and remove the privacy screen. Flat load floor* Do not exceed the maximum load of 150 kg for the load floor; otherwise, dam- age may result. < Access to the storage space Under the load floor, t here is storage space, e.g., for the carg[…]
-
Page 97: Mini Countryman (2011)
Things to remember when driving Driving tip s 95 Removing When removing and stowing the cargo net, pro- ceed in the reverse sequen ce. To fold closed, press the release butto n, arrow. Bag holders* Holders on the left and right sid e of the support for the cargo area cover, arrow, e.g. for hanging shopping bags or storage bags. Only hang light shop[…]
-
Page 98: Mini Countryman (2011)
Driving tips Things to remember when driving 96 Load The permissible load is the sum of the occu- pants’ weights and the we ight of the cargo. The greater the weight of th e occupants, the less cargo/luggage can be transported. Stowing cargo > Position heavy objects as low and as far for- ward as possible, ideally directly behind the rear s[…]
-
Page 99: Mini Countryman (2011)
Things to remember when driving Driving tip s 97 Roof-mounted luggage rack* A special rack system is av ailable as an option for your MINI. Your MINI dealer will be glad to advise you. Comply with the in stallation instruc- tions supplied with the rack system. Loading roof-mounted lu ggage rack Because roof racks raise the vehicle’s center of […]
-
Page 100: Mini Countryman (2011)
Driving tips Things to remember when driving 98 Low inflation pressure increases rolling resis- tance and thus leads to greater fuel consump- tion and tire wear. Drive off immediately D o n o t wa i t f or t he e n g in e t o w a r m u p wh i l e th e vehicle remains stationary. Start driving right away, but at moderate engi ne spe eds. This is the[…]
-
Page 101: Mini Countryman (2011)
Things to remember when driving Driving tip s 99 > After driving thro ugh water at low spee d, lightly press the brake pedal several times to dry the brakes and to prevent the braking effect from being reduced by wetness. > Depending o n the condit ion of the surf ace, it may be practi cal to briefly a ctivate DT C, refer to DTC Dynamic Tra c[…]
-
Page 102: Mini Countryman (2011)
Rock Me. Online Edition for Part no. 01 40 2 607 530 — © 03/11 BMW AG[…]
-
Page 103: Mini Countryman (2011)
AT A GLANCE Controls Driving tips Communications Mobility Reference Entertainment Online Edition for Part no. 01 40 2 607 530 — © 03/11 BMW AG[…]
-
Page 104: Mini Countryman (2011)
Entertainment Radio MINI Boost CD 102 Radio MINI Boost CD switching Radio on/off Press the knob on the left. The radio selects the last set audio source: > Radio > HD Radio * > Satellite radio * > CD > External audio device > USB audio interface*. Listening to the radi o when the ignition is switched off After turning off the radi[…]
-
Page 105: Mini Countryman (2011)
Radio MINI Boost CD Entertainment 103 4. Select the desired volume and press the but- ton on the right. Setting tone controls You can select be tween the foll owing settings: > Bass: bass setting. > Treble: tr eble setti ng. > Balance: volume distribution right/left. > Fader: volume distri bution front/back. The tone sett ings are set f[…]
-
Page 106: Mini Countryman (2011)
Entertainment Radio MINI Boost CD 104 If you do not wish to use the Autostore feature, you can sto re six stations of yo ur choice in the FMA or AMA memory levels. < Playing and selecting stations, sca n You can play all the statio ns that can be received for approx. 10 seconds. Press the button. Interrupting the scan an d selecting a s tation: […]
-
Page 107: Mini Countryman (2011)
Radio MINI Boost CD Entertainment 105 HD Radio™ reception* Many radio stations transmit analog and digital signals. If a digital r adio network is availabl e, these stations can be received digitally and thus with improved sound quality. License conditions HD Radio™ techno logy is manufactured under U.S. and Foreign Patents licensed from iBiqui[…]
-
Page 108: Mini Countryman (2011)
Entertainment Radio MINI Boost CD 106 2. Press the button. 3. Press the button. 4. Select the desi red category. The channels are displayed. This symbol indicates the current channel. Activating 1. Turn the knob on the ri ght to select a chan- nel that is not yet activated. 2. Press the knob on t he right to con firm a channel. A phone number and t[…]
-
Page 109: Mini Countryman (2011)
Radio MINI Boost CD Entertainment 107 Additional information The name of the channel and additional infor- mation about the curren t track is displayed, e.g., the name of the artist. 1. Selecting a desired channel. 2. Press the button. Changing channels using buttons Press the … button for the co rresponding direction. The next activated ch annel[…]
-
Page 110: Mini Countryman (2011)
Entertainment Radio MINI Boost CD 108 Selecting MP3 music tracks The CD player can also play CDs with com- pressed audio data, such as MP3 and WMA. Selecting a track 1. Press the button. 2. Select the desired folder and press the but- ton on the right. > : press the butto n on the right to open a folder > : press the button on the right to cl[…]
-
Page 111: Mini Countryman (2011)
Radio MINI Boost CD Entertainment 109 Damaged CDs Avoid finger prints as well as dust, scratches and moisture . Store CDs in sleeves. Do not expose CDs to a temperat ure greater than 122 7 /50 6 , elevated humidity or direct sunlight. CDs with copy protection CDs are often provided with copy protection from the manu facturer. This can resul t in CD[…]
-
Page 112: Mini Countryman (2011)
Entertainment Radio MINI Boost CD 110 USB device To play audio tracks over the car’s speaker sys- tem, connect the USB device to port 2 . After first connecting, the track informat ion is transferred to the vehicle. The time required is dependent on th e USB device and on the num — ber of tracks. Information from up to four USB devices or appr[…]
-
Page 113: Mini Countryman (2011)
Radio MINI Boost CD Entertainment 111 Notes > The USB audio interface supplies the con- nected audio devices with power, provided that this is supported by the audio device. For this reason, audio devices are not to be connected to a receptac le in the vehicle dur- ing operat ion. > Do not expose aud io devices to extreme ambient conditions, […]
-
Page 114: Mini Countryman (2011)
Connect Me. Online Edition for Part no. 01 40 2 607 530 — © 03/11 BMW AG[…]
-
Page 115: Mini Countryman (2011)
AT A GLANCE Controls Driving tips Entertainment Mobility Reference Communications Online Edition for Part no. 01 40 2 607 530 — © 03/11 BMW AG[…]
-
Page 116: Mini Countryman (2011)
Communic ations Telephone 114 Telephone Overview The concept Mobile phones or other external device s, e.g. audio players, can be connect ed to the vehicle via Bluetooth. Bluetooth® i s a register ed tradem ark of Blue- tooth® SIG, Inc. Your MINI is equipp ed with a comp lete mobile phone preparation. Afte r a suitable mobile phone is pai red wit[…]
-
Page 117: Mini Countryman (2011)
Telephone Communications 115 Operating the mobile phone via the radio To open the men u show above, refer to page 120 . 1 Making and receiving phone calls 119 > «#»: dial phone number > «A-Z»: phone book > «TOP8»: most frequently dialed phone numbers > «LAST8»: last phone numbers dialed > «[…]
-
Page 118: Mini Countryman (2011)
Communic ations Telephone 116 10 Switching displays 120 > «PHONE»: telephone > «COMP» : computer > «CONFIG»: adj usting 11 Radio on/off, volume > Press: to switch radio on/off > Turn: adjustin g volume 119 12 Ejecting CD This symbol appears on the radio display when a phone call is bein g made with the h[…]
-
Page 119: Mini Countryman (2011)
Telephone Communications 117 4. Press the button. 5. Press the button. 6. Press the button. Turn the right rota ry knob to display the Blue- tooth name of your vehicle on t he display. Preparation with mobil e phone 7. Other operations must be performed on the mobile phone and differ de pending on the type of mobile phone, refer to Owner’s Man[…]
-
Page 120: Mini Countryman (2011)
Communic ations Telephone 118 To display the Hot line phone numbe r: Press the button. Turn the right rotary knob to display the Hotline phone number and to d isplay required pairing information on the display. Following the initial pairing > The mobile phone is detected/connect ed in the vehicle within a short period of time when the engine is […]
-
Page 121: Mini Countryman (2011)
Telephone Communications 119 > Is the mobile phone in power economy m o d e o r d o e s i t o n l y h a v e a s m a l l a m o u n t o f battery charge remaining? Charge the mobile phone in the snap-in adapter * or via a charging cable. > Depending o n the mobile phon e, it may only be possible to connect one device to the vehicle. Unpair the […]
-
Page 122: Mini Countryman (2011)
Communic ations Telephone 120 Accepting a call Press the butto n on the radio or on the st eer- ing wheel. Alternative: Press the button. Callrejectin g Press the button. Ending a call Press the butto n on the radio or on the st eer- ing wheel. Alternative: Press the button. Entering phone numbers Dialing a number 1. Press the MENU button. 2. Press[…]
-
Page 123: Mini Countryman (2011)
Telephone Communications 121 name and phone number, are sorted alpha- betically. > «TOP8» The Top 8 list autom atically stores the eigh t phone numbers of the pho ne book that are dialed the most f requently. > «LAST8» The last eight phone numbers you have dialed are stor ed automati cally. The ph one number dialed last ap[…]
-
Page 124: Mini Countryman (2011)
Communic ations Telephone 122 3. Press and hold the button to dial th e phone number. Dialing a phone nu mber stored in a list To select an entry and establish a connection: 1. Press the MENU button. 2. Press the button. 3. Press the desired button to select one of the four lists. 4. Turn the righ t rotary knob to select an entry and press the righ[…]
-
Page 125: Mini Countryman (2011)
Telephone Communications 123 Finishing voice input Press the button on the steerin g wheel briefly or Possible commands Having possible commands read aloud Press the button on the steerin g wheel. Possible commands are read aloud. Each digit can be spoken individually or com- bined into a sequence t o accelerate the entry process. Using alternative[…]
-
Page 126: Mini Countryman (2011)
Communic ations Telephone 124 Deleting all entries To listen to and select the entries: Selecting an entry Adjusting volume Turn knob during announcement. > The volume rema ins the same, ev en if the volume of other audi o sources is changed. > The volume is store d for the remote control currently in use. Notes Do not use the voice activat i[…]
-
Page 127: Mini Countryman (2011)
Telephone Communications 125 2. Insert the snap-in adapte r at the front, arrow 1 , and press downward, arrow 2 , until it clicks into place. Inserting mobile phone 1. Depending on the mobile phone, it may be necessary to rem ove the protective cap of the antenna conn ector and from the U SB connection of the mobile phone. 2. Push the mobile phone […]
-
Page 128: Mini Countryman (2011)
Move Me. Online Edition for Part no. 01 40 2 607 530 — © 03/11 BMW AG[…]
-
Page 129: Mini Countryman (2011)
AT A GLANCE Controls Driving tips Entertainment Communications Reference Mobility Online Edition for Part no. 01 40 2 607 530 — © 03/11 BMW AG[…]
-
Page 130: Mini Countryman (2011)
Mobility Refueling 128 Refueling Switch off the en gine before refueling; otherwise, fuel cannot b e added to the tank and a message will be displayed. < Take all precautionary measures and observe all ap plicable regulations when handling fuel. Do not carry any sp are fuel con- tainers in your vehicle. They can develop a leak and cause an explo[…]
-
Page 131: Mini Countryman (2011)
Refueling Mobility 129 Fuel specifications Fuels that are labeled at the pump as containing metal may not be used. Do not fill the tank with leaded gasoline o r gasoline that contains metal additives, such as manganese or iron; oth erwise, long term damage to the catalytic converter or other com- ponents may result. Do not fill the t ank with E85, […]
-
Page 132: Mini Countryman (2011)
Mobility Wheels and tires 130 Wheels and tires Tire inflation pressures Information for your safety It is not merely the tire s’ service life, but also driving comfort and, to a great extent, driving safety that depend on the conditio n of the tires and the maintenance of the specified tire pres- sure. Checking pressure Check the tire inflatio[…]
-
Page 133: Mini Countryman (2011)
Wheels and tires Mobility 131 Observe all national and local maximum speed limits; otherwise, violations of the law could occur. Online Edition for Part no. 01 40 2 607 530 — © 03/11 BMW AG Online Edition for Part no. 01 40 2 607 530 — © 03/11 BMW AG[…]
-
Page 134: Mini Countryman (2011)
Mobility Wheels and tires 132 Tire inflation pressures MINI Cooper Countryman Tire size Pressure specifications in psi/kPa Speeds up to a max. of 100 mph / 160 km/h Speeds including thos e exceeding 100 mph / 160 km/h All pressu re specif ications in the table are indicated in psi/kilopas- cal with cold tires. Cold = ambient temperature 195/60 R 16[…]
-
Page 135: Mini Countryman (2011)
Wheels and tires Mobility 133 Tire inflation pressures MINI Cooper S Cou ntryman / Cooper S ALL4 Country man Tire size Pressure specifications in psi/kPa Speeds up to a max. of 100 mph / 160 km/h Speeds including those exceeding 100 mph / 160 km/h All pressure specifications in the table are indicated in psi/kilopas- cal with cold tires. Co ld = am[…]
-
Page 136: Mini Countryman (2011)
Mobility Wheels and tires 134 Tire identification marks Knowledge of the labeling on the side of the t ire makes it easier to identi fy and choose the right tires. Tire size Speed letter Q = up to 100 mph or 160 km/h T = up to 118 mph or 190 km/h H = up to 131 m ph or 210 km/h V = up to 150 mph or 240 km/h W = up to 167 mp h or 270 km/h Y = up to 1[…]
-
Page 137: Mini Countryman (2011)
Wheels and tires Mobility 135 failure. Th e grade C correspon ds to a level of performance which all passenger car tires must meet under the Federal Motor Vehicle Safe ty Standard No. 1 09. Grades B and A represen t lev- els of perfo rmance on the labora tory test w heel that exceed the m inimum required by law. The temperature grade for this tire […]
-
Page 138: Mini Countryman (2011)
Mobility Wheels and tires 136 Tire age The manufacturing date of tires is contained in the tire coding: DOT … 0211 means that t he tire was manufac- tured in week 2 of 2011. For various reasons, such as the development of brittleness, the manuf acturer of your MINI rec- ommends tire replacemen t after no more than 6 years, regardless of the actua[…]
-
Page 139: Mini Countryman (2011)
Wheels and tires Mobility 137 Recommended tire brands For each tire size, the manufacturer of your MINI recommends certain tire brands. They are marked with a clearly visible MINI designation on the sidewall of the tire. When properly us ed, these tires meet the high- est standards in terms of safety and handling characteristics. Run-flat tires* Wh[…]
-
Page 140: Mini Countryman (2011)
Mobility Under th e hood 138 Under the hood Never attempt to perform any service or repair operations on yo ur vehicle without the required professional technical traini ng. If you are not f amiliar with the regulations to be observed, have the necessary work on your vehicle carried out only by a MINI dealer or a workshop that has specially trained[…]
-
Page 141: Mini Countryman (2011)
Under the hood Mobility 139 Important parts of the eng ine compartment 1 Vehicle identification number * 2 Battery, under the cover 159 3 Engine oil dipstick 139 4 Engine oil filler neck 140 5 Coolant e xpansion tank 140 6 Engine compartment fu se box 156 7 Reservoir for washer fl uid for the headlamp and window washer system 49 Engine oil The engi[…]
-
Page 142: Mini Countryman (2011)
Mobility Under th e hood 140 Do not fill beyo nd the upper mark on the dipstick. Excess oil will damage th e engine. < Adding engine oil Do not add th e maximum qu antity of 1 US quart/1 liter of engine oil until the oil level has dropped to just above the lower mark on the dipstick, page 139 . Add oil within the next 30 miles/50 km; otherwise, […]
-
Page 143: Mini Countryman (2011)
Under the hood Mobility 141 Coolant temperature If the coolant, and therefore t he engine, should overheat, then a warning li ght wi ll go on, refer to page 165 . Checking coolant level Do not add coolant t o the cooling syst em when the eng ine is hot. Escaping cool ant can cause burns. < Do not open the hood until the engine has cooled down. T[…]
-
Page 144: Mini Countryman (2011)
Mobility Maintenance 142 Maintenance MINI Maintenance System The MINI Maintenance System supports the preservation of the traffic and operating safety of your MINI. The objectiv e is to optimize efforts with respect to min imal vehicle maintenance costs. If and when you come to sell your MINI, a com- prehensive record of serv icing will prove a sig[…]
-
Page 145: Mini Countryman (2011)
Maintenance Mobility 143 Socket for On-Board Diagnosis OBD The primary components that m ake up the emissions can be checked by a device via the OBD socket. Emissions The warning lamps co me on. The vehi cle is producing higher emissions. You can continue your journey, but moderate your speed and exercise due caution. Have the car checked as soon a[…]
-
Page 146: Mini Countryman (2011)
Mobility Care 144 Care Car-care products Regular cleaning and care helps to maintain the value of your MIN I. The manufacturer of your MINI reco mmends using manufacturer-approved products to clean and care for your vehicle. Your MINI dealer would be ple ased to advise you on cleaning and care pro ducts and services for your MINI. The ingredients o[…]
-
Page 147: Mini Countryman (2011)
Care Mobility 145 5. Insert the remote control in the ignition lock so that the vehicle can roll. Steam jets/high-pressure washers When using steam jets or high-pressure washers, make sure th at you maintain suf- ficient distance from the vehicle and do not exceed a maximum temperature of 140 7/60 6. If the distance is too close, the pressure too h[…]
-
Page 148: Mini Countryman (2011)
Mobility Care 146 Chrome parts* Carefully clean vehicle part s such as the radiator grill and door handles with copious quantities of water and, if necessary, a shampoo additive, especially when contamin ated with road salt. For addition al treatmen t, use chrome polish. Light alloy wheels* The system produces brake dust that collects on the light […]
-
Page 149: Mini Countryman (2011)
Care Mobility 147 Decorative strips* Only clean decorative st rips with moi st cloths. Wipe dry with a soft cloth. Safety belts Dirty belt straps impede the reeling action and thus have a negat ive impact on safety. Do not clean che mically, as this m ay destroy the webbing. < Displays To clean displays such as radios or dis play ele- ments, use[…]
-
Page 150: Mini Countryman (2011)
Mobility Replacing components 148 Replacing components Wiper blades Changing the front wiper blades 1. Fold out the wiper arm and hold it. 2. Press together the l o cking spring, arrows 1 , and fold out the wiper blade, arrow 2 . 3. Pull the wiper blade forward and out of the catch mechanism. 4. Press the new wiper blade into the fixture until it e[…]
-
Page 151: Mini Countryman (2011)
Replacing components Mobility 149 tional laser di odes, and legislation de fines them as Class 1 light-em itting diodes. Do not remove the covers or expo se the eyes direct ly to the unfi ltered li ght source for several hours; otherw ise, this could cause irritation of the retina. < Headlamp glass lens In cool or humid weather, condensat ion ma[…]
-
Page 152: Mini Countryman (2011)
Mobility Replacing components 150 2. Push on the catch, arrow 1 , and disconnect the connector, arrow 2 . 3. To insert the new bulb and replace the cover, proceed in reverse order. Turn signals, parking lamps, roadside parking lamps, and fog lamps Accessing the lamps via the wheel well 1 Turn si gnal 2 Parking/roadside parking/fog lamps Replacing a[…]
-
Page 153: Mini Countryman (2011)
Replacing components Mobility 151 Replacing a fog lamp bulb H8 bulb, 35 watts 1. Turn in the wheel. 2. Remove cover 2 . To do so, turn the cover counterclockwise. 3. Pull the cable connector. 4. Unscrew the lower bulb counterclo ckwise. 5. To insert the new bul b and replace the cover, proceed in reverse order. Side turn signals 5w a t t b u l b , […]
-
Page 154: Mini Countryman (2011)
Mobility Replacing components 152 3. Disengage the bulb holder by pressing d own on the clamping clip, arrow. 4. Remove bulb holder. 5. Apply gentle pressure to th e bulb while turn- ing it to the left for removal and replace- ment. 6. Re-engage the bulb holder so that it audibly clicks into place. 7. Replace the cover pane l. License plate lamps 5[…]
-
Page 155: Mini Countryman (2011)
Replacing components Mobility 153 Sealant and compressor 1 Sealant bottle and adhesi ve label with speed limit 2 Filling hose Note the use- by date on the sealant bot- tle. < 3 Holder for the sealant bottle 4 Compressor 5 Plug and cable for th e socket in the ve hicle interior, pa ge 86 6 Connection h ose to connect the compresso r and sealant b[…]
-
Page 156: Mini Countryman (2011)
Mobility Replacing components 154 approx. 73 psi/500 kPa. Do n ot switch off the compressor during this phase. < Do not run the comp ressor for longer than 10 minutes; otherwise, the device will overheat and possibly be dam- aged. < 8. Switch off the compressor. If an air pressure of 26 psi/180 kPa is not reached: 1. Unscrew the filling hose […]
-
Page 157: Mini Countryman (2011)
Replacing components Mobility 155 Changing wheels The pouch with the wheel changing kit * is stored under th e flat load floor * . It includes: > Vehicle jack > Reversible ratchet > Wheel stud wrench > Extractor hook fo r wheel center cover > Chock Preparing for a wheel change Observe the safety precautions regarding flat tires on pa[…]
-
Page 158: Mini Countryman (2011)
Mobility Replacing components 156 7. Lower the veh icle. 8. Remove the jack. Tightening the lug bo lts Tighten the lu g bolts in a diagonal pattern. Immediately have the wheels checked with a calibrated torque wr ench to ensure that the lug bolts are firmly seated. Otherwise, incorrectly tightened lu g bolts can pres ent a safety hazard. < Tight[…]
-
Page 159: Mini Countryman (2011)
Replacing components Mobility 157 In the engine compartment Opening the cover Press the latch. In the vehicle interior On the right side of the footwell. Opening the cover Press out at the recess. Online Edition for Part no. 01 40 2 607 530 — © 03/11 BMW AG Online Edition for Part no. 01 40 2 607 530 — © 03/11 BMW AG[…]
-
Page 160: Mini Countryman (2011)
Mobility Giving and receiving assistance 158 Giving and receiving assistance Roadside Assistance Roadside Assistance is available by phone 24 hours a day in many countries. You can obtain assistance the re in the event of a vehicle breakdown. First aid pouch* Some of the articles co ntained in the first ai d pouch have a limited service life. There[…]
-
Page 161: Mini Countryman (2011)
Giving and receiving assistance Mobility 159 Connecting jumper cables Connect the jumper cables in the correct o r d e r , s o t h a t n o s p arks which could cause injury occur. < 1. Open the battery cover in the engine com- partment to access the positive terminal of your MINI. 2. Release the tabs on the left and right side s of the positive […]
-
Page 162: Mini Countryman (2011)
Mobility Giving and receiving assistance 160 Using a tow fitting The screw-in to w fitting must alw ays be carried in the car. It can be screwe d in at the front or at the right rear. The tow fitting can be found under the right front seat or in the pocket of t he tire changing set * in the cargo area. Use only the to w fitting provided with the ve[…]
-
Page 163: Mini Countryman (2011)
Giving and receiving assistance Mobility 161 With tow rope When starting off in the towing vehicle , make sure that the tow rope is taut. To avoid jerking and the associ ated stresses on vehicle com ponents when towing, always use nylon ropes or nylon strap s. Attach the tow rope to the tow fittings only, as attaching it to other parts of the vehic[…]
-
Page 164: Mini Countryman (2011)
Mobility Indicator and warning lamps 162 Indicator and warning lamps Indicator and warning lamps can light up in var- ious combinations and colors in indic ator area 1 or 2 . Refer to th e table fo r information on causes and how to react. Note whether a lamp lights up alone or in combinatio n with another. Some lamps can light up in different colo[…]
-
Page 165: Mini Countryman (2011)
Indicator and warning lamps Mobility 163 Lights up briefly: Approx. 2.1 US gal/8 liters of fuel are still in the tank Remains on: The remaining rang e is at most 30 miles/50 km, p age 51 Engine refuses to start Depress th e brake or clutch in order to start the engine, p age 41 . Ignition switched on and driver’s door open Switch o ff the igni[…]
-
Page 166: Mini Countryman (2011)
Mobility Indicator and warning lamps 164 Lights up in red: Service due Arrange a servic e appointment . Check service requirements, page 142 . Lights up in yellow: The engine will start the next time the Start/Stop button is b riefly pressed, possibly with out the brake or clutch being depressed Remote control m alfunctioning or, in cars with Comfo[…]
-
Page 167: Mini Countryman (2011)
Indicator and warning lamps Mobility 165 Indicator lamp 1 flashes: Engine malfunction under hig h load. High engine load will result in dam- age to the catalytic converter You can contin ue your journey, but moderate your speed and exercise due caution. Have t he vehicle checked wit hout delay. Indicator lamp 1 comes on: Engine malfunction with adv[…]
-
Page 168: Mini Countryman (2011)
Mobility Indicator and warning lamps 166 Indication in Canadian models Parking brake applied Indication in US models Lights up in red: Brake fluid level too low Braking action is re duced, stop with care. Conta ct the neare st MINI de aler. Lights up in yellow: Hill Assist failed. The car will not be held in place after the brake is released Have t[…]
-
Page 169: Mini Countryman (2011)
Indicator and warning lamps Mobility 167 Indication in US models Vehicle ele ctronics fai led You cannot co ntinue your jo urney. Contact your MIN I dealer. Indication * in Canadian models Vehicle ele ctronics fai led You cannot co ntinue your jo urney. Contact your MIN I dealer. Lights up in red: Have the system in question checked without delay. […]
-
Page 170: Mini Countryman (2011)
Mobility Indicator and warning lamps 168 Dynamic Traction Control DTC is acti- vated, refer also to page 61 The Dynamic Stability Control DSC and Dynamic Traction Control DTC are deactivated, refer also to page 59 Driving stability limited during accel- eration and cornering. Driving style must be adjusted. The Dynamic Stability Control DSC and Dyn[…]
-
Page 171: Mini Countryman (2011)
Indicator and warning lamps Mobility 169 Indication * in Canadian models The driving stabili ty control systems, including ABS, ALL4 all-wheel drive, and the Flat Tire Monitor or the Tire Pressure Monitor * , have failed, refer also to page 59 Drive cautiously and think well ahead. Avoid braking with full force, driving on rough tracks, and depress[…]
-
Page 172: Mini Countryman (2011)
Mobility Indicator and warning lamps 170 Vehicles with Tire Pressure Monitor * Light up in yel low and red: There is a flat tire or significant tire pressure loss, e.g. in the front rig ht tire Carefully bring the car to a stop. Observe the informatio n starting on page 64 . Vehicles with Tire Pressure Monitor * Light up in yel low: Tire Pressure M[…]
-
Page 173: Mini Countryman (2011)
Indicator and warning lamps Mobility 171 Lights up in re d: > Transmission limp-home pro- gram active with restricted range of gears, possibly with reduced acceleration You can contin ue your journey, but moderate your speed and exercise due caution. Have t he system checked wit hout delay. > Gears can be engaged without depressing the brake […]
-
Page 174: Mini Countryman (2011)
Mobility Indicator and warning lamps 172 Selector lever position P not engaged. Ignition cannot be switched off Engage selector le ver position P when you wish to switch o ff the ignition, page 41 . Cruise control system fail ed Have the sy stem check ed. Park Distance Control fail ed Have the system checked. Bulb of exterior lightin g system faile[…]
-
Page 175: Mini Countryman (2011)
Indicator and warning lamps Mobility 173 No service due Set speed limit exceeded Time and date no longer correct Set the time and date, page 57 . 1 2 Cause What to do Online Edition for Part no. 01 40 2 607 530 — © 03/11 BMW AG Online Edition for Part no. 01 40 2 607 530 — © 03/11 BMW AG[…]
-
Page 176: Mini Countryman (2011)
Find Me. Online Edition for Part no. 01 40 2 607 530 — © 03/11 BMW AG[…]
-
Page 177: Mini Countryman (2011)
AT A GLANCE Controls Driving tips Entertainment Communications Mobility Reference Online Edition for Part no. 01 40 2 607 530 — © 03/11 BMW AG[…]
-
Page 178: Mini Countryman (2011)
Reference Technical data 176 Technical data Engine data Cooper Cooper S Displacement cu in/cm μ 97.5/1,598 97.5/1,598 Number of cylinders 4 4 Maximum power out- put hp 121 181 At engine speed rpm 6,000 5,500 Maximum torque with overboost lb ft/Nm 114/155 – 177/240 192/260 At engine speed with overboost rpm 4,250 – 1,600-5,000 1,700-4,500 Overb[…]
-
Page 179: Mini Countryman (2011)
Technical data Reference 177 Dimensions All dimensions in inches/mm. Minimum turning radius dia.: 38.1 ft/11.6 m. Information after th e semicolon: differe nt values for MIN I Cooper S. Online Edition for Part no. 01 40 2 607 530 — © 03/11 BMW AG Online Edition for Part no. 01 40 2 607 530 — © 03/11 BMW AG[…]
-
Page 180: Mini Countryman (2011)
Reference Technical data 178 Weights Never exceed either th e approved axle loads or the gross vehicle weight. Cooper Cooper S Cooper S A LL4 Curb weight, ready for travel , with all optional extras > Manu al transmission lbs./kg 2,9 54/1,340 3,053/1,385 3,208/1,455 > Automatic transmis- sion lbs./kg 3,020/1,370 3,097/1,405 3,252/1,475 Approv[…]
-
Page 181: Mini Countryman (2011)
Technical data Reference 179 Capacities US gal/US quarts Liters Notes Fuel tank 12.4/– approx. 47 Fuel grade: page 129 Including reserve of 2.1/– approx. 8 Window washer system incl. headlamp washer system –/4.2 approx. 4 For more details: page 49 Online Edition for Part no. 01 40 2 607 530 — © 03/11 BMW AG Online Edition for Part no. 01 40 […]
-
Page 182: Mini Countryman (2011)
180 Reference Everything from A to Z Everything from A to Z Index A ABS Antilock Brake System 60 Accessories, refer to Your individual vehicle 4 Acknowledgment signals for locking/unlocking vehicle 22 Activated-charcoa l filter for automatic climate control 80 Adaptive Light Control 73 Additives – coolant 140 – engine oil 140 Adjusting temperat[…]
-
Page 183: Mini Countryman (2011)
Everything from A to Z Reference 181 Battery 156 – charging 156 – disposal 29 , 156 – jump-starting 15 8 – temporary power failure 156 Battery renewal – remote control 29 Being towed 160 Bell – volume 102 Belt tensioner, refer to Safety belts 35 Belts, refer to Safe ty belts 35 Beverag e holders, re fer to Cupholders 85 Black ice, refer[…]
-
Page 184: Mini Countryman (2011)
Reference Everything from A to Z 182 Center Rail, refer to Storage compartments 84 Central locking system 21 – Comfort Access 27 – from inside 24 – from outside 21 – setting unlocki ng behavior 21 Changing bulbs 148 Changing w heels 155 Chassis number, refer to Engine compartment 139 Check Control 57 Child restraint fixing system LATCH 39 C[…]
-
Page 185: Mini Countryman (2011)
Everything from A to Z Reference 183 Door key, refer to Integr ated key/remote control 20 Door lock 24 Door lo ck, confi rmation signals 22 Doors, manu al operation 24 DOT Qual ity Grade s 134 Drinks holders, refer to Cupholders 85 Drive-off assistan t, refer to Hill Assist 62 Drivin g dynamics co ntrol, ref er to Sport button 62 Driving lamps, ref[…]
-
Page 186: Mini Countryman (2011)
Reference Everything from A to Z 184 Flat Tire Monitor FTM 62 – indicating a flat tire 63 – initializing the system 63 – snow chains 63 – system limits 63 Flat tire s, refer to Tire condit ion 135 Floor mats, care 146 Floor plate, refer to Flat load floor 94 Fog lamps – replacing bulb 150 Folding rear seat backrest 92 Footbrake, refer to […]
-
Page 187: Mini Countryman (2011)
Everything from A to Z Reference 185 Ignition key position 1, ref er to Radio readiness 41 Ignition key position 2, ref er to Ignition on 41 Ignition key, refer to Integrated ke y/remote control 20 Ignition lock 41 Imprint 2 Incoming call 119 Indicator and warning lamps 13 , 162 – Tire Pressure Monitor TPM 65 Indicator lighting, refer to Instrume[…]
-
Page 188: Mini Countryman (2011)
Reference Everything from A to Z 186 Luggage rack, refer to Roof-mounte d luggage rack 97 Lumbar support 33 M M+S tires, refer to Winter tires 137 Maintenance, refer to Service and Warranty Information Booklet for US models and Service Guide Boo klet for Canadian models Maintena nce system 142 Malfunction warn ings, refer to Check Control 57 Manual[…]
-
Page 189: Mini Countryman (2011)
Everything from A to Z Reference 187 P Paintwork, care 145 Park Distance Control PDC 59 Parking – vehicle 42 Parking aid, refer to Park Distance Control PDC 59 Parking brake 43 Parking lamps, replacing bulb 150 Parking lamps/low beams 71 Parts and accessories, refer to Your individual vehicle 4 Pathway lighting 71 PDC – volume 102 Personal Prof[…]
-
Page 190: Mini Countryman (2011)
Reference Everything from A to Z 188 Roadside Assistance 158 Roadside parking lamps 74 – replacing bulb 150 Roadworthiness test, refer to Service requirements 55 Roof load capacity 178 Roof-mounted lug gage rack 97 Rope, refer to Tow-starting, towing away 161 RSC Run-flat System Component, refer to Run-flat tires 136 Rubber parts, care 145 Run-fl[…]
-
Page 191: Mini Countryman (2011)
Everything from A to Z Reference 189 Speedo, refer to Speedometer 12 Speedometer 12 Split rear seat backrest, refer to Expanding the cargo area 92 Sport button 62 Stability control, refer to Driving s tability contr ol systems 59 Start/Stop button 41 – starting the engine 42 – switchin g off the engine 42 Starting assistance, refer to Jump-star[…]
-
Page 192: Mini Countryman (2011)
Reference Everything from A to Z 190 Torque 176 – lug bolts 156 Tow bar 160 Tow fitting 160 – screw thread 160 Tow fittings for tow-starting and towing away 160 Tow rope 161 Towing 159 – car with automati c transmission 160 – methods 160 Tow-starting 159 TPM, refer to Tire Pressure Monitor 64 Track width, refer to Dimension 177 Traction con[…]
-
Page 193: Mini Countryman (2011)
Everything from A to Z Reference 191 Windows 30 – closing 30 – convenient operation 22 – opening 30 – pinch protection system 31 – safety switch 31 Windshield – cleaning 48 – defrosting and removing condensation 78 , 80 Windshield wiper blades, changing 148 Windshield wipers, refer to Wiper system 47 Winter tires 137 – storage 137 W[…]
-
Page 194: Mini Countryman (2011)
Online Edition for Part no. 01 40 2 607 530 — © 03/11 BMW AG Online Edition for Part no. 01 40 2 607 530 — © 03/11 BMW AG[…]
-
Page 195: Mini Countryman (2011)
Online Edition for Part no. 01 40 2 607 530 — © 03/11 BMW AG Online Edition for Part no. 01 40 2 607 530 — © 03/11 BMW AG[…]
-
Page 196: Mini Countryman (2011)
01 40 2 607 530 ue *BL260753000J* DRIVE ME. Online Edition for Part no. 01 40 2 607 530 — © 03/11 BMW AG[…]
Manufacturer: MINI, Model Year: 2011,
Model line: Countryman,
Model: MINI Countryman 2011
Pages: 254, PDF Size: 3.84 MB
Trending: check engine light, fuel consumption, steering wheel, roof, fuse, oil capacity, ECU
Page 1 of 254

OWNERS MANUAL
MINI COUNTRYMAN")
Page 2 of 254
")
Page 3 of 254
 Cooper
 S
Cooper S ALL4Congratulations on your new MINI
This Owners Manual should be considered a permanent part of
this vehicle. It should stay with the vehicle when sold to provide
the nex")
Page 4 of 254
 © 2011 Bayerische Motoren Werke
Aktiengesellschaft
Munich, Germany
Reprinting, including excerpts, only with the
written consent of BMW AG, Munich.
US English II/11, 11 03 500
Printed on environmenta")
Page 5 of 254
 CONTENTS
The fastest way to find information on a particu-
lar topic or item is by using the index, refer to
page236.
Notes
4 General information
6 Reporting safety defects
AT A GLANCE
10Cockpit
16 O")
Page 6 of 254
 NotesGeneral information
4
General information
Using this Owners
Manual
We have tried to make all the information in this
Owners Manual easy to find. The fastest way to
find specific topics is to")
Page 7 of 254
 General informationNotes
5
that features described in this Owners Manual
could differ from those on your vehicle.
For your safety
Maintenance and repair
Advanced technology, e.g. the use of
modern")
Page 8 of 254
 NotesGeneral information
6
Service and warranty
We recommend that you read this publication
thoroughly.
Your MINI is covered by the following warran-
ties:
> New Vehicle Limited Warranty
> Rust Perf")
Page 9 of 254
 General informationNotes
7")
Page 10 of 254
 Watch Me.")
- Load next 10 pages
Trending: brake rotor, coolant temperature, lock, fuel consumption, maintenance schedule, jacking, tires
View, print and download for free: MINI Countryman 2011 Owner’s Manual (Mini Connected), 254 Pages, PDF Size: 3.84 MB. Search in MINI Countryman 2011 Owner’s Manual (Mini Connected) online. CarManualsOnline.info is the largest online database of car user manuals. MINI Countryman 2011 Owner’s Manual (Mini Connected) PDF Download.
All product names, logos, and brands are property of their respective owners.
Privacy Policy | About Us & Contact