It is possible to clone an entire hard drive or specific partitions on a hard drive. This is useful if you are upgrading to a larger hard drive. With Macrium Reflect you can boot the target disk on the same system after cloning. Cloning your hard drive creates a bootable new hard drive with the state of your computer at the time you undertook the clone. You can clone to a hard drive installed in your computer or to a hard drive installed in a USB Drive Caddy.
Important
Windows cannot boot from a USB-connected drive. This is a restriction imposed by Microsoft. If you clone your system disk to a USB-connected external drive then, to boot your clone, the physical disk must be removed from the USB caddy and attached internally.
Deleting and re-configuring existing partitions or configuring new partitions is possible with Macrium Reflect, so you don’t need to do this prior to cloning.
Show important information about MS Dynamic Volumes…
A Dynamic volume is a logical abstraction of the underlying physical disk and maybe striped or extended over multiple physical disks. Because of this, Dynamic volume file systems are copied not disk partitions.
For more information see
If your source disk contains Dynamic Volume(s) then the background color will change and the link will show ‘Copy Dynamic Volumes…’:


In the Clone Wizard:
-
The partition selection checkboxes and Copy selected partitions link will not be available. Therefore, Dynamic Volumes must be dragged and dropped to the destination.
-
To copy source Dynamic Volume(s) to destination Dynamic Volume(s) you must prepare the target as Dynamic and format the destination volume(s) in advance of the clone operation. This can be achieved using the Windows Disk Management Console to convert one or more physical disks to Dynamic.
-
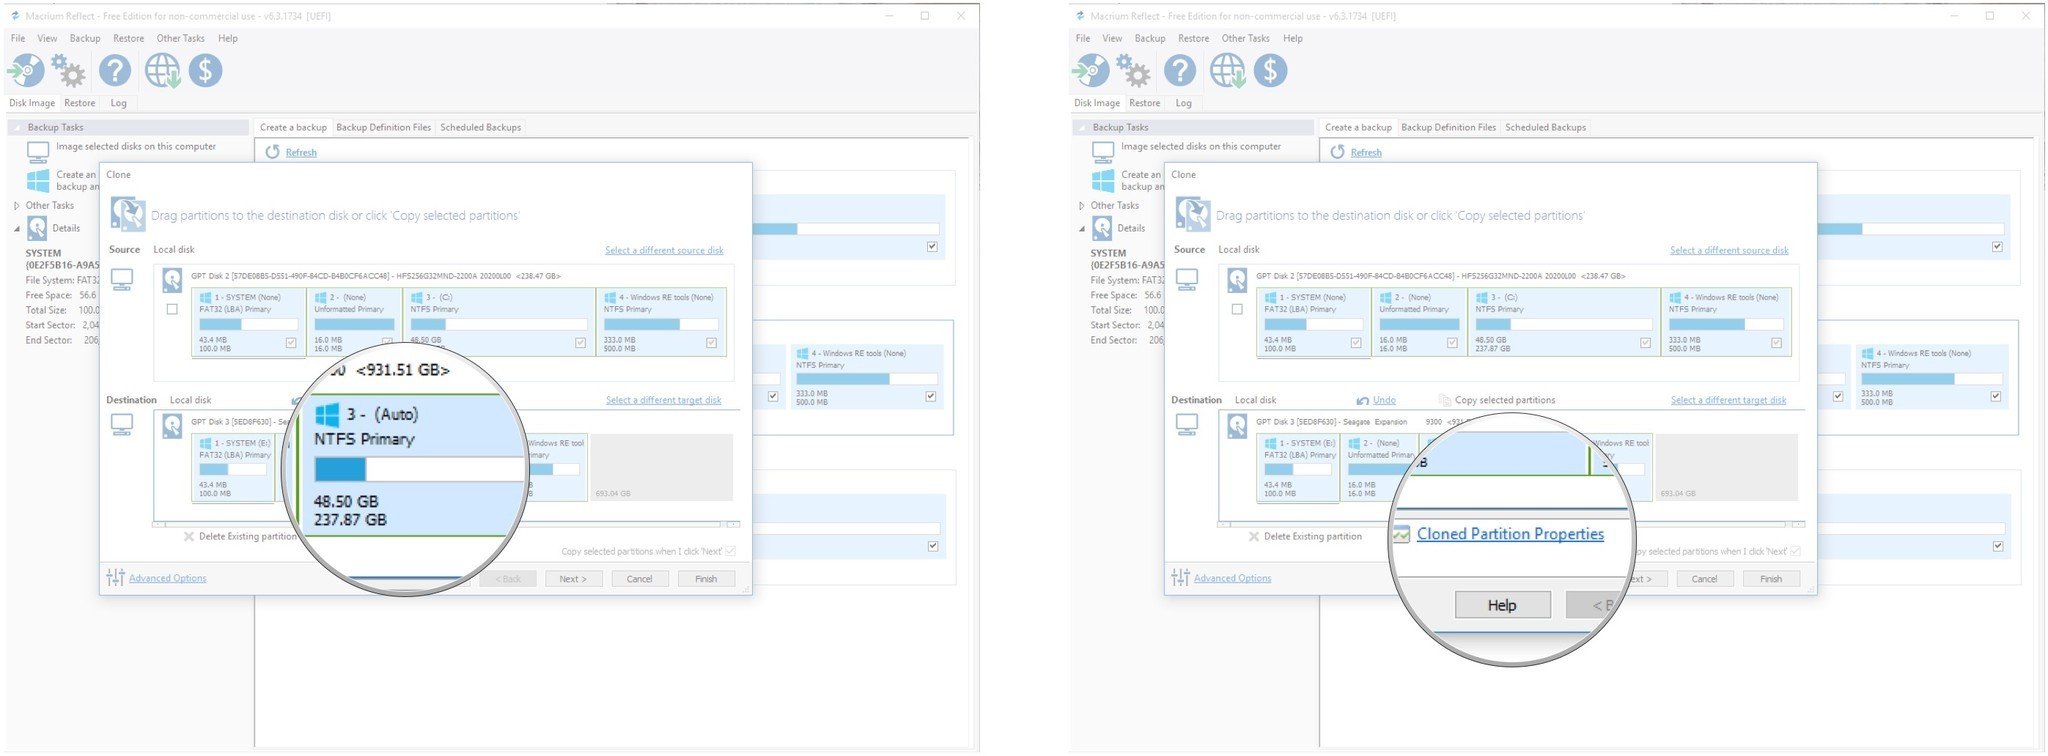
A destination Dynamic Volume cannot be resized so the Cloned partition properties link will not be available if the destination is Dynamic.
-
To convert Dynamic Volume(s) to standard partitions, select an unformatted or an MBR/GPT basic disk as the destination and use Drag and Drop to copy the source volumes. After the clone operation, you can leave the disk as a ‘Basic’ disk or convert it to Dynamic using the Windows Disk Management Console.
See also: Bare metal restore of a Dynamic disk system
Macrium reflect v8 adds additional partition resizing and automation options when cloning and restoring.
For more complex scenarios where partitions are resized and moved on different disk sizes, please see Restore and Clone Partition Layout
-
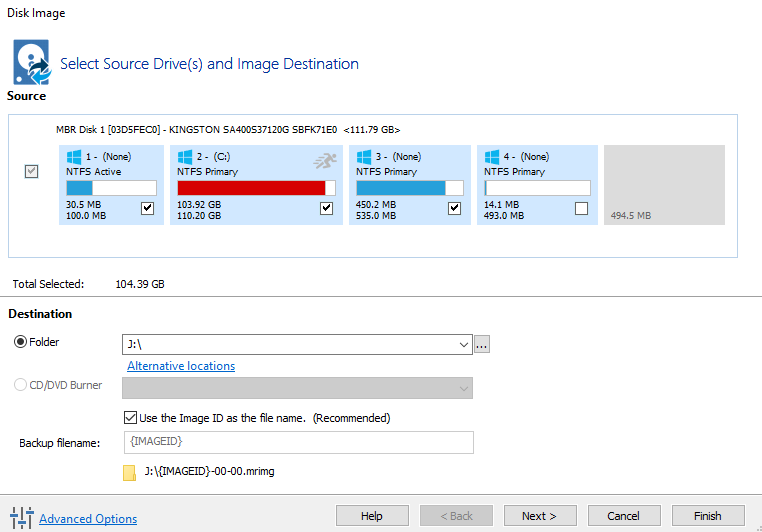
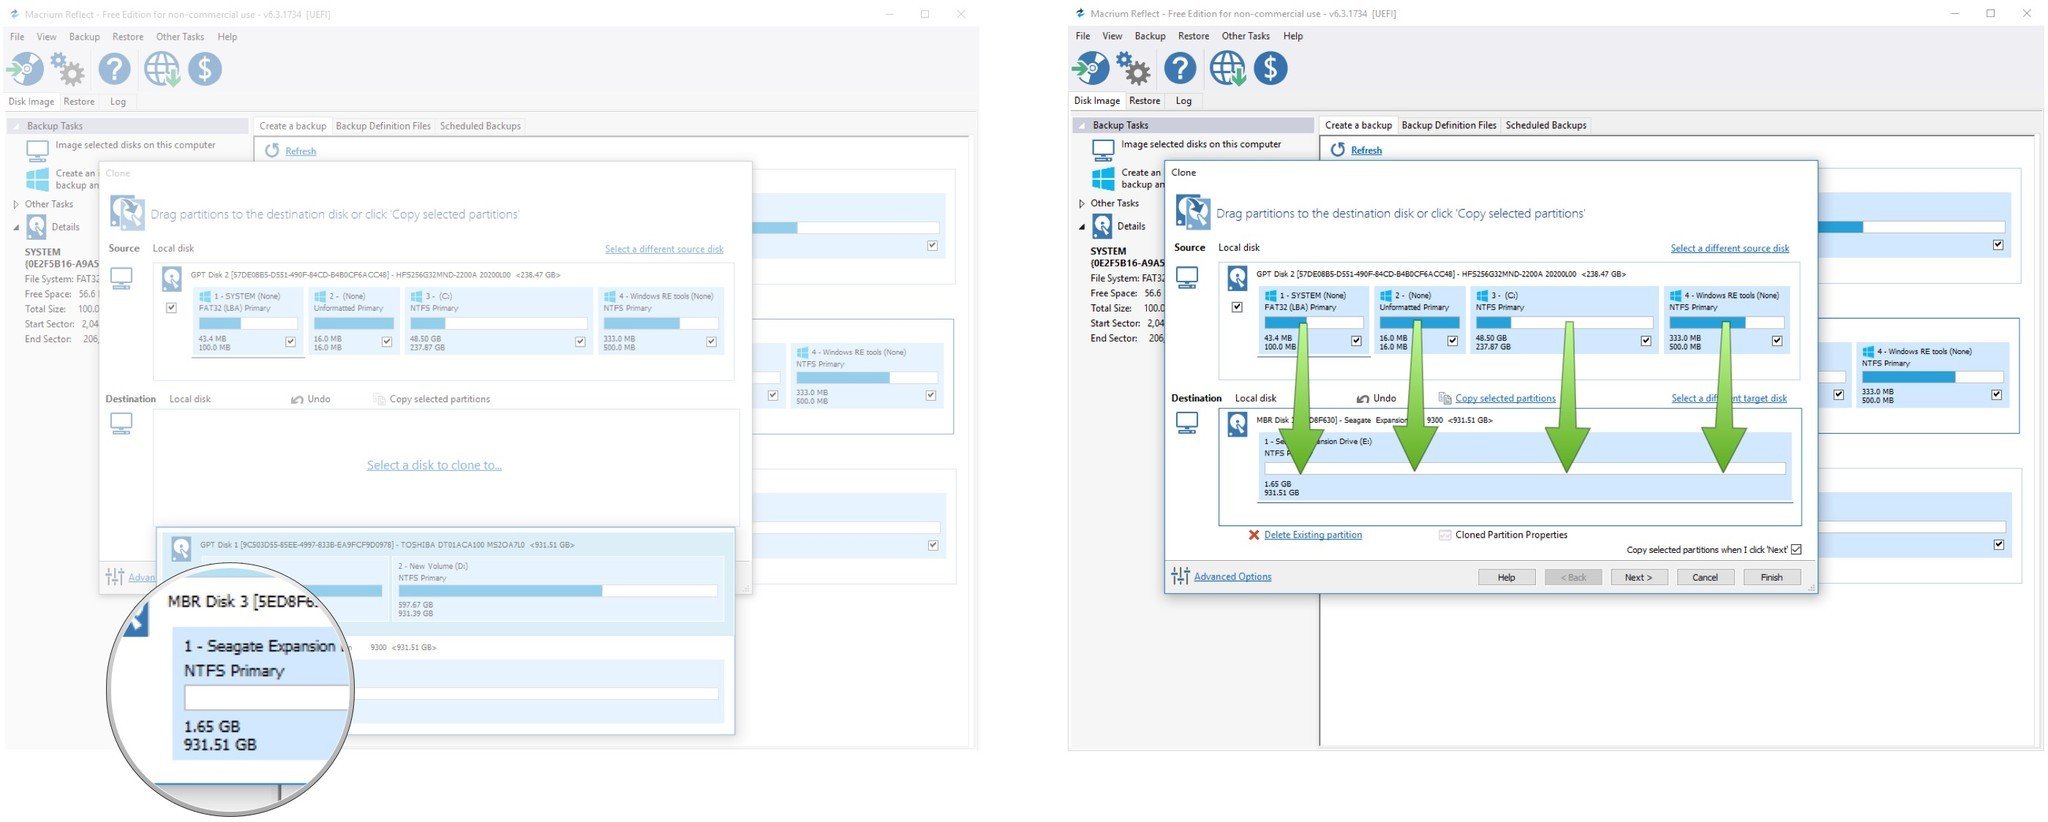
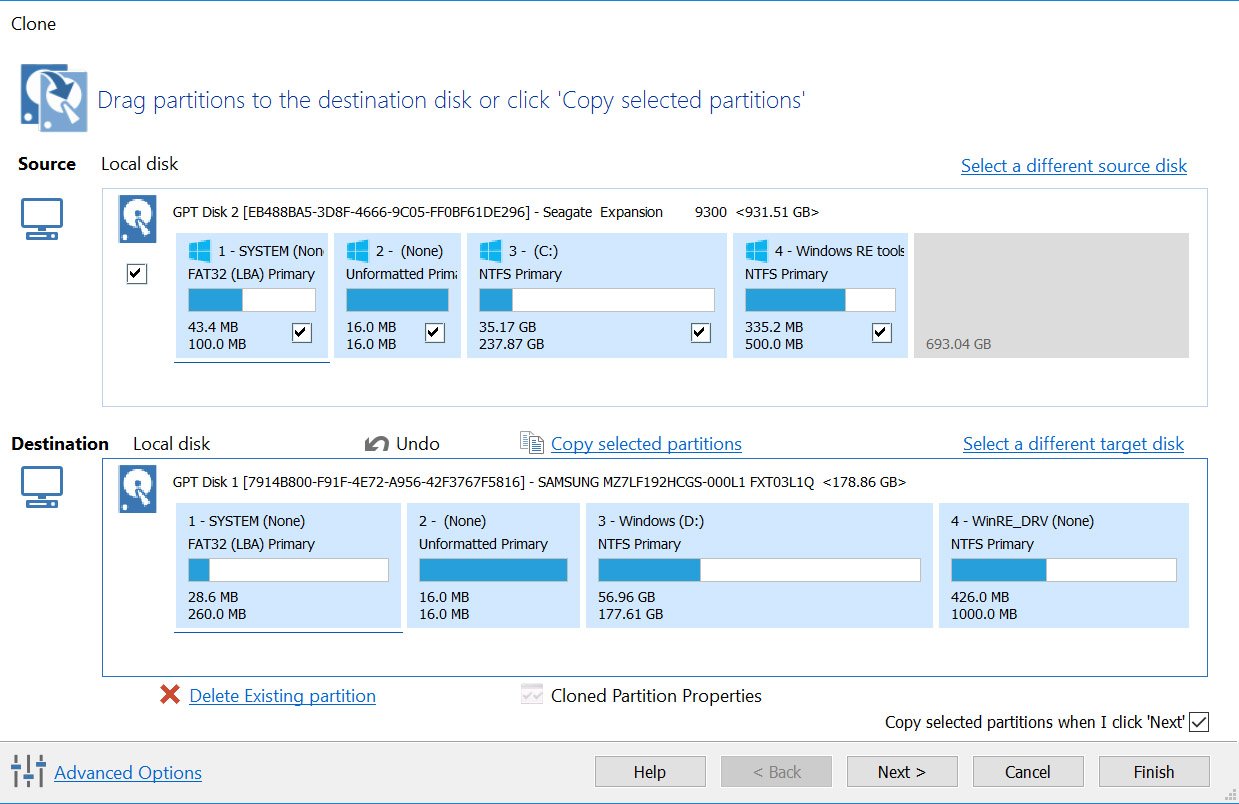
Select the disk to clone from in the main application window and click Clone this disk…

- In the wizard that opens Click Select a disk to clone to…

-
Select the clone target disk. In this case, there is only one disk available.
-
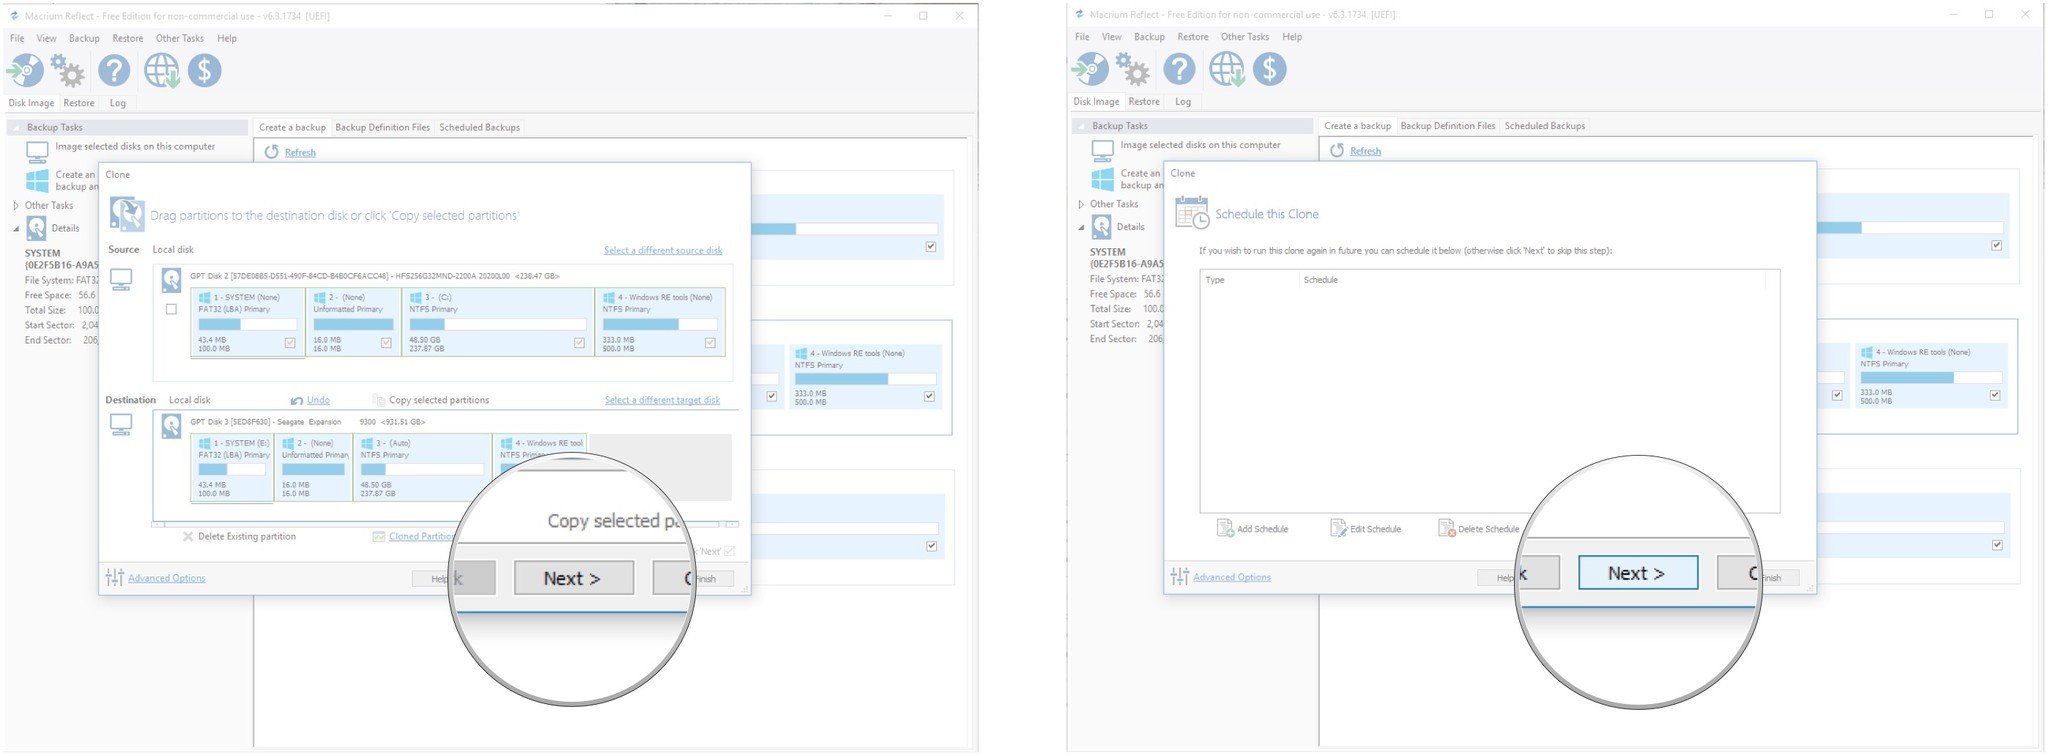
If you do not want to modify the order or size of partitions of the clone, click Next. This is the default behavior.
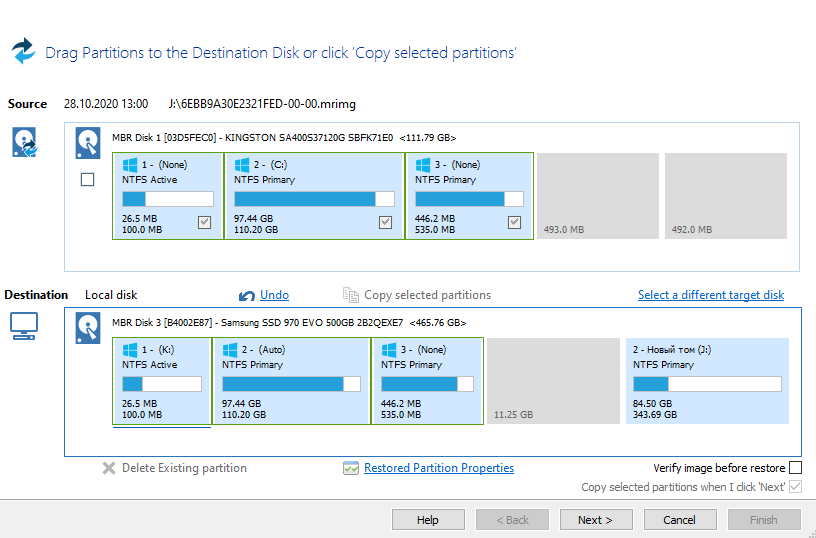
Alternatively, drag the partitions you want to clone, the red arrow below shows this.

Becomes
In this example, there is 650MB of free space after the copied partition. You can modify the size of each partition to fit the new disk if required.
You can delete partitions on the target disk by selecting and clicking ‘Delete existing partitions’..
-
To extend the partition to make use of the remaining space on the destination, click Fill Space.
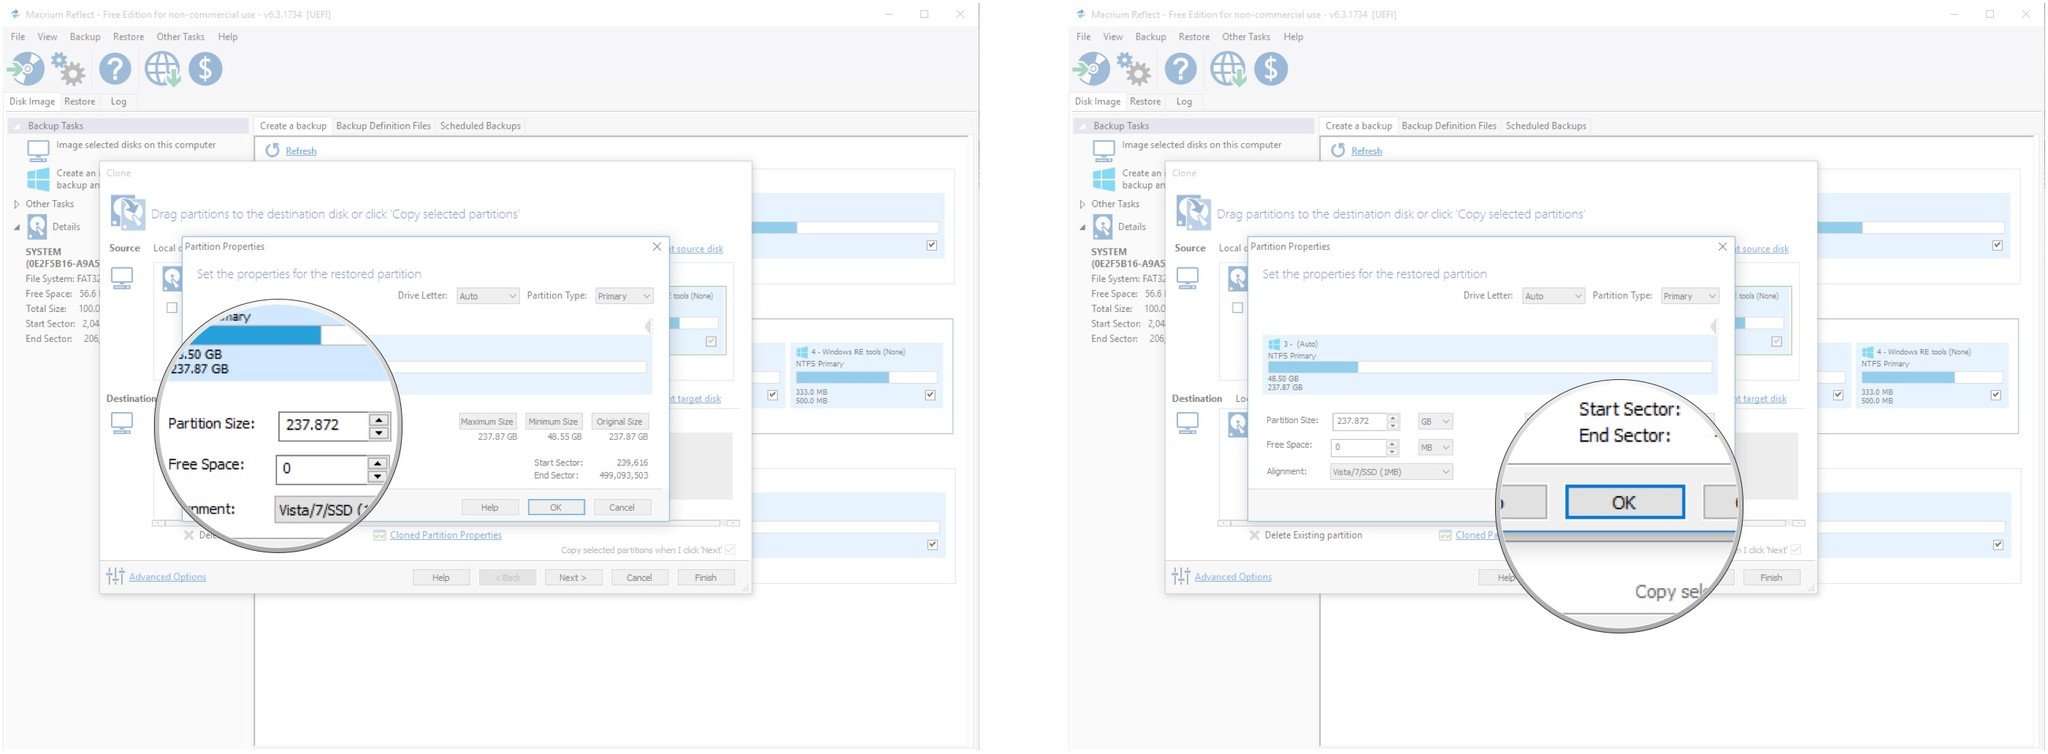
You can open the more detailed Partition Properties dialogue by selecting a partition on the destination then clicking Layout. Using the Partition Properties dialogue you can:
- Set the partition size precisely using the Partition Size entry box.
- Resize the partition automatically by clicking Maximum size or Minimum size. You can set the partition back to the original size by clicking Revert.

- Click OK.
- If required, click Advanced Options to change settings for this clone:
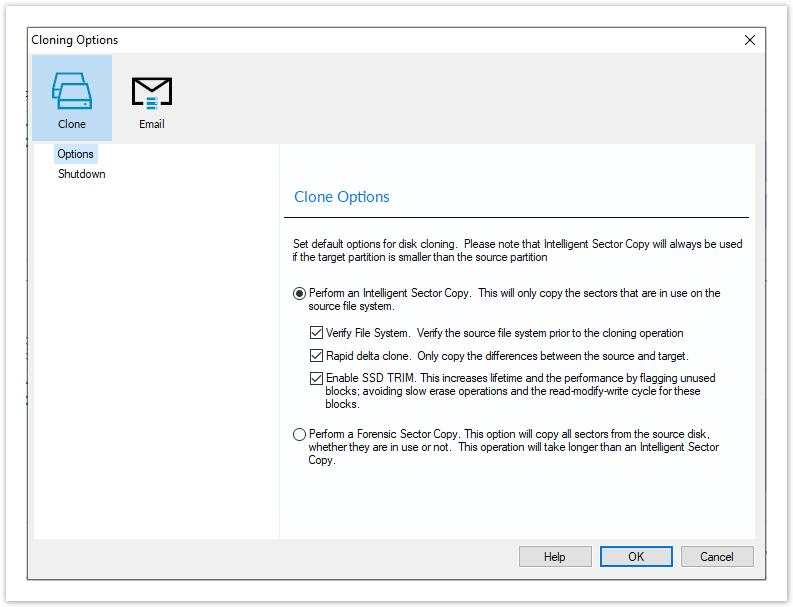
Option_____________ Description Intelligent sector copy Copy only file system sectors/clusters that are in use. This reduces the time to create the clone as unused file system clusters are not copied. Verify File System Verifying the file system prior to cloning ensures that there are no file system errors transferred to the clone.
Please note that this may take several minutes to complete
Rapid Delta Clone Copy only file system differences between the clone source and target. This increases cloning speed dramatically.
Show more information on RDC…
As with Rapid Delta Restore (RDR) the concept of RDR has been something that has been thought about for quite some time here at Macrium Software. We wanted to build a clone solution that would effectively and rapidly copy only the differences between the source and target file systems. The advantage of this is obvious, RDC offers similar a performance increase as an Incremental disk image offers over a Full image and enables regular clones to be a viable and fast DR solution.
How does it work?
The NTFS file system resident on the clone source is compared with file system on the target disk. The two file systems are first verified that they originated from the same format command and then the target NTFS file system structures are analyzed for differences. All the NTFS file system structures are copied to the target disk and any that do not exist or have been modified on the target disk cause the data records for each NTFS file or object to be copied as well. The result is an ‘Incremental’ clone applying only file system changes detected between the source and the target.
Note: RDC works with NTFS file systems only. All other file systems will perform a full clone
Note: RDC is not available when shrinking partitions during a clone.
Enable SSD TRIM Enable SSD TRIM on the clone target to optimize the disk.
Show more information on SSD TRIM…
This features provides automated SSD optimization resulting enhanced SSD performance and longevity. Writing to an unused block is much quicker than an in-use block as it avoids both the slow erase operation and the read-modify-write cycle. This results an increase of both the lifetime and the performance of the device. It is effective for all windows operating systems, even those that support SSD trim natively as the file system driver can only TRIM blocks on de-allocation; it cannot TRIM blocks written by another process. It is also effective for USB attached SSDs.
Forensic Sector Copy Copy every sector from the source to the target disk partition.
Please note that this option is only necessary if you want to copy unused file system space and will significantly increase the time to complete the clone.
Shutdown Set power saving options after a clone task. Email Success Set recipient, subject, body, and attachments should this clone succeed. Email Failure Set recipient, subject, body, and attachments should this clone fail - Click Next.
The options to Add Schedule, Edit Schedule, or Delete Schedule is displayed.
Click Add Schedule to optionally schedule your clone

Make any required changes and click Next.
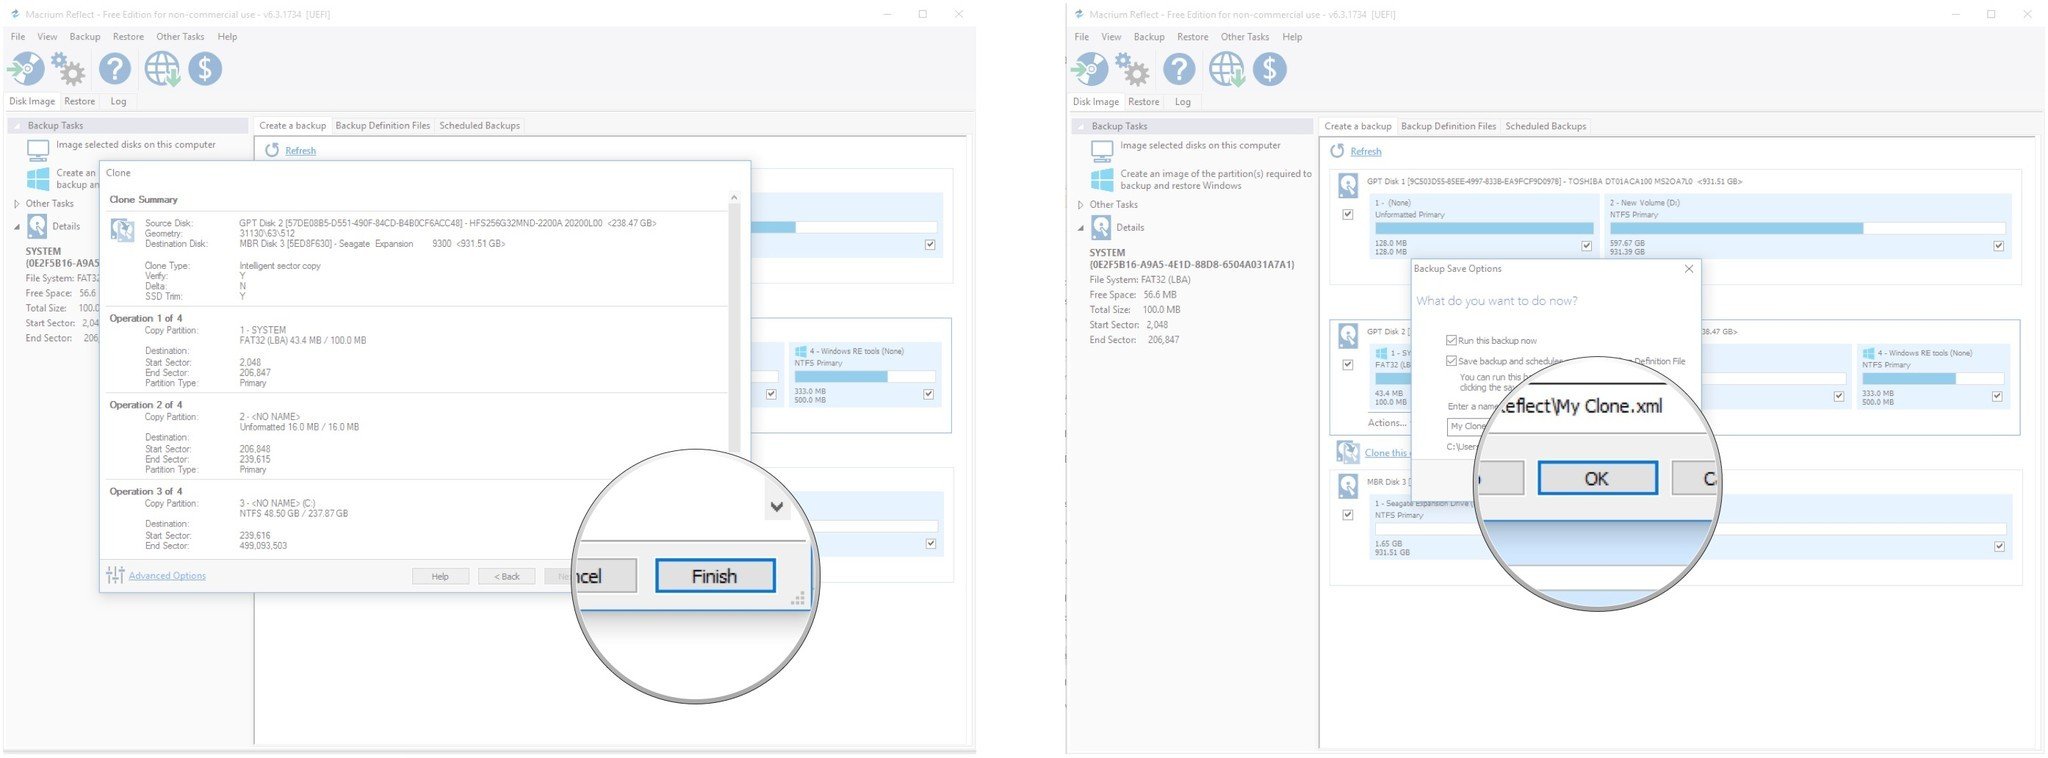
For more information see Scheduling backups. - Review the settings and click Finish.
-
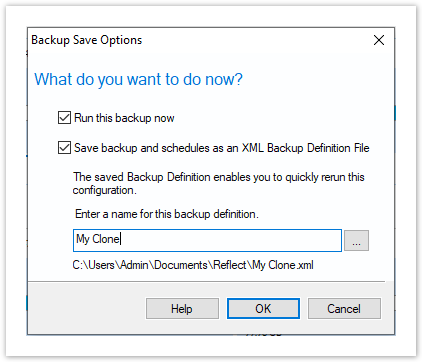
Verify the settings in Backup Save Options and if appropriate, click OK.

Note: Saving a backup definition enables you to run your Clone at any time with a single click
Note: You must save your backup definition if you have created Clone schedules. Your schedules cannot run if this step is missed.
If you want to run the Clone at this point, select Run this backup now and click OK.
-
A Warning box appears, if appropriate click Continue.

Important
The target disk for the clone operation will be overwritten. This is unrecoverable, so please ensure that the target disk contains no valid data.
-
The clone operation now starts.


Incompatible Disk Selected
If you receive the error message ‘Incompatible Disk Selected’ when cloning then please see this article for more information: .Incompatible Disk Selected
Creating a clone video
Рано или поздно любой пользователь ПК сталкивается с необходимостью переустановки операционной системы. И независимо от того, куда будет ставиться Windows, на новый или старый диск, HDD или SSD, во многих случаях желательно сохранить текущие настройки ОС и те программы, которые установлены на компьютере. Что касается пользовательских данных, то их, конечно, можно перенести и вручную. Это займёт немало времени, но ничего сложного в таком переносе нет – это простое копирование файлов.

Но что касается системы и её компонентов, тут всё намного сложнее. Достаточно сказать, что сама процедура инсталляции Windows далеко не всегда протекает гладко, а если говорить о ранее установленных приложениях, то их повторная установка может затянуться на дни и даже недели. Поэтому с целью экономии времени желательно использовать специализированный софт, позволяющий перенести с одного диска на другой не только саму операционную систему, но и все программы и данные, которые были инсталлированы. Такая процедура называется клонированием диска.
Она представляет собой полное посекторное копирование информации с одного носителя на другой, вместе с драйверами и другим софтом, требующим отдельной установки, с различными настройками, пользовательскими данными, паролями и другими данными. По идее, полное клонирование гарантирует работоспособность системы на новом диске, и в подавляющем большинстве случаев так и случается. Таких программ написано немало, и Macrium Reflect – одна из них. При этом размер носителей не обязательно должен быть одинаковым. Единственное важное условие – на целевом накопителе должно быть достаточно места для переноса. Если оно не выполняется, подобные утилиты умеют копировать выборочные данные (выбор осуществляется пользователем), что позволяет соблюсти ограничение.
Установка Macrium Reflect Free Edition
Нужда в клонировании системного накопителя может возникнуть по разным причинам:
- всё чаще пользователи производят апгрейд дисковой подсистемы, устанавливая на компьютер более быстрый SSD диск, причём именно в качестве системного, что связано с ограничениями таких носителей по количеству операций записи. Учитывая, что такие твердотельные накопители уже практически сравнялись в цене с традиционными винчестерами, такой переход приобретает черты массового;
- синхронизация работы на нескольких ПК. Причина не столь распространённая, но, например, в рамках корпоративных проектов такая возможность требуется не так уж редко. Впрочем, вы и сами можете чувствовать себя более независимым, если у вас появится возможность работать в привычной среде на разных устройствах – например, стационарном ПК и ноутбуке;
- создание резервной копии. Здесь много объяснений не требуется – у многих на компьютере содержится большой массив важных данных и установленных программ, потеря которых грозит большими неприятностями, прежде всего финансовыми. Понятно, что некоторые данные можно хранить в облаке, но не все. При этом определённая часть юзеров не пользуется облачными хранилищами из принципа, не доверяя им. В таких случаях наличие резервного накопителя является надёжной гарантией того, что никаких неприятных эксцессов не случится.
Бесплатная утилита Macrium Reflect как раз и позволяет выполнять такие задачи, как клонирование дисков и создание их резервных копий. Последняя функция, хоть в принципе и выполняет то же самое, что и при клонировании, использует немного другой алгоритм, поэтому бекап создаётся быстрее, чем клонирование. Разумеется, клонирование будет оправданным, если текущая версия операционной системы работает «как часики». Если же сбоит, Macrium Reflect не поможет, некорректная работа ОС возобновится и на новом диске – поможет только форматирование и установка Windows с нуля с инсталлированием драйверов и всего остального софта.


Но будем считать, что наша операционка полностью работоспособна, и тогда стоит опробовать Macrium Reflect в деле. Скачиваем утилиту, желательно с официального сайта, выбрав бесплатную версию. В части клонирования возможности свободно распространяемой и платной версии одинаковы, последняя лучше в плане создания резервных копий плюс есть поддержка. Перед скачиванием вам предложат ввести свой e-mail адрес или зарегистрироваться, но делать это необязательно, скачивание начнётся и без этого. Размер инсталлятора небольшой – около 5 МБ, но это веб-установщик, который при запуске попросит указать версию программы и путь, куда она будет устанавливаться, а сами файлы начнут скачиваться с серверов разработчика после нажатия кнопки Install.


Затем в дело вступит полноценный инсталлятор, который весит около 100 МБ, а после него – стандартный установщик Windows. Процедура установки потребует ввода почтового адреса, по которому будет выслан регистрационный код. Больше неожиданностей не предвидится.


Как перенести Windows 10 на диск SSD с помощью Macrium Reflect
После запуска программы (если вы не убирали соответствующую галочку, то она запустится сразу после инсталляции) мы попадаем во вкладку «Create a backup». Дальнейшие действия по клонированию диска выполняются в соответствии со следующей инструкцией:
- если у вас на компьютере установлено несколько дисков, убедитесь, что вверху расположен системный накопитель. Если это так, смело кликаем по кнопке Clone this disk, расположенной под блоком с дисками;

- если диск разбит на несколько томов (разделов), а вы хотите клонировать только системный, просто снимите галочку с тех разделов, которые не подлежат копированию;

- после нажатия кнопки клонирования откроется новое окно, в котором нужно выбрать диск, на который будет производиться клонирование (нужно нажать на фразу «Select a disk to clone to»). После того, как внизу появится целевой диск, тома для клонирования можно перенести обычным перетаскиванием, то есть это альтернатива проставлению галочек;
ВАЖНО. Если копирование производится не на новый диск, все находящиеся на нём данный будут безвозвратно потеряны. Обязательно учтите это. Этой же программой можно сделать бекап накопителя, на который мы хотим клонировать Windows.
- если суммарный объём клонируемых разделов больше объёма целевого накопителя, а перенести их нужно, попробуйте сжать разделы средствами Windows. Для этого можно использовать встроенную в операционную систему утилиту управления дисками (запускается нажатием Win+R и вводом diskmgmt.msc). Но можно поступить по-другому: нажать в Macrium Reflect кнопку «Cloned Partition Properties» и вручную задать размеры разделов так, чтобы они поместились на целевой диск;


- после нажатия кнопки Next появится окно, в котором можно задать график клонирования – в некоторых случаях такая возможность будет не лишней. Но поскольку мы хотим выполнить перенос Windows с HDD на SSD с помощью Macrium Reflect здесь и сейчас, ничего не делаем и просто жмём Next ещё раз;

- после этого откроется окно с перечислением этапов клонирования и их краткого содержимого. Информация, в общем-то, для нас бесполезная, поэтому смело жмём Finish;

- откроется ещё одно окно с двумя параметрами: в первом галочку оставляем, то есть информируем программу, что хотим выполнить клонирование немедленно, во втором снимаем, поскольку сохранять все настройки для повторного копирования нам не нужно (ведь мы делаем не резервную копию, а клонируем диск);
- жмём ОК и дожидаемся окончания процесса клонирования диска в Macrium Reflect, наблюдая за его ходом.


На этом работу программы можно считать завершённой, но, чтобы новый диск стал загрузочным, необходимо в BIOS/UEFI изменить порядок загрузки, поставив новый диск первым.


И напоследок – о возможных проблемах при клонировании:
- иногда сама процедура проходит успешно, Windows грузится с нового диска, но старого в проводнике не видно. Причина в конфликте имён томов, необходимо назначить второму диску другое имя средствами Windows;
- если суммарный объём клонируемых разделов меньше размера целевого диска, после переноса системы может оказаться, что часть дискового пространства носителя оказалась нераспределённой, и в проводнике его объём будет меньше номинального. Лечится встроенной утилитой «Управление дисками» (необходимо кликнуть ПКМ по части диска, обозначенной как нераспределённая область и выбрать пункт «Расширить область);
- встречается ситуация, когда на компьютере имеется два накопителя, на одном из них расположен загрузчик и системный раздел, а на втором – сама операционная система. В таких случаях Macrium Reflect может отработать перенос ОС на третий диск некорректно. Здесь вряд ли что-то можно изменить, решение проблемы – чистая установка Windows, причём другие диски желательно отключить – иначе у вас будет несколько томов с системными разделами, что сможет стать причиной проблем в будущем.
О том, как выполнять с помощью Macrium Reflect резервное копирование, мы поговорим в другой раз.
I intend to replace my HDD with an SSD for improved performance and faster speed. I sought assistance from a buddy, who advised me to utilize Macrium Reflect. But I’ve never used it before. Do you know how to use it to clone a hard drive to an SSD? Thank you in advance.
![]()
Best Answered by
Larissa· Answered on Nov 15, 2023
Macrium Reflect is an overall backup solution with a disk cloning feature, you can use it to clone HDD to SSD with the following steps.
To use Macrium Reflect clone HDD to SSD, follow these steps:
- Download and install Macrium Reflect on your computer.
- Connect the SSD to your computer. Ensure that it is recognized and accessible.
- Launch Macrium Reflect and click on the «Create a backup» tab on the right side, then click on «Clone this disk».
- Select your HDD (the source disk) as the disk to clone.
- Choose the SSD (the destination disk) as the target for the clone under the «Destination» tab, and click «Next».
- Click «Next» to bypass the «scheduled this clone» option.
- Click «Finish» > «OK» > «Continue» > «Close».
- Now Macrium Reflect will start to clone HDD to SSD.
.As you can see, using Macrium Reflect to clone a hard drive is complex and requires many steps. If you want an easier and faster tool, EaseUS Disk Copy is your best choice, which will clone HDD to SSD with very simple steps.
- Download and install EaseUS Disk Copy on your computer.
- Launch EaseUS Disk Copy and select the Disk Mode.
- Choose the source and target disks.
- Check the target disk layout, and click “Proceed” to start.
EaseUS Disk Copy is a better alternative to Macrium Reflect and will assist you to clone disks with ease. You should never miss it.
Related Article: Reflect Alternative to Clone HDD and SSD or Migrate OS
Download the smartest and easiest Disk Cloning Software
Use EaseUS Disk Copy to upgrade small HDD, replace old/failed hard drive, migrate OS, clone HDD to SSD without reinstalling data.
Программа Macrium Reflect позволяет перенести или скопировать ОС Windows 10. Но всё же имеются некоторые нюансы переноса. Для домашнего использования предлагается бесплатная лицензия. Как и все приложения Macrium Reflect имеет свои преимущества и недостатки.
Эта статья расскажет, как пользоваться Macrium Reflect. На примере разберёмся , как перенести систему Windows 10. И неважно перенос с HDD или SSD на другой SSD. Как установит программу разбираться не стоит. Поскольку процесс инсталляции простой и Вы думаете, как использовать.
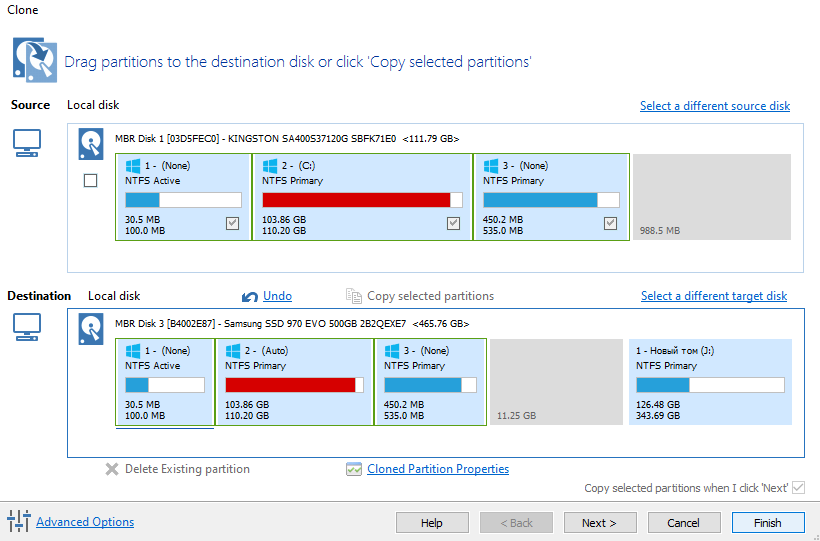
Предыстория. На замену своему бюджетному SSD-накопителю Kingston A400 120 Гб приобрёл Samsung 970 Evo 500 Гб. А заново переустанавливать и настраивать операционную систему долго (хотя и рекомендуется). Задумался о быстром переносе Windows 10 на другой диск.
Ранее было разбито всё доступное пространство на две части в Windows 10. Операционная система будет быстрее работать на новом SSD-накопителе. Было решено выделить 125 Гб (более чем достаточно) для системных нужд, а всё остальное под игры и приложения 350 Гб.
Резервная копия & Восстановление
В разделе Backup > Create a backup нажмите Image this disk… Выделите важные разделы, укажите расположение копии и нажмите Next. В открывшемся окошке можно создать расписание автоматического резервного копирования. Оставляем по умолчанию тыкнув Next.
Ниже укажите имя исходного файла и подтвердите создание резервной копии. Это может занять продолжительное время в зависимости от накопителя и количества данных. В итоге Вы получаете сжатый файл с расширением .mrimg со всеми выбранными разделами Windows 10.

Теперь переходим к восстановлению данных на другом накопителе. Во вкладке Restore нажмите Restore Image (справа от ранее созданной резервной копии). Выберите накопитель нажав Select a different target disk. Ещё можно сохранить структуру: Copy selected partition.
Можно ещё выбрать, какие разделы с копии нужно восстановить. Далее отобразятся разделы, хранящиеся в резервной копии и на диске, после окончания восстановления. Если всё устраивает, тогда перейдите к восстановлению. Обычно процесс восстановления быстрее.
Перенос & Клонирование диска
В расположении Backup > Create a backup нажмите Clone this disk… Выберите новый накопитель Select a disk to clone to… Сохраняем структуру разделов нажав Copy selected partition. Собственно, переходим к автоматическому клонированию диска нажав Finish.
Заключение
К сожалению, Macrium Reflect не имеет русской локализации. Хотя всё более-менее и так понятно. Программа позволяет перенести Windows 10 на другой диск. Загрузить программу можно бесплатно на официальном сайте производителя. И там же получить пробный период.
На практике донор имеет всего 110 Гб, конечный диск 125 Гб. После клонирования 15 Гб будет не распределено. И расширить системный диск средствами системы не получается. Нет параметров для расширения конечного системного раздела (уменьшить, обрезать его можно).
(1 оценок, среднее: 5,00 из 5)
Администратор и основатель проекта Windd.pro. Интересуюсь всеми новыми технологиями. Знаю толк в правильной сборке ПК. Участник программы предварительной оценки Windows Insider Preview. Могу с лёгкостью подобрать комплектующие с учётом соотношения цены — качества. Мой Компьютер: AMD Ryzen 5 3600 | MSI B450 Gaming Plus MAX | ASUS STRIX RX580 8GB GAMING | V-COLOR 16GB Skywalker PRISM RGB (2х8GB).
(Image credit: Windows Central)
Creating a complete backup of your hard drive by cloning it is never a bad idea. Hardware can fail, and it’s a pain losing your data. There are also times where you’d like to swap out a hard drive — whether in a laptop or a desktop — for something faster, but you want your PC to be the same as it was before the swap. In either of these cases, Macrium Reflect is a solid program that easily clones a drive. Why Macrium? It’s the first one we used, it works, and we didn’t find any reason to switch to another.
There are two ways to go about a hard drive swap. You can purchase a hard drive enclosure and hook your PC up to the new internal drive for a direct clone before replacing it — this method will take the least time. If you don’t want to go in for a hard drive enclosure, you can clone the original drive to an external drive, do the physical swap, boot Windows from the external drive, and clone back onto the new internal drive.
If you need a new external hard drive for this process, have a look at our roundup of the best external drives money can buy. If you’re in the market for a new internal drive but unsure of where to start, check out our SSD buyer’s guide.
- See our external hard drive buyer’s guide
- See our solid-state drive buyer’s guide
Download Macrium Reflect
Although there are plenty of options when it comes to cloning-and-backup software, Macrium Reflect has a free version that works great for any casual users who need to make a copy of their hard drives. The first step is to get Macrium Reflect installed on your PC.
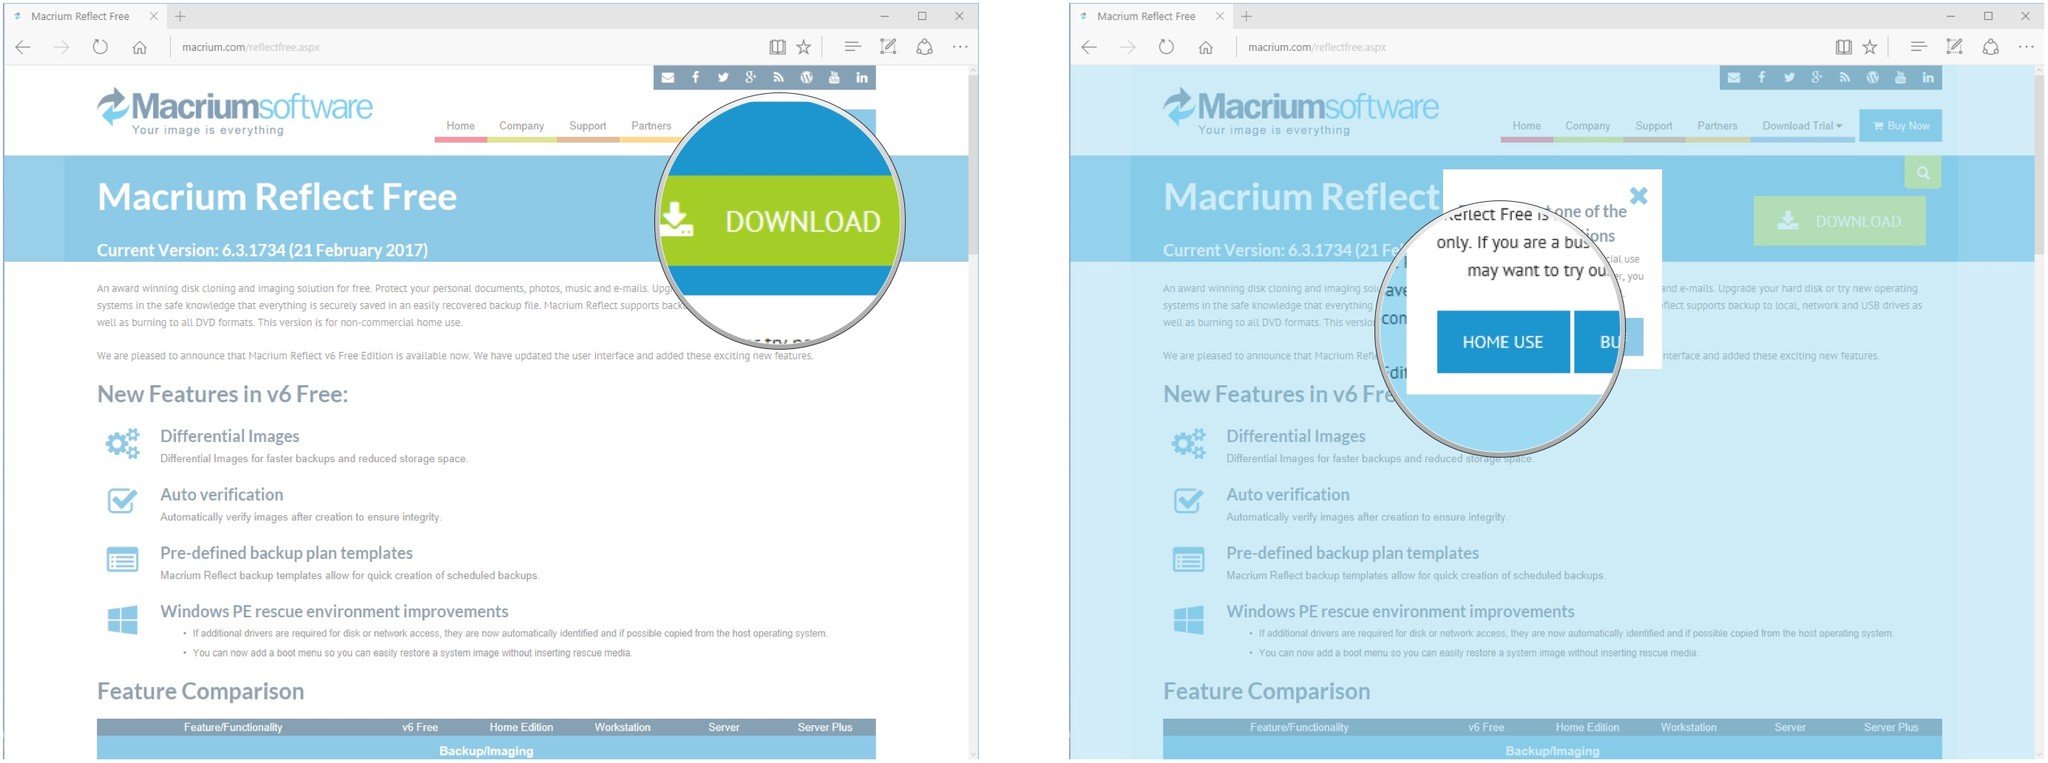
- Launch your web browser from the Start menu, desktop or taskbar.
- Navigate to the Macrium Reflect website.
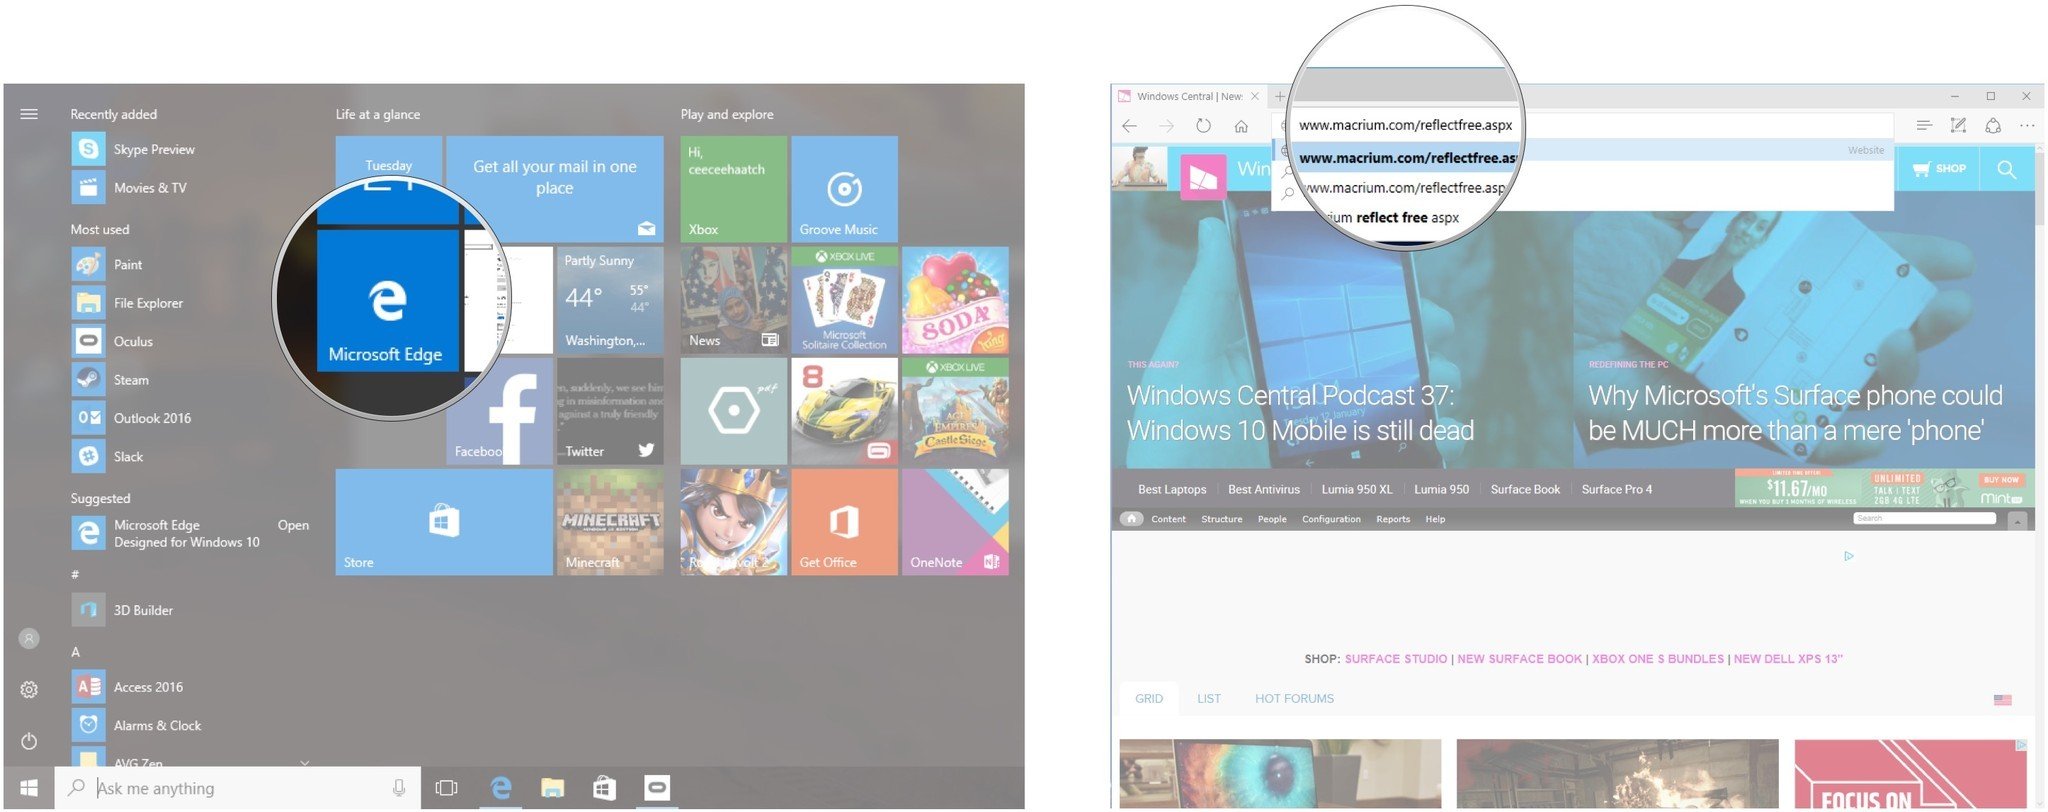
- Click Download.
- Click Home use.
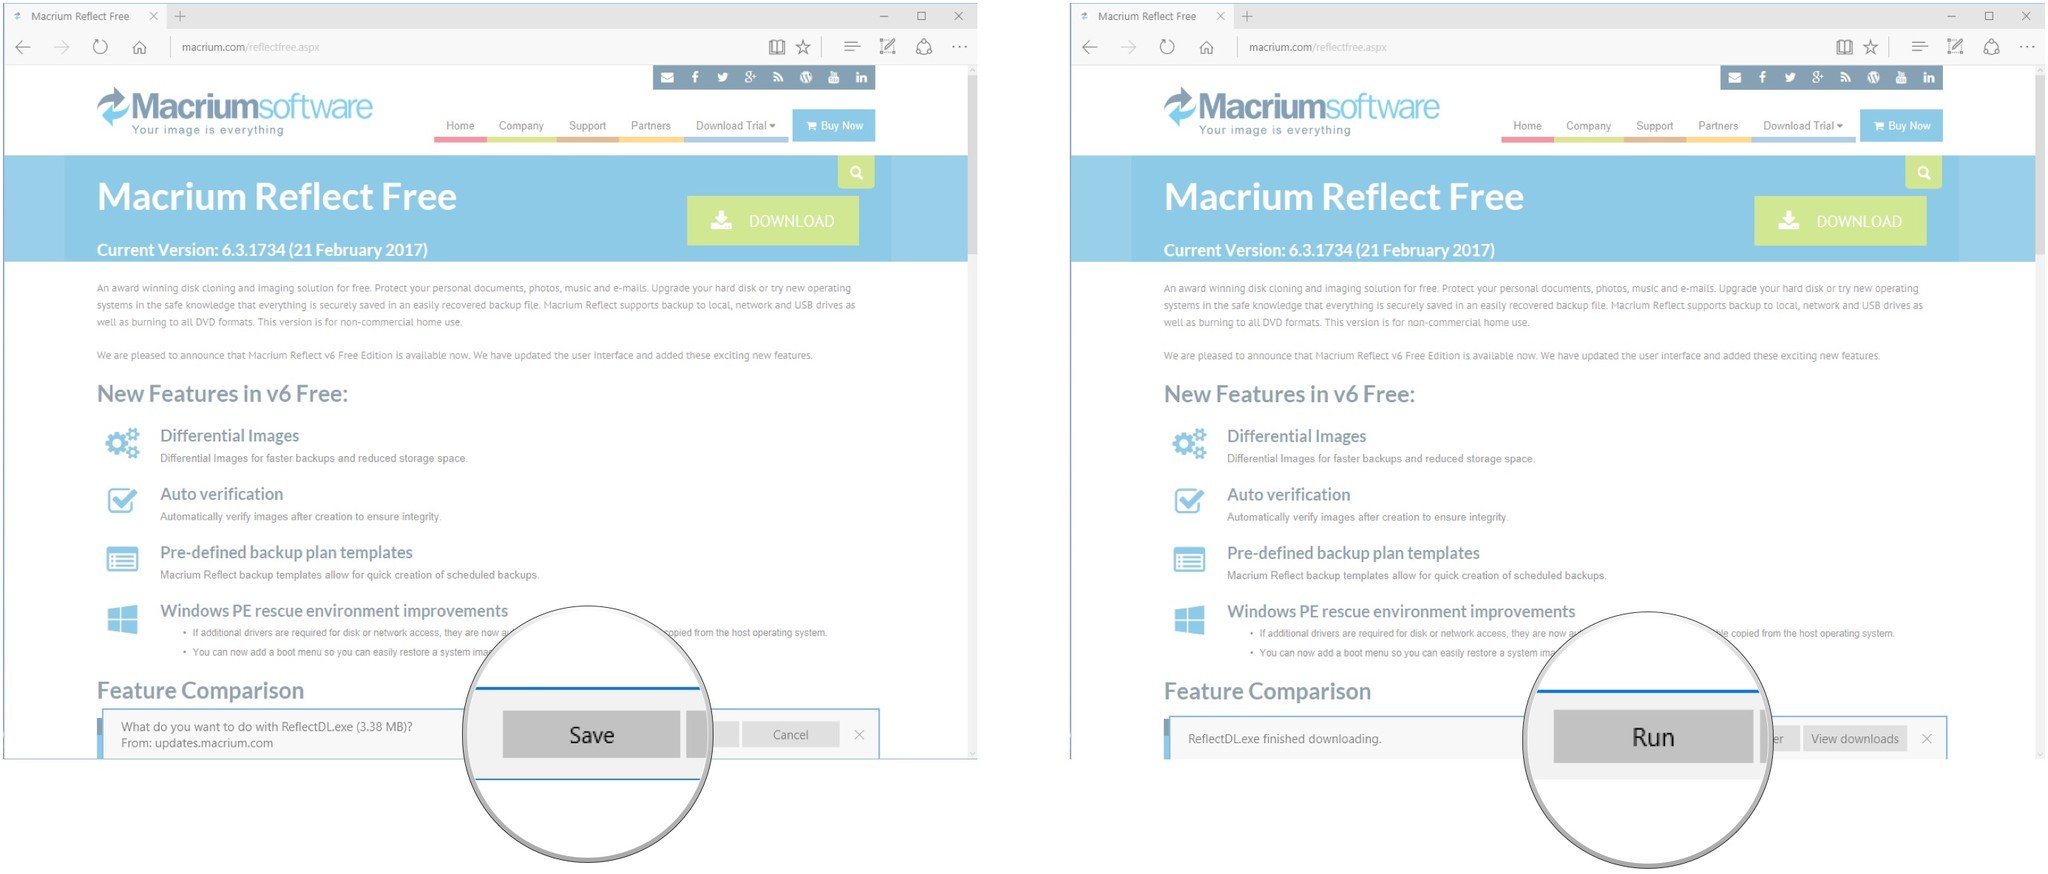
- Click Save.
- Click Run.
- Click Download when you are satisfied with the options listed in the window. I went with the default settings.
- Click Yes, your download will begin.

- Click Next when the download is finished.
- Click Next.

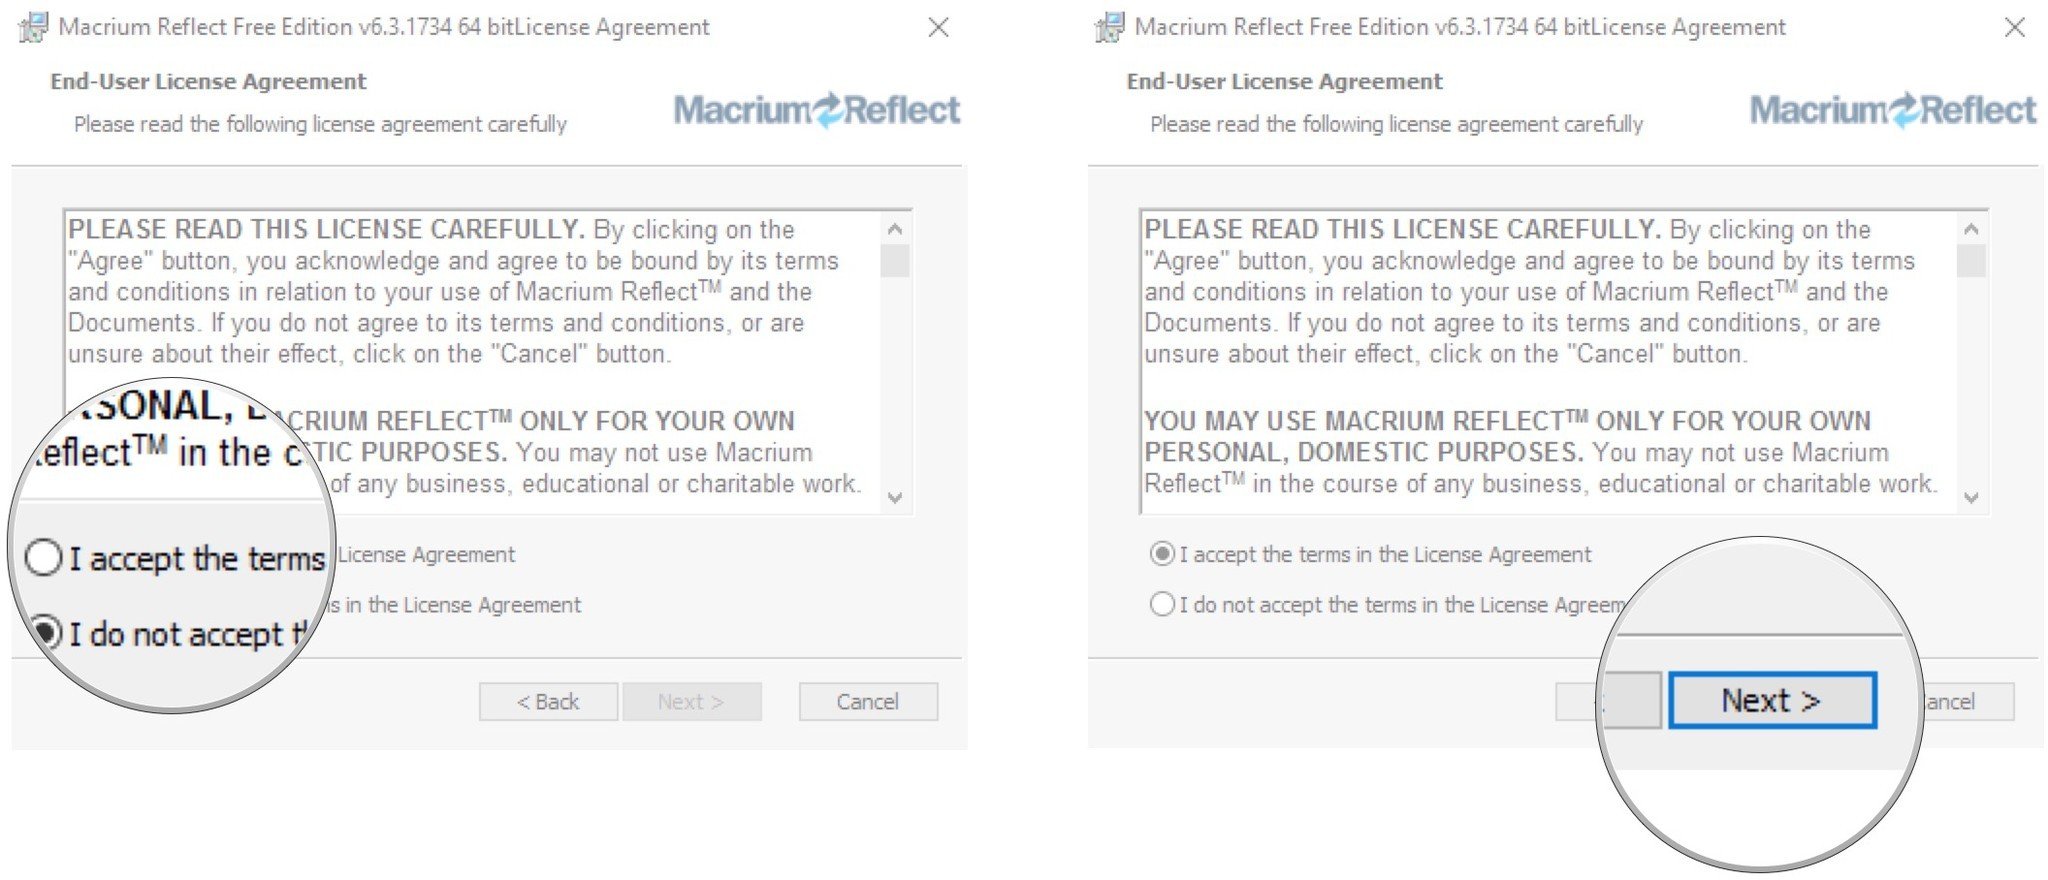
- Click I accept the terms…
- Click Next.
- Click Next.
- Click No or type your information if you want to register Macrium Reflect.
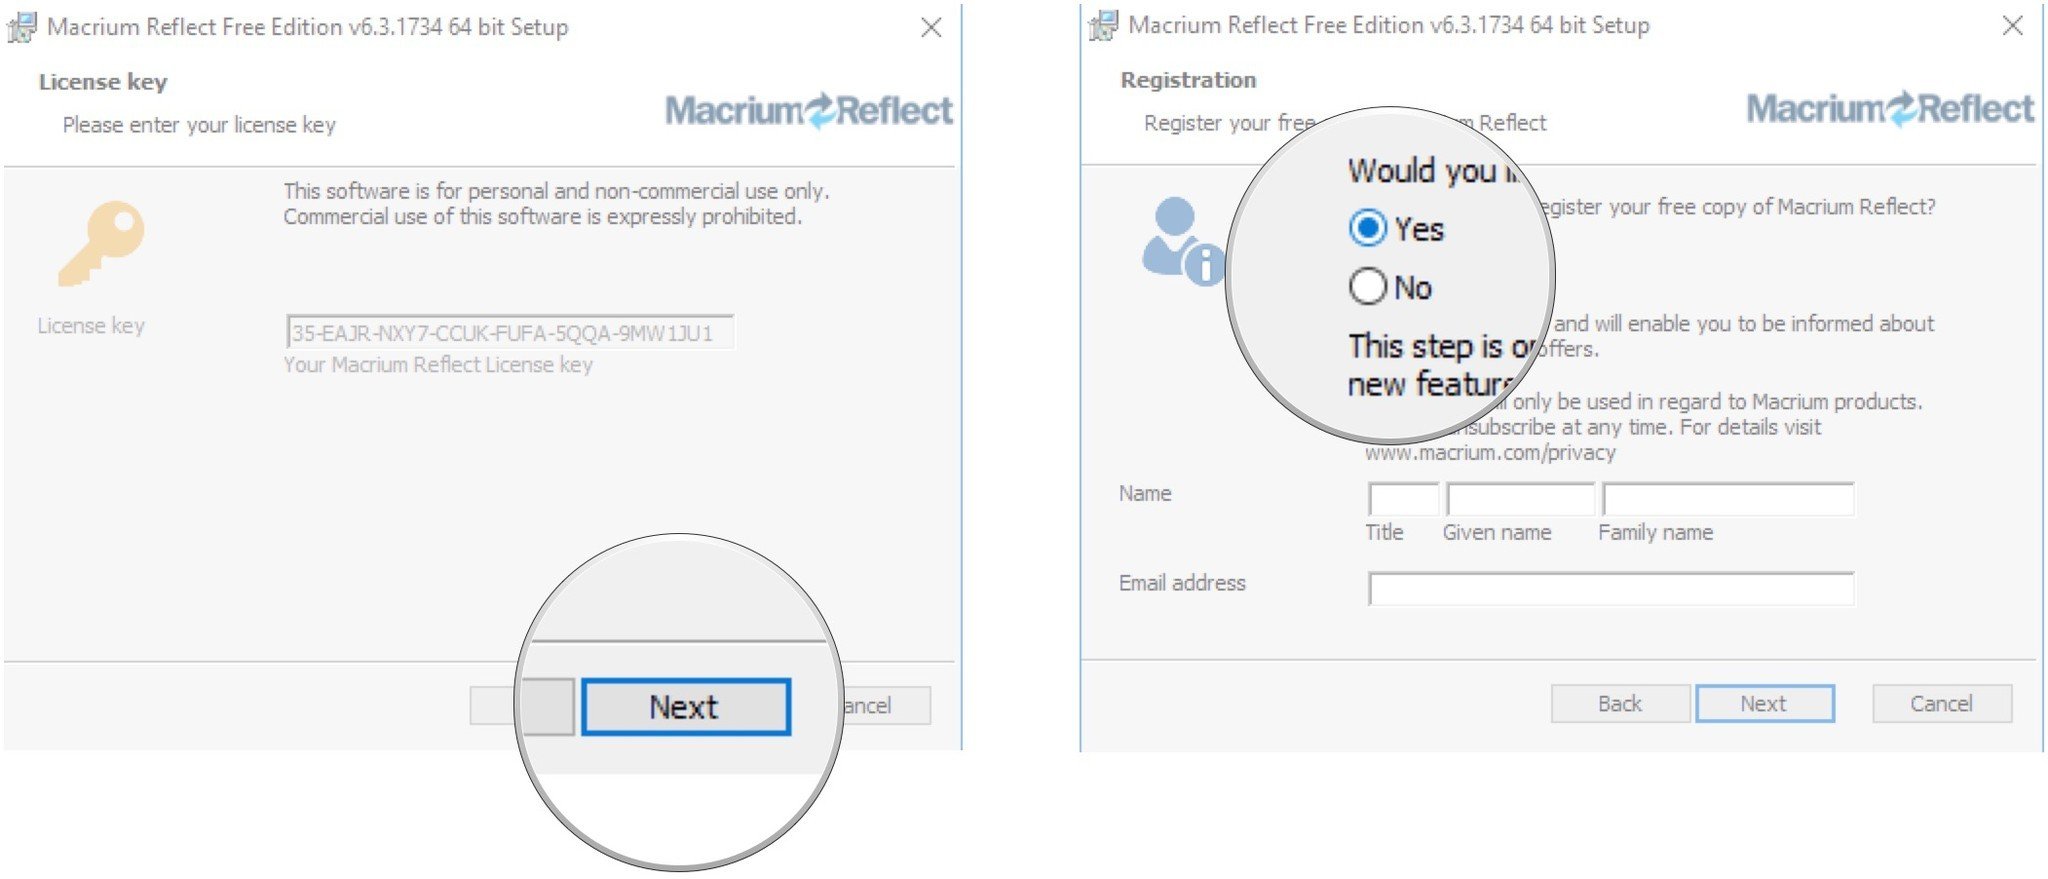
- Click Next.
- Click Next.
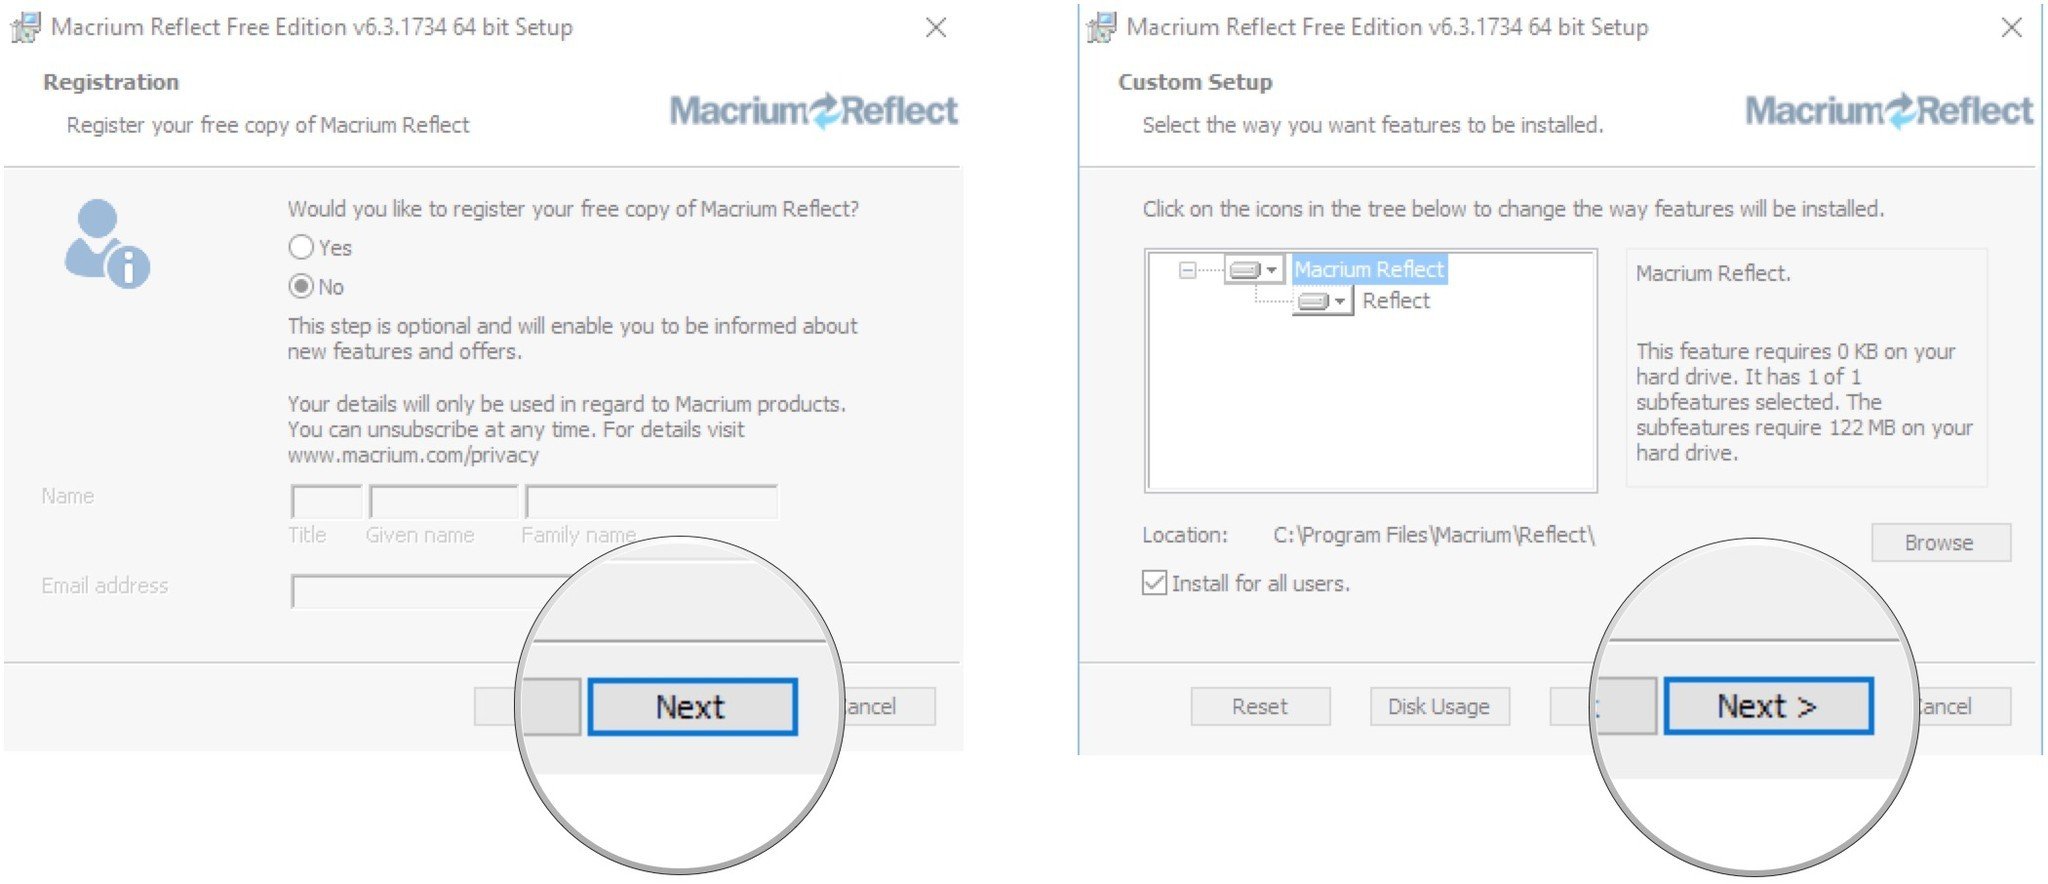
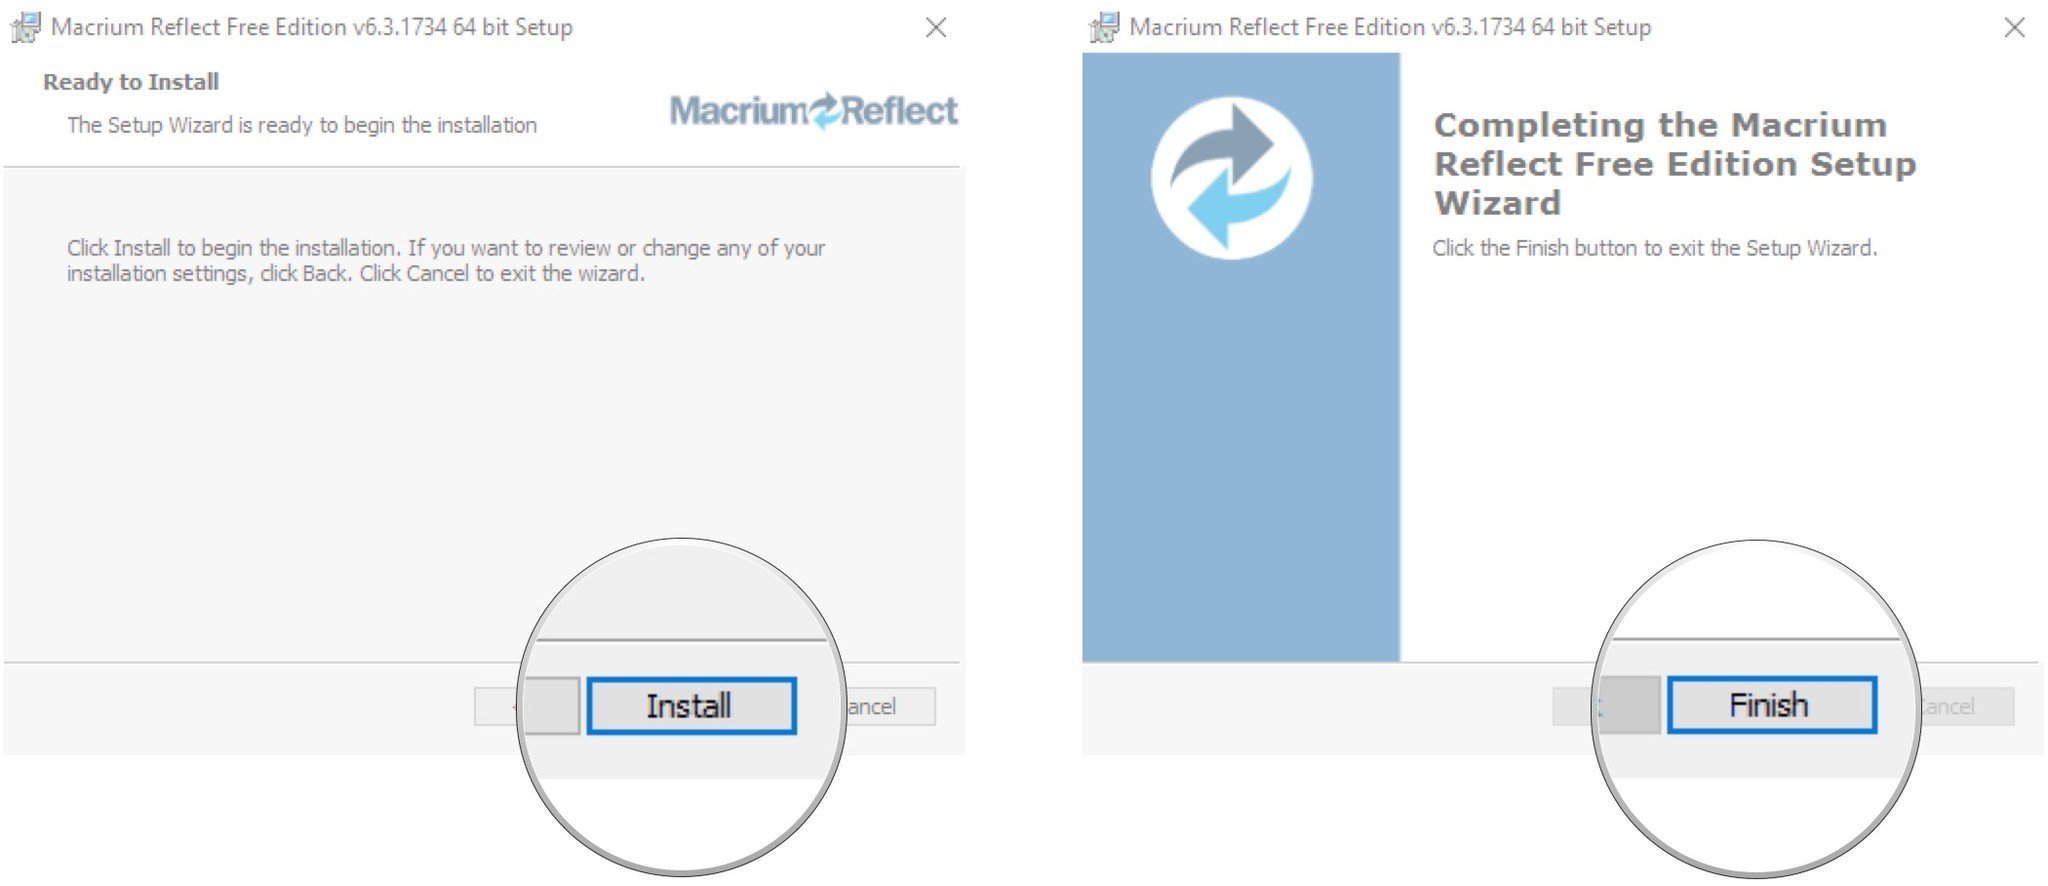
- Click Install.
- Click Finish.
Other cloning software
Although Macrium Reflect is our choice for a cloning tool, there are other options. Some are paid, some are free, but they all do pretty much the same thing.
AOMEI Backupper: Like Macrium Reflect, there is a fully-functional, free version of AOMEI that lets you create system images, back up hard drives, and clone drives. Its UI is super simple to use, and you can even set an automatic file sync that will keep your backup up to date.
See at AOMEI
Clonezilla: This free, open-source cloning tool has been around for a long time, and with good reason. It supports a ton of file systems and it plain works. Just don’t expect a fancy user interface.
See at Clonezilla
Acronis True Image: There are a few buying options to choose from when it comes to Acronis — there is also a 30-day free trial — including subscription options that come with 50GB or 1TB of cloud storage. For just the cloning and backup software, you’ll spend about $40.
See at Acronis
How to clone your hard drive
Before you begin with Macrium Reflect, ensure the drive you’re going to clone to is connected to your PC. It’s also good practice to clean up any files on your system, especially if you’re moving to a smaller drive — you can’t have more data than the new drive can hold.
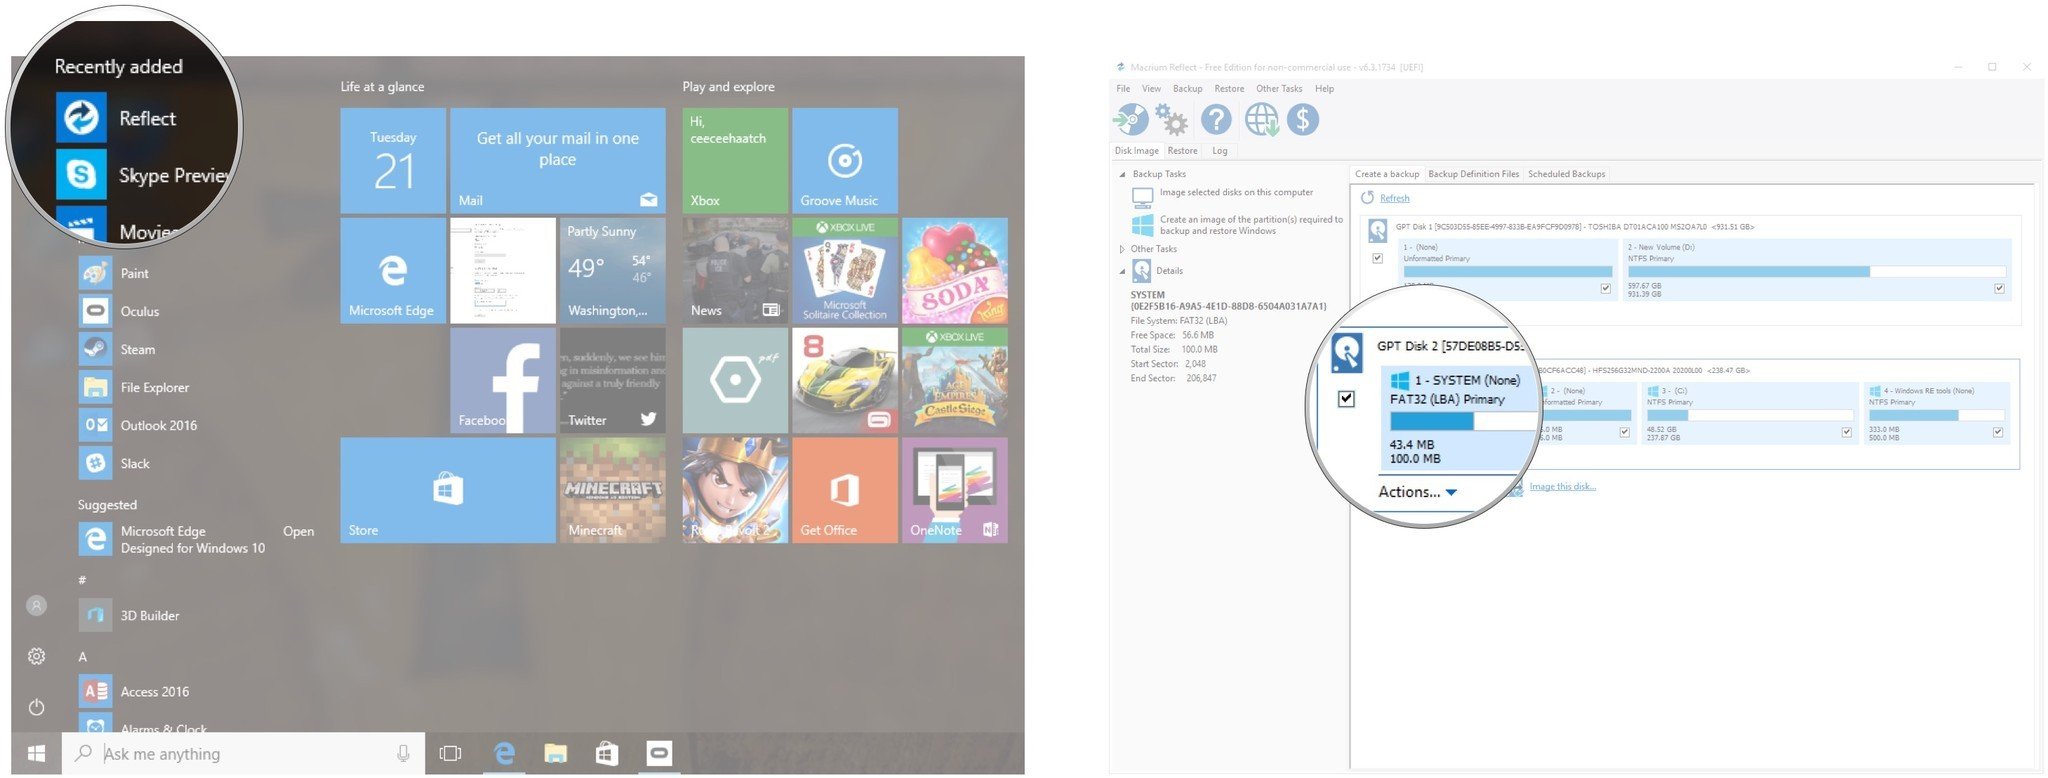
- Launch Macrium Reflect from your Start menu, desktop or taskbar.
- Click the disk you want to clone. In this case, I’m choosing my C: drive because it is the drive I’m swapping out. A blue rectangle will appear when the disk is selected.
- Click Clone this disk…
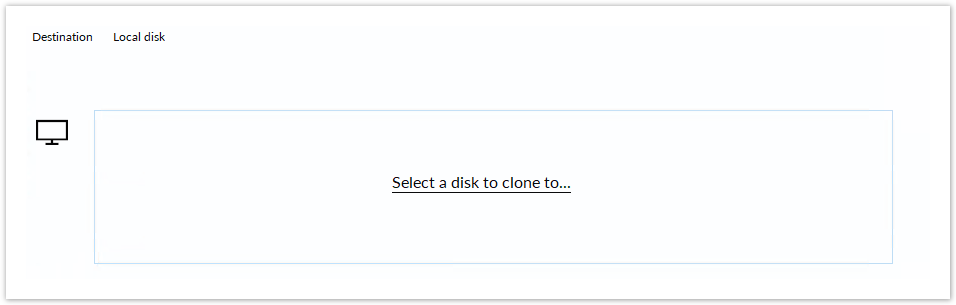
- Click Select a disk to clone to…
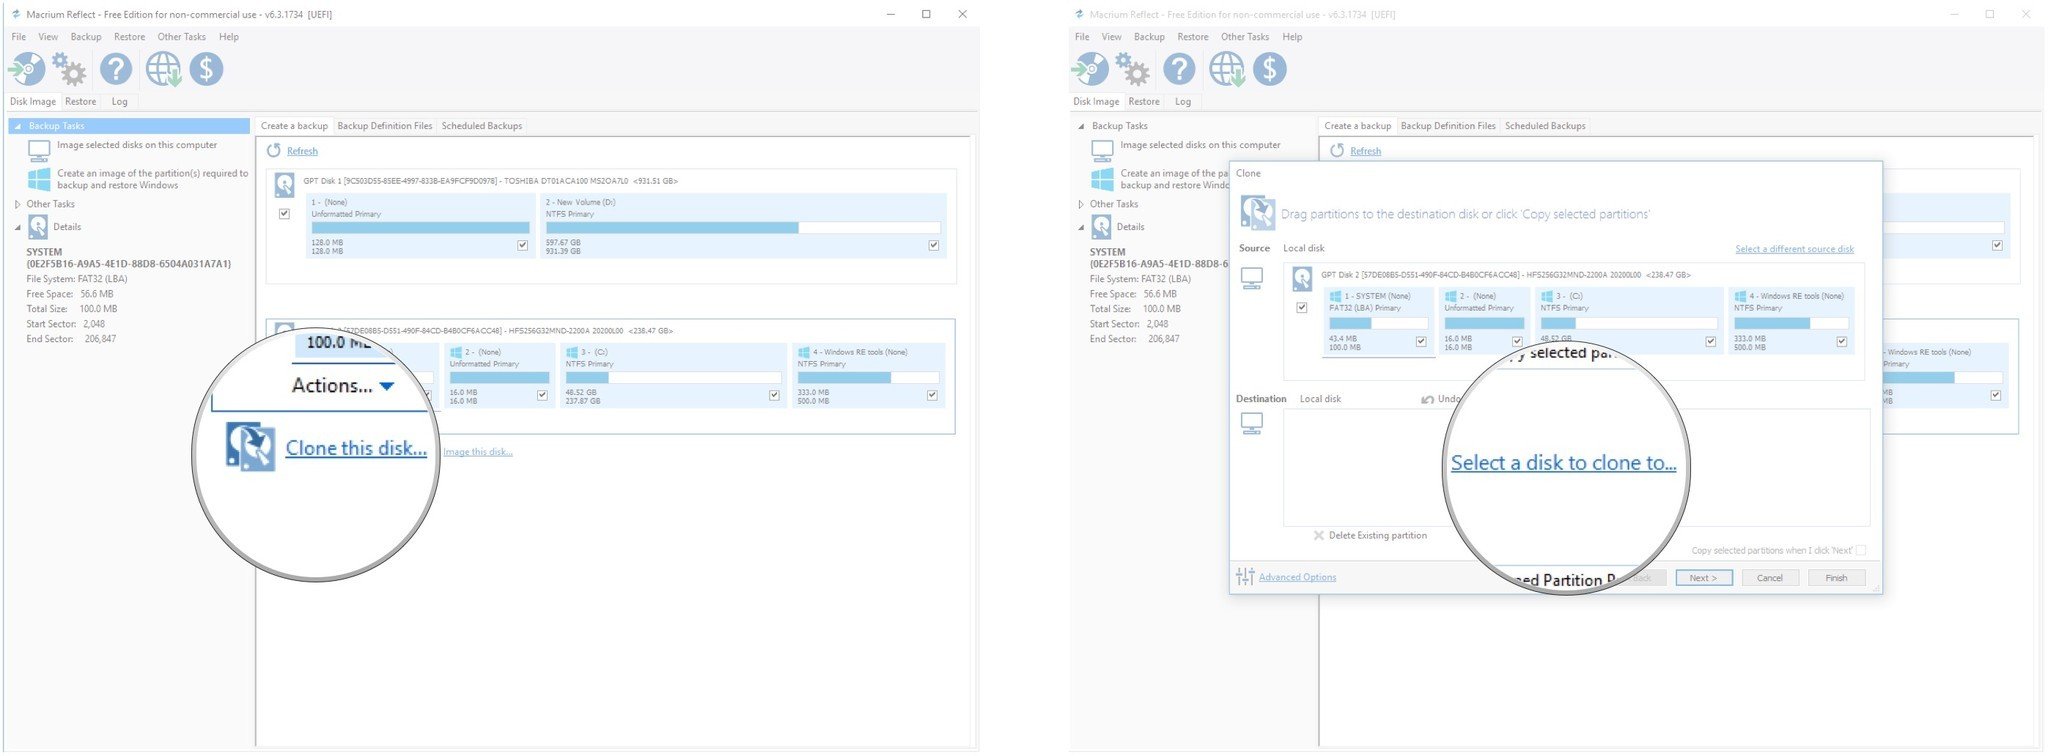
- Click the destination disk to which you want to write a clone — this can be an external hard drive or an internal drive connected by an enclosure. Remember, this process will erase any data stored on the destination drive.
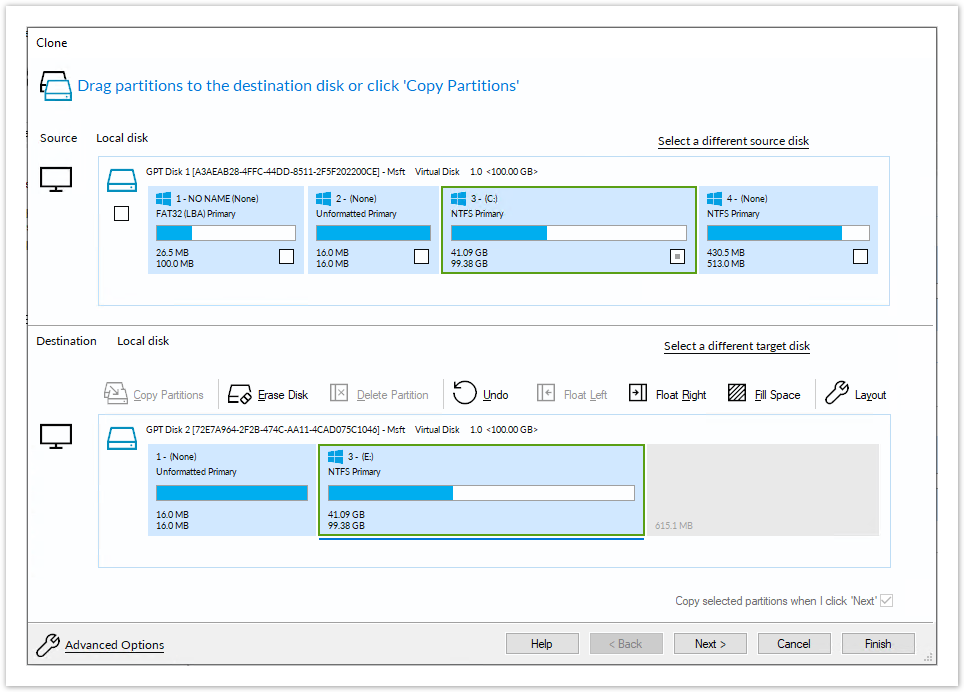
- Click and drag the partitions from the disk you want to clone. Ensure they are in the same order on the external destination drive as they are on the original drive.You may now need to change partition sizes so that they fit a smaller or larger hard drive. In my case, I’m cloning to a drive the same size as the old one, so I don’t need to change anything. If you’re moving to a smaller or larger drive, follow these instructions to resize partitions before proceeding with steps seven to ten.
- Click Next when all partitions have been dragged over to the destination drive.
- Click Next to see a summary of what you’re about to clone. This is a good time to ensure the drive letters are all correct.
- Click Finish.
- Click OK.
Cloning to a smaller or a larger hard drive
Dealing with partitions when moving to a hard drive of a different size requires a couple of extra steps. If you’re moving to a smaller hard drive, you want to ensure your data fits. The first thing you want to do is clean up your original drive so that it has less data than the new drive can hold. If you’re moving to a larger hard drive, you want to expand the primary partition so that it takes up the entirety of the new disk.
Here are the changes you need to make in Macrium Reflect when dealing with hard drives of different size. Insert the following steps in between step 6 and step 7 in the preceding instructions.
- Click the C: partition.
- Click Cloned Partition Properties.
- Type a new number that isn’t smaller than the amount of data you currently have on the partition. Change this value so that the partition grows or shrinks depending on whether you’re moving to a smaller or larger drive.
- Click OK.
You can now continue with steps seven to ten in the preceding section.
How to restore your clone on a new hard drive
If you cloned your original drive to an internal drive using an enclosure, you can simply install the new drive in your PC and turn it on.
If you instead cloned to an external hard drive, you’ll have to go through a couple of extra steps to get Windows working again on the new drive once you have it installed. Make sure your PC is turned off before going through these steps.
- Plug the external drive into the PC that has a new hard drive installed.
- Turn on the PC.
- Enter the BIOS. Note that if your PC employs Secure Boot, you will have to turn it off in the BIOS before you can boot from an external hard drive.
- Access your PC’s boot menu.
- Choose to boot from the external USB drive.
Windows 10 will load as if you hadn’t replaced the drive, so Macrium Reflect is still installed. Launch it and follow the same steps to clone your external drive to the new internal drive.
After completing the clone for a second time, you can restart the PC, remove the USB drive, and let Windows load normally.
Have you used Macrium Reflect or another cloning tool when you swapped out a desktop or laptop hard drive? Tell us about your experience in the comments.
All the latest news, reviews, and guides for Windows and Xbox diehards.
Cale Hunt is formerly a Senior Editor at Windows Central. He focuses mainly on laptop reviews, news, and accessory coverage. He’s been reviewing laptops and accessories full-time since 2016, with hundreds of reviews published for Windows Central. He is an avid PC gamer and multi-platform user, and spends most of his time either tinkering with or writing about tech.
Здравствуйте, уважаемые читатели сайта www.remontcompa! Меня зовут Роман Нахват и в сегодняшей статье мы с вами займёмся клонированием (переносом) операционных систем Windows (на примере Windows 10) c одного жёсткого диска на другой, используя программу Macrium Reflect 7 Home Edition. О данной программе я уже рассказывал в статье «Резервное копирование Windows 7, 8, 8.1, 10 в программе Macrium Reflect 7 Home Edition (на примере Windows 10)», где мы создали резервную копию Windows 10, сохранили её на сетевом диске, а затем восстановили Windows 10 на другой компьютер с жёстким диском, на котором находилось неразмеченное пространство.
Клонирование (перенос) операционной системы Windows может понадобиться пользователю в тех случаях, когда нужно перенести Windows со всеми настройками, драйверами и установленными программами на другой жёсткий диск без переустановки, также данная процерура может быть полезна в случае, когда старый жёсткий диск изношен и для предотвращения потери информации на данном жёстком диске целесообразно выполнить процедуру клонирования.
Клонирование операционных систем Windows 7, 8, 8.1, 10 (на примере Windows 10), используя спасательный носитель восстановления, созданный в программе Macrium Reflect 7 Home Edition
Как таковые, процедуры резервного копирования и клонирования схожи по своему назначению, однако между ними есть отличия. Если во время резервного копирования резервная копия с операционной системой Windows сохраняется в виде отдельного файла, и только потом в случае необходимости из неё восстанавливают ОС на исходный (либо на другой) компьютер, то клонирование подразумевает прямой перенос информации с одного жёсткого диска на другой без создания каких-либо промежуточных файлов (файлов резервных копий).
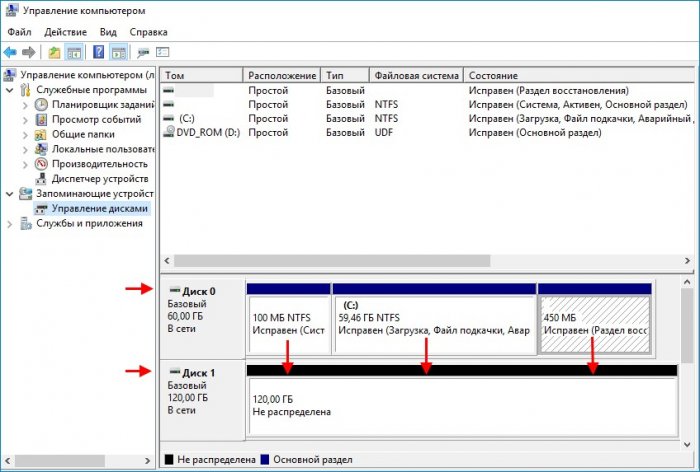
У нас есть компьютер, в котором установлено два жёстких диска: диск 0 (исходный) объёмом 60 GB (на данный диск установлена операционная система Windows 10), и диск 1 (целевой) объёмом 120 GB (на котором не создано ни одного раздела, т.е на нём находится нераспределённое пространство).
Выполним клонирование (перенос) операционной системы Windows 10 c диска 0 на диск 1
Загружаем компьютер с диска или флешки, на который был записан ранее созданный образ восстановления Macrium Reflect 7 Home Edit.

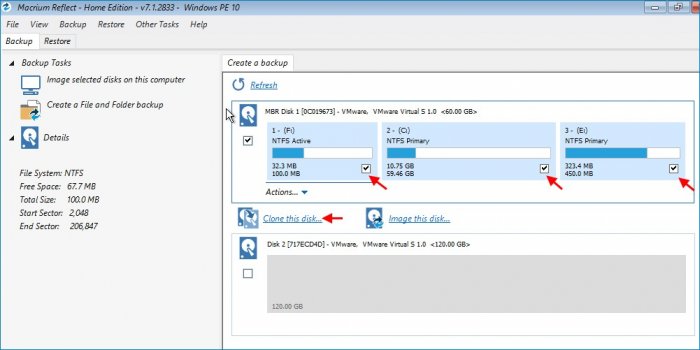
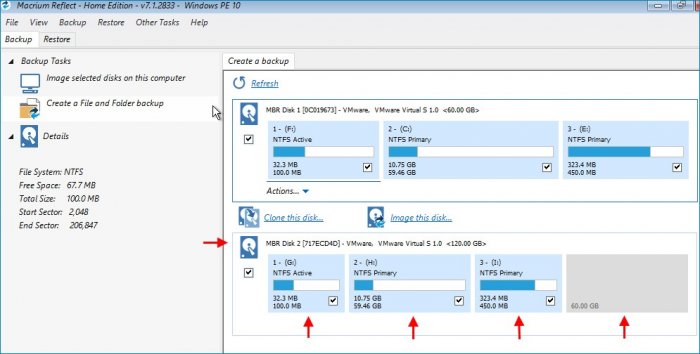
В главном окне переходим на вкладку Backup и видим наши два жёстких диска: исходный диск объемом 60 GB (программа Macrium Reflect определила его как Disk 1), и целевой диск объёмом 120 GB, на который мы и будем переносить операционную систему Windows 10.
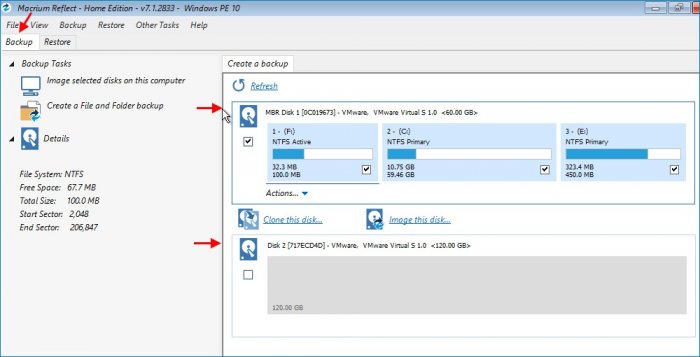
Перенесём на жёсткий диск объёмом 61.95 GB все три раздела, поставив соответствующие галочки напротив каждого и жмём Clone this dis.
Ставим галочки напротив разделов операционной системы Windows 10 исходного жёсткого диска и жмём Clone this disk.
Выбираем целевой диск, т.е тот диск, на который мы будем переносить операционную систему Windows 10. Для этого жмём Select a disk to clone to…
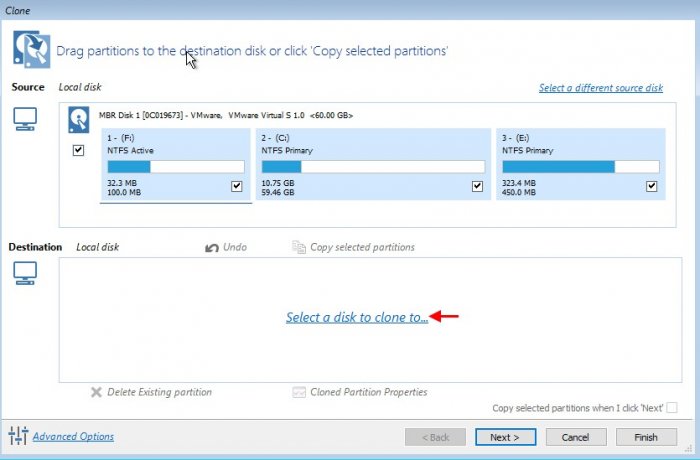
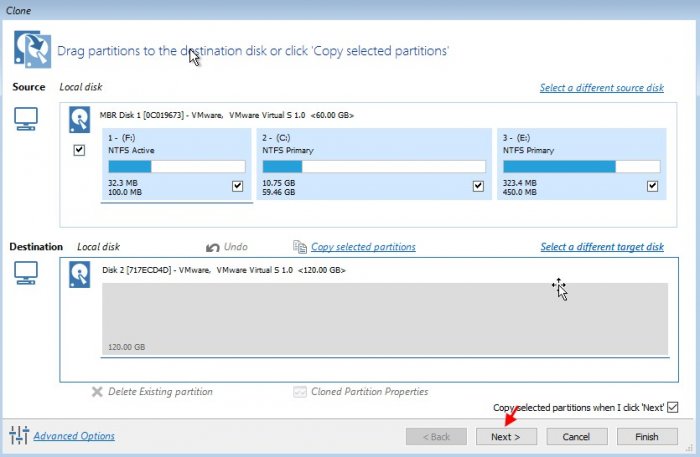
В качестве целевого диска, как мы уже говорили выше, будет выступать диск объёмом 120 GB. Его и выбираем.

Жмём Next.
В результатирующем окне клонирования жмём Finish.
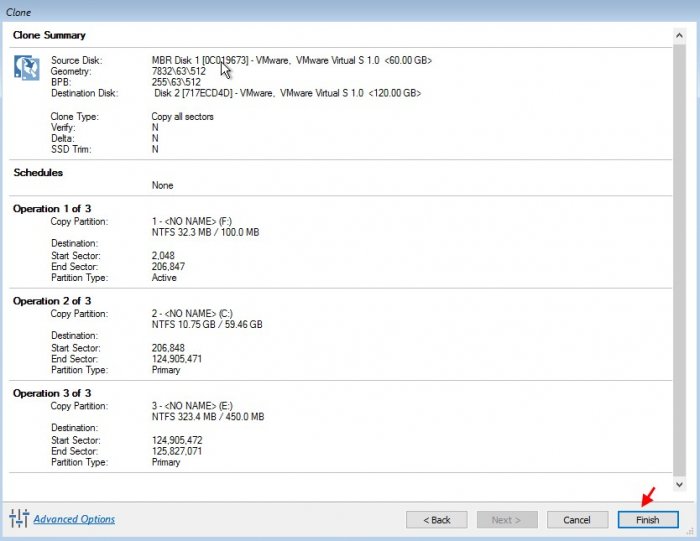
Процесс клонирования (переноса) операционной системы Windows 10.
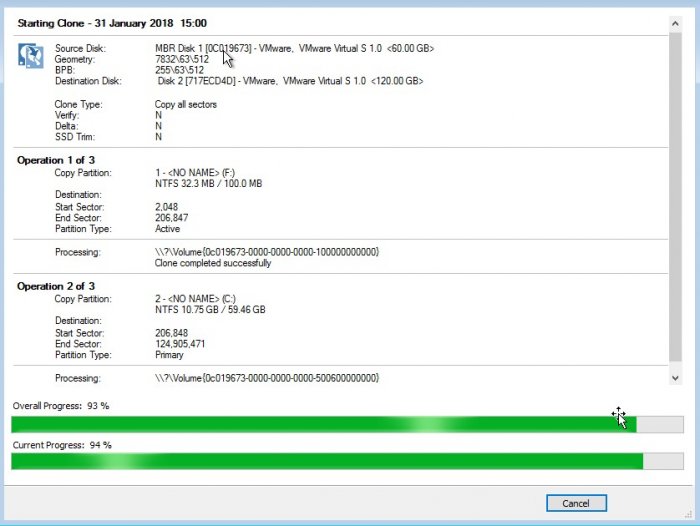
Процесс клонирования Windows 10 успешно завершен. Жмём Close.

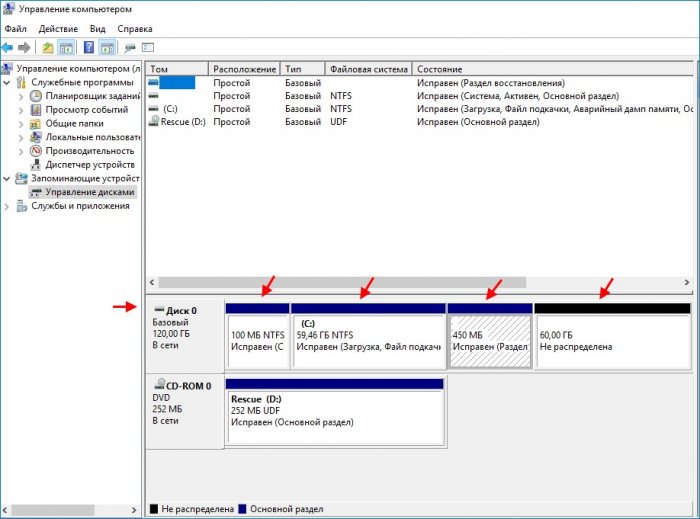
Как видим, разделы операционной системы Windows 10 перенеслись на целевой жесткий диск объёмом 120 GB.
Так как объём исходного жёсткого диска (60 GB), на котором была установлена Windows 10, был меньше объёма целевого жёсткого диска (120 GB), то в результате процесса клонирования на целевом жёстком диске образовалось неразмеченное пространство объёмом 60 GB.
Отключим от компьютера исходный жёсткий диск (объёмом 60 GB), и выполним загрузку с целевого жёсткого диска объёмом 120 GB.
После загрузки компьютера перейдем в Управление дисками, где можем увидеть перенесённые разделы Windows 10 на жёсткий диск объёмом 120 GB, а также нераспределенное пространство объёмом 60 GB.