

www.moulinex.com

|
1 |
|
|
B |
|
|
A |
|
|
7 |
|
|
5 |
|
|
5 |
|
|
4 |
|
|
C |
4 |
|
3 |
|
|
3 |
|
|
2 |
|
|
D |
|
|
E |
|
|
F |
|
|
3 |
4 |
|
2 |
|
|
2 |
|
|
1 |
|
|
1 |
|
|
5 |

|
Slovensko |
23 |
|
|
Српски |
24 |
|
|
Hrvatski |
26 |
|
|
Româneşte |
27 |
|
|
Български |
28 |
|
|
Magyar |
30 |
|
|
Русский |
c. |
32 |
|
Україньска |
c. |
34 |
|
Latviešu |
l. |
36 |
|
Letuviu |
p. |
38 |
|
Eesti |
l. |
40 |
|
43 |
|
Français |
p. |
4 |
|
English |
p. |
5 |
|
Deutsch |
S. |
7 |
|
Nederlands |
p. |
9 |
|
Español |
p. |
10 |
|
Português |
p. |
12 |
|
Italiano |
p. |
13 |
|
Suomi |
s. |
15 |
|
18 |
||
|
Polski |
19 |
|
|
Česky |
21 |
|
|
Slovensky |
22 |
3
|
Sans titre-5 |
3 |
25/01/07, 23:32 |

Description
ARéservoir avec niveau d’eau
BCouvercle de réservoir
CPorte-filtre et support-filtre amovibles
DVerseuse
EInterrupteur avec repère de mise sous tension
FPlaque chauffante
Conseils de sécurité
—Lisez attentivement le mode d’emploi avant la première utilisation de votre appareil : une utilisation non conforme au mode d’emploi dégagerait Moulinex de toute responsabilité.
—Ne laissez pas l’appareil à la portée des enfants sans surveillance. L’utilisation de cet appareil par des jeunes enfants ou des personnes handicapées doit être faite sous surveillance.
—Vérifiez que la tension d’alimentation de votre appareil corresponde bien à celle de votre installation électrique.
—Cet appareil doit être branché sur une prise de courant avec terre.
Toute erreur de branchement annule la garantie.
—Votre appareil est destiné uniquement à un usage domestique et à l’intérieur de la maison.
—Débranchez votre appareil lors d’une absence prolongée et lorsque vous le nettoyez.
—Ne débranchez pas la fiche de la prise en tirant sur le câble.
—N’utilisez pas votre appareil s’il ne fonctionne pas correctement ou s’il a été endommagé. Dans ce cas, adressez-vous à un centre service agréé Moulinex (voir liste dans le livret service).
—Toute intervention autre que le nettoyage et l’entretien usuel par le client doit être effectuée par un centre service agréé Moulinex.
—Ne mettez pas l’appareil, le câble d’alimentation ou la fiche dans l’eau ou tout autre liquide.
—Ne laissez pas pendre le câble d’alimentation à portée de mains des enfants.
—Le câble d’alimentation ne doit jamais être à proximité ou en contact avec les parties chaudes de votre appareil, près d’une source de chaleur ou sur angle vif.
—Si le câble d’alimentation ou la fiche sont endommagés, n’utilisez pas l’appareil. Afin d’éviter tout danger, faites-les obligatoire-
ment remplacer par un centre service agréé Moulinex (voir liste dans le livret service).
—N’utilisez pas la verseuse sur une flamme et sur des plaques de cuisinière électrique.
—Ne remplissez pas d’eau votre appareil s’il est encore chaud (laissez refroidir une dizaine de minutes).
—Ne mettez pas d’eau chaude dans le réservoir.
—Ne faite pas fonctionner la cafetière avec le couvercle du réservoir ouvert.
—Pour votre sécurité, n’utilisez que des accessoires et des pièces détachées Moulinex adaptés à votre appareil.
Mise en service
—Avant une première utilisation, rincez votre cafetière en la faisant fonctionner sans mouture.
Vous pouvez préparer 7 petites ou 5 grandes tasses de café et maintenir votre café au chaud sur la plaque chauffante.
1— Remplissez le réservoir (A) avec de l’eau froide en vous aidant du niveau d’eau.
2— Basculez le porte-filtre (C) et versez votre
3mouture dans un filtre n° 2 positionné dans le support-filtre. Remettez le porte-filtre en place.
—Placez la verseuse avec son couvercle sur la plaque chauffante (F).
—Mettez en marche à l’aide de l’interrupteur
(E). Le témoin lumineux vous indique que votre cafetière est en chauffe.
—Un système stop-gouttes vous permet de retirer la verseuse le temps de vous servir une tasse de café en cours de préparation. Replacez rapidement la verseuse dans la cafetière pour éviter le débordement du porte-filtre. N’oubliez pas de mettre le couvercle sur la verseuse pour assurer la commande stop-gouttes.
Entretien
. Détartrage (toutes les 40 utilisations)
Pour détartrer votre appareil, vous pouvez utiliser :
. soit un sachet de détartrant préalablement dilué dans 2 grandes tasses d’eau.
. soit 2 grandes tasses de vinaigre d’alcool blanc.
—Versez la préparation dans le réservoir et mettez la cafetière en fonctionnement (sans mouture).
4
|
Soléa.BCA1.PM6.5 |
4 |
15/03/06, 12:20 |

—Laissez couler dans la verseuse l’équivalent d’une tasse puis arrêtez.
—Laissez agir la solution détartrante restant dans la cafetière pendant 1 heure.
—Remettez la cafetière en marche pour terminer l’écoulement.
—Rincez la cafetière en la faisant fonctionner 2 ou 3 fois avec de l’eau claire.
Attention : Ne pas laisser le sachet de détartrant entre les mains des enfants.
Description
AWater tank with level indicator
BWater tank lid
CRemovable filter holder and filter support
DJug
ESwitch with power-on indicator light
FHot plate
|
Nettoyage |
Safety recommendations |
|
—Débranchez la cafetière.
—Ne mettez jamais l’appareil dans l’eau ou sous l’eau courante.
—La verseuse (D) peut être nettoyée au lavevaisselle.
—Pour évacuer la mouture usagée, retirez le porte-filtre de la cafetière.
4— Le porte-filtre et le support-filtre sont démon-
5tables pour un nettoyage approfondi ou un passage au lave-vaisselle.
Accessoire
. Verseuse de rechange : A15B01 ou A15B02.
Participons à la protection de l’environnement !
i Votre appareil contient de nombreux matériaux valorisables ou recyclables.
Ü Confiez celui-ci dans un point de collecte ou à défaut dans un centre service agrée pour que son traitement soit effectué.
—Read the instructions for use with care before using your appliance for the first time: any use which does not comply with the instructions will absolve Moulinex from any liability.
—Do not leave the appliance within reach of children unsupervised. The use of this appliance by young children or by disabled persons must always be supervised.
—Check that the power rating of your appliance does in fact match that of your household electrical wiring system.
—The appliance must be connected to an earthed mains socket.
Any error in connection will render the guarantee null and void.
Wiring instructions for U.K and Ireland only :
APPLIANCES WITH FITTED PLUG
Important : For your convenience this appliance is supplied complete with a plug incorporating a 13 amp fuse.
In the event of replacing a fuse in the plug supplied, a 13 amp fuse approved by ASTA to BS1362 must be used.
If the socket outlets are not of the 13A BS 1363 type, and therefore do not accept the plug connected to this appliance, cut off the plug if moulded type or remove the plug if connected by screw terminals.
When the plug is a moulded type and this is cut off from the appliance, the connected wires are a shock hazard. Do not under any circumstances connect a cut off plug into the electrical socket outlet. The cut off plug must be disposed of in a safe manner that prevents any form of connection.
If the fuse cover is detachable, never use the plug with the cover omitted. Replacement covers can be obtained from your service agent.
Fit the appropriate plug according to the instructions in paragraph «Fitting a plug». With
5
|
Soléa.BCA1.PM6.5 |
5 |
15/03/06, 12:20 |

alternative plugs a 15 amp fuse must be fitted either in the plug or adaptor or at the main fuse box.
APPLIANCES WITHOUT FITTED PLUG FITTING A PLUG — IMPORTANT
The wires in the mains lead are coloured in accordance with the following code: GREEN & YELLOW : EARTH
BLUE : NEUTRAL BROWN : LIVE
As the colours in the mains lead of this appliance may not correspond with the coloured markings identifying the terminals in your plug, proceed as follows:
The wire which is coloured GREEN & YELLOW must be connected to the terminal in the plug which is marked with the letter ‘E’ or by the earth symbol  or coloured green or green and yellow. The wire which is coloured BLUE must be connected to the terminal which is marked with the letter ‘N’ or coloured black. The wire which is coloured BROWN must be connected to the terminal which is marked with the letter ‘L’ or coloured red.
This appliance is manufactured to conform to the Low Voltage Electrical Equipment (Safety) Regulations 1989 and is designed to comply with BS 3456. It complies with the requirements of the EEC Directive (89/336/EEC).
—Your appliance is intended solely for domestic, indoor use.
—Unplug your appliance when you are not using it or when you are cleaning it.
—Never unplug the appliance from the socket by pulling on the cable.
—Do not use your appliance if it is not working correctly or if it has been damaged. If this happens, contact an approved Moulinex service centre (see list in service booklet).
—Any intervention other than cleaning and normal maintenance by the customer must be carried out by an approved Moulinex service centre.
—Never put the appliance, the cable or plug in water or any other liquid.
—Do not allow the power cable to hang down within reach of children.
—The power cord must never be allowed to be close to or in contact with the hot parts of your appliance, near to a source of heat or to rest on sharp edges.
—If the power cable or the plug are damaged, do not use the appliance. To avoid any risk, these must be replaced by an approved Moulinex service centre (see list in service booklet).
—Do not use the coffee jug over a flame or on the hotplate of an electric cooker.
—Do not refill your coffee maker with water if it is still hot (allow it to cool down for about 10 minutes).
—Do not put hot water in the tank.
—Do not use the coffee maker with the water tank lid open.
—For your own safety, use only the Moulinex accessories and spare parts which are suitable for your appliance.
Using your appliance
—Before using it for the first time, rinse your coffee maker by running it without putting in any ground coffee.
You can prepare 7 small or 5 large cups of coffee and keep your coffee warm on the hotplate.
1— Fill the water tank (A) with cold water, using the water level indicator as a guide.
2— Swing the filter holder (C) and pour your
3ground coffee into a nº 2 filter positioned in the filter support. Replace the filter holder.
—Place the coffee jug, with its lid on, on the hot plate (F).
—Turn on by pressing the switch (E). The indicator light shows that your coffee maker is now heating up.
. A drip-stop system allows you to remove the coffee jug long enough to pour yourself a cup of coffee during preparation. Quickly replace the coffee jug to prevent the filter holder from overflowing. Remember to keep the lid on the jug to engage the drip-stop system.
Maintenance
. Descaling (every 40 uses)
To descale your appliance, you can use:
. either a sachet of descaler, first diluting it with 2 large cups of water.
. or two cups of white wine vinegar.
—Pour the preparation into the tank and run the coffee maker (without coffee).
—Allow the equivalent of one cupful to run into the jug, then stop.
—Allow the descaling solution remaining in the coffee maker to work for 1 hour.
—Start the coffee maker again in order to complete the run-through.
—Rinse the coffee maker by running it 2 or 3 times with fresh water
6
|
Soléa.BCA1.PM6.5 |
6 |
15/03/06, 12:20 |

Please note: Keep the sachet of descaler out of reach of children.
Cleaning
—Unplug the coffee maker.
—Never place the appliance in water or under running water.
—The coffee jug (D) can be washed in the dishwasher.
—To remove the used coffee grounds, remove the filter holder from the coffee maker.
4 — The filter holder and the filter support can
5
be removed for thorough cleaning or can be washed in the dishwasher.
Accessory
. Replacement jug: A15B01 or A15B02.
Environment protection first !
iYour appliance contains valuable materials which can be recovered or recycled.
Ü Leave it at a collection point.
Beschreibung
AWasserbehälter mit Füllstandsanzeige
BBehälterdeckel
Cherausnehmbarer Filter und Filterträger
DGlaskrug
EEin-/Ausschalter mit Kontrollleuchte
FWarmhalteplatte
Sicherheitshinweise
—Lesen Sie die Gebrauchsanweisung sorgfältig vor der ersten Inbetriebnahme Ihres Gerätes durch: Eine unsachgemäße Verwendung entbindet Moulinex von jeglicher Haftung.
—Überlassen Sie Kindern niemals unbeaufsichtigt das Gerät. Lassen Sie Kinder niemals ohne Aufsicht das Gerät benutzen.
—Überprüfen Sie, ob der Anschlusswert Ihres Gerätes mit der auf Ihrem Stromzähler angegebenen Spannung übereinstimmt.
—Schließen Sie Ihr Gerät unbedingt an eine geerdete Steckdose an.
Bei fehlerhaftem Anschluss erlischt die Garantie.
—Ihr Gerät ist ausschließlich für den Haushaltsgebrauch und nur für den Einsatz in geschlossenen Räumen zugelassen.
—Ziehen Sie den Netzstecker bei längerer Abwesenheit und vor jeder Reinigung des Gerätes.
—Ziehen Sie den Stecker nicht am Kabel aus der Steckdose.
—Benutzen Sie Ihr Gerät nicht, wenn es nicht fehlerfrei funktioniert oder wenn es sichtbare Schäden aufweist. In diesem Fall wenden Sie sich an den Moulinex-Kundendienst (siehe Adressenliste im Serviceheft).
—Jeder andere Eingriff, außer der im Haushalt üblichen Reinigung und Wartung, muss durch den Moulinex-Kundendienst erfolgen.
—Das Gerät, das Kabel oder den Stecker niemals in Wasser oder irgendeine andere Flüssigkeit tauchen.
—Halten Sie das Kabel außer Reichweite von Kindern.
—Lassen Sie das Kabel niemals in die Nähe von oder in Berührung mit den heißen Teilen Ihres Gerätes, einer Wärmequelle oder einer scharfen Kante kommen.
—Benutzen Sie das Gerät nicht, wenn das Kabel oder der Stecker beschädigt sind. Um
7
|
Soléa.BCA1.PM6.5 |
7 |
15/03/06, 12:20 |

jegliche Gefahr zu vermeiden, lassen Sie diese Teile unbedingt vom MoulinexKundendienst austauschen (siehe Liste im Serviceheft).
—Benutzen Sie den Glaskrug nicht auf Gasoder Elektrokochplatten.
—Füllen Sie kein Wasser in das Gerät, wenn es noch heiß ist (lassen Sie es ca. 10 Minuten abkühlen).
—Geben Sie kein heißes Wasser in den Wasserbehälter.
—Nehmen Sie das Gerät nicht mit geöffnetem Behälterdeckel in Betrieb.
—Zu Ihrer eigenen Sicherheit sollten Sie nur Zubehör und Ersatzteile von Moulinex verwenden, die für Ihr Gerät geeignet sind.
—Der Hersteller kann nicht für Schäden verantwortlich gemacht werden, die durch nicht bestimmungsgemäße Verwendung oder falsche Bedienung verursacht werden.
Inbetriebnahme
—Vor dem ersten Gebrauch spülen Sie das Gerät einmal durch, indem Sie einen Brühvorgang ohne Kaffeemehl durchführen.
Sie können 7 kleine oder 5 große Tassen Kaffee zubereiten und Ihren Kaffee auf der Warmhalteplatte warm halten.
1 — Füllen Sie den Wasserbehälter (A) mit kaltem Wasser; beachten Sie dabei die Füllstandsanzeige.
2— Schwenken Sie den Filter (C) heraus und
3setzen Sie einen Papierfilter Nr. 2 in den Filterträger. Füllen Sie dann Kaffeemehl ein. Schwenken Sie den Filter wieder in seine Ausgangsstellung zurück.
—Stellen Sie den Glaskrug mit Deckel auf die Warmhalteplatte (F).
—Schalten Sie das Gerät mit dem Schalter (E) ein. Die Kontrollleuchte zeigt an, dass das Gerät eingeschaltet ist.
—Ein Tropfstopp-System am Filter ermöglicht es Ihnen, den Glaskrug während der Zubereitung kurz zu entnehmen, um vorab eine Tasse Kaffee auszugießen. Stellen Sie den Glaskrug danach sofort wieder auf die Warmhalteplatte zurück, um ein Überlaufen des Filters zu vermeiden. Vergessen Sie nicht, den Deckel des Glaskrugs aufzusetzen, damit das Tropfstopp-System funktioniert.
Pflege
. Entkalken
Um Ihr Gerät zu entkalken, verwenden Sie
. entweder ein Päckchen Entkalker, den Sie zuvor mit zwei großen Tassen Wasser verdünnt haben
. oder zwei große Tassen Essigessenz.
—Gießen Sie die Mischung in den Wasserbehälter und schalten Sie das Gerät ein (ohne Kaffeemehl).
—Lassen Sie die einer Tasse entsprechende Menge in den Glaskrug laufen und schalten dann das Gerät aus.
—Lassen Sie die Entkalkerlösung eine Stunde in dem Gerät wirken.
—Schalten Sie das Gerät wieder ein, damit das restliche Wasser durchlaufen kann.
—Spülen Sie das Gerät gut durch, indem Sie zwei oder drei Brühvorgänge mit klarem Wasser durchführen.
Achtung: Handelsübliche Entkalkungsmittel gehören nicht in Kinderhände!
Reinigung
—Ziehen Sie den Netzstecker.
—Das Gerät niemals in Wasser tauchen oder unter fließendes Wasser halten.
—Der Glaskrug (D) kann in der Spülmaschine gereinigt werden.
—Um gebrauchtes Kaffeemehl zu entfernen, nehmen Sie den Filter aus dem Gerät.
4 — Der Filter und der Filterträger können
5auseinander genommen werden und zwecks gründlicher Reinigung in die Spülmaschine gegeben werden.
Zubehör
. Ersatzkanne: A15B01 oder A15B02
Denken Sie an den Schutz der Umwelt !
i Ihr Gerät enthält wertvolle Rohstoffe, die wieder verwertet werden können.
Ü Geben Sie Ihr Gerät deshalb bitte bei einer Sammelstelle Ihrer Stadt oder Gemeinde ab.
8
|
Soléa.BCA1.PM6.5 |
8 |
15/03/06, 12:20 |

Beschrijving
AReservoir met zichtbaar waterniveau
BDeksel van het reservoir
CUitneembare filterhouder en inzetfilter
DSchenkkan
EAan-/uitschakelaar met controlelampje
FWarmhoudplaat
Veiligheidsvoorschriften
—Lees deze gebruiksaanwijzing zorgvuldig door voordat u het apparaat in gebruik neemt: als het apparaat niet overeenkomstig de gebruiksaanwijzing wordt gebruikt, vervalt de aansprakelijkheid van Moulinex.
—Houd het apparaat buiten bereik van kinderen. Het gebruik van het apparaat door kinderen of gehandicapten dient onder toezicht plaats te vinden.
—Controleer of de netspanning van uw apparaat overeenkomt met de netspanning van het elektriciteitsnet.
—U dient het apparaat aan te sluiten op een stopcontact met randaarde.
Verkeerde aansluiting maakt de garantie ongeldig.
—Het apparaat is uitsluitend bestemd voor huishoudelijk gebruik en mag alleen binnenshuis gebruikt worden.
—Trek bij langdurige afwezigheid en als u het apparaat schoonmaakt de stekker uit het stopcontact.
—Haal de stekker niet uit het stopcontact door aan het aansluitsnoer te trekken.
—Maak geen gebruik van het apparaat als het niet goed functioneert of als het beschadigd is. Neem in zo’n geval contact op met een Moulinex Servicecentrum (zie adres in het serviceboekje).
—Met uitzondering van reiniging en gebruikelijk onderhoud dienen werkzaamheden aan het apparaat te worden uitgevoerd door een Moulinex Servicecentrum.
—Doe het apparaat, noch het aansluitsnoer, noch de stekker in water of in een andere vloeistof.
—Laat het aansluitsnoer niet binnen handbereik van kinderen hangen.
—Laat het aansluitsnoer nooit in aanraking komen met of in de buurt hangen van warme onderdelen van het apparaat of van andere warmtebronnen.
—Laat het aansluitsnoer niet over scherpe hoeken en randen hangen.
—Maak geen gebruik van het apparaat als het aansluitsnoer of de stekker beschadigd is. Om elk risico te vermijden, dient u ze te laten vervangen door een Moulinex Servicecentrum (zie adres in het serviceboekje).
—Zet de schenkkan niet op het vuur, noch op een elektrische kookplaat.
—Schenk geen water in de koffiezetter als deze nog warm is (laat het apparaat 10 minuten afkoelen).
—Schenk geen warm water in het reservoir.
—Stel de koffiezetter niet in werking als het deksel van het reservoir geopend is.
—Voor uw eigen veiligheid, dient u uitsluitend gebruik te maken van Moulinex accessoires en onderdelen, afgestemd op het apparaat.
Ingebruikneming
—Voor het allereerste gebruik spoelt u de koffiezetter om door het apparaat in werking te stellen zonder koffiemaling.
U kunt 7 kleine of 5 grote koppen koffie zetten en uw koffie warmhouden op de warmhoudplaat.
1— Vul het reservoir (A) met koud water; het waterpeilglas geeft aan hoeveel water u inbrengt.
2— Zwenk de filterhouder (C) en schep de
3koffiemaling in een filter n°+2, dat u geplaatst hebt in de inzetfilter. Plaats de filterhouder terug.
—Plaats de schenkkan met deksel op de warmhoudplaat (F).
—Stel de koffiezetter in werking met behulp van de aan-/uitschakelaar (E). Het controlelampje geeft aan dat de koffiezetter in werking is.
—Dankzij de druppelstop kunt u de schenkkan tijdens het koffiezetten even uit de koffiezetter halen om een kopje koffie in te schenken. Plaats de schenkkan snel weer terug in de koffiezetter om overlopen van de filterhouder te voorkomen. Vergeet niet het deksel op de schenkkan te doen, anders werkt de druppelstop niet.
Onderhoud
. Ontkalken (na elke 40 keer koffiezetten)
Om te ontkalken, kunt u gebruiken :
. een zakje ontkalkingsmiddel, opgelost in 2 grote koppen water.
9
|
Soléa.BCA1.PM6.5 |
9 |
15/03/06, 12:20 |

. of 2 grote koppen azijn.
—Schenk het opgeloste ontkalkingsmiddel of de azijn in het reservoir en zet de koffiezetter aan (zonder koffiemaling).
—Laat één kopje doorlopen in de schenkkan en zet vervolgens de koffiezetter uit.
—Laat het restant een uur in de koffiezetter inwerken.
—Zet vervolgens de koffiezetter weer aan om het restant door te laten lopen.
—Spoel de koffiezetter schoon door deze nog 2 à 3 keer in werking te stellen met uitsluitend schoon water.
Let op: houd het zakje ontkalkingsmiddel buiten handbereik van kinderen.
Schoonmaken
—Haal de stekker uit het stopcontact.
—Zet het apparaat nooit in water noch onder de kraan.
—De schenkkan (D) is vaatwasmachinebestendig.
—Voor het verwijderen van de gebruikte koffiemaling, haalt u de filterhouder uit de koffiezetter.
4 — De filterhouder en de inzetfilter zijn
5uitneembaar zodat u ze grondig schoon kunt maken of in de vaatwasmachine kunt zetten.
Accessoire
. Reserveschenkkan : A15B01/A15B02
Wees vriendelijk voor het milieu !
iUw apparaat bevat materialen die geschikt zijnvoor hergebruik.
ÜLever het in bij het milieustation in uw gemeente of bij onze technische dienst.
10
Descripción
ADepósito de agua con indicador del nivel de agua
BTapa del depósito
CPorta filtro y soporte para filtro, extraíbles
DJarra
EInterruptor con indicador de conexión eléctrica
FPlaca de mantenimiento en caliente
Consejos de seguridad
—Lea atentamente las instrucciones de uso antes de utilizar el aparato por primera vez: un uso no conforme con dichas instrucciones liberaría a Moulinex de toda responsabilidad.
—No deje el aparato al alcance de los niños si no hay un adulto vigilando. La utilización de este aparato por niños o personas discapacitadas deberá realizarse bajo vigilancia.
—Compruebe que la tensión de su aparato corresponde con la de su instalación eléctrica.
—Enchufe el aparato únicamente en enchufes con toma de tierra.
Cualquier error de conexión anulará la garantía.
—Este aparato se ha concebido únicamente para un uso doméstico y deberá utilizarse en el interior del hogar.
—Desenchufe el aparato cuando no lo utilice de forma prolongada o cuando lo limpie.
—No enchufe el aparato tirando del cable de alimentación eléctrica.
—No utilice el aparato si no funciona correctamente o si ha resultado dañado. En este caso, diríjase a un centro de servicio técnico concesionario Moulinex (ver la lista en el folleto “Servicio Moulinex”).
—Cualquier manipulación que no sea la limpieza y el mantenimiento habitual del aparato por el usuario debe ser efectuada en un centro de servicio técnico concesionario Moulinex.
—No introduzca el aparato, el cable de alimentación eléctrica ni la clavija en el agua o en cualquier otro tipo de líquido.
—No deje colgando el cable de alimentación eléctrica al alcance de los niños.
—El cable de alimentación eléctrica no deberá estar nunca cerca ni en contacto con las partes calientes del aparato, cerca de una fuente de calor o sobre un ángulo recto.
|
Soléa.BCA1.PM6.5 |
10 |
15/03/06, 12:20 |

—No utilice el aparato si el cable de alimentación eléctrica o la clavija estuvieran dañados. Para evitar cualquier peligro, deberá cambiarlos en un centro de servicio técnico concesionario Moulinex (ver la lista en el folleto “Servicio Moulinex”).
—No ponga la jarra sobre una superficie caliente tal como una encimera y no la utilice encima de una llama.
—No llene de agua el aparato si aún está caliente (deje que se enfríe unos 10 minutos).
—No ponga agua caliente en el depósito.
—No haga funcionar su cafetera con la tapa del depósito abierta.
—Para su propia seguridad, utilice únicamente accesorios y piezas de recambio de Moulinex adaptados a su aparato.
Puesta en marcha
—Antes de utilizar su cafetera por primera vez, aclárela haciéndola funcionar sin café.
Puede preparar 7 tazas pequeñas de café o 5 grandes y mantener su café caliente en la placa de mantenimiento en caliente.
1— Rellene el depósito (A) con agua fría con la ayuda del indicador del nivel de agua.
2— Haga pivotar el porta filtro (C) y vierta café
3molido en el filtro Nº2 colocado en el soporte para filtro. Vuelva a colocar el porta filtro en su sitio.
—Coloque la jarra con su tapa en la placa de mantenimiento en caliente (F).
—Póngala en marcha presionando el interruptor (E). El piloto luminoso le indica que su cafetera se está calentando.
—Un sistema anti goteo le permitirá extraer la jarra para servir el café durante el proceso de preparación. Vuelva a colocar rápidamente la jarra en la placa para evitar que se desborde el porta filtro. No olvide colocar la tapa en la jarra para asegurar el buen funcionamiento del sistema anti goteo.
—Deje salir el agua hacia la jarra la cantidad equivalente a una taza y a continuación párela.
—Deje actuar el producto restante durante una hora.
—Vuelva a poner en marcha la cafetera y finalice el proceso.
—Aclare la cafetera haciendo pasar dos o tres depósitos de agua fría.
Atención: no deje el producto desincrustante al alcance de los niños.
Limpieza
—Desenchufe el aparato.
—No sumerja nunca el aparato en agua o debajo del agua del grifo.
— La jarra (D) se puede lavar en el lavavajillas.
—Para sacar el poso del café, extraiga el porta filtro de la cafetera.
4 — El porta filtro y el soporte del filtro se pueden
5
desmontar para una limpieza en profundidad. Pueden lavarse en el lavavajillas
Accesorios
. Jarra de recambio: A15B01 o A15B02.
¡ ¡ Participe en la conservación del medio ambiente ! !
iSu electrodoméstico contiene materialesrecuperables y/o reciclables.
ÜEntréguelo al final de su vida útil, en un Centro de Recogida Específico o en uno de nuestros Servicios Oficiales Post Venta donde será tratado de forma adecuada.
Mantenimiento
. Desincrustación (cada 40 usos)
Para desincrustar su aparato, puede utilizar:
. Bien un sobre de producto desincrustante diluido en dos tazas grandes de agua.
. O bien dos tazas grandes de vinagre de alcohol blanco.
—Vierta la preparación en el depósito y ponga en marcha la cafetera (sin café).
11
|
Soléa.BCA1.PM6.5 |
11 |
15/03/06, 12:20 |

Descrição
ADepósito com nível de água
BTampa do depósito
CPorta-filtro e suporte filtro amovíveis
DJarra
EInterruptor com indicador de funcionamento
FPlaca aquecedora
Conselhos de segurança
—Leia atentamente o manual de instruções antes da primeira utilização do seu aparelho: uma utilização não conforme liberta a Moulinex de qualquer responsabilidade.
—Mantenha o aparelho fora do alcance das crianças. A utilização deste aparelho por crianças ou pessoas deficientes terá que ser feita sob a vigilância de um adulto.
—Certifique-se que a tensão de alimentação do seu aparelho corresponde à tensão da sua instalação eléctrica.
—Este aparelho tem que estar ligado a uma tomada com ligação à terra.
Qualquer erro de ligação anula a garantia.
—O seu aparelho destina-se unicamente à um uso doméstico e dentro de casa.
—Desligue o seu aparelho durante uma ausência prolongada ou quando efectuar a limpeza.
—Não retire a ficha da tomada puxando pelo cabo de alimentação.
—Não utilize o seu aparelho se não estiver a funcionar correctamente ou se estiver de algum modo danificado. Se tal suceder, dirija-se a um Serviço Após Venda Moulinex (ver folheto Serviços Moulinex).
—Qualquer intervenção que não seja a limpeza terá que ser efectuada por um Serviço Após Venda Moulinex.
—Não coloque o aparelho, o cabo de alimentação ou ficha dentro de água nem qualquer outro líquido.
—Não deixe o cabo de alimentação pendurado, ao alcance das crianças.
—O cabo de alimentação nunca deve estar na proximidade ou em contacto com as partes quentes do aparelho, perto de uma fonte de calor ou num ângulo vivo.
—Se o cabo de alimentação ou a ficha estiverem danificados, não utilize o aparelho. De modo a evitar qualquer tipo de perigo, dirija-se a um Serviço Após Venda
Moulinex para que sejam substituídos. (ver folheto Serviço Moulinex).
—Não coloque a jarra sobre uma chama ou placas eléctricas.
—Não encha o seu aparelho com água se ainda estiver quente (deixe arrefecer cerca de 10 minutos).
—Não ponha água quente no depósito.
—Não ponha a cafeteira a funcionar com a tampa do depósito aberta.
—Para a sua segurança, utilize apenas acessórios ou peças Moulinex adaptados ao seu aparelho.
Funcionamento
—Antes da primeira utilização , ponha a sua cafeteira a funcionar mas, sem café.
Pode preparar 7 chávenas pequenas ou 5 grandes e manter o seu café quente graças à placa aquecedora.
1— Encha o depósito (A) com água fria guiando-se pelo nível de água.
2— Abra o porta-filtro (C) e coloque num filtro
3nº2 (colocado no suporte de filtro) o café. Volte a fechar o porta –filtro.
—Coloque a jarra com a tampa colocada sobre a placa aquecedora (F).
—Para ligar a cafeteira, carregue no interruptor
(E). A luz piloto indica que a cafeteira está a aquecer.
—Um sistema anti-gotas permite retirar a jarra para servir uma chávena de café durante a sua preparação. Coloque rapidamente a jarra na cafeteira para evitar que o portafiltro transborde. Não se esqueça de colocar a tampa na jarra de maneira a garantir o funcionamento do sistema anti-gotas.
Descalcificação
. Descalcificação (após cada 40 utilizações)
Para proceder à descalcificação do seu aparelho, pode utilizar :
. quer uma saqueta de produto descalcificante diluído dentro de duas chávenas grandes de água
. quer duas chávenas grandes de vinagre branco.
—Verta a preparação no depósito e ponha a cafeteira a funcionar (sem café).
—Pare a cafeteira quando obter o equivalente de uma chávena.
12
|
Soléa.BCA1.PM6.5 |
12 |
15/03/06, 12:20 |

—Deixe agir a solução de descalcificação que ficou na cafeteira durante o prazo de uma hora.
—Ponha novamente a cafeteira a funcionar até o depósito ficar vazio.
—Enxagúe a cafeteira fazendo-a funcionar 2 ou 3 vezes com água limpa.
Cuidado : Mantenha a saqueta de produto descalcificante fora do alcance das crianças.
Descrizione
ASerbatoio con livello dell’acqua
BCoperchio del serbatoio
CPorta-filtro e supporto-filtro mobile
DCaraffa
EInterruttore con spia di accensione
FPiastra riscaldante
|
Limpeza |
Consigli di sicurezza |
|
—Desligue a cafeteira retirando a ficha da tomada.
—Nunca ponha o aparelho dentro da água ou debaixo da torneira.
—A jarra (D) pode ir no lava-loiça.
—Para evacuar o café utilizado, retire o portafiltro da cafeteira.
4 — O porta-filtro e o suporte-filtro são
5desmontáveis para permitir uma limpeza perfeita (manual ou lava-loiça).
Acessório
. Jarra : A15B01 / A15B02
Protecção do ambiente em primeiro lugar!
iO seu produto contém materiais que podem ser recuperados ou reciclados.
ÜEntregue-o num ponto de recolha para possibilitar o seu tratamento.
—Precedentemente al primo utilizzo, leggete con molta attenzione le istruzioni d’uso. Ogni uso non conforme alle norme prescritte, manleverà Moulinex da ogni responsabilità.
—Non lasciate l’apparecchio a portata di mano dei bambini. L’utilizzo di questo apparecchio da parte di bambini o di persone portatrici di handicap, deve avvenire sotto sorveglianza di persone adulte.
—Verificate che la tensione di alimentazione del vostro apparecchio, corrisponda a quella della vostra installazione elettrica.
—Questo apparecchio deve essere collegato ad una presa di corrente con terra.
Qualsiasi errore di collegamento elettrico, annulla il diritto alla garanzia.
—Il vostro apparecchio è destinato unicamente ad un uso domestico, all’interno della vostra abitazione.
—Prima di un’operazione di pulizia o per una lunga assenza, scollegate sempre l’apparecchio.
—Non scollegate mai l’apparecchio dalla presa di corrente, tirando il cavo elettrico.
—Se l’apparecchio risulta danneggiato o mal funzionante, non utilizzatelo. In questi casi indirizzatevi presso un centro di assistenza tecnica autorizzato il cui elenco potete trovare sulle Pagine Gialle Casa della vostra città o al n° verde 800 013 044.-
—Qualsiasi intervento al di fuori della normale manutenzione o pulizia, deve essere effettuato da un centro di assistenza autorizzato Moulinex.
—Non mettete l’apparecchio, il cavo o la spina nell’acqua o in altro liquido.
—Non lasciate che il cavo penda alla portata di mano dei bambini.
—Il cavo elettrico non deve mai trovarsi in prossimità o a contatto delle parti calde dell’apparecchio, vicino ad una fonte di calore o pressato in un angolo vivo.
13
|
Soléa.BCA1.PM6.5 |
13 |
15/03/06, 12:20 |

—Se il cavo elettrico o la spina risultano danneggiati, non usate l’apparecchio ed al fine di evitare ogni possibile rischio fatelo obbligatoriamente sostituire da un tecnico di un centro assistenza autorizzato Moulinex il cui elenco potete trovare sulle Pagine Gialle Casa della vostra città o al n° verde 800 013 044.-
—Non mettete mai la caraffa sul fuoco o sulle piastre elettriche della cucina.
—Non riempite d’ acqua l’apparecchio quando è ancora caldo (lasciatelo sempre raffreddare per 10/15 minuti).
—Non riempite mai il serbatoio con acqua calda.
—Non fate funzionare mai la caffettiera con il coperchio del serbatoio aperto.
—Per una totale sicurezza, utilizzate solo accessori e pezzi di ricambio originali Moulinex, gli unici veramente adatti al vostro apparecchio.
Avviamento
—Prima di utilizzarla, lavate la caffettiera facendola funzionare con la sola acqua, senza miscela di caffè.
Potete preparare 7 tazzine o 5 tazze di caffè e mantenerlo al caldo sulla piastra riscaldante.
1— Riempite il serbatoio (A) con acqua fredda verificando il livello dell’acqua.
2— Aprite il porta-filtro (C), versate il caffè
3macinato in un filtro n° 2 posto nel supportofiltro. Riportate il porta-filtro nella sua posizione originale.
—Mettete la caraffa con il suo coperchio sulla piastra (F).
—Avviate la macchina azionando l’interruttore
(E). La spia luminosa accesa vi indica che la caffettiera è in funzione.
—Un sistema ferma-goccia vi consente di ritirare la caraffa, in corso di preparazione, per servirvi una tazzza di caffè. Rimettetela rapidamente al suo posto nella caffettiera, onde evitare che il portafiltro trabocchi. Non dimenticare di posizionare il coperchio sulla caraffa, per assicurare la funzione del fermagoccia.
Manutenzione
. sia una bustina di decalcificante, precedentemente diluita in 2 tazze grandi di acqua,
. sia 2 tazze grandi di aceto bianco.
—Versate il preparato nel serbatoio e mettete la caffettiera in funzione (senza miscela).
—Lasciate scendere nella caraffa l’equivalente di una tazza, quindi fermate il funzionamento.
—Lasciate agire la soluzione restante, per circa 1 ora.
—Passato questo tempo, rimettete in funzione la caffettiera per il totale passaggio della soluzione.
—Sciacquate l’apparecchio, facendolo funzionare 2/3 volte con acqua pulita.
Attenzione : Non lasciate la bustina di decalcificante in mano ai bambini.
Pulizia
—Scollegate la caffettiera dalla rete elettrica.
—Non mettete l’apparecchio dentro l’acqua o sotto l’acqua corrente.
—La caraffa (D) può essere messa in lavastoviglie.
—Per eliminare la miscela utilizzata, estraete il porta-filtro dalla caffettiera.
4— Il porta-filtro ed il suo supporto sono smontabili per una pulizia più approfondita
5o un lavaggio in lavastoviglie.
Accessorio
. Caraffa di ricambio : A15B01 o A15B02.
Partecipiamo alla protezione dell’ambiente !
iIl vostro apparecchio è composto da diversi materiali che possono essere riciclati.
ÜLasciatelo in un punto di raccolta o presso un Centro Assistenza Autorizzato.
. Decalcificazione (ogni 40 utilizzi)
Per decalcificare il vostro apparecchio, potete utilizzare :
14
|
Soléa.BCA1.PM6.5 |
14 |
15/03/06, 12:20 |
 Loading…
View the manual for the Moulinex Little Solea BCA141 here, for free. This manual comes under the category coffee makers and has been rated by 1 people with an average of a 9.6. This manual is available in the following languages: English. Do you have a question about the Moulinex Little Solea BCA141 or do you need help? Ask your question here
Can’t find the answer to your question in the manual? You may find the answer to your question in the FAQs about the Moulinex Little Solea BCA141 below.
How often should I descale my coffee maker?
How often a coffee machine needs to be descaled depends on how often it is used and the hardness of the water. If hard water is used it is recommended to descale once a month, if soft water is used once a quarter is sufficient.
What is the best way to descale my coffee maker?
To descale the coffee maker, it is recommended to use a liquid descaling agent which is labelled as suitable for coffee machines.
What is espresso?
Espresso is a small amount of concentrated coffee.
How long can I keep coffee beans?
The best-before date can be found on the packaging of the coffee beans. This best-before date applies as long as the bag is closed.
What is the best way to store coffee?
It is recommended to store coffee in an airtight and clean container.
What does the grind say about the taste of the coffee?
How the coffee beans are ground strongly influences the taste of the coffee. If the coffee beans are very finely ground you will have a stronger taste and if the grind is coarser you will have a milder taste.
How do I set the brewing time on my Moulinex Little Solea BCA141 coffee maker?
To set the brewing time, press the «Program» button on the control panel. Use the «+» and «-» buttons to adjust the hours and minutes until you reach your desired brewing time. Press the «Program» button again to save the setting.
How do I clean the water tank of my Moulinex Little Solea BCA141 coffee maker?
To clean the water tank, firstly unplug the coffee maker and allow it to cool down. Remove the water tank from the coffee maker and rinse it thoroughly with warm soapy water. Make sure to remove any coffee residue or buildup. Rinse the tank again with clean water and let it air dry before reattaching it to the coffee maker.
How do I adjust the coffee strength on my Moulinex Little Solea BCA141 coffee maker?
To adjust the coffee strength, press the «Aroma» button on the control panel. Each press of the button will cycle through different strength levels, indicated by the number of cups displayed on the screen. Select the desired strength level by stopping at your preferred cup size. The higher the number of cups, the stronger the coffee.
Why is my Moulinex Little Solea BCA141 coffee maker not brewing properly?
If your coffee maker is not brewing properly, it could be due to a clogged filter or mineral buildup. Ensure that the coffee filter is properly inserted, and check if it requires cleaning or replacement. Additionally, descaling the coffee maker regularly using a descaling solution will help remove mineral deposits that could affect the brewing process.
How can I adjust the water temperature on my Moulinex Little Solea BCA141 coffee maker?
The Moulinex Little Solea BCA141 coffee maker does not have a user-adjustable water temperature setting. The appliance is designed to brew coffee at the optimal temperature for flavor extraction. However, to enhance the temperature consistency, you can ensure that the coffee maker is properly warmed up before use by running a cycle without coffee grounds or by preheating your cups with hot water.
Is the manual of the Moulinex Little Solea BCA141 available in English?
Yes, the manual of the Moulinex Little Solea BCA141 is available in English .
Is your question not listed? Ask your question here
Описание порядок работы меры безопасности в инструкции по эксплуатации Moulinex LITTLE SOLEA BCA1L1
Резервуар со шкалой уровня воды
Крышка резервуара
Съемный держатель и съемная опора фильтра
Колба
Переключатель с указателем включения под напряжение
Мармит
Перед включением прибора внимательно прочтите инструкцию: фирма «Мулинекс» не несет никакой ответственности при нарушении правил использования прибора.
Не оставляйте прибор без присмотра в местах доступных для детей Дети и инвалиды могут пользоваться прибором только под контролем.
Убедитесь что рабочее напряжение прибора соответствует напряжению электросети.
Данный прибор должен включаться в сетевую розетку с заземлением.
Любая ошибка при подключении прибора аннулирует действие гарантии. Данный прибор предназначен исключительно для бытового использования в помещении.
При длительных перерывах в работе и перед выполнением чистки обязательно отключайте прибор от сети.
Не тяните за шнур питания чтобы выключить прибор.
Запрещается использовать неисправный или поврежденный прибор В этом случае следует обратиться в технический центр фирмы «Мулинекс» (см перечень приведенный в инструкции).
Любая техническая операция с прибором за исключением чистки или текущего обслуживания выполняется в техническом центре фирмы «Мулинекс».
Запрещается погружать прибор шнур питания и штепсель в воду или другую жидкость.
Следите чтобы дети не могли дотянуться до висящего шнура питания прибора.
Следите чтобы шнур питания не находился вблизи или в контакте с нагревающимися поверхностями работающего прибора поблизости от источников тепла или острых углов.
Запрещается использовать прибор с поврежденным шнуром питания или штепселем По соображениям безопасности их замена выполняется только в техническом центре фирмы «Мулинекс» (см перечень приведенный в инструкции).
Запрещается ставить колбу на газовую или электрическую горелку.
Не заливайте воду в нагретый прибор (подождите примерно десять минут пока он остынет).
Запрещается заливать в резервуар горячую воду.
Перед включением прибора обязательно закройте резервуар крышкой.
В целях вашей собственной безопасности используйте только принадлежности и запасные части фирмы «Мулинекс» предназначенные для данного прибора.
Перед первым использованием промойте кофеварку выполнив рабочий цикл без загрузки молотого кофе.
С помощью вашего прибора вы можете сварить 7 маленьких или 5 больших чашек кофе а также поддерживать кофе горячим на мармите. Заполните резервуар (A) холодной водой соблюдая указания шкалы уровня воды.
Отведите в сторону держатель фильтра (C) вставьте в держатель фильтра фильтр № 2 загрузите в него молотый кофе и установите держатель на место.
Поставьте закрытую крышкой колбу на мармит (F).
С помощью переключателя (E) включите прибор в работу Световой индикатор загорается указывая что прибор нагревается.
Кофеварка снабжена системой удержания капель которая позволяет в ходе работы прибора снять колбу с мармита чтобы налить чашку кофе Сразу же поставьте колбу на место во избежание переполнения водой держатель фильтра Чтобы система удержания капель работала правильно не забудьте закрыть колбу крышкой.
Описание
Порядок работы
Меры безопасности
Little Solea BCA1 russe 6/11/00 16:03 Page 1
-
Инструкции по эксплуатации
1

MOULINEX LITTLE SOLEA BCA1L1 инструкция по эксплуатации
(2 страницы)
- Языки:Русский
-
Тип:
PDF -
Размер:
19.46 KB -
Описание:
Кофеварка
Просмотр
На NoDevice можно скачать инструкцию по эксплуатации для MOULINEX LITTLE SOLEA BCA1L1. Руководство пользователя необходимо для ознакомления с правилами установки и эксплуатации MOULINEX LITTLE SOLEA BCA1L1. Инструкции по использованию помогут правильно настроить MOULINEX LITTLE SOLEA BCA1L1, исправить ошибки и выявить неполадки.
A Резервуар со шкалой уровня воды
B Крышка резервуара
C Съемный держатель и съемная
опора фильтра
D Колба
E Переключатель с указателем
включения под напряжение
F Мармит
— Перед включением прибора вниматель-
но прочтите инструкцию: фирма «Мули-
некс» не несет никакой ответственности
при нарушении правил использования
прибора.
— Не оставляйте прибор без присмот-
ра в местах, доступных для детей.
Дети и инвалиды могут пользоваться
прибором только под контролем.
— Убедитесь, что рабочее напряжение
прибора соответствует напряжению
электросети.
— Данный прибор должен включаться в
сетевую розетку с заземлением.
Любая ошибка при подключении при-
бора аннулирует действие гарантии.
— Данный прибор предназначен исключи-
тельно для бытового использования в
помещении.
— При длительных перерывах в работе и
перед выполнением чистки обязатель-
но отключайте прибор от сети.
— Не тяните за шнур питания, чтобы
выключить прибор.
— Запрещается использовать неисправ—
ный или поврежденный прибор. В этом
случае следует обратиться в техничес-
кий центр фирмы «Мулинекс» (см. пере-
чень, приведенный в инструкции).
— Любая техническая операция с прибо-
ром, за исключением чистки или теку-
щего обслуживания, выполняется в тех-
ническом центре фирмы «Мулинекс».
— Запрещается погружать прибор, шнур
питания и штепсель в воду или другую
жидкость.
— Следите, чтобы дети не могли дотянуть-
ся до висящего шнура питания прибора.
— Следите, чтобы шнур питания не нахо-
дился вблизи или в контакте с нагрева-
ющимися поверхностями работающего
прибора, поблизости от источников
тепла или острых углов.
— Запрещается использовать прибор с по-
врежденным шнуром питания или штеп-
селем. По соображениям безопасности
их замена выполняется только в техниче-
ском центре фирмы «Мулинекс» (см. пе-
речень, приведенный в инструкции).
— Запрещается ставить колбу на газовую
или электрическую горелку.
— Не заливайте воду в нагретый прибор
(подождите примерно десять минут, по-
ка он остынет).
— Запрещается заливать в резервуар го-
рячую воду.
— Перед включением прибора обязатель-
но закройте резервуар крышкой.
— В целях вашей собственной безопасно-
сти используйте только принадлежнос-
ти и запасные части фирмы «Мули-
некс», предназначенные для данного
прибора.
— Перед первым использованием про-
мойте кофеварку, выполнив рабочий
цикл без загрузки молотого кофе.
С помощью вашего прибора вы можете
сварить 7 маленьких или 5 больших чашек
кофе, а также поддерживать кофе горя-
чим на мармите.
— Заполните резервуар (A) холодной во-
дой, соблюдая указания шкалы уровня
воды.
— Отведите в сторону держатель фильтра
(C), вставьте в держатель фильтра
фильтр № 2, загрузите в него молотый
кофе и установите держатель на место.
— Поставьте закрытую крышкой колбу на
мармит (F).
— С помощью переключателя (E) включи-
те прибор в работу. Световой индика-
тор загорается, указывая, что прибор
нагревается.
— Кофеварка снабжена системой удержа-
ния капель, которая позволяет в ходе
работы прибора снять колбу с мармита,
чтобы налить чашку кофе. Сразу же по-
ставьте колбу на место во избежание
переполнения водой держатель фильт-
ра. Чтобы система удержания капель
работала правильно, не забудьте за-
крыть колбу крышкой.
1
Описание
Порядок работы
Меры безопасности
1
2
3
Little Solea BCA1 russe 6/11/00 16:03 Page 1
-
Home
>
-
Instructions
>
-
Beverages
>
-
Filter
>

User manual and frequently asked questions LITTLE SOLEA
Reference : BCA1L1
Voir les documents liés
Voir les questions les plus fr�quentes
FAQ
Never put your jug or insulated pot in the microwave oven, dishwasher or on a hotplate.
You can use a paper filter or permanent filter (nylon or metal). These two types of filter are sold in stores.
Operate your filter coffee maker for the first time without any coffee and with the equivalent of one jug of water to rinse it.
The hotplate is used to keep the coffee at the required temperature while leaving the coffee maker switched on. This function is available only with coffee makers that come with a glass pot.
Tap water (normal household potable water) is perfectly OK as long as it is free of odors that might alter the taste of the beverage. Bottled water is also OK.
Do not use refrigerated or warm water as this might impact the temperature of the beverage.
Use always fresh water and replace the water if system has not been used for more than 2 days.
For cold beverages, use water at ambient temperature, never refrigerated water, and place two or more ice cubes (20g per ice cube) in the cup.
To be noticed that water hardness is the first reason of machine calcification and so it is recommended to descale the machine frequently (every 3months or less according to water hardness).
Depending your appliance model, you can buy it from an after sales service or from the «Accessories» section of the website.
Scale deposits naturally form in your coffee maker. Regular descaling helps protect your coffee maker and ensures it a longer life. It will also help maintain a quality of coffee that remains constant over time.
Use the descaling kit or some white vinegar:
• Use some descaling solution diluted in half a litre of water or use 25cl of white vinegar in half a litre of water.
• Pour the solution into the water tank (without coffee),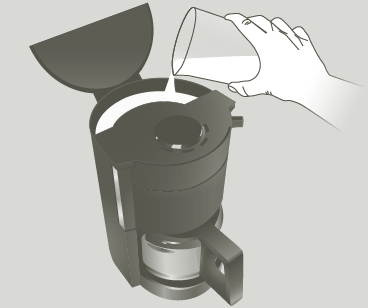
• Start the cycle (without any coffee). After 2 minutes, stop the cycle manually. Leave the coffee maker for an hour,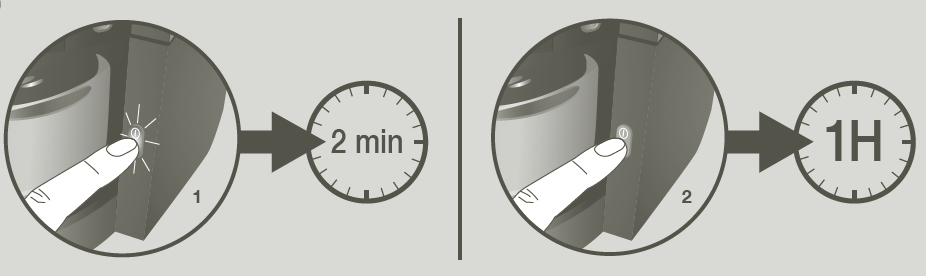
• Restart the coffee maker to finish the cycle,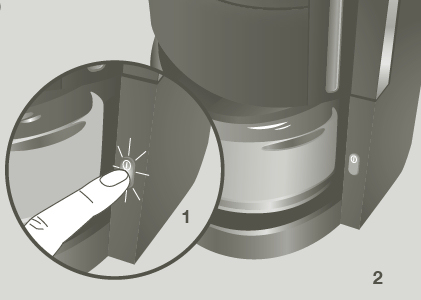
• To rinse the machine, run 2 cycles with water but without coffee.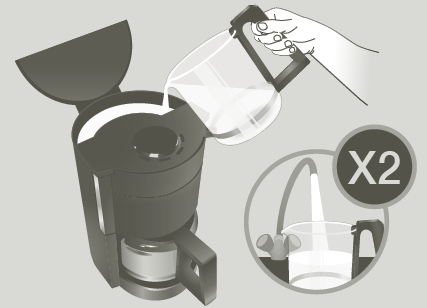
Repeat the complete descaling operation, if necessary.
How often you descale your coffee maker depends on the hardness of the water and on how often you use your coffee maker. The following are tell-tell signs of scaling: the coffee making cycle takes longer, the appliance produces lots of steam, makes much more noise at the end of the cycle or stops during the cycle, this means that scale has built up in your coffee maker. You should descale your coffee maker between every 20 to 40 cycles or once a month depending on the hardness of the water.
Insulated carafes should never be put into the dishwasher!
A plastic insulated carafe should be rinsed under hot water immediately after use.
Never clean the carafe with a dishwashing brush or any other object as this may create hairline cracks that can cause the glass to implode. A brushed steel insulated carafe can easily be cleaned with a dishwashing brush or similar object, even inside.
The glass coffee pot and the filter receptacle must be washed in the upper rack of the dishwasher.
• The quantity of ground coffee is too large. We recommend using one measure of coffee (7 grams) per mug.
• The ground coffee is too fine (‘Espresso’ type ground coffee).
• If you use a permanent filter, do not use a paper filter as well.
• Certain types of paper filter (to make full-bodied coffees) can prolong the time in which it takes for the water to pass through the filter and ultimately cause the water to overflow.
The coffee maker is lined with scale. You should descale it.
In the event of a power cut, it may be necessary to press the On/Off button again.
On models with a timer, the clock must be programmed.
Clean the anti-drip valve of the filter holder under running water, activating it manually.
After following the instructions in the user manual for starting the appliance, make sure that your electrical socket is working by plugging another appliance. If it still does not work, do not try to dismantle or repair the appliance yourself, instead, take it to an approved repair centre
Do not use your appliance. To avoid any danger, have it replaced by an approved repair centre.
This is entirely dependent on taste: you can buy pre-ground coffee for filter machines from supermarkets in a variety of strengths and flavours, you can grind your own coffee beans or you can buy beans at a coffee shop and ask for them to be ground to filter consistency.
Always keep ground coffee in an airtight container or seal the pack with a bag clip. Keep the container in the fridge to prolong freshness.
Medium to fine ground (but not too fine). You can also ask for «Espresso ground».
The inner circuits scale up, water doesn’t flow through properly, and flows much slower.
The warranty excludes failures due to a lack of regular descaling.
Your appliance contains valuable materials which can be recovered or recycled. Leave it at a local civic waste collection point.
If you believe that one part is missing, please call Consumer Services Center and we will help you find a suitable solution.
Please go to the “Accessories” section of the website to easily find whatever you need for your product.
Find more detailed information in the Guarantee section of this website.
See the services