
Страницы и текст этой инструкции
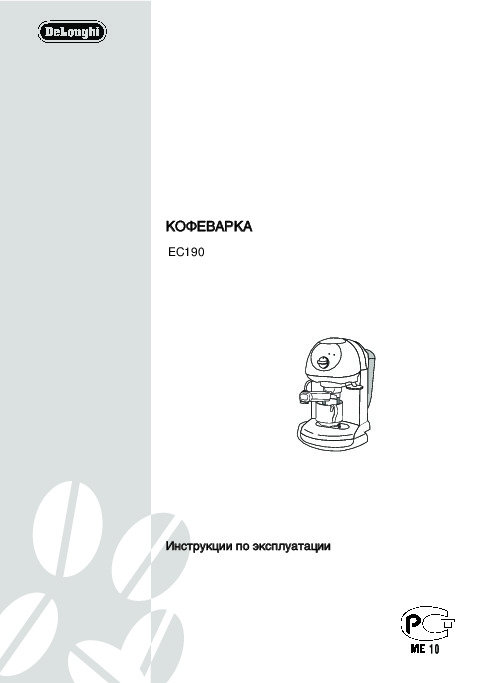 Инструкция кофеварки DeLonghi EC 190
 Информация отображена на картинке
 Информация отображена на картинке
 Информация отображена на картинке
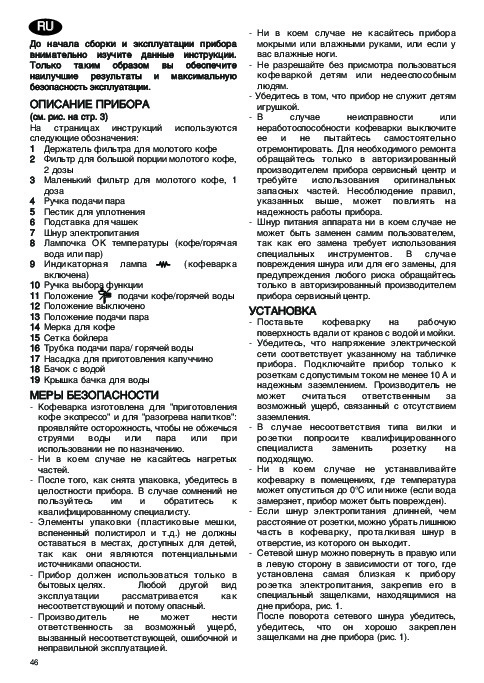 Информация отображена на картинке
Как использовать наш сайт инструкций OnlineManuals.ru
Наша цель состоит в том, чтобы предоставить вам быстрый доступ к содержанию инструкции для кофеварки DeLonghi EC 190.
С помощью онлайн просмотра, Вы можете быстро просмотреть содержимое инструкции и найти решение проблемы с кофеварки DeLonghi EC 190.
Для Вашего удобства
Если листать руководство пользователя кофеварки DeLonghi EC 190 прямо на сайте, не очень удобно для Вас, есть два возможных решения:
• Просмотр в полноэкранном режиме — легко просмотреть руководство пользователя (без загрузки его на свой компьютер), Вы можете использовать режим полноэкранного просмотра.
Для просмотра инструкции пользователя кофеварки DeLonghi EC 190 на полном экране, используйте кнопку «Открыть в Pdf-viewer».
• Загрузка на компьютер — Вы можете также скачать Инструкция кофеварки DeLonghi EC 190 на свой компьютер и сохранить его в файлах.
Многие люди предпочитают читать документы не на экране, а в печатной версии.
Возможность печати руководства пользователя также была предусмотрена на нашем сайте,
и вы можете использовать ее, нажав на иконку «печать» в Pdf-viewer.
Нет необходимости печатать все руководство кофеварки DeLonghi EC 190, можно выбрать только нужные страницы инструкции.
ääÄÄää èèêêààÉÉééííééÇÇààííúú ääééîîÖÖ ùùääëëèèêêÖÖëëëëéé
ääÄÄää èèêêààÉÉééííééÇÇààííúú ùùääëëèèêêÖÖëëëëéé,,
ààëëèèééããúúááììüü ÑÑÖÖêêÜÜÄÄííÖÖããúú îîààããúúííêêÄÄ ÑÑããüü
ççÄÄèèééããççÖÖççààÖÖ ÅÅÄÄóóääÄÄ ÇÇééÑÑééââ
ååééããééííééÉÉéé ääééîîÖÖ
ëÌËÏËÚ Í˚¯ÍÛ Ò ·‡˜Í‡ Ò ‚Ó‰ÓÈ, ËÒ. 2, Á‡ÚÂÏ
1.èÓÒΠԉ‚‡ËÚÂθÌÓ„Ó ‡Áӄ‚‡
ËÁ‚ÎÂÍËÚ ·‡˜ÓÍ, ÔÓÚflÌÛ‚ Â„Ó ‚‚Âı, ËÒ. 3.
ÍÓÙ‚‡ÍË, Í‡Í ÓÔËÒ‡ÌÓ ‚ Ô‰˚‰Û˘ÂÏ
ç‡ÔÓÎÌËÚ ·‡˜ÓÍ Ò‚ÂÊÂÈ Ë ˜ËÒÚÓÈ ‚Ó‰ÓÈ, ÌÂ
Ô‡‡„‡ÙÂ, ÂÒÎË ÌÛÊÌÓ ÔË„ÓÚÓ‚ËÚ¸ ÚÓθÍÓ
Ô‚˚¯‡fl ̇‰ÔËÒË åÄï, ËÒ. 4.
Ó‰ÌÛ ˜‡¯ÍÛ ÍÓÙÂ, ‚ ‰ÂʇÚÂθ ÛÒÚ‡ÌÓ‚ËÚÂ
ìÒÚ‡ÌÓ‚ËÚ ·‡˜ÓÍ Ì‡ ÏÂÒÚÓ ‚ ÍÓÙ‚‡ÍÛ, Ò΄͇
ÙËÎ¸Ú Ì‡ Ó‰ÌÛ ˜‡¯ÍÛ (ÏÂ̸¯ËÈ ËÁ ‰‚Ûı
̇ʇ‚ ̇ Ì„Ó, ‰Îfl ÚÓ„Ó, ˜ÚÓ·˚ ÓÚÍ˚Ú¸ Í·ԇÌ,
ÔË·„‡ÂÏ˚ı Í ÍÓÙ‚‡ÍÂ), ۷‰˂¯ËÒ¸, ˜ÚÓ
̇ıÓ‰fl˘ËÈÒfl ̇ ‰Ì ·‡˜Í‡.
‚˚ÒÚÛÔ Ì‡ ÙËθÚ ‚Ó¯ÂÎ ‚ Ô‡Á, Í‡Í ÔÓ͇Á‡ÌÓ
åÓÊÌÓ Ì‡ÔÓÎÌËÚ¸ ·‡˜ÓÍ ÔÓ˘Â, Ì ËÁ‚ÎÂ͇fl
̇ ËÒ. 9. ÖÒÎË ‚˚ ıÓÚËÚ ÔË„ÓÚÓ‚ËÚ¸ ÚÓθÍÓ
„Ó, ̇ÎË‚ ‚Ó‰Û ÌÂÔÓÒ‰ÒÚ‚ÂÌÌÓ ËÁ ÂÏÍÓÒÚË
Ó‰ËÌ ÍÓÙÂ, ̇ÔÓÎÌËÚ ÙËÎ¸Ú ÏÂÍÓÈ ‰Îfl
‰Îfl Ò·Ó‡ ÍÓÙÂ.
ÏÓÎÓÚÓ„Ó ÍÓÙÂ, ̇ÔÓÎÌÂÌÌÓÈ ‰Ó ͇‚ Ë
ÇÇççààååÄÄççààÖÖ::
ÔÓfl‚ÎÂÌËÂ ‚Ó‰˚ ‚ ÔÓÎÓÒÚË ÔÓ‰
‚Ï¢‡˛˘ÂÈ ÓÍÓÎÓ 7 „‡ÏÏÓ‚ (ËÒ. 10). ÖÒÎË
·‡˜ÍÓÏ – ÌÓχθÌÓ fl‚ÎÂÌËÂ; ÔÂËӉ˘ÂÒÍË
‚˚ ıÓÚËÚ ÔË„ÓÚÓ‚ËÚ¸ ‰‚ ˜‡¯ÍË,
‚˚ÚˇÈÚ ÔÓÎÓÒÚ¸ ÔË ÔÓÏÓ˘Ë ˜ËÒÚÓÈ „Û·ÍË.
ËÒÔÓθÁÛÈÚ ÙËÎ¸Ú Ò ‰Îfl ‰‚Ûı ˜‡¯ÂÍ (·ÓÎÂÂ
èêàåÖóÄçàÖ: ÌË ‚ ÍÓÂÏ ÒÎÛ˜‡Â Ì ‚Íβ˜‡ÈÚÂ
‚ÏÂÒÚËÚÂθÌ˚È ËÁ ‰‚Ûı ÔË·„‡˛˘ËıÒfl Í
ÔË·Ó ·ÂÁ ‚Ó‰˚ ‚ ·‡˜ÍÂ Ë Ì Á‡·˚‚‡ÈÚÂ
ÍÓÙ‚‡ÍÂ) Ë Ì‡ÔÓÎÌËÚÂ Â„Ó ‰‚ÛÏfl
̇ÔÓÎÌflÚ¸ „Ó, ÍÓ„‰‡ ÛÓ‚Â̸ ÓÔÛÒÚËÚÒfl ‰Ó ‰‚Ûı
ÌÂÔÓÎÌ˚ÏË ÏÂ͇ÏË ÏÓÎÓÚÓ„Ó ÍÓÙ (ÓÍÓÎÓ
Ò‡ÌÚËÏÂÚÓ‚ ÓÚ ‰Ì‡ ·‡˜Í‡.
6+6 „‡ÏÏÓ‚). ç‡ÔÓÎÌflÈÚ ÙËθÚ
èèêêÖÖÑÑÇÇÄÄêêààííÖÖããúúççõõââ ççÄÄÉÉêêÖÖÇÇ ììááããÄÄ
χÎÂ̸ÍËÏË ‰ÓÁ‡ÏË, ˜ÚÓ·˚ ËÁ·Âʇڸ
èèêêààÉÉééííééÇÇããÖÖççààüü ääééîîÖÖ
ÔÂÂÔÓÎÌÂÌËfl.
ÑÎfl ÔË„ÓÚÓ‚ÎÂÌËfl ÍÓÙ ˝ÍÒÔÂÒÒÓ ÔË
ééÅÅêêÄÄííààííÖÖ ÇÇççààååÄÄççààÖÖ:: ‰‰ÎÎflfl ÚÚÓÓ„„ÓÓ,, ˜˜ÚÚÓÓ··˚˚
ÌÂÓ·ıÓ‰ËÏÓÈ ÚÂÏÔ‡ÚÛÂ, ÂÍÓÏẨÛÂÚÒfl
ÍÍÓÓÙÙ‚‚‡‡Í͇‡ ‡‡··ÓÓÚÚ‡‡Î·‡ ÔÔ‡‡‚‚ËËÎθ¸ÌÌÓÓ,, ‰‰ÓÓ ÚÚÓÓ„„ÓÓ,, Í͇‡ÍÍ
ÔÓ„ÂÚ¸ ÔË·Ó: ÔÓ‚ÂÌËÚ ۘÍÛ
ÁÁ‡‡ÒÒ˚˚ÔÔ‡‡ÚÚ¸¸ ÍÍÓÓÙÙ ‚‚ ‰‰ÂÂÊʇ‡ÚÚÂÂÎθ¸ ÙÙËËÎθ¸ÚÚ‡‡,, ÌÌÂÂ
ÔÂÂÍβ˜‡ÚÂÎfl , ËÒ. 5 ͇ÈÌÂÈ Ï Á‡ 15-
ÁÁ‡‡··ÛÛ‰‰¸¸ÚÚ ÛÛ··Â‰‰ËËÚÚ¸¸ÒÒflfl,, ˜˜ÚÚÓÓ ÙÙËËÎθ¸ÚÚ ÓÓ˜˜Ëˢ˘ÂÂÌÌ ÓÓÚÚ
30 ÏËÌÛÚ ‰Ó ÔË„ÓÚÓ‚ÎÂÌËfl ÍÓÙÂ, ۷‰˂¯ËÒ¸
ÍÍÓÓÙÙÂÂ,, ËËÒÒÔÔÓÓÎθ¸ÁÁÓÓ‚‚‡‡‚‚¯¯Â„„ÓÓÒÒflfl ÔÔËË ÔÔ‰‰˚˚‰‰ÛÛ˘˘ÂÂÈÈ
˜ÚÓ ‰ÂʇÚÂθ ÙËθڇ ÛÒÚ‡ÌÓ‚ÎÂÌ ‚ ÔË·Ó
‚‚‡‡ÍÍÂÂ..
(Ì Á‡·Û‰¸Ú ۉÓÒÚÓ‚ÂËÚ¸Òfl, ˜ÚÓ Û˜Í‡ ÔÓ‰‡˜Ë
2.ꇂÌÓÏÂÌÓ ‡ÒÔ‰ÂÎËÚ ÏÓÎÓÚ˚È ÍÓÙ Ë
Ô‡‡ Á‡Í˚Ú‡). ÑÎfl ÚÓ„Ó, ˜ÚÓ·˚ ÛÒÚ‡ÌÓ‚ËÚ¸
Ò΄͇ ÛڇϷÛÈÚÂ Â„Ó ÔÂÒÚËÍÓÏ, ËÒ. 11.
‰ÂʇÚÂθ ÙËθڇ, ÔÓÏÂÒÚËÚÂ Â„Ó ÔÓ‰ ÒÂÚÍÛ
èêàåÖóÄçàÖ: ÔÂÒÒÓ‚‡ÌË ÏÓÎÓÚÓ„Ó ÍÓÙ –
·ÓÈ· Û˜ÍÓÈ ‚΂Ó, ÔÓ‰ÚÓÎÍÌËÚÂ Â„Ó ‚‚Âı Ë
‚‡Ê̇fl ÓÔ‡ˆËfl ‰Îfl ÔË„ÓÚÓ‚ÎÂÌËfl ‚ÍÛÒÌÓ„Ó
Ó‰ÌÓ‚ÂÏÂÌÌÓ ÂÁÍÓ ÔÓ‚ÂÌËÚ ۘÍÛ ‚Ô‡‚Ó,
ÍÓÙ ˝ÍÒÔÂÒÒÓ. ÖÒÎË ÍÓÙ ÒÔÂÒÒÓ‚‡Ì
ÒÏ. ËÒ. 6. óÂÂÁ ÔÓΘ‡Ò‡ ÔË„ÓÚÓ‚¸Ú ÍÓÙÂ,
ÒÎ˯ÍÓÏ ÒËθÌÓ, ÍÓÙ ‚˚ıÓ‰ËÚ ËÁ ÍÓÙ‚‡ÍË
ÒΉÛfl Ôӈ‰ۇÏ, ÓÔËÒ‡ÌÌ˚Ï ‚ ÒÎÂ‰Û˛˘ÂÏ
ωÎÂÌÌÓ Ë ÔÂÌ͇ ·Û‰ÂÚ ÚÂÏÌÓ„Ó ˆ‚ÂÚ‡. ÖÒÎË
Ô‡‡„‡ÙÂ. ÑÛ„ËÏ ÔÛÚÂÏ ·˚ÒÚÓ„Ó ‡Áӄ‚‡
ÍÓÙ ÒÔÂÒÒÓ‚‡Ì χÎÓ, ÍÓÙ ·Û‰ÂÚ ‚˚ıÓ‰ËÚ¸
fl‚Îfl˛ÚÒfl ÒÎÂ‰Û˛˘Ë ÓÔ‡ˆËË:
ËÁ ÍÓÙ‚‡ÍË ÒÎ˯ÍÓÏ ·˚ÒÚÓ, ÔÂÌÍË
1.ÇÍβ˜ËÚ ÍÓÙ‚‡ÍÛ, ÔÓ‚ÂÌÛ‚ Û˜ÍÛ
ÔÓÎÛ˜ËÚÒfl χÎÓ Ë ÍÓÙ ·Û‰ÂÚ Ò‚ÂÚÎ˚Ï.
ÔÂÂÍβ˜‡ÚÂÎfl ‚ ÔÓÎÓÊÂÌË , ËÒ. 5 Ë
3.èË ÌÂÓ·ıÓ‰ËÏÓÒÚË ÒÌËÏËÚ ËÁÎ˯ÂÍ ÍÓÙ Ò
ÛÒÚ‡ÌÓ‚ËÚ ‰ÂʇÚÂθ ÙËθڇ, Ì ̇ÔÓÎÌflfl
͇‚ ‰ÂʇÚÂÎfl ÙËθڇ Ë ÛÒÚ‡ÌÓ‚ËÚÂ Â„Ó ‚
Â„Ó ÏÓÎÓÚ˚Ï ÍÓÙÂ.
ÍÓÙ‚‡ÍÛ:
‰‰ÎÎflfl ÚÚÓÓ„„ÓÓ,, ˜˜ÚÚÓÓ··˚˚ ËËÁÁ··ÂÂÊʇ‡ÚÚ¸¸
2.ìÒÚ‡ÌÓ‚ËÚ ÔÓ‰ ‰ÂʇÚÂθ ÙËθڇ ˜‡¯ÍÛ.
‚‚˚˚ÎÎËË‚‚‡‡ÌÌËËflfl ‚‚ÓÓ‰‰˚˚,, ÂÂÁÁÍÍÓÓ ÔÔÓÓ‚‚ÂÂÌÌËËÚÚ ÛÛ˜˜ÍÍÛÛ
àÒÔÓθÁÛÈÚ ÚÛ Ê ˜‡¯ÍÛ, ‚ ÍÓÚÓÛ˛ ·Û‰ÂÚÂ
‚‚ÔÔ‡‡‚‚ÓÓ,, ËËÒÒ.. 66..
Á‡ÎË‚‡Ú¸ „Ófl˜ËÈ ÍÓÙÂ, ˜ÚÓ·˚ ‡ÁÓ„ÂÚ¸ ÂÂ.
4.ìÒÚ‡ÌÓ‚ËÚ ˜‡¯ÍÛ ËÎË ˜‡¯ÍË ÔÓ‰ ÌÓÒËÍË
3.ÑÓʉËÚÂÒ¸ Á‡„Ó‡ÌËfl ·ÏÔ˚ éä, ËÒ. 7 Ë
‰ÂʇÚÂÎfl ÙËθڇ, ËÒ. 12. êÂÍÓÏẨÛÂÚÒfl
Ò‡ÁÛ Ê ÔÓ‚ÂÌËÚ ۘÍÛ ÔÂÂÍβ˜‡ÚÂÎfl ‚
̇„ÂÚ¸ ˜‡¯ÍË ‰Ó ÚÓ„Ó, Ú‡Í „ÓÚÓ‚ËÚ¸ ÍÓÙÂ,
ÔÓÎÓÊÂÌË , ËÒ. 7, ÒÎË‚‡ÈÚ ‚Ó‰Û ‰Ó
ÒÔÓÎÓÒÌËÚ Ëı „Ófl˜ÂÈ ‚Ó‰ÓÈ.
ÔÓ„‡Ò‡ÌËfl Ë̉Ë͇ÚÓÌÓÈ Î‡ÏÔ˚ éä, Á‡ÚÂÏ
5.6. ì·Â‰ËÚÂÒ¸, ˜ÚÓ Î‡ÏÔ‡ éä, ËÒ. 7, „ÓËÚ
ÓÒÚ‡ÌÓ‚ËÚ ÔÓ‰‡˜Û ‚Ó‰˚, ÔÓ‚ÂÌÛ‚ Û˜ÍÛ
(ÂÒÎË Ì „ÓËÚ, ‰ÓʉËÚÂÒ¸  ‚Íβ˜ÂÌËfl),
ÔÂÂÍβ˜‡ÚÂÎfl ‚ ÔÓÎÓÊÂÌË , ËÒ. 5.
Á‡ÚÂÏ ÔÓ‚ÂÌËÚ ۘÍÛ ‚ ÔÓÎÓÊÂÌË ËÒ. 8,
4.ëÎÂÈÚ ‚Ó‰Û ËÁ ˜‡¯ÍË, ‰ÓʉËÚÂÒ¸, ÍÓ„‰‡
‰Ó ÔÓÎÛ˜ÂÌËfl Ú·ÛÂÏÓ„Ó ÍÓ΢ÂÒÚ‚‡ ÍÓÙÂ.
·ÏÔ‡ éä Á‡„ÓËÚÒfl ‚ÌÓ‚¸, Ë ÔÓ‚ÚÓËÚ ¢Â
ÑÎfl ÔÂ͇˘ÂÌËfl ÔÓ‰‡˜Ë, Ô‚‰ËÚÂ
‡Á ÚÛ Ê ÓÔ‡ˆË˛.
ÔÂÂÍβ˜‡ÚÂθ ‚ ÔÓÎÓÊÂÌË , ËÒ. 5.
6.ÑÎfl ÚÓ„Ó, ÒÌflÚ¸ ‰ÂʇÚÂθ ÙËθڇ,
ÔÓ‚ÂÌËÚ ۘÍÛ Ò Ô‡‚ÓÈ Ì‡ ÎÂ‚Û˛ ÒÚÓÓÌÛ.
ÇÇÌÌËËÏχ‡ÌÌËËÂÂ:: ‰‰ÎÎflfl ÚÚÓÓ„„ÓÓ,, ˜˜ÚÚÓÓ··˚˚ ËËÁÁ··ÂÂÊʇ‡ÚÚ¸¸ ‚‚˚˚··ÓÓÒÒ‡‡
ÔÔ‡‡‡‡ ÌÌËË ‚‚ ÍÍÓÓÂÂÏÏ ÒÒÎÎÛÛ˜˜‡‡Â ÌÌ ÒÒÌÌËËÏχ‡ÈÈÚÚ ‰‰ÂÂÊʇ‡ÚÚÂÂÎθ¸
ÙÙËËÎθ¸ÚÚ‡‡,, ÍÍÓÓ„„‰‰‡‡ ÍÍÓÓÙÙ Ì̇‡ÎÎËË‚‚‡‡ÂÂÚÚÒÒflfl ‚‚ ˜˜‡‡¯¯ÍÍÛÛ..
47

Read this manual thoroughly before installing and using the appliance.
This is the only way to ensure best results and maximum safety for the user.
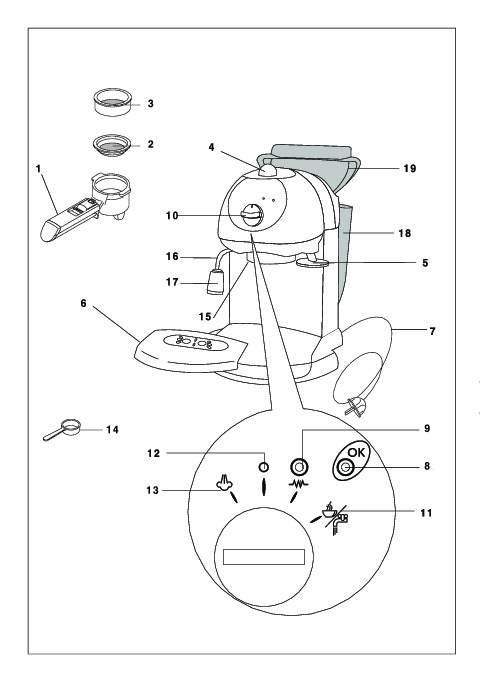
DESCRIPTION
(see figure on page 3).
The terminology below will be used repeatedly on the following pages.
1Filter holder for ground coffee
2Large filter for 2 cups coffee
3Small filter for 1 cup coffee
4Steam knob
5Presser
6Cup tray
7Power cable
8Temperature OK light (coffee/hot water or steam)
9 light (appliance on)
10Function selector knob
11 position to run off coffee/hot water
12Off position
13Steam position
14Coffee measure
15Boiler outlet
16Steam/hot water tube
17Cappuccino maker
18Water tank
19Water tank lid
SAFETY WARNINGS
•This appliance is designed to «make espresso coffee» and «heat drinks». Use with care to avoid scalds from the water and steam jets or through incorrect use.
•Never touch hot parts.
•After removing the packaging, make sure the product is complete. If in doubt, do not use the appliance and contact a professionally qualified person.
•The packing elements (plastic bags, polystyrene foam, etc.) should be kept out of the reach of children as they are a safety hazard.
•This appliance is intended for domestic use only. Any other use is considered improper and thus dangerous.
•The manufacturer cannot be held responsible for any damage caused through incorrect, wrong or unreasonable use.
•Never touch the appliance with wet or damp hands or feet.
•Never let children or unfit persons use the appliance without supervision.
•Never allow children to play with the appliance.
•In the event of malfunction or faulty operation, switch
GB
off and do not attempt to repair.
•If it requires repair, contact an
centre only and ask for original spare used.
•Failure to respect the above could reduce of the appliance.
•The power cable for this appliance replaced by the user as this operation use of special tools.
•If the cable is damaged or requires contact an authorised service centre only risks.
INSTALLATION
•Place the appliance on a work surface taps and sinks.
•Check that the voltage of the mains corresponds to the value indicated on the rating plate.
•Connect the appliance to an
socket with a minimum current rating of
•The manufacturer may not be considered possible incidents caused by the adequately earth the mains.
•If the plug fitted to the appliance does not power socket, have the socket suitable type by a qualified professional.
•Never install the appliance in
the temperature may reach 0°C or appliance may be damaged if the water
•If the power cable is longer than the required to reach the mains socket, the can be stored inside the appliance by cable back through the cable opening.
•The power cable can be positioned to the according to the location of the resting it in the guides on the bottom of the (fig. 1).
When the power cable is in the required make sure it is correctly held in place by the bottom of the appliance (fig. 1).
11

HOW TO MAKE ESPRESSO COFFEE
FILLING THE WATER TANK
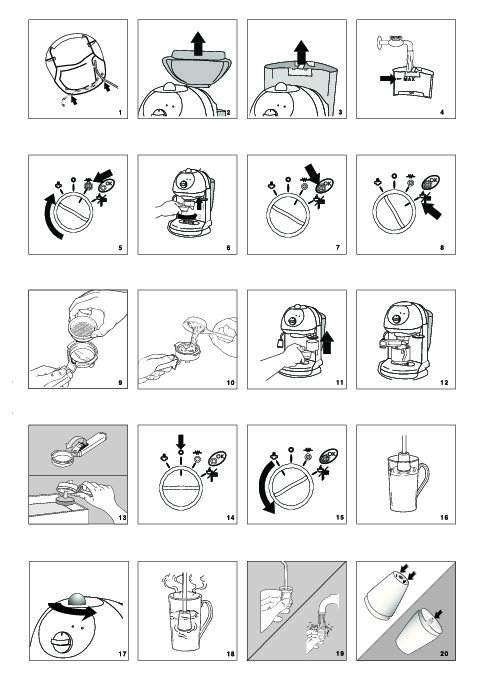
Remove the water tank lid (fig. 2) and then take out the tank by pulling upwards (fig. 3).
Fill the tank with fresh clean water taking care not to exceed the MAX level (fig. 4).
Replace the tank, pressing lightly to open the valve located on the bottom of the tank.
More simply, the tank can also be filled without removing it, pouring the water directly from a jug. IMPORTANT: It is normal for there to be water in the space under the tank. This should therefore be dried regularly with a clean sponge.
NB: Never use the appliance without water in the tank and always remember to top up when the level drops to a couple of centimetres from the bottom.
PREHEATING THE COFFEE UNIT
To obtain espresso coffee at the right temperature, the coffee machine must be preheated. Turn the selector knob to the  position (fig. 5) at least 15 to 30 minutes before making the coffee, making sure the filter holder is attached to the appliance (check that the steam knob is closed). To attach the filter holder, position it under the boiler outlet with the handle towards the left (see fig. 6), push it upwards and at the same time rotate the handle towards the right. Rotate firmly. Wait for half an hour, then make the coffee as described in the following chapter.
Alternatively, preheating can be achieved more rapidly proceeding as follows:
1.Turn the appliance on by rotating the selector knob to the position (fig. 5) and attach the filter holder to the appliance without adding ground coffee.
2.Place a cup under the filter holder. Use the same cup as will be used to prepare the coffee in order to preheat it.
3.Wait for the OK indicator light to come on (fig. 7),
then immediately rotate the selector knob to the  position (fig. 7), run the water off until the OK indicator light goes out, then interrupt delivery by rotating the selector knob to the
 position (fig. 5).
4.Empty the cup. Wait until the OK indicator light comes on again then repeat the same operation.
HOW TO PREPARE ESPRESSO COFFEE USING THE FILTER HOLDER FOR GROUND COFFEE
1.After carrying out the preheating of the machine as described in the preceding section, in order to make just one cup of espresso coffee, insert the 1-cup filter (the smaller of the two provided) into the filter holder (Fig. 9) and fill it with one level measuring spoon of
ground coffee – about 7 grams. If you wish to prepare two cups of espresso coffee, use the 2-cup filter (the larger of the two provided) and fill it with two less-than-level measuring spoons of ground coffee (about 6+6 grams).
IMPORTANT: for correct operation, before adding the ground coffee to the filter holder, clean the filter from residues of ground coffee from the previous infusion.
2.Distribute the ground coffee evenly and press lightly with the pressing pad (fig. 11). NB: Correct pressing of the ground coffee is essential to obtain a good espresso. If pressing is excessive, coffee delivery will be slow and the froth will be dark. If pressing is too light, coffee delivery will be too rapid and the froth will be skimpy and light coloured.
3.Remove any excess coffee from the rim of the filter holder and attach the filter holder to the appliance.
Rotate firmly (fig. 6) to avoid leaks of water.
4.Place the cup or cups (ideally preheated by rinsing with a little hot water) under the filter holder spouts (fig. 12).
5.Make sure the OK light (fig. 7) is on (if off, wait until
|
it comes on), |
then turn the knob to the |
position |
|
(fig. |
the required quantity is obtained. To |
|
|
interrupt, place the selector back in the |
position |
|
|
(fig. 5). |
 until
until6.To remove the filter holder, rotate the handle from right to left.
IMPORTANT: to avoid splashes, never remove the filter holder while the appliance is delivering coffee.
7.To eliminate the used coffee grounds, block the filter in place using the lever incorporated in the handle and empty the coffee by turning the filter holder upside down and tapping (fig. 13).
8.To turn the appliance off, rotate the selector knob to
the «O» position (fig. 14).
IMPORTANT: the first time the appliance is used, all accessories and the internal circuits must be washed through by making at least five coffees without using ground coffee.
12
 Loading…
Page 1 — КОФЕВАРКА
КОФЕВАРКАЕС190рукции по эксплуатации
Page 5 — УСТАНОВКА
43^До начала сборки и эксплуатации прибора внимательно изучите данные инструкции. Только таким образом вы обеспечите наилучшие результаты
Page 6 — -Щ- , рис. 5
КАК ПРИГОТОВИТЬ КОФЕ ЭКСПРЕССОНАПОЛНЕНИЕ БАЧКА ВОДОЙСнимите крышку с бачка с водой, рис. 2, затем извлеките бачок, потянув его вверх, рис. 3. Наполнит
Page 7 — ОЧИСТКА И ОБСЛУЖИВАНИЕ
7.Для того, чтобы удалить использованный кофе, заблокируйте фильтр при помощи специального рычага, находящегося на ручке фильтра и выбейте
Page 8 — ОЧИСТКА СЕТКИ БОЙЛЕРА
если вышеуказанная очистка не выполняется регулярно.ОЧИСТКА СЕТКИ БОЙЛЕРАПримерно каждые 300 чашек кофе необходимо очищать сетку бойлера, выполняя
Page 9 — ВОЗМОЖНЫЕ ПРИЧИНЫ УСТРАНЕНИЕ
ПРОБЛЕМАВОЗМОЖНЫЕ ПРИЧИНЫ УСТРАНЕНИЕКофе экспрессо не выходит из кофеварки- Молотый кофе влажный или слишком спрессован.- Недостаточное количество вод