
Как использовать наш сайт инструкций OnlineManuals.ru
Наша цель состоит в том, чтобы предоставить вам быстрый доступ к содержанию инструкции для Руководство пользователя, руководство по эксплуатации кофеварки Philips HD7751_00.
С помощью онлайн просмотра, Вы можете быстро просмотреть содержимое инструкции и найти решение проблемы с Руководство пользователя, руководство по эксплуатации кофеварки Philips HD7751_00.
Для Вашего удобства
Если листать руководство пользователя Руководство пользователя, руководство по эксплуатации кофеварки Philips HD7751_00 прямо на сайте, не очень удобно для Вас, есть два возможных решения:
• Просмотр в полноэкранном режиме — легко просмотреть руководство пользователя (без загрузки его на свой компьютер), Вы можете использовать режим полноэкранного просмотра.
Для просмотра инструкции пользователя Руководство пользователя, руководство по эксплуатации кофеварки Philips HD7751_00 на полном экране, используйте кнопку «Открыть в Pdf-viewer».
• Загрузка на компьютер — Вы можете также скачать Руководство пользователя, руководство по эксплуатации кофеварки Philips HD7751_00 на свой компьютер и сохранить его в файлах.
Многие люди предпочитают читать документы не на экране, а в печатной версии.
Возможность печати руководства пользователя также была предусмотрена на нашем сайте,
и вы можете использовать ее, нажав на иконку «печать» в Pdf-viewer.
Нет необходимости печатать все руководство Руководство пользователя, руководство по эксплуатации кофеварки Philips HD7751_00, можно выбрать только нужные страницы инструкции.
Раздел: Бытовая, кухонная техника, электроника и оборудование
Тип: Кофеварка
Характеристики, спецификации
Тип используемого кофе:
зерновой
Мощность устройства:
1000 Вт
Настройки:
контроль крепости кофе
Автоматическая декальцинация:
нет
Встроенная кофемолка:
есть, регулировка степени помола, емкость контейнера для зерен 250 г
Противокапельная система:
есть
Возможность одновременного приготовления двух чашек:
нет
Дисплей:
есть, с подсветкой
Отсек для хранения шнура:
есть
Съемный лоток для сбора капель:
есть
Материал изготовления корпуса:
металл
Индикатор уровня воды:
есть
Размеры (Ш*В*Г):
22x42x32 см
Инструкция к Кофеварке Philips HD7751
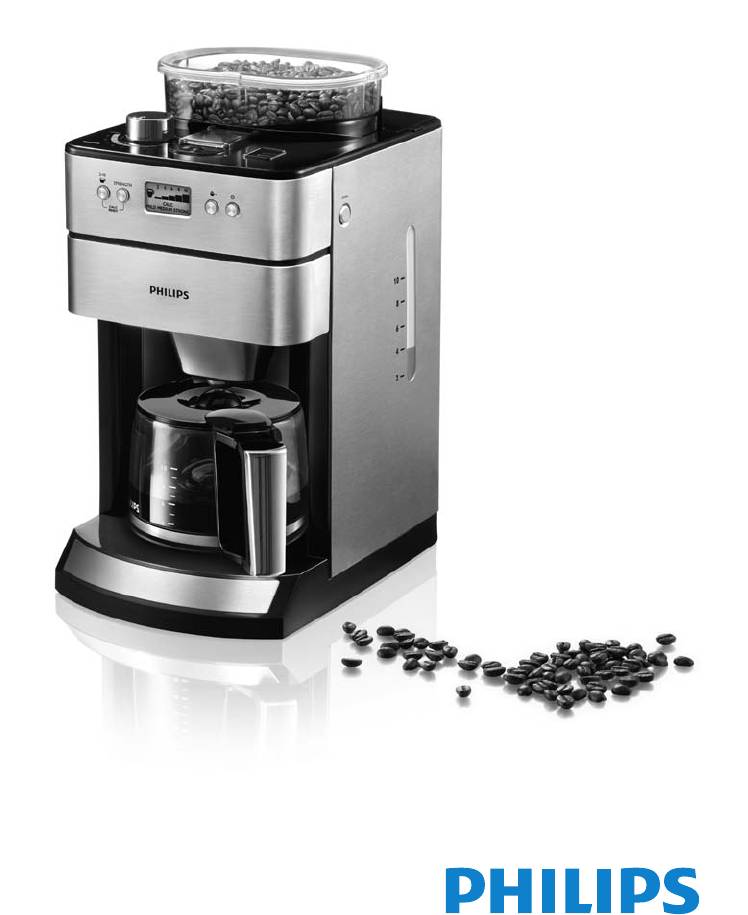
HD7751
Register your product and get support at
www.philips.com/welcome

1

HD7751
102
174
163
151
138
126
114
90
ENGLISH 6
78
66
54
42
30
18
186

6
Warning
22 Hotplate
23 Overow hole
24 On/off switch
Important
Read this user manual carefully before you use the appliance and save it for
future reference.
Danger
— Never immerse the appliance in water or any other liquid, nor rinse it
under the tap.
— Check if the voltage indicated on the bottom of the appliance
20 OPEN button for lter basket holder
corresponds to the local mains voltage before you connect the
appliance.
— If the mains cord is damaged, you must have it replaced by Philips, a
service centre authorised by Philips or similarly qualied persons in
order to avoid a hazard.
— This appliance is not intended for use by persons (including children)
with reduced physical, sensory or mental capabilities, or lack of
experience and knowledge, unless they have been given supervision or
instruction concerning use of the appliance by a person responsible for
their safety.
21 Water reservoir with water level window
19 Start/standby button
Introduction
6 2-10 cups button
Congratulations on your purchase and welcome to Philips! To fully
benet from the support that Philips offers, register your product at
www.philips.com/welcome.
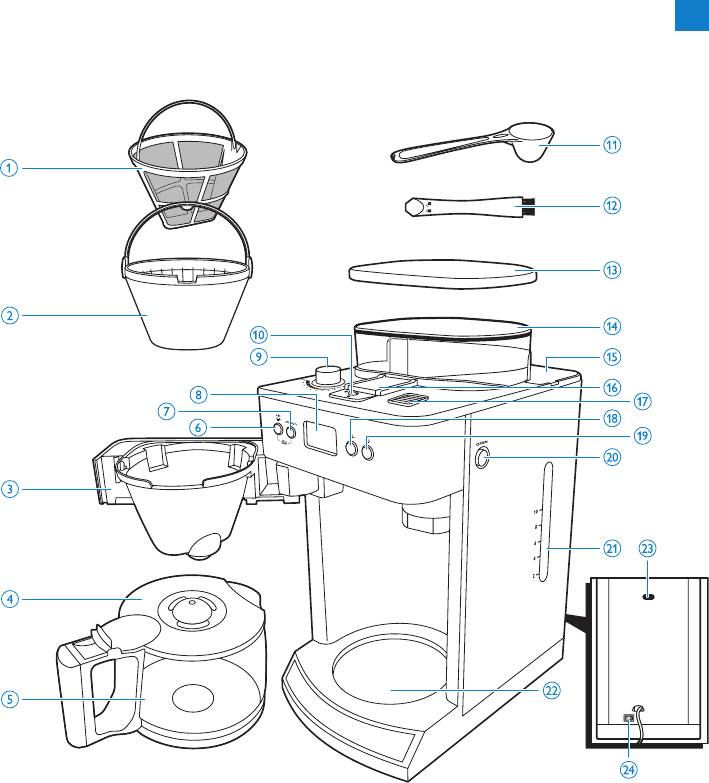
General description (Fig. 1)
1 Permanent lter
2 Filter basket
3 Filter basket holder
4 Jug lid
5 Glass jug
7 STRENGTH button
18 Pre-ground coffee button
8 Display
9 Grind selection knob
10 Lock of coffee bean chute
11 Measuring spoon
12 Cleaning brush
13 Coffee bean container lid
14 Coffee bean container
15 Water reservoir lid
16 Lid of coffee bean chute
17 Steam vent
ENGLISH

— Children should be supervised to ensure that they do not play with the
by clients in hotels, motels, bed and breakfasts and other residential
— Do not move the appliance while it is operating.
— Wait until the appliance has cooled down before you store it. The
hotplate and the coffee jug may be hot.
— After you have unpacked the appliance, make sure it is complete and
undamaged. If in doubt, do not use the appliance but contact the
Consumer Care Centre in your country.
— This appliance is intended for normal household use only. It is not
intended for use in environments such as staff kitchens of shops, ofces,
farms or other work environments. Nor is it intended to be used
environments.
handle.
This Philips appliance complies with all standards regarding electromagnetic
elds (EMF). If handled properly and according to the instructions in this
user manual, the appliance is safe to use based on scientic evidence
available today.
Flushing the appliance
You need to ush the coffeemaker once before rst use.
1 Put the mains plug in the wall socket.
— Never use the jug in a microwave oven.
— The jug is hot during and after brewing. Always hold the jug by its
appliance.
correctly and with care to avoid scalding by hot water and steam.
— Keep the mains cord out of the reach of children. Do not let the
mains cord hang over the edge of the table or worktop on which the
appliance stands.
— Do not touch the grinding burrs of the appliance, especially when the
appliance is connected to the mains.
— Keep the packaging materials (plastic bags, cardboard buffers, etc.) out
of the reach of children, as they are not a toy.
— Do not touch the hot surfaces of the appliance when it operates.
— This appliance is designed to grind beans and make coffee. Use it
— Do not use the appliance if the plug, the mains cord or the appliance
before you clean it.
itself is damaged.
— If a problem occurs that you cannot solve by means of this user manual,
contact the Consumer Care Centre in your country. If the problem
cannot be solved, take the appliance to a service centre authorised
by Philips for examination or repair. Do not attempt to repair the
appliance yourself, otherwise your guarantee becomes invalid.
Caution
— Do not place the appliance on a hot surface and prevent the mains
cord from coming into contact with hot surfaces.
— Unplug the appliance if problems occur during grinding or brewing and
ENGLISH 7
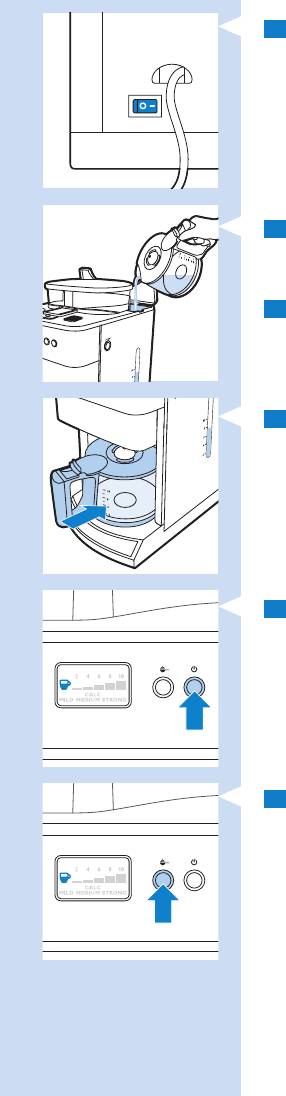
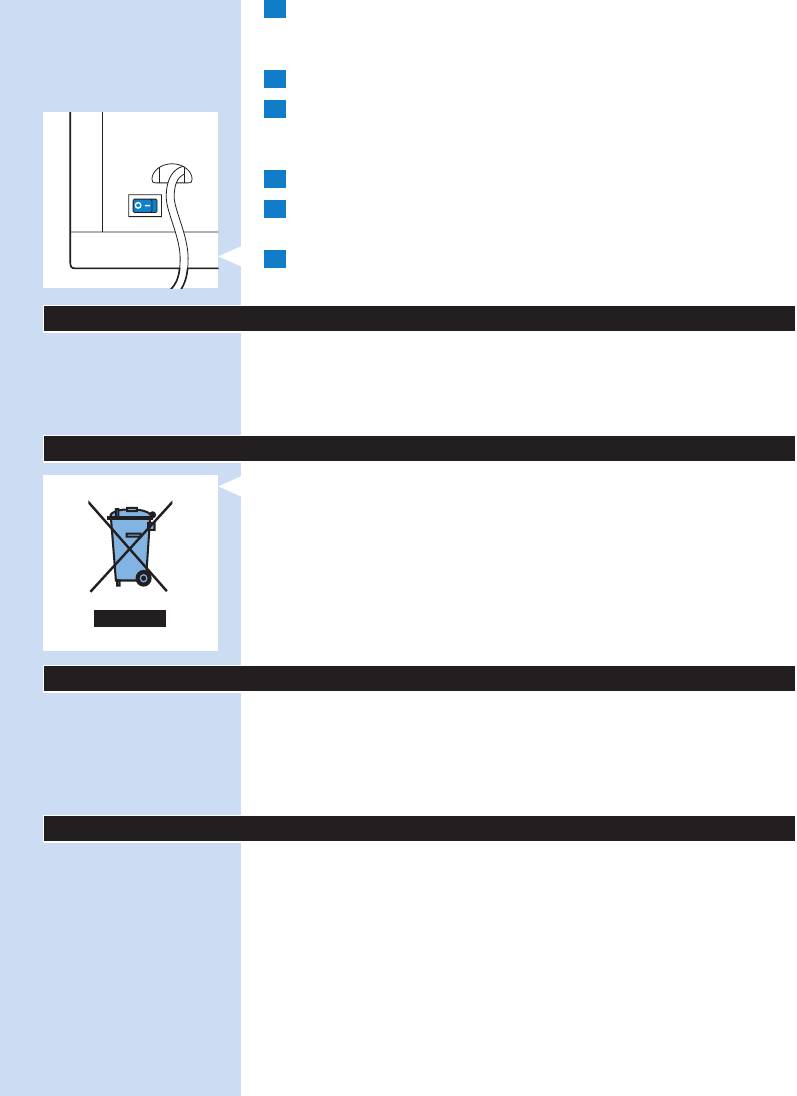
2 Set the on/off switch on the back of the appliance to ‘I’ to switch on
Note: Make sure the jug lid is in place. Without the jug lid, the drip stop
setting are not shown on the display.
Note: When you switch off the grinder, the number of cups and the strength
, The button lights up when you press it.
7 Press the pre-ground coffee button to switch off the grinder.
6 Press the start/standby button.
appliance.
Note: Make sure you put the jug on the hotplate with the spout facing into the
‘Drip stop function’).
function is activated automatically (see chapter ‘Using the appliance’, section
5 Place the jug on the hotplate.
the appliance.
4 Close the water reservoir lid.
Note: Do not put coffee beans or ground coffee in the appliance.
water up to the 10-cup indication.
3 Open the water reservoir lid. Fill the water reservoir with fresh cold
you can press any button to reactivate the appliance.
on to indicate that the appliance is still switched on. In standby mode,
this case, the display goes out and only the start/standby button stays
any button within 1 minute, the appliance goes into standby mode. In
, The start/standby button and the display light up. If you do not press
ENGLISH8
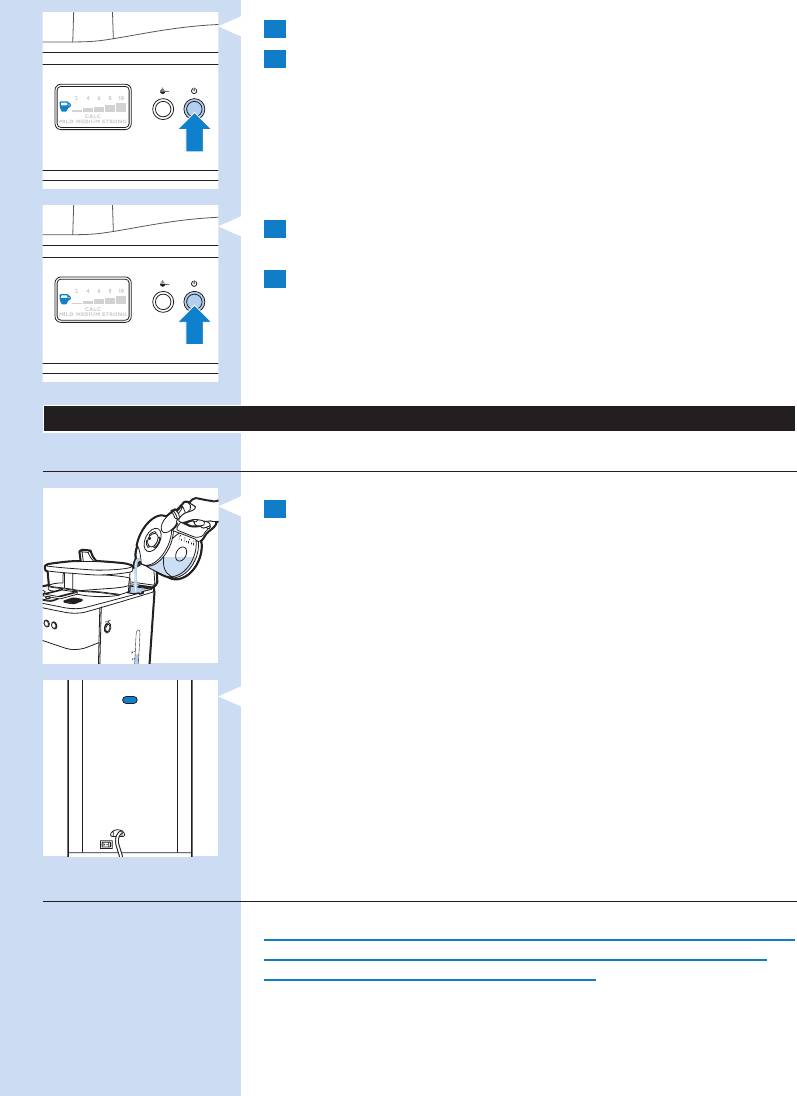
8 Press the start/standby button to start the brewing process.
how much water to put in the water reservoir. Keep in mind that the
water reservoir and block up the water inlet.
container with coffee beans. Otherwise coffee beans can fall into the
Alwayskeepthewaterreservoirlidclosedwhenyoullthecoffeebean
water spills from the opening at the back.
Note: Do not ll the water reservoir beyond the 10-cup indication, otherwise
Tip: Use the jug to ll the water reservoir with the required amount of water.
water.
amount of brewed coffee will be slightly less, since ground coffee absorbs
level window and on the jug. You can use these indications to determine
9 Lettheapplianceoperateuntilallthewaterhasowedintothejug.
There are indications for 2 to 10 cups (275ml to 1375ml) on the water
required amount of cold water.
1 Openthewaterreservoirlidandllthewaterreservoirwiththe
Filling the water reservoir
11 Empty the jug.
process.
10 Press the start/standby button to stop the brewing/ keep-warm
nished.
, The coffeemaker produces 5 beeps when the brewing process is
ENGLISH 9
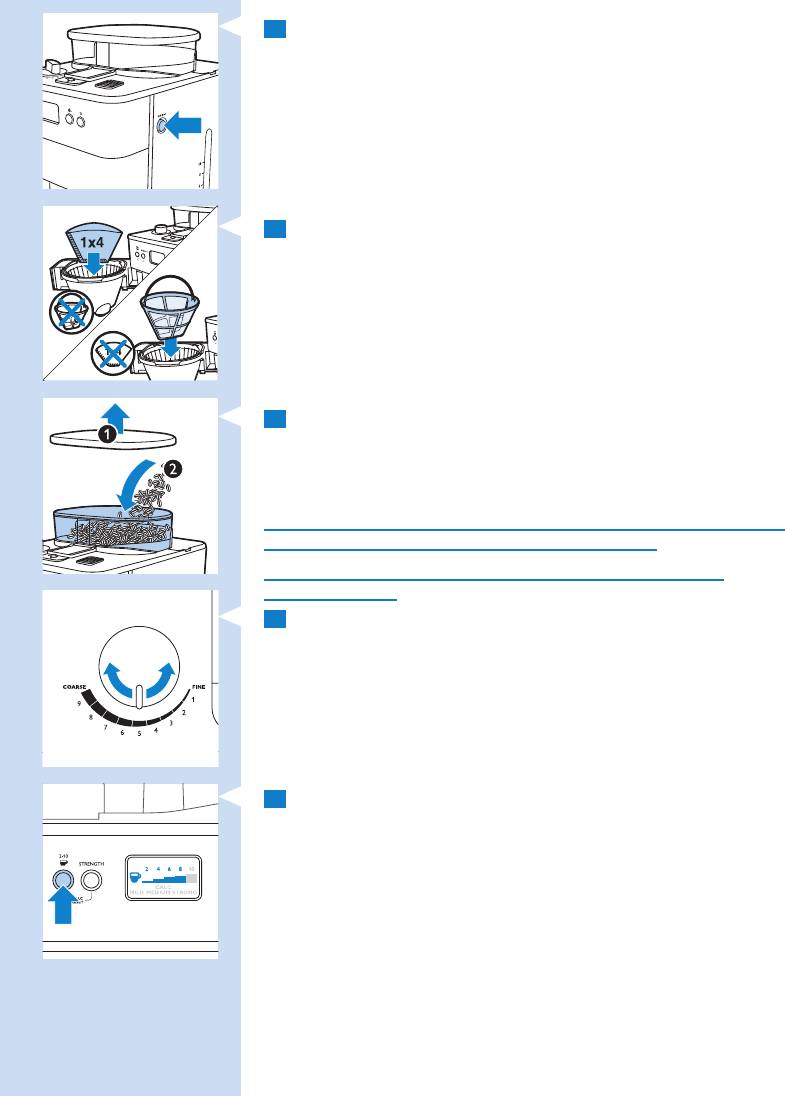
1 Press the OPEN button on the right side of the appliance to
(fromnetocoarse).Thereareninegrindsettings.
RESET
CALC
mind that the appliance uses all water in the water reservoir.
is consistent with the amount of water in the water reservoir. Please keep in
Note: Make sure that the number of cups you select with the 2-10 cups button
, The grinder grinds the required amount of coffee beans.
, The selected number of cups appears on the display.
, The 2-10 cups button lights up when you press it.
times as the desired number of cups.
5 To select the number of cups, press the 2-10 cups button as many
4 Turn the grind selection knob to select the desired type of grind
openthelterbasketholder.
caramelised beans.
To prevent the grinder from jamming, do not use unroasted or
the grinder from jamming, do not exceed this amount.
The maximum capacity of the coffee bean container is 250g. To prevent
Note: Always make sure the bean container is at least half full.
container for the amount of coffee you want to brew.
coffeebeans(2).Makesurethereareenoughcoffeebeansinthe
3 Removethecoffeebeancontainerlid(1)andllthecontainerwith
to collect the ground coffee.
2 Placeapaperlter(no.4)orthepermanentlterinthelterbasket
ENGLISH10
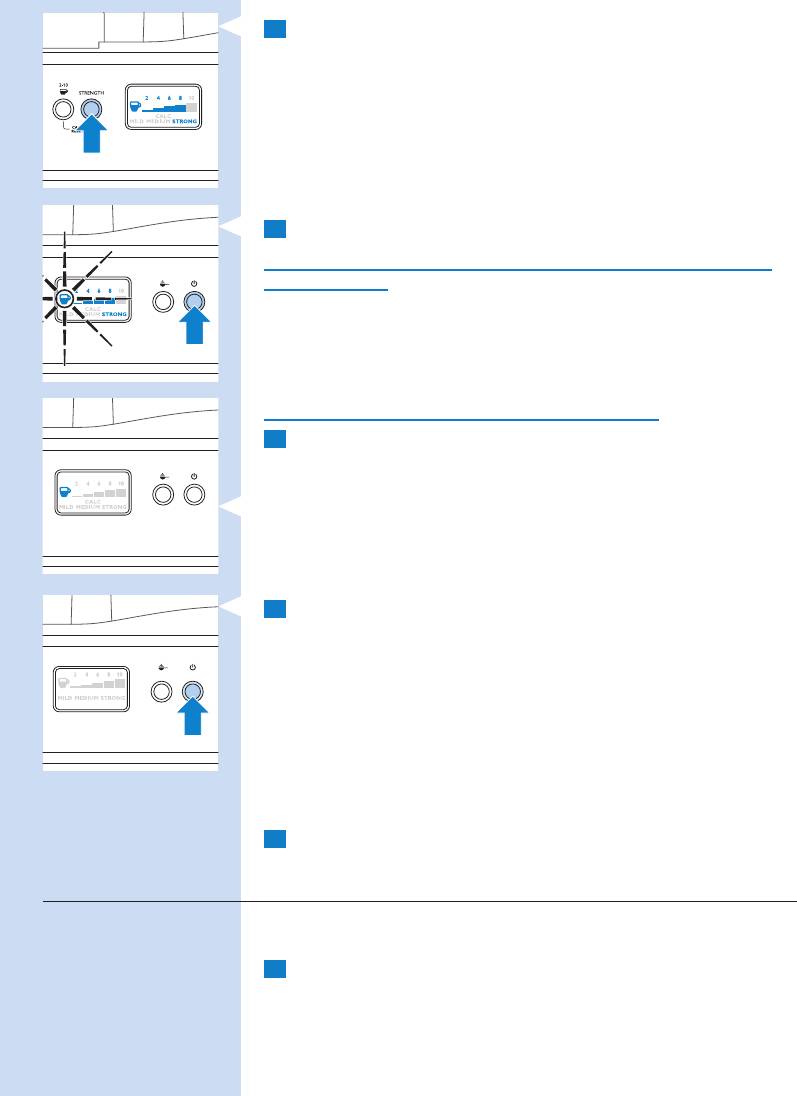
6 Press the STRENGTH button once or several times until the desired
again.
still switched on.
Note: If you do not press the start/standby button to put the appliance in
standby mode, the appliance goes into standby mode automatically after 30
minutes. The start/standby button stays on to indicate that the appliance is still
switched on.
Note: You can press any button to activate the appliance and brew coffee
10 If you do not intend to brew coffee again soon, set the on/off switch
start/standby button to put the appliance in standby mode.
on the back of the appliance to ‘O’ to switch off the appliance.
If you want to use pre-ground coffee instead of coffee beans, follow the
steps below.
1 Fill the water reservoir with water, as described in ‘Filling the water
reservoir’.
, The start/standby button stays on to indicate that the appliance is
9 If you do not need the hotplate to keep the coffee hot, press the
coffeestrengthisselected(mild,mediumorstrong).
processisnished.
, The STRENGTH button lights up when you press it.
, The display shows the selected coffee strength.
7 Press the start/standby button to start the brewing process.
Keep away from the steam vent during brewing, as hot steam escapes
through the vent.
, Thefreshnessindicatorashesonthedisplayuntilthebrewing
, The coffeemaker produces 5 beeps when the brewing process is
brewing, to indicate that the coffee is fresh.
nished.
, The hotplate switches on automatically.
Do not touch the hotplate while it is on, as it gets hot.
8 Wait until the coffeemaker has stopped beeping before you remove
the jug from the hotplate.
Note: After brewing, coffee drips from the lter basket for several seconds.
, The freshness indicator is shown on the display for 30 minutes after
ENGLISH 11
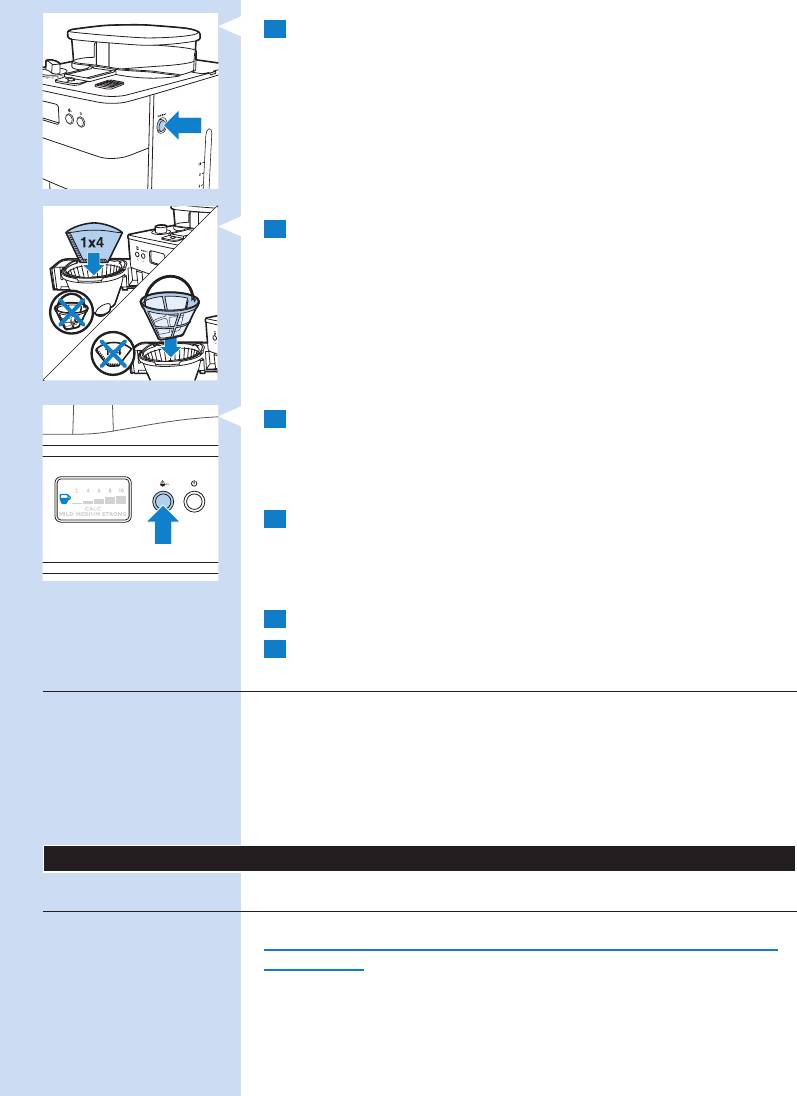
2 Press the OPEN button on the right side of the appliance to
The drip stop function enables you to remove the jug from the
RESET
CALC
under the tap.
Never immerse the appliance in water or any other liquid, nor rinse it
Cleaning after every use
Cleaning and maintenance
basket overows.
do not put the jug back onto the hotplate within 20 seconds, the lter
Note: The brewing process does not stop when you remove the jug. If you
the jug, the drip stop stops the ow of coffee into the jug.
coffeemaker before the brewing process is nished. When you remove
Drip stop function
openthelterbasketholder.
7 Follow steps 7, 8 and 9 in section ‘Using coffee beans’.
6 Closethelterbasketholderandplacethejugonthehotplate.
for each cup (125ml).
a medium-strong cup of coffee, use one measuring spoon (approximately 6g)
Note: How much pre-ground coffee you use is a matter of personal taste. For
5 Putpre-groundcoffeeinthepaperlterorinthepermanentlter.
setting are not shown on the display.
Note: When you switch off the grinder, the number of cups and the strength
, The button lights up when you press it.
4 Press the pre-ground coffee button to switch off the grinder.
3 Placeapaperlter(no.4)orthepermanentlterinthelterbasket.
ENGLISH12
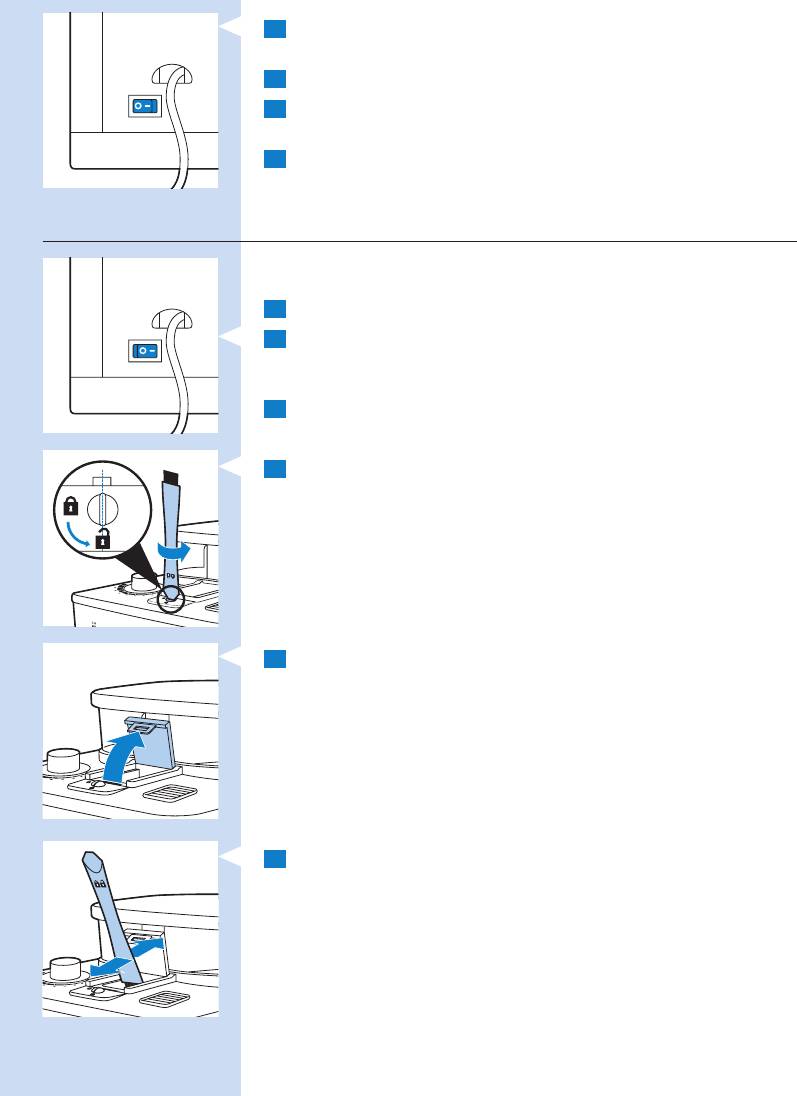
1 Set the on/off switch on the back of the appliance to ‘O’ to switch off
, The start/standby button and the display lights up.
, Thegroundcoffeeresiduesfallintothelterbasket.
the ground coffee.
Tip: Place a paper lter or the permanent lter in the lter basket to collect
lower part of the chute.
6 Use the cleaning brush to brush ground coffee residues into the
5 Open the lid of the coffee bean chute.
and turn the lock to the ‘open’ position.
4 Inserttheatendofthecleaningbrushhandleintothechutelock
the wall socket.
3 Press the start/standby button and then remove the mains plug from
the appliance.
the appliance.
2 Set the on/off switch on the back of the appliance to ‘I’ to switch on
1 Put the mains plug in the wall socket.
the frequency of use.
You have to clean the coffee bean chute every 1 to 2 weeks, depending on
water and some washing-up liquid.
4 Cleanthelterbasket,thepermanentlterandthejugwithhot
cloth.
3 Wipe the outside of the coffeemaker and the hotplate with a damp
2 Remove the mains plug from the wall socket.
ENGLISH 13
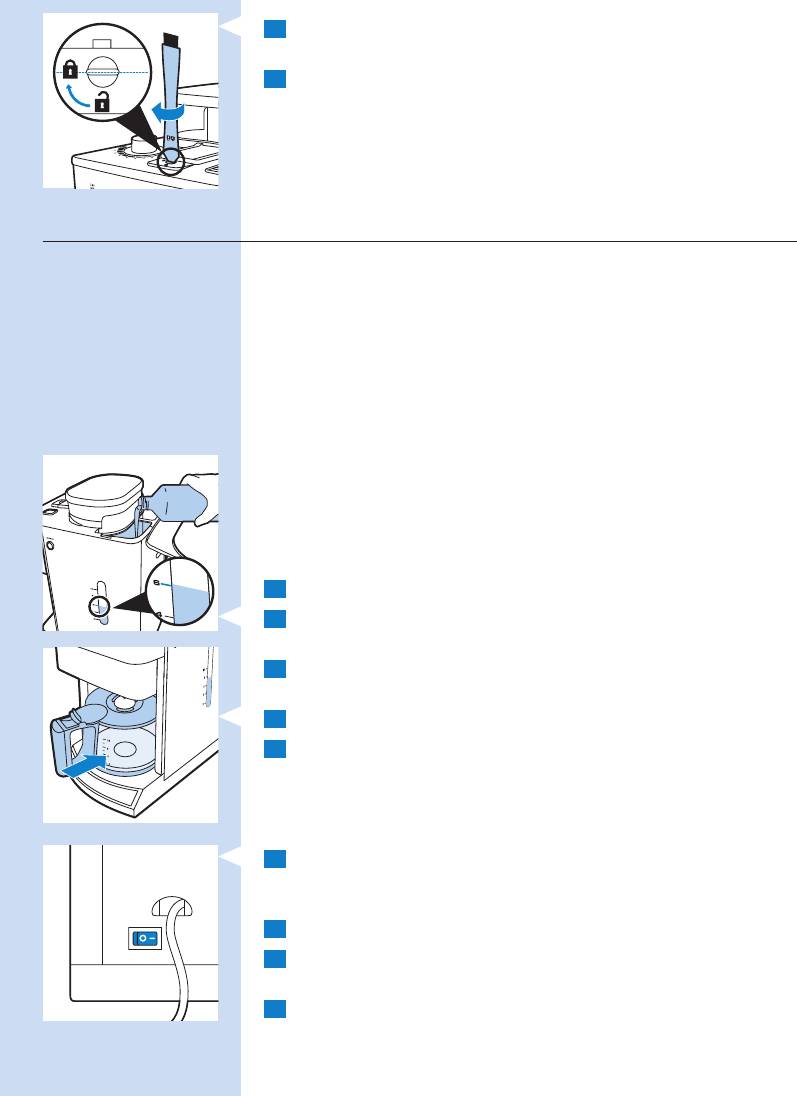
7 Close the lid of the coffee bean chute and turn the lock to the
6 Set the on/off switch on the back of the appliance to ‘I’ to switch on
2 Fillthewaterreservoirwith7cupsofwhitevinegar(4%aceticacid)
and 3 cups of water.
3 Placeapaperlter(no.4)inthelterbasketandclosethelter
basket holder.
4 Place the empty jug on the hotplate.
5 Put the mains plug in the wall socket.
the appliance.
button and the STRENGTH button simultaneously.
, The start/standby button and the display lights up.
7 Press the start/standby button.
8 Press the ‘grinder off’ button to switch off the grinder. Then and
press the start/standby button to start the brewing process.
9 Waituntilhalfofthevinegar-watersolutionhasowedintothejug.
Then press the start/standby button to stop the brewing process and
let the solution soak for at least 15 minutes.
1 Open the water reservoir lid.
Note: To remove the ‘CALC’ message from the display, press the 2-10 CUPS
‘locked’ position.
Regular descaling prolongs the life of the appliance and guarantees optimal
8 Removethepaperlterwiththegroundcoffeeresiduesandthrow
it away.
Descaling the coffeemaker
When the message ‘CALC’ appears on the display (after approx. 60
brewing processes), you need to descale the coffeemaker, as scale can clog
the coffeemaker.
brewing results and a constant brewing time for a long time. Descale the
appliance every time the ‘CALC’ message appears on the display.
appliance:
— every 120 brewing cycles if you use soft water (up to 18dH).
— every 60 brewing cycles if you use hard water (over 18dH).
You can contact your local water board for information about the water
hardness in your area.
Note: If you are not aware of the water hardness in your area and are not
in a position to contact your local water board, we advise you to descale the
ENGLISH14
10 Press the start/standby button to switch the coffeemaker back on
Environment
the information below, contact the Consumer Care Centre in your country.
encounter with the appliance. If you are unable to solve the problem with
This chapter summarises the most common problems you could
to your local Philips dealer.
guarantee leaet. If there is no Consumer Care Centre in your country, go
Care Centre in your country. You nd its phone number in the worldwide
the Philips website at www.philips.com or contact the Philips Consumer
If you need service or information or if you have a problem, please visit
Guarantee and service
recycling. By doing this, you help to preserve the environment.
at the end of its life, but hand it in at an ofcial collection point for
— Do not throw away the appliance with the normal household waste
Centre in your country.
andwaituntiltherestofthesolutionhasowedintothejug.Then
problems obtaining the parts, please contact the Philips Consumer Care
to your Philips Saeco dealer or visit www.philips.com/shop. If you have
If you need to replace a part or want to purchase an additional part, go
Replacement
the appliance.
15 Set the on/off switch on the back of the appliance to ‘O’ to switch off
up liquid.
14 Cleanthelterbasketandthejugwithhotwaterandsomewashing-
13 Repeat step 12 until the water no longer tastes or smells like vinegar.
coffeemaker complete the entire brewing process and empty the jug.
standby button to start another brewing process. Let the
12 Fill the water reservoir with cold water and press the start/
11 Emptythejugandthrowawaythepaperlter.
press the start/standby button to put the appliance in standby mode.
ENGLISH 15

Problem Possible solution
brewing process. Therefore we advise you not to remove the jug and
strength with the STRENGTH button. In this case you can only increase
the coffee strength by increasing the amount of pre-ground coffee or
decreasing the amount of water, or by using coffee of a stronger blend
or avour.
The lter overows when
I remove the jug from the
appliance while it is brewing
coffee.
If you remove the jug for more than 20 seconds during the brewing
process, the drip stop causes the lter holder to overow. Also note
that the coffee does not reach its full taste before the end of the
pour out the coffee before the end of the brewing process.
coffee is too weak.
The appliance continues to
drip long after the brewing
process has ended.
The dripping is caused by condensation of steam. It is completely
normal that the appliance drips for some time.
If the dripping does not stop, the drip stop may be clogged. To clean the
drip stop, push it to open it and then rinse it under the tap.
If you remove the jug for more than 20 seconds during the brewing
process, the drip stop causes the lter basket to overow.
The coffee is not hot enough. Place the jug properly on the hotplate.
Make sure that the hotplate and the bottom of the jug are clean.
When the grinder is switched off, you cannot change the coffee
STRENGTH button, but the
The appliance does not work. Put the mains plug in the wall socket and set the on/off switch on the
ground coffee button, as this switches off the grinder.
back of the appliance to ‘O’.
Make sure that the voltage indicated on the appliance corresponds to
the local mains voltage.
Fill the water reservoir with water.
When I use the grinder, the
coffee is too weak.
Make sure the number of cups you select with the 2-10 cups button is
consistent with the amount of water in the water reservoir. Please keep
in mind that the appliance uses all the water in the water reservoir.
Use the STRENGTH button to set the coffee strength to ‘strong’.
When you use coffee beans, make sure you do not press the pre-
Use coffee beans of a stronger blend or avour.
strength to ‘strong’ with the
To increase the coffee strength, select a higher number of cups with the
2-10 cups button than the number of cups you ll the water reservoir
with.
When I use pre-ground
coffee, the coffee is too weak.
Make sure the amount of pre-ground coffee in the lter is consistent
with the amount of water in the water reservoir. Please keep in mind
that the appliance uses all the water in the water reservoir.
Use ground coffee of a stronger blend or avour.
To increase the coffee strength, increase the amount of pre-ground
coffee or decrease the amount of water.
I have set the coffee
ENGLISH16

Problem Possible solution
Use thin cups, because they absorb less heat from the coffee than thick
cups.
Do not use milk that comes directly out of the fridge.
Descale the appliance. See section ‘Descaling’ in chapter ‘Cleaning and
maintenance’.
ENGLISH 17

18
22 Нагревателна плоча
23 Отвор за преливане
24 Ключ за вкл./изкл.
Преди да използвате уреда, прочетете внимателно това ръководство
за експлоатация и го запазете за справка в бъдеще.
— Не потапяйте задвижващия блок във вода или друга течност и не
го мийте с течаща вода.
— Преди да включите уреда в контакта, проверете дали
20 Бутон OPEN за отваряне на държача на поставката за филтър
напрежението, посочено на дъното на уреда, отговаря на това на
местната електрическа мрежа.
— Ако захранващият кабел се повреди, той трябва винаги да се
подменя от Philips, упълномощен сервиз на Philips или други
квалифицирани лица, за да се избегне опасност.
— Този уред не е предназначен за ползване от хора с физичиска,
сетивна или умствена недостатъчност, а също и от лица без
опит и познания, вкл. деца, ако са оставени без надзор и не са
инструктирани от страна на отговарящо за тяхната безопасност
лице относно начина на използване на уреда.
21 Воден резервоар с прозорче за ниво на водата
19 Бутон за старт/готовност
6 Бутон 2-10 CUPS
Поздравления за вашата покупка и добре дошли във Philips! За
да се възползвате изцяло от предлаганата от Philips поддръжка,
регистрирайте продукта си на адрес www.philips.com/welcome.
1 Постоянен филтър
2 Поставка за филтър
3 Държач на поставката за филтър
4 Капак на каната
5 Стъклена кана
7 Бутон STRENGTH
18 Бутон за мляно кафе
8 Дисплей
9 Бутон за степен на смилане
10 Предпазител на улея за кафе на зърна
11 Мерителна лъжица
12 Четка за почистване
13 Капак на контейнера за кафе на зърна
14 Контейнер за кафе на зърна
15 Капак на водния резервоар
16 Капак на улея за кафе на зърна
17 Отвор за пара

— Следете деца да не играят с уреда.
вашата страна.
— Каната е гореща по време на приготвянето на кафе и след това.
Винаги я дръжте за дръжката.
— Никога не използвайте каната в микровълнова фурна.
— Не местете уреда по време на работа.
— Изчакайте уреда да изстине, преди да го приберете. Възможно е
нагревателната плоча и каната за кафе да са горещи.
— След като сте разопаковали уреда, проверете дали доставката е
пълна и уреда е в изправност. Ако имате съмнения, не използвайте
уреда и се свържете с Центъра за обслужване на клиенти във
— Този уред е предназначен само за обикновени битови цели. Той
време на мелене или варене на кафе, както и преди почистване на
не е предназначен за използване на места, като кухни за персонала
в магазини, офиси, ферми или други работни помещения, нито
за използване от клиенти в хотели, мотели, места за нощуване и
закуска и други жилищни помещения.
Този уред Philips е в съответствие с всички стандарти по отношение
на електромагнитните излъчвания (EMF). Ако се употребява правилно
и съобразно напътствията в Ръководството, уредът е безопасен за
използване според наличните досега научни факти.
уреда.
— Изключвайте щепсела от контакта, ако възникнат проблеми по
— Пазете захранващия кабел от достъп на деца. Не го оставяйте да
приготвяне на кафе. Използвайте го съобразно предписанията, за
виси през ръба на масата или работния плот, на който е поставен
уредът.
— Не докосвайте смилащите устройства, особено когато уредът е
свързан в мрежата.
— Пазете материалите за опаковка (полиетиленови пликове, кашони
и др.) далече от достъп на деца, тъй като те не са играчки.
— Не докосвайте горещите повърхности на уреда по време на
работа.
— Този уред е предназначен за мелене на кафе на зърна и
да избегнете изгаряния от пара и гореща вода.
допиране до горещи повърхности.
— Не използвайте уреда, ако щепселът, мрежовият кабелът или
самият уред са повредени.
— Ако се появи проблем и не можете да го разрешите с помощта
на ръководството за потребителя, свържете се с Центъра за
обслужване на клиенти във вашата страна. Ако проблемът не
може да бъде отстранен, занесете уреда в упълномощен от Philips
сервизен център за преглед и поправка. Не се опитвайте сами да
ремонтирате уреда, защото гаранцията ще стане невалидна.
— Не слагайте уреда върху гореща повърхност и пазете кабела от
19
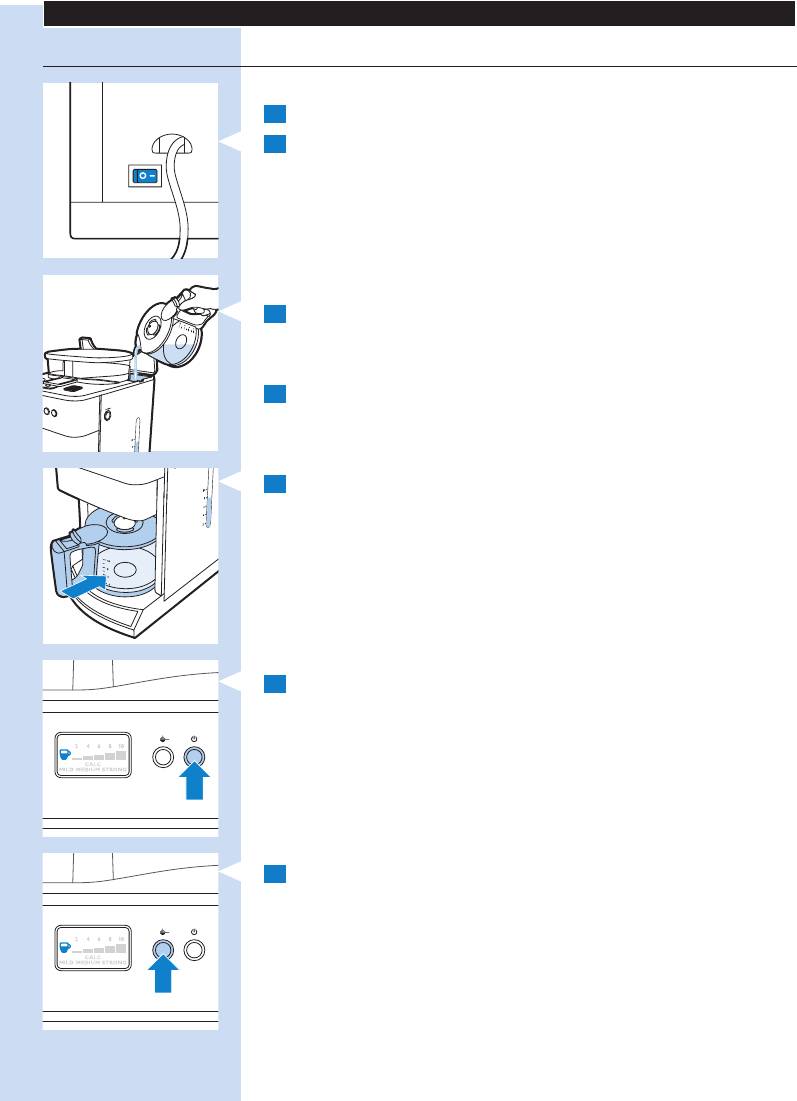
4 Затворетекапаканаводниярезервоар.
сила на кафето не се показват на дисплея.
Забележка: Когато изключите мелачката, индикациите за брой чаши и
, Бутонътсветва,когатогонатиснете.
7 Натиснетебутоназамлянокафе,задаизключитемелачката.
6 Натиснетебутоназастарт/готовност.
плоча с улей, насочен навътре към уреда.
Забележка: Каната трябва да бъде поставена върху нагревателната
спиране на прокапването”).
автоматично (вж. глава “Използване на уреда”, раздел “Функция за
капака на каната функцията за спиране на прокапването се активира
Забележка: Уверете се, че капакът на каната е на мястото си. Без
5 Сложетеканатавърхунагревателнатаплоча.
Забележка: Не поставяйте в уреда кафе на зърна, нито мляно кафе.
пряснастуденаводадоозначениетоза10чаши.
3 Отворетекапаканаводниярезервоар.Напълнетерезервоарас
бутон,задаактивиратеуредаотново.
остававключен.Врежимготовностможетеданатиснетевсеки
старт/готовностоставадасвети,задапокаже,чеуредътси
готовност.Втозислучайдисплеятизгасваисамобутонътза
бутонврамкитена1минута,уредътпреминававрежим
, Бутонътзастарт/готовностидисплеятсветват.Аконенатиснете
задавключитеуреда.
2 Поставетеключазавкл./изкл.нагърбанауредавположение“І”,
1 Включетещепселаназахранващиякабелвконтакта.
Преди първата употреба трябва да промиете кафемашината.
20
Аннотации для Кофеварки Philips HD7751 в формате PDF
Топ 10 инструкций
Другие инструкции
-
Инструкции по эксплуатации
1

Philips HD7751 инструкция по эксплуатации
(144 страницы)
- Языки:Русский
-
Тип:
PDF -
Размер:
1.92 MB -
Описание:
Кофеварка
Просмотр
На NoDevice можно скачать инструкцию по эксплуатации для Philips HD7751. Руководство пользователя необходимо для ознакомления с правилами установки и эксплуатации Philips HD7751. Инструкции по использованию помогут правильно настроить Philips HD7751, исправить ошибки и выявить неполадки.
104
6
С помощью щеточки для очистки сметите
частицы молотого кофе в нижнюю часть
желоба (рис. 22).
E
Совет.
Установите в корзинку фильтра бумажный или
постоянный фильтр, чтобы собрать молотый
кофе.
• Частицы молотого кофе попадут в
корзинку фильтра.
7
Закройте крышку желоба для зерен и
поверните механизм блокировки в положение
“Закрыто” (рис. 23).
8
Извлеките бумажный фильтр с остатками
молотого кофе и выбросите его.
6.3 Очистка кофеварки от
накипи
Во избежание засорения кофеварки очистку от
накипи следует проводить при появлении на
дисплее сообщения CALC (Очистка от накипи)
(после приготовления примерно 60 порций кофе).
регулярная очистка от накипи позволяет продлить
срок службы прибора и гарантирует оптимальные
результаты и время приготовления кофе.
Проводите очистку от накипи:
• после 120 циклов приготовления при
использовании мягкой воды (до 18 dH);
• после 60 циклов приготовления при
использовании жесткой воды (выше 18 dH).
Сведения о жесткости воды можно получить в
местном отделении организации водоснабжения.
D
Примечание
Если вы не знаете уровень жесткости воды
в вашем регионе и не можете обратиться
в отделение организации водоснабжения,
рекомендуем проводить очистку от накипи
каждый раз при появлении сообщения CALC
(Очистка от накипи).
D
Примечание
Чтобы убрать с дисплея сообщение CALC
(Очистка от накипи), одновременно нажмите
кнопку приготовления 2-10 чашек кофе и кнопку
STRENGTH.
1
Откройте крышку емкости для воды.
6 Очистка и уход
6.1 Очистка после каждого
использования
B
Предупреждение
Запрещается погружать прибор в воду или
другие жидкости, а также промывать его под
струей воды.
1
Чтобы выключить прибор, установите
переключатель питания, расположенный
на задней панели устройства, в положение
“O”. (рис. 19)
2
Выньте вилку сетевого шнура из розетки
электросети.
3
Протрите внешнюю поверхность кофеварки и
нагреваемую пластину влажной тканью.
4
Очистите корзинку фильтра, постоянный
фильтр и стеклянный кувшин горячей водой
с добавлением небольшого количества
моющего средства или вымойте их в
посудомоечной машине.
6.2 Очистка желоба для
кофейных зерен
Необходимо очищать желоб для кофейных зерен
каждые 1–2 недели, в зависимости от частоты
использования.
1
Вставьте вилку сетевого шнура в розетку
электросети.
2
Чтобы включить прибор, установите
переключатель питания, расположенный
на задней панели устройства, в положение
“I” (рис. 2).
• Загорится кнопка пуска/режима ожидания,
включится подсветка дисплея.
3
Нажмите кнопку пуска/режима ожидания,
отключите вилку от розетки электросети.
4
Вставьте плоский конец ручки щетки для
чистки в механизм блокировки желоба и
поверните механизм блокировки в положение
“Открыто”. (рис. 20)
5
Откройте крышку желоба для зерен (рис. 21).
-
Страница 1
EN User manual 5 DA Bruger vejledning 1 4 DE Benutzerhandbuch 23 EL Εγχειρίδιοχρήσης 32 ES Manual del usuario 42 FI Käyttöopas 5 1 FR Mode d’emploi 5 9 IT Manuale utente 68 NL Gebruiksaanwijzing 77 NO Brukerhåndbok 86 PT Manual do utilizador 94 SV Användarhandbok 1 03 TR K ullanımkıla vuzu 1 1[…]
-
Страница 2
[…]
-
Страница 3
CALC RESET 1[…]
-
Страница 4
[…]
-
Страница 5
T able of contents 1 Introduction 5 2 General description 5 3 Important 6 4 Befor erstuse 7 5 Using the appliance 5 6 Cleaning and maintenance 10 7 Ordering accessories 11 8 En vironment 11 9 Guarantee and ser vice 11 10 T roub leshooting 12 1 Intr oduction Congratulations on your purchase and welcome ?[…]
-
Страница 6
6 • If a prob lem occur s that you cannot solve by means of this user manual, contact the Consumer Care Centre in your countr y . If the problem cannot be solv ed, take the appliance to a ser vice centre author ised by Philips f or examination or repair . Do not attempt to repair the appliance yourself, otherwise your guarantee becomes invalid. 3[…]
-
Страница 7
7 D Note: When you switch off the grinder , the number of cups and the strength setting are not shown on the displa y . 8 Press the star t/standb y button to star t the 9 Let the appliance operate until all the water ?[…]
-
Страница 8
8 5 T o select the number of cups, press the 2-10 cups button as many times as the desired • The 2-10 cups button lights up when you press it. • The selected number of cups appears on the display . D Note: The appliance uses all the water in the water tank. Make sure t[…]
-
Страница 9
9 4 Press the pre-ground coffee button to switch • The button lights up when you press it. D Note: When you switch off the grinder , the number of cups and the strength setting are not shown on the displa y . 5 ?[…]
-
Страница 10
10 E Tip: coffee. • The gr ound coffee residues fall into the lter bask et. 7 Close the […]
-
Страница 11
11 5 Put the mains plug in the wall socket. 6 Set the on/off switch on the back of the appliance to ‘I’ to switch on the • The star t/standb y button and the display lights up. 7 Press the star t/standb y button. 8 Press the pre-ground coffee button to switch off the grinder . Then pr[…]
-
Страница 12
12 10 T roub leshooting This chapter summarises the most common problems you could encounter with the appliance. If you are unab le to solve the problem with the information below , contact the Consumer Care Centre in your countr y . Problem P ossible solution The appliance does not work. Put the mains plug in the wall socket and set the on/off swi[…]
-
Страница 13
13 Problem P ossible solution The appliance continues to drip long after the brewing process has ended. The dripping is caused by condensation of steam. It is completely normal that the appliance dr ips for some time. If the dripping does not stop, the drip stop may be clogged. T o clean the drip stop, press the OPEN button on the right-hand side o[…]
-
Страница 14
14 2 Gener el beskriv else(g. 1) 2 Filter kur v 3 Dr ypstop-funktion 4 Lås til kaffebønnesliske 5 Vælger knap til maling 6 Display 8 Knappen 2-10 CUPS ?[…]
-
Страница 15
15 • Hvis der opstår prob lemer , du ikke kan løse ved hjælp af brugsvejledningen, bedes du kontakte det lokale Philips Kundecenter . Hvis ikke problemet kan løses, skal du medbringe appar atet til et autoriseret Philips- ser vicevær ksted, så de kan under søge eller reparere det. For søg aldrig selv at reparere apparatet, da reklamations[…]
-
Страница 16
16 7 T r yk på knappen til formaling af kaffe for at • Knappen lyser op, når du tr ykk er på den. D Bemærk: Når du slukker for kværnen, vises antallet af kopper og styr k eindstillingen ikke på displayet. 8 T r yk på star t/standby-knappen for at star te ?[…]
-
Страница 17
17 5 Du vælger antallet af kopper v ed at tr ykke på knappen 2-10 CUPS, så mange gange som det • Knappen 2-10 CUPS lyser , når du tr ykk er på den. • Det valgte antal k opper vises på skærmen. D Bemærk: Apparatet br uger alt vandet i vandtanken. […]
-
Страница 18
18 D Bemærk: Når du slukker for kværnen, vises antallet af kopper og styr k eindstillingen ikke på displayet. 5 D Bemærk: Den mængde formalet kaffe , d[…]
-
Страница 19
19 7 Luk låget til kaffebønneslisken, og drej låsen til 8 og smid det væk. 6.3 Afkalkning af kaffemaskine […]
-
Страница 20
20 8 Miljøhensyn • Apparatet må ikke smides ud sammen med almindeligt husholdningsaffald, når det til sin tid genbr ugsstation. På den måde er du med til at […]
-
Страница 21
21 10 F ejlnding Dette kapitel opsummerer de mest almindelige problemer , du kan støde på. Kan problemet ikke løses ved hjælp af nedenstående oplysninger , bedes du venligst kontakte dit lokale Philips Kundecenter . Problem Mulig løsning Apparatet fungerer ikke . Sæt netledningen i stikkontakten, og sæt derefter on/off-knappen ?[…]
-
Страница 22
22 Problem Mulig løsning Apparatet for tsætter med at dr yppe et stykke tid efter endt br ygning. Det skyldes kondensering af damp. Det er helt normalt, at appar atet dr ypper et stykke tid. Hvis apparatet ikke stopper med at dr yppe, kan dr ypstopfunktionen være tilstoppet. Rengør dr ypstoppet ved at tr ykke på OPEN- ?[…]
-
Страница 23
23 DEUTSCH 9 Filter korbhalter 10 Kannendeckel 11 Glaskanne 12 W ar mhalteplatte 13 Ein-/Ausschalter 15 16 OPEN-T aste für Filter korbhalter 17 Star t-/[…]
-
Страница 24
24 • Bewegen Sie das Gerät nicht, während es in Betrieb ist. • Lassen Sie das Gerät abkühlen, bev or Sie es wegräumen. Die W ar mhalteplatte und die • V ergewisser n Sie sich, nachdem Sie das Gerät ausgepackt haben, dass keine T eile f[…]
-
Страница 25
25 9 Lassen Sie das Gerät laufen, bis alles W asser in die Kanne gelaufen ist. • W enn der Brühvorgang beendet ist, er tönen 5 Pieptöne . 10 Drücken Sie auf die Star t-/Standby-T aste , um 11 Leeren Sie die Kanne aus. 5 Das Gerä[…]
-
Страница 26
26 • Die 2-10 CUPS-T aste leuchtet auf, wenn Sie sie drück en. • Die ausge wählte Anzahl an T assen ersc heint auf dem Display . D Hinweis: Das Gerät verbraucht das ganze Wasser im W asserbehälter . V er gewissern Sie sich, dass die Anzahl der T assen, die Sie mit der 2-10 CUPS- T aste auswählen, mit der W asser menge im W asserbehälter ?[…]
-
Страница 27
27 D Hinweis: W enn Sie das Mahlwerk ausschalten, wird die Anzahl der T assen und die Stär keeinstellung nicht auf dem Display angez eigt. 5 Geben Sie gemahlenen Kaffee in die Filter tüte D Hinweis: Wie viel gemahlenen Kaffee Sie v erwenden, ist eine Frage des individuellen Ge[…]
-
Страница 28
28 6.3 Die Kaffeemaschine entkalk en W enn auf dem Display die Nachricht Kaffeemaschine entkalken, […]
-
Страница 29
29 7 Zubehör bestellen besuchen Sie unseren Online-Shop unter www .shop.philips.com/service . W enn der Online-Shop in Ihrem Land nicht verfügbar ist, wenden Sie sich an Ihren Philips Händler oder ein Philips Ser vice-Center . S[…]
-
Страница 30
30 10 F ehlerbehebung ?[…]
-
Страница 31
31 Problem Das Gerät tropft noch eine W eile nach Ablauf des Brühvorgangs. Das T ropfen wird durch die Kondensation v on Dampf ver ur sacht. Es ist ?[…]
-
Страница 32
32 2 Γενική περιγραφή(Εικ. 1) ?[…]
-
Страница 33
33 ?[…]
-
Страница 34
34 D Σημείωση: 4 5 […]
-
Страница 35
35 1 […]
-
Страница 36
36 8 ?[…]
-
Страница 37
37 5.4 Λειτουργίαπροστασίας σταξίματος(Dripstop) […]
-
Страница 38
38 6.3 Αφαίρεσηαλάτωναπό τηνκαφετιέρα ?[…]
-
Страница 39
39 7 Παραγγελία εξαρτημάτων ?[…]
-
Страница 40
40 10 Οδηγόςανεύρεσης/επίλυσηςπροβλημάτων […]
-
Страница 41
41 ?[…]
-
Страница 42
42 2 Descripción general(g. 1) 1 Filtro per manente 3 Antigoteo 4 Cier re del conducto de granos de café 5 Rueda de selección del molinillo 6 Pantalla 7 Botón de intensidad STRENGTH 8 Botón de 2-10 tazas ?[…]
-
Страница 43
43 3.3 Precaución • calientes y evite que el cable entre en • Desenchufe el aparato antes de limpiar lo , así como si se pr[…]
-
Страница 44
44 6 Pulse el botón de inicio/modo de • El apar ato emite un pitido y el indicador de recién hecho aparece en la pantalla. 7 Pulse el botón de café molido previamente • El botón se ilumina cuan[…]
-
Страница 45
45 5 Para seleccionar el número de tazas, pulse el botón de 2-10 tazas tantas veces como tazas • El botón de 2-10 tazas se ilumina cuando lo pulsa. • El númer o seleccionado de tazas aparece en la pantalla. D Nota: El aparato utiliza toda el agua del depósito. Asegúrese de que el número de t[…]
-
Страница 46
46 5.3 Uso de café molido pre viamente Si desea usar café molido en vez de granos de café, siga los siguientes pasos. 1 Llene el depósito de agua con agua tal y como se describe en la sección “Llenado del depósito de agua”. 2 Pulse el botón OPEN del lado derecho del aparato par a abrir el sopor te de la cesta del ?[…]
-
Страница 47
47 E Consejo: el café molido. • Los restos de café molido caen en la cesta del ltro. 7 Cier[…]
-
Страница 48
48 7 Solicitud de accesorios Si desea adquirir accesor ios para este apar ato, visite nuestra tienda en línea en www .shop.philips.com/ ser vice . Si la tienda en línea no está disponible en su país, diríjase a su distribuidor Philips o a un centro ?[…]
-
Страница 49
49 10 Guía de r esolución de prob lemas En este capítulo se resumen los problemas más frecuentes que pueden surgir . Si no puede resolver el problema con la siguiente información, póngase en contacto con el Ser vicio de Atención al Cliente de su país. Problema P osible solución El aparato no funciona. Enchufe la cla vija a la toma de cor r[…]
-
Страница 50
50 Problema P osible solución El aparato seguirá goteando durante bastante tiempo después preparación del café. El goteo se produce por la condensación del vapor . Es completamente normal que el apar ato gotee un rato. Si el goteo no cesa, puede que el sistema anti[…]
-
Страница 51
51 SUOMI 13 Käynnistyskytkin 14 V aluma-aukko tar kistusikkuna 16 Suodatinkor in telineen a vauspainike 17 Käynnistys-/valmiustilapainike 18 V almiiksi jauhetun kahvin painike […]
-
Страница 52
52 3.4 Sähkömagneettiset k entät (EMF) ?[…]
-
Страница 53
53 5.2 Kahvipapujen käyttö B V aroitus: Älä laita espressokahvipa puja kahvipapusäiliöön. Käytä ainoastaan ta vallisia kahvipapuja. B V aroitus: Pidä vesisäiliön kansi suljettuna, kun täytät kahvipapusäiliön kahvipa vuilla, jotta kahvipa vut eivät putoa vesisäiliöön ja tuki vedentäyttöaukk oa. 1 A vaa suodatinkor in teline pai[…]
-
Страница 54
54 9 kuumana, aseta laite valmiustilaan painamalla • Laite antaa pitkän merkki?[…]
-
Страница 55
55 6.2 Kahvipapukuilun puhdistus Kahvipapukuilu on puhdistettava joka viikk o tai joka toinen viikko sen mukaan, kuinka usein laitetta käytetään. 1 2 Käynnistä laite asettamalla laitteen takana […]
-
Страница 56
56 14 Puhdista suodatinkori ja kannu kuumalla vedellä ja m uutamalla tipalla astianpesuainetta. 15 Sammuta laite asettamalla laitteen takana 7 T ar vikk eiden tilaaminen V o it os t aa l ai t tee n lisä osia os[…]
-
Страница 57
57 10 Vianmääritys ongelmaa alla olevie[…]
-
Страница 58
58 Ongelma Mahdollinen ratkaisu Laitteesta tippuu kahvia pitkään suodatuksen jälkeen. kahvipisaroita tippuu jonkin aikaa. Jos tippuminen jatkuu, tippalukko v o[…]
-
Страница 59
59 10 Couvercle de la verseuse 11 V er seuse en verre 12 Plaque chauffante 13 Inter r upteur on/off 14 Écoulement du trop-plein 15 Réser voir d’eau av ec indicateur du niveau d’eau ?[…]
-
Страница 60
60 • Ne déplacez pas l’appareil en cours d’utilisation. • Attendez que l’appareil ait refroidi a vant de le ranger . La plaque chauffante et la ver seuse risquent d’être encore brûlantes. • […]
-
Страница 61
61 9 Laissez l’appareil fonctionner jusqu’à ce que toute l’eau se soit écoulée dans la verseuse . • La cafetièr e sonne 5 fois lorsque le c ycle de préparation est terminé. 10 Appuyez sur le bouton marche/v eille pour arrêter le cycle de prépar ation/de maintien au 11 Videz la verseuse[…]
-
Страница 62
62 • Le bouton pour 2-10 tasses s’allume lorsque vous appuyez dessus. • Le nombre de tasses que vous avez sélectionné s’afche . D Remarque : L ’appareil utilise toute l’eau présente dans le réser voir . Assurez-vous que le nombre de tasses sélectionné à l’aide du bouton pour 2-10 tasses correspond à la quantité d’eau dan[…]
-
Страница 63
63 3 4 Appuyez sur le bouton de mouture du café […]
-
Страница 64
64 E Conseil : le café moulu. • Les résidus de café moulu tombent dans le por te-ltre. 7 F[…]
-
Страница 65
65 7 Commande d’accessoir es P our acheter des accessoires pour cet appareil, rendez-vous sur notre boutique en ligne à l’adresse www .shop.philips.com/service . Si la boutique en ligne n’est pas disponible dans votre pa ys, contactez votre revendeur Philips ou un Centre Ser vice Agréé Philips. Si vous rencontrez des problèmes pour v ous […]
-
Страница 66
66 10 Dépanna ge Ce chapitre présente les problèmes les plus courants que vous pouvez rencontrer a vec votre appareil. Si vous ne par venez pas à résoudre le prob lème à l’aide des infor mations ci-dessous, contactez le Ser vice Consommateur s Philips de votre pays. Problème Solution possible L ’appareil ne fonctionne pas. Branchez le c[…]
-
Страница 67
67 Problème Solution possible L ’appareil continue à goutter , longtemps préparation du café. Ce phénomène est causé par la condensation de la vapeur . Il est tout à fait normal que l’appareil goutte pendant quelques instants. Si l’appareil n’arrête pas de gou[…]
-
Страница 68
68 8 Pulsante 2-10 CUPS 10 Coperchio della car affa 11 Car affa di vetro 12 Piastra 13 Inter r uttore on/off 14 Aper tura di fuor iuscita controllare il livello dell’acqua […]
-
Страница 69
69 • Non spostate l’apparecchio mentre è in funzione . • Attendete che l’apparecchio si raffreddi pr ima di ripor lo. La piastra e la car affa potrebbero essere calde . • Quando togliete l’apparecchio dalla confezione, controllate che sia integro e che non abbia subito danni. In caso di dub bi, non utilizzatelo ma rivolgetevi al centro[…]
-
Страница 70
70 9 caraffa si r iempie di acqua. • La macchina per il caffè all’amer icana emette 5 segnali acustici a conclusione del processo di er ogazione . 10 Premete il pulsante star t/standb y per interrompere il pr[…]
-
Страница 71
71 E Consiglio Vi consigliamo di fare delle prov e con le var ie impostazioni di macinatura per trovare quella che preferite . 5 P er selezionare il numero di tazze, premete il pulsante 2-10 CUPS un numero di volte pari a • Il pu[…]
-
Страница 72
72 5.3 Utilizzo di caffè pr e- macinato Se volete usare caffè pre-macinato in vece di caffè in grani, seguite i passaggi r ipor tati sotto . 1 Riempite il serbatoio dell’acqua, come descritto in “Riempimento del serbatoio dell’acqua”. 2 Premete il pulsante OPEN sul lato destro dell’apparecchio per aprire il cestello del ?[…]
-
Страница 73
73 E Consiglio raccogliere il caffè macinato. • I residui di caffè macinato cadono nel cestello del lt[…]
-
Страница 74
74 7 Ordinazione degli accessori P er acquistare degli accessori per questo apparecchio, visitate il nostro Online Shop all’indirizzo www .shop.philips.com/service . Se l’Online Shop non è disponibile nel vostro paese , r ivolgetevi al v ostro r ivenditore Philips o a ?[…]
-
Страница 75
75 10 Risoluzione dei guasti In questo capitolo vengono ripor tati i prob lemi più r icorrenti legati all’uso dell’apparecchio. Se non riuscite a r isolvere i prob lemi con le infor mazioni seguenti, vi preghiamo di contattare il Centro Assistenza Clienti Philips del vostro paese. Problema P ossibile soluzione L ’apparecchio non funziona. In[…]
-
Страница 76
76 Problema P ossibile soluzione L ’apparecchio continua a perdere acqua anche molto tempo dopo il processo di erogazione . La fuoriuscita di acqua è causata dalla condensazione del vapore . Si S[…]
-
Страница 77
77 NEDERLANDS 7 STRENGTH-knop 8 2-10-kops knop 9 Filtermandhouder 10 Deksel van kan 11 Glazen kan 12 W ar mhoudplaat 13 Aan/uitknop 14 Overstroomgat 15 Waterreser voir met water niv eauvenster 17 Star t-/stand-b yknop […]
-
Страница 78
78 3.3 Let op • Plaats het apparaat niet op een heet opper vlak en voor kom dat het netsnoer in contact komt met hete opper vlakken. • Haal de stekker van het apparaat uit het stopcontact als er tijdens het malen van optreden, en voordat u[…]
-
Страница 79
79 7 • De knop gaat br anden als u erop drukt. D Opmerking: W anneer u de molen uitschakelt, worden het […]
-
Страница 80
80 E Tip: Wij adviseren u om met de verschillende maalgraadstanden te exper imenteren om te ontdekken welk e stand u het prettigst vindt. 5 Om het aantal koppen te kiezen, dr ukt u op de 2-10-kops knop tot het gewenste aantal is • De 2-10-k ops knop gaat branden als u er op drukt. • Het g eko[…]
-
Страница 81
81 5.3 Metv oorgemalenk ofe V olg de onder staande stappen als u voorgemalen 1 V ul het water reser voir met water , zoals is beschreven in ‘Het water reser voir vullen’. 2 Dr uk op de OPEN-kno[…]
-
Страница 82
82 E Tip: vangen. • De resten g emalen kofe vallen in de ltermand. 7 Sluit h[…]
-
Страница 83
83 7 Accessoir es bestellen Ga naar onze Online Shop op www .shop.philips.com/service om accessoires voor dit apparaat te kopen. Ga naar uw Philips-dealer of een Philips- ser vicecentr um als de Online Shop niet beschikbaar is in uw land. Als u problemen hebt met het vinden van accessoires voor uw apparaat, neem dan contact op met het Philips Consu[…]
-
Страница 84
84 10 Pr oblemen oplossen Dit hoofdstuk behandelt in het kor t de problemen die u kunt tegenkomen tijdens het gebr uik van het apparaat. Als u er niet in slaagt het probleem op te lossen met behulp van de onder staande informatie , neem dan contact op met het Consumer Care Centre in uw land. Probleem Mogelijke oplossing Het apparaat wer kt niet. St[…]
-
Страница 85
85 Probleem Mogelijke oplossing Het apparaat blijft nog lang doordr uppelen nadat voltooid. Het dr uppelen wordt v eroorzaakt door de condensatie van stoom. Het is volkomen normaal dat het apparaat nog even blijft doordr uppelen. Als het dr uppen niet stopt, is de druppelstop mogeli[…]
-
Страница 86
86 8 Knappen for 2–10 kopper 9 Filter kur vholder 10 Kannelokk 11 Glasskanne 12 Kokeplate 13 A v/på-knapp 15 V annbeholder med vannivåvindu 17 Star t/standb […]
-
Страница 87
87 • Dette apparatet er kun beregnet for vanlig br uk i hjemmet. Det er ikke beregnet f or br uk på f.eks. bedriftskjøkken, butikker , kontorer , bondegårder eller andre arbeidsmiljøer . Det er heller ikke beregnet for å brukes av kunder på hoteller , moteller eller i andre typer bomiljøer . 3.4 Elektr omagnetisk e felt (EMF) Dette Philips[…]
-
Страница 88
88 E Tips: Br uk kannen til å fylle vannbeholderen med den mengden vann som kreves. D Merk: (g. 8) Ikke fyll vannbeholderen o ver indikatoren for 10 kopper . Da vil det komme vann ut av åpningen bak. 5.2 Bruk e kaffebønner B Advarsel: Ikk e legg espresso-kaffebønner i kaffebønnebeholder en. Bruk kun vanlige kaffebønner . B Advarse[…]
-
Страница 89
89 B Advarsel: Ikk e ta på varmeplaten mens den er på, siden den blir varm. 8 V ent til kaffetrakteren har stoppet å pipe før du fjerner kannen fr a varmeplaten. D Merk: Etter traktingen dr ypper det kaffe fra • Ferskhetsindikatoren blink er sakte på […]
-
Страница 90
90 1 Sett av/på-br yteren bak på apparatet til O for 2 T a ut støpselet av stikkontakten. 3 Tør k utsiden a v kaffetrakteren og var meplaten med en fuktig klut. 4 ?[…]
-
Страница 91
91 13 Gjenta trinn 12 til vannet ikke lenger smaker eller lukter eddik. 14 vann og litt oppvaskmiddel. 15 Sett av/på-br yteren bak på apparatet til ?[…]
-
Страница 92
92 10 F eilsøking Dette avsnittet oppsummerer de vanligste prob lemene som kan oppstå med appar atet. Hvis du ikke klarer å løse problemet med inf or masjonen nedenfor , kan du ta kontakt med Philips’ forbr uk er tjeneste der du bor . Problem Mulig løsning Apparatet vir ker ikke. Sett støpselet i stikkontakten, og sett av/på-br yteren bak […]
-
Страница 93
93 Problem Mulig løsning Apparatet for tsetter å dr yppe lenge etter at trakteprosessen er ferdig. Dr yppingen forår sakes a v kondens fr a dampen. Det er helt nor malt at apparatet dr ypper en stund. Hvis dr yppingen ikke stopper , kan det hende at dr yppstoppen er blokker t. Du rengjør dr yppstoppen ved å tr ykke på åpneknappen ?[…]
-
Страница 94
94 8 Botão de 2-10 chávenas 10 T ampa de jar ro 11 Jar ro de vidro 12 Placa de aquecimento 13 Inter r uptor ligar/desligar 14 Or ifício de escoamento 15 Depósito de água com janela indicador a do nível da água 16 Botão OPEN par a o supor te do cest[…]
-
Страница 95
95 • Nunca coloque o jarro no microondas. • Não mo va o aparelho dur ante o seu funcionamento. • Aguarde até o aparelho arrefecer antes de o guardar . A placa de aquecimento e o jar ro do café podem estar quentes. • ?[…]
-
Страница 96
96 10 Prima o botão iniciar/em esper a para parar o processo de prepar ação/ manter 11 Esvazie o jarro. 5 Utilizar o apar elho 5.1 Encher o reservatório da água 1 Abra a tampa do depósito da água e encha-o com a quantidade necessária de água […]
-
Страница 97
97 água no respectivo depósito . Se seleccionar um número de chávenas menor do que a quantidade de água, o café torna-se mais fr aco do que o pretendido. 6 Prima o botão STRENGTH uma ou vár ias vez es até a intensidade de café desejada estar ?[…]
-
Страница 98
98 D Nota: A quantidade de café pré-moído que utiliza é uma questão de gosto pessoal. Para um café médio a for te , utilize uma colher de medição 6 […]
-
Страница 99
99 6.3 Descalcicaçãodamáquina de café Quando a mensagem “C ALC” for apresentada […]
-
Страница 100
100 7 Encomendar acessórios Para compr ar acessórios par a este aparelho , visite a nossa loja online em www .shop.philips.com/ ser vice . Se não tiver uma loja online disponível no seu país, dirija-se ao seu distr ibuidor Philips ou a um centro de assistência Philips. Se tiver ?[…]
-
Страница 101
101 10 Resolução de pr oblemas Este capítulo resume os problemas mais com uns que pode ter com o aparelho. Se não conseguir resolver o prob lema com as infor mações fornecidas a seguir , contacte o Centro de Apoio ao Cliente do seu país. Problema Solução possível O aparelho não funciona. ?[…]
-
Страница 102
102 Problema Solução possível O aparelho continua a pingar durante muito tempo depois do processo de preparação terminar . Os pingos são prov ocados pela condensação de vapor . É totalmente normal que o aparelho pingue dur ante algum tempo. Se os pingos não pararem, o sistema antipingos poderá estar obstr uído . Para limpar o sistema an[…]
-
Страница 103
103 9 Filter korghållare 10 Kannlock 11 Glaskanna 12 Värmeplatta 14 Översvämningshål ?[…]
-
Страница 104
104 i verkstäder , på kontor eller i andra användas a v kunder på hotell, motell, bed and 3.4 Ele[…]
-
Страница 105
105 E Tips: Använd kannan och fyll vattenbehållaren med rätt mängd vatten. D Obs! (Bild
 […]
[…] -
Страница 106
106 B V arning! Rör inte värmeplattan medan den är på. Den blir m ycket varm. 8 Vänta tills kaffebr yggaren har slutat pipa innan du tar bor t kannan från värmeplattan. D Obs! När br yggningen är klar droppar det kaffe från • Indikatorn för n[…]
-
Страница 107
107 3 T or ka av kaff ebr yggarens utsida och värmeplattan med en fuktig tr asa. 4 och glaskannan med hett vatten och lite diskmedel, eller diska dem i diskmaskinen. 6.2 Rengöra rännan för kaffebönor ?[…]
-
Страница 108
108 12 Fyll vattenbehållaren med kallt vatten och en ny br yggning. Låt kaffebr yggaren avsluta ?[…]
-
Страница 109
109 10 F elsökning ?[…]
-
Страница 110
110 Problem Apparaten for tsätter droppa långt efter att br yggningen är klar . Droppet beror på kondenserad ånga. Det är helt nor malt att apparaten droppar ett tag. ?[…]
-
Страница 111
111 2 Genel açıklamalar(Şek. 1) 2 Filtre sepeti […]
-
Страница 112
112 • ?[…]
-
Страница 113
113 D Not: 8 ?[…]
-
Страница 114
114 E İpucu: 5 […]
-
Страница 115
115 3 4 ?[…]
-
Страница 116
116 7 8 […]
-
Страница 117
117 8 […]
-
Страница 118
118 10 Sorun giderme ?[…]
-
Страница 119
119 TÜRKÇE Sor un bittikten sonra bir süre damlatmaya devam eder . […]
-
Страница 120
120[…]
-
Страница 121
2 C A LC RESET 3 4 5 6 7 8 9 10 11 12 13 14 15 16 17 18 19 20 21[…]
-
Страница 122
22 23 24 25[…]
-
Страница 123
[…]
-
Страница 124
© 2012 K oninklijke Philips Electr onics N.V . All rights reserved. 4222.200.0555.3[…]
 […]
[…]