
www.krups.com
FULLY AUTOMATIC
SERIE EA89
UK RU PL HU SK CS EL PT IT ES FI SV NO DA NL DE ENROBGHR FR
1
L
K
2
J
N
M
O
O
A
I
B
C
E
D
H
G
F
1
2
1 2 3 4
5 6 7 8
9 10 11 12
13 16
17 18
23 2421 22
14 15
h
h
19
h
20
h
h
o
h

26 27 28
29 30 31 32
33 34
25
h
h
h
h
Chère Cliente, cher Client,
Nous vous félicitons pour l’achat de votre Espresso Automatic Serie EA89.
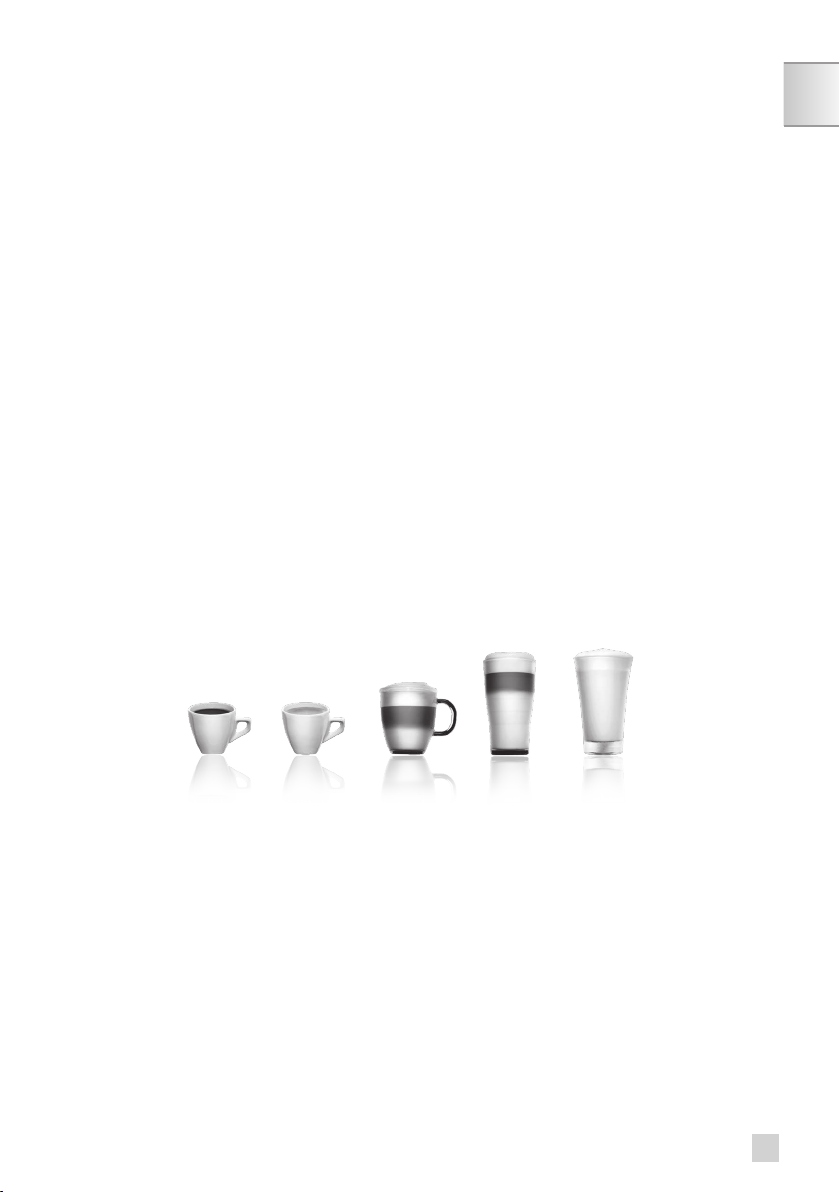
Ce sont plus de 14 boissons chaudes que propose ce nouveau produit : espresso, double espresso, café, double
café, ristretto, doppio, americano, cappuccino, double cappuccino, latte, double latte, lait moussé, thé vert, thé noir,
infusion.
Outre ce choix très large, la machine offre de larges possibilités de personnalisation des boissons, vous pourrez par
exemple utiliser une fonction qui renforcera l’intensité de votre café, si vous appréciez des préparations plutôt corsées.
Vous pouvez agir sur le volume, l’intensité et la température de vos boissons.
Les boissons les plus fréquemment consommées sont accessibles d’un simple geste sur l’interface principale. L’écran,
quant à lui, vous permettra de suivre l’avancement de vos cafés ou d’accéder aisément aux différents menus.
La plupart des boissons peuvent être réalisées par deux, ce qui apporte gain de temps et convivialité.
Grâce à sa technologie KRUPS Quattro force, incluant un thermobloc Compact Thermoblock System avec chambre
de percolation intégrée, sa pompe 15 bars et parce qu’elle travaille à partir de café en grains fraîchement moulus juste
avant extraction, votre machine vous permettra d’obtenir des ristrettos, espressos, et cafés dès la première tasse avec
un maximum d’arômes et recouverts d’une crème couleur brun chamois.
Traditionnellement, et pour permettre à la boisson d’exprimer toute sa saveur, l’espresso est servi dans de petites
tasses en porcelaine évasées. Pour obtenir un espresso à une température optimale et une crème bien compacte, nous
vous conseillons de faire préchauffer vos tasses.
Il vous faudra probablement plusieurs essais pour trouver le café en grains qui vous siéra. En changeant de mélange
et/ou de torréfaction, vous parviendrez à obtenir le résultat idéal.
Le café espresso est plus riche en arôme qu’un café ltre classique. Malgré son goût plus prononcé, très présent en
bouche et plus persistant, l’espresso contient moins de caféine que le café ltre (environ 60 à 80 mg par tasse en
comparaison avec 80 à 100 mg par tasse) en raison d’une durée de percolation plus courte.
La qualité de l’eau utilisée est aussi un autre facteur déterminant quant à la qualité du résultat en tasse. Idéalement,
utilisez une eau tout juste sortie du robinet (an qu’elle n’ait pas eu le temps de stagner au contact de l’air), exempte
d’odeur de chlore et froide.
Les touches tactiles, ergonomiques et confortables, faciliteront votre navigation. Vous serez guidés sur l’ensemble des
étapes, de la préparation de votre boisson aux opérations de maintenance.
Nous vous souhaitons beaucoup de plaisir avec votre machine Krups.
L’équipe Krups
1
FR

Pour utiliser au mieux votre machine et obtenir des cafés de qualité, voici quelques conseils :
• La qualité de l’eau inue fortement sur la qualité des arômes. Le calcaire et le chlore peuvent altérer le
goût de votre café. Nous vous recommandons d’utiliser la cartouche Claris Aqua Filter System, ou de
l’eau faiblement minéralisée, an de préserver tous les arômes de votre café.
• Pour la préparation des boissons exclusivement café nous préconisons d’utiliser des tasses en porcelaine
en forme de tulipe préalablement préchauffées (en les passant sous l’eau chaude par exemple) et
dont la taille est adaptée à la quantité que vous souhaitez. Pour vos préparations lactées, nous vous
recommandons d’utiliser des tasses en verre épais, pour un résultat appétissant.
• Les grains de café torréés peuvent perdre de leur arôme s’ils ne sont pas protégés. Nous vous conseillons
d’utiliser la quantité de grains équivalente à votre consommation pour les 4-5 jours à venir. La qualité du
café en grains est variable et son appréciation subjective, néanmoins nous vous recommandons d’utiliser
de l’arabica plutôt que du robusta.
• Enn, nous vous conseillons de proscrire les grains huileux et caramélisés, ceux-ci pouvant endommager
la machine.
• La qualité et la nesse du broyage du grain inuent sur la force des arômes et la qualité de la crème. Plus
le grain est broyé n, plus la crème sera onctueuse. Le broyage doit par ailleurs être adapté à la boisson
désirée : n pour le ristretto et l’espresso, plus grossier pour le café.
• Vous pouvez utiliser du lait pasteurisé ou UHT, écrémé, demi-écrémé ou entier, sortant du réfrigérateur
(7°C). L’utilisation de laits spéciaux (microltrés, crus, fermentés, enrichis…) ou des laits végétaux (lait
de riz, d’amande, etc) peuvent donner des résultats moins satisfaisants notamment en terme de qualité
de mousse.
2

SOMMAIRE
INFORMATIONS IMPORTANTES SUR LE PRODUIT ET LE MODE D’EMPLOI
……..p. 4
DONNEES TECHNIQUES …………………………………………p. 4
DESCRIPTIF DE L’APPAREIL ………………………………………p. 5
VUE D’ENSEMBLE ……………………………………………..p. 5
APPLICATION KRUPS ESPRESSO ………………………………….p. 6
MISE EN SERVICE
INSTALLATION DE L’APPAREIL …………………………………….p. 7
AVANT LA PREPARATION DES BOISSONS
INDICATIONS IMPORTANTES ……………………………………..p. 8
PREPARATION DES BOISSONS CAFE EN ACCES DIRECT …………………p. 9
PREPARATION DES BOISSONS LACTEES EN ACCES DIRECT ………………p. 9
PREPARATIONS THES …………………………………………..p. 10
PREPARATION DES AUTRES BOISSONS …………………………….p. 11
AUTRES FONCTIONS ……………………………………………p. 11
ENTRETIEN GENERAL …………………………………………..p. 13
PROBLEMES ET ACTIONS CORRECTIVES …………………………….p. 14
3
FR
INFORMATIONS IMPORTANTES SUR LE PRODUIT ET LE MODE D’EMPLOI
Vous trouverez dans ce manuel toutes les informations importantes concernant la mise en service, l’utilisation et
l’entretien de votre machine.
Lisez attentivement le mode d’emploi avant la première utilisation de l’appareil et conservez- le : une utilisation non
conforme dégagerait KRUPS de toute responsabilité.
GUIDE DES SYMBOLES DU MODE D’EMPLOI
Danger : Mise en garde contre des risques de blessures corporelles graves ou mortelles. Le symbole de l’éclair
met en garde contre des dangers liés à la présence de l’électricité.
Attention :
Mise en garde contre la survenue éventuelle de dysfonctionnements, de dommages ou la destruction
de l’appareil.
!
Important : Remarque générale ou importante pour le fonctionnement de l’appareil.
Produits fournis avec votre machine
Vériez les produits fournis avec votre machine. S’il manque une pièce, contactez directement votre hotline (voir p. 6 :
Réglages initiaux).
Pièces fournies :
— Espresso Automatic Serie EA89
— 2 pastilles de nettoyage
— 1 sachet de détartrant
— Conduit lait adaptable sur le bloc « One Touch Cappuccino »
— Clé de démontage pour nettoyage du circuit vapeur
— Livret des consignes de sécurité
— Cartouche Claris – Aqua Filter System avec accessoire de vissage
— 1 bâtonnet de détermination de la dureté de l’eau
— Mode d’emploi
— Répertoire des centres de Service Après-Vente Krups
— Documents de garantie
— 1 kit de nettoyage buse vapeur
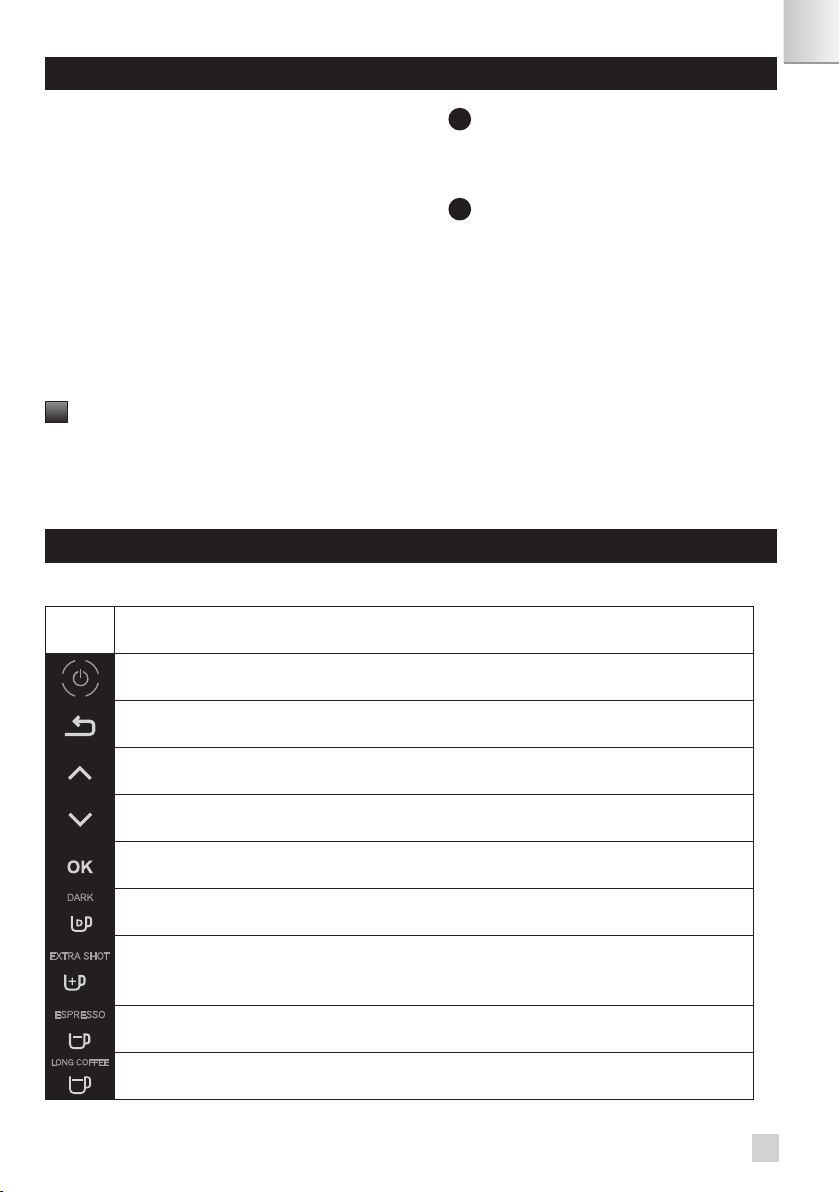
DONNEES TECHNIQUES
Appareil Automatic Espresso EA89
Alimentation électrique 220-240V~ / 50 Hz
Pression de la pompe 15 bars
Réservoir à café en grains 250 g
Consommation d’énergie En fonctionnement : 1450 W
Réservoir d’eau 2.3 l
Mise en service et rangement A l’intérieur, dans un endroit sec (à l’abri du gel).
Dimensions (mm) H x l x P 367 x 240 x 380
Poids EA89 (kg) 8.4
Sous réserve de modications techniques.
4
DESCRIPTIF DE L’APPAREIL
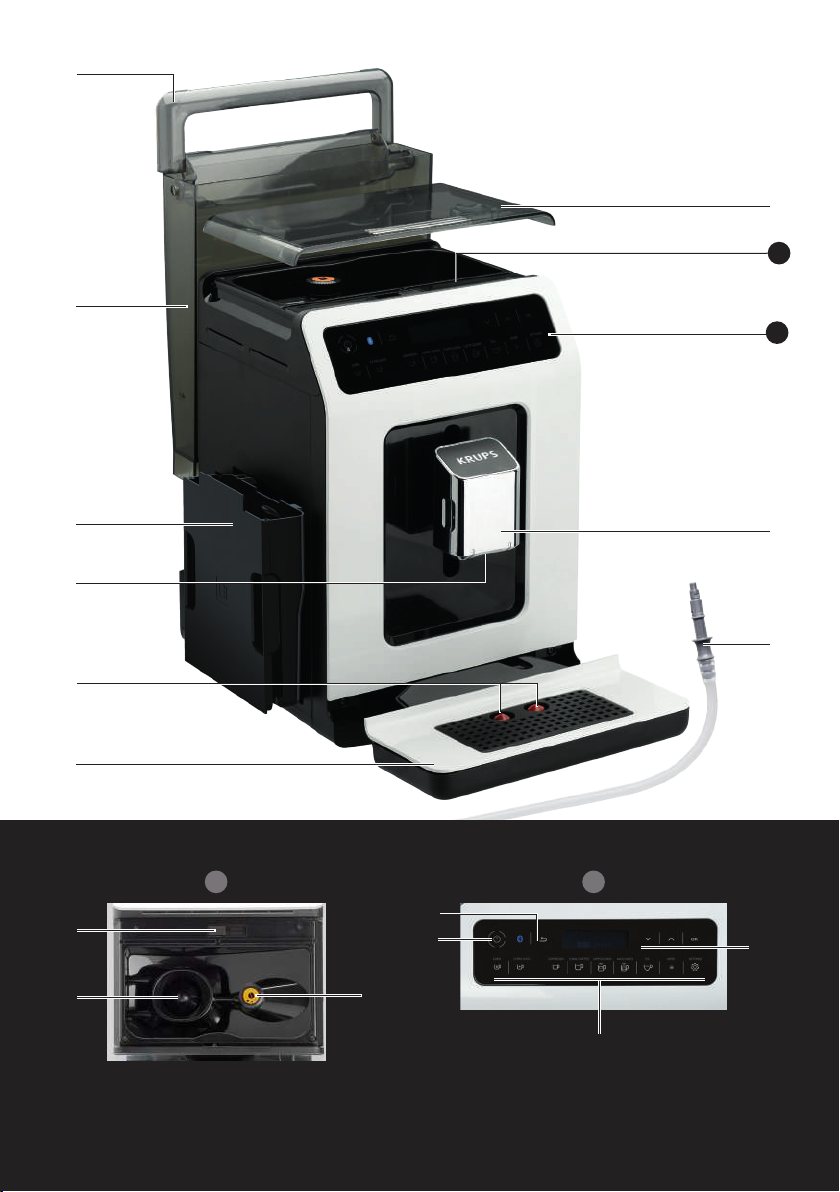
A Poignée couvercle réservoir eau
B Réservoir à eau
C Bac collecteur de marc de café
D Sorties café réglables en hauteur
E Grille et bac récolte-gouttes amovible
F Couvercle du réservoir de café en grains
G Bloc amovible One Touch Cappuccino
H Conduit lait et mélangeur
I Flotteur de niveau d’eau
Réservoir café en grains
J Bouton de réglage de la nesse de broyage
K Goulotte pastille de nettoyage
L Broyeur à meules en métal
Tableau de bord
M Ecran
N Touche “marche/arrêt”
O Touches tactiles
Précisions sur:
Le bac récolte-gouttes : il permet de récupérer l’eau ou le café qui s’écoulerait de l’appareil pendant et après les
préparations. Il est important de toujours le laisser en place et de le vider régulièrement.
!
Important : Lisez attentivement ce mode d’emploi et conservez-le. Veuillez respecter les consignes de sécurité.
Fabricant:
SAS GSM
Rue Saint-Léonard F-53104 Mayenne
France
VUE D’ENSEMBLE
Présentation des différentes touches
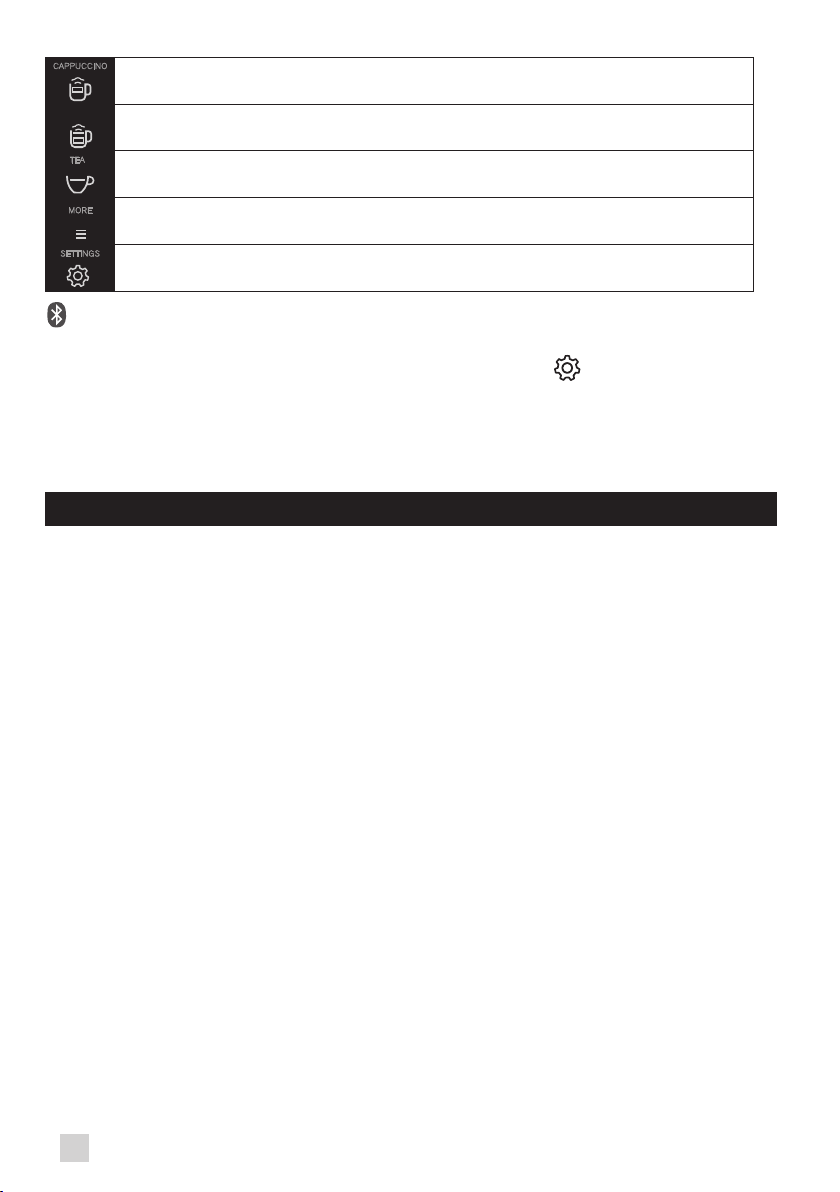
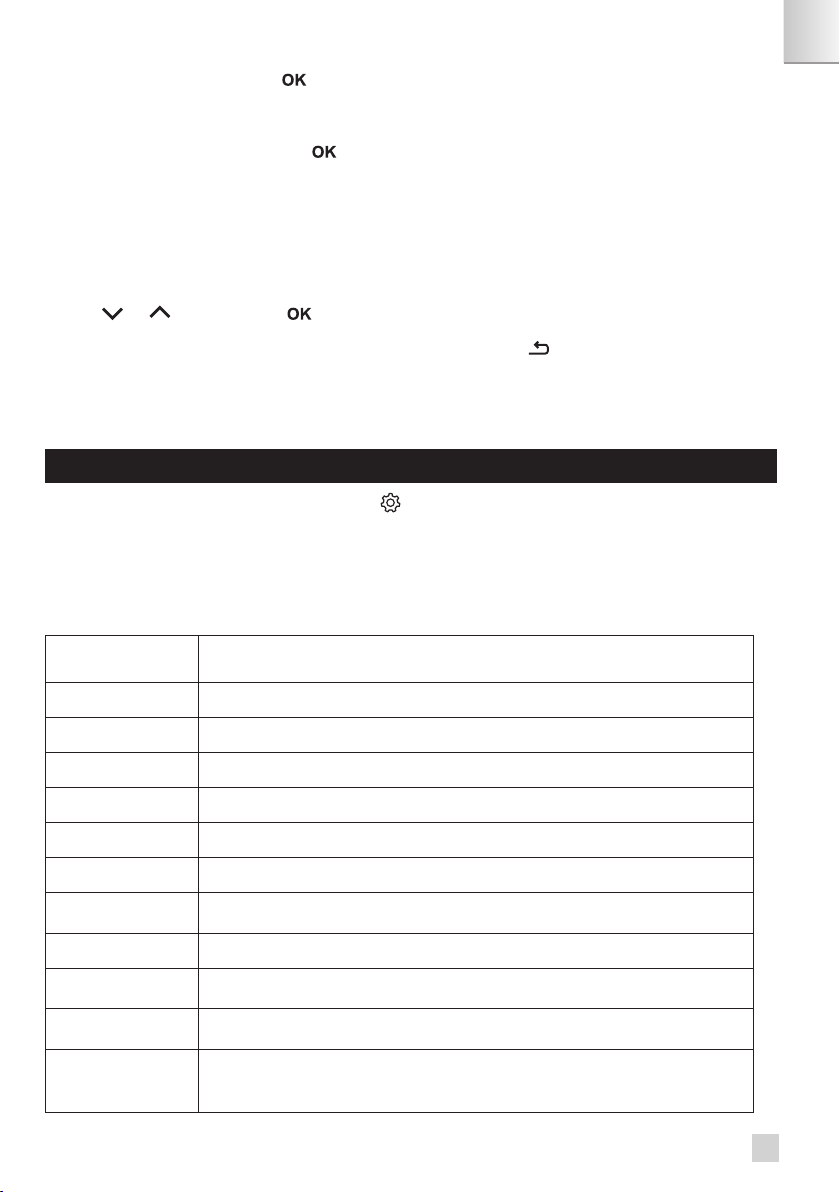
Touche Description/ Fonctions générales
Allumer et éteindre la machine.
Un appui long est nécessaire pour la mise en service de la machine.
Permet de revenir à l’écran précédent ou de stopper une recette en cours.
Navigation vers haut du menu / incrémente le paramètre sélectionné
Navigation vers bas du menu / décrémente le paramètre sélectionné
Validation de la sélection effectuée.
Fonction permettant d’augmenter la force du café.
Fonction permettant de rajouter un espresso corsé à la recette sélectionnée.
Accessibleavec les recettes principales (espresso, long coffee, cappuccino, Macchiato, tea)
selon modèle
Lance la préparation d’un Espresso.
Lance la préparation d’un Café.
1
2
5
FR
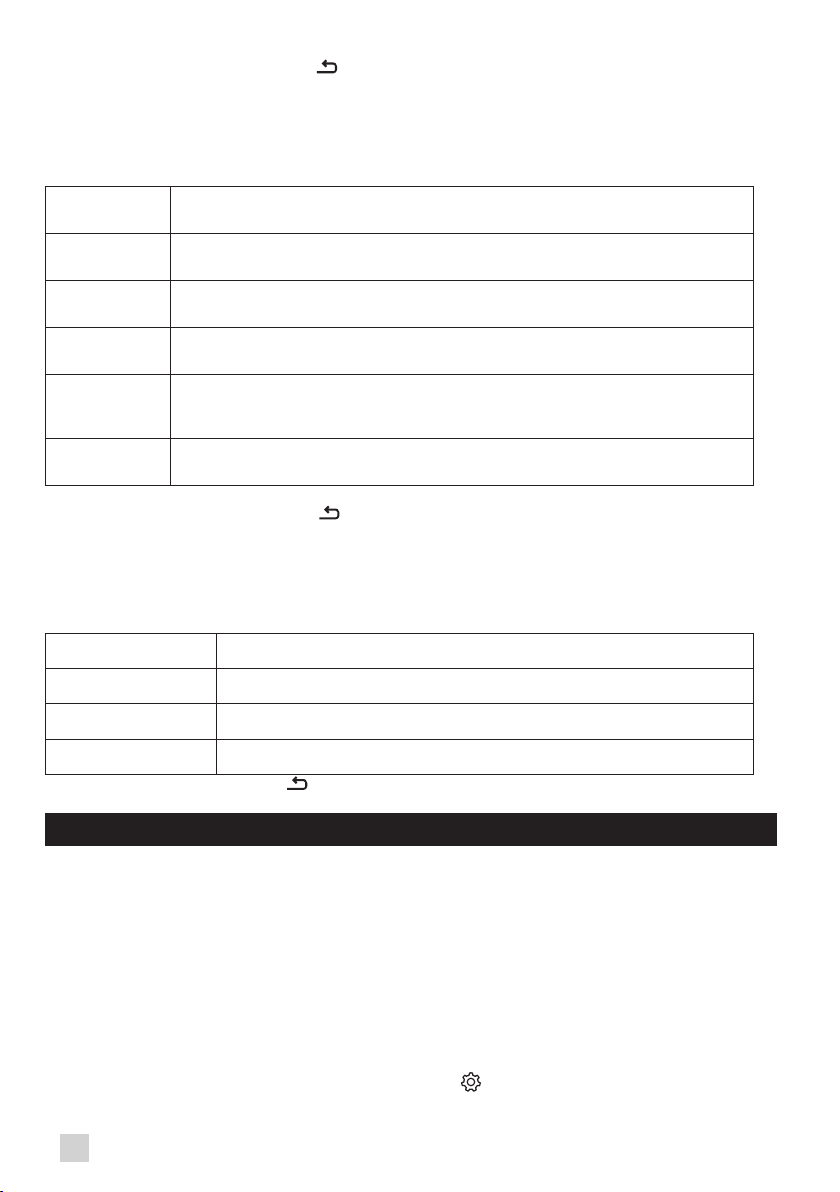
Lance la préparation d’un Cappuccino.
MACCHIATO
Lance la préparation d’un Macchiato (une grande dose de lait, un shot d’Espresso surmonté d’une
mousse de lait onctueuse).
Permet d’accéder au menu de la préparation d’un thé ou d’une infusion.
Permet d’accéder aux préparations supplémentaires: Ristretto, Lait moussé, Doppio, Americano,
(selon modèle).
Permet d’accéder au menu général(réglages machines, entretiens et infos produits).
: Eclairage Bluetooth :
Lorsque le logo est éteint, la machine n’est pas connectée ou la fonction est désactivée.
Lorsque le logo est allumé, la machine est connectée.
Le Bluetooth est toujours actif. Vous pouvez le désactiver en allant dans le menu puis dans «paramètres».
Précisions sur l’éclairage des touches
Lorsqu’une touche est éteinte, la fonction correspondante n’est pas accessible.
Lorsqu’elle est faiblement allumée, la fonction est disponible et peut donc être sélectionnée.
Lors de la réalisation de la fonction demandée, la lumière devient très vive.
APPLICATION KRUPS
Vériez la compatibilité de votre smartphone sur www.krups.com
Téléchargement de l’application
An de pouvoir télécharger l’application vous devez posséder un smartphone équipé d’un module Bluetooth
®
BLE
(blue tooth Low energy) et une version Android > à « 4.3 » ou IOS > « 9 ». Si votre smartphone n’en dispose pas vous
ne pourrez pas utiliser l’application.
L’application KRUPS est disponible sur playstore pour la version android et apple store pour la version IOS.
Paramétrage du compte
An de pouvoir proter de toutes les opportunités offertes par l’application, vous devez dans un premier temps créer
un compte. Remplissez les champs demandés puis validez les conditions d’utilisation an d’achever la création de
votre compte.
Un mot de passe vous sera demandé an de garantir la condentialité de vos données.
Activation du Bluetooth
®
An de connecter votre téléphone à la machine vous devez activer le module Bluetooth
®
BLE de votre smartphone
et vous assurer que le module Bluetooth
®
de la machine est aussi activé. Allez sur le menu réglage, sélectionnez la
fonction connectivité et activez le module Bluetooth
®
s’il a été désactivé (par défaut le module Bluetooth
®
est activé).
Appairage avec la machine
Suivez les instructions décrites sur votre téléphone an d’appairer votre smartphone à la machine. L’appairage peut
se faire uniquement lorsque le logo BLE est allumé.
Lorsque la machine va détecter une demande d’appairage du smartphone, un écran sur la machine vous demande
d’accepter l’appairage. Acceptez en appuyant sur OK, un écran va alors apparaitre sur votre smartphone vous
demandant de conrmer cet appairage: appuyez sur jumeler.
Si le jumelage échoue, il vous est possible de réessayer plusieurs fois et il est conseillé de vérier que le module
Bluetooth
®
BLE de la machine est bien activé.
Si le problème persiste il vous est possible de contacter le service après-vente an d’obtenir une aide à l’installation de
votre application. Dans le menu d’accueil sur votre smartphone, l’option « Contacter Krups » vous permet d’accéder
aux coordonnées du service après vente.
Lorsque la machine est appairée, vous devez voir le symbole Bluetooth
®
en lumière très vive signe qu’il est bien activé.
6

Réglages de la machine
Une fois appairé, vous pouvez modier les réglages de la machine directement via l’application (les date et heure du
smartphone vont alors être mises à jour automatiquement sur la machine vous évitant ainsi de le faire).
L’application mobile facilite la première installation de la machine et les réglages initiaux.
Utilisation de l’application
De nombreuses fonctions vous sont offertes via l’utilisation de l’application :
• Lancement de préparations à distance,
• Gestion d’une bibliothèque de favoris et d’un livre de cave,
• Accès au compte et informations sur la machine,
• Accès à des news et informations sur l’univers café,
• Accès à un guide d’utilisation avec des tutoriels et vidéos pour proter de toutes les potentialités de la machine,
• Contact rapide du service après-vente en cas de question ou problème concernant votre appareil ou l’application.
Vous pourrez découvrir toutes ces fonctions en naviguant dans l’application (que vous soyez ou non connecté à votre
machine).
N’hésitez pas à vous connecter le plus souvent possible à l’application an de voir les news et avoir un suivi régulier
de votre machine.
MISE EN SERVICE
INSTALLATION DE L’APPAREIL
Danger : Branchez l’appareil à une prise secteur de 230V, reliée à la terre. Dans le cas contraire, vous vous
exposez à des blessures mortelles en raison de la présence d’électricité !
Respectez les consignes de sécurité indiquées dans le livret “Consignes de sécurité”.
Mise sous tension
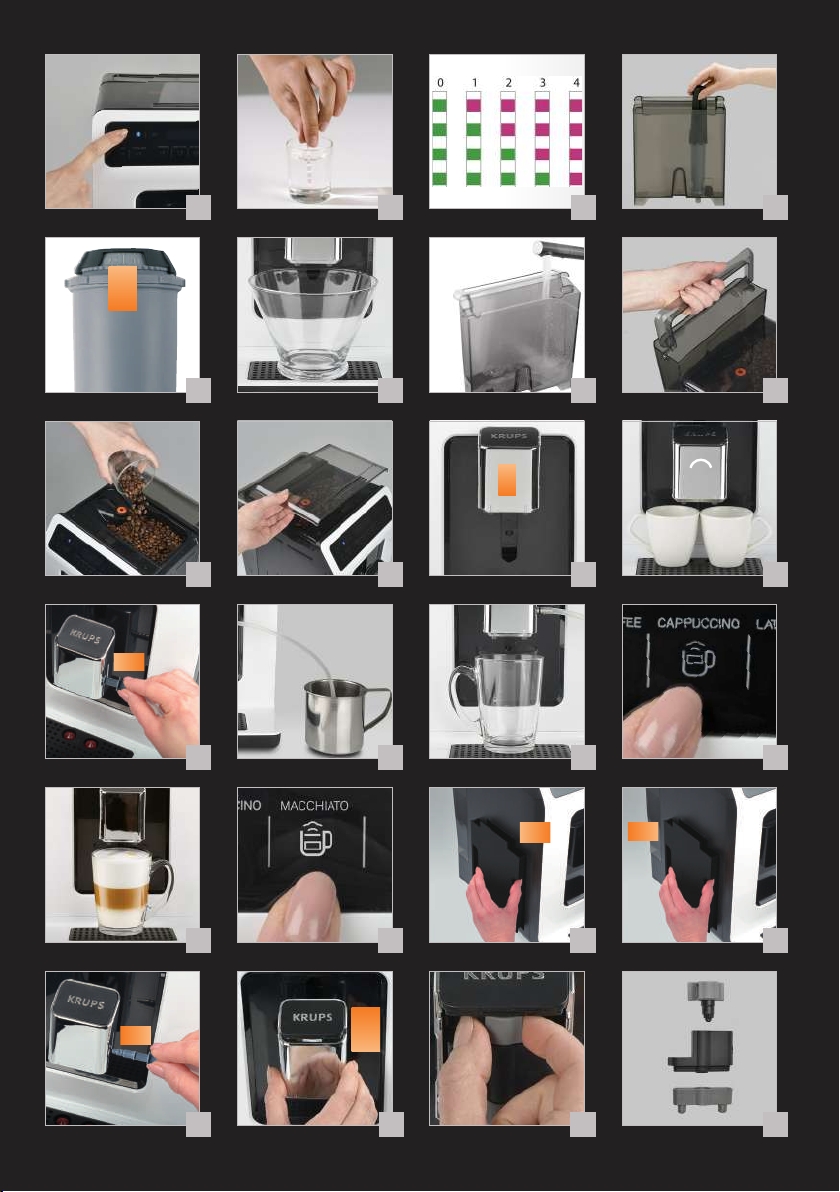
Mettez l’appareil sous tension en appuyant sur la touche “Marche/Arrêt” jusqu’à l’apparition du “Bonjour” sur
l’écran Fig. 1. Laissez-vous guider par votre appareil.
Réglages initiaux
Lors de la première utilisation de la machine, il vous est demandé d’effectuer divers réglages. Suivez les indications qui
s’afchent à l’écran. L’objectif des paragraphes qui suivent est de vous donner quelques repères visuels.
Voici les premiers réglages demandés :
Langue
Sélectionnez une langue d’afchage en appuyant sur les èches jusqu’à ce qu’apparaisse la langue de votre choix.
Appuyez sur “OK” pour valider.
Unité de mesure
Vous pouvez sélectionner l’unité de mesure du volume de votre choix entre ml et oz.
Date et heure
Pour le réglage de l’heure, appuyez sur le format horaire souhaité (24H ou AM/PM).
Auto on / Auto off
Il est possible de programmer l’heure à laquelle vous souhaitez un allumage automatique de votre machine. Ce réglage
peut être adapté a votre convenance: quotidien, hebdomadaire ou week-end. Choisissez l’heure à laquelle vous désirez
le démarrage automatique suivant le format horaire sélectionné auparavant.
Vous pouvez également choisir la durée après laquelle votre appareil s’éteindra automatiquement an d’optimiser votre
consommation énergétique.
Réglage de rinçage du circuit café
Vous pouvez choisir de l’activer ou pas à l’allumage de la machine. Cela vous permet de vous assurez de la qualité du
café en tasse an d’éviter la présence de résidus.
Installation du filtre
A la première mise sous tension, l’appareil vous demande si vous voulez installer le ltre. Si vous le souhaitez, et si la
dureté de votre eau le requiert, selectionnez “OUI” et suivez les instructions à l’écran.
Installation de la cartouche dans l’appareil : Vissez la cartouche ltrante dans le fond du réservoir à eau en utilisant
l’accessoire fourni avec la cartouche. Fig. 4
7
FR
Réglez le mois de mise en place de la cartouche (position 1 sur l’illustration, chiffre à gauche dans l’ouverture) en
tournant la bague grise située sur l’extrémité supérieure du ltre. Le mois de remplacement de la cartouche est indiqué
en position 2 de l’illustration. Fig. 5.
Placez un récipient de 0,6 l sous la sortie vapeur. Fig. 6.
L’amorçage de la machine doit s’opérer, qu’il y ait installation du ltre ou non. Il implique obligatoirement le remplissage
des circuits d’eau. Pour cela, suivre les instructions indiquées à l’écran. La machine débutera par le remplissage des
circuits d’eau, préchauffage des circuits, puis procédera à un rinçage automatique.
L’écran vous indiquera la n de l’installation.
Dureté de l’eau
Vous devez régler votre machine en fonction de la dureté de votre eau, comprise entre 0 et 4. Pour ce faire, suivez les
indications suivantes :
Avant d’utiliser l’appareil pour la première fois, déterminez la dureté de votre eau an de pouvoir adapter l’appareil à la
dureté constatée. Vous veillerez à également effectuer cette opération lorsque vous utiliserez votre machine dans un
lieu dont la dureté de l’eau est différente ou si vous constatez un changement de la dureté de votre eau. Pour connaître
la dureté de l’eau, utilisez le bâtonnet livré avec votre machine ou adressez-vous à votre compagnie des eaux.
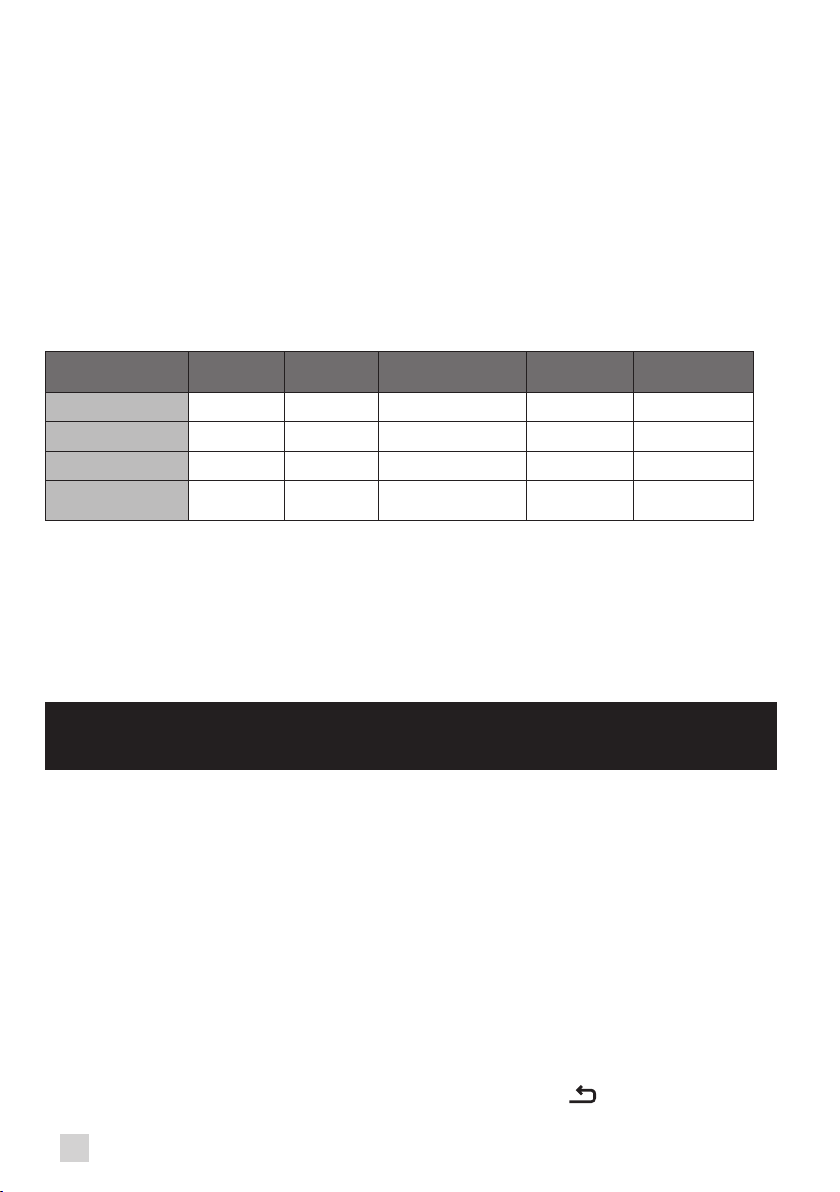
Vous trouverez le détail des classes dans le tableau ci-dessous :
Degré de dureté
Classe 0
Très douce
Classe 1
Douce
Classe 2
Moyennement dure
Classe 3
Dure
Classe 4
Très dure
° dH < 3° > 4° > 7° > 14° > 21°
° e < 3,75° > 5° > 8,75° > 17,5° > 26,25°
° f < 5,4° > 7,2° > 12,6° > 25,2° > 37,8°
Réglage de
l’appareil
0 1 2 3 4
Remplir un verre d’eau et plonger un bâtonnet. Fig. 2
Lire après 1 minute le niveau de dureté de l’eau. Fig. 3
Indiquez le nombre de zones rouges lors du réglage sur l’appareil.
Préparation de l’appareil
Retirez et remplissez le réservoir d’eau. Fig. 7.
Remettez le réservoir en place . Fig. 8.
Retirez le couvercle du réservoir à café en grains, puis versez le café en grains (250 gr maxi). Fig. 9.
Remettez le couvercle du réservoir à café en grains. Fig. 10.
AVANT LA PREPARATION DES BOISSONS
INDICATIONS IMPORTANTES
Selon les boissons choisies, votre Espresso Automatic EA89 règlera automatiquement la quantité de café broyé.
Préparation du broyeur
Vous pouvez ajuster la force de votre café en réglant la nesse de broyage des grains de café. De manière générale,
plus le réglage du broyeur à café est n, plus le café est fort et crémeux. Cela peut également varier en fonction du type
de café utilisé. Nous vous recommandons un réglage n pour les espressos, et plus grossier pour les cafés.
Réglez le degré de nesse de broyage en tournant le bouton réglage de la nesse de broyage (J) situé dans le réservoir
à grains. Ce réglage doit s’effectuer pendant le broyage et cran par cran. Au bout de 3 préparations, vous percevrez
très distinctement une différence de goût.
Le réglage de nesse de broyage est utile lorsque que vous changez de type de café ou si vous souhaitez obtenir un
café plus ou moins fort. Il n’est cependant pas conseillé d’effectuer ce réglage de manière systématique.
Réglage de la sortie café
Pour toutes les boissons proposées, vous pouvez abaisser et remonter les sorties cafés en fonction de la taille de
votre/vos tasse(s) ou verre(s). Fig.11
Arrêt d’une boisson en cours de préparation
Vous pouvez arrêter la préparation à tout moment en appuyant sur la touche retour .
8

Attention, l’appui sur cette touche entraine une phase de mise à niveau de la machine qui peut durer jusqu’à 30
secondes. Cette phase est normale.
Quand un cycle est interrompu, l’arrêt n’est pas immédiat, la machine nira son cycle, la préparation sera bien annulée.
Fonction « Double » préparation
Votre appareil vous permet de préparer deux tasses simultanément. La fonction double préparation est accessible tout
simplement en appuyant deux fois à la suite sur la sélection, et est valable pour toutes les boissons (sauf et ).
Fonction DARK
La fonction « DARK » permet d’augmenter l’intensité du café (sa force).
Vous pouvez l’activer ou désactiver de différentes manières :
— Avant de sélectionner la boisson choisie, il suft d’appuyer sur DARK.
— Pendant la réalisation de la boisson, et jusqu’à la n du broyage : vous pouvez appuyer sur DARK.
— En choisissant le paramètre « DARK » dans le menu Réglages. Pour cela, accéder au menu Réglages par la touche
, puis Réglages réglages boissons Dark. Ainsi la fonction sera active pour l’ensemble des boissons “café” :
, , , .
Vous pouvez procéder de la même façon pour la désactiver.
Fonction EXTRA SHOT
La fonction « extra shot » permet d’ajouter un espresso à la n de la boisson sélectionnée.
Vous pouvez l’activer ou la désactiver de différentes manières :
— Avant de sélectionner la boisson choisie : il suft d’appuyer sur EXTRA SHOT.
— Pendant la réalisation de la boisson,
— En choisissant le paramètre « EXTRA SHOT » dans le menu Réglages. Pour cela, accéder au menu Réglages par la
touche , puis Réglages réglages boissons EXTRA SHOT. Ainsi la fonction sera activée pour les préparations
, , , ,
Vous pouvez procéder de la même façon pour la désactiver.
PREPARATION DES BOISSONS CAFE EN ACCES DIRECT
A noter : A chaque lancement de boisson, la machine prendra en compte la dernière boisson réalisée incluant les
réglages qui auront été sélectionnés.
Préparation
Mettez la ou les tasses sous les buses café. Fig.12
Appuyez sur la touche de la boisson choisie.
Si la machine détecte un manque d’eau lors de la demande de la préparation, elle vous demandera de remplir le
réservoir.
Réglages possibles
Il vous est possible d’augmenter la force café en appuyant sur et /ou ajouter une préparation café par l’appui sur
.
Votre appareil vous permet de préparer une ou deux tasses.
La machine réalise le broyage du grain, le compactage de la mouture et enn la percolation. Il est possible de régler le
volume café en cours de préparation en utilisant les touches de navigations : et .
Vous pouvez arrêter la préparation à tout moment en appuyant sur .
!
Important : Rinçage automatique des sorties café : selon les types de boissons préparées, la machine pourra
effectuer un rinçage automatique lors de son extinction. Le cycle ne dure que quelques secondes et
s’arrêtera automatiquement.
PREPARATION DES BOISSONS LACTEES EN ACCES DIRECT
Réglages possibles
Il vous est possible d’augmenter la force café en appuyant sur et /ou ajouter une préparation café par l’appui sur
.
9
FR

La vapeur sert à faire mousser le lait. Comme la production de vapeur nécessite une température élevée, l’appareil
assure une phase de préchauffage supplémentaire.
Réalisation d’un Cappuccino ou d’un Macchiato
Raccordez le conduit lait côté droit au bloc “One Touch Cappuccino” Fig.13.
Plongez l’autre extrémité (côté biseauté) dans un récipient rempli de lait ou directement dans votre bouteille de lait
Fig.14.
Placez-la ou les tasses sous les buses café/lait. Fig.15.
Appuyez sur la touche “Cappuccino” Fig.16 ou appuyez sur la touche “Macchiato” Fig.18. L’ensemble des
paramètres sont modiables.
La préparation commence par la réalisation du moussage de lait (réglage du temps possible), suivie de l’écoulement
café (réglable en volume). Le réglage du temps de moussage vous permettra de faire varier la quantité de lait et de
mousse.
Les étapes suivantes s’enchainent automatiquement, puis votre boisson est prête pour dégustation Fig.17.
A chaque lancement de “Cappuccino” ou “Macchiato”, la machine prendra en compte la dernière boisson réalisée
incluant les réglages effectués.
Entretien après la réalisation de boissons lactées
Rinçage lait
L’écran indique « Rinçage lait ? » à la n de chaque préparation.
Il est conseillé d’effectuer ce rinçage à chaque n d’utilisation de la fonction lait, pour assurer une bonne hygiène des
accessoires de moussage et un bon moussage du lait.
Lors du rinçage lait, il est demandé d’effectuer systématiquement un démontage et un nettoyage à l’eau chaude du
conduit lait et du mélangeur. Fig 21 et 25
Pour un résultat optimum, il est conseillé de nettoyer le bloc amovible « One Touch Cappuccino » de façon régulière
(voir chapitre entretien général).
Si vous constatez que la qualité de votre mousse de lait est altérée, n’hésitez pas à reproduire ce rinçage et ce nettoyage :
en effet, un système lait mal entretenu provoque ce type de déconvenue.
PREPARATIONS THES
Réglages possibles
Votre appareil vous propose la préparation de 3 types de thés (thé vert, thé noir, infusion). Vous pouvez régler le volume
de boisson selon vos goûts.
La température d’eau chaude est adaptée à la boisson sélectionnée.
Vous pouvez programmer un extra shot dans votre thé ce qui vous permettra de réaliser des boissons « thé/café»
très en vogue.
Préparation d’un thé
Sélectionnez sur l’écran. Placez-la ou les tasses sous les buses café. Fig.12
Puis sélectionnez la boisson choisie, et appuyez sur .
Si la machine détecte un manque d’eau lors de la demande, elle vous demandera de remplir le réservoir.
Vous pouvez modier le volume en utilisant les touches ou , au cours de la préparation.
PREPARATION DES AUTRES BOISSONS : RISTRETTO, DOPPIO,
AMERICANO OU LAIT MOUSSE
Préparation
Mettez la ou les tasses sous les buses café. Fig.12
Si la machine détecte un manque d’eau lors de la demande, elle vous demandera de remplir le réservoir.
Appuyez sur la touche : à l’aide des touches et , sélectionner la boisson désirée: Ristretto, Doppio,
Americano, Lait moussé.
Réalisation d’un Ristretto
Selectionnez Ristretto et appuyez sur .
La machine réalise le broyage du grain, le compactage de la mouture et enn la percolation. Il est possible de régler le
volume café en cours de préparation en utilisant les touches de navigations : et .
Vous pouvez arrêter la préparation à tout moment en appuyant sur .
10
Réalisation d’un Doppio
Sélectionnez DOPPIO et appuyez sur .
Il s’agit d’une préparation identique au RISTRETTO mais avec un double cycle café.
Réalisation d’un Americano
Sélectionnez AMERICANO et appuyez sur .
Il s’agit d’une préparation identique au DOPPIO, suivi d’une eau chaude.
Réalisation d’un Lait moussé
Raccordez le conduit lait côté droit au bloc amovible “One Touch Cappuccino” Fig.13. Plongez l’autre extrémité (côté
biseauté) dans un récipient rempli de lait. Fig.14
La vapeur sert à faire mousser le lait. Comme la production de vapeur nécessite une température élevée, l’appareil
assure une phase de préchauffage supplémentaire.
Un menu vous permettra de personnaliser la durée du moussage. Vous pouvez la modier en appuyant sur les
boutons ou . Puis appuyez sur . La dernière durée de moussage utilisée sera mémorisée pour la prochaine
préparation.
Vous pouvez arrêter la préparation à tout moment en appuyant sur la touche .
Rincage du bloc « One Touch Cappuccino »
Merci de vous reporter au paragraphe « Rinçage lait » dans la section PREPARATION DES BOISSONS LACTEES ONE
TOUCH.
AUTRES FONCTIONS
L’accès au menu Paramétres s’effectue par la touche , qui permet d’accéder au menu général (réglages machines,
entretiens et infos produits).
Réglages
En sélectionnant Réglages, vous pouvez effectuer les modications que vous souhaitez pour un confort d’utilisation
optimum et adapté à vos préférences.
Nous vous présentons ici les principaux réglages disponibles.
Date
Le réglage de la date est nécessaire notamment en cas d’utilisation d’une cartouche
anti-calcaire.
Horloge Vous pouvez sélectionner un afchage horaire sur 12 ou 24 heures.
Langue Vous pouvez sélectionner la langue de votre choix parmi celles proposées.
Unité de mesure Vous pouvez sélectionner l’unité de mesure entre ml et oz.
Luminosité écran Vous pouvez ajuster la luminosité de l’écran selon votre préférence.
Température café Vous pouvez ajuster la température de vos boissons café sur trois niveaux.
Température thé Vous pouvez ajuster la température de vos thés sur trois niveaux.
Dureté eau
Vous devez régler votre dureté d’eau entre 0 et 4. Voir chapitre “Mesure de la dureté
de l’eau”.
Auto-on Vous pouvez lancer automatiquement le préchauffage de l’appareil à une heure choisie.
Auto-off
Vous pouvez choisir la durée après laquelle votre appareil s’arrêtera automatiquement
(durée de non utilisation).
Rinçage auto
Vous pouvez activer ou non le rinçage automatique de la sortie café au démarrage de
la machine.
Réglages boissons
Vous pouvez procéder au rétablissement des paramétrages par défaut. Vous pouvez
aussi activer en permanence la fonction Dark et Extra Shot pour l’ensemble de vos
boissons (sauf ).
11
FR
Pour sortir du menu réglages, appuyez sur ou sur le bouton Réglages.
Les réglages seront conservés en mémoire si vous débranchez la machine à l’exception de la date et de l’heure.
Entretien
Les options ci-dessous vous permettent de lancer les programmes sélectionnés. Ensuite, vous devez suivre les
instructions de l’écran.
Nettoyage lait
Vous permet d’accéder au nettoyage du bloc one touch cappuccino de la machine, impératif
pour vous assurer une bonne qualité de moussage de lait.
Rinçage lait
Vous permet d’accéder au rinçage du bloc one touch cappuccino de la machine, impératif
pour vous assurer une bonne qualité de moussage de lait.
Rinçage café
Vous permet d’accéder au rinçage du circuit café de la machine, vous assurant un goût
café optimal.
Nettoyage café
Vous permet d’accéder au nettoyage du circuit café de la machine (en utilisant une pastille
de nettoyage), vous assurant un goût café optimal.
Détartrage
Vous permet d’accéder au détartrage, maximisant la durée de vie de votre machine. Lorsque
le nombre de boissons n’est pas sufsant pour qu’un détartrage soit nécessaire, la fonction
n’est pas active.
Filtre
Vous permet d’accéder au mode ltre, fort utile en cas d’eau très dure pour assurer un goût
optimal et la santé de votre machine.
Pour sortir du menu Entretien, appuyez sur ou sur le bouton Réglages.
Info
Le menu “Info” vous donne la possibilité d’accéder à un certain nombre d’informations sur votre utilisation et sur
certaines étapes dans la vie de votre machine. Il vous renseigne aussi sur son entretien. Nous vous présentons ici les
principales informations disponibles.
Boissons préparées Afche le nombre de boissons réalisées
Nettoyage circuit café Indique qu’il devra être effectué dans x quantité de cycles.
Détartrage
Indique qu’il devra être effectué dans x quantité de cycles.
Filtre Indique qu’il sera à changer dans x jours ou x litres.
Pour sortir du menu Info, appuyez sur ou sur le bouton Réglages.
ENTRETIEN GENERAL
Vidage du bac collecteur de marc de café et du bac récolte-gouttes
Au bout d’un certain nombre de cafés, la machine vous demandera de vider le bac collecteur de marc à café et le bac
récolte-gouttes. Ne pas faire correctement ces opérations peut endommager votre machine.
Le bac récolte-gouttes reçoit l’eau usagée et le bac collecteur de marc de café reçoit la mouture usagée.
Si le message “Veuillez vider les 2 bacs” s’afche, retirez, videz et nettoyez le bac récolte-gouttes.
Retirez, videz et nettoyez le bac collecteur de marc de café (C ). Fig. 19.
Remettez le bac collecteur de marc de café. Fig. 20
Le bac récolte-gouttes est équipé d’un otteur qui vous indique à tout moment quand le vider. Cependant la machine
est aussi programmée pour demander un vidage du bac récolte-gouttes au bout d’un certain nombre de cafés,
indépendamment des vidages intermédiaires que vous pouvez effectuer.
Rinçage des circuits
Vous pouvez effectuer un rinçage à tout moment en appuyant sur puis en sélectionnant Entretiens.
Selon les types de préparations, la machine pourra effectuer un rinçage automatique lors de son extinction.
Il est possible aussi de régler un rinçage automatique à l’allumage (voir section “Réglages” p.6)
12

Programmes automatiques de nettoyage machine
Programme de nettoyage automatique du circuit café
Lorsqu’il est nécessaire d’exécuter un programme de nettoyage, l’appareil vous en avertit.
Pour effectuer ce programme de nettoyage, vous aurez besoin d’un récipient pouvant contenir au moins 0,6 L qui doit
être placé sous les sorties café, et d’une pastille de nettoyage KRUPS. Fig 34a. Laissez-vous guider par les instructions
afchées à l’écran. Il est également possible de lancer un nettoyage via le menu Entretiens.
!
Important : Vous n’êtes pas obligé d’exécuter sur-le-champ le programme de nettoyage quand l’appareil le
demande mais vous devez toutefois l’effectuer dans un assez bref délai. Si le nettoyage est reporté,
le message d’alerte restera afché tant que l’opération ne sera pas effectuée.
Le programme de nettoyage automatique comprend 2 phases : un cycle de nettoyage et un cycle de rinçage, et dure
environ 13 minutes.
!
Important : Si vous débranchez votre machine pendant le nettoyage ou en cas de panne électrique, le programme
de nettoyage reprendra à l’étape en cours lors de l’incident. Il ne sera pas possible de reporter cette
opération. Ceci est obligatoire pour des raisons de rinçage de circuit d’eau. Dans ce cas, une nouvelle
pastille de nettoyage peut être nécessaire. Bien réaliser le programme de nettoyage en entier pour
éliminer toute trace de produit de nettoyage nocif pour la santé.
Nettoyage du bloc « One Touch Cappuccino »
Pour effectuer ce programme de nettoyage, vous aurez besoin de deux récipients (mini 0,6 l) et du liquide de nettoyage
KRUPS.
Vous pouvez procéder au nettoyage en appuyant sur le bouton .
Puis sélectionner « Entretiens » « Nettoyage Lait ». Suivez les instructions à l’écran.
Démontage du bloc « One Touch Cappuccino »
En plus du rinçage, il est nécessaire de nettoyer les différents éléments du bloc après chaque utilisation. Pour démonter
le bloc, suivez les instructions suivantes :
Retirez le conduit lait, Fig. 21.
Retirez le capot avant de l’ensemble buses café lait. Glissez-le vers le bas et tirez-le vers vous. Fig 22
Retirez le bloc « One Touch Cappuccino » en tirant sur la partie haute du bloc Fig. 23
Désassemblez complètement le bloc. Fig. 24.
Retirez le mélangeur du conduit lait Fig. 25.
Nettoyez l’ensemble des pièces démontées (bloc, mélangeur et conduit lait) à l’eau savonneuse. Puis rincez-les sous
l’eau chaude. Fig. 26
Une fois les éléments nettoyés et séchés, assemblez le bloc et remettez-le dans sa position d’origine. Fig.27.
Repositionnez le capot avant du bloc. Fig. 28 . Remettez le mélangeur dans le conduit lait Fig 29 (côté inverse du côté
biseauté) et le rebrancher dans le bloc. Fig. 30.
Programme de détartrage automatique du circuit vapeur
Attention : Si votre appareil est équipé de notre cartouche Claris — Aqua Filter System, merci de retirer cette
cartouche avant l’opération de détartrage.
Lorsqu’il est nécessaire d’éxécuter un programme de détartrage, l’appareil vous en avertit. La fréquence d’exécution
de ce programme dépend de la qualité de l’eau utilisée et de l’utilisation ou non d’un ltre Claris Aqua Filter System
(plus une eau est calcaire, plus l’appareil doit être régulièrement détartré).
!
Important : Vous n’êtes pas obligé d’exécuter sur-le-champ ce programme quand l’appareil le demande mais vous
devez toutefois l’effectuer dans un assez bref délai. Si le détartrage est reporté, le message d’alerte
restera afché tant que l’opération ne sera pas effectuée.
Lorsque l’alerte détartrage est atteinte et afchée, l’appui sur lancera le programme de détartrage. Pour la reporter,
appuyez sur .
Une fois la procédure lancée, laissez-vous guider par les instructions afchées à l’écran. Il est également possible de
lancer un détartrage via le menu « Entretiens » « Détartrage ».
Pour effectuer ce programme de détartrage, vous aurez besoin d’un récipient pouvant contenir au moins 0,6L qui doit
être placé sous le bloc One Touch Cappuccino ainsi que d’un sachet de détartrant KRUPS (40g). Fig. 34b
Remplissez le réservoir d’eau jusqu’au repère CALC, puis versez le contenu du sachet de détartrant.
Le programme de détartrage comprend 3 phases : un cycle de détartrage et deux cycles de rinçage. Le programme
dure environ 20 min.
13
FR

!
Important : Si une coupure de courant se produit ou si vous débranchez votre machine, le cycle se relancera à
l’étape en cours lors de l’incident, sans possibilité de reporter cette opération. Bien réaliser le cycle
en entier pour éliminer toute trace de produit de détartrage nocif pour la santé.
PROBLEMES ET ACTIONS CORRECTIVES
Si l’un des problèmes énoncés dans le tableau persiste, appelez le service consommateurs KRUPS.
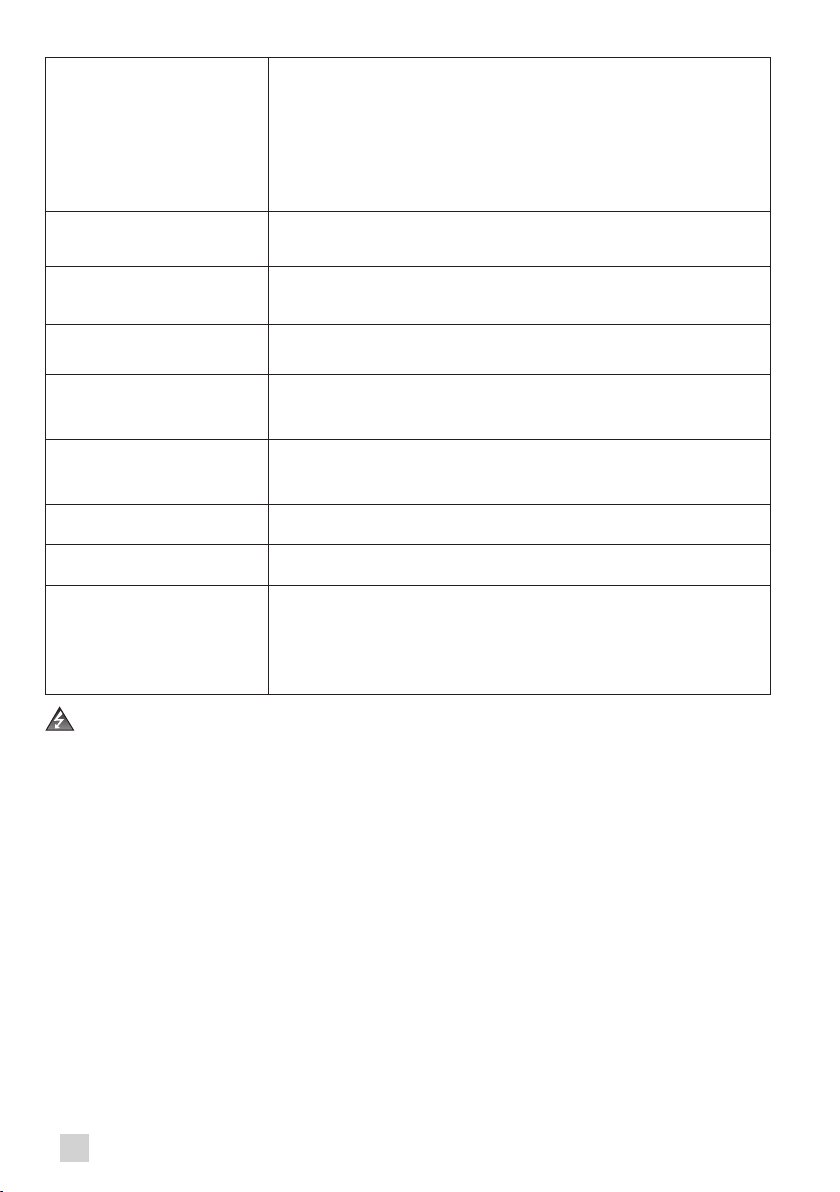
PROBLEME ACTIONS CORRECTIVES
La machine afche une panne, le
logiciel est gé ou votre machine
présente un dysfonctionnement.
Eteignez et débranchez la machine, enlevez la cartouche ltrante, attendez une
minute et redémarrez la machine.
Maintenir l’appui sur la touche marche/arrêt au moins 3 secondes pour le
démarrage.
L’appareil ne s’allume pas après
avoir appuyé sur la touche
Marche/Arrêt( pendant au moins
3 secondes)
Vériez les fusibles et la prise secteur de votre installation électrique.
Vériez que les 2 ches du cordon sont correctement enfoncées côté prise
secteur.
Le broyeur émet un bruit
anormal.
Contactez le Service Consommateurs KRUPS.
Il y a présence de corps étrangers dans le broyeur.
Le bloc One Touch Cappuccino
n’aspire pas le lait.
Le bloc One Touch Cappuccino
ne fait pas ou peu de mousse.
Vériez que le bloc est correctement assemblé (notamment le mélangeur dans
le conduit lait).
Vériez que la sortie vapeur n’est pas bouchée. Si c’est le cas, voir plus bas “La
sortie vapeur de votre machine semble partiellement ou complètement bouchée».
Vériez que le mélangeur n’est pas bouché ou sale; trempez-le dans un mélange
d’eau chaude avec du produit vaisselle, puis rincez et séchez avant remontage.
Vériez que le tuyau souple n’est pas obstrué ou vrillé et qu’il est bien emboîté
dans le bloc One Touch Cappuccino pour éviter toute prise d’air. Vériez qu’il est
bien immergé dans le lait.
Rincez et nettoyez le bloc (voir chapitres correspondant au rinçage et au nettoyage
du bloc One Touch Cappuccino).
Pour les préparations à base de lait, nous vous conseillons d’utiliser du lait frais,
pasteurisé ou UHT, récemment ouvert, il est aussi recommandé d’utiliser un
récipient froid.
La sortie vapeur de votre
machine semble partiellement ou
complètement bouchée.
Démontez l’embout de son support à l’aide de la clé de démontage. Fig. 31.
Remettez le support sans l’embout: Fig.32.
Lancez le cycle de rinçage du bloc One Touch Cappuccino pour évacuer le
reste des dépôts.
Nettoyez la sortie vapeur et vérifiez que le trou de l’embout n’est pas
obstrué par des résidus de lait ou de calcaire. Utilisez l’aiguille de
nettoyage si nécessaire. Fig. 33
Aucune vapeur ne sort de
l’embout vapeur.
Vérier que la sortie vapeur n’est pas bouchée. Voir « La sortie vapeur de votre
machine semble partiellement ou complètement bouchée. » ci-dessus.
Si cela ne fonctionne pas, videz le réservoir à eau et retirez temporairement
la cartouche Claris. Remplissez le réservoir d’eau minérale forte en calcium
(>100mg/l) et faites successivement des cycles vapeur (5 à 10) dans un récipient
jusqu’à l’obtention d’un jet de vapeur continu.
Remettre la cartouche claris dans le réservoir.
De la vapeur s’échappe de la
grille du bac récolte-gouttes.
Selon le type de préparation, de la vapeur peut s’échapper de la grille du bac
récolte-gouttes.
14

La machine demande de vider
le bac récolte-gouttes alors qu’il
n’est pas plein.
La machine est programmée pour demander un vidage du bac récolte-
gouttes au bout d’un certain nombre de cafés, indépendamment des vidages
intermédiaires que vous pouvez effectuer.
L’appareil demande d’être
débranché et rebranché
Débranchez l’appareil pendant 20 secondes, retirez la cartouche Claris Aqua
Filter System le cas échéant, puis remettez-le en service.
Si le défaut persiste, contactez le Service Consommateurs KRUPS.
La machine ne demande pas de
détartrage.
Le cycle de détartrage est demandé à partir d’un nombre important d’utilisations
du circuit vapeur.
De la mouture se trouve dans le
bac récolte-gouttes.
De la mouture de café en faible quantité peut se déposer dans le bac récolte-
gouttes. La machine est faite pour évacuer les surplus de mouture résiduelle
pour que la zone de percolation reste propre.
Le lait ou l’eau ne s’écoule pas
correctement dans la ou les
tasse(s).
Vériez que le bloc One Touch Cappuccino est correctement positionné.
Des traces de lait sont présentes
dans un Americano ou une Eau
chaude.
Réalisez un rinçage lait, ou démontez et nettoyez l’accessoire one touch
cappuccino, avant le lancement de la préparation.
Il y a de l’eau sous l’appareil.
Avant d’enlever le réservoir, attendez 15 secondes après l’écoulement du café
an que la machine termine correctement son cycle. Vériez que le bac récolte-
gouttes est bien positionné sur la machine, il doit toujours être en place, même
lorsque votre appareil n’est pas utilisé.
Vériez que le bac récolte-gouttes n’est pas plein.
Le bac récolte-gouttes ne doit pas être retiré en cours de cycle.
Lors de l’extinction, de l’eau
chaude s’écoule par les sorties
café et le bloc One Touch
Cappuccino.
Selon le type de préparation, la machine peut effectuer un rinçage automatique
lors de son extinction. Le cycle ne dure que quelques secondes et s’arrête
automatiquement.
Après avoir vidé le bac collecteur
de marc à café, le message
d’avertissement reste afché.
Réinstallez correctement le bac collecteur de marc à café, et suivre les
indications à l’écran.
Attendez au moins 5 secondes avant de le réinstaller.
Le café s’écoule trop lentement.
Tournez le bouton de la nesse de broyage vers la droite pour obtenir une
mouture plus grossière (selon le type de café utilisé).
Effectuez un ou plusieurs cycles de rinçage.
Lancez un nettoyage de la machine (cf “Programmes automatiques de
nettoyage machine p.13).
Changez la cartouche Claris Aqua Filter System (cf “Installation du ltre” p.7).
Après avoir rempli le
réservoir d’eau, le message
d’avertissement reste afché à
l’écran.
Vériez le bon positionnement du réservoir dans l’appareil.
Le otteur au fond du réservoir doit se déplacer librement. Vériez et débloquez
si nécessaire le otteur.
Le bouton de réglage de la
nesse de broyage est difcile à
tourner.
Modiez le réglage du broyeur uniquement lorsqu’il est en fonctionnement.
L’espresso ou le café n’est pas
assez chaud.
Réalisez un rinçage circuit café avant de lancer votre café. Augmentez la
température du café dans le menu Réglages. Chauffez la tasse en la rinçant à
l’eau chaude avant de lancer la préparation.
15
FR
Le café est trop clair ou pas
assez corsé.
Evitez d’utiliser des cafés huileux, caramélisés ou aromatisés. Vériez que le
réservoir à grains contient du café et que celui-ci descend correctement.
Diminuez le volume de la préparation, augmentez la force de la préparation en
utilisant la fonction Dark.
Tournez le bouton de réglage de nesse de broyage vers la gauche pour obtenir
une mouture plus ne.
Réalisez votre préparation en deux cycles en utilisant la fonction 2 tasses.
L’appareil n’a pas délivré de
café.
Un incident a été détecté pendant la préparation.
L’appareil s’est réinitialisé automatiquement et est prêt pour un nouveau cycle.
Une coupure de courant s’est
produite lors d’un cycle.
L’appareil se réinitialise automatiquement lors de la remise sous tension.
Votre thé n’est pas assez chaud
ou trop chaud.
Augmentez ou diminuez la température de l’eau chaude dans le menu Réglages.
Vous avez utilisé du café moulu à
la place du café en grains.
Aspirez à l’aide de votre aspirateur le café moulu contenu dans le réservoir à
grains.
L’application n’arrive pas à se
connecter ou se déconnecte très
souvent
Vériez que le Bluetooth de la machine n’est pas désactivé.
Approchez-vous de la machine le plus possible lorsque vous utilisez
l’application.
L’application ne détecte pas la
machine
Eteignez et rallumez l’application.
Apparition de vapeur sous le
couvercle du bac à grains.
Fermez la goulotte pastille de nettoyage située sous le couvercle.
Après le lancement d’une
boisson, si vous demandez
un extra shot la machine vous
indique que ce n’est pas
possible.
Le bac collecteur de marc de café est plein et la fonction extra shot n’est
pas disponible. Une fois votre boisson réalisée, vous pouvez éventuellement
relancer un espresso après avoir vidé le bac collecteur de marc de café.
Danger : Seul un technicien qualié est autorisé à effectuer des réparations sur le cordon électrique et à intervenir
sur le réseau électrique. En cas de non-respect de cette consigne, vous vous exposez à un danger de
mort lié à l’électricité ! N’utilisez jamais un appareil présentant des détériorations visibles !
16
Dear Customer,
Congratulations! You are now the proud owner of your Espresso Automatic EA89 Series.
This new product offers more than 14 hot drinks: espresso, double espresso, coffee, double coffee, ristretto, doppio,
Americano, cappuccino, double cappuccino, latte, double latte, frothy milk, green tea, black tea, herbal tea.
In addition to this very large choice, the machine offers many opportunities for customising drinks, for example, you
can use a function that will increase the intensity of your coffee, if you appreciate more full-bodied preparations. You
can set the amount, strength and temperature of your drinks.
The most frequently consumed drinks are accessible with one simple touch on the main interface. As for the screen, it
allows you to follow the progress of your coffees and provides easy access to the different menus.
Most drinks can be prepared in batches of two, which saves time and is more convivial.
Thanks to its KRUPS Quattro force technology, including a Compact Thermoblock System with built-in percolation
chamber, its 15 bar pump, and because it uses coffee beans which have been freshly ground just before making the
coffee, your machine will serve you hot ristrettos, espressos and coffees from the rst cup with maximum aroma and
a creamy golden-brown froth.
To give the drink maximum avour, an espresso is traditionally served in a small, ared porcelain cup. For an optimum
temperature espresso and a dense creamy froth, we recommend that you pre-heat your cup.
You will probably need to try several types of coffee before you nd the one that suits you. By experimenting with the
blend and/or roast, you will eventually arrive at the ideal result.
Espresso coffee has a richer aroma than classic lter coffee. Despite its stronger taste, which remains longer on the
palate, an espresso contains less caffeine than lter coffee (around 60 to 80 mg per cup compared to 80 to 100 mg
per cup) due to its shorter percolation period.
The quality of water used is another determining factor which affects the overall quality of the brewed coffee. You
should ideally use water which is fresh from the tap (so that it has not had time to stagnate due to air contact), which
is cold and which does not smell of chlorine.
The tactile, ergonomic and comfortable buttons make it easy for you to browse. You will be guided through each step,
from preparing your drink to servicing your machine.
We wish you many years of enjoyment with your Krups machine.
The Krups team
17
EN

To get the most out of your machine and obtain good quality coffees, here is some advice:
• The quality of your water signicantly inuences the quality of the avours. Limescale and chlorine can
alter the taste of your coffee. We recommend that you use the Claris Aqua Filter System cartridge or low
mineral-content water to preserve all of the avours of your coffee.
• When preparing exclusively coffee recipes, we recommend that you use tulip-shaped porcelain cups,
preheated beforehand (by running them under hot water, for instance), and of a size appropriate to the
quantity you want to make. For your milk-based preparations, we recommend that you use thick glass
cups for an appetising result.
• Roasted coffee beans can lose their avour if they are not protected. We recommended that you use
the amount of beans required for your consumption for the next 4-5 days. Although the quality of coffee
beans is subjective and varied, we do recommend that you use arabica rather than robusta.
• Lastly, please remember that oily and caramelised coffee beans must be avoided, as they can damage
your machine.
• The quality and neness of the grinding determine the strength of the avours and the quality of the
cream. The ner the beans are ground, the richer the cream. Indeed, grinding should be adapted to the
drink desired: ne for ristretto and espresso, coarser for coffee.
• You can use pasteurised or UHT, skimmed, semi-skimmed or whole milk, straight from the refrigerator
(7°C). Using special milks (microltered, raw, fermented, enriched, etc.) or vegetable milks (rice, almond
milk, etc.) can produce less satisfactory results especially when it comes to the quantity and quality of
the froth.
18

19
EN
CONTENTS
IMPORTANT INFORMATION CONCERNING THE APPLIANCE AND INSTRUCTIONS ……….p. 20
TECHNICAL DATA
…………………………………………………….p. 20
APPLIANCE DESCRIPTION
……………………………………………..p. 21
OVERALL VIEW
………………………………………………………p. 21
KRUPS APP
…………………………………………………………p. 22
USING YOUR APPLIANCE
INSTALLING THE APPLIANCE
…………………………………………..p. 23
BEFORE PREPARING DRINKS
IMPORTANT INFORMATION
…………………………………………….p. 24
PREPARING COFFEE DRINKS VIA DIRECT ACCESS
…………………………p. 25
PREPARING MILKY DRINKS VIA DIRECT ACCESS
…………………………..p. 25
PREPARING TEAS
…………………………………………………….p. 26
PREPARING OTHER DRINKS: RISTRETTO, DOPPIO, AMERICANO OR FROTHY MILK ……..p. 26
OTHER FUNCTIONS
…………………………………………………..p. 27
GENERAL MAINTENANCE
………………………………………………p. 28
TROUBLESHOOTING
………………………………………………….p. 30
IMPORTANT INFORMATION CONCERNING THE APPLIANCE AND INSTRUCTIONS
In this manual you will nd all of the important information concerning the preparation, use and maintenance of your
machine.
Read the instructions carefully before using your appliance for the rst time and keep them for future reference: KRUPS
may not be held liable in the event of any use that does not comply with the instructions.
GUIDE TO THE SYMBOLS USED IN THE INSTRUCTIONS
Warning: Risk of serious injury or death. The lightning bolt symbol warns against electrical dangers.
Warning: Risk of possible malfunction, damage, or destruction of the appliance.
!
Warning: General or important note concerning the operation of the appliance.
Products supplied with your machine
Check the products supplied with your machine. If any parts are missing, contact your hotline (see p. 22: Initial settings).
Parts supplied:
— Espresso Automatic Series EA89
— 2 cleaning tablets
— 1 descaling sachet
— Milk conduit adaptable to the “One Touch Cappuccino” block
— Dismantling key for cleaning the steam circuit
— Safety instructions booklet
— Claris – Aqua Filter System cartridge with tting accessory
— 1 stick for testing water hardness
— Instructions
— List of approved Krups service centres
— Guarantee documents
— 1 steam nozzle cleaning kit
TECHNICAL DATA
Appliance Espresso Automatic Series EA89
Power supply 220-240V~ / 50 Hz
Pump pressure 15 bars
Coffee bean container 250 g
Power consumption During operation: 1,450 W
Water tank 2.3 l
First use and storage Indoors, in a dry place (protected from frost).
Dimensions (mm) H x L x D 367 x 240 x 380
Weight EA89 (kg) 8.4
Subject to technical adaptations.
20
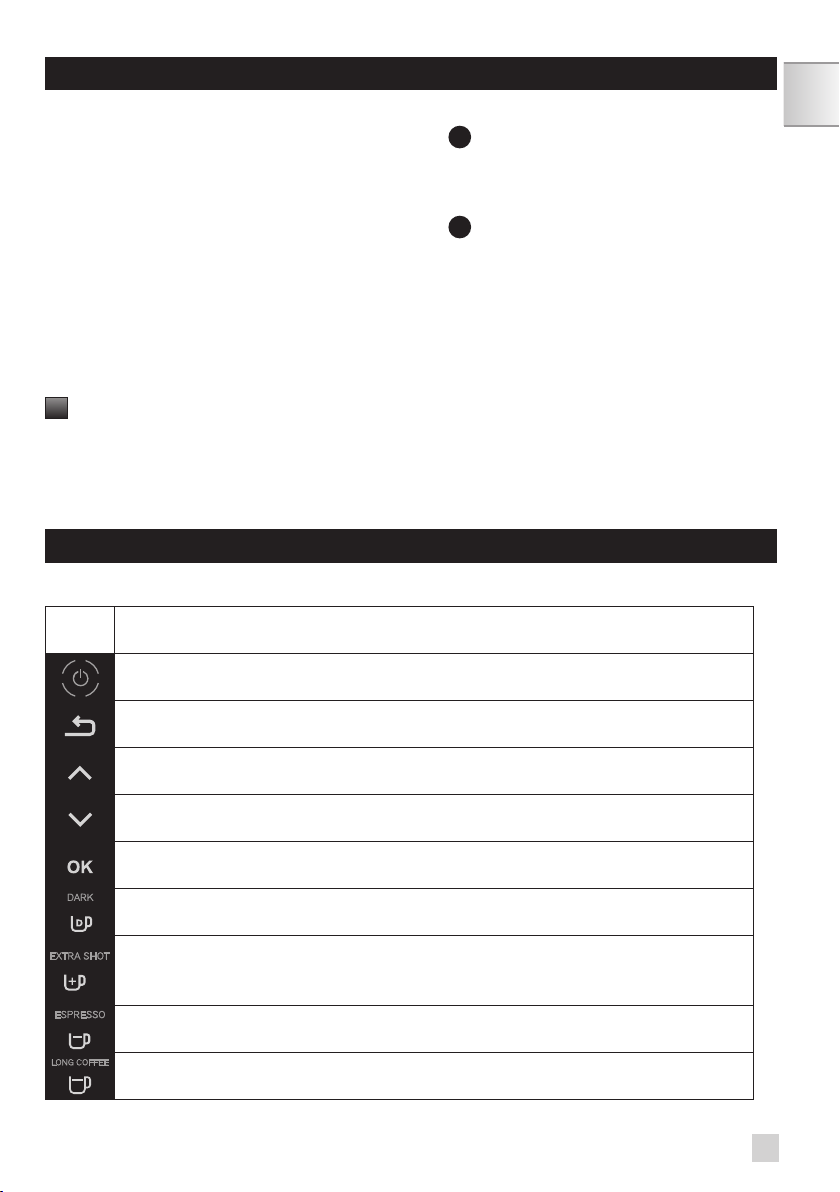
21
EN
APPLIANCE DESCRIPTION
A Water tank handle/lid
B Water tank
C Coffee grounds collector
D Height-adjustable coffee outlets
E Grid and removable drip tray
F Coffee bean container lid
G One Touch Cappuccino removable block
H Milk tube and connector
I Water level oat.
1
Coffee bean container
J Grinding neness adjustment dial
K Cleaning tablet funnel
L Metal grinding mill
2
Display panel
M Display
N “On-off” button
O Tactile buttons
Specific information about:
The drip tray: it allows you to collect water or coffee that might ow out of the appliance during and after preparation.
It is important to always leave it in place and to empty it regularly.
!
Important : Read these instructions carefully and keep them for future reference. Please follow the safety guidelines.
Manufacturer:
SAS GSM
Rue Saint-Léonard F-53104 Mayenne
France
OVERALL VIEW
Presentation of the different buttons
Button Description / General functions
Switching the machine on and off.
It is necessary to press and hold the button to start the machine.
Allows you to return to the previous screen or stop a recipe in progress.
Browse upwards in the menu / increment the parameter selected
Browse downwards in the menu / decrement the parameter selected
Conrmation of selection.
Function for increasing the strength of the coffee.
Function for adding a strong espresso to the recipe selected.
Accessible with the main recipes (espresso, long coffee, cappuccino, Macchiato, tea) according
to model.
Starts preparing an espresso.
Starts preparing a Coffee.
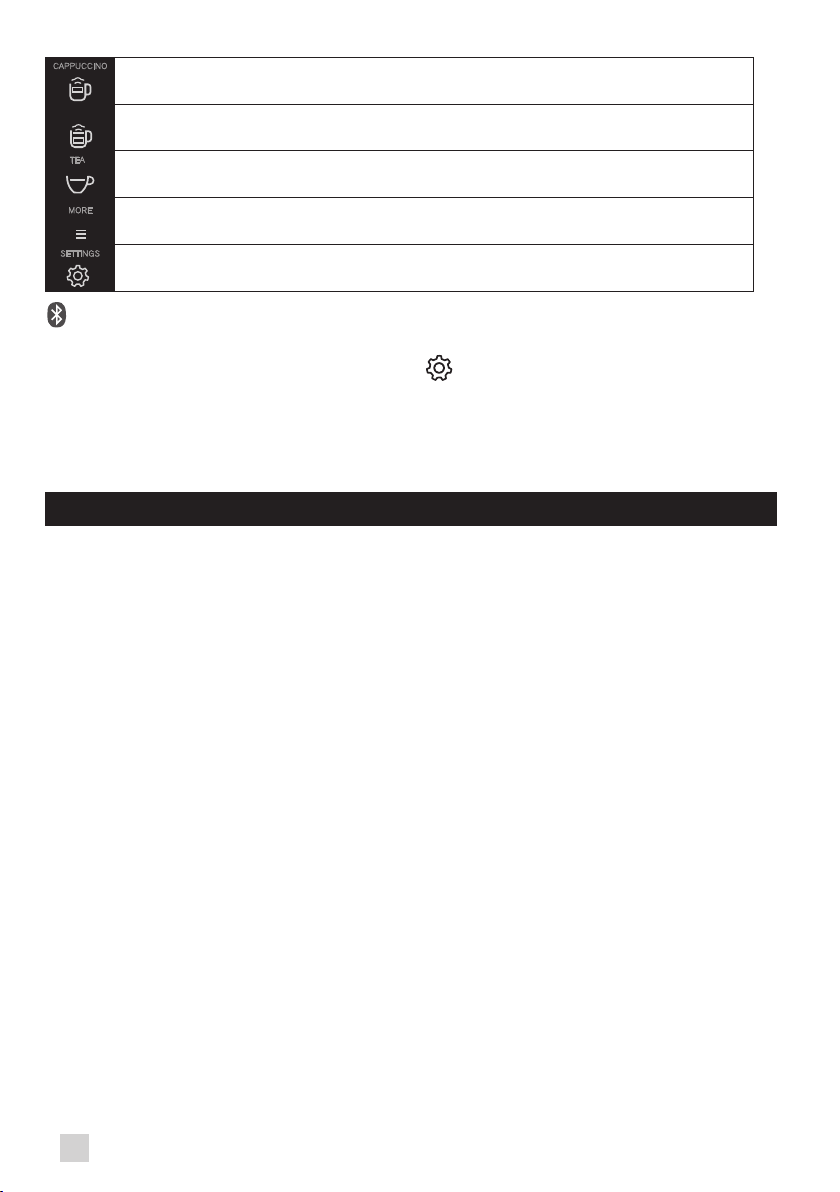
Starts preparing a Cappuccino
MACCHIATO
Starts preparing a Macchiato (a large measure of milk, a shot of Espresso, topped with frothy
milk foam).
Provides access to the menu for preparing a tea or a herbal tea.
Provides access to additional preparations: Ristretto, Frothy milk, Doppio, Americano, (according
to model).
Provides access to the general menu (machine settings, cleaning and product information).
: Bluetooth light:
When the symbol is not lit up, the machine is not connected or the function is deactivated.
When the symbol is lit up, the machine is connected.
Bluetooth is always activated. You can deactivate it in menu and then “settings”.
Specific information about the buttons’ lighting
When a button is not illuminated, the corresponding function is inaccessible.
When it is slightly illuminated, the function is available and can be selected.
While the function requested is in progress, the light becomes very bright.
KRUPS APP
You can check if your smartphone is compatible on www.krups.com
Downloading the app
In order to be able to download the app, you must have a smartphone equipped with a Bluetooth® BLE (blue tooth
Low energy) module and an Android > version “4.3” or IOS > “9”. If your smartphone does not have this, you will not
be able to use the app.
The KRUPS app is available on playstore for the Android version and on App store for the IOS version.
Configuring the account
In order to be able to take advantage of all the opportunities offered by the app, you must start by creating an account.
Complete the elds required and conrm the conditions of use in order to complete the creation of your account.
You will be required to enter a password to guarantee the condentiality of your data.
Bluetooth
®
activation
To connect your telephone to the machine, you must activate your phone’s Bluetooth
®
BLE module and ensure that the
machine’s Bluetooth
®
module is also activated. Go to the settings menu, select the connectivity function and activate
the Bluetooth
®
module if it has been deactivated (the Bluetooth
®
module is activated by default).
Pairing with the machine
Follow the instructions provided on your telephone to pair your smartphone with the machine. Pairing is only possible
when the BLE logo is on.
When the machine detects a pairing request from the smartphone, a screen on the machine asks you to accept the
pairing. Accept by pressing OK, a screen appears on your smartphone asking you to conrm pairing: press to pair.
If pairing fails, it is possible for you to try again several times and it is advised to check that the machine’s Bluetooth
®
BLE module is correctly activated.
If the problem persists, contact the after-sales service for help installing your app. In the home menu on your
smartphone, the “Contact Krups” option allows you to access the contact details for the after-sales service.
When the machine is paired, the Bluetooth
®
symbol should be brightly lit, a sign that is correctly activated.
Machine settings
Once paired, you can modify the machine’s settings via the app (the date and time of the smartphone will be updated
automatically on the machine which means that you do not have to do it).
22

23
EN
The mobile app facilitates the initial installation of the machine and the initial settings.
Using the app
Many functions are offered via the app:
• Running remote preparations,
• Management of a favourites library and a cellar book,
• Access to the account and information on the machine,
• Access to news and information about the world of coffee,
• Access to a user guide with tutorials and videos in order to take advantage of all the machine’s potential,
• Quick access to the after-sales service in the event of a query or a problem concerning your appliance or the app.
You will be able to discover all these functions by browsing the app (whether you are connected to your machine or
not).
Do not hesitate to connect to the app as often as possible in order to view news and regularly monitor your machine.
USING YOUR APPLIANCE
INSTALLING THE APPLIANCE
Warning: Connect the appliance to an earthed 230 V mains socket. Failure to do so means that you run the risk
of fatal injury due to electricity!
Respect the safety guidelines indicated in the “Safety guidelines” booklet.
Switching ON the appliance
Switch on the appliance by pressing the ON/OFF button until “Hello” appears on the screen Fig. 1. Follow the
instructions provided by your appliance.
Initial settings
When using the machine for the rst time, you will be prompted to congure various settings. Follow the indications
displayed on the screen. The aim of the following paragraphs is to give you a few visual cues.
Here are the rst settings required:
Language
Select a display language by pressing the arrows until the language of your choice appears. Press “OK” to conrm.
Measuring unit
You can set the unit of measurement for volume to ml or oz.
Date and time
To set the time, press the desired time format (24 hours or AM/PM).
Auto-off
It is possible to program the time at which you want your machine to switch on automatically. This setting can be
adapted as you wish: daily, weekly or weekend. Select the time at which you want it to start automatically following
the time format selected earlier.
You can also select the length of time after which your appliance will switch off automatically in order to optimise your
energy consumption.
Rinsing the coffee circuit
You can choose to activate it or not when switching on the machine. This allows you to ensure the quality of the coffee
in the cup in order to avoid the presence of residue.
Filter installation
When switching on for the rst time, the appliance asks if you want to install the lter. If you wish to do so, and if the
hardness of your water requires it, select “YES” and follow the instructions on the screen.
Installing the cartridge in the appliance: Screw the lter cartridge into the bottom of the water tank using the
accessory supplied with the cartridge. Fig. 4
Set the month when the cartridge is tted (position 1 on the illustration, left side gure in the opening) by turning the
grey ring located on the upper end of the lter. The month when the cartridge should be replaced is indicated in position
2 on the illustration. Fig. 5.
Put a container of 0.6 l under the steam exit. Fig. 6.
The machine must be primed whether the lter has been installed or not. This means that the water circuits have to
be lled. To do this, follow the instructions provided on the screen. The machine will begin by lling the water circuits,
preheating the circuits and then will complete an automatic rinse.
The screen will inform you when installation is complete.
Water hardness
You must set your machine depending on the hardness of your water, from 0 to 4. To do this, follow these instructions:
Before using the appliance for the rst time, check the hardness of your water so that you can set the appliance
accordingly. This operation should also be carried out when you use your machine in a place where the hardness of
the water is different or if you notice a difference in the hardness of the water. To check the water hardness, use the
test strip supplied with your machine or contact your local water authority.
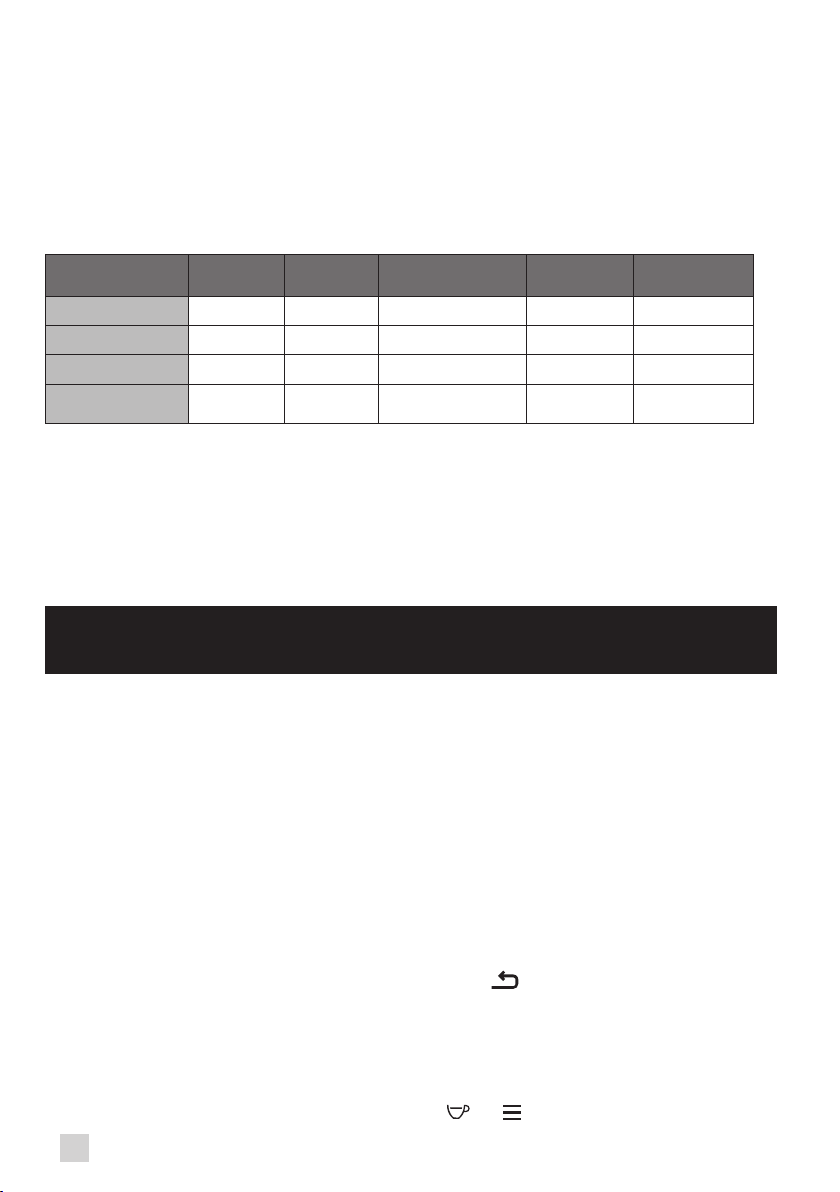
The details of the classes are given in the table below:
Degree of hardness
Class 0
Very soft
Class 1
Soft
Class 2
Average hardness
Class 3
Hard
Class 4
Very hard
° dH < 3° > 4° > 7° > 14° > 21°
° e < 3,75° > 5° > 8,75° > 17,5° > 26,25°
° f < 5,4° > 7,2° > 12,6° > 25,2° > 37,8°
Appliance setting 0 1 2 3 4
Fill a glass of water and insert a strip. Fig. 2
After 1 minute read the level of water hardness. Fig. 3
Indicate the number of red zones when conguring the appliance.
Preparing the appliance
Remove and ll the water tank. Fig. 7.
Replace the water tank. Fig. 8.
Remove the lid of the coffee bean container and add coffee beans (max. 250 g). Fig. 9.
Replace the lid of the coffee bean container. Fig. 10.
BEFORE PREPARING DRINKS
IMPORTANT INFORMATION
Depending on the drinks chosen, your Espresso Automatic EA89 will automatically adjust the quantity of ground coffee.
Preparing the grinder
You can adjust the strength of your coffee by adjusting how nely the coffee beans are ground. In general, the ner the
coffee is ground, the stronger and creamier the coffee will be. It may also vary according to the type of coffee used.
We recommend a ne setting for espressos and a coarser setting for coffees.
Adjust the neness of grinding by turning the coffee grounds neness adjustment knob (J) which is located in the
coffee bean container. This setting should be applied during grinding notch by notch. After 3 rounds, you will notice a
pronounced difference in taste.
Setting the neness of grinding is useful when you change the type of coffee or if you want to make coffee that is more
or less strong. However, it is not advised to use this setting systematically.
Adjusting the coffee outlet
For all the drinks available, you can lower or raise the coffee outlets according to the size of your cup or glass. Fig.11
Stopping a drink during preparation
You can stop the preparation at any time by pressing the return button .
Caution, pressing this button causes the machine to update which may last up to 30 seconds. This phase is normal.
When a cycle is interrupted, it does not stop immediately. The machine will nish its cycle and the preparation will be
cancelled.
“Double” preparation function
You can prepare two cups simultaneously with your appliance. The double preparation function can be accessed simply
by pressing the selection twice and is valid for all drinks (except and ).
24
25
EN
DARK function
The “DARK” function allows you to increase the intensity of the coffee (its strength).
You can activate or deactivate it in various ways:
— Before selecting the chosen drink just press DARK.
— While preparing the drink, and until the end of grinding: you can press DARK.
— By choosing the “DARK” parameter in the Settings menu. To do this, access the Settings menu with the button
, then Settings drink settings Dark. The function will be activated for all “coffee” drinks: , , , .
You can do the same to deactivate it.
EXTRA SHOT function
The “extra shot” function allows you to add an espresso at the end of the selected drink.
You can activate or deactivate it in various ways:
— Before selecting the chosen drink: just press EXTRA SHOT.
— While making the drink,
— By choosing the “EXTRA SHOT” parameter in the Settings menu. To do this, access the Settings menu with the button
, then Settings drink settings EXTRA SHOT. Therefore, the function will be activated for all preparations
, , , , .
You can do the same to deactivate it.
PREPARING COFFEE DRINKS VIA DIRECT ACCESS
N.B.: Every time the drink is launched, the machine will remember the last drink prepared, including the settings that
were selected.
Preparation
Place the cup(s) under the coffee nozzles. Fig.12
Press the button for the desired drink.
If the machine detects a lack of water when you request this preparation, it will ask you to ll the tank.
Possible settings
It is possible to increase the strength of the coffee by pressing and/or adding a coffee preparation by pressing .
You can prepare one or two cups with your appliance.
The machine starts by grinding the beans, tamping the ground coffee and nally brewing the coffee. It is possible to
adjust the volume of the coffee being prepared by using the buttons: and .
You can stop the preparation at any time by pressing .
Important: Automatic rinsing of the coffee outlets: according to the type of preparation, the machine may
complete an automatic rinse program when it switches off. The cycle lasts only a few seconds and
stops automatically.
PREPARING MILKY DRINKS VIA DIRECT ACCESS
Possible settings
It is possible to increase the strength of the coffee by pressing and/or adding a coffee preparation by pressing .
The steam is used to froth the milk. As a higher temperature is required when producing steam, the appliance will run
an additional pre-heating phase.
Making a Cappuccino or a Macchiato
Connect the straight side of the milk tube to the “One Touch Cappuccino” block Fig. 13.
Immerse the other end (bevelled side) in a receptacle lled with milk or directly in your bottle of milk Fig. 14.
Place the cup(s) under the coffee/milk nozzles. Fig.15.
Press the “Cappuccino” button Fig. 16 or press the “Macchiato” button Fig. 18. All of the settings can be
modied.
The preparation starts by frothing the milk (possible to set the time), and then the coffee ow (possible to adjust the
volume). Adjusting the frothing time allows you to vary the quantity of milk and froth.
The next steps follow automatically and your drink is ready to taste Fig.17.
Every time “Cappuccino”or “Macchiato” is run, the machine will remember the last drink prepared, including the
settings that were selected.
Cleaning after preparing milky drinks
Milk rinsing
The screen indicates “Rinse milk?” at the end of each preparation.
It is advised to rinse after using the milk function in order to ensure the cleanliness of the frothing accessories and the
frothiness of the milk.
During milk rinsing, you are required to systematically dismantle and clean the milk tube and connector with hot water.
Fig. 21 and 25.
For the best results, it is advised to clean the “One Touch Cappuccino” removable block regularly (see general
maintenance chapter).
If you note a change in the quality of your milk froth, do not hesitate to repeat the rinsing and cleaning process: indeed
a milk system that is not well maintained may cause this type of problem.
PREPARING TEAS
Possible settings
Your appliance allows you to prepare three types of tea (green tea, black tea, herbal tea). You can adjust the volume
of the drink to taste.
The hot water temperature is adapted to the drink selected.
You can program an extra shot in your tea which will allow you to prepare “tea/coffee” drinks that are very
fashionable.
Preparing a tea
Select on the screen. Place the cup(s) under the coffee nozzles. Fig.12
Then select the chosen drink and press .
If the machine detects no water when you submit your request, it will ask you to ll the tank.
You can modify the volume by using buttons or during preparation.
PREPARING OTHER DRINKS: RISTRETTO, DOPPIO, AMERICANO
OR FROTHY MILK
Preparation
Place the cup(s) under the coffee nozzles. Fig.12
If the machine detects no water when you submit your request, it will ask you to ll the tank.
Press button : with buttons and , select the desired drink: Ristretto, Doppio, Americano, Frothy milk.
Making a Ristretto
Select Ristretto and press .
The machine starts by grinding the beans, tamping the ground coffee and nally brewing the coffee. It is possible to
adjust the volume of the coffee being prepared by using the buttons: and .
You can stop the preparation at any time by pressing .
Making a Doppio
Select DOPPIO and press .
The preparation is identical to the RISTRETTO but with a double coffee cycle.
Making an Americano
Select AMERICANO and press .
The preparation is identical to the DOPPIO, but is followed by hot water.
Making a Frothy milk
Connect the straight side of the milk tube to the “One Touch Cappuccino” removable block Fig. 13. Immerse the other
end (bevelled side) in a receptacle lled with milk. Fig.14
The steam is used to froth the milk. As a higher temperature is required when producing steam, the appliance will
26

27
EN
launch an additional pre-heating phase.
A menu will allow you to customise the frothing time. You can modify it by pressing buttons or . Then press
. The last frothing time used will be memorised for the next preparation.
You can download the preparation at any time by pressing .
Rinsing the “One Touch Cappuccino” block
Please refer to the paragraph “Milk rinsing” in the section PREPARING ONE TOUCH MILK DRINKS.
OTHER FUNCTIONS
The Settings menu can be accessed via button which leads to the general menu (machine settings maintenance
and product information).
Settings
By selecting the Settings menu, you can make the changes you want in order to optimise your ease of use and suit
your preferences.
Below are the main settings available.
Date You must set the date, particularly when you are using an anti-limescale cartridge.
Clock You can select to display a 12 or 24-hour clock.
Language You can select the language of your choice from those offered.
Measuring unit You can set the unit of measurement to be ml or oz.
Screen brightness You can adjust the screen brightness according to your preferences.
Coffee temperature You can adjust the temperature of your coffee drinks to three different levels
Tea temperature You can adjust the temperature of your teas to three different levels
Water hardness You can set your water hardness from 0 to 4. See chapter “Measuring water hardness”.
Auto-on You can automatically start pre-heating of the appliance at a selected time.
Auto-off
You can choose the duration after which your appliance will switch off automatically
(duration of non use).
Automatic rinsing
You can choose to activate automatic rinsing of the coffee outlet or not when starting
the machine.
Drinks settings
You can restore the default settings. You can also permanently activate the Dark and
Extra Shot function for all your drinks (except
).
To quit the settings menu, press or the Settings button.
The settings will be stored in the memory if you unplug your machine, with the exception of the date and time.
Maintenance
All of these options allow you to run the selected programs. You should then follow the on-screen instructions.
Cleaning milk
Provides access to cleaning the machine’s one touch cappuccino block, which is essential
for ensuring good quality milk frothing.
Milk rinsing
Provides access to rinsing the machine’s one touch cappuccino block, which is essential for
ensuring good quality milk frothing.
Coffee rinsing
Provides access to rinsing the machine’s coffee circuit, which ensures the optimum taste
of coffee.

Coffee cleaning
Provides access to cleaning the machine’s coffee circuit (using a cleaning tablet), which
ensures the optimum taste of coffee.
Descaling
Provides access to descaling which is essential for the durability of your machine. When the
number of drinks is not high enough for descaling to be necessary, the function is not active.
Filter
Provides access to the lter mode, useful if the water is very hard, in order to ensure the best
taste and the health of your machine.
To quit the Cleaning menu, press or the Settings button.
Info
The “Info” menu provides access to information about your use and about certain stages in the life of your machine. It
also informs you about its upkeep. Below are the main details available.
Drinks prepared Displays the number of drinks prepared
Coffee circuit cleaning Indicates that is needs to be completed within x number of cycles.
Descaling Indicates that is needs to be completed within x number of cycles.
Filter Indicates that it will need to be changed in x days or x litres.
To quit the Info menu, press or the Settings button.
GENERAL MAINTENANCE
Emptying the coffee grounds collector and the drip tray
After a certain number of coffees, the machine will ask you to empty the coffee grounds collector and the drip tray. Not
to make correctly these operations can damage your machine.
The drip tray collects used water and the coffee grounds collector collects used ground coffee.
If the message “Please empty the two trays” is displayed, remove, empty and clean the drip collector tray. Remove,
empty and clean the coffee grounds collector (C). Fig. 19.
Replace the coffee grounds collector. Fig. 20
The drip tray is equipped with a oat to indicate when it needs emptying. However, the machine is also programmed to
ask for the drip collector tray to be emptied after a certain number of coffees, in addition to any intermediate emptying
operations that you may complete.
Rinsing the circuits:
You can start rinsing at any time by pressing and selecting Maintenance.
According to the type of recipe prepared, the machine may complete an automatic rinsing when it is turned off.
It is also possible to set an automatic rinse program when it is switched on (see “Settings” section p.22).
Automatic cleaning programs
Automatic cleaning program of the coffee circuit
A message on the screen will indicate when a cleaning program needs to be run for the appliance.
To run this cleaning program, you will need a container which holds at least 0.6 l, and which should be placed beneath
the coffee outlets and the steam nozzle, and a KRUPS cleaning tablet. Fig. 34a. Carefully follow the instructions given
on the screen. It is also possible to run a cleaning cycle via the Maintenance menu.
!
Important: You do not have to run the cleaning program as soon as the appliance requests it, but it must be
done reasonably soon after. If cleaning is postponed, the alert message will remain illuminated until
the process is completed.
The automatic cleaning program comprises two phases: a cleaning cycle and a rinsing cycle, and lasts about 13
minutes.
28

29
EN
!
Important: If you unplug your machine during the cleaning cycle, or if there is a power failure, the cleaning program
will continue from the current phase when the power is returned. It is not possible to postpone this
process. This is essential to ensure that the water circuit has been correctly rinsed. In this case, a new
cleaning tablet may be necessary. Complete the full cleaning program in order to remove all of the
cleaning product which is harmful to health.
Cleaning the “One Touch Cappuccino” block
To complete a cleaning program, you will require two containers (minimum 0.6 L) and KRUPS cleaning liquid.
You can start the cleaning cycle by pressing button .
Then selecting “Maintenance” “Milk Cleaning”. Follow the instructions on the screen.
Dismantling the “One Touch Cappuccino” block
In addition to rinsing, it is necessary to clean the different elements of the block every time after using. To dismantle
the block, follow the following instructions:
Remove the milk tube, Fig. 21.
Remove the front lid of the coffee milk nozzles. Slide it downwards and pull it towards you. Fig. 22.
Remove the “One Touch Cappuccino” block by pulling the upper part of the block Fig. 23.
Completely dismantle the block. Fig. 24.
Remove the milk tube connector Fig. 25.
Clean all of the dismantled parts (block, connector and milk tube) with soapy water. Then rinse them in hot water. Fig.
26.
Once the elements are clean and dry, assemble the block and return them to their original position. Fig. 27.
Replace the font lid of the block. Fig. 28. Replace the connector in the milk tube Fig 29 (opposite side of the bevelled
side) and plug in the block. Fig. 30.
Automatic descaling program of the steam circuit
Warning: if your appliance is tted with our Claris — Aqua Filter System cartridge, remove the cartridge before
descaling.
A message on the screen will indicate when a descaling program needs to be run for the appliance. The frequency of
this program depends on the quality of the water used and on whether a Claris Aqua Filter System lter is used or not
(the harder the water, the more often the appliance has to be descaled).
!
Important: You are not obliged to carry out this program immediately the appliance requests it, but it must be
carried out reasonably soon afterwards. If descaling is postponed, the alert message will continue to
be displayed until the process is completed.
When the descaling alert level is reached and displayed, press to run the descaling program. To delay it, press
.
Once the procedure has been launched, follow the instructions provided on the screen. It is also possible to run a
descaling cycle via the “Maintenance” menu “Descaling”.
To carry out a descaling program, you will require a container with a capacity of at least 0.6 L which should be placed
beneath the One Touch Cappuccino block and a KRUPS descaling sachet (40 g). Fig. 34b
Fill the water tank up to the CALC mark then pour in the contents of one sachet of descaler.
The descaling program comprises three phases: a descaling cycle and two rinsing cycles. The program lasts
approximately 20 minutes.
!
Important: If there is a power failure or if you unplug your machine, the cycle will continue from the current phase
when the power is returned. It will not be possible to cancel this operation. Complete the full cycle in
order to remove all of the descaling product which is harmful to health.

TROUBLESHOOTING
If one of the problems described in the table persists, contact KRUPS customer service.
PROBLEM CORRECTIVE ACTION
The machine displays a failure,
the software hangs or your
machine has a malfunction.
Switch off and unplug the appliance, remove the lter cartridge, wait for one
minute and start the appliance again.
Press and hold the on/off button for at least 3 seconds for starting.
The appliance does not switch
on when the ON/OFF button is
pressed (for at least 3 seconds).
Check your fuses and plug sockets.
Check that the two power plugs are correctly inserted into the socket.
The coffee grinder makes a
strange noise.
There is a foreign body in the grinder.
Contact the KRUPS Customer Service team.
The One Touch Cappuccino
block does not suck the milk.
The One Touch Cappuccino
blocks produces little or no froth.
Check that the block is assembled correctly (in particular the connector in the
milk tube).
Ensure that the steam nozzle is not blocked. If this is the case, see below “The
steam nozzle on your machine seems to be partially or completely blocked”.
Check that the connector is not blocked or dirty; soak it in a mixture of hot water
and washing-up liquid, then rinse and dry before reassembling.
Ensure that the exible pipe is not blocked or twisted and that it is properly inserted
into the One Touch Cappuccino block in order to avoid any air leaks. Check that
it is fully immersed in the milk.
Rinse and clean the block (see chapters concerning rinsing and cleaning the One
Touch Cappuccino block).
For milk drinks, we recommend that you use fresh, pasteurised or UHT milk which
has been recently opened. It is also advisable to use a cold container.
The steam nozzle on your
machine seems to be partially or
completely blocked.
Dismantle the nozzle from its support using the dismantling key. Fig. 31.
Replace the support without the nozzle: Fig. 32.
Start the rinse cycle for the One Touch Cappuccino block to remove any
remaining deposits.
Clean the steam nozzle and ensure that the opening of the nozzle is not
obstructed by the remains of milk or limescale. Use the cleaning needle if
necessary. Fig. 33
No steam comes out of the
steam nozzle.
Ensure that the steam nozzle is not blocked. See “The steam nozzle on your
machine seems to be partially or completely blocked.” below
If this does not work, empty the water tank and remove the Claris cartridge
temporarily. Fill the water tank with mineral water with high calcium content
(>100 mg/l) and run steam cycles (5 to 10) consecutively into a container until
you obtain a continuous jet of steam.
Put the cartridge back in the tank.
Steam is leaking from the drip
tray grid.
Depending on the type of preparation, steam may escape from the drip tray
grid.
The machine asks for the drip
tray to be emptied although it is
not full.
The machine is programmed to ask for the drip tray to be emptied after a certain
number of coffees despite any intermediate emptying operations that you may
complete.
30

31
EN
The appliance asks to be
unplugged and plugged back in
again.
Unplug the appliance for 20 seconds, remove the Claris Aqua Filter System
cartridge if necessary, then plug it back in again.
If the error continues, contact the KRUPS Customer Service team.
The machine does not request
descaling.
The descaling cycle is requested after the steam circuit has been used a
signicant number of times.
Some ground coffee has found
its way into the drip tray.
A small amount of ground coffee may settle in the drip tray. The machine is
designed to evacuate any excess ground coffee so that the percolation zone
remains clean.
The milk or water is not owing
correctly into the cup(s).
Check that the One Touch Cappuccino block is correctly positioned.
There are traces of milk in an
Americano or a Hot water.
Complete a milk rinsing cycle or dismantle and clean the one touch cappuccino
accessory before running the preparation.
There is water underneath the
appliance.
Before removing the water tank, wait for 15 seconds after the coffee has
nished owing so that the appliance nishes its cycle properly. Check that the
drip tray is correctly positioned on the machine; it should always be in place,
even when the appliance is not in use. Check that the drip tray is not full.
The drip tray should not be removed during a cycle.
When you turn off the appliance,
warm water ows out of the
coffee outlets and the One Touch
Cappuccino block.
According to the type of recipe prepared, the machine may run an automatic
rinsing cycle when it is turned off. This cycle lasts only a few seconds and stops
automatically.
After emptying the coffee
grounds collector, the warning
message is still displayed on the
screen.
Correctly replace the coffee grounds collector and follow the instructions on
the screen.
Wait at least 5 seconds before replacing them.
The coffee dispenses too slowly.
Turn the ‘neness of grind’ adjustment dial to the right to make the ground
coffee coarser (according to the type of coffee used).
Run one or several rinsing cycles.
Run a machine clean (see “Automatic machine cleaning programs p.28).
Change the Claris Aqua Filter System cartridge (see “Installing the lter”) p. 23).
The water tank has been lled,
but the warning message is still
displayed on the screen.
Check that the tank is installed correctly on the device.
The oat at the bottom of the tank should move freely. Check and unblock the
oat if necessary.
The coffee neness knob is
difcult to turn.
Only change the grinder setting when it is running.
The espresso or coffee is not hot
enough.
Run a coffee circuit rinsing cycle before preparing your coffee.
Increase the coffee temperature in the Settings menu. Warm the cup by rinsing
it with hot water before making the drink.
The coffee is too lightly coloured
or too weak.
Avoid using oily, caramelised or avoured coffee beans. Check that the coffee
bean container has coffee in it and that is it dispensing correctly.
Decrease the volume of the preparation and increase the strength of your drink
by using the Dark function.
Turn the grinding neness adjustment dial to the left to make the grounds ner.
Make the drink in two cycles by using the 2 cups function.

The appliance is not producing
coffee.
A problem has been detected during preparation of the drink.
The appliance has restarted automatically and is ready for a new cycle.
A power failure occurs during a
cycle.
The appliance will automatically restart when the power is switched back on.
Your tea is not hot enough or
too hot.
Increase or reduce the hot water temperature in the Settings menu.
You have used ground coffee
instead of coffee beans.
Use your vacuum cleaner to remove the ground coffee from the coffee bean
container.
The app is unable to connect or
disconnects too often.
Check that the machine’s Bluetooth is not deactivated.
Stand as close as possible to the machine as possible when using the app.
The app does not detect the
machine.
Switch the app off and on.
Appearance of steam under the
lid of the grain tray.
Close the cleaning tablet chute beneath the cover.
After preparing a drink, if you ask
for an extra shot the machine
tells you that this is not possible.
The coffee grounds collector is full and the extra shot function is not available.
Once your drink has been made, you can prepare an espresso after emptying
the coffee grounds collector.
Danger : Only a qualied technician is authorised to carry out repairs on electrical wiring and carry out work on
the electrical grid. If you do not follow these instructions, you risk death by electrocution. Do not use an
appliance that is visibly damaged!
32

33
DE
Liebe Kundin, lieber Kunde!
Wir beglückwünschen Sie zum Kauf Ihrer neuen Espresso Automatic Serie EA89.
Mit diesem neuen Produkt können Sie mehr als 15 verschiedene Heißgetränke zubereiten: Espresso, doppelten
Espresso, Kaffee, doppelten Kaffee, Ristretto, Doppio, Americano, Cappuccino, doppelten Cappuccino, Latte
macchiato, doppelten Latte macchiato, aufgeschäumte Milch, grünen Tee, schwarzen Tee und Kräutertee.
Abgesehen von dieser umfangreichen Auswahl bietet Ihnen dieser Kaffeevollautomat zahlreiche Möglichkeiten der
persönlichen Einstellung für die Getränkespezialitäten. Sie können beispielsweise eine Funktion nutzen, mit der Ihr
Kaffee stärker wird, wenn Sie ihn gerne stärker zubereiten. Sie können dabei die Menge, die Stärke und die Temperatur
Ihrer Getränke einstellen.
Die am häugsten genossenen Getränke lassen sich mit einem einfachen Tastendruck auf dem Hauptbedienfeld
auswählen. Auf dem Display können Sie den Fortschritt Ihres Kaffeegetränks verfolgen oder von dort bequem zu den
verschiedenen Menüs gelangen.
Die meisten Getränke können Sie in doppelter Ausführung zubereiten. So sparen Sie Zeit und protieren von der
Benutzerfreundlichkeit.
Dieser Kaffeevollautomat verfügt über die innovative KRUPS-Technologie Quattro Force, die eine optimale
Kaffeeextraktion gewährleistet: Genießen Sie beispielsweise Ristretto, Espresso und Kaffee, von der ersten Tasse
an mit einem vollen Aroma und einer goldbraunen Crema. Traditionellerweise und zur vollständigen Entfaltung
seines Aromas wird der Espresso in kleinen Porzellantassen in Tulpenform serviert. Um einen Espresso mit optimaler
Temperatur und einer kompakten Crema zu erhalten, empfehlen wir Ihnen, die Tassen vorzuwärmen.
Wahrscheinlich müssen Sie mehrere Kaffeesorten ausprobieren, bis Sie jene nden, die Ihnen am besten schmeckt.
Versuchen Sie verschiedene Mischungen und/oder Röstungen und um die für Sie richtige Kaffeesorte zu nden. Ein
Espresso ist aromatischer als klassischer Filterkaffee. Trotz seines stärkeren, vollmundigeren und länger anhaltenden
Geschmacks enthält ein Espresso aufgrund der kürzeren Brühzeit weniger Koffein als Filterkaffee (ca. 60 bis 80 mg pro
Tasse im Gegensatz zu 80 bis 100 mg pro Tasse).
Auch die Wasserqualität ist entscheidend für die Qualität des Ergebnisses in der Tasse. Am besten verwenden Sie
frisches Leitungswasser (das aufgrund des Kontakts mit der Luft noch nicht abgestanden schmeckt), das kalt und frei
von Chlorgeruch ist.
Die ergonomischen und bedienerfreundlichen Tasten auf dem Touchscreen erleichtern Ihnen die Navigation. Sie
werden durch alle Abschnitte, von der Getränkezubereitung bis zur Wartung der Maschine, geführt.
Wir wünschen Ihnen nun viel Freude mit Ihrer neuen Maschine von Krups.
Ihr Team von Krups

34
Mit den folgenden Tipps möchten wir Ihnen helfen, Ihren neuen Kaffeevollautomaten bestmöglich zu verwenden
und optimale Ergebnisse zu erzielen:
•
Die Qualität des verwendeten Wassers beeinusst sehr stark das Aroma. Kalk und Chlor können den
Geschmack Ihres Kaffees verändern. Wir raten Ihnen daher, eine Filterpatrone (Claris Aqua Filter System)
zu verwenden oder nur schwach mineralisiertes Wasser einzufüllen, um das volle Aroma Ihres Kaffees
zu bewahren.
•
Für die Zubereitung von reinen Kaffeegetränken empfehlen wir Ihnen die Verwendung von Porzellantassen
in Tulpenform, die vorgewärmt sind und deren Größe der von Ihnen eingestellten Getränkemenge
entspricht. Für die Zubereitung von Milchgetränken empfehlen wir Ihnen die Verwendung von
dickwandigen Glastassen, um ein ansprechendes Ergebnis zu erhalten.
•
Geröstete Kaffeebohnen können ihr Aroma verlieren, wenn sie nicht gut verpackt werden. Wir raten Ihnen
daher, immer nur so viele Bohnen einzufüllen, wie Sie in den nächsten 4-5 Tagen verbrauchen werden.
Bohnenkaffee kann von sehr eigener und unterschiedlicher Qualität sein. Wir empfehlen Ihnen mehrer
Kaffeesorten auszuprobieren, bis Sie die für Ihren Geschmack richtige Kaffeesorte gefunden haben..
•
Was ölige und karamellisierte Kaffeebohnen betrifft, so raten wir Ihnen von deren Verwendung dringend
ab, da diese Bohnen die Maschine schädigen können.
•
Mit welcher Qualität und wie fein der Kaffee gemahlen ist, wirkt sich auf die Intensität des Aromas und
die Beschaffenheit der Crema aus. Je feiner das Kaffeepulver, desto cremiger die Schicht. Außerdem
muss der Mahlgrad an das gewünschte Getränk angepasst werden: fein für Ristretto und Espresso,
grober für Kaffee.
•
Sie können in der Maschine pasteurisierte Milch oder H-Milch, Magermilch, fettarme Milch oder
Vollmilch aus dem Kühlschrank (7 °C) verwenden. Die Verwendung von Spezialprodukten (mikroltrierte,
fermentierte oder angereicherte Milch, Rohmilch etc.) oder Milch panzlichen Ursprungs (Reis-,
Mandelmilch etc.) kann zu weniger befriedigenden Ergebnissen führen, insbesondere in Bezug auf die
Qualität des Milchschaums. Für ein gutes Aufschäumergebnis empfehlen wir stets gekühlte Milch zu
verwenden.

35
DE
INHALTSVERZEICHNIS
WICHTIGE INFORMATIONEN ÜBER DAS PRODUKT
UND DIE BEDIENUNGSANLEITUNG ……………………………………………………p. 36
TECHNISCHE DATEN …………………………………………………………………..p. 36
BESCHREIBUNG DES GERÄTES ………………………………………………………p. 37
GESAMTÜBERBLICK …………………………………………………………………..p. 37
KRUPS ESPRESSO APP. . . . . . . . . . . . . . . . . . . . . . . . . . . . . . . . . . . . . . . . . . . . . . . . . . . . . . . . . . . . . . . . . . . . . . . . . .p. 38
INBETRIEBNAHME
INSTALLATION DES GERÄTES …………………………………………………………p. 39
VOR DER ZUBEREITUNG VON GETRÄNKEN
WICHTIGE HINWEISE …………………………………………………………………..p. 40
ZUBEREITUNG VON KAFFEEGETRÄNKEN ONE TOUCH ……………………………..p. 41
ZUBEREITUNG VON MILCHGETRÄNKEN ONE TOUCH ………………………………p. 42
ZUBEREITUNG VON TEE ……………………………………………………………….p. 42
ZUBEREITUNG WEITERER GETRÄNKE: RISTRETTO, DOPPIO, AMERICANO
ODER AUFGESCHÄUMTE MILCH ……………………………………………………..p. 43
SONSTIGE FUNKTIONEN ………………………………………………………………p. 43
ALLGEMEINE WARTUNG ………………………………………………………………p. 44
FEHLERSUCHE UND -BEHEBUNG …………………………………………………….p. 46

36
WICHTIGE INFORMATIONEN ÜBER DAS PRODUKT
UND DIE BEDIENUNGSANLEITUNG
In dieser Bedienungsanleitung nden Sie alle wichtigen Informationen zur Inbetriebnahme, Benutzung und Wartung
des Kaffeevollautomaten.
Lesen Sie die Gebrauchsanweisung vor der ersten Verwendung des Geräts aufmerksam durch und bewahren Sie sie
auf: Bei unsachgemäßem Gebrauch übernimmt KRUPS keine Haftung und die Garantie erlischt.
ÜBERSICHT ÜBER IN DIESER ANLEITUNG VERWENDETE SYMBOLE
Warnung: Warnung vor Gefahren, die zu schweren oder tödlichen Körperverletzungen führen können. Ein Blitz-
Symbol warnt vor Gefahren im Zusammenhang mit elektrischem Strom.
Achtung: Warnung vor Einüssen, die zu Funktionsstörungen, Schäden oder zur Zerstörung des Gerätes führen
können.
!
Wichtig: Allgemeiner oder wichtiger Hinweis zur Sicherung der Funktionsfähigkeit des Gerätes.
Mit Ihrem Kaffeevollautomaten gelieferte Produkte
Überprüfen Sie die Vollständigkeit der mit Ihrer Maschine gelieferten Produkte. Sollte ein Produkt fehlen, kontaktieren
Sie bitte sofort unsere Hotline (siehe S. 39: Ersteinstellung).
Lieferumfang:
— Espresso Automatic Serie EA89
— 2 Reinigungstabletten
— 1 Beutel Entkalker
— Milchleitung, die an das „One-Touch-Cappuccino“-System angeschlossen werden kann
— Demontageschlüssel für die Reinigung des Dampfkreislaufs
— Heft mit den Sicherheitshinweisen
— Claris Filterpatrone — Aqua Filter System mit Schraubteil
— 1 Stäbchen zur Bestimmung der Wasserhärte
— Bedienungsanleitung
— Verzeichnis der Kundenservicestellen von Krups
— Garantieunterlagen
— 1 Reinigungsset für die Dampfdüse
TECHNISCHE DATEN
Gerät Automatic Espresso EA89
Stromversorgung 220-240 V~ / 50 Hz
Pumpendruck 15 bar
Kaffeebohnenbehälter 250 g
Energieverbrauch In Betrieb: 1450 W
Wassertank 2,3 l
Inbetriebnahme und Aufbewahrung
In geschlossenen Räumen an einem
trockenen Ort (frostsicher)
Abmessungen (mm) H x B x T 367 x 240 x 380
Gewicht EA89 (kg) 8,4
Technische Änderungen vorbehalten.

BESCHREIBUNG DES KAFFEEVOLLAUTOMATEN
A Griff/Deckel des Wassertanks
B Wassertank
C Kaffeesatzbehälter
D Höhenverstellbare Kaffeeauslässe
E Abnehmbares Abtropffach mit Gitter
F Deckel des Kaffeebohnenbehälters
G Abnehmbares One-Touch-Cappuccino-
System
H Milchleitung und Mischelement
I Wasserstandschwimmer
1
Kaffeebohnenbehälter
J Mahlgrad-Einstellknopf
K Fach für die Reiningungstablette
L Metallmahlwerk
2
Bedienfeld
M Display
N Ein/Aus-Taste
O Berührungstasten
Anmerkungen zu:
Abtropffach: Es dient zum Sammeln von Wasser oder Kaffee, das bzw. der während und nach der Getränkezubereitung
aus dem Gerät entweicht. Dies muss immer eingesetzt sein und regelmäßig entleert werden.
!
Wichtig: Lesen Sie diese Bedienungsanleitung sorgfältig durch und bewahren Sie sie auf. Bitte befolgen Sie die darin
enthaltenen Sicherheitshinweise.
Hersteller:
SAS GSM
Rue Saint-Léonard F-53104 Mayenne
Frankreich
GESAMTÜBERBLICK
Vorstellung der verschiedenen Tasten
Taste Beschreibung / allgemeine Funktionen
Ein- und Ausschalten der Maschine.
Zur Inbetriebnahme der Maschine lange drücken.
Rückkehr zur vorherigen Anzeige oder Anhalten einer laufenden Zubereitung.
Navigation im Menü nach oben / Erhöhen des ausgewählten Parameters um Eins
Navigation im Menü nach unten / Verringern des ausgewählten Parameters um Eins
Bestätigung der Auswahl
Mit dieser Funktion lässt sich die Kaffeestärke erhöhen.
Mit dieser Funktion lässt sich ein starker Espresso zur ausgewählten Zubereitung hinzugeben.
Je nach Modell mit den wichtigsten Getränken (Espresso, Kaffee, Cappuccino, Macchiato, Tee)
verfügbar.
Starten der Zubereitung eines Espresso
Starten der Zubereitung eines Kaffee
DE
37

38
Starten der Zubereitung eines Cappuccino
MACCHIATO
Starten der Zubereitung eines Macchiatos (viel Milch, ein Schuss Espresso, auf den eine Haube
Milchschaum gegeben wird)
Zugang zum Menü zur Zubereitung von Tee oder Kräutertee
Zugang zu weiteren Zubereitungen: Ristretto, aufgeschäumte Milch, Doppio, Americano (je nach
Modell)
Zugang zum Hauptmenü (Maschineneinstellung, Wartung und Produktinformationen).
: Bluetooth-Licht
Wenn das Licht des Logos nicht leuchtet, ist die Maschine nicht verbunden oder die Funktion ist deaktiviert.
Wenn das Licht des Logos leuchtet, ist die Maschine verbunden.
Die Bluetooth-Verbindung ist immer aktiv. Sie können sie im Menü in „Einstellungen“ deaktivieren.
Erläuterungen zur Beleuchtung der Tasten
Wenn eine Taste nicht leuchtet, ist die entsprechende Funktion nicht verfügbar.
Leuchtet sie schwach, ist die Funktion verfügbar und kann ausgewählt werden.
Wird die gewünschte Funktion ausgeführt, leuchtet die Kontrollleuchte hell.
KRUPS ESPRESSO APP
Überprüfen Sie die Kompatibilität Ihres Smartphones auf www.krups.com
Download der App
Zum Download der App muss Ihr Smartphone mit einem Bluetooth
®
BLE Modul (Bluetooth Low Energy) und einer
Android-Version 4.3 oder höher oder IOS 9 oder höher ausgestattet sein. Sind diese Voraussetzungen nicht erfüllt,
können Sie die App nicht nutzen.
Die KRUPS App ist für Android im Play Store und für IOS im Apple Store verfügbar.
Kontoeinrichtung
Um von den Möglichkeiten der App zu protieren, müssen Sie zuerst ein Benutzerkonto einrichten. Füllen Sie die
Pichtfelder aus, akzeptieren Sie die Nutzungsbedingungen und schließen Sie so die Kontoeinrichtung ab.
Zur Sicherstellung der Vertraulichkeit Ihrer Daten werden Sie nach einem Passwort gefragt.
Aktivieren der Bluetooth
®
-Verbindung
Zur Verbindung Ihres Smartphones mit der Maschine müssen Sie das Bluetooth
®
BLE Modul Ihres Smartphones
aktivieren und sicherstellen, dass das Bluetooth
®
-Modul des Kaffeevollautomaten ebenfalls aktiviert ist. Gehen Sie
im Menü zu „Einstellungen“, wählen Sie die Funktion Verbindung und aktivieren Sie das Bluetooth
®
-Modul, falls es
deaktiviert wurde (standardmäßig ist das Bluetooth
®
-Modul aktiviert).
Verbindungsherstellung mit dem Kaffeevollautomaten
Befolgen Sie zur Herstellung der Verbindung von Smartphone und Kaffeevollautomat die in Ihrem Smartphone
beschriebenen Anweisungen. Die Herstellung der Verbindung ist nur möglich, wenn das Logo BLE leuchtet.
Wenn die Maschine eine Verbindungsanfrage vom Smartphone erkennt, werden Sie über das Display des
Kaffeevollautomaten aufgefordert, die Verbindung zu akzeptieren. Akzeptieren Sie mit „OK“. Auf Ihrem Smartphone
erscheint eine Aufforderung, diese Verbindungsanfrage zu bestätigen: Drücken Sie „Verbinden“.
Ist der Verbindungsversuch fehlgeschlagen, können Sie es mehrmals erneut versuchen. Es empehlt sich zu
kontrollieren, ob das Bluetooth
®
-Modul des Kaffeevollautomaten tatsächlich aktiviert ist.
Falls das Problem weiterhin besteht, können Sie sich an den Kundenservice wenden und um Hilfe bei der Installation
der App bitten. Im Startmenü auf Ihrem Smartphone haben Sie unter der Option „Krups kontaktieren“ Zugriff auf die
Daten des Kundenservice.
Ist der Kaffeevollautomat verbunden, muss das Symbol Bluetooth
®
hell leuchten. Dies zeigt, dass die Funktion aktiviert ist.

39
DE
Einstellungen des Kaffeevollautomaten
Nach der Verbindungsherstellung können Sie die Einstellungen des Kaffeevollautomaten direkt über die App vornehmen
(Datum und Uhrzeit des Smartphones werden automatisch auf dem Kaffeevollautomat aktualisiert, sodass Sie dies
nicht mehr einstellen müssen.)
Die mobile App erleichtert die erste Installation der Maschine und die Ersteinstellungen.
Nutzung der App
Durch die Nutzung der App werden Ihnen zahlreiche Funktionen geboten:
•
Ferngesteuerte Zubereitungen
•
Verwaltung einer Favoriten-Bibliothek und einer Notizliste
•
Zugriff auf das Benutzerkonto und auf Informationen über Ihren Kaffeevollautomat
•
Zugriff auf Neuigkeiten und Informationen aus der Kaffeewelt
•
Zugriff auf eine Bedienungsanleitung mit Tutorials und Videos, damit Sie das Potenzial des Kaffeevollautomaten
voll ausschöpfen können
•
Schnelle Kontaktaufnahme mit dem Kundenservice bei Fragen oder Problemen mit dem Kaffeevollautomat oder
der App.
Sie können alle diese Funktionen beim Navigieren in der App entdecken (ganz gleich, ob Sie mit dem
Kaffeevollautomaten verbunden sind oder nicht).
Verbinden Sie sich so oft wie möglich, um Neuigkeiten und eine regelmäßige Informationen zu erhalten.
INBETRIEBNAHME
INSTALLATION DES KAFFEEVOLLAUTOMATEN
Warnung: Schließen Sie das Gerät an eine Netzsteckdose mit 230 V und Erdung an. Bei Nichteinhaltung kann es
zu tödlichen Verletzungen durch Stromschlag kommen.
Befolgen Sie die Sicherheitshinweise im Heft „Sicherheitshinweise“.
Einschalten
Drücken Sie die „Ein/Aus-Taste“ des Geräts solange, bis die Begrüßung „Guten Tag“ auf dem Bildschirm erscheint
Abb. 1. Das Gerät leitet Sie durch die weiteren Schritte.
Erstinbetriebnahme
Im Rahmen der ersten Inbetriebnahme Ihrer Maschine müssen Sie zunächst verschiedene Einstellungen vornehmen.
Folgen Sie den Anweisungen auf dem Bildschirm. Der folgende Abschnitt soll Ihnen als visuelle Orientierung dienen.
Folgende Einstellungen sind als erstes vorzunehmen:
Sprache
Wählen Sie die Anzeigesprache, indem Sie mit den Pfeilen vor- und zurückblättern, bis Ihre gewünschte Sprache
erscheint. Drücken Sie auf OK, um Ihre Auswahl zu bestätigen.
Maßeinheit
Für die Maßeinheit der Menge können Sie zwischen ml und oz wählen.
Datum und Uhrzeit
Für die Einstellung der Uhrzeit drücken Sie auf das gewünschte Anzeigeformat (24H oder AM/PM).
Auto Ein / Auto Aus
Sie können die Uhrzeit für einen automatischen Start Ihrer Maschine programmieren. Diese Einstellung kann nach Ihren
Wünschen angepasst werden: Täglich, wöchentlich oder Wochenende. Stellen Sie die Uhrzeit für den gewünschten
automatischen Start entsprechend dem zuvor festgelegten Uhrzeitformat ein.
Hier können Sie auch einstellen, nach welcher Zeit sich das Gerät automatisch abschalten soll. So können Sie Ihren
Energieverbrauch senken.
Einstellung der Spülung des Kaffeekreislaufs
Sie können beim Einschalten der Maschine die Aktivierung vornehmen oder auch nicht. Die Spülung stellt die Qualität
des Kaffees in der Tasse sicher, da sie Rückstände entfernt.
Einsetzen des Filters
Beim erstmaligen Einschalten des Gerätes werden Sie gefragt, ob Sie den Filter einsetzen möchten. Wenn Sie dies

40
wünschen und es die Wasserhärte vor Ort erforderlich macht, wählen Sie „JA“ und befolgen Sie die Anweisungen auf
dem Display.
Einsetzen der Patrone in das Gerät: Schrauben Sie die Filterpatrone mithilfe des mit der Patrone mitgelieferten
Zubehörs am Boden des Wassertanks fest. Abb. 4
Stellen Sie den Monat ein, in welchem die Patrone eingesetzt wurde (Position 1 in der Abbildung, Ziffer links in der
Öffnung), indem Sie den am oberen Ende der Patrone bendlichen grauen Ring drehen. Der Monat, in dem die Patrone
wieder ausgewechselt werden muss, wird nun in Position 2 der Abbildung angezeigt. Abb. 5
Stellen Sie einen Behälter mit 0,6 l Fassungsvermögen unter den Dampfauslass. Abb. 6
Der Start der Maschine hat schließlich mit oder ohne Filter zu erfolgen. Die Wasserkreisläufe müssen sich dabei
füllen. Befolgen Sie dazu die auf dem Display angezeigten Anweisungen. Die Maschine beginnt mit dem Befüllen der
Wasserkreisläufe, heizt die Kreisläufe vor und führt anschließend eine automatische Spülung durch.
Das Display zeigt Ihnen das Ende des Vorgangs an.
Wasserhärte
Sie müssen an der Maschine Einstellungen zur Wasserhärte (von 0 bis 4) vor Ort vornehmen. Befolgen Sie hierzu die
folgenden Anweisungen:
Bevor Sie das Gerät zum ersten Mal benutzen, bestimmen Sie die Wasserhärte, um das Gerät auf die richtige Härte
einstellen zu können. Führen Sie die Wasserhärtebestimmung und -einstellung erneut durch, wenn Sie Ihre Maschine
an einem anderen Ort mit anderer Wasserhärte benutzen oder eine Veränderung der Härte Ihres Wassers feststellen.
Verwenden Sie das mitgelieferte Stäbchen zur Bestimmung der Wasserhärte oder erfragen Sie die Härte bei Ihrem
Wasserversorger.
Einzelheiten zu den Härteklassen zeigt die folgende Tabelle:
Härtegrad
Klasse 0
Sehr weich
Klasse 1 Weich
Klasse 2
Mittelhart
Klasse 3
Hart
Klasse 4
Sehr hart
° dH < 3° > 4° > 7° > 14° > 21°
° e < 3,75° > 5° > 8,75° > 17,5° > 26,25°
° f < 5,4° > 7,2° > 12,6° > 25,2° > 37,8°
Einstellung des
Gerätes
0 1 2 3 4
Füllen Sie ein Glas mit Wasser und tauchen Sie das Stäbchen ins Wasser. Abb. 2
Lesen Sie nach 1 Minute den Wert für die Wasserhärte vom Stäbchen ab. Abb. 3
Geben Sie die Anzahl der roten Streifen bei der Einstellung des Gerätes an.
Vorbereitung des Kaffeevollautomaten
Nehmen Sie den Wassertank ab und füllen Sie ihn mit Wasser. Abb. 7
Setzen Sie ihn wieder ein. Abb. 8
Nehmen Sie den Deckel des Kaffeebohnenbehälters ab und füllen Sie Kaffeebohnen ein (max. 250 g). Abb. 9
Setzen Sie den Deckel des Kaffeebohnenbehälters wieder auf. Abb. 10
VOR DER ZUBEREITUNG VON GETRÄNKEN
WICHTIGE HINWEISE
Je nach gewähltem Getränk regelt die Espresso Automatic EA89 die Menge des gemahlenen Kaffees automatisch.
Vorbereitung des Mahlwerks
Sie können die Stärke Ihres Kaffees durch Einstellen des Mahlgrades der Kaffeebohnen anpassen. Im Allgemeinen gilt:
Je feiner der Mahlgrad der Bohnen, desto stärker und cremiger der Kaffee. Dabei mitentscheidend ist jedoch auch die
verwendete Kaffeesorte. Wir empfehlen einen feinen Mahlgrad für Espresso und einen gröberen Mahlgrad für Kaffee.
Stellen Sie den Mahlgrad durch Drehen des Knopfes zur Einstellung des Mahlgrades (J) im Kaffeebohnenbehälter ein.
Diese Einstellung muss während des Mahlvorgangs und stufenweise vorgenommen werden. Nach 3 Zubereitungen
werden Sie ganz deutlich einen Unterschied im Geschmack wahrnehmen.
Die Einstellung des Mahlgrades ist dann nützlich, wenn Sie eine andere Kaffeesorte verwenden oder wenn Sie
einen leichteren bzw. stärkeren Kaffee wünschen. Es wird jedoch davon abgeraten, diese Einstellung systematisch
vorzunehmen.

41
DE
Einstellung der Kaffeeauslässe
Für alle angebotenen Getränke können Sie die Höhe der Kaffeeauslässe in Abhängigkeit von der Größe Ihrer Tassen
oder Gläser verstellen. Abb. 11
Anhalten der laufenden Zubereitung eines Getränks
Sie können die Zubereitung durch Drücken der Taste „Zurück“ jederzeit anhalten.
Achtung: Nach Drücken dieser Taste muss die Maschine wieder betriebsbereit gemacht werden, was bis zu 30
Sekunden dauern kann. Diese Phase ist normal.
Wird ein Zyklus unterbrochen, stoppt das Gerät nicht sofort, sondern der Zyklus wird beendet, die Zubereitung jedoch
abgebrochen.
Funktion „DOUBLE“
Sie können mit Ihrem Kaffeevollautomaten zwei Tassen gleichzeitig zubereiten. Auf die Funktion „DOUBLE“ können
Sie einfach zugreifen, indem Sie zweimal hintereinander auf die Auswahl drücken. Sie gilt für alle Getränke (außer
und ).
Funktion DARK
Mit der Funktion „DARK“ können Sie die Stärke Ihres Kaffees erhöhen.
Sie lässt sich auf verschiedene Weisen aktivieren oder deaktivieren:
— Vor der Auswahl des gewünschten Getränks einfach auf „DARK“ drücken.
— Während der Zubereitung des Getränks und bis zum Ende des Mahlvorgangs auf „DARK“ drücken.
— Den Parameter „DARK“ im Menü „Einstellungen“ auswählen. Dazu gehen Sie in das Menü „Einstellungen“ durch
Drücken der Taste , anschließend zu Einstellungen Getränkeeinstellungen Dark. Die Funktion ist dann für
alle „Kaffee“-Getränke aktiv: , , , .
Zum Deaktivieren der Funktion gehen Sie genauso vor.
Funktion EXTRA SHOT
Mit der Funktion „EXTRA SHOT“ können Sie am Ende der Zubereitung des ausgewählten Getränks einen Espresso
hinzufügen.
Sie lässt sich auf verschiedene Weisen aktivieren oder deaktivieren:
— Vor der Auswahl des gewünschten Getränks einfach auf „EXTRA SHOT“ drücken.
— Während der Zubereitung des Getränks:
— Den Parameter „EXTRA SHOT“ im Menü „Einstellungen“ auswählen. Dazu gehen Sie in das Menü „Einstellungen“
durch Drücken der Taste , anschließend zu Einstellungen Getränkeeinstellungen EXTRA SHOT. Die Funktion
ist dann aktiviert für die Zubereitungen , , , , .
Zum Deaktivieren der Funktion gehen Sie genauso vor.
ZUBEREITUNG VON KAFFEEGETRÄNKEN ONE TOUCH
Hinweis: Bei jedem Start eines Getränks, berücksichtigt die Maschine das letzte zubereitete Getränk einschließlich
der ausgewählten Einstellungen.
Zubereitung
Stellen Sie die Tasse bzw. die Tassen unter den Kaffeeauslass. Abb. 12
Drücken Sie auf die Taste für das gewünschte Getränk.
Stellt der Kaffeevollautomat bei der Auswahl der Zubereitung fest, dass nicht mehr genügend Wasser vorhanden ist,
werden Sie aufgefordert, den Wassertank aufzufüllen.
Mögliche Einstellungen
Sie können die Kaffeestärke erhöhen, indem Sie auf drücken und/oder eine Kaffeezubereitung hinzufügen, indem
Sie auf drücken.
Sie können mit Ihrem Kaffeevollautomaten eine oder zwei Tassen zubereiten.
Der Kaffeevollautomat mahlt die Bohnen, komprimiert das Kaffeemehl und führt anschließend das Aufbrühen durch. Die
Kaffeemenge kann während der Zubereitung mit den Navigationstasten und verändert werden.
Sie können die Zubereitung durch Drücken der Taste jederzeit anhalten.
!
Wichtig: Automatische Spülung der Kaffeeauslässe: Je nach Getränkeart ist es möglich, dass die Maschine bei
ihrer Abschaltung eine automatische Spülung durchführt. Der Zyklus dauert nur einige Sekunden und
stoppt automatisch.

42
ZUBEREITUNG VON MILCHGETRÄNKEN ONE TOUCH
Mögliche Einstellungen
Sie können die Kaffeestärke erhöhen, indem Sie auf drücken und/oder einen Espresso hinzufügen, indem Sie auf
drücken.
Der Dampf dient zum Aufschäumen der Milch. Da für die Dampferzeugung eine hohe Temperatur notwendig ist, führt
die Maschine einen zusätzlichen Aufheizvorgang aus.
Zubereitung eines Cappuccino oder Macchiatos
Schließen Sie die Milchleitung rechts an das „One-Touch-Cappuccino“-System an. Abb. 13
Tauchen Sie das andere Ende (abgeschrägte Seite) in ein mit Milch gefülltes Gefäß oder direkt in die Milchtüte.Abb. 14
Stellen Sie die Tasse bzw. die Tassen unter die Kaffee- bzw. Milchauslässe. Abb. 15
Drücken Sie auf die Taste „Cappuccino“ . Abb. 16 oder drücken Sie die Taste „Macchiato“ . Abb.18. Es können
alle Parameter verändert werden.
Die Zubereitung startet mit dem Aufschäumen der Milch (Einstellung der Dauer möglich), gefolgt vom Austritt des Kaffees
(Menge einstellbar). Durch die Einstellung der Aufschäumzeit können Sie die Menge an Milch und an Schaum variieren.
Die folgenden Schritte laufen automatisch ab, bis Ihr Getränk bereit zum Genießen ist. Abb. 17
Bei jeder Zubereitung eines „Cappuccino“ oder „Macchiatos“ berücksichtigt der Kaffeevollautomat das zuletzt zubereitete
Getränk einschließlich der ausgewählten Einstellungen.
Reinigung nach der Zubereitung von Milchgetränken
Spülen des Milchsystems
Am Ende jeder Zubereitung zeigt das Display „ Spülung des Milchsystems “ an.
Es empehlt sich, nach jeder Verwendung der Milchfunktion diese Spülung vorzunehmen, damit die Hygiene des
Aufschäumzubehörs und ein optimales Ergebnis des Milchaufschäumens sichergestellt wird.
Mit „ Spülung des Milchsystems “ werden Sie aufgefordert, systematisch die Milchleitung und die Mischdüse zu
zerlegen und mit heißem Wasser zu reinigen.
Zur Erzielung eines optimalen Ergebnisses empehlt es sich, das abnehmbare „One-Touch-Cappuccino“-System
regelmäßig zu reinigen (siehe Kapitel Allgemeine Wartung). Abb.21 und 25
Falls Sie eine Veränderung in der Qualität Ihres Milchschaums feststellen, sollten Sie diese Spülung und Reinigung
wiederholen: Wird das Milchsystem nicht sauber gehalten, kann es zu geschmacklichen Verlusten kommen, sowie die
Aufschäumqualität beeinträchtigt werden.
ZUBEREITUNG VON TEE
Mögliche Einstellungen
Mit diesem Kaffeevollautomaten können Sie 3 Sorten von Tee zubereiten (grünen Tee, schwarzen Tee und Kräutertee).
Sie können die Getränkemenge nach Wunsch einstellen.
Die Temperatur des heißen Wassers wird an das ausgewählte Getränk angepasst.
Sie können beispielsweise auch einen Extra Shot in Ihren Tee zubereiten. Sie erhalten dann ein Getränk aus Tee
mit Espresso – die durchaus einen aktuellen Trend widerspiegeln.
Zubereitung eines Tees
Wählen Sie auf dem Display aus. Stellen Sie die Tasse bzw. die Tassen unter die Kaffeeauslässe. Abb. 12
Wählen Sie anschließend das gewünschte Getränk und drücken Sie auf .
Stellt der Kaffeevollautomat bei der Auswahl fest, dass nicht mehr genügend Wasser vorhanden ist, werden Sie
aufgefordert, den Wassertank aufzufüllen.
Sie können während der Zubereitung die Menge mit den Tasten oder ändern.
ZUBEREITUNG WEITERER GETRÄNKE: RISTRETTO, DOPPIO,
AMERICANO ODER AUFGESCHÄUMTE MILCH
Zubereitung
Stellen Sie die Tasse bzw. die Tassen unter die Kaffeeauslässe. Abb. 12
Stellt der Kaffeevollautomat bei der Auswahl fest, dass nicht mehr genügend Wasser vorhanden ist, werden Sie
aufgefordert, den Wassertank aufzufüllen.

43
DE
Drücken Sie die Taste . Mit den Tasten und wählen Sie das gewünschte Getränk aus: Ristretto, Doppio,
Americano, aufgeschäumte Milch.
Zubereitung eines Ristretto
Wählen Sie RISTRETTO aus und drücken Sie auf .
Die Maschine mahlt die Kaffeebohnen, komprimiert das Kaffeemehl und führt anschließend das Aufbrühen durch. Die
Kaffeemenge kann während der Zubereitung mit den Navigationstasten und verändert werden.
Sie können die Zubereitung durch Drücken der Taste jederzeit anhalten.
Zubereitung eines Doppio
Wählen Sie DOPPIO aus und drücken Sie auf .
Die Zubereitung ist identisch mit derjenigen eines RISTRETTO, jedoch mit einem doppelten Kaffeezyklus.
Zubereitung eines Americano
Wählen Sie AMERICANO aus und drücken Sie auf .
Die Zubereitung ist identisch mit derjenigen eines DOPPIO mit anschließender Zugabe von heißem Wasser.
Zubereitung von aufgeschäumter Milch
Schließen Sie den Milchschlauch rechts an das „One-Touch-Cappuccino“-System an. Abb. 13
Tauchen Sie das andere Ende (abgeschrägte Seite) in ein mit Milch gefülltes Gefäß oder direkt in die Milchtüte. Abb. 14
Der Dampf dient zum Aufschäumen der Milch. Da für die Dampferzeugung eine hohe Temperatur notwendig ist, führt
die Maschine einen zusätzlichen Aufheizvorgang aus.
Über das Menü können Sie die Dauer des Aufschäumvorgangs individuell festlegen. Sie können sie mit den Tasten
oder verändern. Drücken Sie anschließend auf . Die letzte verwendete Dauer des Aufschäumvorgangs wird für
die nächste Zubereitung gespeichert.
Sie können die Zubereitung durch Drücken der Taste jederzeit anhalten.
Spülen des „One-Touch-Cappuccino“-Systems
Siehe Absatz „Spülen Milch“ im Abschnitt ZUBEREITUNG VON MILCHGETRÄNKEN ONE TOUCH.
SONSTIGE FUNKTIONEN
Mit Taste gelangen Sie zu den Einstellungen und somit zum Hauptmenü (Maschineneinstellung, Wartung und
Produktinformationen).
Einstellungen
Durch die Auswahl „Einstellungen“ können Sie die von Ihnen gewünschten Änderungen für einen optimalen
Benutzerkomfort vornehmen, der an Ihre Präferenzen angepasst ist.
Wir stellen Ihnen hier die wichtigsten Einstellungen vor.
Datum
Die Einstellung des Datums ist notwendig, vor allem bei der Verwendung einer
Entkalkungspatrone.
Uhrzeit
Sie können bei der Anzeige der Uhrzeit zwischen einem 12- oder 24-Stunden-Modus
wählen.
Sprache Sie können aus der angeführten Auswahl eine Sprache Ihrer Wahl festlegen.
Maßeinheit Sie können bei der Maßeinheit zwischen ml und oz wählen.
Display-Helligkeit Sie können die Display-Helligkeit beliebig einstellen.
Kaffeetemperatur
Sie können bei der Temperatureinstellung Ihrer Kaffeegetränke aus drei Stufen
auswählen.
Teetemperatur Sie können bei der Temperatureinstellung Ihrer Teegetränke aus drei Stufen auswählen.
Wasserhärte
Sie müssen Ihre Wasserhärte auf einen Wert zwischen 0 und 4 einstellen. Siehe Punkt
„Bestimmung der Wasserhärte“.

44
Auto On
Sie können das Aufheizen des Gerätes zu einem bestimmten Zeitpunkt automatisch
starten.
Auto Off
Hier können Sie einstellen, nach Ablauf welcher Zeitspanne sich das Gerät automatisch
abschalten soll (Dauer des Nichtgebrauchs).
Spülautomatik
Sie können die automatische Spülung der Kaffeeauslässe beim Start des
Kaffeevollautomaten aktivieren oder deaktivieren.
Getränkeeinstellungen
Sie können die Werkseinstellungen wiederherstellen. Sie können außerdem dauerhaft
die Funktion DARK und EXTRA SHOT programmieren.
).
Zum Verlassen des Menüs Einstellungen drücken Sie auf oder auf die Einstellungstaste.
Die Einstellungen bleiben gespeichert, wenn Sie den Stecker der Maschine ziehen, mit Ausnahme von Datum und
Uhrzeit.
Wartung
Mit den folgenden Optionen können Sie die ausgewählten Programme starten. In weiterer Folge müssen Sie den
Anweisungen auf dem Display folgen.
Reinigung Milch
Zugang zur Reinigung des „One-Touch-Cappuccino“-Systems der Maschine, die unerlässlich
für eine gute Qualität des Milchschaums ist.
Spülen Milch
Zugang zum Spülen des „One-Touch-Cappuccino“-Systems der Maschine, das unerlässlich
für eine gute Qualität des Milchschaums ist.
Spülen Kaffee
Zugang zum Spülen des Kaffeekreislaufs der Maschine, das den optimalen Kaffeegeschmack
sicherstellt.
Reinigung Kaffee
Zugang zur Reinigung des Kaffeekreislaufs der Maschine (durch Verwendung einer
Reinigungstablette), die den optimalen Kaffeegeschmack sicherstellt.
Entkalken
Zugang zur Entkalkung, die die Lebensdauer der Maschine maximiert. Wenn die Anzahl
der Getränke nicht ausreicht, damit eine Entkalkung erforderlich wird, ist die Funktion nicht
aktiviert.
Filter
Zugang zum Filtermodus, der bei sehr hartem Wasser extrem nützlich ist, um den optimalen
Geschmack und eine lange Lebensdauer der Maschine sicherzustellen.
Zum Verlassen des Menüs Wartung drücken Sie auf oder auf die Einestellungstaste.
Info
Im Menü „Infos“ nden Sie weitere wichtige Informationen über Ihren Kaffeevollautomaten. Außerdem erhalten Sie
Informationen zur Wartung. Wir stellen Ihnen hier die wichtigsten verfügbaren Informationen vor.
Zubereitete Getränke Zeigt die Anzahl zubereiteter Getränke an
Reinigung Kaffeekreislauf Zeigt an, dass die Reinigung nach x Zyklen vorzunehmen ist.
Entkalken Zeigt an, dass die Entkalkung nach x Zyklen vorzunehmen ist.
Filter Zeigt an, dass der Filter in x Tagen oder nach weiteren x Litern zu wechseln ist.
Zum Verlassen des Menüs Infos drücken Sie auf oder auf die Einstellungstaste.
ALLGEMEINE WARTUNG
Leerung des Kaffeesatzbehälters und des Abtropffaches
Nach einer bestimmten Anzahl von Kaffeezubereitungen fordert Sie der Kaffeevollautomat auf, den Kaffeesatzbehälter
und das Abtropffach zu leeren. Wenn Sie diese Vorgänge nicht ordnungsgemäß ausführen, kann der Kaffeevollautomat
beschädigt werden.

45
DE
Im Abtropffach wird gebrauchtes Wasser und im Kaffeesatzbehälter gebrauchtes Kaffeemehl gesammelt.
Erscheint die Meldung „Beide Behälter leeren“, entnehmen, leeren und reinigen Sie das Abtropffach. Entnehmen, leeren
und reinigen Sie den Kaffeesatzbehälter (c). Abb. 19
Setzen Sie den Kaffeesatzbehälter wieder ein. Abb. 20
Das Abtropffach ist mit einem Schwimmer ausgestattet, der Ihnen immer anzeigt, wann eine Leerung spätestens
notwendig ist. Allerdings: Der Kaffeevollautomat ist auch so programmiert, dass sie nach einer bestimmten Anzahl
von Kaffeezubereitungen zu einer Leerung des Abtropffaches aufgefordert werden, unabhängig davon, ob Sie es
zwischendurch geleert haben. Dies gewährleistet eine optimal Hygiene Ihres Kaffeevollautomaten.
Spülung der Kreisläufe
Sie können jederzeit eine Spülung vornehmen, indem Sie auf drücken und dann Wartung auswählen.
Je nach Art der Zubereitung ist es möglich, dass der Kaffeevollautomat bei ihrer Abschaltung eine automatische
Spülung durchführt.
Außerdem können Sie eine automatische Spülung beim Einschalten einstellen (siehe Abschnitt „Einstellungen“, S. X).
Automatische Reinigungsprogramme für den Kaffeevollautomaten
Automatisches Reinigungsprogramm für den Kaffeekreislauf
Wenn eine Reinigung erforderlich ist, wird Sie das Gerät darauf hinweisen.
Für die Durchführung dieses Reinigungsprogramms brauchen Sie ein Gefäß mit mindestens 0,6 Liter Fassungsvermögen,
das unter die Kaffeeauslässe gestellt werden kann, und eine KRUPS-Reinigungstablette (Zubehörartikel XS3000). Abb.
34a Folgen Sie den Anweisungen auf dem Display. Sie können eine Reinigung auch über das Wartungsmenü starten.
!
Wichtig: Sie müssen das Reinigungsprogramm nicht unbedingt sofort ausführen, wenn das Gerät Sie dazu
auffordert. Sie sollten es aber innerhalb kurzer Zeit durchführen. Wird die Reinigung aufgeschoben,
bleibt der Warnhinweis so lange angezeigt, bis sie schließlich durchgeführt wird.
Das automatische Reinigungsprogramm umfasst 2 Phasen, einen Reinigungszyklus und einen Spülzyklus, und dauert
ungefähr 13 Minuten.
!
Wichtig: Wird das Reinigungsprogramm durch eine Abschaltung der Maschine oder einen Stromausfall
unterbrochen, wird es bei Wiedereinschalten genau dort fortgesetzt. Dieser Vorgang kann nicht
aufgeschoben werden. Dies ist notwendig für die Spülung des Wasserkreislaufs. In diesem Fall kann
eine neue Reinigungstablette erforderlich sein. Achten Sie darauf, das Reinigungsprogramm vollständig
auszuführen, um gesundheitsschädliche Spuren des Reinigungsprodukts zu entfernen.
Reinigung des „One-Touch-Cappuccino“-Systems
Für die Reinigung benötigen Sie ein Gefäß von mindestens 0,6 l Fassungsvermögen sowie die KRUPS-
Reinigungsüssigkeit (Zubehörartikel XS9000).
Zum Starten des Reinigungsprogramms drücken Sie auf die Taste .
Anschließend wählen Sie „Wartung“ „Reinigung Milch“. Folgen Sie den Anweisungen auf dem Display.
Zerlegung des „One-Touch-Cappuccino“-Systems
Zusätzlich zum Spülen ist nach jedem Gebrauch eine Reinigung der verschiedenen Komponenten der Einheit
erforderlich. Gehen Sie zur Zerlegung der Einheit wie folgt vor:
Ziehen Sie den Milchschlauch ab. Abb. 21
Nehmen Sie die vordere Abdeckung der Kaffee- bzw. Milchauslässe ab. Schieben Sie sie nach unten und ziehen Sie
zu sich hin. Abb. 22
Entnehmen Sie das „One-Touch-Cappuccino“-System, indem Sie am oberen Teil der Einheit ziehen. Abb. 23
Zerlegen Sie das System vollständig. Abb. 24
Ziehen Sie das Mischelement vom Milchschlauch ab. Abb. 25
Reinigen Sie alle zerlegten Teile (Einheit, Mischelement und Milchschlauch) mit Wasser und etwas Spülmittel. Spülen
Sie sie anschließend mit heißem Wasser ab. Abb. 26
Sind alle Komponenten gereinigt und getrocknet, bauen Sie die Einheit wieder zusammen und setzen sie wieder an
ihrem ursprünglichen Platz ein. Abb. 27
Bringen Sie die vordere Abdeckung der Einheit wieder an. Abb. 28 Schieben Sie das Mischelement in den Milchschlauch
Abb. 29 (auf der Seite, die der abgeschrägten Seite entgegengesetzt ist), und schließen Sie es wieder an der Einheit
an. Abb. 30
Automatisches Entkalkungsprogramm für den Dampfkreislauf
Achtung: Wenn Ihr Kaffeevollautomat mit unserer Claris-Filterpatrone — Aqua Filter System ausgestattet ist, muss
diese vor dem Entkalken herausgenommen werden.
Der Kaffeevollautomat zeigt eine Meldung, wenn das Entkalkungsprogramm durchgeführt werden muss. Die Häugkeit
der Durchführung dieses Programms hängt von der Qualität des benutzten Wassers ab und davon, ob Sie eine Claris-

46
Filterpatrone Aqua Filter System (F088) verwenden oder nicht (je mehr Kalk das Wasser enthält, desto regelmäßiger
muss der Kaffeevollautomat entkalkt werden).
!
Wichtig: Sie müssen das Programm nicht unbedingt sofort ausführen, wenn das Gerät Sie dazu auffordert.
Sie sollten es aber innerhalb kurzer Zeit durchführen. Wird die Entkalkung aufgeschoben, bleibt der
Warnhinweis so lange angezeigt, bis sie schließlich durchgeführt wird.
Wenn eine Entkalkung erforderlich ist und der Warnhinweis angezeigt wird, wird das Entkalkungsprogramm durch
Drücken von gestartet. Möchten Sie die Entkalkung aufschieben, drücken Sie auf .
Nach dem Start des Vorgangs folgen Sie den Anweisungen auf dem Display. Sie können eine Entkalkung auch über
das Menü „Wartung“ „Entkalkung“ starten.
Für die Durchführung dieses Entkalkungsprogramms brauchen Sie ein Gefäß mit mindestens 0,6 Liter
Fassungsvermögen, das unter das One-Touch-Cappuccino-System gestellt werden kann, und ein Päckchen KRUPS-
Entkalker (40 g) (Zubehörartikel F054). Abb. 34b
Füllen Sie den Wassertank bis zur Markierung CALC und geben Sie dann den Inhalt des Entkalkungsbeutels hinein.
Die Entkalkung umfasst 3 Phasen: einen Entkalkungszyklus und zwei Spülzyklen. Das Programm dauert etwa 20
Minuten.
!
Wichtig: Wurde das Programm durch einen Stromausfall oder die Trennung der Maschine vom Stromnetz
abgebrochen, wird es bei Wiedereinschalten genau dort fortgesetzt, wobei ein Aufschieben
dieses Vorgangs nicht möglich ist. Achten Sie darauf, den Zyklus vollständig auszuführen, um
gesundheitsschädliche Spuren des Entkalkerprodukts zu entfernen.
FEHLERSUCHE UND -BEHEBUNG
Wenn eines der in der Tabelle angeführten Probleme fortbesteht, wenden Sie sich an den KRUPS-Kundendienst.
PROBLEM BEHEBUNG
Der Kaffeevollautomat zeigt einen
Defekt an, die Software „hängt“
weist eine Funktionsstörung auf.
Schalten Sie die Maschine aus und ziehen Sie den Netzstecker, nehmen Sie die
Filterpatrone heraus, warten Sie eine Minute und starten Sie die Maschine neu.
Zum Starten halten Sie die Ein/Aus-Taste mindestens 3 Sekunden lang gedrückt.
Der Kaffeevollautomat schaltet sich
nicht ein, nachdem die Ein/Aus-
Taste (mindestens 3 Sekunden lang)
gedrückt wurde.
Überprüfen Sie die Sicherungen und die Steckdose in Ihrem Haushalt.
Stellen Sie sicher, dass die 2 Stecker des Stromkabels richtig in die Steckdose gesteckt
sind.
Das Mahlwerk gibt ein ungewöhnliches
Geräusch von sich.
Es sind Fremdkörper in das Mahlwerk geraten.
Setzen Sie sich mit dem Kundendienstzentrum von KRUPS in Verbindung.
Das One-Touch-Cappuccino-
System
saugt keine Milch an.
Das One-Touch-Cappuccino-
System erzeugt keinen oder nur
wenig Schaum.
Stellen Sie sicher, dass das System ordnungsgemäß zusammengebaut ist
(insbesondere die Einheit zur Milchmischung).
Stellen Sie sicher, dass der Dampfauslass nicht verstopft ist. Ist dies der Fall, siehe
unten „Der Dampfauslass der Maschine scheint ganz oder teilweise verstopft zu sein“.
Stellen Sie sicher, dass die Einheit zur Milchmischung weder verstopft noch
verschmutzt ist; weichen Sie die Einheit in heißem Wasser mit ein wenig Spülmittel
ein, spülen Sie sie ab und trocknen Sie sie vor dem erneuten Einsetzen.
Stellen Sie sicher, dass der Schlauch weder verstopft noch verdreht und richtig an dem
One-Touch-Cappuccino-System angebracht ist, um Luftansaugungen zu vermeiden.
Stellen Sie sicher, dass er richtig in die Milch eingetaucht ist.
Spülen und reinigen Sie die Einheit (siehe Kapitel zum Spülen und zur Reinigung des
One-Touch-Cappuccino-Systems).
Für Zubereitungen auf Milchbasis: Wir empfehlen Ihnen die Verwendung von frischer,
vor kurzem geöffneter pasteurisierter Milch oder H-Milch sowie den Gebrauch eines
kalten Gefäßes.
 Loading…

www.krups.com
FR HOTLINE : B: 070 23 31 59 — F: 09 74 50 10 61 — CH: 044 837 18 40
EN HOTLINE: UK: 0345 330 6460 — ROI: 01 677 4003
DE HOTLINE: DE: 0212 387 400 — AT: 01 890 3476 — CH: 044 837 18 40
NL HOTLINE: NL: 0318 58 24 24
DA KUNDESERVICE: 44 66 31 55
NO KUNDESERVICE: 815 09 567
SV KUNDSERVICE: 08 594 213 30
FI ASIAKASPALVELU: 09 622 94 20
ES HOTLINE : ES: 902 31 23 00
IT SERVIZIO CONSUMATORI: IT: 1 99 207 701 — CH: 044 837 18 40
PT Centro de Contacto do Consumidor : PT: 808 284 735
EL ΓΡΑΜΜΗ ΕΞΥΠΗΡΕΤΗΣΗΣ: 2106371251
CS HORKÁ LINKA: 731 010 111
SK ZÁKAZNÍCKA LINKA: 232 199 930
HU FORRÓDRÓT: 06 1 801 8434
PL INFOLINIA: 801 300 420
RU Горячая линия: 495 213 32 28
UK ГАРЯЧА ЛIНIЯ: 044 300 13 04
RO Centrul de Asistenţă Clienţi : 0 21 316 87 84
8020005296 — 11.2019- Réalisation : Espace graphique
www.krups.com
FULLY AUTOMATIC
SERIE EA89
RO UK RU PL HU SK CS EL PT IT ES FI SV NO DA NL DE EN FR
FULLY AUTOMATIC SERIE EA89
A
I
B
C
E
D
H
F
1
2
1
L
K
2
J
N
M
O
O
8020005296
G
G1
G2
перейти к содержанию


БЫСТРОЕ РУКОВОДСТВО И ТЕХНИЧЕСКОЕ ОБСЛУЖИВАНИЕ


ЗАПУСК МАШИНЫ
Поздравляем с покупкой нового кофейного автомата KRUPS Evidence! Мы рекомендуем вам выполнить следующие действия, чтобы как можно скорее запустить машину.
ВКЛЮЧЕНИЕ МАШИНЫ
- Включите прибор, нажимая кнопку ВКЛ / ВЫКЛ, пока на экране не появится надпись «Hello», и следуйте инструкциям, предоставленным вашим прибором.
ПРОВЕРКА ЖЕСТКОСТИ ВОДЫ - Наполните стакан воды и вставьте тест-полоску для определения жесткости воды. Вы можете найти тест-полоску в приветственном наборе KRUPS.
- Через 1 минуту прочтите уровень жесткости воды.
Степень жесткости воды Настройка устройства SOFT 0 Слегка сложно 1 Умеренно сложно 2 Жесткий 3 Очень сложно 4 Обновите кофемашину, указав жесткость воды при первоначальной настройке или настройках на машине, либо через приложение KRUPS Espresso.
УСТАНОВКА ВОДЯНОГО ФИЛЬТРА - Снимите резервуар для воды с задней части машины.
- Установите месяц, когда картридж установлен (левая сторона картриджа), повернув серое кольцо, расположенное на верхнем конце фильтра. Месяц, в который следует заменить картридж, указан на правой стороне картриджа или на вашем устройстве. Мы рекомендуем, чтобы ваша машина всегда была оснащена фильтром для воды, который меняют каждые 3 месяца или по запросу машины.
- Вкрутите фильтрующий элемент в нижнюю часть резервуара для воды с помощью аксессуара, поставляемого с картриджем.
- Наполните и верните резервуар для воды.
- Поставьте емкость на 600 мл под выход для пара и дайте машине завершить автоматическое ополаскивание.
ПРИГОТОВЛЕНИЕ НАПИТКА
Теперь, когда вы настроили машину Evidence, пришло время приготовить напиток. Просто следуйте приведенным ниже инструкциям или создайте свой персональный напиток через приложение KRUPS Espresso.
НАСЛАЖДАЙТЕСЬ КАПУЧИНО - Снимите крышку контейнера для кофейных зерен и добавьте кофе в зернах (макс. 250 г).
- Закройте контейнер для кофейных зерен крышкой.
- Вы можете опустить или поднять дозатор кофе в зависимости от размера чашки или стакана.
- Поставьте чашку (и) под сопла для кофе. Выберите напиток по вашему выбору в кофемашине или через приложение KRUPS Espresso.
НАСЛАЖДАЙТЕСЬ ЧЕРНЫМ КОФЕ - Подсоедините прямую сторону молочной трубки к блоку One Touch Cappuccino.
- Погрузите трубку из нержавеющей стали в контейнер для молока и закройте крышку. Подсоедините пластиковую трубку к контейнеру для молока.
- Поставьте чашку (и) под насадки для кофе / молока.
- Нажмите «Капучино» кнопку.
- Наслаждайтесь напитком.
- Или насладитесь макиато, нажав кнопку «Маккиато» кнопку.
ОБСЛУЖИВАНИЕ МАШИНЫ
Чтобы обеспечить бесперебойную работу вашей машины на долгие годы, мы рекомендуем вам выполнять следующие действия по техническому обслуживанию.
ЧИСТКА МОЛОЧНОЙ СИСТЕМЫ
Мы рекомендуем очистить молочную ось, как только вы будете готовы выключить машину или после приготовления напитка на основе молока. - Снимите молочную трубку.
- Снимите переднюю крышку форсунок для кофе и молока. Сдвиньте его вниз и потяните на себя.
- Удалить «Капучино в одно касание» блок, вытягивая верхнюю часть блока.
- Демонтировать.
- Снимите соединитель молочной трубки.
- Очистите все демонтированные детали.(блок, соединитель и молочная трубка) с мыльной водой. Затем промойте их в горячей воде.
- Когда элементы станут чистыми и сухими, соберите блок и верните их в исходное положение.
- Заменить переднюю крышку блока.
- Заменить разъем в молочной трубке…
- ..и подключить к блоку.
- Снимите форсунку с опоры с помощью демонтажного ключа.
- Очистите паровое сопло и убедитесь, что его отверстие не закрыто остатками молока или известкового налета. При необходимости используйте чистящую иглу, которую можно найти в приветственном наборе KRUPS.
- Замените форсунку и запустите цикл ополаскивания блока для приготовления капучино One Touch, чтобы удалить оставшиеся отложения.
Мы рекомендуем содержать молочную единицу в чистоте, когда машина не используется, для достижения наилучших результатов вспенивания в долгосрочной перспективе.
УДАЛЕНИЕ НАКИПИ С МАШИНЫ
Мы рекомендуем очищать машину от накипи, когда на дисплее появляется предупреждение. Частота очистки от накипи зависит от использования вашей машины. - Когда уровень предупреждения об удалении накипи будет достигнут и отобразится, нажмите OK, чтобы запустить программу очистки от накипи.
Перед запуском программы очистки от накипи снимите фильтр для воды.
После запуска процедуры следуйте инструкциям на экране.
Также можно запустить цикл очистки от накипи с помощью «Обслуживание» меню → «Удаление накипи».
Для выполнения программы удаления накипи вам потребуется контейнер емкостью не менее 600 мл, который следует разместить под блоком «One Touch Cappuccino», и пакетик для удаления накипи KRUPS. (40g). Наполните резервуар для воды до отметки CALC и налейте в резервуар один пакетик средства для удаления накипи..Программа очистки от накипи состоит из трех этапов: цикла очистки от накипи и двух циклов ополаскивания. Программа длится примерно 20 минут.
Мы рекомендуем установить фильтр для воды, чтобы защитить машину от накипи, см. «Установка фильтра для воды» раздел в машине запускается.
ЧИСТКА МАШИНЫ
Мы рекомендуем запускать программу очистки при появлении соответствующего запроса на машине или после длительного периода бездействия. Доступ к циклу очистки можно получить через «Обслуживание» меню. - Для запуска этой программы очистки вам понадобится емкость объемом не менее 600 мл, которую следует разместить под выходными отверстиями для кофе и паровым соплом, а также таблетка для очистки KRUPS. Внимательно следуйте инструкциям на экране. Также можно запустить цикл очистки через «Обслуживание» меню.
УДАЛЕНИЕ КОФЕЙНОЙ МАШИНЫ - После приготовления определенного количества кофе машина попросит вас опорожнить сборник для кофейной гущи и поддон для сбора капель. Если сообщение «Пожалуйста, опорожните два лотка» отображается, извлеките, опорожните и очистите поддон для сбора капель. Снимите, опорожните и очистите сборник для кофейной гущи.
СОВЕТЫ ДЛЯ МАШИНЫ
- Лучше всего начать с легкой и средней обжарки, если вы новичок в собственном опыте с молотым кофе, это поможет вам найти лучший вкус и аромат кофе для вас.
- Регулярно используйте машину один или два раза в день, если оставить машину на более длительные периоды бездействия, это может отрицательно сказаться на качестве печати. Если вы оставляете машину на длительное время (например, в отпуске), слейте воду из резервуара для воды и удалите зерна (храните в герметичном контейнере в прохладном сухом месте). Убедитесь, что вы очистили машину перед первым использованием по возвращении, налив полный кофе, чтобы очистить систему.
- Если вы используете паровой манипулятор для удаления остатков молока, сделайте быстрое ополаскивание. Быстрая чистка после каждого использования может продлить срок службы вашей машины. Просто смойте и вытрите руку, прежде чем наслаждаться свежим кофе.
- При использовании новой обжарки из зерен начните с самого грубого помола и настройте по вкусу. Будьте осторожны с ароматизированными зернами или сильно темным обжаренным кофе, так как некоторые зерна становятся маслянистыми в процессе обжарки и могут вызвать засорение кофемолок. Чем тоньше помол, тем медленнее подача кофе в вашу чашку. Всегда готовьте длинный кофе грубого помола.
- Хороший крем означает, что все в порядке; Если у вас есть хорошая пенка на приготовленном вами эспрессо, это хороший показатель того, что цикл заваривания и машины находятся в хорошем состоянии. Следуйте индикаторам цикла очистки машины, поскольку они определяются на основе предпочтений качества воды и нагрева, которые вы выбрали при установке машины. Убедитесь, что вы проверяете качество воды каждый сезон (весной, летом и т. Д.), Поскольку оно может меняться в течение года в зависимости от вашего поставщика воды.

Чтобы приобрести аксессуары и основные продукты для обслуживания вашего продукта, перейдите по ссылке: www.krups.co.uk/accessories-store/homewww.krups.co.uk
Чтобы приобрести аксессуары и основные продукты для обслуживания вашего продукта, перейдите по ссылке: www.krups.co.uk/accessories-store/homewww.krups.co.uk
 Чтобы посмотреть обучающие видеоролики о том, как настроить машину и ее обслуживание, посетите канал KRUPS Youtube (вы можете найти его, выполнив поиск «krups uk» на YouTube.com) или загрузите приложение KRUPS Espresso.
 Чтобы посмотреть обучающие видеоролики о том, как настроить машину и ее обслуживание, посетите канал KRUPS Youtube (вы можете найти его, выполнив поиск «krups uk» на YouTube.com) или загрузите приложение KRUPS Espresso.

Доступно на…
Для получения любой помощи или поддержки, пожалуйста, позвоните в нашу службу поддержки клиентов KRUPS по телефону: 0345 330 (Великобритания) или 6460 01 (рентабельность инвестиций).
Доступно на…
Для получения любой помощи или поддержки, пожалуйста, позвоните в нашу службу поддержки клиентов KRUPS по телефону: 0345 330 (Великобритания) или 6460 01 (рентабельность инвестиций).
Документы / Ресурсы
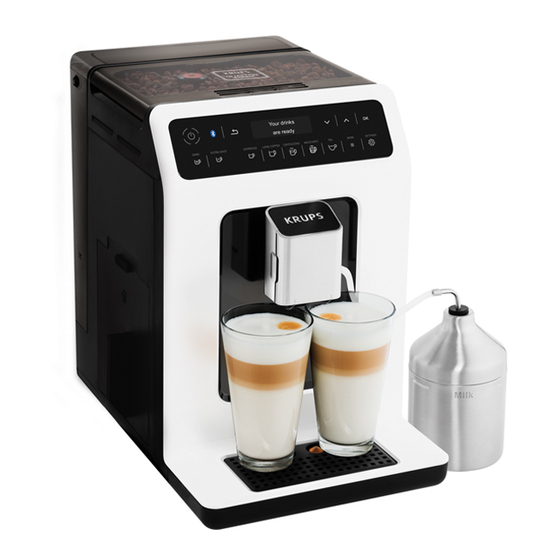
-
Contents
-
Table of Contents
-
Troubleshooting
-
Bookmarks
Quick Links
FULLY AUTOMATIC
SERIE EA89
www.krups.com
Related Manuals for Krups EA89 Series
Summary of Contents for Krups EA89 Series
-
Page 1
FULLY AUTOMATIC SERIE EA89 www.krups.com… -
Page 5
Most drinks can be prepared in batches of two, which saves time and is more convivial. Thanks to its KRUPS Quattro force technology, including a Compact Thermoblock System with built-in percolation chamber, its 15 bar pump, and because it uses coffee beans which have been freshly ground just before making the coffee, your machine will serve you hot ristrettos, espressos and coffees from the first cup with maximum aroma and a creamy golden-brown froth. -
Page 6
To get the most out of your machine and obtain good quality coffees, here is some advice: • The quality of your water significantly influences the quality of the flavours. Limescale and chlorine can alter the taste of your coffee. We recommend that you use the Claris Aqua Filter System cartridge or low mineral-content water to preserve all of the flavours of your coffee. -
Page 7: Table Of Contents
KRUPS APP ……..
-
Page 8: Important Information Concerning The Appliance And Instructions
In this manual you will find all of the important information concerning the preparation, use and maintenance of your machine. Read the instructions carefully before using your appliance for the first time and keep them for future reference: KRUPS may not be held liable in the event of any use that does not comply with the instructions.
-
Page 9: Appliance Description
APPLIANCE DESCRIPTION Water tank handle/lid Water tank Coffee bean container Coffee grounds collector Grinding fineness adjustment dial Height-adjustable coffee outlets Cleaning tablet funnel Grid and removable drip tray Metal grinding mill Coffee bean container lid Display panel One Touch Cappuccino removable block Milk tube and connector Display Water level float.
-
Page 10: Krups App
Low energy) module and an Android > version «4.3» or IOS > «9». If your smartphone does not have this, you will not be able to use the app. The KRUPS app is available on playstore for the Android version and on App store for the IOS version. Configuring the account In order to be able to take advantage of all the opportunities offered by the app, you must start by creating an account.
-
Page 11: Using Your Appliance
The mobile app facilitates the initial installation of the machine and the initial settings. Using the app Many functions are offered via the app: • Running remote preparations, • Management of a favourites library and a cellar book, • Access to the account and information on the machine, •…
-
Page 12: Important Information
filled. To do this, follow the instructions provided on the screen. The machine will begin by filling the water circuits, preheating the circuits and then will complete an automatic rinse. The screen will inform you when installation is complete. Water hardness You must set your machine depending on the hardness of your water, from 0 to 4.
-
Page 13: Preparing Coffee Drinks Via Direct Access
DARK function The «DARK» function allows you to increase the intensity of the coffee (its strength). You can activate or deactivate it in various ways: — Before selecting the chosen drink just press DARK. — While preparing the drink, and until the end of grinding: you can press DARK. — By choosing the «DARK»…
-
Page 14: Preparing Teas
Preparing a Macchiato Connect the right side of the milk tube to the “One Touch Cappuccino” block Fig. 13. Immerse the other end (bevelled side) in a receptacle filled with milk or directly in your bottle of milk Fig.14. Place the cup(s) under the coffee/milk nozzles. Fig.15. Fig.
-
Page 15: Other Functions
Making an Americano Select AMERICANO and press The preparation is identical to the DOPPIO, but is followed by hot water. Making a Frothy milk Connect the straight side of the milk tube to the «One Touch Cappuccino” removable block Fig. 13. Immerse the other end (bevelled side) in a receptacle filled with milk.
-
Page 16: General Maintenance
To run this cleaning program, you will need a container which holds at least 0.6 l, and which should be placed beneath the coffee outlets and the steam nozzle, and a KRUPS cleaning tablet. Fig. 34a. Carefully follow the instructions given…
-
Page 17
Cleaning the «One Touch Cappuccino» block To complete a cleaning program, you will require two containers (minimum 0.6 L) and KRUPS cleaning liquid. You can start the cleaning cycle by pressing button Then selecting «Maintenance»… -
Page 18: Troubleshooting
TROUBLESHOOTING If one of the problems described in the table persists, contact KRUPS customer service. PROBLEM CORRECTIVE ACTION Switch off and unplug the appliance, remove the filter cartridge, wait for one The machine displays a failure, minute and start the appliance again.
-
Page 19
If the error continues, contact the KRUPS Customer Service team. The machine does not request The descaling cycle is requested after the steam circuit has been used a descaling. -
Page 20
A problem has been detected during preparation of the drink. The appliance is not producing coffee. The appliance has restarted automatically and is ready for a new cycle. A power failure occurs during a The appliance will automatically restart when the power is switched back on. cycle. -
Page 22
HORKÁ LINKA: 731 010 111 ZÁKAZNÍCKA LINKA: 232 199 930 FORRÓDRÓT: 06 1 801 8434 Ãîðÿчàÿ ëèíèÿ: 495 213 32 28 INFOLINIA: 801 300 420 ГАРЯЧА ЛIНIЯ: 044 300 13 04 Centrul de Asistenţă Clienţi : 0 21 316 87 84 www.krups.com…
обильное приложение упрощает первоначальную установку машины и исходных настроек.
Использование приложения
Приложение предоставляет доступ к множеству функций:
•
Удаленный запуск аппарата,
•
Управление списком избранных напитков и списком емкостей,
•
Доступ к аккаунту и информации о кофемашине,
•
Доступ к новостям и информации мира кофе,
•
Доступ к руководству пользователя с обучающими видео о том, как максимально воспользоваться потенциалом
кофемашины,
•
Быстрая связь с гарантийным центром в случае вопросов или проблем с вашим аппаратом или приложением.
Вы можете воспользоваться всеми этими функциями, осуществляя навигацию по вашему приложению (вне
зависимости от того, подключены вы к кофемашине или нет).
Пользуйтесь приложением как можно чаще, чтобы быть в курсе всех новостей и состояния вашей кофемашины.
Опасность: Подключите прибор к заземленной розетке электрической сети 230 В. В противном случае вы рискуете
получить смертельные травмы от электричества!
Следуйте инструкциям по технике безопасности в буклете «Информация о безопасности».
Включение
Включите аппарат, удерживая кнопку «Вкл/Выкл»
указаниям прибора.
Исходные установки
При первом использовании машины вам будет предложено выполнить различные настройки. Следуйте инструкциям,
которые появляются на экране. Цель следующих пунктов дать вам несколько визуальных ориентиров.
Вот первые требуемые настройки:
Язык
Выберите язык дисплея с помощью клавиш со стрелками, пока не появится желаемый язык. Нажмите на кнопку «OK»,
чтобы подтвердить.
Единица измерения
Вы можете задать единицу измерения объема в мл или унциях.
Дата и время
Для установки времени задайте желаемый формат времени (24 или 12 часов).
Автоматическое включение/выключение
Вы можете задать время автоматического включения вашей кофемашины. Этот параметр можно настроить по своему
вкусу: ежедневно, еженедельно или в выходные дни. Выберите время автоматического запуска в соответствии с
заданным форматом времени.
Вы также можете выбрать время, по истечении которого устройство будет автоматически выключаться, чтобы
оптимизировать потребление энергии.
Промывка системы приготовления кофе
Вы можете активировать или не активировать эту функцию при включении аппарата. Это позволит вам обеспечить
высокое качество кофе и избежать попадания осадка в кружку.
Установка фильтра
При первом включении аппарат спросит у вас, хотите ли вы установить фильтр. Если вы хотите установить фильтр и если
того требует жесткость вашей воды, выберите «Да» и следуйте инструкциям на экране.
Установка фильтра: Зафиксируйте фильтр в основании резервуара для воды, используя аксессуар в комплекте с
фильтром. Рис. 4
Укажите месяц установки фильтра (позиция 1 на рисунке, цифра в отверстии слева), покрутив серое колесико,
расположенное сверху фильтра. есяц установки фильтра указан на рисунке в позиции 2. Рис. 5.
ПОДГОТОВКА К РАБОТЕ
УСТАНОВКА ПРИБОРА
до появления на экране надписи «Здравствуйте» Рис. 1. Следуйте
263
Смотреть руководство для Krups Evidence EA89 ниже. Все руководства на ManualsCat.com могут просматриваться абсолютно бесплатно. Нажав кнопку «Выбор языка» вы можете изменить язык руководства, которое хотите просмотреть.

MANUALSCAT | RU
Вопросы и ответы
У вас есть вопрос о Krups Evidence EA89, но вы не можете найти ответ в пользовательском руководстве? Возможно, пользователи ManualsCat.com смогут помочь вам и ответят на ваш вопрос. Заполните форму ниже — и ваш вопрос будет отображаться под руководством для Krups Evidence EA89. Пожалуйста, убедитесь, что вы опишите свои трудности с Krups Evidence EA89 как можно более детально. Чем более детальным является ваш вопрос, тем более высоки шансы, что другой пользователь быстро ответит на него. Вам будет автоматически отправлено электронное письмо, чтобы проинформировать вас, когда кто-то из пользователей ответит на ваш вопрос.
Задать вопрос о Krups Evidence EA89
Страница: 1
257
RU
Уважаемые клиенты!
Поздравляем вас с приобретением автоматической кофемашины Krups серии EA89.
Этот новый аппарат изготавливает более 14 горячих напитков: эспрессо, двойной эспрессо, кофе, двойной кофе,
ристретто, доппио, американо, капучино, двойной капучино, латте, двойной латте, молочную пену, зеленый чай, черный
чай, травяной чай.
Помимо этого широкого выбора, кофемашина предоставляет возможности персонализации напитков. К примеру, вы
можете использовать функцию, которая усилит интенсивность вашего кофе, если вы предпочитаете более крепкие
напитки. Вы можете регулировать объем, крепость и температуру ваших напитков.
На главном экране вы можете с легкостью выбрать напитки, потребляемые чаще всего. Экран позволит вам следить за
процессом приготовления вашего кофе или с легкостью открыть разные меню.
Большинство напитков могут быть приготовлены по двое для большего удобства и экономии времени.
Благодаря технологии KRUPS Quattro force и системе Compact Thermoblock со встроенной фильтрующей камерой,
давлению помпы в 15 бар и использованию свежемолотого кофе ваша кофемашина позволит получить максимально
ароматный ристретто, эспрессо и горячий кофе с пенкой светло-коричневого цвета.
Обычно для того чтобы ощутить весь вкус напитка, эспрессо подают в маленьких фарфоровых расширяющихся к верху
чашечках. Для получения эспрессо оптимальной температуры и с плотной пенкой советуем вам предварительно
подогревать чашки.
Вам, вероятно, придется попробовать несколько видов кофе, прежде чем вы найдете наилучший для вас сорт кофе в
зернах. Пробуя разные виды кофе и/или степень его обжарки, вы в конце концов получите оптимальный результат.
Кофе эспрессо имеет более сильный аромат по сравнению с кофе, приготовленным с использованием обычного фильтра.
Несмотря на свой более выраженный и устойчивый вкус, эспрессо содержит меньше кофеина, чем классический кофе
(около 60-80 мг на чашку по сравнению с 80-100 мг на чашку), при меньшей продолжительности фильтрации.
Качество воды также является определяющим для качества напитка в чашке. Для наилучшего результата используйте
холодную воду из-под крана (не давайте воде отстаиваться, контактируя с воздухом) без запаха хлора.
Эргономичные и удобные сенсорные кнопки облегчат использование прибора. Они проведут вас через все этапы,
начиная с приготовления напитков и заканчивая операциями по уходу за прибором.
Желаем вам получить много удовольствия от вашей машины Krups.
Команда Krups
Страница: 2
258
Вот несколько советов о том, как наилучшим образом использовать вашу кофемашину и готовить напитки
высокого качества:
• Качество воды сильно влияет на вкус напитка. Известь и хлор могут изменить вкус вашего кофе. Советуем
вам использовать фильтр Claris Aqua Filter System или слабоминерализованную воду, чтобы сохранить
вкус вашего кофе.
•
Для приготовления кофейных напитков мы рекомендуем использовать предварительно нагретые
(например, под струей воды) фарфоровые чашки в форме тюльпана, размером, соответствующим
желаемому объему напитка. При приготовлении молочных напитков рекомендуем использовать чашки
из толстого стекла для аппетитного результата.
•
Обжаренные кофейные зерна могут потерять свой аромат, если они не защищены. Рекомендуем вам
использовать такое количество зерна, которого хватит на 4-5 дней. Качество кофейных зерен может
меняться, и его оценка субъективна, однако мы рекомендуем использовать арабику, а не робуста.
•
Не рекомендуется использовать маслянистые и карамелизированные кофейные зерна, поскольку они
могут повредить кофемашину.
•
Качество и тонкость помола зерна влияет на силу аромата и текстуру напитка. Чем тоньше помол зерна,
чем более кремообразной будет текстура. Помол также должен быть адаптирован к желаемому напитку:
более тонкий для ристретто и эспрессо, более крупный для кофе.
•
Вы можете использовать пастеризованное, ультрапастеризованное, обезжиренное, полуобезжиренное
или цельное молоко из холодильника (7°C). Использование особого молока (микрофильтрованного,
сырого, ферментированного, обогащенного) или растительного молока (рисового, миндального и других)
может показать менее удовлетворительные результаты, особенно с точки зрения качества пены.
Страница: 3
259
RU
ОГЛАВЛЕНИЕ
ВАЖНАЯ ИНФОРМАЦИЯ О ПРОДУКТЕ И РУКОВОДСТВО ПО ЭКСПЛУАТАЦИИ. . . . . . . . . . . . . . . . . . p. 260
ТЕХНИЧЕСКАЯ ИНФОРМАЦИЯ. . . . . . . . . . . . . . . . . . . . . . . . . . . . . . . . . . . . . . . . . . . . . . . . . . . . . . . . . . . . . . . . . . . . . . . . . . . . . . . . . . . . . . . . p. 260
ОПИСАНИЕ УСТРОЙСТВА. . . . . . . . . . . . . . . . . . . . . . . . . . . . . . . . . . . . . . . . . . . . . . . . . . . . . . . . . . . . . . . . . . . . . . . . . . . . . . . . . . . . . . . . . . . . . . . . p. 260
ОБЗОР. . . . . . . . . . . . . . . . . . . . . . . . . . . . . . . . . . . . . . . . . . . . . . . . . . . . . . . . . . . . . . . . . . . . . . . . . . . . . . . . . . . . . . . . . . . . . . . . . . . . . . . . . . . . . . . . . . . . . . . . . . . . p. 260
ПОДГОТОВКА К РАБОТЕ
УСТАНОВКА ПРИБОРА. . . . . . . . . . . . . . . . . . . . . . . . . . . . . . . . . . . . . . . . . . . . . . . . . . . . . . . . . . . . . . . . . . . . . . . . . . . . . . . . . . . . . . . . . . . . . . . . . . . . p. 262
ПЕРЕД ПРИГОТОВЛЕНИЕМ НАПИТКОВ
ВАЖНЫЕ ЗАМЕЧАНИЯ. . . . . . . . . . . . . . . . . . . . . . . . . . . . . . . . . . . . . . . . . . . . . . . . . . . . . . . . . . . . . . . . . . . . . . . . . . . . . . . . . . . . . . . . . . . . . . . . . . . . p. 263
БЫСТРОЕ ПРИГОТОВЛЕНИЕ НАПИТКОВ. . . . . . . . . . . . . . . . . . . . . . . . . . . . . . . . . . . . . . . . . . . . . . . . . . . . . . . . . . . . . . . . . . . . . . . . . . p. 264
БЫСТРОЕ ПРИГОТОВЛЕНИЕ МОЛОЧНЫХ НАПИТКОВ. . . . . . . . . . . . . . . . . . . . . . . . . . . . . . . . . . . . . . . . . . . . . . . . . . . . . . p. 264
ПРИГОТОВЛЕНИЕ ЧАЯ. . . . . . . . . . . . . . . . . . . . . . . . . . . . . . . . . . . . . . . . . . . . . . . . . . . . . . . . . . . . . . . . . . . . . . . . . . . . . . . . . . . . . . . . . . . . . . . . . . . . p. 265
ПРИГОТОВЛЕНИЕ ПРОЧИХ НАПИТКОВ: РИСТРЕТТО, ДОППИО,
АМЕРИКАНО ИЛИ МОЛОЧНОЙ ПЕНЫ. . . . . . . . . . . . . . . . . . . . . . . . . . . . . . . . . . . . . . . . . . . . . . . . . . . . . . . . . . . . . . . . . . . . . . . . . . . . . p. 265
ДРУГИЕ ФУНКЦИИ. . . . . . . . . . . . . . . . . . . . . . . . . . . . . . . . . . . . . . . . . . . . . . . . . . . . . . . . . . . . . . . . . . . . . . . . . . . . . . . . . . . . . . . . . . . . . . . . . . . . . . . . . . p. 266
ОБЩИЙ УХОД. . . . . . . . . . . . . . . . . . . . . . . . . . . . . . . . . . . . . . . . . . . . . . . . . . . . . . . . . . . . . . . . . . . . . . . . . . . . . . . . . . . . . . . . . . . . . . . . . . . . . . . . . . . . . . . . . p. 267
НЕИСПРАВНОСТИ И ДЕЙСТВИЯ ПО ИХ УСТРАНЕНИЮ. . . . . . . . . . . . . . . . . . . . . . . . . . . . . . . . . . . . . . . . . . . . . . . . . . . . . p. 269
Страница: 4
260
ВАЖНАЯ ИНФОРМАЦИЯ О ПРОДУКТЕ И РУКОВОДСТВО ПО ЭКСПЛУАТАЦИИ
В этом кратком руководстве вы найдете всю важную информацию о вводе в эксплуатацию, эксплуатации и техническом
обслуживании вашей кофемашины.
Внимательно прочитайте инструкцию перед первым использованием прибора и сохраните ее. Использование,
противоречащее инструкции, освобождает KRUPS от всякой ответственности.
УСЛОВНЫЕ ЗНАКИ РУКОВОДСТВА ПО ЭКСПЛУАТАЦИИ
Внимание!
Предупреждение о возможной смерти или серьезной травме. Символ молнии предупреждает об
опасностях, связанных с присутствием электричества.
Осторожно!
Предупреждение о возможном возникновении неисправностей, повреждений или уничтожении
устройства.
!
Важно! Общее или важное примечание о работе устройства.
Детали в комплекте с кофемашиной
Проверьте детали в комплекте с кофемашиной. Если какой-то детали не хватает, свяжитесь с нами напрямую по горячей
линии (см. стр. 263 : Исходные настройки).
Поставляемые детали:
—
автоматическая кофемашина Krups серии EA89
— 2 таблетки для чистки
— 1 пакетик средства от накипи
— Трубка для всасывания молока, предназначаемая для блока «One Touch Cappuccino»
— Ключ для демонтажа для очистки паровой системы
— Правила техники безопасности
— Фильтр Claris – система Aqua Filter System с аксессуаром для фиксации
— 1 полоска для определения жесткости воды
— Руководство по эксплуатации
— Перечень центров гарантийного обслуживания Krups
— Гарантийные документы
ТЕХНИЧЕСКАЯ ИНФОРМАЦИЯ
Прибор Автоматическая кофемашина Krups серии EA89
Электропитание 220-240 В~ / 50 Гц
Давление помпы 15 бар
Контейнер для кофе в зернах 250 г
Потребление энергии В режиме работы: 1450 Вт
Резервуар для воды 2.3 л
Ввод в эксплуатацию и хранение В помещении, в сухом (защищенном от мороза) месте
Размеры (мм) В x Ш x Г 367 x 240 x 380
Вес EA89 (кг) 8.4
Возможны технические изменения.
Страница: 5
261
RU
ОПИСАНИЕ УСТРОЙСТВА
A Ручка/крышка резервуара для воды
B Резервуар для воды
C Коллектор кофейной гущи
D
Регулирующиеся по высоте выпускные
отверстия для кофе
E Решетка и съемный лоток для сбора капель
F
Крышка контейнера для кофе в зернах
G
Съемный блок One Touch Cappuccino
G1 Ключ-съемник для очистки парового
контура
G2 Блок One touch cappuccino
H
Трубка всасывания молока и смеситель
I
Поплавок, показывающий уровень воды
1 Контейнер для кофе в зернах
J Кнопка для регулировки тонкости помола
K Отверстие для помещения таблетки для чистки
L Металлическая кофемолка
2 Приборная панель
M Экран
N Кнопка «Вкл/Выкл»
O Сенсорные кнопки
Подробная информация:
Лоток для сбора капель накапливает воду или кофе, капающие из аппарата во время или после приготовления напитка.
Не снимайте лоток и регулярно опустошайте его.
! Важно: Внимательно прочтите руководство по эксплуатации и сохраните его. Следуйте правилам техники безопасности.
Изготовитель:
SAS GSM
Рю Сен-Леонар Ф-53104, Майен
Франция
ОБЗОР
Описание различных кнопок
Кнопка Описание / Общие функции
Включить и выключить аппарат
Для введения машины в эксплуатацию необходимо длительное нажатие
Позволяет вернуться к предыдущему экрану или остановить процесс приготовления
Движение вверх по меню/ увеличение выбранного параметра
Движение вниз по меню/ уменьшение выбранного параметра
Подтверждение выбора
Функция позволяет усилить крепость кофе
Функция позволяет добавить к выбранному напитку крепкий эспрессо.
Доступна только для основных напитков (эспрессо, эспрессо лунго, капучино, макиато, чай) в
зависимости от модели
Запуск процесса приготовления эспрессо
Запуск процесса приготовления кофе
Запуск процесса приготовления капучино
Страница: 6
262
MACCHIATO
Запуск процесса приготовления макиато (много молока, эспрессо и густая молочная пена)
Позволяет получить доступ к меню приготовления чая.
Позволяет получить доступ к приготовлению дополнительных напитков: ристретто, молочной
пены, доппио, американо (в зависимости от модели)
Позволяет получить доступ к главному меню (настройки машины, уход и информация о продукте)
: Подсветка Bluetooth :
Когда логотип не горит, машина не подключена или функция выключена.
Когда логотип горит, машина подключена.
Bluetooth всегда активен. Вы можете отключить его, перейдя в меню , а затем в раздел «Параметры».
Информация о подсветке кнопок
Если кнопка не подсвечена — функция недоступна.
Если кнопка слегка подсвечена, значит, функция доступна и может быть выбрана.
В процессе выполнения выбранной функции подсветка становится очень яркой.
ПРИЛОЖЕНИЕ KRUPS
Проверьте совместимость вашего смартфона на www.krups.com
Скачайте приложение
Для того чтобы загрузить приложение, ваш смартфон должен быть оснащен модулем Bluetooth® BLE (с низким
энергопотреблением) и версией Android > «4.3» или IOS > «9». Если ваш смартфон не оснащен модулем или
соответствующей операционной системой, вы не сможете пользоваться приложением.
Приложение KRUPS можно скачать в Play Store на устройствах Android и в Apple Store на устройствах IOS.
Конфигурация аккаунта
Для того чтобы воспользоваться всеми возможностями приложения, вы должны зарегистрироваться. Чтобы завершить
создание аккаунта, заполните все необходимые поля и подтвердите принятие условий пользования.
Вас попросят создать пароль, чтобы гарантировать вашу конфиденциальность.
Активация Bluetooth®
Для подключения телефона к аппарату необходимо включить модуль Bluetooth® BLE на вашем смартфоне и убедиться,
что модуль Bluetooth® кофемашины также включен. Перейдите в меню настроек, выберите функцию «Возможности
подключения» и активируйте модуль Bluetooth®, если он отключен (по умолчанию модуль Bluetooth® всегда включен).
Соединение смартфона с кофемашиной
Следуйте инструкциям на вашем телефоне, чтобы подключить ваш смартфон к кофемашине. Соединение можно
произвести, только когда подсвечен логотип BLE.
Когда машина обнаружит запрос на соединение со смартфоном, экран кофемашины попросит вас подтвердить
подключение. Подтвердите, нажав на кнопку OK, тогда на вашем смартфоне появится окно с просьбой подтвердить это
соединение. Нажмите на “Соединить”.
Если соединение не удалось, повторите попытку несколько раз и убедитесь, что модуль Bluetooth® BLE кофемашины
активирован.
Если проблема не устраняется, вы можете обратиться в гарантийную службу для получения помощи при установке
приложения. Опция «Связаться с Krups» в главном меню вашего смартфона позволит получить доступ к контактным
данным гарантийного обслуживания.
Если телефон подключился к кофемашине, вы увидите, что символ Bluetooth® ярко подсвечен. Это означает, что функция
активирована.
Настройка кофемашины
Как только телефон будет подключен, вы сможете изменять настройки кофемашины через приложение (дата и время на
кофемашине будет автоматически обновляться в соответствии с датой и временем смартфона).
Страница: 7
263
RU
Мобильное приложение упрощает первоначальную установку машины и исходных настроек.
Использование приложения
Приложение предоставляет доступ к множеству функций:
•
Удаленный запуск аппарата,
•
Управление списком избранных напитков и списком емкостей,
•
Доступ к аккаунту и информации о кофемашине,
•
Доступ к новостям и информации мира кофе,
•
Доступ к руководству пользователя с обучающими видео о том, как максимально воспользоваться потенциалом
кофемашины,
•
Быстрая связь с гарантийным центром в случае вопросов или проблем с вашим аппаратом или приложением.
Вы можете воспользоваться всеми этими функциями, осуществляя навигацию по вашему приложению (вне
зависимости от того, подключены вы к кофемашине или нет).
Пользуйтесь приложением как можно чаще, чтобы быть в курсе всех новостей и состояния вашей кофемашины.
ПОДГОТОВКА К РАБОТЕ
УСТАНОВКА ПРИБОРА
Опасность: Подключите прибор к заземленной розетке электрической сети 230 В. В противном случае вы рискуете
получить смертельные травмы от электричества!
Следуйте инструкциям по технике безопасности в буклете “Информация о безопасности”.
Включение
Включите аппарат, удерживая кнопку «Вкл/Выкл» до появления на экране надписи «Здравствуйте» Рис. 1. Следуйте
указаниям прибора.
Исходные установки
При первом использовании машины вам будет предложено выполнить различные настройки. Следуйте инструкциям,
которые появляются на экране. Цель следующих пунктов дать вам несколько визуальных ориентиров.
Вот первые требуемые настройки:
Язык
Выберите язык дисплея с помощью клавиш со стрелками, пока не появится желаемый язык. Нажмите на кнопку «OK»,
чтобы подтвердить.
Единица измерения
Вы можете задать единицу измерения объема в мл или унциях.
Дата и время
Для установки времени задайте желаемый формат времени (24 или 12 часов).
Автоматическое включение/выключение
Вы можете задать время автоматического включения вашей кофемашины. Этот параметр можно настроить по своему
вкусу: ежедневно, еженедельно или в выходные дни. Выберите время автоматического запуска в соответствии с
заданным форматом времени.
Вы также можете выбрать время, по истечении которого устройство будет автоматически выключаться, чтобы
оптимизировать потребление энергии.
Промывка системы приготовления кофе
Вы можете активировать или не активировать эту функцию при включении аппарата. Это позволит вам обеспечить
высокое качество кофе и избежать попадания осадка в кружку.
Установка фильтра
При первом включении аппарат спросит у вас, хотите ли вы установить фильтр. Если вы хотите установить фильтр и если
того требует жесткость вашей воды, выберите «Да» и следуйте инструкциям на экране.
Установка фильтра: Зафиксируйте фильтр в основании резервуара для воды, используя аксессуар в комплекте с
фильтром. Рис. 4
Укажите месяц установки фильтра (позиция 1 на рисунке, цифра в отверстии слева), покрутив серое колесико,
расположенное сверху фильтра. Месяц установки фильтра указан на рисунке в позиции 2. Рис. 5.
Страница: 8
264
Поставьте под выход пара емкость 0,6 л. Рис. 6.
Запуск кофемашины будет произведен вне зависимости от того, установлен фильтр или нет. Всенепременно требуется
заполнить систему водой. Для этого следуйте инструкциям на экране. Аппарат начнет работу с заполнения системы
водой, процедур предварительного нагрева и после этого осуществит автоматическую промывку.
Экран оповестит вас об окончании установки.
Жесткость воды
Следует адаптировать работу прибора к классу жесткости воды: от 0 до 4. Для этого выполните следующие действия:
Перед первым использованием аппарата определите жесткость воды, для того чтобы адаптировать работу прибора
к жесткости используемой воды. Выполняйте эту процедуру, когда используете кофемашину в месте, где жесткость
воды отличается от вашей, или если вы заметили изменения в жесткости вашей воды. Для определения жесткости воды
используйте тестовую полоску, поставляемую в комплекте с аппаратом, или свяжитесь с местным управлением водного
хозяйства.
Информацию о классе жесткости воды вы найдете в приведенной ниже таблице:
Степень жесткости
Класс 0
Очень мягкая
Класс 1
Мягкая
Класс 2
Средняя жесткость
Класс 3
Жесткая
Класс 4
Очень жесткая
° dH < 3° > 4° > 7° > 14° > 21°
° e < 3,75° > 5° > 8,75° > 17,5° > 26,25°
° f < 5,4° > 7,2° > 12,6° > 25,2° > 37,8°
Регулировка
прибора
0 1 2 3 4
Наполните стакан водой и опустите в него тестовую полоску. Рис. 2
Через 1 минуту на тестовой полоске появится результат измерения жесткости воды. Рис. 3
При настройке аппарата укажите количество красных зон.
Подготовка прибора
Выньте и заполните резервуар для воды. Рис. 7.
Установите резервуар на место. Рис. 8.
Снимите крышку с контейнера для кофе в зернах и засыпьте в него кофе в зернах (максимум 250 г) Рис. 9.
Закройте крышку контейнера для кофе в зернах. Рис. 10.
ПЕРЕД ПРИГОТОВЛЕНИЕМ НАПИТКОВ
ВАЖНЫЕ ЗАМЕЧАНИЯ
Ваш Эспрессо Автоматик EA89 автоматически отрегулирует количество молотого кофе в соответствии с выбранным
напитком.
Подготовка кофемолки
Вы можете выбирать крепость кофе, регулируя тонкость помола зерен кофе. Обычно чем более мелкий помол установлен
на кофемолке, тем крепче и мягче будет кофе. Эта характеристика может меняться в зависимости от типа используемого
кофе. Рекомендуем мелкий помол кофе для эспрессо и более крупный для других типов кофе.
Настройте тонкость помола, вращая регулятор тонкости помола (J), расположенный в контейнере для кофейных зерен.
Регулировка должна быть произведена во время помола, постепенным передвижением переключателя. Выпив 3
чашечки кофе разного помола, вы отчетливо почувствуете разницу во вкусе.
Регулировка тонкости помола полезна, когда вы меняете тип кофе или когда хотите менее крепкий кофе. Однако не
рекомендуется систематически менять тонкость помола.
Регулировка выхода кофе
Для всех предлагаемых напитков возможно поднять или опустить выход кофе в соответствии с высотой вашей/-их
кружки/-ек или стакана/-ов. Рис.11
Остановка приготовления напитка
Вы можете остановить приготовление в любой момент, нажав на кнопку возврата .
Внимание! Нажатие этой кнопки запускает фазу обновления кофемашины, которая может длиться до 30 секунд. Эта фаза
является нормальной.
Страница: 9
265
RU
Когда цикл прерывается, остановка не будет моментальной, аппарат завершит свой цикл, приготовление напитка будет
аннулировано.
Функция «Double»
Аппарат позволяет приготовить две чашки напитка одновременно. Вы можете запустить функцию двойного напитка, два
раза нажав на свой выбор. Это распространяется на все напитки (за исключением и ).
Функция «DARK»
Функция «DARK» позволяет увеличить насыщенность напитка (крепость).
Есть несколько способов включить и отключить данную функцию:
—
Прежде чем выбрать напиток, нажмите на кнопку «DARK».
—
Нажмите на кнопку «DARK» в процессе приготовления напитка и до конца помола кофе.
—
Выбрав опцию «DARK» в меню настроек. Для этого перейдите в меню «Настройки», нажав на кнопку , затем
«Настройки» «Настройки напитков» «DARK». Таким образом функция будет включена для кофейных напитков:
, , , .
Выполните те же операции для отключения функции.
Функция «EXTRA SHOT»
Функция «EXTRA SHOT » позволяет добавить эспрессо в конце процесса приготовления выбранного напитка.
Есть несколько способов включить и отключить данную функцию:
—
Прежде чем выбрать напиток, нажмите на кнопку «EXTRA SHOT».
—
В ходе приготовления напитка.
— Выбрав опцию «EXTRA SHOT» в меню настроек. Для этого перейдите в меню «Настройки», нажав на кнопку , затем
«Настройки» «Настройки напитков» «EXTRA SHOT». Таким образом функция будет включена для напитков , ,
, , .
Выполните те же операции для отключения функции.
БЫСТРОЕ ПРИГОТОВЛЕНИЕ НАПИТКОВ
К сведению:
При каждом приготовлении напитка кофемашина будет учитывать последний приготовленный напиток, а
также выбранные при этом настройки.
Приготовление
Поставьте чашку или чашки под сопло подачи кофе. Рис.12
Нажмите на кнопку выбранного напитка.
Если во время приготовления напитка аппарат установит нехватку воды, то попросит вас заполнить резервуар.
Возможные настройки
Вы можете усилить крепость кофе, нажав на и /или добавить напиток, нажав на .
Устройство позволяет приготовить одну или две чашки.
Кофемашина выполняет помол кофейных зерен, прессовку молотого кофе и фильтрацию. Вы можете настроить объем
кофе в процессе приготовления, используя кнопки навигации и .
Вы можете остановить приготовление в любой момент, нажав на .
! Важно!
Автоматическая промывка отверстий подачи кофе: в зависимости от типа приготовленного напитка машина
может выполнять автоматическую промывку во время выключения. Цикл длится всего несколько секунд и
автоматически останавливается.
БЫСТРОЕ ПРИГОТОВЛЕНИЕ МОЛОЧНЫХ НАПИТКОВ
Возможные настройки
Вы можете усилить крепость кофе, нажав на и /или добавить напиток, нажав на .
Пар используется для вспенивания молока. Поскольку производство пара требует повышенной температуры, прибор
производит дополнительный этап предварительного прогревания.
Страница: 10
266
Приготовление капучино или макиато
Подключите трубку для всасывания молока с правой стороны к блоку “One Touch Cappuccino” Рис.13
Вставьте другой конец (скошенный край) в емкость для молока или непосредственно в пакет молока Рис.14.
Поставьте чашку или чашки под сопло подачи кофе. Рис.15.
Нажмите на кнопку “Капучино” Рис.16 или кнопку “Макиато” Рис.18. Все параметры могут быть изменены.
Приготовление начинается со вспенивания молока (возможна установка времени), за которым следует подача кофе
(регулируемый объем). Установка времени вспенивания позволит вам менять объем молока и пены.
Следующие этапы происходят автоматически, и ваш напиток готов для дегустации Рис.17.
К сведению: при каждом приготовлении капучино или макиато кофемашина будет запоминать последний
приготовленный напиток, а также выбранные при этом настройки.
Уход за аппаратом после приготовления молочных напитков
Промывка молочного блока
В конце каждого приготовления на экране появится надпись: «Промывка молочного блока».
Рекомендуется промывать молочный блок после каждого использования молока, чтобы обеспечить чистоту
принадлежностей для вспенивания и хорошее вспенивание молока.
Наряду с промывкой молочного блока рекомендуется систематически разбирать и промывать под горячей струей воды
трубку всасывания молока и смеситель. Рис. 21 и 27.
Для оптимального результата рекомендуется регулярно чистить съемный блок «One Touch Cappuccino» (см. главу
общего ухода).
Если вы чувствуете, что качество молочной пены ухудшается, осуществите процесс промывки и очистки: плохой уход за
системой подачи молока становится причиной проблем такого рода.
ПРИГОТОВЛЕНИЕ ЧАЯ
Возможные настройки
Ваш аппарат рассчитан на приготовление 3 видов чая (зеленого, черного, травяного). Вы можете отрегулировать объем
напитка по своему вкусу.
Температура горячей воды регулируется в соответствии с выбранным напитком.
Вы можете включить функцию «EXTRA SHOT» , которая позволит вам создавать очень вкусные напитки «чай/кофе».
Приготовление чая
Выберите на экране. Поставьте чашку или чашки под сопло подачи кофе. Рис.12
Затем выберите напиток и нажмите на .
Если во время приготовления напитка аппарат установит нехватку воды, то попросит вас заполнить резервуар.
Вы можете изменить объем напитка, используя во время приготовления кнопки или .
ПРИГОТОВЛЕНИЕ ПРОЧИХ НАПИТКОВ:РИСТРЕТТО,ДОППИО,
АМЕРИКАНО ИЛИ МОЛОЧНОЙ ПЕНЫ
Приготовление
Поставьте чашку или чашки под сопло подачи кофе. Рис.12
Если во время приготовления напитка аппарат установит нехватку воды, то попросит вас заполнить резервуар.
Нажмите на кнопку : при помощи кнопок и выберите желаемый напиток: ристретто, доппио, американо,
молочную пену.
Приготовление ристретто
Выберите «Ристретто» и нажмите на .
Кофемашина выполняет помол кофейных зерен, прессовку молотого кофе и фильтрацию. Вы можете настроить объем
кофе в процессе приготовления, используя кнопки навигации: и .
Вы можете остановить приготовление в любой момент, нажав на .
Приготовление доппио
Выберите «Доппио и нажмите на .
Процесс приготовления идентичен процессу приготовления ристретто, но с двойным циклом кофе.
Страница: 11
267
RU
Приготовление американо
Выберите «Американо» и нажмите на .
Процесс приготовления идентичен процессу приготовления доппио, за которым следует горячая вода.
Приготовление молочной пены
Подключите трубку для всасывания молока с правой стороны к блоку “One Touch Cappuccino” Рис.13 Вставьте другой
конец (скошенный край) в емкость с молоком. Рис.14
Пар используется для вспенивания молока. Поскольку производство пара требует повышенной температуры, прибор
производит дополнительный этап предварительного прогревания.
Меню позволяет настроить длительность вспенивания. Вы можете изменить ее, нажимая на кнопки или .
Затем нажмите на . Последняя используемая длительность вспенивания будет сохранена в памяти для следующего
приготовления.
Вы можете остановить приготовление в любой момент, нажав на кнопку .
Промывка блока «One Touch Cappuccino»
Обратитесь к пункту «Промывка молочного блока» в разделе ПРИГОТОВЛЕНИЕ МОЛОЧНЫХ НАПИТКОВ ONE TOUCH.
ДРУГИЕ ФУНКЦИИ
Доступ к меню “Параметры” можно получить путем нажатия кнопки , которая позволяет получить доступ к главному
меню (настройки машины, уход и информация о продукте).
Настройка
При выборе настроек вы можете сделать необходимые изменения для оптимального удобства использования
кофемашины и с учетом ваших предпочтений.
Представляем вашему внимаю основные настройки.
Дата Настройка даты особенно необходима при использовании картриджа от накипи.
Часы Вы можете выбрать отображение времени в формате 12 или 24 часов.
Язык Из предложенного вы можете установить язык по своему выбору.
Единица измерения Вы можете выбрать единицу измерения в мл или унциях.
Контрастность экрана Вы можете настроить контрастность экрана по своему выбору.
Температура кофе Можно настроить температуру ваших напитков с использованием трех уровней.
Температура чая Можно настроить температуру вашего чая с использованием трех уровней.
Жесткость воды Вы должны отрегулировать жесткость от 0 до 4. См. главу «Измерение жесткости воды».
Автоматическое
включение
Вы можете автоматически запустить подогрев прибора в определенное время.
Автоматическое
выключение
Вы также можете выбрать время, по истечении которого устройство автоматически
выключится (время неиспользования).
Автоматическая
промывка
Вы можете включить или отключить автоматическое ополаскивание отверстий для
подачи кофе во время загрузки.
Настройка напитков
Вы можете приступить к восстановлению настроек по умолчанию. Вы также можете навсегда
активировать функцию «Dark» и «Extra Shot» для всех ваших напитков (за исключением ).
Чтобы выйти из режима регулировки, нажмите или на кнопку «Настройки».
Настройки сохраняются в памяти при выключении устройства из сети, за исключением даты и времени.
Страница: 12
268
Уход
Следующие опции позволяют вам запускать выбранные программы. Затем вы должны следовать инструкциям на экране.
Очистка
молочного блока
Позволяет вам получить доступ к очистке блока «One Touch Cappuccino». Очистка обязательна
для обеспечения хорошего качества вспенивания молока.
Промывка
молочного блока
Позволяет вам получить доступ к промывке блока «One Touch Cappuccino». Промывка
обязательна для обеспечения хорошего качества вспенивания молока.
Промывка
системы кофе
Позволяет вам получить доступ к ополаскиванию системы приготовления кофе машины, что
обеспечивает оптимальный вкус кофе.
Очистка системы
кофе
Позволяет вам получить доступ к очистке системы приготовления кофе машины (с помощью
очистительной таблетки), что обеспечивает оптимальный вкус кофе.
Очистка от
накипи
Позволяет вам получить доступ к режиму очистки от накипи, увеличивая продолжительность
службы вашей кофемашины. Если количество приготовленных напитков недостаточно для
очистки от накипи, функция не будет активна.
Фильтр
Позволяет вам получить доступ к режиму фильтрации, полезно в случае очень жесткой воды
для обеспечения оптимального вкуса и исправности вашей машины.
Чтобы выйти из режима регулировки, нажмите или на кнопку «Настройки».
Инфо
Меню “Информация” позволит вам получить доступ к определенному количеству информации при использовании
машины и на определенных этапах ее службы. В меню также содержится информация о техническом обслуживании.
Представляем вашему внимаю основную доступную информацию.
Приготовленные Отображает количество приготовленных напитков
Очистка системы кофе Указывает, что очистка должна быть произведена через N количество циклов.
Очистка от накипи Указывает, что очистка должна быть произведена через N количество циклов.
Фильтр
Указывает, что фильтр следует сменить через N количество дней или N количество
литров.
Чтобы выйти из режима регулировки, нажмите или на кнопку «Настройки».
ОБЩИЙ УХОД
Опустошение коллектора кофейной гущи и поддона для сбора капель.
После приготовления определенного количества напитков машина попросит вас опустошить поддон для сбора
кофейной гущи и лоток для сбора капель. Неправильное проведение этих операций может привести к повреждению
машины.
Лоток для сбора капель собирает использованную воду, а поддон для сбора кофейной гущи — использованный кофе.
Если появляется сообщение «Извлеките 2 поддона», извлеките лоток для сбора капель, слейте из него воду и очистите.
Извлеките, опустошите и очистите коллектор кофейной гущи. Рис. 19.
Поставьте на место коллектор кофейной гущи. Рис.20
Лоток для сбора капель имеет поплавок, который сигнализирует о необходимости опустошения лотка. Однако прибор
также запрограммирован сообщать о необходимости опустошить лоток для сбора капель после определенного
количества чашек кофе, независимо от промежуточных выполняемых вами чисток.
Промывка систем
Вы можете произвести промывку в любой момент, нажав кнопку , затем выбрать «Обслуживание».
В зависимости от рецептуры приготовления машина может автоматически проводить промывку во время своего
выключения.
Кроме того, можно установить автоматическое ополаскивание по включению (см. секцию “Настройки” стр. 263)
Страница: 13
269
RU
Автоматические программы очистки машины
Автоматическая программа очистки системы приготовления кофе
Аппарат сообщит вам, когда необходимо выполнить процедуру очистки.
Для проведения процедуры очистки вам необходим сосуд емкостью не менее 0,6 л, который должен быть установлен
под выпускные отверстия для кофе, и 1 таблетка для очистки KRUPS . Рис. 37. Следуйте инструкциям, появляющимся на
экране. Возможно также запустить процедуру очистки в меню «Обслуживание».
! Важно:
вы не обязаны запускать программу очистки сразу после того, как машина проинформирует вас о
необходимости её проведения. Но постарайтесь провести эту процедуру как можно быстрее. Если процесс
очистки откладывается, предупреждающее сообщение будет высвечиваться до тех пор, пока не будет
осуществлена очистка.
Автоматическая программа очистки включает в себя 2 фазы — цикл очистки и цикл промывки — и длится примерно 13
минут.
! Важно:
Если вы отключите вашу машину во время очистки или в случае сбоя питания, программа очистки будет
продолжена с прерванного шага. Отложить эту операцию будет невозможно. Это является обязательным
условием по соображениям необходимости промывки контура циркуляции воды. В этом случае вам может
понадобиться новая таблетка от накипи. Доведите программу очистки до конца, чтобы удалить все следы
вредных для здоровья продуктов очистки.
Очистка блока «One Touch Cappuccino»
Для выполнения программы очистки вам понадобятся две емкости (не менее 0,6 л) и чистящая жидкость KRUPS.
Вы можете приступить к очистке, нажав кнопку .
Затем выберите «Обслуживание» «Очистка молочного блока». Следуйте инструкциям на экране.
Промывка блока «One Touch Cappuccino»
В дополнение к промывке необходимо чистить различные элементы блока после каждого использования. Чтобы
демонтировать блок, выполните следующие действия:
Снимите трубку для всасывания молока, Рис.21.
Снимите крышку перед снятием сопла подачи кофе. Опустите его вниз и потяните ее к себе. Рис. 22.
Извлеките блок One Touch Cappuccino, потянув за верхнюю часть блока, и вытяните оранжевый чистящий инструмент.
Рис. 23.
Полностью разберите блок. Рис. 24.
Снимите смеситель трубки для всасывания молока Рис. 27.
Промойте снятые детали (блок, смеситель и трубку всасывания молока) в мыльной воде. Затем ополосните их теплой
водой. Рис. 28.
Как только детали будут промыты и высушены, соберите блок и поставьте его в исходное положение. Рис.31-32-33.
До установки блока поставьте на место крышку. Рис. 34. Установите смеситель на трубку для всасывания молока Рис. 35
(противоположная сторона скошенной стороны) и вставьте ее в блок. Рис. 36.
Автоматическая программа очистки паровой системы
Внимание!
Если на вашей кофемашине установлен фильтр для воды Claris — Aqua Filter System, снимите его перед
проведением цикла удаления накипи.
Аппарат сообщит вам, когда необходимо выполнить процедуру удаления накипи. Частота выполнения данной
программы зависит от качества используемой воды и от того, используете ли вы фильтр Claris Aqua Filter System (чем
жестче вода, чем чаще следует удалять накипь из аппарата).
! Важно: вы не обязаны запускать эту программу сразу после того, как машина проинформирует вас о необходимости
её проведения. Но постарайтесь провести эту процедуру как можно быстрее. Если процедура удаления
накипи откладывается, предупреждающее сообщение будет высвечиваться до тех пор, пока она не будет
осуществлена.
Нажатие на кнопку в то время как высвечивается сообщение об удалении накипи, запустит процедуру удаления
накипи. Для того чтобы отложить операцию, нажмите на .
Как только процедура будет запущена, следуйте инструкциям, появляющимся на экране. Процедуру удаления накипи
можно также запустить в меню «Обслуживание» «Очистка».
Для проведения процедуры удаления накипи вам потребуется контейнер, который может вместить по крайней мере 0,6
л, для установки под блоком «One Touch Cappuccino», а также мешок удаления накипи KRUPS (40 г). Рис. 37
Наполните резервуар для воды до отметки CALC, затем поместите туда содержимое пакетика со средством удаления
накипи.
Страница: 14
270
Процедура удаления накипи включает 3 фазы: цикл очистки от накипи и два цикла промывки. Эта процедура длится
около 20 минут.
! Важно:
если произошел сбой в подаче электропитания или если вы отключили машину, цикл будет повторно
запущен с прерванного шага без возможности отложить данную операцию. Выполните весь цикл, чтобы
удалить все следы вредных для здоровья продуктов очистки от накипи.
НЕИСПРАВНОСТИ И ДЕЙСТВИЯ ПО ИХ УСТРАНЕНИЮ
Если какая-либо из неполадок, перечисленных в таблице, сохраняется, обратитесь в сервисный центр KRUPS.
НЕИСПРАВНОСТЬ УСТРАНЕНИЕ НЕИСПРАВНОСТЕЙ
Машина показывает сбой,
программа заморожена или ваша
машина неисправна.
Выключите и отсоедините машину, удалите картридж фильтра, подождите
минуту и перезапустите машину.
Для включения удерживайте кнопку Вкл/Выкл не менее 3-х секунд.
Аппарат не включается даже
после того, как вы удерживали
кнопку Вкл/Выкл (в течение не
менее 3-х секунд)
Проверьте предохранители и розетку сети электропитания.
Убедитесь, штекер правильно вставлен в розетку.
Кофемолка издает необычный
шум.
В контейнере находится посторонний предмет.
Обратитесь в сервисный центр KRUPS.
Молоко не поступает в систему
блока «One Touch Cappuccino».
Блок «One Touch Cappuccino» не
производит молочную пену или
производит мало пены.
Убедитесь, что блок правильно собран (в частности смеситель).
Убедитесь, что выход пара не засорен. Если дело в этом, смотрите пункт «Паровое
сопло вашей машины, по-видимому, частично или полностью засорилось» ниже.
Убедитесь, что смеситель не засорен и не загрязнен. Замочите его в растворе
теплой воды и средства для мытья посуды, затем ополосните его и высушите до
установки на место.
Убедитесь,чтотрубканезасорена,неперекрученаихорошовставленавблок«One
Touch Cappuccino» без возможности попадания воздуха. Убедитесь, что трубка
погружена в молоко.
Промойте и очистите блок (см. главу промывки и очистки блока «One Touch
Cappuccino»).
Для приготовления напитков на основе молока мы рекомендуем использовать
свежеемолоко,пастеризованноеилистерилизованное,изнедавнооткрытойтары;
также рекомендуется использовать холодный контейнер.
Отверстия для выхода пара вашей
машины, по-видимому, частично
или полностью засорились.
Снимите насадку с крепления при помощи ключа для демонтажа. Рис. 25.
Запустите цикл промывки блока «One Touch Cappuccino» для удаления остатков
Очистите выход пара и убедитесь, что отверстие насадки не засорено
остатками молока или известняка. При необходимости воспользуйтесь
оранжевым чистящим инструментом. Рис. 26
Не выходит пар из насадки для
выхода пара.
Убедитесь, что выход пара не засорен. См. пункт «Отверстия для выхода пара
вашей машины, по-видимому, частично или полностью засорились» ниже.
Если это не решает проблему, опустошите резервуар для воды и временно
снимите фильтр Claris. Наполните резервуар минеральной водой с повышенным
содержанием кальция (>100 мг/л) и запустите несколько циклов образования
пара в емкость подряд (от 5 до 10) до получения непрерывной струи пара.
Установите фильтр Claris в резервуар.
Из решетки лотка для сбора
капель выходит пар.
В зависимости от напитка пар может выходить из решетки лотка для сбора
капель.
Страница: 15
271
RU
Прибор сообщает о
необходимости освободить лоток
для сбора капель, когда он не
является полным.
Прибор запрограммирован сообщать о необходимости опустошить лоток для
сбора капель после определенного количества чашек кофе, независимо от
промежуточных очисток, которые вы можете выполнять.
Аппарат требует отключение от
сети и повторного включения
Отключите прибор от сети на 20 секунд, при необходимости снимите фильтр
Claris Aqua Filter System, а затем вновь установите его на место.
Если дефект не устранен, обратитесь в сервисный центр KRUPS.
Машине не требуется очистка от
накипи.
Запрос на удаление накипи появляется при частом использовании паровой
системы.
В лотке для сбора капель имеется
молотый кофе
Молотый кофе в небольшом количестве может попасть в лоток для сбора капель.
Машина сделана таким образом, чтобы удалить излишки молотого кофе для того,
чтобы зона фильтрации оставалась чистой.
Молоко или вода не вытекают в
кружку правильно.
Убедитесь, что блок «One Touch Cappuccino» установлен правильно.
В американо или теплой воде
присутствуют следы молока.
Выполните процесс промывки молочного блока или снимите и очистите
аксессуар «One Touch Cappuccino» до запуска приготовления напитка.
Вы обнаружили воду под
устройством.
Перед снятием резервуара после вытекания кофе подождите 15 секунд, чтобы
машина успешно завершила цикл. Убедитесь, что поддон для сбора капель
правильно установлен на машине, так как он всегда должен быть на месте, даже
когда устройство не используется. Убедитесь, что поддон для сбора капель не
переполнен.
Поддон для сбора капель запрещено вынимать во время цикла.
Во время выключения горячая
вода проходит через отверстия
подачи кофе и блок «One Touch
Cappuccino».
В зависимости от приготовленного напитка машина может автоматически
проводить промывку во время своего выключения. Цикл длится всего несколько
секунд и автоматически останавливается.
После опустошения
коллектора кофейной гущи
предупреждающее сообщение не
исчезает.
Установите на место коллектор кофейной гущи и следуйте инструкциям на
экране.
Подождите не менее 5 секунд, затем вставьте его на место.
Слишком медленная подача кофе.
Поверните регулятор тонкости помола по часовой стрелке для получения кофе
более крупного помола (зависит от типа используемого кофе).
Проделайте один или несколько циклов промывки.
Запустите очистку машины (см. раздел «Автоматическая программа очистки
машины»).
Замените фильтр Claris Aqua Filter System (см. раздел «Установка фильтра»).
После заполнения резервуара
для воды на экран выводится
предупреждающее сообщение.
Убедитесь в правильности расположения резервуара в машине.
Поплавок в нижней части резервуара должен свободно двигаться. Проверьте и
при необходимости разблокируйте поплавок.
Проблемы при вращении
регулятора тонкости помола кофе
в кофемолке.
Регулируйте степень помола только во время работы кофемолки.
Эспрессо или кофе недостаточно
горячие.
До приготовления напитка выполните процесс промывки системы кофе.
Увеличьте температуру кофе в меню «Настройки». Предварительно согрейте
чашку, подержав ее под горячей водой.
Страница: 16
272
Кофе слишком светлый или
недостаточно крепкий.
Не используйте маслянистый, карамелизованный или ароматизированный кофе.
Проверьте наличие кофейных зерен в контейнере и не закупорен ли проход.
Уменьшите объем напитка и увеличьте его крепость, используя опцию «Dark».
Поверните регулятор степени помола влево для получения более тонкого
помола.
Приготовьте кофе в два цикла с использованием функции «2 чашки».
Кофемашина не производит кофе.
Во время приготовления было обнаружено нарушение в работе прибора.
Прибор автоматически сбросил настройки и готов к новому циклу.
Перебои в подаче
электроэнергии во время цикла.
Устройство автоматически сбрасывает настройки при восстановлении питания.
Ваш чай недостаточно или
слишком горячий.
Увеличьте или уменьшите температуру горячей воды в меню «Настройки».
Вы использовали молотый кофе
вместо кофе в зернах.
С помощью пылесоса откачайте молотый кофе из резервуара для кофе в зернах.
Приложение не подключается
или отключается слишком часто
Убедитесь, что Bluetooth кофемашины не отключен.
Во время использования приложения подойдите к машине как можно ближе.
Приложение не обнаруживает
машину
Закройте и снова откройте приложение.
Появление пара под крышкой
контейнера для кофейных зерен.
Закройте углубление таблетки для очистки, расположенное под крышкой.
После запуска приготовления
напитка, если вы запросите
дополнительную порцию,
машина сообщает вам, что это
невозможно.
Лоток для сбора кофейной гущи полный, и функция дополнительной порции
недоступна. После приготовления напитка, возможно, вы сможете снова
приготовить эспрессо после опорожнения сборника кофейной гущи.
Опасно!
Только квалифицированный специалист имеет право осуществлять ремонт электрического провода и
электрической сети. В случае несоблюдения этого условия возникает риск поражения электрическим
током! Запрещается использовать прибор с видимыми повреждениями!
Читайте наши статьи

Эксплуатация кофемашины в зимний период
Что происходит с кофемашиной при длительном нахождении в помещении с низкой температурой? Перевозили кофемашину в багажнике — что теперь от неё ожидать?

Скидка на ремонт кофемашины
Получите 20% скидку на ремонт или обслуживание вашей кофемашины, а также при заказе кофе «Coffee-Everyday» у нас.
Уход за кофемашиной: рекомендации и советы
Как увеличить срок экслуатации вашей кофемашины или кофеварки? Как влияет качество воды на долговечность системы? Как правильно определить момент обсуживания?
Хорошее руководство по эксплуатации
Законодательство обязывает продавца передать покупателю, вместе с товаром, руководство по эксплуатации Krups EA89 serie. Отсутствие инструкции либо неправильная информация, переданная потребителю, составляют основание для рекламации в связи с несоответствием устройства с договором. В законодательстве допускается предоставлении руководства в другой, чем бумажная форме, что, в последнее время, часто используется, предоставляя графическую или электронную форму инструкции Krups EA89 serie или обучающее видео для пользователей. Условием остается четкая и понятная форма.
Что такое руководство?
Слово происходит от латинского «instructio», тоесть привести в порядок. Следовательно в инструкции Krups EA89 serie можно найти описание этапов поведения. Цель инструкции заключается в облегчении запуска, использования оборудования либо выполнения определенной деятельности. Инструкция является набором информации о предмете/услуге, подсказкой.
К сожалению немного пользователей находит время для чтения инструкций Krups EA89 serie, и хорошая инструкция позволяет не только узнать ряд дополнительных функций приобретенного устройства, но и позволяет избежать возникновения большинства поломок.
Из чего должно состоять идеальное руководство по эксплуатации?
Прежде всего в инструкции Krups EA89 serie должна находится:
— информация относительно технических данных устройства Krups EA89 serie
— название производителя и год производства оборудования Krups EA89 serie
— правила обслуживания, настройки и ухода за оборудованием Krups EA89 serie
— знаки безопасности и сертификаты, подтверждающие соответствие стандартам
Почему мы не читаем инструкций?
Как правило из-за нехватки времени и уверенности в отдельных функциональностях приобретенных устройств. К сожалению само подсоединение и запуск Krups EA89 serie это слишком мало. Инструкция заключает ряд отдельных указаний, касающихся функциональности, принципов безопасности, способов ухода (даже то, какие средства стоит использовать), возможных поломок Krups EA89 serie и способов решения проблем, возникающих во время использования. И наконец то, в инструкции можно найти адресные данные сайта Krups, в случае отсутствия эффективности предлагаемых решений. Сейчас очень большой популярностью пользуются инструкции в форме интересных анимаций или видео материалов, которое лучше, чем брошюра воспринимаются пользователем. Такой вид инструкции позволяет пользователю просмотреть весь фильм, не пропуская спецификацию и сложные технические описания Krups EA89 serie, как это часто бывает в случае бумажной версии.
Почему стоит читать инструкции?
Прежде всего здесь мы найдем ответы касательно конструкции, возможностей устройства Krups EA89 serie, использования отдельных аксессуаров и ряд информации, позволяющей вполне использовать все функции и упрощения.
После удачной покупки оборудования/устройства стоит посвятить несколько минут для ознакомления с каждой частью инструкции Krups EA89 serie. Сейчас их старательно готовят или переводят, чтобы они были не только понятными для пользователя, но и чтобы выполняли свою основную информационно-поддерживающую функцию.