

Summary of Content for Nespresso Aeroccino 3 Aeroccino + 3192 3194 Manual PDF
Instructions Instructions Instrucciones Instrues
Aeroccino + Aeroccino 3
9421.62 9423.62 9423SA.62
Zone 1
Zone 2
Zone 2 IL
Zone 3
Zone 4
9421.62 9423.62 9423SA.62
Zone 1
Zone 2
Zone 2 IL
Zone 3
Zone 4
Aeroccino + Aeroccino 3
Input power AeroccIno +
USA/CA: 120V, 60Hz, 550W BR/MX: 127V, 60Hz, 620W AR: 220V, 50Hz, 500W BR/CL: 220V-240V, 50-60Hz, 500-600W
Model no. AeroccIno +
3192
Input power AeroccIno 3
USA/CA: 120V, 60Hz, 450W BR/MX: 127V, 60Hz, 505W AR: 220V, 50Hz, 410W BR/CL: 220V-240V, 50/60Hz, 410-490W
Model no. AeroccIno 3
3194
read the safety instructions before operating the appliance
Lisez ces instructions de scurit avant de faire fonctionner lappareil
Lea atentamente las instrucciones de seguridad antes de utilizar este artefacto
Leia as instrues de segurana antes de utilizar o aparelho
en
Fr
eS
Br
The instructions are part of the appliance. read and follow all instructions to avoid possible harm and damage. Save these instructions and pass them on to any subsequent owner.
Avoid risk of fatal electric shock and fire
Only plug the base into suitable, earthed mains connection. Make sure that the voltage of the power source is the same as that specified on the rating plate. Do not pull the cable over sharp edges, clamp it or allow it to hang down. Keep the cable away from heat and damp. If the supply cord is damaged, it must be replaced by the manufacturer, its service agent or similarly qualified persons. Disconnect the base from the mains when not in use for long periods. Disconnect by pulling out the plug and not by pulling the cable itself, as this may damage the cable. Never immerse the base in water. Electricity and water together pose a risk to life from electric shock. Jug is not dishwasher safe. If an extension lead is required, use only an earthed cable with a conductor cross-section of at least 1.5mm2/0.06in2.
Avoid possible harm when operating the appliance
The appliance is intended to prepare bever- ages according to these instructions. This appliance is intended to be used in house- hold and similar applications such as: staff kitchen areas in shops, offices and other working environments; farm houses; by clients in hotels, motels and other residential type environments; bed and breakfast type environments. No liability is accepted for any damage resulting from use for other pur- poses, faulty operation or amateur repairs. Guarantee services are also excluded in such cases. Never leave the appliance unattended during operation. Keep it out of the reach of children. The appliance is only for use by persons who have sufficient experience and knowledge and are physically, sensory, and mentally able to operate the machine safely in accordance with these instructions. The appliance is not intended for use by
IMPorTAnT SAFeGUArDS
enpersons (including children) with reduced physical, sensory or mental capabilities, or lack of experience and knowledge, unless they have been given supervision or instruc- tion concerning use of the appliance by a person responsible for their safety. Children should be supervised to ensure that they do not play with the appliance. Do not use the appliance if damaged. A damaged appliance can cause electric shock, burns and fire. To avoid hazard, never place the appliance on or beside hot surfaces, for example, radiators, cooking rings, gas burners or similar items. Never clean the appliance in a dishwasher. Only use the appliance with the base provided. The appliance is intended to prepare drinks according to these instructions. It is for use in private households. No liability is accepted for any damage resulting from use for other purposes, faulty operation or amateur repairs. Guarantee services are also excluded in such cases.
environmental protection
Packaging materials and appliance contain recyclable materials.
Disposal
Your appliance contains valuable materials which can be recovered or which can be recyclable. Separation of the remaining waste materials into different types facilitates the recycling of valuable raw materials. You can obtain information on disposal from your local authority.
SAve TheSe InSTrUcTIonS
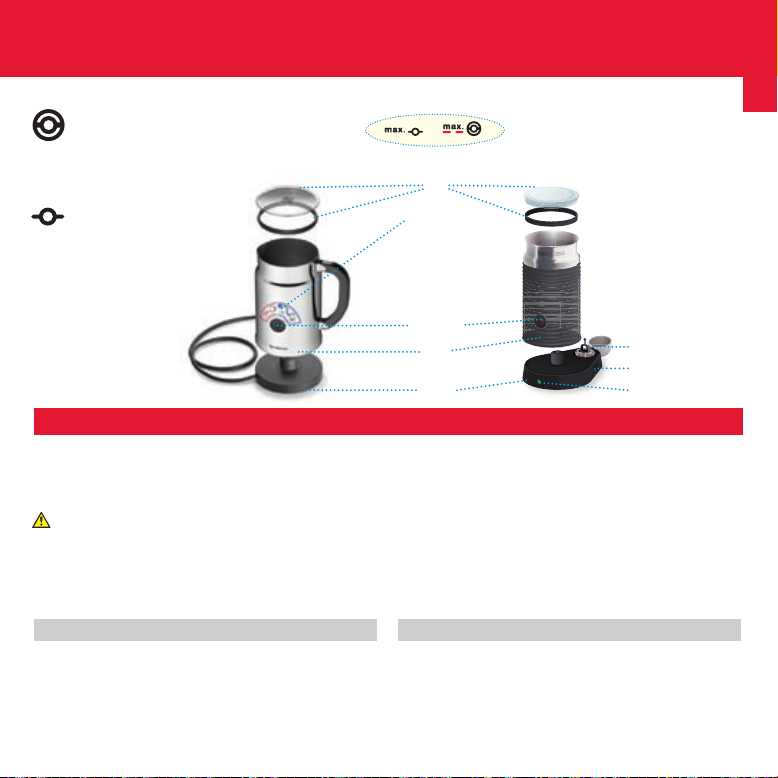
Base
Jug
lid
remove sticker
before first use
Milk frothing whisk (for hot and cold milk froth)
for hot milk for milk froth
Button
Maximum level indicated:
Whisk storage Main switch LED indication
2 whisks
Aeroccino + Aeroccino 3
hot milk whisk (for hot milk)
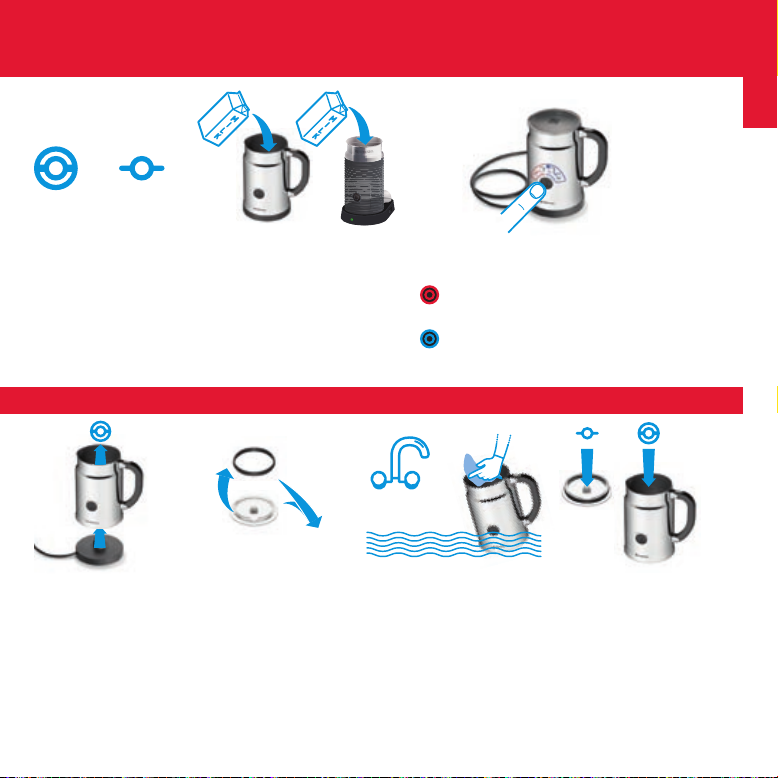
1Underside of the jug must be dry before using the device. 2Plug base into the socket before use. Press main switch located on the base of the unit to turn on the Aeroccino 3. LED turns green and Aeroccino 3 is ready to use. 3Inside of the jug must be cleaned with a cloth suitable for non-stick surfaces.
Tip: Use cold, fresh, full-fat or semi-skimmed milk.
PArTS
PrePArATIon
Preparation Times Hot milk froth Approximately 70 seconds Cold milk froth Approximately 60 seconds Hot milk Approximately 130 seconds
Jugs maximum level for: Milk froth 2 Nespresso Cappuccino cups 1 Nespresso Recipe glass Hot milk 1 Nespresso Recipe glass
or
en
cLeAninG AfTer every USe
TIPS
1 remove from the base and take out whisk (no tools needed). Note: when you have finished using the Aeroccino 3, switch OFF at the base with the main switch.
2 remove the seal from the lid to clean both parts. Rinse and clean with a damp cloth.
3 Jug is water- proof, but NOT dishwash- er safe.
4 clip one of the whisks on to the inner base of the jug and to avoid loss, clip the other on to the lid (or in whisk storage when using the Aeroccino 3).
4 Attach relevant whisk.
5 Pour desired amount of milk up to one of the two max level indicators. Then place milk jug on to the base.
6 Press button to start. Aeroccino stops automatically.
For hot preparations, briefly press button.
For cold milk froth, keep button pressed for approximately 2 seconds.
PrePArATIon
recIPe IDeAS
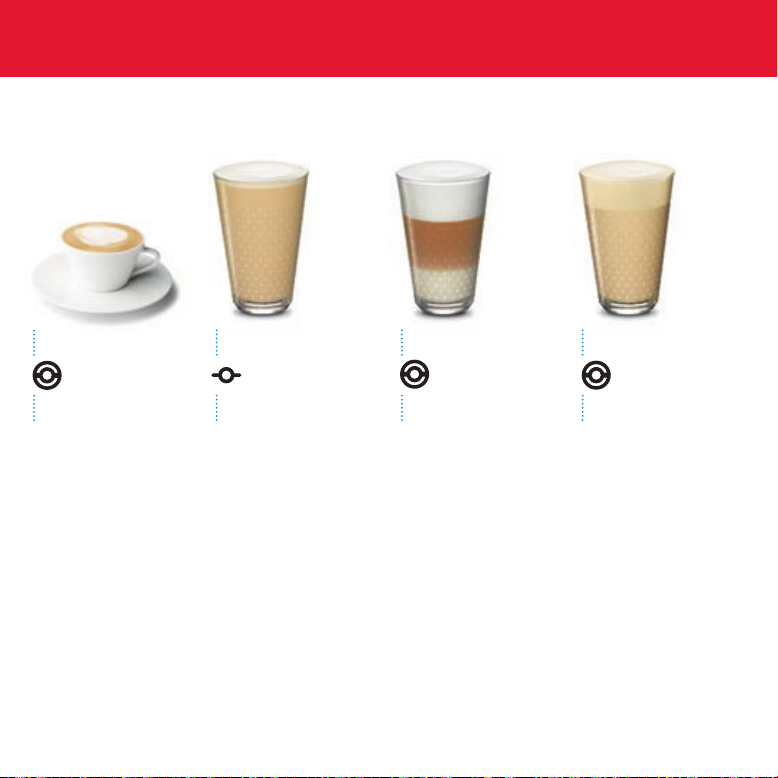
cappuccino caff Latte Iced cappuccinoLatte Macchiato
Prepare an espresso in a Cappuccino cup and add hot milk froth. Add sugar and sprinkle with cocoa if desired. Proportions: 2 3 hot milk froth 1 3 espresso
Recommended with Ristretto, Arpeggio or Decaffeinato Intenso.
Prepare a lungo in a tall glass and add hot milk. Add sugar if desired. Proportions: 1 2 hot milk 1 2 lungo
Recommended with Vivalto or Decaffeinato Lungo.
Prepare a lungo into a lungo cup and add sugar if desired. Pour it into a large glass together with four to five crushed ice cubes. Prepare cold milk froth using the Aeroccino. Carefully add three to four tablespoons of frothed milk to the top of the glass. Sprinkle with cin- namon, nutmeg or cocoa if desired. Proportions: 1 2 cold milk froth 1 2 lungo
Recommended with Vivalto or Decaffeinato Lungo.
Fill a tall glass with hot milk froth. Prepare an espresso and pour it slowly down the inside of the glass to produce a graduation of coffee colour through the milk and a three-layer effect (hot milk at the base, coffee, topped with milk froth). Proportions: 2 3 hot milk froth 1 3 espresso
Recommended with Ristretto, Arpeggio or Decaffeinato Intenso.
en
WArrAnTY
Nespresso warrants this product against defects in materials and workmanship for a period of one year from the date of purchase. During this period, Nespresso will either repair or replace, at its discretion, any defective product at no charge to the owner. Replacement products or repaired parts will be guaranteed for only the unexpired portion of the original warranty or six months, whichever is greater.
This limited warranty does not apply to any defect resulting from accident, misuse, improper mainte- nance, or normal wear and tear.
Except to the extent allowed by applicable law, the terms of this limited warranty do not exclude, restrict or modify, and are in addition to, the man- datory statutory rights applicable to the sale of the product to you.
If you believe your product is defective, contact Nespresso for instructions on where to send or take it for repair.
Please visit our website www.nespresso.com to discover more about Nespresso.
Aeroccino does not start
Make sure that the main ON-OFF switch is ON (specific to Aeroccino 3)
Make sure to correctly position the jug on the base Make sure to correctly attach the whisk to the jug
Quality of milk froth not up to standard
Make sure to use whole or semi-skimmed milk at refrigerator temperature (about 6-8 C / 42 46 F )
Make sure to use the appropriate whisk Make sure the jug is clean
Red Button blinking The appliance is too hot. Rinse it with cool water
Milk Overflow Make sure to use the correct whisk and check the
corresponding indicator level
TroUbLeShooTinG
conSIGneS De ScUrIT Les instructions font partie de lappareil. Lisez ce mode demploi dans son intgralit afin dassurer une utilisation correcte de lappareil. conservez-le dans un endroit sr et remettez-le au nouveau propritaire, si ncessaire.
vitez les risques de choc lectrique et de feu
Connectez lappareil uniquement une prise femelle de courant alternatif dote dun contact de mise la terre. Le voltage de la prise lectrique doit tre le mme que celui indiqu sur la plaque du fabriquant. Ne laissez pas le cble proximit de bords tranchants, bloquez-le ou laissez-le pendre librement. loignez le cble de toute source de chaleur ou dhumidit. Si le cble dalimentation ou la fiche sont endommags, nutilisez pas lappareil. Afin dviter tout danger, faites-les obligatoirement remplacer par un centre de service agr. Dconnectez la prise de lalimentation quand lappareil nest pas utilis pendant une longue priode. Dconnectez-la en tirant la prise, et non en tirant le cble, pour viter que ce der- nier ne soit endommag. Ne jamais plonger la base lectrique dans leau. Lorsque mise en contact avec de leau, llectri- cit peut provoquer un risque dlectrocution.
Ne mettez jamais lappareil dans le lave-vais- selle. Si vous avez besoin dune rallonge, il convient dutiliser uniquement un cble dot dun contact de mise la terre dont la section doit tre dau moins 1,5 mm.
vitez les dangers inhrents lutilisation de lappareil
Lappareil est conu pour la prparation de boissons conformment au prsent mode demploi. Cet appareil est conu pour une utilisation lectromnagre ou similaire, no- tamment : cuisine du personnel dans le com- merce, les bureaux et autres lieux de travail, fermes, usage par la clientle dans les htels, motels et tout autre type de rsidence. Aucune responsabilit ne sera accepte en cas de dommage rsultant dune utilisation inapproprie, dun fonctionnement incorrect ou de rparations non profes- sionnelles. Les prestations de garantie sont galement exclues dans de tels cas.
Ne jamais laisser lappareil sans surveillance pendant quil fonctionne et mettez-le hors de la porte des enfants. Utilisez lappareil uniquement pour sa fonction prvue. La machine nest pas destine tre utilise par des personnes (y compris les enfants) ayant des capacits physiques, sensorielles ou mentales rduites ou qui manquent dex- prience et de connaissances, moins quel- les oprent sous la supervision dune tierce personne ou quelles aient reu des instruc- tions sur lutilisation de la machine par une personne responsable de leur scurit. Les enfants devraient tre encadrs de manire ce quils ne jouent pas avec la machine. Ne pas utiliser lappareil sil est endom- mag. Un appareil endommag peut causer des dcharges lectriques, des brlures et dclencher un incendie. Afin dviter tout danger, ne jamais placer lappareil sur ou ct de surfaces chaudes, comme les radiateurs ou les plaques de cuisson. utiliser uniquement avec la base prvue cet effet. Cet appareil est destin prparer des boissons base de lait, selon les instructions.
Fr
Aucune responsabilit ne sera accepte en cas de dommage rsultant dune utili- sation inapproprie, dun fonctionnement incorrect ou de rparations non profes- sionnelles. Les prestations de garantie sont galement exclues dans de tels cas.
Protection de lenvironnement
Le matriel demballage et lappareil contien- nent des matriaux recyclables.
recyclage
Votre appareil contient de nombreux mat- riaux valorisables ou recyclables. En triant les dchets en diffrentes catgories dordu- res, vous facilitez le recyclage des matires premires. Renseignez-vous auprs de vos autorits locales afin dobtenir des informa- tions sur le recyclage.
conServez ceS InSTrUcTIonS
Aeroccino + Aeroccino 3
Rangement du batteur Interrupteur principal Voyant lumineuxBase lectrique
Pot lait Bouton
Enlever lauto- collant avant la premire utilisation
Couvercle
pour la mousse de laitpour le lait chaud
niveau maximum indiqu :
batteur pour le lait chaud
batteur pour la mousse de lait chaude et froide
2 batteurs
coMPoSAnTS
PrPArATion conseil : utilisez du lait entier ou demi-crm, froid et ouvert depuis peu.
1La douille situe en dessous du pot lait doit tre sche avant utilisation. 2Placez le pot lait sur la base lectrique. Lorsque vous utilisez lAeroccino 3, allumez la base lectrique laide de linterrupteur principal. Le voyant lumineux devient vert. LAeroccino 3 est alors prt lemploi. 3Lintrieur du pot lait doit tre nettoy avec une ponge pour surfaces non adhsives.
niveau maximum du pot lait pour : Mousse de lait 2 tasses Cappuccino
Nespresso 1 verre recettes
Nespresso Lait chaud 1 verre recettes
Nespresso
Dure Mousse de lait chaude environ 70 secondes Mousse de lait froide environ 60 secondes Lait chaud environ 130 secondes
oU Fr
4 insrez le batteur
5 versez la quantit de lait dsire, jusqu lune des indications de niveau max . Puis, placez le pot lait sur la base lectrique.
6 Pressez le bouton pour dmarrer. LAeroccino sarrte automatiquement.
Pressez le bouton brivement pour obtenir une prparation chaude.
Pressez le bouton environ 2 secondes pour obtenir une prparation froide.
conSeILSPrPArATion
neTToyAGe APrS chAqUe UTiLiSATion
1 enlevez lappareil de la base et dtachez le batteur (aucun outil ncessaire). note: Lorsque vous avez fini dutiliser lAeroccino 3, teignez-le depuis la base lectrique laide de linterrupteur principal.
2 rincez (utilisez uniquement un chiffon doux ou un produit net- toyant non corrosif).
3 Le pot lait ne doit pas tre lav au lave-vais- selle.
4 fixez un des batteurs lintrieur du pot lait, et afin dviter de lga- rer, fixez le second dans le couvercle (ou dans le rangement prvu cet effet).
ProPoSiTion De receTTeS
cappucino caff Latte Latte Macchiato cappucino Glac
Prparez un Lungo dans une tasse Lungo et ajoutez du sucre volont, ainsi que 4 5 cuillres soupe de glace pile. Versez dans un grand verre recettes (350 ml). Prparez de la mousse de lait froide avec votre Aeroccino et dposez dlicatement 3 ou 4 cuillres soupe de mousse de lait par-dessus. Saupoudrez le tout de cannelle, de muscade ou de copeaux de chocolat et dgustez. Proportions : 1 2 de mousse de lait froide 1 2 de lungo
Conseill avec un Vivalto ou un Decaffeinato Lungo.
Remplissez un grand verre recettes (350 ml) avec de la mousse de lait chaude. Prparez un espresso et versez-le lentement dans le verre, pour crer un dgrad de la couleur du caf dans le lait (lait chaud en bas, caf, mousse de lait au-dessus). Sucrez volont. Proportions : 2 3 de mousse de lait 1 3 despresso
Conseill avec un Ris- tretto, un Arpeggio ou un Decaffeinato Intenso.
Prparez un caf dans un verre recettes (350 ml) et versez du lait chaud par-dessus. Sucrez volont. Proportions : 1 2 de lait chaud 1 2 de lungo
Conseill avec un Vivalto ou un Decaf feinato Lungo.
Prparez un espresso dans une tasse Cappuccino et ajoutez la mousse de lait. Sucrez volont et saupou- drez de poudre de cacao. Proportions : 2 3 de mousse de lait 1 3 despresso
Conseill avec un Ristretto, un Arpeggio ou un Decaffeinato Intenso.
GArAnTIe
Nespresso garantit ce produit contre les dfauts de pices et de fabrication pour une dure de un an compter de la date dachat. Au cours de cette priode, Nespresso remplacera ou rparera tout produit dfectueux sans frais pour le propri- taire. Les produits changs et les pices rpares seront garantis uniquement pendant la dure restante de la garantie ou durant 6 mois, selon lchance la plus lointaine.
La garantie ne sapplique pas toute dfaillance rsultant dun accident, dune utilisation incor- recte, dun entretien inadapt ou de lusure.
Les conditions de la prsente garantie sajoutent aux droits statutaires obligatoires applicables la vente du produit et ne les excluent, ni ne les restreignent ou modifient en rien, sauf dans les limites autorises par la loi.
Si vous pensez que votre produit est dfectueux, contactez Nespresso pour savoir o envoyer ou apporter votre appareil pour rparation.
Veuillez consulter notre site Internet www.nespresso.com pour de plus amples informations sur Nespresso.
Fr
LAeroccino ne dmarre pas
Assurez-vous que linterrupteur principal Marche-Arrt est bien sur la position Marche
Assurez-vous que le pot lait est correctement positionn sur sa base lectrique
Assurez-vous que le batteur est correctement positionn sur le pot lait
Mauvaise qualit de la mousse de lait
Assurez-vous dutiliser du lait entier ou demi-crm tem- prature du rfrigrateur (environ 6 8 C / 42 46 F )
Assurez-vous dutiliser le batteur appropri pour la prparation de la recette souhaite
Assurez-vous que le pot lait est propre Le bouton rouge clignote Lappareil est trop chaud. Rincez-le sous leau froide
Le lait dborde Assurez-vous dutiliser le batteur appropri et la quantit cor-
respondante de lait
DPAnnAGe
InSTrUccIoneS De SeGUrIDAD Las instrucciones son parte del aparato. Lea la totalidad de las instrucciones y sgalas para evitar posibles daos y perjuicios. Guarde las instrucciones y entrguelas a eventuales usuarios futuros.
evitar el riesgo de descargas elctricas y fuego
Enchufar la base adecuadamente en una conexin de toma de tierra principal. Asegrese de que la tensin de la fuente de alimentacin es la misma que la especifi- cada en la placa de potencia de servicio. No fuerce el cable sobre bordes afilados, no lo engrape ni permita que cuelgue. Mantenga el cable alejado de fuentes de calor y humedad. Si el cable de alimentacin est daado, debe ser substituido por el fabricante, su agente de servicio o personas de calificacin similar. Desconecte la base de la red elctrica cuando no vaya a utilizarla en un periodo largo. Desconctela sacando el enchufe y no tirando del cable, este podra ser daado. Nunca sumerja la base en agua. Electricidad y agua juntas supone un riesgo para su vida. La jarra no es resistente al lavaplatos. Si es necesario un extensin elctrica, utilice
nicamente un cable con toma de tierra con un hilo conductor de mnimo 1,5 mm2.
evite posibles daos durante el funcionamiento del aparato
Este aparato ha sido diseado para pre- parar bebidas segn estas instrucciones y debe usarse en el ambiente domstico o en entornos similares, como cocinas de tiendas, oficinas o cualquier otro entorno de trabajo; granjas; por los clientes de hoteles, moteles u otros entornos residenciales. El fabricante no asume ninguna responsabilidad en caso de daos producidos por el uso inadecuado del aparato o para una finalidad distinta de aqulla para la que ha sido diseado o por reparaciones efectuadas por personas no profesionales. La garanta tampoco ser vlida en estos casos. Nunca deje el aparato sin vigilar durante su funcionamiento. Mantngalo fuera del alcance de los nios. Su uso es solo para personas que tienen experiencia y
conocimiento suficiente y son fsicamente, sensorial y mentalmente capaces de operar la mquina de manera segura acorde con estas instrucciones. La mquina no est concebida para que la usen personas (incluidos los nios) con capacidades fsicas, sensoriales o mentales reducidas o que no tengan experiencia y conocimientos, a menos que lo hagan bajo el control de una tercera persona o que hayan recibido instrucciones sobre su uso por parte de una persona responsable de su seguridad. Debera prohibirse que los nios jugaran con la mquina. No utilice el aparato si este est daado. Un aparato daado puede causar descarga elctrica, quemaduras y fuego. Para evitar daos nunca coloque el aparato sobre superficies calientes o al lado de las mismas, por ejemplo, radiadores, hornillos, quemadores de gas o similares. Nunca ponga el aparato en el lavaplatos. Utilizar solo el aparato con la base incluida en la caja. El aparato est dirigido para preparar bebidas segn estas instrucciones. Es para
uso privado. Los servicios de garanta estn excluidos de daos que resulten del empleo del aparato para otros objetivos, operaciones defectuosas o reparaciones no profesionales.
Proteccin medioambiental
Los materiales de embalaje y los aparatos elctricos contienen elementos reciclables.
reciclaje
Sus aparatos elctricos contienen elementos que se pueden recuperar o reciclar. La clasi- ficacin de los materiales de desecho en di- ferentes tipos facilita el reciclaje de materias primas valiosas. Para saber cmo deshacerse de sus aparatos usados, solicite informacin a las autoridades locales.
eS
conServe eSTAS InSTrUccIoneS
Aeroccino + Aeroccino 3
Base
Jarra
Botn
Sacar pegatinas antes del
primer uso.
Tapa
nivel mximo:
para espuma de lechepara leche caliente
batidor para leche caliente (para leche caliente)
Batidor para espuma de leche (para espuma de leche caliente y fra)
2 batidores
Espacio para almacenar batidores Interruptor principal Indicador luminoso
coMPonenTeS
PrePArAcIn consejo: Utilice leche fra y recin abierta, entera o semidesnatada
1La parte de debajo de la jarra debe estar seca antes de la utilizacin del aparato. 2Conecte la base al enchufe antes de usar el aparato. Si utiliza el Aeroccino 3, ENCIENDA la base con el interruptor principal. El indicador LED se pondr verde y el Aeroccino 3 estar listo para su uso. 3El lado interior de la jarra debe limpiarse con un pao apto para superficies antiadherentes.
capacidad mxima de la jarra: Espuma de leche 2 tazas Cappuccino Nes-
presso 1 vaso de recetas Nespresso
Leche caliente 1 vaso de recetas Nespresso
Duracin Espuma de leche caliente 70 segundos
aproximadamente Espuma de leche fra 60 segundos
aproximadamente Leche caliente 130 segundos
aproximadamente
PrePArAcIn conSeJo
6 Pulsar el botn. El aeroccino se detiene automticamente. Para recetas calien- tes apriete el botn brevemente.
Para recetas con leche fra mantenga apretado el botn durante 2 segundos aproximadamente.
5 verter la cantidad de leche deseada hasta uno de los dos indicadores mximos. Seguidamente coloque la jarra de leche en la base.
4 insertar el batidor.
LiMPiAr DeSPUS De cADA USo
1 Separar la jarra de la base y desmontar el batidor (no se necesitan herramientas). Nota: Cuando termine de utili- zar el Aeroccino 3, AP- GUELO en la base con el interruptor principal.
2 quite el sello de la tapa para limpiar ambas partes. Aclare y limpie con un pao hmedo.
3 La jarra es resistente al agua pero NO al lavapla- tos.
4 fije uno de los batido- res a la parte interior de la base de la jarra y, para evitar que se pier- da, fije el otro a la tapa (o en el compartimento para el batidor si utiliza el Aeroccino 3).
eS
IDeAS De receTAS
cappuccino caffe Latte Latte Macchiato cappuccino helado
Prepare un lungo en una taza lungo, aadir azcar y de 4 a 5 cucharadas soperas de hielo triturado. Prepare la espuma de leche con su Aeroccino y agregar delicadamente 3 o 4 cucharadas soperas de espuma de leche por encima. Espolvorear con canela, nuez moscada o chocolate si lo desea. Proporciones: 1 2 de leche fresca con su espuma 1 2 de lungo
Recomendado con un Vivalto o Decaffeinato Lungo.
Llene un vaso largo con leche caliente con su espuma y verter delicada- mente el espresso contra las paredes del vaso. Ponga azcar al gusto. Proporciones: 2 3 de leche caliente con su espuma 1 3 de espresso
Recomendado con un Ristretto, Arpeggio o Decaffeinato Intenso.
Prepare un lungo en un vaso largo y verter leche caliente por encima. Ponga azcar al gusto. Proporciones: 1 2 de leche caliente 1 2 lungo
Recomendado con un Viv- alto o Decaffeinato Lungo.
Prepare un espresso en una taza de Cappuccino y vierta la leche caliente con su espuma. Ponga azcar y espolvoree con cacao si lo desea. Proporciones: 2 3 de leche caliente con su espuma 1 3 de espresso
Recomendado con un Ristretto, Arpeggio o Decaffeinato Intenso.
GArAnTA
La garanta Nespresso para este producto cubre los defectos en el material y en la mano de obra durante un periodo de un ao a partir de la fecha de compra. Durante este periodo, Nespresso repa- rar o sustituir, a su eleccin, cualquier producto defectuoso sin cargo alguno para el propietario. Los productos sustituidos o las partes reparadas tendrn una garanta equivalente nicamente al periodo de garanta no expirado o de seis meses, con aplicacin del ms largo.
Esta garanta no cubre los daos ocasionados por accidente, utilizacin inadecuada, mantenimiento indebido o desgaste normal.
En cuanto la ley aplicable lo permita, los trminos de esta garanta no excluyen, restringen o modi- fican los derechos legales obligatorios aplicables en la venta del producto al consumidor, y son complementarios a stos.
Si cree que su producto es defectuoso, contacte con Nespresso para que le indiquen cmo puede enviarlo o dnde puede llevarlo para que sea reparado.
Por favor, visite nuestra pgina web www.nespresso.com para descubrir ms sobre Nespresso.
eS
El Aeroccino no se pone en marcha
Asegrese de que el interruptor principal de encendido est conectado (especfico para Aeroccino 3)
Asegrese de colocar correctamente la jarra sobre la base Asegrese de ajustar correctamente el batidor en la jarra
La calidad de la espuma de leche no es buena
Asegrese de utilizar leche entera o semidesnatada a la tem- peratura del frigorfico (entre 6-8 C)
Asegrese de utilizar el batidor correcto para la preparacin de leche deseada
Asegrese de que la jarra est limpia El botn rojo parpadea El aparato est demasiado caliente. Enjuguelo con agua fra
Se sale la leche Asegrese de utilizar el batidor correcto y la cantidad de leche
que corresponda
reSoLUcin De ProbLeMAS
InSTrUeS De SeGUrAnA
As instrues fazem parte do aparelho. Leia e siga todas as instrues para evitar possveis danos e prejuzos. Guarde estas instrues e transmita-as para qualquer usurio Subsequente.
evite riscos de incndio e choques el- tricos fatais
Conecte a base apenas a tomadas eltri- cas adequadas e devidamente aterradas. Certifique-se de que a voltagem da fonte de energia seja igual especificada no aparelho. No passe o cabo sobre objetos afiados, no prenda-o com grampos nem deixe-o pendurado. Mantenha o cabo longe do calor e da umidade. Se o cabo de alimentao for danificado, ele dever ser substitudo pelo fabricante, por um agente de servios ou por profissio- nais qualificados semelhantes. Desconecte a base da tomada se ela no for utilizada por perodos longos. Desco- necte o cabo puxando-o pelo plugue e no pelo prprio cabo, para que ele no seja danificado. Nunca mergulhe a base na gua. Juntas, a eletricidade e a gua podem representar um risco de choque eltrico fatal.
O bule no pode ser lavado em mquinas de lavar louas. Se for necessria uma extenso, use apenas cabos aterrados cujo condutor tenha pelo menos 1,5 mm2/0,06 pol2.
evite possveis danos ao utilizar o aparelho
O aparelho foi projetado para preparar bebidas de acordo com estas instrues. Este aparelho destina-se ao uso em insta- laes domsticas e similares, como: copas de funcionrios em lojas, escritrios e outros ambientes de trabalho, sedes de fazendas, por clientes em hotis e outros ambientes de natureza residencial e ambientes de hos- pedagem breve. Nenhuma responsabilidade ser aceita em caso de danos resultantes do uso para outras finalidades, do uso do aparelho danificado ou de reparos feitos por amadores. Os servios previstos na garantia tambm so excludos nesses casos.
Nunca deixe o aparelho em funcionamento sem superviso. Mantenha-o fora do alcance de crianas. O aparelho deve ser usado ape- nas por pessoas que tenham experincia e conhecimento suficientes e que sejam fsica, sensorial e mentalmente capazes de utilizar a mquina com segurana, de acordo com estas instrues. O aparelho no se destina ao uso por pessoas (ou crianas) com capacidades fsicas, sensoriais ou mentais reduzidas, ou sem experincia e conhecimento, a menos que estejam sob superviso ou tenham sido instrudas sobre o uso do aparelho por uma pessoa responsvel por sua segurana. As crianas devem estar sob superviso para garantir que no utilizem o aparelho como um brinquedo. No use o aparelho se ele estiver danifi- cado. Um aparelho danificado pode causar choques eltricos, queimaduras e incndios. Para evitar, nunca coloque o aparelho sobre ou prximo a superfcies quentes, por exem- plo, radiadores, fogareiros, queimadores a gs ou itens similares. Nunca lave o aparelho em uma mquina de lavar louas.
Use o aparelho apenas com a base fornecida. O aparelho foi projetado para preparar bebidas de acordo com estas instrues. Ele destina-se a uso domstico. Nenhuma res- ponsabilidade ser aceita em caso de danos resultantes do uso para outras finalidades, do uso do aparelho danificado ou de reparos feitos por amadores. Os servios previstos na garantia tambm so excludos nesses casos.
Proteo ambiental
As embalagens e o aparelho contm mate- riais reciclveis.
Descarte
Seu aparelho contm materiais valiosos que podem ser recuperados ou reciclveis. A separao de ma-
teriais residuais em diferentes tipos facilita a reciclagem de matrias-primas valiosas. Voc pode obter mais informaes sobre descarte com a autoridade local responsvel.
Br
GUArDe eSTAS InSTrUeS
Tampa
Remova o adesivo antes do primeiro
uso
Boto Bule
Base
Armazenamento dos batedores Interruptor principal Indicao por LED
Aeroccino + Aeroccino 3
para espuma de leitepara leite quente
nvel mximo indicado
batedor para leite quente (para leite quente)
espumador de leite (para espuma de leite quente e fria)
2 batedores
PeAS
PrePAro Dica: use leite gelado integral ou semidesnatado.
1A parte de baixo do bule deve estar seca antes do uso no dispositivo. 2Conecte a base tomada antes do uso. Pressione o interruptor principal, localizado na base da unidade para ligar o Aeroccino3. O LED fica verde, e o Aeroccino3 est pronto para uso. 3O lado interno do bule deve ser limpo com um pano adequado para superfcies no aderentes
nvel mximo do bule para: Espuma de leite 2 xcaras Cappuccino Nespresso 1 Copo para receitas Nespresso Leite quente 1 Copo para receitas
Nespresso
Tempos de preparo Espuma de leite quente Aproximadamente
70 segundos Espuma de leite frio Aproximadamente
60 segundos Leite quente Aproximadamente
130 segundos
oU
DicAS SUGeSTo
4 conecte o bate- dor apropriado
5 Despeje a quantidade de leite desejada at atingir um dos dois indicadores de nvel mximo. Em seguida, coloque o bule de leite na base.
6 Pressione o boto para iniciar. O Aeroccino pra automaticamente.
Para o preparo de bebidas quentes, pressione o boto rapidamente.
Para o preparo de espuma de leite fria, mantenha o boto pressionado por aproximadamente 2 segundos.
LiMPeZA
1 remova da base e retire o batedor (nenhuma ferramenta necessria). Observao: quando tiver terminado de usar o Aeroccino3, DESLIGUE-O na base com o interrup- tor principal.
2 remova a ve- dao da tampa para limpar as duas peas. Enxgue e limpe com um pano mido.
3 O bule prova dgua, mas NO pode ser lavado em mquinas de lavar louas.
4 Prenda um dos bate- dores na base interna do bule e, para evitar perda, prenda o outro na tampa (ou no local de armazenamento dos batedores ao usar o Aeroccino3).
Br
SUGeSTeS De receiTAS
cappuccino caff Latte Latte Macchiato cappuccino gelado
Prepare um lungo em uma xcara Lungo e adicione acar, se desejar. Despeje- o em um copo grande, jun- tamente com quatro a cinco cubos de gelo triturados Prepare espuma de leite fria usando o Aeroccino. Adicione cuidadosamente de trs a quatro colheres de sopa de espuma de leite por cima. Salpique canela em p, noz-moscada ou cacau, se desejar. Propores: 1 2 parte de espuma de leite fria. 1 2 parte de Lungo.
Recomendado com Vivalto ou Decaffeinato Lungo.
Encha um copo alto com espuma de leite quente. Prepare um espresso e despeje-o lentamente no copo para obter uma camada de caf por cima do leite e um efeito de trs camadas (leite quente na base, caf na camada intermediria e uma cobertura de espuma de leite). Propores: 2 3 de espuma de leite quente 1 3 espresso
Recomendado com Ristretto, Arpeggio ou Decaffeinato Intenso.
Prepare um lungo em um copo alto e adicione leite quente. Adicione acar, se desejar. Propores: 1 2 parte de espuma de leite quente. 1 2 parte de espresso
Recomendado para Vivalto ou Decaffeinato Lungo.
Prepare um espresso em uma xcara Cappuccino e adicione espuma de leite quente. Adicione acar e polvilhe cacau se desejar. Propores: 2 3 de espuma de leite quente. 1 3 de espresso
Recomendado para Ristretto, Arpeggio ou Decaffeinato Intenso.
GArAnTiA LiMiTADA
A Nespresso garante este produto contra defei- tos de materiais e fabricao por um perodo de um ano a partir da data da compra. Durante esse perodo, a Nespresso far o reparo ou a substi- tuio, de acordo com seus critrios, de qualquer produto com defeito sem nenhum custo para o proprietrio. Os produtos de reposio ou as peas consertadas tero garantia apenas durante o perodo restante da garantia original ou por seis meses, o que for maior.
A garantia limitada no se aplica a nenhum defeito resultante de acidentes, uso incorreto, manuteno indevida ou do desgaste causado pelo uso normal.
Com exceo do que for permitido pelas leis aplicveis, os termos desta garantia limitada no excluem, restringem ou alteram os direitos estatu- trios obrigatrios aplicveis venda do produto a voc, mas so um adendo a eles.
Caso acredite que seu produto esteja com defeito, entre em contato com a Nespresso para obter instrues sobre reparo.
Visite nosso site, www.nespresso.com, para saber mais sobre a Nespresso.
Br
O Aeroccino no liga
Verifique se o interruptor principal (ON-OFF) est na posio ON (especfico ao Aeroccino 3)
Posicione corretamente o bule sobre sua base limpa Conecte corretamente o batedor ao bule
A qualidade da espuma de leite no est altura do padro esperado
Certifique-se de usar leite UHT temperatura do refrigerador (cerca de 6 a 8 C) e dentro do prazo de validade.
Certifique-se de usar o batedor apropriado Verifique se o bule est limpo
O boto vermelho est piscando O a
Manualsnet FAQs
If you want to find out how the Aeroccino 3 Nespresso works, you can view and download the Nespresso Aeroccino 3 Aeroccino + 3192 3194 Manual on the Manualsnet website.
Yes, we have the Instruction Manual for Nespresso Aeroccino 3 as well as other Nespresso manuals. All you need to do is to use our search bar and find the user manual that you are looking for.
The Instruction Manual should include all the details that are needed to use a Nespresso Aeroccino 3. Full manuals and user guide PDFs can be downloaded from Manualsnet.com.
The best way to navigate the Nespresso Aeroccino 3 Aeroccino + 3192 3194 Manual is by checking the Table of Contents at the top of the page where available. This allows you to navigate a manual by jumping to the section you are looking for.
This Nespresso Aeroccino 3 Aeroccino + 3192 3194 Manual consists of sections like Table of Contents, to name a few. For easier navigation, use the Table of Contents in the upper left corner.
You can download Nespresso Aeroccino 3 Aeroccino + 3192 3194 Manual free of charge simply by clicking the “download” button in the upper right corner of any manuals page. This feature allows you to download any manual in a couple of seconds and is generally in PDF format. You can also save a manual for later by adding it to your saved documents in the user profile.
To be able to print Nespresso Aeroccino 3 Aeroccino + 3192 3194 Manual, simply download the document to your computer. Once downloaded, open the PDF file and print the Nespresso Aeroccino 3 Aeroccino + 3192 3194 Manual as you would any other document. This can usually be achieved by clicking on “File” and then “Print” from the menu bar.
Хорошее руководство по эксплуатации
Законодательство обязывает продавца передать покупателю, вместе с товаром, руководство по эксплуатации Nespresso Aeroccino 3. Отсутствие инструкции либо неправильная информация, переданная потребителю, составляют основание для рекламации в связи с несоответствием устройства с договором. В законодательстве допускается предоставлении руководства в другой, чем бумажная форме, что, в последнее время, часто используется, предоставляя графическую или электронную форму инструкции Nespresso Aeroccino 3 или обучающее видео для пользователей. Условием остается четкая и понятная форма.
Что такое руководство?
Слово происходит от латинского «instructio», тоесть привести в порядок. Следовательно в инструкции Nespresso Aeroccino 3 можно найти описание этапов поведения. Цель инструкции заключается в облегчении запуска, использования оборудования либо выполнения определенной деятельности. Инструкция является набором информации о предмете/услуге, подсказкой.
К сожалению немного пользователей находит время для чтения инструкций Nespresso Aeroccino 3, и хорошая инструкция позволяет не только узнать ряд дополнительных функций приобретенного устройства, но и позволяет избежать возникновения большинства поломок.
Из чего должно состоять идеальное руководство по эксплуатации?
Прежде всего в инструкции Nespresso Aeroccino 3 должна находится:
— информация относительно технических данных устройства Nespresso Aeroccino 3
— название производителя и год производства оборудования Nespresso Aeroccino 3
— правила обслуживания, настройки и ухода за оборудованием Nespresso Aeroccino 3
— знаки безопасности и сертификаты, подтверждающие соответствие стандартам
Почему мы не читаем инструкций?
Как правило из-за нехватки времени и уверенности в отдельных функциональностях приобретенных устройств. К сожалению само подсоединение и запуск Nespresso Aeroccino 3 это слишком мало. Инструкция заключает ряд отдельных указаний, касающихся функциональности, принципов безопасности, способов ухода (даже то, какие средства стоит использовать), возможных поломок Nespresso Aeroccino 3 и способов решения проблем, возникающих во время использования. И наконец то, в инструкции можно найти адресные данные сайта Nespresso, в случае отсутствия эффективности предлагаемых решений. Сейчас очень большой популярностью пользуются инструкции в форме интересных анимаций или видео материалов, которое лучше, чем брошюра воспринимаются пользователем. Такой вид инструкции позволяет пользователю просмотреть весь фильм, не пропуская спецификацию и сложные технические описания Nespresso Aeroccino 3, как это часто бывает в случае бумажной версии.
Почему стоит читать инструкции?
Прежде всего здесь мы найдем ответы касательно конструкции, возможностей устройства Nespresso Aeroccino 3, использования отдельных аксессуаров и ряд информации, позволяющей вполне использовать все функции и упрощения.
После удачной покупки оборудования/устройства стоит посвятить несколько минут для ознакомления с каждой частью инструкции Nespresso Aeroccino 3. Сейчас их старательно готовят или переводят, чтобы они были не только понятными для пользователя, но и чтобы выполняли свою основную информационно-поддерживающую функцию.
Содержание руководства
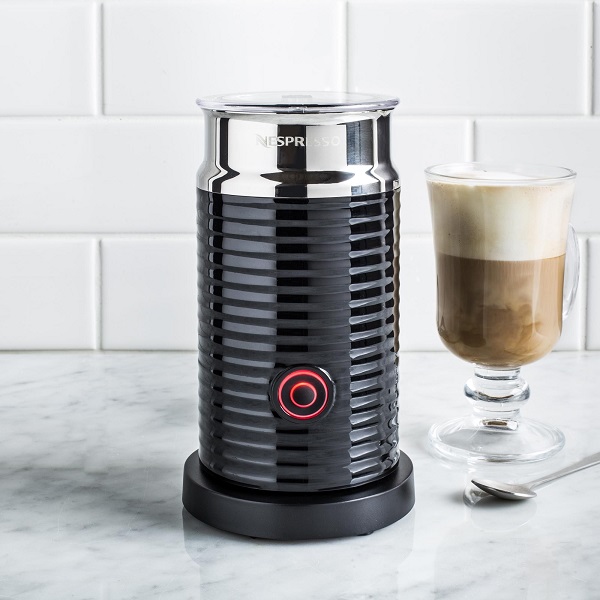
Приготовление кофе с пышной молочной пеной в домашних условиях связано с определенными сложностями. Даже если в кофемашине есть специальный паровой кран, научиться правильно обходиться с питчером порой бывает непросто. Неспрессо Аэрочино – автоматический капучинатор, способный избавить владельца от лишних хлопот и взбить молочную пену идеальной консистенции, которая подойдет для приготовления капучино и латте, а также послужит дополнением к другим напиткам.
История появления
До появления капучинаторов бариста приходилось взбивать молоко в питчере вручную. Для этого использовали обычный венчик. Первую кофемашину со стимером – паровым краном для приготовления пенки – выпустила компания Acorto в 1989 году, а уже пять лет спустя устройство появилось на всех моделях автоматов для приготовления эспрессо.
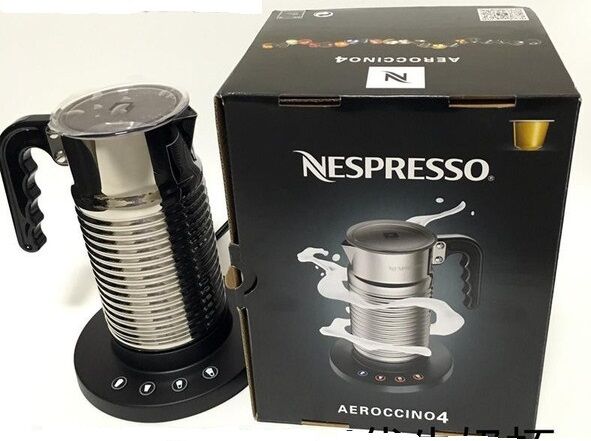
Капучинатор Nespresso Aeroccino выпущен в 2005 году. Первые модели по форме напоминали небольшой кувшин, а их функции ограничивались вспениванием молока. Сейчас появилось уже четвертое поколение аппаратов с расширенными возможностями. Приборы получили современную цилиндрическую форму, а «умный» капучинатор Barista способен подключаться к приложению, задающему программы онлайн.
Внешний вид и комплектация
Внешне Nespresso Aeroccino представляет собой цилиндр с рифленой отделкой из пластика. Верхняя часть выполнена из нержавеющей стали. Устройство закрепляется на подставке, от которой отходит шнур питания. Кнопка включения расположена в нижней части корпуса. Внутри капучинатора находится стакан для молока с антипригарным покрытием. На стенках отмечены границы для разных режимов работы.
В комплекте с прибором идет насадка с венчиком, который держится на магните. Вспенивание происходит в двух режимах – холодном и горячем, поэтому с помощью капучинатора можно готовить не только латте и капучино, но и милкшейки. На нижней панели предусмотрено закрытое отделение для хранения насадки.
Как работает капучинатор Аэрочино
Капучинатор Аэрочино 3 снабжен электромотором, который вращает насадку внутри емкости. В ее нижней части закреплена пружина, способствующая насыщению жидкости пузырьками воздуха. Стойкую пену дает предварительно охлажденное пастеризованное молоко с жирностью до 3,5%. Прибор работает в двух режимах – подогрева и взбивания. Нужное количество продукта поможет определить отметка на внутренней поверхности.
Инструкция к Аэрочино:
- Включить прибор с помощью клавиши.
- Налить молоко до нужной отметки.
- Убедиться, что внешняя сторона емкости сухая.
- Установить рабочую часть на подставку.
- Нажать на кнопку старта.
- Дождаться автоматической остановки прибора.
На взбивание молочной пены, достаточной для двух порций капучино, уходит 70 секунд. Такое же время понадобится, чтобы сделать горячий коктейль. Приготовление холодной пенки занимает одну минуту. Чтобы молоко не подогревалось, кнопку старта нужно удерживать в нажатом состоянии примерно 2 секунды.
Пользуясь подогревом, можно в течение двух минут получить горячий напиток. Это экономит время в тех случаях, когда нужно взять кофе с собой в дорогу или разогреть небольшое количество молока. Чтобы воспользоваться этим режимом, нужно просто снять пружину с насадки.
Продвинутая модель Aeroccino 4 отличается от своего предшественника большим объемом и внутренним покрытием из керамики. Панель управления снабжена подсветкой, в устройстве предусмотрена возможность автоматического отключения. Кувшин можно мыть в посудомоечной машине.
Какие напитки можно сделать в Аэрочино
Наличие капучинатора значительно упрощает приготовление напитков, которые по большей части можно попробовать только в барах и ресторанах. Пена получается пышная, стойкая, с гладкой структурой и отлично выдерживает топпинги – какао, корицу или тертый шоколад. С Неспрессо Аэрочино можно попрактиковаться в латте-арт – украшении кофе при помощи молочной пенки.
Виды напитков со взбитым молоком:
- капучино;
- латте;
- макиато;
- раф-кофе;
- мокко;
- марочино;
- Ice Latte.
Молочные коктейли готовят прямо в капучинаторе. В напиток можно добавить растворимый кофе, сиропы, какао или ваниль. С твердыми ингредиентами пружина не справится – в этом случае лучше использовать обычный блендер.
Недостатки Nespresso Aeroccino
Один из основных недостатков прибора – маленький объем. Приготовить напитки на одну семью достаточно легко, а вот одновременно подать кофе большой компании гостей будет затруднительно.
Кроме того, капучинаторы третьего поколения нельзя мыть в посудомойке и в проточной воде, хотя производитель и обещает определенную водонепроницаемость прибора. Последние модели уже допускают такую возможность, но цена на них пока далека от бюджетной.
Аэрочино подойдет тем, у кого есть дома эспрессо-машина без стимера, а также желающим поэкспериментировать с разными вкусами бодрящего напитка.
Уход за прибором
Очищайте Nespresso Aeroccino после каждого использования. Предварительно выключите прибор с помощью клавиши. Отсоедините пружину, снимите с крышки прокладку и промойте эти части водой без применения моющих средств. Протрите внутреннюю поверхность мягкой губкой, а затем высушите салфеткой. Насадку поместите внутрь емкости, венчик разместите в специальном отсеке на подставке. Избегайте попадания воды внутрь прибора.

Instructions • Instructions • Instrucciones • Instruções
AEROCCINO + AEROCCINO 3
AEROCCINO + AEROCCINO 3
Input power AEROCCINO +
USA/ CA: 120V, 60Hz, 550W
BR/ MX: 127V, 60Hz, 620W
AR: 220V, 50Hz, 500W
BR/ CL: 220V-240V, 50-60Hz, 500-600W
Model no. AEROCCINO +
3192
Input power AEROCCINO 3
USA/ CA: 120V, 60Hz, 450W
BR/ MX: 127V, 60Hz, 505W
AR: 220V, 50Hz, 410W
BR/ CL: 220V-240V, 50/60Hz, 410-490W
Model no. AEROCCINO 3
3194
Read the safety instructions before operating the appliance
EN
Lisez ces instructions de sécurité avant de faire fonctionner l’appareil
Lea atentamente las instrucciones de seguridad antes de utilizar este artefacto
Leia as instruções de segurança antes de utilizar o aparelho
FR
ES
BR
IMPORTANT SAFEGUARDS
The instructions are part of the appliance.
Read and follow all instructions to avoid possible harm and
damage. Save these instructions
and pass them on to any subsequent owner.
Avoid risk of fatal electric
shock and fire
•Only plug the base into suitable, earthed
mains connection. Make sure that the
voltage of the power source is the same as
that specied on the rating plate.
•Do not pull the cable over sharp edges,
clamp it or allow it to hang down. Keep the
cable away from heat and damp.
•If the supply cord is damaged, it must be
replaced by the manufacturer, its service
agent or similarly qualied persons.
•Disconnect the base from the mains when
not in use for long periods. Disconnect by
pulling out the plug and not by pulling the
cable itself, as this may damage the cable.
•Never immerse the base in water. Electricity
and water together pose a risk to life from
electric shock.
•Jug is not dishwasher safe.
•If an extension lead is required, use only an
earthed cable with a conductor cross-section
of at least 1.5mm
2
/0.06in2.
Avoid possible harm when
operating the appliance
•The appliance is intended to prepare beverages according to these instructions. This
appliance is intended to be used in household and similar applications such as: staff
kitchen areas in shops, ofces and other
working environments; farm houses; by
clients in hotels, motels and other residential
type environments; bed and breakfast type
environments. No liability is accepted for any
damage resulting from use for other purposes, faulty operation or amateur repairs.
Guarantee services are also excluded in such
cases.
•Never leave the appliance unattended
during operation. Keep it out of the reach
of children. The appliance is only for use by
persons who have sufcient experience and
knowledge and are physically, sensory, and
mentally able to operate the machine safely
in accordance with these instructions.
•The appliance is not intended for use by
persons (including children) with reduced
physical, sensory or mental capabilities, or
lack of experience and knowledge, unless
they have been given supervision or instruction concerning use of the appliance by a
person responsible for their safety. Children
should be supervised to ensure that they do
not play with the appliance.
•Do not use the appliance if damaged. A
damaged appliance can cause electric shock,
burns and re.
•To avoid hazard, never place the appliance
on or beside hot surfaces, for example,
radiators, cooking rings, gas burners or
similar items.
•Never clean the appliance in a dishwasher.
•Only use the appliance with the base
provided.
•The appliance is intended to prepare drinks
according to these instructions. It is for use
in private households. No liability is accepted
for any damage resulting from use for
other purposes, faulty operation or amateur
repairs. Guarantee services are also excluded
in such cases.
EN
Environmental protection
Packaging materials and appliance contain
recyclable materials.
Disposal
Your appliance contains valuable materials
which can be recovered or which can be
recyclable. Separation of the remaining waste
materials into different types facilitates the
recycling of valuable raw materials. You can
obtain information on disposal from your
local authority.
SAVE THESE INSTRUCTIONS
PARTS
2 whisks
Milk frothing
whisk
(for hot and cold
milk froth)
Hot milk
whisk
(for hot milk)
AEROCCINO +
Maximum level indicated:
for hot milk
lid
remove
sticker
before rst
use
Button
Jug
Base
AEROCCINO 3
for milk froth
PREPARATION
Tip: Use cold, fresh, full-fat or semi-skimmed milk.
1Underside of the jug must be dry before using the device.
2Plug base into the socket before use. Press main switch located on the base of the
unit to turn on the Aeroccino 3. LED turns green and Aeroccino 3 is ready to use.
3Inside of the jug must be cleaned with a cloth suitable for non-stick surfaces.
Whisk storage
Main switch
LED indication
Jug’s maximum level for:
Milk froth 2 Nespresso Cappuccino cups
1 Nespresso Recipe glass
Hot milk 1 Nespresso Recipe glass
Preparation Times
Hot milk froth Approximately 70 seconds
Cold milk froth Approximately 60 seconds
Hot milk Approximately 130 seconds
PREPARATION
OR
TIPS
EN
4 Attach relevant
whisk.
5 Pour desired amount
of milk up to one of
the two “max” level
indicators.
Then place milk jug on
to the base.
CLEANING AFTER EVERY USE
1 Remove from the base
and take out whisk (no
tools needed). Note: when
you have nished using the
Aeroccino 3, switch OFF
at the base with the main
switch.
2 Remove
the seal from the
lid to clean both
parts. Rinse and
clean with
a damp cloth.
6 Press button to start. Aeroccino
stops automatically.
For hot preparations, briey
press button.
For cold milk froth, keep button
pressed for approximately 2 seconds.
3 Jug is
waterproof,
but NOT
dishwasher safe.
4 Clip one of the whisks
on to the inner base
of the jug and to avoid
loss, clip the other on
to the lid (or in whisk
storage when using the
Aeroccino 3).
RECIPE IDEAS
Cappuccino
Prepare an espresso in a
Cappuccino cup and add
hot milk froth.
Add sugar and sprinkle
with cocoa if desired.
Proportions:
2
∕3 hot milk froth
1
∕3 espresso
•Recommended with
Ristretto, Arpeggio or
Decaffeinato Intenso.
Caffé Latte
Prepare a lungo in a tall
glass and add hot milk.
Add sugar if desired.
Proportions:
1
∕2 hot milk
1
∕2 lungo
•Recommended with
Vivalto or Decaffeinato
Lungo.
Fill a tall glass with hot
milk froth. Prepare an
espresso and pour it
slowly down the inside
of the glass to produce
a graduation of coffee
colour through the milk
and a three-layer effect
(hot milk at the base,
coffee, topped with milk
froth).
Proportions:
2
∕3 hot milk froth
1
∕3 espresso
•Recommended with
Ristretto, Arpeggio or
Decaffeinato Intenso.
Iced CappuccinoLatte Macchiato
Prepare a lungo into a
lungo cup and add sugar
if desired. Pour it into a
large glass together with
four to ve crushed ice
cubes. Prepare cold milk
froth using the Aeroccino.
Carefully add three to four
tablespoons of frothed
milk to the top of the
glass. Sprinkle with cinnamon, nutmeg or cocoa
if desired.
Proportions:
1
∕2 cold milk froth
1
∕2 lungo
•Recommended with
Vivalto or Decaffeinato
Lungo.
WARRANTY
Nespresso warrants this product against defects
in materials and workmanship for a period of
one year from the date of purchase. During this
period, Nespresso will either repair or replace, at
its discretion, any defective product at no charge
to the owner. Replacement products or repaired
parts will be guaranteed for only the unexpired
portion of the original warranty or six months,
whichever is greater.
This limited warranty does not apply to any defect
resulting from accident, misuse, improper maintenance, or normal wear and tear.
TROUBLESHOOTING
➔ Make sure that the main ON-OFF switch is ON (specic to
Aeroccino does not start
Quality of milk froth not up to
standard
Red Button blinking
Milk Overow
Aeroccino 3)
➔ Make sure to correctly position the jug on the base
➔ Make sure to correctly attach the whisk to the jug
➔ Make sure to use whole or semi-skimmed milk at refrigerator
temperature (about 6- 8 °C / 42 – 46 °F )
➔ Make sure to use the appropriate whisk
➔ Make sure the jug is clean
➔ The appliance is too hot. Rinse it with cool water
➔ Make sure to use the correct whisk and check the
corresponding indicator level
Except to the extent allowed by applicable law,
the terms of this limited warranty do not exclude,
restrict or modify, and are in addition to, the mandatory statutory rights applicable to the sale of the
product to you.
If you believe your product is defective, contact
Nespresso for instructions on where to send
or take it for repair.
Please visit our website
www.nespresso.com to discover more about
Nespresso.
EN
 Loading…