
Описание мини-АТС Panasonic KX-TA616
Узнать цену KX-TA616
Оптимальное решение Ваших потребностей в телефонной связи
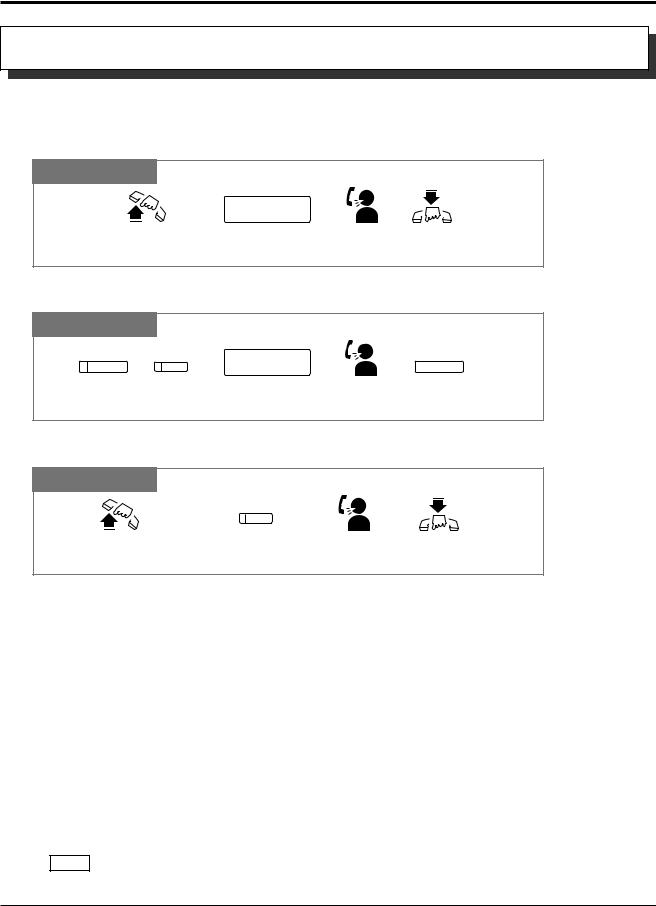
 Телефон является для Вас самым главным средством связи — это контакты с партнерами по бизнесу, заказчиками, друзьями и даже членами Вашей семьи — как в офисе, так и за его пределами. Усовершенствованные гибридные системы КХ-ТА308 и КХ-ТА616 в полной мере отвечают Вашим потребностям в связи и по деловым, и по личным вопросам. КХ-ТА308 поддерживает 3 внешние (СО) линии и 8 добавочных номеров. Если Ваши потребности возрастут, то с помощью приобретаемых дополнительно плат можно без особого труда увеличить емкость системы до 6 внешних (СО) линий и до 24 добавочных номеров*. Обе системы имеют характеристики, способные удовлетворить самого взыскательного потребителя. К ним можно подсоединить целый ряд коммуникационных устройств, таких как беспроводные телефоны, автоответчики, компьютерные модемы, устройство для контроля кредитных карт, факсы и любое иное устройство, которое работает с обычными телефонными линиями. Гибридные системы Panasonic КХ-ТА308 и КХ-ТА616 идеально подходят для малого бизнеса и домашнего офиса, нуждающегося в гибкой системе с широким выбором технических возможностей.
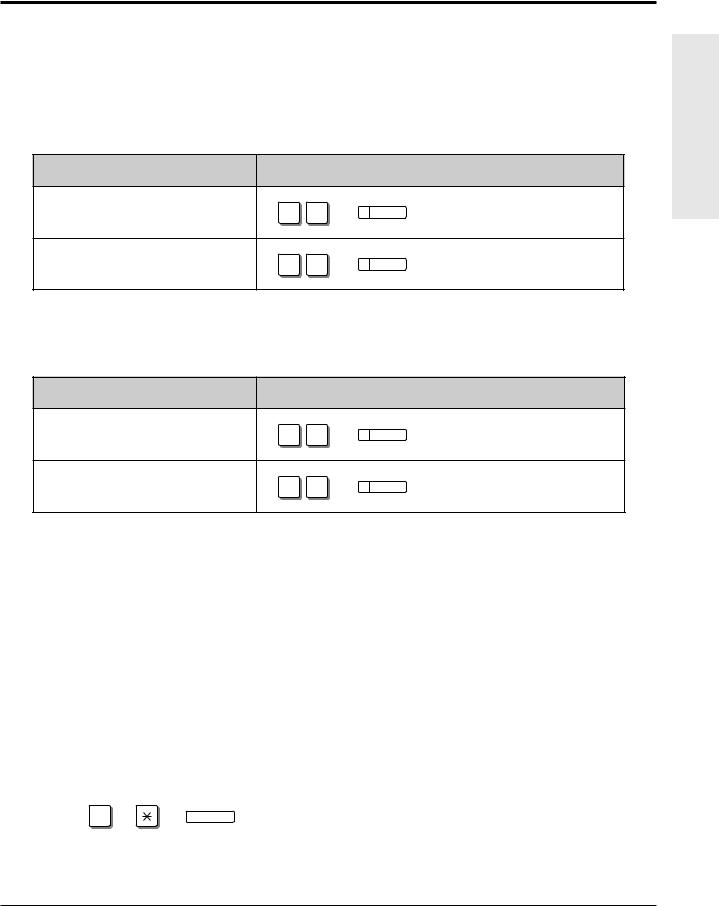
Аналоговые системные телефоны для мини-АТС KX-TA308
Краткое описание телефонов
| Системный телефон | КХ-Т7330 | КХ-Т7320 | КХ-Т7350 | КХ-Т7130 | КХ-Т7030 | КХ-Т7020 | КХ-Т7050 |
| Функциональные кнопки | 12 | 12 | 12 | 12 | 12 | 12 | 12 |
| Программируемые кнопки функций | 12 | 4 | 4 | 4 | |||
| Лампа ожидания ответного звонка | Есть | Есть | Есть | Есть | Есть | Есть | Есть |
| Алфавитно-цифровой ЖК-дисплей | 1х16 | 1х16 | 1х16 | ||||
| Спикерфон | Есть | Есть | Монитор | Есть | Есть | Есть | Монитор |
| Совместимость с наушниками | Есть | Есть | Есть |
Характеристики мини-АТС Panasonic KX-TA616
Перечень функций мини-АТС KX-TA308 / более подробное описание функций
|
|
*Сервис детектирования обратной полярности зависит от услуг, предоставляемых телефонной компанией в Вашей стране.
Конфигурация
| МОДЕЛЬ | База | Опция (КХ-ТА30877) 3 внешних линии / 8 добавочных номеров. Плата для аналогового системного или однолинейного телефонов | Опция (КХ-ТА30874) 8 добавочных номеров. Плата для однолинейного телефона | |
| КХ-ТА308 | Внешние линии | 3 — | —> 6 | |
| Добавочные номера | 8 — | —> 16 — | —> 24 | |
| KX-TA616 | Внешние линии | 6 | ||
| Добавочные номера | 16 — | —> 24 |
Емкость системы (макс.)
| ПУНКТ | КХ-ТА308 | КХ-ТА616 |
| Оператор | 1 | 1 |
| Система ускоренного набора | 100 | 100 |
| Перснальный укоренный набор | 10 / добавочный номер | 10 / добавочный номер |
| Однокнопочный набор | Макс. 12 / добавочный номер | Макс. 12 / добавочный номер |
| Группы добавочных номеров | 8 | 8 |
| Группа равномерного распределения звонков {UCD) | 1 | 1 |
| Уровни ограничения платных звонков | 5 | 5 |
| Подтверждение расчетных кодов | 24 | 24 |
| Перевод удерживаемого звонка в системный буфер | 10 | 10 |
| Сообщение об отсутствии | 6 | 6 |
| Ожидание ответного звонка | 6 / добавочный номер | 8 / добавочныи номер |
| Код срочного вызова | 5 | 5 |
| Внешний источник музыки | 1 | 1 |
| Внешний пейджер | 1 | 1 |
| Домофоны | 4 | 4 |
| Устройства открывания двери | 4 | 4 |
| Консоли DSS | 2 | 2 |
| OGM ^исходящее сообщение) | 2 по 30 сек | 2 по 30 сек |
Технические характеристики
| ПУНКТ | КХ-ТА308 | КХ-ТА616 |
| Максимальная Емкость | 6 внешних линии 24 добавочных номера (16: аналого-цифровых телефонов, 8: однолинейных телефонов) | 6 внешних линий 24 добавочных номера (16: аналого-цифровых телефонов, 8: однолинейных телефонов) |
| Каналы интеркома | 4 | 4 |
| Принцип набора | Внешний номер. Тональный / Импульсный набор (10п/сек, 20п/сек) Внутренний номер: Тональный / Импульсный набор (10п/сек, 20п/сек) | |
| Преобразование набора | От тонального к импульсному или от импульсного к тональному | |
| Подсоединения | Внешняя линия: Модульное гнездо (2-жильное). Интерком: Модульное гнездо (4-жильное). Пейджинг: Гнездо проводки. Внешний источник музыки: Гнездо проводки. Подробное протоколирование трафика станции: RS-232C I/F порт (9-игольный D-SUB») | |
| Подробное протоколирование трафика станции | Подробное протоколирование: дата, время, добавочный номер, внешняя линия номера, набор, продолжительность звонка, расчетный код | |
| Обратное детектирование’ | Есть | Есть |
| Порт голосовой почты | 2 порта (тональный набор) | 4 порта (тональный набор) |
| Ресивер DTMF | 2 | 4 |
| Генератор DTMF | 1 | 1 |
| Внешняя линия — Канал внешних линий | 2 | 2 |
| Переадресация при сбое питания | 1 | 2 |
| Прямое подключение к внутренней батарее | Есть | Есть |
| Источник питания | AC 115-24 | В. 50/60 Гц |
| Размеры | 284мм*368мм*95мм | 284мм*368мм*95мм |
| Масса | 2,5кг | 2.9кг |
Опции
| Опция | Описание | КХ-ТА308 | КХ-ТА616 |
| КХ-ТА30877 Плата на 3 внешних линии/ 8 добавочных номеров | 3 внешних линии 8 добавочных номеров (аналоговый системный или однолинейный телефоны) | Макс. 1 | / |
| КХ-ТА30874 Плата на 8 однолинейных телефонов | 8 добавочных номеров (однолинейный телефон) | Макс. 1 | Макс. 1 |
| КХ.ТА30860 Интерфейсная плата домофона/ Устройства открывания двери | 4домофона/1 плата’ 4 устройства открывания двери/ 1 плата | Макс. 1 | Макс. 1 |
| КХ-ТА30891 Исходящее сообщение/ Плата детектирования факса | Исходящее сообщение: 30 секх2 Тональный детектор факса | Макс. 1 | Макс. 1 |
| КХ-Т30865 | Домофон | Макс. 4 | Макс. 4 |
| КХ-Т7090 | Переносная трубка | ||
| КХ-А227 | Резервный кабель для батареи |
*Домофон #1 и Домофон #2 не могут использоваться одновременно, Домофон #3 и Домофон #4 не могут использоваться одновременно.
PT: Системный телефон
APT: Аналоговый системный телефон
SLT: Однолинейный телефон
Интерфейс
- RS-232C
- Интерфейс батареи
- Домофон /Устройство открывания двери
- Внешний источник музыки
- Внешний пейджер
Документация. Инструкции по установке, программированию и эксплуатации KX-TA308
Инструкция по установке и программированию офисной мини-АТС Panasonic KX-TA308.
Конструкция базовой системы. Установка. Описание функций. Системное программирование. Поиск и устранение неисправностей. (русск.)
Размер zip-файла 2457 КБ, формат PDF.
Руководство по эксплуатации офисной мини-АТС Panasonic KX-TA308.
Эксплуатация. Приложение: список тонов/звонков, светодиодной индикации, номеров функций и возможных неполадок. (русск.)
Размер файла 1029 КБ, формат PDF.
Инструкции по эксплуатации мини-АТС Panasonic, Siemens, LG, Samsung, Karel
Обсуждение вопросов (F.A.Q.) по установке, программированию и обслуживанию офисных и мини-АТС на нашем форуме.
- Manuals
- Brands
- Panasonic Manuals
- Telephone
- KX-TA616
Manuals and User Guides for Panasonic KX-TA616. We have 6 Panasonic KX-TA616 manuals available for free PDF download: Manual De Instalación, Installation Manual, Operating Instructions Manual, Instrucciones De Funcionamiento
Описание мини-АТС Panasonic KX-TA616
Узнать цену KX-TA616
Оптимальное решение Ваших потребностей в телефонной связи
Телефон является для Вас самым главным средством связи — это контакты с партнерами по бизнесу, заказчиками, друзьями и даже членами Вашей семьи — как в офисе, так и за его пределами. Усовершенствованные гибридные системы КХ-ТА308 и КХ-ТА616 в полной мере отвечают Вашим потребностям в связи и по деловым, и по личным вопросам. КХ-ТА308 поддерживает 3 внешние (СО) линии и 8 добавочных номеров. Если Ваши потребности возрастут, то с помощью приобретаемых дополнительно плат можно без особого труда увеличить емкость системы до 6 внешних (СО) линий и до 24 добавочных номеров*. Обе системы имеют характеристики, способные удовлетворить самого взыскательного потребителя. К ним можно подсоединить целый ряд коммуникационных устройств, таких как беспроводные телефоны, автоответчики, компьютерные модемы, устройство для контроля кредитных карт, факсы и любое иное устройство, которое работает с обычными телефонными линиями. Гибридные системы Panasonic КХ-ТА308 и КХ-ТА616 идеально подходят для малого бизнеса и домашнего офиса, нуждающегося в гибкой системе с широким выбором технических возможностей.
Аналоговые системные телефоны для мини-АТС KX-TA308
Краткое описание телефонов
| Системный телефон | КХ-Т7330 | КХ-Т7320 | КХ-Т7350 | КХ-Т7130 | КХ-Т7030 | КХ-Т7020 | КХ-Т7050 |
| Функциональные кнопки | 12 | 12 | 12 | 12 | 12 | 12 | 12 |
| Программируемые кнопки функций | 12 | 4 | 4 | 4 | |||
| Лампа ожидания ответного звонка | Есть | Есть | Есть | Есть | Есть | Есть | Есть |
| Алфавитно-цифровой ЖК-дисплей | 1х16 | 1х16 | 1х16 | ||||
| Спикерфон | Есть | Есть | Монитор | Есть | Есть | Есть | Монитор |
| Совместимость с наушниками | Есть | Есть | Есть |
Характеристики мини-АТС Panasonic KX-TA616
Перечень функций мини-АТС KX-TA308 / более подробное описание функций
|
|
*Сервис детектирования обратной полярности зависит от услуг, предоставляемых телефонной компанией в Вашей стране.
Конфигурация
| МОДЕЛЬ | База | Опция (КХ-ТА30877) 3 внешних линии / 8 добавочных номеров. Плата для аналогового системного или однолинейного телефонов | Опция (КХ-ТА30874) 8 добавочных номеров. Плата для однолинейного телефона | |
| КХ-ТА308 | Внешние линии | 3 — | —> 6 | |
| Добавочные номера | 8 — | —> 16 — | —> 24 | |
| KX-TA616 | Внешние линии | 6 | ||
| Добавочные номера | 16 — | —> 24 |
Емкость системы (макс.)
| ПУНКТ | КХ-ТА308 | КХ-ТА616 |
| Оператор | 1 | 1 |
| Система ускоренного набора | 100 | 100 |
| Перснальный укоренный набор | 10 / добавочный номер | 10 / добавочный номер |
| Однокнопочный набор | Макс. 12 / добавочный номер | Макс. 12 / добавочный номер |
| Группы добавочных номеров | 8 | 8 |
| Группа равномерного распределения звонков {UCD) | 1 | 1 |
| Уровни ограничения платных звонков | 5 | 5 |
| Подтверждение расчетных кодов | 24 | 24 |
| Перевод удерживаемого звонка в системный буфер | 10 | 10 |
| Сообщение об отсутствии | 6 | 6 |
| Ожидание ответного звонка | 6 / добавочный номер | 8 / добавочныи номер |
| Код срочного вызова | 5 | 5 |
| Внешний источник музыки | 1 | 1 |
| Внешний пейджер | 1 | 1 |
| Домофоны | 4 | 4 |
| Устройства открывания двери | 4 | 4 |
| Консоли DSS | 2 | 2 |
| OGM ^исходящее сообщение) | 2 по 30 сек | 2 по 30 сек |
Технические характеристики
| ПУНКТ | КХ-ТА308 | КХ-ТА616 |
| Максимальная Емкость | 6 внешних линии 24 добавочных номера (16: аналого-цифровых телефонов, 8: однолинейных телефонов) | 6 внешних линий 24 добавочных номера (16: аналого-цифровых телефонов, 8: однолинейных телефонов) |
| Каналы интеркома | 4 | 4 |
| Принцип набора | Внешний номер. Тональный / Импульсный набор (10п/сек, 20п/сек) Внутренний номер: Тональный / Импульсный набор (10п/сек, 20п/сек) | |
| Преобразование набора | От тонального к импульсному или от импульсного к тональному | |
| Подсоединения | Внешняя линия: Модульное гнездо (2-жильное). Интерком: Модульное гнездо (4-жильное). Пейджинг: Гнездо проводки. Внешний источник музыки: Гнездо проводки. Подробное протоколирование трафика станции: RS-232C I/F порт (9-игольный D-SUB») | |
| Подробное протоколирование трафика станции | Подробное протоколирование: дата, время, добавочный номер, внешняя линия номера, набор, продолжительность звонка, расчетный код | |
| Обратное детектирование’ | Есть | Есть |
| Порт голосовой почты | 2 порта (тональный набор) | 4 порта (тональный набор) |
| Ресивер DTMF | 2 | 4 |
| Генератор DTMF | 1 | 1 |
| Внешняя линия — Канал внешних линий | 2 | 2 |
| Переадресация при сбое питания | 1 | 2 |
| Прямое подключение к внутренней батарее | Есть | Есть |
| Источник питания | AC 115-24 | В. 50/60 Гц |
| Размеры | 284мм*368мм*95мм | 284мм*368мм*95мм |
| Масса | 2,5кг | 2.9кг |
Опции
| Опция | Описание | КХ-ТА308 | КХ-ТА616 |
| КХ-ТА30877 Плата на 3 внешних линии/ 8 добавочных номеров | 3 внешних линии 8 добавочных номеров (аналоговый системный или однолинейный телефоны) | Макс. 1 | / |
| КХ-ТА30874 Плата на 8 однолинейных телефонов | 8 добавочных номеров (однолинейный телефон) | Макс. 1 | Макс. 1 |
| КХ.ТА30860 Интерфейсная плата домофона/ Устройства открывания двери | 4домофона/1 плата’ 4 устройства открывания двери/ 1 плата | Макс. 1 | Макс. 1 |
| КХ-ТА30891 Исходящее сообщение/ Плата детектирования факса | Исходящее сообщение: 30 секх2 Тональный детектор факса | Макс. 1 | Макс. 1 |
| КХ-Т30865 | Домофон | Макс. 4 | Макс. 4 |
| КХ-Т7090 | Переносная трубка | ||
| КХ-А227 | Резервный кабель для батареи |
*Домофон #1 и Домофон #2 не могут использоваться одновременно, Домофон #3 и Домофон #4 не могут использоваться одновременно.
PT: Системный телефон
APT: Аналоговый системный телефон
SLT: Однолинейный телефон
Интерфейс
- RS-232C
- Интерфейс батареи
- Домофон /Устройство открывания двери
- Внешний источник музыки
- Внешний пейджер
Документация. Инструкции по установке, программированию и эксплуатации KX-TA308
Инструкция по установке и программированию офисной мини-АТС Panasonic KX-TA308.
Конструкция базовой системы. Установка. Описание функций. Системное программирование. Поиск и устранение неисправностей. (русск.)
Размер zip-файла 2457 КБ, формат PDF.
Руководство по эксплуатации офисной мини-АТС Panasonic KX-TA308.
Эксплуатация. Приложение: список тонов/звонков, светодиодной индикации, номеров функций и возможных неполадок. (русск.)
Размер файла 1029 КБ, формат PDF.
Инструкции по эксплуатации мини-АТС Panasonic, Siemens, LG, Samsung, Karel
Обсуждение вопросов (F.A.Q.) по установке, программированию и обслуживанию офисных и мини-АТС на нашем форуме.
Для программирования
мини-АТС KX-TA616
подходит целый ряд системных телефонных
аппаратов: Panasonic
KX-T7130,
KX-T7030,
KX-T7020,
KX-T7055,
KX-T7330,
KX-T7320,
KX-T7350
и некоторые другие модели. В данном
методическом пособие рассматривается
программирование с использованием
Panasonic
KX-T7030RU,
внешний вид данного телефонного аппарата
представлен на рисунке 3.1.
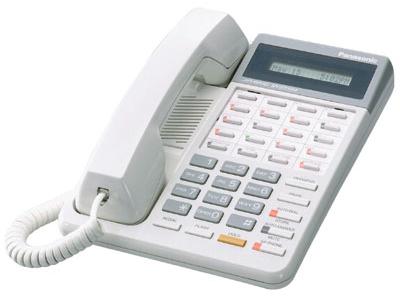
Рис 3.1 Внешний вид
системного телефонного аппарата
KX-T7030RU
Необходимо отметить,
что данный системный телефонный аппарат,
можно использовать как в качестве
программатора для мини-АТС, так и в
качестве обычного телефонного аппарата.
Основные
характеристики телефонного аппарата
KX-T7030RU
сведены в таблицу 1.
Таблица
3.1.
|
Тип |
Системный |
|
Тип |
Аналоговая |
|
Режим |
Тоновый/импульсный |
|
Кол-во |
1 |
|
Количество |
12 |
|
Корпус |
Настольный |
|
Дисплей |
Цифровой |
Для программирования
мини-АТС необходимо перевести системный
телефон в режим программирования, для
этого необходимо выполнить следующие
действия:
1.Подключить
системный аппарат к разъему JACK
01 Мини-АТС (программирование станции
через другие разъемы JACK
возможно, но не рекомендовано
производителем).
2.Перевести системный
аппарат в режим программирования. Для
этого следует перевести переключатель
«Memory»
на задней стороне системного аппарата
в положение «Programm».
Если все сделано правильно, то на экране
появится надпись «Pits
– pgm
No?»,
сообщающая о том, что вы перевели
системный телефон в режим программирования.
3.Последовательно
нажать клавиши «*» и «#». Если все сделано
правильно, то на экране системного
телефона появится приглашение ввода
пароля.
4.Введите пароль
администратора – по умолчанию это 1234
(При системном программирование этот
пароль можно будет изменить). Если все
сделано верно, то на экране появится
надпись «Sys
– Pgm
NO?»,
приглашающая ввести номер программы.
Процесс
программирования мин-АТС по средством
системного телефонного аппарата
заключается в вызове системных программа,
и последующей настройки их параметров.
Программы, управляющие работой мини-АТС
имеют номера в диапазоне 000 – 999. За
полной информацией о назначении всех
программ необходимо обратиться к
«Руководство по установке KX-TA308,KX-TA616»
Во
время работы в режиме программирования
клавиши системного телефона принимают
новые назначения, данные назначения
основных клавиш указаны в Таблице 3.2
Таблица 3.2.
|
Клавиша |
Назначение в |
|
SP-PHONE |
Предназначена |
|
AUTO |
Служит для |
|
AUTO |
Служит для |
|
TRANSFER |
Предназначена |
|
CONF и |
Служат для |
|
HOLD |
Служит для |
Для выхода из
режима программирования и перевода
системного аппарата в режим обычного
телефона необходимо перевести
переключатель «Memory»
на задней стороне системного аппарата
в положение «SET».
Устройство:
Panasonic KX-TA616
Размер: 0,79 MB
Добавлено: 2013-03-18 16:09:30
Количество страниц: 132
Печатать инструкцию
Скачать
Как пользоваться?
Наша цель — обеспечить Вам самый быстрый доступ к руководству по эксплуатации устройства Panasonic KX-TA616. Пользуясь просмотром онлайн Вы можете быстро просмотреть содержание и перейти на страницу, на которой найдете решение своей проблемы с Panasonic KX-TA616.
Для Вашего удобства
Если просмотр руководства Panasonic KX-TA616 непосредственно на этой странице для Вас неудобен, Вы можете воспользоваться двумя возможными решениями:
- Полноэкранный просмотр -, Чтобы удобно просматривать инструкцию (без скачивания на компьютер) Вы можете использовать режим полноэкранного просмотра. Чтобы запустить просмотр инструкции Panasonic KX-TA616 на полном экране, используйте кнопку Полный экран.
- Скачивание на компьютер — Вы можете также скачать инструкцию Panasonic KX-TA616 на свой компьютер и сохранить ее в своем архиве. Если ты все же не хотите занимать место на своем устройстве, Вы всегда можете скачать ее из ManualsBase.
Panasonic KX-TA616 Руководство по эксплуатации
Печатная версия
Многие предпочитают читать документы не на экране, а в печатной версии. Опция распечатки инструкции также предусмотрена и Вы можете воспользоваться ею нажав на ссылку, находящуюся выше — Печатать инструкцию. Вам не обязательно печатать всю инструкцию Panasonic KX-TA616 а только некоторые страницы. Берегите бумагу.
Резюме
Ниже Вы найдете заявки которые находятся на очередных страницах инструкции для Panasonic KX-TA616. Если Вы хотите быстро просмотреть содержимое страниц, которые находятся на очередных страницах инструкции, Вы воспользоваться ими.
4.1
To enter the programming mode
Press the PROGRAM
button.
• The system password can be changed by program [002] «System Password».
!
!
• During the programming mode, your extension is treated as a busy extension.
• If you enter the wrong system password, you will hear an alarm tone (3 beeps). Try
again.
Programming sequence
After entering the programming mode
Enter the Program Address. Enter the parameters.
After pressing the STORE button, you will hear one of the following tones.
Confirmation tone (1 beep):
Alarm tone (3 beeps):
To exit the programming mode
Press the PROGRAM
button.
SECRET
1
2
4
5
7
8
0
PREV
FLASH
KX-T7130
MEMORY
PROGRAM
or
Set to «PROGRAM» on
the back of the telephone.
X
X
X
(2 beeps):
PROGRAM
or
Set to «SET» on the back
of the telephone.
, –
CLEAR
3
PAUSE
6
STORE
9
AUTO
SELECT
END
NEXT
SET
PROGRAM
Press
parameters
STORE
Press the
STORE button.
This informs you that storing is completed. You can
continue programming by entering the same or another
program address
This informs you that the same parameter has already been
stored.
This informs you that the entry is invalid.
MEMORY
SET
PROGRAM
system password
#
#.
Enter the system password.
(default : 1234)
END
Press the END
button.
System Programming
4-3
Для программирования
мини-АТС KX-TA616
подходит целый ряд системных телефонных
аппаратов: Panasonic
KX-T7130,
KX-T7030,
KX-T7020,
KX-T7055,
KX-T7330,
KX-T7320,
KX-T7350
и некоторые другие модели. В данном
методическом пособие рассматривается
программирование с использованием
Panasonic
KX-T7030RU,
внешний вид данного телефонного аппарата
представлен на рисунке 3.1.
Рис 3.1 Внешний вид
системного телефонного аппарата
KX-T7030RU
Необходимо отметить,
что данный системный телефонный аппарат,
можно использовать как в качестве
программатора для мини-АТС, так и в
качестве обычного телефонного аппарата.
Основные
характеристики телефонного аппарата
KX-T7030RU
сведены в таблицу 1.
Таблица
3.1.
|
Тип |
Системный |
|
Тип |
Аналоговая |
|
Режим |
Тоновый/импульсный |
|
Кол-во |
1 |
|
Количество |
12 |
|
Корпус |
Настольный |
|
Дисплей |
Цифровой |
Для программирования
мини-АТС необходимо перевести системный
телефон в режим программирования, для
этого необходимо выполнить следующие
действия:
1.Подключить
системный аппарат к разъему JACK
01 Мини-АТС (программирование станции
через другие разъемы JACK
возможно, но не рекомендовано
производителем).
2.Перевести системный
аппарат в режим программирования. Для
этого следует перевести переключатель
«Memory»
на задней стороне системного аппарата
в положение «Programm».
Если все сделано правильно, то на экране
появится надпись «Pits
– pgm
No?»,
сообщающая о том, что вы перевели
системный телефон в режим программирования.
3.Последовательно
нажать клавиши «*» и «#». Если все сделано
правильно, то на экране системного
телефона появится приглашение ввода
пароля.
4.Введите пароль
администратора – по умолчанию это 1234
(При системном программирование этот
пароль можно будет изменить). Если все
сделано верно, то на экране появится
надпись «Sys
– Pgm
NO?»,
приглашающая ввести номер программы.
Процесс
программирования мин-АТС по средством
системного телефонного аппарата
заключается в вызове системных программа,
и последующей настройки их параметров.
Программы, управляющие работой мини-АТС
имеют номера в диапазоне 000 – 999. За
полной информацией о назначении всех
программ необходимо обратиться к
«Руководство по установке KX-TA308,KX-TA616»
Во
время работы в режиме программирования
клавиши системного телефона принимают
новые назначения, данные назначения
основных клавиш указаны в Таблице 3.2
Таблица 3.2.
|
Клавиша |
Назначение в |
|
SP-PHONE |
Предназначена |
|
AUTO |
Служит для |
|
AUTO |
Служит для |
|
TRANSFER |
Предназначена |
|
CONF и |
Служат для |
|
HOLD |
Служит для |
Для выхода из
режима программирования и перевода
системного аппарата в режим обычного
телефона необходимо перевести
переключатель «Memory»
на задней стороне системного аппарата
в положение «SET».
Руководства Panasonic KX-TA616RU Размер файлов: 1666 KB, Язык: English, Формат: pdf, Платформа: Windows/Linux, Дата: 2015-11-20
На данной странице вы можете скачать руководства Panasonic KX-TA616RU. Мы предлагаем вам ознакомиться с руководством пользователя, инструкцией по сервисному обслуживанию и ремонту.
Также здесь вы найдете список заказных номеров на комплектующие Panasonic KX-TA616RU.
Все файлы предоставляются исключительно в ознакомительных целях. И не являютя руководством по ремонту, а направлены лишь на то чтобы помочь вам более детально ознакомиться с принципом построения устройства.
Содержимое представленных здесь руководств требуют от вас знания технического английского языка.
Если вы собираетесь скачать руководство по сервисному обслуживанию Panasonic KX-TA616RU, иными словами сервис мануал, вы дожны обладать хотя бы минимальными познаниями в области электроники и пониманием базовых принципов работы электромеханических устройств.
Для просмотра руководств вам понадобится Adobe Acrobat Reader версии 9 и выше либо другая программа для просмотра pdf файлов.
В связи с популярностью информации представленной на сайте и ее бесплатного предоставления конечному пользователю, убедительная просьба использовать специальные программные продукты для многопотокового скачивания файлов.
Руководства для Panasonic KX-TA616RU
- Руководство пользователя (User manual)
- Руководство по сервисному обслуживанию (Service manual)
- Руководство по ремонту (Repair manual)
- Перечень комплектующих (PartList)

Advanced Hybrid System
Operating Instructions
KX-TA308
MODEL KX-TA616
This manual was printed with soy based ink.
Please read this manual before connecting the Advanced Hybrid System.

Thank you for purchasing a Panasonic Telephone System.
System Components
|
Model No. |
Description |
||
|
Service Unit |
KX-TA308 / |
Advanced Hybrid System |
|
|
KX-TA616 |
|||
|
KX-T7320 |
Proprietary Telephone (12 COs) |
||
|
KX-T7330 |
Proprietary Telephone with LCD (12 COs) |
||
|
KX-T7350 |
Proprietary Telephone (12 COs) |
||
|
KX-T7020 |
Proprietary Telephone (12 COs) |
||
|
Telephone |
KX-T7030 |
Proprietary Telephone with LCD (12 COs) |
|
|
KX-T7033 |
Proprietary Telephone with LCD (12 COs) and power failure |
||
|
switch |
|||
|
KX-T7050 |
Proprietary Telephone (12 COs) |
||
|
KX-T7055 |
Proprietary Telephone (3 COs) |
||
|
KX-T7130 |
Proprietary Telephone with LCD (12 COs) |
||
|
KX-T7340 |
DSS Console (32 DSSs and 16 Feature buttons) |
||
|
KX-T7040 |
DSS Console (32 DSSs and 16 Feature buttons) |
||
|
KX-TA30860 |
Doorphone/Door Opener Card |
||
|
KX-TA30874 |
Expansion Card (up to 8 extension lines for a single line telephone) |
||
|
Optional |
KX-TA30877 |
Expansion Card (up to 3 outside (CO) lines and 8 extension lines) |
|
|
Equipment |
KX-TA30891 |
OGM and FAX Detection Card |
|
|
KX-T30865 |
Doorphone |
||
|
KX-T7090 |
Headset |
||
|
KX-A227 |
Back-up Battery Cable |
||
NOTICE:
•A Proprietary Telephone is abbreviated as PT.
•A Single Line Telephone is abbreviated as SLT.
•This Operating Instructions does not show the complete model number that indicates the country where your models should be used. The model number of your unit is found on the label affixed to the unit.
MODEL NO. – – – – – – – –
(label)
2

Important Information
Satisfactory performance cannot be guaranteed for each combination of host and subsidiary equipment.
‘Prevention of access by user.’ This equipment is intended to be accessible only by authorized personnel. It must be installed in a locked room or similar environment, so that user access is prevented. Failure to prevent such user access will invalidate any approval given to this equipment.
3

Precautions
•Keep the unit away from heating and electrical noise generating devices such as fluorescent lamps, motors and televisions.
•This unit should be kept free of dust, moisture, high temperature (more than 40 ˚C {104 ˚F}) and vibration, and should not be exposed to direct sunlight.
•Never attempt to insert wires, pins, etc. into the vents or other holes of this unit.
•Do not use benzine, thinner, or the like, or any abrasive powder to clean the cabinet. Wipe it with a soft cloth.
WARNING
THIS UNIT MAY ONLY BE INSTALLED AND SERVED BY QUALIFIED SERVICE PERSONNEL.
WHEN A FAILURE OCCURS WHICH RESULTS IN THE INTERNAL PARTS BECOMING ACCESSIBLE, DISCONNECT THE POWER SUPPLY CORD IMMEDIATELY AND RETURN THIS UNIT TO YOUR DEALER.
DISCONNECT THE TELECOM CONNECTION BEFORE DISCONNECTING THE POWER CONNECTION PRIOR TO RELOCATING THE EQUIPMENT. THEN RECONNECT THE POWER FIRST.
THIS UNIT IS EQUIPPED WITH AN EARTHING CONTACT PLUG. FOR SAFETY REASONS, THIS PLUG MUST ONLY BE CONNECTED TO AN EARTHING CONTACT SOCKET WHICH HAS BEEN INSTALLED ACCORDING TO REGULATIONS.
THE POWER SUPPLY CORD IS USED AS THE MAIN DISCONNECT DEVICE, ENSURE THAT THE SOCKET-OUTLET IS LOCATED/INSTALLED NEAR THE EQUIPMENT AND IS EASILY ACCESSIBLE.
TO PREVENT FIRE OR SHOCK HAZARD, DO NOT EXPOSE THIS PRODUCT TO RAIN OR MOISTURE.
For your future reference
|
SERIAL NO. |
DATE OF PURCHASE |
(found on the bottom of the unit)
NAME OF DEALER
DEALER’S ADDRESS
4

Introduction
Structure of the Manual
This manual consists of the following sections.
Section 1. Operations
Describes the features and their operations. It also provides information about the programming required, conditions and connection references for each feature.
Section 2. Appendix
Provides the Tone/Ring Tone List, LED Indication, Feature Number List and the Telephone Troubleshooting.
Index
Description of the Symbols Mainly Used in this Manual
!
Additional information and conditions.
The feature or program references.
5

Contents
|
Section 1 |
Operations |
|
|
Basic Operations |
||
|
1.1 |
Before Operating ……………………………………………………………………….. |
1-2 |
|
1.2 |
Proprietary Telephone Settings ………………………………………………….. |
1-4 |
|
Customizing Your Telephone Functions ……………………………………… |
1-5 |
|
|
Customizing the Buttons on Your Telephone ………………………………. |
1-8 |
|
|
Display Contrast Adjustment ……………………………………………………….. |
1-14 |
|
|
When Using the Headset …………………………………………………………… |
1-14 |
|
|
Volume Control — Handset Receiver/Headset/Ringer/Speaker …….. |
1-15 |
|
|
1.3 |
Making Calls ……………………………………………………………………………… |
1-16 |
|
<Intercom Calling> |
||
|
Intercom Calling ………………………………………………………………………. |
1-16 |
|
|
Calling an Operator (Operator Call) ……………………………………………. |
1-17 |
|
|
<Outside Calling> |
||
|
Outside Calling ………………………………………………………………………… |
1-17 |
|
|
Flash ………………………………………………………………………………………. |
1-19 |
|
|
Handsfree Operation …………………………………………………………………. |
1-20 |
|
|
Making Emergency Calls (Emergency Call) ……………………………….. |
1-21 |
|
|
<Quick Dialing> |
||
|
Dialing by Simply Pressing a Button (One-Touch Dialing) …………… |
1-22 |
|
|
Dialing with System Speed Dialing (System Speed Dialing) …………. |
1-23 |
|
|
Dialing with Personal Speed Dialing (Personal Speed Dialing) ……… |
1-24 |
|
|
Dialing by Simply Going Off-Hook (Pickup Dialing) …………………… |
1-26 |
|
|
<Redialing> |
||
|
Redialing Automatically (Automatic Redial) ………………………………. |
1-27 |
|
|
Redialing the Last Number Dialed (Last Number Redial) …………….. |
1-27 |
|
|
Redialing the Saved Number (Saved Number Redial) ………………….. |
1-28 |
|
|
<When the Dialed Line is Busy> |
||
|
Sending a Call Waiting Tone to a Busy Extension |
||
|
(Busy Station Signaling – BSS) ……………………………………………… |
1-29 |
|
|
Making Your Telephone Ring Back Automatically When a Line |
||
|
Becomes Free (Automatic Callback Busy – Camp-On) …………….. |
1-30 |
|
|
Interrupting an Existing Call (Executive Busy Override) ………………. |
1-31 |
|
|
Denying “Interrupting an Existing Call” |
||
|
(Executive Busy Override Deny) ……………………………………………. |
1-33 |
|
|
1.4 |
Receiving Calls …………………………………………………………………………… |
1-34 |
|
Receiving Calls ………………………………………………………………………… |
1-34 |
|
|
Handsfree Answerback ……………………………………………………………… |
1-35 |
|
|
<Pick up a Call> |
||
|
Picking up a Call Ringing at Another Extension (Call Pickup) ……… |
1-36 |
6

Contents
|
1.5 During a Conversation ……………………………………………………………….. |
1-38 |
|
<Placing a Call on Hold> |
|
|
Placing a Call on Hold (Call Hold) …………………………………………….. |
1-38 |
|
Placing a Call on Hold Exclusively (Exclusive Hold) …………………… |
1-39 |
|
Retrieving a Call on Hold (Call Hold Retrieve) …………………………… |
1-40 |
|
Placing a Call in System Parking Area (Call Park) ………………………. |
1-41 |
|
<Transferring Calls> |
|
|
Transferring a Call to an Extension (Call Transfer – to Extension) … 1-42 |
|
|
Transferring a Call to an Outside (CO) Line |
|
|
(Call Transfer – to Outside (CO) Line) ……………………………………………. |
1-44 |
|
Call Waiting ……………………………………………………………………………. |
1-45 |
|
Call Splitting ……………………………………………………………………………. |
1-47 |
|
Paging …………………………………………………………………………………….. |
1-48 |
|
Turning off the Microphone (Microphone Mute) …………………………. |
1-51 |
|
1.6 Before Leaving Your Desk …………………………………………………………. |
1-52 |
|
Forwarding a Call (Call Forwarding) ………………………………………….. |
1-52 |
|
Locking Your Telephone (Electronic Station Lockout) …………………. |
1-57 |
|
Showing Your Message on the Calling Party’s Display |
|
|
(Absent Message Capability) …………………………………………………. |
1-58 |
Advanced Operations
|
1.7 Useful Features ………………………………………………………………………….. |
1-59 |
|
Conference (3-party) ………………………………………………………………… |
1-59 |
|
Conference, Unattended ……………………………………………………………. |
1-61 |
|
Conference (5-party) ………………………………………………………………… |
1-62 |
|
Leaving a Message Notification (Message Waiting) …………………….. |
1-65 |
|
Calling with Account Codes (Account Code Entry) ……………………… |
1-67 |
|
Rejecting Incoming Calls (Do Not Disturb — DND) ……………………. |
1-69 |
|
Calling an Extension which Denies Receiving Calls |
|
|
(Do Not Disturb Override) …………………………………………………….. |
1-70 |
|
Secret Dialing ………………………………………………………………………….. |
1-71 |
|
Alarm Setting (Timed Reminder) ………………………………………………. |
1-72 |
|
Time (Day/Night/Lunch) Service ……………………………………………….. |
1-74 |
|
Joining or Leaving a Call Distribution Group (Log-In/Log-Out) ……. |
1-75 |
|
Room Monitor …………………………………………………………………………. |
1-76 |
|
Data Line Security ……………………………………………………………………. |
1-77 |
|
Parallel Connection of a Proprietary Telephone and |
|
|
Single Line Telephone (Paralleled Telephone Connection) ……….. |
1-78 |
|
Mixed Station Dialing ………………………………………………………………. |
1-78 |
|
External Feature Access ……………………………………………………………. |
1-79 |
|
Self-Extension Number Confirmation |
|
|
(KX-T7330/KX-T7030/KX-T7130/KX-T7033 only) ………………… |
1-80 |
|
Turning on the Background Music (BGM) ………………………………….. |
1-80 |
Operations Basic
Operations Advanced
Manager / Operator Operations Console DSS /
Appendix
7

Contents
|
Extension Button Confirmation |
|
|
(KX-T7330/KX-T7030/KX-T7130/KX-T7033 only) ………………… |
1-81 |
|
Pulse to Tone Conversion …………………………………………………………. |
1-81 |
|
Canceling the Feature Settings (Station Feature Clear) …………………. |
1-82 |
|
Alternate Calling — Ring/Voice ………………………………………………… |
1-82 |
|
Doorphone Call ……………………………………………………………………….. |
1-83 |
|
Door Opener ……………………………………………………………………………. |
1-84 |
|
Voice Mail Integration for KX-TVP75/KX-TVP100 ……………………. |
1-85 |
|
Calling Using Your Privileges at Another Extension (Walking COS) … |
1-87 |
|
Ringing Pattern Selection ………………………………………………………….. |
1-88 |
|
Distinctive Dial Tones ………………………………………………………………. |
1-88 |
|
Power Failure Transfer ……………………………………………………………… |
1-89 |
|
Lockout …………………………………………………………………………………… |
1-89 |
Operator / Manager Operations
|
1.8 Operator / Manager Service Features …………………………………………. |
1-90 |
|
Date and Time Setting ………………………………………………………………. |
1-90 |
|
Electronic Station Lockout – CANCEL ALL ………………………………. |
1-91 |
|
Timed Reminder, Remote (Wake-Up Call) …………………………………. |
1-91 |
|
Outgoing Message (OGM) ………………………………………………………… |
1-93 |
|
Remote Station Lock ………………………………………………………………… |
1-94 |
|
Time (Day/Night/Lunch) Service Setting ……………………………………. |
1-95 |
|
Extension Password Set (Manager only) …………………………………….. |
1-97 |
DSS Console Operations
|
1.9 DSS Console Features ………………………………………………………………… |
1-98 |
|
Initial Settings ………………………………………………………………………….. |
1-98 |
|
Direct Station Dialing ……………………………………………………………….. |
1-101 |
|
One-Touch Dialing …………………………………………………………………… |
1-101 |
|
One-Touch Access for System Features ……………………………………… |
1-102 |
|
Call Transfer ……………………………………………………………………………. |
1-102 |
|
Section 2 |
Appendix |
|
|
2.1 |
Tone / Ring Tone List ………………………………………………………………… |
2-2 |
|
2.2 |
LED Indication ………………………………………………………………………….. |
2-3 |
|
2.3 |
Feature Number List ………………………………………………………………….. |
2-4 |
|
2.4 |
Display Example ………………………………………………………………………… |
2-7 |
|
2.5 |
Troubleshooting …………………………………………………………………………. |
2-11 |
Index
8
|
Basic Operations |
Advanced Operations |
Operator / Manager |
|||
|
/ DSS Console Operations |
|||||
|
Section 1 |
Operations |

1.1Before Operating
What kind of telephone do you use?
In this manual, you will find how to operate the feature depending on the telephone you use. If you use single line devices such as a single line telephone or data terminal, you will follow the steps which enter a feature number. If you use single line devices which do not have a
“  ” or “#” key, it is not possible to access features that have “
 ” or “#” in their feature numbers.
If you use a Panasonic proprietary telephone which has a special function button and/or a display, you will follow the button or display operation for easy access. If you use a Panasonic proprietary telephone which does not have a function button, you may change one of the unused buttons to another button. Refer to Section 1.2, “Proprietary Telephone Settings”.
A Panasonic proprietary telephone has Light Emitting Diode (LED) button indicators, so you can see the line conditions according to the lighting patterns. Refer to Section 2.2, “LED Indication”.
Please use the proper operation for your telephone.
Description of the Symbols Used in this Manual
In this manual, many symbols are used. Some of the symbols need explanation. Those are described below.
Lift the handset, or press the SP-PHONE or MONITOR button (Off-hook).
Replace the handset, or press the SP-PHONE or MONITOR button (On-hook).
X Y
Number keys on the telephone — depends on the condition.
Flash the hookswitch on a single line telephone.
Tones which vary depending on the condition.
Refer to “Tone / Ring Tone List” (Section 2.1).
• For proprietary telephone operations, all button illustrations are based on the KX-T7130 ! model.
•The AUTO ANSWER/MUTE button corresponds to the AUTO ANS/MUTE button on a KX-T7300 series.
•The AUTO DIAL/STORE button corresponds to the AUTO/STORE button on a KX-T7300 series.
1-2 Operations
![]()
1.1Before Operating
Operating example
Example: “Interrupting an Existing Call (Executive Busy Override)”, Executive Busy Override — Extension
Applicable telephone:
A PT (Proprietary Telephone) user can follow the operating steps below.
Applicable telephone:
Any Telephone (PT and SLT) user can follow the operating steps below.
|
Interrupting an Existing Call (Executive Busy Override) |
Main feature title |
||
Executive Busy Override — Extension 
 Sub-feature title
Allows you to connect to an existing intercom (extension) call.
System Programming is required to use this feature.
Any Telephone
If you make an intercom call and while hearing a busy tone
|
3 |
A three-party conference |
|
is now established. |
|
|
Dial 3. |
Confirmation tone (optional) |
To leave the conference
Any Telephone
The other two parties continue their conversation.
Hang up or press SP-PHONE.
 Feature description

 Operation steps
To terminate one party and talk to the other
PT
|
CO |
INTERCOM |
|
|
or |
||
|
Press the CO or INTERCOM |
Confirmation tone (optional) |
|
|
of the party to remain connected. |
• If all three parties are extensions, this operation is not available.
|
! |
or “Executive Busy Override Deny” |
Additional |
|
versa, a confirmation tone is sent to |
information |
|
|
Call”(Executive Busy Override |
||
•1.7 Useful Features, “Conference (3-party)”
•1.7 Useful Features, “Data Line Security”
•See the Installation Manual, Section 3, “Executive Busy Override”.

 The feature and program reference
|
! |
• |
If your telephone is not noted in the operation steps (ex. only “PT” is noted and you are |
|
using a single line telephone), this means your telephone cannot execute that feature. |
||
|
• |
If your telephone can perform several operations for one feature, you can select the method |
|
|
according to your needs. |
Operations Basic
Operations 1-3
1.2Proprietary Telephone Settings
If you use a Panasonic proprietary telephone, you can customize your telephone functions. For example, you can change the initial settings according to your needs or the button functions on your telephone. To program, you need to switch your telephone to the programming mode.
During the programming mode, your telephone is busy to outside callers. If you want to make a normal call operation, you must finish the programming mode.
•This feature cannot be used with a single line telephone.
!• Be sure the handset is on the cradle and the SP-PHONE button is off.
•To program, set the MEMORY switch on the proprietary telephone to “PROGRAM” or press the PROGRAM button on the KX-T7300 series.
When you enter the Station Programming mode, the display shows the following message as the initial programming mode.
PITS-PGM NO? →
The display also gives you helpful or stored data information related to the programming steps. You can also refer to the “Display Example” in the Appendix (Section 2.4).
•After programming, return the MEMORY switch to the “SET” position or press the PROGRAM button on the KX-T7300 series.
•If you move your desk and change the extension line, reset as desired. The setting will not remain in your telephone but will remain in the previous extension user’s memory.
•During the programming mode, your extension is treated as a busy extension.
To enter the Programming Mode
PT
Be sure the telephone is idle and on-hook.
MEMORY
PROGRAM
or
SET
 PROGRAM
Set the MEMORY switch to “PROGRAM” on the KX-T7000 series.
OR
Press the PROGRAM button on the KX-T7300 series.
To exit the Programming Mode
PT
When the display shows the initial programming mode;
MEMORY
PROGRAM
or
SET
 PROGRAM
Set the MEMORY switch to “SET” on the KX-T7000 series. OR
Press the PROGRAM button on the KX-T7300 series.
Programming is completed and the normal call operation resumes.
When storing data
After pressing the STORE button to store data, you may hear one of the following tones.
—Confirmation tone (1 beep): storage is completed.
—Confirmation tone (2 beeps): the data is the same as the last entry.
|
— Alarm tone (3 beeps): |
the entry is not valid. |
1-4 Operations
1.2Proprietary Telephone Settings
Customizing Your Telephone Functions
You can change the initial settings of your telephone. Check the available items in the list and change the settings, if required.
Preferred Line Assignment — Outgoing
Idle Line Preference: You can access any enabled idle outside (CO) line to make a call
|
directly by going off-hook. |
|||||||
|
Prime Line Preference: You can access a programmed outside (CO) line directly by going |
|||||||
|
off-hook. |
|||||||
|
No Line Preference: |
You cannot access an outside (CO) line by going off-hook. Choose |
||||||
|
(default) |
the outside (CO) line. |
||||||
|
SELECTION |
PROGRAMMING INPUT |
||||||
|
Idle Line Preference. |
AUTO DIAL |
||||||
|
1 |
2 |
||||||
|
STORE |
|||||||
|
outside (CO) line no. |
AUTO DIAL |
||||||
|
Prime Line Preference. |
1 |
3 |
|||||
|
Enter the outside (CO) line |
STORE |
||||||
|
number (1 through 6). |
|||||||
|
No Line Preference. |
AUTO DIAL |
||||||
|
1 |
1 |
||||||
|
STORE |
|||||||
•Setting a new line preference feature will cancel the previous setting.
!• The user can override the Idle/Prime Line Preference temporarily to select a specific line. To select it, press the desired line access button (INTERCOM or CO button) before going off-hook or pressing the SP-PHONE/MONITOR button.
•If there are only 3 lines in the system, outside (CO) line numbers 4 through 6 cannot be used.
Operations Basic
Operations 1-5
1.2Proprietary Telephone Settings
Preferred Line Assignment — Incoming
|
No Line Preference: |
When an incoming outside call is received, the extension user |
|||||
|
must go off-hook and then press the flashing CO button. |
||||||
|
Prime Line Preference: |
When incoming outside calls from the Central Office are received |
|||||
|
at the same time, you can receive the call on the preferred outside |
||||||
|
(CO) line first only by going off-hook. |
||||||
|
Ringing Line Preference: When an incoming outside call is received, you can receive the |
||||||
|
(default) |
call ringing at your telephone by going off-hook. |
|||||
|
SELECTION |
PROGRAMMING INPUT |
|||||
|
No Line Preference. |
AUTO DIAL |
|||||
|
2 |
1 |
|||||
|
STORE |
||||||
|
outside (CO) line no. |
AUTO DIAL |
|||||
|
Prime Line Preference. |
2 |
3 |
||||
|
Enter the outside (CO) line |
STORE |
|||||
|
number (1 through 6). |
||||||
|
Ringing Line Preference. |
AUTO DIAL |
|||||
|
2 |
2 |
|||||
|
STORE |
||||||
•Setting a new line preference feature will cancel the previous setting.
!• In “Prime Line Preference” mode, if incoming calls from the Central Office are received at the same time except for the preferred outside (CO) line, you must go off-hook and then press the CO button whose indicator is flashing red quickly.
Outside (CO) Line Ringing Selection
You can select whether the extension will ring or not when an outside call is received at your extension.
PROGRAMMING INPUT
outside (CO) line no.
3
Enter the outside (CO) line numbers you want to ring (1 through 6).
• The “Flexible Ringing Assignment” should be set to “Enable”. (See the Installation ! Manual.)
•When an outside call is received at your extension but does not ring, the CO indicator will flash. If you want to answer the outside call, press the flashing CO button.
1-6 Operations
1.2Proprietary Telephone Settings
Intercom Alert Assignment
The intercom alert (tone/voice) at a receiving extension can be selected by programming.
Voice Call: A Voice alert instead of Tone alert is heard through the speaker on the receiving extension.
Tone Call (default): A tone alert (ringing) sounds at the receiving extension.
|
SELECTION |
PROGRAMMING INPUT |
||
|
Voice Call |
AUTO DIAL |
||
|
4 |
2 |
||
|
STORE |
|||
|
Tone Call |
AUTO DIAL |
||
|
4 |
1 |
||
|
(Cancels the Voice Call.) |
|||
|
STORE |
Call Waiting Tone Selection
You can select the call waiting tone, either Tone 1 (default) or Tone 2.
|
SELECTION |
PROGRAMMING INPUT |
|
|
Tone 1 |
AUTO DIAL |
|
|
5 |
1 |
|
|
STORE |
||
|
Tone 2 |
AUTO DIAL |
|
|
5 |
2 |
|
|
STORE |
• 1.5 During a Conversation, “Call Waiting”
• 2.1 Tone / Ring Tone List
Proprietary Telephone Setting Data Default Set
Allows you to reset the proprietary telephone settings at an extension to the default settings.
•Preferred Line Assignment — Outgoing (default: No Line Preference)
•Preferred Line Assignment — Incoming (default: Ringing Line)
•Outside (CO) Line Ringing Selection (default: Ring – all outside (CO) lines)
•Intercom Alert Assignment (default: Tone Call)
•Call Waiting Tone Selection (default: Tone 1)
|
OPERATION |
|||
|
AUTO DIAL |
|||
|
# |
|||
|
STORE |
|||
|
! |
|||
|
• This feature also cancels the Handsfree Answerback feature and pressing the |
|||
|
AUTO ANSWER/MUTE button in the Room Monitor feature. |
Operations Basic
Operations 1-7

1.2Proprietary Telephone Settings
Customizing the Buttons on Your Telephone
Changing the Flexible Buttons
You can change the flexible buttons on your telephone to certain function buttons. For example, if your telephone has more CO buttons than available outside (CO) lines, you may change the unused CO buttons to One-Touch Dialing buttons, etc.
The 4 types of flexible buttons are as follows:
•Flexible CO Buttons (located on a PT only)
•Flexible DSS Buttons (located on a DSS Console only)
•Programmable Feature (PF) Buttons (located on a PT and DSS Console)
•Flexible MESSAGE Buttons (located on a PT except for the KX-T7055)
Check the required operation first. If your telephone is not provided with the button, you can assign the button using this program.
|
FUNCTION |
PROGRAMMABLE BUTTON |
|||||||
|
CO |
DSS |
PF |
MESSAGE |
|||||
|
DSS (Direct Station Selection) |
||||||||
|
One-Touch Dialing |
||||||||
|
CONF (Conference) |
||||||||
|
FWD/DND (Forward/Do Not Disturb) |
||||||||
|
SAVE |
||||||||
|
Log-In/Log-Out |
||||||||
|
Single-CO (S-CO) |
||||||||
|
Other CO (O-CO) |
||||||||
|
Group-CO (G-CO) |
||||||||
|
MESSAGE (Message Waiting) |
||||||||
|
Day |
||||||||
|
Night |
||||||||
|
Lunch |
||||||||
|
Station Lock |
||||||||
|
“ ” indicates that the feature is available. |
||||||||
|
! |
• |
To confirm the stored function data |
||||||
|
Press the button you want to confirm. |
||||||||
|
• |
As to the buttons on your proprietary telephone, please refer to your proprietary telephone |
|||||||
|
manual. |
||||||||
1-8 Operations

1.2Proprietary Telephone Settings
Line Access Buttons
One of the following 3 types of CO buttons must be used to seize an outside (CO) line when making a call.
|
• |
Group-CO (G-CO) button |
||
|
• |
Other-CO (O-CO) button |
||
|
• |
Single-CO (S-CO) button |
||
|
! |
• A flexible CO button can be assigned as a Line Access Button (G-CO, O-CO or S-CO) in |
||
|
Proprietary Telephone Settings. Once a flexible CO button is assigned as a Line Access |
|||
|
Button, it provides the line status using lighting patterns and color indication. Please refer to |
|||
|
“2.2 LED Indication”. |
|||
|
• You can set the G-CO and S-CO buttons on one telephone. Incoming and outgoing calls on |
|||
|
the line are shown on the button in the following priority. |
S-CO > G-CO |
Single-CO (S-CO) Button
A S-CO button is an outside (CO) line access button. This allows you to access a specific line by pressing a S-CO button. An incoming call can be directed to a S-CO button.
PT
|
CO |
0 |
AUTO DIAL |
|||
|
outside (CO) line no. |
|||||
|
STORE |
|||||
|
Press the programmable button. |
Dial 0. |
Enter an outside (CO) line number (1 through 6). |
Press STORE. |
• Only one S-CO button can be assigned to an outside (CO) line.
!• The same outside (CO) line can be assigned as a S-CO button and G-CO button.
Other CO (O-CO) Button
Outside (CO) lines which are not assigned to S-CO or G-CO buttons can be assigned to a flexible CO button on a proprietary telephone. The assigned button serves as the O-CO button. An incoming call, on assigned outside (CO) lines, arrives at the O-CO button. To make an outside call, you simply press the designated O-CO button.
PT
AUTO DIAL
CO
STORE
|
Press the programmable button. |
Dial . |
Press STORE. |
Operations Basic
Operations 1-9
1.2Proprietary Telephone Settings
Group-CO (G-CO) Button
To use outside (CO) lines efficiently, a group of outside (CO) lines (outside (CO) line group) can be assigned to a CO button. This button is referred to as Group-CO (G-CO) button. Any incoming calls from any outside (CO) line in the outside (CO) line group arrive at the G-CO button. To make an outside call, you can access an idle outside (CO) line in the group by simply pressing the assigned G-CO button.
PT
|
CO |
# |
outside (CO) line group no. |
AUTO DIAL |
||
|
STORE |
|||||
|
Press the programmable button. |
Dial #. |
Enter an outside (CO) line group number |
Press STORE. |
||
|
(1 through 6). |
!• The same line can be assigned as a S-CO button and G-CO button.
•The extension for making and/or receiving calls in outside (CO) line groups must be programmed.
•When your extension is assigned as the incoming call destination for an outside (CO) line, you cannot receive any incoming outside calls unless a G-CO, O-CO or S-CO button associated with the line is assigned.
DSS (Direct Station Selection) Button
|
PT |
||||||||||||
|
CO |
1 |
extension no. |
AUTO DIAL |
|||||||||
|
MESSAGE |
||||||||||||
|
STORE |
||||||||||||
|
Press the programmable button. |
Dial 1. |
Enter an extension number |
Press STORE. |
|||||||||
|
(100 through 199). |
||||||||||||
|
• 1.3 Making Calls, “Intercom Calling” |
1-10 Operations
1.2Proprietary Telephone Settings
One-Touch Dialing Button
PT
|
( |
CO |
) |
||||||||
|
+ 2 |
||||||||||
|
MESSAGE |
telephone no. |
AUTO DIAL |
||||||||
|
PF |
STORE |
|||||||||
|
Press the programmable button and dial 2 |
Enter the telephone number |
Press STORE. |
||||||||
|
or press the PF button. |
(max. 24 digits). |
!• To store the telephone number of an external party, a line access code (9, 0 or 81 through
86)must be stored as the first digit.
•You can use 0 through 9,  , #, PAUSE and INTERCOM (Secret) as follows. PAUSE: inserts a pause.
INTERCOM: conceals all or part of a stored number.
•The number of Personal Speed Dialing numbers corresponds to the number of PF buttons assigned as One-Touch Dialing. (PF buttons are on a proprietary telephone.) You cannot assign both the One-Touch Dialing and Personal Speed Dialing features to the same number. For example, if you assign One-Touch Dialing to the PF 1 button and then Personal Speed Dialing 0, only the Personal Speed Dialing 0 feature will be assigned.
• 1.7 Useful Features, “Secret Dialing”
Operations Basic
CONF (Conference) Button
PT
|
CO |
3 |
AUTO DIAL |
|
STORE |
||
|
Press the programmable button. |
Dial 3. |
Press STORE. |
• 1.7 Useful Features, “Conference (3-party)”
•1.7 Useful Features, “Conference, Unattended”
•1.7 Useful Features, “Conference (5-party)”
Operations 1-11
1.2Proprietary Telephone Settings
FWD/DND (Forward/Do Not Disturb) Button
PT
|
CO |
4 |
AUTO DIAL |
|
STORE |
||
|
Press the programmable button. |
Dial 4. |
Press STORE. |
• 1.6 Before Leaving Your Desk, “Forwarding a Call (Call Forwarding)”
• 1.7 Useful Features, “Rejecting Incoming Calls (Do Not Disturb – DND)”
SAVE Button
PT
|
CO |
5 |
AUTO DIAL |
|
STORE |
||
|
Press the programmable button. |
Dial 5. |
Press STORE. |
• 1.3 Making Calls, “Redialing the Saved Number (Saved Number Redial)”
Log-In/Log-Out Button
PT
|
CO |
8 |
AUTO DIAL |
|
STORE |
||
|
Press the programmable button. |
Dial 8. |
Press STORE. |
• 1.7 Useful Features, “Joining or Leaving a Call Distribution Group (Log-In/Log-out)”
• See the Installation Manual, Section 3, “Log-In/Log-Out”.
1-12 Operations
![]()
1.2Proprietary Telephone Settings
Restoring the MESSAGE Button
Allows you to restore the message waiting feature to the MESSAGE button.
PT
|
MESSAGE |
3 |
AUTO DIAL |
|
STORE |
||
|
Press MESSAGE. |
Dial 3. |
Press STORE. |
One-Touch Access for System Features
Features that can be accessed using the dialing buttons can also be programmed into memory.
Programming
PT
|
( |
CO |
) |
||
|
MESSAGE |
+ 2 |
AUTO DIAL |
||
|
feature number |
||||
|
PF |
STORE |
|||
Press the programmable button and dial 2 Enter the desired feature number. Press STORE. or press the PF button.
!• If you want to use a programmable feature button as a button for External Feature Access, you can press the FLASH button instead of the feature number. When you press the assigned button, you can access special features (e.g. Call Waiting) offered by a host PBX or Central Office.
To Access
PT
|
Off-hook. |
Press the programmable button |
Confirmation tone (1 beep) |
|
assigned above. |
!• Whether the confirmation tone is heard or not depends upon the programmable feature.
Operations Basic
Operations 1-13

1.2Proprietary Telephone Settings
Display Contrast Adjustment
The CONTRAST selector is used to adjust the display contrast.
PT
CONTRAST
HIGH
 LOW
LOW
MID
Adjust the CONTRAST lever to the desired setting (LOW/MID/HIGH).
!• This feature is available for a KX-T7330/KX-T7033/KX-T7030/KX-T7130 only.
When Using the Headset
The Panasonic Advanced Hybrid System supports the use of a headset on a proprietary telephone (PT). When you use the headset (optional), you should switch the selection mode first.
PT
HANDSET HEADSET
Adjust the HANDSET/HEADSET lever to “HEADSET”.
!• This feature is available for a KX-T7330/KX-T7033/KX-T7030/KX-T7130 only.
1-14 Operations

1.2Proprietary Telephone Settings
Volume Control — Handset Receiver/Headset/Ringer/Speaker
Allows you to adjust the following volume settings as necessary.
To adjust the handset receiver volume
PT
HANDSET
VOLUME
or VOLUME
NORMAL
 HIGH
HIGH
Adjust the HANDSET VOLUME lever to the desired setting (three levels from NORMAL to HIGH) on the KX-T7000 series. OR
Press the VOLUME Control buttons on the KX-T7300 series.
To adjust the headset volume
PT
Be sure the headset is connected.
HANDSET
VOLUME
or VOLUME
NORMAL
 HIGH
HIGH
Adjust the HANDSET VOLUME lever to the desired setting (three levels from NORMAL to HIGH) on the KX-T7000 series. OR
Press the VOLUME Control buttons on the KX-T7300 series.
To adjust the ringer volume
PT
RINGER
HIGH 
 OFF
OFF
LOW
Adjust the RINGER Volume lever to the desired setting (OFF/LOW/HIGH).
To adjust the speaker volume
PT
VOLUME
MAX  MIN
MIN
or VOLUME
Adjust the VOLUME Control lever to the desired setting (MAX to MIN) on the KX-T7000 series.
OR
Press the VOLUME Control buttons on the KX-T7300 series.
Operations Basic
Operations 1-15
|
1.3 |
Making Calls |
|
|
Intercom Calling |
||
|
Allows you to make a call to another extension. |
||
|
Using the handset |
||
|
Any Telephone |
||
|
extension no. |
||
|
Lift the handset. Enter the extension number Talk. |
Hang up. |
|
|
(100 through 199). |
Using the Speakerphone
PT
SP-PHONE INTERCOM
or
Press SP-PHONE or INTERCOM.
|
extension no. |
SP-PHONE |
|
|
Enter the extension number Talk. |
Press SP-PHONE. |
|
|
(100 through 199). |
Using a DSS (Direct Station Selection) button
PT
|
Lift the handset or press |
Press the flexible button |
Talk. |
Hang up or press |
|
SP-PHONE/MONITOR. |
assigned as a DSS button. |
SP-PHONE. |
|
! |
• After dialing an extension number, you will hear one of the following tones. |
|
|
Ringback tone: Indicates the destination extension is being called. |
||
|
Confirmation tone: Indicates you can perform voice calling (e.g. Paging). |
||
|
Busy tone: Indicates the destination extension is busy. |
||
|
Do Not Disturb (DND) tone: Indicates the destination extension has set the “Do Not |
||
|
Disturb (DND)” feature. |
||
|
PT |
• An extension number and a name, if programmed, are shown on a display PT during an |
|
|
intercom call. |
||
|
PT |
• You can assign a DSS button on a flexible button in Proprietary Telephone Settings. The |
|
|
stored number can be displayed in the following way. |
1.Set the MEMORY switch to “PROGRAM” or press the PROGRAM button on the KX-T7300 series.
2.Press the desired button while on-hook.
The number will be displayed. After checking the number return the MEMORY switch to the “SET” position or press the PROGRAM button on the KX-T7300 series.
PT • You can press a flexible button assigned as a DSS button directly to make an intercom call without going off-hook. It can be done by System Programming.
1-16 Operations
|
1.3 |
Making Calls |
||
|
• 1.2 |
Proprietary Telephone Settings, “Customizing the Buttons on Your Telephone”, |
||
|
DSS (Direct Station Selection) Button |
|||
|
• |
2.1 |
Tone/Ring Tone List |
|
|
• |
See the Installation Manual, Section 3, “Intercom Calling”. |
Calling an Operator (Operator Call)
Allows you to call an operator within the system. One extension can be assigned as an operator.
Any Telephone
|
0 or 9 |
|
|
Lift the handset or press |
Dial 0 or 9. |
|
SP-PHONE/MONITOR. |
•If an operator is not assigned, this feature is not available and you will hear a reorder tone.
!• If the line access number is assigned to “0” by System Programming, the operator call number will be changed to “9”.
• See the Installation Manual, Section 3, “Operator Call”.
Outside Calling
|
Allows you to make a call to an external party using one of the following line access methods. |
|||
|
1.) |
Making Outside Calls Using Automatic Line Access |
||
|
2.) |
Making Outside Calls Using Individual Line Access |
||
|
3.) |
Making Outside Calls Using Outside (CO) Line Group Access |
||
|
! |
• An outside (CO) line which is not assigned to a CO button cannot be dialed. |
||
|
PT |
|||
|
• Helpful hints for the Handsfree (speakerphone) operation are noted in the “Handsfree |
|||
|
PT |
|||
|
Operation” feature. |
|||
|
• 1.2 Proprietary Telephone Settings, “Customizing the Buttons on Your Telephone”, |
|||
|
Single-CO (S-CO) Button, |
Group-CO (G-CO) Button
•1.6 Before Leaving Your Desk, “Locking Your Telephone (Electronic Station Lockout)”
•1.7 Useful Features, “Calling with Account Codes (Account Code Entry)”
•1.7 Useful Features, “Calling Using Your Privileges at Another Extension (Walking COS)”
•1.8 Operator / Manager Service Features, “Remote Station Lock”
•See the Installation Manual, Section 3, “Outside Calling”.
•See the Installation Manual, Section 3, “Toll Restriction Override by Account Codes”.
•See the Installation Manual, Section 3, “Toll Restriction — Station Lock Boundary Class”.
•See the Installation Manual, Section 3, “Toll Restriction”.
Operations Basic
Operations 1-17
1.3Making Calls
Making Outside Calls Using Automatic Line Access
Allows you to select an available outside (CO) line automatically.
Any Telephone
|
9 or 0 |
phone no. |
||||||
|
Lift the handset or press |
Dial 9 or 0. |
Dial tone |
Enter the phone |
Talk. |
Hang up or press |
||
|
SP-PHONE/MONITOR |
number. |
SP-PHONE. |
|||||
|
• |
The selected CO |
light turns |
• |
display shows the phone number. |
|||
|
green. |
|||||||
|
! |
• If the line access number is assigned to “0” by System Programming, the operator call |
||||||
|
number will be changed to “9”. |
Making Outside Calls Using Individual Line Access
Allows you to select the desired outside (CO) line without dialing the line access code.
PT
|
Lift the handset |
Press the CO assigned Dial tone Enter the phone number. Talk. Hang up or press |
|
|
or press |
as a Single-CO button. |
|
|
SP-PHONE/MONITOR. |
||
|
• The |
shows the phone number. |
• The CO indicator light turns green.
|
! |
PT |
• You may skip off-hook and press the Single-CO (S-CO) button directly. |
1-18 Operations
1.3Making Calls
Making Outside Calls Using Individual Outside (CO) Line Group Access
Allows you to select an idle line within a designated outside (CO) line group. Through System Programming, outside (CO) lines can be divided into 6 line groups.
PT and SLT
|
CO |
For a PT |
|||||
|
8 |
outside (CO) |
For an SLT |
phone no. |
|||
|
line group no. |
||||||
|
Lift the handset |
For a PT: Press the CO assigned as |
Dial tone |
Enter the |
Talk. Hang up |
||
|
or press |
the Group-CO button. |
phone number. |
or press |
|||
|
SP-PHONE/MONITOR. |
For an SLT: Dial 8 and the outside (CO) line |
. |
||||
|
group number (1 through 6). |
||||||
|
• The |
shows the phone number. |
|||||
|
• The CO indicator |
green. |
|
! |
PT |
• You may press the Group-CO button directly without going off-hook. |
Flash
Allows you to disconnect the current call and make another call without hanging up.
PT
While hearing any tone, dialing, or talking
FLASH
phone no.
|
Press FLASH. |
Dial tone |
Enter the phone number. |
• System Programming may be required to perform this feature properly.
!• During an outside call, the FLASH button can be used as a External Feature Access button.
• 1.7 Useful Features, “External Feature Access”
• See the Installation Manual, Section 3, “Flash”.
Operations Basic
Operations 1-19
1.3Making Calls
Handsfree Operation
Allows you to dial and to talk to the other party without lifting the handset.
PT
SP-PHONE
Press SP-PHONE.
|
• The microphone |
are now activated and the |
|
handsfree operation |
available. |
Switching from the handset to handsfree mode
PT
SP-PHONE
• Do not replace the handset without pressing the SP-PHONE
|
button first, or the line |
be disconnected. |
Switching from handsfree to the handset mode
PT
Lift the handset.
!
• Helpful hints for the Handsfree operation:
— Use this unit in a quiet room for best performance.
— If you and the other party talk at the same time, parts of your conversation will be lost. To avoid this, talk alternately.
• The handsfree mode is canceled if you do not start dialing within 10 seconds.
• The KX-T7350/KX-T7050/KX-T7055 have MONITOR buttons instead of a SP-PHONE button. It can be used for handsfree dialing, etc., but it cannot be used for a handsfree conversation.
• You can enable the handsfree mode by pressing a CO or INTERCOM button.
• See the Installation Manual, Section 3, “Handsfree Operation”.
1-20 Operations
1.3Making Calls
Making Emergency Calls (Emergency Call)
Allows you to dial a pre-assigned emergency number after seizing an outside (CO) line. Up to 5 emergency dial numbers can be stored.
Dialing
Any Telephone
|
line access code |
emergency no. |
|
|
Lift the handset or press |
Dial the line access code |
Dial tone Dial the emergency number. |
|
SP-PHONE/MONITOR. |
(9, 0 or 81 through 86). |
• You may press button instead.
|
! |
• An emergency call is allowed even in the following cases, |
|
|
— Account Code – Verify–All mode |
||
—Any toll restriction COS number
—Electronic Station Lockout
•If your system is connected to a host PBX, you must dial the host PBX line access code after the line access code.
• See the Installation Manual, Section 3, “Emergency Call”.
Operations Basic
Operations 1-21
1.3Making Calls
Dialing by Simply Pressing a Button (One-Touch Dialing)
Allows you to call a number or access a system feature with the touch of a button. This is done by storing an extension number, telephone number or feature number (up to 24 digits) in a One-Touch Dialing button.
Dialing
|
PT |
||||||||||||||
|
PF |
||||||||||||||
|
Lift the handset or press |
||||||||||||||
|
Press the flexible button assigned as |
||||||||||||||
|
SP-PHONE/MONITOR. |
a One-Touch Dialing button or PF button. |
|||||||||||||
|
! |
||||||||||||||
|
• The destination numbers are stored in Proprietary Telephone Settings. |
||||||||||||||
|
PT |
||||||||||||||
|
• You may press a CO button to select a desired outside (CO) line before pressing the |
||||||||||||||
|
PT |
||||||||||||||
|
One-Touch Dialing button. |
||||||||||||||
|
PT |
• “Speed Dialing”, “One-Touch Dialing” and manual dialing can be used together. |
|||||||||||||
|
• You can store a number consisting of 25 digits or more by dividing and storing it into 2 |
||||||||||||||
|
PT |
||||||||||||||
|
One-Touch Dialing buttons. |
||||||||||||||
|
PT |
• A pause is automatically entered after the stored line access code, 9, 0 or 81 through 86, |
|||||||||||||
|
when dialing. |
||||||||||||||
|
PT |
• To confirm the current status of the button, press the button while on-hook. |
|||||||||||||
|
• 1.2 Proprietary Telephone Settings, “Customizing the Buttons on Your Telephone”, |
||||||||||||||
|
One-Touch Dialing Button |
• See the Installation Manual, Section 3, “One-Touch Dialing”.
1-22 Operations
![]()
1.3Making Calls
Dialing with System Speed Dialing (System Speed Dialing)
Allows you to make a call using pre-programmed speed dial numbers. This system supports 100 speed dial numbers which are available to all extension users.
PT and SLT
AUTO DIAL
For a PT
STORE
system speed dial no.
For an SLT
|
Lift the handset or press |
For a PT: Press AUTO DIAL/STORE. |
Enter a system speed dial number |
|
SP-PHONE/MONITOR. |
For an SLT: Dial . |
(00 through 99). |
|
• |
You will not hear a tone. |
• The AUTO DIAL/STORE indicator |
|
• |
The AUTO DIAL/STORE indicator lights. |
light turns off. |
!• System Speed Dial numbers must be stored by System Programming.
•“Speed Dialing”, “One-Touch Dialing” and manual dialing can be used together.
•You may press a CO button or dial a line access code to select a desired outside (CO) line
|
before pressing the AUTO DIAL/STORE button or dialing . |
|
|
• It is possible to cancel toll restriction with this feature (Toll Restriction Override for System |
|
|
Speed Dialing). In this case, System Programming is necessary. |
|
|
PT |
• A System Speed Dial number can be divided when stored. |
|
<Example> |
|
|
If the number is divided and stored in System Speed Dial numbers 01 and 02, |
|
|
Press: [AUTO DIAL/STORE] [0] [1] [AUTO DIAL/STORE] [0] [2]. |
|
|
PT |
• The dialed number appears on the display. |
|
• A rotary telephone cannot use this feature. |
|
|
SLT |
• See the Installation Manual, Section 3, “Toll Restriction for System Speed Dialing”.
• See the Installation Manual, Section 3, “System Speed Dialing”.
Operations Basic
Operations 1-23

1.3Making Calls
Dialing with Personal Speed Dialing (Personal Speed Dialing)
Allows you to store up to 10 speed dial numbers at your extension. These numbers are available for your extension only.
Storing a phone number
Any Telephone
|
2 |
personal speed dial no. |
desired no. |
# |
||
|
Lift the handset |
Dial 2 . |
Enter the personal speed |
Enter the |
Dial #. Confirmation |
Hang up or press |
|
or press |
dial number (0 through 9). |
desired number. |
tone |
SP-PHONE/MONITOR. |
|
|
SP-PHONE/MONITOR. |
Dialing
Any Telephone
|
# |
personal speed dial no. |
|
|
Lift the handset or press |
Dial #. |
Enter the personal speed |
|
SP-PHONE/MONITOR. |
number (0 through 9). |
|
|
• You may dial |
” instead of “#”. |
|
! |
• An account code must be stored by pressing “ |
” and entering the account code after the |
|
line access code. |
•You can store an extension number, telephone number, or feature number of up to 24 digits. Valid digits are “0 through 9”.
• A pause can be stored by pressing the key. However, in the account code verify-all, verify-toll and forced modes, “ ” is not regarded as a pause.
•To store the telephone number of an external party, a line access code (9, 0 or 81 through 86) must be stored as the first digit.
•The number of Personal Speed Dialing numbers corresponds to the number of PF buttons assigned as One-Touch Dialing. (PF buttons are on a proprietary telephone.) You cannot assign both the One-Touch Dialing and Personal Speed Dialing features to the same number. For example, if you assign One-Touch Dialing to the PF 1 button and then Personal Speed Dialing 0, only the Personal Speed Dialing 0 feature will be assigned.
•A rotary telephone cannot use this feature.
|
• 1.2 Proprietary Telephone Settings, “Customizing the Button on Your Telephone”, |
||
|
One-Touch Dialing Button |
||
|
• |
See the Installation Manual, Section 3, “Personal Speed Dialing”. |
1-24 Operations

1.3Making Calls
Checking the stored personal speed dialing numbers
PT
|
3 |
personal speed dial no. |
# |
|
|
Lift the handset or press |
Dial 3 . |
Enter the personal speed |
Dial #. |
|
SP-PHONE/MONITOR. |
dial number (0 through 9). |
Operations Basic
Operations 1-25

1.3Making Calls
Dialing by Simply Going Off-Hook (Pickup Dialing)
Allows you to make an outgoing call by just going off-hook (single line telephone only).
Storing a phone number
SLT
|
7 |
4 |
2 |
phone no. |
# |
||
|
Lift the handset or press |
Dial 742. |
Enter the phone number. |
Dial #. Confirmation |
Hang up or press |
||
|
SP-PHONE/MONITOR. |
tone and |
SP-PHONE/MONITOR. |
||||
|
dial tone |
||||||
|
• You must dial a line access code |
or 81 through 86) as the |
|||||
|
first digit when storing an external |
phone number. |
Setting / Canceling
SLT
|
7 |
4 |
1 |
# |
To set. |
||
|
7 |
4 |
0 |
# |
To cancel. |
||
|
Lift the handset or press |
To set: Dial 741#. |
Confirmation tone |
Hang up or press |
|||
|
SP-PHONE/MONITOR. |
To cancel: Dial 740#. |
and dial tone |
SP-PHONE/MONITOR. |
Dialing
SLT
|
Lift the handset or press |
Wait for an answer. |
Talk. |
|
SP-PHONE/MONITOR. |
•This feature will not work if you answer an incoming call or retrieve a call on hold.
!• Up to 32 digits, consisting of “0 through 9” and “  ”, can be stored. The “
 ” button is used as a PAUSE. However, in the account code verify-all, verify-toll and forced modes, “
 ” is not regarded as a pause.
•An account code must be stored by pressing “ 
 ” and entering the account code after the line access code.
•During the waiting time after going off-hook, you can call another party and override this feature. You can change the waiting time between going off-hook and connecting with a called line by System Programming.
•A rotary telephone cannot use this feature.
• See the Installation Manual, Section 3, “Pickup Dialing”.
1-26 Operations

1.3Making Calls
Redialing Automatically (Automatic Redial)
PT users can redial the last number dialed and saved number automatically by going off-hook with the SP-PHONE/MONITOR button and pressing the corresponding button directly. Redial will be automatically repeated the pre-programmed number of times until the called party answers.
|
PT |
||||||||||
|
REDIAL |
||||||||||
|
SP-PHONE |
MONITOR |
SAVE |
||||||||
|
or |
or |
|||||||||
|
Press SP-PHONE or MONITOR. |
Press REDIAL or SAVE. |
|||||||||
|
! |
||||||||||
|
• The number of times can be changed by System Programming. |
||||||||||
|
PT |
||||||||||
|
• If another operation is performed during automatic redial, this function will be canceled. |
||||||||||
|
PT |
||||||||||
|
• To cancel automatic redial, press the FLASH button. |
||||||||||
|
PT |
||||||||||
|
• This feature is not available for a KX-T7055. |
||||||||||
|
PT |
||||||||||
|
• A flexible button can be assigned as the SAVE button. |
||||||||||
|
PT |
• 1.3 Making Calls, “Redialing the Last Number Dialed (Last Number Redial)”
•1.3 Making Calls, “Redialing the Saved Number (Saved Number Redial)”
•See the Installation Manual, Section 3, “Redial”.
Redialing the Last Number Dialed (Last Number Redial)
Automatically saves the last outside phone number dialed so that you can make a call to the same party later using a simple operation.
|
PT |
SLT |
||||||||||||||
|
REDIAL |
|||||||||||||||
|
# |
# or 8 0 |
||||||||||||||
|
Lift the handset or press |
Press REDIAL. |
Lift the handset. |
Dial ## or 80. |
||||||||||||
|
SP-PHONE/MONITOR. |
|||||||||||||||
|
! |
|||||||||||||||
|
• Up to 64 digits can be stored and redialed. This does not include an outside (CO) line access |
|||||||||||||||
|
code. |
|||||||||||||||
|
• If you hear a busy tone when attempting to redial, select another line and press the REDIAL |
|||||||||||||||
|
button or feature number. |
|||||||||||||||
|
PT |
• “ ”, “#”, “PAUSE”, and “INTERCOM” (for secret dialing) are counted as 1 digit. |
||||||||||||||
|
• While calling or during a conversation, pressing the REDIAL button will disconnect the |
|||||||||||||||
|
PT |
|||||||||||||||
|
current call and redial the stored number. |
|||||||||||||||
|
PT |
• You can check the stored number. Press the REDIAL button while on-hook, and the stored |
||||||||||||||
|
number will be displayed. |
Operations Basic
Operations 1-27

1.3Making Calls
• 1.3 Making Calls, “Redialing Automatically (Automatic Redial)”
• See the Installation Manual, Section 3, “Redial”.
Redialing the Saved Number (Saved Number Redial)
Allows you to save the current external telephone number during a conversation, so that you can redial the same party later using a simple operation. The saved number can be redialed until another number is stored.
Storing
PT
During a conversation or while hearing a busy tone
|
AUTO DIAL |
SAVE |
|
|
STORE |
||
|
Press AUTO DIAL/STORE. |
Press SAVE. |
Dialing
PT
|
SAVE |
|
|
Lift the handset or press |
Press SAVE. |
|
SP-PHONE/MONITOR. |
|
! |
PT |
• Up to 64 digits can be stored and redialed. This does not include an outside (CO) line access |
|
code. |
||
|
PT |
• “ ”, “#”, “PAUSE”, and “INTERCOM” (for secret dialing) are counted as 1 digit. |
|
|
• A flexible button can be assigned as the SAVE button. |
||
|
PT |
||
|
• You can check the stored number. Press the SAVE button while on-hook, and the stored |
||
|
PT |
||
|
number will be displayed. |
||
|
PT |
• You can change the outside (CO) line when dialing. You may press a CO button to select an |
|
|
outside (CO) line directly after going off-hook before pressing the SAVE button. |
||
|
• 1.2 Proprietary Telephone Settings, “Customizing the Buttons on Your Telephone”, |
||
|
SAVE Button |
• 1.3 Making Calls, “Redialing Automatically (Automatic Redial)”
• See the Installation Manual, Section 3, “Redial”.
1-28 Operations

1.3Making Calls
Sending a Call Waiting Tone to a Busy Extension (Busy Station Signaling – BSS)
The busy extension that you called will hear the assigned Call Waiting tone and know that you are waiting.
Any Telephone
If you make an intercom call and hear a busy tone
|
2 |
Wait for an answer and talk. |
Dial 2.
•To answer from the calling extension, see “Call Waiting” in this manual.
!• If you hear a reorder tone when you set this feature, this feature cannot be operated with the called party. This feature is only available if the called extension has set the “Call Waiting” feature.
• 1.5 During a Conversation, “Call Waiting”
• See the Installation Manual, Section 3, “Busy Station Signaling (BSS)”.
Operations Basic
Operations 1-29

1.3Making Calls
Making Your Telephone Ring Back Automatically When a Line Becomes Free (Automatic Callback Busy – Camp-On)
Allows you to receive callback ringing when the dialed line becomes idle. When you answer the callback ringing;
For an extension: The called extension starts ringing without dialing.
For an outside (CO) line: The line is seized.
Setting
Any Telephone
If you hear a busy tone
6
|
Dial 6. |
Confirmation tone |
Hang up or press |
|
and reorder tone |
SP-PHONE/MONITOR. |
Wait for
the Camp-On recall.
Answering an intercom recall
Any Telephone
If you hear the telephone ringing
the called
Lift the handset or press SP-PHONE/MONITOR.
Answering an outside (CO) line recall
Any Telephone
If you hear the telephone ringing
|
phone no. |
||
|
Lift the handset or press |
Dial tone |
Enter the phone number. |
|
SP-PHONE/MONITOR . |
Canceling
Any Telephone
Lift the handset or press SP-PHONE/MONITOR.
• If you do not answer within 4 callback ring signals (within 10 seconds), this feature will be ! canceled.
• See the Installation Manual, Section 3, “Automatic Callback Busy (Camp-On)”.
1-30 Operations

1.3Making Calls
Interrupting an Existing Call (Executive Busy Override)
Executive Busy Override — Extension
Allows you to connect to an existing intercom (extension) call.
System Programming is required to use this feature.
Any Telephone
If you make an intercom call and while hearing a busy tone
|
3 |
A three-party conference |
|
is now established. |
|
|
Dial 3. |
Confirmation tone (optional) |
To leave the conference
Any Telephone
The other two parties continue their conversation.
Hang up or press SP-PHONE.
To terminate one party and talk to the other
PT
|
CO |
INTERCOM |
|
|
or |
||
|
Press the CO or INTERCOM |
Confirmation tone (optional) |
|
|
of the party to remain connected. |
• If all three parties are extensions, this operation is not available.
|
! |
or “Executive Busy Override Deny” |
|
|
versa, a confirmation tone is sent to |
||
|
Call”(Executive Busy Override |
||
|
• 1.7 |
Useful Features, “Conference (3-party)” |
|
|
• 1.7 |
Useful Features, “Data Line Security” |
• See the Installation Manual, Section 3, “Executive Busy Override”.
Operations Basic
Operations 1-31

1.3Making Calls
Executive Busy Override — Outside (CO) Line
Allows you to connect to an existing outside call or add a third party to your existing conversation.
System Programming is required to use this feature.
PT
Lift the handset or press SP-PHONE/MONITOR.
|
CO |
|
|
Press the desired CO |
Confirmation tone |
|
whose indicator is lit red. |
(optional) |
A three-party conference is now established.
To leave the conference
PT
The other two parties continue their conversation.
Hang up or press SP-PHONE/MONITOR.
To terminate one party and talk to the other
PT
|
CO |
INTERCOM |
|
|
or |
||
|
Press the CO or INTERCOM |
Confirmation tone (optional) |
|
|
of the party to remain connected. |
|
! |
PT |
• |
This feature does not work when “Data Line Security” or “Executive Busy Override Deny” |
|
is set at the extension engaged in the existing outside call. |
|||
|
PT |
• |
When a 2-party call is changed to a 3-party call or vice versa, a confirmation tone is sent to |
|
|
all parties. Eliminating the tone is programmable. |
• 1.3 Making Calls, ‘Denying “Interrupting an Existing Call” (Executive Busy Override Deny)
•1.7 Useful Features, “Conference (3-party)”
•1.7 Useful Features, “Data Line Security”
•See the Installation Manual, Section 3, “Executive Busy Override”.
1-32 Operations
 Loading…