
Когда вы используете какой-либо браузер, например Chrome, некоторая информация о посещенных сайтах сохраняется в файлах cookie и кеш-памяти. Удаление этих данных помогает устранить различные проблемы с сайтами (в том числе с загрузкой и отображением веб-страниц).
В браузере Chrome
- Запустите Chrome на компьютере.
- Нажмите на значок с тремя точками
 в правом верхнем углу экрана.
 - Выберите Дополнительные инструменты
 Удаление данных о просмотренных страницах.
 - В верхней части страницы выберите временной диапазон. Чтобы удалить все данные, выберите Все время.
- Выберите «Файлы cookie и другие данные сайтов» и «Изображения и другие файлы, сохраненные в кеше».
- Нажмите Удалить данные.
Подробнее о том, как управлять файлами cookie в Chrome… (Например, вы можете удалить файлы cookie определенного сайта.)
В других браузерах
Ищите инструкции на сайте техподдержки браузера, которым вы пользуетесь.
Что произойдет после удаления данных
После очистки кеша и удаления файлов cookie:
- Будут удалены некоторые настройки сайтов, например сохраненные имена пользователей и пароли.
- Если синхронизация в Chrome включена, вы не выйдете автоматически из аккаунта Google, с которым синхронизируется информация. Это позволит удалить данные на всех ваших устройствах.
- Возможно, некоторые сайты будут открываться медленнее, чем раньше, так как изображения и другой контент придется загружать заново.
Для чего нужны кеш и файлы cookie
- Файлы cookie – это файлы, создаваемые веб-сайтами, которые вы посещаете. Они делают работу в Интернете проще и удобнее.
- В кеш-памяти сохраняется определенная информация с веб-страниц (например, изображения), чтобы в следующий раз они открывались быстрее.
- Что такое кеш
- Как очистить кеш
- Где находится кеш Браузера
Кеш (cache) браузера — это папка с копиями некоторых данных со страниц, которые вы посещали. Обычно в кеше сохраняются те элементы страницы, которые вряд ли успели измениться за промежуток времени между двумя запросами, — музыка, видео, изображения, стили, скрипты. Когда вы снова откроете ту же самую страницу, браузер не будет запрашивать данные из интернета, а получит их из кеша. Страница откроется быстрее, а нагрузка на сеть снизится.
- Пример использования кеша
-
Когда вы запускаете онлайн-видео, оно загружается быстрее, чем воспроизводится. Загруженные ролики сохраняются в кеше на компьютере. Поэтому после полной загрузки вы досмотрите видео даже без подключения к интернету.

- Почему кеш — это риск для приватности
-
-
Если компьютером пользуется несколько человек — любой из них имеет доступ к папке с кешем. Рекомендуем работать на таких компьютерах в режиме Инкогнито.
-
Если на компьютере присутствует вредоносное ПО, то оно может получить доступ к кешу Браузера.
-

Внимание. Удалять данные в браузере после посещения сайта неэффективно, так как они могут попасть к злоумышленникам во время визита. Чтобы сохранить личные данные в тайне, открывайте сомнительные сайты в режиме Инкогнито.
Чтобы очистить кеш:
-
Нажмите либо сочетание клавиш Ctrl + Shift + Del (в Windows и Linux) или Shift + ⌘ + Backspace (в macOS).
-
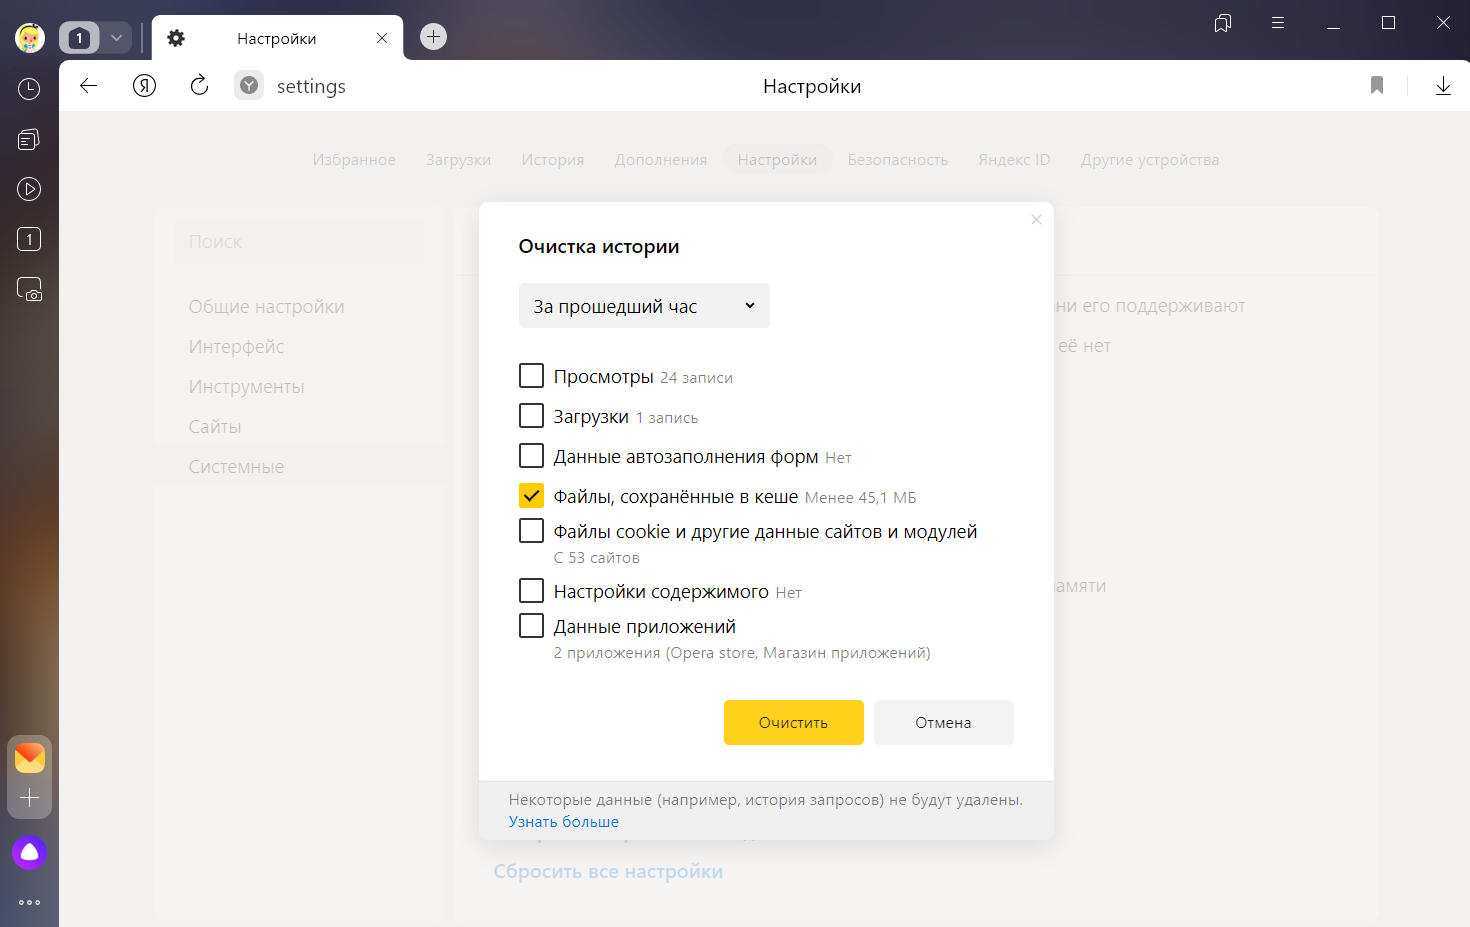
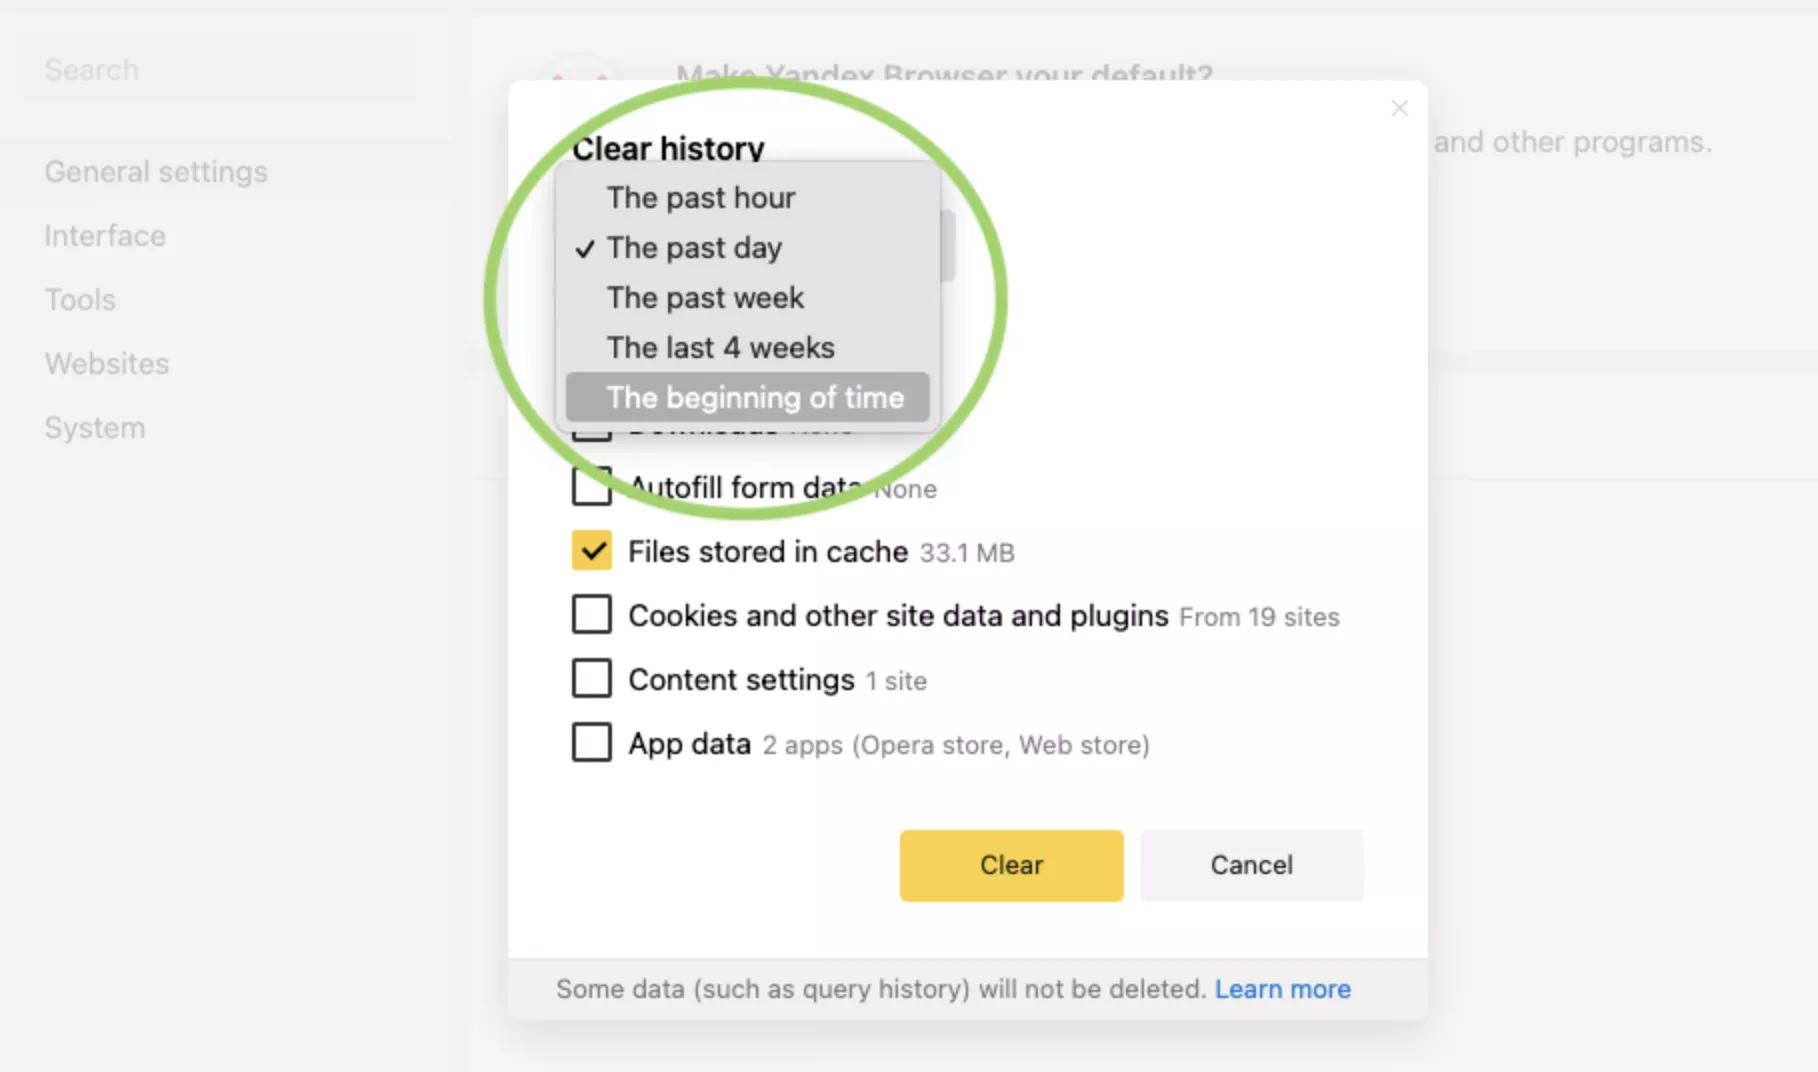
В списке Очистка истории выберите период для удаления кеша.
-
Включите опцию Файлы, сохранённые в кеше.
-
Отключите остальные опции (если хотите очистить только кеш Браузера).
-
Нажмите Очистить.
Чтобы просмотреть или скопировать кеш Яндекс Браузера (например, для технической поддержки), откройте папки:
| Операционная система | Адрес кеша |
|---|---|
| Windows 7, Windows 8, Windows 10, Windows 11 | C:\Пользователи\Имя вашей учетной записи\AppData\Local\Yandex\YandexBrowser\User Data\Default\Cache
Примечание. Папка AppData скрытая. Чтобы ее увидеть, включите отображение скрытых папок. |
| macOS | ~/Library/Application Support/Yandex/YandexBrowser/Default/GPUCache |
| Linux | ~/.cache/yandex-browser/Default/Cache |
Примечание. Поддержка операционных систем Microsoft Windows XP и Vista прекращена с апреля 2017 года.
Кеш хранится только на одном устройстве, при синхронизации устройств он не переносится.
Как очистить кэш браузера
Читайте статью, если хотите узнать, что такое кэш, зачем он нужен и как быстро очистить кэш интернет-браузера.
Что такое кэш
Чтобы понять, что такое кэш, нужно разобраться, как работают интернет-браузеры.
Дело в том, что любой сайт — это набор файлов. Файлы каждого сайта хранятся на одном из серверов в интернете. Чтобы попасть на сайт, сначала нужно найти его файлы в интернет-пространстве. Поэтому когда пользователь вводит запрос в поисковую строку, браузер сразу начинает искать сервер, на котором размещен сайт. Затем он обращается к этому серверу и запрашивает у него файлы сайта. Сервер дает ответ, и в браузере открывается искомая страница.
Этот процесс не виден пользователю, поскольку браузер выполняет его в автоматическом режиме. Со стороны пользователя процесс не выглядит сложным, однако на техническом уровне тратятся время и ресурсы системы.
Чтобы тратить меньше ресурсов, придумали систему кэширования. Кэш — это буферная зона на системном диске, в которой хранятся временные файлы браузера. Кэш позволяет хранить данные (скрипты, картинки, видео и другое) интернет-ресурсов и страниц сайтов, которые недавно посещал пользователь.
Если пользователь захочет зайти на один из ресурсов повторно, браузер возьмет файлы сайта из кэша — папки на системном диске компьютера. Это позволит значимо сократить время повторной загрузки страницы и сэкономить резервы интернет-системы.
Кэш легко перепутать с cookie-файлами и историей посещений браузера. Однако эти элементы слабо связаны друг с другом, поскольку имеют принципиальные различия. История браузера — это перечень всех интернет-ресурсов, на которые в определенный временной период заходил пользователь. Cookie — это небольшие отрывки данных, которые браузер запоминает, а затем использует при аутентификации (например, логин и пароль), воспроизведении настроек и подсчете статистики. В кэш попадает вся техническая информация (html-код, стили CSS, медиафайлы) страниц сайтов, на которые недавно заходил пользователь.
Для чего нужно чистить кэш
Можно сказать, что кэш — это кратковременная память браузера. Следовательно, в ней может хранится ограниченное количество данных и информации. Если в кэше набирается слишком много информации, система начинает функционировать хуже. В этом случае кэш затрудняет работу — страницы грузятся медленнее, браузер и вся система подвисает, что создает проблемы для пользователя.
Также «залежавшийся» кэш нередко играет злую шутку с пользователем. Самый яркий пример — страницы с ошибками. Если при первом переходе на сайт вы столкнулись с ошибкой, браузер запомнит его именно в таком виде. Даже если работа ресурса позднее будет восстановлена, при повторном переходе вы увидите всё ту же ошибку из кэша. Всё это наводит на мысль о том, что кэш необходимо регулярно чистить.
Система кэширования встроена во все современные интернет-браузеры. В инструкциях ниже мы покажем универсальные способы, с помощью которых можно очистить кэш в таких популярных браузерах, как Google Chrome, Mozilla Firefox, Opera, Яндекс.Браузер, Internet Explorer (Edge) и Safari.
С помощью наших инструкций вы сможете как очистить кэш браузера на ноутбуке, так и на стационарном компьютере и других устройствах. Чтобы удалить кэш с мобильного устройства на Android , используйте статью Как очистить кэш браузера на телефоне.
Очистка кэша в Google Chrome
Мы описали наиболее универсальный способ очистить кэш браузера Google. Если вы хотите узнать другие способы очистки, читайте статью Как очистить кэш в браузере Google Chrome.
-
1.
В браузере нажмите на кнопку с тремя точками. Затем кликните Настройки:
-
2.
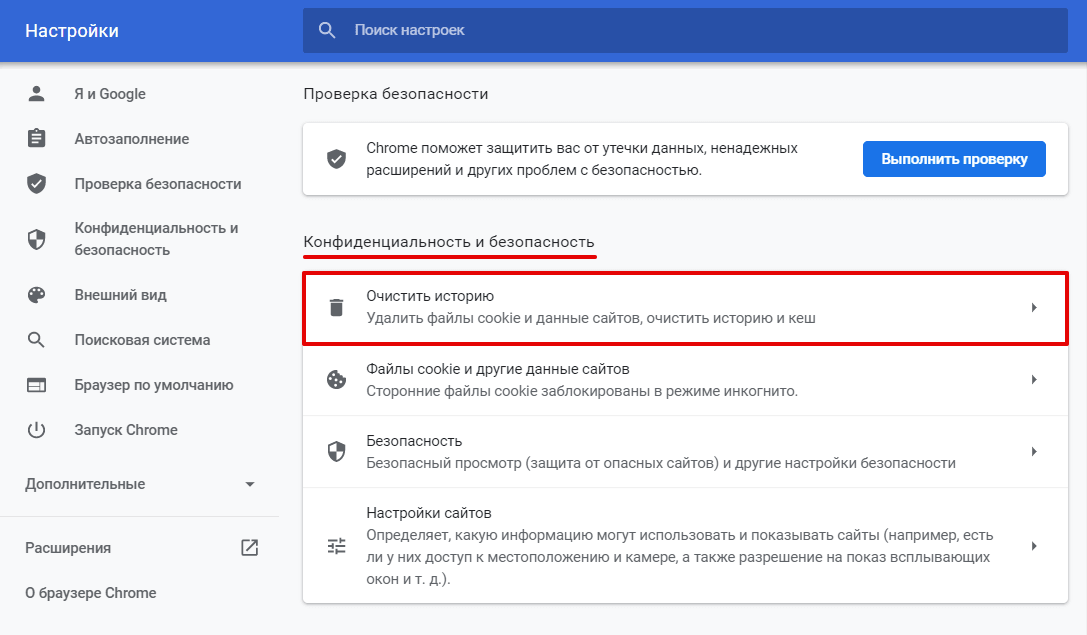
Пролистайте страницу до раздела «Конфиденциальность и безопасность» и нажмите Очистить историю:
-
3.
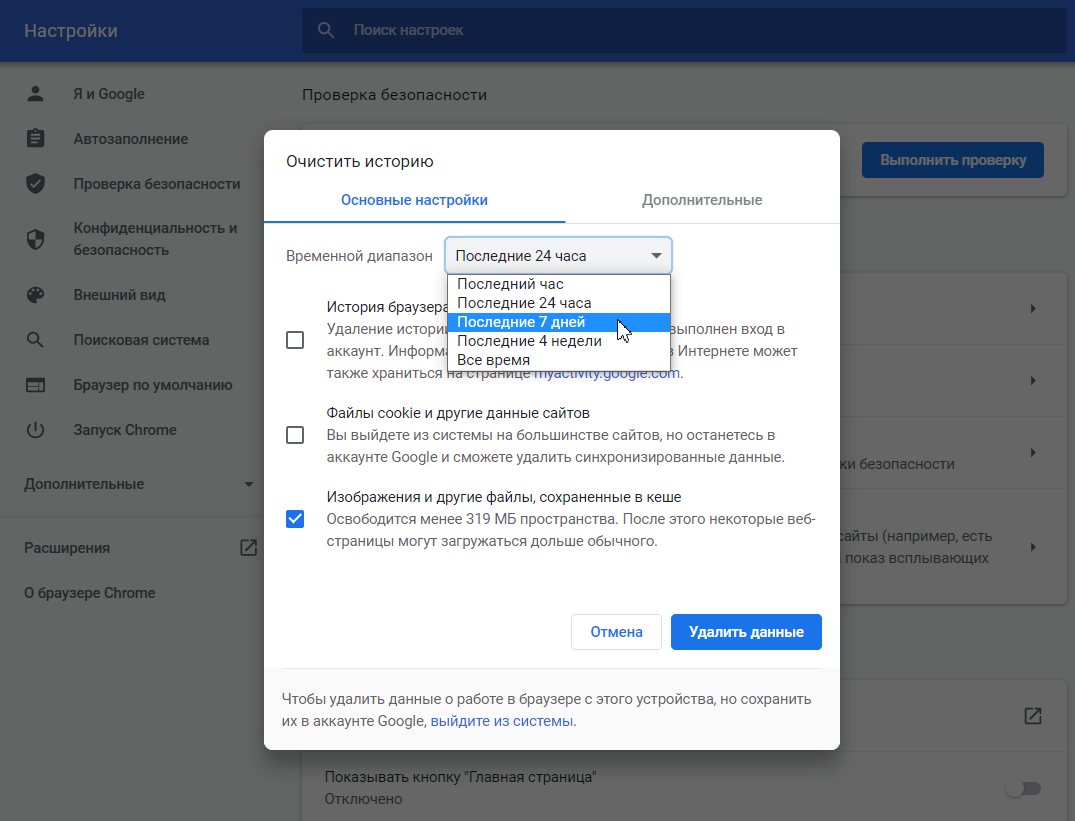
Отметьте чекбокс «Изображения и другие файлы, сохраненные в кеше». Затем выберите нужный временной диапазон в выпадающем списке:
-
4.
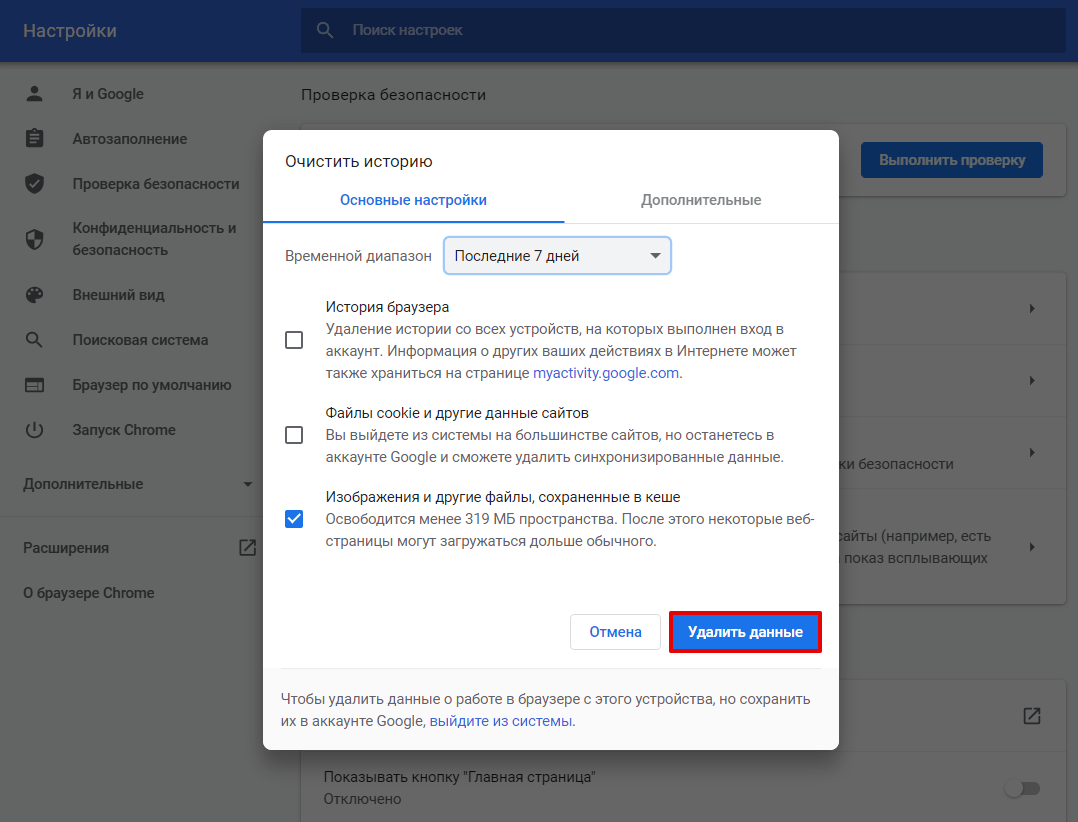
Кликните Удалить данные:

Очистка кэша в Яндекс.Браузер
Мы описали наиболее универсальный способ очистить кэш в браузере Яндекс. Если вы хотите узнать другие способы очистки, читайте статью Как очистить кэш в Яндекс.Браузере.
-
1.
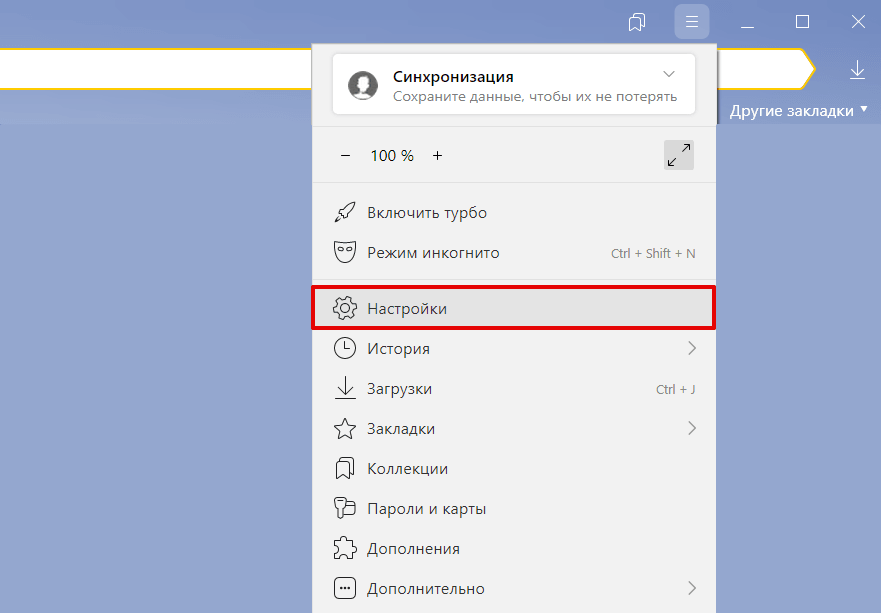
Нажмите в правом верхнем углу на кнопку с тремя горизонтальными полосками.
-
2.
Нажмите Настройки:
-
3.
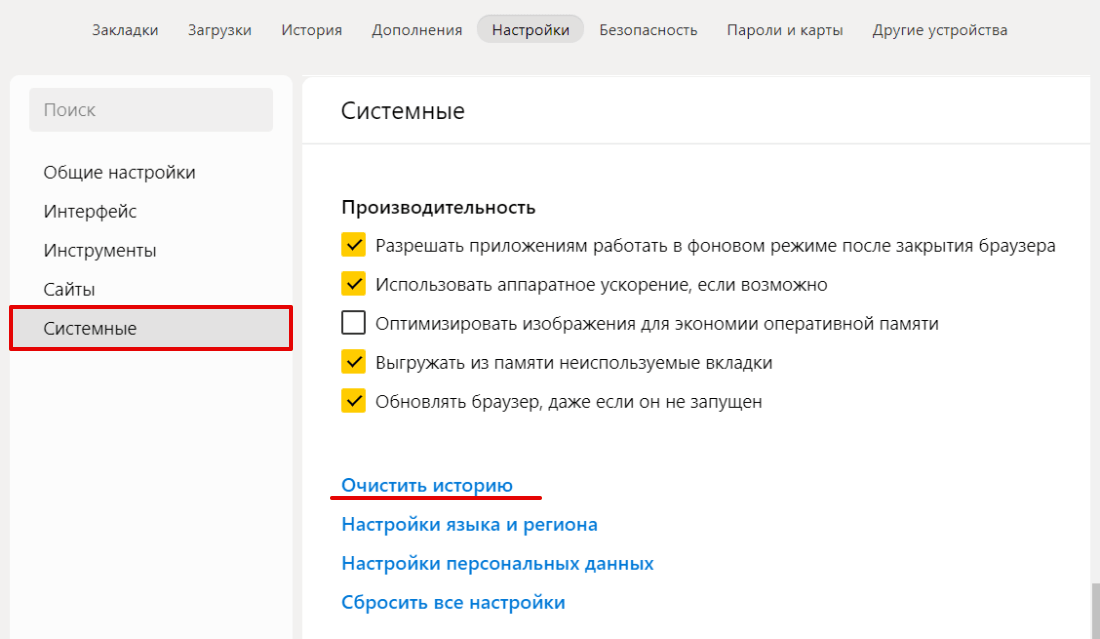
В левом меню выберите блок «Системные» и прокрутите страницу до конца. Нажмите Очистить историю:
Обратите внимание! Для вызова настроек куки и кэша можно использовать горячие клавиши. Введите сочетание клавиш Ctrl + Shift + Del и перед вами откроется окно настроек.
-
4.
В выпадающем списке отметьте временной промежуток и поставьте галочку напротив пункта «Файлы, сохраненные в кеше» и нажмите Очистить:
Очистка кэша в Mozilla Firefox
Мы описали наиболее универсальный способ очистить кэш в браузере Mozilla. Если вы хотите узнать другие способы очистки, читайте статью Как очистить кэш браузера Mozilla Firefox.
-
1.
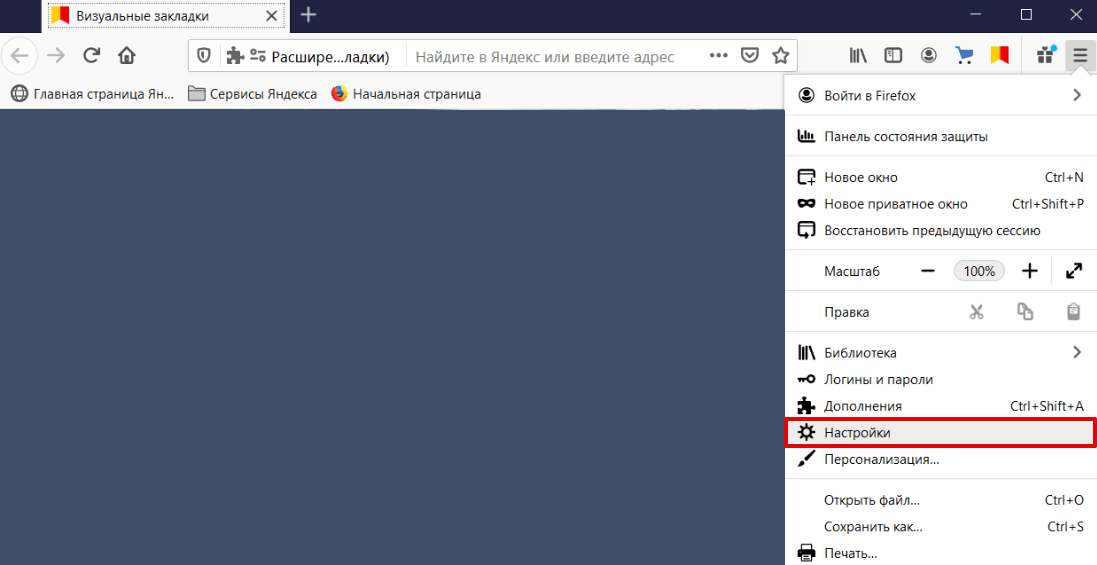
Кликните в правом углу экрана на три горизонтальные линии и нажмите Настройки:
-
2.
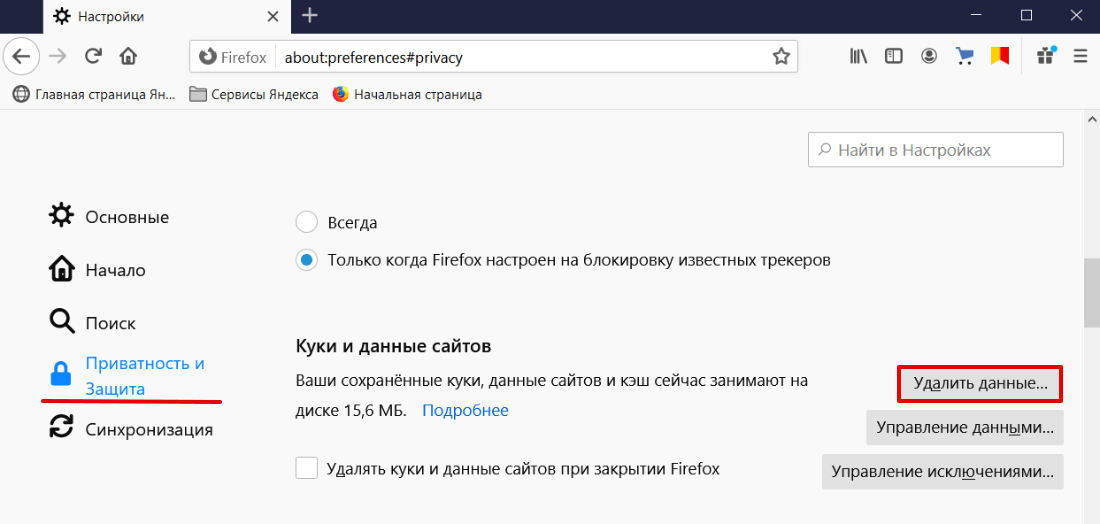
В левом меню выберите «Приватность и Защита». Прокрутите страницу до блока «Куки и данные сайтов» и нажмите Удалить данные:
-
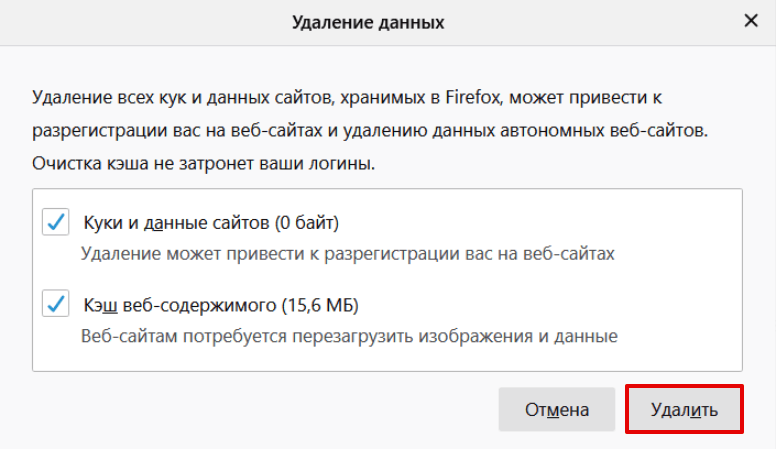
3.
Установите галочки в чекбоксах Кэш веб-содержимого и Куки и данные сайтов (если нужно). Нажмите Удалить:
Очистка кэша в Opera
Мы описали наиболее универсальный способ очистки кэша браузера Opera. Если у вас Windows и вы хотите узнать другие способы, читайте статью Как очистить кэш в браузере Оpеrа на Windows.
-
1.
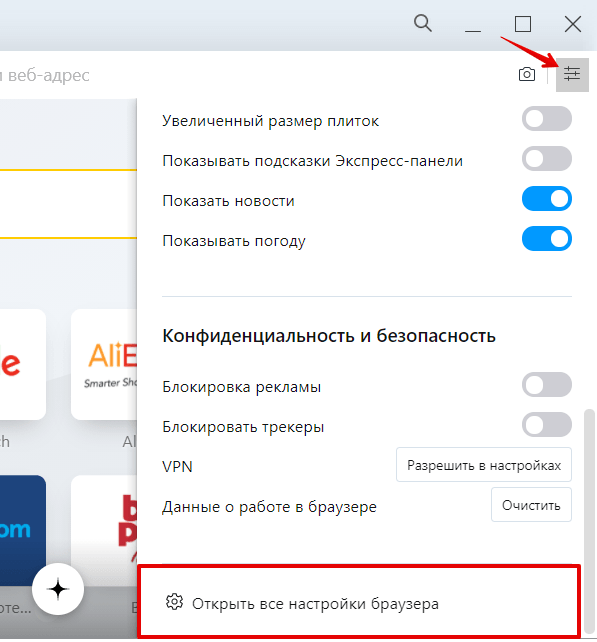
В браузере нажмите на кнопку с тремя перечеркнутыми полосками. Затем кликните Открыть все настройки браузера:
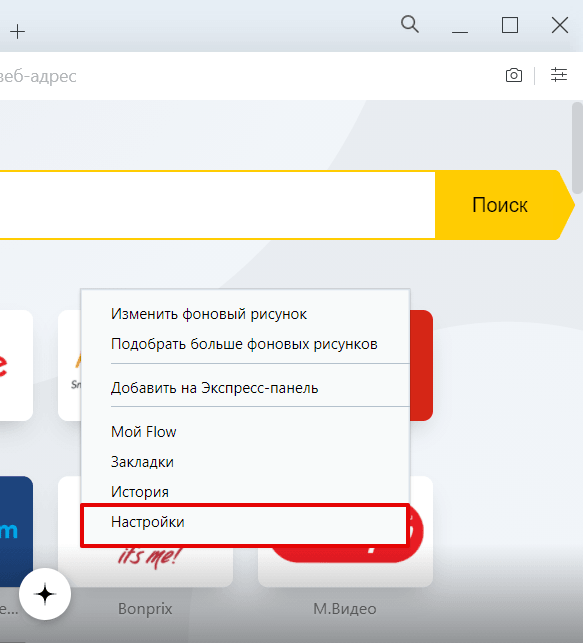
Также на этом шаге вы можете кликнуть правой кнопкой мыши на стартовой странице и нажать Настройки:
-
2.
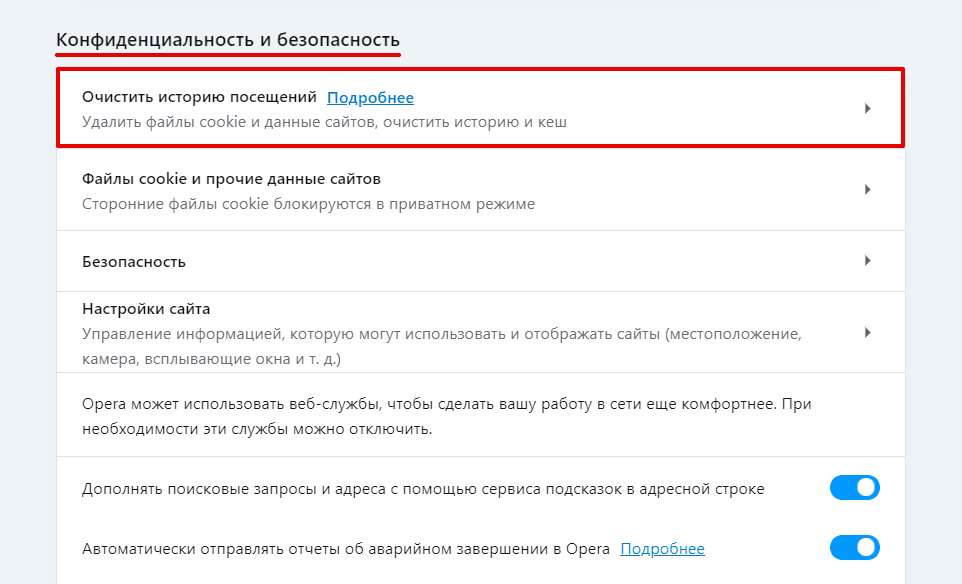
Пролистайте страницу до раздела «Конфиденциальность и безопасность» и нажмите Очистить историю посещений:
-
3.
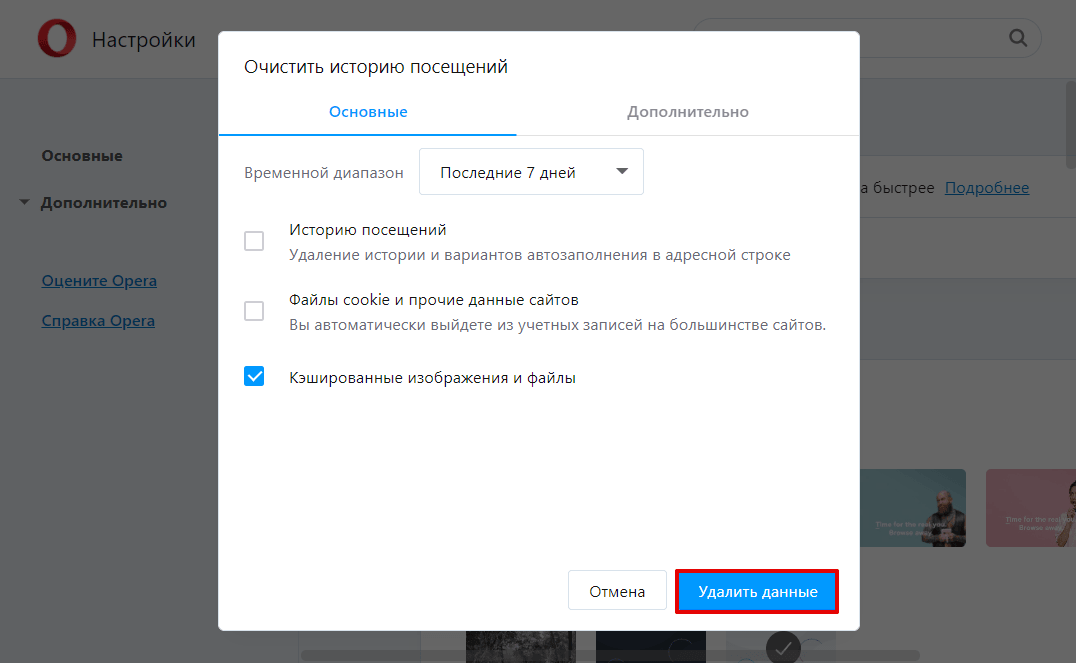
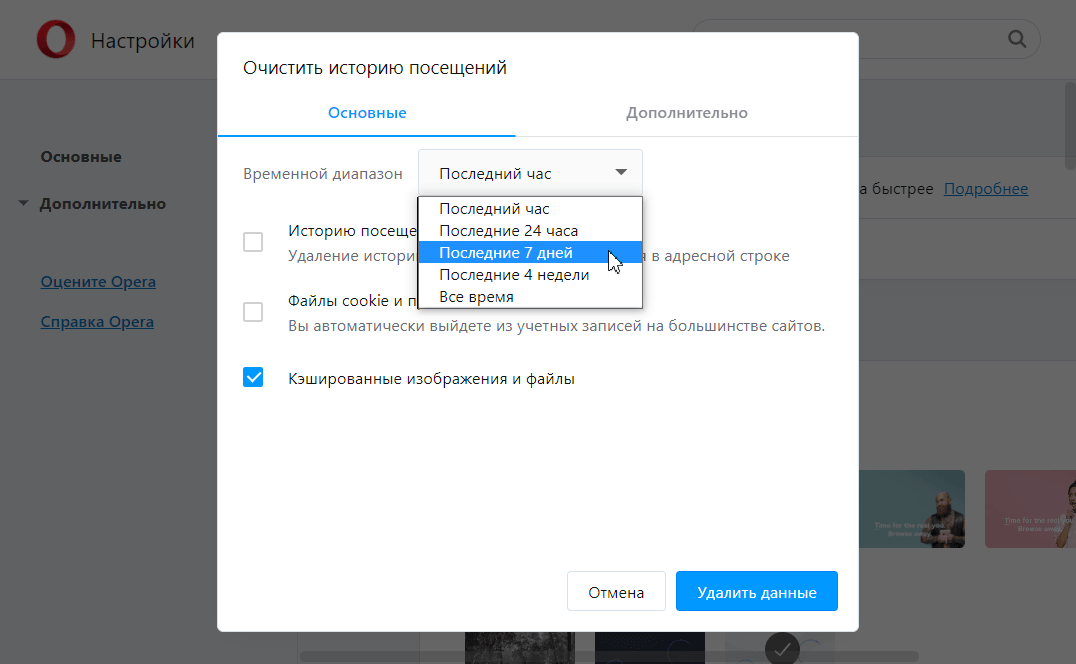
Отметьте чекбокс «Изображения и другие файлы, сохраненные в кеше». Затем в выпадающем списке выберите нужный временной диапазон:
-
4.
Кликните Удалить данные:
Очистка кэша в Microsoft Edge
Мы описали наиболее универсальный способ очистки кэша в браузера Edge. Если вы хотите узнать другие способы очистки, читайте статью Как очистить кэш в браузере Microsoft Edge.
-
1.
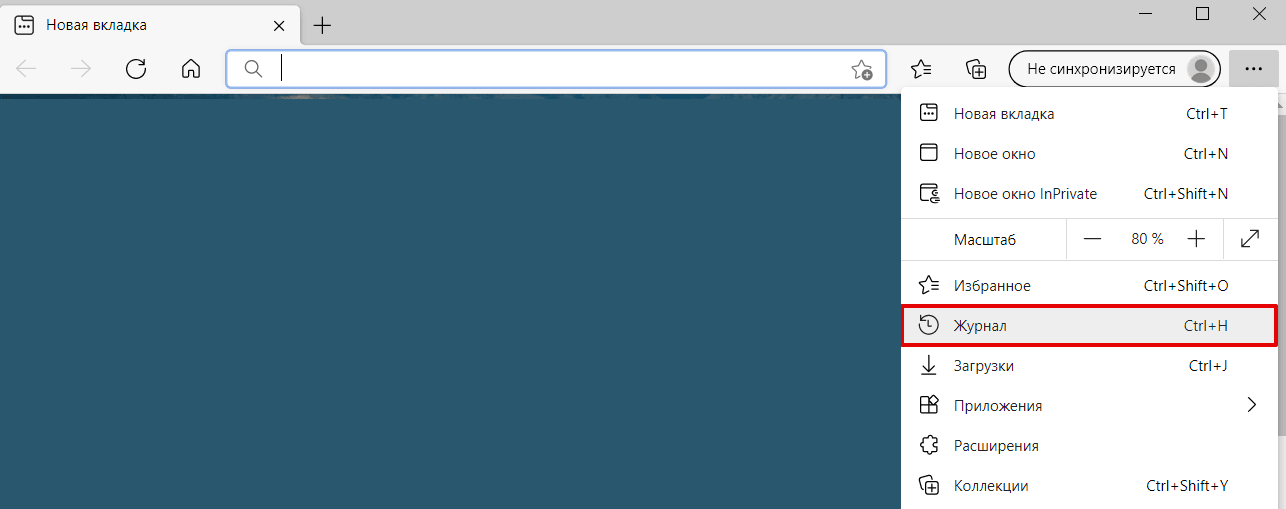
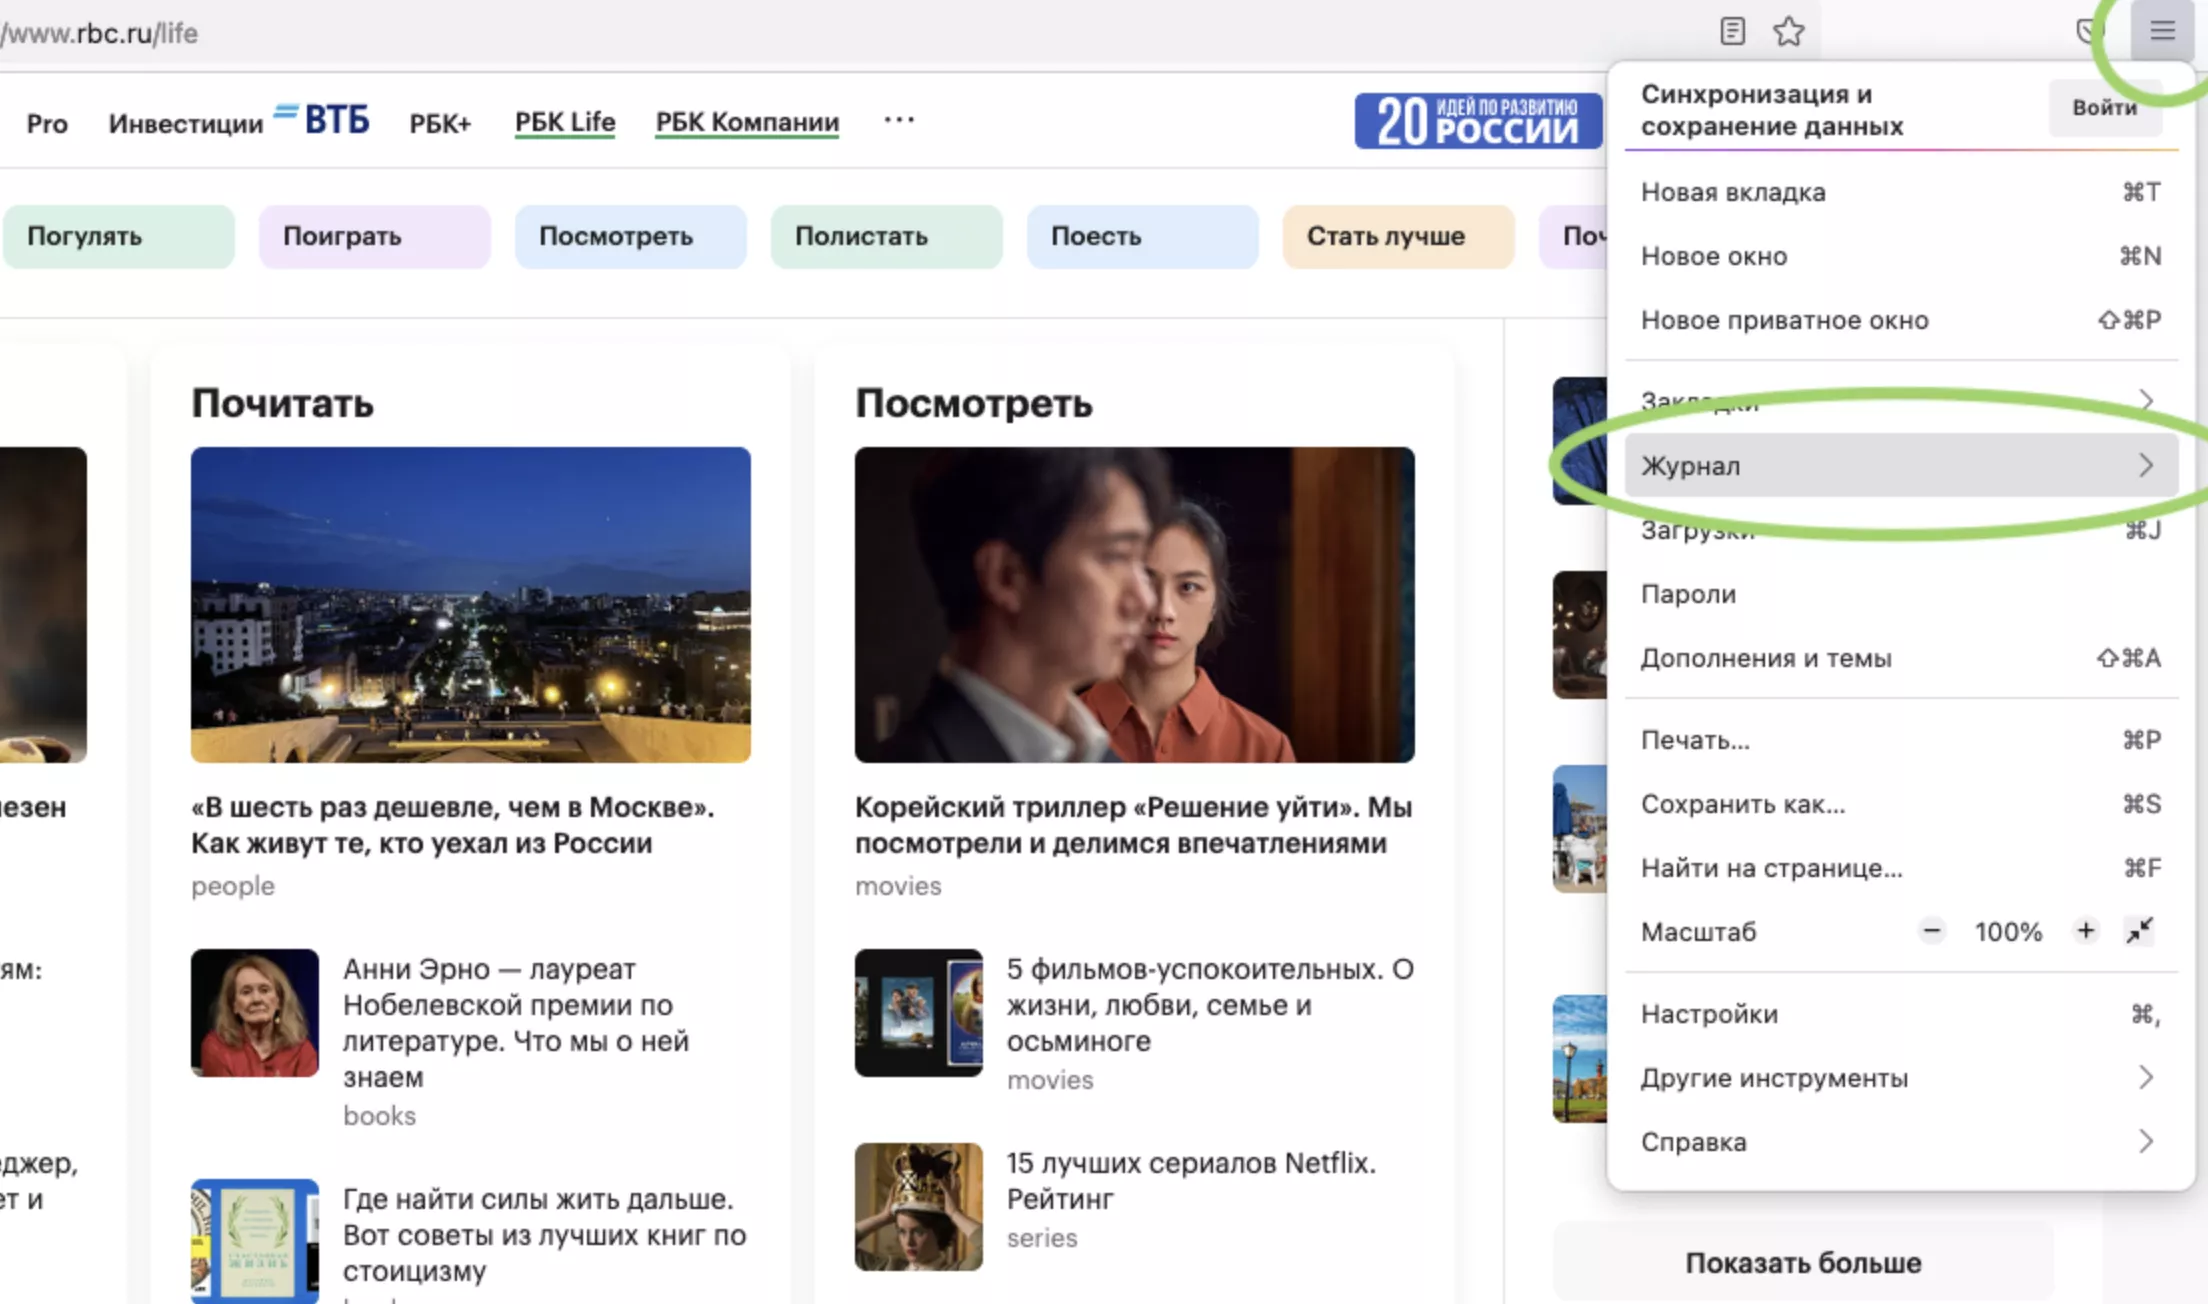
В правом верхнем углу браузера нажмите на три точки. Выберите Журнал:
Также можно использовать горячие клавиши Ctrl+Shift+Delete. В этом случае сразу переходите к шагу 3.
-
2.
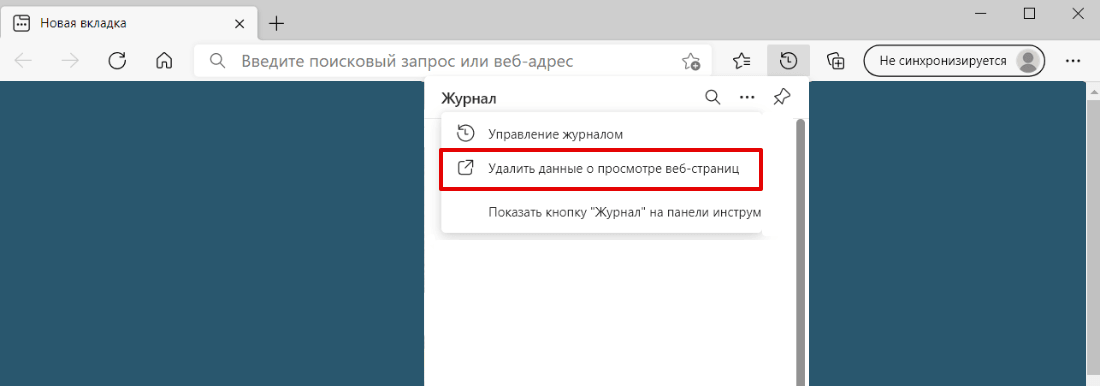
Нажмите на Удалить данные о просмотре веб-страниц:
Как почистить кэш на хостинге -
3.
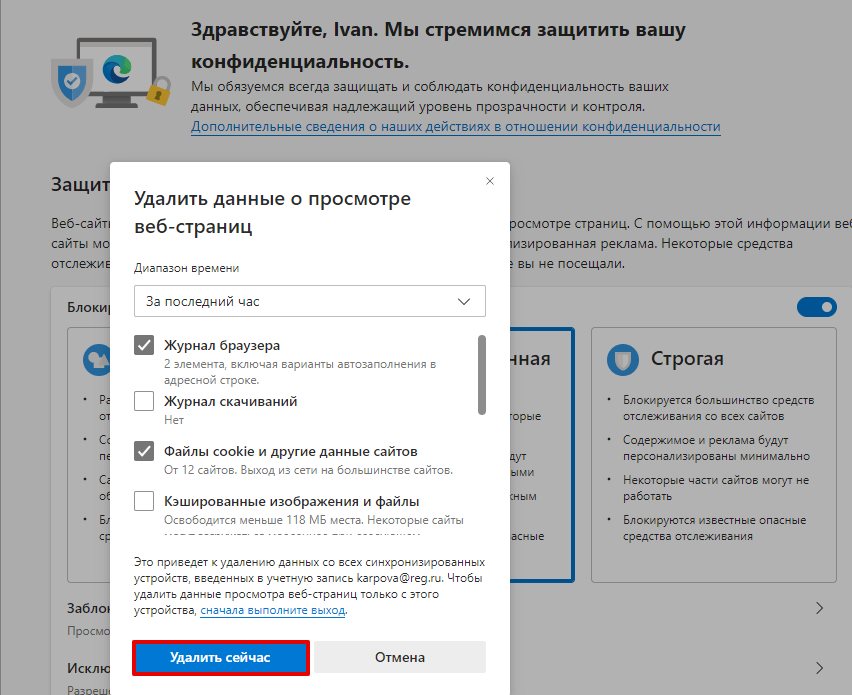
Выберите временной диапазон. Отметьте чекбоксы Журнал браузера и Файлы cookie и другие данные сайтов (если нужно).
-
4.
Нажмите Удалить сейчас:
Очистка кэша в Internet Explorer
Мы описали наиболее универсальный способ очистки кэша в браузера Internet Explorer 11. Если вы хотите узнать другие способы очистки, читайте статью Как очистить кэш в браузере Internet Explorer.
-
1.
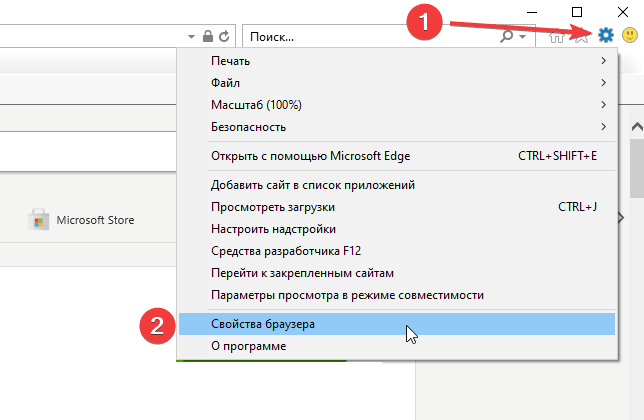
Откройте браузер, нажмите значок настроек в верхнем правом углу и выберите в открывшемся списке Свойства браузера:
-
2.
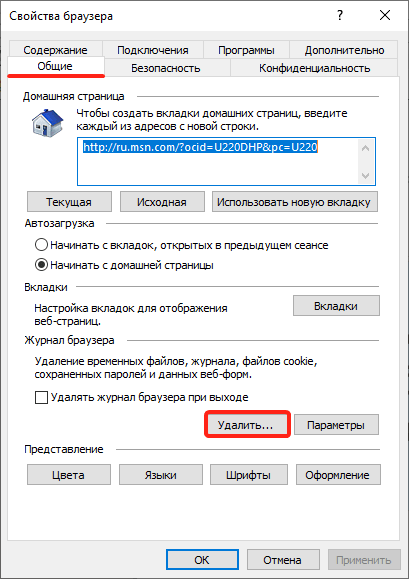
Во вкладке «Общие» нажмите Удалить:
-
3.
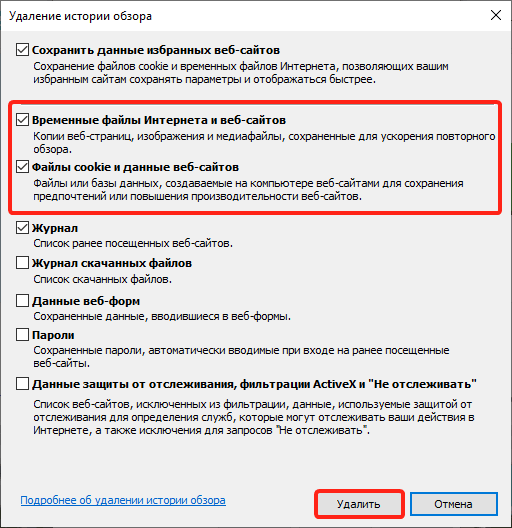
Поставьте чекбоксы напротив пунктов «Временные файлы Интернета и веб-сайтов» и «Файлы cookie и данные веб-сайтов», затем нажмите Удалить:
Очистка кэша в Safari
Чтобы очистить кэш в Safari:
-
1.
В панели управления браузера нажмите Safari. Затем кликните Настройки (Preferences).
-
2.
Поставьте галочку напротив пункта «Показывать меню Разработка в строке меню» (Show Develop menu in menu bar). В панели появится вкладка Разработка (Develop).
-
3.
Нажмите Разработка (Develop) и кликните Очистить кэш (Empty Caches).
Изменения на сайте отображаются не сразу
Что делать, если изменения на сайте отображаются не сразу:
-
1.
Очистите кэш браузера. Возможно, ваш браузер закэшировал старую страницу сайта и показывает неактуальную версию. Для очистки используйте одну из инструкций выше.
-
2.
Очистите кэш CMS, если вы его используете.
-
3.
Добавьте директивы php.ini. Некоторые сборки PHP идут с кэширующем модулем:
- «5.3-with-xcache» — XCache;
- «5.4-bx-optimized2» — XCache;
- «5.4-with-xcache» — XCache;
- «5.5-bx-optimized» — OPcache;
- «5.5» — OPcache;
- «5.6-bx-optimized» — OPcache.
- «5.6» — OPcache;
- «7.0» — OPcache.
Если вы используете одну из этих сборок и хотите, чтобы изменения на сайте отображались сразу, то добавьте директивы в «php.ini». Подробнее читайте в статье Как редактировать php.ini.
Для версий php «5.5», «5.6», «7.0»:
Для версий php «5.3» и «5.4»:
Теперь вы понимаете, что такое кэширование, что значит очистить кэш браузера на компьютере и как это делается в популярных интернет-браузерах.
Помогла ли вам статья?
Спасибо за оценку. Рады помочь 😊
👍
Как быстро очистить кэш на компьютере. Пошаговая инструкция
. Увеличиваем скорость работы браузера в несколько кликов
Обновлено 18 октября 2022, 14:59

Очистка кэша устранит проблемы с загрузкой сайтов, обновит страницы до последней версии и ускорит работу браузера. Это полезная функция, о которой пользователи часто забывают.
РБК Life составил пошаговую инструкцию, как быстро очистить кэш на любом устройстве.
Что такое кэш
Кэш (cache) — это аппаратное или программное обеспечение для временного хранения информации. Он сокращает время доступа к данным, уменьшает задержку ожидания и повышает производительность.
Чаще всего кэшированные данные использует процессор, операционная система устройства, приложения и браузеры. В кэше браузера хранится информация о файлах, загруженных из интернета. Эти данные при повторном обращении на страницу позволят быстрее ее загрузить. К примеру, вы посмотрели видео на YouTube — информация осталась во временном хранилище. Через время вы вновь включаете ролик — за счет кэша он загрузится быстрее [1].

Кэш — это полезная функция, но иногда устаревших и неактуальных данных становится слишком много. Бывает, что кэш мешает увидеть новую версию веб-сайта, если с прошлого вашего посещения разработчики внесли какие-то изменения. Тогда необходимо очистить хранилище вручную.
Большинство браузеров одновременно с кэшем предлагают удалить историю просмотра веб-страниц и файлы cookie. Учтите, что в cookie также содержатся логины и пароли от страниц. При очистке этих файлов придется заново входить в социальные сети, почты и другие ресурсы. Тем не менее раз в несколько месяцев стоит удалять всю историю браузера. Это поможет устранить неполадки в работе и повысит производительность [2].
В большинстве браузеров быстро очистить кэш можно с помощью горячих клавиш:
⌘ + Shift + Del (Mac);
Ctrl + Shift + Del (Windows).
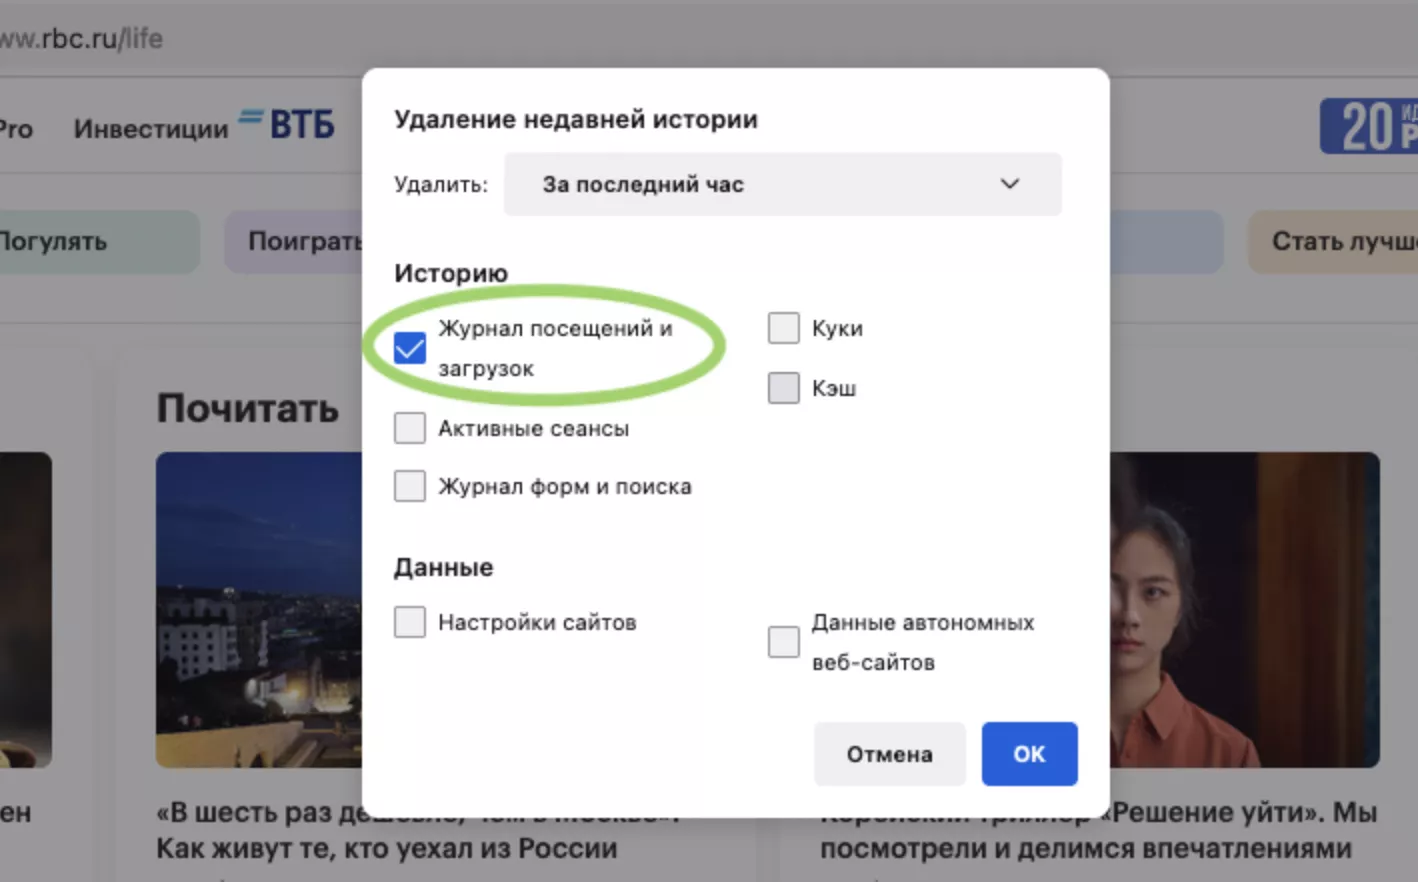
В открывшемся окне поставьте галочку напротив данных кэша и подтвердите действие.
Как очистить кэш в Google Chrome
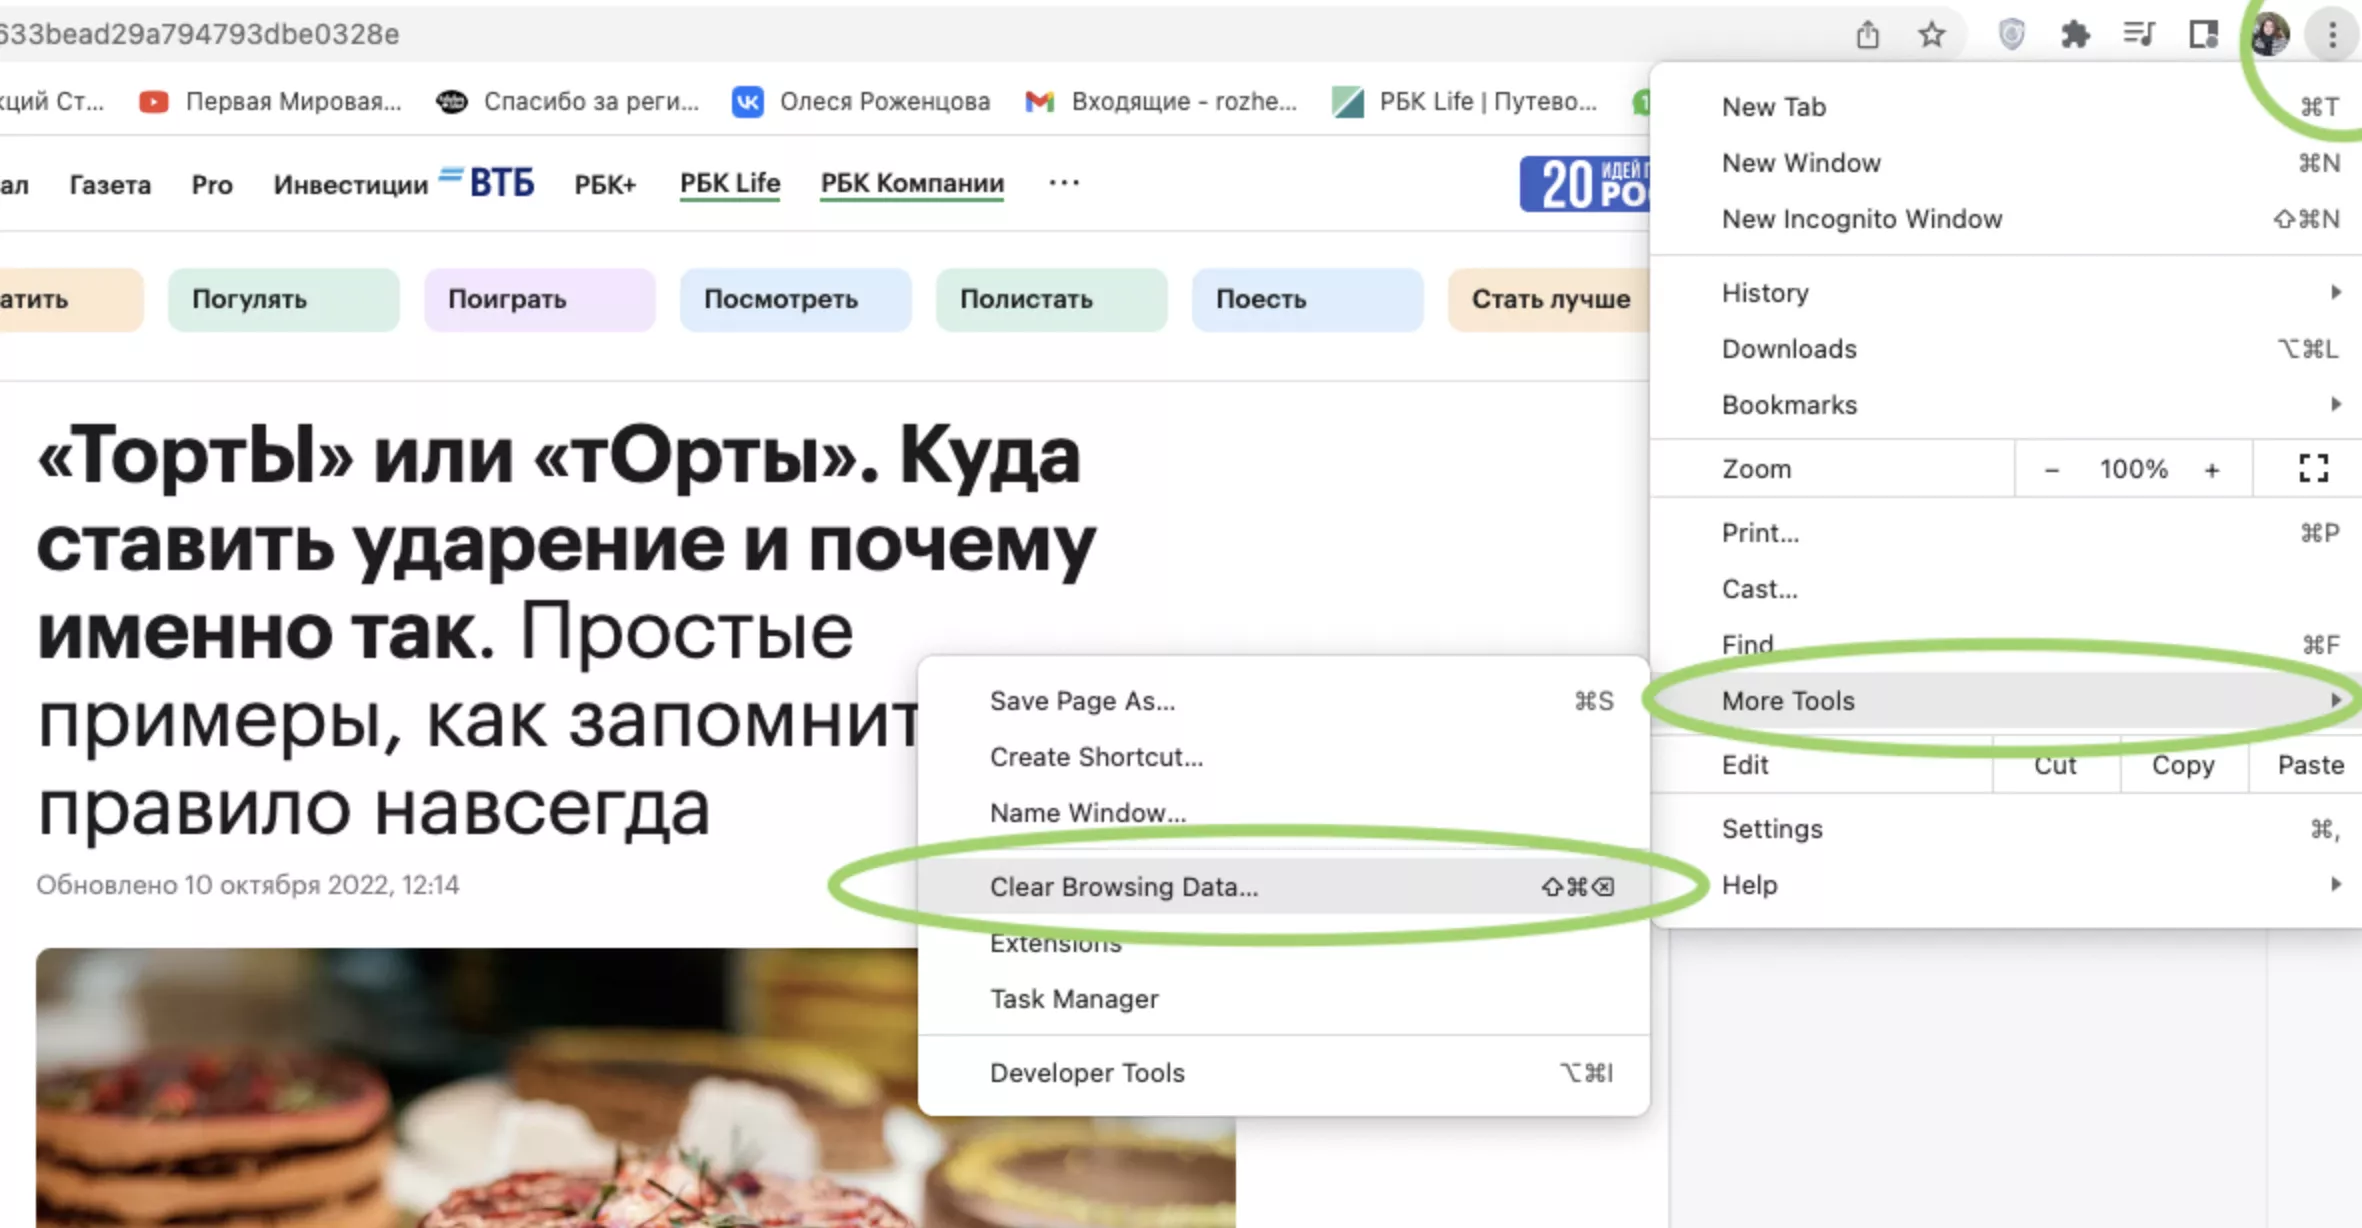
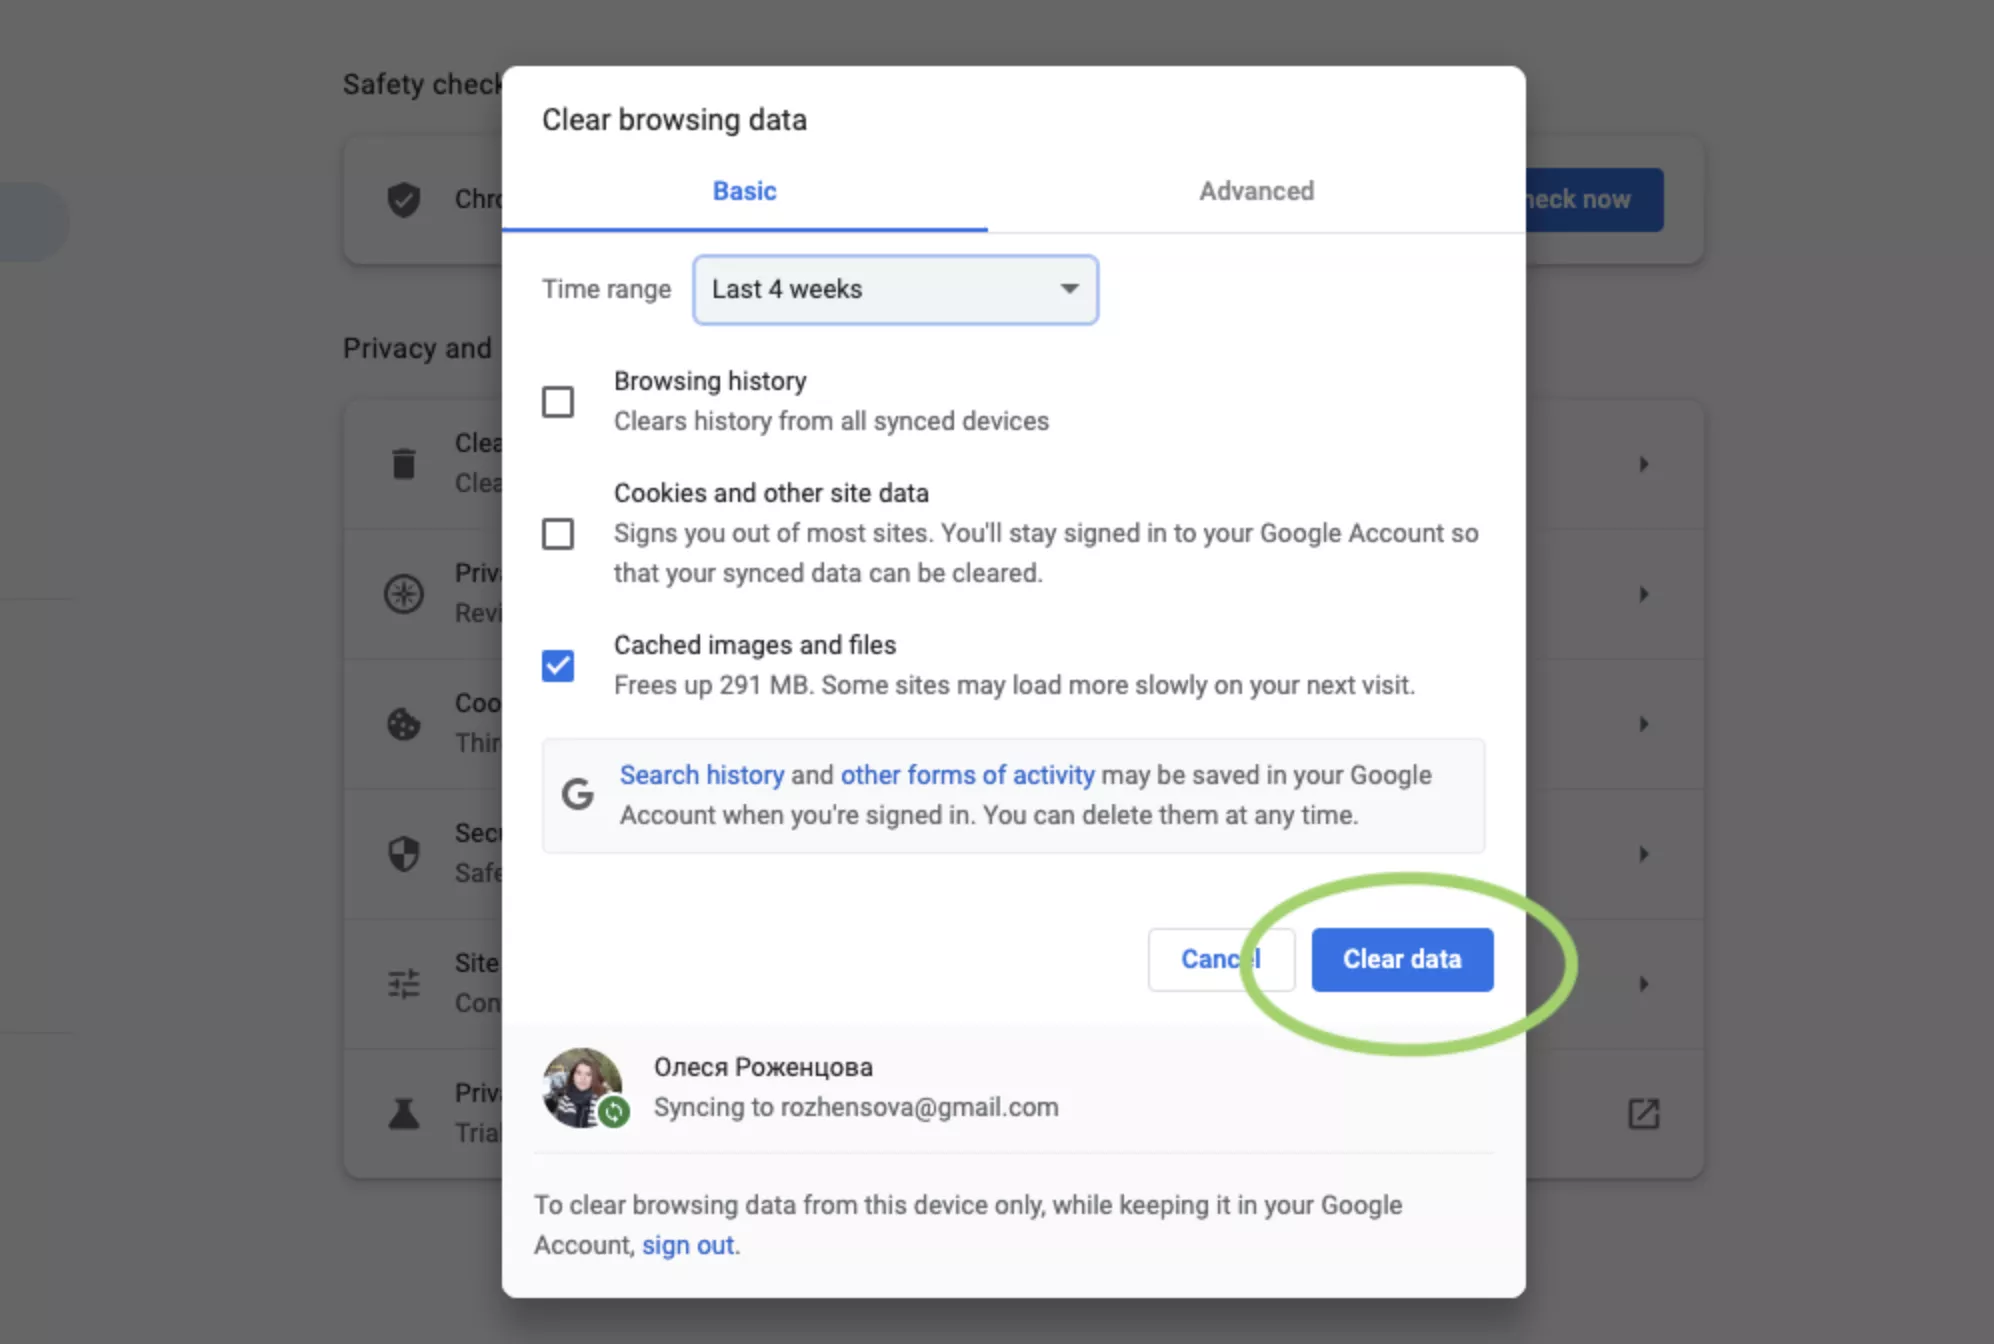
Шаг 1. В браузере нажмите на три точки в правом верхнем углу. Выберите «Дополнительные инструменты», во всплывающем окне перейдите в «Удаление данных о просмотренных страницах».
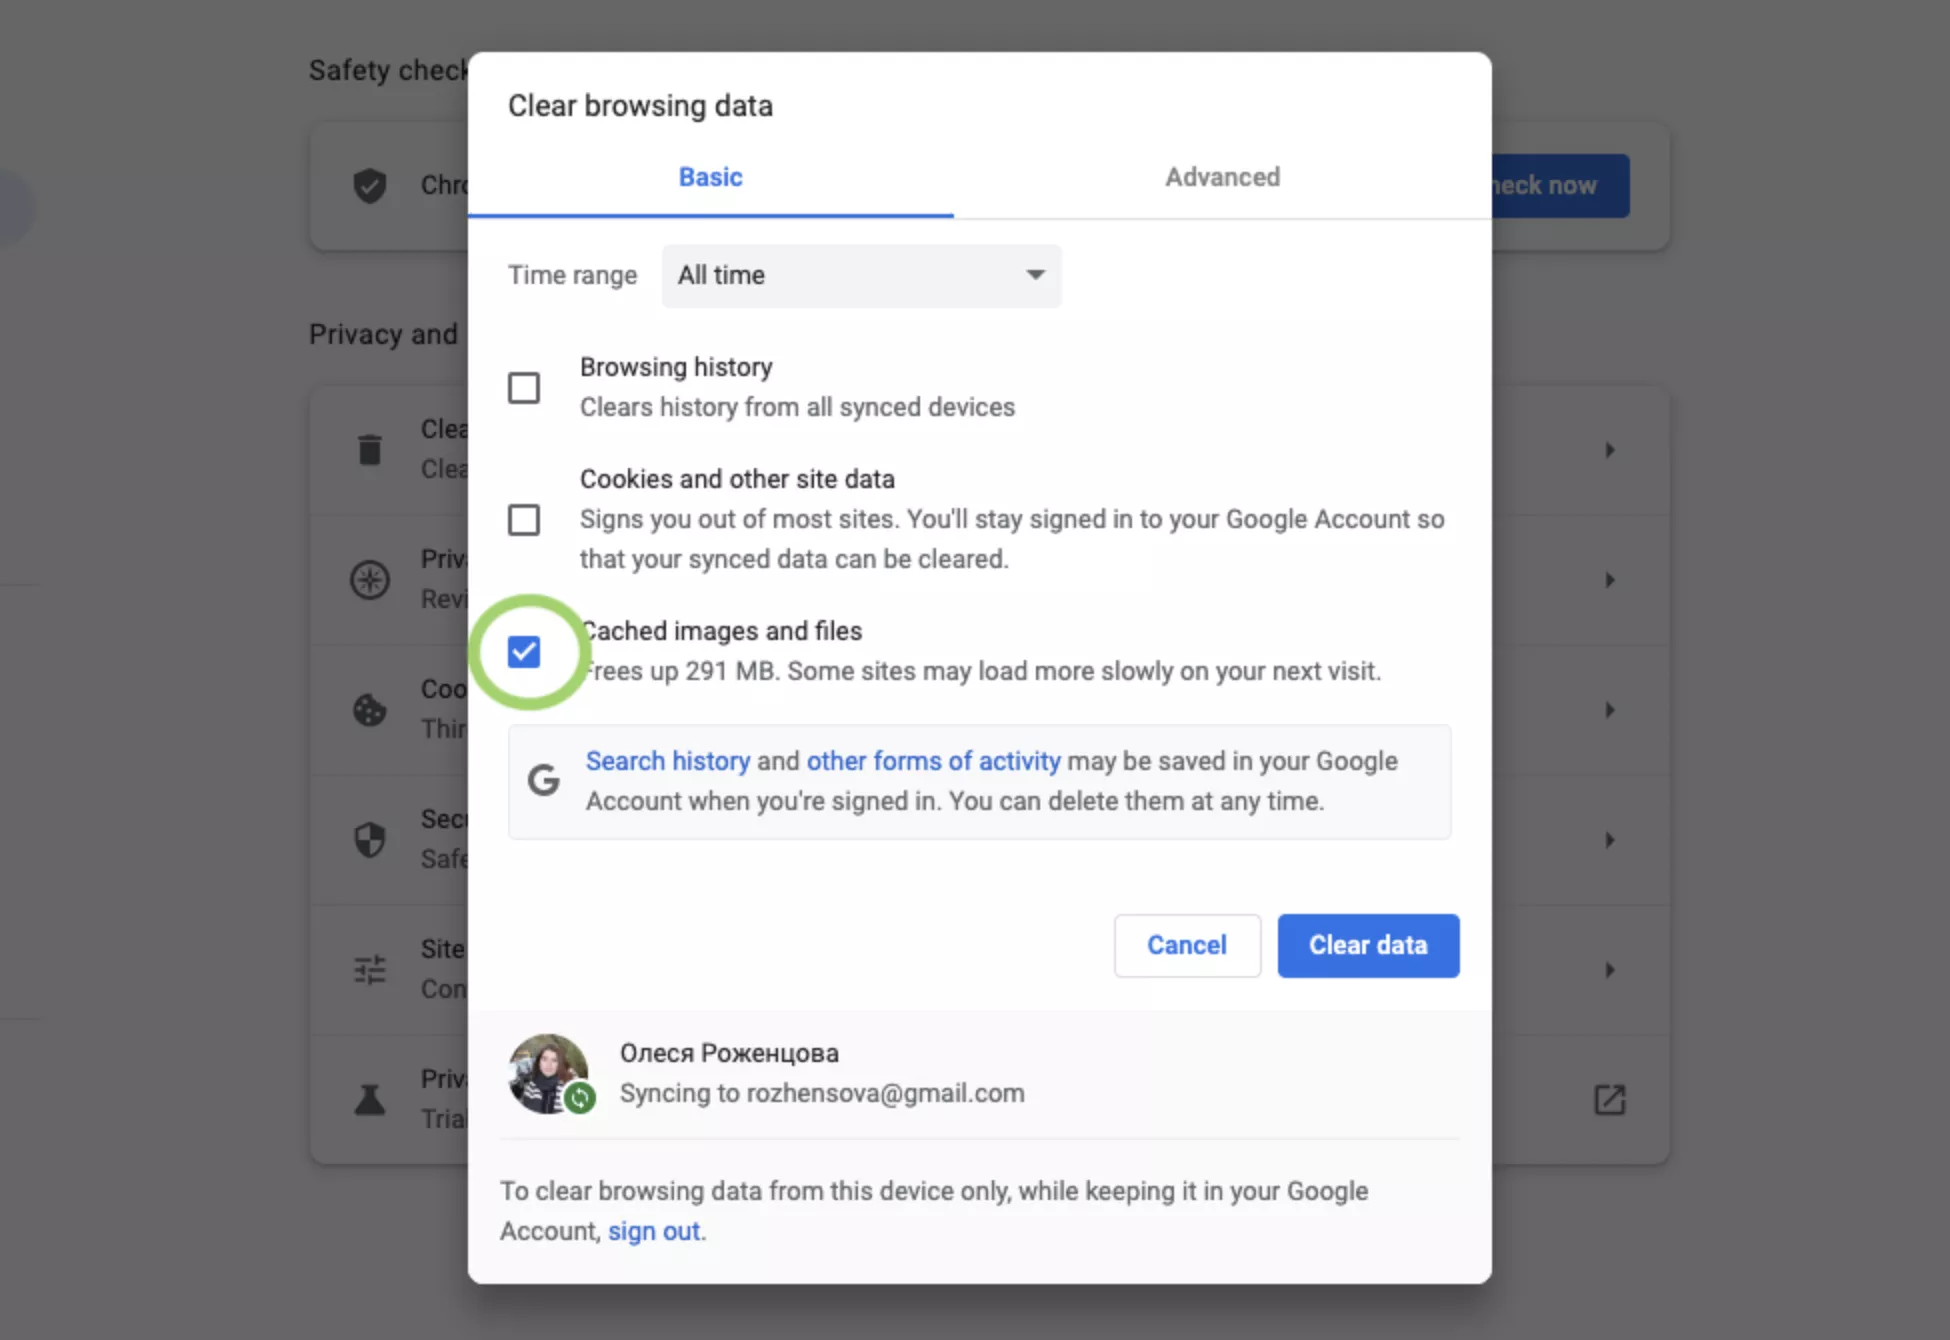
Шаг 2. Появится всплывающее окно. Поставьте галочку напротив «Изображения и другие файлы, сохраненные в кэше». Если вы добавите галочку напротив «Файлы cookie и другие данные сайтов», разлогинитесь во всех сервисах. Решайте сами, нужно вам чистить эти данные или нет.
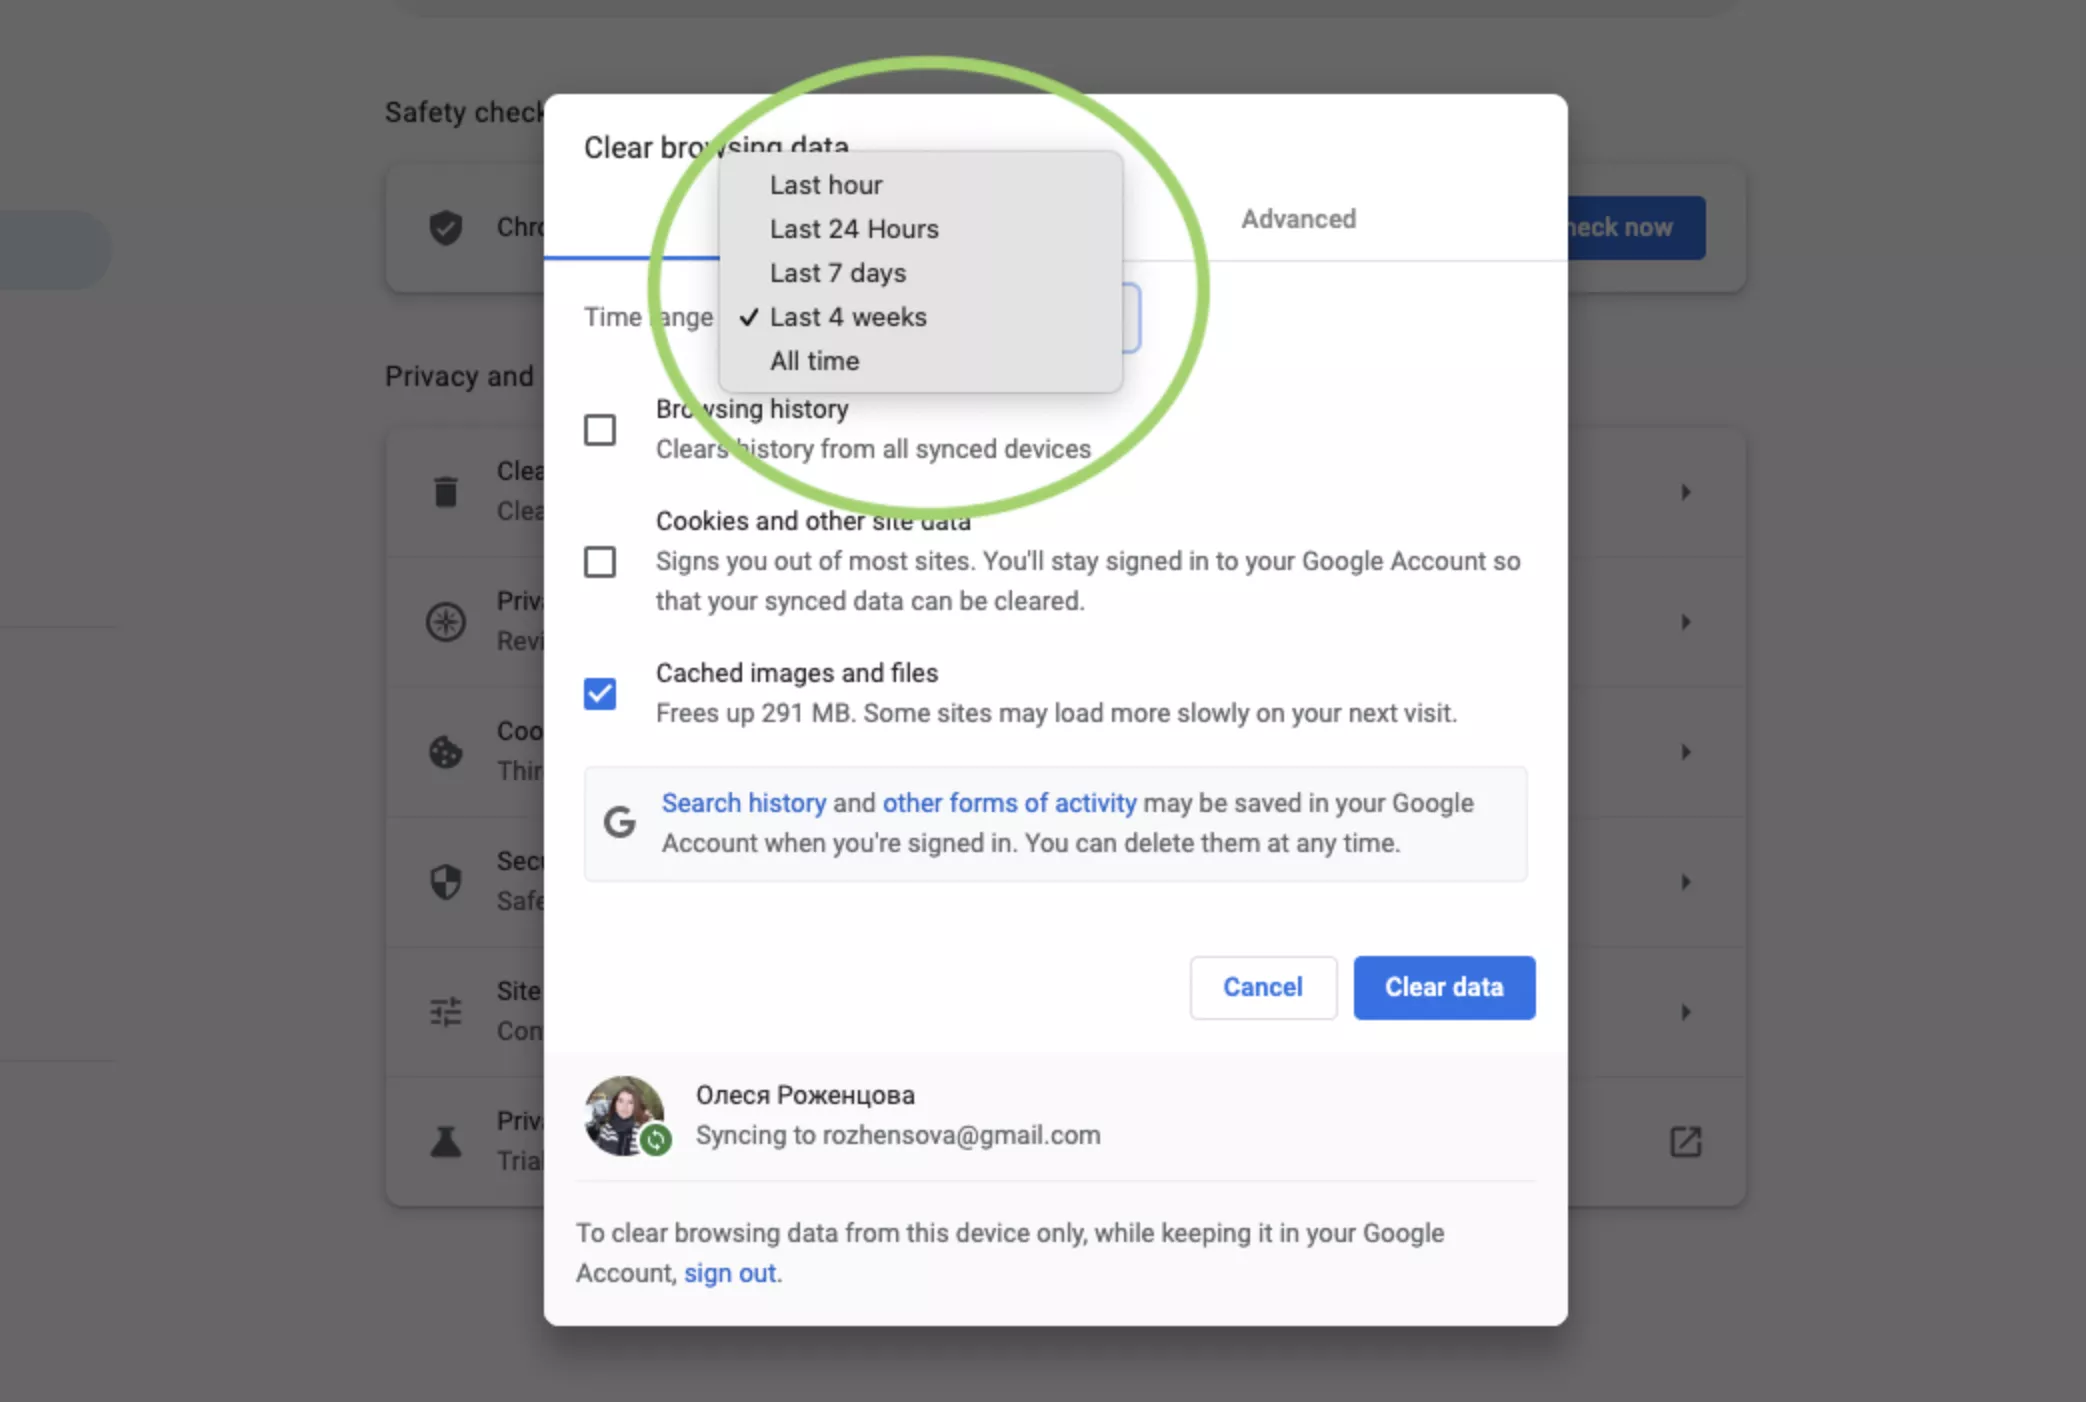
Шаг 3. Установите, за какой период нужно удалить данные: последний час, 24 часа, семь дней, четыре недели или все время.
Шаг 4. Подтвердите действие: нажмите «Удалить данные» [3].

Как очистить кэш в «Яндекс.Браузере»
Шаг 1. Перейдите в меню «Яндекс.Браузера». Наведите курсор мышки на строчку «История» и в появившемся окне вновь нажмите «История».
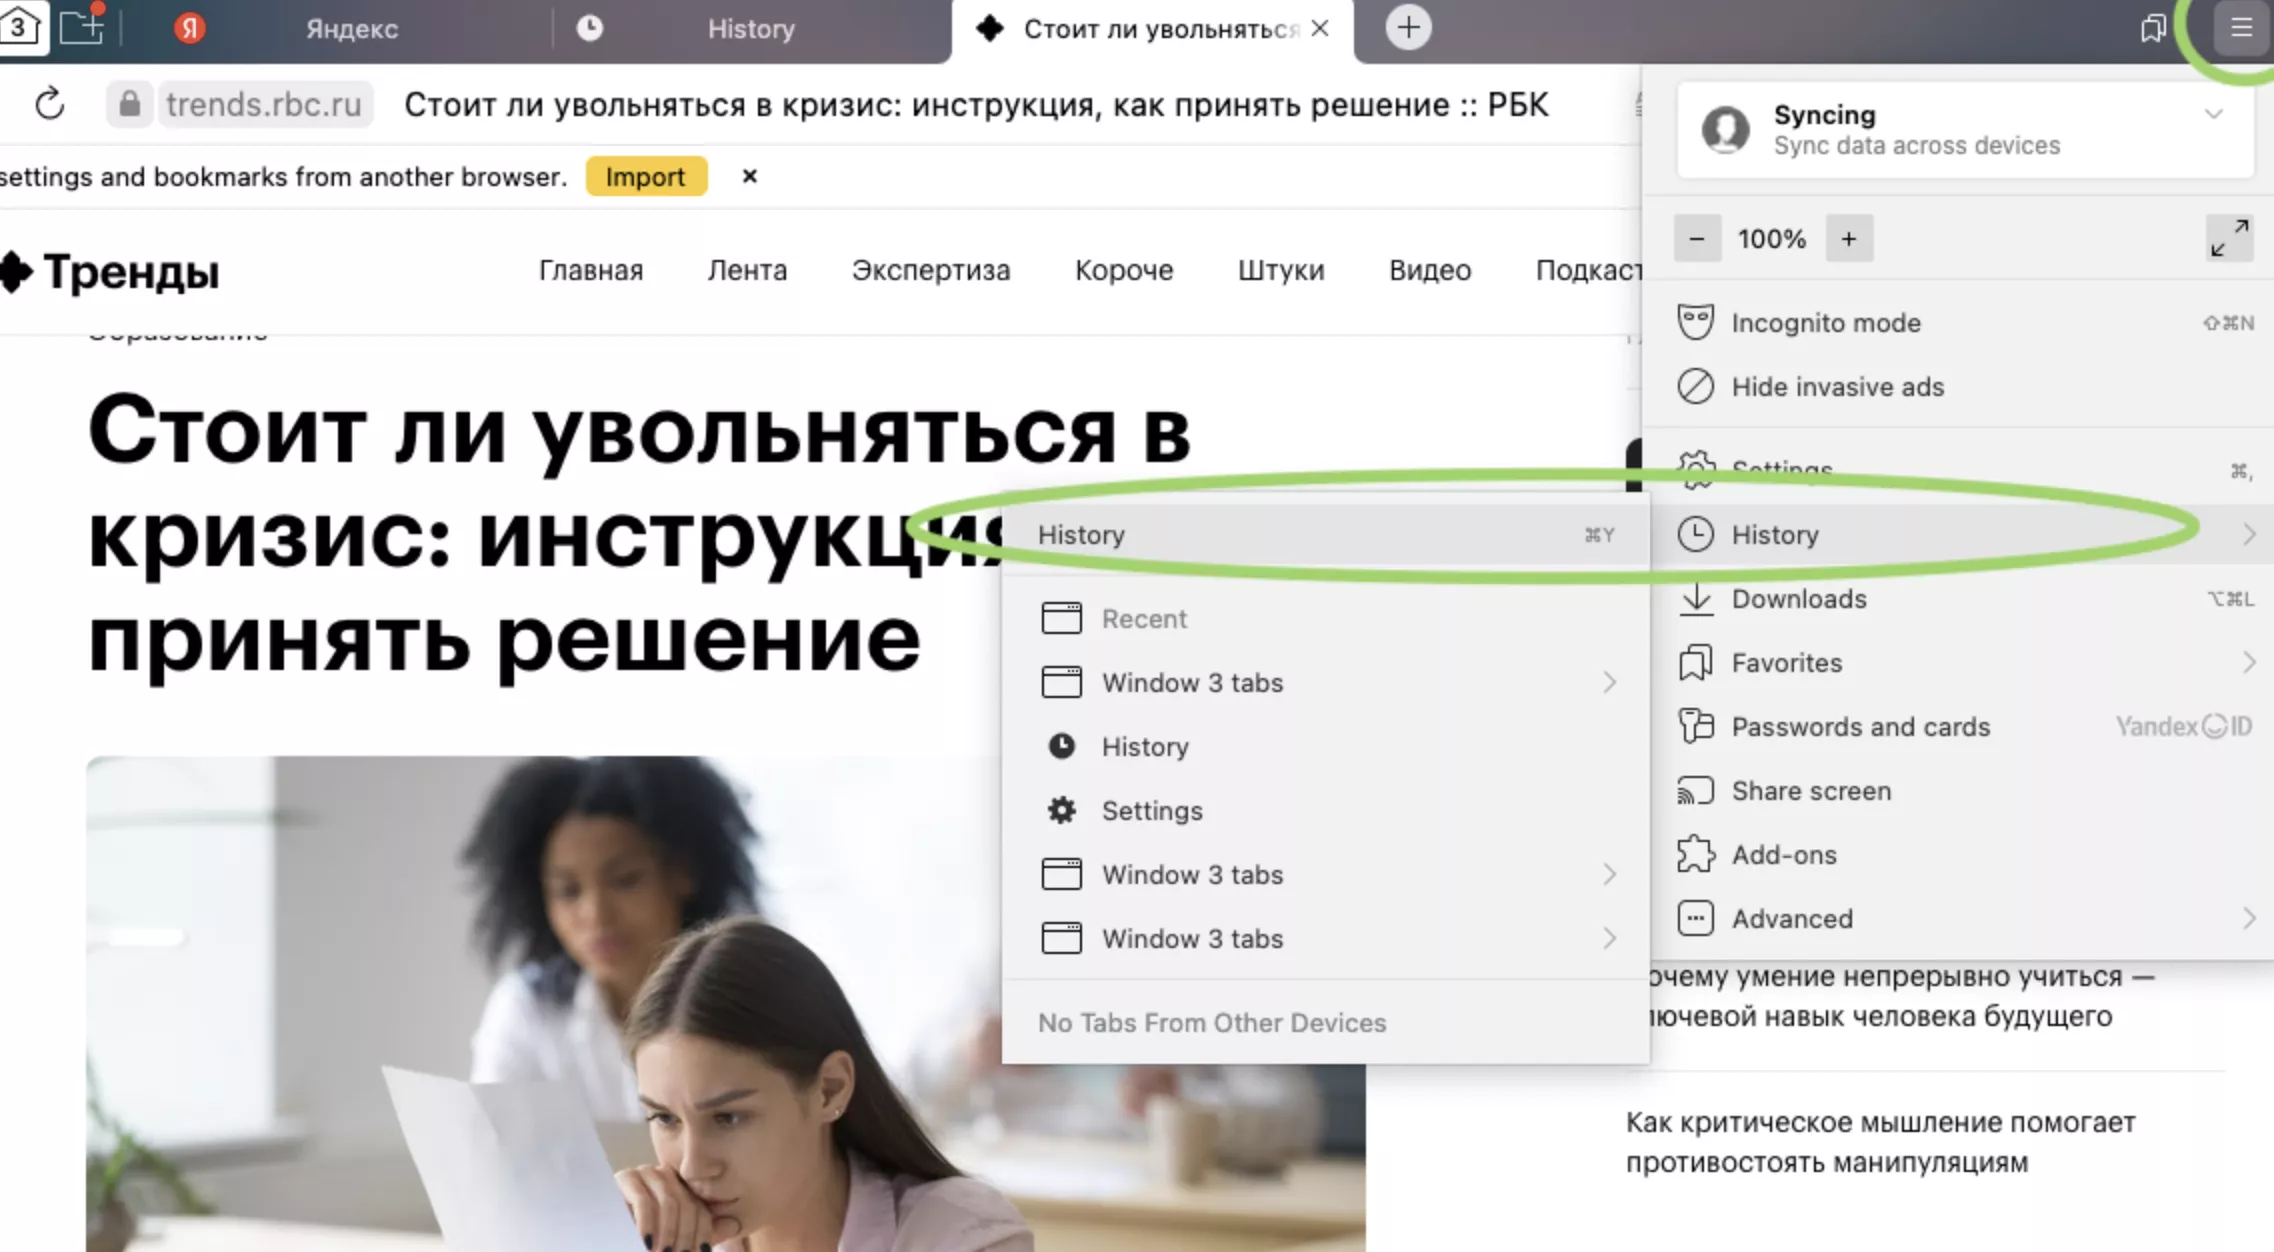
Скриншот «Яндекс.Браузера»
Шаг 2. В левом нижнем углу нажмите «Очистка истории».
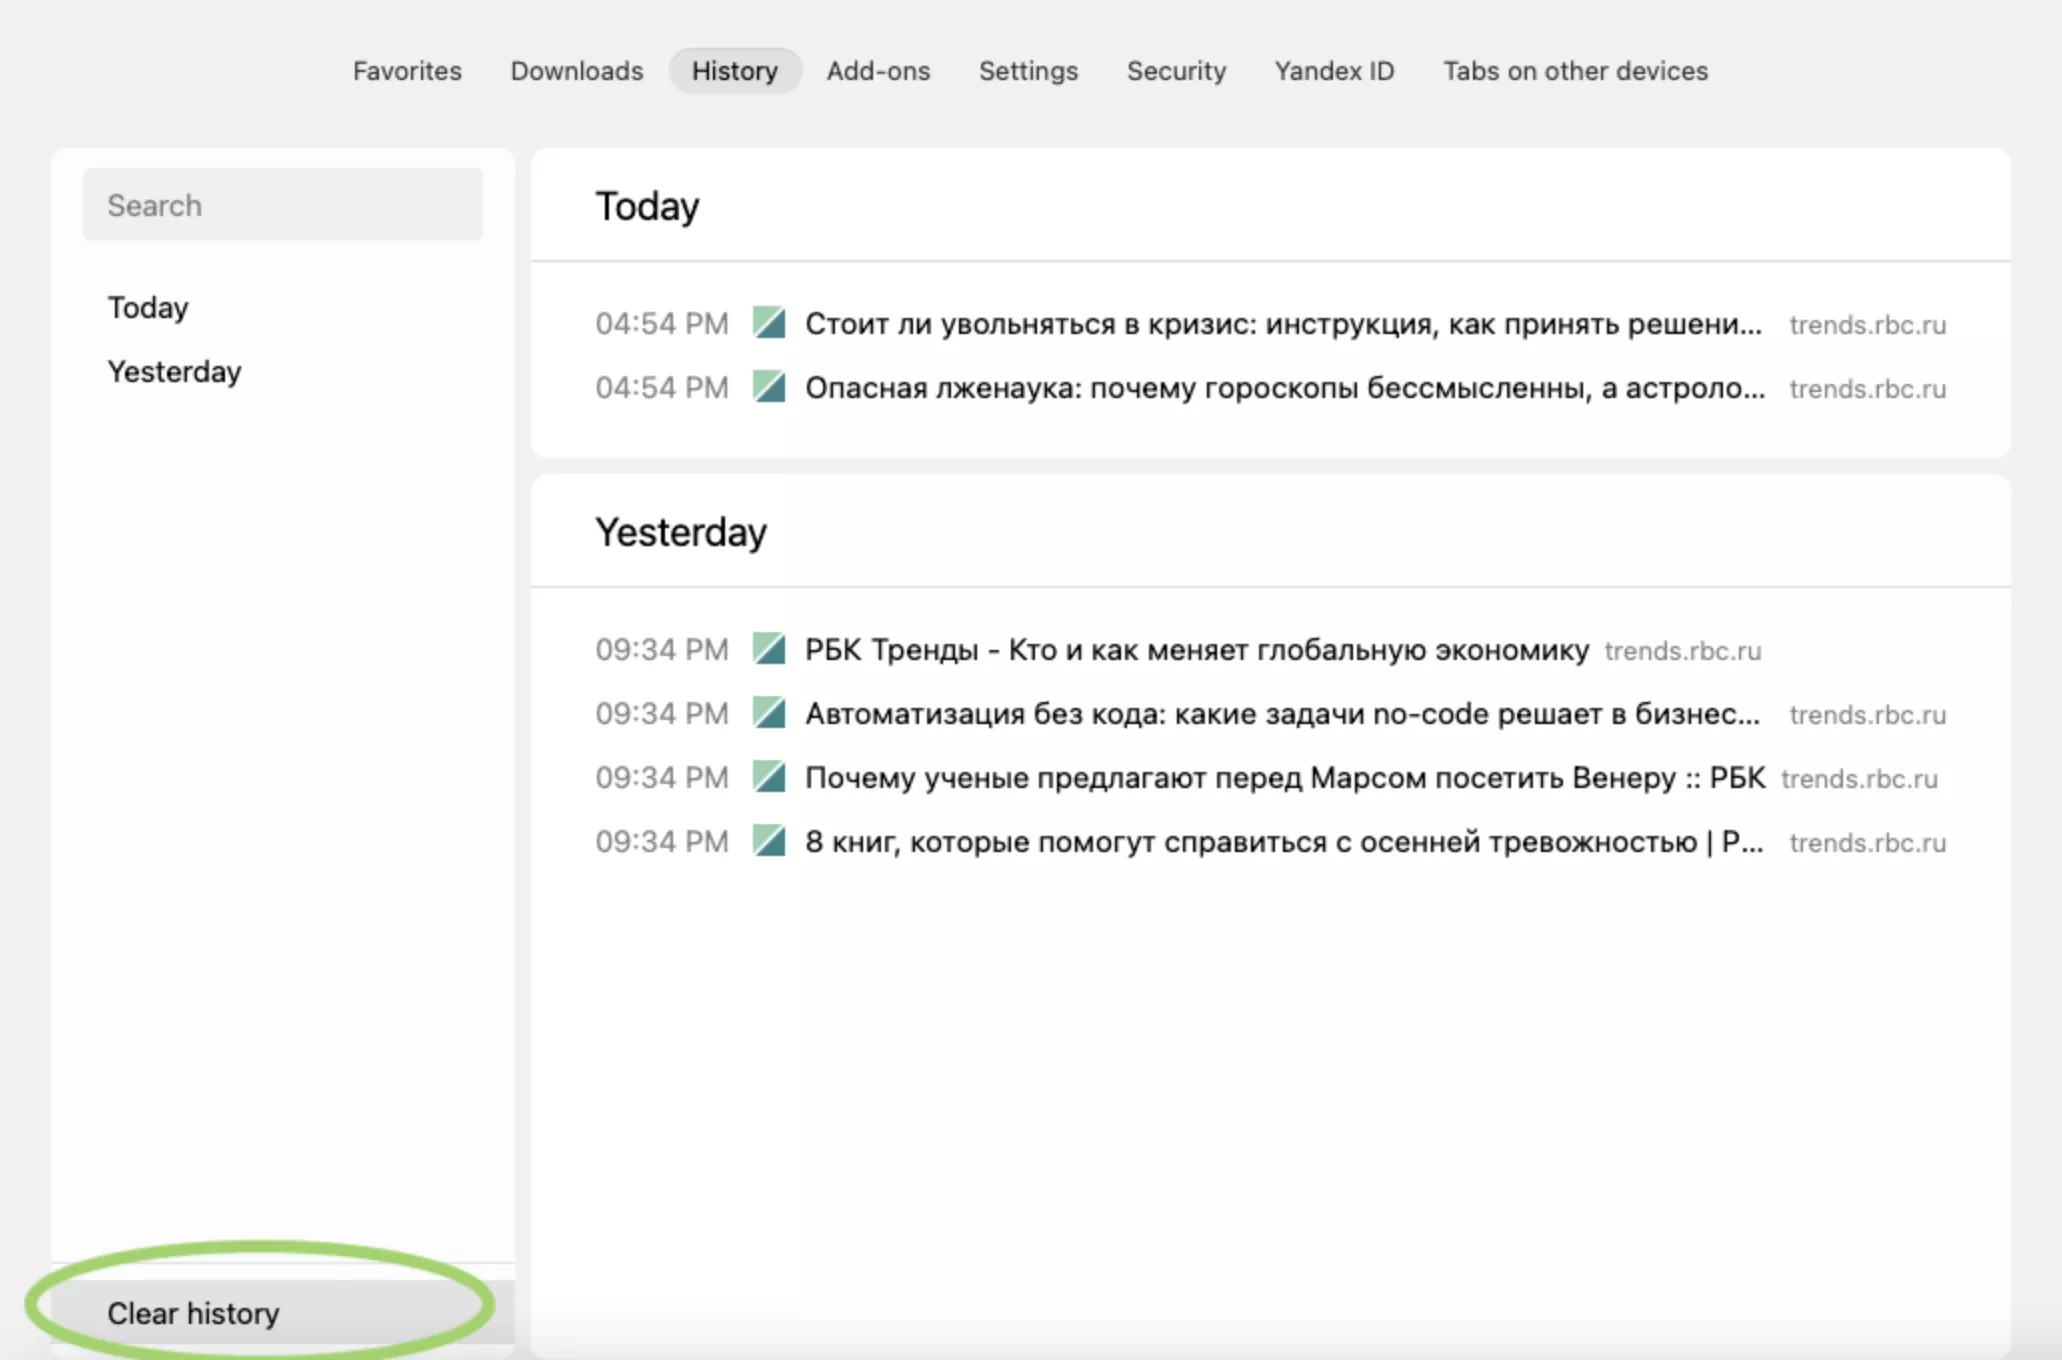
Скриншот «Яндекс.Браузера»
Шаг 3. Поставьте галочку напротив «Файлы, сохраненные в кэше».
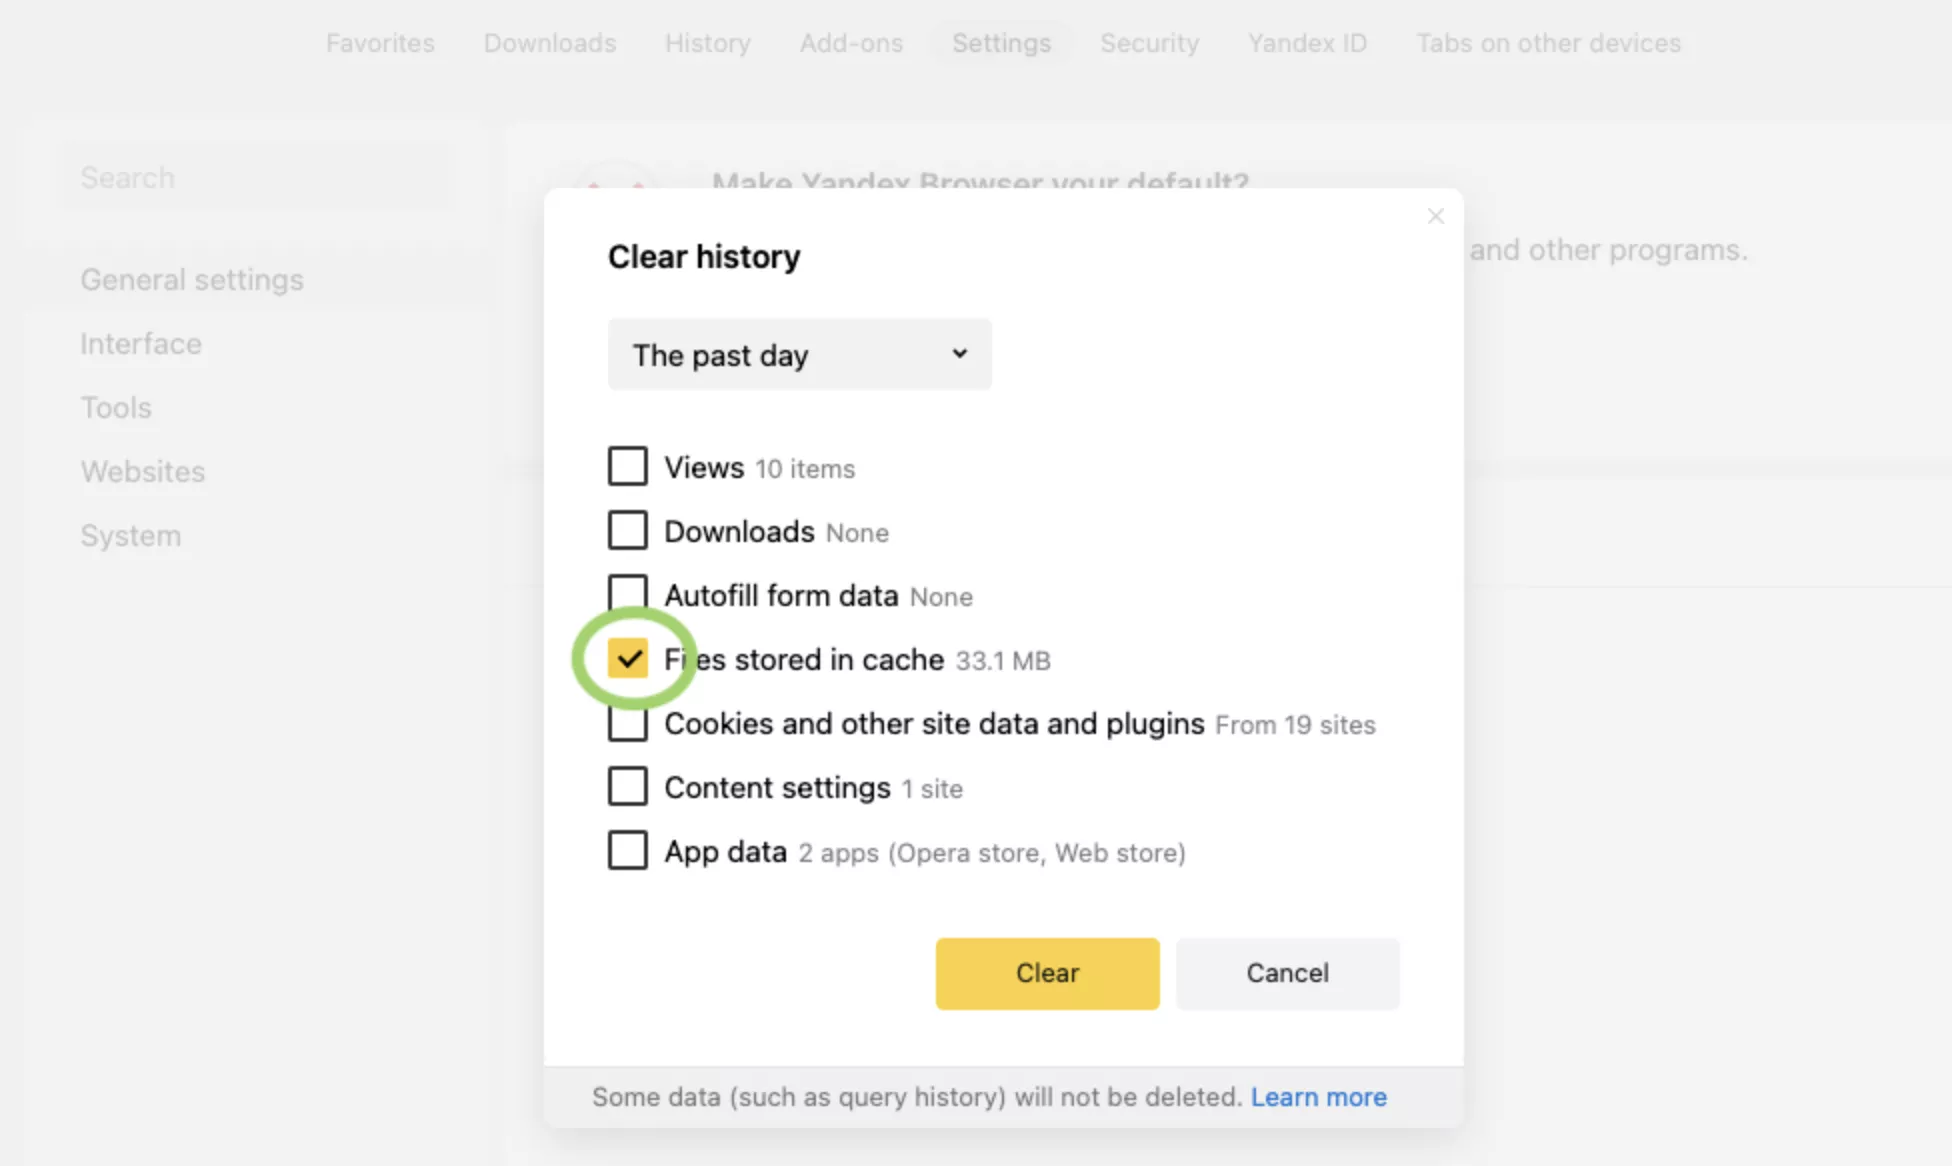
Скриншот «Яндекс.Браузера»
Шаг 4. Установите время, за которое удалятся данные.
Скриншот «Яндекс.Браузера»
Шаг 5. Нажмите «Очистить» [4].

Скриншот «Яндекс.Браузера»
Как очистить кэш в Safari
Внимание: этот способ удаляет историю браузера, файлы cookie и кэш одновременно.
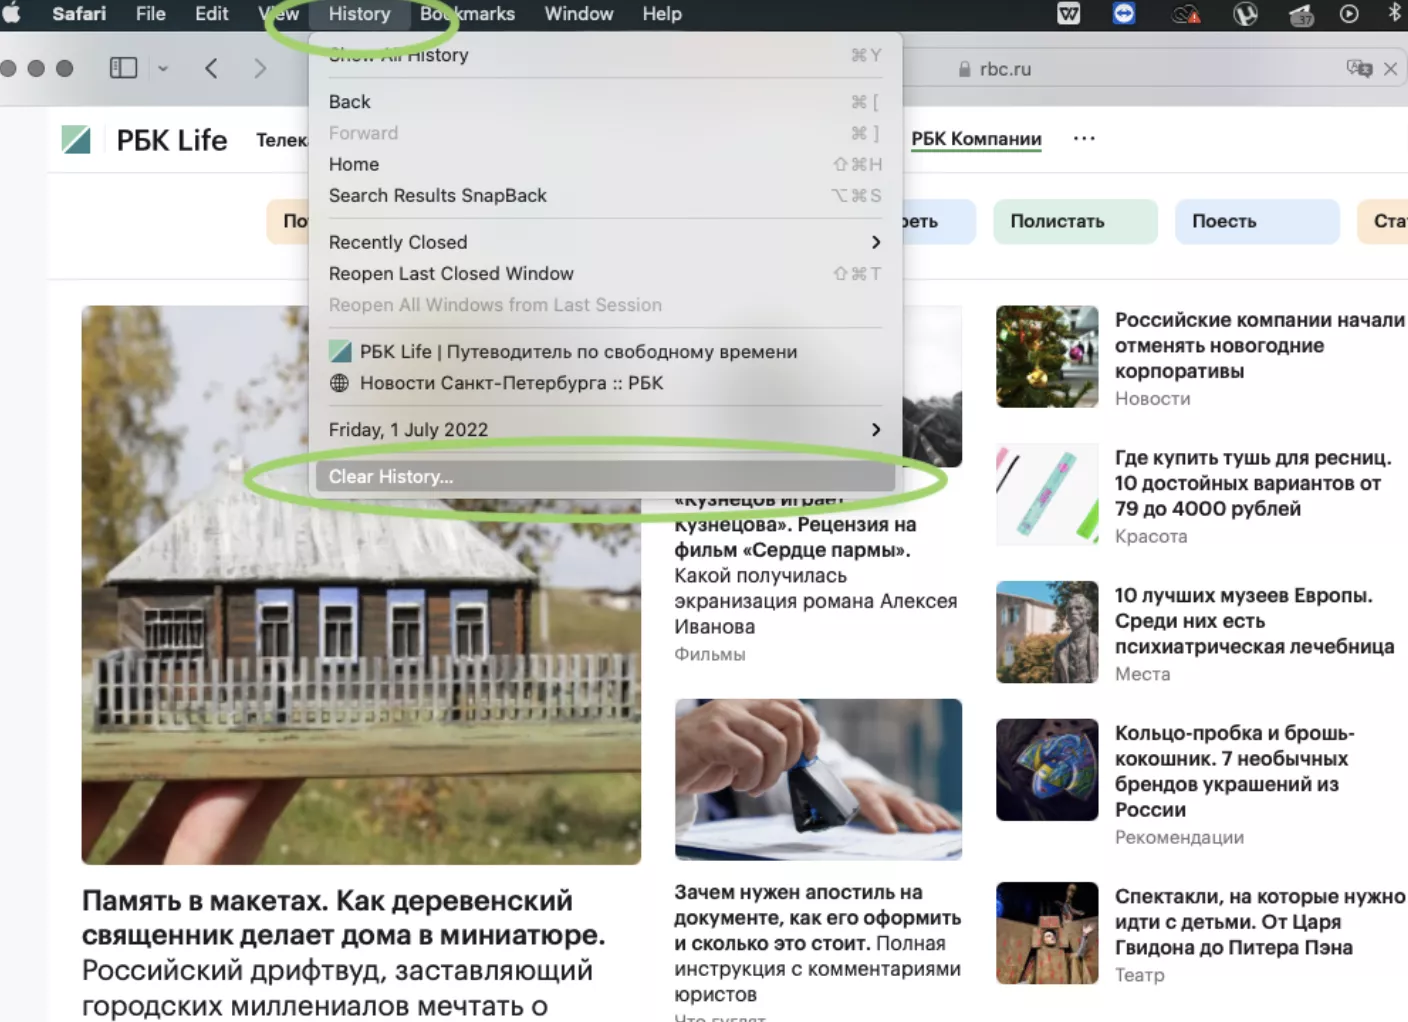
Шаг 1. Выберите в верхнем меню «История». Нажмите «Очистить историю».
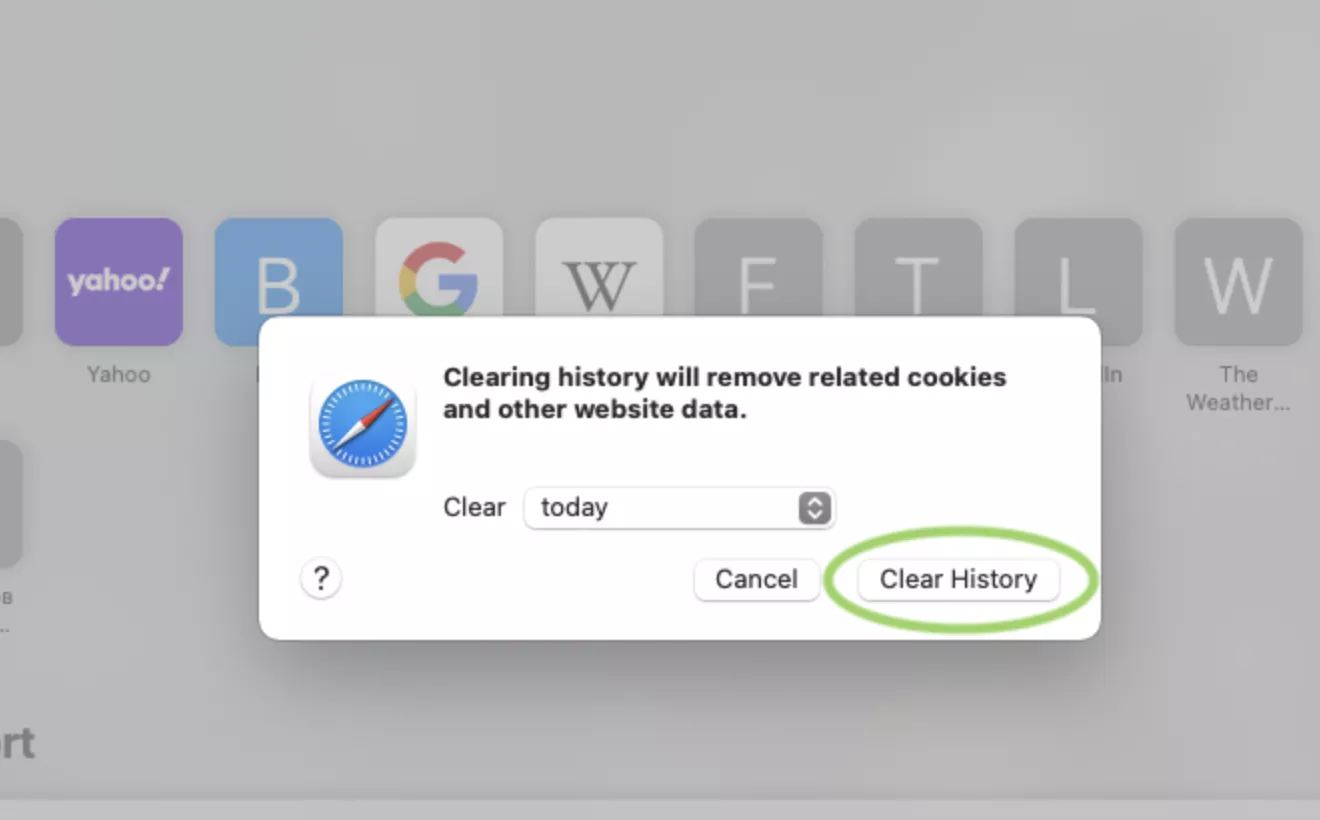
Шаг 2. Выберите, за какое время хотите удалить данные. Подтвердите действие.
Если вам нужно очистить только кэш, без истории просмотра и файлов cookie, сначала придется настроить браузер. Воспользуйтесь следующей пошаговой инструкцией.
Шаг 1. В браузере кликните по Safari, выберите «Настройки».

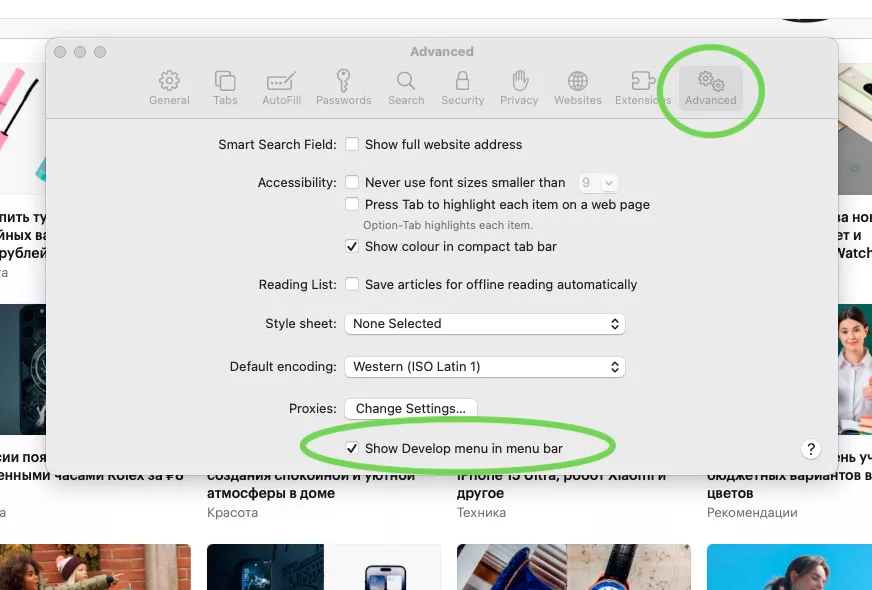
Шаг 2. Нажмите на блок «Дополнения», внизу окошка поставьте галочку напротив «Показывать меню «Разработка» в строке меню».
Шаг 3. В меню браузера появится блок «Разработка». Перейдите в него и нажмите строку «Очистить кэши».


Как очистить кэш в Microsoft Edge
Шаг 1. В правом верхнем углу браузера нажмите «Настройки».

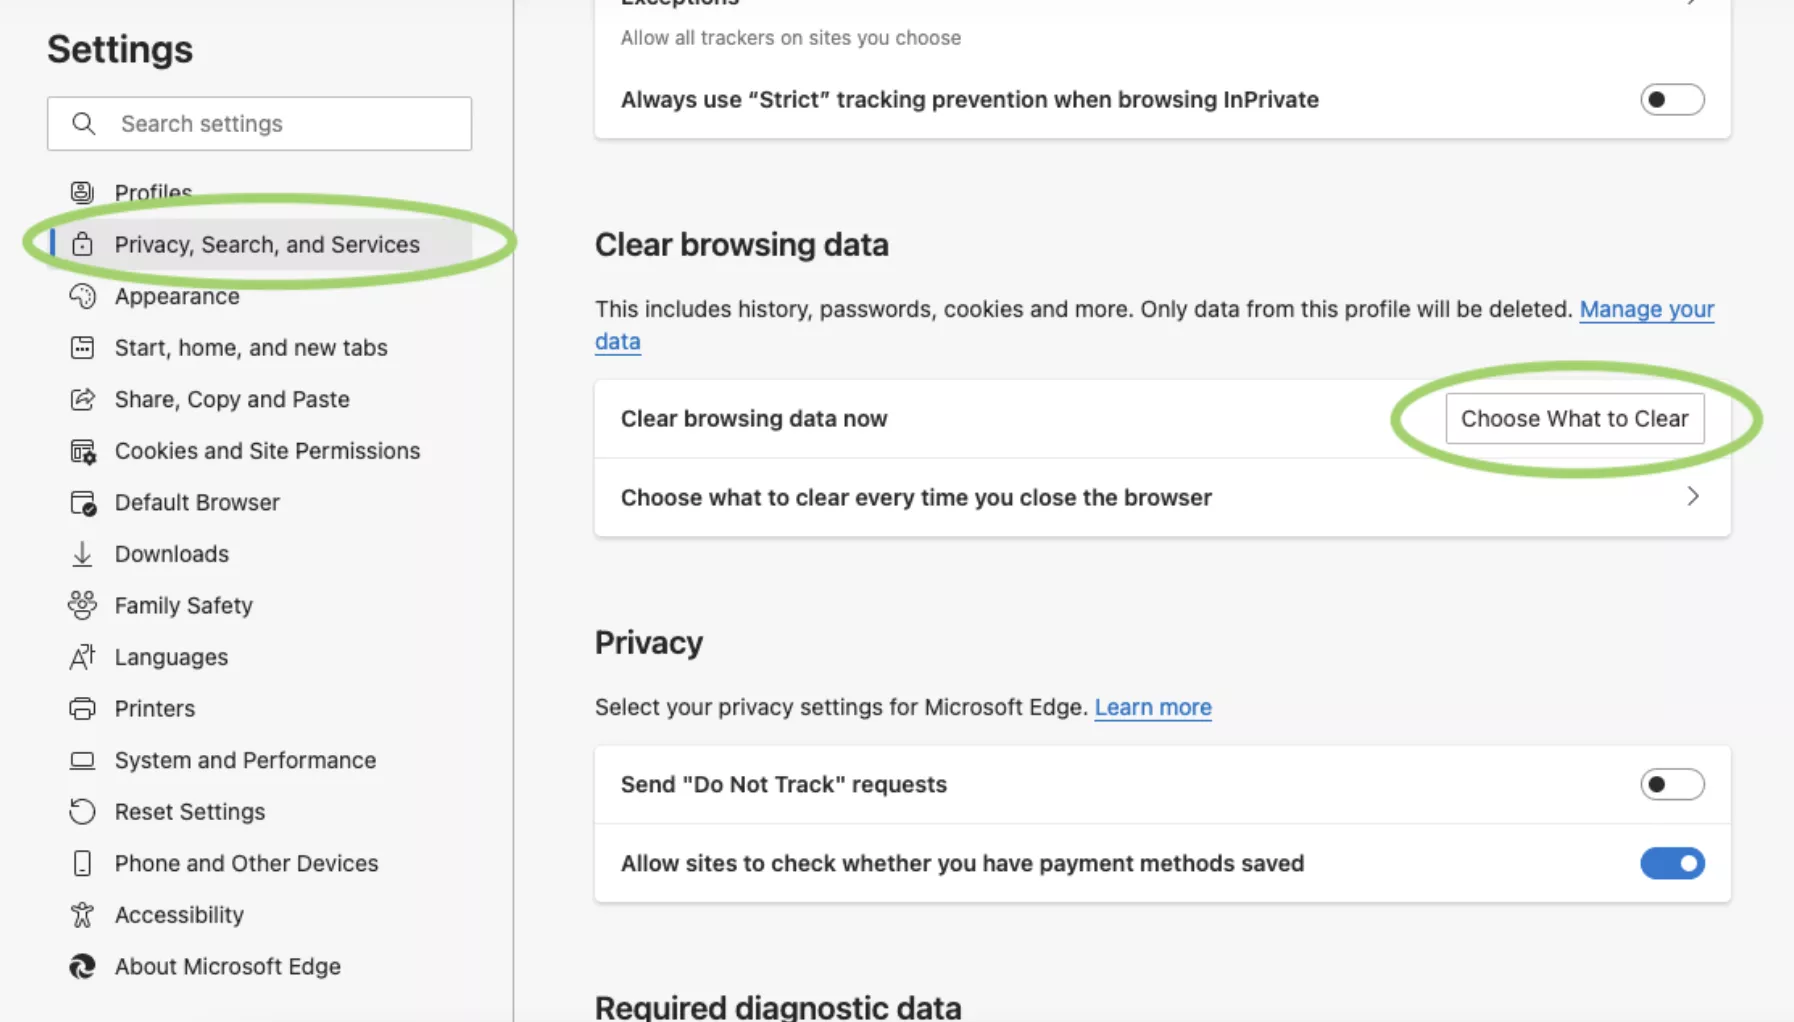
Шаг 2. Выберите в панели слева «Конфиденциальность, поиск и службы». Нажмите на «Очистить данные браузера».
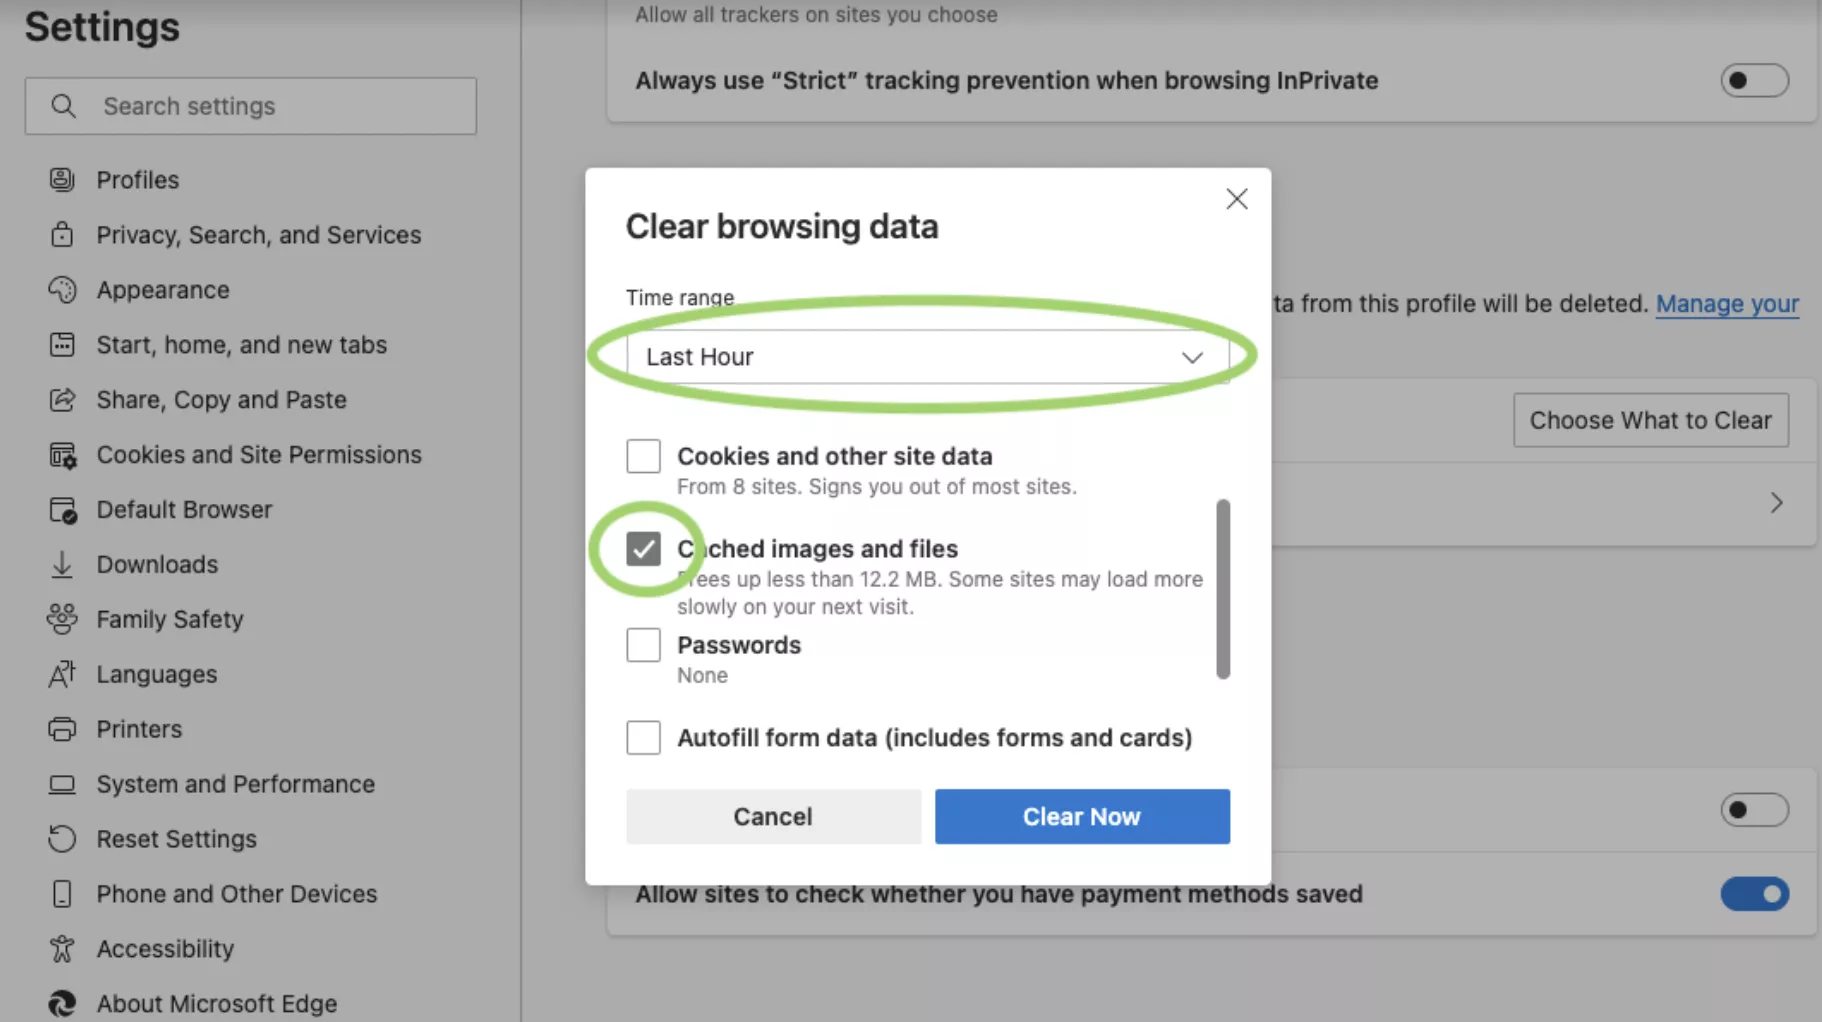
Шаг 3. Поставьте галочку напротив данных кэша, выберите время, за которое нужно удалить файлы.
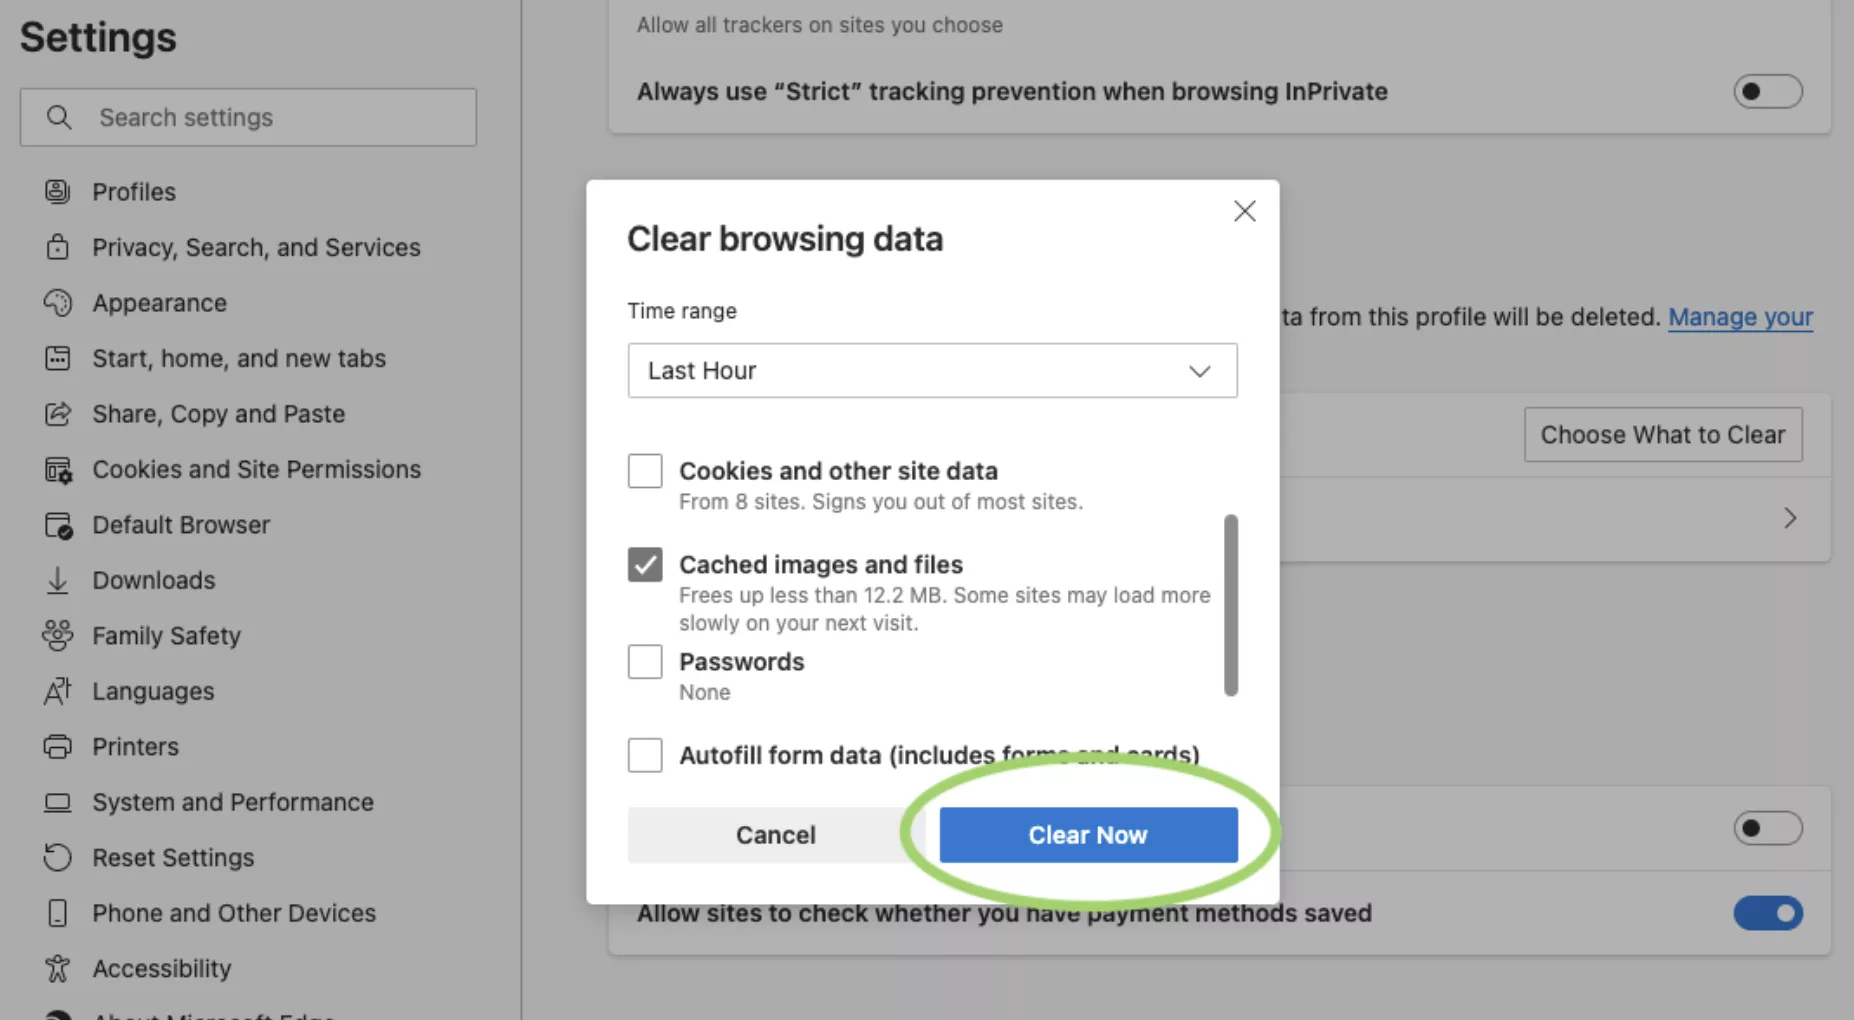
Шаг 4. Подтвердите действие: нажмите «Удалить сейчас».
Как очистить кэш в Mozilla Firefox
Шаг 1. В левом верхнем углу браузера нажмите кнопку «Меню». Выберите «Журнал».
Шаг 2. В появившемся окне нажмите «Удалить историю».

Шаг 3. Выберите «Кэш» и нажмите «Ок» [5].

Как очистить кэш в Opera
Шаг 1. Нажмите кнопку меню в правом верхнем углу браузера.
Шаг 2. Внизу списка перейдите в «Очистить историю посещений».

Шаг 3. Откроется окно с настройками. Поставьте галочку напротив «Кэш», задайте время и нажмите «Очистить».

Does someone keep telling you to “clear your browser cache”? It’s a necessary diagnostic when having website issues (like a 304 error). But what does clearing your browser cache mean, and how do you clear the cache for your specific browser?
Let’s find out!
What’s a Browser Cache?
A browser cache is a database of files used to store downloaded resources from websites. Common resources in a browser cache include images, text content, HTML, CSS, and Javascript. The browser cache is relatively small compared to the many other types of databases used for websites.
A cache, in general, is software or hardware that temporarily captures and stores data for the user to access that data in the future rapidly.
There are several types of caching, like browser caching, distributed server caching for high volume systems, application caching to log website HTML, data caching for content management systems, gateway caching, proxy caching, and many other kinds.
So, as a subset of general caching, browser caching:
- Is a software element stored on whatever browser you use to peruse the internet.
- Uses a small database, much smaller in size than server or standard website cache systems.
- Takes downloaded data (no longer online, but in a local, client-side environment) from websites you visit. In short, it stores the data on your computer.
- Stores website resources such as coding files, media assets, and personalized site preferences.
- Uses the stored website resources to deliver them faster in the future.
- Utilizes that data to provide a more desirable user experience.
Simply put, a browser cache takes elements from the websites you visit and saves them in a database, resulting in faster page load times (especially with a slow or missing internet connection) and a more robust user experience the next time you go to a website you’ve been to before.
Notice that we didn’t only mention page load times as the primary benefit. The user experience is just as necessary. For instance, the browser cache saves user site preferences like color schemes, which may make a website easier to read.
Here are some of the main types of site resources saved within your browser cache:
- Website data and assets like written content, images, videos, and coding filesmake it easier for the site to load up faster in the future and provide options to view some parts of a website while offline.
- Documents from web apps bolster the effectiveness of viewing pages in an offline environment.
- Valuable or repeated website activity such as automated login credentials or products left in a shopping cart.
- Personalized user preferences for specific websites or the internet in general. For instance, you may adjust settings like the font size, typography style, color scheme, or browser zoom.
Here’s an example:
Marla likes buying her home improvement products at Overstock.com. She’s also an avid reader of The Wall Street Journal online, while also getting her comedy fix at The Onion. As a small business owner, Marla has a busy life; she sneaks in her internet browsing during lunch and for 15 minutes before bedtime. She also has a visual impairment and travels to visit clients in rural areas, where internet connection is often lacking.
Even though she may not know it, browser caching helps Marla in the following ways:
- It saves the items she previously added to her Overstock.com cart, making it easy to check out in the future.
- It keeps her login credentials saved on all sites, allowing her to enjoy immediate access to her WSJ subscription, The Onion, and Overstock. It also handles any login credentials for browser-based emails.
- The Onion, and every other site, loads written content, images, and site files rather quickly, so she’s not wasting her lunch hour waiting for pages to render.
- The browser cache saves her personal preferences for much larger font sizes and white backgrounds on The Onion and the WSJ. This accommodates her visual impairment while reading articles.
- Her most visited sites still load their content (or at least some of the content depending on the website) when she travels to areas with poor internet connection. That’s because her frequently visited site resources get stored in the browser cache.
Check Out Our Video Guide to Clearing Cache
How a Browser Cache Works
Here’s a more technical look at how a browser cache functions:
- The browser (let’s say Firefox) notifies the web server that it would like some content, most likely from a website. This is called a request.
- At the same time, our Firefox browser looks to its database, the browser cache. It’s checking to see if any data from the website requested was previously cached (saved inside the cache).
- If the requested content isn’t in the browser cache, it gets sent directly from the webserver. This is called a response.
- If the requested content is found within the browser cache, our Firefox browser ignores the server and pulls the content from its cache.
Not only must the cache contain the correct data for the desired webpage, but it can’t be considered “stale” data. The browser may encounter stale cache content since almost all cached data has an expiration date. It would be irresponsible to log and serve up outdated site content to users, seeing as how site content changes regularly. The goal is for the browser to only serve up content almost identical to what’s actually on the current website.
Overall, the browser pulls from its cache when that cache contains data from the requested website, and that data is not stale.
We discussed the type of data stored in a browser cache, but it’s also worth mentioning that client-side storage uses a few types of packets and databases to log that information. From a fundamental perspective, the browser cache holds resources like login credentials, user settings, and site content. Yet, these resources get stored with more complex database mechanisms like cookies, Web Storage APIs, IndexedDB APIs, and Cache APIs.
How To Clear Cache
We’ll begin by giving you a brief introduction of when you might need to clear your browser cache. Then, we’ll show you how to clear the browser cache on most major browsers. If you want to quickly skip to the “how,” you can click one of the links below. Otherwise, we’ll start at the beginning.
Why Do You Need to Clear Your Browser Cache?
Most of the time, you never even notice browser caching happening. It runs entirely behind the scenes and usually doesn’t affect your browsing experience. But… sometimes things can go wrong.
For example, you might make a change to your site… but you’re unable to see that change because your browser is still serving up the cached version of that resource. Or, the cache might have become corrupted and interfered with a web page’s proper functioning.
For those reasons, a good first step whenever you encounter an issue on your site (or someone else’s site) is to clear your browser cache. It won’t always fix the issue, but it is an essential first diagnostic step to rule out before assuming that a more complicated issue is causing problems.
When using local web development solutions such as MAMP, you can encounter the “This Site Can’t Provide a Secure Connection” error without clearing the cache. You’d be surprised how often what you think is a “huge” website bug is just a caching issue that goes away as soon as you clear your browser cache.
How to Force Refresh a Single Page
Before you go straight to clearing your entire browser cache, one trick you can try is something called a “force refresh.” Typically, when you refresh a page, your browser still serves up the cached version of the page rather than downloading all of the assets again. But you can bypass the cache and force a complete refresh by using some simple hotkeys:
- Windows and Linux browsers: CTRL + F5
- Apple Safari: SHIFT + Reload toolbar button
- Chrome and Firefox for Mac: CMD + SHIFT + R
Again, this method only bypasses the cache for the specific page that you’re on. It leaves the rest of your browser cache untouched. Therefore, this option is great if you’re experiencing issues with just a single page. But if you want to completely reset your experience (say, across an entire site), you’re better off clearing your entire browser cache.
How to Clear Browser Cache for Google Chrome
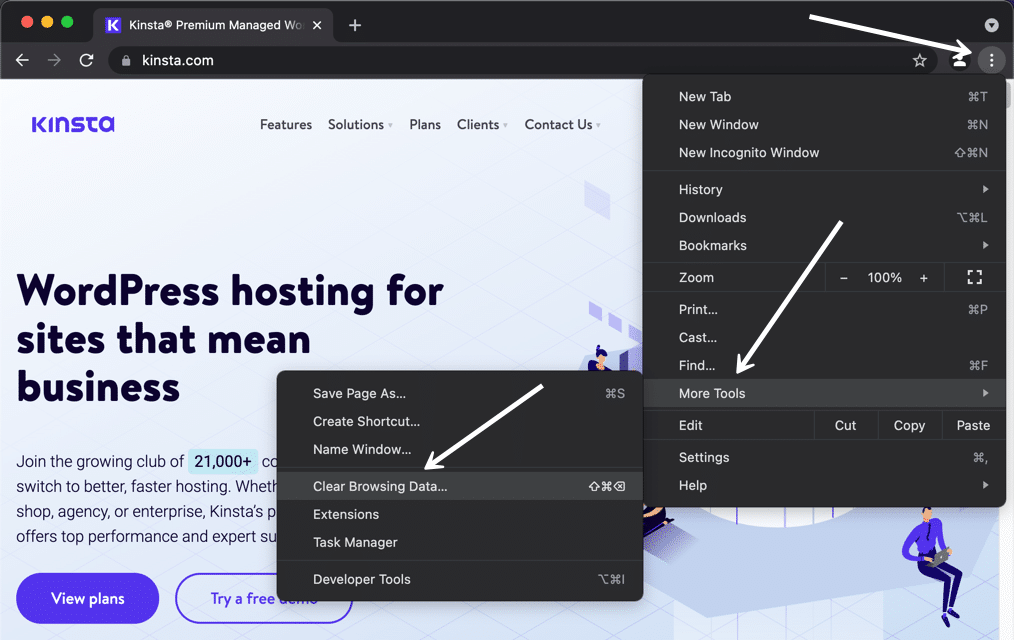
To clear the cache for Google Chrome, start by clicking the Three Dots icon in the top right of your browser window. Then, find the More Tools option and select Clear browsing data… from the submenu:
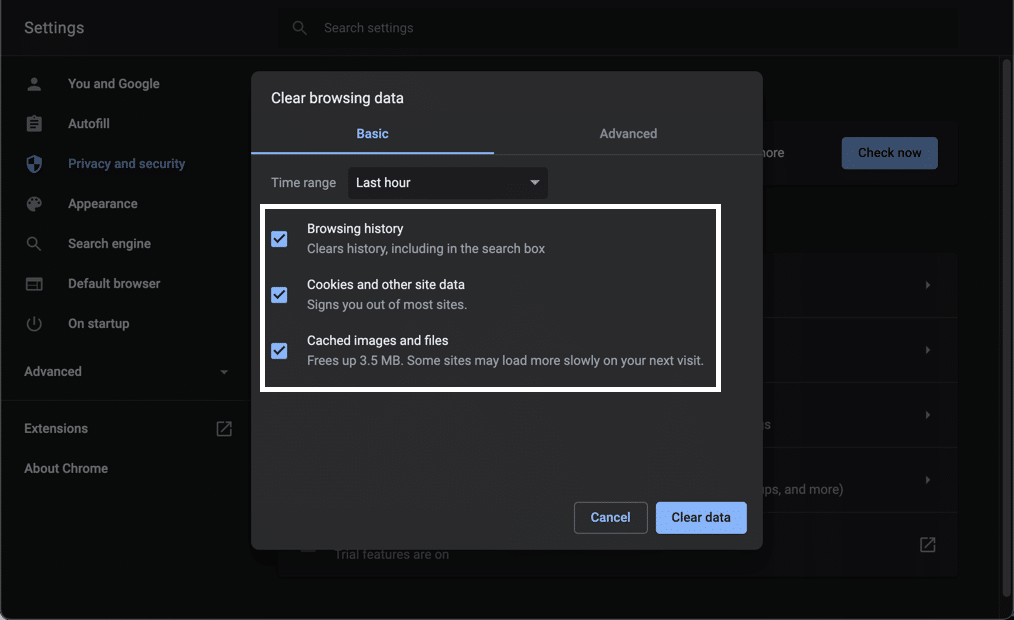
Alternatively, you can also use the hotkey combination: CTRL + SHIFT + DEL. Chrome will open up a new tab with a popup window titled Clear Browsing Data. Make sure that only the Cached images and files box is checked. You can choose to clear your browsing history or opt for more thorough cleansing of the cache by including cookies and other site data in the cache clearing.
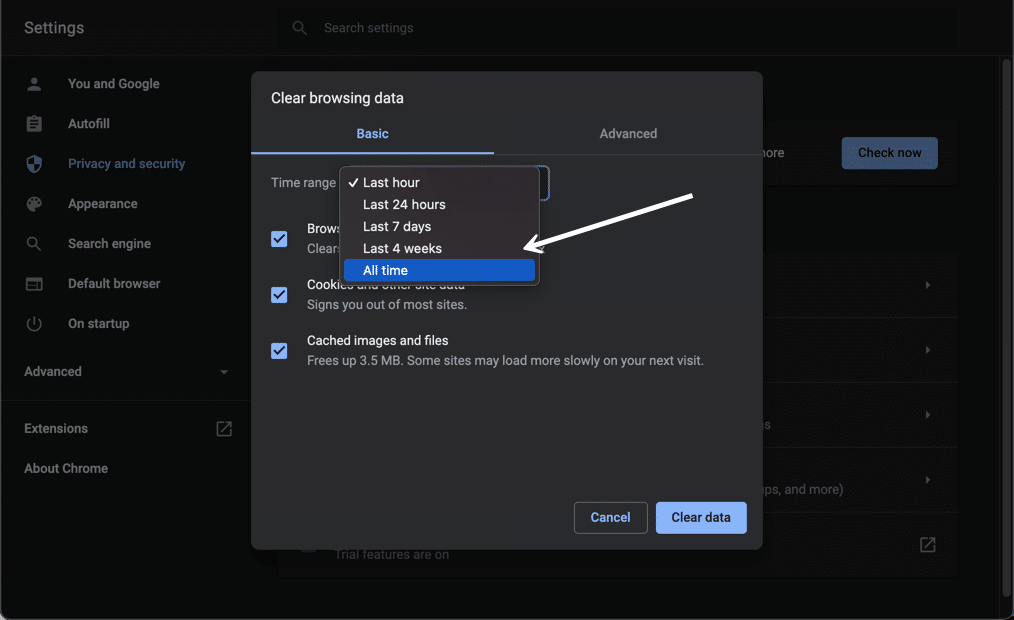
You can also change the time frame at the top. Select the Time Range field, then choose one of the options like the last 24 hours, last 4 weeks, or the entire history.
Finally, click the Clear data button to clear your cache. And that’s it – your Chrome browser cache is now empty.
It’s important to remember that most browsers store more advanced data within the cache that usually doesn’t get cleared with the primary tool. These are usually more critical data items that you might not want to eliminate from the cache.
However, many situations warrant the clearing of all cache data. In Chrome, select the Advanced tab in the Clear browsing data window.
Now, you’ll see additional browsing data checkboxes such as:
- Passwords and other sign-in data.
- Autofill form data.
- Site Settings.
- Hosted app data.
Feel free to mark whichever data items you want to be removed if you’d like. Just know that these are usually essential for improving your overall user experience, like with the passwords that help you log into websites in seconds.
Click on the Clear Data button once you’re done.
Google Chrome has multiple ways to look at your cache data and delete it from the browser.
For instance, you could go right to the Google Chrome Settings page and click on Privacy and Security.
Under that, there’s a button to Clear Browsing Data, which brings you to the same popup window we saw before; it’s simply found by going through different steps.
In addition, you can choose the Cookies and Other Site Data button to specifically take control of third-party cookies.
All tracking cookies are logged within the browser cache, so this is an option for those who are more interested in cleaning out cookies instead of your browser history or login information.
On this page, you have options to:
- Allow all cookies.
- Block third-party cookies in Incognito.
- Block third-party cookies.
- Block all cookies.
The cookie settings empower you to clean up your cache or eliminate unnecessary cache elements automatically. As an example, you may want to block third-party cookies so that you never have to worry about cleaning them out of your browser cache in the future.
You may also want to explore the area to Clear Cookies and Site Data When You Close All Windows. That essentially automates the cache clearing process by deleting items every time you close the Chrome browser.
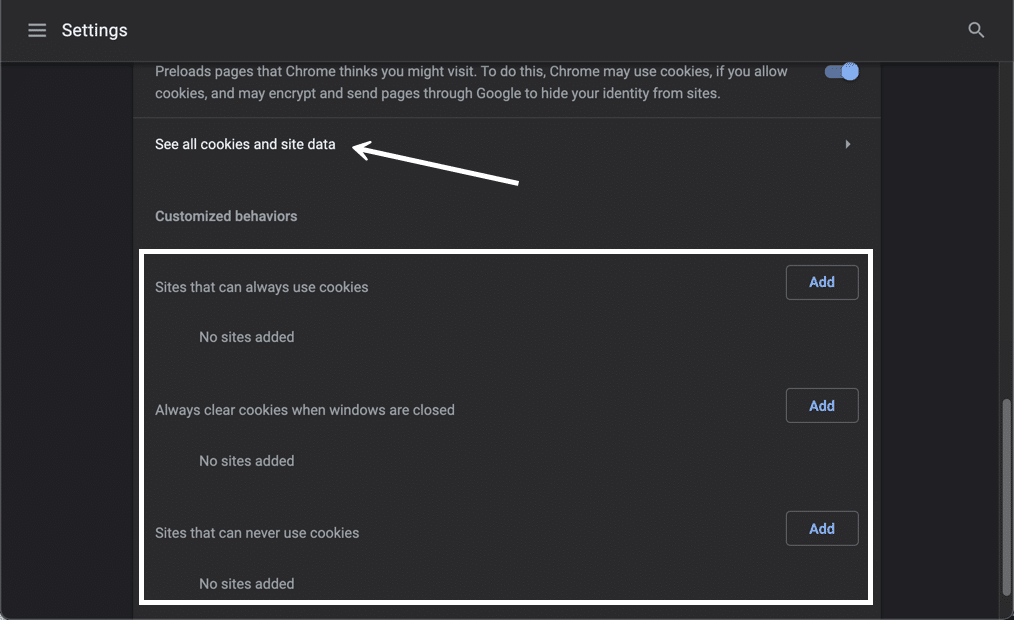
The lower part of this section in Chrome has several other options that pertain to the browser cache.
There’s a button to See All Cookies and Site Data, which comes in handy for clearing out cache items individually.
You can also manage lists that allow sites to use cookies, clear cookies when closed, or block cookies entirely.
How to Clear Cache for Mozilla Firefox
To clear the browser cache for Mozilla Firefox, get started by clicking the Hamburger icon in the top right and selecting History.
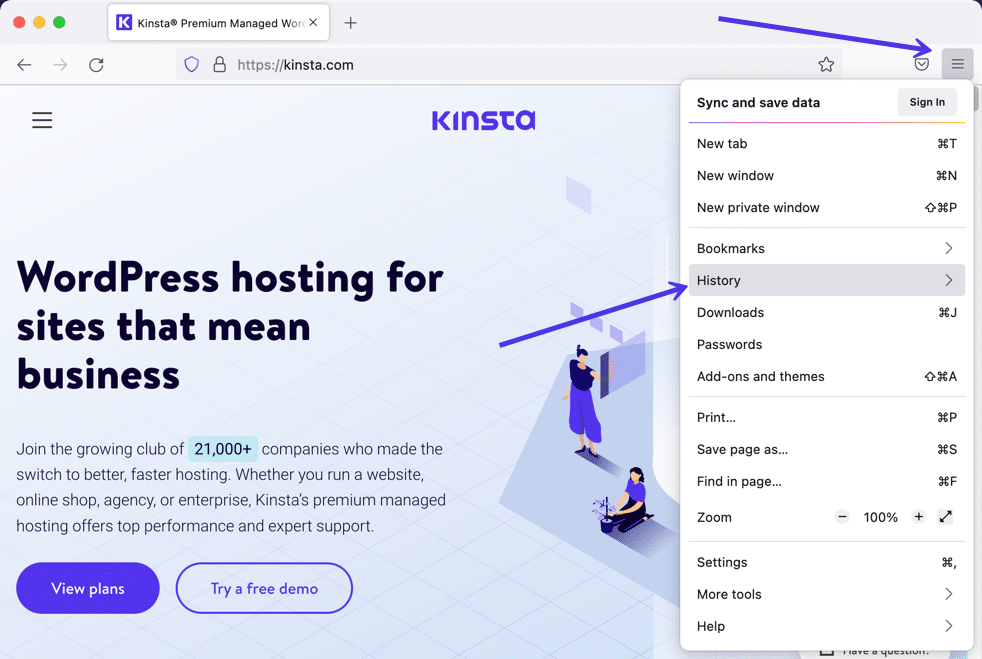
In the menu that appears next, select Clear Recent History…
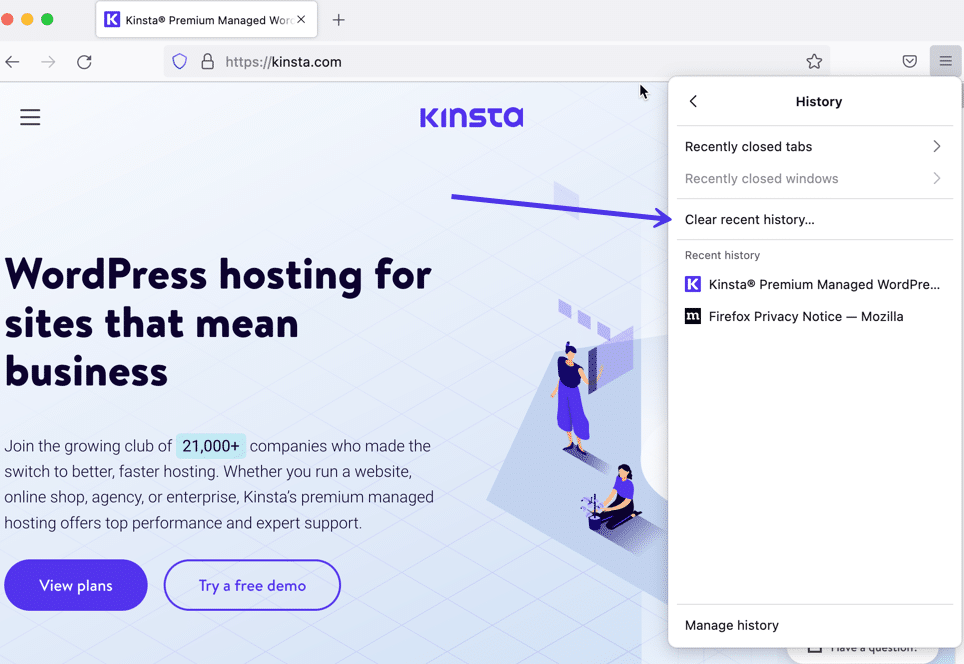
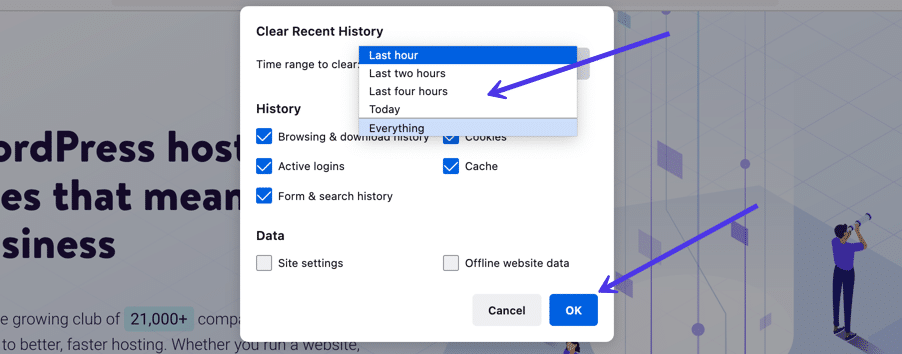
You can also access the menu by using the shortcut: CTRL + SHIFT + DEL. Firefox will then open a popup. In the Time Range to Clear dropdown, select the Cache option and anything else you’d like to remove from your browser’s saved files. You have options to remove the browsing history, cookies, search history, and data items like site settings and offline website data.
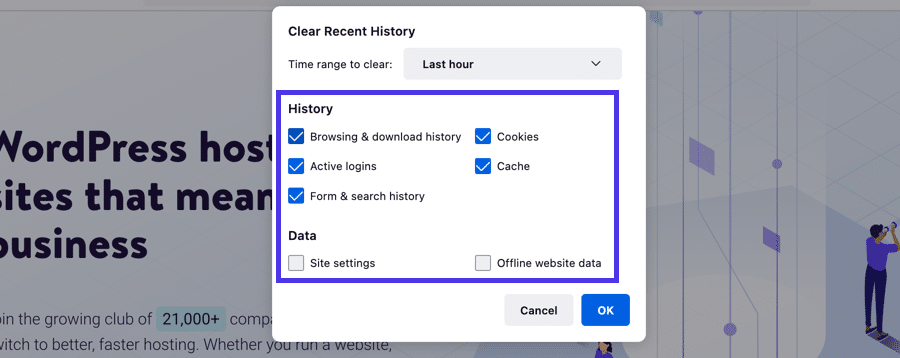
Use the Time Range To Clear menu to pick how far back you’d like to go when clearing out the cache data. You can choose the entire history or even just the last hour.
When you have all the options selected, click on the OK button to proceed. That successfully clears your browser cache in Firefox.
As an alternative (and to find a few extra browser cache settings), go back to the three-lined hamburger icon. Choose the Settings tab this time.
Choose Privacy and Security.
Under the Cookies and Site Data section, you can use the Clear Data button.
This is a little different from the previous method for cleaning out cache data.
You’re only asked about cookies, site data, and cached web contentwith this one. Furthermore, the popup window displays how much storage space you save with these deletions.
Click the Clear button to finish.
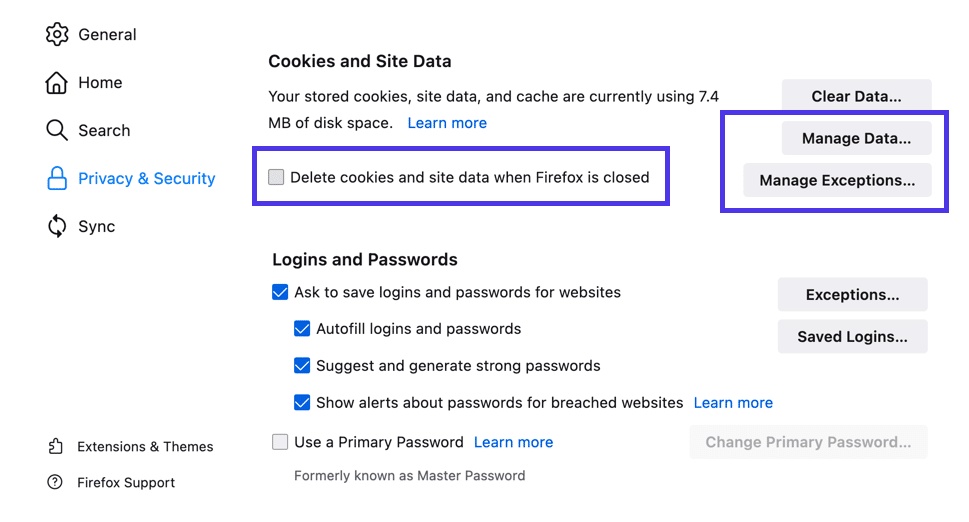
Also, back on the Privacy and Security page, you’ll see the following options:
- Manage Data.
- Manage Exceptions.
- Delete Cookies and Site Data When Firefox is Closed.
The Manage Data button lets you examine each stored data item to delete them one by one potentially. You can also go into the Manage Exceptions area if you’d like to exclude some sites from having their cookies or site data deleted from automated processes. Lastly, the Delete Cookies and Site Data When Firefox is Closed checkbox automates clearing your browser cache, but only when you completely shut down Firefox.
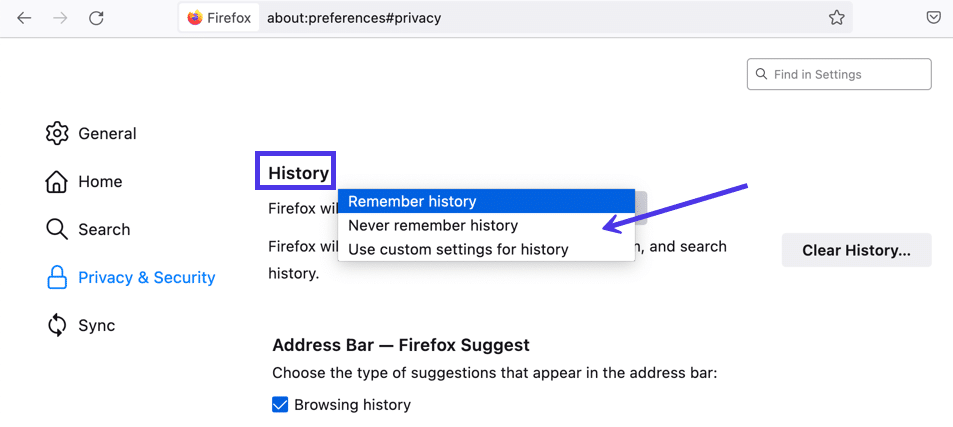
And while we’re in the Privacy and Security area, you should know that there’s another History section, similar to the one accessible from the Firefox hamburger menu icon. Here, you have a button to Clear History, which allows selecting what to delete.
There’s also a dropdown section to never remember the browsing history or customize your settings. Some may use that to automatically prevent the cache from saving data in the first place.
And that’s it! Your Firefox browser cache is now empty and potentially automated for the future.
How to Clear Cache for Safari
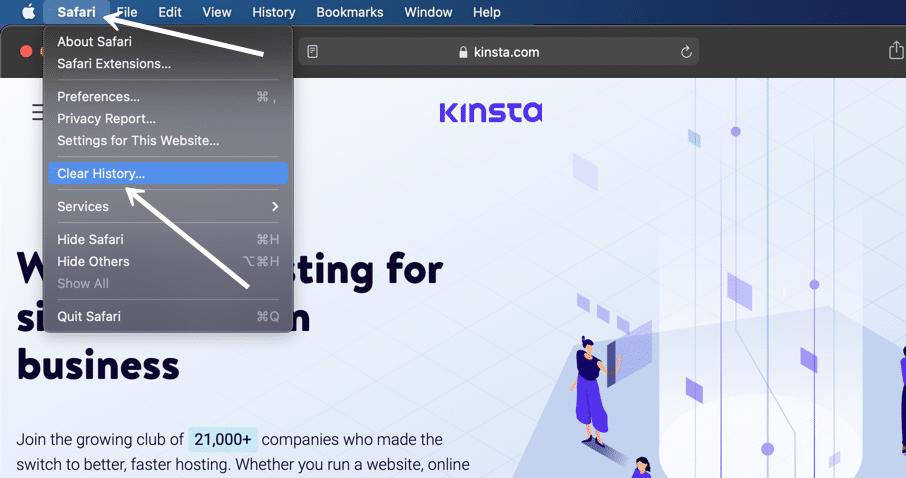
To clear the browser cache for Safari, you have a few options. If you’re ok with clearing your entire browsing history (including cookies and website data), you can take the straightforward approach and just go to Safari > Clear History:
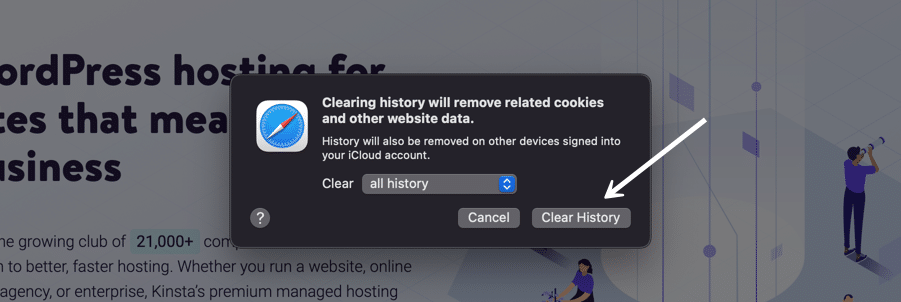
A popup window shows up for you to choose a timeframe for deleting the cache data. As with most browsers, you can go with the last hour, a few days, or maybe the entire history.

After that, click on the Clear History button to finish. That eliminates the Safari cache’s cookies, browsers history, and website data .
There are also more autonomous ways to manage the browser cache in Safari.
To activate these, go to the menu bar and select Safari > Preferences.
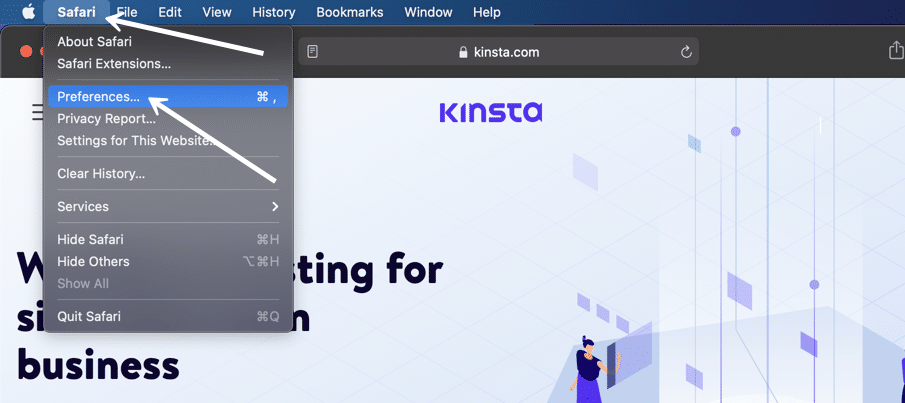
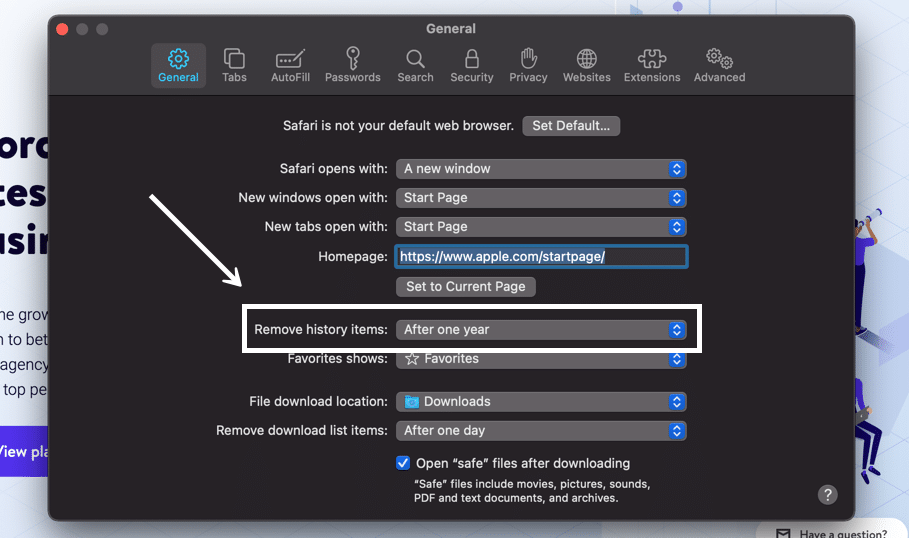
One way to have cache clearing happen in the background is by adjusting the field to Remove History Items. You’ll pick a certain period (like after one year), then Safari automatically clears the browser history cache after that time has passed.
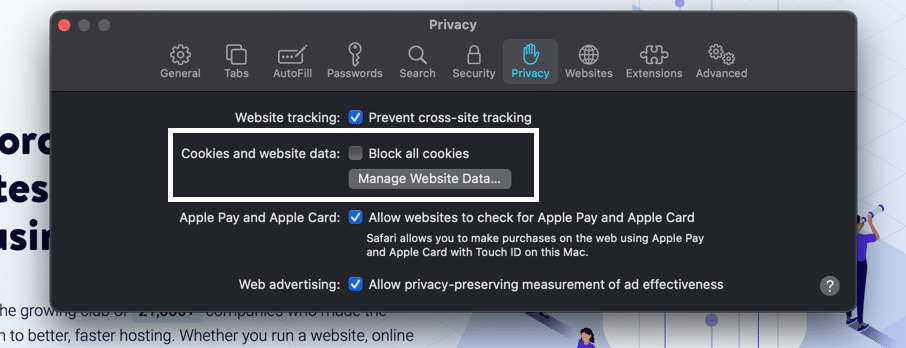
We also recommend going to the Privacy tabsince it provides an area to manage cookies and website data individually.
You’re able to check the box to Block All Cookies. This tells the cache never to log those cookies in the first place, removing the need for you ever to clear them out.
We also suggest you check out the Manage Website Data button.
That presents a list of websites currently storing data within your browser cache. You can either remove them individually or click on the Remove All button.

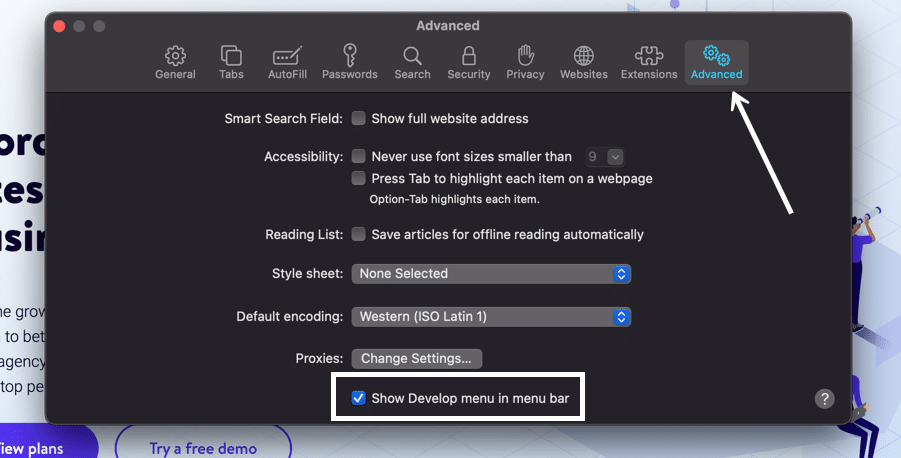
To only empty Safari’s browser cache (instead of the initial method where it also clears cookies and site data), you’ll need to enable the Develop menu by going to Preferences > Advanced and checking the Show Develop Menu in Menu Bar box.
Then, you can go to Develop > Empty Caches to clear Safari’s browser cache.
And those are all the ways to clear the cache in Safari!
How to Clear Cache for Brave Browser
Brave Browser offers a simple way to eliminate your browser history and other cache elements like images, files, and cookies. Brave also provides you with greater control over cookies as a privacy-oriented browser. For example, you can block all third-party cookies or opt to add specific URLs to either block or allow them.
To clear the cache in Brave, click on the Customize and Control Brave button in the upper right corner. You may also know this as a hamburger buttonwith three stacked horizontal lines.
This reveals a menu with quite a few options.
Find and select the Settings item to continue.

There are multiple ways to get to the cache clearing section on the Brave Settings page.
The first one requires you to click the History button in the Settings menu.
This page shows your entire Brave Browser viewing history.
On the left side, click the Clear Browsing Data link.
As an alternative to using the History tab, you can go straight to the Privacy and Security item on the main Settings page.
Then click on Clear Browsing Data.
Both of those methods bring you to the Clear Browsing Data popup window.
As a result, you’re presented with three tabs: Basic, Advanced, and On Exit.
It’s set to Basic by default, and most users won’t need anything more than that.
Check each element you want to clear from the Brave cache.
Feel free to choose all of them or just one or two.
Here are your options:
- Browsing history: gets rid of the browsing history within Brave, including what’s in the search box.
- Cookies and other site data: clears cookies, which results in logging you out of most websites.
- Cached images and files: removes site assets like images and coding files from the cache — this frees up storage but could slow down page load speeds.
Before clearing the cache selection, click on the Time Range dropdown menu to select how far you want to go back in your cache history.
You can clear the browsing history, cookies, and cache items from:
- The last hour
- The last 24 hours
- The last 7 days
- The last 4 weeks
- All time

Once you’re confident in your selections, click on the Clear Data button.
The entire Brave Browser cache, or at least part of the cache depending on your preferences, is cleared!
Remember that the Brave Browser cache stores more than what’s in the Basic tab.
Therefore, you must go to the Advanced tab to run a deeper clean.
More cache clearing items appear, such as:
- Passwords and other sign-in data.
- Autofill form data.
- Site and shields settings.
- Hosted app data.
After choosing the ones you want to delete, click on the Clear Data button.
Some internet users desire more consistent cache clearing. This is common with web developers who need to see regular updates on their site edits without the cache serving up old content.
If you’d like, Brave offers a way to clear certain parts of the browser cache whenever you exit the Brave Browser.
Click the On Exit tab to make this happen.
Go ahead and mark the checkboxes for Browsing History, Download History, or Autofill Form Data.
After you click the Save button, Brave will clear the cache for whatever choices you made.
One final way to clear the cache in Brave is by managing site cookies on an individual basis.
Back under Settings > Privacy and Security, you’ll find a tab called Cookies and Other Site Data. Click on that.
Under General Settings, you can choose to Allow All Cookies, Block Third-party Cookies, or Block All Cookies.
There’s also a setting to Clear Cookies and Site Data When You Close All Windows.
These settings function as cache clearing mechanisms since you’re restricting the cache from logging them in the first place. It’s up to you, but we recommend sticking to the Block Third-party Cookies option since it provides privacy but doesn’t break every website you visit.

It’s also possible to remove individual cookies from the cache.
To complete that process, go to See All Cookies And Site Data.
Brave presents a list of all cookies and site data stored in the cache. It’s listed by the website URL, and you can even click on each one to view what types of cookies are being used.
You can either click on the Remove All button to delete all of them or the individual Trash icons to only clear out specific cookies.
You may want to ensure that cookies from some sites never get stored in the cache as a final measure. Or maybe you’d like to allow your favorite sites that don’t pose any threats.
To allow cookies from particular sites, click on the Add button under Sites That Can Always Use Cookies.
Further down on the page, Brave has lists to Always Clear Cookies When Windows Are Closed and for Sites That Can Never Use Cookies. Simply choose the Add button next to the one you’d like to edit.
How to Clear Cache for Internet Explorer
To clear the browser cache for Microsoft Edge, get started by clicking the Gear icon in the top right to access the Tools menu. Then, find Safety and select Delete Browsing History… from the submenu:
You can also access the menu by using the shortcut: CTRL + SHIFT + DEL. Internet Explorer will open a popup. Make sure to select the Temporary Internet files and website files box to avoid clearing important information. Then, click the Delete button at the bottom:
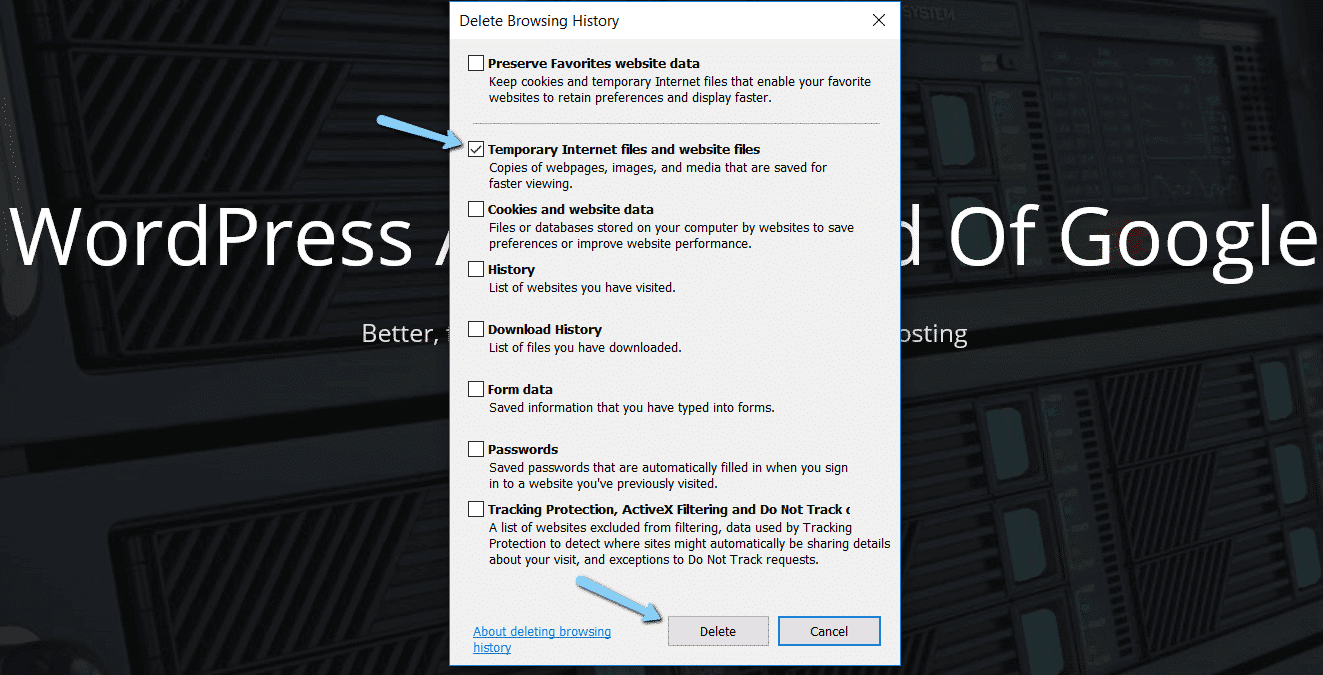
And your Internet Explorer browser cache is clear!
How to Clear Cache for Microsoft Edge
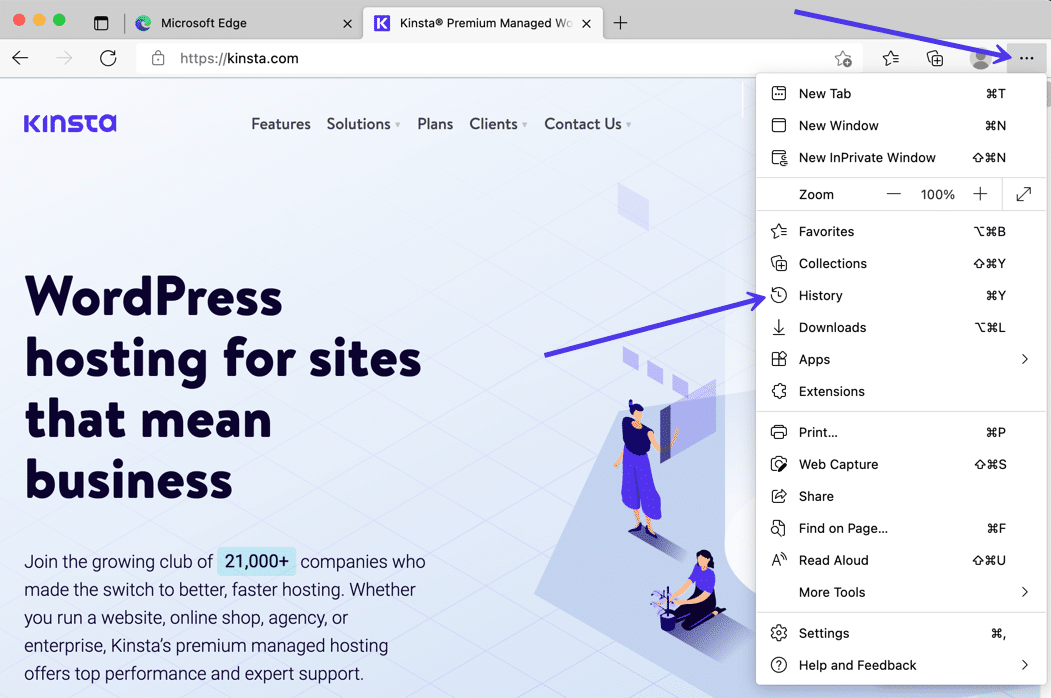
To clear the browser cache for Microsoft Edge, click the Three Dots icon in the top right of your browser window.
Choose History.
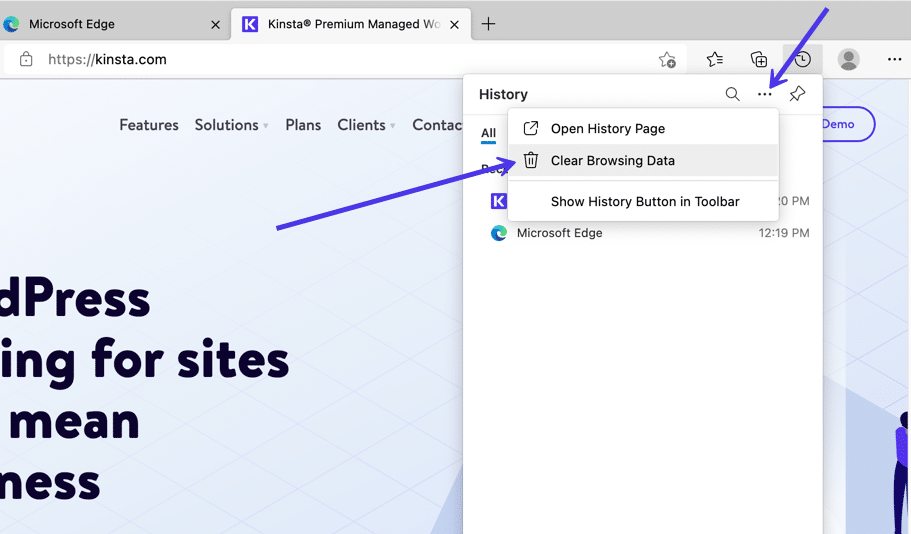
A new history module shows up to see the most recently visited websites. You should see another Three Dots icon within that module. Click that.
In the resulting menu dropdown, choose Clear Browsing Data.
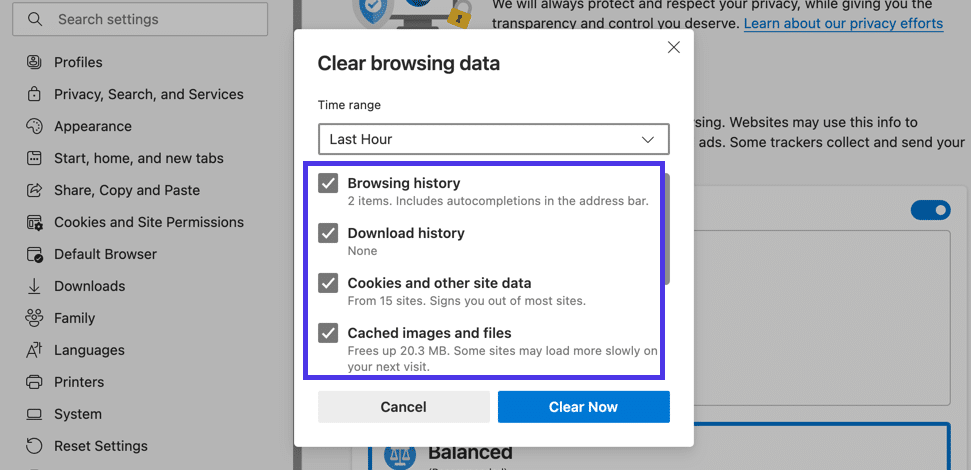
Microsoft Edge now opens a Clear Browsing Data window. You can check off the following items to include with your deletion:
- Browsing history.
- Download history.
- Cookies and other site data.
- Cached images and files.
What’s nice about Microsoft Edge is that it displays quantitive information like the number of browsing history items that will be deleted if you clear the cache. You can also view how much space you may free up from the cache clearing.
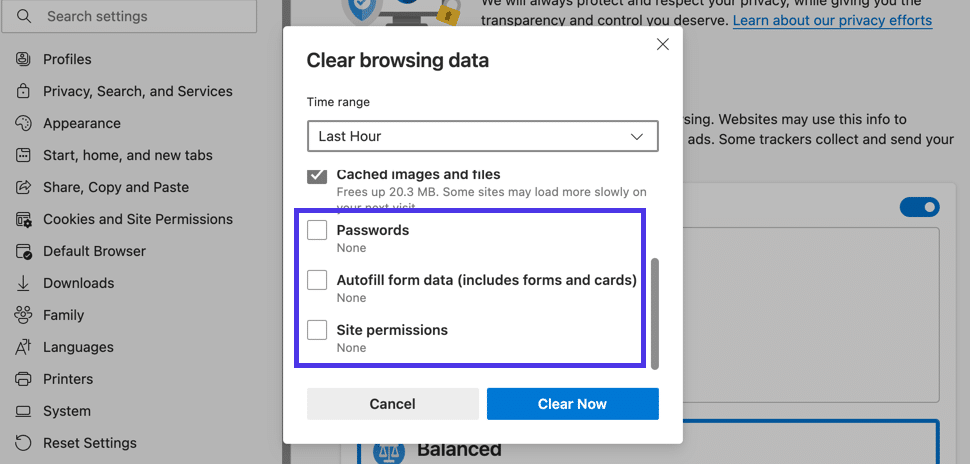
Scroll down the list to see three more data clearing options. These aren’t checked by default, so you’ll have to mark them yourself if you want to clean up passwords, autofill form data, and site permissions.
With your selection made, go through the Time Range field to indicate how far back in your cache you want to delete.
For the last step, click on the Clear Now button. That’s the easiest way to clear the browser cache in Microsoft Edge!
To get more specific with clearing the Edge cache, select the Three Dots icon in the upper right corner, then choose Settings.
Navigate to the Privacy, Search, and Services tab.
The first option is to Clear Browsing Data Now, which offers a button to Choose What To Clear and sends you to the popup window we discussed above with the checkboxes. It’s simply a different route to get there.
You also may want to explore the tab to Choose What to Clear Every Time You Close the Browser. This way, you can automatically clear the cache of unnecessary items after closing Edge; maybe you’d rather the browser history, cookies, or login information didn’t save every time.
As you can see, the page for choosing what you clear after closing the browser has a long list of toggles for adding or removing specific cache data from the automated cache purge.

If you’re more interested in removing cookies from the cache or managing the ones you want to allow, navigate to the Cookies and Site Data tab on the Microsoft Edge Settings page.
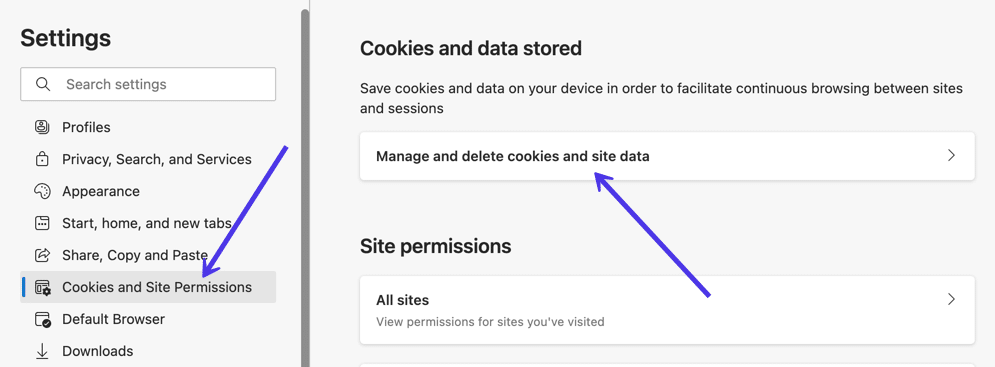
On this page, you have options to Block Third-party Cookies, Preload Pages for Faster Browsing and Searching, and See All Cookies and Site Data. We recommend going to the See All Cookies and Site Data page to get an idea of what tracking items are being placed inside the browser cache.
You can then add sites to the Block or Allow lists, creating a situation where the cache doesn’t need as much monitoring in the first place.
How to Clear Cache for Opera
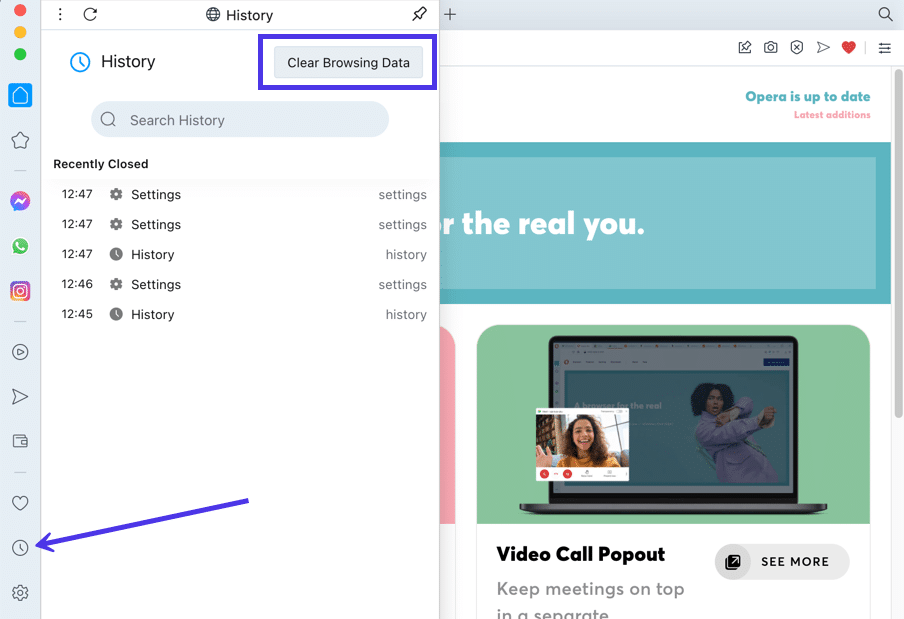
To clear the browser cache for Opera, click the History icon button on the lower left side menu. It looks like a small clock.
A new overlaying window slides into the frame, with a list of recently closed websites and a search bar to locate specific instances within your history log.
What you really want, however, is the Clear Browser Data button. Click on that.
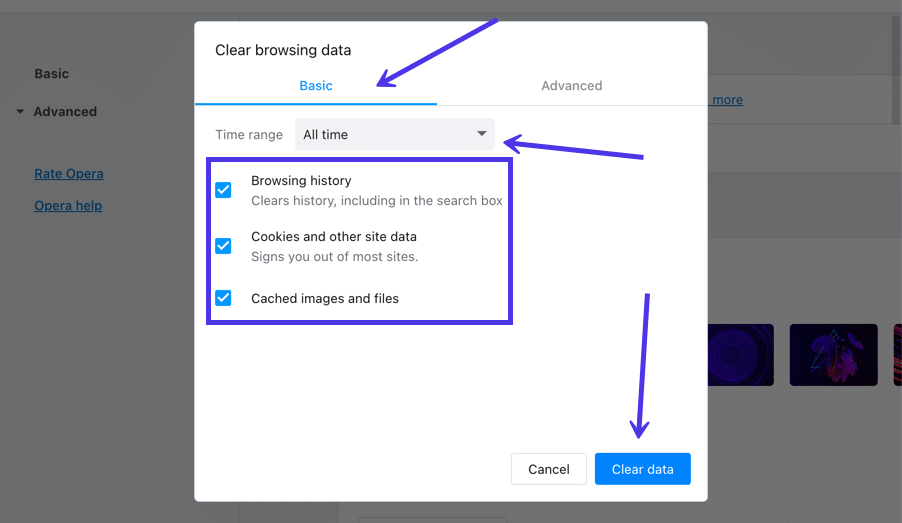
Opera sends you to the Clear Browsing Data module, automatically showing the Basic tab. Here, you can check or uncheck items to clear from the cache, such as browsing history, cookies and other site data, and cached images and files.
Proceed by choosing a time range like the entire history or just a few hours or days.
To finish the job, click on the Clear Data button.
That covers the fastest way to clear the Opera browser cache, but it’s technically not the most comprehensive solution.
There are still bits of data stored inside the cache, mainly data that are generally considered more important to the user. Due to that, Opera doesn’t immediately recommend that people clear out things like the news usage data or autofill form data.
However, you may decide that you’d like to remove everything from the cache. If that’s the case, choose the Advanced tab.
Several new checkboxes appear, including one to clear the Download History and another to clear the News Usage Data.
Further down, you’ll find even more checkboxes for removing data like passwords, sign-in data, autofill form data, site settings, and hosted app data.
Feel free to choose which ones to remove from the cache, then click the Clear Data button.
Your Opera browser cache is now empty, or at least the parts you chose to clear.
Moving forward, you have a few other choices when it comes to clearing a browser cache in Opera. There’s one other way to get to the same Clear Browsing Data page, and Opera has a section for specifically choosing which cookies to delete or block.
Click the Easy Setup button in the upper right corner. It looks like three horizontal lines with adjustable knobs on them.
In the revealed menu, click Go To Full Browser Settings. Alternatively, you can select the Settings button in the lower-left menu, which looks like a gear shape. They both send you to the same place.
Under the Basic section, look for the Privacy and Security area.
The first tab offers you to Clear Browsing Data. Select that to view the page we covered before for selecting the parts of the cache to clear in Opera.
Another option is the Cookies and Other Site Data tab. Click that to manage how cookies get handled by the Opera browser cache.
On this page, you can:
- Allow all cookies.
- Block third-party cookies in private mode.
- Block third-party cookies in general.
- Block all cookies.
It’s also possible to clear the cache whenever you close out of Opera. To make that happen, flip the switch where it says Clear Cookies and Site Data When You Quit Opera.
And those are the best ways to clear the cache in Opera and all of the most popular browsers!
Does someone keep telling you to “clear your browser cache”? It’s a necessary diagnostic when having website issues (like a 304 error). But what does clearing your browser cache mean, and how do you clear the cache for your specific browser?
Let’s find out!
What’s a Browser Cache?
A browser cache is a database of files used to store downloaded resources from websites. Common resources in a browser cache include images, text content, HTML, CSS, and Javascript. The browser cache is relatively small compared to the many other types of databases used for websites.
A cache, in general, is software or hardware that temporarily captures and stores data for the user to access that data in the future rapidly.
There are several types of caching, like browser caching, distributed server caching for high volume systems, application caching to log website HTML, data caching for content management systems, gateway caching, proxy caching, and many other kinds.
So, as a subset of general caching, browser caching:
- Is a software element stored on whatever browser you use to peruse the internet.
- Uses a small database, much smaller in size than server or standard website cache systems.
- Takes downloaded data (no longer online, but in a local, client-side environment) from websites you visit. In short, it stores the data on your computer.
- Stores website resources such as coding files, media assets, and personalized site preferences.
- Uses the stored website resources to deliver them faster in the future.
- Utilizes that data to provide a more desirable user experience.
Simply put, a browser cache takes elements from the websites you visit and saves them in a database, resulting in faster page load times (especially with a slow or missing internet connection) and a more robust user experience the next time you go to a website you’ve been to before.
Notice that we didn’t only mention page load times as the primary benefit. The user experience is just as necessary. For instance, the browser cache saves user site preferences like color schemes, which may make a website easier to read.
Here are some of the main types of site resources saved within your browser cache:
- Website data and assets like written content, images, videos, and coding filesmake it easier for the site to load up faster in the future and provide options to view some parts of a website while offline.
- Documents from web apps bolster the effectiveness of viewing pages in an offline environment.
- Valuable or repeated website activity such as automated login credentials or products left in a shopping cart.
- Personalized user preferences for specific websites or the internet in general. For instance, you may adjust settings like the font size, typography style, color scheme, or browser zoom.
Here’s an example:
Marla likes buying her home improvement products at Overstock.com. She’s also an avid reader of The Wall Street Journal online, while also getting her comedy fix at The Onion. As a small business owner, Marla has a busy life; she sneaks in her internet browsing during lunch and for 15 minutes before bedtime. She also has a visual impairment and travels to visit clients in rural areas, where internet connection is often lacking.
Even though she may not know it, browser caching helps Marla in the following ways:
- It saves the items she previously added to her Overstock.com cart, making it easy to check out in the future.
- It keeps her login credentials saved on all sites, allowing her to enjoy immediate access to her WSJ subscription, The Onion, and Overstock. It also handles any login credentials for browser-based emails.
- The Onion, and every other site, loads written content, images, and site files rather quickly, so she’s not wasting her lunch hour waiting for pages to render.
- The browser cache saves her personal preferences for much larger font sizes and white backgrounds on The Onion and the WSJ. This accommodates her visual impairment while reading articles.
- Her most visited sites still load their content (or at least some of the content depending on the website) when she travels to areas with poor internet connection. That’s because her frequently visited site resources get stored in the browser cache.
Check Out Our Video Guide to Clearing Cache
How a Browser Cache Works
Here’s a more technical look at how a browser cache functions:
- The browser (let’s say Firefox) notifies the web server that it would like some content, most likely from a website. This is called a request.
- At the same time, our Firefox browser looks to its database, the browser cache. It’s checking to see if any data from the website requested was previously cached (saved inside the cache).
- If the requested content isn’t in the browser cache, it gets sent directly from the webserver. This is called a response.
- If the requested content is found within the browser cache, our Firefox browser ignores the server and pulls the content from its cache.
Not only must the cache contain the correct data for the desired webpage, but it can’t be considered “stale” data. The browser may encounter stale cache content since almost all cached data has an expiration date. It would be irresponsible to log and serve up outdated site content to users, seeing as how site content changes regularly. The goal is for the browser to only serve up content almost identical to what’s actually on the current website.
Overall, the browser pulls from its cache when that cache contains data from the requested website, and that data is not stale.
We discussed the type of data stored in a browser cache, but it’s also worth mentioning that client-side storage uses a few types of packets and databases to log that information. From a fundamental perspective, the browser cache holds resources like login credentials, user settings, and site content. Yet, these resources get stored with more complex database mechanisms like cookies, Web Storage APIs, IndexedDB APIs, and Cache APIs.
How To Clear Cache
We’ll begin by giving you a brief introduction of when you might need to clear your browser cache. Then, we’ll show you how to clear the browser cache on most major browsers. If you want to quickly skip to the “how,” you can click one of the links below. Otherwise, we’ll start at the beginning.
Why Do You Need to Clear Your Browser Cache?
Most of the time, you never even notice browser caching happening. It runs entirely behind the scenes and usually doesn’t affect your browsing experience. But… sometimes things can go wrong.
For example, you might make a change to your site… but you’re unable to see that change because your browser is still serving up the cached version of that resource. Or, the cache might have become corrupted and interfered with a web page’s proper functioning.
For those reasons, a good first step whenever you encounter an issue on your site (or someone else’s site) is to clear your browser cache. It won’t always fix the issue, but it is an essential first diagnostic step to rule out before assuming that a more complicated issue is causing problems.
When using local web development solutions such as MAMP, you can encounter the “This Site Can’t Provide a Secure Connection” error without clearing the cache. You’d be surprised how often what you think is a “huge” website bug is just a caching issue that goes away as soon as you clear your browser cache.
How to Force Refresh a Single Page
Before you go straight to clearing your entire browser cache, one trick you can try is something called a “force refresh.” Typically, when you refresh a page, your browser still serves up the cached version of the page rather than downloading all of the assets again. But you can bypass the cache and force a complete refresh by using some simple hotkeys:
- Windows and Linux browsers: CTRL + F5
- Apple Safari: SHIFT + Reload toolbar button
- Chrome and Firefox for Mac: CMD + SHIFT + R
Again, this method only bypasses the cache for the specific page that you’re on. It leaves the rest of your browser cache untouched. Therefore, this option is great if you’re experiencing issues with just a single page. But if you want to completely reset your experience (say, across an entire site), you’re better off clearing your entire browser cache.
How to Clear Browser Cache for Google Chrome
To clear the cache for Google Chrome, start by clicking the Three Dots icon in the top right of your browser window. Then, find the More Tools option and select Clear browsing data… from the submenu:
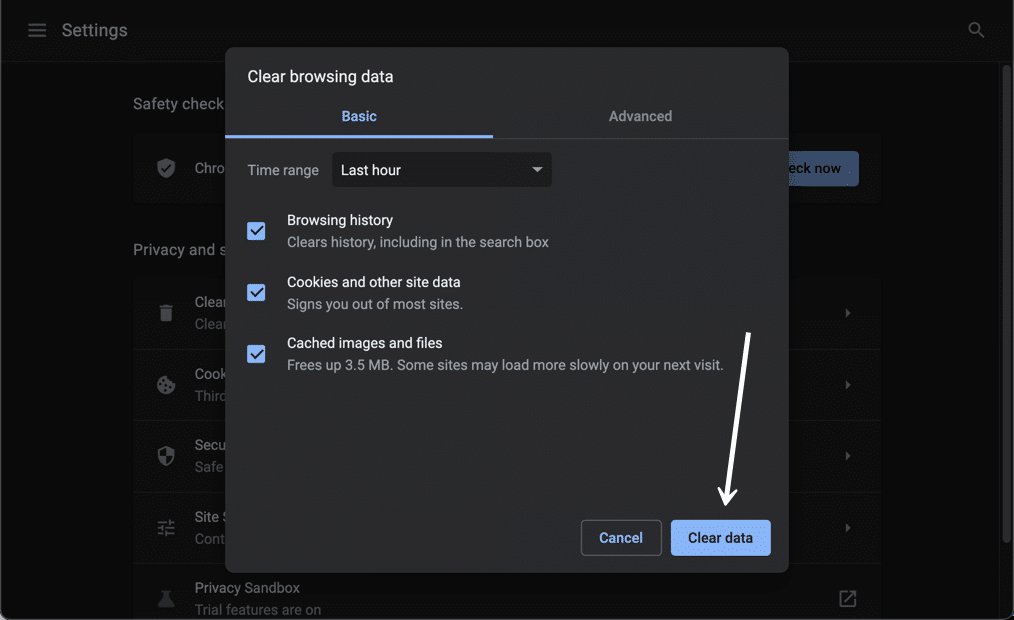
Alternatively, you can also use the hotkey combination: CTRL + SHIFT + DEL. Chrome will open up a new tab with a popup window titled Clear Browsing Data. Make sure that only the Cached images and files box is checked. You can choose to clear your browsing history or opt for more thorough cleansing of the cache by including cookies and other site data in the cache clearing.
You can also change the time frame at the top. Select the Time Range field, then choose one of the options like the last 24 hours, last 4 weeks, or the entire history.
Finally, click the Clear data button to clear your cache. And that’s it – your Chrome browser cache is now empty.
It’s important to remember that most browsers store more advanced data within the cache that usually doesn’t get cleared with the primary tool. These are usually more critical data items that you might not want to eliminate from the cache.
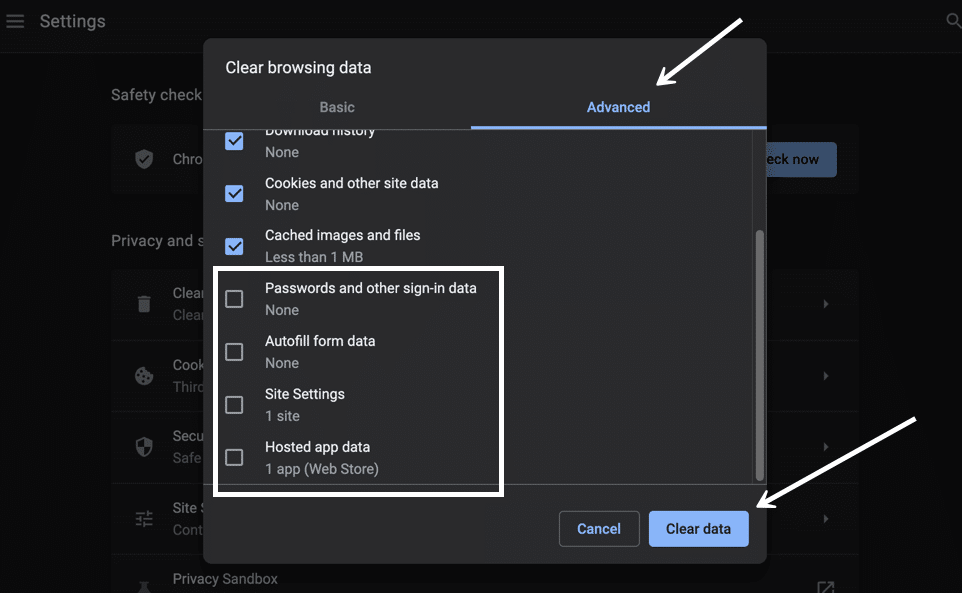
However, many situations warrant the clearing of all cache data. In Chrome, select the Advanced tab in the Clear browsing data window.
Now, you’ll see additional browsing data checkboxes such as:
- Passwords and other sign-in data.
- Autofill form data.
- Site Settings.
- Hosted app data.
Feel free to mark whichever data items you want to be removed if you’d like. Just know that these are usually essential for improving your overall user experience, like with the passwords that help you log into websites in seconds.
Click on the Clear Data button once you’re done.
Google Chrome has multiple ways to look at your cache data and delete it from the browser.
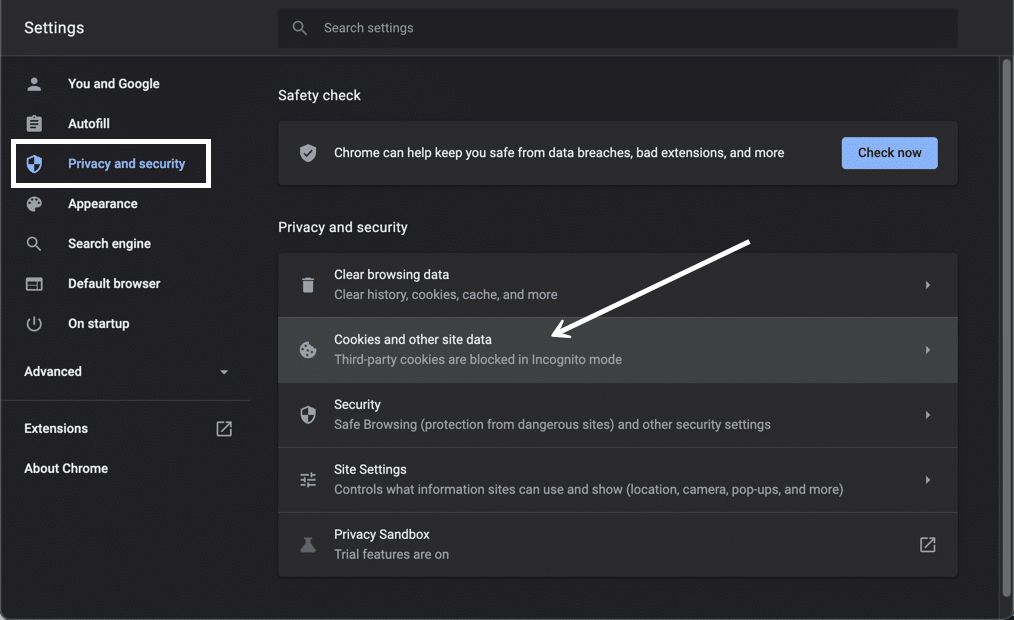
For instance, you could go right to the Google Chrome Settings page and click on Privacy and Security.
Under that, there’s a button to Clear Browsing Data, which brings you to the same popup window we saw before; it’s simply found by going through different steps.
In addition, you can choose the Cookies and Other Site Data button to specifically take control of third-party cookies.
All tracking cookies are logged within the browser cache, so this is an option for those who are more interested in cleaning out cookies instead of your browser history or login information.
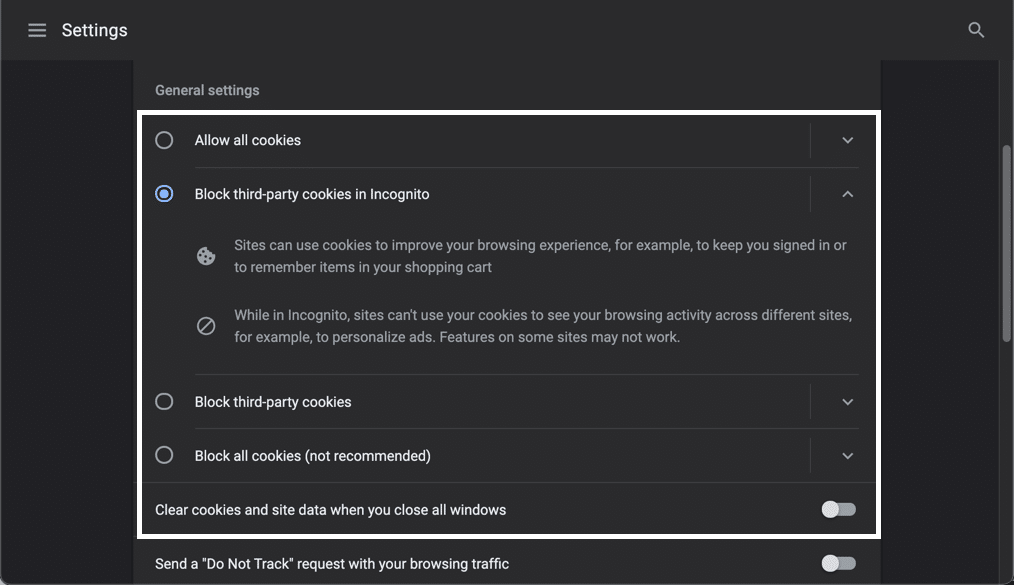
On this page, you have options to:
- Allow all cookies.
- Block third-party cookies in Incognito.
- Block third-party cookies.
- Block all cookies.
The cookie settings empower you to clean up your cache or eliminate unnecessary cache elements automatically. As an example, you may want to block third-party cookies so that you never have to worry about cleaning them out of your browser cache in the future.
You may also want to explore the area to Clear Cookies and Site Data When You Close All Windows. That essentially automates the cache clearing process by deleting items every time you close the Chrome browser.
The lower part of this section in Chrome has several other options that pertain to the browser cache.
There’s a button to See All Cookies and Site Data, which comes in handy for clearing out cache items individually.
You can also manage lists that allow sites to use cookies, clear cookies when closed, or block cookies entirely.
How to Clear Cache for Mozilla Firefox
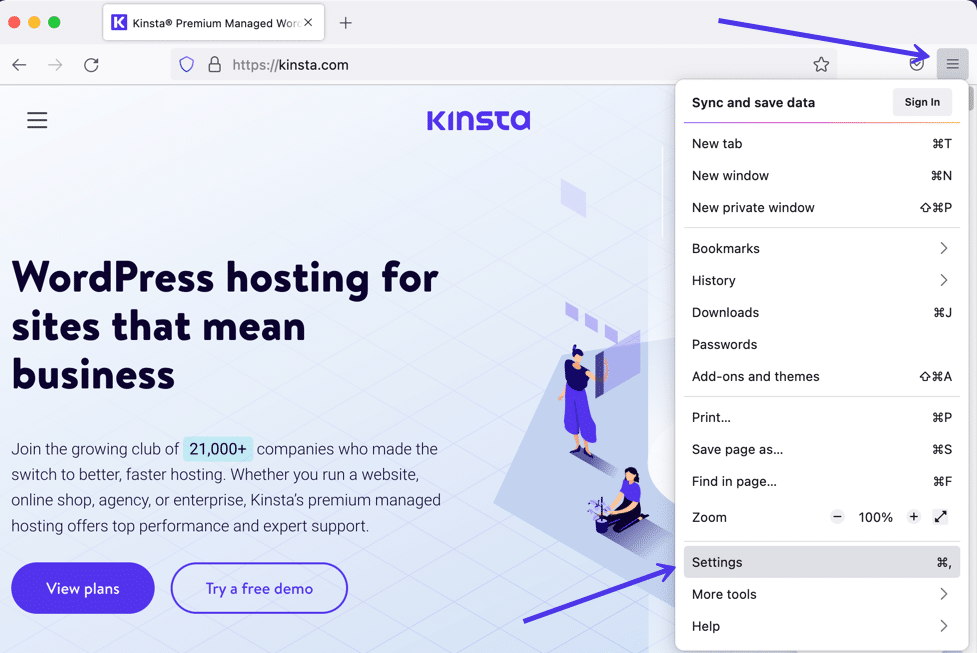
To clear the browser cache for Mozilla Firefox, get started by clicking the Hamburger icon in the top right and selecting History.
In the menu that appears next, select Clear Recent History…
You can also access the menu by using the shortcut: CTRL + SHIFT + DEL. Firefox will then open a popup. In the Time Range to Clear dropdown, select the Cache option and anything else you’d like to remove from your browser’s saved files. You have options to remove the browsing history, cookies, search history, and data items like site settings and offline website data.
Use the Time Range To Clear menu to pick how far back you’d like to go when clearing out the cache data. You can choose the entire history or even just the last hour.
When you have all the options selected, click on the OK button to proceed. That successfully clears your browser cache in Firefox.
As an alternative (and to find a few extra browser cache settings), go back to the three-lined hamburger icon. Choose the Settings tab this time.
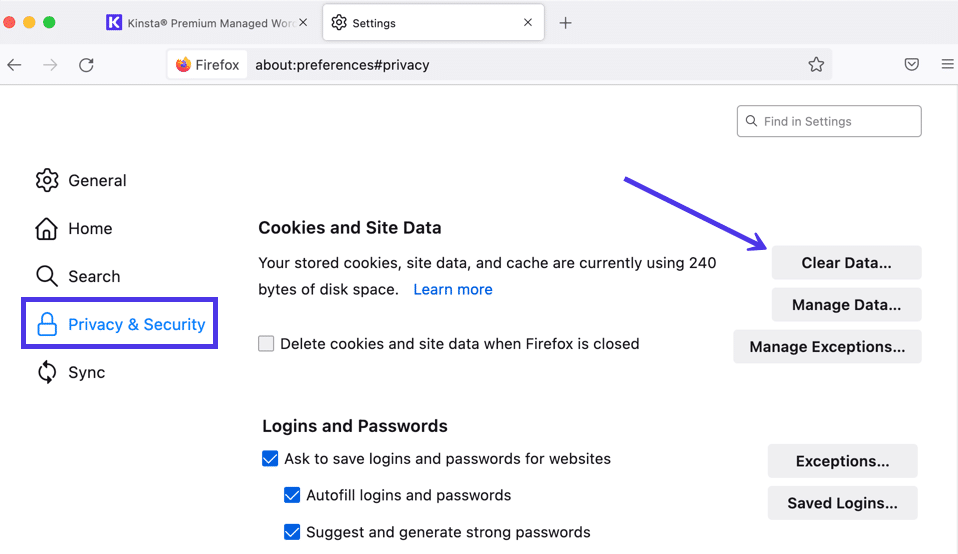
Choose Privacy and Security.
Under the Cookies and Site Data section, you can use the Clear Data button.
This is a little different from the previous method for cleaning out cache data.
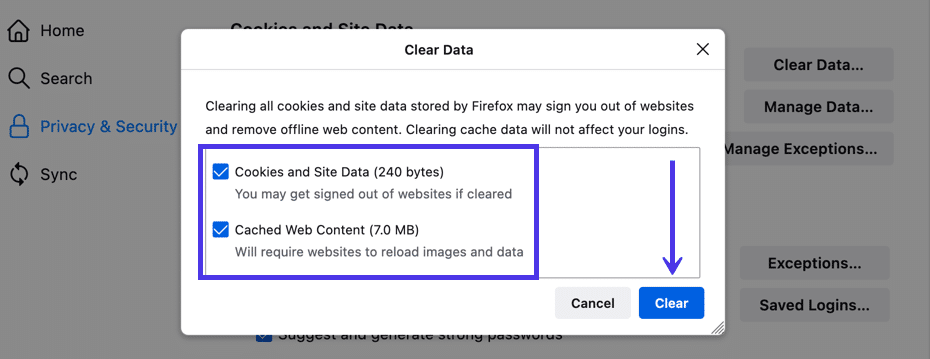
You’re only asked about cookies, site data, and cached web contentwith this one. Furthermore, the popup window displays how much storage space you save with these deletions.
Click the Clear button to finish.
Also, back on the Privacy and Security page, you’ll see the following options:
- Manage Data.
- Manage Exceptions.
- Delete Cookies and Site Data When Firefox is Closed.
The Manage Data button lets you examine each stored data item to delete them one by one potentially. You can also go into the Manage Exceptions area if you’d like to exclude some sites from having their cookies or site data deleted from automated processes. Lastly, the Delete Cookies and Site Data When Firefox is Closed checkbox automates clearing your browser cache, but only when you completely shut down Firefox.
And while we’re in the Privacy and Security area, you should know that there’s another History section, similar to the one accessible from the Firefox hamburger menu icon. Here, you have a button to Clear History, which allows selecting what to delete.
There’s also a dropdown section to never remember the browsing history or customize your settings. Some may use that to automatically prevent the cache from saving data in the first place.
And that’s it! Your Firefox browser cache is now empty and potentially automated for the future.
How to Clear Cache for Safari
To clear the browser cache for Safari, you have a few options. If you’re ok with clearing your entire browsing history (including cookies and website data), you can take the straightforward approach and just go to Safari > Clear History:
A popup window shows up for you to choose a timeframe for deleting the cache data. As with most browsers, you can go with the last hour, a few days, or maybe the entire history.
After that, click on the Clear History button to finish. That eliminates the Safari cache’s cookies, browsers history, and website data .
There are also more autonomous ways to manage the browser cache in Safari.
To activate these, go to the menu bar and select Safari > Preferences.
One way to have cache clearing happen in the background is by adjusting the field to Remove History Items. You’ll pick a certain period (like after one year), then Safari automatically clears the browser history cache after that time has passed.
We also recommend going to the Privacy tabsince it provides an area to manage cookies and website data individually.
You’re able to check the box to Block All Cookies. This tells the cache never to log those cookies in the first place, removing the need for you ever to clear them out.
We also suggest you check out the Manage Website Data button.
That presents a list of websites currently storing data within your browser cache. You can either remove them individually or click on the Remove All button.
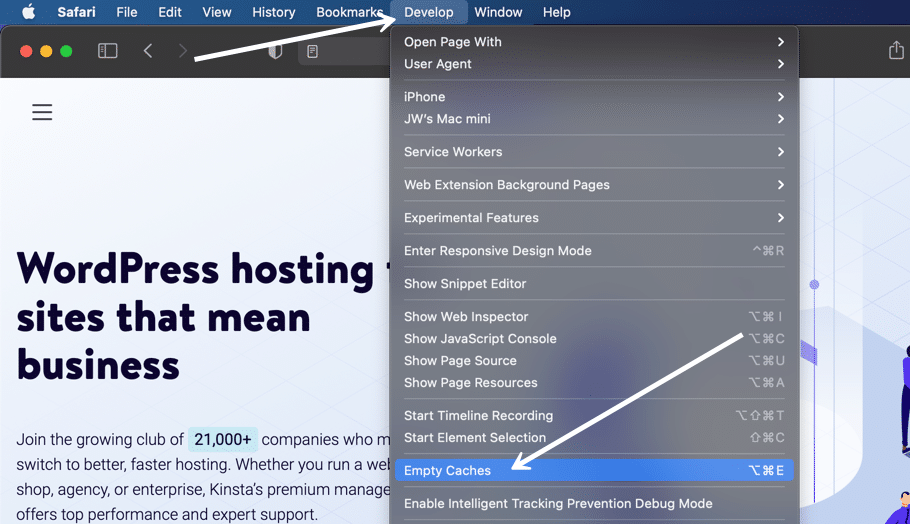
To only empty Safari’s browser cache (instead of the initial method where it also clears cookies and site data), you’ll need to enable the Develop menu by going to Preferences > Advanced and checking the Show Develop Menu in Menu Bar box.
Then, you can go to Develop > Empty Caches to clear Safari’s browser cache.
And those are all the ways to clear the cache in Safari!
How to Clear Cache for Brave Browser
Brave Browser offers a simple way to eliminate your browser history and other cache elements like images, files, and cookies. Brave also provides you with greater control over cookies as a privacy-oriented browser. For example, you can block all third-party cookies or opt to add specific URLs to either block or allow them.
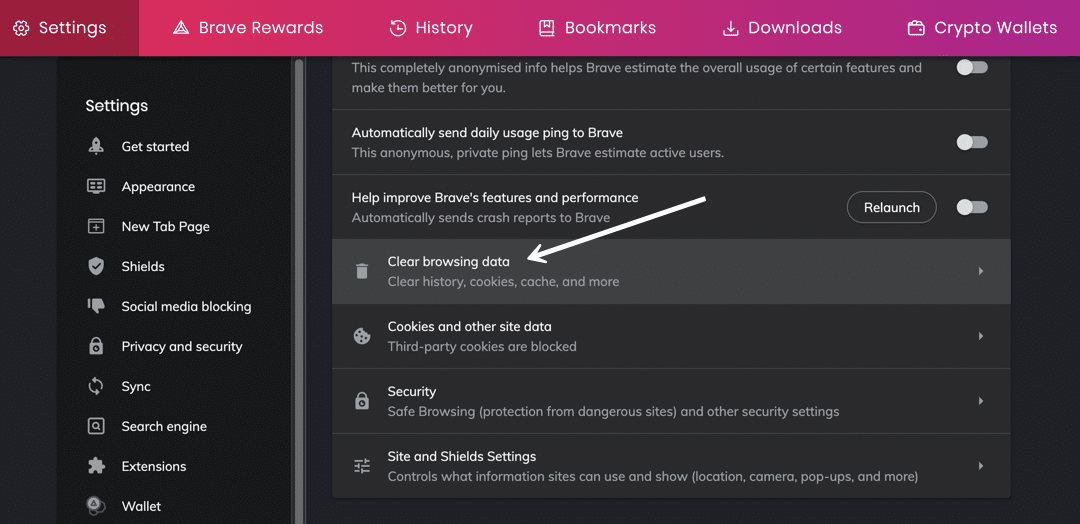
To clear the cache in Brave, click on the Customize and Control Brave button in the upper right corner. You may also know this as a hamburger buttonwith three stacked horizontal lines.
This reveals a menu with quite a few options.
Find and select the Settings item to continue.
There are multiple ways to get to the cache clearing section on the Brave Settings page.
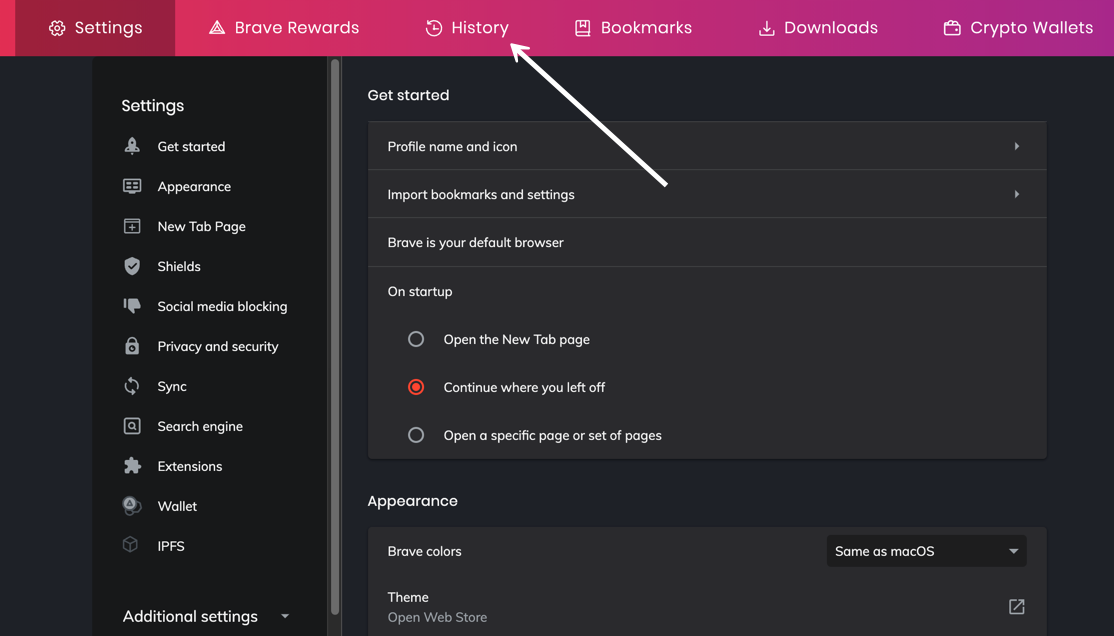
The first one requires you to click the History button in the Settings menu.
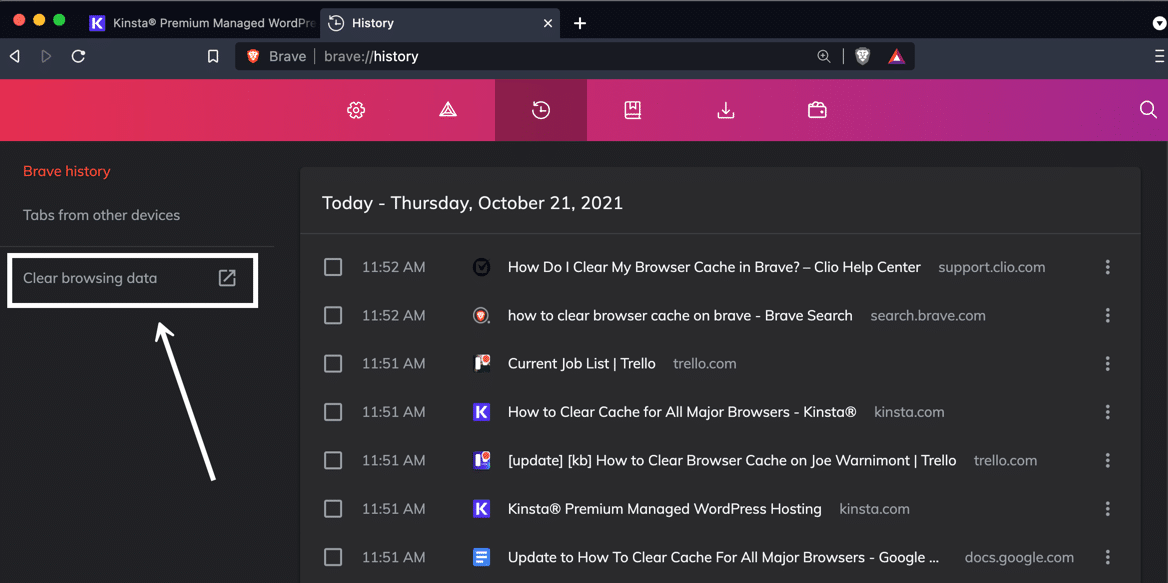
This page shows your entire Brave Browser viewing history.
On the left side, click the Clear Browsing Data link.
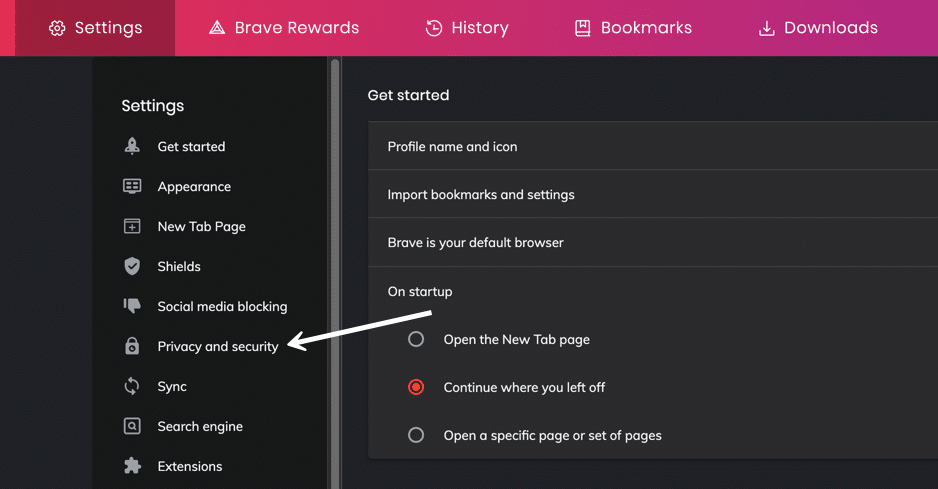
As an alternative to using the History tab, you can go straight to the Privacy and Security item on the main Settings page.
Then click on Clear Browsing Data.
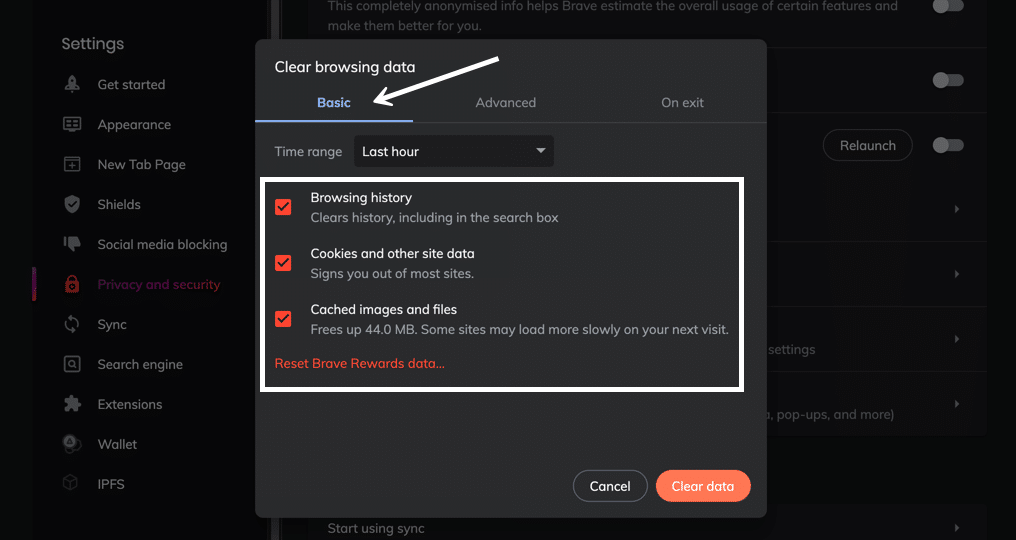
Both of those methods bring you to the Clear Browsing Data popup window.
As a result, you’re presented with three tabs: Basic, Advanced, and On Exit.
It’s set to Basic by default, and most users won’t need anything more than that.
Check each element you want to clear from the Brave cache.
Feel free to choose all of them or just one or two.
Here are your options:
- Browsing history: gets rid of the browsing history within Brave, including what’s in the search box.
- Cookies and other site data: clears cookies, which results in logging you out of most websites.
- Cached images and files: removes site assets like images and coding files from the cache — this frees up storage but could slow down page load speeds.
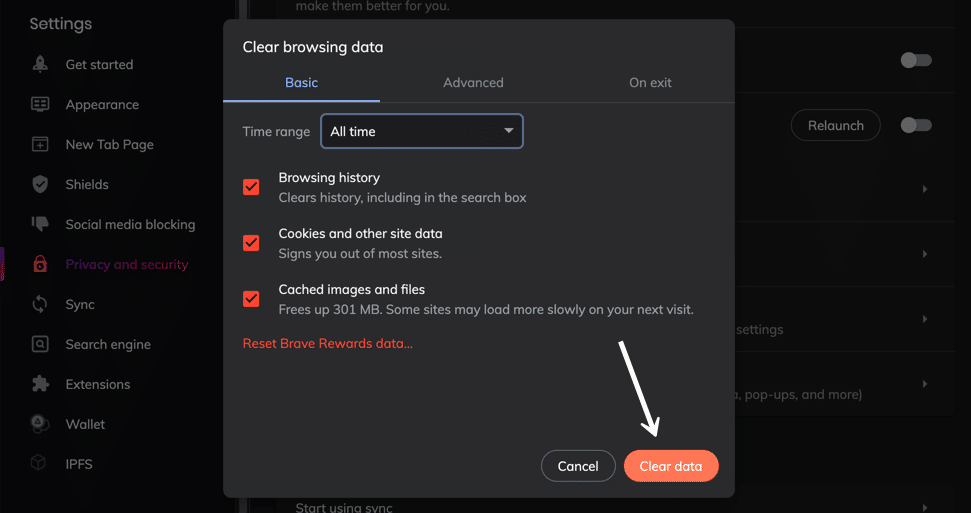
Before clearing the cache selection, click on the Time Range dropdown menu to select how far you want to go back in your cache history.
You can clear the browsing history, cookies, and cache items from:
- The last hour
- The last 24 hours
- The last 7 days
- The last 4 weeks
- All time
Once you’re confident in your selections, click on the Clear Data button.
The entire Brave Browser cache, or at least part of the cache depending on your preferences, is cleared!
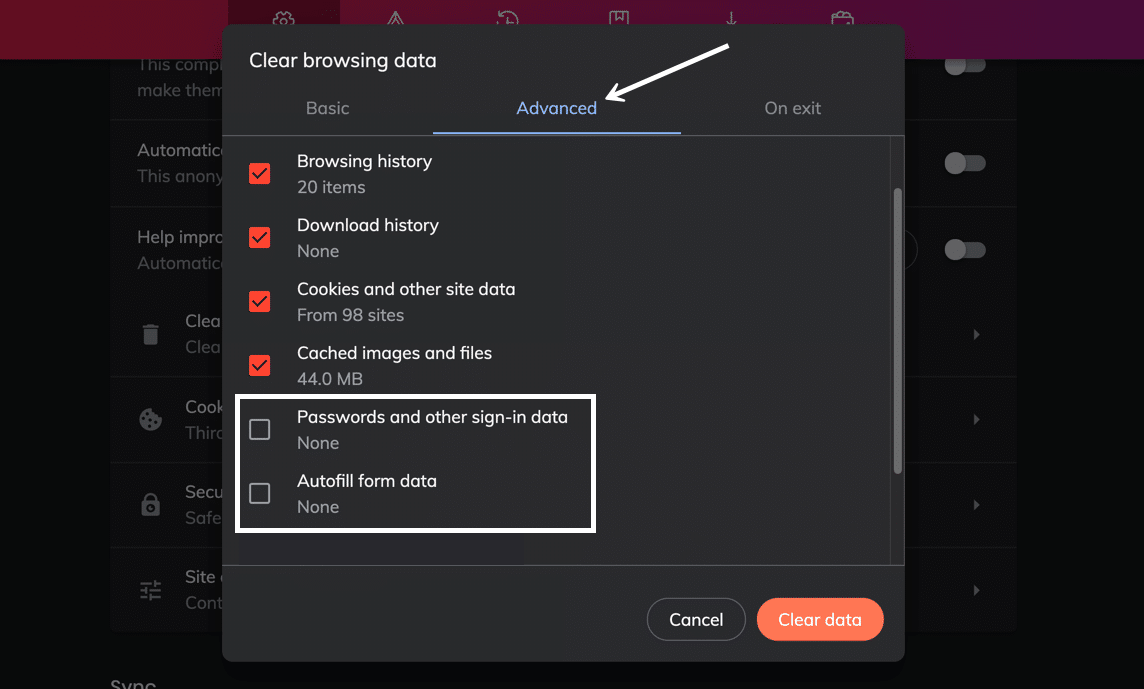
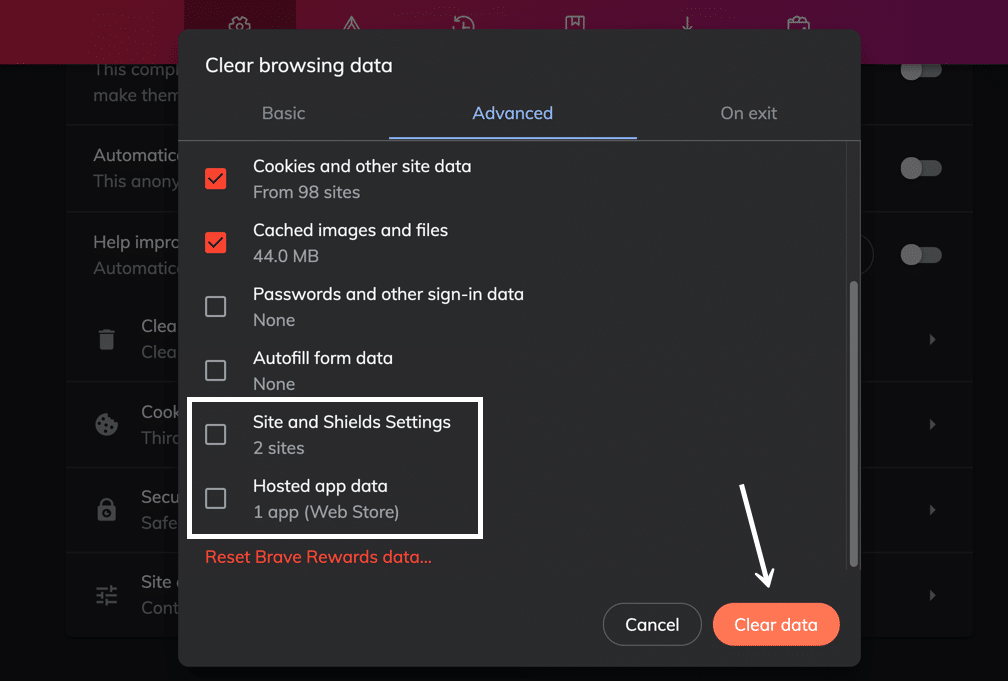
Remember that the Brave Browser cache stores more than what’s in the Basic tab.
Therefore, you must go to the Advanced tab to run a deeper clean.
More cache clearing items appear, such as:
- Passwords and other sign-in data.
- Autofill form data.
- Site and shields settings.
- Hosted app data.
After choosing the ones you want to delete, click on the Clear Data button.
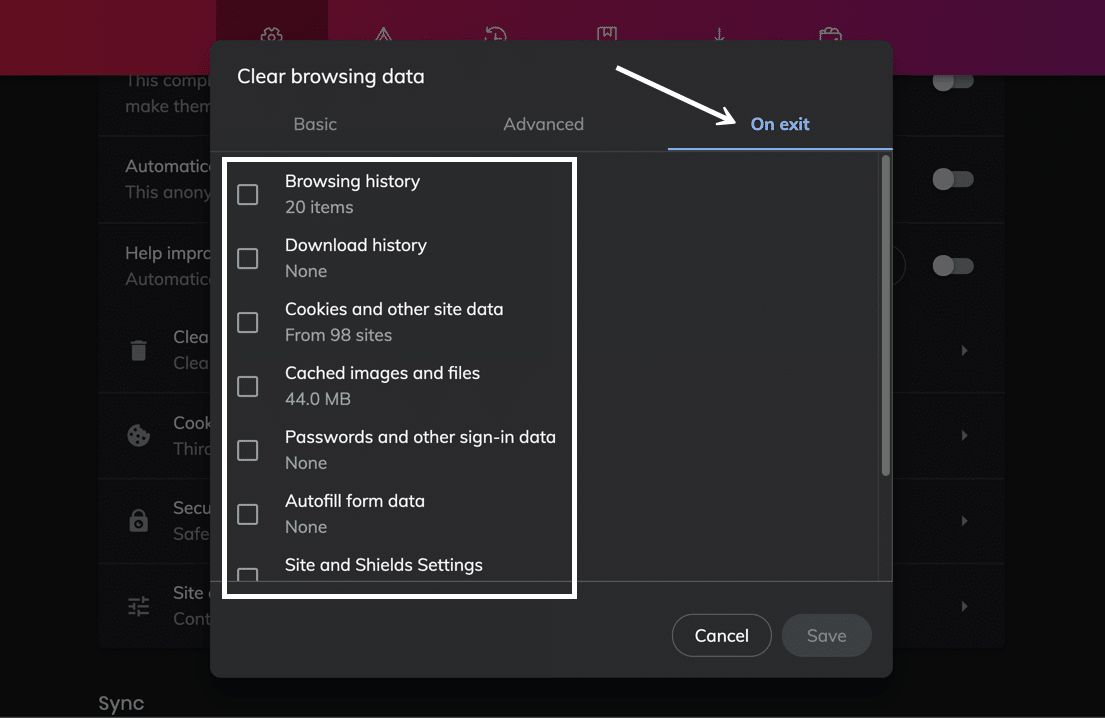
Some internet users desire more consistent cache clearing. This is common with web developers who need to see regular updates on their site edits without the cache serving up old content.
If you’d like, Brave offers a way to clear certain parts of the browser cache whenever you exit the Brave Browser.
Click the On Exit tab to make this happen.
Go ahead and mark the checkboxes for Browsing History, Download History, or Autofill Form Data.
After you click the Save button, Brave will clear the cache for whatever choices you made.
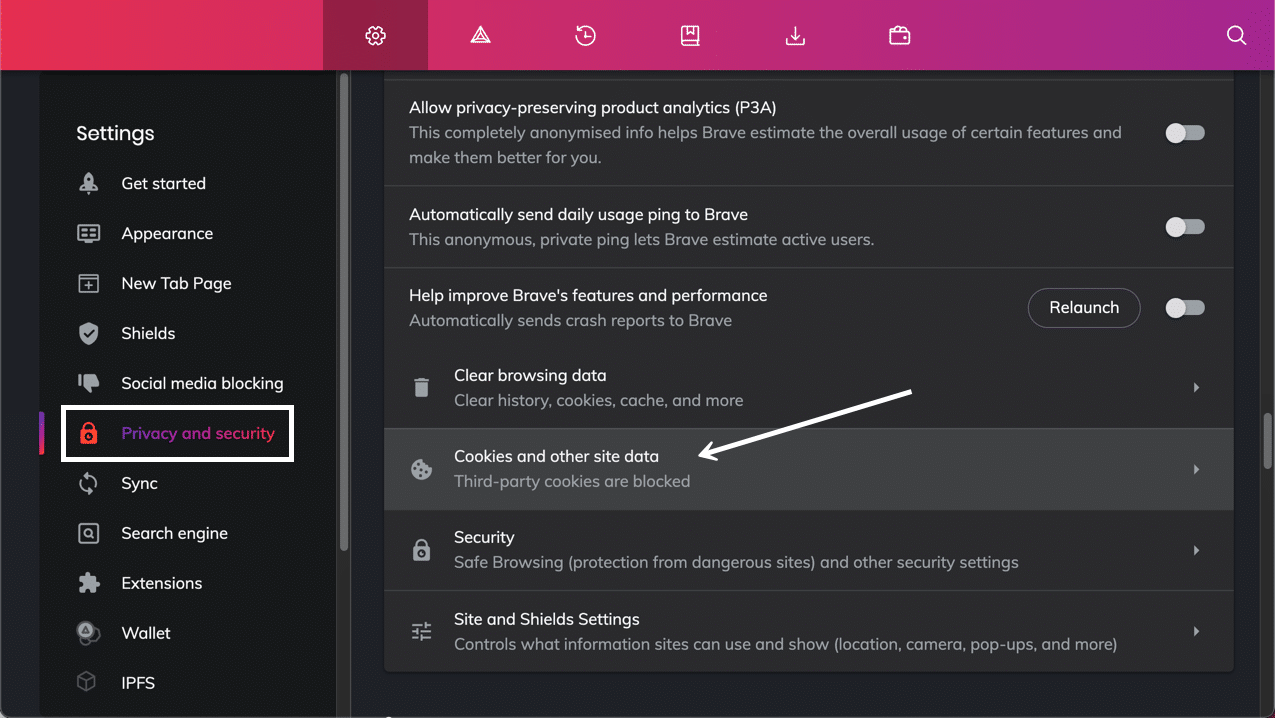
One final way to clear the cache in Brave is by managing site cookies on an individual basis.
Back under Settings > Privacy and Security, you’ll find a tab called Cookies and Other Site Data. Click on that.
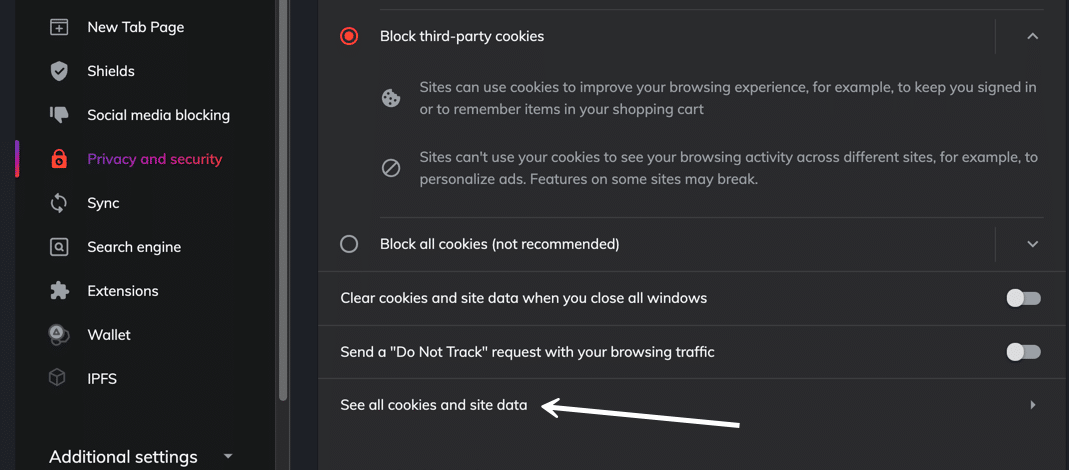
Under General Settings, you can choose to Allow All Cookies, Block Third-party Cookies, or Block All Cookies.
There’s also a setting to Clear Cookies and Site Data When You Close All Windows.
These settings function as cache clearing mechanisms since you’re restricting the cache from logging them in the first place. It’s up to you, but we recommend sticking to the Block Third-party Cookies option since it provides privacy but doesn’t break every website you visit.
It’s also possible to remove individual cookies from the cache.
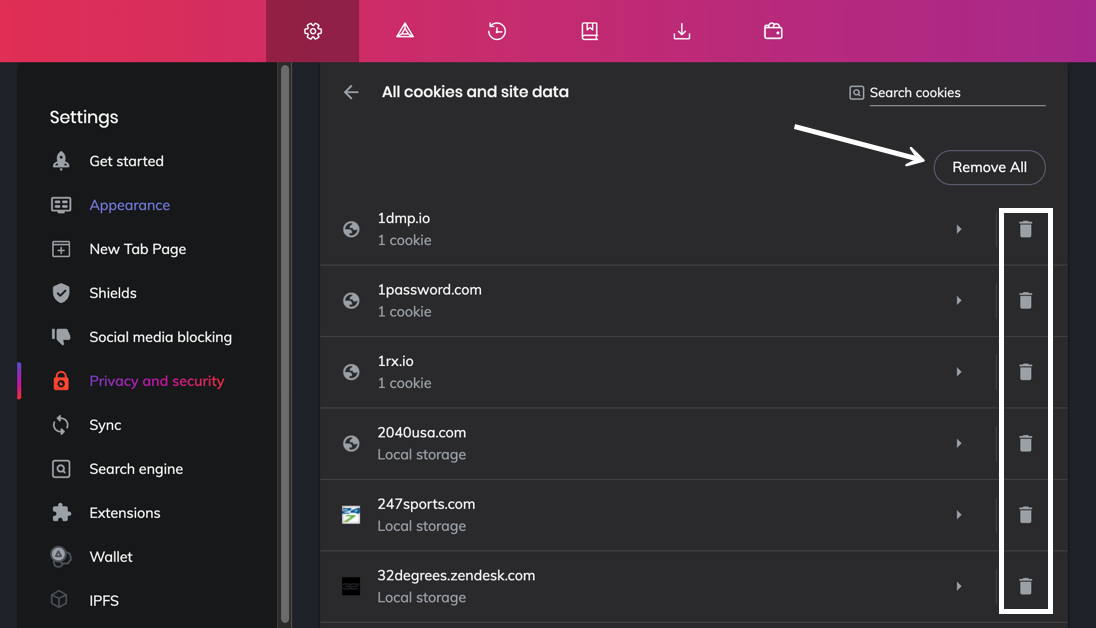
To complete that process, go to See All Cookies And Site Data.
Brave presents a list of all cookies and site data stored in the cache. It’s listed by the website URL, and you can even click on each one to view what types of cookies are being used.
You can either click on the Remove All button to delete all of them or the individual Trash icons to only clear out specific cookies.
You may want to ensure that cookies from some sites never get stored in the cache as a final measure. Or maybe you’d like to allow your favorite sites that don’t pose any threats.
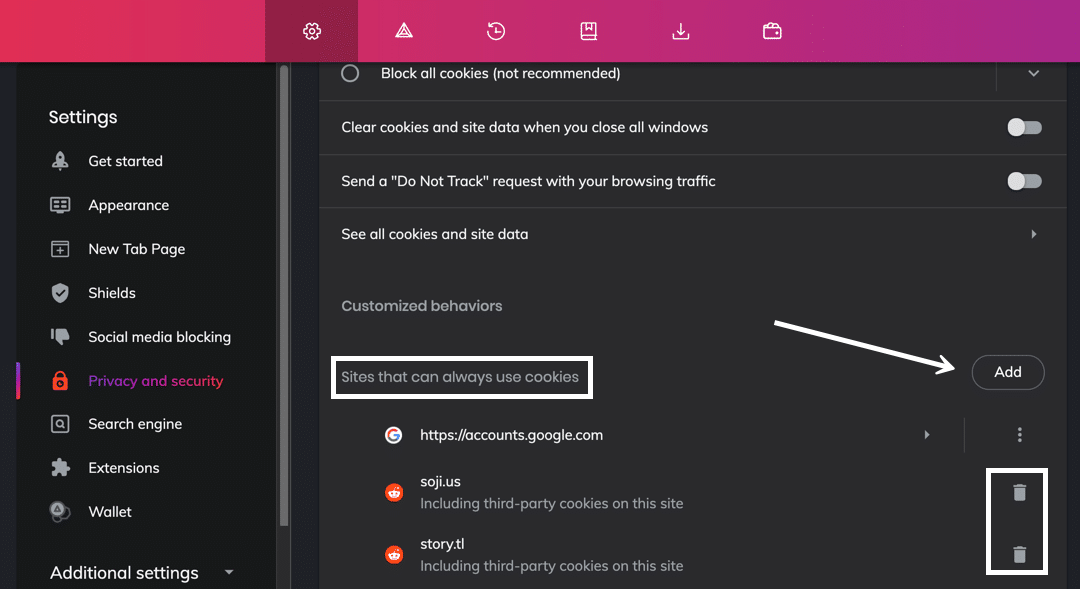
To allow cookies from particular sites, click on the Add button under Sites That Can Always Use Cookies.
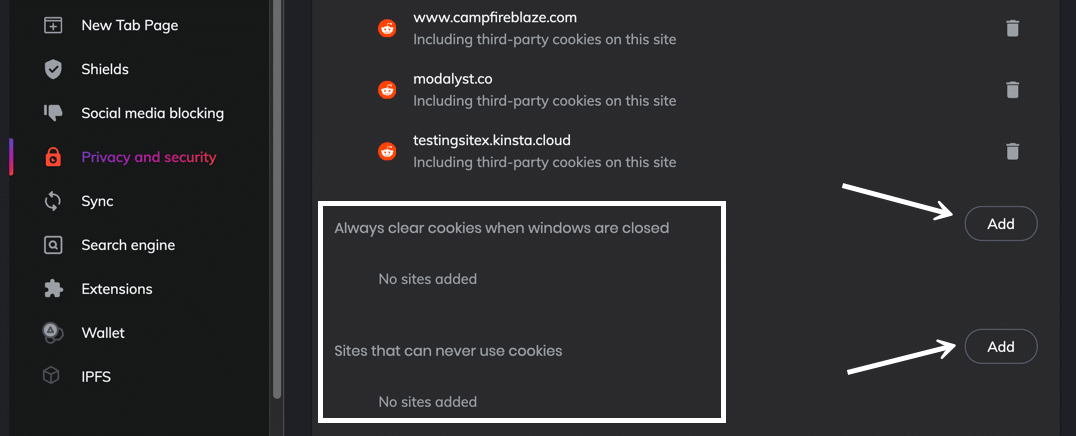
Further down on the page, Brave has lists to Always Clear Cookies When Windows Are Closed and for Sites That Can Never Use Cookies. Simply choose the Add button next to the one you’d like to edit.
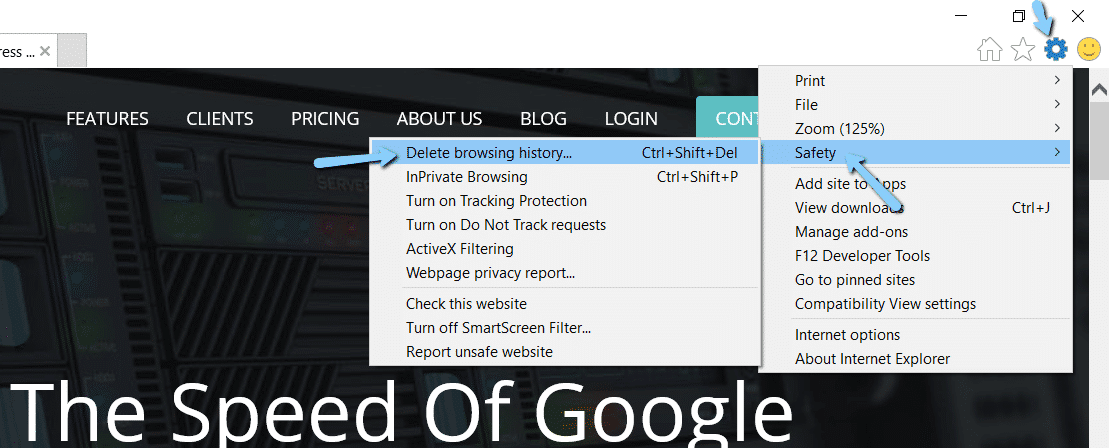
How to Clear Cache for Internet Explorer
To clear the browser cache for Microsoft Edge, get started by clicking the Gear icon in the top right to access the Tools menu. Then, find Safety and select Delete Browsing History… from the submenu:
You can also access the menu by using the shortcut: CTRL + SHIFT + DEL. Internet Explorer will open a popup. Make sure to select the Temporary Internet files and website files box to avoid clearing important information. Then, click the Delete button at the bottom:
And your Internet Explorer browser cache is clear!
How to Clear Cache for Microsoft Edge
To clear the browser cache for Microsoft Edge, click the Three Dots icon in the top right of your browser window.
Choose History.
A new history module shows up to see the most recently visited websites. You should see another Three Dots icon within that module. Click that.
In the resulting menu dropdown, choose Clear Browsing Data.
Microsoft Edge now opens a Clear Browsing Data window. You can check off the following items to include with your deletion:
- Browsing history.
- Download history.
- Cookies and other site data.
- Cached images and files.
What’s nice about Microsoft Edge is that it displays quantitive information like the number of browsing history items that will be deleted if you clear the cache. You can also view how much space you may free up from the cache clearing.
Scroll down the list to see three more data clearing options. These aren’t checked by default, so you’ll have to mark them yourself if you want to clean up passwords, autofill form data, and site permissions.
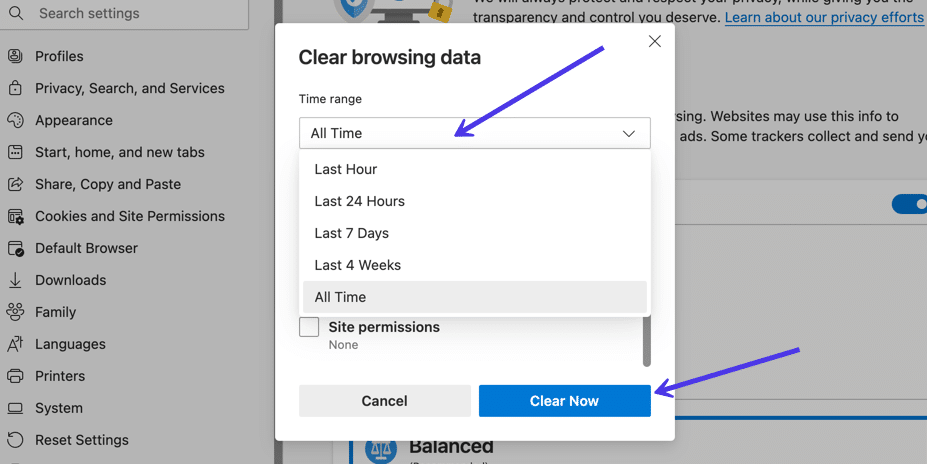
With your selection made, go through the Time Range field to indicate how far back in your cache you want to delete.
For the last step, click on the Clear Now button. That’s the easiest way to clear the browser cache in Microsoft Edge!
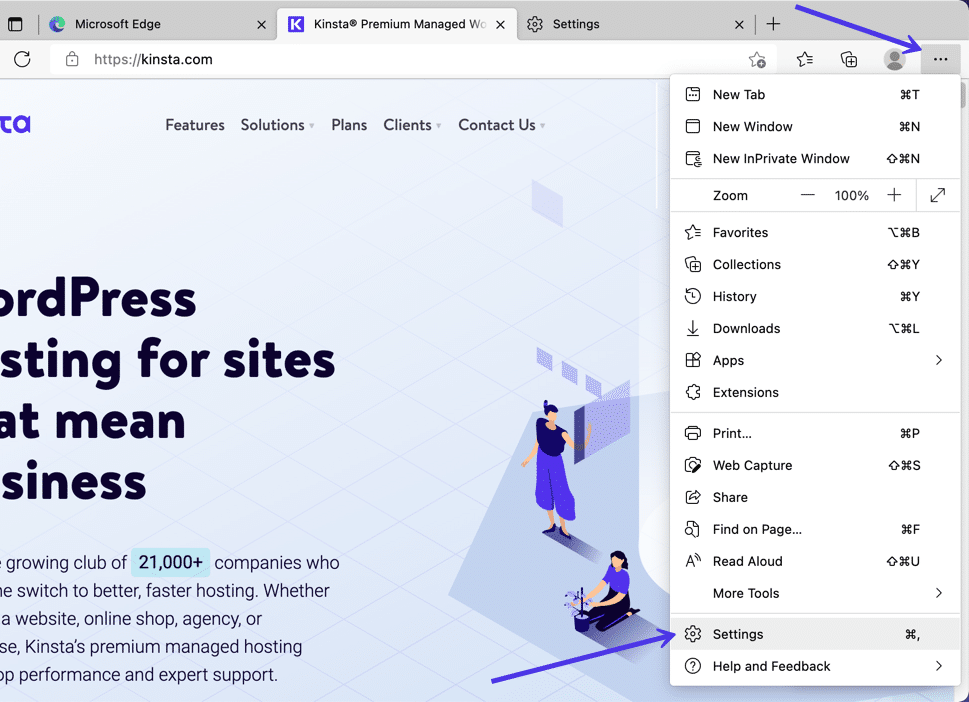
To get more specific with clearing the Edge cache, select the Three Dots icon in the upper right corner, then choose Settings.
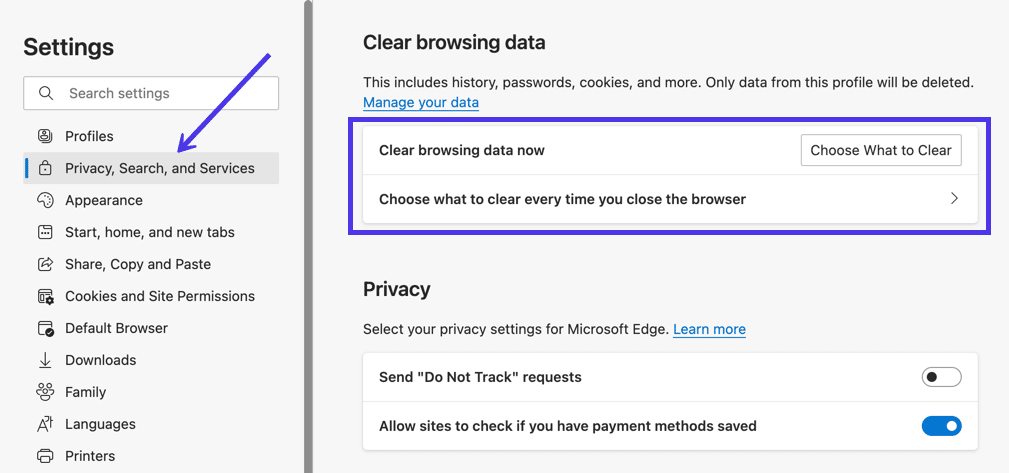
Navigate to the Privacy, Search, and Services tab.
The first option is to Clear Browsing Data Now, which offers a button to Choose What To Clear and sends you to the popup window we discussed above with the checkboxes. It’s simply a different route to get there.
You also may want to explore the tab to Choose What to Clear Every Time You Close the Browser. This way, you can automatically clear the cache of unnecessary items after closing Edge; maybe you’d rather the browser history, cookies, or login information didn’t save every time.
As you can see, the page for choosing what you clear after closing the browser has a long list of toggles for adding or removing specific cache data from the automated cache purge.
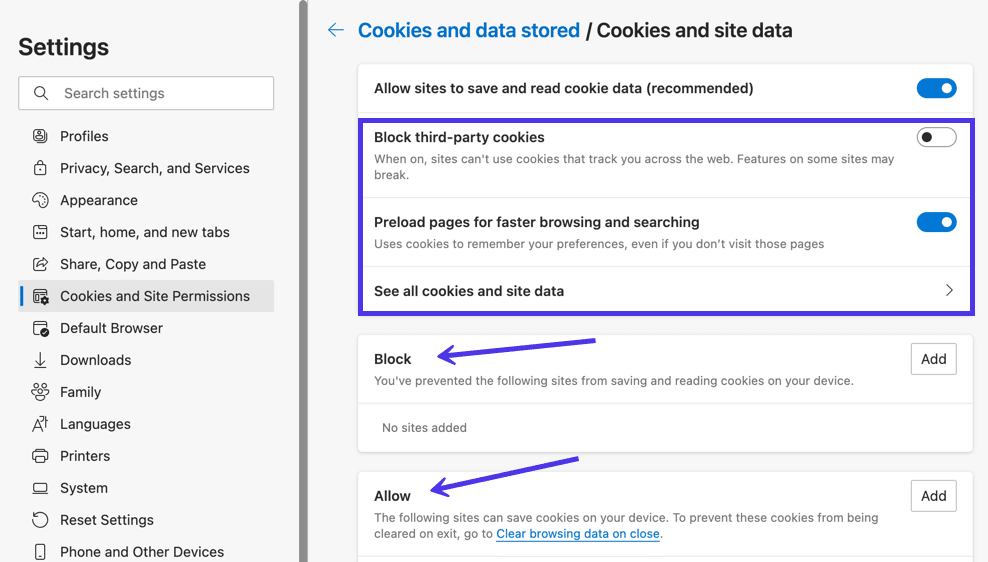
If you’re more interested in removing cookies from the cache or managing the ones you want to allow, navigate to the Cookies and Site Data tab on the Microsoft Edge Settings page.
On this page, you have options to Block Third-party Cookies, Preload Pages for Faster Browsing and Searching, and See All Cookies and Site Data. We recommend going to the See All Cookies and Site Data page to get an idea of what tracking items are being placed inside the browser cache.
You can then add sites to the Block or Allow lists, creating a situation where the cache doesn’t need as much monitoring in the first place.
How to Clear Cache for Opera
To clear the browser cache for Opera, click the History icon button on the lower left side menu. It looks like a small clock.
A new overlaying window slides into the frame, with a list of recently closed websites and a search bar to locate specific instances within your history log.
What you really want, however, is the Clear Browser Data button. Click on that.
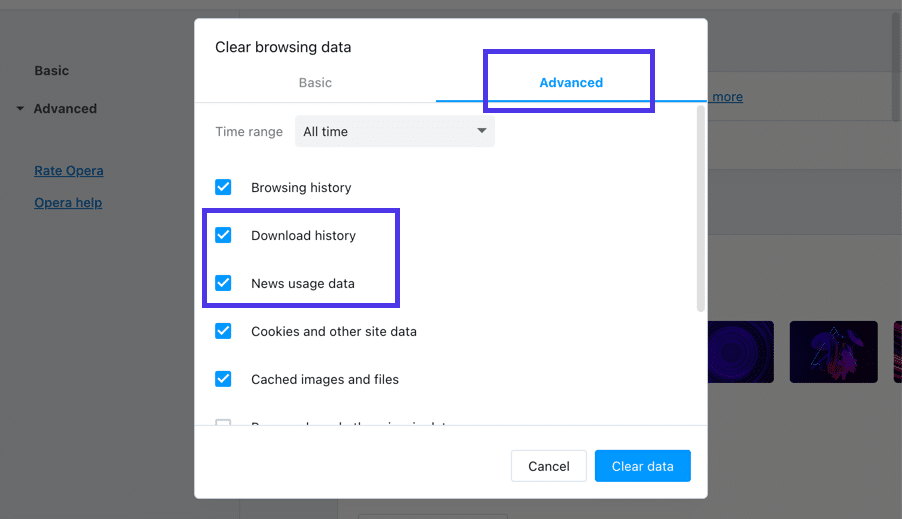
Opera sends you to the Clear Browsing Data module, automatically showing the Basic tab. Here, you can check or uncheck items to clear from the cache, such as browsing history, cookies and other site data, and cached images and files.
Proceed by choosing a time range like the entire history or just a few hours or days.
To finish the job, click on the Clear Data button.
That covers the fastest way to clear the Opera browser cache, but it’s technically not the most comprehensive solution.
There are still bits of data stored inside the cache, mainly data that are generally considered more important to the user. Due to that, Opera doesn’t immediately recommend that people clear out things like the news usage data or autofill form data.
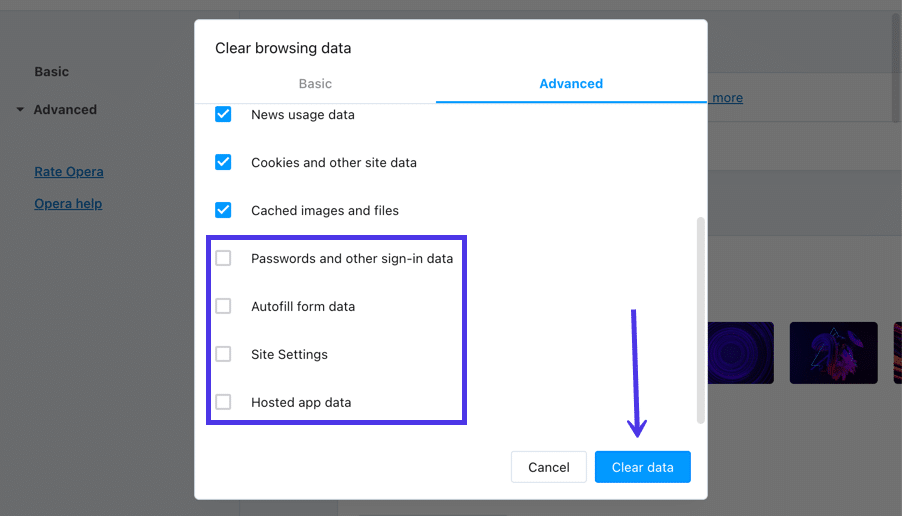
However, you may decide that you’d like to remove everything from the cache. If that’s the case, choose the Advanced tab.
Several new checkboxes appear, including one to clear the Download History and another to clear the News Usage Data.
Further down, you’ll find even more checkboxes for removing data like passwords, sign-in data, autofill form data, site settings, and hosted app data.
Feel free to choose which ones to remove from the cache, then click the Clear Data button.
Your Opera browser cache is now empty, or at least the parts you chose to clear.
Moving forward, you have a few other choices when it comes to clearing a browser cache in Opera. There’s one other way to get to the same Clear Browsing Data page, and Opera has a section for specifically choosing which cookies to delete or block.
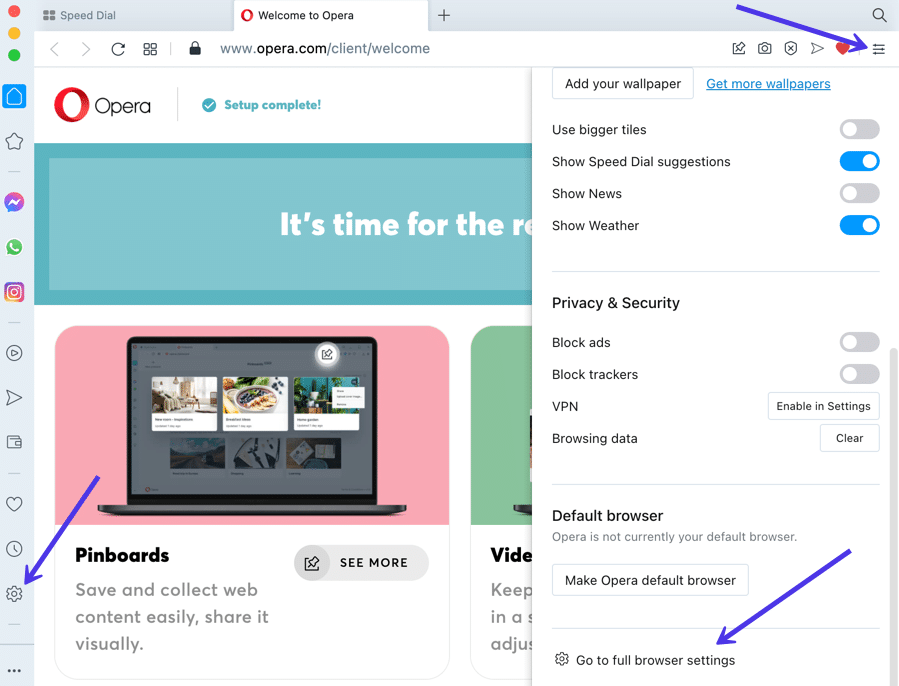
Click the Easy Setup button in the upper right corner. It looks like three horizontal lines with adjustable knobs on them.
In the revealed menu, click Go To Full Browser Settings. Alternatively, you can select the Settings button in the lower-left menu, which looks like a gear shape. They both send you to the same place.
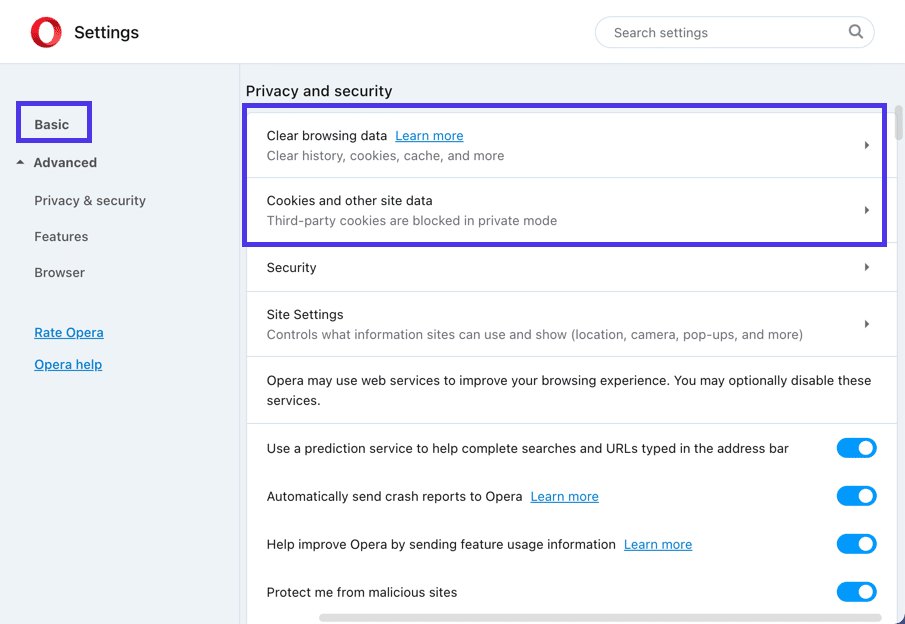
Under the Basic section, look for the Privacy and Security area.
The first tab offers you to Clear Browsing Data. Select that to view the page we covered before for selecting the parts of the cache to clear in Opera.
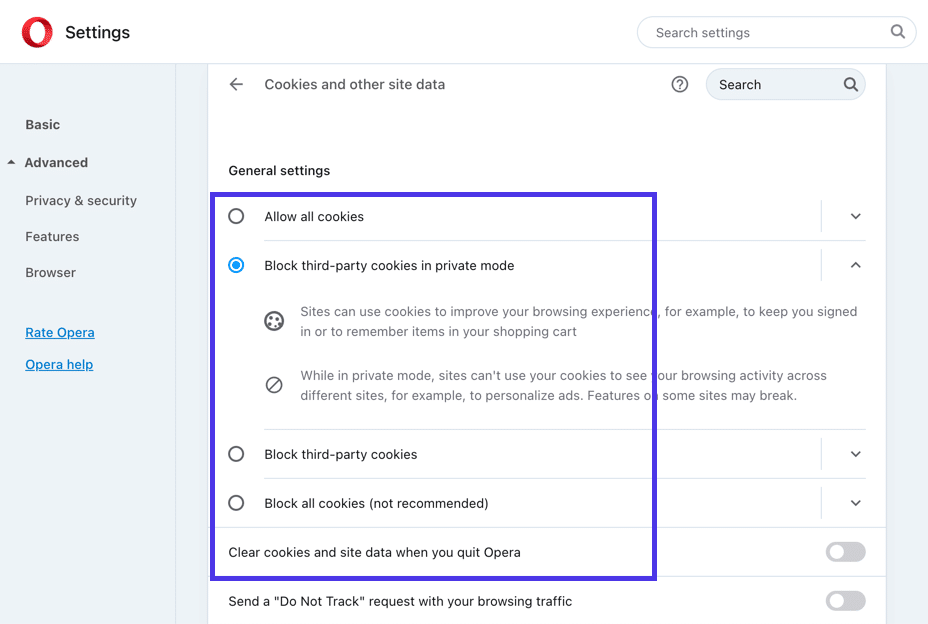
Another option is the Cookies and Other Site Data tab. Click that to manage how cookies get handled by the Opera browser cache.
On this page, you can:
- Allow all cookies.
- Block third-party cookies in private mode.
- Block third-party cookies in general.
- Block all cookies.
It’s also possible to clear the cache whenever you close out of Opera. To make that happen, flip the switch where it says Clear Cookies and Site Data When You Quit Opera.
And those are the best ways to clear the cache in Opera and all of the most popular browsers!