
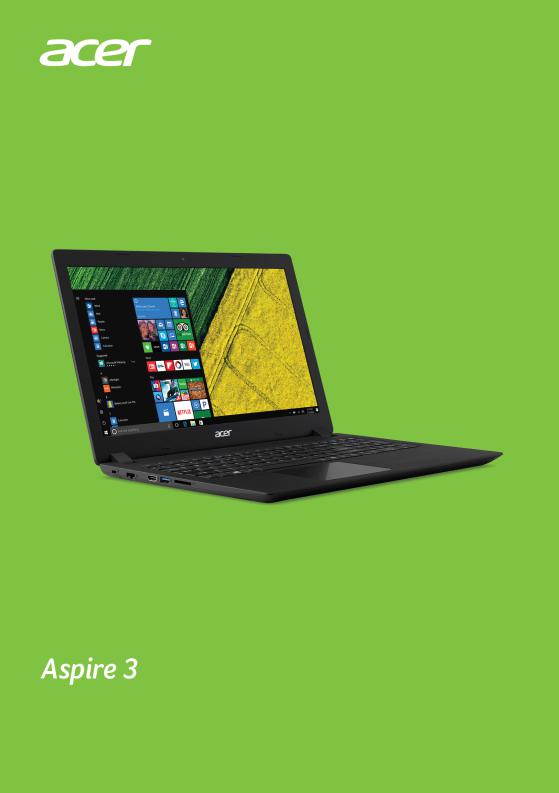
USER’S MANUAL
2 —
© 2017. All Rights Reserved. Aspire 3
Covers: A315-51 / A315-31 / A315-21 / A315-21G This revision: March 2017
Sign up for an Acer ID and enjoy great benefits
Open the Acer Portal app to sign up for an Acer ID or sign in if you already have an Acer ID.
There are three great reasons for you to get an Acer ID:
•Create your own connected world.
•Get the latest offers and product information.
•Register your device for quick, personalized customer support.
For more information, please visit the Acer BYOC website:
www.acer.com/byoc-start
Important
This manual contains proprietary information that is protected by copyright laws. The information contained in this manual is subject to change without notice. Images provided herein are for reference only and may contain information or features that do not apply to your computer. Acer Group shall not be liable for technical or editorial errors or omissions contained in this manual.
Model number: _________________________________
Serial number: _________________________________
Date of purchase: ______________________________
Place of purchase: ______________________________

Table of contents — 3
TABLE OF CONTENTS
|
First things first |
5 |
|
Your guides ……………………………………… |
5 |
|
Basic care and tips for using your |
|
|
computer………………………………………….. |
5 |
|
Turning your computer off……………………… |
5 |
|
Taking care of your computer ………………… |
6 |
|
Taking care of your AC adapter……………… |
7 |
|
Cleaning and servicing………………………….. |
7 |
|
Your Acer notebook tour |
8 |
|
Screen view……………………………………… |
8 |
|
Keyboard view………………………………….. |
9 |
|
Left view ………………………………………… |
10 |
|
Right view ……………………………………… |
11 |
|
USB 3.0 information……………………………. |
11 |
|
Base view ……………………………………… |
12 |
|
Using the keyboard |
13 |
|
Lock keys……………………………………….. |
13 |
|
Hotkeys…………………………………………….. |
13 |
|
Windows keys…………………………………. |
14 |
|
Using the Precision Touchpad |
15 |
|
Touchpad gestures………………………….. |
15 |
|
Changing touchpad settings……………… |
16 |
|
Recovery |
18 |
|
Creating a factory default backup………. |
18 |
|
Backing up your wireless and LAN |
|
|
drivers……………………………………………. |
21 |
|
Restoring your computer ………………….. |
21 |
|
Reset this PC and keep my files…………… |
21 |
|
Reset this PC and remove everything …… |
22 |
|
Using a Bluetooth connection |
25 |
|
Enabling and disabling Bluetooth ………. |
25 |
|
Power management |
37 |
|
Saving power………………………………….. |
37 |
|
Battery pack |
39 |
|
Battery characteristics ……………………… |
39 |
|
Charging the battery …………………………… |
39 |
|
Optimizing battery life …………………………. |
40 |
|
Checking the battery level……………………. |
41 |
|
Battery-low warning ……………………………. |
41 |
|
Traveling with your computer |
42 |
|
Disconnecting from the desktop ………… |
42 |
|
Moving around………………………………… |
42 |
|
Preparing the computer ………………………. |
42 |
|
What to bring to meetings……………………. |
43 |
|
Taking the computer home……………….. |
43 |
|
Preparing the computer ………………………. |
43 |
|
What to take with you………………………….. |
44 |
|
Special considerations………………………… |
44 |
|
Setting up a home office ……………………… |
44 |
|
Traveling with the computer………………. |
45 |
|
Preparing the computer ………………………. |
45 |
|
What to take with you………………………….. |
45 |
|
Special considerations………………………… |
45 |
|
Traveling internationally……………………. |
45 |
|
Preparing the computer ………………………. |
46 |
|
What to bring with you ………………………… |
46 |
|
Special considerations………………………… |
46 |
|
Universal Serial Bus (USB) |
48 |
|
SD card reader |
49 |
|
HDMI |
50 |
|
Frequently asked questions |
52 |
|
Requesting service ………………………….. |
54 |
|
Tips and hints for using Windows 10….. |
55 |
|
Enable Bluetooth and add a device ………. |
25 |
How do I get to Start? …………………………. |
55 |
|
|
Connecting to the Internet |
27 |
How do I turn off my computer?……………. |
55 |
|
|
Connecting to a wireless network |
27 |
How do I unlock my computer?…………….. |
55 |
|
|
How do I set the alarm? |
57 |
|||
|
Connecting to a wireless LAN |
27 |
|||
|
Where are my apps? |
57 |
|||
|
Connecting with a cable |
31 |
|||
|
What is a Microsoft ID (account)?…………. |
58 |
|||
|
Built-in network feature ……………………….. |
31 |
How do I check for Windows updates?….. |
59 |
|
|
Connecting to a cellular network ……….. |
31 |
Where can I get more information?……….. |
59 |
|
|
Bluelight Shield |
32 |
Troubleshooting………………………………. |
60 |
|
|
Securing your computer |
34 |
Troubleshooting tips……………………………. |
60 |
|
|
Error messages………………………………….. |
60 |
|||
|
Using a computer security lock………….. |
34 |
Internet and online security |
62 |
|
|
Using passwords |
34 |
|||
|
First steps on the net |
62 |
|||
|
Entering passwords |
35 |
|||
|
Protecting your computer |
62 |
|||
|
BIOS utility |
36 |
|||
|
Choose an Internet Service Provider…….. |
62 |
|||
|
Boot sequence………………………………… |
36 |
Network connections…………………………… |
64 |
|
|
Setting passwords …………………………… |
36 |
Surf the Net!………………………………………. |
65 |
|
|
Internet security software…………………….. |
66 |
Getting started…
In this section you will find:
•Useful information on caring for your computer and your health
•Where to find the power button, ports and connectors
•Tips and tricks for using the touchpad and keyboard
•How to create recovery backups
•Guidelines for connecting to a network and using Bluetooth
•Information on using Acer’s bundled software

First things first — 5
FIRST THINGS FIRST
We would like to thank you for making this Acer notebook your choice for meeting your mobile computing needs.
Your guides
To help you use your Acer notebook, we have designed a set of guides:
First off, the Setup Guide helps you get started with setting up your computer.
The Quick Guide introduces you to the basic features and functions of your new computer. For more on how your computer can help you to be more productive, please refer to the User’s Manual. This guide contains detailed information on such subjects as system utilities, data recovery, expansion options and troubleshooting.
Once you have connected to the internet, you can download updates for your computer from:
http://go.acer.com/?id=17883
1.The link will open the Acer Service & Support webpage.
2.Scroll down to Drivers and Manuals and search for your model by pasting in or manually entering the serial number, SNID, or product model.
3.From this page you can also download and install the Acer identification utility that will automatically detect your computer’s serial number and SNID and allow you to copy it to the clipboard.
4.Once you have found your product model, any updates, or documents will be listed.
Basic care and tips for using your computer
Turning your computer off
To turn the power off, do any of the following:
•Use the Windows shutdown command: Press the Windows key or select the Windows Start button, select Power > Shut down.

6 — First things first
•Right-click the Windows Start button > Shut down or sign out >
Shut down.
If you need to power down the computer for a short while, but don’t want to completely shut it down, you can put it to Sleep by doing any of the following:
•Press the power button.
•Press the sleep hotkey.
•Press the Windows key or select the Windows Start button, select
Power > Sleep.
•Right-click the Windows Start button > Shut down or sign out >
Sleep.
 Note
Note
If you cannot power off the computer normally, press and hold the power button for up to ten seconds to shut down the computer. If you turn off the computer and want to turn it on again, wait at least two seconds before powering up.
Taking care of your computer
Your computer will serve you well if you take care of it.
•Only use the adapter provided with your device, or an Acerapproved adapter to power your device.
•Do not expose the computer to direct sunlight. Do not place it near sources of heat, such as a radiator.
•Do not expose the computer to temperatures below 0º C (32º F) or above 50º C (122º F).
•Do not subject the computer to magnetic fields.
•Do not expose the computer to rain or moisture.
•Do not spill water or any liquid on the computer.
•Do not subject the computer to heavy shock or vibration.
•Do not expose the computer to dust or dirt.
•Never place objects on top of the computer.
•Do not slam the computer display when you close it.
•Never place the computer on uneven surfaces.
First things first — 7
Taking care of your AC adapter
Here are some ways to take care of your AC adapter:
•Do not connect the adapter to any other device.
•Do not step on the power cord or place heavy objects on top of it. Route the power cord and any cables away from where people walk.
•When unplugging the power cord, do not pull on the cord itself but pull on the plug.
•The total ampere ratings of the equipment plugged in should not exceed the ampere rating of the cord if you are using an extension cord. Also, the total current rating of all equipment plugged into a single wall outlet should not exceed the fuse rating.
Cleaning and servicing
When cleaning the computer, follow these steps:
1.Turn off the computer.
2.Disconnect the AC adapter.
3.Use a soft, moist cloth. Do not use liquid or aerosol cleaners.
If your computer is dropped or visibly damaged, or does not work normally, please contact your nearest authorized Acer service center.
8 — Your Acer notebook tour
YOUR ACER NOTEBOOK TOUR
After setting up your computer as illustrated in the Setup Guide, let us show you around your new Acer computer.
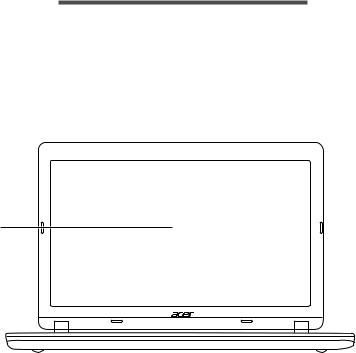
Screen view
1


 3
3
2
|
# |
Icon Item |
Description |
|
|
Web camera for video |
|||
|
1 |
Webcam |
communication. |
|
|
A light next to the webcam indicates |
|||
|
that the webcam is active. |
|||
|
2 |
Screen with |
Displays computer output. |
|
|
lay-flat hinge |
|||
|
3 |
Microphone |
Internal digital microphone for sound |
|
|
recording. |
|||
Your Acer notebook tour — 9
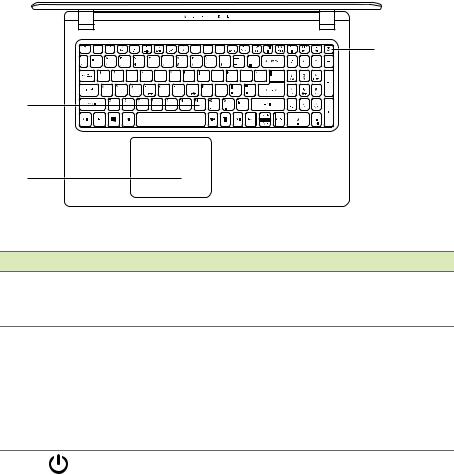
Keyboard view
3
1
2
For entering data into your computer.
1Keyboard See «Using the keyboard» on page
13.
Touch-sensitive pointing device.
The touchpad and selection buttons form a single surface.
2Touchpad Press down firmly on the touchpad
surface to perform a left click. Press down firmly on the lower right corner to perform a right click.
|
3 |
Power button |
Turns the computer on and off. |
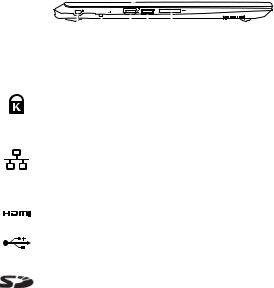
10 — Your Acer notebook tour
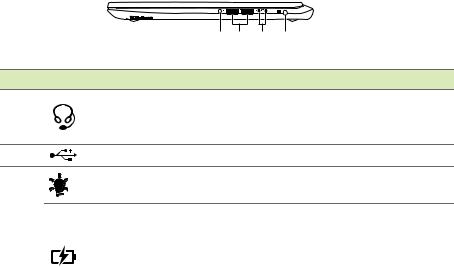
Left view
|
1 |
2 |
3 4 |
5 |
|||||||||
|
# |
Icon Item |
Description |
||||||||||
|
1 |
Kensington lock |
Connects to a Kensington-compatible |
||||||||||
|
slot |
security lock. |
|||||||||||
|
Connects to an Ethernet 10/100/ |
||||||||||||
|
2 |
Ethernet (RJ-45) |
1000-based network. |
||||||||||
|
port |
Pull the lip down to open the port |
|||||||||||
|
fully. |
||||||||||||
|
3 |
HDMI port |
Supports high-definition digital video |
||||||||||
|
connections. |
||||||||||||
|
4 |
USB ports |
Connect to USB devices. |
||||||||||
|
Accepts one Secure Digital (SD or |
||||||||||||
|
5 |
SD card reader |
SDHC) card. |
||||||||||
|
Only one card can operate at a time. |
Your Acer notebook tour — 11
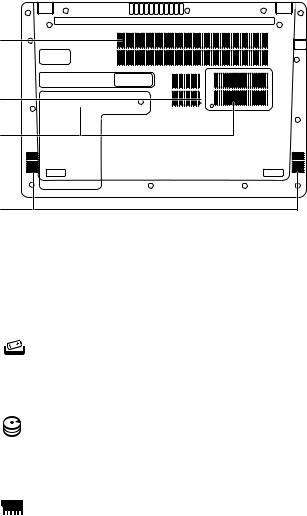
Right view
|
1 |
2 |
3 |
4 |
|||
|
# |
Icon Item |
Description |
||||
|
Headset/ |
Connects to audio devices (e.g., |
|||||
|
1 |
speakers, headphones) or a headset |
|||||
|
speaker jack |
||||||
|
with microphone. |
||||||
|
2 |
USB port |
Connects to USB devices. |
||||
|
Power indicator |
Indicates the computer’s power |
|||||
|
status. |
Indicates the computer’s battery 3 status.
Battery indicator Charging: The light shows amber when the battery is charging.
Fully charged: The light shows blue when in AC mode.
|
4 |
DC-in jack |
Connects to an AC adapter. |
|||||
USB 3.0 information
•USB 3.0 compatible ports are blue.
•Compatible with USB 3.0 and earlier devices.
•For optimal performance, use USB 3.0-certified devices.
•Defined by the USB 3.0 specification (SuperSpeed USB).
12 — Your Acer notebook tour
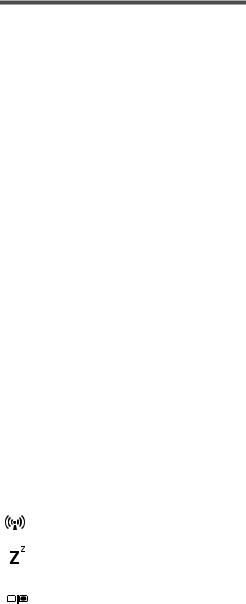
Base view
1
2
3
4
|
# |
Icon Item |
Description |
|
|
1 |
Ventilation and |
Allows the computer to stay cool. |
|
|
Do not cover or obstruct the |
|||
|
cooling fan |
openings. |
||
|
Simulates removing and reinstalling |
|||
|
2 |
Battery reset |
the battery. |
|
|
pinhole |
Insert a paperclip into the hole and |
||
|
press for four seconds. |
|||
|
Houses the computer’s main storage. |
|||
|
Main storage |
You may upgrade your computer’s |
||
|
main storage. Acer recommends |
|||
|
compartment |
|||
|
asking an approved service center to |
|||
|
3 |
do this. |
||
|
Memory |
Houses the computer’s memory. |
||
|
You may upgrade your computer’s |
|||
|
compartment |
mmemory. Acer recommends asking |
||
|
an approved service center to do this. |
|||
|
4 |
Speakers |
Deliver stereo audio output. |
Using the keyboard — 13
USING THE KEYBOARD
The keyboard has full-sized keys and a separate numeric keypad, separate cursor, lock, Windows, function and special keys.
Lock keys
The keyboard has lock keys which you can use to turn keyboard functions on and off.
|
Lock key |
Description |
|
|
Caps Lock |
When Caps Lock is on, all alphabetic characters |
|
|
typed are in uppercase. |
||
|
When Num Lock is on, the keypad is in numeric |
||
|
mode. The keys function as a calculator (complete |
||
|
Num Lock |
with the arithmetic operators +, -, *, and /). Use this |
|
|
mode when you need to do a lot of numeric data |
||
|
entry. |
||
|
When Scroll Lock is on, the screen moves one line |
||
|
Scroll Lock |
up or down when you press the up or down arrow |
|
|
Fn + F12 |
keys respectively. Scroll Lock does not work with |
|
|
some applications. |
Hotkeys
The computer employs hotkeys or key combinations to access most of the computer’s controls like screen brightness and volume output.
To activate hotkeys, press and hold the Fn key before pressing the other key in the hotkey combination.
|
Hotkey |
Icon Function |
Description |
|
|
Fn + F3 |
Airplane mode |
Turns on / off the computer’s |
|
|
network devices. |
|||
|
Fn + F4 |
Sleep |
Puts the computer in Sleep |
|
|
mode. |
|||
|
Fn + F5 |
Switches display output between |
||
|
Display toggle |
the display screen, external |
||
|
monitor (if connected) and both. |
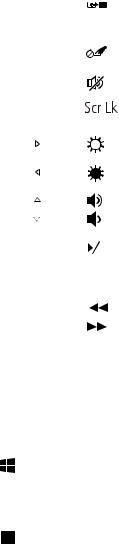
|
14 — Using the keyboard |
||||||||
|
Hotkey |
Icon |
Function |
Description |
|||||
|
Fn + F6 |
Turns the display screen |
|||||||
|
Display off |
backlight off to save power. |
|||||||
|
Press any key to return. |
||||||||
|
Fn + F7 |
Touchpad |
Turns the built-in touchpad on |
||||||
|
toggle |
and off. |
|||||||
|
Fn + F8 |
Speaker toggle Turns the speakers on and off. |
|||||||
|
Fn + F12 |
Scroll Lock |
Turns Scroll Lock on or off. |
||||||
|
Fn + Del |
Ins |
Turns Insert on or off. |
||||||
|
Fn + |
Brightness up |
Increases the screen brightness. |
||||||
|
Fn + |
Brightness |
Decreases the screen |
||||||
|
down |
brightness. |
|||||||
|
Fn + |
Volume up |
Increases the sound volume. |
||||||
|
Fn + |
Volume down |
Decreases the sound volume. |
||||||
|
Fn + Home |
Play/Pause |
Play or pause a selected media |
||||||
|
file. |
||||||||
|
Fn + Pg Up |
Stop |
Stop playing the selected media |
||||||
|
file. |
||||||||
|
Fn + Pg Dn |
Previous |
Return to the previous media file. |
||||||
|
Fn + End |
Next |
Jump to the next media file. |
||||||
Windows keys
The keyboard has two keys that perform Windows-specific functions.
|
Key |
Description |
|
Pressed alone it returns to the Start screen |
|
|
Windows key |
or to return to the last open app. |
|
It can also be used with other keys for |
|
|
special functions, please check Windows |
|
|
Help. |
|
|
Application key |
This key has the same effect as clicking |
|
the right mouse button; it opens the |
|
|
application’s context menu. |
Using the Precision Touchpad — 15
USING THE PRECISION TOUCHPAD
The touchpad controls the arrow (or ‘cursor’) on the screen. As you slide your finger across the touchpad, the cursor will follow this movement. The Precision Touchpad (PTP) is designed to provide a more uniform, smooth, and accurate touchpad experience. Many applications support precision touchpad gestures that use one or more fingers, however, some gestures may not be supported by the specific application or program you are using.
Touchpad gestures
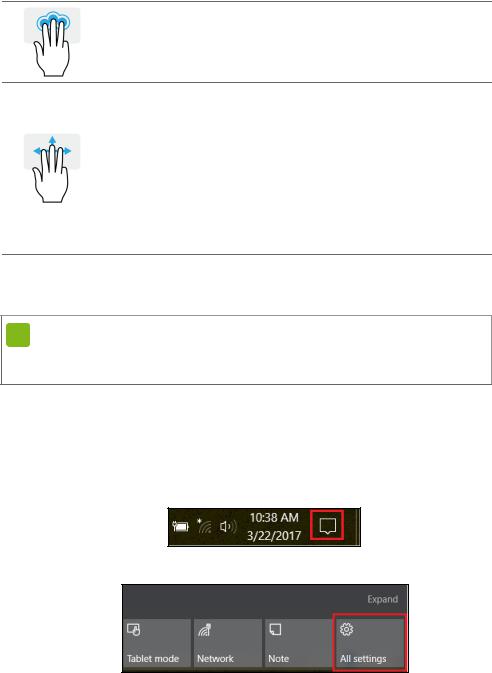
Single-finger slide
Slide a finger across the touchpad to move the cursor.
Single-finger press or tap
Press the touchpad down, or lightly tap the touchpad with your finger, to perform a ‘click’, which will select or start an item. Quickly repeat the tap to perform a double tap or ‘double click’.
Two-finger press
Lightly tap the touchpad with two fingers to perform a  ‘right click’. In the Start screen, this will toggle the app commands. In most apps this will open a context menu related to the selected item.
Two-finger slide
Swiftly scroll through web pages, documents and playlists by placing two fingers on the touchpad and moving both in any direction.
Two-finger pinch
Zoom in and out of photos, maps and documents with a simple finger-and-thumb gesture.
16 — Using the Precision Touchpad
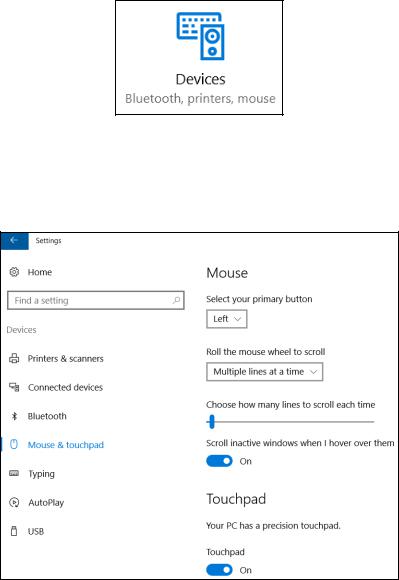
Three-finger press
Lightly tap the touchpad with three fingers to open Cortana (if your computer supports Cortana) or open the Action Center (if your computer does not support Cortana).
Three-finger swipe
Swipe across the touchpad with three fingers.
•Swipe up to open Task View. Move the cursor over a window and tap the touchpad to select that window, or swipe downwards to exit Task View.
•Swipe down to minimize all open windows and show Desktop; swipe upwards to restore the minimized windows.
•Swipe left or right to switch between open windows.
The precision touchpad includes added technology features that help recognize and prevent unintentional gestures such as accidental taps, gestures, and pointer movement.
 Note
Note
The touchpad is sensitive to finger movement; the lighter the touch, the better the response. Please keep the touchpad and your fingers dry and clean.
Changing touchpad settings
To change the touchpad settings to suit your personal requirements, please do the following.
1.In the icon tray in the lower right-hand corner of the screen, select the Notifications icon to open the Notifications pane.
2.Select All settings.
Using the Precision Touchpad — 17
3.Select Devices > Mouse & touchpad.
4.Now you can adjust the settings to suit your personal needs. You can change the primary button for leftor right-handed use, turn the touchpad off if you prefer to use a mouse, or set a delay to prevent the cursor from moving if you accidentally tap the touchpad with your palm while working. Scroll down to see more settings.
18 — Recovery
RECOVERY
If you are having trouble with your computer, and the frequently asked questions (see Got a question? on page 51) do not help, you can recover your computer.
This section describes the recovery tools available on your computer. Acer provides Acer Care Center, which allows you to reset your PC, refresh your PC, or create a factory default backup.
 Note
Note
Acer Care Center is only available with a pre-installed Windows operating system.
Important
We recommend that you create a Factory Default Backup as soon as possible. In certain situations a full recovery will require a USB recovery backup.
Creating a factory default backup
Backup allows you to quickly and easily back up your operating system, installed apps and data.
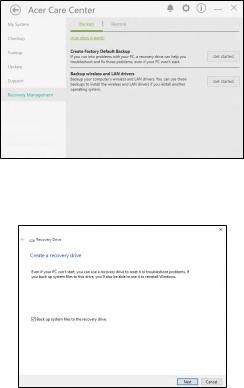
1.From Start, select All apps then Acer. Select Acer Recovery Management in the list of Acer apps.
 Note
Note
Since the recovery backup requires at least 8 GB of storage after formatting, it is recommended to use a USB drive with a capacity of 16 GB or larger.
Recovery — 19
2.Select the Backup tab and click Get Started for Create Factory Default Backup to open the Recovery Drive window.
3.Make sure Backup system files to the recovery drive is selected and click Next.
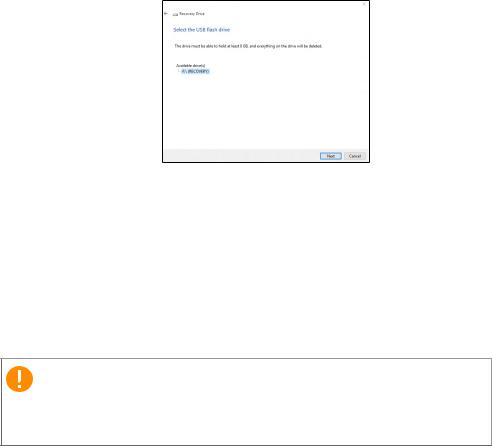
4.Plug in the USB drive and wait for the PC to detect the USB drive then click Next.
20 — Recovery
•Since the recovery backup requires at least 8 GB of storage after formatting, it is recommended to use a USB drive with a capacity of 16 GB or larger.
5.Everything on the drive will be deleted. Click Create to continue.
6.You will be shown the backup progress on the screen.
7.Follow the process until it completes.
8.After creating the recovery backup, you can choose to delete the recovery information on your computer. If you delete this information, you can only use the USB recovery backup to restore your computer, if you lose or erase the USB drive, you cannot restore your computer.
9.Unplug the USB drive and label it clearly.
Important
Write a unique, descriptive label on the backup, such as ‘Windows Recovery Backup’. Make sure you keep the backup in a safe place that you will remember.

Recovery — 21
Backing up your wireless and LAN drivers
Back up your wireless and LAN drivers. You can use these backups to install the wireless and LAN drivers if you install another operating system.
1.From Start, select All apps then Acer. Select Acer Recovery Management in the list of Acer apps.
2.Select the Backup tab and click Get started for Backup wireless and LAN drivers. Choose a folder to save your drivers and select
OK.
Restoring your computer
Recovery Management allows you to quickly and easily restore your computer back to its default status. You can choose to keep your files or remove them before reinstalling Windows.
Reset this PC and keep my files
1.From Start, select All apps then Acer. Select Acer Recovery Management in the list of Acer apps.
2.Select the Restore tab and click Get started to Choose an option.
 Loading…
View the manual for the Acer Aspire 3 here, for free. This manual comes under the category laptops and has been rated by 60 people with an average of a 8.5. This manual is available in the following languages: English. Do you have a question about the Acer Aspire 3 or do you need help? Ask your question here
The Acer Aspire 3 is a laptop featuring an Intel® Pentium® processor model SU4100, with a 800 MHz front side bus and an Intel® GS45 Express motherboard chipset. It has a storage capacity of 320 GB, which uses a SATA HDD interface with a speed of 5400 RPM. The laptop is equipped with a 13.3″ LED backlight display that has a resolution of 1366 x 768 pixels and a native aspect ratio of 16:9.
This laptop comes with 4 GB of internal memory, and can be upgraded to a maximum internal memory of 8 GB. It is built to be durable, with high-quality materials that ensure its longevity over time.
Overall, the Acer Aspire 3 is a reliable and functional laptop that can handle basic computing needs. Its compact size and lightweight design make it a great option for people on-the-go who need a convenient device to take with them wherever they go.
General
| Acer | |
| Aspire 3 | LX.PL302.010 | |
| laptop | |
| 4718235427740 | |
| English | |
| User manual (PDF), Safety instructions (PDF) |
Processor
| Processor family | Intel® Pentium® |
| Processor model | SU4100 |
| Processor front side bus | 800 MHz |
| Motherboard chipset | Intel® GS45 Express |
| Processor frequency | 1.3 GHz |
| Processor cache type | L2 |
| Processor cache | 2 MB |
| Processor socket | BGA 956 |
| System bus rate | — GT/s |
| Processor cores | 2 |
| Processor threads | 2 |
| Processor lithography | 45 nm |
| Processor operating modes | 64-bit |
| Stepping | R0 |
| Bus type | FSB |
| Processor codename | Penryn |
| ECC supported by processor | No |
| Thermal Design Power (TDP) | 10 W |
| FSB Parity | No |
| Tcase | 100 °C |
| Number of Processing Die Transistors | 410 M |
| Processing Die size | 107 mm² |
| Processor manufacturer | Intel |
Storage
| Total storage capacity | 320 GB |
| HDD interface | SATA |
| HDD speed | 5400 RPM |
| Card reader integrated | Yes |
| Optical drive type | — |
Display
| Display diagonal | 13.3 « |
| Display resolution | 1366 x 768 pixels |
| Native aspect ratio | 16:9 |
| LED backlight | Yes |
Memory
| Internal memory | 4 GB |
| Memory slots | 2x SO-DIMM |
| Internal memory type | DDR3-SDRAM |
| Maximum internal memory | 8 GB |
| Memory clock speed | 1066 MHz |
Graphics
| Maximum graphics card memory | 1.759 GB |
| Discrete graphics card model | Intel® GMA 4500MHD |
| Discrete graphics card | Yes |
Other features
| Graphics card family | Intel |
| TV tuner integrated | No |
| Internal modem | No |
| Wake-on-LAN ready | Yes |
| Compliance industry standards | IEEE 802.11a/b/g/n |
| AC adapter included | Yes |
| Infrared data port | No |
| TV-in port | No |
| HDD user password | Yes |
| Type | PC |
Audio
| Number of built-in speakers | 2 |
Network
| Bluetooth | No |
| Networking features | Gigabit Ethernet |
| Wi-Fi | Yes |
Software
| Operating system installed | Windows 7 Home Premium |
Battery
| Battery capacity | 5600 mAh |
| Battery life (max) | 9 h |
| Number of battery cells | 6 |
Ports & interfaces
| ExpressCard slot | No |
| VGA (D-Sub) ports quantity | 1 |
| Serial ports quantity | 0 |
| Parallel ports quantity | 0 |
| PS/2 ports quantity | 0 |
| Ethernet LAN (RJ-45) ports | 1 |
| Firewire (IEEE 1394) ports | 0 |
| TV-out | No |
| USB 2.0 ports quantity | 3 |
| Modem (RJ-11) ports | 0 |
| Headphone outputs | 1 |
| Microphone in | Yes |
| S/PDIF out port | No |
| DVI port | No |
| CardBus PCMCIA slots quantity | 0 |
| SmartCard slot | No |
| CardBus PCMCIA slot type | No |
| Docking connector | No |
| HDMI ports quantity | 1 |
| eSATA ports quantity | 0 |
| DisplayPorts quantity | 0 |
| USB 3.2 Gen 1 (3.1 Gen 1) Type-A ports quantity | 0 |
| Charging port type | DC-in jack |
Security
| Cable lock slot | Yes |
| Password protection type | BIOS |
| Cable lock slot type | Kensington |
Weight & dimensions
| Weight | 1600 g |
| Depth | 228 mm |
| Height | 28.9 mm |
| Width | 322 mm |
Design
| Product colour | Black, Grey |
Sustainability
| Sustainability certificates | ENERGY STAR |
Power
Processor special features
| Enhanced Intel SpeedStep Technology | Yes |
| Intel® Clear Video HD Technology (Intel® CVT HD) | No |
| Intel Clear Video Technology | No |
| Intel® InTru™ 3D Technology | No |
| Intel® Insider™ | No |
| Intel® Quick Sync Video Technology | No |
| Intel Flex Memory Access | No |
| Intel® AES New Instructions (Intel® AES-NI) | No |
| Intel Trusted Execution Technology | No |
| Intel Enhanced Halt State | No |
| Intel VT-x with Extended Page Tables (EPT) | No |
| Intel Demand Based Switching | No |
| Intel® Clear Video Technology for Mobile Internet Devices (Intel CVT for MID) | No |
| Intel 64 | Yes |
| Execute Disable Bit | Yes |
| Thermal Monitoring Technologies | No |
| Processor package size | 22 x22 mm |
| Processor code | SLGS4 |
| Embedded options available | No |
| Intel Virtualization Technology for Directed I/O (VT-d) | No |
| Conflict-Free processor | No |
| Intel Dual Display Capable Technology | No |
| Intel FDI Technology | No |
| Intel Rapid Storage Technology | No |
| Intel Fast Memory Access | No |
| Intel® My WiFi Technology (Intel® MWT) | No |
| Intel® Anti-Theft Technology (Intel® AT) | No |
| Intel® Hyper Threading Technology (Intel® HT Technology) | No |
| Intel® Turbo Boost Technology | No |
| Intel® Wireless Display (Intel® WiDi) | No |
| Processor ARK ID | 43568 |
| Intel Virtualization Technology (VT-x) | No |
show more
Can’t find the answer to your question in the manual? You may find the answer to your question in the FAQs about the Acer Aspire 3 below.
What does the download speed on the internet depend on?
The download speed on the internet depends on the type of connection you have. If you have a 25 Mb/s connection this means that theoretically you should be able to download 25 MB per second.
What screen dimensions does my laptop have?
The size of your laptop is usually expressed in inches, 1 inch is 2.54 centimetres. The size is the diagonal size of your laptop, so you measure the screen from bottom left to top right.
What is HDMI?
HDMI stands for High-Definition Multimedia Interface. An HDMI cable is used to transport audio and video signals between devices.
How can I best clean my laptop?
A slightly damp cleaning cloth or soft, dust-free cloth works best to remove fingerprints. Dust in hard-to-reach places is best removed with compressed air.
How do I clean my keyboard?
Hold the keyboard upside down and use a can of compressed air to blow away the dirt. The keys can even be cleaned with a damp cloth.
What is bluetooth?
Bluetooth is a way of exchanging data wirelessly between electronic devices via radio waves. The distance between the two devices that exchange data can in most cases be no more than ten metres.
What is the weight of the Acer Aspire 3?
The Acer Aspire 3 has a weight of 1600 g.
What is the screen size of the Acer Aspire 3?
The screen size of the Acer Aspire 3 is 13.3 «.
What is the height of the Acer Aspire 3?
The Acer Aspire 3 has a height of 28.9 mm.
What is the screen resolution of the display of the Acer Aspire 3?
The screen resolution of the Acer Aspire 3 is 1366 x 768 pixels.
What is the width of the Acer Aspire 3?
The Acer Aspire 3 has a width of 322 mm.
What is the depth of the Acer Aspire 3?
The Acer Aspire 3 has a depth of 228 mm.
Is the manual of the Acer Aspire 3 available in English?
Yes, the manual of the Acer Aspire 3 is available in English .
Is your question not listed? Ask your question here
USER’S MANUAL
Aspire 3

2 —
© 2019. All Rights Reserved.
Aspire 3
Covers: A315-42 / A315-42G / A315-54 / A315-54K / A315-56
This revision: October 2019
Register your Acer product
If your new device runs on Windows OS, you may have had your
product registered automatically while you start up your device with
Windows OS.
Log in at www.acer.com/myproducts with the email address you
registered for Windows OS to review your product record. (Reset your
password if you do not know it.)
If the record is not found, please follow the steps below to register.
1. Ensure you are connected to the Internet.
2. Go to www.acer.com/register-product.
3. Sign in or sign up for an Acer ID.
4. Enter S/N or SNID of your device to register it.
This manual contains proprietary information that is protected by
copyright laws. The information contained in this manual is subject to
change without notice. Some features described in this manual may not
be supported depending on the Operating System version. Images
provided herein are for reference only and may contain information or
features that do not apply to your computer. Acer Group shall not be
liable for technical or editorial errors or omissions contained in this
manual.
Model number: _________________________________
Serial number: _________________________________
Date of purchase: ______________________________
Place of purchase: ______________________________

Table of contents — 3
TABLE OF CONTENTS
First things first 5
Your guides ……………………………………… 5
Basic care and tips for using your
computer…………………………………..……… 5
Turning your computer off……………….…….. 5
Taking care of your computer ………..………. 6
Taking care of your AC adapter ………….….. 7
Cleaning and servicing………….………………. 7
Your Acer notebook tour 8
Screen view ……………………………………… 8
Keyboard view ……….………………………… 9
Left view ………………………………………. 10
Right view ……………..………………………. 10
USB 3.1 Gen 1 information …….………….… 10
Base view ………………………………………. 11
Using the keyboard 12
Lock keys………………………………….……. 12
Special keys ……………………………..……. 12
Hotkeys………………….………………………. 13
Windows keys…………………………………. 14
Using the Precision Touchpad 15
Touchpad gestures………………………….. 15
Changing touchpad settings ……………… 17
Recovery 18
Creating a factory default backup………. 18
Backing up your wireless and LAN
drivers……………………………………………. 20
Restoring your computer ………………….. 20
Reset this PC and keep my files …….…….. 21
Reset this PC and remove everything …… 22
Using a Bluetooth connection 25
Enabling and disabling Bluetooth ………. 25
Enable Bluetooth and add a device ………. 25
Connecting to the Internet 27
Connecting to a wireless network………. 27
Connecting to a wireless LAN………………. 27
Connecting with a cable …………………… 30
Built-in network feature …..………….……….. 30
Connecting to a cellular network ……….. 30
Bluelight Shield 31
Securing your computer 33
Using a computer security lock………….. 33
Using passwords …………………………….. 33
Entering passwords ………………..………..… 34
BIOS utility 35
Boot sequence………………………………… 35
Setting passwords …………………………… 35
Power management 36
Saving power ………………………………….. 36
Battery pack 38
Battery characteristics ……………………... 38
Charging the battery ……………….………..… 38
Optimizing battery life ……………..………….. 39
Checking the battery level.………….……….. 40
Battery-low warning ……………………….…… 40
Traveling with your computer 41
Disconnecting from the desktop ………… 41
Moving around ……………..…………………. 41
Preparing the computer ………………….…… 41
What to bring to meetings ….………….…….. 42
Taking the computer home ……………….. 42
Preparing the computer ………………….…… 42
What to take with you………..……….……….. 42
Special considerations .……….………….…… 43
Setting up a home office ………….………….. 43
Traveling with the computer………………. 43
Preparing the computer ………………….…… 44
What to take with you………..……….……….. 44
Special considerations .……….………….…… 44
Traveling internationally……………………. 44
Preparing the computer ………………….…… 44
What to bring with you ………………….…….. 44
Special considerations .……….………….…… 45
Universal Serial Bus (USB) 47
Video and audio connectors 48
Connecting a monitor……………………….. 48
Headphones and microphone……………. 48
HDMI 49
Frequently asked questions 51
Requesting service ………………………….. 53
Tips and hints for using Windows 10 ….. 54
How do I get to Start? ……….………….…….. 54
How do I turn off my computer?…..……….. 54
How do I unlock my computer?.………….… 54
How do I set the alarm? …….……….……….. 56
Where are my apps?……………..………….… 57
What is a Microsoft ID (account)?…..…….. 57
How do I check for Windows updates?….. 58
Where can I get more information?……….. 58
Troubleshooting ………………………………. 59
Troubleshooting tips………………………..….. 59
Error messages.………..………….……….…… 59
Internet and online security 61
First steps on the net ……………………….. 61
Protecting your computer…………………….. 61
Choose an Internet Service Provider …..… 61
Network connections……………..………….… 63
Surf the Net!………………….………….……….. 64
Internet security software…….………..…….. 64

Getting started…
In this section you will find:
• Useful information on caring for your computer and your health
• Where to find the power button, ports and connectors
• Tips and tricks for using the touchpad and keyboard
• How to create recovery backups
• Guidelines for connecting to a network and using Bluetooth
• Information on using Acer’s bundled software

First things first — 5
FIRST THINGS FIRST
We would like to thank you for making this Acer notebook your choice
for meeting your mobile computing needs.
Your guides
To help you use your Acer notebook, we have designed a set of
guides:
First off, the Setup Guide helps you get started with setting up your
computer.
The Quick Guide introduces you to the basic features and functions
of your new computer. For more on how your computer can help you
to be more productive, please refer to the User’s Manual. This guide
contains detailed information on such subjects as system utilities, data
recovery, expansion options and troubleshooting.
Once you have connected to the internet, you can download updates
for your computer from:
http://go.acer.com/?id=17883
1. The link will open the Acer Support webpage.
2. Scroll down to Drivers and Manuals and search for your model by
pasting in or manually entering the serial number, SNID, or
product model.
3. From this page you can also download and install the Acer
identification utility that will automatically detect your computer’s
serial number and SNID and allow you to copy it to the clipboard.
4. Once you have found your product model, any updates, or
documents will be listed.
Basic care and tips for using your computer
Turning your computer off
To turn the power off, do any of the following:
• Use the Windows shutdown command: Press the Windows key or
select the Windows Start button, select Power > Shut down.
6 — First things first
• Right-click the Windows Start button > Shut down or sign out >
Shut down.
If you need to power down the computer for a short while, but don’t
want to completely shut it down, you can put it to Sleep by doing any
of the following:
• Press the power button.
• Press the sleep hotkey.
• Press the Windows key or select the Windows Start button, select
Power > Sleep.
• Right-click the Windows Start button > Shut down or sign out >
Sleep.
Taking care of your computer
Your computer will serve you well if you take care of it.
• Only use the adapter provided with your device, or an Acer-
approved adapter to power your device.
• Do not expose the computer to direct sunlight. Do not place it near
sources of heat, such as a radiator.
• Do not expose the computer to temperatures below 0º C (32º F) or
above 50º C (122º F).
• Do not subject the computer to magnetic fields.
• Do not expose the computer to rain or moisture.
• Do not spill water or any liquid on the computer.
• Do not subject the computer to heavy shock or vibration.
• Do not expose the computer to dust or dirt.
• Never place objects on top of the computer.
• Do not slam the computer display when you close it.
• Never place the computer on uneven surfaces.
If you cannot power off the computer normally, press and hold the power
button for up to ten seconds to shut down the computer. If you turn off the
computer and want to turn it on again, wait at least two seconds before
powering up.

First things first — 7
Taking care of your AC adapter
Here are some ways to take care of your AC adapter:
• Do not connect the adapter to any other device.
• Do not step on the power cord or place heavy objects on top of it.
Route the power cord and any cables away from where people walk.
• When unplugging the power cord, do not pull on the cord itself but
pull on the plug.
• The total ampere ratings of the equipment plugged in should not
exceed the ampere rating of the cord if you are using an extension
cord. Also, the total current rating of all equipment plugged into a
single wall outlet should not exceed the fuse rating.
Cleaning and servicing
When cleaning the computer, follow these steps:
1. Turn off the computer.
2. Disconnect the AC adapter.
3. Use a soft, moist cloth. Do not use liquid or aerosol cleaners.
If your computer is dropped or visibly damaged, or does not work
normally, please contact your nearest authorized Acer service center.
8 — Your Acer notebook tour
YOUR ACER NOTEBOOK TOUR
After setting up your computer as illustrated in the Setup Guide, let us
show you around your new Acer computer.
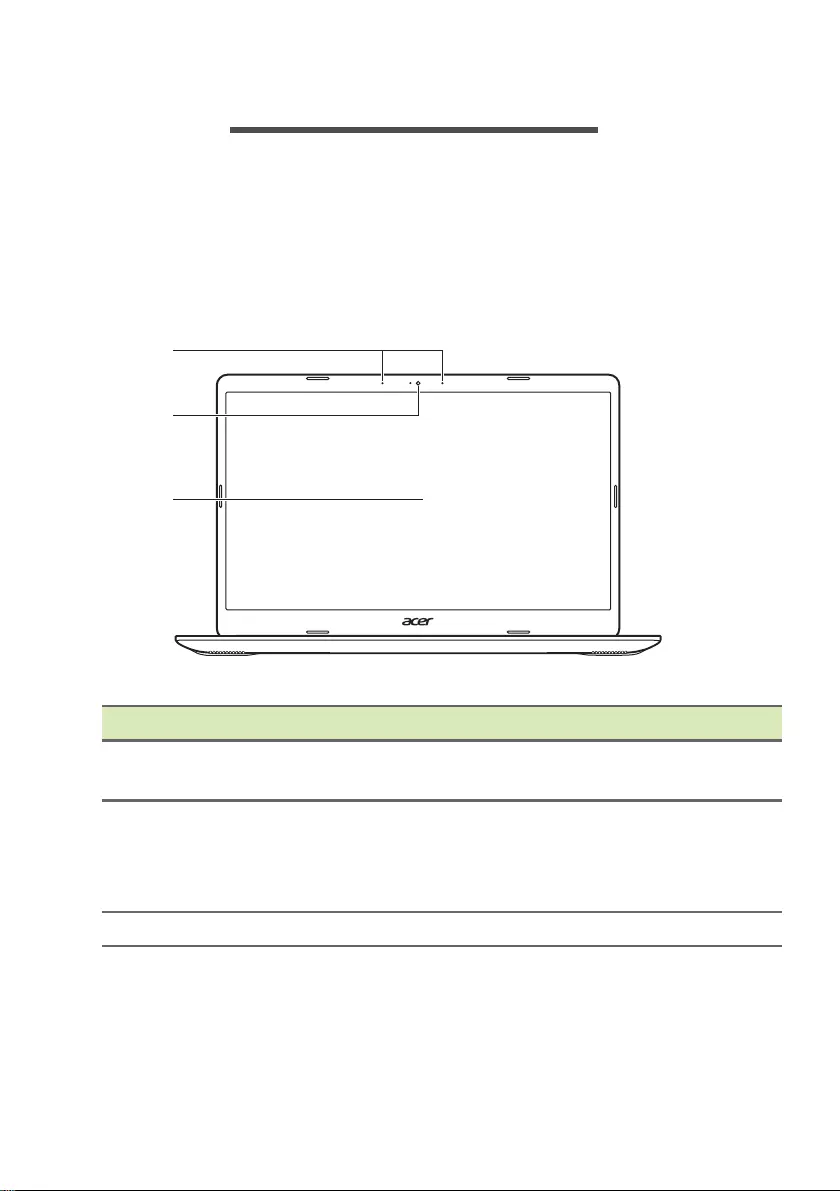
Screen view
#Icon Item Description
1 Microphones Internal digital microphones for
sound recording.
2 Webcam
Web camera for video
communication.
A light next to the webcam indicates
that the webcam is active.
3 Screen Displays computer output.
Your Acer notebook tour — 9
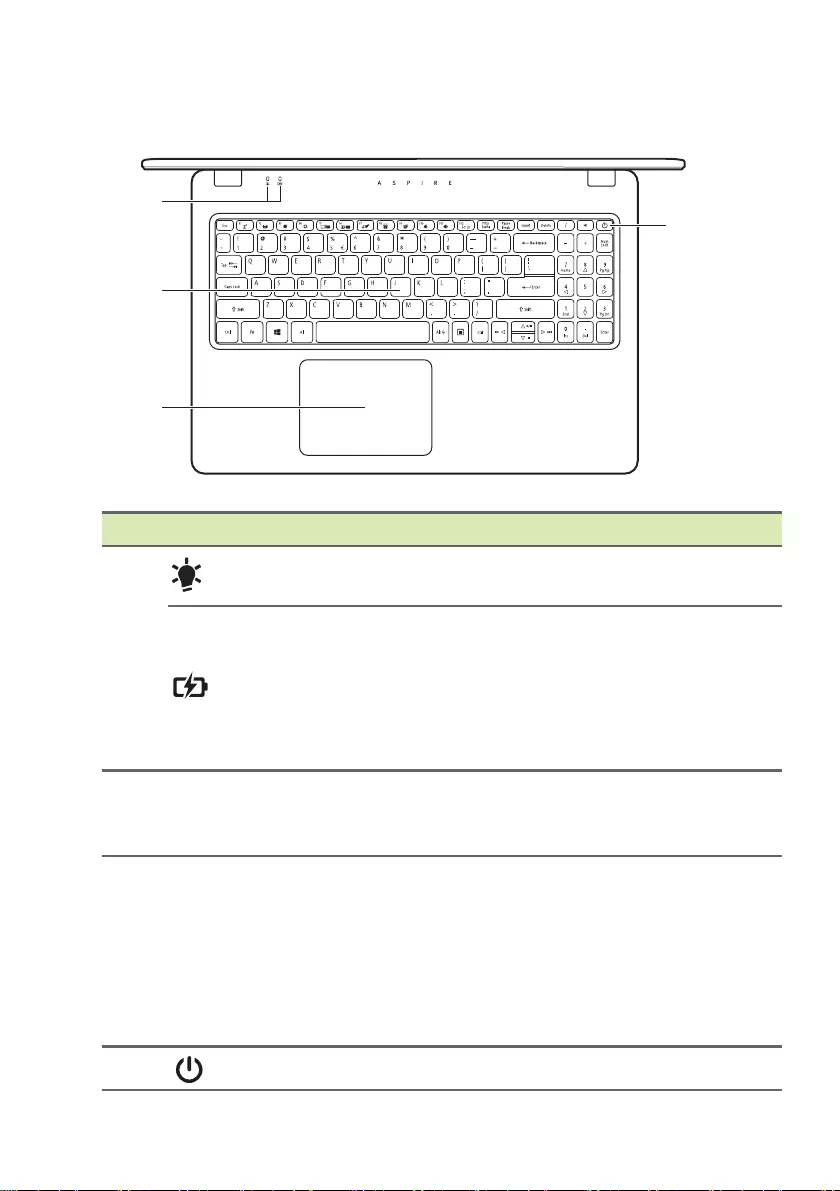
Keyboard view
#Icon Item Description
1
Power indicator Indicates the computer’s power
status.
Battery indicator
Indicates the computer’s battery
status.
Charging: The light shows amber
when the battery is charging.
Fully charged: The light shows blue
when in AC mode.
2 Keyboard
For entering data into your computer.
See «Using the keyboard» on page
12.
3 Touchpad
Touch-sensitive pointing device.
The touchpad and selection buttons
form a single surface.
Press down firmly on the touchpad
surface to perform a left click.
Press down firmly on the lower right
corner to perform a right click.
4 Power button Turns the computer on and off.
10 — Your Acer notebook tour
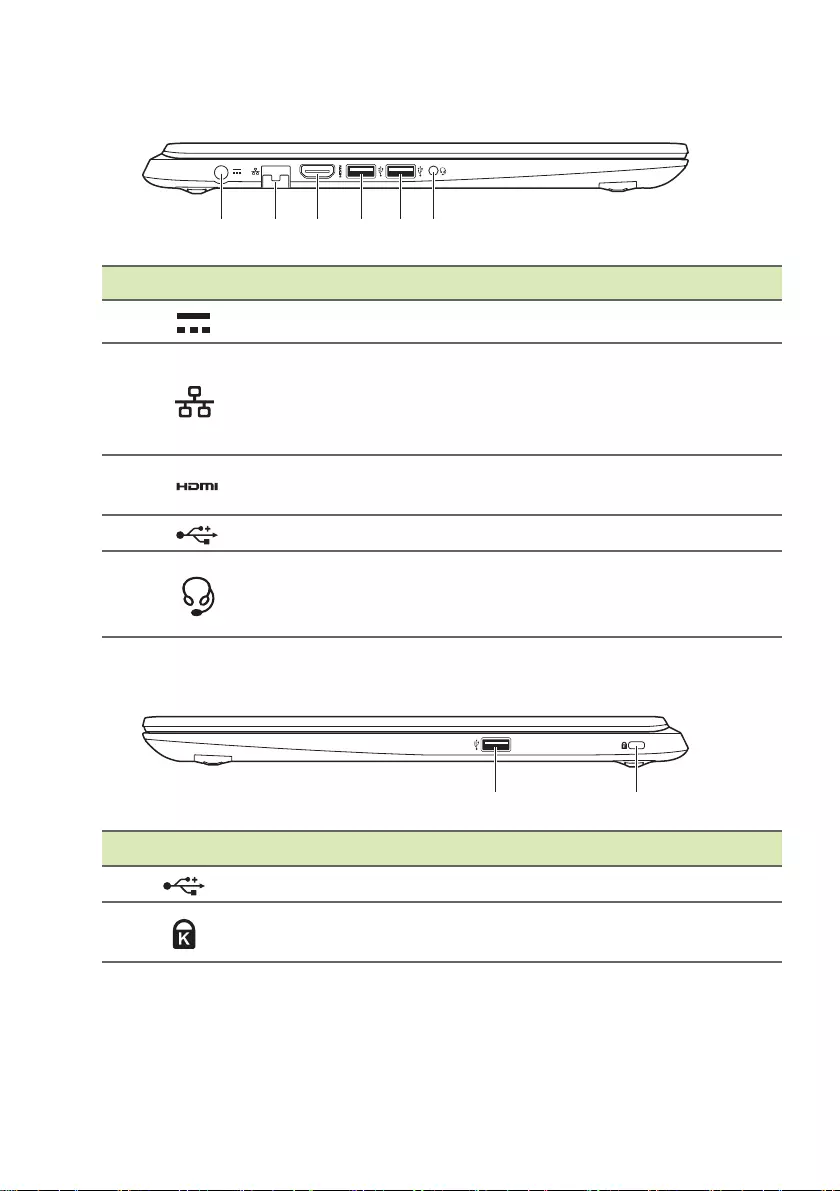
Left view
Right view
USB 3.1 Gen 1 information
• USB 3.1 Gen 1 compatible ports are blue.
• Compatible with USB 3.1 Gen 1 and earlier devices.
#Icon Item Description
1 DC-in jack Connects to an AC adapter.
2Ethernet (RJ-45)
port
Connects to an Ethernet 10/100/
1000-based network.
Pull the lip down to open the port
fully.
3 HDMI port Supports high-definition digital video
connections.
4 / 5 USB ports Connect to USB devices.
6Headset/
speaker jack
Connects to audio devices (e.g.,
speakers, headphones) or a headset
with microphone.
#Icon Item Description
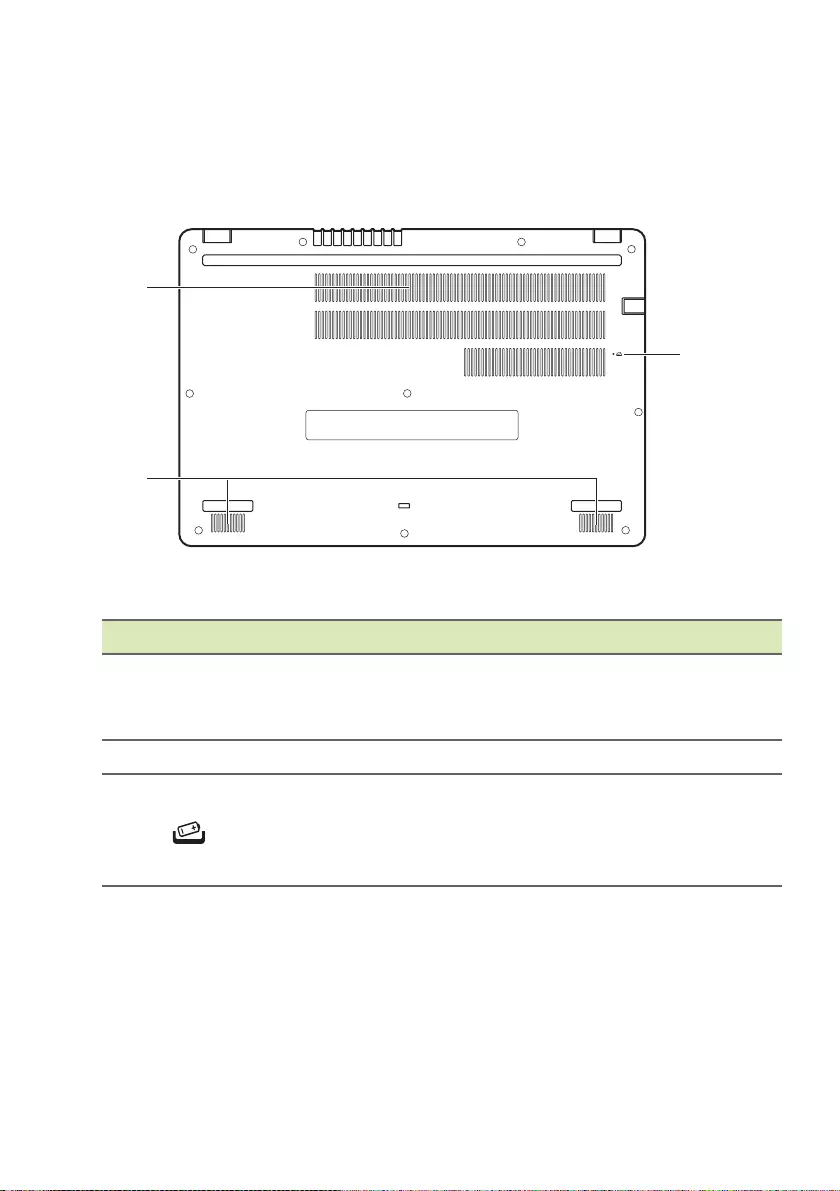
1 USB port Connects to USB devices.
2Kensington lock
slot
Connects to a Kensington-compatible
security lock.
Your Acer notebook tour — 11
• For optimal performance, use USB 3.1 Gen 1-certified devices.
• Defined by the USB 3.1 Gen 1 specification (SuperSpeed USB).
Base view
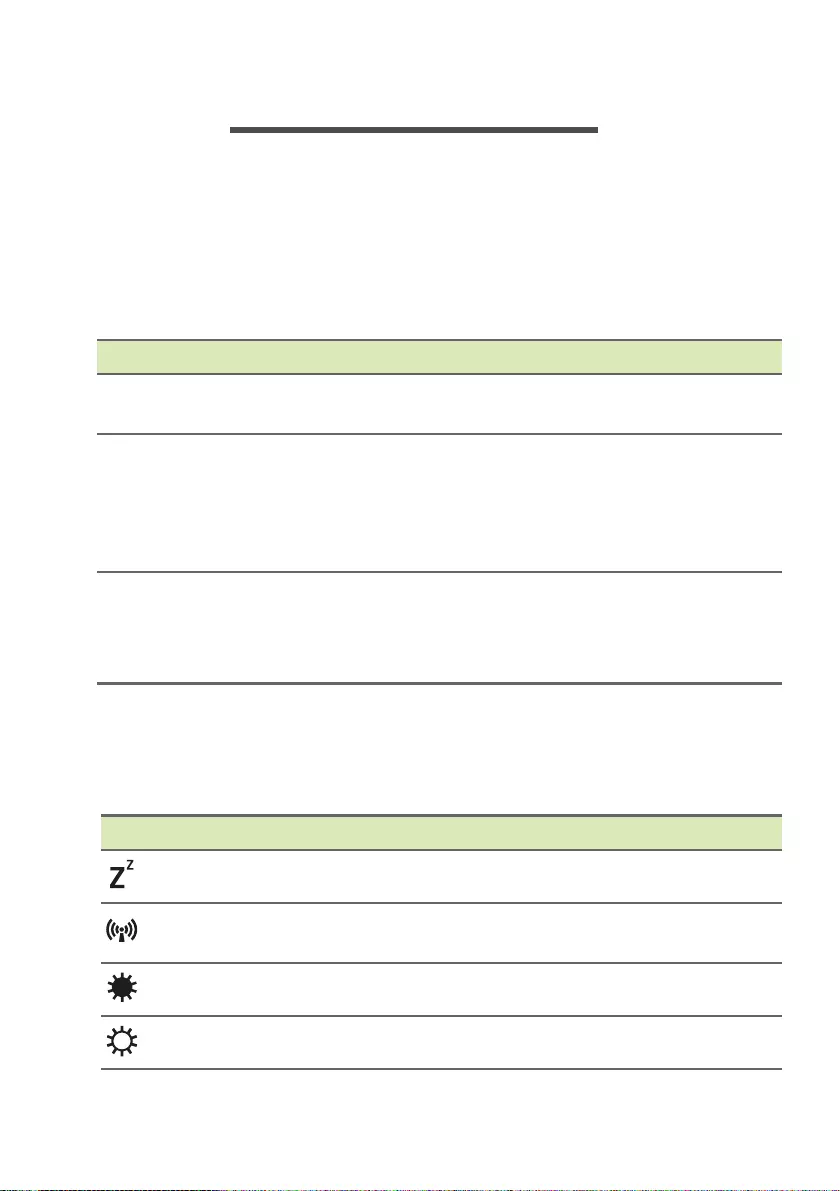
#Icon Item Description
1Ventilation and
cooling fan
Allows the computer to stay cool.
Do not cover or obstruct the
openings.
2 Speakers Deliver stereo audio output.
3Battery reset
pinhole
Simulates removing and reinstalling
the battery.
Insert a paperclip into the hole and
press for four seconds.
12 — Using the keyboard
USING THE KEYBOARD
The keyboard has full-sized keys, a numeric keypad, separate cursor,
lock, Windows, special keys and hotkeys.
Lock keys
The keyboard has lock keys which you can use to turn keyboard
functions on and off.
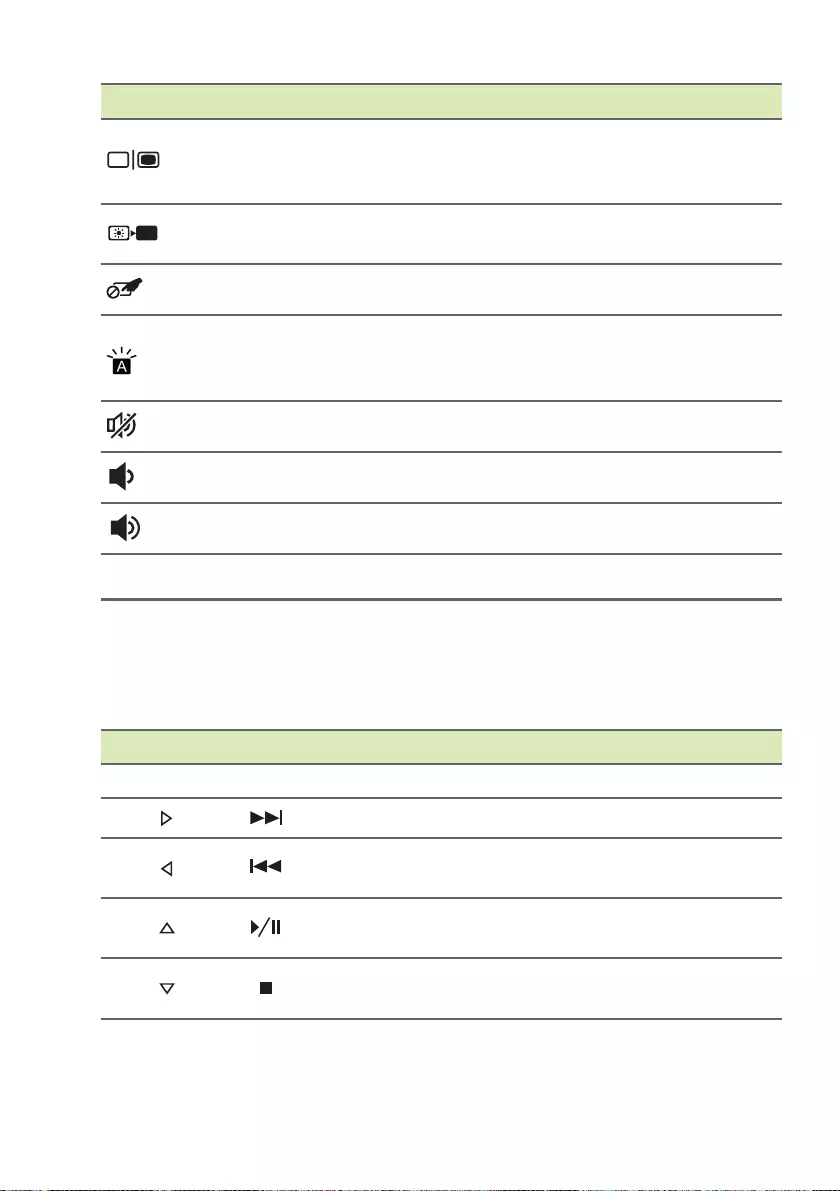
Special keys
Your computer’s keyboard includes keys that activate special
functions. The function of each key is clearly marked with an icon.
Lock key Description
Caps Lock When Caps Lock is on, all alphabetic characters
typed are in uppercase.
NumLk
(Numeric Lock)
When Num Lock is on, the keypad is in numeric
mode. The keys function as a calculator (complete
with the arithmetic operators +, -, *, and /). Use this
mode when you need to do a lot of numeric data
entry.
Scr LK
(Scroll Lock)
When Scroll Lock is on, the screen moves one line
up or down when you press the up or down arrow
keys respectively. Scroll Lock does not work with
some applications.
Icon Function Description
Sleep Puts the computer in Sleep mode.
Flight mode Turns on / off the computer’s network
devices.
Brightness down Decreases the screen brightness.
Brightness up Increases the screen brightness.
Using the keyboard — 13
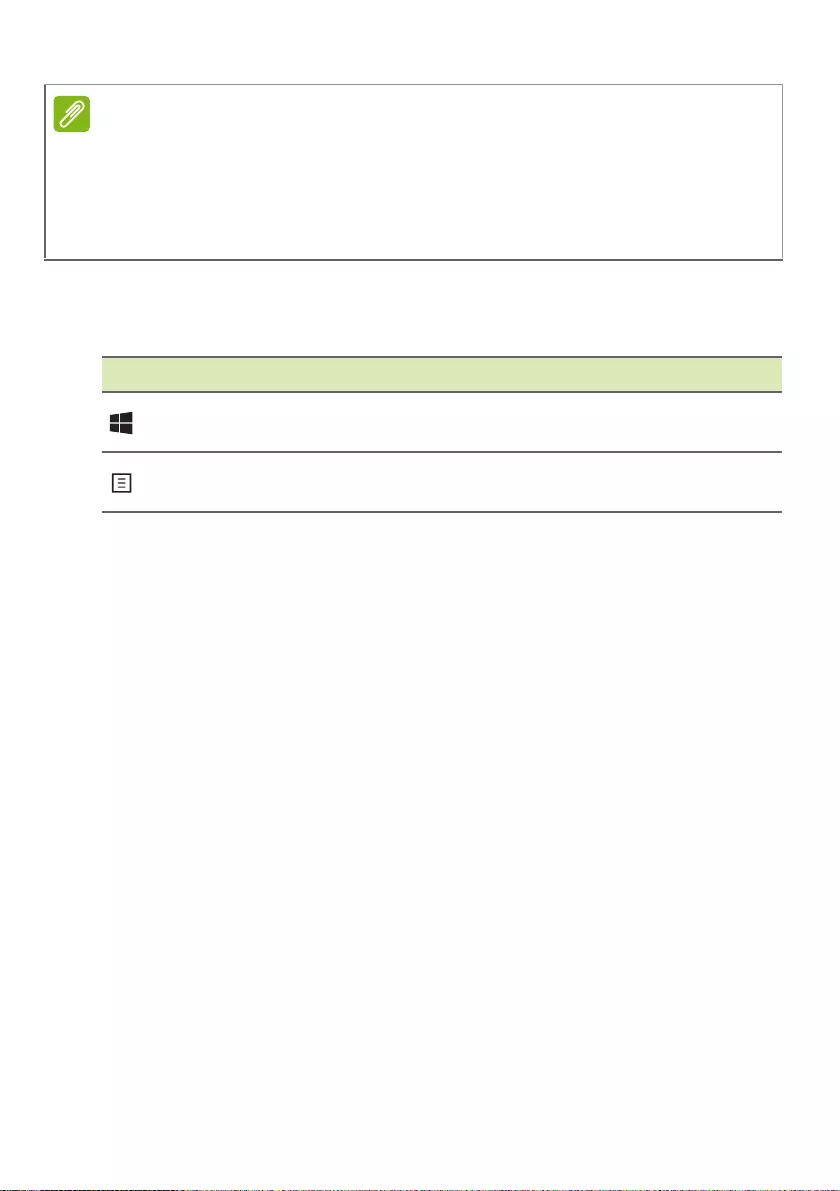
Hotkeys
To activate hotkeys, press and hold the Fn key before pressing the
other key in the hotkey combination.
Display toggle
Switches display output between the
display screen, external monitor (if
connected) and both.
Display off Turns the display screen backlight off to
save power. Press any key to return.
Touchpad toggle Turns the built-in touchpad on and off.
Keyboard
backlight toggle
Turns the keyboard backlight on and off.
Function varies depending on
configuration.
Speaker toggle Turns the speakers on and off.
Volume down Decreases the sound volume.
Volume up Increases the sound volume.
Scr LK Scroll Lock Turns Scroll Lock on or off.
Icon Function Description
Hotkey Icon Function Description
Fn + F1-F12 Function keys Activate the F1 to F12 keys.
Fn + Next Jump to the next media file.
Fn + Previous Return to the previous media
file.
Fn + Play/Pause Play or pause a selected
media file.
Fn + Stop Stop playing the selected
media file.
14 — Using the keyboard
Windows keys
The keyboard has two keys that perform Windows-specific functions.
To swap the hotkey and special function of the F1 to F12 keys, change the
function key setting in the BIOS (to open the BIOS press F2 when starting
your computer, then select the Main menu and change Function key
behavior to Function keys).
(Specifications vary depending on model.)
Key Description
Windows key Pressed alone it returns to the Start screen
or to return to the last open app.
Application key This key has the same effect as clicking
the right mouse button.
Using the Precision Touchpad — 15
USING THE PRECISION TOUCHPAD
The touchpad controls the arrow (or ‘cursor’) on the screen. As you
slide your finger across the touchpad, the cursor will follow this
movement. The Precision Touchpad (PTP) is designed to provide a
more uniform, smooth, and accurate touchpad experience. Many
applications support precision touchpad gestures that use one or
more fingers, however, some gestures may not be supported by the
specific application or program you are using.
Touchpad gestures
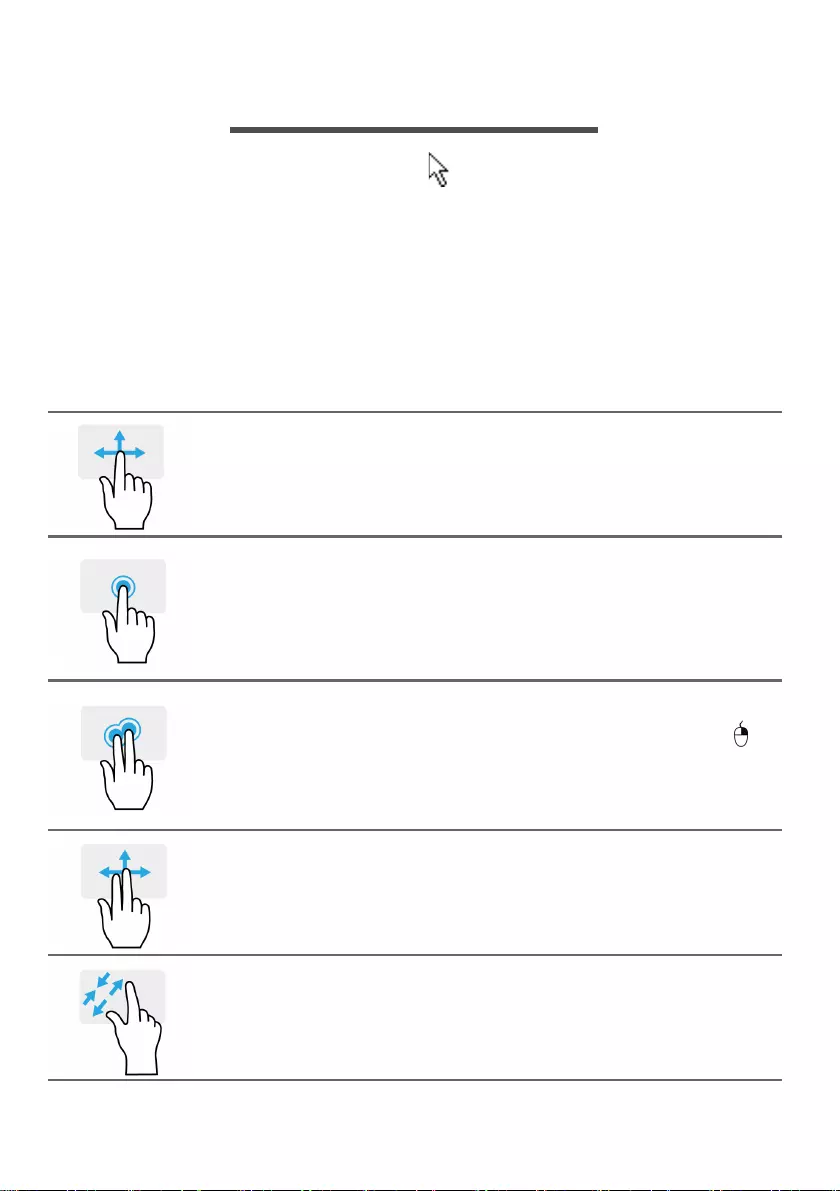
Single-finger slide
Slide a finger across the touchpad to move the cursor.
Single-finger press or tap
Press the touchpad down, or lightly tap the touchpad with
your finger, to perform a ‘click’, which will select or start an
item. Quickly repeat the tap to perform a double tap or
‘double click’.
Two-finger press
Lightly tap the touchpad with two fingers to perform a
‘right click’. In the Start screen, this will toggle the app
commands. In most apps this will open a context menu
related to the selected item.
Two-finger slide
Swiftly scroll through web pages, documents and playlists
by placing two fingers on the touchpad and moving both in
any direction.
Two-finger pinch
Zoom in and out of photos, maps and documents with a
simple finger-and-thumb gesture.
16 — Using the Precision Touchpad
The precision touchpad includes added technology features that help
recognize and prevent unintentional gestures such as accidental taps,
gestures, and pointer movement.
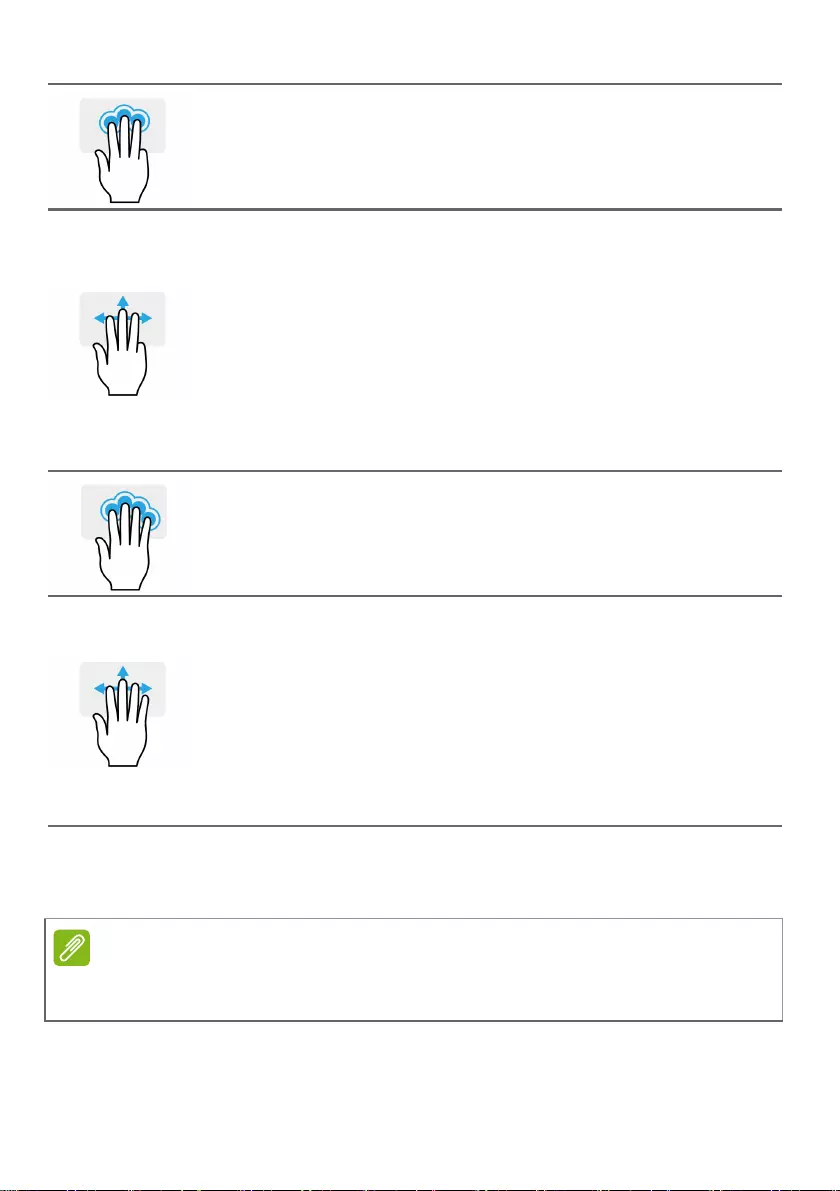
Three-finger press
Lightly tap the touchpad with three fingers to open the
Search Windows.
Three-finger swipe
Swipe across the touchpad with three fingers.
• Swipe up to open Task View. Move the cursor over a
window and tap the touchpad to select that window, or
swipe downwards to exit Task View.
• Swipe down to minimize all open windows and show
Desktop; swipe upwards to restore the minimized
windows.
• Swipe left or right to switch between open windows.
Four-finger press
Lightly tap the touchpad with four fingers to open the
Action Center.
Four-finger swipe
Swipe across the touchpad with four fingers.
• Swipe up to open Task View. Move the cursor over a
window and tap the touchpad to select that window, or
swipe downwards to exit Task View.
• Swipe down to minimize all open windows and show
Desktop; swipe upwards to restore the minimized
windows.
The touchpad is sensitive to finger movement; the lighter the touch, the better
the response. Please keep the touchpad and your fingers dry and clean.
Using the Precision Touchpad — 17
Changing touchpad settings
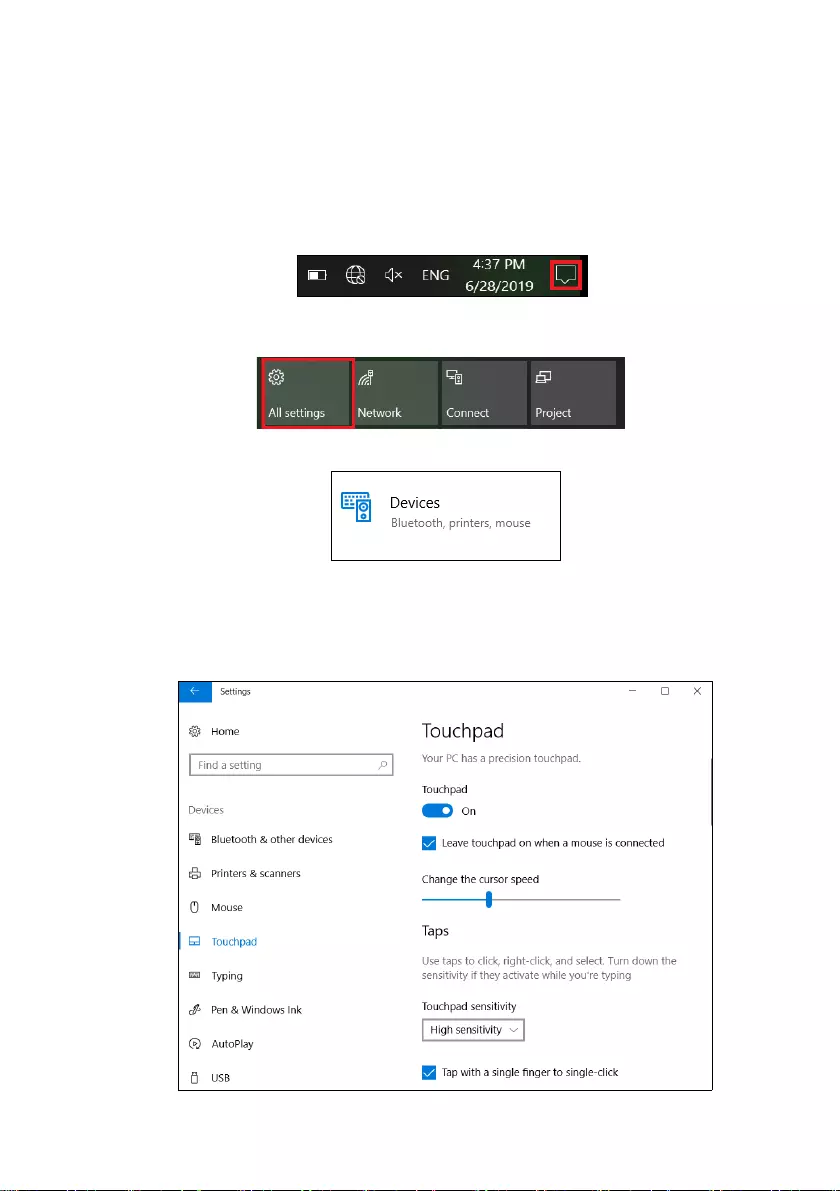
To change the touchpad settings to suit your personal requirements,
please do the following.
1. In the icon tray in the lower right-hand corner of the screen, select
the Notifications icon to open the Notifications pane.
2. Select All settings.
3. Select Devices > Touchpad
4. Now you can adjust the settings to suit your personal needs. You
can switch off the touchpad if you prefer to use a mouse. Or you can
adjust the touchpad sensitivity to suit your needs. Scroll down to see
more settings.
18 — Recovery
RECOVERY
If you are having trouble with your computer, and the frequently asked
questions (see Got a question? on page 50) do not help, you can
recover your computer.
This section describes the recovery tools available on your computer.
Acer provides Acer Care Center, which allows you to reset your PC,
refresh your PC, or create a factory default backup. If you cannot
access Acer Care Center, click Settings in the Start menu, select
Update & Security and then click Recovery.
Creating a factory default backup
Recovery Management allows you to quickly and easily back up your
operating system, installed apps and data.
Acer Care Center vary depending on model or Operating System.
We recommend that you create a Factory Default Backup as soon as
possible. In certain situations a full recovery will require a USB
recovery backup.
Since the recovery backup requires at least 8 GB of storage after formatting,
it is recommended to use a USB drive with a capacity of 16 GB or larger.
Recovery — 19
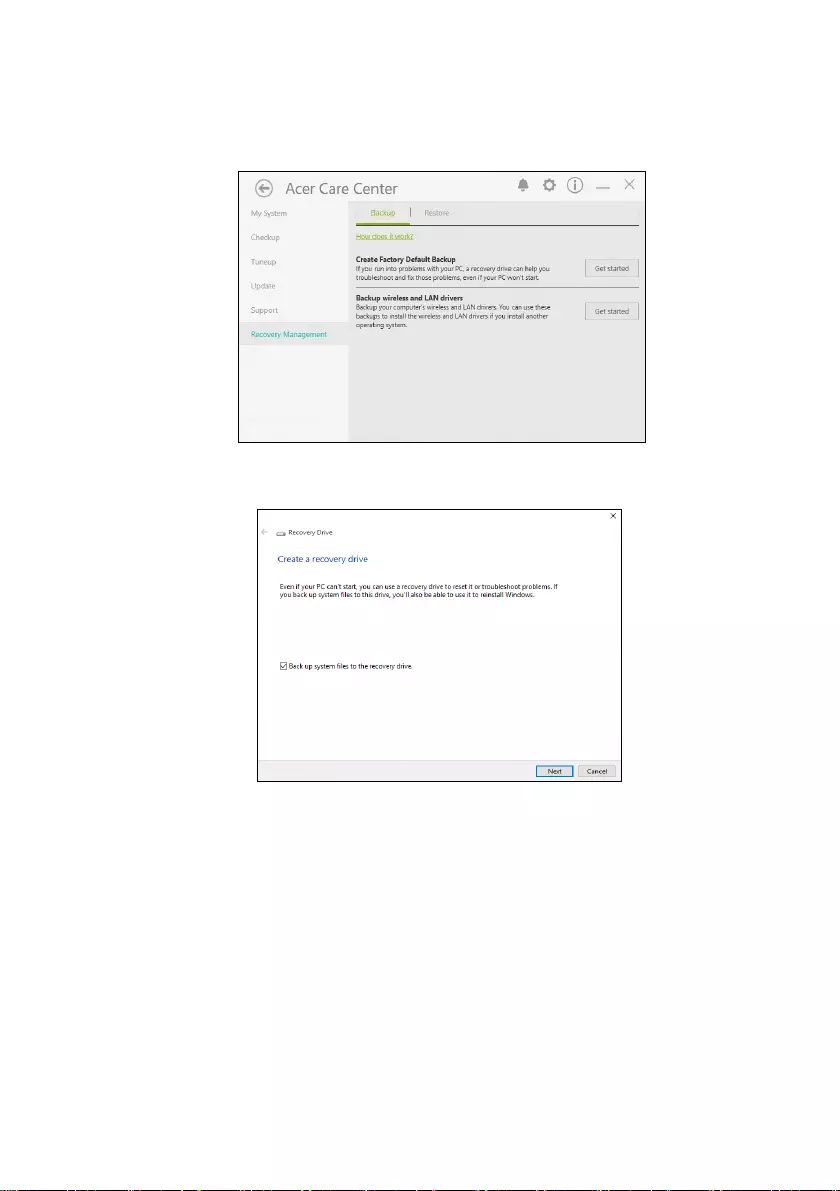
1. From Start, select Care Center then Recovery Management.
2. Select the Backup tab and click Get Started for Create Factory
Default Backup to open the Recovery Drive window.
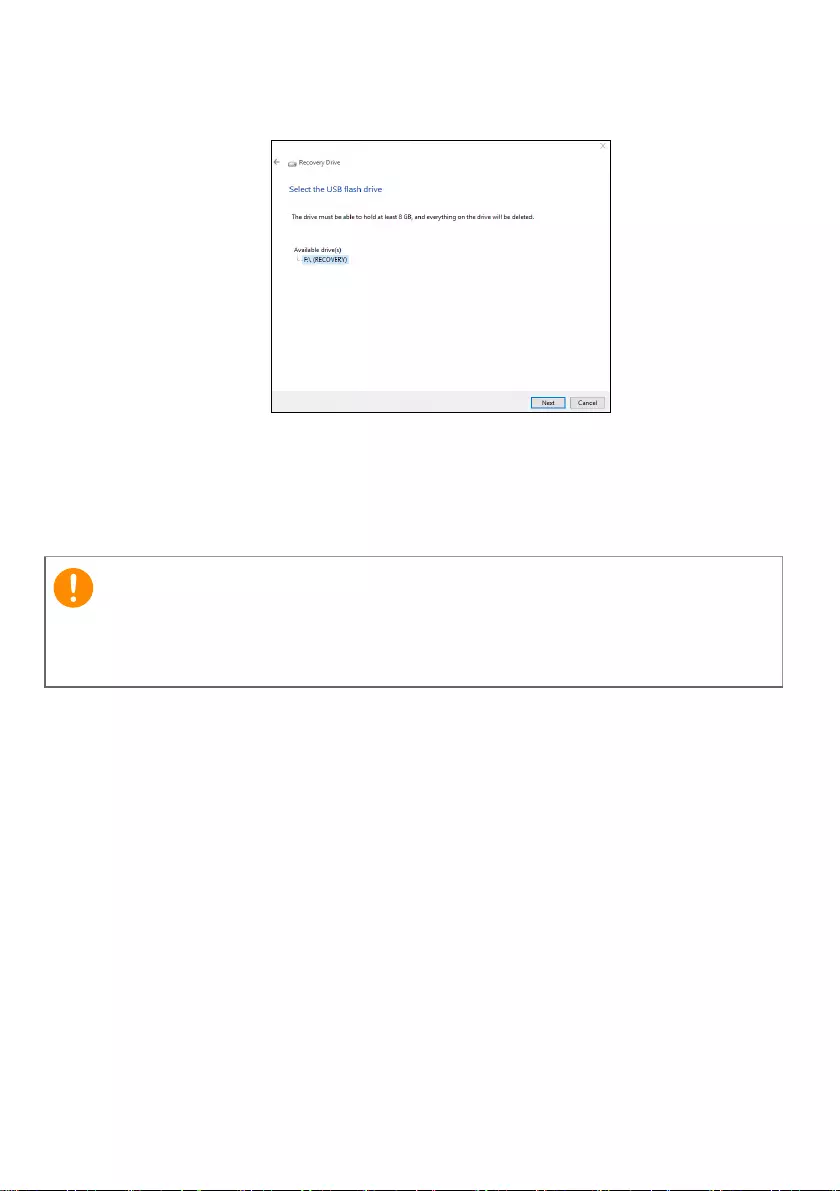
3. Make sure Back up system files to the recovery drive is selected
and click Next.
20 — Recovery
4. Plug in the USB drive and wait for the PC to detect the USB drive
then click Next.
5. Everything on the drive will be deleted. Click Create to continue.
6. You will be shown the backup progress on the screen.
7. Follow the process until it completes.
8. Unplug the USB drive and label it clearly.
Backing up your wireless and LAN drivers
Back up your wireless and LAN drivers. You can use these backups to
install the wireless and LAN drivers if you install another operating
system.
1. From Start, select Care Center then Recovery Management.
2. Select the Backup tab and click Get started for Backup wireless
and LAN drivers. Choose a folder to save your drivers and select
OK.
Restoring your computer
Recovery Management allows you to quickly and easily restore your
computer back to its default status. You can choose to keep your files
or remove them before reinstalling Windows.
Write a unique, descriptive label on the backup, such as ‘Windows
Recovery Backup’. Make sure you keep the backup in a safe place that
you will remember.
Recovery — 21
Reset this PC and keep my files
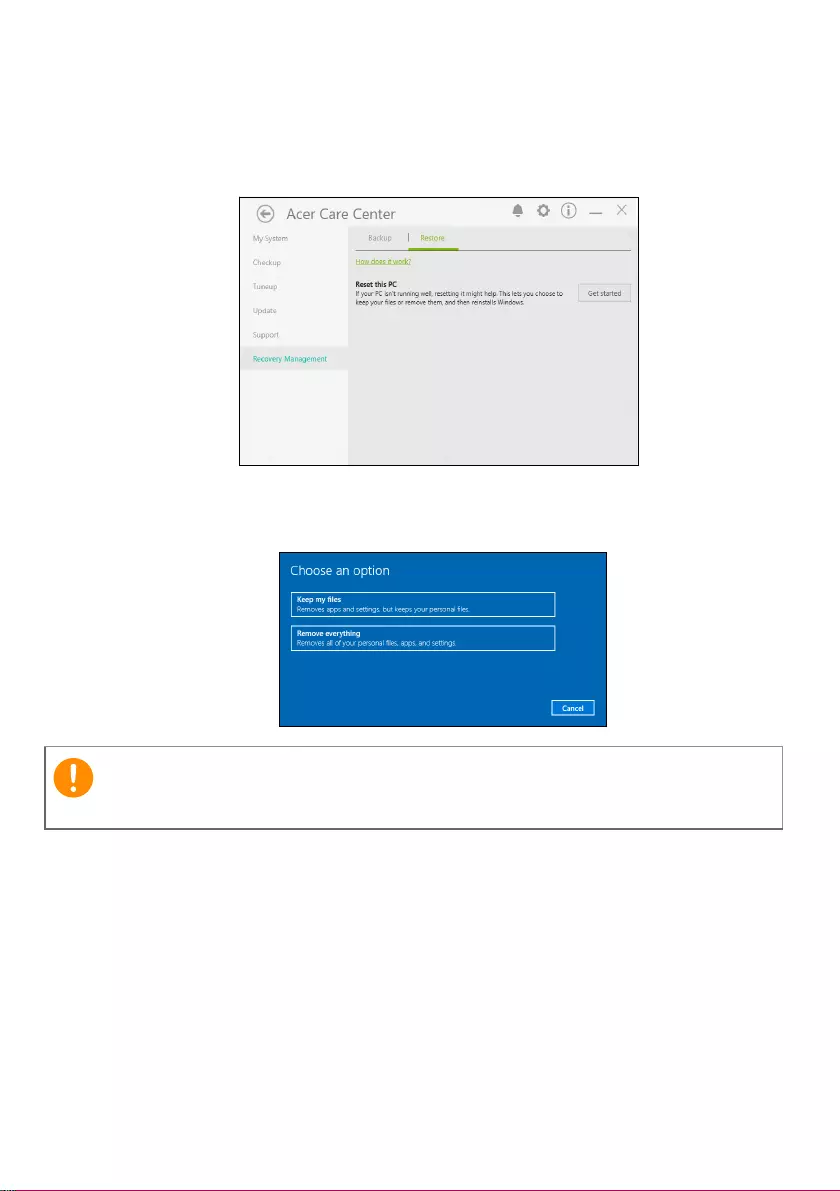
1. From Start, select Care Center then Recovery Management.
2. Select the Restore tab and click Get started to Choose an option.
3. Select Keep my files to refresh your PC and reinstall your operating
system without removing your personal files. Click Next to continue.
If you have apps installed on your PC, they will be removed.
22 — Recovery
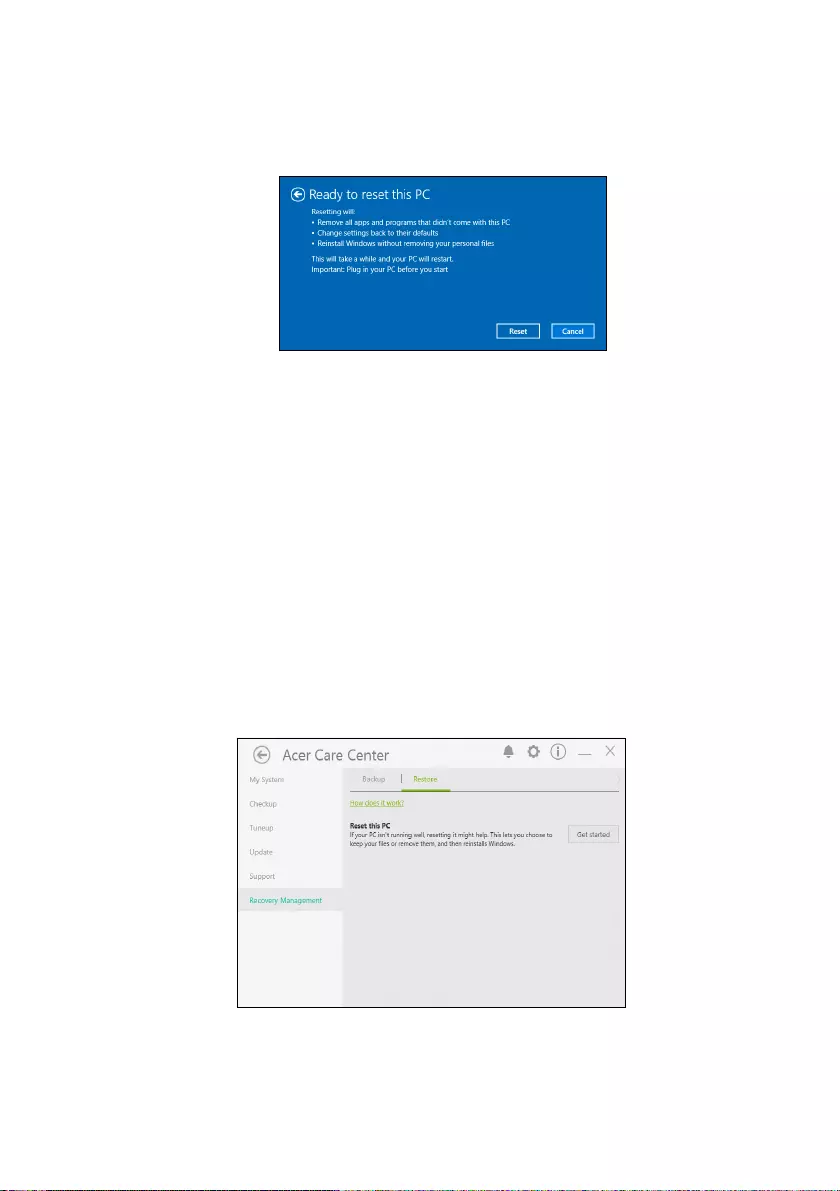
4. Resetting the PC will reinstall Windows, change settings back to
their factory defaults and remove all preinstalled apps and programs
without removing your personal files. Click Reset to continue.
5. You will be shown the reset progress on the screen. The screen will
turn off during the reset process.
6. The screen will turn back on when it is installing Windows. Your PC
will restart several times during the reset process.
7. Follow the process until it completes.
8. When your PC has completed the reset process, Windows will have
been reset back to its factory default settings without removing your
personal files.
Reset this PC and remove everything
1. From Start, select Care Center then Recovery Management.
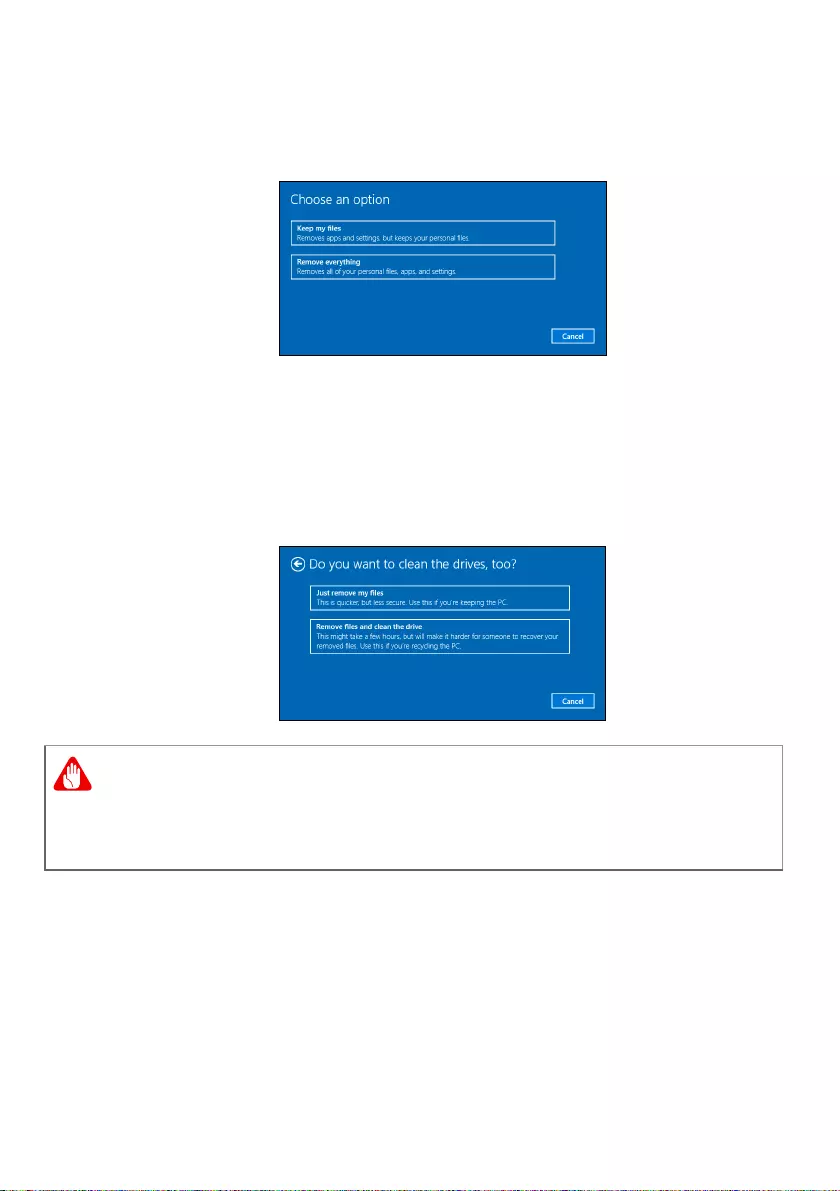
2. Select the Restore tab and click Get Started to Choose an option.
Recovery — 23
3. Select Remove everything to reset your PC back to its factory
default. This process will reinstall your operating system and
remove all of your personal files, apps, and settings.
4. Select Just remove my files if you are keeping your computer. This
will be quicker, but less secure. Files may still be recovered with a
file recovery program.
Select Remove files and clean the drive if you are not keeping
your computer. This process will take longer, but will be more
secure.
Selecting «Remove files and clean the drive» will remove all of your
personal files and accounts, along with pre-existing drivers that may
affect your Windows installation.

24 — Recovery
5. Click Reset to continue.
6. You will be shown the reset progress on the screen. The screen will
turn off during the reset process.
7. The screen will turn back on when it is installing Windows. Your PC
will restart several times during the reset process.
8. Follow the process until it completes.
9. When your PC has completed the reset process, Windows will use
factory default settings.
Using a Bluetooth connection — 25
USING A BLUETOOTH CONNECTION
Bluetooth is a technology enabling you to transfer data wirelessly over
short distances between many different types of devices. Bluetooth-
enabled devices include computers, cell phones, tablets, wireless
headsets, and keyboards.
To use Bluetooth, you must ensure the following:
1. Bluetooth is enabled on both devices.
2. Your devices are «paired» (or connected).
Enabling and disabling Bluetooth
The Bluetooth adapter must be enabled on both devices. For your
computer, this may be an external switch, a software setting, or a
separate Bluetooth dongle plugged into the computer’s USB port (if no
internal Bluetooth adapter is available).
Enable Bluetooth and add a device
Every new device must first be «paired» with your computer’s
Bluetooth adapter. This means it must first be authenticated for
security purposes. You only need to pair once. After that, simply
turning on the Bluetooth adapter of both devices will connect them.
Bluetooth on your computer is disabled by default. To enable your
computer’s Bluetooth adapter, do the following:
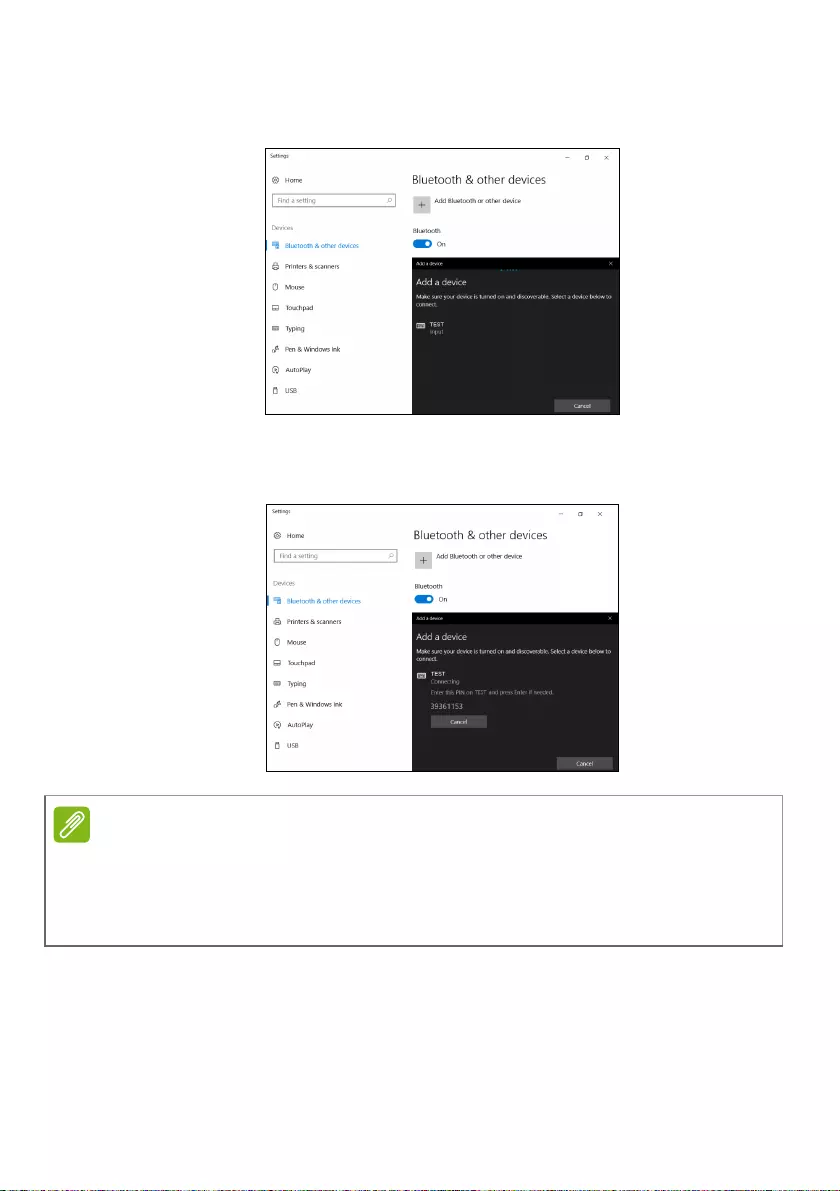
1. Press the Windows key or select the Windows Start button >
Settings > Devices > Bluetooth & other devices, and click the
toggle under Bluetooth to enable/disable it.
2. Click on Add Bluetooth or other device then select the device that
you want to add.
3. Your computer will automatically start searching for devices, as well
as make itself visible to other devices.
Please check your devices owner’s manual to determine how to turn on its
Bluetooth adapter.
26 — Using a Bluetooth connection
4. Select the device you wish to pair from the list of discovered
devices.
5. After pairing, if there is a code displaying on the screen, enter that
code on the device to proceed the connection.
You can also enter the Bluetooth settings by selecting the
Notifications icon in the lower right-hand corner of the screen to open
the Notifications pane. From here, you can enable or disable
Bluetooth or right-click on Bluetooth > Go to Settings to enter the
Bluetooth settings.
Some devices using older versions of the Bluetooth technology require both
devices to enter a PIN. In the case of one of the devices not having any inputs
(as in a headset), the passcode is hardcoded into the device (usually «0000»
or «1234»). Consult your device’s user manual for more information.
Connecting to the Internet — 27
CONNECTING TO THE INTERNET
This chapter includes general information on types of connections,
and getting connected to the internet. For detailed information, please
refer to Network connections on page 63.
Your computer’s built-in network features make it easy for you to
connect your computer to the internet.
First though, in order to connect to the internet from home, you’ll need
to sign up for internet services from an ISP (Internet Service Provider)
— usually a phone or cable company — that will have to go to your
home or office to set up internet service. The ISP will install a small
box, a router or modem, that will allow you to connect to the internet.
Connecting to a wireless network
Connecting to a wireless LAN
A wireless LAN (or WLAN) is a wireless local area network, which can
link two or more computers without using wires. Once connected to
WLAN, you can access the internet. You can also share files, other
devices, and even your internet connection itself.
Your computer’s wireless connection is turned on by default and
Windows will detect and display a list of available networks during
setup. Select your network and enter the password if required.
Acer notebook computers feature a Flight mode hotkey that turns the
network connection on or off. You can use the network management
options to turn your wireless network on/off or control what is shared
over the network.
Using wireless devices while flying in aircraft may be prohibited. All
wireless devices must be switched off before boarding an aircraft and
during take-off, as they may be dangerous to the operation of the
aircraft, disrupt communications, and even be illegal. You may turn on
your computer’s wireless devices only when informed that it is safe to
do so by the cabin crew.
28 — Connecting to the Internet
To connect to a wireless network, please follow the steps below.
1. Ensure you have a wireless router/access point and current internet
connection through the ISP of your choice. Make a note of the
wireless network’s name and password (if necessary). If you are
trying to connect to a public network (such as at a coffeeshop),
make sure you have the wireless network’s name.
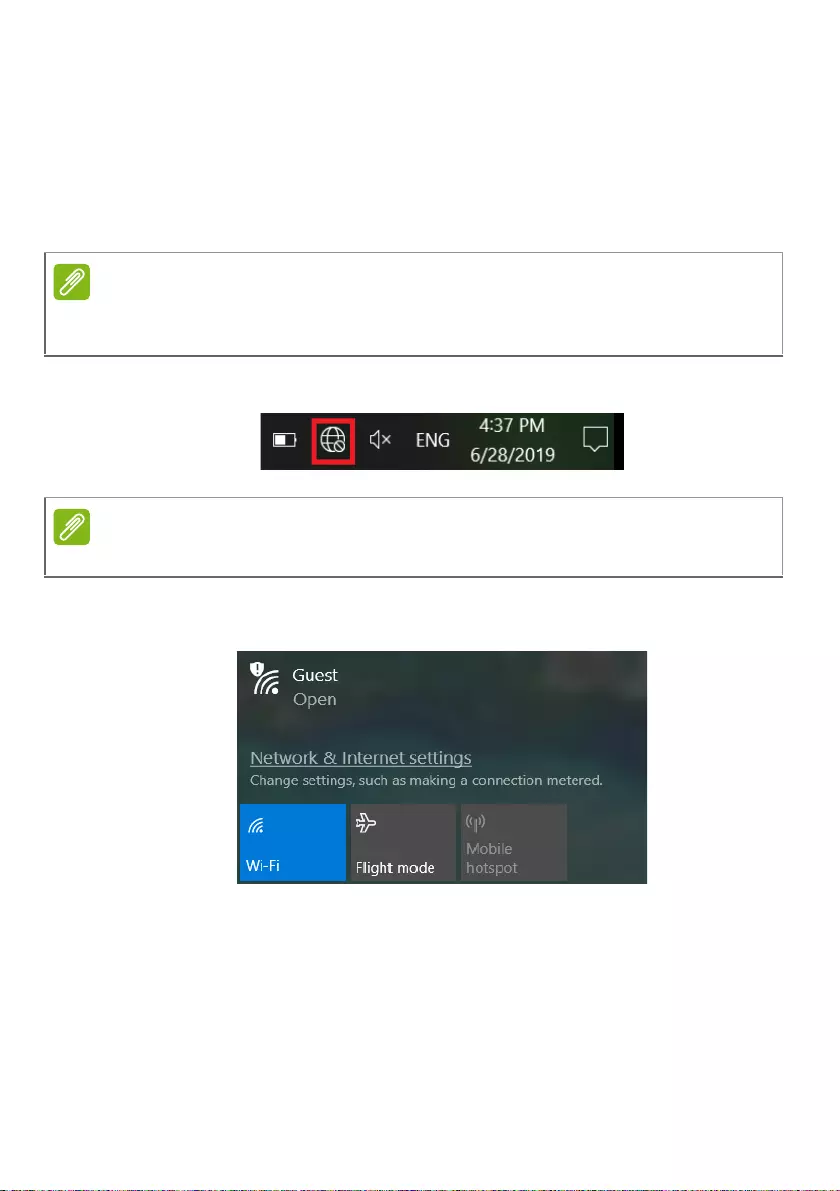
2. Click Network icon in the notification area.
3. You will see a list of available wireless networks. Select the one you
wish to use.
Please refer to your ISP or router documentation for details on connecting to
the internet.
If Wi-Fi is turned off, please click Wi-Fi tile to turn it on.
Connecting to the Internet — 29
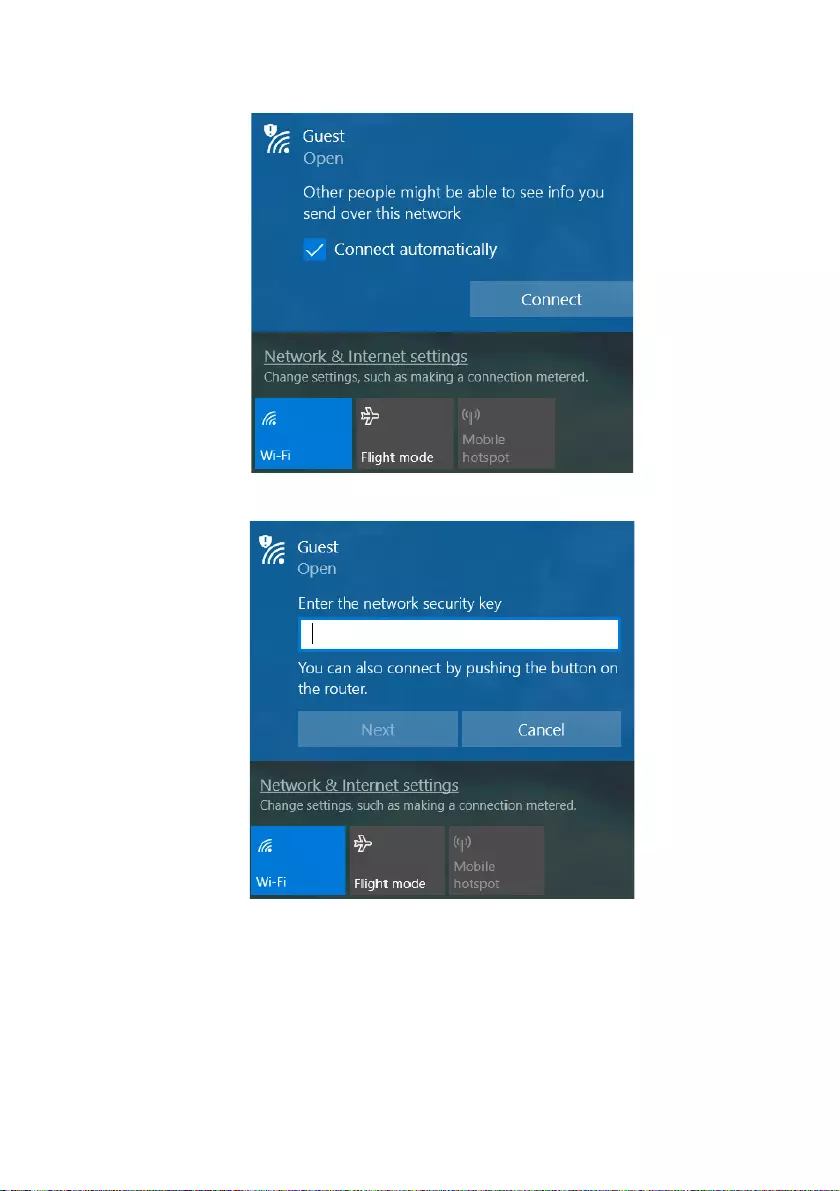
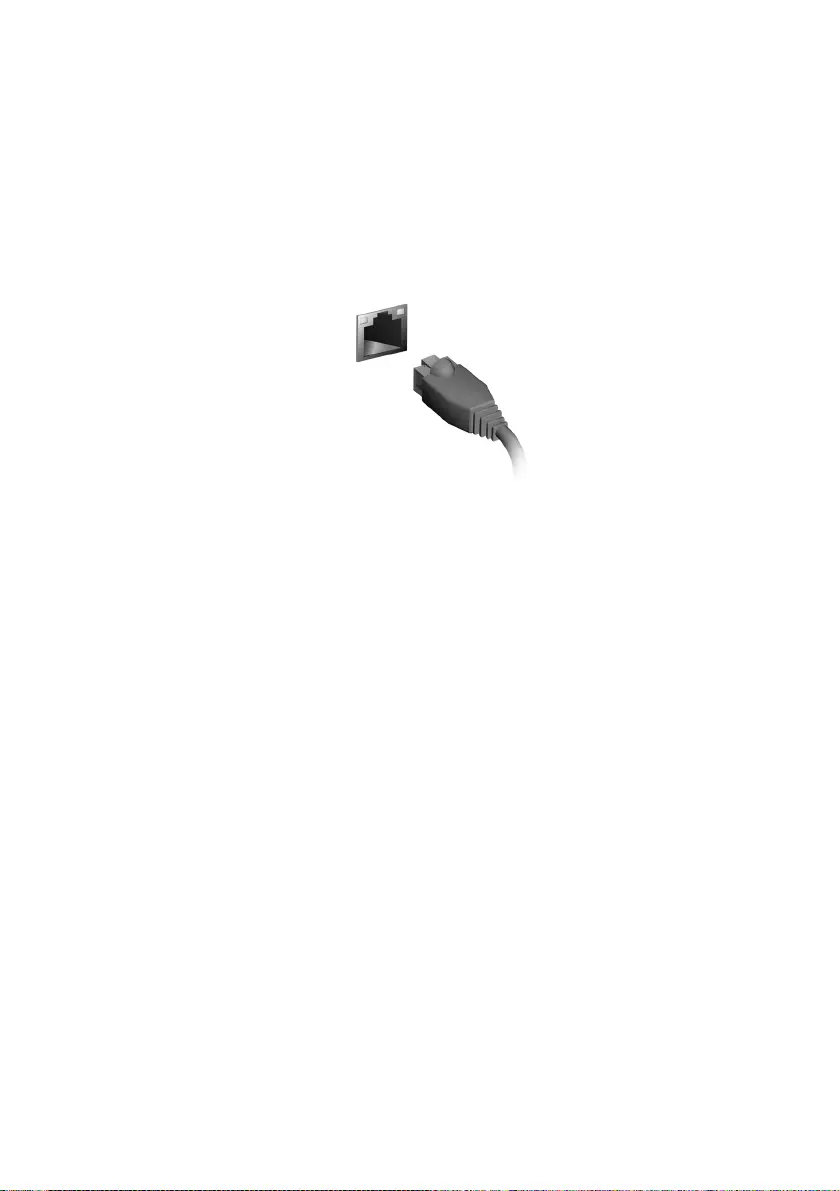
4. Once you select a wireless network, select Connect.
5. If required, enter the network’s password.
30 — Connecting to the Internet
Connecting with a cable
Built-in network feature
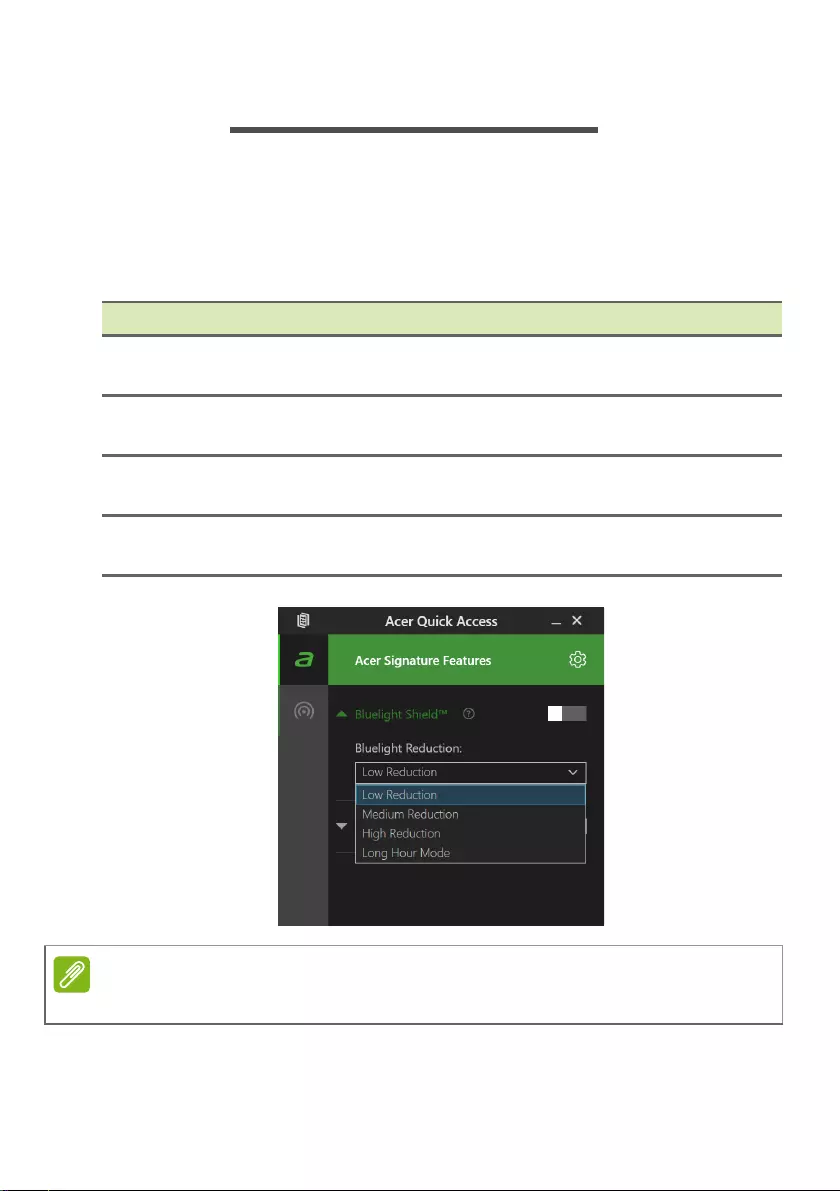
If your computer has a network port, plug one end of a network cable
into the network port on your computer, and the other end into a port
on your router (refer to the image below.) Then, you’ll be ready to get
online.
Connecting to a cellular network
If your computer has a SIM slot, you can connect to the internet using
a cellular phone network. To do this, you must have a compatible SIM
card and a data contract with your cellular provider. Contact your
cellular provider for more information on connecting to the internet
using a cellular network.
Bluelight Shield — 31
BLUELIGHT SHIELD
The Bluelight Shield can be enabled to reduce blue-light emissions
from the screen to protect your eyes.
To configure the Bluelight Shield, search for ’Quick Access’ in the
Start Menu. From here you can toggle Bluelight Shield on or off, and
you can choose from four different modes to fit your needs:
No. Item Description
1Low
Reduction
Reduces blue light emission from the LED backlit
screen by 10% to 25% for basic protection.
2Medium
Reduction
Reduces blue light emission from the LED backlit
screen by 26% to 45% to protect your eyes.
3High
Reduction
Reduces blue light emission from the LED backlit
screen by 46% to 65% for maximum protection.
4Long Hour
Mode
Professionally tuned to reduce eye strain over an
extended period of time.
Specifications vary depending on model or Operating System.

Keeping your computer
and data safe…
In this section you will find:
• How to secure your computer
• Setting passwords
• What you need to prepare when you’re traveling
• How to get the most out of your battery

Securing your computer — 33
SECURING YOUR COMPUTER
Your computer is a valuable investment that you need to take care of.
Learn how to protect and take care of your computer.
Security features include hardware and software locks — a security
notch and passwords.
Using a computer security lock
The computer comes with a computer security slot for a security lock.
Wrap a computer security lock cable around an immovable object
such as a table or handle of a locked drawer. Insert the lock into the
notch and turn the key to secure the lock. Some keyless models are
also available.
Using passwords
Passwords protect your computer from unauthorized access. Setting
these passwords creates several different levels of protection for your
computer and data:
• Supervisor Password prevents unauthorized entry into the BIOS
utility. Once set, you must enter this password to gain access to the
BIOS utility. See Setting passwords on page 35.
• User Password secures your computer against unauthorized use.
Combine the use of this password with password checkpoints on
boot-up and resume from Hibernation (if available) for maximum
security.
• Password on Boot secures your computer against unauthorized
use. Combine the use of this password with password checkpoints
on boot-up and resume from Hibernation (if available) for maximum
security.
Do not forget your Supervisor Password! If you forget your password,
please get in touch with your dealer or an authorized service center.
34 — Securing your computer
Entering passwords
When a password is set, a password prompt appears in the center of
the display screen.
• When the Supervisor Password is set, a prompt appears when you
enter the BIOS utility.
• Type the Supervisor Password and press Enter to access the BIOS
utility. If you enter the password incorrectly, a warning message
appears. Try again and press Enter.
• When the User Password is set and the password on boot
parameter is enabled, a prompt appears at boot-up.
• Type the User Password and press Enter to use the computer. If
you enter the password incorrectly, a warning message appears.
Try again and press Enter.
You have three chances to enter a password. If you fail to enter the
password correctly after three tries, the system halts. Press and hold
the power button for four seconds to shut down the computer. Then
turn on the computer again, and try again.

BIOS utility — 35
BIOS UTILITY
The BIOS utility is a hardware configuration program built into your
computer’s BIOS.
Your computer is already properly configured and optimized, and you
do not normally need to run this utility. However, if you encounter
configuration problems, you may need to run it.
To activate the BIOS utility, press F2 while the computer logo is being
displayed.
Boot sequence
To set the boot sequence in the BIOS utility, activate the BIOS utility,
then select Boot from the categories listed on the top of the screen.
Setting passwords
To set a password on boot, activate the BIOS utility, then select
Security from the categories listed on the top of the screen.
Find Set Supervisor Password and enter a password to enable this
feature. Once you have entered a password for this feature, you may
then enable/disable Password on Boot.
Remember to select F10 to properly save and exit the BIOS utility
when you are done making changes.
36 — Power management
POWER MANAGEMENT
This computer has a built-in power management unit that monitors
system activity. System activity refers to any activity involving one or
more of the following devices: keyboard, mouse, hard disk,
peripherals connected to the computer, and video memory. If no
activity is detected for a period of time, the computer stops some or all
of these devices in order to conserve energy.
Saving power
Disable Fast startup
Your computer uses Fast startup to start quickly, but also uses a small
amount of power to check for signals to start. These checks will slowly
drain your computer’s battery.
If you prefer to reduce your computer’s power requirements and
environmental impact, turn off Fast startup:
1. Press the Windows key or select the Windows Start button then
select Settings > System > Power & sleep.
2. Select Additional power settings.
3. Select Choose what the power buttons do.
If Fast startup is off, your computer will take longer to start from Sleep.
Your computer will also not start if it receives an instruction to start over a
network (Wake on LAN).
Power management — 37
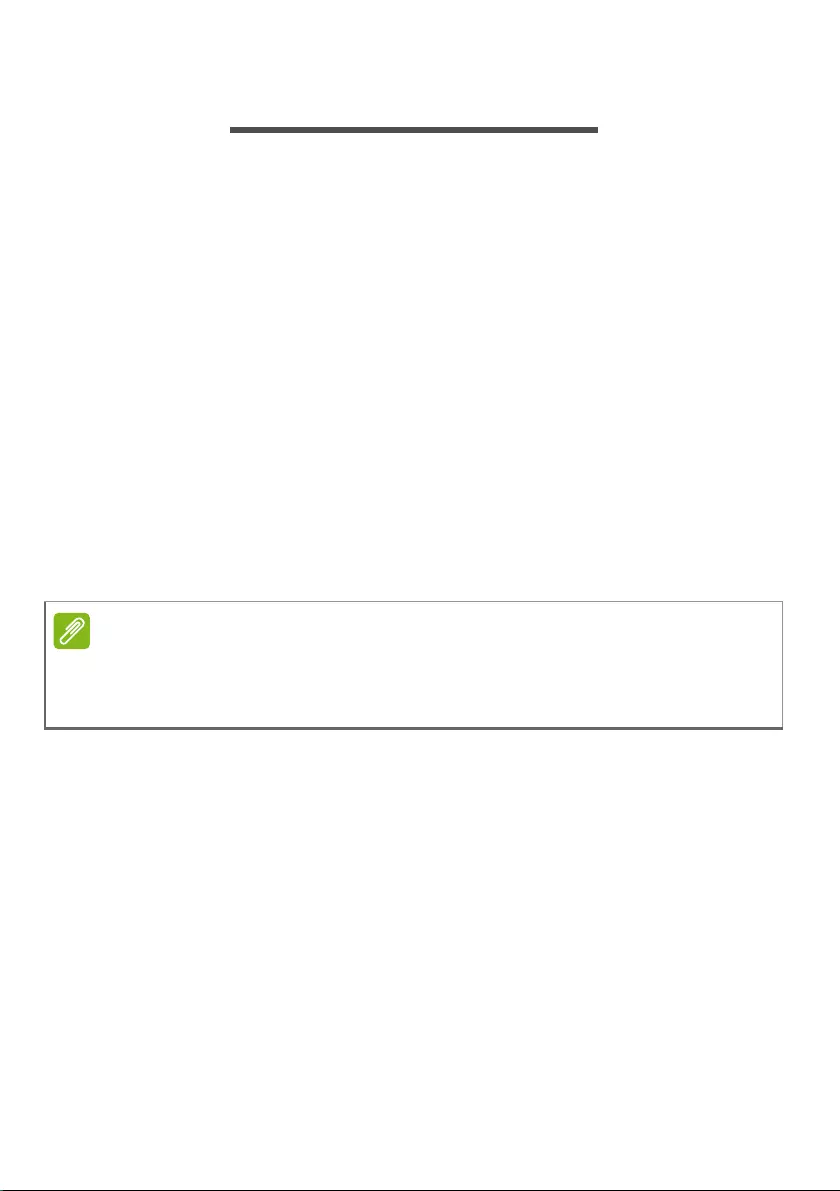
4. Select Change settings that are currently unavailable.
5. Scroll down and disable Turn on fast startup.
6. Select Save changes.
38 — Battery pack
BATTERY PACK
The computer uses an embedded Lithium battery that gives you long
use between charges.
Battery characteristics
The battery is recharged whenever you connect the computer to the
AC adapter. Your computer supports charge-in-use, enabling you to
recharge the battery while you continue to operate the computer.
However, recharging with the computer turned off significantly
reduces charge time.
The battery will come in handy when you travel or during a power
failure.
Charging the battery
Plug the AC adapter into the computer, and connect to a mains power
outlet.
Conditioning a new battery pack
Before you use a battery pack for the first time, there is a conditioning
process that you should follow:
1. Connect the AC adapter and fully charge the battery.
2. Turn on the computer and complete setting up the operating system.
3. Disconnect the AC adapter.
4. Operate the computer using battery power.
5. Fully deplete the battery until the battery-low warning appears.
6. Reconnect the AC adapter and fully charge the battery again.
Follow these steps again until the battery has been charged and
discharged three times.
You are advised to charge the battery before retiring for the day. Charging
the battery overnight before traveling enables you to start the next day with a
fully charged battery.

Battery pack — 39
Use this conditioning process for all new batteries, or if a battery
hasn’t been used for a long time.
The battery conditioning process ensures your battery accepts the
maximum possible charge. Failure to follow this procedure will prevent
you from obtaining the maximum battery charge, and will also shorten
the effective lifespan of the battery.
In addition, the useful lifespan of the battery is adversely affected by
the following usage patterns:
• Using the computer on constant AC power.
• Not discharging and recharging the battery to its extremes, as
described above.
• Frequent use; the more you use the battery, the faster it will reach
the end of its effective life. An embedded battery has a life span of
more than 1,000 charge/discharge cycles.
Optimizing battery life
Optimizing battery life helps you get the most out of battery operation,
prolonging the charge/recharge cycle and improving recharging
efficiency. You are advised to follow the suggestions set out below:
• Use AC power whenever possible, reserving battery for mobile use.
• Remove accessories that are not being used (e.g. a USB disk
drive), as they can continue to draw power.
• Store your PC in a cool, dry place. The recommended temperature
is 10° C (50° F) to 30° C (86° F). Higher temperatures cause the
battery to self-discharge faster.
• Excessive recharging decreases the battery life.
• Look after your AC adapter and battery.
Do not expose battery packs to temperatures below 0° C (32° F) or
above 45° C (113° F). Extreme temperatures may adversely affect the
battery pack.
40 — Battery pack
Checking the battery level
The power meter indicates the current battery level. Rest the cursor
over the battery/power icon on the taskbar to see the battery’s present
charge level.
Battery-low warning
When using battery power pay attention to the power meter.
When the battery-low warning appears, the recommended course of
action depends on your situation:
Connect the AC adapter as soon as possible after the battery-low
warning appears. Data may be lost if the battery is allowed to become
fully depleted and the computer shuts down.
Situation Recommended Action
The AC adapter
and a power
outlet are
available.
1. Plug the AC adapter into the computer, and
then connect to the main power supply.
2. Save all necessary files.
3. Resume work.
Turn off the computer if you want to recharge
the battery rapidly.
The AC adapter
or a power outlet
is unavailable.
1. Save all necessary files.
2. Close all applications.
3. Turn off the computer.

Traveling with your computer — 41
TRAVELING WITH YOUR COMPUTER
This section gives you tips and hints to consider when moving around
or traveling with your computer.
Disconnecting from the desktop
Follow these steps to disconnect your computer from external
accessories:
1. Save any open files.
2. Shut down the computer or put it into Sleep or Hibernate mode.
3. Close the display cover.
4. Disconnect the cord from the AC adapter.
5. Disconnect the keyboard, pointing device, printer, external monitor
and other external devices.
6. Disconnect the Kensington / Noble lock if you are using one to
secure the computer.
Moving around
When you are just moving within short distances, for example, from
your office desk to a meeting room.
Preparing the computer
Before moving the computer, close and latch the display cover to
place it in Sleep mode. You can now safely take the computer
anywhere you go within the building. To wake the computer from
Sleep mode, open the display and, if necessary, press and release
the power button.
If you are taking the computer to a client’s office or a different building,
you may choose to shut down the computer:
Press the Windows key, click Power then select Shut Down
Or:
You can put the computer in Sleep mode by pressing the Sleep
hotkey or by closing the display.
42 — Traveling with your computer
When you are ready to use the computer again, open the display and,
if necessary, press and release the power button.
What to bring to meetings
If your meeting is relatively short, you probably do not need to bring
anything with you other than your computer. If your meeting will be
longer, or if your battery is not fully charged, you may want to bring
the AC adapter with you to plug in your computer in the meeting room.
If the meeting room does not have an electrical outlet, reduce the
drain on the battery by putting the computer in Sleep mode. Press the
Sleep hotkey or close the display cover whenever you are not actively
using the computer.
Taking the computer home
When you are moving from your office to your home or vice versa.
Preparing the computer
After disconnecting the computer from your desktop, follow these
steps to prepare the computer for the trip home:
• Pack the computer in a protective case that can prevent the
computer from sliding around and cushion it if it should fall.
What to take with you
Unless you have some items at home, take the following items with
you:
• AC adapter and power cord.
• The printed Setup Guide.
The computer may enter Hibernation or Deep Sleep mode after being in
Sleep mode for a period of time.
Avoid packing items next to the top cover of the computer. Pressure
against the top cover can damage the screen.
Traveling with your computer — 43
Special considerations
Follow these guidelines to protect your computer while traveling to
and from work:
• Minimize the effects of temperature changes by keeping the
computer with you.
• If you need to stop for an extended period of time and cannot carry
the computer with you, leave the computer in the trunk of the car to
avoid exposing the computer to excessive heat.
• Changes in temperature and humidity can cause condensation.
Allow the computer to return to room temperature, and inspect the
screen for condensation before turning on the computer. If the
temperature change is greater than 10° C (18° F), allow the
computer to come to room temperature slowly. If possible, leave the
computer for 30 minutes in an environment with a temperature
between outside and room temperature.
Setting up a home office
If you frequently work on your computer at home, you may want to
purchase a second AC adapter for use at home. With a second AC
adapter, you can avoid carrying the extra weight to and from home.
If you use your computer at home for significant periods of time, you
might also want to add an external keyboard, monitor or mouse.
Traveling with the computer
When you are moving within a larger distance, for instance, from your
office building to a client’s office building or traveling locally.
Check with your airline for any special requirements for travelling with
Lithium batteries.
44 — Traveling with your computer
Preparing the computer
Prepare the computer as if you were taking it home. Make sure that
the battery in the computer is charged. Airport security may require
you to turn on your computer when carrying it into the gate area.
What to take with you
Take the following items with you:
• AC adapter
• Additional printer driver files if you plan to use another printer
Special considerations
In addition to the guidelines for taking the computer home, follow
these guidelines to protect your computer while traveling:
• Always take the computer as carry-on luggage.
• If possible, have the computer inspected by hand. Airport security X-
ray machines are safe, but do not put the computer through a metal
detector.
Traveling internationally
When you are moving from country to country.
Preparing the computer
Prepare the computer as you would normally prepare it for traveling.
What to bring with you
Bring the following items with you:
• AC adapter.
• Power cords that are appropriate for your destination(s).
Check with your airline for any special requirements for travelling with
Lithium batteries.

Traveling with your computer — 45
• Additional printer driver files if you plan to use another printer.
• Proof of purchase, in case you need to show it to customs officials.
• International Travelers Warranty passport.
Special considerations
Follow the same special considerations as when traveling with the
computer.
In addition, these tips are useful when traveling internationally:
• When traveling in another country, check that the local AC voltage
and the AC adapter power cord specifications are compatible. If not,
purchase a power cord that is compatible with the local AC voltage.
Do not use converter kits sold for appliances to power the computer.
• If you are using the modem, check if the modem and connector are
compatible with the telecommunications system of the country you
are traveling in.

In this section you will find:
• Information on the ports and connectors fitted to your computer
Ports and connectors…
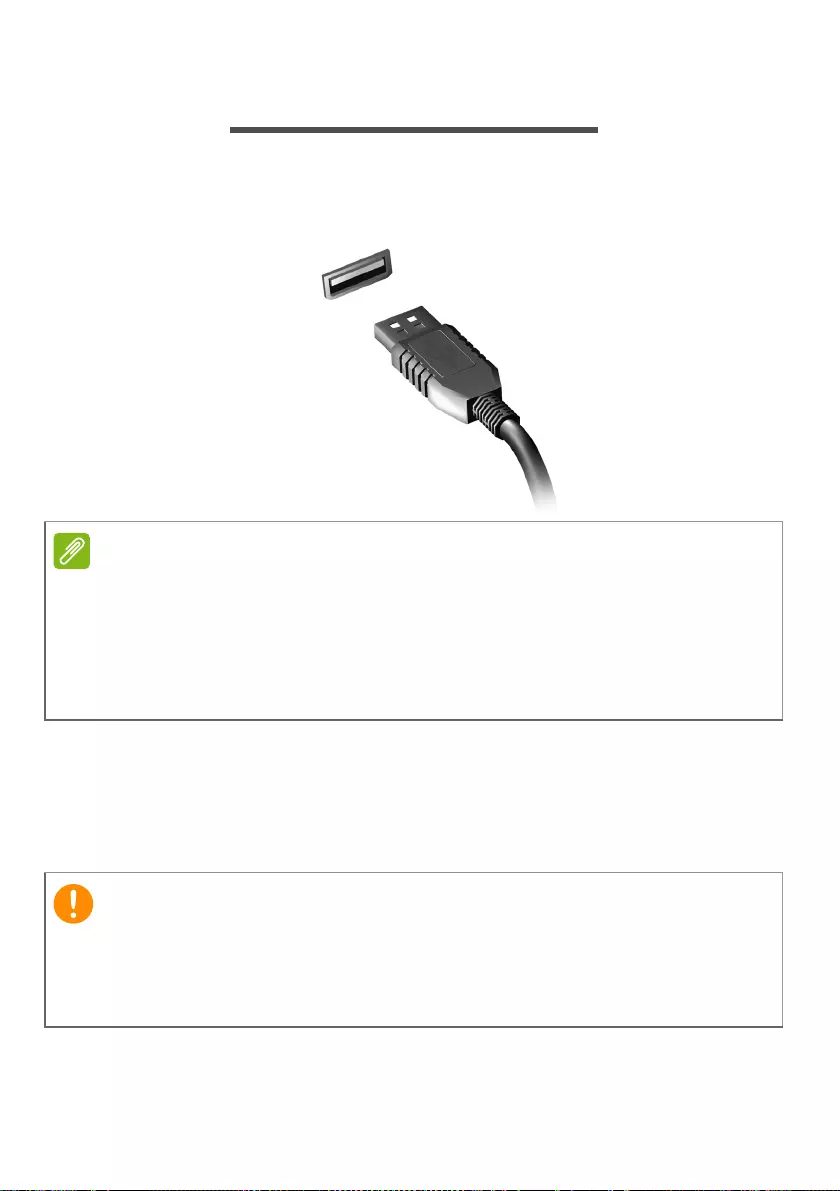
Universal Serial Bus (USB) — 47
UNIVERSAL SERIAL BUS (USB)
The USB port is a high-speed port which allows you to connect USB
peripherals, such as a mouse, an external keyboard, additional
storage (external hard disks), or any other compatible device.
You can also charge devices such as tablets, smartphones, or other
devices through a USB port. Some USB 3.1 Gen 1 ports support
charging devices when the computer is in Hibernate or turned off.
Additionally, you can use a USB hub to connect multiple devices to a
single USB port.
Two USB standards are currently available on Acer computers: USB 2.0
(High-speed USB) and USB 3.1 Gen 1 (SuperSpeed USB). USB 2.0 ports on
Acer computers have a black tongue in the port, while USB 3.1 Gen 1 ports
have a blue tongue. For best performance, USB 3.1 Gen 1 devices should
always be plugged into USB 3.1 Gen 1 ports. Consult your device’s
documentation to see which standard it supports.
When removing a USB storage device, you should right-click on the
USB icon in the Windows task bar and select «Eject <device>» to tell the
operating system to stop using the device before removing it. Failure to
do this may result in data loss or damage to your peripheral.
48 — Video and audio connectors
VIDEO AND AUDIO CONNECTORS
Add an external monitor to your computer via a video port. The type of
port available depends on your computer’s configuration.
Connecting a monitor
1. Check that the computer is powered off and the monitor power
switch is turned off.
2. Attach the video cable to the monitor port on the computer.
3. Connect the monitor power cable and plug it into a properly
grounded wall outlet.
4. Follow any setup instructions in the monitor’s user’s guide.
5. Turn on power to the monitor, then the computer.
6. The correct resolution and refresh rate should be detected
automatically. If necessary, change the display settings used by the
computer.
Headphones and microphone
One or more 3.5 mm jacks on your computer allow you to connect
audio devices.
Use the headphone port to plug in stereo headphones or powered
speakers; connecting an audio device to the headphone port disables
the built-in speakers.
Use the microphone port to connect an external microphone;
connecting a microphone disables the built-in microphone.
To access the display controls, right-click anywhere on the desktop and
select Display settings.
Some computers have a single «combo» port that allows you to use single-pin
headsets with a built-in microphone. These headsets are most commonly
used with smartphones.
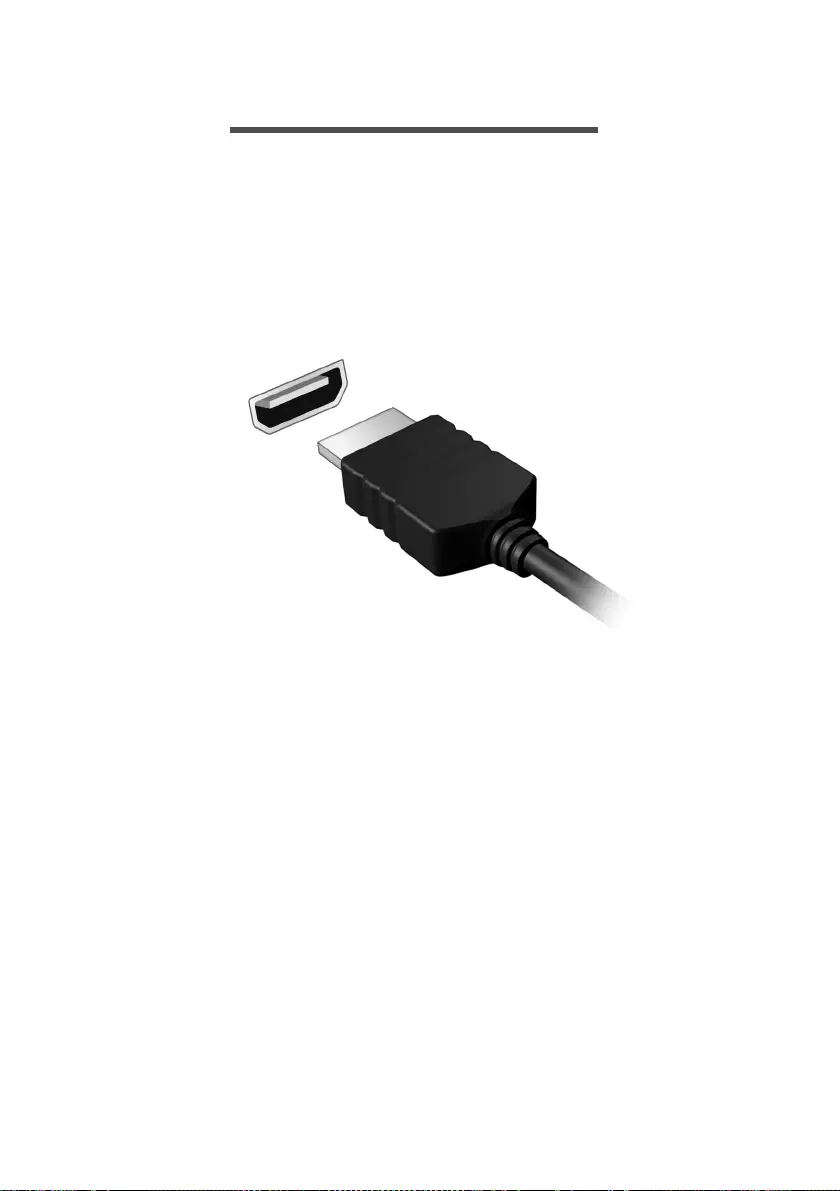
HDMI — 49
HDMI
HDMI (High-Definition Multimedia Interface) is a high-quality, digital
audio/video interface. HDMI allows you to connect any compatible
digital audio/video source, such as your computer, a set-top box, DVD
player, and audio/video receiver to any compatible digital audio and/or
video monitor, such as a digital television (DTV) with a single cable.
The single cable keeps everything neat and tidy while ensuring easy
connection and the best audio and visual quality.

Got a question?
In this section you will find:
• Frequently asked questions
• Tips for using Windows 10
• Troubleshooting information
• How to protect yourself while online
• Where to find Acer service center contact information

Frequently asked questions — 51
FREQUENTLY ASKED QUESTIONS
The following is a list of possible situations that may arise during the
use of your computer. Easy solutions are provided for each one.
I turned on the power, but the computer does not start or boot up.
Check if power is being supplied to the computer (if your computer
has a power indicator, it will be off); if there is no power, check the
following:
• If you are using on the battery, it may be low and unable to power
the computer. Connect the AC adapter to recharge the battery pack.
You may need to wait a few minutes before trying to turn your
computer on again.
• Make sure that the AC adapter is properly plugged into the
computer and to the power outlet.
If power is being supplied to the computer, check the following:
• Do you have a USB storage device (USB drive, CD drive or
smartphone) plugged into your computer? Unplug it and press Ctrl
+ Alt + Del to restart the system.
Nothing appears on the screen.
The computer’s power management system automatically blanks the
screen to save power. Press any key to turn the display back on.
If pressing a key does not turn the display back on, three things might
be the cause:
• The brightness level might be too low. Use the Brightness up hotkey
to adjust the brightness level.
• The display device might be set to an external monitor. Press the
display toggle hotkey to toggle the display back to the computer.
• The computer may be in Sleep or Hibernate mode (if there is a
power LED, it will flash). Press and release the power button to
resume.
No audio is heard from the computer.
Check the following:
• The volume may be muted. Look at the volume control (speaker)
52 — Frequently asked questions
icon in the taskbar. If it is crossed-out, click the icon and drag the
slider to the right to increase the volume.
• The volume level may be too low. Check the volume from the
volume control (speaker) icon in the taskbar. You can also use the
volume control hotkeys to adjust the volume.
• If headphones, earphones or external speakers are connected to
the headphone jack on the computer, the internal speakers
automatically turn off.
The keyboard does not respond.
Try attaching an external keyboard to a USB port on the computer. If it
works, contact your dealer or an authorized service center as the
internal keyboard cable may be loose.
The printer does not work.
• Make sure that the printer is connected to a power outlet and that it
is turned on.
• Make sure that the printer cable is connected securely to a USB port
and the corresponding port on the printer.
I want to restore my computer to its original settings.
This recovery process helps you restore the C: drive with the original
software content that is installed when you purchased your computer.
Before performing a restore operation, please check the BIOS settings.
1. If there is a D2D Recovery setting in Main, make sure it is Enabled.
2. Exit the BIOS utility and save changes. The system will reboot.
If your system is the multilingual version, the operating system and language
you choose when you first turn on the system will be the only option for future
recovery operations.
Your C: drive will be reformatted and all data will be erased. It is
important to back up all data files before using this option.

Frequently asked questions — 53
For more information, see Restoring your computer on page 20.
Requesting service
International Travelers Warranty (ITW)
Your computer is backed by an International Travelers Warranty
(ITW) that gives you security and peace of mind when traveling. An
ITW passport came with your computer and contains all you need to
know about the ITW program. A list of available, authorized service
centers is in this handy booklet. Read this passport thoroughly.
Always have your ITW passport on hand, especially when you travel,
to receive the benefits from our support centers. Attach your proof-of-
purchase to the ITW passport.
If the country you are traveling in does not have an Acer-authorized
ITW service site, you can still get in contact with our offices worldwide.
Please visit www.acer.com.
Before you call
Please have the following information available when you call Acer for
online service, and please be at your computer when you call. With
your support, we can reduce the amount of time a call takes and help
solve your problems efficiently. If there are error messages or beeps
reported by your computer, write them down as they appear on the
screen (or the number and sequence in the case of beeps).
You are required to provide the following information:
Name:
Address:
Telephone number:
Machine and model type:
Serial number:
Date of purchase:
To access the BIOS utility, press F2 when you see the Acer logo during boot
up.

54 — Frequently asked questions
Tips and hints for using Windows 10
We know this is a new operating system that will take some getting
used to, so we’ve created a few pointers to help you get started.
How do I get to Start?
Press the Windows key or select the Windows Start button on the
lower left-hand corner of the screen. Selecting it will open Start where
you can launch apps.
How do I see all of my apps?
Press the Windows key or select the Windows Start button to show a
list of installed apps on the computer.
How do I turn off my computer?
Press the Windows key or select the Windows Start button and select
the power icon > Shut down. You can also turn off the computer by
right-clicking the Windows Start button > Shut down or sign out >
Shut down.
Can I turn off notifications?
You can turn off notifications so that you can leave your computer
running, but not be disturbed by notifications.
Press the Windows key or select the Windows Start button and select
Settings > System > Notifications & actions. From here you can
enable/disable notifications for all of your apps or choose which apps
to enable/disable.
How do I unlock my computer?
Press the space bar and select a user account icon to unlock the
computer. If your account has a password set, you will need to enter
the password to continue.
Frequently as

Frequently asked questions — 55
Can I personalize the Lock screen?
You can personalize the lock screen with a different image, to run a
slideshow of images, or to show you quick status and notifications to
suit your personal needs.
To change the background, press the Windows key or select the
Windows Start button and select Settings > Personalization > Lock
screen. From here you can:
• Select a background image for the lock screen
• Turn the Slideshow on or off
• Select lock screen apps.
How do I set up the lock screen slideshow?
1. Press the Windows key or select the Windows Start button and
select Settings > Personalization.
2. Under Lock screen, select Slideshow.
3. Select Add a folder and open the folder you wish to use (your
Pictures folder will open by default). Select Choose this folder to
add the folder to the lock screen slideshow.
4. Select a folder and select Remove to remove the folder from the
lock screen slideshow.
5. Change the other settings to suit your needs.
How do I move tiles?
Select a tile and drag it to the place on Start that you want it to
appear. Other tiles will be moved to accommodate the tile in its new
location.
Can I arrange tiles in groups?
Yes, you can. Select an existing tile and drag the tile to arrange Start
to your liking. Right-click on an app and select Pin to Start to create a
new group on Start. From here, you can drag the tile to an existing
group on Start. You can give the group(s) a name and arrange the
tiles within the groups to suit your needs.
Can I make tiles bigger or smaller?
Yes, you can. Right-click on a tile and select Resize. Select a size
from the menu that appears.
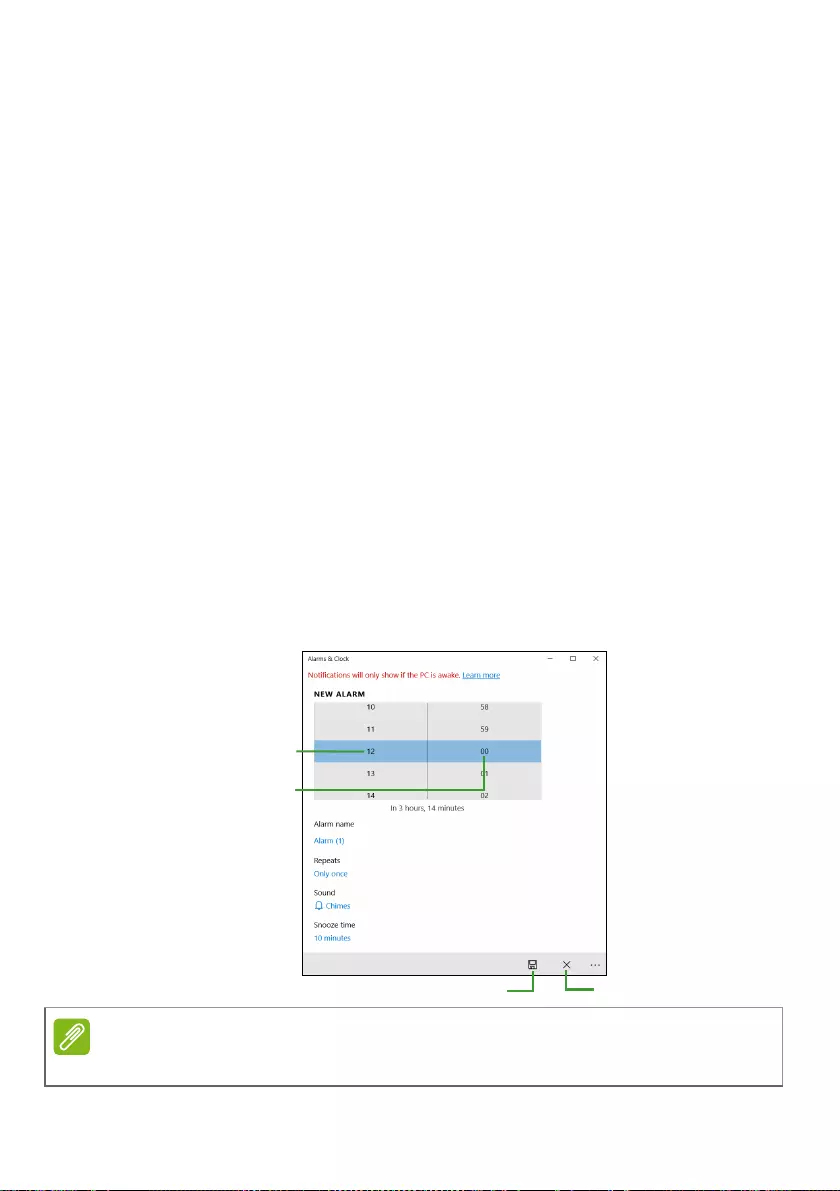
56 — Frequently asked questions
Can I change the screen resolution?
Yes, you can. Move your cursor to the lower left-hand corner of the
screen and type ‘
Resolution
‘ in the text box to display the results; select
Change the resolution of the display
. Alternatively, you can also
right-click anywhere on the desktop and select
Display settings >
Display
.
How do I set the alarm?
Your computer can act as an alarm clock. Type ’Alarms’ to search for
the Alarms & Clock app.
1. Select an alarm from the list, or select the + in the lower-right corner
to create a new alarm.
2. Enter the Alarm name.
3. Set the time by choosing the hour and minute.
4. Choose which days the alarm should go off.
5. Select the sound notification.
6. Select the snooze time.
7. Select the Save icon in the bottom right-hand corner to save the alarm.
8. Select On or Off to activate or deactivate the alarm.
The alarm will only sound if your computer is awake at the set time.

Frequently asked questions — 57
Where are my apps?
Move your cursor to the lower left-hand corner of the screen and click
search box, start typing the name of the app you would like to open.
How do I make an app appear on Start?
If you’re in all apps list and you want to make an app appear on Start,
right-click an app and select Pin to Start.
How do I remove a tile from Start?
Right-click a tile to select it and select Unpin from Start to remove
the tile from Start.
How do I make an app appear on my taskbar?
If you’re in all apps list and you want to make an app appear on the
taskbar, right-click an app or tile and select More > Pin to taskbar.
How do I install apps?
You will need to have a Microsoft ID to purchase and download apps
from Microsoft Store.
I can’t find apps like Notepad and Paint! Where are they?
Move your cursor to the lower left-hand corner of the screen and click
search box. Type the name of the app you would like to open.
Alternatively, open all apps list and scroll to ’Windows Accessories’ to
see the list of legacy programs.
What is a Microsoft ID (account)?
A Microsoft account is an email address and password that you use to
sign in to Windows. You can use any email address, but it is best if
you choose the one you already use to communicate with friends and
sign in to your favorite websites. When you sign in to your PC with a
Microsoft account, you’ll connect your PC to the people, files, and
devices you care about.

58 — Frequently asked questions
Do I need one?
You do not need a Microsoft ID to use Windows 10, but it makes life
easier because you can sync data across different machines you sign
in to using a Microsoft ID.
How do I get one?
If you’ve already installed Windows 10 and didn’t sign in with a
Microsoft account or you don’t have a Microsoft account and want to
get one, press the Windows key or select the Windows Start button >
Settings > Accounts > Sign in with a Microsoft account instead,
and follow the onscreen instructions.
How do I check for Windows updates?
Press the Windows key or select the Windows Start button > Settings
> Update & Security > Windows Update. Select Advanced options
to configure the settings.
Where can I get more information?
For more information please visit the following pages:
• Windows 10 information: www.microsoft.com
• Support FAQs: support.acer.com

Frequently asked questions — 59
Troubleshooting
This chapter shows you how to deal with common system problems.
Read it before calling a technician if a problem occurs. Solutions to
more serious problems require opening up the computer. Do not
attempt to open the computer yourself; contact your dealer or
authorized service center for assistance.
Troubleshooting tips
This computer incorporates an advanced design that delivers
onscreen error message reports to help you solve problems.
If the system reports an error message or an error symptom occurs,
see «Error messages» below. If the problem cannot be resolved,
contact your dealer.
Error messages
If you receive an error message, note the message and take the
corrective action. The following table lists the error messages in
alphabetical order together with the recommended course of action.
Error messages Corrective action
CMOS battery bad Contact your dealer or an authorized service
center.
CMOS checksum
error
Contact your dealer or an authorized service
center.
Disk boot failure Insert a system (bootable) disk, then press
Enter to reboot.
Equipment
configuration error
Press Fn + F2 (during POST) to enter the BIOS
utility, then press Exit in the BIOS utility to
reboot.
Hard disk 0 error Contact your dealer or an authorized service
center.
Hard disk 0
extended type error
Contact your dealer or an authorized service
center.
requen
y as
e
ques
ons

60 — Frequently asked questions
If you still encounter problems after going through the corrective
measures, please contact your dealer or an authorized service center
for assistance.
I/O parity error Contact your dealer or an authorized service
center.
Keyboard error or no
keyboard connected
Contact your dealer or an authorized service
center.
Keyboard interface
error
Contact your dealer or an authorized service
center.
Memory size
mismatch
Press Fn + F2 (during POST) to enter the BIOS
utility, then press Exit in the BIOS utility to
reboot.
Error messages Corrective action
Internet and online security — 61
INTERNET AND ONLINE SECURITY
First steps on the net
Protecting your computer
It is vital to protect your computer from viruses and attacks over the
internet (see Internet security software on page 64).
A comprehensive internet security program is offered when you first
start your computer. You should activate this protection as soon as
possible, certainly before you connect to the internet.
Choose an Internet Service Provider
Using the internet has become a natural part of daily
computing. Just a few simple steps can connect you to
a vast collection of knowledge and communication
tools. To accomplish these steps you should first
select an Internet Service Provider (ISP), which
supplies the connection between your computer and
the internet. You should research the ISPs available in
your region, not forgetting to talk to friends and family about their
experiences or to check reviews and consumer reports. The ISP you
select will provide instructions on how to connect to the internet (you
may need additional software or a special ‘box’ that connects to your
phone line).
Connection types
Depending on your computer model, your location and your
communication needs, you have several ways to connect to the
internet.
Dial-up
Some computers include a telephone dial-up (‘modem’) connector.
This allows you to connect to the internet using your telephone line.
With a dial-up connection, you cannot use the modem and the
telephone simultaneously on a single phone line. This type of
connection is recommended only if you have limited use of the
62 — Internet and online security
internet as the connection speed is low and connection time is
typically charged per hour.
DSL (e.g. ADSL)
DSL (Digital Subscriber Line) is an ‘always-on’ connection that runs
over the phone line. As DSL and phone do not use the same
frequencies, you can use your telephone at the same time you are
connected to the internet (this requires a ‘micro-filter’ on each
telephone socket to avoid interference). To be eligible for DSL, you
must be located near an DSL-equipped phone exchange (service is
sometimes unavailable in rural areas). Connection speeds vary
depending on your location, but DSL generally provides very fast and
reliable internet connection. As the connection is always-on, it is
generally charged at fixed monthly rates.
Cable
A cable connection provides fast and always-on internet service via a
cable television line. This service is generally available in large cities.
You can use your telephone and watch cable TV at the same time you
are connected to the internet.
Cellular
A cellular connection allows you to use cellular networks (such as
those used by a mobile phone) to connect to the internet while away
from home. The socket for a SIM card may be built in to your
computer, or may require an external device, such as a USB modem
or even an appropriately equipped mobile phone.
A DSL connection requires an appropriate modem. A modem is usually
provided by the ISP when you register. Many of these modems include an
‘router’ that provides network and Wi-Fi access.
If your computer includes a SIM card slot, you require a compatible SIM card
and a contract with a cellular provider.
Before using the cellular features, check with your service provider to see if
any additional charges will be incurred, especially roaming charges.

Internet and online security — 63
Network connections
A LAN (Local Area Network) is a group of computers (for example,
within an office building or home) that share a common
communications line and resources. When you set up a network, you
can share files, peripheral devices (such as a printer) and an internet
connection. You can set up a LAN using wired technologies (such as
Ethernet) or wireless technologies (such as Wi-Fi or Bluetooth).
Wireless networks
A wireless LAN or WLAN is a wireless local area network, which may
link two or more computers without using wires. Setting up a wireless
network is easy and allows you to share files, peripheral devices and
an internet connection.
What are benefits of a wireless network?
Mobility
Wireless LAN systems allow you and other users of your home
network to share access to files and devices connected to the
network, for example a printer or scanner.
Also you can share an internet connection with other computers in
your home.
Installation speed and simplicity
Installing a wireless LAN system can be fast and easy and eliminates
the need to pull cables through walls and ceilings.
Components of a wireless LAN
To set up your Wireless network at home you need to have the
following:
Access point (router)
Access points (routers) are two-way transceivers that broadcast data
into the surrounding environment. Access points act as a mediator
between wired and wireless network. Most routers have a built-in DSL
modem that will allow you access to a high speed DSL internet
connection. The ISP (Internet Service Provider) you have chosen
normally supplies a modem/router with the subscription to their
64 — Internet and online security
services. Read carefully the documentation supplied with your Access
point/router for detailed setup instructions.
Wireless adapter
Most computers feature a wireless module and Wi-Fi button that turns
the network connection on or off. You may also turn your wireless
network on or off, or control what is shared over the network with the
network management options.
Surf the Net!
To surf the internet, you need a program called an
internet browser. Microsoft Edge provides an easy and
secure web browsing experience. As soon as you have
your internet access installed and you are connected,
from the Start Menu, click the Microsoft Edge tile or the
icon located in the taskbar and take your internet
experience to a new level!
Acer website
To get you started why not visit our website, www.acer.com.
Acer is dedicated to provide you with on-going personalized support.
Check out our Support section to get help tailored to your needs.
www.acer.com is your portal to a world of online activities and
services: visit us regularly for the latest information and downloads!
Internet security software
To help you stay ahead of cybercriminals, Acer has partnered with
Norton to offer you security for all your devices.
Using wireless devices while flying in aircraft may be prohibited. Switch
off all devices before boarding an aircraft; they may be dangerous to
the operation of the aircraft, disrupt communications, and even be
illegal. After take off, ask the cabin crew if you may enable Wi-Fi.

Internet and online security — 65
Select Acer computers include protection by Norton Security
Norton Security is pre-installed on select Acer computers, protecting
your identity and financial data from viruses, spyware, malware and
other online threats. Learn more about how to stay safe online and
how to stay protected after your introductory subscription ends.
Staying ahead of cybercriminals
Stay ahead of hackers and cybercriminals by understanding the
tactics they use to access your private data.
Ensure your software is up to date
Cybercriminals rely heavily upon software or platform vulnerabilities,
as they are the easiest way to sneak malware into a user’s device
unnoticed, sometimes with little action on the user’s part. Immediately
after a software manufacturer announces an update, hackers are
ready with malware that can breach holes in the software that would
have been patched if the update was installed.
How to stay safe: Perform any and all software updates as soon as
they are available.
Keep a lookout for fake or phishing emails
Beware of emails that appear to be from a friend or business
colleague that you know but seem a little odd. Maybe they didn’t
capitalize your name or there are misspellings. The email might be
from cybercriminals who are trying to fool you into sending them your
credit card number, social security number, or logging into a fake
bank website that looks like yours but really isn‘t.
How to stay safe: Use a strong antispam filter. If an email looks
strange, don’t click on anything and delete it immediately. Instead
manually launch a browser and type in your bank’s website address
and log-in yourself.
Don’t be fooled if someone calls your phone
A tech support scam is a form of online fraud where people call you
on the phone saying they’re Technical Support from a trusted
Specifications vary depending on model or Operating System.

66 — Internet and online security
company like Norton or Microsoft and that you have a virus. The main
motive behind these scams is to extort money from the victim.
Cybercriminals can also install malware such as keylogging software
or backdoor Trojans in order to gain access to personal information.
How to stay safe: Don’t fall for phone calls that tell you your software
or computer isn’t working. Never give your personal information like
social security or credit card numbers to someone that you don’t know
over the phone.
Common threats cybercriminals use
Now you know a few very common ways cybercriminals try to sneak
onto your device or trick you into providing private information to them
directly. Here are a few of the types of malware they like to deploy
once they’ve got into a device and what to do if you’re ever infected.
Ransomware
A form of malware that will encrypt personal data files on your
computer and attached devices. Encryption converts files into another
format, that can only be opened with a specific decryption key. Once
the ransomware installs itself, it will display a warning message that
the computer is now locked. The user is given a specific amount of
money to pay as a «fine» and a timeframe in which to pay. Even if
paid, the criminal might choose to not unencrypt the files anyway!
What to do if you’re infected: Avoid getting infected in the first place
by staying protected with internet security software like Norton
Security. Also, perform regular backups of all your data either online
or to a separate external hard drive that is only attached to your
computer while performing the backup. Ransomware has been known
to lock access to external hard drives attached to the computer.
If you are infected with ransomware, think twice before you pay the
ransom. There is no guarantee the cybercriminal will unlock your files
and you’ll be funding them to prey upon another innocent victim.
Botnets
A botnet is a string of infected, connected computers coordinated
together to perform a task. Botnets gain access to your machine
through some piece of malicious coding. Once the software is
downloaded, the botnet will now contact its master computer and let it
know that everything is ready to go. Now your computer, phone,

Internet and online security — 67
tablet, or IoT device is entirely under the control of the person who
created the botnet. Most people who are infected with botnets aren’t
even aware that their computer’s security has become compromised!
What to do if you’re infected: If you’re infected you probably don’t
realize it as bots are notoriously quiet. Your Internet Service Provider
might send you a notification alerting you that they found a threat on
your network and that you need to remove the bot. If you have a bot,
use internet security software like Norton Security to scan all of your
devices.
Viruses/Malware
«Virus» is the commonplace word for all malicious software programs
for years now; however, a virus is just one type of malicious threat. A
virus is classified as a self-replicating piece of malicious code that
travels by inserting itself into files or programs.
What to do if you’re infected: Take steps to avoid infection by
staying protected with internet security software like Norton Security.
If you subscribed to Norton Security and think you may have a virus,
contact Norton’s on-call technicians to help eliminate the virus.
Take special precautions when using public Wi-Fi
Public Wi-Fi is available just about everywhere, from the local coffee
shop to the hotels and airports you visit while traveling. While public
Wi-Fi has made our lives a little easier, it also poses security risks to
the personal information available on our laptops and smartphones. A
virtual private network (VPN) gives you online privacy and anonymity
by creating a private network from a public internet connection. VPNs
mask your internet protocol (IP) address so your online actions are
virtually untraceable as well as secure. One of the biggest security
risks on public Wi-Fi are man-in-the-middle attacks (MITM). These
attacks are akin to eavesdropping. Data is sent from point A
(computer) to point B (server/website), and an attacker can get in—
between these transmissions. They then set up tools programmed to
«listen in» on transmissions, intercept data that is specifically targeted
as valuable, and capture the data, such as your login credentials and
passwords.
Use a virtual private network (VPN) to ensure your privacy and
anonymity are protected when you use public Wi-Fi. VPN services

68 — Internet and online security
can encrypt all the data that you send and receive while using a public
Wi-Fi hotspot, securing your information from hackers and other users
of the same connection.
For more tips on how to stay safe
Good security habits can reduce your exposure to online crime. By
adopting a few basic behaviors, you can make big strides in reducing
cybercrime risk:
• Protect your accounts with strong, unique passwords that use a
combination of at least 10 uppercase and lowercase letters,
symbols and numbers.
• Don’t click on random links or open unsolicited messages and
attachments-particularly from people you don’t know.
• Don’t access any personal information or social media accounts
over unprotected Wi-Fi networks.
• Use security software on your devices to help protect yourself from
the latest threats.
Protect your computer with Windows security tools
Windows provides a variety of protection applications.
Windows Updates
If you have an active internet connection, Windows can check for
important updates for your computer and install them automatically.
These updates include security patches and program updates that
can improve your computing experience and help protect your
computer against new viruses and attacks.
How do I know when my computer is at risk?
If the Action Center reports an alert, or if your computer behaves
erratically, crashes unexpectedly or if some of your programs do not
work correctly, your computer may be infected by malicious software.
However, do not blame every computer problem on a virus! If you
suspect your computer is infected, the first thing to do is update, if you
have not already done so, and run your antivirus and anti-spyware
software.
Главная » Acer » Руководство пользователя ноутбука Aspire 3
View Fullscreen
Руководство пользователя ноутбука Aspire 3 — Оптимизированный PDF
Руководство пользователя ноутбука Aspire 3 — Исходный PDF
Похожие сообщения
-

Руководство пользователя ноутбука Acer Aspire 5
Руководство пользователя ноутбука Acer Aspire 5 — Оптимизированный PDF-файл Руководство пользователя ноутбука Acer Aspire 5 — Исходный PDF-файл
-
Руководство пользователя ноутбука Acer NITRO 5
Руководство пользователя ноутбука Acer NITRO 5 — Оптимизированный PDF-файл Руководство пользователя ноутбука Acer NITRO 5 — Исходный PDF-файл
-
Руководство пользователя ноутбука Acer NITRO 5
Руководство пользователя ноутбука Acer NITRO 5 — Оптимизированный PDF-файл Руководство пользователя ноутбука Acer NITRO 5 — Исходный PDF-файл
-
Ноутбук Acer TravelMate P4 Руководство пользователя
Руководство пользователя ноутбука Acer TravelMate P4 — Оптимизированный PDF-файл Руководство пользователя ноутбука Acer TravelMate P4 — Исходный PDF-файл


Присоединяйтесь к обсуждению

1 комментарий
-
Руководство Preciso do Note ACERA315-56-3090I3 8gb256ssdgraywin10
Руководство Preciso do Note ACERA315-56-3090I3 8gb256ssdgraywin10Ответить
Оставить комментарий
Ваш электронный адрес не будет опубликован. Обязательные поля помечены * *
КОММЕНТАРИЙ *
Имя и фамилия
Эл. адрес
Cайт
Сохраните мое имя, адрес электронной почты и веб-сайт в этом браузере для следующего комментария.
Требуется руководство для вашей Acer Aspire 3 A315-33 Ноутбук? Ниже вы можете просмотреть и загрузить бесплатно руководство в формате PDF. Кроме того, приведены часто задаваемые вопросы, рейтинг изделия и отзывы пользователей, что позволит оптимально использовать ваше изделие. Если это не то руководство, которое вы искали, – свяжитесь с нами.
Ваше устройство неисправно, и в руководстве отсутствует решение? Перейдите в Repair Café для получения бесплатных ремонтных услуг.
Руководство

Рейтинг
Сообщите нам, что вы думаете о Acer Aspire 3 A315-33 Ноутбук, оставив оценку продукта. Хотите поделиться вашими впечатлениями от данного изделия или задать вопрос? Вы можете оставить комментарий в нижней части страницы.
Довольны ли вы данным изделием Acer?
Да Нет
2 голоса
Часто задаваемые вопросы
Наша служба поддержки выполняет поиск полезной информации по изделиям и отвечает на часто задаваемые вопросы. Если вы заметили неточность в наших часто задаваемых вопросах, сообщите нам об этом с помощью нашей контактной формы.
Нужно ли полностью разряжать литий-ионный аккумулятор перед зарядкой? Проверенный
Нет, не нужно. Это необходимо было делать с аккумуляторами старого образца. Литий-ионные аккумуляторы можно заряжать после использования и останавливать процесс зарядки в любой момент.
Это было полезно (119)
Я пролил жидкость на трекпад ноутбука, что мне делать? Проверенный
В любом случае сразу выключите ноутбук! Только в случае небольшого количества воды возможно, что трекпад после высыхания будет работать без изменений.
Это было полезно (103)
Могу ли я очистить вытяжную вентиляцию ноутбука пылесосом? Проверенный
Нет, обычный пылесос слишком мощный. Используйте влажную ткань, чтобы очистить выхлоп, или отсосите пыль с помощью ручного пылесоса.
Это было полезно (73)
Что означает HDMI? Проверенный
HDMI означает мультимедийный интерфейс высокой четкости. HDMI — это соединение для передачи высококачественного видео и звука с одного устройства на другое.
Это было полезно (47)
Как лучше всего очистить мою клавиатуру Проверенный
Никогда не вставляйте предметы между краями клавиш, так как это в основном приведет к попаданию грязи и повреждению клавиатуры. Лучше всего очищать клавиатуру сжатым воздухом, держа ее вверх ногами. Верхнюю часть клавиш можно протирать слегка влажной тканью.
Это было полезно (47)
Что лучше всего использовать для очистки экрана мобильного устройства? Проверенный
Лучше всего использовать салфетку из микрофибры, возможно, со специальным моющим средством. Никогда не используйте кухонные полотенца или другие бумажные салфетки, они оставят царапины!
Это было полезно (35)
В каких условиях лучше всего длительно хранить литий-ионный аккумулятор? Проверенный
Рекомендуется хранить литий-ионный аккумулятор при температуре от 5 до 45 °C. Прежде чем отправить аккумулятор на хранение, следует также убедиться в том, что он заряжен примерно на 67%.
Это было полезно (35)
Сколько килобайт, мегабайт, гигабайт и терабайт? Проверенный
Один килобайт состоит из 1000 байтов. 1 мегабайт = 1000 килобайт. 1 гигабайт = 1000 мегабайт. 1 терабайт = 1000 гигабайт.
Это было полезно (35)
В каких условиях литий-ионный аккумулятор функционирует оптимально? Проверенный
Литий-ионный аккумулятор работает оптимально при температуре от 5 до 45 °C. В очень холодную и очень теплую погоду вы можете заметить, что аккумулятор быстрее разряжается. Не рекомендуется заряжать аккумулятор при температурах ниже 5 °C и выше 45 °C.
Это было полезно (35)
Работает ли bluetooth через стены и потолок? Проверенный
Сигнал Bluetooth будет проходить через стены и потолок, если они не сделаны из металла. В зависимости от толщины и материала стены сигнал может терять силу.
Это было полезно (34)
Требуется руководство для вашей Acer Aspire 3 A315-33 Ноутбук? Ниже вы можете просмотреть и загрузить бесплатно руководство в формате PDF. Кроме того, приведены часто задаваемые вопросы, рейтинг изделия и отзывы пользователей, что позволит оптимально использовать ваше изделие. Если это не то руководство, которое вы искали, – свяжитесь с нами.
Ваше устройство неисправно, и в руководстве отсутствует решение? Перейдите в Repair Café для получения бесплатных ремонтных услуг.
Руководство
Рейтинг
Сообщите нам, что вы думаете о Acer Aspire 3 A315-33 Ноутбук, оставив оценку продукта. Хотите поделиться вашими впечатлениями от данного изделия или задать вопрос? Вы можете оставить комментарий в нижней части страницы.
Довольны ли вы данным изделием Acer?
Да Нет
2 голоса
Часто задаваемые вопросы
Наша служба поддержки выполняет поиск полезной информации по изделиям и отвечает на часто задаваемые вопросы. Если вы заметили неточность в наших часто задаваемых вопросах, сообщите нам об этом с помощью нашей контактной формы.
Нужно ли полностью разряжать литий-ионный аккумулятор перед зарядкой? Проверенный
Нет, не нужно. Это необходимо было делать с аккумуляторами старого образца. Литий-ионные аккумуляторы можно заряжать после использования и останавливать процесс зарядки в любой момент.
Это было полезно (108)
Я пролил жидкость на трекпад ноутбука, что мне делать? Проверенный
В любом случае сразу выключите ноутбук! Только в случае небольшого количества воды возможно, что трекпад после высыхания будет работать без изменений.
Это было полезно (100)
Могу ли я очистить вытяжную вентиляцию ноутбука пылесосом? Проверенный
Нет, обычный пылесос слишком мощный. Используйте влажную ткань, чтобы очистить выхлоп, или отсосите пыль с помощью ручного пылесоса.
Это было полезно (68)
Что означает HDMI? Проверенный
HDMI означает мультимедийный интерфейс высокой четкости. HDMI — это соединение для передачи высококачественного видео и звука с одного устройства на другое.
Это было полезно (42)
Как лучше всего очистить мою клавиатуру Проверенный
Никогда не вставляйте предметы между краями клавиш, так как это в основном приведет к попаданию грязи и повреждению клавиатуры. Лучше всего очищать клавиатуру сжатым воздухом, держа ее вверх ногами. Верхнюю часть клавиш можно протирать слегка влажной тканью.
Это было полезно (41)
В каких условиях лучше всего длительно хранить литий-ионный аккумулятор? Проверенный
Рекомендуется хранить литий-ионный аккумулятор при температуре от 5 до 45 °C. Прежде чем отправить аккумулятор на хранение, следует также убедиться в том, что он заряжен примерно на 67%.
Это было полезно (34)
Что лучше всего использовать для очистки экрана мобильного устройства? Проверенный
Лучше всего использовать салфетку из микрофибры, возможно, со специальным моющим средством. Никогда не используйте кухонные полотенца или другие бумажные салфетки, они оставят царапины!
Это было полезно (33)
Сколько килобайт, мегабайт, гигабайт и терабайт? Проверенный
Один килобайт состоит из 1000 байтов. 1 мегабайт = 1000 килобайт. 1 гигабайт = 1000 мегабайт. 1 терабайт = 1000 гигабайт.
Это было полезно (33)
Работает ли bluetooth через стены и потолок? Проверенный
Сигнал Bluetooth будет проходить через стены и потолок, если они не сделаны из металла. В зависимости от толщины и материала стены сигнал может терять силу.
Это было полезно (33)
В каких условиях литий-ионный аккумулятор функционирует оптимально? Проверенный
Литий-ионный аккумулятор работает оптимально при температуре от 5 до 45 °C. В очень холодную и очень теплую погоду вы можете заметить, что аккумулятор быстрее разряжается. Не рекомендуется заряжать аккумулятор при температурах ниже 5 °C и выше 45 °C.
Это было полезно (32)
-
Драйверы
25
-
Инструкции по эксплуатации
15
Языки:

Acer Aspire A315-58 инструкция по эксплуатации
(1 страница)
- Языки:Русский
- Тип:
PDF - Размер:
59.33 KB
Просмотр

Acer Aspire A315-58 инструкция по эксплуатации
(96 страниц)
- Языки:Русский
- Тип:
PDF - Размер:
5.14 MB

Acer Aspire A315-58 инструкция по эксплуатации
(82 страницы)
- Языки:Русский
- Тип:
PDF - Размер:
3.51 MB
Просмотр

Acer Aspire A315-58 инструкция по эксплуатации
(90 страниц)
- Языки:Португальский
- Тип:
PDF - Размер:
4.77 MB
Просмотр

Acer Aspire A315-58 инструкция по эксплуатации
(94 страницы)
- Языки:Немецкий
- Тип:
PDF - Размер:
4.77 MB
Просмотр

Acer Aspire A315-58 инструкция по эксплуатации
(276 страниц)
- Языки:Французский
- Тип:
PDF - Размер:
68.36 MB
Просмотр

Acer Aspire A315-58 инструкция по эксплуатации
(91 страница)
- Языки:Французский
- Тип:
PDF - Размер:
4.94 MB
Просмотр

Acer Aspire A315-58 инструкция по эксплуатации
(91 страница)
- Языки:Французский
- Тип:
PDF - Размер:
4.94 MB
Просмотр

Acer Aspire A315-58 инструкция по эксплуатации
(1 страница)
- Языки:Немецкий
- Тип:
PDF - Размер:
56.98 KB

Acer Aspire A315-58 инструкция по эксплуатации
(1 страница)
- Языки:Французский
- Тип:
PDF - Размер:
58.21 KB
Просмотр

Acer Aspire A315-58 инструкция по эксплуатации
(76 страниц)
- Языки:Португальский
- Тип:
PDF - Размер:
3.42 MB
Просмотр

Acer Aspire A315-58 инструкция по эксплуатации
(77 страниц)
- Языки:Португальский
- Тип:
PDF - Размер:
3.41 MB
Просмотр

Acer Aspire A315-58 инструкция по эксплуатации
(78 страниц)
- Языки:Французский
- Тип:
PDF - Размер:
3.35 MB
Просмотр

Acer Aspire A315-58 инструкция по эксплуатации
(79 страниц)
- Языки:Немецкий
- Тип:
PDF - Размер:
3.36 MB
Просмотр

Acer Aspire A315-58 инструкция по эксплуатации
(78 страниц)
- Языки:Французский
- Тип:
PDF - Размер:
3.35 MB
Просмотр
На NoDevice можно скачать инструкцию по эксплуатации для Acer Aspire A315-58. Руководство пользователя необходимо для ознакомления с правилами установки и эксплуатации Acer Aspire A315-58. Инструкции по использованию помогут правильно настроить Acer Aspire A315-58, исправить ошибки и выявить неполадки.
Главная » Acer » Руководство пользователя ноутбука Aspire 3
View Fullscreen
Руководство пользователя ноутбука Aspire 3 — Оптимизированный PDF
Руководство пользователя ноутбука Aspire 3 — Исходный PDF
Похожие сообщения

1 комментарий
-
Руководство Preciso do Note ACERA315-56-3090I3 8gb256ssdgraywin10
Руководство Preciso do Note ACERA315-56-3090I3 8gb256ssdgraywin10Ответить
Оставить комментарий
Ваш электронный адрес не будет опубликован. Обязательные поля помечены * *
КОММЕНТАРИЙ *
Имя и фамилия
Эл. адрес
Cайт
Сохраните мое имя, адрес электронной почты и веб-сайт в этом браузере для следующего комментария.
Требуется руководство для вашей Acer Aspire 3 A315-33 Ноутбук? Ниже вы можете просмотреть и загрузить бесплатно руководство в формате PDF. Кроме того, приведены часто задаваемые вопросы, рейтинг изделия и отзывы пользователей, что позволит оптимально использовать ваше изделие. Если это не то руководство, которое вы искали, – свяжитесь с нами.
Ваше устройство неисправно, и в руководстве отсутствует решение? Перейдите в Repair Café для получения бесплатных ремонтных услуг.
Руководство
Рейтинг
Сообщите нам, что вы думаете о Acer Aspire 3 A315-33 Ноутбук, оставив оценку продукта. Хотите поделиться вашими впечатлениями от данного изделия или задать вопрос? Вы можете оставить комментарий в нижней части страницы.
Довольны ли вы данным изделием Acer?
Да Нет
2 голоса
Часто задаваемые вопросы
Наша служба поддержки выполняет поиск полезной информации по изделиям и отвечает на часто задаваемые вопросы. Если вы заметили неточность в наших часто задаваемых вопросах, сообщите нам об этом с помощью нашей контактной формы.
Нужно ли полностью разряжать литий-ионный аккумулятор перед зарядкой? Проверенный
Нет, не нужно. Это необходимо было делать с аккумуляторами старого образца. Литий-ионные аккумуляторы можно заряжать после использования и останавливать процесс зарядки в любой момент.
Это было полезно (119)
Я пролил жидкость на трекпад ноутбука, что мне делать? Проверенный
В любом случае сразу выключите ноутбук! Только в случае небольшого количества воды возможно, что трекпад после высыхания будет работать без изменений.
Это было полезно (103)
Могу ли я очистить вытяжную вентиляцию ноутбука пылесосом? Проверенный
Нет, обычный пылесос слишком мощный. Используйте влажную ткань, чтобы очистить выхлоп, или отсосите пыль с помощью ручного пылесоса.
Это было полезно (73)
Что означает HDMI? Проверенный
HDMI означает мультимедийный интерфейс высокой четкости. HDMI — это соединение для передачи высококачественного видео и звука с одного устройства на другое.
Это было полезно (47)
Как лучше всего очистить мою клавиатуру Проверенный
Никогда не вставляйте предметы между краями клавиш, так как это в основном приведет к попаданию грязи и повреждению клавиатуры. Лучше всего очищать клавиатуру сжатым воздухом, держа ее вверх ногами. Верхнюю часть клавиш можно протирать слегка влажной тканью.
Это было полезно (47)
Что лучше всего использовать для очистки экрана мобильного устройства? Проверенный
Лучше всего использовать салфетку из микрофибры, возможно, со специальным моющим средством. Никогда не используйте кухонные полотенца или другие бумажные салфетки, они оставят царапины!
Это было полезно (35)
В каких условиях лучше всего длительно хранить литий-ионный аккумулятор? Проверенный
Рекомендуется хранить литий-ионный аккумулятор при температуре от 5 до 45 °C. Прежде чем отправить аккумулятор на хранение, следует также убедиться в том, что он заряжен примерно на 67%.
Это было полезно (35)
Сколько килобайт, мегабайт, гигабайт и терабайт? Проверенный
Один килобайт состоит из 1000 байтов. 1 мегабайт = 1000 килобайт. 1 гигабайт = 1000 мегабайт. 1 терабайт = 1000 гигабайт.
Это было полезно (35)
В каких условиях литий-ионный аккумулятор функционирует оптимально? Проверенный
Литий-ионный аккумулятор работает оптимально при температуре от 5 до 45 °C. В очень холодную и очень теплую погоду вы можете заметить, что аккумулятор быстрее разряжается. Не рекомендуется заряжать аккумулятор при температурах ниже 5 °C и выше 45 °C.
Это было полезно (35)
Работает ли bluetooth через стены и потолок? Проверенный
Сигнал Bluetooth будет проходить через стены и потолок, если они не сделаны из металла. В зависимости от толщины и материала стены сигнал может терять силу.
Это было полезно (34)
Требуется руководство для вашей Acer Aspire 3 A315-33 Ноутбук? Ниже вы можете просмотреть и загрузить бесплатно руководство в формате PDF. Кроме того, приведены часто задаваемые вопросы, рейтинг изделия и отзывы пользователей, что позволит оптимально использовать ваше изделие. Если это не то руководство, которое вы искали, – свяжитесь с нами.
Ваше устройство неисправно, и в руководстве отсутствует решение? Перейдите в Repair Café для получения бесплатных ремонтных услуг.
Руководство
Рейтинг
Сообщите нам, что вы думаете о Acer Aspire 3 A315-33 Ноутбук, оставив оценку продукта. Хотите поделиться вашими впечатлениями от данного изделия или задать вопрос? Вы можете оставить комментарий в нижней части страницы.
Довольны ли вы данным изделием Acer?
Да Нет
2 голоса
Часто задаваемые вопросы
Наша служба поддержки выполняет поиск полезной информации по изделиям и отвечает на часто задаваемые вопросы. Если вы заметили неточность в наших часто задаваемых вопросах, сообщите нам об этом с помощью нашей контактной формы.
Нужно ли полностью разряжать литий-ионный аккумулятор перед зарядкой? Проверенный
Нет, не нужно. Это необходимо было делать с аккумуляторами старого образца. Литий-ионные аккумуляторы можно заряжать после использования и останавливать процесс зарядки в любой момент.
Это было полезно (108)
Я пролил жидкость на трекпад ноутбука, что мне делать? Проверенный
В любом случае сразу выключите ноутбук! Только в случае небольшого количества воды возможно, что трекпад после высыхания будет работать без изменений.
Это было полезно (100)
Могу ли я очистить вытяжную вентиляцию ноутбука пылесосом? Проверенный
Нет, обычный пылесос слишком мощный. Используйте влажную ткань, чтобы очистить выхлоп, или отсосите пыль с помощью ручного пылесоса.
Это было полезно (68)
Что означает HDMI? Проверенный
HDMI означает мультимедийный интерфейс высокой четкости. HDMI — это соединение для передачи высококачественного видео и звука с одного устройства на другое.
Это было полезно (42)
Как лучше всего очистить мою клавиатуру Проверенный
Никогда не вставляйте предметы между краями клавиш, так как это в основном приведет к попаданию грязи и повреждению клавиатуры. Лучше всего очищать клавиатуру сжатым воздухом, держа ее вверх ногами. Верхнюю часть клавиш можно протирать слегка влажной тканью.
Это было полезно (41)
В каких условиях лучше всего длительно хранить литий-ионный аккумулятор? Проверенный
Рекомендуется хранить литий-ионный аккумулятор при температуре от 5 до 45 °C. Прежде чем отправить аккумулятор на хранение, следует также убедиться в том, что он заряжен примерно на 67%.
Это было полезно (34)
Что лучше всего использовать для очистки экрана мобильного устройства? Проверенный
Лучше всего использовать салфетку из микрофибры, возможно, со специальным моющим средством. Никогда не используйте кухонные полотенца или другие бумажные салфетки, они оставят царапины!
Это было полезно (33)
Сколько килобайт, мегабайт, гигабайт и терабайт? Проверенный
Один килобайт состоит из 1000 байтов. 1 мегабайт = 1000 килобайт. 1 гигабайт = 1000 мегабайт. 1 терабайт = 1000 гигабайт.
Это было полезно (33)
Работает ли bluetooth через стены и потолок? Проверенный
Сигнал Bluetooth будет проходить через стены и потолок, если они не сделаны из металла. В зависимости от толщины и материала стены сигнал может терять силу.
Это было полезно (33)
В каких условиях литий-ионный аккумулятор функционирует оптимально? Проверенный
Литий-ионный аккумулятор работает оптимально при температуре от 5 до 45 °C. В очень холодную и очень теплую погоду вы можете заметить, что аккумулятор быстрее разряжается. Не рекомендуется заряжать аккумулятор при температурах ниже 5 °C и выше 45 °C.
Это было полезно (32)
-
Драйверы
25
-
Инструкции по эксплуатации
15
Языки:
Acer Aspire A315-58 инструкция по эксплуатации
(1 страница)
- Языки:Русский
- Тип:
PDF - Размер:
59.33 KB
Просмотр
Acer Aspire A315-58 инструкция по эксплуатации
(96 страниц)
- Языки:Русский
- Тип:
PDF - Размер:
5.14 MB
Acer Aspire A315-58 инструкция по эксплуатации
(82 страницы)
- Языки:Русский
- Тип:
PDF - Размер:
3.51 MB
Просмотр
Acer Aspire A315-58 инструкция по эксплуатации
(90 страниц)
- Языки:Португальский
- Тип:
PDF - Размер:
4.77 MB
Просмотр
Acer Aspire A315-58 инструкция по эксплуатации
(94 страницы)
- Языки:Немецкий
- Тип:
PDF - Размер:
4.77 MB
Просмотр
Acer Aspire A315-58 инструкция по эксплуатации
(276 страниц)
- Языки:Французский
- Тип:
PDF - Размер:
68.36 MB
Просмотр
Acer Aspire A315-58 инструкция по эксплуатации
(91 страница)
- Языки:Французский
- Тип:
PDF - Размер:
4.94 MB
Просмотр
Acer Aspire A315-58 инструкция по эксплуатации
(91 страница)
- Языки:Французский
- Тип:
PDF - Размер:
4.94 MB
Просмотр
Acer Aspire A315-58 инструкция по эксплуатации
(1 страница)
- Языки:Немецкий
- Тип:
PDF - Размер:
56.98 KB
Acer Aspire A315-58 инструкция по эксплуатации
(1 страница)
- Языки:Французский
- Тип:
PDF - Размер:
58.21 KB
Просмотр
Acer Aspire A315-58 инструкция по эксплуатации
(76 страниц)
- Языки:Португальский
- Тип:
PDF - Размер:
3.42 MB
Просмотр
Acer Aspire A315-58 инструкция по эксплуатации
(77 страниц)
- Языки:Португальский
- Тип:
PDF - Размер:
3.41 MB
Просмотр
Acer Aspire A315-58 инструкция по эксплуатации
(78 страниц)
- Языки:Французский
- Тип:
PDF - Размер:
3.35 MB
Просмотр
Acer Aspire A315-58 инструкция по эксплуатации
(79 страниц)
- Языки:Немецкий
- Тип:
PDF - Размер:
3.36 MB
Просмотр
Acer Aspire A315-58 инструкция по эксплуатации
(78 страниц)
- Языки:Французский
- Тип:
PDF - Размер:
3.35 MB
Просмотр
На NoDevice можно скачать инструкцию по эксплуатации для Acer Aspire A315-58. Руководство пользователя необходимо для ознакомления с правилами установки и эксплуатации Acer Aspire A315-58. Инструкции по использованию помогут правильно настроить Acer Aspire A315-58, исправить ошибки и выявить неполадки.
Главная » Acer » Руководство пользователя ноутбука Aspire 3
View Fullscreen
Руководство пользователя ноутбука Aspire 3 — Оптимизированный PDF
Руководство пользователя ноутбука Aspire 3 — Исходный PDF
Похожие сообщения
-
Руководство пользователя ноутбука Acer Aspire 5
Руководство пользователя ноутбука Acer Aspire 5 — Оптимизированный PDF-файл Руководство пользователя ноутбука Acer Aspire 5 — Исходный PDF-файл
-
Руководство пользователя ноутбука Acer NITRO 5
Руководство пользователя ноутбука Acer NITRO 5 — Оптимизированный PDF-файл Руководство пользователя ноутбука Acer NITRO 5 — Исходный PDF-файл
-
Руководство пользователя ноутбука Acer NITRO 5
Руководство пользователя ноутбука Acer NITRO 5 — Оптимизированный PDF-файл Руководство пользователя ноутбука Acer NITRO 5 — Исходный PDF-файл
-
Ноутбук Acer TravelMate P4 Руководство пользователя
Руководство пользователя ноутбука Acer TravelMate P4 — Оптимизированный PDF-файл Руководство пользователя ноутбука Acer TravelMate P4 — Исходный PDF-файл


Присоединяйтесь к обсуждению
-
Руководство Preciso do Note ACERA315-56-3090I3 8gb256ssdgraywin10
Руководство Preciso do Note ACERA315-56-3090I3 8gb256ssdgraywin10
Оставить комментарий
Ваш электронный адрес не будет опубликован. Обязательные поля помечены * *
КОММЕНТАРИЙ *
Имя и фамилия
Эл. адрес
Cайт
Сохраните мое имя, адрес электронной почты и веб-сайт в этом браузере для следующего комментария.

PDF инструкция · 123 страниц(ы) английский
инструкцияAcer Aspire 3

Aspire 5680/5650/5630/
5610/5610Z/3690 Series
User’s Guide
Посмотреть инструкция для Acer Aspire 3 бесплатно. Руководство относится к категории Ноутбуки, 52 человек(а) дали ему среднюю оценку 8.6. Руководство доступно на следующих языках: английский. У вас есть вопрос о Acer Aspire 3 или вам нужна помощь? Задайте свой вопрос здесь
- Aspire 5680/5650/5630/ 5610/5610Z/3690 Series
Главная
| Acer | |
| Aspire 3 | LX.PL302.010 | |
| Ноутбук | |
| 4718235427740 | |
| английский | |
| Руководство пользователя (PDF), Правила техники безопасности (PDF) |
Процессор
| Семейство процессоров | Процессор Intel® Pentium® |
| Модель процессора | SU4100 |
| Частота шины процессора | 800 MHz |
| Чипсет материнской платы | Intel® GS45 Express |
| Тактовая частота процессора | 1.3 GHz |
| Тип кэша процессора | L2 |
| Кеш-память процессора | 2 MB |
| Сокет процессора | BGA 956 |
| Скорость передачи данных системной шины | — GT/s |
| Количество ядер процессора | 2 |
| Потоки процессора | 2 |
| Технологический процесс | 45 nm |
| Операционные режимы процессора | 64-разрядный |
| Пошаговое выполнение | R0 |
| Тип шины | FSB |
| Кодовое название процессора | Penryn |
| ECC-память поддерживается процессором | Нет |
| TDP | 10 W |
| Паритет FSB | Нет |
| Tcase | 100 °C |
| Количество Транзисторов для Обработки | 410 M |
| Размер Обработки Кристаллов | 107 mm² |
| Производитель процессора | Intel |
Устройства хранения данных
| Полный объем хранения | 320 GB |
| Интерфейс жесткого диска | SATA |
| Скорость вращения шпинделя | 5400 RPM |
| Встроенный кардридер | Да |
| Тип оптического привода | — |
Экран
| Диагональ экрана | 13.3 « |
| Разрешение экрана | 1366 x 768 пикселей |
| Собственное форматное соотношение | 16:9 |
| LED подсветка | Да |
Память
| Оперативная память | 4 GB |
| Слоты памяти | 2x SO-DIMM |
| Тип внутренней памяти | DDR3-SDRAM |
| Максимальная внутренняя память | 8 GB |
| Тактовая частота памяти | 1066 MHz |
Графический адаптер
| максимальная память графического адаптера | 1.759 GB |
| Модель дискретного графического адаптера | Intel® GMA 4500MHD |
| Дискретный графическоо адаптер | Да |
Прочие свойства
| Семейство графического адаптера | Intel |
| Встроенный TV-тюнер | Нет |
| Внутренний модем | Нет |
| Функция Wake-on-LAN | Да |
| Соответствие промышленным стандартам | IEEE 802.11a/b/g/n |
| Сетевой адаптер в комплекте | Да |
| ИК-порт | Нет |
| Порт входа TV | Нет |
| Пароль для защиты жесткого диска | Да |
| Тип | ПК |
Аудио
| Число встроенных динамиков | 2 |
Сеть
| Bluetooth | Нет |
| Характеристики сети | Гигабитный Ethernet |
| Wi-Fi | Да |
программное обеспечение
| Установленная операционная система | Windows 7 Home Premium |
Батарея
| Емкость батареи | 5600 mAh |
| Время работы батареи (макс) | 9 h |
| Количество элементов аккумулятора | 6 |
Порты и интерфейсы
| ExpressCard слот | Нет |
| Количество портов VGA (D-Sub) | 1 |
| Количество последовательных портов | 0 |
| Количество параллельных портов | 0 |
| Количество портов PS/2 | 0 |
| Количество портов Ethernet LAN ( RJ-45) | 1 |
| Порты FireWire | 0 |
| Выход TV | Нет |
| Количество портов USB 2.0 | 3 |
| Порты модема (RJ-11) | 0 |
| Линейные выходы наушников | 1 |
| Линейный вход микрофона | Да |
| Порт выхода S/PDIF | Нет |
| Порт DVI | Нет |
| Количество слотов CardBus PCMCIA | 0 |
| Слот SmartCard | Нет |
| Тип слота CardBus PCMCIA | Нет |
| Разъем докстанции | Нет |
| Количество HDMI портов | 1 |
| Количество портов eSATA | 0 |
| Количество портов DisplayPort | 0 |
| Количество портов USB 3.2 Gen 1 (3.1 Gen 1) Type-A | 0 |
| Тип зарядного порта | Гнездо для постоянного тока |
Безопасность
| Слот кабельной блокировки | Да |
| Тип защиты паролем | BIOS |
| Тип слота кабельной блокировки | Kensington |
Вес и размеры
| Вес | 1600 g |
| Глубина | 228 mm |
| Высота | 28.9 mm |
| Ширина | 322 mm |
Дизайн
Устойчивость
| Сертификаты устойчивого развития | ENERGY STAR |
Энергопитание
| Рассеиваемая мощность адаптера переменного тока | 65 W |
Особые свойства процессора
| Технология Enhanced Intel SpeedStep | Да |
| Intel Clear Video HD Technology | Нет |
| Технология Intel Clear Video | Нет |
| Intel® InTru™ 3D Technology | Нет |
| Intel® Insider™ | Нет |
| Intel® Quick Sync Video Technology | Нет |
| Intel Flex Memory Access | Нет |
| Intel AES New Instructions | Нет |
| Intel Trusted Execution Technology | Нет |
| Intel Enhanced Halt State | Нет |
| Intel VT-x with Extended Page Tables (EPT) | Нет |
| Intel Demand Based Switching | Нет |
| Технология Intel® Clear Video для мобильных интернет-устройств (Intel CVT for MID) | Нет |
| Intel® 64 | Да |
| Execute Disable Bit | Да |
| технологии термомониторинга | Нет |
| Размер корпуса процессора | 22 x22 mm |
| Код процессора | SLGS4 |
| Доступные встроенные опции | Нет |
| Технология Intel Virtualization for Directed I/O (VT-d) | Нет |
| Бесконфликтный процессор | Нет |
| Intel Dual Display Capable Technology | Нет |
| Intel FDI Technology | Нет |
| Intel Rapid Storage Technology | Нет |
| Intel Fast Memory Access | Нет |
| Технология Intel My WiFi | Нет |
| Технология Intel Anti-Theft | Нет |
| Технология Intel Hyper-Threading | Нет |
| Технология Intel Turbo Boost | Нет |
| Технология Intel Wireless Display (WiDi) | Нет |
| ID ARK процессора | 43568 |
| Технология Визуализации (VT-x) Intel | Нет |
показать больше
Не можете найти ответ на свой вопрос в руководстве? Вы можете найти ответ на свой вопрос ниже, в разделе часто задаваемых вопросов о Acer Aspire 3.
От чего зависит скорость загрузки в Интернете?
Каковы размеры экрана Ноутбук?
Как лучше всего выполнять чистку Ноутбук?
Как почистить клавиатуру?
Какая высота Acer Aspire 3?
Какая ширина Acer Aspire 3?
Какая толщина Acer Aspire 3?
Какое разрешение экрана дисплея Acer Aspire 3?
Какой размер экрана Acer Aspire 3?
Инструкция Acer Aspire 3 доступно в русский?
Не нашли свой вопрос? Задайте свой вопрос здесь
Смотреть руководство для Acer Aspire 3 ниже. Все руководства на ManualsCat.com могут просматриваться абсолютно бесплатно. Нажав кнопку «Выбор языка» вы можете изменить язык руководства, которое хотите просмотреть.
- Бренд:
- Acer
- Продукт:
- ноутбуки
- Модель/название:
- Aspire 3
- Тип файла:
- Доступные языки:
- голландский, английский, немецкий, французский, испанский, итальянский, шведский, португальский, датский, польский, русский, норвежский, Финляндия, румынский, турецкий, словацкий, венгерский, словенский, китайский, хорватский, Индонезийский, Японский Язык, Корейский Язык
PDF инструкция · 123 страниц(ы) английский
инструкцияAcer Aspire 3
Aspire 5680/5650/5630/
5610/5610Z/3690 Series
User’s Guide
Посмотреть инструкция для Acer Aspire 3 бесплатно. Руководство относится к категории ноутбуки, 56 человек(а) дали ему среднюю оценку 8.5. Руководство доступно на следующих языках: английский. У вас есть вопрос о Acer Aspire 3 или вам нужна помощь? Задайте свой вопрос здесь
- Aspire 5680/5650/5630/ 5610/5610Z/3690 Series
Главная
| Acer | |
| Aspire 3 | LX.PL302.010 | |
| ноутбук | |
| 4718235427740 | |
| английский | |
| Руководство пользователя (PDF), Правила техники безопасности (PDF) |
Процессор
| Семейство процессоров | Процессор Intel® Pentium® |
| Модель процессора | SU4100 |
| Частота шины процессора | 800 MHz |
| Чипсет материнской платы | Intel® GS45 Express |
| Тактовая частота процессора | 1.3 GHz |
| Тип кэша процессора | L2 |
| Кеш-память процессора | 2 MB |
| Сокет процессора | BGA 956 |
| Скорость передачи данных системной шины | — GT/s |
| Количество ядер процессора | 2 |
| Потоки процессора | 2 |
| Технологический процесс | 45 nm |
| Операционные режимы процессора | 64-разрядный |
| Пошаговое выполнение | R0 |
| Тип шины | FSB |
| Кодовое название процессора | Penryn |
| ECC-память поддерживается процессором | Нет |
| TDP | 10 W |
| Паритет FSB | Нет |
| Tcase | 100 °C |
| Количество Транзисторов для Обработки | 410 M |
| Размер Обработки Кристаллов | 107 mm² |
| Производитель процессора | Intel |
Устройства хранения данных
| Полный объем хранения | 320 GB |
| Интерфейс жесткого диска | SATA |
| Скорость вращения шпинделя | 5400 RPM |
| Встроенный кардридер | Да |
| Тип оптического привода | — |
Экран
| Диагональ экрана | 13.3 « |
| Разрешение экрана | 1366 x 768 пикселей |
| Собственное форматное соотношение | 16:9 |
| LED подсветка | Да |
Память
| Оперативная память | 4 GB |
| Слоты памяти | 2x SO-DIMM |
| Тип внутренней памяти | DDR3-SDRAM |
| Максимальная внутренняя память | 8 GB |
| Тактовая частота памяти | 1066 MHz |
Графический адаптер
| максимальная память графического адаптера | 1.759 GB |
| Модель дискретного графического адаптера | Intel® GMA 4500MHD |
| Дискретный графическоо адаптер | Да |
Прочие свойства
| Семейство графического адаптера | Intel |
| Встроенный TV-тюнер | Нет |
| Внутренний модем | Нет |
| Функция Wake-on-LAN | Да |
| Соответствие промышленным стандартам | IEEE 802.11a/b/g/n |
| Сетевой адаптер в комплекте | Да |
| ИК-порт | Нет |
| Порт входа TV | Нет |
| Пароль для защиты жесткого диска | Да |
| Тип | ПК |
Аудио
| Число встроенных динамиков | 2 |
Сеть
| Bluetooth | Нет |
| Характеристики сети | Гигабитный Ethernet |
| Wi-Fi | Да |
программное обеспечение
| Установленная операционная система | Windows 7 Home Premium |
Батарея
| Емкость батареи | 5600 mAh |
| Время работы батареи (макс) | 9 h |
| Количество элементов аккумулятора | 6 |
Порты и интерфейсы
| ExpressCard слот | Нет |
| Количество портов VGA (D-Sub) | 1 |
| Количество последовательных портов | 0 |
| Количество параллельных портов | 0 |
| Количество портов PS/2 | 0 |
| Количество портов Ethernet LAN ( RJ-45) | 1 |
| Порты FireWire | 0 |
| Выход TV | Нет |
| Количество портов USB 2.0 | 3 |
| Порты модема (RJ-11) | 0 |
| Линейные выходы наушников | 1 |
| Линейный вход микрофона | Да |
| Порт выхода S/PDIF | Нет |
| Порт DVI | Нет |
| Количество слотов CardBus PCMCIA | 0 |
| Слот SmartCard | Нет |
| Тип слота CardBus PCMCIA | Нет |
| Разъем докстанции | Нет |
| Количество HDMI портов | 1 |
| Количество портов eSATA | 0 |
| Количество портов DisplayPort | 0 |
| Количество портов USB 3.2 Gen 1 (3.1 Gen 1) Type-A | 0 |
| Тип зарядного порта | Гнездо для постоянного тока |
Безопасность
| Слот кабельной блокировки | Да |
| Тип защиты паролем | BIOS |
| Тип слота кабельной блокировки | Kensington |
Вес и размеры
| Вес | 1600 g |
| Глубина | 228 mm |
| Высота | 28.9 mm |
| Ширина | 322 mm |
Дизайн
Устойчивость
| Сертификаты устойчивого развития | ENERGY STAR |
Энергопитание
| Рассеиваемая мощность адаптера переменного тока | 65 W |
Особые свойства процессора
| Технология Enhanced Intel SpeedStep | Да |
| Intel Clear Video HD Technology | Нет |
| Технология Intel Clear Video | Нет |
| Intel® InTru™ 3D Technology | Нет |
| Intel® Insider™ | Нет |
| Intel® Quick Sync Video Technology | Нет |
| Intel Flex Memory Access | Нет |
| Intel AES New Instructions | Нет |
| Intel Trusted Execution Technology | Нет |
| Intel Enhanced Halt State | Нет |
| Intel VT-x with Extended Page Tables (EPT) | Нет |
| Intel Demand Based Switching | Нет |
| Технология Intel® Clear Video для мобильных интернет-устройств (Intel CVT for MID) | Нет |
| Intel® 64 | Да |
| Execute Disable Bit | Да |
| технологии термомониторинга | Нет |
| Размер корпуса процессора | 22 x22 mm |
| Код процессора | SLGS4 |
| Доступные встроенные опции | Нет |
| Технология Intel Virtualization for Directed I/O (VT-d) | Нет |
| Бесконфликтный процессор | Нет |
| Intel Dual Display Capable Technology | Нет |
| Intel FDI Technology | Нет |
| Intel Rapid Storage Technology | Нет |
| Intel Fast Memory Access | Нет |
| Технология Intel My WiFi | Нет |
| Технология Intel Anti-Theft | Нет |
| Технология Intel Hyper-Threading | Нет |
| Технология Intel Turbo Boost | Нет |
| Технология Intel Wireless Display (WiDi) | Нет |
| ID ARK процессора | 43568 |
| Технология Визуализации (VT-x) Intel | Нет |
показать больше
Не можете найти ответ на свой вопрос в руководстве? Вы можете найти ответ на свой вопрос ниже, в разделе часто задаваемых вопросов о Acer Aspire 3.
От чего зависит скорость загрузки в Интернете?
Каковы размеры экрана ноутбук?
Как лучше всего выполнять чистку ноутбук?
Как почистить клавиатуру?
Какой размер экрана Acer Aspire 3?
Какая высота Acer Aspire 3?
Какое разрешение экрана дисплея Acer Aspire 3?
Какая ширина Acer Aspire 3?
Какая толщина Acer Aspire 3?
Инструкция Acer Aspire 3 доступно в русский?
Не нашли свой вопрос? Задайте свой вопрос здесь