
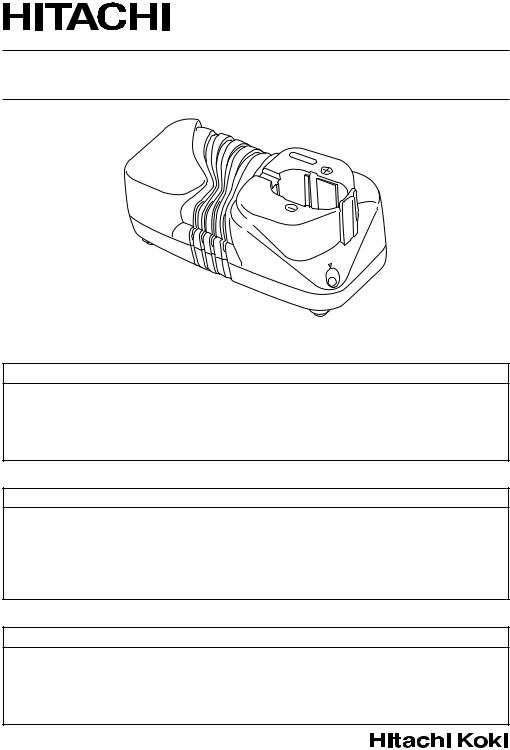
UC 18YG
Battery Charger Chargeur de batterie Cargador de baterías
SAFETY INSTRUCTIONS AND INSTRUCTION MANUAL
 WARNING
IMPROPER OR UNSAFE use of this battery charger can result in death or serious bodily injury!
This manual contains important information about product safety. Please read and understand this manual BEFORE operating the power tool. Please keep this manual available for other users and owners before they use the battery charger. This manual should be stored in safe place.
INSTRUCTIONS DE SECURITE ET MODE D’EMPLOI
 AVERTISSEMENT
Une utilisation INCORRECTE OU DANGEREUSE de ce chargeur de batterie peut entraîner la mort ou de sérieuses blessures corporelles!
Ce mode d’emploi contient d’importantes informations à propos de la sécurité de ce produit. Prière de lire et de comprendre ce mode d’emploi AVANT d’utiliser l’outil motorisé. Garder ce mode d’emploi à la disponibilité des autres utilisateurs et propriétaires avant qu’ils utilisent le chargeur de batterie. Ce mode d’emploi doit être conservé dans un endroit sûr.
INSTRUCCIONES DE SEGURIDAD Y MANUAL DE INSTRUCCIONES
 ADVERTENCIA
¡La utilización INAPROPIADA O PELIGROSA de este cargador de baterías puede resultar en lesiones de gravedad o la muerte!
Este manual contiene información importante sobre la seguridad del producto. Lea y comprenda este manual ANTES de utilizar la herramienta eléctrica. Guarde este manual para que puedan leerlo otras personas antes de utilizar el cargador de baterías. Este manual debe ser guardado en un lugar seguro.
|
Page |
|
|
IMPORTANT SAFETY INFORMATION |
…………. 3 |
|
MEANINGS OF SIGNAL WORDS ………………… |
3 |
|
SAFETY |
|
|
IMPORTANT SAFETY INSTRUCTIONS |
|
|
FOR BATTERY CHARGER …………………….. |
4 |
|
IMPORTANT SAFETY INSTRUCTIONS |
|
|
FOR USE OF THE BATTERY AND |
|
|
BATTERY CHARGER …………………………….. |
5 |
|
DISPOSAL OF THE EXHAUSTED |
|
|
BATTERY …………………………………………….. |
6 |
|
Page |
|
|
OPERATION AND MAINTENANCE |
|
|
MODEL ………………………………………………………. |
7 |
|
NAME OF PARTS ……………………………………….. |
7 |
|
SPECIFICATIONS ……………………………………………. |
8 |
|
APPLICATIONS ………………………………………………. |
8 |
|
CHARGING METHOD ……………………………………… |
8 |
|
BEFORE USE ………………………………………………… |
11 |
|
MAINTENANCE AND INSPECTION ……………….. |
11 |
|
STORAGE …………………………………………………….. |
12 |
|
SERVICE AND REPAIRS ………………………………… |
12 |
|
PARTS LIST ………………………………………………….. |
33 |
TABLE DES MATIERES
Français
|
Page |
|
|
INFORMATIONS IMPORTANTES |
|
|
DE SÉCURITÉ …………………………………………… |
13 |
|
SIGNIFICATION DES MOTS |
|
|
D’AVERTISSEMENT ………………………………….. |
13 |
|
SECURITE |
|
|
CONSIGNES DE SÉCURITÉ IMPORTANTES |
|
|
POUR LE CHARGEUR DE BATTERIE ……. |
14 |
|
CONSIGNES DE SÉCURITÉ IMPORTANTES |
|
|
POUR L’UTILISATION DE LA BATTERIE |
|
|
ET DU CHARGEUR DE BATTERIE ……….. |
15 |
|
MISE AU REBUT D’UNE BATTERIE USÉE ….. |
16 |
|
Page |
|
|
UTILISATION ET ENTRETIEN |
|
|
MODÈLE ………………………………………………….. |
17 |
|
NOM DES PARTIES ………………………………….. |
17 |
|
SPECIFICATIONS ……………………………………… |
18 |
|
UTILISATIONS …………………………………………. |
18 |
|
MÉTHODE DE RECHARGE ………………………… |
18 |
|
AVANT L’UTILISATION …………………………….. |
21 |
|
ENTRETIEN ET INSPECTION ……………………… |
21 |
|
RANGEMENT …………………………………………… |
22 |
|
SERVICE APRES-VENTE ET RÉPARATIONS … |
22 |
|
LISTE DES PIÈCES ……………………………………. |
33 |
|
INFORMACIÓN IMPORTANTE SOBRE |
|
|
SEGURIDAD ………………………………………. |
23 |
|
SIGNIFICADO DE LAS PALABRAS |
|
|
DE SEÑALIZACIÓN ……………………………. |
23 |
|
SEGURIDAD |
|
|
INSTRUCCIONES IMPORTANTES |
|
|
DE SEGURIDAD PARA EL CARGADOR |
|
|
DE BATERÍAS …………………………………….. |
24 |
|
INSTRUCCIONES IMPORTANTES |
|
|
DE SEGURIDAD PARA LA BATERÍA |
|
|
Y EL CARGADOR DE BATERÍAS ………….. |
25 |
|
ELIMINACIÓN LAS BATERÍAS AGOTADAS .. |
26 |
|
OPERACIÓN Y MANTENIMIENTO |
|
|
MODELO ………………………………………………….. |
27 |
|
NOMENCLATURA …………………………………….. |
27 |
|
ESPECIFICACIONES ………………………………….. |
28 |
|
APLICACIONES ………………………………………… |
28 |
|
MÉTODO DE CARGA ………………………………… |
28 |
|
ANTES DE LA UTILIZACIÓN ……………………… |
31 |
|
MANTENIMIENTO E INSPECCIÓN …………….. |
31 |
|
ALMACENAMIENTO …………………………………. |
32 |
|
SERVICIO Y REPARACIONES …………………….. |
32 |
|
LISTA DE PIEZAS ……………………………………… |
33 |
English
IMPORTANT SAFETY INFORMATION
Read and understand all of the safety precautions, warnings and operating instructions in the Instruction Manual before operating or maintaining this battery charger.
Most accidents that result from battery charger operation and maintenance are caused by the failure to observe basic safety rules or precautions. An accident can often be avoided by recognizing a potentially hazardous situation before it occurs, and by observing appropriate safety procedures.
Basic safety precautions are outlined in the “SAFETY” section of this Instruction Manual and in the sections which contain the operation and maintenance instructions.
Hazards that must be avoided to prevent bodily injury or machine damage are identified by WARNINGS on the battery charger and in this Instruction Manual.
NEVER use this battery charger in a manner that has not been specifically recommended by HITACHI.
MEANINGS OF SIGNAL WORDS
WARNING indicates a potentially hazardous situations which, if ignored, could result in death or serious injury.
CAUTION indicates a potentially hazardous situations which, if not avoided, may result in minor or moderate injury, or may cause machine damage.
NOTE emphasizes essential information.
3
English
SAFETY
IMPORTANT SAFETY INSTRUCTIONS
FOR BATTERY CHARGER
 WARNING: Death or serious bodily injury could result from improper or unsafe use of battery chargers. To avoid these risks, follow these basic safety instructions:
READ ALL INSTRUCTIONS
1.This manual contains important safety and operating instructions for battery charger Model UC18YG.
2.Before using battery charger, read all instructions and cautionary markings on (1) battery charger, (2) battery, and (3) product using battery.
3.To reduce risk of injury, charge HITACHI rechargeable battery types FEB, EB7, EB9, EB12, EB14 and EB18 series. Other type of batteries may burst causing personal injury and damage.
4.Do not expose battery charger to rain or snow.
5.Use of an attachment not recommended or sold by the battery charger manufacturer may result in a risk of fire, electric shock, or injury to persons.
6.To reduce risk of damage to electric plug and cord, pull by plug when disconnecting battery charger.
7.Make sure cord is located so that it will not be stepped on, tripped over, or otherwise subjected to damage or stress.
8.An extension cord should not be used unless absolutely necessary. Use of improper extension cord could result in a risk of fire and electric shock.
If extension cord must be used make sure:
a.That blades of extension cord are the same number, size, and shape as those of plug on battery charger:
b.That extension cord is properly wired and in good electrical condition; and
c.That wire size is large enough for AC ampere rating of battery charger as specified in Table 1.
Table 1
RECOMMENDED MINIMUM AWG SIZE FOR
EXTENTION CORDS FOR BATTERY CHARGERS
|
AC Input Rating Amperes* |
AWG Size of Cord |
||||
|
Equal to or |
but less |
Length of Cord, Feet (Meter) |
|||
|
greater than |
than |
25 (7.5) |
50 (15) |
100 (30) |
150 (45) |
|
0 |
2 |
18 |
18 |
18 |
16 |
|
2 |
3 |
18 |
18 |
16 |
14 |
|
3 |
4 |
18 |
18 |
16 |
14 |
4
English
*If the input rating of a battery charger is given in watts rather than in amperes, the corresponding ampere rating is to be determined by dividing the wattage rating by the voltage rating–for example:
1,250 watts
= 10 amperes
125 volts
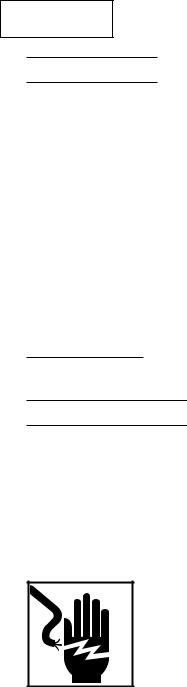
9. Do not operate battery charger with damaged cord or plug-replace them immediately. 10. Do not operate battery charger if it has received a sharp blow, been dropped, or otherwise
damaged in any way; take it to a qualified serviceman.
11. Do not disassemble battery charger; take it to a qualified serviceman when service or repair is required. Incorrect reassembly may result in a risk of electric shock or fire.
12. To reduce risk of electric shock, unplug charger from receptacle before attempting any maintenance or cleaning. Removing the battery will not reduce this risk.
13. This battery charger might be attached to HITACHI battery operated tools as a standard accessory. In this case, please confirm Instruction Manual of the HITACHI battery operated tools before using the battery charger.
IMPORTANT SAFETY INSTRUCTIONS FOR USE OF THE BATTERY AND BATTERY CHARGER
You must charge the battery before you can use the power tool. Before using the model UC18YG battery charger, be sure to read all instructions and cautionary statements on it, the battery and in this manual.
REMEMBER: USE ONLY HITACHI BATTERY TYPES FEB SERIES, EB7 SERIES, EB9 SERIES, EB12 SERIES, EB14 SERIES AND EB18 SERIES. OTHER TYPES OF BATTERIES MAY BURST AND CAUSE INJURY!
Follow these instructions to avoid the risk of injury:
 WARNING: Improper use of the battery or battery charger can lead to serious injury. To avoid these injuries:
1.NEVER disassemble the battery.
2.NEVER incinerate the battery, even if it is damaged or is completely worn out. The
battery can explode in a fire.
3.NEVER short-circuit the battery.
4.NEVER insert any objects into the battery charger’s air vents. Electric shock or damage
to the battery charger may result.
5.NEVER charge outdoors. Keep the battery away from direct sunlight and use only
where there is low humidity and good ventilation.
6.NEVER charge when the temperature is below 50°F (10°C) or above 104°F (40°C).
7.NEVER connect two battery chargers together.
8.NEVER insert foreign objects into the hole for the battery or the battery charger.
9.NEVER use a booster transformer when charging.
10.NEVER use an engine generator or DC power to charge.
11.NEVER store the battery or battery charger in places where the temperature may
reach or exceed 104°F (40°C).
5
English
12. ALWAYS operate charger on standard household electrical power (120 volts). Using the charger on any other voltage may overheat and damage the charger.
13.ALWAYS wait at least 15 minutes between charges to avoid overheating the charger.
14.ALWAYS disconnect the power cord from its receptacle when the charger is not in
use.
DISPOSAL OF THE EXHAUSTED BATTERY
 WARNING: Do not dispose of the exhausted battery. The battery must explode if it is incinerated. The product that you have purchased contains a rechargeable battery. The battery is recyclable. At the end of it’s useful life, under various state and local laws, it may be illegal to dispose of this battery into the municipal waste stream. Check with your local solid waste officials for details in your area for recycling options or proper disposal.
SAVE THESE INSTRUCTIONS
AND
MAKE THEM AVAILABLE TO
OTHER USERS
AND
OWNERS OF THIS TOOL!
6
English
OPERATION AND MAINTENANCE
NOTE:
The information contained in this Instruction Manual is designed to assist you in the safe operation and maintenance of the battery charger.
NEVER operate, or attempt any maintenance on the battery charger unless you have first read and understood all safety instructions contained in this manual.
Some illustrations in this Instruction Manual may show details or attachments that differ from those on your own battery charger.
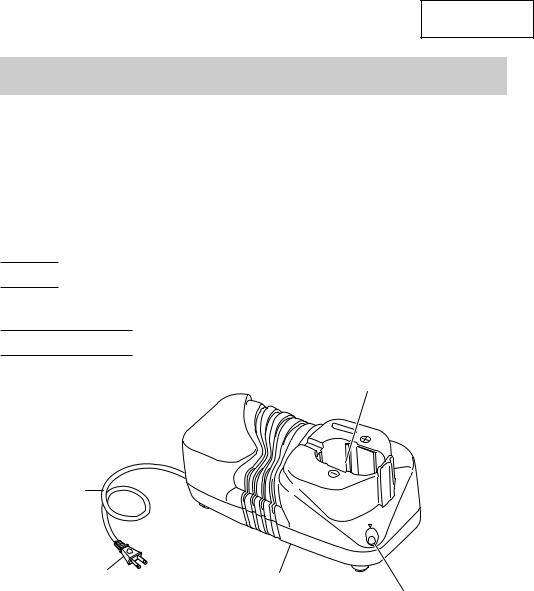
MODEL
UC18YG
NAME OF PARTS
Battery installation hole
Cord
|
Plug |
Nameplate |
|
Pilot lamp |
Fig. 1
7
English
SPECIFICATIONS
|
Input power source |
Single phase: AC120V 60Hz |
|||
|
Approx. 30 minutes ………. |
EB712S, EB7S, FEB7S, EB714S, |
|||
|
EB912S, EB9S, FEB9S, EB914, EB914S, |
||||
|
EB1212S, EB12S, FEB12S, EB1214L, |
||||
|
Charging time |
EB1214S, EB1412S, EB1414, EB1414S, |
|||
|
EB1812S, EB1814SL |
||||
|
Approx. 50 minutes ………. |
EB7B, EB9B, EB12B, EB1220BL, |
|||
|
EB14B, EB1820, EB1820L |
||||
|
Approx. 60 minutes ………. |
EB924, EB1224, EB1424, EB1824L |
|||
|
Charger |
Charging voltage ………………………… |
DC 7.2–18V |
||
|
Charging current |
DC 2.6A |
|||
|
Weight |
0.7 lbs (0.3kg) |
|||
APPLICATIONS
For charging the HITACHI batteries types FEB, EB7, EB9, EB12, EB14 and EB18 series.
CHARGING METHOD
NOTE: Before plugging into the receptacle, make sure the following points.
The power source voltage is stated on the nameplate.
The cord is not damaged.
 WARNING: Do not charge at voltage higher than indicated on the nameplate.
If charged at voltage higher than indicated on the nameplate, the charger will burn up.
1. Insert the plug of battery charger into the receptacle.
 WARNING:
Do not use the electrical cord if damaged. Have it repaired immediately.
8
English
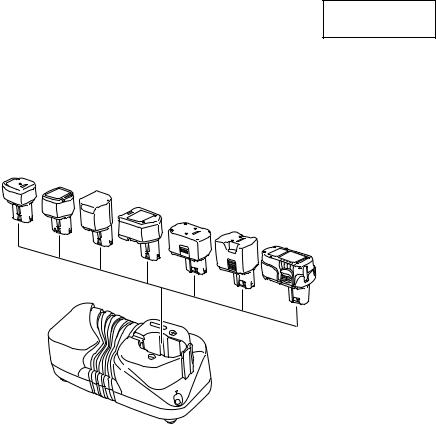
2.Insert the battery to the battery charger.
Insert the battery into the battery charger as shown in Fig. 2.
|
EB912S |
||||||
|
EB712S |
EB9S |
|||||
|
EB7S |
FEB9S |
|||||
|
EB914 |
||||||
|
FEB7S |
EB12S |
|||||
|
EB714S |
EB914S FEB12S |
EB1212S |
EB1412S |
|||
|
EB7B |
EB9B |
EB12B |
EB1214L |
EB1414 |
||
|
EB924 |
||||||
|
EB1224 |
EB1214S |
EB1414S |
||||
|
EB1220BL |
EB14B |
EB1812S |
EB1814SL |
|||
|
EB1424 |
||||||
|
EB1820 |
EB1820L |
|||||
|
EB1824L |
Fig. 2
3. Charging
When the battery is connected to the battery charger, charging will commence and the pilot lamp will light on.
NOTE: If the pilot lamp does not light, pull out the plug from the receptacle and check if the battery is properly mounted.
When the battery is fully charged, the pilot lamp will go out.
NOTE: The battery charging time becomes longer when a temperature is low or the voltage of the power source is too low.
When the pilot lamp does not go off even if more than four hour has passed after start of the charging, stop the charging and contact your HITACHI AUTHORIZED SERVICE CENTER.
9
English
Regarding the temperature of the rechargeable battery.
The temperatures for rechargeable batteries are as shown in the table below, and batteries that have become hot should be cooled for a while before being recharged.
|
Table 2 |
|
|
Rechargeable batteries |
Temperature at which the battery can be recharged |
|
EB712S, EB7S, FEB7S, EB714S, |
|
|
EB7B, EB912S, EB9S, FEB9S, |
|
|
EB914, EB914S, EB9B, EB924, |
|
|
EB1212S, EB12S, FEB12S, |
|
|
EB1214L, EB1214S, EB12B, |
32°F — 104°F (0°C — 40°C) |
|
EB1220BL, EB1224, EB1412S, |
|
|
EB1414, EB1414S, EB14B, |
|
|
EB1424, EB1812S, EB1814SL, |
|
|
EB1820, EB1820L, EB1824L |
|
Regarding recharging time
Table 3 shows the recharging time required according to the type of battery.
Table 3 Recharging time (approx. min.) at 20°C
|
Battery |
Battery capacity (Ah) |
|||||
|
voltage (V) |
1.2–1.4 Ah |
2.0 Ah |
2.4 Ah |
|||
|
7.2 |
EB712S, EB7S, |
EB7B |
––– |
––– |
||
|
FEB7S, EB714S |
||||||
|
9.6 |
EB912S, EB9S, FEB9S, |
|||||
|
EB9B |
EB924 |
|||||
|
EB914, EB914S |
||||||
|
EB1212S, EB12S, |
||||||
|
EB12B, |
||||||
|
12 |
FEB12S, EB1214L, |
30 min. |
50 min. |
EB1224 |
||
|
EB1214S |
EB1220BL |
60 min. |
||||
|
14.4 |
EB1412S, EB1414, |
|||||
|
EB14B |
EB1424 |
|||||
|
EB1414S |
||||||
|
18 |
EB1812S, EB1814SL |
EB1820, |
EB1824L |
|||
|
EB1820L |
||||||
NOTE: The recharging time may vary according to the ambient temperature and the power supply voltage.
4. Disconnect battery charger from the receptacle.
 CAUTION:
Do not pull the plug out of the receptacle by pulling on the cord.
Make sure to grasp the plug when removing from receptacle to avoid damaging cord.
5.Remove the battery from the battery charger.
Supporting the battery charger with hand, pull out the battery from the battery charger.
10
English
Regarding electric discharge in case of new batteries, etc.
As the internal chemical substance of new batteries and batteries that have not been used for an extended period is not activated, the electric discharge might be low when using them the first and second time. This is a temporary phenomenon, and normal time required for recharging will be restored by recharging the batteries 2 – 3 times.
How to make the batteries perform longer.
Recharge the batteries before they become completely exhausted.
When you feel that the power of the tool becomes weaker, stop using the tool and recharge its battery. If you continue to use the tool and exhaust the electric current, the battery may be damaged and its life will become shorter.
Avoid recharging at high temperatures.
A rechargeable battery will be hot immediately after use. If such a battery is recharged immediately after use, its internal chemical substance will deteriorate, and the battery life will be shortened. Leave the battery and recharge it after it has cooled for a while.
 CAUTION:
When the battery charger has been continuously used, the battery charger will be heated, thus constituting the cause of the failures. Once the charging has been completed, give 15 minutes rest until the next charging.
If the battery is recharged when it is warm due to battery use or exposure to sunlight, the pilot lamp may not light.
The battery will not be recharged. In such a case, let the battery cool before charging.
If the battery charger does not work while the battery is mounted correctly, it is probable that the battery or charger is malfunctioning. Take it to your authorized Service Center.
BEFORE USE
Check the work area to make sure that it is clear of debris and clutter.
Clear the area of unnecessary personnel. Ensure that lighting and ventilation is adequate.
MAINTENANCE AND INSPECTION
 CAUTION: Pull out battery before doing any inspection or maintenance.
1.Check the Screws
Loose screws are dangerous. Regularly inspect them and make sure they are tight.
 CAUTION: Using this battery charger with loosened screws is extremely dangerous.
2.Check for Dust
Dust may be removed with a soft cloth or a cloth dampened with soapy water.
Do not use bleach, chlorine, gasoline or thinner, for they may damage the plastics.
11
 Loading…
- Categories
- Brands
-
Home
-
Hitachi
-
Accessories communication
-
UC 18YG
Owner’s manuals and user’s guides for Accessories communication Hitachi UC 18YG.
We providing 1 pdf manuals Hitachi UC 18YG for download free by document types: User Manual

Table of contents
More products and manuals for Accessories communication Hitachi
| Models | Document Type |
|---|---|
|
HANDYTONE-486 |
User Manual
45 pages |

Найди любой мануал:
Например: Sony VGN-FW460J/T
Вы можете бесплатно скачать Инструкция по эксплуатации для Hitachi UC 18YG.
Также вы сможете прочесть онлайн этот документ без скачивания.
Скачать Инструкция по эксплуатации для Hitachi UC 18YG
Тип файла
PDF
Размер
287 Kb
Кол-во страниц
36
Просмотров
2062
Читать онлайн Инструкция по эксплуатации для Hitachi UC 18YG (Страница 1)

Другие Зарядные устройства Hitachi UC 18YG
Топ Hitachi Зарядные устройства
Вопросы
Ранее вы смотрели
Эта страница полезна для вас? Поделитесь ссылкой:

Русский
- Bedienungsanleitung Hitachi UC18YG
- Hitachi UC18YG User Manual
- Manual Usuario Hitachi UC18YG
- Mode d’emploi Hitachi UC18YG
- Istruzioni Hitachi UC18YG
- инструкция Hitachi UC18YG
- Hitachi UC18YGの取扱説明書
- Handleiding Hitachi UC18YG
- Manual de uso Hitachi UC18YG
Вам нужна инструкция? Мы поможем Вам ее найти и сэкономить Ваше время.
- 45 stron
- 0.43 mb
Изделие Hitachi UC18YG, а также другие, которыми Вы пользуетесь ежедневно, наверняка вы получили в комплекте с инструкцией обслуживания. Из опыта наших пользователей мы знаем, что большинство из Вас не уделили этому особого внимания. Большая часть инструкций, сразу же после покупки попадает в корзину для мусора вместе с коробкой — это ошибка. Ознакомьтесь с информацией, касающейся инструкции Hitachi UC18YG, которая поможет Вам в будущем сэкономить нервы и избежать головной боли.
Важная подсказка — не забывайте хотя бы раз прочитать инструкцию Hitachi UC18YG
Если вы не хотите каждый раз читать информационные брошюры, касающиеся, тех или Hitachi UC18YG иных изделий, достаточно, прочитать их раз — сразу же после покупки устройства. Вы получите основное знания, касающиеся поддержания изделия Hitachi UC18YG в хорошем эксплуатационном состоянии, так, чтобы без проблем достигнуть его планируемого цикла работы. Затем инструкцию можно отложить на полку и вернуться к ней только в случае, если вы не уверены, правильно ли проводится техобслуживание изделия. Правильный уход является необходимым элементом Вашего удовольствия Hitachi UC18YG.
Раз в году пересмотрите шкафчик, в котором держите инструкции для всех устройств, — выбросите те, которыми вы уже не пользуетесься. Это поможет Вам сохранять порядок в своей домашней базе инструкций обслуживания.
Summary of Contents for Hitachi UC18YG
Что находится в инструкции Hitachi UC18YG? Почему стоит ее прочитать?
- Гарантия и подробности, касающиеся техобслуживания изделия
Хорошей идеей будет прикрепить чек к странице инструкции. Если что-то плохое случится во время использования Hitachi UC18YG, у вас будет комплект документов, необходимый для гарантийного ремонта. В этой части инструкции вы найдете информацию об авторизованных сервисных центрахHitachi UC18YG а также, как самостоятельно правильно ухаживать за оборудованием — так, чтобы не потерять гарантийных прав. - Указания по монтажу и Setup
Не терять нервов и времени на самостоятельную попытку установки и первого запуска изделия. Воспользуйтесь рекомендациями производителя Hitachi UC18YG чтобы правильно запустить изделие, без лишнего риска повреждения оборудования. - Информация, касающаяся дополнительных запчастей (входящих в комплект а также являющихся опцией)
Пересматривая эту часть документа вы сможете проверить, доставлен ли ваш Hitachi UC18YG с полним комплектом аксессуаров. Вы также сможете узнать, какие дополнительные запчасти или аксессуары для Hitachi UC18YG Вы сможете найти и докупить к своему устройству. - Troubleshooting
Самые частые проблемы, касающиеся Hitachi UC18YG и методы их решения. Это очень полезная часть руководства по обслуживанию — она позволит Вам сэкономить много времени на поиск решений. 90% проблем с Hitachi UC18YG повторяется у многих пользователей. - Требования, касающиеся питания и энергетический класс
Информация, касающаяся количества потребляемой энергии, а также рекомендации, касающиеся установки и питания Hitachi UC18YG. Прочитайте, чтобы оптимально пользоваться Hitachi UC18YG и не использовать большего количества ресурсов, нежели это необходимо для правильной работы изделия. - Специальные функции Hitachi UC18YG
Здесь вы можешь узнать, как персонализировать изделие Hitachi UC18YG. Вы узнаете, какие дополнительные функции могут помочь Вам удобно использовать продукт Hitachi UC18YG а также, какие функции Вашего устройства оптимальны для выполнения конкретной деятельности.
Как видите в инструкции вы найдете информацию, которая реально поможет Вам в использовании Вашего изделия. Стоит с ней ознакомиться, чтобы избежать разочарований, возникающих из более короткого, нежели предусматривалось, периода исправности изделия Hitachi UC18YG. Если все же вы не хотите копить инструкции в своем доме, наш сайт поможет Вам в этом — вы должны найти у нас руководство по обслуживанию большинства из своих устройств, а также Hitachi UC18YG.