

Цена вопроса: 0 ₽
Пробег: 99 075 км
Запчасти
18 сентября 2017
Метки: другое
Войдите или зарегистрируйтесь, чтобы писать комментарии, задавать вопросы и участвовать в обсуждении.
-
Page 1: BMW 520D
The Ultimate Driving Mac hine Owner ‘s Hand book for Vehicle Contents A to Z Online Edition for Part-No. 01 41 0 159 725 © 09/05 BMW AG[…]
-
Page 2: BMW 520D
523i 525i 530i 540i 550i 525xi 530xi 530xd 520d 525d 530d 535d Owner’s Handbook Congratulations on your choice o f a BMW. The better you are ac quainted with y our car, t he easier yo u will find it is to handle. We would therefore like to o ffer you the follow- ing a dvic e: Please read the Owner’s Handbook before setting out in your new[…]
-
Page 3: BMW 520D
© 2005 Bayerische Motoren W erke Aktiengesellschaft Munich, Ge rmany Not to be repr oduced, wholly or in part, without wri tten permi ssio n f rom B MW AG, Muni ch. Order No. 01 41 0 159 725 English VIII/05, 05 09 510 Printed in Ge rmany Printed on enviro nmental ly frien dly pap er, bleached with out chlorine, suit able for recycling. Online Edit[…]
-
Page 4: BMW 520D
Ent er tai nme nt Overview Contr ols Driving hints Navigat ion Mobility Refere nce Contents The quickest access to a particular topic or item is by consulting the detailed alphabetical i ndex, see page 228 . About this Owner’s Handbook 4 Notes Overview 8 Driving area 14 iDrive 20 Voic e inpu t syste m Controls 26 Open ing a nd c losi ng 42 Adj[…]
-
Page 5: BMW 520D
Notes 4 Notes About this Owner’s Handbook We have tried to make all the information in this Owner’s Handbook easy to find. The quicke st access to a specific topic or item i s by consult- ing the deta iled alpha betical inde x at the end. Consult the first chapter for an overview of your car. When the time comes to sell your BMW , please […]
-
Page 6: BMW 520D
5 Ent er tai nme nt Overview Contr ols Driving hints Navigat ion Mobility Refere nce Your car When you ordere d your BMW, yo u chose vari — ous items of equipment .This Owner’s Hand- book describes all models and equipment specifi cations whi ch BMW offers within this par ticul ar mo del line. This explains why the Owner’s Handbook may al[…]
-
Page 7: BMW 520D
Online Edition for Part-No. 01 41 0 159 725 © 09/05 BMW AG[…]
-
Page 8: BMW 520D
Overview This summary of but tons, switc hes and displays s erves as an in itial gui de. In addition, it gi ves you an insight into the principles behind the various ways in which functions can be per formed. Overview Online Edition for Part-No. 01 41 0 159 725 © 09/05 BMW AG[…]
-
Page 9: BMW 520D
Driving area 8 Driving ar ea Around the steering wheel: controls and displays 1 Sa loon: r olle r sun blind * for rear window 110 2 Safety switch for rear window s 38 3 Op enin g and clos ing w indo ws 37 4 Fol ding outs ide m irro rs in a nd ou t * 49 5 Adjusting outside mirrors 49 Parking position function * 50 6 Flashing turn indicators 62 High-[…]
-
Page 10: BMW 520D
9 Ent er tai nme nt Overview Contr ols Driving hints Navigat ion Mobility Refere nce 7 Buttons o n the stee ring wheel 8 Instrument cl uster 10 11 Ignition lock 56 12 Horn, ent ire surfa ce 15 Releasing the engine compartment lid 185 16 Opening the luggage compartment lid/ tailgate 33 Telephone * : > Press: r eceiving and ending a call, dial sta[…]
-
Page 11: BMW 520D
Driving area 10 Instrument cluster 1 Flashing turn indicators 2 Speedometer 3 Indicator and wa rning la mps 11 4 Display for Active Cruise Con trol * 68 5 Revolution counter 71 6 Energy control 72 7 Display for > Time/date 71 > Outside temperature 71 > Indicator and warnin g lamps 76 > Crui se cont rol spe ed * 64 > Desi red spee d f[…]
-
Page 12: BMW 520D
11 Ent er tai nme nt Overview Contr ols Driving hints Navigat ion Mobility Refere nce Indicator and warning lamps Princi ple Ind icato r and warn ing lamps may light up in a var iety of co lour s and com bin atio ns bo th in the panel 1 and in the display 2 . Some lamps in t he panel are checked fo r proper functioning and thus come on briefly when[…]
-
Page 13: BMW 520D
Driving area 12 Around the centre conso le: controls and di splays Online Edition for Part-No. 01 41 0 159 725 © 09/05 BMW AG[…]
-
Page 14: BMW 520D
13 Ent er tai nme nt Overview Contr ols Driving hints Navigat ion Mobility Refere nce 1 Microphone for hands -fr ee opera tion of the telephone * and for the voice inpu t sy stem * 20 2 Rea ding ligh ts 97 3 Mak ing an em erge ncy c all * 200 4 Interior l ight 97 5 Glass ro of, el ectric * 38 Panorama glass roof * 39 6 Indicator/warning l ight, fro[…]
-
Page 15: BMW 520D
iDrive 14 iDrive iDrive integrates the functions of a large number of swi tches. Thes e function s can now be controlled fr om one central point. The basic menu-guided operati ng principle is explaine d below. Detai ls of how to cont rol indi vidual func- tions are provided under the descriptions of the items of equi pment concerned. Controls 1 Con[…]
-
Page 16: BMW 520D
15 Ent er tai nme nt Overview Contr ols Driving hints Navigat ion Mobility Refere nce Menu summary Com mun icat ion > Telephone * , see separ ate Op erat ing Instructions > BMW Assis t * , BMW Online * or TeleServ- ice * , see separate Operating Instr uctions Navigation or on-board in formation > Navigation system * > On-b oa rd in form[…]
-
Page 17: BMW 520D
iDrive 16 Comfo rt me nu ite m sel ect ion The comfort selection feature enables you to: > Call up a menu item in the start menu in the last configur ation us ed > Toggle directly between Communication, Navigation, Entertainment and Climate without needing to press the button To do this, move the controller in the relevant dire ctio n an d ho[…]
-
Page 18: BMW 520D
17 Ent er tai nme nt Overview Contr ols Driving hints Navigat ion Mobility Refere nce Operating pr inciple at a gla nce Thi s illus trati on sh ows how t he car can be op er- ated via iDrive. The individua l steps are explained under Set- tings on the control display, Setting time, see page 79 . 1 Select a menu item: > Turn the controller ; the […]
-
Page 19: BMW 520D
iDrive 18 Status information 1 Display for: > Entertainment: Radio, CD, T V * > Telephone * : Name of network operator, no netwo rk, or name of mobile phone registered with the car > «Car Ph one» * : Active voice connection for emergency calls if BMW Assist is not in itial ised > «BMW Assist» * : Active voice connect[…]
-
Page 20: BMW 520D
19 Ent er tai nme nt Overview Contr ols Driving hints Navigat ion Mobility Refere nce Selecting disp lay 1. Move the controller to the r ight to switch to the assista nce windo w and pres s the con — troller. 2. Select a menu item. 3. Press th e controll er. Switching assistance window on/off 1. Move the controller to the r ight to switch to the as[…]
-
Page 21: BMW 520D
Voice inpu t system 20 Voice inpu t system Principle The voice input s ystem enable s you to oper ate various items of equipment on your car without having to take your hands off the steer ing wheel. Individual menu i tems on the contr ol display can be selected by means of short commands. It is not necessary to use the controller to select them. T[…]
-
Page 22: BMW 520D
21 Ent er tai nme nt Overview Contr ols Driving hints Navigat ion Mobility Refere nce This sy mbol appear s on th e control d ispl ay if further commands can be gi ven. If no fur ther c omm and s are pos sib le, co nt inue by operating t he item of equipment via iDrive. Ending or in terrupt ing voice inpu t Press the button on the steering wheel or[…]
-
Page 23: BMW 520D
Voice inpu t system 22 5. Press the butto n on the s teering wh eel or in the centre console. Notes Mo re inf orma tion abou t voi ce co ntro l of the telephone appears in the separate Oper ati ng I nstr uct ions . < When speaking commands, note the f ollowi ng: > Say the commands and numbers fluentl y and at normal volume; avoid unnatural em[…]
-
Page 24: BMW 520D
23 Ent er tai nme nt Overview Contr ols Driving hints Navigat ion Mobility Refere nce Online Edition for Part-No. 01 41 0 159 725 © 09/05 BMW AG[…]
-
Page 25: BMW 520D
Online Edition for Part-No. 01 41 0 159 725 © 09/05 BMW AG[…]
-
Page 26: BMW 520D
Controls This chap ter enab les yo u to o pera te yo ur ca r with gre ater ease. All equi pment items t hat ar e of re leva nce fo r dri ving and m ake y our j ourn ey saf er an d mo re com fo rtabl e are d escr ibed here . Controls Online Edition for Part-No. 01 41 0 159 725 © 09/05 BMW AG[…]
-
Page 27: BMW 520D
Opening and closing 26 Opening and closing Key/Remote control 1 Remote control with integrated key 2 Spare key 3 Adapter for s pare key, i n glove box Remote control w ith integrated key Every remote control contains a r echargeable battery that is automatically recharged when it is in the i gnitio n lock while t he car i s being driven. Use the re[…]
-
Page 28: BMW 520D
27 Ent er tai nme nt Overview Contr ols Driving hints Navigat ion Mobility Refere nce Remove the adapter from the holder in the glove box and insert the spare key into the adapter. Personal Profile Princi ple You can set m any of your BMW’s functions to suit y our persona l needs and pre ferenc es. Without any action on your part, Personal Pro[…]
-
Page 29: BMW 520D
Opening and closing 28 Operating from out side > via the remote control > via the door lock > with comfort access * via the door handles The alarm sys tem is also oper ated at t he same time. This prevents the doors being unlocked either at the safety lock buttons or door han- dles. The al arm system * is also ar med or dis- armed. The int[…]
-
Page 30: BMW 520D
29 Ent er tai nme nt Overview Contr ols Driving hints Navigat ion Mobility Refere nce Locking Press the button. Do not lock the car from the outside when the re is so meon e ins ide it , as it c ann ot then be unlocked from the inside in some national-market ve rsions. < Comfort closing Press and hold down the button. The windows and the glass r[…]
-
Page 31: BMW 520D
Opening and closing 30 Malf unctio ns The remote c ontrol may malfuncti on as a r esult of i nter fe ren ce f rom l oc ali sed rad io s ign als. If this occurs , unlock and l ock the car by i nsert- ing the key into the door lock. If the car can no longer be locked with a remote control, the battery in the remote control is flat. Use this remote co[…]
-
Page 32: BMW 520D
31 Ent er tai nme nt Overview Contr ols Driving hints Navigat ion Mobility Refere nce 5. Select «Centr al lockin g» and press the con- troller. 6. Select «Lock if no door opened» or «Lock after moving off». 7. Press th e controll er. indicates that the setting is selected. The setting is saved for the remote control cu[…]
-
Page 33: BMW 520D
Opening and closing 32 All keys, see page 26 , fit the lock on the luggage compartment lid. Locking sepa rately Turn a key in the luggage compartment lid beyond a pressure point clockwise and remove in the horizontal position. This locks the luggage compar tment lid and disconnects it f rom the central locking syste m. If you then give the remote c[…]
-
Page 34: BMW 520D
33 Ent er tai nme nt Overview Contr ols Driving hints Navigat ion Mobility Refere nce Opening from ou tside Press the button on the tailgate or press the button on the remote control for approx. 1 second: the tailgate opens a short way. It can now be swung upwards. The load area cover is ra ised when th e tailgate is opened. Before closing the tail[…]
-
Page 35: BMW 520D
Opening and closing 34 Opening tailgate The tailgate opens automatically if you: > Press the button on the outside of the tail- gate when the ca r is unl ocked. > Press the button in the driver’s side footwell. > Press the button on the remote control for approx. 1 second. The tailgate swings rea rwards and upwards when ope ned. Make […]
-
Page 36: BMW 520D
35 Ent er tai nme nt Overview Contr ols Driving hints Navigat ion Mobility Refere nce Arming and disarming Whenever the c ar is locked o r unlocked, either with the remote control or at the door lock, the alarm system is armed or disarmed at the same time. Even when the al arm system is armed, you can open the luggage compartment lid/tai lgate by p[…]
-
Page 37: BMW 520D
Opening and closing 36 Com fort access su pports the following fu nc- tions: > Unlocking/lo cking the car > Starting the engine > Comfort closing Operating requirement s > The car can only be locked once it has ascertained that the remote control on your per son is not in side the ca r. > About two seconds have to elapse before the c[…]
-
Page 38: BMW 520D
37 Ent er tai nme n t Overview Contr ols Driving hints Navigat ion Mobility Refere nce Before driv ing a ca r with automatic transmission into a car wash 1. Insert the remote control in the ignition lock. 2. Depress t he brake. 3. Engage selector lever position N. 4. Switch off the engine . The car wi ll be able to roll . Malfunc tion Comfort acces[…]
-
Page 39: BMW 520D
Opening and closing 38 not taken, the risk remains that thin objects, for instance, could fail to interrupt the closing movement. To restrict the trap protection function, pull the switch be yond its press ure point and hold i t in position. In this instance, if the cl osing force exceeds a spe cific value the windo w is opened onl y a s ho rt way […]
-
Page 40: BMW 520D
39 Ent er tai nme n t Overview Contr ols Driving hints Navigat ion Mobility Refere nce Automatic open ing and cl osing Press the swi tch beyond t he pressur e point. Further to this, the following movements are automated: > When the roof is open, press t he switch in the direc tion for rais ing : the roof m ove s to the fully raised position. &g[…]
-
Page 41: BMW 520D
Opening and closing 40 Raising, opening, closi ng Press th e swi tch or pu sh it in th e requ ired d irec- tion as far as the pressure point. The sliding trim is opened: > In unison with the roof > A short dis tance wh en the roof is raised When the roof is closed or in th e raised po sition, the sliding trim can be op ened or clo sed inde- p[…]
-
Page 42: BMW 520D
41 Ent er tai nme n t Overview Contr ols Driving hints Navigat ion Mobility Refere nce 2. Take the Allen key from the holder ne xt to the toolkit and insert it into the designated aperture. Turn the roof in the de sired direc- tion. To close, turn in the direction indicated by the arrow. Online Edition for Part-No. 01 41 0 159 725 © 09/05 BMW AG[…]
-
Page 43: BMW 520D
Adjusting 42 Adjusting Safe seated position A seated posi tion that suitably reflects your req uir emen ts i s a vita l co ndit ion of r elax ed d riv- ing with a mi nimum of fati gue. In conjunct ion with the seat belts, the head restraints and the airbags, th e seated po sition has a m ajor influ- ence on your safety in the event of an accident. […]
-
Page 44: BMW 520D
43 Ent er tai nme n t Overview Contr ols Driving hints Navigat ion Mobility Refere nce Seats Note before adjusting Do not reposition the driver’s seat whi le the car is in motion. The seat could move unexpectedly, leading t o the driver losing co n- trol of the car, so that an accident could be caused. Do not recline the driver’s or front[…]
-
Page 45: BMW 520D
Adjusting 44 4 Backrest * Additional, dependi ng on seat: 1 Backrest wi dth * 2 Shoulder support * 3 Thigh support * 4 Lumbar support * , see further below Shoulder support: the adjustable upper section of the se at back supp orts the sh oulder ar ea of the occu pant ‘s bod y. T his re sults in a rel axed seated position and redu ces the load […]
-
Page 46: BMW 520D
45 Ent er tai nme n t Overview Contr ols Driving hints Navigat ion Mobility Refere nce Seat, mirror and steering wheel position memor y* Yo u c an memor ise a nd ca ll u p two di ff eren t positions for the driver’s and fro nt passenger’s seat * , the outside mirrors and the steering wheel. The lumbar support setting is not stored in the […]
-
Page 47: BMW 520D
Adjusting 46 7. Select «After unl ocking» or «After door opens». 8. Press the c ontroll er. To switch off the calling-up procedure: Select «Auto matic of f» and pre ss the co ntroller . If this function is used, first make sure that the footwel l behind th e driver’s s eat is uno bstru cte d. Oth erwi se pe rsons […]
-
Page 48: BMW 520D
47 Ent er tai nme n t Overview Contr ols Driving hints Navigat ion Mobility Refere nce Adjusting side sections o n Comfort seat Fold the side sections forward to provide greater lateral support in the rest position. Front head restraint, acti ve* The Comfort seats ar e equipped with an active hea d res train t. In the event of a sufficient ly serio[…]
-
Page 49: BMW 520D
Adjusting 48 Open in g 1. Hold onto the belt. 2. Press the red button on the belt buckle. 3. Guide the belt back up to the reel . The upper belt anchorage is suitable for adults of any stature as long as they are sitting cor- rectly, see page 43 . The two seat belt buckl es integrated into th e rear seat ar e intended for the left and right seat oc[…]
-
Page 50: BMW 520D
49 Ent er tai nme n t Overview Contr ols Driving hints Navigat ion Mobility Refere nce To switch off: press and hold down the button. The highest stage with three LEDs lit is for a rapid cooling effect, e.g. if the car’s interior has become very hot. The system auto- matically sw itches down a sta ge after a short time to a void overcooling. &[…]
-
Page 51: BMW 520D
Adjusting 50 Passenger-side mirror tilt-down – Automatic parkin g function* Activating 1. Push the switch to the position for the driver-sid e mirror, arrow 1 . 2. Engage reverse gear or move the selector lever to position R. The glass in the mirror on the pas senger side til ts slight ly down. T he road s urface close to the car, e.g. the kerb, […]
-
Page 52: BMW 520D
51 Ent er tai nme n t Overview Contr ols Driving hints Navigat ion Mobility Refere nce Easy entry/exit* To facil itate ent ry and exi t, the steer ing wheel temporarily moves to its highest position. Heated steering wheel* Press the button with the ignition sw itched on. When the ste ering whee l heating i s on, the LED in the button is lit. Progra[…]
-
Page 53: BMW 520D
Adjusting 52 The chosen func tion can be opera ted with the appropriate key. The setting is saved for the remote control cur- ren tly in use. Operating a funct ion Press the appro priate butt on on the s teering wheel. If you have programmed «Voice output of nav. system» f or one of the buttons : > Switching spoken instructions on/off:[…]
-
Page 54: BMW 520D
53 Ent er tai nme n t Overview Contr ols Driving hints Navigat ion Mobility Refere nce Child safety Important considerations Do not leave children unattended in the car, as t hey could oth erwise enda nger themselves and/or other persons by opening the doors, for exa mple. < All the s eats in y our BMW, except f or the driver’s seat, are in[…]
-
Page 55: BMW 520D
Child safety 54 Functional state of f ront passenger airbag The layout of the switc hes and indicator l amps may vary depending on the car’s equipment. > The indicator lamp remains on if the front passenger’s airbags have be en deactivated. > The indic at or lam p do es no t come on if the front pass enger’s airb ags have been […]
-
Page 56: BMW 520D
55 Ent er tai nme n t Overview Contr ols Driving hints Navigat ion Mobility Refere nce Saloon: rear seats with throu gh loading system* The brackets for the ISOFIX child seat mount- ings are located behind the caps as shown. Before fitting the ISOFIX child seat, remove the caps and pull the belt away from the are a around the child seat mou ntings.[…]
-
Page 57: BMW 520D
Driving 56 Driving Ignition lock Insert the remote control fully into the ignition lock. > Radio readines s swit ches on . Individual electr ical consu mers can oper ate. > The electr ic stee ring wheel l ock disen- gages audibly. Insert the remote control into the ignition lock before starting off, o therwise the electri c steering whe el lo[…]
-
Page 58: BMW 520D
57 Ent er tai nme n t Overview Contr ols Driving hints Navigat ion Mobility Refere nce Starting the engine Never run the engine in encl osed spaces, as inhali ng the harmful exhaust gas ca n lead to los s of consciousness with fatal conse- quences. Th e exhaust gas co ntains carbon mon oxid e, wh ich is colou rless and odou rless , but highly toxic[…]
-
Page 59: BMW 520D
Driving 58 Stopping engine Do not remove the remo te control from the ignition lock whilst the car is moving in order to a void the s teering lo ck engaging dur ing steeri ng. Always take the remote control with you when you lea ve the car. W hen par king o n an incl ine, apply the ha ndbrake, othe rwise the ca r could roll away. < Manual gearbo[…]
-
Page 60: BMW 520D
59 Ent er tai nme n t Overview Contr ols Driving hints Navigat ion Mobility Refere nce Reverse Engage this gear only when the car is standing stil l. Wh en the gea rshift lev er is pr ess ed to t he left, a slight resi stance has to be ove rcome. The reversing lights come on automatically when the i gnition is switched on . Sequential Manual Gearbo[…]
-
Page 61: BMW 520D
Driving 60 It is also possible to move off in second gear, e.g. on slippery roads. In the fo llowing situatio ns, SMG will ta ke contro l on your behalf: > Upshifts and downshifts are performed only at a suitable engine or road speed ; for example, the gearbox cannot shift do wn if the resulti ng engine speed w o uld be t oo high. > When you […]
-
Page 62: BMW 520D
61 Ent er tai nme n t Overview Contr ols Driving hints Navigat ion Mobility Refere nce Deactivating the system > Press the SPO RT button again or > Engage reverse or > Switch off the engine . The LED in the button and the SPORT display in the instrument cluster go out. Accelerati on assistant The acc eleration as sistant permi ts optimum a[…]
-
Page 63: BMW 520D
Driving 62 Kick-down Kick-down enable s you to ac hieve maximum performance : press the accelera tor pedal do wn beyond the regular full-throttle position; increa sed resi stance will be felt. Sport program and M/S manual-sh ift mode Move s elector lever to the left from pos ition D, into the M/S selection gate: The Sport program is activated and D[…]
-
Page 64: BMW 520D
63 Ent er tai nme n t Overview Contr ols Driving hints Navigat ion Mobility Refere nce Indicat ing a turn briefly Press and hold the lever as far as t he press ure point for as long as you wish to indicate a turn. Tripl e turn signa l Press the lever as far as the pressure point; the flashing turn indicator flashes three times. You can activate or […]
-
Page 65: BMW 520D
Driving 64 Clea ning wind screen an d h eadlig hts* Fluid from the wa sher flui d reserv oir is spr ayed on to the wi ndscreen a nd the wipers a re oper- ate d bri efly. When the ca r’s light s are swi tched on, the hea d- lights ar e cleaned simul taneousl y at prac tical intervals . Only operat e the was her syst ems and cleaning equi pment […]
-
Page 66: BMW 520D
65 Ent er tai nme n t Overview Contr ols Driving hints Navigat ion Mobility Refere nce material. Otherwise you could l ose contro l of the car and cause an acc ident as a result. < One leve r for all funct ion s 1 Maintainin g and memorising s peed, accel- erating 2 Maintainin g and memorising s peed, decel — erating 3 Interrupting crui se contr[…]
-
Page 67: BMW 520D
Driving 66 Active Cruise Control* Prin ciple Active Cruise Control enables you to select a speed which the car will then maintain automat- ically, a ssuming yo ur progr ess is not obst ructe d. Subject to reasonable limits, the sy stem auto- matically adjusts the speed of your car if you come up behind a slower vehi cle. You c an vary the distance […]
-
Page 68: BMW 520D
67 Ent er tai nme n t Overview Contr ols Driving hints Navigat ion Mobility Refere nce One leve r for all funct ion s 1 Memorising and i ncreasing the desired speed 2 Memorising and r educing the desi red speed 3 Deacti vati ng the system, see page 68 4 Calling up memorised speed a nd distance, see page 68 5 Selecting di stance from vehicl e in fro[…]
-
Page 69: BMW 520D
Driving 68 The se lecte d distan ce is displ ayed in the inst ru- ment cluster. Adapt the distance chosen from the ve hi- cle in front to the traffic and weather con- ditions, otherwise you may risk committing a traffic offe nce or causi ng an accident. < Deactivating the system Press the l ever up or d own. The displ ays in the instrument clust[…]
-
Page 70: BMW 520D
69 Ent er tai nme n t Overview Contr ols Driving hints Navigat ion Mobility Refere nce If — km/h or — mph appears briefl y on the instrument cluster, the system may not be ready f or operat ion. Callin g up Check Contro l messages, see page 76 . < Warning lamps The display 2 flashes red, a signal sounds. The sy stem i nstruct s you t o int e[…]
-
Page 71: BMW 520D
Driving 70 cle u nti l it has moved ent irely into th e sam e lan e as yo ur car. If a vehicl e ahead suddenl y swerves into your lane, the sy stem may n ot always be able to maintain the selected distance automat- ically. The same applie s to high differe nces between your spee d and that of prece ding vehi- cles, e.g. when r apidly approaching a […]
-
Page 72: BMW 520D
71 Ent er tai nme n t Overview Contr ols Driving hints Navigat ion Mobility Refere nce Everyth ing unde r contro l Odometer, outside temperature display, clock 1 Time, out side temperat ure and date 2 Distance recorder – odometer – and trip dis- tance reco rder 3 Press the kno b: > Reset trip distance recorder with the ignition switched on &[…]
-
Page 73: BMW 520D
Everyth ing under co ntrol 72 Energy control Shows the momentary fuel consumption. Th is enables you to chec k how economical and envi- ronmentally f riendly y our curre nt driving s tyle is. Fuel gauge Fuel tank capacity: approx. 70 litres, approx. 15.4 gal. Notes on re fuelling, see page 180 . If the car is at an angle for some time, for exam- pl[…]
-
Page 74: BMW 520D
73 Ent er tai nme n t Overview Contr ols Driving hints Navigat ion Mobility Refere nce Average fuel consumption The average fuel consumption is cal culated for the peri od since the engine was last sta rted. You can ha ve the avera ge fuel consumption f or two different dis tances displayed on the control disp lay, s ee D ispla ys o n the c ontr ol[…]
-
Page 75: BMW 520D
Everyth ing under co ntrol 74 Jour ney comp uter* The journ ey c ompu ter is suita ble e .g. fo r a hol i- day trip. 1. Call up the s tart menu. 2. Cal l up «Na vigat ion» . On cars without navigation system * : call up «OBC». 3. Select «O n-boar d Info» and press the c on- troller. 4. Select «Jo urney computer&qu[…]
-
Page 76: BMW 520D
75 Ent er tai nme n t Overview Contr ols Driving hints Navigat ion Mobility Refere nce Further i nformation You can have furthe r informat ion on the scope of maintenance dis played on the c ontrol dis- play, see page 14 . 1. Call up the start menu. 2. Press the controller to ca ll up the menu. 3. Select «Servi ce» and press the co ntroll[…]
-
Page 77: BMW 520D
Everyth ing under co ntrol 76 9. Press the controller to adopt the setting. The year is sele cted . 10. Turn the controlle r to make the adjustment. 11. Press the controller to adopt the setting. The date input is memorised. To exit the me nu: Select the arrow and pr ess the co ntroller . Check Control Prin ciple The Check Control mo nitors car fun[…]
-
Page 78: BMW 520D
77 Ent er tai nme n t Overview Contr ols Driving hints Navigat ion Mobility Refere nce To hide thes e Check Contro l messages: Press the CHECK button on the flashing turn indicator l ever. Displaying memorised Check Control messages 1. Press and hold down the button: The first message st ored is displa yed. 2. Press the button: Every time you press[…]
-
Page 79: BMW 520D
Everyth ing under co ntrol 78 The sy mbols also s how the se rvice re quire- ments stat us, se e page 74 . Messages display ed at end of a journey Ma lfunc tio ns wh ich h ave bee n ind icat ed du ring a jou rney ar e di spla yed agai n wh en y ou swi tch off the ignition. You ca n call up the m essage s again provid ed the display has not yet gone[…]
-
Page 80: BMW 520D
79 Ent er tai nme n t Overview Contr ols Driving hints Navigat ion Mobility Refere nce > Select «Stop» and press the controller. Timekeeping is stopped. Tak ing an inte rmed iate time readin g Select «Int erm. time» and press t he controll er. The inter mediate reading i s displaye d below the current time display. You can al[…]
-
Page 81: BMW 520D
Everyth ing under co ntrol 80 3. Turn the cont roller unt il «Set t ime» is sele cted and p ress th e con trol ler. Adjusting settings 1. Turn the controller to set the hour and press the contr oller. 2. Turn the controller to set the minutes and press the c ontroll er. The syste m accepts th e new time. Switching on hour signal * Shortly[…]
-
Page 82: BMW 520D
81 Ent er tai nme n t Overview Contr ols Driving hints Navigat ion Mobility Refere nce Units of m easur ement You can alter the units of meas urement for fuel consumption, distance, temper ature and pres- sure. 1. Select «Un its» and pr ess th e control ler. 2. Select the desi red menu item and press the controller. 3. Select the de sired[…]
-
Page 83: BMW 520D
Technical featu res for dr iving comfort and safety 82 Technical features fo r d riving comfort and safety Park Distance Control PDC* Prin ciple PDC as sists you when m anoeuvr ing in to a parking space. Audible signals and a visual display * indicate that you are approachi ng an object in front of or behind your car. Four ultra- soni c sens ors in[…]
-
Page 84: BMW 520D
83 Ent er tai nme n t Overview Contr ols Driving hints Navigat ion Mobility Refere nce Malfunc tion The LED in the button flash es and a message appears on the control display. PD C has failed. Have the sy stem checked. As a precautionar y measure, keep the sensor s clean and f ree from i ce, so that t hey always operate r eliably . Do not s pray f[…]
-
Page 85: BMW 520D
Technical featu res for dr iving comfort and safety 84 Dyna mic Brak e Control D BC If the brake is pres sed down rapidly, thi s system automatically boosts the braking forc e to a maximum and thus helps to keep the braking distance as s hort as possible when a full brake applicati on is made. I t also makes ful l use of the advantages offered by A[…]
-
Page 86: BMW 520D
85 Ent er tai nme n t Overview Contr ols Driving hints Navigat ion Mobility Refere nce Activating DTC Press the button; the DTC indicator lamp in the instrument cluste r comes on. Deactivati ng DTC Press the button again; the DTC indicator lamp in the instrument cluster goes out. Indica tor lamps If the indicator lamp is fl ashing: DTC is re gula t[…]
-
Page 87: BMW 520D
Technical featu res for dr iving comfort and safety 86 Using HDC Manual transmiss ion: Use HDC in lo w gears and wh en reversing. Automatic tr ansmission: HDC can be use d in any t ransmissi on speed. Displays in the instru ment cluster 1 Display o f target s peed 2 HDC displa y Malfu nction If th e HD C dis play goes out w hile HDC is in operation[…]
-
Page 88: BMW 520D
87 Ent er tai nme n t Overview Contr ols Driving hints Navigat ion Mobility Refere nce Run Flat Indicator RPA Princi ple The Run Flat Indicator monitors the pressures in the four tyres fitted to the wheels while the car is bei ng driven. The s ystem reports any sig- n i f i c a n t l o s s o f p r e s s u r e i n o n e t y r e i n r e l a t i o n t[…]
-
Page 89: BMW 520D
Technical featu res for dr iving comfort and safety 88 Indication of a flat tyre The warni ng lam p sh ows red . A me s- sage appears on the control display. An acoustic signal also sounds. There is a flat tyr e or subst antial loss of tyr e pressure. 1. Reduce your speed and st op the car ca re- fully. Avoid violent or sudden br aking and steering[…]
-
Page 90: BMW 520D
89 Ent er tai nme n t Overview Contr ols Driving hints Navigat ion Mobility Refere nce Two-stage brake lights* Picture on the left: normal braking. Picture on the right: strong br aking when rear fog lights * are not switc hed on. Online Edition for Part-No. 01 41 0 159 725 © 09/05 BMW AG[…]
-
Page 91: BMW 520D
Technical featu res for dr iving comfort and safety 90 Airbags There are the following airbags beneath the covers indicated: 1 Front airbags 2 Head-level airbag 3 Side airbags at front and rear * Prot ecti ve effect Comply with the notes on page 42 , or there may be a risk to your personal safet y. < The front ai rbags protect the driver and fro[…]
-
Page 92: BMW 520D
91 Ent er tai nme n t Overview Contr ols Driving hints Navigat ion Mobility Refere nce Head-Up Di splay* Princi ple The Head-Up Display projects important i nfor- mation into the dri v er’s fi eld of view, e.g. naviga — tion instr uction s. T his ena ble s you to regis ter this information without having to divert your eyes fro m the road. Swi[…]
-
Page 93: BMW 520D
Technical featu res for dr iving comfort and safety 92 4. Select «Bri ghtness» and press the control- ler. 5. Move the contr oller to the left if necessary , to call up «Head-Up Display Offset». 6. Turn the controller u ntil the desired setting is obtained. The setting is saved for the remote control cur- ren tly in use. Notes T[…]
-
Page 94: BMW 520D
93 Ent er tai nme n t Overview Contr ols Driving hints Navigat ion Mobility Refere nce Lights Side lights/Low-b eam headlights 1 Automatic driving lights control * , Adaptive Head Light * and High-beam headlights assistant * 2 Side lights 3 Low-beam headlights and daytime drivi ng ligh ts Side lights When the swi tch is in po sition 2 the li ghts a[…]
-
Page 95: BMW 520D
Lights 94 5. Select «Daytime r unning light» and pres s the contr oller. Daytime dri ving li ghts are swit ched on. Automatic dri ving lights contro l* When the switch is in position 1 , the low-beam headlights a re switched on and off automati- cally depending on ambi ent light conditions , e.g . in a tu nne l, tw iligh t, and in pr ecip[…]
-
Page 96: BMW 520D
95 Ent er tai nme n t Overview Contr ols Driving hints Navigat ion Mobility Refere nce Saloon The second value i n each case applies when towing a trailer. 0 / 1 = 1 to 2 persons without l uggage 1 / 1 = 5 persons without luggage 1 / 2 = 5 persons with luggage 2 / 2 = 1 person, luggage compartment full Comply with r ear axle load limit, s ee page 2[…]
-
Page 97: BMW 520D
Lights 96 The indicator lamp on the instrument cluster comes on whe n the high-beam headlights assistant is active. The lights are turned up and down automatically as the system responds to traffic travelling in fr ont and in the oncomin g direction, and also when ambient lighting i s sufficient, e.g. in bui lt-up areas. Turning up and down manuall[…]
-
Page 98: BMW 520D
97 Ent er tai nme n t Overview Contr ols Driving hints Navigat ion Mobility Refere nce Rear fog lights* The low-beam headlights or front fog lights must be switc hed on. The yellow indi cato r lam p in the inst rume nt cl uste r comes on when th e rear fo g lights are i n use. Instrument lighting You can adjust the lighting inten sity with the knur[…]
-
Page 99: BMW 520D
Climate 98 Climate Equipmen t versions There are two ve rsions of automatic air co ndi- tioning, depending on the equipment fitted to your car. 1 Automatic air conditioning 2 Automatic air conditioning with extended range of fe atures * Air vents 3 Air to winds creen and s ide windows 4 Air to the upper body area, see Ventilati on at front on page […]
-
Page 100: BMW 520D
99 Ent er tai nme n t Overview Contr ols Driving hints Navigat ion Mobility Refere nce Automatic air conditioning 1 Air distribution, adjusting manually 2 AUTO program 3 Air volume, a djusting man ually 4 Switching cooling f unction on/off manually 5 Temperature c ontrol 6 Switching off automatic a ir conditioning 7 Reci rcula ted- air m od e 8 LED[…]
-
Page 101: BMW 520D
Climate 100 Switching cool ing function on and off Air is coole d and dried when the cooling function is switched on, then reheated to suit the tempera- ture setting. Depending on weather conditions, the windscreen ma y fog o ver momentarily when the engine i s started. The cooling function is switched on automati- cally in the AUTO program. The in[…]
-
Page 102: BMW 520D
101 Ent er tai nme n t Overview Contr ols Driving hints Navigat ion Mobility Refere nce Draught-f ree ventilation Turn outlets so that the airflow pass es the occupants without striking their bodies directly. Adjusting temperature for the upper body area With the ignition switched on, you can adjust the settings of the automatic air conditioning sy[…]
-
Page 103: BMW 520D
Climate 102 Automatic air conditioning with extended range o f features* 1 Temperature, l e ft-hand s ide of inter ior compartment 2 Maximum cooling e ffect 3 Defrosting and demis ting windows 4 Air volume, adjusting m anually 5 Switching off automatic a ir condit ioning 6 Switching c ooling function o n/off manuall y 7 Temperature, r ight-hand si […]
-
Page 104: BMW 520D
103 Ent er tai nme n t Overview Contr ols Driving hints Navigat ion Mobility Refere nce 3. Sele ct » Autom atic prog ram mes » and press the controll er. 4. Sele ct th e desi red in tens ity a nd pre ss t he controller. The selected intensity le vel of the auto- matic prog ram is swit ched on. Tempe ra ture Set the desired temperatures in[…]
-
Page 105: BMW 520D
Climate 104 6. Turn the controller to adapt the air distr ibu- tion. Driver’s side: 1 Air to winds creen and s ide windows 2 Air to the upper body area 3 Air to foo twe lls Front pass enger’ s si de: 4 Air to the upper body area 5 Air to foo twe lls Pressing the A UTO button cancels the air distribution settings at the control dis- play, […]
-
Page 106: BMW 520D
105 Ent er tai nme n t Overview Contr ols Driving hints Navigat ion Mobility Refere nce Switch ing off a utomatic air conditi oning The air volume, the heating and the cooling function are switched off. The automatic air conditi oning can be switched on again by pressing any button, except REST button. Ventila tion at fr ont 1 Knurled whee ls for c[…]
-
Page 107: BMW 520D
Climate 106 Since their cur rent consumption is hi gh, you shou ld not run th em twice in successi on unless there has in the meantime bee n an opportunity to recharge the car’s battery by driving the car . Both syste ms are controll ed via iD rive or using the remote control, see page 107 . Independent ventilation system The remote cont rol a[…]
-
Page 108: BMW 520D
107 Ent er tai nme n t Overview Contr ols Driving hints Navigat ion Mobility Refere nce 3. Select «Indepe ndent mode » and press the controller. 4. Select «Switch-on times » and press the controller. 5. Move the controller to the left or right to select «Ti mer 1″ or » Timer 2″. 6. Select the time a nd press […]
-
Page 109: BMW 520D
Climate 108 The symbol on the automatic ai r conditioning display fla shes. If you switch on the inde pendent ventila- tion system or auxiliary heater with the remote control, the interior light comes on fo r a short time by way of confirmation. < Inte rf ere nce The remote control handset may fail to function properly i f there i s interf erenc[…]
-
Page 110: BMW 520D
109 Ent er tai nme n t Overview Contr ols Driving hints Navigat ion Mobility Refere nce Practical interior equipment Integrated universa l remo te control* Princi ple The integr ated universal remote cont rol replaces up t o three di fferent hand-hel d trans- mitters for various sy stems or de vices that are operated by radio r emote control , for […]
-
Page 111: BMW 520D
Practical interior equipment 110 5. To program additional original hand-held transmi tters, repe at steps 3 an d 4. The corresponding memor y button 1 is no w programmed wit h the same sign al as the o rigi- na l hand -hel d tra nsm itter . You can operat e the syste m when the engine is running or when the ignition is switched on. If the system fa[…]
-
Page 112: BMW 520D
111 Ent er tai nme n t Overview Contr ols Driving hints Navigat ion Mobility Refere nce Glove box Opening Pull the handle. The l ight in the glove box comes on. Closing Swing the lid u p. After usi ng the glo ve box whil e the car i s moving, close its lid without delay, so that it cannot cause injur y in the event of an acci — dent. This also a pp[…]
-
Page 113: BMW 520D
Practical interior equipment 112 Access to lower section Press the button on the fr ont and fol d the upper section o r telephone cradle up. Ventilating the l ower sectio n* Slide the cover in t he lower section up. The temperature i nside the ventilated section may become quite high, depend- ing on the automatic air conditioning settings. Should t[…]
-
Page 114: BMW 520D
113 Ent er tai nme n t Overview Contr ols Driving hints Navigat ion Mobility Refere nce Emptying Press the ashtray at the front: it pops up and can be removed. On cars with non-smoker package, the inser t is removed in the same way. Cigar ette lighter, front* With the engine running or the ignition switched on, press in the cigarette lighter. The c[…]
-
Page 115: BMW 520D
Practical interior equipment 114 Touri ng: In the load area To ga in access to th e powe r sock et: Open the cap. Rear ce ntre co nsole * Depending on the equ ipment speci fication, th e power socket s at the r ear are fi tted with caps or a cigarette lighter. See Cigarette lighter, front, page 113 . To ga in access to th e powe r sock et: Pull off[…]
-
Page 116: BMW 520D
115 Ent er tai nme n t Overview Contr ols Driving hints Navigat ion Mobility Refere nce When folding back to the s eating posi- tion, make sure that the catch engages properly, otherwise even braking or swerving, for example, could c ause items of luggage to be displaced forwards into the interior compart- ment, endangering the occu pa nts. < Th[…]
-
Page 117: BMW 520D
Practical interior equipment 116 1. Pull the handle forwards and lift out the ski bag. 2. Close the lid in t he luggage compart ment. For more info rmation on th e various fit- tings available, contact BMW Ser vice. < Touring: load area Load area cover Pull out the cover and locate it in the holders. The cover can support the weight of light art[…]
-
Page 118: BMW 520D
117 Ent er tai nme n t Overview Contr ols Driving hints Navigat ion Mobility Refere nce If you no longer re quire the partition net, take hold of the rail at both ends and remove it from the hol ders, ar row 2 . Allow the partition net to slide slowly into the casse tte. With enlarged load area 1. Fold down both rear seat ba cks, see En larg- ing t[…]
-
Page 119: BMW 520D
Practical interior equipment 118 Hook Ther e are two ho oks for secu ring smal ler obj ects. Press at the base and fold out until engaged. Floor compartments Front compartment: > To open, pull up th e front floor panel flap by the handle. > To close, pr ess down th e front fl oor panel flap unti l it e ngages. Rear compartment: to ope n, reac[…]
-
Page 120: BMW 520D
119 Ent er tai nme n t Overview Contr ols Driving hints Navigat ion Mobility Refere nce Online Edition for Part-No. 01 41 0 159 725 © 09/05 BMW AG[…]
-
Page 121: BMW 520D
Online Edition for Part-No. 01 41 0 159 725 © 09/05 BMW AG[…]
-
Page 122: BMW 520D
Driving hints He re is a vari ety of i nfor mat ion tha t yo u m ay requ ire in par ticu lar d rivin g situ ati ons or operating modes. Driving hints Online Edition for Part-No. 01 41 0 159 725 © 09/05 BMW AG[…]
-
Page 123: BMW 520D
Driving precautions 122 Driving precautions Running-in Moving parts need a certain time to achieve maximum operati ng efficie ncy as a unit . Please com ply with the fol lowi ng in stru ctio ns, w hich are intended t o ensure t hat your car achieves its optimum operati ng life a nd economy. Engine and final dri ve Observe the nati onal speed limi t[…]
-
Page 124: BMW 520D
123 Ent er tai nme n t Overview Contr ols Driving hints Navigat ion Mobility Refere nce Diesel particle filt er* The diesel particle fi lter collects so ot particles and burns them periodical ly at high tempera- ture s. Thi s cle aning p roc edure takes sever al minutes. Under some circums tances, yo u may notice it by the fact that the engine temp[…]
-
Page 125: BMW 520D
Driving precautions 124 assistance wi ll no longer hold the car aft er about 2 seconds and it will start to roll back. < Safe bra king Your BMW is equi pped with ABS as sta ndard. Where a si tuation re quires yo u to apply the brakes hard, you ar e advised to do s o. Since the car remain s steera ble, you ca n avoid obstacle s by turning the s t[…]
-
Page 126: BMW 520D
125 Ent er tai nme n t Overview Contr ols Driving hints Navigat ion Mobility Refere nce 1. Switch off the light and re move the remote control from the igni tion lock. 2. In the engine compartment, turn the stop- pers on the headlights anti-clockwise and remove. 3. Driving o n left: push each lever towards t he middle of t he car. Driving on ri ght[…]
-
Page 127: BMW 520D
Driving precautions 126 Secur ing the lo ad > Sma ll an d relat ively ligh t item s can b e retained with the tensioning straps, a load- area net * or other suitable straps. > BMW Service can suppl y suitable lashi ngs * for secur ing larger o r heavier loads. To secure t hese las hings, th ere are four eyes in the luggage compartm ent or loa[…]
-
Page 128: BMW 520D
127 Ent er tai nme n t Overview Contr ols Driving hints Navigat ion Mobility Refere nce Towing a trailer Info rmat ion a bou t per mis sible trail er lo ads appears on page 217 onwards. BMW Service will pro vide info rmation abo ut ways to i ncrease these load ratings. Cover flap Removing Take hold of the cover flap for the trailer tow hitch * by t[…]
-
Page 129: BMW 520D
Driving precautions 128 Electrical consumers When tow ing a caravan, try to avoid o perating electrical equipment for too long at a time, in order to limit the drain on the car’s battery. Before starting a journey, check that the trailer’s rear li ghts are op erating corr ectly. It is an offence to drive wi thout functioning rear lights, […]
-
Page 130: BMW 520D
129 Ent er tai nme n t Overview Contr ols Driving hints Navigat ion Mobility Refere nce Online Edition for Part-No. 01 41 0 159 725 © 09/05 BMW AG[…]
-
Page 131: BMW 520D
Online Edition for Part-No. 01 41 0 159 725 © 09/05 BMW AG[…]
-
Page 132: BMW 520D
Navigation This chapter describes how you can enter destinations and choose your route , so that your navigation system guide s you reliably to your desti nation. Navigation Online Edition for Part-No. 01 41 0 159 725 © 09/05 BMW AG[…]
-
Page 133: BMW 520D
Starting navigation sy stem 132 Starting navigation system Your navigation system can determine the pre- cise p osition of your car by means of sa tellite s and guide you r eliably to any spe cified des tina- tion. Navigation DVD A special na vigation DV D is requi red for the navigation system. This navigation DVD differs for the Professi onal and[…]
-
Page 134: BMW 520D
133 Ent er tai nme n t Overview Contr ols Driving hints Navigat ion Mobility Refere nce 2. Press th e controll er. Furt her menu it ems a re di splaye d. 3. Select the desir ed view of the route or «Ve hicle p ositi on». 4. Press th e controll er. The assistance window is constantly updated as you travel. Online Edition for Part-No. 01 41[…]
-
Page 135: BMW 520D
Destination input 134 Destination input You c an ch oose fr om th e foll owing opt ion s f or ent erin g a des tina tion : > Entering a destination manually, see below > Entering a destination via voice com- mands*, see page 138 > Selecting the destinati on via I nformation, see page 140 > Select ing a destina tion fro m a list, see Des[…]
-
Page 136: BMW 520D
135 Ent er tai nme n t Overview Contr ols Driving hints Navigat ion Mobility Refere nce The system in addition supports you with the following s pecial f eatures: > If you do not enter a street name , you will be guided to the centre of the town or city. > You can skip input of the country, town or city if you wish to retai n previous inputs.[…]
-
Page 137: BMW 520D
Destination input 136 Entering dest ination via postcode 1. Select » City» or «City / Postcode» and press the contr oller. 2. Entering postcode: Select the i ndividual characte rs and press the contro ller each time. > To enter s paces, if ne cessary: Select th e symbol and press the co n- troller. > To delete indi vidual […]
-
Page 138: BMW 520D
137 Ent er tai nme n t Overview Contr ols Driving hints Navigat ion Mobility Refere nce 2. Turn the controller to the ri ght until a request appears to enter a street within the country, and press the controller. 3. Move the highlighted marker to the s econd field from the top a nd enter th e street. Entering a house nu mber 1. Select «Bui ldi[…]
-
Page 139: BMW 520D
Destination input 138 Entering a destination via voice commands* In conjunction with the Professional navigation system, you can enter a desired dest ination via the voice i nput system. To enter a des tinatio n, it is possi ble at any time to ma ke entries vi a voice command s or via iDrive. To do so, simply reac- tivate the voice input system, if[…]
-
Page 140: BMW 520D
139 Ent er tai nme n t Overview Contr ols Driving hints Navigat ion Mobility Refere nce Selecting a destination from a map Professional navigation system: If you know only the pos ition of a place or street, you can enter the destination with the aid of a map. You can narrow do wn the destination on the map by means of cross-hairs and then transfer[…]
-
Page 141: BMW 520D
Destination input 140 7. Press the c ontroll er. The map for destinatio n input can also be call ed up in the map vi ew: Select the symbol and press the controlle r. Selecting the destinati o n via Information You can call u p selected dest inations, e.g. hotels, tourist attractions or hospitals, phone them and tr ansfer these des tinati ons for ro[…]
-
Page 142: BMW 520D
141 Ent er tai nme n t Overview Contr ols Driving hints Navigat ion Mobility Refere nce Sele ct «N aviga tion » an d pres s the c ontr olle r. The dest inat ion last e nter ed is liste d fi rst in the desti natio ns list . This symbol i dentifies the curr ent desti na- tion. To s how other des tina tions in the dest inat ion s list: Turn […]
-
Page 143: BMW 520D
Destination input 142 Business and Professional nav igation systems 1. Entering a destination manually, see page 134 . 2. Select «Add to address book» and press the controller. You can also sa ve a destination from the desti- nations li st in the address book, see page 141 . Professional navigation system 1. Select «Addres s book&quo[…]
-
Page 144: BMW 520D
143 Ent er tai nme n t Overview Contr ols Driving hints Navigat ion Mobility Refere nce principle, see Entering a destinati on manu- ally, page 134 . 4. Select «Save a ddress» and pres s the con- troller. You can transfer your current position to the address book even if you have left the area dig- itised on the navigation DVD. To do thi […]
-
Page 145: BMW 520D
Destination input 144 3. Select «Delet e» and press the controlle r. Deleting al l destinations from addre ss book 1. Call up the s tart menu. 2. Press the c ontroller t o call up the menu. 3. Selec t «Vehic le settin gs» and pr ess the controller. 4. Select » Delete data » and pres s the contro l- ler. 5. Select «[…]
-
Page 146: BMW 520D
145 Ent er tai nme n t Overview Contr ols Driving hints Navigat ion Mobility Refere nce To use your home addres s as the destina tion: 1. Select «Ho me address» and press t he con- troller. 2. Sele ct «St art gu idanc e» a nd pre ss the co n- troller. To change the entry: 1. Select «Ho me address» and press t he con- t[…]
-
Page 147: BMW 520D
Destination input 146 Wordmat ch princip le The wordmatch principle ma kes the input of place names an d streets easier . It compa res your destination i nputs continuously with the data stored on the navigation DVD, and reacts even if sl ight di screpa ncies ar e found. This has the follo wing advantages f or you: > You can also input place nam[…]
-
Page 148: BMW 520D
147 Ent er tai nme n t Overview Contr ols Driving hints Navigat ion Mobility Refere nce Route guidance Starting route guidance iDrive concept , see page 14 . 1. If necessary, move the highlighted marker to the uppermost field. Turn the controller until «Nav igation» is sel ected and press the controller. 2. Turn the cont roller to s elect[…]
-
Page 149: BMW 520D
Route guidance 148 appear at the start of the next journey: «Contin ue gui dance?». Route guidance starts automatically after a short while. To start r oute guidance immediately: Select «Y es» and pr ess the controller . Displaying the route Various m odes are available for displaying the course of the route during route guidanc[…]
-
Page 150: BMW 520D
149 Ent er tai nme n t Overview Contr ols Driving hints Navigat ion Mobility Refere nce Display ing ma p view Professional navigation system: You can have the car ‘s position shown on a map. After starting route guidance, the planned route is shown on the map. 1. Sele ct «Nav igat ion» and pre ss th e cont rol- ler. 2. Move the highl[…]
-
Page 151: BMW 520D
Route guidance 150 Professional navigation system: Direction ar rows and congestion war nings are also dis played. To exit the me nu: Select the arrow and pr ess the co ntroller . Route guidance by spoken instructions Switching spok en instructions on/off During route guidance, voice message s can be swit che d on or off in the a rr ow v iew or t h[…]
-
Page 152: BMW 520D
151 Ent er tai nme n t Overview Contr ols Driving hints Navigat ion Mobility Refere nce Adjusting the volume of the sp oken instructio ns The volume can be adjusted only whil e a spo- ken inst ructio n is b eing issue d. 1. Have th e last spok en instruc tion rep eated if desired. 2. Turn the knob dur ing the sp oken instruc tion until th e desired[…]
-
Page 153: BMW 520D
Route guidance 152 3. Turn the controller to enter the desired value, t hen press the controll er. 4. Busine ss navigation sy stem: Select «Calcul ate» and press the controller. The rou te is re cal culat ed. To exit the menu without altering the route: Select the arrow and pr ess the co ntroller . Traffic info rmation* At any time you ca[…]
-
Page 154: BMW 520D
153 Ent er tai nme n t Overview Contr ols Driving hints Navigat ion Mobility Refere nce «AUTO»: automa tic selection of the TMC station with the strongest received signal. Calling up traffic in formation manually During route guidance, traffic information can be switched on o r off in th e arrow view or the map view: This sym bol will app[…]
-
Page 155: BMW 520D
Route guidance 154 Representation of traffic information in the map view Professional navigation system: The tra ffic info rmation symbo ls are show n in the map view up to a scale of 200 km or 100 mil es. At scales of up to 10 km or 5 miles, additional inf orma tion is disp layed . The leng th, di recti on and severity of traffic congestion are sh[…]
-
Page 156: BMW 520D
155 Ent er tai nme n t Overview Contr ols Driving hints Navigat ion Mobility Refere nce Busines s navigation syste m: Select «Dynamic route planning» and pre ss the controll er. The navigation syste m calculates a route that depends on the road type and the nature and length of the traffic congestion. The route ma y lead thr ough the tra […]
-
Page 157: BMW 520D
What to do if … 156 What to do if … What to do if … > a navigation DVD has been ins erted but a request to in sert the DVD is displayed o n the control display? The navigation DV D is possibly not the cor- rect DVD f or the na vigation s ystem. Check the DVD’ s labe l. > you call up your c ar’s curr ent position, but the displ[…]
-
Page 158: BMW 520D
157 Ent er tai nme n t Overview Contr ols Driving hints Navigat ion Mobility Refere nce Online Edition for Part-No. 01 41 0 159 725 © 09/05 BMW AG[…]
-
Page 159: BMW 520D
Online Edition for Part-No. 01 41 0 159 725 © 09/05 BMW AG[…]
-
Page 160: BMW 520D
Entertain ment This chapter tells you how to operate the radio, CD and TV and adjust the tone settings for these systems. Entertain ment Online Edition for Part-No. 01 41 0 159 725 © 09/05 BMW AG[…]
-
Page 161: BMW 520D
On/off and settings 160 On/off and settings The follo wing audio a nd video sour ces sh are the same controls and adjustment option s: > Professional radio * or Busin ess radio > CD player > CD changer * > Television, TV * Controls The audio and video s ources can be opera ted via: > Buttons next to CD player > iDrive > Buttons[…]
-
Page 162: BMW 520D
161 Ent er tai nme n t Overview Contr ols Driving hints Navigat ion Mobility Refere nce signa l, sto re sta tion s, ton e cont rol, s ample stations . From another menu, you can switch direct ly to the sc reen last shown, see Comfort menu i tem selectio n page 16 . < The selected a udio sour ce is sa ved for th e remote co ntrol curr ently in us[…]
-
Page 163: BMW 520D
On/off and settings 162 Treble and bass 1. Selec t «Treb le / Bass » and pres s the con — troller. 2. Move the controller to the left or right to select «Tr eble» or «Bass». 3. Turn the controller u ntil the desired setting is obtained. Balanc e and fad e r You can a djust volum e dist rib ution in the sa me way as &qu[…]
-
Page 164: BMW 520D
163 Ent er tai nme n t Overview Contr ols Driving hints Navigat ion Mobility Refere nce 2. Select «Concert hall» or «Thea tre». 3. Press th e controll er. LOGIC7 room acoustics are switched on. To switch off the room ac oustics effect: Select «Off» and press t he controll er. LOGIC7 and t he LOGIC7 logo are regi stered[…]
-
Page 165: BMW 520D
Radi o 164 Radio Your radio is designed for receiving the FM and AM wa veba nds: > FM: stations on the VHF waveband > AM: stat ions on the LW * , MW and SW * wavebands Listening to the radio Press th e knob if so und output is switche d off. iDrive co ncept, see page 14 . 1. Press the button. The start menu is call ed up. 2. Move the controll[…]
-
Page 166: BMW 520D
165 Ent er tai nme n t Overview Contr ols Driving hints Navigat ion Mobility Refere nce Changing selec tion criter ia 1. Move the highlighted marker to the s econd field from the top. 2. Turn the controll er until the desired selec- tion cri terion is select ed and press t he con- troller. Buttons next to CD player Press button for the correspondin[…]
-
Page 167: BMW 520D
Radi o 166 3. Select «Au tostore» a nd press the contro ller. «Se t» is s elec ted. 4. Press the c ontroll er. Further menu items are displaye d. 5. Select «Au tostore» a nd press the contro ller. The disp lay of st ation s wit h the b est re cept ion is updated. The frequencie s of th e stations a re displayed . Memor[…]
-
Page 168: BMW 520D
167 Ent er tai nme n t Overview Contr ols Driving hints Navigat ion Mobility Refere nce Changing memory location 1. Select «Memor ised stat ions» and pr ess the controller. 2. Select the desir ed station. «Set» is sel ected . 3. Press th e controll er. Furt her menu it ems a re di splaye d. 4. Select «S ave» and pres s[…]
-
Page 169: BMW 520D
Radi o 168 Traffic repor ts* You can receiv e traffic i nformation announce- ments whil e you are l istenin g to a CD or w atch- ing a TV program. In t his case, the TP function, Traffic Programme, m ust be switched on. On cars with the Professional radio, your radio wi ll rec eive traf fic inf orm atio n ann oun cem ents even if you are tuned to a[…]
-
Page 170: BMW 520D
169 Ent er tai nme n t Overview Contr ols Driving hints Navigat ion Mobility Refere nce CD player and CD changer Listening to CDs Spe cific atio n wi th tw o d isc drive s: The upper disc drive is intended for a udio CDs. Compressed audio files* CDs wi th compre ssed audi o files know n as MP3s can be played bac k on the CD player. Removing navigat[…]
-
Page 171: BMW 520D
CD player and CD changer 170 CD changer: starting a CD 1. Load and insert the CD magazine, see page 173 . 2. Press the button. The start menu is call ed up. 3. Move the controller to the rear to call up «Enter tainment» . 4. If necessary, move the highlighted marker to the uppermost field. Turn the controller until «CD» is selec[…]
-
Page 172: BMW 520D
171 Ent er tai nme n t Overview Contr ols Driving hints Navigat ion Mobility Refere nce To change the directory : Select a director y and press the controller. To exit the menu: Select the arrow and press the controlle r. Displayin g informatio n on the track* With comp ressed au dio files, you can have any saved information a bout the current trac[…]
-
Page 173: BMW 520D
CD player and CD changer 172 Compressed audio f iles* 1. Select current track and press the control- ler. 2. Select the desired menu item: > To sample all the tracks in the current director y, select «Scan directory» and press the controller. > To sample all the tracks on the CD, select «Scan a ll» and press the control — […]
-
Page 174: BMW 520D
173 Ent er tai nme n t Overview Contr ols Driving hints Navigat ion Mobility Refere nce Random p lay The tracks on t he current CD are pla yed once each in random order. 1. Select «S et» and pres s the contr oller. Furt her menu it ems a re di splaye d. 2. Select «Random» and press the controller. To stop random play: 1. Press t[…]
-
Page 175: BMW 520D
CD player and CD changer 174 Inse rti ng th e CD mag azin e Insert th e CD magazine in fully i n the dir ection of th e arr ow. The CD changer automa tically reads in the CDs in the changer and is then operational. Notes BMW CD/D VD players and changers are officia lly designate d Class 1 lase r prod- ucts. Never use them if the cover is damaged, o[…]
-
Page 176: BMW 520D
175 Ent er tai nme n t Overview Contr ols Driving hints Navigat ion Mobility Refere nce TV Calling up Pres s the knob if soun d out put is swit che d off. iDrive concept , see page 14 . 1. Press the button. The start menu is cal led up. 2. Move the controller to the rear to call up «Entertainment». 3. Select «TV» and press t he […]
-
Page 177: BMW 520D
TV 176 You can also change the cha nnel by turning the controller while the programme i s on. You can also change the channel using the but- tons on the st eering whee l, see page 9 . Upda ting dis play of r eceiv able channels If you have driven o ut of the transmission range of the channe ls you were o riginally receiving, you can update the di s[…]
-
Page 178: BMW 520D
177 Ent er tai nme n t Overview Contr ols Driving hints Navigat ion Mobility Refere nce 3. Select «Entertain ment settings» and press the controll er. 4. Select «Pic ture» and press the controll er. To call up t he TV sta ndard, pres s the con- tro ller t wice whil e a pr ogra mme is on. 5. Selec t «TV standar d» and p[…]
-
Page 179: BMW 520D
Online Edition for Part-No. 01 41 0 159 725 © 09/05 BMW AG[…]
-
Page 180: BMW 520D
Mobility To assi st you in p reservi ng your ca r’s mob ility, this sectio n contains important i nfo rmati on on operating fluids, wheels a nd tyr es, maint enance rout ines and m ino r repa irs. Mobility Online Edition for Part-No. 01 41 0 159 725 © 09/05 BMW AG[…]
-
Page 181: BMW 520D
Refuelling 180 Refuelling Fuel filler flap Briefly pres s the rea r edge to open and c l ose. Manual rele ase In the event of an electrical fault, you can release t he fuel fi ller flap manuall y. Saloon 1. Lift up the floor mat and the cover beneath it in the luggage compartment. 2. Release the quick-release fa steners on the right-hand side trim […]
-
Page 182: BMW 520D
181 Ent er tai nme n t Overview Contr ols Driving hints Navigat ion Mobility Refere nce Tank cap Fastening Fit the tank cap and turn clockwise unti l it is clearly heard to click into place. Do not crush the tape attached to the cap. A message wi ll appear i f the cap is loos e or missing. < Fuel grade Petrol engin e Never use fuel containing le[…]
-
Page 183: BMW 520D
Wheels and tyres 182 Wheels and tyre s Tyre pressures Information fo r your safety The condition of the ty re s and maintenance of the correct tyre pressures not only influence tyre life but are also dec isive factors in road safety and ride quality. Checking pressur es Check and adjust the ty re pressur es – including t he compact wh eel * – o[…]
-
Page 184: BMW 520D
183 Ent er tai nme n t Overview Contr ols Driving hints Navigat ion Mobility Refere nce In such cases, r educe speed immedia tely and have the wheels and tyres c hecked without delay. Proceed with caution to the near- est BMW Service o r specia list tyre dealer tha t operates to BMW s pecifications and has suita- bly trained personnel. Have the car[…]
-
Page 185: BMW 520D
Wheels and tyres 184 Recommended makes o f tyre Certain makes of tyre are recommended by BMW for each tyre si ze. They are marked wit h a clearly vis ible BMW designation on the si de wall of the ty re. When properly used, t hese tyres meet the hi gh- est stan dards in te rms of saf ety and hand ling characte ristics. Run-flat tyres When fitting ne[…]
-
Page 186: BMW 520D
185 Ent er tai nme n t Overview Contr ols Driving hints Navigat ion Mobility Refere nce In the engine compartment Do not work on the car unless you pos- sess th e nec essary techn ical k nowle dge. If you a re unfamili ar wit h the sta tutory guide- line s, hav e any work on th e car p erfo rmed only by BMW Service or by a workshop that oper- ates […]
-
Page 187: BMW 520D
In the e ngine co mpartment 186 Important parts of the engine compartment 1 Filler neck f or engine oil, see Adding engi ne oil 2 Reservoi r for brake flui d, under the microfil- ter housing 3 Jump-starting connection, see page 201 4 Diesel engi nes: Dipstick f or engine oi l, see Checki ng the eng ine o il lev el 5 Re servo ir for w ash er flui d […]
-
Page 188: BMW 520D
187 Ent er tai nme n t Overview Contr ols Driving hints Navigat ion Mobility Refere nce The quantity of oil between the mid-points of the two dipsti ck marks is a pprox. 1.5 litres, approx. 2.6 pints. Do not add oil beyond the uppe r dipstick mark, other wise the engi ne may be dam- aged by exce ss oil . < Checking the engine oil level on petrol[…]
-
Page 189: BMW 520D
In the e ngine co mpartment 188 level is reached, a me ssage also appears on the control displa y. Top up the oil level within th e next 200 km, app rox . 12 0 mil es, othe rwi se t he engine may suf fer damage. < Keep all oils, gr eases etc. ou t of the reach of children and r ead and com ply with any warning i nstruct ions on the containers, t[…]
-
Page 190: BMW 520D
189 Ent er tai nme n t Overview Contr ols Driving hints Navigat ion Mobility Refere nce Brake system Malfunc tion Brake flu id If the warni ng lamp lights up red even though the handbrake is released and a message appe ars on the control dis- play: stop as soon as possi ble. The brak e flu id lev el in the re se rvoir i s too l ow. You may simultan[…]
-
Page 191: BMW 520D
Maintenance 190 Maintenance BMW Maintenance System The BMW Maintenance System contri butes to wards upho ldin g the roa dwort hin ess an d operating reli a bilit y of your BMW. It also covers comfort and convenience aspects, such as ensuring tha t filt ers for the air i n the car ‘s inte- rior are renewed in good time. I ts purpose is to optim[…]
-
Page 192: BMW 520D
191 Ent er tai nme n t Overview Contr ols Driving hints Navigat ion Mobility Refere nce Socket for o n-board diagnosis OBD Components which have a decisive effe ct on exhaust emissions can be tested via the OBD socke t with a suitab le dev ice. This on-board diagnosis socket is on the driver’s side, on the unders ide of t he instr ument panel […]
-
Page 193: BMW 520D
Replacing parts 192 Replacing parts Toolkit Saloon You will find the toolkit in the l uggage compart- ment lid. Unscrew the wing bo lt to o pen. Touri ng You will find the toolkit behind the left-hand side trim in the load area. Wiper blades, renewing Front 1. Fold out th e wiper ar m and hold it s ecurely. 2. Squeeze together the retaining tabs, s[…]
-
Page 194: BMW 520D
193 Ent er tai nme n t Overview Contr ols Driving hints Navigat ion Mobility Refere nce Please see the booklet Looking after your car for notes on care of the headlights. Halog en headl ight s The pictur e shows th e left si de of the engine compartment. 1 Cov er f or low- beam he adl igh t 2 Cover for hi gh-beam headlight Turn the cover to the lef[…]
-
Page 195: BMW 520D
Replacing parts 194 formed inexpe rtly, beca use of the high ele ctri- cal voltages pr esent. < Side and parking lig hts In the event of a fault, please contact BMW Serv ic e or a wor kshop t hat op er ate s to BMW sp ecific atio ns a nd has suita bly train ed pe rso n- nel. Front fl ashing tu rn indica tor 21 Wa tt bulb, PY 21 W 1. Turn the bul[…]
-
Page 196: BMW 520D
195 Ent er tai nme n t Overview Contr ols Driving hints Navigat ion Mobility Refere nce 4 Reversing li ght 5 Reflec tor 6 Parking, stop and brake lights Centr e brake lig ht This light u ses LED technology. In the event of a fault, please contact BMW Service or a work- shop that ope rat es to BMW spec ifica tio ns and has sui tably tra ined pers on[…]
-
Page 197: BMW 520D
Replacing parts 196 Changing a w heel Safety precautions in t he event of a punc- ture or when changing a wheel : park the car as far as possi ble from moving traffic, on a firm surf ace . Swit ch o n the haza rd w arni ng flashers. Allow the steering lock to engage with the wheels in the straight-ahead position. Apply the handbrake and engage fir […]
-
Page 198: BMW 520D
197 Ent er tai nme n t Overview Contr ols Driving hints Navigat ion Mobility Refere nce 4. Fold the floor panel flap forw ards to release it, then take it out. 5. Open the front floor panel flap. 6. Swing up the spar e wheel cover an d engage the hook in the upper frame of the tailgate cutout. 7. Lift out the cross-bar. When fitting the floor panel[…]
-
Page 199: BMW 520D
Replacing parts 198 3. Fit the new wheel or the com pact wheel and insert at least two d iagonally opposed whee l studs. If the car is not fitted with alloy wheels of the Genuine BMW type, note that different wheel studs may be needed. 4. Insert and screw u p the rema ining wheel studs, then tighten them all firmly, working across the hub rather th[…]
-
Page 200: BMW 520D
199 Ent er tai nme n t Overview Contr ols Driving hints Navigat ion Mobility Refere nce Dispos al After changing batteries, have any old batteries disposed of by BMW Service or take them to an official collecting point. Batter- ies fi lled wit h acid shou ld be trans ported and stored upright. Protect batteries against falling over when in transit.[…]
-
Page 201: BMW 520D
Mutual aid 200 Mutual aid Emergency call* In order to make an emergency call : > Business mobile phone preparation pack- age. > Radio readines s is switch ed on. > The mobile phone network mus t be receiv- able. > The em erg ency c all syste m must b e opera- tional. > BMW As sist has been activated. To activate BMW Assist , see the […]
-
Page 202: BMW 520D
201 Ent er tai nme n t Overview Contr ols Driving hints Navigat ion Mobility Refere nce Touri ng Release two qu ick-release fasteners and fol d down the trim. First aid pouch* Certain items i n the first ai d pouch have a lim- ited usef ul lif e. Check the ex piry dates o f the contents re gularly a nd replace any items t hat have expired. Saloon Y[…]
-
Page 203: BMW 520D
Mutual aid 202 Preparation s 1. Check whether t he battery of the other vehicle ha s a voltage of 12 Volt and appr ox. the same c apac ity in Am p/h . This shou ld be printed on the battery. 2. Switch off the engine of the donor veh icle. 3. Switch off all consumers in both vehicles. The bodies of the two vehicles must not make contact, otherwis e […]
-
Page 204: BMW 520D
203 Ent er tai nme n t Overview Contr ols Driving hints Navigat ion Mobility Refere nce Touring: It is stored in the toolkit behind the left-hand side tr im in the load area, s ee page 192 . Use only the t owing eye suppli ed with t he car, and make sure that it is screwed i n fully and is tight. Only use the towing eye for towing on roads. Avoid l[…]
-
Page 205: BMW 520D
Mutual aid 204 Only attach the towbar to the towing eyes. Attaching the towb ar to other parts of the car can result in dam age. < With towrop e Ensure that the towrope is taut when the towing vehicle moves off. For towing, use nylon ropes or tapes, as these will help to avoid sudden tensile loads. Only attach the towrope to the towing eyes. Att[…]
-
Page 206: BMW 520D
205 Ent er tai nme n t Overview Contr ols Driving hints Navigat ion Mobility Refere nce Online Edition for Part-No. 01 41 0 159 725 © 09/05 BMW AG[…]
-
Page 207: BMW 520D
Online Edition for Part-No. 01 41 0 159 725 © 09/05 BMW AG[…]
-
Page 208: BMW 520D
Reference This chapter contains the technical data, the short commands for the voice input system and the index , which will hel p you find speci fic items of information with ease. Reference Online Edition for Part-No. 01 41 0 159 725 © 09/05 BMW AG[…]
-
Page 209: BMW 520D
Technical data 208 Technical data Engine data 523i 525i/ xi 530i/xi Displ ace ment cc 2497 249 7 2996 N u m b e r o f c y l i n d e r s 666 Maxim um power outp ut kW /hp 130/175 160/215 190/255 at eng ine speed rpm 5800 6500 6600 Maxi mum t or que Nm/l b ft 230/ 180 25 0/18 0 300 /220 at en gine s peed rpm 3500-50 00 2750-4250 2500 -4000 540i 550i […]
-
Page 210: BMW 520D
209 Ent er tai nme n t Overview Contr ols Driving hints Navigat ion Mobility Refere nce Fuel consumption, carbon d ioxide/ Θ emissions 523i/Tou ring 523i/To uring 525i /Tou rin g 525i /Tou rin g Manual Automatic Manual Automatic Urban Litres/100 km (mpg) 12.1/ 12.1 (23. 3/23 .3) 13.4 /13 .7 (21. 1/20 .6) 12.4/12.5 (22. 8/22 .6) 13.5/13.5 (20.9/20.[…]
-
Page 211: BMW 520D
Technical data 210 525xi/Tou ring 525x i/To uri ng 530xi/To uring 53 0xi/T our ing Manual Automatic Manual, SMG Autom atic Urban Litres/100 km (mpg) 13.7/13.7 (20.6/20.6) 14.8/14.7 (19.1/19.2) 13.6 /14 .1 (20.8/20.0 ) 14.4/14.6 (19.6/19.3) Extra-urba n Litres/100 km (mpg) 7.2/ 7.7 (39.2/36.7) 7.7/7.9 (36.7/35.8) 7.4/7.8 (38.2/36.2 ) 7.9/ 8.1 (35.8/[…]
-
Page 212: BMW 520D
211 Ent er tai nme n t Overview Contr ols Driving hints Navigat ion Mobility Refere nce Fue l co nsum ptio n is det ermi ned acco rdin g to a standard test method, EU Directive 80/1268/E EC. It is not the same as the average fuel consumption in practic e, which depends on a great many different factors su ch as driving style, load, road condition, […]
-
Page 213: BMW 520D
Technical data 212 Dimensions All dimensio ns in mm. Car height w ith xDrive: 1482 m m, approx. 4 ft 10 in Smallest tur ning circle ∆ : 11.4 m, approx. 37 ft 6 in, with xDr ive 11.9 m, approx. 39 ft 1 in Online Edition for Part-No. 01 41 0 159 725 © 09/05 BMW AG[…]
-
Page 214: BMW 520D
213 Ent er tai nme n t Overview Contr ols Driving hints Navigat ion Mobility Refere nce All d ime nsio ns in m m. S mall est t urnin g cir cle ∆ : 1 1.4 m, approx. 37 ft 6 in, with xDrive 11.9 m, approx. 39 ft 1 in Online Edition for Part-No. 01 41 0 159 725 © 09/05 BMW AG[…]
-
Page 215: BMW 520D
Technical data 214 Weigh ts Saloon 523i 525i 530i 54 0i 550i Kerb weight, r eady for road, with 75 kg (165 lb ) load, tank 90 Ξ full, without optional extras > Manual transmissi on, SMG kg (lb) 1545 (3405) 1550 (3410) 1565 (3450) 1725 (380 0) 1735 (3825) > Automatic transm ission kg (lb) 1565 (3450) 1570 (3460) 1575 (3472) 1725 (380 0) 1735 […]
-
Page 216: BMW 520D
215 Ent er tai nme n t Overview Contr ols Driving hints Navigat ion Mobility Refere nce Saloon 520d 52 5d 530d 535d Kerb weight, ready for road, with 75 kg (165 lb) load, tank 90 Ξ full, without optional extras > Manual tra nsmissi on, SMG kg (lb) 1585 (3490) 1660 (3660) 1665 (367 0) — > Automatic transmiss ion kg (lb) 1595 (3520) 1670 (3680[…]
-
Page 217: BMW 520D
Technical data 216 Touring 525xi 530xi 530xd Kerb weight, r eady for road, with 75 kg (165 lb ) load, tank 90 Ξ full, without optional extras > Manual transmissi on, SMG kg (lb) 1760 (3880) 1760 (38 80 ) 1830 (4030) > Automatic transm ission kg (lb) 1775 (3910) 1775 (39 10 ) 1845 (4070) Permitted gross weight > Manual transmissi on, SMG k[…]
-
Page 218: BMW 520D
217 Ent er tai nme n t Overview Contr ols Driving hints Navigat ion Mobility Refere nce Towing a trailer Saloon 523i 52 5i 530i 540i 55 0i Permitted gross weight > Manual tra nsmissi on, SMG kg (lb) 2010 (443 0) 2035 (449 0) 2050 (451 9) 2270 (500 0) 2280 (503 0) > Automatic transmiss ion kg (lb) 2030 (447 0) 2055 (453 0) 2060 (454 0) 2270 (5[…]
-
Page 219: BMW 520D
Technical data 218 Saloon 520d 525d 530d 535d Permitted gross weight > Manual transmissi on, SMG kg (lb) 2110 (4650) 2145 (4730) 2210 (4650) — > Automatic transm ission kg (lb) 2120 (4670) 2155 (4750) 2210 (4870) 2220 (4890) Rear axle load l imit kg (lb) 1250 (2750) 1245 (2740) 1310 (2890) 1275 (2810) Towing loads accord ing to EU operating p[…]
-
Page 220: BMW 520D
219 Ent er tai nme n t Overview Contr ols Driving hints Navigat ion Mobility Refere nce Touring 525xi 530x i 530xd Permitted gross weight > Manual tra nsmissi on, SMG kg (lb) 2325 (5130) 2325 (513 0) 2375 (5240) > Automatic transmission kg (lb) 2340 (5160) 2340 (516 0) 2390 (5270) Rea r axle load limit kg (lb) 1400 (3090) 1400 (309 0) 1400 (3[…]
-
Page 221: BMW 520D
Technical data 220 Performance 523i/Tourin g 525i/To uring 530i/T ouri ng Top speed > Manual transmissi on, SMG km/h (mph) 235/2 27 (146/141) 245/240 (152/149 ) 250/250 (155 /155 ) > Automatic transmi ssion km/h (mph) 232/2 24 (144/139) 242/237 (150/147 ) 250/250 (155 /155 ) Acceleration from 0 to 100 km/h (0 to 62 mph) > Manual transmi ss[…]
-
Page 222: BMW 520D
221 Ent er tai nme n t Overview Contr ols Driving hints Navigat ion Mobility Refere nce 525xi/ Touring 530x i/ Touring 530x d/ Touring Top speed > Manual tra nsmissi on, SMG km/h (mph) 237/232 (147 /144 ) 250/ 245 (155/152 ) 242/235 (150 /146 ) > Automatic transmission km/h (mph) 232/228 (144 /141 ) 248/ 242 (154/150 ) 238/233 (148 /145 ) Acc[…]
-
Page 223: BMW 520D
Technical data 222 Filling capacities Litr es (I mp. uni ts) Note Fuel tank approx. 70 (15.4 gal) Fuel grade: page 181 including a reser ve of approx. 8 (1.8 gal) Wind ow washer system Further d etails: pa ge 64 > Saloon approx. 3 (5 pints) > incl. headlamp cle aning system a pprox. 5 (9 pi nts) > Touring approx. 5 (9 pints) Engine with oi[…]
-
Page 224: BMW 520D
223 Ent er tai nme n t Overview Contr ols Driving hints Navigat ion Mobility Refere nce Short co mmands for the v oice input syst em Short commands ena ble you to perform certain functio ns direct ly irres pective of which menu item is select ed. Impor tant short commands for the voice i nput system a re listed be low. Assistance window Com mun ica[…]
-
Page 225: BMW 520D
Short co mmands for the v oice input s ystem 224 Navigation Displaying » Calls accepte d» { Calls accepted } Displaying » Calls not a ccepted» { Calls not accepted } Displayi ng «Bluetooth» { B luetooth } Function Command Function Command Ca lling up na viga tio n 134 { Navigation } Call ing u p «Addr ess in put&q[…]
-
Page 226: BMW 520D
225 Ent er tai nme n t Overview Contr ols Driving hints Navigat ion Mobility Refere nce On-board inform ation Entertainment Function Command Calling up «On-board Info» 73 { On-boar d in fo } Display ing computer 73 { Co mputer } Displaying jour ney computer 74 { Journey computer } Calling up limit speed 78 { Limit } Calling up stopwatch 7[…]
-
Page 227: BMW 520D
Short co mmands for the v oice input s ystem 226 Climate menu Selecting a mus ic track 170 { CD track … } Selecting CD and music tr acks 17 0 { CD 1…6 track… } Ca lling up TV 175 { Television Menu } Switching on TV 175 { Televi sion } Adjusting the picture 176 { Picture } Function Command Function Command Adjusting temperature distribution fo[…]
-
Page 228: BMW 520D
227 Ent er tai nme n t Overview Contr ols Driving hints Navigat ion Mobility Refere nce Calling up «Date» 80 { Date } Calling up «RPA» 87 { RPA } Calling up «HDC» 85 { HDC } Calling up «PDC» 83 { PDC } Calling up «Traffic i nfo rmat ion settings» 152 { Tr affic information settings } Calling up &quo[…]
-
Page 229: BMW 520D
From A-Z 228 From A-Z Index «…» Identifies texts on the control display for selecting functions and refers you to the page wh ere these texts are t o be f ound . A ABS Ant i-loc k Bra ke System 83 ACC, see Active Cruis e Control 66 Acc ele rat ion 220 Accele ration as sista nt fo r Sequ enti al Manua l Ge arbo x SMG 61 «Acce pt as […]
-
Page 230: BMW 520D
229 Ent er tai nme n t Overview Contr ols Driving hints Navigat ion Mobility Refere nce Armrest, s ee Centre ar mrest – fron t 111 – rear 114 Around the centre console 12 Aro und the s teer ing w heel 8 Arrival ti me – see Comput er 73 – see Startin g route guidance 147 «Arro w vie w» in navigation 148 Ashtrays – fron t 112 – […]
-
Page 231: BMW 520D
From A-Z 230 Brakes – Anti-lo ck Brake Sys tem ABS 83 – bra ke flu id 189 – bra ke flu id leve l 18 9 – brake pads 12 2 , 189 – Corneri ng Brake Contr ol CBC 83 – dis c brakes 124 – Dynamic Brake Control DBC 84 – elec tronic bra ke forc e distribution 83 – hand bra ke 58 – runni ng-in 122 – see Safe braking 124 – two-st age […]
-
Page 232: BMW 520D
231 Ent er tai nme n t Overview Contr ols Driving hints Navigat ion Mobility Refere nce Chr ome parts , care , see book le t L ooki ng aft er you r car Cigarette lighter 113 Cigarette lighter socket 113 «City / Postcode» 136 «C ity» in de stin atio n in put 135 Cleaning, see bookle t Looking after your car Clearance wa rning, se[…]
-
Page 233: BMW 520D
From A-Z 232 «Delete data» in navigation 144 Demistin g windows 100 , 103 Destinatio n address – deleti ng 143 – ente ring 13 4 , 138 Destinatio n country i n navigation 135 Destination i n navigati on – desti nations list 140 – ente ring 13 4 – home addr ess 14 4 – manua l input 134 , 13 8 – memor ising 141 – sele ctin g […]
-
Page 234: BMW 520D
233 Ent er tai nme n t Overview Contr ols Driving hints Navigat ion Mobility Refere nce Emergency opera tion, see Manual operati on – door lock 30 – driver’s door 30 – fuel fi ller flap 180 – glas s roof 39 – luggage compartment li d 32 – panorama glass roof 40 – se lect or le ver int erlo ck, automatic transmission 62 – tailga[…]
-
Page 235: BMW 520D
From A-Z 234 Frost protectio n – coo lant 188 – washer fluid 64 Fuel 181 – additives 18 1 – consumpti on values, s ee Fuel consumption 209 – fuel g auge 72 – gra de 181 – see Aver age fuel consumption 73 – see Fuel grade 181 – tank capacity 222 Fuel filler flap 180 – manual operation 180 Fuel level 72 Fuses 199 G Garage door ope[…]
-
Page 236: BMW 520D
235 Ent er tai nme n t Overview Contr ols Driving hints Navigat ion Mobility Refere nce Holder fo r teleph one or mobile phone 111 «Home address» in navigation 144 «Home li ghts» 93 Homepage 4 Horn 8 Hot exhaust system 122 «Hour memo» 80 Hydraul ic brake assist, s ee Dynamic Brake Control DBC 84 I ID3 tag, s ee Informa[…]
-
Page 237: BMW 520D
From A-Z 236 Intermittent wiper ope rat ion 63 «Interm. t ime» 79 Internet site 4 ISOFIX child seat mou nt in gs 54 J Jack 196 – mounting points 197 Jacking points 197 «Journey comp uter» 74 Journey computer 74 Joystick, s ee iDrive 14 Jump-sta rting, see Starting with a flat battery 201 Junction inpu t 136 K Ke rb weig ht, se[…]
-
Page 238: BMW 520D
237 Ent er tai nme n t Overview Contr ols Driving hints Navigat ion Mobility Refere nce Luggage compartment lid 31 – deadlocking separately 32 – emergency o peratio n, see Manual operati on 32 – opening from inside 31 – opening f rom outside 31 – un lock ing a nd lo ckin g from inside 30 – u nloc king man ual ly 32 Luggage compartment l[…]
-
Page 239: BMW 520D
From A-Z 238 Navig atio n system 132 – address book 141 – adjus tin g volume 151 – avoiding sections of route 151 – ca lling up 134 – de stin atio n inp ut 134 – desti nations list 140 – disp laying ro ute 14 8 – dis playing the car ‘s position 155 – ending/resuming r oute guidance 147 – entering a destinatio n address manu[…]
-
Page 240: BMW 520D
239 Ent er tai nme n t Overview Contr ols Driving hints Navigat ion Mobility Refere nce Petrol, s ee Fuel grade 18 1 Petrol consumption, see Fue l consumption 209 «Pictur e» 176 , 177 Pivoting headlights, see Adap ti ve Hea d Li ght 94 Placing a ca ll, see Te lephone Oper atin g I nstr ucti ons «Plan de tour» 154 Plasters, see F[…]
-
Page 241: BMW 520D
From A-Z 240 Remote c ontrol fo r independent ventilati on system/aux iliary heater 10 7 – battery, changing 108 – new re mote control 108 Renewing tyres 18 3 «Repeat di rectory» for audio mod e 172 «Repeat» for audio mo de 172 «Repeat tra ck» for audi o mod e 172 Replacement f uses 19 9 Replacement r emote control[…]
-
Page 242: BMW 520D
241 Ent er tai nme n t Overview Contr ols Driving hints Navigat ion Mobility Refere nce «Save curr ent destination» 144 «Save» for ra dio 166 Saving the car’s position 142 «Scan» – sampling sta tions 165 – sampli ng tr acks 171 «Scan all» fo r audio mode 172 «Scan directory» for audio mode […]
-
Page 243: BMW 520D
From A-Z 242 Socket for On-Board Diagnosi s 191 Sockets, see Co nnecting electri cal appliances 113 Song search on CD, see Sampling tracks 171 Soot parti cle fi lter, se e Diese l particle fi lter 12 3 SOS, see Making an emergency cal l 200 Spare fuses 19 9 Spare key 26 – adapter 26 Spare wheel, s ee Changing a wheel 196 Spare wheel, s ee Compact[…]
-
Page 244: BMW 520D
243 Ent er tai nme n t Overview Contr ols Driving hints Navigat ion Mobility Refere nce Television, see TV 175 Temperature – adjustment fo r the automatic air conditioning system 99 , 103 – adjustment fo r the upper body area 101 , 103 – of co ola nt, see Coo lant temperature 71 Temperature di splay – outside temperature 71 – setting unit[…]
-
Page 245: BMW 520D
From A-Z 244 Turning circl e, see Dimensions 212 Turning up and down automatically, see High- beam he adlights assista nt 95 «TV» 160 , 175 TV 175 – ca lling up 175 – ch ang ing cha nnel 175 – changing standard 176 – contr ols 160 – receiva ble channels 176 – swi tchin g on/off 160 – tone control 16 1 – vol ume 16 0 TV con[…]
-
Page 246: BMW 520D
245 Ent er tai nme n t Overview Contr ols Driving hints Navigat ion Mobility Refere nce Wheel chock 196 Wheels and tyres 182 Wheelslip c o ntrol, see Dy nami c Sta bilit y Co ntro l DSC 84 Wheel stu ds 197 – keys 196 – thie fpr oof 198 – tightening torque, see After fitting 198 Width, see Dimensions 212 Windows 37 – comf ort opera ti on 28 […]
-
Page 247: BMW 520D
Refuelling So that you always have a ccess to the data you need when refue lling, you are recommended to enter the relevant figures for your car in the ta- ble provided below. Use the i ndex to find the in- formation you need. Fuel Engine oil Diesel en gines: The quantity of oil between the mid-points of the two dipstick marks is approx. 1.5 litres[…]
-
Page 248: BMW 520D
01 41 0 159 725 en *BL0159725009* The Ultimate Driving Mach ine More about BMW www.b mw. com Online Edition for Part-No. 01 41 0 159 725 © 09/05 BMW AG[…]
Owner’s Handbook for Vehicle
The Ultimate
Driving Machine
Online Edition for Part-No. 01 41 0 159 725 © 09/05 BMW AG

523i
525i
530i
540i
550i
525xi
530xi
530xd
520d
525d
530d
535d
Owner’s Handbook
Congratulations on your choice of a BMW.
The better you are acquainted with your car, the easier you will find it is to handle. We would therefore like to offer you the following advice:
Please read the Owner’s Handbook before setting out in your new BMW. It contains important notes on how to operate the car, enabling you to derive maximum benefit from the technical advantages of your BMW. It also contains useful information which will help you to uphold both the operating safety and full resale value of your BMW.
Supplementary information is provided in the other documents of on-board literature.
We wish you many a safe and enjoyable journey, BMW AG
Online Edition for Part-No. 01 41 0 159 725 © 09/05 BMW AG
© 2005 Bayerische Motoren Werke Aktiengesellschaft
Munich, Germany
Not to be reproduced, wholly or in part, without written permission from BMW AG, Munich. Order No. 01 41 0 159 725
English VIII/05, 05 09 510 Printed in Germany
Printed on environmentally friendly paper, bleached without chlorine, suitable for recycling.
Online Edition for Part-No. 01 41 0 159 725 © 09/05 BMW AG

Contents
The quickest access to a particular topic or item is by consulting the detailed alphabetical index, see page 228.
About this Owner’s Handbook
4 Notes
Overview
8 Driving area
14 iDrive
20 Voice input system
Controls
26 Opening and closing
42 Adjusting
53 Child safety
56 Driving
71 Everything under control
82Technical features for driving comfort and safety
93 Lights
98 Climate
109 Practical interior equipment
Driving hints
122 Driving precautions
Navigation
132 Starting navigation system
134 Destination input
147 Route guidance
156 What to do if …
Entertainment
|
160 |
On/off and settings |
|
164 |
Radio |
|
169 |
CD player and CD changer |
|
175 |
TV |
Mobility
|
180 |
Refuelling |
|
182 |
Wheels and tyres |
|
185 |
In the engine compartment |
|
190 |
Maintenance |
|
192 |
Replacing parts |
|
200 |
Mutual aid |
Reference
208 Technical data
223Short commands for the voice input system
228 From A-Z
Overview
Entertainment Navigation Driving hints Controls
Reference Mobility
Online Edition for Part-No. 01 41 0 159 725 © 09/05 BMW AG

Notes
Notes
About this Owner’s
Handbook
We have tried to make all the information in this Owner’s Handbook easy to find. The quickest access to a specific topic or item is by consulting the detailed alphabetical index at the end.
Consult the first chapter for an overview of your car.
When the time comes to sell your BMW, please remember to hand over this Owner’s Handbook; it is an important part of the car.
Additional sources of information
If you have any queries, BMW Service will be glad to advise you.
Information on BMW, e.g. on technical aspects, can also be found on the Internet at www.bmw.com.
4 
Symbols used
Indicates precautions that must be followed precisely in order to avoid the pos-
sibility of personal injury and serious damage to the vehicle.
Indicates information that will assist you in gaining the optimum benefit from your vehicle and enable you to care more effectively
for your vehicle.
Refers to measures that can be taken to help protect the environment.
< Marks the end of a specific item of information.
* Identifies optional extras or specific nationalmarket items of equipment, as well as equipment and functions not yet available at the time of printing.
«…» Identifies texts on the control display for selecting functions.
{…} Identifies commands for the voice input system.
{{…}} Identifies replies by the voice input system.
Symbol for components and assemblies
Recommends that you study the relevant section of this Owner’s Handbook in con-
nection with a particular part or assembly.
Online Edition for Part-No. 01 41 0 159 725 © 09/05 BMW AG
Your car
When you ordered your BMW, you chose various items of equipment.This Owner’s Handbook describes all models and equipment specifications which BMW offers within this particular model line.
This explains why the Owner’s Handbook may also contain details of items which you have not ordered. The differences can easily be identified by the asterisk * shown against optional extras.
If your BMW contains equipment that is not described in this Owner’s Handbook, Supplementary Owner’s Handbooks will be supplied and you are requested to study and comply with them.
In cars with right-hand drive, some of the controls are arranged differently from
those shown in the illustrations of this Owner’s Handbook.<
Status at time of printing
The high safety and quality standards of BMW vehicles are maintained by unceasing development work on designs, equipment and accessories. In rare instances, your car may therefore differ from the information supplied in the Owner’s Handbook.
For your own safety
Maintenance and repair
The advanced technology behind this car, for example the use of modern materials and high-performance electronics, means that
specially adapted methods of maintenance and repair are required. Always have the necessary work on your BMW performed either by BMW Service or by a workshop that operates to BMW specifications and has suitably trained personnel. If such work is performed inexpertly, it could result in consequential damage and thus constitute a safety risk.<
Parts and accessories
BMW recommends using parts and accessory products on this car that are
specifically approved for this purpose by BMW. You are recommended to consult BMW Service for advice on Genuine BMW parts and accessories, other BMW-approved products and competent advice on all related matters.
The safety and compatibility of these parts and products in conjunction with BMW vehicles have been checked by BMW. BMW accepts product liability for them.
BMW cannot accept liability for parts or accessory products of any kind which it has not approved.
BMW is unable to assess each individual product of outside origin as to its suitability for use on BMW vehicles without safety risk. Nor can suitability be assured if an official permit has been issued for it in a specific country. Tests performed for such permits cannot always cover all operating conditions for BMW vehicles, and some of them therefore are insufficient.<
Overview
Entertainment Navigation Driving hints Controls
Mobility
Online Edition for Part-No. 01 41 0 159 725 © 09/05 BMW AG
Online Edition for Part-No. 01 41 0 159 725 © 09/05 BMW AG

Overview
This summary of buttons, switches and displays serves as an initial guide.
In addition, it gives you an insight into the principles behind the various ways in which functions can be performed.
Online Edition for Part-No. 01 41 0 159 725 © 09/05 BMW AG
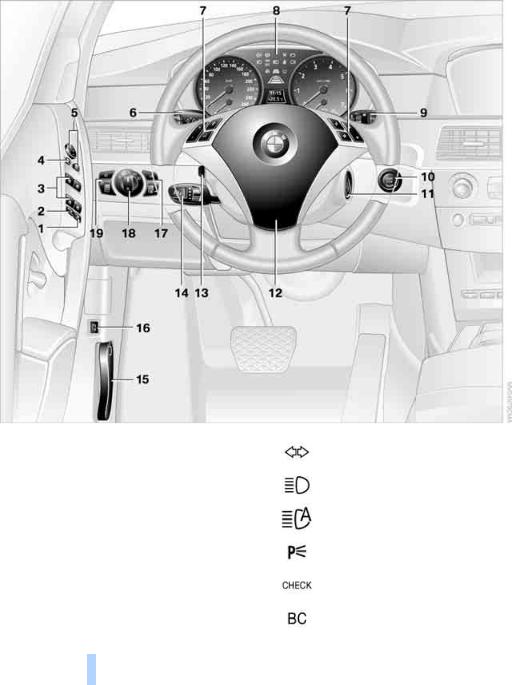
Driving area
Driving area
Around the steering wheel: controls and displays
|
1 |
Saloon: roller sun blind* for rear |
6 |
Flashing turn indicators 62 |
|||
|
window 110 |
||||||
|
2 |
Safety switch for rear windows |
38 |
High-beam headlights, headlight |
|||
|
3 |
Opening and closing windows |
37 |
flasher 95 |
|||
|
4 |
Folding outside mirrors in and out* 49 |
High-beam headlights |
||||
|
5 |
Adjusting outside mirrors |
49 |
assistant* 95 |
|||
|
Parking position function* |
50 |
Parking lights |
95 |
|||
|
Check Control |
76 |
|||||
|
Computer 72 |
||||||
|
8 |
Online Edition for Part-No. 01 41 0 159 725 © 09/05 BMW AG
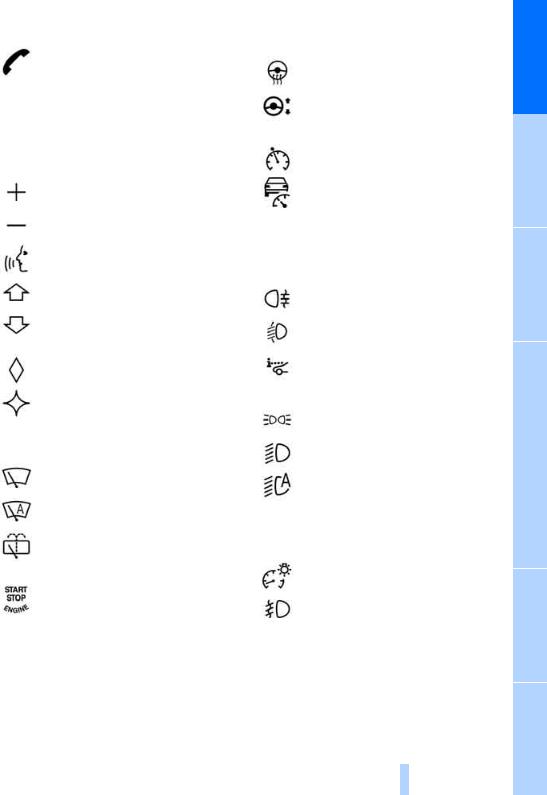
7 Buttons on the steering wheel Telephone*:
>Press: receiving and ending a call, dial starting* for a selected phone number and redialling if no phone number has been selected
>Press and hold down: redialling
Volume control
Activating/deactivating voice input system* 20
Changing radio station Selecting a music track Changing TV station* Scrolling in the telephone book and in lists of stored numbers
Individually programmable* 51
Individually programmable 51
8Instrument cluster 10
9Windscreen wipers 63 Rain sensor 63
Touring: rear window wiper 64
10Switching the ignition on/off and starting/stopping the engine 56
11Ignition lock 56
12Horn, entire surface
13Heated steering wheel* 51 Steering wheel adjustment* 50
14Cruise control* 64 Active Cruise Control* 66
15 Releasing the engine compartment lid 185
16Opening the luggage compartment lid/ tailgate 33
17Rear fog lights* 97
Headlight beam throw adjustment 94
Head-Up Display* 91
18Side lights 93
Low-beam headlights 93
Automatic driving lights control* 94
Adaptive head light* 94
High-beam headlights assistant* 95
19Instrument lighting 97 Front fog lights* 96
9
Overview
Entertainment Navigation Driving hints Controls
Reference Mobility
Online Edition for Part-No. 01 41 0 159 725 © 09/05 BMW AG
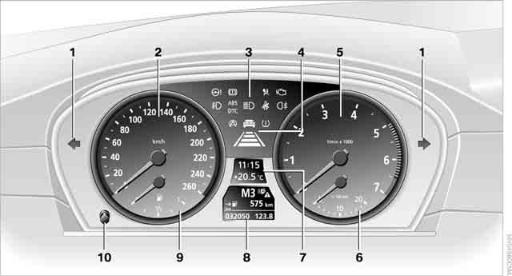
Driving area
Instrument cluster
1Flashing turn indicators
2Speedometer
3Indicator and warning lamps 11
4Display for Active Cruise Control* 68
5Revolution counter 71
6Energy control 72
7Display for
>Time/date 71
>Outside temperature 71
>Indicator and warning lamps 76
>Cruise control speed* 64
>Desired speed for Active Cruise Control* 66
10 
8Display for
>Distance recorder – odometer – and trip distance recorder 71
>Computer 72
>Date and remaining distance to next Service 74
>Automatic transmission with Steptronic* 61
>Sequential Manual Gearbox SMG* 59
>Hill Descent Control HDC* 85
>High-beam headlights assistant* 95
> Current Check Control message 76
9Fuel gauge 72
10Resetting trip distance recorder 71
Online Edition for Part-No. 01 41 0 159 725 © 09/05 BMW AG
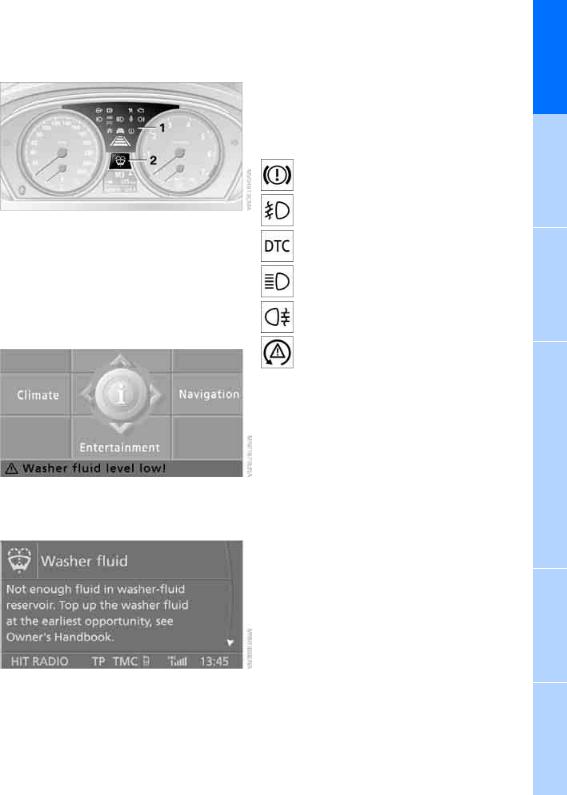
Indicator and warning lamps
Principle
Indicator and warning lamps may light up in a variety of colours and combinations both in the panel 1 and in the display 2.
Some lamps in the panel are checked for proper functioning and thus come on briefly when the engine starts or the ignition is switched on.
Explanatory text messages
Text messages appearing along the lower edge of the control display explain the meaning of the indicator and warning lamps that have come on.
You can call up further information, e.g. on the cause of a fault and on what action is required, via the Check Control, see page 76.
If action is required as a matter of urgency, this information is flashed up as soon as the accompanying lamp comes on.
Indicator lamps not accompanied by text messages
The following indicator lamps in display area 1 indicate that certain functions are active:
Handbrake applied 58
Front fog lights* 96
Dynamic Traction Control DTC 85
High-beam headlights/ headlight flasher 95
Rear fog lights* 97
Lamp flashes:
DSC or DTC is regulating the propulsive and brake forces in order to maintain driving stability 84
11 
Overview
Entertainment Navigation Driving hints Controls
Reference Mobility
Online Edition for Part-No. 01 41 0 159 725 © 09/05 BMW AG
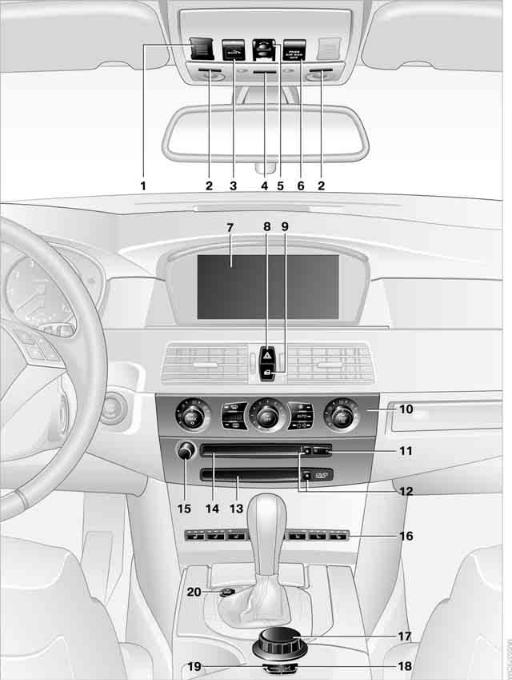
Driving area
Around the centre console: controls and displays
12 
Online Edition for Part-No. 01 41 0 159 725 © 09/05 BMW AG

1Microphone for hands-free operation of the telephone*
and for the voice input system* 20
2Reading lights 97
3Making an emergency call* 200
4Interior light 97
5Glass roof, electric* 38 Panorama glass roof* 39
6Indicator/warning light,
front passenger airbags* 54
7Control display 14
8Hazard warning flashers
9Central locking system 30
10Automatic air conditioning 99
Automatic air conditioning with extended range of features* 102
Temperature adjustment, left/ right 99, 103
Air distribution 99, 103
Automatic air distribution and volume 99, 102
Cooling function 100, 104
Automatic Recirculated Air Control
AUC* 104
Recirculated-air mode 100, 104
Maximum cooling effect* 104
Residual heat utilisation* 104
Switching off automatic air conditioning 100, 105
Air volume 99, 103
Defrosting windows and removing mist 100, 103
Heated rear window 99, 102
11Changing
>Radio stations 160
>Tracks 160
12Eject button for
>Navigation DVD* 160
>Audio CD 160
13Drive for navigation DVD for Professional* navigation system 132
14Drive for
>Navigation DVD for Business* navigation system 132
>Audio CD 160
15Switching entertainment audio output on/ off and adjusting volume 160
16Seat heating* 48
Active seat ventilation* 48
Active backrest width adjustment* 44
Active seat* 49
Park Distance Control PDC* 82 Dynamic Traction Control DTC 85
17Controller 14
Can be turned, pressed, or moved horizontally in four directions
18Activating voice input system* 20
|
19 |
Calling up start menu on control display 15 |
|
20 |
Dynamic Driving Control* 60 |
13 
Overview
Entertainment Navigation Driving hints Controls
Reference Mobility
Online Edition for Part-No. 01 41 0 159 725 © 09/05 BMW AG
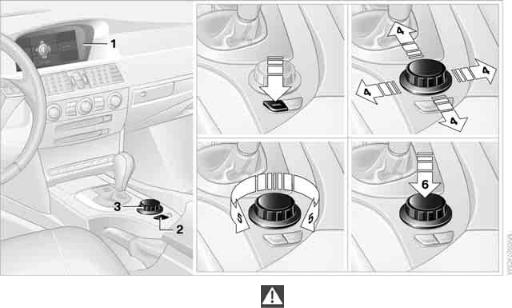
iDrive
iDrive
iDrive integrates the functions of a large number of switches. These functions can now be controlled from one central point. The basic menu-guided operating principle is explained
below. Details of how to control individual functions are provided under the descriptions of the items of equipment concerned.
Controls
1Control display
2 button
To call up the start menu
3Controller
You can select menu items and adjust settings with the controller:
>Move it in four directions, arrow 4
>Turn it, arrow 5
>Press it, arrow 6
14 
Only make adjustments if the traffic conditions are sufficiently quiet or clear, so as not to endanger the car’s occupants and other
road users by being distracted.<
Online Edition for Part-No. 01 41 0 159 725 © 09/05 BMW AG
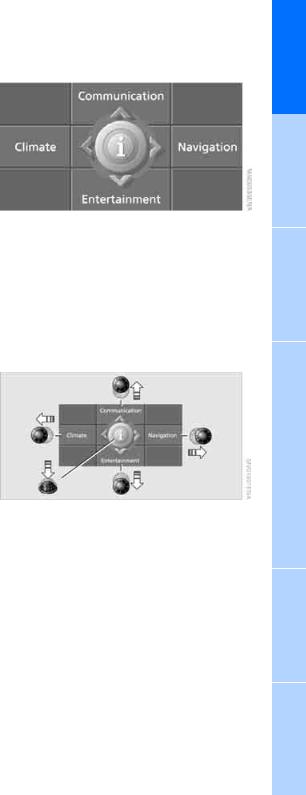
Menu summary
Communication
>Telephone*, see separate Operating Instructions
>BMW Assist*, BMW Online* or TeleService*, see separate Operating Instructions
Navigation or on-board information
>Navigation system*
>On-board information, e.g. to display the average fuel consumption
Entertainment
>Radio
>CD player and CD changer*
>TV*
Climate
>Air distribution
>Seat climate control*
>Automatic program
>Auxiliary heater/independent ventilation system*
 menu
menu
>Switching off control display
>Tone and display settings
>Traffic information settings
>Settings for your car, e.g. for the central locking
>Display of maintenance requirements and dates of next statutory emissions test and vehicle inspection
>Settings for telephone
Operating principle
Start menu
All iDrive functions can be called up via five menu items.
Calling up the start menu
Press the  button.
To call up the start menu from the  menu: Press the
  button twice.
Calling up menu items in the start menu
Following radio readiness, see page 56:
You can call up the four menu items Communication, Navigation, Entertainment and Climate via the start menu by moving the controller left, right, forwards or back. Depending on the selection, the menu previously called up will be shown.
Press the controller to call up the  menu.
menu.
Overview
Entertainment Navigation Driving hints Controls
Mobility
15 
Reference
Online Edition for Part-No. 01 41 0 159 725 © 09/05 BMW AG
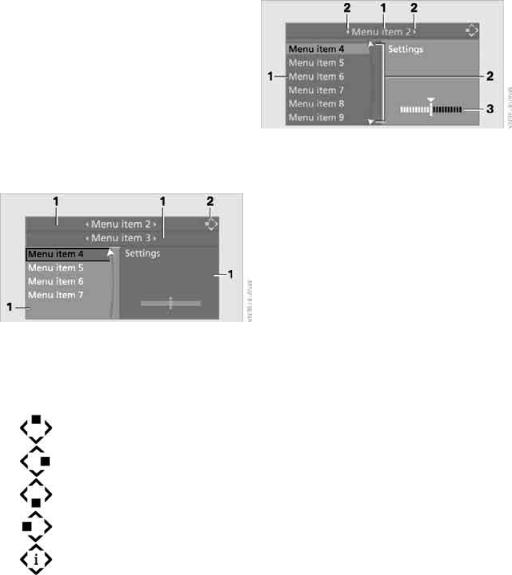
iDrive
Comfort menu item selection
The comfort selection feature enables you to:
>Call up a menu item in the start menu in the last configuration used
>Toggle directly between Communication, Navigation, Entertainment and Climate without needing to press the  button
To do this, move the controller in the relevant direction and hold it in position for more than about 2 seconds.
Displays in the menu
1Each menu is subdivided into different fields. The field currently selected appears highlighted in the display.
2A symbol shows you which menu item of the start menu was last selected:
Communication
Navigation or on-board information
Entertainment
Climate
 menu
menu
16 
1Menu items are usually grouped in horizontal or vertical lists.
2Arrows indicate that there are additional menu items within a list, but that they are not currently visible.
3Settings are represented graphically or as numerical values.
Online Edition for Part-No. 01 41 0 159 725 © 09/05 BMW AG
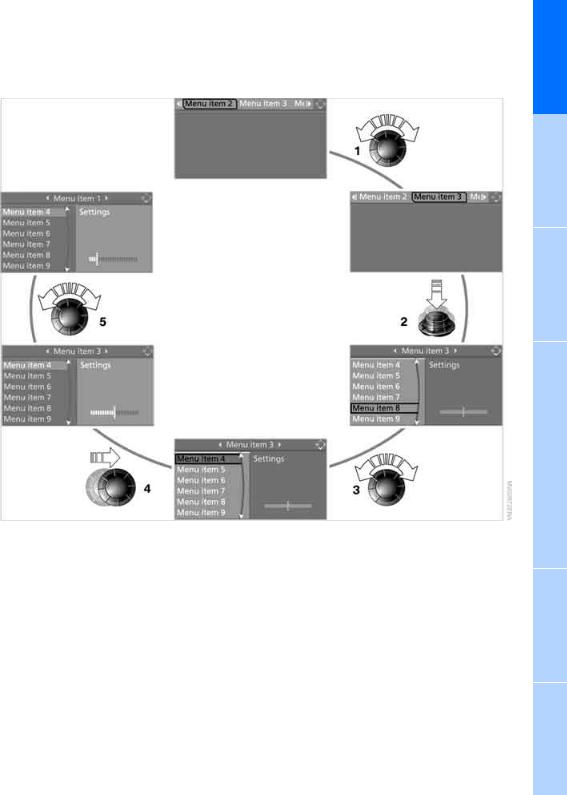
Operating principle at a glance
This illustration shows how the car can be operated via iDrive.
1Select a menu item:
>Turn the controller; the highlighted marker moves
>Menu items in white can be selected by highlighting them
2To activate a menu item:
>Press the controller
>New menu items are displayed or the function is executed
3Select a menu item: see 1
The individual steps are explained under Settings on the control display, Setting time, see page 79.
4To switch between fields:
>Slightly move the controller to the left, right, forwards or backwards
>Release the controller
>The active field becomes brighter in colour
5To perform adjustments:
>Turn the controller
>Graphic display, numerical value or text displays can be changed
>Confirm by changing the field
17 
Overview
Entertainment Navigation Driving hints Controls
Reference Mobility
Online Edition for Part-No. 01 41 0 159 725 © 09/05 BMW AG
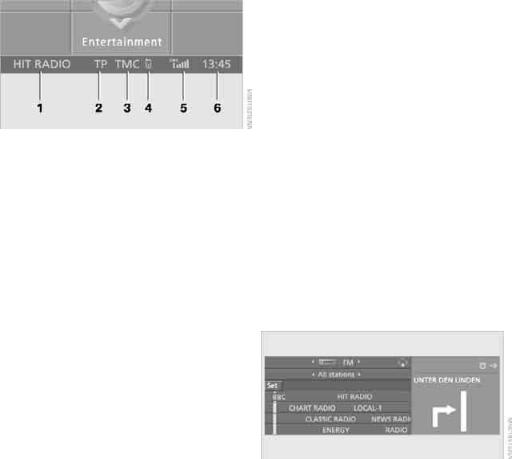
iDrive
Status information
1Display for:
>Entertainment: Radio, CD, TV*
>Telephone*:
Name of network operator, no network, or name of mobile phone registered with the car
>«Car Phone»*:
Active voice connection for emergency calls if BMW Assist is not initialised
>«BMW Assist»*:
Active voice connection with a BMW Assist service
>«Online» or «GPRS Online»*:
Active connection with BMW Online*
2 Entertainment sound output off or display for traffic announcements*:
>«TP»:
Traffic Programme switched on
>«T»:
Traffic Programme is switched off but the selected radio station does broadcast traffic reports
>No display:
The selected radio station does not broadcast traffic reports
18 
3Display for traffic information*:
>«TMC»:
Traffic information for the navigation system can be received and broadcasting is switched on
>«Ti+»:
Traffic info + traffic information can be received and broadcasting is switched on
4Calls not accepted*
5 It is possible to use the telephone* if the mobile phone is registered with the car
 Mobile phone network reception strength depends on the mobile phone
6Time
Other displays:
Status information is temporarily hidden during Check Control message displays or inputs via the voice input system*.
Assistance window*
Additional information can be displayed in the assistance window:
>The computer or journey computer*
>The arrow or map view for cars with navigation system*
>The car’s position*
Online Edition for Part-No. 01 41 0 159 725 © 09/05 BMW AG
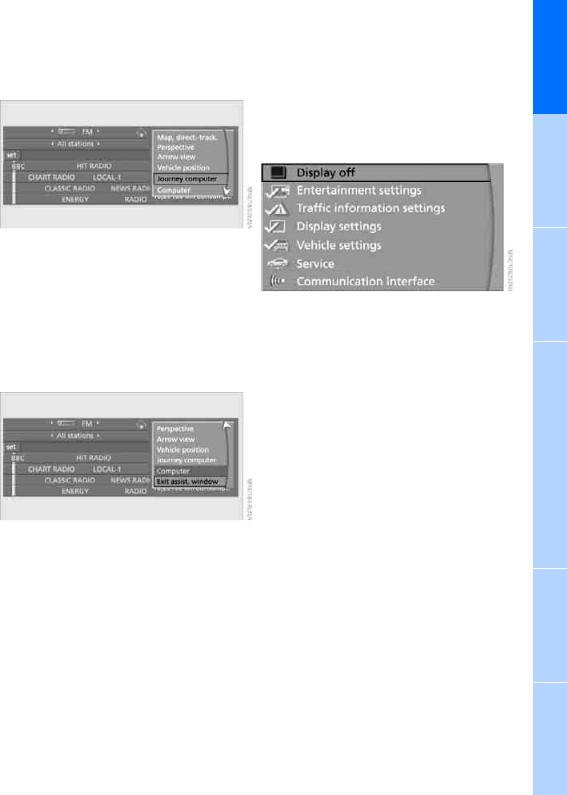
Selecting display
1.Move the controller to the right to switch to the assistance window and press the controller.
2.Select a menu item.
3.Press the controller.
Switching assistance window on/off
1.Move the controller to the right to switch to the assistance window and press the controller.
2.Select «Exit assist. window» and press the controller.
To turn back on, switch to the assistance window and press the controller.
Switching control display on/off
1.Press the  button. The start menu is called up.
2.Press the controller to call up the  menu.
menu.
3.Select «Display off» and press the controller.
Press the controller to switch on.
19 
Overview
Entertainment Navigation Driving hints Controls
Reference Mobility
Online Edition for Part-No. 01 41 0 159 725 © 09/05 BMW AG

Voice input system
Voice input system*
Principle
The voice input system enables you to operate various items of equipment on your car without having to take your hands off the steering wheel.
Individual menu items on the control display can be selected by means of short commands. It is not necessary to use the controller to select them.
The voice input system translates your commands into control signals for the system in question, and prompts you by means of announcements or questions.
The voice input system includes a special microphone positioned near the interior mirror, see page 12.
Condition
Via iDrive, select the language in which the voice input system is operating, so that the spoken commands can be identified. Selecting the language for iDrive, see page 81.
Symbol in the Owner’s Handbook
{…} Say the commands marked with this symbol word for word.
{{…}} Identifies the replies by the voice input system.
20 
Speaking commands
Activating voice input
1.Press the  button on the steering wheel or in the centre console.
 This symbol on the control display and an acoustic signal indicate that the voice input system is ready to pick up commands.
2.Issue the command.
The command appears on the control display.
Online Edition for Part-No. 01 41 0 159 725 © 09/05 BMW AG
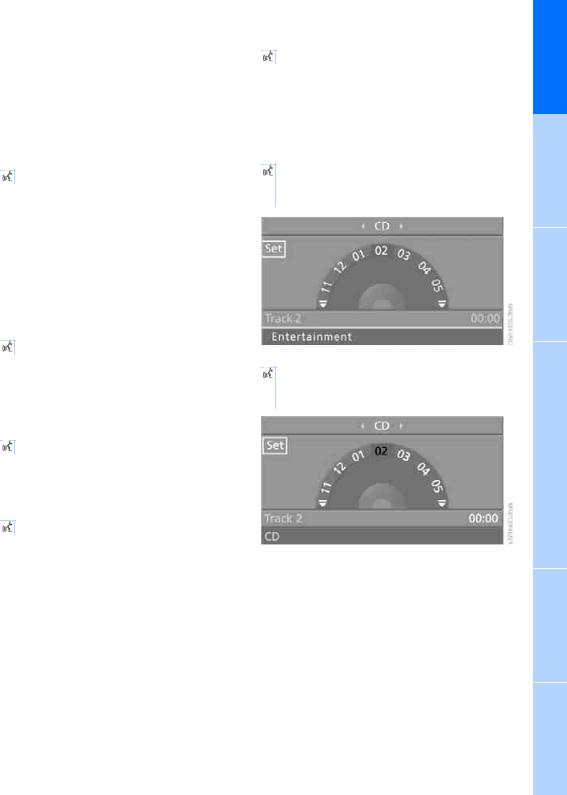
 This symbol appears on the control display if further commands can be given.
If no further commands are possible, continue by operating the item of equipment via iDrive.
Ending or interrupting voice input
Press the  button on the steering wheel or in the centre console
or
{Cancel}
Commands
Having possible commands read aloud
You can prompt the system to read out the commands that are possible, depending on which menu item is selected on the control display.
To have the possible commands read out to you:
{Options}
For instance, if you have selected «CD», the commands available for operating the CD player and CD changer* will be read out.
Calling up start menu
{Main menu}
An example: selecting a track
1.If necessary, switch on entertainment audio output.
2.Press the  button on the steering wheel or in the centre console.
3. {Entertainment} The system says: {{Entertainment}}
4. {CD}
The system says:
{{CD drive switched on}}
Requesting help
{Help}
Using alternative commands
There are often several different commands available for performing the same function, e.g.:
{Settings menu} or {i menu}
Calling up functions immediately using short commands
Short commands enable you to perform certain functions straight away, irrespective of which menu item is selected, see page 223.
21 
Overview
Entertainment Navigation Driving hints Controls
Reference Mobility
Online Edition for Part-No. 01 41 0 159 725 © 09/05 BMW AG
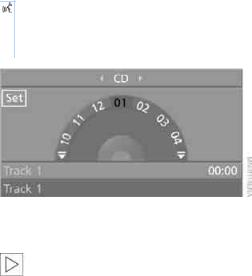
Voice input system
5.Press the  button on the steering wheel or in the centre console.
6. Select a music track, e.g.: {Track 1}
The system says: {{Track 1}}
Notes
More information about voice control of the telephone appears in the separate
Operating Instructions.<
When speaking commands, note the following:
>Say the commands and numbers fluently and at normal volume; avoid unnatural emphases and pauses between words. This also applies to spelling a destination entry.
>Always speak the commands in the language of the voice input system.
>When selecting a radio station, use the standard pronunciation of the station name.
>When making entries in the voice-activated phone book, use only names in the language of the voice input system, and do not use abbreviations.
>Keep the doors, windows and glass roof* or panorama glass roof* closed in order to avoid interference from outside noise.
>Avoid causing background noise in the car while you are speaking.
22 
Online Edition for Part-No. 01 41 0 159 725 © 09/05 BMW AG

23 
Online Edition for Part-No. 01 41 0 159 725 © 09/05 BMW AG
Overview
Entertainment Navigation Driving hints Controls
Reference Mobility
Online Edition for Part-No. 01 41 0 159 725 © 09/05 BMW AG
Controls
This chapter enables you to operate your car with greater ease. All equipment items that are of relevance for driving and make your journey safer and more comfortable are described here.
Online Edition for Part-No. 01 41 0 159 725 © 09/05 BMW AG
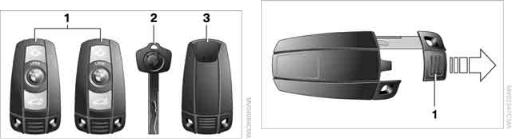
Opening and closing
Opening and closing
Key/Remote control |
Integrated key |
1Remote control with integrated key
2Spare key
3Adapter for spare key, in glove box
Remote control with integrated key
Every remote control contains a rechargeable battery that is automatically recharged when it is in the ignition lock while the car is being driven. Use the remote control at least twice a year in order to keep the battery charged. If your car is fitted with comfort access*, the remote control will feature a replaceable battery, see page 37.
On the basis of the remote control detected when unlocking the car, various settings will be called up in the car and applied, see Personal Profile, page 27.
In addition, information about service requirements is stored in the remote control, see Service data in the remote control, page 190.
Press button 1 to release the key.
The integrated key fits the following locks:
>Key switch* for front passenger airbags, see page 53
>Glove box, see page 111
>Touring: floor panel flap in load area, see page 117
>Driver’s door, see page 30
>Luggage compartment lid, see page 31
New remote controls
BMW Service can supply new remote controls with integrated keys, as additional units or as replacements in the event of loss.
Spare key
Spare key, to be kept in a safe place, for instance in a purse or wallet. This key is not intended for regular use.
The spare key and integrated key for the remote control fit the same locks.
Adapter for spare key
You need the adapter to start the car with the spare key or to switch on radio readiness.
26 
Online Edition for Part-No. 01 41 0 159 725 © 09/05 BMW AG

Remove the adapter from the holder in the glove box and insert the spare key into the adapter.
Personal Profile
Principle
You can set many of your BMW’s functions to suit your personal needs and preferences. Without any action on your part, Personal Profile ensures that most of these settings are saved for the remote control currently in use. When you unlock the car the remote control used for the purpose is recognised and the settings saved for it are called up and implemented.
This means that your personal settings are active when you return to your BMW, even if the car was used in the interim by someone else with a remote control of their own and the settings were changed accordingly. Individual settings are saved for up to four remote controls.
Personal Profile settings
>When unlocking with the remote control, either the driver’s door only or the entire car is unlocked, see page 28
>Locking the car after a short time or after setting off, see page 30
>Assignment of the programmable buttons* on the steering wheel, see page 51
>Settings shown on the control display:
>Brightness of the control display, see page 80
>Units of measurement for fuel consumption, distance, temperature and pressure, see page 81
>Language on the control display, see page 81
>12 hour/24 hour mode of clock, see page 80
>Date format, see page 80
>Displaying optical warning for Park Distance Control PDC*, see page 83
>Selection and brightness of Head-Up Display*, see page 91
>Air distribution, temperature to upper body
and intensity for automatic air conditioning with extended range of features*, see page 102
>Adjusting spoken instructions for route guidance by navigation system*, see page 150
The last settings of the following items of equipment are in addition called up when the car is unlocked:
>Position of driver’s seat, door mirrors and steering wheel*, see page 45
>The volume and tone settings for audio and video sources, see page 161
>The display of memorised stations for the radio, see page 164
Central locking
Principle
The central locking becomes active when the driver’s door is closed. The following are unlocked or locked in combination:
>Doors
>Luggage compartment lid/tailgate
>Fuel filler flap
27 
Overview
Entertainment Navigation Driving hints Controls
Reference Mobility
Online Edition for Part-No. 01 41 0 159 725 © 09/05 BMW AG
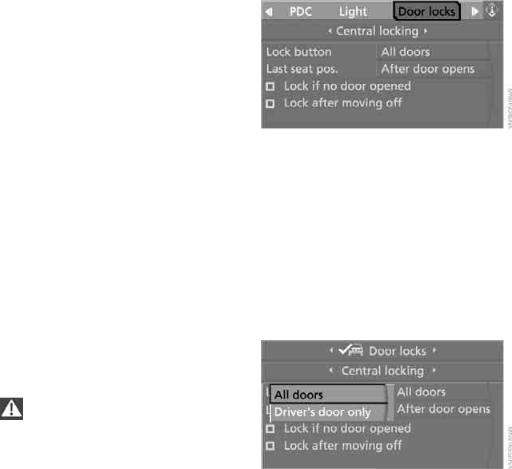
Opening and closing
Operating from outside
>via the remote control
>via the door lock
>with comfort access* via the door handles
The alarm system is also operated at the same time. This prevents the doors being unlocked either at the safety lock buttons or door handles. The alarm system* is also armed or disarmed. The interior light and the ground lights* are also switched on or off with the remote control.
For more information about the alarm system*, see page 34.
Operating from inside
Via the button for the central locking system, see page 30. The fuel filler flap is not locked*.
In the event of an accident of sufficient severity, the central locking is released automatically. The hazard warning flashers and the interior light are in addition switched on.
Opening and closing: from the outside
With the remote control
Persons remaining in the car or pets left inside can lock the doors from the inside.
Take the remote control with you, so that the car can be opened from the outside.<
Unlocking
You can unlock the car with the  button, depending on its settings.
iDrive concept, see page 14.
1.Press the  button. The start menu is called up.
2.Press the controller to call up the  menu.
menu.
3.Select «Vehicle settings» and press the controller.
28 
4.Select «Door locks» and press the controller.
5.Select «Central locking» and press the controller.
6.Select «Lock button» and press the controller.
7.Select a menu item:
>«All doors»
Press  button once to unlock the entire car.
>«Driver’s door only»
Press  button once to unlock only the driver’s door and the fuel filler flap. Press it twice to unlock the entire car.
8. Press the controller.
The setting is saved for the remote control currently in use.
Comfort opening
Press and hold down the  button. The windows and the glass roof* are opened.
Online Edition for Part-No. 01 41 0 159 725 © 09/05 BMW AG
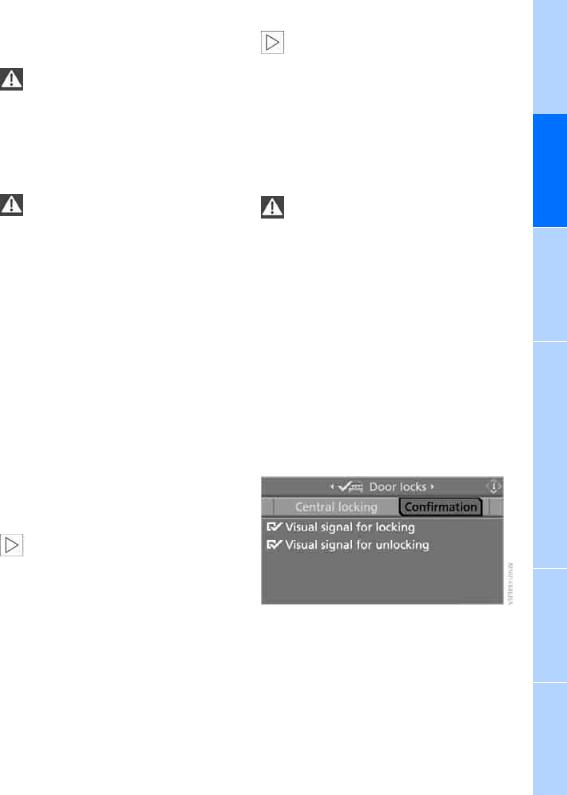
Locking
Press the  button.
Do not lock the car from the outside when there is someone inside it, as it cannot
then be unlocked from the inside in some national-market versions.<
Comfort closing
Press and hold down the  button. The windows and the glass roof* are closed.
Watch the closing movement to ensure that no-one is trapped. The closing procedure is interrupted immediately if the button
is released.<
Switching on the interior light
With the car locked, press the button.
This function enables you to locate the car, for instance in a parking garage.
Panic mode*
You can also activate the alarm system in the event of danger:
Press the  button for at least three seconds. To switch the alarm off: press any button.
Saloon: opening the luggage compartment lid
Press the  button for about one second.
The luggage compartment lid opens, regardless of whether it was locked or unlocked.
The luggage compartment lid swings rearwards and upwards when opened.
Make sure that there is sufficient clearance. To avoid locking yourself out of the car inadvertently, do not leave the remote control in the luggage compartment. If the luggage compartment lid was previously locked, it will be locked again as soon as it is closed.<
Touring: unlocking the tailgate
Press the  button for about one second.
The tailgate opens a short way, regardless of whether it was locked or unlocked.
The tailgate swings rearwards and upwards when opened. Make sure that
there is sufficient clearance.
To avoid locking yourself out of the car inadvertently, do not leave the remote control in the luggage compartment. If the tailgate was previously locked, it will be locked again as soon as it is closed.
The load area cover is raised when the tailgate is opened. Before closing the tailgate, press the cover down until it engages in position.<
Wrap protective material around any sharp ends or edges of items of luggage
that could strike the rear window while the car is moving, to prevent these damaging the heating conductors in the rear window.<
Adjusting confirmation signals
You can also deactivate the optical acknowledgement signal for unlocking or locking.
1.Call up the start menu.
2.Press the controller to call up the  menu.
menu.
3.Select «Vehicle settings» and press the controller.
4.Select «Door locks» and press the controller.
5.Select «Confirmation» and press the controller.
6.Select the desired signal.
7.Press the controller.
 The signals are switched on.
29 
Overview
Entertainment Navigation Driving hints Controls
Reference Mobility
Online Edition for Part-No. 01 41 0 159 725 © 09/05 BMW AG

Opening and closing
Malfunctions
The remote control may malfunction as a result of interference from localised radio signals.
If this occurs, unlock and lock the car by inserting the key into the door lock.
If the car can no longer be locked with a remote control, the battery in the remote control is flat. Use this remote control when driving a relatively long distance to recharge its battery, see page 26.
Via the door lock
Watch the closing movement to ensure that no-one is trapped. The movement is
stopped when the key is released.<
Manual operation
In the event of an electrical fault, you can lock and unlock the driver’s door by turning the key to the limit positions in the door lock.
Opening and closing:
From the inside
Do not lock the car from the outside when there is someone inside it, as it cannot
then be unlocked from the inside in some national-market versions.<
In some national versions, the alarm system* is triggered when the door lock is
unlocked.
To switch off the alarm:
Unlock the car with the remote control, see page 28, or insert the remote control fully into the ignition lock.<
For further details of the alarm system*, see page 34.
Comfort operation
The windows and the glass roof* can also be operated via the door lock.
>Opening:
When the door is closed, turn the key in the door lock to the unlocking position and hold it there.
>Closing:
When the door is closed, turn the key to the locking position and hold it there.
30 
This button unlocks or locks the doors and luggage compartment lid/tailgate when the front doors are closed, but does not deadlock them. The fuel filler flap remains unlocked*.
You can in addition select the following settings:
>The central locking is engaged automatically after a short while if no door has been opened.
>The central locking is engaged as soon as you drive off.
iDrive concept, see page 14.
1.Press the  button. The start menu is called up.
2.Press the controller to call up the  menu.
menu.
3.Select «Vehicle settings» and press the controller.
4.Select «Door locks» and press the controller.
Online Edition for Part-No. 01 41 0 159 725 © 09/05 BMW AG

5.Select «Central locking» and press the controller.
6.Select «Lock if no door opened» or
«Lock after moving off».
7.Press the controller.
 indicates that the setting is selected.
The setting is saved for the remote control currently in use.
Unlocking and opening
>Either use the central locking button to unlock all doors at once, then pull the door handle above the armrest, or
>Pull the handle on each individual door twice: the first time to unlock the door, and the second time to open it.
Locking
>Either lock all doors by pressing the central locking button, or
>Press down the safety lock button on the door in question. To avoid being shut out of the car accidentally, the driver’s door cannot be locked with the safety lock button when it is open.
Persons remaining in the car or pets left inside can lock the doors from the inside.
Take the remote control with you, so that the car can be opened from the outside.<
Luggage compartment lid/ tailgate
The luggage compartment lid/tailgate swings rearwards and upwards when
opened. Make sure that there is sufficient clearance.<
Saloon
Opening from inside
Press the button: the luggage compartment lid will open as long as it is not deadlocked.
Opening from outside
Press the button on the luggage compartment lid or press the  button on the remote control for approx. 1 second: the luggage compartment lid opens.
31 
Overview
Entertainment Navigation Driving hints Controls
Reference Mobility
Online Edition for Part-No. 01 41 0 159 725 © 09/05 BMW AG

Opening and closing
All keys, see page 26, fit the lock on the luggage compartment lid.
Locking separately
Turn a key in the luggage compartment lid beyond a pressure point clockwise and remove in the horizontal position.
This locks the luggage compartment lid and disconnects it from the central locking system. If you then give the remote control to a third party with the integrated key, see page 26, it will not be possible to access the luggage compartment. This is an advantage at hotels, for example.
Releasing and opening manually
Turn the key as far as possible anti-clockwise: The luggage compartment lid opens.
If you open the luggage compartment lid via the lock when the alarm system* is
armed, the alarm will be triggered off. You should therefore unlock the car first. If the alarm has inadvertently been triggered off: switching off the alarm, see page 35.<
Closing
To avoid injuries, make sure that the closing area of the luggage compartment lid is
unobstructed.<
The recessed handles in the luggage compartment lid lining make it easier to pull the luggage compartment lid down.
Touring: opening and closing rear window
The rear window can be opened separately for ease of loading and unloading small items.
The load area cover is raised when the rear window is opened. Before closing the
rear window, press the cover down until it engages in position.<
Press the button: the rear window opens a short way. It can now be swung upwards.
Press the window shut to close it.
Wrap protective material around any sharp ends or edges of items of luggage
that could strike the rear window while the car is moving, to prevent these damaging the heating conductors in the rear window.<
Touring: tailgate
Opening from inside
Press the button: the tailgate will open as long as it is not deadlocked.
32 
Online Edition for Part-No. 01 41 0 159 725 © 09/05 BMW AG

Opening from outside
Overview
Press the button on the tailgate or press the  button on the remote control for approx.
1 second: the tailgate opens a short way. It can now be swung upwards.
The load area cover is raised when the tailgate is opened. Before closing the tail-
gate, press the cover down until it engages in position.<
Opening manually
In the event of an electrical fault:
1.From inside the load area, press out the cover 1 attached to the tailgate with a screwdriver.
2.Press the bar 2 in the direction of the arrow.
3.Open the tailgate and press the cover back into place.
The tailgate is locked again as soon as it is closed.
Closing
To avoid injuries, ensure that the closing area of the tailgate is unobstructed.<
The recessed handles in the tailgate lining make it easier to pull the lid down.
To close the tailgate, press it down only lightly. The actual closing action is automatic.
Touring: automatic tailgate operation*
Adjusting limit of opening
You can set how far the tailgate is to open. iDrive concept, see page 14.
1.Press the  button. The start menu is called up.
2.Press the controller to call up the  menu.
menu.
3.Select «Vehicle settings» and press the controller.
4.Select «Door locks» and press the controller.
5.Select «Luggage compartment lid opening» and press the controller.
6.Turn the controller. The setting is adopted; you can now change to another field.
33 
Entertainment Navigation Driving hints Controls
Reference Mobility
Online Edition for Part-No. 01 41 0 159 725 © 09/05 BMW AG

Opening and closing
Opening tailgate
The tailgate opens automatically if you:
>Press the button on the outside of the tailgate when the car is unlocked.
>Press the  button in the driver’s side footwell.
>Press the  button on the remote control for approx. 1 second.
The tailgate swings rearwards and upwards when opened. Make sure that
there is sufficient clearance.<
To interrupt the opening operation:
>Press the button on the outside of the tailgate.
>Press and hold down the  button on the remote control.
>Press the button on the inside of the tailgate.
The load area cover is raised when the tailgate is opened. Before closing the tail-
gate, press the cover down until it engages in position.<
Closing the tailgate
To avoid injuries, ensure that the closing area of the tailgate is unobstructed.<
34 
The tailgate closes automatically if you:
>Press the button on the inside of the tailgate.
>Press and hold down the  button on the remote control.
To interrupt the closing operation:
>Press the button on the inside of the tailgate
>Release the  button on the remote control
>Press the button on the outside of the tailgate
The closing operation will not be interrupted if you set off in the car.<
Alarm system*
Principle
The alarm system reacts if:
>Opening a door, the engine compartment
lid, the luggage compartment lid/tailgate or the rear window*
>There is any movement inside the car: interior movement detector, see further below
>The car’s inclination changes, for instance if an attempt is made to jack it up and steal the wheels or to raise it prior to towing away
>There is an interruption in the power supply from the battery
The alarm will respond briefly as follows to indicate unauthorised attempts to access the car:
>Acoustic alarm
>Activation* of the hazard warning system
Online Edition for Part-No. 01 41 0 159 725 © 09/05 BMW AG

Arming and disarming
Whenever the car is locked or unlocked, either with the remote control or at the door lock, the alarm system is armed or disarmed at the same time.
Even when the alarm system is armed, you can open the luggage compartment lid/tailgate by pressing the  button on the remote control, see page 31. When you close the luggage compartment lid/tailgate subsequently, it will be locked and monitored.
Opening certain national-market versions via the door lock triggers off the alarm.<
Switching off alarm
>Unlock the car with the remote control, see page 28, or
>Insert the remote control into the ignition as far as it will go, see page 56.
Indicator lamp displays
>The indicator lamp beneath the inside mirror flashes steadily: the system is armed.
>The indicator lamp flashes after the car has
been locked: the doors, luggage compartment lid/tailgate or rear window* have not been closed properly. Even if an item is not closed fully, the remaining items are deadlocked and the indicator lamp begins to flash steadily after 10 seconds. However, the interior movement detector is not activated.
>The indicator lamp goes out after the car has been unlocked: no attempt was made to tamper with the car during your absence.
>If the indicator light flashes after unlocking until the remote control is inserted in the ignition, but for no longer than approx.
5 minutes: an attempt was made to tamper with the car.
Tilt alarm sensor
The car’s angle is monitored. The alarm is set off for instance if an attempt is made to steal the car’s wheels or tow it away.
Interior movement detector
Before the interior movement detector can operate correctly, the windows and glass roof* must be closed.
Avoiding false alarms
The tilt alarm sensor and the interior movement detector can be switched off together. This prevents false alarms, e.g. in the following situations:
>In two-level garages
>When the car is being transported by autorail
>If pets are to remain inside the car
Switching off the tilt alarm sensor and interior movement detector
Press the  button on the remote control again immediately after locking the car.
The indicator lamp comes on briefly, then continues to flash steadily. The tilt alarm sensor and interior movement detector are switched off until the car is next unlocked and locked.
Comfort access*
Comfort access enables you to access your car without having to take the remote control into your hand. It is sufficient to have the remote control on your person, for example in a jacket pocket. The car automatically recognises your remote control when it is in the immediate vicinity or inside the car.
35 
Overview
Entertainment Navigation Driving hints Controls
Reference Mobility
Online Edition for Part-No. 01 41 0 159 725 © 09/05 BMW AG

Opening and closing
Comfort access supports the following functions:
>Unlocking/locking the car
>Starting the engine
>Comfort closing
Operating requirements
>The car can only be locked once it has ascertained that the remote control on your person is not inside the car.
>About two seconds have to elapse before the car can again be unlocked and locked.
>The engine can be started only when the car ascertains that the remote control on your person is inside the car.
Special features in contrast to conventional remote control
Generally speaking, it makes no difference whether you control the functions outlined above by using comfort access or by pressing the buttons on the remote control. Consequently, you should begin by familiarising yourself with the instructions for opening and closing, starting on page 26.
The features specific to comfort access are described below.
Releasing
Take a firm hold of one of the door handles, arrow 1. This corresponds to pressing the  button.
When a remote control is detected inside the passenger compartment after the car has been unlocked, the electric steering wheel lock disengages, see page 56.
36 
Locking
Touch the area, arrow 2 on the driver’s door or 3 on the other doors, for approx. 1 second. This corresponds to pressing the  button.
For comfort closing, press the area, arrow 2 or 3 with your finger.
If the car detects a remote control which has been left in the luggage compart-
ment/load area accidentally once the luggage compartment lid/tailgate has been closed, the lid will reopen. The hazard warning system flashes and a signal* sounds.<
Switching on radio readiness
Lightly touching the start/stop button switches on radio readiness, see page 56.
Do not depress the brake, otherwise the engine will start immediately.<
Starting the engine
You can start the engine or switch on the ignition when a remote control is inside the car. It is not necessary to insert the remote control in the ignition lock, see page 56.
If you take the remote control with you when you leave the car with the engine running, a warning light will come on. In addition, a message will appear on the control display. As long as the car does not detect a remote control, once the engine has been switched off, you will not be able to restart it for approx. 10 seconds.
Switching off the engine, automatic transmission
The engine can be switched off only when the selector lever is in position P, see page 58.
To switch off the engine with the selector lever in position N, the remote control must be in the ignition lock.
Online Edition for Part-No. 01 41 0 159 725 © 09/05 BMW AG

Before driving a car with automatic transmission into a car wash
1.Insert the remote control in the ignition lock.
2.Depress the brake.
3.Engage selector lever position N.
4.Switch off the engine.
The car will be able to roll.
Malfunction
Comfort access may malfunction as a result of interference from local radio signals. In this case, open or close the car using the buttons on the remote control or the key. You can subsequently start the engine by inserting the remote control into the ignition lock.
Changing the battery
The battery in the remote control for comfort access requires replacement from time to time.
1.Remove the integrated key from the remote control, see page 26.
2.Remove the cover.
3.Insert a new battery with the plus side up.
4.Press the cover back into position.
Dispose of the old battery only at an authorised collecting point or hand it in to
BMW Service.<
Windows
Observe the windows during the closing procedure, to avoid any injuries.
Take the remote control with you when you leave the car, otherwise children, for example, could operate the windows and possibly injure themselves.<
Opening, closing
>Press the switch until the pressure point is felt:
The window is opened for as long as you press the switch.
>Press the switch beyond the pressure point: The window opens automatically. Press the switch again to halt the opening movement.
Close the window similarly by pulling the switch.
For comfort operation using the remote control or door lock, see page 28 or 30.
Comfort closing with comfort access see Locking on page 36.
After the ignition is switched off
You can still operate the windows for approx. 1 minute after the remote control has been removed or the ignition switched off.
Trap protection
If the closing force of a window exceeds
a specific value as it closes, the closing action is interrupted immediately and the window reopens slightly.
Despite the trap protection function, make sure that the windows are not
obstructed as they close; if this precaution is
37 
Overview
Entertainment Navigation Driving hints Controls
Reference Mobility
Online Edition for Part-No. 01 41 0 159 725 © 09/05 BMW AG

Opening and closing
not taken, the risk remains that thin objects, for instance, could fail to interrupt the closing movement.
To restrict the trap protection function, pull the switch beyond its pressure point and hold it in position. In this instance, if the closing force exceeds a specific value the window is opened only a short way.
If the switch is pulled beyond the pressure point again within approx. 4 seconds and held in that position, the trap protection function is overridden.<
Safety switch
This enables you to prevent the rear door windows being opened and closed at the switches in the rear seat area, for instance by children.
When the safety function is switched on, the LED comes on.
Press the safety switch when carrying children on the rear seat, otherwise care-
less closing of the windows could result in injury.<
Accessories near the windows
If you fit accessories within the window movement range, e.g. a clip-on aerial for your mobile phone, the system must be initialised to teach it the new conditions. BMW recommends that you have this work performed by BMW Service.
Raising
Press the switch.
>If the glass roof is closed, it is raised and the sliding trim opens slightly.
>If the glass roof is open, it automatically moves to the raised position. The sliding trim remains fully open.
Do not close the sliding trim forcibly with the roof in the raised position, as this
could damage the mechanism.<
Opening, closing
>Push the switch back as far as the pressure point.
The glass roof and sliding trim open in unison for as long as you hold the switch in position.
>Push the switch back beyond the pressure point.
The glass roof and sliding trim open automatically. Press the switch again briefly to halt the opening movement.
The glass roof is closed in the same way by sliding the switch forwards. The sliding trim remains open and can be closed manually.
For comfort operation using the remote control or door lock, see page 28 or 30.
Comfort closing with comfort access see Locking on page 36.
Glass roof, electric*
Observe the glass roof during the closing procedure, to avoid any injuries.
Take the remote control with you when you leave the car, otherwise children could operate the roof and possibly injure themselves.<
38 
After the ignition is switched off
You can still operate the roof for approx.
1 minute after the remote control has been removed or the ignition switched off.
Online Edition for Part-No. 01 41 0 159 725 © 09/05 BMW AG

Automatic opening and closing
Press the switch beyond the pressure point.
Further to this, the following movements are automated:
>When the roof is open, press the switch in the direction for raising: the roof moves to the fully raised position.
>When the roof is raised, press the switch in the direction for opening: the roof moves to the fully open position.
Pressing the switch again stops this movement.
Trap protection
If the glass roof encounters an obstruction during closing from approximately the centre of the roof aperture, or during closing from the raised position, the closing movement is interrupted and the glass roof is opened again slightly.
Despite the trap protection function, make sure that the roof is not obstructed
as it closes; if this precaution is not taken, the risk remains that thin objects, for instance, could fail to interrupt the closing movement. The trap protection function is overridden by pressing the switch beyond its pressure point and holding it in position.<
After a power failure
After a power failure, it is possible that the roof will only move to the raised position. The system must be initialised. BMW recommends that you have this work performed by BMW Service.
Manual operation
In the event of an electrical fault, you can move the glass roof manually:
1.Fold the cover down, possibly with the aid of the screwdriver from the toolkit, see page 192.
2.Insert the Allen key from the toolkit, see page 192, into the designated aperture. Turn the glass roof in the desired direction. To close, turn in the direction indicated by the arrow.
Touring:
Panorama glass roof*
Observe the panorama glass roof during the closing procedure, to avoid any inju-
ries.
Take the remote control with you when you leave the car, otherwise children could operate the roof and possibly injure themselves.<
39 
Overview
Entertainment Navigation Driving hints Controls
Reference Mobility
Online Edition for Part-No. 01 41 0 159 725 © 09/05 BMW AG

Opening and closing
Raising, opening, closing
Press the switch or push it in the required direction as far as the pressure point.
The sliding trim is opened:
>In unison with the roof
>A short distance when the roof is raised
When the roof is closed or in the raised position, the sliding trim can be opened or closed independently.
For comfort operation using the remote control or door lock, see page 28 or 30.
Comfort closing with comfort access see Locking on page 36.
Vent position
Press the switch:
The glass roof is raised and the sliding trim opened a short distance.
After the ignition is switched off
You can still operate the roof for approx.
1 minute after the remote control has been removed or the ignition switched off.
Automatic opening and closing
Press the switch beyond the pressure point. Pressing the switch again stops this movement.
Opening and closing roof and sliding trim together
Press the switch twice in rapid succession beyond the pressure point.
Pressing the switch again stops this movement.
Comfort position
Each time it is fully opened and subsequently closed, the panorama glass roof halts in the comfort position. If desired, the movement can then be continued using the switch.
The comfort position minimises wind noise inside the car.
Trap protection
If the panorama glass roof or sliding trim encounters an obstruction during closing from approximately one-third of the roof aperture, or during closing from the raised position, the closing movement is interrupted and the panorama glass roof and sliding trim are opened again slightly.
Despite the trap protection function, make sure that the roof is not obstructed
as it closes; if this precaution is not taken, the risk remains that thin objects, for instance, could fail to interrupt the closing movement. The trap protection function is overridden by pressing the switch beyond its pressure point and holding it in position.<
After a power failure
After a power failure, it is possible that the roof will only move to the raised position. The system must be initialised. BMW recommends that you have this work performed by BMW Service.
Manual operation
In the event of an electrical fault, you can move the roof manually:
1.Fold the cover down, possibly applying the screwdriver from the toolkit at the point indicated, see page 192.
40 
Online Edition for Part-No. 01 41 0 159 725 © 09/05 BMW AG

2.Take the Allen key from the holder next to the toolkit and insert it into the designated aperture. Turn the roof in the desired direction. To close, turn in the direction indicated by the arrow.
41 
Overview
Entertainment Navigation Driving hints Controls
Reference Mobility
Online Edition for Part-No. 01 41 0 159 725 © 09/05 BMW AG

Adjusting
Adjusting
Safe seated position
A seated position that suitably reflects your requirements is a vital condition of relaxed driving with a minimum of fatigue. In conjunction with the seat belts, the head restraints and the airbags, the seated position has a major influence on your safety in the event of an accident. You should therefore observe the following notes in order to maintain the protective function of the car’s safety systems.
For additional notes on carrying children in safety, see page 53.
Airbags
Keep your distance from the airbags. Always grip the steering wheel on the rim,
with your hands in the 3 o’clock and 9 o’clock positions, to minimise the risk of injury to the hands or arms in the event of the airbag being triggered off.
No other persons, pets or objects should be held or permitted to remain between the airbag and yourself.
Do not use the front airbag cover on the front passenger’s side as a tray. Make sure that the front passenger likewise adopts a correct seated position and does not rest feet or legs on the instrument panel, for example, otherwise he/she could sustain leg injuries in the event of the front airbag being triggered.
Make sure that passengers do not use the side or head-level airbags as headrests, otherwise they may sustain injuries in the event of the airbags triggering.<
Even if all these instructions are complied with, certain injuries as a result of contact with the airbag cannot be entirely ruled out, depending on the circumstances in which an accident occurs. Occupants with sensitive hearing may be subject to brief and generally temporary impaired hearing caused by the ignition and inflation noise.
42 
The locations of the airbags and additional notes are given on page 90.
Head restraints
Head restraints adjusted to the correct height reduce the risk of injuries to the neck in the event of an accident.
Adjust the head restraint in such a way that its centre is at approximately ear
level; otherwise, there is an increased risk of injury should an accident occur.<
Seat belt
All occupants should always fasten their seat belts before you set off. The airbags are a complementary safety feature and not a substitute for the seat belts.
Never restrain more than one person with each seat belt. Babies or small children
must not travel on the lap of another occupant. Pregnant women should also wear the seat belt, making sure that the strap in the pelvic area is well down on the hips and does not press on the abdominal region of the body. The seat belt must not pass across the neck, become trapped at any point or chafe against any sharp edges. The seat belt should not be twisted and must be positioned firmly over the pelvis and shoulder, as close to the body as possible. It should not pass over hard or fragile objects, otherwise the belt in the pelvic area could slide over the hips in the event of a head-on collision and injure the lower abdomen. Avoid wearing bulky clothing and regularly pull the belt in the upper-body area taut, otherwise its restraining effect could be impaired.
Touring: if the centre seat belt is used, the wider backrest must be locked in position, see
page 116, otherwise the centre seat belt will not have any restraining effect.<
Operating seat belts, see page 47.
Online Edition for Part-No. 01 41 0 159 725 © 09/05 BMW AG

Seats
Note before adjusting
Do not reposition the driver’s seat while the car is in motion. The seat could move unexpectedly, leading to the driver losing con-
trol of the car, so that an accident could be caused.
Do not recline the driver’s or front passenger’s seat back too far, otherwise there will be a risk of sliding under the seat belt in an accident, so that the belt loses its protective effect.<
Observe also the notes on damaged seat belts on page 48 and on the active front head restraint* on page 47.
Adjusting manually
Comply with the notes on page 42, or there may be a risk to your personal
safety.<
Thigh support*
Pull the lever and move the thigh support forward or back.
Electrical adjustment
Comply with the notes on page 42, or there may be a risk to your personal
safety.<
|
3 |
Height |
|
|
4 |
Seat back |
|
|
1 Forward/back |
Non-standard, depending on seat: |
|
|
2 Angle of driver’s seat |
||
|
Forward/back: pull the lever up and slide the |
||
|
seat to the preferred position. After releasing |
||
|
the lever, move the seat gently forward or back |
||
|
to make sure it engages properly in position. |
||
|
Angle of driver’s seat: pull the lever up and |
||
|
move the seat until the desired angle is |
||
|
obtained. After releasing the lever, move the |
||
|
seat gently forward or back to make sure it |
1 |
Longitudinal direction* |
|
engages properly in position. |
||
|
2 |
Height* |
|
|
3 |
Seat tilt* |
43 
Overview
Entertainment Navigation Driving hints Controls
Reference Mobility
Online Edition for Part-No. 01 41 0 159 725 © 09/05 BMW AG

Adjusting
4 Backrest*
Additional, depending on seat:
1Backrest width*
2Shoulder support*
3Thigh support*
4Lumbar support*, see further below
Shoulder support: the adjustable upper section of the seat back supports the shoulder area of the occupant’s body. This results in a relaxed seated position and reduces the load on the shoulder muscles.
Adjusting lumbar support*
The seat back contour can be altered to provide more support to the curved, lumbar section of the spine.
44 
The upper edge of the pelvis and the spinal column are supported, to encourage an upright but relaxed seated position.
>To increase or reduce the curvature: press switch at front or rear edge.
>To move the curved section up or down: press switch at top or bottom.
Active backrest width adjustment*
First adjust the width of the backrest to a comfortable position, see further above. Using the selected backrest width as the basis, lateral support is automatically adapted to the current driving situation.
The extent to which the backrest is adjusted and the speed with which this takes place depend on the program. You can choose from three programs, ranging from comfortable to sporty.
Each press of the button switches between the programs:
>«Comfort» program: one LED
>«Normal» program: two LEDs
>«Sport» program: three LEDs
To switch off: press and hold down button.
Easy entry/exit*
To facilitate entry and exit, the backrest width is temporarily opened fully.
Online Edition for Part-No. 01 41 0 159 725 © 09/05 BMW AG

Seat, mirror and steering wheel position memory*
You can memorise and call up two different positions for the driver’s and front passenger’s seat*, the outside mirrors and the steering wheel.
The lumbar support setting is not stored in the position memory.
Memorising
1.Switch on radio readiness or the ignition, see page 56.
2.Select the desired seat, outside mirror and steering wheel positions.
3.Press the  button:
The LED in the button comes on.
4.Press the desired memory button 1 or 2: The LED goes out.
Calling up
Do not call up the memory while the car is in motion, otherwise an unexpected seat
or steering wheel movement may cause an accident.<
Convenience function
1.Unlock and open the driver’s door or switch on radio readiness.
2.Briefly press memory button 1 or 2 as desired.
The positioning movement is interrupted immediately if you briefly press a seat adjustment switch or one of the memory buttons.
Safety function
1.Close the driver’s door and switch the ignition on or off.
2.Press memory button 1 or 2 as desired until the adjusting procedure has been completed.
If the  button was pressed accidentally: Press the button again; the LED will go out.
Request with remote control
The last driver’s seat, outside mirror and steering wheel position selected is memorised in the remote control currently in use.
You can choose when the position is called up:
>Calling up when unlocking the car
>Calling up when opening the driver’s door iDrive concept, see page 14.
1.Call up the start menu.
2.Press the controller to call up the  menu.
menu.
3.Select «Vehicle settings» and press the controller.
4.Select «Door locks» and press the controller.
5.Select «Central locking» and press the controller.
6.Select «Last seat pos.» and press the controller.
45 
Overview
Entertainment Navigation Driving hints Controls
Reference Mobility
Online Edition for Part-No. 01 41 0 159 725 © 09/05 BMW AG

Adjusting
7.Select «After unlocking» or «After door opens».
8. Press the controller.
To switch off the calling-up procedure:
Select «Automatic off» and press the controller.
If this function is used, first make sure that the footwell behind the driver’s seat is
unobstructed. Otherwise persons could be injured or objects damaged if the seat should start to move towards the rear.<
Head restraints
Head restraints adjusted to the correct height reduce the risk of injuries to the neck in the event of an accident.
Adjust the head restraint in such a way that its centre is at approximately ear
level; otherwise, there is an increased risk of injury should an accident occur.<
Front seats: adjusting height
You can adjust the height of the head restraints manually or electrically, depending on the type of seat.
46 
Adjusting manually
Up: pull.
Down: press the button, arrow 1, and slide the head restraint down.
To remove:
1.Pull the head restraint up as far as its limit of travel.
2.Press the button, arrow 1, and pull the head restraint fully out.
Adjusting electrically*
Front seats: adjusting angle
Tilt the head restraint as required.
On the Comfort seat, you adjust the distance between the head restraint and the back of your head via the shoulder support.
Online Edition for Part-No. 01 41 0 159 725 © 09/05 BMW AG

Adjusting side sections on
Comfort seat
Fold the side sections forward to provide greater lateral support in the rest position.
Front head restraint, active*
The Comfort seats are equipped with an active head restraint.
In the event of a sufficiently serious rear-end collision, the active head restraint reduces the distance between itself and the head.
Do not use seat or head restraint covers or hang objects, e.g. coat-hangers, from the head restraints or attach accessories to the
seat or head restraint; this will impair the protective function of the active head restraints, thereby putting personal safety at risk.<
Seat belts
Comply with the notes on page 42, or there may be a risk to your personal
safety.<
All occupants should always fasten their seat belts before you set off. The airbags are a complementary safety feature and not a substitute for the seat belts.
Rear seats: adjusting height
Up: pull.
Down: press the button, arrow 1, and slide the head restraint down.
Fastening
The seat belt buckle must be heard to engage.
Belt reminder for driver’s and front passenger’s seat*
The indicator lamp comes on and an acoustic signal sounds. In addition, a message will appear on the control dis-
play. Please check whether the seat belt is fastened correctly.
The ‘Fasten seat belts’ reminder is issued as long as the driver’s seat belt has not been fastened. On certain national-market versions, the ‘Fasten seat belts’ reminder is also activated at road speeds above approx. 8 km/h, approx.
5 mph, if the front passenger’s seat belt is not fastened, if heavy objects are placed on the front passenger seat, or if the driver or front passenger unfasten their seat belts.
47 
Overview
Entertainment Navigation Driving hints Controls
Reference Mobility
Online Edition for Part-No. 01 41 0 159 725 © 09/05 BMW AG

Adjusting
Opening
1.Hold onto the belt.
2.Press the red button on the belt buckle.
3.Guide the belt back up to the reel.
The upper belt anchorage is suitable for adults of any stature as long as they are sitting correctly, see page 43.
The two seat belt buckles integrated into the rear seat are intended for the left and right seat occupants. The buckle marked CENTER is only to be used by a person occupying the centre rear seat.
Damaged seat belts
Should the seat belts be placed under strain in the event of an accident or sus-
tain damage, replace the belt system including the seat-belt tensioner and have the belt tensioner tested. Have this work performed only by BMW Service or by a workshop that operates to BMW specifications and has suitably trained personnel, otherwise the correct functioning of this safety equipment is not guaranteed.<
Heated seats*
Front
1.Call up the start menu.
2.Move the controller to the left to call up «Climate».
3.Select «Seat-heating distribution» and press the controller.
4.Move the controller to the left or right to select «Driver» or «Passenger».
5.Turn the controller. The setting is adopted; you can now change to another field.
Rear
|
Function as for heated front seats, two temper- |
|
|
ature stages. |
|
Active seat ventilation* |
|
|
Press once per temperature stage. Three LEDs |
|
|
indicates the highest preset temperature. |
|
|
To switch off: press and hold down the button. |
|
|
Temperature distribution |
|
|
The temperature distribution between the seat |
|
|
cushion and seat back can be varied. |
|
|
iDrive concept, see page 14. |
Press once per ventilation stage. |
|
48 |
Online Edition for Part-No. 01 41 0 159 725 © 09/05 BMW AG

To switch off: press and hold down the button.
The highest stage with three LEDs lit is for a rapid cooling effect, e.g. if the car’s
interior has become very hot. The system automatically switches down a stage after a short time to avoid overcooling.<
Active seat*
The seat cushion is actively varied by the right and left halves of the seat cushion being raised and lowered alternately. This helps to avoid muscular strain and signs of fatigue, and thus guards against back pains in the lumbar region.
To switch on, press the button; the LED lights up.
When you switch off the active seat, it may take up to 1 minute for the two halves of the base cushion to return to their home positions.
Mirrors
Door mirrors
The outer sections of the mirrors depict a larger field of view* than the inner sections. In this way, the view to the rear is extended and the blind spot, as it is known, is reduced in size.
The objects seen in the mirrors are closer than they appear. Do not gauge your distance from following traffic based on what you
see in the mirrors; otherwise there is an increased risk of accident.<
1Adjusting
2Changing over to the mirror on the other side or to the automatic parking function, see Passenger-side mirror tilt-down on page 50
3Folding mirrors in and out*
To memorise mirror positions, see Seat, mirror and steering wheel position memory on
page 45.
Adjusting manually
The mirrors can also be adjusted manually by pressing the edge of the glass.
Folding mirrors in and out*
At speeds up to approx. 30 km/h, approx. 20 mph, you can fold the mirrors in or out by
pressing button 3. This can be useful for example in car washes or narrow streets, or to fold the mirrors back out into the correct position after they have been folded in manually. If the mirrors have been folded in, they automatically fold out again when a speed of approx. 40 km/h, approx. 25 mph, is reached.
Before putting the car through a car wash, fold the mirrors in either manually or by
pressing button 3, otherwise they could be damaged on account of the car’s width.<
Automatic heating
Both outside mirrors are heated automatically while the engine is running or the ignition switched on.
49 
Overview
Entertainment Navigation Driving hints Controls
Reference Mobility
Online Edition for Part-No. 01 41 0 159 725 © 09/05 BMW AG
 Loading…
-
Страница 1
С удовольств ием за рулем Руководств о по эксплуатации автомобиля[…]
-
Страница 2
523i 525i 530i 540i 550i 525xi 530xi 530xd 520d 525d 530d 535d Руководство по эксплуатации автомобиля Мы рады, что Вы сделали сво й выбор в пользу автомобиля марки BMW. Чем лучше Вы его узнаете, тем увереннее будете чувств[…]
-
Страница 3
© 2006 Bayeris che Motoren Werke Aktiengesells chaft M ü nchen, Deutschland Воспроизведени е, полное или частичное, допускается только с письменного ра зрешения BMW AG, M ü nchen. Номер для заказ а 01 92 0 157 256 русский II /06, 06 03 50 0 Отпеча?[…]
-
Страница 4
Развлекательные системы Обзор Управление Полезно знать Система навигации Мобильно сть Характеристики Оглавление Для быстрого поиска информации используйт е алфавитный указатель на стран?[…]
-
Страница 5
Примечания 4 Примечания О данном „Руководстве“ Мы уделили особое вн имание тому, чтобы Вы могли хорошо ориентироваться в данном „Руководстве“. Инте ресующие Вас темы легче всего найти с по?[…]
-
Страница 6
Развлекательные системы Обзор Управление П олезно знать Си стема навигации Мобильность Характеристики 5 Ваш автомобиль При покупке автомобиля BMW Вы выбра ли конкретную модель в ин дивидуаль[…]
-
Страница 7
[…]
-
Страница 8
Обзор Обзорная информа ция этого раздела позволит Вам сориентироваться в многообразии клавиш, переключателей и индикаторов. Кроме того, она п оможет Вам б ыстро освоить основные принципы уп?[…]
-
Страница 9
Место водителя 8 Место водителя В зоне рулевого колеса: ор ганы управления и индикации 1 Седан: солнцезащитная штора * за днего стекла 113 2 Защитный выключатель задних стеклоподъемников 39 3 Откр[…]
-
Страница 10
9 Развлекательные системы Обзор Управление Полезно знать Система навигации Мобильно сть Характеристики 7 Клавиши на рулевом колесе 8 Комбинация приборов 10 11 Замок зажигания 57 12 Звуковой сигн[…]
-
Страница 11
Место водителя 10 Комбинация приборов 1 Контрольные лампы у казателей поворота 2 Спидометр 3 Контрольные и сигнальные лампы 11 4 Индикатор ак тивного круизконтроля * 69 5 Тахометр 72 6 Энергоконтр[…]
-
Страница 12
11 Развлекательные системы Обзор Управление Полезно знать Система навигации Мобильно сть Характеристики Контрольные и сигнальные лампы Принцип действ ия Контрольные и сигнальные ламп ы заг[…]
-
Страница 13
Место водителя 12 Центральная консоль: органы управления и индикации[…]
-
Страница 14
13 Развлекательные системы Обзор Управление Полезно знать Система навигации Мобильно сть Характеристики 1 Микрофон уст ройства громко й связи телефона * и системы голосового управления * 20 2 Л[…]
-
Страница 15
iDrive 14 iDrive iDrive объединяет в себе функции большого количест ва пере ключател ей и пред ставля ет собой единый центр управления. Ниже мы покажем Вам схему навигации по разл ичным меню и экр анам д[…]
-
Страница 16
15 Развлекательные системы Обзор Управление Полезно знать Система навигации Мобильно сть Характеристики Обзор всех меню Communication (Связ ь) > Телефон * , см. отдельное р уководство по эксплуатац?[…]
-
Страница 17
iDrive 16 > переходить из одного главного меню в другое, не нажимая на клавишу . Для этого сдвиньте контроллер в соответ ствующем направлен ии и удерживайте его так более 2 секунд. Структура мен?[…]
-
Страница 18
17 Развлекательные системы Обзор Управление Полезно знать Система навигации Мобильно сть Характеристики Коротко о принципах управ ления Ниже описываетс я пр инцип управления системами с по?[…]
-
Страница 19
iDrive 18 Информация о состоянии 1 Поле индикации состояния : > аудио и ви деосистем: радиоприемника, CDплеера, ТВ * > телефона * : название операт ора, поиск сети или название зарегистрирова нно[…]
-
Страница 20
19 Развлекательные системы Обзор Управление Полезно знать Система навигации Мобильно сть Характеристики Выбор показания 1. Сдвиньте контролл ер вправо, чтобы перейти во вспомогательное ок н?[…]
-
Страница 21
Система голосового управления 20 Система голосового управления Принцип действия Система обработки речи позволяет управлять ус тройствами автомоби ля, не убирая рук с рулевого колеса. Команд[…]
-
Страница 22
21 Развлекательные системы Обзор Управление Полезно знать Система навигации Мобильно сть Характеристики Если дальнейшие голосовые команды отсутствуют, продолжите управление с помощью iDrive. […]
-
Страница 23
Система голосового управления 22 5. Нажмите на руле вом колесе или на центральной конс оли клавишу . Примечания О голосовом управлении телефоном см. также в отдель ном руководстве по эксплуата?[…]
-
Страница 24
23 Развлекательные системы Обзор Управление Полезно знать Система навигации Мобильно сть Характеристики[…]
-
Страница 25
[…]
-
Страница 26
Управление Сведения из данного раздела придадут Вам уверенности при упра влении автомобилем. Здесь описываются все элементы комплектации, которы е служат как для самого вождения, так и для о[…]
-
Страница 27
Открывание и закрывание 26 Открывание и закрывание Комплект ключей 1 Электронный ключ со встроенным механическим кл ючом 2 Запасной ключ 3 Адаптер для запа сного ключа ( находится в перчаточно?[…]
-
Страница 28
27 Развлекательные системы Обзор Управление Полезно знать Система навигации Мобильно сть Характеристики Выньте адаптер из держателя в перчаточном ящике и вставьте в него запасной ключ . Пер?[…]
-
Страница 29
Открывание и закрывание 28 > крышка багажника ил и багажная дверь и заднее стек ло; > лючок топлив ного бака. Приведение в действ ие снаружи > Снаружи замок можн о привести в действие с помощ[…]
-
Страница 30
29 Развлекательные системы Обзор Управление Полезно знать Система навигации Мобильно сть Характеристики Комфортное открывание Нажмите и удерживайте кнопку . Открываются окна и стеклянный л[…]
-
Страница 31
Открывание и закрывание 30 5. Выберите „Confirmatio n“ (Подтверждение) и нажмите на контроллер. 6. Выберите предпо чтительный сигн ал. 7. Нажмите на контроллер. отмечает включенные сиг налы. Помехи Рад[…]
-
Страница 32
31 Развлекательные системы Обзор Управление Полезно знать Система навигации Мобильно сть Характеристики 4. Выберите „Door locks“ (Двер ные замки) и нажмите на контроллер. 5. Выберите „Central locking“ (Ц[…]
-
Страница 33
Открывание и закрывание 32 Открывание снаружи Нажмите клавишу на кр ышке багажника или примерно 1 секунду удерживайте нажатой кнопку на пульте ДУ – крышка багажника откроется. При некоторых ?[…]
-
Страница 34
33 Развлекательные системы Обзор Управление Полезно знать Система навигации Мобильно сть Характеристики Нажмите клавишу – стекло багажной д вери приоткроется и его можно будет по днять вве?[…]
-
Страница 35
Открывание и закрывание 34 Ручное открывание (при неисправности электрооб орудования) 1. С помощью отвертки выдавите крышк у 1 на багажной двери со с тороны б агажного отделения. 2. Отожмите зад?[…]
-
Страница 36
35 Развлекательные системы Обзор Управление Полезно знать Система навигации Мобильно сть Характеристики > на клавишу в пространстве для ног водителя; > в течение 1 секунд ы – на кнопку дист[…]
-
Страница 37
Открывание и закрывание 36 Постановка на сигнализацию и снятие с сигнализации Постановка на сигнализацию и снятие с нее происходят одно временно с з апиранием и отпиранием автомобиля путем п[…]
-
Страница 38
37 Развлекательные системы Обзор Управление Полезно знать Система навигации Мобильно сть Характеристики не достав ая ключ из карм ана. Достаточн о лишь иметь его при себе. Электронный ключ ав[…]
-
Страница 39
Открывание и закрывание 38 При этом мигае т аварийная световая сигна лизация и раздается звуковой сигнал * . < Туринг: открывание стекла бага жной двери Нажмите клавишу на стекле багажной дв[…]
-
Страница 40
39 Развлекательные системы Обзор Управление Полезно знать Система навигации Мобильно сть Характеристики Открывание и закрыв ание > Нажмите переключател ь до точки сраба тывания – стекло […]
-
Страница 41
Открывание и закрывание 40 Приподнимание крышки Нажмите на переключатель. > Если крышка люка закрыта , то она приподнима ется, а ее сдвижная панель немного ото двигается. > Если крышка откры?[…]
-
Страница 42
41 Развлекательные системы Обзор Управление Полезно знать Система навигации Мобильно сть Характеристики (см. страницу 198) и вставьте его в специально преду смотренное отвер с тие. Перемести?[…]
-
Страница 43
Открывание и закрывание 42 натолкнется на преп ятствие, то она оста новится и приоткро ется. То же самое происходит при закрывании крышки из приподнятого по ложения. В любом случае сл едите з?[…]
-
Страница 44
43 Развлекательные системы Обзор Управление Полезно знать Система навигации Мобильно сть Характеристики Регулировка Правильная посадка на сиденье Чтобы при поездке Ваши мышцы не напря га?[…]
-
Страница 45
Регулировка 44 Не разрешайте пассажиру на переднем сиденье езди ть с сильно отки нутой наза д спинкой и не делайт е этого сами, ч тобы при аварии не соскользнуть под ремень безопасности. < Обр?[…]
-
Страница 46
45 Развлекательные системы Обзор Управление Полезно знать Система навигации Мобильно сть Характеристики 4 Регулировка спинки * Дополнительно (зависит от сиден ья): 1 Ширина спинки сиденья * 2 П?[…]
-
Страница 47
Регулировка 46 Память положения сидений, зеркал и рулевого колеса* Вы можете запрогр аммировать по д ва поло жения для сидений водите ля и переднего пассажира * , наружн ых зеркал и ру левого к[…]
-
Страница 48
47 Развлекательные системы Обзор Управление Полезно знать Система навигации Мобильно сть Характеристики 7. Выберите „After unlocking“ (Пос ле отпи рания) ил и „After door opens “ (После открывания двери).[…]
-
Страница 49
Регулировка 48 Для нормальной работы акт ивных подголовников и подд ержания долж ного уровня пассив ной безопасн ости не обтягивайте сиденья и подголовники чехлами, не крепите на них никак ?[…]
-
Страница 50
49 Развлекательные системы Обзор Управление Полезно знать Система навигации Мобильно сть Характеристики Если сиден ье отрегулиро вано прав ильно, то верхняя точка крепле ния ремня подходит ?[…]
-
Страница 51
Регулировка 50 Выключение: несколько дольше удержи вайте клавишу нажатой. Самая высокая ступ ень (горят три светодиода) служит дл я быстрого охлаждения сиденья.Чтобы сидящий не застуди л себ[…]
-
Страница 52
51 Развлекательные системы Обзор Управление Полезно знать Система навигации Мобильно сть Характеристики Наклон вниз зеркала на стороне переднего пасса жира – автоматическая установка в па?[…]
-
Страница 53
Регулировка 52 Функция помощи при пос адке ив ы с а д к е * Для облегчения посадк и и высадки рулевое колесо автоматически перемещается до упора в верх. Обогрев рулевого колеса* При включенном з?[…]
-
Страница 54
53 Развлекательные системы Обзор Управление Полезно знать Система навигации Мобильно сть Характеристики 6. Выберите программируемую клавишу (если их несколько) и нажмите на контроллер. Тепер[…]
-
Страница 55
Безопасная перевозка детей 54 Безопасная перевозка детей Выбор правильного места для перевозки детей Не оставляйте детей в автомобил е без присмотра. Необдуманными действи ями они могут по[…]
-
Страница 56
55 Развлекательные системы Обзор Управление Полезно знать Система навигации Мобильно сть Характеристики Индикация состояния НПБ передне го пассажира Расположение выключателей и контрольн?[…]
-
Страница 57
Безопасная перевозка детей 56 Перед установк ой детского сиде нья отве дите в сторону ремен ь безопасности. Седан: задние сиденья с люком для перевозки длинномера* Крепления ISOF IX находятся п?[…]
-
Страница 58
57 Развлекательные системы Обзор Управление Полезно знать Система навигации Мобильно сть Характеристики Вождение Замок зажигания Вставьте электронный ключ до упора в замок зажигания. > Вк?[…]
-
Страница 59
Вождение 58 Пуск двигателя Не оставля йте двига тель раб отать в закрытых помещениях: вдыхание вредных для здоровья отработавших газов может привести к поте ре сознания и даже к летальному ис?[…]
-
Страница 60
59 Развлекательные системы Обзор Управление Полезно знать Система навигации Мобильно сть Характеристики Выключение двигателя Не вынимайте электронный ключ из замка, когда авт омобиль наход[…]
-
Страница 61
Вождение 60 Передача заднего хода Включайте это положение только после полной остановки автомобиля. Рычаг отво дится влево с преодоле нием сопротивления. Секвентальная коробка передач (SMG)* […]
-
Страница 62
61 Развлекательные системы Обзор Управление Полезно знать Система навигации Мобильно сть Характеристики Выбор передач осуществляется с помощью переключателей на рулевом колесе или рычагом[…]
-
Страница 63
Вождение 62 Выключение систе мы > Еще раз нажмите клавишу „SPORT“. > Или включите передачу заднего хода . > Или выключите двигатель. Светодиод в клавише и надпись „SPORT“ в комбинации приборов […]
-
Страница 64
63 Развлекательные системы Обзор Управление Полезно знать Система навигации Мобильно сть Характеристики R: передача заднего хода Включайте это положение только после полной остановки автом?[…]
-
Страница 65
Вождение 64 Включение указателей поворота без фиксации Нажмите рычажный переключатель до точки срабатыван ия. Удер живайте его в этом поло жении до тех пор, пока не решите выключить указате?[…]
-
Страница 66
65 Развлекательные системы Обзор Управление Полезно знать Система навигации Мобильно сть Характеристики Выключение датчика интенсивн ости дождя Еще раз нажмите клав ишу, см. стрелку 3 . Свето[…]
-
Страница 67
Вождение 66 Не пользуйтесь системой, если обилие поворотов, плотны й транспортный поток или плохое состояние доро ги (снег, дождь, гололед, рыхлый грун т) не позволяют двигаться с равномерной с?[…]
-
Страница 68
67 Развлекательные системы Обзор Управление Полезно знать Система навигации Мобильно сть Характеристики Активный круиз=контроль* Принцип действ ия С помощью активной системы поддержания за[…]
-
Страница 69
Вождение 68 Переключатель управления всеми функциями 1 Ввод скорости в память и у величение скорости 2 Ввод скорости в память и уменьшен ие скорости 3 Выключение системы, см. страницу 69 4 Восста?[…]
-
Страница 70
69 Развлекательные системы Обзор Управление Полезно знать Система навигации Мобильно сть Характеристики Выбранная дистанци я отобра жается в комбинации приборов. Выбирайте дистанцию с учет[…]
-
Страница 71
Вождение 70 4 Кратковременное по казание зада нной скорости Если не выполнены усл овия работы системы, в комбинации приборов на короткое время высвечивается показа ние km/h. Откройте соо?[…]
-
Страница 72
71 Развлекательные системы Обзор Управление Полезно знать Система навигации Мобильно сть Характеристики Перестраивающиеся автомобили Система замечает перестраивающийся из соседнего ряд а[…]
-
Страница 73
Все под контролем 72 Все под контролем Счетчики пробега, индикатор температуры наружного воздуха, часы 1 Время, температу ра наружног о воздуха ид а т а 2 Счетчики общего и разового пр обега 3 Кн?[…]
-
Страница 74
73 Развлекательные системы Обзор Управление Полезно знать Система навигации Мобильно сть Характеристики Энергоконтроль Этот прибор показывает текущий расход топлива. Он позволяет следить ?[…]
-
Страница 75
Все под контролем 74 Чтобы обнулить показани е среднего расхода топлива, нажмите и 2 с екунды удерж ивайте клавишу „BC“ на переключателе указателей поворота. Индикация на дисплее управления Б?[…]
-
Страница 76
75 Развлекательные системы Обзор Управление Полезно знать Система навигации Мобильно сть Характеристики Путевой компьютер* Путевым компьютером удобн о пользоваться в путешествии. 1. Откройт[…]
-
Страница 77
Все под контролем 76 Подробна я инфо рмация Более подробную информа цию об объеме технического обслужив ания можно просмот реть на дисплее уп равления, принципы управления см. на странице 14. […]
-
Страница 78
77 Развлекательные системы Обзор Управление Полезно знать Система навигации Мобильно сть Характеристики 6. Выберите „Stat. exhaust. insp.“ (Проверка ОГ) или „Stat. vehicle ins p.“ (Техосмотр) и нажмите на кон?[…]
-
Страница 79
Все под контролем 78 Поясняющие сообщения Сообщения в нижней строке дисплея управ ления поясняют сигналы контрольных ламп. По больши нству сообщ ений Вы може те вывести дополнительную инфо?[…]
-
Страница 80
79 Развлекательные системы Обзор Управление Полезно знать Система навигации Мобильно сть Характеристики 4. Выберите „Check Control messages“ (Сообщения автоматической диагн ос тики) и нажмите на кон[…]
-
Страница 81
Все под контролем 80 4. Выберите „Limit“ (Предел) и нажмите на контроллер . 5. Настройте значение скорости и нажмите на контролл ер. 6. Значение ск орости наст раивает ся пово ротом контро ллера. Ес[…]
-
Страница 82
81 Развлекательные системы Обзор Управление Полезно знать Система навигации Мобильно сть Характеристики Настройки дисплея управления Принципы управления iDrive см. на стра нице 14. 1. Откройте […]
-
Страница 83
Все под контролем 82 Выберите „Hour memo“ (Сигна л полного часа) и нажмите на контроллер. Сигнал полног о часа включен. Выбор режима показа времени 1. Выберите „Time format“ (Режим показа времени) и нажм[…]
-
Страница 84
83 Развлекательные системы Обзор Управление Полезно знать Система навигации Мобильно сть Характеристики Язык меню дисплея управления 1. Выберите „Languages“ (Язык) и на жмите на контроллер. 2. Выб[…]
-
Страница 85
Техника для комфорта и безопасности 84 Техника для комфорта и безопасности Сигнализация аварийного сближения при парковке (PDC)* Принцип действия Система PDC оказывает помощь при парков ке, со?[…]
-
Страница 86
85 Развлекательные системы Обзор Управление Полезно знать Система навигации Мобильно сть Характеристики моечными установками высо кого давления следите за тем, чтобы струи не за держива л?[…]
-
Страница 87
Техника для комфорта и безопасности 86 пути при торможении до полной оста новки. При этом задействуютс я также преимущест ва системы ABS. До тех пор, пока т ребуется торможение, не ослабляйте н?[…]
-
Страница 88
87 Развлекательные системы Обзор Управление Полезно знать Система навигации Мобильно сть Характеристики Выключение системы DTC Еще раз нажмите клавишу. Контрольная лампа в комбин ации прибор[…]
-
Страница 89
Техника для комфорта и безопасности 88 Неисправности При включенной системе индикатор HDC не загорается или гаснет – изза перегрева тормозов систе ма HDC временн о не работает. Dynamic Drive* Принци?[…]
-
Страница 90
89 Развлекательные системы Обзор Управление Полезно знать Система навигации Мобильно сть Характеристики Физические границы работы системы Индикатор повреждения шин не может предупредить о[…]
-
Страница 91
Техника для комфорта и безопасности 90 2. При первой же возможности проверьте давление воздуха во всех четырех шинах. При нормальном давлении во всех шинах причиной ложной тревоги могло быть т[…]
-
Страница 92
91 Развлекательные системы Обзор Управление Полезно знать Система навигации Мобильно сть Характеристики Двухступенчатые стоп=сигналы* Слева: нормальн ое торможение. Справа: резкое торможен?[…]
-
Страница 93
Техника для комфорта и безопасности 92 отдельные компонен ты. Это касается также травмобезопасной о блицовки рулевого колеса, панели приборов, боковой об шивки, дверей, продольных брусьев кры[…]
-
Страница 94
93 Развлекательные системы Обзор Управление Полезно знать Система навигации Мобильно сть Характеристики Выбор информации для показа Принципы управления iDrive см. на стра нице 14. 1. Нажмите кл?[…]
-
Страница 95
Техника для комфорта и безопасности 94 Уход Все нужное по этой теме Вы найдете в брошю ре „Уход “. Для протирания крышки проектора используйте только м ягкую, нецара пающую ткань ил и сп ециа[…]
-
Страница 96
95 Развлекательные системы Обзор Управление Полезно знать Система навигации Мобильно сть Характеристики Включение системы BMW Night Vision 1. Поверните переключ ат ель света в поло жение 2 или 3 , см[…]
-
Страница 97
Техника для комфорта и безопасности 96 Очистка камеры Сильный дождь, а также грязь, снег и лед могут ограничить возмож ности камеры. Обледенению камеры препятствует автома тический обогрев, […]
-
Страница 98
97 Развлекательные системы Обзор Управление Полезно знать Система навигации Мобильно сть Характеристики Освещение Стояночные огни и ближний свет 0 Освещение выключено 1 Стояночные огни 2 Бли[…]
-
Страница 99
Освещение 98 6. Вращая контроллер, настройте продол жительность. 7. Нажмите на контроллер , чтобы подт вер дить настройку. Постоянный ближний свет* При желании переключ атель света можно оста[…]
-
Страница 100
99 Развлекательные системы Обзор Управление Полезно знать Система навигации Мобильно сть Характеристики Соблюдайте но рмы разрешен ной нагрузки на заднюю ось, см. страницу 222. Ксеноновые фар?[…]
-
Страница 101
Освещение 100 дальним светом фар отключает ся. Чтобы снова включить систему, нажмите переключатель указ ателей поворота в направлении для включения дальнего света. > Если автоматика включил?[…]
-
Страница 102
101 Развлекательные системы Обзор Управление Полезно знать Система навигации Мобильно сть Характеристики Освещение салона Освещением салона, п ространства для н ог, порогов, бага жника * и пр?[…]
-
Страница 103
Микроклимат 102 Микроклимат Варианты исполнения Панель климатконтроля существует в двух исполнениях, завися щих от комплектации автомобиля. 1 Автоматический климатконтроль 2 Автоматичес?[…]
-
Страница 104
103 Развлекательные системы Обзор Управление Полезно знать Система навигации Мобильно сть Характеристики Автоматический климат=контроль 1 Ручная регулировка распределения потоков воздуха 2[…]
-
Страница 105
Микроклимат 104 Включение и выключение режима охлаждения При включенном режиме охлаж дения воздух охлаждает ся, осу шается и, в зависимости от наст роенной температур ы, снова подогрева е[…]
-
Страница 106
105 Развлекательные системы Обзор Управление Полезно знать Система навигации Мобильно сть Характеристики Вентиляция без сквозняков Отрегулируйте вентил яционные решетки так, чтобы воздух д[…]
-
Страница 107
Микроклимат 106 8 Режим исполь зования оста точного теп ла 9 Автоматическая программа 10 Автомати ческая сист ема конт роля загрязненности наружн ого воздуха (AUC)/режим рециркуляции 11 Светодиод ?[…]
-
Страница 108
107 Развлекательные системы Обзор Управление Полезно знать Система навигации Мобильно сть Характеристики 4. Сдвиньте контроллер на нужное поле и, вращая его, наст ройте температуру по своему ?[…]
-
Страница 109
Микроклимат 108 Автоматическая система контроля загрязненности наружного воздуха (AUC)/режим рециркуляции При неприятном запахе с улицы или загазованн ости можно перекрыть подачу наружн ого в[…]
-
Страница 110
109 Развлекательные системы Обзор Управление Полезно знать Система навигации Мобильно сть Характеристики Вентиляция в задней ча сти салона 1 Колесико для плавно го открывания и закрывания во[…]
-
Страница 111
Микроклимат 110 ни цвета, ни зап аха ядовитый угарный газ. Выключайте автономную систему отопления на время заправки топливом. < Автономная система отопления не работает, если топлива в баке ?[…]
-
Страница 112
111 Развлекательные системы Обзор Управление Полезно знать Система навигации Мобильно сть Характеристики Таймер вклю чен. Значок на дисплее климаткон троля горит. После включе ния системы ?[…]
-
Страница 113
Практичные элементы внутреннего оснащения 112 Практичные элементы внутреннего оснащения Встроенное универсальное дистанционное управление* Принцип действия Встроенное универсаль ное дист[…]
-
Страница 114
113 Развлекательные системы Обзор Управление Полезно знать Система навигации Мобильно сть Характеристики Теперь соотве тствующая к лавиша 1 запрограммирован а на сигнал оригиналь ного пул[…]
-
Страница 115
Практичные элементы внутреннего оснащения 114 Перчаточный ящик Открывание Потяните за ручку. Ящик от кроется, и в нем загорится подсве тка. Не оставляйте перчаточный ящик открытым без необход[…]
-
Страница 116
115 Развлекательные системы Обзор Управление Полезно знать Система навигации Мобильно сть Характеристики Доступ к нижнему ящику Нажмите расположенну ю спереди кнопк у и поднимите верхний ящ[…]
-
Страница 117
Практичные элементы внутреннего оснащения 116 Очистка Нажмите на передний край пепельницы. Пепельница приподнимется, и ее можн о будет вынуть. На автомо билях с па кетом оснащ ения для некурящ[…]
-
Страница 118
117 Развлекательные системы Обзор Управление Полезно знать Система навигации Мобильно сть Характеристики Туринг: в багажном отсеке Для доступа к розетк е откройте крышку. В задней центральн ?[…]
-
Страница 119
Практичные элементы внутреннего оснащения 118 4. Разблокированная спинка немног о подается вперед. В озьмитесь рукой за подголовник и о пустите спинку вперед . Закрывание 1. Верните спинку задн[…]
-
Страница 120
119 Развлекательные системы Обзор Управление Полезно знать Система навигации Мобильно сть Характеристики Чтобы не подвергать себя и своих пассажир ов опаснос ти, соблю дайте правила пользов?[…]
-
Страница 121
Практичные элементы внутреннего оснащения 120 Крышка отсека для запасного колеса 1. Поднимите крышку. 2. Вын ьт е и з д ерж ат ел я кр юч ок и з ац епи те за него крышку. Перед опусканием крышки отц?[…]
-
Страница 122
121 Развлекательные системы Обзор Управление Полезно знать Система навигации Мобильно сть Характеристики Загрузка 1. Опустите средний подлокотник, нажмите на кнопку и откройте крышку. 2. Еще р[…]
-
Страница 123
[…]
-
Страница 124
Полезно знать Информация этого раздела подскажет Вам, как действовать в тех или иных ситуациях и при необычных обст оятельствах. Полезно знать[…]
-
Страница 125
Особенности эксплуатации 124 Особенности эксплуатации Обкатка Новый автомобиль необходимо обкатать, чтобы его подвижные детали и узлы притер лись друг к другу. Соблюдайте приведенные ниже […]
-
Страница 126
125 Развлекательные системы Обзор Управление Полезно знать Система навигации Мобильно сть Характеристики Водитель м ожет заме тить его по том у, что двигатель некоторое время работает шум н[…]
-
Страница 127
Особенности эксплуатации 126 Автомобили с коробкой передач SMG На подъеме трогайтесь с места энергично. На уклоне придержива йте автомобиль не газом, а стояночным торм о зом. В противном случа[…]
-
Страница 128
127 Развлекательные системы Обзор Управление Полезно знать Система навигации Мобильно сть Характеристики Все нужное по теме ухода за авт омобилем Вы найдете в брош юре „Уход“. Задний ст екло[…]
-
Страница 129
Особенности эксплуатации 128 Размещение багажа > Тяжелые грузы размещайте ка к можно глубже, то есть сразу за спинками за дних сидений, и как можно ниже. > Острые кромки и уг лы накройте или о?[…]
-
Страница 130
129 Развлекательные системы Обзор Управление Полезно знать Система навигации Мобильно сть Характеристики Багажник на крыше* К Вашему BMW предла гается специальный багажник для установки на кр[…]
-
Страница 131
Особенности эксплуатации 130 Перед поездкой Разрешенная нагрузка на тягово=сцепное устройство Минимальная нагрузка на тяговосцепное устройство составляет 25 кг. Значения раз решенной мак[…]
-
Страница 132
131 Развлекательные системы Обзор Управление Полезно знать Система навигации Мобильно сть Характеристики В экстремальной си туации сис тема может оказать стабилизирующее воздействие даже в[…]
-
Страница 133
[…]
-
Страница 134
Система навигации В этом разделе Вы уз наете, как управлять системой навига ции, чтобы она прив ела Вас точно к цели. Система навигации[…]
-
Страница 135
Запуск системы навигации 134 Запуск системы навигации Система навигации способна отслеживать с помощью спу тников точное местонахож дение автомобиля и с высокой до лей надежности ук азыва?[…]
-
Страница 136
135 Развлекательные системы Обзор Управление Полезно знать Система навигации Мобильно сть Характеристики Индикация во вспомогательном окне В системе навигац ии „Professional“: Информацию о марш?[…]
-
Страница 137
Ввод цели 136 Ввод цели Выбрать цель можно сл едующими способами: > указать це ль вручную, см. ниже; > ввести цель через систему голосового управления, см. страницу 140; > выбрать цель через доп?[…]
-
Страница 138
137 Развлекательные системы Обзор Управление Полезно знать Система навигации Мобильно сть Характеристики 3. Выберите „Address in put“ (Ввод цел и) и нажмите на контроллер. Система имеет следующие о?[…]
-
Страница 139
Ввод цели 138 С каждой последующей буквой этот список все более сокращается. > Ввод пробел а: выберите и нажмит е на контроллер. 5. Перейдите в третье поле с верху. Поворотом контроллера выберит[…]
-
Страница 140
139 Развлекательные системы Обзор Управление Полезно знать Система навигации Мобильно сть Характеристики Ввод улицы и перекрестка 1. Выберите пункт меню „ Street“ (Улица ) или уже имеющееся на э?[…]
-
Страница 141
Ввод цели 140 Включение ведения к цели после ввода цели вручную > Выберите „Start guidance“ (Включить ведение к цели) и нажмите на конт роллер. Ведение к цели включается. > Если Вы собираетесь вкл?[…]
-
Страница 142
141 Развлекательные системы Обзор Управление Полезно знать Система навигации Мобильно сть Характеристики поиска. Одновр еменно на дисплей мо жет быть выведено не б олее 6 названий. Выбрать пу?[…]
-
Страница 143
Ввод цели 142 На дисплее управления появляется фрагмент кар ты: > во время ведения к цели – район текущей цели; > при включенном ведении к цели – район введенной в посл едний раз цели. 4. Выбер?[…]
-
Страница 144
143 Развлекательные системы Обзор Управление Полезно знать Система навигации Мобильно сть Характеристики 3. Выберите „Information“ (Информация) и нажмите на контроллер. 4. Выберите населенный пунк[…]
-
Страница 145
Ввод цели 144 Выбор цели 1. Выберите цель в списке и нажмите на контроллер . 2. Выберите „Guidance“ (Ведение к цели) ин а ж м и т е н а к о н т р о л л е р . Редактирование списка целей 1. Выберите цель в спи?[…]
-
Страница 146
145 Развлекательные системы Обзор Управление Полезно знать Система навигации Мобильно сть Характеристики Система навигации „Professional“ 1. Выберите „Address book“ ( Адресная книга) и нажмит е на конт[…]
-
Страница 147
Ввод цели 146 На дисплее управления появится список записанных в па мять адресов. 2. Выберите запись и нажмите на конт роллер. Чтобы включить ведение к цели, выберите „Start guidance“ (Включить веде?[…]
-
Страница 148
147 Развлекательные системы Обзор Управление Полезно знать Система навигации Мобильно сть Характеристики 4. Выберите „Delete data“ (Стереть данные) и нажмите на контроллер. 5. Выберите „Delete address book[…]
-
Страница 149
Ввод цели 148 Изменение критериев маршрута 1. Выберите „Navigation“ (Навигация) ин а ж м и т е н а к о н т р о л л е р . 2. Перейдите в третье поле с верху. Поворотом контрол лера выберите „Route criteria“ (Крите[…]
-
Страница 150
149 Развлекательные системы Обзор Управление Полезно знать Система навигации Мобильно сть Характеристики Функция сопоставления слов Функция сопоставления слов облегчает ввод названий насе[…]
-
Страница 151
Ведение к цели 150 Ведение к цели Включение ведения к цели Принципы управления iDrive см. на стра нице 14. 1. Перейдите в верхне е поле. Поворотом контроллера выб ерите „Navigat ion“ (Навигация) и нажмит[…]
-
Страница 152
151 Развлекательные системы Обзор Управление Полезно знать Система навигации Мобильно сть Характеристики Если к концу предыдущей по ездки выбра н ная цель не была до стигнута, то в н ачале с?[…]
-
Страница 153
Ведение к цели 152 1 Название ули цы/дороги , куда предсто ит свернуть 2 Расстояние до поворота 3 Поворот Для выхода из меню выберите и нажмите на контроллер . Включение карты маршрута В системе н?[…]
-
Страница 154
153 Развлекательные системы Обзор Управление Полезно знать Система навигации Мобильно сть Характеристики Показ населенных пунктов и трасс по маршруту Во время ведения к цели Вы можете вывес?[…]
-
Страница 155
Ведение к цели 154 > прерывание объявления в системе навигации „Business“ – ко роткое нажатие клавиши. Регулировка громкости Громкость можно настро ить только во врем я объявления. 1. Включите п?[…]
-
Страница 156
155 Развлекательные системы Обзор Управление Полезно знать Система навигации Мобильно сть Характеристики Вы можете объехать участок определен ной длины: > в системе навигац ии „Professional“ ?[…]
-
Страница 157
Ведение к цели 156 „AUTO“: автоматический выбор радиостанции TMC с наилучшим приемом. Просмотр дорожной информации Во время ведения к цели дорожную инфор мацию можно наложить на стрелочный ука[…]
-
Страница 158
157 Развлекательные системы Обзор Управление Полезно знать Система навигации Мобильно сть Характеристики Значки дорожн ой информации Отображение доро жной инф ормации на карте ма ршрута В с?[…]
-
Страница 159
Ведение к цели 158 Перед подъез дом к этому уча стку она инфо р мирует Вас о последней воз можности свернуть. Эта информация также появ ляется, когда на дисплее управления открыто другое меню. […]
-
Страница 160
159 Развлекательные системы Обзор Управление Полезно знать Система навигации Мобильно сть Характеристики А что, если … А что, если … > Вы вставили навигационный DVD в устройство чтения, а на д?[…]
-
Страница 161
[…]
-
Страница 162
Развлекательные В этом разделе рассказывается о пользован ии аудио и в идеоаппар атурой и о настройке параметров звучания ии з о б р а ж е н и я . Развлекательные системы[…]
-
Страница 163
Включение и выключение, настройка 162 Включение и выключение, настройка Следующие аудио и видеоприборы имеют общие органы управления и настройки: > радиоприем ник „Professional“ * или радиоприе?[…]
-
Страница 164
163 Развлекательные системы Обзор Управление Полезно знать Система навигации Мобильно сть Характеристики > „Set“ (Настроить) : настройка аудиоприбо ров, наприм ер у радиоп риемника: вклю ч[…]
-
Страница 165
Включение и выключение, настройка 164 Высокие и низкие частоты 1. Выберите „Treble / Bass“ (Высокие / низкие) и нажмите на контроллер. 2. Сдвиньте контроллер влево или вправо и выберите „Treble“ (Высокие[…]
-
Страница 166
165 Развлекательные системы Обзор Управление Полезно знать Система навигации Мобильно сть Характеристики 2. Выберите „Concert hall“ ( Концертный зал) или „Theatre“ (Театр). 3. Нажмите на контроллер. Вк?[…]
-
Страница 167
Радиоприемник 166 Радиоприемник Радиоприемник рассчитан на прием волн в диапазонах: > FM: прием в диапазоне УКВ. > AM: прием в диап азонах ДВ * , СВ и КВ * . Прослушивание радиопередач Если прибор ?[…]
-
Страница 168
167 Развлекательные системы Обзор Управление Полезно знать Система навигации Мобильно сть Характеристики Настройка критериев выборки 1. Перейдите во второе поле сверху. 2. Поворотом контролл?[…]
-
Страница 169
Радиоприемник 168 3. Выберите „Autostore“ (Автосо хранение) ин а ж м и т е н а к о н т р о л л е р . Пункт „Set“ ( Настроить) выбирается по умолчанию. 4. Нажмите на контроллер. На экране появляются следую щи[…]
-
Страница 170
169 Развлекательные системы Обзор Управление Полезно знать Система навигации Мобильно сть Характеристики Изменение канала памяти 1. Выберите „Memorised stations“ (Запрог раммированные станции) и н[…]
-
Страница 171
Радиоприемник 170 Трансляция дорожной информации* Вы можете получать радиосообщени я о ситуаци и на дорогах во время прослуш и вания дисков и просмотра телевизионных программ. Для эт ого нео[…]
-
Страница 172
171 Развлекательные системы Обзор Управление Полезно знать Система навигации Мобильно сть Характеристики „TP AUTO“: автомати чески выбирается станция с наилучшим приемом. Трансляция дорожной […]
-
Страница 173
CD=плеер и CD=чейнджер 172 CD=плеер и CD=чейнджер Прослушивание CD При оснащении двумя ус тройствами чтения дисков: верхнее устройство предусмотрено для компактдисков в формате „аудио“ (аудиоCD)[…]
-
Страница 174
173 Развлекательные системы Обзор Управление Полезно знать Система навигации Мобильно сть Характеристики CD=чейнджер: запуск воспроизведения CD 1. Заправьте и установите магазин, см. страницу 17[…]
-
Страница 175
CD=плеер и CD=чейнджер 174 Для перехода в другой каталог в ыберите каталог и нажмит е на контроллер. Для выхода из меню выберите и нажмите на контроллер . Вывод информации о файле* Вы можете вывес т[…]
-
Страница 176
175 Развлекательные системы Обзор Управление Полезно знать Система навигации Мобильно сть Характеристики Сжатые аудиофайлы* 1. Выберите трек и нажмите на ко нтроллер. 2. Выберите пункт меню: >[…]
-
Страница 177
CD=плеер и CD=чейнджер 176 Произвольное воспроизведение, случайная выборка Треки выбранного компактдис ка воспроиз водятся в случайной последовательности. 1. Выберите „Set“ (Настроить) и нажм[…]
-
Страница 178
177 Развлекательные системы Обзор Управление Полезно знать Система навигации Мобильно сть Характеристики Выемка: выдвиньте консоль и снимите с нее диск. Установка магазина Вставьте магазин ([…]
-
Страница 179
CD=плеер и CD=чейнджер 178 Уход Для протирки зеркальной рабо чей поверх ности CD/DVD пользу йтесь специальными чистящими салфетками (продаются в магазинах). При этом ведите салфетку не по кругу, а ?[…]
-
Страница 180
179 Развлекательные системы Обзор Управление Полезно знать Система навигации Мобильно сть Характеристики Внешний аудиоприбор Вы можете под ключить внеш ний аудио прибор, например MP3плеер[…]
-
Страница 181
Телевизор (ТВ) 180 Телевизор (ТВ) Включение Если прибор выключен , нажмите эту кнопку. Принципы управления iDrive см. на стра нице 14. 1. Нажмите клавишу . Открывается исходное м еню. 2. Сдвинув контр о[…]
-
Страница 182
181 Развлекательные системы Обзор Управление Полезно знать Система навигации Мобильно сть Характеристики Обновление перечня принимаемых каналов Когда в дальней поездке Вы покидаете з ону в?[…]
-
Страница 183
Телевизор (ТВ) 182 3. Перейдите в верхне е поле. Выберите „TV“ (ТВ) и нажмите на контроллер, чтобы включить трансляцию. 4. Во время трансляц ии дважды нажмите на контроллер . 5. Выберите „Set picture“ (На?[…]
-
Страница 184
183 Развлекательные системы Обзор Управление Полезно знать Система навигации Мобильно сть Характеристики[…]
-
Страница 185
[…]
-
Страница 186
Мобильность Чтобы уметь поддерж ивать сво й автомо биль на ходу, ознако мьтесь в этом разде ле с темами „Рабочие жидкости“, „Колеса и диски“, „Т ехническ ое обслужив ание“ и „Что делать в с?[…]
-
Страница 187
Заправка топливом 186 Заправка топливом Лючок топливного бака Чтобы открыть или закрыть лючо к, нажмите на задний край его крышки. Ручное отпирание При неисправности в электрооборудовании лю?[…]
-
Страница 188
187 Развлекательные системы Обзор Управление Полезно знать Система навигации Мобильно сть Характеристики Пробка топливного бака Закрывание Вставьте пробку и поверните ее по часовой стрелке[…]
-
Страница 189
Колеса и шины 188 Колеса и шины Давление воздуха в шинах Для Вашей собственной безопасности От качества шин и от того, насколько тща тельно подд ерживаетс я давление воздуха в них, зависит не […]
-
Страница 190
189 Развлекательные системы Обзор Управление Полезно знать Система навигации Мобильно сть Характеристики В этом случае колеса и шины необхо димо как можно скорее проверить. Немедленно сбав[…]
-
Страница 191
Колеса и шины 190 Рекомендованные марки шин Для каждого типоразмера BMW рекоменду ет определенные марки шин. Рекомендован ные шины можно узнать по отчетливой метке BMW на боковине. При правильн[…]
-
Страница 192
191 Развлекательные системы Обзор Управление Полезно знать Система навигации Мобильно сть Характеристики Под капотом Любые работы на автомобиле разре шается выполнять только при наличии с[…]
-
Страница 193
Под капотом 192 Самое важное в моторном отсеке 1 Маслозаливная горл овина двигателя, см. раздел „Долив м оторного масла“ 2 Бачок для тормозно й жидкости, под облицовкой микрофильтра 3 Вывод для […]
-
Страница 194
193 Развлекательные системы Обзор Управление Полезно знать Система навигации Мобильно сть Характеристики Нельзя заливать масло выше верхней метки. Избыток масла вредит двигателю. < Бензино[…]
-
Страница 195
Под капотом 194 Долейте масло, не дожидаясь, пока последующий пробег превысит 200 км, иначе Вы рискуете повредить двигатель. < Храните масла и смаз ки в недоступном для детей месте и соблюдайте ?[…]
-
Страница 196
195 Развлекательные системы Обзор Управление Полезно знать Система навигации Мобильно сть Характеристики Тормозная система Неисправности Тормозная жидкость Сигнальная л ампа горит кр асны?[…]
-
Страница 197
Техническое обслуживание 196 Техническое обслуживание Система технического обслуживания BMW Система техническог о обслуживания BMW призвана обеспечить безопасность и экс плуатационную н ад?[…]
-
Страница 198
197 Развлекательные системы Обзор Управление Полезно знать Система навигации Мобильно сть Характеристики Розетка бортовой системы диагностики (OBD) Этот инте рфейс позвол яет провер ять компо[…]
-
Страница 199
Замена деталей 198 Замена деталей Шоферский инструмент Седан Шоферский инструмент находится в крышке багажника. Чтобы открыть отсек, отверните барашковый винт. Туринг Шоферский инстр умент н[…]
-
Страница 200
199 Развлекательные системы Обзор Управление Полезно знать Система навигации Мобильно сть Характеристики правил. Выполнение незнакомых или не описанных в данном „Руковод стве“ работ поруч?[…]
-
Страница 201
Замена деталей 200 1. Поверните патрон лампы п ротив часовой стрелки и выньте его. 2. Выньте лампу из патр она и замените ее. Стояночные и парковочные огни Лампы 5 Вт, W 5 W Лампы находятся над ф арам?[…]
-
Страница 202
201 Развлекательные системы Обзор Управление Полезно знать Система навигации Мобильно сть Характеристики Блоки задних фонарей Седан > Указатель по ворота: лам па 21 Вт, PY 21 W > Фонарь заднего […]
-
Страница 203
Замена деталей 202 Фонари в крышке багажника Фонари подсветки номерного знака Лампа 5 Вт, C 5 W 1. Вставьте отвертку в шлиц и отожмите фонарь вправо (см. стрелки) – крепление фонаря расфиксируется.[…]
-
Страница 204
203 Развлекательные системы Обзор Управление Полезно знать Система навигации Мобильно сть Характеристики Туринг: снятие и установка крышки пола багажного отсе ка (пакет мест хранения) 1. Отце?[…]
-
Страница 205
Замена деталей 204 и упираться в землю всей своей поверх ностью. Используйте домкрат только для замены колес. Не поднимайте с его помощью автомобили других мар ок и какие бы то ни было г рузы: ?[…]
-
Страница 206
205 Развлекательные системы Обзор Управление Полезно знать Система навигации Мобильно сть Характеристики Снятие 1. Вставьте в колесный болт переходник 2 . 2. Выверните колесный болт 1 . Завернув[…]
-
Страница 207
Замена деталей 206 Седан: в багажнике 1. Поднимите коврик. 2. Отоприте и снимите правую боковую обшивку. Туринг: в багажном отсеке 1. Отцепите страховочный ремень * , см. страницу 120. 2. Откройте крыш?[…]
-
Страница 208
207 Развлекательные системы Обзор Управление Полезно знать Система навигации Мобильно сть Характеристики Помогаем и зовем на помощь Экстренный вызов* Условия, необхо димые для экстре нного в[…]
-
Страница 209
Помогаем и зовем на помощь 208 Туринг Отоприте два ф иксатора и опу стите обшивку. Аптечка* Срок годност и медикам ентов огра ничен. Поэтому содержимое аптечки нужно регулярно проверять и своев[…]
-
Страница 210
209 Развлекательные системы Обзор Управление Полезно знать Система навигации Мобильно сть Характеристики Подготовка 1. Убедитесь в том, что аккумулятор другого автомобиля имеет напряжение 12 […]
-
Страница 211
Помогаем и зовем на помощь 210 Туринг: Буксирная проуши на находится в комплекте шоферского инструмента за левой боковой крышкой багажного отсека, см. стра ницу 198. При буксировке используйте[…]
-
Страница 212
211 Развлекательные системы Обзор Управление Полезно знать Система навигации Мобильно сть Характеристики Если диагонал ьное расположение буксирных пр оушин неизбежн о, помните ос л е д у ю щ ?[…]
-
Страница 213
Помогаем и зовем на помощь 212 Автомобили с коробкой передач SMG 1. Начните буксировку при рычаге селектора в положении N. 2. Выберите секвентальный режим. Авто матически вклю чится нужная перед?[…]
-
Страница 214
213 Развлекательные системы Обзор Управление Полезно знать Система навигации Мобильно сть Характеристики[…]
-
Страница 215
[…]
-
Страница 216
Характеристики Этот раздел содержи т технические характеристики, кома нды для у скоренн ого голосового управления и алфавитный указатель для быстрого поиска отдельных тем. Характеристики[…]
-
Страница 217
Технические характеристики 216 Технические характеристики Характеристики двигателей Расход топлива, выброс двуокиси углерода (CO 2 ) 523i 525i/xi 530i/xi Рабочий объем см 3 2497 2497 2996 Число цилиндров 6 6 6 М?[…]
-
Страница 218
217 Развлекательные системы Обзор Управление Полезно знать Система навигации Мобильно сть Характеристики 530i/Туринг 53 0i/Туринг 540i 540i МКПП, SMG АКПП МКПП, SMG АКПП В городском цикле л/100 км 12,6/13,1 13,6/13[…]
-
Страница 219
Технические характеристики 218 Расход топлива замеряется по единой европейской методике 80/1268/EWG. Он ни в коем случае не ид ентичен среднему потреблению, которое зависит о т многих факторов, так[…]
-
Страница 220
219 Развлекательные системы Обзор Управление Полезно знать Система навигации Мобильно сть Характеристики Габариты Все размеры указаны в мм. Высота автомобиля с xDrive: 1482 мм Минимальный диаметр[…]
-
Страница 221
Технические характеристики 220 Все размеры указан ы в мм. Минимальный диамет р пово рота: 11,4 м; с xDrive – 11,9 м[…]
-
Страница 222
221 Развлекательные системы Обзор Управление Полезно знать Система навигации Мобильно сть Характеристики Массы Седан 523i 525 i 5 30i 540i 550i Собственная масса снаряженн ого автомобиля с г рузом 75 кг,[…]
-
Страница 223
Технические характеристики 222 Туринг 523i 525i 530i 550i Собственная масса снаряженного автомо биля с грузом 75 кг, заполненным на 90 % топливным баком, б ез дополнительного оборудования > с МКПП, SMG кг […]
-
Страница 224
223 Развлекательные системы Обзор Управление Полезно знать Система навигации Мобильно сть Характеристики Движение с прицепом 1 При SMG эксплуатация с прицепом запрещена Седан 523i 525 i 530i 1 540i 550i 1 […]
-
Страница 225
Технические характеристики 224 1 При SMG экс плуатация с прице пом запрещен а Седан 520d 525d 530d 535d Разрешенная полная масса > с МКПП, SMG кг 2110 2145 2210 – > с АКПП кг 2120 2155 2210 2220 Разрешенная нагрузка на з?[…]
-
Страница 226
225 Развлекательные системы Обзор Управление Полезно знать Система навигации Мобильно сть Характеристики Туринг 525xi 530xi 530xd Разрешенная полная ма сса > с МКПП, SMG кг 2325 2325 2375 > с АКПП кг 2340 2340 23[…]
-
Страница 227
Технические характеристики 226 Тягово=динамические показатели 523i/Туринг 525i/Туринг 530i/Туринг Максимальная скорость > с МКПП, SMG км/ч 235/227 245/240 250/250 > с АКПП км/ч 232/224 242/237 250/250 Разгон 0–100 км/ч > с[…]
-
Страница 228
227 Развлекательные системы Обзор Управление Полезно знать Система навигации Мобильно сть Характеристики Заправочные емкости 520d/Туринг 525d/Тур инг 530d/Туринг Максималь ная скорость > с МКПП к[…]
-
Страница 229
Команды для ускоренного голосового управления 228 Команды для ускоренного голосового управления Ускоренные команды позволяют управлять некоторыми функциями, независимо от того, какой пункт[…]
-
Страница 230
229 Развлекательные системы Обзор Управление Полезно знать Система навигации Мобильно сть Характеристики Навигация Показ принятых вызов ›Calls accepted‹ Показ непринятых вызовов ›Calls not accept ed‹ П?[…]
-
Страница 231
Команды для ускоренного голосового управления 230 Бортовая информация Развлечения Функция Команда Вызов бортовой информации 74 ›Onboard info‹ Показ бортового комп ьютера 74 ›Computer‹ Показ путево?[…]
-
Страница 232
231 Развлекательные системы Обзор Управление Полезно знать Система навигации Мобильно сть Характеристики Микроклимат Меню Выбор трека 173 ›CD track …‹ Выбор CD и трека 173 ›CD 1…6 track .. .‹ ТВ 180 ›Televisi[…]
-
Страница 233
Команды для ускоренного голосового управления 232 Дата 82 ›Date‹ RPA 89 ›RPA‹ HDC 87 ›HDC‹ PDC 85 ›PDC‹ Настройки дорожного канала 155 ›T raffic information settings‹ Настройки развлекательных сист ем 163 ›Entertainment settings?[…]
-
Страница 234
233 Развлекательные системы Обзор Управление П олезно знать Си стема навигации Мобильность Характеристики Все от А до Я Алфавитный указатель „…“ в такие кавычки, в частности, заключены назв?[…]
-
Страница 235
234 Все от А до Я „Contrast“ (Контрастност ь) у BMW Night Vision 95 „Contrast“ (Контрастност ь) уТ В 1 8 1 „Country“ (С трана) при вводе цели 137 „Curve mode“ (Режим поворотов) у BMW Night Vision 95 D „Date“ (Дата) 82 „Date format“ (Формат да[…]
-
Страница 236
235 Развлекательные системы Обзор Управление Полезно знать Система навигации Мобильно сть Характеристики „Information“ ( Информация) вс и с т е м е навигации 140 , 143 „Initializing…“ (Инициализация) 89 „Inte[…]
-
Страница 237
236 Все от А до Я Shiftlock –а в т о м а т и ч е с к а я К П П с системой „Стептроник“ 62 – секвент альная КПП (SMG) 60 „Short route“ (Кратчайший маршрут) в системе навигации 148 „Show destination position“ (Показ цели) 142 „Sho[…]
-
Страница 238
237 Развлекательные системы Обзор Управление Полезно знать Система навигации Мобильно сть Характеристики –а в т о м а т и ч е с к о е распределен ие потоков воздуха 103 , 106 –в ы к л ю ч е н и е 1 0 4 , 1[…]
-
Страница 239
238 Все от А до Я – замена л амп 199 Блоки задни х фонарей 201 – замена л амп 201 Блокировка рычага селектора, см. Shiftlock –а в т о м а т и ч е с к а я К П П с системой „Стептроник“ 62 – секвент альная КПП (SMG[…]
-
Страница 240
239 Развлекательные системы Обзор Управление Полезно знать Система навигации Мобильно сть Характеристики Гнездо для электронного ключа, см. Замок зажигания 57 Гнездо прикуривателя 116 Гнездо р[…]
-
Страница 241
240 Все от А до Я Е Единицы измерения – средний расход топлива 82 –т е м п е р а т у р а 8 2 Ж Жидкость для системы охлаждения 194 Жидкость охлаждающая 194 „Жучки“ 205 З Завести двигатель, см. Пуск двига?[…]
-
Страница 242
241 Развлекательные системы Обзор Управление Полезно знать Система навигации Мобильно сть Характеристики Изменение участка пут и 154 Изменение языка меню дисплея управления 83 Изменения, техн?[…]
-
Страница 243
242 Все от А до Я Комфортный дос туп 36 –в м о е ч н ы х у с т а н о в к а х 3 8 – замена эл емента питания 38 Комфортный запуск, см. Пуск двигателя 58 Комфортный режим управления –о к н а 2 9 – окна при фун?[…]
-
Страница 244
243 Развлекательные системы Обзор Управление Полезно знать Система навигации Мобильно сть Характеристики –р е к о м е н д о в а н н ы е марки 194 –у р о в е н ь 1 9 2 Маслоизмерительный щуп 192 Масса б?[…]
-
Страница 245
244 Все от А до Я O Обдув, см. Вентиляция 104 , 108 – на стоянке 109 Обкатка 124 Обкатка задней глав ной передачи 124 Обкатка сцепления 124 Обогрев – заднее стекло 104 , 107 – наружные зеркала задн его вида 50 –[…]
-
Страница 246
245 Развлекательные системы Обзор Управление Полезно знать Система навигации Мобильно сть Характеристики Охлаждающая жидкость 194 – проверка уровня 194 – температура 72 Охлаждение, максимальн?[…]
-
Страница 247
246 Все от А до Я Положение 2 ключа зажига ния, см. Зажиган ие 5 7 Положение „Радио“ 57 –в к л ю ч е н о 5 7 – выключено 57 – при функции комфортного доступа 38 Положения рычага управления –а в т о м а […]
-
Страница 248
247 Развлекательные системы Обзор Управление Полезно знать Система навигации Мобильно сть Характеристики Р Работы в подкапотно м пространстве 191 Рабочий тормоз , см. Надеж ное торможение 126 ?[…]
-
Страница 249
248 Все от А до Я Рычаг пер еключен ия передач –а в т о м а т и ч е с к а я К П П с системой „Стептроник“ 62 –м е х а н и ч е с к а я К П П 5 9 – секвент альная КПП (SMG) 60 Рычаг управления –а в т о м а т и ч е ?[…]
-
Страница 250
249 Развлекательные системы Обзор Управление Полезно знать Система навигации Мобильно сть Характеристики Система ноч ного видени я, см. BMW Night Vision 94 Система охранн ой сигнали зации, см. Сигнал[…]
-
Страница 251
250 Все от А до Я –г р о м к о с т ь 1 6 2 – настройка параметр ов звучания 163 – органы управления 162 – переключение каналов 180 – переключение стандартов 181 – принима емые кана лы 181 Текущее местонах[…]
-
Страница 252
251 Развлекательные системы Обзор Управление Полезно знать Система навигации Мобильно сть Характеристики Удаление льда со стекол, см. Оттаивание стекол 104 , 107 Удаленность от цели, см. Бор тов[…]
-
Страница 253
252 Все от А до Я Циркуляция во здуха, см. Рециркуляция воздуха 104 , 108 Ч Части спинки заднего сиденья, см. Люк для пере возки длин номерного груза 117 Часы 72 – режим ы 12 и 24ча совой 82 –у с т а н о ?[…]
-
Страница 254
На заправке Мы рекомендуе м Вам внести в эти таб лицы соответствующие данные, чт обы при оста новке на заправке они всегда был и у Вас под рукой. Алфавитный указатель пом ожет Вам найти их. То[…]
-
Страница 255
01 92 0 157 256 ru С удовольств ием за рулем Подробнее о BMW www.bmw.ru[…]
-
Страница 256
5 ru[…]
Page 1 — THE NEW BMW 5 SERIES
THE NEW BMW 5 SERIES SALOON.PRICE LIST.FROM JULY 2013.The UltimateDriving MachineThe new BMW 5 SeriesSaloon www.bmw.co.uk
Page 2 — CONTENTS
PRICING INFORMATION.Model Basic price (excluding VAT)VAT20%Retail price (including VAT)On the road priceP11d value BIK tax rate (2013 / 2014) 1VED ban
Page 3 — THE NEW BMW 5 SERIES SALOON
Model Basic price (excluding VAT)VAT20%Retail price (including VAT)On the road priceP11d value BIK tax rate (2013 / 2014) 1VED band 1Insurance group D
Page 4 — RRP from £29,050 inc. VAT
520i SE520i Modern520i Luxury520i M Sport528i SE528i Modern528i Luxury528i M Sport535i Luxury535i M SportActiveHybrid 5 SEActiveHybrid 5 ModernActiveH
Page 5 — RRP from £31,050 inc. VAT
520i SE520i Modern520i Luxury520i M Sport528i SE528i Modern528i Luxury528i M Sport535i Luxury535i M SportActiveHybrid 5 SEActiveHybrid 5 ModernActiveH
Page 6 — RRP from £31,850 inc. VAT
Key○ = Optional - = Not available Only with = these options must be ordered together Not with = these options are not available for ordering
Page 7 — RRP from £46,700 inc. VAT
Packages520i SE520i Modern520i Luxury520i M Sport528i SE528i Modern528i Luxury528i M Sport535i Luxury535i M SportActiveHybrid 5 SEActiveHybrid 5 Moder
Page 8 — THE BMW 5 SERIES SALOON
Key● = Standard ○ = Optional - = Not available Only with = these options must be ordered together Not with = these options are not availabl
Page 9
Interior Trims / Transmissions520i SE520i Modern520i Luxury520i M Sport528i SE528i Modern528i Luxury528i M Sport535i Luxury535i M SportActiveHybrid 5
Page 12 — UPHOLSTERIES
CONTENTS.www.bmw.co.uk/new5seriessaloonPage 1 ContentsPage 2 The new BMW 5 Series Saloon IntroductionPage 3 Standard Equipment Highlights – SE mo
Page 13
Key● = Standard ○ = Optional - = Not available Only with = these options must be ordered together Not with = these options are not availabl
Page 14 — PACKAGES
520i SE520i Modern520i Luxury520i M Sport528i SE528i Modern528i Luxury528i M Sport535i Luxury535i M SportActiveHybrid 5 SEActiveHybrid 5 ModernActiveH
Page 15
Key● = Standard ○ = Optional - = Not available Only with = these options must be ordered together Not with = these options are not availabl
Page 16 — TRANSMISSIONS
Seats / Exterior Equipment520i SE520i Modern520i Luxury520i M Sport528i SE528i Modern528i Luxury528i M Sport535i Luxury535i M SportActiveHybrid 5 SEAc
Page 17
Key● = Standard ○ = Optional - = Not available Only with = these options must be ordered together Not with = these options are not availabl
Page 18
520i SE520i Modern520i Luxury520i M Sport528i SE528i Modern528i Luxury528i M Sport535i Luxury535i M SportActiveHybrid 5 SEActiveHybrid 5 ModernActiveH
Page 19
Key● = Standard ○ = Optional - = Not available Only with = these options must be ordered together Not with = these options are not availabl
Page 20 — SAFETY AND TECHNOLOGY
Steering Wheels / Audio and Communication520i SE520i Modern520i Luxury520i M Sport528i SE528i Modern528i Luxury528i M Sport535i Luxury535i M SportActi
Page 21
520i SE520i Modern520i Luxury520i M Sport528i SE528i Modern528i Luxury528i M Sport535i Luxury535i M SportActiveHybrid 5 SEActiveHybrid 5 ModernActiveH
Page 22 — EXTERIOR EQUIPMENT
520i SE520i Modern520i Luxury520i M Sport528i SE528i Modern528i Luxury528i M Sport535i Luxury535i M SportActiveHybrid 5 SEActiveHybrid 5 ModernActiveH
Page 23
THE NEW BMW 5 SERIES SALOON.A combination of elegant yet sporty styling, a high-quality, luxurious interior and trademark BMW driving dynamics means t
Page 24 — INTERIOR EQUIPMENT
Key○ = Optional - = Not available / = Indicates ‘or’ 1 = Terms and Conditions apply, find out more online at www.bmw.co.uk/serviceinclusive.
Page 25
Supplementary Options520i SE520i Modern520i Luxury520i M Sport528i SE528i Modern528i Luxury528i M Sport535i Luxury535i M SportActiveHybrid 5 SEActiveH
Page 28 — LIGHT ALLOY WHEELS
CODE GLOSSARY.205 Automatic transmission223 Variable Damper Control (VDC)225 M Sport suspension deletion248 Steering wheel heating255 Sport leather st
Page 29
Code GlossaryCode Glossary / BMW ConnectedDrive ServicesBMW CONNECTED DRIVE SERVICES.1. General informationBMW (UK) Limited of Elleseld Avenue, Brack
Page 30 — SUPPLEMENTARY OPTIONS
The UltimateDriving MachineMore about BMW Tel. 0800 325 600 www.bmw.co.ukBMW UK on Facebookwww.facebook.com/bmwuk Valid from July 2013.
Page 31
STANDARD EQUIPMENT HIGHLIGHTS.A GUIDE TO TRIM LEVELS.The new BMW 5 Series Saloon is available in a variety of trim levels, each providing a different
Page 32
Please note that some equipment may be replaced when selecting alternative trim levels. Standard equipment may also vary depending on engine variant.M
Page 33
STANDARD EQUIPMENT HIGHLIGHTS.Luxury models (In addition / replacement to SE models) █18″ light alloy Multi-spoke style 454 with run-flat tyres █
Page 34 — CODE GLOSSARY
ActiveHybrid models (In addition / replacement to SE models) █20GB hard disc drive (HDD) memory █Air conditioning, automatic with four-zone control █
Page 36 — Valid from July 2013
Model Power output(hp)0-62mph(secs)Combined fuel consumption (mpg)CO2 emissions(g/km)DIESELAlloy Wheels: 2K1, 2W3, 2ANAlloy Wheels: 2AX, 2AU, 2W1,