
![]()
MPK Mini Play
User Guide
English ( 3 – 7 )
Guía del usuario
Español ( 8 – 12 )
Guide d’utilisation
Français ( 13 – 17 )
Guida per l’uso
Italiano ( 18 – 23 )
Benutzerhandbuch
Deutsch ( 24 – 29 )
Appendix
English ( 30 )

2

User Guide (English)
Introduction
Thank you for purchasing the MPK Mini Play. At Akai Professional, we know how serious music is to you. That’s why we design our equipment with only one thing in mind—to make your performance the best it can be.
Box Contents
MPK Mini Play
USB Cable
Software Download Card
User Guide
Safety & Warranty Manual
Support
For the latest information about this product (documentation, technical specifications, system requirements, compatibility information, etc.) and product registration, visit akaipro.com.
For additional product support, visit akaipro.com/support.
3

Quick Start
Playing Sounds
Note: To play internal sounds, the Internal Sounds button must be engaged.
To access the Drum sounds: There are 10 drum kits available. Press the Drums button and rotate the encoder to select a drum kit. Tap the pads to trigger the drum kit sounds.
To access the Keyboard sounds: There are 128 Keys programs available. Press the Keys button and rotate the encoder to select a Keys program. The Keys programs are played with the 25 keys.
Accessing the Favorites: A Favorite consists of a Keys patch, a Drums patch, and your effects knobs settings. To access a Favorite, press the Favorites button then tap one of the pads to call up that Favorite.
Saving a Favorite: You can store up to eight Favorites with MPK Mini Play. To do this, press the Favorites + Internal Sounds buttons, then tap one of the eight pads to store your Favorite to that location.
Setting up MPK Mini Play with GarageBand
1.Adjust the power switch on the MPK Mini Play’s rear panel to the USB position.
2.Connect MPK Mini Play to your computer using a standard USB cable. (If you are connecting MPK Mini Play to a USB hub, make sure it is a powered hub.)
3.Open GarageBand. Go to Preferences > Audio/MIDI in GarageBand and select “MPK Mini Play” as the MIDI input device (the controller may appear as USB Device or USB PnP Audio Device.
4.Choose from the list of instruments in GarageBand and play the keys on MPK Mini Play to hear the instrument being played through your headphones or speakers connected to your computer.
Setting up MPK Mini Play With Other Software
To select MPK Mini Play as a controller for your digital audio workstation (DAW):
1.Adjust the power switch on the rear panel to the USB position.
2.Connect MPK Mini Play to your computer using a standard USB cable. (If you are connecting MPK Mini Play to a USB hub, make sure it is a powered hub.)
3.Open your DAW.
4.Open your DAW’s Preferences, Options, or Device Setup, select MPK Mini Play as your hardware controller, and then close that window.
Your MPK Mini Play is now able to communicate with your software.
4

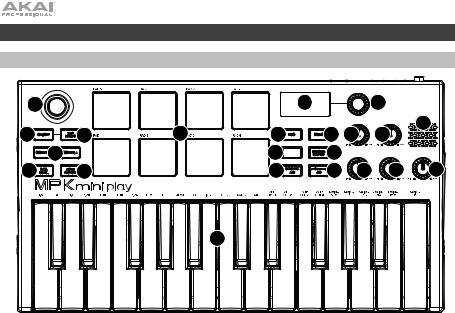
Features
Top Panel
|
FAV 5 |
FAV 6 |
FAV 7 |
FAV 8 |
||||||||
|
3 |
9 |
10 |
|||||||||
|
4 |
ARPEGGIATOR |
2 |
22 |
||||||||
|
5 |
FAV 1 |
FAV 2 |
FAV 3 |
FAV 4 |
11 |
12 |
17 |
18 |
|||
|
6 |
13 FAVORITES |
14 |
FILTER |
RESONANCE |
|||||||
|
ATTACK |
RELEASE |
||||||||||
|
7 |
8 |
15 |
16 |
19 |
20 |
21 |
|||||
|
REVERB AMT |
CHORUS AMT |
VOLUME |
|||||||||
|
EQ LOW |
EQ HIGH |
||||||||||
|
1 |
1.Keybed: This 25-note keyboard is velocity-sensitive and, along with the Octave Down / Up buttons, can control a ten-octave range. You can use the keys to access certain additional commands, as well. Hold down the Arpeggiator button and press a key to set the Arpeggiator parameters. Press the Keys button and turn the encoder to change sounds triggered from the keys.
2.Drum Pads: The pads can be used to trigger drum hits or other samples in your software. The pads are velocity-sensitive, which makes them very responsive and intuitive to play. When the Drums button is pressed, you can turn the encoder to change sounds on the drum pads. Access one of the 8 Favorites (a combination of a sound on the keyboard and a sound on the drum pads) by pressing and holding the Favorites button and tapping a drum pad.
3.X-Y Controller: Use this 4-axis thumbstick to send MIDI pitch bend messages or send MIDI CC messages.
4.Arpeggiator: Press this button to turn the Arpeggiator on or off. Pressing it during a latched arpeggio will stop the arpeggio. Hold down this button and press the corresponding key to set the following parameters:
5

•Time Division: 1/4 note, 1/4 note triplet (1/4T), 1/8 note, 1/8 note triplet (1/8T), 1/16 note, 1/16 note triplet (1/16T), 1/32 note, or 1/32 note triplet (1/32T).
•Mode: The mode determines how the arpeggiated notes are played back.
o Up: Notes will sound from the lowest to the highest.
o Down: Notes will sound from the highest to lowest.
oIncl (Inclusive): Notes will sound from the lowest to the highest, and then back down. The lowest and highest notes will sound twice at the directional change.
oExcl (Exclusive): Notes will sound from the lowest to the highest, and then back down. The lowest and highest notes will sound only once at the directional change.
o Order: Notes will sound in the order they were pressed.
o Rand (Random): Notes will sound in random order.
oLatch: The Arpeggiator will continue to arpeggiate the notes even after you lift your fingers. While holding down the keys, you can add more notes to the arpeggiated chord by pressing down additional keys. If you press the keys, release them, and then press down a new combination of notes, the Arpeggiator will memorize and arpeggiate the new notes.
•Octave: Arpeggio octave range (Arp Oct) of 0, 1, 2, or 3 octaves.
•Swing: 50% (no swing), 55%, 57%, 59%, 61%, or 64%.
5.Tap Tempo: Tap this button at the desired rate to determine the tempo of the Arpeggiator.
Note: This function is disabled if the Arpeggiator is synced to external MIDI clock.
6.Octave Down / Up: Use these buttons to shift the keyboard’s range up or down (up to four octaves in either direction). When you are higher or lower than the center octave, the corresponding Octave button will light. Press both Octave buttons simultaneously to reset the keyboard to the default center octave.
7.Full Level: Press this button to activate or deactivate Full Level mode in which the pads always play at a maximum velocity (127), no matter how hard or soft you hit them.
8.Note Repeat: Press and hold this button while striking a pad to cause the pad to retrigger at a rate based on the current Tempo and Time Division settings.
9.Display Screen: Shows the sounds, menus, and adjustable parameters.
10.Selector Knob: Select from the internal sounds and menu options with this knob.
11.Keys: When this button is pressed, the current program being played by the keys is displayed. Also, when this button is pressed, you can turn the encoder to change sounds on the keyboard.
12.Drums: When this button is pressed, the current program being played by the Drum Pads is displayed. Also, when this button is pressed, you can turn the encoder to change sounds on the drum pads.
13.Favorites: Press this button and Internal Sounds button, then tap one of the eight pads to store your Favorite to that location. Also, press this button and then tap one of the pads to recall a Favorite.
14.Internal Sounds: Press this button and the Favorites button, then tap one of the eight pads to store your Favorite to that location. Press this button to enable/disable the internal sounds when a key or pad is pressed. When disabled, your MPK Mini Play will send and receive MIDI only using the USB port.
15.Pad Bank A/B: Press this button to switch the pads between Bank A or Bank B.
16.Knob Bank A/B: Press this button to switch the knobs between Bank A or Bank B.
17.Filter/Attack: This assignable 270º knob sends a MIDI CC message and can be switched to its secondary function using the Knob Bank A/B button. When the Knob Bank A/B button is set to Bank A, adjust this knob to change the Filter setting for the internal sounds. When the Knob Bank A/B button is set to Bank B, adjust this knob to change the the Attack setting for the internal sounds. In USB mode, adjust this knob to send assignable MIDI CC messages.
6

18.Resonance/Release: This assignable 270º knob sends a MIDI CC message and can be switched to its secondary function using the Knob Bank A/B button. When the Knob Bank A/B button is set to Bank A, adjust this knob to change the Resonance setting for the internal sounds. When the Knob Bank A/B button is set to Bank B, adjust this knob to change the the Release setting for the internal sounds. In USB mode, adjust this knob to send assignable MIDI CC messages.
19.Reverb Amount/EQ Low: This assignable 270º knob sends a MIDI CC message and can be switched to its secondary function using the Knob Bank A/B button. When the Knob Bank A/B button is set to Bank A, adjust this knob to change the amount of the Reverb effect for the internal sounds. When the Knob Bank A/B button is set to Bank B, adjust this knob to change the low band EQ setting for the internal sounds. In USB mode, adjust this knob to send assignable MIDI CC messages.
20.Chorus Amount/EQ High: This assignable 270º knob sends a MIDI CC message and can be switched to its secondary function using the Knob Bank A/B button. When the Knob Bank A/B button is set to Bank A, adjust this knob to change the amount of the Chorus effect setting for the internal sounds. When the Knob Bank A/B button is set to Bank B, adjust this knob to change the high band EQ setting for the internal sounds. In USB mode, adjust this knob to send assignable MIDI CC messages.
21.Volume: Controls the internal sounds volume sent to the internal speaker and the Headphone Output.
22.Speaker: Hear the internal sounds that are played with the keys and pads from here.
Note: The internal speaker is disabled when the headphone output is used.
Rear Panel
|
POWER |
2 |
SUSTAIN |
USB |
|
USB BATT |
|||
|
1 |
3 |
4 |
1.Power Switch: Adjust this switch to the appropriate position when powering the unit through a USB connection or with batteries. When set to USB, with no cable connected, this button will turn off your MPK Mini Play to save battery life.
2.Headphone Output: Connect headphones here to listen to the internal sounds triggered with the keys and pads. You can also connect MPK Mini Play to speakers using an 1/8” adapter.
Note: Connecting this output will disable the internal speaker.
3.Sustain Input: This socket accepts a momentary-contact foot pedal (sold separately). When pressed, this pedal will sustain the sound you are playing without having to keep your fingers pressed down on the keys.
4.USB Port: The USB port delivers power to the keyboard and transmits MIDI data when connected to a computer to trigger a software synth or MIDI sequencer.
Bottom Panel (not shown)
1.Battery Compartment: Install 3 AA alkaline batteries here to power the unit if not being powered through a USB connection.
7

Guía del usuario (Español)
Introducción
Gracias por comprar el MPK Mini Play. En Akai Professional, sabemos que usted se toma la música en serio. Por eso es que diseñamos nuestros equipos con una sola cosa en mente— hacer que pueda tocar su mejor interpretación.
Contenido de la caja
MPK Mini Play
Cable USB
Tarjeta de descarga de software
Guía del usuario
Manual sobre la seguridad y garantía
Soporte
Para obtener la información más reciente acerca de este producto (documentación, especificaciones técnicas, requisitos de sistema, información de compatibilidad, etc.) y registrarlo, visite akaipro.com.
Para obtener soporte adicional del producto, visite akaipro.com/support.
8

Inicio rápido
Reproducción de sonidos
Nota: Para reproducir los sonidos internos, debe usarse el botón Internal Sounds.
Cómo acceder a los sonidos de batería: Hay 10 baterías disponibles. Pulse el botón Drums y gire el codificador para seleccionar una batería. Toque los pads para ejecutar los sonidos de batería.
Cómo acceder a los sonidos de teclado: Hay 128 programas de teclas disponibles. Pulse el botón Keys y gire el codificador para seleccionar un programa de teclas. Los programas de teclas se tocan con las 25 teclas.
Cómo acceder a los favoritos: Un favorito consiste de un parche de teclas, un parche de batería y los ajustes de sus perillas de efectos. Para acceder a un favorito, pulse el botón Favorites y luego toque uno de los pads para cargar ese favorito.
Cómo guardar un favorito: Se pueden guardar hasta ocho favoritos en el MPK Mini Play. Para lograr esto, pulse los botones Favorites + Internal Sounds y luego toque uno de los ocho pads para guardar su favorito en esa ubicación.
Configuración del MPK Mini Play con GarageBand
1.Coloque el interruptor de encendido del panel trasero del MPK Mini Play en la posición USB.
2.Conecte el MPK Mini Play a su ordenador mediante un cable USB estándar. (Si está conectando el MPK Mini Play a un concentrador [«hub»] USB, asegúrese de que sea un concentrador alimentado).
3.Abra GarageBand. Vaya a Preferences > Audio/MIDI en GarageBand y seleccione “MPK Mini Play” como el dispositivo de entrada MIDI (el controlador puede aparecer como USB Device o
USB PnP Audio Device).
4.Elija un instrumento de la lista del GarageBand y toque las teclas del MPK Mini Play para escuchar cómo suena el instrumento a través de sus auriculares o altavoces conectados a su ordenador.
Configuración del MPK Mini Play con otro software
Para seleccionar el MPK Mini Play como controlador para su estación de trabajo de audio digital (DAW):
1.Coloque el interruptor de encendido del panel trasero en la posición USB.
2.Abra su DAW.
3.Abra Preferences (Preferencias), Options (Opciones), o Device Setup (Configuración de dispositivo) de su DAW, seleccione el MPK Mini Play como su controlador de hardware y luego cierre esa ventana.
Su MPK Mini Play es ahora capaz de comunicarse con su software.
9
Características
Panel superior
|
FAV 5 |
FAV 6 |
FAV 7 |
FAV 8 |
||||||||
|
3 |
9 |
10 |
|||||||||
|
4 |
ARPEGGIATOR |
2 |
22 |
||||||||
|
5 |
FAV 1 |
FAV 2 |
FAV 3 |
FAV 4 |
11 |
12 |
17 |
18 |
|||
|
6 |
13 FAVORITES |
14 |
FILTER |
RESONANCE |
|||||||
|
ATTACK |
RELEASE |
||||||||||
|
7 |
8 |
15 |
16 |
19 |
20 |
21 |
|||||
|
REVERB AMT |
CHORUS AMT |
VOLUME |
|||||||||
|
EQ LOW |
EQ HIGH |
||||||||||
|
1 |
1.Placa del teclado: Este teclado de 25 notas es sensible a la velocidad y, en junto con los botones Octave Down / Up (subir / bajar octava), puede controlar una gama de diez octavas. También puede utilizar las teclas para acceder a ciertos comandos adicionales. Mantenga pulsado el botón Arpeggiator y pulse una tecla para ajustar los parámetros del arpegiador. Pulse el botón Keys y gire el codificador para cambiar los sonidos que se ejecutan desde las teclas.
2.Pads de batería: Estos pads se pueden usar para disparar golpes de batería u otras muestras existentes en su software. Los pads son sensibles a la velocidad, lo que los hace de rápida respuesta y muy intuitivos para tocar. Al pulsar el botón Drums puede girar el codificador para modificar los sonidos de los otros pads de batería. Acceda a uno de los 8 favoritos (una combinación de un sonido en el teclado y un sonido en los pads de batería) manteniendo pulsado el botón Favorites y tocando un pad de batería.
3.Controlador X-Y: Use este joystick de pulgar para enviar mensajes inflexión del tono MIDI o mensajes de CC de MIDI.
4.Arpegiador: Pulse este botón para encender o apagar el arpegiador. Pulsarlo durante un arpegio trabado detendrá el arpegio. Mantenga este botón y pulse la tecla correspondiente para ajustar los siguientes parámetros:
10
 Loading…
Contents Registration Downloading, and Installing the MPK mini Software Manager Installing MPC Beats Installing the AIR Plugins Installing Sample …
Mon, 22 May, 2023 at 2:52 PM
Join Riley from inMusic and learn how to set up & customize your MIDI control mapping in MPC Beats. 0:00 Intro 0:10 Connect hardware & sel…
Wed, 25 May, 2022 at 3:02 PM
The new MPK Mini Play mk3 has a built-in speaker and 128 internal sounds. Learn how to access & control them in this video, as well as how to sync the A…
Wed, 25 May, 2022 at 3:03 PM
With over 100 built-in melodic instruments, drum kits, and sound effects, the MPK mini Play is an all-in-one solution to portable jam sessions. Whether yo…
Wed, 12 Jan, 2022 at 3:55 PM
Making a great, hit-sounding song is fun and easy on with the MPK mini. Watch as Andy walks you through the steps to create your own track in MPC Beats on t…
Wed, 25 May, 2022 at 3:19 PM
CONTENTS MPK2 Series Hardware Setup Ableton Live 9 Lite Software Setup Virtual Instruments and Plugins Adjusting Ableton Live 9 Lite Plugin Sources…
Mon, 3 Oct, 2022 at 1:06 PM
inMusic World Headquarters
200 Scenic View Drive
Suite 201
Cumberland, RI 02864
United States
inMusic Brands Europe LTD
Unit 3, Nexus Park, Lysons Avenue
Ash Vale
Hampshire GU12 5QE
United Kingdom
inMusic GmbH
Hans Günther Sohl Str. 4a
47807 Krefeld
Germany
inMusic Taipei
7th Floor, NO. 165, Naking East Road
Section 4
Taipei 105
Taiwan
inMusic Japan Corporation
Minami Azabu 1-5-10
Koike Building 1-2F
Minato-ku, Tokyo
106-0047 Japan
Хорошее руководство по эксплуатации
Законодательство обязывает продавца передать покупателю, вместе с товаром, руководство по эксплуатации Akai MPK mini. Отсутствие инструкции либо неправильная информация, переданная потребителю, составляют основание для рекламации в связи с несоответствием устройства с договором. В законодательстве допускается предоставлении руководства в другой, чем бумажная форме, что, в последнее время, часто используется, предоставляя графическую или электронную форму инструкции Akai MPK mini или обучающее видео для пользователей. Условием остается четкая и понятная форма.
Что такое руководство?
Слово происходит от латинского «instructio», тоесть привести в порядок. Следовательно в инструкции Akai MPK mini можно найти описание этапов поведения. Цель инструкции заключается в облегчении запуска, использования оборудования либо выполнения определенной деятельности. Инструкция является набором информации о предмете/услуге, подсказкой.
К сожалению немного пользователей находит время для чтения инструкций Akai MPK mini, и хорошая инструкция позволяет не только узнать ряд дополнительных функций приобретенного устройства, но и позволяет избежать возникновения большинства поломок.
Из чего должно состоять идеальное руководство по эксплуатации?
Прежде всего в инструкции Akai MPK mini должна находится:
— информация относительно технических данных устройства Akai MPK mini
— название производителя и год производства оборудования Akai MPK mini
— правила обслуживания, настройки и ухода за оборудованием Akai MPK mini
— знаки безопасности и сертификаты, подтверждающие соответствие стандартам
Почему мы не читаем инструкций?
Как правило из-за нехватки времени и уверенности в отдельных функциональностях приобретенных устройств. К сожалению само подсоединение и запуск Akai MPK mini это слишком мало. Инструкция заключает ряд отдельных указаний, касающихся функциональности, принципов безопасности, способов ухода (даже то, какие средства стоит использовать), возможных поломок Akai MPK mini и способов решения проблем, возникающих во время использования. И наконец то, в инструкции можно найти адресные данные сайта Akai, в случае отсутствия эффективности предлагаемых решений. Сейчас очень большой популярностью пользуются инструкции в форме интересных анимаций или видео материалов, которое лучше, чем брошюра воспринимаются пользователем. Такой вид инструкции позволяет пользователю просмотреть весь фильм, не пропуская спецификацию и сложные технические описания Akai MPK mini, как это часто бывает в случае бумажной версии.
Почему стоит читать инструкции?
Прежде всего здесь мы найдем ответы касательно конструкции, возможностей устройства Akai MPK mini, использования отдельных аксессуаров и ряд информации, позволяющей вполне использовать все функции и упрощения.
После удачной покупки оборудования/устройства стоит посвятить несколько минут для ознакомления с каждой частью инструкции Akai MPK mini. Сейчас их старательно готовят или переводят, чтобы они были не только понятными для пользователя, но и чтобы выполняли свою основную информационно-поддерживающую функцию.
- Инструкции и руководства
- Бренды
- Akai
- MPK MINI
- Справочник Пользователя
![]()
WWW.AKAIPRO.COM
SCHNELLSTARTANLEITUNG
DEUTSCH
(Ocr-Read Summary of Contents of some pages of the Akai MPK Mini Play Document (Main Content), UPD: 11 June 2023)
-
12, 12 18. Resonancia/Liberación: Esta perilla asignable de 270º envía un mensaje de CC MIDI y puede conmutarse a su función secundaria mediante el botón Knob Bank A/B. Cuando el botón Knob Bank A/B se ajusta al banco A, gire esta perilla para modificar el ajuste de la resonancia de los sonidos internos. Cuando el botón Knob Bank A/B se ajusta al banco B, gire esta perilla para modificar el ajuste de la liberación de los sonidos internos. En modo USB, ajuste esta perilla para enviar mensajes de CC MIDI a…
-
30, Akai MPK Mini Play 30 Appendix (English) Technical Specifications Power Via USB or 3 AA alkaline batteries Dimensions (width x depth x height) 12.29” x 6.80” x 1.83 / 31.2 x 17.2 x 4.6 cm Weight 1.6 lbs. / 0.45 kg Specifications are subject to change without notice. Trademarks & Licenses Akai Professional is a trademark of inMusic Brands, Inc., registered in the U.S. and other countries. Akai Professional and MPC are trademar…
-
23, 23 Pannello posteriore 1. Interruttore di alimentazione: regolare questo interruttore posizionandolo adeguatamente quando si alimenta il dispositivo tramite un collegamento USB o a batterie. Se impostato su USB, senza cavi collegati, questo tasto spegnerà l’MPK Mini Play per risparmiare la batteria. 2. Uscita cuffie: collegare le cuffie a questo livello per ascoltare i suoni interni attivati con i tasti e i pad. Si può inoltre collegare l’M…
-
15, 15 Caractéristiques Panneau supérieur 1. Plateau de clavier : Ce clavier de 25 notes sensibles à la dynamique peut commander une plage de dix octaves à l’aide des touches Octave. Vous pouvez également utiliser ces touches pour accéder à des commandes supplémentaires. Maintenez la touche Arpeggiator enfoncée et appuyez sur une touche pour définir les paramètres de l’arpégiateur. Appuyez sur la touche Keys puis tournez l’encodeur afin …
-
9, Akai MPK Mini Play 9 Inicio rápido Reproducción de sonidos Nota: Para reproducir los sonidos internos, debe usarse el botón Internal Sounds. Cómo acceder a los sonidos de batería: Hay 10 baterías disponibles. Pulse el botón Drums y gire el codificador para seleccionar una batería. Toque los pads para ejecutar los sonidos de batería. Cómo acceder a los sonidos de teclado: Hay 128 programas de teclas disponibles. Pulse el botón …
-
6, 6 • Time Division: 1/4 note, 1/4 note triplet (1/4T), 1/8 note, 1/8 note triplet (1/8T), 1/16 note, 1/16 note triplet (1/16T), 1/32 note, or 1/32 note triplet (1/32T). • Mode: The mode determines how the arpeggiated notes are played back. o Up: Notes will sound from the lowest to the highest. o Down: Notes will sound from the highest to lowest. o Incl (Inclusive): Notes will sound from the lowest to the highest, and then back down. The lowest and highest notes will sound twice at the directional change. o Excl (Exclusive…
-
20, 20 Caratteristiche Pannello superiore 1. Tastiera: questa tastiera a 25 tasti è sensibile alla velocità e, unitamente ai tasti Octave Up/Down, è in grado di controllare una gamma di dieci ottave. Si possono inoltre utilizzare i tasti per accedere a determinati comandi aggiuntivi. Tenere premuto il tasto Arpeggiator e premere un tasto per impostare i parametri dell’arpeggiatore. Premere il tasto Keys e girare il codificatore per mo…
-
11, 11 • División de tiempo: 1/4 (negras), tresillo de negras (1/4T), 1/8 (corcheas), tresillo de corcheas (1/8T), 1/16 (semicorcheas), tresillo de semicorcheas (1/16T), 1/32 (fusas) o tresillo de fusas (1/32T). • Modo: El modo determina la forma en la que se reproducen las notas arpegiadas. o Arriba: Las notas suenan desde la más baja a la más alta. o Abajo: Las notas suenan desde la más alta a la más baja. o Incl (Inclusivo): Las notas suenan desde la más baja a la m…
-
21, 21 • Time Division (divisione di tempo): 1/4, 1/4 di croma («1/4 T»), 1/8, 1/8 di croma («1/8 T»), 1/16, 1/16 di croma («1/16 T»), 1/32, o 1/32 di croma («1/32 T»). • Modalità: la modalità stabilisce il modo in cui le note arpeggiate vengono riprodotte. o Up (su): le note suoneranno dalla più bassa alla più alta. o Down (giù): le note suoneranno dalla più alta alla più bassa. o Incl (Incluso): le note suoneranno dalla più bassa alla più alta e viceversa. Le note più basse e pi�…
-
19, 19 Guida rapida Riproduzione di suoni Nota bene: per riprodurre suoni interni, occorre attivare il tasto Internal Sounds Accesso ai suoni di batteria: sono disponibili 10 set batteria. Premere il tasto Drums e girare il codificatore per selezionare un set batteria. Toccare i pad per attivare i suoni del set batteria. Per accedere ai suoni della tastiera: sono disponibili 128 programmi di accordi. Premere il tasto Keys e girare il codificatore per selezionare un programma accordi (Key…
-
5, 5 Features Top Panel 1. Keybed: This 25-note keyboard is velocity-sensitive and, along with the Octave Down / Up buttons, can control a ten-octave range. You can use the keys to access certain additional commands, as well. Hold down the Arpeggiator button and press a key to set the Arpeggiator parameters. Press the Keys button and turn the encoder to change sounds triggered from the keys. 2. Drum Pads: The pads ca…
-
18, 18 Guida per l’uso (Italiano) Introduzione Grazie per aver acquistato il MPK Mini Play. Noi di Akai Professional sappiamo che per te la musica è una cosa seria. Ecco perché progettiamo i nostri dispositivi con un unico obiettivo in mente: rendere le tue prestazioni le migliori possibili. Contenuti della confezione MPK Mini Play Cavo USB Scheda per il download del software Guida per l’uso Istruzioni di …
-
16, 16 • Division temporelle : Noire (1/4), triolet de noires (1/4T), croche (1/8), triolet de croches (1/8T), double-croche (1/16), triolet de doubles-croches (1/16T), triple croche (1/32) ou triolet de triples croches (1/32T) • Mode : Le mode détermine comment les notes arpégées seront jouées. o Up : Les notes jouent de la plus basse à la plus haute. o Down : Les notes jouent de la plus haute à la plus basse. o Incl (Inclusive…
-
25, 25 Schnellstart Sounds wiedergeben Hinweis: Um interne Sounds abzuspielen, muss die Taste Internal Sounds aktiviert sein. So greifen Sie auf die Drum-Sounds zu: Es sind 10 Drum-Kits verfügbar. Drücken Sie die Drums-Taste und drehen Sie den Encoder, um ein Drum-Kit auszuwählen. Tippen Sie auf die Pads, um die Drum-Kit-Sounds auszulösen. So greifen Sie auf die Keyboard-Sounds zu: Es stehen 128 Keys-Programme zur Verfügung. Drücken Sie die Taste Keys und drehen Sie den…
-
26, Akai MPK Mini Play 26 Funktionen Oberseite 1. Klaviatur: Das 25-Tasten-Keyboard ist anschlagdynamisch und kann mit den Oktaventasten Auf/Ab zehn Oktaven ansteuern. Sie können die Tasten auch verwenden, um auf bestimmte zusätzliche Befehle zuzugreifen. Halten Sie die Arpeggiator-Taste gedrückt und drücken Sie eine Taste, um die Arpeggiator-Parameter einzustellen. Drücken Sie die Taste «Keys» und drehen Sie den Encoder, um die von den Tasten getriggerten Sounds zu ändern. 2. Drum-Pads: Die Pads werden zum Trig…
-
7, Akai MPK Mini Play 7 18. Resonance/Release: This assignable 270º knob sends a MIDI CC message and can be switched to its secondary function using the Knob Bank A/B button. When the Knob Bank A/B button is set to Bank A, adjust this knob to change the Resonance setting for the internal sounds. When the Knob Bank A/B button is set to Bank B, adjust this knob to change the the Release setting for the internal sounds. In USB mode, adjust this knob to send assignable MIDI CC messages. 19. Reverb Amount/EQ Low…
-
27, 27 • Zeiteinteilung: 1/4-Note, 1/4-Triole (1/4T), 1/8-Note, 1/8-Triole (1/8T), 1/16-Note, 1/16- Triole (1/16T), 1/32-Note oder 1/32-Triole (1/32T). • Modus: Der Modus bestimmt, wie das Arpeggio wiedergegeben wird. o Aufwärts: Die Noten werden von der tiefsten bis zur höchsten wiedergegeben. o Abwärts: Die Noten werden von der höchsten bis zur tiefsten wiedergegeben. o Incl (Inklusive): Die Noten werden vom tiefsten bis zum höchsten …
-
4, Akai MPK Mini Play 4 Quick Start Playing Sounds Note: To play internal sounds, the Internal Sounds button must be engaged. To access the Drum sounds: There are 10 drum kits available. Press the Drums button and rotate the encoder to select a drum kit. Tap the pads to trigger the drum kit sounds. To access the Keyboard sounds: There are 128 Keys programs available. Press the Keys button and rotate the encoder to select a Keys program. The Keys programs are played with the 25 keys. Accessing the Favorites: A Favorite consists of a Keys pa…
-
14, 14 Guide de démarrage Utiliser des sonorités Remarque : Afin de pouvoir utiliser les sonorités internes, la touche Internal Sounds doit être enfoncée. Pour accéder aux sonorités de batterie : Il y a 10 kits de batterie parmi lesquels choisir. Appuyez sur la touche Drums puis tournez l’encodeur afin de sélectionner un kit de batterie. Tapez sur les pads pour déclencher les sonorités du kit de batterie. Pour accé…
-
1, Akai MPK Mini Play User Guide English ( 3 – 7 ) Guía del usuario Español ( 8 – 12 ) Guide d’utilisation Français ( 13 – 17 ) Guida per l’uso Italiano ( 18 – 23 ) Benutzerhandbuch Deutsch ( 24 – 29 ) Appendix English ( 30 ) MPK Mini Play
… -
28, Akai MPK Mini Play 28 13. Favoriten: Drücken Sie dazu diese Taste und die Taste Internal Sounds und anschließend eines der acht Pads, um Ihren Favoriten an diesem Ort zu speichern. Drücken Sie diese Taste und tippen Sie anschließend auf eines der Pads, um einen Favoriten aufzurufen. 14. Interne Sounds: Drücken Sie dazu diese Taste, die Taste Favorites und tippen anschließend auf eines der acht Pads, um Ihren Favoriten an diesem Ort zu speichern. Drücken Sie diese Taste, um die internen…
-
24, 24 Benutzerhandbuch (Deutsch) Einführung Vielen Dank für den Kauf des MPK Mini Play. Wir von Akai Professional wissen, wie wichtig Ihnen die Musik ist. Darum entwerfen wir unsere Geräte stets nur mit einem einzigen Ziel vor Augen: Ihre Performance so gut wie möglich zu unterstützen. Lieferumfang MPK Mini Play USB-Kabel Software-Download-Karte Benutzerhandbuch Sicherheitshinweise und Garantieinformationen Kundendienst Für die neu…
-
3, 3 User Guide (English) Introduction Thank you for purchasing the MPK Mini Play. At Akai Professional, we know how serious music is to you. That’s why we design our equipment with only one thing in mind—to make your performance the best it can be. Box Contents MPK Mini Play USB Cable Software Download Card User Guide Safety & Warranty Manual Support For the latest information about this product (documentation, technical specifications, system requ…
![]()
Русский
- Bedienungsanleitung Akai MPK mini
- Akai MPK mini User Manual
- Manual Usuario Akai MPK mini
- Mode d’emploi Akai MPK mini
- Istruzioni Akai MPK mini
- инструкция Akai MPK mini
- Akai MPK miniの取扱説明書
- Handleiding Akai MPK mini
- Manual de uso Akai MPK mini
Вам нужна инструкция? Мы поможем Вам ее найти и сэкономить Ваше время.
- 10 stron
- 0.95 mb
Изделие Akai MPK mini, а также другие, которыми Вы пользуетесь ежедневно, наверняка вы получили в комплекте с инструкцией обслуживания. Из опыта наших пользователей мы знаем, что большинство из Вас не уделили этому особого внимания. Большая часть инструкций, сразу же после покупки попадает в корзину для мусора вместе с коробкой — это ошибка. Ознакомьтесь с информацией, касающейся инструкции Akai MPK mini, которая поможет Вам в будущем сэкономить нервы и избежать головной боли.
Важная подсказка — не забывайте хотя бы раз прочитать инструкцию Akai MPK mini
Если вы не хотите каждый раз читать информационные брошюры, касающиеся, тех или Akai MPK mini иных изделий, достаточно, прочитать их раз — сразу же после покупки устройства. Вы получите основное знания, касающиеся поддержания изделия Akai MPK mini в хорошем эксплуатационном состоянии, так, чтобы без проблем достигнуть его планируемого цикла работы. Затем инструкцию можно отложить на полку и вернуться к ней только в случае, если вы не уверены, правильно ли проводится техобслуживание изделия. Правильный уход является необходимым элементом Вашего удовольствия Akai MPK mini.
Раз в году пересмотрите шкафчик, в котором держите инструкции для всех устройств, — выбросите те, которыми вы уже не пользуетесься. Это поможет Вам сохранять порядок в своей домашней базе инструкций обслуживания.
Summary of Contents for Akai MPK mini
Что находится в инструкции Akai MPK mini? Почему стоит ее прочитать?
- Гарантия и подробности, касающиеся техобслуживания изделия
Хорошей идеей будет прикрепить чек к странице инструкции. Если что-то плохое случится во время использования Akai MPK mini, у вас будет комплект документов, необходимый для гарантийного ремонта. В этой части инструкции вы найдете информацию об авторизованных сервисных центрахAkai MPK mini а также, как самостоятельно правильно ухаживать за оборудованием — так, чтобы не потерять гарантийных прав. - Указания по монтажу и Setup
Не терять нервов и времени на самостоятельную попытку установки и первого запуска изделия. Воспользуйтесь рекомендациями производителя Akai MPK mini чтобы правильно запустить изделие, без лишнего риска повреждения оборудования. - Информация, касающаяся дополнительных запчастей (входящих в комплект а также являющихся опцией)
Пересматривая эту часть документа вы сможете проверить, доставлен ли ваш Akai MPK mini с полним комплектом аксессуаров. Вы также сможете узнать, какие дополнительные запчасти или аксессуары для Akai MPK mini Вы сможете найти и докупить к своему устройству. - Troubleshooting
Самые частые проблемы, касающиеся Akai MPK mini и методы их решения. Это очень полезная часть руководства по обслуживанию — она позволит Вам сэкономить много времени на поиск решений. 90% проблем с Akai MPK mini повторяется у многих пользователей. - Требования, касающиеся питания и энергетический класс
Информация, касающаяся количества потребляемой энергии, а также рекомендации, касающиеся установки и питания Akai MPK mini. Прочитайте, чтобы оптимально пользоваться Akai MPK mini и не использовать большего количества ресурсов, нежели это необходимо для правильной работы изделия. - Специальные функции Akai MPK mini
Здесь вы можешь узнать, как персонализировать изделие Akai MPK mini. Вы узнаете, какие дополнительные функции могут помочь Вам удобно использовать продукт Akai MPK mini а также, какие функции Вашего устройства оптимальны для выполнения конкретной деятельности.
Как видите в инструкции вы найдете информацию, которая реально поможет Вам в использовании Вашего изделия. Стоит с ней ознакомиться, чтобы избежать разочарований, возникающих из более короткого, нежели предусматривалось, периода исправности изделия Akai MPK mini. Если все же вы не хотите копить инструкции в своем доме, наш сайт поможет Вам в этом — вы должны найти у нас руководство по обслуживанию большинства из своих устройств, а также Akai MPK mini.