
Для моделей с двигателем с объемом 3,5 л.
очень долго искал сам. Решил поделиться также.
касается LEXUS RX350, TOYOTA HARRIER 3.5, TOYOTA HIGHLANDER 3.5
Очень полезная вещь. Я считаю, что всегда и везде необходим электронный вариант.
Всем удачи, пусть руководство пригодится настолько, насколько вам этого хотелось бы.
закинул к себе на облако, лежит здесь:
drive.google.com/file/d/0…El_2rOHN4WWs0YW1ncW8/view
прошу нажать «Нравится» 
Цена вопроса: 0 ₽
Пробег: 104 000 км
ВЛАДЕЛЬЦАМ
РУКОВОДСТВА ДЛЯ ВЛАДЕЛЬЦА
Ознакомьтесь со всеми функциями и эксплуатационными особенностями автомобиля Lexus в онлайн-версии руководства.
РУКОВОДСТВА ДЛЯ ВЛАДЕЛЬЦА LEXUS UX
РУКОВОДСТВА ДЛЯ ВЛАДЕЛЬЦА LEXUS NX
РУКОВОДСТВА ДЛЯ ВЛАДЕЛЬЦА LEXUS RX
РУКОВОДСТВА ДЛЯ ВЛАДЕЛЬЦА LEXUS GX
РУКОВОДСТВА ДЛЯ ВЛАДЕЛЬЦА LEXUS LX
РУКОВОДСТВА ДЛЯ ВЛАДЕЛЬЦА LEXUS ES
РУКОВОДСТВА ДЛЯ ВЛАДЕЛЬЦА LEXUS LS
РУКОВОДСТВА ДЛЯ ВЛАДЕЛЬЦА LEXUS LC
ПОЧЕМУ ВАЖНО ПРОХОДИТЬ ОБСЛУЖИВАНИЕ У ОФИЦИАЛЬНОГО ДИЛЕРА?
-
ЭКСПЕРТНЫЙ ПОДХОД
Профессионализм специалистов достигается благодаря специальной системе обучения на базе ООО «Тойота Мотор»: все сотрудники дилерского центра проходят тренинги и регулярные переаттестации.
-
СТАНДАРТЫ ГОСТЕПРИИМСТВА
Ваша уверенность в качестве услуг и премиальном обслуживании – основной приоритет, поэтому мы гарантируем максимальный комфорт при посещении дилерских центров.
-
ВЫГОДНЫЕ РЕШЕНИЯ
Программы Lexus позволяют экономить на обслуживании автомобиля и при этом гарантированно получить качественный сервис, продлевающий безупречную надежность вашего автомобиля.
![]()
|
4-1. |
Maintenance and care ……… |
272 |
|
Cleaning and protecting the |
||
|
vehicle exterior…………………… |
272 |
|
|
Cleaning and protecting the |
||
|
vehicle interior……………………. |
275 |
|
|
4-2. |
Maintenance ……………………… |
278 |
|
Maintenance |
||
|
requirements………………………. |
278 |
|
|
General maintenance ………… |
280 |
|
|
Emission inspection and |
||
|
maintenance (I/M) |
||
|
programs …………………………….. |
283 |
|
|
4-3. |
Do-it-yourself |
|
|
maintenance…………………… |
284 |
|
|
Do-it-yourself service |
||
|
precautions…………………………. |
284 |
|
|
Hood……………………………………….. |
287 |
|
|
Positioning the jack……………… |
288 |
|
|
Engine compartment…………… |
290 |
|
|
Tires ………………………………………… |
304 |
|
|
Tire inflation pressure……………… |
311 |
|
|
Wheels…………………………………….. |
315 |
|
|
Air conditioning filter……………. |
317 |
|
|
Wireless remote control |
||
|
battery…………………………………… |
319 |
|
|
Rear seat entertainment system |
||
|
controller ……………………………… |
321 |
|
Checking and replacing |
|
|
fuses……………………………………… |
323 |
|
Headlight aim (vehicles with |
|
|
discharge headlights)……….. |
335 |
|
Light bulbs……………………………… |
336 |
271

3-5. Using the storage features
List of storage features
Glove box
3 Interiorfeatures
 Unlock with the key
 Lock with the key
 Open (pull lever)
241

3-5. Using the storage features
Glove box and console boxes
nGlove box light
The glove box light turns on when the tail lights are turned on.
nPower back door main switch
The power back door main switch is located in the glove box. (→P. 13)
 CAUTION
nCaution while driving
Keep the glove box closed.
Injuries may result in the event of an accident or sudden braking.
 Console boxes
n Using the console box
 Front
Front
 Open
Open  Close
Close
 Rear (if equipped)
 Pull up the knob to release the lock.
 Lift the armrest to open.
242
3-5. Using the storage features Console boxes
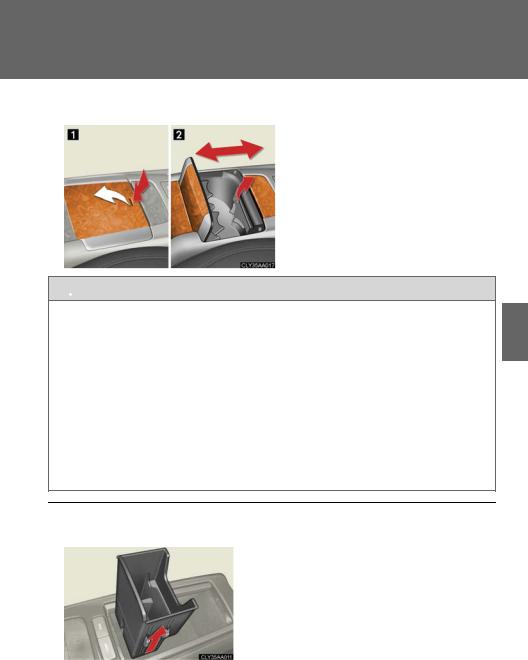
n Adjusting the position of the console box (front)
 Open the cup holder lid on the console box.
 Adjust the position of the box while lifting the lock release lever.
 CAUTION
nConsole box adjustment precaution
•Do not adjust the position of the console box while the vehicle is moving.
This may cause the driver to mishandle the vehicle and may lead to an accident that results in death or serious injury.
•Be careful not to get hands or feet pinched between the front console box and the center panel or rear seat.
•Be careful not to allow the front console box to hit any passengers while adjusting its position.
•After adjusting the console box, make sure it is securely locked in position.
nRemoving the adapter tray
Pull up.
nConsole box light (front)
The console box light turn on when the tail lights are turned on.
3 Interiorfeatures
243
3-5. Using the storage features
Console boxes and overhead console
 CAUTION
nCaution while driving
Keep the console box closed.
Injuries may result in the event of an accident or sudden braking.
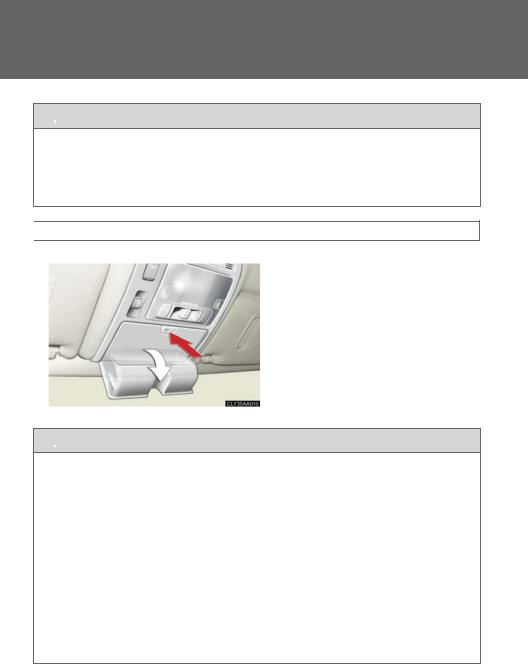
 Overhead console
The overhead console is useful for temporarily storing sunglasses and similar small items.
 CAUTION
nItems that should not be left in the overhead console
Do not leave glasses or lighters in the console.
If the interior of the vehicle becomes hot, lighters may explode and glasses may warp or become cracked.
nCaution while driving
Do not leave the overhead console open while driving. Items may fall out and cause injury.
nMaximum storage weight
Do not place any object heavier than 0.22 lb. (100 g) in it. The console may be opened and cause injury.
244

3-5. Using the storage features Cup holders
 Cup holders
 Front (type A)
To open, press in and release the front cup holder.
 Front (type B)
To open, press down and release 3 the rear of the cup holder lid.
features Interior
 Rear
Rear
To open, press down the button on the armrest.
nCup holder light (front-type B)
The cup holder light turn on when the tail lights are turned on.
245

3-5. Using the storage features
Cup holders and door pockets
 CAUTION
nItems unsuitable for the cup holder
Do not place anything other than cups or aluminum cans in the cup holders. Other items may be thrown out of the holders in the event of an accident or sudden braking and cause injury. If possible, cover hot drinks to prevent burns.
nWhen not in use
Keep the cup holders closed.
Injuries may result in the event of an accident or sudden braking.
 Door pockets
The door pocket can be opened and closed.
 CAUTION
nCaution while driving
Keep the door pockets closed.
Injuries may result in the event of an accident or sudden braking.
246

4-1. Maintenance and care
Cleaning and protecting the vehicle exterior
Perform the following to protect the vehicle and maintain it in prime condition.
•Working from top to bottom, liberally apply water to the vehicle body, wheel wells and underside of the vehicle to remove any dirt and dust.
Wash the vehicle body using a sponge or soft cloth, such as a chamois.
•For hard-to-remove marks, use car wash soap and rinse thoroughly with water.
•Wipe away any water.
•Wax the vehicle when the waterproof coating deteriorates.
If water does not bead on a clean surface, apply wax when the vehicle body is cool.
272

4-1. Maintenance and care
nAutomatic car washes
•Before washing the vehicle:
•Fold the mirrors back.
•Remove the antenna.
•Turn the power back door system off.
•Brushes used in automatic car washes may scratch the vehicle surface and harm your vehicle’s paint.
nHigh pressure automatic car washes
Do not allow the nozzles of the car wash to come within close proximity of the windows and the air suspension unit (if equipped). Before entering an automatic car wash, check that the fuel filler door on your vehicle is closed properly.
nAluminum wheels
Remove any dirt immediately by using a neutral detergent. Do not use hard brushes or abrasive cleaners. Do not use strong or harsh chemical cleaners. Use the same mild detergent and wax as used on the paint.
nBumpers and side moldings
Do not scrub with abrasive cleaners.
nTo prevent deterioration and corrosion
•Wash the vehicle immediately in the following cases:
•After driving near the sea coast
•After driving on salted roads
•If you see coal tar or tree sap on the paint surface
•If you see dead insects or insect droppings on the paint
•After driving in an area contaminated with soot, oily smoke, mine dust, iron powder or chemical substances
•If the vehicle becomes heavily soiled in dust or mud
•If liquids such as benzene and gasoline are spilled on the paint surface
•If the paint is chipped or scratched, have it repaired immediately.
4 Maintenanceand care
273

4-1. Maintenance and care
 CAUTION
nCaution about the exhaust pipe
Exhaust gasses cause the exhaust pipe to become quite hot.
When washing the vehicle, be careful not to touch the pipe until it has cooled sufficiently, as touching a hot exhaust pipe can cause burns.
 NOTICE
nTo protect your vehicle’s painted surfaces
Do not use organic cleaners such as benzene or gasoline.
nIf the windshield washer nozzle become blocked
Contact your Lexus dealer. Do not try to clear it with a pin or other object. This may damage the nozzle.
nCleaning the exterior lights
•Wash carefully. Do not use organic substances or scrub with a hard brush. This may damage the surfaces of the lights.
•Do not apply wax on the surfaces of the lights. Wax may cause damage to the lenses.
nTo prevent damage to the windshield wiper arms
When lifting the wiper arms away from the windshield, pull the driver side wiper arm upward first, and repeat for the passenger side. When returning the wipers to their original position, do so from the passenger side first.
274
![]()
4-1. Maintenance and care
Cleaning and protecting the vehicle interior
The following procedures will help protect your vehicle’s interior and keep it in top condition:
nProtecting the vehicle interior
Remove dirt and dust using a vacuum cleaner. Wipe dirty surfaces with a cloth dampened with lukewarm water.
nCleaning the leather areas
•Remove dirt and dust using a vacuum cleaner.
•Wipe any excess dirt and dust with a soft cloth dampened with diluted detergent.
Use a diluted water solution of approximately 5% neutral wool detergent.
•Wring out any excess water from the cloth and thoroughly wipe off all remaining traces of detergent.
•Wipe the surface with a dry, soft cloth to remove any remaining moisture. Allow the leather to dry in shaded and ventilated area.
nSynthetic leather areas
•Remove loose dirt using a vacuum cleaner.
•Apply a mild soap solution to the synthetic leather using a sponge or soft cloth.
•Allow the solution to soak in for a few minutes. Remove the dirt and wipe off the solution with a clean, damp cloth.
4 Maintenanceand care
275

4-1. Maintenance and care
nCleaning the inside of the rear window
Do not use glass cleaner to clean the rear window, as this may cause damage to the rear window defogger heater wires. Use a cloth dampened with lukewarm water to gently wipe the window clean. Wipe the window in strokes running parallel to the heater wires.
nCaring for leather areas
Lexus recommends cleaning the interior of the vehicle at least twice a year to maintain the quality of the vehicle’s interior.
nShampooing the carpets
There are several commercial foaming-type cleaners available. Use a sponge or brush to apply the foam. Rub in overlapping circles. Do not apply water. The excellent results are obtained by keeping the carpet as dry as possible.
nSeat belts
Clean with mild soap and lukewarm water using a cloth or sponge. Also check the belts periodically for excessive wear, fraying or cuts.
 CAUTION
nWater in the vehicle
•Be careful not to splash or spill liquid on the floor.
•Do not get any of the SRS components or wiring in the vehicle interior wet. (→P. 58)
Electrical malfunction may cause the airbags to deploy or not function properly, resulting in death or severe injury.
276

4-1. Maintenance and care
 NOTICE
nCleaning detergents
Do not use the following types of detergent, as they may discolor the vehicle interior or cause streaks or damage to painted surfaces.
•Non-seat portions: Organic substances such as benzene or gasoline, alkaline or acidic solutions, dye, or bleach.
•Seats: Acidic solutions, such as thinner, benzene, or alcohol.
nPreventing damage to leather surfaces
Observe the following precautions to avoid damage to and deterioration of leather surfaces.
•Remove any dust or dirt on leather surfaces immediately.
•Do not expose the vehicle to direct sunlight for extended periods of time. Park the vehicle in the shade, especially during summer.
•Do not place items made of vinyl, plastic, or that contain wax on the upholstery, as they may stick to the leather surface if the vehicle interior heats up significantly.
nWater on the floor
Do not wash the vehicle floor with water.
Vehicle systems such as the audio system may be damaged if water comes into contact with electrical components under the floor of the vehicle, and may also cause the body to rust.
nCleaning the inside of the rear window
Be careful not to scratch or damage the heater wires or antenna.
4 Maintenanceand care
277

3-6. Other interior features
Sun visors
 Forward position: Flip down.
 Side position:
Flip down, unhook, and swing to the side.
At this position, the visors can be slid backward.
3 Interiorfeatures
247

3-6. Other interior features
Vanity mirror
 Open
Open
The light turns on when the cover is opened.
 Adjust the brightness of the light
248

3-6. Other interior features
Clock
 Adjusts the hour.
 Adjusts the minutes.
 Rounds to the nearest hour.*
*: e.g. 1:00 to 1:29 →1:00 1:30 to 1:59 →2:00
nThe clock is displayed when |
3 |
|
The ignition switch is in the ACC or ON position. |
||
|
features Interior |
249

3-6. Other interior features
Outside temperature display
 Displays the outside air temperature
The temperature range that can be displayed is from -22°F (-30°C) to 122°F (50°C).
nIf the temperature does not appear or it shows
Have the vehicle inspected by your Lexus dealer.
250

3-6. Other interior features
Multi-display light control
Adjusts the brightness of the light
Push and release the button until the desired brightness is obtained.
3 Interiorfeatures
251
3-6. Other interior features
Power outlet
The power outlet can be used for a following component.
12 V: Accessories that run on less than 10 A.
115 VAC: Audio device that use less than 100 W.
 On center cluster (12 V)
 Tray under the front console box (12 V)
 Luggage compartment (12 V)
252

3-6. Other interior features
 Luggage compartment (115 VAC*)
 Main switch
To use the power outlet, turn on the main switch.
 Power outlet socket
*: If equipped
nThe power outlet can be used when  12 V
12 V
 12 V
12 VThe ignition switch is in the ACC or ON position.
 115 VAC
The ignition switch is in the ON position.
 NOTICE
nTo avoid damaging the power outlet
Close the power outlet lid when the power outlet is not in use.
Foreign objects or liquids that enter the power outlet may cause a short circuit.
nTo prevent the fuse from being blown
 12 V
12 V
Do not use an accessory that uses more than 12 V 10 A.
 115 VAC
Do not use a 115 VAC appliance that requires more than 100 W.
If a 115 VAC appliance that consumes more than 100 W is used, the protection circuit will cut the power supply.
3 Interiorfeatures
253
![]()
3-6. Other interior features
 NOTICE
nTo prevent the battery from being discharged
Do not use the power outlet longer than necessary when the engine is not running.
nAppliances that may not operate properly (115 VAC)
The following 115 VAC appliances may not operate properly even if their power consumption is under 100 W.
•Appliances with high initial peak wattage
•Measuring devices that process precise data
•Other appliances that require an extremely stable power supply
254

3-6. Other interior features
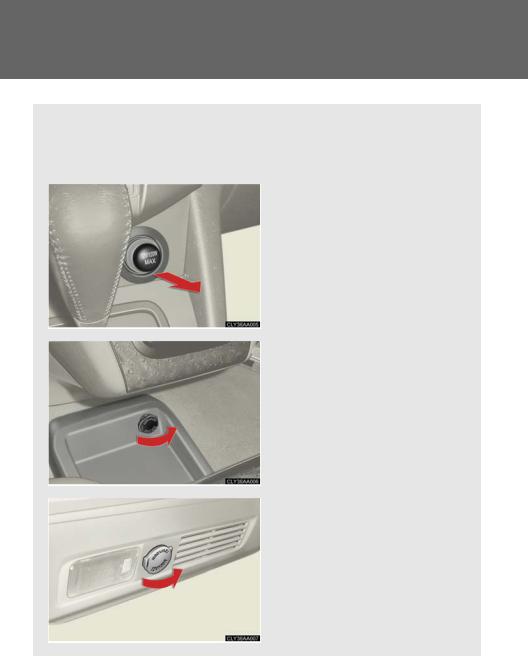
Seat heaters (if equipped)
|
Driver’s |
Front |
||
|
seat |
passenger’s |
||
|
seat |
|||
 Pops the switch out
 ON
ON
The indicator light comes on.
 Adjusts the seat temperature
The further you turn the knob clockwise, the warmer the seat becomes.
nThe seat heaters can be used when
The ignition switch is in the ON position.
nWhen not in use
Turn the knob counterclockwise. The indicator light turns off. Press the knob into the recessed position.
 CAUTION
nBurns
•Use caution when seating the following persons in a seat with the seat heater on to avoid the possibility of burns:
•Babies, small children, the elderly, the sick and the disabled
•Persons with sensitive skin
•Persons who are fatigued
•Persons who have taken alcohol or drugs that induce sleep (sleeping drugs, cold remedies, etc.)
•Do not cover the seat with anything when using the seat heater.
Using the seat heater with a blanket or cushion increases the temperature of the seat and may lead to overheating.
3 Interiorfeatures
255

3-6. Other interior features
 NOTICE
nTo prevent seat heater damage
Do not put unevenly weighted objects on the seat and do not stick sharp objects (needles, nails, etc.) into the seat.
nTo prevent battery discharge
Turn the switches off when the engine is not running.
256

3-6. Other interior features
Armrest
n Front
Pull the armrest down for use.
n Rear
Pull the armrest down for use.
 NOTICE
nTo prevent damage to the armrest
Do not place too much strain on the armrest.
3 Interiorfeatures
257

3-6. Other interior features
Floor mat
Securely place a mat that matches the size of the space on the carpet.
Secure the driver’s floor mat using the hooks provided.
 CAUTION
nWhen inserting the floor mat
Make sure the floor mat is properly placed on the vehicle carpet.
If the floor mat slips and interferes with the movement of the pedals during driving, it may cause an accident.
258

3-6. Other interior features
Luggage compartment features
n Cargo hooks
Cargo hooks are provided for securing loose items.
n Auxilialy box
 To lift the luggage mat up, press down the button.
An auxiliary box is under the luggage mat.
n Shopping bag hooks
3 Interiorfeatures
259

3-6. Other interior features
n Luggage cover |
|||
|
Attach the hooks to the head |
|||
|
STEP |
1 |
||
|
restraints. |
|||
|
STEP 2 |
Pull out the luggage cover and |
|
hook it onto the anchors. |
 Removing luggage cover
 Push
Push
 Lift up
After removing the luggage cover, stow it in the auxiliary box or place it somewhere other than the passenger compartment.
260

3-6. Other interior features
 Automatic retract function of luggage cover
The knob is in the active position, the luggage cover is retracted automatically when the back door is opened.
 Active position
  Inactive position
 CAUTION
nWhen the cargo hooks are not in use
To avoid injury, always return the cargo hooks to their positions when they are not in use.
 NOTICE
nShopping bag hook weight capacity
Do not hang any object heavier than 4 lb. (2 kg) on shopping bag hooks.
3 Interiorfeatures
261

3-6. Other interior features
Garage door opener
The garage door opener can be programmed to operate garage doors, gates, entry doors, door locks, home lighting systems, and security systems, and other devices.
The garage door opener (HomeLink→ Universal Transceiver) is manufactured under license from HomeLink→.
 Programming the HomeLink→ (for U.S.A. owners)
The HomeLink→ compatible transceiver in your vehicle has 3 buttons which can be programmed to operate 3 different devices. Refer to the programming method below appropriate for the device.
n Programming the HomeLink→
 Buttons
 Indicator
Point the remote control for the device 1 to 3 in. (25 to 75 mm) from the HomeLink→ control buttons.
Keep the indicator light on the HomeLink→ in view while programming.
262

3-6. Other interior features
|
STEP 2 |
Press and hold down one of the |
||||
|
buttons on the HomeLink→ |
and |
||||
|
the button on the transmitter. |
|||||
|
When the indicator light on the |
|||||
|
HomeLink→ changes from a slow |
|||||
|
to a rapid flash after 20 seconds, |
|||||
|
you can release both buttons. |
|||||
|
STEP 3 |
Test |
the |
→ operation |
of |
the |
|
HomeLink |
by pressing the newly |
||||
|
programmed button. |
If programming a garage door opener, check to see if the garage door opens and closes. If the garage door does not operate, see if your garage transmitter is of the Rolling Code type. Press and hold the programmed HomeLink→ button. The garage door has the rolling code feature if the indicator light (on the HomeLink→) flashes rapidly for 2 seconds and then remains lit. If your transmitter is the Rolling Code type, proceed to the heading “Programming a rolling code system”.
STEP 4 Repeat the steps above to program another device for each of the remaining HomeLink→ buttons.
3 Interiorfeatures
263
![]()
3-6. Other interior features
nProgramming a Rolling Code system (for U.S.A. owners)
If your device is Rolling Code equipped, follow the steps under the heading “Programming the HomeLink→” before proceeding with the steps listed below.
STEP 1
STEP 2
STEP 3
STEP 4
Locate the training button on the ceiling mounted garage door opener motor. The exact location and color of the button may vary by brand of garage door opener.
Refer to the operation manual supplied with the garage door opener for the location of the training button.
Press the training button.
Press and release the vehicle’s programmed HomeLink→ button twice. The garage door may open.
If the garage door opens, the programming process is complete. If the door does not open, press and release the button a third time. This third press and release will complete the programming process by opening the garage door.
The ceiling mounted garage door opener motor should now recognize the HomeLink→ transceiver and operate the garage door.
Repeat the steps above to program another rolling code system for any of the remaining HomeLink→ buttons.
nProgramming an entry gate (for U.S.A. owners)/Programming all devices in the Canadian market
STEP 1 Place your transmitter 1 to 3 in. (25 to 75 mm) away from the surface of the HomeLink→.
Keep the indicator light on the HomeLink→ in view while programming.
STEP 2 Press and hold the selected HomeLink→ button.
STEP 3 Repeatedly press and release (cycle) the device’s remote control button for two seconds each until step 4 is complete.
STEP 4 When the indicator light on the HomeLink→ compatible transceiver start to flashing rapidly, release the buttons.
264

3-6. Other interior features
STEP 5 Test the operation of the HomeLink→ by pressing the newly programmed button. Check to see if the gate/device operates correctly.
STEP 6 Repeat the steps above to program another device for each of the remaining HomeLink→ buttons.
nProgramming other devices
To program other devices such as home security systems, home door locks or lighting, contact your authorized Lexus dealer for assistance.
nReprogramming a button
The individual HomeLink→ buttons cannot be erased but can be reprogrammed. To reprogram a button, follow the “Programming the HomeLink→” instructions.
 Operating the HomeLink®
Press the appropriate HomeLink→ button. The HomeLink→ indicator light on the HomeLink→ transceiver should turn on.
The HomeLink→ continues to send a signal for up to 20 seconds as long as the button is pressed.
 Erasing the entire HomeLink® memory (all three programs)
Press and hold down the 2 outside buttons for 20 seconds until the indicator light flashes.
If you sell your vehicle, be sure to erase the programs stored in the HomeLink→ memory.
3 Interiorfeatures
265

3-6. Other interior features
nBefore programming
•Install a new battery in the transmitter.
•The battery side of the transmitter must be pointed away from the HomeLink→.
nCertification for the garage door opener
This device complies with Part 15 of the FCC Rules and with RSS-210 of the IC Rules.
Operation is subject to the following two conditions: (1) This device may not cause harmful interference, and (2) this device must accept any interference received, including interference that may cause undesired operation.
WARNING: This transmitter has been tested and complies with FCC and IC rules. Changes or modifications not expressly approved by the party responsible for compliance could void the user’s authority to operate the device.
 CAUTION
nWhen programming a garage door or other remote control device
The garage door may operate, so ensure people and objects are out of danger to prevent potential harm.
nConforming to federal safety standards
Do not use the HomeLink→ Compatible Transceiver with any garage door opener or device that lacks safety stop and reverse features as required by federal safety standards.
This includes any garage door that cannot detect an obstruction object. A door or device without these features increases the risk of death or serious injury.
266

3-6. Other interior features
Compass
The compass on the inside rear view mirror indicates the direction in which the vehicle is heading.
n Operation
 To turn the compass on or off, press the switch.
n Displays and directions
|
Display |
Direction |
|
N |
North |
|
NE |
Northeast |
|
E |
East |
|
SE |
Southeast |
|
S |
South |
|
SW |
Southwest |
|
W |
West |
|
NW |
Northwest |
3 Interiorfeatures
267

3-6. Other interior features
 Calibrating the compass
The direction display deviates from the true direction determined by the earth’s magnetic field. The amount of deviation varies according to the geographic position of the vehicle.
If you cross over a map boundary shown in illustration, the compass will deviate.
To obtain higher precision or perfect calibration, refer to the following. n Deviation calibration
STEP 1 Stop the vehicle where it is safe to drive in a circle.
|
Press the switch until a number |
||
|
STEP |
2 |
|
|
(1 to 15) appears on the compass |
||
|
display. |
STEP 3 Press the switch, and referring to the map above, select the number of the zone where you are.
If the direction is displayed several seconds after adjustment, the calibration is complete.
268

3-6. Other interior features
n Circling calibration
When C appears on the display, drive the vehicle at 5 mph
(8 km/h) or less in a circle until a direction is displayed.
If there is not enough space to drive in a circle, drive around the block until the direction is displayed.
nConditions unfavorable to correct operation
The compass may not show the correct direction in the following conditions:
•The vehicle is stopped immediately after turning.
•The vehicle is on an inclined surface.
•The vehicle is in a place where the earth’s magnetic field is subject to interference by artificial magnetic fields (underground car park/parking lot, under a steel tower, between buildings, roof car park/parking lot, near an intersection, near a large vehicle, etc.).
•The vehicle has become magnetized.
(There is a magnet or metal object near the inside rear view mirror.)
•The battery has been disconnected.
•A door is open.
3 Interiorfeatures
269

3-6. Other interior features
 CAUTION
nWhile driving the vehicle
Do not adjust the display. Be sure to adjust the display only when the vehicle is stopped.
nWhen doing the circling calibration
Be sure to secure a wide space, and watch out for people and vehicles in the neighborhood. Do not violate any local traffic rules while performing circling calibration.
 NOTICE
nTo avoid the compass malfunctions
Do not place magnets or any metal objects near the inside rear view mirror. Doing this may cause a malfunction of the compass sensor.
nTo ensure normal operation of the compass
•Do not perform circling calibration of the compass in a place where the earth’s magnetic field is subject to interference by artificial magnetic fields.
•During calibration, do not operate electric systems (moon roof, power windows, etc.) as they may interfere with the calibration.
270

236

3-4. Using the interior lights
nIlluminated entry system
The following lights turn on when any of the doors are unlocked or opened. (The lights remain on for approximately 15 seconds when the doors are unlocked, but the lights turn off immediately if the doors are locked.)
•Foot well lighting •Ignition switch light
•Front interior light (interior light switch is in the DOOR position) •Rear interior light (interior light switch is in the DOOR position) •Inside door handle lights
•Scuff lighting
The following lights turn on for approximately 15 seconds when the ignition switch is turned to the LOCK position from the ON or ACC position. (The lights turn off immediately if the ignition switch is turned to the ACC or ON position.)
•Ignition switch light
•Front interior light (interior light switch is in the DOOR position)
•Rear interior light (interior light switch is in the DOOR position)
•Scuff lighting
The following lights turn on when the ignition switch is in the ON position. (The lights dim when the shift lever is moved out of the P position. The lights remain on for approximately 15 seconds after turning the ignition switch to the LOCK position from the ON or ACC position.)
•Inside door handle lights
•Foot well lighting
The front overhead courtesy light turns on when the ignition switch is in the ACC or ON position.
3 Interiorfeatures
237

3-4. Using the interior lights
nTo prevent the battery from being discharged
If the following lights remain ON when the door is not fully closed and the interior light switch is in the DOOR position, the lights will go off automatically after 20 minutes.
•Ignition switch light •Front interior light •Rear interior light
•Inside door handle lights •Scuff lighting
•Foot well lighting
nCustomization
Setting (e.g. The time elapsed before lights turn off) can be changed. (→P. 410)
238
![]()
3-4. Using the interior lights Interior lights
 Interior lights
 Door position ON
 ON
ON
 OFF
OFF
Front (models with an electric moon roof)
 Front (models with an electric moon roof)
3 Interiorfeatures
Front (models without an electric moon roof)
 Front (models without an electric moon roof)
 Rear
 Rear
Rear239

3-4. Using the interior lights
Personal lights
 Personal lights
 ON/OFF
Models with an electric moon roof
 Models with an electric moon roof
 Models without an electric moon roof
 Models without an electric moon roof
240

209

3-3. Using the rear audio system
 Opening and closing the display
Press the lock release button to open the display.
Pull the display down to an easily viewable angle (between 90° and 125°).
To close the display, press the display up until a click is heard to close the display.
The illumination of the screen is automatically turned off when the display is closed. However, the rear seat entertainment system is not turned off.
 Loading a disc
Insert the disc into the slot with the label side up.
The DISC indicator light turns on while the disc is loaded.
The player will play the track or chapter, and will repeat it after it reaches the end.
210

3-3. Using the rear audio system
 Ejecting a disc
Press  and remove the disc.
 Headphone jacks
 To use the headphones, connect them to the jack.
 To adjust the volume
Right side dial: Turn it toward the front of the vehicle to increase the volume. Turn it toward the rear of the vehicle to decrease the volume.
Left side dial: Turn it toward the rear of the vehicle to increase the volume. Turn it toward the front of the vehicle to decrease the volume.
3 Interiorfeatures
211

3-3. Using the rear audio system
nThe rear seat entertainment system can be used when
The ignition switch is in the ACC or ON position.
nDiscs that can be used
Discs with the marks shown below can be used.
Playback may not be possible depending on recording format or disc features, or due to scratches, dirt or deterioration.
nWhen appears on the screen
It indicates that the selected switch cannot work.
nRear system lock
→P. 206
212

3-3. Using the rear audio system
nError messages |
|
|
DISC CHECK: |
Indicates that the disc is dirty, damaged or was inserted upside |
|
down. Clean the disc or insert it correctly. |
REGION ERROR: Indicates that the DVD region code is not set properly.
|
DVD ERROR: |
Indicates that there is a problem inside the player. Eject the disc. |
|
Set the disc again. |
|
|
If the malfunction still exists, take the vehicle to your Lexus |
|
|
dealer. |
nBefore using the remote control (for new vehicle owners)
An insulating sheet is set to prevent the batteries from being discharged. Remove the insulating sheet before using the remote control.
nHeadphones
With some headphones generally available in the market, it may be difficult to catch signals properly. Lexus recommends the use of Lexus genuine wireless headphones.
Please contact your Lexus dealer for further details.
nVolume
•Adjust the volume when you connect the headphones to the jack. Loud sounds may have a significant impact on the human body.
•Conversational speech on some DVDs is recorded at a low volume to emphasize the impact of sound effects. If you adjust the volume assuming that the conversations represent the maximum volume level that the DVD will play, you may be startled by louder sound effects or when you change to a different audio source. Be sure to adjust the volume with this in mind.
3 Interiorfeatures
213

3-3. Using the rear audio system
 CAUTION
nWhile driving
Do not use headphones.
Doing so may cause an accident, resulting in death or serious injury.
nWhen the rear seat entertainment system is not used
Keep the display closed.
In the event of an accident or sudden braking, the opened display may hit an occupant’s body, resulting in injury.
nTo prevent accidents and electric shock
Do not disassemble or modify the remote control.
nWhen the remote control is not used
Stow the remote control.
Injuries may result in the event of an accident or sudden braking.
214

3-3. Using the rear audio system
Using the DVD player (DVD video)
n Remote control
 Turning on the DVD mode
 Selecting a chapter
 Reversing a screen
 Turning on the menu screen
 Turning on the title selection screen
 Searching the title
 Changing the screen angle
 Inputting the selected switch
 Selecting a switch
 Playing/pausing a screen
 Fast forwarding a screen
 Stopping a screen
 Changing the subtitle language
 Changing the audio language
n Unit
 Turning on the DVD mode
 Skipping to the desired chapter
 Playing/pausing a screen
 Selecting a switch/inputting the selected switch
3 Interiorfeatures
215

3-3. Using the rear audio system
n Display (Page 1)
 Turning off the operation switches on the display
 Displaying Page 2
 Turning on or off the title selection screen for the disc
 Turning on or off the menu screen for the disc
 Reversing a screen
 Stopping a screen
 Pausing the disc/canceling the pause
 Fast forwarding a screen
n Display (Page 2)
 Displaying to the initial setting screen
 Displaying to Page 1
 Search for a title
 Returning to the previous screen
 Changing the audio language
 Changing the subtitle language
 Changing the angle
216
 Loading…
-
nekesha
- Администратор
- Сообщения: 1668
- Зарегистрирован: 17 дек 2014, 03:43
- Благодарил (а): 2 раза
- Поблагодарили: 6 раз
Lexus RX350 2006-2009 / Лексус РИкс 350 2006-2009
Руководство по эксплуатации, техобслуживанию и ремонту Lexus RX350 / Лексус РИкс 350
Operation, Maintenance and Repair Manual Lexus RX350

- Года выпуска: 2006-2009
Year of release: 2006-2009
Бензиновые двигатели: 2GR-FE
Gasoline engines: 2GR-FE
- Язык: Русский
Формат: PDF
Размер: 386 Мб
Russian language
Format: PDF
Size: 386 MB
Скачать документацию Lexus RX350 / Лексус РИкс350
Download the documentation of Lexus RX350
для распаковки используйте пароль — avtoproblem-net.ru
use the password to unpack — avtoproblem-net.ru

Мультимедийное руководство на английском языке по техническому обслуживанию и ремонту + схемы электрооборудования автомобиля Lexus RX400h серии MHU38.
- Автор: —
- Издательство: Toyota Motor Corporation
- Год издания: —
- Страниц: —
- Формат: ISO
- Размер: 125,7 Mb

Руководство на английском языке по техническому обслуживанию и ремонту + схемы электрооборудования автомобиля Lexus RX300 серии MCU15.
- Автор: —
- Издательство: Toyota Motor Corporation
- Год издания: —
- Страниц: —
- Формат: PDF
- Размер: 326,0 Mb
Руководство по эксплуатации и техническому обслуживанию автомобиля Lexus RX300 1997-2003 годов выпуска.
- Автор: —
- Издательство: MoToR
- Год издания: —
- Страниц: 324
- Формат: —
- Размер: —

Руководство по эксплуатации и техническому обслуживанию автомобиля Lexus RX330 с 2003 года выпуска.
- Автор: —
- Издательство: Монолит
- Год издания: —
- Страниц: 372
- Формат: —
- Размер: —

Руководство по эксплуатации и техническому обслуживанию автомобиля Lexus RX350 с 2003 года выпуска.
- Автор: —
- Издательство: Монолит
- Год издания: —
- Страниц: 232
- Формат: —
- Размер: —

Руководство по эксплуатации и техническому обслуживанию автомобиля Lexus RX350 с 2010 года выпуска.
- Автор: —
- Издательство: Монолит
- Год издания: —
- Страниц: 346
- Формат: —
- Размер: —
Руководство по техническому обслуживанию и ремонту автомобилей Lexus RX300/330 и Toyota Highlander 1999-2006 годов выпуска.
- Автор: —
- Издательство: Алфамер Паблишинг
- Год издания: —
- Страниц: 268
- Формат: PDF
- Размер: 205,0 Mb
Руководство по техническому обслуживанию и ремонту автомобилей Lexus RX330 и Toyota Highlander 1999-2006 годов выпуска.
- Автор: —
- Издательство: Алфамер Паблишинг
- Год издания: —
- Страниц: 312
- Формат: —
- Размер: —
Руководство на английском языке по техническому обслуживанию и ремонту автомобиля Lexus RX300.
- Автор: —
- Издательство: —
- Год издания: —
- Страниц: —
- Формат: PDF
- Размер: 129,6 Mb
Мультимедийное руководство по техническому обслуживанию и ремонту + схемы электрооборудования автомобилей Lexus RX300/330 серии MCU15.
- Автор: —
- Издательство: —
- Год издания: —
- Страниц: —
- Формат: HTML
- Размер: 40,7 Mb

Мультимедийное руководство по техническому обслуживанию и ремонту + схемы электрооборудования автомобилей Lexus RX300/330/350 серий GSU35, MCU35/38.
- Автор: —
- Издательство: —
- Год издания: —
- Страниц: —
- Формат: ISO
- Размер: 165,1 Mb

Мультимедийное руководство по кузовному ремонту, схемы электрооборудования и сервисная карта автомобиля Lexus RX400h серии MHU38.
- Автор: —
- Издательство: Toyota Motor Corporation
- Год издания: —
- Страниц: —
- Формат: ISO
- Размер: 98,2 Mb

Мультимедийное руководство по техническому обслуживанию и ремонту автомобиля Lexus RX400h серии MHU38.
- Автор: —
- Издательство: Toyota Motor Corporation
- Год издания: —
- Страниц: —
- Формат: ISO
- Размер: 108,0 Mb
Руководство по эксплуатации, техническому обслуживанию и ремонту + каталог расходных запчастей автомобилей Lexus RX370/350 2009-2015 годjd выпуска с бензиновыми двигателями объемом 2,7/3,5 л.
- Автор: —
- Издательство: Легион-Автодата
- Год издания: —
- Страниц: 592
- Формат: —
- Размер: —
Руководство по эксплуатации, техническому обслуживанию и ремонту + каталог расходных запчастей автомобилей Lexus RX300 и Toyota Harrier 1997-2003 годов выпуска с бензиновыми двигателями объемом 2.2/2.4/3,0 л.
- Автор: —
- Издательство: Легион-Автодата
- Год издания: —
- Страниц: 558
- Формат: —
- Размер: —
Руководство по эксплуатации, техническому обслуживанию и ремонту + каталог расходных запчастей автомобиля Lexus RX300 1997-2003 годов выпуска с бензиновым двигателем объемом 3,0 л.
- Автор: —
- Издательство: Легион-Автодата
- Год издания: 2014
- Страниц: 243
- Формат: —
- Размер: —
Руководство по эксплуатации, техническому обслуживанию и ремонту + каталог расходных запчастей автомобилей Lexus RX300/330 2003-2006 годов выпуска с бензиновыми двигателями объемом 3,0/3,3 л.
- Автор: —
- Издательство: Легион-Автодата
- Год издания: 2014
- Страниц: 359
- Формат: —
- Размер: —
Руководство по техническому обслуживанию и ремонту автомобилей Lexus RX400h 2005-2008 и Toyota Harrier Hybrid с 2005 года выпуска.
- Автор: —
- Издательство: Легион-Автодата
- Год издания: 2012
- Страниц: 499
- Формат: —
- Размер: —

Руководство по эксплуатации и ремонту автомобилей Lexus RX200t/300/350/350l/450h с 2015 года выпуска с бензиновыми двигателями объемом 2,0/3,5 л.
- Автор: —
- Издательство: Монолит
- Год издания: —
- Страниц: 664
- Формат: —
- Размер: —
Руководство по эксплуатации и ремонту автомобилей Lexus RX370/350/450h с 2010 года выпуска с бензиновыми двигателями объемом 2,7/3,5 л.
- Автор: —
- Издательство: Монолит
- Год издания: —
- Страниц: 456
- Формат: —
- Размер: —
Руководство по эксплуатации и ремонту автомобилей Lexus RX300/330/350, Toyota Highlander и Toyota Harrier 1997-2006 годов выпуска с бензиновыми двигателями объемом 3,0/3,3/3,5 л.
- Автор: —
- Издательство: Монолит
- Год издания: —
- Страниц: 400
- Формат: —
- Размер: —
Руководство по эксплуатации, техническому обслуживанию и ремонту автомобиля Lexus RX300 с 1997 года выпуска с бензиновым двигателем объемом 3,0 л.
- Автор: —
- Издательство: Арго-Авто
- Год издания: —
- Страниц: 288
- Формат: —
- Размер: —
Мультимедийное руководство по техническому обслуживанию и ремонту автомобиля Lexus RX300 1998-2003 годов выпуска.
- Автор: —
- Издательство: —
- Год издания: —
- Страниц: —
- Формат: —
- Размер: 50,5 Mb
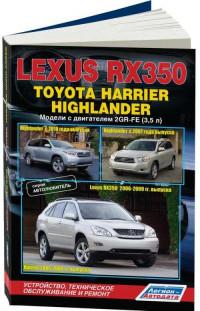
Руководство по техническому обслуживанию и ремонту автомобилей Lexus RX350 2006-2009, Toyota Harrier 2006-2008 и Toyota Highlander с 2007 года выпуска с бензиновым двигателем объемом 3,5 л.
- Автор: —
- Издательство: Легион-Автодата
- Год издания: 2012
- Страниц: 545
- Формат: —
- Размер: —
