

E INSTRUCTION MANUAL
Tone-curve corrections
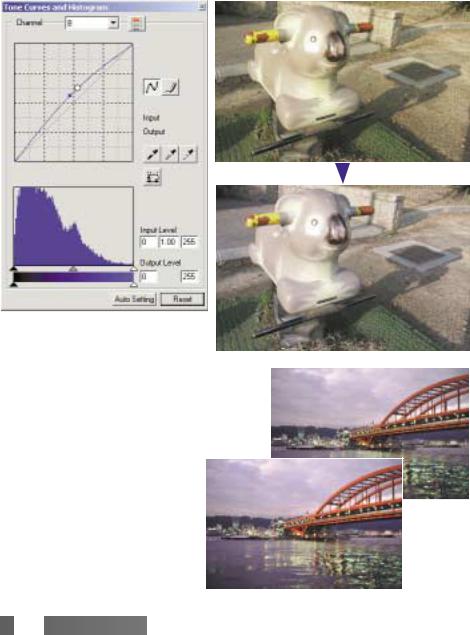
By selecting individual color channels on the tone curve, adjustments to the overall color of an image can be made. In this example, the image is too yellow. By moving the blue curve up, the image looks more neutral. For more on tone curve corrections, see page 60.
|
Selective-color palette |
||
|
In the original image, the colors |
||
|
were muted making the whole |
||
|
scene flat. By subtracting cyan |
||
|
from the red channel, the bridge |
||
|
and faint details in the clouds could |
||
|
be accentuated. The cloud detail |
Before |
|
|
was further enhanced by |
||
|
subtracting yellow from the blue |
||
|
channel. For more on the selective- |
||
|
color palette, see page 71. |
||
|
After |
 2
2 

 COLOR EXAMPLES


FOR PROPER AND SAFE USE
Read and understand all warnings and cautions before using this product.
 WARNING
•Use only within the voltage range specified on the unit. Inappropriate current may cause damage or injury through fire or electric shock.
•Use only the specified AC adapter (Ya Hsin Industrial 019-240840) within the voltage range indicated on the adapter unit. An inappropriate adapter or current may cause damage or injury through fire or electric shock.
•Do not disassemble this product. Electric shock may cause injury if a high-voltage circuit inside the product is touched. Take the product to a Minolta Service Facility when repairs are required.
•Immediately unplug the unit and discontinue use if the product is dropped or subjected to an impact in which the interior is exposed. The continued use of a damaged product may cause injuries or fire.
•Store this product out of reach of children. Be careful when around children not to harm them with the product or parts.
•Do not operate this product or handle the power cord with wet hands. Do not place a container with liquid near the product. If liquid comes in contact with the product, immediately unplug the unit. The continued use of a product exposed to a liquid may cause damage or injury through fire or electric shock.
•Do not insert hands, inflammable objects, or metal objects such as paper clips or staples into this product. It may cause damage or injury through fire or electric shock. Discontinue use if an object enters the product.
•Do not use the product near inflammable gases or liquids such as gasoline, benzine, or paint thinner. Do not use inflammable products such as alcohol, benzine, or paint thinner to clean the product. The use of inflammable cleaners and solvents may cause an explosion or fire.
•When unplugging the unit, do not pull on the power cord. Hold the adapter unit when removing it from an outlet.
•Do not damage, twist, modify, heat, or place heavy objects on the power cord. A damaged cord may cause damage or injury through fire or electric shock.
•If the product emits a strange odor, heat, or smoke, discontinue use. Immediately unplug the product. The continued use of a damaged product or part may cause injuries or fire.
•Take the product to a Konica Minolta service facility when repairs are required.
 CAUTION
•Damage or injury through fire or electric shock may result if the product is used or stored in the following conditions:
In humid or dusty environments
In direct sunlight or hot environments In smoky or oily areas
In unventilated areas
On unstable or unlevel surfaces
 4
4 

 FOR
FOR PROPER AND SAFE USE


•This product should only be operated in the upright position. Inappropriate placement may result in fire.
•Insert the plug securely into the electrical outlet.
•Do not use if the cord is damaged.
•Do not connect the ground to a gas pipe, telephone ground, or water pipe. Improper grounding can result in injury from electric shock.
•Do not cover the AC adapter. A fire may result.
•Do not obstruct access to the AC adapter; this can hinder the unplugging of the unit in emergencies.
•Unplug the product when cleaning or when the unit is not in use for long periods.
•Periodically check that the power cord is not damaged and the plug is clean. Dust and dirt that may collect between the prongs of the plugs may result in fire.
As an ENERGY STAR® Partner, Konica Minolta has determined that this product meets the ENERGY STAR® guidelines for energy efficiency.
This mark certifies that this product meets the requirements of the EU (European Union) concerning interference causing equipment regulations. CE stands for
Conformité Européenne.
|
FCC Compliance Statement |
DiMAGE Scan Dual IV |
|
|
Declaration on Conformity |
Responsible Party: Konica Minolta Photo Imaging U.S.A. Inc.
Address: 725 Darlington Avenue, Mahwah, NJ 07430
This device complies with Part 15 of the FCC Rules. Operation is subject to the following two conditions: (1) This device may not cause harmful interference, and (2) this device must accept any interference received, including interference that may cause undesired operation. Changes or modifications not approved by the party responsible for compliance could void the user’s authority to operate the equipment. This equipment has been tested and found to comply with the limits for a Class B digital device, pursuant to Part 15 of the FCC Rules. These limits are designed to provide reasonable protection against harmful interference in a residential installation.
This equipment generates, uses and can radiate radio frequency energy and, if not installed and used in accordance with the instructions, may cause harmful interference to radio communications. However, there is no guarantee that interference will not occur in a particular installation. If this equipment does cause harmful interference to radio or television reception, which can be determined by turning the equipment off and on, the user is encouraged to try to correct the interference by one or more of the following measures:
•Reorient or relocate the receiving antenna.
•Increase the separation between the equipment and the receiver.
•Connect the equipment to an outlet on a circuit different from that to which the receiver is connected.
•Consult the dealer or an experienced radio/TV technician for help.
Do not remove the ferrite cores from the cables.
This Class B digital apparatus complies with Canadian ICES-003.
The sound pressure level is less than 70dB according to ISO 3744 or ISO 7779.


 5
5


|
TABLE OF CONTENTS |
|
|
Color examples ……………………………………………………………………………………………. |
2 |
|
Before you begin ………………………………………………………………………………………….. |
3 |
|
For proper and safe use ……………………………………………………………………………….. |
4 |
|
Names of parts ……………………………………………………………………………………………. |
9 |
|
Installation ……………………………………………………………………………………………….. |
9 |
|
Before installing the DiMAGE Scan Utility ……………………………………………… |
9 |
|
DiMAGE Scan system requirements …………………………………………………… |
10 |
|
Additional system requirements ………………………………………………………….. |
11 |
|
Adobe Photoshop Elements ……………………………………………………………….. |
11 |
|
Windows ………………………………………………………………………………………….. |
12 |
|
Macintosh ………………………………………………………………………………………… |
14 |
|
Scanner setup ……………………………………………………………………………………………. |
16 |
|
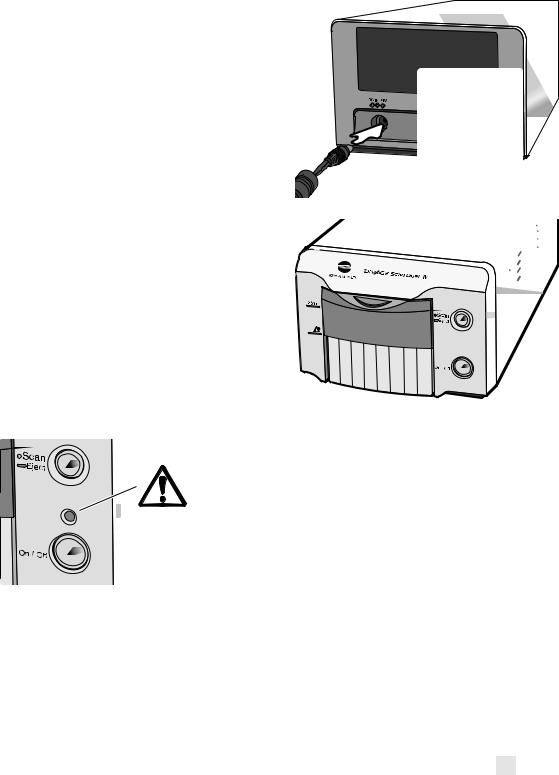
Before connecting the scanner to a computer ………………………………………. |
16 |
|
Connecting the USB cable …………………………………………………………………. |
16 |
|
Connecting the AC adapter…………………………………………………………………. |
17 |
|
Turning on the scanner………………………………………………………………………. |
17 |
|
Disconnecting the scanner …………………………………………………………………. |
17 |
|
Loading the film holders……………………………………………………………………………….. |
18 |
|
Handling film …………………………………………………………………………………….. |
18 |
|
Where is the emulsion? …………………………………………………………………….. |
18 |
|
Loading 35mm film strips …………………………………………………………………… |
18 |
|
Loading mounted slides …………………………………………………………………….. |
19 |
|
Loading a film holder into the scanner …………………………………………………. |
19 |
|
Using the APS Adapter AD-10 (sold separately) …………………………………… |
20 |
|
Ejecting a film holder ………………………………………………………………………… |
21 |
|
DiMAGE Scan Launcher ……………………………………………………………………………… |
22 |
|
Easy Scan Utility ………………………………………………………………………………………… |
23 |
|
Launching the Easy Scan Utility ………………………………………………………….. |
23 |
|
Using the Easy Scan Utility ……………………………………………………………….. |
24 |
|
Basic scanning……………………………………………………………………………………………. |
28 |
|
Launching the DiMAGE Scan Utility …………………………………………………….. |
28 |
|
Scanning basics ……………………………………………………………………………….. |
28 |
|
Scanner setup…………………………………………………………………………………… |
29 |
|
Main window and index scan tab ………………………………………………………… |
29 |
|
Making an index scan ………………………………………………………………………… |
30 |
|
Selecting index thumbnails …………………………………………………………………. |
30 |
|
Flip and rotate images ………………………………………………………………………. |
31 |
|
Fit-to-window button ………………………………………………………………………….. |
32 |
|
Main window and prescan tab ……………………………………………………………. |
32 |
|
Making a prescan ……………………………………………………………………………… |
32 |
|
Grab tool ………………………………………………………………………………………….. |
33 |
|
Magnifying tool …………………………………………………………………………………. |
33 |
|
Auto cropping …………………………………………………………………………………… |
33 |
|
CHP button (APS film) ………………………………………………………………………. |
33 |
|
Making the final scan ………………………………………………………………………… |
34 |
 6
6 

 TABLE OF CONTENTS


|
Basic image processing……………………………………………………………………………….. |
36 |
|
Main window and image-correction tab ……………………………………………….. |
36 |
|
Pixel Polish ………………………………………………………………………………………. |
37 |
|
Auto Dust Brush ……………………………………………………………………………….. |
38 |
|
Auto Dust Brush retouching level ………………………………………………………… |
38 |
|
Variation palette ……………………………………………………………………………….. |
39 |
|
Brightness, contrast, and color-balance palette …………………………………….. |
40 |
|
An introduction to color ………………………………………………………………………. |
41 |
|
Comparing pre and post-correction images ………………………………………….. |
42 |
|
Undoing and redoing image corrections……………………………………………….. |
42 |
|
Quitting the DiMAGE Scan Utility ………………………………………………………… |
43 |
|
Advanced scanning …………………………………………………………………………………….. |
44 |
|
Setting scanner preferences……………………………………………………………….. |
44 |
|
Exposure control tab………………………………………………………………………….. |
46 |
|
Saving exposure settings………………………………………………………….. |
47 |
|
Loading exposure settings………………………………………………………… |
47 |
|
More index scan functions …………………………………………………………………. |
48 |
|
Reverse frame order ……………………………………………………………….. |
48 |
|
Saving the index thumbnails …………………………………………………….. |
49 |
|
Saving an index file …………………………………………………………………. |
49 |
|
Loading an index file ……………………………………………………………….. |
49 |
|
More prescan functions …………………………………………………………………….. |
50 |
|
Point AF (Autofocus) ……………………………………………………………….. |
50 |
|
Manual focus ………………………………………………………………………….. |
51 |
|
Manual cropping …………………………………………………………………….. |
52 |
|
Autoexposure………………………………………………………………………….. |
53 |
|
AE area selection ……………………………………………………………….. |
53 |
|
AE lock……………………………………………………………………………….. |
53 |
|
Inputting scan settings manually………………………………………………………….. |
54 |
|
About resolution and output size ………………………………………………………… |
55 |
|
Scan setting examples ………………………………………………………………………. |
56 |
|
Saving scan settings as a Job ……………………………………………………………. |
57 |
|
Deleting a Job…………………………………………………………………………………… |
57 |
|
Advanced image processing ………………………………………………………………………… |
58 |
|
More image-processing tools ……………………………………………………………… |
58 |
|
Digital Grain Dissolver ………………………………………………………………………. |
59 |
|
Tone curve / histogram palette ……………………………………………………………. |
60 |
|
Using tone curves ……………………………………………………………………………… |
60 |
|
Drawing tone curves by freehand………………………………………………………… |
61 |
|
A short guide to tone-curve corrections ……………………………………………….. |
62 |
|
Histogram corrections ………………………………………………………………………… |
64 |
|
Tone-curve / histogram auto setting …………………………………………………….. |
65 |
|
A short guide to histogram corrections …………………………………………………. |
66 |
|
White, black, and gray-point corrections ……………………………………………… |
68 |
|
Setting the white and black-point values ……………………………………………… |
69 |
|
Tracking image corrections — snapshot button ………………………………………. |
69 |
|
Hue, saturation, and lightness palette …………………………………………………. |
70 |
|
Selective-color palette………………………………………………………………………… |
71 |


 7
7


|
About RGB and CMY ………………………………………………………………………… |
71 |
|
Unsharp mask…………………………………………………………………………………… |
72 |
|
Saving image corrections …………………………………………………………………… |
73 |
|
Loading image-correction Jobs……………………………………………………………. |
73 |
|
Custom Wizard ………………………………………………………………………………………….. |
74 |
|
Batch Scan Utility………………………………………………………………………………………… |
76 |
|
Advanced Batch Scan setup……………………………………………………………….. |
78 |
|
Color matching……………………………………………………………………………………………. |
80 |
|
Setting the output color space ……………………………………………………………. |
80 |
|
Output color spaces ………………………………………………………………………….. |
81 |
|
Setting the monitor ICC profile ……………………………………………………………. |
82 |
|
Scanner color profiles ………………………………………………………………………… |
82 |
|
Color matching recommendations ………………………………………………………. |
83 |
|
Auto Dust Brush plug-in……………………………………………………………………………….. |
84 |
|
Before installing the plug-in ……………………………………………………………….. |
84 |
|
Installation — Windows………………………………………………………………………… |
84 |
|
Installation — Macintosh ………………………………………………………………………. |
86 |
|
Using the Auto Dust Brush plug-in ………………………………………………………. |
87 |
|
Appendix ……………………………………………………………………………………………… |
89 |
|
Glossary of common terms…………………………………………………………………. |
89 |
|
Uninstalling the DiMAGE Scan software ……………………………………………… |
90 |
|
Installed file and folders …………………………………………………………………….. |
91 |
|
Job file list ………………………………………………………………………………………… |
92 |
|
Troubleshooting ………………………………………………………………………………………….. |
94 |
|
Checking software installation — Windows ……………………………………………. |
95 |
|
Technical specifications ……………………………………………………………………………….. |
96 |
|
Technical support ……………………………………………………………………………… |
97 |
|
Warranty and product registration ………………………………………………………. |
97 |
|
Record keeping…………………………………………………………………………………. |
97 |
|
Image Data Sheet……………………………………………………………………………… |
98 |
|
Color examples …………………………………………………………………………………. |
99 |
Konica Minolta is a trademark of Konica Minolta Holdings, Inc. DiMAGE is a trademark of Konica Minolta Camera, Inc. Microsoft, Windows, Windows 98, Windows Me, Windows 2000 Professional, and Windows XP are registered trademarks of the Microsoft Corporation. Macintosh, Apple, and Power Macintosh are registered trademarks of Apple Computer, Inc. Adobe and Photoshop are registered trademarks of Adobe Systems Incorporated. CorelPhotoPaint is a trademark of the Corel Corporation. Paint Shop Pro is the copyright of Met’s Corporation. All other brand and product names are trademarks or registered trademarks of their respective owners.
 8
8 

 TABLE OF CONTENTS


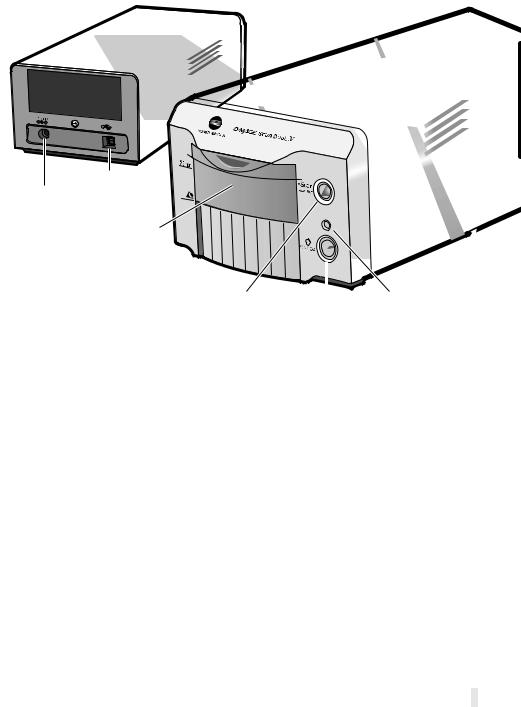
NAMES OF PARTS
USB port
DC terminal
Front door
|
Quick Scan / Eject button |
Indicator lamp |
||
|
Power |
switch |
||
INSTALLATION
 Before installing the DiMAGE Scan Utility
RAM-stationed programs such as anti-virus or installation-monitoring software may cause the installer to fail. Remove or disable these programs before installing the DiMAGE Scan Utility. Reinstall or enable the software when the installation is complete.
Do NOT connect the scanner to a computer before installing the DiMAGE Scan Utility software.


 9
9


DiMAGE Scan system requirements
The computer and the operating system must be guarantied by the manufacturer to support USB interface. To use the scanner, your computer system must meet the following requirements:
Pentium 166 Mhz or later processor. Pentium III or later recommended.
Windows 98, 98 Second Edition,
2000 Professional, Me, or
XP (Home/Professional).
64MB of RAM.
PowerPC G3 or later. PowerPC G4 or later recommended.
Mac OS 8.6 ~ 9.2.2
Mac OS X 10.1.3 ~ 10.1.5, 10.2.1 ~ 10.2.8,
10.3 ~ 10.3.1
64MB of RAM in addition to the requirements for the Mac OS and applications.
Hard-disk space: 3 to 10 times the file size of the scanned image.
800 X 600 monitor capable of displaying High Color (16 bit) is required.
1024 x 768 monitor is recommended.
800 X 600 monitor capable of displaying at least 32,000 colors is required.
1024 x 768 monitor is recommended.
USB (ver. 2.0 or 1.1) interface
Recommended USB boards Adaptec USB2connect 3100, Adaptec
USB2connect 5100, Adaptec DuoConnect,
Apple USB port
Belkin Hi-speed USB 2.0 5-Port PCI, Belkin Hi-speed USB 2.0 2-Port PCI, or port supplied with the computer.
TWAIN driver compatible with
Photoshop 6.0.1, and 7.0.1,
Plug-in compatible with
Photoshop Elements 2.0,
Photoshop 6.0.1, and 7.0.1,
Paint Shop Pro 8, CorelPhotoPaint 11.0.
Photoshop Elements 2.0,
* To use preinstalled Mac OS 8.6 with a built-in FireWire port, a Firewire 2.2 to 2.3.3 extension must be installed. This software can be downloaded free of charge from the apple web site at http://www.apple.com.
Check the Minolta web site for the latest compatibility information: North America: http://www.konicaminolta.us/
Europe: http://www.konicaminoltasupport.com
![]()
Additional memory requirements
When scanning with:
64MB of RAM. 128MB recommended. 128MB of RAM. 256MB recommended. 128MB of RAM. 256MB recommended. 128MB of RAM. 256MB recommended.
When scanning with:
128MB of RAM. 256MB recommended. 128MB of RAM. 256MB recommended. 128MB of RAM. 256MB recommended. 128MB of RAM. 256MB recommended.
Mac OS 8.6 — 9.2.2: allocate DiMAGE Scan Dual 4 Utility through an image-processing software.
With Mac OS 8.6 ~ 9.2.2, to image-processing application, more than 128 MB. With the unused memory before launching than 128 MB, close all other
400MB hard disk space 800MB recommended. 600MB hard disk space 1.2GB recommended. 600MB hard disk space 1.2GB recommended. 1.0GB hard disk space 2.0GB recommended.
computers
400MB hard disk space 800MB recommended. 600MB hard disk space 1.2GB recommended. 600MB hard disk space 1.2GB recommended. 1.0GB hard disk space 2.0GB recommended.
to the Easy Scan Utility or the DiMAGE Scan Utility requirements to the host
utility is opened through an memory for the OS must be open, check the amount of the block of memory is less
Adobe Photoshop
|
Take time to register your |
2.0 with Adobe. You can |
|
register online, by fax, or |
registered online during |
|
installation by following the |
. To register by fax or |
|
mail, read the instructions in |
in the technical-information |
|
folder on the Adobe Photoshop |
|
|
PC / AT compatible |
computers |
|
Pentium processor |
processor |
|
Windows 98, 98 Second |
OS 9.1, 9.2.x, or |
|
2000, or XP. |
X 10.1.3 to 10.1.5. |
|
Internet Explorer 5.0, 5. |
MB of RAM |
|
128 MB of RAM |
virtual memory on) |
|
150 MB of available hard |
hard disk space |
Color monitor capable of displaying thousands of colors at a resolution of 800 X 600 or greater.
Macintosh
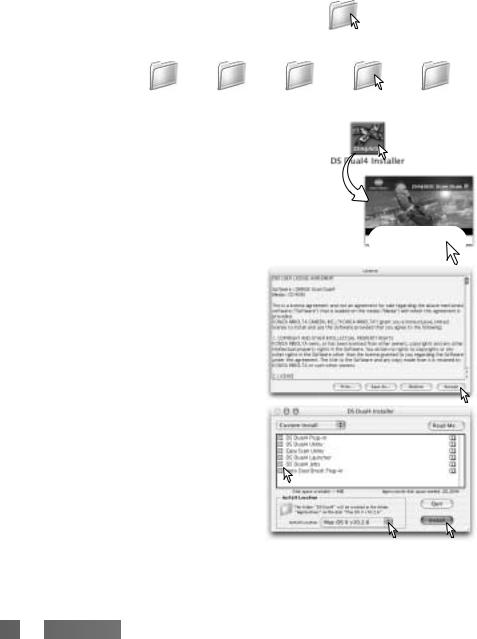
Turn on the computer to start the Mac OS. Insert the DiMAGE Scan Utility CD-ROM into the CD-ROM drive. The Dimage Scan Utility CD-ROM icon appears on the desktop. Double-click on the icon; the driver, manual, and acrobat reader folders are displayed.
Open the driver folder to view the language folders.
|
Driver |
|||||
|
Open the appropriate |
|||||
|
language folder. |
Deutsch |
Espanol |
Francais |
English |
Japanese |
Double click on the DiMAGE Scan installer; installer’s start-up screen will open.
Click the continue button on the installer screen to begin the installation routine.
The end-user license agreement will appear. If you accept the terms of the agreement, click the accept button to continue the installation routine. If you do not agree to the conditions in the end-user license agreement, click the decline button and the software will not be installed.
With custom installation selected from the popup menu at the top left of the installer screen, the check boxes indicates the software to be installed. To deselect a file for installation, click on the box to uncheck it
At the bottom of the installer screen, specify the location in which the software will be installed. To change the designated location, use the install-location menu; this menu can be used to select an existing location or create a new one.
Click the install button to begin installation.
 14
14 

 INSTALLATION


SCANNER SETUP
Before connecting the scanner to a computer
|
Before |
the DiMAGE Scan Utility must |
|
|
first |
the installation procedure. |
|
|
The scanner |
from vibrations. It should be |
|
|
located away |
well-ventilated area. Never |
|
|
connect the |
between the computer and |
|
|
peripheral |
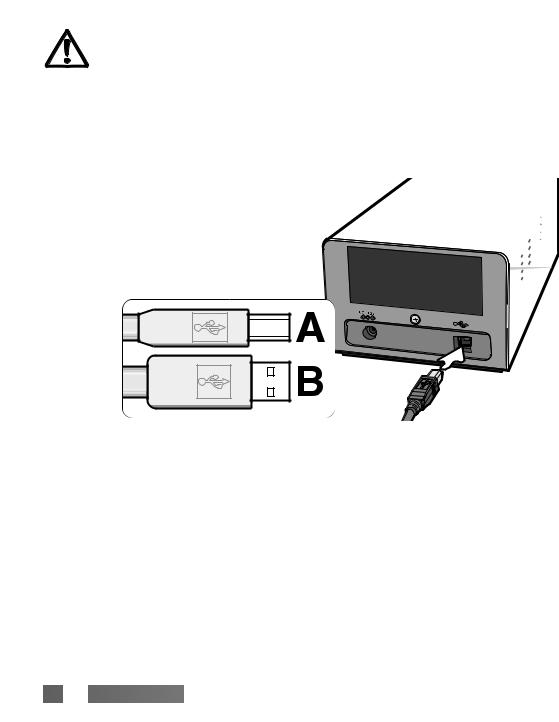
Connecting the USB cable
Securely plug cable into the connector into
The scanner the computer. hub may prevent
When the scanner is initially connected to a computer with a Windows 98, 98SE, or 2000 Professional operating system, the found-new-hardware wizard will appear briefly. No action is required. With Windows 2000, the “Digital Signature Not Found…” message may appear. Click the yes button to complete the scanner installation.
When the scanner is initially connected to a computer with a Windows XP operating system, the found-new-hardware wizard will appear. Click the next button. The “not passed Windows Logo testing” message appears. Click the continue-anyway button to complete the scanner installation.
 16
16 

 SCANNER SETUP


Connecting the AC adapter
|
1. |
Connect the output plug of the AC |
|
|
adapter to the scanner’s DC terminal. |
2 |
|
|
2. |
Plug the AC adapter into a standard |
1 |
|
household outlet. |
Turning on the scanner
Confirm the front door of the scanner is closed; the scanner is unable to initialize if the door is open. Turn on the scanner with the power switch. Start up the computer.
When launching the DiMAGE Scan Utility, the indicator lamp (1) blinks when the scanner is initializing. Once the indicator lamp glows steadily, the scanner can be used.
 1
1
Power switch
Disconnecting the scanner
Never disconnect the scanner when the indicator lamp is blinking.
Quit the DiMAGE Scan Utility. Confirm that the scanner indicator lamp is not blinking. Turn the scanner off and then disconnect the cable.


 17
17


LOADING THE FILM HOLDERS
Handling film
To achieve the best possible reproduction from the scanner, the film and film holder should be free from dust and dirt. Always work with processed film in a clean, dustfree environment. Handle film by the edges or mount to prevent fingerprints and dirt marring the image area. Special lint free gloves are available from photographic equipment retailers for film handling as well as anti-static cloths, brushes, and blowers for removing dust. Film cleaner can be used to remove oil, grease, or dirt from film; carefully follow the manufacturer’s instructions and precautions for the film cleaning solvent.
Where is the emulsion?
When film is scanned, the emulsion side of the film should be down. When viewing the film image, if the image is orientated correctly rather than a mirror image, the emulsion side is facing down. If the image is abstract or symmetrical so its orientation is difficult to determine, the emulsion is down if the frame numbers and edge markings can be read correctly. With mounted slides, the emulsion is on the same side of the mount as the film manufacturer’s or processor’s name is printed.
Loading 35mm film strips
Film strips of up to six frames can be loaded into the FH-U2 film holder. To open the holder, lift the latch and open the cover (1).
With the emulsion down, place the film in the holder and under the retaining tabs
(2). Align the film with the frame apertures.
|
Carefully lower the |
|||
|
cover |
until |
the |
|
|
latch clicks |
into |
||
|
place. Take care |
2 |
||
|
not to |
move the |
||
|
film |
during |
this |
|
|
operation. |
|||
|
2 |
 18
18 

 LOADING THE FILM
 HOLDERS


DIMAGE SCAN LAUNCHER
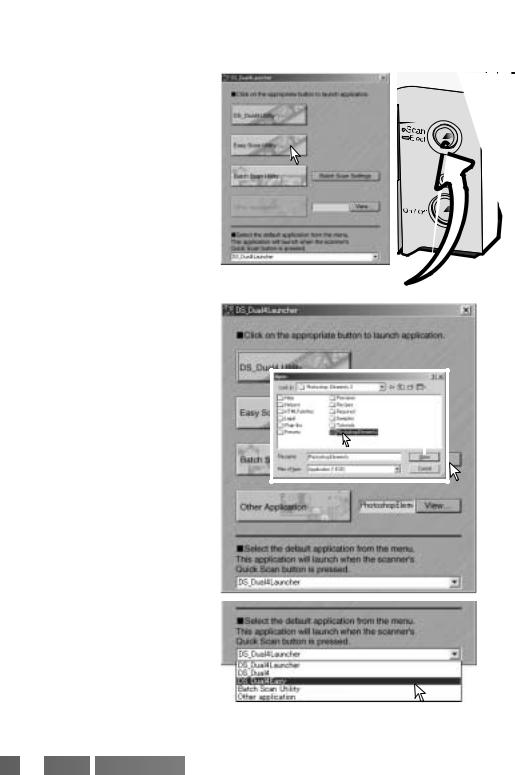
The Quick Scan button launches the DiMAGE Scan applications. When the button is pressed, the launcher is displayed; the button is disabled when a scanner application is open. Simply click on one of the launcher buttons to start the appropriate application. There should be no holder in the scanner. Refer to the following sections for more information on the use of the applications:
|
DS Dual4 Utility — page 28 |
|
|
Easy Scan Utility — page 23 |
Quick Scan button |
|
Batch Scan Utility — page 76 |
The launcher can be used to directly open an image-processing application with which the scanner will be used.
|
To specify the application, click |
2 |
|||
|
view button (1); the open dialog |
||||
|
will be displayed. Locate and click |
||||
|
the application to highlight it. Click |
||||
|
open button (2) to complete |
||||
|
procedure; the name of the application |
3 |
1 |
||
|
will be displayed in the launcher (3). |
||||
The Quick Scan button can be used to launch a single application directly. Simply select the application from the drop-down menu at the bottom of the launcher; each time the Quick Scan button is pressed, that application will open along with the launcher.
 22
22 

 DIMAGE
 SCAN LAUNCHER


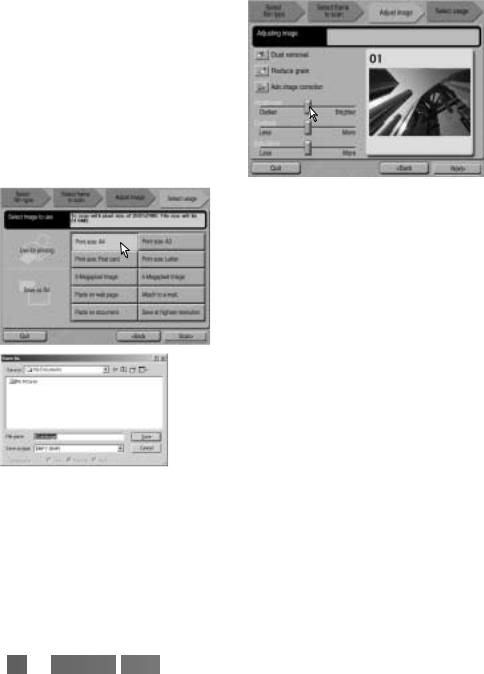
If the adjust-image option was checked in the previous screen, the adjust-image screen is displayed. The same automatic image-processing functions shown in the previous screen are also displayed here.
Click and drag the brightness, contrast, and saturation sliders to adjust the image; change are reflected in the display. Any changes made remain in effect until reset or the utility is closed. Returning to the previous screen and unchecking the adjust-image box will not reset these settings.
After making adjustments to the image, click the next button.
Select the option which best describes the final use of the scanned image. Only one choice can be made. Click the scan button to continue; the save-as screen will open. If an image has multiple uses, repeat the Easy Scan procedure for each use of the image.
On the save-as screen, specify the file name, file format, and destination of the image data. Images can be saved in BMP, JPEG, TIFF, or PICT file formats. See page 35 for more about these formats. When saving JPEG files, the compression ratio can be specified. Click the save button to complete the final scan.
When using a USB storage device on the same bus as the scanner, save the data on the computer’s hard disk first before transferring it to the storage device. Saving the scanned data directly to the device may corrupt the image data.
 26
26 

 EASY SCAN
 UTILITY


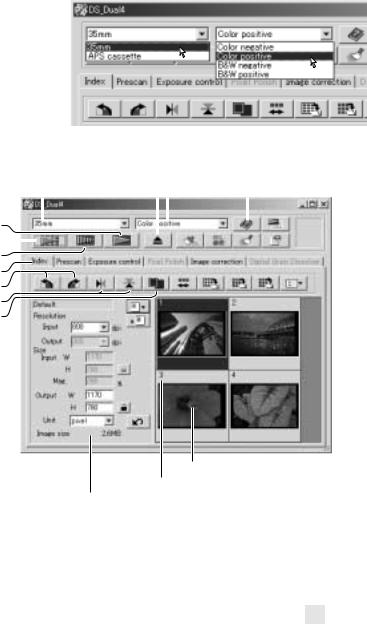
Scanner setup
Before making a scan, the film format and type must be specified. Film type can be selected between color and black and white, positive and negative film. Film for prints is negative film. Slide film is positive film. APS has an additional film-type option, auto detect. This automatically sets the film among color and black and white, and positive and negative.
Film format and type are selected from the drop-down menus in the top left corner of the main window. If the holder and selected film format do not match, a warning will be displayed and the scan will not be made.
Main window and index scan tab
|
Eject button |
|||||||||
|
Film format |
Film type |
Help |
|||||||
|
Scan button (p. 34) |
|||||||||
|
Index scan button (p. 30) |
|||||||||
|
Prescan button (p. 32) |
|||||||||
|
Index tab |
|||||||||
|
Rotate buttons (p. 31) |
|||||||||
|
Flip buttons (p. 31) |
|||||||||
|
Fit-to-window button |
|||||||||
|
(p. 31) |
The utility window can be resized by clicking and dragging the bottom right corner.
Index thumbnail
Frame number
Scan-setting window (p. 34, 54)


 29
29

 Loading…
![]()
Русский
- Bedienungsanleitung Minolta DiMAGE Scan Dual IV
- Minolta DiMAGE Scan Dual IV User Manual
- Manual Usuario Minolta DiMAGE Scan Dual IV
- Mode d’emploi Minolta DiMAGE Scan Dual IV
- Istruzioni Minolta DiMAGE Scan Dual IV
- инструкция Minolta DiMAGE Scan Dual IV
- Minolta DiMAGE Scan Dual IVの取扱説明書
- Handleiding Minolta DiMAGE Scan Dual IV
- Manual de uso Minolta DiMAGE Scan Dual IV
Вам нужна инструкция? Мы поможем Вам ее найти и сэкономить Ваше время.
- 100 stron
- 18.87 mb
Изделие Minolta DiMAGE Scan Dual IV, а также другие, которыми Вы пользуетесь ежедневно, наверняка вы получили в комплекте с инструкцией обслуживания. Из опыта наших пользователей мы знаем, что большинство из Вас не уделили этому особого внимания. Большая часть инструкций, сразу же после покупки попадает в корзину для мусора вместе с коробкой — это ошибка. Ознакомьтесь с информацией, касающейся инструкции Minolta DiMAGE Scan Dual IV, которая поможет Вам в будущем сэкономить нервы и избежать головной боли.
Важная подсказка — не забывайте хотя бы раз прочитать инструкцию Minolta DiMAGE Scan Dual IV
Если вы не хотите каждый раз читать информационные брошюры, касающиеся, тех или Minolta DiMAGE Scan Dual IV иных изделий, достаточно, прочитать их раз — сразу же после покупки устройства. Вы получите основное знания, касающиеся поддержания изделия Minolta DiMAGE Scan Dual IV в хорошем эксплуатационном состоянии, так, чтобы без проблем достигнуть его планируемого цикла работы. Затем инструкцию можно отложить на полку и вернуться к ней только в случае, если вы не уверены, правильно ли проводится техобслуживание изделия. Правильный уход является необходимым элементом Вашего удовольствия Minolta DiMAGE Scan Dual IV.
Раз в году пересмотрите шкафчик, в котором держите инструкции для всех устройств, — выбросите те, которыми вы уже не пользуетесься. Это поможет Вам сохранять порядок в своей домашней базе инструкций обслуживания.
Summary of Contents for Minolta DiMAGE Scan Dual IV
Что находится в инструкции Minolta DiMAGE Scan Dual IV? Почему стоит ее прочитать?
- Гарантия и подробности, касающиеся техобслуживания изделия
Хорошей идеей будет прикрепить чек к странице инструкции. Если что-то плохое случится во время использования Minolta DiMAGE Scan Dual IV, у вас будет комплект документов, необходимый для гарантийного ремонта. В этой части инструкции вы найдете информацию об авторизованных сервисных центрахMinolta DiMAGE Scan Dual IV а также, как самостоятельно правильно ухаживать за оборудованием — так, чтобы не потерять гарантийных прав. - Указания по монтажу и Setup
Не терять нервов и времени на самостоятельную попытку установки и первого запуска изделия. Воспользуйтесь рекомендациями производителя Minolta DiMAGE Scan Dual IV чтобы правильно запустить изделие, без лишнего риска повреждения оборудования. - Информация, касающаяся дополнительных запчастей (входящих в комплект а также являющихся опцией)
Пересматривая эту часть документа вы сможете проверить, доставлен ли ваш Minolta DiMAGE Scan Dual IV с полним комплектом аксессуаров. Вы также сможете узнать, какие дополнительные запчасти или аксессуары для Minolta DiMAGE Scan Dual IV Вы сможете найти и докупить к своему устройству. - Troubleshooting
Самые частые проблемы, касающиеся Minolta DiMAGE Scan Dual IV и методы их решения. Это очень полезная часть руководства по обслуживанию — она позволит Вам сэкономить много времени на поиск решений. 90% проблем с Minolta DiMAGE Scan Dual IV повторяется у многих пользователей. - Требования, касающиеся питания и энергетический класс
Информация, касающаяся количества потребляемой энергии, а также рекомендации, касающиеся установки и питания Minolta DiMAGE Scan Dual IV. Прочитайте, чтобы оптимально пользоваться Minolta DiMAGE Scan Dual IV и не использовать большего количества ресурсов, нежели это необходимо для правильной работы изделия. - Специальные функции Minolta DiMAGE Scan Dual IV
Здесь вы можешь узнать, как персонализировать изделие Minolta DiMAGE Scan Dual IV. Вы узнаете, какие дополнительные функции могут помочь Вам удобно использовать продукт Minolta DiMAGE Scan Dual IV а также, какие функции Вашего устройства оптимальны для выполнения конкретной деятельности.
Как видите в инструкции вы найдете информацию, которая реально поможет Вам в использовании Вашего изделия. Стоит с ней ознакомиться, чтобы избежать разочарований, возникающих из более короткого, нежели предусматривалось, периода исправности изделия Minolta DiMAGE Scan Dual IV. Если все же вы не хотите копить инструкции в своем доме, наш сайт поможет Вам в этом — вы должны найти у нас руководство по обслуживанию большинства из своих устройств, а также Minolta DiMAGE Scan Dual IV.
Комментарии (0)
| Language | Type | Pages | |
|---|---|---|---|
| English | User Manual | 100 | > Go to the manual |
| German | User Manual | 100 | Go to the manual |
| Dutch | User Manual | 100 | Go to the manual |
512178
Report abuse
Libble takes abuse of its services very seriously. We’re committed to dealing with such abuse according to the laws in your country of residence. When you submit a report, we’ll investigate it and take the appropriate action. We’ll get back to you only if we require additional details or have more information to share.
Product: Minolta DiMAGE Scan Dual IV
Forumrules
To achieve meaningful questions, we apply the following rules:
- First, read the manual;
- Check if your question has been asked previously;
- Try to ask your question as clearly as possible;
- Did you already try to solve the problem? Please mention this;
- Is your problem solved by a visitor then let him/her know in this forum;
- To give a response to a question or answer, do not use this form but click on the button ‘reply to this question’;
- Your question will be posted here and emailed to our subscribers. Therefore, avoid filling in personal details.
Your question has been posted on this page
Would you like to receive an email when new answers and questions are posted? Please enter your email address.
Page 1 — INSTRUCTION MANUAL
INSTRUCTION MANUALE
Page 2 — Selective-color palette
10 INSTALLATIONDiMAGE Scan system requirementsHard-disk space: 3 to 10 times the file size of the scanned image.* To use preinstalled Mac OS 8.6 with
Page 3 — BEFORE YOU BEGIN
© 2003 Konica Minolta Camera, Inc. under the Berne Convention and the Universal Copyright Convention.9222-2891-11 AV-A312Printed in Taiwan
Page 4 — FOR PROPER AND SAFE USE
11Additional memory requirementsPC / AT compatible computers16-bit color depthMacintosh computersMac OS 8.6 — 9.2.2: allocate the RAM requirements abo
Page 5 — DiMAGE Scan Dual IV
12 INSTALLATIONWindowsThe opening screen of the InstallShield Wizardwill appear. Click the next button to continue.Insert the DiMAGE Scan Utility CD-R
Page 6 — TABLE OF CONTENTS
13The InstallShield Wizard will indicate thatinstallation was successful. Select the restart-computer option and then click Finish. When thecomputer r
Page 7
With custom installation selected from the pop-up menu at the top left of the installer screen,the check boxes indicates the software to beinstalled.
Page 8 — 8 TABLE OF CONTENTS
A screen confirming the successful installationof the software will appear. Click the restartbutton to exit the installation program andrestart the co
Page 9 — INSTALLATION
16 SCANNER SETUPSecurely plug the A connector of the USBcable into the scanner’s USB port and the Bconnector into the computer’s USB port. The scanner
Page 10 — 10 INSTALLATION
171. Connect the output plug of the ACadapter to the scanner’s DC terminal. 2. Plug the AC adapter into a standardhousehold outlet.Connecting the AC a
Page 12 — 12 INSTALLATION
Loading mounted slidesUp to four mounted 35mm or APS slides can beinserted into the slide mount holder. The slidemounts must be between 1 mm and 2 mmt
Page 13
2 COLOR EXAMPLESBy selecting individual color channels on the tone curve, adjustments to the overallcolor of an image can be made. In this example, th
Page 14 — Macintosh
Using the APS Adapter AD-10 (sold separately)APS (Advanced Photo System) cassette film can be scanned using the APS AdapterAD-10. The cassette must co
Page 15
Ejecting a film holderClick the eject button in theDiMAGE Scan Utility window orpress and hold the Quick Scan /eject button on the scanner toremove th
Page 16 — SCANNER SETUP
22 DIMAGE SCAN LAUNCHERDIMAGE SCAN LAUNCHERThe Quick Scan button launches theDiMAGE Scan applications. When thebutton is pressed, the launcher isdispl
Page 17 — Connecting the AC adapter
23The DiMAGE Scan Easy Scan Utility is a simple, automatic scanning application fortrouble-free scans. The utility works as a stand-alone program, and
Page 18 — LOADING THE FILM HOLDERS
24 EASY SCAN UTILITYUsing the Easy Scan UtilityWhen the Easy Scan Utility is launched, the Easy Scan Wizard opens. Simply followthe instructions on th
Page 19 — Loading mounted slides
25(Continued on next page.)Index thumbnailsRotate buttonsAdjust-image check boxAuto Dust Brush (p. 38)Pixel Polish (p. 37)Digital Grain Dissolver (p.
Page 20 — 20 LOADING THE FILM HOLDERS
26 EASY SCAN UTILITYIf the adjust-image option was checked in the previous screen, the adjust-imagescreen is displayed. The same automatic image-proce
Page 21 — Ejecting a film holder
27After the scanning is completed, the image is ready touse. Click the appropriate button to continue or closethe utility. The quit button closes the
Page 22 — DIMAGE SCAN LAUNCHER
28 BASIC SCANNINGBASIC SCANNINGOpen the DS Dual4 folder, and double click the DiMAGEScan Dual4 Utility icon.Launching the DiMAGE Scan UtilitySelect Di
Page 23 — EASY SCAN UTILITY
29Scanner setupBefore making a scan, the film format and type must be specified. Film type can beselected between color and black and white, positive
Page 24 — Using the Easy Scan Utility
3BEFORE YOU BEGINThank you for purchasing this Konica Minolta product. Please take the time to readthrough this instruction manual so you can enjoy al
Page 25 — (Continued on next page.)
30 BASIC SCANNINGThe thumbnail display allows the selectionof single or multiple images forprescanning or scanning. Selected imagescan also be affecte
Page 26 — 26 EASY SCAN UTILITY
31Flip and rotate imagesOriginal imageFlip — when an image isflipped, it will create amirror image. Rotate — the rotate-right buttonrotates the thumbn
Page 27
32 BASIC SCANNINGMain window and prescan tabFilm formatIndex scan button (p. 30)Prescan button Scan button (p. 34)HelpRotate-right button (p. 31)Rotat
Page 28 — BASIC SCANNING
Auto cropping eliminates the blank space aroundthe image area. Clicking the auto-cropping buttoncycles through its three positions: crop to outsideedg
Page 29 — Scanner setup
34 BASIC SCANNINGMaking the final scanClick the load Job button. The Job-selection dialog boxwill open.Select a Job category from the drop-down list.B
Page 30 — Selecting index thumbnails
35Click the scan button in the main window to start thefinal scan. If the DiMAGE Scan Utility was opened inan image-processing application, the scanne
Page 31 — Fit-to-window button
36 BASIC IMAGE PROCESSINGBASIC IMAGE PROCESSINGMain window and image-correction tabIndex scan button (p. 30)Prescan button (p. 32)Scan button (p. 34)I
Page 32 — Making a prescan
37To make custom corrections, click the Pixel Polish tab. If a prescan has not beenmade, the scanner will make one automatically. Click the custom rad
Page 33 — CHP button (APS film)
38 BASIC IMAGE PROCESSINGAuto Dust BrushOriginal image With Auto Dust Brush processingThe Auto Dust Brush reduces the visibility of fine dust particle
Page 34 — Making the final scan
39Variation paletteThe variation palette allows an image to be corrected by comparing it to other slightlycorrected images surrounding it. This is an
Page 35
4 FOR PROPER AND SAFE USERead and understand all warnings and cautions before using this product.WARNING• Use only within the voltage range specified
Page 36 — BASIC IMAGE PROCESSING
40 BASIC IMAGE PROCESSINGDrag the brightness, contrast, or color sliders, or enterspecific values in the corresponding text box to makecorrections. Dr
Page 37 — Pixel Polish
41An introduction to colorIn photography, red, green, and blue arethe primary colors. The secondarycolors, cyan, magenta, and yellow, aremade from com
Page 38 — Auto Dust Brush
42 BASIC IMAGE PROCESSINGComparing pre and post-correction imagesClicking the comparison display button divides the image display area in two. Theorig
Page 39 — Variation palette
43Quitting the DiMAGE Scan UtilityTo close the DiMAGE Scan Utility, simplyclick the close button in the top right cornerof the main window.
Page 40 — 40 BASIC IMAGE PROCESSING
44 ADVANCED SCANNINGADVANCED SCANNINGThis section covers the advanced scanning tools in the DiMAGE Scan Utility. Thebasic scanning section on pages 28
Page 41 — An introduction to color
45Multi-sample list box: multi-sample scans reduce random noise in the image byanalyzing the data of each sample scan; 2, 4, 8, and 16 samples can be
Page 42 — 42 BASIC IMAGE PROCESSING
46 ADVANCED SCANNINGExposure-control tabSave setting buttonLoad setting buttonReset buttonApply buttonApply-all buttonFit-to-window buttonSimply click
Page 43
47Adjust the sliders or enter values between ±2 in 0.1increments in the text boxes. Press the apply button (1)to view the effect on the preview image
Page 44 — ADVANCED SCANNING
48 ADVANCED SCANNINGSave index-file button (p. 49)Save index-image button (p. 49)Load image-correction Job button (p. 73)Reverse-frame-order button Mo
Page 45
49The index thumbnails can be saved as an index file. The index file can be loaded intothe scanner so that the index scan does not need to be made aga
Page 46 — Exposure-control tab
5This mark certifies that this product meets the requirements of the EU (EuropeanUnion) concerning interference causing equipment regulations. CE stan
Page 47 — Loading exposure settings
50 ADVANCED SCANNINGMore prescan functionsManual-focus button (p. 51)Point-AF button Crop-prescan button (p. 52)AE lock button (p. 53)Auto-cropping bu
Page 48 — Reverse frame order
51Manual focusClick the manual-focus button. The mousepointer will change to the manual-focuscursor. To cancel the function, click themanual-focus but
Page 49 — Loading an index file
52 ADVANCED SCANNINGManual croppingWith the pointer is outside the croppingframe, click and drag to define a newcropping frame.Pressing the auto-cropp
Page 50 — Point AF (Autofocus)
53The AE lock function sets the scanner exposure based on the exposure determinedfor a specific prescan with or without the use of AE area selection.
Page 51 — Manual focus
54 ADVANCED SCANNINGInputting scan settings manuallySettings for the final scan can be made in the index scan or prescan windows.Job-name list boxInpu
Page 52 — Manual cropping
55Resolution can be expressed in dpi (dots per inch). This refers to how many pixels areplaced along one linear inch. A resolution of 350 dpi, which i
Page 53 — Autoexposure
56 ADVANCED SCANNINGExample 1: setting the scanner output by pixels. This example creates an image withthe pixel dimension of 640 X 480 to be displaye
Page 54 — 54 ADVANCED SCANNING
57Frequently used scan settings can be saved.With the settings to be saved in the scan setting window,click the save Job button. The Job-registry dial
Page 55
58 ADVANCED IMAGE PROCESSINGADVANCED IMAGE PROCESSINGMore image-processing toolsRGB displayLoad image-correction Job button (p. 73)Save image-correcti
Page 56 — Scan setting examples
59Digital Grain DissolverDigital GEM reduces the effect of film grain. Grain is a sandy texture that cansometimes be seen in smooth uniform areas of t
Page 58 — ADVANCED IMAGE PROCESSING
60 ADVANCED IMAGE PROCESSINGTone curve and histogram paletteClick the tone-curve/histogram button to display the palette.Reset buttonAuto-setting butt
Page 59 — Digital Grain Dissolver
61Place the mouse pointer over the tone curve.Click and drag the curve. Any corrections madeon the tone curve are immediately applied to thedisplayed
Page 60 — Using tone curves
62 ADVANCED IMAGE PROCESSINGA short guide to tone curve correctionsImage processing is a highly specialized and difficult field that takes years of pr
Page 61
By selecting individual color channels on the tone curve, adjustments to the overallcolor of an image can be made. This can be used to eliminate unnat
Page 62 — About the tone curve
64 ADVANCED IMAGE PROCESSINGHistogram correctionsThe histogram indicates the distribution of pixels with specific brightness or colorvalues in the ima
Page 63 — Correcting color
65The input shadow slider sets the black level. As the slider is moved to the right, anapparent increase in contrast can be seen in the displayed imag
Page 64 — Histogram corrections
66 ADVANCED IMAGE PROCESSINGA short guide to histogram correctionsThis guide shows simple corrections that can be made with a histogram. Unlike theton
Page 65
67This image is flat. The pixel distribution inthe histogram reflects the low-contrastscene. The lack of any strong shadows ordark tones is indicated
Page 66 — Konica Minolta History
68 ADVANCED IMAGE PROCESSINGOn the tone curve / histogram palette, corrections can be made by specifying a white,black, and gray point within the imag
Page 67
Image corrections can be stored temporarily as a thumbnail next to the displayedimage. Simply click the snapshot button on the tool bar to create a th
Page 69
70 ADVANCED IMAGE PROCESSINGDrag the hue, saturation, or lightness slider, orenter specific values in the corresponding text boxto make corrections; c
Page 71 — About RGB and CMY
72 ADVANCED IMAGE PROCESSINGAmount: to adjust the contrast of the mask between0% and 500%. If the value is too high, pixilation willbe apparent; the i
Page 72 — Unsharp mask
73Saving image correctionsLoading image-correction JobsAll corrections applied to an image can be saved as an image-correction Job. The Jobcan be load
Page 74 — CUSTOM WIZARD
Select specific image processing. Pixel Polishcannot be used with black and white film. Click thenext button to continue. For more on Auto Dust Brush
Page 75
76 BATCH SCAN UTILITYBATCH SCAN UTILITYThe Batch Scan Utility is for scanning a large volume of images. This utilityautomatically scans, processes, an
Page 76 — BATCH SCAN UTILITY
To select file names. The automatic option names files based on the date and time ofthe scan; the file name begins with DS followed sets of two regist
Page 77
78 BATCH SCAN UTILITYTo change scanner preferences.For more on the preferences dialog box, seepage 44. For information on color matching,see page 80.T
Page 78 — Advanced Batch Scan setup
79To set the parameters for Auto Dust Brush(p. 38), Pixel Polish (p. 37), and DigitalGrain Dissolver (p. 59) image processing.To apply image processin
Page 79
8 TABLE OF CONTENTSKonica Minolta is a trademark of Konica Minolta Holdings, Inc. DiMAGE is a trademark of KonicaMinolta Camera, Inc. Microsoft, Windo
Page 80 — COLOR MATCHING
80 COLOR MATCHINGEach output device (monitor or printer) defines color and contrast differently. To ensurethe reproduction of the image on the monitor
Page 81 — Output color spaces
81The choice of output color space depends on how the image will be reproduced. Formost personal use where the image is displayed on a monitor or prin
Page 82 — Scanner color profiles
82 COLOR MATCHINGMonitor ICC profiles are located in the same folder as the scanner color profiles, seebelow. When using Mac OS X, the monitor profile
Page 83 — Library ColorSync Profiles
83The following are recommendations for output color space and monitor ICC-profilesettings with image-processing applications. Some applications, such
Page 84 — AUTO DUST BRUSH PLUG-IN
84AUTO DUST BRUSH PLUG-INInstallation — WindowsThe opening screen of the InstallShieldWizard appears. Click the next button tocontinue.Insert the DiMA
Page 85
85Click the yes button to accept theagreement and continue. Read the entireagreement carefully before continuing. Ifyou do not agree to the terms of t
Page 86 — Installation — Macintosh
86 AUTO DUST BRUSH PLUG-INInstallation — MacintoshIf the Auto Dust Brush plug-in was installed,simply drag and drop the plug-in file into animage-proc
Page 87
87Using the Auto Dust Brush plug-inOpen an image in theapplication with the Auto DustBrush plug-in. Only RGB andgrayscale images can beprocessed.Using
Page 88 — 88 AUTO DUST BRUSH PLUG-IN
88 AUTO DUST BRUSH PLUG-INFilm type: the type of film scanned must be specified. Dust on positive or slide film isshown as dark spots. On negative or
Page 89 — APPENDIX
89Glossary of common termsSaturationResolutionPixelsHueGrainContrastHighlightsShadowsMid-tonesContrast adjusts the relationship between the light and
Page 90 — 90 APPENDIX
9NAMES OF PARTSFront doorPower switchUSB portDC terminalIndicator lampQuick Scan / Eject buttonRAM-stationed programs such as anti-virus or installati
Page 91 — Installed files and folders
90 APPENDIXTo uninstall the DiMAGE Scan softwarefrom a Macintosh computer, place theDiMAGE Scan CD-ROM in the CD-ROMdrive repeat the installation proc
Page 92 — Job file list
91Mac OS XLibrary CFMSupportMFSIOUsb2891.bundleUsers(User logon name)Library PreferencesDS_Dual4Installed files and foldersThe following files and fol
Page 93
92 APPENDIXJobs can be used to make scan settings based on the final use of the image. Seemaking-the-final-scan section on page 34. The following char
Page 95
94 TROUBLESHOOTINGThis section covers minor problems with scanner operation. For major problems ordamage, or if a problem continues to reoccur frequen
Page 96 — TECHNICAL SPECIFICATIONS
95If the scanner was connected to the computer before the DiMAGE Scan Utility wasinstalled, the computer may not recognize the scanner unit. Use the f
Page 97 — Technical support
Scan type: Moving film, fixed sensor, single-pass scanFilm type: Negative and positive, color and monochromeFilm formats: 35mm and APS film. Scanning
Page 98 — Image Data Sheet
97Record keepingKeeping records when scanning is important. It allows for results to be reproduced aswell as a good reference for settings when new im
Page 99 — Hue corrections
98 APPENDIXImage: Date:Film: Exposure: Filtration: Processing:Image processingBrightness, contrast, &color balance paletteHue, saturation & li
Page 100 — Printed in Taiwan
99Changes in hue rotate the originalcolor values though a color spaceand reassigns a new hue based onthe new position in that space. Inthis example, t
Lastmanuals offers a socially driven service of sharing, storing and searching manuals related to use of hardware and software : user guide, owner’s manual, quick start guide, technical datasheets… DON’T FORGET : ALWAYS READ THE USER GUIDE BEFORE BUYING !!!
If this document matches the user guide, instructions manual or user manual, feature sets, schematics you are looking for, download it now. Lastmanuals provides you a fast and easy access to the user manual KONICA MINOLTA DIMAGE SCAN DUAL IV. We hope that this KONICA MINOLTA DIMAGE SCAN DUAL IV user guide will be useful to you.
Lastmanuals help download the user guide KONICA MINOLTA DIMAGE SCAN DUAL IV.
 |
KONICA MINOLTA DIMAGE SCAN DUAL IV Software Manual: Download the complete user guide (4608 Ko) |
You may also download the following manuals related to this product:
 KONICA MINOLTA DIMAGE SCAN DUAL IV (16922 ko)
Manual abstract: user guide KONICA MINOLTA DIMAGE SCAN DUAL IVSoftware Manual
Detailed instructions for use are in the User’s Guide.
[. . . ] 9222-7310-11 AV-A304/ME-0304
E
SOFTWARE MANUAL
Tone-curve corrections
By selecting individual color channels on the tone curve, adjustments to the overall color of an image can be made. In this example, the image is too yellow. By moving the blue curve up, the image looks more neutral. For more on tone curve corrections, see page 50.
Digital ROC — Reconstruction Of Color
Original image
After Digital ROC processing
Digital ROC restores the color of old faded film, see page 45.
2
Color examples
BEFORE YOU BEGIN
Thank you for purchasing this Minolta product. [. . . ] This function is useful when scanning a series of high and low-key images that have consistent exposures. By locking the exposure on one frame when scanning a bracket series, the scans of the other frames will show the exposure difference in each frame of the series. After making a prescan or setting the exposure of the reference image with the AE-area-selection function, click the AE lock button to fix the scanner’s exposure. Select another image and click the prescan button to view the result with the set exposure. To cancel the AE lock, click the AE lock button again. The prescan and final scan will be made with the locked exposure setting until the AE lock is canceled, the scanner is initialized, or the film type is changed.
39
Inputting scan settings manually
Settings for the final scan can be made in the index scan or prescan windows. Job-name list box Load Job button Save Job button Input-resolution list box Output-resolution list box
Input-size text boxes Input-size lock button Magnification text box Output-size text boxes Output-size lock button Unit list box Reset button Image-size display Input-resolution list box: values can be selected among the drop-down list or be entered into the box directly. See scanner resolution in the scanner notes section of the hardware manual for the resolution of the specific scanner model. Output-resolution list box: values can be selected among the drop-down list or be entered into the box directly. Output-resolution cannot be entered if pixel is selected in the unit list box. Input-size text box: input size is determined by either the cropping frame dimensions or the values entered in the width and height boxes. The cropping frame will adjust to any value entered. Input-size cannot be entered if pixel is selected in the unit list box. Input-size lock button: to lock the input values. The cropping frame can be moved, but not resized while this button is clicked. Clicking the button again releases the lock. The input-size lock button cannot be used if pixel is selected in the unit list box. Magnification text box: to set image magnification. This value is based on input and output resolution, or output and input size. The magnification text box cannot be used if pixel is selected in the unit list box.
40
Advanced scanning
When the input size and output size are unlocked, the input resolution and output size vary according to the entered magnification value. When the output size is locked, the input resolution and input size vary according to the entered magnification value. When the input size is locked, the input resolution and output size vary according to the entered magnification. [. . . ] With 16-bit color depth: 500MB (35mm), 1GB (Multi-format 35mm), 2GB (6X9). Recommended hard disk space: 600MB (35mm), 1GB (Multi-format 35mm), 2GB (6X9). With16-bit color depth: 1GB (35mm), 2GB (Multi-format 35mm), 4GB (6X9).
72
Appendix
About the Dimage Scan Multi and Multi II
The DiMAGE Scan Utility can be used with the Dimage Scan Multi and Multi II model scanners. However, certain functions are not available: DiMAGE Scan Multi Digital ICE, ROC, and GEM DiMAGE Scan Multi II Digital ICE Pixel Polish Grain Dissolver Holder-type list box Prescan-size list box (Preference window) Easy Scan Utility Batch Scan Utility DiMAGE Scan Launcher Manual Focus Dial The input-resolution range for the Dimage Multi is 176 dpi to 2810 dpi for 35mm film and 70 dpi to 1128 dpi with medium-format film. [. . . ]
DISCLAIMER TO DOWNLOAD THE USER GUIDE KONICA MINOLTA DIMAGE SCAN DUAL IV
Lastmanuals offers a socially driven service of sharing, storing and searching manuals related to use of hardware and software : user guide, owner’s manual, quick start guide, technical datasheets…
In any way can’t Lastmanuals be held responsible if the document you are looking for is not available, incomplete, in a different language than yours, or if the model or language do not match the description. Lastmanuals, for instance, does not offer a translation service.
Click on «Download the user manual» at the end of this Contract if you accept its terms, the downloading of the manual KONICA MINOLTA DIMAGE SCAN DUAL IV will begin.
Copyright © 2015 — LastManuals —
All Rights Reserved.
Designated trademarks and brands are the property of their respective owners.
![]()