

Максим aka WisH
Высшее образование по специальности «Информационные системы». Опыт работы системным администратором — 5 лет.
Задать вопрос
Мобильные роутеры сейчас не пользуются большой популярностью, потому что телефоны имеют доступ к мобильной сети и умеют раздавать вайфай. Правда, есть ситуации, в которых такие маршрутизаторы могут пригодиться, ведь у других мобильных устройств тоже есть ограничения. Сегодня расскажем о Tp-Link M7200 – мобильном маршрутизаторе, способном подключаться к мобильной сети и раздавать вайфай.
Содержание
- Обзор TP-Link M2700
- Характеристики и возможности
- Комплектация
- Актуальные цены
- Как подключить мобильный Wi-Fi роутер
- Настройка TP-Link M7200
- Инструкция по обновлению прошивки 4G LTE маршрутизатора
- Отзывы о работе TP-Link M7200
Обзор TP-Link M2700
Мобильный маршрутизатор используется в том случае, когда требуется подключить к сети несколько устройств. Смартфоны раздают интернет на небольшие расстояния, да и часто режут скорость, если люди подключаются с ноутбуков. Если же нужно подключить к Wi-Fi несколько компьютеров, телевизор, телефоны или еще какую-то технику, то лучше использовать маршрутизатор.
Мобильные роутеры используются, когда нет проводного подключения к интернету или когда нет доступа к электричеству.
Если едите на дачу, в деревню или еще в какое-то место, где нет проводной связи, то стоит использовать роутер с возможностью подключения к телефонной сети. В таких местах также бывают перебои с электричеством, так что стоит брать мобильные роутер, который сможет работать от своего аккумуляторы или же подзарядите его от обычного павербанка.
Характеристики и возможности
TP-Link M7200 представляет собой небольшую коробку с черным корпусом, сделанным из пластика. Основные характеристики устройства следующие:
- Доступное поколение мобильной связи: 3G, 4G;
- Технологии: DC-HSPA+, GSM, HSPA+, 4G LTE;
- Надстройки над GSM: EDGE;
- Используемые диапазоны частот: GSM 900, GSM 1800, LTE-FDD 800, LTE-FDD 900, LTE-FDD 1800, LTE-FDD 2100, WCDMA 900, WCDMA 2100;
- Максимальная скорость приема: 150 Мбит/с;
- Стандарт Wi-Fi: 4 (802.11n);
- Класс Wi-Fi: N300;
- Максимальная скорость беспроводного соединения: 300 Мбит/с;
- Частоты Wi-Fi: 2.4 ГГц;
- Максимальное число одновременно подключенных девайсов: 10;
- Два диапазона: нет;
- Протоколы защиты вайфай: WEP, WPA, WPA-PSK, WPA2, WPA2-PSK, WPS;
- Передатчик: 19 dBm;
- Антенна: внутренняя;
- Количество антенн: 2;
- DHCP-сервер: да;
- NAT: да;
- Поддержка VPN: да;
- Межсетевой экран (FireWall): есть;
- Емкость аккумулятора: 2000 мА*ч;
- Время работы на аккумуляторе: 8 ч;
- Интерфейсы: MicroUSB, SIM-слот;
- Настройка и управление: Web-интерфейс, мобильное приложение.

Этот роутер от ТП-Линк умеет подключаться к мобильной сети, создает вайфай сеть, к которой подключается до десяти устройств. Неважно, какие это будут устройства, их количество все равно будет ограничено десятью штуками. Скорость интернета не станет превышать 150 Мбит/с, но и такая скорость станет доступна при хорошем уровне сигнала. Внутри беспроводной сети, устройства станут обмениваться информацией со скоростью в 300 Мбит/с.
Комплектация
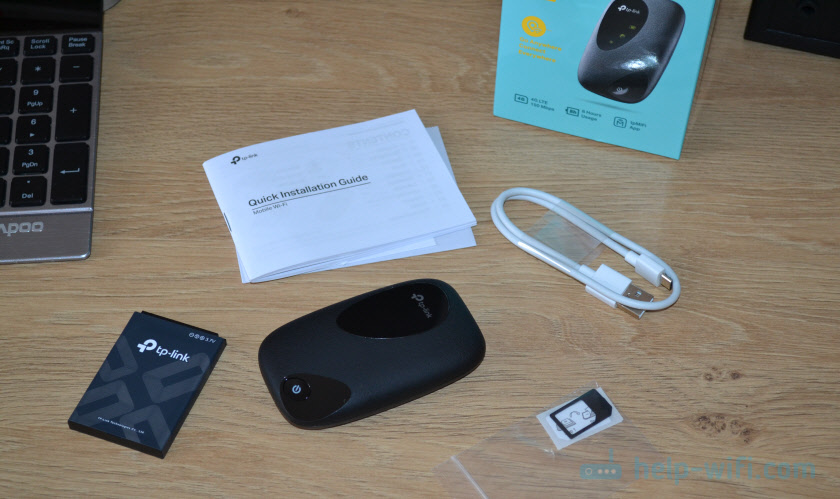
В комплектацию маршрутизатора M7200 входят следующие предметы: сам мобильный роутер, аккумулятор, провод для зарядки (или для подсоединения к компьютеру), переходники с mini SIM и micro SIM на стандартную симку, а также несколько инструкций. В комплекте оказывается только то, что может пригодиться при подключении маршрутизатора.

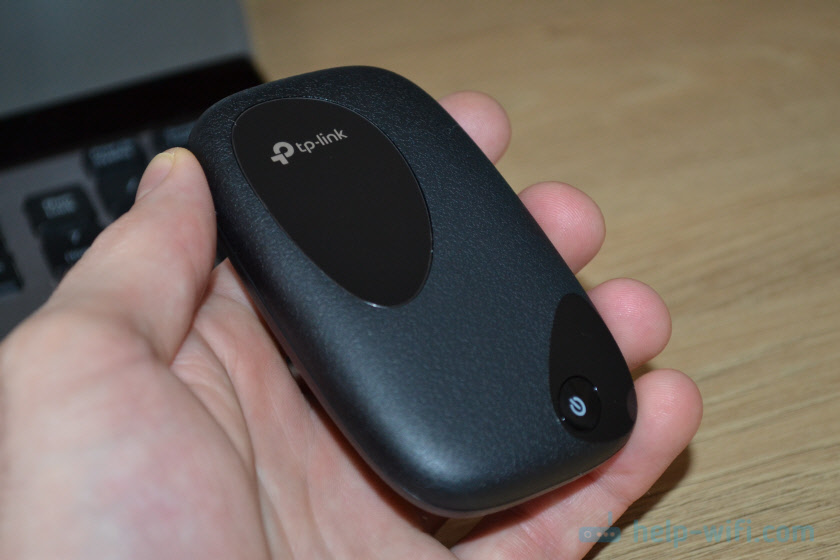
Роутер имеет прямоугольную форму и черный, пластиковый корпус. На передней стороне маршрутизатора расположены индикаторы, которые не видны в обычном состоянии. Они загораются при первом включении, чтобы просмотреть их во время работы роутера, потребуется нажать один раз на кнопку питания. Индикаторы отвечают за: заряд аккумулятора, подключение к интернету и Wi-Fi сети. Если какой-то из них не горит или ведет себя странно, то по ним сможете узнать в чем же проблема.

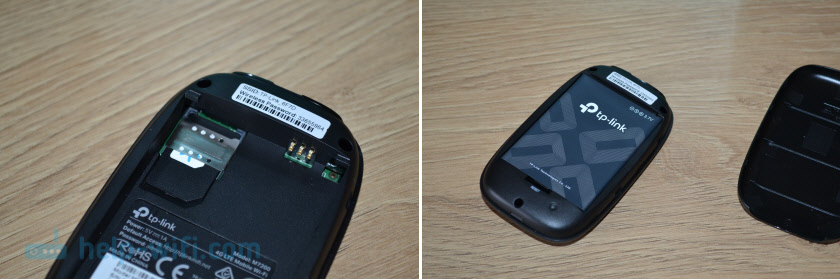
С нижней стороны находится разъем для подключения зарядного устройства или же для подключения маршрутизатора к компьютеру. Задняя крышка открывается, за ней располагается аккумулятор, данные о сети с лот для сим-карты.
Актуальные цены
Цену на технику меняются из-за выхода новых моделей роутеров, устаревания, редкости модели или из-за колебания курса валют. Из-за этого ориентироваться на текущие цены сложно, но они дадут вам представление о том, как изменились цены на роутер, когда вы посмотрите их в любом из магазинов.
На данный момент стоимость TP-Link M7200 в популярных магазинах от 4390 до 5500 рублей.
Цены в магазинах не сильно отличаются друг от друга, а в некоторых крупных сетях подобных роутеров вообще нет. Попробуйте посмотреть цены в магазинах в своем городе и, если они сильно отличаются, то заказывайте в каком-то из онлайн-магазинов. Ревизий и моделей у этого роутера нет, так что можно купить не ошибетесь при покупке и отличия в характеристиках не будет.
Как подключить мобильный Wi-Fi роутер
Установка роутера производится просто. Снимите заднюю крышку с маршрутизатора, для этого придется слегка поддеть её, для чего есть специальная выемка. Внутри увидите разъем под SIM-карту, вставьте туда вашу симку. Если размер не подходит, то воспользуйтесь теми переходниками, которые шли в комплекте с устройством. Достаньте батарею и посмотрите, что на ней нет никаких защитных пленок. Вставьте её обратно и включите устройство, подержав кнопку включения 3 секунды, крышку пока можно не закрывать.

Роутер не требует настройки при использовании только интернета через беспроводную сеть.
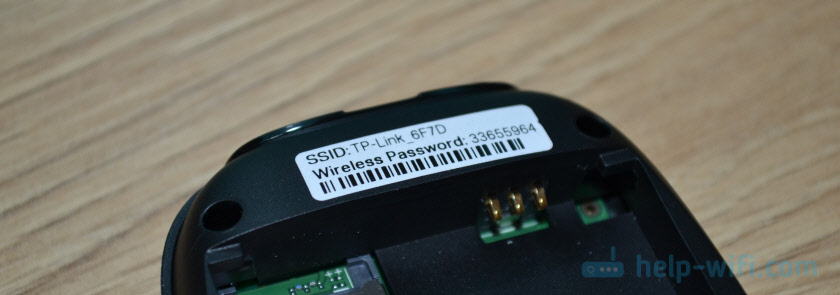
Теперь смотрите на индикаторы на внешней стороне. Если все горят, то роутер подключится к мобильной сети и уже раздает вайфай. Вам потребуется подключиться к нему, имя сети и пароль от неё написаны рядом с местом для сим-карты, введите их в свой телефон, подключитесь к беспроводной сети и проверьте работу инета. Для подключения к компьютеру воткните провод в роутер и в юсб разъем, роутер автоматически подключится к компьютеру и попытается раздать на него интернет через провод.
Настройка TP-Link M7200
Если у вас iPhone, или Android-телефон, то загрузите на них приложение tpMiFi, оно есть в стандартном магазине. Запустите утилиту и дождитесь, пока телефон не найдет маршрутизатор. Теперь требуется ввести пароль от устройства, пароль по умолчанию – admin. Здесь вы сможете увидеть данные о работе устройства. Здесь отображается информация о провайдере, сети в которой работает роутер, приложение показывает текущий уровень сигнала, а также количество использованных мегабайт.

Здесь же есть данные об аккумуляторе, остатке его заряда и предполагаемом времени работы, раздел с SMS-сообщениями, подключенные клиенты и «Обмен СД» (здесь нет карты памяти). Имеется и отдельная вкладка «Клиенты», здесь показаны все подключенные девайсы, а также указан расход трафика на них, здесь же получится задать лимит на использование данных,задать ограничение на входящую и исходящую скорость, для этого нажмите на название устройства и выставьте ограничения.

Для настройки роутера перейдите во вкладку «Инструменты». Быстрая настройка позволит пошагово проверить все параметры роутера и поменять их, если есть необходимость. В настройках беспроводного режима сможете задать название вайфая, пароль, безопасность и другие вещи. Параметры интернет соединения позволят кое-что изменить для мобильного подключения. Использование данных позволит поставить ограничения.
В разделе «Аккумулятор» имеется информация о расходе заряда и состоянии самого аккумулятора, там включается режим энергосбережения. В SMS находятся пришедшие сообщения и есть возможность отправить свое сообщение.
Приложение – это не единственный способ войти в модем. Также можете войти через браузер на телефоне или компьютере, подключенном к вайфаю устройства. Введите название сайта http://tplinkmifi.net в адресной строке и впишите пароль от роутера.
Инструкция по обновлению прошивки 4G LTE маршрутизатора
В разделе инструментов есть пункт «Системные утилиты». Здесь находятся параметры по управлению роутером. В первом пункте происходит смена языка в меню, во втором пункте меняют пароль от роутера, а третий предназначен для обновления прошивки. Нажмите на него.

После этого устройство подключится к официальному сайту и проверит наличие новой прошивки. Если она есть, то вам придется одобрить её загрузку и установку. Пока прошивка устанавливается не будет доступен вайфай, а также во время установки нельзя выключать роутер, так что проверьте, что у него достаточно заряда аккумулятора или же подключите его к сети. Когда установка закончится, роутер перезагрузится и будет готов к работе.
Отзывы о работе TP-Link M7200
Отзывы об устройстве положительные. Большинству людей нравится компактный дизайн и несложная настройка маршрутизатора, ведь им можно пользоваться сразу, не заходя в настройки. В качестве проблем отмечают то, что у некоторых маршрутизатор часто уходит в спящий режим или же отключается. Такая проблема возникает из-за недостаточного питания по юсб-проводу или из-за того, что аккумулятор износился. Попробуйте заменить зарядное, блок питания или же сам аккумулятор.
Судя по отзывам, TP-Link M7200 работает без проблем от года до нескольких лет, если ему подобрать подходящий блок питания или же заряжать от компьютера. Сам аккумулятор при ежедневном интенсивном использовании живет около года, а потом требует замены, если же использовать его не так часто, то и роутер проработает дольше.
Мобильный роутер пригодится во многих случаях, но если вам он требуется для постоянной установки в доме, то посмотрите на маршрутизаторы без аккумулятора, потому что именно они чаще выходят из строя. Для поездок же такого роутера хватит надолго, ведь аккумулятор не будет изнашиваться с такой скоростью.
В этой статье мы будем обозревать и настраивать новый мобильный Wi-Fi роутер TP-Link M7200. Несмотря на то, что популярность подобных устройств сильно упала, в первую очередь из-за низкой стоимости мобильного интернета и поддержки 4G в каждом смартфоне, есть много ситуаций, в которых намного проще и удобнее использовать именно мобильный Wi-Fi роутер. Например, если необходимо подключить к мобильному интернету такие устройства как ноутбуки, ПК, телевизоры, в которых нет поддержки мобильной сети. Да и на отдыхе проще купить одну SIM-карту с доступом в интернет, вставить ее в TP-Link M7200 и раздать интернет по Wi-Fi на все устройства своих близких и друзей.
TP-Link M7200 поддерживает сети 3G/4G FDD/TDD-LTE и обеспечивает подключение к интернету на скорости до 150 Мбит/с. Это автономный роутер. Аккумулятор на 2000 мАч может обеспечить до 8 часов работы. Максимальное количество одновременно подключенных устройств – 10. Wi-Fi сеть на скорости до 300 Мбит/с (поддержка IEEE 802.11b/g/n).Так же в компании TP-Link разработали отдельное приложение tpMiFi, с помощью которого можно управлять TP-Link M7200 с мобильного устройства. Это очень удобно, нет необходимости выполнят настройку через веб-интерфейс. Но такая возможность тоже есть.
TP-Link M7200 поставляется в небольшой, красивой коробочке.

Комплект поставки состоит из мобильного роутера, аккумулятора, кабеля для зарядки (подключения к компьютеру), переходников с mini SIM и micro SIM на обычную SIM-карту и инструкций.
Сам роутер сделан из черного пластика. С текстурой, как у кожаных изделий. Есть несколько вставок из глянцевого пластика.

На лицевой панели находится кнопка включения/отключения (нужно подержать нажатой 3 секунды) и активации индикаторов (один раз нажали — индикаторы загорелись). На большой вставке из глянцевого пластика находится три индикатора: заряда аккумулятора, подключения к интернету и Wi-Fi сети. Через некоторое время после включения TP-Link M7200 индикаторы гаснут. Чтобы их активировать, нужно нажать на кнопку питания.

На верхнем торце расположен разъем micro USB для зарядки и подключения к компьютеру. Если подключить TP-Link M7200 к компьютеру с помощью USB кабеля, то на компьютере будет настроено сетевое подключение к интернету. Этот роутер можно использовать для подключения к интернету не только по Wi-Fi, но и по кабелю.

Еще одно фото и переходим к настройке.
Роутер небольшой. Без проблем поместится в карман. Задняя крышка (под которой находится батарея, слот под SIM-карту, кнопка Reset) держится на защелках. Все собрано достаточно хорошо. Ничего не скрипит. Единственный вопрос к глянцевым вставкам. Да, они красивые, но это не стационарный роутер. Уже после первого дня использования они все покроются царапинами.
Настройка TP-Link M7200
Пользоваться TP-Link M7200 можно вообще без настройки. Просто открываем заднюю крышку, вставляем SIM-карту (при необходимости используем переходник и фиксируем ее наклейкой), вставляем аккумулятор, включаем роутер и через секунд 30 можно подключаться к Wi-Fi сети и пользоваться интернетом. В большинстве случаев настройка под оператора происходит автоматически.
Но давайте по порядку. В любом случае сначала вставляем SIM-карту, батарею и включаем модем (крышку пока-что можете не закрывать).
Если кроме индикатора питания и Wi-Fi загорелся индикатор подключения к интернету, то роутер уже раздает интернет. Но несмотря на это нужно подключится к его Wi-Fi сети. Заводское имя (SSID) и пароль указаны на наклейке под крышкой.
Просто выберите Wi-Fi сеть из писка доступных на своем мобильном устройстве, или компьютере, введите пароль и подключитесь. После подключения с любого устройства, через любой браузер можно зайти в настройки TP-Link M7200. Для этого перейдите по адресу http://tplinkmifi.net. Заводской пароль для входа в настройки — admin.

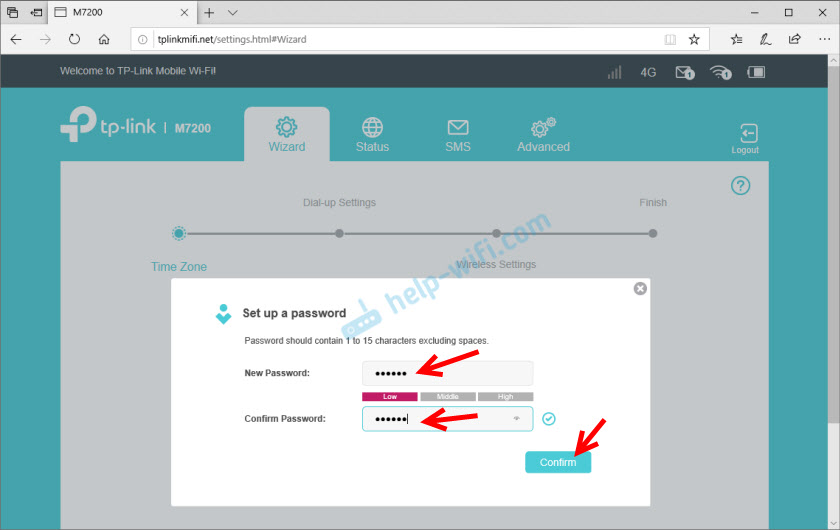
В веб-интерфейсе нам сразу предложат сменить заводской пароль admin на другой. Сделайте этого. Только запомните (а лучше запишите) пароль.
В настройках разобраться не сложно. Но я предлагаю более подробно рассмотреть настройку именно через приложение tpMiFi. Так как в большинстве случаев такие устройства покупают для подключения именно мобильных устройств. А в таком случае управлять настройками TP-Link M7200 через приложение будет намного удобнее.
Установите на свой iPhone, или Android-устройство приложение tpMiFi с магазина приложений. Подключите телефон к Wi-Fi сети TP-Link M7200 (если он еще не подключен).
Запустите приложение tpMiFi. Если роутер будет обнаружен, то понадобится ввести пароль администратора роутера. Напомню, что заводской пароль (если вы его не меняли) – admin. На главной странице мы сразу видим информацию об операторе, сети в которой работает роутер, уровню сигнала и использованных данных. Ниже находится информация об аккумуляторе, раздел с SMS-сообщениями, подключенные клиенты и «Обмен СД» (эта модель не поддерживает SD-карты). Так же на нижней панели есть вкладка «Клиенты», где можно посмотреть список подключенных устройств, установить для каждого (нажав на него) лимит на использование данных (мегабайт), задать ограничение на входящую и исходящую скорость.

Все основные настройки находятся на вкладке «Инструменты». Первый в списке мастер быстрой настройки. С его помощью можно изменить все основные настройки роутера (пошагово). В разделе «Настройка беспроводного режима» можно сменить имя сети и/или пароль, а так же сделать Wi-Fi сеть скрытой. А в разделе «Параметры интернет соединения» есть возможность отключить мобильную передачу данных, включить передачу данных в роуминге, выбрать режим сети, вручную изменить APN, выполнить необходимые операции с PIN-кодом и выбрать оператора (по умолчанию стоит автоматический выбор). Как я уже писал в начале статьи, TP-Link M7200 автоматически определяет оператора и настраивает подключение к интернету.

Дальше у нас идет раздел с настройками аккумулятора (можно посмотреть уровень заряда, включить режим энергосбережения, сменить диапазон Wi-Fi и настроить отключение Wi-Fi сети, когда роутер не используется). Есть так же отдельная страница, где можно просматривать/отправлять SMS-сообщения и USSD команды. Например, для проверки состояния счета, бонусов, смены тарифных планов.
А на вкладке «Системные утилиты» можно выполнить обновление прошивки TP-Link M7200, сменить язык, пароль администратора, перезагрузить роутер, выключить его, или выполнить сброс настроек.

Рекомендую настраивать TP-Link M7200 именно через приложение tpMiFi. Очень удобно. Можно не только сменить необходимые настройки, но и контролировать расход трафика, устанавливать лимит трафика с предупреждением об пользовании определенного процента данных от общего лимита по вашему тарифному плану.
Тест скорости в сети LTE
К сожалению, продемонстрировать все возможности TP-Link M7200 в плане скорости у меня не получится. LTE есть, но работает он очень плохо. Сигнал слабый, базовые станции скорее всего перегружены (сейчас тарифы позволяют использовать мобильный интернет вовсю), и это все в центре города. Но раз я уже сделал замеры, то поделюсь ими. Скорость через TP-Link M7200:

И примерно такая же скорость напрямую с телефона (когда SIM-карта в телефоне).
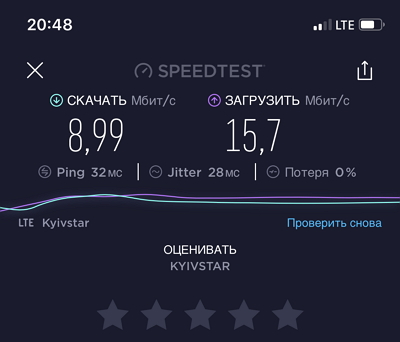
Как видите, все совсем грустно. Вот такая скорость в сети LTE у Киевстар.
Что касается TP-Link M7200, то это классный, простой мобильный роутер, который на все 100% выполняет свои задачи. К тому же его очень просто настроить. Обязательно оставляйте свои отзывы о TP-Link M7200 в комментариях.
About This Guide
This guide is a complement of Quick Installation Guide. The Quick Installation Guide provides instructions for quick internet setup, while this guide contains details of each function and demonstrates how to configure them.
Features available in the Mobile Wi-Fi may vary by model and software version. Mobile Wi-Fi availability may also vary by region or ISP. All images, steps, and descriptions in this guide are only examples and may not reflect your actual Mobile Wi-Fi experience.
Conventions
In this guide the following conventions are used:
|
Convention |
Description |
|
Underlined |
Underlined words or phrases are hyperlinks. You can click to redirect to a website or a specific section. |
|
Teal |
Contents to be emphasized and texts on the web page are in teal, including the menus, items, buttons and so on. |
|
> |
The menu structures to show the path to load the corresponding page. For example, Advanced > Wireless > Black List means the Black List page is under the Wireless menu that is located in the Advanced tab. |
|
|
Ignoring this type of note might result in a malfunction or damage to the device. |
|
|
Indicates important information that helps you make better use of your device. |
*Maximum wireless signal rates are the physical rates derived from IEEE Standard 802.11 specifications. Actual wireless data throughput and wireless coverage are not guaranteed and will vary as a result of 1) environmental factors, including building materials, physical objects, and obstacles, 2) network conditions, including local interference, volume and density of traffic, product location, network complexity, and network overhead, and 3) client limitations, including rated performance, location, connection, quality, and client condition.
*Battery life estimates obtained through testing in a laboratory setting.
More Info
The latest software, management app and utility are available at the Download Center at www.tp-link.com/support.
The Quick Installation Guide can be found in the same place you found this guide or inside the package of the Mobile Wi-Fi.
Specifications can be found on the product page at https://www.tp-link.com.
TP-Link Community is provided for you to discuss our products and share knowledge at https://community.tp-link.com.
Our Technical Support contact information can be found at Contact Technical Support page at www.tp-link.com/support.
Displayed below is the user manual for M7200 by TP-Link which is a product in the Cellular Network Devices category.
This manual has pages.

REV1.0.0 1910012243
User Guide
4G LTE Mobile Wi-Fi
M7200

Contents
About This Guide . . . . . . . . . . . . . . . . . . . . . . . . . . . . . . . . . . . . . . . . . . . . . . . . . . . . .1
Chapter 1. Get to Know About Your Mobile Wi-Fi. . . . . . . . . . . . . . . . . . . . . .2
1. 1. Product Overview. . . . . . . . . . . . . . . . . . . . . . . . . . . . . . . . . . . . . . . . . . . . . . . . . . . . . . . . . . . . 3
1. 2. Physical Description . . . . . . . . . . . . . . . . . . . . . . . . . . . . . . . . . . . . . . . . . . . . . . . . . . . . . . . . . 4
1. 2. 1. The Exterior. . . . . . . . . . . . . . . . . . . . . . . . . . . . . . . . . . . . . . . . . . . . . . . . . . . . . . . . . . . 4
1. 2. 2. The Interior . . . . . . . . . . . . . . . . . . . . . . . . . . . . . . . . . . . . . . . . . . . . . . . . . . . . . . . . . . . 5
Chapter 2. Set Up Internet Connection . . . . . . . . . . . . . . . . . . . . . . . . . . . . . . .6
2. 1. Install the Mobile Wi-Fi . . . . . . . . . . . . . . . . . . . . . . . . . . . . . . . . . . . . . . . . . . . . . . . . . . . . . . . 7
2. 2. Connect to the Internet . . . . . . . . . . . . . . . . . . . . . . . . . . . . . . . . . . . . . . . . . . . . . . . . . . . . . . 8
Chapter 3. Log In. . . . . . . . . . . . . . . . . . . . . . . . . . . . . . . . . . . . . . . . . . . . . . . . . . . 10
3. 1. Via Phone Login Entry . . . . . . . . . . . . . . . . . . . . . . . . . . . . . . . . . . . . . . . . . . . . . . . . . . . . . . 11
3. 2. Via PC Login Entry . . . . . . . . . . . . . . . . . . . . . . . . . . . . . . . . . . . . . . . . . . . . . . . . . . . . . . . . . . 11
3. 3. Via tpMiFi App . . . . . . . . . . . . . . . . . . . . . . . . . . . . . . . . . . . . . . . . . . . . . . . . . . . . . . . . . . . . 12
Chapter 4. Manage Your Data Usage . . . . . . . . . . . . . . . . . . . . . . . . . . . . . . . 14
4. 1. Track Data Usage . . . . . . . . . . . . . . . . . . . . . . . . . . . . . . . . . . . . . . . . . . . . . . . . . . . . . . . . . . . 15
4. 1. 1. Check Data Usage on the Web Management Page. . . . . . . . . . . . . . . . . . . . 15
4. 1. 2. Check Data Usage via SMS. . . . . . . . . . . . . . . . . . . . . . . . . . . . . . . . . . . . . . . . . . . 15
4. 1. 3. Revise Data Usage . . . . . . . . . . . . . . . . . . . . . . . . . . . . . . . . . . . . . . . . . . . . . . . . . . . 16
4. 2. Limit Data Usage . . . . . . . . . . . . . . . . . . . . . . . . . . . . . . . . . . . . . . . . . . . . . . . . . . . . . . . . . . . 17
4. 2. 1. Limit Data Package. . . . . . . . . . . . . . . . . . . . . . . . . . . . . . . . . . . . . . . . . . . . . . . . . . . 17
4. 2. 2. Limit Monthly Data Usage . . . . . . . . . . . . . . . . . . . . . . . . . . . . . . . . . . . . . . . . . . . . 18
4. 3. Set Up Free Data Period . . . . . . . . . . . . . . . . . . . . . . . . . . . . . . . . . . . . . . . . . . . . . . . . . . . . 19
4. 4. Enable Mobile Data . . . . . . . . . . . . . . . . . . . . . . . . . . . . . . . . . . . . . . . . . . . . . . . . . . . . . . . . . 20
4. 5. Enable Data Roaming . . . . . . . . . . . . . . . . . . . . . . . . . . . . . . . . . . . . . . . . . . . . . . . . . . . . . . . 21
Chapter 5. Secure Your Network . . . . . . . . . . . . . . . . . . . . . . . . . . . . . . . . . . . 22
5. 1. Secure Wireless Network . . . . . . . . . . . . . . . . . . . . . . . . . . . . . . . . . . . . . . . . . . . . . . . . . . . 23
5. 2. Block Unwelcome Devices . . . . . . . . . . . . . . . . . . . . . . . . . . . . . . . . . . . . . . . . . . . . . . . . . . 24
5. 3. Lock SIM Card . . . . . . . . . . . . . . . . . . . . . . . . . . . . . . . . . . . . . . . . . . . . . . . . . . . . . . . . . . . . . . 24
Chapter 6. Customize Your Network . . . . . . . . . . . . . . . . . . . . . . . . . . . . . . . . 27

6. 1. Specify Network Mode . . . . . . . . . . . . . . . . . . . . . . . . . . . . . . . . . . . . . . . . . . . . . . . . . . . . . 28
6. 2. Configure Dial-up . . . . . . . . . . . . . . . . . . . . . . . . . . . . . . . . . . . . . . . . . . . . . . . . . . . . . . . . . . . 29
6. 2. 1. Configure Dial-up Settings . . . . . . . . . . . . . . . . . . . . . . . . . . . . . . . . . . . . . . . . . . . 29
6. 2. 2. Configure Network Search . . . . . . . . . . . . . . . . . . . . . . . . . . . . . . . . . . . . . . . . . . . 30
6. 3. Configure DHCP Server. . . . . . . . . . . . . . . . . . . . . . . . . . . . . . . . . . . . . . . . . . . . . . . . . . . . . 30
Chapter 7. Manage Your Mobile Wi-Fi . . . . . . . . . . . . . . . . . . . . . . . . . . . . . . 32
7. 1. Save the Mobile Wi-Fi’s Power . . . . . . . . . . . . . . . . . . . . . . . . . . . . . . . . . . . . . . . . . . . . . . 33
7. 2. Change Login Password . . . . . . . . . . . . . . . . . . . . . . . . . . . . . . . . . . . . . . . . . . . . . . . . . . . . 34
7. 3. Set Up System Time . . . . . . . . . . . . . . . . . . . . . . . . . . . . . . . . . . . . . . . . . . . . . . . . . . . . . . . . 35
7. 4. Restore Configuration Settings . . . . . . . . . . . . . . . . . . . . . . . . . . . . . . . . . . . . . . . . . . . . . 35
7. 5. Update the Firmware . . . . . . . . . . . . . . . . . . . . . . . . . . . . . . . . . . . . . . . . . . . . . . . . . . . . . . . 36
7. 6. Update ISP Parameters . . . . . . . . . . . . . . . . . . . . . . . . . . . . . . . . . . . . . . . . . . . . . . . . . . . . . 37
7. 7. System Log. . . . . . . . . . . . . . . . . . . . . . . . . . . . . . . . . . . . . . . . . . . . . . . . . . . . . . . . . . . . . . . . . 38
FAQ . . . . . . . . . . . . . . . . . . . . . . . . . . . . . . . . . . . . . . . . . . . . . . . . . . . . . . . . . . . . . . . . . 40
1
About This Guide
This guide is a complement of Quick Installation Guide. The Quick Installation
Guide provides instructions for quick internet setup, while this guide contains
details of each function and demonstrates how to configure them.
When using this guide, please notice that features of the Mobile Wi-Fi may
vary slightly depending on the model, the software version you have, your
location, system language, and internet service provider. All screenshots,
images, parameters and descriptions documented in this guide are used for
demonstration only.
Conventions
In this guide the following conventions are used:
Convention Description
Underlined Underlined words or phrases are hyperlinks. You can click to redirect to a website or a
specific section.
Teal Contents to be emphasized and texts on the web page are in teal, including the menus,
items, buttons and so on.
>
The menu structures to show the path to load the corresponding page. For example,
Advanced > Wireless > Black List means the Black List page is under the Wireless menu
that is located in the Advanced tab.
Note: Ignoring this type of note might result in a malfunction or damage to the device.
Tips: Indicates important information that helps you make better use of your device.
More Info
The latest software, management app and utility are available at the Download
Center at www.tp-link.com/support.
The Quick Installation Guide can be found in the same place you found this guide
or inside the package of the Mobile Wi-Fi.
Specifications can be found on the product page at http://www.tp-link.com.
A Technical Support Forum is provided for you to discuss our products at
http://forum.tp-link.com.
Our Technical Support contact information can be found at Contact Technical
Support page at www.tp-link.com/support.

Chapter 1
Get to Know About Your
Mobile Wi-Fi
This chapter introduces what the Mobile Wi-Fi can do and its appearance.
It includes the following sections:
• Product Overview
• Physical Description

3
Chapter 1 Get to Know About Your Mobile Wi-Fi
1. 1. Product Overview
The Faster Connections, The More You Can Do
Just insert a 4G SIM card to create your reliable personal Wi-Fi hotspot and
share instant 4G/3G connectivity with friends. The Mobile Wi-Fi, supporting the
latest generation 4G LTE network, can reach a faster download speed so that
users can enjoy HD movies without interruption, download files in seconds, and
hold a video chat without dropouts.
Artful Little Gadget and Built-in Battery for Life on the Go
The TP-Link Mobile Wi-Fi features a compact, elegant design and rechargeable
powerful battery very suitable for travel, business trips and outdoor activities.
With added flexibility, the device can be charged via a micro USB cable connected
to an adapter, laptop or portable charger for endless hours of 4G sharing.
Easy Management with the tpMiFi App
With the tpMiFi App, you can conveniently access and manage the Mobile Wi-Fi
right on your iOS/Android devices. The tpMiFi app allows you to set data limits,
control Wi-Fi access, send messages, and share media files to/from a removable
micro SD card.

4
Chapter 1 Get to Know About Your Mobile Wi-Fi
1. 2. Physical Description
1. 2. 1. The Exterior
LEDs
Power Butt
Micro USB Port
LED Explanation
LED Status Indication
(Wi-Fi)
On Wi-Fi is enabled.
Off Wi-Fi is disabled.
(Internet)
On Internet service is available.
Off Internet service is unavailable.
(Battery)
On Power is on.
Off Power is off.
Blinking Red The battery level is lower than 10%.
Blinking Green The Mobile Wi-Fi is charging.
Note:
1. The LEDs will turn off automatically after idling for 30 seconds. To check the LED status, press the Power
button to turn them on again.
2. If the Battery LED blinks red when the battery level is enough or when charging, make sure the device is
being used within 0-40°C and the battery is inserted.
Item Explanation
Item Description
Power Button • Press and hold to power on/off the Mobile Wi-Fi.
• Press to turn on LEDs if they are off after idling.
Micro USB Port Plug in the USB cable to this port to charge your Mobile Wi-Fi.

5
Chapter 1 Get to Know About Your Mobile Wi-Fi
1. 2. 2. The Interior
SSID:
TP-Link_XXXX
Wireless Password:
XXXXXXXX
Reset Button
SIM Card Slo
Item Explanation
Item Description
SIM Card Slot Insert a SIM card into the slot. A micro or nano SIM card must be converted
using a SIM card adapter.
Reset Button With the Mobile Wi-Fi powered on, use a pin to press and hold this button until
all LEDs turn on momentarily to reset the Mobile Wi-Fi.
Note:
Resetting the device to its factory defaults will clear all previous configuration.

Chapter 2
Set Up Internet
Connection
This chapter introduces how to install the Mobile Wi-Fi and connect your wireless
or smart devices to the internet.
It includes the following sections:
• Install the Mobile Wi-Fi
• Connect to the Internet
7
Chapter 2 Set Up Internet Connection
2. 1. Install the Mobile Wi-Fi
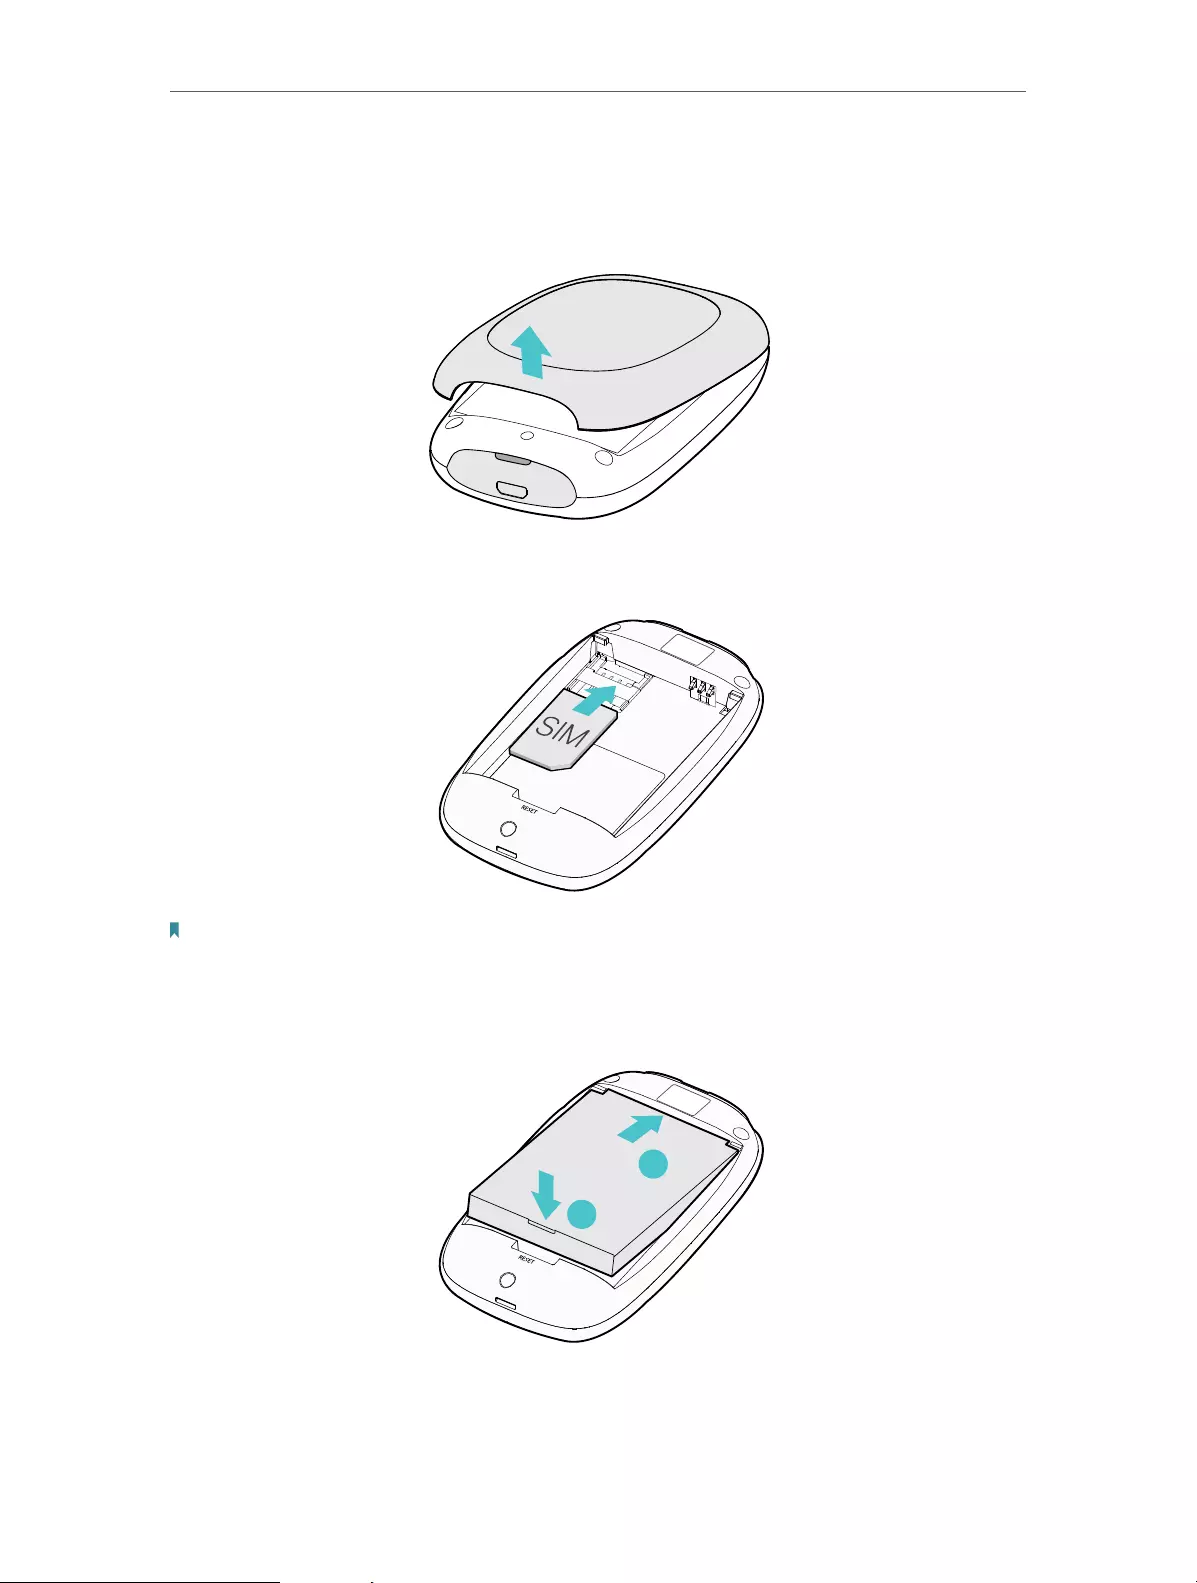
1. Remove the back cover.
2. Insert your SIM card.
SSID:
TP-Link_XXXX
Wireless Password:
XXXX XXXX
Note:
• A micro or nano SIM card must be converted using a SIM card adapter.
• The SIM card and SIM card adapter are not provided by TP-Link.
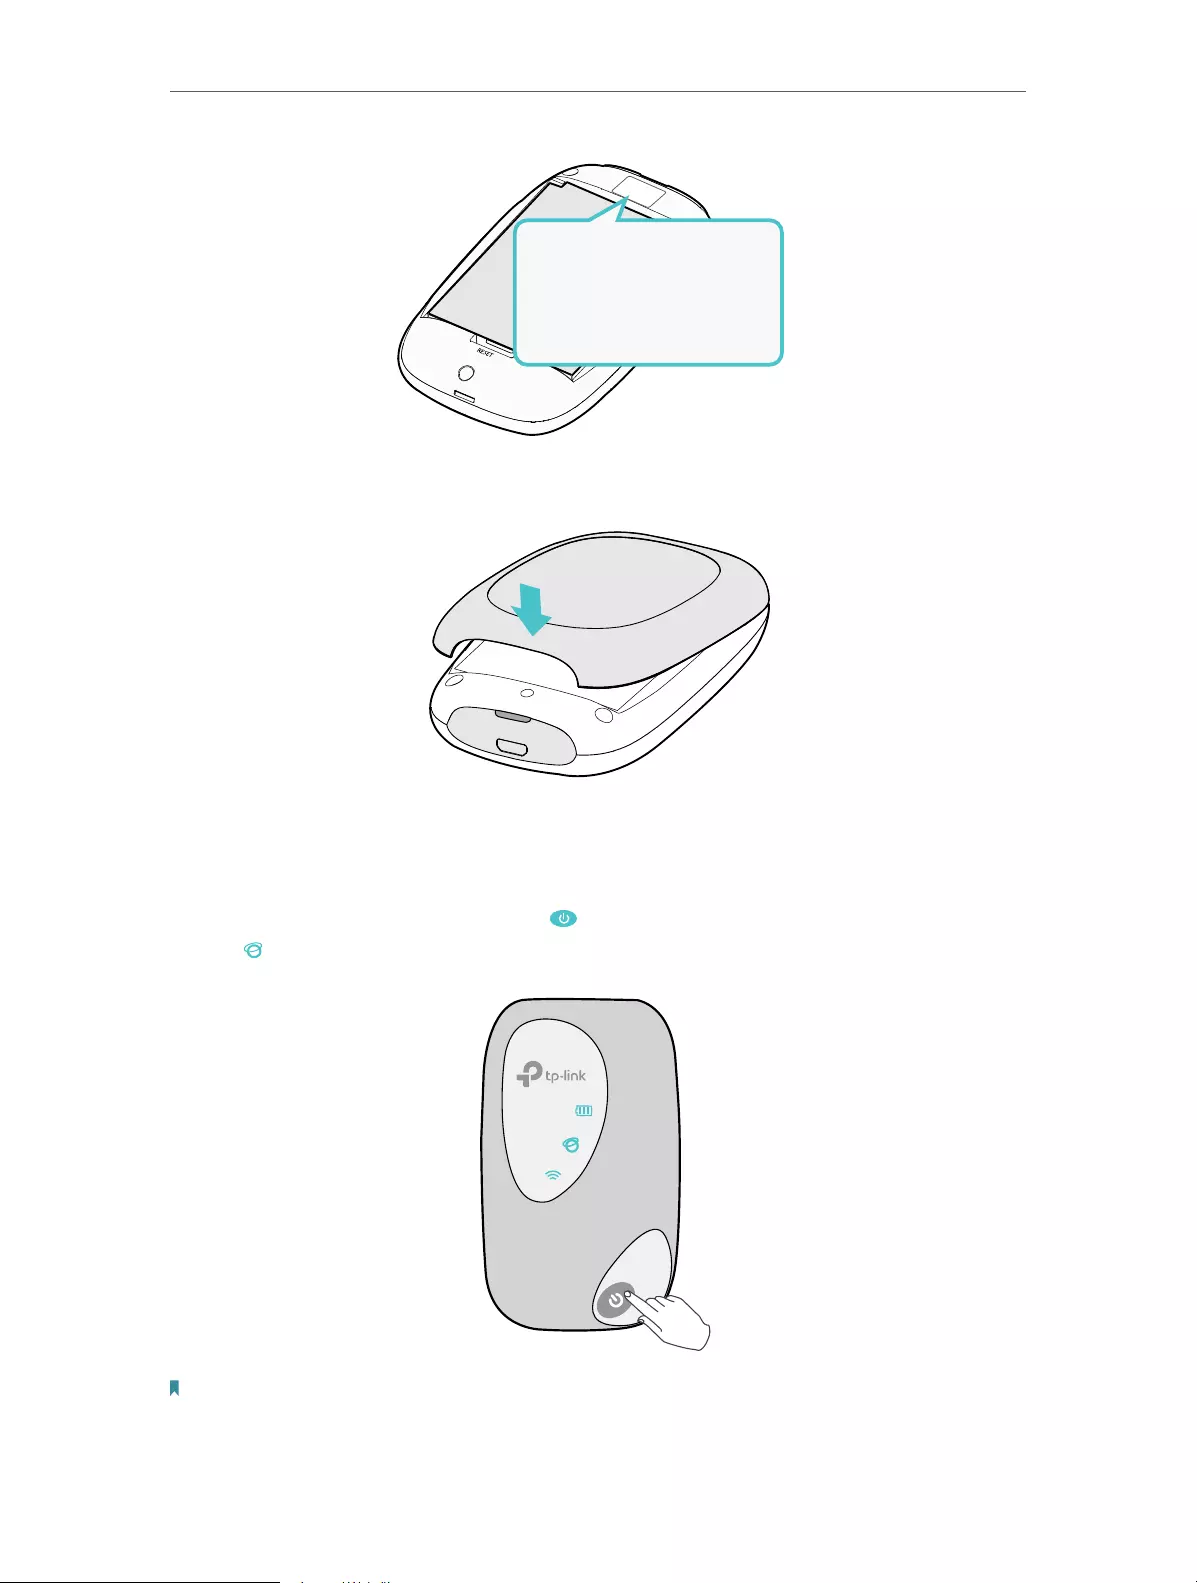
3. Install the provided battery.
SSID:
TP-Link_XXXX
Wireless Password:
XXXX XXXX
a
b
4. Note down the default SSID and Wireless Password.
8
Chapter 2 Set Up Internet Connection
SSID:
TP-Link_XXXX
Wireless Password:
XXXX XXXX
SSID:
TP-Link_XXXX
Wireless Password:
XXXX XXXX
SSID:
TP-Link_XXXX
Wireless Password:
XXXXXXXX
5. Replace the cover.
2. 2. Connect to the Internet
1. Press and hold the Power button until all LEDs are lit. Wait until the Internet
LED turns solid green.
Note:
• To power off, press and hold the Power button until all the LEDs are off.
• If the Internet LED doesn’t light up, refer to FAQ > Q2.
9
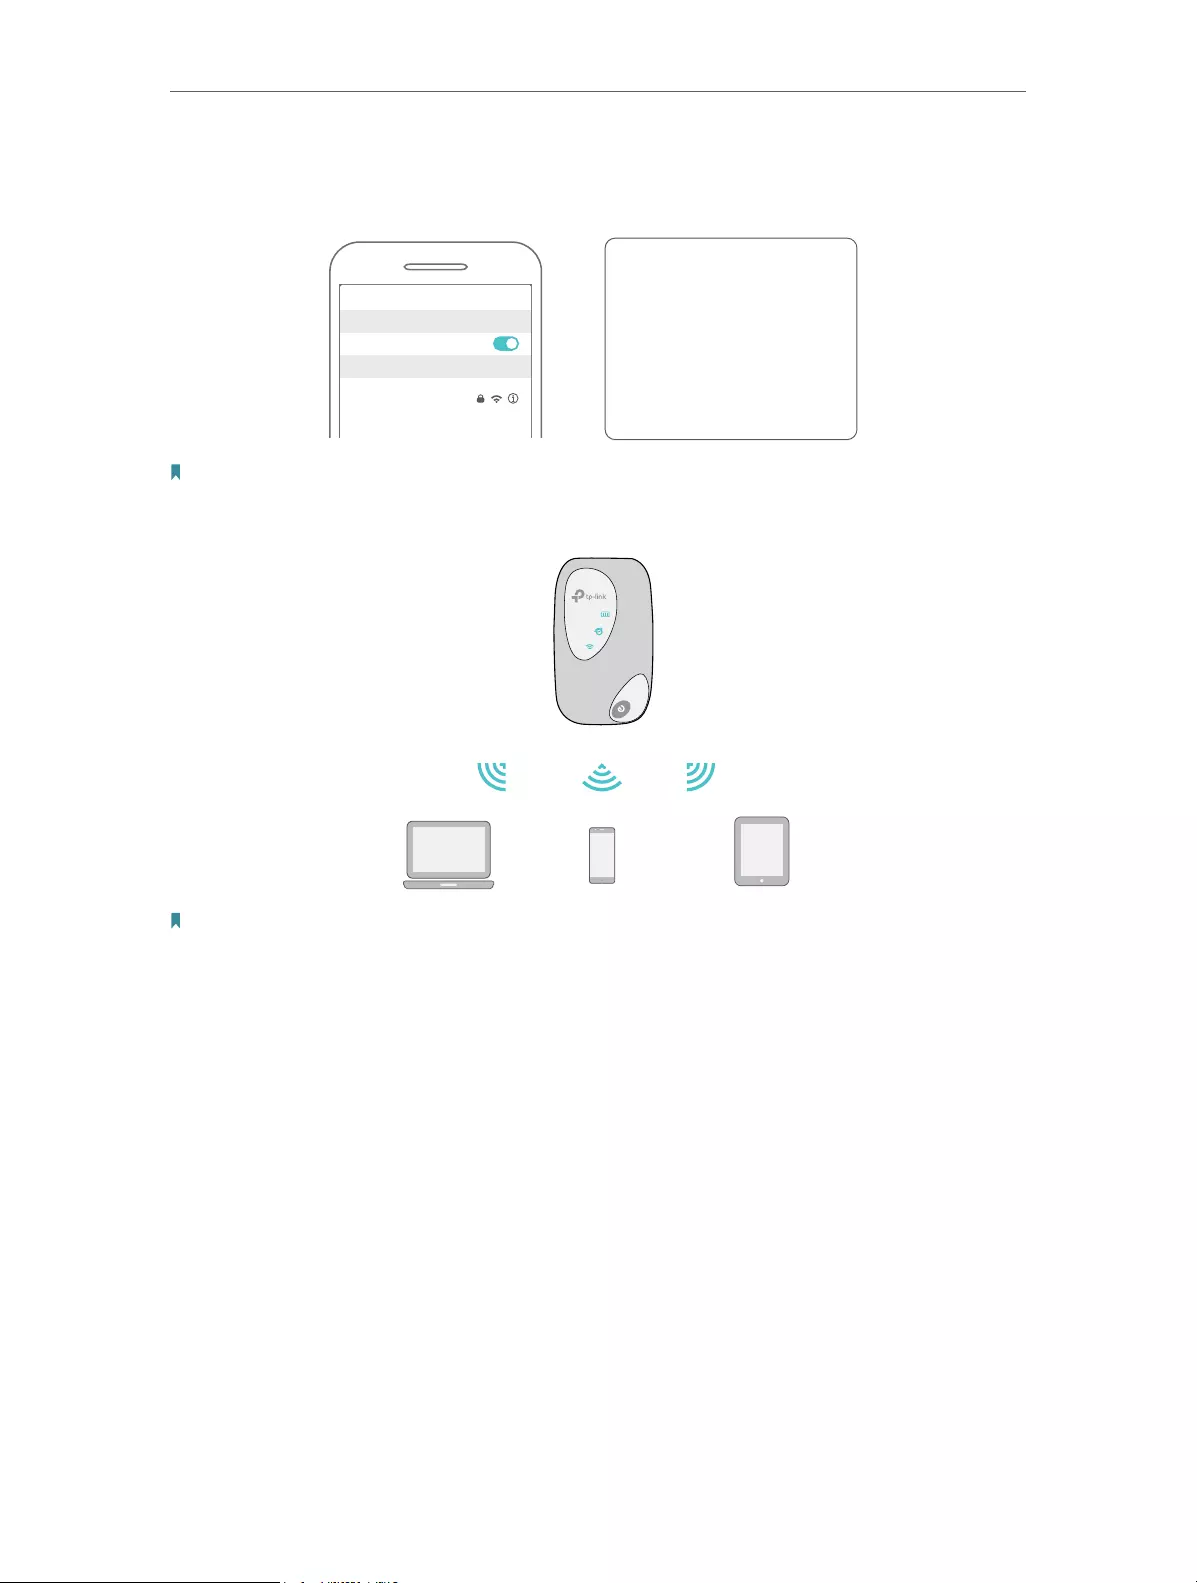
Chapter 2 Set Up Internet Connection
2. Connect your wireless device to the Mobile Wi-Fi using the SSID and the
Wireless Password you have noted down.
SSID:
TP-Link_XXXX
Wireless Password:
XXXXXXXX
Wi-Fi
Wi-Fi
TP-Link_XXXX
CHOOSE A NETWORK…
Other…
< Settings
Note: If you use a computer to connect to the Mobile Wi-Fi, set it to obtain an IP address automatically.
3. Now you can enjoy the internet!
Note: By default, Power Saving is enabled and the Mobile Wi-Fi will turn off the Wi-Fi when no wireless
devices are connected to it for 10 minutes. To resume the Wi-Fi connection, press the Power button.

Chapter 3
Log In
This chapter introduces how to log in to the web management page.
Demonstrations in this guide use the phone web management interfaces, while
some use the PC ones as those functions are only available on the PC web
management page.
Before login, make sure your device is connected to the Mobile Wi-Fi’s SSID.
This chapter includes the following sections:
• Via Phone Login Entry
• Via PC Login Entry
• Via tpMiFi App

11
Chapter 3 Log In
3. 1. Via Phone Login Entry
1. On your smart phone, visit http://tplinkmifi.net, and log in with the default
password: admin.
2. Create a new login password for security purposes and use it for future logins.
3. 2. Via PC Login Entry
On the PC web management interfaces, you can enjoy more features, such as
DHCP settings.
1. On your computer or tablet, visit http://tplinkmifi.net, and log in with the
password: admin.

12
Chapter 3 Log In
2. Go to Wizard, create a new login password for security purposes and use it for
future logins.
3. 3. Via tpMiFi App
1. Search “tpMiFi“ at the App Store or Google Play or simply scan the QR code
to download the tpMifi app.
2. Connect your device to the Mobile Wi-Fi.
3. Launch the tpMiFi app, and log in with the default password: admin.

13
Chapter 3 Log In
4. Create a new password for security purposes and use it for future logins.

Chapter 4
Manage Your Data Usage
This chapter explains how to manage the data usage of your Mobile Wi-Fi.
It includes the following sections:
• Track Data Usage
• Limit Data Usage
• Set Up Free Data Period
• Enable Mobile Data
• Enable Data Roaming

15
Chapter 4 Manage Your Data Usage
4. 1. Track Data Usage
This feature allows you to monitor the amount of data you have used on your
Mobile Wi-Fi and revise the displayed data usage as needed.
4. 1. 1. Check Data Usage on the Web Management Page
1. Visit http://tplinkmifi.net, and log in with the password you set for the Mobile
Wi-Fi.
2. You can view the data usage on the Status page as shown below.
Note:
1. Actual data usage may vary from the estimated data usage displayed on the usage meter.
2. The page above displays the monthly data usage if you have enabled Monthly Data Statistics.
4. 1. 2. Check Data Usage via SMS
Your mobile carrier can provide more accurate data usage information. To obtain
it, you can send messages to your mobile carrier.
1. Visit http://tplinkmifi.net, and log in with the password you set for the Mobile
Wi-Fi.

16
Chapter 4 Manage Your Data Usage
2. Go to SMS.
3. Tap New Message.
4. Create a message to your carrier and then tap to send it. And a few minutes
later, you will receive a message of data usage information. For the phone
number and message content, check from your carrier. Example below is from
the mobile carrier China Unicom.
4. 1. 3. Revise Data Usage
If the data usage displayed is not accurate, you can modify it as needed.
1. Visit http://tplinkmifi.net, and log in with the password you set for the Mobile
Wi-Fi.
2. Go to Device > Data Usage Settings.
3. The figure below displays the current data usage. Tap Correct, enter a more
accurate value for the data usage.

17
Chapter 4 Manage Your Data Usage
4. Tap Done.
Note:
1. You can obtain the exact data usage from your carrier. Please refer to Check Data Usage via SMS.
2. The page above displays the monthly data usage if you have enabled Monthly Data Statistics.
4. 2. Limit Data Usage
This feature allows you to establish data limits for different data packages so
that you can better control your data usage.
4. 2. 1. Limit Data Package
Limit my data usage so that I will not exceed my data
package (2GB). I wish to:
1. Receive an alert when the data usage reaches 1.8GB
(90% of the allowance);
2. Disable the internet access automatically when it
reaches the allowance (2GB).
1. Visit http://tplinkmifi.net, and log in with the password
you set for the Mobile Wi-Fi.
2. Go to Device > Data Usage Settings.
3. Enable Data Usage Limit.
4. Enter 2 in Total Allowance field and specify GB as the
unit of measure. To inform you that your data usage
has reached the allowance, the internet access will be
disabled automatically and the data usage value on the
Status page will turn red.
5. Set 90 as the Usage Alert percentage. To inform you
that your data usage has reached the alert value, the
data usage value on the Status page will turn orange.
I want to:
How can I do
that ?

18
Chapter 4 Manage Your Data Usage
6. Tap Done.
Now your data usage is limited according to your settings.
4. 2. 2. Limit Monthly Data Usage
Limit my data usage so that I will not exceed my monthly
data package (800MB). I wish to:
1. Receive an alert when the data usage reaches 720MB
(90% of the allowance).
2. Disable the internet access automatically when it
reaches the allowance (800MB).
1. Visit http://tplinkmifi.net, and log in with the password
you set for the Mobile Wi-Fi.
2. Go to Device > Data Usage Settings.
3. Enable Data Usage Limit and Monthly Data Statistics.
4. Enter 800 in Monthly Allowance field and specify MB as
the unit of measure. To inform you that your data usage
has reached the allowance, the internet access will be
disabled automatically and the data usage value on the
Status page will turn red.
5. Set 90 as the Usage Alert percentage. To inform you
that your data usage has reached the alert value, the
data usage value on the Status page will turn orange.
6. Enter the Start Date.
Note:
The monthly data usage statistics will be cleared and recounted from the date
you have set every month.
Done!
I want to:I want to:
How can I
do that?

19
Chapter 4 Manage Your Data Usage
7. Tap Done.
Now your data usage is limited according to your settings.
4. 3. Set Up Free Data Period
In the free data period, you will not be charged for data by the mobile carrier. If
your carrier has provided this data service to you, you can specify the free data
period during, so the data usage will not be counted for data alert and limitation.
1. Visit http://tplinkmifi.net, and log in with the password you set for the Mobile
Wi-Fi.
2. Go to Device > Data Usage Settings.
3. Enable Free Data Period.
4. Enter the Start Time and End Time of Free Data Period.
Done!

20
Chapter 4 Manage Your Data Usage
5. Tap Done.
4. 4. Enable Mobile Data
With Mobile Data (also known as cellular data) enabled, devices connected to
the Mobile Wi-Fi can access the internet. This feature is enabled by default.
1. Visit http://tplinkmifi.net, and log in with the password you set for the Mobile
Wi-Fi.
2. Go to Dial-up.
3. Enable Mobile Data.
4. Tap Done.

21
Chapter 4 Manage Your Data Usage
4. 5. Enable Data Roaming
If you are out of your carrier’s service area, the icon will appear on the Mobile
Wi-Fi’s PC web management page, and you will need to enable data roaming to
access the internet.
1. Visit http://tplinkmifi.net, and log in with the password you set for the mobile
Wi-Fi.
2. Go to Dial-up.
3. Enable Data Roaming.
4. Tap Done.

Chapter 5
Secure Your Network
This chapter explains how to secure your network in various ways. You can
change the SSID, manage the blacklist and lock your SIM card to safeguard your
network.
It includes the following sections:
• Secure Wireless Network
• Block Unwelcome Devices
• Lock SIM Card

23
Chapter 5 Secure Your Network
5. 1. Secure Wireless Network
The SSID (wireless network name), wireless password of the Mobile Wi-Fi and
security options are preset as default. The default SSID and password can be
found inside the back cover of your Mobile Wi-Fi. You can customize the wireless
settings as needed.
1. Visit http://tplinkmifi.net, and log in with the password you set for the Mobile
Wi-Fi.
2. Go to Wireless.
¾To change the SSID and wireless password:
1. Enter a new SSID and wireless password in the Wireless Network Name and
Wireless Password fields respectively.
2. Tap Done.
¾To hide the SSID:
1. Toggle off SSID Broadcast, so the SSID will not be displayed when you scan
for wireless networks.
2. Tap Done.
Note:
If the SSID is hidden, it will not be displayed on your wireless device when you scan for local wireless
networks. And you need to manually enter the SSID to join the network.

24
Chapter 5 Secure Your Network
5. 2. Block Unwelcome Devices
This feature allows you to restrict unwelcome devices to accessing the wireless
network of your Mobile Wi-Fi.
1. Visit http://tplinkmifi.net, and log in with the password you set for the mobile
Wi-Fi.
2. Go to Status > Current Clients.
3. Tap .
4. Select the device(s) that you want to block from the Online Clients list.
5. Tap Block.
5. 3. Lock SIM Card
This feature allows you to lock your SIM card with the PIN lock. Once the PIN
lock is enabled, every time you start your Mobile Wi-Fi or another device (such

25
Chapter 5 Secure Your Network
as a smartphone or tablet) with this SIM card inserted, you need to enter the PIN
code to access the internet.
If you don’t wish to enter the PIN code when using this SIM card on your Mobile
Wi-Fi, you can enable the Auto-unlock PIN upon Power—on function. You will still
have to enter the PIN code after inserting the SIM card to another device (such
as a smartphone or tablet), however.
¾To enable the PIN lock:
1. Visit http://tplinkmifi.net, and log in with the password you set for the Mobile
Wi-Fi.
2. Go to Device > Advanced > PIN Management. Toggle on Enable PIN.
3. Enter the PIN code of your SIM card.
4. Tap Done.
5. Visit http://tplinkmifi.net and enter the PIN code to access the internet every
time you start your Mobile Wi-Fi.
Note:
1. The PIN code of your SIM card is preset by your carrier and usually can be found on the package of the
SIM card.
2. After 3 failed verification attempts the SIM will be locked, and you will need to enter the PUK code to
unlock it. The PUK code can usually be found on the package of the SIM card, too.
¾To enable Auto-unlock PIN upon Power—on:
1. Visit http://tplinkmifi.net, and log in with the password you set for the Mobile
Wi-Fi.
2. Go to Device > Advanced > PIN Management.
3. Enable Auto-unlock PIN upon Power-on.

26
Chapter 5 Secure Your Network
4. Once enabled, you can save the trouble of entering the PIN code on your
Mobile Wi-Fi upon power—on.
¾To reset PIN code:
1. On your computer or tablet, visit http://tplinkmifi.net, and log in with the
password you set for the Mobile Wi-Fi.
2. Go to Advanced > Dial-up > PIN Management.
3. If SIM Card Status is disabled, select Enable from the drop-down list, enter the
PIN code of your SIM card, and then click Apply.
4. Select Modify from the drop-down list.
5. Enter the current PIN code and then enter a new PIN code twice.
6. Click Apply.
7. Use the new PIN code for future PIN verifications.

Chapter 6
Customize Your Network
This chapter guides you on how to configure network settings of your Mobile
Wi-Fi.
It contains the following sections:
• Specify Network Mode
• Configure Dial-up
• Configure DHCP Server

28
Chapter 6 Customize Your Network
6. 1. Specify Network Mode
This Mobile Wi-Fi supports three modes of network connection: 4G Preferred,
4G Only and 3G Only. If your SIM card supports WCDMA, select 3G Only; if your
SIM card supports FDD-LTE or TDD-LTE, select 4G Preferred or 4G Only as
needed. In general, the 4G network is faster than the 3G one.
1. Visit http://tplinkmifi.net, and log in with the password you set for the Mobile
Wi-Fi.
2. Go to Device > Advanced > Network Mode.
3. Select 4G Preferred, 4G Only or 3G Only as needed.
4. Tap Done.

29
Chapter 6 Customize Your Network
6. 2. Configure Dial-up
6. 2. 1. Configure Dial-up Settings
If you are in a location beyond your mobile carrier’s service area, you may need to
configure the dial-up settings to access the internet provided by a local mobile
carrier.
1. Visit http://tplinkmifi.net, and log in with the password you set for the Mobile
Wi-Fi.
2. Go to Dial-up.
3. Tap Create to build a dial-up profile.
4. Specify a name for the profile and fill in the parameters provided by your
carrier.
5. Tap Done and then tap Ye s in the pop-up to apply the new profile.
Note:
1. Mobile Data is enabled by default. If disabled, internet access is prohibited.
2. Data Roaming is disabled by default. If enabled, data service is allowed when roaming.

30
Chapter 6 Customize Your Network
3. You can click View profile details to check the current profile. If any parameter is wrong, you can click
Create to build a new one.
6. 2. 2. Configure Network Search
The Mobile Wi-Fi provides two types of network connection: Auto and Manual.
• Auto: The Mobile Wi-Fi will automatically establish internet connection
when it is started.
• Manual: When you have selected Manual, click Search and the Mobile Wi-
Fi will scan for mobile networks. You can choose a network with better
performance to connect to. The mobile carrier providing the network
must be or have cooperation with your SIM card provider.
1. On your computer or tablet, visit http://tplinkmifi.net, and log in with the
password you set for the Mobile Wi-Fi.
2. Go to Advanced > Dial-up > Network Settings.
3. Select Auto or Manual for Network Search as needed.
4. Click Save.
6. 3. Configure DHCP Server
The Mobile Wi-Fi acts as a DHCP (Dynamic Host Configuration Protocol) server,
dynamically assigning TCP/IP parameters to devices from the IP Address pool.
You can change the settings of the DHCP server if necessary.
1. On your computer or tablet, visit http://tplinkmifi.net, and log in with the
password you set for the Mobile Wi-Fi.
2. Go to Advanced > DHCP Server.
3. Enter a new IP address in the IP Address field and leave the Subnet Mask as
default. And enter the starting and ending IP addresses in the Start and End IP
Address fields respectively.
Note:
1. The start and end IP addresses should be on the same network segment as the IP address you have
entered.

31
Chapter 6 Customize Your Network
2. If you have changed the IP address of your Mobile Wi-Fi, you should use the new IP address or
http://tplinkmifi.net to log in to the web management page.
4. Enter the lease time in the Lease Time field. When the lease time expires, the
Mobile Wi-Fi will reassign IP addresses.
5. Enter the primary DNS IP address which usually accords with the IP address.
6. Enter the secondary DNS IP address if provided by your carrier.
7. Click Save.

Chapter 7
Manage Your Mobile Wi-Fi
This chapter presents how to manage and maintain your Mobile Wi-Fi.
It includes the following sections:
• Save the Mobile Wi-Fi’s Power
• Change Login Password
• Set Up System Time
• Restore Configuration Settings
• Update the Firmware
• Update ISP Parameters
• System Log

33
Chapter 7 Manage Your Mobile Wi-Fi
7. 1. Save the Mobile Wi-Fi’s Power
The Power Saving feature allows you to slow down the power consumption
of your Mobile Wi-Fi, by adjusting the Wi-Fi range or enabling the Wi-Fi Auto-
disable Time feature.
1. Visit http://tplinkmifi.net, and log in with the password you set for the Mobile
Wi-Fi.
2. Go to Device > Power Saving.
¾To set Wi-Fi Range:
1. Enable Power Saving Mode.
2. Select Long, Medium or Short from the Wi-Fi Range drop-down list.
Note:
The shorter the Wi-Fi Range is, the less power your Mobile Wi-Fi uses.
3. Tap Done.
4. Tap Restart Wi-Fi on the pop-up to make the configurations take effect, and
then reconnect to the Wi-Fi after it restarts.
¾To set Wi-Fi Auto-disable Time:
1. Enable Power Saving Mode.
2. Specify the Wi-Fi Auto-disable Time.

34
Chapter 7 Manage Your Mobile Wi-Fi
3. Tap Done. If there are no devices connected to the Mobile Wi-Fi for the time
your specified, the Wi-Fi will be disabled automatically.
Note:
To resume the Wi-Fi, press the Power button.
7. 2. Change Login Password
This feature allows you to change your login password of the web management
page.
1. Visit http://tplinkmifi.net, and log in with the password you set for the Mobile
Wi-Fi.
2. Go to Device > Account.
3. Enter the current password. Then enter the new password twice (case-
sensitive) and tap Done.
4. Use the new password for future logins.

35
Chapter 7 Manage Your Mobile Wi-Fi
7. 3. Set Up System Time
The system time you configure here will be used for time-based functions.
Note:
Make sure your Mobile Wi-Fi has access to the internet. Otherwise, it can not synchronize the current time.
1. Visit http://tplinkmifi.net, and log in with the password you set for the mobile
Wi-Fi
2. Go to Device > Advanced > Time Settings.
3. Select your local Time Zone from the drop-down list.
4. Tap Done.
7. 4. Restore Configuration Settings
The Factory Defaults feature allows you to restore your Mobile Wi-Fi to its factory
defaults. After you restore your Mobile Wi-Fi, all previous settings will be cleared
and you have to reconfigure them.
Method One: Via the Reset button
With the Mobile Wi- Fi powered on, remove the cover. Use a pin to press and hold
the Reset button until all LEDs turn on momentarily.
Method Two: Via the web page
1. On your computer or tablet, visit http://tplinkmifi.net and log in with the
password you set for the Mobile Wi-Fi.
2. Go to Advanced > Device > Factory Defaults.
3. Click Restore.

36
Chapter 7 Manage Your Mobile Wi-Fi
4. Wait a few minutes for the restore to complete and the Mobile Wi-Fi to restart.
Note: During the resetting process, do not power off the Mobile Wi-Fi.
7. 5. Update the Firmware
TP-Link is committed to improving product features, giving you a better network
experience. We will inform you web management page if there’s any newly
released update firmware. Also, you can download it from the Support page of
our website www.tp-link.com.
Note:
1. Make sure the latest firmware file is matched with the hardware version (as shown in the Download
section of the Support page).
2. Make sure that you have a stable connection between the Mobile Wi-Fi and your computer.
3. Do NOT power off the Mobile Wi-Fi during the firmware update and make sure it has sufficient power.
¾To update the firmware locally:
1. Download the latest firmware file for your Mobile Wi-Fi from our website
www.tp-link.com.
2. On your computer or tablet, visit http://tplinkmifi.net, and log in with the
password you set for the Mobile Wi-Fi.
3. Go to Advanced > Device > Firmware Update.
4. Select Update via the local server, click Browse to locate the downloaded file,
and then click Update.
5. Wait a few minutes for the update to complete and the mobile Wi-Fi to restart.

37
Chapter 7 Manage Your Mobile Wi-Fi
¾To update the firmware online:
1. On your computer or tablet, visit http://tplinkmifi.net, and log in with the
password you set for the Mobile Wi-Fi.
2. Go to Advanced > Device > Firmware Update.
3. Select Update via the cloud server.
4. Click Update.
5. Wait a few minutes for the update to complete and the Mobile Wi-Fi to restart.
Note:
To download the latest firmware file, you can also click the New Version number, such as 1.0.5 in the page
above. To view update details, click Release Note.
7. 6. Update ISP Parameters
You can update the ISP information.
1. Download the latest ISP update file from the Support page at
www.tp-link.com.
2. On your computer or tablet, visit http://tplinkmifi.net, and log in with the
password you set for the Mobile Wi-Fi.
3. Go to Advanced > Dial-up > ISP Update.
4. Click Browse to locate the downloaded file.
5. Click Update.

38
Chapter 7 Manage Your Mobile Wi-Fi
7. 7. System Log
When the Mobile Wi-Fi does not work normally, you can save the system log and
send it to our technical support for troubleshooting.
¾To save the system logs locally:
1. On your computer or tablet, visit http://tplinkmifi.net, and log in with the
password you set for the Mobile Wi-Fi.
2. Go to Advanced > Device > System Log.
3. Click Save Logs to save the logs to your local device.
¾To debug logs:
The Debug Log feature can save logs for specific troubleshooting. This function
should be enabled under the requirement of our technical support.
1. Insert an SD card of at least 100MB storage in your Mobile Wi-Fi.

39
Chapter 7 Manage Your Mobile Wi-Fi
2. Put the file provided by our technical support in the SD card.
3. On your computer or tablet, visit http://tplinkmifi.net, and log in with the
password you set for the Mobile Wi-Fi.
4. Go to the Advanced > Storage Sharing and set By Wi-Fi as Access Mode.
5. Go to Advanced > Device > System Log.
6. Enable Debug Log and click Save Logs.
Note:
Do not remove the SD card or switch the storage sharing mode when using this function.
7. Visit the SD card and send the saved files to our technical support.

40
FAQ
Q1. What should I do if I cannot log in to the web management page?
¾Verify that your device is connected to the Mobile Wi-Fi’s SSID.
¾Verify that you have entered http://tplinkmifi.net or http://192.168.0.1
correctly.
¾Verify that your computer is set to obtain an IP address automatically.
Q2. What should I do if the Internet LED doesn’t light up (I cannot access
the internet)?
¾Check PIN status
Log in to the web management page on your phone. If the current SIM card
status is PIN Locked, you will need to unlock it using the PIN code provided
by your mobile carrier.
¾Verify the mobile carrier parameters
1 ) Log in to the web management page on your phone. Go to Dial-up, tap
View profile details, and verify the parameters (i.e. APN, Username, and
Password) provided by your mobile carrier are correctly entered.
2 ) If the mobile carrier parameters are not correct, return to the Dial-up
page and create a new profile with the correct information. Then choose
the new created profile from the Profile List.
¾Check the Data Roaming settings
If your SIM card is operated in a roaming service area, log in to the web
management page on your phone. Go to Dial-up and enable the Data
Roaming option.
¾Check Mobile Data
Log in to the web management page on your phone. Go to Dial-up to verify
that Mobile Data is On. If not, enable it.
¾Check Data Limit
Log in to the web management page on your phone. Go to Device > Data
Usage Settings to check whether your data usage has exceeded the Total/
Monthly allowance.
Q3. What should I do if my internet speed is slow?
Log in to the web management page on your phone. Go to Device > Advanced >
Network Mode and try a different network.

41
Q4. How do I reset the Mobile Wi-Fi to its factory default settings?
¾With the Mobile Wi-Fi powered on, remove the cover. Use a pin to press and
hold the Reset button until all LEDs turn on momentarily.
¾On your computer or tablet, log in to the Mobile Wi-Fi’s web management
page. Go to Advanced > Device > Factory Defaults and click Restore.

COPYRIGHT & TRADEMARKS
Specifications are subject to change without notice. is a registered
trademark of TP-Link Technologies Co., Ltd. Other brands and product names
are trademarks or registered trademarks of their respective holders.
No part of the specifications may be reproduced in any form or by any means or
used to make any derivative such as translation, transformation, or adaptation
without permission from TP-Link Technologies Co., Ltd.
Copyright © 2017 TP-Link Technologies Co., Ltd. All rights reserved.

CE Mark Warning
This is a class B product. In a domestic environment, this product may cause
radio interference, in which case the user may be required to take adequate
measures.
OPERATING FREQUENCY(the maximum transmitted power)
2412MHz—2472MHz (20dBm)
EU declaration of conformity
TP-Link hereby declares that the device is in compliance with the essential
requirements and other relevant provisions of directives 2014/53/EU and
2011/65/EU.
The original EU declaration of conformity may be found at
http://www.tp-link.com/en/ce
RF Exposure Information
This device meets the EU requirements (2014/53/EU Article 3.1a) on the
limitation of exposure of the general public to electromagnetic fields by way of
health protection.
This device has been tested and meets the ICNIRP exposure guidelines and
the European Standard EN 62209-2. SAR is measured with this device at a
separation of 0.5 cm to the body, while transmitting at the highest certified
output power level in all frequency bands of this device. Carry this device at
least 0.5 cm away from your body to ensure exposure levels remain at or below
the as-tested levels.
NCC Notice
注意!
依據 低功率電波輻射性電機管理辦法
第十二條 經型式認證合格之低功率射頻電機,非經許可,公司、商號或使用者均
不得擅自變更頻率、加大功率或變更原設計之特性或功能。
第十四條 低功率射頻電機之使用不得影響飛航安全及干擾合法通信;經發現有干
擾現象時,應立即停用,並改善至無干擾時方得繼續使用。前項合法通信,指依
電信規定作業之無線電信。低功率射頻電機需忍受合法通信或工業、科學以及醫
療用電波輻射性電機設備之干擾。
減少電磁波影響,請妥適使用。
BSMI Notice
安全諮詢及注意事項

• 請使用原裝電源供應器或只能按照本產品注明的電源類型使用本產品。
• 清潔本產品之前請先拔掉電源線。請勿使用液體、噴霧清潔劑或濕布進行清
潔。
• 注意防潮,請勿將水或其他液體潑灑到本產品上。
• 插槽與開口供通風使用,以確保本產品的操作可靠並防止過熱,請勿堵塞或覆
蓋開口。
• 請勿將本產品置放於靠近熱源的地方。除非有正常的通風,否則不可放在密閉
位置中。
• 請不要私自打開機殼,不要嘗試自行維修本產品,請由授權的專業人士進行此
項工作。
限用物質含有情況標示聲明書
產品元件名稱
限用物質及其化學符號
鉛
Pb
鎘
Cd
汞
Hg
六價鉻
CrVI
多溴聯苯
PBB
多溴二苯醚
PBDE
PCB ○ ○ ○ ○ ○ ○
外殼 ○ ○ ○ ○ ○ ○
锂电池 ○ ○ ○ ○ ○ ○
備考 1. « 超出 0.1 wt %» 及 « 超出 0.01 wt %» 系指限用物質之百分比含量超出百
分比含量基準值。
備考 2. « ○ « 系指該項限用物質之百分比含量未超出百分比含量基準值。
備考 3. «—» 系指該項限用物質為排除項目。
Продукт сертифіковано згідно с правилами системи УкрСЕПРО на
відповідність вимогам нормативних документів та вимогам, що передбачені
чинними законодавчими актами України.
Safety Information
• Keep the device away from water, fire, humidity or hot environments.
• Do not attempt to disassemble, repair, or modify the device.
• Do not use damaged charger or USB cable to charge the device.
• Do not use any other chargers than those recommended
• Do not use the device where wireless devices are not allowed.
• Do not disassemble, crush, puncture, short external contacts, or dispose of
the battery in fire or water.

• CAUTION: RISK OF EXPLOSION IF BATTERY IS REPLACED BY AN INCORRECT TYPE.
DISPOSE OF USED BATTERIES ACCORDING TO THE INSTRUCTIONS.
Please read and follow the above safety information when operating the device. We cannot
guarantee that no accidents or damage will occur due to improper use of the device. Please
use this product with care and operate at your own risk.
Explanations of the symbols on the product label
Symbol Explanation
DC voltage
RECYCLING
This product bears the selective sorting symbol for Waste electrical and electronic
equipment (WEEE). This means that this product must be handled pursuant to European
directive 2012/19/EU in order to be recycled or dismantled to minimize its impact on
the environment.
User has the choice to give his product to a competent recycling organization or to the
retailer when he buys a new electrical or electronic equipment.