
Страницы и текст этой инструкции
 Инструкция автомагнитолы JVC KD-G847
 Информация отображена на картинке
 Информация отображена на картинке
 Информация отображена на картинке
 Информация отображена на картинке
Как использовать наш сайт инструкций OnlineManuals.ru
Наша цель состоит в том, чтобы предоставить вам быстрый доступ к содержанию инструкции для автомагнитолы JVC KD-G847.
С помощью онлайн просмотра, Вы можете быстро просмотреть содержимое инструкции и найти решение проблемы с автомагнитолы JVC KD-G847.
Для Вашего удобства
Если листать руководство пользователя автомагнитолы JVC KD-G847 прямо на сайте, не очень удобно для Вас, есть два возможных решения:
• Просмотр в полноэкранном режиме — легко просмотреть руководство пользователя (без загрузки его на свой компьютер), Вы можете использовать режим полноэкранного просмотра.
Для просмотра инструкции пользователя автомагнитолы JVC KD-G847 на полном экране, используйте кнопку «Открыть в Pdf-viewer».
• Загрузка на компьютер — Вы можете также скачать Инструкция автомагнитолы JVC KD-G847 на свой компьютер и сохранить его в файлах.
Многие люди предпочитают читать документы не на экране, а в печатной версии.
Возможность печати руководства пользователя также была предусмотрена на нашем сайте,
и вы можете использовать ее, нажав на иконку «печать» в Pdf-viewer.
Нет необходимости печатать все руководство автомагнитолы JVC KD-G847, можно выбрать только нужные страницы инструкции.
Перейти к контенту
Автомагнитолы JVC

- Размер инструкции: 3.28 Мб
- Формат файла: pdf
Если вы потеряли инструкцию от автомагнитолы JVC KD-G847, можете скачать файл для просмотра на компьютере или печати.
Инструкция для автомагнитолы JVC KD-G847 на русском языке. В руководстве описаны возможности и полезные функции, а также правила эксплуатации. Перед использованием внимательно ознакомьтесь с инструкцией.
Чтобы не читать всю инструкцию вы можете выполнить поиск по содержимому внутри инструкции и быстро найти необходимую информацию. Рекомендации по использованию помогут увеличить срок службы автомагнитолы JVC KD-G847. Если у вас появилась проблема, то найдите раздел с описанием неисправностей и способами их решения. В нем указаны типичные поломки и способы их решения.
ENGLISH CD RECEIVER РУCCKИЙ РЕСИВЕР С ПРОИГРЫВАТЕЛЕМ КОМПАКТ-ДИСКОВ ПРИЙМАЧ З ПРОГРАВАЧЕМ КОМПАКТ-ДИСКІВ УКРАЇНА KD-G847 В соответствии с Законом Российской Федерации “О защите прав потребителей” срок службы (годности) данного товара “по истечении которого он может представлять опасность для жизни,
ENGLISH Thank you for purchasing a JVC product. Please read all instructions carefully before operation, to ensure your complete understanding and to obtain the best possible performance from the unit. IMPORTANT FOR LASER PRODUCTS 1. CLASS 1 LASER PRODUCT 2. CAUTION: Do not open the top cover.
CONTENTS INTRODUCTIONS Preparation ………………………………………….. 4 OPERATIONS Basic operations ……………………………………. 5 • Your preset adjustments will also be erased (except the registered Bluetooth device, see pages 14 and 15). How to forcibly eject a disc
ENGLISH Preparation Cancel the display demonstration and set the clock • See also pages 25 and 26. 1 2 Turn on the power. 3 Cancel the display demonstrations Enter the PSM settings. Select “Demo,” then “Off.” Set the clock Select “Clock Hr” (hour), then adjust the hour. Select “Clock Min” (minute),
ENGLISH Basic operations Using the control panel 1 • TUNER: Select preset station. 2 3 4 5 6 7 8 • CD/USB/CD-CH: Select folder. • USB-iPod: Enter the main menu [Hold]. • iPod: Enter the main menu/Pause playback/ Confirm selection. • BT-PHONE/BT-AUDIO: Select a registered device. • Turn on the
ENGLISH Using the remote controller (RM-RK50) Installing the lithium coin battery (CR2025) Before using the remote controller: • Aim the remote controller directly at the remote sensor on the unit. • DO NOT expose the remote sensor to bright light (direct sunlight or artificial lighting). 1 • Turns
Listening to the radio 1 Select “TUNER.” 2 3 Select the bands. Search for a station to listen—Auto Search. Manual Search: Hold either one of the buttons until “M” lights up on the display, then press it repeatedly. lights up • When receiving an FM stereo broadcast with sufficient signal strength,
2 ENGLISH 2 3 Display the Preset Station List. 4 Select the preset number you want to store into. 3 Local FM stations with the strongest signals are searched and stored automatically in the selected FM band. Manual presetting Ex.: Storing FM station of 92.5 MHz into preset number 4 of the FM1 band.
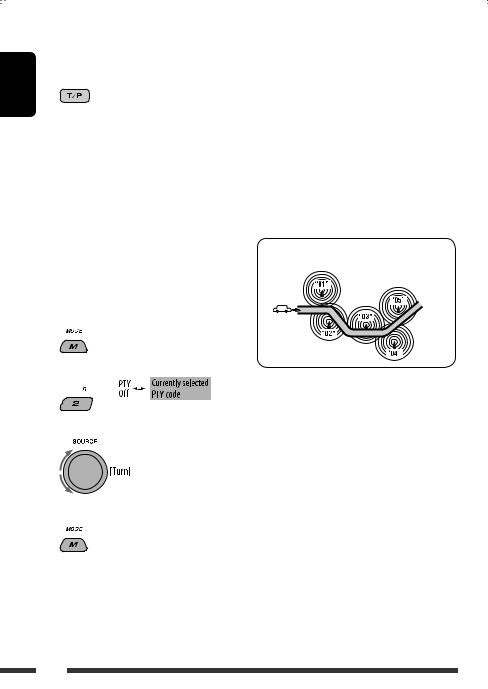
Searching for FM RDS programme — PTY Search You can search for your favorite programmes being broadcast by selecting the PTY code for your favorite programmes. • When appears on the display, you can move back to the previous display by pressing number button 3. / appears on the display, • When you
ENGLISH Activating TA/PTY Standby Reception TA Standby Reception either lights up or flashes on the display. • If lights up, the unit temporarily will switch to Traffic Announcement (TA), if available, from any source other than AM. The volume changes to the preset TA volume level if the current
ENGLISH Disc operations All tracks will be played repeatedly until you change the source or eject the disc. To stop play and eject the disc Caution: • Press SOURCE to listen to another playback source. Make sure to detach the USB device before opening the control panel, as it might block the
ENGLISH Selecting a folder/track on the list (only for MP3/WMA file) • When is shown on the display, you can move back to the previous screen by pressing number button 3. 1 2 Change to the selected item. A If File List is selected The list disappears and playback starts. B If Folder List is
You can connect a USB mass storage class device such as a USB memory, Digital Audio Player *, portable HDD, etc. to the unit. • You can also connect an Apple iPod to the USB input jack. For details of the operations, see pages 20 and 21. This unit can play MP3/WMA/WMA-DRM10 */WAV tracks stored in a
ENGLISH Using the Bluetooth ® devices For Bluetooth operations, it is required to connect the Bluetooth Adapter (KS-BTA200) to the CD changer jack on the rear of this unit. • Refer also to the instructions supplied with the Bluetooth adapter and the Bluetooth device. • Refer to the list (included
3 Repeat steps 1 and 2 until you finish 2 Select a device you want to connect. 3 • For available devices… 1 Enter the specific PIN code of the device to the unit. Refer to the instructions supplied with the device to check the PIN code. 2 Use the Bluetooth device to connect. Now connection is
ENGLISH • Select “Delete,” then confirm the selection. Press number button 3 to select “No” or return to the previous screen. You can set the unit to connect the Bluetooth device automatically when the unit is turned on. (See “Auto Connect” on page 30.) Using the Bluetooth cellular phone 1 Select
1 Select “BT-PHONE.” * Displayed only when your cellular phone is equipped with these functions. – If not displayed, try to transfer the phone book memory of the cellular phone to this unit. (Refer to the instruction manual supplied with your cellular phone.) – With some cellular phones, the phone
ENGLISH Using voice command 1 2 2 Select a phone number. You can also enter a new phone number (see also “How to enter phone number” on page 17) to store. 3 Select a preset number to store. “Say…” appears on the display. Speak the name (registered words) you want to call. • You can also use voice
ENGLISH Listening to the CD changer It is recommended to use a JVC MP3-compatible CD changer with your unit. You can connect a CD changer to the CD changer jack on the rear of the unit. • You can only play conventional CDs (including CD Text) and MP3 discs. Preparation: Make sure “Changer” is
ENGLISH Listening to the iPod You can play songs in an Apple iPod by: – Connecting it with the USB cable supplied with your iPod to the USB input jack on the control panel. – Connecting the Interface adapter for iPod, KS-PD100 (separately purchased) to the CD changer jack on the rear of the unit.
Selecting a track from the menu 1 Enter the main menu. 2 Select the desired menu. 3 For iPod connected through KS-PD100 For iPod connected to the USB input jack Playlists Ô Artists Ô Albums Ô Songs Ô Genres Ô Composers Playlists Ô Artists Ô Albums Ô SongsÔ Podcasts Ô Genres Ô Composers Ô Audiobooks
ENGLISH Listening to the other external components You can connect an external component to: • CD changer jack on the rear of this unit using the following adapters: – Line Input Adapter, KS-U57 – AUX Input Adapter, KS-U58 Preparation: Make sure “Ext Input” is selected for the external input
ENGLISH Selecting a preset sound mode You can select a preset sound mode suitable to the music genre (iEQ: intelligent equalizer). 1 Enter setting menu. 2 Select “EQ.” 3 Select a sound mode. USER, ROCK, CLASSIC, POPS, HIP HOP, JAZZ Preset value setting for each sound mode Preset value Sound mode
B Subwoofer 1 Press number button 1 ( ENGLISH ) to move to the “Subwoofer” adjustment display. 2 Use 4 /¢ to select a cutoff frequency to the subwoofer. • OFF: All signals are sent to the subwoofer. • 80Hz: Frequencies higher than 80 Hz are cut off. • 120Hz: Frequencies higher than 120 Hz are cut
You can change PSM (Preferred Setting Mode) items listed in the table below and on pages 26 – 28. 1 Enter the PSM settings. 2 Select a PSM category. ENGLISH General settings — PSM 4 Adjust the selected PSM item. 5 Repeat steps 2 – 4 to adjust other PSM items if necessary. 6 Finish the procedure. To
ENGLISH Category Indication DISP (display) CLOCK Clock Hr Hour adjustment Item ( : Initial) Setting, [reference page] 0 – 23 (1 – 12AM/ 1 – 12PM) 00 – 59 : Initial: 0 (0:00AM), [4]. Clock Min Minute adjustment 24H/12H • 12Hours Time display mode • 24Hours Clock Adj • Auto Clock adjustment • Off
AUDIO TUNER AF-Regn‘l Alternative frequency/ regionalization reception TA Volume Traffic announcement volume P-Search Programme search IF Band Intermediate frequency band Item ( : Initial) Setting, [reference page] • AF : When the currently received signals become weak, the unit switches to another
ENGLISH Category Indication Color Sel Color selection Color Set Color setting Item Setting, [reference page] ( : Initial) Initial: All Source; Color: Pale — : Select your favorite display color for each source (or for all sources), [28, 29]. COLOR : Create your own colors, and select them for the
Creating your own color—User Color 2 3 1 Follow steps 1 to 3 on page 25. • In step 2, select “COLOR.” • In step 3, select “Color Set.” 2 Select “Day Color” or “NightColor.” *1 When you select “All Source,” you can use the same color for all the sources. *2 Depends on the “Ext Input” setting, see
ENGLISH Bluetooth settings You can change the settings listed on the right column according to your preference. • When is shown on the display, you can move back to the previous screen by pressing number button 3. 1 Select “BT-PHONE” or “BT-AUDIO.” 2 Enter the Bluetooth menu. 3 Select “Setting.” 4
Basic operations Turning on the power • By pressing SOURCE on the unit, you can also turn on the power. If the source is ready, playback also starts. Turning off the power • If you turn off the power while listening to a track, playback will start from where it had been stopped previously next time
ENGLISH • File/folder list may not appear correctly if too many hierarchies and folders are used. • If the ejected disc is not removed within 15 seconds, the disc is automatically inserted again into the loading slot again to protect it from dust. Playback starts automatically. Playing a CD-R or
Playing MP3/WMA/WAV tracks from a USB device • Connecting a USB device automatically changes the source to “USB.” • While playing from a USB device, the playback order may differ from the one from other players. • This unit may be unable to play back some USB devices or some files due to their
ENGLISH appears when the connection is established. Appears when the Bluetooth phone is connected. Appears when the Bluetooth audio player is connected. Appears when the Bluetooth phone and Bluetooth audio player are connected. Icons for phone types These icons indicate the phone type set on the
Notice: When operating an iPod, some operations may not be performed correctly or as intended. In this case, visit the following JVC web site: <http://www.jvc. co.jp/english/car/support/ks-pd100/index.html> General settings—PSM • “Auto” setting for “Dimmer” may not work correctly on some vehicles,
ENGLISH Disc playback MP3/WMA playback USB device 36 Symptoms Remedies/Causes • Disc sound is sometimes interrupted. • Stop playback while driving on rough roads. • Change the disc. • Check the cords and connections. Eject the disc forcibly (see page 3). • Disc cannot be recognized (“No Disc,” “CD
USB device Remedies/Causes • “No File” flashes on the display. • “No USB” appears on the display. • “Not Support” appears on the display and track skips. • “Read failed” appears on the display. Connect a USB device that contains tracks encoded in an appropriate format. The track is unplayable. •
CD changer iPod ENGLISH Symptoms Remedies/Causes • “No Disc” appears on the display. • “No Magazine” appears on the display. • “Reset 08” appears on the display. Insert a disc into the magazine. Insert the magazine. Connect this unit and the CD changer correctly and press the reset button of the CD
How to clean the connectors Frequent detachment will deteriorate the connectors. To minimize this possibility, periodically wipe the connectors with a cotton swab or cloth moistened with alcohol, being careful not to damage the connectors. Connectors Moisture condensation Moisture may condense on
AUDIO AMPLIFIER SECTION ENGLISH Specifications Maximum Power Output: Front/Rear: 50 W per channel Continuous Power Output (RMS): Front/Rear: 19 W per channel into 4 Ω, 40 Hz to 20 000 Hz at no more than 0.8% total harmonic distortion Load Impedance: Tone Control Range: TUNER SECTION Bass: ±12 dB
Type: Non-contact optical pickup (semiconductor laser) Number of Channels: 2 channels (stereo) Frequency Response: 5 Hz to 20 000 Hz Dynamic Range: 96 dB Signal-to-Noise Ratio: 98 dB Wow and Flutter: Less than measurable limit MP3 Decoding Format: (MPEG1/2 Audio Layer 3) Max. Bit Rate: 320 kbps WMA
Благодарим Вас за приобретение изделия JVC. Перед тем, как приступать к эксплуатации, пожалуйста, внимательно прочитайте все инструкции с тем, чтобы полностью изучить и обеспечить оптимальную работу этого устройства. РУCCKИЙ ВАЖНО ДЛЯ ЛАЗЕРНОЙ АППАРАТУРЫ 1. ЛАЗЕРНАЯ АППАРАТУРА КЛАССА 1 2.
Как перенастроить Ваше устройство CОДЕРЖАНИЕ ОПЕРАЦИИ Основные операции …………………………….. 5 • Запрограммированные настройки будут также удалены (за исключением зарегистрированного устройства Bluetooth, см. стр. 14 и 15). Принудительное извлечение диска • Использование панели
Подготовка Отмена демонстрации функций дисплея и настройка часов РУCCKИЙ • См. также стр. 25 и 26. 1 2 Включение питания. 3 Отмена демонстрации функций дисплея Войдите в настройки PSM. Выберите “Demo”, затем “Off”. Настройка часов Выберите “Clock Hr” (час) и настройте час. Выберите “Clock Min”
Основные операции РУCCKИЙ Использование панели управления 1 • TUNER: Выбор запрограммированнойрадиос 2 3 4 5 6 7 8 танции. • CD/USB/CD-CH: Выберите папку. • USB-iPod: Перейдите главное меню [Удерживать]. • iPod: Вход в главное меню/Пауза/ Подтверждение выбора. • BT-PHONE/BT-AUDIO: Выбор
Использование пульта дистанционного управления (RM-RK50) РУCCKИЙ Установка литиевой батареи-таблетки (CR2025) 1 • Включение питания при кратковременном Перед использованием пульта дистанционного управления выполните следующие действия: • Направьте пульт дистанционного управления непосредственно на
– Пропуск сразу 10 элементов при нажатии и удерживании нажатой. Подключение к входному разъему USB: – Непосредственный запуск воспроизведения выбранной папки при нажатии и удерживании нажатой. • Пропуск в прямом/обратном направлении для аудиоустройства Bluetooth. РУCCKИЙ • Быстрая перемотка дорожки
2 2 3 Отобразите список запрограммированных радиостанций. 4 Выберите номер, под которым хотите сохранить станцию. РУCCKИЙ 3 Осуществляется поиск местных FMрадиостанций с наиболее сильными сигналами и их автоматическое сохранение в выбранном FM-диапазоне. Запоминание станций в ручном режиме Напр.:
Поиск программы FM RDS — поиск PTY Можно осуществлять поиск предпочитаемых программ, которые передаются, выбирая код PTY предпочитаемых программ. • При появлении на дисплее индикатора можно вернуться к предыдущему экрану, нажав нумерованную кнопку 3. • При появлении на дисплее индикатора / можно
Включение функции резервного приема сообщений о движении на дорогах (TA) или PTY РУCCKИЙ Резервный прием TA На экране дисплея горит или мигает индикатор . • Если загорится индикатор , устройство временно перейдет в режим резервного приема сообщений о движении на дорогах (TA), если таковые имеются,
Операции с дисками Внимание: Перед открытием панели управления убедитесь в том, что USB-устройство отсоединено, так как это может блокировать открывающий механизм. • Информацию об отсоединении USB-устройства см. на стр. 13. Останов воспроизведения и извлечение диска РУCCKИЙ Все дорожки будут
Выбор папки/дорожки из списка (только для файла MP3/WMA) • При появлении на дисплее индикатора можно вернуться на предыдущий экран, нажав нумерованную кнопку 3. РУCCKИЙ 1 2 Измените элемент на выбранный. A При выборе списка файлов Список исчезает, и начинается воспроизведение. B При выборе списка
К приемнику можно подключить запоминающее устройство USB большой емкости, например USB-память, цифровой аудиопроигрыватель*, съемный жесткий диск и т.д. • Можно также подключать Apple iPod к входному разъему USB. Подробные сведения об операциях см. на стр. 20 и 21. Приемник может воспроизводить
РУCCKИЙ Использование устройств Bluetooth® Для работы с устройствами Bluetooth необходимо подключить адаптер Bluetooth (KS-BTA200) к разъему устройства автоматической смены компакт-дисков, расположенному на задней панели устройства. • См. также инструкции, прилагаемые к адаптеру Bluetooth и
2 Выберите устройство, с которым необходимо установить соединение. 3 Повторяйте действия 1 и 2 до тех пор, 3 • Для доступных устройств… 1 Введите на приемнике PIN-код данного устройства. Информацию о PIN-коде см. в инструкциях, поставляемых с устройством. 2 Используйте устройство Bluetooth для
РУCCKИЙ • Выберите “Delete”, затем подтвердите выбор. Нажмите нумерованную кнопку 3, чтобы выбрать значение “No”. Можно настроить автоматическое подключение устройства Bluetooth при включении приемника. (См. раздел “Auto Connect” на стр. 30). Использование сотового телефона Bluetooth 1 Выберите
1 Выберите “BT-PHONE”. 2 Меню ввода настроек. 3 Выберите “Dial Menu”. * Отображается только при поддержке данных функций сотовым телефоном. – Если эта информация не отображается, попытайтесь перенести телефонную книгу с сотового телефона на данный приемник. (Дополнительную информацию см. в
Использование голосовой команды 1 РУCCKИЙ 2 2 Выберите номер телефона. Можно также ввести номер телефона (см. также “Порядок ввода телефонного номера” на стр. 17), чтобы сохранить его. 3 Выберите запрограммированный номер, под которым следует его сохранить. На дисплее появляется надпись “Say…”.
Прослушивание с устройства автоматической смены компакт-дисков Подготовка: Убедитесь в том, что для настройки внешнего входа выбрано значение “Changer” (см. стр. 27). 1 Выберите “CD-CH”. 2 Выберите диск для воспроизведения. [Нажмите] Выбор диска с номером от 1 до 6. [Удерживать] Выбор диска с
РУCCKИЙ Прослушивание проигрывателя iPod Можно воспроизводить песни на проигрывателе Apple iPod: – Подключив его с помощью USB-кабеля, поставляемого с проигрывателем iPod, к разъему USB-входа на панели управления; – Подключив интерфейсный адаптер KS-PD100 для проигрывателя iPod (приобретается
Выбор дорожки из меню Управление 1 Перейдите главное меню. 2 Выберите необходимое меню. 3 Для проигрывателя iPod, подключенного через адаптер KS-PD100 Для проигрывателя iPod, подключенного к разъему USB-входа Playlists Ô Artists Ô Albums Ô Songs Ô Genres Ô Composers Playlists Ô Artists Ô Albums Ô
РУCCKИЙ Прослушивание с других внешних устройств Можно подключить внешнее устройство к: • разъему устройства автоматической смены компакт-дисков на задней панели устройства с помощью следующих адаптеров: – Адаптер линейного входа, KS-U57 – Адаптер дополнительного входа (AUX), KS-U58 Подготовка:
Выбор запрограммированного режима звучания 1 Меню ввода настроек. 2 Выберите “EQ”. 3 Выберите режим звучания. РУCCKИЙ Можно выбрать режим звучания, соответствующий музыкальному жанру (iEQ: программируемый эквалайзер). USER, ROCK, CLASSIC, POPS, HIP HOP, JAZZ Запрограммированные значения настроек
B Subwoofer 1 Нажмите нумерованную кнопку 1 РУCCKИЙ ( ) для перехода на экран настройки “Subwoofer”. 2 Используйте 4 /¢ для выбора критической частоты низкочастотного динамика. • OFF: Все сигналы передаются в низкочастотный динамик. • 80Hz: Частоты выше 80 Гц не воспроизводятся. • 120Hz: Частоты
Можно изменять настройки PSM (предпочитаемый режим настройки), которые перечислены в таблице ниже и на стр. 26 – 28. 1 Войдите в настройки PSM. 2 Выберите категорию PSM. 4 Настройте выбранный элемент PSM. 5 Повторите действия 2 до 4 для настройки других параметров PSM, если необходимо. 6 Завершите
Категория Индикатор DISP (дисплей) CLOCK РУCCKИЙ Clock Hr Настройка часа Элемент Настройки, [страница для справки] ( : По умолчанию) 0 – 23 (1 – 12AM/ 1 – 12PM) 00 – 59 Clock Min Настройка минуты 24H/12H • 12Hours Формат • 24Hours отображения времени Clock Adj • Auto Настройка часов • Off 2 • Once
Индикатор TUNER AF-Regn’l Прием на альтернативных частотах/прием региональных передач TA Volume Громкость передачи сообщений о движении на дорогах P-Search Поиск программ IF Band Полоса промежуточных частот AUDIO Ext Input *6 Ввод внешних сигналов Telephone Отключение звука телефона AudioBooks *7
Элемент Настройки, [страница для справки] ( : По умолчанию) Color Sel По : Выберите необходимый цвет дисплея для каждого Выбор цвета умолчанию: источника (или для всех источников), [28, 29]. Все источники; Color: Pale Color Set — : Создайте свои цвета и выберите их в качестве цветов Настройка
Создание собственного цвета—User Color 2 3 All Source *1 Ô CD Ô Changer *3 (или Ext In *2) Ô USB *3 Ô FM Ô AM Ô iPod *3 Ô Aux In Ô BT Phone*3 Ô BT Audio*3 Ô (возврат в начало) *1 В случае выбора “All Source” можно использовать один цвет для всех источников. *2 В зависимости от настройки “Ext Input”
РУCCKИЙ Настройки Bluetooth Приведенные в правом столбце настройки можно изменить в соответствии с предпочтениями пользователя. • При появлении на дисплее индикатора можно вернуться на предыдущий экран, нажав нумерованную кнопку 3. 1 Выберите “BT-PHONE” или “BT-AUDIO”. 2 Выберите меню “Bluetooth”.
Дополнительная информация о приемнике • Для включения питания приемника также можно использовать кнопку SOURCE. Если источник готов, воспроизведение также начинается. Выключение питания • Если питание отключается во время прослушивания дорожки, при последующем включении питания воспроизведение
РУCCKИЙ • Список файлов/папок, возможно, не будет отображаться правильно, если используется слишком много иерархических структур и папок. • Если в течение 15 секунд извлеченный диск не будет вынут, он автоматически помещается обратно в загрузочный отсек в целях защиты от загрязнения.
Воспроизведение дорожек MP3, WMA или WAV с устройства USB • При подключении устройства USB источник автоматически меняется на “USB”. • Порядок воспроизведения с устройства USB может отличаться от других устройств воспроизведения. • Приемник может не воспроизводить некоторые устройства USB или
РУCCKИЙ появляется при установлении соединения. Отображается, если подключен телефон Bluetooth. Отображается, если подключен аудиопроигрыватель Bluetooth. Отображается, если подключены телефон Bluetooth и аудиопроигрыватель Bluetooth. Значки типов телефонов Эти значки указывают на установленный на
Примечание: При управлении проигрывателем iPod некоторые операции могут выполняться неправильно. В этом случае см. веб-узел компании JVC: <http://www.jvc.co.jp/english/car/ support/ks-pd100/index.html> Общие настройки—PSM • Настройка “Auto” для функции “Dimmer” может работать некорректно в
Воспроизведение диска • Диск не распознается (мигает надпись “No Disc”, “CD Loading Error” или “Eject Error”). • На дисплее появляется надпись “Please Eject”. • Диск не воспроизводится. Воспроизведение MP3/WMA • Слышен шум. Устройство USB РУCCKИЙ Симптомы • Звук, записанный на диске, иногда
• Не отображаются правильные символы (т.е. название альбома). • Звук иногда прерывается во время воспроизведения дорожки. Способы устранения/Причины Подключайте устройство USB, которое содержит дорожки, кодированные в соответствующем формате. Дорожка не подлежит воспроизведению. Подключенное
устройство автоматической смены компакт-дисков Способы устранения/Причины • На дисплее появляется надпись “No Disc”. • На дисплее появляется надпись “No Magazine”. • На дисплее появляется надпись “Reset 08”. Вставьте диск в загрузочное отверстие. Вставьте загрузочный механизм. • На дисплее
Обслуживание Разъемы Конденсация влаги Влага может конденсироваться на линзе внутри устройства в следующих случаях: • После включения автомобильного обогревателя. • При повышении влажности внутри автомобиля. Это может привести к неисправной работе устройства. В этом случае извлеките диск и оставьте
БЛОК УСИЛИТЕЛЕЙ ЗВУКА БЛОК РАДИОПРИЕМНИКА РУCCKИЙ Технические характеристики 40 Максимальная выходная мощность: Длительная выходная мощность (RMS): Импеданс нагрузки: Диапазон настройки тембра: Передние/Задние: 50 Вт на каждый канал Передние/Задние: 19 Вт на канал в при 4 Ω, от 40 Гц до 20 000 Гц и
Число каналов: Частотная характеристика: Динамический диапазон: Отношение сигнал/помеха: Коэффициент детонации: от 5 Гц до 20 000 Гц 96 дБ 98 дБ в пределах допусков измерительной аппаратуры Формат декодирования MP3: (MPEG1/2 Макс. скорость передачи 320 кбит/с Audio Layer 3) битов: Формат
Дякуємо за придбання продукції JVC. Перед роботою уважно ознайомтеся з усіма інструкціями; досягти найкращої роботи пристрою можна тільки добре розуміючи їх. ВАЖЛИВО ДЛЯ ЛАЗЕРНИХ ПРИСТРОЇВ УКРАЇНА 1. ЛАЗЕРНИЙ ПРИСТРІЙ КЛАСУ 1 2. УВАГА: Не відкривайте верхню кришку. В пристрої немає частин, які міг
Як повторно налаштувати пристрій ЗМІСТ ПЕРЕДМОВА Підготовка ………………………………………….. 4 Примусове виймання диску • Використання панелі керування ………….. • Використання пульту дистанційного керування (RM-RK50) …………………………. 5 6 Прослуховування радіо
Підготовка Відміна демонстрації функцій дисплею та встановлення часу на годиннику • Див. також стор. 25 і 26. 1 2 Вмикання живлення. 3 Відмініть демонстрацію функцій дисплею Увійдіть у режим налаштування PSM. УКРАЇНА Виберіть “Demo”, а потім “Off”. Встановіть час на годиннику Виберіть “Clock Hr”
Основні функції УКРАЇНА Використання панелі керування 1 • TUNER: Вибрати запрограмовану станцію. 2 3 4 5 6 7 8 • CD/USB/CD-CH: Вибір папки. • USB-iPod: Увійдіть у головне меню [Утримувати]. • iPod: Вхід до головного меню/Призупинення відтворення/Підтвердження вибору. • BT-PHONE/BT-AUDIO: Вибір
Використання пульту дистанційного керування (RM-RK50) Встановлення літієвої таблеткової батареї (CR2025) УКРАЇНА 1 • При короткочасному натисканні – увімкнення Перед використанням пульту дистанційного керування: • Націльте дистанційний блок керування прямо на дистанційний датчик пристрою. • НЕ
– При натисканні та утриманні – перехід через 10 пунктів за один раз. Приєднання до вхідного гнізда USB: – Початок безпосереднього відтворення вибраної папки при натисканні і утримуванні. • Пропуск елементу у зворотному/прямому напрямку при роботі з аудіопристроями Bluetooth. 7 • При короткочасному
2 2 3 Відтворення переліку попередньо запрограмованих станцій. 4 Виберіть номер, під яким ви бажаєте зберегти станцію. 3 УКРАЇНА Пошук та занесення у пам’ять локальних FM-станцій з найсильнішими сигналами виконується в обраному FM-діапазоні автоматично. Запам’ятовування станції в ручному режимі
Пошук програми FM RDS—PTYпошук Можна шукати улюблені програми, які транслюються, за їхнім PTY-кодом. • Якщо на екрані з’являється значок “ ”, ви можете повернутися до попереднього екрану натиснувши цифрову кнопку 3. • Якщо на екрані з’являється значок “ / ”, ви можете перейти до іншого списку,
Вмикання режиму очікування прийому TA/PTY УКРАЇНА Прийом повідомлень про стан дорожнього руху у режимі очікування горить або блимає на екрані. • Якщо горить , то пристрій тимчасово переключиться у режим ТА — повідомлень про стан дорожнього руху, які можуть поступати з будь-якого джерела, крім радіо
Робота з дисками Усі доріжки будуть програватись у повторному режимі, доки не буде змінено джерело або висунуто диск. Щоби припинити програвання та висунути диск Застереження: • Натисніть “SOURCE”, щоб змінити джерело прослуховування. Блокування висування диску УКРАЇНА Обов’язково відключайте
Вибір папки/доріжки з переліку (тільки для файлів MP3/WMA) • Якщо на екрані з’являється , ви можете повернутися до попереднього екрана, натиснувши цифрову кнопку 3. 1 УКРАЇНА 2 Зміна обраного пункту. A Якщо обрано File List (список файлів) Список зникне і розпочнеться відтворення. B Якщо обрано
Прослуховування USB-пристроїв До системи можна підключити такі запам’ятовуючі USB-пристрої, як пам’ять USB, цифровий аудіопрогравач*, переносний жорсткий диск и т.і. • Можна також підключити Apple iPod до вхідного гнізда USB. Детальна інформація про операції наведена на сторінках 20 та 21. Пристрій
Використання Bluetooth®-пристроїв УКРАЇНА Для роботи з Bluetooth необхідно приєднати Bluetooth-адаптер (модель KS-BTA200) до гнізда пристрою зміни CD-дисків на тильному боці цього пристрою. • Також дивіться інструкції, що входять до комплектів постачання інтерфейсного Bluetoothадаптеру та
3 Повторюйте етапи 1 і 2, поки повністю не 2 Вибір пристрою, який потрібно підключити. 3 • Для доступних пристроїв… 1 Введіть заданий раніше PIN-код пристрою у головний блок. Для перевірки PIN-коду зверніться до інструкції, що входить до комплекту постачання пристрою. 2 Налаштуйте
• Виберіть “Delete” (Видалення), потім підтвердить вибір. Натисніть цифрову кнопку 3, щоб обрати “No” (Ні), або поверніться до попереднього екрана. УКРАЇНА Встановлення автоматичного з’єднання з Bluetooth-пристроєм при включенні головного блоку. (Див. “Auto Connect” на стор. 30). Використання
1 Виберіть пункт “BT-PHONE”. 2 Вхід до меню налаштувань. 3 Виберіть пункт “Dial Menu”. * Відображається тільки тоді, коли мобільний телефон оснащений такими функціями. – Якщо не відображається, спробуйте перенести пам’ять телефонної книги мобільного телефону до пам’яті пристрою. (Дивіться
Використання голосового набору 1 УКРАЇНА 2 Промовте ім’я абонента (зареєстровані слова), якого потрібно викликати. • Функцію голосового набору можна також вибрати з меню набору номера. В меню набору номера виберіть пункт “Voice Dial”. • Якщо мобільний телефон не має функції розпізнавання голосу, на
Прослуховування пристрою зміни CD-дисків Для вашого пристрою рекомендовано користуватися пристроєм зміни CD-дисків виробництва компанії JVC, -що є сумісним з дисками формату MP3. Можна підключити пристрій зміни CD-дисків до відповідного гнізда, яке розташоване на тильному боці головного блоку. •
Прослуховування iPod Ви можете прослуховувати пісні на Apple iPod: – Підключивши кабель USB, що входить до комплекту постачання iPod до вхідного гнізда USB, розташованого на панелі керування. – Приєднавши інтерфейсний адаптер для iPod, KS-PD100 (який був придбаний окремо), до гнізда пристрою зміни
Дії 1 Увійдіть у головне меню. 2 Оберіть бажане меню. 3 Для iPod, приєднаного через KS-PD100 Для iPod приєднаного до вхідного гнізда USB Playlists Ô Artists Ô Albums Ô Songs Ô Genres Ô Composers Playlists Ô Artists Ô Albums Ô SongsÔ Podcasts Ô Genres Ô Composers Ô Audiobooks Підтвердіть вибір. •
Прослуховування інших зовнішніх компонентів Ви можете приєднати зовнішній пристрій до: • Гніздо пристрою зміни CD-дисків, розташоване на його тильній стінці, призначене для наступних адаптерів: – Адаптер лінійного входу, KS-U57 – Адаптер входу зовнішнього сигналу, KS-U58 Підготовка: Переконайтесь,
Вибір запрограмованих режимів звучання 1 Вхід до меню налаштувань. 2 Виберіть пункт “EQ”. 3 Виберіть режим звучання. USER (користувальницький), ROCK (рок), CLASSIC (класика), POPS (поп), HIP HOP (хіп-хоп), JAZZ (джаз) Запрограмоване налаштування для кожного режиму звучання Запрограмоване значення
B Subwoofer 1 Щоб перейти до екрану регулювання УКРАЇНА “Subwoofer” натисніть цифрову кнопку 1( ). 2 Щоб задати граничну частоту для відтворення низькочастотним динаміком, використовуйте 4 / ¢ . • OFF: Всі сигнали посилаються до низькочастотного динаміка. • 80Hz: Частоти, вищі за 80 Гц обрізаються.
Можна змінювати режими PSM (режим преференційних налаштувань), що наведені у наступній таблиці та на сторінках 26 – 28. 1 Увійдіть у режим налаштування PSM. 2 Виберіть категорію PSM. Для відтворення решти 3 4 Налаштуйте вибраний режим PSM. 5 Повторіть кроки 2 – 4, щоби відрегулювати інші режими PSM
УКРАЇНА CLOCK Категорія Індикація Clock Hr Налаштування годин Clock Min Налаштування хвилин 24H/12H Режим показу часу Clock Adj Налаштування годинника Scroll *2 Скролінг DISP (дисплей) Dimmer Затемнювач Режим ( : Первісна) Налаштування, [посилання на сторінку] 0 – 23 (1 – 12AM/ 1 – 12PM) 00 – 59 :
AUDIO Режим Налаштування, [посилання на сторінку] ( : Первісна) AF-Regn‘l • AF : Коли сигнали, що приймаються, слабішають, система Прийом на переключається на іншу станцію або сервіс (програма якої альтернативній може відрізнятися від тієї, що приймається), [10]. частоті / • AF REG : Коли сигнали,
Категорія Індикація УКРАЇНА COLOR Color Sel Вибір кольору Color Set Налаштування кольорів Режим Налаштування, [посилання на сторінку] ( : Первісна) Первісна: All : Оберіть улюблений колір екрану для кожного джерела Source; (або для всіх джерел ), [28, 29]. Колір: Блідий — : Створюйте власні
Створення власного кольору — колір користувача 2 Ви можете створювати власні кольори—“Day Color” (денний) та “NightColor” (нічний). Вибір джерела. All Source *1 Ô CD Ô Changer *3 (або Ext In *2) Ô USB *3 Ô FM Ô AM Ô iPod *3 Ô Aux In Ô BT Phone*3 Ô BT Audio*3 Ô (назад до початку) *1 Якщо обрано “All
Налаштування Bluetooth Можна змінювати налаштування, наведені в правому стовпчику, відповідно до власних уподобань. • Якщо на екрані з’являється , ви можете повернутися до попереднього екрана, натиснувши цифрову кнопку 3. УКРАЇНА 1 Виберіть пункт “BT-PHONE” або “BT-AUDIO”. 2 Ввійдіть до меню
Додаткова інформація про пристрій • Живлення можна також включити натиском на кнопку SOURCE в системі. Якщо джерело програвання готове, також почнеться й його програвання. Відключення живлення • Якщо відключити живлення під час прослуховування доріжки, то після наступного включення живлення
• Список файлів/папок може зображуватися некоректно при використанні занадто громіздкої ієрархії й великої кількості папок. • Якщо диск після висування не буде забрано протягом 15 секунд, він автоматично буде втягнений знов у завантажувальний отвір для захисту від пилу. Відтворення почнеться
Відтворення доріжок MP3/WMA/WAV, які знаходяться на пристрої USB • При підключенні USB-пристрою джерело сигналу автоматично змінюється на “USB”. • При відтворенні доріжок з USB-пристрою послідовність їхнього відтворення може відрізнятись від такої, що притаманна іншим програвачам. • Пристрій може
з’являється при встановленні з’єднання Відображається тільки, якщо приєднано телефонний пристрій Bluetooth. Відображається тільки, якщо приєднано аудіопрогравач з Bluetooth. Відображається тільки, якщо приєднано телефон та аудіопрогравач з Bluetooth. УКРАЇНА Значки для різних типів телефонів Значки
Увага: Під час користування iPod деякі функції можуть не виконуватись належним або очікуваним чином. В такому разі відвідайте веб-сайт компанії JVC: <http://www.jvc.co.jp/english/car/ support/ks-pd100/index.html> Загальні параметри—PSM • Налаштування “Auto” для функції “Dimmer” (зменшення
Програвання диску Симптоми • Звук диску інколи переривається. • • Програвання MP3/WMA • • • • • • • • • USB-пристрій УКРАЇНА • 36 • Засоби виправлення/Причини • Зупиняйте відтворення на поганих ділянках доріг. • Змініть диск. • Перевірте шнури та з’єднання. Диск не розпізнається (блимає “No Disc”,
Засоби виправлення/Причини • На дисплеї блимає напис “No File”. • На дисплеї з’являється “No USB”. • На екрані з’явиться напис “Not Support” і доріжки будуть пропущені. • На дисплеї з’являється “Read failed”. Підключіть USB-пристрій, який містить доріжки відповідного формату. Ця доріжка не може
CD changer (Пристрій зміни CD-дисків) УКРАЇНА Симптоми Засоби виправлення/Причини • На дисплеї з’являється “No Disc”. • На дисплеї з’являється “No Magazine”. • На дисплеї з’являється “Reset 08”. Вставте диск на пластину. Вставте пластину у отвір. Правильно приєднайте головний блок до пристрою зміни
Обслуговування Чищення дисків Забруднений диск може програватись некоректно. Якщо диск забруднився, протріть його м’якою тканиною прямими рухами від центру до краю. • Для очищення дисків не використовуйте ніякі розчинники (наприклад, очищувач для звичайних грампластинок, аерозоль, розчинник, бензин
Характеристики Максимальна Передні/задні колонки: вихідна потужність: 50 Вт на канал Тривала вихідна потужність (ефективна): 19 Вт на канал на 4 Ом, від 40 Гц до 20 000 Гц при не більш ніж 0,8% загальних нелінійних викривлень Передні/задні колонки: АУДІО ПІДСИЛЮВАЧ Діапазон регулювання тону: Низькі
Тип: Програвач компакт-дисків Безконтактне оптичне знімання (напівпровідниковим лазером) Кількість каналів: 2-канальний (стерео) Частотні характеристики: 5 Гц – 20 000 Гц Динамічний діапазон: 96 дБ Співвідношення “сигнал/шум”: 98 дБ Коефіцієнт детонації: менший за межу вимірювання Формат
Having TROUBLE with operation? Please reset your unit Refer to page of How to reset your unit Затруднения при эксплуатации? Пожалуйста, перезагрузите Ваше устройство Для получения информации о перезагрузке Вашего устройства обратитесь на соответствующую страницу Маєте ПРОБЛЕМУ з функціонуванням?
Instructions CD RECEIVER KD-G847

CD RECEIVER
РЕСИВЕР С ПРОИГРЫВАТЕЛЕМ КОМПАКТ-ДИСКОВ ПРИЙМАЧ З ПРОГРАВАЧЕМ КОМПАКТ-ДИСКІВ
KD-G847
УКРАЇНА РУCCKИЙ ENGLISH
В соответствии с Законом Российской Федерации “О защите прав потребителей” срок службы (годности) данного товара “по истечении которого он может представлять опасность для жизни, здоровья потребителя, причинять вред его имуществу или окружающей среде” составляет семь (7) лет со дня производства. Этот срок является временем,
втечение которого потребитель данного товара может безопасно им пользоваться при условии соблюдения инструкции по эксплуатации данного товара, проводя необходимое обслуживание, включающее замену расходных материалов и/или соответствующее ремонтное обеспечение в специализированном сервисном центре.
Дополнительные косметические материалы к данному товару, поставляемые вместе с ним, могут храниться в течение двух (2) лет со дня его производства.
Срок службы (годности), кроме срока хранения дополнительных косметических материалов, упомянутых
впредыдущих двух пунктах, не затрагивает никаких других прав потребителя, в частности, гарантийного свидетельства JVC, которое он может получить в соответствии с законом о правах потребителя или других законов, связанных с ним.
For canceling the display demonstration, see page 4.
Информацию об отмене демонстрации функций дисплея см. на стр. 4. Інформацію щодо відміни демонстрації функцій дисплею див. на стор. 4.
For installation and connections, refer to the separate manual.
Указания по установке и выполнению соединений приводятся в отдельной инструкции. Вказівки по встановленню та виконанню підключень наведені у окремій інструкції.
INSTRUCTIONS
ИНСТРУКЦИИ ПО ЭКСПЛУАТАЦИИ ІНСТРУКЦІЇ
GET0525-001A
[EE]
ENGLISH
Thank you for purchasing a JVC product.
Please read all instructions carefully before operation, to ensure your complete understanding and to obtain the best possible performance from the unit.
IMPORTANT FOR LASER PRODUCTS
1.CLASS 1 LASER PRODUCT
2.CAUTION: Do not open the top cover. There are no user serviceable parts inside the unit; leave all servicing to qualified service personnel.
3.CAUTION: Visible and/or invisible class 1M laser radiation when open. Do not view directly with optical instruments.
4.REPRODUCTION OF LABEL: CAUTION LABEL, PLACED OUTSIDE THE UNIT.
[European Union only]
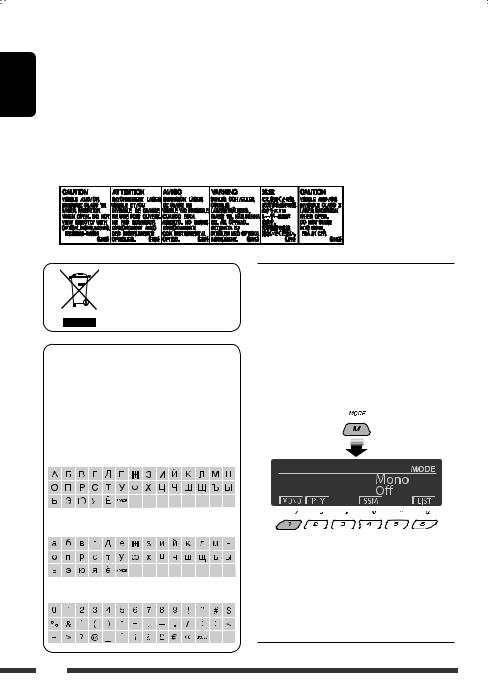
Available characters on the display
This unit can display Romans alphabets (A – Z,
a – z), Cyrillic alphabets, numbers, and symbols (see below).
These characters are also used to show the various information on the display.
Upper case (Cyrillic alphabets)
Lower case (Cyrillic alphabets)
Numbers and symbols
 How to use the M MODE and SEL buttons
If you use M MODE or SEL (select), the display and some controls (such as the number buttons,
4  /¢
/¢ buttons, 5/∞ buttons, and the control dial) enter the corresponding control mode.
Ex.: When you press number button 1 after pressing M MODE, to operate the FM tuner.
To use these controls for original functions, press M MODE again.
•However, pressing SEL makes the unit enters a different mode.
•Waiting for about 15 seconds (or 30 seconds for Bluetooth sources) without pressing any of these buttons will automatically cancels the control.
2
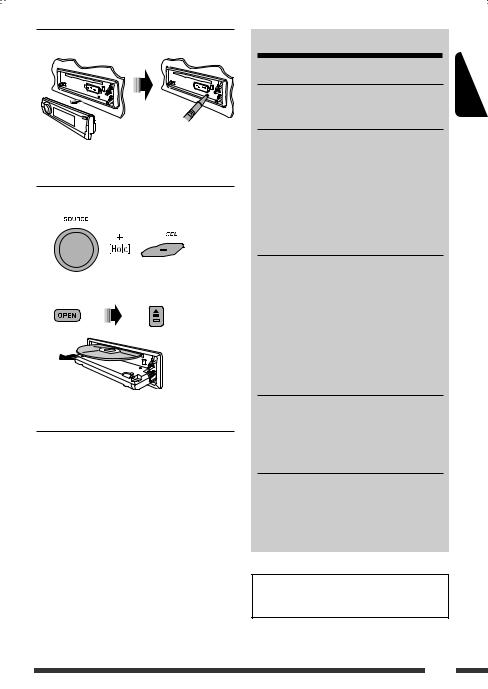
 How to reset your unit
•Your preset adjustments will also be erased (except the registered Bluetooth device, see pages 14 and 15).
 How to forcibly eject a disc
“Please Eject” appears on the display.
•Be careful not to drop the disc when it ejects.
•If this does not work, reset your unit.
Warning:
If you need to operate the unit while driving, be sure to look around carefully or you may be involved in a traffic accident.
For safety…
•Do not raise the volume level too much, as this will block outside sounds, making driving dangerous.
•Stop the car before performing any complicated operations.
Temperature inside the car…
If you have parked the car for a long time in hot or cold weather, wait until the temperature in the car becomes normal before operating the unit.
|
CONTENTS |
|
|
INTRODUCTIONS |
|
|
Preparation………………………………………….. |
4 |
|
OPERATIONS |
|
|
Basic operations……………………………………. |
5 |
|
• Using the control panel…………………………. |
5 |
|
• Using the remote controller (RM-RK50)…… |
6 |
|
Listening to the radio…………………………….. |
7 |
|
Disc operations……………………………………… |
11 |
|
Listening to the USB device…………………….. |
13 |
|
EXTERNAL DEVICES |
|
|
Using the Bluetooth® devices………………….. |
14 |
|
• Using the Bluetooth cellular phone ………… |
16 |
|
• Using the Bluetooth audio player …………… |
18 |
|
Listening to the CD changer ……………………. |
19 |
|
Listening to the iPod……………………………… |
20 |
|
Listening to the other external |
|
|
components………………………………………. |
22 |
|
SETTINGS |
|
|
Selecting a preset sound mode ……………….. |
23 |
|
General settings—PSM ………………………… |
25 |
|
Bluetooth settings ………………………………… |
30 |
|
REFERENCES |
|
|
More about this unit ……………………………… |
31 |
|
Troubleshooting……………………………………. |
35 |
|
Maintenance………………………………………… |
39 |
|
Specifications……………………………………….. |
40 |
|
For detaching/attaching the control panel, see |
|
|
page 38. |
ENGLISH
3
ENGLISH
Preparation
 Cancel the display demonstration and set the clock
• See also pages 25 and 26.
|
1 |
Turn on the power. |
|
2 |
Enter the PSM settings. |
|
3 |
Cancel the display demonstrations |
|
Select “Demo,” then “Off.” |
|
|
Set the clock |
|
|
Select “Clock Hr” (hour), then adjust the hour. |
|
|
Select “Clock Min” (minute), then adjust the minute. |
|
|
Select “24H/12H,” then “24Hours” or “12Hours.” |
|
|
4 |
Finish the procedure. |
Changing the display information and pattern
When the power is turned off: Check the current clock time
Ex.: When tuner is selected as the source
|
Source operation display |
Audio level meter display |
|||||||||||||||
|
(see “LevelMeter” on page 25) |
Caution:
If the temperature inside the car is below 0°C, the movement of animation and text scroll will be halted on the display to prevent the display from being blurred.  appears on the display.
When the temperature increases, and the operating temperature is resumed, these functions will start working again.
Caution on volume setting:
Digital devices (CD/USB) produce very little noise compared with other sources. Lower the volume before playing these digital sources to avoid damaging the speakers by sudden increase of the output level.
4INTRODUCTIONS
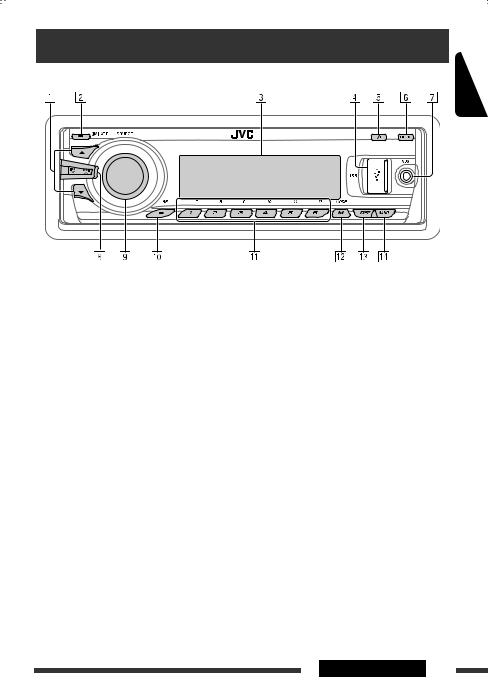
Basic operations
Using the control panel 
ENGLISH
1• TUNER: Select preset station.
•CD/USB/CD-CH: Select folder.
•USB-iPod: Enter the main menu [Hold].
•iPod: Enter the main menu/Pause playback/ Confirm selection.
•BT-PHONE/BT-AUDIO: Select a registered device.
2• Turn on the power.
•Turn off the power [Hold].
•Attenuate the sound (if the power is on). 3 Display window
4 USB (Universal Serial Bus) input jack
5• Activate/deactivate TA Standby Reception.
•Enter programme type searching mode [Hold]. 6 Flip down the control panel.
•To eject the disc, flip down the control panel then press 0 on the unit.
7 AUX (auxiliary) input jack
8• TUNER: Search for station.
•CD/USB/CD-CH/USB-iPod/iPod: Select track.
•BT-AUDIO: Reverse skip/forward skip.
9• Volume control [Turn].
•Select the source [Press]*1.
TUNER = CD*2 = USB*2 (or USB-iPod)*2 =
CD-CH*2/iPod*2 (or EXT IN) = BT-PHONE*2 = BT-AUDIO*2 = AUX IN = (back to the beginning)
P • Select/adjust the sound mode.
• Enter the PSM settings [Hold].
Q• TUNER: Select preset station.
•CD/USB/CD-CH: Select folder/track/disc (for CD changer).
•USB-iPod: Select preset top menu items.
•BT-PHONE: Dial preset phone number*3.
W• Enter functions mode.
•BT-PHONE: Activate Voice Dialing [Hold]. E Change the display information and pattern.
R• TUNER: Select the bands.
• USB-iPod/BT-AUDIO: Start/pause playback.
*1 Holding SOURCE will enter the Bluetooth menu.
*2 You cannot select these sources if they are not ready or not connected.
*3 For storing preset phone number, see page 18.
OPERATIONS 5
ENGLISH
Using the remote controller (RM-RK50) 
Installing the lithium coin battery (CR2025)
Before using the remote controller:
•Aim the remote controller directly at the remote sensor on the unit.
•DO NOT expose the remote sensor to bright light (direct sunlight or artificial lighting).
Remote sensor
Warning (to prevent accidents and damage):
•Do not install any battery other than CR2025 or its equivalent.
•Do not leave the remote controller in a place (such as dashboards) exposed to direct sunlight for a long time.
•Store the battery in a place where children cannot reach.
•Do not recharge, short, disassemble, heat the battery, or dispose of it in a fire.
•Do not leave the battery with other metallic materials.
•Do not poke the battery with tweezers or similar tools.
•Wrap the battery with tape and insulate when throwing away or saving it.
1• Turns the power on if pressed briefly or attenuates the sound when the power is on.
•Turns the power off if pressed and held.
2• Changes the FM/AM bands with 5 U.
•Changes the preset stations with D ∞.
•Changes the folder of the MP3/WMA/WAV.
•While playing an MP3 disc on an MP3-compatible CD changer:
–Changes the disc if pressed briefly.
–Changes the folder if pressed and held.
•While listening to an Apple iPod:
Connected to KS-PD100:
–Pauses or resumes playback with D ∞.
–Enters the main menu with 5 U.
(Now 5 U/D ∞/2 R/F 3 work as the menu selecting buttons.)*
* 5 U : Returns to the previous menu. D ∞ : Confirms the selection.
Connected to the USB input jack:
–Enter the main menu if pressed and held.
–Select the desired menu if pressed briefly.
–Fast skip in every layer of the main menu if pressed and held.
3 Adjusts the volume level.
4 Selects the sound mode (iEQ: intelligent equalizer).
5 Selects the source.
6For Bluetooth cellular phone:
–Answers calls if pressed briefly.
–Rejects calls if pressed and held.
7• Searches for stations if pressed briefly.
•Fast-forwards or reverses the track if pressed and held.
•Changes the tracks if pressed briefly.
6
•While listening to an iPod (in menu selecting mode):
Connected to KS-PD100:
–Selects an item if pressed briefly. (Then, press D ∞ to confirm the selection.)
–Skips 10 items at a time if pressed and held.
Connected to the USB input jack:
–Start play back the selected folder directly if pressed and held.
•Reverse skip/forward skip for Bluetooth audio.
ENGLISH
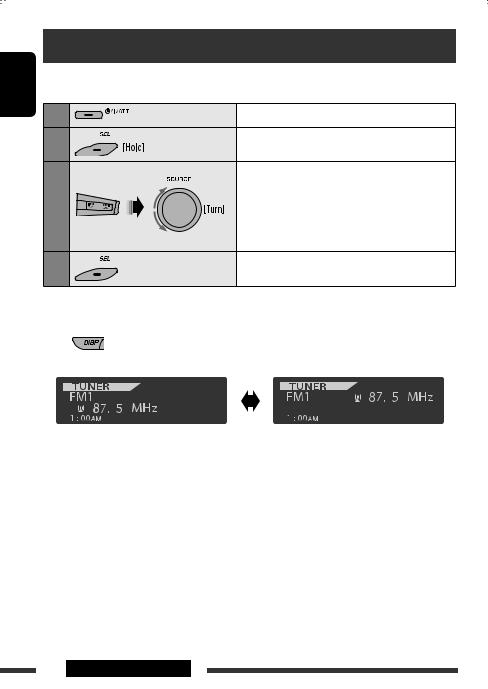
Listening to the radio
Select “TUNER.”
Select the bands.
Search for a station to listen—Auto Search.
Manual Search: Hold either one of the buttons until “M” lights up on the display, then press it repeatedly.
•When receiving an FM stereo broadcast with sufficient signal strength,  lights up on the display.
|
Note: FM1 and FM2: |
87.5 MHz – 108.0 MHz |
|
FM3: |
65.00 MHz – 74.00 MHz |
 When an FM stereo broadcast is hard to receive
1
2
Reception improves, but stereo effect will be lost.
•  lights up on the display.
3 Exit from the setting.
 FM station automatic presetting —SSM (Strong-station Sequential Memory)
You can preset up to six stations for each band.
1 While listening to a station…
Continued on the next page
OPERATIONS 7
ENGLISH
2 
3 
2
3 Display the Preset Station List.
Local FM stations with the strongest signals are searched and stored automatically in the selected FM band.
 Manual presetting
Ex.: Storing FM station of 92.5 MHz into preset number 4 of the FM1 band.
Using the number buttons
1 
2
3
Preset number flashes for a while.
Using the Preset Station list
•When  is shown on the display, you can move back to the previous screen by pressing number button 3.
1Follow steps 1 and 2 of “Using the number buttons” above.
•By holding 5 / ∞, the Preset Station List will also appear (go to step 4).
4Select the preset number you want to store into.
•You can move to the lists of the other FM bands
by pressing number button 5 ( ) or 6 (
 ) repeatedly.
5 Store the station.
 Listening to the preset station on the Preset Station List
1Display the Preset Station List, then select the preset station you want to listen to.
2 Change to the selected station.
8
The following features are available only for FM RDS stations.
 Searching for FM RDS programme
—PTY Search
You can search for your favorite programmes being broadcast by selecting the PTY code for your favorite programmes.
•When  appears on the display, you can move back to the previous display by pressing number button 3.
•When  /
/  appears on the display, you can move to the other lists by pressing number button 5 or 6 repeatedly.
1 
2 Select “Search.”
The three preset PTY codes appears on the display.
3 Select a PTY code.
You can select a PTY code from the 29 preset PTY codes or from the six stored PTY codes.
•To store your favorite programme types, see the following.
4Start searching for your favorite programme.
If there is a station broadcasting a programme of the same PTY code as you have selected, that station is tuned in.
Storing your favorite programme types
You can store six favorite programme types.
|
• When |
appears on the display, you can |
ENGLISH |
|||||
|
move back to the previous display by pressing |
|||||||
|
number button 3. |
|||||||
|
1 |
|||||||
|
2 |
Select “Memory.” |
||||||
3Select a preset number (“Preset1”– “Preset6”) you want to store into.
4 Select one of the PTY codes.
5 Store the selected PTY code.
Ex.: When “Classics” is selected in step 5
6Repeat steps 3 to 5 to store other PTY codes into other preset numbers.
7 Exit from the setting.
Continued on the next page
OPERATIONS 9
 Activating TA/PTY Standby
Reception
|
ENGLISH |
TA Standby Reception |
 either lights up or flashes on the display.
• If  lights up, the unit temporarily will switch to Traffic Announcement (TA), if available, from any source other than AM.
The volume changes to the preset TA volume level if the current level is lower than the preset level (see page 27).
• If  flashes, TA Standby reception is not yet activated. Tune in to another station providing the RDS signals.
To deactivate TA Standby Reception, press T/P again.  goes off.
PTY Standby Reception
1
2 
3 Select a PTY code.
4 Exit from the setting.
 either lights up or flashes on the display.
• If  lights up, the unit temporarily will switch to your favorite PTY programme from any source other than AM.
• If  flashes, PTY Standby reception is not yet activated. Tune in to another station (or service) providing the RDS signals.
To deactivate PTY Standby Reception, select “Off” in step 2.  goes off.
•The unit will not switch to Traffic Announcement or PTY programme when a call connection is established through “BT-PHONE.”
 Tracing the same programme— Network-Tracking Reception
When driving in an area where FM reception is not sufficient enough, this unit automatically tunes in to another FM RDS station of the same network, possibly broadcasting the same programme with stronger signals (see the illustration below).
Programme A broadcasting on different frequency areas (01 – 05)
When shipped from the factory, Network-Tracking Reception is activated.
To change the Network-Tracking Reception setting, see “AF-Regn’l” on page 27.
 Automatic station selection— Programme Search
Usually when you press the number buttons, the preset station is tuned in.
If the signals from the FM RDS preset station are not sufficient for good reception, this unit, using the AF data, tunes in to another frequency broadcasting the same programme as the original preset station is broadcasting.
•The unit takes some time to tune in to another station using programme search.
•See also page 27.
10
![]()
Disc operations
All tracks will be played repeatedly until you change the source or eject the disc.
Caution:
Make sure to detach the USB device before opening the control panel, as it might block the opening mechanism.
• To detach the USB device, see page 13.
To stop play and eject the disc
• Press SOURCE to listen to another playback source.
Prohibiting disc ejection
To cancel the prohibition, repeat the same procedure.
ENGLISH
Pressing (or holding) the following buttons allows you
to…
|
[Press] |
Select track |
|
|
[Hold] |
Reverse/fast-forward |
|
|
track |
||
|
*1 |
MP3/WMA: Select folder |
|
|
Locate particular folder*3 |
||
|
(for MP3/WMA disc) or track |
||
|
(Number buttons)*2 |
directly |
*1 By holding either one of the buttons, you can display the Folder List (see page 12).
*2 Press to select number 1 to 6; hold to select number 7 to 12.
*3 It is required that folders be assigned with 2-digit numbers at the beginning of their folder names—01, 02, 03, and so on.
After pressing M MODE, press the following buttons to…
Skip 10 tracks
MP3/WMA: Within the same folder
Repeat Track:
Repeat current track
Repeat Folder:
MP3/WMA: Repeat current folder
Random Folder:
MP3/WMA: Randomly play all tracks of current folder, then tracks of next folders
Random Disc:
Randomly play all tracks
•You can also cancel the playback mode by selecting “Off” or press number button 4 (  ).
).
Continued on the next page
OPERATIONS 11
ENGLISH
|
Selecting a folder/track on the list |
5 Change to the selected item. |
|||
|
(only for MP3/WMA file) |
A If File List is selected |
|||
|
• When |
is shown on the display, you can |
The list disappears and playback |
||
|
move back to the previous screen by pressing number |
starts. |
|
button 3. |
Select “LIST.”
Select the list type.
Select an item.
Ex.: When “File” is selected in step 3
•You can move to the other lists by pressing
number button 5 (  ) or 6 (
  ) repeatedly.
BIf Folder List is selected
•If the current folder is selected, File List appears, then repeat steps 4 and 5 A to start playback.
•If another folder is selected, playback starts from the 1st file of the selected folder.
12

Listening to the USB device
You can connect a USB mass storage class device such as a USB memory, Digital Audio Player*, portable HDD, etc. to the unit.
• You can also connect an Apple iPod to the USB input jack. For details of the operations, see pages 20 and 21.
This unit can play MP3/WMA/WMA-DRM10*/WAV tracks stored in a USB device.
* You can connect both MTP (Media Transfer Protocol) devices and USB mass storage class devices. See also page 33.
All tracks will be played repeatedly until you change the source or detach the USB device.
USB memory
ENGLISH
If a USB device has been attached…
Playback starts from where it has been stopped previously.
•If a different USB device is currently attached, playback starts from the beginning.
To stop play and detach the USB device
Straightly pull it out from the unit.
• Press SOURCE to listen to another playback source.
You can operate the USB device in the same way you operate the files on a disc. (See pages 11 and 12.)
•You can listen to WAV files by following the MP3/ WMA files operations listed on pages 11 and 12.
Cautions:
•Avoid using the USB device if it might hinder your safety driving.
•Do not pull out and attach the USB device repeatedly while “Reading” is shown on the display.
•Do not start the car engine if a USB device is connected.
•This unit may not be able to play the files depending on the type of USB device.
•Operation and power supply may not work as intended for some USB devices.
•You cannot connect a computer to the USB input terminal of the unit.
•Make sure all important data has been backed up to avoid losing the data.
•Do not leave a USB device in the car, expose to direct sunlight, or high temperature to avoid deformation or cause damages to the device.
•Some USB devices may not work immediately after you turn on the power.
•For more details about USB operations, see page 33.
OPERATIONS 13
ENGLISH
Using the Bluetooth® devices
For Bluetooth operations, it is required to connect the Bluetooth Adapter (KS-BTA200) to the CD changer jack on the rear of this unit.
•Refer also to the instructions supplied with the Bluetooth adapter and the Bluetooth device.
•Refer to the list (included in the box) to check the countries where you may use the Bluetooth® function.
Registering using “Open”
Preparation: Operate the device to turn on its Bluetooth function.
1 Select “BT-PHONE” or “BT-AUDIO.”
To use a Bluetooth device through the unit (“BT-PHONE” and “BT-AUDIO”) for the first time, you need to establish Bluetooth wireless connection between the unit and the device.
•Once the connection is established, it is registered in the unit even if you reset your unit. Up to five devices can be registered in total.
•Only one device can be connected at a time for each source (“BT-PHONE” and “BT-AUDIO”).
 Registering a Bluetooth device
Registration (Pairing) methods
Use either of the following items in the Bluetooth menu to register and establish the connection with a device.
•Select “BT-PHONE” or “BT-AUDIO” as the source to operate the Bluetooth menu.
Open Make the unit ready to establish a new Bluetooth connection.
Connection is established by operating the Bluetooth device.
Search Make the unit ready to establish a new Bluetooth connection.
Connection is established by operating the unit.
•When is shown on the display, you can move back to the previous screen by pressing number button 3.
2 Select “NEW.”
3 Enter setting menu.
4 Select “Open.”
5Enter a PIN (Personal Identification Number) code to the unit.
•You can enter any number you like (1-digit to 16-digit number). [Initial: 0000]
•To enter a PIN code less than 4-digit, firstly delete the initial PIN code (0000) by pressing
number button 5 ( ).
).
*Some devices have their own PIN code. Enter the specified PIN code to the unit.
1Move to the next (or previous) number position.
14
2 Select a number or blank space.
3Repeat steps 1 and 2 until you finish entering a PIN code.
4 Confirm the entry.
“Open…” flashes on the display.
6Use the Bluetooth device to search and connect.
On the device to be connected, enter the same PIN code you have just entered for this unit. “Connected (and device name)” appears on the display.
Now connection is established and you can use the device through the unit.
The device remains registered even after you disconnect the device. Use “Connect“ (or activate “Auto Connect”) to connect the same device from next time on. (See the following and page 30.)
Connecting a device
Perform steps 1 – 3 on page 14, then…
1• Select “Search” to search for available devices.
The unit searches and displays the list of the available devices.
If no available device is detected, “Device Not Found” appears.
•Select “Special” to connect a special device.
The unit displays the list of the preset devices.
|
2 |
Select a device you want to connect. |
|
|
3 |
• For available devices… |
ENGLISH |
1Enter the specific PIN code of the device to the unit.
Refer to the instructions supplied with the device to check the PIN code.
2Use the Bluetooth device to connect.
Now connection is established and you can use the device through the unit.
•For special device…
Use “Open” or “Search” to connect.
Connecting/disconnecting/deleting a registered device
1 Select “BT-PHONE” or “BT-AUDIO.”
2Select a registered device you want to connect/disconnect/delete.
3 Enter setting menu.
4• Select “Connect” or “Disconnect” to connect/disconnect the selected device.
Continued on the next page
EXTERNAL DEVICES 15

• Select “Delete,” then confirm the selection.
ENGLISH
Press number button 3 to select “No” or return to the previous screen.
You can set the unit to connect the Bluetooth device automatically when the unit is turned on. (See “Auto Connect” on page 30.)
Using the Bluetooth cellular phone 
|
1 |
Select “BT-PHONE.” |
|
|
2 |
Enter Bluetooth menu. |
|
|
3 |
— |
Establish the connection with a device, then make a call (or settings |
|
using the Bluetooth menu). |
||
When a call comes in….
The source is automatically changed to “BT-PHONE.”
When “Auto Answer” is activated….
The unit answers the incoming calls automatically, see page 30.
•When “Auto Answer” is deactivated, press any button (except 


 /control dial) to answer the incoming call.
To end the call
Hold any button (except 


 /control dial).
•You can adjust the microphone volume level (see page 30).
When an SMS comes in….
If the cellular phone is compatible with SMS (Short Message Service) and “Message Info” is set to “Auto” (see page 30), the unit rings and “Received Message” appears on the display to inform you of the message arrival.
16
 Making a call
You can make a call using one of the Dial Menu items.
•When is shown on the display, you can move back to the previous screen by pressing number button 3.
1 Select “BT-PHONE.”
2 Enter setting menu.
3 Select “Dial Menu.”
*Displayed only when your cellular phone is equipped with these functions.
–If not displayed, try to transfer the phone book memory of the cellular phone to this unit. (Refer to the instruction manual supplied with your cellular phone.)
–With some cellular phones, the phone book memory is transferred automatically.
5Select the name/phone number you want to call.
How to enter phone number
ENGLISH
4Select the method to make a call.
•Redial*: Shows the list of the phone numbers you have dialed. Go to the following step.
•Received*: Shows the list of the received calls. Go to the following step.
•Phonebook*: Shows the phone book of the connected cellular phone. Go to the following step.
•Missed*: Shows the list of the missed calls. Go to the following step.
•Number: Shows the phone number entry screen. See “How to enter phone number” on the right column.
•Voice Dial (Only accessible when the connected cellular phone has the voice recognition system): Speak the name (registered words) you want to call.
Select a number.
Move the entry position.
Confirm the entry.
Continued on the next page
EXTERNAL DEVICES 17
ENGLISH
Using voice command
|
1 |
“Say…” appears on the display. |
2Speak the name (registered words) you want to call.
•You can also use voice command from the Dial Menu. Select “Voice Dial” from the Dial Menu.
•If your cellular phone does not support the voice recognition system, “Error” appears on the display.
2 Select a phone number.
You can also enter a new phone number (see also “How to enter phone number” on page 17) to store.
3 Select a preset number to store.
To call a preset number
While in Bluetooth phone….
 Presetting the phone number
You can preset up to six phone numbers.
•When is shown on the display, you can move back to the previous screen by pressing number button 3.
1Display the phone number you want to preset by using one of the “Dial Menu” items.
Using the Bluetooth audio player 
• Operations and display indications differ depending on their availability on the connected audio player.
Select “BT-AUDIO.”
If playback does not start automatically, operate the Bluetooth audio player to start playback.
Reverse skip/forward skip
Start/pause playback
Enter setting menu (Device list)
•Refer also to pages 15 and 16 for connecting/ disconnecting/deleting a registered device.
Bluetooth Information:
If you wish to receive more information about Bluetooth, visit the following JVC web site: <http:// www.jvc-victor.co.jp/english/car/>.
18
Listening to the CD changer
It is recommended to use a JVC MP3-compatible CD changer with your unit. You can connect a CD changer to the CD changer jack on the rear of the unit.
• You can only play conventional CDs (including CD Text) and MP3 discs.
Preparation: Make sure “Changer” is selected for the external input setting, see page 27.
|
1 |
Select “CD-CH.” |
||
|
2 |
Select a disc to start playing. |
||
|
[Press] |
For selecting disc number 1 |
– 6. |
|
|
[Hold] |
For selecting disc number 7 |
– 12. |
ENGLISH
|
[Press] |
Select track |
|
[Hold] |
Reverse/fast-forward track |
 * MP3: Select folders
*By holding either one of the buttons, you can display the Disc List (see page 12).
To select a disc/folder/track on the list
See “Selecting a folder/track on the list (only for MP3/ WMA file)” on page 12.
Select “Disc” in step 3 to display the Disc List of the CD changer.
After pressing M MODE, press the following buttons to…
Skip 10 tracks
MP3: Within the same folder
Repeat Track:
Repeat current track
Repeat Folder:
MP3: Repeat all tracks of current folder
Repeat Disc:
Repeat all tracks of the current disc
Random Folder:
MP3: Randomly play all tracks of the current folder, then tracks of the next folder
Random Disc:
Randomly play all tracks of current disc
Random All:
Randomly play all tracks of the discs in the magazine
•You can also cancel the playback mode by selecting “Off” or press number button 4 (  ).
).
EXTERNAL DEVICES 19
ENGLISH
Listening to the iPod
You can play songs in an Apple iPod by:
–Connecting it with the USB cable supplied with your iPod to the USB input jack on the control panel.
–Connecting the Interface adapter for iPod, KS-PD100 (separately purchased) to the CD changer jack on the rear of the unit.
Preparation: Make sure “Changer” is selected for the external input setting, see page 27.
•You can control playback from the unit.
•Disconnecting the iPod will stop playback. Press SOURCE to listen to another playback source.
•For details, refer also to the manual supplied for your iPod.
Caution:
•Avoid using the iPod if it might hinder your safety while driving.
•Make sure all important data has been backed up to avoid losing the data.
|
1 |
Connect an iPod to the USB input jack or through KS-PD100. |
|
|
— |
Playback starts automatically from where it had been paused previously. |
|
|
• If an iPod has been connected, press SOURCE to select “USB-iPod” or “iPod” as |
||
|
the playback source. |
||
|
2 |
Select a track. |
|
|
3 |
— |
Adjust the volume and sound as you want. (See pages 23 and 24.) |
 Playback control from the unit
|
Button |
For iPod connected through KS-PD100 |
For iPod connected to the USB input jack |
||
|
[Press] |
Go to the next or previous track |
[Press] |
Go to the next or previous track |
|
|
[Hold] |
Fast-forward or reverse the track |
[Hold] |
Fast-forward or reverse the track |
|
|
during playback |
during playback |
|||
|
[Press] |
Enter main menu when you press 5. |
[Hold] |
Enter main menu |
|
|
Pause/resume playback when ∞ is |
[Press] |
Go to the top menu of “Playlists,” |
||
|
pressed. |
“Artists,” “Albums,” “Songs,” |
|||
|
“Podcasts,” “Genres,” “Composers,” or |
||||
|
“Audiobooks” in the main menu. |
||||
|
• Pressing the number buttons (1 – 6) |
||||
|
or holding 1 (7) and 2 (8) can also |
||||
|
select the preset top menus |
||||
|
— |
[Press] |
Pause/resume playback. |
||
20
![]()
 Selecting a track from the menu
|
No. |
Operation |
For iPod connected through |
For iPod connected to the USB |
|
|
KS-PD100 |
input jack |
|||
|
1 |
Enter the main |
|||
|
menu. |
||||
|
2 |
Select the desired |
|||
|
menu. |
||||
|
Playlists Ô Artists Ô Albums Ô |
Playlists Ô Artists Ô Albums Ô |
|||
|
SongsÔ Podcasts Ô Genres Ô |
||||
|
Songs Ô Genres Ô Composers |
||||
|
Composers Ô Audiobooks |
||||
|
3 |
Confirm the |
|||
|
selection. |
||||
|
• By holding 4 /¢ , you |
• |
By holding ¢ , you can start |
||
|
can fast skip during song search in |
play back the selected item directly. |
|||
|
the main menu. |
• |
By holding 4 , you can go |
||
|
back to the previous menu. |
||||
|
• By holding 5/∞, you can fast skip |
||||
|
in every layer of the main menu. |
•If a track is selected, playback starts automatically.
•If the selected item has another layer, you will enter the layer. Repeat steps 2 and 3 until the desired track is played.
After pressing M MODE, press the following buttons to…
Repeat One:
Same as “Repeat One.”
Repeat All:
Same as “Repeat All.”
Repeat Off:
Cancels.
Random Album*:
Same as “Shuffle Albums.”
Random Song:
Same as “Shuffle Songs.”
Random Off:
Cancels.
The menu selecting mode will be canceled:
•If no operations are performed for about:
–5 seconds for iPod connected through KS-PD100.
–15 seconds for iPod connected to the USB input jack.
•When you confirm the selection of a track.
*Functions only if you select “All Albums” or “All” in “Albums” of the main “MENU.”
ENGLISH
EXTERNAL DEVICES 21
ENGLISH
Listening to the other external components
You can connect an external component to:
•CD changer jack on the rear of this unit using the following adapters:
–Line Input Adapter, KS-U57
–AUX Input Adapter, KS-U58
Preparation: Make sure “Ext Input” is selected for the external input setting, see page 27.
• AUX (auxiliary) input jack on the control panel.
|
1 |
Select “EXT IN” or “AUX IN.” |
|||
|
2 |
— |
Turn on the connected component and start playing the source. |
||
|
3 |
Adjust the volume. |
|||
|
4 |
— |
Adjust the sound as you want (see pages 23 and 24). |
||
Connecting an external component to the AUX input jack
Portable audio player, etc.
3.5 mm stereo mini plug (not supplied)
22 EXTERNAL DEVICES
Selecting a preset sound mode
You can select a preset sound mode suitable to the music genre (iEQ: intelligent equalizer).
|
1 |
Enter setting menu. |
||||||||||||||
|
2 |
Select “EQ.” |
||||||||||||||
|
3 |
Select a sound mode. |
||||||||||||||
|
USER, ROCK, CLASSIC, POPS, HIP HOP, JAZZ |
|||||||||||||||
|
Preset value setting for each sound mode |
|||||||||||||||
|
Preset value |
|||||||||||||||
|
Sound mode |
Bass |
Mid (mid-range) |
Treble |
||||||||||||
|
Freq. |
Level |
Q |
Freq. |
Level |
Q |
Freq. |
Level |
Q |
|||||||
|
USER |
60 Hz |
00 |
Q1.25 |
1.0 kHz |
00 |
Q1.25 |
10.0 kHz |
00 |
– |
||||||
|
ROCK |
100 Hz |
+03 |
Q1.0 |
1.0 kHz |
00 |
Q1.25 |
10.0 kHz |
+02 |
– |
||||||
|
CLASSIC |
80 Hz |
+01 |
Q1.25 |
1.0 kHz |
00 |
Q1.25 |
10.0 kHz |
+03 |
– |
||||||
|
POPS |
100 Hz |
+02 |
Q1.25 |
1.0 kHz |
+01 |
Q1.25 |
10.0 kHz |
+02 |
– |
||||||
|
HIP HOP |
60 Hz |
+04 |
Q1.0 |
1.0 kHz |
–02 |
Q1.0 |
10.0 kHz |
+01 |
– |
||||||
|
JAZZ |
80 Hz |
+03 |
Q1.25 |
1.0 kHz |
00 |
Q1.25 |
10.0 kHz |
+03 |
– |
||||||
|
Freq.: Frequency |
Q: Q-slope |
||||||||||||||
ENGLISH
|
Adjusting the sound |
3 Adjust the selected setting item. |
||||
|
You can adjust the sound characteristics to your |
A Fad/Bal (Fader/Balance) |
||||
|
1 Press number button 1 ( |
|||||
|
preference. |
) |
||||
|
• When |
is shown on the display, you can |
to move to the “Fad/Bal” adjustment |
|||
|
move back to the previous screen by pressing number |
display. |
|
|
2 Adjust the speaker output balance by |
||
|
button 3 or 6. |
||
|
1 |
pressing: |
|
|
5 / ∞: between the front and rear |
||
|
speakers. [F6 to R6] |
||
|
2 |
4 /¢ : between the left and |
|
|
right speakers. [L6 to R6] |
||
|
• For “EQ” setting, see above. |
||
|
* Displayed only when “L/O Mode” is set to “Woofer” |
||
|
(see page 27). |
Continued on the next page |
|
SETTINGS 23
ENGLISH
BSubwoofer
1 Press number button 1 ( ) to move to the “Subwoofer” adjustment display.
2Use 4  /¢
/¢  to select a cutoff frequency to the subwoofer.
|
• OFF: |
All signals are sent to the |
|
subwoofer. |
•80Hz: Frequencies higher than 80 Hz are cut off.
•120Hz: Frequencies higher than 120 Hz are cut off.
•160Hz: Frequencies higher than 160 Hz are cut off.
3Turn the control dial to adjust the subwoofer output level. [0 to 8]
4Press number button 1 ( ) to select the subwoofer phase.
[0deg (normal) or 180deg (reverse)]
CVolAdjust, [–5 to +5]
Turn the control dial to adjust the input level of each source (except FM).
Adjust to match the input level of the FM sound level.
•Before making an adjustment, select the source you want to adjust.
DLoudness, [Off or On]
Turn the control dial to select “Off” or “On.” When “On” is selected, low and high frequencies sound are boosted to produce a well-balanced sound at low volume level.
4 Exit from the setting.
 Storing your own sound modes
You can adjust the sound modes and store your own adjustments in memory.
•When is shown on the display, you can move back to the previous screen by pressing number button 6.
1
2 Select a sound mode.
3 Select a frequency range.
4Adjust the sound elements of the selected frequency range.
1 Use 5 / ∞ to adjust the level.
2 Press number button 5 ( ), then turn the control dial to select the frequency.
3 Press number button 5 ( ), then turn the control dial to select the quality slope (Q).
|
Sound |
Range/selectable items |
||
|
elements |
Low |
Mid |
High |
|
Frequency |
60 Hz |
500 Hz |
10 kHz |
|
80 Hz |
1 kHz |
12.5 kHz |
|
|
100 Hz |
1.5 kHz |
15 kHz |
|
|
200 Hz |
2.5 kHz |
17.5 kHz |
|
|
Level |
–6 to +6 |
–6 to +6 |
–6 to +6 |
|
Q (Q-slope) |
Q1.0 |
Q0.5 |
Fix |
|
Q1.25 |
Q0.75 |
||
|
Q1.5 |
Q1.0 |
||
|
Q2.0 |
Q1.25 |
||
5Repeat steps 3 and 4 to adjust the other frequency bands.
6 Store the adjustments.
24
General settings—PSM
You can change PSM (Preferred Setting Mode) items listed in the table below and on pages 26 – 28.
1 Enter the PSM settings.
2 Select a PSM category.
To display the rest
3 Select a PSM item.
4 Adjust the selected PSM item.
5Repeat steps 2 – 4 to adjust other PSM items if necessary.
6 Finish the procedure.
ENGLISH
By pressing either one of the buttons repeatedly, you can also move to the item of the other categories.
|
Category |
Indication |
Item |
Setting, [reference page] |
|||
|
( |
: Initial) |
|||||
|
(movie) |
Demo |
• |
On |
: |
Display demonstration will be activated automatically if no |
|
|
Display |
operation is done for about 20 seconds, [4]. |
|||||
|
demonstration |
• |
Off |
: |
Cancels. |
||
|
MOV |
||||||
|
LevelMeter |
• |
Meter 1 |
: |
Select the different level meter patterns. |
||
|
Audio level meter |
• |
Meter 2 |
• |
Press DISP to show the selected level meter. |
||
|
CLOCK |
Clock Disp*1 |
• |
On |
: Clock time is shown on the display when the power is |
||
|
Clock display |
turned off. |
|||||
|
• |
Off |
: |
Cancels; pressing DISP will show the clock time for about |
|||
|
5 seconds when the power is turned off, [4]. |
*1 If the power supply is not interrupted by turning off the ignition key of your car, it is recommended to select “Off” to save the car’s battery.
Continued on the next page
SETTINGS 25

ENGLISH
|
Category |
Indication |
Item |
Setting, [reference page] |
|||
|
( |
: Initial) |
|||||
|
Clock Hr |
0 – 23 |
: |
Initial: 0 (0:00AM), [4]. |
|||
|
Hour adjustment |
(1 – 12AM/ |
|||||
|
1 – 12PM) |
||||||
|
CLOCK |
Clock Min |
00 – 59 |
: |
Initial: 00 (0:00AM), [4]. |
||
|
Minute adjustment |
||||||
|
24H/12H |
• |
12Hours |
: |
See also page 4 for setting. |
||
|
Time display mode |
• |
24Hours |
||||
|
Clock Adj |
• |
Auto |
: The built-in clock is automatically adjusted using the CT |
|||
|
Clock adjustment |
(clock time) data in the RDS signal. |
|||||
|
• |
Off |
: |
Cancels. |
|||
|
Scroll*2 |
• |
Once |
: Scrolls the track information once. |
|||
|
Scroll |
• |
Auto |
: Repeats scrolling (at 5-second intervals). |
|||
|
• |
Off |
: Cancels. (Holding DISP can scroll the display regardless of |
||||
|
the setting.) |
||||||
|
Dimmer |
• |
Auto |
: Dims the display when you turn on the headlights. |
|||
|
Dimmer |
• |
Off |
: |
Cancels. |
||
|
• |
On |
: Dims the display and button illumination. |
||||
|
(display) |
• |
Time Set |
: |
Set the timer for dimmer, [28]. |
||
|
Any hour – Any hour |
||||||
|
From – To*3 |
— |
: |
Initial: 18 – 7. |
|||
|
DISP |
Contrast |
1 – 8 |
: Adjust the display contrast to make the display indications |
|||
|
Contrast |
Initial: 5 |
clear and legible. |
||||
|
LCD Type |
• |
Auto |
: Positive pattern will be selected during the day time*4; |
|||
|
Display type |
while negative pattern will be used during the night |
|||||
|
time*4. |
||||||
|
• |
Positive |
: Positive pattern of the display. |
||||
|
• |
Negative |
: Negative pattern of the display. |
||||
|
Tag |
• |
On |
: Shows the tag while playing MP3/WMA/WAV tracks. |
|||
|
Tag display |
• |
Off |
: |
Cancels. |
||
*2 Some characters or symbols will not be shown correctly (or will be blanked) on the display. *3 Adjustable only when “Dimmer” is set to “Time Set.”
*4 Depends on the “Dimmer” setting.
26

|
Category |
Indication |
Item |
Setting, [reference page] |
|||||
|
( |
: Initial) |
|||||||
|
ENGLISH |
||||||||
|
AF-Regn‘l |
• |
AF |
: |
When the currently received signals become weak, the unit |
||||
|
Alternative |
switches to another station or service (the programme may |
|||||||
|
frequency/ |
differ from the one currently received), [10]. |
|||||||
|
regionalization |
• |
AF REG |
: |
When the currently received signals become weak, the unit |
||||
|
reception |
switches to another station broadcasting the same programme. |
|||||||
|
• |
Off |
: |
Cancels. |
|||||
|
TA Volume |
• |
Volume 0 – |
: |
Initial: Volume 15 |
||||
|
TUNER |
Traffic |
Volume 30 |
||||||
|
volume |
• |
Volume 50*5 |
||||||
|
announcement |
Volume 0 – |
|||||||
|
P-Search |
• |
On |
: |
Activates Programme Search, [10]. |
||||
|
Programme |
• |
Off |
: Cancels. |
|||||
|
search |
||||||||
|
IF Band |
• |
Auto |
: |
Increases the tuner selectivity to reduce interference noises |
||||
|
Intermediate |
between adjacent stations. (Stereo effect may be lost.) |
|||||||
|
frequency band |
• |
Wide |
: |
Subject to interference noises from adjacent stations, but sound |
||||
|
quality will not be degraded and the stereo effect will remain. |
||||||||
|
Ext Input*6 |
• |
Changer |
: |
To use a JVC CD changer, [19], or an Apple iPod, [20]. |
||||
|
External input |
• |
Ext In |
: |
To use any other external component, [22]. |
||||
|
Telephone |
• |
Muting1/ |
: |
Select either one which mutes the sounds while using a cellular |
||||
|
Telephone |
Muting2 |
phone. |
||||||
|
muting |
• |
Off |
: |
Cancels. |
||||
|
• |
Playback pauses/mutes while telephone muting is working. |
|||||||
|
AUDIO |
AudioBooks*7 |
• |
Normal |
: |
You can select the playback speed of the “Audiobook” sound |
|||
|
Speed control of |
• |
Faster |
file in your iPod. |
|||||
|
“Audiobook” |
• |
Slower |
• |
Initial selected item depends on your iPod setting. |
||||
|
L/O Mode |
• |
Rear |
: |
Select if the REAR LINE OUT terminals are used for connecting |
||||
|
Line output |
the rear speakers (through an external amplifier). |
|||||||
|
mode |
• |
Woofer |
: |
Select if the REAR LINE OUT terminals are used for connecting a |
||||
|
subwoofer (through an external amplifier). |
||||||||
|
Amp Gain |
• |
High PWR |
: Volume 00 – Volume 50 |
|||||
|
Amplifier gain |
• |
Low PWR |
: Volume 00 – Volume 30 (Select if the maximum power of each |
|||||
|
control |
speaker is less than 50 W to prevent damaging the speaker.) |
|||||||
|
*5 |
Depends on the amplifier gain control. |
|||||||
|
*6 |
Displayed only when one of the following sources is selected—TUNER, CD, USB, or Bluetooth. |
|||||||
|
*7 |
Displayed only when an iPod is connected to the USB input jack and playback is controlled from the unit. |
Continued on the next page
SETTINGS 27
|
Category |
Indication |
Item |
Setting, [reference page] |
|||||
|
( |
: Initial) |
|||||||
|
ENGLISH |
||||||||
|
Color Sel |
Initial: All |
: Select your favorite display color for each source (or for all |
||||||
|
Color selection |
Source; |
sources), [28, 29]. |
||||||
|
Color: Pale |
||||||||
|
Color Set |
— |
: Create your own colors, and select them for the display color, |
||||||
|
COLOR |
Color setting |
[29]. |
||||||
|
Day Color |
: User color during the day time*8. |
|||||||
|
NightColor |
: User color during the night time*8. |
|||||||
|
Red |
00 — 11 |
: Initial: Day Color: 07, NightColor: 05 |
||||||
|
Green |
00 — 11 |
: Initial: Day Color: 07, NightColor: 05 |
||||||
|
Blue |
00 — 11 |
: Initial: Day Color: 07, NightColor: 05 |
||||||
|
Key Illum |
• |
Red |
: You can select the button illumination according to your |
|||||
|
Illumination switch |
• |
Green |
preference. |
|||||
|
*8 Depends on the “Dimmer” setting. |
||||||||
|
Setting the time for dimmer |
4 Exit from the setting. |
|||||||
•When is shown on the display, you can move back to the previous screen by pressing number button 3.
1Follow steps 1 to 3 on page 25.
•In step 2, select “DISP.”
•In step 3, select “Dimmer.”
2 Select “Time Set.”
3 Adjust the dimmer start time.
1Turn the control dial to set the dimmer start time.
2Press ¢  to select “To.” Then, turn the control dial to set the dimmer end time.
 Changing the display color
You can select your favorite display color for each source (or all sources).
•When is shown on the display, you can move back to the previous screen by pressing number button 3 or 6.
Setting the display color
1Follow steps 1 to 3 on page 25.
•In step 2, select “COLOR.”
•In step 3, select “Color Sel.”
28
2
3Select a source.
All Source*1 Ô CD Ô Changer*3 (or Ext In*2) Ô USB*3 Ô FM Ô AM Ô iPod*3 Ô Aux In Ô BT Phone*3 Ô
BT Audio*3 Ô (back to the beginning)
*1 When you select “All Source,” you can use the same color for all the sources.
*2 Depends on the “Ext Input” setting, see page 27. *3 Displayed only when the target component is
connected.
4Select a color.
Pale Ô Aqua Ô Sky Ô Sea Ô Leaves Ô Grass Ô Apple Ô Rose Ô Amber Ô Honey Ô Violet Ô Grape Ô Every*4 Ô
User*5 Ô (back to the beginning)
*4 The color changes every 2 seconds.
*5 The user-edited colors—“Day Color” and “NightColor” will be applied (see the right column for details).
5Repeat steps 3 and 4 to select the color for each source (except when selecting “All Source” in step 3).
6 Exit from the setting.
Creating your own color—User Color
|
You can create your own colors—“Day Color” or |
ENGLISH |
||
|
“NightColor.” |
|||
|
1 |
Follow steps 1 to 3 on page 25. |
||
|
• In step 2, select “COLOR.” |
|||
|
• In step 3, select “Color Set.” |
|||
|
2 |
Select “Day Color” or “NightColor.” |
3 Select a primary color.
4Adjust the level (00 to 11) of the selected primary color.
5Repeat steps 3 and 4 to adjust other primary colors.
6 Exit from the setting.
SETTINGS 29
Bluetooth settings
|
ENGLISH |
You can change the settings listed on the right column |
|
|
according to your preference. |
||
|
• When |
is shown on the display, you can |
move back to the previous screen by pressing number button 3.
1 Select “BT-PHONE” or “BT-AUDIO.”
2 Enter the Bluetooth menu.
3 Select “Setting.”
4 Select a setting item.
*1 Displayed only when a Bluetooth phone is connected.
*2 Displayed only when a Bluetooth phone is connected and it is compatible with text message.
*3 Bluetooth Audio: Shows only “Version.”
5 Change the setting accordingly.
Setting menu ( : Initial)
Auto Connect
When the unit is turned on, the connection is established automatically with…
Off: No Bluetooth device.
Last: The last connected Bluetooth device. Order: The available registered Bluetooth device
found at first.
Auto Answer
Only for the device being connected for “BT-PHONE.” On: The unit answers the incoming calls
automatically.
Off: The unit does not answer the calls automatically. Answer the calls manually.
Reject: The unit rejects all incoming calls.
Message Info
Only for the device being connected for “BT-PHONE.” Auto: The unit informs you of the arrival of
a message by ringing and displaying “Received Message.”
Manual: The unit does not inform you of the arrival of a message.
MIC setting (microphone setting)
Only for the device being connected for “BT-PHONE.” Adjust the built-in microphone volume,
[LEVEL 01/02/03].
Version
The Bluetooth software and hardware versions are shown.
30 SETTINGS
![]()
More about this unit
 Basic operations
Turning on the power
•By pressing SOURCE on the unit, you can also turn on the power. If the source is ready, playback also starts.
Turning off the power
•If you turn off the power while listening to a track, playback will start from where it had been stopped previously next time you turn on the power.
General
•If you change the source while listening to a disc, playback stops.
Next time you select “CD” as the playback source, playback will start from where it had been stopped previously.
•After ejecting a disc or removing a USB device, “No Disc” or “No USB” appears and you cannot operate some of the buttons. Insert another disc, reattach a USB device, or press SOURCE to select another playback source.
 FM/AM/RDS
Storing stations in memory
•During SSM search…
–All previously stored stations are erased and the stations are stored anew.
–Received stations are preset in No. 1 (lowest frequency) to No. 6 (highest frequency).
–When SSM is over, the station stored in No. 1 will be automatically tuned in.
•When storing a station manually, the previously preset station is erased when a new station is stored in the same preset number.
FM RDS operations
|
• Network-Tracking Reception requires two types of |
ENGLISH |
|
RDS signals—PI (Programme Identification) and AF |
|
|
(Alternative Frequency) to work correctly. Without |
|
|
receiving these data correctly, Network-Tracking |
|
|
Reception will not operate correctly. |
|
|
• If a Traffic Announcement is received by TA Standby |
|
|
Reception, the volume level automatically changes |
|
|
to the preset level (TA Volume) if the current level is |
|
|
lower than the preset level. |
|
|
• When Alternative Frequency Reception is activated |
|
|
(with AF selected), Network-Tracking Reception is |
|
|
also activated automatically. |
|
|
• If you want to know more about RDS, visit |
|
|
<http://www.rds.org.uk>. |
 Disc/USB operations
Caution for DualDisc playback
•The Non-DVD side of a “DualDisc” does not comply with the “Compact Disc Digital Audio” standard. Therefore, the use of Non-DVD side of a DualDisc on this product may not be recommended.
General
•This unit has been designed to reproduce CDs/CD Texts, and CD-Rs (Recordable)/CD-RWs (Rewritable) in audio CD (CD-DA), MP3 and WMA formats.
•When a disc is inserted upside down, “Please Eject” appears on the display. Press OPEN, then 0 to eject the disc.
•In this manual, words “track” and “file” are interchangeably used.
•While fast-forwarding or reversing on MP3/WMA/ WAV files, you can only hear intermittent sounds.
Continued on the next page
REFERENCES 31

ENGLISH
•File/folder list may not appear correctly if too many hierarchies and folders are used.
•If the ejected disc is not removed within 15 seconds, the disc is automatically inserted again into the loading slot again to protect it from dust. Playback starts automatically.
Playing a CD-R or CD-RW
•Use only “finalized” CD-Rs or CD-RWs.
•This unit can only play back files of the same type as those which are detected first if a disc includes both audio CD (CD-DA) files and MP3/WMA files.
•This unit can play back multi-session discs; however, unclosed sessions will be skipped while playing.
•Some CD-Rs or CD-RWs may not play back on this unit because of their disc characteristics, or for the following reasons:
–Discs are dirty or scratched.
–Moisture condensation has occurred on the lens inside the unit.
–The pickup lens inside the unit is dirty.
–The files on the CD-R/CD-RW are written using the “Packet Write” method.
–There are improper recording conditions (missing data, etc.) or media conditions (stained, scratched, warped, etc.).
•CD-RWs may require a longer readout time since the reflectance of CD-RWs is lower than that of regular CDs.
•Do not use the following CD-Rs or CD-RWs:
–Discs with stickers, labels, or a protective seal stuck to the surface.
–Discs on which labels can be directly printed by an
ink jet printer.
Using these discs under high temperature or high humidity may cause malfunctions or damage to the unit.
Playing an MP3/WMA disc
•This unit can play back MP3/WMA files with the extension code <.mp3> or <.wma> (regardless of the letter case—upper/lower).
•This unit can show the names of albums, artists (performer), and Tag (Version 1.0, 1.1, 2.2, 2.3, or 2.4) for MP3 files and for WMA files.
•This unit can display only one-byte characters. No other characters can be correctly displayed.
•This unit can play back MP3/WMA files meeting the conditions below:
MP3:
–Bit rate: 8 kbps — 320 kbps
–Sampling frequency: 48 kHz, 44.1 kHz, 32 kHz, 24 kHz, 22.05 kHz, 16 kHz, 12 kHz, 11.025 kHz,
8 kHz WMA:
–Bit rate: 32 kbps — 192 kbps
–Sampling frequency: 48 kHz, 44.1 kHz, 32 kHz
–Disc format: ISO 9660 Level 1/Level 2, Romeo, Joliet, Windows long file name
•The maximum number of characters for file/folder names vary depending on the disc format used (includes 4 extension characters—<.mp3> or <.wma>).
–ISO 9660 Level 1: up to 12 characters
–ISO 9660 Level 2: up to 31 characters
–Romeo*: up to 128 characters
–Joliet*: up to 64 characters
–Windows long file name*: up to 128 characters
* The parenthetic figure is the maximum number of characters for file/folder names in case the total number of files and folders is 271 or more.
•This unit can recognize a total of 512 files, 200 folders, and 8 hierarchical levels.
•This unit can play back files recorded in VBR (variable bit rate).
Files recorded in VBR have a discrepancy in the elapsed time display, and do not show the actual elapsed time. In particular, this difference becomes noticeable after performing the search function.
•This unit cannot play back the following files:
–MP3 files encoded in MP3i and MP3 PRO format.
–MP3 files encoded in an inappropriate format.
–MP3 files encoded with Layer 1/2.
–WMA files encoded in lossless, professional, and voice format.
–WMA files which are not based upon Windows Media® Audio.
–WMA files copy-protected with DRM.
–Files which have data such as AIFF, ATRAC3, etc.
32

•The search function works but search speed is not constant.
Playing MP3/WMA/WAV tracks from a USB device
•Connecting a USB device automatically changes the source to “USB.”
•While playing from a USB device, the playback order may differ from the one from other players.
•This unit may be unable to play back some USB devices or some files due to their characteristics or recording conditions.
•Depending on the shape of the USB devices and connection ports, some USB devices may not be attached properly or the connection might be loose.
•When connecting a USB mass storage class device, refer also to its instructions.
•Connect one USB mass storage class device to the unit at a time. Do not use a USB hub.
•You can connect two types of USB device to this unit—MTP device and Mass storage class device. If you connect an MTP device featuring “USB digital media streaming” to this unit, you can play back the WMA-DRM10 (Digital Right Management) files purchased through the music distributing web sites, through this unit.
•This unit is compatible with the USB Full-Speed.
•If the connected USB device does not have the correct files, “No File” appears.
•This unit can show ID3 Tag (Version 1.0, 1.1, 2.2, 2.3, or 2.4) for MP3 and WMA/WAV Tag.
•This unit can play back MP3/WMA/WAV files meeting the conditions below:
MP3:
– Bit rate: 32 kbps — 320 kbps (MPEG-1)
8 kbps — 160 kbps (MPEG-2)
–Sampling frequency:
48 kHz, 44.1 kHz, 32 kHz (for MPEG-1) 24 kHz, 22.05 kHz, 16 kHz (for MPEG-2)
WMA:
–Bit rate: 5 kbps — 320 kbps
–Sampling frequency: 8 kHz — 48 kHz
–Channel: 1 ch/2 ch
|
WAV: |
|
|
– Bit rate: Linear PCM at 705 kbps and 1 411 kbps |
|
|
– Sampling frequency: 44.1 kHz |
ENGLISH |
|
(variable bit rate). |
|
|
– Channel: 1 ch/2 ch |
|
|
• This unit can play back MP3 files recorded in VBR |
|
|
• The maximum number of characters for folder and |
|
|
file names is 25 characters; 128 characters for MP3/ |
|
|
WMA/WAV Tag. |
|
|
• This unit can recognize a total of 20 000 files and |
|
|
2 000 folders (999 files per folder). However, the |
|
|
display can shows until 9 999 folders/files. |
|
|
• The unit cannot recognize a USB mass storage class |
|
|
device whose rating is other than 5 V and exceeds |
|
|
500 mA. |
|
|
• USB devices equipped with special functions such as |
|
|
data security functions cannot be used with the unit. |
|
|
• Do not use a USB device with 2 or more partitions. |
|
|
• This unit may not recognized a USB device connected |
|
|
through a USB card reader. |
|
|
• This unit may not play back files in a USB device |
|
|
properly when using a USB extension cord. |
|
|
• This unit cannot assure proper functions or supply |
|
|
power to all types of USB devices. |
 Bluetooth operations
General
•While driving, do not perform complicated operation such as dialing the numbers, using phone book, etc. When you perform these operations, stop your car in a safe place.
•Some Bluetooth devices may not be connected to this unit depending on the Bluetooth version of the device.
•This unit may not work for some Bluetooth devices.
•Connecting condition may vary depending on the circumstances around you.
•When the unit is turned off, the device is disconnected.
Continued on the next page
REFERENCES 33

ENGLISH
 appears when the connection is established.
Appears when the Bluetooth phone is connected.
Appears when the Bluetooth audio player is connected.
Appears when the Bluetooth phone and
Bluetooth audio player are connected.
Icons for phone types
These icons indicate the phone type set on the device:
Warning messages for Bluetooth operations
•Connection Error:
The device is registered but the connection has failed. Use “Connect” to connect the device again. (See page 15.)
•Error
Try the operation again. If “Error” appears again, check if the device supports the function you have tried.
•Device Not Found
No available Bluetooth device is detected by “Search…”.
•Loading…
The unit is updating the phone book and/or text messages.
•Please Wait…
The unit is preparing to use the Bluetooth function. If the message does not disappear, turn off and turn on the unit, then connect the device again (or reset the unit).
•Reset 08
Check the connection between the adapter and this unit.
 iPod
iPod
• Controllable iPod (connected through….):
(A) KS-PD100:
–iPod with dock connector (3rd Generation)
–iPod with click wheel (4th Generation)
–iPod nano (1st & 2nd*1 Generation)
–iPod mini (1st Generation)
–iPod video (5th Generation)*2
–iPod photo
(B) USB input jack:
–iPod nano (1st & 2nd Generation)
–iPod video (5th Generation)
*1 When you connect the iPod nano to the interface adapter, be sure to disconnect the headphones; otherwise, no sound is heard.
*2 It is not possible to browse video files on the “Videos” menu while the iPod is connected to the interface adapter.
•Update your iPod to the latest software version before using it with this unit.
–You can check the software version of your iPod under “About” in the “Setting” menu of the iPod.
–For details about updating your iPod, visit <http://www.apple.com>.
•While the unit is being turned on, the iPod is charged through this unit.
•While connecting an iPod with Video:
–No video shows on the iPod’s display or the external monitor (only the audio part is available).
–It is not possible to browse video files on the “Video“ menu. (If you connect the iPod during the playback or pausing of a video file, resuming playback will not work.)
•iPod shuffle and iPhone cannot be used with this unit.
•You can control the iPod from this unit when “JVC” or “ ” appears on the iPod display after connection.
•The song order displayed on the selection menu of this unit may differ from that of the iPod.
•If playback is stopped, select a track from the selection menu or press BAND to play back the same track again.
34

•The text information may not be displayed correctly:
–Some characters such as accented letters cannot be shown correctly on the display.
–Communication between the iPod and the unit is not stable.
•If the text information includes more than
16 characters, it scrolls on the display. This unit can display up to 128 characters.
Notice:
When operating an iPod, some operations may not be performed correctly or as intended. In this case, visit the following JVC web site: <http://www.jvc. co.jp/english/car/support/ks-pd100/index.html>
 General settings—PSM
•“Auto” setting for “Dimmer” may not work correctly on some vehicles, particularly on those having a control dial for dimming.
In this case, change the “Dimmer” setting to any other than “Auto.”
•If “LCD Type” is set to “Auto,” the display pattern will change to the “Positive” or “Negative” pattern depending on the “Dimmer” setting.
•If you change the “Amp Gain” setting from
“High PWR” to “Low PWR” while the volume level is set higher than “Volume 30,” the unit automatically changes the volume level to “Volume 30.”
Available PTY codes
News, Affairs, Info, Sport, Educate, Drama, Culture, Science, Varied, Pop M (music), Rock M (music), Easy M (music), Light M (music), Classics, Other
M (music), Weather, Finance, Children, Social, Religion, Phone In, Travel, Leisure, Jazz, Country, Nation M (music), Oldies, Folk M (music), Document
ENGLISH
Troubleshooting
What appears to be trouble is not always serious. Check the following points before calling a service center.
Disc playback FM/AM General
|
Symptoms |
Remedies/Causes |
|
• Sound cannot be heard from the speakers. |
• Adjust the volume to the optimum level. |
|
• Check the cords and connections. |
|
|
• The unit does not work at all. |
Reset the unit (see page 3). |
|
• “Connect Error” appears on the display. |
Remove the control panel, wipe the connector, then |
|
attach it again (see page 38). |
|
|
• SSM automatic presetting does not work. |
Store stations manually. |
|
• Static noise while listening to the radio. |
Connect the aerial firmly. |
|
• Disc cannot be played back. |
Insert the disc correctly. |
|
• CD-R/CD-RW cannot be played back. |
• Insert a finalized CD-R/CD-RW. |
|
• Tracks on the CD-R/CD-RW cannot be |
• Finalize the CD-R/CD-RW with the component which |
|
skipped. |
you used for recording. |
|
• Disc can neither be played back nor ejected. |
• Unlock the disc (see page 11). |
|
• Eject the disc forcibly (see page 3). |
Continued on the next page
REFERENCES 35

MP3/WMA playback
USB device
|
Symptoms |
Remedies/Causes |
|
• Disc sound is sometimes interrupted. |
• Stop playback while driving on rough roads. |
|
• Change the disc. |
|
|
• Check the cords and connections. |
|
|
• Disc cannot be recognized (“No Disc,” |
Eject the disc forcibly (see page 3). |
|
“CD Loading Error,” or “Eject Error” flashes). |
|
|
• “Please Eject“ appears on the display. |
This occurs sometimes due to over-heating. Eject the disc |
|
or change to another playback source. |
|
|
• Disc cannot be played back. |
• Use a disc with MP3/WMA tracks recorded in a format |
|
compliant with ISO 9660 Level 1, Level 2, Romeo, or |
|
|
Joliet. |
|
|
• Add the extension code <.mp3> or <.wma> to the |
|
|
file names. |
|
|
• Noise is generated. |
Skip to another track or change the disc. (Do not add the |
|
extension code <.mp3> or <.wma> to non-MP3 or |
|
|
WMA tracks.) |
|
|
• A longer readout time is required |
Do not use too many hierarchical levels and folders. |
|
(“Reading” keeps flashing on the display). |
|
|
• Tracks do not play back in the order you |
The playback order is determined when the files are |
|
have intended them to play. |
recorded. |
|
• The elapsed playing time is not correct. |
This sometimes occurs during playback. This is caused |
|
by how the tracks are recorded on the disc (eg. variable |
|
|
bit rate). |
|
|
• “Please Eject” appears on the display. |
Insert a disc that contains MP3/WMA tracks. |
|
• “Not Support” appears on the display and |
Skip to the next track encoded in an appropriate format |
|
track skips. |
or to the next non-copy-protected WMA track. |
|
• Correct characters are not displayed (e.g. |
This unit can display Roman alphabets, Cyrillic alphabets, |
|
album name). |
numbers and symbols (see page 2). |
|
• Noise is generated. |
• The track played back is not a playable file format |
|
(MP3/WMA/WAV). Skip to another file. |
|
|
• Do not add the extension code <.mp3>, <.wma>, or |
|
|
<.wav> to non-MP3/WMA/WAV tracks. |
|
|
• Tracks cannot play back as you have |
Playback order may differs from the one played back |
|
intended them to play. |
using other players. |
|
• “Reading” keeps flashing on the display. |
• Readout time varies depending on the USB device. |
|
• Do not use too many hierarchy, folders and empty |
|
|
folders.* |
|
|
• Turn off the power then on again. |
|
|
• Do not pull out or connect the USB device repeatedly |
|
|
while “Reading” is displayed on the display. |
|
|
* Folder that is phisically empty or folder that contains |
|
|
data but does not contain valid MP3/WMA/WAV track. |
36

|
Symptoms |
Remedies/Causes |
|
• “No File” flashes on the display. |
Connect a USB device that contains tracks encoded in an |
|
• “No USB” appears on the display. |
appropriate format. |
|
• “Not Support” appears on the display and |
The track is unplayable. |
|
track skips. |
|
|
• “Read failed” appears on the display. |
The connected USB device may be malfunctioning, |
|
or may not have been formatted correctly. The files |
|
|
included in the USB device are corrupted. |
|
|
• Correct characters are not displayed (e.g. |
For available characters, see page 2. |
|
album name). |
|
|
• While playing a track, sound is sometimes |
The tracks have not been properly copied into the USB |
|
interrupted. |
device. Copy tracks again into the USB device, and try |
|
again. |
|
|
• The sound is interrupted or skipped during |
• Turn off, then turn on the unit. |
|
playback of a USB device. |
• Connect the device again, when the sound is not yet |
|
restored. |
|
|
• Bluetooth device does not detect the unit. |
The unit can be connected with one Bluetooth cellular |
|
phone and one Bluetooth audio device at a time. |
|
|
While connecting a device, this unit cannot be detected |
|
|
from another device. Disconnect currently connected |
|
|
device and search again. |
|
|
• The unit does not detect the Bluetooth |
• Check the Bluetooth setting of the device. |
|
device. |
• Search from the Bluetooth device. After the device |
|
detects the unit, select “Open…” on the unit to connect |
|
|
the device. (See page 14.) |
|
|
• The unit does not make pairing with the |
• Enter the same PIN code for both the unit and target |
|
Bluetooth device. |
device. |
|
• Select the device name from “Special,” then try to |
|
|
connect again. (See page 15.) |
|
|
• Phone sound quality is poor. |
• Reduce the distance between the unit and the |
|
Bluetooth cellular phone. |
|
|
• Move the car to a place where you can get a better |
|
|
signal reception. |
|
|
• The sound is interrupted or skipped during |
• Reduce the distance between the unit and the |
|
playback of a Bluetooth audio player. |
Bluetooth audio player. |
|
• Disconnect the device connected for “BT-PHONE.” |
|
|
• Turn off, then turn on the unit. |
|
|
• Connect the player again, when the sound is not yet |
|
|
restored. |
|
|
• The connected audio player cannot be |
Check whether the connected audio player supports |
|
controlled. |
AVRCP (Audio Video Remote Control Profile). |
|
(Operations depend on the connected audio player.) |
|
|
Continued on the next page |
ENGLISH
REFERENCES 37
 Loading…