

Инструкция Jeppesen по работе с навигационными картами
→ Размер:
25 MB
→ Дата:
12 лет назад (20.11.2011 18:40)
→ Разрешил модератор:
UEMJ
→ Лицензия:
Freeware — Бесплатная версия, распространение не ограничено
→ Скачан:
4413 раз
LONG LIVE FOR «JEPPESSEN a BOEING COMPANY»! Приславшему- уважительная благодарность. Спасибо. =)
− UR67393,
12 лет назад,
#
Какая же, однако, богатая неделя на «инсрукции»…
− 86110,
12 лет назад,
#
+1
О, прошу прощения за писавшего оглавление человека- извините меня пожалуйста за такую опечатку- мою (!) оплошность.. Ни в коем случае не хотел вам причинить неудобства в комфортном чтении 
− UR67393,
12 лет назад,
#

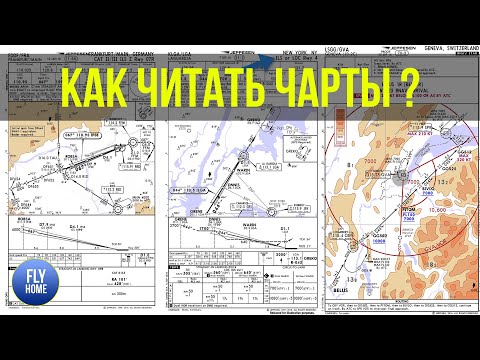
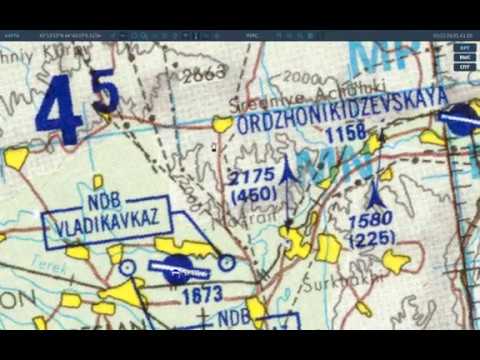
Возьмем для примера Пулково. Полоса 28 правая.
Поехали.
- Заголовок карты:
1. Код аэропорта по ICAO. Его название.
2. Дата последней редакции.
3. Индекс листа внутри пакета карт, относящихся к данному аэропорту.
4. Город и страна аэропорта.
5. Процедура для которой предназначена данная карта. Номер полосы.
- Связь (частоты):
6. Частота ATIS (Automatic Terminal Information Service)
7 — 9. Частоты диспетчерского пункта подхода. С «Подходом» работаем при подлете к зоне аэродрома, при пересечении высоты перехода (transition altitude). Они сообщают условия входа в зону, условия выполнения подхода (STAR). При вылете координируют точку выхода из зоны аэродрома.
7. Частота, используемая в период времени с 4 утра до 8 вечера для ВС с истинным курсом сектора от 360 до 180 градусов (восточное направление).
8. Частота, используемая в период времени с 4 утра до 8 вечера для ВС с истинным курсом сектора от 180 до 360 градусов (западное направление).
9. Частота, используемая в период времени с 8 вечера до 4 утра (время по Гринвичу, оно же GMT, оно же Zulu Time).
10. Частота для связи с диспетчером ближней зоны. В западной системе радиообмена зоны «Круг» нет. Служба «Круг» бережет нас на высоте от 200 метров (ниже работает служба «Старт»), назначает безопасную высоту (как правило 1800 метров) и дает указания по выходу из района аэродрома. Это при взлете. При посадке, «Круг» разрешает заход и корректирует его схему.
11. Частота для связи со службой «Старт». При взлете у нее запрашивается разрешение занять исполнительный и на взлет, и она передает нам условия выхода из зоны аэропорта. При посадке — мы должны заявить о готовности к ней или об уходе на второй круг. Зона ответственности до высоты 200 метров. Выше — зона ответственности службы «Круг». После посадки и освобождения полосы мы связываемся с этой службой, благодарим и прощаемся, переключаясь на службу «Руление».
12. Частота для связи с диспетчером «Руление» (Ground). На этой частоте просят разрешение на запуск двигателей и на руление. В данной ситуации (посадке) нам должны сообщить маршрут руления и место стоянки.
- Навигационные данные.
13. Частота локалайзера. IPL — идентификатор — эти три буквы азбукой Морзе постоянно передается на данной частоте.
14. Частота NDB. Звездочка (*) означает, что этот маяк работает с перерывами. В Пулково дважды в сутки изменяют направление взлета-посадки — я наблюдаю это почти каждый день из окна своей кухни.
15. Посадочный курс.
16. Следует читать так: При движении по глиссаде с использованием ILS, в точке прохождения дальнего приводного маркера высота должна быть 722 фута (над уровнем моря) или 656 футов (над аэродромом).
17. Следует читать так: На удалении 7.5 миль от VOR «SPB» минимальная высота 2040 футов над уровнем моря.
18. При ILS посадке высота принятия решения — 266 футов. «Н» в скобках — height — высота над аэродромом.
19. 440 футов — MDA (Minimum Descent Altitude) — минимальная высота, до которой разрешается снижение во время захода по неточным системам, при отсутствии визуального контакта с ориентирами.
20. Apt Elev — превышение аэродрома, др. словами: самая высокая точка ВПП. RWY — высота ВПП в точке касания в футах над уровнем моря.
21. Инструкция по уходу на второй круг.
22. MSA — минимальная безопасная высота в указанных секторах. «Aiport» — указание на то, что в центре круга именно аэропорт. Радиус круга — 25 миль по умолчанию.
23. Здесь пишется дополнительная информация касающаяся процедуры.
Alt set — установка альтиметра. Здесь по умолчанию применяются миллиметры (ММ), а Гектопаскали — по требованию.
QNH on req — барометрическое давление на уровне моря АТС дает по требованию.
Transition altitude — высота перехода. Ниже этой высоты альтиметр устанавливается по давлению над уровнем моря. Выше — 29.92 дюймов ртутного столба или 1013.25 Гектопаскалей (миллибар) или 760 мм ртутного столба.
Transition level — эшелон перехода. FL 49 — 4900 футов. Единица в черном кружке примечание, о котором мы вспомним чуть позже.
- Собственно карта.
24. Здесь изображен VOR. Из сноски мы понимаем, что он относится к Санкт-Петербургу. Что частота его 113.4. Что на этой частоте азбукой Морзе передаются три символа «SPB». Внизу указано как это звучит: три точки, точка-тире-тире-точка, и т.д.
Буковка «D» означает, что VOR оборудован системой DME.
25. Маркер, совмещенный с NDB. NDB — кружок, стостоящий из трех рядов точек. Маркер — серая сигарообразная фигня.
Тень от сноски (вокруг прямоугольника), говорит о том, что этот маяк имеет решающее значение при навигации.
На сноске: частота маяка и код, который он транслирует.
26. Параметры ILS: курс посадки, и частота ILS.
27. Об этом говорилось выше — в разделе «Навигационные данные». Примечание относиться в указанию по эшелону перехода.
Эшелон 5900 футов, если давление между 706 и 733 мм ртутного столба.
Эшелон 6900 футов, если давление ниже 706 мм.
28. 30-40 — это часть координатной сетки. 30 градусов, 40 минут восточной долготы.
Нарисованная вышка показывает любое высокое рукотворное сооружение. В нашем случае его высота 1022 фута. Жирная стрелка показывает, что это самое высокое сооружение в зоне аэродрома.
29. Треугольник обозначает точку пути (intersection). Тут же описаны ее параметры, которые читаются следующим образом: На удалении 11 морских миль от VOR SPB, при радиале 091 градус, высота должна быть 3020 футов (или 2954 над торцом полосы).
30. 069 градуса -это курс от NDB до следующей точки пути (intersection). 7.6 — расстояние между этими двумя пунктами в милях.
31. Штриховая линия показывает границы запретной или ограниченной для полетов зоны.
Литера «Р» означает, что это запретная.
Если бы была «R», то это была бы ограниченная зона.
UL(P)-22 — название (индекс) зоны.
32. Конверсионная таблица. Столбец слева — высота над уровнем моря в футах, справа — высота над аэродромом в футах и метрах.
33. Пунктирная линия показывает уход на второй круг.
Черная сплошная вовсе НЕ говорит о том, что нужно ОБЯЗАТЕЛЬНО при посадке следовать ей. Смотрите карту STAR (об этом позже). Здесь это рекомендация при посадке после ухода на второй круг.
- Профиль посадки.
34. Проследовать средний маркер на высоте не ниже 262 футов.
35. ОСА — Obstacle Clearance Altitude — безопасная высота пролёта препятствий- минимальная высота над порогом полосы 28 П. Каждая высота для своей категории.
36. ТСН 50′ — высота пересечения порога полосы. 50 футов, стало быть.
37. LMM — средний маркер. Заштрихованная фигура обозначает маркер. Серая — NDB.
38. LOM — дальний маркер. При пересечении этой точки по глиссаде высота должна быть 722 фута (656).
39. От LOM до точки ухода на второй круг 1 миля. MAP — missed approach point. Точка ухода показана стрелкой с литерой «М». Вторая стрелка — та, что ниже — высота принятия решения.
«Subscribe on SkyWay_public to get more information about aviation»
40. Точка входа в глиссаду (помечена крестом). «D 7.5 SPB» — дистанция до VOR SPB — 7.5 миль. 2040 — высота для входа в глиссаду.
41. Стрелочка показывает, что для тех, кто садится по NDB, в точке LOM высота должна быть 730 футов.
42. Цифры над чертой (1.7 и 4.5) показывают расстояние между соседними точками. Цифры ПОД чертой (0.5 и 2.2) показывают расстояние до порога полосы.
- Конверсионная таблица, световая разметка и уход на второй круг
43. Таблица показывает соотношение скорости ВС и вертикальной скорости при посадке.
Например, при скорости 120 узлов вертикальная скорость должна быть 570 футов в минуту. А после пересечения точки LOM до точки ухода на второй круг есть 30 секунд.
44. HIALS — High Intensity Approach Light System. Картинка показывает какой свет нас ждет перед торцом полосы.
45. Просто какой-то комикс (рассказ в картинках) про уход на второй круг. Читается комикс так: если Missed approach, то набираем высоту 2040 футов, двигаясь при этом курсом 279. Потом делаем поворот влево на NDB PL (частота 525), для тех, кто по стрелке не может определить где право, а где лево, написано: «LT» — Left Turn. По достижении PL, набираем высоту 3020 футов.
- Посадочные минимумы
Текущее состояние видимости в районе аэродрома передает служба ATIS. Если видимость оказывается ниже указанных параметров, то придется уходить на запасной аэродром.
46. Минимумы для ILS: высота принятия решения 266.
FULL — полностью включенная световая разметка полосы.
ALS OUT — с выключенными огнями подхода.
47. RVR — дальность видимости полосы. То есть — дальность, при которой пилот, находящийся на оси полосы, может различать ее разметку.
VIS — видимость на поверхности полосы.
48. При выключенных огнях подхода, минимум дальности видимости полосы составляет 1200 метров.
49. Посадка по локалайзеру (без активирования GS) запрещена.
50. Минимумы посадки по NDB. Здесь в левой колонке имеется градация по категориям.

Все что нужно знать о аэронавигационных чартах (картах) | Как читать чарты?Подробнее
Jeppesen APPROACH CHARTS — How to READ AND BRIEFПодробнее
FSX Учимся читать схемы Jeppesen №1 Информация о схемах и о руленииПодробнее
NAVIGRAPH JEPPESEN — как читать план аэропорта.Подробнее
Как читать ЧАРТЫ АЭРОПОРТА — Гайд для НОВИЧКОВПодробнее

Обновление навигационных программ Jeppesen FS,FM и FDПодробнее
Обозначения аэронавигационной информации 1 часть (Полётные карты)Подробнее
Актуальное
![]()
User’s Guide
Jeppesen
55 Inverness Drive East
Englewood, CO 80112-5498 1-800-621-5377
Western Hemisphere 303-328-4274
Fax 303-328-4153
Eastern Hemisphere +49 6102 5070
Fax +49 6102 507999 http://www.jeppesen.com
|
Table Of Contents |
|
|
Welcome ……………………………………………………………………………………………… |
13 |
|
JeppView Recommended Use ……………………………………………………………………….. |
15 |
|
Legal Notices ………………………………………………………………………………………………. |
15 |
|
Your Records………………………………………………………………………………………………. |
19 |
|
JeppView Suggestions………………………………………………………………………………….. |
19 |
|
What’s New in this Version…………………………………………………………………………….. |
21 |
|
Using the Help File……………………………………………………………………………………….. |
25 |
|
Conventions used in this Help program……………………………………………….. |
25 |
|
Context Sensitive Help Icon …………………………………………………………….. |
26 |
|
Installation and Activation ……………………………………………………………………. |
27 |
|
System Requirements…………………………………………………………………………………… |
27 |
|
JeppView Hard-Drive Space Requirements ……………………………………………………… |
29 |
|
NavSuite Global Free Hard Drive Space………………………………………………………….. |
30 |
|
NavSuite IFR Free Hard Drive Space ……………………………………………………………… |
30 |
|
What You Get ……………………………………………………………………………………………… |
30 |
|
Administrative Permissions ……………………………………………………………………………. |
31 |
|
Windows 2000 and XP……………………………………………………………………. |
31 |
|
Windows Vista……………………………………………………………………………… |
32 |
|
Microsoft Windows Vista Compatibility Mode ……………………………………………………. |
32 |
|
Microsoft Windows Vista Folders ……………………………………………………………………. |
33 |
|
Standard Installation …………………………………………………………………………………….. |
34 |
|
New JeppView Users Start Here………………………………………………………… |
34 |
|
Existing Users Start Here………………………………………………………………… |
35 |
|
Electronic Chart Data Disc 1…………………………………………………………….. |
35 |
|
Electronic Chart Data Disc 2…………………………………………………………….. |
36 |
|
Network Installation………………………………………………………………………………………. |
37 |
|
Upgrading JeppView from Version 3.3 to 3.5 ………………………………………… |
37 |
|
Initial Server Installation ………………………………………………………………… |
41 |
|
Client Installation …………………………………………………………………………. |
44 |
|
Updating Data on the Server……………………………………………………………. |
46 |
|
Viewing the Help File for Network Installations ……………………………………… |
47 |
|
Workstation Imaging …………………………………………………………………………………….. |
49 |
|
iii |
|
JeppView User’s Guide |
|
|
What You Need ……………………………………………………………………………. |
49 |
|
Creating a Master Image ………………………………………………………………… |
50 |
|
Installing Electronic Chart Data Disc 1………………………………………………… |
50 |
|
Installing Electronic Chart Data Disc 2………………………………………………… |
52 |
|
Upgrade Procedures…………………………………………………………………………………….. |
52 |
|
Activating JeppView for New Users…………………………………………………………………. |
56 |
|
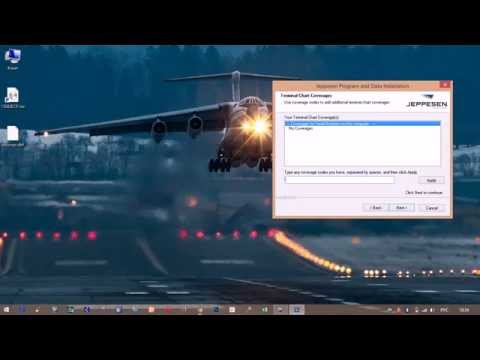
Adding Terminal Chart Coverages ………………………………………………………………….. |
60 |
|
Viewing Your Current Coverage Regions ……………………………………………… |
60 |
|
Expanding your Regional Coverage Area……………………………………………… |
61 |
|
Proxy Setup ………………………………………………………………………………………………… |
62 |
|
Starting JeppView ………………………………………………………………………………………… |
64 |
|
Opening Warning………………………………………………………………………….. |
65 |
|
Backup and Recovery…………………………………………………………………………………… |
66 |
|
Backup………………………………………………………………………………………. |
66 |
|
Recovery ……………………………………………………………………………………. |
67 |
|
Viewing Hidden Folders in Windows Vista…………………………………………….. |
67 |
|
Deactivating JeppView………………………………………………………………………………….. |
68 |
|
Removing JeppView and FliteDeck…………………………………………………………………. |
69 |
|
Keeping Your Programs Up-to-Date………………………………………………………. |
71 |
|
JeppView Revisions……………………………………………………………………………………… |
71 |
|
CD Updates ………………………………………………………………………………… |
72 |
|
Updating the Program and Data Electronically ………………………………………. |
72 |
|
The UpdatePack ………………………………………………………………………………………….. |
75 |
|
Creating an UpdatePack …………………………………………………………………. |
75 |
|
Updating the Target Computer …………………………………………………………. |
76 |
|
Updating Terminal Charts ……………………………………………………………………………… |
77 |
|
Revision Letters and Update Letters ……………………………………………………………….. |
78 |
|
Examples……………………………………………………………………………………. |
78 |
|
Printing a Revision Letter………………………………………………………………… |
78 |
|
Printing an Update Letter………………………………………………………………… |
80 |
|
JeppView Tour …………………………………………………………………………………….. |
81 |
|
JeppView Screen Layout ………………………………………………………………………………. |
81 |
|
Default View Button………………………………………………………………………………………. |
82 |
|
Tip of the Day………………………………………………………………………………………………. |
82 |
iv
|
Table Of Contents |
|
|
ToolTips……………………………………………………………………………………………………… |
83 |
|
Airport List Features……………………………………………………………………………………… |
84 |
|
RoutePack Overview…………………………………………………………………………………….. |
85 |
|
Multiple Select……………………………………………………………………………………………… |
85 |
|
Notebook Features ………………………………………………………………………………………. |
86 |
|
Using the Notebook View………………………………………………………………… |
86 |
|
Using the Properties Notebook …………………………………………………………. |
87 |
|
Viewing the Text Pages ………………………………………………………………………………… |
87 |
|
Toolbar Overview…………………………………………………………………………………………. |
87 |
|
Standard Toolbar………………………………………………………………………….. |
88 |
|
Chart Toolbar………………………………………………………………………………. |
88 |
|
Preference Toolbar………………………………………………………………………… |
89 |
|
Displaying and Hiding Toolbars…………………………………………………………. |
91 |
|
Resetting a Toolbar……………………………………………………………………….. |
92 |
|
Creating a Toolbar ………………………………………………………………………… |
92 |
|
Modifying Toolbars………………………………………………………………………… |
93 |
|
Deleting a Toolbar ………………………………………………………………………… |
93 |
|
Arranging List Windows and Toolbars……………………………………………………………… |
94 |
|
Toolbars …………………………………………………………………………………….. |
94 |
|
List Windows……………………………………………………………………………….. |
95 |
|
Right-Click Menus………………………………………………………………………………………… |
97 |
|
Enroute Chart View Right-Click Menus………………………………………………… |
98 |
|
RoutePack Right-Click Menus …………………………………………………………. |
101 |
|
Airport List Right-Click Menus…………………………………………………………. |
110 |
|
Using the Enroute Chart……………………………………………………………………… |
112 |
|
Enroute Chart Objects…………………………………………………………………………………. |
113 |
|
Right-Click Menu for Enroute Chart View Objects ……………………………………………. |
113 |
|
Navigating the Map …………………………………………………………………………………….. |
114 |
|
Panning the Chart……………………………………………………………………….. |
114 |
|
Zooming the Chart………………………………………………………………………. |
115 |
|
Centering On the Chart ………………………………………………………………… |
116 |
|
Previous and Next View ………………………………………………………………… |
117 |
|
Searching for a Navaid………………………………………………………………………………… |
117 |
|
Displaying Chart Object Properties ……………………………………………………………….. |
118 |
v
|
JeppView User’s Guide |
|
|
Navigational Aid Information………………………………………………………….. |
119 |
|
Working with User-Defined Waypoints …………………………………………………………… |
120 |
|
Placing a User-Defined Waypoint on the Enroute Chart………………………….. |
120 |
|
Modifying a User-Defined Waypoint………………………………………………….. |
121 |
|
Showing and Hiding User-Defined Waypoints ……………………………………… |
122 |
|
Changing the Default Icon …………………………………………………………….. |
122 |
|
Deleting a User-Defined Waypoint …………………………………………………… |
122 |
|
Electronic Ruler………………………………………………………………………………………….. |
123 |
|
Enroute Chart Themes………………………………………………………………………………… |
123 |
|
Selecting a Chart Theme ………………………………………………………………. |
123 |
|
Customizing Themes ……………………………………………………………………. |
124 |
|
Resetting Themes……………………………………………………………………….. |
125 |
|
Enroute Chart Projections ……………………………………………………………………………. |
125 |
|
Chart Projections ………………………………………………………………………… |
126 |
|
Using Enroute Chart View Filters ………………………………………………………………….. |
126 |
|
Airport Filters…………………………………………………………………………….. |
127 |
|
Obstacle Filters ………………………………………………………………………….. |
128 |
|
Setting a Default Display……………………………………………………………………………… |
128 |
|
Changing the Enroute Chart Default View ………………………………………….. |
128 |
|
Displaying the Enroute Chart Default View …………………………………………. |
129 |
|
Creating a Favorite View……………………………………………………………………………… |
129 |
|
Adding a Favorite View…………………………………………………………………. |
129 |
|
Returning to a Favorite View ………………………………………………………….. |
129 |
|
Managing Favorite Views ………………………………………………………………. |
130 |
|
Thumbnail …………………………………………………………………………………………………. |
130 |
|
Zooming In and Out…………………………………………………………………….. |
131 |
|
Changing the Theme……………………………………………………………………. |
131 |
|
Customizing the Chart Properties…………………………………………………….. |
131 |
|
Graphic Scale and Terrain Legend………………………………………………………………… |
131 |
|
Displaying and Hiding the Scale and Legend ………………………………………. |
132 |
|
Moving the Scale and Legend …………………………………………………………. |
132 |
|
Displaying Different Units ……………………………………………………………… |
132 |
|
Changing the Graphic Scale Transparency …………………………………………. |
132 |
|
Working with the Airport List………………………………………………………………. |
133 |
vi
|
Table Of Contents |
|
|
Airport List Overview…………………………………………………………………………………… |
133 |
|
Sorting by Column Heading……………………………………………………………. |
134 |
|
Resizing Columns ……………………………………………………………………….. |
134 |
|
Moving Columns …………………………………………………………………………. |
134 |
|
Sorting by Distance …………………………………………………………………….. |
135 |
|
Centering on an Airport ………………………………………………………………… |
135 |
|
Printing by Sort Order ………………………………………………………………….. |
136 |
|
Airport Properties ……………………………………………………………………………………….. |
136 |
|
Distinguishing Between IFR and VFR ……………………………………………………………. |
137 |
|
Jeppesen Assigned Airport Identifiers……………………………………………….. |
138 |
|
Airport Search……………………………………………………………………………………………. |
139 |
|
Column Searching ………………………………………………………………………. |
139 |
|
Searching for European VFR Airports………………………………………………… |
140 |
|
Favorite Airports…………………………………………………………………………………………. |
140 |
|
Selecting Favorite Airports …………………………………………………………….. |
140 |
|
Sorting Favorite Airports……………………………………………………………….. |
141 |
|
Filtering Favorite Airports ……………………………………………………………… |
142 |
|
Clearing the Favorite Airports Filter………………………………………………….. |
143 |
|
Airport Filters……………………………………………………………………………………………… |
143 |
|
Airport List Filters ……………………………………………………………………….. |
145 |
|
Airport List Right-Click Menus…………………………………………………………. |
145 |
|
Airport Right-Click Menu in the Airport List ………………………………………… |
146 |
|
Airports Filter Settings Tab ……………………………………………………………. |
147 |
|
Geographic Area Tab……………………………………………………………………. |
150 |
|
Using Airport Filters with Column Sorting in the Airport List ……………………. |
155 |
|
Working with Terminal Charts …………………………………………………………….. |
157 |
|
RoutePack Terminal Charts Right-Click Menu ………………………………………………… |
157 |
|
Viewing the List of Airport Terminal Charts …………………………………………………….. |
157 |
|
Understanding Terminal Chart Icons ………………………………………………… |
158 |
|
Displaying Terminal Chart Changes………………………………………………….. |
159 |
|
Future Effectivity ………………………………………………………………………………………… |
161 |
|
Obsolete Charts …………………………………………………………………………………………. |
162 |
|
Finding VFR Area Charts (Europe VFR Only) …………………………………………………. |
163 |
|
Displaying a Terminal Chart …………………………………………………………………………. |
165 |
vii
|
JeppView User’s Guide |
|
|
High Quality Mode Terminal Chart Display …………………………………………. |
166 |
|
Navigating in the Terminal Charts View………………………………………………………….. |
166 |
|
Scrolling…………………………………………………………………………………… |
167 |
|
Zooming…………………………………………………………………………………… |
167 |
|
Zooming to a Preset Terminal Chart Section……………………………………….. |
167 |
|
Zooming Out to Show the Full Chart ………………………………………………… |
168 |
|
Changing Chart Orientation……………………………………………………………. |
168 |
|
Next View/Previous View ………………………………………………………………. |
168 |
|
Terminal Chart Filters………………………………………………………………………………….. |
169 |
|
Terminal Chart Filter Status …………………………………………………………… |
169 |
|
Quick Terminal Chart Filters…………………………………………………………… |
169 |
|
Specifying Detailed Terminal Chart Filtering Criteria……………………………… |
170 |
|
Clearing Terminal Chart Filters in the Airport List…………………………………. |
173 |
|
NOTAMS View…………………………………………………………………………………………… |
173 |
|
Terminal Chart NOTAMs ……………………………………………………………….. |
173 |
|
RoutePacks and Route Planning…………………………………………………………. |
175 |
|
Creating RoutePacks and Routes …………………………………………………………………. |
175 |
|
RoutePack Structure ……………………………………………………………………. |
176 |
|
RoutePack Wizard……………………………………………………………………….. |
177 |
|
Opening and Closing the RoutePack List ……………………………………………. |
180 |
|
Creating a RoutePack …………………………………………………………………… |
180 |
|
Creating a Route ………………………………………………………………………… |
185 |
|
Graphical Routing (Point and Click) ………………………………………………….. |
187 |
|
Adding a Route to a RoutePack……………………………………………………….. |
188 |
|
Modify a Route…………………………………………………………………………………………… |
190 |
|
Inserting Waypoints into a Route…………………………………………………….. |
190 |
|
Appending Waypoints to a Route …………………………………………………….. |
194 |
|
Deleting Route Objects…………………………………………………………………. |
194 |
|
Replanning a Route……………………………………………………………………… |
195 |
|
Rearranging Waypoints in a Route …………………………………………………… |
195 |
|
Reversing a Route ………………………………………………………………………. |
196 |
|
Adding an Alternate Route …………………………………………………………….. |
196 |
|
Renumber Route Waypoints…………………………………………………………… |
197 |
|
Filtering Terminal Charts in the RoutePack …………………………………………………….. |
198 |
viii
|
Table Of Contents |
|
|
Setting the Chart Types for Departure, Destination, and Alternate Airports …. |
198 |
|
Applying Chart Type Filters to Existing RoutePacks, Routes, and Airports……. |
200 |
|
Resetting To the Default Filter Settings …………………………………………….. |
201 |
|
Setting the Chart Types for Other Airports …………………………………………. |
201 |
|
Manually Selecting Terminal Charts in Your RoutePack …………………………………… |
202 |
|
Removing Terminal Charts From the RoutePack…………………………………… |
202 |
|
Redisplaying Charts in the Route …………………………………………………….. |
203 |
|
Add Other Charts to a RoutePack …………………………………………………………………. |
204 |
|
Copy and Paste ………………………………………………………………………….. |
204 |
|
Drag and Drop …………………………………………………………………………… |
204 |
|
Saving and Deleting a RoutePack…………………………………………………………………. |
205 |
|
Saving a RoutePack …………………………………………………………………….. |
205 |
|
Deleting a RoutePack …………………………………………………………………… |
206 |
|
Loading and Unload RoutePacks………………………………………………………………….. |
207 |
|
Loading a RoutePack……………………………………………………………………. |
207 |
|
Unloading a RoutePack…………………………………………………………………. |
207 |
|
Updating a RoutePack ………………………………………………………………………………… |
208 |
|
RoutePack Properties …………………………………………………………………………………. |
208 |
|
Route Properties ………………………………………………………………………………………… |
209 |
|
Printing ……………………………………………………………………………………………… |
211 |
|
Print Overview……………………………………………………………………………………………. |
211 |
|
The Fast Way to Print what you are Viewing……………………………………….. |
211 |
|
Printing Multiple Charts for an Airport……………………………………………….. |
211 |
|
The Recommended Procedure — Printing a RoutePack Trip Kit ………………… |
211 |
|
Print Options ……………………………………………………………………………………………… |
211 |
|
Vector Charts…………………………………………………………………………….. |
212 |
|
Terminal Procedures ……………………………………………………………………. |
212 |
|
Page Settings…………………………………………………………………………….. |
213 |
|
Printer Guidelines ………………………………………………………………………………………. |
213 |
|
Starting to Print ………………………………………………………………………………………….. |
214 |
|
Previewing the Print Job ……………………………………………………………….. |
214 |
|
When You’re Ready to Print …………………………………………………………… |
214 |
|
Printing a Trip Kit for a Route or RoutePack……………………………………………………. |
215 |
|
Printing a Trip Kit ……………………………………………………………………….. |
215 |
ix
|
JeppView User’s Guide |
|
|
Revision Letters and Update Letters ……………………………………………………………… |
220 |
|
Examples………………………………………………………………………………….. |
221 |
|
Printing a Revision Letter………………………………………………………………. |
221 |
|
Printing an Update Letter………………………………………………………………. |
222 |
|
Jeppesen Paper for Printing Terminal Charts………………………………………………….. |
223 |
|
Printing Items not in RoutePacks ………………………………………………………………….. |
223 |
|
Printing Selected Terminal Charts ……………………………………………………. |
223 |
|
Printing Airport Charts and Information …………………………………………….. |
225 |
|
Printing Enroute Charts ………………………………………………………………… |
227 |
|
Printing a Topic from the Airway Manual……………………………………………. |
228 |
|
Viewing and Printing NOTAMs…………………………………………………………. |
228 |
|
Printing the Notebook ………………………………………………………………….. |
229 |
|
Printing to a Fax…………………………………………………………………………………………. |
229 |
|
Fax from Windows 2000 ……………………………………………………………….. |
229 |
|
FAX from Windows Vista……………………………………………………………….. |
230 |
|
Fax from Windows XP…………………………………………………………………… |
230 |
|
Text Pages…………………………………………………………………………………………. |
233 |
|
Viewing the Text Pages ………………………………………………………………………………. |
233 |
|
Viewing the Manuals …………………………………………………………………………………… |
233 |
|
Viewing the Jeppesen Airway Manual ……………………………………………….. |
233 |
|
Viewing the VFR (Bottlang) Airfield Manual ………………………………………… |
234 |
|
Searching the Manuals ……………………………………………………………………………….. |
234 |
|
Search Results …………………………………………………………………………… |
235 |
|
Using the Text Viewer Toolbar ……………………………………………………………………… |
235 |
|
Working with Different Languages…………………………………………………………………. |
236 |
|
Working with the Images……………………………………………………………………………… |
237 |
|
Organizing Your Bookmarks ………………………………………………………………………… |
238 |
|
Adding a Folder ………………………………………………………………………….. |
238 |
|
Moving Bookmarks ……………………………………………………………………… |
239 |
|
Renaming Bookmarks ………………………………………………………………….. |
239 |
|
Removing Bookmarks…………………………………………………………………… |
239 |
|
Printing a Text Topic …………………………………………………………………………………… |
240 |
|
Tools …………………………………………………………………………………………………. |
241 |
|
JeppView Tools………………………………………………………………………………………….. |
241 |
x
|
Table Of Contents |
|
|
ToolTips……………………………………………………………………………………………………. |
241 |
|
Conversions………………………………………………………………………………………………. |
241 |
|
Options …………………………………………………………………………………………………….. |
242 |
|
Display Tab……………………………………………………………………………….. |
242 |
|
Printing Tab ………………………………………………………………………………. |
244 |
|
Measurements Tab ……………………………………………………………………… |
245 |
|
Warnings Tab…………………………………………………………………………….. |
246 |
|
Status Bar …………………………………………………………………………………………………. |
246 |
|
Quick Reference Guide ………………………………………………………………………. |
249 |
|
Keyboard Commands in the RoutePack List …………………………………………………… |
249 |
|
Keyboard Commands in the Airport List…………………………………………………………. |
249 |
|
Terminal Chart Issue Dates………………………………………………………………………….. |
250 |
|
Troubleshooting and Getting Help………………………………………………………. |
255 |
|
Installation…………………………………………………………………………………………………. |
255 |
|
Updates ……………………………………………………………………………………………………. |
257 |
|
Functionality………………………………………………………………………………………………. |
260 |
|
Printing……………………………………………………………………………………………………… |
261 |
|
Compatibility ……………………………………………………………………………………………… |
263 |
|
Contacting Jeppesen ………………………………………………………………………………….. |
265 |
|
Sales/Customer Service………………………………………………………………… |
265 |
|
Technical Support……………………………………………………………………….. |
265 |
|
Returns ……………………………………………………………………………………. |
265 |
|
Index …………………………………………………………………………………………………. |
267 |
xi

Welcome
Select any topic in the Table of Contents window or enter specific terms into the Index search to view the pages that reference that subject.
The following links direct you to JeppView’s main features:
•View the JeppView / JeppView FliteDeck Tutorial, click Help > Interactive
Training.
•Locate terminal charts for an airport, see Working with Terminal Charts.
•View Chart NOTAMs, see NOTAMs.
•Print a revision letter, see Revision and Update Letters.
•Work with enroute charts, see Utilizing the Enroute Chart.
•Understand how RoutePacks and routes can be utilized, see Creating RoutePacks and Routes.
•Learn about the best ways to print the information you need, see Print Overview, Printing a Trip Kit from a Route or RoutePack.
•Update your Program and Data, see JeppView Revisions.
•Need information in the Airway Manual or Bottlang Airfield Manual, see Viewing Text Pages.
13
JeppView Recommended Use
JeppView provides the capability to view and print Jeppesen terminal charts and enroute maps from a desktop or portable computer. It is intended for use in the ground environment. Jeppesen recommends printing the charts that you need prior to flight. Among an extensive selection of chart printing options, JeppView provides a Trip Kit feature that prints charts for the route in the order that you use them during the flight, including charts for the departure, destination, alternate, and contingency airports.
Jeppesen also offers integrated flight planning and moving map programs for cockpit-friendly personal computers. If you use a personal computer in the cockpit, please refer to FAR 91.21 Portable Electronic Devices, and any other applicable state authority policies and guidelines. Jeppesen recommends that you familiarize yourself with all preflight planning regulations as well as recommended and required information and flying equipment.
Legal Notices
Copyright
Copyright © 2004-2010 Jeppesen, All Rights Reserved.
Except as otherwise provided and authorized in a written agreement between both Jeppesen and your company, Jeppesen’s copyrighted information and materials may not be processed, reformatted, reproduced, stored in a retrieval system, or transmitted in whole or in part, in any form or by any means, whether electrical, mechanical, photocopying, recording or otherwise, without prior written permission of Jeppesen.
Material from the Australian Aeronautical information Publication has been used by agreement with Airservices Australia.
Trademark
Jeppesen, Jeppesen Sanderson, and Airway Manual are registered trademarks of Jeppesen in the U.S. and other countries.
Third Party Software
Portions of this software are copyrighted by others, as follows:
Boost — Boost Software License — Version 1.0 — August 17th, 2003. Permission is hereby granted, free of charge, to any person or organization obtaining a copy of the software and accompanying documentation covered by this license (the «Software») to use, reproduce, display, distribute, execute, and transmit the Software, and to prepare derivative works of the Software, and to permit third-parties to whom the Software is furnished to do so, all subject to the following:
The copyright notices in the Software and this entire statement, including the above license grant, this restriction and the following disclaimer, must be included in all copies of the Software, in whole or in part, an all derivative works of the Software,
15
JeppView User’s Guide
unless such copies or derivative works are solely in the form of machine-executable object code generated by a source language processor.
THE SOFTWARE IS PROVIDED «AS IS», WITHOUT WARRANTY OF ANY KIND, EXPRESS OR IMPLIED, INCLUDING BUT NOT LIMITED TO THE WARRANTIES OF MERCHANTABILITY, FITNESS FOR A PARTICULAR PURPOSE, TITLE AND NONINFRINGEMENT. IN NO EVENT SHALL THE COPYRIGHT HOLDERS OR ANYONE DISTRIBUTING THE SOFTWARE BE LIABLE FOR ANY DAMAGES OR OTHER LIABILITY, WHETHER IN CONTRACT, TORT OR OTHERWISE, ARISING FROM, OUT OF OR IN CONNECTION WITH THE SOFTWARE OR THE USE OR OTHER DEALINGS IN THE SOFTWARE.
LibJPEG — This software is based in part on the work of the Independent JPEG Group. Copyright © 1991-1998, Thomas G. Lane.
LibPNG — Portions Copyright © 2004 Glenn Randers-Pehrson and others MPL 1.1 — Copyright © 2005–2007 Mozilla. All rights reserved. NAPDrv32 — Naplps Graphics driver for Win32.
OpenSSL — This product includes software developed by the OpenSSL Project for use in the OpenSSL Toolkit (http://www.openssl.org/). Copyright © 1998-2003 The OpenSSL Project. All rights reserved.
PICN13 — Win32 library, attribution unknown.
Protobuf — Copyright © 2010, Jeppesen. All rights reserved. Conditions: * Redistributions of source code must retain the above copyright notice, this list of conditions and the following disclaimer.
*Redistributions in binary form must reproduce the above copyright notice, this list of conditions and the following disclaimer in the documentation and/or other materials provided with the distribution.
*Neither the name of Jeppesen nor the names of its contributors may be used to endorse or promote products derived from this software without specific prior written permission.
THIS SOFTWARE IS PROVIDED BY THE COPYRIGHT HOLDERS AND CONTRIBUTORS «AS IS» AND ANY EXPRESS OR IMPLIED WARRANTIES, INCLUDING, BUT NOT LIMITED TO, THE IMPLIED WARRANTIES OF MERCHANTABILITY AND FITNESS FOR A PARTICULAR PURPOSE ARE DISCLAIMED. IN NO EVENT SHALL THE COPYRIGHT HOLDER OR CONTRIBUTORS BE LIABLE FOR ANY DIRECT, INDIRECT, INCIDENTAL, SPECIAL, EXEMPLARY, OR CONSEQUENTIAL DAMAGES (INCLUDING, BUT NOT LIMITED TO, PROCUREMENT OF SUBSTITUTE GOODS OR SERVICES; LOSS OF USE, DATA, OR PROFITS; OR BUSINESS INTERRUPTION) HOWEVER CAUSED AND ON ANY THEORY OF LIABILITY, WHETHER IN CONTRACT, STRICT LIABILITY, OR TORT (INCLUDING NEGLIGENCE OR OTHERWISE) ARISING IN ANY WAY OUT OF THE USE OF THIS SOFTWARE, EVEN IF ADVISED OF THE POSSIBILITY OF SUCH DAMAGE.
Ragel — Copyright © 2007 Free Software Foundation, Inc, (http://fsf.org/) RMTC32 — Resolution Mapping, Inc., map drawing dll.
Templated Unit Test Framework (TUT) — Copyright © 2002-2003 Vladimir Dozen TinyXML — Portions Copyright © 2000-2002 Lee Thomason www.grinninglizard.com)
16
Legal Notices
Xalan — Copyright © 2007-2010 Jeppesen. Licensed under the Apache License, Version 2.0 (the «License»); you may not use this file except in compliance with the License. You may obtain a copy of the License at http://www.apache.org/licenses/LICENSE-2.0. Unless required by applicable law or agreed to in writing, software distributed under the License is distributed on an «AS IS» BASIS, WITHOUT WARRANTIES OR CONDITIONS OF ANY KIND, either express or implied. See the License for the specific language governing permissions and limitations under the License.
XERCES — Copyright © 2007-2010 Jeppesen. Licensed under the Apache License, Version 2.0 (the «License»); you may not use this file except in compliance with the License. You may obtain a copy of the License at http://www.apache.org/licenses/LICENSE-2.0. Unless required by applicable law or agreed to in writing, software distributed under the License is distributed on an «AS IS» BASIS, WITHOUT WARRANTIES OR CONDITIONS OF ANY KIND, either express or implied. See the License for the specific language governing permissions and limitations under the License.
zlib — Portions Copyright © 1995-2003 Jean-loup Gailly and Mark Adler.
All other product or brand names may be trademarks or registered trademarks of their respective owners.
License Agreement
To view the license agreement, click Help > License Agreement.
17
Your Records
We suggest you record your serial number on this page for safekeeping. You may need to provide your serial number and customer number when calling customer service or technical support. It may also be useful in the future to have your Site Key and Site Code available.
Serial Number (16-characters): ______________________________________
Site Key/Code: ___________________________________________________
Customer Number: ________________________________________________
Coverage Code: __________________________________________________
Notes:____________________________________________________________
__________________________________________________________________
__________________________________________________________________
__________________________________________________________________
__________________________________________________________________
__________________________________________________________________
__________________________________________________________________
__________________________________________________________________
__________________________________________________________________
__________________________________________________________________
__________________________________________________________________
__________________________________________________________________
__________________________________________________________________
__________________________________________________________________
__________________________________________________________________
__________________________________________________________________
__________________________________________________________________
__________________________________________________________________
JeppView Suggestions
We strive to provide the best possible products to meet your needs, and we value your input in that process. If you have suggestions for product changes or enhancements or if you would like to tell us what you like or dislike about JeppView FliteDeck, please send an email to captain@jeppesen.com.
19

What’s New in This Version
Version 3.7.2, Released JULY, 2010
|
Fixes |
|
|
Terrain Overlay |
Fix for terrain overlay problem in 3.7.1 update. |
Version 3.7.1, Released JULY, 2010
|
Fixes |
||||
|
Terminal Chart |
Fix for (terminal chart installation/ update runtime and «.dll not |
|||
|
Update |
found» errors related to daylight savings time. |
|||
|
Version 3.7, Released JULY, 2010 |
||||
|
Fixes |
||||
|
Terminal Charts |
A new JeppView terminal chart decluttering command fades |
|||
|
cultural and terrain features to visually emphasize navigation |
||||
|
Tab |
||||
|
data. |
||||
|
Shared Charts |
In network installations, multiple users can now view the same |
|||
|
on Network |
chart simultaneously. |
—Program changes for compatibility with FliteStar 9.5.
Version 3.6.4, Released AUGUST, 2009
Fixes
|
Maintenance |
Internal maintenance release. |
Version 3.6.3, Released MARCH, 2009
Fixes
|
Maintenance |
License update. |

Version 3.6.2, Released JANUARY, 2009
|
Fixes |
||
|
Airport |
Fix to worldwide airport diagram display. |
|
|
Diagrams |
||
|
Version 3.6.1, Released AUGUST, 2008 |
|
Fixes |
||
|
Tower |
The tower frequency labels were fixed. |
|
|
Frequencies |
||
|
UpdatePacks |
A problem with Updatepacks misreading NavData cycles and |
|
|
including text was corrected. |
||
Version 3.6.0, Released JUNE,2008
|
New Features |
||
|
and |
||
|
Improvements |
||
|
The release of version 3.6 incorporates two changes: |
||
|
o Settings previously stored in the [application].ini files are |
||
|
placed in the registry during installation or moved to the |
||
|
registry during an update. |
||
|
Microsoft |
o The 3.6 installer places files in directories compatible with |
|
|
Windows |
the Microsoft Windows Vista file directory structure. If you |
|
|
have already installed JeppView on Windows XP and 2000, |
||
|
Vista |
||
|
you will not see any change to file locations. |
||
|
If you are a current Windows XP or Windows 2000 user migrating |
||
|
to Microsoft Vista and would like to know where common files will |
||
|
be stored, see Microsoft Windows Vista Compatibility Mode and |
||
|
Microsoft Windows Vista Folders. |
||
|
Previous versions of JeppView MFD did not include JeppView |
||
|
JV MFD and |
FliteDeck. Starting with version 3.5.3, all current JeppView MFD |
|
|
subscribers have the option to install JeppView MFD during either |
||
|
FliteDeck |
||
|
the initial installation, the Electronic Chart CD (Disc 2) update, or |
||
|
electronic (online) update. |
||
Version 3.5.2, Released SEPTEMBER, 2007
New Features
and
Improvements

Index
|
License |
Updated the JeppView and NavSuite License agreement to |
|
|
acknowledge that Jeppesen uses Australia Air Services data. To view |
||
|
Agreements |
||
|
the agreement, click Help > License Agreement. |
||
|
Avidyne Files |
Updated the Avidyne Extractor with new Avidyne files. |
|
|
Fixes |
||
|
Printing a |
Fixed an application crash when printing a Revision Letter for a |
|
|
Revision |
||
|
RoutePack containing previously and currently updated charts. |
||
|
Letter |
||
|
Version 3.5.1, Released MAY, 2007 |
||
|
Fixes |
||
|
Printing |
Fixed an issue where individual terminal charts would not print after |
|
|
printing a Revision Letter. |
||
Version 3.5, Released MARCH, 2007
|
New Features |
||
|
and |
||
|
Improvements |
||
|
The Electronic Chart Data (ECD) discs received in the mail have been |
||
|
restructured where you must install ECD Disc 1 and 2 to receive |
||
|
Installation |
updated information for your terminal charts, program updates, |
|
|
navigational data, and text data. If you update the data |
||
|
electronically, you are not impacted with the CD update method. |
||
|
Recommended Topic: JeppView Revisions |
||
|
Network |
If you are using JeppView in a networking environment, please see |
|
|
Network Installation regarding changing the client network path to a |
||
|
Installation |
||
|
network drive. |
||
|
Added European VFR Charts (Bottlang charts). The visual approach |
||
|
charts cover 2,100 airports and aerodromes in 29 European |
||
|
European VFR |
countries. Customers are given the option of ordering VFR coverages |
|
|
by country or by geographic regions. You may choose between |
||
|
Charts |
services that offer only VFR charts, only IFR charts, or both VFR and |
|
|
IFR. Call Jeppesen Customer Service if you are interested in a |
||
|
subscription. Recommended Topic: Distinguishing Between IFR and |
||
|
VFR Airports |
||
|
Printing |
An additional printing option has been added to the Printing tab |
|
|
when clicking Tools > Options. This new option allows you to print |
||
|
Options |
large European VFR area charts on multiple pages. Recommended |
|
|
Topic: Printing Options |
||
|
Text pages are now provided in XML format rather than PDF which |
||
|
Text |
makes searching and accessing both IFR and VFR information much |
|
|
easier. You can search keywords, bookmark pages, zoom and scroll |
||
|
Information |
to quickly find text-based information. If you have a European VFR |
|
|
subscription, the text for the Bottlang Airfield Manual becomes |
||
|
available. Recommended Topic: Viewing the Text Pages |
||
|
Favorite |
Modified the Favorite Airport column in the Airport List. You can |
|
|
select your favorite airports and click on the column header to |
||
|
Airports |
bundle them together or use the filter to hide the airports not |
|
|
selected as a favorite. Recommended Topic: Favorite Airports |
||
|
Terminal |
Moved the terminal chart check boxes that were previously in the |
|
|
Airport List window to the Filter button in the Airport List window. |
||
|
Chart Filters |
||
|
Recommended Topic: Terminal Chart Filters |
||
|
Routing |
Added and fixed some auto routing techniques that can be used in |
|
|
Techniques |
the RoutePack Wizard. Recommended Topic: RoutePack Wizard |
|
|
Fixes |
||
|
Opening |
||
|
RoutePacks |
Fixed a program crash when opening a RoutePack from Explorer. |
|
|
with Explorer |
||
|
Repair |
Fixed the repair function where it removed the JeppView desktop |
|
|
Function |
icons and shortcuts. |
|
|
Fixed LAND areas incorrectly attributed as water. |
||
|
• Usedom Island — Baltic coast of the Germany/Poland border |
||
|
• Various small Baltic Sea Islands belonging to Finland |
||
|
• Schouwen Island — Rhine delta in the Netherlands |
||
|
Enroute Chart |
• Reunion Island — Indian Ocean near Madagascar |
|
|
• New Georgia Island — part of the Solomon Islands, near |
||
|
Data |
||
|
Guadalcanal |
||
|
• Vanua Levu Island — part of the Fiji Islands |
||
|
• Groote Island — Gulf of Carpentaria, Northern Australia |
||
|
• Frederik Hendrik Island (southern half) — southwestern coast |
||
|
of New Guinea |
||
|
• Saint Martin Island — Caribbean |
||
|
Fixed WATER areas incorrectly attributed as land: |
||
|
Enroute Chart |
• Malaysia half of the straits separating Singapore from the |
|
|
Malay peninsula |
||
|
Data |
||
|
• Western half of the Gulf of Pohai in China, near city of |
||
|
Tientsin |
||
|
Enroute Chart |
Fixed COUNTRIES incorrectly attributed as other countries: |
|
|
• The southern half of Azerbaijan was incorrectly attributed as |
||
|
Data |
||
|
Armenia |
||
JeppView User’s Guide
|
Terminal |
Moved the terminal chart check boxes that were previously in |
|
|
the Airport List window to the Filter button in the Airport List |
||
|
Chart Filters |
||
|
window. Recommended Topic: Terminal Chart Filters |
||
|
Routing |
Added and fixed some auto routing techniques that can be |
|
|
used in the RoutePack Wizard. Recommended Topic: |
||
|
Techniques |
||
|
RoutePack Wizard |
||
|
Fixes |
||
|
Opening |
Fixed a program crash when opening a RoutePack from |
|
|
RoutePacks |
||
|
Explorer. |
||
|
with Explorer |
||
|
Repair |
Fixed the repair function where it removed the JeppView |
|
|
Function |
desktop icons and shortcuts. |
|
|
Fixed LAND areas incorrectly attributed as water. |
||
|
• Usedom Island — Baltic coast of the Germany/Poland |
||
|
border |
||
|
• Various small Baltic Sea Islands belonging to Finland |
||
|
Enroute Chart |
• Schouwen Island — Rhine delta in the Netherlands |
|
|
• Reunion Island — Indian Ocean near Madagascar |
||
|
Data |
• New Georgia Island — part of the Solomon Islands, |
|
|
near Guadalcanal |
||
|
• Vanua Levu Island — part of the Fiji Islands |
||
|
• Groote Island — Gulf of Carpentaria, Northern Australia |
||
|
• Frederik Hendrik Island (southern half) — southwestern |
||
|
coast of New Guinea |
||
|
• Saint Martin Island — Caribbean |
||
|
Fixed WATER areas incorrectly attributed as land: |
||
|
Enroute Chart |
• Malaysia half of the straits separating Singapore from |
|
|
the Malay peninsula |
||
|
Data |
||
|
• Western half of the Gulf of Pohai in China, near city of |
||
|
Tientsin |
||
|
Enroute Chart |
Fixed COUNTRIES incorrectly attributed as other countries: |
|
|
• The southern half of Azerbaijan was incorrectly |
||
|
Data |
||
|
attributed as Armenia |
||
24

Using the Help File
The JeppView help file is one of many sources to help you learn JeppView. Besides this help file, you may also want to look at the following sources of information:
•A JeppView and JeppView FliteDeck tutorial is available by clicking Help >
Interactive Training.
•A JeppView User’s Guide is available by clicking Start > Programs > Jeppesen > JeppView3 > JeppView3 User’s Guide. The User’s Guide is formatted in a Portable Document Format (PDF) and may be printed easily. To use the latest version of Acrobat Reader to read the PDF, download the latest version at http://www.adobe.com/products/acrobat/readstep2.html.
•The JeppView resource Internet page is available at www.Jeppesen.com.
Conventions used in this Help program
«JeppView» refers to the new JeppView, version 3.0 or higher. Reference to the previous JeppView program is «JeppView 2.x».
•Bold text represents commands on menus (including right-click menus), buttons, nested menu structures, and elements on a dialog box (such as tabs and check boxes).
•The ‘>’ character represents nested menu structures. For example, «Click
Chart > Favorite Views > Add Favorite» describes the menu shown in the image below.
•Italics are used for emphasis. They are also used for names of books.
•View refers to the five main windows in the program (Enroute Charts, Terminal Charts, Notebook, NOTAMs, or Text), accessed by View tabs. For example, the Enroute Charts tab displays the Enroute Charts View.
•Text that is typed into a dialog box or other entry area appears in this monospace font.
In electronic versions:
25

JeppView User’s Guide
•Blue or underlined text links to other Help pages, additional information and Internet addresses related to that topic. Click the text to view additional information.
•Click on the blue bold text to view additional information about a topic.
•Use the Back button at the top of your browser to return to previously-visited topics, or the Forward button to return to the present topic after using the Back button.
•
Context Sensitive Help Icon
•Displays a help topic for a selected item in the screen (not applicable in the main JeppView window).
26

Installation and Activation
These instructions cover installation of JeppView and FliteDeck. These programs are designed to work together, but they do not need to be installed on the same computer. Your JeppView/JeppView FliteDeck license allows you to install any combination of these two programs on up to four separate computers.
•You may wish to install JeppView on a desktop computer for planning.
•And install FliteDeck on a Tablet PC to take in the aircraft.
•Or you could install both programs on the same computer.
•You may install JeppView on a network (see your license agreement), but not FliteDeck.
The following instructions are for installing JeppView and FliteDeck from NOTE the JeppView product. If you are installing JeppView and FliteDeck from
the NavSuite, please refer to the NavSuite Quick Start Guide.
This section contains the following topics:
•System Requirements
•What You Get
•Administrative Permissions
•Microsoft Windows Vista Compatibility Mode
•Microsoft Windows Vista Folders
•Standard Installation
•Network Installation
•Workstation Imaging
•Upgrade Procedures
•Activating JeppView
•Checking and Adding Coverages
•Proxy Setup
•Starting JeppView
•Backup and Recovery
•Deactivating JeppView
•Removing JeppView and FliteDeck
System Requirements
The following system requirements were set up to give you the most out of your JeppView software. Although the program might run on systems that do not meet
27

JeppView User’s Guide
these requirements, Jeppesen cannot guarantee that the program will run properly unless the system meets these requirements.
|
Minimum |
Recommended |
||
|
PC Type |
|||
|
Desktop, Notebook, or Tablet PC |
Desktop, Notebook, or Tablet PC |
||
|
CPU |
|||
|
500MHz , 32-bit (x86) or higher |
2GHz or higher, 32-bit (x86) processor |
||
|
processor |
|||
|
Operating System (English Only) |
|||
•Microsoft Windows® XP SP2, or XP Tablet PC Edition SP2
•Microsoft Windows® XP SP3 or XP Tablet PC SP3 Edition
•Microsoft Windows® Vista 32-bit: Home Basic, Home Premium, Business Edition, Enterprise Edition and Ultimate Edition
|
RAM |
|||
|
256MB |
1GB |
||
|
Display |
|||
|
VGA 800 x 600, 16-bit display |
|||
|
VGA 600 x 800 (JeppView FliteDeck |
VGA 1280 x 1024, 24-bit color display |
||
|
portrait orientation) |
|||
|
Graphics Processor |
|||
|
32MB Video Card |
64MB Video Card |
||
|
Input Devices |
|||
|
Pointer device |
Pointer device |
||
|
Keyboard |
Keyboard |
||
|
CD-ROM |
|||
|
8x |
24x or higher |
||
|
Internet Connection |
|||
|
Broadband Internet Connection (for |
Broadband Internet Connection (for |
||
|
online download of program updates) |
online download of program updates) |
||
|
Internet Explorer 5.0 or higher |
Internet Explorer 7 |
||
|
Printer (Optional) |
|||
|
300dpi |
600dpi, 6 pages per minute, color |
||
28
Installation and Activation
Free Hard Drive Space*
(U.S. 48 State Coverage)
|
JeppView: 2.0GB |
||
|
JeppView FliteDeck: 2.1GB |
Higher than the minimum requirement |
|
|
Both: 2.2GB |
||
|
(Europe IFR) |
||
|
JeppView: 2.0GB |
||
|
JeppView FliteDeck: 2.0GB |
Higher than the minimum requirement |
|
|
Both: 2.15GB |
||
|
(Europe VFR) |
||
|
JeppView: 2.0GB |
||
|
JeppView FliteDeck: 2.1GB |
Higher than the minimum requirement |
|
|
Both: 2.2GB |
||
(Worldwide IFR and VFR Coverage)
|
JeppView: 2.5GB |
|
|
JeppView FliteDeck: 2.55GB |
Higher than the minimum requirement |
|
Both: 2.85GB |
|
* Hard disk space requirements vary depending on coverage area and data installed. In order for terminal charts to install to the hard drive, the hard drive space shown above is needed.
JeppView Hard-Drive Space Requirements
|
Data Region |
Minimum* |
Recommended |
||||
|
JeppView: 200MB |
JeppView: 1.2GB |
|||||
|
USA — 48 States |
FliteDeck: |
260MB |
FliteDeck: |
1.2GB |
||
|
Both: 530MB |
Both: 2.5GB |
|||||
|
Europe |
JeppView: 170MB |
JeppView: 1.3GB |
||||
|
FliteDeck: |
225MB |
FliteDeck: |
1.4GB |
|||
|
Both: 455MB |
Both: 1.6GB |
|||||
|
Worldwide |
JeppView: 285MB |
JeppView: 2GB |
||||
|
FliteDeck: |
340MB |
FliteDeck: |
2.1GB |
|||
|
Both: 670MB |
Both: 2.3GB |
|||||
NOTE The figures above are estimates, as the data varies across update cycles.
* Minimum Requirements are for no installation of the optional data from the Program and Electronic Chart Data CDs. They also do not take into account RoutePack saves, Internet updates and weather file storage.
29

JeppView User’s Guide
NavSuite Global Free Hard Drive Space
NavSuite Global consists of JeppView, JeppView FliteDeck, and JetPlanner.
|
Requirement |
Minimum* |
Recommended |
|
|
USA — 48 States |
580 MB |
1.7 GB |
|
|
Europe |
550 MB |
1.7 GB |
|
|
Worldwide |
875 MB |
2.75 GB |
|
NOTE The figures above are estimates, as the data varies across update cycles.
* Minimum Requirements are for no installation of the optional data from the Program and Electronic Chart Data CDs. They also do not take into account RoutePack saves, Internet updates and weather file storage.
NavSuite IFR Free Hard Drive Space
NavSuite IFR consists of JeppView, JeppView FliteDeck, and FliteStar IFR.
|
Requirement |
Minimum* |
Recommended |
|
|
USA — 48 States |
610 MB |
1.8 GB |
|
|
Europe |
580 MB |
1.8 GB |
|
|
Worldwide |
910 MB |
2.7 GB |
|
NOTE The figures above are estimates, as the data varies across update cycles.
* Minimum Requirements are obtained by not installing any optional data available on the Program and Electronic Chart Data CDs. Terminal Charts run from the CD. It also does not take into account of RoutePack saves and Internet updates.
What You Get
When you first purchase JeppView or JeppView FliteDeck, you get three CDs, which must be installed in the following order:
•Program CD — Contains program and basic geographic and terrain data. Install this once on each computer.
•Electronic Chart Data (ECD) Disc 1 — Contains Jeppesen terminal chart data and is updated every 14 days. Install it after the Program CD installation and update the data through the Internet.
30

Installation and Activation
•Electronic Chart Data (ECD) Disc 2 — Contains program updates to JeppView and FliteDeck, Jeppesen aeronautical data, and the text information in the Jeppesen Airway Manual and the Bottlang Airfield Manual. This data is updated every 14 days. Install it after the ECD Disc 1 installation and update the data through the Internet.
Keep your Program CD and your latest ECD Discs in a safe IMPORTANT place in situations where you need to install JeppView and
FliteDeck on another computer.
If you are interested in receiving ECD Disc 1 and 2 updates by mail, NOTE please contact a Jeppesen Customer Service Representative for
information and pricing.
For initial installation on a computer, continue with one of the following:
•Standard Installation
•Network Installation
•Workstation ImagingStandard Installation
•JeppView MFD — see Standard Installation
Administrative Permissions
Before installing JeppView on Windows 2000, XP or Vista, verify that the permissions are set sot individual users have access to full use of JeppView. Administrative permissions are required for the initial installation of JeppView, and any program updates that might be available when clicking File > Check for Updates or with the CD update. Users do not need the full administrative permissions to update only navigational data and terminal chart data.
Windows 2000 and XP
Follow these steps to confirm administrative rights on your home computer:
1.Right-click My Computer on your desktop and choose Manage from the shortcut menu.
2.In the left pane, expand System Tools, and then click Local Users and
Groups.
3.In the right pane, double-click Groups.
4.Double-click Administrators. If your account has administrator rights, it appears in the Members section. If your account is not listed, click Add and enter the account name that you want to assign administrative privileges.
5.Click OK, and then reboot your computer if you have added an account.
If you are logged in without administrative rights, Windows may return the error «The following error occurred accessing the properties of the local group
31
JeppView User’s Guide
Administrators: Access is denied. The local group properties cannot be edited or viewed at this time.» If you are trying to install JeppView on a corporate computer, please contact your network administrator for administrative permission.
Windows Vista
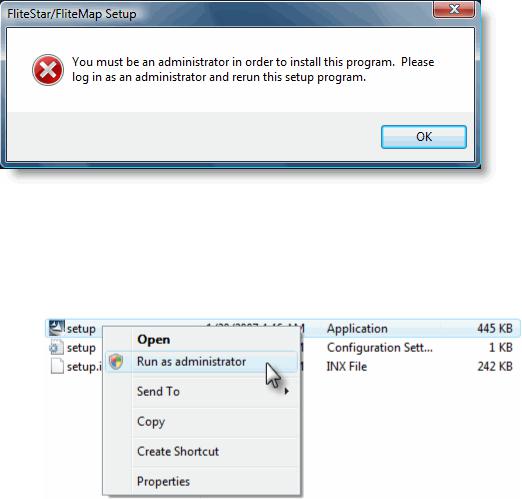
If you do not have administrative permissions on Windows Vista, you will receive the following message when attempting to install or update JeppView:
If this occurs, you need to elevate your status with administrative permissions. Use one of the following methods to gain access to the JeppView installer:
•Log in to your computer using the local «administrator» account. Thereafter, browse to your computer CD-ROM drive, and then double-click setup.exe.
•Browse to your computer CD-ROM drive, right-click setup.exe, and then select Run as administrator.
If you are installing JeppView on a corporate computer, please contact your network administrator for administrative permission.
Microsoft Windows Vista Compatibility Mode
If you are currently using a version of JeppView that is not Vista aware (version 3.5.2 or lower) on a Windows Vista machine using the compatibility mode feature, it is recommended that you turn off the compatibility mode and update the application with the Vista aware Electronic Chart Data (ECD) Discs or electronically through the Internet.
32

Installation and Activation
When using the Compatibility mode feature, Windows Vista redirects some files and folders to other areas of your computer. For instance, if you are a standard user and cannot write to the C:\Program Files folder, it will redirect the files and place it in the C:\Users[User Profile] folder. Windows Vista gives the application its own private copy of the file in the user’s profile, so the application will function properly. When files are moved randomly, the Vista aware Jeppesen applications might not be able to find the files needed or place additional files on your computer raising the amount of space required on your computer. It might also reduce the application’s performance and cause application conflicts.
For additional Windows Virtualization issues, visit Microsoft on the Web at http://support.microsoft.com/default.aspx/kb/927387.
Try these steps to turn off Windows compatibility mode:
1.Ensure that the Jeppesen applications are closed.
2.Right-click the Jeppesen application icon on your desktop.
3.From the shortcut menu, click Properties.
4.Click the Compatibility tab.
5.Clear the Compatibility mode check box if it’s selected.
6.Click OK.
7.Insert the Vista aware Electronic Chart Data CDs or update the application electronically.
Microsoft Windows Vista Folders
The release of JeppView version 3.6 incorporated a new directory structure applicable only for users that will be using the Microsoft Windows Vista operating system. Users with Windows XP and 2000 will not see a change. Use the following table if you are a Windows XP or Windows 2000 user migrating to Microsoft Vista to locate where common user files are stored.
The table assumes that JeppView is installed in the default location on the C: drive.
|
File |
Windows 2000 and XP* |
Windows Vista |
|
|
C:\Jeppesen\Common\ |
C:\ProgramData\Jeppesen\ |
||
|
CreateUpdatePack.exe |
Common\Utilities |
||
|
Utilities |
|||
|
C:\Jeppesen\JeppView3 |
C:\Program |
||
|
Deactivate.exe |
Files\Jeppesen\ |
||
|
JeppView3 |
|||
|
Markers.ini file (user- |
C:\Jeppesen\JeppView3 |
C:\Users\[UserProfile]\ |
|
|
defined waypoints) |
AppData\Local |
||
|
C:\Jeppesen\JeppView3\ |
C:\Users\[user |
||
|
Notebook files (.txt) |
profile]\Jeppesen\ |
||
|
Notebook |
|||
|
JeppView3\Notebook |
|||
33
![]()
|
JeppView User’s Guide |
||||
|
C:\Jeppesen\Common\ |
C:\Users\[user |
|||
|
RoutePack files (.rpk) |
profile]\Jeppesen\ |
|||
|
RoutePack |
||||
|
Common\RoutePack |
||||
|
UpdateClient.exe |
C:\Jeppesen\JeppView3 |
C:\Program |
||
|
Files\Jeppesen\JeppView3 |
||||
* Depending on your computer setup, files might also be placed in the
[root]:\Program Files\Jeppesen\ folders.  Hidden folder
To view hidden folders, see Backup and Recovery.
Standard Installation
The following instructions are for standard installation on a computer. If you need to install JeppView in a network environment, please see Network Installation.
•New JeppView Users Start Here.
•Existing Users Start Here.
•Installing Electronic Chart Data Disc 1.
•Installing Electronic Chart Data Disc 2.
The first time installing JeppView and JeppView FliteDeck, you must install the program and data with the CDs. After the data is installed on the computer, update the data through the Internet or with a CD subscription.
|
IMPORTANT |
Keep your initial CDs in a safe place in situations where you |
|
|
need to install JeppView and FliteDeck on another computer. |
||
The following instructions are for installing JeppView and FliteDeck
NOTE from the JeppView product. If you are installing JeppView and FliteDeck from the NavSuite, please refer to the NavSuite Quick Start
Guide you received when you ordered the product.
New JeppView Users Start Here
If this is your first time using JeppView, or if you are currently running JeppView 2, follow these steps. Ensure that you have administrative permissions on your computer before starting the following steps.
Insert the Program CD into your computer CD-ROM drive. If the setup program does not start automatically, browse to your computer CD-ROM drive and double-click setup.exe. To install the JeppView programs on your computer, follow these steps:
1.In the Welcome screen, click Next.
2.Read the information in the Installation Overview window and click Next.
3.Read the license agreement and accept the terms, and then click Next.
34

Installation and Activation
Accept the license agreement. Because JeppView is designed to be used on a combination of home, office, laptop, and aircraft computers, the license agreement allows you to
IMPORTANT install the JeppView and FliteDeck components on various combinations of up to four computers for your own personal use. Under no circumstances should this software be used by more than one person at the same time.
4.In the Pilot Information dialog box, enter your name and 16-character or alphanumeric serial number from the front of your CD album, and then click
Next.
5.Select the programs to install. You can install JeppView, FliteDeck or both.
6.Select the path in which to install JeppView and FliteDeck and click Next. Jeppesen recommends that you use the default folder or a location where other Jeppesen programs have previously been installed. If you want to use a different drive or folder, click Change, and then type the path or browse to the folder that you want.
7.Click Next through the remaining screens, accepting all default options.
8.When the installation is complete, click Finish. A dialog box appears instructing you to insert ECD Disc 1. If your computer requires a reboot, do so before moving to the next procedure.
Existing Users Start Here
If you changed your JeppView subscription to update your MFD system, or are currently using JeppView v3 with a different serial number, you must deactivate your current version. After you have deactivated JeppView, you will be provided the opportunity to insert your new JeppView serial number. You do not need the program CD.
To deactivate JeppView:
1.Open the JeppView program folder (the default location is
C:\Jeppesen\JeppView3).
2.Double-click deactivate.exe.
3.If prompted, select JeppView and click OK.
4.Select the check box to continue and click Next.
5.Click Yes to deactivate JeppView.
6.Select a deactivation process (we recommend that you select the Internet (Automated) method if you have an Internet connection), and click Next.
7.Record your serial number and deactivation code, and click Finish.
8.Insert ECD Disc 1 and complete the installation.
Electronic Chart Data Disc 1
35

JeppView User’s Guide
The first installation of JeppView requires ECD Disc 1 and 2. Thereafter, update the data every 14 days through the Internet or with the CD updates received in the mail. To install your terminal charts, follow these steps:
1.Insert ECD Disc 1 into your computer CD-ROM drive. If the setup program doesn’t start automatically, browse to your computer CD-ROM drive and double-click setup.exe.
2.If you deactivated a JeppView 3 serial number, enter your new serial number and click Next.
3.JeppView MFD Users Only: If this is your first time installing ECD Disc 1, click Yes to install JSUM. JSUM is used to assist in transferring the electronic chart data to the media used with your MFD system.
4.JeppView MFD Users Only: If applicable, select the Run Jeppesen Services check box and click Next. This option launches the Jeppesen Services Update Manager (JSUM) near the end of the ECD Disc 1 update. This option is only available if JSUM is already installed.
5.Verify the terminal chart coverage(s) listed for your serial number are the same as what you have purchased.
A.The first time that you install ECD Disc 1 on a given computer, you may not see any coverages. If that occurs, a box for entering a coverage code appears near the bottom of the Setup window.
B.Type the coverage codes from the front of your JeppView CD album (below the serial number), and then click Apply.
Coverage codes change with each terminal chart cycle. If the coverage code you have no longer works, or you don’t have a
NOTE coverage code, or you don’t see the coverages you need after entering your codes, have your order number or customer number
available and contact Jeppesen Customer Service. After you have the codes you need, complete the steps outlined below.
6.JeppView MFD Users Only: The JSUM installer and program launches, and you can log in and begin the programming process to your media. For JSUM information, see the JSUM help file.
7.After the update is complete, continue the installation with ECD Disc 2.
Electronic Chart Data Disc 2
To receive JeppView and FliteDeck program updates, Jeppesen aeronautical data and text data, follow these steps:
36

Installation and Activation
1.If you haven’t already done so, insert ECD Disc 2 into the CD-ROM drive. If the setup program doesn’t start automatically, browse to your computer CDROM drive and double-click setup.exe.
2.Click Next after the welcome screen appears.
3.JeppView MFD Users Only: If you do not have FliteDeck installed, the installer gives you the option to install it. If given the option and you want FliteDeck, select the span class=Bold>Install FliteDeck check box and click
Next.
4.Review the installation summary, and click Next.
5.Select the following check boxes and click Next:
•View the readme file — Displays new information regarding the latest program update.
•Install Jeppesen Weather Service* — This option launches the Jeppesen Weather Service installer, allowing FliteDeck to display weather using your XM WxWorx Satellite Weather Service. The Jeppesen Weather Service option only appears if you are installing FliteDeck and you did not previously install the Jeppesen Weather Services. For additional information about using your XM WxWorx Satellite Weather Service in FliteDeck, refer to the JeppView FliteDeck User’s Guide and Help file.
6.Follow the remaining screens to finish the installation.
See JeppView Revisions for information about updating your data NOTE electronically after the initial installation. Depending on the expiration
date of the data on the CDs, you might need to update your data soon after installing JeppView.
* XM Weather provides service to the contiguous US (all states except Alaska and Hawaii), its territories and adjacent water. To learn of any changes to the coverage areas, contact XM WX at 1-800-985-9200.
Network Installation
A standard license allows installation of JeppView on four computers for use by one pilot. If you are interested in purchasing the network version of JeppView or purchasing multiple licenses, please contact Jeppesen Customer Service for information and pricing.
If you are an existing customer upgrading JeppView from version 3.3 to version 3.5 on a network, you will need to change the client network path to a network drive. If you are installing JeppView on the server for the first time with JeppView 3.5, continue to Initial Server Installation.
Upgrading JeppView from Version 3.3 to 3.5
If you update your data on the server through the Internet, the update process has not changed. If you update your JeppView data on the server using discs received by
37

JeppView User’s Guide
mail, you will receive two Electronic Chart Data Discs. Install Electronic Chart Data Disc 1 and 2 on the server:
•Electronic Chart Data (ECD) Disc 1 — Contains Jeppesen terminal chart data and is updated every 14 days.
•Electronic Chart Data (ECD) Disc 2 — Contains program updates to JeppView and FliteDeck, Jeppesen aeronautical data, and the textual information in the Jeppesen Airway Manual and the Bottlang Airfield Manual. This data is updated every 14 days.
After JeppView has been updated on the server, the following steps need to take place on each client machine:
1.After you have finished the installation process of the JeppView upgrade, ensure that you have a shared folder on the server that points to the Jeppesen folder.
A.On the server, right-click the program folder which could be
[root]:\Jeppesen and choose Sharing and Security.
B.On the Sharing tab, click Share this folder.
38

Installation and Activation
C.To set a user limit other than the default Maximum Allowed, click Allow this number of users and specify the maximum number of concurrent users.
D.To specify which users may access the shared folder, click Permissions.
E.Select the users or groups of users who will have access to JeppView.
F.Under the Allow column, select the Change and Read check box for each user or each group of users accessing JeppView.
G.Click OK to return to the previous screen.
H.Click OK.
2.On the client machine, map a network drive to \\<servername>\Jeppesen where servername is the name of the server where you installed the JeppView program.
A.Click Start > Settings > Control Panel.
B.Double-click Network Connections.
C.Click Tools > Map Network Drive.
39

JeppView User’s Guide
D.In the Folder text box, enter \\<servername>\Jeppesen where servername is the name of the server where you installed the JeppView program.
E.Select the Reconnect at logon check box.
F.Click Finish. You should now be able to access your network drive.
3.Start JeppView on the client.
4.Read the message that appears about using a network drive instead of a network path, and then click OK.
5.JeppView shuts down and attempts to launch the NetworkCorrectionUtility.exe program located in the \\<servername>\Jeppesen\\JeppView3\\Utils folder. This utility assists in remapping your JeppView server location to a network drive.
6.In the JeppView Network Correction Utility Welcome dialog box, click
Next.
7.Read the client/server setup instructions and ensure you have completed all the steps listed before continuing. Click Next.
40
Installation and Activation
8.Specify the network drive that contains the server JeppView3 executable. (Z:\, where Z is the network drive). This location is on the server and not on the local machine.
9.Click Next to complete the installation.
10.Repeat steps 2 through 8 for each client.
Initial Server Installation
Insert the JeppView program disc into the CD-ROM drive on your server. The installer will guide you through the following steps and procedures:
1.In the JeppView Welcome screen, click Next.
2.Read the information in the Installation Overview window and click Next.
3.Accept the terms of the license agreements, and then click Next.
4.Enter your registration information and 16-character or alphanumeric number that came with JeppView, and then click Next.
5.Select the JeppView check box only and click Next. Follow the guidelines on the screen.
6.Select the path in which to install JeppView and click Next. Jeppesen recommends that you use the default folder or a location where other Jeppesen programs have previously been installed. If you want to use a different drive or folder, click Browse, and then type the path or browse to the folder that you want.
7.Click Next on the remaining windows accepting the default entries.
8.After the update is complete, insert ECD Disc 1.
Installing Electronic Chart Data Disc 1 on a Server
Jeppesen terminal chart data is provided on ECD Disc 1. The on-screen instructions are similar to those for the program installer, and will guide you through the setup:
1.Click Next after the Welcome screen appears.
2.Check the coverage regions listed in the installation Setup dialog box. If you received coverage codes from Jeppesen Customer Support for additional regions, enter them in the field below the list box. When you are finished, click Next.
3.After the update is complete, continue with the Installing Electronic Chart Data Disc 2 on a Server to update your enroute data and any program updates that might be available.
If you did not receive a serial number or coverage code, please contact Jeppesen Customer Service.
Installing Electronic Chart Data Disc 2 on a Server
41

JeppView User’s Guide
After the ECD Disc 1 is installed, place ECD Disc 2 into the CD drive. ECD Disc 2 contains updates to JeppView, Jeppesen aeronautical data, and the text for the
Jeppesen Airway Manual and the Bottlang Airfield Manual.
If the setup program does not start automatically, click Start > Run. Type d:\setup.exe (where d: is the letter of the CD-ROM drive).
1.Click Next after the welcome screen appears.
2.Review the installation summary, and then click Next.
3.Select the ReadMe file check box to review any new information regarding the latest program update, and then click Next. Follow the prompts on the remaining installation windows.
Sharing the Server
After you have finished the installation process of the JeppView program CD and the two ECD Discs, you must set up a shared folder on the server that points to the Jeppesen folder.
1.On the server, right-click the Jeppesen folder that contains the JeppView program files and choose Sharing and Security. The default folder is
[root]:\Jeppesen or [root]:\Program Files\Jeppesen.
2.On the Sharing tab, click Share this folder. If the server is using Microsoft Windows Vista, click Advanced Sharing.
42

Installation and Activation
3.To set a user limit other than the default Maximum Allowed, click Allow this number of users and specify the maximum number of concurrent users.
4.Click Permissions.
5.Select users or groups of users whom you want to grant access to JeppView.
6.Under the Allow column, select the Change and Read check box for each user or groups of users accessing JeppView.
7.Click OK to return to the previous screen.
8.Click OK.
If the server is using Microsoft Windows Vista, you will need an additional network share for the terminal charts and text data.
|
NOTE |
1. |
Browse to the [root]:\ProgramData folder. |
|
|
2. |
Right-click the Jeppesen folder, and click Share. |
||
|
3. |
Select the users that will need access to JeppView. |
||
|
4. |
Set their permissions to Read. |
||
43
![]()
JeppView User’s Guide
Activating JeppView on the Server
To receive electronic updates, you must activate JeppView on the server. After JeppView is installed:
1.Click Start > Programs > Jeppesen > JeppView3 > JeppView3 or click the Jeppesen JeppView icon on the desktop.
2.Follow the prompts on the JeppView activation installation windows. See also Activating JeppView.
3.After JeppView has been activated, click File > Exit.
Client Installation
On each client system:
1.Map a network drive on the client that maps to \\<servername>\Jeppesen.
A.Click Start > Settings > Control Panel.
B.Double-click Network Connections.
C.Click Tools > Map Network Drive.
D.In the Folder text box, enter \\<servername>\Jeppesen where servername is the name of the server where you installed the JeppView program.
44

Installation and Activation
E.Select the Reconnect at logon check box.
F.Click Finish. You should now be able to access your network drive.
|
NOTE |
If the server is using Microsoft Windows Vista, repeat step 1 to map to |
|
|
the network share of the terminal charts and text data. |
||
2.On the client machine, insert the JeppView program CD into the CD-ROM drive. Click Cancel if the installer starts.
3.Double-click My Computer.
4.Right-click the drive containing the program CD and choose Explore.
5. In the CD contents, double-click the network folder.
45

JeppView User’s Guide
6.Double-click JeppViewNetworkSetup.exe.
7.Click Next to start the installer.
8.Read the License Agreement, and then click Yes to install.
9.Enter the same serial number that you used to install JeppView on the server. This must be the same serial number.
10.Read the installation summary and ensure you have completed all of the steps listed before continuing, and then click Next.
11.Click Yes or No when asked if the server is using Windows Vista. Clicking Yes initiates the installer to look for the additional network share of terminal charts and text data required when the server is using Windows Vista.
12.If applicable, specify the network drive that contains the server JeppView3.exe (Z:\, where Z is the network drive). This location is on the server and not on the local machine. Click Next to complete the installation.
13.Select the folder where chart preference files will be stored on the local workstation (such as C:\Jeppesen). Click Next.
14.Select where the program folder will be located (the default is
…\Jeppesen\JeppView3).
15.Installation will take a few seconds. If requested, reboot the workstation at this point.
16.Launch JeppView on the client computer using either the Start menu or the desktop shortcut icon.
Updating Data on the Server
46

Installation and Activation
See JeppView Revisions for information on updating your data electronically after the initial installation. Depending on the expiration date of the data on the CD, you might need to update your data soon after installing JeppView. You need to update the data only on the server; not on the client machines.
Viewing the Help File for Network Installations
Microsoft released a security patch that makes it impossible to view CHM files that are stored on a network drive (as opposed to CHM files stored on your own computer). The help file will appear, but instead of the topic text, you will see the error message, «this page cannot be displayed.»
If you trust all of the computers on your LAN or intranet (and the people using them), you can use the following steps to lower the restrictions on the Local Intranet zone to allow CHM files to be displayed:
1. Click Start > Run and enter regedit. Click OK.
2. Locate and click the following subkey:
HKEY_LOCAL_MACHINE\SOFTWARE\Microsoft\HTMLHelp\1.x\ItssRestrictions If this registry subkey does not exist, create it:
A. Right-click 1.x and choose New > Key.
47

JeppView User’s Guide
B. Right-click New Key #1 and choose Rename.
C. Rename the subkey to ItssRestrictions.
3. Right-click ItssRestrictions and choose New > DWORD Value.
4. Enter MaxAllowedZone, and then press ENTER.
48

Installation and Activation
5. Right-click MaxAllowedZone and choose Modify.
6. In the Value data text box, enter 1, and click OK.
7. Click File > Exit to close the Registry Editor.
If this solution does not work for you, please visit http://support.microsoft.com/kb/896358 for alternatives.
Workstation Imaging
These instructions cover the installation of JeppView when using an imaging process such as Symantec™ Norton Ghost™ or Acronis True Image™ to deploy the application on additional computers.
What You Need
The following resources are needed in order to image a workstation and deploy the image with JeppView on other workstations:
49
JeppView User’s Guide
•Imaging software such as Symantec™ Norton Ghost™ and Acronis True Image™.
•JeppView Program CD.
•Electronic Chart Data (ECD) Disc 1.
•Electronic Chart Data (ECD) Disc 2.
Creating a Master Image
To create an image with JeppView, install the program CD only. After the program CD is installed, you can continue with imaging the system for other workstations.
1.Insert the Program CD into your computer CD-ROM drive. The Installation Wizard appears. (If it doesn’t, browse to your computer CD-ROM drive and double-click setup.exe.)
2.On the Welcome screen, click Next.
3.Read the information in the Installation Overview window and click Next.
4.Read the license agreement and accept the terms, and then click Next.
5.In the Pilot Information dialog box, enter at least your name and the 16character and alphanumeric JeppView serial number, and then click Next.
6.Select whether to install JeppView, FliteDeck, or both, and then click Next.
7.Select the path to install JeppView and click Next. Jeppesen recommends that you use the default folder, which is C:\Program Files\Jeppesen or a location where other Jeppesen programs have been installed. If you use a different drive or folder, click Change, and then type the path or browse to the folder.
8.Follow the remaining on-screen installation instructions to finish the program installation. When the installation is complete, click Finish.
9.Click Close Window when the dialog box appears that instructs you to insert the ECD Disc 1. Do not insert ECD Disc 1. After the image has been transferred to each workstation, you will install the ECD data on all target machines. If the computer requires a reboot, do so before beginning the next procedure.
10.After you have finished installing the program CD, image the workstation using an imaging software (for example, Symantec Norton Ghost or Acronis True Image).
11.Deploy the master image to individual workstations.
Installing Electronic Chart Data Disc 1
After you have deployed the master image to the workstations, install ECD Disc 1 and 2 on the workstations. To install terminal charts, follow these steps:
1.If the setup program does not start automatically, click Start > Run. Type d:\setup.exe (where d: is the letter of the CD-ROM drive).
50

Installation and Activation
2.Check for the terminal chart coverages that you have purchased under your serial number, and click Next.
A.The first time you install the ECD Disc 1 on a given computer, you might not see any coverages. If that occurs, a box appears near the bottom of the Setup window for entering a coverage code.
B.Type the coverage codes from the back of your JeppView CD album (below the Serial Number), and then click Apply.
Coverage codes change with each terminal chart cycle. If the coverage code
you have no longer works, or you don’t have a coverage code, or you don’t see NOTE the coverages you need after entering any codes you have, have your order
number or customer number available and call Jeppesen Customer Service. Once you have the codes you need, complete the steps outlined below.
C.If necessary, restart the ECD Disc 1 Setup program.
D.On the Coverages screen, select the I have additional Coverage Codes check box, and then click Next. Setup displays a box into which you type additional codes.
E.Enter any coverage codes you have, and then click Apply.
51

JeppView User’s Guide
3. After the update is complete, the installer automatically closes. Continue with Installing ECD Disc 2 to update your enroute data and any program updates that might be available.
If you did not receive a serial number or coverage code, please contact Jeppesen Customer Service. If you need to navigate outside your current coverage area, you can expand your coverage instantly by contacting Jeppesen and purchasing additional coverage codes.
Installing Electronic Chart Data Disc 2
To update the JeppView and FliteDeck programs, Jeppesen aeronautical data, and text data, follow these steps:
1. Insert ECD Disc 2 in the CD-ROM drive.
If the setup program does not start automatically, click Start > Run. Type d:\setup.exe (where d: is the letter of the CD-ROM drive).
2.Click Next after the JeppView Welcome screen appears.
3.Review the installation summary, and then click Next.
4.Select the following check boxes and click Next.
•View the readme file — Displays new information regarding the latest program update.
•Install Jeppesen Weather Service — This option launches the Jeppesen Weather Service installer, so that FliteDeck can display weather using your XM WX Satellite Weather™ service. The Jeppesen Weather Service option only appears if you are installing FliteDeck and you have not previously installed the Jeppesen Weather Services. For additional information about using your XM WX Satellite Weather service in FliteDeck, refer to the JeppView FliteDeck User’s Guide or Help file.
5.Follow the prompts on the remaining installation windows.
See JeppView Revisions for information about updating your data NOTE electronically after the initial installation. Depending on the expiration
date of the data on the CDs, you might need to update your data soon after installing JeppView.
* XM Weather provides service to the contiguous US (all states except Alaska and Hawaii), its territories and adjacent water. To learn of any changes to the coverage areas, contact XM WX at 1-800-985-9200.
Upgrade Procedures
The following table outlines how to migrate your current JeppView subscription to another JeppView product variant (JeppView with JeppView FliteDeck, JeppView for MFDs, and NavSuite).
52

Installation and Activation
|
Currently |
Change To |
What You |
Procedure |
You Will Have |
||||
|
Installed |
Need |
|||||||
|
1. |
Do not |
|||||||
|
uninstall |
||||||||
|
your |
||||||||
|
current |
• |
JeppView |
||||||
|
subscriptio |
||||||||
|
v3.x |
||||||||
|
• |
NavSuite |
n. |
||||||
|
• |
JeppView |
|||||||
|
IFR or |
2. |
Deactivate |
||||||
|
FliteDeck |
||||||||
|
Global |
JeppView |
|||||||
|
v3.x |
||||||||
|
Serial |
3. |
Back up |
||||||
|
NavSuite IFR |
• |
FliteStar |
||||||
|
Number |
any |
|||||||
|
• |
JeppView |
• |
Coverage |
JeppView |
IFR |
|||
|
(depending |
||||||||
|
• |
FliteStar IFR |
Code |
files you |
|||||
|
on your |
||||||||
|
JeppView |
• |
NavSuite |
might |
|||||
|
NavSuite |
||||||||
|
Program |
need. |
|||||||
|
3.x |
NavSuite Global |
version) |
||||||
|
CD |
4. |
Insert the |
||||||
|
(Standard) |
• |
JetPlanner |
||||||
|
• |
JeppView |
• |
NavSuite |
NavSuite |
||||
|
(depending |
||||||||
|
• |
JetPlanner |
Electronic |
Program |
|||||
|
on your |
||||||||
|
Global |
Chart Data |
CD and |
||||||
|
NavSuite |
||||||||
|
• |
JetPlan.com |
Disc 1 |
follow the |
|||||
|
version) |
||||||||
|
• |
NavSuite |
installation |
||||||
|
• |
JetPlan |
|||||||
|
Electronic |
process. |
|||||||
|
(depending |
||||||||
|
Chart Data |
5. |
When the |
||||||
|
on your |
||||||||
|
Disc 2 |
installer |
|||||||
|
NavSuite |
||||||||
|
asks about |
||||||||
|
version) |
||||||||
|
overwriting |
||||||||
|
the existing |
||||||||
|
application, |
||||||||
|
click Yes. |
||||||||
|
1. |
Do not |
|||||||
|
uninstall |
||||||||
|
• |
NavSuite |
your |
||||||
|
current |
||||||||
|
IFR Serial |
||||||||
|
subscriptio |
||||||||
|
JeppView |
Number |
|||||||
|
n. |
||||||||
|
• |
Coverage |
|||||||
|
3.x |
2. |
Deactivate |
||||||
|
Code |
• |
JeppView |
||||||
|
(Standard) |
JeppView |
|||||||
|
• |
NavSuite |
|||||||
|
and any |
and |
v3.x |
||||||
|
Program |
||||||||
|
FliteStar |
FliteStar. |
• |
JeppView |
|||||
|
NavSuite IFR |
CD |
|||||||
|
or |
See the |
FliteDeck |
||||||
|
• |
NavSuite |
|||||||
|
FliteMap |
FliteStar |
v3.x |
||||||
|
Electronic |
||||||||
|
version |
Help file |
• |
FliteStar |
|||||
|
Chart Data |
||||||||
|
(VFR, IFR, |
regarding |
IFR |
||||||
|
Disc 1 |
||||||||
|
or |
deactivatin |
|||||||
|
• |
NavSuite |
|||||||
|
Corporate) |
g FliteStar. |
|||||||
|
Electronic |
||||||||
|
3. |
Back up |
|||||||
|
Chart Data |
||||||||
|
any |
||||||||
|
Disc 2 |
||||||||
|
JeppView |
||||||||
|
files you |
||||||||
|
might |
53
 Loading…