

English Manual
Acoustic Play

|
Important safety instructions |
1 |
Setup button/section |
28 |
Mix button/section |
57 |
||||
|
Input page (1/7) |
29 |
Mix page (1/2) |
58 |
||||||
|
Before you begin |
4 |
Output page (2/7) |
31 |
Mix page (2/2) |
59 |
||||
|
About this manual |
5 |
System page (3/7) |
32 |
||||||
|
Getting support |
5 |
System page 2 (4/7) |
33 |
The Looper |
60 |
||||
|
VoiceSupport |
5 |
Loop page (5/7) |
34 |
What is looping? |
61 |
||||
|
Please register your Play Acoustic |
5 |
Switch-3 page (6/7) |
35 |
Using the Play Acoustic looper |
61 |
||||
|
Product Info page (7/7) |
36 |
Looping tips |
62 |
||||||
|
Introduction |
6 |
Using a Switch-3 for looping |
63 |
||||||
|
Diagram legend |
7 |
Vocal FX button/section |
37 |
||||||
|
Diagrams |
8 |
Harmony page (1/7) |
39 |
Troubleshooting |
64 |
||||
|
Harmony Advanced page |
40 |
General troubleshooting |
65 |
||||||
|
Basics |
9 |
Double page (2/7) |
41 |
||||||
|
Inputs and outputs |
10 |
Delay page (3/7) |
42 |
Appendix |
66 |
||||
|
Gain settings |
12 |
Delay Advanced page |
43 |
TC-Helicon scales reference chart |
67 |
||||
|
Switches and operation |
14 |
Reverb page (4/7) |
44 |
||||||
|
Control knob and arrow buttons |
16 |
HardTune page (5/7) |
45 |
Links |
68 |
||||
|
Soft buttons |
18 |
Transducer page (6/7) |
46 |
||||||
|
Transducer Advanced page |
47 |
Technical specifications |
70 |
||||||
|
Connection diagrams |
20 |
µMod page (7/7) |
48 |
||||||
|
Mixer setup |
21 |
||||||||
|
Play Acoustic back panel inputs |
Guitar FX button/section |
49 |
|||||||
|
and outputs |
21 |
Guitar Reverb page (1/7) |
51 |
||||||
|
Stereo (or mono) vocals and guitar |
22 |
Guitar µMod page (2/7) |
52 |
||||||
|
Mono vocals and guitar amp |
23 |
BodyRez EQ page (3/7) |
53 |
||||||
|
Mono vocal and guitar with a |
BodyRez Shelf EQ page (4/7) |
54 |
|||||||
|
TC-Helicon FX150 |
24 |
BodyRez Parametric EQ page (5/7) |
54 |
||||||
|
Mono vocals via FX150 and a guitar amp |
25 |
BodyRez Compressor page (6/7) |
54 |
||||||
|
Guitar and vocals via FX150 and stereo out |
Guitar Anti-Feedback page (7/7) |
56 |
|||||||
|
to a PA |
26 |
Notch Filter section |
56 |
||||||
|
Stereo PA and TC-Helicon |
Simple steps for feedback reduction |
56 |
|||||||
|
Guitar & Headphone cable |
27 |
||||||||
|
Product |
Play Acoustic |
||||||||
|
Product (firmware) version |
1.0 |
||||||||
|
Document |
Reference manual |
||||||||
|
Document version / date |
2014-07-16 |
||||||||
|
Play Acoustic – Reference manual (2014-07-16) |
a |

Important safety instructions
Important safety instructions
|
Play Acoustic – Reference manual (2014-07-16) |
1 |

Important safety instructions
1.Read these instructions.
2.Keep these instructions.
3.Heed all warnings.
4.Follow all instructions.
5.Do not use this apparatus near water.
6.Clean only with a dry cloth.
7.Do not block any ventilation openings. Install in accordance with the manufacturer’s instructions.
8.Do not install near any heat sources such as radiators, heat registers, stoves, or other apparatus (including amplifiers) that produce heat.
9.Do not defeat the safety purpose of the polarized or grounding-type plug. A polarized plug has two blades with one wider than the other. A grounding-type plug has two blades and a third grounding prong. The wide blade or the third prong is provided for your safety. If the provided plug does not fit into your outlet, consult an electrician for replacement of the obsolete outlet.
10.Protect the power cord from being walked on or pinched, particularly at plugs, convenience receptacles, and the point where they exit from the apparatus.
11.Only use attachments/accessories specified by the manufacturer.
12.Use only with a cart, stand, tripod,
bracket, or table specified by the manufacturer, or sold with the apparatus. When a cart is used, use
caution when moving the cart/apparatus combination to avoid injury from tip-over.
13.Unplug this apparatus during lightning storms or when unused for long periods of time.
Play Acoustic – Reference manual (2014-07-16)
14.Refer all servicing to qualified service personnel. Servicing is required when the apparatus has been damaged in any way, such as power-supply cord or plug is damaged, liquid has been spilled or objects have fallen into the apparatus, the apparatus has been exposed to rain or moisture, does not operate normally, or has been dropped.
Caution
You are cautioned that any change or modifications not expressly approved in this manual could void your authority to operate this equipment.
Service
►► All service must be performed by qualified personnel.
►► There are no user-serviceable parts inside.
Warning
►► To reduce the risk of fire or electric shock, do not expose this apparatus to rain or moisture and objects filled with liquids, such as vases, should not be placed on this apparatus.
►► This apparatus must be earthed.
►► Use a three wire grounding type line cord like the one supplied with the product.
►► Be advised that different operating voltages require the use of different types of line cord and attachment plugs.
►► Check the voltage in your area and use the correct type.
|
Voltage |
Line plug according to standard |
|
110 to 125 V |
UL817 and CSA C22.2 no 42. |
|
220 to 230 V |
CEE 7 page VII, SR section 107- |
|
2-D1 / IEC 83 page C4. |
►► This equipment should be installed near the socket outlet and disconnection of the device should be easily accessible.
►► To completely disconnect from AC mains, disconnect the power supply cord from the AC receptacle.
►► The mains plug of the power supply shall remain readily operable.
►► Do not install this device in a confined space. ►► For use at an altitude of 2000 m or lower.
►► Do not open the unit – risk of electric shock inside.
2

Important safety instructions
EMC / EMI
Electromagnetic compatibility /
Electromagnetic interference
This equipment has been tested and found to comply with the limits for a Class B digital device, pursuant to part 15 of the FCC rules.
These limits are designed to provide reasonable protection against harmful interference in residential installations. This equipment generates, uses and can radiate radio frequency energy and, if not installed and used in accordance with the instructions, may cause harmful interference to radio communications. However, there is no guarantee that interference will not occur in a particular installation.
If this equipment does cause harmful interference to radio or television reception, which can be determined by turning the equipment off and on, the user is encouraged to try to correct the interference by one or more of the following measures:
►► Reorient or relocate the receiving antenna.
►► Increase the separation between the equipment and receiver.
►► Connect the equipment into an outlet on a circuit different from that to which the receiver is connected.
►► Consult the dealer or an experienced radio / TV technician for help.
For customers in Canada
This Class B digital apparatus complies with Canadian ICES-003.
Cet appareil numérique de la classe B est conforme à la norme NMB-003 du Canada.
Explanation of graphic symbols
The lightning bolt triangle is used to alert the user to the presence of uninsulated “dangerous voltages” within the unit’s chassis that may be of sufficient magnitude to constitute a risk of electric shock to humans.
The exclamation point triangle is used to alert the user to presence of important operating and service instructions in the literature accompanying the product.
|
Play Acoustic – Reference manual (2014-07-16) |
3 |

Before you begin
Before you begin
|
Play Acoustic – Reference manual (2014-07-16) |
4 |
Before you begin
About this manual
This manual will help you understand and operate your Play Acoustic.
You can download the most current version of this reference manual from tc-helicon.com/products/play-acoustic/support/
To get the most from this reference manual, please read it from start to finish, or you may miss important information.
Getting support
If you still have questions after reading this reference manual, please read the FAQs, visit the user forums and get in touch with support at: support.tc-helicon.com/
VoiceSupport
VoiceSupport is the application that allows you to fully unlock the potential of your TC-Helicon product and stay in touch with the latest news, tips and tricks.
VoiceSupport key features include:
►► Professionally authored preset libraries ►► Direct access to product manuals
►► Update messaging – helping you stay up to date with the latest software
►► Drag & drop preset management
►► Customizable content about your products ►► VoiceCouncil feeds for the latest advice for
singers
►► Firmware upgrading ►► Account management ►► Access to support
You can download VoiceSupport for Microsoft Windows and Mac OS X from tc-helicon.com/products/voicesupport/
Please register your Play Acoustic
To register your Play Acoustic using the VoiceSupport software, launch VoiceSupport and click on the ACCOUNT button.
Please note that registration of your product is not required to use VoiceSupport, download presets, update firmware or contact support.
|
Play Acoustic – Reference manual (2014-07-16) |
5 |

Introduction
Introduction
|
Play Acoustic – Reference manual (2014-07-16) |
6 |
Introduction
Welcome to the Play Acoustic manual!
First, thank you so much for purchasing Play Acoustic. We at TC-Helicon are confident that your vocal and acoustic guitar performances will be positively impacted with this great effects processor.
As you discovered in the Quick Start Guide (the short manual that came in the box), Play Acoustic is easy to use at the top level, but there is more under the hood of this compact device than you might think. We recommend you treat your Play Acoustic like any other new instrument and dedicate some time to learning how to use it.
Yes, that means RTFM!
Read the… full manual.
And if you ever find yourself without this manual: On the bottom of your Play Acoustic , you will find a “cheat sheet” explaining the most important functions.
Play Acoustic – Reference manual (2014-07-16)
Diagram legend
The following icons are used in the diagrams in this manual.
P.A.
Microphone
Guitar amp
Acoustic Guitar
XLR cables
¼“ / 6.5 mm TRS (Tip / Ring / Sleeve )
and TS (Tip / Sleeve) guitar cables
Monitor Mix
⅛” / 3.5 mm cable
Mixing Board
7
Diagrams
On the following pages, you will see some connection diagrams. We have set things up to give you clear and concise representations of what goes where.
There are a few things we would like you to keep in mind as you look at the diagrams:
1. Inputs to Play Acoustic will be to the left of the back panel image.
2. Outputs from Play Acoustic will be to the right of the back panel image.
3.There are two boxes on the bottom of each diagram.
►► The Play Acoustic box shows “what you hear” from your Play Acoustic headphone output.
►► The P.A. box shows “what you hear” from the P.A. speakers.
4.We don’t account for other inputs/instruments when showing “what you hear” from the P.A.,
|
5. In a lot of cases, “what you hear” will be the |
PLAY ACOUSTIC |
|
so you won’t see pictures of drums etc. |
|
|
same for both Play Acoustic headphone out- |
|
|
put and P.A. – but it can also be different. |
Play Acoustic – Reference manual (2014-07-16)
![]()
Play Acoustic – Reference manual (2014-07-16)

Basics
Play Acoustic – rear panel
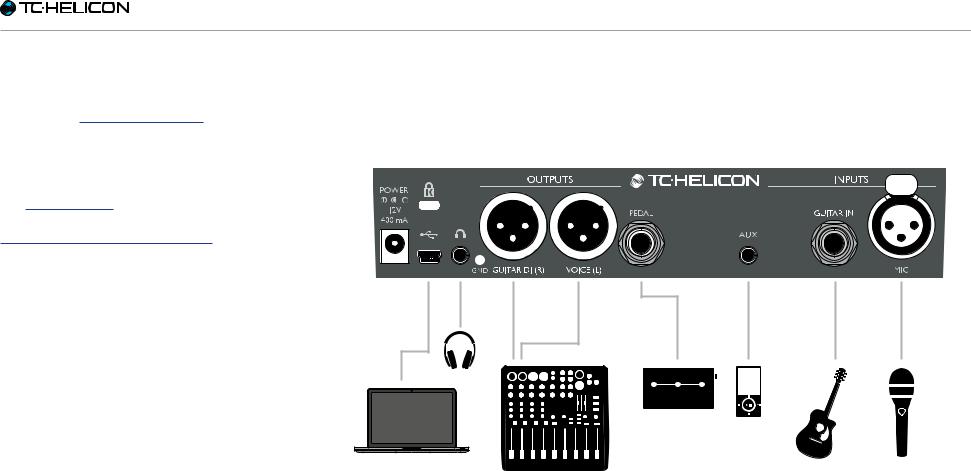
Inputs and outputs
Connectors are described from right to left. For setup examples, see “Connection diagrams”.
MIC connector
This is where the magic happens!
Plug your dynamic, condenser, MP-75, or e835 fx microphone in here. Remember to set the microphone type and level correctly, as described in the Play Acoustic Quick Start Guide.
Play Acoustic – Reference manual (2014-07-16)
|
GUITAR IN connector |
via the Voice (L) connector, and a mono guitar |
|
Connect your guitar to this input. |
signal is sent via the Guitar DI (R) jack. This con- |
|
figuration can be changed in the Setup/Output |
|
|
menu. |
AUX connector
Use a 1/8” cable to connect any music source you want to use to your Play Acoustic (especially that 8-Track from your 1974 Comet). When an input is detected here and no guitar is plugged in, Play Acoustic will use the music signal to figure out key and scale information.
GUITAR DI (R) and VOICE
(L) output connectors
These are the main output connectors of your Play Acoustic. By default, mono vocals are sent
GND switch
This is a ground lift switch. If you experience hum while using Play Acoustic, try pressing the GND switch to reduce or remove the hum.
Headphones connector
Connect your headphones to the Phones connector.
10

Basics
PEDAL connector
Use a TRS cable to connect a Switch-3 (optional) to the PEDAL connector. If you use the Switch-3, you have direct access to looping and other effect control. See the Switch-3 menu section for details on assigning controls to each Switch-3 button.
USB connector
Connect to your computer with the included cable. Use the VoiceSupport software to manage presets and update the product’s internal software (firmware).
You can download VoiceSupport here: tc-helicon.com/products/voicesupport/
Stereo audio input and output via USB is also supported at 16 bit resolution with 44.1 or 48 kHz sample rate.
Incoming USB audio signals are NOT passed to the USB output, allowing you to sing/play along with tracks from your DAW while recording back “just the vocals and guitar”.
Power socket
Connect the included power supply. Your Play Acoustic will power up immediately. Always use a TC-Helicon power supply (12 V, 400 mA).
Using any other power supply may damage the unit and will void your warranty.
|
Play Acoustic – Reference manual (2014-07-16) |
11 |

Basics
Gain settings
How the Input LED
Level Meter Works
The LED on the top of your Play Acoustic is used for both vocal and guitar level metering.
When setting the level for your microphone or guitar, make sure that you sing or play separately. If you are setting your vocal level, don’t play your guitar – and vice versa.
The meter will show a combined level for both guitar and vocals when you sing and play.
If you see the LED light red – indicating clipping –, it is helpful to play/sing individually to see which input may be getting too much level.
Keep in mind that the combined level of two inputs can clip, even when the individual inputs do not. If this happens for you, it’s best to simply turn down each input slightly until the LED no longer lights red when you sing and play simultaneously.
Setting Microphone Gain
Once you have connected your microphone and selected the microphone type (Dynamic, Condenser, MP-75, e835 FX), use the Mic Gain knob on the side of your Play Acoustic to set the input level for your microphone.
As you increase the level, pay close attention to the LED on top of Play Acoustic. You want the
Play Acoustic – Reference manual (2014-07-16)
input to light the LED green. It’s OK if the LED sometimes lights yellow – but it should never turn red. If it does turn red, reduce the level. Red means that a) the input is overloading and b) you’ve got powerful lungs!
Setting the guitar level
The control for your guitar input is on Page 1 of the Setup menu. You can access the Setup menu by pressing the SETUP button and then use the < or > buttons to move to Page 1. Press the “soft” button next to the “Guitar IN” box and use the Control knob to adjust your level.
Reading the LCD Display
The Play Acoustic display
The LCD display of your Play Acoustic displays the following information:
Preset Name
The name of the currently selected preset. In the screen shot above, it is “High Harmony“. The Presets concept is explained in “What are presets?”.
Preset Number
The unique preset number – i.e., the number of the slot where the preset is stored. In the screen shot above, it is 1.
“FAV” indicator
The “FAV” indicator is shown in the upper right corner of the display if the current preset has been tagged as a Favorite.
“NP” indicator
The “NP” indicator is shown in the lower right corner of the display when chord information changes have been detected by Play Acoustic.
You may see the “NP” indicator switch on and off somewhat erratically as it processes incoming musical information. This is normal.
What is NaturalPlay?
NaturalPlay is the voodoo we do inside Play Acoustic to figure out which key your music is in. If you plug your guitar into the GUITAR IN connector, NaturalPlay will look there first for key/ scale info. Next, it will look at the Aux input and listen to the RoomSense microphones.
Once Play Acoustic “hears” key/scale information from one of these inputs, it will set the key/
12

Basics
scale on the fly. “NP” is only shown when a change in key/scale is detected – so don’t panic if you don’t see it all the time.
“LOOP” indicator
The “LOOP” indicator is shown in the lower right corner of the display when a loop is running, but you are currently not on the Loop mode screen.
GB (Guitar Boost) indicator
The GB (“Guitar Boost”) indicator is shown in the lower left corner of the display when guitar boost is active.
Genre indicator
If you have set the Genre selector to any other value than “All”, the currently selected genre is shown in the upper left corner of the display. In the screen shot above, it is “Harmony“.
|
Play Acoustic – Reference manual (2014-07-16) |
13 |

Basics
Switches and operation
The three Play Acoustic footswitches
DOWN and UP footswitches
Form here on, we will refer…
►► to the footswitch with the down-pointing triangle as the DOWN footswitch and
►► to the footswitch with the up-pointing triangle as the UP footswitch.
The DOWN and UP footswitches allow you to navigate through presets.
►► Press a footswitch once to switch to the previous or next preset slot.
►► Press and hold a footswitch to quickly move through presets.
Play Acoustic – Reference manual (2014-07-16)
HIT / Hold for TALK footswitch
During normal operation, this footswitch acts as a HIT button. What does this mean?
When you activate HIT by tapping the footswitch, a new effect (or several effects) will be added to the current sound. This feature is perfect for spicing up a section of a song with a particular effect, e.g. Harmony.
TALK mode
When you press and hold the HIT / Hold for TALK footswitch, Play Acoustic enters TALK mode.
In TALK mode, all vocal effects are bypassed, and the microphone input is passed directly to the output.
TALK/Tuner mode
If you have a guitar plugged into the GUITAR IN, you will enter TALK/Tuner mode, activating the guitar tuner built into Play Acoustic. The guitar
output is muted to allow tuning, but the dry voice is still passed to the output, allowing you to tune your instrument and still entertain the crowd with witty banter.
Activating Loop mode
To enter Loop mode, press and hold the DOWN and UP footswitches simultaneously.
For more information on the Looper, see “The Looper”.
Loop mode screen
In Loop mode, the DOWN footswitch controls the following functions:
►► PLAY
►► REC (Record) ►► Overdub
Holding the DOWN footswitch will undo your most recently recorded Overdub.
In Loop mode, the UP footswitch controls the following functions:
►► STOP
►► ERA (HOLD to erase)
14
Basics
To exit Loop mode, tap the HIT footswitch.
You may exit Loop mode while a loop is still playing. That means you can choose a new vocal sound – and then re-enter Loop mode to add a new overdub to the loop.
Loop Undo/Redo
To undo a loop overdub, press and hold the DOWN footswitch.
To restore the overdub (Redo), press and hold the DOWN footswitch again. Restoring a loop overdub this way is only possible if you have not recorded another overdub after using Undo.
Looping with a Switch-3
If you connect a TC-Helicon Switch-3 (optional) to the PEDAL connector of your Play Acoustic, you can use it to control all Loop features.
The benefit of using a Switch-3 is the addition of the dedicated Undo button.
When a Switch-3 is connected, Play Acoustic’s UP and DOWN footswitches are assigned to Set Key/Scale.
For more information, see “Switch-3 page (6/7)”.
where pressing the DOWN and UP footswitches simultaneously will allow you to set key/scale. You can set this mode on System page 5 under “UP/DN Function”.
When you have activated this alternative mode, pressing the UP and DOWN footswitches simultaneously will allow you to set Key and Scale using these two footswitches.
If you don’t know which Key and Scale a particular song is in, try using the last chord of the song for the Key and Major 2 for the Scale. It’s often correct, especially in popular music.
For more information, see “TC-Helicon scales reference chart”. You can also find this chart on the TC-Helicon website: support.tc-helicon.com/entries/ 21051886-scale-chart-for-TC-helicon-products/
To use your newly selected Key and Scale, simply press EXIT.
To save the current preset with your chosen Key and Scale, press STORE twice. Storing presets is covered in more detail later in this manual.
Tap tempo
To access Tap Tempo, press and hold the UP and HIT footswitches simultaneously.
Tap tempo screen
Once you see the current tempo displayed on the LCD screen, tap the HIT button in time with your music.
When you are finished, stop tapping, and the screen will “time out” back to the preset screen.
Using DOWN and UP for setting key and scale
Activating Loop mode by pressing the DOWN and UP footswitches simultaneously is the default mode. There is also an alternative mode
|
Play Acoustic – Reference manual (2014-07-16) |
15 |
Basics
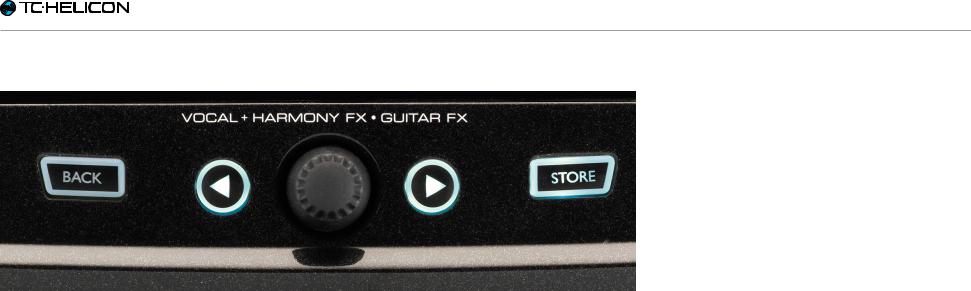
Control knob and arrow buttons
BACK, STORE, arrow buttons and the control knob
Use the control knob to scroll through presets and to move through various settings in the Edit, System or other menus.
The arrow buttons act similarly, allowing you to move through presets, effect/setup pages, styles, Genres etc.
Quick Tip: You can press and hold the arrow buttons to “jump” to the first or last page in a menu. For example, in the Vocal FX menu, you can move from Harmony (page 1) to Transducer (page 7) directly by pressing and holding the > button.
BACK button
Press the BACK button to exit the current screen or mode.
Play Acoustic – Reference manual (2014-07-16)
STORE button
What are presets?
To use Play Acoustic effectively, you need to understand the concept of Presets.
Essentially, a Preset is a record of all the settings for a group of effects that you can recall quickly and easily.
The Preset concept is extremely flexible. A Preset can be general purpose – like a simple Reverb or Harmony sound. But a Preset can also represent a specific song or portion of a song via multiple effects and settings.
A good modern analogy for a Preset is a user account on a computer. Even though each user has access to the same hardware (CPU, RAM etc.) each user can change their desktop wallpaper,
icons on the desktop, program behaviors and much more. When each user logs in, the computer recalls all of their custom settings.
Depending on how you like you to work with effects, you may find that you like to use a few general purpose Presets. Or you might be the kind of guy or girl who likes to spend a bit more time in advance of the performance to create Presets for all sorts of things.
Once you have fine-tuned all settings in the Vocal section, you should store them as a Preset, so you can later recall them.
Keep in mind that you never have to save Guitar effects settings. They are global and retain their values across all of your vocal presets.
Storing presets
When you have made a change to a preset, simply press the STORE button.
Pressing the STORE button once will bring up the name/location display, allowing you to rename and/or relocate the preset.
Pressing the STORE button again will save the preset, along with its new name or location.
16

Basics
Changing preset names
To change the name of a preset, press the STORE button once, then press the left blue soft button and use the control knob to modify the letters/numbers. Press the STORE button again to complete the process.
Storing a preset to another location
To save the current preset to a different preset slot (location), press the store button once, then press the right Blue soft Button and use the control knob to select the destination number for the preset. Press store again to complete the process.
If you change your mind and don’t want to save the changes, simply press BACK.
|
Play Acoustic – Reference manual (2014-07-16) |
17 |
Basics
Soft buttons
Soft buttons
There are six “soft” buttons on the Play Acoustic
– three on each side of the LC display.
Each button is context-specific – meaning that when its function is available, you’ll see it lit up with a WHITE or BLUE LED.
When there is no function available, the button will not be lit.
►► In white LED mode, the text on the button refers to its action.
►► In blue LED mode, the button will select the segment of the LCD screen that is directly beside that button.
Not every menu uses all six buttons.
Play Acoustic – Reference manual (2014-07-16)
Vocal FX button
Press the Vocal FX button to open the Vocal FX menu, which controls the settings of the vocal effects. This button is described in its own chapter: “Vocal FX button/section”.
Guitar FX button
Press the Guitar FX button to open the Guitar FX menu, which controls the settings of the guitar effects. This button is described in its own chapter: “Guitar FX button/section”
Mix button
Press the Mix button to open the Mix menu, which allows you to adjust the levels of the signals. This button is described in its own chapter: “Mix button/section”
Favorite button
You can tag a preset as a “Favorite”. This allows you to e.g. mark all presets you want to use in a show and filter out all others. This means that you can use Favorites to create a set list or simply group all the presets you like, regardless of their Genre.
►► To add the current preset to your Favorites, press the FAVORITE button. “FAV” will be shown in the top right corner of the display.
►► To remove the current preset from your Favorites, press the FAVORITE button.
►► To only browse your Favorite presets, press the GENRE button and select FAV as the Genre. Press the BACK button to return to the Home screen.
If there are no presets tagged as Favorites, the FAV option will not appear in the Genre menu.
GENRE button
Genres allow you to filter your presets by categories, such as musical styles and effect types.
Press the GENRE button to open the Genre menu.
18
![]()
Basics
In the Genre menu, use the control knob to navigate through the available options. Select a Genre.
Press the BACK button to return to the main window, where you will see only the presets contained within the Genre that you have selected.
Presets can be associated with multiple genres.
Setup button
Press the SETUP button to open the Setup menu, which controls the general functions of the device. This button is described in its own chapter: “Setup button/section”
|
Play Acoustic – Reference manual (2014-07-16) |
19 |

Connection diagrams
Connection diagrams
|
Play Acoustic – Reference manual (2014-07-16) |
20 |
Connection diagrams
The following connection diagrams show you some common ways to hook up Play Acoustic. For basic information about audio inputs and outputs, see “Inputs and outputs”.
Play Acoustic back panel inputs and outputs
Mixer setup
For connection to your mixer or PA, check out this Craig’s Corner video:
youtube.com/watch?v=qq0AOtafIjs
It’s very important to follow gain-staging instructions in order to get the best signal to noise ratio (SNR) from your device and prevent distortion in the signal chain.
SWITCH-3
Play Acoustic back panel
|
Play Acoustic – Reference manual (2014-07-16) |
21 |
 Loading…
More products and manuals for Audio TC-Helicon
| Models | Document Type |
|---|---|
|
Mic Mechanic Manual |
User Manual
2 pages |
|
Harmony Singer Manual |
User Manual
2 pages |
|
Ditto Mic Looper — Reference Manual |
User Manual
15 pages |
|
Ditto Mic Looper — Reference Manual |
User Manual
17 pages |
|
Ditto Mic Looper — Reference Manual |
User Manual
19 pages |
|
Ditto Mic Looper — Reference Manual |
User Manual
18 pages |
|
Ditto Mic Looper — Reference Manual |
User Manual
17 pages |
|
VoiceLive Touch 2 Reference Manual |
User Manual
98 pages |
|
VoiceLive Touch 2 Reference Manual |
User Manual
95 pages |
|
VoiceLive Touch 2 Reference Manual |
User Manual
111 pages |
|
VoiceLive Touch 2 Quick Guide |
User Manual
17 pages |
|
VoiceLive Touch 2 Quick Guide |
User Manual
23 pages |
|
VoiceLive Touch 2 Quick Guide |
User Manual
17 pages |
|
VoiceLive Touch 2 Quick Guide |
User Manual
17 pages |
|
VoiceLive Touch 2 Quick Guide |
User Manual
17 pages |
|
VoiceTone Harmony-M Manual |
User Manual
28 pages |
|
VoiceTone Harmony-M Manual |
User Manual
28 pages |
|
VoiceTone Harmony-M Manual |
User Manual
28 pages |
|
VoiceTone Harmony-M Manual |
User Manual
28 pages |
|
VoiceTone Harmony-M Manual |
User Manual
28 pages |


-
TC Helicon Play Acoustic — page 1
…
-
TC Helicon Play Acoustic — page 2
…
-
TC Helicon Play Acoustic — page 3
…
-
TC Helicon Play Acoustic — page 4
…
-
TC Helicon Play Acoustic — page 5
…
-
TC Helicon Play Acoustic — page 6
…
-
TC Helicon Play Acoustic — page 7
…
-
TC Helicon Play Acoustic — page 8
…
-
TC Helicon Play Acoustic — page 9
…
-
TC Helicon Play Acoustic — page 10
…
-
TC Helicon Play Acoustic — page 11
…
-
TC Helicon Play Acoustic — page 12
…
-
TC Helicon Play Acoustic — page 13
…
-
TC Helicon Play Acoustic — page 14
…
-
TC Helicon Play Acoustic — page 15
…
-
TC Helicon Play Acoustic — page 16
…
-
TC Helicon Play Acoustic — page 17
…
-
TC Helicon Play Acoustic — page 18
…
-
TC Helicon Play Acoustic — page 19
…
-
TC Helicon Play Acoustic — page 20
…
-
TC Helicon Play Acoustic — page 21
…
-
TC Helicon Play Acoustic — page 22
…
-
TC Helicon Play Acoustic — page 23
…
-
TC Helicon Play Acoustic — page 24
…
-
TC Helicon Play Acoustic — page 25
…
-
TC Helicon Play Acoustic — page 26
…
-
TC Helicon Play Acoustic — page 27
…
-
TC Helicon Play Acoustic — page 28
…
-
TC Helicon Play Acoustic — page 29
…
-
TC Helicon Play Acoustic — page 30
…
-
TC Helicon Play Acoustic — page 31
…
-
TC Helicon Play Acoustic — page 32
…
-
TC Helicon Play Acoustic — page 33
…
-
TC Helicon Play Acoustic — page 34
…
-
TC Helicon Play Acoustic — page 35
…
-
TC Helicon Play Acoustic — page 36
…
-
TC Helicon Play Acoustic — page 37
…
-
TC Helicon Play Acoustic — page 38
…
-
TC Helicon Play Acoustic — page 39
…
-
TC Helicon Play Acoustic — page 40
…
-
TC Helicon Play Acoustic — page 41
…
-
TC Helicon Play Acoustic — page 42
…
-
TC Helicon Play Acoustic — page 43
…
-
TC Helicon Play Acoustic — page 44
…
-
TC Helicon Play Acoustic — page 45
…
-
TC Helicon Play Acoustic — page 46
…
-
TC Helicon Play Acoustic — page 47
…
-
TC Helicon Play Acoustic — page 48
…
-
TC Helicon Play Acoustic — page 49
…
-
TC Helicon Play Acoustic — page 50
…
-
TC Helicon Play Acoustic — page 51
…
-
TC Helicon Play Acoustic — page 52
…
-
TC Helicon Play Acoustic — page 53
…
-
TC Helicon Play Acoustic — page 54
…
-
TC Helicon Play Acoustic — page 55
…
-
TC Helicon Play Acoustic — page 56
…
-
TC Helicon Play Acoustic — page 57
…
-
TC Helicon Play Acoustic — page 58
…
-
TC Helicon Play Acoustic — page 59
…
-
TC Helicon Play Acoustic — page 60
…
-
TC Helicon Play Acoustic — page 61
…
-
TC Helicon Play Acoustic — page 62
…
-
TC Helicon Play Acoustic — page 63
…
-
TC Helicon Play Acoustic — page 64
…
-
TC Helicon Play Acoustic — page 65
…
-
TC Helicon Play Acoustic — page 66
…
-
TC Helicon Play Acoustic — page 67
…
-
TC Helicon Play Acoustic — page 68
…
-
TC Helicon Play Acoustic — page 69
…
-
TC Helicon Play Acoustic — page 70
…
-
TC Helicon Play Acoustic — page 71
…
-
TC Helicon Play Acoustic — page 72
…
-
TC Helicon Play Acoustic — page 73
…
-
TC Helicon Play Acoustic — page 74
…
-
TC Helicon Play Acoustic — page 75
…
-
TC Helicon Play Acoustic — page 76
…
-
TC Helicon Play Acoustic — page 77
…
-
TC Helicon Play Acoustic — page 78
…
-
TC Helicon Play Acoustic — page 79
…
-
TC Helicon Play Acoustic — page 80
…
-
TC Helicon Play Acoustic — page 81
…
Гитарно-вокальный процессор Play Acoustic разработан компанией с мировым именем TC-HELICON, что уже способно выделить данный девайс из множества аналогов. разработан специально для артиста, который хочет исполнять свои песни с наилучшим качеством звука.
Разработан специально для вокалистов, поющих под аккомпанемент акустической гитары.
Благодаря данному процессору, любой исполнитель сможет поднять свой LIVE-концерт на потенциально новый уровень за счет саунд-эффектов, защиты от обратной связи, всевозможной обработки звука, пресетов и прочих «фишек». В то же время, TC HELICON предлагает музыкантам беспрецедентную простоту использования, доступность и яркие неповторимые эффекты. Профессиональные певцы, музыканты, а также любители смогут по достоинству оценить процессор Play Acoustic на «живых» концертах и в студии звукозаписи. Каждая функция была упрощена, чтобы сделать пользование вокальным процессором еще доступнее и полезнее. Самое естественное звучание, которое Вы сможете найти на российском рынке, обеспечивает данный аудио девайс. Это настоящая магия без капитальных вложений и лишних громоздких функциональных блоков.
Функциональные особенности
Вокальный гармонайзер добавляет 1 или 2 голоса реалистической гармонии к Вашему голосу (28 стилей). Эффект качественного «бэк-вокала». Гармонии звучат «в унисон» благодаря анализу и автоопределению аккордов гитары «на лету» или установке ключа вручную, нажав обе педали одновременно. Адаптация к вашему голосу, делая его четким, полным и чистым. Надстройки Humanize/Portamento.
Эффект «реверберации» голоса крайне необходим, например, для имитации выступления на широком открытом пространстве и не только: театр, клуб, стадион, студия и пр. Применяется 1 из 29 стилей к Вашему голосу, например, Hall/Plate/Theater/Club/Room/Studio/Ambience/Arena.
Хард тюнинг и коррекция тона. Гендерная регулировка позволяет сделать голос глубже или, наоборот, тоньше.
Широкий спектр эхо-эффектов добавляет глубину в исполнение сольного музыканта или группы. Формирование акустического пространства для студийной записи. Очень гибкое сочетание эха и задержки позволяет достичь эффекта жанра Rockabilly 50-х годов, а также запрограммировать наложения эха на биты. Возможность наложения постоянного эха без необходимости нажатия на педаль.
Микрофонная модуляция µMod для наложения разносторонних эффектов на вокальную и гитарную составляющую.
Уникальная технология BodyRez EQ с множеством пресетов значительно улучшает акустическую игру на гитаре в помещении.
Гибкие настройки по задержке и синхронизации сигналов и наложенных эффектов.
Автоматическая хроматическая коррекция высоких нот.
Авто питч-коррекция.
Функция дублирования голоса.
Gate-функция для понижения уровня микрофона и гитары, когда Вы не поете.
Отдельно регулируемый эффект Warmth позволяет добавить низких частот Вашему голосу тогда, когда это необходимо. Shape управляет многополосным эквалайзером, убирая ненужные НЧ составляющие в голосе. Идеальное звучание вокального исполнения как вплотную к микрофону, так и на удалении от него. Высококачественный алгоритм обработки хорошо сочетается с Вашим голосом и аккомпанементом.
Anti-Feedback — подавитель обратной связи — предотвращает негативные проявления акустической обратной связи в виде свиста, гула, фона и пр.
Встроенный лупер — уникальная возможность создавать лупы (петли, циклы) как вокальных, так и инструментальных сетов; это превосходная возможность самовыражения для всех творческих музыкальных личностей. Позволяет бесконечно экспериментировать и создавать новые шедевры.
HIT-функция, отвечающая за добавления яркости Вашему вокалу; мгновенно активирует эффект, например, затухания в любой комбинации с пресетами.
Эффекты компрессии и динамической обработки студийного уровня позволяют достичь тот самый первоклассный неповторимый звук; де-эссер гасит пики и ликвидирует свисты в голосе.
Дополнительные фильтры мегафона/телефона и искажений звучат на 100% натурально. Очень гибкое сочетание стилей позволяет достичь эффекта старомодной звукозаписи прошлого века с выраженными эффектами искажений. Модный «телефонный» стиль часто применяется поп-артистами при записи хитовых композиций.
Встроенные микрофоны и технология RoomSense для «придания атмосферности» исполнению вокалиста, фиксируя звуки в помещении или на сцене.
Индивидуальные стили и комбинации эффектов сохраняются в пользовательских предустановках (пресетах).
Цифровое аудио через USB-порт.
Выбор типа используемого микрофона и аудиоисточника.
Большой информативный LCD-дисплей с подсветкой и регулировкой контраста и яркости.
Удобные эргономичные педали гарантируют легкую активацию эффектов, исключая случайные нажатия. Обеспечивают пользование педалью с закрытыми глазами.
Входные/выходные разъемы
Тыльная сторона оснащена всеми необходимыми разъемами. Динамический, конденсаторный микрофон коннектится к XLR-гнезду. Очень удобное управление с кнопки микрофона при совместном использовании с МР-75 от бренда TC-Helicon или Sennheiser e835 FX. Функция подачи фантомного питания 48 В DC. Акустическая гитара подключается к TRS-гнезду. Дополнительный 3,5 mm вход AUX для подключения любого музыкального источника. Выходы организованы с использованием профессиональных разъемов XLR (назначение «гитара — вокал» могут быть переназначены). Переключать GROUND LIFT помогает избавиться от ненужного шума. Отдельный выход на наушники. Для подключения Switch-3 используется коннектор PEDAL. USB-интерфейс для подключения ПК с бесплатным ПО «VoiceSupport» с целью предоставления пользователям обновлений, информации о новинках компании и пр. USB поддерживает цифровой стерео аудиовход и аудиовыход. Питание процессора осуществляется через сетевой адаптер 12 В DC; токопотребление при это всего 14 Вт.
Руководство пользователя TC HELICON Play Accoustic
Play Acoustic Начало работы
Шаг 1: Начиная


- Выбрать предустановки
- Нажмите Favorite, чтобы добавить ваш пресет в любимый жанр.
- Нажмите GENRE для сортировки по стилю, эффекту или избранному.
- Нажмите VOCAL FX, чтобы отредактировать предустановленный звук вокала.
- В меню FX эти кнопки выбирают параметр для редактирования.
- Дважды нажмите STORE, чтобы сохранить отредактированный пресет.
- Play Acoustic обнаружит ключевую информацию со встроенного микрофона, акустической гитары или входа Aux и выберет соответствующие гармонии.
- Подключитесь к компьютеру для обновления прошивки и поддержки
- Войти musictribe.com скачать полное руководство
Часто задаваемые вопросы
- Как выбрать микрофон MP-75 или конденсаторный?
Нажмите «Настройка» и используйте стрелки влево или вправо, чтобы перейти на экран ввода. Нажмите программную кнопку рядом с надписью «Вход» и с помощью ручки управления выберите микрофон. - Как переключаться между моно и стерео?
Нажмите «Настройка» и используйте стрелки влево или вправо, чтобы перейти к экрану вывода. Нажмите программную кнопку рядом с надписью «Выход» и с помощью ручки управления измените настройку выхода. - Могу ли я отменить вокал в смешанной песне?
Нажмите «Настройка» и используйте стрелки влево или вправо, чтобы перейти к экрану вывода.
Нажмите программную кнопку рядом с Vocal Cancel и используйте ручку управления, чтобы включить эту функцию. Эта настройка отлично подходит для того, чтобы подпевать! - Как сделать петли?
Найдите понравившийся пресет. Одновременно удерживайте педальные переключатели Up и Down в течение 1 секунды, чтобы войти в режим Loop. На дисплее отобразится переназначенное расположение педального переключателя. Нажмите педальный переключатель Record / Play на сильную долю и запишите короткую фразу. Коснитесь его еще раз, чтобы зациклить эту фразу. Нажмите еще раз, чтобы наложить на первую фразу. Нажмите и удерживайте педаль для отмены / возврата. Средний ножной переключатель предназначен для остановки воспроизведения и очистки. Вы можете использовать педальный переключатель Exit для поиска других пресетов во время воспроизведения или записи петли. - Могу я Заставить мое вокальное эхо приземлиться на битах песен?
Да! Удерживайте педальные переключатели Up и Hit в течение 1 секунды, чтобы войти в режим Tap Tempo. Нажмите педальный переключатель Hit на пару битов песни. Вы также можете использовать педальные переключатели Up и Down для обрезки
BPM (ударов в минуту) до точного числа. Экран Tap Tempo исчезнет автоматически. - Как установить тональность Harmony + Hardtune стоя?
Нажмите кнопку Setup, затем используйте стрелки влево или вправо, чтобы найти элемент управления функцией Up / Dn. Поверните ручку управления и измените ее на «Set Key». Нажмите Exit. Теперь вы можете удерживать педальные переключатели Up и Down, чтобы войти в режим настройки клавиш. Установите тональность и масштаб с помощью ножных переключателей, а затем дайте экрану выйти автоматически. - Могу ли я получить доступ к дополнительным параметрам эффектов?
Некоторые эффекты, такие как Delay и Harmony, имеют дополнительную страницу, которой вы можете управлять. Удерживайте любую из кнопок, когда вы находитесь на экране редактирования эффекта, чтобы получить доступ к дополнительным элементам управления. Если ничего не происходит, нет никаких дополнительных настроек для этого конкретного эффекта или стиля. Нажмите Назад, чтобы вернуться на исходную страницу редактирования. - Что мне помогает Roomsense?
VoiceLive Play имеет конденсаторные стереомикрофоны, встроенные по бокам корпуса, которые мы называем «RoomSense». Есть три функции, которые вы можете выбрать, нажав кнопку «Настройка» и отрегулировав параметр RoomSense:- Ambient: Микширует окружающий звук комнаты на наушники и USB-выход. Установите уровень RoomSense на экране Mix.
- Авто ключ: Любая музыка, которую может слышать RoomSense, используется для автоматической настройки параметров Harmony и HardTune. Убедитесь, что музыка звучит громче или ближе к RoomSense, чем вы, певец.
- Вокал: RoomSense заменяет микрофонный вход XLR. Это отлично подходит для прослушивания пресетов и тренировки без использования портативного микрофона. Эта функция работает только с выходами для наушников и USB.
Примечание: RoomSense недоступен, когда устройство подключено к входу Aux.
Опции
ОТКАЗ ОТ ОТВЕТСТВЕННОСТИ
Music Tribe не несет ответственности за любые убытки, которые может понести любое лицо, полностью или частично полагающееся на любое описание, фотографию или заявление, содержащееся в данном документе. Технические характеристики, внешний вид и другая информация могут быть изменены без предварительного уведомления. Все торговые марки являются собственностью их соответствующих владельцев. Midas, Klark Teknik, Lab Gruppen, Lake, Tannoy,
Turbosound, TC Electronic, TC Helicon, Behringer, Bugera, Oberheim, Auratone и Coolaudioare товарные знаки или зарегистрированные товарные знаки Music Tribe Global Brands Ltd. © Music Tribe Global Brands Ltd. 2021 Все права защищены.
ОГРАНИЧЕННАЯ ГАРАНТИЯ
Чтобы ознакомиться с применимыми условиями гарантии и дополнительной информацией об Ограниченной гарантии Music Tribe, пожалуйста, ознакомьтесь с подробной информацией на сайте musictribe.com/гарантия
ИНФОРМАЦИЯ О СОБЛЮДЕНИИ ФЕДЕРАЛЬНОЙ КОМИССИИ СВЯЗИ
ТЦ Геликон
Играть на акустике
Имя ответственной стороны: Music Tribe Commercial NV Inc.
Адрес: 5270 Procyon Street, Лас-Вегас, NV 89118, США
Номер телефона: + 1 702 800 8290
Играть на акустике
Это оборудование было протестировано и признано соответствующим ограничениям для цифровых устройств класса B в соответствии с частью 15 правил FCC. Эти ограничения разработаны для обеспечения разумной защиты от вредных помех при установке в жилых помещениях. Это оборудование генерирует, использует и может излучать радиочастотную энергию и, если оно установлено и используется не в соответствии с инструкциями, может создавать вредные помехи для радиосвязи. Однако нет гарантии, что помехи не возникнут при конкретной установке. Если это оборудование действительно создает недопустимые помехи для приема радио или телевидения, что можно определить путем включения и выключения оборудования, пользователю рекомендуется попытаться устранить помехи одним или несколькими из следующих способов:
- Изменить ориентацию или местоположение приемной антенны.
- Увеличьте расстояние между оборудованием и приемником.
- Подключить оборудование к розетке в цепи, отличной от той, к которой подключен приемник.
- Обратитесь за помощью к дилеру или опытному радио / телевизионному технику.
Это устройство соответствует части 15 правил FCC. Эксплуатация возможна при соблюдении следующих двух условий:
- это устройство не должно вызывать вредных помех, и
- это устройство должно принимать любые помехи, включая помехи, которые могут вызвать сбои в работе.
Важная информация:
Изменения или модификации оборудования, явно не одобренные Music Tribe
может лишить пользователя права использовать оборудование.
Рабочая температура окружающей среды до 45 ° C.
Настоящим Music Tribe заявляет, что этот продукт соответствует Директиве 2014/35 / EU, Директиве 2014/30 / EU, Директиве 2011/65 / EU и поправке 2015/863 / EU, Директиве 2012/19 / EU, Положению 519 /. 2012 REACH SVHC и Директива 1907/2006 / EC.
Полный текст DoC ЕС доступен по адресу https://community.musictribe.com/
Представитель в ЕС: Music Tribe Brands DK A / S
Адрес: Ib Spang Olsens Gade 17, DK — 8200 Aarhus N, Дания

Документы / Ресурсы
 |
TC HELICON Play Акустика [pdf] Руководство пользователя 3-кнопочный стомпбокс эффектов для вокала и акустической гитары с BodyRez и Looping, Play Accoustic |