
![]()
Русский
- Bedienungsanleitung Casio AP-250 Celviano
- Casio AP-250 Celviano User Manual
- Manual Usuario Casio AP-250 Celviano
- Mode d’emploi Casio AP-250 Celviano
- Istruzioni Casio AP-250 Celviano
- инструкция Casio AP-250 Celviano
- Casio AP-250 Celvianoの取扱説明書
- Handleiding Casio AP-250 Celviano
- Manual de uso Casio AP-250 Celviano
Вам нужна инструкция? Мы поможем Вам ее найти и сэкономить Ваше время.
- 41 stron
- 0.91 mb
Изделие Casio AP-250 Celviano, а также другие, которыми Вы пользуетесь ежедневно, наверняка вы получили в комплекте с инструкцией обслуживания. Из опыта наших пользователей мы знаем, что большинство из Вас не уделили этому особого внимания. Большая часть инструкций, сразу же после покупки попадает в корзину для мусора вместе с коробкой — это ошибка. Ознакомьтесь с информацией, касающейся инструкции Casio AP-250 Celviano, которая поможет Вам в будущем сэкономить нервы и избежать головной боли.
Важная подсказка — не забывайте хотя бы раз прочитать инструкцию Casio AP-250 Celviano
Если вы не хотите каждый раз читать информационные брошюры, касающиеся, тех или Casio AP-250 Celviano иных изделий, достаточно, прочитать их раз — сразу же после покупки устройства. Вы получите основное знания, касающиеся поддержания изделия Casio AP-250 Celviano в хорошем эксплуатационном состоянии, так, чтобы без проблем достигнуть его планируемого цикла работы. Затем инструкцию можно отложить на полку и вернуться к ней только в случае, если вы не уверены, правильно ли проводится техобслуживание изделия. Правильный уход является необходимым элементом Вашего удовольствия Casio AP-250 Celviano.
Раз в году пересмотрите шкафчик, в котором держите инструкции для всех устройств, — выбросите те, которыми вы уже не пользуетесься. Это поможет Вам сохранять порядок в своей домашней базе инструкций обслуживания.
Summary of Contents for Casio AP-250 Celviano
Что находится в инструкции Casio AP-250 Celviano? Почему стоит ее прочитать?
- Гарантия и подробности, касающиеся техобслуживания изделия
Хорошей идеей будет прикрепить чек к странице инструкции. Если что-то плохое случится во время использования Casio AP-250 Celviano, у вас будет комплект документов, необходимый для гарантийного ремонта. В этой части инструкции вы найдете информацию об авторизованных сервисных центрахCasio AP-250 Celviano а также, как самостоятельно правильно ухаживать за оборудованием — так, чтобы не потерять гарантийных прав. - Указания по монтажу и Setup
Не терять нервов и времени на самостоятельную попытку установки и первого запуска изделия. Воспользуйтесь рекомендациями производителя Casio AP-250 Celviano чтобы правильно запустить изделие, без лишнего риска повреждения оборудования. - Информация, касающаяся дополнительных запчастей (входящих в комплект а также являющихся опцией)
Пересматривая эту часть документа вы сможете проверить, доставлен ли ваш Casio AP-250 Celviano с полним комплектом аксессуаров. Вы также сможете узнать, какие дополнительные запчасти или аксессуары для Casio AP-250 Celviano Вы сможете найти и докупить к своему устройству. - Troubleshooting
Самые частые проблемы, касающиеся Casio AP-250 Celviano и методы их решения. Это очень полезная часть руководства по обслуживанию — она позволит Вам сэкономить много времени на поиск решений. 90% проблем с Casio AP-250 Celviano повторяется у многих пользователей. - Требования, касающиеся питания и энергетический класс
Информация, касающаяся количества потребляемой энергии, а также рекомендации, касающиеся установки и питания Casio AP-250 Celviano. Прочитайте, чтобы оптимально пользоваться Casio AP-250 Celviano и не использовать большего количества ресурсов, нежели это необходимо для правильной работы изделия. - Специальные функции Casio AP-250 Celviano
Здесь вы можешь узнать, как персонализировать изделие Casio AP-250 Celviano. Вы узнаете, какие дополнительные функции могут помочь Вам удобно использовать продукт Casio AP-250 Celviano а также, какие функции Вашего устройства оптимальны для выполнения конкретной деятельности.
Как видите в инструкции вы найдете информацию, которая реально поможет Вам в использовании Вашего изделия. Стоит с ней ознакомиться, чтобы избежать разочарований, возникающих из более короткого, нежели предусматривалось, периода исправности изделия Casio AP-250 Celviano. Если все же вы не хотите копить инструкции в своем доме, наш сайт поможет Вам в этом — вы должны найти у нас руководство по обслуживанию большинства из своих устройств, а также Casio AP-250 Celviano.
Комментарии (0)
Перейти к контенту
Синтезаторы, цифровые пианино Casio

- Размер инструкции: 992.19 kB
- Формат файла: pdf
Если вы потеряли инструкцию от синтезатора, цифрового пианино Casio AP-250, можете скачать файл для просмотра на компьютере или печати.
Инструкция для синтезатора, цифрового пианино Casio AP-250 на русском языке. В руководстве описаны возможности и полезные функции, а также правила эксплуатации. Перед использованием внимательно ознакомьтесь с инструкцией.
Чтобы не читать всю инструкцию вы можете выполнить поиск по содержимому внутри инструкции и быстро найти необходимую информацию. Рекомендации по использованию помогут увеличить срок службы синтезатора, цифрового пианино Casio AP-250. Если у вас появилась проблема, то найдите раздел с описанием неисправностей и способами их решения. В нем указаны типичные поломки и способы их решения.
![]()
F
AP-250
MODE D’EMPLOI
Conservez en lieu sûr pour toute référence future.
Consignes de sécurité
Avant d’utiliser le piano, veuillez lire les « Précautions concernant la sécurité » imprimées séparément.
AP250-F-1A
Important !
Veuillez noter les informations suivantes avant d’utiliser le produit, car elles sont importantes.
•Avant d’utiliser l’adaptateur secteur AD-A12150LW en option pour alimenter ce produit, assurez-vous qu’il n’est pas endommagé. Vérifiez soigneusement si le cordon d’alimentation n’est pas coupé, les fils à nu ou s’il ne présente pas d’autres dommages. Ne jamais laisser un enfant utiliser un adaptateur sérieusement endommagé.
•Ce produit n’est pas destiné aux enfants de moins 3 ans.
•N’utiliser que l’adaptateur secteur CASIO AD-A12150LW.
•L’adaptateur secteur n’est pas un jouet.
•Ne pas oublier de débrancher l’adaptateur secteur avant de nettoyer le produit.
Cette marque ne s’applique qu’aux pays de l’UE.
Déclaration de conformité à la Directive de l’Union Européenne
Manufacturer:
CASIO COMPUTER CO., LTD.
6-2, Hon-machi 1-chome, Shibuya-ku, Tokyo 151-8543, Japan
Responsible within the European Union:
CASIO EUROPE GmbH
Casio-Platz 1, 22848 Norderstedt, Germany

 Sommaire
|
Assemblage du support |
……………………………………………………………………………….. |
F-29 |
|
|
Déballage…………………………………………………………. . |
F — 29 |
Pour raccorder le cordon de pédales |
………………….. F-31 |
|
Pour assembler le support………………………………….. ……………………………. |
F — 29 |
Installer le pupitre de musique |
F-31 |
|
Guide général………………………………. |
F-2 |
|
Bouton FUNCTION……………………………………………… |
F-3 |
|
Sauvegarde des réglages et verrouillage |
|
|
des opérations ……………………………………………………. |
F-3 |
|
Prise d’alimentation……………………… |
F-4 |
|
Utilisation d’un adaptateur secteur ………………………… |
F-4 |
|
Mise sous et hors tension …………………………………….. |
F-5 |
|
Raccordements……………………………. |
F-6 |
|
Raccordement d’un casque ………………………………….. |
F-6 |
|
Raccordement d’un appareil audio ou |
|
|
d’un amplificateur………………………………………………… |
F-6 |
|
Accessoires fournis et optionnels ………………………….. |
F-7 |
|
Utilisation de différentes |
|
|
sonorités……………………………………… |
F-8 |
|
Sélection et utilisation d’une sonorité …………………….. |
F-8 |
|
Superposition de deux sonorités …………………………. |
F-10 |
|
Utilisation d’effets………………………………………………. |
F-11 |
|
Utilisation des pédales du piano numérique ………….. |
F-11 |
|
Utilisation du métronome ……………………………………. |
F-12 |
|
Interprétation à quatre mains………………………………. |
F-13 |
|
Écoute des morceaux intégrés……. |
F-14 |
|
Écoute de tous les morceaux intégrés………………….. |
F-14 |
|
Écoute d’un morceau particulier de la |
|
|
bibliothèque musicale ………………………………………… |
F-15 |
|
Étude d’un morceau de la bibliothèque musicale …… |
F-15 |
|
Enregistrement et lecture …………… |
F-16 |
|
Pistes ………………………………………………………………. |
F-16 |
|
Enregistrer sur une piste particulière |
|
|
d’un morceau ……………………………………………………. |
F-17 |
|
Enregistrer sur une piste d’un morceau tout |
|
|
en écoutant l’autre piste……………………………………… |
F-18 |
|
Lecture depuis la mémoire du piano numérique…….. |
F-18 |
|
Suppression des données enregistrées ……………….. |
F-19 |
|
Réglage des paramètres |
|
|
avec le clavier……………………………. |
F-20 |
|
Régler les paramètres avec le clavier ………………….. |
F-20 |
|
Touches de clavier utilisées pour régler |
|
|
les paramètres …………………………………………………. |
F-21 |
|
Liste des paramètres…………………………………………. |
F-22 |
|
Sélection d’une sonorité …………………………………. |
F-22 |
|
Réverbération ……………………………………………….. |
F-22 |
|
Chorus …………………………………………………………. |
F-22 |
|
Brilliance ………………………………………………………. |
F-22 |
|
Balance des sonorités superposées…………………. |
F-22 |
|
Tempo (TEMPO) …………………………………………… |
F-22 |
|
Sélection d’un morceau (SONG SELECT) ………… |
F-22 |
|
Volume des morceaux ……………………………………. |
F-22 |
|
Battement du métronome (METRONOME BEAT)….. |
F-22 |
|
Volume du métronome …………………………………… |
F-22 |
|
Touche du clavier (Transposition) ……………………. |
F-23 |
|
Accordage du clavier (Accordage)……………………. |
F-23 |
|
Décalage d’octave …………………………………………. |
F-23 |
|
Tempérament ……………………………………………….. |
F-23 |
|
Sélection du tempérament………………………………. |
F-23 |
|
Note de base du tempérament ………………………… |
F-23 |
|
Réponse au toucher (TOUCH RESPONSE) ……… |
F-23 |
|
Mode Périphérique USB …………………………………. |
F-24 |
|
Canal d’envoi ………………………………………………… |
F-24 |
|
Contrôle local………………………………………………… |
F-24 |
|
Son de fonctionnement…………………………………… |
F-24 |
|
Sauvegarde ………………………………………………….. |
F-24 |
|
Verrouillage des opérations …………………………….. |
F-24 |
|
Raccordement à un ordinateur…… |
F-25 |
|
Configuration système minimale de l’ordinateur ……. |
F-25 |
|
Raccordement du piano numérique à |
|
|
votre ordinateur ………………………………………………… |
F-25 |
|
Utilisation de MIDI …………………………………………….. |
F-26 |
|
Transfert des données de morceaux |
|
|
avec un ordinateur ……………………………………………. |
F-26 |
|
Référence………………………………….. |
F-32 |
|
En cas de problème ………………………………………….. |
F-32 |
|
Fiche technique………………………………………………… |
F-33 |
|
Précautions d’emploi…………………………………………. |
F-34 |
|
Appendice…………………………………… |
A-1 |
|
Liste des sonorités ……………………………………………… |
A-1 |
|
Liste des morceaux …………………………………………….. |
A-1 |
MIDI Implementation Chart
Les noms de société et de produits mentionnés dans ce manuel peuvent être des marques déposées de tiers.
F-1


 Guide général
|
1 |
2 |
3 |
4 |
5 |
6 |
7 |
8 |
9 |
|
Dessous |
bk |
bl |
bm |
|
Arrière |
Avant
bo
bn
F-2
Guide général 

 REMARQUE
• Les noms suivants sont toujours écrits en caractères gras dans le texte de ce manuel.
|
1 |
Bouton d’alimentation P (POWER) |
8 Bouton de piano à queue moderne |
|
2 |
Commande de réglage du volume (VOLUME) |
(GRAND PIANO (MODERN)) |
|
3 |
Bouton de fonction (FUNCTION) |
9 Bouton de piano électrique (ELEC PIANO) |
|
4 |
Bouton de morceau, démo (SONG a, DEMO) |
bk Connecteur de pédales |
|
5 |
Bouton d’enregistreur gauche, droite |
bl Port USB |
|
(RECORDER (L/R)) |
bm Borne de courant continu 12 V (DC 12V) |
|
|
6 |
Bouton de métronome, duo (METRONOME, DUET) |
bn Prises de casques (PHONES) |
|
7 |
Bouton de piano à queue de concert |
bo Témoin d’alimentation |
|
(GRAND PIANO (CONCERT)) |
Bouton FUNCTION
Le bouton FUNCTION sert à paramétrer un certain nombre de réglages du piano numérique. Les fonctions de base du bouton FUNCTION sont les suivantes.
z Pour changer un réglage, appuyez sur la touche du clavier correspondant au réglage que vous voulez sélectionner tout en maintenant le bouton
FUNCTION enfoncé.
Un son de confirmation est émis lorsque vous appuyez sur la touche du clavier pour changer un réglage.
Exemple : « Pour sélectionner une sonorité » à la page F-8
 REMARQUE
• Pour de plus amples informations sur le fonctionnement et les réglages, reportez-vous à « Réglage des paramètres avec le clavier » à la page F-20.
zLe changement de fonction de certains boutons à la suite d’une pression du bouton FUNCTION est indiqué dans le tableau suivant.
|
Ce bouton : |
Agit de cette façon à la suite d’une pression du bouton FUNCTION : |
|
SONG a |
Lance et arrête la lecture des morceaux de la démo. |
|
RECORDER |
Sélectionne la partie main gauche et la partie main droite. |
|
METRONOME |
Met en ou hors service le jeu en duo. |
Sauvegarde des réglages et verrouillage des opérations
Vous pouvez sauvegarder les réglages actuels du piano numérique et verrouiller les boutons pour empêcher les changements de réglages dus à des erreurs de manipulation. Pour de plus amples informations à ce sujet, reportezvous à « Liste des paramètres » aux pages F-22 — F-24.
F-3


 Prise d’alimentation
Votre piano numérique fonctionne sur le courant secteur domestique. Veillez à éteindre le piano numérique lorsque vous ne l’utilisez pas.
Utilisation d’un adaptateur secteur
N’utilisez que l’adaptateur secteur (norme JEITA, avec fiche à polarité unifiée) fourni avec ce piano numérique. L’emploi d’un autre type d’adaptateur secteur peut entraîner une panne du piano numérique.
Adaptateur secteur spécifié : AD-A12150LW
•Utilisez le cordon d’alimentation fourni pour raccorder l’adaptateur secteur comme indiqué sur l’illustration suivante.
•Rattachez le cordon de l’adaptateur secteur avec le clip fixé à côté de la prise d’alimentation (page F-31).
Prise DC 12V
Clip
Prise d’alimentation domestique
|
Cordon |
Adaptateur secteur |
|
d’alimentation |
• La forme et le type dépendent du |
|
lieu de commercialisation. |
■ Pour fixer le clip
Comme indiqué sur l’illustration, appuyez sur (a) pour faire rentrer l’extrémité du clip dans la fente. Appuyez de sorte que le clip s’encliquette bien en place.
Fente
Extrémité
¨á©
■ Pour détacher le clip
Comme indiqué sur l’illustration, pressez (b) dans le sens de la flèche.
¨â©
Veuillez prendre les précautions suivantes pour éviter d’endommager le cordon d’alimentation.
Pendant l’emploi
•Ne tirez jamais trop fort sur le cordon.
•Ne tirez jamais de façon répétée sur le cordon.
•Ne tordez jamais le cordon au niveau de la fiche ou du connecteur.
Pendant le changement de place
•Avant de déplacer le piano numérique, débranchez l’adaptateur secteur de la prise secteur.
Pendant l’entreposage
•Enroulez et liez le cordon d’alimentation, mais ne l’enroulez pas autour de l’adaptateur secteur.
 IMPORTANT !
•Ne raccordez jamais l’adaptateur secteur (norme JEITA, avec fiche à polarité unifiée) fourni avec ce piano numérique à un autre appareil que ce piano. Ceci peut entraîner une panne.
•Assurez-vous que le piano numérique est éteint avant de brancher ou de débrancher l’adaptateur secteur.
•L’adaptateur secteur devient chaud au toucher après une longue période d’utilisation. C’est normal et il ne s’agit pas d’une défectuosité.
F-4
Prise d’alimentation 

Mise sous et hors tension
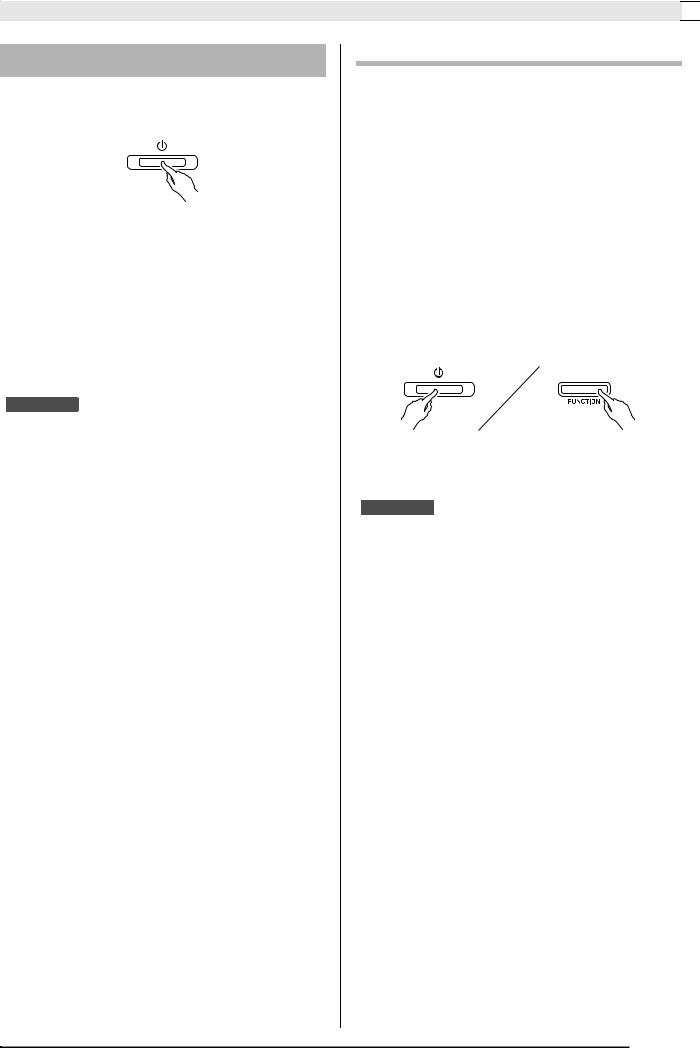
1. Appuyez sur le bouton P (POWER) pour allumer le piano numérique.
•Le bouton P (POWER) s’éclaire.
•Lorsque vous mettez le piano numérique sous tension, son système doit d’abord être initialisé. Durant l’initialisation du système, les témoins des boutons de sonorités s’allument et s’éteignent pendant environ cinq secondes pour vous signaler que le système est en train d’être initialisé.
2.Pour éteindre le piano numérique, appuyez une nouvelle fois sur le bouton P (POWER).
 REMARQUE
•Une pression sur le bouton P (POWER) pour éteindre le piano numérique, le met en fait en veille. En veille, un courant minime continue de circuler dans le piano numérique. Si vous prévoyez de ne pas utiliser le piano numérique pendant un certain temps, ou en cas d’orage, veillez à débrancher l’adaptateur secteur de la prise secteur.
Extinction automatique
Le panio numérique est conçu pour s’éteindre automatiquement au bout d’un certain temps d’inactivité afin d’économiser l’énergie. Le délai d’extinction automatique est d’environ quatre heures.
•Vous pouvez aussi suspendre temporairement l’extinction automatique de la façon suivante.
■ Pour désactiver l’extinction automatique
1. Lorsque le piano numérique est allumé, appuyez sur le bouton P (POWER) pour l’éteindre.
2. Tout en tenant le bouton FUNCTION enfoncé, appuyez sur le bouton P (POWER) pour allumer le piano numérique.
•L’extinction automatique se désactivera à ce moment.
 REMARQUE
•L’extinction du piano numérique après les opérations précédentes réactive l’extinction automatique.
F-5

 Raccordements
 IMPORTANT !
•Avant de raccorder un appareil au piano numérique, réduisez le volume avec la commande VOLUME. Vous pouvez augmenter le volume au niveau souhaité après le raccordement.
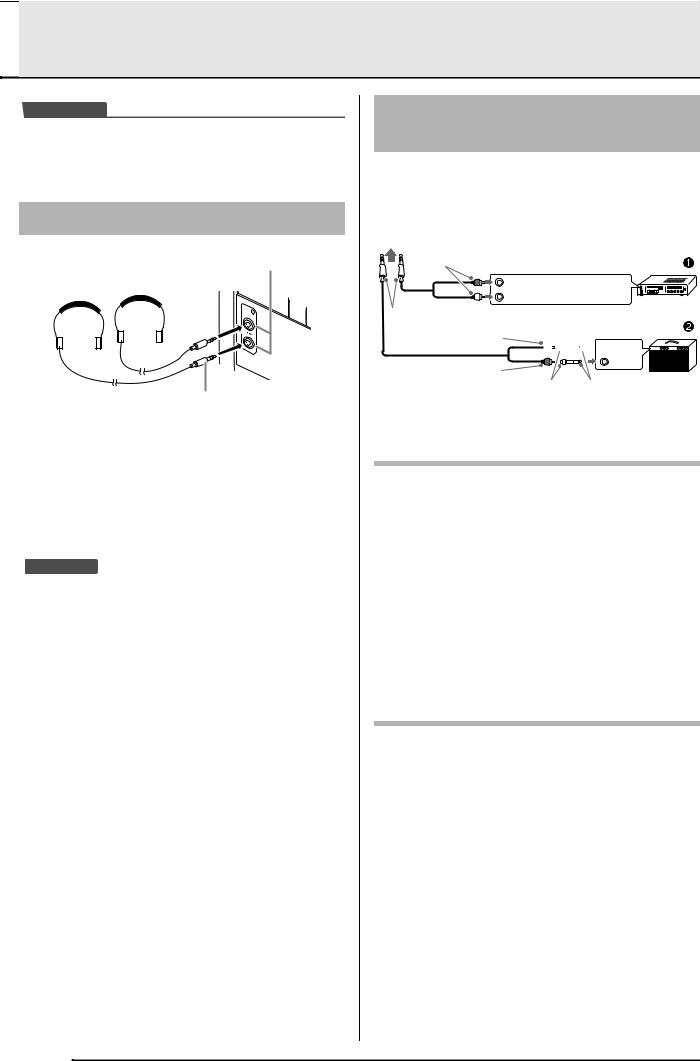
Raccordement d’un casque
|
Avant |
Prises PHONES |
|||||||
Fiche ordinaire stéréo
Raccordez des casques en vente dans le commerce aux prises PHONES. La sortie du son par les haut-parleurs est coupée lorsque des casques sont branchés sur les prises PHONES, ce qui permet de s’exercer la nuit sans déranger personne. Pour vous protéger l’ouïe, n’augmentez pas trop le niveau sonore lorsque vous utilisez un casque.
 REMARQUE
•Enfoncez bien la fiche du casque à fond dans l’une des prises PHONES. Si la fiche n’est pas bien enfoncée, le son ne sortira que d’un côté du casque.
•Si la fiche du casque que vous utilisez ne s’insère pas dans les prises PHONES, utilisez l’adaptateur de fiche approprié en vente dans le commerce.
•Si vous utilisez un adaptateur de fiche pour votre casque, veillez à ne pas le laisser sur la prise lorsque vous débranchez le casque. Sinon, les haut-parleurs ne restitueront pas le son.
Raccordement d’un appareil audio ou d’un amplificateur
Vous pouvez raccorder un appareil audio ou un amplificateur de musique au piano numérique, puis transmettre le son à des enceintes pour l’amplifier et améliorer sa qualité.
À une des prises PHONES du piano numérique
|
Fiche cinch |
Prise AUX IN d’amplificateur audio, etc. |
|
DROITE (rouge) |
|
GAUCHE (blanche) |
Fiche ordinaire stéréo
Amplificateur de guitare
Amplificateur de clavier, etc.
Fiche cinch (blanche)


 INPUT 1
|
Fiche cinch (rouge) |
INPUT 2 |
|
Prise cinch |
Fiche ordinaire |
Raccordement d’un appareil audio (Figure 1)
Utilisez des cordons de liaison du commerce (fiche ordinaire × 1, fiches cinch × 2) pour effectuer les liaisons indiquées sur la Figure 1. L’extrémité du cordon que vous branchez sur le piano numérique doit être une fiche stéréo ordinaire. Une seule des deux voies stéréo sera transmise si vous utilisez un cordon à fiche mono ordinaire. Normalement vous devez régler le sélecteur d’entrée de l’appareil audio sur la borne à laquelle le piano numérique est raccordé (AUX IN, etc.). Réglez ensuite le volume avec la commande VOLUME du piano numérique.
Raccordement d’un amplificateur de musique (Figure 2)
Raccordez le cordon de liaison* à un des types d’amplificateurs indiqués sur la Figure 2.
Réglez le volume à l’aide de la commande VOLUME du piano numérique.
* Piano numérique : Fiche ordinaire stéréo Amplificateur : Transmet les signaux des voies
gauche et droite. Une seule des deux voies stéréo sera transmise si vous ne raccordez qu’une seule fiche.
F-6

Raccordements 

Accessoires fournis et optionnels
N’utilisez que les accessoires spécifiés pour ce piano numérique.
L’utilisation d’accessoires non autorisés crée un risque d’incendie, de choc électrique et de blessure.
 REMARQUE
•Vous obtiendrez toutes les informations nécessaires sur les accessoires de ce produit vendus séparément dans le catalogue CASIO, disponible auprès de votre revendeur, ainsi que sur le site CASIO à l’adresse suivante.
http://world.casio.com/
F-7

 Utilisation de différentes sonorités
|
VOLUME |
FUNCTION |
METRONOME |
ELEC PIANO |
||||||||||||
|
SONG a |
GRAND PIANO |
||||||||||||||
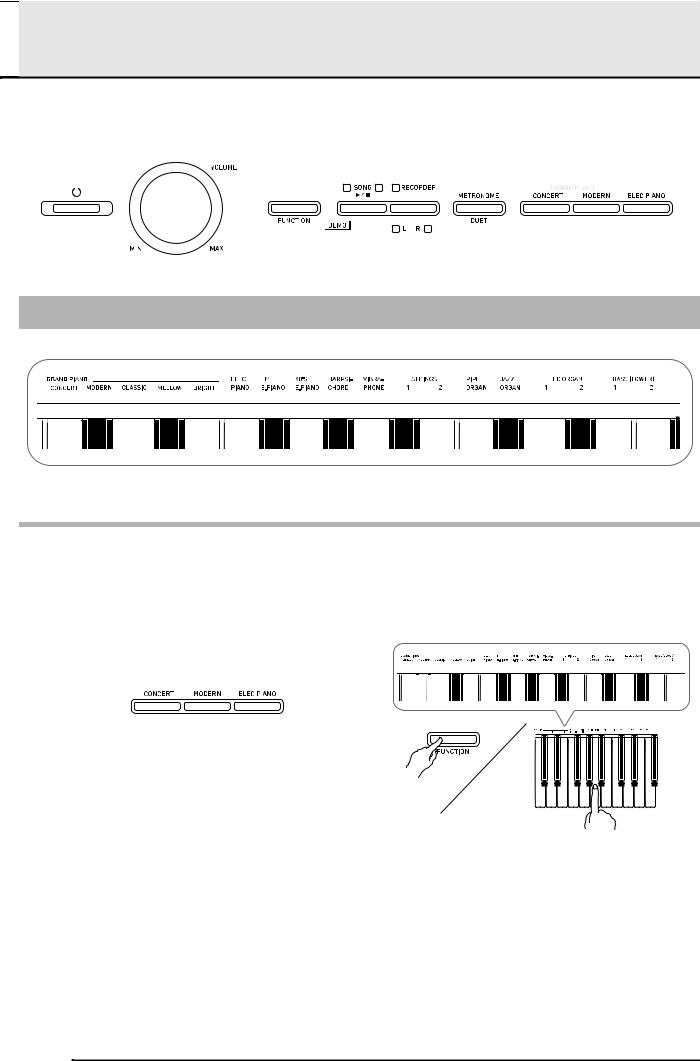
Sélection et utilisation d’une sonorité
Ce piano présente 18 sonorités intégrées.
• Les noms des sonorités associées aux touches du clavier sont inscrits au-dessus des touches.
Pour sélectionner une sonorité
|
1. Sélectionnez la sonorité souhaitée. |
|||||||||||||||||||||||||||||
|
z Pour sélectionner GRAND PIANO (CONCERT ou |
z Pour sélectionner une des autres sonorités |
||||||||||||||||||||||||||||
|
MODERN) ou ELEC PIANO |
• Tout en tenant le bouton FUNCTION enfoncé, |
||||||||||||||||||||||||||||
|
• Appuyez sur un des boutons GRAND PIANO |
appuyez sur la touche du clavier correspondant |
||||||||||||||||||||||||||||
|
(CONCERT ou MODERN) ou sur le bouton |
à la sonorité que vous voulez sélectionner. |
||||||||||||||||||||||||||||
|
ELEC PIANO pour sélectionner la sonorité |
|||||||||||||||||||||||||||||
|
souhaitée. |
|||||||||||||||||||||||||||||
• Le témoin de la sonorité sélectionnée s’éclaire.
2. Utilisez la commande VOLUME pour régler le volume.
F-8
![]()
Utilisation de différentes sonorités 

 REMARQUE
•Parmi les 18 sonorités du piano numérique, les cinq premières sont des sonorités de piano à queue. Chaque sonorité a ses propres mérites, si bien que vous devriez sélectionner celle qui est la mieux adaptée au morceau que vous jouez, ou bien selon vos préférences. Les sonorités CONCERT et MODERN sont attribuées à des boutons pour que leur sélection soit plus facile et rapide.
|
Nom de |
Caractéristiques |
|
|
sonorité |
||
|
CONCERT |
Sonorité de piano à queue de concert |
|
|
utilisant un mappage linéaire* pour des |
||
|
changements de sonorité dynamiques et |
||
|
naturels. Sonorité conçue pour |
||
|
reproduire des nuances de pédale forte, |
||
|
résonance et d’autres nuances de piano, |
||
|
idéale pour presque tous les types de |
||
|
performances pianistiques. |
||
|
MODERN |
Sonorité restituant le son brillant d’un |
|
|
piano à queue. Le volume et le timbre |
||
|
de cette sonorité changent rapidement |
||
|
selon les différences de pression des |
||
|
doigts sur le clavier et se caractérisent |
||
|
par une réverbération profonde. Cette |
||
|
sonorité est idéale pour les |
||
|
performances dynamiques et vivantes. |
||
|
CLASSIC |
C’est la sonorité naturelle d’un piano, |
|
|
très proche du son d’un piano |
||
|
acoustique. Bien que la réverbération et |
||
|
d’autres effets éclatants restent modérés |
||
|
pour cette sonorité, la résonance est plus |
||
|
accentuée, ce qui autorise des nuances |
||
|
plus délicates dans l’expressivité. Cette |
||
|
sonorité est idéale pour les leçons et les |
||
|
exercices. |
||
|
MELLOW |
Sonorité de piano chaude et douce |
|
|
BRIGHT |
Sonorité de piano lumineuse et claire |
|
*Fonctionnalité appliquant la technique informatique du mappage pour permettre des changements harmonieux des sons échantillonnés dans les différentes dynamiques depuis un piano à queue de concert.
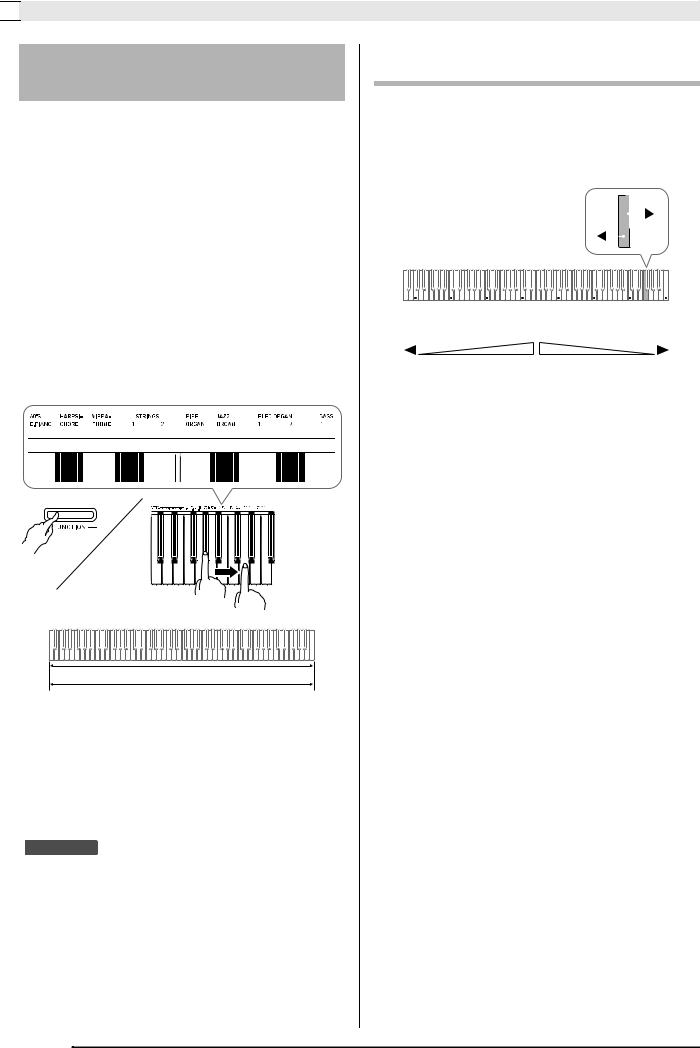
Sonorités de basse (BASS 1, BASS 2)
Lorsque vous sélectionnez une des deux sonorités BASS (LOWER) (1 ou 2) à l’étape 1 ci-dessus, la sonorité de basse sélectionnée est attribuée au registre inférieur (côté gauche) du clavier. La sonorité sélectionnée lorsque vous avez appuyé sur la touche BASS 1 ou BASS 2 sera attribuée au registre supérieur (côté droit).
•BASS 1 et BASS 2 permettent de partager facilement le clavier en deux sonorités différentes.
Point de partage
|
Registre inférieur |
Registre supérieur |
|
BASS 2 |
PIPE ORGAN |
|
(Sonorité actuellement sélectionnée.) |
 REMARQUE
•Pour revenir à une seule sonorité du clavier, sélectionnez une autre sonorité que BASS 1 ou BASS 2.
•Vous ne pouvez pas sélectionner BASS 1 ou BASS 2 lors de l’enregistrement sur la piste 2.
F-9

 Utilisation de différentes sonorités
Superposition de deux sonorités
Procédez de la façon suivante pour superposer deux sonorités qui résonneront en même temps.
Lorsque vous spécifiez deux sonorités pour la superposition, la première sonorité sélectionnée est la sonorité principale et la seconde sonorité est la sonorité superposée.
1. Tout en tenant le bouton FUNCTION enfoncé, appuyez sur la touche de clavier correspondant à la première sonorité que vous voulez superposer puis appuyez sur la touche de clavier correspondant à la seconde sonorité.
Exemple : Appuyez d’abord sur la touche
HARPSICHORD puis sur la touche ELEC
ELEC ORGAN 1
2. Pour désactiver la superposition de sonorités, sélectionnez une autre sonorité en appuyant sur le bouton GRAND PIANO ou en procédant comme indiqué dans « Sélection et utilisation d’une sonorité » (page F-8).
 REMARQUE
•Vous ne pouvez pas superposer la sonorité BASS 1 ou BASS 2 à une autre sonorité.
•Vous ne pouvez pas superposer de sonorités lors de l’enregistrement sur la piste 2.
Pour ajuster la balance sonore entre les deux sonorités superposées
1. Tout en tenant le bouton FUNCTION enfoncé, utilisez les touches du clavier indiquées ci-dessous pour ajuster le volume des sonorités superposées.
|
C1 |
C2 |
C3 |
C4 |
C5 |
C6 |
C7 |
C8 |
||||||||||
|
Réglage par défaut (Centre) |
|||||||||||||||||
|
Volume de la sonorité superposée |
Volume de la sonorité principale |
||||||||||||||||
|
(Seconde sonorité sélectionnée) |
(Première sonorité sélectionnée) |
•Pour revenir au réglage initial du volume, appuyez simultanément sur les deux touches tout en tenant le bouton FUNCTION enfoncé.
F-10
Utilisation de différentes sonorités 

Utilisation d’effets
Réverbération : Fait résonner les notes.
|
Chorus |
: Donne plus d’ampleur aux notes. |
1. Tout en tenant le bouton FUNCTION enfoncé, utilisez la touche de clavier Reverb ou Chorus pour faire défiler les réglages disponibles.
•A chaque pression sur la touche de clavier Reverb ou Chorus, le piano numérique bipe selon le réglage sélectionné, comme indiqué sur le tableau suivant.
Réverbération Chorus
|
• |
Réverbération |
||
|
Nombre de bips |
Réglage |
||
|
1 |
(long) |
Hors service (OFF) |
|
|
1 |
(court) |
Salle |
|
|
2 |
Petite salle |
||
|
3 |
Grande salle |
||
|
4 |
Stade |
||
|
• |
Chorus |
||
|
Nombre de bips |
Réglage |
||
|
1 |
(long) |
Hors service (OFF) |
|
|
1 |
(court) |
Chorus léger |
|
|
2 |
Chorus moyen |
||
|
3 |
Chorus profond |
||
|
4 |
Flanger (Effet de train) |
||
■ À propos du DSP
Le DSP permet de produire numériquement des effets acoustiques complexes. Le DSP est attribué à chaque sonorité à la mise sous tension du piano numérique.
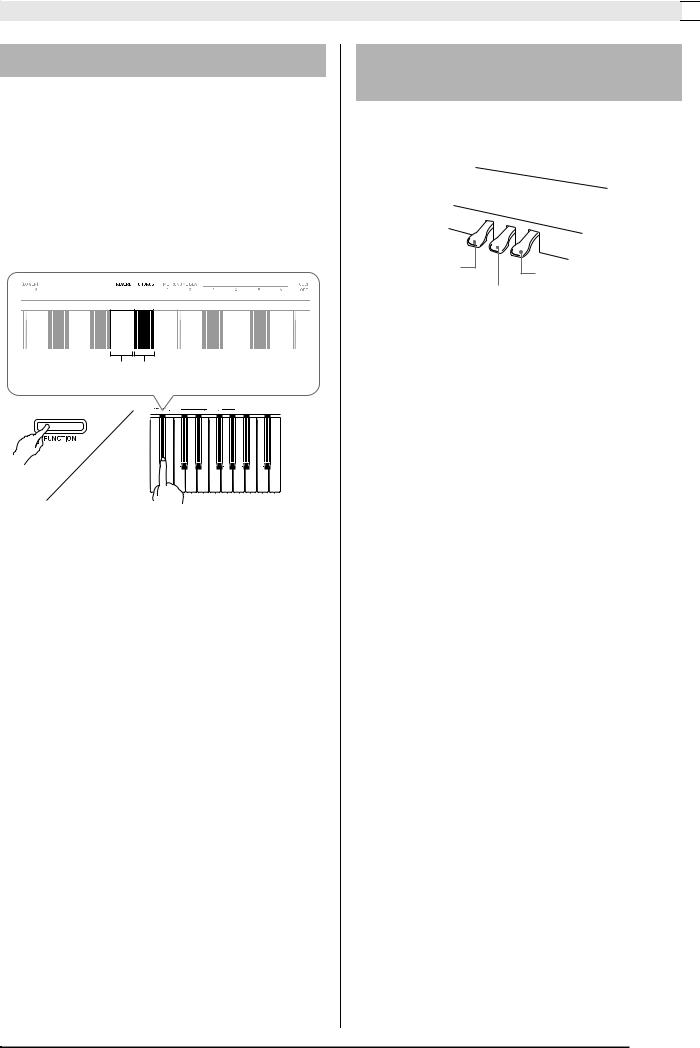
Utilisation des pédales du piano numérique
Votre piano numérique est équipé de trois pédales : une pédale forte, une pédale douce et une pédale de sostenuto.
Pédale douce
Pédale forte
Pédale de sostenuto
Fonctions des pédales
z Pédale forte
Une pression sur cette pédale pendant l’exécution d’un morceau fait réverbérer longtemps les notes jouées.
•Quand une sonorité GRAND PIANO (CONCERT/ MODERN/CLASSIC/MELLOW/BRIGHT) est sélectionnée et qu’on appuie sur cette pédale, les notes réverbèrent (avec une résonance) comme lorsqu’on appuie sur la pédale forte d’un piano à queue acoustique. Les demi-pressions de pédale (pressions à mi-course) sont également possibles.
z Pédale douce
Une pression sur cette pédale pendant l’exécution d’un morceau coupe les notes jouées après la pression et rend leur son plus doux.
z Pédale de sostenuto
Seules les notes des touches pressées au moment où cette pédale est enfoncée sont soutenues jusqu’au relâchement de la pédale.
F-11
 Loading…

Summary of Content for Casio Celviano AP250 Keyboard User’s Guide PDF
AP250-ES-1A
ES
USERS GUIDE GUA DEL USUARIO Please keep all information for future reference. Guarde toda informacin para tener como referencia futura.
Safety Precautions Before trying to use the piano, be sure to read the separate Safety Precautions.
Precauciones de seguridad Antes de intentar usar el piano, asegrese de leer las Precauciones de seguridad separadas.
E n
g li
s h
E s
p a
o
l
AP-250
TO REDUCE THE RISK OF FIRE OR ELECTRIC SHOCK, REFER SERVICING TO QUALIFIED SERVICE PERSONNEL.
Important! Please note the following important information before using this product.
Before using the AD-A12150LW Adaptor to power the unit, be sure to check the AC Adaptor for any damage first. Carefully check the power cord for breakage, cuts, exposed wire and other serious damage. Never let children use an AC adaptor that is seriously damaged.
The product is not intended for children under 3 years. Use only CASIO AD-A12150LW adaptor. The AC adaptor is not a toy. Be sure to disconnect the AC adaptor before cleaning the product.
IMPORTANT SAFETY INSTRUCTIONS 1. Read these instructions. 2. Keep these instructions. 3. Heed all warnings. 4. Follow all instructions. 5. Do not use this apparatus near water. 6. Clean only with dry cloth. 7. Do not block any ventilation openings. Install in accordance with the manufacturers instructions. 8. Do not install near any heat sources such as radiators, heat registers, stoves, or other apparatus (including amplifiers) that produce heat. 9. Do not defeat the safety purpose of the polarized or grounding-type plug. A polarized plug has two blades with one wider than the other.
A grounding type plug has two blades and a third grounding prong. The wide blade or the third prong are provided for your safety. If the provided plug does not fit into your outlet, consult an electrician for replacement of the obsolete outlet.
10. Protect the power cord from being walked on or pinched particularly at plugs, convenience receptacles, and the point where they exit from the apparatus.
11. Only use attachments/accessories specified by the manufacturer. 12. Use only with the cart, stand, tripod, bracket, or table specified by the manufacturer, or sold with the
apparatus. When a cart is used, use caution when moving the cart/apparatus combination to avoid injury from tip-over.
13. Unplug this apparatus during lightning storms or when unused for long periods of time. 14. Refer all servicing to qualified service personnel. Servicing is required when the apparatus has been damaged in any way, such as
power-supply cord or plug is damaged, liquid has been spilled or objects have fallen into the apparatus, the apparatus has been exposed to rain or moisture, does not operate normally, or has been dropped.
The apparatus shall not be exposed to dripping or splashing and that no objects filled with liquids, such as vases, shall be placed on the apparatus.
The P (POWER) indicator being unlit does not mean the apparatus is completely disconnected from the MAINS. When you need to have the apparatus completely disconnected from the MAINS, you must unplug the power cord. For that purpose, locate the apparatus in a way that secures easy access to the power cord.
NOTICE This equipment has been tested and found to comply with the limits for a Class B digital device, pursuant to Part 15 of the FCC Rules. These limits are designed to provide reasonable protection against harmful interference in a residential installation. This equipment generates, uses and can radiate radio frequency energy and, if not installed and used in accordance with the instructions, may cause harmful interference to radio communications. However, there is no guarantee that interference will not occur in a particular installation. If this equipment does cause harmful interference to radio or television reception, which can be determined by turning the equipment off and on, the user is encouraged to try to correct the interference by one or more of the following measures:
Reorient or relocate the receiving antenna. Increase the separation between the equipment and receiver. Connect the equipment into an outlet on a circuit different from that to which the receiver is connected. Consult the dealer or an experienced radio/TV technician for help.
FCC WARNING Changes or modifications not expressly approved by the party responsible for compliance could void the users authority to operate the equipment.
Declaration of Conformity Model Number: AP-250 Trade Name: CASIO COMPUTER CO., LTD. Responsible party: CASIO AMERICA, INC. Address: 570 MT. PLEASANT AVENUE, DOVER, NEW JERSEY 07801 Telephone number: 973-361-5400 This device complies with Part 15 of the FCC Rules, Operation is subject to the following two conditions: (1) This device may not cause harmful interference, and (2) this device must accept any interference received, including interference that may cause undesired operation.
Manufacturer: CASIO COMPUTER CO., LTD. 6-2, Hon-machi 1-chome, Shibuya-ku, Tokyo 151-8543, Japan
Responsible within the European Union: CASIO EUROPE GmbH Casio-Platz 1, 22848 Norderstedt, Germany
This mark applies in EU countries only.
Declaration of Conformity According to EU Directive
E-1
E n
g li
s h
Contents
General Guide …………………………….. E-2 FUNCTION Button……………………………………………… E-3
Saving Settings and Using Operation Lock ……………. E-3
Power Outlet……………………………….. E-4 Using an AC Adaptor ………………………………………….. E-4
Turning Power On or Off……………………………………… E-5
Connections……………………………….. E-6 Connecting Headphones …………………………………….. E-6 Connecting Audio Equipment or an Amplifier …………. E-6
Bundled and Optional Accessories……………………….. E-7
Playing with Different Tones ……….. E-8 Selecting and Playing a Tone ………………………………. E-8
Layering Two Tones …………………………………………. E-10 Using Effects……………………………………………………. E-11
Using the Digital Pianos Pedals…………………………. E-11
Using the Metronome ……………………………………….. E-12 Playing a Piano Duet ………………………………………… E-13
Playing Back Built-in Songs………. E-14 Playing Back All of the Built-in Songs………………….. E-14
Playing Back a Specific Music Library Song…………. E-15
Practicing with a Music Library Song…………………… E-15
Recording and Play Back…………… E-16 Tracks …………………………………………………………….. E-16 To record to a specific track of a song…………………. E-17
To record to one track of a song while listening to the playback of the other track……………………………. E-18
Playing Back from Digital Piano Memory……………… E-18
Deleting Recorded Data ……………………………………. E-19
Configuring Settings with the Keyboard……………………… E-20
To configure settings with the keyboard………………..E-20
Keyboard Keys Used for Configuring Settings………. E-21 Parameter List…………………………………………………..E-22
Tone selection ………………………………………………. E-22 Reverb …………………………………………………………. E-22 Chorus …………………………………………………………. E-22 Brilliance ………………………………………………………. E-22 Layer balance ………………………………………………..E-22 Tempo (TEMPO) ……………………………………………E-22 Song select (SONG SELECT) ………………………….E-22 Song volume…………………………………………………. E-22 Metronome beat (METRONOME BEAT) …………… E-22 Metronome volume …………………………………………E-22 Keyboard key (Transpose) ……………………………… E-23 Keyboard tuning (Tuning) ……………………………….. E-23 Octave shift…………………………………………………… E-23 Temperament ………………………………………………..E-23 Temperament select ………………………………………. E-23 Temperament Base note ………………………………… E-23 Touch response (TOUCH RESPONSE)……………. E-23 USB device mode ………………………………………….. E-24 Send channel…………………………………………………E-24 Local control …………………………………………………. E-24 Operation tone ………………………………………………. E-24 Back up………………………………………………………… E-24 Operation lock………………………………………………..E-24
Connecting to a Computer…………. E-25 Minimum Computer System Requirements …………..E-25
Connecting the Digital Piano to Your Computer ……. E-25 Using MIDI ………………………………………………………. E-26
Transferring Song Data with a Computer……………… E-26
Reference………………………………….. E-32 Troubleshooting ………………………………………………..E-32
Product Specifications……………………………………….. E-33
Operating Precautions ………………………………………. E-34
Appendix…………………………………….. A-1 Tone List …………………………………………………………… A-1 Song List …………………………………………………………… A-1
MIDI Implementation Chart
Company and product names used in this manual may be registered trademarks of others.
Assembling the Stand………………………………………………………………………………….. E-29 Unpacking……………………………………………………….. E-29
To assemble the stand ……………………………………… E-29
To connect the pedal cord………………………………….. E-31
To install the music stand……………………………………E-31
E-2
General Guide
21 3 4 5 6 8 97
bk bl bm
bo
bn
Bottom
Front
Rear
General Guide
E-3
E n
g li
s h
NOTE
The names shown here are always indicated in bold when they appear within the text of this manual.
The FUNCTION button is used when configuring a variety of different digital piano settings. The following are FUNCTION button basics.
To change a setting, hold down the FUNCTION button as you press the keyboard key that is assigned the setting you want to select. An operation confirmation tone will sound whenever you press a keyboard key to configure a setting.
Example: To select a tone on page E-8
NOTE
For details about operations and settings, see Configuring Settings with the Keyboard on page E-20.
The following table shows how pressing the FUNCTION button changes the operation of certain buttons.
Your digital piano lets you save its current settings and lock its buttons to protect against operation errors. For details, see Parameter List on pages E-22 — E-24.
FUNCTION Button
This button: Does this while FUNCTION button is depressed:
SONG a Starts and stops demo tune play.
RECORDER Selects the left-hand part and the right-hand part.
METRONOME Toggles Duet on and off.
Saving Settings and Using Operation Lock
1 P (POWER) button
2 VOLUME controller
3 FUNCTION button
4 SONG a, DEMO button
5 RECORDER (L/R) button
6 METRONOME, DUET button
7 GRAND PIANO (CONCERT) button
8 GRAND PIANO (MODERN) button
9 ELEC PIANO button
bk Pedal connector
bl USB port
bm DC 12V terminal
bn PHONES jacks
bo Power lamp
E-4
Power Outlet
Your digital piano runs on standard household power. Be sure to turn off power whenever you are not using the digital piano.
Use only the AC adaptor (JEITA Standard, with unified polarity plug) that comes with this digital piano. Use of a different type of AC adaptor can cause malfunction of the digital piano. Specified AC Adaptor: AD-A12150LW
Use the supplied power cord to connect the AC adaptor as shown in the illustration below.
Secure the AC adaptor cord with the clip you affixed next to the power terminal (page E-31).
To fasten the clip As shown in the illustration, press down on (a) to force the tip of the clip into the slot. Press down until you hear the clip click securely into place.
To release the clip As shown in the illustration, press (b) in the direction indicated by the arrow.
Note the following important precautions to avoid damage to the power cord.
During Use Never pull on the cord with excessive force. Never repeatedly pull on the cord. Never twist the cord at the base of the plug or
connector.
During Movement Before moving the digital piano, be sure to unplug
the AC adaptor from the power outlet.
During Storage Loop and bundle the power cord, but never wind it
around the AC adaptor.
IMPORTANT!
Never connect the AC adaptor (JEITA Standard, with unified polarity plug) that comes with this digital piano to any other device besides this piano. Doing so creates the risk of malfunction.
Make sure the digital piano is turned off before plugging in or unplugging the AC adaptor.
The AC adaptor will become warm to the touch after very long use. This is normal and does not indicate malfunction.
Using an AC Adaptor
Household power outlet
Power cord
DC 12V terminal
Clip
AC adaptor Configuration and type depends on
your geographic location.
Slot
Tip
E n
g li
s h
Power Outlet
E-5
1. Press the P (POWER) button to turn on digital piano power.
This causes the P (POWER) button to light. When you turn on the digital piano, it performs a
power up operation in order to initialize its system. During system initialization the tone button lamps cycle on and off in the sequence for about five seconds to let you know that system initialization is in progress.
2. To turn off the digital piano, hold down the P (POWER) button until its light goes out.
NOTE
Pressing the P (POWER) button to turn off power actually puts the digital piano into a standby state. Minute amounts of current continue to flow within the digital piano in the standby state. If you do not plan to use the digital piano for a long time or if there is a lightning storm in your area, be sure to unplug the AC adaptor from the power outlet.
Auto Power Off
This digital piano is designed to turn off automatically to avoid wasting power after no operation is performed for a preset amount of time. The Auto Power Off trigger time is about four hours. You also can use the procedure below to temporarily
suspend Auto Power Off.
To disable Auto Power Off
1. While the digital piano is turned on, press the P (POWER) button to turn it off.
2. While holding down the FUNCTION button, press the P (POWER) button to turn on the digital piano.
Auto Power Off will be disabled at this time.
NOTE
Turning off the digital piano after performing the above steps will re-enable Auto Power Off.
Turning Power On or Off
E-6
Connections
IMPORTANT!
Whenever connecting something to the digital piano, first use the VOLUME controller to set the volume to a low level. After connecting, you can adjust the volume to the level you want.
Connect commercially available headphones to the PHONES jacks. Connecting headphones to either of the PHONES jack cuts off output to the speakers, which means you can practice even late at night without bothering others. To protect your hearing, make sure that you do not set the volume level too high when using headphones.
NOTE
Be sure to push the headphones plug into the PHONES jacks as far as it will go. If you dont, you may hear sound from only one side of the headphones.
If the plug of the headphones you are using does not match the PHONES jacks, use the applicable commercially available adaptor plug.
If you are using headphones that require an adaptor plug, make sure you do not leave the adaptor plugged in when you unplug the headphones. If you do, nothing will sound from the speakers when you play.
You can connect audio equipment or a music amplifier to the digital piano and then play through external speakers for more powerful volume and better sound quality.
Connecting Audio Equipment (Figure 1)
Use commercially available connecting cords (Standard Plug 1, Pin Plugs 2) to connect as shown in Figure 1. Make sure that the end of the cord that you connect to the digital piano is a stereo standard plug. A monaural standard plug will result in output of only one of the two stereo channels. Normally, you should set the input selector of the audio equipment to the terminal where the digital piano is connected (AUX IN, etc.) Adjust volume using the digital pianos VOLUME controller.
Connecting a Music Amplifier (Figure 2)
Connect the connecting cord* to one of the types of amplifiers shown in Figure 2. Adjust volume using the digital pianos VOLUME controller.
Connecting Headphones
Stereo standard plug
PHONES jacksFront
Connecting Audio Equipment or an Amplifier
* Digital Piano: Stereo standard plug Amplifier : Inputs signals for the left and right
channels. Not connecting either plug will result in output of only one of the two stereo channels.
INPUT 1
INPUT 2
Audio amplifier AUX IN jack, etc.
Guitar amplifier Keyboard amplifier, etc.
Pin plug
Pin jack Standard plug
RIGHT (Red)
To either of the digital pianos PHONES jack
Stereo standard plug
Pin plug (red)
Pin plug (white)
LEFT (White)
E n
g li
s h
Connections
E-7
Use only accessories that are specified for use with this digital piano. Use of unauthorized accessories creates the risk of fire, electric shock, and personal injury.
NOTE
You can get information about accessories that are sold separately for this product from the CASIO catalog available from your retailer, and from the CASIO website at the following URL. http://world.casio.com/
Bundled and Optional Accessories
E-8
Playing with Different Tones
The piano comes with 18 built-in tones.
The names of the tones are marked above the keyboard keys to which they are assigned.
To select a tone
1. Select the tone you want.
2. Use the VOLUME controller to adjust the volume.
Selecting and Playing a Tone
SONG a
FUNCTION METRONOME ELEC PIANO
GRAND PIANO
VOLUME
To select GRAND PIANO (CONCERT or MODERN) or ELEC PIANO Press one of the GRAND PIANO buttons
(CONCERT or MODERN) or the ELEC PIANO button to select the one you want.
The button lamp of the selected tone will light.
To select one of the other tones While holding down the FUNCTION button,
press the keyboard key that corresponds to the tone you want to select.
E n
g li
s h
Playing with Different Tones
E-9
NOTE
Of the digital pianos 18 built-in tones, the first five are grand piano tone. Each tone has its own distinctive merits, so you should select the tone that suits the song you are playing along with or your own personal preferences. The CONCERT and MODERN tones are assigned to buttons for quick and easy selection.
* Feature that applies computer morphing technology to enable seamless changes between sounds sampled at various dynamics from a full concert grand piano.
Bass Tones (BASS 1, BASS 2)
Selecting either of the two BASS (LOWER) tones (1 or 2) in step 1 of the above procedure will assign the selected bass tone to the low range (left side) of the keyboard. The high range (right side) will be assigned the tone that was selected when you pressed the BASS 1 or BASS 2 key. BASS 1 and BASS 2 let you effectively split the
keyboard between two different tones.
NOTE
To return the keyboard to a single tone, select any tone other than BASS 1 or BASS 2.
You cannot select BASS 1 or BASS 2 when recording to Track 2.
Tone Name Characteristics
CONCERT This is a full concert grand piano tone that uses Linear Morphing* for dynamic and natural tone changes. This tone is designed to reproduce damper, resonance, and other piano nuances, which makes it ideal for virtually any type of piano performance.
MODERN This tone provides a bright grand piano sound. The volume and timbre of this tone is quick to respond to different keyboard pressures, and it has relatively deep reverb. This tone is a good choice for dynamic and lively performances.
CLASSIC This is a natural piano tone that closely resembles the sound of an acoustic piano. Though reverb and other flashy effects are subdued for this tone, resonance is more pronounced, which enables expression of delicate nuances. This tone is a good choice for lesson and practice sessions.
MELLOW Warm and mellow piano tone
BRIGHT Bright and clear piano tone
Split Point
Low Range High Range
BASS 2 PIPE ORGAN (Currently selected tone.)
E-10
Playing with Different Tones
Use the following procedure to layer two tones, so they sound at the same time. When specifying two tones for layering, first tone you select will be the main tone, while the second tone will be the layered tone.
1. While holding down the FUNCTION button, press down the keyboard key for the first tone you want to layer and then the key for the second tone. Example: First press the HARPSICHORD key and
then the ELEC ORGAN 1 key.
2. To unlayer the keyboard, select another tone by pressing the GRAND PIANO button or by using the procedure under Selecting and Playing a Tone (page E-8).
NOTE
You cannot layer the BASS 1 or BASS 2 tone with another tone.
You cannot perform the layer operation when recording to Track 2.
To adjust the volume balance between two layered tones
1. While holding down the FUNCTION button, use the keyboard keys shown below to adjust the volume of the layered tones.
To return the volume setting to its initial default, hold down the FUNCTION button and press both of the keys at the same time.
Layering Two Tones
HARPSICHORD
ELEC ORGAN 1
C1 C2 C3 C4 C5 C6 C7 C8
Initial default (Center)
Volume of the main tone (First tone you selected)
Volume of the layered tone (Second tone you selected)
E n
g li
s h
Playing with Different Tones
E-11
1. While holding down the FUNCTION button, use the Reverb or Chorus keyboard key to cycle through the available settings. Each press of the Reverb or Chorus keyboard key
causes the digital piano to beep according to which setting is selected, as shown in the table below.
Reverb
Chorus
About DSP DSP makes it possible to digitally produce complex acoustic effects. The DSP is assigned to each tone whenever you turn on digital piano power.
Your digital piano comes equipped with three pedals: damper, soft, and sostenuto.
Pedal Functions
Damper Pedal Pressing the damper pedal while playing will cause the notes you play to reverberate for a long time. When a GRAND PIANO tone (CONCERT/
MODERN/CLASSIC/MELLOW/BRIGHT) is selected as the tone, pressing this pedal will cause notes to reverberate (with damper resonance) just like the damper pedal on an acoustic grand piano. Half-pedal operation (pressing the pedal part way) is also supported.
Soft Pedal Pressing this pedal while playing suppresses notes played on the keyboard after the pedal was pressed, and makes them sound softer.
Sostenuto Pedal Only the notes of the keys that are depressed when this pedal is pressed are sustained until the pedal is released.
Using Effects Reverb : Makes your notes resonate. Chorus : Adds more breadth to your notes.
Number of Beeps Setting
1 (long) 1 (short) 2 3 4
Off (OFF) Room Small Hall Large Hall Stadium
Number of Beeps Setting
1 (long) 1 (short) 2 3 4
Off (OFF) Light Chorus Medium Chorus Deep Chorus Flanger (whooshing effect)
ChorusReverb
Using the Digital Pianos Pedals
Soft pedal Damper pedal
Sostenuto pedal
E-12
Playing with Different Tones
1. Press the METRONOME button. This starts the metronome. The lamp above the SONG a button flash in time
with the metronome beat.
2. To change the beat, hold down the FUNCTION button as you press one of the METRONOME BEAT keys to select a beat setting.
You can specify beats per measure value of 0, 2, 3, 4, 5, or 6. Specifying 0 as the setting plays a straight click, without any chime. This setting lets you practice with a steady beat.
3. While holding down the FUNCTION button, use the TEMPO keys to specify a tempo value in the range of 20 to 255 beats per minute.
Each press of the + or key raises or lowers the tempo value by 1.
You can use the value input keys (0 to 9) to enter a specific three-digit. Be sure to input all three digits.
Example: To enter 96, press keys 0, 9, 6.
4. Press the METRONOME button or SONG a button to turn off the metronome.
NOTE
To return the tempo setting to the default tempo of the currently selected Music Library tune, press the + and keys at the same time in step 3. Pressing + and while recording will return the tempo value to 120.
To adjust the metronome volume
You can perform the following procedure at any time, regardless of whether or not the metronome is sounding.
1. While holding down the FUNCTION button, use the METRONOME VOLUME keys to specify a volume value in the range of 0 to 42. For details about using the keyboard keys for
settings, see Keyboard Keys Used for Configuring Settings on page E-21.
Each press of the or key raises or lowers the metronome volume value by 1.
NOTE
To return to the initial default setting, press and at the same time.
Using the Metronome
E n
g li
s h
Playing with Different Tones
E-13
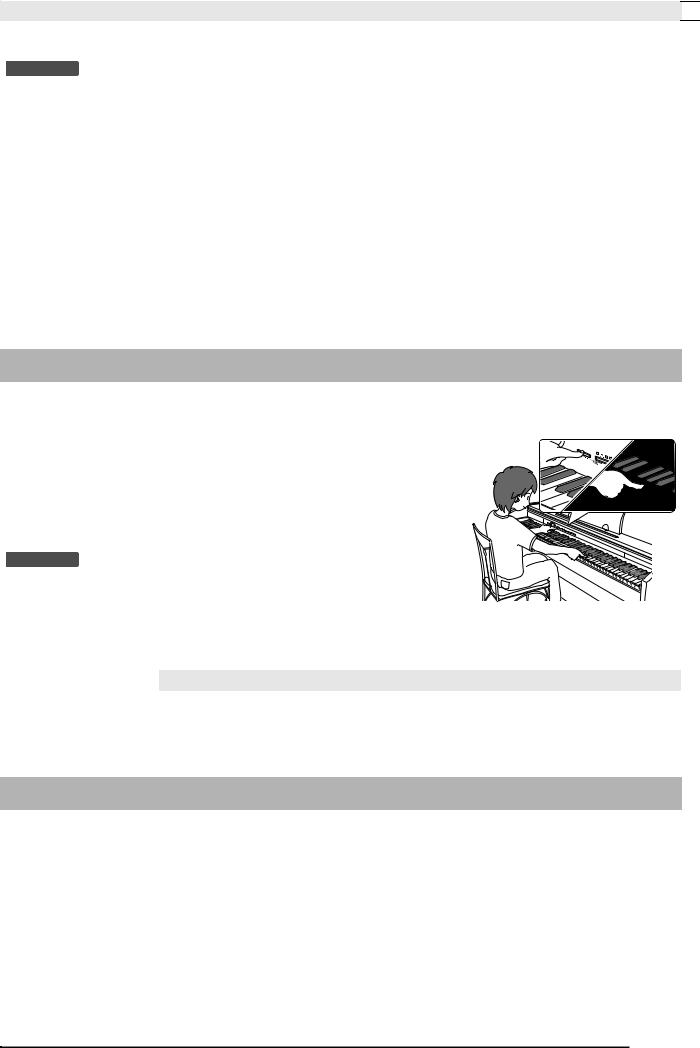
You can use the Duet Mode to split the pianos keyboard in the center so two people can play a duet. The left and right side keyboards have virtually the same range. The left pedal operates as the left side damper pedal, while the right pedal is the right side damper pedal. This makes it possible to configure the keyboard so, for example, the teacher can play on the left and the student can follow along on the right. Or one person can play the left hand part on the left, while another plays the right hand part on the right.
Pedal Operation when Playing a Duet
NOTE
Only the damper pedal for the right side keyboard supports half-pedal operations.
1. Select the piano tone you want to use for the duet. Example: GRAND PIANO (MODERN)
2. While holding down the FUNCTION button, press the METRONOME button to toggle duet on and off.
IMPORTANT!
You cannot use the Duet Mode while recording (page E-16).
Changing the Octaves of the duet keyboards
You can change the ranges of the left and right keyboards in octave units from their initial default settings. This comes in handy, for example, if the initial default range is not enough when one person is playing the left hand part and another person is playing the right hand part.
1. While holding down the FUNCTION and METRONOME buttons, press the keyboard C key that you want located at C4 (middle C) of the left keyboard.
Example: Press the keyboard key of the leftmost C (C4) will assign the range shown below.
2. While holding down the FUNCTION and METRONOME buttons, press the keyboard C key that you want located at C4 (middle C) of the right keyboard.
NOTE
You can return the keyboards to their initial default ranges by exiting and then re-entering the Duet Mode.
Playing a Piano Duet
C3 C4 C5 C6 C3 C4 C5 C6
Keyboard Split point
Left keyboard Right keyboard
(middle C)(middle C)
Left side damper pedal
Left and right side damper pedal
Right side damper pedal (Half-pedal operation supported)
C4 C5 C6 C7 C3 C4 C5 C6
Left keyboard Right keyboard
(Pressed key)
1 octave higher than initial setting
Unchanged
E-14
Playing Back Built-in Songs
Your digital piano comes with a Music Library of 60 built-in tunes. You can play all 60 tunes in sequence, from beginning to end.
IMPORTANT!
After you select a built-in song, it can take a number of seconds for the song data to be loaded. While the data is being loaded, the keyboard keys and button operations will be disabled. If you are playing something on the keyboard, the following operation will cause output to stop.
1. While holding down the FUNCTION button, press the SONG a button. This will start repeat demo playback of the built-in
songs in sequence, from 01 through 60. You can play along with a song on the keyboard as it
is playing. The tone assigned to the keyboard is the one that is preset for the song that is playing.
2. To change demo playback to a different song, hold down the FUNCTION button as you use the SONG SELECT keys to specify a song number.
Each press of the + or key raises or lowers the song number by 1.
You can use the value input keys (0 to 9) to enter a specific two-digit song number. Be sure to input both digits.
Example: To select song 08, enter 0 and then 8.
3. Press the SONG a button again to stop built-in song play.
NOTE
The tune selection and playback stop operations described above are the only operations that are possible during demo tune play.
SONG a
FUNCTION RECORDER
Playing Back All of the Built-in Songs
E n
g li
s h
Playing Back Built-in Songs
E-15
The Music Library includes both built-in songs (01 to 60), plus songs (61 to 70) that have been saved to digital piano memory from a computer*. You can use the procedure below to select one of these songs and play it back. * You can download music data from the Internet and
then transfer it from your computer to digital piano memory. See Transferring Song Data with a Computer on page E-26 for more information.
1. Find the song number of the song you want to play in the song list on page A-1.
2. To change to another song, hold down the FUNCTION button as you use the SONG SELECT keys to specify a song number. For information about how to perform this step, see
the note under step 2 of the procedure under Playing Back All of the Built-in Songs on page E-14.
3. Press the SONG a button. This starts the playback of the song.
4. To stop playback, press the SONG a button again. Playback will stop automatically when the end of the
song is reached.
NOTE
Pressing the + and keys at the same time will select song number 01.
You also can adjust the playback tempo and volume of the song. See Configuring Settings with the Keyboard on page E-20 for more information.
You can turn off the left hand part or right hand part of a song and play along on the piano.
NOTE
The Music Library includes a number of duets. While a duet is selected, you can turn off the first piano <Primo> or second piano <Secondo> tone and play along with the song.
PREPARATION Select the song you want to practice and adjust the
tempo. See Configuring Settings with the Keyboard on page E-20.
A number of tunes have tempo changes part way through in order to produce specific musical effects.
1. While holding down the FUNCTION button, press the RECORDER (L/R) button to select the part you want to turn off. Pressing a button toggles its part on (button lamp on)
and off (button lamp off).
2. Press the SONG a button. This starts playback, without the part you turned off
in step 1.
3. Play the missing part on the keyboard.
4. To stop playback, press the SONG a button again.
Playing Back a Specific Music Library Song
Practicing with a Music Library Song
Left hand Right hand
Both parts on Right hand part off
Left hand part off
E-16
Recording and Play Back
You can store the notes you play in digital piano memory for later playback.
A track is a container of recorded data, and a song consists of two tracks: Track 1 and Track 2. You can record each track separately and then combine them so they play back together as a single song.
Memory Capacity
You can record approximately 5,000 notes in digital piano memory.
The RECORDER button lamp will flash at high speed when memory runs low.
Recording stops automatically if the number of notes in memory exceeds the maximum.
Recorded Data
Keyboard play Tone used Pedal operations Reverb and chorus settings (Track 1 only) Tempo setting (Track 1 only) Layer setting (Track 1 only) Split setting (Track 1 only) Temperament and base note settings (Track 1 only) Octave shift setting (Track 1 only)
Recording Data Storage
Starting a new recording deletes any data that was previously recorded in memory.
If power to the Digital Piano is cut off while recording is in progress, everything you recorded up to that point will be deleted. Take care so power is not turned off accidentally during recording operations.
IMPORTANT!
CASIO COMPUTER CO., LTD. takes no responsibility for any damages, lost profits, or claims by third parties arising from the deletion of recorded data due to malfunction, repair, or for any other reason.
Using the RECORDER Button
Each press of the RECORDER button cycles through the recording options in the sequence shown below.
SONG a
FUNCTION RECORDER
METRONOME
Tracks
Track 1 Record While playing back. . .
Track 2 Record
Song
Lit Flashing Off
Playback Standby
Record Standby Normal
E n
g li
s h
Recording and Play Back
E-17
After recording to either of the tracks of a song, you can record to the other track while listening to playback what you recorded in the first track.
1. Press the RECORDER button twice so its lamp is flashing.
At this time the L lamp will flash to indicate that the digital piano is standing by for recording to Track 1.
2. To change the recording track, hold down the FUNCTION button as you press the RECORDER (L/R) button. Make sure that the indicator lamp for the record track
is flashing. Track 1: L lamp Track 2: R lamp
Example: Track 1 selected
3. Select the tone and effects (Track 1 only) you want to use in your recording. Tone (page E-8) Effects (page E-11)
NOTE
If you want the metronome to sound while you are recording, configure the beat and tempo settings, and then press the METRONOME button. See Using the Metronome on page E-12 for more information.
4. Start playing something on the keyboard. Recording will start automatically.
5. To stop recording, press the SONG a button. This will cause the RECORDER button lamp and the
lamp of the track you recorded to change from flashing to lit.
To play back the track you just recorded, press the SONG a button.
6. After you are finished recording or playing back, press the RECORDER button so its lamp goes out.
To record to a specific track of a song
E-18
Recording and Play Back
1. Press the RECORDER button so its lamp is lit.
2. While holding down the FUNCTION button, press the RECORDER (L/R) button to select the track you want to play back while recording.
3. Press the RECORDER button so its lamp is flashing. This will cause the L lamp to flash.
4. While holding down the FUNCTION button, press the RECORDER (L/R) button to select the track you want to record. Make sure that the indicator lamp for the record track
is flashing. Example: To listen to playback of Track 1 as you record
to Track 2
5. Select the tone and effects (Track 1 only) you want to use for your recording.
6. Press the SONG a button or play something on the keyboard. This will start both playback of the recorded track
and recording to the other track.
7. To stop recording, press the SONG a button.
1. Press the RECORDER button so its lamp is lit.
NOTE
When a song has something recorded in both tracks, you can turn off one track and play back just the other track, if you want.
2. Press the SONG a button. This starts playback of the song and/or track you
selected.
NOTE
You can change the tempo setting as a track is playing.
Press the SONG a button again to stop playback.
To record to one track of a song while listening to the playback of the other track
Lit (Play) Flashing (Record Standby)
Playing Back from Digital Piano Memory
E n
g li
s h
Recording and Play Back
E-19
The following procedure deletes a specific track of a song.
IMPORTANT!
The procedure below deletes all of the data of the selected track. Note that the delete operation cannot be undone. Check to make sure you really do not need the data in digital piano memory before you perform the following steps.
1. Press the RECORDER button twice so its lamp is flashing.
2. While holding down the FUNCTION button, press the RECORDER (L/R) button to select the track you want to delete.
3. Press the RECORDER button until its lamp is lit. This will cause the lamp of the track you selected in
step 2 of this procedure to flash. Example: If you selected Track 2 for deletion
4. Once again, hold down the FUNCTION button as you press the RECORDER (L/R) button. This deletes the selected track and enters playback
standby. To cancel the delete operation at any time, press the
RECORDER button twice so its lamp is unlit.
NOTE
Only the digital pianos RECORDER (L/R) button is operational from step 3 until you actually perform the delete operation in step 4. No other button operation can be performed.
Deleting Recorded Data
Off Flashing: Delete standby
E-20
Configuring Settings with the Keyboard
In addition to selecting tones and Music Library tunes, you also can use the FUNCTION button in combination with the keyboard keys to configure effect, keyboard touch, and other settings.
1. Use the Parameter List on pages E-22 — E-24 to find the setting you want to configure, and note its details.
2. Use Keyboard Keys Used for Configuring Settings on page E-21 to find the location on the keyboard for configuring the setting you want.
3. While holding down the FUNCTION button, press the keyboard key for the setting you want to configure. The digital piano will sound an operation tone after it
configures the setting. Example: To lower the transpose setting by one
semitone
4. Release the FUNCTION button to complete the setting procedure.
NOTE
You can configure the digital piano so no operation tone sounds in step 3. For details, see bt Operation Tone under Parameter List on pages E-22 — E-24.
Keyboard Setting Operation Types
There are four types of operations that you can perform while configuring settings with the keyboard keys: Type A, Type B, Type C, and Type D.
Example: Pressing the STRINGS keyboard key to select the STRINGS 1 tone
Holding down a key raises or lowers the setting at high speed.
To return to the initial default setting, press both keys at the same time.
Example: To enter 120, press keys 1, 2, 0.
When you press a key, the digital piano will beep to let you know which setting is selected.
A long beep indicates that the applicable setting is turned off.
Example: While reverb is turned off, pressing the Reverb keyboard key twice will cause the digital piano to beep twice, which indicates that the Small Hall setting is selected.
NOTE
You can find out what operation type applies to each setting by checking the Operation Type in the Parameter List on pages E-22 — E-24.
FUNCTION
To configure settings with the keyboard
Transpose key
Type A: Direct input
Type B: Raising or lowering a setting using the + and or and keyboard keys
Type C: Value input using the numeric keys (0 to 9)
Type D: Toggling or cycling through settings by pressing a keyboard key
Configuring Settings with the Keyboard
E-21
E n
g li
s h
The numbers 1 through cl correspond to the same numbers in the Parameter List on pages E-22 — E-24.
Keyboard Keys Used for Configuring Settings
+
OFF/ON OFF/ON
OFF/ON OFF/ON
[Left keyboard]
[Overall]
[Center keyboard]
[Right keyboard]
5Tempo/Temperament select
bmSong volume
boBrilliance
bnMetronome volume
1Keyboard key (Transpose)
2Keyboard tuning (Tuning)
3Octave shift
6Song select/Base note 7Tone selection
bpUSB device mode
bqLayer balance
blTouch response
brSend channel
bsLocal control
btOperation tone
ckBack up
clOperation lock
4Temperament
bkMetronome beat
8Reverb
9Chorus
E-22
Configuring Settings with the Keyboard
Tones
Song/Metronome
Parameter List
Parameter Settings Operation
Type (page E-20)
Description Remarks
7 Tone selection See page E-8. Default: GRAND PIANO (CONCERT)
A Assigns a tone to the keyboard. (page E-8)
8 Reverb Off (OFF), 1 to 4 Default: 2
D Specifies the reverb of notes. (page E-11)
9 Chorus Off (OFF), 1 to 4 Default: 2
D Controls the breadth of notes. (page E-11)
bo Brilliance 3 to 0 to 3 Default: 0
B Specifies the brilliance of notes. Pressing [+] makes notes brighter and harder. Pressing [] makes notes mellower and softer.
To return the setting to its initial default (0), press [+] and [] at the same time.
bq Layer balance 24 to 0 to 24 Default: 0
B Specifies the volume balance between the main tone and the layered tone. (page E-10)
Parameter Settings Operation
Type (page E-20)
Description Remarks
5 Tempo (TEMPO) 20 to 255 Default: 120
B (+/) C (0 to 9)
Specifies the tempo of Music Library songs, the metronome, recording and playback, etc. (page E-12)
Always enter three digits when using the number keys (0 to 9) to input a value. Example: To input 90, enter 0, 9, 0 (leading
zero required). During recording, pressing + and at the
same time sets a value of 120.
6 Song select (SONG SELECT)
01 to 70 Default: 01
B (+/) C (0 to 9)
Selects a Music Library tune. (page E-15)
Always enter two-digits when using the number keys (0 to 9) to input a value. Example: To input 8, enter 0, 8 (leading
zero required). This setting cannot be changed while
recording.
bm Song volume 00 to 42 Default: 42
B Sets the volume level of Music Library playback.
This setting cannot be changed while recording.
bk Metronome beat (METRONOME BEAT)
0, 2, 3, 4, 5, 6 Default: 4
A Specifies the metronome beat. (page E-12)
The metronome beat setting cannot be changed while playback of a Music Library tune is in progress.
bn Metronome volume
00 to 42 Default: 36
B Specifies the metronome volume. (page E-12)
Configuring Settings with the Keyboard
E-23
E n
g li
s h
Keyboard
Parameter Settings Operation Type
(page E-20) Description Remarks
1 Keyboard key (Transpose)
12 to 0 to 12 Default: 0
B Raises or lowers the tuning of the digital piano in semitone steps.
The transpose setting cannot be configured while Music Library playback is in progress or while in the Duet Mode.
Raising the key of the digital piano can cause notes the highest part of the range to become distorted.
2 Keyboard tuning (Tuning)
415.5Hz to 440.0Hz to 465.9Hz Default: 440.0Hz
B Raises or lowers the overall pitch of the digital piano in 0.1Hz steps from the standard pitch of A4 = 440.0Hz.
The pitch setting cannot be changed while playback of a Music Library tune is in progress.
3 Octave shift 2 to 0 to 2 Default: 0
B Change the range of the keyboard in octave units.
You can configure octave shift settings for the main tone part and layered tone part.
You cannot configure octave shift settings for split tone parts.
4
5
6
Temperament Temperament select Temperament Base note
Temperament: 00 to 16 Base note: , +, 0 to 9 (C to B)
Defaults: Temperament: 00 (Equal Temperament) Base note: C
Hold down FUNCTION as you press each of the following keyboard keys.
1. TEMPERAMENT (4)
2. TEMPERAMENT SELECT (5)
3. BASE NOTE (6)
You can change the scale (tuning system) of the keyboard from standard equal temperament to another tuning that is more suitable for playing Indian music, Arabic music, classical pieces, etc.
00: Equal / 01: Pure Major / 02: Pure Minor / 03: Pythagorean / 04: Kirnberger 3 / 05: Werckmeister / 06: Mean-Tone / 07: Rast / 08: Bayati / 09: Hijaz / 10: Saba / 11: Dashti / 12: Chahargah / 13: Segah / 14: Gurjari Todi / 15: Chandrakauns / 16: Charukeshi
: C / +: C# / 0: D / 1: Eb / 2: E / 3: F / 4: F# / 5: G / 6: Ab / 7: A / 8: Bb / 9: B
bl Touch response (TOUCH RESPONSE)
Off (OFF), 1 to 3 Default: 2
A Specifies the relative touch of the keyboard keys. Setting a smaller value causes lighter touch to produce more powerful sound.
E-24
Configuring Settings with the Keyboard
MIDI and Other Settings
Parameter Settings Operation
Type (page E-20)
Description Remarks
bp USB device mode
MIDI, Storage Default: MIDI
The digital piano enters MIDI mode automatically when it is connected to a computer by a USB cable. Select storage when saving Recorder memory song data to a computer or when loading computer song data to digital piano memory. (page E-26)
While Storage is selected for this setting, the GRAND PIANO (CONCERT, MODERN) and ELEC PIANO button lamps flash, and all other lamps are unlit.
All digital piano operations are disabled at this time.
Each press of the USB device mode keyboard key toggles between the MIDI and storage modes.
br Send channel 01 to 16 Default: 01
B Specifies one of the MIDI channels (1 through 16) as the Send channel, which is used for sending MIDI messages to an external device.
bs Local control Off, On Default: On
D Selecting Off for Local control cuts off the digital pianos sound source, so no sound is produced by the digital piano when keys are pressed.
The Local control setting cannot be changed while playback of a Music Library tune is in progress.
bt Operation tone Off, On Default: On
D Selecting Off disables sounding of the operation tone whenever a keyboard key is pressed while the FUNCTION is depressed.
This setting is retained even when the digital piano is turned off.
The operation tone setting cannot be changed while Music Library playback is in progress, while the metronome is sounding, and during recording.
ck Back up Off, On Default: Off
D When On is selected for this setting, the digital piano will remember its current settings*1, and restore them when it is turned on again. When Off is selected, settings*2 are reset to their initial defaults whenever the digital piano is turned on.
The back up setting cannot be changed while Music Library playback is in progress, while the metronome is sounding, in the Duet Mode, and during recording.
*1The following settings are not remembered. Duet Mode Tune LR (part) Local control
*2Except for the operation tone on/off setting.
cl Operation lock Off, On Default: Off
D Selecting On for this setting locks the digital pianos buttons (except for the P (POWER) button and the buttons required for unlock), so no operation can be performed. Turn on operation lock when you want to protect against unintentional button operations.
The operation lock setting cannot be changed while Music Library playback is in progress, while the metronome is sounding, and during recording.
E-25
E n
g li
s h
Connecting to a Computer
You can connect the digital piano to a computer and exchange MIDI data between them. You can send play data from the digital piano to commercially available music software running on your computer, or you can send MIDI data from your computer to the digital piano for playback.
The following shows the minimum computer system requirements for sending and receiving MIDI data. Check to make sure that your computer complies with these requirements before connecting the digital piano to it.
Operating System Windows XP (SP2 or later)*1
Windows Vista *2
Windows 7 *3
Mac OS X (10.3.9, 10.4.11, 10.5.X, 10.6.X, 10.7.X)
USB port
IMPORTANT!
Never connect to a computer that does not conform to the above requirements. Doing so can cause problems with your computer.
IMPORTANT!
Make sure you follow the steps of the procedure below exactly. Connecting incorrectly can make data send and receive impossible.
1. Turn off the digital piano and then start up your computer. Do not start up the music software on your computer
yet!
2. After starting up your computer, use a commercially available USB cable to connect it to the digital piano.
3. Turn on the digital piano. If this is the first time you are connecting the digital
piano to your computer, the driver software required to send and receive data will be installed on your computer automatically.
4. Start up commercially available music software on your computer.
5. Configure the music software settings to select one of the following as the MIDI device.
For information about how to select the MIDI device, see the user documentation that comes with the music software you are using.
IMPORTANT!
Be sure to turn on the digital piano first before starting up your computers music software.
NOTE
Once you are able to connect successfully, there is no problem with leaving the USB cable connected when you turn off your computer and/or digital piano.
For detailed specifications and connections that apply to MIDI data send and receive by this digital piano, see the latest support information provided by the website at the following URL. http://world.casio.com/
Minimum Computer System Requirements
*1: Windows XP Home Edition Windows XP Professional (32-bit)
*2: Windows Vista (32-bit) *3: Windows 7 (32-bit, 64-bit)
Connecting the Digital Piano to Your Computer
CASIO USB-MIDI : (For Windows Vista, Windows 7, Mac OS X)
USB Audio Device: (For Windows XP)
Computer USB port
A connector
Digital Piano USB port
B connector
USB cable (A-B type)
E-26
Connecting to a Computer
What is MIDI?
The letters MIDI stand for Musical Instrument Digital Interface, which is the name of a worldwide standard for digital signals and connectors that makes it possible to exchange musical data between musical instruments and computers (machines) produced by different manufacturers.
NOTE
For detailed information about MIDI Implementation, visit the CASIO website at: http://world.casio.com/.
See Send channel and Local control on page E-24.
Use the procedures in this section to transfer Recorder memory data to a computer for storage, and to load songs to user song memory (Music Library 61 to 70).
IMPORTANT!
Turning off the Digital Piano while it is exchanging data with a computer can cause data in Digital Piano memory to become corrupted. If this happens, a memory format operation will start the next time you turn on the Digital Piano. Note that it takes about 20 seconds for the format operation to finish, and you will not be able to perform any operation during that time.
1. Perform steps 1 through 3 of the procedure under Connecting the Digital Piano to Your Computer on page E-25.
2. Change the digital pianos USB device mode to storage.
While holding down the FUNCTION button, press the keyboard key that corresponds to the USB device mode (page E-21).
After this setting is changed, the GRAND PIANO (CONCERT, MODERN) and ELEC PIANO button lamps flash, and all other lamps are unlit.
See USB device mode on page E-24 for more information.
3. On your computer, perform the required operation to display your computers storage devices.
The memory of this digital piano will appear as PIANO under Devices with Removable Storage.
Using MIDI
Transferring Song Data with a Computer
If your computer is running this operating system:
Do this:
Windows XP Double-click My Computer.
Windows Vista, Windows 7
Double-click Computer.
Mac OS Skip step 3 and double-click PIANO on your Mac desktop.
E n
g li
s h
Connecting to a Computer
E-27
4. Double-click PIANO. PIANO contains folders named MUSICLIB and
RECORDER. To transfer a user song to the digital piano from your
computer, open the MUSICLIB folder and put the song into one of the numbered subfolders (61 through 70). Each subfolder corresponds to a Music Library number: Subfolder 61 to Music Library 61, and so on.
The files in the RECORDER folder are songs that have been recorded with the digital pianos recorder function. You can move files from the RECORDER folder to another location on your computer, and you can return recorded song files to the digital piano by placing them into the RECORDER folder.
* Before starting a store or load operation, first check the file name extension to ensure it matches the ones shown in this column. In the case of a song recorded with the digital pianos recorder function, change its file name to one of the names and extensions shown in this column.
The initial default configuration for Windows XP, Windows Vista, and Windows 7 is to hide file name extensions. Perform one of the following operations on your computer to show file name extensions.
To show file name extensions under Windows XP
To show file name extensions under Windows Vista or Windows 7
To load a song into user song memory (Music Library 61 to 70)
If there are two files with the filename extensions .MID and .CM2 in the MUSICLIB folder, only the .MID data will be loaded into user song memory.
To transfer Recorder memory data between the digital piano and your computer
To transfer the digital pianos current Recorder memory data to your computer, copy the contents of the RECORDER folder to your computer. To return Recorder data you previously saved to your computer back to Recorder memory, copy it back to the RECORDER folder (and replace the current RECORDER folder contents).
Data Type Folder Name
File Name and Extension*
User songs MUSICLIB .MID: SMF format data (format 0/1) .CM2: CASIO original format data
Recorder memory data
RECORDER BIDREC01.CSR: CASIO original format data
1. Open the folder you want. 2. On the [Tools] menu, click [Folder Options]. 3. Click the [View] tab. In the [Advanced settings] list,
clear the check box next to [Hide extensions for known file types].
4. Click [OK].
1. Open Folder Options by clicking the [Start] button, clicking [Control Panel], clicking [Appearance and Personalization], and then clicking [Folder Options].
2. Click the [View] tab. Under [Advanced settings] clear the [Hide extensions for known file types] check box.
3. Click [OK].
1. Open the MUSICLIB folder. 2. Copy the song file(.MID or .CM2) to the number-
named subfolder (61 to 70) whose name matches the number of the Music Library location to which you want to load the song.
E-28
Connecting to a Computer
5. After the file copy operation is complete, return the USB device mode to MIDI. If you are using a Macintosh, perform the eject
operation (drag them to the trash can). While holding down the FUNCTION button, press
the applicable keyboard key. See USB device mode on page E-24 for more information.
Returning the USB device mode to MIDI will load the contents of MUSICLIB into user song memory and the contents of RECORDER into Recorder memory.
IMPORTANT!
A data conversion error is indicated when both of the SONG a button lamps, and the GRAND PIANO (CONCERT, MODERN) and ELEC PIANO button lamps are all lit, and all other lamps are unlit.
Copyrights The rights of creators and copyright holders of music, images, computer programs, databases, and other data are protected by copyright laws. You are allowed to reproduce such works for personal or non- commercial use only. For any other purpose, all reproduction (including data format conversion), modification, transfer of reproductions, distribution over a network, or any other use without permission of the copyright holder exposes you to claims for damages and criminal prosecution for copyright infringement and violation of the authors personal rights. Be sure to reproduce and otherwise use copyrighted works only in accordance with applicable copyright laws.
E-29
E n
g li
s h
Assembling the Stand
PREPARATION This stand does not include any of the tools required
for assembly. It is up to you to prepare a large Philips head (+) screwdriver for assembly.
IMPORTANT!
If anything is missing or damaged, contact your local CASIO service provider.
Note that use of any unauthorized parts or components can cause damage to the stand and/or the piano.
Before starting stand assembly, unfasten the band 1 that bundles the pedal cord in the back of crosspiece D, and extend the cord.
CAUTION Assembly of the stand should be performed by at
least two people working together. This stand should be assembled on a flat surface. Do not remove the tape securing the keyboard cover
in place until assembly is complete. Removing the tape can cause the keyboard cover to open and close during assembly, creating the risk of personal injury to your hands and fingers.
Take care that you do not pinch your fingers between parts when assembling them.
1. Attach side panels A and B to crosspiece D. Secure the side panels using four E screws. When installing parts 2, slide the brackets 3 into the
slots in either end of crosspiece D. If the brackets 3 are not inserted into the ends of the crosspiece D as far as they will go, the screws E will not be able to enter into the screw holes of the brackets 3, which can strip the threads of the screws.
Cover the screw heads with the caps J.
Unpacking
A
B C
D
Part Qty
E 4
F 6
G 1
H 2
I 2
J 4
K 1
1
To assemble the stand
A E
D
E
B
J
J
3
2
E-30
Assembling the Stand
2. Slide back panel C into the grooves 4 of the side panels. After you slide back panel C into place, the positions
of its screw holes should be aligned with those of crosspiece D.
3. Use the two screws I to secure the top left and right edges of the back panel C to the brackets 5 of side panels A and B. At location 6, slip the clip G onto to the screw I
before installing the screw.
4. Next, secure the bottom of the back panel C with the six screws F.
5. Adjust the height adjustment screw 7 to provide support so crosspiece D does not bow downwards when the pedals are pressed.
IMPORTANT!
Pressing the pedals without adjusting height adjustment screw 7 can result in damage to crosspiece D. Always make sure you adjust height adjustment screw 7 before operating the pedals.
6. Place the piano onto the stand.
At this time the screws on the bottom of the piano 8 should hook into the cutouts in the stand brackets 9.
C
4
5
I
I
6
G
C
F
AB
7D
9 9
9
8 Bracket cutout
Back of piano
Stand side panel
E n
g li
s h
Assembling the Stand
E-31
7. Use the two screws H to secure the piano to the stand.
IMPORTANT!
The screws keep the piano from slipping off the stand. Never use the piano without the screws installed.
8. Affix the adaptor cord clip K next to the power terminal (DC12V). For information about securing the cord, see Power
Outlet on page E-4.
1. Orienting the pedal plug as shown in the illustration, plug it into the pedal connector on the bottom of the piano. Secure the pedal cord with the clip G.
1. Install the music stand by inserting its pegs into the holes in the top of the piano.
H
K
DC 12V terminal
To connect the pedal cord
To install the music stand
G
Pedal plug
E-32
Reference
Troubleshooting
Problem Cause Action See
Page No sound is produced when I press a keyboard key.
1. The VOLUME controller is set to MIN.
1. Rotate the VOLUME controller more towards MAX.
E-8
2. Headphones or an adaptor plug is plugged into one of the PHONES jacks.
2. Disconnect whatever is connected to the PHONES jacks.
E-6
3. MIDI Local control is turned off. 3. Turn on the Local control setting. E-24
The pitch of the digital piano is off.
1. The digital pianos key setting is something other than 0.
1. Change the key setting to 0, or turn digital piano power off and then back on again.
E-23
2. Digital piano tuning is incorrect. 2. Adjust digital piano tuning, or turn the digital piano off and then back on again.
E-23
3. Octave shift is enabled. 3. Change the octave shift setting to 0. E-23
4. A non-standard temperament setting is being used.
4. Change the temperament setting to 00:Equal, which is the standard modern tuning.
E-23
Tones and/or effects sound strange. Turning power off and then back on again does not eliminate the problem. Example: Note intensity does not change even though I alter key pressure.
The Back up feature is turned on. Turn off Back up. Next, turn power off and then back on again.
E-24
I cannot transfer data after connecting the digital piano to a computer.
1. Check to make sure that the USB cable is connected to the digital piano and computer, and that the correct device is selected with your computers music software.
E-25
2. Turn off the digital piano and then exit the music software on your computer. Next, turn the digital piano back on and then restart the music software on your computer.
It takes a long time before I can use the Digital Piano after I turn it on.
Digital Piano memory data was corrupted because a data transfer operation with a computer was in progress the last time you turned off the piano. When this happens, the Digital Piano performs a memory format operation the next time you turn it on. You cannot perform any other operation while a format operation is in progress.
It takes about 20 seconds after you turn on power to perform the memory format operation. Wait until the format operation is complete. Note that you should take care to avoid turning off the Digital Piano while a data transfer operation with a computer is in progress.
E-26
A tones quality and volume sounds slightly different depending where it is played on the keyboard.
This is an unavoidable result of the digital sampling process,* and does not indicate malfunction. * Multiple digital samples are taken for the low range, middle range, and high range of the original
musical instrument. Because of this, there may be very slight differences in tonal quality and volume between sample ranges.
When I press a button, the note that is sounding cuts out momentarily or there is a slight change in how effects are applied.
This happens when the sounds of multiple parts are sounding at the same time while using layer, using the Duet Mode, playing back a built-in tune, recording, etc. Pressing a button when one of these conditions exists will cause the effect setting that is built into the tone to change automatically, which causes notes to cut out momentarily or causes a slight change in how effects are being applied.
Reference
E-33
E n
g li
s h
Specifications and designs are subject to change without notice.
Product Specifications
Model AP-250BK/AP-250BN
Keyboard 88-key piano keyboard, with Touch Response
Maximum Polyphony 128 notes
Tones 18 Layer (excluding bass tones) Split (Low-range bass tones only)
Effects Brilliance (3 to 0 to 3), Reverb (4 types), Chorus (4 types), DSP, Damper Resonance
Metronome Beats: 0, 2, 3, 4, 5, 6 Tempo Range: 20 to 255
Duet Adjustable tone range (1 to 2 octaves)
Music Library Number of Songs: 60, User Songs: 10 songs (Up to approximately 90KB per song, approximately 900KB for 10 songs)* * Based on 1KB = 1024 bytes, 1MB = 10242 bytes
Song volume: Adjustable Part On/Off: L, R
Recorder Functions: Real-time recording, playback Number of Song: 1 Number of Tracks: 2 Capacity: Approximately 5,000 notes total Recorded Data Protection: Built-in flash memory
Pedals Damper (with half-pedal operation), soft, sostenuto
Other Functions Touch Select: 3 types, Off Transpose: 2 octaves (12 to 0 to 12) Tuning: A4 = 415.5Hz to 440.0Hz to 465.9Hz (variable) Temperament Octave shift Operation lock
MIDI 16-channel multi-timbre receive
Inputs/Outputs PHONES jacks: Stereo standard jacks 2 Output impedance: 3 Output Voltage: 1.5V (RMS) MAX
Power: 12V DC USB port: TYPE B Pedal connector
Speakers 12cm 2 (Output 8W + 8W)
Power Requirements AC Adaptor: AD-A12150LW Auto Power Off: Approximately 4 hours after last operation. Auto Power Off can be disabled.
Power Consumption 12V = 18W
Dimensions Digital Piano and Stand: 137.7 (W) 43.2 (D) 84.0 (H) cm (54 1/4 17 33 1/8 inch)
Weight Digital Piano and Stand: approximately 39.5kg (87.1 lbs)
E-34
Reference
Be sure to read and observe the following operating precautions.
Location Avoid the following locations for this product. Areas exposed to direct sunlight and high humidity Areas subjected to temperature extremes Near a radio, TV, video deck, or tuner
The above devices will not cause malfunction of the product, but the product can cause interference in the audio or video of a nearby device.
User Maintenance Never use benzine, alcohol, thinner, or other
chemical agents to clean the product. To clean the product or its keyboard, wipe with a
soft cloth moistened in a weak solution of water and a mild neutral detergent. Wring all excess moisture from the cloth before wiping.
Included and Optional Accessories Use only accessories that are specified for use with this product. Use of unauthorized accessories creates the risk of fire, electric shock, and personal injury.
Weld Lines Lines may be visible on the exterior of the product. These are weld lines that result from the plastic molding process. They are not cracks or scratches.
Musical Instrument Etiquette Always be aware of others around you whenever using this product. Be especially careful when playing late at night to keep the volume at levels that do not disturb others. Other steps you can take when playing late at night are closing the window and using headphones.
Any reproduction of the contents of this manual, either in part or its entirety, is prohibited. Except for your own, personal use, any other use of the contents of this manual without the consent of CASIO is prohibited under copyright laws.
IN NO EVENT SHALL CASIO BE LIABLE FOR ANY DAMAGES WHATSOEVER (INCLUDING, WITHOUT LIMITATION, DAMAGES FOR LOSS OF PROFITS, BUSINESS INTERRUPTION, LOSS OF INFORMATION) ARISING OUT OF THE USE OF OR INABILITY TO USE THIS MANUAL OR PRODUCT, EVEN IF CASIO HAS BEEN ADVISED OF THE POSSIBILITY OF SUCH DAMAGES.
The contents of this manual are subject to change without notice.
AC Adaptor Handling Precautions Use a power outlet that is easily accessible so you
can unplug the AC adaptor when a malfunction occurs or whenever else you need to do so.
The AC adaptor is intended for indoor use only. Do not use it where it might be exposed to splashing or moisture. Do not place any container, such as a flower vase, that contains liquid on the AC adaptor.
Store the AC adaptor in a dry place. Use the AC adaptor in an open, well-ventilated area. Never cover the AC adaptor with newspaper, a table
cloth, a curtain, or any other similar item. Unplug the AC adaptor from the power outlet if you
do not plan to use the Digital Piano for a long time. Never try to repair the AC adaptor or modify it in
any way. AC adaptor operating environment
Temperature: 0 to 40C Humidity: 10% to 90% RH
Output polarity:
Operating Precautions
Reference
E-35
E n
g li
s h
AC Adaptor Handling Precautions
Model: AD-A12150LW 1. Read these instructions. 2. Keep these instructions on hand. 3. Heed all warnings. 4. Follow all instructions. 5. Do not use this product near water. 6. Clean only with a dry cloth. 7. Do not install near radiators, heat registers, stoves, or any other source of heat (including amplifiers). 8. Use only attachments and accessories specified by the manufacturer. 9. Refer all servicing to qualified service personnel. Servicing is required after any of the following occurs:
when the product is damaged, when the power supply cord or plug is damaged, when liquid is spilled into the product, when a foreign object falls into the product, when the product is exposed to rain or moisture, when the product does not operate normally, when the product is dropped.
10. Do not allow the product to be exposed to dripping or splashing liquid. Do not place any object containing liquid on the product.
11. Do not allow the electrical load output to exceed the label rating. 12. Make sure the surrounding area is dry before plugging into a power source. 13. Make sure the product is oriented correctly. 14. Unplug the product during lightning storms or when you do not plan to use it for a long time. 15. Do not allow product ventilation openings to become blocked. Install the product in accordance with the
manufacturers instructions. 16. Take care the power cord is located where it will not be stepped upon or bent severely, particularly in
locations close to plugs and convenience receptacles, and in locations where it exits from the product. 17. The AC adaptor should be plugged into a power outlet as close to the product as possible to allow
immediate disconnection of the plug in case of emergency.
The symbol below is an alert indicating un-insulated hazardous voltage inside the products enclosure, which may be sufficient to constitute the risk of electric shock to users.
The symbol below is an alert indicating the presence of important operating and maintenance (servicing) instructions in the documentation that accompanies the product.
*
A-1
Appendix/Apndice
Tone List/Lista de tonos
Tone Name/ Nombre de tonos
Program Change/ Cambio de programa
Bank Select MSB/ MSB de seleccin de
banco
GRAND PIANO CONCERT 0 0
GRAND PIANO MODERN 0 1
GRAND PIANO CLASSIC 0 2
GRAND PIANO MELLOW 0 3
GRAND PIANO BRIGHT 0 4
ELEC PIANO 4 0
FM E.PIANO 5 0
60S E.PIANO 4 1
HARPSICHORD 6 0
VIBRAPHONE 11 0
STRINGS 1 49 0
STRINGS 2 48 0
PIPE ORGAN 19 0
JAZZ ORGAN 17 0
ELEC ORGAN 1 16 0
ELEC ORGAN 2 16 1
BASS (LOWER) 1 32 0
BASS (LOWER) 2 32 1
Song List/Lista de canciones No./N Song Name/Nombre de canciones
01 Nocturne Op.9-2
02 Fantaisie-Impromptu Op.66
03 tude Op.10-3 Chanson de ladieu
04 tude Op.10-5 Black Keys
05 tude Op.10-12 Revolutionary
06 tude Op.25-9 Butterflies
07 Prlude Op.28-7
08 Valse Op.64-1 Petit Chien
09 Valse Op.64-2
10 Moments Musicaux 3
11 Impromptu Op.90-2
12 Marche Militaire 1 (Duet)
13 Frhlingslied [Lieder Ohne Worte Heft 5]
14 Frhlicher Landmann [Album fr die Jugend]
15 Von fremden Lndern und Menschen [Kinderszenen]
16 Trumerei [Kinderszenen]
17 Tambourin
18 Menuet BWV Anh.114 [Clavierbchlein der Anna Magdalena Bach]
19 Inventio 1 BWV 772
20 Inventio 8 BWV 779
21 Inventio 13 BWV 784
22 Praeludium 1 BWV 846 [Das Wohltemperierte Klavier 1]
23 Le Coucou
24 Gavotte
25 Sonatina Op.36-1 1st Mov.
26 Sonatine Op.20-1 1st Mov.
27 Sonate K.545 1st Mov.
28 Sonate K.331 3rd Mov. Turkish March
29 Rondo K.485
30 Fr Elise
31 Marcia alla Turca
32 Sonate Op.13 Pathtique 1st Mov.
33 Sonate Op.13 Pathtique 2nd Mov.
34 Sonate Op.13 Pathtique 3rd Mov.
35 Sonate Op.27-2 Moonlight 1st Mov.
36 Rhapsodie 2
37 Waltz Op.39-15 (Duet)
38 Liebestrume 3
39 Blumenlied
40 La Prire dune Vierge
41 Csikos Post
42 Humoresque Op.101-7
43 Melodie [Lyrische Stcke Heft 2]
44 Sicilienne Op.78
45 Berceuse [Dolly] (Duet)
46 Arabesque 1
47 La Fille aux Cheveux de Lin [Prludes]
48 Passepied [Suite bergamasque]
49 Gymnopdie 1
50 Je Te Veux
51 Salut dAmour
52 The Entertainer
53 Maple Leaf Rag
54 Larabesque [25 Etden Op.100]
55 La Styrienne [25 Etden Op.100]
56 Ave Maria [25 Etden Op.100]
57 Le retour [25 Etden Op.100]
58 La chevaleresque [25 Etden Op.100]
59 No.13 [tudes de Mcanisme Op.849]
60 No.26 [tudes de Mcanisme Op.849]
F u
n ct
io n
Tr an
sm it
te d
R ec
o g
n iz
ed R
em ar
ks
B as
ic
C h
an n
el 1
— 16
1 —
16 1
— 16
1 —
16 D
ef au
lt C
ha ng
ed
N o
te N
u m
b er
0 —
12 7
0 —
12 7
0 —
12 7*
1 Tr
ue v
oi ce
A ft
er
To u
ch
C o
n tr
o l
C h
an g
e
X X X O
P it
ch B
en d
er X
O
K ey
s C
h s
V el
o ci
ty O
9 nH
v =
1 —
1 27
X 8
nH v
= 6
4 O
9 nH
v =
1 —
1 27
X 9
nH v
= 0
, 8 nH
v = * *
N ot
e O
N N
ot e
O F
F
M o
d e
M od
e 3
X M
od e
3 X
D ef
au lt
M es
sa ge
s A
lte re
d
0, 32 1 5
6, 3
8 7 10 11 16 17 18 19 64 65
B an
k se
le ct
M od
ul at
io n
P or
ta m
en to
T im
e D
at a
en tr
y LS
B , M
S B * 2
V ol
um e
P an
E xp
re ss
io n
D S
P P
ar am
et er
0* 2
D S
P P
ar am
et er
1* 2
D S
P P
ar am
et er
2* 2
D S
P P
ar am
et er
3* 2
D am
pe r
P or
ta m
en to
S w
itc h
M o
d el
A P
-2 50
V er
si o
n :
1. 0
O O O O O O O O O O O O O
O X X X O X X X X X X O X
*1 :
D ep
en ds
o n
to ne
*1 :
D ep
en de
d el
to no
** :
no r
el at
io n
** :
si n
re la
ci n
M ID
I I m
p le
m en
ta ti
o n
C h
ar t
P ro
g ra
m C
h an
g e
O O
0 —
12 7
:T ru
e #
S ys
te m
E xc
lu si
ve O
O
S ys
te m
C
o m
m o
n X X X
X X X
: S on
g P
os : S
on g
S el
: T un
e
A u
x M
es sa
g es
R em
ar ks
S ys
te m
R
ea l T
im e
O O X X
: C lo
ck : C
om m
an ds
66 67 76 77 78 80 81 82 83 84 88 91 93 10
0, 1
01
S os
te nu
to S
of t p
ed al
V ib
ra to
r at
e V
ib ra
to d
ep th
V ib
ra to
d el
ay D
S P
P ar
am et
er 4*
2
D S
P P
ar am
et er
5* 2
D S
P P
ar am
et er
6* 2
D S
P P
ar am
et er
7* 2
P or
ta m
en to
C on
tr ol
H ig
h re
so lu
tio n
ve lo
ci ty
p re
fix * 3
R ev
er b
se nd
C ho
ru s
se nd
R P
N L
S B
, M S
B * 2
M od
e 1
: O M
N I O
N , P
O LY
M
od e
3 : O
M N
I O F
F, P
O LY
M od
e 2
: O M
N I O
N , M
O N
O
M od
e 4
: O M
N I O
F F,
M O
N O
O :
Y es
X :
N o
O O O O O O O O O O O O O O
O O X X X X X X X X O X O X
* 2
X O X O X X
O O X O O X
: A ll
so un
d of
f : R
es et
a ll
co nt
ro lle
r : L
oc al
O N
/O F
F : A
ll no
te s
O F
F : A
ct iv
e S
en se
: R es
et
*2 :F
or d
et ai
ls , s
ee M
ID I I
m pl
em en
ta tio
n at
h ttp
:// w
or ld
.c as
io .c
om /.
*2 :S
i d es
ea m
s in
fo rm
ac i
n, v
ea Im
pl em
en ta
ci n
M ID
I e n
ht tp
:// w
or ld
.c as
io .c
Manualsnet FAQs
If you want to find out how the Celviano Casio works, you can view and download the Casio Celviano AP250 Keyboard User’s Guide on the Manualsnet website.
Yes, we have the User’s Guide for Casio Celviano as well as other Casio manuals. All you need to do is to use our search bar and find the user manual that you are looking for.
The User’s Guide should include all the details that are needed to use a Casio Celviano. Full manuals and user guide PDFs can be downloaded from Manualsnet.com.
The best way to navigate the Casio Celviano AP250 Keyboard User’s Guide is by checking the Table of Contents at the top of the page where available. This allows you to navigate a manual by jumping to the section you are looking for.
This Casio Celviano AP250 Keyboard User’s Guide consists of sections like Table of Contents, to name a few. For easier navigation, use the Table of Contents in the upper left corner.
You can download Casio Celviano AP250 Keyboard User’s Guide free of charge simply by clicking the “download” button in the upper right corner of any manuals page. This feature allows you to download any manual in a couple of seconds and is generally in PDF format. You can also save a manual for later by adding it to your saved documents in the user profile.
To be able to print Casio Celviano AP250 Keyboard User’s Guide, simply download the document to your computer. Once downloaded, open the PDF file and print the Casio Celviano AP250 Keyboard User’s Guide as you would any other document. This can usually be achieved by clicking on “File” and then “Print” from the menu bar.
Просмотр
Доступно к просмотру 41 страница. Рекомендуем вам скачать файл инструкции, поскольку онлайн просмотр документа может сильно отличаться от оригинала.
-
AP250_r_Cover1-4.fm  Page 1  Friday, June 1, 2012  3:57 PM
R
AP-250
ИНСТРУКЦИЯ ПО ЭКСПЛУАТАЦИИ
Сохраните всю информацию, чтобы обращаться к ней в будущем.
Правила безопасности
Данный знак утилизации означает, что упаковка
Перед тем как приступать к эксплуатации
соответствует экологическому законодательству Германии.
пианино, прочитайте брошюру «Правила
безопасности».
C  MA1206-A  Printed in China
AP250-RU-1A
-
AP250_r_Cover1-4.fm  Page 2  Friday, June 1, 2012  3:57 PM
Внимание!
Прежде чем приступать к эксплуатации данного изделия, ознакомьтесь со следующей важной информацией.
•Прежде чем приступать к эксплуатации адаптера переменного тока AD-A12150LW для подачи питания на инструмент, проверить
адаптер на предмет повреждений. Сетевой шнур тщательно проверить на предмет разрывов, порезов, оголения провода, других
серьезных повреждений. Если адаптер серьезно поврежден, не давать его детям.
•Изделие не предназначено для детей в возрасте до 3 лет.
• Применять только адаптер CASIO AD-A12150LW.
•Адаптер переменного тока — не игрушка!
•Перед протиранием изделия отсоединять от него адаптер переменного тока.
Version : 1.0                                                                                                                                                             O : Yes  X : No
Remarks                                                                                High resolution velocity prefix *3
Bank select  Modulation  Portamento Time Data entry LSB, MSB *2  Volume  Pan  Expression  DSP Parameter0 *2  DSP Parameter1 *2  DSP Parameter2 *2  DSP Parameter3 *2  Damper  Portamento Switch  Sostenuto  Soft pedal  Vibrato rate  Vibrato depth  Vibrato delay  DSP Parameter4 *2  DSP Parameter5 *2  DSP Parameter6 *2  DSP Parameter7 *2  Portamento Control  Reverb send  Chorus send  RPN LSB, MSB *2  *2
Recognized  1 - 16  1 - 16  Mode 3  X  0 - 127  0 - 127*1  O 9nH v = 1 - 127 X 9nH v = 0, 8nH v =**  X  O  O  O  O  O  O  O  O  O  O  O  O  O  O  O  O  O  O  O  O  O  O  O  O  O  O  O  O  O  O  0 - 127  O  X  X  X  X  X  O  O  X  O  O  X *2.Для получения подробной информации см. информацию по внедрению MIDI по адресу http://world.casio.com/.
Transmitted  1 - 16  1 - 16  Mode 3  X  0 - 127  O 9nH v = 1 - 127  X 8nH v = 64  X  X  X  O  X  X  X  O  X  X  X  X  X  X  O  X  O  O  X  X  X  X  X  X  X  X  O  X  O  X  O  O  X  X  X  O  O  X  O  X  O  X  X  *3.Только для события «Note on»  Mode 2 : OMNI ON, MONO  Mode 4 : OMNI OFF , MONO
0,32  1  5  6, 38  7  10  11  16  17  18  19  64  65  66  67  76  77  78  80  81  82  83  84  88  91  93  100, 101
Default   Changed  Default  Messages  Altered  True voice  Note ON  Note OFF  Key’s  Ch’s  :True #     : Song Pos  : Song Sel  : Tune  : Clock  : Commands  : All sound off  : Reset all controller  : Local ON/OFF  : All notes OFF  : Active Sense  : Reset
Function                                                                                                                                                      Mode 1 : OMNI ON, POLY  Mode 3 : OMNI OFF, POLY
Model  AP-250      Basic   Channel  Mode  Note  Number  Velocity  After   Touch  Pitch Bender  Control  Change  Program  Change  System Exclusive  System   Common  System   Real Time  Aux   Messages  Remarks
Декларация о соответствии согласно Директиве ЕС
Manufacturer:
CASIO COMPUTER CO.,LTD.
6-2, Hon-machi 1-chome, Shibuya-ku, Tokyo 151-8543, Japan
Responsible within the European Union:
CASIO EUROPE GmbH
Casio-Platz 1, 22848 Norderstedt, Germany
-
AP250_r.book  Page 1  Friday, June 1, 2012  3:58 PM
Содержание
Сборка стойки..........................................................................................................R-29
Распаковка.............................................................. R-29  Как подсоединить шнур педали ............................R-31
Как собрать стойку................................................. R-29  Как установить пюпитр ..........................................R-31
Общие указания .............................. R-2    Задание показателей настройки
Кнопка «FUNCTION»................................................ R-3  с помощью клавиатуры...............R-20
Сохранение настройки и применение                    Как задавать показатели настройки с помощью
блокировки органов управления ............................ R-3  клавиатуры..............................................................R-20
Клавиши клавиатуры, используемые
Сетевая розетка.............................. R-4       для задания показателей настройки....................R-21
Перечень параметров.............................................R-22
Пользование адаптером переменного тока........... R-4
Выбор тембра.......................................................R-22
Включение и выключение инструмента................. R-5  Pеверберация ......................................................R-22
Хорус.....................................................................R-22
Подключения .................................. R-6        Яркость.................................................................R-22
Баланс сдвоенного тембра.................................R-22
Подключение наушников......................................... R-6  Темп (TEMPO)......................................................R-22
Подключение аудиоаппаратуры, усилителя ......... R-6   Выбор композиции (SONG SELECT)..................R-22
Принадлежности из комплекта изделия и                  Громкость композиции........................................R-22
Задаваемый метрономом размер
продаваемые отдельно............................................ R-7
(METRONOME BEAT) ..........................................R-22
Громкость метронома..........................................R-22
Игра с применением разных                                 Тональность (транспониро-вание) .....................R-23
тембров............................................. R-8  Настройка клавиатуры .......................................R-23
Октавный сдвиг ...................................................R-23
Выбор и воспроизведение тембра.......................... R-8  Темперация ..........................................................R-23
Наложение двух тембров ...................................... R-10  Выбор темперации...............................................R-23
Основной звук темперации ................................R-23
Применение эффектов .......................................... R-11
Динамическая чувствитель-ность клавиатуры
Пользование педалями цифрового пианино ....... R-11    (TOUCH RESPONSE)...........................................R-23
Работа с метрономом............................................. R-12  Режим «USB-устройство»...................................R-24
Канал передачи данных......................................R-24
Игра дуэтом............................................................. R-13
Встроенный источник звука ...............................R-24
Рабочий сигнал ....................................................R-24
Воспроизведение встроенных                                Сохранение показателей настройки .................R-24
композиций.................................... R-14       Блокировка органов управления.......................R-24
Воспроизведение всех встроенных                   Подключение к компьютеру....... R-25
композиций.............................................................. R-14
Минимальные требования к компьютерной
Воспроизведение определенной композиции из           системе ....................................................................R-25
фонотеки................................................................. R-15  Подключение цифрового пианино
Занятия с помощью композиции из фонотеки .... R-15   к компьютеру...........................................................R-25
Работа с MIDI...........................................................R-26
Запись и воспроизведение......... R-16                  Перенос композиций с помощью компьютера .....R-26
Дорожки................................................................... R-16
Справочная информация............ R-32
Как записать определенную дорожку
Поиск и устранение неисправностей....................R-32
композиции.............................................................. R-17
Технические характеристики изделия .................R-33
Как выполнить запись на одну дорожку
Правила безопасности ...........................................R-34
композиции, слушая другую дорожку .................. R-18
Воспроизведение материала из памяти               Приложение..................................... A-1
цифрового пианино ................................................ R-18
Перечень тембров.....................................................A-1
Удаление записанного материала........................ R-19  Список композиций...................................................A-1
MIDI Implementation Chart
Упоминаемые в данной инструкции названия
компаний и наименования изделий могут являться
зарегистрированными торговыми марками других
компаний.
R-1
- 1
- 2
- 3
- 4
- 41