
-
Драйверы
5
-
Инструкции по эксплуатации
17
Языки:

HP OfficeJet Pro 7720 инструкция по эксплуатации
(193 страницы)
- Языки:Русский
-
Тип:
PDF -
Размер:
3.12 MB
Просмотр

HP OfficeJet Pro 7720 инструкция по эксплуатации
(177 страниц)
- Языки:Английский
-
Тип:
PDF -
Размер:
2.79 MB
Просмотр

HP OfficeJet Pro 7720 инструкция по эксплуатации
(184 страницы)
- Языки:Словенский
-
Тип:
PDF -
Размер:
2.84 MB
Просмотр

HP OfficeJet Pro 7720 инструкция по эксплуатации
(196 страниц)
- Языки:Греческий
-
Тип:
PDF -
Размер:
3.13 MB
Просмотр

HP OfficeJet Pro 7720 инструкция по эксплуатации
(181 страница)
- Языки:Эстонский
-
Тип:
PDF -
Размер:
2.82 MB
Просмотр

HP OfficeJet Pro 7720 инструкция по эксплуатации
(192 страницы)
- Языки:Тайский
-
Тип:
PDF -
Размер:
3.71 MB
Просмотр

HP OfficeJet Pro 7720 инструкция по эксплуатации
(189 страниц)
- Языки:Испанский
-
Тип:
PDF -
Размер:
2.85 MB
Просмотр

HP OfficeJet Pro 7720 инструкция по эксплуатации
(188 страниц)
- Языки:Португальский
-
Тип:
PDF -
Размер:
2.86 MB
Просмотр

HP OfficeJet Pro 7720 инструкция по эксплуатации
(192 страницы)
- Языки:Французский
-
Тип:
PDF -
Размер:
2.9 MB
Просмотр

HP OfficeJet Pro 7720 инструкция по эксплуатации
(189 страниц)
- Языки:Румынский
-
Тип:
PDF -
Размер:
3.18 MB
Просмотр

HP OfficeJet Pro 7720 инструкция по эксплуатации
(194 страницы)
- Языки:Немецкий
-
Тип:
PDF -
Размер:
2.87 MB
Просмотр

HP OfficeJet Pro 7720 инструкция по эксплуатации
(191 страница)
- Языки:Японский
-
Тип:
PDF -
Размер:
3.18 MB
Просмотр

HP OfficeJet Pro 7720 инструкция по эксплуатации
(189 страниц)
- Языки:Итальянский
-
Тип:
PDF -
Размер:
2.87 MB
Просмотр

HP OfficeJet Pro 7720 инструкция по эксплуатации
(187 страниц)
- Языки:Нидерландский
-
Тип:
PDF -
Размер:
2.84 MB
Просмотр

HP OfficeJet Pro 7720 инструкция по эксплуатации
(181 страница)
- Языки:Датский
-
Тип:
PDF -
Размер:
2.83 MB
Просмотр

HP OfficeJet Pro 7720 инструкция по эксплуатации
(188 страниц)
- Языки:Польский
-
Тип:
PDF -
Размер:
2.87 MB
Просмотр

HP OfficeJet Pro 7720 инструкция по эксплуатации
(177 страниц)
- Языки:Корейский
-
Тип:
PDF -
Размер:
3.17 MB
Просмотр
На NoDevice можно скачать инструкцию по эксплуатации для HP OfficeJet Pro 7720. Руководство пользователя необходимо для ознакомления с правилами установки и эксплуатации HP OfficeJet Pro 7720. Инструкции по использованию помогут правильно настроить HP OfficeJet Pro 7720, исправить ошибки и выявить неполадки.


HP OiceJet Pro 7720 Wide Format All-in-
One series
User Guide

Copyright information
© Copyright 2018 HP Development Company,
L.P.
HP Company notices
The information contained in this document is
subject to change without notice.
All rights reserved. Reproduction, adaptation,
or translation of this material is prohibited
without prior written permission of HP, except
as allowed under copyright laws.
The only warranties for HP products and
services are set forth in the express warranty
statements accompanying such products and
services. Nothing herein should be construed
as constituting an additional warranty. HP shall
not be liable for technical or editorial errors or
omissions contained herein.
Acknowledgements
Microsoft and Windows are either registered
trademarks or trademarks of Microsoft
Corporation in the United States and/or other
countries.
ENERGY STAR and the ENERGY STAR mark are
registered trademarks owned by the U.S.
Environmental Protection Agency.
Mac, OS X, and AirPrint are trademarks of Apple
Inc., registered in the U.S. and other countries.

Safety information
Always follow basic safety precautions when
using this product to reduce risk of injury from
re or electric shock.
— Read and understand all instructions in the
documentation that comes with the printer.
— Observe all warnings and instructions marked
on the product.
— Unplug this product from wall outlets before
cleaning.
— Do not install or use this product near water,
or when you are wet.
— Install the product securely on a stable
surface.
— Install the product in a protected location
where no one can step on or trip over the line
cord, and the line cord cannot be damaged.
— If the product does not operate normally, see
Solve a problem.
— There are no user-serviceable parts inside.
Refer servicing to qualied service personnel.


Table of contents
1 How do I? …………………………………………………………………………………………………………………………………… 1
2 Get started …………………………………………………………………………………………………………………………………. 2
Accessibility ………………………………………………………………………………………………………………………………………… 2
HP EcoSolutions (HP and the Environment) ……………………………………………………………………………………………. 2
Manage power ……………………………………………………………………………………………………………………. 3
Quiet Mode …………………………………………………………………………………………………………………………. 4
Optimize Printing Supplies …………………………………………………………………………………………………… 5
Understand the printer parts ………………………………………………………………………………………………………………… 5
Top and front view ………………………………………………………………………………………………………………. 6
Printing supplies area ………………………………………………………………………………………………………….. 6
Back view …………………………………………………………………………………………………………………………… 7
Use the printer control panel ………………………………………………………………………………………………………………… 7
Lift the control panel …………………………………………………………………………………………………………… 7
Overview of buttons and lights …………………………………………………………………………………………….. 8
Control panel display icons ………………………………………………………………………………………………….. 9
Change printer settings ……………………………………………………………………………………………………… 10
Dashboard ……………………………………………………………………………………………………………………….. 10
Paper basics ……………………………………………………………………………………………………………………………………… 11
Recommended papers for printing ……………………………………………………………………………………… 11
Order HP paper supplies ……………………………………………………………………………………………………. 12
Tips for selecting and using paper ………………………………………………………………………………………. 12
Load paper ……………………………………………………………………………………………………………………………………….. 13
Load an original on the scanner glass ………………………………………………………………………………………………….. 25
Load an original in the document feeder ……………………………………………………………………………………………… 25
Update the printer …………………………………………………………………………………………………………………………….. 26
Open the HP printer software (Windows) ……………………………………………………………………………………………… 27
Use the HP Smart app to print, scan, and troubleshoot from an iOS, Android, or Windows 10 device …………. 27
Turn the printer o ……………………………………………………………………………………………………………………………. 28
3 Print ……………………………………………………………………………………………………………………………………….. 29
Print documents ……………………………………………………………………………………………………………………………….. 29
Print brochures …………………………………………………………………………………………………………………………………. 30
Print on envelopes …………………………………………………………………………………………………………………………….. 31
Print photos ……………………………………………………………………………………………………………………………………… 32
Print on special and custom-size paper ……………………………………………………………………………………………….. 33
ENWW v

Print on both sides (duplexing) …………………………………………………………………………………………………………… 35
Print using the HP Smart app ……………………………………………………………………………………………………………… 36
Print with mobile devices …………………………………………………………………………………………………………………… 36
Print from mobile devices ………………………………………………………………………………………………….. 36
Tips for successful printing ………………………………………………………………………………………………………………… 37
4 Copy and scan ……………………………………………………………………………………………………………………………. 40
Copy ………………………………………………………………………………………………………………………………………………… 40
Scan …………………………………………………………………………………………………………………………………………………. 40
Scan to a computer ……………………………………………………………………………………………………………. 41
Scan to email ……………………………………………………………………………………………………………………. 42
Set up Scan to Email …………………………………………………………………………………………. 42
Scan a document or photo to email …………………………………………………………………….. 43
Change account settings ……………………………………………………………………………………. 43
Scan using HP Smart …………………………………………………………………………………………………………. 44
Scan from a Windows 10 device …………………………………………………………………………. 44
Scan from an Android or iOS device …………………………………………………………………….. 45
Scan using Webscan ………………………………………………………………………………………………………….. 46
Scanning documents as editable text ………………………………………………………………………………….. 46
Scan documents as editable text ……………………………………………………………………….. 46
Guidelines for scanning documents as editable text …………………………………………….. 47
Create a new scan shortcut (Windows) ………………………………………………………………………………… 48
Change scan settings (Windows) ………………………………………………………………………………………… 48
Tips for copy and scan success ……………………………………………………………………………………………………………. 49
5 Fax …………………………………………………………………………………………………………………………………………. 50
Send a fax ………………………………………………………………………………………………………………………………………… 50
Send a standard fax ………………………………………………………………………………………………………….. 50
Send a standard fax from the computer ………………………………………………………………………………. 51
Send a fax from a phone ……………………………………………………………………………………………………. 52
Send a fax using monitor dialing ………………………………………………………………………………………… 52
Send a fax using printer memory ………………………………………………………………………………………… 53
Send a fax to multiple recipients ………………………………………………………………………………………… 53
Send a fax in Error Correction Mode ……………………………………………………………………………………. 54
Receive a fax …………………………………………………………………………………………………………………………………….. 54
Receive a fax manually ………………………………………………………………………………………………………. 55
Set up backup fax ……………………………………………………………………………………………………………… 55
Reprint received faxes from memory ………………………………………………………………………………….. 56
Forward faxes to another number ………………………………………………………………………………………. 56
Set automatic reduction for incoming faxes ………………………………………………………………………… 57
Block unwanted fax numbers …………………………………………………………………………………………….. 57
vi ENWW

Set up phone book contacts ……………………………………………………………………………………………………………….. 58
Create and edit a phone book contact …………………………………………………………………………………. 58
Create and edit a group phone book contact ………………………………………………………………………… 59
Delete phone book contacts ………………………………………………………………………………………………. 59
Change fax settings …………………………………………………………………………………………………………………………… 60
Congure the fax header ……………………………………………………………………………………………………. 60
Set the answer mode (Auto answer) ……………………………………………………………………………………. 60
Set the number of rings before answering …………………………………………………………………………… 61
Change the answer ring pattern for distinctive ring ………………………………………………………………. 61
Set the dial type ……………………………………………………………………………………………………………….. 62
Set the redial options ………………………………………………………………………………………………………… 62
Set the fax speed ………………………………………………………………………………………………………………. 63
Set the fax sound volume ………………………………………………………………………………………………….. 63
Fax and digital phone services ……………………………………………………………………………………………………………. 63
Fax on Voice over Internet Protocol …………………………………………………………………………………………………….. 64
Use reports ………………………………………………………………………………………………………………………………………. 64
Print fax conrmation reports ……………………………………………………………………………………………. 65
Print fax error reports ……………………………………………………………………………………………………….. 65
Print and view the fax log ………………………………………………………………………………………………….. 66
Clear the fax log ……………………………………………………………………………………………………………….. 66
Print the details of the last fax transaction ………………………………………………………………………….. 66
Print a Caller ID Report ………………………………………………………………………………………………………. 66
View the Call History …………………………………………………………………………………………………………. 67
Additional fax setup ………………………………………………………………………………………………………………………….. 67
Set up faxing (parallel phone systems) ……………………………………………………………………………….. 67
Select the correct fax setup for your home or oice …………………………………………….. 68
Case A: Separate fax line (no voice calls received) ………………………………………………… 70
Case B: Set up the printer with DSL …………………………………………………………………….. 71
Case C: Set up the printer with a PBX phone system or an ISDN line ……………………….. 72
Case D: Fax with a distinctive ring service on the same line …………………………………… 72
Case E: Shared voice/fax line ……………………………………………………………………………… 73
Case F: Shared voice/fax line with voice mail ……………………………………………………….. 75
Case G: Fax line shared with computer modem (no voice calls received) …………………. 75
Set up the printer with a computer dial-up modem ……………………………… 76
Set up the printer with a computer DSL/ADSL modem ………………………….. 77
Case H: Shared voice/fax line with computer modem …………………………………………… 78
Shared voice/fax with computer dial-up modem …………………………………. 78
Shared voice/fax with computer DSL/ADSL modem ……………………………… 79
Case I: Shared voice/fax line with answering machine ………………………………………….. 81
Case J: Shared voice/fax line with computer modem and answering machine …………. 82
ENWW vii

Shared voice/fax line with computer dial-up modem and answering
machine ………………………………………………………………………………………….. 82
Shared voice/fax line with computer DSL/ADSL modem and answering
machine ………………………………………………………………………………………….. 84
Case K: Shared voice/fax line with computer dial-up modem and voice mail …………… 85
Test fax setup …………………………………………………………………………………………………………………… 87
6 Web Services …………………………………………………………………………………………………………………………….. 88
What are Web Services? ……………………………………………………………………………………………………………………… 88
Set up Web Services …………………………………………………………………………………………………………………………… 88
Use Web Services ………………………………………………………………………………………………………………………………. 89
HP ePrint ………………………………………………………………………………………………………………………….. 90
Print apps ………………………………………………………………………………………………………………………… 90
Remove Web Services ………………………………………………………………………………………………………………………… 91
7 Work with cartridges ………………………………………………………………………………………………………………….. 92
Information on cartridges and the printhead ……………………………………………………………………………………….. 92
Check the estimated ink levels ……………………………………………………………………………………………………………. 93
Replace the cartridges ……………………………………………………………………………………………………………………….. 93
Order cartridges ………………………………………………………………………………………………………………………………… 94
Store printing supplies ………………………………………………………………………………………………………………………. 95
Anonymous usage information storage ……………………………………………………………………………………………….. 95
Cartridge warranty information ………………………………………………………………………………………………………….. 96
8 Network setup …………………………………………………………………………………………………………………………… 97
Set up the printer for wireless communication ……………………………………………………………………………………… 97
Before you begin ………………………………………………………………………………………………………………. 97
Set up the printer on your wireless network ………………………………………………………………………… 98
Connect your printer by using the HP Smart app ………………………………………………………………….. 98
Change the connection type ………………………………………………………………………………………………. 98
Test the wireless connection …………………………………………………………………………………………….. 100
Turn on or o the wireless capability of the printer …………………………………………………………….. 100
Change network settings …………………………………………………………………………………………………………………. 100
Use Wi-Fi Direct ………………………………………………………………………………………………………………………………. 102
9 Printer management tools ………………………………………………………………………………………………………….. 105
Toolbox (Windows) ………………………………………………………………………………………………………………………….. 105
HP Utility (OS X and macOS) ……………………………………………………………………………………………………………… 105
Embedded web server ……………………………………………………………………………………………………………………… 105
About cookies …………………………………………………………………………………………………………………. 106
viii ENWW

Open the embedded web server ……………………………………………………………………………………….. 106
Embedded web server cannot be opened ………………………………………………………………………….. 107
10 Solve a problem ……………………………………………………………………………………………………………………… 108
Jams and paper-feed issues ……………………………………………………………………………………………………………… 108
Clear a paper jam …………………………………………………………………………………………………………….. 108
Read general instructions in the Help for clearing paper jams ……………………………… 109
Clear a print carriage jam …………………………………………………………………………………………………. 113
Read general instructions in the Help for clearing a print carriage jams ……………….. 113
Learn how to avoid paper jams …………………………………………………………………………………………. 113
Solve paper-feed problems ………………………………………………………………………………………………. 114
Printing issues ………………………………………………………………………………………………………………………………… 114
Fix problems with page not printing (unable to print) …………………………………………………………. 114
Read general instructions in the Help for unable to print issues ………………………….. 115
Fix print quality issues …………………………………………………………………………………………………….. 119
Read general instructions in the Help for resolving print quality issues ………………… 119
Copy issues …………………………………………………………………………………………………………………………………….. 122
Scan issues …………………………………………………………………………………………………………………………………….. 122
Fax issues ……………………………………………………………………………………………………………………………………….. 122
Run the fax test ………………………………………………………………………………………………………………. 123
What to do if the fax test failed ………………………………………………………………………………………… 123
Troubleshoot fax problems ………………………………………………………………………………………………. 127
Read general instructions in the Help for specic fax problems …………………………………………… 127
The display always shows Phone O Hook ………………………………………………………… 127
The printer is having problems sending and receiving faxes ……………………………….. 127
The printer cannot receive faxes, but can send faxes ………………………………………….. 129
The printer cannot send faxes, but can receive faxes ………………………………………….. 130
Fax tones are recorded on my answering machine ……………………………………………… 130
The computer cannot receive faxes (HP Digital Fax) …………………………………………… 130
Network and connection issues ………………………………………………………………………………………………………… 130
Fix wireless connection ……………………………………………………………………………………………………. 131
Find network settings for wireless connection …………………………………………………………………… 131
Fix Wi-Fi Direct connection ………………………………………………………………………………………………. 131
Fix Ethernet connection …………………………………………………………………………………………………… 132
Printer hardware issues ……………………………………………………………………………………………………………………. 132
Get help from the printer control panel ……………………………………………………………………………………………… 133
Get help from the HP Smart app ……………………………………………………………………………………………………….. 133
Understand printer reports ………………………………………………………………………………………………………………. 133
Printer status report ……………………………………………………………………………………………………….. 133
Network conguration page …………………………………………………………………………………………….. 134
Print quality report ………………………………………………………………………………………………………….. 134
ENWW ix

Wireless test report …………………………………………………………………………………………………………. 134
Web access test report …………………………………………………………………………………………………….. 134
Solve problems using Web Services …………………………………………………………………………………………………… 134
Maintain the printer …………………………………………………………………………………………………………………………. 135
Clean the scanner glass …………………………………………………………………………………………………… 135
Clean the exterior ……………………………………………………………………………………………………………. 136
Clean the document feeder ………………………………………………………………………………………………. 136
Maintain the printhead and cartridges ………………………………………………………………………………. 137
Restore original factory defaults and settings ……………………………………………………………………………………. 138
HP support ……………………………………………………………………………………………………………………………………… 139
Appendix A Technical information ………………………………………………………………………………………………….. 141
Specications ………………………………………………………………………………………………………………………………….. 141
Regulatory notices …………………………………………………………………………………………………………………………… 143
Regulatory model identication number …………………………………………………………………………… 144
FCC statement ………………………………………………………………………………………………………………… 144
Noise emission statement for Germany …………………………………………………………………………….. 144
European Union Regulatory Notice ……………………………………………………………………………………. 144
Products with wireless functionality …………………………………………………………………. 145
Declaration of conformity ………………………………………………………………………………………………… 146
Visual display workplaces statement for Germany ……………………………………………………………… 147
Notice to users of the U.S. telephone network: FCC requirements ………………………………………… 148
Notice to users of the Canadian telephone network ……………………………………………………………. 149
Notice to users of the German telephone network ……………………………………………………………… 149
Australia wired fax statement ………………………………………………………………………………………….. 149
Regulatory information for wireless products ……………………………………………………………………. 150
Exposure to radio frequency radiation ………………………………………………………………. 150
Notice to users in Brazil …………………………………………………………………………………… 150
Notice to users in Canada ………………………………………………………………………………… 150
Notice to users in Taiwan …………………………………………………………………………………. 151
Notice to users in Mexico …………………………………………………………………………………. 151
Environmental product stewardship program …………………………………………………………………………………….. 151
Eco-Tips …………………………………………………………………………………………………………………………. 152
European Union Commission Regulation 1275/2008 ………………………………………………………….. 152
Paper …………………………………………………………………………………………………………………………….. 152
Plastics ………………………………………………………………………………………………………………………….. 152
Safety data sheets ………………………………………………………………………………………………………….. 152
Recycling program ………………………………………………………………………………………………………….. 152
HP inkjet supplies recycling program ………………………………………………………………………………… 153
Power consumption ………………………………………………………………………………………………………… 153
Disposal of waste equipment by users ………………………………………………………………………………. 153
x ENWW

Waste disposal for Brazil …………………………………………………………………………………………………. 153
Chemical substances ……………………………………………………………………………………………………….. 154
Declaration of the Presence Condition of the Restricted Substances Marking (Taiwan) …………… 155
The Table of Hazardous Substances/Elements and their Content (China) ……………………………… 156
Restriction of hazardous substance (Ukraine) ……………………………………………………………………. 156
Restriction of hazardous substance (India) ………………………………………………………………………… 156
Restriction on hazardous substances statement (Turkey) …………………………………………………… 157
EPEAT …………………………………………………………………………………………………………………………….. 157
SEPA Ecolabel User Information (China) …………………………………………………………………………….. 157
China Energy Label for Printer, Fax and Copier ……………………………………………………………………. 157
Battery disposal in Taiwan ……………………………………………………………………………………………….. 158
European Union Battery Directive …………………………………………………………………………………….. 158
Battery notice for Brazil …………………………………………………………………………………………………… 158
California Perchlorate Material Notice ……………………………………………………………………………….. 158
Index ……………………………………………………………………………………………………………………………………….. 159
ENWW xi

xii ENWW

1 How do I?
● Get started
●
Copy and scan
● Fax
● Web Services
● Work with cartridges
● Network setup
● Printer management tools
● Solve a problem
ENWW 1

2 Get started
This guide provides details about how to use the printer and how to resolve problems.
●
Accessibility
●
HP EcoSolutions (HP and the Environment)
●
Understand the printer parts
●
Use the printer control panel
●
Paper basics
●
Load paper
●
Load an original on the scanner glass
●
Load an original in the document feeder
●
Update the printer
●
Open the HP printer software (Windows)
●
Use the HP Smart app to print, scan, and troubleshoot from an iOS, Android, or Windows 10 device
●
Turn the printer o
Accessibility
The printer provides a number of features that make it accessible for people with disabilities.
● Visual
The HP software is accessible for users with visual impairments or low vision by using your operating
system’s accessibility options and features. The software also supports most assistive technology such
as screen readers, Braille readers, and voice-to-text applications. For users who are color blind, colored
buttons and tabs used in the HP software have simple text or icon labels that convey the appropriate
action.
● Mobility
For users with mobility impairments, the HP software functions can be executed through keyboard
commands. The HP software also supports Windows accessibility options such as StickyKeys,
ToggleKeys, FilterKeys, and MouseKeys. The printer doors, buttons, paper trays, and paper-width guides
can be operated by users with limited strength and reach.
For more information about accessibility solutions for HP products, visit the HP Accessibility and Aging
website (www.hp.com/accessibility).
For accessibility information for OS X, visit the Apple website at www.apple.com/accessibility.
HP EcoSolutions (HP and the Environment)
HP is committed to helping you optimize your environmental footprint and empowering you to print
responsibly—at home or in the oice.
2 Chapter 2 Get started ENWW

For more detailed information about environmental guidelines that HP follows during the manufacturing
process, see Environmental product stewardship program. For more information about HP’s environmental
initiatives, visit www.hp.com/ecosolutions.
●
Manage power
●
Quiet Mode
●
Optimize Printing Supplies
Manage power
Use Sleep Mode, Auto-O and Schedule Printer On/O to conserve electricity.
Sleep mode
Power usage is reduced while in Sleep mode. After initial setup of printer, the printer will enter Sleep mode
after ve minutes of inactivity.
Use the following instructions to change the period of inactivity before the printer sleeps.
1. From the printer control panel, touch or swipe down the tab at the top of the screen to open the
Dashboard, touch .
2. Touch Sleep Mode, and then touch the desired option.
Auto-O
This feature turns the printer o after 8 hours of inactivity to help reduce energy use. Auto-O turns the
printer o completely, so you must use the Power button to turn on the printer again.
If your printer supports this energy saving feature, Auto-O is automatically enabled or disabled depending
on printer capabilities and connection options. Even when Auto-O is disabled, the printer enters Sleep mode
after 5 minutes of inactivity to help reduce energy use.
● Auto-O is enabled when the printer is turned on, if the printer does not have network, fax or Wi-Fi
Direct capability, or is not using these capabilities.
● Auto-O is disabled when a printer’s wireless or Wi-Fi Direct capability is turned on or when a printer
with fax, USB, or Ethernet network capability establishes a fax, USB, or Ethernet network connection.
Schedule On and O
Use this feature to automatically turn the printer on or o on selected days. For example, you can schedule
the printer to turn on at 8 a.m. and turn o at 8 p.m. from Monday to Friday. In this way, you save energy
during the night and weekends.
Use the following instructions to schedule the day and time for On and O.
1. From the printer control panel, touch or swipe down the tab at the top of the screen to open the
Dashboard, touch .
2. Touch Schedule Printer On/O.
3. You can touch Schecule On/O to get to the time settings after setting one of these to ON.
4. Touch the desired option, and follow the onscreen messages to set the day and time to turn the printer
o and on.
ENWW HP EcoSolutions (HP and the Environment) 3

CAUTION: Always turn the printer o properly, using either Schedule O or (the Power button) located
on the front left side of the printer.
If you improperly turn the printer o, the print carriage might not return to the correct position, causing
problems with the cartridges and print quality issues.
Never turn o the printer when cartridges are missing. HP recommends that you replace any missing
cartridges as soon as possible to avoid print quality issues, possible extra ink usage from the remaining
cartridges, or damage to the ink system.
Quiet Mode
Quiet Mode slows down printing to reduce overall noise without aecting print quality. It only works when
printing on plain paper. Additionally, Quiet Mode is disabled if you are printing using the best or presentation
print quality. To reduce printing noise, turn on Quiet Mode. To print at normal speed, turn Quiet Mode o.
Quiet Mode is o by default.
NOTE: Quiet Mode does not work if you print photos or envelopes.
You can create a schedule by selecting the time when the printer prints in Quiet Mode. For example, you can
schedule the printer to be in Quiet Mode from 10 p.m. to 8 a.m. everyday.
To turn on Quiet Mode from the printer control panel
1. From the printer control panel, touch or swipe down the tab at the top of the screen to open the
Dashboard, and then touch ( Setup ).
2. Touch Quiet Mode .
3. Touch the toggle button next to Quiet Mode to turn it on.
To create a schedule for Quiet Mode from the printer control panel
1. From the printer control panel, touch or swipe down the tab at the top of the screen to open the
Dashboard, and then touch ( Setup ).
2. Touch Quiet Mode .
3. Turn on Quiet Mode .
4. Touch the toggle button next to Schedule to turn it on, and then change the start time and end time of
the schedule.
To turn on Quiet Mode while the printer is printing
1. From the printer control panel, touch or swipe down the tab at the top of the screen to open the
Dashboard, and then select the current print job in progress.
2. On the printing screen, touch (Quiet Mode) to turn it on.
NOTE: Quiet Mode is turned on only after the current page is printed and is only used for the current print
job.
To turn Quiet Mode on or o from the printer software (Windows)
1. Open the HP printer software. For more information, see Open the HP printer software (Windows).
2. Click Quiet Mode .
4 Chapter 2 Get started ENWW

3. Select On or O .
4. Click Save Setting.
To turn Quiet Mode on or o from the printer software (OS X and macOS)
1. Open HP Utility.
NOTE: HP Utility is located in the HP folder in the Applications folder.
2. Select the printer.
3. Click Quiet Mode .
4. Select On or O .
5. Click Apply Now.
To turn Quiet Mode on or o from the Embedded Web Server (EWS)
1. Open the EWS. For more information, see Open the embedded web server.
2. Click the Settings tab.
3. In the Preferences section, select Quiet Mode , and then select On or O .
4. Click Apply.
Optimize Printing Supplies
To optimize printing supplies such as ink and paper, try the following:
● Recycle used original HP ink cartridges through HP Planet Partners. For more information, visit
www.hp.com/recycle.
● Optimize paper usage by printing on both sides of the paper.
● Change the print quality in the printer driver to a draft setting. The draft setting uses less ink.
● Do not clean the printhead unnecessarily. Doing so wastes ink and shortens the life of the cartridges.
Understand the printer parts
This section contains the following topics:
●
Top and front view
●
Printing supplies area
●
Back view
ENWW Understand the printer parts 5

Top and front view
1 Document feeder
2 Document feeder paper-width guides
3 Document feeder tray
4 Scanner lid
5 Scanner glass
6 Cartridge access door
7 Output tray
8 Output tray extension
9 Input tray
10 Power button
11 Control panel display
Printing supplies area
1 Printhead
2 Cartridges
3 Cartridge access door
6 Chapter 2 Get started ENWW

NOTE: Cartridges should be kept in the printer to prevent possible print quality issues or printhead damage.
Avoid removing supplies for extended periods of time. Do not turn the printer o when a cartridge is missing.
Back view
1 Fax port (2-EXT)
2 Fax port (1-LINE)
3 Ethernet network port
4 Rear USB port
5 Power input
6 Rear access panel
Use the printer control panel
This section contains the following topics:
●
Lift the control panel
●
Overview of buttons and lights
●
Control panel display icons
●
Change printer settings
●
Dashboard
Lift the control panel
You can move the control panel for easier use.
● Use the handle at the bottom left of the control panel to slowly lift or lower it.
ENWW Use the printer control panel 7
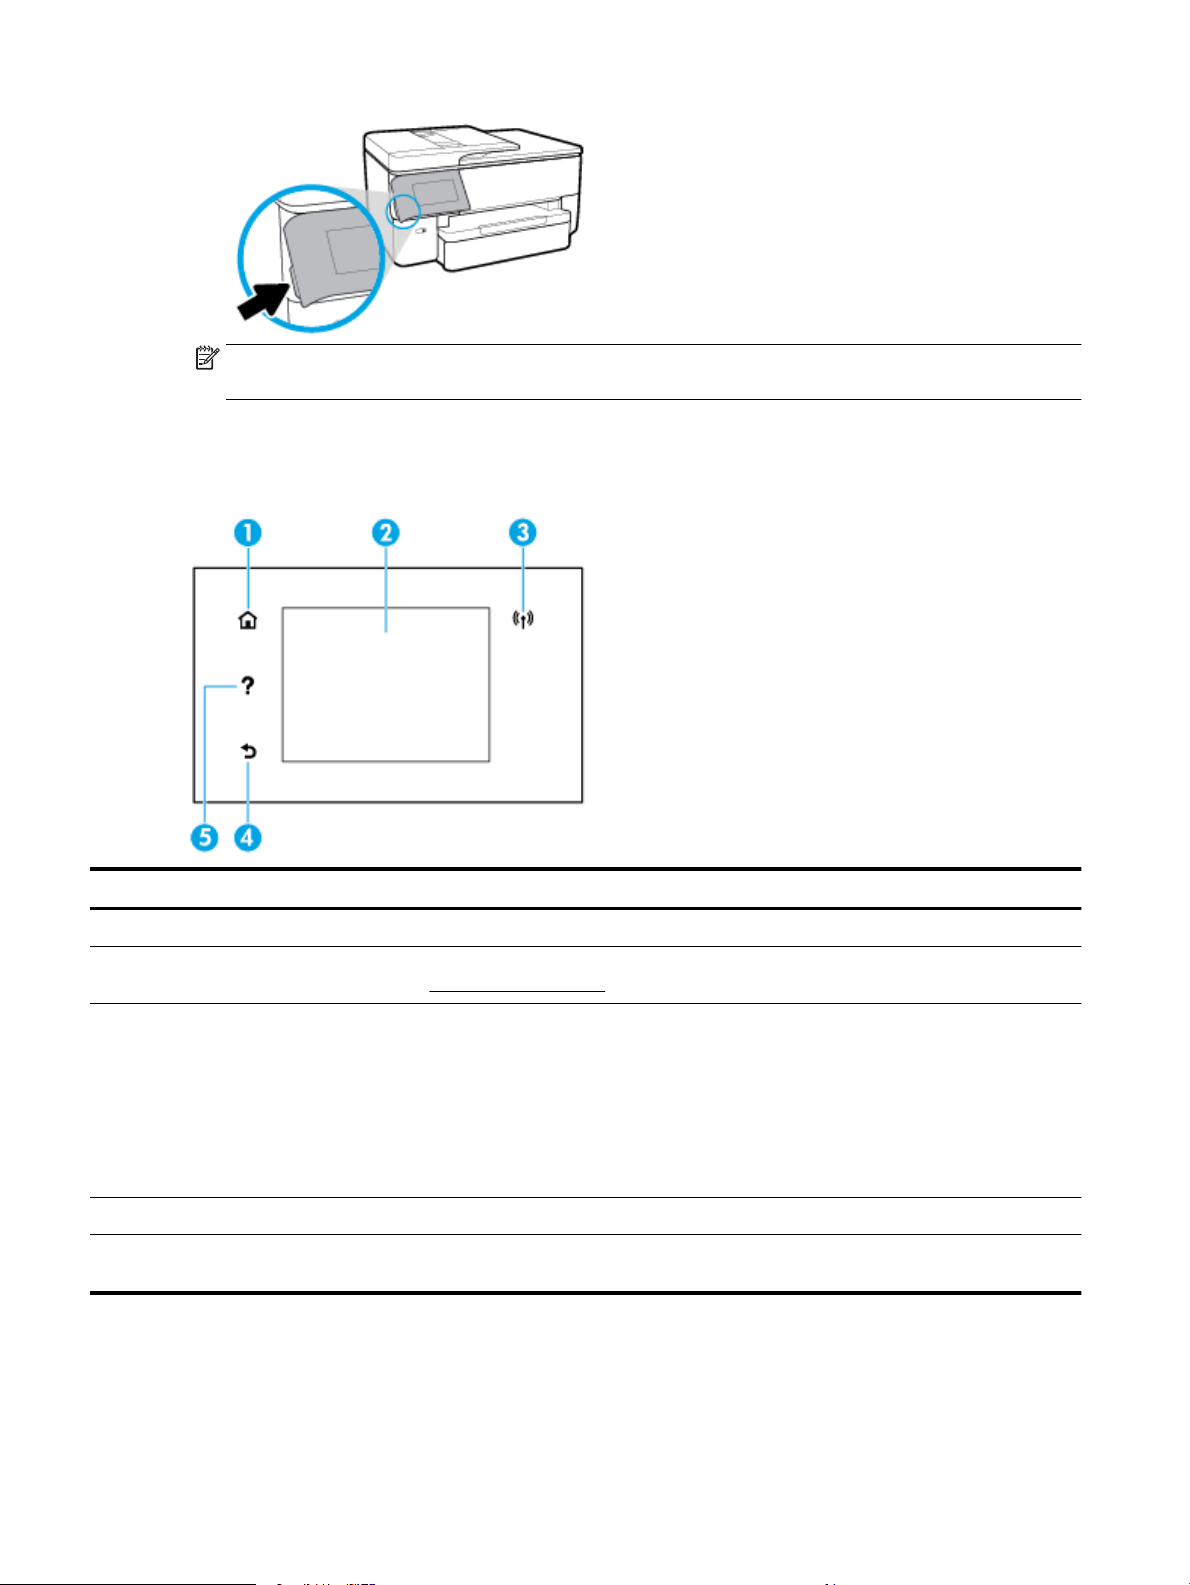
NOTE: Return the control panel to its original position by pushing down the left side until it is back in
place.
Overview of buttons and lights
The following diagram and related table provide a quick reference to the printer control panel features.
Label Name and Description
1 Home button: Returns to the home screen from any other screen.
2 Control panel display: Touch the screen to select menu options, or scroll through the menu items. For information about the icons
that appear on the display, see Control panel display icons.
3 Wireless light: Indicates the status of the printer’s wireless connection.
● Solid blue light indicates that wireless connection has been established and you can print.
● Slow blinking light indicates that wireless is on, but the printer is not connected to a network. Make sure your printer is
within the range of wireless signal.
● Fast blinking light indicates wireless error. Refer to the message on the printer display.
● If the wireless light is o, wireless is turned o.
4 Back button: Returns to the previous menu.
5 Help button: Opens the Help menu when on the Home screen, or shows contextual help content if it is available for the current
operation when on other screens.
8 Chapter 2 Get started ENWW

Control panel display icons
Icon Purpose
Copy: Opens the Copy menu where you can select a copy type or change the copy settings.
Scan: Opens the Scan menu where you can select a destination for your scan.
Apps: Access the apps from your printer.
Fax: Displays a screen where you can send a fax, or change fax settings.
Setup: Displays the setup screen for changing preferences, network setup, Wi-Fi Direct, Web Services setup, fax
setup, and other maintenance settings and generating reports.
Wireless: Displays wireless status and menu options. For more information, see Set up the printer for wireless
communication.
NOTE: (Ethernet) and (Wireless) will not be displayed at the same time. Showing the Ethernet icon or
the wireless icon depends on the way your printer is connected to the network. If the network connection of the
printer has not been set up, then the printer control panel display shows (Wireless) by default.
Ethernet: Shows that an Ethernet network connection exists and also provides easy access to the the network
status screen.
HP ePrint: Displays the Web Services Summary menu, where you can check ePrint status details, change ePrint
settings, or view the printer email address. For more information, see HP ePrint .
Wi-Fi Direct: Displays the status, name, and password for Wi-Fi Direct, and the number of devices connected. You
can also change settings and print a guide.
Ink: Displays the estimated ink levels.
NOTE: Ink level alerts and indicators provide estimates for planning purposes only. When you receive a low-ink
alert, consider having a replacement cartridge available to avoid possible printing delays. You do not have to
replace the cartridges until prompted to do so.
Fax Status: Displays status information for the Auto Answer function, fax logs, and the fax sound volume.
ENWW Use the printer control panel 9

Icon Purpose
HP EcoSolutions: Displays a screen where you can congure some of the printer’s environmental features.
Help: Opens the Help menu where you can view How To videos, printer feature information, and tips.
Change printer settings
Use the control panel to change the printer functions and settings, print reports, or get help for the printer.
TIP: If the printer is connected to a computer, you can also change the printer settings using the printer
management tools in the software.
For more information about these tools, see Printer management tools.
To change settings for a function
The Home screen of the control panel display shows the available functions for the printer.
1. From the Home screen, select a desired function such as Copy or Scan .
2. After selecting a function, touch ( Settings ), scroll through the available settings, and then touch
the setting you want to change.
3. Follow the prompts on the control panel display to change the settings.
TIP:
Touch (Home) to return to the Home screen.
To change the printer settings
To change the printer settings or print reports, use the options available on the Setup menu.
1. From the printer control panel, touch or swipe down the tab at the top of the screen to open the
Dashboard, and then touch ( Setup ).
2. Touch and scroll through the screens.
3. Touch the screen items to select screens or options.
TIP:
Touch (Home) to return to the Home screen.
Dashboard
The Dashboard on the printer control panel lets you access the icons on the display, check the status of the
printer, or monitor and manage current and scheduled printer tasks.
To open the Dashboard, touch or swipe down the tab at the top of a screen on the control panel.
10 Chapter 2 Get started ENWW

Paper basics
The printer is designed to work well with most types of oice paper. It is best to test a variety of print paper
types before buying large quantities. Use HP paper for optimum print quality. Visit the HP website at
www.hp.com for more information about HP paper.
HP recommends plain papers with the ColorLok logo for printing everyday documents. All
papers with the ColorLok logo are independently tested to meet high standards of
reliability and print quality, and produce documents with crisp, vivid color, bolder blacks,
and that dry faster than ordinary plain papers. Look for papers with the ColorLok logo in
a variety of weights and sizes from major paper manufacturers.
This section contains the following topics:
●
Recommended papers for printing
●
Order HP paper supplies
●
Tips for selecting and using paper
Recommended papers for printing
If you want the best print quality, HP recommends using HP papers that are specically designed for the type
of project you are printing.
Depending on your country/region, some of these papers might not be available.
Photo printing
● HP Advanced Photo Paper
This glossy photo paper features an instant-dry nish for easy handling without smudging. It resists
water, smears, ngerprints, and humidity. Your prints have a look and feel comparable to a store-
processed photo. It is available in several sizes, including A4, 8.5 x 11 inches, 10 x 15 cm (4 x 6 inches),
13 x 18 cm (5 x 7 inches), 11 x 17 inches. It is acid-free for longer lasting documents.
● HP Everyday Photo Paper
Print colorful, everyday snapshots at a low cost, using paper designed for casual photo printing. This
aordable photo paper dries quickly for easy handling. Get sharp, crisp images when you use this paper
with any inkjet printer. It is available in glossy nish in several sizes, including A4, 8.5 x 11 inches, 5 x 7
inches and 4 x 6 inches 10 x 15 cm. It is acid-free for longer lasting documents.
ENWW Paper basics 11

Business documents
● HP Premium Presentation Paper 120g Matte or HP Professional Paper 120 Matte
These paper are heavy two-sided matte paper perfect for presentation, proposals, reports, and
newsletters. They are heavyweight for an impressive look and feel.
● HP Brochure Paper Glossy or HP Professional Paper Glossy
These papers are glossy-coated on both sides for two-sided use. They are the perfect choice for near-
photographic reproductions and business graphics for report covers, special presentations, brochures,
mailers, and calendars.
● HP Brochure Paper Matte or HP Professional Paper Matte
These papers are matte-coated on both sides for two-sided use. They are the perfect choice for near-
photographic reproductions and business graphics for report covers, special presentations, brochures,
mailers, and calendars.
Everyday printing
All the papers are listed below for everyday printing feature ColorLok Technology for less smearing, bolder
blacks, and vivid colors.
● HP Bright White Inkjet Paper
HP Bright White Inkjet Paper delivers high-contrast colors and sharp text. It is opaque enough for two-
sided color usage with no show-through, which makes it ideal for newsletters, reports, and yers.
● HP Printing Paper
HP Printing Paper is a high-quality multifunction paper. It produces documents that look and feel more
substantial than documents printed on standard multipurpose or copy paper. It is acid-free for longer
lasting documents.
● HP Oice Paper
HP Oice Paper is a high-quality multifunction paper. It is suitable for copies, drafts, memos, and other
everyday documents. It is acid-free for longer lasting documents.
Order HP paper supplies
The printer is designed to work well with most types of oice paper. Use HP paper for optimum print quality.
To order HP papers and other supplies, go to www.hp.com . At this time, some portions of the HP website are
available in English only.
HP recommends plain papers with the ColorLok logo for printing and copying of everyday documents. All
papers with the ColorLok logo are independently tested to meet high standards of reliability and print quality,
and produce documents with crisp, vivid color, bolder blacks and shorter dry-time than ordinary plain papers.
Look for papers with the ColorLok logo in a variety of weights and sizes from major paper manufacturers.
Tips for selecting and using paper
For the best results, observe the following guidelines.
● Load only one type and one size of paper at a time into a tray or document feeder.
● Make sure the paper is loaded correctly when loading from the input tray or document feeder.
12 Chapter 2 Get started ENWW

● Do not overload the tray or document feeder.
● To prevent jams, poor print quality, and other printing problems, avoid loading the following paper in the
tray or document feeder:
– Multipart forms
– Media that is damaged, curled, or wrinkled
– Media with cutouts or perforations
– Media that is heavily textured, embossed, or does not accept ink well
– Media that is too lightweight or stretches easily
– Media that contains staples or clips
Load paper
To load standard paper
1. Pull out the input tray completely with both hands.
NOTE: If there is other paper in the input tray, remove the paper before loading a dierent paper type
or size.
2. Slide the paper guides towards the edges of the tray as far as possible.
● To slide the paper-width guides, press the button on the left paper-width guide and slide the guide
at the same time.
● To slide the paper-length guide, press the button on the paper-length guide and slide the guide at
the same time.
ENWW Load paper 13

3. Insert the paper in portrait orientation and with the side to be printed facing down.
Make sure the stack of paper is aligned with the appropriate paper size lines on the front of the tray.
Also, make sure the stack of paper does not exceed the stack height marking on the right edge of the
tray.
NOTE: Do not load paper while the printer is printing.
14 Chapter 2 Get started ENWW

4. Adjust the paper-width guides and the paper-length guide until they touch the edge of the stack of
paper.
NOTE: Before inserting the input tray, check the gap in the printer where the input tray was and
remove any paper.
5. Close the input tray cover and reinsert the input tray into the printer.
ENWW Load paper 15

6. Pull out the output tray extension as shown.
To load B-size paper
1. Pull out the input tray completely with both hands.
NOTE: If there is other paper in the input tray, remove the paper before loading a dierent paper type
or size.
2. Press the button near the front right of the tray, and pull out the input tray extension.
NOTE: You might need to open the input tray cover to extend the tray.
3. Slide the paper guides towards the edges of the tray as far as possible.
● To slide the paper-width guides, press the button on the left paper-width guide and slide the guide
at the same time.
● To slide the paper-length guide, press the button on the paper-length guide and slide the guide at
the same time.
16 Chapter 2 Get started ENWW

4. Insert the paper in portrait orientation and with the side to be printed facing down.
Make sure the stack of paper is aligned with the appropriate paper size lines on the front of the tray.
Also, make sure the stack of paper does not exceed the stack height marking on the left edge of the tray.
NOTE: Do not load paper while the printer is printing.
ENWW Load paper 17

5. Adjust the paper-width guides and the paper-length guide until they touch the edge of the stack of
paper.
NOTE: Before inserting the input tray, check the gap in the printer where the input tray was and
remove any paper.
6. Close the input tray cover and reinsert the input tray into the printer.
NOTE: When you insert the input tray, the input tray extension remains outside of the printer. This is
the expected result.
18 Chapter 2 Get started ENWW

7. Pull out the output tray extension as shown.
Pull out the output tray extension further to fully extend the tray.
To load an envelope
1. Pull out the input tray completely with both hands.
NOTE: If there is other paper in the input tray, remove the paper before loading a dierent paper type
or size.
2. Slide the paper guides towards the edges of the tray as far as possible.
● To slide the paper-width guides, press the button on the left paper-width guide and slide the guide
at the same time.
● To slide the paper-length guide, press the button on the paper-length guide and slide the guide at
the same time.
ENWW Load paper 19

3. Insert the envelope in portrait orientation and with the side to be printed facing down.
Make sure the stack of envelope is aligned with the appropriate paper size lines on the front of the tray.
Also, make sure the stack of envelope does not exceed the stack height marking on the right edge of the
tray.
NOTE: Do not load paper while the printer is printing.
20 Chapter 2 Get started ENWW

4. Adjust the paper-width guides and the paper-length guide until they touch the edge of the stack of
paper.
NOTE: Before inserting the input tray, check the gap in the printer where the input tray was and
remove any paper.
5. Close the input tray cover and reinsert the input tray into the printer.
ENWW Load paper 21

6. Pull out the output tray extension as shown.
To load cards and photo paper
1. Pull out the input tray completely with both hands.
NOTE: If there is other paper in the input tray, remove the paper before loading a dierent paper type
or size.
2. Slide the paper guides towards the edges of the tray as far as possible.
● To slide the paper-width guides, press the button on the left paper-width guide and slide the guide
at the same time.
● To slide the paper-length guide, press the button on the paper-length guide and slide the guide at
the same time.
22 Chapter 2 Get started ENWW

3. Insert the cards or photo paper in portrait orientation and with the side to be printed facing down.
Make sure the stack of card or photo is aligned with the appropriate paper size lines on the front of the
tray. Also, make sure the stack of card or photo does not exceed the stack height marking on the right
edge of the tray.
NOTE: Do not load paper while the printer is printing.
ENWW Load paper 23

4. Adjust the paper-width guides and the paper-length guide until they touch the edge of the stack of
paper.
NOTE: Before inserting the input tray, check the gap in the printer where the input tray was and
remove any paper.
5. Close the input tray cover and reinsert the input tray into the printer.
24 Chapter 2 Get started ENWW

6. Pull out the output tray extension as shown.
Load an original on the scanner glass
You can copy, scan, or fax originals by loading them on the scanner glass.
NOTE: Many of the special features do not work correctly if the scanner glass and lid backing are not clean.
For more information, see Maintain the printer.
NOTE: Remove all originals from the document feeder tray before lifting the lid on the printer.
To load an original on the scanner glass
1. Lift the scanner lid.
2. Load your original print-side down and align it with the marking on the rear left corner of the glass.
TIP: For more help on loading an original, refer to the engraved guides along the edge of the scanner
glass.
3. Close the lid.
ENWW Load an original on the scanner glass 25

Load an original in the document feeder
You can copy, scan, or fax a document by placing it in the document feeder.
CAUTION: Do not load photos in the document feeder, this might cause damage to your photos. Use only
paper that is supported by the document feeder.
NOTE: Some features, such as the Fit to Page copy feature, do not work when you load your originals in the
document feeder. For those features to work, load your originals on the scanner glass.
To load an original in the document feeder
1. Load your original print-side up into the document feeder.
a. If you are loading an original printed in portrait orientation, place the pages so that the top edge of
the document goes in rst. If you are loading an original printed in landscape orientation, place the
pages so that the left edge of the document goes in rst.
b. Slide the paper into the document feeder until you hear a tone or see a message on the printer
control panel display indicating that the loaded pages were detected.
TIP: For more help on loading originals in the document feeder, refer to the diagram on the document
feeder tray.
2. Slide the paper-width guides inward until they stop at the left and right edges of the paper.
Update the printer
By default, if the printer is connected to a network and Web Services has been enabled, the printer
automatically checks for updates.
To update the printer using the printer control panel
1. From the top of the screen, touch or swipe down the tab to open the Dashboard, touch ( Setup )
2. Touch Printer Maintenance .
3. Touch Update the Printer .
4. Touch Check for Printer Updates Now.
26 Chapter 2 Get started ENWW

To enable the printer to automatically check for updates
NOTE: The default setting of Auto Update is On .
1. From the printer control panel, touch or swipe down the tab at the top of the screen to open the
Dashboard, and then touch (Setup).
2. Touch Printer Maintenance.
3. Touch Update the Printer.
4. Touch Printer Update Options.
5. Select Install Automatically (Recommended), Alert When Available or Do Not Check.
To update the printer using the embedded web server
1. Open the EWS.
For more information, see Embedded web server.
2. Click the Tools tab.
3. In the Printer Updates section, click Firmware Updates, and then follow the onscreen instructions.
NOTE: If a printer update is available, the printer downloads and installs the update, and then restarts.
NOTE: If prompted for proxy settings and if your network uses proxy settings, follow the onscreen
instructions to set up a proxy server. If you do not have the details, contact your network administrator or the
person who set up the network.
Open the HP printer software (Windows)
After installing the HP printer software, depending on your operating system, do one of the following:
● Windows 10: From the computer desktop, click Start, select HP from the app list, and then select the
icon with the printer name.
● Windows 8.1: Click the down arrow in lower left corner of the Start screen, and then select the printer
name.
● Windows 8: Right-click an empty area on the Start screen, click All Apps on the app bar, and then select
the printer name.
● Windows 7, Windows Vista, and Windows XP: From the computer desktop, click Start, select All
Programs, click HP, click the folder for the printer, and then select the icon with the printer name.
Use the HP Smart app to print, scan, and troubleshoot from an
iOS, Android, or Windows 10 device
HP Smart (formerly known as HP All-in-One Printer Remote) helps you to set up, scan, print, share, and
manage your HP printer. You can share documents and images through email, text messages, and popular
cloud and social media services (such as iCloud, Google Drive, Dropbox, and Facebook). You can also set up
new HP printers, as well as monitor and order supplies.
NOTE: The HP Smart app might not be available in all languages. Some features might not be available with
all printer models.
ENWW Open the HP printer software (Windows) 27

To install the HP Smart app
▲ The HP Smart app is supported on iOS, Android, and Windows 10 devices. To install the app on your
device, go to 123.hp.com and follow the onscreen instructions to access your device’s app store.
To open the HP Smart app on a Windows 10 computer
▲ After installing the HP Smart app, from the device desktop, click Start, and then select HP Smart from
the app list.
Connect to your printer
▲ Make sure that the printer is turned on and is connected to the same network as your device. Then HP
Smart will automatically detect the printer.
Get more information about the HP Smart app
For basic instructions on how to print, scan, and troubleshoot using HP Smart, see Print using the HP Smart
app, Scan using HP Smart and Get help from the HP Smart app .
For more information about using HP Smart for printing, scanning, accessing printer features, and
troubleshooting issues, go to:
● iOS/Android: www.hp.com/go/hpsmart-help
● Windows: www.hp.com/go/hpsmartwin-help
Turn the printer o
Press (the Power button) to turn o the printer. Wait until the power light turns o before unplugging the
power cord or turning
o a power strip.
CAUTION: If you incorrectly turn the printer o, the print carriage might not return to the correct position,
causing problems with the cartridges and print quality issues.
28 Chapter 2 Get started ENWW

3 Print
Most print settings are automatically handled by the software application. Change the settings manually only
when you want to change print quality, print on specic types of paper, or use special features.
TIP: This printer includes HP ePrint , a free service from HP that allows you to print documents on your HP
ePrint-enabled printer anytime, from any location, without any additional software or printer drivers. For
more information, see HP ePrint .
TIP: You can use this printer to print documents and photos on your mobile device (such as a smartphone or
tablet). For more information, visit the HP Mobile Printing website ( www.hp.com/go/mobileprinting ). (At this
time, this website might not be available in all languages.)
●
Print documents
●
Print brochures
●
Print on envelopes
●
Print photos
●
Print on special and custom-size paper
●
Print on both sides (duplexing)
●
Print using the HP Smart app
●
Print with mobile devices
●
Tips for successful printing
Print documents
To print documents (Windows)
1. Load paper in the input tray. For more information, see Load paper.
2. From your software, select Print.
3. Make sure your printer is selected.
4. Click the button that opens the Properties dialog box.
Depending on your software application, this button might be called Properties, Options, Printer Setup,
Printer Properties, Printer, or Preferences.
NOTE: To set print settings for all print jobs, make the changes in the HP software. For more
information on the HP software, see Printer management tools.
5. Select the appropriate options on the Printing Shortcut tab.
6. If you want to change other print settings, click the other tabs. For more printing tips, see Tips for
successful printing.
NOTE: If you change the paper size, be sure to load the correct paper in the input tray and set the
paper size on the printer control panel.
ENWW Print documents 29

7. Click OK to close the Properties dialog box.
8. Click Print or OK to begin printing.
To print documents (OS X and macOS)
1. From the File menu in your software, choose Print.
2. Make sure your printer is selected.
3. Set the print options.
If you do not see options on the Print dialog, click Show Details.
● Choose the appropriate paper size in the Paper Size pop-up menu.
NOTE: If you change the paper size, ensure that you have loaded the correct paper.
● Select the orientation.
● Enter the scaling percentage.
4. Click Print.
Print brochures
To print brochures (Windows)
1. Load paper in the input tray. For more information, see Load paper.
2. On the File menu in your software application, click Print .
3. Make sure your printer is selected.
4. To change settings, click the button that opens the Properties dialog box.
Depending on your software application, this button might be called Properties , Options , Printer
Setup , Printer , or Preferences .
NOTE: To set print settings for all print jobs, make the changes in the HP software. For more
information on the HP software, see Printer management tools.
5. Select the appropriate options on the Printing Shortcut tab.
6. If you want to change other print settings, click the other tabs. For more printing tips, see Tips for
successful printing.
NOTE: If you change the paper size, be sure to load the correct paper in the input tray and set the
paper size on the printer control panel.
7. Click OK to close the Properties dialog box.
8. Click Print or OK to begin printing.
To print brochures (OS X and macOS)
1. From the File menu in your software, choose Print.
2. Make sure your printer is selected.
3. Set the print options.
If you do not see options on the Print dialog, click Show Details.
30 Chapter 3 Print ENWW

a. Choose the appropriate paper size in the Paper Size pop-up menu.
NOTE: If you change the paper size, ensure that you have loaded the correct paper.
b. From the pop-up menu, choose Paper Type/Quality, and then choose the option that provides the
best quality or maximum dpi.
4. Click Print.
Print on envelopes
Avoid envelopes with the following characteristics:
● Very slick nish
● Self-stick adhesives, clasps, or windows
● Thick, irregular, or curled edges
● Areas that are wrinkled, torn, or otherwise damaged
Make sure the folds of envelopes you load in the printer are sharply creased.
NOTE: For more information about printing on envelopes, see the documentation available with the
software program you are using.
To print envelopes (Windows)
1. Load paper in the input tray. For more information, see Load paper.
2. On the File menu in your software, click Print.
3. Make sure your printer is selected.
4. Click the button that opens the Properties dialog box.
Depending on your software application, this button might be called Properties, Options, Printer Setup,
Printer Properties, Printer, or Preferences.
NOTE: To set print settings for all print jobs, make the changes in the HP software. For more
information on the HP software, see Printer management tools.
5. Select the appropriate options on the Printing Shortcut tab.
6. If you want to change other print settings, click the other tabs. For more printing tips, see Tips for
successful printing.
NOTE: If you change the paper size, be sure to load the correct paper in the input tray and set the
paper size on the printer control panel.
7. Click OK to close the Properties dialog box.
8. Click Print or OK to begin printing.
To print envelopes (OS X and macOS)
1. From the File menu in your software, choose Print.
2. Make sure your printer is selected.
3. Select the appropriate envelope size from the Paper Size pop-up menu.
If you do not see options on the Print dialog, click Show Details.
ENWW Print on envelopes 31

NOTE: If you change the paper size, ensure that you have loaded the correct paper.
4. From the pop-up menu, choose Paper Type/Quality, and verify the paper type setting is set to Plain
Paper.
5. Click Print.
Print photos
You can print a photo from a computer.
Do not leave unused photo paper in the input tray. The paper might start to curl, which could impair the
quality of your printout. Photo paper should be at before printing.
TIP: You can use this printer to print documents and photos on your mobile device (such as a smartphone or
tablet). For more information, visit the HP Mobile Printing website ( www.hp.com/go/mobileprinting ). (At this
time, this website might not be available in all languages.)
To print a photo from the computer (Windows)
1. Load paper in the input tray. For more information, see Load paper.
2. From your software, select Print.
3. Make sure your printer is selected.
4. Click the button that opens the Properties dialog box.
Depending on your software application, this button might be called Properties, Options, Printer Setup,
Printer Properties, Printer, or Preferences.
5. Select the appropriate options on the Printing Shortcut tab.
6. If you want to change other print settings, click the other tabs. For more printing tips, see Tips for
successful printing.
NOTE: If you change the paper size, be sure to load the correct paper in the input tray and set the
paper size on the printer control panel.
7. Click OK to close the Properties dialog box.
8. Click Print or OK to begin printing.
NOTE: After the printing is nished, remove unused photo paper from the input tray. Store the photo paper
so it does not start to curl, which could reduce the quality of your printout.
To print a photo from the computer (OS X and macOS)
1. From the File menu in your software, choose Print.
2. Make sure your printer is selected.
3. Set the print options.
If you do not see options on the Print dialog, click Show Details.
● Choose the appropriate paper size in the Paper Size pop-up menu.
NOTE: If you change the paper size ensure that you have loaded the correct paper.
● Select the orientation.
32 Chapter 3 Print ENWW

4. From the pop-up menu, choose Paper Type/Quality, and then choose the following settings:
● Paper Type: The appropriate photo paper type
● Quality: Select the option that provides the best quality or maximum dpi.
● Click the Color Options disclosure triangle, and then choose the appropriate Photo Fix option.
– O: applies no changes to the image.
– On: automatically focuses the image; moderately adjusts image sharpness.
5. Select any other print settings you want, and then click Print.
Print on special and custom-size paper
If your application supports custom-size paper, set the size in the application before printing the document. If
not, set the size in the printer driver. You might need to reformat existing documents to print them correctly
on custom-size paper.
To set up custom sizes (Windows)
1. Depending on your operating system, do one of the following:
● Windows 10: From the Windows Start menu, select Windows System from the app list, select
Control Panel, and then click View devices and printers under Hardware and Sound. Select the
printer name, and click Print server properties .
● Windows 8.1 and Windows 8: Point to or tap the upper-right corner of the screen to open the
Charms bar, click the Settings icon, click or tap Control Panel, and then click or tap View devices
and printers. Click or tap the printer name, and click or tap Print server properties.
● Windows 7: From the Windows Start menu, click Devices and Printers. Select the printer name,
and select Print server properties.
● Windows Vista: From the Windows Start menu, click Control Panel, and then click Printers. Right-
click an empty area in the Printers window, and select Server Properties.
● Windows XP: From the Windows Start menu, click Control Panel, and then click Printers and
Faxes. From the File menu, click Server Properties.
2. Select the Create a new form checkbox.
3. Enter the name of the custom size paper.
4. Enter the dimensions of the custom size in the Form description (measurements) section.
5. Click Save Form, and then click Close.
To set up custom sizes (OS X and macOS)
1. Depending on your operating system, do one of the following:
ENWW Print on special and custom-size paper 33

● From the File menu in your software application, click Page Setup, and then make sure the printer
you want to use is selected in the Format For pop-up menu.
● From the File menu in your software application, click Print, and then make sure the printer you
want to use is selected.
2. Select Manage Custom Sizes in the Paper Size pop-up menu.
NOTE: If you do not see these options in the Print dialog, click the disclosure triangle next to the
Printer pop-up menu or click Show Details.
3. Click the + on the left side of the screen, double-click Untitled, and type a name for the new custom
size.
4. In the Width and Height boxes, type the dimensions, and then set the margins, if you want to customize
them.
5. Click OK.
To print on special or custom-size paper (Windows)
NOTE: Before you can print on custom-size paper, you must set up the custom size in the Print Server
Properties.
1. Load the appropriate paper in the input tray. For more information, see Load paper.
2. From the File menu in your software application, click Print.
3. Make sure your printer is selected.
4. Click the button that opens the Properties dialog box.
Depending on your software application, this button might be called Properties, Options, Printer Setup,
Printer Properties, Printer, or Preferences.
NOTE: To set print settings for all print jobs, make the changes in the HP software. For more
information on the HP software, see Printer management tools.
5. On the Layout tab or Paper/Quality tab, click the Advanced button.
6. In the Paper/Output area, select the custom size from the Paper Size drop-down list.
NOTE: If you change the paper size, be sure to load the correct paper in the input tray and set the
paper size on the printer control panel.
7. Select any other print settings that you want, and then click OK.
8. Click Print or OK to begin printing.
To print on special or custom-size paper (OS X and macOS)
Before you can print on custom-size paper, you must set up the custom size in the HP software.
1. Load the appropriate paper in the tray.
2. Create the new custom paper size.
a. In the software you want to print from, click File, and then click Print.
b. Make sure your printer is selected.
c. Click Manage Custom Sizes in the Paper Size pop-up menu.
If you do not see options on the Print dialog, click Show Details.
34 Chapter 3 Print ENWW

d. Click +, and then select the new item in the list and type a name for the custom paper size.
e. Enter the height and width for your custom paper.
f. Click Done or OK, and then click Save.
3. Use the created custom paper size to print.
a. From the File menu in your software application, click Print.
b. Make sure your printer is selected.
c. Choose the custom paper size name you created in the Paper Size pop-up menu.
d. Select any other print settings you want, and then click Print.
Print on both sides (duplexing)
To print on both sides of the page (Windows)
1. Load paper in the input tray. For more information, see Load paper.
2. From your software, select Print.
3. Make sure your printer is selected.
4. Click the button that opens the Properties dialog box.
Depending on your software application, this button might be called Properties, Options, Printer Setup,
Printer Properties, Printer, or Preferences.
NOTE: To set print settings for all print jobs, make the changes in the HP software. For more
information on the HP software, see Printer management tools.
5. On the Printing Shortcut tab, select the Two-sided (Duplex) Printing shortcut.
6. If you want to change other print settings, click the other tabs. For more printing tips, see Tips for
successful printing.
NOTE: The printer supports automatic two-sided printing of A4, Letter, Executive, and JIS B5 paper
sizes.
NOTE: If you change the paper size, be sure to load the correct paper in the input tray and set the
paper size on the printer control panel.
7. Click OK to close the Properties dialog box.
8. Click Print or OK to begin printing.
To print on both sides of the paper (OS X and macOS)
1. From the File menu in your software, choose Print.
2. In the Print dialog, choose Layout from the pop-up menu.
3. Choose the type of binding you want for your two-sided pages, and then click Print.
ENWW Print on both sides (duplexing) 35

Print using the HP Smart app
This section provides basic instructions for using the HP Smart app to print from your Android, iOS, or
Windows 10 device. For more information about using the HP Smart app, go to:
● iOS/Android: www.hp.com/go/hpsmart-help
● Windows: www.hp.com/go/hpsmartwin-help
To print from a Windows 10 device
1. Load paper in the input tray. For more information, see Load paper.
2. Open HP Smart. For more information, see Use the HP Smart app to print, scan, and troubleshoot from
an iOS, Android, or Windows 10 device.
3. On the HP Smart Home screen, make sure your printer is selected.
TIP: If you want to select a dierent printer, click or tap the Printer icon on the toolbar at the left side
of the screen, and then select Select a Dierent Printer to view all available printers.
4. At the bottom of the Home screen, click or tap Print.
5. Select Print Photo, locate a photo you want to print, and then click or tap Select Photos to Print.
Select Print Document, locate a PDF document you want to print, and then click or tap Print.
6. Select the appropriate options. To view more settings, click or tap More settings. For more information
about printing settings, see Tips for successful printing.
7. Click or tap Print to begin printing.
To print from an Android or iOS device
1. Open the HP Smart app.
2. Tap the Plus icon if you need to change to a dierent printer, or add a new printer.
3. Tap a printing option (for example, Print Photos or Print Facebook Photos, etc.). You can print photos
and documents from your device, cloud storage, or social media sites.
4. Select the photo or document you want to print.
5. Tap Print.
Print with mobile devices
Print from mobile devices
You can print documents and photos directly from your mobile devices, including iOS, Android, Windows
Mobile, Chromebook and Amazon Kindle.
NOTE: You can also use the HP Smart app to print from mobile devices. For more information, see Print
using the HP Smart app.
1. Make sure your printer is connected to the same network as your mobile device.
2. Enable printing on your mobile device:
● iOS: Use the Print option from the Share menu. No setup is required since iOS AirPrint is
preinstalled.
36 Chapter 3 Print ENWW

NOTE: Devices running iOS 4.2 or later have AirPrint preinstalled.
● Android: Download the HP Print Service Plugin (supported by most Android devices) from the
Google Play Store and enable it on your device.
NOTE: Devices running Android 4.4 or later are supported by the HP Print Service Plugin. Devices
running Android 4.3 or earlier can print using the HP ePrint app, available in the Google Play Store.
● Windows Mobile: Tap Print from the Device menu. No setup is required since the software is
preinstalled.
NOTE: If your printer is not listed, you might need to do a one-time setup of the printer using the
Add Printer wizard.
● Chromebook: Download and install the HP Print for Chrome app from the Chrome Web Store to
enable both Wi-Fi and USB printing.
● Amazon Kindle Fire HD9 and HDX: The rst time you select Print on your device, the HP Print
Service Plugin is automatically downloaded to enable mobile printing.
NOTE: For detailed information about enabling printing from your mobile devices, visit
www.hp.com/go/mobileprinting. If a local version of this website is not available in your country/region
or language, you might be directed to the HP Mobile Printing website in another country/region or
language.
3. Make sure the loaded paper matches the paper settings of the printer (see Load paper for more
information). Accurately setting the paper size for the paper that is loaded enables your mobile device to
know what paper size it is printing.
Tips for successful printing
Software settings selected in the print driver only apply to printing, they do not apply to copying or scanning.
You can print your document on both sides of the paper. For more information, see Print on both sides
(duplexing).
Ink tips
Following are the ink tips for successful printing:
● If the print quality is not acceptable, see Printing issues for more information.
● Use Original HP cartridges.
Original HP cartridges are designed and tested with HP printers and papers to help you easily produce
great results, time after time.
NOTE: HP cannot guarantee the quality or reliability of non-HP supplies. Product service or repairs
required as a result of using a non-HP supply will not be covered under warranty.
If you believe you purchased Original HP cartridges, go to www.hp.com/go/anticounterfeit.
● Install both the black and color cartridges correctly.
For more information, see Replace the cartridges.
● Check the estimated ink levels in the cartridges to make sure there is suicient ink.
For more information, see Check the estimated ink levels.
ENWW Tips for successful printing 37
 Loading…
![]()
Русский
- Bedienungsanleitung HP OfficeJet Pro 7720
- HP OfficeJet Pro 7720 User Manual
- Manual Usuario HP OfficeJet Pro 7720
- Mode d’emploi HP OfficeJet Pro 7720
- Istruzioni HP OfficeJet Pro 7720
- инструкция HP OfficeJet Pro 7720
- HP OfficeJet Pro 7720の取扱説明書
- Handleiding HP OfficeJet Pro 7720
- Manual de uso HP OfficeJet Pro 7720
Вам нужна инструкция? Мы поможем Вам ее найти и сэкономить Ваше время.
- 186 stron
- 3.2 mb
Изделие HP OfficeJet Pro 7720, а также другие, которыми Вы пользуетесь ежедневно, наверняка вы получили в комплекте с инструкцией обслуживания. Из опыта наших пользователей мы знаем, что большинство из Вас не уделили этому особого внимания. Большая часть инструкций, сразу же после покупки попадает в корзину для мусора вместе с коробкой — это ошибка. Ознакомьтесь с информацией, касающейся инструкции HP OfficeJet Pro 7720, которая поможет Вам в будущем сэкономить нервы и избежать головной боли.
Важная подсказка — не забывайте хотя бы раз прочитать инструкцию HP OfficeJet Pro 7720
Если вы не хотите каждый раз читать информационные брошюры, касающиеся, тех или HP OfficeJet Pro 7720 иных изделий, достаточно, прочитать их раз — сразу же после покупки устройства. Вы получите основное знания, касающиеся поддержания изделия HP OfficeJet Pro 7720 в хорошем эксплуатационном состоянии, так, чтобы без проблем достигнуть его планируемого цикла работы. Затем инструкцию можно отложить на полку и вернуться к ней только в случае, если вы не уверены, правильно ли проводится техобслуживание изделия. Правильный уход является необходимым элементом Вашего удовольствия HP OfficeJet Pro 7720.
Раз в году пересмотрите шкафчик, в котором держите инструкции для всех устройств, — выбросите те, которыми вы уже не пользуетесься. Это поможет Вам сохранять порядок в своей домашней базе инструкций обслуживания.
Summary of Contents for HP OfficeJet Pro 7720
Что находится в инструкции HP OfficeJet Pro 7720? Почему стоит ее прочитать?
- Гарантия и подробности, касающиеся техобслуживания изделия
Хорошей идеей будет прикрепить чек к странице инструкции. Если что-то плохое случится во время использования HP OfficeJet Pro 7720, у вас будет комплект документов, необходимый для гарантийного ремонта. В этой части инструкции вы найдете информацию об авторизованных сервисных центрахHP OfficeJet Pro 7720 а также, как самостоятельно правильно ухаживать за оборудованием — так, чтобы не потерять гарантийных прав. - Указания по монтажу и Setup
Не терять нервов и времени на самостоятельную попытку установки и первого запуска изделия. Воспользуйтесь рекомендациями производителя HP OfficeJet Pro 7720 чтобы правильно запустить изделие, без лишнего риска повреждения оборудования. - Информация, касающаяся дополнительных запчастей (входящих в комплект а также являющихся опцией)
Пересматривая эту часть документа вы сможете проверить, доставлен ли ваш HP OfficeJet Pro 7720 с полним комплектом аксессуаров. Вы также сможете узнать, какие дополнительные запчасти или аксессуары для HP OfficeJet Pro 7720 Вы сможете найти и докупить к своему устройству. - Troubleshooting
Самые частые проблемы, касающиеся HP OfficeJet Pro 7720 и методы их решения. Это очень полезная часть руководства по обслуживанию — она позволит Вам сэкономить много времени на поиск решений. 90% проблем с HP OfficeJet Pro 7720 повторяется у многих пользователей. - Требования, касающиеся питания и энергетический класс
Информация, касающаяся количества потребляемой энергии, а также рекомендации, касающиеся установки и питания HP OfficeJet Pro 7720. Прочитайте, чтобы оптимально пользоваться HP OfficeJet Pro 7720 и не использовать большего количества ресурсов, нежели это необходимо для правильной работы изделия. - Специальные функции HP OfficeJet Pro 7720
Здесь вы можешь узнать, как персонализировать изделие HP OfficeJet Pro 7720. Вы узнаете, какие дополнительные функции могут помочь Вам удобно использовать продукт HP OfficeJet Pro 7720 а также, какие функции Вашего устройства оптимальны для выполнения конкретной деятельности.
Как видите в инструкции вы найдете информацию, которая реально поможет Вам в использовании Вашего изделия. Стоит с ней ознакомиться, чтобы избежать разочарований, возникающих из более короткого, нежели предусматривалось, периода исправности изделия HP OfficeJet Pro 7720. Если все же вы не хотите копить инструкции в своем доме, наш сайт поможет Вам в этом — вы должны найти у нас руководство по обслуживанию большинства из своих устройств, а также HP OfficeJet Pro 7720.
Комментарии (0)
|
Код: 112429 Извините, товара сейчас нет в наличии
Бесплатная доставка
Извините, товара сейчас нет в наличии Сравнить Новости интернет-магазина «Лаукар»:28.03.2023 22.02.2023 13.02.2023 Дополнительная информация в категории МФУ:Принтеры и МФУ — особенности и термины Таблица Авторизованных сервисных центров по брендам. Описание Инструкция Отзывы (0) В интернет-магазине бытовой техники «Лаукар» Вы можете скачать инструкцию к товару МФУ HP OfficeJet Pro 7720 Wide Format совершенно бесплатно. Все инструкции, представленные на сайте интернет-магазина бытовой техники «Лаукар», предоставляются производителем товара. Для того чтобы скачать инструкцию, Вам необходимо нажать на ссылку «скачать инструкцию», расположенную ниже, а в случае, если ссылки нет, Скачать инструкцию Смотреть инструкцию
Фирма-производитель оставляет за собой право на внесение изменений в конструкцию, дизайн и комплектацию товара: МФУ HP OfficeJet Pro 7720 Wide Format. Пожалуйста, сверяйте информацию о товаре с информацией на |


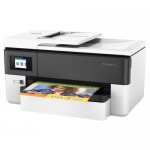


- Каталог
- Офис и мебель
- Техника для печати
- Струйные МФУ
- HP
- МФУ HP OfficeJet Pro 7720 (Принтер/ Копир/ Сканер/Факс: A3 1200x4800dpi 15ppm 256Mb Wi-Fi Ethernet AirPrint USB)
- Инструкции и файлы
МФУ HP OfficeJet Pro 7720 (Принтер/ Копир/ Сканер/Факс: A3 1200x4800dpi 15ppm 256Mb Wi-Fi Ethernet AirPrint USB)

12
Код товара: 1167933
МФУ HP OfficeJet Pro 7720 (Принтер/ Копир/ Сканер/Факс: A3 1200x4800dpi 15ppm 256Mb Wi-Fi Ethernet AirPrint USB)

Характеристики
Отзывы12ОбзорыИнструкции и файлы2
Как выбрать?
Советуют эксперты DNS
Инструкции и файлы для МФУ HP OfficeJet Pro 7720 (Принтер/ Копир/ Сканер/Факс: A3 1200x4800dpi 15ppm 256Mb Wi-Fi Ethernet AirPrint USB)
-
Декларация: Многофункциональные устройстваРусский
-
Инструкция: HP OfficeJet Pro 7720Русский2.9 Мб
Нашли ошибку?
Выделите текст с ошибкой и нажмите Ctrl+Enter или
напишите нам
.
Указанное предложение действительно на 28.11.2023