
HP was not wrong with its small printer, without revolutionizing the genre, the HP Deskjet 3700 Series brings a new breath to the printer market with its vivid colors and its shapes while round and modern, which makes the printer easily transportable. Enjoy compact printing performance and independence thanks to wireless operation and print, scan, and copy from practically any mobile device. The world’s smallest all-in-one printer can optionally be purchased with Instant Ink support, fits practically anywhere, and still looks good. For every room and place, this super-compact all-in-one was designed to fit wherever you need it. On the top, there is a black and white LCD screen that provides some practical information such as the ink level or the quality of the Wi-Fi and buttons with a small LED to activate the Wi-Fi, start a copy but also print an information page. HP promises black texts in razor-sharp quality for its black ink. It has a long shelf life, dries well, and is not erasable. It also withstands UV radiation for a long time. HP uses a different chemical principle for the colored inks. They make brilliant photos and graphic prints. On the photo side, the HP Deskjet 3700 Series printer has only two cartridges and this is reflected in the colors which are not perfect but the printing remains generally of good quality. However, you should not be in a hurry to contemplate your photos, printing being extremely long in A4 as in 10 x 15. It takes about 2 minutes for 10 x 15 and 5 to 6 minutes for an A4 photo. A rather basic scanner with a resolution of 600 x 600 but efficient and fast. The copy function is also a good surprise, the quality is excellent but everything is a bit slow. According to the manufacturer, the XL cartridge has a range of approx. 300 pages. This applies to a page coverage of 5% and also depends on the print quality. For those who only print now and then, the standard size of 120 pages can be sufficient. HP Deskjet 3700 Series with its Wi-Fi connectivity, the printer limits cables and is also compatible with AirPrint, Google Cloud Print, and Wifi Direct. Finally, it is also possible to manage your printer with the HP All-in-one Printer Remote application.

HP DeskJet 3700 Manual PDF
Download HP DeskJet 3700 Manual for Windows and macOS
Before downloading the manual, refer to the following operating systems to make sure the HP DeskJet 3700 printer is compatible with your PC or Mac to avoid when installation, installing the driver or using the printer.
Download HP DeskJet 3700 User Guide, Getting Started Guide, and Setup Poster
The manual provided includes all tutorials from beginning to advanced guide to using your printer.
HP DeskJet 3700 Series User Guide
File size: 2.47MB
HP DeskJet 3700 Getting Started Guide
File size: 1.32MB
HP DeskJet 3700 Setup Guide
File size: 0.81MB
Related series: HP DeskJet 2755 Manual
All HP DeskJet 3700 Manuals available for download through the website owned and operated by HP Manual are copyrighted by HP Official or one of the third-party of HP official vendors. customer agrees to the applicable license or other agreement between HP or a third party vendor and the customer.
HP DeskJet
Ink Advantage 3700 All-in-One series
www.hp.com/eu/m/DJIA3775
*J9V87-90006*
*J9V87-90006*
J9V87-90006
Printed in [English]
EN
HR
EL
CS
TR
RO
RU
SK
UK KK
SL
SR
BG
HE
PL
HU
© Copyright 2016 HP Development Company, L.P.
Get started
1. Prepare: Follow the instructions in the setup flyer to begin printer setup.
2. Connect: Visit 123.hp.com/dj3700 to download and run the HP setup software or mobile app, and connect
the printer to your network.
Note: The HP All-in-One Printer Remote app is available on an app store.
Note for Windows® users: You can also use the printer software CD. If the installation program does not
start, browse to Computer, double-click the CD/DVD drive icon with the HP logo, and then double-click
setup.exe.
3. Activate: Create an account or register your printer and finish installing the HP printer software or
HP All-in-One Remote app so you can print and scan.
Need help?
Visit hp.com/support/dj3700 to get more information about how to set up your printer.
Learn more
Electronic Help:
For Windows® users, it is available after you install the HP printer software on your computer.
For OS X users, install the electronic Help by selecting it from the recommended software during the installation
of HP printer software. Learn about product features, printing, troubleshooting, and support. Find notices,
environmental, and regulatory information, including the European Union Regulatory Notice and compliance
statements, in the Technical Information section.
• Windows® 10: Click the Start button, select All apps, select HP, select the icon with the printer name, click
Help, and then click Search HP Help.
• Windows® 8.1: Click the down arrow in the lower left corner of the Start screen, select the icon with the
printer name, click Help, and then click Search HP Help.
• Windows® 8: On the Start screen, right-click an empty area on the screen, click All Apps on the app bar,
select the icon with the printer name, click Help, and then click Search HP Help.
• Windows® 7, Windows Vista®, and Windows® XP: Click the Start button, select All Programs, select HP,
select the folder for the printer, and then select Help.
• OS X Yosemite v10.10 and OS X El Capitan v10.11: Click Help > Mac Help. In the Help Viewer window, type
your printer name in the search field.
• OS X Mavericks v10.9: Click Help > Help Center. In the Help Viewer window, click Help for all your apps,
and then click the Help for your printer.
Readme:
Contains HP support information, operating system requirements, and recent printer updates.
• Windows: Insert the software CD in your computer, and then browse to the ReadMe.chm file. Double-click
ReadMe.chm to open, and then select the ReadMe in your language.
On the Web:
Additional help and information: www.support.hp.com. Printer registration:
www.register.hp.com. Declaration of Conformity: www.hp.eu/certificates. Ink usage:
www.hp.com/go/inkusage.
Scan to find out more!
Standard data rates may apply. Might not be available in all languages.
The information
contained herein
is subject to change
without notice.
English
![]()
HP DeskJet 3700 All-in-One series

Содержание
|
1 Справка HP DeskJet 3700 series ……………………………………………………………………………………………………… |
1 |
|
2 Начало работы ………………………………………………………………………………………………………………………….. |
3 |
|
Компоненты принтера ……………………………………………………………………………………………………………………….. |
4 |
|
Функции панели управления ……………………………………………………………………………………………………………… |
5 |
|
Индикаторы панели управления и состояние значков на экране ………………………………………………………… |
7 |
|
Загрузка бумаги ……………………………………………………………………………………………………………………………….. |
10 |
|
Измените размер бумаги по умолчанию, который был определен принтером …………………………………… |
14 |
|
Основные сведения о бумаге ……………………………………………………………………………………………………………. |
15 |
|
Откройте программное обеспечение принтера HP (Windows) ……………………………………………………………. |
18 |
|
Спящий режим …………………………………………………………………………………………………………………………………. |
19 |
|
Бесшумный режим …………………………………………………………………………………………………………………………… |
20 |
|
Автоотключение ……………………………………………………………………………………………………………………………… |
21 |
|
3 Печать ……………………………………………………………………………………………………………………………………. |
23 |
|
Печать документов ………………………………………………………………………………………………………………………….. |
24 |
|
Печать фотографий …………………………………………………………………………………………………………………………. |
26 |
|
Печать на конвертах ………………………………………………………………………………………………………………………… |
28 |
|
Печать в режиме Максимум dpi ………………………………………………………………………………………………………… |
29 |
|
Печать с мобильных устройств ………………………………………………………………………………………………………… |
31 |
|
Советы по успешной печати …………………………………………………………………………………………………………….. |
32 |
|
4 Использование веб-служб ………………………………………………………………………………………………………….. |
35 |
|
Что такое веб-службы? ……………………………………………………………………………………………………………………. |
36 |
|
Настройка веб-служб ………………………………………………………………………………………………………………………. |
37 |
|
Печать с помощью службы HP ePrint ……………………………………………………………………………………………….. |
38 |
|
Удаление веб-служб ………………………………………………………………………………………………………………………… |
39 |
|
5 Копирование и сканирование ……………………………………………………………………………………………………… |
41 |
|
Копирование документов ………………………………………………………………………………………………………………… |
42 |
|
Сканирование с помощью HP программное обеспечение принтера …………………………………………………… |
43 |
|
Сканирование с помощью функции веб-сканирования …………………………………………………………………….. |
47 |
|
Советы по успешному копированию и сканированию ………………………………………………………………………. |
48 |
|
6 Управление картриджами ………………………………………………………………………………………………………….. |
49 |
|
Проверка приблизительного уровня чернил …………………………………………………………………………………….. |
50 |
|
Заказ расходных материалов …………………………………………………………………………………………………………… |
51 |
|
Замена картриджей …………………………………………………………………………………………………………………………. |
52 |
|
Использование режима одного картриджа ………………………………………………………………………………………. |
54 |
|
Информация о гарантии на картридж ………………………………………………………………………………………………. |
55 |
|
Советы по работе с картриджами …………………………………………………………………………………………………….. |
56 |
|
7 Подключите принтер ………………………………………………………………………………………………………………… |
57 |
|
Подключите принтер к беспроводной сети через маршрутизатор ……………………………………………………. |
58 |
|
Беспроводное подключение к принтеру без использования маршрутизатора ………………………………….. |
61 |
|
Параметры беспроводной связи ………………………………………………………………………………………………………. |
65 |
|
Подключите принтер к компьютеру с помощью USB-кабеля (подключение не по сети) …………………… |
66 |
|
Переход с USB-соединения на подключение по беспроводной сети …………………………………………………. |
67 |
|
Дополнительные средства управления принтером (для сетевых принтеров) …………………………………… |
68 |
|
Советы по настройке и использованию сетевого принтера ……………………………………………………………….. |
70 |
|
8 Решение проблемы …………………………………………………………………………………………………………………… |
71 |
|
Замятие и ошибки подачи бумаги …………………………………………………………………………………………………….. |
72 |
|
Проблемы с картриджем …………………………………………………………………………………………………………………. |
76 |
|
Проблемы печати …………………………………………………………………………………………………………………………….. |
79 |
|
Проблемы копирования …………………………………………………………………………………………………………………… |
88 |
|
Проблемы сканирования …………………………………………………………………………………………………………………. |
89 |
|
Проблемы с сетью и подключением ………………………………………………………………………………………………… |
90 |
|
Аппаратные проблемы принтера ……………………………………………………………………………………………………… |
92 |
|
Коды ошибок и индикаторы состояния контрольной панели …………………………………………………………… |
93 |
|
Служба поддержки HP …………………………………………………………………………………………………………………….. |
97 |
|
Приложение А Техническая информация ………………………………………………………………………………………… |
99 |
|
Уведомления компании HP …………………………………………………………………………………………………………….. |
100 |
|
Технические характеристики …………………………………………………………………………………………………………. |
101 |
|
Соответствие нормам …………………………………………………………………………………………………………………….. |
103 |
|
Программа охраны окружающей среды …………………………………………………………………………………………. |
111 |
|
Указатель …………………………………………………………………………………………………………………………………. |
119 |

1Справка HP DeskJet 3700 series
Получите подробную информацию об использовании HP DeskJet 3700 series.
●Начало работы на стр. 3
●Печать на стр. 23
●Использование веб-служб на стр. 35
●Копирование и сканирование на стр. 41
●Управление картриджами на стр. 49
●Подключите принтер на стр. 57
●Техническая информация на стр. 99
●Решение проблемы на стр. 71
|
2 Глава 1 Справка HP DeskJet 3700 series |
RUWW |

2Начало работы
●Компоненты принтера
●Функции панели управления
●Индикаторы панели управления и состояние значков на экране
●Загрузка бумаги
●Измените размер бумаги по умолчанию, который был определен принтером
●Основные сведения о бумаге
●Откройте программное обеспечение принтера HP (Windows)
●Спящий режим
●Бесшумный режим
●Автоотключение

Компоненты принтера
|
1 |
Направляющая ширины бумаги |
|
2 |
Удлинитель входного лотка |
|
3 |
Входной лоток |
|
4 |
Крышка входного лотка |
|
5 |
Сканер |
|
6 |
Тракт сканирования |
|
7 |
Индикатор сканирования |
|
8 |
Панель управления |
|
9 |
Крышка доступа к картриджам |
|
10 |
Картриджи |
|
11 |
Выходной лоток |
|
12 |
Удлинитель выходного лотка (также называется удлинителем лотка) |
|
13 |
Ограничитель бумаги |
|
14 |
Разъем питания |
|
15 |
Порт USB |
|
4 Глава 2 Начало работы |
RUWW |
Функции панели управления
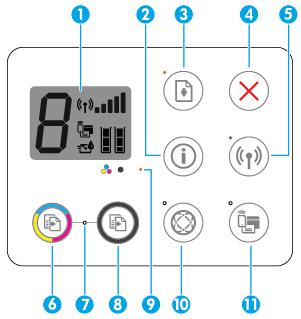
Обзор кнопок и индикаторов
|
Функция |
Описание |
|
1 |
Дисплей панели управления : обозначает число копий, ошибки с носителями, ошибки |
|
беспроводного подключения и уровень сигнала, состояние Wi-Fi Direct и уровень чернил. |
|
|
2 |
Кнопка Информация : используется для печати страницы со сведениями о принтере. Нажмите эту |
|
кнопку одновременно с кнопкой Беспроводное соединение или Wi-Fi Direct , чтобы распечатать |
|
|
страницы с подробной информацией о функциях этих кнопок. |
|
|
3 |
Кнопка Возобновить : используется для возобновления задания печати (например, после загрузки |
|
бумаги или устранения замятия). |
|
|
Индикатор Возобновить : оповещает о наличии проблемы в работе принтера или ошибки. |
|
|
Дополнительную информацию см. в разделе Коды ошибок и индикаторы состояния контрольной |
|
|
панели на стр. 93. |
|
|
4 |
Кнопка Отмена . Останавливает текущую операцию. |
|
5 |
Кнопка Беспроводное соединение : используется для включения и отключения функции |
|
беспроводной связи принтера. |
|
|
Индикатор Беспроводное соединение : показывает, что принтер подключен к беспроводной сети. |
|
|
6 |
Кнопка Запуск цветного копирования : используется для запуска цветного копирования. Для |
|
увеличения количества цветных копий следует быстро нажать эту кнопку несколько раз. |
|
|
7 |
Индикатор Зап. копир.: Мигающий индикатор указывает на то, что кнопки Запуск цветного |
|
копирования и Запуск черно-белого копирования готовы к использованию. |
|
|
8 |
Кнопка Запуск черно-белого копирования : Запуск черно-белого копирования. Для увеличения |
|
количества черно-белых копий следует быстро нажать эту кнопку несколько раз. |
|
|
9 |
Индикатор Предупреждение о чернилах : Сигнализирует о низком уровне чернил или проблемах с |
|
картриджем. Дополнительную информацию см. в разделе Коды ошибок и индикаторы состояния |
|
|
контрольной панели на стр. 93. |
|
|
RUWW |
Функции панели управления 5 |
|
Функция |
Описание |
|
10 |
Кнопка Веб-службы : Печатает страницу диагностики для поиска и устранения неполадок с Веб- |
|
службы, если мигает индикатор Веб-службы . |
|
|
Индикатор Веб-службы : Мигающий индикатор указывает на наличие проблемы подключения к |
|
|
Веб-службы. |
|
|
11 |
Кнопка Wi-Fi Direct : включение и выключение функции Wi-Fi Direct. |
|
Индикатор Wi-Fi Direct : показывает, что функция Wi-Fi Direct включена. |
|
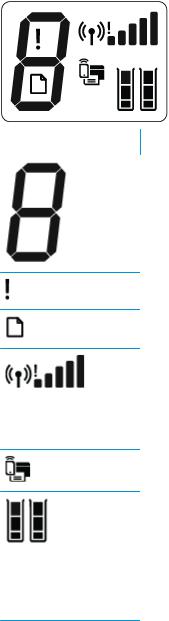
Значки на дисплее панели управления
|
Значок |
Описание |
|
Значок Количество копий : обозначает число копий при копировании документов. Его значение |
|
|
попеременно меняется с буквы «Е» на соответствующую цифру при наличии ошибки в работе |
|
|
принтера. |
Значок Ошибка : указывает на ошибку.
Значок Проблема с бумагой : указывает на наличие ошибки, связанной с бумагой.
Значки состояния Беспроводное соединение : указывают на состояние беспроводного соединения принтера.
Для отображение состояния беспроводной связи используются три значка: Беспроводное соединение ( ), Проблема с беспроводным соединением (
 ) и Уровень сигнала (
 ).
).
Значок Wi-Fi Direct : указывает, что функция Wi-Fi Direct включена либо выполняется подключение.
Значки Уровень чернил : левый значок обозначает приблизительный уровень чернил в трехцветном картридже, а правый значок обозначает приблизительный уровень чернил в черном картридже.
ПРИМЕЧАНИЕ. Предупреждения и индикаторы уровней чернил предоставляют приблизительные значения, предназначенные только для планирования. При получении сообщения о низком уровне чернил подготовьте для замены новый картридж, чтобы избежать возможных задержек при печати. Картридж можно заменить, когда качество печати станет неприемлемым.
|
6 Глава 2 Начало работы |
RUWW |
![]()
Индикаторы панели управления и состояние значков на экране
Индикатор кнопки Характеристики
●
|
Состояние |
Описание |
|
|
Светится |
Принтер включен. |
|
|
Выкл |
Питание принтера выключено. |
|
|
Светится тусклым светом |
Принтер находится в спящем режиме. Принтер автоматически переходит в спящий режим |
|
|
после пяти минут бездействия. |
||
|
Мигает |
Принтер обрабатывает задание. Чтобы отменить задание, нажмите кнопку Отмена ( |
). |
|
Быстро мигает |
Если крышка доступа к картриджам открыта, закройте ее. Если крышка доступа к |
|
|
картриджу закрыта, а индикатор часто мигает, в работе принтера произошла ошибка, |
||
|
которую можно устранить, следуя инструкциям на экране. Если на экране нет сообщений, |
||
|
попробуйте напечатать документ, чтобы появилось сообщение. |
||
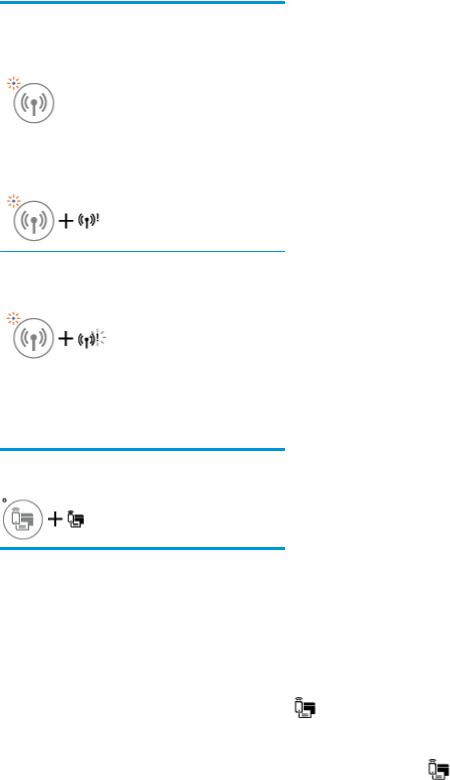
Индикатор и значки Беспроводное соединение
●Индикатор Беспроводное соединение рядом с кнопкой Беспроводное соединение ( ) и
) и
значки состояния беспроводного подключения на экране панели управления указывают на состояние беспроводного подключения.
|
Состояние |
Описание |
|
Индикатор Беспроводное соединение , значок |
Принтер подключен к беспроводной сети. |
|
Беспроводное соединение и значок Уровень сигнала |
|
|
горят. |
|
Индикатор Беспроводное соединение не горит. |
Беспроводная связь отключена. Чтобы включить |
|
|
беспроводную связь, нажмите кнопку Беспроводное |
||
|
соединение ( |
). |
|
|
Индикатор Беспроводное соединение мигает, значок |
Принтер подключается к беспроводной сети либо |
|
|
Беспроводное соединение горит, значок Уровень сигнала |
находится в режиме Wi-Fi Protected Setup (WPS). |
|
|
отображается. |
||
|
RUWW |
Индикаторы панели управления и состояние значков на экране |
7 |
|
Состояние |
Описание |
|
Индикатор Беспроводное соединение мигает в течение |
Беспроводная связь отключена. |
|
трех секунд и гаснет. |
Измените параметры беспроводного подключения. |
|
Дополнительную информацию см. в разделе Параметры |
|
|
беспроводной связи на стр. 65. |
|
|
Индикатор Беспроводное соединение мигает, значки |
Беспроводной сигнал отсутствует. |
|
Беспроводное соединение и Проблема с беспроводным |
— Убедитесь, что беспроводной маршрутизатор или |
|
соединением горят. |
|
|
точка доступа включены. |
|
|
— Разместите принтер ближе к беспроводному |
|
|
маршрутизатору. |
Индикатор Беспроводное соединение мигает, значок Беспроводное соединение горит, значок Проблема с беспроводным соединением мигает.
Могло произойти одно из указанных ниже событий.
—Принтеру не удалось подключиться к беспроводной сети.
—При использовании WPS возникает ошибка или регистрируется наложение сеансов.
Одновременно нажмите кнопки Беспроводное соединение ( ) и Информация (
 ), чтобы
запустить проверку состояния беспроводного подключения, а затем ознакомьтесь с полученным отчетом, чтобы устранить проблему.
Индикатор и значок Wi-Fi Direct .
●
|
Состояние |
Описание |
||
|
Индикатор и значок Wi-Fi Direct горят. |
Функция Wi-Fi Direct включена и готова к использованию. |
||
|
Информацию о том, как подключить принтер с помощью |
|||
|
Wi-Fi Direct, см. в разделе Беспроводное подключение к |
|||
|
принтеру без использования маршрутизатора на стр. 61. |
|||
|
Индикатор и значок Wi-Fi Direct не горят. |
Функция Wi-Fi Direct отключена. |
||
|
Чтобы включить Wi-Fi Direct, нажмите кнопку Wi-Fi Direct |
|||
|
( |
). |
||
|
Индикатор Wi-Fi Direct мигает. |
Принтер устанавливает соединение с мобильным |
||
|
устройством в режиме Wi-Fi Protected Setup (WPS). |
|||
|
Нажмите кнопку Wi-Fi Direct ( |
), чтобы завершить |
||
|
процесс подключения. |
|||
|
8 Глава 2 Начало работы |
RUWW |

|
Состояние |
Описание |
|
Индикатор Wi-Fi Direct мигает в течение трех секунд, а |
Установлено максимальное число подключений Wi-Fi |
|
затем горит постоянно. |
Direct. Другое устройство пытается подключиться к |
|
принтеру посредством Wi-Fi Direct. |
|
|
Индикатор Wi-Fi Direct мигает часто в течение трех секунд |
Функция Wi-Fi Direct отключена. За дополнительной |
|
и гаснет. |
информацией обращайтесь к специалисту, выполнившему |
|
настройку принтера. |
|
Индикатор Веб-службы
●
|
Состояние |
Описание |
|
|
Индикатор Веб-службы светится белым. |
Функция Веб-службы включена и готова к использованию. |
|
|
Дополнительную информацию о функции Веб-службы см. |
||
|
в разделе Использование веб-служб на стр. 35. |
||
|
Индикатор Веб-службы не горит. |
Функция Веб-службы не зарегистрирована. |
|
|
Информацию об регистрации Веб-служб см. в разделе |
||
|
Настройка веб-служб на стр. 37. |
||
|
Индикатор Веб-службы мигает белым. |
Функция Веб-службы зарегистрирована, но возникла |
|
|
проблема с подключением. |
||
|
Нажмите кнопку Веб-службы ( |
), чтобы напечатать |
|
|
страницу диагностики, затем следуйте приведенным |
||
|
инструкциям. |
||
|
Индикатор Веб-службы мигает желтым. |
Функция Веб-службы включена, но задание |
|
|
приостановлено из-за ошибки. |
||
|
Нажмите кнопку Веб-службы ( |
), чтобы напечатать |
|
|
страницу диагностики, затем следуйте приведенным |
||
|
инструкциям. |
||
|
RUWW |
Индикаторы панели управления и состояние значков на экране |
9 |
Загрузка бумаги
Для продолжения выберите размер бумаги.
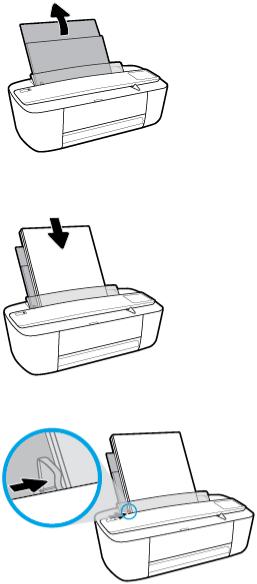
Загрузка полноразмерной бумаги
1.Поднимите входной лоток и удлинитель входного лотка.
2.Поместите стопку бумаги во входной лоток коротким краем вниз и стороной для печати вверх. Сдвиньте стопку бумаги вперед до упора.
3.Сдвиньте направляющую ширины бумаги вправо так, чтобы она плотно прилегала к краю бумаги.
|
10 Глава 2 Начало работы |
RUWW |
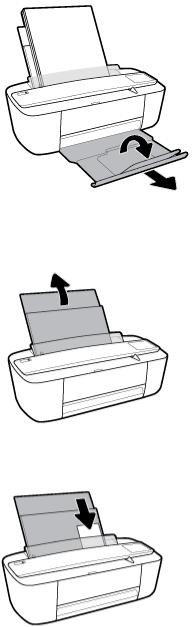
4.Извлеките выходной лоток и удлинитель выходного лотка, а затем поднимите ограничитель бумаги.
Загрузка бумаги небольшого размера
1.Поднимите входной лоток и удлинитель входного лотка.
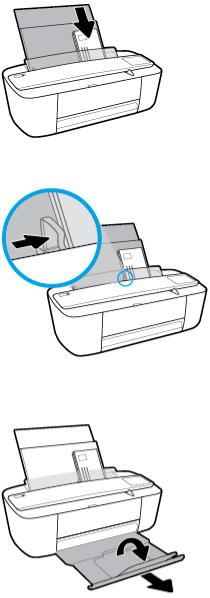
2.Поместите стопку фотобумаги в крайний правый угол входного лотка коротким краем вниз и стороной для печати вверх. Сдвиньте стопку фотобумаги вниз до упора.

3.Сдвиньте направляющую ширины бумаги вправо так, чтобы она плотно прилегала к краю бумаги.
4.Извлеките выходной лоток и удлинитель выходного лотка, а затем поднимите ограничитель бумаги.
Загрузка конвертов
1.Поднимите входной лоток и удлинитель входного лотка.
|
12 Глава 2 Начало работы |
RUWW |
2.Поместите один или несколько конвертов в правый дальний угол входного лотка и сдвиньте стопку конвертов вниз до упора. Сторона для печати должна быть расположена сверху.
3.Переместите направляющую ширины бумаги вплотную к стопке конвертов.
4.Извлеките выходной лоток и удлинитель выходного лотка, а затем поднимите ограничитель бумаги.
Измените размер бумаги по умолчанию, который был определен принтером
Принтер может автоматически определять, загружена ли бумага во входной лоток и каков ее размер (большой, средний, маленький). Размер бумаги по умолчанию (большой, средний или маленький), определяемый принтером, можно изменить.
Изменение размера бумаги по умолчанию, определяемого принтером
1.Откройте встроенный веб-сервер (EWS). Дополнительная информация: Откройте встроенный вебсервер на стр. 68.
2.Перейдите на вкладку Параметры.
3.В разделе Параметры щелкните Управление лотком и бумагой, а затем выберите необходимый параметр.
4.Нажмите кнопку Применить.
|
14 Глава 2 Начало работы |
RUWW |

Основные сведения о бумаге
Принтер хорошо работает практически с любым видом офисной бумаги. Перед закупкой больших партий бумаги попробуйте различные типы носителей. Оптимальное качество печати достигается при использовании бумаги компании HP. Подробнее о бумаге HP см. на веб-сайте компании HP по адресу www.hp.com .
Компания HP рекомендует использовать для повседневной печати документов обычную бумагу с логотипом ColorLok. Вся бумага с логотипом ColorLok проходит независимую проверку на соответствие высоким стандартам качества печати и надежности, позволяет получать документы с четкими и яркими цветами, более насыщенным черным и высыхает быстрее стандартной обычной бумаги. Бумага с логотипом ColorLok поставляется крупнейшими производителями бумаги с различными показателями плотности и размера.
Этот раздел содержит указанные ниже темы.
●Типы бумаги, рекомендуемые для печати
●Заказ бумаги и других расходных материалов HP
Типы бумаги, рекомендуемые для печати
Для обеспечения наилучшего качества печати компания HP рекомендует использовать бумагу HP, которая создана специально для различных заданий печати.
В зависимости от страны (региона) некоторые типы бумаги могут быть недоступны.
Фотопечать
●Фотобумага HP высшего качества
Фотобумага HP высшего качества обеспечит наилучшее качество фотографий. Используя фотобумагу HP высшего качества, вы сможете печатать качественные быстросохнущие фотографии, которыми можно поделиться сразу после печати. Доступны различные размеры бумаги, в том числе A4, 8,5 x 11 дюймов 216 x 279 мм, 4 x 6 дюймов 10 x 15 см, 5 x 7 дюймов
13 x 18 см, а также различные покрытия — глянцевое и полуглянцевое (полуматовое). Эта бумага идеально подходит для того, чтобы вставлять ваши фотографии и специальные фотопроекты в рамки, демонстрировать и дарить их. Фотобумага HP высшего качества — это отличный результат, профессиональное качество и долговечность.
●Улучшенная фотобумага HP
Эта глянцевая фотобумага имеет специальное покрытие, обеспечивающее мгновенное высыхание чернил и исключающее смазывание изображений. Эта бумага устойчива к воздействию воды, загрязнений, отпечатков пальцев и влажности. Напечатанные на этой бумаге изображения выглядят как профессионально отпечатанные фотографии. Доступны различные размеры бумаги, в том числе A4, 8,5 x 11 дюймов 216 x 279 мм, 4 x 6 дюймов 10 x 15 см и
5 x 7 дюймов 13 x 18 см. Бумага не содержит кислот, что позволяет получать более долговечные фотографии.
●Фотобумага HP для повседневного использования
Эта бумага предназначена для экономичной повседневной печати полноцветных фотографий на обычной фотобумаге. Кроме того, эта доступная фотобумага быстро высыхает, что облегчает работу с ней. При использовании этой бумаги на любом струйном принтере будут получаться
|
RUWW |
Основные сведения о бумаге 15 |
четкие и резкие изображения. Доступны различные размеры бумаги глянцевого покрытия, в том числе A4, 8,5 x 11 дюймов 216 x 279 мм, 5 x 7 дюймов 13 x 18 см и 4 x 6 дюймов 10 x 15 см. Бумага не содержит кислот, что позволяет получать более долговечные фотографии.
●Экономичные пакеты фотоматериалов HP
В экономичных пакетах фотоматериалов HP содержатся оригинальные картриджи HP и улучшенная фотобумага HP. Это позволяет сэкономить время и гарантированно получать при печати доступные профессиональные фотографии с помощью принтера HP. Оригинальные чернила HP и улучшенная фотобумага HP специально разработаны для совместного использования, что позволяет получать долговечные и яркие фотографии. Такой набор идеально подходит для печати всех отпускных фотографий или большого количества копий фотографий.
Деловые документы
●Бумага HP повышенного качества для презентаций, мат. 120 г, или Профессиональная бумага
HP, мат. 120 г
Этот тип бумаги представляет собой плотную двустороннюю бумагу, идеально подходящую для печати презентаций, предложений, отчетов и информационных бюллетеней. Большая плотность придает им выразительный внешний вид.
●Бумага HP для брошюр, глянц. 180 г или Профессиональная бумага HP, глянц. 180 г
Эти типы бумаги имеют глянцевое покрытие с обеих сторон, что делает их подходящими для двусторонней печати. Этот тип бумаги обеспечивает качество, близкое к фотографическому, и наиболее подходит для воспроизведения изображений и деловой графики для обложек отчетов, специальных презентаций, брошюр, почтовой корреспонденции и календарей.
●Бумага HP для брошюр, мат. 180 г или Профессиональная бумага HP, мат. 180 г
Эти типы бумаги имеют матовое покрытие с обеих сторон, что делает их подходящими для двусторонней печати. Этот тип бумаги обеспечивает качество, близкое к фотографическому, и наиболее подходит для воспроизведения изображений и деловой графики для обложек отчетов, специальных презентаций, брошюр, почтовой корреспонденции и календарей.
Повседневная печать
Все типы бумаги предназначены для ежедневной печати, для их производства используется технология ColorLok, которая снижает вероятность появления пятен и обеспечивает насыщенный черный цвет и яркие другие цвета.
●Ярко-белая бумага HP для струйной печати и Цветная бумага для струйной печати HP
Ярко-белая бумага для струйной печати и Цветная бумага для струйной печати HP обеспечивают высокую контрастность цветов и четкость текста. Они достаточно непрозрачные, подходят для двусторонней цветной печати и не просвечивают, что делает их наиболее подходящими для создания газет, отчетов и рекламных листков.
●Универсальная бумага HP
Универсальная бумага HP — это бумага высокого качества, которая предназначена для выполнения различных задач. При печати на этой бумаге документы имеют более качественный вид по сравнению с обычной или копировальной бумагой. Бумага не содержит кислот, что позволяет получать более долговечные фотографии.
●Бумага HP для офиса, а также для копирования или копирования и печати
|
16 Глава 2 Начало работы |
RUWW |
Такие виды высококачественной бумаги HP предназначены для выполнения различных задач и подходят для печати копий, черновиков, заметок и других повседневных документов. Бумага не содержит кислот, что позволяет получать более долговечные документы.
●Офисная бумага HP из макулатуры
Офисная бумага HP из макулатуры представляет собой высококачественную бумагу для широкого набора задач, содержащую 30 % вторичного волокна.
Заказ бумаги и других расходных материалов HP
Принтер хорошо работает практически с любым видом офисной бумаги. Оптимальное качество печати достигается при использовании бумаги компании HP.
Бумагу и расходные материалы HP можно заказать по адресу: www.hp.com . В настоящее время некоторые разделы веб-сайта HP доступны только на английском языке.
Компания HP рекомендует использовать для повседневной печати и копирования документов обычную бумагу с логотипом ColorLok. Все типы бумаги с логотипом ColorLok проходят независимые испытания на соответствие высоким стандартам надежности и качества печати. Отпечатки на этой бумаге отличаются высокой контрастностью, яркостью цветов и насыщенными оттенками черного. Кроме того, они высыхают быстрее, чем документы, напечатанные на стандартных типах обычной бумаги. Бумага с логотипом ColorLok поставляется крупнейшими производителями бумаги с различными показателями плотности и размера.
|
RUWW |
Основные сведения о бумаге 17 |
Откройте программное обеспечение принтера HP (Windows)
После установки программного обеспечения для принтера HP дважды щелкните значок принтера на рабочем столе или выполните одно из следующих действий, чтобы открыть программное обеспечение принтера.
●Windows 10. На рабочем столе компьютера щелкните Пуск, Все приложения, HP. Выберите папку принтера и значок с именем принтера.
●Windows 8.1. Щелкните стрелку вниз в левом нижнем углу начального экрана и выберите название принтера.
●Windows 8. На начальном экране щелкните правой кнопкой мыши пустое пространство, на панели приложений щелкните Все приложения и выберите название принтера.
●Windows XP, Windows Vista и Windows 7. На рабочем столе компьютера щелкните Пуск, Все программы, HP. Выберите папку принтера и значок с именем принтера.
|
18 Глава 2 Начало работы |
RUWW |
Спящий режим
●В спящем режиме расход электроэнергии снижается.
●После начальной настройки принтер автоматически переходит в спящий режим после 5 минут бездействия.
Изменение времени перехода в спящий режим
1.Откройте встроенный веб-сервер (EWS). Дополнительная информация: Откройте встроенный вебсервер на стр. 68.
2.Перейдите на вкладку Параметры.
3.В разделе Управление питанием нажмите Энергосберегающий режим и выберите необходимый параметр.
4.Нажмите кнопку Применить.

Бесшумный режим
В бесшумном режиме скорость печати замедляется, чтобы снизить общий уровень шума без ухудшения качества печати. Печать в бесшумном режиме возможна только при использовании Обычного качества печати и простой бумаги. Чтобы снизить шум при печати, включите бесшумный режим. Чтобы выполнить печать на обычной скорости, выключите бесшумный режим. По умолчанию бесшумный режим выключен.
 ПРИМЕЧАНИЕ. При выполнении печати на простой бумаге в бесшумном режиме с качеством печати Черновая печать или Высокое либо при печати фотографий или конвертов принтер работает так, как если бы бесшумный режим был выключен.
Включение и выключение бесшумного режима с помощью программного обеспечения принтера (Windows)
1.Откройте программное обеспечение принтера HP. Дополнительную информацию см. в разделе Откройте программное обеспечение принтера HP (Windows) на стр. 18.
2.Перейдите на вкладку Бесшумный режим
3.Нажмите Вкл. или Выкл.
4.Щелкните Сохранить параметры.
Включение и выключение бесшумного режима с помощью программного обеспечения принтера (OS X)
1.Запустите программу Утилита HP.
 ПРИМЕЧАНИЕ. Утилита HP Utility расположена в папке HP в папке Приложения.
2.Выберите принтер.
3.Выберите Тихий режим .
4.Выберите Вкл или Выкл .
5.Нажмите кнопку Применить сейчас.
Включение и выключение бесшумного режима с помощью встроенного веб-сервера (EWS)
1.Откройте встроенный веб-сервер. Дополнительную информацию см. в разделе Откройте встроенный веб-сервер на стр. 68.
2.Перейдите на вкладку Параметры.
3.В разделе Параметры выберите пункт Бесшумный режим, а затем нажмите Вкл. или Выкл.
4.Нажмите кнопку Применить.
|
20 Глава 2 Начало работы |
RUWW |
Автоотключение
Эта функция используется для отключения принтера после 2 часов бездействия для уменьшения расхода электроэнергии. Функция Автоотключение полностью выключает принтер. Чтобы снова включить его, необходимо нажать кнопку питания. Если используемый принтер поддерживает функцию экономии расхода энергии, Автоотключение автоматически включается или выключается в зависимости от возможностей принтера и параметров подключения. Даже если функция Автоотключение не работает, принтер переходит в спящий режим автоматически после 5 минут бездействия для уменьшения расхода электроэнергии.
●Функция Автоотключение активируется при включении принтера, если он не оснащен сетевыми функциями или средствами работы с факсом либо не использует эти возможности.
●Автоотключение отключается, когда включена функция беспроводной связи принтера или функция Wi-Fi Direct. Либо, когда принтер, поддерживающий работу с факсом, через USBсоединение или подключение по сети Ethernet, устанавливает подключение с факсом, USBсоединение или подключение по сети Ethernet.
|
22 Глава 2 Начало работы |
RUWW |

3Печать
●Печать документов
●Печать фотографий
●Печать на конвертах
●Печать в режиме Максимум dpi
●Печать с мобильных устройств
●Советы по успешной печати

Печать документов
Перед печатью документов убедитесь, что во входном лотке есть бумага, а выходной лоток открыт. Дополнительную информацию о загрузке бумаги см. в разделе Загрузка бумаги на стр. 10.
Печать документа (Windows)
1.В используемой программе выберите Печать.
2.Убедитесь, что выбран принтер нужной модели.
3.Щелкните кнопку, с помощью которой открывается диалоговое окно Свойства.
В зависимости от используемой программы эта кнопка может называться Свойства, Параметры,
Настройка принтера, Свойства принтера, Принтер или Предпочтения.
4.Выберите соответствующие параметры на вкладке Профиль печати.
Изменить значения других настроек печати можно на дополнительных вкладках.
Дополнительные советы см. в разделе Советы по успешной печати на стр. 32.
 ПРИМЕЧАНИЕ. При изменении размера бумаги убедитесь, что во входной лоток загружена бумага соответствующего размера.
5.Щелкните ОК, чтобы закрыть диалоговое окно Свойства.
6.Щелкните Печать или ОК, чтобы начать печать.
Печать документов в (OS X)
1.В меню Файл программного обеспечения выберите Печать.
2.Убедитесь, что выбран принтер нужной модели.
3.Задайте параметры печати.
Если на диалоговом окне печати не отображаются параметры, щелкните Показать сведения.
● В меню Размер бумаги выберите соответствующий размер бумаги.
 ПРИМЕЧАНИЕ. После изменения формата бумаги убедитесь, что загрузили бумагу соответствующего размера.
●Выберите ориентацию.
●Введите процентное значение масштаба.
4.Щелкните Печать.
Печать на обеих сторонах листа (Windows)
1.В используемой программе выберите Печать.
2.Убедитесь, что выбран этот принтер.

3.Щелкните кнопку, с помощью которой открывается диалоговое окно Свойства.
В зависимости от используемой программы эта кнопка может называться Свойства, Параметры,
Настройка принтера, Свойства принтера, Принтер или Предпочтения.
4.На вкладке Профиль печати выберите профиль Двусторонней печати.
Изменить значения других настроек печати можно на дополнительных вкладках.
Дополнительные советы см. в разделе Советы по успешной печати на стр. 32.
 ПРИМЕЧАНИЕ. При изменении размера бумаги убедитесь, что во входной лоток загружена бумага соответствующего размера.
5.По завершении печати первой стороны следуйте инструкциям на экране, чтобы заново вставить бумагу, затем щелкните Продолжить.
6.Для печати щелкните ОК.
Печать на обеих сторонах листа (OS X)
1.В меню Файл программного обеспечения выберите Печать.
2.В диалоговом окне печати на панели Работа с бумагой для параметра Порядок страниц выберите значение Обычный.
3.Для параметра Страницы для печати выберите значение Только нечетные.
4.Щелкните Печать.
5.После печати всех нечетных страниц документа извлеките документ из выходного лотка.
6.Снова загрузите документ в принтер стороной, которая вышла первой из принтера, и чистой стороной в сторону передней части принтера.
7.В диалоговом окне печати вернитесь к панели Работа с бумагой, выберите значение Обычный для параметра Порядок страниц и значение Только четные для параметра Страницы для печати.
8.Щелкните Печать.
|
RUWW |
Печать документов 25 |

Печать фотографий
Перед печатью фотографий убедитесь, что во входном лотке есть фотобумага, а выходной лоток открыт. Дополнительную информацию о загрузке бумаги см. в разделе Загрузка бумаги на стр. 10.
Печать фотографий на фотобумаге (Windows)
1.В используемой программе выберите Печать.
2.Убедитесь, что выбран принтер нужной модели.
3.Щелкните кнопку, с помощью которой открывается диалоговое окно Свойства.
В зависимости от используемой программы эта кнопка может называться Свойства, Параметры,
Настройка принтера, Свойства принтера, Принтер или Предпочтения.
4.Выберите соответствующие параметры на вкладке Профиль печати.
Изменить значения других настроек печати можно на дополнительных вкладках.
Дополнительные советы см. в разделе Советы по успешной печати на стр. 32.
 ПРИМЕЧАНИЕ. При изменении размера бумаги убедитесь, что во входной лоток загружена бумага соответствующего размера.
5.Щелкните ОК, чтобы вернуться в диалоговое окно Свойства.
6.Щелкните ОК, а затем выберите Печать или ОК в диалоговом окне Печать.
 ПРИМЕЧАНИЕ. После завершения печати удалите неиспользованную фотобумагу из входного лотка. Храните бумагу таким образом, чтобы исключить ее скручивание, иначе это приведет к снижению качества печати.
Печать фотографии с компьютера (OS X)
1.В меню Файл программного обеспечения выберите Печать.
2.Убедитесь, что выбран принтер нужной модели.
3.Задайте параметры печати.
Если на диалоговом окне печати не отображаются параметры, щелкните Показать сведения.
● В меню Размер бумаги выберите соответствующий размер бумаги.
 ПРИМЕЧАНИЕ. После изменения формата бумаги убедитесь, что загрузили бумагу соответствующего размера.
●Выберите ориентацию.
4.В меню программы выберите Тип бумаги/Качество, затем выберите следующие параметры.
●Тип бумаги. Соответствующий тип фотобумаги.
●Качество. Выберите параметр, который обеспечит наилучшее качество печати или максимальное разрешение.
●Щелкните треугольник раскрытия Параметры цвета и выберите подходящие параметры функции Исправить фото.
—Выкл.: изменения к изображению не применяются.
—Вкл. выполняется автоматическая фокусировка изображения. Средняя настройка резкости изображения.
5.Выберите требуемые значения других параметров печати и щелкните ОК.
|
RUWW |
Печать фотографий 27 |

Печать на конвертах
Перед печатью конвертов убедитесь, что во входном лотке есть конверты, а выходной лоток открыт. Во входной лоток принтера можно загрузить один или несколько конвертов. Не используйте глянцевые или тисненые конверты, а также конверты с застежками или окнами. Дополнительную информацию о загрузке конвертов см. в разделе Загрузка бумаги на стр. 10.
 ПРИМЕЧАНИЕ. Подробные сведения о форматировании текста для печати на конвертах см. в справочной системе текстового процессора.
Печать на конверте (Windows)
1.В используемой программе выберите Печать.
2.Убедитесь, что выбран принтер нужной модели.
3.Щелкните кнопку, с помощью которой открывается диалоговое окно Свойства.
В зависимости от используемой программы эта кнопка может называться Свойства, Параметры,
Настройка принтера, Свойства принтера, Принтер или Предпочтения.
4.Выберите соответствующие параметры.
● На вкладке Макет выберите ориентацию страницы: Книжная или Альбомная.
●На вкладке Бумага/Качество в разделе Выбор лотка выберите соответствующий тип бумаги в раскрывающемся списке Носитель. После этого укажите качество печати в разделе
Параметры качества и цвет в разделе Цвет.
●Нажмите Дополнительно и в раскрывающемся списке Размер бумаги выберите необходимый размер конвертов.
5.Щелкните ОК, а затем выберите Печать или ОК в диалоговом окне Печать.
Печать на конвертах (OS X)
1.В меню Файл программного обеспечения выберите Печать.
2.Убедитесь, что выбран принтер нужной модели.
3.Выберите подходящий размер конверта в меню Размер бумаги.
Если на диалоговом окне печати не отображаются параметры, щелкните Показать сведения.
 ПРИМЕЧАНИЕ. После изменения формата бумаги убедитесь, что загрузили бумагу соответствующего размера.
4.Во всплывающем меню выберите Тип бумаги/Качество и убедитесь, что выбран тип бумаги
Обычная бумага.
5.Щелкните Печать.

Печать в режиме Максимум dpi
Используйте режим максимального разрешения (макс. количество точек на дюйм) для печати высококачественных четких изображений на фотобумаге.
Печать в режиме максимального разрешения выполняется дольше, чем в других режимах, а также требует большего объема дискового пространства.
Список поддерживаемых разрешений печати см. на веб-сайте технической поддержки по адресу www.hp.com/support.
Печать в режиме максимального разрешения (Windows)
1.В используемой программе выберите Печать.
2.Убедитесь, что выбран принтер нужной модели.
3.Щелкните кнопку, с помощью которой открывается диалоговое окно Свойства.
В зависимости от используемой программы эта кнопка может называться Свойства, Параметры,
Настройка принтера, Свойства принтера, Принтер или Предпочтения.
4.Щелкните вкладку Бумага/Качество.
5.Выберите подходящий тип бумаги в раскрывающемся списке Носители.
6.Щелкните кнопку Дополнительно.
7.В раскрывающемся списке Размер бумаги выберите размер бумаги.
8.В области Параметры принтера выберите Да в списке Печать с максимальным разрешением.
9.Чтобы закрыть дополнительные параметры, щелкните ОК.
10.На вкладке Макет подтвердите значение параметра Ориентация и щелкните ОК, чтобы начать печать.
Печать с максимальным разрешением (OS X)
1.В меню Файл программного обеспечения выберите Печать.
2.Убедитесь, что выбран принтер нужной модели.
3.Задайте параметры печати.
Если на диалоговом окне печати не отображаются параметры, щелкните Показать сведения.
● В меню Размер бумаги выберите соответствующий размер бумаги.
 ПРИМЕЧАНИЕ. При изменении размера бумаги убедитесь, что загружена бумага соответствующего размера.
● Выберите ориентацию.
4.В меню программы выберите Тип бумаги/Качество, затем выберите следующие параметры.
|
RUWW |
Печать в режиме Максимум dpi 29 |
●Тип бумаги. Требуемый тип фотобумаги.
●Качество. Максимальное разрешение
5.Выберите требуемые значения других параметров печати и щелкните Печать.

Печать с мобильных устройств
Вы можете печатать документы и фотографии напрямую с ваших мобильных устройств, включая устройства iOS, Android, Windows Mobile, Chromebook и Amazon Kindle.
Как печатать с мобильных устройств
1.Убедитесь, что принтер подключен к той же сети, что и мобильное устройство.
2.Включите печать на мобильном устройстве:
●iOS: Используйте пункт Печать из меню Поделиться. Дополнительной настройки не требуется, приложение iOS AirPrint уже установлено.
 ПРИМЕЧАНИЕ. На устройствах под управлением iOS 4.2 и более поздних версий приложение AirPrint уже установлено.
●Android: Загрузите «Подключаемый модуль для печати HP» (поддерживается большинством устройств на Android) из Google Play и активируйте его на устройстве.
 ПРИМЕЧАНИЕ. Устройства под управлением Android 4.4 или более поздних версий поддерживаются «Подключаемым модулем для печати HP». На устройствах под управлением Android 4.3 или более ранних версий можно осуществлять печать с помощью приложения HP ePrint, которое можно загрузить из магазина Google Play.
●Windows Mobile: Коснитесь Печать в меню Устройство. Дополнительной настройки не требуется, поскольку программное обеспечение уже установлено.
 ПРИМЕЧАНИЕ. Если вашего принтера нет в списке, может потребоваться однократная настройка принтера с помощью мастера установки принтера.
●Chromebook: Загрузите и установите приложение HP Print для Chrome из интернет-магазина Chrome, чтобы активировать печать по Wi-Fi и USB.
●Amazon Kindle Fire HD9 и HDX: Когда вы первый раз нажимаете Печать на вашем устройстве, «Подключаемый модуль для печати HP» автоматически загружается, позволяя печатать с мобильного устройства.
 ПРИМЕЧАНИЕ. Подробную информацию о включении мобильной печати на ваших мобильных устройствах см. на веб-сайте www.hp.com/go/mobileprinting. Если локальная версия сайта для вашей страны, региона или языка недоступна, вы будете перенаправлены на веб-сайт о возможностях мобильной печати для другой страны, региона или на другом языке.
3.Убедитесь, что загруженная бумага соответствует параметрам принтера (подробнее см. Загрузка бумаги на стр. 10). Установка точного размера загруженной бумаги позволяет мобильному устройству определить, на какой бумаге будет выполнена печать.
|
RUWW |
Печать с мобильных устройств 31 |
Советы по успешной печати
Для обеспечения успешной печати картриджи HP должны работать правильно и иметь достаточное количество чернил, бумага должна быть загружена верно, а также должны быть установлены соответствующие параметры устройства.
Параметры печати не применяются к копированию и сканированию.
Советы по картриджам
●Используйте оригинальные картриджи HP.
●Должны быть установлены оба картриджа: черный и трехцветный.
Дополнительную информацию см. в разделе Замена картриджей на стр. 52.
●Следите за приблизительным уровнем чернил в картриджах. В картриджах должно быть достаточно чернил.
Дополнительную информацию см. в разделе Проверка приблизительного уровня чернил на стр. 50.
●Если качество печати оставляет желать лучшего, см. раздел Проблемы печати на стр. 79.
Советы по загрузке бумаги
●Загружайте листы не по отдельности, а стопкой. Для предотвращения замятия все листы в стопке должны быть одинакового размера и типа.
●Бумага должна быть расположена стороной для печати вверх.
●Убедитесь, что бумага, загруженная во входной лоток, не имеет изгибов, загнутых краев и разрывов.
●Отрегулируйте направляющую ширины бумаги во входном лотке, чтобы она вплотную прилегала к бумаге. Убедитесь, что направляющая ширины не сгибает бумагу во входном лотке.
Дополнительную информацию см. в разделе Загрузка бумаги на стр. 10.
Советы по настройке принтера (Windows)
●Для изменения параметров печати по умолчанию откройте программу HP программное обеспечение принтера, щелкните Печать и сканирование , а затем выберите пункт Установка параметров. Информацию о том, как открыть программу программное обеспечение принтера, см. в разделе Откройте программное обеспечение принтера HP (Windows) на стр. 18.
●Чтобы выбрать количество страниц на листе для печати, на вкладке Макет в раскрывающемся списке Страниц на листе щелкните соответствующий параметр.
●Для отображения дополнительных параметров на вкладке Шаблоны или Бумага/Качество щелкните кнопку Дополнительно, после чего откроется диалоговое окно Дополнительные параметры.
— Печать в оттенках серого: позволяет печатать черно-белый документ, используя только черные чернила. Выберите Только черные чернила и щелкните ОК . Функция также

позволяет печатать черно-белые изображения высокого качества. Выберите пункт Оттенки серого в высоком качестве и нажмите кнопку ОК .
—Макет расположения страниц на листе. Позволяет указывать порядок страниц при печати документа с более чем двумя страницами на одном листе.
 ПРИМЕЧАНИЕ. При предварительном просмотре на вкладке Макет не отобразится параметр, выбранный в раскрывающемся списке Макет расположения страниц на листе.
—Технологии HP Real Life. Данная функция позволяет выравнивать и делать более четкими изображения и графику для повышенного качества печати.
—Буклет. Позволяет печатать многостраничный документ в виде буклета. С помощью данной функции две страницы помещаются на лист, который в последствии можно согнуть пополам в виде буклета. В раскрывающемся списке выберите метод переплета и щелкните OK.
○Буклет-ПереплетСлева. После сгиба в виде буклета переплет будет с левой стороны. Выберите данный параметр для чтения слева направо.
○Буклет-ПереплетСправа. После сгиба в виде буклета переплет будет с правой стороны. Выберите данный параметр для чтения справа налево.
 ПРИМЕЧАНИЕ. При предварительном просмотре на вкладке Макет не отобразится параметр, выбранный в раскрывающемся списке Буклет.
—Выбор страниц для печати: позволяет печатать все страницы, только четные или только нечетные.
—Границы листа: позволяет добавлять границы к страницам при печати документа, состоящего из более чем двух страниц.
 ПРИМЕЧАНИЕ. При предварительном просмотре на вкладке Макет не отобразится параметр, выбранный в раскрывающемся списке Границы страницы.
●Можно использовать профиль печати, чтобы сократить время настройки параметров печати. Профиль печати сохраняет значения параметров, соответствующих какому-либо определенному виду задания,что позволяет установить все параметры одним щелчком мыши. Чтобы использовать данную функцию, перейдите на вкладку Профиль печати, выберите профиль печати и щелкните OK.
Чтобы добавить новый профиль печати, после настройки параметров на вкладке Макет или
Бумага/Качество щелкните вкладку Профиль печати, выберите Сохранить как и введите имя,
затем щелкните OK.
Чтобы удалить профиль печати, выберите его и щелкните Удалить.
 ПРИМЕЧАНИЕ. Профили печати по умолчанию удалить невозможно.
|
RUWW |
Советы по успешной печати 33 |

Советы по настройке принтера (OS X)
●В диалоговом окне печати с помощью меню Размер бумаги выберите размер загруженной в принтер бумаги.
●В диалоговом окне печати на панели Бумага/Качество выберите в меню соответствующий тип бумаги и качество.
●Если необходимо напечатать черно-белый документ с помощью только черных чернил, выберите панель Тип бумаги/Качество, а затем в меню «Цвет» выберите Оттенки серого.
Примечания
●Оригинальные картриджи HP предназначены специально для принтеров и бумаги HP. Они прошли все необходимые испытания для обеспечения неизменно высокого качества печати.
 ПРИМЕЧАНИЕ. HP не гарантирует качество и надежность расходных материалов других производителей. Гарантия не распространяется на обслуживание и ремонт устройства в связи с использованием расходных материалов другого производителя (не HP).
Если эти картриджи были приобретены как оригинальные картриджи HP, перейдите по адресу
www.hp.com/go/anticounterfeit
●Вы также можете использовать двустороннюю печать, однако листы необходимо будет переворачивать ручную.
 Loading…
Printer parts

| 1 | Paper-width guide |
| 2 | Input tray extender |
| 3 | Input tray |
| 4 | Input tray shield |
| 5 | Scanner |
| 6 | Scan path |
| 7 | Scan light |
| 8 | Control panel |
| 9 | Cartridge access door |
| 10 | Cartridges |
| 11 | Output tray |
| 12 | Output tray extender (also referred to as the tray extender) |
| 13 | Paper catch |
| 14 | Power connection |
| 15 | USB port |
Control panel features
Overview of buttons and lights

| Feature | Description |
| 1 | Control panel display : Indicates number of copies, media errors, wireless status and signal strength, Wi-Fi Direct status, and ink levels. |
| 2 | Information button: Prints out a printer information page. Press the button in combination with theWireless button, or the Wi-Fi Direct button to get more specific help pages tied to each of these buttons. |
| 3 | Resume button: Resumes a job after a disruption (for example, after loading paper or clearing a paper jam). Resume light: Indicates the printer is in a warning or error state. For more information, see Control panel error codes and status on page 89. |
| 4 | Cancel button: Stops the current operation. |
| 5 | Wireless button: Turns on or off the printer wireless capabilities. Wireless light: Indicates whether the printer is connected to a wireless network. |
| 6 | Start Copy Color button: Starts a color copy job. To increase the number of color copies, press the button multiple times fast. |
| 7 | Start Copy light: A blinking light indicates the Start Copy Color and Start Copy Black buttons are ready for use. |
| 8 | Start Copy Black button: Starts a black-and-white copy job. To increase the number of black-and-white copies, press the button multiple times fast. |
| 9 | Ink Alert light: Indicates low ink or cartridge problems. For more information, see Control panel error codes and status on page 89. |
| Feature | Description |
| 10 | Web Services button: Prints a diagnostic page to help troubleshooting Web Services issues if Web Serviceslight is blinking. Web Services light: A blinking light indicates a problem with the connection to Web Services. |
| 11 | Wi-Fi Direct button: Turns on or off Wi-Fi Direct. Wi-Fi Direct light: Indicates the on or off status of Wi-Fi Direct. |
Control panel display icons
| Icon | Description |
 |
Number of copies icon: Shows the number of copies when you are copying documents, and alternates between the letter E and a number when the printer is in an error state. |
| Error icon: Indicates an error. | |
| Paper Error icon: Indicates a paper-related error. | |
| Wireless status icons: Show the status of a wireless connection. The wireless status icons consist of three icons, the Wireless icon ( ), the Wireless Attention icon (), and the Signal Bars icon ( ). |
|
| Wi-Fi Direct icon: Indicates Wi-Fi Direct is on or is in the process of being connected. | |
| Ink Level icons: The left ink icon shows the estimated ink level of the tri-color cartridge, and the right icon shows the estimated ink level of the black cartridge. NOTE: Ink level warnings and indicators provide estimates for planning purposes only. When you receive a low-ink warning message, consider having a replacement cartridge available to avoid possible printing delays. You do not need to replace cartridges until the print quality becomes unacceptable. |
Control panel lights and display icons status
Power button light
●![]()
| Status | Description |
| On | The printer is on. |
| Off | The printer is powered off. |
| Dimmed | Indicates the printer is in Sleep mode. The printer automatically enters Sleep mode after five minutes of inactivity. |
| Blinking | The printer is processing a job. To cancel the job, press the Cancel button ( ). |
| Blinking fast | If the cartridge access door is open, close it. If the cartridge access door is closed and the light is blinking fast, the printer is in an error state that you can resolve by following the onscreen messages from the computer. If you do not see any onscreen messages, try printing a document to generate an onscreen message. |
Wireless light and icons
- The Wireless light next to the Wireless button ( ) and the wireless status icons on the control panel display work together to indicate the status of a wireless connection.
| Status | Description |
| The Wireless light, the Wireless icon, and the Signal Bars icon are on. |
The printer is connected to a wireless network. |
| The Wireless light is off. |
The wireless capability of the printer is off. To turn on the wireless capability, press the Wireless button ( ). |
The Wireless light is blinking, the Wireless icon is on, and theSignal Bars icon are cycling. |
The printer is connecting to a wireless network or is in the Wi- Fi Protected Setup (WPS) push mode. |
| The Wireless light blinks for three seconds and then turns off. |
The wireless capability of the printer is disabled. Change the wireless settings. For more information, see Wireless settings on page 62. |
| Status | Description |
| The Wireless light is blinking, and the Wireless icon andWireless Attention icon are on. |
There is no wireless signal. Make sure your wireless router or access point is powered on.Move the printer closer to the wireless router. |
| The Wireless light is blinking, the Wireless icon is on, and theWireless Attention icon is blinking. |
One of the following might have occurred. The printer has a problem connecting to the wireless network.An error occurs or an overlap session is detected when using WPS. Press the Wireless button ( ) and the Information button ( ) together to run the wireless test, and then review the test report for information on how to solve the problem. |
Wi-Fi Direct light and icon
●![]()
| Status | Description |
| The Wi-Fi Direct light and icon are on. | Wi-Fi Direct is turned on and ready to use. To learn how to connect to your printer using Wi-Fi Direct, see Connect wirelessly to the printer without a routeron page 59. |
| The Wi-Fi Direct light and icon are off. | Wi-Fi Direct is off. To turn on Wi-Fi Direct, press the Wi-Fi Direct button ( ). |
| The Wi-Fi Direct light is blinking. | The printer is connecting to a mobile device in the Wi-Fi Protected Setup (WPS) push mode. Press the Wi-Fi Direct button ( ) to finish connecting. |
| The Wi-Fi Direct light blinks fast for three seconds, and then stays on. | The printer already has the maximum number of Wi-Fi Direct connection and another device is trying to connect to the printer with Wi-Fi Direct. |
| The Wi-Fi Direct light blinks fast for three seconds, and then turns off. | Wi-Fi Direct is disabled. For more information, contact the person who sets up the printer. |
Web Services light
●![]()
| Status | Description |
| The Web Services light is white and on. | The Web Services feature is on and ready to use. For information about Web Services, see Use Web Services on page 33. |
| The Web Services light is off. | The Web Services feature is not registered. To learn how to register Web Services, see Set up Web Services on page 35. |
| The Web Services light is white and keeps blinking. | The Web Services feature has been registered, but there is a connectivity issue. Press the Web Services button ( ) to print a diagnostic page, and then follow the instructions on the page. |
| The Web Services light is amber and keeps blinking. | The Web Services feature is turned on, but a job is being blocked because of an error. Press the Web Services button ( ) to print a diagnostic page, and then follow the instructions on the page. |
Select a paper size to continue.
To load full-size paper
- Raise the input tray and input tray extender.

- Insert a stack of paper into the input tray with the short edge down and the print side up, and slide the stack of paper down until it stops.

- Slide the paper-width guide to the right until it stops at the edge of the paper.

- Pull out the output tray and the output tray extender, and then lift the paper catch.

To load small-size paper
- Raise the input tray and input tray extender.
- Insert a stack of photo paper into the far-right side of the input tray with the short edge down and the print side up, and slide the stack of paper down until it stops.

- Slide the paper-width guide to the right until it stops at the edge of the paper.

- Pull out the output tray and the output tray extender, and then lift the paper catch.

To load envelopes
- Raise the input tray and input tray extender.
- Insert one or more envelopes into the far-right side of the input tray and slide the stack of envelopes down until it stops. The side to be printed on should face up.

- Slide the paper-width guide to the right against the stack of envelopes until it stops.

- Pull out the output tray and the output tray extender, and then lift the paper catch.

Change the default paper size detected by printer
The printer can automatically detect whether the input tray has paper loaded and detect whether the loaded paper is large, small, or medium width. You can change the default large, medium, or small paper size detected by the printer.
To change the default paper size detected by the printer
- Open the embedded web server (EWS). For more information, see Open the embedded web server on page 65.
- Click the Settings tab.
- In the Preferences section, click Tray and Paper Management, and then select the desired option.
- Click Apply.
Paper basics
The printer is designed to work well with most types of office paper. It is best to test a variety of print paper types before buying large quantities. Use HP paper for optimum print quality. Visit the HP website at www.hp.com for more information about HP paper.
 |
HP recommends plain papers with the ColorLok logo for printing everyday documents. All papers with the ColorLok logo are independently tested to meet high standards of reliability and print quality, and produce documents with crisp, vivid color, bolder blacks, and that dry faster than ordinary plain papers. Look for papers with the ColorLok logo in a variety of weights and sizes from major paper manufacturers. |
This section contains the following topics:
- Recommended papers for printing
- Order HP paper supplies
Recommended papers for printing
If you want the best print quality, HP recommends using HP papers that are specifically designed for the type of project you are printing.
Depending on your country/region, some of these papers might not be available.
Photo printing
- HP Premium Plus Photo Paper
HP Premium Plus Photo Paper is HP’s highest-quality photo paper for your best photos. With HP Premium Plus Photo Paper, you can print beautiful photos that are instant-dry so you can share them right off the printer. It is available in several sizes, including A4, 8.5 x 11 inches (216 x 279 mm), 4 x 6 inches (10 x 15 cm), and 5 x 7 inches (13 x 18 cm), and in two finishes – glossy or soft gloss (semi-gloss). Ideal for framing, displaying, or gifting your best photos and special photo projects. HP Premium Plus Photo Paper delivers exceptional results with professional quality and durability.
- HP Advanced Photo Paper
This glossy photo paper features an instant-dry finish for easy handling without smudging. It resists water, smears, fingerprints, and humidity. Your prints have a look and feel comparable to a store- processed photo. It is available in several sizes, including A4, 8.5 x 11 inches (216 x 279 mm), 4 x
6 inches (10 x 15 cm), and 5 x 7 inches (13 x 18 cm). It is acid-free for longer lasting documents.
- HP Everyday Photo Paper
Print colorful, everyday snapshots at a low cost, using paper designed for casual photo printing. This affordable photo paper dries quickly for easy handling. Get sharp, crisp images when you use this paper with any inkjet printer. It is available in glossy finish in several sizes, including A4, 8.5 x 11 inches (216 x 279 mm), 5 x 7 inches (13 x 18 cm), and 4 x 6 inches (10 x 15 cm). It is acid-free for longer lasting documents.
- HP Photo Value Packs
HP Photo Value Packs conveniently package original HP ink cartridges and HP Advanced Photo Paper to save you time and take the guesswork out of printing affordable, lab-quality photos with your HP printer. Original HP inks and HP Advanced Photo Paper have been designed to work together so your photos are long lasting and vivid, print after print. Great for printing out an entire vacation’s worth of photos or multiple prints to share.
Business documents
- HP Premium Presentation Paper 120g Matte or HP Professional Paper 120 Matt
This paper is a heavy two-sided matte paper perfect for presentation, proposals, reports, and newsletters. It is heavyweight for an impressive look and feel.
- HP Brochure Paper 180g Glossy or HP Professional Paper 180 Glossy
These papers are glossy-coated on both sides for two-sided use. They are the perfect choice for near- photographic reproductions and business graphics for report covers, special presentations, brochures, mailers, and calendars.
- HP Brochure Paper 180g Matte or HP Professional Paper 180 Matt
These papers are matte-coated on both sides for two-sided use. They are the perfect choice for near- photographic reproductions and business graphics for report covers, special presentations, brochures, mailers, and calendars.
Everyday printing
All the papers listed for everyday printing feature ColorLok Technology for less smearing, bolder blacks, and vivid colors.
- HP Bright White Inkjet Paper and Color Inkjet Paper
HP Bright White Inkjet Paper and Color Inkjet Paper deliver high-contrast colors and sharp text. They are opaque enough for two-sided color usage with no show-through, making them ideal for newsletters, reports, and flyers.
- HP Multipurpose and All-in-One Printing Paper
HP Multipurpose and All-in-One Printing Paper is a high-quality multifunction paper. It produces documents that look and feel more substantial than documents printed on standard multipurpose or copy paper. It is acid-free for longer lasting documents.
- HP Office, Copy, and Copy & Print Paper
These varieties of HP paper high-quality multifunction paper are suitable for copies, drafts, memos, and other everyday documents. They are acid-free for longer lasting documents.
- HP Office Recycled Paper
HP Office Recycled Paper is a high-quality multifunction paper made with 30% recycled fiber.
Order HP paper supplies
The printer is designed to work well with most types of office paper. Use HP paper for optimum print quality.
To order HP papers and other supplies, go to www.hp.com . At this time, some portions of the HP website are available in English only.
HP recommends plain papers with the ColorLok logo for printing and copying of everyday documents. All papers with the ColorLok logo are independently tested to meet high standards of reliability and print quality, and produce documents with crisp, vivid color, bolder blacks and shorter dry-time than ordinary plain papers. Look for papers with the ColorLok logo in a variety of weights and sizes from major paper manufacturers.
Open the HP printer software (Windows)
After installing the HP printer software, double-click the printer icon on the desktop or do one of the following to open the printer software:
- Windows 10: From the computer desktop, click Start, select All apps, click HP, and then select the icon with the printer name.
- Windows 8.1: Click the down arrow in lower left corner of the Start screen, and then select the printer name.
- Windows 8: Right-click an empty area on the Start screen, click All Apps on the app bar, and then select the printer name.
- Windows 7, Windows Vista, and Windows XP: From the computer desktop, click Start, select All Programs, click HP, click the folder for the printer, and then select the icon with the printer name.
Sleep mode
- Power usage is reduced while in Sleep mode.
- After initial setup of printer, the printer will enter Sleep mode after 5 minutes of inactivity. To change the time to Sleep mode
- Open the embedded web server (EWS). For more information, see Open the embedded web server on page 65.
- Click the Settings tab.
- In the Power Management section, click Energy Save Mode, and select the desired option.
- Click Apply.
Quiet Mode
Quiet Mode slows down printing to reduce overall noise without affecting print quality. Quiet Mode only works for printing with Normal print quality on plain paper. To reduce printing noise, turn on Quiet Mode. To print at normal speed, turn Quiet Mode off. Quiet Mode is off by default.
NOTE: In Quiet Mode, if you print on plain paper with the Draft or Best print quality, or if you print photos or envelopes, the printer works in the same way as when Quiet Mode is off. ![]()
![]()
To turn Quiet Mode on or off from the printer software (Windows)
- Open the HP printer software. For more information, see Open the HP printer software (Windows) on page 18.
- Click the Quiet Mode tab.
- Click On or Off.
- Click Save Setting.
To turn Quiet Mode on or off from the printer software (OS X)
- Open HP Utility.
![]()
![]()
- Select the printer.
- Click Quiet Mode .
- Select On or Off .
- Click Apply Now.
To turn Quiet Mode on or off from the Embedded Web Server (EWS)
- Open the EWS. For more information, see Open the embedded web server on page 65.
- Click the Settings tab.
- In the Preferences section, select Quiet Mode, and then select On or Off.
- Click Apply.
Auto-Off
This feature turns the printer off after 2 hours of inactivity to help reduce energy use. Auto-Off turns the printer off completely, so you must use the Power button to turn the printer back on. If your printer supports this energy saving feature, Auto-Off is automatically enabled or disabled depending on printer capabilities and connection options. Even when Auto-Off is disabled, the printer enters Sleep mode after 5 minutes of inactivity to help reduce energy use.
- Auto-Off is enabled when the printer is turned on, if the printer does not have network or fax capability, or is not using these capabilities.
- Auto-Off is disabled when a printer’s wireless or Wi-Fi Direct capability is turned on or when a printer with fax, USB, or Ethernet network capability establishes a fax, USB, or Ethernet network connection.

- Print documents
- Print photos
- Print envelopes
- Print using the maximum dpi
- Print from mobile devices
- Tips for print success
Print documents
Before printing documents, make sure you have paper loaded in the input tray and the output tray is open. For more information about loading paper, see Load media on page 10.
To print a document (Windows)
- From your software, select Print.
- Make sure your printer is selected.
- Click the button that opens the Properties dialog box.
Depending on your software application, this button might be called Properties, Options, Printer Setup, Printer Properties, Printer, or Preferences.
- Select the appropriate options on the Printing Shortcut tab. To change other print settings, click the other tabs.
For more printing tips, see Tips for print success on page 30.![]()
![]()
- Click OK to close the Properties dialog box.
- Click Print or OK to begin printing.
To print documents (OS X)
- From the File menu in your software, choose Print.
- Make sure your printer is selected.
- Set the print options.
If you do not see options on the Print dialog, click Show Details.
- Choose the appropriate paper size in the Paper Size pop-up menu.
![]()
![]()
- Select the orientation.
- Enter the scaling percentage.
- Click Print.
To print on both sides of the page (Windows)
- From your software, select Print.
- Make sure your printer is selected.
- Click the button that opens the Properties dialog box.
Depending on your software application, this button might be called Properties, Options, Printer Setup, Printer Properties, Printer, or Preferences.
- On the Printing Shortcut tab, select the Two-sided (Duplex) Printing shortcut. To change other print settings, click the other tabs.
For more printing tips, see Tips for print success on page 30.![]()
![]()
- After you print the first side, follow the onscreen instructions to reload the paper, and then click
Continue.
- Click OK to print.
To print on both sides of the page (OS X)
- From the File menu in your software, choose Print.
- In the Print dialog, choose Paper Handling from the pop-up menu and set Page Order to Normal.
- Set Pages to Print to Odd Only.
- Click Print.
- After all of the odd numbered pages have printed, remove the document from the output tray.
- Reload the document so that the end that came out of the printer is now going into the printer and the blank side of the document is facing toward the front of the printer.
- In the Print dialog, return to the Paper Handling pop-up menu and set the page order to Normal and the pages to print to Even Only.
- Click Print.
Print photos
Before printing photos, make sure you have photo paper loaded in the input tray and the output tray is open. For more information about loading paper, see Load media on page 10.
To print a photo on photo paper (Windows)
- From your software, select Print.
- Make sure your printer is selected.
- Click the button that opens the Properties dialog box.
Depending on your software application, this button might be called Properties, Options, Printer Setup, Printer Properties, Printer, or Preferences.
- Select the appropriate options on the Printing Shortcut tab. To change other print settings, click the other tabs.
For more printing tips, see Tips for print success on page 30.![]()
![]()
- Click OK to return to the Properties dialog box.
- Click OK, and then click Print or OK in the Print dialog box.
NOTE: After the printing is finished, remove unused photo paper from the input tray. Store the photo paper so it does not start to curl, which could reduce the quality of your printout. ![]()
![]()
To print a photo from the computer (OS X)
- From the File menu in your software, choose Print.
- Make sure your printer is selected.
- Set the print options.
If you do not see options on the Print dialog, click Show Details.
- Choose the appropriate paper size in the Paper Size pop-up menu.
![]()
![]()
- Select the orientation.
- From the pop-up menu, choose Paper Type/Quality, and then choose the following settings:
- Paper Type: The appropriate photo paper type
- Quality: Select the option that provides the best quality or maximum dpi.
- Click the Color Options disclosure triangle, and then choose the appropriate Photo Fix option.
- Off: applies no changes to the image.
- On: automatically focuses the image; moderately adjusts image sharpness.
- Select any other print settings you want, and then click Print.
Print envelopes
Before printing envelopes, make sure you have envelopes loaded in the input tray and the output tray is open. You can load one or more envelopes into the input tray. Do not use shiny or embossed envelopes or envelopes that have clasps or windows. For more information about loading envelopes, see Load media on page 10.
NOTE: For specific details on how to format text for printing on envelopes, consult the help files in your word application. ![]()
![]()
To print an envelope (Windows)
- From your software, select Print.
- Make sure your printer is selected.
- Click the button that opens the Properties dialog box.
Depending on your software application, this button might be called Properties, Options, Printer Setup, Printer Properties, Printer, or Preferences.
- Select the appropriate options.
- On the Layout tab, select Portrait or Landscape orientation.
- On the Paper/Quality tab, select the appropriate paper type from the Media drop-down list in the Tray Selection area, select the appropriate print quality in the Quality Settings area, and then select the appropriate color in the Color area.
- Click Advanced to select the appropriate envelope size from the Paper Size drop-down list.
- Click OK, and then click Print or OK in the Print dialog box.
To print envelopes (OS X)
- From the File menu in your software, choose Print.
- Make sure your printer is selected.
- Select the appropriate envelope size from the Paper Size pop-up menu. If you do not see options on the Print dialog, click Show Details.

- From the pop-up menu, choose Paper Type/Quality, and verify the paper type setting is set to Plain Paper.
- Click Print.
Print using the maximum dpi
Use maximum dots per inch (dpi) to print high-quality, sharp images on photo paper.
Printing in maximum dpi takes longer than printing with other settings and requires a large amount of disk space.
For a list of supported print resolutions, visit the product support website at www.support.hp.com.
To print in maximum dpi mode (Windows)
- From your software, select Print.
- Make sure your printer is selected.
- Click the button that opens the Properties dialog box.
Depending on your software application, this button might be called Properties, Options, Printer Setup, Printer Properties, Printer, or Preferences.
- Click the Paper/Quality tab.
- From the Media drop-down list, select an appropriate paper type.
- Click the Advanced button.
- Select the appropriate paper size from the Paper Size drop-down list.
- In the Printer Features area, select Yes from the Print in Max DPI drop-down list.
- Click OK to close the advanced options.
- Confirm Orientation on the Layout tab, and then click OK to print.
To print using maximum dpi (OS X)
- From the File menu in your software, choose Print.
- Make sure your printer is selected.
- Set the print options.
If you do not see options on the Print dialog, click Show Details.
- Choose the appropriate paper size in the Paper Size pop-up menu.
![]()
![]()
- Select the orientation.
- From the pop-up menu, choose Paper Type/Quality, and then choose the following settings:
- Paper Type: The appropriate paper type
- Quality: Maximum dpi
- Select any other print settings that you want, and then click Print.
Print from mobile devices
You can print documents and photos directly from your mobile devices, including iOS, Android, Windows Mobile, Chromebook and Amazon Kindle.
To print from mobile devices
- Make sure your printer is connected to the same network as your mobile device.
- Enable printing on your mobile device:
- iOS: Use the Print option from the Share menu. No setup is required since iOS AirPrint is preinstalled.
![]()
![]()
- Android: Download the HP Print Service Plugin (supported by most Android devices) from the Google Play Store and enable it on your device.
NOTE: Devices running Android 4.4 or later are supported by the HP Print Service Plugin. Devices running Android 4.3 or earlier can print using the HP ePrint app, available in the Google Play Store.![]()
![]()
- Windows Mobile: Tap Print from the Device menu. No setup is required since the software is preinstalled.
Add Printer wizard.![]()
![]()
- Chromebook: Download and install the HP Print for Chrome app from the Chrome Web Store to enable both Wi-Fi and USB printing.
- Amazon Kindle Fire HD9 and HDX: The first time you select Print on your device, the HP Print Service Plugin is automatically downloaded to enable mobile printing.
NOTE: For detailed information about enabling printing from your mobile devices, visit www.hp.com/go/mobileprinting. If a local version of this website is not available in your country/region or language, you might be directed to the HP Mobile Printing website in another country/region or language. ![]()
![]()
- Make sure the loaded paper matches the paper settings of the printer (see Load media on page 10 for more information). Accurately setting the paper size for the paper that is loaded enables your mobile device to know what paper size it is printing.
Tips for print success
To print successfully, the HP cartridges should be functioning properly with sufficient ink, the paper should be loaded correctly, and the printer should have the appropriate settings.
Print settings do not apply to copying or scanning.
Ink tips
- Use original HP cartridges.
- Install both the black and tri-color cartridges correctly. For more information, see Replace cartridges on page 50.
- Check the estimated ink levels in the cartridges to make sure there is sufficient ink. For more information, see Check estimated ink levels on page 48.
- If the print quality is not acceptable, see Printing issues on page 76 for more information.
Paper loading tips
- Load a stack of paper (not just one page). All of the paper in the stack should be in the same size and type to avoid a paper jam.
- Load the paper with side to be printed on facing up.
- Ensure that paper loaded in the input tray lays flat, and the edges are not bent or torn.
- Adjust the paper-width guide in the input tray to fit snugly against all paper. Make sure the paper-width guide does not bend the paper in the input tray.
For more information, see Load media on page 10.
Printer settings tips (Windows)
- To change default print settings, open the HP printer software, click Print & Scan , and then click Set Preferences. For information how to open the printer software, see Open the HP printer software (Windows) on page 18.
- To select the number of pages to print per sheet, on the Layout tab, select the appropriate option from the Pages per Sheet drop-down list.
- To view more printing settings, on the Layout or Paper/Quality tab, click the Advanced button to open the Advanced Options dialog box.
- Print in Grayscale: Allows you to print a black and white document using the black ink only. Select Black Ink Only, and then click OK . It also allows you to print a high quality black and white image. Select High Quality Grayscale, and then click OK .
- Pages per Sheet Layout: Helps you specify the order of the pages if you print the document with more than two pages per sheet.
NOTE: The preview on the Layout tab cannot reflect what you select from the Pages per Sheet Layout drop-down list. ![]()
![]()
- HP Real Life Technologies: This feature smooths and sharpens images and graphics for improved print quality.
- Booklet: Allows you to print a multiple-page document as a booklet. It places two pages on each side of a sheet that can then be folded into a booklet in half size of the paper. Select a binding method from the drop-down list, and then click OK.
- Booklet-LeftBinding: The binding side after folded into a booklet appears at the left side. Select the option if your reading habit is from left to right.
- Booklet-RightBinding: The binding side after folded into a booklet appears at the right side. Select the option if your reading habit is from right to left.
- Booklet: Allows you to print a multiple-page document as a booklet. It places two pages on each side of a sheet that can then be folded into a booklet in half size of the paper. Select a binding method from the drop-down list, and then click OK.
NOTE: The preview on the Layout tab cannot reflect what you select from the Booklet drop- down list.![]()
![]()
- Pages to Print: Allows you to print the odd pages only, print the even pages only, or print all pages.
- Page Borders: Allows you to add borders to the pages if you print the document with two or more pages per sheet.
NOTE: The preview on the Layout tab cannot reflect what you select from the Page Borders![]()
![]()
drop-down list.
- You can use printing shortcut to save time setting printing preferences. A printing shortcut stores the setting values that are appropriate for a particular kind of job, so that you can set all the options with a single click. To use it, go to the Printing Shortcut tab, select one printing shortcut, and then click OK.
To add a new printing shortcut, after making settings on the Layout or Paper/Quality tab, click the
Printing Shortcut tab, click Save As and enter a name, and then click OK. To delete a printing shortcut, select it, and then click Delete.
Printer settings tips (OS X)
- On the Print dialog, use the Paper Size pop-up menu to select the size of paper loaded in the printer.
- On the Print dialog, choose the Paper Type/Quality pop-up menu and select the appropriate paper type and quality.
- To print a black and white document using only black ink, choose the Paper Type/Quality from the pop- up menu and choose Grayscale from the Color pop-up menu.
Notes
- Original HP cartridges are designed and tested with HP printers and papers to help you easily produce great results, time after time.
NOTE: HP cannot guarantee the quality or reliability of non-HP supplies. Product service or repairs required as a result of using a non-HP supply will not be covered under warranty.![]()
![]()
If you believe the purchased original HP cartridges, go to: www.hp.com/go/anticounterfeit
- You can print your document on both sides of the paper manually.
- Use Web Services
- What are Web Services?
- Set up Web Services
- Print with HP ePrint
- Remove Web Services
What are Web Services?
The printer offers innovative, web-enabled solutions that can help you quickly access the Internet, obtain documents, and print them faster and with less hassle—and all without using a computer.
NOTE: To use these web features, the printer must be connected to the Internet (using wireless connection). You cannot use these web features if the printer is connected using a USB cable. ![]()
![]()
HP ePrint
- HP ePrint is a free service from HP that allows you to print to your HP ePrint-enabled printer anytime, from any location. It’s as simple as sending an email to the email address assigned to your printer when you enable Web Services on the printer. No special drivers or software are needed. If you can send an email, you can print from anywhere, using HP ePrint.
Once you have signed up for an account on HP Connected (might not be available in all countries/ regions), you can sign in to view your HP ePrint job status, manage your HP ePrint printer queue, control who can use your printer’s HP ePrint email address to print, and get help for HP ePrint.
Set up Web Services
Before you set up Web Services, make sure your printer is connected to the Internet using a wireless connection.
To set up Web Services
- Open the embedded web server (EWS). For more information, see Open the embedded web server on page 65.
- Click the Web Services tab.
- In the Web Services Settings section, click Setup , click Continue, and follow the onscreen instructions to accept the terms of use.
- If prompted, choose to allow the printer to check for and install printer updates.
NOTE: If a printer update is available, the printer downloads and installs the update, and then restarts. Repeat the instructions from step 1 to set up Web Services.![]()
![]()
NOTE: If prompted for proxy settings and if your network uses proxy settings, follow the onscreen instructions to set up a proxy server. If you do not have the proxy details, contact your network administrator or the person who set up the network.
- When the printer is connected to the server, the printer prints an information page. Follow the instructions on the information page to finish the setup.
Print with HP ePrint
HP ePrint allows you to print to your HP ePrint-enabled printer anytime, from any location.
Before you can use HP ePrint, make sure the printer is connected to an active network providing Internet access.
To print a document using HP ePrint
- Make sure you have set up Web Services.
For more information, see Set up Web Services on page 35.
- Press the Information button () to print an information page, and then find the email address for your printer from the page.
- Email your document to the printer.
- On your computer or mobile device, open your email application.
NOTE: For information about using the email application on your computer or mobile device, see the documentation provided with the application. ![]()
![]()
- Create a new email and attach the document to print.
- Send the email to the printer email address. The printer prints the attached document.


NOTE: Enter only the HP ePrint email address in the “To” field. Do not enter any additional email addresses in the other fields. The HP ePrint server does not accept email print jobs if there are multiple addresses in the “To” field or any address in the “Cc” field.”
NOTE: The email will be printed once it is received. As with any email, there is no guarantee when or whether it will be received. You can check the print status on HP Connected (might not be available in all countries/regions).
NOTE: Documents printed with HP ePrint may appear different from the original. Style, formatting, and text flow may differ from the original document. For documents that need to be printed with a higher quality (such as legal documents), we recommend that you print from the software application on your computer, where you will have more control over what your printout looks like.
Remove Web Services
To remove Web Services, complete the following steps:
- Open the embedded web server (EWS). For more information, see Open the embedded web server on page 65.
- Click the Web Services tab, and then click Remove Web Services in the Web Services Settings section.
- Click Remove Web Services.
- Click Yes to remove Web Services from your printer.
- Copy and scan
- Copy documents
- Scan using the HP printer software
- Scan using Webscan
- Tips for copy and scan success
Copy documents
NOTE: All documents are copied in normal quality print mode. You cannot change the print mode quality when copying. ![]()
![]()
To copy documents
- Load paper in the input tray.
For information about how to load paper, see Load media on page 10.
- Load the original print side up, fully justified to the right side of the scanner, until it feeds into the scan path and the scan light turns on.

- Press either the Start Copy Black button () or the Start Copy Color button ( ) to make a copy.
You can increase the number of copies by pressing the button multiple times fast within two seconds. If the original is not pulled in, push it into the scan path by hand until it moves on its own.
The scanner automatically feeds the original for scanning. Printing for copy starts after scanning is complete.
Scan using the HP printer software
- Scan to a computer
- Create a new scan shortcut (Windows)
- Change scan settings (Windows)
Scan to a computer
Before scanning to a computer, make sure you have already installed the HP recommended printer software. The printer and computer must be connected and turned on.
To scan a document or photo to a file (Windows)
- Load the original print side up, fully justified to the right side of the scanner, until it feeds into the scan path and the scan light turns on.
- Double-click the printer icon on the desktop or do one of the following to open the printer software:
- Windows 10: From the computer desktop, click Start, select All apps, click HP, and then select the icon with the printer name.
- Windows 8.1: Click the down arrow in lower left corner of the Start screen, and then select the printer name.
- Windows 8: Right-click an empty area on the Start screen, click All Apps on the app bar, and then select the printer name.
- Windows 7, Windows Vista, and Windows XP: From the computer desktop, click Start, select All Programs, click HP, click the folder for the printer, and then select the icon with the printer name.
- In the printer software, click Scan , and then click Scan a Document or Photo .
- Select the type of scan you want and then click Scan .
- Choose Save as PDF to save the document (or photo) as a PDF file.
- Choose Save as JPEG to save the photo (or document) as an image file.
NOTE: The initial screen allows you to review and modify basic settings. Click the More link at the top right corner of the Scan dialog to review and modify detailed settings.![]()
![]()
For more information, see Change scan settings (Windows) on page 43.
If Show Viewer After Scan is selected, you can make adjustments to the scanned image in the preview screen.
To scan a document or photo to email (Windows)
- Load the original print side up, fully justified to the right side of the scanner, until it feeds into the scan path and the scan light turns on.
- Double-click the printer icon on the desktop or do one of the following to open the printer software:
- Windows 10: From the computer desktop, click Start, select All apps, click HP, and then select the icon with the printer name.
- Windows 8.1: Click the down arrow in lower left corner of the Start screen, and then select the printer name.
- Windows 8: Right-click an empty area on the Start screen, click All Apps on the app bar, and then select the printer name.
- Windows 7, Windows Vista, and Windows XP: From the computer desktop, click Start, select All Programs, click HP, click the folder for the printer, and then select the icon with the printer name.
- In the printer software, click Scan , and then click Scan a Document or Photo .
- Select the type of scan you want and then click Scan .
Choose Email as PDF or Email as JPEG to open your email software with the scanned file as an attachment.
NOTE: Click the More link at the top right corner of the Scan dialog to review and modify settings for any scan.![]()
![]()
For more information, see Change scan settings (Windows) on page 43.
If Show Viewer After Scan is selected, you can make adjustments to the scanned image in the preview screen.
To scan an original from HP printer software (OS X)
- Open HP Easy Scan.
HP Easy Scan is located in the Applications folder.
- Choose the type of scan profile you want.
- Click Scan.
Create a new scan shortcut (Windows)
You can create your own scan shortcut to make scanning easier. For example, you might want to regularly scan and save photos in PNG format, rather than JPEG.
- Load the original print side up, fully justified to the right side of the scanner, until it feeds into the scan path and the scan light turns on.
- Double-click the printer icon on the desktop or do one of the following to open the printer software:
- Windows 10: From the computer desktop, click Start, select All apps, click HP, and then select the icon with the printer name.
- Windows 8.1: Click the down arrow in lower left corner of the Start screen, and then select the printer name.
- Windows 8: Right-click an empty area on the Start screen, click All Apps on the app bar, and then select the printer name.
- Windows 7, Windows Vista, and Windows XP: From the computer desktop, click Start, select All Programs, click HP, click the folder for the printer, and then select the icon with the printer name.
- In the printer software, click Scan , and then click Scan a Document or Photo .
- Click Create New Scan Shortcut .
- Enter a descriptive name, choose an existing shortcut on which to base your new shortcut, and then click
Create .
For example, if you are creating a new shortcut for photos, choose either Save as JPEG or Email as JPEG . This makes available the options for working with graphics when scanning.
- Change the settings for your new shortcut to meet your needs, and then click the save icon to the right of the shortcut.
NOTE: Click the More link at the top right corner of the Scan dialog to review and modify settings for any scan.![]()
![]()
For more information, see Change scan settings (Windows) on page 43.
Change scan settings (Windows)
You can modify any of the scan settings either for a singular use or save the changes to use permanently. These settings include options such as page size and orientation, scan resolution, contrast, and the folder location for saved scans.
- Load the original print side up, fully justified to the right side of the scanner, until it feeds into the scan path and the scan light turns on.
- Double-click the printer icon on the desktop or do one of the following to open the printer software:
- Windows 10: From the computer desktop, click Start, select All apps, click HP, and then select the icon with the printer name.
- Windows 8.1: Click the down arrow in lower left corner of the Start screen, and then select the printer name.
- Windows 8: Right-click an empty area on the Start screen, click All Apps on the app bar, and then select the printer name.
- Windows 7, Windows Vista, and Windows XP: From the computer desktop, click Start, select All Programs, click HP, click the folder for the printer, and then select the icon with the printer name.
- In the printer software, click Scan , and then click Scan a Document or Photo .
- Click the More link in the top right corner of the HP Scan dialog.
The detailed settings pane appears on the right. The left column summarizes the current settings for each section. The right column allows you to change the settings in the highlighted section.
- Click each section at the left of the detailed settings pane to review the settings in that section. You can review and change most settings using drop-down menus.
Some settings allow greater flexibility by displaying a new pane. These are indicated by a + (plus sign) at the right of the setting. You must either accept or cancel any changes on this pane to return to the detailed settings pane.
- When you have finished changing settings, do one of the following.
- Click Scan . You are prompted to save or reject the changes to the shortcut after the scan is finished.
- Click the save icon to the right of the shortcut, and then click Scan . Go online to learn more about using the HP Scan software. Learn how to:
- customize scan settings, such as image file type, scan resolution, and contrast levels.
- scan to network folders and cloud drives.
- preview and adjust images before scanning.
Scan using Webscan
Webscan is a feature of the embedded web server that lets you scan photos and documents from your printer to your computer using a web browser.
This feature is available even if you did not install the printer software on your computer.![]()
![]()
If you are unable to open Webscan in the EWS, your network administrator might have turned it off. For more information, contact your network administrator or the person who set up your network.
To enable Webscan
- Open the embedded web server. For more information, see Open the embedded web server on page 65.
- Click the Settings tab.
- In the Security section, click Administrator Settings.
- Select Webscan from EWS to enable Webscan.
- Click Apply.
To scan using Webscan
Scanning using Webscan offers basic scan options. For additional scan options or functionality, scan from the HP printer software.
- Load the original print side up, fully justified to the right side of the scanner, until it feeds into the scan path and the scan light turns on.
- Open the embedded web server. For more information, see Open the embedded web server on page 65.
- Click the Scan tab.
- Click Webscan in the left pane, change any settings, and then click Start Scan .
Tips for copy and scan success
Use the following tips to copy and scan successfully:
- Load single sheet of original to the scanner at a time.
- Do not scan originals with staples or paper clips attached.
- Do not scan originals containing wet materials (such as crayons, markers, or other painted items).
- Remove original from the scan path once scan is complete.
- Do not put the scanner in direct sunlight, bright lighting, or dusty environment.
- If you see vertical streaks in your copied or scanned documents, use a compressed air duster to blow air into the scan path where the streaks appear.
- To make a large copy of a small original, scan the original into the computer, resize the image in the scanning software, and then print a copy of the enlarged image.
- To avoid incorrect or missing scanned text, make sure the brightness is set appropriately in the software.
- Manage cartridges
This section contains the following topics:
- Check estimated ink levels
- Order ink supplies
- Replace cartridges
- Use single cartridge mode
- Cartridge warranty information
- Tips for working with cartridges
Check estimated ink levels
You can easily check the ink supply level to determine how soon you might need to replace a cartridge. The ink supply level shows an estimate of the amount of ink remaining in the cartridges.
NOTE: If you have installed a refilled or remanufactured cartridge, or a cartridge that has been used in another printer, the ink level indicator might be inaccurate or unavailable.![]()
![]()
NOTE: Ink level warnings and indicators provide estimates for planning purposes only. When you receive a low-ink warning message, consider having a replacement cartridge available to avoid possible printing delays. You do not have to replace the cartridges until the print quality is unacceptable.
NOTE: Ink from the cartridges is used in the printing process in a number of different ways, including in the initialization process, which prepares the printer and cartridges for printing, and in printhead servicing, which keeps print nozzles clear and ink flowing smoothly. In addition, some residual ink is left in the cartridge after it is used. For more information, see www.hp.com/go/inkusage.
To check the ink levels from the printer control panel
- The Ink Level icons on the printer display show an estimate of ink remaining in the cartridges.
To check the ink levels from the HP printer software (Windows)
- Open the HP printer software. For more information, see Open the HP printer software (Windows) on page 18.
- In the printer software, click the Estimated Levels tab.
To check the ink levels from the HP printer software (OS X)
- Open HP Utility.
![]()
![]()
- Select the HP DeskJet 3700 series from the list of devices at the left of the window.
- Click Supplies Status.
The estimated ink levels appear.
- Click All Settings to return to the Information and Support pane.
Order ink supplies
Before ordering cartridges, locate the correct cartridge number.
To locate the cartridge number on the printer
- The cartridge number is located inside the cartridge access door.

To locate the cartridge number from the printer software (Windows)
- Open the HP printer software. For more information, see Open the HP printer software (Windows) on page 18.
- In the printer software, click Shop, click Shop For Supplies Online, and then follow the onscreen instructions.
To find the print cartridge reorder numbers (OS X)
- Open HP Utility.
![]()
![]()
- Click Supplies Info.
The print cartridge ordering numbers appear.
- Click All Settings to return to the Information and Support pane.
To order original HP supplies for the HP DeskJet 3700 series, go to www.hp.com/buy/supplies . If prompted, choose your country/region, and then follow the prompts to find the right cartridges for your printer.
NOTE: Ordering cartridges online is not supported in all countries/regions. If it is not available in your country/region, you may still view supplies information and print a list for reference when shopping at a local HP reseller. ![]()
![]()
Replace cartridges
To replace the cartridges
- Check that power is on.
- Remove the cartridge.
- Open the cartridge access door and wait for the print carriage to move to the center of the printer.

- Press down to release the cartridge, and then pull it toward you out of the slot.

- Insert a new cartridge.
- Remove the cartridge from the packaging.

- Remove the plastic tape using the pull tab.


- Slide the cartridge into the slot at a slight upward angle, and then push up on the cartridge until it clicks into place.

- Close the cartridge access door.

Use single cartridge mode
Use the single cartridge mode to operate the printer with only one cartridge. The single cartridge mode is initiated when one of the following occurs.
- There is only one cartridge installed in the carriage.
- A cartridge is removed from the carriage if there are two cartridges installed previously.
NOTE: If the printer enters the single cartridge mode when two cartridges are installed in the printer, verify that the protective piece of plastic tape has been removed from each cartridge. When the plastic tape covers the cartridge contacts, the printer cannot detect that the cartridge is installed. If there is no plastic tape on the cartridges, try cleaning the cartridge contacts. For information about cleaning cartridge contacts, see Cartridge issues on page 74. ![]()
![]()
To exit the single cartridge mode
- Install both the black and tri-color cartridges in the printer.
Cartridge warranty information
The HP cartridge warranty is applicable when the cartridge is used in its designated HP printing device. This warranty does not cover HP cartridges that have been refilled, remanufactured, refurbished, misused, or tampered with.
During the warranty period, the cartridge is covered as long as the HP ink is not depleted and the end of warranty date has not been reached. The end of warranty date, in YYYY/MM/DD format, may be found on the cartridge as indicated:
For a copy of the HP Limited Warranty Statement, see the printed documentation that came with the printer.
Tips for working with cartridges
Use the following tips to work with cartridges:
- To protect the cartridges from drying out, always turn the printer off using the Power button, and wait until the Power button light goes out.
- Do not open or untape cartridges until you are ready to install them. Leaving tape on the cartridges reduces ink evaporation.
- Insert the cartridges into the correct slots. Match the color and icon of each cartridge to the color and icon for each slot. Make sure the cartridges snap into place.
- Align the printer for best print quality. See Printing issues on page 76 for more information.
- When the Estimated Cartridge Levels screen shows one or both cartridges in a low state, consider getting replacement cartridges to avoid possible printing delays. You do not need to replace the cartridges until print quality becomes unacceptable. See Replace cartridges on page 50 for more information.
- If you remove a cartridge from the printer for any reason, try to replace it again as soon as possible. Outside of the printer, if unprotected, cartridges begin to dry out.
- Connect your printer
- Connect your printer to a wireless network with a router
- Connect wirelessly to the printer without a router
- Wireless settings
- Connect your printer to your computer with a USB cable (non-network connection)
- Change from a USB connection to a wireless network
- Advanced printer management tools (for networked printers)
- Tips for setting up and using a networked printer
Connect your printer to a wireless network with a router


- Connect your printer to a wireless network using Wi-Fi Protected Setup (WPS)
- Connect your printer to a wireless network using HP printer software
Connect your printer to a wireless network using Wi-Fi Protected Setup (WPS)
Before you can connect your printer to a wireless network using WPS, make sure you have following:
- A wireless 802.11b/g/n network that includes a WPS-enabled wireless router or access point.
![]()
![]()
- A computer connected to the wireless network that you intend to connect the printer to. Be sure you have installed the HP printer software on the computer.
If you have a WPS router with a WPS push button, follow the Push Button method. If you are not certain your router has a push button, follow the PIN method.
To use the Push Button Configuration (PBC) method
- Press and hold the Wireless button () on the printer for more than three seconds to start WPS push mode. The Wireless light starts blinking.
- Press the WPS button on your router.
![]()
![]()

To use the PIN method
- Press the Wireless button () and Information button () at the same time to print the network configuration page, and then locate a WPS PIN.
The WPS PIN is printed at the top of the printed information page.
- Press and hold the Wireless button () from the printer control panel for more than three seconds. The wireless light starts blinking.
- Open the configuration utility or software for the wireless router or wireless access point, and then enter the WPS PIN.
NOTE: For more information about using the configuration utility, see the documentation provided with the router or wireless access point.![]()
![]()
Wait for about two minutes. If the printer connects successfully, the Wireless light stops blinking but remains lit.
Connect your printer to a wireless network using HP printer software
To connect the printer to an integrated wireless WLAN 802.11 network, you will need the following:
- A wireless 802.11b/g/n network that includes a wireless router or access point.
![]()
![]()
- A computer connected to the wireless network that you intend to connect the printer to.
- Network name (SSID).
- WEP key or WPA Passphrase (if needed).
To connect your printer using HP printer software (Windows)
- Depending on whether you have installed the HP printer software or not, do one of the following:
If you have not installed the HP printer software on your computer
- Visit 123.hp.com to download and install the printer software.
NOTE: During the software installation, a USB cable might be required for temporary connection between the printer and the computer. Do not connect the USB cable until the printer software prompts to do so. ![]()
![]()
- When you are prompted, select Wireless, and then follow the onscreen instructions.
If you have the HP printer software installed on your computer
- Open the printer software. For more information, see Open the HP printer software (Windows) on page 18.
- In the printer software, click Tools.
- Click Device Setup & Software.
- Click Connect a new device, click Wireless, and then follow the onscreen instructions.
- After the printer connects successfully, the blue Wireless light stops blinking and remains on.
To connect your printer using HP printer software (OS X)
- Depending on whether you have installed the HP printer software or not, do one of the following:
If you have not installed the HP printer software on your computer
▲ Visit 123.hp.com to download and install the printer software.
If you have the HP printer software installed on your computer
- Double-click HP Utility in the HP folder in the Applications folder.
- On the menu bar at the top of the screen, choose Setup New Device from the Devices menu, and then follow the onscreen instructions.
- After the printer connects successfully, the blue Wireless light stops blinking and remains on.
To connect a new printer (Windows)
- Open the printer software. For more information, see Open the HP printer software (Windows) on page 18.
- In the printer software, click Tools.
- Select Device Setup & Software.
- Select Connect a new device. Follow the onscreen instructions.
To connect a new printer (OS X)
- Open System Preferences .
- Depending on your operating system, click Printers & Scanners .
- Click + below the list of printers at the left.
- Select the new printer from the list.
Connect wirelessly to the printer without a router
With Wi-Fi Direct, you can print wirelessly from a computer, smart phone, tablet, or other wireless-capable device—without connecting to an existing wireless network.
Guidelines for using Wi-Fi Direct
- Make sure your computer or mobile device has the necessary software.
- If you are using a computer, make sure you have installed the HP printer software.
If you have not installed the HP printer software on the computer, connect to Wi-Fi Direct first and then install the printer software. Select Wireless when prompted by the printer software for a connection type.
- If you are using a mobile device, make sure you have installed a compatible printing app. For more information, visit the HP Mobile Printing website at www.hp.com/go/mobileprinting. If a local version of this website is not available in your country/region or language, you might be directed to the HP Mobile Printing website in another country/region or language.
- Make sure Wi-Fi Direct for your printer is turned on.
- Up to five computers and mobile devices can use the same Wi-Fi Direct connection.
- Wi-Fi Direct can be used while the printer is also connected either to a computer using a USB cable or to a network using a wireless connection.
- Wi-Fi Direct cannot be used to connect a computer, mobile device, or printer to the Internet.
To turn Wi-Fi Direct on or off
On the printer control panel, press the Wi-Fi Direct button ().
- When Wi-Fi Direct is turned on, the Wi-Fi Direct light is on steady. To find the Wi-Fi Direct name and password, press the Information button () to print a printer information page.
NOTE: When you turn on Wi-Fi Direct the first time, the printer automatically prints a Wi-Fi Direct guide. The guide provides instructions about how to use Wi-Fi Direct. After that, you can press the Wi-Fi Direct button () and the Information button ( ) together to print the Wi-Fi Direct guide. The guide may not be available in all languages. ![]()
![]()
- When Wi-Fi Direct is turned off, the Wi-Fi Direct light is off.
- For more information about the Wi-Fi Direct light status, see Control panel lights and display icons status on page 7.
To print from a wireless-capable mobile device that supports Wi-Fi Direct
Make sure you have installed the latest version of HP Print Service Plugin on your mobile device. You can download this plugin from the Google Play application store.
- Make sure you have turned on Wi-Fi Direct on the printer.
- Turn on Wi-Fi Direct on your mobile device. For more information, see the documentation provided with the mobile device.
- From your mobile device, select a document from a print enabled application, and then select the option to print the document.
The list of available printers appears.
- From the list of available printers, choose the Wi-Fi Direct name shown such as DIRECT-**-HP DeskJet 3700 series (where ** are the unique characters to identify your printer).
- If the Wi-Fi Direct connection security for the printer is Automatic (the default setting), the mobile device will connect to the printer automatically and send the print job.
- If the Wi-Fi Direct connection security for the printer is set to Manual, do one of the following to connect to the printer and print.
- If the Wi-Fi Direct light on the printer control panel keeps blinking, press the Wi-Fi Direct
button (). The light will stop blinking and stay on.
- If the printer prints out a page with a PIN code, follow the instruction on the page.
![]() TIP: You can change the Wi-Fi Direct connection security setting for the printer from the embedded web server (EWS). For more information, see Open the embedded web server on page 65.
TIP: You can change the Wi-Fi Direct connection security setting for the printer from the embedded web server (EWS). For more information, see Open the embedded web server on page 65.
To print from a wireless-capable mobile device that does not support Wi-Fi Direct
Make sure you have installed a compatible printing app on your mobile device. For more information, visit the HP Mobile Printing website at www.hp.com/go/mobileprinting. If a local version of this website is not available in your country/region or language, you might be directed to the HP Mobile Printing website in another country/region or language.
- Make sure you have turned on Wi-Fi Direct on the printer.
- Turn on the Wi-Fi connection on your mobile device. For more information, see the documentation provided with the mobile device.
![]()
![]()
- From the mobile device, connect to a new network. Use the process you normally use to connect to a new wireless network or hotspot. Choose the Wi-Fi Direct name from the list of wireless networks shown such as DIRECT-**-HP DeskJet 3700 series (where ** are the unique characters to identify your printer).
Enter the Wi-Fi Direct password when prompted.
- Print your document.
To print from a wireless-capable computer (Windows)
- Make sure you have turned on Wi-Fi Direct on the printer.
- Turn on the computer’s Wi-Fi connection. For more information, see the documentation provided with the computer.
![]()
![]()
- From the computer, connect to a new network. Use the process you normally use to connect to a new wireless network or hotspot. Choose the Wi-Fi Direct name from the list of wireless networks shown such as DIRECT-**-HP DeskJet 3700 series (where ** are the unique characters to identify your printer).
Enter the Wi-Fi Direct password when prompted.
- Proceed to step 5 if the printer has been installed and connected to the computer over a wireless network. If the printer has been installed and connected to your computer with a USB cable, follow the steps below to install the printer software using the HP Wi-Fi Direct connection.
- Depending on your operating system, do one of the following:
- Windows 10: From the computer desktop, click Start, select All apps, click HP, and then select the icon with the printer name.
- Windows 8.1: Click the down arrow in lower left corner of the Start screen, and then select the printer name.
- Windows 8: Right-click an empty area on the Start screen, click All Apps on the app bar, and then select the printer name.
- Windows 7, Windows Vista, and Windows XP: From the computer desktop, click Start, select All Programs, click HP, click the folder for the printer, and then select the icon with the printer name.
- In the printer software, click Tools.
- Click Device Setup & Software, and then select Connect a new device.
- When the Connection Options software screen appears, select Wireless. Select your HP printer software from the list of detected printers.
- Follow the onscreen instructions.
- Depending on your operating system, do one of the following:
- Print your document.
To print from a wireless-capable computer (OS X)
- Make sure you have turned on Wi-Fi Direct on the printer.
- Turn on Wi-Fi on the computer.
For more information, see the documentation provided by Apple.
- Click the Wi-Fi icon and choose the Wi-Fi Direct name, such as DIRECT-**-HP DeskJet 3700 series (where
** are the unique characters to identify your printer).
If Wi-Fi Direct is turned on with security, enter the password when prompted.
- Add the printer.
- Open System Preferences .
- Depending on your operating system, click Printers & Scanners .
- Click + below the list of printers at the left.
- Select the printer from the list of detected printers (the word “Bonjour” is listed the right column beside the printer name), and click Add.
Wireless settings
You can set up and manage your printer wireless connection and perform a variety of network management tasks. This includes printing information about network settings, turning the wireless function on or off, and changing wireless settings.
To turn on or off the wireless capability of the printer
Press the Wireless button () to turn on or off the printer wireless capabilities.
- If the printer has an active connection to a wireless network, the Wireless light is on solid blue, and the printer display shows the Wireless icon and the Signal Bars icon.
- If wireless is turned off, the Wireless light is off.
- For more information about the wireless status, see Control panel error codes and status on page 89.
To print the wireless network test report and network configuration page
Press the Wireless button () and the Information button ( ) at the same time.
- The wireless network test report shows the diagnostics results for the status of the wireless network, wireless signal strength, detected networks, and more.
- The network configuration page shows the network status, hostname, network name, and more.
To change wireless settings (Windows)
This method is available if you have already installed the printer software.![]()
![]()
- Open the HP printer software. For more information, see Open the HP printer software (Windows) on page 18.
- In the printer software, click Tools.
- Click Device Setup & Software.
- Select Reconfigure Wireless Settings. Follow the onscreen instructions.
To restore network settings to default settings
- Press the Wireless button () and the Cancel button ( ) from the printer control panel at the same time, and then hold them for three seconds.

Connect your printer to your computer with a USB cable (non- network connection)
The printer supports a rear USB 2.0 High Speed port for connection to a computer.
To connect the printer with the USB cable
- Visit 123.hp.com to download and install the printer software.
![]()
![]()
- Follow the onscreen instructions. When you are prompted, connect the printer to the computer by selecting USB on the Connection Options screen.
- Follow the onscreen instructions.
If the printer software has been installed, the printer will operate as a plug-and-play device.
Change from a USB connection to a wireless network
If you first set up your printer and installed the software with a USB cable, directly connecting the printer to your computer, you can easily change to a wireless network connection. You will need a wireless 802.11b/g/n network that includes a wireless router or access point.![]()
![]()
Before changing from a USB connection to a wireless network, make sure that:
- The printer is connected to your computer with the USB cable until you are prompted to disconnect the cable.
- The computer is connected to the wireless network that you intend to install the printer on.
Change from a USB connection to a wireless network (Windows)
- Open the HP printer software. For more information, see Open the HP printer software (Windows) on page 18.
- In the printer software, click Tools.
- Click Device Setup & Software.
- Select Convert a USB connected printer to wireless. Follow the onscreen instructions.
To change from a USB connection to a wireless network (OS X)
- Connect the printer to your wireless network.
- Use 123.hp.com to change the software connection to wireless for this printer.
When the printer is connected to a network, you can use the embedded web server (EWS) to view status information, change settings, and manage the printer from your computer.
NOTE: You can open and use the EWS without being connected to the Internet. However, some features are not available.![]()
![]()
NOTE: To view or change some settings, you might need a password.
- Open the embedded web server
- About cookies
Open the embedded web server
You can use one of the following ways to open the embedded web server.
To open the embedded web server through a network
- From the printer control panel, press the Wireless button () and the Information button () together to print the network configuration page.
- Find out the IP address or hostname of the printer from the network configuration page.
- In a supported web browser on your computer, type the IP address or hostname assigned to the printer.
For example, if the IP address is 192.168.0.12, type the following address into a Web browser: http:// 192.168.0.12.
To open the embedded web server from the HP printer software (Windows)
- Open the printer software. For more information, see Open the HP printer software (Windows) on page 18.
- Click Print & Scan , and then click Printer Home Page (EWS).
To open the embedded web server through Wi-Fi Direct
- If the Wi-Fi Direct light is off, press the Wi-Fi Direct button () to turn it on. To find the Wi-Fi Direct name and password, press the Information button ( ) to print a printer information page.
- From your wireless computer, turn wireless on, search for and connect to the Wi-Fi Direct name, for example: DIRECT-**-HP DeskJet 3700 series. Enter the Wi-Fi Direct password when prompted.
- In a supported web browser on your computer, type the following address: http:// 192.168.223.1.
About cookies
The embedded Web server (EWS) places very small text files (cookies) on your hard drive when you are browsing. These files let the EWS recognize your computer the next time you visit. For example, if you have configured the EWS language, a cookie helps remember which language you have selected so that the next time you access the EWS, the pages are displayed in that language. Some cookies (such as the cookie that stores customer-specific preferences) are stored on the computer until you clear them manually.
You can configure your browser to accept all cookies, or you can configure it to alert you every time a cookie is offered, which allows you to decide which cookies to accept or refuse. You can also use your browser to remove unwanted cookies.
NOTE: Depending on your printer, if you disable cookies, you also disable one or more of the following features: ![]()
![]()
- Starting where you left the application (especially useful when using setup wizards)
- Remembering the EWS browser language setting
- Personalizing the EWS Home page
For information about how to change your privacy and cookie settings and how to view or delete cookies, see the documentation available with your Web browser.
Tips for setting up and using a networked printer
Use the following tips to set up and use a networked printer:
- When setting up the wireless networked printer, make sure your wireless router or access point is powered on. The printer searches for wireless routers, then lists the detected network names on the computer.
- If your computer is connected to a Virtual Private Network (VPN), you need to disconnect from the VPN before you can access any other device on your network, including the printer.
- Learn more about configuring your network and the printer for wireless printing. Click here to go online for more information.
- Learn how to find your network security settings. Click here to go online for more information.
- Learn about the HP Print and Scan Doctor. Click here to go online for more information.
![]()
![]()
- Learn how to change from a USB to wireless connection. Click here to go online for more information.
- Learn how to work with your firewall and antivirus programs during printer setup. Click here to go online for more information.
- Solve a problem
This section contains the following topics:
- Jams and paper-feed issues
- Cartridge issues
- Printing issues
- Copy issues
- Scan issues
- Network and connection issues
- Printer hardware issues
- Control panel error codes and status
- HP support
Jams and paper-feed issues
What do you want to do?
Clear a paper jam
| Solve paper jam issues. | Use an HP online troubleshooting wizard. Instructions for clearing paper jams and resolving issues with paper or the paper feed. |
![]()
![]()
Read general instructions in the Help for clearing paper jams
Paper jams can occur in several locations.
To clear a paper jam from the input tray
- Press the Cancel button () to try to clear the jam automatically. If this does not work, complete the following steps to clear the jam manually.
- Pull the paper gently out of the input tray.

- Make sure there is no foreign object in the paper path, and then reload paper.
NOTE: The input tray shield can prevent foreign debris from falling into the paper path and causing serious paper jams. Do not take down the input tray shield. ![]()
![]()
- Press the Resume button ( ) on the control panel to continue the current job.
To clear a paper jam from the output tray
- Press the Cancel button () to try to clear the jam automatically. If this does not work, complete the following steps to clear the jam manually.
- Pull the paper gently out of the output tray.

- Press the Resume button ( ) on the control panel to continue the current job.
To clear a paper jam from the cartridge access area
- Press the Cancel button () to try to clear the jam automatically. If this does not work, complete the following steps to clear the jam manually.
- Remove the jammed paper.
- Press the Power button ( ) to turn off the printer.
- Open the cartridge access door.
- If the print carriage is in the center of the printer, slide it to the right.

- Remove the jammed paper.

- Close the cartridge access door.
- Press the Power button ( ) to turn on the printer.
Clear a print carriage jam
| Resolve a print carriage jam. | Use an HP online troubleshooting wizard. If something is blocking the print carriage or it does not move easily, get step-by-step instructions. |
![]()
![]()
Read general instructions in the Help for clearing a print carriage jams
▲ Remove any objects, such as paper, that are blocking the print carriage.
NOTE: Do not use any tools or other devices to remove jammed paper. Always use caution when removing jammed paper from inside the printer. ![]()
![]()
Learn how to avoid paper jams
To help avoid paper jams, follow these guidelines.
- Do not overfill the input tray.
- Remove printed papers from the output tray frequently.
- Ensure that paper loaded in the input tray lays flat, and the edges are not bent or torn.
- Do not combine different paper types and paper sizes in the input tray; the entire stack of paper in the input tray must be the same size and type.
- Adjust the paper-width guide in the input tray to fit snugly against all paper. Make sure the paper-width guide does not bend the paper in the input tray.
- Do not force paper too far down in the input tray.
- Do not add paper while the printer is printing. If the printer is about to run out of paper, wait until the out of paper message appears before adding paper.
Solve paper-feed problems
What kind of problem are you having?
- Paper is not picked up from the input tray
- Make sure paper is loaded in the input tray. For more information, see Load media on page 10.
- Adjust the paper-width guide in the input tray to fit snugly against all paper. Make sure the paper- width guide does not bend the paper in the input tray.
- Make sure paper in the input tray is not curled. Uncurl paper by bending it in the opposite direction of the curl.
- Pages are skewing
- Make sure the paper is loaded in the far-right side of the input tray and the paper-width guide is fit against the left side of the paper.
- Load paper into the printer only when it is not printing.
- Multiple pages are being picked up
- Adjust the paper-width guide in the input tray to fit snugly against all paper. Make sure the paper- width guide does not bend the paper in the input tray.
- Make sure the input tray is not overloaded with paper.
- Make sure the pieces of the loaded paper are not sticking together.
- Use HP paper for optimum performance and efficiency.
Cartridge issues
Identify whether a cartridge has a problem
To identify whether a cartridge has a problem, check the status of the Ink Alert light and the corresponding
Ink Level icon. For more information, see Control panel error codes and status on page 89.
If you get a cartridge problem message from the printer software that states at least one of the cartridges has a problem, do the following to identify whether a cartridge has a problem.
- Remove the black cartridge and then close the cartridge access door.
- If the Ink Level icon for the tri-color cartridge blinks, the tri-color cartridge has a problem.
- If the Ink Level icon for the tri-color cartridge does not blink, the tri-color cartridge does not have a problem.
- Install the black cartridge back in the printer, remove tri-color cartridge, and then close the cartridge access door.
- If the Ink Level icon for the black cartridge blinks, the black cartridge has a problem.
- If the Ink Level icon for the black cartridge does not blink, the black cartridge does not have a problem.
Fix cartridge problems
If an error occurs after a cartridge is installed, or if a message indicates a cartridge problem, try removing the cartridges, verifying the protective piece of plastic tape has been removed from each cartridge, and then reinserting the cartridges. If this does not work, clean the cartridge contacts. If the problem is still not resolved, replace the cartridges. For information about replacing cartridges, see Replace cartridges
on page 50.
To clean cartridge contacts
CAUTION: The cleaning procedure should take only a few minutes. Make sure that the cartridges are reinstalled in the printer as soon as possible. It is not recommended to leave the cartridges outside of the printer longer than 30 minutes. This could result in damage to the printhead or the cartridges. ![]()
![]()
- Check that power is on.
- Open the cartridge access door and wait for the print carriage to move to the center of the printer.
- Remove the cartridge indicated in the error message.
- Clean the cartridge contacts and printer contacts.
- Hold the cartridge by its sides with the bottom pointing up and locate the electrical contacts on the cartridge.
The electrical contacts are the small gold-colored dots on the cartridge.
- Wipe only the contacts with a dry swab or lint-free cloth.
CAUTION: Be careful to wipe only the contacts, and do not smear any of the ink or other debris elsewhere on the cartridge. ![]()
![]()
- On the inside of the printer, locate the contacts for the cartridge.
The printer contacts are the set of gold-colored bumps positioned to meet the contacts on the cartridge.
- Use a dry swab or lint-free cloth to wipe the contacts.
- Reinstall the cartridge.
- Close the cartridge access door.
- Check if the error message has gone away. If you still receive the error message, turn the printer off, and then on.
NOTE: If one cartridge is causing problems, you can remove it and use the single cartridge mode to operate the printer with only one cartridge. ![]()
![]()
Printing issues
What do you want to do?
Fix problems with page not printing (unable to print)
NOTE: The HP Print and Scan Doctor and the HP online troubleshooting wizards may not be available in all languages. ![]()
![]()
Read general instructions in the Help for unable to print issues
To resolve print issues (Windows)
Make sure that the printer is turned on and that there is paper in the input tray. If you are still unable to print, try the following in order:
- Check for error messages from the printer software and resolve them by following the onscreen instructions.
- If your computer is connected to the printer with a USB cable, disconnect and reconnect the USB cable. If your computer is connected to the printer with a wireless connection, confirm that the connection is working.
- Verify that the printer is not paused or offline.
To verify that the printer is not paused or offline
- Depending upon your operating system, do one of the following:
- Windows 10: From the Windows Start menu, click All apps, select Windows System, Control Panel, and then click View devices and printers under Hardware and Sound menu.
- Windows 8.1 and Windows 8: Point to or tap the upper-right corner of the screen to open the Charms bar, click the Settings icon, click or tap Control Panel, and then click or tap View devices and printers.
- Windows 7: From the Windows Start menu, click Devices and Printers.
- Windows Vista: From the Windows Start menu, click Control Panel, and then click Printers.
- Windows XP: From the Windows Start menu, click Control Panel, and then click Printers and Faxes.
- Either double-click the icon for your printer or right-click the icon for your printer and select See what’s printing to open the print queue.
- On the Printer menu, make sure there are no check marks next to Pause Printing or Use Printer Offline.
- If you made any changes, try to print again.
- Verify that the printer is set as the default printer.
To verify that the printer is set as the default printer
- Depending upon your operating system, do one of the following:
- Windows 10: From the Windows Start menu, click All apps, select Windows System, Control Panel, and then click View devices and printers under Hardware and Sound menu.
- Windows 8.1 and Windows 8: Point to or tap the upper-right corner of the screen to open the Charms bar, click the Settings icon, click or tap Control Panel, and then click or tap View devices and printers.
- Windows 7: From the Windows Start menu, click Devices and Printers.
- Windows Vista: From the Windows Start menu, click Control Panel, and then click Printers.
- Windows XP: From the Windows Start menu, click Control Panel, and then click Printers and Faxes.
- Make sure the correct printer is set as the default printer.
The default printer has a check mark in a black or green circle next to it.
- If the wrong printer is set as the default printer, right-click the correct printer and select Set as Default Printer.
- Try using your printer again.
- Restart the print spooler.
To restart the print spooler
- Depending upon your operating system, do one of the following:
Windows 10
- From the Windows Start menu, click All apps, and then click Windows System.
- Click Control Panel, System and Security, and then click Administrative Tools.
- Double-click Services.
- Right-click the Print Spooler, and then click Properties.
- On the General tab, next to Startup type, make sure that Automatic is selected.
- If the service is not already running, under Service status, click Start, and then click OK.
Windows 8.1 and Windows 8
- Point to or tap the upper-right corner of the screen to open the Charms bar, and then click the
Settings icon.
- Click or tap Control Panel, and then click or tap System and Security.
- Click or tap Administrative Tools, and then double-click or double-tap Services.
- Right-click or touch and hold Print Spooler, and then click Properties.
- On the General tab, next to Startup type, make sure that Automatic is selected.
- If the service is not already running, under Service status, click or tap Start, and then click or tap OK.
Windows 7
- From the Windows Start menu, click Control Panel, System and Security, and then
Administrative Tools.
- Double-click Services.
- Right-click the Print Spooler, and then click Properties.
- On the General tab, next to Startup type, make sure that Automatic is selected.
- If the service is not already running, under Service status, click Start, and then click OK.
Windows Vista
- From the Windows Start menu, click Control Panel, System and Maintenance, Administrative Tools.
- Double-click Services.
- Right-click the Print Spooler service, and then click Properties.
- On the General tab, next to Startup type, make sure that Automatic is selected.
- If the service is not already running, under Service status, click Start, and then click OK.
Windows XP
- From the Windows Start menu, right click My Computer.
- Click Manage, and then click Services and Applications.
- Double-click Services, and then select Print Spooler.
- Right-click Print Spooler, and click Restart to restart the service.
- Make sure the correct printer is set as the default printer.
The default printer has a check mark in a black or green circle next to it.
- If the wrong printer is set as the default printer, right-click the correct printer and select Set as Default Printer.
- Try using your printer again.
- Restart the computer.
- Clear the print queue.
To clear the print queue
- Depending upon your operating system, do one of the following:
- Windows 10: From the Windows Start menu, click All apps, select Windows System, Control Panel, and then click View devices and printers under Hardware and Sound menu.
- Windows 8.1 and Windows 8: Point to or tap the upper-right corner of the screen to open the Charms bar, click the Settings icon, click or tap Control Panel, and then click or tap View devices and printers.
- Windows 7: From the Windows Start menu, click Devices and Printers.
- Windows Vista: From the Windows Start menu, click Control Panel, and then click Printers.
- Windows XP: From the Windows Start menu, click Control Panel, and then click Printers and Faxes.
- Double-click the icon for your printer to open the print queue.
- On the Printer menu, click Cancel all documents or Purge Print Document, and then click Yes to confirm.
- If there are still documents in the queue, restart the computer and try printing again after the computer has restarted.
- Check the print queue again to make sure it is clear, and then try to print again.
To resolve print issues (OS X)
- Check for error messages and resolve.
- Disconnect and reconnect the USB cable.
- Verify that the product is not paused or offline.
To verify that the product is not paused or offline
- In System Preferences, click Printers & Scanners .
- Click the Open Print Queue button.
- Click a print job to select it.
Use the following buttons to manage the print job:
- Delete: Cancel the selected print job.
- Hold: Pause the selected print job.
- Resume: Continue a paused print job.
- Pause Printer: Pause all print jobs in the print queue.
- If you made any changes, try to print again.
- Restart the computer.
Fix print quality issues
Read general instructions in the Help for resolving print quality issues
NOTE: To protect the cartridges from drying out, always turn the printer off using the Power button, and wait until the Power button light goes out. ![]()
![]()
To improve print quality (Windows)
- Make sure you are using original HP cartridges.
- Check the paper type.
For best print quality, use high quality HP paper, or papers that adhere to the ColorLok® standard. For more information, see Paper basics on page 15.
Always make sure the paper you are printing on is flat. For best results when printing images, use HP Advanced Photo Paper.
Store specialty paper in its original packaging inside a resealable plastic bag on a flat surface in a cool, dry place. When you are ready to print, remove only the paper you plan to use immediately. When you have finished printing, return any unused photo paper to the plastic bag. This prevents the photo paper from curling.
- Check the printer software to make sure you have selected the appropriate paper type from the Media
drop-down list and print quality from the Quality Settings drop-down list.
In the printer software, click Print & Scan and then click Set Preferences to access the print properties.
- Check the estimated ink levels to determine if the cartridges are low on ink.
For more information, see Check estimated ink levels on page 48. If the cartridges are low on ink consider replacing them.
- Align the cartridges.
To align the cartridges
- Load letter or A4 unused plain white paper into the input tray.
- Open the printer software. For more information, see Open the HP printer software (Windows) on page 18.
- In the printer software, click Print & Scan and then click Maintain Your Printer to access the printer toolbox.
The printer toolbox appears.
- Click Align Cartridges on the Device Services tab. The printer prints an alignment page.
- Follow the onscreen instructions to align the cartridges. Recycle or discard the cartridge alignment sheet later.
- Print a diagnostics page if the cartridges are not low on ink.
To print a diagnostics page
- Load letter or A4 unused plain white paper into the input tray.
- Open the printer software. For more information, see Open the HP printer software (Windows) on page 18.
- In the printer software, click Print & Scan and then click Maintain Your Printer to access the printer toolbox.
- Click Print Diagnostic Information on the Device Reports tab to print a diagnostics page.
- Review the blue, magenta, yellow, and black boxes on the diagnostics page.

- Clean the cartridges, if the diagnostic page shows steaks or missing portions of the color and black boxes.
To clean the cartridges
- Load letter or A4 unused plain white paper into the input tray.
- Open the printer software. For more information, see Open the HP printer software (Windows) on page 18.
- In the printer software, click Print & Scan and then click Maintain Your Printer to access the printer toolbox.
- Click Clean cartridges on the Device Services tab. Follow the onscreen instructions.
To improve print quality (OS X)
- Make sure you are using original HP cartridges.
- Check the paper type.
For best print quality, use high quality HP paper, or papers that adhere to the ColorLok® standard. For more information, see Paper basics on page 15.
Always make sure the paper you are printing on is flat. For best results when printing images, use HP Advanced Photo Paper.
Store specialty paper in its original packaging inside a resealable plastic bag on a flat surface in a cool, dry place. When you are ready to print, remove only the paper you plan to use immediately. When you have finished printing, return any unused photo paper to the plastic bag. This prevents the photo paper from curling.
- Make sure you have selected the appropriate paper type and print quality in the Print dialog.
- Check the estimated ink levels to determine if the cartridges are low on ink. Consider replacing the print cartridges if they are low on ink.
- Align the printhead.
To align the printhead from the software
- Load Letter or A4 plain, white paper in the input tray.
- Open HP Utility.
![]()
![]()
- Select your printer from the list of devices at the left of the window.
- Click Align.
- Click Align and follow the onscreen instructions.
- Click All Settings to return to the Information and Support pane.
- Print a test page.
To print a test page
- Load Letter or A4 plain, white paper in the input tray.
- Open HP Utility.
![]()
![]()
- Select your printer from the list of devices at the left of the window.
- Click Test Page.
- Click the Print Test Page button, and follow the onscreen instructions.
- If the diagnostic page shows steaks or missing portions of the text or colored boxes, clean the printhead automatically.
To automatically clean the printhead
- Load Letter or A4 plain, white paper in the input tray.
- Open HP Utility.
![]()
![]()
- Select your printer from the list of devices at the left of the window.
- Click Clean Printheads.
- Click Clean, and follow the onscreen instructions.
CAUTION: Clean the printhead only when necessary. Unnecessary cleaning wastes ink and shortens the life of the print head.![]()
![]()
NOTE: If print quality still seems poor after you complete cleaning, try aligning the printhead. If print quality problems persist after cleaning and aligning, contact HP support.
- Click All Settings to return to the Information and Support pane.
Copy issues
| Troubleshoot copy problems. | Use an HP online troubleshooting wizard. Get step-by-step instructions if the printer does not create a copy, or if your printouts are low quality. |
![]()
![]()
Tips for copy and scan success on page 46
Scan issues
| HP Print and Scan Doctor | The HP Print and Scan Doctor is a utility that will try to diagnose and fix the issue automatically. NOTE: This utility is only available for Windows operating system. |
| Solve scan problems | Use an HP online troubleshooting wizard. Get step-by-step instructions if you cannot create a scan or if your scans are low quality. |
NOTE: The HP Print and Scan Doctor and the HP online troubleshooting wizards may not be available in all languages. ![]()
![]()
Tips for copy and scan success on page 46
Network and connection issues
What do you want to do?
Fix wireless connection
Choose one of the following troubleshooting options.
NOTE: The HP Print and Scan Doctor and the HP online troubleshooting wizards may not be available in all languages. ![]()
![]()
Read general instructions in the Help for wireless troubleshooting
▲ Press the Wireless button () and the Information button () at the same time to print the wireless network test report and network configuration page.
Find network settings for wireless connection
Choose one of the following troubleshooting options.
NOTE: The HP Print and Scan Doctor and the HP online troubleshooting wizards may not be available in all languages.![]()
![]()
Fix Wi-Fi Direct connection
![]()
![]()
Read general instructions in the Help for Wi-Fi Direct troubleshooting
- Make sure that the Wi-Fi Direct light on the printer control panel is on. If the light is off, press the Wi-Fi Direct button () to turn it on.
- From your wireless computer or mobile device, turn on the Wi-Fi connection, and then search for and connect to the Wi-Fi Direct name of your printer.
- Enter the Wi-Fi Direct password when prompted.
- If you are using a mobile device, make sure you have installed a compatible printing app. For more information, visit the HP Mobile Printing website at www.hp.com/go/mobileprinting. If a local version of this website is not available in your country/region or language, you might be directed to the HP Mobile Printing website in another country/region or language.
Printer hardware issues
Close cartridge access door
- Cartridge door must be closed to begin printing.
The printer shuts down unexpectedly
- Check the power and power connections.
- Make sure the power cord of the printer is connected firmly to a functioning power outlet.
NOTE: When Auto-Off is enabled, the printer will automatically turn off after 2 hours of inactivity to help reduce energy use. For more information, see Auto-Off on page 21. ![]()
![]()
Resolve printer failure
- Turn the printer off, then on. If that does not resolve the problem, contact HP.
Control panel error codes and status
Control panel error codes
- If the Number of copies icon on the printer display is alternating between the letter E and a number, it indicates the printer is in an error state. The letter E and the number work as error codes.
| Light behavior | Cause and Solution |
The Number of copies icon is alternating between the letter E and the number 1. At the same time, the Resume light is blinking. |
The printer receives a printing job, starts feeding paper, and detects that the paper width for the printing job is bigger than the width of the loaded paper. Press either the Resume button ( ) or the Cancel button ( ) to cancel the printing job and eject paper.To avoid the paper size mismatch problem, do one of the following before printing.Change the paper size setting for the printing job to match the paper loaded.Remove all paper from the input tray, and then load paper that matches the paper size setting for the printing job.TIP: You can change the default paper size automatically detected by the printer. For more information, see Change the default paper size detected by printer on page 14. |
The Number of copies icon is alternating between the letter E and the number 2. At the same time, the Resume light is blinking. |
The printer receives a multipage printing job, detects that the paper length for the printing job does not match the length of the loaded paper, and then prints out the first page of the job with errors.To cancel the printing job, press the Cancel button ( ).To continue printing the remaining pages, press the Resume button ( ). The remaining pages will have the same errors as the first page.TIP: You can change the default paper size automatically detected by the printer. For more information, see Change the default paper size detected by printer on page 14. |
The Number of copies icon is alternating between the letter E and the number 3. At the same time, the Resume light and the Ink Alert light are blinking. |
The carriage inside the printer has stalled. Open the cartridge access door and make sure the carriage is not obstructed. Move the carriage to the right, close the cartridge access door, and then press the Resume button( ) to continue printing. See Jams and paper-feed issues on page 70 for more information. |
| Light behavior | Cause and Solution |
The Number of copies icon is alternating between the letter E and the number 4. At the same time, the Resume light is blinking. |
There is a paper jam. Clear the jam, and then press the Resume button ( ) to continue printing.For more information, see Jams and paper-feed issues on page 70. |
The Number of copies icon is alternating between the letter E and the number 5. At the same time, all lights on the control panel are blinking. |
The scanner is not working. Turn off and turn on the printer.If the problem persists, contact HP. The printer still prints even if the scanner is not working. |
The Number of copies icon is alternating between the letter E and the number 6. |
The printer is in an error state. Turn off the printer. Unplug the power cord. Wait a minute, and then plug the power cord back in. Turn on the printer. If the problem persists, contact HP. |
Control panel ink error status
●
| Light behavior | Cause and Solution |
| Both Ink Level icons are blinking with no segment, and the Ink Alert light is blinking. One of the following might have occurred. |
One of the following might have occurred. Both cartridges are missing. Both cartridges are installed improperly, or still have plastic tape on them.Both cartridges are incompatible or damaged. Try the following solutions to solve the problem. If there is no cartridge installed in the printer, install the cartridges.If both cartridges are installed in the printer, remove the cartridges, make sure there is no plastic tape on them, and then reinsert the cartridges securely.Make sure that you are using the correct HP cartridges for your printer.If the error persists, replace the cartridges. For information about how to replace cartridges, see Replace cartridges on page 50. |
| Light behavior | Cause and Solution |
| One of the Ink Level icons is blinking with no segment, the Ink Alert light is on, and the Resume light is blinking. |
One of the following might have occurred. Both cartridges are missing. Both cartridges are installed improperly, or still have plastic tape on them.Both cartridges are incompatible or damaged. Try the following solutions to solve the problem. If the corresponding cartridge is newly installed, it might be counterfeit or previously used. Refer to the message in the HP printer software for more information.If the corresponding cartridge is not newly installed, it is very low on ink. Press the Resume button ( ) tocontinue printing, and replace the cartridge when the print quality is no longer acceptable. For information about how to replace cartridges, see Replace cartridges on page 50. |
| Both Ink Level icons are blinking with no segment, the Ink Alert light is on, and the Resume light is blinking. |
One of the following might have occurred. The counterfeit or previously used cartridges are installed.Both of the cartridges are very low on ink. Try the following solutions to solve the problem. If the cartridges are newly installed, they might be counterfeit or previously used. Refer to the message in the HP printer software for more information.If the cartridges are not newly installed, they are very low on ink. Press the Resume button ( ) to continueprinting, and replace the cartridges when the print quality is no longer acceptable. For information about how to replace cartridges, see Replace cartridgeson page 50. |
Control panel paper error status
●
HP support
For the latest product updates and support information, visit the product support website at www.support.hp.com. HP online support provides a variety of options for help with your printer:
 There is no paper in the input tray. Load paper in the input tray.For information about how to load paper, see Load media on page 10.The Error icon, the Paper Error icon, and the Resume light are blinking. There is no paper in the input tray. Load paper in the input tray.For information about how to load paper, see Load media on page 10.The Error icon, the Paper Error icon, and the Resume light are blinking. The printer receives a printing job, and detects that there is no paper in the input tray. Load paper, and then press the Resume button ( ) to continue printing.For information about how to load paper, see Load media on page 10. |
Drivers & downloads: Download software drivers and updates, as well as product manuals and documentation that came in the box with your printer. |
| HP support forums: Visit HP Support Forums for answers to common questions and issues. You can view questions posted by other HP customers, or sign in and post your own questions and comments. | |
| Troubleshooting: Use HP online tools to detect your printer and find recommended solutions. |
Contact HP
If you need help from an HP technical support representative to solve a problem, visit the Contact Support website. The following contact options are available at no cost for in-warranty customers (HP agent-assisted support for out-of warranty customers may require a fee):
| Chat with an HP support agent online. | |
| Call an HP support agent. |
When contacting HP support, be prepared to provide the following information:
- Product name (Located on the printer, such as HP DeskJet 3700)
- Product number (located inside the cartridge access door)

- Serial number (located on the back or bottom of the printer)
Register printer
By taking just a few quick minutes to register, you can enjoy quicker service, more efficient support, and product support alerts. If you did not register your printer while installing the software, you can register now at http://www.register.hp.com.
Additional warranty options
Extended service plans are available for the HP DeskJet 3700 series at additional costs. Go to www.support.hp.com , select your country/region and language, then explore the extended warranty options available for your printer.
A Technical information
The technical specifications and international regulatory information for the HP DeskJet 3700 series are provided in this section.
For additional specifications, see the printed documentation that came with the HP DeskJet 3700 series. This section contains the following topics:
- HP Company notices
- Specifications
- Regulatory notices
- Environmental product stewardship program
HP Company notices
The information contained herein is subject to change without notice.
All rights reserved. Reproduction, adaptation, or translation of this material is prohibited without prior written permission of HP, except as allowed under the copyright laws. The only warranties for HP products and services are set forth in the express warranty statements accompanying such products and services. Nothing herein should be construed as constituting an additional warranty. HP shall not be liable for technical or editorial errors or omissions contained herein.
© Copyright 2016 HP Development Company, L.P.
H3Specifications
Microsoft and Windows are either registered trademarks or trademarks of Microsoft Corporation in the United States and/or other countries.
Specifications
Technical specifications for the HP DeskJet 3700 series are provided in this section. For more product specifications, see the Product Data Sheet at www.support.hp.com .
System requirements
- For information about software and system requirements or future operating system releases and support, visit the HP online support website at www.support.hp.com .
Environmental specifications
- Recommended operating temperature range: 15ºC to 30ºC (59ºF to 86ºF)
- Allowable operating temperature range: 5ºC to 40ºC (41ºF to 104ºF)
- Humidity: 15% to 80% RH non-condensing; 28ºC maximum dewpoint
- Nonoperating (Storage) temperature range: –40ºC to 60ºC (–40ºF to 140ºF)
- In the presence of high electromagnetic fields, it is possible the output from the HP DeskJet 3700 series may be slightly distorted
- HP recommends using a USB cable less than or equal to 3 m (10 feet) in length to minimize injected noise due to potential high electromagnetic fields
Input tray capacity
- Plain paper sheets (80 g/m2 [20lb]): Up to 60
- Envelopes: Up to 5
- Index cards: Up to 20
- Photo paper sheets: Up to 20
Output tray capacity
- Plain paper sheets (80 g/m2 [20lb]): Up to 25
- Envelopes: Up to 5
- Index cards: Up to 10
- Photo paper sheets: Up to 10
Paper size
- For a complete list of supported media sizes, see the printer software.
Paper weights
- Plain Paper: 64 to 90 g/m² (16 to 24 lb)
- Envelopes: 75 to 90 g/m² (20 to 24 lb)
- Cards: Up to 200 g/m² (110-lb index maximum)
- Photo Paper: Up to 280 g/m² (75 lb)
Print specifications
- Print speeds vary according to the complexity of the document
- Method: drop-on-demand thermal inkjet
- Language: PCL3 GUI
Copy specifications
- Digital image processing
- Copy speeds vary according to the complexity of the document and model
Scan specifications
- Resolution: up to 600 ppi
- Color: 24 bits RGB color, 8 bits grayscale
- Maximum scan size from scan path: 21.6 x 29.7 cm (8.5 x 11inches)
For more information about ppi resolution, color, and scan size, see the scanner software.
Print resolution
- For a list of supported print resolutions, visit the product support website at www.support.hp.com.
Cartridge yield
- Visit www.hp.com/go/learnaboutsupplies for more information on estimated cartridge yields.
Acoustic information
If you have Internet access, you can access acoustic information from the HP website.
Download HP DeskJet 3700 All-in-One User Manual Guide PDFs
View the manual for the HP DeskJet 3700 here, for free. This manual comes under the category printers and has been rated by 6 people with an average of a 8. This manual is available in the following languages: English. Do you have a question about the HP DeskJet 3700 or do you need help? Ask your question here
The HP DeskJet 3700 is a printer that is designed for home and small office use. It is a compact and stylish printer that features wireless connectivity, allowing for convenient printing from various devices. The printer is easy to set up and use, making it ideal for individuals who require a simple and efficient printing solution.
The DeskJet 3700 is capable of printing both black and white and color documents. It produces high-quality prints with crisp text and vibrant colors. The printer utilizes thermal inkjet technology to achieve accurate and detailed printing results.
With its compact design, the DeskJet 3700 can fit into tight spaces without taking up much room. It is lightweight and portable, making it easy to move around as needed. The printer also features a built-in paper tray that can hold up to 60 sheets of paper, reducing the need for frequent paper reloading.
In terms of connectivity, the DeskJet 3700 supports both USB and wireless connections. Users can connect their devices to the printer via Wi-Fi Direct or using the HP Smart app. This allows for effortless printing from smartphones, tablets, and laptops.
Overall, the HP DeskJet 3700 is a reliable and user-friendly printer that offers convenient wireless printing capabilities. It is a suitable option for individuals looking for a compact and efficient printing solution for their home or small office.
General
| HP | |
| DeskJet 3700 | |
| printer | |
| 0829160410821 | |
| English | |
| User manual (PDF) |
Can’t find the answer to your question in the manual? You may find the answer to your question in the FAQs about the HP DeskJet 3700 below.
What is the best way to remove jammed paper from my printer?
It is best to gently pull the paper out of the printer. Turn the printer off, and make sure that the printhead is not hanging over the paper and that no paper remains in the printer.
How come my printer does not accept original cartridges?
Non-genuine cartridges may not be recognised by the printer. In that case you will receive a message that the cartridge is empty. The manual of the purchased cartridge usually contains the solution, if this does not work, it is advisable to contact the seller.
How come my prints are of poor quality?
There can be various reasons for poor print quality. Check if the cartridges or toners are full. If so, inkjet printers often require cleaning the printer, the cartridges have dried out, or the print head is broken. With laser printers, calibrating the laser printer is recommended.
What is the difference between a laser printer and an inkjet printer?
A laser printer prints with a toner and an inkjet printer prints with ink.
How come my inkjet printer has black stripes?
In most cases, the inkjet printer cartridge is broken and the cartridge needs to be replaced.
What does DPI stand for?
DPI stands for Dots Per Inch and is the number of ink droplets (per inch) that end up on the paper when printing.
Why is my printer not printing anything?
Ensure that the printer is turned on and connected to the power source. Additionally, check if there are any error messages on the printer’s display panel or computer screen. Verify that there is enough paper in the input tray and that the ink cartridges have sufficient ink.
How can I fix paper jams in my printer?
Gently remove any stuck paper from the paper input tray or output tray. Open the rear door of the printer and carefully pull out any jammed paper. Make sure not to tear the paper while removing it. Once cleared, properly align the paper and reload it into the input tray.
What should I do when my printer is not connecting to my wireless network?
Check if the wireless network is functioning properly by testing it with other devices. Restart both the printer and the wireless router. Ensure that the printer is within range of the router and not obstructed by any physical barriers. Navigate to the printer settings and attempt to reconnect it to the network using the wireless setup wizard.
How can I resolve print quality issues like smudges or streaks?
Firstly, ensure that you are using genuine HP ink cartridges for optimum print quality. Perform a printhead cleaning through the printer’s software or control panel. Align the printhead to enhance the printing results. Lastly, make sure the paper being used is compatible with the printer and properly loaded into the input tray.
What steps should I follow to set up my printer for the first time?
Begin by unpacking the printer and removing all protective materials. Connect the power cord to the printer and plug it into a power outlet. Install the ink cartridges and load paper into the input tray. Turn on the printer and go through the initial setup process, following the on-screen instructions. Finally, install the necessary software and drivers on your computer to enable printing functionality.
Is the manual of the HP DeskJet 3700 available in English?
Yes, the manual of the HP DeskJet 3700 is available in English .
Is your question not listed? Ask your question here
More products and manuals for Multifunction Devices HP
| Models | Document Type |
|---|---|
|
DeskJet GT 5820 |
User Manual
136 pages |
|
DeskJet GT 5820 |
User Manual
16 pages |
|
DeskJet GT 5820 |
User Manual
138 pages |
|
DeskJet GT 5820 |
User Manual
137 pages |
|
LaserJet Pro MFP M227fdw |
User Manual
214 pages |
|
LaserJet Pro MFP M130a |
User Manual
12 pages |
|
LaserJet Pro MFP M130a |
User Manual
206 pages |
|
OfficeJet Pro 7740 |
User Manual
180 pages |
|
LaserJet Ultra M106w |
User Manual
16 pages |
|
LaserJet Ultra M106w |
User Manual
110 pages |
|
LaserJet Pro MFP M227fdw |
User Manual
48 pages |
|
LaserJet Pro MFP M227fdw |
User Manual
212 pages |
|
LaserJet Pro MFP M227fdw |
User Manual
24 pages |
|
LaserJet Pro MFP M227fdw |
User Manual
58 pages |
|
LaserJet Pro MFP M227fdw |
User Manual
60 pages |
|
LaserJet Pro MFP M227fdw |
User Manual
60 pages |
|
LaserJet Pro MFP M227fdw |
User Manual
206 pages |
|
LaserJet Pro MFP M227fdw |
User Manual
210 pages |
|
LaserJet Pro MFP M227fdw |
User Manual
212 pages |
|
Color LaserJet Enterprise CM4540 |
User Manual
424 pages |


