
Select a Honda Vehicle
Enter the year and model to access manuals, guides, and warranty information
Environmental Vehicle Owners: To register and manage your vehicle, visit
ev.owners.honda.com
Or
Sign in to select your vehicle
Sign in to view manuals and warranties specific to your vehicle.
- Manuals
- Warranty Info
Owner’s Guides and Manuals are viewable on any computer or device with Adobe® Reader. These files
contain detailed information about your vehicle, and can be downloaded, searched, and printed.
Warranty Booklet
The Warranty Booklet has detailed information about the coverage and terms of your warranties including:
- General warranty provisions
- New vehicle limited warranty
- Emissions warranties
- Warranties on accessories, replacement parts, and more.
Parts Covered by Emissions Warranty
To view a list of parts covered under your vehicle’s emissions warranty, select the state where the vehicle is registered and operated.
Комментарии
20
Войдите или зарегистрируйтесь, чтобы писать комментарии, задавать вопросы и участвовать в обсуждении.


По первой ссылке на простого хомяка инструкция на японском. Можно на русском?
Спасибо, конечно! Но это на старый кузов, мне бы на 2010 год
Sayan022
Спасибо, конечно! Но это на старый кузов, мне бы на 2010 год


Чето все скачал, пересмотрел, на второго фита ничего не нашел в ссылках. Там этого нет, или я проглядел. Подскажи пожалуйста. Нигде книгу не могу найти

Блиин, можно мне тоже мануал на гибридного фита, пожалуйста)
Качай, ссылки перезалил, проверил все рабочие


Весьма благодарен, столько искал и все не выходило)
Да только сегодня hondabro с Клуб владельцев Honda Fit (Honda Jazz) сделал скан и загрузил


Все комментарии

Сокращения и условные обозначения
Сокращения А/С — кондиционер воздуха ABS — антиблокировочная система тормозов АТ, А/Т — автоматическая коробка передач CVT — вариатор ECU — электронный блок управления EGR — система рециркуляции отработавших газов EPS —…

Идентификация автомобиля
Технические характеристики двигателей Примечание: приведенные значения мощности и крутящего момента (стандарт JIS) являются ориентировочными и могут изменяться в зависимости от конкретной модификации и года выпуска, но в…

Номер двигателя и идентификационные таблички
Таблички с номером двигателя и трансмиссии расположены, как показано на рисунке. 1 — номер кузова, 2 — марка кузова, номер кузова, 3 — номер трансмиссии (вариатор), 4 — номер трансмиссии (МКПП), 5 — номер двигателя. Расшифровка…
Общие инструкции по ремонту
1. Пользуйтесь чехлами на крылья, сиденья и напольными коврами, чтобы предохранить автомобиль от загрязнения и повреждений. 2. При разборке укладывайте детали в соответствующем порядке, чтобы облегчить последующую сборку. 3….


Блокировка дверей
Внимание: при проведений работ в салоне автомобиля, оборудованного системой подушек безопасности и преднатяжителей ремней (система «SRS»), следует быть особенно внимательными, чтобы не повредить шок управления системы «SRS», Во…

Одометр и счетчик пробега
Одометр и счетчик пробега. а) Одометр показывает общий пробег автомобиля. б) Счетчики пробега показывают расстояние, которое проехал, автомобиль с момента последней установки счетчика на ноль. в) Кнопка «ODO/TRIP» предназначена…
Тахометр — общие сведения
Тахометр — показывает число оборотов коленчатого вала двигателя в минуту (об/мин). Внимание: во время движения следите за показаниями тахометра. Его стрелка, показывающая частоту вращения коленчатого вала двигателя, не должна…
Указатель количества топлива
Указатель показывает уровень топлива в топливном баке (F — полный бак, Е — пустой бак), когда ключ в замке зажигания находится в положении «II». Индикатор низкого уровня топлива загорается, когда уровень топлива в баке менее 6…

Индикаторы комбинации приборов
1. Индикаторы указателей поворотов. Индикаторы мигают при включении указателей поворотов или аварийной сигнализации. Слишком частое мигание индикаторов указывает на плохое соединение в цепи указателей поворотов или на отказ лампы…

Стеклоподъемники — общие сведения
На моделях с электроприводом стеклоподъемников дверей регулировка положения стекол, дверей осуществляется нажатием на соответствующий выключатель. При этом ключ в замке зажигания должен быть установлен в положение «II». С панели…

Световая сигнализация в автомобиле
1. Включение габаритов, фар, подсветки комбинации приборов и номерного знака. Примечание: переключатель света фар и указателей поворота работает независимо от положения ключа в замке зажигания. а) При повороте ручки переключателя…

Система коррекции положения фар
Корректировка направления пучка света фар осуществляется вращением регулятора. Необходимость корректировки пучка света фар возникает в зависимости от загрузки автомобиля. Этой функцией можно пользоваться, только когда включен…

Капот и задняя дверь
1. Для открывания капота необходимо произвести следующие процедуры: а) Потяните вверх за рычаг привода замка капота, как показано на рисунке. б) Слега приподнимите капот и потяните рычаг блокировки замка капота вверх. в)…

Управление стеклоочистителем и омывателем
Переключатель управления стеклоочистителем и омывателем работает, когда ключ зажигания находится в положении «II». 1. Для включения и остановки очистителя необходимо перевести переключатель в одно из положений: «OFF» — полная…

Регулировка положения рулевого колеса
Для регулировки вертикального положения рулевого колеса необходимо потянуть рычаг блокировки вниз. Дальнейшая регулировка производится перемещением рулевого колеса по вертикали, при этом рулевое колесо стремится занять самое…

Управление зеркалами
Регулировка зеркал производится с панели управления зеркал. При этом ключ зажигания должен находиться в положении «II». Выбор управления правым или левым зеркалом осуществляется установкой переключателя, показанного на рисунке, в…

Сиденья — общие сведения
1. Регулировка продольного положения передних сидений. Для регулировки продольного положения сидений переведите рычаг вверх и передвиньте сиденье в требуемое положение. После регулировки установите рычаг в исходное положение. 2….

Ремни безопасности
Чтобы защитить вас и ваших пассажиров в случае дорожно-транспортного происшествия рекомендуется всем людям, находящимся в автомобиле, быть пристегнутыми ремнями безопасности. Внимание: Не надевайте плечевую часть ремня так, чтобы…


Люк — общие сведения
Управление люком возможно, когда ключ зажигания находится в положении «II». Люк может находиться в двух различных открытых состояниях: в сдвинутом и в открытом под углом. Открытие и закрытие люка Внимание: при закрывании и…

Управление отопителем и кондиционером
Управление работой кондиционера и отопителя осуществляется с панели управления. 1. Для включения отопителя необходимо перевести переключатель скорости вращения вентилятора отопителя (5) из положения «OFF» в любое другое (модели с…

Обогреватель заднего стекла
При запотевании, заднего стекла необходимо нажать на выключатель (1) (модели с механическим управлением) или (3) (модели с автоматическим управлением) обогревателя заднего стекла, расположенный, как показано на рисунке. Модели с…

Панель приборов
Панель приборов со стороны водителя. 1 — магнитола, 2 — выключатель аварийной сигнализации, 3 — переключатель управления стеклоочистителем и омывателем, 4 — переключатель понижения передачи в режиме ручного переключения, 5 -…

Расположение компонентов в салоне автомобиля
Расположение компонентов в салоне автомобиля. 1 — солнцезащитный козырек, 2 — внутреннее зеркало заднего вида, 3 — лампа местной подсветки/лампа освещения передней, части салона, 4 — люк, 5 — регулируемое крепление ремня, 6 -…

Замена салонного фильтра
1. Откройте вещевой ящик. 2. Извлеките нижнюю часть вещевого ящика. 3. Нажмите на фиксаторы слева й справа корпуса салонного, фильтра и извлеките его. 4. Извлеките фильтр из корпуса. Установите новый «фильтр меткой «AIR FLOW «,…
Антиблокировочная тормозная система (ABS)
Внимание: используйте шины одинакового размера, конструкции и нагрузочной способности с исходными шинами автомобиле, поскольку, использование шин другого типа можешь помешать нормальной работе антиблокировочной тормозной системы….
Система экстренного торможения (ВА)
Система распознает ситуацию экстренного торможения и автоматически усиливает тормозное давление, тем самым обеспечивая максимальное тормозное усилие. Система обеспечивает экстренное торможение в случае, когда водитель нажимает на…

Управление автомобилем с АКПП
Для управления автоматической коробкой передач на центральной консоли установлен селектор. Селектор тросом соединен с блоком клапанов, и с его помощью можно задавать диапазон используемых передач. Для предотвращения поломок…

Управление автомобилем с вариатором
Для управления вариатором на центральной консоли установлен селектор. Селектор тросом соединен с вариатором и с его помощью можно задавать режим работы вариатора. Для предотвращения, поломок вариатора при неправильном выборе…

Управление автомобилем с МКПП
Схема расположения передач показана на рисунке. Также схема изображена на ручке рычага. Прежде чем переключать передачу, всегда полностью выжимайте педаль сцепления. Внимание: Не держите ногу на педали сцепления во время…
Особенности трансмиссии моделей 4WD
Внимание: во избежание повреждения элементов трансмиссии для моделей 4WD запрещена буксировка методом частичной погрузки (поднятием только одной из осей автомобиля). Модели с 4WD имеют автоматически подключаемый полный привод….
Советы по вождению в различных условия
Общие рекомендации Внимание: Перед началом движения убедитесь, что стояночный тормоз полностью отпущен и соответствующий индикатор погас. Не держите ногу на педали тормоза во время движения. Это может привести к опасному…

Буксировка автомобиля
Внимание: категорически запрещено буксировать автомобили 4WD методом частичной погрузки, т.е. с поднятием с одной из осей автомобиля. Внимание: буксировка автомобилей с АКПП разрешается при скорости не выше 30 км/ч на расстояние…

Запуск двигателя
Замок зажигания Существуют четыре фиксированных положения ключа в замке зажигания: 0: В этом положении можно вставить или вынуть ключ из замка зажигания. При вынутом ключе блокируется рулевое колесо. I: В этом положений можно…
Неисправности двигателя во время движения
Остановка двигателя во время движения 1. Постепенно снизьте скорость. Отведите автомобиль в безопасное место. 2. Включите аварийную сигнализацию. 3. Попробуйте запустить двигатель. Примечание: при неработающем двигателе усилители…

Запасное колесо, домкрат и инструменты
Запасное колесо, домкрат и инструменты хранятся в багажном отделении, как показано на рисунке. 1. Поднимите, коврик багажного отделения и зафиксируйте его, как показано на рисунке. 1 — запасное колесо, 2 — домкрат, 3 -…

Поддомкрачивание автомобиля
1. Установите автомобиль на ровной и твердой поверхности. 2. Заглушите двигатель, задействуйте стояноный тормоз и выполните, блокировку колеса, по диагонали противоположного тому, замена которого будет производиться. 3….

Замена колеса
1. Если необходимо, заменить колесо в дороге, то постепенно снизьте скорость и отведите автомобиль в безопасное место. 2. Остановите автомобиль на ровном месте с твердым грунтом. 3. Остановите двигатель и включите аварийную…

Рекомендации по выбору шин
При выборе шин обращайте внимание на маркировку. Геометрические размеры, грузоподъемность и максимальная скорость должны строго соответствовать рекомендациям завода-изготовителя. Посадочный диаметр выбранной шины должен…
Проверка давления и состояния шин
1. Регулярно проверяйте шины на наличие повреждений. Проверяйте давление в шинах через каждые две недели или, по меньшей мере, раз в месяц. Не забывайте проверять давление в запасной шине. Рекомендуемое «Honda» давление в шинах…

Замена шин
1. При замене шин используйте только шины одинаковых размеров и конструкции с первоначально установленными, и с одинаковой или большей нагрузочной способностью. Использование шины любых других размеров или типа может серьезно…
Особенности эксплуатации алюминиевых дисков
Внимание: во избежание повреждения слоя защитного лака, не позволяйте работникам шиномонтажных мастерских чистить внешнюю поверхность диска металлической щеткой и при замене клеевых балансировочных грузиков удалять их отверткой….

Замена дисков колес
1. Замене дисков колес следует уделять должное внимание. Убедитесь, что устанавливаются диски с одинаковыми нагрузочной способностью, диаметром, шириной обода и вылетом. 2. Неправильный выбор дисков и шин может плохо повлиять на…

Индикаторы износа накладок тормозных колонок
Колодки, для дисковых тормозов оборудованы индикаторами износа таким образом, что при движении, когда толщина накладок минимальна, индикатор износа касается тормозного диска и тормоза издают неприятный звук («визг»).
Каталитический нейтрализатор и система выпуска
1. Каталитический нейтрализатор является устройством снижения токсичности отработавших газов. При эксплуатации автомобиля, оснащенного нейтрализатором, соблюдайте следующие меры предосторожности: а) Во время и после работы…

Проверка и замена предохранителей
Если фары или другие электрические узлы не работают, то проверьте предохранители. Если какой-либо из элементов перегорел, то его необходимо заменить. Примечание: для снятия и установки предохранителей типа «А» пользуйтесь…

Замена ламп
Внимание: Перед заменой лампы убедитесь, что выключатели освещений выключены. Чтобы избежать ожога, заменяйте лампы только после их остывания. Галогеновые лампы требуют особо бережного обращения. Не дотрагивайтесь до стеклянной…
Ссылка в разных форматах на этот раздел
TEXTHTMLBB Code
![]()
Owner’s Manual
2020 FIT

3WARNING
California Proposition 65 Warning
Operating, servicing and maintaining a passenger vehicle or off-highway motor vehicle can expose you to chemicals including engine exhaust, carbon monoxide, phthalates, and lead, which are known to the State of California to cause cancer and birth defects or other reproductive harm. To minimize exposure, avoid breathing exhaust, do not idle the engine except as necessary, service your vehicle in a well-ventilated area and wear gloves or wash your hands frequently when servicing your vehicle. For more information go to www.P65Warnings.ca.gov/passenger-vehicle.
Event Data Recorders
This vehicle is equipped with an event data recorder (EDR).
The main purpose of an EDR is to record, in certain crash or near crash-like situations, such as an air bag deployment or hitting a road obstacle, data that will assist in understanding how a vehicle’s systems performed. The EDR is designed to record data related to vehicle dynamics and safety systems for a short period of time, typically 30 seconds or less. The EDR in this vehicle is designed to record such data as:
•How various systems in your vehicle were operating;
•Whether or not the driver and passenger safety belts were buckled/fastened;
•How far (if at all) the driver was depressing the accelerator and/or brake pedal; and,
•How fast the vehicle was traveling.
These data can help provide a better understanding of the circumstances in which crashes and injuries occur. NOTE: EDR data are recorded by your vehicle only if a non-trivial crash situation occurs; no data are recorded by the EDR under normal driving conditions and no personal data (e.g., name, gender, age, and crash location) are recorded. However, other parties, such as law enforcement, could combine the EDR data with the type of personally identifying data routinely acquired during a crash investigation.
To read data recorded by an EDR, special equipment is required, and access to the vehicle or the EDR is needed. In addition to the vehicle manufacturer, other parties, such as law enforcement, that have the special equipment, can read the information if they have access to the vehicle or the EDR.
The data belongs to the vehicle owner and may not be accessed by anyone else except as legally required or with the permission of the vehicle owner.
Service Diagnostic Recorders
This vehicle is equipped with service-related devices that record information about powertrain performance. The data can be used to verify emissions law requirements and/or help technicians diagnose and solve service problems. It may also be combined with data from other sources for research purposes, but it remains confidential. Some diagnostic and maintenance information is uploaded to Honda upon vehicle start up.

California Perchlorate Contamination Prevention Act
The airbags, seat belt tensioners, and CR type batteries in this vehicle may contain perchlorate materials — special handling may apply. See www.dtsc.ca.gov/hazardouswaste/perchlorate/
As you read this manual, you will find information that is preceded by a NOTICE symbol. This information is intended to help you avoid
damage to your vehicle, other property, or the environment.
Software End User License Agreement
Your vehicle comes equipped with software, which is governed by the End User License Agreement in Owner’s Manual, and which contains a binding arbitration clause. Please refer to the End User License Agreement for the terms and conditions governing your use of the installed software, as well as the applications, services, functions, and content provided through the software. Your use of the installed software will serve as your consent to the terms and conditions of the End User License Agreement.
You may opt out within 30 days of your initial use of the Software by sending a signed, written notice to HONDA at American Honda Motor Co., Inc. Honda Automobile Customer Services Mail Stop 100-5E-8A, 1919 Torrance Blvd. Torrance, CA 90501-2746.
Privacy Notice
This vehicle may share location and usage information. To manage this setting, visit www.hondalink.com/vehicle-data-choices.
A Few Words About Safety
To help you make informed decisions about safety, we have provided operating procedures and other information on labels and in this manual. This information alerts you to potential hazards that could hurt you or others.
Of course, it is not practical or possible to warn you about all the hazards associated with operating or maintaining your vehicle. You must use your own good judgment.
You will find this important safety information in a variety of forms, including:
●Safety Labels — on the vehicle.
●Safety Messages — preceded by a safety alert symbol 3 and one of three signal words: DANGER, WARNING, or CAUTION. These signal words mean:
3DANGER
3WARNING
3CAUTION
You WILL be KILLED or SERIOUSLY HURT if you don’t follow instructions.
You CAN be KILLED or SERIOUSLY HURT if you don’t follow instructions.
You CAN be HURT if you don’t follow instructions.
●Safety Headings — such as Important Safety Precautions.
●Safety Section — such as Safe Driving.
●Instructions — how to use this vehicle correctly and safely.
Your safety, and the safety of others, is very important. And operating this vehicle safely is an important responsibility.
This entire book is filled with important safety information — please read it carefully.

This owner’s manual should be considered a permanent part of the vehicle and should remain with the vehicle when it is sold.
This owner’s manual covers all models of your vehicle. You may find descriptions of equipment and features that are not on your particular model.
Images throughout this owner’s manual (including the front cover) represent features and equipment that are available on some, but not all, models. Your particular model may not have some of these features.
This owner’s manual is for vehicles sold in the United States and Canada.
The information and specifications included in this publication were in effect at the time of approval for printing. Honda Motor Co., Ltd. reserves the right, however, to discontinue or change specifications or design at any time without notice and without incurring any obligation.
|
2 |
Safe Driving P. 31 |
|||
|
For Safe Driving P. 32 |
Seat Belts P. 36 |
Airbags P. 46 |
||
|
2 |
Instrument Panel P. 75 |
|||
|
Indicators P. 76 |
Gauges and Displays P. 103 |
|||
|
2 |
Controls P. 121 |
|||
|
Clock P. 122 |
Locking and Unlocking the Doors P. 124 |
|||
|
Opening and Closing the Windows P. 151 |
||||
|
Operating the Switches Around the Steering Wheel P. 154 |
||||
|
Interior Lights/Interior Convenience Items P. 186 |
||||
|
2 |
Features P. 205 |
|||
|
Audio System P. 206 |
Audio System Basic Operation P. 212, 233 |
|||
|
Customized Features P. 321, 328 |
Bluetooth® HandsFreeLink® P. 343, 368 |
|||
|
2 |
Driving P. 399 |
|||
|
Before Driving P. 400 |
Towing a Trailer P. 405 |
|||
|
Multi-View Rear Camera P. 482 |
||||
|
2 |
Maintenance P. 489 |
|||
|
Before Performing Maintenance P. 490 |
Maintenance MinderTM P. 493 |
Checking and Maintaining Wiper Blades P. 520
Heating and Cooling System*/Climate Control System* Maintenance P. 538
2 Handling the Unexpected P. 545
|
Tools P. 546 |
If a Tire Goes Flat P. 547 |
|
|
Overheating P. 560 |
Indicator, Coming On/Blinking P. 562 |
Fuses P. 566 |
2 Information P. 575
|
Specifications P. 576 |
Identification Numbers P. 578 |
|
Emissions Testing P. 581 |
Warranty Coverages P. 583 |

|
Child Safety P. 60 |
Exhaust Gas Hazard P. 73 |
Safety Labels P. 74 |
|
Opening and Closing the Tailgate P. 145 |
Security System P. 148 |
|
Opening and Closing the Moonroof* P. 153 |
|
|
Adjusting the Mirrors P. 173 |
Adjusting the Seats P. 174 |
|
Heating and Cooling System* P. 196 |
Climate Control System* P. 199 |
|
Audio Error Messages P. 312 |
General Information on the Audio System P. 317 |
|
When Driving P. 409 |
Braking P. 469 |
Parking Your Vehicle P. 481 |
|
Refueling P. 484 |
Fuel Economy and CO2 Emissions P. 487 |
|
|
Maintenance Under the Hood P. 501 |
Replacing Light Bulbs P. 513 |
|
|
Checking and Maintaining Tires P. 524 |
Battery P. 534 |
Remote Transmitter Care P. 536 |
|
Cleaning P. 539 |
Accessories and Modifications P. 544 |
|
|
Engine Does Not Start P. 554 |
Jump Starting P. 557 |
Shift Lever Does Not Move P. 559 |
|
Emergency Towing P. 571 |
When You Cannot Open the Tailgate P. 572 |
|
Contents
Quick Reference Guide P. 4
Safe Driving P. 31
Instrument Panel P. 75
Controls P. 121
Features P. 205
Driving P. 399
Maintenance P. 489
Handling the Unexpected P. 545
Information P. 575
Index P. 588
|
Devices that Emit Radio Waves P. 579 |
Reporting Safety Defects P. 580 |
|
Authorized Manuals P. 585 |
Customer Service Information P. 586 |
Guide Reference Quick
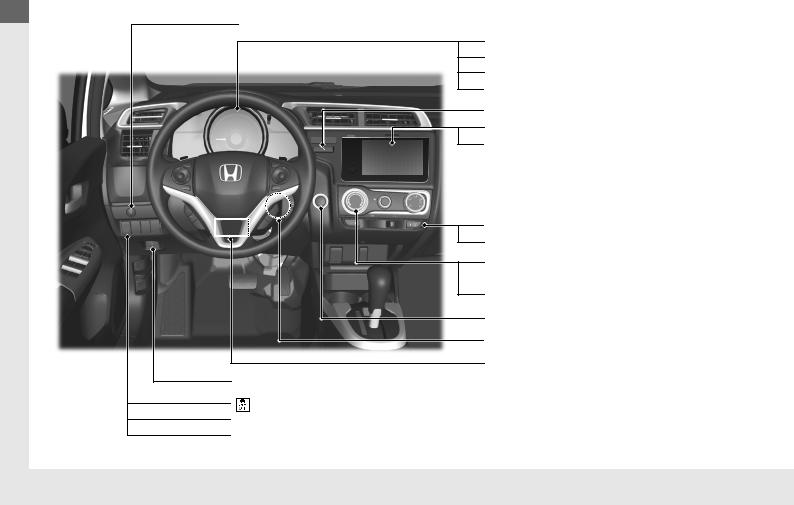
Visual Index
ECON Button* (P427)
System Indicators (P76)
Gauges (P103)
Information Display* (P104)
Multi-Information Display* (P107)
|
Hazard Warning Button |
|
Audio System (P206) |
|
Navigation System* |
() See the Navigation System Manual
|
Rear Defogger (P171) |
|
Heated Mirror Button* (P171) |
|
Heating and Cooling System* |
|
(P196) |
|
Climate Control System* (P199) |
|
ENGINE START/STOP Button*1 (P155) |
|
Ignition Switch* (P154) |
|
Steering Wheel Adjustments (P172) |
|
Tire Pressure Monitoring System (TPMS) Button* (P465) |
|
(Vehicle Stability AssistTM (VSA®) System OFF) Button (P460) |
|
Collision Mitigation Braking SystemTM (CMBSTM) OFF Button* (P473) |
|
Road Departure Mitigation (RDM) Button* (P447) |
*1: Models with the smart entry system have an ENGINE START/STOP button instead of an ignition switch.
4

|
Headlights/Turn Signals (P159, 160) |
Quick |
||
|
Fog Lights* (P163) |
|||
|
LaneWatchTM* (P461) |
|||
|
Paddle Shifter (Shift Down)* (P 422) |
Reference |
||
|
(Display) Button* (P234) |
|||
|
(Select/Reset) Knob (P104) |
|||
|
Guide |
|||
|
Brightness Control (P170) |
|||
|
Paddle Shifter (Shift Up)* (P422) |
|||
|
Wipers/Washers (P168) |
|||
|
MAIN Button* (P434) |
|||
|
CRUISE Button* (P428) |
|||
|
Interval Button* (P441) |
|||
|
Lane Keeping Assist System (LKAS) Button* |
|||
|
(P452) |
Horn (Press an area around  .)
.)
Bluetooth® HandsFreeLink® System
Voice Control Buttons (P343, 368)
Navigation System Voice Control Buttons*
() See the Navigation System Manual
Audio Remote Control Buttons* (P210)
|
* Not available on all models |
5 |

Visual Index
|
Quick |
Power Window Switches (P151) |
|
|
Power Door Lock Master Switch (P137) |
||
|
Door Mirror Controls (P173) |
||
|
Guide Reference |
||
|
Interior Fuse Box (P568) |
||
|
Driver’s Front Airbag (P49) |
||
Passenger’s Front Airbag (P49)
Accessory Power Socket (P191)
USB Port (P207)
Glove Box (P188)
Shift Lever
Continuously Variable
Transmission* (P417, 419)
Manual Transmission* (P423)
|
Seat Heater Switches* (P195) |
|
Parking Brake (P469) |
Hood Release Handle (P502)
Fuel Fill Door Release Handle (P485)
6
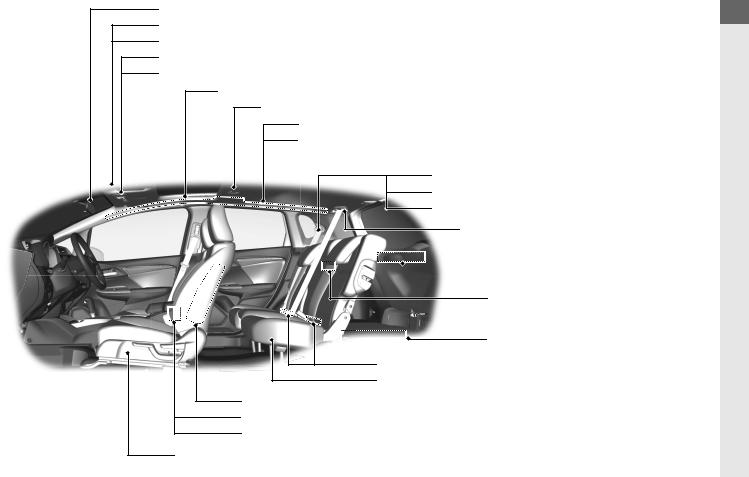
Rearview Mirror (P173)
Sun Visors
Vanity Mirrors
Map Lights (P187)
Moonroof Switch* (P153)
Side Curtain Airbags (P55)
Interior Light (P186)
Grab Handle
Coat Hook (P192)
(Only on the rear left side)
Seat Belts (P36)
Seat Belt (Installing a Child Seat) (P67)Seat Belt to Secure a Child Seat (P69)
Seat Belt with Detachable Anchor
(P43)
 Cargo Area Cover* (P194)
Cargo Area Light (P187)
|
Cargo Floor Box (P190) |
|
LATCH to Secure a Child Seat (P65) |
|
Rear Seat (P178) |
|
Side Airbags (P53) |
|
Accessory Power Socket* (P191) |
|
USB Port* (P207) |
Front Seat (P174)
Guide Reference Quick
|
* Not available on all models |
7 |
Guide Reference Quick
Visual Index
|
Maintenance Under the Hood (P501) |
|
Windshield Wipers (P168, 520) |
|
Power Door Mirrors (P173) |
|
Door Lock/Unlock Control (P127) |
Headlights (P160, 513)
Front Turn Signal/Parking Lights (P159, 514)
 Side Marker Lights (P160, 515)
 Tires (P524, 547)
Fog Lights* (P163, 515)
How to Refuel (P485)
 Audio Antenna (P209)
 High-Mount Brake Light (P518)
 Rear Wiper (P169, 522)
|
Opening/Closing the Tailgate (P145) |
|
Tailgate Outer Handle/Release Button (P146) |
|
License Plate Lights (P519) |
|
Multi-View Rear Camera (P482) |
Brake/Tail/Rear Side Marker Lights (P518)
Back-Up Lights (P517)
Rear Turn Signal Lights (P517)
8
![]()
Eco Assist® System
ECON Button* (P427)
Helps maximize fuel economy.
Ambient Meter
●The color of the ambient meter changes to green to indicate that the vehicle is being driven in a fuel efficient manner.
Models with multi-information display
The message is displayed for a few seconds when the ECON button is pressed.
ECON Mode Indicator*
(P85)
Comes on when the ECON button is pressed.
Guide Reference Quick
|
* Not available on all models |
9 |
Guide Reference Quick
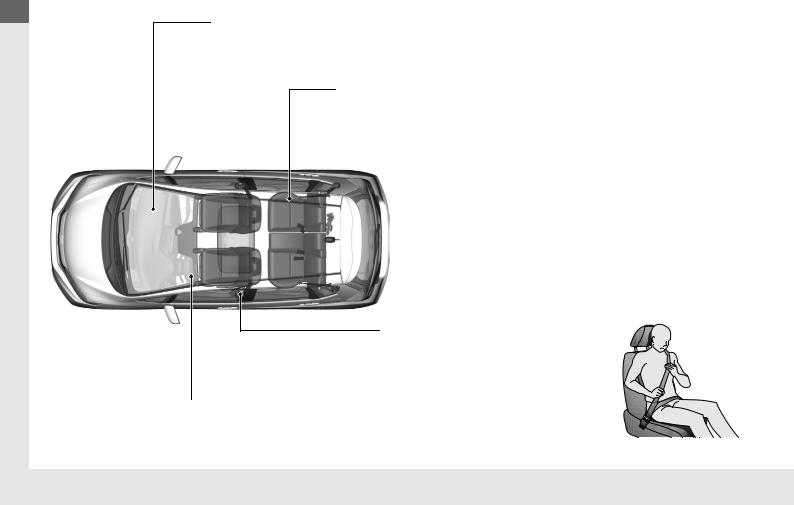
Safe Driving (P 31)
Airbags (P46)
●Your vehicle is fitted with airbags to help protect you and your passengers during a moderate-to-severe collision.
Child Safety (P60)
●All children 12 and younger should be seated in the rear seat.
●Smaller children should be properly restrained in a forward-facing child seat.
●Infants must be properly restrained in a rear-facing child seat.
 Exhaust Gas Hazard (P73)
● Your vehicle emits dangerous exhaust gases that contain carbon monoxide. Do not run the engine in confined spaces where carbon monoxide gas can accumulate.
Seat Belts (P36)
● Fasten your seat belt and sit upright well back in the seat.
● Check that your passengers are wearing their seat belts correctly.
Before Driving Checklist (P400)
|
● Before driving, check that the front seats, head restraints, |
|
|
steering wheel, and mirrors have been properly adjusted. |
Fasten your lap belt as |
|
low as possible. |
10
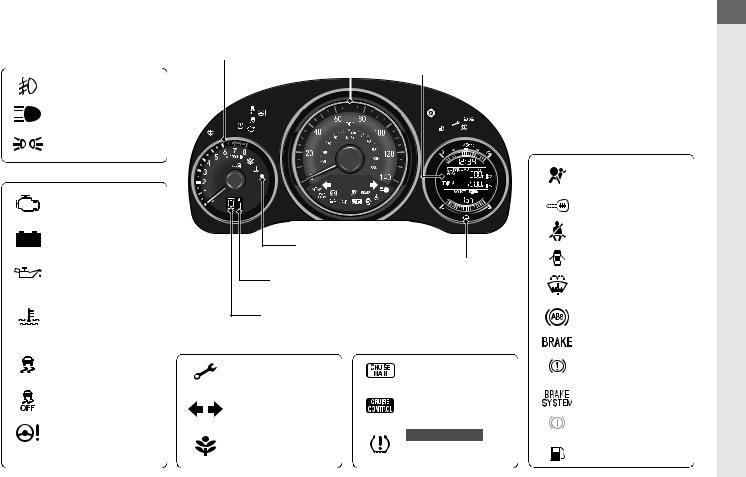
Instrument Panel (P75)
Gauges (P103)/Information Display* (P104) Multi-Information Display* (P107)/System Indicators (P76)
|
Models with information display |
Speedometer |
||||||
|
Lights Indicators |
Tachometer |
||||||
|
Information Display |
|||||||
|
Fog Light Indicator* |
|||||||
System Indicators
System Indicators
Charging System
Indicator
Low Temperature
Indicator (Blue)
Security System
Alarm Indicator
Fuel Gauge
M (7-speed manual shift mode)
Indicator/Shift Indicator*
Shift Lever Position Indicator*
|
System Indicators |
System Indicators |
|
|
Maintenance |
||
|
Minder Indicator |
CRUISE CONTROL |
|
|
Indicator* |
||
|
ECON Mode |
U.S. models only |
|
|
Low Tire Pressure/ |
||
|
Indicator* |
||
|
TPMS Indicator |
Washer Level
Indicator*
U.S.
Canada
U.S. Brake System
Indicator (Amber)
Canada
Guide Reference Quick
|
* Not available on all models |
11 |
Guide Reference Quick
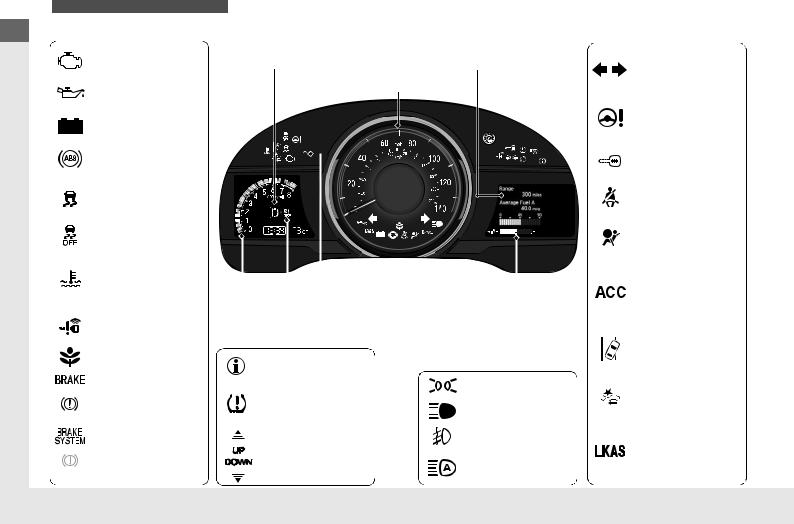
Models with multi-information display
System Indicators
|
Shift Lever Position Indicator* |
Multi-information Display |
Speedometer
High Temperature
Indicator (Red)
Low Temperature
Indicator (Blue)
Smart Entry System
Indicator*
U.S.
Canada
U.S. Brake System
Indicator (Amber)
Canada
|
Security System Alarm Indicator |
|||||||||
|
M (7-speed manual shift mode) |
|||||||||
|
Tachometer |
Fuel Gauge |
||||||||
|
Indicator/Shift Indicator* |
|||||||||
|
System Indicators |
|
|
System Message |
Lights Indicators |
|
Indicator |
|
Fog Light Indicator* |
||||||
|
Shift Up / Down |
||||||
|
Indicator* |
Auto High-Beam |
|||||
|
Indicator |
System Indicators
Adaptive Cruise
Control (ACC)
Indicator (Amber/
Green)
Road Departure
Mitigation (RDM)
Indicator
Collision Mitigation
Braking SystemTM
(CMBSTM) Indicator
Lane Keeping Assist
System (LKAS)
Indicator (Amber/
Green)
12
Controls (P121)
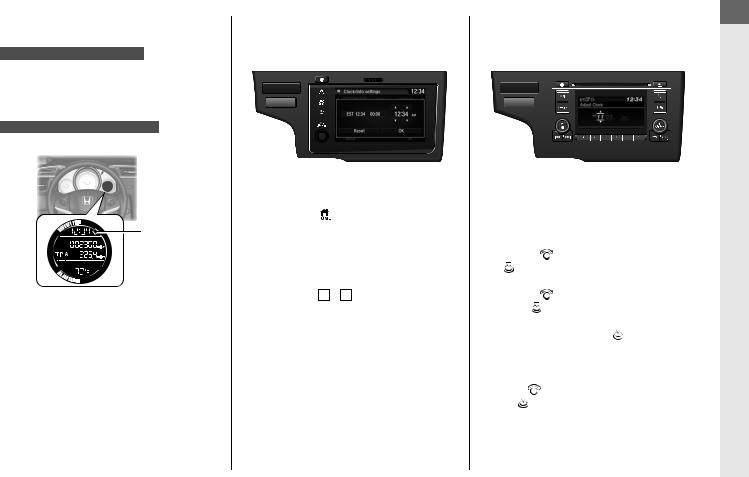
Clock (P122)
Models with navigation system
The navigation system receives signals from GPS satellites, updating the clock automatically.
Models without navigation system
Clock
The clock in the information display is automatically updated along with the audio system’s clock display.
|
Models with display audio system |
Models with color audio system |
|
a Select the |
(HOME) icon, then select |
a Press and hold the MENU/CLOCK |
|||||||||||||||||||||
|
Settings. |
button. |
||||||||||||||||||||||
|
b Select System, Clock/Info, then Clock |
b Rotate |
to change hour, then press |
|||||||||||||||||||||
|
Adjustment. |
. |
||||||||||||||||||||||
|
c Touch the 3 / 4 icon to adjust the |
c Rotate |
to change minute, then |
|||||||||||||||||||||
|
numbers up or down. |
press . |
||||||||||||||||||||||
|
d Select OK. |
d Select SET, then press . |
||||||||||||||||||||||
|
These indications are used to show how to |
|||||||||||||||||||||||
|
operate the LIST/SELECT (List/Selector) knob. |
|||||||||||||||||||||||
|
• |
Rotate |
to select. |
|||||||||||||||||||||
|
• |
Press to enter. |
Guide Reference Quick
|
* Not available on all models |
13 |

Guide Reference Quick
Engine START/STOP
Button* (P155)
Press the button to change the vehicle’s power mode.
Turn Signals (P159)
Turn Signal Control Lever
Right
Left
Lights (P160)
U.S. models
Light Control Switches
High Beam
Low Beam
Flashing
Canadian models
High Beam
Low Beam
Flashing
Wipers and Washers
(P168)
Wiper/Washer Control Lever
Pull toward you to spray washer fluid.
Adjustment Ring*
 : Lower speed, fewer sweeps
  : High speed, more sweeps
MIST
OFF
INT: Low speed with intermittent LO: Low speed wipe
HI: High speed wipe
14
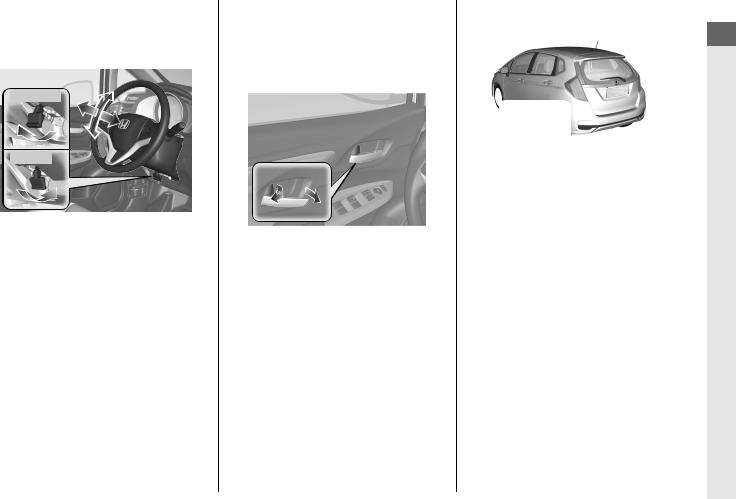
Steering Wheel (P172)
●To adjust, pull the adjustment lever towards you, adjust to the desired position, then lock the lever back in place.
To adjust
To lock
Unlocking the Front Doors from the Inside
(P136)
●Pull either front door inner handle to unlock and open it in one motion.
●Unlocking and opening the driver’s door from the inner handle unlocks all the other doors.
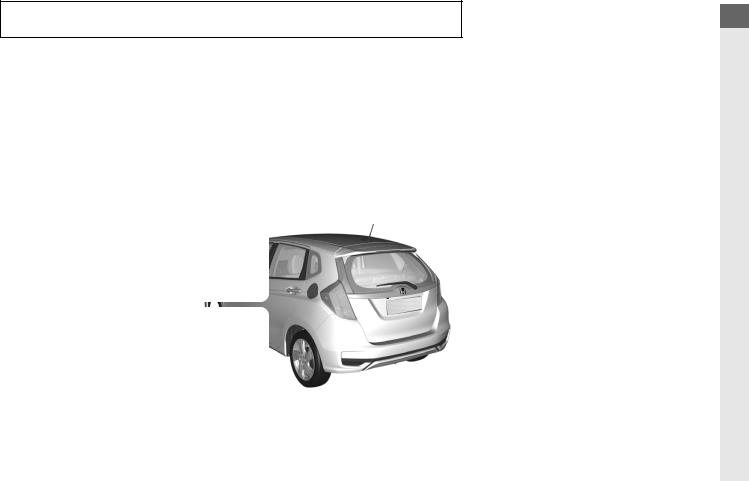
Tailgate (P145)
Models without smart entry system
●With all the doors unlocked, pull the tailgate outer handle, and lift up to open it.
Models with smart entry system
●With all the doors unlocked, push the tailgate release button on the tailgate to open it.
●Press the tailgate release button to unlock and open the tailgate when you carry the smart entry remote.
Guide Reference Quick
|
* Not available on all models |
15 |
Guide Reference Quick
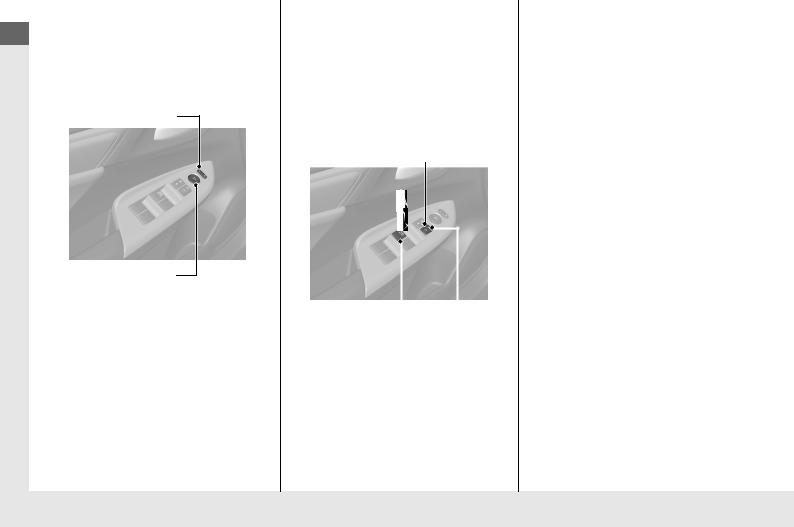
Power Door Mirrors
(P173)
●With the ignition switch in ON w*1, move the selector switch to L or R.
●Push the appropriate edge of the adjustment switch to adjust the mirror.
Selector Switch
Adjustment Switch
*1: Models with the smart entry system have an ENGINE START/STOP button instead of an ignition switch.
Power Windows (P151)
●With the ignition switch in ON w*1, open and close the power windows.
●If the power window lock button is in the off position, each passenger’s window can be opened and closed with its own switch.
●If the power window lock button is in the on position (indicator on), each passenger’s window switch is disabled.
Power Window Lock Button
|
Window Switch |
||||
|
Indicator |
||||
16
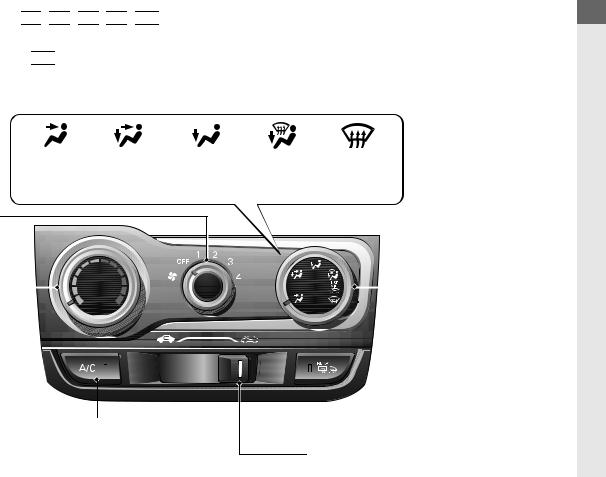
Heating and Cooling System* (P196)
●Rotate the fan control dial to adjust the fan speed.
●Rotate the mode control dial (


 /
/ 


 /
/ 


 /
/ 


 /
/ 

 ) to select the vents air flows from.
●Rotate the temperature control dial to adjust the temperature.
●Rotate the fan control dial to OFF to turn the system off.
●Rotate the mode control dial to 

 to defrost the windshield.
|
Air flows |
Air flows from |
Air flows |
Air flows from |
Air flows from |
|
from |
floor and |
from floor |
floor and |
windshield |
|
dashboard |
dashboard |
vents. |
windshield |
defroster |
|
vents. |
vents. |
defroster vents. |
vents. |
Fan Control Dial
|
Temperature Control Dial |
Mode Control Dial |
|||||
A/C (Air Conditioning) Button* 
Fresh Air/Recirculation Lever
Guide Reference Quick
|
* Not available on all models |
17 |

Guide Reference Quick
Climate Control System* (P199)
●Select the AUTO icon to activate the climate control system.
●Select the 


 icon to turn the system on or off.
●Select the 


 icon to defrost the windshield.
|
Air flows from |
Air flows from |
Air flows from |
Air flows from |
||||
|
dashboard |
floor and |
floor vents. |
floor and |
||||
|
vents. |
dashboard vents. |
windshield |
|||||
|
defroster vents. |
|||||||
|
Temperature Control Icons |
Fan Control Icons |
|
AUTO Icon |
|
|
(ON/OFF) Icon |
(windshield Defroster) Icon |
|
A/C (Air Conditioning) Icon |
(Fresh Air) Icon |
|
(Recirculation) Icon |
Mode Control Icons |
18
![]()
Features (P205) |
Audio System (P206) |
For navigation system operation () See the Navigation System Manual
Audio Remote Controls*
|
(P210) |
Models with color audio system |
||||||
|
/ |
/ |
/ |
Buttons |
||||
|
Audio/Information Screen |
|||||||
|
(Day/Night) Button |
CD Slot |
||||||
|
(CD Eject) Button |
|||||||
|
RADIO Button |
|||||||
|
SOURCE Button |
(Phone) Button |
||||||
|
● |
/ |
Button |
(Sound) Button |
||||
|
Press to adjust the volume up/down. |
MEDIA |
||||||
|
● |
SOURCE Button |
Selector Knob |
|||||
|
Button |
|||||||
|
Models with color audio system |
MENU/CLOCK Button |
||||||
|
VOL / |
|||||||
|
Press to change the audio mode: FM/AM/ |
|||||||
|
(Volume/Power) |
|||||||
|
CD/USB/iPod/Bluetooth® Audio. |
|||||||
|
Knob |
|||||||
|
Models with display audio system |
|||||||
|
Press to change the audio mode: FM/AM/ |
/ |
(Back) Button |
||||||||||
|
SiriusXM®/USB/iPod/Bluetooth® Audio/Pandora®*/ |
||||||||||||
|
(Skip/Seek) Buttons |
||||||||||||
|
Apps/Apple CarPlayTM/Android AutoTM. |
Preset Buttons (1-6) |
|||||||||||
●

 /
/ 

 Button
Radio:Press to change the preset station. Press and hold to select the next or previous strong station.
CD*/USB device:
Press to skip to the beginning of the next song or return to the beginning of the current song. Press and hold to change a folder.
Guide Reference Quick
|
* Not available on all models |
19 |

Guide Reference Quick
Models with display audio system
|
(Day/Night) Button |
Audio/Information Screen |
|||


 (Home) Icon


 (Menu) Icon


 (Back) Icon
VOL/

 (Power/Volume) Knob

20

Driving (P399)
Manual Transmission* (P423)
Continuously Variable Transmission*
(P417, 419)
● Shift to (P and depress the brake pedal when starting the engine.
Shifting
|
Models with |
Models without |
|||
|
paddle shifters |
paddle shifters |
|||
Park
Turn off or start the engine. Transmission is locked.
Reverse
Used when reversing.
Neutral
Transmission is not locked.
Depress the brake pedal and press the release button to move out of (P.
Move the shift lever without pressing the release button.
Press the release button to move the shift lever.
 Shift Lever
Release
Button
7-Speed Manual Shift Mode* (P421)
●Allows you to manually shift the transmission up or down without removing your hands from the steering wheel.
When the shift lever is in (S
●Pulling a paddle shifter changes the mode from continuously variable transmission to 7-speed manual shift mode.
●The M indicator and the selected speed number are displayed in the shift indicator.
When the shift lever is in (D
●Pulling a paddle shifter temporarily changes the mode from continuously variable transmission to 7-speed manual shift mode. The selected speed number is displayed in the shift indicator.
|
M Indicator |
Shift Down |
Shift Up |
||
|
Paddle Shifter |
Paddle Shifter |
|||
Shift Indicator
Drive
Normal driving.
On models with paddle shifters, 7-speed mode can be used temporarily.
Models with paddle shifters
Drive (S)
7-speed manual shift mode can be used.
Models without paddle shifters
Drive (S)
●Better acceleration
●Used to increase engine braking
●Used when going up or down hills
Low
●Used to further increase engine braking
●Used when going up or down hills
Guide Reference Quick
|
* Not available on all models |
21 |

Guide Reference Quick
VSA® On and Off (P460)
●The Vehicle Stability AssistTM (VSA®) system helps stabilize the vehicle during cornering, and helps maintain traction while accelerating on loose or slippery road surfaces.
●VSA® comes on automatically every time you start the engine.
●To partially disable VSA functionality/ features, press and hold button until you hear a beep.
Cruise Control* (P428)
●Cruise control allows you to maintain a set speed without keeping your foot on the accelerator pedal.
●To use cruise control, press the CRUISE button, then press the -/SET button once you have achieved the desired speed (above 25 mph or 40 km/h).
CMBSTM On and Off*
(P476)
●When a possible collision is likely unavoidable, the CMBSTM can help you to reduce the vehicle speed and the severity of the collision.
●The CMBS is turned on every time you start the engine.
●To turn the CMBSTM on or off, press and hold the button until you hear a beep.
U.S. models only
Tire Pressure Monitoring
System (TPMS) (P463)
●Detects a change in tire conditions and overall dimensions due to decrease in tire pressures.
●TPMS is turned on automatically every time you start the engine.
●A calibration procedure must be performed when certain conditions arise.
22
Refueling (P484)
Fuel recommendation: Unleaded gasoline, pump octane number 87 or higher Fuel tank capacity: 10.6 US gal (40 L)
a Pull the fuel fill door release handle.
b Turn the fuel fill cap slowly to remove the cap.
c Place the cap in the holder on the fuel fill door.
d After refueling, screw the cap back on until it clicks at least once.
Guide Reference Quick
|
* Not available on all models |
23 |

Guide Reference Quick
Honda Sensing®*
Honda Sensing® is a driver support system which employs the use of two distinctly different kinds of sensors, a radar sensor located at in the front grille and a front sensor camera mounted to the interior side of the windshield, behind the rearview mirror.
The camera is located behind the rearview mirror.
Front Sensor
Camera
Radar Sensor 
The radar sensor is in the front grille.
Adaptive Cruise Control
(ACC) (P 433)
Helps maintain a constant vehicle speed and a set following-interval behind a vehicle detected ahead of yours, without you having to keep your foot on the brake or the accelerator.
Road Departure
Mitigation (RDM) System
(P 447)
Alerts and helps to assist you when the system detects a possibility of your vehicle unintentionally crossing over detected lane markings and/or leaving the roadway altogether.
Lane Keeping Assist
System (LKAS) (P 452)
Provides steering input to help keep the vehicle in the middle of a detected lane and provides tactile and visual alerts if the vehicle is detected drifting out of its lane.
Collision Mitigation
Braking SystemTM
(CMBSTM) (P 473)
Can assist you when there is a possibility of your vehicle colliding with a vehicle or a pedestrian detected in front of yours. The CMBSTM is designed to alert you when a potential collision is determined, as well as to reduce your vehicle speed to help minimize collision severity when a collision is deemed unavoidable.
24

Maintenance (P489)
Under the Hood (P501)
|
● Check engine oil, engine coolant, and window washer |
Wiper Blades (P520) |
||
|
fluid. Add when necessary. |
|||
|
● Check brake/clutch* fluid |
● Replace blades if they leave streaks |
||
|
● Check the battery condition monthly. |
|||
|
across the windshield. |
|||
|
a Pull the hood release handle under the corner of |
|||
|
the dashboard. |
|||
b Locate the hood latch lever, push it to the side, and then raise the hood. Once you have raised the hood slightly, you can release the lever.
|
Tires (P524) |
Lights (P513) |
||||
|
● Inspect tires and wheels regularly. |
● Inspect all lights regularly. |
||||
|
c When finished, close the hood and make sure it is |
● Check tire pressures regularly. |
||||
|
● Install snow tires for winter |
|||||
|
driving. |
firmly locked in place.
Guide Reference Quick
|
* Not available on all models |
25 |

Guide Reference Quick
Handling the Unexpected (P545)
Flat Tire (P547)
●Park in a safe location and replace the flat tire with the compact spare tire in the cargo area.
|
Engine Won’t Start (P554) |
Overheating (P560) |
||||
|
● If the battery is dead, jump start using a |
● Park in a safe location. If you do not see |
||||
|
booster battery. |
steam under the hood, open the hood, |
||||
|
and let the engine cool down. |
|||||
Indicators Come On
(P562)
●Identify the indicator and consult the owner’s manual.
|
Blown Fuse (P566) |
Emergency Towing (P571) |
||||||
|
● Check for a blown fuse if an electrical |
● Call a professional towing service if you |
||||||
|
device does not operate. |
need to tow your vehicle. |
||||||
26
What to Do If
U.S. models with manual transmission
Canadian models
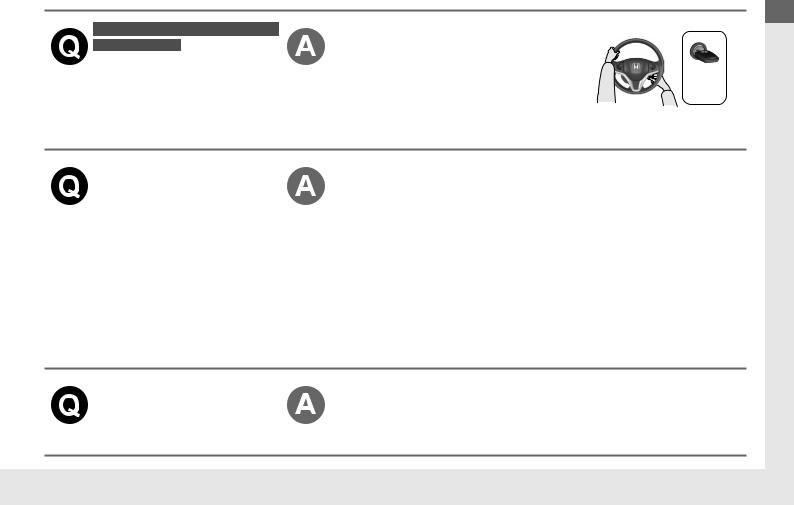
The ignition switch does not turn from 0 to q*1.
Why?
● The steering wheel may be locked.
Models without smart entry system
●Try to turn the steering wheel left and right while turning the ignition key.
Models with smart entry system
●Move the steering wheel left and right after pressing the ENGINE START/STOP.
|
Continuously variable transmission |
The shift lever should be moved to P. |
|
models without smart entry system |
|
|
The ignition switch does |
|
|
not turn from q to 0 and |
|
|
I cannot remove the key. |
|
|
Why? |
|
|
Continuously variable transmission |
|
|
models with smart entry system |
|
|
The power mode does not |
|
|
change from ACCESSORY |
|
|
to VEHICLE OFF (LOCK). |
|
|
Why? |
Why does the brake pedal pulsate slightly when applying the brakes?
This can occur when the ABS activates and does not indicate a problem. Apply firm, steady pressure on the brake pedal. Never pump the brake pedal.
2 Anti-lock Brake System (ABS) (P471)
*1: Models with the smart entry system have an ENGINE START/STOP button instead of an ignition switch.
Guide Reference Quick
27
Guide Reference Quick
The rear door cannot be opened from inside the vehicle. Why?
Check if the childproof lock is in the lock position. If so, open the rear door with the outside door handle.
To cancel this function, push the lever to the unlock position.
|
Why do the doors lock |
If you do not open the doors within 30 seconds, the doors are |
|
after I unlocked the doors? |
relocked automatically for security. |
Why does the beeper sound when I open the driver’s door?
The beeper sounds when:
● The exterior lights are left on.
Models without smart entry system
● The key is left in the ignition switch.
Models with smart entry system
● The power mode is in ACCESSORY.
|
Why does a beeper sound |
The beeper sounds if you move outside the walk away auto |
|
|
when I walk away from the |
door lock operating range before the door completely closes. |
|
|
vehicle after I close the |
2 Locking the vehicle (Walk away auto lock) (P129) |
|
|
door? |
||
|
Why does the beeper |
The beeper sounds when: |
|
|
sound when I start driving? |
● |
Driver and/or front passenger are not wearing their seat belts. |
|
● |
The parking brake lever is not fully released. |
|
28
![]()
|
Why do I hear a screeching |
The brake pads may need to be replaced. Have your vehicle |
|
|
sound when I apply the |
inspected by a dealer. |
|
|
brake pedal? |
||
|
U.S. models only |
The Tire Pressure Monitoring System (TPMS) needs attention. If |
|
|
I’m seeing an amber |
you recently inflated or changed a tire, you have to recalibrate |
|
|
indicator of a tire with an |
||
|
the system. |
||
|
exclamation point. What is |
||
|
2 Tire Pressure Monitoring System (TPMS) (P 463) |
||
|
that? |
||
Guide Reference Quick
29
30

Safe Driving
You can find many safety recommendations throughout this chapter, and throughout this manual.
|
For Safe Driving |
……………………..Side Curtain Airbags |
55 |
|
|
Important Safety Precautions …………. |
32 |
Airbag System Indicators……………….. |
57 |
|
Your Vehicle’s Safety Features………… |
34 |
Airbag Care ………………………………… |
59 |
|
Seat Belts |
Child Safety |
||
|
About Your Seat Belts…………………… |
36 |
Protecting Child Passengers …………… |
60 |
|
Fastening a Seat Belt…………………….. |
40 |
Safety of Infants and Small Children…. |
62 |
|
Seat Belt Inspection………………………. |
45 |
Safety of Larger Children ………………. |
71 |
|
Airbags |
Exhaust Gas Hazard |
||
|
Airbag System Components…………… |
46 |
Carbon Monoxide Gas………………….. |
73 |
|
Types of Airbags ………………………….. |
49 |
Safety Labels |
|
|
Front Airbags (SRS) ………………………. |
49 |
Label Locations ……………………………. |
74 |
|
Side Airbags………………………………… |
53 |
31

For Safe Driving
Driving Safe
The following pages explain your vehicle’s safety features and how to use them properly. The safety precautions below are ones that we consider to be among the most important.
Important Safety Precautions
■ Always wear your seat belt
A seat belt is your best protection in all types of collisions. Airbags are designed to supplement seat belts, not replace them. So even though your vehicle is equipped with airbags, make sure you and your passengers always wear your seat belts, and wear them properly.
■ Restrain all children
Children ages 12 and under should ride properly restrained in a back seat, not the front seat. Infants and small children should be restrained in a child seat. Larger children should use a booster seat and a lap/shoulder seat belt until they can use the belt properly without a booster seat.
■ Be aware of airbag hazards
While airbags can save lives, they can cause serious or fatal injuries to occupants who sit too close to them, or are not properly restrained. Infants, young children, and short adults are at the greatest risk. Be sure to follow all instructions and warnings in this manual.
■ Don’t drink and drive
Alcohol and driving don’t mix. Even one drink can reduce your ability to respond to changing conditions, and your reaction time gets worse with every additional drink. So don’t drink and drive, and don’t let your friends drink and drive, either.
1Important Safety Precautions
Some states, provinces and territories prohibit the use of cell phones other than hands-free devices by the driver while driving.
32

■ Pay appropriate attention to the task of driving safely
Engaging in cell phone conversation or other activities that keep you from paying close attention to the road, other vehicles, and pedestrians could lead to a crash. Remember, situations can change quickly, and only you can decide when it is safe to divert some attention away from driving.
■ Control your speed
Excessive speed is a major factor in crash injuries and deaths. Generally, the higher the speed, the greater the risk, but serious injuries can also occur at lower speeds. Never drive faster than is safe for current conditions, regardless of the maximum speed posted.
■ Keep your vehicle in safe condition
Having a tire blowout or a mechanical failure can be extremely hazardous.
To reduce the possibility of such problems, check your tire pressures and condition frequently, and perform all regularly scheduled maintenance.
■ Do not leave children unattended in the vehicle
Children left unattended in the vehicle may be injured if they activate one or more of the vehicle controls. They may also cause the vehicle to move, resulting in a crash in which the children and/or another person(s) can be injured or killed. Also, depending on the ambient temperature, the temperature of the interior may reach extreme levels, which can result in injury or death.
Even if the climate control system is on, never leave children in the vehicle unattended as the climate control system can shut off at any time.
uuFor Safe DrivinguImportant Safety Precautions
Driving Safe
33

Driving Safe
uuFor Safe DrivinguYour Vehicle’s Safety Features
Your Vehicle’s Safety Features
6
10
7
|
8 |
||||||||
|
10 |
||||||||
|
11 |
||||||||
|
Safety Cage |
||||||||
|
Crush Zones |
||||||||
|
7 |
||||||||
|
Seats and Seat-Backs |
||||||||
|
Head Restraints |
||||||||
|
Collapsible Steering Column |
||||||||
|
6 |
Seat Belts |
|||||||
|
7 |
Front Airbags |
|||||||
|
8 |
Side Airbags |
|||||||
|
9 |
Side Curtain Airbags |
|||||||
|
10 |
Door Locks |
|||||||
|
11 |
Seat Belt Tensioners |
The following checklist will help you take an active role in protecting yourself and your passengers.
1Your Vehicle’s Safety Features
Your vehicle is equipped with many features that work together help to protect you and your passengers during a crash.
Some features do not require any action on your part. These include a strong steel framework that forms a safety cage around the passenger compartment, front and rear crush zones, a collapsible steering column, and tensioners that tighten the front seat belts in a sufficient crash.
However, you and your passengers cannot take full advantage of these features unless you remain seated in the correct position and always wear your seat belts. In fact, some safety features can contribute to injuries if they are not used properly.
34

uuFor Safe DrivinguSafety Checklist
Safety Checklist
For the safety of you and your passengers, make a habit of checking these items each time before you drive.
•After everyone has entered the vehicle, be sure all doors and the tailgate are closed and locked. Locking the doors and the tailgate helps prevent an occupant from being ejected and an outsider from unexpectedly opening a door or the tailgate.
2 Locking/Unlocking the Doors from the Inside P. 135
•Adjust your seat to a position suitable for driving. Be sure the front seats are adjusted as far to the rear as possible while allowing the driver to control the vehicle. Sitting too close to a front airbag can result in serious or fatal injury in a crash.
2 Adjusting the Seats P. 174
•Adjust head restraints to the proper position. Head restraints are most effective when the center of the head restraint aligns with the center of your head. Taller persons should adjust their head restraint to the highest position.
2 Adjusting the front head restraint positions P. 181
•Always wear your seat belt, and make sure you wear it properly. Confirm that any passengers are properly belted as well.
2 Fastening a Seat Belt P. 40
•Protect children by using seat belts or child seats according to a child’s age, height and weight.
2 Child Safety P. 60
1Safety Checklist
Models without multi-information display
If the door and tailgate open indicator is on, a door and/ or the tailgate is not completely closed. Close all doors and the tailgate tightly until the indicator goes off.
2 Door and Tailgate Open Indicator* P. 82
Models with multi-information display
If the door and/or tailgate open message appears on the multi-information display (MID), a door and/or the tailgate is not completely closed. Close all doors and the tailgate tightly until the message disappears.
2Multi-Information Display Warning and Information Messages* P. 92
Driving Safe
|
* Not available on all models |
35 |

Driving Safe
Seat Belts
About Your Seat Belts
Seat belts are the single most effective safety device because they keep you connected to the vehicle so that you can take advantage of many built-in safety features. They also help keep you from being thrown against the inside of the vehicle, against any passengers, or out of the vehicle. When worn properly, seat belts also keep your body properly positioned in a crash so that you can take full advantage of the additional protection provided by the airbags.
In addition, seat belts help protect you in almost every type of crash, including:
—frontal impacts
—side impacts
—rear impacts
—rollovers
■ Lap/shoulder seat belts
All five seating positions are equipped with lap/shoulder seat belts with emergency locking retractors. In normal driving the retractor lets you move freely while keeping some tension on the belt. During a collision or sudden stop the retractor locks to restrain your body. The front passenger’s and rear seat belts also have a lockable retractor for use with child seats.
2 Installing a Child Seat with a Lap/Shoulder Seat Belt P. 67
1About Your Seat Belts
3WARNING
Not wearing a seat belt properly increases the chance of serious injury or death in a crash, even though your vehicle has airbags.
Be sure you and your passengers always wear seat belts and wear them properly.
If a rear seat passenger moves around and extends the seat belt, the lockable retractor may activate. If this happens, release the retractor by unfastening the seat belt and allow the belt to retract completely. Then refasten the belt.
If you extend the seat belt too quickly, it will lock in place. If this happens, slightly retract the seat belt, then extend it slowly.
Seat belts cannot completely protect you in every crash. But in most cases, seat belts can reduce your risk of serious injury.
Most states and all Canadian provinces and territories require you to wear seat belts.
36

■ Proper use of seat belts
Follow these guidelines for proper use:
•All occupants should sit upright, well back in the seat, and remain in that position for the duration of the trip. Slouching and leaning reduce the effectiveness of the belt and can increase the chance of serious injury in a crash.
•Never place the shoulder part of a lap/shoulder seat belt under your arm or behind your back. This could cause very serious injuries in a crash.
•Two people should never use the same seat belt. If they do, they could be very seriously injured in a crash.
•Do not put any accessories on the seat belts. Devices intended to improve comfort or reposition the shoulder part of a seat belt can reduce the protective capability and increase the chance of serious injury in a crash.
uuSeat BeltsuAbout Your Seat Belts
Driving Safe

Driving Safe
uuSeat BeltsuAbout Your Seat Belts
■ Seat Belt Reminder
Models without multi-information display
Models with multi-information display
The seat belt system includes an indicator on the instrument panel to remind the driver or a front passenger or both to fasten their seat belts.
If the ignition switch is turned to ON w*1 and a seat belt is not fastened, a beeper will sound and the indicator will blink. After a few seconds, the beeper will stop and the indicator will come on and remain illuminated until the seat belt is fastened.
The beeper will periodically sound and the indicator will blink while the vehicle is moving until the seat belt is fastened.
1Seat Belt Reminder
The indicator will also come on if a front passenger does not fasten their seat belt within six seconds after the ignition switch is turned to ON (w*1.
When no one is sitting in the front passenger’s seat, the indicator will not come on and the beeper will not sound.
The indicator also may not come on and the beeper may not sound when the occupant is not heavy enough to trigger the weight sensor. Such occupants (e.g., infants and smaller children) should be moved to a rear seat as a deploying front airbag likely will injure or kill them.
2 Protecting Child Passengers P. 60
*1: Models with the smart entry system have an ENGINE START/STOP button instead of an ignition switch.
38
![]()
uuSeat BeltsuAbout Your Seat Belts
■ Automatic Seat Belt Tensioners
The front seats are equipped with automatic seat belt tensioners to enhance safety.
The tensioners automatically tighten the front seat belts during a moderate-to- severe frontal collision, sometimes even if the collision is not severe enough to inflate the front airbags.
1Automatic Seat Belt Tensioners
The seat belt tensioners can only operate once.
If a tensioner is activated, the SRS indicator will come on. Have a dealer replace the tensioner and thoroughly inspect the seat belt system as it may not offer protection in a subsequent crash.
During a moderate-to-severe side impact, the tensioner on that side of the vehicle also activates.
Driving Safe
39

Driving Safe
uuSeat BeltsuFastening a Seat Belt
Fastening a Seat Belt
After adjusting a front seat to the proper position, and while sitting upright and well back in the seat:
2 Adjusting the Seats P. 174
Pull out slowly.
Correct
Seated
Posture.
Latch
Plate
Buckle
1. Pull the seat belt out slowly.
2.Insert the latch plate into the buckle, then tug on the belt to make sure the buckle is secure.
u Make sure that the belt is not twisted or caught on anything.
1Fastening a Seat Belt
No one should sit in a seat with an inoperative seat belt or one that does not appear to be working correctly. Using a seat belt that is not working properly may not protect the occupant in a crash. Have a dealer check the belt as soon as possible.
If the seat belt appears to be locked in a fully retracted position, firmly pull out on the shoulder belt once, then push it back in. Then smoothly pull it out of the retractor and fasten. If you are unable to release the seat belt from a fully retracted position, do not allow anyone to sit in the seat, and take your vehicle to a dealer for repair.
2 About Your Seat Belts P. 36
2 Seat Belt Inspection P. 45
40

uuSeat BeltsuFastening a Seat Belt
Lap belt as low as possible
3.Position the lap part of the belt as low as possible across your hips, then pull up on the shoulder part of the belt so the lap part fits snugly. This lets your strong pelvic bones take the force of a crash and reduces the chance of internal injuries.
4.If necessary, pull up on the belt again to remove any slack, then check that the belt rests across the center of your chest and over your shoulder. This spreads the forces of a crash over the strongest bones in your upper body.
1Fastening a Seat Belt
3WARNING
Improperly positioning the seat belts can cause serious injury or death in a crash.
Make sure all seat belts are properly positioned before driving.
To release the belt, push the red PRESS button and then guide the belt by hand until it has retracted completely.
When exiting the vehicle, be sure the belt is properly stowed so that it will not get caught in the closing door.
Never insert any foreign objects into the buckle or retractor mechanism.
Driving Safe

Driving Safe
uuSeat BeltsuFastening a Seat Belt
■ Adjusting the Shoulder Anchor
The front seats have adjustable shoulder anchors to accommodate taller and shorter occupants.
1.Move the anchor up and down while pulling the release outward.
2.Position the anchor so that the belt rests across the center of your chest and over
your shoulder.
Pull outward
1Adjusting the Shoulder Anchor
The shoulder anchor height can be adjusted to four levels. If the belt contacts your neck, lower the height one level at a time.
After an adjustment, make sure that the shoulder anchor position is secure.
42

uuSeat BeltsuFastening a Seat Belt
■ Seat Belt with Detachable Anchor
|
Latch Plate |
1. Pull out the seat belt’s small latch plate and |
|||||
|
the latch plate from each holding slot in the |
||||||
|
ceiling. |
||||||
Small Latch
Plate
Anchor
Buckle
Latch Plate
2.Line up the triangle marks on the small latch plate and anchor buckle.
Make sure the seat belt is not twisted. Attach the belt to the anchor buckle.
3.Insert the latch plate into the buckle. Properly fasten the seat belt the same way you fasten the lap/shoulder seat belt.
1Seat Belt with Detachable Anchor
3WARNING
Using the seat belt with the detachable anchor unlatched increases the chance of serious injury or death in a crash.
Before using the seat belt, make sure the detachable anchor is correctly latched.
To unlatch the detachable anchor, insert the latch plate into the slot on the side of the anchor buckle.
|
Anchor |
|
|
Buckle |
Latch Plate |
Buckle
Driving Safe

Driving Safe
uuSeat BeltsuFastening a Seat Belt
■ Advice for Pregnant Women
If you are pregnant, the best way to protect yourself and your unborn child when driving or riding in a vehicle is to always wear a seat belt and keep the lap part of the belt as low as possible across the hips.
Wear the shoulder belt across the chest avoiding the abdomen.
Wear the lap part of the belt as low as possible across the hips.
1Advice for Pregnant Women
Each time you have a checkup, ask your doctor if it is okay for you to drive.
To reduce the risk of injuries to both you and your unborn child that can be caused by an inflating front airbag:
•When driving, sit upright and adjust the seat as far back as possible while allowing full control of the vehicle.
•When sitting in the front passenger’s seat, adjust the seat as far back as possible.
44

uuSeat BeltsuSeat Belt Inspection
Seat Belt Inspection
Regularly check the condition of your seat belts as follows:
•Pull each belt out fully, and look for frays, cuts, burns, and wear.
•Check that the latch plates and buckles work smoothly and the belts retract
easily.
u If a belt does not retract easily, cleaning the belt may correct the problem. Only use a mild soap and warm water. Do not use bleach or cleaning solvents. Make sure the belt is completely dry before allowing it to retract.
Any belt that is not in good condition or working properly will not provide proper protection and should be replaced as soon as possible.
A belt that has been worn during a crash may not provide the same level of protection in a subsequent crash. Have your seat belts inspected by a dealer after any collision.
1Seat Belt Inspection
3WARNING
Not checking or maintaining seat belts can result in serious injury or death if the seat belts do not work properly when needed.
Check your seat belts regularly and have any problem corrected as soon as possible.
Driving Safe
45

Airbags
Airbag System Components
46

uuAirbagsuAirbag System Components
The front, front side, and side curtain airbags are deployed according to the direction and severity of impact. Both side curtain airbags are deployed in a rollover. The airbag system includes:
aTwo SRS (Supplemental Restraint System) front airbags. The driver’s airbag is stored in the center of the steering wheel; the front passenger’s airbag is stored in the dashboard. Both are marked SRS AIRBAG.
bTwo side airbags, one for the driver and one for a front passenger. The airbags are stored in the outer edges of the seatbacks. Both are marked SIDE AIRBAG.
cTwo side curtain airbags, one for each side of the vehicle. The airbags are stored in the ceiling, above the side windows. The front and rear pillars are marked
SIDE CURTAIN AIRBAG.
dAn electronic control unit that, when the ignition switch is ON w*1, continually monitors information about the various impact sensors, seat and buckle sensors, rollover sensor, airbag activators, seat belt tensioners, and other vehicle information. During a crash event the unit can record such information.
eAutomatic front seat belt tensioners. In addition, the driver’s and front passenger’s seat belt buckles incorporate sensors that detect whether or not the belts are fastened.
fA driver’s seat position sensor. This sensor determines the optimal force at which the airbag will deploy in a crash.
gWeight sensors in the front passenger’s seat. The front passenger’s airbag will be turned off if the weight on the seat is approximately 65 lbs (29 kg) or less (the weight of an infant or small child).
hImpact sensors that can detect a moderate-to-severe front or side impact.
iAn indicator on the dashboard that alerts you that the front passenger’s front airbag has been turned off.
jAn indicator on the instrument panel that alerts you to a possible problem with your airbag system or seat belt tensioners.
kA rollover sensor that can detect if your vehicle is about to roll over and signal the control unit to deploy both side curtain airbags.
*1: Models with the smart entry system have an ENGINE START/STOP button instead of an ignition switch.
Driving Safe
Continued 47

Driving Safe
uuAirbagsuAirbag System Components
■ Important facts about your airbags
Airbags can pose serious hazards. To do their job, airbags must inflate with tremendous force. So, while airbags help save lives, they can cause burns, bruises, and other minor injuries, sometimes even fatal ones if occupants are not wearing their seat belts properly and sitting correctly.
What you should do: Always wear your seat belt properly, and sit upright and as far back from the steering wheel as possible while allowing full control of the vehicle. A front passenger should move their seat as far back from the dashboard as possible.
Remember, however, that no safety system can prevent all injuries or deaths that can occur in a severe crash, even when seat belts are properly worn and the airbags deploy.
Do not place hard or sharp objects between yourself and a front airbag.
Carrying hard or sharp objects on your lap, or driving with a pipe or other sharp object in your mouth, can result in injuries if your front airbag inflates.
Do not attach or place objects on the front airbag covers. Objects on the covers marked SRS AIRBAG could interfere with the proper operation of the airbags or be propelled inside the vehicle and hurt someone if the airbags inflate.
1Important facts about your airbags
Do not attempt to deactivate your airbags. Together, airbags and seat belts provide the best protection.
When driving, keep hands and arms out of the deployment path of the front airbag by holding each side of the steering wheel. Do not cross an arm over the airbag cover.
48
 Loading…
Руководство по эксплуатации
ВНИМАНИЕ: при проведении работ в салоне автомобиля, оборудованного системой подушек безопасности и преднатяжителей ремней (система «SRS»), следует быть особенно внимательными, чтобы не повредить блок управления системы «SRS». Во избежание случайного срабатывания подушек безопасности или преднатяжителей ремней перед началом работ установите колеса в положение прямолинейного движения и замок зажигания в положение «0», отсоедините провод от отрицательной клеммы аккумулятора и подождите не менее 90 секунд (время разряда резервного питания). Не пытайтесь разбирать узел подушки безопасности или узел преднатяжителя ремня, т.к. в данных узлах нет деталей, требующих обслуживания. Если подушки безопасности и/или преднатяжители ремней срабатывали (разворачивались), то их нельзя отремонтировать или использовать повторно.
Блокировка дверей
1. В комплект входят два ключа: один главный и один дополнительный. Так же в комплект может входить ключ- карта.
Номер ключей выбит на бирке, прилагаемой к ключам. Храните ее в надежном месте. Если вы потеряете ключи, дубликаты могут быть изготовлены вашим дилером фирмы «Honda» по номеру.
Главный ключ позволяет запустить двигатель, открыть боковые двери, заднюю дверь и вещевой ящик. Дополнительный ключ позволяет открыть боковые двери, запустить двигатель, открыть заднюю дверь, но не позволяет открыть вещевой ящик. При ремонте автомобиля в автосервисе рекомендуется отдавать дополнительный ключ представителям автосервиса, что позволит хранить документы в вещевом ящике.
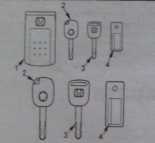
Модели до 2006 года. 1 — брелок «SMART-KEY», 2 — основной ключ, 3 — дополнительный ключ, 4 — номер комплекта.
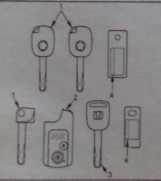
Модели с 2006 года. 1 — главный ключ, 2 — брелок «SMART KEY», 3 — дополнительный ключ, 4 — номер комплекта.
2. Для отпирания/запирания передних дверей необходимо вставить ключ в дверной замок и провернуть его вперед/назад.

Передние двери можно закрыть без ключа. Для этого нажмите кнопку блокировки замка двери, потяните ручку открывания двери на себя и, удерживая ручку, закройте дверь.
Для задних боковых дверей нажмите кнопку блокировки замка двери и за-кройте дверь.
При отпирании или запирании ключом двери водителя автоматически отпираются/запираются замки всех боковых дверей и заднюю дверь.
3. Модели оборудованные системой дистанционного управления цен-тральным замком.
Отпирание/запирание боковых дверей и двери багажника осуществляется нажатием на кнопку, расположенную на главном ключе.
Расстояние до автомобиля при этом должно быть не более 1 м.

Модели до 2006 года и модели с 2006 года без брелка «SMART KEY».
Запирание дверей сопровождается однократным миганием указателей поворотов. Отпирание дверей сопровождается двойным миганием указателей поворотов.
Примечание: система дистанционно го управления замками не срабатывает, если ключ зажигания находится в замке зажигания, неплотно за крыта какая — либо из дверей или разрядилась батарейка передатчика. Процедуру замены батарейки см. в главе «Электрооборудование кузова*
4. Модели оборудованные системой «SMART KEY».
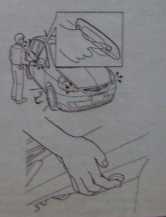 Для отпирания/запирания боковых дверей и двери багажника с помощью брелка «SMART KEY» нажмите на со-ответствующую кнопку.
Также отпереть/запереть двери и заднюю дверь можно, если брелок «SMART KEY» находится у вас в кармане или в сумке.
Модели до 2006 года Двери автоматически отопрутся, когда вы подойдете к автомобилю и возьметесь за ручку любой из передних две¬рей или за ручку задней двери.
Двери автоматически запрутся, когда вы отойдете от автомобиля на рас-стояние более одного метра.
Модели с 2006 года Двери автоматически отопрутся, когда вы подойдете к автомобилю и возьметесь за ручку любой из передних дверей или за ручку задней двери.
Чтобы запереть боковые двери на-жмите на кнопку, показанную на рисунке.
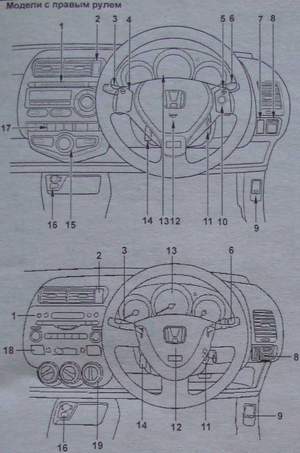
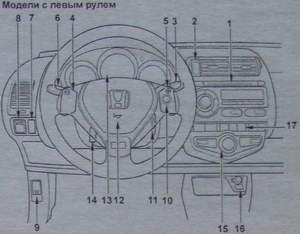
Панель приборов со стороны водителя. 1 — магнитола, 2 — выключатель аварийной сигнализации, 3 — переключатель управления стеклоочистителем и омывателем, 4 — переключатель понижения передачи в режиме ручного переключения, 5 — переключатель повышения передачи в режиме ручного переключения,
6 — переключатель света фар и указателей поворотов,
7 — заглушка, регулятор системы коррекции фар (модели с галогеновыми лампами дальнего света фар), 8 — панель управления положением боковых зеркал, 9 — рычаг привода замка капота, 10 — выключатель режима ручного переключения передач (АКПП), 11 — замок зажигания, 12 — сигнал, 13 — комбинация приборов, 14 — рычаг блокировки рулевой колонки, 15 — панель управления отопителем и кондиционером (с автоматическим управлением), 16 — разъем для подключения внешнего аудиоустройства, 17 — выключатель подогрева боковых зеркал, 18- выключатель обогрева заднего стекла, 19 — панель управления отопителем и кондиционером (с механическим управлением).
Чтобы запереть заднюю дверь нажмите на кнопку, показанную на рисунке.
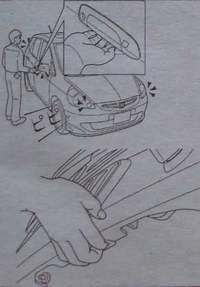
Запирание дверей сопровождается однократным миганием указателей поворотов. Отпирание дверей сопровождается двойным миганием указателей поворотов.
Примечание: двери не запрутся, если ключ находится в замке зажигания, не закрыта какая-либо из дверей. Двери не отопрутся, если после их запирания прошло менее 5 секунд.
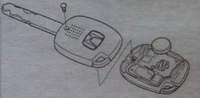 5. На задних боковых дверях установлена дополнительная блокировка дверей. Данная функция позволяет запереть дверь так, что она может быть открыта только снаружи. Рекомендуется
использовать эту функцию каждый раз,
когда в автомобиле находятся маленькие дети. Для включения переместите
запорный рычаг в положение «LOCK».
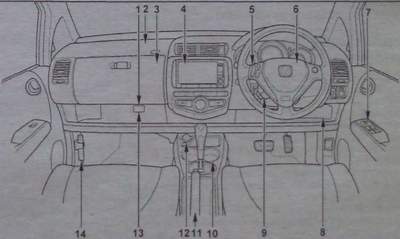 Панель приборов. 1 — разъем для подключения аудио-видеоустройств, 2 — подушка безопасности переднего пассажира, 3 — вещевой ящик, 4 — многофункциональный дисплей, 5 — панель управления магнитолой. 6 — подушка безопасности водителя, 7 — панель управления стеклоподъемниками, 8 — блок предохранителей, 9 — переключатели коммуникационной системы,10 — подстаканники, 11 — рычаг стояночного тормоза, 12 — разъем для подключения дополнительного оборудования, 13 — разъем коммуникационной системы, 14 — фальшфейер.
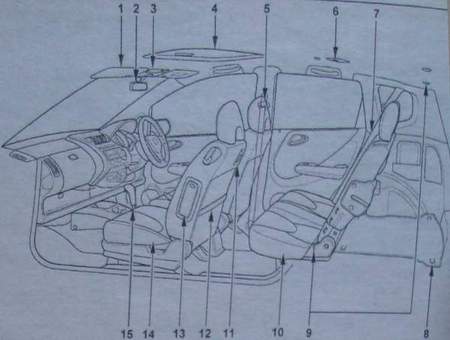 Одометр и счетчик пробега
Одометр и счетчик пробега.
а) Одометр показывает общий пробег автомобиля.
б) Счетчики пробега показывают расстояние, которое проехал автомобиль с момента последней установки счетчика на ноль.
в) Кнопка «ODO/TRIP» предназначена для переключения режимов и для сброса показаний счетчиков пробега на ноль. При кратковременном нажатии на кнопку идет переключение: одометр — счетчик пробега средний расход топлива. При каждом режиме горит соответствующий индикатор. Обнуление счетчика пробега происходит при длительном нажатии на кнопку «ODO/TRIP».
Расположение компонентов в салоне автомобиля. 1 — солнцезащитный козырек, 2 — внутреннее зеркало заднего вида, 3 — лампа местной подсвет ки/лампа освещения передней части салона, 4 — люк, 5 — регулируемое крепление ремня, 6 — лампа освещения задней части салона, 7 — ремень безопасности заднего пассажира, 8 — крюки для крепления сетки фиксации груза, 9 — крепления для детского сиденья ISO FIX, 10 — заднее сиденье, 11 — крючок, 12 — карман, 13 — боковая подушка безопасности, 14 — переднее сиденье, 15 — селектор АКПП
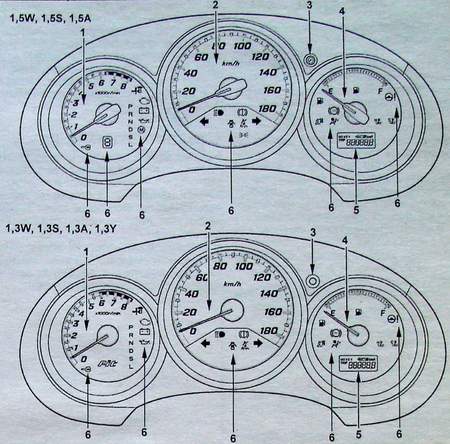
Тахометр
Тахометр показывает число оборотов коленчатого вала двигателя в минуту (об/мин).
Внимание: во время движения следите за показаниями тахометра. Его стрелка, показывающая частоту вращения коленчатого вала двигателя, не должна входить в красную зону (зона повышенных оборотов двигателя).
Указатель количества топлива
Указатель показывает уровень топлива в топливном баке (F — полный бак, Е — пустой бак), когда ключ в замке зажигания находится в положении «II». Индикатор низкого уровня топлива загорается, когда уровень топлива в баке менее 6 литров. В зависимости от комплектации автомобиля топлива может хватить на 40 — 60 км пути. На склонах или при поворотах индикатор может загораться из-за колебаний топлива в баке.
Емкость топливного бака 42 л
Внимание: не ездите при слишком низком уровне топлива в баке. Полная выработка топлива может привести к выходу из строя топливного насоса.
Комбинация приборов (модели до 2006 года). 1 — тахометр, 2 — спидометр, 3 — кнопка переключения одометр/счетчик пробега, 4 — указатель количества топлива, 5 — одометр/счетчик пробега, 6 — индикаторы.
Индикаторы комбинации приборов
1. Индикаторы указателей поворотов. Индикаторы мигают при включении указателей поворотов или аварийной сигнализации. Слишком частое мигание индикаторов указывает на плохое соединение в цепи указателей поворотов или на отказ лампы указателя поворота.
2. Индикатор включения дальнего света фар загорается при включении дальнего света фар.
3. Индикатор включения габаритных огней загорается при включении габаритных огней.
4. Индикатор пониженной температуры охлаждающей жидкости двигателя. Индикатор загорается (зеленый), когда двигатель холодный, и горит до тех пор, пока двигатель не прогреется. Начинать движение рекомендуется, когда двигатель прогреется и индикатор погаснет.
5 Индикатор системы блокировки двигателя.
Индикатор загорается на несколько секунд при переводе ключа в замке зажигания в положение «II», а затем гаснет.
Индикатор начинает мигать, если датчик иммобилайзера не может распознать сигнал от ключа или брелка «SMART KEY”. В этом случае вы не сможете запустить двигатель.
6. Индикатор отключения боковых подушек безопасности.
Индикатор загорается на 5 секунд при переводе ключа в замке зажигания в положение «II». Если на переднем сиденье нет пассажира, то индикатор продолжает гореть, при наличии пассажира на переднем сиденье индикатор гаснет.
7. Индикатор состояния стояночной тормозной системы и уровня тормозной жидкости.
а) Индикатор загорается, если:
— включен стояночный тормоз;
— низкий уровень тормозной жидкости или нарушена герметичность вакуумного усилителя тормозов;
— неисправна электрическая цепь индикатора.
б) Если во время движения загорелся индикатор, то необходимо замедлить скорость, съехать с дороги и осторожно остановить автомобиль. Замедлить скорость можно торможением двигателя и применением стояночного тормоза, но не забудьте при этом нажать на тормозную педаль для включения стоп-сигналов, чтобы предупредить о торможении водителей едущих сзади.
Проверьте стояночный тормоз, возможно, он включен. Если стояночный тормоз выключен, а индикатор горит после его выключения, то возникла неисправность в тормозной системе.
Проверьте уровень тормозной жидкости в бачке.
— Если уровень тормозной жидкости низок, долейте жидкость и в безопасном месте проверьте эффективность торможения автомобиля. Если вы считаете, что тормоза все еще работают достаточно эффективно, то осторожно доведите автомобиль до ближайшего места ремонта. Если тормоза не работают, то автомобиль необходимо отбуксировать или эвакуировать для ремонта.
Внимание: движение в автомобиле с низким уровнем тормозной жидкости опасно.
8. Индикатор низкого давления моторного масла.
а) Индикатор загорается, если давление моторного масла слишком низкое.
б) Если во время движения индикатор мигает или горит, то необходимо съехать на обочину и выключить двигатель.
— Индикатор может мигать после резкого торможения или когда двигатель работает на холостом ходу. Неисправность отсутствует, если индикатор гаснет при небольшом увеличении оборотов двигателя.
— Индикатор может загореться, когда уровень масла в двигателе слишком низок. Но данный индикатор не предназначен для информирования о низком уровне масла, поэтому периодически проверяйте уровень с помощью щупа.
Проверьте уровень масла и убедитесь в отсутствии утечек.
— Если уровень масла находится в допустимых пределах и утечки отсутствуют, отбуксируйте или эвакуируйте автомобиль для ремонта.
— Если уровень масла, ниже минимально допустимого и утечки отсутствуют, долейте масло и запустите двигатель. Если индикатор мигает или горит, то выключите двигатель и отбуксируйте или эвакуируйте автомобиль для ремонта.
9. Индикатор «проверь двигатель» (CHECK ENGINE).
Индикатор загорается при повороте ключа в замке зажигания в положение «II» на несколько секунд, а затем гаснет, информируя водителя о проверке системы управления двигателем. Если индикатор продолжает гореть или загорается во время движения, это свидетельствует о наличии неисправностей в электронной системе управления двигателем. В данном случае необходимо двигаться к месту ремонта и произвести диагностику системы управления двигателем.
10. Индикатор зарядки аккумуляторной батареи.
А) Индикатор загорается при повороте ключа в замке зажигания в положение «II» и должен погаснуть после запуска двигателя.
Б) Если во время движения загорелся индикатор, то неисправна система зарядки или ослаблен (оборван) ремень привода генератора. Однако двигатель будет продолжать работать, пока аккумуляторная батарея полностью не разрядится. Выключите дополнительное оборудование (кондиционер, вентилятор, радио – приемник и др.) и двигайтесь к месту ремонта.
11. Индикатор положения селектора в диапазоне «D».
Мигание индикатора говорит о неисправности АКПП.
12. Индикатор низкого уровня топлива. Индикатор загорается, когда уровень топлива в топливном баке менее 7 литров.
13. Индикатор непристегнутого ремня безопасности водителя.
Индикатор загорается при включении зажигания на несколько секунд, а затем гаснет, если водитель пристегнут. В случае если водитель не пристегнут ремнем безопасности, индикатор продолжает гореть.
14. Индикатор открытой или неплотно закрытой двери.
Индикатор остается включенным до тех пор, пока все двери не будут плотно закрыты.
15. Индикатор повышенной температуры охлаждающей жидкости двигателя. Индикатор загорается (красный) при приближении температуры к критической отметке, что указывает на перегрев двигателя. В этом случае немедленно остановите автомобиль в безопасном месте и выполните процедуры, описанные в разделе «Перегрев двигателя» данной главы. Устраните причину перегрева.
16. Индикатор системы подушек безопасности (SRS).
Индикатор загорается, когда ключ в замке зажигания находится в положении «1» или «II». Через несколько секунд индикатор погаснет. В случае если индикатор не загорелся или горит во время движения, имеется неисправность в компонентах системы SRS.
17. Индикатор антиблокировочной системы тормозов (ABS).
После включения зажигания индикатор загорается на несколько секунд, а затем гаснет. Если во время движения загорается индикатор или индикатор не загорается, или не гаснет при включении двигателя, то возможны неисправности в антиблокировочной системе.
18. Индикатор электроусилителя рулевого управления.
Индикатор загорается при возникновении неисправности в электроусилителе рулевого управления.
Остановите автомобиль в безопасном месте и заглушите двигатель. Подождите несколько минут и вновь запустите двигатель, если индикатор продолжает гореть, эвакуируйте ваш автомобиль на место ремонта.
19. Индикатор брелка «SMART KEY». Индикатор загорается на несколько секунд при переводе ключа в замке зажигания в положение «II», или «0», а затем гаснет.
Если индикатор продолжает гореть, это говорит о не исправности в системе «SMART KEY».
20. Индикатор режима ручного переключения передач загорается, если селектор АКПП находится в положении «D» и нажат выключатель режима ручного переключения. Более подробное описание смотрите в разделе «Управление автомобилем с АКПП». Если индикатор мигает во время движения, то возможна неисправность в системе.
21. Индикатор выбранной передачи в режиме ручного переключения. Индикатор показывает включенную передачу, если селектор АКПП находится в положении «D» и включен режим ручного переключения передач. Более подробное описание смотрите в разделе «Управление автомобилем с АКПП».

Стеклоподъемники
На моделях с электроприводом стеклоподъемников дверей регулировка положения стекол дверей осуществляется нажатием на соответствующий выключатель. При этом ключ в замке зажигания должен быть установлен в положение «IP.
С панели двери водителя можно управлять положением стекол всех дверей, а также осуществлять их блокировку соответствующим выключателем.
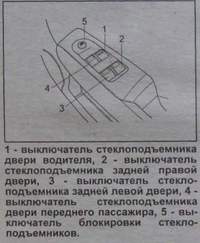
На панели каждой пассажирской двери находится выключатель, нажатием и удерживанием которого пассажир может регулировать положение стекла только со своей стороны.
При легком нажатии на выключатель стеклоподъемника двери водителя вниз стекло будет опускаться до тех пор, пока выключатель будет удерживаться. Для поднятия стекла необходимо слегка потянуть за выключатель вверх и удерживать в таком положении, пока стекло полностью не поднимется.
У выключателя стеклоподъемника двери водителя есть дополнительная функция — полное опускание и полное закрытие стекла водителя («AUTO»), при котором нет необходимости удерживать выключатель в соответствующем положении.
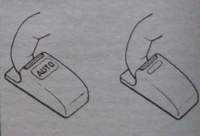
Для опускания стекла нужно нажать на выключатель до конца его хода. При необходимости остановки стекла в приоткрытом положении кратковременно нажмите на выключатель вверх и снова опустите. Для поднимания стекла необходимо потянуть выключатель до конца хода вверх.
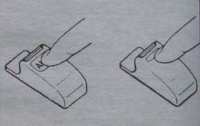
На панели управления стеклоподъемниками находится выключатель блокировки стеклоподъемников «WINDOW LOCK». При его нажатом положении опускание стекол невозможно.
Световая сигнализация в автомобиле
1. Включение габаритов, фар, подсветки комбинации приборов и номерного знака.
Примечание: переключатель света фар и указателей поворота работает независимо от положения ключа в замке зажигания. а) При повороте ручки переключателя до первого щелчка (положение «ON1») включаются габариты, подсветка комбинации приборов и номерного знака. б) При повороте ручки переключателя до второго щелчка (положение «ON2») включается ближний свет фар.
|
Положение ручки |
ON1 |
ON2 |
|
Передние фары |
—- |
О |
|
Габариты |
О |
О |
|
Подсветка номерного знака |
О |
О |
|
Подсветка комбинации приборов |
О |
О |
Внимание: во избежание разряда аккумуляторной батареи при выключенном двигателе не оставляйте фары включенными на длительный промежуток времени.
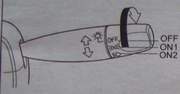 2. Для включения дальнего света фар нажмите на переключатель от себя. Работа фар дальнего света сопровождается высвечиванием на комбинации приборов соответствующего индикатора.
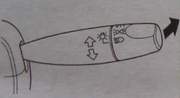
Для выключения дальнего света фар и включения ближнего света фар переведите переключатель в исходное положение.
3. Для кратковременного включения дальнего света фар (сигнализация дальним светом фар) потяните переключатель на себя до упора, затем отпустите.
4. Для включения указателя поворота переведите переключатель в положение вверх или вниз. Переключатель автоматически вернется в исходное положение после завершения поворота. Однако при смене полосы движения, возможно, потребуется рукой вернуть переключатель в нейтральное положение.
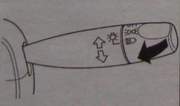
Для включения сигнала смены полосы переведите переключатель вверх или вниз до момента возникновения сопротивления перемещению и установите его в этом положении.
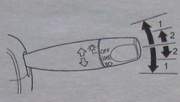
6. Аварийная сигнализация включается нажатием на выключатель, расположенный, как показано на рисунке.
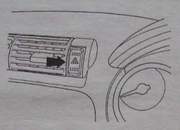
Капот и задняя дверь
1. Для открывания капота необходимо произвести следующие процедуры:
а) Потяните вверх за рычаг привода замка капота, как показано на рисунке.
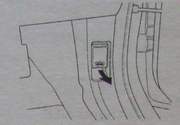
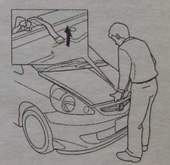
б) Слега приподнимите капот и потяните рычаг блокировки замка капота вверх.
в) Поднимите капот и зафиксируйте его на стойке, как показано на рисунке.
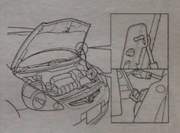
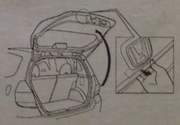 2. Для того чтобы закрыть капот, необходимо освободить стойку капота, уложить ее в штатное место и закрыть капот.
3. Чтобы открыть заднюю дверь возьмитесь за ручку, показанную на рисунке и плавно откройте дверь.
Продолжение следует . .