
4
IAN 96769
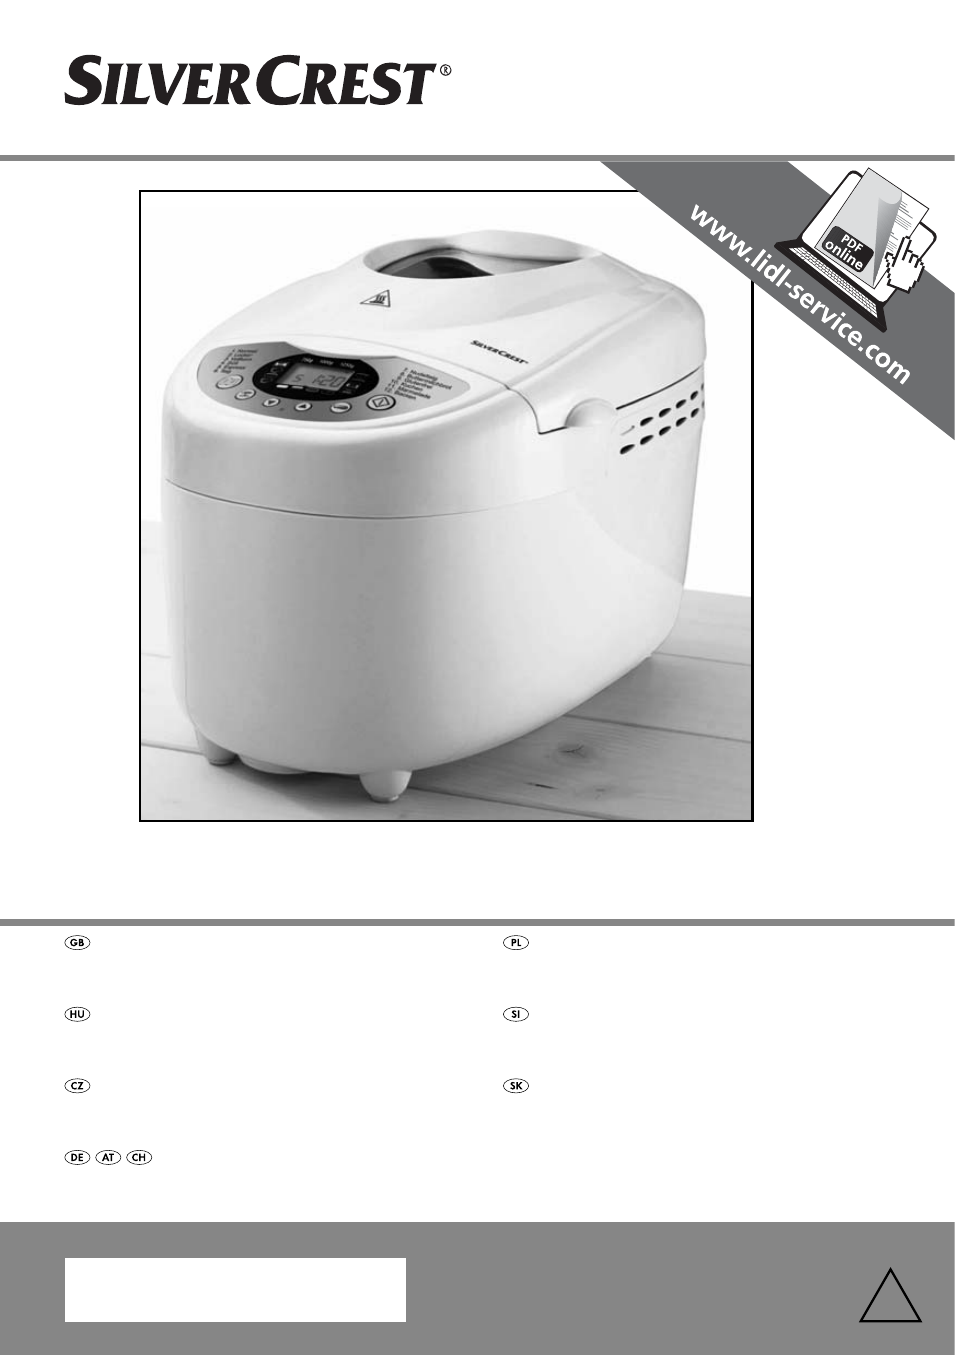
BREAD MAKER SBB 850 A1
BREAD MAKER
Operating instructions
APARAT ZA PEKO KRUHA
Navodila za uporabo
KENYÉRSÜTOGÉP
Használati utasítás
AUTOMAT DO PIECZENIA CHLEBA
Instrukcja obsługi
AUTOMAT NA PEČENIE CHLEBA
Návod na obsluhu
DOMÁCÍ PEKÁRNA
Návod k obsluze
BROTBACKAUTOMAT
Bedienungsanleitung
|
KITCHEN TOOLS |
|||
|
6 |
Bread Maker SBB 850 EDS A1 |
||
Bread Maker
Operating instructions
KOMPERNASS GMBH
BURGSTRASSE 21 · D-44867 BOCHUM
www.kompernass.com
ID-Nr.: SBB 850 EDS A1-01/11-V1
IAN: 64338
SBB 850 EDS A1

750g 1000g 1250g

|
INDEX |
PAGE |
|
Safety Notices |
2 |
|
Appliance Overview |
3 |
|
Accessories |
3 |
|
Intended Use |
3 |
|
Before the first usage |
4 |
|
Properties |
4 |
|
Control panel |
5 |
|
Programme |
6 |
|
Timer-Function |
7 |
|
Before baking |
8 |
|
Baking bread |
8 |
|
Error Messages |
10 |
|
Cleaning and Care |
10 |
|
Technical data |
11 |
|
Disposal |
11 |
|
Warranty and Service |
12 |
|
Importer |
12 |
|
Programme sequence |
13 |
|
Troubleshooting the Bread Baking Machine |
17 |
Read the operating instructions carefully before using the device for the first time and preserve this booklet for later reference. Pass this manual on to whoever might acquire the device at a future date.
— 1 —

Safety Notices
•Please read the operating instructions through completely before using the appliance for the first time!
•Danger of suffocation! Children can suffocate through the improper use of packaging materials. Dispose of them immediately after unpakking or store them in a place that is out of reach of children.
•After unpacking, check the appliance for damage that may have occurred during transportation. If necessary, contact your supplier.
•Place the appliance on a dry, flat and heatresistant surface.
•Do not place the appliance near inflammable materials or explosive/ignitable gases. A minimum distance of 10 cm must be maintained to all other materials.
•Ensure that the ventilation slots of the appliance are kept free at all times. Risk of overheating!
•Before plugging the appliance in, check that the electricity type and mains voltage matches the information given on the type plate.
•Do not place the power cable over sharp edges or close to hot surfaces or objects. These may damage the insulation of the power cable.
•Never leave the appliance unsupervised whilst in use.
•To avoid the risk of tripping accidents the appliance is provided with a short power cable.
•Only use the appliance inside buildings.
•Never place the appliance on or close to a gas or electric cooker, a hot oven or any other source of heat. Risk of overheating!
•Never cover the appliance with a tea-towel or other material. Heat and steam must be able to escape. A fire could occur if the appliance is covered with an inflammable material or comes into contact with inflammable materials, e.g. curtains.
•If you use an extension cable, ensure that the maximum permitted power rating for the cable corresponds to that of the bread baking machine.
•Place the extension cable in such a way as to prevent anyone from tripping over it or unintentially pulling on it .
•Always check the power cable and plug before use. Should the power cable of the appliance become damaged, to avoid the risk of injury or a fatality it must be replaced by the manufacturer, the manufacturer’s customer service or a similarly qualified specialist.
•The use of ancillaries not recommended by the manufacturer could cause damage to the appliance. Only use the appliance for its intended purposes. Non-compliance invalidates all claims under the warranty.
•Start a baking programme only when a baking mould is fitted in. If a mould is not fitted, it could cause irreparable damage to the appliance.
•If children are in the vicinity, supervise the app-liance particularly well! If the appliance is not in use, and also before cleaning it, remove the plug from the power socket. Allow the appliance to cool down before removing individual parts.
•This appliance is not intended for use by individuals (including children) with restricted physical, physiological or intellectual abilities or deficiences in experience and/or knowledge unless they are supervised by a person responsible for their safety or receive from this person instruction in how the appliance is to be used. Children should be supervised to ensure that they do not play with the appliance.
•This appliance complies with standard safety regulations. Inspection, repair and technical maintenance may only be performed by a qualified specialist. Non-compliance invalidates all claims under the warranty.
— 2 —

•Do not place any objects on the appliance and do not cover it during operation. Risk of fire!
•Caution! The bread maker becomes very hot during operation. Do not touch the appliance until it has cooled down, or use oven gloves.
•Before taking out or inserting accessories, unplug the power cable and allow the appliance to cool down.
•Do not transport the Bread Baking Machine if the baking mould contains hot or fluid contents, e.g. jams. There is a danger of being burnt!
•During use, NEVER come into contact with the rotating kneading paddles. There is also a risk of personal injury!
•Do not pull on the cable to remove the plug, rather, pull the plug itself from the socket.
•When not in use, and before cleaning the app-liance, remove the power cable from the wall socket.
•Do not use the Bread Baking Machine for the storage of foods or utensils.
•Never lay aluminium foil or other metallic objects in the Bread Baking Machine. This could lead to a short circuit. There would be a risk of fire!
•Never place the bread machine in water or other liquids. Risk of fatal electrical shocks!
•Do not clean the appliance with abrasive sponge cleaning pads.
Should particles break away from the sponge and come into contact with electrical components, you could receive an electric shock.
•Do not use an external timing switch or a separate remote control system to operate the appliance.
•Never use the appliance without a baking mould or with an empty one. This would irreparably damage the appliance.
•Always close the lid during operation.
•NEVER remove the baking mould during operation.
•When baking, never insert more than 700g of
flour and never add more than a 1 1/4 packet (ca.26g) of dry yeast. The dough
could overflow and cause a fire!
Appliance Overview
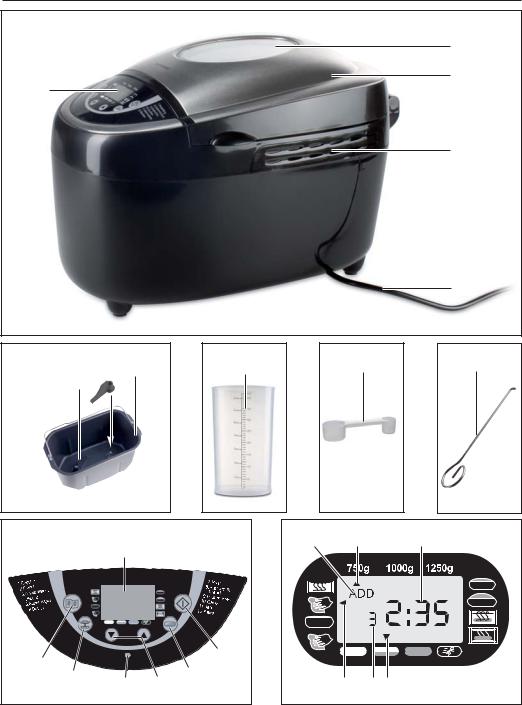
Viewing windowAppliance lidVentilation slitsPower cable
Control panel
Caution! Hot surfaces!
Accessories
2 kneading paddles
Baking mould for bread weights up to 1250 gMeasuring cup
Measuring spoon
Kneading paddle remover
•Concise instruction sheet
•Recipe book
•Operating manual
Intended Use
Use your Bread Baking Machine for baking bread and making jams or marmaldes in domestic areas only.
Do not use the appliance for drying foodstuffs or other objects. Do not use the Bread Baking Machine outdoors.
Use only the ancillaries recommended by the manufacturer. Non-recommended accessories may cause damage to the appliance.
— 3 —

Before the first usage
Disposal of the packaging material
Unpack your appliance and dispose of the packaging material in accordance with your local regulations.
Initial cleaning
Wipe the baking mould , kneading paddles and outer surfaces of the bread baking machine with a clean, damp cloth before putting it into operation. Do not use abrasive scrubbers or cleaning powders. Remove the protective foil from the control panel , as well as from the viewing window
.
Pre-heating
Please take note of the following notice regarding the first usage:
For the first heating up ONLY, place the empty baking mould into the appliance. Close the appliance lid . Select the programme 12, as described in the section «PROGRAMMES“ then press the button Start/Stop , to warm up the appliance for 5 minutes. To terminate the programme, after 5 minutes press the button Start/Stop until a long signal tone is heard.
As the heating elements are lightly greased, a slight smell may occur when first putting the appliance into operation. This is harmless and stops after a short time. Provide for sufficient ventilation, for example, open a window.
Allow the appliance to cool down completely and once again wipe the baking mould , kneading paddles and the outer surfaces of the Bread Baking Machine with a clean moist cloth.
Risk of fire! Do not allow the Bread Baking Machine to warm up for more than 5 minutes with an empty baking mould . There is a real danger of overheating.
Properties
With this Bread Baking Machine you have the possibility to bake bread according to your taste.
•You can choose from 12 different baking programmes.
•You can employ ready-to-use baking mixtures.
•You can knead dough for buns and noodles and also prepare marmalades and jams.
•With the programme “Gluten Free” you can bake gluten-free baking mixtures and recipes with gluten-free flours, such as cornflour, buckwheat flour and potato starch.
— 4 —
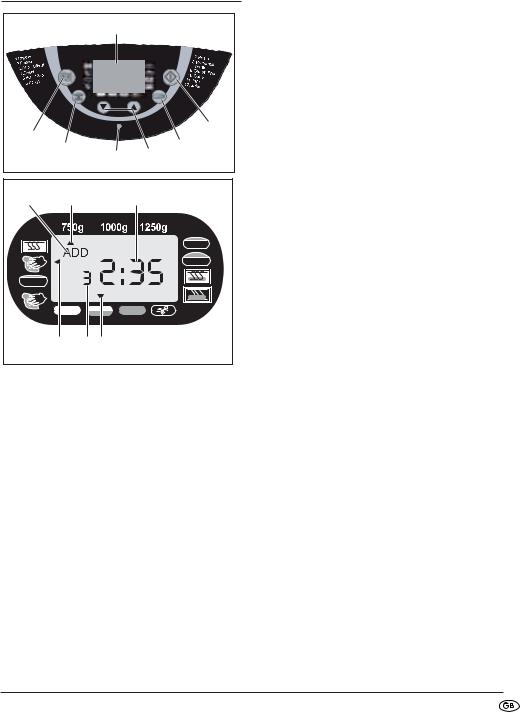
Control panel
750g 1000g 1250g
Display
Display for
selection of the weight (750 g, 1000 g, 1250 g)
the remaining baking time in minutes and the programmed time
the selected level of browning (light  , medium
  , dark
  , Rapid
  )
)
the selected program numberthe programme sequence
the addition of ingredients („ADD“)
Start / Stop
To start and stop an operation or to delete a time-programming.
To interrupt the operation, briefly press the Start/Stop button until a signal tone sounds and the time in the display flashes. By once again pressing the Start/Stop button within 10 minutes, the operation can be continued. Should you forget to re-start the programme, after 10 minutes it will be automatically continued.
To completely terminate the operation or to delete a programming, press the Start/Stop button for 3 seconds, until long signal tone sounds.
Note:
Do not press the Start/Stop button if you want to simply check the condition of the bread. You can watch the baking operation through the viewing window.
Please note:
When pressing all buttons an acoustic signal must be audible, unless the appliance is in operation.
Level of browning (or Rapid modus) 
Select the browning level or switch into the Rapid modus (light/medium/dark/Rapid). Press the Browning Level button repeatedly, until the arrow is located above the desired browning level. For the Programmes 1 — 4 you can, through repeated pressing of the Browning Level button , activate the Rapid modus to shorten the baking process. Press the Browning Level button repeatedly until the arrow appears over «Rapid». A browning level cannot be selected with the programmes 6, 7 and 11.
Timer ▼ ▲
Time-delayed baking.
Note:
Time-delayed baking cannot be arranged with Programme 11.
— 5 —

Operation indicator lamp
The operation indicator lamp indicates with its glowing that a programme is currently running. If you want to start a programme time-delayed by using the timer function, the operation indicator lamp first glows when the programme itself starts, not when the timer is activated.
Bread weight 
Select the bread weight (750 g / 1000 g / 1250 g). Press the button repeatedly until the arrow appears under the desired weight. The weight details (750 g / 1000 g / 1250 g) relate themselves to the amount of ingredients placed in the baking mould .
Note:
The default setting when switching the appliance on is 1250 g. You cannot adjust the bread weight with the Programmes 6, 7, 11 and 12.
Programme selection (Menu)
Call-up of the desired baking programme (1-12). In the display appears the Programme number and the corresponding baking time.
Memory Function
When being switched on again after a power failure of up to approx. 10 minutes, the program will continue from the same point. This is however not valid when erasing/terminating the baking process or pressing the button Start/Stop until an extended signal tone sounds.
Viewing window
You can observe the baking process through the window .
Programme
Select the desired programme with the button Programme selection . The corresponding programme number is shown in the display . The baking times are dependant on the selected Programme combinations. See the chapter «Programme sequence“.
Programme 1: Regular
For white and mixed breads mainly consisting of wheat flour or rye flour. The bread has a compact consistency. Set the browning of the bread with the button browning level .
Programme 2: French
For light breads from well-milled flour. As a rule, the bread is light and has a crispy crust.
Programmme 3: Whole Wheat
For breads made from robust flours, e.g. whole wheat flour and whole rye flour. The bread will be more compact and heavy.
Programmme 4: Sweet
For breads with ingredients like fruit juices, coconut flakes, raisins, dried fruit, chocolate or additional sugar. Due to an extended rising phase the bread will be lighter and airier.
Programmme 5: Super Rapid
Less time is required for kneading, rising and baking. For this Programme, however, use only such recipes that do not contain any heavy ingredients or heavy varieties of flour. Note that in this programme the bread is less aerated and may not be quite so tasty.
Programmme 6: Dough (kneading)
For the preparation of yeast dough for buns, pizza or plaits. In this Programme no baking is done.
— 6 —

Programmme 7: Pasta
For the preparation of pasta dough. In this Programme no baking is done.
Programmme 8: Buttermilk bread
For breads made with buttermilk or yoghurt.
Programme 9: Gluten Free
For breads made of gluten-free flours and baking mixtures. Gluten-free flours require longer for the absorption of liquids and have differing rising properties.
Note:
When you wish to bake gluten-free breads, ensure that you clean the mould , the dough hook and the appliance especially thoroughly. Even small residual amounts of flour can cause an allergic reaction in gluten-sensitive people.
Programmme 10: Cake
In this programe the ingredients are kneaded, allowed to rise and then baked. Use baking powder for this programme.
Programmme 11: Jam
For making jams, preserves, jellies and fruit spreads.
Programmme 12: Bake
For the after-baking of breads that are not brown enough, not baked through or ready-made dough. All kneading and rising processes are dispensed with in this programme. The bread is kept warm for up to one hour after the baking process. This prevents the bread from becoming too moist.
Programmme 12 bakes the bread for 60 minutes. To terminate these functions prematurely, press the Start/Stop button until a long signal tone is heard. To switch the appliance off, remove the power plug from the wall socket.
Note:
With the programmes 1, 2, 3, 4, 5, 6, 8 and 9 a signal tone sounds during the programme process and „ADD“ appears in the display.
As soon as possible after it sounds add the other ingredients, such as fruit or nuts.
The ingredients will not be crushed by the kneading paddle .
If you have set the timer, you can put all the ingredients into the baking mould at the beginning. In this case, however, fruits and nuts should be cut into smaller pieces before inserting them.
Timer-Function
The timer function allows you to do time-delayed baking.
With the arrow buttons ▲ and ▼ enter in the desired completion time for the baking process. The maximum time delay amounts to 15 hours.
Warning! Before you bake a particular type of bread with time delay first try out the recipe under observation, to ensure that the relationships of the ingredients to each other are correct, the dough is not too firm or too thin, and that the amounts are not too large and could possibly overflow. Risk of fire!
Select a Programme. The display indicates the required baking time.
With the arrow key ▲ you can postpone the end of the Programme. The first activation pushes the completion time back to the next full interval of 10 minutes. Each subsequent activation of the arrow key ▲ pushes the completion time back by 10 minutes. You can accelerate this procedure by holding the button pressed down. The display shows
you the whole period of the baking time and delay time. On a possible exceeding of the possible time
delay you can correct the time with the arrow button
▼ .
— 7 —

Confirm the programming of the timer with the Start/Stop button . The colon on the display flashes and the programmed time starts to run. As soon as the programme starts, the operating indicator lamp glows.
When the baking process has been completed, ten acoustic signals are sounded and the display indicates 0:00.
Example:
It is 8:00 a.m. and you would like to have fresh bread in 7 hours and 30 minutes, in other words at 3:30 p.m.
First of all select Programme 1 and then press the arrow button until 7:30 appears in the display, as the time period to be allowed for completion is one of 7 hours and 30 minutes.
Note: The timer function cannot be activated with the Programme «Jam».
Note
With time delayed baking please do not use perish-able ingredients such as milk, eggs, fruit, yoghurt, onions etc.
Before baking
For a successful baking process, please consider the following factors:
Ingredients
Note
Take the baking mould out of the housing before putting in the ingredients. Should ingredients drop into the baking area, a fire may be caused by them burning on the heating elements.
•Always place ingredients into the baking mould in the sequence specified .
•All ingedients should be at room temperature, to ensure an optimal rising result from the yeast.
•Ensure that you measure the ingredients precisely. Even negligible deviations from the quantities specified in the recipe may affect the baking results.
Note
NEVER use quantities larger than those specified. Too much dough could rise out of the baking mould drop onto the hot heating elements and cause a fire.
Baking bread
Preparation
Pay heed to the safety instructions in this manual. Place the Bread Baking Machine on a level and firm surface.
1.Pull the baking mould upwards and out of the appliance.
2.Push the kneading paddles onto the drive shafts in the baking mould . Make sure they are firmly in place.
3.Place the ingredients for your recipe into the baking mould in the specified order. First add the liquids, sugar and salt, then the flour, adding the yeast as the last ingredient.
Note
Ensure that the yeast does not come into contact with salt or fluids.
4.Place the baking mould back in the appliance. Ensure that it engages correctly.
5.Close the appliance lid .
6.Insert the power plug into the wall socket. A signal tone sounds and in the display
appears the Programme number and the timeduration for Programmme 1.
7.Select your programme with the Programme select button . Each input is confirmed with a signal tone.
8.If necessary, select the size of bread you want to bake with the button .
— 8 —

9.Select the browning level for your bread. In the display the arrow shows you what you have selected, light, medium or dark.
Here you can also select the setting «Rapid» to shorten the time period in which the dough rises.
Note
A browning level cannot be selected with the programmes 6, 7 and 11.
The function «Rapid» is only available with Programmes 1-4.
A bread weight level cannot be selected with the Programmes 6, 7, 11 and 12.
10.You now have the option of setting the end time of your programme using the timer function. You can enter in a maximum time delay of up to 15 hours.
Note
This function is not available for Programmme 11.
Starting the Programme
Now start the programme with the Start/Stop button
.
Note: The Programmes 1, 2, 3, 4, 6, 8 and 9 start with a 10 to 30 minute pre-heat phase (except Rapid, see Table for Programme Sequences). The kneading paddles do not move themselves. That is not an error of the machine.
The Programme automatically carries out the various operations.
You can watch the programme sequence via the window of your Bread Baking Machine. Occasionally, condensation may collect in the window during baking . The appliance lid can be opened during the kneading phase.
Note
Do not open the appliance lid during the rising or baking phases. The bread could collapse.
Ending the Programme
When the baking process has been completed, ten acoustic signals are sounded and the display indicates 0:00.
At the end of the programme the appliance automatically changes to a keep-warm mode for up to 60 minutes.
Note
This is not applicable to Programmes 6, 7 and 11.
In this mode, warm air circulates inside the appliance. The keep warm period can be prematurely terminated by pressing down the Start/Stop button until the signal tone sounds.
Warning
Before opening the appliance lid remove the power plug from the wall socket.
When not in use, the appliance should never be plugged in!
Taking out the bread
When handling the hot baking mould, always use pot holders or oven gloves.
Hold the baking mould tilted over a grid and shake it lightly until the bread slides out of the baking mould .
If the bread does not slip off the kneading paddles, carefully remove the kneading paddles using the supplied kneading paddle remover .
Note
Do not use any metal objects which may cause scratches on the non-stick coating.
— 9 —

After removing the bread, immediately rinse the baking mould with warm water. This prevents the kneading paddles from sticking to the driving shaft.
Tip: If you remove the kneading paddles after the last kneading of the dough, the bread will remain intact when you remove it from the baking mould .
•Briefly press the Start/Stop button to interrupt the programme at the very start of the baking phase or, remove the power plug from the wall socket. Ensure that you re-insert the power plug within 10 minutes so that the baking process can be continued.
•Open the appliance lid and remove the baking mould . You can take the dough out with floured hands and remove the kneading paddles .
•Lay the dough back into the baking mould . Replace the baking mould and close the appliance lid .
•Insert the power plug into the wall socket. The baking programme continues from where it was stopped.
Allow the bread to cool for 15-30 minutes before eating it.
Before cutting the bread, ensure that the kneading paddles have been removed .
Error Messages
•If the display shows «HHH» after the programme has been started, it indicates that the temperature in the Bread Baking Machine is still too high. Stop the programme and remove the power plug. Open the appliance lid and allow the machine to cool down for 20 minutes before reusing it.
•If a new Programme cannot be started directly after the Bread Baking Machine has completed a baking process, it means the appliance is still too hot. In this case the display panel reverts to the default setting (Programmme 1). Open the appliance lid and allow the machine to cool down for 20 minutes before re-using it.
Warning
Do not attempt to take the appliance into use before it has cooled itself down. This functions only with programmes 11 and 12.
•If the display shows «EE0», «EE1» or «LLL» after the programme has been started, first of all switch the Bread Baking Machine off and then back on by removing and then re-inserting the power plug from/into the wall socket. Should the error display continue, make contact with Customer Services.
Cleaning and Care
Warning
Before cleaning it, always remove the power plug from the wall socket and allow the appliance to cool down completely.
Protect the appliance against moisture, this could cause you to receive an electric shock.
Please also observe the safety instructions.
Important
The appliance and its ancillaries are not suitable for being cleaned in a dish washing machine!
Housing, lid, baking space
Remove all particles left behind inside the baking area using a wet cloth or a slightly wet soft sponge. Wipe the housing and the lid too, only with a moist cloth or sponge.
— 10 —
 Loading…
Если у вас отсутствует техническая возможность для скачивания Инструкция по эксплуатации для Silvercrest SBB 850 EDS A1
вы можете прочесть документ прямо на нашем сайте или
Скачать Silvercrest SBB 850 EDS A1 Инструкция по эксплуатации

- 1
- 2
- 3
- 4
- 5
- 6
- 7
- 8
- 9
- 10
- 11
- 12
- 13
- 14
- 15
- 16
- 17
- 18
- 19
- 20
- 21
- 22
- 23
- 24
- 25
- 26
- 27
- 28
- 29
- 30
- 31
- 32
- 33
- 34
- 35
- 36
- 37
- 38
Инструкции для прочих Silvercrest Хлебопечки
Инструкции для прочих Silvercrest
Page 1 — IAN 96769
4IAN 96769BREAD MAKER SBB 850 A1 BREAD MAKEROperating instructionsAPARAT ZA PEKO KRUHANavodila za uporaboKENYÉRSÜTOGÉPHasználati utasításAUTOMAT DO
Page 2
— 7 - DisplayDisplay for selection of the weight (750 g, 1000 g, 1250 g) the remaining baking time in minutes and the programmed time the selecte
Page 3
— 97 -9. Vyberte stupeň zhnědnutí chleba. Šipka na displeji vám ukáže, zda máte nastavensvětlý, střední nebo tmavý stupeň. Můžete zvo-lit také nas
Page 4 — Content Page
— 98 -Nelze-li chléb uvolnit z hnětacích háků , odstraňteopatrně hnětací háky pomocí přiloženéhoodstraňovače hnětacích háků . Upozornění: Nepouž
Page 5 — Bread Maker
— 99 - Pozor!Díly přístroje, resp. příslušenství nejsou vhodné pro mytí v myčkách!Nepoužívejte k čištění pekárny žádné chemickéčisticí prostředky ani
Page 6 — Safety Notices
— 100 -LikvidaceV žádném případě nevyhazujte přístrojdo běžného domovního odpadu. Tentovýrobek musí plnit ustanovení evrops-ké směrnice 2012/19/EU.Zli
Page 7 — DIN A5 148 mm x 210 mm
— 101 -* 3A znamená, že automatická domácí pekárna hněte 3 minuty a současně se ozývá signál pro přidánípřísad a na displeji se zobrazí „ADD“ .Progra
Page 8
— 102 -Program 3. Celozrnný 4. SladkýStupeň zhnědnutíSvětlýStředníTmavýRychlýSvětlýStředníTmavýRychlýVelikost: 750 g 1000 g 1250 g 750 g 1000 g 1250 g
Page 9 — Control panel
— 103 -* 5A znamená, že automatická domácí pekárna hněte 5 minut a současně se ozývá signál pro přidání pří-sad a na displeji se zobrazí „ADD“ .Progr
Page 10 — Warning!
— 104 -Program 10. Koláč 11. Marmeláda 12. PečeníStupeň zhnědnutíSvětlýStředníTmavýnelze aplikovatSvětlýStředníTmavýVelikost: 750 g 1000 g 1250 g nelz
Page 11 — Programme
— 105 -Co udělat, když hnětací hák zůstane po pečení vězet v pečicí formě ? Naplňte horkou vodu do pečicí formy a otáčejte hnětací hák , abyste
Page 13 — Baking bread
— 8 - Programme selection (Menu) Call-up of the desired baking programme (1-12). In the display appears the Programme numberand the corresponding b
Page 14
(Místo, datum) (Podpis)ZPŮSOB PLATBYBankovní převod=OBJEDNÁVKOVÝ LIST SBB 850 A1 OBJEDNÁVANÉ MNOŽSTVÍ(max. 3 sady pro objednávku)OZNAČENÍ ZBOŽÍ CENA
Page 15 — Cleaning and Care
1) Do okénka „Odesílatel / Objednavatel“ zadejte hůlkovým písmem Vaše jméno, adresu a telefonní číslo (pro případné otázky).2) Předem převeďte celko
Page 16 — Important!
— 109 -Obsah StranaÚvod 110Používanie primerané účelu 110Obsah dodávky 110Zariadenie sa skladá z 110Technické údaje 110Bezpečnostné pokyny 111Pred prv
Page 17 — Importer
— 110 -Automat na pečeniechlebaÚvodSrdečne vám gratulujeme ku kúpe tohto nového prí-stroja.Rozhodli ste sa tým pre vysokokvalitný výrobok. Ná-vod na p
Page 18 — Programme sequence
— 111 - Bezpečnostné pokyny• Pred používaním prístroja si najprv prečítajte celý návod na používanie!• Nebezpečenstvo zadusenia! Deti sa môžu zadusiť
Page 19
— 112 -• Používanie príslušenstva neodporúčaného výrobcom môže viesť k poškodeni-am. Prístroj používajte len na účely, na ktoré bol určený. Inak zanik
Page 20
— 113 -• Dávajte pozor, aby ste pri používaní neprišli do styku s rotujúcim hákom namiesenie. Hrozí nebezpečenstvo poranenia• Zástrčku nevyťahujte zo
Page 21
— 114 -Pred prvým použitímLikvidácia obalového materiáluVybaľte automat a zlikvidujte obalový materiálpodľa predpisov platných vo Vašom bydlisku. Prvé
Page 22
— 115 - DisplejZobrazuje voľbu hmotnosti(750 g, 1000 g, 1250 g) zostávajúci čas a naprogramovaný čas zvolený stupeň zhnednutia (svetlý , stred-n
Page 23
— 116 - Voľba programov (menu) Vyvolanie požadovaného programu (1-12). Nadispleji sa zobrazí číslo programu a príslušnádoba pečenia. Funkcia pamäte
Page 24 — ORDER CARD SBB 850 A1
— 9 -Programme 10: CakeIn this programe the ingredients are kneaded, allowed to rise and then baked. Use baking powder for this programme. Programme 1
Page 25
— 117 -Program 10: KoláčSuroviny sa v tomto programe miesia, nechajúvykysnúť a upečú. Pri tomto programe používajteprášok do pečiva. Program 11: Lekvá
Page 26 — Spis treści Strona
— 118 -Príklad:Je 8:00 a vy by ste chceli mať čerstvý chlieb za 7 hodín a 30 minút, teda o 15:30. Najskôr zvoľte program 1 a stláčajte tlačidlá sošípk
Page 27 — Automat do pieczenia
— 119 -9. Zvoľte stupeň zhnednutia chleba. Na displeji vám šípka ukáže, či ste nastavili svetlý, stred-ný alebo tmavý. Môžete zvoliť i „rýchlo“, ab
Page 28 — Wskazówki bezpieczeństwa
— 120 -Keď sa chlieb od hákov neoddelí , odstráňteopatrne hnetacie háky pomocou priloženéhovyberača hnetacích hákov . Upozornenie:Nepoužívajte ž
Page 29
— 121 - Pozor!Jednotlivé diely prístroja a príslušenstva nie súvhodné na umývanie v umývačke riadu!Na čistenie domácej pekárničky nepoužívajte žiad-n
Page 30
— 122 -LikvidáciaPrístroj v žiadnom prípade nevyhadzuj-te do normálneho domového odpadu.Tento výrobok podlieha európskejsmernici 2012/19/EU.Zlikvidujt
Page 31 — Panel obsługi
— 123 -* 3A znamená, že prístroj 3 minúty miesi a súčasne zaznie signál upozorňujúci na pridanie prísad a na displeji sa zobrazí „ADD“ .Program 1. N
Page 32 — Uwaga!
— 124 -Program 3. Celozrnný 4. SladkýStupeň zhnednutiasvetlýstrednýtmavýrýchlysvetlýstrednýtmavýrýchlyVeľkosť 750 g 1000 g 1250 g 750 g 1000 g 1250 g
Page 33
— 125 -* 5A znamená, že prístroj 5 minút miesi a súčasne zaznie signál upozorňujúci na pridanie prísad a na displeji sa zobrazí „ADD“ .Program 5. Ex
Page 34 — Funkcja programatora czasu
— 126 -Program 10. Koláč 11. Lekvár 12. PečenieStupeň zhnednutiasvetlýstrednýtmavýN/AsvetlýstrednýtmavýVeľkosť 750 g 1000 g 1250 g N/A N/AČas (hodiny)
Page 35 — Pieczenie chleba
— 10 -Example:It is 8:00 a.m. and you would like to have freshbread in 7 hours and 30 minutes, in other words at 3:30 p.m. First of all select Program
Page 36
— 127 -Čo robiť, keď hnetací hák po pečení zostane v nádobena pečenie ? Naplňte horúcou vodou nádobu na pečenie a otáčajtehnetacie háky , aby sa
Page 38
(Miesto, Dátum) (Podpis)SPÔSOB PLATENIADobierkavrát. ostatné náklady (spracovanie, poštovné, balné).5 €+=OBJEDNÁVKOVÝ LIST SBB 850 A1OBJEDNÁVANÉ MNOŽS
Page 39 — Gwarancja i serwis
1) Pod „Odosielateľ / Objednávajúci uveďte svoje meno, adresu a telefónne číslo (pre prípadné otázky) paličkovým písmom.2) Bankový prevod: Preveďte
Page 40 — Przebieg programu
— 131 -Inhaltsverzeichnis SeiteEinführung 132Bestimmungsgemäßer Gebrauch 132Lieferumfang 132Gerätebeschreibung 132Technische Daten 132Sicherheitshinwe
Page 41
— 132 -BrotbackautomatEinführungHerzlichen Glückwunsch zum Kauf Ihres neuen Gerätes.Sie haben sich damit für ein hochwertiges Produktentschieden. Die
Page 42
— 133 - Sicherheitshinweise• Lesen Sie bitte die Bedienungsanleitung erst vollständig durch, bevor Sie dasGerät benutzen!• Erstickungsgefahr! Kinder
Page 43
— 134 -• Die Verwendung von nicht vom Hersteller empfohlenem Zubehör kann zuBeschädigungen führen. Das Gerät nur für den vorgesehenen Zweck ver-wenden
Page 44
— 135 -• Kommen Sie nie während der Benutzung mit den rotierenden Knethaken inBerührung. Es besteht Verletzungsgefahr!• Ziehen Sie den Stecker nicht a
Page 45
— 136 -Vor dem ersten GebrauchEntsorgung des VerpackungsmaterialsPacken Sie Ihr Gerät aus und entsorgen Sie dasVerpackungsmaterial gemäß den Vorschrif
Page 46 — Karta zamówienia SBB 850 A1
— 11 -9. Select the browning level for your bread. In the display the arrow shows you whatyou have selected, light, medium or dark. Here you can a
Page 47
— 137 - DisplayAnzeige für die Auswahl des Gewichts(750 g, 1000 g, 1250 g) die noch verbleibende Betriebszeit in Stundenund die programmierte Zeitv
Page 48 — Tartalomjegyzék Oldalszám
— 138 - Programmwahl (Menü) Aufrufen des gewünschten Backprogramms (1-12).Im Display erscheint die Programm-Nummer unddie entsprechende Backzeit. M
Page 49 — Kenyérsütőgép
— 139 -Programm 10: KuchenDie Zutaten werden bei diesem Programm gekne-tet, gehen gelassen und gebacken. Benutzen SieBackpulver für dieses Programm. P
Page 50 — Biztonsági utasítások
— 140 -Beispiel:Es ist 8.00 Uhr und Sie möchten in 7 Stunden und 30Minuten, also um 15:30 Uhr, frisches Brot haben. Wählen Sie zunächst das Programm 1
Page 51
— 141 -9. Wählen Sie den Bräunungsgrad IhresBrotes. Im Display zeigt Ihnen der Pfeil, obSie Hell, Mittel oder Dunkel eingestellt haben.Sie können
Page 52
— 142 -Löst sich das Brot nicht von den Knethaken , entfernen Sie vorsichtig die Knethaken mit dembeiliegenden Knethakenentferner . Hinweis:Benu
Page 53 — Vezérlőpult
— 143 - Achtung!Die Geräte- bzw. Zubehörteile sind nicht spülma-schinengeeignet!Benutzen Sie zum Reinigen des Brotbackautomatenkeine chemischen Reini
Page 54 — Figyelem!
— 144 -EntsorgungWerfen Sie das Gerät keinesfalls in dennormalen Hausmüll. Dieses Produktunterliegt der europäischen Richtlinie2012/19/EU.Entsorgen Si
Page 55 — Programok
— 145 -Programm 1. Normal 2. LockerBräunungsgradHellMittelDunkelSchnellHellMittelDunkelSchnellGröße 750 g 1000 g 1250 g 750 g 1000 g 1250 g 750 g 1000
Page 56 — Időzítő funkció
— 146 -Programm 3. Vollkorn 4. SüßBräunungsgradHellMittelDunkelSchnellHellMittelDunkelSchnellGröße 750 g 1000 g 1250 g 750 g 1000 g 1250 g 750 g 1000
Page 57 — Kenyérsütés
— 12 -If the bread does not slip off the kneading paddles, carefully remove the kneading paddles using the supplied kneading paddle remover . Not
Page 58
— 147 -* 5A heißt, dass der Brotbackautomat 5 Minuten knetet und gleichzeitig der Signalton zum Zutaten hinzu-geben ertönt und die Displayanzeige „ADD
Page 59 — Tisztítás és ápolás
— 148 -Programm 10. Kuchen 11. Marmelade 12. BackenBräunungsgradHellMittelDunkelN/AHellMittelDunkelGröße 750 g 1000 g 1250 g N/A N/AZeit (Stunden) 1:3
Page 60
— 149 -Fehlerbehebung BrotbackautomatWas tun, wenn der Knethaken nach dem Backen inder Backform stecken bleibt? Füllen Sie heißes Wasser in die Ba
Page 62 — Programmenet
(Ort, Datum) (Unterschrift)ZAHLUNGSWEISE Überweisungzzgl. Abwicklungskosten für Porto, Handling, Verpackung und Versand.5,00 €+BESTELLKARTE SBB 850
Page 63
1) Tragen Sie unter „Absender / Besteller“ Ihren Namen, Ihre Anschrift und IhreTelefonnummer (für eventuelle Rückfragen) in Blockschrift ein.2) Über
Page 64
zzgl. Abwicklungskosten für Porto, Handling, Verpackung und Versand.5,00 €+€► 1 Backform inkl. 2 Knethaken10 €► 4er-Set Knethaken10 €€zzgl. Abwicklung
Page 65
1) Tragen Sie unter „Absender / Besteller“ Ihren Namen, Ihre Anschrift und IhreTelefonnummer (für eventuelle Rückfragen) in Blockschrift ein.2) Über
Page 66 — MEGRENDELŐLAP SBB 850 A1
(Ort, Datum/Lieu, date/luogo, data)(Unterschrift/Signature/fi rma)ZAHLUNGSWEISE/MODE DE RÈGLEMENT/TIPO DI PAGAMENTOÜberweisung/Virement/Bonifi co€=Beste
Page 67
1) Tragen Sie unter „Absender/Besteller“ Ihren Namen, Ihre Anschrift und Ihre Telefonnummer (für eventuelle Rückfragen) in Blockschrift ein. / Saisis
Page 68 — Kazalo vsebine Stran
— 13 - Important!The appliance and its ancillaries are not suitablefor being cleaned in a dish washing machine!Do not use any chemical cleaning agent
Page 69 — Aparat za peko kruha
4IAN 96769KOMPERNASS HANDELS GMBHBURGSTRASSE 2144867 BOCHUMDEUTSCHLAND / GERMANYwww.kompernass.comLast Information Update · Stan informacji · Informác
Page 70 — Varnostni napotki
— 14 -DisposalDo not dispose of the appliance in yournormal domestic waste. This product issubject to the European guideline2012/19/EU.Dispose of the
Page 71
— 15 -* 3A means that the Bread Baking Machine kneads for 3 minutes and simultaneusly the signal tone soundsto add ingredients and the display notice
Page 72
— 16 -Programme 3. Whole Wheat 4. SweetLevel of browningLightMediumDarkRapidLightMediumDarkRapidSize 750 g 1000 g 1250 g 750 g 1000 g 1250 g 750 g 100
Page 73 — Upravljalno polje
GB Operating instructions Page 1PL Instrukcja obsługi Strona 23HU Használati utasítás Oldal 45SI Navodila za uporabo Stran 65CZ Návod k obsluze
Page 74 — Napotek:
— 17 -* 5A means that the Bread Baking Machine kneads for 5 minutes and simultaneusly the signal tone soundsto add ingredients and the display notice
Page 75 — Programi
— 18 -Programme 10. Cake 11. Jam 12. BakeLevel of browningLightMediumDarkN/ALightMediumDarkSize 750 g 1000 g 1250 g N/A N/ATime (Hours) 1:30 1:35 1:40
Page 76 — Funkcija časovnika
— 19 -Troubleshooting the Bread MakerWhat do I do if the kneading paddle gets stuck in the baking mould after baking? Fill the baking mould with
Page 78
(Location, Date) (Signature) PAYMENT METHOD Bank Transfer £Postage and packaging £ 5+=ORDER CARD SBB 850 A1 QUANTITY ORDERED(max 3 sets per or
Page 79 — Čiščenje in nega
1) Enter under “Sender/orderer”your name, address and telephone number (for possible queries) in block capitals. 2) Please transfer the complete amo
Page 80
— 23 -Spis treści StronaWprowadzenie 24Użytkowanie zgodne z przeznaczeniem 24Zakres dostawy 24Opis urządzenia 24Dane techniczne 24Wskazówki bezpieczeń
Page 81 — Garancijski list
— 24 -Automat do pieczeniachlebaWprowadzenieGratulujemy Ci zakupu naszego urządzenia.Jest to produkt wysokiej jakości. Instrukcja obsługistanowi część
Page 82 — Potek programa
— 25 - Wskazówki bezpieczeństwa• Przed przystąpieniem do użytkowania urzą-dzenia dokładnie zapoznaj się zzawartością instrukcji obsługi!• Zagrożenie
Page 83
— 26 -• Użytkowanie oprzyrządowania niedopuszczonego przez producenta urząd-zenia może doprowadzić do różnego rodzaju uszkodzeń. Użytkowanieurządzenia
Page 85
— 27 -• Nie dotykaj nigdy haków do zagniatania ciasta, jeśli obracają się one wczasie pracy urządzenia. Zagrożenie odniesienia obrażeń!• Nie wyłączać
Page 86
— 28 -Przed pierwszym użyciemLikwidacja opakowaniaRozpakuj swój automat i zlikwiduj opakowaniezgodnie z przepisami obowiązującymi naTwoim terenie. Pie
Page 87
— 29 - WyświetlaczWyświetla wybór ciężaru (750 g, 1000 g, 1250 g) czas w godzinach pozostały do zakończeniapieczenia i zaprogramowany czas pracy
Page 88 — NAROČILNICA SBB 850 A1
— 30 - Wybór programu (menu) Wybór żądanego programu pieczenia (1-12). Na wyświetlaczu pojawia się numer programu iodpowiedni czas pieczenia. Funkc
Page 89
— 31 -Program 10: CiastoW tym programie składniki są wyrabiane, ciastopozostawiane do wyrośnięcia i upieczone. W tymprogramie należy zastosować prosze
Page 90
— 32 -Przykład:Jest godzina 8.00 i chcesz mieć świeży chleb za 7godzin i 30 minut, a więc o godzinie 15:30. Wybierz najpierw program 1 i naciskaj przy
Page 91 — Domácí pekárna
— 33 -9. Wybierz stopień wypieczenia chleba .Strzałka na wyświetlaczu pokazuje, czyustawione jest jasne, średnie lub ciemnespieczenie ciasta. Możes
Page 92 — Bezpečnostní pokyny
— 34 -Jeśli chleb nie chce się odczepić od mieszadeł ,wyjmij ostrożnie mieszadła dołączonymprzyrządem do wyjmowania . Wskazówka:Nie stosować żad
Page 93
— 35 - Uwaga!Urządzenie, ewentualnie jego akcesoria nie nadająsię do zmywania w zmywarkach.Do czyszczenia automatu do pieczenia nie stosujchemicznych
Page 94
— 36 -UtylizacjaUrządzenia nie należy wyrzucać wrazz normalnymi odpadami domowymi.Niniejszy produkt podlega działaniom,przewidziamyn w przepisach dyre
Page 95 — Před prvním použitím
— 1 -Content PageIntroduction 2Intended Use 2Items supplied 2Description of the appliance 2Technical data 2Safety Notices 3Before the first usage 6Pr
Page 96 — Upozornění:
— 37 -* 3A oznacza, że automat przez 3 minuty wyrabia ciasto i jednocześnie włącza się sygnał dźwiękowy nakazujący dodanie składników i na wyświetlacz
Page 97
— 38 -Program 3. Razowe 4. SłodkieStopień spieczenia:jasnyśredniciemnySzybki jasnyśredniciemnySzybki Wielkość: 750 g 1000 g 1250 g 750 g 1000 g 1250 g
Page 98 — Funkce časovače
— 39 -* 5A oznacza, że automat przez 5 minut wyrabia ciasto i jednocześnie włącza się sygnał dźwiękowy nakazujący dodanie składników i na wyświetlaczu
Page 99 — Pečení chleba
— 40 -Program 10. Ciasto 11. Konfitura 12. PieczenieStopień spieczenia:jasnyśredniciemnybdjasnyśredniciemnyWielkość: 750 g 1000 g 1250 g bd bdCzas (go
Page 100
— 41 -Co uczynić, kiedy łopatka po pieczeniu zostanie w formie ? Nalej do formy gorącą wodę i obracaj łopatkę ,aby usunąć zaschnięte pozostałośc
Page 102 — Pozor!
(miejsce, data) (Podpis)SPOSÓB ZAPŁATYPrzelewPLN=Karta zamówienia SBB 850 A1ZAMAWIANA ILOŚĆ(maks. 3 zestawy w zamówieniu)NAZWA TOWARU CENA JEDNOSTKOWA
Page 103 — Záruka & servis
1) W polu „Nadawca/Zamawiający“ proszę wpisać czytelnie drukowanymi literami swoje imię i nazwisko, adres i numer telefonu (w wypadku ewentualnych py
Page 104 — Průběh programu
— 45 -Tartalomjegyzék OldalszámBevezetés 46Rendeltetésszerű használat 46Tartozékok 46A készülék részei 46Műszaki adatok 46Biztonsági utasítások 47Az e
Page 105
— 46 -KenyérsütőgépBevezetésGratulálunk új készüléke megvásárlásához.Vásárlásával kiváló minőségű termék mellett dön-tött. A használati útmutató a ter
Page 106
— 2 -Bread MakerIntroductionCongratulations on the purchase of your new appli-ance.You have clearly decided in favour of a quality pro-duct. These ope
Page 107
— 47 - Biztonsági utasítások• Kérjük, először teljesen olvassa el a használati útmutatót, mielőtt használná akészüléket!• Fulladásveszély! A gyermeke
Page 108
— 48 -• A nem a gyártó által ajánlott tartozék felhasz-nálása a készülék sérüléséhezvezethet. A készüléket csak rendeltetésének megfelelően használja.
Page 109
— 49 -• Használat közben soha ne érjen hozzá a forgó dagasztókarhoz. Balesetves-zélyes!• Ne húzza ki a csatlakozót a vezetéknél fogva a konnektorból.•
Page 111
— 51 - kijelzőA következő adatok kijelzése: a mennyiség kiválasztása (750 g, 1000 g, 1250 g) a még fennmaradó üzemelési idő órában és a beprogramoz
Page 112 — Obsah Strana
— 52 - Programválasztás (menü) A kívánt sütőprogram előhívása (1-12). A kijelzőn a program száma és a megfelelő sütési idő jelenik meg. Memória funk
Page 113 — Automat na pečenie
— 53 -10-es program: SüteményA készülék ebben a programban a hozzávalókatösszegyúrja, keleszti és süti. Ehhez a programhozhasználjon sütőport. 11-es p
Page 114 — Bezpečnostné pokyny
— 54 -Példa:8:00 óra van és Ön 7 óra 30 perc múlva, azaz15:30-kor szeretne friss kenyeret. Először válassza ki az 1-es programot, majd nyom-ja meg add
Page 115
— 55 -9. Válassza ki a kenyér pirítási fokát . A kijelzőn a nyíl mutatja, hogy világost,közepeset vagy sötétet állított-e be. A «Gyors»be
Page 116
— 56 -Ha nem válik le a kenyér a dagasztókarról , óvatosan vegye ki a dagasztókart a csomagbantalálható dagasztókar kiszedővel . Tudnivaló:Ne ha
Page 117 — Ovládací panel
— 3 - Safety Notices • Please read the operating instructions through completely before using theappliance for the first time!• Danger of suffocation
Page 118 — Upozornenie:
— 57 - Figyelem! A készülék és tartozékainak alkatrészei nem alkalmasak a mosogatógépben való tisztításra!A kenyérsütő automata tisztításához ne hasz
Page 119 — Programy
— 58 -ÁrtalmatlanításSemmi esetre se dobja a készüléket aháztartási hulladékba. Jelen termékrea 2012/19/EU számú európai utasításrendelkezési vonatkoz
Page 120 — Funkcia časovania
— 59 -* A «3A» azt jelenti, hogy a kenyérsütő automata 3 percig dagaszt és egyszerre szólal meg a Hozzávalók hozzáadása hangjelzés és jeleni
Page 121 — Pečenie chleba
— 60 -Program 3. Teljes kiőrlésű 4. ÉdesPirítási fok:Világos:Közepes:Sötét:Gyors:Világos:Közepes:Sötét:Gyors:Nagyság: 750 g 1000 g 1250 g 750 g 1000 g
Page 122
— 61 -* Az «5A» azt jelenti, hogy a kenyérsütő automata 5 percig dagaszt és egyszerre szólal meg a Hozzávalók hozzáadása hangjelzés és jelen
Page 124
(Helység, dátum)(Aláírás)FIZETÉSI MÓDátutalásKezelési költség (kezelési díj, csomagolás és szállítás)1000,- HUF+=MEGRENDELŐLAP SBB 850 A1RENDELT MENNY
Page 125 — Záruka a servis
1) Írja be a nevét, címét és telefonszámát (ha esetlegesen kérdésünk merülne fel) nyomta-tott betűkkel a „Feladó/Megrendelő“ rovatba.2) Utalja át el
Page 126 — Priebeh programu
— 65 -Kazalo vsebine StranUvod 66Predvidena uporaba 66Vsebina kompleta 66Upravljalni elementi 66Tehnični podatki 66Varnostni napotki 67Pred prvo upora
Page 127
— 66 -Aparat za peko kruha UvodIskrene čestitke ob nakupu vaše nove naprave.Odločili ste se za kakovosten izdelek. Ta navodilaza uporabo so sestavni d
Page 128
— 4 -• The use of ancillaries not recommended by the manufacturer could causedamage to the appliance. Only use the appliance for its intended purposes
Page 129
— 67 - Varnostni napotki• Preden avtomat začnete uporabljati, najprej v celoti preberite ta navodila zauporabo!• Nevarnost zadušitve! Otroci se ob ne
Page 131
— 69 -• Med uporabo ne smete priti v stik z vrtečima se nastavkoma za gnetenje.Obstaja nevarnost poškodb!• Vtiča ne vlecite iz vtičnice za omrežni kab
Page 132
— 70 -Pred prvo uporaboOdstranitev embalažnega materialaAvtomat vzemite iz embalaže in odstranite emba-lažni material v skladu s predpisi v vašem kraj
Page 133
— 71 - PrikazovalnikPrikaz za izbiro teže (750 g, 1000 g, 1250 g) preostali čas obratovanja v urah in pro-gramirano predizbiro časa izbrano stopnj
Page 134 — Inhaltsverzeichnis Seite
— 72 - Izbira programa (meni) Priklic želenega programa peke (1–12). Na prika-zovalniku se pojavi številka programa in ustre-zen čas peke. Funkcija
Page 135 — Brotbackautomat
— 73 -Program 10: KolačPri tem programu se sestavine zgnetejo, pustijovzhajati in se spečejo. Pri tem programu uporabitepecilni prašek. Program 11: Ma
Page 136 — Sicherheitshinweise
— 74 -Primer:Ura je 8.00 in v 7 urah in 30 minutah, torej ob15:30 uri, želite imeti svež kruh. Najprej izberite program 1 in potem puščične tipke pri
Page 137
— 75 -9. Izberite stopnjo zapečenosti svojega kruha.Na prikazovalniku vam puščica pokaže, aliste nastavili rahlo, srednje ali temno. Tukaj lahko i
Page 138
— 76 -Če se kruh ne loči od nastavkov za gnetenje ,nastavka za gnetenje previdno odstranite s prilo-ženim odstranjevalnikom nastavka za gnetenje .
Page 139 — Bedienfeld
— 5 -• During use, NEVER come into contact with the rotating kneading paddles.There is also a risk of personal injury!• Do not pull on the cable to re
Page 140 — Achtung!
— 77 - Pozor!Deli avtomata oz. pribora niso primerni za pomival-ni stroj!Za čiščenje avtomata za peko kruha ne uporabljaj-te kemičnih čistil ali razr
Page 141
— 78 -OdstranitevNaprave v nobenem primeru ne odvrzite v običajne hišne smeti. Ta proizvod je podvržen evropski Direktivi 2012/19/EU.Napravo oddajte p
Page 142 — Timer-Funktion
— 79 -* 3A pomeni, da avtomat za peko kruha gnete 3 minute in istočasno zadoni signalni ton za dodajanje sestavin ter se na prikazovalniku pojavi prik
Page 143 — Brot backen
— 80 -Program 3. Polnozrnat 4. SladekStopnja zapečenostiRahloSrednjeTemnoHitroRahloSrednjeTemnoHitroVelikost 750 g 1000 g 1250 g 750 g 1000 g 1250 g 7
Page 144
— 81 -* 5A pomeni, da avtomat za peko kruha gnete 5 minut in istočasno zadoni signalni ton za dodajanje sestavin ter se na prikazovalniku pojavi prika
Page 145 — Reinigung und Pflege
— 82 -Program 10. Kolač 11. Marmelada 12. PekaStopnja zapečenostiRahloSrednjeTemnoN/ARahloSrednjeTemnoVelikost 750 g 1000 g 1250 g N/A N/AČas (ur) 1:3
Page 146
— 83 -Kaj storiti, če nastavek za gnetenje po peki obtiči v pekaču ? V pekač nalijte vročo vodo in nastavek za gnetenje obračajte, da odstranite
Page 148 — Programmablauf
(kraj, datum) (podpis) NAČIN PLAČILA Nakazilo €dodatno še stroški za poštnino, obdelavo, pakiranje in pošiljanje.5 €+=NAROČILNICA SBB 850 A1ŠT. NAR
Page 149
1) V rubriko „Pošiljatelj/naročnik“ vnesite svoje ime, svoj naslov ter svojo telefonsko številko (za more-bitna vprašanja) z velikimi tiskanimi črkam
Page 150
— 6 -Before the first usageDisposal of the packaging materialUnpack your appliance and dispose of the packagingmaterial in accordance with your local
Page 151
— 87 -Obsah StranaÚvod 88Účel použití 88Obsah dodávky 88Popis přístroje 88Technická data 88Bezpečnostní pokyny 89Před prvním použitím 92Vlastnosti 92O
Page 152 — leuchtet
— 88 -Domácí pekárnaÚvodGratulujeme Vám k zakoupení nového přístroje.Vaším nákupem jste si vybrali kvalitní výrobek. Ná-vod k obsluze je součástí toho
Page 153
— 89 - Bezpečnostní pokyny• Před použitím tohoto přístroje si nejprve důkladně pročtěte tento návod kobsluze!• Nebezpečí udušení! Děti se mohou udusi
Page 154 — BESTELLKARTE SBB 850 A1
— 90 -• Používání příslušenství, které nebylo schváleno výrobcem, může vést k poš-kození přístroje. Přístroj může být používán pouze k účelu, pro kter
Page 155
— 91 -• Během používání se vyhněte kontaktu s rotujícími hnětacími háky. Hrozínebezpečí poranění!• Nevytahujte zástrčku ze zásuvky škubáním za kabel.•
Page 156
— 92 -Před prvním použitímLikvidace obalového materiáluVybalte přístroj a obalový materiál zneškodnětepodle předpisů v místě vašeho bydliště. První či
Page 157
— 93 - DisplejUkazatel zvolené hmotnosti (750 g, 1000 g, 1250 g) zbývající doby pečení v hodinách a naprogramované časové předvolby zvoleného stu
Page 158
— 94 - Volba programu (menu) Vyvolání požadovaného programu pečení (1-12).Na displeji se zobrazí číslo programu a odpoví-dající doba pečení. Funkce
Page 159 — MITTENTE
— 95 -Program 10: KoláčU tohoto programu dojde k prohnětení přísad, k vykynutí a k pečení. Pro tento program používejteprášek na pečení. Program 11: M
Page 160
— 96 -Příklad:Je 8.00 hod. a vy byste chtěli mít za 7 hodin a 30 minut, tedy v 15.30, hotový čerstvý chléb. Vyberte nejprve program 1 a poté tiskněte
-
Страница 1
6 KIT CHEN TOOLS B r ead M aker SBB 850 EDS A1 Bread Mak er Operating instructions K OMPERNASS GMBH BURGSTRASSE 21 · D-44867 BOCHUM www .k ompernass.com ID-Nr .: SBB 850 EDS A1-01/11-V1 IAN: 64338[…]
-
Страница 2
750g 1000g 1250g SBB 850 EDS A1[…]
-
Страница 3
— 1 — INDEX P A GE Safety Notices 2 Appliance Ov er view 3 Accessories 3 Intended Use 3 Before the first usage 4 Proper ties 4 Control panel 5 Programme 6 Timer -Function 7 Before baking 8 Baking bread 8 Error Messages 10 Cleaning and Care 10 T ec hnical data 11 Disposal 11 W arranty and Ser vice 12 Impor ter 12 Programme sequence 13 T roubleshooti[…]
-
Страница 4
— 2 — Safety N otices • Please read the operating instructions through completely before using the appliance for the first time! • Danger of suffocation! Children can suf focate through the improper use of pack aging materi- al s. Dispose of t hem immediately after unpak- king or store them in a place that is out of reach of children. • A[…]
-
Страница 5
— 3 — • Do not place any objects on the appliance and do not cov er it during operation. Risk of fire! • Caution! The bread mak er becomes very hot during operation. Do not touch the appliance until it has cooled down, or use o ven glo ves. • Before taking out or inser ting accessories, un pl ug the pow er cable and allow the appliance to coo[…]
-
Страница 6
— 4 — Before the f irst usage Disposal of the packaging material Unpack your appliance and dispose of the pack a- gi ng material in accor dance with your local regula- tions. Initial cleaning Wipe the baking mould , kneading paddles and outer surfaces of t he bread baking machine with a clean, damp cloth before putting it into opera- ti on […]
-
Страница 7
— 5 — Control panel Display Display for selection of the weight (750 g, 1000 g, 1250 g) the remaining baking time in minutes and the programmed time the selected level of br owning (light , medium , dark , Rapid ) the selected program number the programme sequence the addition of ingredients („ ADD“) Start / Stop[…]
-
Страница 8
— 6 — Operation indicator lamp The operation indicator lamp indicates with its glowing that a progr amme is currently running. If you w ant to star t a progr amme time-delayed b y using the timer function, the operation indicator lamp first glows when the progr amme itself starts, not when t he timer is activated. Bread weight Selec[…]
-
Страница 9
— 7 — Programmme 7: Pasta For the prepar ation of pasta dough. In this Programme no baking is done. Programmme 8: Buttermilk bread For breads made with buttermilk or y oghur t. Programme 9: Gluten Free For breads made of gluten-fr ee flours and baking mixtures. Gluten-free flours requir e longer for the absorption of liquids and have differing r is[…]
-
Страница 10
— 8 — Confi rm the p rog ram ming of the time r with th e Start/Stop button . The colon on the display flashes and the programmed time starts to r un. As soon as the programme starts, the operating indi- cator lamp glows. When the baking process has been completed, ten acoustic signals are sounded and the display indicates 0:00. Exa[…]
-
Страница 11
— 9 — 9. Select the browning le vel for y our bread. In the display the arrow show s you what you hav e selected, light, medium or dark. Here y ou can also select the setting «Rapid» to shorten t he time period in which the dough rises. Note A bro wning level cannot be selected with the pro- grammes 6, 7 and 11. The function &[…]
-
Страница 12
— 10 — Af ter re moving the bread, immediately rinse the baking mould wit h wa rm wa ter. Th is p revent s the kneading paddles from sticking to the driving shaf t. Tip: If y ou remov e the kneading paddles af ter the last kneading of the dough, the bread will remain intact when y ou remov e it from the baking mould . • Briefly pr[…]
-
Страница 13
— 11 — • Ensure that the interior is completely dr y . For easier cleaning, the appliance lid can be remo ved from the housing: • Open the appliance lid until the wedge- shaped hinge cams pass through the ope- nings of the hinge guides. • Pull t he appliance lid out of the hinge guides. • T o reassemble the appliance lid , g[…]
-
Страница 14
— 12 — W ar ranty and Ser vice Y ou receive a 3-y ear warranty for this device as of the purchase date. The device has been manufactu- red with care and meticulously e xamined before delivery . Please retain y our receipt as proof of pur chase. In the case of a warranty claim, please mak e contact by telephone with our service depar tment. Only in […]
-
Страница 15
— 13 — * 3A means that the Bread Baking Machine kneads for 3 minutes and simultaneusly the signal tone sounds to add ingredients and the display notice «ADD» appears. Programme 1. R egular 2. French Level of br owning Light Medium Dark Rapid Light Medium Dark Rapid Size 750 g 1000 g 1250 g 750 g 1000 g 1250 g 750 g 1000 g 1250 g 750 g[…]
-
Страница 16
— 14 — Programme 3. Whole Wheat 4. Sweet Level of br owning Light Medium Dark Rapid Light Medium Dark Rapid Size 750 g 1000 g 1250 g 750 g 1000 g 1250 g 750 g 1000 g 1250 g 750 g 1000 g 1250 g Time (Hours) 3:18 3:25 3:35 2:24 2:30 2:35 2:56 3:01 3:10 2:10 2:16 2:20 Preheat (Min) 15 15 20 N/A N/A N/A 10 10 15 N/A N/A N/A Kneading 1 (min) 11 12 12 11[…]
-
Страница 17
— 15 — * 5A means that the Bread Baking Machine kneads for 5 minutes and simultaneusly the signal tone sounds to add ingredients and the display notice «ADD» appears. Programme 5. Super R apid 6. Dough 7. Pasta 8. Buttermilk bread 9. Gluten Free Level of br owning Light Medium Dark N/A N/A Light Medium Dark Light Medium Dark Size 750 […]
-
Страница 18
— 16 — Programme 10. Cak e 11. Jam 12. Bake Level of br owning Light Medium Dark N/A Light Medium Dark Size 750 g 1000 g 1250 g N/A N/A Time (Hours) 1:30 1:35 1:40 1:20 1:00 Preheat (Min) N/A N/A N/A N/A N/A Kneading 1 (min) 15 15 15 N/A N/A Rise 1 (Min) N/A N/A N/A 15 Heat + kneading N/A Kneading 2 (min) N/A N/A N/A N/A N/A N/A N/A N/A N/A N/A N/A[…]
-
Страница 19
— 17 — What do I do if the kneading paddle gets stuck in the baking mould after baking? Fill the baking mould with hot water and twist the kneading paddle to loosen the encrustation underneath. What happens if the finished bread is left inside the bread mak er? Through the «K eep-warm function» it is ensured that the bread[…]
-
Страница 20
— 18 -[…]
-
Страница 21
Order card SBB 850 EDS A1 www .k omper nass.com £ (Location, Date) (Signature) Paym ent m eth od Add. £ 7 p&p. Quantity ordered (max. 3 sets per order) Name of article Cost p. Unit To t a l s u m 1 baking mould incl. 2 Kneading paddles £ 7,- £ 4 Kneading paddles £ 7,- £ Bank T ransfer[…]
-
Страница 22
Bank Transfer (B ACS): Please transfer the complete amount to our account below: Natwest Bank Plc Hammersmith Branc h Sort Code: 60-50-06 Account No: 37758829 Account Name: Domestic Electrical Solutions UK Limited On your transfer , please pro vide the article(s) you ordered as well as y our complete name and address. Then post your completed or de[…]
-
Страница 23
Order card SBB 850 EDS A1 www .k omper nass.com € (Location, Date) (Signature) Paym ent m eth od Add. 12,50 € p&p. Quantity ordered (max. 3 sets per order) Name of article Cost p. Unit To t a l s u m 1 baking mould incl. 2 Kneading paddles 10 € € 4 Kneading paddles 10 € € Cheque payment[…]
-
Страница 24
A: By cheque: Please place a cheque made payable to Irish Connection together with your completed order card into an env elope and post to our postal address below . Our postal address: K ompernass Ser vice Ireland c/o Irish Connection 41 Harbour view Howth Co. Dublin Import ant : • Please af fix suff icient postage to the letter . • Write your[…]
-
Страница 25
6 KIT CHEN TOOLS R ecipe Book SBB 850 EDS A1 Recipe Book K OMPERNASS GMBH BURGSTRASSE 21 · D-44867 BOCHUM www .kompernass.com ID-Nr .: SBB 850 EDS A1-01/11-V1 IAN: 64338[…]
-
Страница 26
— 1 — RECIPE BOOK P A GE Useful information about ingredients 2 Baking tips 3 Ready-to-use baking mixtures 4 Slicing and storing bread 4 Recipes for appro x. 1000 g bread 5 Programme 1 R egular ……………………………………………………………………………………………………….5 Programme 2 F rench …………….[…]
-
Страница 27
— 2 — Useful infor mation about ingredients FLOUR Most of the commercially available v arieties of flour , such as wheat or r ye flour , are suitable for baking. The type designation for flour types may var y fro m country to countr y . Wit h the baking program » gluten- free», gluten-free flour types such as co rn, b uck whe at or potato[…]
-
Страница 28
— 3 — EGGS Eggs enrich the bread and give it a softer structure. Use eggs of the largest size class when baking the recipes giv en in this recipe book. F ATS: BAKING F A T, BUTTER OR OIL Baking fats, butter and oil make the y east-based bread mellow . The unique form of crust and structure in French-style br eads is due to its fat-free ingredients.[…]
-
Страница 29
— 4 — Ready-to-use baking mixtures Y ou can also use ready-to-use baking mixtures with this bread mak er . Follo w the manufacturer’s instructions on the pack a- ging. The following table pr ovides y ou the examples of conv ersion for some of the baking mixtures. Slicing and stor ing bread Y ou can achieve the best results, if y ou place t he fre[…]
-
Страница 30
— 5 — Recipes for appr ox. 1000 g bread Note: T o achieve a better baking result, pr epare the dough with a mixer . Then place t he finished dough in the baking mould. Using the button “Bre- ad weight” enter the weight 1000 gr . Select the desired degree of br owning for y our bread. Please note that the quantities given are intended as gui- di[…]
-
Страница 31
— 6 — Cornbread 350 ml water 1 tbsp. butter 540 g flour of type 550 3 tbsp. corn semolina 1/2 chopped apple with peel 3/4 packet of dry yeast Programme 2 French «Classic» white bread 320 ml water/milk 2 tbsp. butter 1,5 tsp. Salt 2 tbsp. sugar 600 g wheat flour of type 550 1 packet of dry yeast Light white bread 320 ml water 20 g butter 1[…]
-
Страница 32
— 7 — Wheat groats bread 350 ml water 1 tsp. salt 2 tbsp. butter 1.5 tbsp. honey 360 g flour of type 1050 180 g wheat whole grain flour 50 g wheat groats 3/4 packet of dry yeast Whole grain bread 350 ml water 25 g butter 1 tsp. salt 1 tsp. sugar 270 g flour of type 1050 270 g wheat whole grain flour 3/4 packet of dry yeast Rye bread 300 ml water 1.[…]
-
Страница 33
— 8 — Chocolate bread 400 ml milk 100 g low fat cur d cheese 1,5 tsp. salt 1.5 tsp. sugar 600 g wheat whole grain flour 10 tbsp. cocoa 100 g chopped whole milk chocolate 1 packet of dry yeast Use whole milk or semi-sweet chocolate. If you brush the dough with 1 tbsp. milk af ter kneading, the crust will be darker . Sweet bread 300 ml water/milk 2 t[…]
-
Страница 34
— 9 — Pretzels 200 ml water 1/4 tsp. salt 360 g flour of type 405 1/2 tsp. sugar 1/2 packet of dry yeast Form the dough into pretzels. Then coat the pret- zels with 1 whisked egg and spr ead coarse salt ove r to p (a total of 1-2 tbsp. coarse salt for about 12 pr et ze ls) . Bak e the pretzels at approx. 230°C for appro x. 15-20 minutes. French ba[…]
-
Страница 35
— 10 — Gluten-free yoghurt bread 350 ml water 150 g natural yoghurt 1.5 tbsp. oil 1.5 tbsp. vinegar 100 g gluten-free flour (e.g. millet, rice, buckwheat) 400 g gluten-free flour mixture (e.g. «Mix B» from Schär) 1,5 tsp salt 1.5 tsp. sugar 1.5 packet of dry yeast 1 tsp. guar seed or car ob seed flour Gluten-free seed bread 250 ml water […]
-
Страница 36
— 11 — Orange marmelade 350 g oranges 150 g lemons 500 g gelling sugar Strawberr y jam 500 g strawberries 500 g gelling sugar 2-3 tbsp. lemon juice Berr y jam 500 g thawed berries 500 g gelling sugar 1 tbsp. lemon juice Mix all ingredients in the baking mould. Enjoy y our meal! These recipes are pr ovided without guarantee. All ingredients and prep[…]
-
Страница 37
— 12 — Why does m y bread occasionally have some flour on the side crusts? Y our dough may be too dr y .. Next time, take particular care with measuring the ingredients. Add up to 1 tbsp. of additional liquid. Why do I need to add the ingr edients in a par ticular sequence? This is the best way to prepar e the dough. Using the timer function prev e[…]