
SC-401
INSTRUCTION MANUAL
РУКОВОДСТВО ПО ЭКСПЛУАТАЦИИ
ІНСТРУКЦІЯ З ЕКСПЛУАТАЦІЇ
GB MULTIFUNCTIONAL BREADMAKER…………………………………...4
RUS МУЛЬТИФУНКЦИОНАЛЬНАЯ ХЛЕБОПЕЧЬ ……………………….8
UA БАГАТОФУНКЦІОНАЛЬНА ХЛІБОПІЧКА …………………………...13
KZ МУЛЬТИФУНКЦИОНАЛДЫҚ НАН ПЕШІ……………………………..18
EST MITMEOTSTARBELINE LEIVAKÜPSETI ……………………………...23
LT DAUGIAFUNKCINĖ DUONKEPĖ ………………………………………….27
LV DAUDZFUNKCIONĀLĀ MAIZES KRĀSNS …………………………...32
H TÖBBFUNKCIÓS KENYÉRSÜTŐ ………………………………………...36
GB TABLE OF OPERATION TIME ………………………………………………. 42
RUS ТАБЛИЦА ВРЕМЕНИ РАБОТЫ ПРОГРАММ ………………………. 44
UA ТАБЛИЦЯ ЧАСУ РОБОТИ ПРОГРАМ …………………………………… 46
GB RECIPES …………………………………………………………………………..48
RUS РЕЦЕПТЫ ………………………………………………………………………..50
UA РЕЦЕПТИ ………………………………………………………………………….52
KZ РЕЦЕПТТЕР……………………………………………………………………….55
EST RETSEPTID………………………………………………………………………..57
LT RECEPTAI………………………………………………………………………….59
LV RECEPTES………………………………………………………………………...61
H RECEPTEK………………………………………………………………………...63
www.scarlett.ru
IM009
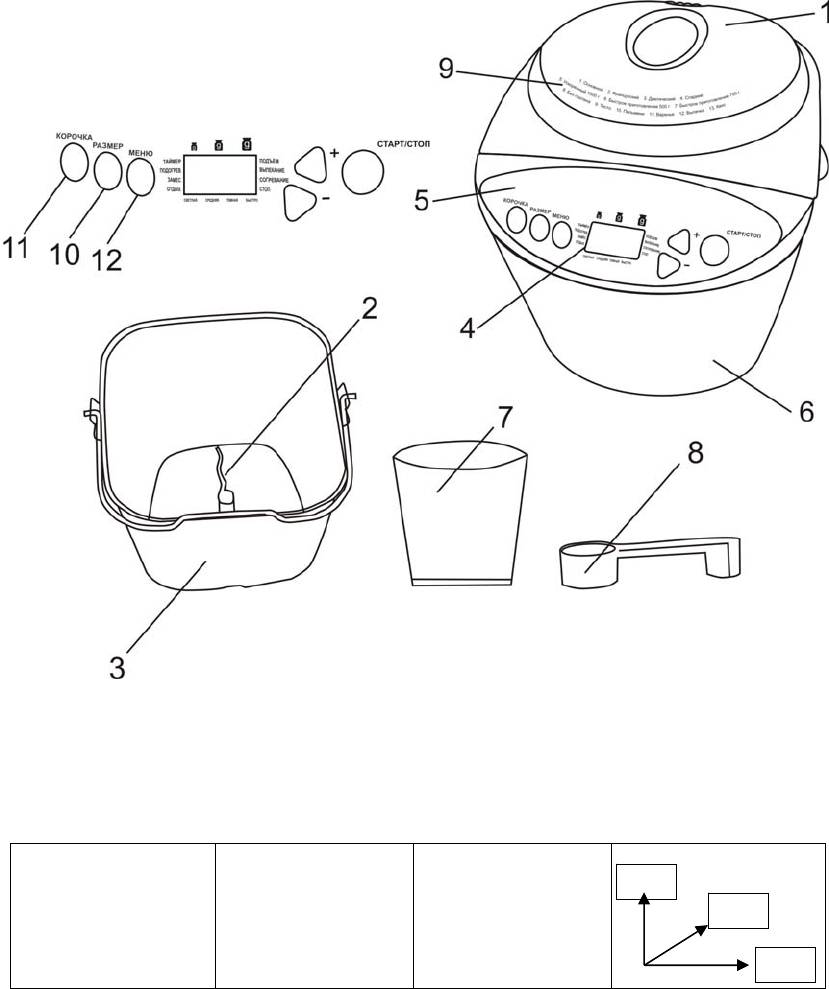
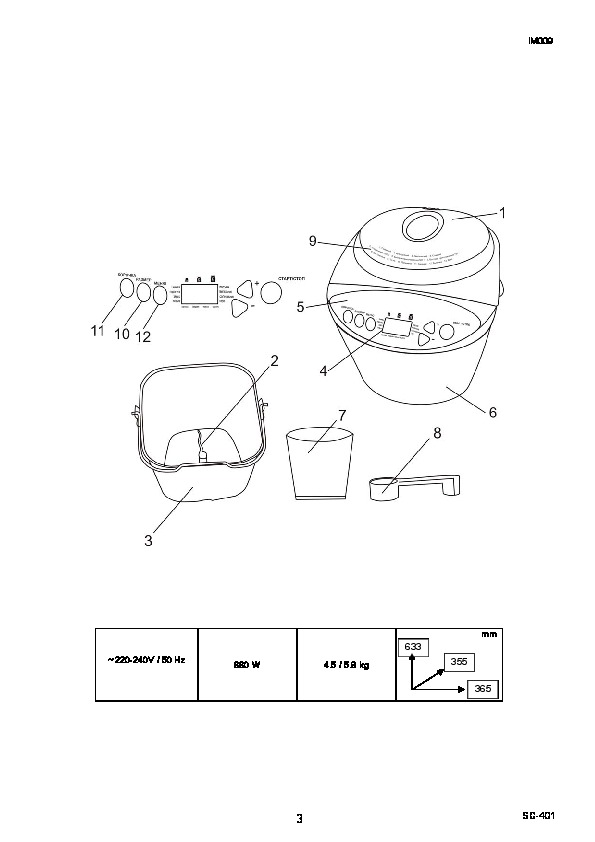
GB DESCRIPTION RUS УСТРОЙСТВО ИЗДЕЛИЯ
1. Lid
1. Откидная крышка
2. Kneading blade
2. Лопатка для замешивания
3. Baking pan
3. Съемная чаша
4. LCD display
4. ЖК дисплей
5. Control panel
5. Панель управления
6. Main body
6. Корпус
7. Measuring cup
7. Градуированный стаканчик
8. Measuring spoon
8. Мерная ложка
9. List of programmes
9. Перечень программ
LCD DISPLAY
ЖК ДИСПЛЕЙ
10. Loaf weight (500g./750g./1000g.)
10. Выбор веса буханки (500г./750г./1000г.)
11. Crust colour
11. Выбор цвета корочки
12. Program selection
12. Выбор программы
UA СКЛАД ВИРОБУ KZ СИПАТТАМА
1. Відкидна
кришка
1. Қайырмалы қақпақ
2. Лопатка для замішування
2. Илеуге арналған қалақ
3. Знімна чаша
3. Шешілмелі ыдыс
4. РК дисплей
4. СК дисплей
5. Панель управління
5. Басқару тақтасы
6. Корпус
6. Корпус
7. Градуйована склянка
7. Градустары бар кішкентай стакан
8. Мірна ложка
8. Өлшеуіш қасық
9. Перелік програм
9. Бағдарламалар тізімі
UA РК ДИСПЛЕЙ KZ СК ДИСПЛЕЙ
10. Вибір ваги буханця (500г./750г./1000г.)
10. Бөлке салмағын таңдау (500г./750г/1000г.)
11. Вибір кольору скоринки
11. Қабықша түсін таңдау
12. Вибір програми
12. Бағдарламаны таңдау
EST KIRJELDUS LT APRAŠYMAS
1. Ülestõstetav kaas
1. Atlošiamasis dangtis
2. Segamislaba
2. Maišymo mentelė
3. Äravõetav kauss
3. Išimama kepimo forma
4. LC näidik
4. Skystųjų kristalų displėjus
5. Juhtpaneel
5. Valdymo skydelis
6. Korpus
6. Korpusas
7. Mõõteskaalaga klaas
7. Matavimo stiklinė
8. Mõõtelusikas
8. Matavimo šaukštas
9. Programmide loetelu
9. Programų sąrašas
EST LC NÄIDIK LT SKYSTŲJŲ KRISTALŲ DISPLĖJUS
10. Pätsi kaalu valik (500 g./750 g./1000 g.)
10. Pasirinkti duonos kepalo svorį (500 g./ 750 g./1000g.)
11. Kooriku värvuse valik
11. Pasirinkti plutelės spalvą
12. Programmi valik
12. 3. Pasirinkti programą
LV APRAKSTS H LEÍRÁS
1. Paceļams vāks
1. Felhajtható fedél
2. Maisāmā lāpstiņa
2. Keverőlapát
3. Noņemams trauks
3. Kiemelhető csésze
4. LCD displejs
4. LCD kijelző
5. Vadības panelis
5. Vezérlőpad
6. Korpuss
6. Készüléktest
7. Mērglāze
7. Mérőpohár
8. Mērkarote
8. Mérőkanál
9. Programmu uzskaitījums
9. Programlista
LV LCD DISPLEJS H LCD KIJELZŐ
10. Klaipa svara izvēle (500g./750g./1000g.)
10. Kenyértömeg kiválasztása (500g./750g./1000g.)
11. Garozas krāsas izvēle
11. Pirítási szint kiválasztása
12. Programmas izvēle
12. Programválasztás
SC-401
2
IM009
mm
633
~ 220-240V / 50 Hz
355
660 W 4.5 / 5.8 kg
365
SC-401
3

IM009
GB USER MANUAL
SAFETY MEASURES
Important safety procedures. Read attentively and keep for further references.
• Incorrect use of this appliance may cause its failure and damage to the user.
• Before using for the first time check, whether the technical specifications of the product indicated on the label
correspond to the electric supply network parameters.
ATTENTION! The power supply plug has a phase and an earth connection. Plug the appliance only into properly
earthed outlets.
• Only for household use in compliance with this Instruction Manual. The appliance is not intended for commercial
use.
• Do not use outdoors.
• Always unplug the appliance before cleaning or when not in use.
• The appliance is not intended for use by persons (including children) with reduced physical, sensual or
intellectual abilities or if they lack the experience or knowledge, unless they are supervised or have been
instructed on operating the appliance by the person responsible for their safety.
• Children must be supervised to prevent playing with the appliance.
• Do not leave the operating appliance unattended.
• Do not use accessories other than the standard equipment.
• To avoid danger damaged power supply cord must be replaced by the manufacturer or the authorized service
centre, or similar qualified personnel.
• Do not immerse appliance or cord in water or other liquids. If this happened immediately unplug the appliance
and before operating it further, have qualified specialists check the operating capability and safety of the
appliance.
• Make sure cord does not touch sharp edges or hot surfaces.
• Do not pull by the cord, do not twist it or wrap it around the appliance.
• Use the bread maker only for cooking food. Never dry clothes, paper or other things in it.
• Do not switch the bread maker on with an empty baking chamber. Do not use the baking chamber for storing
things.
• The bread maker is not intended for food canning.
• Do not pour ingredients into the baking chamber directly, use the removable pan.
• Use cooking recipes for guidance.
• To avoid short circuit failure or bread maker malfunction prevent water entry into the steam vents.
• Failure to keep the bread maker clean may lead to surface wear, which might have an adverse effect on the
operation of the appliance and create potential danger for the user.
• When using an extension cord make sure the maximum power capacity of the cord corresponds to the power
consumption of the bread maker.
• Attention! During operation the appliance gets hot! If necessary to touch the bread maker during its operation
use oven mitts or pot holders.
• Avoid touching the kneading paddle during the unit is in operation, this may cause injury!
• ATTENTION! During operation do not open the bread maker lid or remove the bread pan.
The lid may only be opened for adding necessary ingredients into the dough strictly when the beep is heard.
• The manufacturer reserves the right to introduce minor changes into the product design without prior notice,
unless such changes influence significantly the product safety, performance, and functions.
ADVANTAGES OF YOUR BREAD MAKER
• The bread maker has an automatic bread baking mode.
• You can select out of 13 different baking programmes.
• You can use pre-packaged bread mixes.
• The bread maker allows making jam.
• You can knead the dough for ravioli (pelmeni) or other courses.
INSTALLATION
• Make sure there are no packaging materials or foreign objects inside the bread maker.
• Check that the following have not been damaged during shipping:
• Lid;
• Main body and viewing window;
• Chamber walls;
• Removable bread pan.
• If you discover any defects do not operate the bread maker; address the seller.
• Place the unit on a dry, even and heat-resistant surface.
• Do not place the appliance near combustible materials, explosives or self-igniting gases.
• Do not place the appliance near a gas or an electric cooker or any other heat sources.
• Do not put anything on the bread maker. Do not clog steam vents.
SC-401
4
IM009
• The bread maker should not be placed in a cupboard. To ensure normal operation of the bread maker free
space for ventilation should be left. at least: 20 cm on top, 10 cm at the back panel, and at least 5 cm at both
sides.
• Before first use wipe bread baking pan, kneading paddle, inner and outer parts of the breadmaker with a clean
wet cloth. Peel the protective film from the control panel.
OPERATION
• Plug the bread maker to the outlet.
• Place the ingredients in the bread maker (according to the recipe) and close the lid.
MENU BUTTON
• Load the desired baking programme. The number of the programme and the respective baking time will appear
on the LCD display.
• Attention: a sound should be heard when pressing buttons.
CRUST COLOUR
• The crust colour function allows to programme baking bread with light, medium or dark crust.
• Press the CRUST button once, twice or three times to have light, medium or dark crust respectively.
• ATTENTION: If you select programmes 5-13 you cannot adjust the crust colour.
• ATTENTION: When selecting programmes 1-3 the CRUST button allows to set the QUICK mode, when the
bread is baked in express mode.
• The possibility of choosing the colour of the crust is not envisaged for the QUICK mode.
LOAF SIZE
• This function allows to set the weight of the baked loaf. The weight of the loaf is 500 g / 750 g / 1000 g
• Press the SIZE button once, twice or three times to set 500 g / 750 g / 1000 g respectively.
• ATTENTION: If you select programme 5-13 you cannot adjust the loaf size.
START/STOP BUTTON
• To start/stop the operation of the bread maker or reset the selected function press the START/STOP BUTTON.
• To end an operation or delete the parameters press and hold the button for 2 seconds until a long audio signal
sounds.
• ATTENTION: Do not press the START/STOP BUTTON if you want to check the state of the dough. To check the
dough use the window in the bread maker lid.
MEMORY FUNCTION
• In case of a power supply failure during less than 7 minutes the bread maker will resume the selected
programme from the moment there was a power outage.
KEEPING WARM
• After the baking is complete, the bread maker will automatically proceed to the keeping warm mode – 60
minutes.
• After the baking is complete the beep will sound 5 times with a 5-minute interval.
TIMER
• The timer function allows to delay baking time.
• Maximum delay time is 13 hours.
• Use buttons + and — to add or take 10 minutes of delay with each pressing. Then press the START/STOP button
to activate the timer. The countdown will start at the display.
• For example: it is 20:30 now, you want the bread to be ready by 7:00, i.e. in 10 hours and 30 minutes. Press the
MENU button, select the mode, select the colour of the crust and the loaf size, then press the + button to add
time to 10 hours 30 minutes. The time will appear on the LCD display. Then press the START/STOP button to
activate the timer. The countdown will start at the display.
• ATTENTION: do not use timer when using perishable ingredients such as eggs, milk, cream, and cheese.
BAKING PROGRAMMES
• To select the necessary programme press the MENU button.
Baking programme 1. Basic
• This mode is used for baking white and mixed breads. For baking bread rye or wheat flour is used. The loaf is
light and compact. See the list of ingredients for baking in the table at the end of the Instruction Manual.
Baking programme 2. French
• This mode is used for baking bread with light texture and crispy crust from wheat flour. See the list of ingredients
for baking in the table at the end of the Instruction Manual.
Baking programme 3. Diet
• This mode is used for baking bread from coarse flours. In this mode dough kneading takes a longer time, and
dough rises much longer. The loaf is heavy and compact. See recipes for baking in the table at the end of the
Instruction Manual.
Baking programme 4. Sweet
• This mode is used for baking bread with various sweet additives, such as fruit juices, ground nuts, dried fruit,
chocolate or sugar. In this mode the time for bread rising is increased, and so the bread is of light texture. See
recipes for baking in the table at the end of the Instruction Manual.
SC-401
5
IM009
Baking programmes: 5. Quick 1000 g; 6. Rapid baking 500 g; 7. Rapid baking 750 g
• In these modes the processes of kneading, rising and baking are significantly reduced and do not take much
time. As a result the bread is of the coarsest texture of all 12 offered modes. See recipes for baking in the table
at the end of the Instruction Manual.
Additional ingredients: Programmes 1-5
• For modes 1-5 adding further ingredients, such as nuts or fruit is possible after an audio signal, which will sound
according to the bread baking programme.
• In case timer is set fruit and nuts can be added at the beginning but these are to be cut into small pieces.
Baking programme 8. Gluten free
• Baking gluten free bread is significantly different from baking regular breads. If you bake this bread because of
health reasons consult your doctor and follow the instructions closely. This programme was specially designed
for gluten free bread mixes. The result may be different depending on the mixture type. If this bread is chosen for
diet reasons, it is very important to prevent getting other flour containing gluten into the dough.
Baking programme 9. Dough
• This mode is used for kneading dough. In this mode only kneading is done without further baking. See recipes in
the table at the end of the Instruction Manual.
Baking programme 10. Ravioli
• This mode is used for kneading dough for pasta, ravioli or pizza. In this mode only kneading is done without
further baking. See recipes in the table at the end of the Instruction Manual.
Baking programme 11. Jam
• This mode is used for making jam. See recipes in the table at the end of the Instruction Manual.
Baking programme 12. Baking
• This mode is used for additional baking in case the bread has not baked completely or the crust is not crisp
roasted enough, as well as for baking ready dough. See baking time in the table at the end of the Instruction
Manual.
• For an early stop press the STOP/START button and hold it down for 2 seconds until an audio signal sounds.
Baking programme 13. Cake
• This mode is used for making cakes and pies. See the recipes in the table at the end of the Instruction Manual.
USEFUL TIPS
• First you need to take out the removable bread pan, add necessary ingredients and only after that put the pan
into the bread maker.
• Always follow the order of adding ingredients. First add liquids, butter, sugar, salt, then flour and the rest of
ingredients, add yeast at the end.
• All ingredients must be at room temperature to support optimal leavening of yeast.
• Measure the amount of ingredients precisely. Even slight deviation from the amount indicated in the recipe can
affect the result of baking.
• During operation do not open the bread maker lid or remove the bread pan.
• The lid may only be opened for adding necessary ingredients into the dough (toast, candied fruit, etc.) strictly
when the beep is heard. During the operation the beep will sound 8 times, when ingredients are to be added.
• Opening the lid at other times leads to the violation of temperature conditions in the bread baker and can affect
the quality of bread baking.
OPERATING PROCEDURE
• Remove the bread pan.
• Install the kneading paddle, check whether it works.
• Put the ingredients into the pan.
• ATTENTION: make sure the yeast does not come in contact with salt or liquid.
•
Put the removable pan back into the bread maker.
• Make sure you have placed the pan correctly.
• Close the appliance lid.
• Plug the unit to the outlet. An audio signal will sound and the number of the programme and the baking time will
appear on the display.
• Press the MENU button and select the programme number.
• Select the crust colour and the loaf size.
• Now you can adjust the baking time with the timer.
• Press the START/STOP button to start the programme.
• When the baking is complete an audio signal will sound, and 0:00 will appear on the display.
• Let the bread stand for some time.
• Before opening the lid unplug the appliance.
• Remove the pan with a pot holder or an oven mitten.
• Hold the pan upside down and shake gently. If the bread does not go out easily you can use wooden or plastic
paddles to take the bread out of the pan. Never use metal objects, they can scratch the surface of the pan!
• Let the bread cool down for 30 minutes, then you can cut it.
SC-401
6

IM009
• ATTENTION: make sure the kneading paddle is not in the loaf. If this happened, remove it carefully from the
bread. Never use metal objects, they can scratch the surface of the pan!
TROUBLESHOOTING GUIDE
Before calling the service centre, please, familiarize with the below table.
The bread does
The quality of gluten in your flour is inadequate if you use flour other than bread flour.
not rise
(The quality of gluten can differ depending on the temperature, humidity, flour
storage conditions and the time of harvesting)
• Try another type of flour, another manufacturer or another flour batch.
The dough has become too hard, because you added too little liquid.
• Bread flour with high protein content absorbs more water than other types, so try
to add another 10-20 ml water.
You use inadequate yeast.
• Use dry yeast from packages with an inscription “quick-acting yeast”. This type
does not need pre-fermentation
You have put too little yeast or your yeast is stale.
• Use the measuring spoon from the set. Check the expiry date of the yeast. (Store
The top of the
it in the refrigerator).
bread is rugged
Liquid was in contact with the yeast before kneading.
• Check that you have put the ingredients according to the order as given in the
instruction manual.
You have put too much salt or not enough sugar.
• Check the recipe and measure the correct amount with the standard measuring
spoon, which comes with the appliance.
• Check that salt or sugar are not present in other ingredients.
The bread has a
You have used too much yeast.
too light texture
• Check the recipe and measure the correct amount with the standard measuring
spoon, which comes with the appliance.
You have added too much liquid.
• Some types of flour absorb more water than others; try to reduce the amount of
water by 10-20 ml.
The bread fell
The quality of your flour is unsatisfactory.
after rising
• Try flour of another manufacturer.
You have used too much liquid.
• Try to reduce the amount of water by 10-20 ml.
The bread rose
You have used too much yeast/water.
too high
• Check the recipe and measure the correct amount with the standard measuring
spoon (yeast) / cup (water), which come with the appliance.
• Check that no excessive water comes from other ingredients.
You have not enough flour.
• Weigh flour accurately with the weigh-scale.
The bread is
You use too little yeast or your yeast is stale.
pale and sticky
• Use the measuring spoon from the set. Check the expiry date of the yeast. (Store
it in the refrigerator).
There was a power outage or the bread maker was stopped during the baking cycle.
• The bread making machine stops if it was stopped for more than 10 minutes. You
have to remove the bread from the pan and start the cycle again with the new
ingredients.
There is flour left
You have used too much flour, or you have too little liquid.
on the bread.
• Check the recipe and measure the correct amount of flour with the weigh-scale
or liquid with the measuring cup for liquids, which comes with the set.
The bread is not
You have not inserted a kneading paddle into the bread pan.
well kneaded
• Before you load the ingredients make sure the kneading paddle is in the pan.
• There was a power outage or the bread maker was stopped during the baking
cycle.
• The bread making machine switches off if it was stopped for more than 10
minutes.
• Presumably you would have to start bread baking again but this could lead to
adverse results if the kneading has already started.
After the start of
This means that the temperature inside the oven is too low. It is necessary to move
the programme
the appliance to a warmer room.
HHH appeared
on the display
SC-401
7

IM009
After the start of
This means that the temperature inside the oven is too high. You need to stop the
the programme
programme, unplug the appliance, open the lid and let the unit cool down before
EEE appeared
resuming the programme.
on the display
After the start of
There was a power outage, failure of the temperature sensor. You need to call the
the bread maker
Service Centre.
operation Е00/
Е01 appeared
on the display
—
CLEANING AND MAINTENANCE
• The bread maker should be cleaned regularly and any remains of food should be removed from it.
• Before cleaning unplug the bread maker.
• Let the bread maker cool down fully.
• Wipe the control panel, outer and inner surfaces, the removable bread pan with a wet cloth with a detergent.
• Do not use aggressive substances or abrasive materials.
STORAGE
• Make sure the bread maker is unplugged and has fully cooled down.
• Observe all requirements from the “CLEANING AND MAINTENANCE” Section.
• Store the bread maker with a slightly opened lid in a dry clean place.
RUS РУКОВОДСТВО ПО ЭКСПЛУАТАЦИИ
МЕРЫ БЕЗОПАСНОСТИ
Важные инструкции по безопасности. Прочитайте внимательно и сохраните для будущих справок.
• Неправильное обращение с прибором может привести к его поломке и причинить вред пользователю.
• Перед первоначальным включением проверьте, соответствуют ли технические характеристики изделия,
указанные на наклейке, параметрам электросети.
ВНИМАНИЕ! Вилка шнура питания
имеет провод и контакт заземления. Подключайте прибор только к
соответствующим заземлённым розеткам
• Использовать только в бытовых целях в соответствии с данным Руководством по эксплуатации. Прибор
не предназначен для промышленного применения.
• Не использовать вне помещений.
• Всегда отключайте устройство от электросети перед очисткой, или если Вы его не используете.
• Прибор не предназначен для использования лицами (включая детей) с пониженными физическими,
чувственными или умственными способностями или при отсутствии у них опыта или знаний, если они не
находятся под контролем или не проинструктированы об использовании прибора лицом, ответственным
за их безопасность.
• Дети должны находиться под контролем для недопущения игры
с прибором.
• Не оставляйте включенный прибор без присмотра.
• Не используйте принадлежности, не входящие в комплект поставки.
• При повреждении шнура питания его замену, во избежание опасности, должен производить изготовитель
или уполномоченный им сервисный центр, или аналогичный квалифицированный персонал.
• Не погружайте прибор и шнур питания в воду или другие
жидкости. Если это случилось, немедленно
отключите устройство от электросети и, прежде чем пользоваться им дальше, проверьте
работоспособность и безопасность прибора у квалифицированных специалистов.
• Следите, чтобы шнур питания не касался острых кромок и горячих поверхностей.
• Не тяните за шнур питания, не перекручивайте и не обматывайте его вокруг устройства.
•
Используйте хлебопечь только для приготовления продуктов. Ни в коем случае не сушите в ней одежду,
бумагу или другие предметы.
• Не включайте хлебопечь с пустой камерой. Не используйте камеру для хранения чего—либо.
• Печь не предназначена для консервирования продуктов.
• Не выкладывайте продукты непосредственно на дно камеры, используйте съемную чашу
.
• Руководствуйтесь рецептами приготовления.
• Во избежание короткого замыкания и поломки печи, не допускайте попадания воды в вентиляционные
отверстия.
• Ненадлежащее поддержание хлебопечи в чистом состоянии может привести к износу поверхности, что
может неблагоприятно повлиять на работу прибора и создать возможную опасность для пользователя.
• При использовании удлинителя, убедитесь, что
максимально допустимая мощность кабеля
соответствует мощности хлебопечи.
• Внимание! Во время работы прибор нагревается! В случае необходимости контакта с печью во время ее
работы, используйте кухонные рукавицы или прихватки.
SC-401
8
IM009
• Избегайте контакта с лопаточкой для замешивания во время эксплуатации прибора, это травмоопасно!
• ВНИМАНИЕ! Во время работы не открывайте крышку хлебопекарни и не вытаскивайте форму для
выпечки хлеба.
Крышку можно открывать только для добавки в тесто необходимых ингредиентов строго по сигналу
бипера.
• Производитель оставляет за собой право без
дополнительного уведомления вносить незначительные
изменения в конструкцию изделия, кардинально не влияющие на его безопасность, работоспособность и
функциональность.
ПРЕИМУЩЕСТВА ВАШЕЙ ХЛЕБОПЕЧИ
• Хлебопечь оснащена автоматическим режимом приготовления хлеба.
• Вы можете выбрать 13 различных программ приготовления выпечки.
• Вы можете использовать готовые смеси для выпекания.
• Хлебопечь позволяет варить варенье.
• Вы можете
замесить тесто для приготовления пельменей и других блюд.
УСТАНОВКА
• Убедитесь, что внутри хлебопечи нет упаковочных материалов и посторонних предметов.
• Проверьте, не повреждены ли при транспортировке:
• крышка;
• корпус и смотровое окно;
• стенки камеры;
• съемная чаша.
• При обнаружении любых дефектов не включайте печь; обратитесь к
продавцу.
• Установите прибор на сухую, ровную и жароустойчивую поверхность.
• Не устанавливайте прибор вблизи горючих материалов, взрывчатых веществ и самовоспламеняющихся
газов.
• Не ставьте прибор рядом с газовой или электрической плитами, а также другими источниками тепла.
• Ничего не кладите на печь. Не перекрывайте вентиляционные отверстия.
• Хлебопечь не следует
располагать в шкафу. Для нормальной работы печи необходимо обеспечить
свободное пространство для вентиляции: не менее: 20 см сверху, 10 см со стороны задней панели и не
менее 5 см с боковых сторон.
• Перед первым использованием протрите съемную чашу, лопаточку для замешивания, внутреннюю и
внешнюю части хлебопечи чистой влажной тканью. Снимите защитную пленку
с панели управления.
РАБОТА
• Подключите хлебопечь к электросети.
• Поместите чашу с продуктами в печь (согласно рецепту) и закройте крышку.
КНОПКА МЕНЮ
• Загрузите желаемую программу выпечки. Номер программы и соответствующее программе время
выпечки появится на ЖК дисплее.
• Внимание: при нажатии на кнопки должен раздаваться звуковой сигнал.
“КНОПКА
КОРОЧКА“
• Функция “КОРОЧКА“ позволяет запрограммировать выпекание светлой, средней или темной корочки.
• Нажмите кнопку “КОРОЧКА“ один, два или три раза, для светлой, средней или темной корочки
соответственно.
• ВНИМАНИЕ: При выборе программы 5-13 регулировать цвет корочки нельзя.
• ВНИМАНИЕ: При выборе программы 1-3 кнопка КОРОЧКА позволяет установить режим «БЫСТРО», при
котором хлеб
выпекается в ускоренном режиме.
• Возможность выбора цвета корочки в режиме «БЫСТРО» не предусмотрена.
КНОПКА РАЗМЕР
• Данная функция позволяет задать вес выпекаемой буханки. Вес буханки составляет 500г / 750г /1000г
• Нажмите кнопку РАЗМЕР один, два или три раза для 500г / 750г /1000г соответственно.
• ВНИМАНИЕ: При выборе программы 5-13 регулировать
размер буханки нельзя.
КНОПКА СТАРТ/СТОП
• Для запуска/остановки работы хлебопечки или сброса выбранной функции нажмите кнопку СТАРТ/СТОП.
• Чтобы завершить операцию или удалить параметры, держите кнопку нажатой в течение 2 секунд, пока не
раздастся длинный звуковой сигнал.
• ВНИМАНИЕ: Не нажимайте кнопку СТАРТ/СТОП, если вы хотите проверить состояние
выпечки. Для
проверки выпечки используйте окно на крышке хлебопечки.
ФУНКЦИЯ ПАМЯТИ
• В случае возникновения сбоя питания не более 7 минут, хлебопечка продолжит выполнение выбранной
программы с момента сбоя в электросети.
ПОДДЕРЖАНИЕ ТЕМПЕРАТУРЫ
• После завершения приготовления, хлебопечь автоматически переходит в режим поддержания
температуры – 60 минут.
SC-401
9
Страницы и текст этой инструкции
 Руководство пользователя хлебопечки Scarlett SC-401
 Информация отображена на картинке
 Информация отображена на картинке
 Информация отображена на картинке
 Информация отображена на картинке
Как использовать наш сайт инструкций OnlineManuals.ru
Наша цель состоит в том, чтобы предоставить вам быстрый доступ к содержанию инструкции для хлебопечки Scarlett SC-401.
С помощью онлайн просмотра, Вы можете быстро просмотреть содержимое инструкции и найти решение проблемы с хлебопечки Scarlett SC-401.
Для Вашего удобства
Если листать руководство пользователя хлебопечки Scarlett SC-401 прямо на сайте, не очень удобно для Вас, есть два возможных решения:
• Просмотр в полноэкранном режиме — легко просмотреть руководство пользователя (без загрузки его на свой компьютер), Вы можете использовать режим полноэкранного просмотра.
Для просмотра инструкции пользователя хлебопечки Scarlett SC-401 на полном экране, используйте кнопку «Открыть в Pdf-viewer».
• Загрузка на компьютер — Вы можете также скачать Руководство пользователя хлебопечки Scarlett SC-401 на свой компьютер и сохранить его в файлах.
Многие люди предпочитают читать документы не на экране, а в печатной версии.
Возможность печати руководства пользователя также была предусмотрена на нашем сайте,
и вы можете использовать ее, нажав на иконку «печать» в Pdf-viewer.
Нет необходимости печатать все руководство хлебопечки Scarlett SC-401, можно выбрать только нужные страницы инструкции.
Перейти к контенту
Хлебопечки Scarlett

- Размер инструкции: 697.51 kB
- Формат файла: pdf
Если вы потеряли инструкцию от хлебопечки Scarlett SC-401, можете скачать файл для просмотра на компьютере или печати.
Инструкция для хлебопечки Scarlett SC-401 на русском языке. В руководстве описаны возможности и полезные функции, а также правила эксплуатации. Перед использованием внимательно ознакомьтесь с инструкцией.
Чтобы не читать всю инструкцию вы можете выполнить поиск по содержимому внутри инструкции и быстро найти необходимую информацию. Рекомендации по использованию помогут увеличить срок службы хлебопечки Scarlett SC-401. Если у вас появилась проблема, то найдите раздел с описанием неисправностей и способами их решения. В нем указаны типичные поломки и способы их решения.
IM009
9
SC-401
• Избегайте контакта с лопаточкой для замешивания во время эксплуатации прибора, это травмоопасно!
• ВНИМАНИЕ! Во время работы не открывайте крышку хлебопекарни и не вытаскивайте форму для
выпечки хлеба.
Крышку можно открывать только для добавки в тесто необходимых ингредиентов строго по сигналу
бипера.
• Производитель оставляет за собой право без дополнительного уведомления вносить незначительные
изменения в конструкцию изделия, кардинально не влияющие на его безопасность, работоспособность и
функциональность.
ПРЕИМУЩЕСТВА ВАШЕЙ ХЛЕБОПЕЧИ
• Хлебопечь оснащена автоматическим режимом приготовления хлеба.
• Вы можете выбрать 13 различных программ приготовления выпечки.
• Вы можете использовать готовые смеси для выпекания.
• Хлебопечь позволяет варить варенье.
• Вы можете замесить тесто для приготовления пельменей и других блюд.
УСТАНОВКА
• Убедитесь, что внутри хлебопечи нет упаковочных материалов и посторонних предметов.
• Проверьте, не повреждены ли при транспортировке:
• крышка;
• корпус и смотровое окно;
• стенки камеры;
• съемная чаша.
• При обнаружении любых дефектов не включайте печь; обратитесь к продавцу.
• Установите прибор на сухую, ровную и жароустойчивую поверхность.
• Не устанавливайте прибор вблизи горючих материалов, взрывчатых веществ и самовоспламеняющихся
газов.
• Не ставьте прибор рядом с газовой или электрической плитами, а также другими источниками тепла.
• Ничего не кладите на печь. Не перекрывайте вентиляционные отверстия.
• Хлебопечь не следует располагать в шкафу. Для нормальной работы печи необходимо обеспечить
свободное пространство для вентиляции: не менее: 20 см сверху, 10 см со стороны задней панели и не
менее 5 см с боковых сторон.
• Перед первым использованием протрите съемную чашу, лопаточку для замешивания, внутреннюю и
внешнюю части хлебопечи чистой влажной тканью. Снимите защитную пленку с панели управления.
РАБОТА
• Подключите хлебопечь к электросети.
• Поместите чашу с продуктами в печь (согласно рецепту) и закройте крышку.
КНОПКА МЕНЮ
• Загрузите желаемую программу выпечки. Номер программы и соответствующее программе время
выпечки появится на ЖК дисплее.
• Внимание: при нажатии на кнопки должен раздаваться звуковой сигнал.
“КНОПКА КОРОЧКА“
• Функция “КОРОЧКА“ позволяет запрограммировать выпекание светлой, средней или темной корочки.
• Нажмите кнопку “КОРОЧКА“ один, два или три раза, для светлой, средней или темной корочки
соответственно.
• ВНИМАНИЕ: При выборе программы 5-13 регулировать цвет корочки нельзя.
• ВНИМАНИЕ: При выборе программы 1-3 кнопка КОРОЧКА позволяет установить режим «БЫСТРО», при
котором хлеб выпекается в ускоренном режиме.
• Возможность выбора цвета корочки в режиме «БЫСТРО» не предусмотрена.
КНОПКА РАЗМЕР
• Данная функция позволяет задать вес выпекаемой буханки. Вес буханки составляет 500г / 750г /1000г
• Нажмите кнопку РАЗМЕР один, два или три раза для 500г / 750г /1000г соответственно.
• ВНИМАНИЕ: При выборе программы 5-13 регулировать размер буханки нельзя.
КНОПКА СТАРТ/СТОП
• Для запуска/остановки работы хлебопечки или сброса выбранной функции нажмите кнопку СТАРТ/СТОП.
• Чтобы завершить операцию или удалить параметры, держите кнопку нажатой в течение 2 секунд, пока не
раздастся длинный звуковой сигнал.
• ВНИМАНИЕ: Не нажимайте кнопку СТАРТ/СТОП, если вы хотите проверить состояние выпечки. Для
проверки выпечки используйте окно на крышке хлебопечки.
ФУНКЦИЯ ПАМЯТИ
• В случае возникновения сбоя питания не более 7 минут, хлебопечка продолжит выполнение выбранной
программы с момента сбоя в электросети.
ПОДДЕРЖАНИЕ ТЕМПЕРАТУРЫ
• После завершения приготовления, хлебопечь автоматически переходит в режим поддержания
температуры – 60 минут.
Download or browse on-line these Instruction Manual for Scarlett SC-401 Bread Maker.
Summary of Contents:
 |
[Page 1] Scarlett SC-401 INSTRUCTION MANUAL РУКОВОДСТВО ПО ЭКСПЛУАТАЦИИ ІНСТРУКЦІЯ З ЕКСПЛУАТАЦІЇ GB MULTIFUNCTIONAL BREADMAKER……………………………………4 RUS МУЛЬТИФУНКЦИОНАЛЬН�… |
 |
[Page 2] Scarlett SC-401 IM009 2 SC-401 GB DESCRIPTION RUS УСТРОЙСТВО ИЗДЕЛИЯ 1. Lid 2. Kneading blade 3. Baking pan 4. LCD display 5. Control panel 6. Main body 7. Measuring cup 8. Measuring spoon 9. List of programmes 1. Отки�… |
 |
[Page 3] Scarlett SC-401 IM009 3 SC-401 ~ 220-240V / 50 Hz 660 W 4.5 / 5.8 kg mm 633 355 365 |
 |
[Page 4] Scarlett SC-401 IM009 4 SC-401 GB USER MANUAL SAFETY MEASURES Important safety procedures. Read attentively and keep for further references. • Incorrect use of this appliance may cause its failure and damage to the user. • Before using for the first … |
 |
[Page 5] Scarlett SC-401 IM009 5 SC-401 • The bread maker should not be placed in a cupboard. To ensure normal operation of the bread maker free space for ventilation should be left. at least: 20 cm on top, 10 cm at the back panel, and at least 5 cm at both sides. �… |
 |
[Page 6] Scarlett SC-401 IM009 6 SC-401 Baking programmes: 5. Quick 1000 g; 6. Rapid baking 500 g; 7. Rapid baking 750 g • In these modes the processes of kneading, rising and baking are significantly reduced and do not take much time. As a result the bread is of the… |
 |
[Page 7] Scarlett SC-401 IM009 7 SC-401 • ATTENTION: make sure the kneading paddle is not in the loaf. If this happened, remove it carefully from the bread. Never use metal objects, they can scratch the surface of the pan! TROUBLESHOOTING GUIDE Before calling the se… |
 |
[Page 8] Scarlett SC-401 IM009 8 SC-401 After the start of the programme EEE appeared on the display This means that the temperature inside the oven is too high. You need to stop the programme, unplug the appliance, open the lid and let the unit cool down before re… |
 |
[Page 9] Scarlett SC-401 IM009 9 SC-401 • Избегайте контакта с лопаточкой для замешивания во время эксплуатации прибора, это травмоопасно! • ВНИМАНИЕ! Во время раб�… |
 |
[Page 10] Scarlett SC-401 IM009 10 SC-401 • По окончанию работы сигнал бипера будет звучать 5 раз с интервалом 5 минут. ТАЙМЕР • Функция таймера позволяет откладыват�… |
 |
[Page 11] Scarlett SC-401 IM009 11 SC-401 • Для досрочной остановки нажмите кнопку СТОП/СТАРТ и держите ее нажатой в течение 2 секунд, пока не раздастся звуковой сигна… |
 |
[Page 12] Scarlett SC-401 IM009 12 SC-401 дрожжей. (Храните их в холодильнике) На дрожжи попала жидкость перед замешиванием. • Проверьте, что вы положили ингредиенты �… |
 |
[Page 13] Scarlett SC-401 IM009 13 SC-401 ОЧИСТКА И УХОД • Печь следует регулярно чистить и удалять с ее поверхности любые остатки пищи. • Перед очисткой выключите… |
 |
[Page 14] Scarlett SC-401 IM009 14 SC-401 • Ви можете використати готові суміші для випікання. • Хлібопічка дозволяє варити варення. • Ви можете замісити тісто для… |
 |
[Page 15] Scarlett SC-401 IM009 15 SC-401 • УВАГА: не використовуйте таймер при використанні інгредієнтів, що швидко псуються, таких як яйця, молоко, вершки та сир. П�… |
 |
[Page 16] Scarlett SC-401 IM009 16 SC-401 • Точно вимірюйте кількість інгредієнтів. Навіть незначне відхилення від вказаної в рецепті кількості може вплинути на рез�… |
 |
[Page 17] Scarlett SC-401 IM009 17 SC-401 піднявся • Спробуйте зменшити кількість води на 10-20 мл. Хліб дуже сильно піднявся Ви використовуєте надмірну кількість д… |
 |
[Page 18] Scarlett SC-401 IM009 18 SC-401 НАЗАР АУДАРЫҢЫЗ! Қуат сымының айырында сым жəне жерге қосу контактісі бар. Құрылғыны тек тиісті жерге қосылған розеткаларға �… |
 |
[Page 19] Scarlett SC-401 IM009 19 SC-401 • Нан пешін шкафқа орналастырмаған жөн. Қалыпты жұмыс істеуі үшін пешке желдету үшін бос кеңістікті қамтамасыз ету керек: мы… |
 |
[Page 20] Scarlett SC-401 IM009 20 SC-401 • Бұл режим ірі тартылған ұннан нан пісіру үшін қолданылады. Бұл режимде қамыр ұзағырақ иленеді жəне нанның көтерілу процес�… |
 |
[Page 21] Scarlett SC-401 IM009 21 SC-401 • Ыдысты дұрыс орналастырғаныңызға көз жеткізіңіз. • Құрылғы қақпағын жабыңыз. • Құрылғыны желіге қосыңыз. Дыбыстық сигн�… |
 |
[Page 22] Scarlett SC-401 IM009 22 SC-401 қалдырылған. • Машина он минуттан көбірек қалдырылса өшеді. Нанды қалыптан шығарып, жаңа ингредиенттермен циклды қайтадан �… |
 |
[Page 23] Scarlett SC-401 IM009 23 SC-401 • Ärge jätke sisselülitatud seadet järelevalveta. • Ärge kasutage tarvikuid, mis seadme tarnekomplekti ei kuulu. • Vigastatud toitejuhtme peab ohu vältimiseks asendama tootja, tema poolt volitatud teeninduskeskus v… |
 |
[Page 24] Scarlett SC-401 IM009 24 SC-401 • See funktsioon võimaldab seada küpsetatava pätsi suuruse. Pätsi kaal on 500 g / 750 g / 1000 g. • Vajutage nupule SUURUS üks, kaks või kolm korda – vastavalt 500 g / 750 g / 1000 g. • TÄHELEPANU! Programmide 5 … |
 |
[Page 25] Scarlett SC-401 IM009 25 SC-401 Küpsetusprogramm 12. Küpsetis • Seda režiimi kasutatakse täiendavaks küpsetamiseks, juhul kui leib ei ole läbi küpsenud või koorik ei ole piisavalt krõbe, samuti valmistaina küpsetamiseks. Küpsetusaega vaata tabelis… |
 |
[Page 26] Scarlett SC-401 IM009 26 SC-401 • Kontrollige retsepti ja mõõtke välja õige kogus kaasasoleva mõõtelusika abil. Te olete lisanud liiga palju vedelikku. • Mõned jahusordid imavad rohkem vett kui teised. Proovige vähendada veekogust 10 – 20 ml v�… |
 |
[Page 27] Scarlett SC-401 IM009 27 SC-401 • Nenaudoti už patalpos ribų. • Prieš pradėdami valyti prietaisą ar jo nesinaudodami visada išjunkite jį iš elektros lizdo. • Prietaisas nėra skirtas naudoti asmenims (įskaitant vaikus) su ribotais fiziniais, jut… |
 |
[Page 28] Scarlett SC-401 IM009 28 SC-401 • Norėdami pasirinkti šviesią, vidutinę ar tamsią plutele, paspauskite „PLUTELĖS“ mygtuką atitinkamai vieną, du ar tris kartus. • DĖMESIO: Pasirinkus programas Nr. 5-13 plutelės spalvos reguliuoti negalima. •… |
 |
[Page 29] Scarlett SC-401 IM009 29 SC-401 Papildomi ingredientai: programos Nr. 1-5 • Režimuose Nr. 1 – 5 į duonkepę galima įdėti papildomus ingredientus (riešutus, vaisius) po garso signalo, kuris pasigirs pagal duonos kepimo programą. • Nustačius laikma… |
 |
[Page 30] Scarlett SC-401 IM009 30 SC-401 • Kepimo pabaigoje pasigirs garso signalas, o displėjuje bus rodomas laikas 0:00. • Palaukite, kol duona truputi nusistovės. • Prieš atidarydami dangtelį išjunkite prietaisą iš elektros tinklo. • Išimkite kep… |
 |
[Page 31] Scarlett SC-401 IM009 31 SC-401 jei minkymas jau buvo pradėtas. Paleidus programa displėjuje pasirodė užrašas HHH Tai reiškia, jog temperatūra duonkepėje yra pernelyg žema. Reikia perkelti prietaisą į šiltesnę patalpą. Paleidus programa … |
 |
[Page 32] Scarlett SC-401 IM009 32 SC-401 • Maizes krāsns nepienācīga uzturēšana tīrībā var izraisīt virsmas nodilumu, kas var nelabvēlīgi ietekmēt ierīces funkcionēšanu un radīt potenciālus draudus lietotājam. • Izmantojot pagarinātāju pārlieci… |
 |
[Page 33] Scarlett SC-401 IM009 33 SC-401 TAIMERIS • Taimera funkcija ļauj atlikt cepšanas laiku. • Maksimālais atlikšanas laiks ir 13 stundas. • Izmantojiet taustiņus + un — , lai pieliktu vai atņemtu 10 aiztures minūtes ar katru spiedienu. Tad piespiediet… |
 |
[Page 34] Scarlett SC-401 IM009 34 SC-401 • Precīzi nomēriet sastāvdaļu daudzumu. Pat nenozīmīga novirze no receptē norādītā daudzuma var ietekmēt cepšanas rezultātu. • Darbības laikā neatveriet maizes krāsns vāku un neņemiet ārā maizes cepšanas … |
 |
[Page 35] Scarlett SC-401 IM009 35 SC-401 daudz uzbriedusi • Pārbaudiet recepti un nomēriet pareizu daudzumu ar komplektā ietilpstošas mērkarotes palīdzību (raugam) un mērglāzes palīdzību(ūdenim). • Pārbaudiet, lai liekais ūdens daudzums neizsūktos … |
 |
[Page 36] Scarlett SC-401 IM009 36 SC-401 • Tisztítás előtt vagy használaton kívül áramtalanítsa a készüléket. • Ne használják a készüléket fizikai-, érzelmi-, illetve szellemi fogyatékos személyek, vagy tapasztalattal, elegendő tudással nem ren… |
 |
[Page 37] Scarlett SC-401 IM009 37 SC-401 • A Pirítási Szint funkció lehetőséget nyújt beprogramozni, hogy a kenyérhéj világosra, kissé sötétebbre, vagy sötét színűre süljön. • Nyomja meg a KENYÉRHÉJ gombot egyszer, kétszer vagy háromszor, ha … |
 |
[Page 38] Scarlett SC-401 IM009 38 SC-401 • Időmérő beállítása esetén a gyümölcsöt és diót legelején hozzá lehet adni a tésztához, viszont előzőleg fel kell őket aprítani. 8. Sütőprogram. Gluténmentes kenyér • A gluténmentes kenyér sütés… |
 |
[Page 39] Scarlett SC-401 IM009 39 SC-401 FELMERÜLHETŐ PROBLÉMÁK ÉS AZOK ORVOSLÁSA Mielőtt szervizbe fordulna, szíveskedjen megismerkedni az alábbi táblázattal. A kenyér nem emelkedik fel A kenyér teteje egyenetlen A felhasznált… |
 |
[Page 40] Scarlett SC-401 IM009 40 SC-401 Amennyiben a program bekapcsolása után a kijelzőn megjelent a ЕЕЕ felirat • Ez azt jelenti, hogy a sütő hőmérséklete nagyon alacsony. Állítsa le a programot, áramtalanítsa a készüléket, nyissa fel a fed… |
 |
[Page 41] Scarlett SC-401 IM009 41 SC-401 GB TABLE OF OPERATION TIME RUS ТАБЛИЦА ВРЕМЕНИ РАБОТЫ ПРОГРАММ UA ТАБЛИЦЯ ЧАСУ РОБОТИ ПРОГРАМ GB TABLE OF OPERATION TIME Item 1.Basic Crust color Light Medium Dark R… |
 |
[Page 42] Scarlett SC-401 IM009 42 SC-401 Item 3.Whole Wheat Crust color Light Medium Dark Rapid LB Selection 500g 750g 1000g 500g 750g 1000g 500g 750g 1000g 500g 750g 1000g Delay time 15:00 15:00 15:00 15:00 15:00 15:00 15:00 15:00 15:00 1… |
 |
[Page 43] Scarlett SC-401 IM009 43 SC-401 RUS ТАБЛИЦА ВРЕМЕНИ РАБОТЫ ПРОГРАММ Цикл 1.Основной Цвет корочки Светлая Средняя Темная Быстро Размер буханки 500г 750г 1000г… |
 |
[Page 44] Scarlett SC-401 IM009 44 SC-401 Цикл 3.Диетический Цвет корочки Светлая Средняя Темная Быстро Размер буханки 500г 750г 1000г 500г 750г 1000г 500г 750г 1000г 500г 750г 1000г … |
 |
[Page 45] Scarlett SC-401 IM009 45 SC-401 UA ТАБЛИЦЯ ЧАСУ РОБОТИ ПРОГРАМ Цикл 1.Основний Колір скоринки Світла Темніша Темна Швидко Розмір буханця 500г 750г 1000г 500г … |
 |
[Page 46] Scarlett SC-401 IM009 46 SC-401 Цикл 3.Дієтичний Колір скоринки Світла Темніша Темна Швидко Розмір буханця 500г 750г 1000г 500г 750г 1000г 500г 750г 1000г 500г 750г 1000г Ча�… |
 |
[Page 47] Scarlett SC-401 IM009 47 SC-401 EN RECIPES 1. WHITE BREAD Ingredients 1000 g 750 g 500 g 1 Lemon juice 350 ml 260 ml 190 ml 2 Water 2 spoonfuls 2 tablespoon 1½ tablespoon 3 Oil 1 teaspoon ¾teaspoon ½ teaspoon 4 Salt 2 spoonfuls… |
 |
[Page 48] Scarlett SC-401 IM009 48 SC-401 1. Put all ingredients into the removable bread pan in the indicated order. 2. Put the removable pan into the bread maker. 3. Select programme SWEET, the crust colour and the loaf size. 4. When the programme is complete r… |
 |
[Page 49] Scarlett SC-401 IM009 49 SC-401 1 Strawberry 1 ½ cups 2 Lemon juice 1 tablespoon 3 Sugar 1 teaspoon 4 Jelly 1 tablespoon 4. Cut the fruit into small pieces and put all ingredients into the removable pan. 5. Put the removable pan into the bread maker…. |
 |
[Page 50] Scarlett SC-401 IM009 50 SC-401 4.СЛАДКИЙ ХЛЕБ Ингредиенты 1000 гр 750 гр 500 гр 1 Вода 350 мл 270 мл 190 мл 2 Масло растительное 2 ст.л. 1 ст.л. 1 ст.л. 3 Соль 1½ ч.л…. |
 |
[Page 51] Scarlett SC-401 IM009 51 SC-401 1 Апельсины 3 шт. 2 Лимон 1 шт. 3 Сахар 2 ст.л. 4 Желе 1¼чашки 1. Выложите все ингредиенты в съемную чашу, фрукты предварительно �… |
 |
[Page 52] Scarlett SC-401 IM009 52 SC-401 7 Борошно з цільних зерен 1 чашка 1 чашка ½ чашки 8 Дріжджі 1½ ч.л. 1 ч.л. 1 ч.л. 1. Покладіть усі інгредієнти в знімну чашу у вк�… |
 |
[Page 53] Scarlett SC-401 IM009 53 SC-401 4 Молоко сухе 2 ст.л. 5 Борошно 4 ½ чашки 6 Цукор 1 ст.л. 7 Дріжджі 1 ч.л. 1. Покладіть усі інгредієнти в знімну чашу у вказаному по�… |
 |
[Page 54] Scarlett SC-401 IM009 54 SC-401 3.БҮТІН ДƏНДІ ҰН ҚОСЫЛҒАН НАН 1000 гр 750 гр 500 гр 1 Су 360 мл 270 мл 210 мл 2 Өсімдік майы 3 ас қасық 2 ас қасық 1½ ас қасық 3 Тұз 1… |
 |
[Page 55] Scarlett SC-401 IM009 55 SC-401 7.АШЫТҚЫ ҚАМЫРЫ Ингредиенттер 1 Өсімдік майы 2 ас қасық 2 Су 410мл 3 Тұз 2 ас қасық 4 Құрғақ сүт 2 ас қасық 5 Ұн 4 ½ шыны �… |
 |
[Page 56] Scarlett SC-401 IM009 56 SC-401 7 Pärm 1½ tl 1 tl 1 tl 1. Pange kõik koostisosad äravõetavasse kaussi ettenähtud järjekorras. 2. Vee asemel võib kasutada piima. 3. Asetage äravõetav kauss leivaküpsetisse. 4. Valige programm PRANTSUS… |
 |
[Page 57] Scarlett SC-401 IM009 57 SC-401 Koostisosad 1 Vesi 430 ml 2 Taimeõli 1 spl 3 Gluteenivaba segu 500 g 4 Pärm 1 tl 1. Pange kõik koostisosad äravõetavasse kaussi ettenähtud järjekorras. 2. Asetage äravõetav kauss leivaküpsetisse. 3. … |
 |
[Page 58] Scarlett SC-401 IM009 58 SC-401 6. Kepdami duoną su pienu vietoj vandens nesinaudokite laikmačiu kepimo laikui atidėti. 2. PRANCŪZIŠKA DUONA Ingredientai 1000 g 750 g 500 g 1 Citrinų sultys 1 arbat. šaukšt. 1 arbat. šaukšt. 1 arbat…. |
 |
[Page 59] Scarlett SC-401 IM009 59 SC-401 2. Įstatykite išimamą kepimo formą į duonkepę. 3. Pasirinkite programą: Greitasis kepimas 1000 g dideliam kepalui (1000 g) Greitasis kepimas 750 g vidutiniam kepalui (750 g) Greitasis kepimas 500 g maža… |
 |
[Page 60] Scarlett SC-401 IM009 60 SC-401 4 Cukurs 2 ēd. k. 1½ ēd. k. 1 ēd. k. 5 Sausais piens 2 ēd. k. 1 ēd. k. 1 ēd. k. 6 Milti 4 gl. 3 gl 2 gl 7 Raugs 2 tējk. 1½ tējk. 1 tējk. 1. Salieciet visas sastāvdaļas noņemamajā traukā norād�… |
 |
[Page 61] Scarlett SC-401 IM009 61 SC-401 1 Ūdens ar olu 370 ml 270 ml 200 ml 3 Augu eļļa 2 ēd. k. 2 ēd. k. 2 ēd. k. 4 Sāls 1 tējk. 1 tējk. 1 tējk. 5 Cukurs 2 ēd. k. 2 ēd. k. 2 ēd. k. 6 Sausais piens 3 ēd. k. 3 ēd. k. 3 ēd. k. 7 Mil… |
 |
[Page 62] Scarlett SC-401 IM009 62 SC-401 1. Salieciet visas sastāvdaļas noņemamajā traukā, ogas iepriekš sasmalcinot. 2. Ievietojiet noņemamo trauku maizes krāsnī. 3. Izvēlieties programmu IEVĀRĪJUMS. H RECEPTEK 1. FEHÉR KENYÉR Hozz… |
 |
[Page 63] Scarlett SC-401 IM009 63 SC-401 4 Cukor ½ csésze ½ csésze ¼ csésze 5 Száraztej 2 e.k. 1½ e.k. 1 e.k. 6 Liszt 4 csésze 3 csésze 2 csésze 7 Élesztő 3 t.k. 2 t.k. 1 t.k. 1. Helyezze az összes hozzávalót a kiemelhető csészébe me… |
 |
[Page 64] Scarlett SC-401 IM009 64 SC-401 Hozzávalók 1 Narancs 3 v 2 Citrom 1 v 3 Cukor 2 e.k. 4 Zselé 1¼ csésze 1. Helyezze az összes hozzávalót a kiemelhető csészébe, előzőleg felaprítva a gyümölcsöt. 2. Helyezze a kiemelhető csész�… |