
На чтение 3 мин Просмотров 1.5к. Опубликовано
В данной статье мы рассмотрим процесс настройки IP телефона Grandstream GXP1160 / GXP1165. Грубо говоря, данная инструкция подходит и к другим моделям телефонов указанной фирмы, т.к. алгоритм настройки, да и web-интерфейс похожи. По поводу используемой модели – стоит заметить, что телефон Grandstream GXP1160 отличается от модели GXP1165 только наличием питания PoE. Ранее рассматривался процесс настройки голосового шлюза Grandstream GXW4224.
Итак, переходим к настройке. Первым делом подключаем телефон к локальной сети (используется порт LAN) и включаем питание. Ноутбук или ПК, с которого будем выполнять настройку – в порт PC (либо коммутатор). По-умолчанию, на указанных портах настроен режим Bridge.
Следующим шагом будет подключение к web-интерфейс телефона. Для этого определяем IP адрес по его MAC, проще всего его посмотреть на DHCP сервере (сразу сделайте резервирование). Также IP адрес отображается на дисплее телефона, чтобы его узнать необходимо зайти в подменю Status -> Network Status. Узнав, адрес IP телефона – переходим в браузере в его web-интерфейс. Пароль администратора по умолчанию – admin.

Первой страницей, отображаемой после авторизации, является Account Status:
Затем переходим во вкладку Network>Basic Settings, где указываем способ получения IP адреса (DHCP, PPPoE), либо задаем статический адрес. После внесения изменений – нажимаем Save and Applay и Reboot.
Также сразу меняем пароль администратора по умолчанию. Это делается в подменю Maintenance>Web Access>Admin Password.

Чтобы на дисплее телефона отображался русский язык, перейдя в Maintenance-Language, выбираем из выпадающего меню язык “Русский”. В завершении базовых настроек устройства – проверяем время и дату в подменю Settings>General Settings>Data and Time, задаем требуемые параметры.
Теперь переходим к настройке SIP аккаунта. Перейдем во вкладку Accounts->General Settings. Замечу, что в модели Grandstream GXP1160/GXP1165 доступен только один SIP аккаунт.
Вносим изменения в указанные поля:
- Account Active – Yes
- Account Name – Название вашего аккаунта, можно ввести любое имя
- SIP Server – IP адрес или доменное имя вашей АТС
- SIP User ID – Имя пользователя
- Authenticate ID – Идентификационное имя, которое идет в соответствии с паролем
- Authenticate Password – Пароль для регистрации на АТС
- Name – Отображаемое имя при звонках
После проделанных настроек, телефон (SIP номер) должен быть зарегистрирован на сервере IP телефонии (Asterisk, FreePBX), о чем свидетельствует “зеленый” статус “YES”.
Затем переходим во вкладку Accounts->Network Settings. Если телефон работает за NAT, то в поле NAT Traversal выбираем значение Keep-Alive. Если же вы работаете в одной подсети с АТС, то оставляйте настройки по-умолчанию.
Устанавливаем приоритет кодеков (при необходимости), перейдя во вкладку Accounts->Audio Settings.
Для обновления прошивки заходим во вкладку Maintenance->Upgrade and Provision и указываем в полях Firmware Server Path, Confirm Server Path следующую строку firmware.grandstream.com – это официальный сервер с ПО для Grandstream. Обновление должно пройти без проблем 😉

Настройка IP телефона Grandstream GXP1160 / GXP1165 завершена. По всем вопросам – обращайтесь в комментарии или на страницу Контакты.
Занимаюсь IT с 2007 года. Всё началось с увлечения — разгона компьютерного оборудования. Много воды и азота утекло с тех пор… Сейчас уже более 3х лет со своей командой оказываю комплексную поддержку и продвижение бизнеса: SEO, Яндекс.Директ, рассылки и удалённое обслуживание серверов. Буду рад помочь, обращайтесь!
Для настройки телефона в первую очередь вам необходимо подсоединить кабель LAN к аппарату, и узнать его IP адрес.
Для этого нажимаете Меню, Статус, Статус сети.
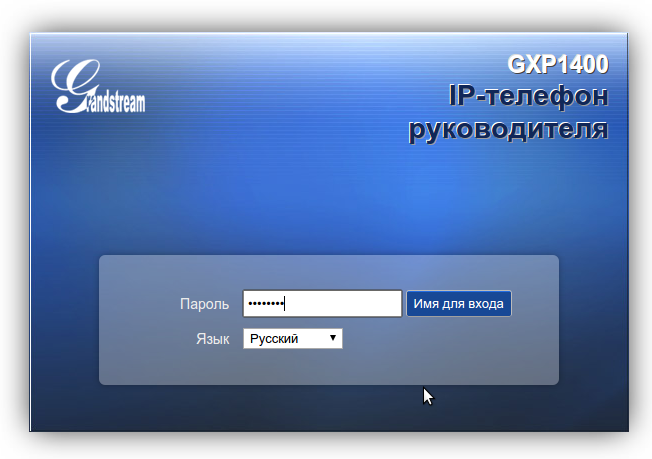
Вбиваем этот адрес в браузер компьютера, чтобы открыть панель управления.
Пароль для входа обычно указан в инструкции к аппарату, по умолчанию – admin.
После аутентификации вы попадаете в панель управления.
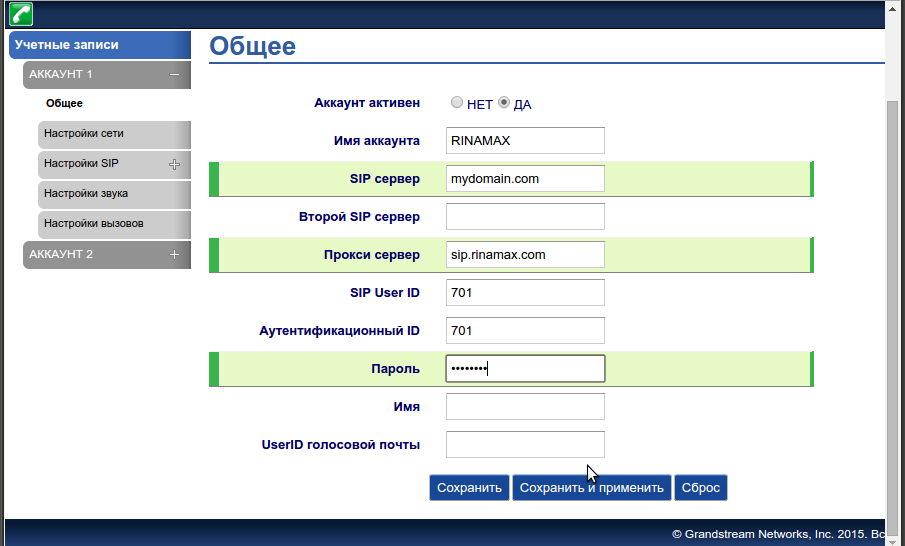
Теперь нам необходимо зарегистрировать телефон в системе. Для этого переходим во вкладку Учетные записи.
Заполните поля по примеру как на изображении. Для примера будем настраивать внутреннего пользователя 701.
- Имя аккаунта: 701
- SIP сервер: mydomain.com
- SIP User ID: 701
- Идентификационный ID: 701
- Прокси сервер: sip.digitoffice.ru
- Идентификационный ID: 701
- Режим DNS: Запись
- Транспорт SIP: UDP
- Проброс NAT: Нет
- Outbound Proxy Mode: not in route
- Удалять OBP из маршрута: Да
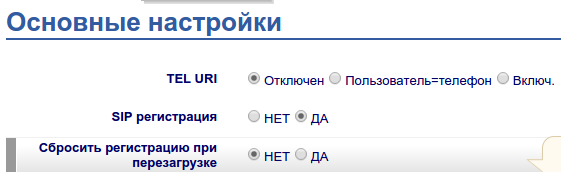
Перейдите в меню Настройки SIP > Основные настройки и включите SIP регистрацию
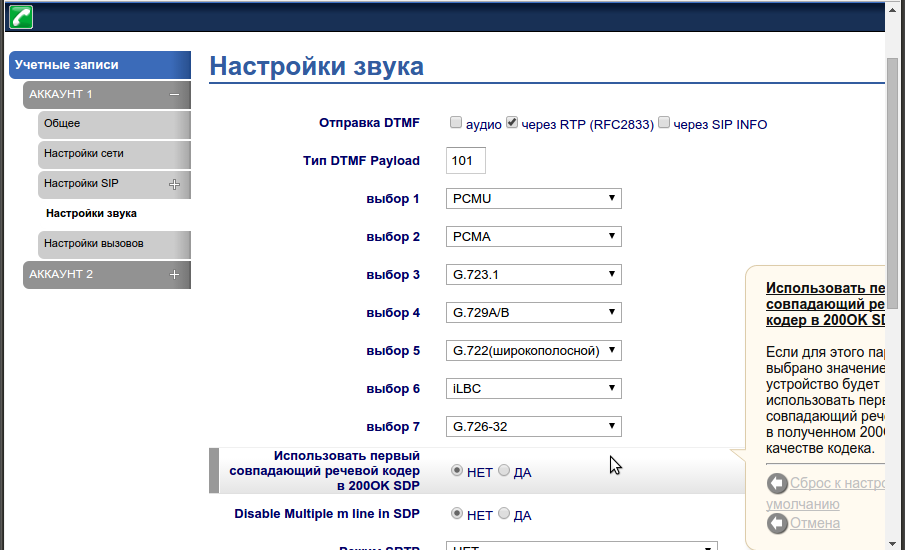
Так же необходимо убедиться, что аудиокодеки выставлены в правильной последовательности.
Для этого переходим во вкладку Настройка звука, и выставляем приоритеты —
- Выбор 1: PCMU
- Выбор 2: PCMA
Так же рекомендуется установить использование произвольного порта для входящих звонков, вместо 5060 (Use Random Port) и
разрешить принимать входящие звонки только с сервера регистрации (Allow Incoming SIP Messages from SIP Proxy Only).
После этих настроек необходимо сделать тестовые звонки. Если у вас не удается сделать тестовый звонок, еще раз
пересмотрите настройки. Если и после этого не удается позвонить, сделайте скриншоты ваших настроек, и пришлите
их нам в службу поддержки.
Настройка GXP1160/1165 с помощью клавиатуры:
1. Убедитесь, что телефон не активен;
2. Для доступа к вариантам меню для настройки телефона нажмите кнопку
“МЕНЮ”;
3. Для конфигурации настроек SIP Proxy, Outbound Proxy, SIP User ID, SIP
Auth ID, SIP Password выберите МЕНЮ->Config;
4. Для настройки основных функций телефона используйте варианты
МЕНЮ. например: IP-адрес при использовании статического IP. Подробности
приведены в руководстве пользователя GXP1160/1165;
5. Дополнительные настройки, которые могут быть необходимы для кон-
фигурации телефона, можно получить, обратившись к провайдеру по
обслуживанию Интернет-телефонии.
1. Для доступа к МЕНЮ нажмите круглую кнопку МЕНЮ;
2. Навигация по меню осуществляется с помощью кнопок ВВЕРХ/ВНИЗ и
ВПРАВО/ВЛЕВО;
3. Для подтверждения выбора меню нажмите круглую кнопку МЕНЮ;
4. При входящем звонке, снятии с подставки, или если режим МЕНЮ не
активен в течение 60 секунд, телефон автоматически выйдет из режима
МЕНЮ.
Советы по использованию клавиатуры:
1. Проверьте, подключен ли телефон к питанию и к Интернету;
2. Для перехода в меню телефона нажмите кнопку МЕНЮ;
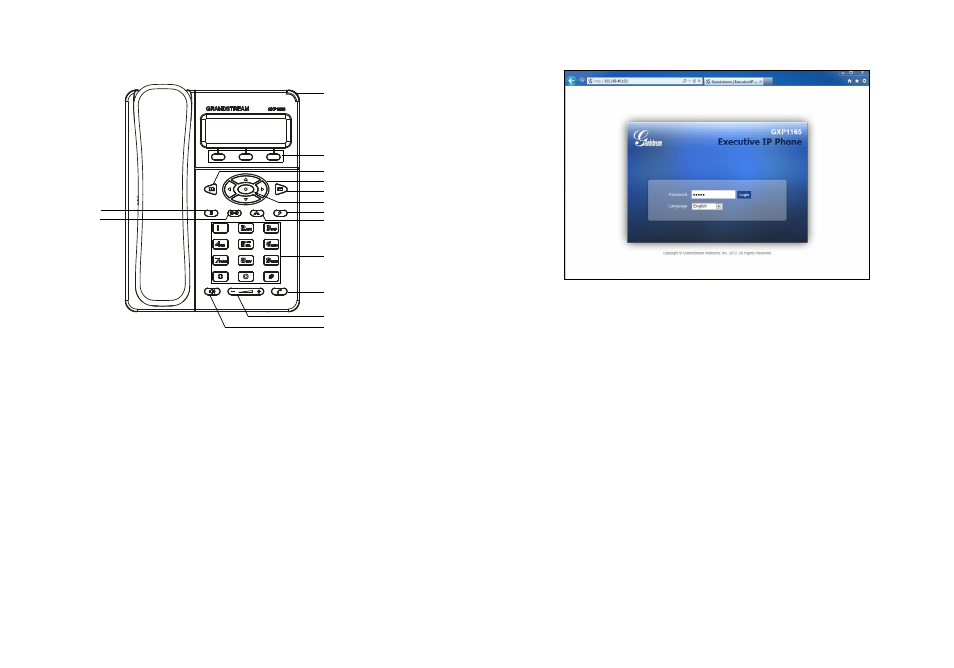
3. Нажимайте кнопку со стрелкой ‘вниз” до положения “Состояние” и нажмите
кнопку МЕНЮ, чтобы проверить IP-адрес;
4. Введите IP-адрес в обозреватель ПК (См. рисунок справа);
5. Пароль администратора по умолчанию: “admin”; пароль конечного пользо-
вателя по умолчанию: “123”.
Примечание. Подробное руководство пользователя можно загрузить здесь.
http://www.grandstream.com/support
НАСТРОЙКА ТЕЛЕФОНА:
Настройка GXP1160/1165 с помощью веб-обозревателя:
Функциональные клавиши
Индикатор ожидания
сообщений
Телефонная книга
Клавиши навигации
Клавиша меню/OK
Сообщение
Удерживание
Передача
Flash
Конференция
Стандартная клавиатура
Динамик
Громкость
Отправить
41
42
-
Страница 1
GXP1 160/GXP1 165 USER MANUAL Grandstream Networks, Inc. GXP1 160/GXP1 165 Small-Medium Business IP Phone[…]
-
Страница 2
FIRM WARE VERSION 1.0.5. 26 GXP1 160/GXP1 16 5 USER MANUAL P age 2 of 63 GXP1 160/GXP1 165 User Manual Index GUI INTERF A CE EXA MPLES ………………………………………………………….. 5 GNU GPL INFOR MA TION ……………………………………………………………….. 6 CHANGE L OG ……………………………[…]
-
Страница 3
FIRM WARE VERSION 1.0.5. 26 GX P1 160/GXP1 16 5 USER MANUAL Page 3 of 63 MUTE ……………………………………………………………………………………………………………….. ………… 22 CALL TRANSFER …………………………………………………………………………………………………..[…]
-
Страница 4
FIRM WARE VERSION 1.0.5. 26 GX P1 160/GXP1 16 5 USER MANUAL Page 4 of 63 T able of T ables GXP1 16 0/GXP1 165 User M anual T able 1: GXP1 160/GXP 1 165 TECHNICAL SPECIFICA TIONS …………………………………………………………… 9 T able 2: GXP1 160/GXP 1 165 EQUIPMENT P ACKAGIN G ………………………………………….[…]
-
Страница 5
FIRM WARE VERSION 1.0.5. 26 GX P1 160/GXP1 16 5 USER MANUAL Page 5 of 63 GUI INTERF ACE EXAMPLES http://www . grandstream .com /products/gxp_series/gen eral/docum ents/gxp21xx_gui.zip 1. Screenshot of Login Page 2. Screenshots of S tatus Pages 3. Screenshots of Accounts Pages 4. Screenshots of Settings Pages 5. Screenshots of Network Pages 6. Scree[…]
-
Страница 6
FIRM WARE VERSION 1.0.5. 26 GX P1 160/GXP1 16 5 USER MANUAL Page 6 of 63 GNU GPL INFORMA TION GXP1 160/GXP1 16 5 firmware contain s third-party software licensed under the GNU General Public License (GPL). Gr andstream uses software under the s pecific term s of the GPL. Please see t he GNU General Public License (G PL) for the exact term s a nd co[…]
-
Страница 7
FIRM WARE VERSION 1.0.5. 26 GX P1 160/GXP1 16 5 USER MANUAL Page 7 of 63 CHANGE LO G Th is section documents significant changes from previous versions of user manuals for GXP1 160/GXP1 16 5. O nly m ajor new features or major docum ent updates are listed here. Minor u pdates for correc tions or editing are not docum ented here. FIRMW ARE VERS ION […]
-
Страница 8
FIRM WARE VERSION 1.0.5. 26 GX P1 160/GXP1 16 5 USER MANUAL Page 8 of 63 WELC OME Thank y ou for purchasing Grandstr eam GXP1 160/GX P1 165 Small — Medium Business IP Phone. GXP1 160/GXP1 16 5 is a next generation sm all- to -medium business IP phone t hat features single SI P account, up to 2 c all ap pearances, a 128 x 40 gr aphical LCD, 3 XML pr[…]
-
Страница 9
FIRM WARE VERSION 1.0.5. 26 GX P1 160/GXP1 16 5 USER MANUAL Page 9 of 63 PR ODU CT O VER VIEW FEA TURE HIGHTLIGHTS 128 x 40 pixel grap hical LCD displa y; Single SIP account, up to 2 call ap pearances, 3 XML programm able context-sensi tive soft k eys, 3-way conference; Phonebook with up t o 500 contacts and call histor y with up to 500[…]
-
Страница 10
FIRM WARE VERSION 1.0.5. 26 GX P1 160/GXP1 16 5 USER MANUAL Page 10 of 63 W all Mou nt able Y es QoS Layer 2 (802.1Q, 80 2.1p) and La yer 3 (T oS, DiffServ , MPLS) Qo S Security User and administrator level passwords, MD 5 and MD5 -sess based authentication, 256-bit AES encrypted configuration file, TLS, SR TP , 802.1X media access control Multi-la[…]
-
Страница 11
FIRM WARE VERSION 1.0.5. 26 GX P1 160/GXP1 16 5 USER MANUAL Page 11 of 63 INS T A LLA TI ON EQUIPMENT P A CKA GING T able 2: GXP1 160/GXP1 165 EQUIP MENT P A CK AGING Main Case Y es 1 Handset Y es 1 Phone Cord Y es 1 Power A daptor Y es 1 Ethernet Cable Y es 1 Phone St and Y es 1 Quick St art Guide Y es 1 CONNECTING Y O UR PHONE Figure 1: GXP1 160/[…]
-
Страница 12
FIRM WARE VERSION 1.0.5. 26 GX P1 160/GXP1 16 5 USER MANUAL Page 12 of 63 T able 3: GXP1 160/GXP1 165 CONNEC TORS Handset Port RJ9 Headset Port RJ9 headset con nector por t, sup porting EH S (E lectronic Ho ok -Switch) with Plantronics headsets LAN Port 10/100Mbps RJ-45 port connecting to Et hernet, integrated PoE (GXP1165 only) PC Port 10/100Mbps […]
-
Страница 13
FIRM WARE VERSION 1.0.5. 26 GX P1 160/GXP1 16 5 USER MANUAL Page 13 of 63 S AFETY COMPLIANCES The GXP1160/GXP1165 phone com plies with FCC/CE and vari ous safety sta ndards. The GXP1160/GXP1165 power adapter is com pliant with the UL s tandard. Us e the universa l pow er adapter provided with the GX P1160/GXP1 165 pack age only . The m anufacturer?[…]
-
Страница 14
FIRM WARE VERSION 1.0.5. 26 GX P1 160/GXP1 16 5 USER MANUAL Page 14 of 63 USING THE GXP1160/GXP1165 GETTING F AMILAR WITH THE LCD GXP1 160/GXP1 16 5 has a d ynamic and custom izable screen. T he screen displays differently depe nding on whether the phone is idle or in use (active). The following table describes the items displayed on the GXP1 160/G[…]
-
Страница 15
FIRM WARE VERSION 1.0.5. 26 GX P1 160/GXP1 16 5 USER MANUAL Page 15 of 63 Redial Redials th e l ast dialed num ber after off hook when the re is existed call log. Dial Dials the call out after off hook and entering the num ber . Answer Answers the incom ing call when the phone is ringing. Reject Rejects the incom ing call when the p[…]
-
Страница 16
FIRM WARE VERSION 1.0.5. 26 GX P1 160/GXP1 16 5 USER MANUAL Page 16 of 63 Headset Status. OFF — headset off ON — headset on DND St atus. OFF — Do Not Disturb disabled ON — Do Not Distur b enabled Call Forward St atus. OFF — Call For ward feature disabled ON — Call Forward feature enable d MUT E St atus. OFF — The active call is not m uted ON — The […]
-
Страница 17
FIRM WARE VERSION 1.0.5. 26 GX P1 160/GXP1 16 5 USER MANUAL Page 17 of 63 Phonebook . Brin gs phonebook on screen. Voicemail . Press to re trieve voice m ails. Navigation Ke ys/Menu . Press the 4 nav igation keys to move up/down/left/right; Press the r ound b utton in the ce nter to enter Keypad Configuration MENU when phon e is in idle; ?[…]
-
Страница 18
FIRM WARE VERSION 1.0.5. 26 GX P1 160/GXP1 16 5 USER MANUAL Page 18 of 63 COMPLETING CALLS There are several wa ys to com plete a call on GX P1 160/GX P1 165. On hook dialing. Enter the number when the phone is on hook and then send out . W hen the phone is in idle, enter t he number to be dialed out; Take handset of f hook; or Pr[…]
-
Страница 19
FIRM WARE VERSION 1.0.5. 26 GX P1 160/GXP1 16 5 USER MANUAL Page 19 of 63 Select the phonebook entry you would like to c all using the nav igation «UP» an d «DOW N» arrow ke y s; Press SEND k ey to dial the selected contact. V ia Paging /Intercom. T ake handset off hook; or Press S peaker button; or Press Headset[…]
-
Страница 20
FIRM WARE VERSION 1.0.5. 26 GX P1 160/GXP1 16 5 USER MANUAL Page 20 of 63 Both phones can be conne cted through a router us ing public or private I P addres ses (with neces sary port forwarding or DMZ) . T o make a direct IP call, please f ollow the steps below: Press MENU button to bring up m ain menu; Select «Direct IP Call»[…]
-
Страница 21
FIRM WARE VERSION 1.0.5. 26 GX P1 160/GXP1 16 5 USER MANUAL Page 21 of 63 If you have a SIP ser ver co nfigured, d irect IP c all sti ll wor ks. If you are using STUN, d irect IP call will also use STUN; Configure the «User R andom Port» to «No» when com pleting direct IP calls. ANSWERING PHONE CALL S RECEIVING CALLS […]
-
Страница 22
FIRM WARE VERSION 1.0.5. 26 GX P1 160/GXP1 16 5 USER MANUAL Page 22 of 63 ke y . Call waiting tone (stutter tone) will be audible on new incom ing call during the active call. MUTE During an active call, pre ss the MUTE softkey to m ute/unm ute the m icrophone. T he LCD will show » Ta lking» or «MUTE» to indicate the m ute statu[…]
-
Страница 23
FIRM WARE VERSION 1.0.5. 26 GX P1 160/GXP1 16 5 USER MANUAL Page 23 of 63 automatically placed on hold; Dial th e num ber and press SEND k ey or # to m ake a second call. (Once the num ber is entered, a «Transfer» s oftkey will show . If «T ransfer» softkey is pressed instead of SEND or #, a blind transfer will b e perform e[…]
-
Страница 24
FIRM WARE VERSION 1.0.5. 26 GX P1 160/GXP1 16 5 USER MANUAL Page 24 of 63 on hold separately; Press FLASH ke y to resum e the 2 -wa y conversation with the second established call; If users would like t o re -establish co nference call, before FLAS H k ey is pres sed in t he above step, pres s the ReConf softkey right after the conference c[…]
-
Страница 25
FIRM WARE VERSION 1.0.5. 26 GX P1 160/GXP1 16 5 USER MANUAL Page 25 of 63 This will end the second c all and the screen will show the firs t call on hold. End Conference . Press HOLD k ey to split the co nference call. T he conf erence call will be ended with both calls on hold; Or Users could press the EndCall softke y or sim ply h[…]
-
Страница 26
FIRM WARE VERSION 1.0.5. 26 GX P1 160/GXP1 16 5 USER MANUAL Page 26 of 63 *31 Send Caller ID (f or all subsequent c alls) Off hook the phone; Dial *31. *67 Block Caller ID (p er call) Off hook the phone; Dial *67 and then ent er the num ber to dial out. *82 Send Caller ID (p er call) Off hook the phone; Dial *82 and then ent[…]
-
Страница 27
FIRM WARE VERSION 1.0.5. 26 GX P1 160/GXP1 16 5 USER MANUAL Page 27 of 63 Hang up the call. *92 Delayed Call Forw ard . T o set up delayed call for ward: Off hook the phone; Dial *92 and then enter the num ber to forward the ca ll; Press OK softke y or SEND ke y . *93 Cancel Delayed Call Forw ard . T o cancel the dela yed call for w[…]
-
Страница 28
FIRM WARE VERSION 1.0.5. 26 GX P1 160/GXP1 16 5 USER MANUAL Page 28 of 63 C ONFIGURA T ION GUIDE The GXP1160/GXP 1165 c an be configured via two ways: LCD Configuration Menu us ing the phone’s k eypad; W eb GUI embedded on the phone us ing PC’s web bro wser. CONFIGURA TION VIA KEYP AD To configure the LCD m enu using p hone’s[…]
-
Страница 29
FIRM WARE VERSION 1.0.5. 26 GX P1 160/GXP1 16 5 USER MANUAL Page 29 of 63 Gateway and DNS ser ver . Account X : Reg istered/Not Reg istered. Boot version Prog version : This is the m ain firm ware release number . Core version Ba se version Aux version DSP version M A C addres s HW version P/N number Phone Bo[…]
-
Страница 30
FIRM WARE VERSION 1.0.5. 26 GX P1 160/GXP1 16 5 USER MANUAL Page 30 of 63 Erases custom XML idle sc reen previously loaded on t he phon e. After erasing it, the phone wil l show default idle sc reen. Display Language Selects the langua ge to b e displa yed on t he phone ‘s LCD. Users cou ld select Automatic for loca l language based on I P[…]
-
Страница 31
FIRM WARE VERSION 1.0.5. 26 GX P1 160/GXP1 16 5 USER MANUAL Page 31 of 63 Network Selects IP m ode (DHCP/S tatic IP/PP PoE); Co nfigures PPPoE account ID an d password; Configures IP address, Netmask , Gatewa y , DNS Ser ver 1 and DNS Server 2; Configures 802.1X mode. Call Features Configures call for ward f eatures for For ward All, F orward Bus y[…]
-
Страница 32
FIRM WARE VERSION 1.0.5. 26 GX P1 160/GXP1 16 5 USER MANUAL Page 32 of 63 Figure 3: Keyp ad MENU Flo w Call History St atus Phone Book LDAP Directory Instant Messages Direct IP Call Preference Config Factory Functions Network Call Features V oice Mails Reboot Exit MENU A nswered Calls Dialed Calls Missed Calls T ransferred Calls Forwarded Calls Cle[…]
-
Страница 33
FIRM WARE VERSION 1.0.5. 26 GX P1 160/GXP1 16 5 USER MANUAL Page 33 of 63 CONFIGURA TION VIA WEB BR OW SER The GXP1 160/GXP1 165 em bedded Web server responds to HTTP/HTTPS GET/POST requests. Embedded HTML pages allow a user to configure the IP phone through a Web brow ser such as Microsoft’ s IE, Mozilla Firefox and Google Chrome. T o access the[…]
-
Страница 34
FIRM WARE VERSION 1.0.5. 26 GX P1 160/GXP1 16 5 USER MANUAL Page 34 of 63 Status: Displa ys the Account status, Network status, and S ystem Info of the phone; Account : To conf igure the SIP account ; Network : T o configure network settings; Settings: To c onfigure call f eatures, ring tone, LCD dis play, Web services, X ML a pplic[…]
-
Страница 35
FIRM WARE VERSION 1.0.5. 26 GX P1 160/GXP1 16 5 USER MANUAL Page 35 of 63 Prog: program vers ion num ber . This is th e m ain firm ware release number , which is alwa ys used for identif ying the software system of the phone; Aux: Aux version num ber; Dsp: DSP version num ber . System Up T ime System up tim e since the last reboot. Syst[…]
-
Страница 36
FIRM WARE VERSION 1.0.5. 26 GX P1 160/GXP1 16 5 USER MANUAL Page 36 of 63 DNS Mode This parameter controls how the Search Ap pliance look s up IP addres se s f or hostnames. Ther e are f our m odes: A Record, SRV, N ATPTR/SRV , Us e Configured IP. The default setting is «A Record». If the user wishes to locate the server by DNS SRV, the u[…]
-
Страница 37
FIRM WARE VERSION 1.0.5. 26 GX P1 160/GXP1 16 5 USER MANUAL Page 37 of 63 506 0 for Acc ount 1. SIP Registration Failure Retry Wait T ime Specifies the interval to r etr y registration if the process is failed. The d efault value is 20 seconds. SIP T1 Timeout SIP T1 Tim eout. The default setting is 0.5 seconds. SIP T2 interval SIP T2 Interval. The […]
-
Страница 38
FIRM WARE VERSION 1.0.5. 26 GX P1 160/GXP1 16 5 USER MANUAL Page 38 of 63 Use P-Preferred-Id entit y Header Controls whet her the P-Pref erred-Identit y Header will present in t he SIP INVITE m essage or not . The defa ult setting is «default», which is when «Huawei IM S» spec ial f eature is on, the P-Pr eferred- Identity H ead[…]
-
Страница 39
FIRM WARE VERSION 1.0.5. 26 GX P1 160/GXP1 16 5 USER MANUAL Page 39 of 63 Force T imer If Forc e Timer is set to «Yes», th e phone will use the s ession tim er even if the remote party does not support this feature. If Forc e Tim er is set to «No», th e phone will enable the sess ion tim er only when the rem ote party supports t[…]
-
Страница 40
FIRM WARE VERSION 1.0.5. 26 GX P1 160/GXP1 16 5 USER MANUAL Page 40 of 63 Symmetric RTP Defines wheth er s y mm etric RTP is sup ported or not. The defau lt setting is «No». Silence Suppression Co ntrols the silence suppression/VAD f eature of the aud io co dec G. 723 and G.729. If set to «Yes», w hen silence is detected, a smal[…]
-
Страница 41
FIRM WARE VERSION 1.0.5. 26 GX P1 160/GXP1 16 5 USER MANUAL Page 41 of 63 f) < 2=01 1> — re place digit 2 wi th 01 1 when dialing g) | — the OR o perand Example 1: {[369]1 1 | 1617xxxxxxx } Allow 31 1, 61 1, and 91 1 or any 10 digit num bers with leading di gits 1617 ; Example 2: { ^1900x+ | <=1617>xxx xxxx} Block an y n umber o[…]
-
Страница 42
FIRM WARE VERSION 1.0.5. 26 GX P1 160/GXP1 16 5 USER MANUAL Page 42 of 63 Call Log Configures Call Log settin g on the phone. Y o u can log all c alls, only l og incoming/outgoing calls or disable call log. The default setting is «Log All Calls». Account Ring T one Allows users to c onfigure t he ringtone for the acc ount. Us ers c an cho[…]
-
Страница 43
FIRM WARE VERSION 1.0.5. 26 GX P1 160/GXP1 16 5 USER MANUAL Page 43 of 63 Trans fer on Conference Hangup Defines whether or not the call is transf erred to the other party if the i nitiato r of the conference ha ngs up. The default setting is » No «. No Key Entry Timeout (s) Defines the tim eout (in seconds) f or no key entr y . If no k e[…]
-
Страница 44
FIRM WARE VERSION 1.0.5. 26 GX P1 160/GXP1 16 5 USER MANUAL Page 44 of 63 Settings -> Call Featu res Off-hook Auto Dia l Configures a User ID/extens ion to dial automaticall y when the phone is off hook. T he phone will use the firs t account to dial out. The def ault setting is «No». Off-hook T imeout If conf igured, when the phone is[…]
-
Страница 45
FIRM WARE VERSION 1.0.5. 26 GX P1 160/GXP1 16 5 USER MANUAL Page 45 of 63 System Ring T one Dial T one Message Waiting Ring Back T one Call-Waiting T one Busy T one Reorder T one telecom. The de fault value is North Am erican standard. F requencies should be conf igured with known values to avoid u ncomfortable high pitch sounds. Syntax : f1=val,f […]
-
Страница 46
FIRM WARE VERSION 1.0.5. 26 GX P1 160/GXP1 16 5 USER MANUAL Page 46 of 63 on «Toggle Headset/Speak er» m ode. If set to «Yes», when the phone is in Headset «Toggle Headset/Speaker» mode, bo th headset and speaker will ring on incom ing call. The default settin g is «No». Headset TX gain Configures the tra nsm[…]
-
Страница 47
FIRM WARE VERSION 1.0.5. 26 GX P1 160/GXP1 16 5 USER MANUAL Page 47 of 63 yyyy- mm — dd: 2012 — 07 — 02 mm — dd -yyyy: 07- 02 -2012 dd — mm -yyyy: 02- 07 -2012 dddd, MMMM dd: Fr iday, October 12 MMMM dd, dddd: O ctober 12, Frida y Ti me Displa y Format Configures the time display in 12-hour or 24-hour format on the LCD. The defa[…]
-
Страница 48
FIRM WARE VERSION 1.0.5. 26 GX P1 160/GXP1 16 5 USER MANUAL Page 48 of 63 DHCP Host nam e (Option 12) Specifies the name of the client. This field is optional but ma y be required by some Internet Serv ice Providers. DHCP Vendor Class ID (Option 60) Used by clients and ser vers to exchan ge vendor class ID. PPPoE Account ID Enter the PPPoE ac count[…]
-
Страница 49
FIRM WARE VERSION 1.0.5. 26 GX P1 160/GXP1 16 5 USER MANUAL Page 49 of 63 HTTP Prox y Specifies the HTT P proxy URL f or the phone to send packets to. The proxy s erver will act as an interm ediary to route the packets to the destination. HTTPS Proxy Specifies the HT T PS prox y URL f or t he phone to se nd pack ets to. T he proxy s erver will act […]
-
Страница 50
FIRM WARE VERSION 1.0.5. 26 GX P1 160/GXP1 16 5 USER MANUAL Page 50 of 63 Upgrade Via Allows users to choose the firmware upgrade method: TFTP, HTTP or HTTPS. Firmware Server Path Defines the server pat h for the firm ware serv er. It could b e dif ferent f rom the configuration server f or provisioning. Config Server Path Defines the s erver path […]
-
Страница 51
FIRM WARE VERSION 1.0.5. 26 GX P1 160/GXP1 16 5 USER MANUAL Page 51 of 63 inbound and outb ound calls (INFO le vel); registration status c hange (INFO le vel); nego tiated co dec (INFO level) ; ethernet link up (INFO level) ; SLIC chip except ion (W ARNING and ERROR l evels); mem ory exception (ERROR level) . Send SIP Log Co[…]
-
Страница 52
FIRM WARE VERSION 1.0.5. 26 GX P1 160/GXP1 16 5 USER MANUAL Page 52 of 63 Enable ST AR k ey Keypad locking If set to «Y es «, the keypad can be locked by pr essing and holding the ST AR * ke y for about 4 seconds. A lock icon will sh ow indicat in g the k eypad is lock ed . The default setting is «Y es». Note: W hen the ke yp ad[…]
-
Страница 53
FIRM WARE VERSION 1.0.5. 26 GX P1 160/GXP1 16 5 USER MANUAL Page 53 of 63 Phonebook -> LD AP Server Address Configures the IP address or DNS nam e of the LDAP server. Port Configures the LDAP serv er port. Base Configures the LD AP search base. This is the location i n the direct ory where the search is requested to begin. Example: dc=grandstrea[…]
-
Страница 54
FIRM WARE VERSION 1.0.5. 26 GX P1 160/GXP1 16 5 USER MANUAL Page 54 of 63 LDAP search result. This field allows the users to co nfigure multiple space separated num ber attribute s. Example: telephoneNum ber telephoneNum ber Mobile LDAP Display Name Configures th e entry information to be shown on p hone ‘s LCD. Up to 3 fields can be displa ye[…]
-
Страница 55
FIRM WARE VERSION 1.0.5. 26 GX P1 160/GXP1 16 5 USER MANUAL Page 55 of 63 NAT Traversal It is under Accounts X — > Netw ork Setting s . Default setting is » No «. Enable the device to use N AT traversal when it is be hind f irewall on a private networ k. Select Keep-Alive, Auto, STUN (with ST UN server path configured too) or other[…]
-
Страница 56
FIRM WARE VERSION 1.0.5. 26 GX P1 160/GXP1 16 5 USER MANUAL Page 56 of 63 PUBLIC MODE The G XP1160/GXP1165 supports hot desk ing using public m ode. Und er pub lic m ode, us ers c ould login the ph one with the SIP account User ID and p asswor d. Please follow the s teps below t o conf igure the phone for public m ode: Fill up the SIP serv er a[…]
-
Страница 57
FIRM WARE VERSION 1.0.5. 26 GX P1 160/GXP1 16 5 USER MANUAL Page 57 of 63 ip_address : Phone’s IP Address . phonenumber= 1234 : The num ber for the phone to dial out account= 0 : The account in dex f or the phone to m ake call. T he index is 0 f or ac count 1, 1 fo r account 2, 2 for account 3, and etc. password= admin : The ad[…]
-
Страница 58
FIRM WARE VERSION 1.0.5. 26 GX P1 160/GXP1 16 5 USER MANUAL Page 58 of 63 «Save and App ly» button. W e recommend rebootin g or power ing c y cle the phone after appl ying all the changes. REBO OTING FR OM REMO TE L OC A TIONS Press the «Reboot» button on th e to p ri ght c orner of the web GUI p age to reboot the phon e rem ote[…]
-
Страница 59
FIRM WARE VERSION 1.0.5. 26 GX P1 160/GXP1 16 5 USER MANUAL Page 59 of 63 UPGRADING AND PRO V ISIONING The GX P1 160/GXP1 165 c an be u pgraded via TFTP/HTT P/HTTPS by conf iguring the URL /IP Addres s for the TFTP/HTT P/HTTPS server and selecting a d ownload m ethod. Conf igure a valid URL f or T FTP o r HTTP/HTT PS; the server nam e can be FQDN o[…]
-
Страница 60
FIRM WARE VERSION 1.0.5. 26 GX P1 160/GXP1 16 5 USER MANUAL Page 60 of 63 restart again. Please do not interrupt or power c ycle the phone whe n the upgradin g process is on. Firmware upgrading tak es around 60 seconds in a co ntrolled LAN or 5 -10 m inutes over the Internet. W e recommend com pleting firm ware upgrades in a contr olled LAN en viro[…]
-
Страница 61
FIRM WARE VERSION 1.0.5. 26 GX P1 160/GXP1 16 5 USER MANUAL Page 61 of 63 numbers. i.e., P 2 is associated with the «Admin Password» in the W eb GUI->M aintenance->W eb/T elnet Access page. F or a det ailed parameter list, ple ase refer to the correspo nding firm ware re lease configuration tem plate. W hen the GXP1160/GXP1 165 boot[…]
-
Страница 62
FIRM WARE VERSION 1.0.5. 26 GX P1 160/GXP1 16 5 USER MANUAL Page 62 of 63 REST ORE F ACT OR Y DEF A U L T SET TINGS W arning : Restoring the F actory Def ault Settings wi ll delete al l configuration inform ation on the phon e. Please backup or print all the set tings before y ou restor e t o the factory default settin gs. Grandstream is not respon[…]
-
Страница 63
FIRM WARE VERSION 1.0.5. 26 GX P1 160/GXP1 16 5 USER MANUAL Page 63 of 63 EXPERIENCING THE GXP1160/GXP1165 Please visit our website: h ttp://w ww .gra ndstream.com to receive the m ost up- to -date updates on f irmware releases, additional feat ures, F AQs, documentation and news on new products. W e encourage you to brows e our product related doc[…]