
![]()
E290
You can find the most up-to-date user guide at
www.gigaset.com/manuals

Contents
Contents
Overview . . . . . . . . . . . . . . . . . . . . . . . . . . . . . . . . . . . . . . . . . . . . . . . . . . . . . . . . . . . 5 Safety precautions . . . . . . . . . . . . . . . . . . . . . . . . . . . . . . . . . . . . . . . . . . . . . . . . . . 9 Getting started . . . . . . . . . . . . . . . . . . . . . . . . . . . . . . . . . . . . . . . . . . . . . . . . . . . . 11
Package contents . . . . . . . . . . . . . . . . . . . . . . . . . . . . . . . . . . . . . . . . . . . . . . . . . . . 11 Base . . . . . . . . . . . . . . . . . . . . . . . . . . . . . . . . . . . . . . . . . . . . . . . . . . . . . . . . . . . . . . . . 12 Handset . . . . . . . . . . . . . . . . . . . . . . . . . . . . . . . . . . . . . . . . . . . . . . . . . . . . . . . . . . . . 13
Operating the handset . . . . . . . . . . . . . . . . . . . . . . . . . . . . . . . . . . . . . . . . . . . . . 16
Switch the handset on and off . . . . . . . . . . . . . . . . . . . . . . . . . . . . . . . . . . . . . . . 16 Lock/unlock the keypad . . . . . . . . . . . . . . . . . . . . . . . . . . . . . . . . . . . . . . . . . . . . . 16 Changing the receiver/handsfree volume . . . . . . . . . . . . . . . . . . . . . . . . . . . . 16 Control key . . . . . . . . . . . . . . . . . . . . . . . . . . . . . . . . . . . . . . . . . . . . . . . . . . . . . . . . . 17 Display . . . . . . . . . . . . . . . . . . . . . . . . . . . . . . . . . . . . . . . . . . . . . . . . . . . . . . . . . . . . . 18 Menu navigation . . . . . . . . . . . . . . . . . . . . . . . . . . . . . . . . . . . . . . . . . . . . . . . . . . . . 19
Making calls . . . . . . . . . . . . . . . . . . . . . . . . . . . . . . . . . . . . . . . . . . . . . . . . . . . . . . . 20
Making a call . . . . . . . . . . . . . . . . . . . . . . . . . . . . . . . . . . . . . . . . . . . . . . . . . . . . . . . . 20 Accepting a call . . . . . . . . . . . . . . . . . . . . . . . . . . . . . . . . . . . . . . . . . . . . . . . . . . . . . 21 Handsfree mode . . . . . . . . . . . . . . . . . . . . . . . . . . . . . . . . . . . . . . . . . . . . . . . . . . . . 22 Muting . . . . . . . . . . . . . . . . . . . . . . . . . . . . . . . . . . . . . . . . . . . . . . . . . . . . . . . . . . . . . . 22 Making internal calls . . . . . . . . . . . . . . . . . . . . . . . . . . . . . . . . . . . . . . . . . . . . . . . . 22 Calling Line Identification . . . . . . . . . . . . . . . . . . . . . . . . . . . . . . . . . . . . . . . . . . . 24 Automatic network provider selection (preselection) (if available) . . . . . 24
Call/message lists . . . . . . . . . . . . . . . . . . . . . . . . . . . . . . . . . . . . . . . . . . . . . . . . . . 26
Call list . . . . . . . . . . . . . . . . . . . . . . . . . . . . . . . . . . . . . . . . . . . . . . . . . . . . . . . . . . . . . . 26 Message list . . . . . . . . . . . . . . . . . . . . . . . . . . . . . . . . . . . . . . . . . . . . . . . . . . . . . . . . . 27
Directory . . . . . . . . . . . . . . . . . . . . . . . . . . . . . . . . . . . . . . . . . . . . . . . . . . . . . . . . . . 28 Network mailbox . . . . . . . . . . . . . . . . . . . . . . . . . . . . . . . . . . . . . . . . . . . . . . . . . . 30
Entering the number of the network mailbox . . . . . . . . . . . . . . . . . . . . . . . . 30 Playing messages . . . . . . . . . . . . . . . . . . . . . . . . . . . . . . . . . . . . . . . . . . . . . . . . . . . 30
3

Contents
Additional functions . . . . . . . . . . . . . . . . . . . . . . . . . . . . . . . . . . . . . . . . . . . . . . . 31
Quick access . . . . . . . . . . . . . . . . . . . . . . . . . . . . . . . . . . . . . . . . . . . . . . . . . . . . . . . . 31 Alarm clock . . . . . . . . . . . . . . . . . . . . . . . . . . . . . . . . . . . . . . . . . . . . . . . . . . . . . . . . . 32 Baby monitor . . . . . . . . . . . . . . . . . . . . . . . . . . . . . . . . . . . . . . . . . . . . . . . . . . . . . . . 32 ECO DECT . . . . . . . . . . . . . . . . . . . . . . . . . . . . . . . . . . . . . . . . . . . . . . . . . . . . . . . . . . . 34 Protection from undesired calls . . . . . . . . . . . . . . . . . . . . . . . . . . . . . . . . . . . . . . 35
Extending the functionality of the phone . . . . . . . . . . . . . . . . . . . . . . . . . . . . 36
Multiple handsets . . . . . . . . . . . . . . . . . . . . . . . . . . . . . . . . . . . . . . . . . . . . . . . . . . . 36 Repeater support . . . . . . . . . . . . . . . . . . . . . . . . . . . . . . . . . . . . . . . . . . . . . . . . . . . 37 Operating the base on a router/PABX . . . . . . . . . . . . . . . . . . . . . . . . . . . . . . . . 38
Phone settings . . . . . . . . . . . . . . . . . . . . . . . . . . . . . . . . . . . . . . . . . . . . . . . . . . . . . 39
Date and time . . . . . . . . . . . . . . . . . . . . . . . . . . . . . . . . . . . . . . . . . . . . . . . . . . . . . . . 39 Display . . . . . . . . . . . . . . . . . . . . . . . . . . . . . . . . . . . . . . . . . . . . . . . . . . . . . . . . . . . . . 39 Tones and signals . . . . . . . . . . . . . . . . . . . . . . . . . . . . . . . . . . . . . . . . . . . . . . . . . . . 41 System . . . . . . . . . . . . . . . . . . . . . . . . . . . . . . . . . . . . . . . . . . . . . . . . . . . . . . . . . . . . . . 43
Service (Customer Care) . . . . . . . . . . . . . . . . . . . . . . . . . . . . . . . . . . . . . . . . . . . . 45
Questions and answers . . . . . . . . . . . . . . . . . . . . . . . . . . . . . . . . . . . . . . . . . . . . . . 46
Guarantee Certificate . . . . . . . . . . . . . . . . . . . . . . . . . . . . . . . . . . . . . . . . . . . . . . . . 47
Manufacturer’s advice . . . . . . . . . . . . . . . . . . . . . . . . . . . . . . . . . . . . . . . . . . . . . . 48
|
Authorisation . . . . . . . . . . . . . . . . . . . . . . . . . . . . . . . . . . . . . . . . . . . . . . . . . . . . . . . |
48 |
|
Data protection . . . . . . . . . . . . . . . . . . . . . . . . . . . . . . . . . . . . . . . . . . . . . . . . . . . . . |
48 |
|
Environment . . . . . . . . . . . . . . . . . . . . . . . . . . . . . . . . . . . . . . . . . . . . . . . . . . . . . . . . |
49 |
|
Care . . . . . . . . . . . . . . . . . . . . . . . . . . . . . . . . . . . . . . . . . . . . . . . . . . . . . . . . . . . . . . . . |
50 |
|
Contact with liquid . . . . . . . . . . . . . . . . . . . . . . . . . . . . . . . . . . . . . . . . . . . . . . . . . |
50 |
Technical data . . . . . . . . . . . . . . . . . . . . . . . . . . . . . . . . . . . . . . . . . . . . . . . . . . . . . 51 Menu tree . . . . . . . . . . . . . . . . . . . . . . . . . . . . . . . . . . . . . . . . . . . . . . . . . . . . . . . . . 53 Index . . . . . . . . . . . . . . . . . . . . . . . . . . . . . . . . . . . . . . . . . . . . . . . . . . . . . . . . . . . . . . 55
Not all functions described in the user guide are available in all countries or from all network providers.
4

Overview
Setting the display language ( p. 15)
5
Overview
1 Status bar ( p. 19)
Icons display current settings and the status of the phone 2 Time ( p. 39)
3 number of missed calls
4Display keys
Quick dial ( p. 20); various functions (
 p. 18)
|
5 |
Talk key / Handsfree key |
¤ Press briefly |
|
Accept call; select number displayed; |
||
|
open redial list |
¤ Press and hold |
|
|
Start dialling |
||
|
6 |
Key 1 |
¤ Press and hold |
|
Access network mailbox |
||
|
7 |
Messages key / Star key |
¤ Press and hold |
|
Access to the call and message lists |
||
|
flashes: new message or new call |
¤ Press briefly |
|
|
Switch from pulse dialling to tone dialling |
||
|
8 |
Microphone |
|
|
9 |
Control key / Menu key ( p. 17) |
¤ Press briefly |
|
Open menu; open directory; |
||
|
navigate within menus and input fields |
¤ Press and hold |
|
|
Enable/disable ringtone; change call volume |
||
|
10 |
End call key / On/Off key |
¤ Press briefly |
|
End call; Cancel function; one level back |
||
|
Back to idle mode, switch handset on/off |
¤ Press and hold |
|
|
11 |
Hash key / Lock key |
¤ Press and hold |
|
Lock/unlock the keypad; enter a dialling pause |
||
|
Toggle between upper/lower case and digits |
¤ Press briefly |
|
|
12 |
Recall key ( p. 38) |
¤ Press and hold |
|
Consultation call (flash) |
If multiple functions are listed, the button function depends on the situation.
The colour and shape of your device may be different from the illustration.
6
Overview
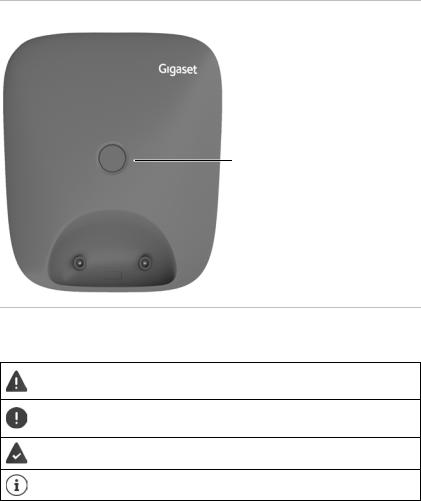
Base
Registration/paging key
Locate a handset (paging):
¤ Press briefly
Registering handsets: ¤ Press and hold
Symbols used in the user guide
Icons
Warnings, the non-adherence to which can result in damage to devices or personal injury.
Important information regarding function and appropriate handling or functions that could generate costs.
Prerequisite for carrying out the following action.
Additional helpful information.
7
Overview
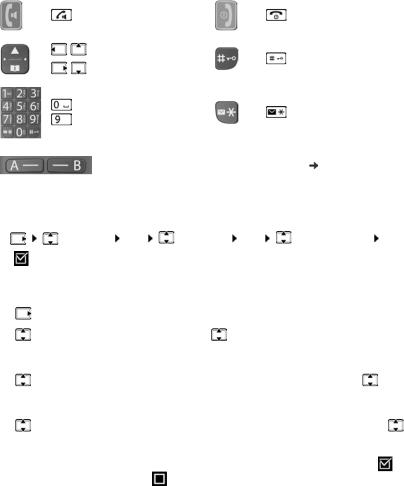
Buttons
|
Key |
Icon |
Meaning |
Key |
Icon |
Meaning |
|||
|
Talk/Handsfree |
End call key |
|||||||
|
key |
||||||||
|
Control key left, |
||||||||
|
top, right, |
Hash key |
|||||||
|
bottom |
||||||||
|
to |
Digit/Letter keys |
Messages/Star |
||||||
|
key |
||||||||
|
Display keys, dependent on situation |
p. 18 |
|||||||
|
Procedures |
||||||||
|
Example: Enabling/disabling Auto Answer: |
||||||||
|
¤ |
Settings OK |
Handset OK |
Auto Answer |
OK |
||||
|
( |
= enabled) |
|||||||
|
Step |
Meaning |
|||||||
|
¤ |
Press right on the control key. The menu is opened. |
|||||||
|
¤ |
Settings |
Use the control key |
to navigate to entry Settings. |
|||||
|
¤ OK |
Press OK to confirm. The Settings submenu is opened. |
|||||||
|
¤ |
Handset |
Select the Handset entry using the control key . |
||||||
|
¤ OK |
Press OK to confirm. The Handset submenu is opened. |
|||||||
|
¤ |
Auto |
Select the Auto Answer entry using the control key . |
||||||
|
Answer |
||||||||
|
¤ OK |
Enable or disable it using OK. Function is enabled |
/ |
||||||
|
disabled . |
||||||||
8

Safety precautions
Safety precautions
Read the safety precautions and the user guide before use.
The device cannot be used in the event of a power failure. In case of a power failure it is also not possible to make emergency calls.
Emergency numbers cannot be dialled if the keypad/display lock is activated!
Use only rechargeable batteries that correspond to the specification (see list of permitted batteries  www.gigaset.com/service). Never use a conventional (non-rechargeable) battery or other battery types as this could result in significant health risks and personal injury. Rechargeable batteries, which are noticeably damaged, must be replaced.
The handset must not be operated if the battery cover is open.
Do not use the devices in environments with a potential explosion hazard (e.g. paint shops).
The devices are not splashproof. For this reason do not install them in a damp environment such as bathrooms or shower rooms.
Use only the power adapter indicated on the device.
Whilst charging, the power socket must be easily accessible.
Remove faulty devices from use or have them repaired by our Service team, as these could interfere with other wireless services.
Do not use the device if the display is cracked or broken. Broken glass or plastic can cause injury to hands and face. Send the device to our Service department to be repaired.
Do not hold the rear of the handset to your ear when it is ringing or when speaker mode is activated. Otherwise you risk serious and permanent damage to your hearing.
The phone may cause interference in analogue hearing aids (humming or whistling) or cause them to overload. If you require assistance, please contact the hearing aid supplier.
9

Safety precautions
Keep small cells and batteries, which can be swallowed, out of the reach of children.
Swallowing a battery can lead to burns, perforation of soft tissue and death. Severe burns can occur within 2 hours of swallowing.
In the case of a swallowed cell or battery, seek medical care immediately.
Using your telephone may affect nearby medical equipment. Be aware of the technical conditions in your particular environment, e.g. doctor’s surgery. If you use a medical device (e.g. a pacemaker), please contact the device manufacturer. They will be able to advise you regarding the susceptibility of the device to external sources of high frequency energy (for the specifications of your Gigaset product see «Technical data»).
10
![]()
Getting started
Getting started
Package contents
•One base, one power adapter, one phone cable
•One handset, two batteries, one battery cover, one user guide Models with multiple handsets, per handset:
•One handset, one charging cradle with power adapter, two batteries and one battery cover
Position the base on a level, non-slip surface at a central point in the flat or house.
The range of the base is 300 metres outdoors and 50 metres indoors.
The base and charging cradle are designed for use in closed, dry rooms within a temperature range of +5°C to +45°C.
The device’s feet do not usually leave any marks on surfaces. However, due to the multitude of different varnishes and polishes used on furniture, contact marks on the surfaces cannot be completely ruled out.
Never expose the telephone to heat sources, direct sunlight or other electrical devices.
Protect your telephone from moisture, dust, corrosive liquids and vapours.
11
Getting started
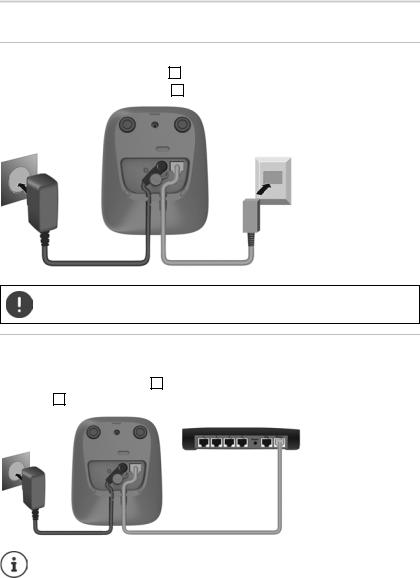
Base
|
Connecting the base to power supply and telephone network |
|||||
|
¤ |
Connecting the phone jack 1 . |
||||
|
¤ |
Connect the power adapter 2 |
and insert the cables into the cable ducts. |
|||
|
2 |
1 |
The power adapter must always be connected as the phone does not work without a power supply.
Connecting the base to the router
You can also operate the telephone on the analogue connection of a router. ¤ Connect the phone jack 1 and connect it to the analogue port of a
router 2 .
Any echoes can be reduced by enabling XES Mode ( p. 38).
12

Getting started
Handset
Connect the charging cradle (if included)
¤Connect the flat plug of the power adapter 1 .  Plug the power adapter into the power socket 2 .
To remove the plug from the charging cradle again: ¤ Press the release button 3 .  Pull out the plug 4 .

 2
2 


 3
3 

13
Getting started
Setting up the handset for use
The display is protected by a plastic film. Please remove the protective film.
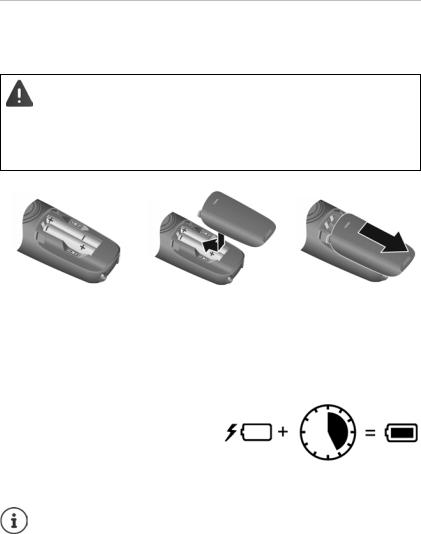
Inserting the batteries
Only use rechargeable batteries, as this could otherwise result in significant health risks and personal injury. For example, the outer casing of the batteries could be damaged beyond repair or the batteries could explode. The device could also malfunction or be damaged as a result of using batteries that are not of the recommended type.
¤Insert the batteries with the polarity in the right direction (refer to the picture for +/- positions).
¤Fit the battery cover from the top.
¤Push the cover closed until it clicks into place.
Charging the batteries
¤Before using batteries the first time, fully charge them in the base or charging cradle.
The batteries are fully charged when the battery icon  disappears from the display.
To re-open the battery cover:
¤Grip the notch on the cover and slide it downwards.
5 h
Batteries can heat up during the charge process. This is not dangerous.
Over time, the charging capacity of the batteries will decrease for technical reasons.
Handsets contained in the package have already been registered to the base. If a handset has not been registered however (Please register handset or Put into base is displayed), please register it manually ( p. 36).
14

15
Operating the handset
Operating the handset
Switch the handset on and off
|
Switching on: |
¤ When the handset is switched off, press and hold the End |
|
call key |
|
|
Switching off: |
¤ When the handset is in idle mode, press and hold the End |
|
call key |
When you place a switched off handset into the base or charging cradle, it switches itself on automatically.
Lock/unlock the keypad
The keypad lock prevents any accidental use of the phone. Lock/unlock the keypad: 
 Press and hold
Keypad lock enabled: The  symbol is shown on the display
If a call is indicated on the handset, the keypad automatically unlocks and you can accept the call. It then locks again when the call is finished.
It is also not possible to call emergency numbers when keypad lock is enabled.
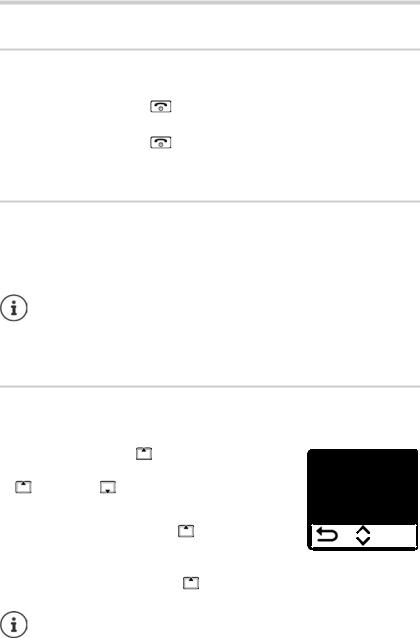
Changing the receiver/handsfree volume
During a call, adjust the volume for receiver or speaker (5 levels + extra loud function).
|
¤ Press the control key |
at the top . . . the current |
Volume |
||||||||
|
¤ |
setting is displayed |
|||||||||
|
(= louder) / |
(= quieter) |
B |
||||||||
|
Extra loud function (Boost) |
||||||||||
|
¤ |
Keep pressing the control key |
at the top until the |
OK |
|||||||
|
highest level is reached |
||||||||||
|
or |
||||||||||
|
¤ |
Press and hold the control key |
at the top . . . the extra loud function is |
enabled immediately
The extra loud setting only applies for the duration of the call.
16
Operating the handset
This setting can result in harm to health for those with normal hearing ability and is only intended for those with a hearing impairment or reduced hearing.
Disruptive noises on the phone line can be increased.
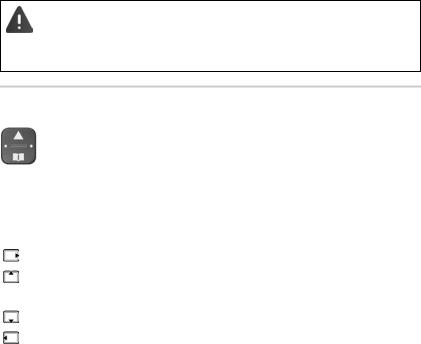
Control key
The control key enables you to navigate the menus and input fields, and also to call up certain functions depending on the situation.
In the description below, the side of the control key is marked with an arrow (up, down, left, right) that must be pressed in the different operating situations, e.g.  for “press right on the control key”.
|
In idle mode |
During a conversation |
|
Open the main menu |
Mute the microphone |
|
Opening the main menu |
Adjust the loudspeaker volume for |
|
Enabling/disabling the ringtone |
receiver and handsfree mode |
|
Open the directory |
Open the directory |
|
Make internal call / |
Initiate an internal consultation |
|
Open list of handsets |
call |
17
Operating the handset
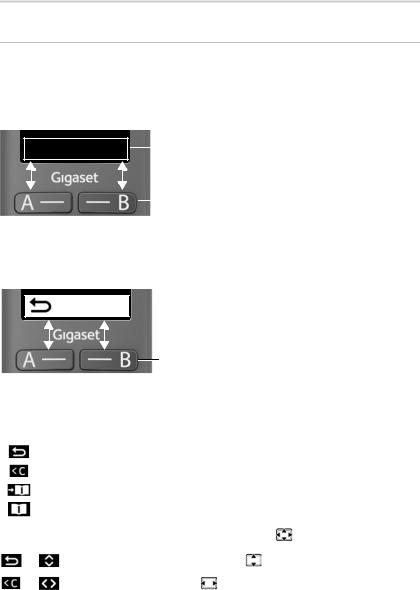
Display
Display keys / Quick access function
The keys under the display perform a range of functions depending on the situation.
In idle mode
|
Mia |
Peter |
Current assignment of display keys A and B for |
||
|
quick access |
||||
|
Display keys with quick access function |
||||
¤ Press the display key . . . the number saved is dialled. Setting up the quick access function:  p. 35
p. 35
From the menu
OK Current display key functions
Display keys
¤ Press the display key . . . Function shown in display above
|
Menu |
Open the submenu |
||
|
Confirm menu function / save entry |
|||
|
OK |
|||
|
Back one menu level |
|||
|
Delete character by character to the left |
|||
|
Copy a number to the directory |
|||
|
Use a number from the directory |
|||
|
Display functions accessed from the control key |
|||
|
Scroll up and down with |
|||
|
Menu |
|||
|
Move the cursor to the left/right |
|||
|
OK |
|||
18
 Loading…
инструкцияGigaset E290

Gigaset E290 / LUG RU ru / A31008-M2901-S301-1-5619 / Cover_front_c.fm / 1/23/20
Последняя полная версия руководства
пользователя представлена по адресу
www.gigaset.com/manuals
E290
Посмотреть инструкция для Gigaset E290 бесплатно. Руководство относится к категории телефоны, 99 человек(а) дали ему среднюю оценку 8. Руководство доступно на следующих языках: русский. У вас есть вопрос о Gigaset E290 или вам нужна помощь? Задайте свой вопрос здесь
- Содержание
- Общие сведения
- Начало работы
- Работа с трубкой
- Совершение вызовов
- Списки вызовов/сообщений
- Телефонный справочник
- Сетевой почтовый ящик
- Дополнительные функции
- Расширение функциональных возможностей телефона
- Настройки телефона
- Служба сервиса и поддержи
- Рекомендации изготовителя
- Технические характеристики
- Обзор меню
- Алфавитный указатель
Телефон Gigaset E290 — это аналоговый/DECT телефон с беспроводным трубкой и встроенным дисплеем. Он оснащен интеркомом и может использоваться в помещении на расстоянии до 50 метров и на открытых пространствах на расстоянии до 300 метров. Диагональ дисплея составляет 2 дюйма, а его разрешение — 96 x 64 пикселя. Дисплей имеет подсветку. Тип звонка — полифонический, с 21 мелодией. Есть 5 уровней громкости для звонка. Телефон можно разместить на столе.
Gigaset E290 — надежный и прочный телефон для домашнего использования. Беспроводная трубка позволяет свободно перемещаться в пределах дома, а подсветка дисплея обеспечивает хорошую видимость в любое время суток. Телефон удобно использовать для внутренней связи и, благодаря большому радиусу действия, он станет идеальным выбором для частных домов и дач. Пользователи смогут выбрать свою любимую мелодию и настроить уровень громкости для звонков. Gigaset E290 — это великолепный выбор для тех, кто ищет надежный и удобный телефон для ежедневного использования.
Главная
| Gigaset | |
| E290 | S30852-H2901-D202 | |
| телефон | |
| 4250366856100, 4250366856247 | |
| русский | |
| Руководство пользователя (PDF) |
Производительность
| Тип | Аналоговый/DECT телефон |
| Автоответчик | Нет |
| Система двусторонней связи | Да |
| Тип телефонной трубки | Беспроводная телефонная трубка |
| Максимальная дальность в помещении | 50 m |
| Максимальная дальность вне помещения | 300 m |
| Тип сигнала вызова | Полифонический |
| Количество мелодий | 21 |
| Количество уровней громкости звонка | 5 |
Экран
| Встроенный экран | Да |
| Диагональ экрана | 2 « |
| Размер дисплея (ГхВ) | 37 x 34 mm |
| Разрешение экрана | 96 x 64 пикселей |
| Дисплей с задней подсветкой | Да |
| Дисплей | LED |
| Цвет подсветки | Белый |
Дизайн
| Тип крепления | Стол |
| Цвет товара | Белый |
| Телефон для пожилых людей | Нет |
| Подсветка кнопок | Да |
| Большие кнопки | Да |
| Блокировка клавиатуры | Да |
Энергопитание
| Тип батареек | AAA |
| Число поддерживаемых батарей | 2 |
| Время работы в режиме разговора | 10 h |
| Время работы в режиме ожидания | 200 h |
| Время подзарядки батареи | 5 h |
| Технология батареи | Никель-металл-гидридный (NiMH) |
Характеристики телефона
| Громкоговоритель | Да |
| Вместимость телефонной книги | 150 записей |
| Поддержка нескольких телефонных трубок | 4 |
| Функция радио-няни | Да |
Управление вызовами
| Идентификация абонента (Caller ID) | Да |
| Повторный набор | Да |
| Вместимость списка повторного набора | 10 |
| Переадресация вызова | Да |
| Индикация номера входящего звонка | Да |
| Блокирование вызовов | Да |
| Таймер звонка | Да |
Характеристики управления
Вес и размеры
| Ширина | 52 mm |
| Глубина | 28 mm |
| Высота | 173 mm |
| Вес | 122 g |
| Размеры базы | 88 x 105 x 48 mm |
| Вага бази | 70 g |
Содержимое упаковки
| Количество трубок в комплекте | 1 |
| Базовая станция | Да |
| Инструкция | Да |
| Гарнитура в комплекте | Да |
показать больше
Не можете найти ответ на свой вопрос в руководстве? Вы можете найти ответ на свой вопрос ниже, в разделе часто задаваемых вопросов о Gigaset E290.
Какой вес Gigaset E290?
Gigaset E290 имеет вес 122 g.
Какой размер экрана Gigaset E290?
Размер экрана Gigaset E290 составляет 2 «.
Какая высота Gigaset E290?
Gigaset E290 имеет высоту 173 mm.
Сколько времени нужно, чтобы зарядить аккумулятор Gigaset E290?
Нужно 5 h чтобы зарядить аккумулятор Gigaset E290.
Какое разрешение экрана дисплея Gigaset E290?
Разрешение экрана Gigaset E290 следующее 96 x 64 пикселей.
Какая ширина Gigaset E290?
Gigaset E290 имеет ширину 52 mm.
Какая толщина Gigaset E290?
Gigaset E290 имеет толщину 28 mm.
Инструкция Gigaset E290 доступно в русский?
Да, руководствоGigaset E290 доступно врусский .
Не нашли свой вопрос? Задайте свой вопрос здесь
-
Gigaset E290-E290A — page 1
…
-
Gigaset E290-E290A — page 2
…
-
Gigaset E290-E290A — page 3
…
-
Gigaset E290-E290A — page 4
…
-
Gigaset E290-E290A — page 5
…
-
Gigaset E290-E290A — page 6
…
-
Gigaset E290-E290A — page 7
…
-
Gigaset E290-E290A — page 8
…
-
Gigaset E290-E290A — page 9
…
-
Gigaset E290-E290A — page 10
…
-
Gigaset E290-E290A — page 11
…
-
Gigaset E290-E290A — page 12
…
-
Gigaset E290-E290A — page 13
…
-
Gigaset E290-E290A — page 14
…
-
Gigaset E290-E290A — page 15
…
-
Gigaset E290-E290A — page 16
…
-
Gigaset E290-E290A — page 17
…
-
Gigaset E290-E290A — page 18
…
-
Gigaset E290-E290A — page 19
…
-
Gigaset E290-E290A — page 20
…
-
Gigaset E290-E290A — page 21
…
-
Gigaset E290-E290A — page 22
…
-
Gigaset E290-E290A — page 23
…
-
Gigaset E290-E290A — page 24
…
-
Gigaset E290-E290A — page 25
…
-
Gigaset E290-E290A — page 26
…
-
Gigaset E290-E290A — page 27
…
-
Gigaset E290-E290A — page 28
…
-
Gigaset E290-E290A — page 29
…
-
Gigaset E290-E290A — page 30
…
-
Gigaset E290-E290A — page 31
…
-
Gigaset E290-E290A — page 32
…
-
Gigaset E290-E290A — page 33
…
-
Gigaset E290-E290A — page 34
…
-
Gigaset E290-E290A — page 35
…
-
Gigaset E290-E290A — page 36
…
-
Gigaset E290-E290A — page 37
…
-
Gigaset E290-E290A — page 38
…
-
Gigaset E290-E290A — page 39
…
-
Gigaset E290-E290A — page 40
…
-
Gigaset E290-E290A — page 41
…
-
Gigaset E290-E290A — page 42
…
-
Gigaset E290-E290A — page 43
…
-
Gigaset E290-E290A — page 44
…
-
Gigaset E290-E290A — page 45
…
-
Gigaset E290-E290A — page 46
…
-
Gigaset E290-E290A — page 47
…
-
Gigaset E290-E290A — page 48
…
-
Gigaset E290-E290A — page 49
…
-
Gigaset E290-E290A — page 50
…
-
Gigaset E290-E290A — page 51
…
-
Gigaset E290-E290A — page 52
…
-
Gigaset E290-E290A — page 53
…
-
Gigaset E290-E290A — page 54
…
-
Gigaset E290-E290A — page 55
…
-
Gigaset E290-E290A — page 56
…
-
Gigaset E290-E290A — page 57
…
-
Gigaset E290-E290A — page 58
…
-
Gigaset E290-E290A — page 59
…
-
Gigaset E290-E290A — page 60
…
-
Gigaset E290-E290A — page 61
…
-
Gigaset E290-E290A — page 62
…
-
Gigaset E290-E290A — page 63
…
-
Gigaset E290-E290A — page 64
…
-
Gigaset E290-E290A — page 65
…
-
Gigaset E290-E290A — page 66
…
-
Gigaset E290-E290A — page 67
…
-
Gigaset E290-E290A — page 68
…
-
Gigaset E290-E290A — page 69
…
![]()
Русский
- Bedienungsanleitung Gigaset E290-E290A
- Gigaset E290-E290A User Manual
- Manual Usuario Gigaset E290-E290A
- Mode d’emploi Gigaset E290-E290A
- Istruzioni Gigaset E290-E290A
- инструкция Gigaset E290-E290A
- Gigaset E290-E290Aの取扱説明書
- Handleiding Gigaset E290-E290A
- Manual de uso Gigaset E290-E290A
Вам нужна инструкция? Мы поможем Вам ее найти и сэкономить Ваше время.
- 69 stron
- 1.09 mb
Изделие Gigaset E290-E290A, а также другие, которыми Вы пользуетесь ежедневно, наверняка вы получили в комплекте с инструкцией обслуживания. Из опыта наших пользователей мы знаем, что большинство из Вас не уделили этому особого внимания. Большая часть инструкций, сразу же после покупки попадает в корзину для мусора вместе с коробкой — это ошибка. Ознакомьтесь с информацией, касающейся инструкции Gigaset E290-E290A, которая поможет Вам в будущем сэкономить нервы и избежать головной боли.
Важная подсказка — не забывайте хотя бы раз прочитать инструкцию Gigaset E290-E290A
Если вы не хотите каждый раз читать информационные брошюры, касающиеся, тех или Gigaset E290-E290A иных изделий, достаточно, прочитать их раз — сразу же после покупки устройства. Вы получите основное знания, касающиеся поддержания изделия Gigaset E290-E290A в хорошем эксплуатационном состоянии, так, чтобы без проблем достигнуть его планируемого цикла работы. Затем инструкцию можно отложить на полку и вернуться к ней только в случае, если вы не уверены, правильно ли проводится техобслуживание изделия. Правильный уход является необходимым элементом Вашего удовольствия Gigaset E290-E290A.
Раз в году пересмотрите шкафчик, в котором держите инструкции для всех устройств, — выбросите те, которыми вы уже не пользуетесься. Это поможет Вам сохранять порядок в своей домашней базе инструкций обслуживания.
Summary of Contents for Gigaset E290-E290A
Что находится в инструкции Gigaset E290-E290A? Почему стоит ее прочитать?
- Гарантия и подробности, касающиеся техобслуживания изделия
Хорошей идеей будет прикрепить чек к странице инструкции. Если что-то плохое случится во время использования Gigaset E290-E290A, у вас будет комплект документов, необходимый для гарантийного ремонта. В этой части инструкции вы найдете информацию об авторизованных сервисных центрахGigaset E290-E290A а также, как самостоятельно правильно ухаживать за оборудованием — так, чтобы не потерять гарантийных прав. - Указания по монтажу и Setup
Не терять нервов и времени на самостоятельную попытку установки и первого запуска изделия. Воспользуйтесь рекомендациями производителя Gigaset E290-E290A чтобы правильно запустить изделие, без лишнего риска повреждения оборудования. - Информация, касающаяся дополнительных запчастей (входящих в комплект а также являющихся опцией)
Пересматривая эту часть документа вы сможете проверить, доставлен ли ваш Gigaset E290-E290A с полним комплектом аксессуаров. Вы также сможете узнать, какие дополнительные запчасти или аксессуары для Gigaset E290-E290A Вы сможете найти и докупить к своему устройству. - Troubleshooting
Самые частые проблемы, касающиеся Gigaset E290-E290A и методы их решения. Это очень полезная часть руководства по обслуживанию — она позволит Вам сэкономить много времени на поиск решений. 90% проблем с Gigaset E290-E290A повторяется у многих пользователей. - Требования, касающиеся питания и энергетический класс
Информация, касающаяся количества потребляемой энергии, а также рекомендации, касающиеся установки и питания Gigaset E290-E290A. Прочитайте, чтобы оптимально пользоваться Gigaset E290-E290A и не использовать большего количества ресурсов, нежели это необходимо для правильной работы изделия. - Специальные функции Gigaset E290-E290A
Здесь вы можешь узнать, как персонализировать изделие Gigaset E290-E290A. Вы узнаете, какие дополнительные функции могут помочь Вам удобно использовать продукт Gigaset E290-E290A а также, какие функции Вашего устройства оптимальны для выполнения конкретной деятельности.
Как видите в инструкции вы найдете информацию, которая реально поможет Вам в использовании Вашего изделия. Стоит с ней ознакомиться, чтобы избежать разочарований, возникающих из более короткого, нежели предусматривалось, периода исправности изделия Gigaset E290-E290A. Если все же вы не хотите копить инструкции в своем доме, наш сайт поможет Вам в этом — вы должны найти у нас руководство по обслуживанию большинства из своих устройств, а также Gigaset E290-E290A.