
Casio Watch Line: G-Shock
Module number: 5612
Manual in PDF: Watch 5612 Online → (without downloading, good for mobile);
English Instruction Manual in PDF: Download
Like your watch? Enjoy our recent news about GA-140 Series


All G-Shock GA-140 News →
GA-140 Profile / Casio G-Shock
Average Amazon Price: $90 (yes, we may earn a commission on qualifying purchases from our links to Amazon). Check the Price on Amazon →
Year of first release: 2019
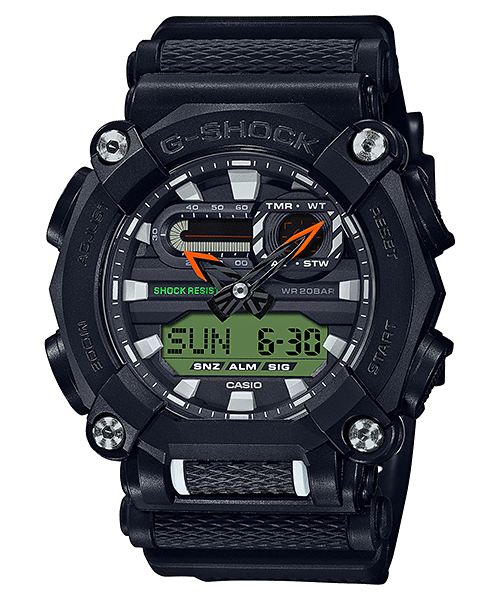
STANDART ANA-DIGI (This Line includes Digital and Analog displays on G-Shocks that are the best in “price/quality” category. Usually have traditional digital functions, but with beautiful hands. Don’t worry, the hands won’t prevent you from seeing digits, since there is a special Hand Shift technology that moves them to the neutral position) All G-Shock Standart Ana-Digi Watches →
Best for: Teenagers, Top in G-Shock Lookbooks, Artists, Singers, Dancers…
The most distinctive specs:
– 200-meter water resistance (good for swimming but not for deep diving)
– Speed measurement (if you know the distance, you will know the speed in your watch)
– ISO 764 class magnetic resistant (A magnetic-resistant plate is mounted on the module. The plate prevents magnetic fields from interfering with proper movement of the hands in daily use)
Other colors and full specs: GA-140 Wiki Page
G-Shock GA-140 Rating System

| Size | ★★ |
| Weight | ★★ |
| Functions | ★★★ |
| Materials | ★★★★ |
| Battery Years | ★★ |
| Price | ★★★★★ |
Other G-Shock GA Watches *similar by price and functions but different by cases


These are not all G-Shock GA Series. Here is a list of All G-Shock GA Watches →
Требуется руководство для вашей Casio G-Shock GA-140-1A1ER Наручные часы? Ниже вы можете просмотреть и загрузить бесплатно руководство в формате PDF. Кроме того, приведены часто задаваемые вопросы, рейтинг изделия и отзывы пользователей, что позволит оптимально использовать ваше изделие. Если это не то руководство, которое вы искали, – свяжитесь с нами.
Ваше устройство неисправно, и в руководстве отсутствует решение? Перейдите в Repair Café для получения бесплатных ремонтных услуг.
Руководство

Рейтинг
Сообщите нам, что вы думаете о Casio G-Shock GA-140-1A1ER Наручные часы, оставив оценку продукта. Хотите поделиться вашими впечатлениями от данного изделия или задать вопрос? Вы можете оставить комментарий в нижней части страницы.
Довольны ли вы данным изделием Casio?
Да Нет
8 голоса
Часто задаваемые вопросы
Наша служба поддержки выполняет поиск полезной информации по изделиям и отвечает на часто задаваемые вопросы. Если вы заметили неточность в наших часто задаваемых вопросах, сообщите нам об этом с помощью нашей контактной формы.
Мои механические часы быстро бегают, что мне делать? Проверенный
Это может быть вызвано воздействием магнитного поля. Ее можно решить с помощью процесса размагничивания, выполняемого профессиональным часовщиком.
Это было полезно (639)
Аккумулятор в моем устройстве окислился, могу ли я его безопасно использовать? Проверенный
Ja, устройство все еще можно безопасно использовать. Во-первых снимаем оксидизд АКБ. Никогда не используйте для этого голые руки. Затем протрите батарейный отсек ватным тампоном, смоченным уксусом или лимонным соком. Дайте ему высохнуть и вставьте новые батарейки.
Это было полезно (618)
Что означают AM и PM? Проверенный
AM означает Ante Meridiem и указывает на то, что время еще до полудня. PM расшифровывается как Post Meridiem и указывает на то, что время прошло после полудня.
Это было полезно (558)
Что такое хронограф? Проверенный
Хронограф дословно означает «писатель времени». Этим термином называют наручные и другие виды часов, которые не только показывают который час, но и могут измерить определенный промежуток времени, как секундомер.
Это было полезно (500)
Что такое кварцевый механизм? Проверенный
Наручные и другие виды часов с кварцевым механизмом работают на батарейке. Батарейка посылает электрический ток через кристаллы кварца, заставляя их вибрировать. Эти вибрации приводят часовой механизм в действие. Поскольку кварц вибрирует с фиксированной частотой, часы с кварцевым механизмом чрезвычайно точны.
Это было полезно (336)
Что такое GMT? Проверенный
GMT означает среднее время по Гринвичу (иногда его называют UTC, что означает всемирное координированное время). Это время для долготы 0, которая проходит через Гринвич недалеко от Лондона.
Это было полезно (332)
Под стеклом моих часов Casio появилась влага. Что мне делать? Проверенный
Casio утверждают, что если влага появляется после экстремального изменения температуры и впоследствии относительно быстро исчезает, то в этом нет ничего плохого. Если влага не исчезает, необходимо как можно скорее отремонтировать часы.
Это было полезно (45)

Operation Guide 5612 5613
E-9
To set the digital time and date
1. In the Timekeeping Mode, hold down
A
for at least
three seconds until the currently selected city code
flashes in the lower digital display. This is the setting
mode.
2. Use
D
(east) and
B
(west) to display the city code
you want to select.
• Make sure you select your Home City code before
changing any other setting.
• For full information on city codes, see the “City Code
Table” at the back of this manual.
City code
PM indicator
Hour
Seconds
Minutes
E-8
Timekeeping
You can adjust the Home Time city date and time in the Timekeeping Mode.
• The analog time of this watch is synchronized with the digital time. The analog time
setting is adjusted automatically whenever you change the digital time.
• If the analog time does not match the digital time for any reason, use the procedure
described under “To adjust home positions” (page E-44) to match the analog setting to
the digital setting.
• Pressing
D
in the Timekeeping Mode toggles digital display between the Home
City Date and Home City Time.
Home City Date Home City Time
Day of week
Month Day PM indicator Hour : Minutes
Day of week SecondsSeconds
D
E-7
Alarm Mode
(page E-34)
Countdown Timer Mode
(page E-26)
World Time Mode
(page E-30)
Stopwatch Mode
(page E-14)
C
C
C
E-6
General Guide
• Press
C
to change from mode to mode.
• In any mode (except a setting mode), press
B
to illuminate the face.
Timekeeping Mode
C
C
E-5
Illumination ……………………………………………………………………………E-39
To illuminate the face manually ………………………………………………E-39
To specify the illumination duration……………………………………………E-40
To turn the auto light switch on and off ………………………………………E-43
Hand Home Position Correction ……………………………………………………E-44
To adjust home positions ………………………………………………………E-44
Reference ………………………………………………………………………………E-46
Specifications …………………………………………………………………………E-50
Operating Precautions ………………………………………………………………E-52
User Maintenance ……………………………………………………………………E-63
E-4
Countdown Timer………………………………………………………………………E-26
To use the countdown timer ……………………………………………………E-27
To configure countdown start time and auto-repeat settings ………………E-28
World Time ………………………………………………………………………………E-30
To view the current time in another time zone ………………………………E-31
To toggle a city code time between Standard Time and
Daylight Saving Time ………………………………………………………E-32
To swap your Home City and World Time City ………………………………E-33
Alarms ……………………………………………………………………………………E-34
To set an alarm time ……………………………………………………………E-35
To turn an alarm on and off ……………………………………………………E-37
To turn the Hourly Time Signal on and off ……………………………………E-38
E-3
Contents
General Guide ………………………………………………………………………… E-6
Timekeeping …………………………………………………………………………… E-8
To set the digital time and date ……………………………………………… E-9
To change the Daylight Saving Time (summer time) setting ………………E-12
Stopwatch ………………………………………………………………………………E-14
To specify a distance value ……………………………………………………E-16
To specify lap time or split time readings ……………………………………E-19
To perform elapsed time measurement ………………………………………E-20
To set up the stopwatch to take lap time readings …………………………E-21
To perform a lap time measurement …………………………………………E-22
To set up the stopwatch to take split time readings …………………………E-23
To perform a split time measurement …………………………………………E-24
To measure times with the stopwatch ………………………………………E-25
E-2
• Each section of this manual provides you with the information you need to perform
operations in each mode. Further details and technical information can be found in
the “Reference” section.
• To ensure that this watch provides you with the years of service for which it is
designed, carefully read and follow the instructions under “Operating Precautions”
and “User Maintenance.”
E-1
About This Manual
• Depending on the model of your watch, digital display text appears either as dark
figures on a light background or light figures on a dark background. All sample
displays in this manual are shown using dark figures on a light background.
• Button operations are indicated using the letters shown in the illustration.
• Note that the product illustrations in this manual are intended for reference only,
and so the actual product may appear somewhat different than depicted by an
illustration.
MO1906-EA
© 2019 CASIO COMPUTER CO., LTD.
Casio Watch Line: G-Shock
Module number: 5612
Manual in PDF: Watch 5612 Online → (without downloading, good for mobile);
English Instruction Manual in PDF: Download
Like your watch? Enjoy our recent news about GA-140 Series
All G-Shock GA-140 News →
GA-140 Profile / Casio G-Shock
Average Amazon Price: $90 (yes, we may earn a commission on qualifying purchases from our links to Amazon). Check the Price on Amazon →
Year of first release: 2019
STANDART ANA-DIGI (This Line includes Digital and Analog displays on G-Shocks that are the best in “price/quality” category. Usually have traditional digital functions, but with beautiful hands. Don’t worry, the hands won’t prevent you from seeing digits, since there is a special Hand Shift technology that moves them to the neutral position) All G-Shock Standart Ana-Digi Watches →
Best for: Teenagers, Top in G-Shock Lookbooks, Artists, Singers, Dancers…
The most distinctive specs:
– 200-meter water resistance (good for swimming but not for deep diving)
– Speed measurement (if you know the distance, you will know the speed in your watch)
– ISO 764 class magnetic resistant (A magnetic-resistant plate is mounted on the module. The plate prevents magnetic fields from interfering with proper movement of the hands in daily use)
Other colors and full specs: GA-140 Wiki Page
G-Shock GA-140 Rating System
| Size | ★★ |
| Weight | ★★ |
| Functions | ★★★ |
| Materials | ★★★★ |
| Battery Years | ★★ |
| Price | ★★★★★ |
Other G-Shock GA Watches *similar by price and functions but different by cases
These are not all G-Shock GA Series. Here is a list of All G-Shock GA Watches →
-
Tags
GA-140
Смотреть руководство для Casio G-Shock GA-140BMC-1AER ниже. Все руководства на ManualsCat.com могут просматриваться абсолютно бесплатно. Нажав кнопку «Выбор языка» вы можете изменить язык руководства, которое хотите просмотреть.

MANUALSCAT | RU
Вопросы и ответы
У вас есть вопрос о Casio G-Shock GA-140BMC-1AER, но вы не можете найти ответ в пользовательском руководстве? Возможно, пользователи ManualsCat.com смогут помочь вам и ответят на ваш вопрос. Заполните форму ниже — и ваш вопрос будет отображаться под руководством для Casio G-Shock GA-140BMC-1AER. Пожалуйста, убедитесь, что вы опишите свои трудности с Casio G-Shock GA-140BMC-1AER как можно более детально. Чем более детальным является ваш вопрос, тем более высоки шансы, что другой пользователь быстро ответит на него. Вам будет автоматически отправлено электронное письмо, чтобы проинформировать вас, когда кто-то из пользователей ответит на ваш вопрос.
Задать вопрос о Casio G-Shock GA-140BMC-1AER
- Бренд:
- Casio
- Продукт:
- часы
- Модель/название:
- G-Shock GA-140BMC-1AER
- Тип файла:
- Доступные языки:
- английский
Сопутствующие товары Casio G-Shock GA-140BMC-1AER

Operation Guide 5612 5613
E-9
To set the digital time and date
1. In the Timekeeping Mode, hold down
A
for at least
three seconds until the currently selected city code
flashes in the lower digital display. This is the setting
mode.
2. Use
D
(east) and
B
(west) to display the city code
you want to select.
• Make sure you select your Home City code before
changing any other setting.
• For full information on city codes, see the “City Code
Table” at the back of this manual.
City code
PM indicator
Hour
Seconds
Minutes
E-8
Timekeeping
You can adjust the Home Time city date and time in the Timekeeping Mode.
• The analog time of this watch is synchronized with the digital time. The analog time
setting is adjusted automatically whenever you change the digital time.
• If the analog time does not match the digital time for any reason, use the procedure
described under “To adjust home positions” (page E-44) to match the analog setting to
the digital setting.
• Pressing
D
in the Timekeeping Mode toggles digital display between the Home
City Date and Home City Time.
Home City Date Home City Time
Day of week
Month Day PM indicator Hour : Minutes
Day of week SecondsSeconds
D
E-7
Alarm Mode
(page E-34)
Countdown Timer Mode
(page E-26)
World Time Mode
(page E-30)
Stopwatch Mode
(page E-14)
C
C
C
E-6
General Guide
• Press
C
to change from mode to mode.
• In any mode (except a setting mode), press
B
to illuminate the face.
Timekeeping Mode
C
C
E-5
Illumination ……………………………………………………………………………E-39
To illuminate the face manually ………………………………………………E-39
To specify the illumination duration……………………………………………E-40
To turn the auto light switch on and off ………………………………………E-43
Hand Home Position Correction ……………………………………………………E-44
To adjust home positions ………………………………………………………E-44
Reference ………………………………………………………………………………E-46
Specifications …………………………………………………………………………E-50
Operating Precautions ………………………………………………………………E-52
User Maintenance ……………………………………………………………………E-63
E-4
Countdown Timer………………………………………………………………………E-26
To use the countdown timer ……………………………………………………E-27
To configure countdown start time and auto-repeat settings ………………E-28
World Time ………………………………………………………………………………E-30
To view the current time in another time zone ………………………………E-31
To toggle a city code time between Standard Time and
Daylight Saving Time ………………………………………………………E-32
To swap your Home City and World Time City ………………………………E-33
Alarms ……………………………………………………………………………………E-34
To set an alarm time ……………………………………………………………E-35
To turn an alarm on and off ……………………………………………………E-37
To turn the Hourly Time Signal on and off ……………………………………E-38
E-3
Contents
General Guide ………………………………………………………………………… E-6
Timekeeping …………………………………………………………………………… E-8
To set the digital time and date ……………………………………………… E-9
To change the Daylight Saving Time (summer time) setting ………………E-12
Stopwatch ………………………………………………………………………………E-14
To specify a distance value ……………………………………………………E-16
To specify lap time or split time readings ……………………………………E-19
To perform elapsed time measurement ………………………………………E-20
To set up the stopwatch to take lap time readings …………………………E-21
To perform a lap time measurement …………………………………………E-22
To set up the stopwatch to take split time readings …………………………E-23
To perform a split time measurement …………………………………………E-24
To measure times with the stopwatch ………………………………………E-25
E-2
• Each section of this manual provides you with the information you need to perform
operations in each mode. Further details and technical information can be found in
the “Reference” section.
• To ensure that this watch provides you with the years of service for which it is
designed, carefully read and follow the instructions under “Operating Precautions”
and “User Maintenance.”
E-1
About This Manual
• Depending on the model of your watch, digital display text appears either as dark
figures on a light background or light figures on a dark background. All sample
displays in this manual are shown using dark figures on a light background.
• Button operations are indicated using the letters shown in the illustration.
• Note that the product illustrations in this manual are intended for reference only,
and so the actual product may appear somewhat different than depicted by an
illustration.
MO1906-EA
© 2019 CASIO COMPUTER CO., LTD.
| Характеристики | |
|---|---|
|
Пол |
Мужские |
|
Материал корпуса |
Каучук |
|
Цвет браслета |
Черный |
|
Цвет циферблата |
Разноцветный |
|
Тип батареи |
От батарейки |
|
Водонепроницаемость |
200 м |
|
Форма |
Круглая |
|
Стекло |
Минеральное |
|
Циферблат |
Комбинированный |
|
Будильник |
есть |
|
Второй часовой пояс |
есть |
|
Секундомер |
есть |
|
Таймер |
есть |
|
Функции |
Отображение времени в формате 12/24 |
|
Тип механизма |
Кварц |
|
Отображение даты |
День недели, Месяц, Число |
|
Страна производитель |
Япония |
|
Подсветка |
Дисплея, Стрелок |
|
Цифры |
Нет |
|
Вес |
72 г |
|
Размеры |
51.20x55x16.90 мм |
|
Дополнительно |
будильник (количество установок: 5), ремешок из полимерного материала, Секундная стрелка отсутствует |
Описание
Каучуковый корпус
Корпус из каучука может противостоять самым сильным ударам без потери своего внешнего вида и качеств.
Часы на батарейке
Ход кварцевого механизма осуществляется энергией от батарейки. Срок службы батарейки — несколько лет, после чего ее нужно будет заменить.
Водонепроницаемость — 200 м
Эти часы имеют водозащиту 20 bar и выдерживают давление в 20 атмосфер. Производитель на специальном оборудовании проверяет герметичность часов при нагрузке 20 бар. Значение 200 метров не является эквивалентом погружения под воду на глубину 200 метров и является теоретическим значением. На практике атмосферное давление, движения руками, удары, возраст прокладок в часах влияют на водонепроницаемость. Часы с таким параметром производитель рекомендует использовать при плавании, нырянии и погружении
Минеральное часовое стекло
Минеральное стекло — самый распространенный материал для часов. Это тот же материал, который используется для окон, но в случае с часами, стекло еще дополнительно закаливают, чтобы оно стало прочнее. Тем не менее его все равно легче поцарапать, чем сапфировое стекло. Из плюсов — не колкое как сапфировое стекло. При прямом ударе по стеклу только разбивается, сапфировое стекло раскалывается пополам.
Будильник
Все мы знаем как работает будильник=p. В разных часах бывают от 1 до 10 различных записей для будильника. Количество ячеек памяти для будильника лучше уточнить в инструкции к часам, прикрепленной под характеристиками.
Второй часовой пояс
Часы с показом времени в двух часовых поясах. Время выводится или в дополнительном циферблате, или нажатием кнопки (в зависимости от модели).
Отображение времени в формате 12/24
Часы с данной функцией способны показать время в 12 и 24 часовом форматах.
Секундомер
Секундомер — функция для того, чтобы засечь время.
Таймер
Таймер — спортивная функция, встроенная в эти часы. Позволит засечь время, по истечении которого часы дадут сигнал. Удобно для тех, кому необходимо выполнять упражнения по времени.
Кварцевые часы
Кварцевые часы используют энергию батареи. Считаются более точными и удобными.
Подсветка всего дисплея
В этих часах предусмотрена подсветка всего дисплея: светодиодная (LED), электролюминесцентная (за счет преобразования электричества в свет воздействием на атомы фосфора) или тритиевая (может быть самых разных цветов), — в зависимости от модели.
Подсветка стрелок
У этой модели часов на стрелки нанесен накапливающий свет флуоресцирующий материал, за счет которого обеспечивается свечение стрелок в темноте.
Нашли ошибку в тексте? Выделите ее и нажмите Ctrl+Enter

Operation Guide 5612 5613
E-9
To set the digital time and date
1. In the Timekeeping Mode, hold down
A
for at least
three seconds until the currently selected city code
flashes in the lower digital display. This is the setting
mode.
2. Use
D
(east) and
B
(west) to display the city code
you want to select.
• Make sure you select your Home City code before
changing any other setting.
• For full information on city codes, see the “City Code
Table” at the back of this manual.
City code
PM indicator
Hour
Seconds
Minutes
E-8
Timekeeping
You can adjust the Home Time city date and time in the Timekeeping Mode.
• The analog time of this watch is synchronized with the digital time. The analog time
setting is adjusted automatically whenever you change the digital time.
• If the analog time does not match the digital time for any reason, use the procedure
described under “To adjust home positions” (page E-44) to match the analog setting to
the digital setting.
• Pressing
D
in the Timekeeping Mode toggles digital display between the Home
City Date and Home City Time.
Home City Date Home City Time
Day of week
Month Day PM indicator Hour : Minutes
Day of week SecondsSeconds
D
E-7
Alarm Mode
(page E-34)
Countdown Timer Mode
(page E-26)
World Time Mode
(page E-30)
Stopwatch Mode
(page E-14)
C
C
C
E-6
General Guide
• Press
C
to change from mode to mode.
• In any mode (except a setting mode), press
B
to illuminate the face.
Timekeeping Mode
C
C
E-5
Illumination ……………………………………………………………………………E-39
To illuminate the face manually ………………………………………………E-39
To specify the illumination duration……………………………………………E-40
To turn the auto light switch on and off ………………………………………E-43
Hand Home Position Correction ……………………………………………………E-44
To adjust home positions ………………………………………………………E-44
Reference ………………………………………………………………………………E-46
Specifications …………………………………………………………………………E-50
Operating Precautions ………………………………………………………………E-52
User Maintenance ……………………………………………………………………E-63
E-4
Countdown Timer………………………………………………………………………E-26
To use the countdown timer ……………………………………………………E-27
To configure countdown start time and auto-repeat settings ………………E-28
World Time ………………………………………………………………………………E-30
To view the current time in another time zone ………………………………E-31
To toggle a city code time between Standard Time and
Daylight Saving Time ………………………………………………………E-32
To swap your Home City and World Time City ………………………………E-33
Alarms ……………………………………………………………………………………E-34
To set an alarm time ……………………………………………………………E-35
To turn an alarm on and off ……………………………………………………E-37
To turn the Hourly Time Signal on and off ……………………………………E-38
E-3
Contents
General Guide ………………………………………………………………………… E-6
Timekeeping …………………………………………………………………………… E-8
To set the digital time and date ……………………………………………… E-9
To change the Daylight Saving Time (summer time) setting ………………E-12
Stopwatch ………………………………………………………………………………E-14
To specify a distance value ……………………………………………………E-16
To specify lap time or split time readings ……………………………………E-19
To perform elapsed time measurement ………………………………………E-20
To set up the stopwatch to take lap time readings …………………………E-21
To perform a lap time measurement …………………………………………E-22
To set up the stopwatch to take split time readings …………………………E-23
To perform a split time measurement …………………………………………E-24
To measure times with the stopwatch ………………………………………E-25
E-2
• Each section of this manual provides you with the information you need to perform
operations in each mode. Further details and technical information can be found in
the “Reference” section.
• To ensure that this watch provides you with the years of service for which it is
designed, carefully read and follow the instructions under “Operating Precautions”
and “User Maintenance.”
E-1
About This Manual
• Depending on the model of your watch, digital display text appears either as dark
figures on a light background or light figures on a dark background. All sample
displays in this manual are shown using dark figures on a light background.
• Button operations are indicated using the letters shown in the illustration.
• Note that the product illustrations in this manual are intended for reference only,
and so the actual product may appear somewhat different than depicted by an
illustration.
MO1906-EA
© 2019 CASIO COMPUTER CO., LTD.
Требуется руководство для вашей Casio G-Shock GA-140-1A1ER Наручные часы? Ниже вы можете просмотреть и загрузить бесплатно руководство в формате PDF. Кроме того, приведены часто задаваемые вопросы, рейтинг изделия и отзывы пользователей, что позволит оптимально использовать ваше изделие. Если это не то руководство, которое вы искали, – свяжитесь с нами.
Ваше устройство неисправно, и в руководстве отсутствует решение? Перейдите в Repair Café для получения бесплатных ремонтных услуг.
Руководство
Рейтинг
Сообщите нам, что вы думаете о Casio G-Shock GA-140-1A1ER Наручные часы, оставив оценку продукта. Хотите поделиться вашими впечатлениями от данного изделия или задать вопрос? Вы можете оставить комментарий в нижней части страницы.
Довольны ли вы данным изделием Casio?
Да Нет
8 голоса
Часто задаваемые вопросы
Наша служба поддержки выполняет поиск полезной информации по изделиям и отвечает на часто задаваемые вопросы. Если вы заметили неточность в наших часто задаваемых вопросах, сообщите нам об этом с помощью нашей контактной формы.
Мои механические часы быстро бегают, что мне делать? Проверенный
Это может быть вызвано воздействием магнитного поля. Ее можно решить с помощью процесса размагничивания, выполняемого профессиональным часовщиком.
Это было полезно (639)
Аккумулятор в моем устройстве окислился, могу ли я его безопасно использовать? Проверенный
Ja, устройство все еще можно безопасно использовать. Во-первых снимаем оксидизд АКБ. Никогда не используйте для этого голые руки. Затем протрите батарейный отсек ватным тампоном, смоченным уксусом или лимонным соком. Дайте ему высохнуть и вставьте новые батарейки.
Это было полезно (618)
Что означают AM и PM? Проверенный
AM означает Ante Meridiem и указывает на то, что время еще до полудня. PM расшифровывается как Post Meridiem и указывает на то, что время прошло после полудня.
Это было полезно (558)
Что такое хронограф? Проверенный
Хронограф дословно означает «писатель времени». Этим термином называют наручные и другие виды часов, которые не только показывают который час, но и могут измерить определенный промежуток времени, как секундомер.
Это было полезно (500)
Что такое кварцевый механизм? Проверенный
Наручные и другие виды часов с кварцевым механизмом работают на батарейке. Батарейка посылает электрический ток через кристаллы кварца, заставляя их вибрировать. Эти вибрации приводят часовой механизм в действие. Поскольку кварц вибрирует с фиксированной частотой, часы с кварцевым механизмом чрезвычайно точны.
Это было полезно (336)
Что такое GMT? Проверенный
GMT означает среднее время по Гринвичу (иногда его называют UTC, что означает всемирное координированное время). Это время для долготы 0, которая проходит через Гринвич недалеко от Лондона.
Это было полезно (332)
Под стеклом моих часов Casio появилась влага. Что мне делать? Проверенный
Casio утверждают, что если влага появляется после экстремального изменения температуры и впоследствии относительно быстро исчезает, то в этом нет ничего плохого. Если влага не исчезает, необходимо как можно скорее отремонтировать часы.
Это было полезно (45)

Operation Guide 5612 5613
E-9
To set the digital time and date
1. In the Timekeeping Mode, hold down
A
for at least
three seconds until the currently selected city code
flashes in the lower digital display. This is the setting
mode.
2. Use
D
(east) and
B
(west) to display the city code
you want to select.
• Make sure you select your Home City code before
changing any other setting.
• For full information on city codes, see the “City Code
Table” at the back of this manual.
City code
PM indicator
Hour
Seconds
Minutes
E-8
Timekeeping
You can adjust the Home Time city date and time in the Timekeeping Mode.
• The analog time of this watch is synchronized with the digital time. The analog time
setting is adjusted automatically whenever you change the digital time.
• If the analog time does not match the digital time for any reason, use the procedure
described under “To adjust home positions” (page E-44) to match the analog setting to
the digital setting.
• Pressing
D
in the Timekeeping Mode toggles digital display between the Home
City Date and Home City Time.
Home City Date Home City Time
Day of week
Month Day PM indicator Hour : Minutes
Day of week SecondsSeconds
D
E-7
Alarm Mode
(page E-34)
Countdown Timer Mode
(page E-26)
World Time Mode
(page E-30)
Stopwatch Mode
(page E-14)
C
C
C
E-6
General Guide
• Press
C
to change from mode to mode.
• In any mode (except a setting mode), press
B
to illuminate the face.
Timekeeping Mode
C
C
E-5
Illumination ……………………………………………………………………………E-39
To illuminate the face manually ………………………………………………E-39
To specify the illumination duration……………………………………………E-40
To turn the auto light switch on and off ………………………………………E-43
Hand Home Position Correction ……………………………………………………E-44
To adjust home positions ………………………………………………………E-44
Reference ………………………………………………………………………………E-46
Specifications …………………………………………………………………………E-50
Operating Precautions ………………………………………………………………E-52
User Maintenance ……………………………………………………………………E-63
E-4
Countdown Timer………………………………………………………………………E-26
To use the countdown timer ……………………………………………………E-27
To configure countdown start time and auto-repeat settings ………………E-28
World Time ………………………………………………………………………………E-30
To view the current time in another time zone ………………………………E-31
To toggle a city code time between Standard Time and
Daylight Saving Time ………………………………………………………E-32
To swap your Home City and World Time City ………………………………E-33
Alarms ……………………………………………………………………………………E-34
To set an alarm time ……………………………………………………………E-35
To turn an alarm on and off ……………………………………………………E-37
To turn the Hourly Time Signal on and off ……………………………………E-38
E-3
Contents
General Guide ………………………………………………………………………… E-6
Timekeeping …………………………………………………………………………… E-8
To set the digital time and date ……………………………………………… E-9
To change the Daylight Saving Time (summer time) setting ………………E-12
Stopwatch ………………………………………………………………………………E-14
To specify a distance value ……………………………………………………E-16
To specify lap time or split time readings ……………………………………E-19
To perform elapsed time measurement ………………………………………E-20
To set up the stopwatch to take lap time readings …………………………E-21
To perform a lap time measurement …………………………………………E-22
To set up the stopwatch to take split time readings …………………………E-23
To perform a split time measurement …………………………………………E-24
To measure times with the stopwatch ………………………………………E-25
E-2
• Each section of this manual provides you with the information you need to perform
operations in each mode. Further details and technical information can be found in
the “Reference” section.
• To ensure that this watch provides you with the years of service for which it is
designed, carefully read and follow the instructions under “Operating Precautions”
and “User Maintenance.”
E-1
About This Manual
• Depending on the model of your watch, digital display text appears either as dark
figures on a light background or light figures on a dark background. All sample
displays in this manual are shown using dark figures on a light background.
• Button operations are indicated using the letters shown in the illustration.
• Note that the product illustrations in this manual are intended for reference only,
and so the actual product may appear somewhat different than depicted by an
illustration.
MO1906-EA
© 2019 CASIO COMPUTER CO., LTD.
Смотреть руководство для Casio G-Shock GA-140DC-1AER ниже. Все руководства на ManualsCat.com могут просматриваться абсолютно бесплатно. Нажав кнопку «Выбор языка» вы можете изменить язык руководства, которое хотите просмотреть.
MANUALSCAT | RU
Вопросы и ответы
У вас есть вопрос о Casio G-Shock GA-140DC-1AER, но вы не можете найти ответ в пользовательском руководстве? Возможно, пользователи ManualsCat.com смогут помочь вам и ответят на ваш вопрос. Заполните форму ниже — и ваш вопрос будет отображаться под руководством для Casio G-Shock GA-140DC-1AER. Пожалуйста, убедитесь, что вы опишите свои трудности с Casio G-Shock GA-140DC-1AER как можно более детально. Чем более детальным является ваш вопрос, тем более высоки шансы, что другой пользователь быстро ответит на него. Вам будет автоматически отправлено электронное письмо, чтобы проинформировать вас, когда кто-то из пользователей ответит на ваш вопрос.
Задать вопрос о Casio G-Shock GA-140DC-1AER
- Бренд:
- Casio
- Продукт:
- часы
- Модель/название:
- G-Shock GA-140DC-1AER
- Тип файла:
- Доступные языки:
- английский
Сопутствующие товары Casio G-Shock GA-140DC-1AER
В данном материале постараемся объяснить общий принцип настройки времени в G-Shock-ах на примере конкретных популярных моделей [которых очень много на рынке], подробно разобрать последовательность действий. Логика работы в целом повторяется от модели к модели, вам лишь важно разобраться в базовых процессах настройки. Имейте ввиду, настройка стрелок и электронного времени совершенно разная. Цифровым дисплеем легче оперировать, а вот для стрелок нужно чуть ли не запоминание последовательности действий. В рамках статьи будет описан процесс настройки времени для: GA-100, GA-110, GA-120, G-2900, GA-1000.
Если же ваши часы не попали в данный список, все равно можете ознакомиться с настройкой, либо перейти к полному список инструкций для G-Shock-ов.
Выберите одну из серий
[tabs slidertype=”top tabs”] [tabcontainer] [tabtext]GA-100[/tabtext] [tabtext]GA-110[/tabtext] [tabtext]GA-120[/tabtext][tabtext]G-2900[/tabtext][tabtext]GA-1000[/tabtext] [/tabcontainer] [tabcontent] [tab]
Рассмотрим настройку времени для серии GA-100

Для начала нужно убедиться, что часы находятся в режиме текущего времени. В этом режиме на дисплее отображается время [или дата] и день недели, а индикатор режима часов указывает на Time [не у всех часов есть такой индикатор]. Примерно так выглядит режим текущего времени:

Далее нам нужно перейти в режим настройки времени.
- Зажмите кнопку “A” [в левом верхнем углу] примерно на 3 секунды. На цифровом дисплее начнет мигать код города, для которого настроено текущее время.
- Нажимайте кнопку “C” для перехода к нужному параметру настройки в следующей. последовательности:
- Если вы выбрали для коррекции секунды (изображение секунд мигает), нажмите кнопку “D” для сброса значения счетчика секунд в 00. Если вы нажмете кнопку “D” при значении счетчика секунд между 30 и 59, то значение счетчика установится в 00 и 1 прибавится к счетчику минут, если значение счетчика секунд будет между 00 и 29, то изменение счетчика минут не произойдет.
- Для изменения значений минут и т.д., используйте кнопку “D” для увеличения и кнопку “ В” для уменьшения значений.
- После окончания установок нажмите кнопку “ А” для возврата в Режим Текущего Времени.
- Удерживание кнопок в нажатом состоянии позволяет изменять значения с большей скоростью.
- День недели устанавливается автоматически в соответствии с датой.
- Вы можете установить значение времени в диапазоне от 2000г. до 2099г.
Бывают ситуации, когда аналоговое время не совпадает с цифровым, т.е. стрелки и цифры показывают разное время. Это может произойти по нескольким причинам: сильно магнитное воздействие на часы или удар и т.п. В таком случае нужно вручную откорректировать положение стрелок.
- В Режиме Текущего Времени нажимайте и удерживайте кнопку “D” до появления индикатора “H-SET” в верхнем левом дисплее и индикатора “Sub” в правом верхнем дисплее.
- Проверьте положение стрелки скорости – она должна указывать на значение 50, то есть находиться в положении 12-ти часов. Если этого не происходит, нажмите кнопку “D” для перемещения стрелки в нужное положение.

- После этого нажмите кнопку “С”.
- Проверьте положение стрелок часов и минут – они должны находиться в положении 12-ти часов. Если этого не происходит, нажимайте кнопки “D” и “В”для перемещения стрелок в нужное положение.
- После этого нажмите кнопку “А” для возврата к дисплею текущего времени.
- Часовая и минутная стрелки при этом должны перейти в положения значения текущего времени, а стрелка скорости – в положение 0.
- Нажатие кнопки “С” на данном этапе вернет Вас к установкам пункта 2.

[/tab] [tab]
Рассмотрим настройку времени для серии GA-110

Сперва нужно перевести часы в режим текущего времени. В этом режиме на дисплее отображается время [или дата] и день недели, а индикатор режима часов указывает на Time [не у всех часов есть такой индикатор]. Так выглядит режим текущего времени у GA-110:

- Зажмите кнопку “ А” [около 3 секунд] в Режиме Текущего Времени. Изображение кода города начнет мигать.
- Нажимайте кнопку “ С” для перехода из разряда в разряд в следующей последовательности:

- Если вы выбрали для коррекции секунды (изображение секунд мигает), нажмите кнопку “D” для сброса значения счетчика секунд в 00. Если вы нажмете кнопку “D” при значении счетчика секунд между 30 и 59, то значение счетчика установится в 00 и 1 прибавится к счетчику минут, если значение счетчика секунд будет между 00 и 29, то изменение счетчика минут не произойдет.
- Для изменения значений минут и т.д., используйте кнопку “D” для увеличения и кнопку “ В” для уменьшения значений.

- Удерживание кнопок в нажатом состоянии позволяет изменять значения с большей скоростью.
- День недели устанавливается автоматически в соответствии с датой.
- Вы можете установить значение времени в диапазоне от 2000г. до 2099г.
- По окончании установок нажмите кнопку “ А” для возврата в Режим Текущего Времени.
- Если вы не будете нажимать кнопки в течение некоторого времени, то часы автоматически перейдут в Режим Текущего Времени.
В случае отклонения стрелочного времени от цифрового [от магнитного воздействия или сильного удара] нужно произвести следующие действия:
- В Режиме Текущего Времени нажимайте и удерживайте кнопку “D” до появления индикатора “H-SET” в верхнем левом дисплее и индикатора “Sub” в правом верхнем дисплее.
- Проверьте положение стрелки скорости – она должна указывать на значение 50, то есть находиться в положении 12-ти часов. Если этого не происходит, нажмите кнопку “D” для перемещения стрелки в нужное положение.

- После этого нажмите кнопку “С”.
- Проверьте положение стрелок часов и минут – они должны находиться в положении 12-ти часов. Если этого не происходит, нажимайте кнопки “D” и “В”для перемещения стрелок в нужное положение.
- После этого нажмите кнопку “А” для возврата к дисплею текущего времени.

-
- Часовая и минутная стрелки при этом должны перейти в положения значения текущего времени, а стрелка скорости – в положение 0.
- Нажатие кнопки “С” на данном этапе вернет Вас к установкам пункта 2.
[/tab] [tab]
Рассмотрим настройку времени для серии GA-120

Переведите часы в режим текущего времени [он как правило по умолчанию]. На дисплее отображается время [или дата] и день недели, а индикатор режима часов указывает на Time [не у всех часов есть такой индикатор]. Вот так это выглядит:

Далее нам нужно перейти в режим настройки времени.
- Зажмите кнопку “ А” [около 3 секунд] в Режиме Текущего Времени. Изображение кода города начнет мигать.
- Нажимайте кнопку “ С” для перехода из разряда в разряд в следующей последовательности:

- Если вы выбрали для коррекции секунды (изображение секунд мигает), нажмите кнопку “D” для сброса значения счетчика секунд в 00. Если вы нажмете кнопку “D” при значении счетчика секунд между 30 и 59, то значение счетчика установится в 00 и 1 прибавится к счетчику минут, если значение счетчика секунд будет между 00 и 29, то изменение счетчика минут не произойдет.
- Для изменения значений минут и т.д., используйте кнопку “D” для увеличения и кнопку “ В” для уменьшения значений.
- Удерживание кнопок в нажатом состоянии позволяет изменять значения с большей скоростью.
- День недели устанавливается автоматически в соответствии с датой.
- Вы можете установить значение времени в диапазоне от 2000г. до 2099г.

- По окончании установок нажмите кнопку “ А” для возврата в Режим Текущего Времени.
-
- Если вы не будете нажимать кнопки в течение некоторого времени, то часы автоматически перейдут в Режим Текущего Времени.
При сильном ударе или воздействии магнитного поля на часы, стрелочное время может не совпадать с цифровым. Для этого производитель предусмотрел возможность ручной корректировки стрелок:
- В Режиме Текущего Времени нажимайте и удерживайте кнопку “D” до появления индикатора “H-SET” в верхнем левом дисплее и индикатора “Sub” в правом верхнем дисплее.
- Проверьте положение стрелки скорости – она должна указывать на значение 50, то есть находиться в положении 12-ти часов. Если этого не происходит, нажмите кнопку “D” для перемещения стрелки в нужное положение.

- После этого нажмите кнопку “С”.
- Проверьте положение стрелок часов и минут – они должны находиться в положении 12-ти часов. Если этого не происходит, нажимайте кнопки “D” и “В”для перемещения стрелок в нужное положение.
- После этого нажмите кнопку “А” для возврата к дисплею текущего времени.
- Часовая и минутная стрелки при этом должны перейти в положения значения текущего времени, а стрелка скорости – в положение 0.
- Нажатие кнопки “С” на данном этапе вернет Вас к установкам пункта 2.

[/tab] [tab]
Рассмотрим настройку времени для серии G-2900

Сначала нужно перевести часы в режим текущего времени. В этом случае на циферблате отображается текущее время и дата. Так выглядит режим текущего времени в G-Shock G-2900:
- Нажмите и удержите кнопку “ А” в Режиме Текущего времени, до тех пор, пока значение секунд не замигает на дисплее, что означает переход к режиму установки.
- Нажмите кнопку “ С” для перехода мигающего значения из разряда в разряд в следующей последовательности:

- Когда разряд, который Вы хотите изменить, находится в мигающем состоянии, используйте кнопки «D» и « В» для увеличения или уменьшения значения.
- Установив желаемые значения для всех параметров, нажмите кнопку “ А”, чтобы вернуться к показу текущего времени.
- Выбранная в Режиме Текущего времени 12- или 24-часовая система измерения времени распространяется также на все остальные режимы.
- При использовании 12-часового формата слева от значения часа в диапазоне от полудня до 11:59 вечера появляется индикатор Р. От полуночи до 11:59 утра на экране находится индикатор А.
- При использовании 24-часового формата время отображается в диапазоне от 0:00 до 23:59 без индикатора.
- День недели устанавливается автоматически в соответствии с датой.

[/tab] [tab]
Рассмотрим настройку времени для серии GA-1000

Перед настройкой убедитесь, что часы находятся в режиме текущего времени — на экране отображается текущее время и дата, а стрелка режимов указывает на Time. Так выглядит режим текущего времени у GA-1100:

- В Режиме Текущего Времени зажмите и удерживайте кнопку “ А” до то появления мигающей индикации “ADJ”. Отпустите кнопку, после этого на дисплее появляется индикация “SET”, что означает начало установок.

- Нажимайте кнопку “D” для перехода от установки к установке в следующей последовательности:

- Если вы выбрали для коррекции секунды (изображение секунд мигает), нажмите кнопку “ Е” для сброса значения счетчика секунд в 00. Если вы нажмете кнопку “ Е” при значении счетчика секунд между 30 и 59, то значение счетчика установится в 00 и 1 прибавится к счетчику минут, если значение счетчика секунд будет между 00 и 29, то изменение счетчика минут не произойдет.
- Для изменения значений минут и т.д. используйте кнопку “ Е” для увеличения и кнопку “ В” для уменьшения выбранного значения.
- Для выбора кода города используйте кнопки “ Е” и “ В”.
- Для включения (ON)/выключения (OFF) летнего времени нажимайте кнопку “Е”.
- Для переключения 12/24 часового формата представления времени нажимайте кнопку “ Е”. При выбранном 12-ти часовом формате представления времени индикатор “ Р” обозначает значение времени после полудня.
- По окончании установок нажмите кнопку “ А”.


Сильный удар или воздействие магнитного поля могут сбить стрелки, и аналоговое время не будет совпадать с цифровым. В таком случае нужно вручную откорректировать положение стрелок:

- В Режиме Текущего Времени нажимайте и удерживайте кнопку “ А” до появления индикации “H-SET” в верхнем дисплее. Секундная стрелка при этом переместится в положение 12:00 часов. После нажатия кнопки “ А” на дисплее часов сначала появится индикатор “ADJ”, будьте внимательны и не отпускайте кнопку “ А” до появления индикации “HSET”.
- Для выбора стрелок при корректировке используйте кнопку “D”: секундная стрелка – часовая стрелка – минутная стрелка – стрелка дисплея режимов. При этом соответствующая стрелка будет переходить в положение 12-ти часов, а на нижнем дисплее часов будут появляться следующие значения: 00 при выборе секундной стрелки, 0:00 часовой и минутной стрелки, Sub стрелки дисплея режимов
- Если стрелка не переходит в положение 12-ти часов, перейдите к 3 пункту.
- Для корректировки положения стрелок используйте кнопки “ Е” и “ В”. Удерживание кнопки в нажатом состоянии позволяет изменять значение с большей скоростью.
- По окончании установок нажмите кнопку “ А”.
[/tab] [tab]
[/tab] [/tabcontent] [/tabs]
Мы рассмотрели настройку времени только для самых популярных серий часов G-Shock. Если у вас другая модель, тогда инструкцию для нее вы можете найти по номеру модуля часов G-Shock:
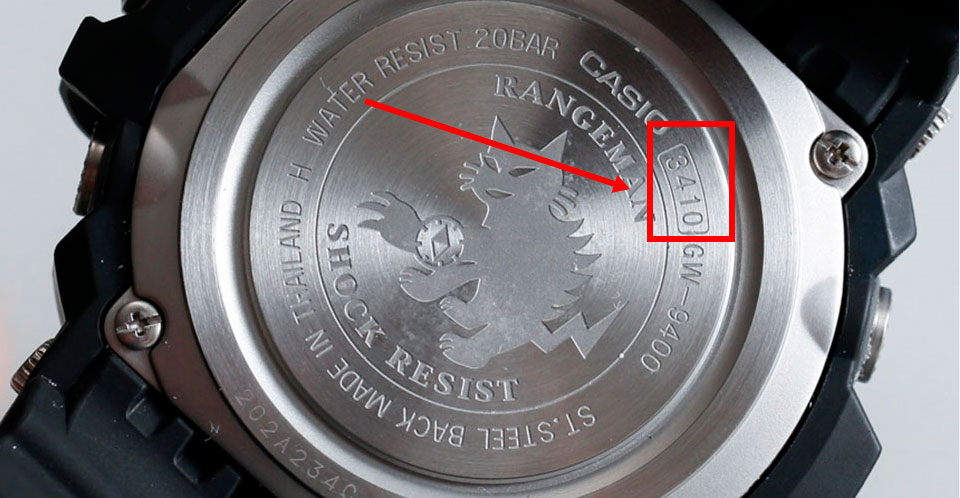
*номер модуля расположен на задней крышке часов — как правило 4 цифры (легче всего искать с помощью поиска CTRL + F на клавиатуре)
1545 — DW-5600
2548 — G-2900
3031 — G-9000
3088 — G-9100
3095 — G-7700
3095 — G-7710
3147 — GW-9200
3150 — GW-9010
3151 — GLX-5600
3159 — GW-M5610
3159 — GW-5000
3159 — GW-5510
3178 — GLS-5600
3179 — GW-6900
3184 — GWF-1000
3193 — GW-7900
3194 — G-7900
3194 — GLX-6900
3195 — GW-2310
3217 — GW-9110
3221 — GX-56
3222 — GWX-5600
3230 — DW-6900
3230 — DW-6901
3232 — DW-9052
3255 — GDF-100
3261 — G-9300
3261 — GW-9300
3263 — GD-100
3266 — GF-8250
3267 — GD-200
3269 — GR-8900
3279 — GWX-8900
3285 — G-8900
3295 — GLX-150
3400 — GD-110
3402 — GD-X6900
3402 — GLS-100
3403 — GD-350
3405 — GW-M500
3410 — GW-9400
3417 — GB-6900
3418 — GB-X6900
3419 — GB-5600
3420 — GD-X6930E
3422 — GLS-8900
3427 — GD-120
3434 — GD-400
3436 — GMD-S6900
3445 — GWF-D1000
3450 — GLS-6900
4778 — AW-590
4778 — AW-591
5081 — GA-100
5087 — GW-4000
5121 — GW-3000
5146 — GA-110
5158 — G-100
5173 — GW-3500
5229 — GA-120
5229 — GA-200
5229 — GA-201
5230 — AWG-M100
5230 — AWG-M510
5240 — GW-A1000
5255 — GA-150
5259 — GA-300
5277 — GAC-100
5302 — GA-1000
5311 — GW-A1100
5357 — GA-310
5369 — MTG-S1000
5371 — GWN-1000
5398 — GA-400
5410 — GPW-1000
5411 — MRG-G1000
5413 — GBA-400
5425 — GMA-S110
5441 — GA-1100
5443 — GN-1000
5444 — GST-W100
5444 — GST-W110
5444 — GAW-100
5445 — GST-S100
5445 — GST-S110
5445 — GAS-100
5455 — MTG-G1000
5463 — GWG-1000
5475 — GST-210
5475 — GST-200
5476 — GG-1000
5477 — GWN-Q1000
5478 — GA-500
5485 — GAX-100
5502 — GPW-2000
5513 — GST-B100
5515 — GST-W120
5515 — GST-W130
5518 — GMA-S120
5522 — GA-700
5522 — GA-710
5524 — GST-W300
5524 — GST-W310
5531 — MRG-G2000
5535 — GA-800
5540 — GMA-S130
Все равно не нашли инструкцию и не знаете как настроить точное время? Тогда вам нужно посмотреть на наш главный каталог инструкций. Вероятно, у вас не G-Shock, а другое модельное направление (либо мы еще не успели обновить информацию).
Классическая и самая популярная линейка G-Shock GA в 2019 получила нового представителя, которому уготована судьба повторить успех своих предшественников — часов GA-100/110. Однако смогут ли новые G-Shock GA-140 повторить тот колоссальный успех — это уже вопрос времени. Мы же хотим разобраться, чем же эта новинка отличается от своих старших собратьев и есть ли в ней какие-то новые интересные фишки, помимо измененного дизайна.
Рассматриваем дизайн
Сразу понятно, что внешне GA-140 должны напоминать GA-100/110, чтобы с ними не терялась ассоциация, а также из-за того, что этот корпус, да и сам силуэт часов, спустя многие годы существования на рынке, остается очень востребованным. Именно поэтому мы видим практически идентичный по строению корпус с круглыми очертаниями, массивностью и со спортивно-агрессивным дизайном.

Можно сказать, что новинка получила лишь косметические изменения, которые затронули главный дисплей. Если смотреть на экран, то видно движение мысли дизайнеров в сторону современных тенденций. В типичной шоковской аналого-цифровой модели появились дополнительные цифровые окошки, что, если честно, выглядит одновременно и наляписто, но и современно. Тем более каждое отдельное окошко отвечает за индикацию переделенной функции, поэтому, можно сказать, теперь считываемость информации должна стать еще проще.

В общем, это все еще ана-джи стилистика с привычной нам аналоговой зоной, но теперь стрелочки получили заостренную форму. Зачем? Во-первых, это свежо для такого формата шоков. Во-вторых, такие стрелочки теперь точнее указывают на часовое деление, а это уже плюс к информативности.

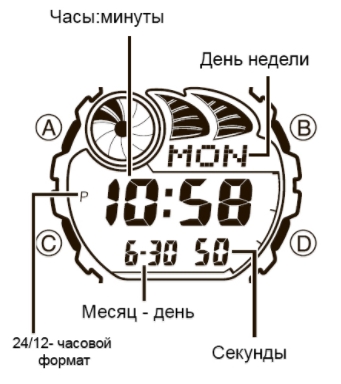
Давайте теперь пробежимся по цифровым окошкам:
- Привычное верхнее и нижнее круглое окошко. Верхнее отвечает за время, нижнее — за календарь.
- Окошко скорости, а также работы секундомера на отметке 3 часа.
- Внизу экрана появились четыре небольших индикатора, где отображаются активация таких функций: будильник, автоподсветка, звуковой ежечасный сигнал, «спящий режим».
- Вверху парные Г-образные окошки отвечают за индикацию при использовании функции измерения скорости.
Материалы и функционал
Что касается материалов, то как и во всей линейке G-Classic в G-Shock GA-140 преобладает полимерный пластик в основе корпуса, где часовой механизм и циферблат находятся под защитой минерального стекла. Ремешок также остался той же формы и из эластичного полимера. Все та же устойчивость к ударам и прежние 200 метров водозащиты. В общем, прежняя история, как и у всех предыдущих представителей линейки GA. Кстати, и габариты остались прежние, что и у старичков — 55,0 x 51,2 x 16,9 мм.

По функционалу также особых различий от предшественников найдено не было. Давайте просто перечислим арсенал новинки:
- мировое время;
- отображение скорости;
- автоматический календарь;
- улучшенный секундомер (1/1000 секунды — 100 часов);
- таймер на 24 часа с автоповтором;
- два формата отображения времени — 12 и 24 часа;
- автоматическая подсветка на один диод.
Итог
Что сказать о G-Shock GA-140? Японцы снова хотят сыграть на популярности сотого корпуса, сделав часы более молодежными. Однако нужна ли покупателям эта «молодежность» или они выберут классический образ, покоривший весь мир? Это уже серьезный вопрос. Если бы добавились какие-то молодежные функции, типа шагомера или улучшить подсветку — это была бы уже другая история. И при этом, чтобы ценник был в пределах 120 вечно зеленых. А пока нам приходится лишь наблюдать, как новинка покажет себя на мировой арене, поскольку шоковцы уже не раз пытались подобным образом сделать нечто «новое», косметически замаскировав популярную модель. Такое не всегда заходит, а иногда бывает и весьма популярным.
View a manual of the Casio G-Shock GA-140GM-1A1ER below. All manuals on ManualsCat.com can be viewed completely free of charge. By using the ‘Select a language’ button, you can choose the language of the manual you want to view.
MANUALSCAT | EN
Question & answers
Have a question about the Casio G-Shock GA-140GM-1A1ER but cannot find the answer in the user manual? Perhaps the users of ManualsCat.com can help you answer your question. By filling in the form below, your question will appear below the manual of the Casio G-Shock GA-140GM-1A1ER. Please make sure that you describe your difficulty with the Casio G-Shock GA-140GM-1A1ER as precisely as you can. The more precies your question is, the higher the chances of quickly receiving an answer from another user. You will automatically be sent an e-mail to inform you when someone has reacted to your question.
Ask a question about the Casio G-Shock GA-140GM-1A1ER
Page: 1
Operation Guide 5612 5613
E-9
To set the digital time and date
1. In the Timekeeping Mode, hold down A for at least
three seconds until the currently selected city code
flashes in the lower digital display. This is the setting
mode.
2. Use D (east) and B (west) to display the city code
you want to select.
• Make sure you select your Home City code before
changing any other setting.
• For full information on city codes, see the “City Code
Table” at the back of this manual.
City code
PM indicator
Hour
Seconds
Minutes
E-8
Timekeeping
You can adjust the Home Time city date and time in the Timekeeping Mode.
• The analog time of this watch is synchronized with the digital time. The analog time
setting is adjusted automatically whenever you change the digital time.
• If the analog time does not match the digital time for any reason, use the procedure
described under “To adjust home positions” (page E-44) to match the analog setting to
the digital setting.
• Pressing D in the Timekeeping Mode toggles digital display between the Home
City Date and Home City Time.
Home City Date Home City Time
Day of week
Month Day PM indicator Hour : Minutes
Day of week Seconds
Seconds
D
E-7
Alarm Mode (page E-34)
Countdown Timer Mode (page E-26)
World Time Mode (page E-30)
Stopwatch Mode (page E-14)
C
C
C
E-6
General Guide
• Press C to change from mode to mode.
• In any mode (except a setting mode), press B to illuminate the face.
Timekeeping Mode
C
C
E-5
Illumination ……………………………………………………………………………E-39
To illuminate the face manually ………………………………………………E-39
To specify the illumination duration……………………………………………E-40
To turn the auto light switch on and off ………………………………………E-43
Hand Home Position Correction ……………………………………………………E-44
To adjust home positions ………………………………………………………E-44
Reference ………………………………………………………………………………E-46
Specifications …………………………………………………………………………E-50
Operating Precautions ………………………………………………………………E-52
User Maintenance ……………………………………………………………………E-63
E-4
Countdown Timer………………………………………………………………………E-26
To use the countdown timer……………………………………………………E-27
To configure countdown start time and auto-repeat settings ………………E-28
World Time………………………………………………………………………………E-30
To view the current time in another time zone ………………………………E-31
To toggle a city code time between Standard Time and
Daylight Saving Time ………………………………………………………E-32
To swap your Home City and World Time City………………………………E-33
Alarms……………………………………………………………………………………E-34
To set an alarm time ……………………………………………………………E-35
To turn an alarm on and off ……………………………………………………E-37
To turn the Hourly Time Signal on and off……………………………………E-38
E-3
Contents
General Guide ………………………………………………………………………… E-6
Timekeeping …………………………………………………………………………… E-8
To set the digital time and date ……………………………………………… E-9
To change the Daylight Saving Time (summer time) setting ………………E-12
Stopwatch ………………………………………………………………………………E-14
To specify a distance value ……………………………………………………E-16
To specify lap time or split time readings ……………………………………E-19
To perform elapsed time measurement ………………………………………E-20
To set up the stopwatch to take lap time readings …………………………E-21
To perform a lap time measurement …………………………………………E-22
To set up the stopwatch to take split time readings …………………………E-23
To perform a split time measurement…………………………………………E-24
To measure times with the stopwatch ………………………………………E-25
E-2
• Each section of this manual provides you with the information you need to perform
operations in each mode. Further details and technical information can be found in
the “Reference” section.
• To ensure that this watch provides you with the years of service for which it is
designed, carefully read and follow the instructions under “Operating Precautions”
and “User Maintenance.”
E-1
About This Manual
• Depending on the model of your watch, digital display text appears either as dark
figures on a light background or light figures on a dark background. All sample
displays in this manual are shown using dark figures on a light background.
• Button operations are indicated using the letters shown in the illustration.
• Note that the product illustrations in this manual are intended for reference only,
and so the actual product may appear somewhat different than depicted by an
illustration.
MO1906-EA © 2019 CASIO COMPUTER CO., LTD.
Page: 2
Operation Guide 5612 5613
E-19
To specify lap time or split time readings
1. In the Stopwatch Mode, make sure the stopwatch is stopped and reset to all zeros.
• Make sure that LAP (lap times) or SPL (split times) is shown in the lower digital
display.
• If you need to reset the stopwatch to all zeros, press A.
2. You can toggle between LAP (lap times) and SPL (split times) by pressing A.
A
E-18
Example:
When the speed value is 1,740.
Speed hand: Indicates 40.
Upper digital segments: Indicate 700.
1000 and MACH indicators: Displayed
Time Measurement
You need to specify either lap time (page E-21) or split time (page E-23) measurement before
you start a stopwatch operation.
• If you want to measure total elapsed time, select split time measurement.
E-17
How speed is indicated
• While an elapsed time measurement operation is being
performed in the Stopwatch Mode, the watch will
indicate a speed value, which is calculated based on
the distance you specified and the elapsed time.
The speed value is indicated as described below.
• Upper digital segments: 100 unit
• 1000 appears when the speed exceeds 1,000.
• MACH appears when the speed exceeds 1,226.
• The speed hand indicates speed values less than 100.
Only even-numbered values are indicated.
• Speed can be indicated from 0 to 1998. OVER is
indicated by the speed hand when the speed exceeds
1998.
Segments
(100 unit)
OVER
Speed hand
(Up to 100)
Mach (MACH)
1000 indicator
E-16
To specify a distance value
1. In the Stopwatch Mode, make sure the stopwatch is
stopped and reset to all zeros.
• If you need to reset the stopwatch to all zeros, press
A.
2. Hold down A for at least three seconds until the current
distance value setting flashes in the upper digital display.
• This is the distance value setting mode.
3. Press C to move the flashing between the values on
the left side and right side of the distance value decimal
point.
4. While a distance value is flashing, use D (+) and B (–)
to change it.
• You can specify a distance value in the range of 0.1
to 99.9.
5. After specifying the distance value you want, press A
to exit the setting mode.
E-15
Important!
• Check to make sure that the speed hand is not moving before you perform any
Stopwatch Mode button operation.
Specifying a Distance Value
You can use the procedure below to specify a distance value, if you want. If you
specify a distance value, the watch will calculate and indicate speed for certain
stopwatch operations.
• The distance value represents kilometers, miles, or any other distance unit you
want. Specifying a distance value of 10.0, for example, can mean 10.0 kilometers or
10.0 miles.
• No speed calculation is performed when 0.0 is specified as the current distance
value.
• For lap time readings, you can specify either the lap distance (when all the laps are
the same distance) or the total race distance.
• For split time readings, you can specify the total race distance only. Though the
watch will indicate a speed each time you take a split reading, they will be based
on the total race distance, and so they will not indicate actual intermediate split
speeds.
E-14
Stopwatch
You can use the stopwatch to measure elapsed time, lap
times and split times. If you specify a distance value, the
stopwatch also will calculate and display speeds.
• The digital display range of the stopwatch is 99 hours,
59 minutes, 59.999 seconds. The stopwatch continues
to run until you stop it. If it reaches the above limit, it will
restart the time measurement from zero.
• The stopwatch operation continues even if you exit the
Stopwatch Mode. If you exit the Stopwatch Mode while
a stopwatch operation is in progress, the upper digital
segments will appear and disappear sequentially in
accordance with the passage of timekeeping seconds.
This is to let you know that a stopwatch operation is in
progress.
• All of the operations in this section are performed in the
Stopwatch Mode, which you enter by pressing C (page
E-7).
Speed hand
Upper digital
segments
E-13
4. When the setting you want is selected, press A to exit the setting mode.
• The DST indicator appears to indicate that Daylight Saving Time is turned on.
12-hour and 24-hour timekeeping
• With the 12-hour format, the PM indicator appears for times in the range of noon to
11:59 p.m. and no indicator appears for times in the range of midnight to 11:59 a.m.
• With the 24-hour format, times are displayed in the range of 0:00 to 23:59, without
the PM indicator.
• The 12-hour/24-hour timekeeping format you select in the Timekeeping Mode is
applied in all other modes.
E-12
5. Press A to exit the setting mode.
• The day of the week is displayed automatically in accordance with the date
(year, month, and day) settings.
Daylight Saving Time (DST)
Daylight Saving Time (summer time) advances the time setting by one hour from
Standard Time. Remember that not all countries or even local areas use Daylight
Saving Time.
To change the Daylight Saving Time (summer time) setting
1. In the Timekeeping Mode, hold down A for at least
three seconds until the currently selected city code
flashes in the lower digital display. This is the setting
mode.
2. Press C. This will display the DST setting screen.
3. Use D to toggle the DST setting on (on) and off (OFF).
• The default DST setting is off (OFF).
DST indicator
E-11
Screen: To do this: Do this:
Toggle between 12-hour (12H) and
24-hour (24H) timekeeping
Press D.
Reset the seconds to 00 Press D.
Change the hour and minutes
Use D (+) and B (–).
Change the year, month, or day
Toggle the face illumination duration
between 1.5 seconds (LT1) and three
seconds (LT3)
Press D.
E-10
3. Press C to change the flashing screen content in the sequence shown below to
select the other settings.
City Code DST
12/24-Hour
Format
Illumination
Duration
Seconds Hour
Year
Month
Day Minutes
4. When the setting you want to change is flashing, use D or B to change it as
described below.
Screen: To do this: Do this:
Change the city code
Use D (east) and B
(west).
Toggle the DST setting between Daylight
Saving Time (on) and Standard Time
(OFF).
Press D.
Page: 3
Operation Guide 5612 5613
E-29
• To toggle auto repeat between on and off, press D while the on/off setting is
flashing.
4. Press A to exit the setting mode.
• The auto-repeat on ( ) indicator is displayed on the Countdown Timer Mode
screen while this function is turned on.
E-28
To configure countdown start time and auto-repeat settings
1. While the countdown start time is in the Countdown
Timer Mode, hold down A for at least three seconds
until the hour setting of the countdown start time starts
to flash. This is the setting mode.
• If the countdown start time is not displayed, use the
procedure under “To use the countdown timer” (page
E-27) to display it.
2. Press C to move the flashing in the sequence shown
below, and select the setting you want to change.
Start Time
(Hours)
Start Time
(Minutes)
Auto-Repeat
On/Off
3. Perform the following operations, depending on which setting currently is selected
above.
• While the start time setting is flashing, use D (+) and B (–) to change it.
Start time
(Hours : Minutes)
Auto-repeat on
E-27
To use the countdown timer
Press D while in the Countdown Timer Mode to start the countdown in the upper
digital display.
• When the end of the countdown is reached, the alarm will sound for 10 seconds or
until you stop it by pressing any button.
• If auto-repeat is turned off, the countdown time is reset to its starting value
automatically after the alarm stops.
• If auto-repeat is turned on, the countdown will restart automatically without pausing
when it reaches zero.
• The countdown timer measurement operation continues even if you exit the
Countdown Timer Mode.
• Press D while a countdown operation is in progress to pause it.
Press D again to resume the countdown.
• To stop a countdown timer operation completely, first pause it (by pressing D),
and then press A. This returns the countdown time to its starting value.
E-26
Countdown Timer
You can set the countdown start time within a range of
one minute to 24 hours. An alarm sounds when the
countdown reaches zero.
• You also can select auto-repeat, which automatically
restarts the countdown from the original value you set
whenever zero is reached.
• All of the operations in this section are performed in the
Countdown Timer Mode, which you enter by pressing
C (page E-7).
Seconds
Auto-repeat off
Start time
(Hours : Minutes)
E-25
To measure times with the stopwatch
Elapsed Time
D D A
Start Stop Reset
Lap Time
D A A D A
Start
(LAP displayed)
Lap
(Lap01)
Lap
(Lap02)
Stop Reset
Split Time
D A A D A
Start
(SPL displayed)
Split Split release Stop Reset
E-24
To perform a split time measurement
Select split time (SPL) measurement and then perform the
following button operations.
D Start ➝ A Split ➝ A Split Release* ➝ D Stop ➝
A Reset
* The split time is released automatically if you do not
press A within about 12 seconds.
• You can press A to take split readings as many times
as you like. The SPL indicator flashes while a split
reading is displayed.
• The stopwatch continues elapsed time measurement
internally while a split time reading is displayed.
• Pressing A while a split time is displayed will switch
back to normal elapsed time measurement. The
elapsed time will appear in the upper digital display.
• You also could press D to stop elapsed time
measurement instead.
• Pressing D to stop elapsed time measurement
displays the time (and speed if a distance is specified)
of the final split (which is the overall elapsed time).
Hours
SPL indicator
Speed hand (calculated)
Minutes
Seconds
1/1000 seconds
E-23
Split Time
Split time readings appear in the upper digital display.
They show the time elapsed since the beginning of the
current time measurement.
• If you want the watch to calculate the speed of the race,
specify the race distance for the distance setting (page
E-15).
• For split time readings, you can specify the total race
distance only. Though the watch will indicate a speed
each time you take a split reading, they will be based
on the total race distance, and so they will not indicate
actual intermediate split speeds.
To set up the stopwatch to take split time readings
1. In the Stopwatch Mode, make sure the stopwatch is stopped and reset to all zeros.
• If you need to reset the stopwatch to all zeros, press A.
2. Make sure that SPL (split times) is shown in the lower digital display.
• If LAP (lap times) is displayed, press A to toggle it to SPL.
Split time
E-22
To perform a lap time measurement
Select lap time (LAP) measurement and then perform the
following button operations.
D Start ➝ A Lap* ➝ A Lap* ➝ D Stop ➝ A Reset
* Lap time remains frozen in the upper digital display for
about 12 seconds. After that, elapsed time
measurement reappears.
• You can press A to take lap readings as many times
as you like. The LAP indicator flashes while a lap
reading is displayed.
• While a lap time is displayed, the lower digital display
will alternate between the lap hour value and the lap
number (#01 to #99). If you take more than 99 lap
readings, the lap number will restart from #00 following
lap #99.
• Pressing D to stop elapsed time measurement
displays the time (and speed if a distance is specified)
of the final lap.
Lap number
LAP indicator
Speed hand (calculated)
Minutes
Seconds
1/1000 seconds
Hours
E-21
Lap Time
Lap time readings appear in the upper digital display.
They show the time elapsed since the last lap time
reading was taken.
• If you want the watch to calculate the speed of each lap
(when all of the laps are the same distance), specify the
lap distance for the distance setting (page E-15).
• If you want the watch to calculate the speed of the
entire race, specify the race distance for the distance
setting (page E-15). A speed will be indicated each time
you take a lap reading, but these lap speeds will not
indicate actual speed of the entire race.
To set up the stopwatch to take lap time readings
1. In the Stopwatch Mode, make sure the stopwatch is stopped and reset to all zeros.
• If you need to reset the stopwatch to all zeros, press A.
2. Make sure that LAP (lap times) is shown in the lower digital display.
• If SPL (split times) is displayed, press A to toggle it to LAP.
Lap time
E-20
Elapsed Time Measurement
Use the following procedure to measure elapsed time, without taking lap time or split
time readings.
To perform elapsed time measurement
Select split time (SPL) measurement and then perform the following button operations.
D Start ➝ D Stop ➝ A Reset
• If you have a distance value (page E-15) specified for the current elapsed time
measurement, the upper digital segments and speed hand will indicate the speed
when you press D to stop the elapsed time operation.
• After pressing D to stop an elapsed time operation, you could press D again to
restart from the point where you left off.
Page: 4
Operation Guide 5612 5613
E-39
Illumination
An LED (light-emitting diode) illuminates the face of the
watch for easy reading in the dark. The watch’s auto light
switch turns on illumination automatically when you angle
the watch towards your face.
• The auto light switch must be turned on (indicated by
the auto light switch on indicator) for it to operate.
• See “Illumination Precautions” (page E-48) for other
important information about using illumination.
To illuminate the face manually
In any mode, press B to turn on illumination.
• The above operation turns on illumination regardless of
the current auto light switch setting.
Auto light switch on
indicator
E-38
To turn the Hourly Time Signal on and off
1. In the Alarm Mode, use D to select the Hourly Time
Signal (SIG) (page E-35).
2. Press A to toggle it on (on) and off (OFF).
• The Hourly Time Signal on indicator is shown on the
display in all modes while this function is turned on.
Hourly time signal
on indicator
On/Off status
E-37
To turn an alarm on and off
1. In the Alarm Mode, use D to select an alarm.
2. Press A to toggle it on (on) and off (OFF).
• Turning on a alarm (AL1, AL2, AL3, AL4 or SNZ)
displays the alarm on indicator on its Alarm Mode
screen.
• In all modes, the alarm on indicator is shown when
any alarm is turned on.
• The alarm on indicator flashes while the alarm is
sounding.
• The snooze alarm indicator flashes while the snooze
alarm is sounding and during the 5-minute intervals
between alarms.
Alarm on indicator
Snooze alarm indicator
On/Off status
E-36
3. Press C to move the flashing between the hour and minute settings.
4. While a setting is flashing, use D (+) and B (–) to change it.
5. Press A to exit the setting mode.
Alarm Operation
The alarm tone sounds at the preset time for 10 seconds, regardless of the mode the
watch is in. In the case of the snooze alarm, the alarm operation is performed a total
of seven times, every five minutes, or until you turn the alarm off (page E-37).
• Alarm and Hourly Time Signal operations are performed in accordance with the
current time in your Home City, as kept in the Timekeeping Mode.
• To stop the alarm tone after it starts to sound, press any button.
• Performing any one of the following operations during a 5-minute interval between
snooze alarms cancels the current snooze alarm operation.
Displaying the Timekeeping Mode setting screen (page E-9)
Displaying the SNZ setting screen (page E-35)
E-35
To set an alarm time
1. In the Alarm Mode, use D to scroll through the alarm
screens until the one whose time you want to set is
displayed.
AL1
SIG
AL2 SNZ
AL3 AL4
• To set a daily alarm, display alarm screen AL1, AL2,
AL3 or AL4. To set the snooze alarm, display the
SNZ screen.
• SIG is the Hourly Time Signal setting (page E-38).
• The snooze alarm repeats every five minutes.
2. After you select an alarm, hold down A for at least three seconds until the hour
setting of the alarm time starts to flash. This is the setting mode.
• This operation turns on the alarm automatically.
On/Off status
E-34
Alarms
When an alarm is turned on, the alarm tone will sound
when its alarm time is reached. One of the alarms is a
snooze alarm, while the other four are daily alarms.
You also can turn on an Hourly Time Signal that causes
the watch to beep twice every hour on the hour.
• There are five alarm screens numbered AL1, AL2, AL3
and AL4 for the daily alarm, and a snooze alarm screen
indicated by SNZ. The Hourly Time Signal screen is
indicated by SIG.
• All of the operations in this section are performed in the
Alarm Mode, which you enter by pressing C (page E-7).
Alarm time
(Hour : Minutes)
Alarm number
E-33
Swapping your Home City and World Time City
You can use the procedure below to swap your Home City and World Time City. This
changes your Home City to your World Time City, and your World Time City to your
Home City. This capability can come in handy when you frequently travel between two
cities in different time zones.
To swap your Home City and World Time City
1. In the World Time Mode, use D to select the World Time City you want.
2. Hold down A and B until the watch beeps.
• This will make the World Time City you selected in step 1 your Home City, and
cause the hour and minute hands to move to the current time in that city. At the
same time, it will change the Home City you had selected prior to step 2 your
World Time City, and cause the content of upper digital display to change
accordingly.
• After swapping the Home City and World Time City, the watch stays in the World
Time Mode with the city that was selected as the Home City prior to step 2 now
displayed as the World Time City.
E-32
To toggle a city code time between Standard Time and Daylight Saving Time
1. In the World Time Mode, press D to display the city
code (time zone) whose Standard Time/Daylight Saving
Time setting you want to change.
2. Hold down A for at least three seconds to toggle
between Daylight Saving Time (DST indicator
displayed) and Standard Time (DST indicator not
displayed).
• A DST indicator will be displayed in the upper digital
display if Daylight Saving Time is turned on.
• You can turn on DST individually for each city code,
except UTC.
• Turning on DST for the city code that is currently
selected as your Home City will turn on DST for
normal timekeeping.
DST indicator
E-31
To view the current time in another time zone
In the World Time Mode, use D to scroll through available city codes (time zones).
• The upper digital display will show the time in the currently selected World Time
City.
• A PM indicator will be displayed in the upper digital display between the hours of
noon and midnight.
• When the city code (time zone) you want is selected, you can press A to display
the date. After about one second, the watch will resume regular timekeeping for the
currently selected city.
One second
Hour : Minutes
Seconds
PM indicator Date
A
E-30
World Time
World Time digitally displays the current time in one of
48 cities (29 time zones) around the world. A simple
operation swaps your Home City with the currently
selected World Time City.
• The times kept in the World Time Mode are
synchronized with the time being kept in the
Timekeeping Mode. If you feel that there is an error in
any World Time Mode time, check to make sure you
have the correct city selected as your Home City. Also
check to make sure that the current time as shown in
the Timekeeping Mode is correct.
• Times in the World Time Mode are based on UTC offsets. See the “City Code
Table” at the back of this manual for information about the UTC offsets that are
supported.
• All of the operations in this section are performed in the World Time Mode, which
you enter by pressing C (page E-7).
Currently selected
World Time City
World Time
Page: 5
Operation Guide 5612 5613
E-49
• Static electricity or magnetic force can interfere with proper operation of the auto
light switch. If illumination does not turn on, try moving the watch back to the
starting position (parallel with the ground) and then tilt it back toward you again. If
this does not work, drop your arm all the way down so it hangs at your side, and
then bring it back up again.
• Under certain conditions, illumination may not turn on until about one second after
you turn the face of the watch towards you. This does not necessarily indicate
malfunction of the auto light switch.
• You may notice a very faint clicking sound coming from the watch when it is shaken
back and forth. This sound is caused by mechanical operation of the auto light
switch, and does not indicate a problem with the watch.
E-48
Illumination Precautions
• Illumination may be difficult to see when viewed under direct sunlight.
• Illumination turns off automatically whenever an alarm sounds.
• Frequent use of illumination runs down the battery.
Auto light switch precautions
• Avoid wearing the watch on the inside of your wrist. Doing so causes the auto light
switch to operate when it is not needed, which shortens battery life. If you want to
wear the watch on the inside of your wrist, turn off the auto light switch feature.
• Illumination may not turn on if the face of the watch is
more than 15 degrees above or below parallel. Make
sure that the back of your hand is parallel to the ground.
• Illumination turns off in about 1.5 seconds or 3 seconds,
even if you keep the watch pointed towards your face.
More than 15 degrees
too high
E-47
Initial Screens
When you enter the Stopwatch Mode, World Time Mode or Alarm Mode, the data you
were viewing when you last exited the mode will appear first.
Timekeeping
• Resetting the seconds to 00 while the current count is in the range of 30 to 59
causes the minutes to be increased by 1. In the range of 00 to 29, the seconds are
reset to 00 without changing the minutes.
• The year can be set in the range of 2000 to 2099.
• The watch’s built-in full automatic calendar makes allowances for different month
lengths and leap years. Once you set the date, there should be no reason to
change it except when battery has replaced.
• The current time for all city codes in the Timekeeping Mode and World Time Mode
is calculated in accordance with the Coordinated Universal Time (UTC) for each
city, based on your Home City time setting.
E-46
Reference
This section contains more detailed and technical information about watch operation.
It also contains important precautions and notes about the various features and
functions of this watch.
Auto Return Features
• If you leave the watch with a flashing setting on any digital display for two or three
minutes without performing any operation, the watch will exit the setting mode
automatically.
• The watch will return to the Timekeeping Mode automatically if you do not perform
any operation for two or three minutes in the Alarm Mode.
High-Speed Movement
• The D and B buttons are used to change setting in various setting modes. In
most cases, holding down these buttons will start high-speed movement.
E-45
3. Check the positions of the hour and minute hands.
• The hands are in the correct home positions if they
are pointed at 12 o’clock. If they aren’t, use D
(clockwise) and B (counterclockwise) to adjust their
positions.
4. When everything is the way you want, press A to
return to regular timekeeping.
• This will cause the hour and minute hands to move to
the current Timekeeping Mode time and the speed
hand to move to the 0 position.
• Pressing C here will return to the setting at the
beginning of step 2.
Correct hour and minute
hand positions
Hour and minute hands
E-44
Hand Home Position Correction
The speed, hour, and minute hands of the watch can be thrown off by exposure to
strong magnetism or impact. The watch is designed to correct speed, hour and minute
hand manually.
To adjust home positions
1. In the Timekeeping Mode, hold down D for at least
three seconds until Sub flashes in the upper digital
display.
• This is the home position adjustment mode.
2. Check the position of the speed hand.
• The speed hand is in the correct home position if it is
pointed at 50 (12 o’clock). If it isn’t, use D to move
the hand clockwise until it is.
• After confirming that the speed hand is in its correct
home position, press C.
Speed hand
Correct speed hand
position
E-43
To turn the auto light switch on and off
In the Timekeeping Mode, hold down B for at least three seconds to toggle the auto
light switch on (auto light switch on indicator displayed) and off (auto light switch on
indicator not displayed).
• The auto light switch on indicator remains in all modes while the auto light switch is
turned on.
• In order to protect against running down the battery, the auto light switch will turn
off automatically approximately six hours after you turn it on. Repeat the above
procedure to turn the auto light switch back on if you want.
E-42
Warning!
• Always make sure you are in a safe place whenever you are reading the watch
using the auto light switch. Be especially careful when running or engaged in
any other activity that can result in accident or injury. Also take care that
sudden illumination by the auto light switch does not startle or distract others
around you.
• When you are wearing the watch, make sure that its auto light switch is turned
off before riding a bicycle or operating a motorcycle or any other motor
vehicle. Sudden and unintended operation of the auto light switch can create
a distraction, which can result in a traffic accident and serious personal injury.
E-41
About the Auto Light Switch
Turning on the auto light switch causes illumination to turn on, whenever you position
your wrist as described below in any mode.
Moving the watch to a position that is parallel to the ground and then tilting it towards
you more than 40 degrees causes illumination to turn on.
• Wear the watch on the outside of your wrist.
Parallel to
ground
More than
40°
E-40
• You can use the procedure below to select either 1.5 seconds or 3 seconds as the
illumination duration. When you press B, illumination will remain on for about 1.5
seconds or 3 seconds, depending on the current illumination duration setting.
To specify the illumination duration
1. In the Timekeeping Mode, hold down A until the
display contents start to flash. This is the setting mode.
2. Press C nine times to display the current illumination
duration LT1 or LT3.
3. Press D to toggle the setting between LT1 (1.5
seconds) and LT3 (three seconds).
4. Press A to exit the setting mode.
Page: 6
Operation Guide 5612 5613
E-59
• Leaving your watch where it is exposed to direct sunlight (ultraviolet rays) for long
periods or failure to clean dirt from your watch for long periods can cause it to
become discolored.
• Friction caused by certain conditions (strong external force, sustained rubbing,
impact, etc.) can cause discoloration of painted components.
• If there are printed figures on the band, strong rubbing of the printed area can cause
discoloration.
• Leaving your watch wet for long periods can cause fluorescent color to fade. Wipe
the watch dry as soon as possible after it becomes wet.
• Semi-transparent resin parts can become discolored due to sweat and dirt, and if
exposed to high temperatures and humidity for long periods.
• Daily use and long-term storage of your watch can lead to deterioration, breaking, or
bending of resin components. The extent of such damage depends on usage
conditions and storage conditions.
E-58
Chemicals
• Do not allow your watch to come into contact with thinner, gasoline, solvents, oils, or
fats, or with any cleaners, adhesives, paints, medicines, or cosmetics that contain
such ingredients. Doing so can cause discoloration of or damage to the resin case,
resin band, leather, and other parts.
Storage
• If you do not plan to use your watch for a long time, thoroughly wipe it free of all dirt,
sweat, and moisture, and store it in a cool, dry place.
Resin Components
• Allowing your watch to remain in contact with other items or storing it together with
other items for long periods while it is wet can cause color on resin components to
transfer to the other items, or the color of the other items to transfer to the resin
components of your watch. Be sure to dry off your watch thoroughly before storing it
and make sure it is not in contact with other items.
E-57
Magnetism
• Though this watch is designed to maintain normal performance in DC magnetic
fields up to 4800 A/m, it should not be allowed to come into contact with or be
located close to a source of strong magnetism (audio speakers, magnetic necklace,
cell phone, etc.) Sources of strong magnetism can affect the motor that moves the
hands of the watch, causing them to slow down, speed up, or stop, resulting in the
incorrect time being displayed.
• Very strong magnetism (from medical equipment, etc.) should be avoided because it
can cause malfunction of your watch and damage to electronic components.
Electrostatic Charge
• Exposure to very strong electrostatic charge can cause your watch to display the
wrong time. Very strong electrostatic charge even can damage electronic
components.
• Electrostatic charge can cause the display to go blank momentarily or cause a
rainbow effect on the display.
E-56
Temperature
• Never leave your watch on the dashboard of a car, near a heater, or in any other
location that is subject to very high temperatures. Do not leave your watch where it
will be exposed to very low temperatures. Temperature extremes can cause your
watch to lose or gain time, to stop, or otherwise malfunction.
• Leaving your watch in an area hotter than +60°C (140°F) for long periods can lead
to problems with its LCD. The LCD may become difficult to read at temperatures
lower than 0°C (32°F) and greater than +40°C (104°F).
Impact
• Your watch is designed to withstand impact incurred during normal daily use and
during light activity such as playing catch, tennis, etc. Dropping your watch or
otherwise subjecting it to strong impact, however, can lead to malfunction. Note that
watches with shock-resistant designs (G-SHOCK, BABY-G, G-MS) can be worn
while operating a chain saw or engaging in other activities that generate strong
vibration, or while engaging in strenuous sports activities (motocross, etc.)
E-55
Band
• Tightening the band too tightly can cause you to sweat and make it difficult for air to
pass under the band, which can lead to skin irritation. Do not fasten the band too
tightly. There should be enough room between the band and your wrist so you can
insert your finger.
• Deterioration, rust, and other conditions can cause the band to break or come off of
your watch, which in turn can cause band pins to fly out of position or to fall out. This
creates the risk of your watch falling from your wrist and becoming lost, and also
creates the risk of personal injury. Always take good care of your band and keep it
clean.
• Immediately stop using a band if you even notice any of the following: loss of band
flexibility, band cracks, band discoloration, band looseness, band connecting pin
flying or falling out, or any other abnormality. Take your watch to your original retailer
or to a CASIO service center for inspection and repair (for which you will be charged)
or to have the band replaced (for which you will be charged).
E-54
• A trained technician will inspect your watch for proper water resistance whenever
you have its battery replaced. Battery replacement requires the use of special tools.
Always request battery replacement from your original retailer or from an authorized
CASIO service center.
• Some water-resistant watches come with fashionable leather bands. Avoid
swimming, washing, or any other activity that causes direct exposure of a leather
band to water.
• The inside surface of the watch glass may fog when the watch is exposed to a
sudden drop in temperature. No problem is indicated if the fogging clears up
relatively quickly. Sudden and extreme temperature changes (such as coming into
an air conditioned room in the summer and standing close to an air conditioner
outlet, or leaving a heated room in the winter and allowing your watch to come into
contact with snow) can cause it to take longer for glass fogging to clear up. If glass
fogging does not clear up or if you notice moisture inside of the glass, immediately
stop using your watch and take it to your original retailer or to an authorized CASIO
service center.
• Your water-resistant watch has been tested in accordance with International
Organization for Standardization regulations.
E-53
• Watches that do not have WATER RESIST or WATER RESISTANT marked on the
back cover are not protected against the effects of sweat. Avoid using such a watch
under conditions where it will be exposed to large amounts of sweat or moisture, or
to direct splashing with water.
• Even if a watch is water resistant, note the usage precautions described below.
Such types of use reduce water resistance performance and can cause fogging of
the glass.
− Do not operate the crown or buttons while your watch is submersed in water or
wet.
− Avoid wearing your watch while in the bath.
− Do not wear your watch while in a heated swimming pool, sauna, or any other high
temperature/high humidity environment.
− Do not wear your watch while washing your hands or face, while doing housework,
or while performing any other task that involves soaps or detergents.
• After submersion in seawater, use plain water to rinse all salt and dirt from your
watch.
• To maintain water resistance, have the gaskets of your watch replaced periodically
(about once every two or three years).
E-52
Operating Precautions
Water Resistance
• The information below applies to watches with WATER RESIST or WATER
RESISTANT marked on the back cover.
Water
Resistance
Under Daily
Use
Enhanced Water Resistance Under Daily
Use
5
Atmospheres
10
Atmospheres
20
Atmospheres
Marking
On watch front or on
back cover
No
BAR mark
5BAR 10BAR 20BAR
Example of
Daily Use
Hand washing, rain Yes Yes Yes Yes
Water-related work, swimming No Yes Yes Yes
Windsurfing No No Yes Yes
Skin diving No No Yes Yes
• Do not use your watch for scuba diving or other types of diving that requires air tanks.
OPUM-E
E-51
Countdown Timer:
Measuring unit: 1 second
Input range: 1 minute to 24 hours (1-minute increments)
Other: Auto-repeat timing
World Time: 48 cities (29 time zones)
Other: Daylight Saving Time/Standard Time; Home City/World Time City
Swapping
Alarms: 5 daily alarms (with one snooze alarm); Hourly Time Signal
Illumination: LED (light-emitting diode); Auto Light Switch; Selectable illumination
duration
Battery: One lithium battery (Type: CR1220)
Approximate Battery Life: 2 years on type CR1220
(10 seconds of alarm operation per day, one illumination operation (1.5 seconds)
per day)
Specifications are subject to change without notice.
E-50
Specifications
Accuracy at normal temperature: ± 15 seconds a month
Digital Timekeeping: Hour, minutes, seconds, p.m. (P), month, day, day of the week
Time format: 12-hour and 24-hour
Calendar system: Full Auto-calendar pre-programmed from the year 2000 to 2099
Other: Home City code (can be assigned one of 48 city codes); Standard Time /
Daylight Saving Time (summer time)
Analog Timekeeping: Hour, minutes (hand moves every 20 seconds)
Stopwatch:
Measuring unit: 1/1000 seconds
Measuring capacity: 99:59’59.999″
Measuring accuracy: ±0.0006%
Measuring modes: Elapsed time, Lap time, Split time
Other: Speed
Page: 7
Operation Guide 5612 5613
L-1
E-67
Low Battery Power
• Low battery power is indicated by large timekeeping error, by dim display contents,
or by a blank display.
• Operation while battery power is low can result in malfunction. Replace the battery
as soon as possible.
E-66
• When replacing the battery, also request a check for proper water resistance.
• Ornamental resin components may become worn, cracked, or bent over time when
subjected to normal daily use. Note that if cracking or any other abnormality
indicating possible damage is noticed in a watch submitted for battery replacement,
your watch will be returned with an explanation of the abnormality, without the
requested servicing being performed.
Initial Battery
• The battery that comes loaded in your watch when you purchase it is used for
function and performance testing at the factory.
• The test battery may go dead quicker than the normally rated battery life as noted in
the User’s Guide. Note that you will be charged for replacement of this battery, even
if replacement is required within your watch’s warranty period.
E-65
• Even if the surface of the metal appears clean, sweat and rust in crevasses can soil
the sleeves of clothing, cause skin irritation, and even interfere with watch
performance.
Premature Wear
• Leaving sweat or water on a resin band or bezel, or storing your watch an area
subject to high moisture can lead to premature wear, cuts, and breaks.
Skin Irritation
• Individuals with sensitive skin or in poor physical condition may experience skin
irritation when wearing a watch. Such individuals should keep their leather band or
resin band particularly clean. Should you ever experience a rash or other skin
irritation, immediately remove your watch and contact a skin care professional.
Battery Replacement
• Leave battery replacement up to your original retailer or authorized CASIO service
center.
• Have the battery replaced only with the type specified in the User’s Guide. Use of a
different battery type can cause malfunction.
E-64
• Clean water and sweat from a leather band by wiping with a soft cloth.
• Not operating a watch crown, buttons, or rotary bezel could lead to later problems
with their operation. Periodically rotate the crown and rotary bezel, and press
buttons to maintain proper operation.
Dangers of Poor Watch Care
Rust
• Though the metal steel used for your watch is highly rust-resistant, rust can form if
your watch is not cleaned after it becomes dirty.
− Dirt on your watch can make it impossible for oxygen to come into contact with the
metal, which can lead to breakdown of the oxidization layer on the metal surface
and the formation of rust.
• Rust can cause sharp areas on metal components and can cause band pins to fly
out of position or to fall out. If you ever notice any abnormality immediately stop
using your watch and take it to your original retailer or to an authorized CASIO
service center.
E-63
User Maintenance
Caring for Your Watch
Remember that you wear your watch next to your skin, just like a piece of clothing. To
ensure your watch performs at the level for which it is designed, keep it clean by
frequently wiping with a soft cloth to keep your watch and band free of dirt, sweat,
water and other foreign matter.
• Whenever your watch is exposed to sea water or mud, rinse it off with clean fresh
water.
• For a metal band or a resin band with metal parts, use a soft toothbrush or similar
tool to scrub the band with a weak solution of water and a mild neutral detergent, or
with soapy water. Next, rinse with water to remove all remaining detergent and then
wipe dry with a soft absorbent cloth. When washing the band, wrap the watch case
with kitchen plastic wrap so it does not come into contact with the detergent or soap.
• For a resin band, wash with water and then wipe dry with a soft cloth. Note that
sometimes a smudge like pattern may appear on the surface of a resin band. This
will not have any effect on your skin or clothing. Wipe with a cloth to remove the
smudge pattern.
E-62
Note that CASIO COMPUTER CO., LTD. assumes no responsibility for any
damage or loss suffered by you or any third party arising through the use of your
watch or its malfunction.
E-61
• Use a soft toothbrush or similar tool to scrub the metal with a weak solution of water
and a mild neutral detergent, or with soapy water. Next, rinse with water to remove
all remaining detergent and then wipe dry with a soft absorbent cloth. When washing
metal components, wrap the watch case with kitchen plastic wrap so it does not
come into contact with the detergent or soap.
Bacteria and Odor Resistant Band
• The bacteria and odor resistant band protects against odor generated by the
formation of bacteria from sweat, which ensures comfort and hygiene. In order to
ensure maximum bacteria and odor resistance, keep the band clean. Use an
absorbent soft cloth to thoroughly wipe the band clean of dirt, sweat, and moisture.
A bacteria and odor resistant band suppresses the formation of organisms and
bacteria. It does not protect against rash due to allergic reaction, etc.
Liquid Crystal Display
• Display figures may be difficult to read when viewed from an angle.
E-60
Leather Band
• Allowing your watch to remain in contact with other items or storing it together with
other items for long periods while it is wet can cause the color of the leather band to
transfer to the other items or the color of the other items to transfer to the leather
band. Be sure to dry off your watch thoroughly with a soft cloth before storing it and
make sure it is not in contact with other items.
• Leaving a leather band where it is exposed to direct sunlight (ultraviolet rays) for
long periods or failure to clean dirt from a leather band for long periods can cause it
to become discolored.
CAUTION: Exposing a leather band to rubbing or dirt can cause color transfer and
discoloration.
Metal Components
• Failure to clean dirt from metal components can lead to formation of rust, even if
components are stainless steel or plated. If metal components exposed to sweat or
water, wipe thoroughly with a soft, absorbent cloth and then place the watch in a
well-ventilated location to dry.
Page: 8
Operation Guide 5612 5613
CASIO COMPUTER CO., LTD.
6-2, Hon-machi 1-chome
Shibuya-ku, Tokyo 151-8543, Japan
City
Code
City
UTC Offset/
GMT Differential
SIN Singapore
+8
HKG Hong Kong
BJS Beijing
TPE Taipei
SEL Seoul
+9
TYO Tokyo
ADL Adelaide +9.5
GUM Guam
+10
SYD Sydney
NOU Noumea +11
WLG Wellington +12
x This table shows the city codes of this
watch (As of July 2018).
• The rules governing global times (UTC
offset and GMT differential) and
summer time are determined by each
individual country.
L-4
City
Code
City
UTC Offset/
GMT Differential
UTC
0
LIS Lisbon
LON London
MAD Madrid
+1
PAR Paris
ROM Rome
BER Berlin
STO Stockholm
ATH Athens
+2
CAI Cairo
JRS Jerusalem
City
Code
City
UTC Offset/
GMT Differential
MOW Moscow
+3
JED Jeddah
THR Tehran +3.5
DXB Dubai +4
KBL Kabul +4.5
KHI Karachi +5
DEL Delhi +5.5
DAC Dhaka +6
RGN Yangon +6.5
BKK Bangkok +7
L-3
City
Code
City
UTC Offset/
GMT Differential
PPG Pago Pago –11
HNL Honolulu –10
ANC Anchorage –9
YVR Vancouver
–8
LAX Los Angeles
YEA Edmonton
–7
DEN Denver
MEX Mexico City
–6
CHI Chicago
City
Code
City
UTC Offset/
GMT Differential
MIA Miami
–5
YTO Toronto
NYC New York
SCL Santiago
–4
YHZ Halifax
YYT St. Johns –3.5
RIO Rio De Janeiro –3
RAI Praia –1
City Code Table
L-2