
Производитель Furuno
Категория Telephone
Документы, которые мы получаем от производителя устройства Furuno FM-8500 мы можем разделить на несколько групп. Это в частности:
— технические чертежи Furuno
— инструкции обслуживания FM-8500
— паспорта изделия Furuno
— информационные брошюры
— энергетические этикетки Furuno FM-8500
Все из них важны, однако самую важную информацию с точки зрения пользователя мы найдем в инструкции обслуживания Furuno FM-8500.
Группа документов, определяемая как инструкции обслуживания, делится также на более подробные типы, такие как: Инструкции монтажа Furuno FM-8500, инструкции обслуживания, короткие инструкции или инструкции пользователя Furuno FM-8500. В зависимости от потребностей, Вам необходимо поискать требуемый документ. На нашем сайте Вы можете просмотреть самую популярную инструкцию использования изделия Furuno FM-8500.
Полная инструкция обслуживания устройства Furuno FM-8500, как должна выглядеть?
Инструкция обслуживания, определяемая также как пособие пользователя, или просто «руководство» — это технический документ, цель которого заключается в использовании Furuno FM-8500 пользователями. Инструкции пишет, как правило технический писатель, языком, доступным для всех пользователей Furuno FM-8500.
Полная инструкция обслуживания Furuno, должна заключать несколько основных элементов. Часть из них менее важная, как например: обложка / титульный лист или авторские страницы. Однако остальная часть, должна дать нам важную с точки зрения пользователя информацию.
1. Вступление и рекомендации, как пользоваться инструкцией Furuno FM-8500 — В начале каждой инструкции, необходимо найти указания, как пользоваться данным пособием. Здесь должна находится информация, касающаяся местонахождения содержания Furuno FM-8500, FAQ и самых распространенных проблем — то есть мест, которые чаще всего ищут пользователи в каждой инструкции обслуживания
2. Содержание — индекс всех советов, касающихся Furuno FM-8500, которое найдем в данном документе
3. Советы по использованию основных функций устройства Furuno FM-8500 — которые должны облегчить нам первые шаги во время использования Furuno FM-8500
4. Troubleshooting — систематизированный ряд действия, который поможет нам диагностировать а в дальнейшем очередность решения важнейших проблем Furuno FM-8500
5. FAQ — чаще всего задаваемые вопросы
6. Контактные данные Информация о том, где искать контактные данные производителя / сервисного центра Furuno FM-8500 в данной стране, если самостоятельно не получится решить проблему.
Хорошее руководство по эксплуатации
Законодательство обязывает продавца передать покупателю, вместе с товаром, руководство по эксплуатации Furuno FM-8500. Отсутствие инструкции либо неправильная информация, переданная потребителю, составляют основание для рекламации в связи с несоответствием устройства с договором. В законодательстве допускается предоставлении руководства в другой, чем бумажная форме, что, в последнее время, часто используется, предоставляя графическую или электронную форму инструкции Furuno FM-8500 или обучающее видео для пользователей. Условием остается четкая и понятная форма.
Что такое руководство?
Слово происходит от латинского «instructio», тоесть привести в порядок. Следовательно в инструкции Furuno FM-8500 можно найти описание этапов поведения. Цель инструкции заключается в облегчении запуска, использования оборудования либо выполнения определенной деятельности. Инструкция является набором информации о предмете/услуге, подсказкой.
К сожалению немного пользователей находит время для чтения инструкций Furuno FM-8500, и хорошая инструкция позволяет не только узнать ряд дополнительных функций приобретенного устройства, но и позволяет избежать возникновения большинства поломок.
Из чего должно состоять идеальное руководство по эксплуатации?
Прежде всего в инструкции Furuno FM-8500 должна находится:
— информация относительно технических данных устройства Furuno FM-8500
— название производителя и год производства оборудования Furuno FM-8500
— правила обслуживания, настройки и ухода за оборудованием Furuno FM-8500
— знаки безопасности и сертификаты, подтверждающие соответствие стандартам
Почему мы не читаем инструкций?
Как правило из-за нехватки времени и уверенности в отдельных функциональностях приобретенных устройств. К сожалению само подсоединение и запуск Furuno FM-8500 это слишком мало. Инструкция заключает ряд отдельных указаний, касающихся функциональности, принципов безопасности, способов ухода (даже то, какие средства стоит использовать), возможных поломок Furuno FM-8500 и способов решения проблем, возникающих во время использования. И наконец то, в инструкции можно найти адресные данные сайта Furuno, в случае отсутствия эффективности предлагаемых решений. Сейчас очень большой популярностью пользуются инструкции в форме интересных анимаций или видео материалов, которое лучше, чем брошюра воспринимаются пользователем. Такой вид инструкции позволяет пользователю просмотреть весь фильм, не пропуская спецификацию и сложные технические описания Furuno FM-8500, как это часто бывает в случае бумажной версии.
Почему стоит читать инструкции?
Прежде всего здесь мы найдем ответы касательно конструкции, возможностей устройства Furuno FM-8500, использования отдельных аксессуаров и ряд информации, позволяющей вполне использовать все функции и упрощения.
После удачной покупки оборудования/устройства стоит посвятить несколько минут для ознакомления с каждой частью инструкции Furuno FM-8500. Сейчас их старательно готовят или переводят, чтобы они были не только понятными для пользователя, но и чтобы выполняли свою основную информационно-поддерживающую функцию.
- Главная
-
Furuno
-
Телефоны
-
FM-8500
На этой странице вы найдёте полный список документов на Телефоны Furuno FM-8500.
Выберите необходимый PDF файл.
-

Телефоны
Furuno FM-8500 Инструкция по эксплуатацииТип файла
PDFРазмер
760 KbКол-во страниц
99Просмотров
10795Download / Read online

- 1
Другие Furuno Телефоны
-
Furuno FS-1570 Инструкция по эксплуатации
PDF файлов
1Просмотров
19791 -
Furuno FS-1502 Инструкция по эксплуатации
PDF файлов
1Просмотров
13099 -
Furuno FM-8500 Инструкция по эксплуатации
PDF файлов
1Просмотров
12089 -
Furuno FS-2570 Инструкция по эксплуатации
PDF файлов
1Просмотров
9404 -
Furuno FS-1501 Инструкция по эксплуатации
PDF файлов
1Просмотров
7049 -
Furuno FS-1503 Инструкция по эксплуатации
PDF файлов
1Просмотров
6441
Другие устройства Furuno
-
Стереосистемы
Furuno RC-1500-1T Инструкция по эксплуатацииPDF файлов
1Просмотров
24536 -
Судовые радиостанции
Furuno DSC-5R Инструкция по эксплуатацииPDF файлов
1Просмотров
19090 -
Судовые радиостанции
Furuno DSC-5 Инструкция по эксплуатацииPDF файлов
1Просмотров
18728 -
Сетевые карты
Furuno DP-6 Инструкция по эксплуатацииPDF файлов
1Просмотров
13056 -
Судовые РЛС
Furuno 1832 Руководство пользователяPDF файлов
2Просмотров
12900 -
Радар-детекторы
Furuno 1942 Руководство пользователяPDF файлов
2Просмотров
11738
Вопросы
-
слабая батарея
Ноутбуки
Acer
1310
Alex 12.02.2016 17:26
Ранее вы смотрели
Производители
ALK Technologies
Elgato
Genz-Benz
Iluv
Midland
Opticon
Pico Communications
Propellerhead
Rio Audio
TMI Products
Типы устройств
Дистанционные стартеры
Педали эффектов (стомпбокс)
Тюнеры
Наждачная бумага и абразивы
Подкатные домкраты
Фрезы
Лыжи
Мобильные точки доступа
Инжекторы
Устройства
Bradford-White Corp 25X-78B-3N
Ferplast Cayman 60 Professional
GE neral Electric Air Conditioner ASM12
Husqvarna HUV 4213-G
Jabra BT620s
JL Audio Stealthbox SB-GM-SLVCTR2/10W3v3/DG
Kawasaki 691191
Magnavox DVD MRD510
Nortel Networks M7324
Viking DGSU1004BSLP
freeuserguide.ru
About Us
Contacts
Disclamers
Privacy Policy
Эта страница полезна для вас? Поделитесь ссылкой:
![]()
Русский
- Bedienungsanleitung Furuno FM-8500
- Furuno FM-8500 User Manual
- Manual Usuario Furuno FM-8500
- Mode d’emploi Furuno FM-8500
- Istruzioni Furuno FM-8500
- инструкция Furuno FM-8500
- Furuno FM-8500の取扱説明書
- Handleiding Furuno FM-8500
- Manual de uso Furuno FM-8500
Вам нужна инструкция? Мы поможем Вам ее найти и сэкономить Ваше время.
- 99 stron
- 0.74 mb
Изделие Furuno FM-8500, а также другие, которыми Вы пользуетесь ежедневно, наверняка вы получили в комплекте с инструкцией обслуживания. Из опыта наших пользователей мы знаем, что большинство из Вас не уделили этому особого внимания. Большая часть инструкций, сразу же после покупки попадает в корзину для мусора вместе с коробкой — это ошибка. Ознакомьтесь с информацией, касающейся инструкции Furuno FM-8500, которая поможет Вам в будущем сэкономить нервы и избежать головной боли.
Важная подсказка — не забывайте хотя бы раз прочитать инструкцию Furuno FM-8500
Если вы не хотите каждый раз читать информационные брошюры, касающиеся, тех или Furuno FM-8500 иных изделий, достаточно, прочитать их раз — сразу же после покупки устройства. Вы получите основное знания, касающиеся поддержания изделия Furuno FM-8500 в хорошем эксплуатационном состоянии, так, чтобы без проблем достигнуть его планируемого цикла работы. Затем инструкцию можно отложить на полку и вернуться к ней только в случае, если вы не уверены, правильно ли проводится техобслуживание изделия. Правильный уход является необходимым элементом Вашего удовольствия Furuno FM-8500.
Раз в году пересмотрите шкафчик, в котором держите инструкции для всех устройств, — выбросите те, которыми вы уже не пользуетесься. Это поможет Вам сохранять порядок в своей домашней базе инструкций обслуживания.
Summary of Contents for Furuno FM-8500
Что находится в инструкции Furuno FM-8500? Почему стоит ее прочитать?
- Гарантия и подробности, касающиеся техобслуживания изделия
Хорошей идеей будет прикрепить чек к странице инструкции. Если что-то плохое случится во время использования Furuno FM-8500, у вас будет комплект документов, необходимый для гарантийного ремонта. В этой части инструкции вы найдете информацию об авторизованных сервисных центрахFuruno FM-8500 а также, как самостоятельно правильно ухаживать за оборудованием — так, чтобы не потерять гарантийных прав. - Указания по монтажу и Setup
Не терять нервов и времени на самостоятельную попытку установки и первого запуска изделия. Воспользуйтесь рекомендациями производителя Furuno FM-8500 чтобы правильно запустить изделие, без лишнего риска повреждения оборудования. - Информация, касающаяся дополнительных запчастей (входящих в комплект а также являющихся опцией)
Пересматривая эту часть документа вы сможете проверить, доставлен ли ваш Furuno FM-8500 с полним комплектом аксессуаров. Вы также сможете узнать, какие дополнительные запчасти или аксессуары для Furuno FM-8500 Вы сможете найти и докупить к своему устройству. - Troubleshooting
Самые частые проблемы, касающиеся Furuno FM-8500 и методы их решения. Это очень полезная часть руководства по обслуживанию — она позволит Вам сэкономить много времени на поиск решений. 90% проблем с Furuno FM-8500 повторяется у многих пользователей. - Требования, касающиеся питания и энергетический класс
Информация, касающаяся количества потребляемой энергии, а также рекомендации, касающиеся установки и питания Furuno FM-8500. Прочитайте, чтобы оптимально пользоваться Furuno FM-8500 и не использовать большего количества ресурсов, нежели это необходимо для правильной работы изделия. - Специальные функции Furuno FM-8500
Здесь вы можешь узнать, как персонализировать изделие Furuno FM-8500. Вы узнаете, какие дополнительные функции могут помочь Вам удобно использовать продукт Furuno FM-8500 а также, какие функции Вашего устройства оптимальны для выполнения конкретной деятельности.
Как видите в инструкции вы найдете информацию, которая реально поможет Вам в использовании Вашего изделия. Стоит с ней ознакомиться, чтобы избежать разочарований, возникающих из более короткого, нежели предусматривалось, периода исправности изделия Furuno FM-8500. Если все же вы не хотите копить инструкции в своем доме, наш сайт поможет Вам в этом — вы должны найти у нас руководство по обслуживанию большинства из своих устройств, а также Furuno FM-8500.
Комментарии (1)
![]()
VHF RADIOTELEPHONE
MODEL FM-8500

9-52 Ashihara-cho,
Nishinomiya, Japan
Telephone : 0798-65-2111
Telefax : 0798-65-4200
|
All rights reserved. |
Printed in Japan |
PUB.No. OME-56030
( TATA ) FM-8500
Your Local Agent/Dealer
FIRST EDITION : DEC. 1995
K : MAY. 17,2002
*00080762901*
*00080762901*
* 0 0 0 8 0 7 6 2 9 0 1 *
*OME56030K00*
*OME56030K00*
* O M E 5 6 0 3 0 K 0 0 *
CANCELLING A FALSE DISTRESS ALERT
1.Switch off transmitter immediately.
2.Switch equipment on and set to Channel 16.
3.Make broadcast to «All Stations» giving your vessel’s name, callsign and DSC number, and cancel the false distress alert.
Example message:
All Stations, All Stations, All Stations
This is NAME, CALLSIGN,
DSC NUMBER, POSITION.
Cancel my distress alert of
DATE, TIME, UTC.
=Master, NAME, CALLSIGN.
DSC NUMBER, DATE, TIME UTC.
i

ii

 WARNING
Do not open the equipment except to replace paper or fuse.
Hazardous voltage which can cause electrical shock, burn or serious injury exists inside the equipment. Only qualified personnel should work inside the equipment.
Do not disassemble or modify the equipment.
Fire, electrical shock or serious injury can result.
Turn off the power immediately if water leaks into the equipment or the equipment is emitting smoke or fire.
Continued use of the equipment can cause fire or electrical shock.
Do not place liquid-filled containers on the top of the equipment.
Fire or electrical shock can result if a liquid spills into the equipment.
Do not operate the equipment with wet hands.
Electrical shock can result.
Keep heater away from equipment.
Heat can alter equipment shape and melt the power cord, which can cause fire or electrical shock.
 CAUTION
Use the proper fuse.
Use of a wrong fuse can result in fire or permanent equipment damage.
Do not use the equipment for other than its intended purpose.
Personal injury can result if the equipment is used as a chair or stepping stool, for example.
Do not place objects on the top of the equipment.
The equipment can overheat or personal injury can result if the object falls.
iii

Table of Contents
|
FOREWORD ………………………………………………………………………….. |
vii |
|
|
System Configuration …………………………………………………………… |
viii |
|
|
1. VHF Radiotelephone Operational Overview |
||
|
1.1 |
Controls, Indications …………………………………………………………………………………….. |
1-2 |
|
1.2 |
Telephone Operation ……………………………………………………………………………………. |
1-3 |
|
2. DSC Terminal Operational Overview |
||
|
2.1 |
DSC Messages …………………………………………………………………………………………….. |
2-1 |
|
2.2 |
Controls, LEDs …………………………………………………………………………………………….. |
2-3 |
|
2.3 |
Basic Operation ……………………………………………………………………………………………. |
2-5 |
|
2.4 Auto Acknowledge ……………………………………………………………………………………….. |
2-8 |
|
|
3. DSC Distress Alert |
||
|
3.1 |
Distress Alert Transmission ……………………………………………………………………………. |
3-1 |
|
3.2 |
Manual Entry of Ship’s Position and Time ………………………………………………………. |
3-4 |
|
3.3 |
Receiving Distress Alert from Other Ship ………………………………………………………… |
3-5 |
|
3.4 |
Distress Relay ………………………………………………………………………………………………. |
3-9 |
|
4. DSC Communication |
||
|
4.1 |
Transmitting Individual Calls …………………………………………………………………………. |
4-1 |
|
4.2 |
Receiving Individual Call (ACK RQ) ……………………………………………………………… |
4-5 |
|
4.3 |
Transmitting All Ships Calls ………………………………………………………………………….. |
4-9 |
|
4.4 |
Receiving All Ships Calls …………………………………………………………………………….. |
4-12 |
|
4.5 |
Creating and Saving Transmit Messages ……………………………………………………….. |
4-15 |
|
4.6 |
Writing Over Files ………………………………………………………………………………………. |
4-17 |
|
4.7 |
Retrieving, Transmitting Files ………………………………………………………………………. |
4-18 |
|
4.8 Transmit/Receive Message Memory ……………………………………………………………… |
4-19 |
|
|
5. Other Calling Types and Other Functions |
||
|
5.1 |
Other Calling Types………………………………………………………………………………………. |
5-1 |
|
5.2 |
Making Telephone Calls ………………………………………………………………………………… |
5-4 |
|
5.3 |
Receiving Telephone Call from Coast Station ………………………………………………….. |
5-7 |
|
5.4 |
Other Station IDs and Telephone Nos. …………………………………………………………….. |
5-8 |
v
6. Other Settings
|
6.1 Printer Setup (Auto/Manual) ………………………………………………………………………….. |
6-1 |
|
6.2 Turning Keyboard Click ON/OFF…………………………………………………………………… |
6-4 |
|
6.3 Aural Alarm Setup ………………………………………………………………………………………… |
6-5 |
7. System Confirmation
|
7.1 |
Confirming Own Ship’s ID ……………………………………………………………………………. |
7-1 |
|
7.2 |
Confirming ROM Version ……………………………………………………………………………… |
7-2 |
|
7.3 |
Confirming VHF Section Settings ………………………………………………………………….. |
7-3 |
|
7.4 |
Confirming VHF Channels ……………………………………………………………………………. |
7-4 |
|
7.5 |
Confirming Tx Output Power ………………………………………………………………………… |
7-5 |
8. Maintenance & Troubleshooting
|
8.1 |
Maintenance ………………………………………………………………………………………………… |
8-1 |
|
8.2 Troubleshooting ……………………………………………………………………………………………. |
8-1 |
|
|
8.3 |
Diagnostic Test …………………………………………………………………………………………….. |
8-2 |
9.Specifications
10.Menu List
|
APPENDIX 1 Marine VHF Channel Lists ……………………………… |
AP-1 |
|
APPENDIX 2 Memory Channel List …………………………………….. |
AP-2 |
|
APPENDIX 3 DIGITAL INTERFACE (IEC 61162-1 Edition 2) …… |
AP-3 |
Declaration of conformity to type
vi

FOREWORD
Thank you for purchasing this VHF Radiotelephone FM-8500. We are confident you will discover why FURUNO has become synonymous with quality and reliability.
Dedicated in the design and manufacture of marine electronics equipment for half a century, FURUNO Electric Company has gained an unrivaled reputation as a world leader in the industry. This is the result of our technical excellence as well as our worldwide distribution and service network.
Please carefully read and follow the safety information and operating and maintenance instructions set forth in this manual before attempting to operate the equipment and conduct any maintenance. Your VHF Radiotelephone FM-8500 will perform to the utmost of its ability only if it is operated and maintained in accordance with the correct procedures.
Features
The FM-8500 is a highly advanced, semi-duplex, fully synthesized 25W VHF transceiver with DSC terminal, designed to satisfy the stringent requirements of marine communications. It complies with GMDSS carriage requirements for safety and general communications.
•Conforms to the following standards and regulations: IMO A. 694(17)
IMO A. 803(19) IMO A. 524(13)
IMO MSC 68(68), MSC/Circ.862 IEC-61097-3/7/8
IEC-60945 (3rd edition) IEC-61162-1
ETS 300 338, 301 033, 300 162 ITU-R M.493-9, M.541-8, M.689-2
•Automatic position and time input and update with connection of EPFS (Electronic Position-Fixing Equipment).
•Optional printer can automatically print out received messages and test results.
•Log stores 50 each of latest ordinary, distress and transmitted messages, in separate memory blocks.
•One-touch testing facility.
Program number
|
DSC |
0550182010 (version 1.12) |
|
RT |
0550183006 (version 1.06) |
vii

System Configuration
CH70 Antenna VHF Antenna
|
External |
Power Supply |
Position-fixing |
|
Speaker |
PR-300 |
Equipment |
|
Handset |
DSC Section |
|
MIC Receptacle |
|
|
Box |
|
|
FM-8500 |
|
|
VHF Section |
|
|
Distress Message Controller |
Printer Interface |
|
DMC-5 |
IF-8500 |
Printer
Figure 1 FM-8500 system configuration
viii
This page is intentionally left blank.
![]()
1. VHF Radiotelephone
Operational Overview
The FM-8500 system consists of a main transceiver unit and two antennas. The transceiver unit contains a VHF transmitter, receiver, and channel 70 watch receiver module. The performance and operation are controlled on its front panel. The antenna may be of any type available from FURUNO or market and the recommended type is a vertically polarized non-directional type. The first antenna works for transmitting and receiving and the 2nd antenna for watch keeping.
|
LCD |
Keyboard |
|
(for DSC operation) |
Controls for VHF operation
|
VHF RADIOTELEPHONE FM-8500 |
||||||
|
Watch CH 70 |
POSITION |
AUTO ACK |
TEST |
|||
|
1 |
2 |
3 |
CANCEL |
|||
|
auto |
||||||
|
|
CONTRAST |
VOLUME |
||||
|
DISTRESS CANCEL |
4 |
5 |
6 |
|||
|
DISTRESS |
ALARM |
CALL |
FILE |
RCVD |
XMTD |
|
|
STOP |
7 |
8 |
9 |
SELECT |
||
|
VOLUME |
SQUELCH |
CHANNEL |
0 |
ENT |
|||||
|
OFF/DW/SCAN(PUSH) |
LOW |
TX |
REM |
USA |
WX |
PRIV MODE(PUSH) |
|||
|
(PUSH) |
|||||||||
|
HI |
CH16 |
||||||||
|
LOW |
|||||||||
|
OFF |
AUTO |
|
Volume with |
CH16 key |
Channel selector |
|
|
High/Low power |
|||
|
Power ON/OFF |
(Press for Mode selection) |
||
|
(Press to turn on/off |
Squelch control |
Channel No. display |
|
|
loudspeaker.) |
(Press for DW, Scan) |
Figure 1-1 FM-8500 transceiver unit
1-1

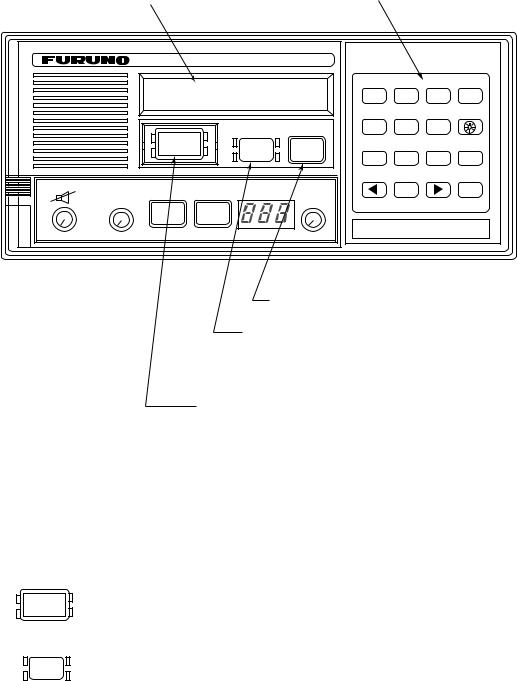
1.1 Controls, Indications
Controls
|
CHANNEL/ |
Selects a channel. Pressing the Channel Selector |
|
MODE |
(rotary control) changes the mode from INTL, |
|
USA, WX, and PRIV in this order. (Appears when |
|
|
USA/WX and PRIV mode are registered.) |
|
|
SQUELCH/ |
Mutes the receiver when no signal is present on |
|
DW/SCAN |
the channel selected. Auto position automatically |
|
reduces white noise. |
|
|
Pressing the control changes the operating modes: |
|
|
Dual watch, Scan and Off. |
|
|
VOLUME/ |
Turns the power on or off and adjusts the volume |
|
LOUDSPEAKER |
of the built-in loudspeaker. |
|
Pressing the control turns the loudspeaker on or |
|
|
off. |
|
|
HI/LOW key |
Alternates high or low output power. |
|
CH16 key |
Selects channel 16. |
Indications
The display shows the following indications;
|
Indication |
Function |
|
|
Internal loudspeaker OFF, by pressing the VOLUME |
||
|
control. Internal loudspeaker is automatically turned |
||
|
off whenever the handset is picked up. |
||
|
LOW |
Lights for low RF power. |
|
|
TX |
Lights while transmitting. |
|
|
REM |
Lights when FM-8500 is under control by RB-700 |
|
|
Remote Station. |
||
|
USA |
USA mode. (Some ITU duplex channels are used as |
|
|
simplex channels.) |
||
|
WX |
Lights when a weather channel is selected. (Available |
|
|
in US version.) |
||
|
DW/SCAN |
DW for Dual Watch; SCAN for scanning. |
|
1-2

1.2 Telephone Operation
Turning the power on and off
To turn the power on, turn the VOLUME control clockwise until you hear a click. To turn the power off, turn the control fully counterclockwise until you hear the click.
Selecting channel modes
While pressing the channel selector, press the CH16 key to select the channel mode, International, USA (in the case of USA version), private (if authorized), or weather mode (USA version). The International version of FM-8500 has no such selection.
On the weather channel mode, a beep is emitted when the weather alert tone is received.
NOTE: Private channels are available only where permitted by the authorities.
Selecting channels
Rotate the CHANNEL selector clockwise (counterclockwise) until a desired channel is reached.
Adjusting volume
The VOLUME control adjusts the volume of the loudspeaker.
Adjusting squelch
The SQUELCH control adjusts the squelch threshold level. Adjust it so that white noise heard in the loudspeaker just fades out. Perform this operation when no traffic is being received. AUTO squelch automatically reduces white noise. Usually select «AUTO» position. Avoid turning the squelch too far clockwise: you may miss a long distance communication.
Note: To obtain correct scan watch/dual watch response, adjust the SQUELCH control precisely.
Every press of the SQUELCH control changes the function as follows:
1-3

Transmitting
Press the PTT (Press-to-talk) switch on the handset or microphone to talk, and release it to listen for the response.
Output power
•BEFORE transmitting, think about the subjects which have to be communicated and, if necessary, prepare written notes to avoid unecessary interruptions and ensure that no valuable time is wasted on a busy channel.
•Listen before commencing to transmit to make certain that the channel is not already in use.
Each press of the [HI/LOW] key selects HI or LOW output power. The transmitter power is automatically set for low on the following channels.
|
International: |
CH15, CH17 |
|
USA: |
CH13, CH15, CH17, CH67; to operate USA chan- |
|
nel 13 or 67 in high power, keep [HI/LOW] |
|
|
pressed while talking into the handset. |
Turning the loudspeaker on/off
To turn the loudspeaker on/off, press the VOLUME control. The loudspeaker off mark appears when the speaker is off. The loudspeaker is automatically turned off when the telephone handset is used on semi-duplex channels.
Channel 16
Press the [CH16] key to select channel CH16, International Calling and Safety Channel.
This is an international calling and safety channel. The use is limited for distress, safety and calling. The transmission on CH16 (156.800 MHz) should be limited to within 1 minute except for distress calling.
Avoid calling on Channel 16 for purposes other than distress, urgency and very brief safety communications when another calling channel is available.
1-4

Dual watch
The dual watch allows you to keep watch on channel 16 and another channel. CH16 and another channel are watched at intervals of 0.15 seconds and one second, respectively.
To start DW, press the SQUELCH control once. When the receiver finds a signal on channel 16, it locks on CH16 and restarts dual watching after the signal on CH16 has gone. If another channel has traffic, it still continues dual watch. The speech is heard intermittently. If you are annoyed with the intermittence, turn off DW by pressing the PTT switch on the handset or pressing the SQUELCH control.
Scanning
The receiver scans all channels in the selected channel mode in ascending channel order, watching CH16 between channels as below:
To start scanning, press the SQUELCH control and SCAN is started. When the receiver finds a signal, scanning is stopped on that channel and starts dual watch on it and channel 16.
1  16
16  2
2  16
16  3
3  16
16  4…
4…
16  88
88  16
16  87
87  16
16  86
86  16…
16…
Time-out-timer (U.S.A. type only)
The FM-8500 is equipped with an automatic timing device that deactivates the transmitter and reverts the transceiver to the receive mode after an uninterrupted transmission period of 5 minutes.
Remarks on voice communications
Automatic acknowledge is automatically changed to manual acknowledge when voice communications begin. (The «auto» indication, however, remains on the screen.) This is done to prevent break in communications. Automatic acknowledge is automatically restored once voice communications are terminated.
Priority
The priority of the equipments is as follows.
DSC section of FM-8500 > Wing handset > Handset of FM-8500 > Remote Station RB-700
1-5
This page is intentionally left blank.

2. DSC Terminal
Operational Overview
2.1 DSC Messages
The contents of a DSC message change with format specifier (calling category).
1. Format: Calling type
|
IND: |
Individual Call |
|
TEL: |
Telephone Call |
|
ALL: |
All Ships Call |
|
R/A: |
Relay All Ships Call |
|
R/S: |
Relay Specific Ships Call |
|
GRP: |
Group Call |
|
POS: |
Position Request Call |
2. Address: Station’s 9-digit ID number
IDs starting with “00” are coast stations, those starting with “0” are group IDs or another IDs are ship’s IDs.
3. Category: Communication priority
There are four communication priorities as below:
DIS: A vessel is in grave and imminent danger and requests immediate assistance.
URG: Announce important safety information or request medical assistance.
SAF: Transmitting a message containing an important navigational or an important meteorological warning.
ROU: For routine (individual) calling.
4. DSC: DSC channel
A DSC channel is different from the usual communication channel because it is not used for voice communication but rather DSC and acknowledging receipt of message.
5. Telecom1: Telecommand
The communication mode; simplex or semi-duplex.
2-1
6. Channel: Voice communication channel
To communicate with a coast station, a station sends its position data to the coast station and the coast station determines the channel to use. A station may only use CH16 (distress channel) in the event of distress.
7. Pos: Ship’s position
Position input by radionavigational equipment.
8. UTC: Universal Time Coordination
The equipment contains a clock. External time input from radionavigational equipment cannot be used.
9. ACK RQ (BQ):
Acknowledge request (RQ) or acknowledge reply (BQ).
2-2
2.2 Controls, LEDs
Controls
VHF RADIOTELEPHONE FM-8500
|
Watch VHF ch70 |
POSITION |
AUTO ACK |
TEST |
|||||
|
1 |
2 |
3 |
CANCEL |
|||||
|
auto |
||||||||
|
|
CONTRAST |
VOLUME |
||||||
|
DISTRESS CANCEL |
4 |
5 |
6 |
|||||
|
DISTRESS |
ALARM |
CALL |
FILE |
RCVD |
XMTD |
|||
|
STOP |
7 |
8 |
9 |
SELECT |
||||
|
VOLUME |
SQUELCH |
CHANNEL |
0 |
ENT |
||||
|
(PUSH) OFF/DW/SCAN(PUSH) LOW |
TX |
REM USA WX PRIV |
||||||
|
MODE(PUSH) |
||||||||
|
HI |
CH16 |
|||||||
|
LOW |
||||||||
|
OFF |
AUTO |
Transmits messages other than distress.
Silences the receive alarm.
Stops repetitive alerts.
Transmits the distress alert. Open cover on [DISTRESS] key and press the key 4 seconds continuously.
Figure 2-1 FM-8500 transceiver unit
The four LEDs surrounding the [DISTRESS] key light when the key is pressed, 4 seconds continuously.
•The upper two of the four LEDs surrounding the [ALARM STOP] key blink (and alarm sounds) when distress or urgent message is received. LEDs can be extinguished and alarm silenced by pressing the [ALARM STOP] key.
•The lower two LEDs (Green) blink (and alarm sounds) when message other than distress/urgent are received. Alarm is automatically silenced five seconds after message is received.
2-3

|
POSITION |
AUTO ACK |
TEST |
|
|
1 |
2 |
3 |
CANCEL |
|
|
CONTRAST |
VOLUME |
|
|
4 |
5 |
6 |
|
|
FILE |
RCVD |
XMTD |
|
|
7 |
8 |
9 |
SELECT |
|
0 |
ENT |
Figure 2-2 Keyboard
0  9 Enter numeric data.
|
CANCEL |
Cancels wrong data and restores previous menu. |
||
|
Adjusts illumination of LED and keys in four levels. |
|||
|
SELECT |
1. |
Display “Set up menu” (Main menu). |
|
|
2. |
Changes settings of items appearing with blinking question mark. |
||
|
ENT |
Registers key input. (Blinking item is registered when key is pressed.) |
||
|
1. |
Shifts the cursor leftward. |
||
|
2. |
Restores previous display when pressed at displays with a blinking |
||
|
question mark. |
|||
|
Shifts the cursor rightward. |
|||
|
POSITION |
Ship’s position and time are shown while pressed and held down. |
||
|
1 |
|||
|
AUTO ACK |
Turns automatic transmission of acknowledge call (AUTO ACK) on/off. (Refer |
2to page 2-8.) Note that distress alert cannot be automatically acknowledged by “auto acknowledge”.
TEST
|
4 |
Printing. (This is also available for automatic setting of the printer.) |
|
|
CONTRAST |
Adjusts contrast of LCD in eight levels. |
|
|
5 |
||
|
FILE |
Retrieves files. |
|
|
7 |
||
|
RCVD |
Displays contents of received messages (Storage capacity: 100 files, 50 each |
|
|
8 |
of distress and other). (Refer to page 4-21.) |
|
|
XMTD |
Displays contents of transmitted messages (Storage capacity: 50 files). |
|
|
9 |
||
|
(Refer to page 4-19.) |
||
|
VOLUME |
Not used. |
|
|
6 |
2-4
![]()
2.3 Basic Operation
Normal display
When the FM-8500 is turned on, the following display appears.
This display is known as the “normal display.”
|
Watch VHF CH70 |
Normal display |
|
auto |
screen |
 [2] key pressed to get “auto” screen.
Should you get lost in operation you can return to the normal display by pressing the [CANCEL] key several times.
Selecting and registering items
The arrow keys ( [t] and [s] ) function to select items on the LCD.
After selecting item, press the [ENT] key to register it.
|
Item selected by cursor |
|||||
|
appears here. |
|||||
|
Blinking |
|||||
|
Call type <ALL ships> |
Call type |
||||
|
cusor |
|||||
|
IND TEL |
R/A — |
selection screen |
|||
|
ALL |
|||||
|
encloses |
|||||
|
(In this example |
|||||
|
current |
it is “Call type”.) |
||||
|
selection. |
(Shifts |
(Shifts |
|||
|
cursor |
cursor |
||||
|
leftward.) |
rightward.) |
Press the [ENT] key.
When blinking question mark appears
Press the [ENT] or [SELECT] key depending on your desire.
* VHF call message *
Format  INDIVIDUAL
Blinking question mark
Format selection screen (In this example it is format for “VHF call message”.)
•If change is necessary, press the [SELECT] key.
•If no change is necessary, press the [ENT] key.
2-5
Preparing and Transmitting Messages
There are two methods by which you can prepare and transmit messages, and they are shown below.
Preparing message for immediate transmission
Prepare message and then transmit it.
Normal display
Press the [ENT] key.
* VHF call message *
Format INDIVIDUAL
For how to prepare a message, refer to page 4-1.
After preparation, press the [CALL] key to transmit the message.
Preparing and storing message for later transmission
Prepare messages excluding distress message and save them to the memory. (Maximum 99 files) You may retrieve and transmit a memory-stored message as follows.
Normal display
Press the [SELECT] key.
|
Set up menu < |
> |
||||||
|
1 |
2 |
3 |
4 |
6 |
7 |
9 |
ALM |
Press the [7] key.
For how to prepare and store a message, refer to “4.5 Preparing and Saving Transmit Messages”.
After the normal display appears, press keys in the order shown below to transmit a message.
Press the [7] key. / (Enter file number.) / Press the [CALL] key.
2-6
Status of FM-8500 during DSC Call
When the distress alert is transmitted (by pressing the [DISTRESS] key), the output power of the FM-8500 is automatically set to maximum (25 W).
Key entry of VHF
The FM-8500’s keyboard accepts no key input while DSC message is transmitted. (Distress call: inoperative about 3 seconds, other calls: inoperative about 0.5 seconds.)
To unlock it manually, if necessary, press the [CANCEL] key.
The VHF section keyboard accepts no key input when the PTT switch is operated.
2-7
2.4 Auto Acknowledge
Auto acknowledge functions to automatically acknowledge individual calls. Press the [2] (AUTO ACK) key to automatically transmit the acknowledge back (ACK BQ) to the sending station when an individual call is received.
An individual message cannot be automatically acknowledged when it is received while the handset is off hook.
When auto acknowledge is disabled
•Automatic acknowledge is disabled when an Error Checking Code (ECC) appears at the end of a receive message.
•A distress alert is received.(A distress alert cannot be acknowledged automatically.)
Turning & AUTO ACK on/off
Each press of the[2] key enables/disables auto acknowledge function..
“auto” function
Provides automatic acknowledge of individual calls. Automatic acknowledge, however, is disabled when conducting voice communications.
“manual” function
Manual acknowledge of all calls. However, an all ship’s call is automatically acknowledged when no voice communications are taking place when the call is received. See page 4-12 for details.
2-8


Transmitting the distress call
If no numeric key is pressed, distress alert is automatically transmitted.
Watch VHF CH70
auto
1 Open cover on [DISTRESS] key.
2 Press [DISTRESS] key 4 seconds continuously.
DISTRESS CALL CH70
34° 40N 135° 20E at 15:20
Nature of Distress
[1]: Fire, explosion [2]: Flooding
[3]: Collision [4]: Grounding
[5]: Listing, capsizing [6]: Sinking
[7]: Disabled & adrift [8]: Abandoning
[0]: Undesignated [ ]: Piracy/armed robbery attack [ ]: Man overboard
Position/Time
To announce nature of distress, press appropriate key for nature of distress within 3 sec. after pressing the [DISTRESS] key. Continue pressing [DISTRESS] key 4 sec.
|
DISTRESS CALL Nature? |
Nature of Distress |
UNDESIGNATED
If wrong nature of distress is input, enter correct nature within 3 seconds.
|
* Call in progress * |
|
|
DISTRESS CALL CH70 |
(Transmitting) |
Transmission time is about three seconds.
A coast station will transmit a DIST ACK signal to you to confirm the distress alert. Once you have received the DIST ACK signal, CH16 (Distress, Safety and Calling frequency) is automatically selected so that you may commence voice communications with the coast station. After the [DISTRESS] key has been pressed, no further operation of the radiotelephone is required until you have received the DIST ACK signal.
|
* Wait for dist ack * |
||||
|
(Waiting for distress |
||||
|
Next CH70 |
3.7 |
min |
||
|
acknowldege) |
||||
Counts down. If distress call is not acknowledged it is automatically retransmitted until acknowledged.
(Do nothing until own ship receives DIST ACK.)
(continued on next page)
3-2

Distress call
Distress communications
(from previous page)
* Received * DISTRESS ACK
ID : 001234567
ID of station (usually coast station) which transmitted DIST ACK.
Commence voice communications with coast station on CH16.
1.Provide the following information to the coast station:
(1)Speak slowly and distinctly, “MAYDAY, MAYDAY, MAYDAY”, pronounced as the French expression “m’aider”.
(2)This is;
(3)The name of your vessel and call sign three times.
Then, begin the distress communications, which consists of:
(1)Position in latitude and longitude;
(2)The name of the distress;
(3)The kind of assistance desired;
(4)Any other information which might facilitate rescue, for example, length, color, and type of vessel, number of persons on board.
2.Indicate the end of message by saying “Over”.
Some countries do not have sea area A. In this case «ACK» from the coast station does not arrive over DSC. A ship nearby will contact the vessel in distress over CH16. After transmitting the distress alert conduct voice distress communications as shown above.
3-3

3.2 Manual Entry of Ship’s Position and Time
Entering data manually
If automatic position input is lost for one minute the message «EPFS error» appears. In this case, enter position manually as below.
(Normal display)
|
* VHF call message * |
Watch VHF CH70 |
Format: DISTRESS
To enter data manually from the Distress Alert message, press [ENT]
and select call type
Distress. Press the [SELECT] key followed by the [1] key.
Press [ENT], [ENT] [SELECT] in this order.
|
Position < |
> |
||||
|
NORTH= ˚ |
S E= |
˚ |
W |
UTC= |
: |
|
Enter |
Enter |
Enter time |
|||
|
latitude. |
longitude. |
(UTC). |
|
To move blinking cursor from NORTH |
Press the [ENT] key. |
|
|
(Returns to normal |
||
|
position to SOUTH, press the [s] key. |
||
|
display.) |
||
Note: If the manually entered position is not updated within four hours the buzzer sounds and the message «Warning: Update position!» appears on the screen. And if not updated within 23.5 hours the position entered is erased. Once automatic input of position is restored, cancel manually entered position as below.
Confirming Ship’s Position and Time
Press and hold down the [1] (POSITION) key, ship’s position and time are shown while the key is pressed.
Canceling manually entered data
To cancel the manually entered data, enter 9999 for the time and press the [ENT] key.
Note: Above procedure may also be used when you do not know your ship’s position. This data is input as NO INFORMATION in POS&TIME in the DISTRESS ALERT MESSAGE.
3-4
3.3 Receiving Distress Alert from Other Ship
In no case is a ship permitted to transmit a DSC distress relay call on receipt of a DSC distress alert on VHF channel 70.
Conditions necessary for relaying distress alert:
1When the station in distress is not itself in a position to transmit the distress message, or
2 When the master or person responsible for the vessel not in distress, or the person responsible for the coast station, considers that further help is necessary.
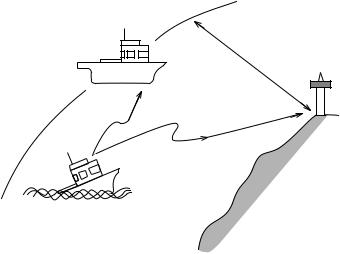
Procedure when in area A1
1.When the FM-8500 receives a distress alert from another vessel the upper two LEDs (Red) near the [ALARM STOP] key blink and the FM-8500 sounds the distress alarm.
2.Silence the alarm by pressing the [ALARM STOP] key.
3.Wait up to three minutes until the DIST ACK signal from a coast station is received. Be prepared to follow the instructions of the coast station.
4.If you do not receive the DIST ACK signal, follow the flow chart shown on the next page.
If further DSC alerts are received from the same source and the ship in distress is beyond doubt in the vicinity, a DSC acknowledgement may, after consulation with an RCC or Coast Station, be sent to terminate the call.
Note 1: An asterisk (*) in a received distress alert message indicates error or unknown at the location marked with the asterisk.
Note 2: Do not send DISK ACK in response to receipt of distress alert having a nature of distress of EPIRB emission.
Your Ship
About 20 to 30 miles (Sea area A1)
Coast station
Distress Alert
Transmission
Vessel in Distress
3-5

Flow chart — Action by ships upon reception of VHF DSC distress alert
DSC Distress alert received.
Press [ALARM STOP] key to silence alarm.
Listen on CH16 for 5 minutes.
|
Did you receive |
No |
Is distress traffic |
||||
|
acknowledge from |
||||||
|
CS and/or RCC? |
in progress? |
|||||
|
Yes |
||||||
|
Yes |
Is own |
|||||
|
vessel able |
||||||
|
to assist? |
||||||
|
CS = Coast Station |
No |
|||||
|
RCC = Rescue Co-ordination Center |
||||||
Enter details in log. 
|
No |
Is distress call |
No |
||||||
|
continuing? |
||||||||
|
Yes |
||||||||
|
Yes |
Acknowledge the alert by |
|||||||
|
radiotelphony to the ship |
||||||||
|
in distress on VHF CH16. |
||||||||
|
1. Say «MAYDAY» ONCE. |
||||||||
|
2. |
Say ID number of vessel |
|||||||
|
in distress THREE TIMES. |
||||||||
|
3. |
Say «This is» ONCE. |
|||||||
|
4. |
Say ID number of your vessel |
|||||||
|
THREE TIMES. |
||||||||
|
5. |
Say «Received MAYDAY» |
|||||||
|
ONCE. |
||||||||
Inform CS and/or RCC.
3-6
 Loading…